

BLAUPUNKT San Francisco 300 User Manual [en, fr, it, gr, da, es, pt, de, fi, hu, nl, pl, sl, cs]
Page 1
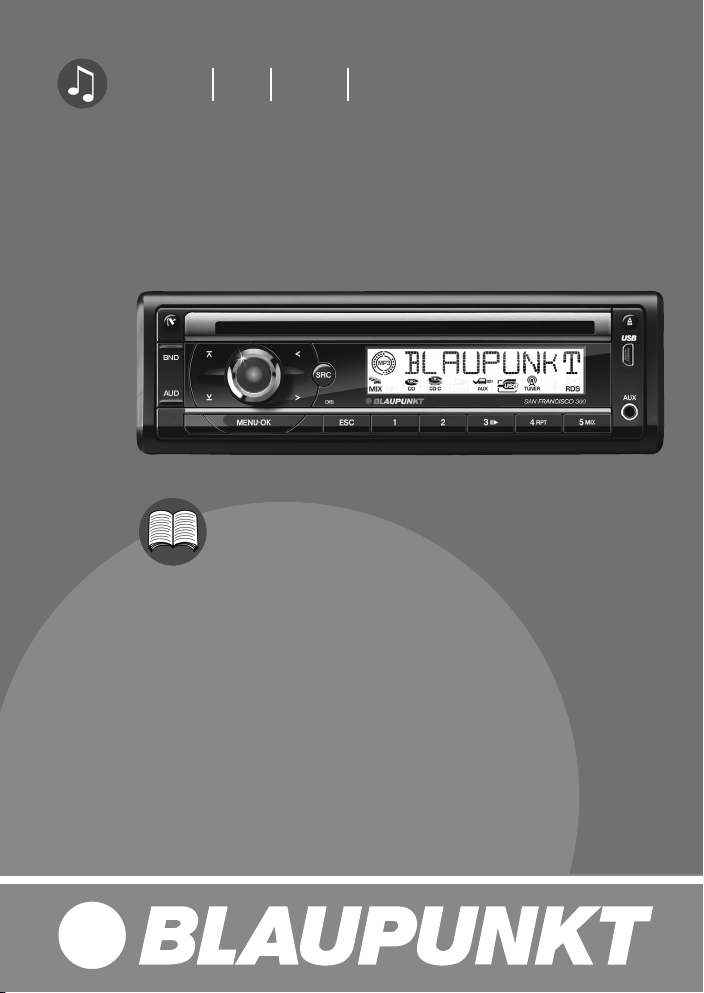
Radio CD MP3 WMA
San Francisco 300 7 649 030 110 / 7 649 031 010
www.blaupunkt.com
Bedienungs- und Einbauanleitung
Operating and installation instructions
Mode d’emploi et de montage
Istruzioni d’uso e di installazione
Gebruiksaanwijzing en inbouwhandleiding
Bruks- och monteringsanvisning
Instrucciones de manejo e instalación
Instruções de serviço e de montagem
Betjenings- og monteringsvejledning
Instrukcja obsługi i montażowa
Návod k obsluze a k montáži
Käyttö- ja asennusohje
Kezelési és beszerelési útmutató
Инструкция по эксплуатации и установке
Οδηγίες τοποθέτησης και χρήσης
Page 2
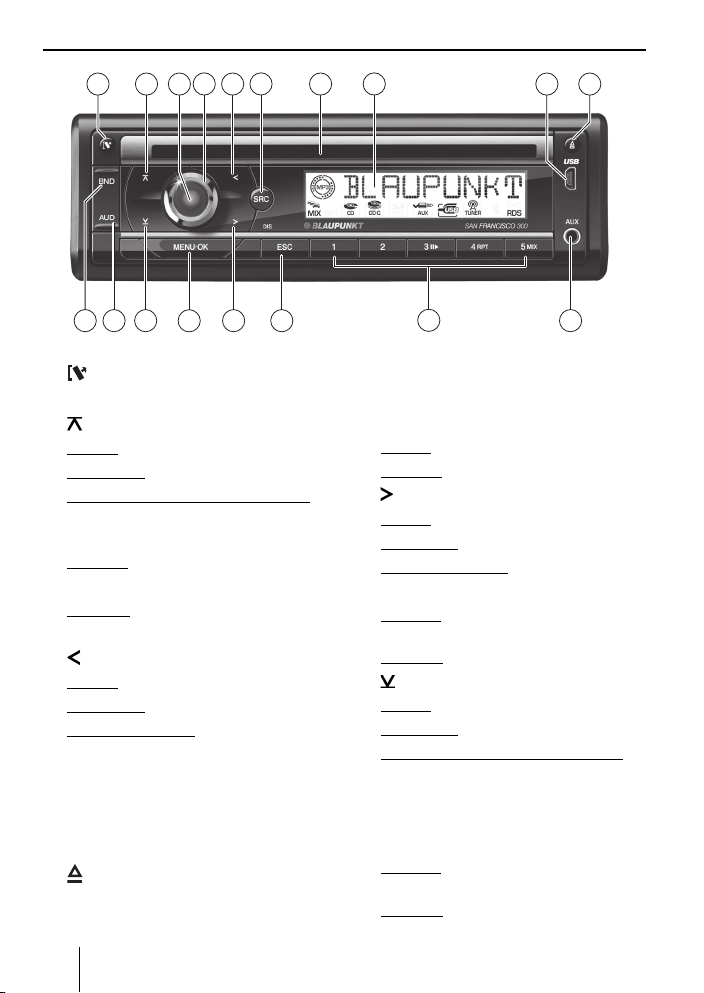
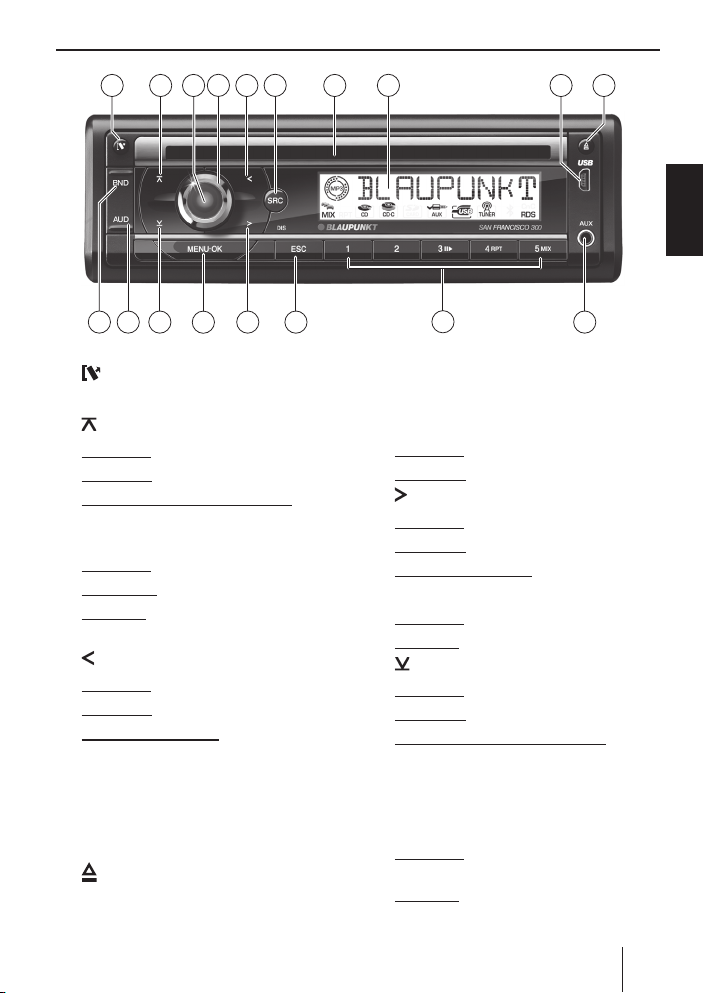
Bedienelemente
1
6
4
8
9 1072 53
18 17
16 11
15
14
1 -Taste
Abnehmbares Bedienteil entriegeln
2 -Tast e
Im Menü: Menüpunkt aufrufen
Radiobetrieb: Sendersuchlauf starten
MP3-/WMA-/C‘n‘C-/CD-Wechsler-Betrieb: Zu
nächstem Ordner/ nächster CD wechseln
3 Ein-/Aus-Taste
Kurzdruck: Autoradio einschalten
Im Betrieb: Autoradio leise schalten (Mute)
Langdruck: Autoradio ausschalten
4 Lautstärkeregler
5 -Tast e
Im Menü: Einstellungen ändern
Radiobetrieb: Sender einstellen
Andere Betriebsarten: Titelwahl
6 SRC-Taste
Audioquelle wählen
7 CD-Schacht
8 Display
9 USB-Anschluss
: -Taste (Eject)
CD ausgeben
2
13
12
; Front-AUX-IN-Buchse
< Tastenblock 1 - 5
=
DIS/ESC-Taste
Im Menü: Menü verlassen
Im Betrieb: Anzeige umschalten
> -Taste
Im Menü: Einstellungen ändern
Radiobetrieb: Sender einstellen
Andere Betriebsarten: Titelwahl
? MENU•OK-Taste
Kurzdruck: Menü aufrufen, Einstellungen bestätigen
Langdruck: Scan-Funktion starten
@ -Taste
Im Menü: Menüpunkt aufrufen
Radiobetrieb: Sendersuchlauf starten
MP3-/WMA-/C‘n‘C-/CD-Wechsler-Betrieb: Zu
vorigem Ordner/ voriger CD wechseln
A AUD-Taste
Audiomenü aufrufen
B BND-Taste
Kurzdruck: Im Radiobetrieb Speicherebene
wählen
Langdruck: Im Radiobetrieb TravelstoreFunktion starten
Page 3

Inhalt
Sicherheitshinweise ...................................4
Verwendete Symbole ................................4
Verkehrssicherheit ...................................4
Allgemeine Sicherheitshinweise .................4
Konformitätserklärung ..............................4
Reinigungshinweise ....................................5
Entsorgungshinweise ..................................5
Lieferumfang..............................................5
Sonderzubehör(nicht im Lieferumfang) .......5
In Betrieb nehmen ......................................6
Bedienteil anbringen/abnehmen.................6
Tuner-Region einstellen .............................6
Ein-/Ausschalten ......................................6
Lautstärke ...............................................7
Demo-Modus ein-/ausschalten ...................7
Versionsnummern anzeigen .......................7
Verkehrsfunk .............................................7
Radiobetrieb ..............................................8
RDS .......................................................8
In den Radiobetrieb wechseln ....................8
Speicherebene wählen ..............................8
Sender einstellen .....................................8
Sender speichern/Gespeicherten Sender
aufrufen ..................................................9
Sender anspielen .....................................9
Sender automatisch speichern
(Travelstore) ............................................9
PTY ........................................................9
Anzeige einstellen ..................................10
CD-/MP3-/WMA-/C‘n‘C-/
CD-Wechsler-Betrieb ................................10
Grundlegende Informationen ...................10
In den CD-/MP3-/WMA/C‘n‘C-/
CD-Wechsler-Betrieb wechseln ................11
CD einlegen ...........................................12
CD entnehmen .......................................12
USB-Datenträger anschießen/entfernen ....12
Titel wählen ...........................................12
Ordner/CD wählen (nur im MP3-/WMA-/
C‘n‘C- bzw. CD-Wechsler-Betrieb) .............12
Schneller Suchlauf .................................12
Wiedergabe unterbrechen .......................13
Playlist-Modus
(nur im MP3-/WMA-Betrieb) ....................13
Alle Titel anspielen..................................13
Titel in zufälliger Reihenfolge abspielen......13
Einzelne Titel bzw. CDs oder
Verzeichnisse wiederholt abspielen ..........14
Anzeige einstellen ..................................14
Externe Audioquellen ................................14
Front-AUX-IN-Buchse ..............................14
Rückseitiger AUX-Eingang ........................15
Klangeinstellungen ...................................15
Audiomenü aufrufen und verlassen ...........16
Einstellung im Audiomenü vornehmen .......16
Erweitertes Audiomenü aufrufen und
verlassen ..............................................16
Einstellung im erweiterten Audiomenü
vornehmen ............................................17
Benutzereinstellungen ..............................17
Benutzermenü aufrufen und verlassen .......17
Einstellung im Benutzermenü
vornehmen ............................................18
Werkseinstellungen ..................................21
Nützliche Informationen............................22
Gewährleistung ......................................22
Service .................................................22
Technische Daten .....................................22
Einbauanleitung .....................................317
DEUTSCH
3
Page 4
Sicherheitshinweise
Sicherheitshinweise
Das Autoradio wurde
Stand der Technik und den anerkannten sicherheitstechnischen Regeln hergestellt. Trotzdem
können Gefahren entstehen, wenn Sie die Sicherheitshinweise in dieser Anleitung nicht beachten.
Diese Anleitung enthält wichtige Informationen,
um das Autoradio einfach und sicher einzubauen
und zu bedienen.
•
Lesen Sie diese Anleitung sorgfältig und vollständig, bevor Sie das Autoradio benutzen.
•
Bewahren Sie die Anleitung so auf, dass sie jederzeit für alle Benutzer zugänglich ist.
•
Geben Sie das Autoradio an Dritte stets zusammen mit dieser An leitung weiter.
Beachten Sie außerdem die Anleitungen der Geräte, die Sie im Zusammenhang mit diesem Autoradio verwenden.
Verwendete Symbole
In dieser Anleitung werden folgende Symbole verwendet:
GEFAHR!
Warnt vor Verletzungen
VORSICHT!
Warnt vor Beschädigung des CD-Laufwerks
Das CE-Kennzeichen bestätigt die Einhaltung der EU-Richtlinien.
Kennzeichnet einen Handlungsschritt
쏅
Kennzeichnet eine Aufzählung
•
Verkehrssicherheit
Beachten Sie folgende Hinweise zur Verkehrssicherheit:
Benutzen Sie Ihr Gerät so, dass Sie Ihr Fahr-
•
zeug immer sicher steuern können. Im Zwei-
felsfall halten Sie an geeigneter Stelle an und
bedienen Ihr Gerät bei stehendem Fahrzeug.
4
entsprechend dem heutigen
•
Entnehmen oder bringen Sie das Bedienteil
nur bei stehendem Fahrzeug an.
•
Hören Sie stets in mäßiger Lautstärke, um
Ihr Gehör zu schützen und um akustische
Warnsignale (z. B. der Polizei) hören zu können. In Stummschaltungspausen (z. B. beim
Wechsel der Audioquelle) ist das Verändern
der Lautstärke nicht hörbar. Erhöhen Sie die
Lautstärke nicht während dieser Stummschaltungspause.
Allgemeine Sicherheitshinweise
Beachten Sie folgende Hinweise, um sich selbst
vor Verletzungen zuschützen:
Verändern oder öffnen Sie das Gerät nicht.
•
Im Gerät befi ndet sich ein Class-1-Laser, der
Ihre Augen verletzen kann.
Erhöhen Sie die Lautstärke nicht während
•
Stummschaltungspausen, z. B. beim Wech-
sel der Audioquelle. Das Verändern der Lautstärke ist während der Stummschaltung nicht
hörbar.
Bestimmungsgemäßer Gebrauch
Dieses Autoradio ist für den Einbau und Be trieb
in einem Fahrzeug mit 12-V-Bord netz spannung
vorgesehen und muss in einen DIN-Schacht eingebaut werden. Be achten Sie die Leistungsgrenzen in den Technischen Daten. Lassen Sie Reparaturen und ggf. den Einbau von einem Fachmann
durchführen.
Einbauhinweise
Sie dürfen das Autoradio nur dann einbauen,
wenn Sie Erfahrung mit dem Einbau von Autoradios haben und Ihnen die Elektrik des Fahrzeugs
vertraut ist. Beachten Sie dazu die Einbauanleitung am Ende dieser Anleitung.
Konformitätserklärung
Hiermit erklärt die Blaupunkt GmbH, dass sich
das Autoradio San Francisco 300 in Übereinstimmung mit den grundlegenden Anforderungen und
den anderen relevanten Vorschriften der Richtlinie 89/336/EWG befi nden.
Page 5

Reinigungshinweise | Entsorgungshinweise | Lieferumfang
Reinigungshinweise
Löse-, Reinigungs- und Scheuermittel sowie
Cockpit-Spray und Kunststoff-Pfl egemittel können Stoffe enthalten, welche die Oberfl äche des
Autoradios angreifen.
•
Verwenden Sie zur Reinigung des Autoradios
nur ein trockenes oder leicht feuchtes Tuch.
•
Reinigen Sie bei Bedarf die Kontakte des Bedienteils mit einem weichen, mit Reinigungsalkohol getränkten Tuch.
Entsorgungshinweise
Entsorgen Sie Ihr Altgerät nicht in den Haus-
müll!
Nutzen Sie zur Entsorgung des Altgerätes die zur
Verfügung stehenden Rückgabe- und Sammelsysteme.
Lieferumfang
Im Lieferumfang enthalten sind:
1 Autoradio
1 Bedienungs-/Einbauanleitung
1 Etui für das Bedienteil
1 Halterahmen
1 Kleinteileset
2 Demontagewerkzeuge
1 USB-Anschlussleitung
Hinweis:
Wir empfehlen die Verwendung von original
Blaupunkt-Zubehör (www.blaupunkt.com).
Sonderzubehör
(nicht im Lieferumfang)
Informieren Sie sich bei Ihrem Blaupunkt-Fachhändler oder im Internet unter www.blaupunkt.
com über Sonderzubehör, zum Beispiel:
•
Die Lenkrad- oder Handfernbedienung von
Blaupunkt für sichere und komfortable Bedienung der Grundfunktionen (Ein-/Ausschalten
mit der Fernbedienung nicht möglich)
•
Die C‘n‘C-fähigen Interfaces von Blaupunkt
(C‘n‘C = Command and Control) für den Anschluss von Bluetooth®-fähigen Mobiltelefonen und Streaming-Geräten (z. B. über das
Bluetooth®/USB-Interface) sowie von zusätzlichen Datenträgern und Geräten (z. B. über
das iPod/USB-Interface)
Blaupunkt-CD-Wechsler
•
Blaupunkt- oder Velocity-Verstärker (Ampli-
•
fi er)
DEUTSCH
5
Page 6

In Betrieb nehmen
In Betrieb nehmen
Bedienteil anbringen/abnehmen
Ihr Autoradio ist zum Schutz gegen Diebstahl mit
einem abnehmbaren Bedienteil (Release-Panel)
ausgestattet. Bei Auslieferung befi ndet sich das
Bedienteil im mitgelieferten Etui. Um das Radio
nach dem Einbau in Betrieb zu nehmen, müssen
Sie zunächst das Bedienteil anbringen (siehe Abschnitt „Bedienteil anbringen“ in diesem Kapitel).
Nehmen Sie das Bedienteil bei jedem Verlassen
des Fahrzeugs mit. Ohne dieses Bedienteil ist das
Autoradio für einen Dieb wertlos.
Vorsicht
Beschädigung des Bedienteils
Lassen Sie das Bedienteil nicht fallen.
Transportieren Sie das Bedienteil so, dass es vor
Stößen geschützt ist und die Kontakte nicht verschmutzen können.
Setzen Sie das Bedienteil nicht direktem Sonnenlicht oder anderen Wärmequellen aus.
Vermeiden Sie eine direkte Berührung der Kontakte des Bedienteils mit der Haut.
Bedienteil anbringen
Schieben Sie das Bedienteil in die Halterung
쏅
am rechten Gehäuserand.
Drücken Sie das Bedienteil vorsichtig in die
쏅
linke Halterung, bis es einrastet.
Bedienteil abnehmen
Drücken Sie die Taste
쏅
teil zu entriegeln.
Die linke Seite des Bedienteils löst sich aus
dem Gerät und wird durch eine Raste gegen
Herausfallen gesichert.
Fassen Sie das Bedienteil an der linken Seite
쏅
an und ziehen Sie es über den Wiederstand
der Raste gerade aus der Halterung heraus.
Hinweis:
Das Autoradio schaltet sich automatisch aus,
sobald das Bedienteil abgenommen wird.
6
1, um das Bedien-
Tuner-Region einstellen
Dieses Autoradio ist für den Betrieb in verschiedenen Regionen mit unterschiedlichen Frequenzbereichen und Sendertechnologien ausgelegt.
Werksseitig ist die Tuner-Region „EUROPE“ (Europa) eingestellt. Zur Verfügung stehen außerdem
die Tuner-Regionen „USA“, „THAI“ (Thailand) und
„S AMERICA“ (Südamerika). Betreiben Sie das
Autoradio außerhalb von Europa, müssen Sie ggf.
erst eine geeignete Tuner-Region einstellen:
쏅
Schalten Sie ggf. erst das Autoradio aus.
쏅
Halten Sie gleichzeitig die Tasten MENU•OK
4 < gedrückt und drücken Sie die
? und
Ein-/Aus-Taste 3.
Das Autoradio wird eingeschaltet. Im Display
erscheint die aktuell eingestellte Tuner-Region.
Drücken Sie die Taste
쏅
bis die gewünschte Tuner-Region angezeigt
wird.
쏅
Drücken Sie die Taste MENU•OK
@/ 2 so oft,
?.
Ein-/Ausschalten
Ein-/Ausschalten mit der
Ein-/Aus-Taste
쏅
Zum Einschalten drücken Sie die Ein-/ AusTas te 3.
Das Autoradio schaltet ein.
쏅
Zum Ausschalten halten Sie die Ein-/ Aus-Taste 3 länger als 2 Sekunden gedrückt.
Das Autoradio schaltet aus.
Hinweis:
Schalten Sie das Autoradio bei ausgeschalteter Fahrzeugzündung ein, schaltet es sich
automatisch nach 1 Stunde aus, um die Fahrzeugbatterie zu schonen.
Aus-/Einschalten über die Fahrzeugzündung
Wenn das Autoradio, wie in der Einbauanleitung
dargestellt, mit der Fahrzeug zündung verbunden
ist und es nicht mit der Ein-/Aus-Taste 3 ausge-
schaltet wurde, wird es mit der Zündung aus- bzw.
eingeschaltet.
Page 7

In Betrieb nehmen | Verkehrsfunk
Lautstärke
Lautstärke einstellen
Die Lautstärke ist in Schritten von 0 (aus) bis 50
(maximal) einstellbar.
쏅
Drehen Sie den Lautstärkeregler
Lautstärke zu verändern.
Hinweis:
Ist ein Telefon oder Navigationssystem wie
in der Einbauanleitung beschrieben mit dem
Autoradio verbunden, wird das Autoradio bei
einem Telefongespräch bzw. einer Navigationsdurchsage stummgeschaltet und das Gespräch bzw. die Sprachausgabe wird über die
Autoradiolautsprecher wiedergegeben. Im
Display erscheint dann „TELEPHONE“.
Autoradio leise schalten (Mute)
Sie können die Lautstärke schnell auf einen von
Ihnen eingestellten Wert absenken.
쏅
Drücken Sie kurz die Ein-/Aus-Taste 3, um
das Autoradio leise zu schalten bzw. um wieder die vorherige Lautstärke zu aktivieren.
Im Display wird während der Leiseschaltung
„MUTE“ angezeigt.
Zum Einstellen der Mute-Lautstärke lesen Sie im
Kapitel „Benutzereinstellungen“ den Abschnitt
„Einstellung im Benutzermenü vornehmen“,
Menüpunkt „MUTE LVL“.
4, um die
Demo-Modus ein-/ausschalten
Der Demo-Modus zeigt Ihnen die Funktionen des
Autoradios als Laufschrift im Display. Sie können
den Demo-Modus ein- bzw. auschalten:
쏅
Schalten Sie ggf. erst das Autoradio aus.
쏅
Halten Sie gleichzeitig die Tasten MENU•OK
? und
2 < gedrückt und drücken Sie die
Ein-/Aus-Taste 3.
Das Autoradio wird eingeschaltet. Im Display
wird kurz „DEMO MODE“ angezeigt, wenn
Sie den Demo-Modus eingeschaltet haben.
Durch Betätigen einer beliebigen Taste wird
der Demo-Modus unterbrochen und Sie können das Gerät bedienen.
Versionsnummern anzeigen
Sie können die Versionsnummern der verschiedenen Gerätekomponenten anzeigen lassen.
쏅
Schalten Sie ggf. erst das Autoradio aus.
쏅
Halten Sie gleichzeitig die Tasten MENU•OK
1 < gedrückt und drücken Sie die
? und
Ein-/Aus-Taste 3.
Das Autoradio wird eingeschaltet. Im Display
erscheint die Versionsnummer der ersten
Komponente. Das erste Zeichen kennzeichnet die Komponente: P = Prozessor, E = EPROM, A = Accordo.
쏅
Drücken Sie die Taste
Versionsnummern der anderen Komponenten anzuzeigen.
쏅
Drücken Sie die Taste MENU•OK
zuletzt gehörten Audioquelle zurückzukehren.
5 / >, um die
?, um zur
Verkehrsfunk
In der Tuner-Region „EUROPE“ kann ein FM-Sender Verkehrsmeldungen durch ein RDS-Signal
kennzeichnen. Wenn der Vorrang für Verkehrsmeldungen eingeschaltet ist, wird eine Verkehrsmeldung automatisch durchgestellt, auch wenn
sich das Autoradio gerade nicht im Radiobetrieb
befi ndet oder wenn ein Sender der Wellenbereiche MW oder LW eingestellt ist.
Bei eingeschaltetem Vorrang wird im Display das
Stau-Symbol (
durchgestellten Verkehrsdurchsage wird „TRAFFIC“ im Display angezeigt.
Zum Ein- und Ausschalten des Vorrangs lesen Sie
im Kapitel „Benutzereinstellungen“ den Abschnitt
„Einstellung im Benutzermenü vornehmen“,
Menüpunkt „TRAF“).
Hinweise:
•
Die Lautstärke wird für die Dauer der
durchgestellten Verkehrsdurchsage erhöht. Sie können die Minimallautstärke für
Verkehrsdurchsagen einstellen (siehe Kap.
„Benutzereinstellungen“, Abschnitt „Einstellung im Benutzermenü vornehmen“,
Menüpunkt „TA VOLUME“).
) angezeigt. Während einer
7
DEUTSCH
Page 8
Verkehrsfunk | Radiobetrieb
Um eine durchgestellte Verkehrsdurch-
•
sage abzubrechen, drücken Sie die Taste
DIS/ESC =.
Radiobetrieb
RDS
In der Tuner-Region „EUROPE“ strahlen viele FMSender neben ihrem Programm ein RDS-Signal
(Radio Data System) aus, das die folgenden Zusatzfunktionen ermöglicht:
Der
Sendername wird im Display angezeigt.
•
Das Autoradio erkennt Verkehrsdurchsagen
•
und Nachrichtensendungen und kann sie in jeder Betriebsart (z. B. im CD-Betrieb) automatisch durchschalten.
Alternativ frequenz: Wenn RDS eingeschaltet
•
ist, schaltet das Autoradio automatisch auf die
am besten zu empfangende Frequenz des eingestellten Senders.
Regional (REG): Einige Sender teilen zu be-
•
stimmten Zeiten ihr Programm in Regionalprogramme mit unterschiedlichem Inhalt auf.
Bei eingeschalteter REG-Funktion wechselt
das Autoradio nur auf Alternativfrequenzen,
auf denen dasselbe Regionalprogramm ausgestrahlt wird.
Zum Ein- und Ausschalten der RDS- bzw. REGFunktion lesen Sie im Kapitel „Benutzereinstellungen“ den Abschnitt „Einstellung im Benutzermenü vornehmen“ (Menüpunkte „RDS“, „REG“).
In den Radiobetrieb wechseln
Drücken Sie die Taste SRC 6 so oft, bis „TU-
쏅
NER“ angezeigt wird:
Die aktuelle Speicherebene erscheint einmal
als Laufschrift im Display.
Speicherebene wählen
Folgende Speicherebenen stehen Ihnen in den
verschiedenen Tuner-Regionen zur Verfügung:
Region Speicherebenen
EUROPE
USA
THAI
S AMERICA
Drücken Sie die Taste BND
쏅
gewünschte Speicherebene angezeigt wird.
Hinweis:
Auf jeder Speicherebene können bis zu
5 Sender gespeichert werden.
FM1, FM2, FMT, MW, LW
FM1, FM2, FMT, AM, AMT
FM1, FM2, FMT, AM
FM1, FM2, FMT, AM, AMT
B so oft, bis die
Sender einstellen
Sie haben verschiedene Möglichkeiten, einen
Sender einzustellen:
Sender manuell einstellen
Drücken Sie die Taste
쏅
mehrmals kurz, um die Frequenz schrittweise zu ändern, bzw. lang, um die Frequenz
schnell zu ändern.
Hinweise:
Für die Tuner-Region „EUROPE“: Im Wel-
•
lenbereich FM wird bei eingeschalteter
RDS-Funktion automatisch der nächste
Sender der Senderkette eingestellt.
Für die Tuner-Regionen „EUROPE“, „USA”
•
und „S AMERICA“: Im Wellenbereich FM
wird bei eingeschalteter PTY-Funktion der
aktuell gewählte Programmtyp angezeigt
und kann geändert werden (siehe Kap.
„PTY“).
Sendersuchlauf starten
Drücken Sie die Taste
쏅
Sendersuchlauf zu starten.
Der nächste empfangbare Sender wird ein-
gestellt.
Hinweise:
•
Für die Tuner-Region „EUROPE“: Im Wellenbereich FM werden bei eingeschaltetem Vorrang für Verkehrsfunk (
Verkehrsfunksender eingestellt.
5 / > ein- oder
@/ 2, um den
) nur
8
Page 9

•
Für die Tuner-Regionen „EUROPE“, „USA”
und „S AMERICA“: Im Wellenbereich FM
wird bei eingeschalteter PTY-Funktion der
nächste Sender mit dem aktuell gewählten Programmtyp eingestellt (siehe Kap.
„PTY“).
•
Die Empfi ndlichkeit des Suchlaufs kann
eingestellt werden (siehe Kapitel „Benutzereinstellungen“, Abschnitt „Einstellung
im Benutzermenü vornehmen“, Menüpunkt „SENS“).
Sender speichern/Gespeicherten
Sender aufrufen
쏅
Wählen Sie die gewünschte Speicherebene.
쏅
Stellen Sie ggf. den gewünschten Sender
ein.
쏅
Drücken Sie die Stationstaste
2 Sekunden, um den aktuellen Sender auf der
Taste zu speichern.
- bzw. -
쏅
Drücken Sie die Stationstaste
um den gespeicherten Sender aufzurufen.
1 -5 < für ca.
1 - 5 < kurz,
Sender anspielen
Mit der Scan-Funktion wird jeder empfangbare
Sender des aktuellen Wellenbereichs angespielt.
쏅
Drücken Sie die Taste MENU•OK
Sekunden, um das Anspielen zu starten, bzw.
kurz, um den aktuell eingestellten Sender
weiter zu hören.
Während des Anspielens werden im Display
abwechselnd „SCAN“ und die aktuelle Frequenz sowie Speicherebene bzw. der Sendername angezeigt.
Hinweis:
Für den Radiobetrieb kann die Anspielzeit pro
Sender eingestellt werden (siehe Kap. „Benutzereinstellungen“, Abschnitt „Einstellung
im Benutzermenü vornehmen“, Menüpunkt
„SCAN TIME“).
? für ca. 2
Radiobetrieb
Sender automatisch speichern
(Travelstore)
Mit Travelstore können Sie die 5 stärksten Sender der Region automatisch suchen und auf einer
Speicherebene speichern. Zuvor gespeicherte
Sender dieser Speicherebene werden dabei gelöscht.
In den Tuner-Regionen „EUROPE“ und „THAI“ können Sie mit Travelstore 5 FM-Sender auf der Speicherebene FMT speichern. In den Tuner-Regionen
„USA“ und „S AMERICA“ können Sie außerdem 5
AM-Sender auf der Speicherebene AMT speichern.
쏅
Wählen Sie eine Speicherebene des gewünschten Wellenbereichs, z. B. FM1 oder
AM.
쏅
Drücken Sie die Taste BND
kunden.
Der Tuner beginnt mit dem automatischen
Sendersuchlauf; im Display wird „FM
TSTORE“ bzw. „ AM TSTORE“ angezeigt. Wenn
das Speichern beendet ist, wird der Sender
auf Speicherplatz 1 der Ebene FMT bzw. AMT
wiedergegeben.
Hinweis:
Für die Tuner-Region „EUROPE“: Bei eingeschaltetem Vorrang für Verkehrsfunk (
werden nur Verkehrsfunksender gespeichert.
B für ca. 2 Se-
PTY
In den Tuner-Regionen „EUROPE“, „USA” und
„S AMERICA“ kann ein FM-Sender seinen aktuellen Programmtyp übermitteln, z. B. KULTUR,
POP, JAZZ, ROCK, SPORT oder WISSEN. Mit der
PTY-Funktion können Sie so gezielt nach Sendungen eines bestimmten Programmtyps suchen,
z. B. nach Rock- oder Sportsendungen. Beachten
Sie, dass PTY nicht von allen Sendern unterstützt
wird.
Hinweis:
Um die PTY-Funktion zu nutzen, müssen Sie
sie gesondert im Menü einschalten (siehe
DEUTSCH
)
9
Page 10
Radiobetrieb | CD-/MP3-/WMA/C‘n‘C-/CD-Wechsler-Betrieb
Kap. „Benutzereinstellungen“, Abschnitt
„Einstellung im Benutzermenü vornehmen“,
Menüpunkt „PTY“).
Programmtyp wählen
Hinweis:
In der Tuner-Region „EUROPE“ können Sie die
Sprache, in der die Programmtypen angezeigt
werden, einstellen (siehe Kap. „Benutzereinstellungen“, Abschnitt „Einstellung im Benutzermenü vornehmen“, Menüpunkt „PTY
LANG“).
쏅
Drücken Sie die Taste
Der aktuelle ausgewählte Programmtyp wird
kurz angezeigt und Sie können einen anderen
Programmtyp auswählen.
Drücken Sie ggf. die Taste
쏅
oft, bis der gewünschte Programmtyp ausgewählt ist.
Sender suchen
Drücken Sie die Taste
쏅
Sobald der Suchlauf beginnt, erscheint kurz
„SEARCH“ im Display. Danach wird der aktuelle Programmtyp angezeigt.
Sobald ein Sender gefunden wird, erscheint
kurz „PTY FOUND“. Solange der Programmtyp des eingestellten Senders mit dem aktuell
gewählten Programmtyp übereinstimmt, werden im Display abwechselnd der Programmtyp und der Sendername bzw. die Frequenz
angezeigt.
Hinweise:
Wird kein Sender mit dem ausgewählten
•
Programmtyp gefunden, wird kurz „NO
PTY“ angezeigt und ein Beep ertönt. Der
zuletzt gespielte Sender wird wieder eingestellt.
Wenn der eingestellte oder ein anderer
•
Sender aus der Senderkette zu einem
späteren Zeitpunkt den gewünschten Programm-Typ ausstrahlt, wechselt das Autoradio automatisch vom aktuellen Sender
bzw. von der aktuellen Audioquelle (z. B.
5 / > kurz.
5 / > so
@/ 2.
CD) zu dem Sender mit dem gewünschten
Programm-Typ. Beachten Sie, dass diese
Funktion nicht von allen Sendern unterstützt wird.
Anzeige einstellen
쏅
Drücken Sie die Taste DIS/ESC =, um zwi-
schen diesen beiden Anzeigen zu wechseln:
Anzeige Bedeutung
ABCDEF
bzw.
FM1 102.90
FM1 11:32
Sendername
bzw.
Speicherebene/Frequenz
Speicherebene/Uhrzeit
CD-/MP3-/WMA-/C‘n‘C-/CDWechsler-Betrieb
Grundlegende Informationen
CD-/MP3-/WMA-Betrieb
Sie können mit diesem Autoradio Audio-CDs
(CDDA) und CD-R/RWs mit Audio-, MP3- oder
WMA-Dateien sowie MP3- oder WMA-Dateien auf
USB-Datenträgern abspielen.
Zerstörungsgefahr des CD-Laufwerks!
Unrund konturierte CDs (Shape-CDs) und
CDs mit 8 cm Durchmesser (Mini-CDs)
dürfen nicht verwendet werden.
Für Beschädigungen des CD-Laufwerks durch ungeeignete CDs wird keine Haftung übernommen.
Hinweise:
•
Für eine einwandfreie Funktion verwenden
Sie nur CDs mit dem Compact-Disc-Logo.
•
Blaupunkt kann nicht die einwandfreie
Funktion von kopiergeschützten CDs sowie
aller auf dem Markt erhältlichen CD-Rohlinge und USB-Datenträger garantieren.
Beachten Sie beim Vorbereiten eines MP3-/WMADatenträgers die folgenden Angaben:
10
Page 11

Benennung von Titeln und Verzeichnissen:
•
Max. 16 Zeichen (CD) bzw. 24 Zeichen
–
(USB) inkl. der Dateiendung „.mp3“ bzw.
„.wma“ (bei mehr Zeichen verringert sich
die Anzahl der vom Autoradio erkennbaren Titel und Ordner)
–
Keine Umlaute oder Sonderzeichen
•
CD-Formate: Audio-CD (CDDA), CD-R/RW,
Ø: 12 cm
•
CD-Datenformate: ISO 9669 Level 1 und 2,
Joliet
CD-Brenngeschwindigkeit: Max. 16-fach
•
(empfohlen)
USB-Format/-Dateisystem: Mass Storage De-
•
vice (Massenspeicher)/FAT32
Dateiendung von Audiodateien:
•
.MP3 für MP3-Dateien
–
.WMA für WMA-Dateien
–
WMA-Dateien nur ohne Digital Rights Manage-
•
ment (DRM) und erstellt mit Windows Media
Player ab Version 8
MP3-ID3-Tags: Version 1 und 2
•
Bitrate für die Erzeugung von Audiodateien:
•
MP3: 32 bis 320 kbps
–
WMA: 32 bis 192 kbps
–
In Abhängigkeit der Datenstruktur auf dem
•
USB Medium können maximal bis zu 20 000
Einträge verwaltet werden.
C‘n‘C-Betrieb
Die C'n'C-Schnittstelle von Blaupunkt (C'n'C =
Command and Control) ermöglicht Ihnen eine
noch komfortablere Steuerung von Geräten und
Datenträgern, die über ein C'n'C-fähiges Blaupunkt-Interface an das Autoradio angeschlossen
sind.
Bevor Sie ein C'n'C-fähiges Blaupunkt-Interface
anschließen, überprüfen Sie den Modus des
rückseitigen AUX-Eingangs. Lesen Sie dazu den
Abschnitt „Rückseitiger AUX-Eingang“ im Kapitel
„Externe Audioquellen“.
CD-/MP3-/WMA/C‘n‘C-/CD-Wechsler-Betrieb
CD-Wechsler-Betrieb
Sie können an das Autoradio folgende CD-Wechsler anschließen:
•
Blaupunkt CDC A03
•
Blaupunkt CDC A08
•
Blaupunkt IDC A09
Informationen über den Umgang mit CDs, das
Einlegen von CDs und zur Handhabung des CDWechslers fi nden Sie in der Bedienungsanleitung
Ihres CD-Wechslers.
Bevor Sie einen CD-Wechsler anschließen, überprüfen Sie den Modus des rückseitigen AUX-Eingangs. Lesen Sie dazu den Abschnitt „Rückseitiger
AUX-Eingang“ im Kapitel „Externe Audioquellen“.
In den CD-/MP3-/WMA/C‘n‘C-/CDWechsler-Betrieb wechseln
쏅
Drücken Sie die Taste SRC 6 so oft, bis die
gewünschte Audioquelle angezeigt wird:
•
„CD“: Eingelegte CD.
•
„MP3“: Eingelegte CD, die bereits als MP3CD erkannt ist.
•
„USB“: Angeschlossener USB-Datenträger.
•
Name des über C‘n‘C angeschlossenen
Gerätes
•
„CDC / AUX“: Angeschlossener CD-Wechsler (wenn keine andere externe Audioquelle angeschlossen ist).
Hinweise:
•
Die jeweilige Audioquelle kann nur ausgewählt werden, wenn eine entsprechende
CD eingelegt ist bzw. ein entsprechendes
Gerät (z. B. ein USB-Datenträger oder ein
CD-Wechsler) angeschlossen ist.
•
Falls das Autoradio die Daten eines angeschlossenen Gerätes oder Datenträgers
vor der Wiedergabe erst lesen muss, erscheint solange „READING“ im Display.
Dies kann bei großen Datenmengen bis
zu 1 Minute dauern. Falls Gerät oder Datenträger fehlerhaft sind oder die übertra-
DEUTSCH
11
Page 12

CD-/MP3-/WMA/C‘n‘C-/CD-Wechsler-Betrieb
genen Daten nicht wiedergegeben werden
können, wird eine entsprechende Meldung
im Display angezeigt (z. B. „ERROR“ oder
„USB ERROR“).
•
Erfasst der angeschlossene CD-Wechsler
zunächst die eingelegten CDs (z. B. nach
einer Unterbrechung der Stromversorgung
oder nach einem Magazinwechsel), wird
solange „MAG SCAN“ angezeigt. Falls der
CD-Wechsler keine CDs oder kein Magazin
enthält, wird „NO DISC“ angezeigt.
CD einlegen
Hinweis:
Der automatische Einzug der CD darf nicht
behindert oder unterstützt werden.
Schieben Sie die CD mit der bedruckten Sei-
쏅
te nach oben in den CD-Schacht
Widerstand spürbar wird.
Die CD wird automatisch eingezogen und ihre
Daten werden überprüft (im Display wird solange „READING“ angezeigt). Danach beginnt
die Wiedergabe im CD- bzw. MP3-Betrieb. Im
Display wird bei eingelegter CD das CD-Symbol angezeigt.
Hinweis:
Kann die eingelegte CD nicht wiedergegeben
werden, wird kurz „CD ERROR“ angezeigt und
die CD wird nach ca. 2 Sekunden automatisch
ausgeschoben.
7, bis ein
CD entnehmen
Hinweise:
Eine ausgeschobene und nicht entnom-
•
mene CD wird nach ca. 10 Sekunden automatisch wieder eingezogen.
Sie können CDs auch ausschieben lassen,
•
wenn das Autoradio ausgeschaltet ist oder
wenn eine andere Audioquelle aktiv ist.
Drücken Sie die Taste
쏅
legte CD auszuschieben.
:, um eine einge-
12
USB-Datenträger anschießen/
entfernen
Um einen USB-Datenträger anschließen zu können, muss das mitgelieferte USB-Kabel am Autoradio angeschlossen werden (siehe Einbauanleitung).
쏅
Schalten Sie das Autoradio aus, damit der Datenträger korrekt an- und abgemeldet wird.
쏅
Schließen Sie den USB-Datenträger an das
USB-Kabel an bzw. ziehen Sie ihn ab.
Im Display wird bei angeschlossenem USBDatenträger das USB-Symbol angezeigt. Wird
der USB-Datenträger nach dem Anschließen
bzw. nach Einschalten des Autoradios das
erste Mal als Audioquelle ausgewählt, werden
zunächst die Daten eingelesen (im Display
wird solange „READING“ angezeigt).
Hinweise:
•
Kann der angeschlossene USB-Datenträger nicht wiedergegeben werden, wird
kurz „USB ERROR“ angezeigt.
•
Die für das Einlesen benötigte Zeit hängt
von der Bauart und Größe des USB-Datenträgers ab.
Titel wählen
쏅
Drücken Sie die Taste 5 / > kurz, um
zum vorherigen/nächsten Titel zu wechseln.
Hinweis:
Wenn der aktuelle Titel länger als 3 Sekunden
spielt, startet einmaliges Drücken von
den Titel erneut.
5
Ordner/CD wählen (nur im MP3-/
WMA-/C‘n‘C- bzw. CD-WechslerBetrieb)
Drücken Sie die Taste @/ 2, um zum
쏅
vorherigen/nächsten Ordner bzw. zur vorherigen/nächsten CD zu wechseln.
Hinweis:
Sie können so auch zwischen Playlisten eines
über C‘n‘C angeschlossenen Gerätes wechseln.
Page 13
CD-/MP3-/WMA/C‘n‘C-/CD-Wechsler-Betrieb
Schneller Suchlauf
쏅
Halten Sie die Taste 5 / > solange gedrückt, bis die gewünschte Stelle erreicht ist.
Wiedergabe unterbrechen
쏅
Drücken Sie die Taste 3 <, um die Wiedergabe zu unterbrechen („PAUSE“) bzw.
wieder fortzusetzen.
Playlist-Modus (nur im MP3-/WMABetrieb)
Das Autoradio kann Playlisten abspielen, die mit
einem MP3-Manager wie z. B. WinAmp oder Microsoft Media Player erstellt wurden. Die Playlisten
müssen im Root-Ordner der CD bzw. des USB-Datenträgers gespeichert sein. Folgende Playlist-Formate können erkannt werden: M3U, PLS.
Titel im Playlist-Modus wählen
Drücken Sie die Taste 2 < für ca. 2 Sekun-
쏅
den, um in den Playlist-Modus zu wechseln:
Im Display wird kurz „LIST ON“ angezeigt. Der
erste Titel der ersten Playliste wird gespielt.
Hinweis:
Falls der Datenträger keine Playlisten enthält,
wird kurz „LIST MODE“ angezeigt.
Drücken Sie die Taste
쏅
zum vorherigen/nächsten Titel der aktuellen
Playliste zu wechseln.
쏅
Drücken Sie die Taste
vorherigen/nächsten Playliste zu wechseln.
Im Display wird kurz der Name der gewählten Playliste angezeigt und der erste Titel der
Playliste wird gespielt.
Playlist-Modus verlassen
Drücken Sie die Taste 2 < für ca. 2 Sekun-
쏅
den:
Im Display wird kurz „LIST OFF“ angezeigt.
Der aktuelle Titel wird weiter gespielt.
5 / > kurz, um
@/ 2, um zur
Alle Titel anspielen
Mit der Scan-Funktion werden alle verfügbaren
Titel angespielt.
쏅
Drücken Sie die Taste MENU•OK
? für ca.
2 Sekunden, um das Anspielen zu starten,
bzw. kurz, um den aktuell angespielten Titel
weiter zu hören.
Während des Anspielens werden im Display
abwechselnd „SCAN“ und die aktuelle Titelnummer bzw. der Dateiname angezeigt.
Hinweise:
•
Im CD-Wechsler-Betrieb beträgt die Anspielzeit pro Titel ca. 10 Sekunden. Für
alle anderen Betriebsarten kann die Anspielzeit pro Titel eingestellt werden (siehe
Kap. „Benutzereinstellungen“, Abschnitt
„Einstellung im Benutzermenü vornehmen“, Menüpunkt „SCAN TIME“).
•
Im Playlist-Modus (MP3-Betrieb) werden
nur die Titel der aktuellen Playlist angespielt.
Titel in zufälliger Reihenfolge
abspielen
Drücken Sie die Taste 5 MIX <, um zwischen
쏅
den Wiedergabemodi zu wechseln:
Betrieb Anzeige Bedeutung
CD
MP3/
WMA/
C‘n‘C
1
MIX ALL
MIX DIR
MIX ALL
MIX CD
CDC
MIX ALL
Allg.
1
Im C‘n‘C-Betrieb können je nach ange-
MIX OFF
schlossenem Gerät weitere Wiedergabemodi zur Verfügung stehen
Titel mischen
Titel des aktuellen
2
Ordners mischen
Titel des Datenträ-
2
gers mischen
Titel der aktuellen
CD mischen
Titel aller CDs
mischen
Normale Wieder-
gabe
DEUTSCH
13
Page 14
CD-/MP3-/WMA/C‘n‘C-/CD-Wechsler-Betrieb | Externe Audioquellen
2
Nicht im MP3-Playlist-Modus
Betrieb Anzeige Bedeutung
Ist die MIX-Funktion eingeschaltet, wird das
MIX-Symbol im Display angezeigt.
Einzelne Titel bzw. CDs oder
Verzeichnisse wiederholt abspielen
쏅
Drücken Sie die Taste 4 RPT <, um zwi-
CDC
schen den Wiedergabemodi zu wechseln:
Betrieb Anzeige Bedeutung
CD
RPT TRACK
RPT TRACK
MP3/
WMA/
C‘n‘C
CDC
Allg.
1
Im C‘n‘C-Betrieb können je nach ange-
RPT DIR
1
RPT TRACK
RPT DISC
RPT OFF
Titel wiederholen
Titel wiederholen
Ordner wieder-
2
holen
Titel wiederholen
CD wiederholen
Normale Wieder-
gabe
schlossenem Gerät weitere Wiedergabemodi zur Verfügung stehen
2
Nicht im MP3-Playlist-Modus
Ist die RPT-Funktion eingeschaltet, wird das
RPT-Symbol im Display angezeigt.
1
Interpret und Albumname müssen als ID3-
Tag gespeichert sein und werden nur für ca.
10 Sekunden und ggf. als Laufschrift angezeigt; sonst wird der Dateiname angezeigt.
Hinweis
Sie können die Anzeige von CD-Text einer Audio-CD ein- und ausschalten (siehe Kap. „Benutzereinstellungen“, Abschnitt „Einstellung
im Benutzermenü vornehmen“, Menüpunkt
„CD TEXT“). Bei eingeschaltetem CD-Text wird
zu Beginn jedes Titels der entsprechende CDText einmal als Laufschrift angezeigt.
Externe Audioquellen
Front-AUX-IN-Buchse
Anzeige einstellen
Drücken Sie die Taste DIS/ESC = ein- oder
쏅
mehrmals, um zwischen diesen Anzeigen zu
wechseln:
Betrieb Anzeige Bedeutung
Titelnummer
und Spielzeit
Titelnummer
und Uhrzeit
Dateiname
1
Interpret
Albumname
Spielzeit
Uhrzeit
CD
MP3/
WMA/
C‘n‘C
T 01 02:15
T 01 18:33
01 ABC
ABCDEF
ABCDEF
PLAY 02:15
CLK 18:33
stehende Stecker in der Front-AUX-IN-Buchse
Verletzungen verursachen. Die Verwendung gerader Stecker oder Adapter führt zu einem erhöhten
Verletzungsrisiko.
Aus diesem Grund empfehlen wir die Nut zung von
abgewinkelten Klinkensteckern, z. B. das Blaupunkt Zubehör-Kabel (7 607 001 535).
Sobald eine externe Audioquelle wie z. B. ein
tragbarer CD-/ MiniDisc- oder MP3-Spieler an die
1
Front-AUX-IN-Buchse angeschossen ist, kann sie
mit der Taste SRC 6 ausgewählt werden. Im Dis-
play wird dann „FRONT AUX“ angezeigt.
T 01 02:15
T 01 18:33
Titelnummer
und Spielzeit
Titelnummer
und Uhrzeit
CD-Nummer
CD 02T 03
und Titelnummer
Gefahr! Erhöhte Verletzungsgefahr
durch Stecker.
Im Falle eines Unfalls kann der hervor-
14
Page 15

Rückseitiger AUX-Eingang
Über den rückseitigen AUX-Eingang (Rear-AUXIN) können Sie verschiedene externe Audioquellen an das Autoradio anschließen:
•
C‘n‘C-fähige Geräte aus dem BlaupunktZubehörprogramm (z. B. ein C‘n‘C-fähiges
Bluetooth®/USB- oder I-Pod/USB-Interface;
C‘n‘C = Command and Control).
•
CD-Wechsler
•
Andere externe Audioquellen wie z. B. tragbare CD-Spieler, MiniDisc-Spieler, MP3-Spieler oder ein nicht-C‘n‘C-fähiges Blaupunkt-Interface.
Hinweis:
Zum Anschluss einer externen Audioquelle
über den rückseitigen AUX-Eingang benötigen Sie ein Adapterkabel. Dieses Kabel (Blaupunkt-Nr.: 7 607 897 093) kön nen Sie über
Ihren Blaupunkt-Fachhändler beziehen.
Bevor Sie ein bestimmtes Gerät anschließen,
prüfen Sie zunächst den Modus des rückseitigen
AUX-Eingangs und ändern Sie ggf. die Einstellung
(siehe Kap. „Benutzereinstellungen“, Abschnitt
„Einstellung im Benutzermenü vornehmen“,
Menüpunkt „CDC“). Beachten Sie, dass Sie die
Einstellung nur ändern, solange kein Gerät an den
rückseitigen AUX-Eingang angeschlossen ist. Entfernen Sie ggf. angeschlossene Geräte vorher bei
ausgeschaltetem Autoradio.
C'n'C-Betrieb starten
Drücken Sie die Taste SRC 6 so oft, bis der
쏅
Name des über C'n'C angeschlossenen Gerätes im Display erscheint.
Die Wiedergabe be ginnt.
Hinweise:
Der C'n'C-Betrieb ist nur wählbar, wenn ein
•
geeignetes Gerät über ein C'n'C-fähiges Interface angeschlossen ist.
Zur Bedienung des Radios im C‘n‘C-Betrieb
•
lesen Sie bitte das Kapitel „CD-/MP3-/
WMA-/C‘n‘C-/CD-Wechsler-Betrieb“.
Externe Audioquellen | Klangeinstellungen
Sie können unter Verwendung geeig-
•
neter Adapterkabel bis zu 3 C'n'C-fähige
Blaupunkt-Interfaces an das Autoradio
anschließen. Damit das Autoradio die
verschiedenen Interfaces unterscheiden
kann, können Sie jedem Interface eine individuelle Gerätenummer zuweisen (siehe
Kap. „Benutzereinstellungen“, Abschnitt
„Einstellung im Benutzermenü vornehmen“, Menüpunkt „C‘N‘C“).
AUX-Betrieb starten
Drücken Sie die Taste SRC 6 so oft, bis
쏅
„CDC / AUX“ im Display erscheint.
Die Wiedergabe be ginnt.
Hinweis:
Sie können für den rückseitigen AUX-Eingang
einen eigenen Namen eingeben, der im AUXBetrieb im Display angezeigt wird, wenn Sie
die angeschlossene Audioquelle ausgewählt
haben (siehe Kap. „Benutzereinstellungen“,
Abschnitt „Einstellung im Benutzermenü vornehmen“, Menüpunkt „AUX EDIT“).
Klangeinstellungen
Im Audio-Menü können Sie folgende Klangeinstellungen ändern:
Bass- und Höhenpegel einstellen
•
Laustärkeverteilung links/rechts (Balance)
•
bzw. vorn/hinten (Fader) einstellen
Anhebung der Bässe bei geringer Lautstärke
•
(X-Bass) einstellen.
Im erweiterten Audio-Menü können Sie außerdem
folgende Einstellungen vornehmen:
3-Band-Equalizer einstellen:
•
Mittenpegel einstellen.
–
Bass-, Mitten- und Höhenfrequenz wäh-
–
len.
Gütefaktor für Bass und Mitten einstellen.
–
Erweiterte X-Bass-Einstellung vornehmen (Pe-
•
gel und Frequenz)
Equalizer-Voreinstellung wählen
•
DEUTSCH
15
Page 16
Klangeinstellungen
Hinweis:
Die Einstellungen für Bässe, Mitten und Höhen werden jeweils für die aktuelle Audioquelle gespeichert.
Audiomenü aufrufen und verlassen
쏅
Drücken Sie die Taste AUD A kurz, um das
Audiomenü zu öffnen.
쏅
Drücken Sie die Taste
bis der gewünschte Menüpunkt ausgewählt
ist.
Nehmen Sie die Einstellung vor (siehe nächs-
쏅
ten Abschnitt).
Drücken Sie die Taste MENU•OK ? kurz,
쏅
um einen anderen Menüpunkt auszuwählen.
- oder Drücken Sie die Taste DIS/ESC = kurz, um
쏅
das Menü zu verlassen.
Hinweis:
Das Menü wird automatisch ca. 15 Sekunden
nach der letzten Tastenbetätigung verlassen
und Sie kehren zum Display der aktuellen Audioquelle zurück.
@/ 2 so oft,
Einstellung im Audiomenü
vornehmen
BASS
Basspegel. Einstellungen: -7 bis +7.
쏅
Drücken Sie die Taste
menü zu öffnen.
쏅
Drücken Sie die Taste
Einstellung vorzunehmen.
TREBLE
Höhenpegel. Einstellungen: -7 bis +7.
쏅
Drücken Sie die Taste
menü zu öffnen.
쏅
Drücken Sie die Taste
Einstellung vorzunehmen.
>, um das Unter-
@/ 2, um die
>, um das Unter-
@/ 2, um die
BALANCE
Lautstärkeverteilung links/rechts. Einstellungen:
L9 (links) bis R9 (rechts).
Drücken Sie die Taste
쏅
menü zu öffnen.
쏅
Drücken Sie die Taste
Einstellung vorzunehmen.
FADER
Lautstärkeverteilung vorn/hinten. Einstellungen:
R9 (hinten) bis F9 (vorn).
쏅
Drücken Sie die Taste
menü zu öffnen.
쏅
Drücken Sie die Taste
Einstellung vorzunehmen.
X-BAS S
Anhebung der Bässe bei geringer Lautstärke. Einstellungen: 0 (aus)bis 3 (stärkste Anhebung).
쏅
Drücken Sie die Taste
menü zu öffnen.
쏅
Drücken Sie die Taste
Einstellung vorzunehmen.
>, um das Unter-
@/ 2, um die
>, um das Unter-
@/ 2, um die
>, um das Unter-
@/ 2, um die
Erweitertes Audiomenü aufrufen und
verlassen
쏅
Wählen Sie im Audiomenü den Menüpunkt
„ENHANCED“.
쏅
Drücken Sie die Taste
CED-Menü zu öffnen.
쏅
Drücken Sie die Taste
bis der gewünschte Menüpunkt ausgewählt
ist.
쏅
Nehmen Sie die Einstellung vor (siehe nächsten Abschnitt).
쏅
Drücken Sie die Taste MENU•OK ? kurz,
um einen anderen Menüpunkt auszuwählen.
- oder -
쏅
Drücken Sie die Taste DIS/ESC = kurz, um
das Menü zu verlassen.
>, um das ENHAN-
@/ 2 so oft,
16
Page 17

Klangeinstellungen | Benutzereinstellungen
Einstellung im erweiterten
Audiomenü vornehmen
E-BASS
Bassfrequenz und Gütefaktor einstellen. Einstellungen:
•
Bassfrequenz: 60/80/100/200 Hz
•
Gütefaktor: 1,0/1,25/1,5/2,0
쏅
Drücken Sie die Taste
menü E-BASS zu öffnen.
쏅
Drücken Sie die Taste
schen den Untermenüs „FREQ“ (Frequenz)
und QFAC (Gütefaktor) zu wechseln.
쏅
Drücken Sie die Taste
schen den verfügbaren Einstellungen des Untermenüs zu wechseln.
E-TREBLE
Höhenfrequenz einstellen. Einstellungen:
10/12,5/ 15/17,5 kHz.
쏅
Drücken Sie die Taste
menü E-TREBLE zu öffnen.
쏅
Drücken Sie die Taste
schen den verfügbaren Einstellungen des Untermenüs zu wechseln.
E-MIDDLE
Mittelpegel und -frequenz sowie Gütefaktor einstellen. Einstellungen:
•
Mittenpegel: -7 bis +7
•
Mittenfrequenz: 0,5/1,0/1,5/2,5 kHz
•
Gütefaktor: 0,5/0,75/1,0/1,25
쏅
Drücken Sie die Taste
menü E-MIDDLE zu öffnen.
쏅
Drücken Sie die Taste
zwischen den Untermenüs „GAIN“ (Pegel),
„FREQ“ (Frequenz) und QFAC (Gütefaktor)
zu wechseln.
쏅
Drücken Sie die Taste
schen den verfügbaren Einstellungen des Untermenüs zu wechseln.
>, um das Unter-
@/ 2, um zwi-
5 / >, um zwi-
>, um das Unter-
5 / >, um zwi-
>, um das Unter-
@/ 2, um
5 / >, um zwi-
E-XBASS
X-Basspegel und -frequenz einstellen. Einstellungen:
X-Basspegel: 0 (aus) bis 3
•
X-Bassfrequenz: 30/60/100 Hz
•
Drücken Sie die Taste
쏅
menü E-XBASS zu öffnen.
쏅
Drücken Sie die Taste
schen den Untermenüs „GAIN“ (Pegel) und
„FREQ“ (Frequenz) zu wechseln.
쏅
Drücken Sie die Taste
schen den verfügbaren Einstellungen des Untermenüs zu wechseln.
PRESETS
Equalizer-Voreinstellung wählen. Einstellungen:
POP, ROCK, CLASSIC, P-EQ OFF (keine Voreinstellung).
쏅
Drücken Sie die Taste
menü PRESETS zu öffnen.
쏅
Drücken Sie die Taste
schen den Einstellungen zu wechseln.
>, um das Unter-
@/ 2, um zwi-
5 / >, um zwi-
>, um das Unter-
@/ 2, um zwi-
Benutzereinstellungen
Benutzermenü aufrufen und
verlassen
쏅
Drücken Sie die Taste MENU•OK ? kurz,
um das Menü zu öffnen.
쏅
Drücken Sie die Taste
bis der gewünschte Menüpunkt ausgewählt
ist.
쏅
Nehmen Sie die Einstellung vor (siehe nächsten Abschnitt).
쏅
Drücken Sie die Taste MENU•OK ? kurz,
um einen anderen Menüpunkt auszuwählen.
- oder -
쏅
Drücken Sie die Taste DIS/ESC = kurz, um
das Menü zu verlassen.
Hinweis:
Das Menü wird automatisch ca. 15 Sekunden
nach der letzten Tastenbetätigung verlassen
@/ 2 so oft,
DEUTSCH
17
Page 18
Benutzereinstellungen
und Sie kehren zum Display der aktuellen Audioquelle zurück.
Einstellung im Benutzermenü
vornehmen
CDC
Modus des rückseitigen AUX-Eingangs einstellen. Einstellungen: ON (zum Anschluss eines CDWechslers oder einer anderen externen Audioquelle), OFF (zum Anschluss eines C‘n‘C-fähigen
Blaupunkt-Interfaces).
쏅
Drücken Sie die Taste
menü zu öffnen.
쏅
Drücken Sie die Taste
den Einstellungen zu wechseln.
쏅
Drücken Sie die Taste MENU•OK ? kurz,
um die gewählte Einstellung zu bestätigen.
Das Autoradio schaltet sich automatisch aus
und mit der gewählten Einstellung wieder
ein.
C‘N‘C
Angeschlossenen C‘n‘C-fähigen Interfaces eine individuelle Gerätenummer zuweisen (C‘n‘C = Command and Control). Länge: 4 Stellen, Ziffern: 0-9,
A-F (hexadezimal).
Drücken Sie die Taste
쏅
menü zu öffnen.
쏅
Drücken Sie die Taste
Interface zu wählen („DEV 1 - 3“).
쏅
Drücken Sie die Taste
nummer zu ändern.
쏅
Drücken Sie die Taste
schen den Stellen zu wechseln.
Das Zeichen auf der ausgewählten Stelle
blinkt, wenn sie ausgewählt ist.
쏅
Drücken Sie dieTaste
der ausgewählten Stelle eine Ziffer zu wählen.
쏅
Drücken Sie die Taste MENU•OK ? kurz,
um die eingegebene Gerätenummer zu bestätigen.
>, um das Unter-
>, um zwischen
>, um das Unter-
@/ 2, um das
>, um die Geräte-
5 / >, um zwi-
@/ 2, um auf
CDTEXT
Anzeige von CD-Text ein- oder ausschalten. Einstellungen: ON (ein), OFF (aus).
Drücken Sie die Taste
쏅
menü zu öffnen.
쏅
Drücken Sie die Taste
den Einstellungen zu wechseln.
쏅
Drücken Sie die Taste MENU•OK ? kurz,
um die gewählte Einstellung zu bestätigen.
TA VOLUME
(nur für Tuner-Region „EUROPE“)
Minimallautstärke für Verkehrsdurchsagen einstellen. Einstellungen: 1 - 50.
Drücken Sie die Taste
쏅
menü zu öffnen.
쏅
Drücken Sie die Taste
drehen Sie den Lautstärkeregler 4, um die
Einstellung vorzunehmen.
SENS
Nur im Radiobetrieb möglich: Empfi ndlichkeit des
Sendersuchlaufs einstellen. Einstellungen: LO1
(geringste) – HI6 (größte).
쏅
Drücken Sie die Taste
menü zu öffnen.
Drücken Sie die Taste
쏅
Einstellung vorzunehmen.
SCAN TIME
Anspielzeit in 5-Sekunden-Schritten einstellen.
Einstellungen: 5 – 30.
쏅
Drücken Sie die Taste
menü zu öffnen.
쏅
Drücken Sie die Taste
Einstellung vorzunehmen.
CLOCK SET
Einstellen der Uhrzeit.
쏅
Drücken Sie die Taste
menü zu öffnen.
쏅
Drücken Sie die Taste
schen Minuten und Stunden zu wechseln.
>, um das Unter-
>, um zwischen
>, um das Unter-
@/ 2 oder
>, um das Unter-
@/ 2, um die
>, um das Unter-
@/ 2, um die
>, um das Unter-
5 / >, um zwi-
18
Page 19

Benutzereinstellungen
Die Minuten- bzw- Stundenanzeige blinkt,
wenn sie ausgewählt ist.
쏅
Drücken Sie die Taste
@/ 2, um die
Minuten bzw. Stunden einzustellen.
쏅
Drücken Sie die Taste MENU•OK ? kurz,
um die eingegebene Uhrzeit zu bestätigen.
Hinweis:
Im 12-Std.-Uhrzeitmodus (12H MODE) wird
hinter der Uhrzeit ein „A“ für vormittags bzw.
ein „P“ für nachmittags angezeigt.
12H/24H MODE
12- bzw. 24-Std.-Uhrzeitmodus wählen. Einstellungen: 12H, 24H.
쏅
Drücken Sie die Taste
>, um das Unter-
menü zu öffnen.
쏅
Drücken Sie die Taste
>, um zwischen
den Einstellungen zu wechseln.
CLOCK
Anzeige der Uhrzeit bei ausgeschaltetem Radio
und ausgeschalteter Fahrzeugzündung ein- oder
ausschalten. Einstellungen: ON (ein), OFF (aus).
쏅
Drücken Sie die Taste
>, um das Unter-
menü zu öffnen.
쏅
Drücken Sie die Taste
>, um zwischen
den Einstellungen zu wechseln.
쏅
Drücken Sie die Taste MENU•OK ? kurz,
um die eingegebene Uhrzeit zu bestätigen.
BEEP
Bestätigungston ein- oder ausschalten. Einstellungen: ON (ein), OFF (aus).
쏅
Drücken Sie die Taste
>, um das Unter-
menü zu öffnen.
쏅
Drücken Sie die Taste
>, um zwischen
den Einstellungen zu wechseln.
쏅
Drücken Sie die Taste MENU•OK ? kurz,
um die eingegebene Uhrzeit zu bestätigen.
TEL VOL
Minimallautstärke für Navigationsdurchsagen
und Telefongespräche einstellen. Einstellungen:
1 - 50.
Drücken Sie die Taste
쏅
>, um das Unter-
menü zu öffnen.
쏅
Drücken Sie die Taste
@/ 2 oder
drehen Sie den Lautstärkeregler 4, um die
Einstellung vorzunehmen.
MUTE LVL
Lautstärke für die Leiseschaltung einstellen. Einstellungen: 0 - 50.
쏅
Drücken Sie die Taste
>, um das Unter-
menü zu öffnen.
쏅
Drücken Sie die Taste
@/ 2 oder
drehen Sie den Lautstärkeregler 4, um die
Einstellung vorzunehmen.
ON VOLUME
Einschaltlautstärke einstellen. Einstellungen:
0 – 50 oder LAST VOL (vor dem Ausschalten des
Autoradios zuletzt eingestellte Lautstärke).
쏅
Drücken Sie die Taste
>, um die Einstel-
lung „LAST VOL“ zu wählen.
- oder Drücken Sie die Taste
쏅
5, um die Einschaltlautstärke zwischen 0 und 50 einzustellen.
쏅
Drücken Sie die Taste
@/ 2 oder
drehen Sie den Lautstärkeregler 4, um die
Einstellung vorzunehmen.
REG
(nur für Tuner-Region „EUROPE“, „USA”,
„S AMERICA”)
Nur im FM-Radiobetrieb möglich: REG-Funktion
ein- oder ausschalten. Einstellungen: ON (ein),
OFF (aus).
Drücken Sie die Taste
쏅
>, um das Unter-
menü zu öffnen.
쏅
Drücken Sie die Taste
>, um zwischen
den Einstellungen zu wechseln.
DEUTSCH
19
Page 20
Benutzereinstellungen
PTY LANG
(nur für Tuner-Region „EUROPE“)
Nur im FM-Radiobetrieb möglich: Sprache für die
Anzeigen von Programmtypen wählen. Einstellungen: ENGLISH, FRANCAIS, DEUTSCH.
쏅
Drücken Sie die Taste
menü zu öffnen.
쏅
Drücken Sie die Taste
schen den Einstellungen zu wechseln.
PTY
(nur für Tuner-Regionen „EUROPE“, „USA“)
Nur im FM-Radiobetrieb möglich: PTY-Funktion
ein- oder ausschalten. Einstellungen: ON (ein),
OFF (aus).
쏅
Drücken Sie die Taste
menü zu öffnen.
쏅
Drücken Sie die Taste
den Einstellungen zu wechseln.
DISP COL
Farbe für die Displaybeleuchtung aus den Grundfarben Rot, Grün und Blau (RGB) mischen. Einstellungen: Für R, G und B jeweils 0 bis 16.
쏅
Drücken Sie die Taste
menü „4096 COL“ zu wählen (Einstellen von
R, G, und B), bzw. die Taste
Untermenü „256 COL“ zu wählen (Einstellen
von R und G, B bleibt unverändert).
쏅
Drücken Sie die Taste
menü zu öffnen.
쏅
Drücken Sie die Taste
schen den Farben zu wechseln.
Der Wert der ausgewählten Farbe blinkt.
쏅
Drücken Sie die Taste
Wert der ausgewählten Farbe einzustellen.
쏅
Drücken Sie die Taste MENU•OK ? kurz,
um die gewählte Einstellung zu bestätigen.
SCAN
Ständigen Farbwechsel der Displaybeleuchtung
ein- oder ausschalten. Einstellungen: ON (ein),
OFF (aus).
<, um das Unter-
@/ 2, um zwi-
>, um das Unter-
>, um zwischen
5, um das Unter-
>, um das
>, um das Unter-
5 / >, um zwi-
@/ 2, um den
20
Drücken Sie die Taste
쏅
menü zu öffnen.
쏅
Drücken Sie die Taste
den Einstellungen zu wechseln.
Drücken Sie die Taste MENU•OK ? kurz,
쏅
um die gewählte Einstellung zu bestätigen.
Ist der ständige Farbwechsel eingeschaltet, ändert sich die Farbe der Displaybeleuchtung fortlaufend über das ganze Farbspektrum.
COL SCAN
Farbe der Displaybeleuchtung während eines
Farbsuchlaufs auswählen.
쏅
Drücken Sie die Taste
suchlauf zu starten.
Im Display wird abwechselnd „SCANNING“
und „OK (MENU)“ angezeigt und die Farbe der
Displaybeleuchtung ändert sich fortlaufend.
쏅
Drücken Sie die Taste MENU•OK ? kurz, um
die gerade eingestellte Farbe auszuwählen.
DIM DAY/DIM NIGHT
Displayhelligkeit für den Tag (DIM DAY) bzw. für
die Nacht (DIM NIGHT) einstellen. Einstellungen:
1 – 16.
쏅
Drücken Sie die Taste
menü zu öffnen.
쏅
Drücken Sie die Taste
Einstellung vorzunehmen.
Wenn Ihr Autoradio, wie in der Ein bauanleitung
beschrieben, angeschlossen ist und Ihr Fahrzeug
über den entsprechenden Anschluss verfügt, erfolgt die Umschaltung der Displayhelligkeit für
Tag und Nacht durch das Ein- bzw. Ausschalten
der Fahrzeugbeleuchtung.
AUX EDIT
Namen für den rückseitigen AUX-Eingang im AUXBetrieb eingeben. Länge: 9 Stellen; Zeichen: A-Z,
0-9.
쏅
Drücken Sie die Taste
menü zu öffnen.
쏅
Drücken Sie die Taste
schen den Stellen zu wechseln.
>, um das Unter-
>, um zwischen
>, um den Farb-
>, um das Unter-
@/ 2, um die
>, um das Unter-
5 / >, um zwi-
Page 21
Benutzereinstellungen | Werkseinstellungen
Das Zeichen auf der ausgewählten Stelle
blinkt, wenn sie ausgewählt ist.
Drücken Sie die Taste
쏅
ausgewählten Stelle ein Zeichen zu wählen.
Drücken Sie die Taste MENU•OK ? kurz,
쏅
um den eingegebenen Namen zu bestätigen.
TRAF
(nur für Tuner-Region „EUROPE“)
Nur im FM-Radiobetrieb möglich: Vorrang für Verkehrsmeldungen ein- oder ausschalten. Einstellungen: ON (ein), OFF (aus).
Drücken Sie die Taste
쏅
menü zu öffnen.
Drücken Sie die Taste
쏅
den Einstellungen zu wechseln.
RDS
(nur für Tuner-Region „EUROPE“)
Nur im FM-Radiobetrieb möglich: RDS-Funktion
ein- oder ausschalten. Einstellungen: ON (ein),
OFF (aus).
Drücken Sie die Taste
쏅
menü zu öffnen.
Drücken Sie die Taste
쏅
den Einstellungen zu wechseln.
@/ 2, um auf der
>, um das Unter-
>, um zwischen
>, um das Unter-
>, um zwischen
Werkseinstellungen
Werkseinstellungen im Benutzermenü:
ON VOLUME LAST VOL
MUTE LVL 0
SENS HI6
SCAN TIME 10
CLOCK OFF
BEEP ON
DIM DAY 15
DIM NIGHT 12
CDTEXT OFF
12H/24H MODE 24H
CLOCKSET 00:00
TEL VOL 17
TA V OL 2 0
RDS* ON
REG* ON
TRAF* OFF
* Nur in Tuner-Region „EUROPE“
Sie können die ursprünglichen Werkseinstellun-
gen des Autoradios wiederherstellen:
쏅
Drücken Sie die Taste MENU•OK ? kurz,
um das Menü zu öffnen.
쏅
Drücken Sie die Taste
der Menüpunkt „NORMSET“ ausgewählt ist.
쏅
Drücken Sie die Taste MENU•OK ? länger
als 4 Sekunden.
Im Display wird kurz „NORM ON“ angezeigt.
Das Autoradio schaltet sich automatisch aus
und mit den Werkseinstellungen wieder ein.
Hinweis:
Drücken Sie die Taste MENU•OK ? kürzer
als 4 Sekunden, wird „NORM OFF“ im Display
angezeigt und die bisherigen Einstellungen
bleiben erhalten.
@/ 2 so oft, bis
DEUTSCH
21
Page 22

Nützliche Informationen | Technische Daten
Nützliche Informationen
Gewährleistung
Für innerhalb der Euro päischen Union ge kaufte
Produkte geben wir eine Her steller garantie. Für
außerhalb der Europäischen Union gekaufte Geräte gelten die von unserer jeweils zuständigen
Landesvertretung herausgegebenen Garantiebedingungen.
Die Garantiebedingungen können Sie unter
www.blaupunkt.com abrufen oder direkt anfordern bei:
Blaupunkt GmbH
Hotline
Robert-Bosch-Str. 200
D-31139 Hildesheim
Service
In einigen Ländern bietet Blaupunkt einen Reparatur- und Abholservice.
Unter www.blaupunkt.com können Sie sich informieren, ob dieser Service in Ihrem Land verfügbar ist.
Möchten Sie diesen Service in Anspruch nehmen,
können Sie über das Internet einen Abholservice
für Ihr Autoradio anfordern.
Technische Daten
Spannungsversorgung
Betriebsspannung: 10,5 - 14,4 V
Stromaufnahme
Im Betrieb: 10 A
10 Sek. nach dem
Ausschalten: < 3,5 mA
Verstärker
Ausgangsleistung: 4 x 26 Watt Sinus bei
14,4 V an 4 Ohm.
4 x 50 Watt max. Power
Tun er
Wellenbereiche Europa/Thailand:
FM: 87,5 - 108 MHz
AM (MW): 531 - 1 602 kHz
LW (nur Europa): 153 - 279 kHz
Wellenbereiche USA:
UKW (FM): 87,7 - 107,9 MHz
AM (/MW): 530 - 1 710 kHz
Wellenbereiche Südamerika:
UKW (FM): 87,5 - 107,9 MHz
AM (/MW): 530 - 1 710 kHz
FM - Übertragungsbereich:
30 - 15 000 Hz
CD
Übertragungsbereich:
20 - 20 000 Hz
Pre-amp Out
4 Kanäle: 2 V
Eingangsempfi ndlichkeit
Rear-AUX-IN: 1,2 V / 10 kΩ
Front-AUX-IN: 500 mV / 6 kΩ
Tel-/Navi-Eingang: 10 V / 1 kΩ
Abmessungen und Gewicht
B x H x T (mm): 182 x 53 x 155
Gewicht: ca. 1,30 kg
Änderungen vorbehalten
22
Page 23
Controls
6
1
4
8
9 1072 53
ENGLISH
16 11
18 17
15
14
1 button
Unlock the detachable control panel
2 button
In the menu: Call up menu item
Radio mode: Start the station seek tuning
MP3/WMA/C‘n‘C/CD changer mode: Change
to next folder / CD
3 On/Off button
Short press: Switch on car sound system
In operation: Mute car sound system (Mute)
Long press: Switch off car sound system
4 Volume control
5 button
In the menu: Change settings
Radio mode: Adjust the stations
Other operating modes: Track selection
6 SRC button
Selecting an audio source
7 CD tray
8 Display
9 USB port
: button (Eject)
Eject a CD
13
12
; Front AUX-IN socket
< Keys 1 - 5
= DIS/ESC button
In the menu: Exit menu
In operation: Switch display
> button
In the menu: Change settings
Radio mode: Adjust the stations
Other operating modes: Track selection
? MENU•OK button
Short press: Call up menu, confi rm settings
Long press: Start scan function
@ button
In the menu: Call up menu item
Radio mode: Start the station seek tuning
MP3/WMA/C‘n‘C/CD changer mode: Change
to previous folder / CD
A AUD button
Calling up the Audio menu
B BND button
Short press: Select memory bank in Radio
mode
Long press: Start Travelstore function in
Radio mode
23
Page 24

Contents
Safety notes .............................................25
Symbols used ............................................25
Road safety ...........................................25
General safety notes ...............................25
Declaration of conformity ........................25
Cleaning notes..........................................26
Disposal notes ..........................................26
Scope of delivery ......................................26
Optional equipment
(not part of the scope of delivery) .............26
Placing the device in operation ..................27
Attaching/detaching the control panel .......27
Setting the tuner region ...........................27
Switching on/off ....................................27
Volume .................................................28
Switching demo mode on/off ...................28
Displaying version numbers .....................28
Traffi c information ....................................28
Radio mode ..............................................29
RDS .....................................................29
Changing to radio mode ..........................29
Selecting the memory bank .....................29
Tuning into a station ................................29
Storing stations/Calling stored stations......30
Scanning stations ...................................30
Storing stations automatically (Travelstore) ...30
PTY ......................................................30
Confi guring the display............................31
CD/MP3/WMA/C‘n‘C/CD changer mode .....31
Basic information ...................................31
Changing to CD/MP3/WMA/C‘n‘C/
CD changer mode ...................................32
Inserting a CD ........................................32
Ejecting a CD .........................................32
Connecting/removing a USB data carrier ...33
Selecting tracks .....................................33
Select a folder/CD (only in MP3/WMA/
C‘n‘C or CD changer mode) ......................33
Fast searching ........................................33
Interrupting playback ..............................33
Playlist mode (only in MP3/WMA mode) ....33
Scanning all tracks..................................34
Playing tracks in random order .................34
Repeatedly playing individual tracks,
CDs or directories ..................................34
Confi guring the display............................34
External audio sources ..............................35
Front AUX-IN socket ................................35
Rear AUX input .......................................35
Sound settings .........................................36
Calling and exiting the audio menu ............36
Performing settings in the audio menu .......36
Calling and exiting the enhanced audio
menu ....................................................37
Performing settings in the enhanced
audio menu ...........................................37
User settings ............................................38
Calling and exiting the user menu ..............38
Performing settings in the user menu ........38
Factory settings ........................................41
Useful information ....................................42
Warranty ...............................................42
Service .................................................42
Technical data ..........................................42
Installation instructions ..........................317
24
Page 25
Safety notes
The car sound system was
ing to the state of the art and established safety
guidelines. Even so, dangers may occur if you
do not observe the safety notes in these instructions.
These instructions contain important information to easily and safely install and operate the car
sound system.
•
Read these instructions carefully and completely before using the car sound system.
•
Keep the instructions at a location so that they
are always accessible to all users.
•
Always pass on the car sound system to third
parties together with these instructions.
In addition, observe the instructions of the devices used in conjunction with this car sound
system.
Symbols used
These instructions employ the following symbols:
DANGER!
Warns about injuries
CAUTION!
Warns about damaging the CD drive
The CE mark confi rms the compliance
with EU directives.
쏅
Identifi es a sequencing step
•
Identifi es a listing
Road safety
Observe the following notes about road safety:
Use your device in such a way that you can
•
always safely control your vehicle. In case of
doubt, stop at a suitable location and operate
your device while the vehicle is standing.
manufactured accord-
Safety notes
•
Remove or attach the control panel only
while the vehicle is standing an.
•
Always listen at a moderate volume to pro-
tect your hearing and to be able to hear acoustic warning signals (e.g. police sirens). During
mute phases (e.g. when changing the audio
source), changing the volume is not audible.
Do not increase the volume during this mute
phase.
General safety notes
Observe the following notes to protect yourself
against injuries:
•
Do not modify or open the device. The device
contains a Class 1 laser that can cause injuries
to your eyes.
•
Do not increase the volume during mute
phases, e.g. when changing the audio source.
Changing the volume is not audible during a
mute phase.
Use as directed
This car sound system is intended for installation
and operation in a vehicle with 12 V vehicle system voltage and must be installed in a DIN slot.
Observe the performance limits in the technical data. Repairs and installation, if necessary,
should be performed by a specialist.
Installation instructions
You may only install the car sound system yourself if you are experienced in installing car sound
systems and are very familiar with the electrical
system of the vehicle. For this purpose, observe
the installation instructions at the end of these
instructions.
Declaration of conformity
The Blaupunkt GmbH declares that the car sound
system San Francisco 300 complies with the basic requirements and the other relevant regulations of the directive 89/336/EWG.
ENGLISH
25
Page 26

Cleaning notes | Disposal notes | Scope of delivery
Cleaning notes
Solvents, cleaning and scouring agents as well as
dashboard spray and plastics care product may
contain ingredients that will damage the surface
of the car sound system.
•
Use only a dry or slightly moistened cloth for
cleaning the car sound system.
If necessary, clean the contacts of the control
•
panel regularly using a soft cloth moistened
with cleaning alcohol.
Disposal notes
Do not dispose of your old unit in the house-
hold trash!
Use the return and collection systems available to
dispose of the old device.
Scope of delivery
The scope of delivery includes:
1 Car sound system
1 Operating/installation instructions
1 Case for the control panel
1 Support frame
1 Set of small parts
2 Disassembly tools
1 USB connecting cable
Note:
We recommend the use of original Blaupunkt
accessories (www.blaupunkt.com).
Optional equipment
(not part of the scope of delivery)
Contact your Blaupunkt specialised dealer or visit
us on the Internet under www.blaupunkt.com for
information about optional equipment, such as:
•
The steering wheel or handheld remote control
from Blaupunkt for safe and convenient operation of the basic functions (switching on/off
not possible with the remote control)
•
The C‘n‘C-ready interfaces from Blaupunkt
(C‘n‘C = Command and Control) for connecting Bluetooth®-ready cell phones and streaming devices (e.g. via the Bluetooth®/USB interface) as well as additional data carriers and
devices (e.g. via the iPod/USB interface)
Blaupunkt CD changer
•
Blaupunkt or Velocity amplifi er
•
26
Page 27
Placing the device in operation
Placing the device in operation
Attaching/detaching the control panel
The car sound system is equipped with a detachable control panel (release panel) to protect your
equipment against theft. In the delivery state, the
control panel is in the supplied case. To start operating the radio after installation, you must fi rst
attach the control panel (see the section "Attaching the control panel" in this chapter).
Always take the control panel with you when leaving the vehicle. The car sound system is worthless
to a thief without this control panel.
Caution
Damage to the control panel
Never drop the control panel.
Transport the control panel so that it is protected
against impacts and the contacts cannot become
dirty.
Do not expose the control panel to direct sunlight
or another heat source.
Avoid direct skin contact with the control panel’s
electrical contacts.
Attaching the control panel
쏅
Push the control panel into the bracket at the
right edge of the device.
쏅
Push the control panel carefully into the left
bracket until it clicks into place.
Removing the control panel
쏅
Press the
panel.
The left side of the control panel detaches
from the device and is secured by a latch
against falling out.
Grasp the control panel at the left side and
쏅
pull it beyond the resistance of the latch and
straight out of the bracket.
Note:
The car sound system automatically switches
off as soon as the control panel is removed.
1 to unlock the control
button
Setting the tuner region
This car sound system is designed for operation in
different regions with different frequency ranges
and station technologies. It is factory set to the
tuner region "EUROPE". Other available tuner
regions include "USA", "THAI" (Thailand) and
"S AMERICA" (South America). If you operate the
car sound system outside of Europe, you may fi rst
have to set a suitable tuner region:
쏅
Switch off the car sound system if it is not
already turned off.
쏅
Press and hold the buttons MENU•OK ?
4 < at the same time and press the On/
and
Off button 3.
The car sound system switches on. The currently set tuner region appears on the display.
쏅
Press the button
until the desired tuner region is displayed.
쏅
Press the MENU•OK
@ / 2 repeatedly
button ?.
Switching on/off
Switching on/off with the On/Off button
쏅
For switch-on, press the On/Off button 3.
The car sound system switches on.
쏅
To switch off the device, press and hold down
the On/Off button 3 for longer than 2 seconds.
The car sound system switches off.
Note:
If you switch on the car sound system while
the vehicle ignition is switched off, it automatically switches off after 1 hour to preserve
the vehicle battery.
Switching on/off via vehicle ignition
The car sound system will switch off/on simultaneously with the ignition if the device is correctly
connected to the vehicle’s ignition as shown in the
installation instructions and you did not switch the
device off by pressing the On/Off button 3.
27
ENGLISH
Page 28
Placing the device in operation | Traffi c information
Volume
Adjusting the volume
You can adjust the volume in steps from 0 (off) to
50 (maximum).
쏅
Turn the volume control
volume.
Note:
If a telephone or navigation system is connected with the car sound system as described in
the installation instructions, the car sound
system is muted in case of a telephone call
or navigation announcement and the call or
voice output is played via the loudspeakers of
the car sound system. The display then shows
"TELEPHONE".
Muting the car sound system (Mute)
You can quickly reduce the volume to a preset
level.
쏅
Briefl y press the On/Off button 3 to mute
the car sound system or to reactivate the previous volume.
While it is switched low, the display shows
"MUTE".
To adjust the mute volume, please read the section "Performing settings in the user menu", "Mute
LVL" menu item in the chapter "User settings".
4 to change the
Switching demo mode on/off
The demo mode shows the functions of the car
sound system as scrolling text on the display. You
can turn the demo mode on or off:
Switch off the car sound system if it is not
쏅
already turned off.
Press and hold the buttons MENU•OK ?
쏅
and
2 < at the same time and press the On/
Off button 3.
The car sound system switches on. The dis-
play briefl y shows "DEMO MODE" if you
switched on the demo mode. By pressing any
button, the demo mode is interrupted and
you can operate the device.
Displaying version numbers
You can display the version numbers of the different device components.
쏅
Switch off the car sound system if it is not
already turned off.
쏅
Press and hold the buttons MENU•OK ?
1 < at the same time and press the On/
and
Off button 3.
The car sound system switches on. The display
shows the version number of the fi rst component. The fi rst character identifi es the component: P = CPU, E = EPROM, A = Accordo.
쏅
Press the button
version number of the other components.
쏅
Press the MENU•OK
5 / > to display the
button ? to return to
the previously played audio source.
Traffi c information
In the tuner region "EUROPE", an FM station can
identify traffi c reports by means of an RDS signal. If the priority for traffi c announcements is
switched on, a traffi c announcement is automatically switched through, even if the car sound system is currently not in radio mode or if a station of
the wavebands MW or LW is set.
If priority is switched on, the display shows the
traffi c jam symbol (
during a switched-through traffi c announcement.
To switch the priority on and off, please read the
section "Performing settings in the user menu",
"TRAF" menu item in the chapter "User settings".
Notes:
•
The volume is increased for the duration
of the switched-through traffi c announcement. You can adjust the minimum volume for traffi c announcements (see the
ch. "User settings", section "Performing
settings in the user menu", "TA VOLUME"
menu item).
•
To cancel a switched-though traffi c announcement, press the DIS/ESC button
=.
). "TRAFFIC" is displayed
28
Page 29
Radio mode
RDS
Many FM stations broadcast an RDS (Radio Data
System) signal in addition to their programme in
the tuner region "EUROPE" that allows the following additional functions:
station name is shown on the display.
•
The
The car sound system recognises traffi c an-
•
nouncements and news broadcasts and can
automatically switch them through in any operating mode (e.g. in CD mode).
Alternate frequency: If RDS is activated, the
•
car sound system automatically selects the
best receivable frequency for the station that
is currently set.
Regional (REG): At certain times, some radio
•
stations divide their programme into regional
programmes providing different content. If the
REG function is activated, the car sound system changes only to those alternate frequencies on which the same regional programme is
being broadcast.
To switch the RDS or REG function on or off, please
read the section "Performing settings in the user
menu" in the chapter "User settings" (menu items
"RDS", "REG").
Changing to radio mode
Press the SRC button 6 repeatedly until
쏅
"TUNER" is displayed:
The current memory bank appears once as
scrolling text on the display.
Selecting the memory bank
The following memory banks are available in the
different tuner regions:
Region Memory banks
EUROPE
USA
THAI
S AMERICA
FM1, FM2, FMT, MW, LW
FM1, FM2, FMT, AM, AMT
FM1, FM2, FMT, AM
FM1, FM2, FMT, AM, AMT
Radio mode
쏅
Press the BND
the desired memory bank is displayed.
Note:
Up to 5 stations can be stored in each memory bank.
button B repeatedly until
Tuning into a station
There are various ways of tuning into a station:
Tuning into stations manually
쏅
Briefl y press the button
or several times to change the frequency in
increments, or long to quickly change the
frequency.
Notes:
•
For the tuner region "EUROPE": In the FM
waveband, the next station of the broadcasting network is automatically tuned into
if the RDS function is switched on.
•
For the tuner regions "EUROPE", "USA" and
"S AMERICA": In the FM waveband, the current selected programme type is displayed
and can be changed if the PTY function is
activated (see the ch. "PTY").
Starting station seek tuning
쏅
Press the button
station seek tuning
The radio tunes into the next receivable station.
Notes:
•
For the tuner region "EUROPE": In the FM
waveband, only traffi c information stations
are tuned into if the priority for traffi c information (
•
For the tuner regions "EUROPE", "USA"
and "S AMERICA": In the FM waveband,
the next station with the currently selected
programme type is tuned into if the PTY
function is activated (see the ch. "PTY").
•
The sensitivity of seek tuning can be adjusted (see the chapter "User settings",
section "Performing settings in the user
menu", menu item "SENS").
) is switched on.
5 / > once
@/ 2 to start the
ENGLISH
29
Page 30

Radio mode
Storing stations/Calling stored
stations
Select the desired memory bank.
쏅
If necessary, set the desired station.
쏅
Press the station button
쏅
1 - 5 < for approx.
2 seconds to store the current station under
the button.
- or -
쏅
Briefl y press the station button
call up the stored station.
1 - 5 < to
Scanning stations
The scan function is used to scan every receivable
station of the current waveband.
Press the MENU•OK
쏅
button ? for approx.
2 seconds to start the scan, or long to continue playing the currently set station.
During the scan, the display alternately displays "SCAN" and the current frequency as
well as memory bank or station name.
Note:
For radio mode, you can adjust the scan time
for each station (see the ch. "User settings",
section "Performing settings in the user
menu", "SCAN TIME" menu item).
Storing stations automatically
(Travelstore)
With Travelstore, you can automatically search for
and store the 5 FM stations offering the strongest
reception in the region in one memory bank, Any
previously stored stations in this memory bank
are deleted in the process.
In the tuner regions "EUROPE" and "THAI", you
can store 5 FM stations in the FMT memory bank
with Travelstore. In the tuner regions "USA" and
"S AMERICA", you can also store 5 AM stations in
the AMT memory bank.
Select a memory bank of the desired wave-
쏅
band, e.g. FM1 or AM.
Press the BND
쏅
onds.
button B for approx. 2 sec-
The tuner starts the automatic station seek
tuning; the display shows "FM TSTORE" or
"AM TSTORE". After the storing is completed,
the radio plays the station at memory location
1 of the FMT or AMT level.
Note:
For the tuner region "EUROPE": If the priority
for traffi c information is switched on (
only traffi c information stations are stored.
),
PTY
In the tuner regions "EUROPE", "USA" and "S
AMERICA", an FM station can transmit its current programme type, e.g. CULTURE, POP, JAZZ,
ROCK, SPORT or SCIENCE. Hence, the PTY function allows a targeted search for broadcasts of a
certain programme type, e.g. for rock or sports
broadcasts. Note that PTY is not supported by all
stations.
Note:
To use the PTY function, you must activate
it separately in the menu (see the ch. "User
settings", section "Performing settings in the
user menu", "PTY" menu item).
Selecting a programme type
Note:
In the tuner region "EUROPE", you can adjust
the language in which the programme types
are displayed (see the ch. "User settings",
section "Performing settings in the user
menu", "PTY LANG" menu item).
Briefl y press the button
쏅
The currently selected programme type is
briefl y displayed, and you can select a different programme type.
If necessary, press the button
쏅
repeatedly until the desired programme type
is selected.
5 / >.
5 / >
30
Page 31

Radio mode | CD/MP3/WMA/C‘n‘C/CD changer mode
Searching for stations
쏅
Press the button
As soon as the seek tuning starts, the display
briefl y shows "SEARCH". Afterwards, the current programme type is displayed
As soon as a station is found, "PTY FOUND"
is briefl y shown. As long as the programme
type of the adjusted station corresponds to
the currently selected programme type, the
display alternately shows the programme
type and the station name or frequency.
Notes:
•
If no station with the selected programme
type is found, "NO PTY" is briefl y displayed
and a beep sounds. The radio will then
retune to the station that it played last.
•
If the tuned radio station or another station
on the broadcasting network broadcasts
your selected programme type at a later
point in time, the car sound system will automatically switch from the currently tuned
station or from the current audio source
(e.g. CD) to the station whose programme
type matches the one you selected. Note
that this function is not supported by all
stations.
@/ 2.
.
Confi guring the display
Press the DIS/ESC button = to change be-
쏅
tween these two displays:
Display Meaning
ABCDEF
FM1 102.90
FM1 11:32
Station name
or
or
memory bank/frequency
Memory bank/time
CD/MP3/WMA/C‘n‘C/
CD changer mode
Basic information
CD/MP3/WMA mode
This car sound system can be used to play audio
CDs (CDDA) and CD-R/RWs with audio, MP3 or
WMA fi les as well as MP3 or WMA fi les on USB
data carriers.
Risk of severe damage to the CD drive!
Noncircular contoured CDs (shape CDs)
and CDs with a diameter of 8 cm (mini
CDs) must not be used.
We accept no responsibility for any damage to the
CD drive that may occur as a result of the use of
unsuitable CDs.
Notes:
To ensure proper functioning, use only CDs
•
with the Compact-Disc logo.
Blaupunkt cannot guarantee the fl awless
•
function of copy-protected CDs and all CD
blanks and USB data carriers available on
the market.
Note the following information when preparing an
MP3/WMA data carrier:
Naming of tracks and directories:
•
Max. 16 characters (CD) or 24 charac-
–
ters (USB) incl. the fi le extension ".mp3"
or ".wma" (if more characters are used,
the number of tracks and folders that are
recognisable by the car sound system is
reduced)
No umlauts or special characters
–
CD formats: Audio CD (CDDA), CD-R/RW,
•
Ø: 12 cm
CD data formats: ISO 9669 Level 1 and 2,
•
Joliet
CD burn speed: Max. 16x (recommended)
•
USB format/fi le system: Mass storage device/
•
FAT3 2
ENGLISH
31
Page 32

CD/MP3/WMA/C‘n‘C/CD changer mode
File extension of audio fi les:
•
.MP3 for MP3 fi les
–
.WMA for WMA fi les
–
WMA fi les only without Digital Rights Manage-
•
ment (DRM) and created with Windows Media
Player version 8 or later
•
MP3 ID3 tags: Version 1 and 2
•
Bitrate for creating audio fi les:
–
MP3: 32 to 320 kbps
–
WMA: 32 to 192 kbps
•
Max. number of tracks: 20,000
C‘n‘C mode
The C'n'C interface from Blaupunkt (C'n'C = Command and Control) allows an even more convenient control of devices and data carriers that are
connected to the car sound system via a C'n'Cready Blaupunkt interface.
Before connecting a C'n'C-ready Blaupunkt interface, check the mode of the rear AUX input. For
further details, please read the section "Rear AUX
input" in the chapter "External audio sources".
CD changer mode
You can connect the following CD changers to the
car sound system:
Blaupunkt CDC A03
•
Blaupunkt CDC A08
•
Blaupunkt IDC A09
•
Information on handling CDs, inserting CDs and
operating the CD changer can be found in the
operating instructions supplied with your CD
changer.
Before connecting a CD changer, check the mode
of the rear AUX input. For further details, please
read the section "Rear AUX input" in the chapter
"External audio sources".
Changing to CD/MP3/WMA/C‘n‘C/
CD changer mode
Press the SRC button 6 repeatedly until
쏅
the desired audio source is displayed:
"CD": Inserted CD.
•
•
"MP3": Inserted CD that has already been
recognised as MP3 CD.
•
"USB": Connected USB data carrier.
•
Name of the device connected via C‘n‘C
•
"CDC / AUX": Connected CD changer (if no
other external audio source is connected).
Notes:
•
The respective audio source can be selected only if a corresponding CD is inserted or
a corresponding device (e.g. a USB data
carrier or CD changer) is connected.
•
If the car sound system fi rst has to read
the data of a connected device or data carrier before the playback, the display shows
"READING". For large data volumes, this
may take up to 1 minute. If the device or
data carrier is defective or the transferred
data cannot be played back, a corresponding message appears on the display (e.g.
"ERROR" or "USB ERROR").
If the connected CD changer fi rst acquires
•
the inserted CDs (e.g. after an interruption
of the power supply or a change of the magazine), "MAG SCAN" is displayed. If the CD
changer does not contain any CDs or magazine, "NO DISC" is displayed.
Inserting a CD
Note:
You must not hinder or assist the drive as it
automatically draws in the CD.
쏅
Insert the CD with its printed side up into the
CD tray
7 until you feel a slight resistance.
The CD is automatically pulled in and its data
are checked (the display shows "READING"
during this time). Afterwards, the playback
starts in CD or MP3 mode. If a CD is inserted,
the display shows the CD symbol.
Note:
If the inserted CD cannot be played back, "CD
ERROR" is briefl y displayed and the CD is automatically ejected after approx. 2 seconds.
32
Page 33

CD/MP3/WMA/C‘n‘C/CD changer mode
Ejecting a CD
Notes:
•
If a CD is ejected and not removed, the
drive will automatically draw it back in
again after approx. 10 seconds.
•
You can also eject CDs while the car sound
system is switched off or whilst another audio source is activated.
쏅
Press the
CD.
: to eject an inserted
button
Connecting/removing a USB data
carrier
To be able to connect a USB data carrier, the supplied USB cable must be connected to the car
sound system (see Installation Instructions).
Switch of the car sound system so that the
쏅
data carrier will be correctly registered and
unregistered.
Connect the USB data carrier to the USB
쏅
cable or pull it off.
If a USB data carrier is connected, the display
shows the USB symbol. If the USB data carrier is initially selected as audio source after
connecting it or after switching on the car
sound system, the data are read in fi rst (the
display shows "READING" during this time).
Notes:
If the connected USB data carrier cannot be
•
seen, "USB ERROR" is briefl y displayed.
The time required for reading in the data
•
depends on the design and size of the USB
data carrier.
Selecting tracks
쏅
Briefl y press the button 5 / > to
change to the previous/next track.
Note:
If the current track plays longer than 3 seconds, pressing
5 once restarts the track.
Select a folder/CD (only in MP3/
WMA/C‘n‘C or CD changer mode)
쏅
Press the button @ / 2 to change to
the previous/next folder or CD.
Note:
This also allows you to change between
playlists of a device connected via C‘n‘C.
Fast searching
쏅
Press and hold down the button 5 / >
until the desired position has been reached.
Interrupting playback
쏅
Press the button 3 < to interrupt the
playback ("PAUSE") or to continue.
Playlist mode (only in MP3/WMA
mode)
The car sound system can play playlists that were
created with an MP3 manager, such as WinAmp
or Microsoft Media Player. The playlists must be
stored in the root folder of the CD or USB data carrier. The following playlist formats can be recognised: M3U, PLS.
Selecting tracks in Playlist mode
Press the 2 button < for approx. 2 seconds
쏅
to change to the Playlist mode:
"LIST MODE" briefl y appears on the display.
The fi rst track of the fi rst playlist is played.
Note:
If the data carrier does not contain any
playlists, "LIST MODE" is briefl y displayed.
Briefl y press the button
쏅
change to the previous/next track of the current playlist.
쏅
Press the button
the previous/next playlist.
The display briefl y shows the name of the
selected playlist, and the fi rst track of the
playlist is being played.
5 / > to
@ / 2 to change to
ENGLISH
33
Page 34

CD/MP3/WMA/C‘n‘C/CD changer mode
Exiting the Playlist mode
쏅
Press the 2 button < for approx. 2 sec-
onds:
"LIST OFF" briefl y appears on the display. The
current track continues playing.
Scanning all tracks
The scan function scans all available tracks.
쏅
Press the MENU•OK
button ? for approx.
2 seconds to start the scan, or long to continue playing the currently scanned track.
During the scan, the display alternately displays "SCAN" and the current track number
or fi le name.
Notes:
In the CD changer mode, the scan time per
•
track is approx. 10 seconds. For all other
operating modes, you can adjust the scan
time for each track (see the ch. "User settings", section "Performing settings in the
user menu", "SCAN TIME" menu item).
In the Playlist mode (MP3 mode), only the
•
tracks of the current playlist are scanned.
Playing tracks in random order
Press the 5 MIX button < to change be-
쏅
tween the playback modes:
Opera-
Display Meaning
tion
CD
MP3/
WMA/
C‘n‘C
CDC
Gen.
1
MIX ALL
MIX DIR
MIX ALL
MIX CD
MIX ALL
MIX OFF
Mixing tracks
Mixing tracks of the
2
current folder
Mixing tracks of the
2
data carrier
Mixing tracks of the
current CD
Mixing tracks of
all CDs
Regular playback
34
1
In C‘n‘C mode, additional playback modes
may be available depending on the connected device
2
Not in MP3 Playlist mode
If the MIX function is active, the MIX symbol
appears on the display.
Repeatedly playing individual tracks,
CDs or directories
쏅
Press the 4 RPT button < to change between the playback modes:
Opera-
Display Meaning
tion
CD
RPT TRACK
MP3/
RPT TRACK
WMA/
C‘n‘C
CDC
Gen.
1
In C‘n‘C mode, additional playback modes
RPT DIR
1
RPT TRACK
RPT DISC
RPT OFF
Repeating tracks
Repeating tracks
Repeating folders
2
Repeating tracks
Repeating a CD
Regular playback
may be available depending on the connected device
2
Not in MP3 Playlist mode
If the RPT function is active, the RPT symbol
appears on the display.
Confi guring the display
쏅
Press the DIS/ESC button = once or several
times to change between these displays:
Opera-
Display Meaning
tion
Track number
and playing time
Track number
and time
File name
1
Artist
Album name
1
Playing time
Time
CD
MP3/
WMA/
C‘n‘C
T 01 02:15
T 01 18:33
01 ABC
ABCDEF
ABCDEF
PLAY 02:15
CLK 18:33
Page 35

CD/MP3/WMA/C‘n‘C/CD changer mode | External audio sources
Opera-
Display Meaning
tion
T 01 02:15
CDC
1
Artist and album name must be stored as
ID3 tag and are displayed only for approx.
10 seconds and perhaps as scrolling text;
otherwise, the fi le name is displayed.
Note
You can switch the display of CD text of an
audio CD on and off (see the ch. "User settings", section "Performing settings in the
user menu", "CD TEXT" menu item). If CD text
is switched on, the corresponding CD text is
displayed once as scrolling text at the start of
a track.
T 01 18:33
CD 02T 03
Track number
and playing time
Track number
and time
CD number and
track number
External audio sources
Front AUX-IN socket
Danger! Increased risk of injury
from connector.
connector in the front AUX-IN socket may cause
injuries. The use of straight plugs or adapters
leads to an increased risk of injury.
For this reason, we recommend using angled
jack plugs, e.g. the Blaupunkt accessories cable
(7 607 001 535).
As soon as an external audio source, such as a
portable CD/MiniDisc or MP3 player is connected
to the Front-AUX-IN socket, it can be selected with
the SRC button 6. "FRONT AUX" then appears
on the display.
In case of an accident, the protruding
Rear AUX input
Different external audio sources can be connected to the car sound system via the rear AUX input
(Rear-AUX-IN):
•
C‘n‘C-ready devices from the Blaupunkt accessories programme (e.g. a C‘n‘C-ready
Bluetooth®/USB or iPod®/USB interface;
C‘n‘C = Command and Control).
•
CD changer
•
Other external audio sources, such as portable
CD players, MiniDisc players, MP3 players or a
non-C‘n‘C-capable Blaupunkt interface.
Note:
An adapter cable is needed to connect an
external audio source via the rear AUX input.
You can obtain this cable (Blaupunkt no.:
7 607 897 093) from your Blaupunkt dealer.
Before you connect a certain device, fi rst check
the mode of the rear AUX input and, if necessary, change the setting (see ch. "User settings",
section "Performing settings in the user menu",
"CDC" menu item). Ensure that you change the
setting only as long as no device is connected
to the rear AUX input. If necessary, remove connected devices fi rst while the car sound system is
switched off.
Starting C'n'C mode
쏅
Press the SRC button 6 repeatedly until
the name of the device connected via C'n'C
appears on the display.
The playback starts.
Notes:
•
The C'n'C mode can be selected only if a
suitable device is connected via a C'n'Cready interface.
To operate the radio in C‘n‘C mode, please
•
read the chapter "CD/MP3/WMA/C‘n‘C/CD
changer mode".
When using suitable adapter cables, you
•
can connect up to 3 C'n'C-ready Blaupunkt
interfaces to the car sound system. For the
car sound system to distinguish the differ-
ENGLISH
35
Page 36

Sound settings
ent interfaces, you can assign an individual
device number to every interface (see ch.
"User settings", section "Performing settings
in the user menu", "C‘N‘C" menu item).
Starting AUX mode
쏅
Press the SRC button 6 repeatedly until
"CDC / AUX" appears on the display.
The playback starts.
Note:
You can enter a separate name for the rear
AUX input that is shown on the display in
AUX mode if you selected the connected audio source (see ch. "User settings", section
"Performing settings in the user menu", "AUX
EDIT" menu item).
Sound settings
The following sound settings can be changed in
the Audio menu:
Adjusting bass and treble
•
Setting the left/right volume distribution (Bal-
•
ance) or front/rear (Fader)
Setting the boost of bass at low volume
•
(X-Bass).
In the Enhanced Audio menu, you can also perform the following settings:
Setting the 3-band equalizer:
•
Setting the middle level
–
Selecting bass, middle and treble
–
Adjusting quality factor for bass and mid-
–
dle
Performing advanced X-Bass settings (level
•
and frequency)
Selecting equalizer presettings
•
Note:
The settings for bass, middle and treble are
each stored for the current audio source.
Calling and exiting the audio menu
Briefl y press the AUD button A to open the
쏅
audio menu.
Press the button
쏅
until the desired menu item is selected.
Perform the setting (see the next section).
쏅
Briefl y press the MENU•OK button ? to
쏅
select a different menu item.
- or Briefl y press the DIS/ESC button = to exit
쏅
the menu.
Note:
The menu is automatically exited approx.
15 seconds after the last button activation
and you are returned to the display of the current audio source.
@ / 2 repeatedly
Performing settings in the audio
menu
BASS
Bass level. Settings: -7 to +7.
Press the
쏅
menu.
Press the button
쏅
the setting.
TREBLE
Treble. Settings: -7 to +7.
Press the
쏅
menu.
Press the button
쏅
the setting.
BALANCE
Left/right volume distribution. Settings: L9 (left)
to R9 (right).
Press the
쏅
menu.
Press the button
쏅
the setting.
button > to open the sub-
@ / 2 to perform
button > to open the sub-
@ / 2 to perform
button > to open the sub-
@ / 2 to perform
36
Page 37

Sound settings
FADER
Front/rear volume distribution. Settings: R9
(rear) to F9 (front).
Press the
쏅
menu.
Press the button
쏅
the setting.
X-BAS S
Increase of bass at low volume. Settings: 0 (off) to
3 (highest increase).
쏅
Press the
menu.
Press the button
쏅
the setting.
button > to open the sub-
@ / 2 to perform
button > to open the sub-
@/ 2 to perform
Calling and exiting the enhanced
audio menu
쏅
In the audio menu, select the "ENHANCED"
menu item.
쏅
Press the
HANCED menu.
쏅
Press the button
until the desired menu item is selected.
쏅
Perform the setting (see the next section).
쏅
Briefl y press the MENU•OK button ? to
select a different menu item.
- or -
쏅
Briefl y press the DIS/ESC button = to exit
the menu.
button > to open the EN-
@/ 2 repeatedly
Performing settings in the enhanced
audio menu
E-BASS
Adjusting bass frequency and quality factor. Settings:
•
Bass frequency: 60/80/100/200 Hz
•
Quality factor: 1.0/1.25/1.5/2.0
쏅
Press the
submenu.
button > to open the E-BASS
Press the button
쏅
tween the submenus "FREQ" (frequency) and
"QFAC" (quality factor).
쏅
Press the button
tween the available settings of the submenu.
E-TREBLE
Setting the treble frequency. Settings:
10/12.5/15/17.5 kHz.
Press the
쏅
submenu.
Press the button
쏅
tween the available settings of the submenu.
E-MIDDLE
Setting the middle level and frequency as well
as quality factor. Settings:
Middle level: -7 to +7
•
Centre frequency: 0.5/1.0/1.5/2.5 kHz
•
Quality factor: 0.5/0.75/1.0/1.25
•
Press the
쏅
submenu.
쏅
Press the button
tween the submenus "GAIN" (level), "FREQ"
(frequency) and QFAC (quality factor).
쏅
Press the button
tween the available settings of the submenu.
E-XBASS
Setting the X-bass level and frequency. Settings:
•
X-bass level: 0 (off) to 3
•
X-bass frequency: 30/60/100 Hz
쏅
Press the
submenu.
쏅
Press the button
between the submenus "GAIN" (level) and
"FREQ" (frequency).
Press the button
쏅
tween the available settings of the submenu.
@ / 2 to change be-
5 / > to change be-
button > to open the E-TREBLE
5 / > to change be-
button > to open the E-MIDDLE
@ / 2 to change be-
5 / > to change be-
button > to open the E-XBASS
@ / 2 to change
5 / > to change be-
ENGLISH
37
Page 38

User settings
PRESETS
Selecting equalizer presettings. Settings: POP,
ROCK, CLASSIC, P-EQ OFF (no presetting).
Press the
쏅
submenu.
쏅
Press the button
tween the settings.
button > to open the PRESETS
@ / 2 to change be-
User settings
Calling and exiting the user menu
쏅
Briefl y press the MENU•OK button ? to
open the menu.
쏅
Press the button
until the desired menu item is selected.
쏅
Perform the setting (see the next section).
쏅
Briefl y press the MENU•OK button ? to
select a different menu item.
- or -
쏅
Briefl y press the DIS/ESC button = to exit
the menu.
Note:
The menu is automatically exited approx.
15 seconds after the last button activation
and you are returned to the display of the current audio source.
Performing settings in the user menu
CDC
Setting the rear AUX input mode Settings: ON (to
connect a CD changer or another external audio
source), OFF (to connect a C‘n‘C-ready Blaupunkt
interface).
쏅
Press the
menu.
쏅
Press the
the settings.
쏅
Briefl y press the MENU•OK button ? to
confi rm the selected setting.
The car sound system automatically switches
off and on again with the selected setting.
@ / 2 repeatedly
button > to open the sub-
button > to change between
C‘N‘C
Assigning an individual device number to connected C‘n‘C-ready interfaces (C‘n‘C = Command
and Control). Length: 4 digits, characters: 0-9,
A-F (hexadecimal).
Press the
쏅
menu.
쏅
Press the button
interface ("DEV 1 - 3").
쏅
Press the
number.
Press the button
쏅
between the positions.
The character at the selected position fl ashes
if selected.
Press the button
쏅
character at the selected location.
쏅
Briefl y press the MENU•OK button ? to
confi rm the device number entered.
CDTEXT
Switching the display of CD text on or off. Settings: ON, OFF.
쏅
Press the
menu.
쏅
Press the
the settings.
쏅
Briefl y press the MENU•OK button ? to
confi rm the selected setting.
TA VOLUME
(only for tuner region "EUROPE")
Setting the minimum volume for traffi c announcements. Settings: 1 - 50.
쏅
Press the
menu.
쏅
Press the button
volume control 4 to perform the setting.
SENS
Only possible in FM radio mode: Setting the sensitivity of station seek tuning. Settings: LO1 (lowest) – HI6 (highest).
button > to open the sub-
@ / 2 to select the
button > to change the device
5 / > to change
@ / 2 to select a
button > to open the sub-
button > to change between
button > to open the sub-
@ / 2 or turn the
38
Page 39

쏅
Press the button > to open the submenu.
쏅
Press the button
@ / 2 to perform
the setting.
SCAN TIME
Setting the scan time in 5-second increments.
Settings: 5 – 30.
쏅
Press the
button > to open the sub-
menu.
쏅
Press the button
@ / 2 to perform
the setting.
CLOCK SET
Setting the time.
Press the
쏅
button > to open the sub-
menu.
쏅
Press the button
5 / > to change
between minutes and hours.
The minute or hour display fl ashes if it is
selected.
Press the button
쏅
@ / 2 to adjust the
minutes or hours.
쏅
Briefl y press the MENU•OK button ? to
confi rm the time entered.
Note:
In 12-hour mode (12H MODE), an "A" is displayed after the time for the time before noon
or a "P" for the time after noon.
12H/24H MODE
Selecting the 12 or 24-hour time. Settings: 12H,
24H.
쏅
Press the
button > to open the sub-
menu.
쏅
Press the
button > to change between
the settings.
CLOCK
Switching the display of time on or off with radio
and vehicle ignition switched off. Settings: ON,
OFF.
User settings
Press the
쏅
button > to open the sub-
menu.
쏅
Press the
button > to change between
the settings.
쏅
Briefl y press the MENU•OK button ? to
confi rm the selected setting.
BEEP
Switching the confi rmation beep on or off. Settings: ON, OFF.
쏅
Press the
button > to open the sub-
menu.
쏅
Press the
button > to change between
the settings.
쏅
Briefl y press the MENU•OK button ? to
confi rm the selected setting.
TEL VOL
Minimum volume for navigation announcements
and telephone calls. Settings: 1 - 50.
쏅
Press the
button > to open the sub-
menu.
쏅
Press the button
@ / 2 or turn the
volume control 4 to perform the setting.
MUTE LVL
Setting the volume for low volume. Settings: 0 -
50.
쏅
Press the
button > to open the sub-
menu.
쏅
Press the button
@ / 2 or turn the
volume control 4 to perform the setting.
ON VOLUME
Setting the power-on volume Settings: 0 – 50 or
LAST VOL (volume set last before switching off
the car sound system). With the "LAST VOL" setting, the power-on volume is limited to max. 25.
쏅
Press the
button > to select the setting
"LAST VOL".
- or -
쏅
Press the
button 5 to set the power-on
volume between 0 and 50.
ENGLISH
39
Page 40

User settings
Press the button @ / 2 or turn the
쏅
volume control 4 to perform the setting.
REG
(only for tuner region "EUROPE")
Only possible in FM radio mode: Switching REG
function on or off. Settings: ON, OFF.
Press the
쏅
menu.
Press the
쏅
the settings.
PTY LANG
(only for tuner region "EUROPE")
Only possible in FM radio mode: Selecting the
language for the display of programme types. Settings: ENGLISH, FRANCAIS, DEUTSCH.
쏅
Press the
menu.
쏅
Press the button
tween the settings.
PTY
(only for tuner regions "EUROPE", "USA",
"S AMERICA")
Only possible in FM radio mode: Switching PTY
function on or off. Settings: ON, OFF.
쏅
Press the
menu.
쏅
Press the
the settings.
DISP COL
Mixing the colour for the display illumination from
the basic colours Red, Green and Blue (RGB). Settings: For R, G and B each 0 to 16.
쏅
Press the
COL" submenu (setting R, G and B) or
the
submenu (setting R and G, B remains unchanged).
쏅
Press the
menu.
button > to open the sub-
button > to change between
button > to open the sub-
@ / 2 to change be-
button > to open the sub-
button > to change between
button 5 to select the "4096
button > to select the "256 COL"
button > to open the sub-
Press the button
쏅
between the colours.
The value of the selected colour fl ashes.
쏅
Press the button
value of the selected colour.
쏅
Briefl y press the MENU•OK button ? to
confi rm the selected setting.
SCAN
Switching the constant colour change of the display illumination on or off. Settings: ON, OFF.
쏅
Press the
menu.
쏅
Press the
the settings.
쏅
Briefl y press the MENU•OK button ? to
confi rm the selected setting.
If the constant colour change is switched on, the
colour of the display illumination changes constantly across the colour spectrum.
COL SCAN
Selecting the colour of the display illumination
during a colour seek.
쏅
Press the
seek.
The display alternately shows "SCANNING"
and "OK (MENU)" and the colour of the display illumination changes constantly.
쏅
Briefl y press the MENU•OK button ? to se-
lect the currently set colour.
DIM DAY/DIM NIGHT
Setting the display brightness for the day (DIM
DAY) or the night (DIM NIGHT). Settings: 1 – 16.
쏅
Press the
menu.
쏅
Press the button
the setting.
If your car sound system is installed as described
in the installation instructions and your vehicle
features the corresponding connection, the dis-
5 / > to change
@ / 2 to adjust the
button > to open the sub-
button > to change between
button > to start the colour
button > to open the sub-
@ / 2 to perform
40
Page 41

User settings | Factory settings
play brightness for day and night is switched by
switching the vehicle lighting on or off.
AUX EDIT
Entering names for the rear AUX input in AUX
mode. Length: 9 digits; characters: A-Z, 0-9.
쏅
Press the
menu.
Press the button
쏅
tween the positions.
The character at the selected position fl ashes
if selected.
Press the button
쏅
character at the selected location.
Briefl y press the MENU•OK button ? to
쏅
confi rm the name entered.
TRAF
(only for tuner region "EUROPE")
Only possible in FM radio mode: Switching priority for traffi c announcements on or off. Settings:
ON, OFF.
쏅
Press the
menu.
쏅
Press the
the settings.
RDS
(only for tuner region "EUROPE")
Only possible in FM radio mode: Switching RDS
function on or off. Settings: ON, OFF.
쏅
Press the
menu.
쏅
Press the
the settings.
button > to open the sub-
5 / > to change be-
@ / 2 to select a
button > to open the sub-
button > to change between
button > to open the sub-
button > to change between
Factory settings
Factory settings in the user menu:
ON VOLUME LAST VOL
MUTE LVL 0
SENS HI6
SCAN TIME 10
CLOCK OFF
BEEP ON
DIM DAY 15
DIM NIGHT 12
CDTEXT OFF
12H/24H MODE 24H
CLOCKSET 00:00
TEL VOL 17
TA V OL 2 0
RDS* ON
REG* ON
TRAF* OFF
* Only in tuner region "EUROPE"
You can restore the original factory settings of the
car sound system:
쏅
Briefl y press the MENU•OK button ? to
open the menu.
쏅
Press the button
until the "NORMSET" menu item is selected.
쏅
Press and hold down the MENU•OK button
? for longer than 4 seconds.
"NORM ON" briefl y appears on the display.
The car sound system automatically switches
off and on again with the factory settings.
Note:
If you press the MENU•OK button ? for less
than 4 seconds, "NORM OFF" appears on the
display and the current settings are retained.
@ / 2 repeatedly
ENGLISH
41
Page 42

Useful information | Technical data
Useful information
Warranty
We provide a manufacturer's warranty for products bought within the European Union. For devices purchased outside the European Union, the
warranty terms issued by our respective responsible domestic agency are valid.
The warranty terms can be called up under
www.blaupunkt.com or requested directly from:
Blaupunkt GmbH
Hotline
Robert-Bosch-Str. 200
D-31139 Hildesheim
Service
In some countries, Blaupunkt offers a repair and
pick-up service.
Information about the availability of this service in
your country can be found at www.blaupunkt.com.
If you want to take advantage of this service, you
may request a pick-up service for your car sound
system via the Internet.
Technical data
Voltage supply
Operating voltage: 10.5 - 14.4 V
Current consumption
In operation: 10 A
10 sec. after switch-off: < 3.5 mA
Amplifi er
Output power: 4 x 26 watts sine at
14.4 V at 4 ohms.
4 x 50 watts max.
power
Tun er
Wavebands in Europe/Thailand:
FM: 87.5 - 108 MHz
AM (MW): 531 - 1,602 kHz
LW (Europe only): 153 - 279 kHz
Wavebands in the US:
FM: 87.7 - 107.9 MHz
AM (MW): 530 - 1,710 kHz
Wavebands in South America:
FM: 87.5 - 107.9 MHz
AM (MW): 530 - 1,710 kHz
FM frequency response:
30 - 15,000 Hz
CD
Frequency response:
20 - 20,000 Hz
Pre-amp out
4 channels: 2 V
Input sensitivity
Rear-AUX-IN: 1.2 V / 10 kΩ
Front-AUX-IN: 500 mV / 6 kΩ
Tel/Navi input: 10 V / 1 kΩ
Dimensions and weight
W x H x D (mm): 182 x 53 x 155
Weight: approx. 1.30 kg
42
Subject to changes
Page 43

Eléments de commande
6
1
4
8
9 1072 53
16 11
18 17
15
14
13
1 Touche
Déverrouillage de la face avant détachable
2 Touche
Dans le menu : ouverture de l’option de menu
Mode radio : démarrer la recherche des sta-
tions
Mode MP3/WMA/C‘n‘C/changeur de CD :
sélection du dossier ou du CD suivant
3 Touche marche/arrêt
Pression brève : mise en marche de l’autoradio
En fonctionnement : abaissement rapide du
volume sonore de l’autoradio (Mute)
Pression prolongée : arrêt de l’autoradio
4 Bouton de réglage du volume
5 Touche
Dans le menu : modifi cation des réglages
Mode radio : réglage des stations
Autres modes de fonctionnement : sélection
du titre
6 Touche SRC
Sélection d’une source audio
7 Fente d’insertion de CD
8 Ecran
9 Raccordement USB
: Touche (Eject)
Ejection du CD
; Prise AUX-IN frontale
12
< Bloc de touches 1 - 5
= Touche DIS/ESC
Dans le menu : sortie du menu
En fonctionnement : commutation de l’affi -
chage
> Touche
Dans le menu : modifi cation des réglages
Mode radio : réglage des stations
Autres modes de fonctionnement : sélection
du titre
? Touche MENU•OK
Pression brève : ouverture du menu, confi rmation des réglages
Pression prolongée : démarrage de la fonction de balayage (Scan)
@ Touche
Dans le menu : ouverture de l’option de menu
Mode radio : démarrer la recherche des sta-
tions
Mode MP3/WMA/C‘n‘C/changeur de CD :
sélection du dossier ou du CD précédent
A Touche AUD
Appel du menu audio
B Touche BND
Pression brève : sélection du niveau de mémoire en mode radio
Pression prolongée : démarrage de la fonction Travelstore en mode radio
FRANÇAIS
43
Page 44

Sommaire
Consignes de sécurité ...............................45
Symboles utilisés ...................................45
Sécurité routière ....................................45
Consignes de sécurité générales ...............45
Déclaration de conformité .......................45
Instructions de nettoyage ..........................46
Instructions pour l’élimination ...................46
Composition de la fourniture .....................46
Accessoires spéciaux (non fournis) ...........46
Mise en service.........................................47
Mise en place et retrait de la face avant ......47
Réglage de la zone tuner ..........................47
Mise en marche et arrêt ...........................47
Volume sonore .......................................48
Activation et désactivation du mode démo .48
Affi chage des numéros de version .............48
Informations routières ..............................48
Mode radio ...............................................49
RDS .....................................................49
Passage dans le mode radio .....................49
Sélection des niveaux de mémoire ............49
Sélection des stations .............................49
Mémorisation des stations /appel des
stations mémorisées ...............................50
Balayage des stations ..............................50
Mémorisation automatique de stations (Tra-
velstore) ...............................................50
PTY ......................................................51
Réglage de l’affi chage .............................51
Mode CD/MP3/WMA/C‘n‘C/changeur
de CD .......................................................52
Informations de base ..............................52
Activation du mode CD/MP3/WMA/
C‘n‘C/changeur de CD .............................53
Introduction des CD ................................53
Retrait des CD .......................................53
Branchement/débranchement des
supports de données USB .......................53
Sélection des titres .................................54
Sélection des dossiers/CD (uniquement
dans le mode MP3/WMA/C‘n‘C ou
changeur de CD) ....................................54
Recherche rapide ...................................54
Arrêt de la lecture ...................................54
Mode « Liste de lecture » (uniquement
dans le mode MP3/WMA) ........................54
Balayage de tous les titres ........................54
Lecture des titres dans un ordre aléatoire ...55
Répétition de la lecture d’un titre, d’un
CD ou d’un répertoire ..............................55
Réglage de l’affi chage .............................55
Sources audio externes .............................56
Prise AUX-IN frontale...............................56
Entrée AUX arrière ..................................56
Réglages de tonalité .................................57
Appel et sortie du menu audio ..................57
Réglages dans le menu audio....................57
Appel et sortie du menu audio étendu ........58
Réglages dans le menu audio étendu .........58
Réglages utilisateur ..................................59
Appel et sortie du menu utilisateur ............59
Réglages dans le menu utilisateur .............59
Réglages d’usine .......................................63
Informations utiles ...................................63
Garantie................................................63
Service .................................................63
Caractéristiques techniques ......................64
Notice de montage ..................................317
44
Page 45

Consignes de sécurité
L’autoradio a été
tuel des connaissances techniques et selon les
règles techniques de sécurité reconnues. Vous
prenez cependant des risques si vous ne suivez
pas les consignes de sécurité qui se trouvent dans
cette notice.
Cette notice contient des informations importantes pour un montage et une utilisation simples et
sûrs de l’autoradio.
•
Lisez cette notice avec soin et intégralement
avant d’utiliser l’autoradio.
•
Conservez cette notice de façon à ce qu’elle soit
accessible à tout moment à tous les utilisateurs.
•
Remettez toujours l’autoradio à un tiers avec
cette notice.
Tenez également compte des notices jointes aux
appareils utilisés conjointement à cet autoradio.
Symboles utilisés
Les symboles suivants sont utilisés dans cette
notice :
쏅
Identifi e une action
•
Identifi e une énumération
Sécurité routière
Tenez compte des remarques suivantes relatives à
la sécurité routière:
•
Utilisez l’appareil de manière à pouvoir toujours conduire votre véhicule en toute sécurité. En cas de doute, arrêtez-vous dans un
endroit approprié et manipulez l’appareil alors
que le véhicule est immobilisé.
fabriqué en fonction de l’état ac-
DANGER !
Avertit d’un risque de blessure
ATTENTION !
Avertit de la possibilité d’endommager
le lecteur de CD
Le sigle CE confi rme que les directives
UE sont respectées.
Consignes de sécurité
Retirez la face avant ou remettez-la en place
•
uniquement lorsque le véhicule est à l’arrêt.
Réglez toujours un volume sonore modéré
•
de manière à protéger votre ouïe et à pouvoir
entendre les signaux d’alerte (par ex. de la police). Si vous modifi ez le volume sonore pendant
une coupure momentanée du son (par ex. lors
d’un changement de source audio), la différence ne sera audible qu’une fois le son rétabli.
N’augmentez pas le volume sonore pendant la
coupure momentanée du son.
Consignes de sécurité générales
Tenez compte des remarques suivantes pour ne
pas vous exposer à un risque de blessure :
•
N’ouvrez pas l’appareil, ne le modifi ez pas.
L’appareil comporte un laser de classe 1 qui est
susceptible de blesser vos yeux.
•
N’augmentez pas le volume sonore pendant
la coupure momentanée du son, par ex. lors
d’un changement de source audio. La modifi cation du volume sonore n’est pas audible pendant la coupure du son.
Utilisation conforme
Cet autoradio est prévu pour le montage et le
fonctionnement dans un véhicule disposant d’une
tension de bord de 12 V et il doit être monté dans
une baie DIN. Tenez compte des limites de puissance indiquées dans les caractéristiques techniques. Confi ez les réparations, et éventuellement
le montage, à un spécialiste.
Instructions de montage
Vous n’êtes autorisé à monter l’autoradio que si
vous possédez une expérience dans le montage
d’autoradios et disposez de bonnes connaissances en électricité automobile. Tenez compte pour
cela de la notice de montage qui se trouve à la fi n
de ce mode d’emploi.
Déclaration de conformité
Blaupunkt GmbH déclare ici que l’autoradio San
Francisco 300 satisfait aux exigences de base et
aux exigences des autres dispositions applicables
de la directive 89/336/CEE.
45
FRANÇAIS
Page 46

Instructions de nettoyage | Instructions pour l’élimination | Composition de la fourniture
Instructions de nettoyage
Les solvants, les produits de nettoyage, les abrasifs et les produits pour l’entretien du poste de
conduite et du plastique contiennent des substances susceptibles d’attaquer les surfaces de
l’autoradio.
•
Pour nettoyer l’autoradio, utilisez uniquement
un chiffon sec ou légèrement humide.
•
Nettoyez au besoin les contacts de la face
avant avec un chiffon doux imbibé d’alcool de
nettoyage.
Instructions pour l’élimination
Ne jetez pas votre ancien appareil avec les
ordures ménagères !
Utilisez les systèmes mis à votre disposition pour
le retour ou la collecte des anciens appareils en
vue de leur élimination.
Composition de la fourniture
La fourniture comprend :
1 Autoradio
1 Notice d’utilisation et de montage
1 Etui pour la face avant
1 Cadre support
1 Petit matériel
2 Outils de démontage
1 Câble de raccordement USB
Remarque :
Nous recommandons l’utilisation des
accessoires d’origine Blaupunkt (www.blaupunkt.com).
Accessoires spéciaux
(non fournis)
Renseignez-vous auprès de votre revendeur
Blaupunkt ou sur Internet à l’adresse www.blaupunkt.com. pour les accessoires spéciaux tels
que
•
les télécommandes de volant ou portables
d’origine Blaupunkt pour une utilisation sûre et
confortable des fonctions de base (la mise en
marche et l’arrêt avec la télécommande ne sont
pas possibles),
•
l’interface compatible C‘n‘C de Blaupunkt
(C‘n‘C = Command and Control) pour le raccordement de téléphones portables et d’appareils
Streaming compatibles Bluetooth® (par ex. par
l’intermédiaire de l’interface Bluetooth®/USB)
ainsi que de supports de données et d’appareils additionnels (par ex. par l’intermédiaire
de l’interface iPod/USB),
•
les changeurs de CD Blaupunkt,
•
les amplifi cateurs Blaupunkt et Velocity (Amplifi er).
46
Page 47

Mise en service
Mise en service
Mise en place et retrait de la face avant
Votre autoradio est équipé d’une face avant détachable (Release-Panel) qui le protège contre
le vol. Lors de la livraison, la face avant se trouve
dans un étui. Pour mettre l’autoradio en marche
une fois monté, vous devez d’abord mettre la face
avant en place (voir section « Mise en place de la
face avant » dans ce chapitre).
Prenez toujours la face avant avec vous chaque fois
que vous quittez le véhicule. Sans cette face avant,
l’autoradio n’a aucune valeur pour le voleur.
Attention
Risque d’endommagement de la face avant
Ne laissez pas tomber la face avant par terre.
Transportez la face avant de manière à ce qu’elle
soit protégée des coups et que les contacts ne
puissent pas être encrassés.
N’exposez pas la face avant directement à la lumière du soleil ou à d’autres sources de chaleur.
Evitez que la peau ne touche directement les
contacts de la face avant.
Mise en place de la face avant
쏅
Poussez la face avant dans la fi xation qui se
trouve sur le bord droit du boîtier.
쏅
Appuyez avec précaution sur la face avant
jusqu’à ce qu’elle se verrouille dans la fi xation
qui se trouve à gauche.
Retrait de la face avant
쏅
Appuyez sur la touche
rouiller la face avant.
Le côté gauche de la face avant se détache de
l’appareil, mais celle-ci ne peut pas tomber
car elle est retenue par un cran.
Saisissez la face avant par le côté gauche et
쏅
tirez-la tout droit en dehors de la fi xation en
surmontant la résistance du cran de retenue.
1 pour déver-
Remarque :
L’autoradio s’arrête automatiquement dès
que la face avant est retirée.
Réglage de la zone tuner
Cet autoradio est conçu pour fonctionner dans différentes zones avec des plages de fréquences et
des technologies d’émission diverses. La zone tuner est réglée d’usine sur « EUROPE ». Les régions
« USA », « THAI » (Thaïlande) et « S AMERICA »
(Amérique du Sud) sont également disponibles.
Si vous utilisez l’autoradio en dehors de l’Europe,
vous devez régler une zone tuner appropriée :
쏅
Arrêtez d’abord l’autoradio.
쏅
Appuyez simultanément sur les touches
MENU•OK ? et
puyées et appuyez sur la touche marche/
arrêt 3.
L’autoradio se met en marche. La zone tuner
réglée actuellement apparaît.
쏅
Appuyez sur la touche
de fois qu’il est nécessaire pour faire apparaître la zone tuner souhaitée.
쏅
Appuyez sur la touche MENU•OK
4 <, maintenez-les ap-
@ / 2 autant
?.
Mise en marche et arrêt
Mise en marche et arrêt avec la touche
marche/arrêt
쏅
Pour mettre l’appareil en marche, appuyez
sur le touche marche/arrêt 3.
L’autoradio se met en marche.
쏅
Pour arrêter l’appareil, appuyez sur la touche
marche/arrêt 3 et maintenez-la appuyée
pendant plus de 2 secondes.
L’autoradio s’arrête.
Remarque :
Si vous mettez l’autoradio en marche alors
que le contact du véhicule est coupé, il s’arrête automatiquement au bout d’une heure afi n
de ménager la batterie du véhicule.
FRANÇAIS
47
Page 48

Mise en service | Informations routières
Mise en marche et arrêt par l’intermédiaire du
contact du véhicule
Si l’autoradio est relié à l’allumage du véhicule
comme indiqué dans la notice de montage, et s’il
n’a pas été arrêté avec la touche marche/arrêt 3,
il se met en marche ou s’arrête lorsque le contact
est mis ou coupé.
Volume sonore
Réglage du volume sonore
Le volume est réglable de 0 (volume désactivé) à
50 (volume maximal).
쏅
Tourner le bouton de réglage du volume
4
pour modifi er le volume sonore.
Remarque :
Si un téléphone ou un système de navigation
est relié à l’autoradio comme décrit dans la
notice de montage, le son de l’autoradio est
coupé lors d’une communication téléphonique ou d’une instruction vocale du système
de navigation et la communication téléphonique ou la sortie vocale du système de navigation s’effectuent par l’intermédiaire des
haut-parleurs de l’autoradio. « TELEPHONE »
apparaît alors sur l’écran.
Abaissement rapide du volume sonore de
l’autoradio (Mute)
Vous avez la possibilité d’abaisser rapidement le
volume sonore jusqu’à un niveau que vous avez
préalablement défi ni.
쏅
Appuyez brièvement sur la touche marche/
arrêt 3 pour abaisser rapidement le volume
sonore de l’autoradio ou réactiver le volume
sonore précédent.
« MUTE » est affi ché sur l’écran pendant que
le volume sonore est abaissé.
Pour le réglage de l’abaissement du volume sonore, consultez le chapitre « Réglages utilisateur »,
section « Réglages dans le menu utilisateur », option de menu « MUTE LVL ».
48
Activation et désactivation du mode
démo
Le mode démo vous montre les fonctions de
l’autoradio sous la forme d’un texte qui défi le
sur l’écran. Vous pouvez activer ou désactiver le
mode démo :
쏅
Arrêtez d’abord l’autoradio.
쏅
Appuyez simultanément sur les touches
MENU•OK ? et
puyées et appuyez sur la touche marche/
arrêt 3.
L’autoradio se met en marche. « DEMO MODE »
apparaît brièvement sur l’écran une fois le
mode démo activé. Lorsque vous appuyez sur
une touche quelconque, le mode démo est interrompu et vous pouvez utiliser l’autoradio.
2 <, maintenez-les ap-
Affi chage des numéros de version
Vous pouvez affi cher les numéros de version des
différents composants de l’autoradio.
쏅
Arrêtez d’abord l’autoradio.
쏅
Appuyez simultanément sur les touches
MENU•OK ? et
puyées et appuyez sur la touche marche/
arrêt 3.
L’autoradio se met en marche. Le numéro
de version du premier composant apparaît
sur l’écran. Le premier caractère identifi e
le composant : P = processeur, E = EPROM,
A = Accordo.
쏅
Appuyez sur la touche
affi cher le numéro de version des autres composants.
쏅
Appuyez sur la touche MENU•OK
revenir à la source audio écoutée en dernier.
1 <, maintenez-les ap-
5 / > pour
? pour
Informations routières
Dans la zone tuner « EUROPE », une station FM
peut identifi er les informations routières grâce au
signal RDS. Lorsque la priorité aux informations
routières est activée, un message d’information
routière est diffusé automatiquement, même si
à ce moment là l’autoradio ne se trouve pas dans
Page 49

Informations routières | Mode radio
le mode radio ou s’il est réglé sur une station des
gammes d’ondes OM (PO) ou OL (GO).
Lorsque la priorité aux informations routières est
activée, le symbole de bouchon (
sur l’écran. Pendant la diffusion d’une information
routière, « TRAFFIC » apparaît sur l’écran.
Pour activer ou désactiver la priorité aux informations routières, consultez le chapitre « Réglages
utilisateur », section « Réglages dans le menu utilisateur », option de menu « TRAF ».
Remarque :
•
Le volume sonore est augmenté pendant la
diffusion du message d’information routière. Vous pouvez régler le volume sonore minimal pour les messages d’information routière (voir chapitre « Réglages utilisateur »,
section « Réglages dans le menu utilisateur », option de menu « TA VOLUME »).
Pour interrompre la diffusion du message
•
d’information routière, appuyez sur la touche DIS/ESC =.
) est affi ché
Mode radio
RDS
Dans la zone tuner « EUROPE », de nombreuses
stations FM émettent, outre leur programme, un
signal RDS (Radio Data System) qui propose les
fonctions supplémentaires suivantes :
•
Affi chage du
•
Reconnaissance des informations routières et
autres messages d’information par l’autoradio
et possibilité de retransmettre ceux-ci dans
tous les modes de fonctionnement (par ex.
dans le mode CD).
Fréquence alternative : lorsque la fonction
•
RDS est activée, l’autoradio se règle automatiquement sur la station que vous écoutez qui
fournit le signal le plus puissant.
Régional (REG) : quelques stations partagent à
•
certaines heures leur programme avec des programmes régionaux différents. Si la fonction
REG est activée, l’autoradio se règle uniquement sur la fréquence alternative d’une station
qui diffuse le même programme régional.
nom de la station sur l’écran.
Pour activer et désactiver les fonctions RDS et
REG, consultez le chapitre « Réglages utilisateur »,
section « Réglages dans le menu utilisateur », options de menu « RDS » et « REG ».
Passage dans le mode radio
쏅
Appuyez sur la touche SRC 6 autant de
fois qu’il est nécessaire pour faire apparaître
« TUNER » sur l’écran :
Le niveau de mémoire actuel apparaît sous la
forme d’un texte qui défi le sur l’écran.
Sélection des niveaux de mémoire
Les niveaux de mémoire suivants sont disponibles
dans les différentes zones tuner :
Région Niveaux de mémoire
EUROPE
USA
THAI
S AMERICA
Appuyez sur la touche BND
쏅
que nécessaire pour faire apparaître le niveau
de mémoire souhaité.
Remarque :
Cinq stations au maximum peuvent être mémorisées sur chaque niveau de mémoire.
FM1, FM2, FMT, OM (PO),
OL (GO)
FM1, FM2, FMT, AM, AMT
FM1, FM2, FMT, AM
FM1, FM2, FMT, AM, AMT
B autant de fois
Sélection des stations
Vous avez plusieurs possibilités pour régler une
station :
Réglage manuel des stations
Appuyez brièvement une ou plusieurs fois
쏅
sur la touche
fréquence pas à pas ou de manière prolongée
pour modifi er rapidement la fréquence.
Remarque :
Pour la zone tuner « EUROPE » : dans la
•
gamme d’ondes FM, la station suivante
de la chaîne de stations est réglée automatiquement lorsque la fonction RDS est
activée.
5 / > pour modifi er la
FRANÇAIS
49
Page 50

Mode radio
•
Pour les zones tuner « EUROPE », « USA »
et « S AMERICA » : dans la gamme d’ondes
FM, le type de programme sélectionné actuellement est affi ché lorsque la fonction
PTY est activée et il peut être modifi é (voir
section « PTY »).
Démarrage de la recherche des stations
쏅
Appuyez sur la touche
démarrer la recherche des stations.
L’autoradio se règle sur la station suivante qui
peut être reçue.
Remarque :
•
Pour la zone tuner « EUROPE » : dans la
gamme d’ondes FM, seules les stations qui
diffusent des informations routières sont
réglées lorsque la priorité aux informations
routières est activée (
•
Pour les zones tuner « EUROPE », « USA »
et « S AMERICA » : dans la gamme d’ondes
FM, la station suivante dont le type de programme est celui sélectionné actuellement
est réglée lorsque la fonction PTY est activée (voir section « PTY »).
Vous pouvez régler la sensibilité de la recher-
•
che (voir section « Réglages dans le menu
utilisateur », option de menu « SENS », du
chapitre « Réglages utilisateur »).
@/ 2 pour
).
Mémorisation des stations /appel des
stations mémorisées
Sélectionnez le niveau de mémoire souhaité.
쏅
Réglez au besoin la station souhaitée.
쏅
Appuyez sur la touche de présélection
쏅
< et maintenez-la appuyée pendant env.
2 secondes pour affecter la station actuelle
à la touche.
- ou -
Appuyez brièvement sur la touche de présé-
쏅
lection
1 - 5 < pour appeler la station mé-
morisée.
1 - 5
Balayage des stations
La fonction de balayage (Scan) permet d’entendre successivement toutes les stations qui peuvent être reçues dans la gamme d’ondes actuelle.
쏅
Appuyez sur la touche MENU•OK
tenez-la appuyée pendant env. 2 secondes
pour démarrer le balayage, ou appuyez brièvement sur la touche pour continuer d’écouter la station réglée sur le moment.
Pendant le balayage des stations, « SCAN »
et la fréquence actuelle ainsi que le niveau de
mémoire ou le nom de la station apparaissent
à tour de rôle sur l’écran.
Remarque :
La durée d’écoute des stations lors du balayage dans le mode radio peut être réglée
(voir chapitre « Réglages utilisateur », section
« Réglages dans le menu utilisateur », option
de menu « SCAN TIME »).
? et main-
Mémorisation automatique de
stations (Travelstore)
La fonction Travelstore vous permet de rechercher
automatiquement les 5 stations les plus puissantes de la région et de les mémoriser sur un niveau
de mémoire. Les stations déjà mémorisées sur ce
niveau de mémoire sont alors effacées.
Dans les zones tuner « EUROPE » et « THAI », vous
pouvez mémoriser 5 stations FM sur le niveau de
mémoire FMT avec la fonction Travelstore. Dans
les zones tuner « USA » et « S AMERICA », vous
pouvez également mémoriser 5 stations AM sur le
niveau de mémoire AMT.
Sélectionner un niveau de mémoire de la gam-
쏅
me d’ondes souhaitée, par ex. FM1 ou AM.
Appuyez sur la touche BND
쏅
la appuyée pendant env. 2 secondes.
Le tuner commence la recherche automatique
des stations, « FM TSTORE » ou « AM TSTORE »
apparaît sur l’écran. A la fi n de la mémorisation,
la station occupant l’emplacement mémoire 1
du niveau FMT ou AMT est diffusée.
B et maintenez-
50
Page 51

Mode radio
Remarque :
Pour la zone tuner « EUROPE » : seules les stations qui diffusent des informations routières
sont réglées lorsque la priorité aux informations routières est activée (
).
PTY
Dans les zones tuner « EUROPE », « USA » et « S
AMERICA », une station FM peut transmettre
le type de programme qu’elle diffuse, par ex.
CULTURE, POP, JAZZ, ROCK, SPORT ou SCIENCES. La fonction PTY vous permet de sélectionner directement des stations diffusant un certain
type de programme, par ex. du rock ou du sport.
N’oubliez pas que la fonction PTY n’est pas proposée par toutes les stations.
Remarque :
Pour utiliser la fonction PTY, vous devez l’activer
spécialement dans le menu (voir chapitre « Réglages utilisateur », section « Réglages dans le
menu utilisateur », option de menu « PTY »).
Sélection d’un type de programme
Remarque :
Dans la zone tuner « EUROPE », vous pouvez
régler la langue dans laquelle les types de programme sont affi chés (voir chapitre « Réglages
utilisateur », section « Réglages dans le menu
utilisateur », option de menu « PTY LANG »).
Appuyez brièvement sur la touche
쏅
>.
Le type de programme sélectionné actuellement apparaît brièvement et vous pouvez sélectionner un autre type de programme.
Appuyez au besoin sur la touche
쏅
> autant de fois qu’il est nécessaire pour
faire apparaître le type de programme souhaité.
Recherche des stations
쏅
Appuyez sur la touche
Dès que la recherche commence, « SEARCH »
apparaît brièvement sur l’écran. Le type de
programme actuel est affi ché ensuite.
@ ou 2.
5 /
5 /
Dès qu’une station a été trouvée, « PTY
FOUND » apparaît brièvement sur l’écran.
Tant que le type de programme de la station
réglée coïncide avec le type de programme
sélectionné actuellement, le type de programme et le nom de la station, ou la fréquence, sont affi chés à tour de rôle.
Remarque :
•
Si aucune station diffusant le type de programme sélectionné n’a été trouvée, « NO
PTY » apparaît brièvement sur l’écran et un
bip retentit. La station écoutée en dernier
est de nouveau réglée.
•
Si la station réglée ou une autre station de
la chaîne de stations diffuse par la suite le
type de programme souhaité, l’autoradio
quitte automatiquement la station réglée
sur le moment ou la source audio actuelle
(par ex. le CD) pour passer à la station qui
diffuse le type de programme souhaité.
N’oubliez pas que cette fonction n’est pas
proposée par toutes les stations.
Réglage de l’affi chage
Appuyez sur la touche DIS/ESC = pour com-
쏅
muter entre les deux affi chages suivants :
Affi chage Signifi cation
ABCDEF
FM1 102.90
FM1 11:32
Nom de la station
ou
ou
Niveau de mémoire/
fréquence
Niveau de mémoire/heure
FRANÇAIS
51
Page 52

Mode CD/MP3/WMA/C‘n‘C/changeur de CD
Mode CD/MP3/WMA/C‘n‘C/
changeur de CD
Informations de base
Mode CD/MP3/WMA
Cet autoradio vous permet de lire des CD audio
(CDDA) et des CD-R/RW avec des fi chiers audio,
MP3 ou WMA ainsi que des fi chiers MP3 ou WMA
sur des supports de données USB.
Risque de destruction du lecteur CD !
Les CD de forme autre que circulaire
(shape CD) et les CD de 8 cm de diamètre
(mini CD) ne doivent pas être utilisés.
Nous déclinons toute responsabilité en cas d’endommagement du lecteur CD dû à l’utilisation de
CD non adéquats.
Remarque :
•
Pour éviter tout problème de fonctionnement, utilisez uniquement des CD portant
le logo Compact-Disc.
•
Blaupunkt ne peut pas garantir le bon fonctionnement de ses appareils avec des CD
protégés contre la copie ainsi qu’avec certains CD vierges et supports de données
USB disponibles sur le marché.
Pour préparer un support de données MP3/WMA,
tenez compte des remarques suivantes :
•
Noms pour les titres et les répertoires :
–
16 caractères (CD) ou 24 caractères
(USB) au maximum, extension « .mp3 »
ou « .wma » comprise (un nombre de caractères plus grand limite le nombre de
titres et de dossiers que l’appareil peut
reconnaître)
–
Pas de caractères spéciaux
•
Formats de CD : CD audio (CDDA), CD R/RW,
Ø : 12 cm
Formats de données de CD : ISO 9669 Level
•
1 et 2, Joliet
Vitesse de gravage des CD : max. 16x (recom-
•
mandé)
Système de fi chiers/format USB : Mass Storage
•
Device (mémoire de masse)/FAT32
Extensions des fi chiers audio :
•
.MP3 pour les fi chiers MP3
–
.WMA pour les fi chiers WMA
–
Fichiers WMA uniquement sans Digital Rights
•
Management (DRM) et établis avec Windows
Media Player à partir de la version 8
Balise ID3 du MP3 : versions 1 et 2
•
Vitesse de transmission pour la génération des
•
fi chiers audio :
MP3 : 32 à 320 kbps
–
WMA : 32 à 192 kbps
–
Nombre max. de titres : 20 000
•
Mode C‘n‘C
L’interface C‘n‘C de Blaupunkt (C‘n‘C = Command
and Control) vous permet de commander encore
plus confortablement les appareils et supports de
données qui sont raccordés à l’autoradio par l’intermédiaire de cette interface.
Avant de raccorder une interface Blaupunkt compatible C‘n‘C, contrôler le mode de fonctionnement de l’entrée AUX arrière. Consultez pour
cela la section « Entrée AUX arrière » du chapitre
« Sources audio externes ».
Mode changeur CD
Vous pouvez raccorder les changeurs de CD suivants à l’autoradio :
Blaupunkt CDC A03
•
Blaupunkt CDC A08
•
Blaupunkt IDC A09
•
Pour toutes informations sur la manipulation des
CD, leur insertion et l’utilisation du changeur CD,
reportez-vous au manuel d’utilisation de votre
changeur CD.
Avant de raccorder un changeur de CD, contrôler
le mode de fonctionnement de l’entrée AUX arrière. Consultez pour cela la section « Entrée AUX
arrière » du chapitre « Sources audio externes ».
52
Page 53

Mode CD/MP3/WMA/C‘n‘C/changeur de CD
Activation du mode CD/MP3/WMA/
C‘n‘C/changeur de CD
쏅
Appuyez sur la touche SRC 6 autant de fois
qu’il est nécessaire pour faire apparaître la
source audio souhaitée :
•
« CD » : CD introduit.
•
« MP3 » : CD introduit, identifi able comme
CD MP3.
•
« USB » : support de données USB raccordé.
•
Nom de l’appareil raccordé par l’intermédiaire de l’interface C‘n‘C
•
« CDC / AUX » : changeur de CD raccordé
(uniquement si aucune autre source audio
externe n’est raccordée).
Remarque :
•
La source audio correspondante peut être
sélectionnée uniquement lorsqu’un CD approprié est introduit ou qu’un appareil approprié est raccordé (par ex. un support de
données USB ou un changeur de CD).
•
Dans le cas où l’autoradio doit lire les
données de l’appareil ou du support de
données raccordé avant de procéder à
la reproduction, « READING » est affi ché
pendant ce temps sur l’écran. Si la quantité de données est importante, la lecture
peut prendre jusqu’à 1 minute. Dans le cas
où l’appareil ou le support de données est
défectueux ou que les données à transférer
ne peuvent pas être reproduites, un message correspondant apparaît sur l’écran
(par ex. « ERROR » ou « USB ERROR »).
•
Lorsque le changeur de CD raccordé enregistre les CD introduits (par ex. après une
interruption de l’alimentation électrique
ou après changement du chargeur), « MAG
SCAN » est affi ché pendant ce temps. Si le
changeur de CD ne contient aucun CD ni
chargeur, « NO DISC » est affi ché.
Introduction des CD
Remarque :
L’introduction automatique du CD doit s’effectuer sans entrave et sans intervention de
votre part.
쏅
Introduisez le CD dans la fente d’insertion du
7 avec la face imprimée tournée vers
CD
le haut, jusqu’à ce que vous rencontriez une
résistance.
Le CD est alors entraîné automatiquement
dans le lecteur et les données sont contrôlées
(« READING » est affi ché pendant ce temps
sur l’écran). La lecture dans le mode CD ou
MP3 commence ensuite. Une fois le CD chargé, le symbole de CD apparaît sur l’écran.
Remarque :
Si le CD introduit ne peut pas être lu, « CD
ERROR » apparaît brièvement sur l’écran et
le CD est éjecté automatiquement au bout
d’env. 2 secondes.
Retrait des CD
Remarque :
•
Si le CD éjecté n’est pas retiré, il est de
nouveau entraîné automatiquement dans
le lecteur au bout de 10 secondes environ.
•
Vous pouvez aussi retirer le CD lorsque
l’autoradio est arrêté ou qu’une autre source audio est active.
쏅
Appuyez sur la touche
CD qui se trouve dans l’autoradio.
: pour éjecter un
Branchement/débranchement des
supports de données USB
Pour pouvoir raccorder un support de données
USB, le câble USB livré doit être raccordé à l’autoradio (voir notice de montage).
쏅
Arrêtez l’autoradio afi n que le support de
données puisse être enregistré ou désenregistré correctement.
쏅
Branchez, ou débranchez, le support de données USB au câble USB.
FRANÇAIS
53
Page 54

Mode CD/MP3/WMA/C‘n‘C/changeur de CD
Lorsque le support de données USB est raccordé, le symbole USB est affi ché sur l’écran.
Si, après le raccordement ou la mise en marche de l’autoradio, le support de données USB
est sélectionné pour la première fois comme
source audio, les données sont d’abord lues
(« READING » est affi ché sur l’écran pendant
ce temps).
Remarque :
•
Si le support de données USB raccordé ne
peut pas être lu, « USB ERROR » apparaît
brièvement sur l’écran.
•
Le temps nécessaire pour la lecture dépend du type et de la capacité du support
de données USB.
Sélection des titres
쏅
Appuyez brièvement sur la touche 5 /
> pour passer au titre précédent/sui-
vant.
Remarque :
Si le titre actuel est lu pendant plus de 3 secondes, l’actionnement de la touche
entraîne la répétition de la lecture du titre.
Sélection des dossiers/CD
(uniquement dans le mode MP3/
WMA/C‘n‘C ou changeur de CD)
쏅
Appuyez sur la touche @ / 2 pour
sélectionner le dossier précédent/suivant ou
le CD précédent/suivant.
Remarque :
Vous pouvez également passer d’une des listes de lecture à l’autre d’un appareil raccordé
par l’intermédiaire de l’interface C‘n‘C.
Recherche rapide
쏅
Appuyez sur la touche 5 ou > et
maintenez-la appuyée jusqu’à ce que la position souhaitée soit atteinte.
Arrêt de la lecture
Appuyez sur la touche 3 < pour interrom-
쏅
pre la lecture (« PAUSE ») ou la reprendre.
Mode « Liste de lecture » (uniquement
dans le mode MP3/WMA)
L’autoradio peut lire des listes qui ont été créées
avec un gestionnaire MP3 tels que WinAmp ou Microsoft Media Player. Les listes de lecture doivent
être mémorisées dans le répertoire racine du CD ou
du support de données USB. Les formats de liste
de lecture suivants sont reconnus : M3U, PLS.
Sélection d’un titre dans le mode « Liste de
lecture »
Appuyez sur la touche 2 < et maintenez-la
쏅
appuyée pendant env. 2 secondes pour passer dans le mode « Liste de lecture » :
« LIST MODE » apparaît brièvement sur
l’écran. La lecture du premier titre de la première liste de lecture commence.
Remarque :
5
Dans le cas où le support de données ne
contient aucune liste de lecture, « LIST
MODE » apparaît brièvement sur l’écran.
Appuyez brièvement sur la touche
쏅
> pour passer au titre précédent/suivant
de la liste de lecture actuelle.
Appuyez sur la touche
쏅
passer à la liste de lecture précédente/suivante.
Le nom de la liste de lecture sélectionnée apparaît brièvement sur l’écran et la lecture du
premier titre de la liste commence.
Sortie du mode « Liste de lecture »
쏅
Appuyez sur la touche 2 < et maintenez-la
appuyée pendant env. 2 secondes :
« LIST OFF » apparaît brièvement sur l’écran.
Le titre actuel continue d’être lu.
@ / 2 pour
Balayage de tous les titres
La fonction de balayage (Scan) permet d’entendre le début de tous les titres disponibles.
5 /
54
Page 55

쏅
Appuyez sur la touche MENU•OK ? et
maintenez-la appuyée pendant env. 2 secondes pour démarrer le balayage, ou appuyez
brièvement sur la touche pour continuer
d’écouter le titre lu sur le moment.
Pendant le balayage des titres, « SCAN » et
le numéro du titre actuel ou le nom du fi chier
apparaissent à tour de rôle sur l’écran.
Remarque :
•
Dans le mode changeur de CD, la durée
d’écoute lors du balayage est d’env. 10 secondes par titre. La durée d’écoute des titres lors du balayage dans tous les autres
modes de fonctionnement peut être réglée
(voir chapitre « Réglages utilisateur », section « Réglages dans le menu utilisateur »,
option de menu « SCAN TIME »).
•
Dans le mode « Liste de lecture » (mode
MP3), le balayage s’effectue uniquement
sur les titres de la liste de lecture actuelle.
Lecture des titres dans un ordre aléatoire
쏅
Appuyez sur la touche 5 MIX < pour passer
d’un des modes de lecture à l’autre :
Utilisa-
Affi chage Signifi cation
tion
CD
MP3/
WMA/
C‘n‘C
1
MIX ALL
MIX DIR
MIX ALL
MIX CD
CDC
MIX ALL
Gén.
1
Dans le mode C‘n‘C, d’autres modes de
MIX OFF
lecture sont disponibles en fonction de
l’appareil raccordé
2
Pas dans le mode « Liste de lecture » MP3
Si la fonction MIX est activée, le symbole
MIX est affi ché sur l’écran.
Mélange des titres
Mélange des titres
2
du dossier actuel
Mélange des titres
2
du support de données
Mélange des titres
du CD actuel
Mélange des titres
de tous les CD
Lecture normale
Mode CD/MP3/WMA/C‘n‘C/changeur de CD
Répétition de la lecture d’un titre,
d’un CD ou d’un répertoire
Appuyez sur la touche 4 RPT < pour passer
쏅
d’un des modes de lecture à l’autre :
Utilisa-
Affi chage Signifi cation
tion
CD
RPT TRACK
RPT TRACK
MP3/
WMA/
C‘n‘C
Entrée
CDC
Gén.
1
Dans le mode C‘n‘C, d’autres modes de
RPT DIR
1
RPT TRACK
RPT DISC
RPT OFF
Répétition du titre
Répétition du titre
Répétition du
2
dossier
Répétition du titre
Répétition du CD
Lecture normale
lecture sont disponibles en fonction de
l’appareil raccordé
2
Pas dans le mode « Liste de lecture »
Si la fonction RPT est activée, le symbole RPT
est affi ché sur l’écran.
Réglage de l’affi chage
Appuyez une ou plusieurs fois sur la touche
쏅
DIS/ESC = pour commuter entre les affi -
chages suivants :
Mode Affi chage Signifi cation
Numéro du
titre et durée de
lecture
Numéro du titre
et heure
Nom du fi chier
1
Interprète
Nom d’album
Durée de lecture
Heure
CD
MP3/
WMA/
C‘n‘C
T 01 02:15
T 01 18:33
01 ABC
ABCDEF
ABCDEF
PLAY 02:15
CLK 18:33
FRANÇAIS
1
55
Page 56

Mode CD/MP3/WMA/C‘n‘C/changeur de CD / Sources audio externes
Mode Affi chage Signifi cation
Numéro du
T 01 02:15
Entrée
CDC
1
L’interprète et le nom d’album doivent être
Remarque
Vous pouvez activer ou désactiver l’affi chage
d’un texte de CD audio (voir chapitre « Réglages utilisateur », section « Réglages dans
le menu utilisateur », option de menu « CD
TEXT »). Lorsque l’affi chage du texte de CD
est activé, celui-ci apparaît une fois au début
de la lecture du titre sous la forme d’un texte
qui défi le.
T 01 18:33
CD 02T 03
mémorisés en tant que balise ID3 et ils sont
affi chés uniquement pendant env. 10 secondes, au besoin sous la forme d’un texte qui
défi le. Sinon, le nom du fi chier est affi ché.
titre et durée de
lecture
Numéro du titre
et heure
Numéro de CD
et numéro du
titre
Sources audio externes
Prise AUX-IN frontale
Danger ! Risque élevé de blessure
par la fi che.
frontale dépasse et peut provoquer des blessures
en cas d’accident. L’utilisation d’une fi che droite
ou d’un adaptateur entraîne un risque de blessure
élevé.
Pour cette raison, nous recommandons l’utilisation d’un câble muni d’un jack coudé, par exemple
le câble Blaupunkt disponible comme accessoire
sous la réf. 7 607 001 535.
Dès qu’une source audio externe, par ex. un lecteur portable CD, MiniDisc ou MP3, est raccordée
à la prise AUX-IN frontale, elle peut être sélection-
La fi che introduite dans la prise AUX-IN
née avec la touche SRC 6. « FRONT AUX » est
alors affi ché sur l’écran.
Entrée AUX arrière
Vous pouvez relier différentes sources audio externes à l’autoradio par l’intermédiaire de l’entrée
AUX arrière (Rear-AUX-IN) :
•
Appareils compatibles C‘n‘C du programme
d’accessoires Blaupunkt (par ex. une interface
Bluetooth®/USB ou iPod®/USB compatible
C‘n‘C ; C‘n‘C = Command and Control).
•
Changeur de CD
•
Autres sources audio externes, telles qu’un
lecteur de CD portable, un lecteur de MiniDisc,
un lecteur MP3 ou une interface Blaupunkt non
compatible C‘n‘C.
Remarque :
Pour raccorder une source audio externe
par l’intermédiaire de l’entrée AUX arrière,
vous avez besoin d’un câble adaptateur. Vous
pouvez vous procurer ce câble (réf. Blaupunkt 7 607 897 093) auprès d’un revendeur
Blaupunkt.
Avant de relier un appareil, contrôlez d’abord le
mode de l’entrée AUX arrière et modifi ez le réglage si nécessaire (voir chapitre « Réglages utilisateur », section « Réglages dans le menu utilisateur », option de menu « CDC »). Veillez à modifi er
le réglage uniquement lorsqu’aucun appareil n’est
raccordé à l’entrée AUX. Débranchez si nécessaire les appareils raccordés alors que l’autoradio
est arrêté.
Activation du mode C’n’C
Appuyez sur la touche SRC 6 autant de fois
쏅
qu’il est nécessaire pour faire apparaître sur
l’écran le nom de l’appareil raccordé par l’intermédiaire d’une interface C’n’C.
La lecture commence.
Remarque :
Le mode C’n’C peut être sélectionné uni-
•
quement lorsqu’un appareil approprié est
raccordé par l’intermédiaire d’une interface compatible C’n’C.
56
Page 57

Sources audio externes | Réglages de tonalité
Pour l’utilisation de l’autoradio dans le
•
mode C‘n‘C, consultez le chapitre « Mode
CD/MP3/WMA/C‘n‘C/changeur de CD ».
A condition d’utiliser un câble adaptateur
•
approprié, vous pouvez raccorder jusqu’à
3 interfaces Blaupunkt compatibles C’n’C
à l’autoradio. Afi n de pouvoir distinguer les
différentes interfaces, vous pouvez affecter un numéro d’appareil spécifi que à chaque interface (voir chapitre « Réglages utilisateur », section « Réglages dans le menu
utilisateur », option de menu « C‘N‘C »).
Activation du mode AUX
쏅
Appuyez sur la touche SRC 6 autant de
fois qu’il est nécessaire pour faire apparaître
« CDC / AUX » sur l’écran.
La lecture commence.
Remarque :
Vous pouvez donner à l’entrée AUX arrière
un nom qui apparaît sur l’écran dans le mode
AUX lorsque vous sélectionnez la source audio
qui lui est raccordée (voir chapitre « Réglages
utilisateur », section « Réglages dans le menu
utilisateur », option de menu « AUX EDIT »).
Réglages de tonalité
Dans le menu audio, vous pouvez effectuer les
réglages de tonalité suivants :
Réglage du niveau des graves et des aiguës
•
Réglage de la répartition gauche/droite (balan-
•
ce) ou avant/arrière (fader) du volume sonore
Réglage du relèvement des graves à faible
•
volume sonore (X-Bass)
Dans le menu audio étendu, vous pouvez en outre
effectuer les réglages suivants :
Réglage de l’égaliseur 3 bandes :
•
Réglage du niveau du médium.
–
Sélection des fréquences graves, médium
–
et aiguës.
Réglage du facteur de qualité pour les gra-
–
ves et le médium.
Réglage étendu des graves (X-Bass) (niveau et
•
fréquence)
•
Sélection des préréglages de l’égaliseur
Remarque :
Les réglages pour les graves, le médium et les
aiguës sont mémorisés pour la source audio
sélectionnée sur le moment.
Appel et sortie du menu audio
Appuyez brièvement sur la touche AUD A
쏅
pour ouvrir le menu audio.
Appuyez sur la touche
쏅
de fois qu’il est nécessaire pour faire apparaître l’option de menu souhaitée.
쏅
Effectuez les réglages (voir la section suivante).
쏅
Appuyez brièvement sur la touche MENU•OK
? pour sélectionner une autre option de
menu.
- ou -
Appuyez brièvement sur la touche DIS/ESC
쏅
= pour quitter le menu.
Remarque :
Le menu est quitté automatiquement env.
15 secondes après le dernier actionnement
de touche et l’affi chage de la source audio
actuelle réapparaît sur l’écran.
@ / 2 autant
Réglages dans le menu audio
BASS
Niveau des graves. Réglage : -7 à +7.
쏅
Appuyez sur la touche
sous-menu.
쏅
Appuyez sur la touche
effectuer le réglage.
TREBLE
Niveau des aiguës. Réglage : -7 à +7.
쏅
Appuyez sur la touche
sous-menu.
쏅
Appuyez sur la touche
effectuer le réglage.
> pour ouvrir le
@ / 2 pour
> pour ouvrir le
@ / 2 pour
FRANÇAIS
57
Page 58

Réglages de tonalité
BALANCE
Répartition gauche/droite du volume sonore.
Réglage : L9 (à gauche) à R9 (à droite).
쏅
Appuyez sur la touche
sous-menu.
쏅
Appuyez sur la touche
effectuer le réglage.
FADER
Répartition avant/arrière du volume sonore. Réglage : R9 (à l’arrière) à F9 (à l’avant).
쏅
Appuyez sur la touche
sous-menu.
쏅
Appuyez sur la touche
effectuer le réglage.
X-BAS S
Relèvement des graves à faible volume sonore.
Réglage : 0 (arrêt) à 3 (relèvement maximal).
쏅
Appuyez sur la touche
sous-menu.
쏅
Appuyez sur la touche
effectuer le réglage.
> pour ouvrir le
@ / 2 pour
> pour ouvrir le
@ / 2 pour
> pour ouvrir le
@ / 2 pour
Appel et sortie du menu audio étendu
쏅
Sélectionnez l’option de menu « ENHANCED »
du menu audio.
쏅
Appuyez sur la touche
menu ENHANCED.
쏅
Appuyez sur la touche
de fois qu’il est nécessaire pour faire apparaître l’option de menu souhaitée.
쏅
Effectuez les réglages (voir la section suivante).
쏅
Appuyez brièvement sur la touche MENU•OK
? pour sélectionner une autre option de
menu.
- ou -
쏅
Appuyez brièvement sur la touche DIS/ESC
= pour quitter le menu.
> pour ouvrir le
@ / 2 autant
Réglages dans le menu audio étendu
E-BASS
Réglage de la fréquence grave et du facteur de
qualité. Réglages :
•
Fréquence grave : 60/80/100/200 Hz
•
Facteur de qualité : 1,0/1,25/1,5/2,0
쏅
Appuyez sur la touche
sous-menu E-BASS.
쏅
Appuyez sur la touche
sélectionner « FREQ » (fréquence) ou QFAC
(facteur de qualité).
쏅
Appuyez sur la touche
passer d’un des réglages disponibles du
sous-menu à l’autre.
E-TREBLE
Réglage de la fréquence aiguë. Réglages :
10/12,5/ 15/17,5 kHz.
쏅
Appuyez sur la touche
sous-menu E-TREBLE.
쏅
Appuyez sur la touche
passer d’un des réglages disponibles du
sous-menu à l’autre.
E-MIDDLE
Réglage du niveau et de la fréquence centrale
ainsi que du facteur de qualité. Réglages :
•
Niveau du médium : -7 à +7
•
Fréquence centrale : 0,5/1,0/1,5/2,5 kHz
•
Facteur de qualité : 0,5/0,75/1,0/1,25
쏅
Appuyez sur la touche
sous-menu E-MIDDLE.
쏅
Appuyez sur la touche
sélectionner « GAIN » (niveau), « FREQ » (fréquence) et QFAC (facteur de qualité).
쏅
Appuyez sur la touche
passer d’un des réglages disponibles du
sous-menu à l’autre.
> pour ouvrir le
@ / 2 pour
5 / > pour
> pour ouvrir le
5 / > pour
> pour ouvrir le
@ / 2 pour
5 / > pour
58
Page 59

Réglages utilisateur
E-XBASS
Réglage du niveau et de la fréquence grave
(X-Bass). Réglages :
•
Niveau de grave X-Bass : 0 (arrêt) à 3
•
Fréquence X-Bass : 30/60/100 Hz
쏅
Appuyez sur la touche
sous-menu E-XBASS.
쏅
Appuyez sur la touche
sélectionner « GAIN » (niveau) et « FREQ »
(fréquence).
쏅
Appuyez sur la touche
passer d’un des réglages disponibles du
sous-menu à l’autre.
PRESETS
Sélection des préréglages de l’égaliseur. Réglages : POP, ROCK, CLASSIC, P-EQ OFF (aucun
préréglage).
쏅
Appuyez sur la touche
sous-menu PRESETS.
쏅
Appuyez sur la touche
passer d’un réglage à l’autre.
> pour ouvrir le
@ / 2 pour
5 / > pour
> pour ouvrir le
@ / 2 pour
Réglages utilisateur
Appel et sortie du menu utilisateur
쏅
Appuyez brièvement sur la touche MENU•OK
? pour ouvrir le menu.
쏅
Appuyez sur la touche
de fois qu’il est nécessaire pour faire apparaître l’option de menu souhaitée.
쏅
Effectuez les réglages (voir la section suivante).
쏅
Appuyez brièvement sur la touche MENU•OK
? pour sélectionner une autre option de
menu.
- ou -
쏅
Appuyez brièvement sur la touche DIS/ESC
= pour quitter le menu.
Remarque :
Le menu est quitté automatiquement env.
15 secondes après le dernier actionnement
@ / 2 autant
de touche et l’affi chage de la source audio
actuelle réapparaît sur l’écran.
Réglages dans le menu utilisateur
Entrée CDC
Réglage du mode de l’entrée AUX arrière. Réglages : ON (pour le raccordement d’un changeur
de CD ou d’une autre source audio externe), OFF
(pour le raccordement d’une interface Blaupunkt
compatible C‘n‘C).
Appuyez sur la touche
쏅
sous-menu.
쏅
Appuyez sur la touche
réglage à l’autre.
쏅
Appuyez brièvement sur la touche MENU•OK
? pour confi rmer le réglage sélectionné.
L’autoradio s’arrête automatiquement, puis
il se remet en marche avec le réglage sélectionné.
C‘N‘C
Affectation d’un numéro d’appareil spécifi que aux
interfaces compatibles C‘n‘C (C‘n‘C = Command
and Control). Longueur : 4 positions, chiffres de
0 à 9, lettres de A à F (hexadécimal).
Appuyez sur la touche
쏅
sous-menu.
쏅
Appuyez sur la touche
sélectionner l’interface (« DEV 1 - 3 »).
쏅
Appuyez sur la touche
numéro d’appareil.
쏅
Appuyez sur la touche
passer d’une position à l’autre.
Le caractère de la position sélectionnée clignote.
쏅
Appuyez sur la touche
sélectionner un chiffre pour la position.
쏅
Appuyez brièvement sur la touche MENU•OK
? pour confi rmer le numéro d’appareil entré.
> pour ouvrir le
> pour passer d’un
> pour ouvrir le
@ / 2 pour
> pour modifi er le
5 / > pour
@/ 2 pour
FRANÇAIS
59
Page 60

Réglages utilisateur
CDTEXT
Activation et désactivation de l’affi chage du texte
de CD. Réglages : ON (activé), OFF (désactivé).
Appuyez sur la touche
쏅
sous-menu.
쏅
Appuyez sur la touche
réglage à l’autre.
쏅
Appuyez brièvement sur la touche MENU•OK
? pour confi rmer le réglage sélectionné.
TA VOLUME
(uniquement pour la zone tuner « EUROPE »)
Réglage du volume sonore minimal pour les messages d’information routière. Réglage : 1 à 50.
Appuyez sur la touche
쏅
sous-menu.
Appuyez sur la touche
쏅
nez le bouton de réglage du volume 4 pour
effectuer le réglage.
SENS
Possible uniquement dans le mode radio FM : Réglage de la sensibilité de la recherche de stations.
Réglage : LO1 (minimum) à HI6 (maximum).
쏅
Appuyez sur la touche
sous-menu.
Appuyez sur la touche
쏅
effectuer le réglage.
SCAN TIME
Réglage de la durée d’écoute lors du balayage par
paliers de 5 secondes. Réglage : 5 à 30.
쏅
Appuyez sur la touche
sous-menu.
쏅
Appuyez sur la touche
effectuer le réglage.
CLOCK SET
Réglage de l’heure.
쏅
Appuyez sur la touche
sous-menu.
쏅
Appuyez sur la touche
passer du nombre des heures au nombre des
minutes ou inversement.
> pour ouvrir le
> pour passer d’un
> pour ouvrir le
@ / 2 ou tour-
> pour ouvrir le
@ / 2 pour
> pour ouvrir le
@ / 2 pour
> pour ouvrir le
5 / > pour
Le nombre des heures ou des minutes clignote lorsqu’il est sélectionné.
Appuyez sur la touche
쏅
régler le nombre des heures ou des minutes.
쏅
Appuyez brièvement sur la touche MENU•OK
? pour confi rmer l’heure entrée.
Remarque :
Dans le mode d’affi chage de l’heure sur
12 heures (12H MODE), l’heure est suivie de
« A » le matin et de « P » l’après-midi.
12H/24H MODE
Sélection du mode d’affi chage de l’heure sur
12 heures ou sur 24 heures. Réglages : 12H, 24H.
쏅
Appuyez sur la touche
sous-menu.
쏅
Appuyez sur la touche
réglage à l’autre.
CLOCK
Activation et désactivation de l’affi chage de l’heure lorsque l’autoradio est arrêté et que le contact
du véhicule est coupé. Réglages : ON (activé),
OFF (désactivé).
쏅
Appuyez sur la touche
sous-menu.
쏅
Appuyez sur la touche
réglage à l’autre.
쏅
Appuyez brièvement sur la touche MENU•OK
? pour confi rmer le réglage sélectionné.
BEEP
Activation et désactivation du bip de confi rmation. Réglages : ON (activé), OFF (désactivé).
쏅
Appuyez sur la touche
sous-menu.
쏅
Appuyez sur la touche
réglage à l’autre.
쏅
Appuyez brièvement sur la touche MENU•OK
? pour confi rmer le réglage sélectionné.
@ / 2 pour
> pour ouvrir le
> pour passer d’un
> pour ouvrir le
> pour passer d’un
> pour ouvrir le
> pour passer d’un
60
Page 61

Réglages utilisateur
TEL VOL
Réglage du volume sonore minimal pour les instructions vocales du système de navigation et
les communications téléphoniques. Réglage :
1 à 50.
쏅
Appuyez sur la touche
> pour ouvrir le
sous-menu.
Appuyez sur la touche
쏅
@/ 2 ou tournez le bouton de réglage du volume 4 pour
effectuer le réglage.
MUTE LVL
Réglage de l’abaissement rapide du volume sonore. Réglage : 0 à 50.
Appuyez sur la touche
쏅
> pour ouvrir le
sous-menu.
쏅
Appuyez sur la touche
@ / 2 ou tournez le bouton de réglage du volume 4 pour
effectuer le réglage.
ON VOLUME
Réglage du volume sonore à la mise en marche.
Réglages : 0 à 50 ou LAST VOL (dernier volume
sonore réglé avant l’arrêt de l’autoradio). Avec le
réglage « LAST VOL », le volume sonore à la mise
en marche est limité à la valeur 25.
Appuyez sur la touche
쏅
> pour sélection-
ner le réglage « LAST VOL ».
- ou -
쏅
Appuyez sur la touche
5 pour régler le
volume sonore à la mise en marche entre 0
et 50.
쏅
Appuyez sur la touche
@ / 2 ou tournez le bouton de réglage du volume 4 pour
effectuer le réglage.
REG
(uniquement pour la zone tuner « EUROPE »)
Possible uniquement dans le mode radio FM :
activation et désactivation de la fonction REG.
Réglages : ON (activée), OFF (désactivée).
쏅
Appuyez sur la touche
> pour ouvrir le
sous-menu.
Appuyez sur la touche
쏅
> pour passer d’un
réglage à l’autre.
PTY LANG
(uniquement pour la zone tuner « EUROPE »)
Possible uniquement dans le mode radio FM :
sélection de la langue pour l’affi chage des types
de programme. Réglages : ENGLISH, FRANCAIS,
DEUTSCH.
쏅
Appuyez sur la touche
> pour ouvrir le
sous-menu.
쏅
Appuyez sur la touche
@ / 2 pour
passer d’un réglage à l’autre.
PTY
(uniquement pour les zones tuner « EUROPE »,
« USA » et « S AMERICA »)
Possible uniquement dans le mode radio FM : activation et désactivation de la fonction PTY. Réglages : ON (activée), OFF (désactivée).
Appuyez sur la touche
쏅
> pour ouvrir le
sous-menu.
쏅
Appuyez sur la touche
> pour passer d’un
réglage à l’autre.
DISP COL
Mélange des couleurs de base rouge, vert et bleu
(RVB) pour l’éclairage de l’écran. Réglage : 0 à 16
pour R, V et B.
Appuyez sur la touche
쏅
5 pour sélectionner le sous-menu « 4096 COL » (réglage de R,
V et B), ou sur la touche
> pour sélectionner le sous-menu « 256 COL » (réglage de R
et V, B ne change pas).
Appuyez sur la touche
쏅
> pour ouvrir le
sous-menu.
쏅
Appuyez sur la touche
5 / > pour
passer d’une couleur à l’autre.
La valeur pour la couleur sélectionnée clignote.
쏅
Appuyez sur la touche
@ / 2 pour
régler la valeur de la couleur sélectionnée.
쏅
Appuyez brièvement sur la touche MENU•OK
? pour confi rmer le réglage sélectionné.
FRANÇAIS
61
Page 62

Réglages utilisateur
SCAN
Activation et désactivation du changement de
couleur permanent de l’éclairage de l’écran.
Réglages : ON (activé), OFF (désactivé).
쏅
Appuyez sur la touche
sous-menu.
쏅
Appuyez sur la touche
réglage à l’autre.
쏅
Appuyez brièvement sur la touche MENU•OK
? pour confi rmer le réglage sélectionné.
Si le changement de couleur permanent est activé, la couleur de l’éclairage de l’écran change
continuellement sur l’ensemble du spectre des
couleurs.
COL SCAN
Sélection de l’éclairage de l’écran pendant une
recherche de couleur.
쏅
Appuyez sur la touche
la recherche de couleur.
« SCANNING » et « OK (MENU) » apparaissent à tour de rôle sur l’écran et l’éclairage de
l’écran change en continu.
쏅
Appuyez brièvement sur la touche MENU•OK
? pour sélectionner la couleur réglée sur le
moment.
DIM DAY/DIM NIGHT
Réglage de la luminosité de l’écran pour le jour
(DIM DAY) ou pour la nuit (DIM NIGHT). Réglage : 1 à 16.
쏅
Appuyez sur la touche
sous-menu.
쏅
Appuyez sur la touche
effectuer le réglage.
Si votre autoradio est raccordé comme décrit
dans la notice de montage et que votre véhicule
dispose de la sortie correspondante, la luminosité de l’écran passe de jour à nuit ou inversement
lorsque vous allumez ou éteignez l’éclairage du
véhicule.
> pour ouvrir le
> pour passer d’un
> pour démarrer
> pour ouvrir le
@ / 2 pour
AUX EDIT
Entrée d’un nom pour l’entrée AUX arrière dans
le mode AUX. Longueur : 9 positions, caractères :
A-Z, 0-9.
Appuyez sur la touche
쏅
sous-menu.
쏅
Appuyez sur la touche
passer d’une position à l’autre.
Le caractère de la position sélectionnée
clignote.
Appuyez sur la touche
쏅
sélectionner un chiffre pour la position.
쏅
Appuyez brièvement sur la touche MENU•OK
? pour confi rmer le nom entré.
TRAF
(uniquement pour la zone tuner « EUROPE »)
Possible uniquement dans le mode radio FM :
activation et désactivation de la priorité aux informations routières. Réglages : ON (activée), OFF
(désactivée).
Appuyez sur la touche
쏅
sous-menu.
쏅
Appuyez sur la touche
réglage à l’autre.
RDS
(uniquement pour la zone tuner « EUROPE »)
Possible uniquement dans le mode radio FM :
activation et désactivation de la fonction RDS.
Réglages : ON (activée), OFF (désactivée).
쏅
Appuyez sur la touche
sous-menu.
쏅
Appuyez sur la touche
réglage à l’autre.
> pour ouvrir le
5 / > pour
@ / 2 pour
> pour ouvrir le
> pour passer d’un
> pour ouvrir le
> pour passer d’un
62
Page 63

Réglages d’usine / Informations utiles
Réglages d’usine
Réglage d’usine dans le menu utilisateur :
ON VOLUME LAST VOL
MUTE LVL 0
SENS HI6
SCAN TIME 10
CLOCK OFF
BEEP ON
DIM DAY 15
DIM NIGHT 12
CDTEXT OFF
12H/24H MODE 24H
CLOCKSET 00:00
TEL VOL 17
TA V OL 2 0
RDS* ON
REG* ON
TRAF* OFF
* Uniquement dans la zone tuner « EUROPE »
Vous pouvez rétablir les réglage d’usine de l’auto-
radio :
쏅
Appuyez brièvement sur la touche MENU•OK
? pour ouvrir le menu.
쏅
Appuyez sur la touche
de fois qu’il est nécessaire pour faire apparaître l’option de menu « NORMSET ».
Appuyez sur la touche MENU•OK ? et
쏅
maintenez-la appuyée pendant plus de 4 secondes.
« NORM ON » apparaît brièvement sur l’écran.
L’autoradio s’arrête automatiquement, puis il
se remet en marche avec les réglages d’usine.
Remarque :
Si vous appuyez sur la touche MENU•OK ?
pendant moins de 4 secondes, « NORM OFF »
@ / 2 autant
apparaît sur l’écran et les réglages précédents
sont conservés.
Informations utiles
Garantie
Notre garantie constructeur s’étend à tous nos
produits achetés au sein de l’Union Européenne.
Pour les appareils vendus en dehors de l’Union
européenne, les conditions de garantie applicables sont celles défi nies par notre représentant
agréé dans le pays.
Vous pouvez consulter les conditions de garantie
sur le site www.blaupunkt.com ou les demander
directement à :
Blaupunkt GmbH
Hotline
Robert-Bosch-Str. 200
D-31139 Hildesheim
Service
Dans certains pays, Blaupunkt propose un service
d’enlèvement et de réparation.
Vous pouvez contrôler si ce service est disponible
dans votre pays à l’adresse www.blaupunkt.com.
Si vous souhaitez recourir à ce service, vous pouvez effectuer une demande d’enlèvement de votre
autoradio par Internet.
FRANÇAIS
63
Page 64

Caractéristiques techniques
Caractéristiques techniques
Alimentation électrique
Tension de service : 10,5 - 14,4 V
Consommation de courant
En fonctionnement : 10 A
10 s après l'arrêt : < 3,5 mA
Amplifi cateur
Puissance de sortie sinusoïdale :
4 x 26 watts pour
14,4 V sur 4 ohms.
Puissance maximale
4 x 50 watts
Tuner
Gammes d’ondes Europe/Thaïlande :
FM : 87,5 - 108 MHz
AM (OM) : 531 - 1 602 kHz
OL (uniquement Europe) : 153 - 279 kHz
CD
Bande passante :
20 - 20 000 Hz
Sortie préamplifi cateur
4 canaux : 2 V
Sensibilité de sortie
Rear-AUX-IN : 1,2 V / 10 kΩ
Front-AUX-IN : 500 mV / 6 kΩ
Entrée tél/navi : 10 V / 1 kΩ
Dimensions et poids
l x H x P (mm) : 182 x 53 x 155
Poids : env. 1,30 kg
Gamme d’ondes USA :
FM : 87,7 - 107,9 MHz
AM (OM) : 530 - 1 710 kHz
Gammes d’ondes Amérique du Sud :
FM : 87,5 - 107,9 MHz
AM (OM) : 530 - 1 710 kHz
FM - Bande passante :
30 - 15 000 Hz
64
Sous réserves de modifi cations
Page 65

Elementi di comando
6
1
4
8
9 1072 53
16 11
18 17
15
14
13
1 Tasto
Sbloccaggio del frontalino amovibile
2 Tasto
Nel menu: richiamo della voce del menu
Esercizio radio: avvio ricerca stazioni
Esercizio MP3/WMA/C‘n‘C/multilettore CD:
passare alla cartella successiva/CD successivo
3 Tasto On/Off
Premuto brevemente: attivazione autoradio
Durante l'uso: attivazione dell'autoradio in
modalità "silenziosa" (Mute)
Premuto a lungo: spegnimento dell'autoradio
4 Regolatore del volume
5 Tasto
Nel menu: modifi ca delle impostazioni
Esercizio radio: sintonizzazione delle stazioni
Altre modalità: selezione dei brani
6 Tasto SRC
Selezionare la fonte audio
7 Vano CD
8 Display
9 Porta USB
: Tasto (Eject)
Espulsione del CD
12
; Presa frontale AUX-IN
< Blocco dei tasti 1 - 5
= Tasto DIS/ESC
Nel menu: uscita dal menu
Durante l'uso: disattivazione dell'indicazione
> Tasto
Nel menu: modifi ca delle impostazioni
Esercizio radio: impostazione delle stazioni
Altre modalità: selezione dei brani
? Tasto MENU•OK
Premuto brevemente: richiamo del menu,
conferma delle impostazioni
Premuto a lungo: avvio della funzione Scan
@ Tasto
Nel menu: richiamo della voce del menu
Esercizio radio: avvio ricerca stazioni
Esercizio MP3/WMA/C‘n‘C/multilettore CD:
passare alla cartella precedente/CD precedente
A Tasto AUD
Richiamo menu Audio
B Tasto BND
Premuto brevemente: in modalità esercizio
radio selezione del livello di memoria
Premuto a lungo: in modalità esercizio radio
avvio della funzione Travelstore
ITALIANO
65
Page 66

Sommario
Norme di sicurezza ...................................67
Simboli utilizzati .....................................67
Sicurezza stradale ..................................67
Norme di sicurezza generali .....................67
Dichiarazione di conformità .....................67
Avvertenze per la pulizia ...........................68
Avvertenze per lo smaltimento ..................68
Dotazione.................................................68
Accessori speciali
(non compresi nella fornitura) ..................68
Messa in funzione .....................................69
Inserimento/estrazione frontalino .............69
Impostazione del Paese di sintonizzazione .69
Accensione e spegnimento ......................69
Volume .................................................70
Attivazione e disattivazione della modalità
Demo ...................................................70
Visualizzazione dei numeri di versione .......70
Informazioni sul traffi co ............................70
Esercizio radio ..........................................71
RDS .....................................................71
Passaggio all'esercizio radio .....................71
Selezione del livello di memoria ................71
Sintonizzazione di una stazione ................71
Memorizzazione delle stazioni/richiamo
delle stazioni memorizzate .......................72
Breve ascolto delle stazioni ......................72
Memorizzazione automatica di
una stazione (Travelstore) ........................72
PTY ......................................................72
Impostazione dell'indicazione sul display ...73
Esercizio CD/MP3/WMA/C‘n‘C/
multilettore CD .........................................73
Informazioni principali ............................73
Commutare nell'esercizio CD/MP3/
WMA/C‘n‘C/multilettore CD .....................74
Inserimento CD ......................................75
Estrazione del CD ...................................75
Collegamento/rimozione di un supporto
USB .....................................................75
Selezione di un brano ..............................75
Selezione di una cartella/CD
(solo in esercizio MP3/WMA/
C‘n‘C o multilettore CD) ...........................75
Ciclo di ricerca rapido .............................76
Interruzione della riproduzione .................76
Modalità Playlist (solo in esercizio
MP3/WMA) ...........................................76
Breve ascolto di tutti i brani ......................76
Riproduzione di brani in ordine casuale ......76
Riproduzione ripetuta di singoli brani o
CD oppure directory ...............................77
Impostazione dell'indicazione sul display ...77
Fonti audio esterne ...................................78
Presa frontale AUX-IN ..............................78
Entrata AUX posteriore ............................78
Regolazione del suono ..............................79
Richiamo ed abbandono del menu audio ....79
Effettuare impostazioni nel menu audio .....79
Richiamo ed abbandono del menu audio
avanzato ...............................................80
Effettuare impostazioni nel menu audio
avanzato ...............................................80
Impostazioni personalizzate ......................81
Richiamo ed abbandono del menu utente ...81
Effettuare impostazioni nel menu utente ....81
Impostazioni di fabbrica ............................84
Informazioni utili ......................................85
Garanzia ...............................................85
Servizio di assistenza ..............................85
Dati tecnici ...............................................85
Istruzioni di installazione ........................317
66
Page 67

Norme di sicurezza
L'autoradio è stata prodotta
stato attuale della tecnica e alle regole di sicurezza generali riconosciute. Ciononostante possono
sussistere pericoli a causa della mancata osservanza delle norme di sicurezza contenute in queste istruzioni.
Queste istruzioni contengono informazioni importanti per montare e utilizzare in modo sicuro
e semplice l'autoradio.
•
Leggere accuratamente tutte le istruzioni,
prima di utilizzare l'autoradio.
•
Conservare le istruzioni in modo che siano
sempre disponibili per tutti gli utilizzatori.
•
Consegnare l'autoradio a terzi sempre completa di manuale.
Osservare inoltre le istruzioni degli apparecchi
che si utilizzano in questo contesto.
Simboli utilizzati
In queste istruzioni vengono utilizzati i seguenti
simboli:
PERICOLO!
Pericolo di lesioni
ATTENZIONE!
Danneggiamento del lettore CD
Il marchio CE certifi ca l'osservanza
delle direttive UE.
쏅
Identifi ca un passo operativo
•
Identifi ca un conteggio
Sicurezza stradale
Prestare attenzione alle seguenti note sulla sicurezza stradale:
•
Utilizzare l'apparecchio in modo da poter
condurre il veicolo sempre in sicurezza. In
caso di dubbio, fermarsi in un luogo adeguato
e utilizzare l'apparecchio a veicolo fermo.
conformemente allo
Norme di sicurezza
Rimuovere o applicare il frontalino soltanto
•
a veicolo fermo.
L'ascolto deve avvenire sempre a volume
•
moderato per poter proteggere l'udito e per-
cepire i segnali di avvertimento acustici (ad
esempio la polizia). Nelle pause durante le
quali l'apparecchio si trova in modalità silenziosa (ad es. quando si commuta su una diversa
fonte audio) la variazione del volume non può
essere percepita. Non aumentare il volume
durante la pausa in modalità silenziosa.
Norme di sicurezza generali
Prestare attenzione alle seguenti note per proteggere se stessi da eventuali lesioni:
•
Non aprire né apportare modifi che all'apparecchio. Nell'apparecchio è presente un laser
Classe 1, che può danneggiare gli occhi.
•
Non alzare il volume durante le pause in cui
l'apparecchio si trova in modalità silenziosa,
ad es. quando si commuta su una diversa fonte
audio. In modalità silenziosa, la variazione del
volume non può essere percepita.
Uso conforme alle norme
Questa autoradio è concepita per il montaggio e
l'impiego in un veicolo con tensione della rete di
bordo a 12 Volt e deve essere installato in un vano
conforme alle norme DIN. Osservare i limiti di potenza contenuti nei dati tecnici. Far eseguire le
riparazioni ed eventualmente il montaggio da un
tecnico specializzato.
Avvertenze per il montaggio
L'autoradio può essere montata solo da chi abbia
esperienza nel montaggio di autoradio e sistemi
di navigazione e conosca bene l'impianto elettrico del veicolo. Osservare a tal fi ne le istruzioni di
montaggio contenute in fondo a queste istruzioni.
Dichiarazione di conformità
Blaupunkt GmbH dichiara che l'autoradio San
Francisco 300 BT è conforme ai requisiti fondamentali e ad altre prescrizioni importanti della direttiva 89/336/CEE.
ITALIANO
67
Page 68

Avvertenze per la pulizia | Avvertenze per lo smaltimento | Fornitura
Avvertenze per la pulizia
Solventi, detergenti e abrasivi come spray per il
cockpit e prodotti per la cura dei materiali sintetici possono contenere sostanze corrosive per la
superfi cie dell'autoradio.
•
Per la pulizia dell'autoradio utilizzare soltanto
un panno asciutto o leggermente umido.
•
Se necessario, pulire i contatti del frontalino
estraibile con un panno non sfi lacciato imbevuto di alcol detergente.
Avvertenze per lo smaltimento
Non smaltire il proprio vecchio apparecchio
nei rifi uti domestici!
Per lo smaltimento del vecchio apparecchio, utilizzare i sistemi di restituzione e raccolta disponibili.
Dotazione
Sono compresi nella fornitura:
1 autoradio
1 istruzioni di comando e installazione
1 custodia per il frontalino
1 telaio di supporto
1 kit minuteria
2 utensili di smontaggio
1 cavo di connessione USB
Nota:
Si raccomanda di utilizzare accessori originali
Blaupunkt (www.blaupunkt.com).
Accessori speciali
(non compresi nella fornitura)
È possibile rivolgersi al proprio rivenditore specializzato Blaupunkt o su Internet all'indirizzo
www.blaupunkt.com per avere informazioni sugli
accessori speciali, ad esempio:
•
Comandi al volante o telecomando manuale di
Blaupunkt per controllare le funzioni principali
in modo comodo e sicuro (accensione e spegnimento con telecomando non possibili)
•
Le interfacce con predisposizione C‘n‘C di
Blaupunkt (C‘n‘C = Command and Control) per
il collegamento di telefoni cellulari con tecnologia Bluetooth® e dispositivi di streaming (ad es.
tramite Bluetooth®/Interfaccia USB) oltre che
di supporti e apparecchi supplementari (ad es.
tramite iPod/interfaccia USB)
Multilettore CD Blaupunkt
•
Amplifi catore (Amplifi er) Blaupunkt o Velocity
•
68
Page 69

Messa in funzione
Messa in funzione
Inserimento/estrazione frontalino
Quale protezione antifurto la vostra autoradio è
dotata di un frontalino amovibile (Release Panel).
Al momento della consegna, il frontalino si trova
nell'astuccio in dotazione. Per attivare la radio
dopo il montaggio, è necessario innanzitutto inserire il frontalino (vedi il paragrafo "Inserimento
frontalino" in questo capitolo).
Portare sempre con sé il frontalino ogni volta che
ci si allontana dal veicolo. Senza questo frontalino
l'autoradio per un ladro non ha nessun valore.
Attenzione
Danneggiamento del frontalino
Non lasciar cadere il frontalino.
Trasportare il frontalino in modo che sia protetto
dagli urti e i contatti non si possano sporcare.
Non esporre il frontalino direttamente ai raggi del
sole o ad altre fonti di calore.
Evitare di entrare in contatto diretto con i contatti
elettrici del frontalino.
Inserimento frontalino
쏅
Far scorrere il frontalino nel supporto presente sul lato destro dell'alloggiamento.
쏅
Per l'inserimento nel supporto sinistro, premere con cautela il frontalino fi no allo scatto
in sede.
Estrazione del frontalino
쏅
Premere il tasto
talino.
Il lato sinistro del frontalino si stacca dall'autoradio e viene trattenuto, per evitarne la caduta, da un dispositivo di arresto.
Afferrare il frontalino dal lato sinistro ed
쏅
estrarlo dal supporto tirandolo, vincendo la
resistenza del dispositivo di arresto.
Nota:
Non appena il frontalino viene rimosso, l'autoradio si spegne automaticamente.
1 per sbloccare il fron-
Impostazione del Paese di
sintonizzazione
Questa autoradio è progettata per funzionare in
diversi Paesi, con diversi range di frequenza e
tecnologie di trasmissione. Il Paese di sintonizzazione impostato di fabbrica è "EUROPE" (Europa).
Sono inoltre disponibili i Paesi di sintonizzazione
"USA", "THAI" (Thailandia) e "S AMERICA" (Sudamerica). Se l'autoradio viene utilizzata al di fuori
dell'Europa, è necessario impostare il Paese di
sintonizzazione adeguato:
쏅
Se l'autoradio è accesa, spegnerla.
쏅
Tenere premuti contemporaneamente i tasti
MENU•OK ? e
Off 3.
L’autoradio si accende. Sul display appare il
Paese di sintonizzazione attualmente impostato.
Premere ripetutamente il tasto
쏅
2, fi nché non compare il Paese di sinto-
nizzazione desiderato.
쏅
Premere il tasto MENU•OK
4 < e premere il tasto On/
@ /
?.
Accensione e spegnimento
Accensione e spegnimento con tasto On/Off
쏅
Per l'accensione premere il tasto On/Off 3.
L'autoradio si accende.
쏅
Per spegnere l'autoradio tenere premuto il
tasto On/Off 3 per più di 2 secondi.
L'autoradio si spegne.
Nota:
Se si accende l'autoradio con l'accensione del
veicolo disattivata, essa si spegne automaticamente dopo 1 ora per preservare la batteria del veicolo.
Spegnimento e accensione tramite
l'accensione d'auto
Se l’autoradio, come illustrato nelle istruzioni di
installazione, è collegata correttamente all’accensione del veicolo e non è stata spenta con il tasto
On/Off 3, essa si spegne e si accende contem-
69
ITALIANO
Page 70

Messa in funzione | Informazioni sul traffi co
poraneamente con lo spegnimento/accensione
del veicolo.
Volume
Regolazione del volume
Il volume si può regolare passo a passo dal valore
0 (spento) fi no a 50 (massimo).
쏅
Girare il regolatore del volume
il volume.
Nota:
Se all'autoradio è collegato un telefono o un
sistema di navigazione, come descritto nelle
istruzioni di installazione, l'autoradio, durante
la conversazione telefonica o la trasmissione
di informazioni di navigazione, viene commutata in modalità silenziosa e la conversazione
o il messaggio vocale viene riprodotto tramite
gli altoparlanti dell'autoradio. Sul display viene visualizzato "TELEPHONE".
Attivazione dell'autoradio in modalità
"silenziosa" (Mute)
È possibile abbassare rapidamente il volume su
un valore da voi impostato (Mute).
Premere brevemente il tasto On/Off 3 per
쏅
passare in modalità "mute" o per ripristinare
il livello di volume precedente.
Sul display, durante la modalità "silenziosa",
appare la scritta "MUTE".
Per impostare il volume della modalità "silenziosa", leggere il paragrafo "Effettuare impostazioni
nel menu utente", voce del menu "MUTE LVL", nel
capitolo "Impostazioni personalizzate".
4 per variare
Attivazione e disattivazione della
modalità Demo
La modalità Demo presenta le funzioni dell'autoradio sul display, con testo scorrevole. È possibile
attivare o disattivare la modalità Demo:
쏅
Se l'autoradio è accesa, spegnerla.
쏅
Tenere premuti contemporaneamente i tasti
MENU•OK ? e
Off 3.
2 < e premere il tasto On/
70
L’autoradio si accende. Attivando la modalità
Demo, sul display appare brevemente la scritta "DEMO MODE". Azionando un tasto a piacere la modalità di dimostrazione si interrompe e
diviene possibile comandare l'apparecchio.
Visualizzazione dei numeri di versione
È possibile far visualizzare i numeri di versione dei
diversi componenti dell'apparecchio.
쏅
Se l'autoradio è accesa, spegnerla.
쏅
Tenere premuti contemporaneamente i tasti
MENU•OK ? e
Off 3.
L’autoradio si accende. Sul display viene
visualizzato il numero della versione del primo componente. La prima lettera indica il
componente: P = Processore, E = EPROM,
A = Accordo.
쏅
Premere il tasto
i numeri di versione degli altri componenti.
쏅
Premere il tasto MENU•OK
all'ultima fonte audio ascoltata.
1 < e premere il tasto On/
5 / > per visualizzare
? per tornare
Informazioni sul traffi co
Nel Paese di sintonizzazione "EUROPE", una stazione FM può identifi care messaggi sul traffi co
tramite segnale RDS. Quando la priorità per i
messaggi sul traffi co è attivata, i messaggi vengono passati automaticamente, anche se l'autoradio
non si trova in modalità radio o se è impostata una
stazione che trasmette su frequenze OM (MW) o
OL (LW).
Con priorità attivata, sul display visualizzato il
simbolo di ingorgo (
ne delle informazioni sul traffi co, sul display viene
visualizzato "TRAFFIC".
Per attivare e disattivare la priorità, leggi il paragrafo "Effettuare impostazioni nel menu utente",
voce del menu "TRAF", nel capitolo "Impostazioni
personalizzate".
Note
•
Il volume, durante la trasmissione delle
informazioni sul traffi co, viene alzato. È
possibile impostare il volume minimo per
). Durante la trasmissio-
Page 71

Informazioni sul traffi co | Esercizio radio
le informazioni sul traffi co (vedi cap. "Impostazioni personalizzate", paragrafo "Effettuare impostazioni nel menu utente",
voce del menu "TA VOLUME").
•
Per interrompere un'informazione sul traffi co in trasmissione, premere il tasto DIS/
ESC =.
Esercizio radio
RDS
Nel Paese di sintonizzazione "EUROPE", molte
stazioni FM trasmettono oltre al proprio programma un segnale RDS (Radio Data System), che
consente di utilizzare le seguenti funzioni supplementari:
Il
nome della stazione viene visualizzato sul
•
display.
L'autoradio riconosce informazioni sul traffi co
•
e giornali radio e può trasmetterli automaticamente in qualsiasi modalità (ad es. nell'esercizio CD).
Frequenza alternata: se l'RDS è attivato, l'au-
•
toradio commuta automaticamente sulla migliore frequenza di ricezione della stazione
sintonizzata.
Regional (REG): in determinate ore del giorno
•
alcune stazioni suddividono il loro programma
in diversi programmi nazionali con differenti
contenuti. Con funzione REG attivata l'autoradio commuta solo sulle frequenze alternate
su cui viene trasmesso lo stesso programma
nazionale.
Per attivare e disattivare la funzione RDS o REG
leggere nel capitolo "Impostazioni personalizzate" il paragrafo "Effettuare impostazioni nel menu
utente" (voci del menu "RDS", "REG").
Passaggio all'esercizio radio
Premere ripetutamente il tasto SRC 6 fi n -
쏅
ché viene visualizzato "TUNER":
Il livello di memoria attuale viene visualizzato
una volta come testo scorrevole sul display.
Selezione del livello di memoria
Nei vari Paesi di sintonizzazione, sono disponibili
i seguenti livelli di memoria:
Regione Livelli di memoria
EUROPE
USA
THAI
S AMERICA
쏅
Premere una o più volte il tasto BND
ché compare il livello di memoria desiderato.
Nota:
Su ogni livello di memoria si possono memorizzare al massimo 5 stazioni.
FM1, FM2, FMT, OM (MW),
OL (LW)
FM1, FM2, FMT, AM, AMT
FM1, FM2, FMT, AM
FM1, FM2, FMT, AM, AMT
B fi n -
Sintonizzazione di una stazione
Ci sono diverse possibilità di sintonizzazione di
una stazione.
Impostazione manuale delle stazioni
Premere brevemente il tasto
쏅
una o più volte per variare gradualmente la
frequenza, oppure tenerlo premuto a lungo
per variare la frequenza velocemente.
Note
•
Per il Paese di sintonizzazione "EUROPE":
nella gamma di lunghezze d'onda FM, se
la funzione RDS è attivata, viene automaticamente sintonizzata la stazione seguente
nella catena di stazioni.
Per i Paesi di sintonizzazione "EUROPE",
•
"USA" e "S AMERICA": nella gamma di
lunghezze d'onda FM, se la funzione PTY
è attivata, viene visualizzato il tipo di programma attualmente selezionato, che può
essere cambiato (vedi cap. "PTY").
Avvio della ricerca delle stazioni
Premere il tasto
쏅
ricerca delle stazioni.
La radio si sintonizza su una delle prossime
stazioni ricevibili.
@/ 2 per avviare la
5 / >
ITALIANO
71
Page 72

Esercizio radio
Note
•
Per il Paese di sintonizzazione "EUROPE": nella gamma di lunghezze d'onda FM, se la priorità per le informazioni sul traffi co è attivata
), verranno sintonizzate solo stazioni
(
che trasmettono informazioni sul traffi co.
•
Per i Paesi di sintonizzazione "EUROPE",
"USA" e "S AMERICA": nella gamma di lunghezze d'onda FM, se la funzione PTY è attivata, viene sintonizzata la stazione con il
tipo di programma attualmente selezionato
(vedi cap. "PTY").
•
La sensibilità della ricerca automatica può
essere impostata (vedere capitolo "Impostazioni personalizzate", paragrafo "Effettuare impostazioni nel menu utente", voce
del menu "SENS").
Memorizzazione delle stazioni/
richiamo delle stazioni memorizzate
쏅
Selezionare il livello di memoria desiderato.
쏅
Sintonizzarsi, se necessario, sulla stazione
desiderata.
쏅
Premere il tasto di stazione
2 secondi per memorizzarvi la stazione corrente.
- oppure Premere brevemente il tasto di stazione
쏅
< per richiamare quella memorizzata.
1 -5 < per circa
1 - 5
Breve ascolto delle stazioni
Con la funzione Scan si può avviare l'ascolto breve
di qualsiasi stazione ricevibile della gamma di lunghezze d'onda corrente.
Premere il tasto MENU•OK
쏅
condi per avviare l'ascolto, o premerlo brevemente per continuare ad ascoltare la stazione
attualmente sintonizzata.
Durante l'ascolto breve, sul display vengono
visualizzati alternativamente "SCAN" e la frequenza attuale, nonché il livello di memoria e
il nome della stazione.
? per circa 2 se-
Nota:
Per l'esercizio radio, è possibile impostare
la durata di ascolto breve per ogni stazione
(vedi cap. "Impostazioni personalizzate",
paragrafo "Effettuare impostazioni nel menu
utente", voce del menu "SCAN TIME").
Memorizzazione automatica di una
stazione (Travelstore)
Con Travelstore, le 5 stazioni FM di maggiore potenza del Paese possono essere ricercate automaticamente e memorizzate su un livello di memoria.
Le stazioni di questo livello memorizzate precedentemente vengono in tal modo cancellate.
Nei Paesi di sintonizzazione "EUROPE" e "THAI",
con Travelstore è possibile memorizzare 5 stazioni FM nel livello di memoria FMT. Nei Paesi di
sintonizzazione "USA" e "S AMERICA" è inoltre
possibile memorizzare 5 stazioni AM nel livello di
memoria AMT.
Selezionare un livello di memoria della gam-
쏅
ma di lunghezze d'onda desiderata, ad es.
FM1 e AM.
Premere il tasto BND
쏅
Il tuner avvia la ricerca automatica delle stazioni; sul display appare "FM TSTORE" o "AM
TSTORE". Quando la memorizzazione è conclusa, si ascolta la stazione della posizione di
memoria 1 del livello FMT o AMT.
Nota:
Per il Paese di sintonizzazione "EUROPE": se la
priorità per le informazioni sul traffi co è attivata (
), vengono memorizzate solo stazioni
che trasmettono informazioni sul traffi co.
B per ca. 2 secondi.
PTY
Nei Paesi di sintonizzazione "EUROPE", "USA" e
"S AMERICA", una stazione FM può comunicare qual è il tipo di programma corrente, ad es.
CULTURA, POP, JAZZ, ROCK, SPORT o SAPERE.
Con la funzione PTY è possibile cercare in modo
mirato un determinato tipo di programma in base
alle trasmissioni, ad es. rock o sportive. Prestare
attenzione al fatto che la funzione PTY non è supportata da tutte le stazioni.
72
Page 73

Nota:
Per utilizzare la funzione PTY, è necessaria la
sua specifi ca attivazione nel menu (vedi cap.
"Impostazioni personalizzate", paragrafo "Effettuare impostazioni nel menu utente", voce
del menu "PTY").
Selezione del tipo di programma
Nota:
Nel Paese di sintonizzazione "EUROPE", è
possibile impostare la lingua in cui viene visualizzato il tipo di programma (vedi cap.
"Impostazioni personalizzate", paragrafo "Effettuare impostazioni nel menu utente", voce
del menu "PTY LANG").
쏅
Premere brevemente il tasto
Viene visualizzato il tipo di programma sele-
zionato attualmente e sarà possibile sceglierne un altro.
쏅
Premere ripetutamente il tasto
fi no a selezionare il tipo di programma desiderato.
Ricerca delle stazioni
쏅
Premere il tasto
Non appena inizia la ricerca automatica, sul
display appare brevemente "SEARCH". Quindi viene visualizzato il tipo di programma corrente
.
Quando viene trovata una stazione, appare
brevemente la scritta "PTY FOUND". Finché
il tipo di programma della stazione sintonizzata è compatibile con quello selezionato, sul
display vengono visualizzati alternativamente
il tipo di programma e il nome della stazione
o la frequenza.
Note
•
Se non viene individuata alcuna stazione
con il tipo di programma desiderato, sul
display appare brevemente il messaggio
"NO PTY" e si sente un beep. La radio si
sintonizza nuovamente sull'ultima stazione
ascoltata.
@/ 2.
5 / >.
5 / >
Esercizio radio | Esercizio CD/MP3/WMA/C‘n‘C/multilettore CD
•
Se la stazione in ascolto o un’altra stazione
della stessa catena trasmetterà solo in un
momento successivo il tipo di programma
desiderato, allora l’autoradio commuta automaticamente dalla stazione o dalla fonte
audio in ascolto (ad es. un CD) alla stazione
con il tipo di programma desiderato. Prestare attenzione al fatto che questa funzione non è supportata da tutte le stazioni.
Impostazione dell'indicazione sul
display
쏅
Premere il tasto DIS/ESC = per passare da
una di queste due visualizzazioni all'altra:
Indicazione Signifi cato
ABCDEF
FM1 102.90
FM1 11:32
Nome della stazione
o
o
livello di memoria/
frequenza
Livello di memoria/ora
Esercizio CD/MP3/WMA/C‘n‘C/
multilettore CD
Informazioni principali
Esercizio CD/MP3/WMA
Con questa autoradio è possibile riprodurre CD
audio (CDDA) e CD-R/RWs con fi le audio, MP3 o
WMA, nonché fi le MP o WMA su supporto USB.
Danneggiamento del lettore CD!
Non utilizzare CD sagomati (shape CD) e
CD con diametro di 8 cm (mini CD).
Non ci assumiamo nessuna responsabilità per
danni al lettore CD conseguenti all'impiego di CD
inadatti.
Note
•
Per evitare problemi di funzionamento,
utilizzare esclusivamente CD con il logo
Compact Disc.
•
Blaupunkt non può garantire il perfetto funzionamento dei CD con controllo di copia,
ITALIANO
73
Page 74

Esercizio CD/MP3/WMA/C‘n‘C/multilettore CD
nonché di tutti i CD vergini e supporti USB
disponibili sul mercato.
Nel preparare un supporto MP3/WMA prestare
attenzione alle seguenti indicazioni:
Denominazione di brani e directory:
•
Max. 16 caratteri (CD) o 24 caratteri
–
(USB) incl. l'estensione del fi le ".mp3" o
".wma" (in caso di caratteri in eccesso, il
numero di titoli e cartelle riconoscibili dall'autoradio sarà limitato)
Nessuna dieresi o carattere speciale
–
Formati CD: CD audio (CDDA), CD-R/RW,
•
Ø: 12 cm
Formato dati CD: ISO 9669 Level 1 e 2, Joliet
•
Velocità di masterizzazione dei CD: max 16x
•
(consigliata)
Formato USB/File System USB: Mass Storage
•
Device (memoria di massa)/FAT32
Estensione di fi le audio:
•
.MP3 per fi le MP3
–
.WMA per fi le WMA
–
File WMA solo senza Digital Rights Manage-
•
ment (DRM) e realizzati con Windows Media
Player a partire dalla versione 8
Tag MP3-ID3: versione 1 e 2
•
Velocità di trasferimento dati per la generazio-
•
ne di fi le audio:
MP3: da 32 a 320 kbps
–
WMA: da 32 a 192 kbps
–
Numero max. di brani: 20 000
•
Modalità C‘n‘C
L'interfaccia C'n'C (C'n'C = Command and Control) di Blaupunkt consente di comandare ancor
più comodamente apparecchi e supporti collegati
all'autoradio tramite un'interfaccia Blaupunkt abilitata C'n'C.
Prima di collegare un'interfaccia Blaupunkt abilitata C'n'C, controllare l'impostazione della modalità di entrata AUX posteriore. Leggere a tal proposito il paragrafo "Entrata AUX posteriore" nel
capitolo "Fonti audio esterne".
74
Esercizio multilettore CD
All'autoradio è possibile collegare i seguenti multilettori CD:
•
Blaupunkt CDC A03
•
Blaupunkt CDC A08
•
Blaupunkt IDC A09
Per quanto riguarda le informazioni sul modo di
trattare i CD, come inserirli e come utilizzare il
multilettore, consultare le istruzioni d'uso del
multilettore CD.
Prima di collegare un multilettore CD, controllare l'impostazione della modalità di entrata AUX
posteriore. Leggere a tal proposito il paragrafo
"Entrata AUX posteriore" nel capitolo "Fonti audio
esterne".
Commutare nell'esercizio CD/MP3/
WMA/C‘n‘C/multilettore CD
쏅
Premere ripetutamente il tasto SRC 6, fi n-
ché non compare la fonte audio desiderata:
•
"CD": CD inserito.
•
"MP3": CD inserito, già riconosciuto come
CD MP3.
•
"USB": supporto USB collegato.
•
Nome dell'apparecchio collegato tramite
C‘n‘C.
•
"CDC / AUX": multilettore CD collegato (se
non sono collegate altre fonti audio esterne).
Note
•
Una determinata fonte audio può essere
selezionata soltanto se è inserito il relativo
CD o se è collegato il relativo apparecchio
(ad es. un supporto USB o un multilettore
CD).
•
Qualora l'autoradio, prima della riproduzione, debba leggere i dati contenuti nell'apparecchio o nel supporto collegati, sul
display appare la scritta "READING", fi nché
l'operazione di lettura non è conclusa. In
caso di grandi volumi di dati, tale operazione può durare fi no a 1 minuto. Qualora
l'apparecchio o il supporto siano difettosi
Page 75

Esercizio CD/MP3/WMA/C‘n‘C/multilettore CD
o i dati non possano essere riprodotti, sul
display appare un messaggio che segnala
il problema (ad es. "ERROR" o "USB ERROR").
•
Se il multilettore CD collegato sta rilevando
per la prima volta i CD inseriti (ad es. dopo
un'interruzione dell'alimentazione di corrente o dopo un cambio di caricatore), appare la scritta "MAG SCAN" fi no ad operazione conclusa. Qualora il multilettore CD
non contenga alcun CD o caricatore, sarà
visualizzato "NO DISC".
Inserimento CD
Nota:
L'inserimento automatico del CD non deve essere impedito o aiutato.
Spingere il CD nel vano CD
쏅
stampato rivolto verso l'alto fi nché si percepisce una certa resistenza.
Il CD rientra automaticamente e ne vengono
controllati i dati (sul display viene visualizzato
"READING"). Viene quindi avviata la riproduzione nell'esercizio CD o MP3. Con CD inserito, sul display viene visualizzato il simbolo
CD.
Nota:
Se il CD inserito non può essere riprodotto,
appare brevemente il messaggio "CD ERROR"
e, dopo 2 secondi, il CD viene automaticamente espulso.
7 con il lato
Estrazione del CD
Note
Il CD estratto e non estratto viene auto-
•
maticamente inserito di nuovo dopo circa
10 secondi.
Si può estrarre un CD anche quando l'au-
•
toradio è spenta o quando è attiva un'altra
fonte audio.
Premere il tasto
쏅
inserito.
: per estrarre il CD
Collegamento/rimozione di un
supporto USB
Per poter collegare un supporto USB, è necessario connettere all'autoradio il cavo USB fornito
(vedi Istruzioni di installazione).
쏅
Spegnere l'autoradio affi nché il supporto
possa connettersi e disconnettersi correttamente.
쏅
Collegare il supporto USB al cavo USB o scollegarlo.
Sul display, quando il suppor to USB è collegato, appare il simbolo USB. Se il supporto USB,
dopo il collegamento o l'accensione dell'autoradio, viene selezionato come fonte audio per
la prima volta, viene dapprima avviata la lettura dei dati (sul display appare "READING" fi no
ad operazione completata).
Note:
Se il supporto USB collegato non può esse-
•
re riprodotto, viene brevemente visualizzato "USB ERROR".
Il tempo necessario per il caricamento dei
•
dati dipende dal tipo e dalla dimensione
del supporto USB.
Selezione di un brano
쏅
Premere brevemente il tasto 5 / >
per passare al brano precedente/successivo.
Nota:
Quando il brano corrente è in riproduzione da
più di 3 secondi, premendo una volta il tasto
5 si riprende nuovamente la riproduzione
del brano dall'inizio.
Selezione di una cartella/CD
(solo in esercizio MP3/WMA/
C‘n‘C o multilettore CD)
쏅
Premere il tasto @/ 2 per passare
alla cartella o CD precedenti/successivi.
Nota:
Allo stesso modo è possibile passare da una
playlist all'altra di un apparecchio collegato
tramite C‘n‘C.
75
ITALIANO
Page 76

Esercizio CD/MP3/WMA/C‘n‘C/multilettore CD
Ciclo di ricerca rapido
쏅
Tenere premuto il tasto 5 / > per
quanto necessario fi no a raggiungere il punto
desiderato.
Interruzione della riproduzione
쏅
Premere il tasto 3 > per interrompere la
riproduzione ("PAUSE") o per riavviarla.
Modalità Playlist
(solo in esercizio MP3/WMA)
L'autoradio può riprodurre playlist create con un
MP3 manager, ad es. WinAmp o Microsoft Media
Player. Le playlist devono essere memorizzate in
una cartella root del CD o del supporto USB. Sono
supportati i seguenti formati di playlist: M3U,
PLS.
Scelta dii un brano in modalità Playlist
쏅
Premere il tasto 2 < per circa 2 secondi per
passare alla modalità Playlist:
Sul display compare brevemente "LIST
MODE". Viene riprodotto il primo brano della
prima playlist.
Nota:
Qualora il supporto non contenga alcuna
playlist, viene brevemente visualizzato "NO
LIST".
쏅
Premere brevemente il tasto
5 / >
per passare al brano precedente/successivo
della playlist corrente.
쏅
Premere il tasto
@ / 2, per passare
alla playlist precedente/successiva.
Sul display viene brevemente visualizzato il
nome della playlist selezionata e viene avviata
la riproduzione del primo brano della playlist.
Uscita dalla modalità Playlist
쏅
Premere il tasto 2 < per circa 2 secondi:
Sul display compare brevemente "LIST OFF".
Continua la riproduzione del brano attualmente in ascolto.
76
Breve ascolto di tutti i brani
Con la funzione Scan è possibile avviare l'ascolto
breve di tutti i brani disponibili.
쏅
Premere il tasto MENU•OK
? per circa
2 secondi per avviare l'ascolto, o premerlo
brevemente per continuare ad ascoltare il
brano attualmente in riproduzione.
Durante l'ascolto breve, sul display vengono
visualizzati alternativamente "SCAN" e il numero del brano corrente o il nome del fi le.
Note
•
Nell'esercizio multilettore CD, la durata
dell'ascolto breve è di circa 10 secondi per
brano. Per tutte le altre modalità, è possibile
impostare la durata di ascolto breve per brano (vedi cap. "Impostazioni personalizzate",
paragrafo "Effettuare impostazioni nel menu
utente", voce del menu "SCAN TIME").
•
In modalità Playlist (esercizio MP3),
l'ascolto breve avviene solo per i brani della playlist corrente.
Riproduzione di brani in ordine casuale
쏅
Per passare da una modalità di riproduzione
all'altra premere il tasto 5 MIX <:
Fun-
Indicazio-neSignifi cato
zionamento
CD
MP3/
WMA/
C‘n‘C
1
MIX ALL
MIX DIR
MIX ALL
MIX CD
CDC
MIX ALL
Gener.
1
Nell'esercizio C‘n‘C, a seconda dell'appa-
MIX OFF
recchio collegato, possono essere disponibili altre modalità di riproduzione
Mescolare i brani
Mescolare i brani
2
della cartella attuale
Mescolare i brani del
2
supporto
Mescolare i brani del
CD attuale
Mescolare i brani di
tutti i CD
Riproduzione
normale
Page 77

2
Non in modalità Playlist MP3
La funzione MIX è attiva quando sul display
viene visualizzato il simbolo MIX.
Riproduzione ripetuta di singoli brani
o CD oppure directory
Per passare da una modalità di riproduzione
쏅
all'altra premere il tasto
Fun-
Indicazione Signifi cato
4 RPT <:
zionamento
CD
RPT TRACK
MP3/
RPT TRACK
WMA/
C‘n‘C
CDC
Gener.
1
Nell'esercizio C‘n‘C, a seconda dell'appa-
RPT DIR
1
RPT TRACK
RPT DISC
RPT OFF
Ripetizione brano
Ripetizione brano
Ripetizione cartella
2
Ripetizione brano
Ripetizione CD
Riproduzione
normale
recchio collegato, possono essere disponibili altre modalità di riproduzione
2
Non in modalità Playlist MP3
La funzione RPT è attivata quando sul display
viene visualizzato il simbolo RPT.
Impostazione dell'indicazione sul
display
Premere una o più volte il tasto DIS/ESC =
쏅
per passare da una visualizzazione all'altra:
Funzio-
Indicazione Signifi cato
namento
Numero del bra-
T 01 02:15
CD
T 01 18:33
no e durata di
riproduzione
Numero del
brano e ora
Esercizio CD/MP3/WMA/C‘n‘C/multilettore CD
Funzio-
Indicazione Signifi cato
namento
Nome del fi le
1
Interprete
Nome dell'album
Durata di ripro-
duzione
Ora
MP3/
WMA/
C‘n‘C
01 ABC
ABCDEF
ABCDEF
PLAY 02:15
CLK 18:33
Numero del bra-
T 01 02:15
no e durata di
riproduzione
CDC
T 01 18:33
CD 02T 03
1
L'interprete e il nome dell'album devono es-
Numero del
brano e ora
Numero del CD e
numero del brano
sere memorizzati come tag ID3 e vengono
visualizzati per circa 10 secondi in forma di
testo scorrevole; altrimenti viene visualizzato il nome del fi le.
Nota
È possibile attivare e disattivare l'indicazione del testo del CD di un CD audio (vedi cap.
"Impostazioni personalizzate", paragrafo "Effettuare impostazioni nel menu utente", voce
del menu "CD TEXT"). Con la funzione testo
del CD attivata, all'inizio di ogni brano viene
visualizzato una volta, come testo scorrevole,
il testo del CD corrispondente.
1
ITALIANO
77
Page 78

Fonti audio esterne
Fonti audio esterne
Presa frontale AUX-IN
Pericolo! Maggior pericolo di
lesioni a causa del connettore.
nella presa Front-AUX-IN potrebbe essere causa
di lesioni. L'impiego di una presa sporgente o di
un adattatore aumenta il rischio di lesioni.
Per questo motivo consigliamo l'impiego di una
spina per jack, ad esempio il cavo accessori
Blaupunkt (7 607 001 535).
Non appena una fonte audio esterna, ad es., un
lettore CD, MiniDisc o MP3 portatile, è collegata
alla presa AUX-IN anteriore, è possibile selezionarla con il tasto SRC 6. Sul display viene quindi visualizzato "FRONT AUX".
Entrata AUX posteriore
Tramite l'entrata AUX posteriore (Rear-AUX-IN) è
possibile collegare all'autoradio varie fonti audio
esterne:
•
•
•
Prima di collegare un determinato apparecchio,
controllare innanzitutto l'impostazione della
modalità di entrata AUX posteriore e modifi care
In caso di incidenti la presa sporgente
Apparecchi abilitati C‘n‘C del programma di
accessori Blaupunkt (ad es. un'interfaccia
Bluetooth®/USB o iPod®/USB abilitata C‘n‘C;
C‘n‘C = Command and Control).
Multilettore CD
Altre fonti audio esterne come lettore CD por-
tatili, lettore MiniDisc, lettore MP3 o un'interfaccia Blaupunkt non abilitata C'n'C.
Nota:
Per il collegamento di una fonte audio esterna attraverso l'entrata AUX è necessario un
cavo di adattamento. Questo cavo (codice
Blaupunkt 7 607 897 093) può essere acquistato presso il rivenditore specializzato
Blaupunkt di zona.
eventualmente di conseguenza l'impostazione
(vedi cap. "Impostazioni personalizzate", paragrafo "Effettuare impostazioni nel menu utente",
voce del menu "CDC"). Fare attenzione a modifi care l'impostazione solo fi nché all'entrata AUX
posteriore non sia collegato alcun apparecchio.
Rimuovere prima eventuali apparecchi collegati,
ad autoradio spenta.
Avvio dell'esercizio C'n'C
쏅
Premere ripetutamente il tasto SRC 6 fino a
che sul display compaia il nome dell'apparecchio collegato mediante C'n'C .
Inizia la riproduzione.
Note
•
La modalità C'n'C è selezionabile solo se è
collegato un apparecchio idoneo mediante
un'interfaccia abilitata C'n'C.
•
Per controllare la radio nell'esercizio C‘n‘C,
leggere il capitolo "Esercizio CD/MP3/
WMA/C‘n‘C/multilettore CD".
•
Utilizzando cavi adattatori idonei, è possibile collegare all'autoradio fi no a 3 interfacce Blaupunkt abilitate C'n'C. Per permettere all'autoradio di distinguere le varie
interfacce, è possibile attribuire ad ognuna
di esse un numero di apparecchio specifi co (vedi cap. "Impostazioni personalizzate", paragrafo "Effettuare impostazioni nel
menu utente", voce del menu "C‘N‘C").
Avvio dell'esercizio AUX
쏅
Premere ripetutamente il tasto SRC 6 fin-
ché sul display compare "CDC / AUX".
Inizia la riproduzione.
Nota:
L'utente può inserire un nome per l'entrata
AUX posteriore che sarà visualizzato sul display durante l'esercizio AUX, quando verrà
selezionata la fonte audio collegata (vedi cap.
"Impostazioni personalizzate", paragrafo "Effettuare impostazioni nel menu utente", voce
del menu "AUX EDIT").
78
Page 79

Regolazione del suono
Regolazione del suono
Nel menu audio è possibile modifi care le seguenti
impostazioni audio:
•
Impostazione del livello dei bassi e degli acuti
•
Regolazione del bilanciamento del volume sinistra/destra (balance) o davanti/dietro (fader)
•
Impostazione dell'aumento dei bassi udibili nel
caso di ascolto a basso volume (X-Bass).
Nel menu audio avanzato è possibile eseguire,
inoltre, le seguenti impostazioni:
•
Impostazione dell'equalizzatore triband:
–
impostazione del livello dei medi
–
selezione della frequenza dei bassi, medi
e alti
–
impostazione del fattore qualità per i bassi e i medi
•
Effettuare l'impostazione avanzata X-Bass
(livello e frequenza)
•
Selezione delle preimpostazioni dell'equalizzatore
Nota:
Le impostazioni dei bassi, medi e alti vengono memorizzate ogni volta per la fonte audio
corrente.
Richiamo ed abbandono del menu audio
Premere brevemente il tasto AUD A per
쏅
aprire il menu audio.
Premere ripetutamente il tasto
쏅
fi no a selezionare la voce del menu desiderata.
Effettuare l'impostazione (vedere paragrafo
쏅
successivo).
Premere brevemente il tasto MENU•OK ?
쏅
per selezionare un'altra voce del menu.
- oppure Premere brevemente il tasto DIS/ESC = per
쏅
uscire dal menu.
Nota:
Trascorsi circa 15 secondi dall'ultima attivazione dei tasti avviene l'uscita automatica dal
@ / 2
menu e si ritorna al display della fonte audio
corrente.
Effettuare impostazioni nel menu
audio
BASS
Livello dei bassi. Impostazioni: da -7 a +7.
쏅
Premere il tasto
menu.
쏅
Premere il tasto
l'impostazione.
TREBLE
Livello degli alti. Impostazioni: da -7 a +7.
쏅
Premere il tasto
menu.
쏅
Premere il tasto
l'impostazione.
BALANCE
Bilanciamento del volume sinistra/destra. Impostazioni: da L9 (sinistra) a R9 (destra).
쏅
Premere il tasto
menu.
쏅
Premere il tasto
l'impostazione.
FADER
Bilanciamento del volume davanti/dietro. Impostazioni: da R9 (dietro) a F9 (davanti).
쏅
Premere il tasto
menu.
쏅
Premere il tasto
l'impostazione.
X-BAS S
Aumento dei toni bassi a volume esiguo. Impostazioni: da 0 (spento) a 3 (aumento massimo).
쏅
Premere il tasto
menu.
쏅
Premere il tasto
l'impostazione.
> per accedere al sotto-
@ / 2 per eseguire
> per accedere al sotto-
@ / 2 per eseguire
> per accedere al sotto-
@ / 2 per eseguire
> per accedere al sotto-
@ / 2 per eseguire
> per accedere al sotto-
@ / 2 per eseguire
ITALIANO
79
Page 80

Regolazione del suono
Richiamo ed abbandono del menu
audio avanzato
Selezionare nel menu audio la voce "ENHAN-
쏅
CED".
Premere il tasto
쏅
ENHANCED.
Premere ripetutamente il tasto
쏅
fi no a selezionare la voce del menu desiderata.
Effettuare l'impostazione (vedere paragrafo
쏅
successivo).
Premere brevemente il tasto MENU•OK ?
쏅
per selezionare un'altra voce del menu.
- oppure Premere brevemente il tasto DIS/ESC = per
쏅
uscire dal menu.
> per accedere al menu
@ / 2
Effettuare impostazioni nel menu
audio avanzato
E-BASS
Regolare la frequenza dei bassi e del fattore qualità. Impostazioni:
•
Frequenza dei bassi: 60/80/100/200 Hz
•
Fattore qualità: 1,0/1,25/1,5/2,0
쏅
Premere il tasto
menu E-Bass.
쏅
Premere il tasto
tra i sottomenu "FREQ" (frequenza) e QFAC
(fattore qualità).
Per passare da una all'altra delle impostazio-
쏅
ni disponibili nel sottomenu, premere il tasto
5 / >.
E-TREBLE
Impostare la frequenza degli alti. Impostazioni:
10/12,5/ 15/17,5 kHz.
Premere il tasto
쏅
menu E-Treble.
쏅
Per passare da una all'altra delle impostazioni disponibili nel sottomenu, premere il tasto
5 / >.
> per accedere al sotto-
@ / 2 per scegliere
>per accedere al sotto-
E-MIDDLE
Impostare il livello e la frequenza dei medi e il
fattore di qualità. Impostazioni:
Livello dei medi: da -7 a +7
•
•
Frequenza dei medi: 0,5/1,0/1,5/2,5 kHz
•
Fattore qualità: 0,5/0,75/1,0/1,25
쏅
Premere il tasto
menu E-Middle.
쏅
Premere il tasto
tra i sottomenu "GAIN" (livello), "FREQ" (frequenza) e "QFAC" (fattore di qualità).
쏅
Per passare da una all'altra delle impostazioni disponibili nel sottomenu, premere il tasto
5 / >.
E-XBASS
Impostare il livello e la frequenza X-Bass. Impostazioni:
•
Livello X-Bass: da 0 (spento) a 3
•
Frequenza X-Bass: 30/60/100 Hz
쏅
Premere il tasto
menu E-XBASS.
쏅
Premere il tasto
tra i sottomenu "GAIN" (livello) e "FREQ" (frequenza).
쏅
Per passare da una all'altra delle impostazioni disponibili nel sottomenu, premere il tasto
5 / >.
PRESETS
Selezionare le preimpostazioni dell'equalizzatore.
Impostazioni: POP, ROCK, CLASSIC, P-EQ OFF
(nessuna preimpostazione).
쏅
Premere il tasto
menu PRESETS.
쏅
Per passare da un'impostazione all'altra, premere il tasto
> per accedere al sotto-
@ / 2 per scegliere
> per accedere al sotto-
@ / 2 per scegliere
> per accedere al sotto-
@ / 2.
80
Page 81

Impostazioni personalizzate
Impostazioni personalizzate
Richiamo ed abbandono del menu
utente
쏅
Premere brevemente il tasto MENU•OK ?
per aprire il menu.
쏅
Premere ripetutamente il tasto
fi no a selezionare la voce del menu desiderata.
쏅
Effettuare l'impostazione (vedere paragrafo
successivo).
쏅
Premere brevemente il tasto MENU•OK ?
per selezionare un'altra voce del menu.
- oppure -
쏅
Premere brevemente il tasto DIS/ESC = per
uscire dal menu.
Nota:
Trascorsi circa 15 secondi dall'ultima attivazione dei tasti avviene l'uscita automatica dal
menu e si ritorna al display della fonte audio
corrente.
Effettuare impostazioni nel menu
utente
CDC
Impostare la modalità di entrata AUX posteriore
Impostazioni: ON (per collegare un multilettore
CD o altra fonte audio esterna), OFF (per collegare un'interfaccia Blaupunkt abilitata C‘n‘C).
쏅
Premere il tasto
menu.
쏅
Per passare da un'impostazione all'altra, premere il tasto
쏅
Premere brevemente il tasto MENU•OK ?
per confermare l'impostazione scelta.
L'autoradio si spegne automaticamente e si
riaccende con l'impostazione selezionata.
C‘N‘C
Attribuire all'interfaccia abilitata C‘n‘C collegata
un numero di apparecchio specifi co (C‘n‘C = Com-
> per accedere al sotto-
>.
@ / 2
mand and Control). Lunghezza: 4 cifre, caratteri:
0-9, A-F (esadecimali).
Premere il tasto
쏅
menu.
쏅
Premere il tasto
re l'interfaccia ("DEV 1 - 3").
쏅
Premere il tasto
ro di apparecchio.
Per passare da una cifra all'altra, premere il
쏅
tasto
5 / >.
Il carattere selezionato lampeggia.
Premere il tasto
쏅
una cifra nel posto selezionato.
Premere brevemente il tasto MENU•OK ?
쏅
per confermare il numero di apparecchio inserito.
CDTEXT
Attivare o disattivare l'indicazione di testo del CD.
Impostazioni: ON (att.), OFF (disatt.).
Premere il tasto
쏅
menu.
쏅
Per passare da un'impostazione all'altra, premere il tasto
쏅
Premere brevemente il tasto MENU•OK ?
per confermare l'impostazione scelta.
TA VOLUME
(solo per Paese di sintonizzazione "EUROPE")
Impostare il volume minimo per le informazioni
sul traffi co. Impostazioni: da 1 a 50.
쏅
Premere il tasto
menu.
쏅
Premere il tasto
re il regolatore del volume 4 per effettuare
l'impostazione.
SENS
Possibile solo nell'esercizio radio FM: Impostare
la sensibilità della ricerca automatica delle stazioni. Impostazioni: LO1 (minima) – HI6 (massima).
쏅
Premere il tasto
menu.
> per accedere al sotto-
@ / 2 per seleziona-
> per modifi care il nume-
@/ 2 per inserire
> per accedere al sotto-
>.
> per accedere al sotto-
@ / 2 oppure ruota-
> per accedere al sotto-
ITALIANO
81
Page 82

Impostazioni personalizzate
쏅
Premere il tasto @ / 2 per eseguire
l'impostazione.
SCAN TIME
Impostare la durata di ascolto breve in passi da
5 secondi. Impostazioni: da 5 a 30.
쏅
Premere il tasto
menu.
쏅
Premere il tasto
l'impostazione.
CLOCK SET
Impostare l'ora.
쏅
Premere il tasto
menu.
쏅
Premere il tasto
re i minuti o le ore.
L'indicazione dei minuti o delle ore lampeggia
quando è selezionata.
쏅
Premere il tasto
i minuti e le ore.
쏅
Premere brevemente il tasto MENU•OK ?
per confermare l'ora inserita.
Nota:
Nella modalità di visualizzazione 12 ore (12H
MODE), accanto all'ora viene visualizzata una
"A" per antimeridiane e una "P" per postmeridiane.
12H/24H MODE
Selezionare la modalità di visualizzazione 12 ore o
24 ore. Impostazioni: 12H, 24H.
쏅
Premere il tasto
menu.
쏅
Per passare da un'impostazione all'altra, premere il tasto
CLOCK
Attivare o disattivare l'indicazione dell'ora ad
autoradio spenta e veicolo spento. Impostazioni:
ON (att.), OFF (disatt.).
쏅
Premere il tasto
menu.
> per accedere al sotto-
@ / 2 per eseguire
> per accedere al sotto-
5 / > per seleziona-
@ / 2 per impostare
> per accedere al sotto-
>.
> per accedere al sotto-
Per passare da un'impostazione all'altra,
쏅
premere il tasto
Premere brevemente il tasto MENU•OK ?
쏅
per confermare l'impostazione scelta.
BEEP
Attivare o disattivare il segnale acustico di conferma. Impostazioni: ON (att.), OFF (disatt.).
쏅
Premere il tasto
menu.
Per passare da un'impostazione all'altra,
쏅
premere il tasto
Premere brevemente il tasto MENU•OK ?
쏅
per confermare l'impostazione scelta.
TEL VOL
Impostare il volume minimo per i messaggi di navigazione e le conversazioni telefoniche. Impostazioni: da 1 a 50.
쏅
Premere il tasto
menu.
Premere il tasto
쏅
re il regolatore del volume 4 per effettuare
l'impostazione.
MUTE LVL
Impostare il volume per la modalità "mute". Impostazioni: da 0 a 50.
Premere il tasto
쏅
menu.
쏅
Premere il tasto
re il regolatore del volume 4 per effettuare
l'impostazione.
ON VOLUME
Impostazione del volume al momento dell'accensione. Impostazioni: da 0 a 50 oppure LAST VOL
(l'ultimo volume impostato prima dello spegnimento dell'autoradio). Con l'impostazione "LAST
VOL", il volume al momento dell'accensione è
limitato a max. 25.
Premere il tasto
쏅
stazione "LAST VOL".
- oppure -
>.
> per accedere al sotto-
>.
> per accedere al sotto-
@/ 2 oppure ruota-
> per accedere al sotto-
@ / 2 oppure ruota-
> per selezionare l'impo-
82
Page 83

Impostazioni personalizzate
쏅
Premere il tasto 5 per impostare il volume al momento dell'accensione tra 0 e 50.
쏅
Premere il tasto
@ / 2 oppure ruotare il regolatore del volume 4 per effettuare
l'impostazione.
REG
(solo per Paese di sintonizzazione "EUROPE")
Possibile solo nell'esercizio radio FM: attivare
o disattivare la funzione REG. Impostazioni: ON
(att.), OFF (disatt.).
쏅
Premere il tasto
> per accedere al sottomenu.
쏅
Per passare da un'impostazione all'altra,
premere il tasto
>.
PTY LANG
(solo per Paese di sintonizzazione "EUROPE")
Possibile solo nell'esercizio radio FM: selezionare
la lingua per l'indicazione dei tipi di programma.
Impostazioni: ENGLISH, FRANCAIS, DEUTSCH.
Premere il tasto
쏅
> per accedere al sottomenu.
Per passare da un'impostazione all'altra,
쏅
premere il tasto
@ / 2.
PTY
(solo per Paesi di sintonizzazione "EUROPE",
"USA", "S AMERICA")
Possibile solo nell'esercizio radio FM: attivare
o disattivare la funzione PTY. Impostazioni: ON
(att.), OFF (disatt.).
Premere il tasto
쏅
> per accedere al sottomenu.
쏅
Per passare da un'impostazione all'altra,
premere il tasto
>.
DISP COL
Miscelare i colori per l'illuminazione del display
dai colori di base rosso, verde e blu (RGB). Impostazioni: per R, G e B da 0 a 16.
쏅
Premere il tasto
5 per selezionare il sottomenu "4096 COL" (impostazione di R, G
e B), oppure il tasto
> per selezionare il
sottomenu "256 COL" (impostazione di R, G
e B resta invariata).
Premere il tasto
쏅
> per accedere al sotto-
menu.
Per passare da un colore all'altro, premere il
쏅
tasto
5 / >.
Il valore del colore selezionato lampeggia.
Premere il tasto
쏅
@ / 2 per impostare
il valore del colore selezionato.
Premere brevemente il tasto MENU•OK ?
쏅
per confermare l'impostazione scelta.
SCAN
Attivare o disattivare la variazione continua di colori dell'illuminazione del display. Impostazioni:
ON (att.), OFF (disatt.).
Premere il tasto
쏅
> per accedere al sotto-
menu.
쏅
Per passare da un'impostazione all'altra,
premere il tasto
쏅
Premere brevemente il tasto MENU•OK ?
>.
per confermare l'impostazione scelta.
Se la variazione dei colori continua è attivato, il
colore dell'illuminazione del display varia continuamente in tutto lo spettro dei colori.
COL SCAN
Selezionare i colori dell'illuminazione del display
durante la ricerca automatica del colore.
쏅
Premere il tasto
> per avviare la ricerca
automatica del colore.
Sul display vengono alternativamente visualizzati "SCANNING" e "OK (MENU)"; il colore
dell'illuminazione del display continua a cambiare.
쏅
Premere brevemente il tasto MENU•OK ?
per selezionare il colore impostato.
DIM DAY/DIM NIGHT
Impostare la luminosità del display per il giorno
(DIM DAY) e per la notte (DIM NIGHT). Impostazioni: da 1 a 16.
쏅
Premere il tasto
> per accedere al sotto-
menu.
83
ITALIANO
Page 84

Impostazioni personalizzate | Impostazioni di fabbrica
쏅
Premere il tasto @ / 2 per eseguire
l'impostazione.
Se l'autoradio è stata collegata in conformità alle
istruzioni di installazione e il veicolo è dotato del
relativo collegamento, la commutazione della
luminosità del display per il giorno e la notte avviene all'accensione o spegnimento delle luci del
veicolo.
AUX EDIT
Inserire il nome per l'entrata AUX posteriore
nell'esercizio AUX. Lunghezza: 9 cifre; caratteri:
A-Z, 0-9.
쏅
Premere il tasto
menu.
쏅
Per passare da una cifra all'altra, premere il
tasto
5 / >.
Il carattere selezionato lampeggia.
쏅
Premere il tasto
una cifra nel posto selezionato.
Premere brevemente il tasto MENU•OK ?
쏅
per confermare il nome inserito.
TRAF
(solo per Paese di sintonizzazione "EUROPE")
Possibile solo nell'esercizio radio FM: attivazione
o disattivazione della priorità dei messaggi sul
traffi co. Impostazioni: ON (att.), OFF (disatt.).
Premere il tasto
쏅
menu.
Per passare da un'impostazione all'altra,
쏅
premere il tasto
RDS
(solo per Paese di sintonizzazione "EUROPE")
Possibile solo nell'esercizio radio FM: attivazione
o disattivazione della funzione RDS. Impostazioni: ON (att.), OFF (disatt.).
Premere il tasto
쏅
menu.
Per passare da un'impostazione all'altra,
쏅
premere il tasto
> per accedere al sotto-
@/ 2 per inserire
> per accedere al sotto-
>.
> per accedere al sotto-
>.
Impostazioni di fabbrica
Impostazioni di fabbrica nel menu utente:
ON VOLUME LAST VOL
MUTE LVL 0
SENS HI6
SCAN TIME 10
CLOCK OFF
BEEP ON
DIM DAY 15
DIM NIGHT 12
CDTEXT OFF
12H/24H MODE 24H
CLOCKSET 00:00
TEL VOL 17
TA V OL 2 0
RDS* ON
REG* ON
TRAF* OFF
* Solo nel Paese di sintonizzazione "EUROPE"
È possibile ripristinare le impostazioni di fabbrica
originali dell'autoradio:
쏅
premere brevemente il tasto MENU•OK ?
per aprire il menu.
쏅
Premere ripetutamente il tasto
fi no a selezionare la voce del menu "NORMSET".
Premere il tasto MENU•OK ? per più di
쏅
4 secondi.
Sul display compare brevemente "NORM ON".
L'autoradio si spegne automaticamente e si
riaccende con le impostazioni di fabbrica.
Nota:
Premendo il tasto MENU•OK ? per meno di
4 secondi, sul display appare "NORM OFF" e
vengono mantenute le impostazioni correnti.
@/ 2
84
Page 85

Informazioni utili | Dati tecnici
Informazioni utili
Garanzia
Concediamo una garanzia del produttore per gli
apparecchi acquistati in uno dei paesi della Comunità Europea. Per gli apparecchi venduti fuori dell'Unione Europea, valgono le condizioni di garanzia
stabilite dalla nostra rappresentanza nel Paese.
Le condizioni di garanzia possono essere consultate sul sito www.blaupunkt.com o richieste direttamente a:
Blaupunkt GmbH
Hotline
Robert-Bosch-Str. 200
D-31139 Hildesheim
Servizio di assistenza
In alcuni Paesi Blaupunkt offre un servizio di riparazione e ritiro.
Sul sito www.blaupunkt.com è possibile scoprire
se questo servizio di assistenza è disponibile nel
vostro Paese.
Nel caso voleste usufruire di questo servizio di
assistenza, potete richiedere il ritiro della vostra
autoradio mediante Internet.
Dati tecnici
Alimentazione
Tensione di esercizio: 10,5 - 14,4 V
Corrente assorbita
Durante l'uso: 10 A
10 sec. dopo lo
spegnimento: < 3,5 mA
Amplifi catori
Potenza di uscita: 4 x 26 watt sinusoidali
con 14,4 V a 4 Ohm.
4 x 50 watt di potenza
massima
Tuner
Gamme di lunghezze d'onda Europa/Thailandia:
FM: 87,5 - 108 MHz
AM (MW): 531 - 1 602 kHz
OL (LW) (solo Europa): 153 - 279 kHz
Gamme d'onda USA:
FM : 87,7 - 107,9 MHz
AM (MW): 530 - 1 710 kHz
Gamme di lunghezza d'onda Sudamerica:
FM : 87,5 - 107,9 MHz
AM (MW): 530 - 1 710 kHz
Gamma di trasmissione FM:
30 - 15 000 Hz
CD
Gamma di trasmissione:
20 - 20.000 Hz
Pre-amp Out
4 canali: 2 V
Sensibilità in entrata
Rear-AUX-IN: 1,2 V / 10 kΩ
Front-AUX-IN: 500 mV / 6 kΩ
Ingresso Tel/Nav: 10 V / 1 kΩ
Dimensioni e peso
L x H x P (mm): 182 x 53 x 155
Peso ca. 1,30 kg
Con riserva di modifi che
L'apparecchio illustrato nel presente libretto di istruzioni d'uso è conforme all'articolo 2 comma 1, del Decreto
Ministeriale 28 agosto 1995, n. 548.
Hildesheim, 26.01.2009
Blaupunkt GmbH
Robert-Bosch-Straße 200
D-31139 Hildesheim
ITALIANO
85
Page 86

Bedieningselementen
1
6
4
8
9 1072 53
18 17
16 11
15
14
1 -toets
Afneembaar bedieningspaneel ontgrendelen
2 -toets
In menu: menupunt oproepen
Radioweergave: zoekafstemming starten
MP3-/WMA-/C‘n‘C-/CD-wisselaar- weergave:
naar volgende map/volgende CD gaan
3 Aan-/uit-toets
Kort indrukken: autoradio inschakelen
In bedrijf: autoradio onderdrukken (Mute)
Lang indrukken: autoradio uitschakelen
4 Volumeregelaar
5 -toets
Im het menu: instelling veranderen
Radioweergave: zender instellen
Andere weergavesoorten: titelselectie
6 SRC-toets
Audiobron kiezen
7 CD-opening
8 Display
9 USB-aansluiting
: -toets (Eject)
CD uitwerpen
86
13
12
; Front-AUX-IN-bus
< Toetsenblok 1 - 5
= DIS/ESC-toets
In menu: menu verlaten
In bedrijf: weergave omschakelen
> -toets
In het menu: instelling veranderen
Radioweergave: zender instellen
Andere weergavesoorten: titelselectie
? MENU•OK-toets
Kort indrukken: menu oproepen, instellingen
bevestigen
Lang indrukken: scan-functie starten
@ -toets
In menu: menupunt oproepen
Radioweergave: zoekafstemming starten
MP3-/WMA-/C‘n‘C-/CD-wisselaar- weergave:
naar vorige map/vorige CD gaan
A AUD-toets
Audiomenu oproepen
B BND-toets
Kort indrukken: tijdens radioweergave geheugenniveau kiezen
Lang indrukken: tijdens radioweergave Travelstore-functie starten
Page 87

Inhoud
Veiligheidsinstructies ...............................88
Gebruikte symbolen ...............................88
Verkeersveiligheid ..................................88
Algemene veiligheidsinstructies ...............88
Conformiteitsverklaring ...........................88
Reinigingsinstructies ................................89
Afvoerinstructies......................................89
Leveringsomvang .....................................89
Speciale toebehoren (niet meegeleverd) ....89
In bedrijf nemen .......................................90
Bedieningspaneel plaatsen/verwijderen ....90
Tunerregio instellen ................................90
In-/uitschakelen .....................................90
Volume .................................................91
Demo-modus in-/uitschakelen ..................91
Versienummers weergeven ......................91
Verkeersinformatie ...................................91
Radioweergave .........................................92
RDS .....................................................92
Naar radioweergave omschakelen .............92
Geheugenniveau kiezen ...........................92
Zenders instellen ....................................92
Zender opslaan/opgeslagen zenders
oproepen ..............................................93
Zenders kort weergeven ..........................93
Zenders automatisch programmeren
(Travelstore) ..........................................93
PTY ......................................................93
Displayweergave instellen ........................94
CD-/MP3-/WMA-/C‘n‘C-/CD-wisselaar-
weergave .................................................94
Basisinformatie ......................................94
Overschakelen naar de CD-/MP3-/
WMA-/C‘n‘C-/CD-wisselaar- weergave .......95
CD plaatsen ...........................................96
CD verwijderen ......................................96
USB-datadrager aansluiten/verwijderen ....96
Titel kiezen ............................................96
Map/CD kiezen (alleen bij MP3-/WMA-/
C‘n‘C- resp. CD-wisselaar- weergave) ........96
Snelle zoekdoorloop ...............................97
Weergave onderbreken ...........................97
Afspeellijst-modus (alleen in MP3-/
WMA-weergave) .....................................97
Alle titels kort weergeven .........................97
Titels in willekeurige volgorde weergeven ...97
Afzonderlijke titels, resp. CD's of
mappen herhaald afspelen ......................98
Displayweergave instellen ........................98
Externe audiobronnen...............................98
Front-AUX-IN-bus ...................................98
AUX-ingang aan achterzijde ......................99
Klankinstellingen ......................................99
Audiomenu oproepen en verlaten ...........100
Instelling in audiomenu uitvoeren ............100
Uitgebreid audiomenu oproepen
en verlaten ..........................................100
Instelling in het uitgebreide audiomenu
uitvoeren ............................................101
Gebruikersinstellingen ...........................101
Gebruikersmenu oproepen en verlaten ....101
Instelling in gebruikersmenu uitvoeren .....102
Fabrieksinstellingen ...............................105
Nuttige informatie ..................................106
Garantie..............................................106
Service ...............................................106
Technische gegevens ..............................106
Inbouwhandleidnig .................................317
NEDERLANDS
87
Page 88

Veiligheidsinstructies
Veiligheidsinstructies
De autoradio is
techniek en erkende veiligheidstechnische voorschriften geproduceerd. Toch kunnen er gevaren
ontstaan wanneer u de veiligheidsinstructies in
deze handleiding niet aanhoudt.
Deze handleiding bevat belangrijke informatie
voor het eenvoudig en veilig inbouwen en bedienen van de autoradio.
•
Lees deze handleiding zorgvuldig en volledig
door, voordat u de autoradio gebruikt.
•
Bewaar deze handleiding zodanig, dat deze te
allen tijde voor alle gebruikers toegankelijk is.
•
Geef de autoradio altijd samen met deze handleiding aan derden door.
Houd u tevens de handleidingen van de apparaten
aan die in combinatie met deze autoradio worden
gebruikt.
Gebruikte symbolen
In deze handleiding worden de volgende symbolen gebruikt:
Geeft een handeling aan
쏅
Geeft een opsomming aan
•
conform de huidige stand van de
GEVAAR!
Waarschuwt voor persoonlijk letsel
VOORZICHTIG!
Waarschuwt voor beschadiging van de
CD-speler
Het CE-teken bevestigt dat de EU-richtlijnen zijn aangehouden.
twijfel op een geschikte plek en bedien uw apparaat terwijl het voertuig stil staat.
•
Bedieningsdeel alleen bij stilstaand voertuig verwijderen of bevestigen.
•
Luister altijd met een redelijk volume, om
uw gehoor te beschermen en om akoestische
waarschuwingssignalen (bijv. politie) te kunnen horen. Tijdens mute-pauzes (bijv. bij het
wisselen van audiobron) is het veranderen van
het volume niet hoorbaar. Verhoog niet het volume tijdens deze geluidsonderdrukking.
Algemene veiligheidsinstructies
Houd de volgende instructies aan, om uzelf tegen
letsel te beschermen:
•
U mag het apparaat niet openen of veranderen. In dit apparaat bevindt zich een klasse-1-
laser welke letsel aan uw ogen kan veroorzaken.
•
Verhoog het volumen niet tijdens onderdrukkingspauzes, bijv. bij het wisselen van
audiobron. Het wijzigen van het volume is niet
hoorbaar tijdens de geluidsonderdrukking.
Correct gebruik
Deze autoradio is voor inbouw en gebruik in een
voertuig met 12 V boordspanning ontworpen en
moet in een DIN-opening worden ingebouwd. Let
op de vermogensgrenzen in de technische gegevens. Laat reparaties en eventueel de inbouw
door een vakman uitvoeren.
Inbouwinstructies
U mag de autoradio alleen inbouwen, wanneer u
ervaring heeft met de inbouw van autoradio's en
bekend bent met het elektrische systeem van het
voertuig. Houdt u daarom de Inbouwhandleiding
aan het einde van deze handleiding aan.
Verkeersveiligheid
Houd de volgende instructies aan m.b.t. de verkeersveiligheid:
Gebruik het apparaat zodanig, dat u uw
•
voertuig altijd veilig kunt besturen. Stop bij
88
Conformiteitsverklaring
Hiermee verklaart Blaupunkt GmbH dat deze autoradio San Francisco 300 in overeenstemming
is met de vereisten en de andere relevante voorschriften van de richtlijn 89/336/EG.
Page 89

Reinigingsinstructies | Afvoerinstructies | Leveringsomvang
Reinigingsinstructies
Oplos-, reinigings- en schuurmiddelen alsmede
cockpit-spray en kunststofonderhoudsmiddelen
kunnen stoffen bevatten welke het oppervlak van
de autoradio aantasten.
•
Gebruik voor de reiniging van de autoradio uitsluitend een droge, of licht vochtige doek.
Reinig indien nodig de contacten van het be-
•
dieningspaneel met een zachte, in schoonmaakalcohol gedrenkte doek.
Afvoerinstructies
Voer uw afgedankte apparaat niet af met het
huisvuil!
Gebruik voor het afvoeren van het oude apparaat
de beschikbare retour- en verzamelsystemen.
Leveringsomvang
In de leveringsomvang zijn inbegrepen:
1 Autoradio
1 Bedienings-/inbouwhandleiding
1 Etui voor het bedieningspaneel
1 Frame
1 Onderdelenset
2 Demontagegereedschappen
1 USB-aansluitkabel
Opmerking:
Wij raden het gebruik van originele Blaupunkttoebehoren aan (www.blaupunkt.com).
Speciale toebehoren
(niet meegeleverd)
Informeer bij uw Blaupunkt-vakhandel of via het
internet onder www.blaupunkt.com over speciale
accessoires, bijvoorbeeld:
De stuurwiel- of handafstandsbediening van
•
Blaupunkt voor betrouwbare en comfortabele
bediening van de basisfuncties (in-/uitschakelen met de afstandsbediening niet mogelijk)
De C‘n‘C-compatibel interfaces van Blaupunkt
•
(C‘n‘C = Command and Control) voor aansluiting op Bluetooth®-compatibel mobiele telefoons en streaming-apparaten (bijv. via de
Bluetooth®/USB-interface) en van aanvullende
datadragers en apparaten (bijv. via de iPod/
USB-interface)via de iPod®/USB-interface)
Blaupunkt-CD-wisselaar
•
Blaupunkt- of Velocity-versterker
•
NEDERLANDS
89
Page 90

In bedrijf nemen
In bedrijf nemen
Bedieningspaneel plaatsen/verwijderen
Uw autoradio is ter bescherming tegen diefstal
uitgerust met een afneembaar bedieningspaneel
(Release-Panel). Bij uitlevering bevindt het bedieningspaneel zich in de meegeleverde etui. Om de
radio na inbouw in bedrijf te nemen, moet u eerst
het bedieningspaneel plaatsen (zie paragraaf "Bedieningspaneel plaatsen" in dit hoofdstuk).
Neem het bedieningspaneel steeds mee wanneer
u het voertuig verlaat. Zonder dit bedieningspaneel is de autoradio voor een dief waardeloos.
Voorzichtig
Beschadiging van het bedieningspaneel
Laat het bedieningspaneel niet vallen.
Transporteer het bedieningspaneel zo dat het te-
gen stoten is beschermd en de contacten niet vuil
kunnen worden.
Stel het bedieningspaneel niet aan direct zonlicht
of andere warmtebronnen bloot.
Voorkom directe aanraking van de contacten van
het bedieningspaneel met de huid.
Bedieningspaneel plaatsen
쏅
Schuif het bedieningspaneel in de houder
aan de rechter rand van de behuizing.
쏅
Duw het bedieningspaneel voorzichtig in de
linker houder totdat het vergrendelt.
Bedieningspaneel afnemen
쏅
Druk op de toets
paneel vrij te geven.
De linkerkant van het bedieningspaneel komt
los uit het apparaat en door een vergrendeling
wordt voorkomen dat het paneel er uit valt.
Pak het bedieningspaneel aan de linker zijde
쏅
vast en trek deze door de weerstand van de
vergrendeling recht naar voren uit de bevestiging.
Opmerking:
De autoradio schakelt automatisch uit, zodra
het bedieningspaneel wordt verwijderd.
90
1, om het bedienings-
Tunerregio instellen
Deze autoradio is gemaakt voor gebruik in verschillende regio's met verschillende frequentiebereiken en zendertechnologieën. Af fabriek is de
Tunerregio "EUROPE" (Europa) ingesteld. Daarnaast zijn de tunerregio's "USA", "THAI" (Thailand) en "S AMERICA" (Zuid-Amerika) beschikbaar. Wanneer u de autoradio buiten Europa gebruikt, dan moet u eventueel eerst een geschikte
tunerregio instellen:
쏅
Schakel de autoradio eventueel eerst uit.
쏅
Houdt tegelijkertijd de toetsen MENU•OK
4 < ingedrukt en druk op de aan-/uit-
? en
toets 3.
De autoradio wordt ingeschakeld. Op het display verschijnt de actueel ingestelde tunerregio.
Druk net zo vaak op de toets
쏅
totdat de gewenste tunerregio wordt weergegeven.
쏅
Druk op de toets MENU•OK
@ / 2
?.
In-/uitschakelen
In-/uitschakelen met de aan-/uit-toets
쏅
Voor het inschakelen drukt u op de aan-/uittoets 3.
De autoradio schakelt in.
쏅
Om het apparaat uit te schakelen houdt u
aan-/uit-toets 3 langer dan 2 seconden ingedrukt.
De autoradio schakelt uit.
Opmerking:
Wanneer u de autoradio bij uitgeschakeld
voertuigcontact aan zet, dan schakelt de radio zich automatisch na 1 uur uit, zodat de
accu van het voertuig niet leeg raakt.
In-/uitschakelen via het contact van het
voertuig
Wanneer de autoradio conform de inbouwhandleiding, met het contactslot van de auto is verbonden en niet met aan-/uit-toets 3 is uitge-
Page 91

In bedrijf nemen | Verkeersinformatie
schakeld, wordt het met het contact in-, resp.
uitgeschakeld.
Volume
Volume instellen
Het volume kan in stappen van 0 (uit) tot 50
(maximaal) worden ingesteld.
Draai aan de volumeregelaar
쏅
4, om het
volume te wijzigen.
Opmerking:
Wanneer een telefoon of navigatiesysteem is
aangesloten op de autoradio zoals omschreven in de inbouwhandleiding, dan wordt de
autoradio bij een telefoongesprek, resp. bij
een navigatiemededeling onderdrukt,en
het gesprek resp. de gesproken mededeling
wordt via de autoradioluidsprekers doorgegeven. Op het display verschijnt dan "TELEPHONE".
Autoradio zacht zetten (mute)
U kunt het volume snel naar een door u ingestelde
waarde reduceren.
Druk kort op de aan-/uit-toets 3 om de au-
쏅
toradio zacht te zetten, resp. om het vorige
volume weer te activeren.
Op het display wordt tijdens de onderdrukking "MUTE" weergegeven.
Lees voor het instellen van het mute-volume in het
hoofdstuk "Gebruikersinstellingen" de paragraaf
"Instelling in gebruikersmenu uitvoeren", menupunt "MUTE LVL".
Demo-modus in-/uitschakelen
De demomodus toont u de functies van de autoradio als lichtkrant op het display. U kunt de demomodus in- resp. uitschakelen:
쏅
Schakel de autoradio eventueel eerst uit.
쏅
Houd tegelijkertijd de toetsen MENU•OK ?
en
2 < ingedrukt en druk op de aan-/uit-
toets 3.
De autoradio wordt ingeschakeld. Op het dis-
play wordt kort "DEMO MODE" weergeven,
wanneer u de demomode heeft ingeschakeld.
Door het indrukken van een willekeurige toets
wordt de demomodus onderbroken en kunt u
het apparaat bedienen.
Versienummers weergeven
U kun de versienummers van de verschillende
apparaatcomponenten laten weergeven.
쏅
Schakel de autoradio eventueel eerst uit.
쏅
Houdt tegelijkertijd de toetsen MENU•OK
1 < ingedrukt en druk op de aan-/
? en
uit-toets 3.
De autoradio wordt ingeschakeld. Op het display verschijnt het versienummer van de eerste componenten. Het eerste teken geeft het
component aan: P = Processor, E = EPROM,
A = Accordo.
Druk op de toets
쏅
nummers van de andere componenten weer
te geven.
Druk op de toets MENU•OK
쏅
laatst beluisterde audiobron terug te gaan.
5 / >, om de versie-
?, om naar de
Verkeersinformatie
In de tunerregio "EUROPE" kan een FM-zender
verkeersberichten markeren m.b.v. een RDS-signaal. Wanneer de voorrang voor verkeersberichten is ingeschakeld, wordt een verkeersbericht
automatisch weergegeven, ook wanneer de autoradio momenteel niet op de radioweergave is
ingesteld of wanneer een zender van het MW of
LW golfgebied is ingesteld.
Bij ingeschakelde voorrang wordt in het display
het fi lesymbool (
weergegeven verkeersbericht wordt "TRAFFIC" in
het display weergegeven.
Lees voor het in- en uitschakelen van de voorrang
in het hoofdstuk "Gebruikersinstellingen" de paragraaf "Instelling in gebruikersmenu uitvoeren",
menupunt "TRAF".
Opmerkingen:
Het volume wordt voor de duur van het
•
doorgeschakelde verkeersbericht verhoogd. U kunt het minimale volume voor
) weergegeven. Tijdens een
91
NEDERLANDS
Page 92

Verkeersinformatie | Radioweergave
verkeersberichten instellen (zie hoofdstuk
"Gebruikersinstellingen", paragraaf "Instelling in gebruikersmenu uitvoeren".
•
Om een doorgegeven verkeersbericht af te
breken, drukt u op de toets DIS/ESC =.
Radioweergave
RDS
In de tunerregio "EUROPE" zenden veel FM-zenders naast hun programma tevens een RDS-signaal (Radio Data System) uit, dat de volgende
extra functies mogelijk maakt:
De
•
zendernaam wordt in het display getoond.
•
De autoradio herkent verkeersberichten en
nieuwsuitzendingen en kan deze in iedere
weergavesoort (bijv. tijdens CD-weergave) automatisch doorgeven.
Alternatieve frequentie (F): wanneer de RDS-
•
functie geactiveerd is, schakelt de autoradio
automatisch naar de als beste te ontvangen
frequentie van de ingestelde zender.
Regionaal (REG): Sommige zenders verdelen
•
hun programma op bepaalde tijden in regionale programma's met verschillende inhoud. Bij
ingeschakelde REG-functie schakelt de autoradio alleen over naar alternatieve frequenties,
wanneer die hetzelfde regionale programma
uitzenden.
Voor het in- en uitschakelen van de RDS- resp.
REG-functie leest u in hoofdstuk "Gebruikersinstellingen" de paragraaf "Instelling in gebruikersmenu uitvoeren" (menupunten "RDS", "REG").
Naar radioweergave omschakelen
Druk net zo vaak op de toets SRC 6 totdat
쏅
"TUNER" wordt weergegeven:
Het actuele geheugenniveau verschijnt een-
maal als lichtkrant op het display.
Geheugenniveau kiezen
De volgende geheugenniveaus zijn in de verschillende tunerregio's beschikbaar:
Regio Geheugenniveaus
EUROPE
USA
THAI
S AMERICA
쏅
Druk net zo vaak op de toets BND
het gewenste geheugenniveau wordt weergegeven.
Opmerking:
Op elk geheugenniveau kunnen maximaal
5 zenders worden geprogrammeerd.
FM1, FM2, FMT, MW, LW
FM1, FM2, FMT, AM, AMT
FM1, FM2, FMT, AM
FM1, FM2, FMT, AM, AMT
B totdat
Zenders instellen
U hebt verschillende mogelijkheden om een zender in te stellen:
Zenders handmatig instellen
쏅
Druk toets
malen in om de frequentie stapsgewijs te
wijzigen, resp. lang om de frequentie snel te
wijzigen.
Opmerkingen:
•
Voor de tunerregio "EUROPE": in het golfgebied FM wordt bij ingeschakelde RDSwerking automatisch de volgende zender
van de zenderketen ingesteld.
Voor de tunerregio "EUROPE", "USA" en
•
"S AMERICA": in het golfgebied FM wordt
bij ingeschakelde PTY-functie het actueel
gekozen programmatype weergegeven
en kan worden gewijzigd (zie hoofdstuk
"PTY").
Zoekafstemming starten
Druk op de toets
쏅
afstemming te starten.
De eerstvolgende ontvangbare zender wordt
ingesteld.
5 / > één- of meerdere
@/ 2, om de zoek-
92
Page 93

Radioweergave
Opmerkingen:
•
Voor de tunerregio "EUROPE": in het golfgebied FM worden bij ingeschakelde voorrang voor verkeersinformatie (
verkeersinformatiezenders ingesteld.
•
Voor de tunerregio's "EUROPE", "USA" en
"S AMERICA": in het golfgebied FM wordt
bij ingeschakelde PTY-functie de volgende
zender met het actueel gekozen programmatype ingesteld (zie hoofdstuk "PTY").
•
De gevoeligheid van de zoekdoorloop kan
worden ingesteld (zie hoofdstuk "Gebruikersinstellingen", paragraaf "Instelling in
gebruikersmenu uitvoeren", menupunt
"SENS").
) alleen
Zender opslaan/opgeslagen zenders
oproepen
쏅
Kies het gewenste geheugenniveau.
쏅
Stel evt. de gewenste zender in.
쏅
Druk op de voorkeuzetoets
rende ca. 2 seconden, om de actuele zender
onder de toets op te slaan.
- resp. -
쏅
Druk kort op de voorkeuzetoets
de opgeslagen zender te kiezen.
1 - 5 < gedu-
1 - 5 < om
Zenders kort weergeven
Met de scanfunctie wordt elke ontvangbare zender van het actuele golfgebied kort weergegeven.
쏅
Druk de toets MENU•OK
2 seconden in, om het kort weergeven te starten, resp. kort, om de actueel ingestelde zender verder te beluisteren.
Tijdens het kort weergeven worden op het
display afwisselend "SCAN" en de actuele frequentie alsmede het geheugenniveau resp.
de zendernaam weergegeven.
Opmerking:
Voor de radioweergave kan de duur van fragment per zender worden ingesteld (zie hoofd-
? gedurende ca.
stuk "Gebruikersinstellingen", paragraaf
"Instelling in gebruikersmenu uitvoeren",
menupunt "SCAN TIME").
Zenders automatisch programmeren
(Travelstore)
Met Travelstore kunt u de 5 sterkste zenders van
de regio automatisch zoeken en op een geheugenniveau opslaan. Eerder opgeslagen zenders van
dit geheugenniveau worden hierbij gewist.
In de tunerregio "EUROPE" en "THAI" kunt u met
Travelstore 5 FM-zenders op het geheugenniveau FMT opslaan. In de tunerregio "USA" en
"S AMERICA" kunt u daarnaast 5 AM-zenders op
het geheugenniveau AMT opslaan.
쏅
Kies een geheugenniveau van het gewenste
golfgebied, bijv. FM1 of AM.
쏅
Druk op de toets BND
2 seconden.
De tuner begint dan met de automatische
zoekafstemming; op het display wordt "FM
TSTORE" resp. "AM TSTORE" weergeven.
Wanneer het opslaan voltooid is, wordt de
zender op geheugenpositie 1 van geheugenniveau FMT, resp. AMT weergegeven.
Opmerking:
Voor de tunerregio "EUROPE": bij ingeschakelde voorrang voor verkeersinformatie (
worden uitsluitend verkeersinformatiezenders opgeslagen.
B gedurende ca.
PTY
In de tunerregio's "EUROPE", "USA" en "S AMERICA" kan een FM-zender zijn actuele programmatype doorgeven, bijv. CULTUUR, POP, JAZZ, ROCK,
SPORT of WETENSCHAP. Met de PTY-functie kunt
u zo doelgericht naar uitzendingen van een bepaald programmatype zoeken, bijv. naar rock- of
sportuitzendingen. Let erop, dat PTY niet door
alle zenders wordt ondersteund.
NEDERLANDS
)
93
Page 94

Radioweergave | CD-/MP3-/WMA-/C‘n‘C-/CD-wisselaar- weergave
Opmerking:
Om de PTY-functie te gebruiken, moet u
deze afzonderlijk in het menu inschakelen
(zie hoofdstuk "Gebruikersinstellingen", paragraaf "Instelling in gebruikersmenu uitvoeren", menupunt "PTY").
Programmatype kiezen
Opmerking:
In de tunerregio "EUROPE" kunt u de taal
instellen, waarin de programmatypen worden weergegeven (zie hoofdstuk "Gebruikersinstellingen", paragraaf "Instelling in
gebruikersmenu uitvoeren", menupunt "PTY
LANG").
쏅
Druk kort op de toets
Het actueel gekozen programmatype wordt
kort weergegeven en u kunt een ander programmatype kiezen.
쏅
Druk indien gewenst net zo vaak op de toets
5 / > totdat het gewenste program-
matype wordt weergegeven.
Zender zoeken
쏅
Druk op de toets
Zodra de zoekdoorloop begint, verschijnt
kort "SEARCH" op het display. Daarna wordt
het actuele programmatype weergegeven
Zodra een zender is gevonden, verschijnt kort
"PTY FOUND". Zolang het programmatype
van de ingestelde zender overeenstemt met
het actueel gekozen programmatype, worden
in het display afwisselend het programmatype en de zendernaam, resp. de frequentie
weergegeven.
Opmerkingen:
•
Wanneer er geen zender met het gekozen
programmatype wordt gevonden, wordt
kort "NO PTY" weergeven en klinkt een
pieptoon. De laatst weergegeven zender
wordt opnieuw ingesteld.
Wanneer de ingestelde of een andere zen-
•
der uit de zenderketen op een later tijdstip
het gewenste programmatype uitzendt,
5 / >.
@/ 2.
dan schakelt de autoradio automatisch
van de actuele zender, resp. actuele audiobron, (bijv. CD) naar de zender met het gewenste programmatype. Houd er rekening
mee dat deze functie niet door alle zenders
wordt ondersteund.
Displayweergave instellen
쏅
Druk op de toets DIS/ESC =, om tussen
deze beide weergaves te wisselen:
Weergave Betekenis
ABCDEF
resp.
FM1 102.90
FM1 11:32
Zendernaam
resp.
geheugenniveau/
frequentie
Geheugenniveau/tijd
CD-/MP3-/WMA-/C‘n‘C-/
CD-wisselaar- weergave
Basisinformatie
CD-/MP3-/WMA-weergave
U kunt met deze autoradio audio-CD's (CDDA) en
CD-R/RWs met audio-, MP3- of WMA-bestanden
alsmede MP3- of WMA-bestanden op USB-datadragers afspelen.
.
Gevaar voor vernieling van de
CD-speler!
Niet ronde contour-CD's (shape CD's) en
CD's met een doorsnede van 8 cm (miniCD's) mogen niet worden gebruikt.
Wij aanvaarden geen aansprakelijkheid voor beschadigingen aan de CD-speler door ongeschikte
CD's.
Opmerkingen:
Voor optimaal functioneren moet u alleen
•
CD's gebruiken met het Compact-Disc-logo.
Blaupunkt kan geen garantie geven voor
•
het optimaal functioneren van tegen kopieren beveiligde CD's en op de markt leverbare lege CD's en USB-datadragers.
94
Page 95

CD-/MP3-/WMA-/C‘n‘C-/CD-wisselaar- weergave
Houdt bij het voorbereiden van een MP3-/WMAdatadrager de volgende instructies aan:
Benaming van titels en mappen:
•
Max. 16 tekens (CD) resp. 24 tekens
–
(USB) incl. de bestandsextensie ".mp3"
resp. ".wma" (bij meer tekens wordt het
aantal van de door de autoradio herkenbare titels en mappen beperkt)
–
Geen speciale tekens of umlauten
•
CD-formaat: audio-CD (CDDA), CD-R/RW,
Ø: 12 cm
•
CD-dataformaat: ISO 9669 Level 1 en 2, Joliet
•
CD-brandsnelheid: max. 16-voudig (aanbevolen)
•
USB-formaat/-bestandssysteem: mass storage
device (massageheugen)/FAT32
Extensie van audiobestanden:
•
.MP3 voor MP3-bestanden
–
.WMA voor WMA-bestanden
–
WMA-bestanden alleen zonder Digital Rights
•
Management (DRM) en aangemaakt met Windows Media Player vanaf versie 8
MP3-ID3-tags: versie 1 en 2
•
Bitrate voor het aanmaken van audiobestan-
•
den:
MP3: 32 tot 320 kbps
–
WMA: 32 tot 192 kbps
–
Max. aantal titels: 20 000
•
C‘n‘C-weergave
De C'n'C-interface van Blaupunkt (C'n'C = Command and Control) zorgt voor een nog comfortabelere bediening van apparaat en datadragers,
die via een C'n'C-compatibele Blaupunkt-interface op de autoradio zijn aangesloten.
Controleer voordat u een C'n'C-geschikte Blaupunkt-interface aansluit de modus van de AUXingang op de achterzijde. Lees daarvoor de paragraaf "AUX-ingang op achterzijde" in het hoofdstuk "Externe audiobronnen".
CD-wisselaar-weergave
U kunt op de autoradio de volgende CD-wisselaar
aansluiten:
•
Blaupunkt CDC A03
•
Blaupunkt CDC A08
•
Blaupunkt IDC A09
Informatie over de behandeling van CD's, het
plaatsen van CD's en voor de bediening van de
CD-wisselaar vindt u in de gebruiksaanwijzing van
uw CD-wisselaar.
Controleer voordat u een CD-wisselaar aansluit de
modus van de AUX-ingang op de achterzijde. Lees
daarvoor de paragraaf "AUX-ingang op achterzijde" in het hoofdstuk "Externe audiobronnen".
Overschakelen naar de CD-/MP3-/
WMA-/C‘n‘C-/CD-wisselaar- weergave
쏅
Druk net zo vaak op de toets SRC 6 tot de
gewenste audiobron wordt weergegeven:
•
"CD": geplaatste CD.
•
"MP3": geplaatste CD, die al als MP3-CD
herkend is.
•
"USB": aangesloten USB-datadrager.
•
Naam van het via C‘n‘C aangesloten apparaat
•
"CDC / AUX": aangesloten CD-wisselaar
(wanneer geen andere externe audiobron
is aangesloten).
Opmerkingen:
•
De betreffende audiobron kan uitsluitend
worden geselecteerd, wanneer een corresponderende CD is geplaatst, resp. een
corresponderend apparaat (bijv. een USBdatadrager of een CD-wisselaar) is aangesloten.
•
Wanneer de autoradio de data van een
aangesloten apparaat of datadrager voor
de weergave eerst moet lezen, verschijnt
zolang "READING" in het display. Dit kan
bij grote datahoeveelheden wel tot 1 minuut duren. Wanneer er sprake is van een
storing in het apparaat of datadrager of
wanneer de overgedragen data niet weer-
95
NEDERLANDS
Page 96

CD-/MP3-/WMA-/C‘n‘C-/CD-wisselaar- weergave
gegeven kunnen worden, wordt een overeenkomstige melding op het display weergegeven (bijv. "ERROR" of "USB ERROR").
•
Leest de aangesloten CD-wisselaar vervolgens de geplaatste CD's (bijv. na een
onderbreking in de voeding of na een magazijnwisseling), dan wordt gedurende
die periode "MAG SCAN" weergegeven.
Wanneer de CD-wisselaar geen CD's of
geen magazijn bevat, dan wordt "NO DISC"
weergegeven.
CD plaatsen
Opmerking:
Het automatische transport van de CD mag
niet worden gehinderd of geholpen.
쏅
Schuif de CD met de bedrukte zijde naar boven in de CD-opening
stand waarneembaar wordt.
De CD wordt automatisch naar binnen getrokken en uw data worden gecontroleerd (op het
display wordt zolang "READING" weergegeven). Daarna begint de weergave in CD- resp.
MP3-weergave. Op het display wordt bij geplaatste CD het CD-symbool getoond.
Opmerking:
Wanneer de geplaatste CD niet kan worden
weergegeven, wordt kort "CD ERROR" weergegeven en wordt de CD na ca. 2 seconden
uit het apparaat geschoven.
7, totdat een weer-
CD verwijderen
Opmerkingen:
•
Een naar buiten geschoven en niet weggenomen CD wordt na ca. 10 seconden
automatisch weer naar binnen getransporteerd.
U kunt ook CD's naar buiten laten schuiven
•
wanneer de autoradio is uitgeschakeld of
er een andere audiobron actief is.
Druk op de toets
쏅
CD er uit te schuiven.
:, om een geplaatste
96
USB-datadrager aansluiten/
verwijderen
Om een USB-datadrager aan te kunnen sluiten,
moet de meegeleverde USB-kabel op de autoradio
worden aangesloten (zie inbouwhandleiding).
쏅
Schakel de autoradio uit, zodat de datadrager
op de juiste wijze wordt aan- en afgemeld.
쏅
Sluit de USB-datadrager op de USB-kabel
aan, resp. ontkoppel deze.
Op het display wordt bij aangesloten USBdatadrager het USB-symbool weergegeven.
Wordt de USB-datadrager na het aansluiten
resp. na het inschakelen van de autoradio de
eerste keer als audiobron geselecteerd, dan
worden vervolgens de data ingelezen (op
het display wordt gedurende deze periode
"READING" weergegeven).
Opmerkingen:
Wanneer de aangesloten USB-datadrager
•
niet weergegeven kan worden, wordt kort
"USB ERROR" weergegeven.
De voor het inlezen benodigde tijd hangt af
•
van het model en de grootte van de USBdatadrager.
Titel kiezen
쏅
Druk kort op de toets 5 / , om naar de
vorige/volgende titel te gaan.
Opmerking:
Wanneer de actuele titel langer dan 3 seconden wordt weergegeven, wordt de titel
opnieuw gestart door één keer op
drukken.
5 te
Map/CD kiezen (alleen bij MP3-/
WMA-/C‘n‘C- resp. CD-wisselaarweergave)
쏅
Druk op de toets @/ 2, om naar de
vorige/volgende map resp. vorige/volgende
CD te gaan.
Opmerking:
U kunt zo ook tussen afspeellijsten van een via
C‘n‘C aangesloten apparaat wisselen.
Page 97

CD-/MP3-/WMA-/C‘n‘C-/CD-wisselaar- weergave
Snelle zoekdoorloop
쏅
Houdt de toets 5 / net zolang ingedrukt tot de gewenste positie is bereikt.
Weergave onderbreken
쏅
Druk op toets 3 <, om de weergave te
onderbreken ("PAUSE") resp. weer te hervatten.
Afspeellijst-modus (alleen in
MP3-/WMA-weergave)
De autoradio kan afspeellijsten afspelen, die met
een MP3-manager zoals bijv. WinAmp of Microsoft
Media Player zijn gemaakt. De afspeellijsten moeten zijn opgeslagen in de root-map van de CD resp.
de USB-datadrager. De volgende afspeellijstformaten kunnen herkend worden: M3U, PLS.
Titel in afspeellijst-modus kiezen
쏅
Druk gedurende ca. 2 seconden op de toets
2 < om naar de afspeellijst-modus over te
schakelen:
Op het display wordt kort "LIST MODE" weergegeven. De eerste titel van de eerste afspeellijst wordt afgespeeld.
Opmerking:
Wanneer de datadrager geen afspeellijsten
bevat, wordt kort "NO LIST" weergegeven.
쏅
Druk kort op de toets
de vorige/volgende titel van de actuele afspeellijst te gaan.
쏅
Druk op de toets
vorige/volgende afspeellijst te gaan.
Op het display wordt kort de naam van de gekozen afspeellijst weergegeven en de eerste
titel van de afspeellijst wordt afgespeeld.
Afspeellijst-modus verlaten
쏅
Druk gedurende ca. 2 seconden op toets
2 <:
Op het display wordt kort "LIST OFF" weergegeven. De actuele titel wordt verder afgespeeld.
5 / > om naar
@ / 2, om naar de
Alle titels kort weergeven
Met de scanfunctie worden alle beschikbare titels
weergegeven.
Druk gedurende ca. 2 seconden op toets
쏅
MENU•OK
? om het kort weergeven te
starten, resp. kort, om de actueel kort weergegeven titel verder te beluisteren.
Tijdens het kort weergeven worden op het
display afwisselend "SCAN" en het actuele
titelnummer resp. de bestandsnaam weergegeven.
Opmerkingen:
•
Bij weergave van CD-wisselaar is de duur
van fragment per titel ca. 10 seconden.
Voor alle andere weergavesoorten kan de
duur van fragment per titel worden ingesteld (zie hoofdstuk "Gebruikersinstellingen", paragraaf "Instelling in gebruikersmenu uitvoeren", menupunt "SCAN TIME").
In de afspeellijst-modus (MP3-weergave)
•
worden uitsluitend de titels van de actuele
afspeellijst kort weergegeven.
Titels in willekeurige volgorde
weergeven
Druk op de toets 5 MIX <, om te schakelen
쏅
tussen de weergavemodi:
Bedrijf Weergave Betekenis
CD
MP3/
WMA/
C‘n‘C
1
MIX ALL
MIX DIR
MIX ALL
MIX CD
CDC
MIX ALL
Alg.
1
Bij C‘n‘C-bedrijf kunnen afhankelijk van het
MIX OFF
Titels mixen
Titels van de actuele
2
mappen mixen
Titels van de data-
2
dragers mixen
Titels van de actuele
CD mixen
Titels van alle CD's
mixen
Normale weergave
aangesloten apparaat verdere weergavemodi beschikbaar zijn
2
Niet in MP3-afspeellijst-modus
97
NEDERLANDS
Page 98

CD-/MP3-/WMA-/C‘n‘C-/CD-wisselaar- weergave / Externe audiobronnen
Wanneer de MIX-functie actief is, wordt het
MIX-symbool op het display weergegeven.
Afzonderlijke titels, resp. CD's of
mappen herhaald afspelen
쏅
Druk op de toets 4 RPT <, om tussen de
weergavemodi te schakelen:
Bedrijf Weergave Betekenis
CD
RPT TRACK
MP3/
RPT TRACK
WMA/
C‘n‘C
CDC
Alg.
1
Bij C‘n‘C-bedrijf kunnen afhankelijk van het
RPT DIR
1
RPT TRACK
RPT DISC
RPT OFF
Titel herhalen
Titel herhalen
Map herhalen
2
Titel herhalen
CD herhalen
Normale weergave
aangesloten apparaat verdere weergavemodi beschikbaar zijn
2
Niet in MP3-afspeellijst-modus
Wanneer de RPT-functie actief is, wordt het
RPT-symbool op het display weergegeven.
Displayweergave instellen
Druk één of meerdere malen op toets DIS/
쏅
= om tussen deze weergaven te wis-
ESC
selen:
Bedrijf Weergave Betekenis
Titelnummer en
speeltijd
Titelnummer
en tijd
Bestandsnaam
1
Artiest
Albumnaam
Speeltijd
Tijd
CD
MP3/
WMA/
C‘n‘C
T 01 02:15
T 01 18:33
01 ABC
ABCDEF
ABCDEF
PLAY 02:15
CLK 18:33
Bedrijf Weergave Betekenis
T 01 02:15
CDC
T 01 18:33
CD 02T 03
1
Artiest en albumnaam moeten als ID3-tag
zijn opgeslagen en worden slechts gedurende ca. 10 seconden en eventueel als
lichtkracht weergegeven; anders wordt de
bestandsnaam weergegeven.
Opmerking
U kunt de weergave van CD-tekst van een
audio-CD in- en uitschakelen (zie hoofdstuk
"Gebruikersinstellingen", paragraaf "Instelling in gebruikersmenu uitvoeren", menupunt
"CD TEXT"). Bij ingeschakelde CD-tekst wordt
bij aanvang van elke titel de betreffende CDtekst eenmaal als lichtkrant weergegeven.
Externe audiobronnen
Front-AUX-IN-bus
Gevaar! Verhoogd letselgevaar
door stekker.
stekende stekker in de front-AUX-IN-bus letsel
veroorzaken. Het gebruik van rechte stekkers of
adapters leidt tot een verhoogd risicoletsel.
Daarom verdient gebruik van haakse stekkers
aanbeveling, bijv. de Blaupunkt toebehorenkabel
(7 607 001 535).
1
Zodra een externe audiobron zoals bijvoorbeeld
een draagbare CD-/ MiniDisc- of MP3-speler op
de front-AUX-IN-bus is aangesloten, kan deze met
de toets SRC 6 worden geselecteerd. Op het
display wordt dan "FRONT AUX" weergegeven.
In geval van een ongeluk kan de uit-
Titelnummer en
speeltijd
Titelnummer en
kloktijd
CD-nummer en
titelnummer
98
Page 99

AUX-ingang aan achterzijde
Via de AUX-ingang aan de achterzijde (Rear-AUXIN) kunt u verschillende externe audiobronnen op
de autoradio aansluiten:
•
C‘n‘C-geschikte apparaten uit het Blaupunkttoebehorenprogramma (bijv. een C‘n‘C-geschikte Bluetooth®/USB- of iPod®/USB-interface; C‘n‘C = Command and Control).
•
CD-wisselaar
•
Andere externe audiobronnen zoals bijvoorbeeld draagbare CD-spelers, MiniDisc-spelers,
MP3-spelers of een niet C‘n‘C-compatibele
Blaupunkt-interface.
Opmerking:
Voor het aansluiten van een externe audiobron via de AUX-ingang op de achterzijde
heeft u een adapterkabel nodig. Deze kabel
(Blaupunkt-nr. 7 607 897 093) is verkrijgbaar bij uw Blaupunkt-vakhandel.
Controleer voordat u een bepaald apparaat aansluit, eerst de modus van de AUX-ingang op de
achterzijde en wijzig eventueel de instelling (zie
hoofdstuk "Gebruikersinstellingen", paragraaf "Instelling in gebruikersmenu uitvoeren", menupunt
"CDC"). Let er op dat u de instellingen uitsluitend
wijzigt zolang er geen apparaat op de AUX-ingang
aan de achterzijde is aangesloten. Verwijder eerst
eventueel aangesloten apparaten bij uitgeschakelde autoradio.
C'n'C-weergave starten
쏅
Druk net zo vaak op toets SRC 6 totdat de
naam van het via C'n'C aangesloten apparaat
op het display verschijnt.
De weergave begint.
Opmerkingen:
•
De C'n'C-weergave kan alleen worden gekozen wanneer een geschikt apparaat op
een C'n'C-interface is aangesloten.
•
Lees voor de bediening van de radio in
C‘n‘C-bedrijf het hoofdstuk "CD-/MP3-/
WMA-/C‘n‘C-/CD-wisselaar- weergave".
Externe audiobronnen Klankinstellingen
U kunt gebruik makend van een geschikte
•
adapterkabel tot maximaal 3 C'n'C-compatibel Blaupunkt-interfaces op de autoradio
aansluiten. Om er voor te zorgen dat de autoradio de verschillende interfaces kan onderscheiden, kunt u aan elke interface een
individueel apparaatnummer toekennen
(zie hoofdstuk "Gebruikersinstellingen",
paragraaf "Instelling in gebruikersmenu
uitvoeren", menupunt "C‘N‘C").
AUX-weergave starten
쏅
Druk net zo vaak op toets SRC 6 totdat
"CDC / AUX" op het display verschijnt.
De weergave begint.
Opmerking:
U kunt voor de AUX-ingang op de achterzijde
een eigen naam invoeren, welke in AUX-weergave op het display wordt weergegeven, wanneer u de aangesloten audiobron heeft geselecteerd (zie hoofdstuk "Gebruikersinstellingen", paragraaf "Instelling in gebruikersmenu
uitvoeren", menupunt "AUX EDIT").
Klankinstellingen
In het audio-menu kunt u de volgende klankkleurinstellingen veranderen:
Bas en treble instellen
•
Volumeverdeling links/rechts (balans) resp.
•
voor/achter (fader) instellen
Versterking van de lage tonen bij laag volume
•
(X-Bass) instellen.
In het uitgebreide audio-menu kunt u daarnaast
de volgende instellingen uitvoeren:
3-band-equalizer instellen:
•
Middentonenniveau instellen.
–
Bas-, midden- en hoge tonen frequentie
–
kiezen.
Kwaliteitsfactor voor bas en middentonen
–
instellen.
Uitgebreide X-Bass-instellingen uitvoeren (ni-
•
veau en frequentie)
NEDERLANDS
99
Page 100

Klankinstellingen
Equalizer-voorinstellingen kiezen
•
Opmerking:
De instellingen voor bassen midden- en hoge
tonen worden steeds voor de actuele audiobron opgeslagen.
Audiomenu oproepen en verlaten
Druk kort op de toets AUD A, om het audio-
쏅
menu te openen.
Druk net zo vaak op de toets
쏅
totdat het gewenste menupunt is geselecteerd.
쏅
Voer de instelling uit (zie volgende paragraaf).
쏅
Druk kort op toets MENU•OK ? om een
ander menupunt te selecteren.
- of -
쏅
Druk kort op toets DIS/ESC = om het menu
te verlaten.
Opmerking:
Het menu wordt automatisch ca. 15 seconden nadat voor het laatst toetsen zijn ingedrukt verlaten en u keert terug naar de weergave van de actuele audiobron.
@ / 2
Instelling in audiomenu uitvoeren
BAS
Niveau lage tonen. Instellingen: -7 tot +7.
쏅
Druk op toets
nen.
쏅
Druk op toets
uit te voeren.
TREBLE
Niveau hoge tonen. Instellingen: -7 tot +7.
쏅
Druk op toets
nen.
쏅
Druk op toets
uit te voeren.
>, om het submenu te ope-
@ / 2 om de instelling
>, om het submenu te ope-
@ / 2 om de instelling
Balans
Volumeverdeling links/rechts. Instellingen: L9
(links) tot R9 (rechts).
Druk op toets
쏅
nen.
쏅
Druk op toets
uit te voeren.
FADER
volumeverdeling voor/achter. Instellingen: R9
(achter) tot F9 (voor).
쏅
Druk op toets
nen.
쏅
Druk op toets
uit te voeren.
X-BAS S
Versterking van de lage tonen bij gering volume.
Instellingen: 0 (uit) tot 3 (grootste versterking).
쏅
Druk op toets
nen.
쏅
Druk op toets
uit te voeren.
>, om het submenu te ope-
@ / 2 om de instelling
>, om het submenu te ope-
@ / 2 om de instelling
>, om het submenu te ope-
@/ 2 om de instelling
Uitgebreid audiomenu oproepen en
verlaten
쏅
Kies in het audiomenu het menupunt "ENHANCED".
쏅
Druk op toets
menu te openen.
쏅
Druk net zo vaak op de toets
totdat het gewenste menupunt is geselecteerd.
쏅
Voer de instelling uit (zie volgende paragraaf).
쏅
Druk kort op toets MENU•OK ? om een
ander menupunt te selecteren.
- of -
쏅
Druk kort op toets DIS/ESC = om het menu
te verlaten.
> om het ENHANCED-
@ / 2
100
 Loading...