

Page 1

Enjoy it.
CAR MULTIMEDIA
Osaka 960
Operating instructions
Manual de instrucciones
Page 2
Appendix
2
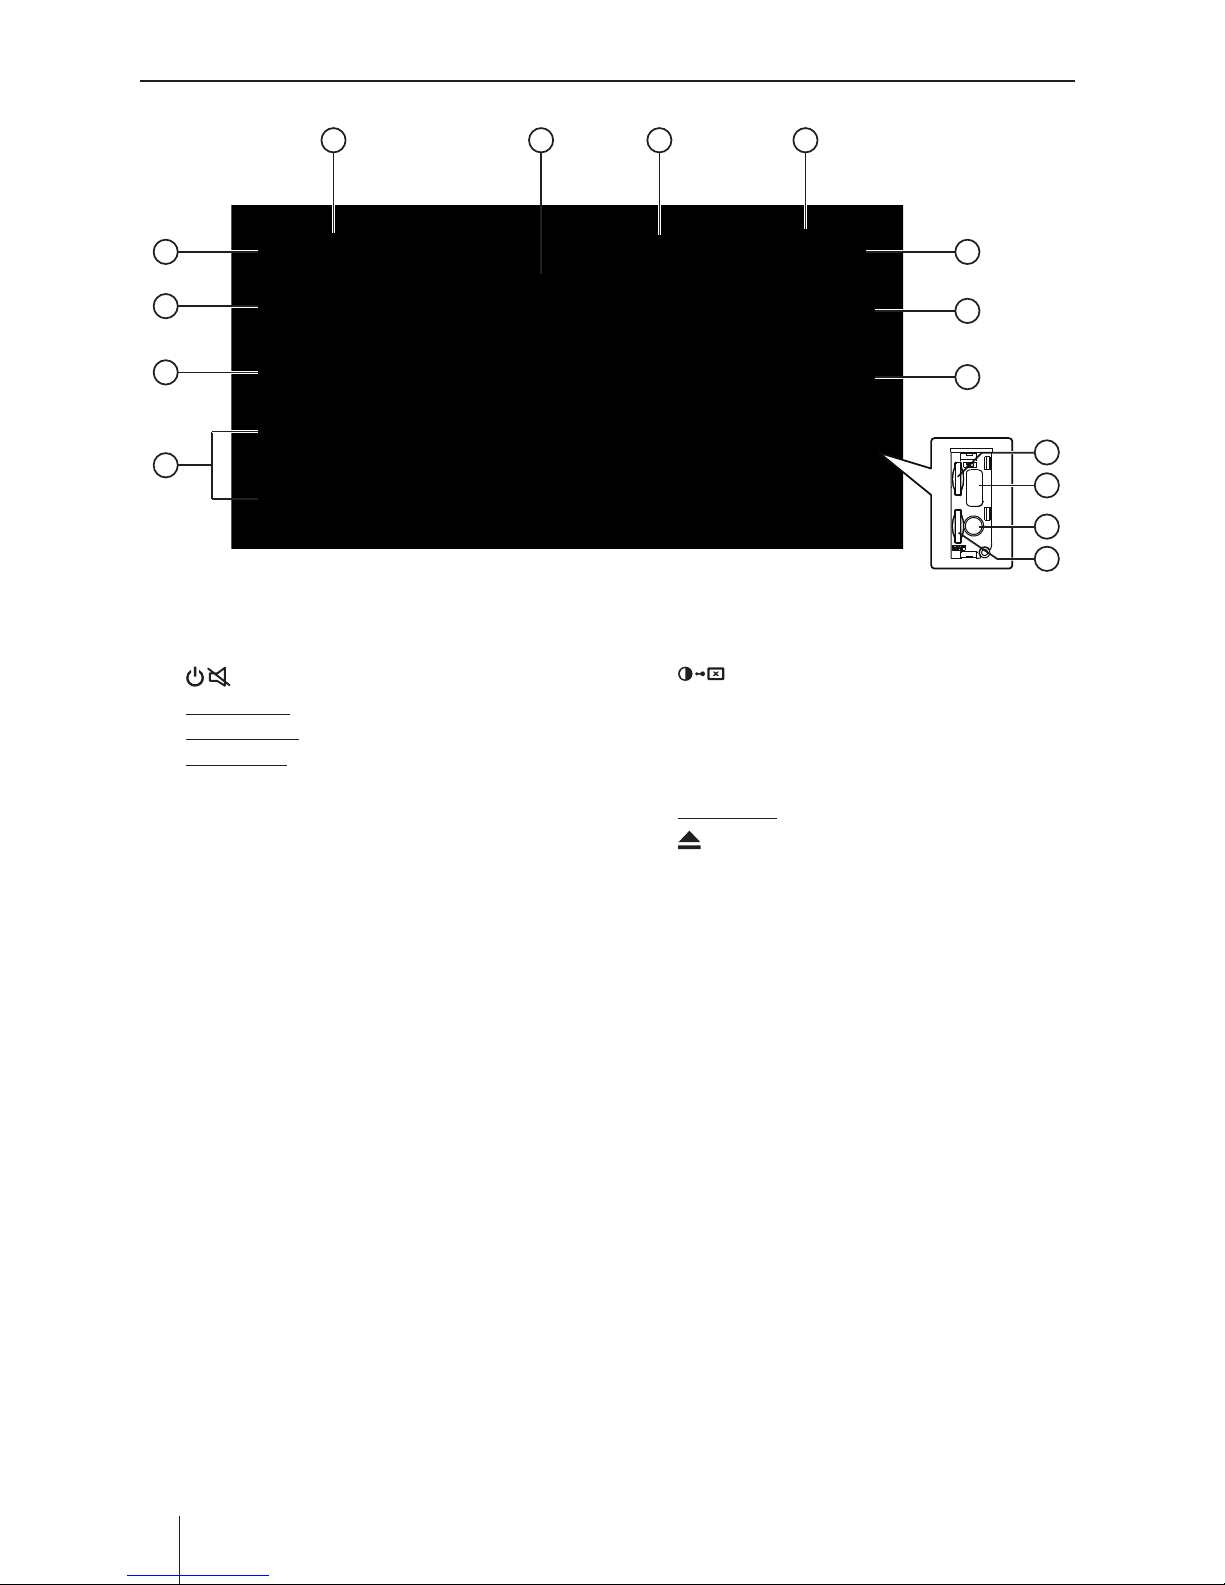
Controls - Device
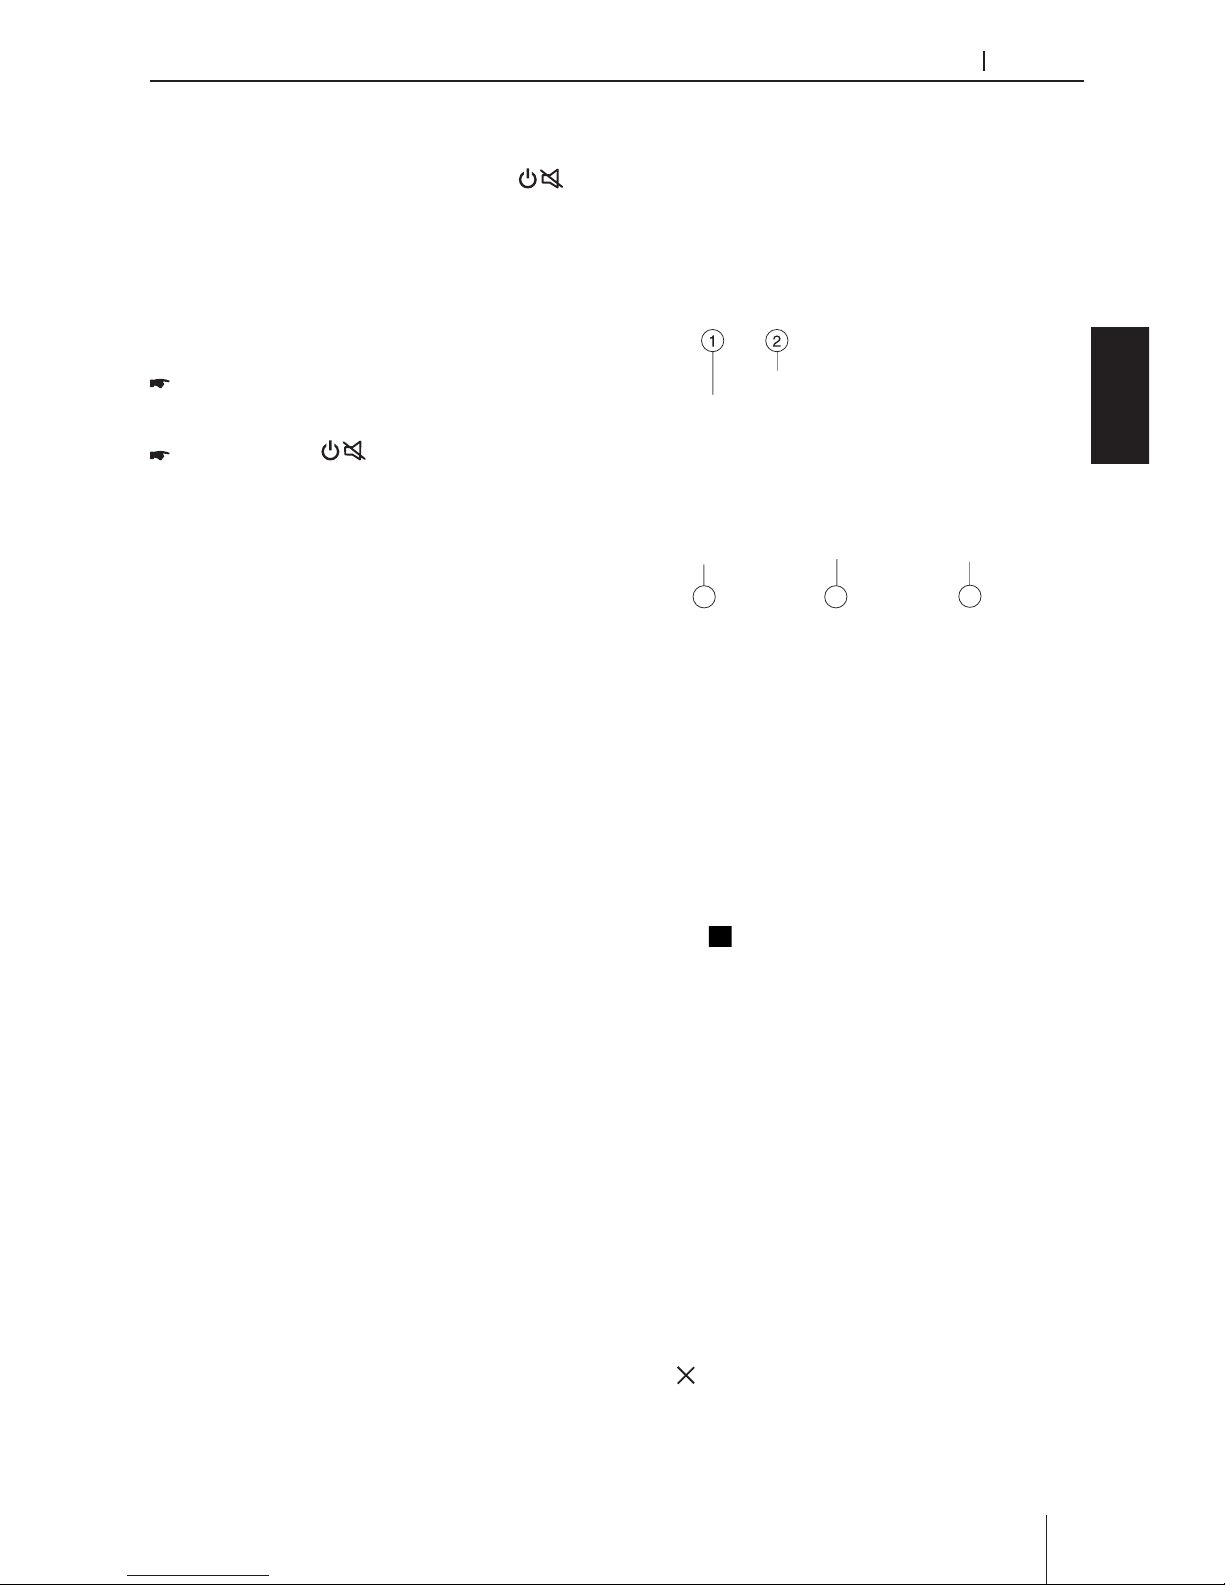
1 button
Short press: Switch on device
In operation: Mute audio source
Long press: Switch o device
2
HOME button
Call up main menu
3 BACK button
Returns to previous screen
4 VOL+/VOL- button
Adjust volume
5 microSD card reader for navigation data
Access only with open cover
6 AV-IN socket
Access only with open cover
7 USB socket
Access only with open cover
8
microSD card reader
Access only with open cover
9 button
Adjust the display brightness
10 NAVI button
With inserted microSD card with naviga-
tion data:
Short press
: Start the navigation
11 button (Eject)
Eject a DVD/CD
12 Infrared receiver for remote control
13 DVD/CD drive
14 Touchscreen user interface
15 Reset button
Restoring the original factory settings of the
device.
Caution! All personal settings will be lost!
1
2
3
4
7
6
8
5
11
10
9
12131415
Page 3
Appendix
ENGLISH
3
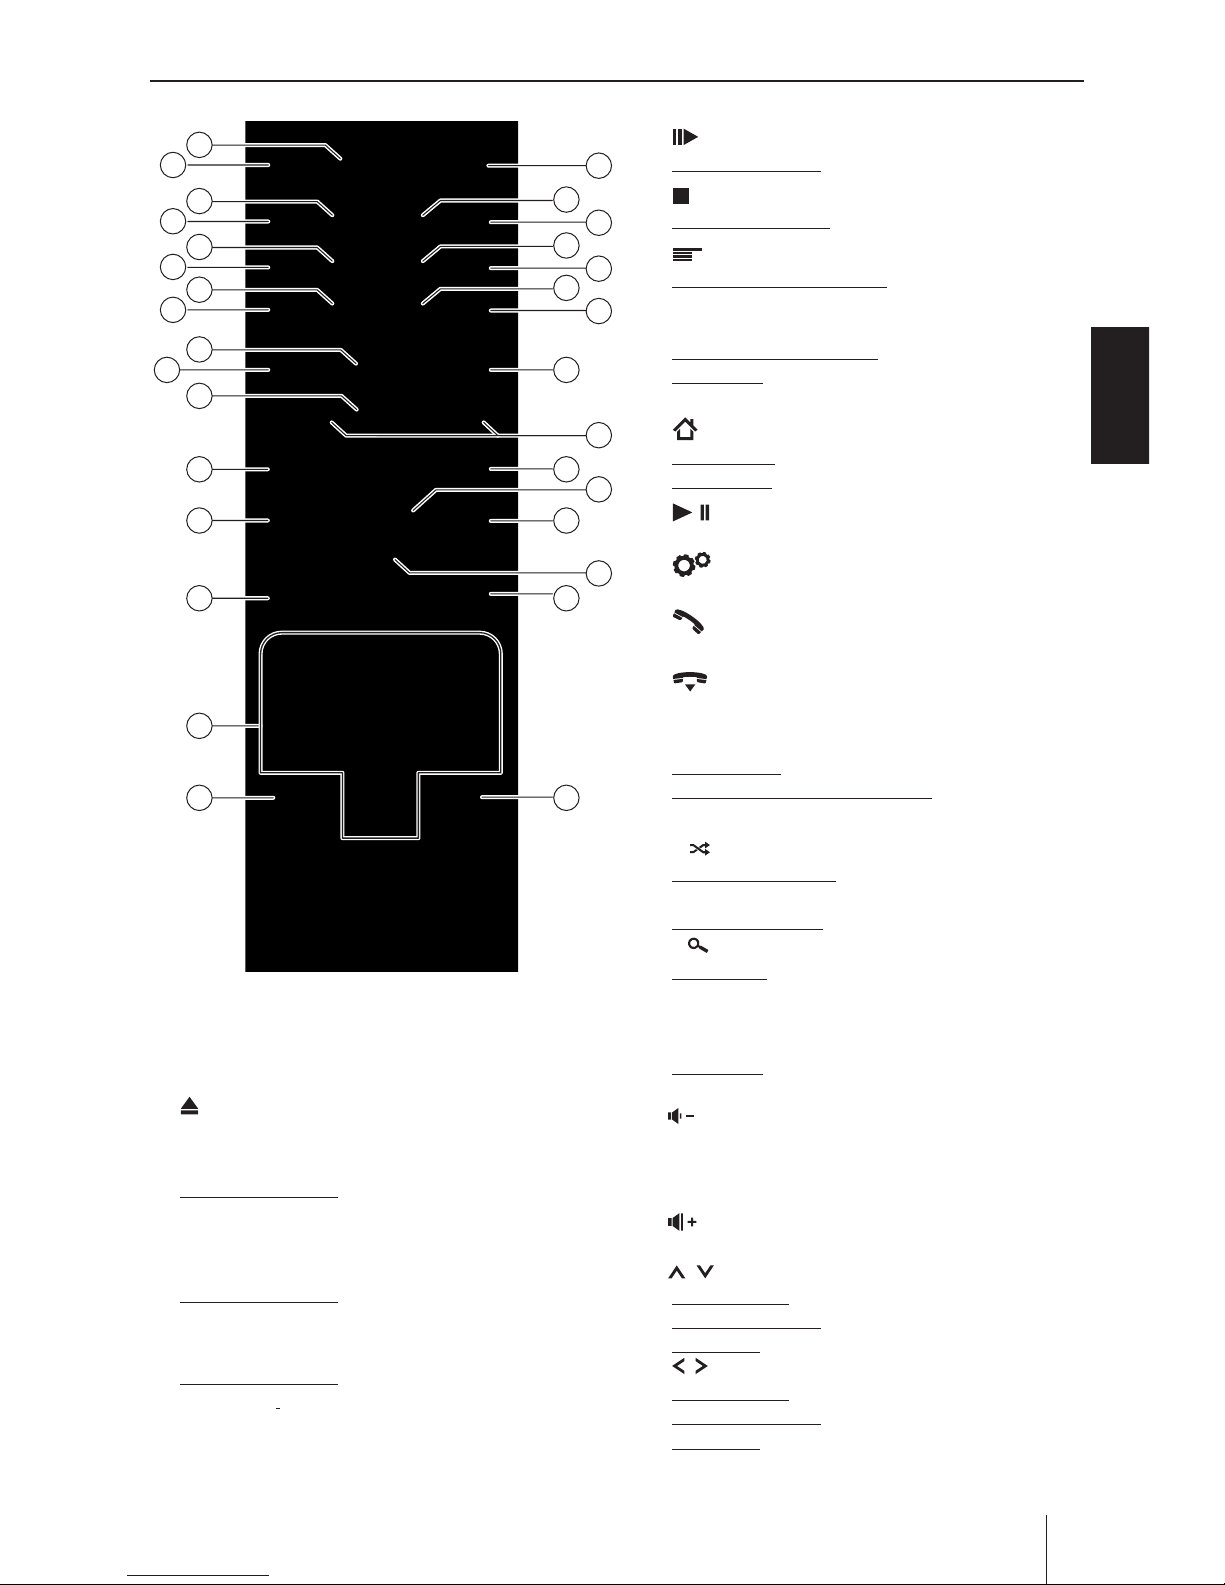
Controls - Remote control
1 SRC button
Switching between radio, navigation and
available
media sources
2 button (Eject)
Eject a DVD/CD
3 INFO button
For DVD playback: Displays track/chapter
number as
well as shows/hides current playing time
4 MENU button
For DVD playback: Opens DVD menu/returns to
playback
5 ZOOM button
For DVD playback: Selects zoom level 1-3,
deactivates zoom
6 PIC button
Opening display brightness setting
7 button
For DVD playback: Starts slow motion
8 button
For DVD playback: Ends playback
9 button
Short press in main menu: Shortcut for background
settings and opens Settings menu
Short press in active app: Opens options
Long press: Function for current Android app (if
available)
10 button
Short press: Opens main menu
Long press: Displays active apps
11 button
Pausing/continuing media playback
12 button
Open Settings menu
13 button
Answering a call
14 button
Ending/rejecting a phone call
15 Number buttons 0 - 9
On keyboard: Number input
Number “0” for media playback: Sets repeat title
(not for Bluetooth® streaming)
16
# /
button
For media playback: Sets random track playback
(not for Bluetooth® streaming)
On phone keypad: Enters “#” character
17.
* /
button
Short press:
Radio: Scans stored stations
Media: Scans tracks
On phone keypad: Enters “*” character
Long press:
Radio: Scans stations of current waveband
18. button\
Decreasing the volume
19 OK button
Conrming a selection
20. button
Increasing the volume
21.
/
button
In main menu: Toggles between app lines
In settings menus: Selects menu entry
In displays: Toggles between display areas
/
button
In main menu: Selects an app button
In settings menus: Changes setting
In displays: Selects button
Note:
Conrm a selection with OK in each case.
12
14
15
4
6
8
10
2
7
9
11
16
5
3
1
13
22
18
19
21
24
26
28
30
23
25
27
29
31
17
20
Page 4
Appendix
4
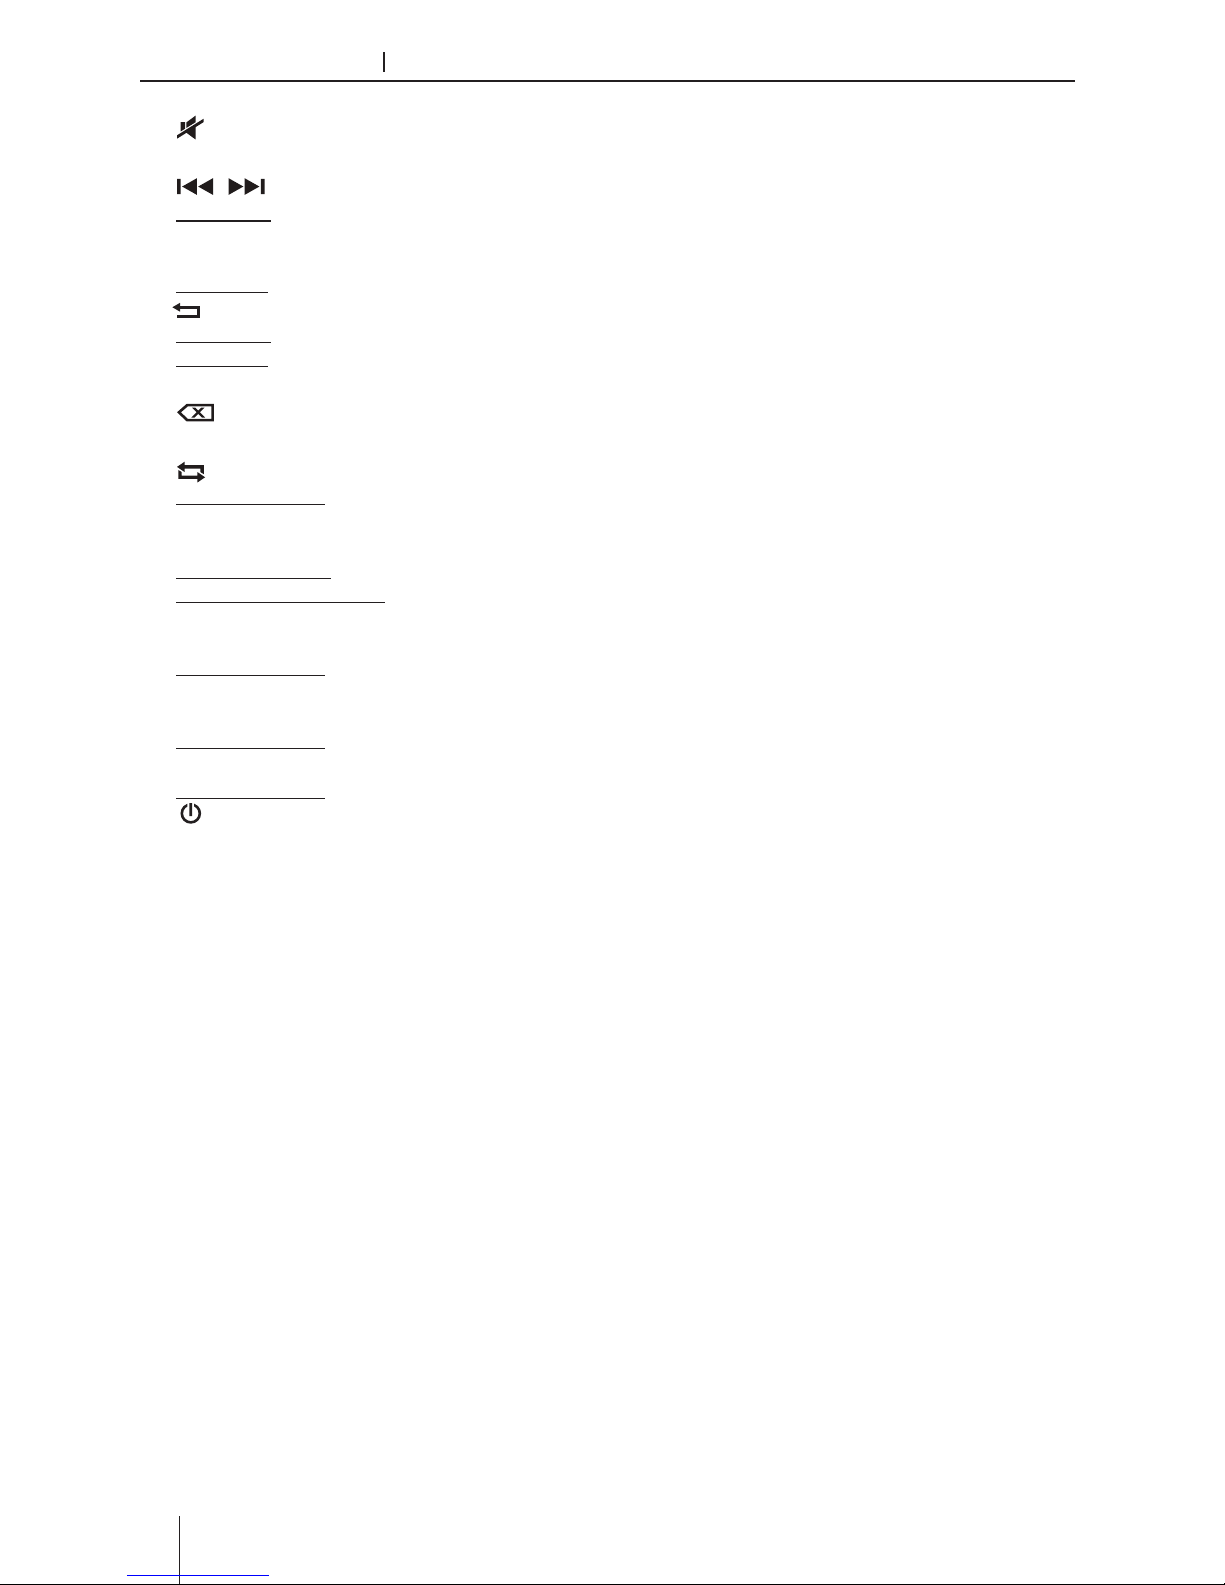
Controls-Remote control Contents
22 button
Muting the device/cancelling mute
23 / button
Short press:
Radio: Changes frequency in increments
Media: Selects previous/next track
Long press: Fast searching
24. button
Short press: Returns to previous screen
Long press: Calls up brightness settings for
display
25 button
Deletes last keyboard entry
26 A-B button
For DVD playback: Repeats individual section
(Apply to other models)
27.
GOTO
button
For radio playback: Selects frequency
For media/DVD playback: Selects track/chapter
number
28.
ANGLE
button
For DVD playback: Selects camera viewing angle
(if alternative camera viewing angle is available)
29.
SUBTITLE
button
For DVD playback: Selects subtitle language
30.
AUDIO
button
For DVD playback: Selects playback language
31.
/ POWER
button
Switching the device on/o
Safety notes
...........................................................5
Cleaning notes
.......................................................6
Disposal notes........................................................6
Scope of delivery
...................................................6
Software update
....................................................6
Placing the device in operation
............................6
Switching on/o .
.............................................................6
Volume .
..............................................................................7
Operation
...............................................................7
Touchscreen .
....................................................................7
Main Menu .
.......................................................................7
Applications Menu
..........................................................7
Radio mode
............................................................8
Starting radio playback
..................................................8
Select memory bank
.......................................................8
Tuning into a station
.......................................................8
Storing stations manually
............................................8
Storing stations automatically
..................................9
Scanning stations ............................................................9
Switching RDS on/o
....................................................9
DVD/CD/USB/microSDHC media playback
....... 10
Basic information
.......................................................... 10
DVD/CD mode
...............................................................10
USB data carrier
............................................................. 10
MicroSDHC cards
..........................................................11
DVD movie playback
...................................................11
Audio playback from DVD/CD, USB or
microSDHC
...................................................................... 11
Video playback from DVD/CD, USB or
microSDHC
...................................................................... 12
Image playback from DVD/CD,
USB or audioSDHC
........................................................13
Bluetooth mode
.................................................. 14
Starting Bluetooth mode
........................................... 14
Registering Bluetooth devices
................................. 14
Telephone mode - Bluetooth.................................... 14
Making a Call
................................................................. 14
Call History
...................................................................... 15
Bluetooth Settings
........................................................15
Audio playback of Android smartphone
.............. 15
PhoneLink
........................................................... 16
Overview of PhoneLink
..............................................16
Connect with Android phone...................................16
Connect with iPhone
................................................... 16
Page 5
Appendix
ENGLISH
5
Contents Safety notes
Safety notes
The car sound system was manufactured according
to the state of the art and established safety guidelines. Even so, dangers may occur if you do not
observe the safety notes in these instructions.
These instructions are intended to familiarise you
with the most important functions. Detailed information can be found on the Internet under www.
blaupunkt.com.
• Read these instructions carefully and com-
pletely
before using the car sound system.
• Keep the instructions at a location so that they
are always accessible to all users.
• Always pass on the car sound system to third
parties together with these instructions.
In addition, observe the instructions of the devices
used in conjunction with this car sound system.
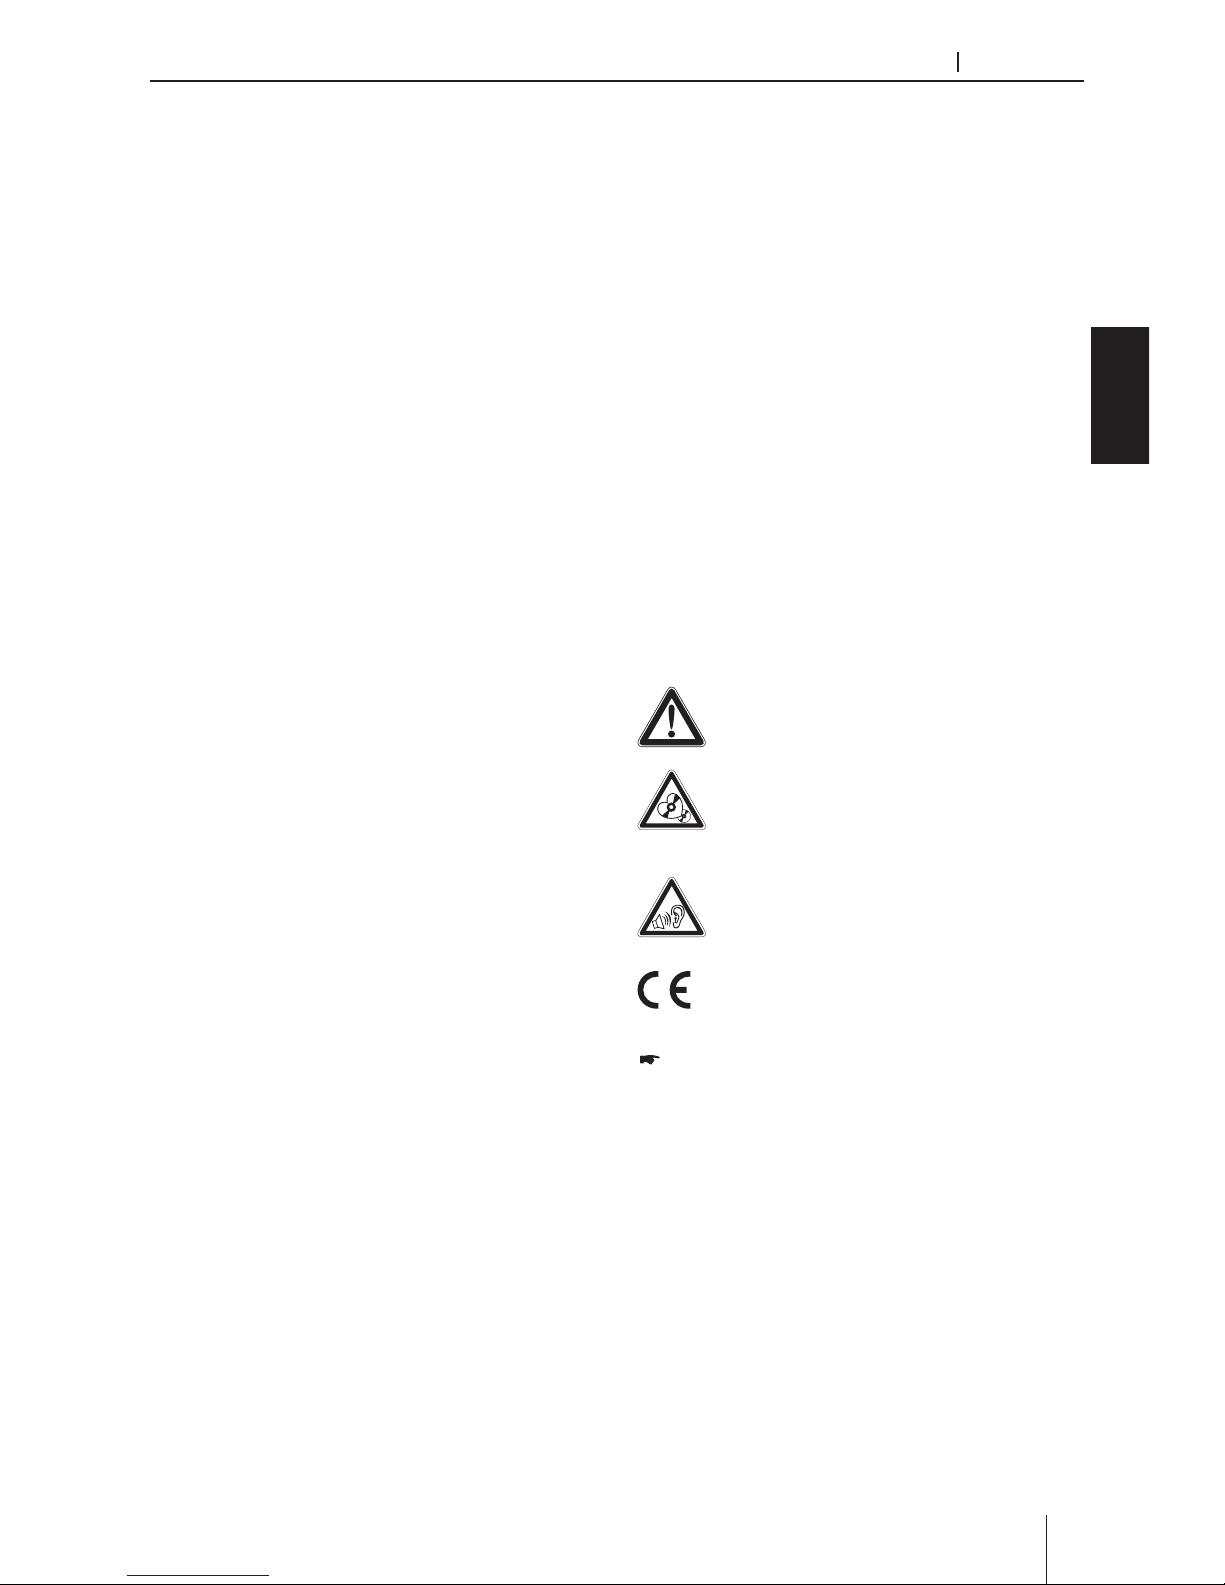
Symbols used
These instructions employ the following symbols:
DANGER!
Warns about injuries
CAUTION!
Warns about damages to the DVD/CD
drive
DANGER!
Warns about high volume
The CE mark conrms the compliance
with EU directives.
Identies a sequencing step
• Identies a listing
Road safety
Observe the following notes about road safety:
• Use your device in such a way that you can
always safely control your vehicle. In case of
doubt, stop at a suitable location and operate
your device while the vehicle is standing. As the
driver, you may not use the applications that
will distract you from trac (depending on the
scope of functions of the device, e.g. viewing
videos, entering a destination).
Sound settings .................................................... 17
Volume distribution
..................................................... 17
Equalizer
...........................................................................17
External audio/video sources
............................ 17
SWC
...................................................................... 17
WLAN
................................................................... 18
Basic Settings
...................................................... 18
Useful information
............................................. 19
Technical data
..................................................... 19
Connection Diagram
.......................................... 39
Page 6

Appendix
6
Safety notes Cleaning notes Disposal notes Placing the device in operation
• Follow the driving recommendations during
the route guidance only if you are not
violating any trac regulations! Trac signs
and trac regulations have always priority over
driving recommendations.
• Always listen at a moderate volume to protect
your hearing and to be able to hear acoustic
warning signals (e.g. police sirens). During mute
phases (e.g. when changing the audio source),
changing the volume is not audible. Do not
increase the volume during this mute phase.
General safety notes
Observe the following note to protect yourself
against injuries:
Do not modify or open the device. The device
contains a Class 1 laser that can cause injuries to
your eyes.
Use as directed
This car sound system is intended for installation and operation in a vehicle with 12 V vehicle
system voltage and must be installed in a DIN slot.
Observe the output limits of the device. Repairs and
installation, if necessary, should be performed by a
specialist.
Installation instructions
You may only install the car sound system yourself if
you are experienced in installing car sound systems
and are very familiar with the electrical system of
the vehicle. For this purpose, observe the connection diagram at the end of these instructions.
Declaration of conformity
The Blaupunkt Technology GmbH declares that
the device complies with the basic requirements
and the other relevant regulations of the directive
1999/5/EC.
The declaration of conformity can be found on the
Internet under www.blaupunkt.com.
Cleaning notes
Solvents, cleaning and scouring agents as well as
dashboard spray and plastics care product may
contain ingredients that will damage the surface of
the car sound system.
Use only a dry or slightly moistened cloth for cleaning the car sound system.
Disposal notes
Do not dispose of your old unit in the household trash!
Use the return and collection systems available to dispose of the old device, the remote
control and exhausted batteries.
Scope of delivery
The scope of delivery includes:
• Car sound system
• Remote control (incl. battery)
• TMC tuner (only for devices with Europe navi-
gation)
• microSD card with navigation data in the mi-
croSD card slot (only for devices with navigation)
• GPS antenna
• External Bluetooth microphone
• Getting started
• Support frame
• Small parts set
• Installation material
• Connecting cable
Software update
Under www.blaupunkt.com, you will nd the latest
software for your device, including instructions for
the software update.
Software updates are located at:
http://www.blaupunkt.com/en/servicesupport/
car-audio/downloads/updates/
Placing the device in operation
Caution!
Transport securing screws
Ensure that the transport securing screws at the top
side of the device are removed before the startup of
the device.
Switching on/o
Switching on/o with the button
For switch-on, press the
button.
For switch-o, hold the
button pressed for
more than 2 seconds.
Page 7
Appendix
ENGLISH
7
Placing the device in operation Operation
Switching on/o via vehicle ignition
If the car sound system is connected with the vehicle ignition and it was switched o with the
button, it is switched on or o with the ignition.
Volume
Adjusting the volume
You can adjust the volume in steps from 0 (o) to
50 (maximum).
Press VOL+/VOL- button to change the volume.
Muting the car sound system (Mute)
Briey press the
button to mute the
device or to reactivate the previous volume.
Operation
Touchscreen
Important note:
Do not use any pointed or hard objects, such as
ball point pens or fountain pens, to operate the
touchscreen.
The device features a capacitive touchscreen that
provides a remote control and device buttons (see
the section “Controls” at the beginning of these
instructions) and allows operating the device.
Tapping
To activate a control, e.g. a button, a slight touching
of the display surface is sucient. You do not have
to exert any pressure on the display surface.
• Short tap:
A short tap on the display surface is sucient
for activating most of the controls.
• Long tap:
Some functions require a long tap. Rest your
ngertip on the display surface for approximately 1 second.
Swiping/scrolling
Some functions require swiping across the display
surface, e.g.
• scrolling in lists,
• adjusting sliders.
Tap on the display surface and rest your nger on
the surface. Next, move your nger over the surface.
Zooming
When displaying maps (navigation) and images,
you can enlarge or reduce the view (zoom):
Tap on the area of the map display with two ngers
and rest your ngers on the surface. Move your two
ngers closer together (zoom out/reduce) or further
apart (zoom in/enlarge).
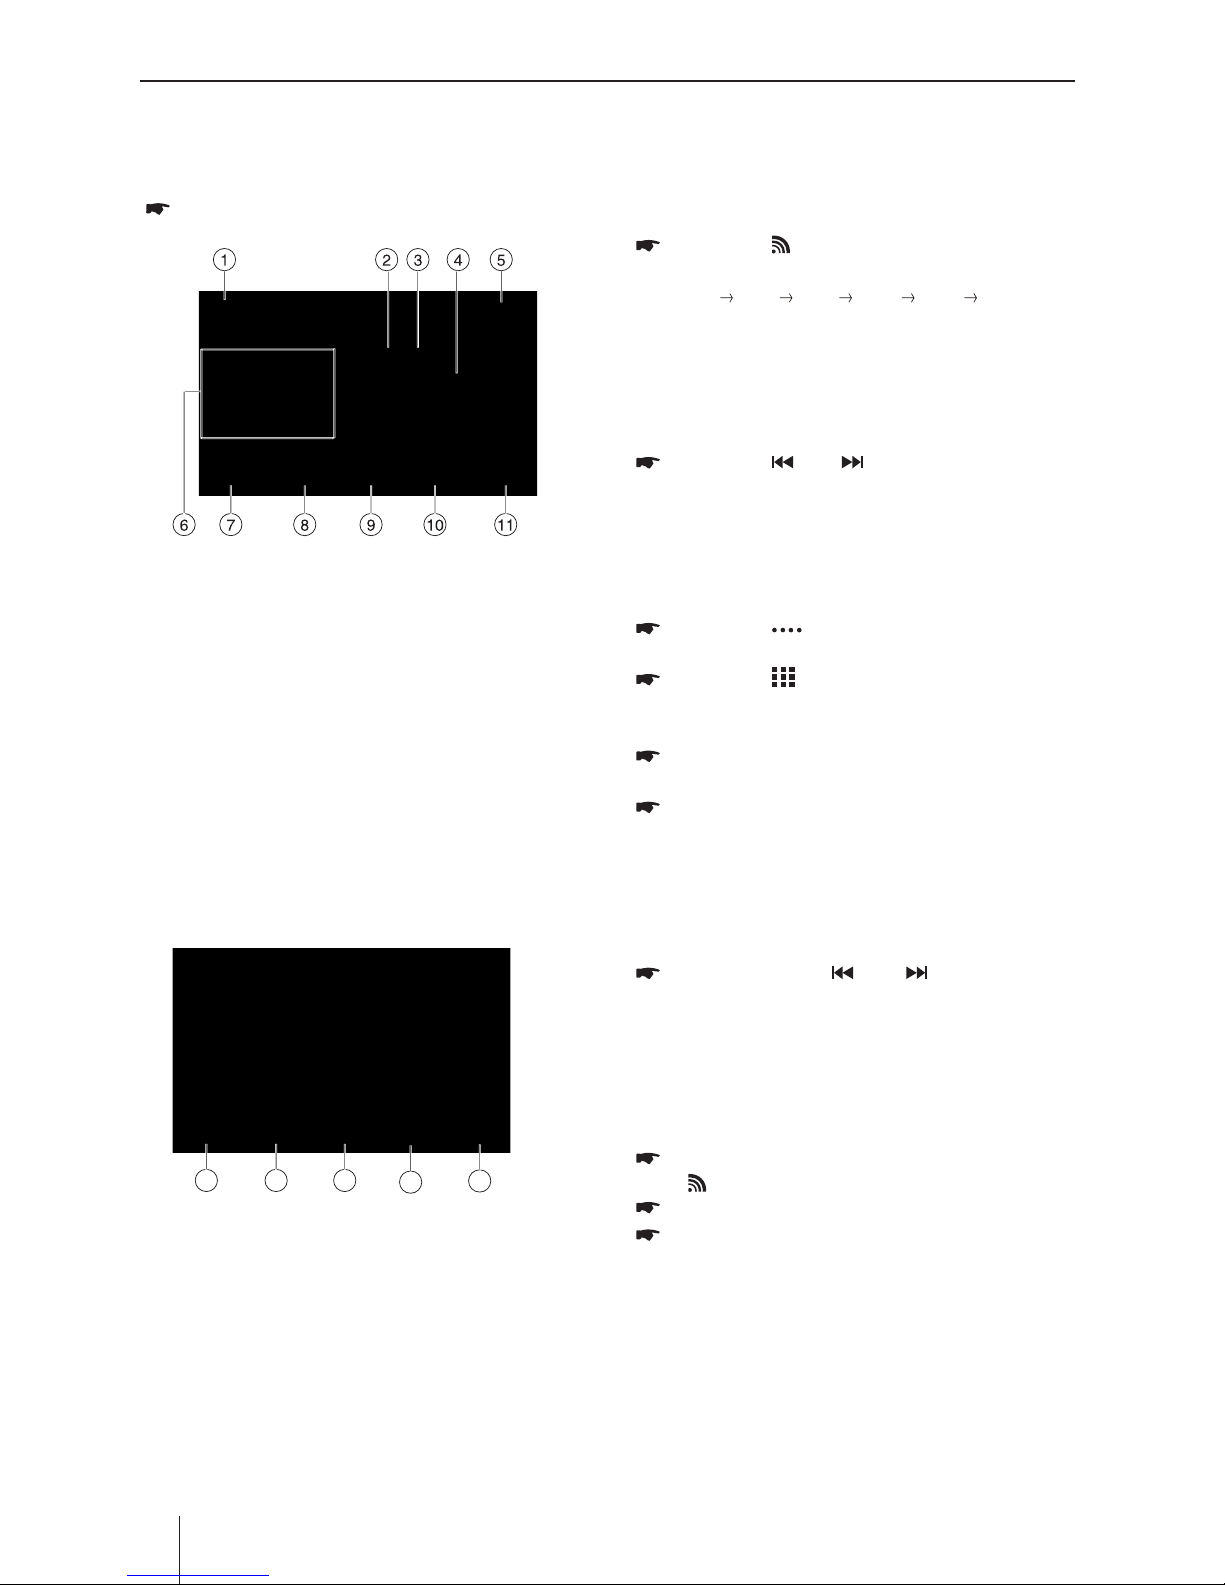
Main Menu
Press the [ HOME ] button to enter main source
menu.
5
43
①
Car AV system source bar:
Touch and hold the center of the bar and drag
left/right to show more icons.
Touch desired icon to enter corresponding
mode.
②
Clock.
③
Current audio/video source.
④
Show applications list.
⑤
Enter setting mode.
Applications Menu
Touch [ ] to enter applications menu.
1. IN-CAR
Show the Car AV applications.
2. APPS
Show the Android applications installed.
In the list menu, drag left/right to scroll.
Touch and hold an icon for more than 2
seconds to add shortcut to the desktop. To
delete the shortcut, hold it and drag to the
[ ] on the top, and release after it turns red.
Page 8
Appendix
8
Radio mode
Radio
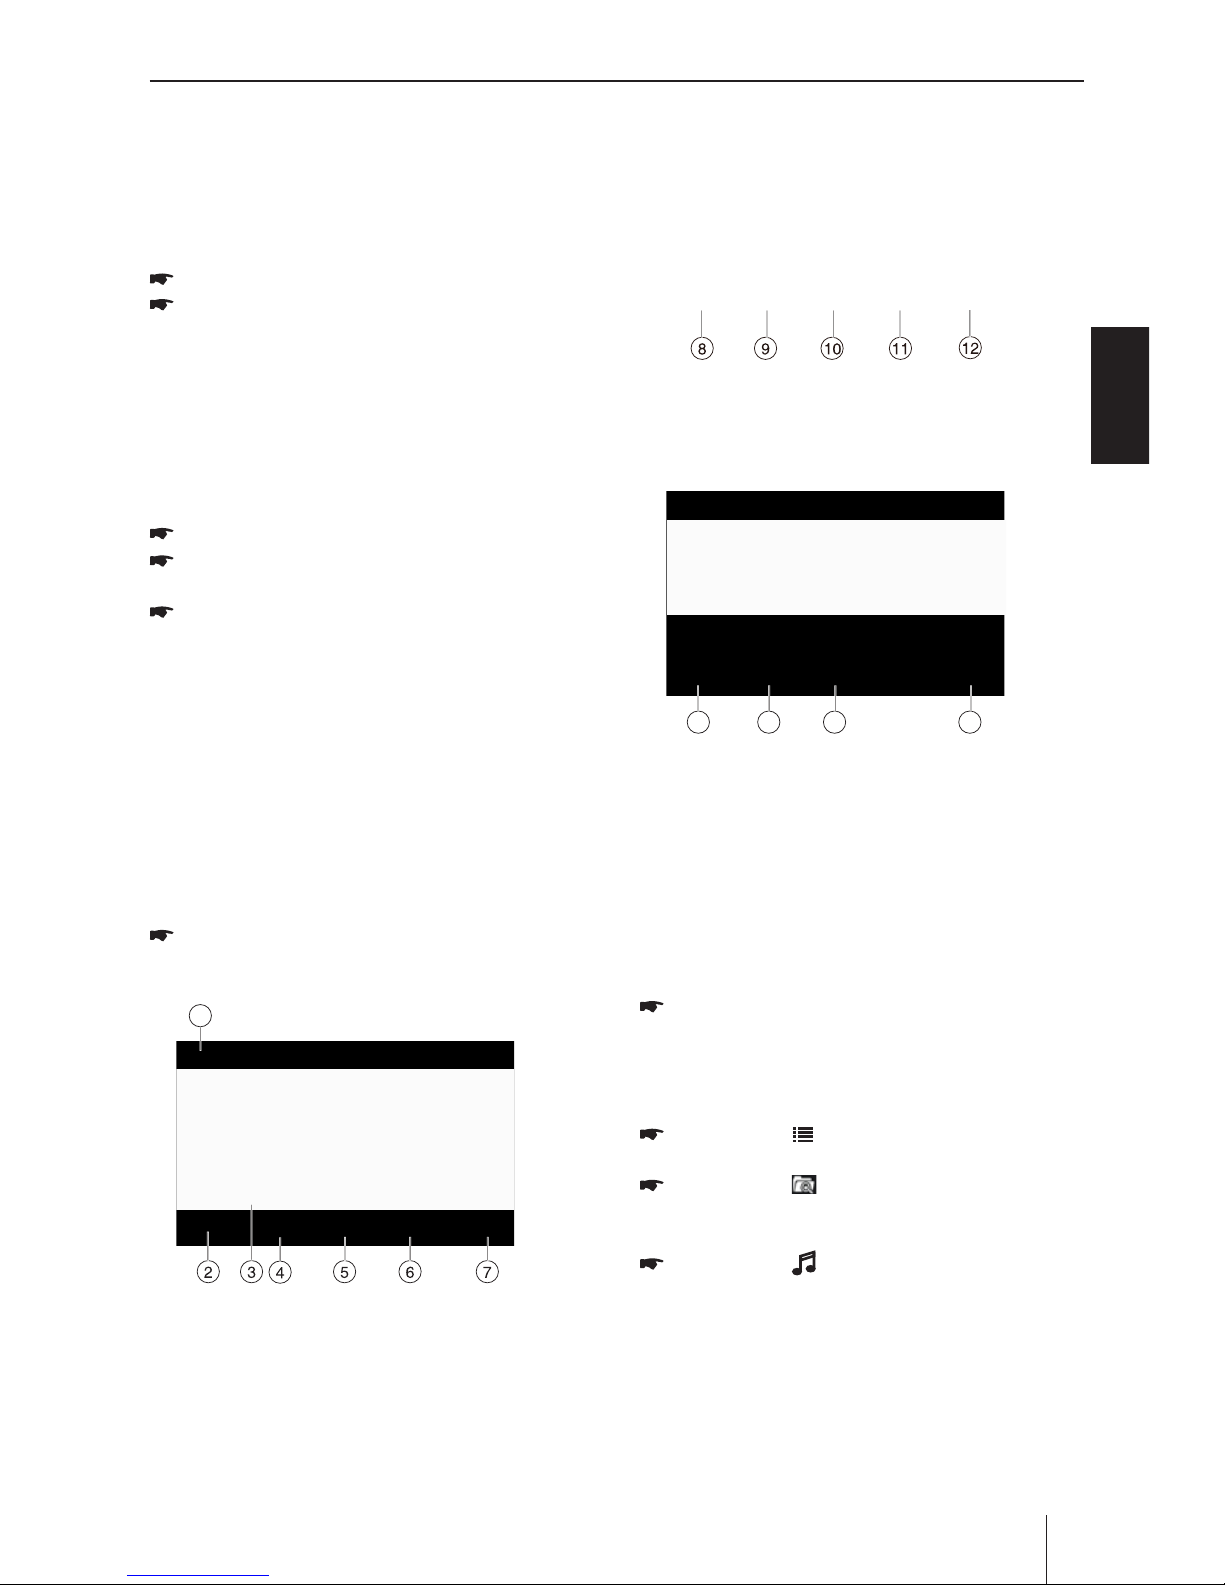
Starting radio playback
In the main menu, press the [ Radio ] button.
The radio playback menu is displayed.
The radio display features the following functions
and displays:
①
Return to home menu
②
Current radio band indicator
③
Current preset radio station
④
Current frequency
⑤
Clock
⑥
Broadcaster information stored at the preset
⑦
Touch to view more on-screen buttons
⑧
Auto tune backward.
Tune backward (long press)
⑨
Auto tune forward.
Tune forward (long press)
⑩
Scan preset stations
⑪
Band switch
12 13 14
15
16
⑫
Touch for quick access to Equalizer level
settings
⑬
Enter frequency directly
⑭
Storing stations automatically
⑮
RDS setting options
⑯
To show PTY list
Select memory bank
Dierent memory banks and wavebands are
available. Up to 6 stations can be stored in each
memory bank.
Press the [ ] button repeatedly until the
desired memory bank is displayed.
FM1 FM2 FM3 AM1 AM2 FM1
Tuning into a station
Tuning into stations manually
During manual tuning, the frequency will be
changed in steps.
Press the [ ] or [ ] button for approx.2
seconds to tune in a higher / lower station.
Enter broadcast frequency directly
If the frequency of the desired stations is known,
it can be entered directly via the touchscreen.
Press the [ ] button to display additional
operating options.
Press the [ ] button.
A numeric keypad is displayed for the
frequency input.
Enter the frequency of the desired station
with the numeric keypad.
Press the [ OK ] button.
The radio playback menu is displayed, the
station of the frequency entered is played
back.
Starting station seek tuning
Briey Press the [ ] or [ ] icon on the
user interface to seek a higher / lower
station. To stop searching, repeat the
operation above or press other keys having
radio functions.
Storing stations manually
Select the desired memory bank with the
[ ] button.
Set the desired station.
Press one of the memory buttons [ P1 ] -
[ P6 ] for approx. 2 seconds to store the
current station at the button.
The station is stored.
Page 9

Appendix
ENGLISH
9
Radio mode
Storing stations automatically
(Travelstore)
With Travelstore, you can automatically search
for and store the 6 FM stations o ering the
strongest reception in the region in the current
memory bank. Any previously stored stations in
this memory bank are deleted in the process.
Select a memory bank.
Press the [ ] button to display additional
operating options.
Press the [ TS ] button.
The tuner starts the automatic station seek
tuning. After the storing is completed, the
radio plays the station at memory location 1
of the previously selected memory bank.
Note:
For the reception area Europe: With
switched-on priority for trac information,
only trac information stations are stored.
Scanning stations
You can use the scan function to play all the
preset stations for a few seconds.
Press the [ ] button.
Each stored station will play for 5 seconds
automatically.
Pressing the [ ] button again selects the
currently scanned station and plays it back.
RDS setting
Many FM stations broadcast an RDS (Radio Data
System) signal in addition to their programme in
the reception area Europe that allows additional
functions, such as the display of the station name.
RDS Alternative Frequency : Switches RDS
AF on/o.
If RDS AF is activated, the device automatically
changes to the strongest frequency of the set
station.
Switching priority for traffic
announcements on/off : In the reception
region Europe, an FM station can identify
traffic announcements via an RDS signal. If
priority for trac reports is switched on, a tra
c report is automatically switched through,
even if the car sound system is currently not in
radio mode.
RDS Regional : Switches RDS regional mode
on/o. If regional mode is activated, the device
changes only to the alternative frequencies
of the set station that broadcast the same
regional programme.
RDS Time : Switches RDS time on/off. With
RDS CT activated, the time of the device is
automatically set via the received RDS signal.
PTY List : Opens a list of programme types.
Tap on the desired programme type to restrict
reception to the corresponding stations.
Page 10

Appendix
10
DVD/CD mode
Inserting a DVD/CD
Risk of severe damage to the DVD/CD drive!
Noncircular contoured DVDs/CDs and DVDs/CDs
with a diameter of 8 cm (mini DVDs/CDs) must not
be used.
We accept no responsibility for any damage to
the drive that may occur as a result of the use of
unsuitable DVDs/CDs.
Insert the DVD/CD with its printed side up
into the DVD/CD tray until you feel a slight
resistance.
The DVD/CD is automatically drawn in and
playback starts.
Note:
You must not hinder or assist the drive as it
automatically draws in the DVD/CD.
Ejecting a DVD/CD
Long press of the button to eject an
inserted DVD/CD.
Note:
You must not hinder or assist the drive as it
ejects the DVD/CD.
USB data carrier
This device features three USB ports:
USB1 port under the cover at the front of the
device
USB2 and USB3 port at the rear of the device
Notes:
Use the USB-1/2/3 ports for USB data carriers
with media contents.
Use the USB-2 or 3 port for the supplied
WLAN USB stick.
Connecting a USB data carrier to the front of
the device
Open the cover at the front of the unit.
Insert the USB data carrier in the USB socket.
The device automatically switches to USB mode.
The data are read, the playback starts with the rst
media le recognized by the device.
Removing a USB data carrier
Turn o the car sound system.
Disconnect the USB data carrier.
DVD/CD/USB/microSDHC media playback
DVD/CD/USB/microSDHC media
playback
Basic information
Playable data carriers and media
DVD/VCD/CDDA
DVD/CD-R/RWs
USB data carriers
microSDHC cards
MP3 or WMA les, movies and images
Notes:
To ensure proper functioning, use only CDs
with the Compact-Disc logo and DVDs with
the DVD logo.
Blaupunkt cannot guarantee the flawless
function of copy-protected DVDs/CDs and
all DVD/CD blanks, USB data carriers and
microSD cards available on the market.
The playback of movies and images on the
device display is allowed only while the
vehicle is stand-ing and the hand brake
is applied. The “PARKING” cable must be
connected with the hand brake connection
of the vehicle. The movie playback on an
external monitor (Rear Seat Enter-tainment)
is also possible while driving.
Note the following information when preparing
an MP3/WMA data carrier:
DVD/CD formats: DVD/CD-R/RW, Ø: 12 cm
DVD/CD data formats: ISO 9669 Level 1 and 2,
Joliet
CD burn speed: Max. 16x (recommended)
USB format/le system: FAT/FAT16/FAT32/NTFS
microSD card le system: FAT/FAT16/FAT32
File extension of audio les:
– .MP3 for MP3 les
– .WMA for WMA les
WMA files only without Digital Rights
Management (DRM) and created with
Windows Media® Player version 8 or later
MP3 ID3 tags: Version 1 and 2
Bitrate for creating audio les:
– MP3: 32 to 320 kbps
– WMA: 32 to 192 kbps
Maximum number of les and directories:
– Up to 40,000 les (dep. on the le/directory
struc-ture)
Page 11
Appendix
ENGLISH
11
DVD/CD/USB/microSDHC media playback
MicroSDHC cards
This device features a microSDHC card reader
under the cover at the front of the device.
Inserting a microSDHC card
Open the cover at the front of the unit.
Insert the microSDHC card with its labelled
side to the right (contacts to the left) and
its contacts rst into the card reader until it
clicks into place.
The device automatically switches to microSDHC
mode. The data are read, the playback starts with
the rst media le recognized by the device.
Removing a microSDHC card
If necessary, open the cover .
Push on the microSDHC card until it
disengages.
Pull the microSDHC card out of the card
reader.
DVD movie playback
The car sound system can play video DVDs and
VCDs. After inserting the DVD, the playback starts
automatically. The DVD menu is displayed.
You can navigate in the DVD menu by touching
the corresponding buttons in the DVD menu on
the touchscreen. After starting the movie via the
menu of the DVD, the movie is displayed. The
playback menu for DVDs is hidden.
Briey touch the touchscreen once to display
the playback menu again
The playback menu is shown.
1
①
Return to home menu
②
Show additional operating options
③
Progress bar
④
Previous chapter
⑤
Play/Pause
⑥
Next chapter
⑦
Show DVD menu
⑧
Hide additional operating options
⑨
Random play
⑩
Repeat play
⑪
Touch to access Equalizer settings menu
⑫
To enter search menu
13
14
15
16
⑬
Select audio channel
⑭
Select viewing angle
⑮
Select subtitle language
⑯
Hide additional operating options
Audio playback from DVD/CD, USB
or microSDHC
The principles of audio playback (MP3/WMA)
from data carriers are identical for all sources.
Select the desired source via the main menu.
The device changes to the desired source
and the playback starts.
If the playback does not start with the audio
playback,
Press the [ ] button to change to the
folder/le list.
Press the [ ] button to display all the
folders and les of the data carrier.
- Or -
Press the [ ] button to display all the
audio les of the data carrier.
Page 12
Appendix
12
DVD/CD/USB/microSDHC media playback
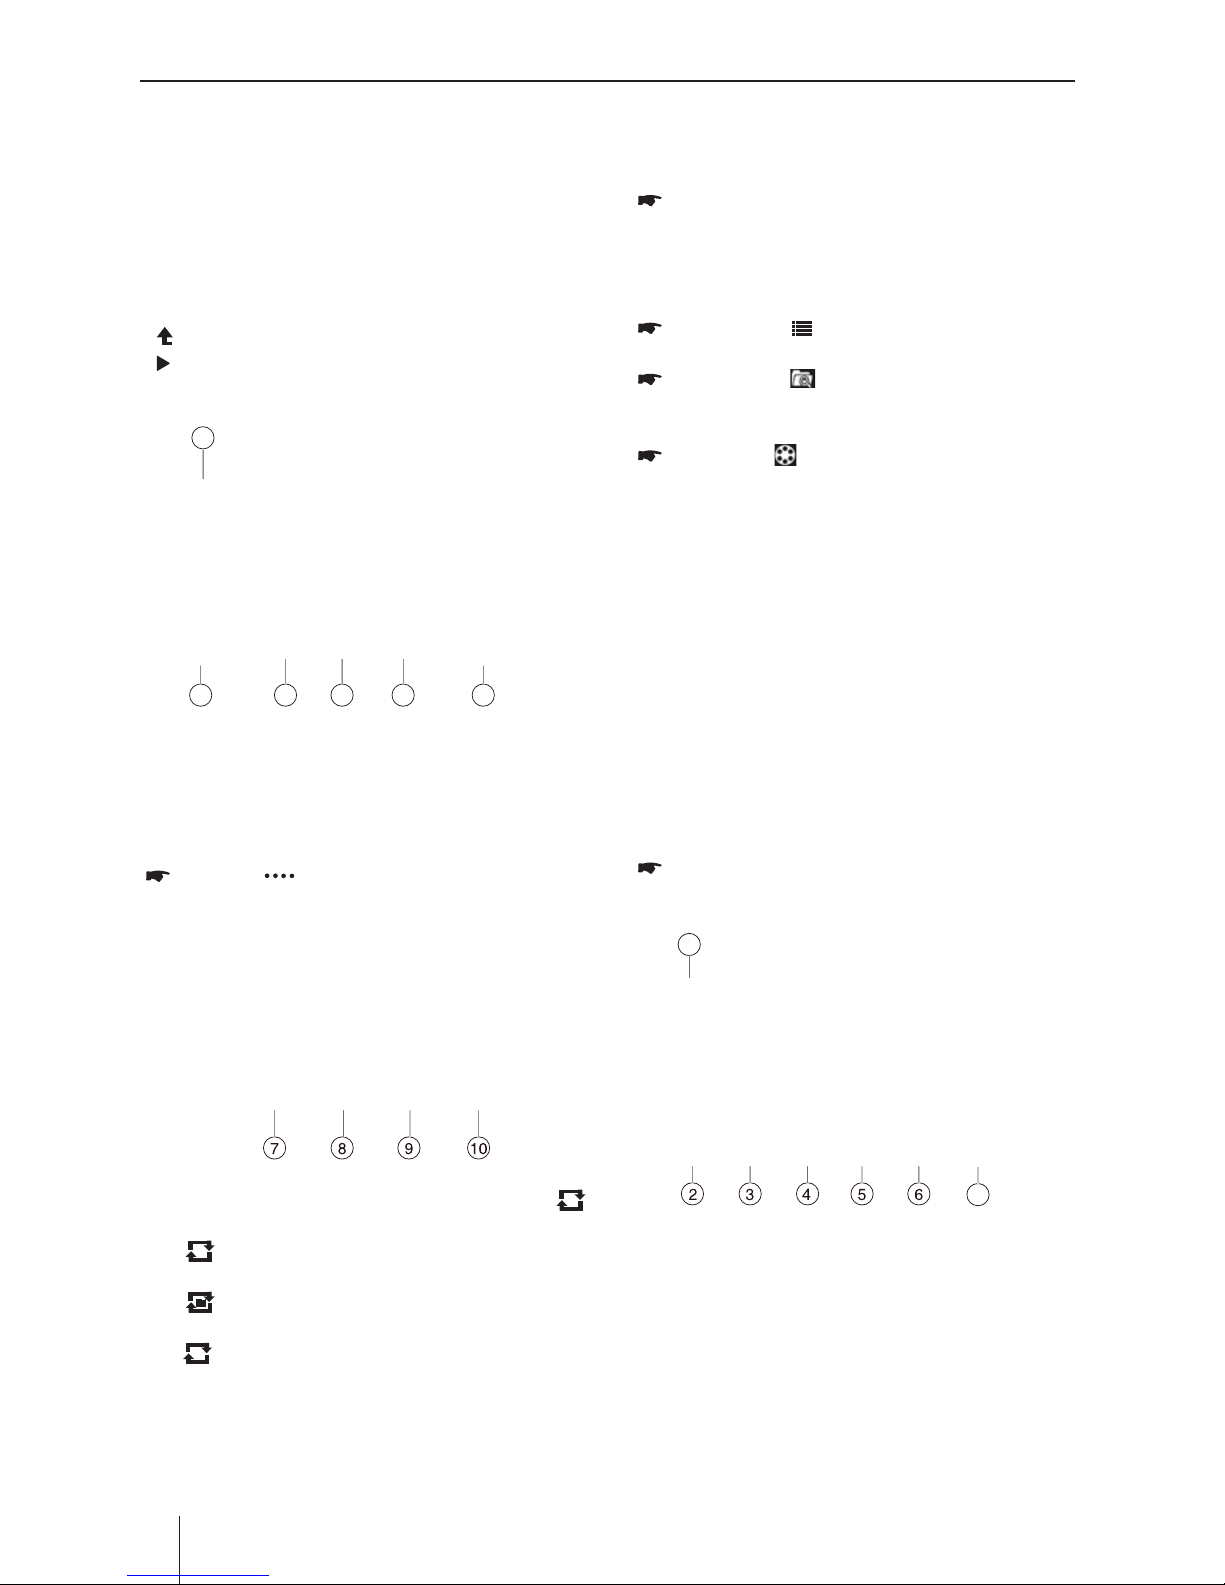
[ ] Change to next higher folder level.
[ ] start titles.
After starting a title, the playback menu is
displayed.
1
2 3 4 5 6
①
Return to home menu
②
Show additional operating options
③
Title selection
④
Interrupt playback and continue playback
⑤
Title selection
⑥
Display the folder/le list
Tap on [ ] to display additional operating
options of the playback menu.
⑦
Start and end REPEAT function.
The REPEAT mode changes each time the [
] button is pressed.
[ 1 ] Repeat single: Play the current single
repeatedly.
[ ] Repeat folder: Play the current folder
repeatedly.
[ ] Repeat o: Cancel repeat play.
⑧
Random play
⑨
Touch to access Equalizer settings menu
⑩
Display keypad to directly enter the number of
the desired title.
Video playback from DVD/CD, USB or
microSDHC
Select the desired source via the main menu.
The device changes to the desired source
and the playback starts.
If the playback does not start with the video
playback,
Press the [ ] button to change to the
folder/le list.
Press the [ ] button to display all the
folders and les of the data carrier.
- Or -
Press the [ ] button to display all the video
les of the data carrier.
Note:
Folders and videos are selected and started as
described under audio playback.
If you selected a movie, the playback is started.
During the movie playback, the playback menu is
hidden.
Briey touch the touchscreen once to display
the playback menu again.
The playback menu is shown.
1
7
①
Return to home menu
②
Show additional operating options
③
Select previous movie.
④
Interrupt playback and continue playback
⑤
Select next movie.
⑥
Call up keypad for direct selection of movie or
playing time.
⑦
Display equalizer
Page 13

Appendix
ENGLISH
13
DVD/CD/USB/microSDHC media playback
Image playback from DVD/CD, USB
or audioSDHC
Select the desired source via the main menu.
The device changes to the desired source
and the playback starts.
If the playback does not start with the image
playback,
Press the [ ] button to change to the
folder/le list.
Press the [ ] button to display all the
folders and les of the data carrier.
- Or -
Press the [ ] button to display all the
images of the data carrier.
Note:
Folders and images are selected and started as
described under audio playback.
Page 14

Appendix
14
Bluetooth mode
The Bluetooth® function allows registering cell
phones and media playback devices with the car
sound system.
When you register a cell phone with the car sound
sys-tem, you can make phone calls with the builtin hands-free function. You can access the lists
of dialled numbers and the phone book of the
registered cell phone.
If the connected Bluetooth® device supports the
func-tions A2DP and AVRCP, you can play the
music via the car sound system and control the
playback.
Starting Bluetooth mode
Touch [ BT Phone ] on the main menu to
enter Bluetooth Phone mode.
[ ] Add new Bluetooth® device.
[ ] Display options menu.
Press the [ Connect ] button of the Bluetooth®
device with which you want to establish a
connection.
When the device is in range, the connection
is established and the menu for the device is
displayed.
Press the [ Delete ] button if you want to
delete the Bluetooth® device from the list.
Registering Bluetooth devices
If you want to register a device with the car sound
system for the rst time, proceed as follows:
Ensure that Bluetooth® is activated at the car
sound system and at your Bluetooth® device.
In the options menu of the Bluetooth® mode,
enter a pairing code (see Bluetooth® settings).
Search for new devices/connections on your
Bluetooth® device.
The car sound system appears as “PDE 960” in
the list of Bluetooth® devices.
Establish the connection; you may have to
enter the pairing code that was previously
entered on the car sound system.
The connection is being established and the menu
for the registered device is displayed.
Note:
If a telephone is connected with the car sound
sys-tem, the Bluetooth® icon is displayed at
the top right edge of the display in all audio/
video sources.
Telephone mode - Bluetooth
If you connected a phone with the car sound
system via Bluetooth®, the following menu
appears.
[ ] Display BT options menu.
[ ] Call up the phone book.
[ ] Call up caller lists.
[ ] Activating voice dialing.
[ ] Display BT setting menu.
Making a Call
• DialNumber
Input numbers by digit-keys on the screen.
Touch [ ] to clear the digits.
Touch [ ] button to dial out.
[ ] Hang up the call.
[ ] Mute the microphone.
[ ] Show the key pad.
[ ] Transfer the call to your mobile phone.
• Voicedial
Touch [ ] button to Voice dial.
Bluetooth mode
Page 15

Appendix
ENGLISH
15
Bluetooth Operations
Bluetooth mode
• Answeringacall
You can answer an incoming call by pressing the
[ ] button.
Touch [ ] button to reject an incoming call.
Call History
Access Call History by touching [ ] button.
Then select a number from Dialled/Missed/
Received calls.
Bluetooth Settings
In the options menu for Bluetooth®, you can
make the basic settings for the Bluetooth® mode.
In Bluetooth menu, touch [ ].
The option menu is displayed.
Touch on the selected option to change the
setting.
Auto answer - If “Auto Answer” is activated,
incoming phone calls are automatically
answered.
External Microphone - External Microphone
can be switched on of o.
Twin connect - Activating/deactivating twin
connect (2 cell phones can be connected
simultaneously).
PIN code - Many Bluetooth® devices request
the pairing code before establishing the
connection. You can dene it here.
Phone Book sync - To be able to access the
phone book of a connected telephone, you
must rst syn-chronise it via this menu entry.
Press [ ] to exit the options menu.
Audio playback via Bluetooth
streaming
If an audio streaming device is connected with the
car sound system via Bluetooth®, you can play back
the music via the car sound system and control the
playback.
Press the Streaming button on the main
menu to change to the audio playback.
[ ] Short press: Title selection.
Long press: Fast searching.
[
] Interrupt playback and continue play-
back.
[
] Short press: Title selection.
Long press: Fast searching.
[
] Display equalizer.
Note:
The Music Player app is already pre-installed
on the device. In addition, the Music Player
App Series 900 app must be installed on your
smartphone. It can be downloaded on the
Internet from www.blaupunkt.com.
Page 16

Appendix
16
PhoneLink
Overview of PhoneLink
The system of the car device is Android version,
which supports the connection between the car
device and Smart phone.
And you can also control your phone by the
car device, such as receiving calls, dialing calls,
listening to the music and watching movies
or pictures from your phone, as well using
navigation from the Smart phone to the screen
of the car device.
Note:
You can't control your iPhone by the unit. (iPhone
mirrors display on screen)
Connect with Android phone
Select “Phone Link” in the main menu and
select “Android USB” on the screen.
Start Android phone [USB debugging].
The operations of Android phone’s entering
[Setting] are as follows (since the Android
phone versions are not the same, it roughly
has two conditions):
1) Existence of [Developer options]: Click
[Additional settings]-Click [Developer
options]-click to open [Start developer
options]-click to open [USB debugging]determine to allow.
2) Inexistence of [Developer options]: Click
system version number (interior version
number) for 8 times, then back to setting
and click [Developer options]-click to open
“Start developer options”-click to open [USB
debugging]-determine to allow.
Bluetooth connection.
Scan for Bluetooth devices and select this
system for connection.
Correctly connect USB wire.
Auto install APP.
For the rst connection with SmartLink,
if the Android phone is not installed with
interconnection APP, the Smartlink will ask
for installing the App to the Android phone.
Finish connection.
(If it is not connected successfully, please
replace
USB cable or vehicle USB interface, or re-
insert USB wire or restart Android phone and
retry).
After connection, operate according to the
screen software.
Tip:
• Foryourdrivingsafety,pleasedonotusethe
function during driving.
• Fornormaluse,Android4.0 toAndroid6.0
version is recommended. Since Android 2.3X
and below version system lacks relevant
support, when using the version system to
connect the product, some functions (such
as: mobile video play, etc.) may not display
normally.
• Accordingtothedifferentmobile phone”
Media library” and “Video” program support
formats, it is not all the video files copied to
mobile phone can be identified and played.
According to the dierent equipment function,
not all video les of all formats can be played in
vehicle terminal smoothly.
• Sincethemobilephonedatacable
performance difference in the market, it is
strongly recommended using the original USB
data line to connect so as to guarantee the
connection stability.
• Duetothedifferenceofmobile phone
performance, when using different mobile
phones to connect, the performance may be
dierent.
Connect with iPhone
Select “Phone Link” in the main menu and
select “iPhone WiFi” on the screen.
Turn on the WiFi and Personal Hotspot on the
settings menu of your iPhone.
Select the hotspot name of your iPhone on
the list of the screen and enter the password.
Open the control center of your iPhone and
touch [AirPlay].
Select [EC-Mirror], and turn on the
“Mirroring” function.
After connecting successfully, the desktop of
you iPhone will display on the screen of the
unit.
If it is not connected successfully, please restart
the WiFi of your iPhone, and refresh the hotspot
list on the unit.
Page 17

Appendix
ENGLISH
17
Sound settings
Volume distribution (fader/balance)
You can adjust the volume distribution in the
vehicle for all sources.
On the control bar of the current audio
source, press the [
] button.
The equalizer menu is displayed.
Press the [ ] button.
The menu for fader and balance is displayed.
Adjust fader and balance with [ ]/[ ] or
[ ]/[ ].
Next, press [ ] . The setting is stored, the
current source is displayed again.
Equalizer
You can adjust the equalizer for all sources.
On the control bar of the current audio
source, press the [
] button.
The equalizer menu is displayed.
Select a preset equalizer via the buttons.
- Or -
Press the [ User ] button to adjust the level of
the available frequency bands according to
your prefer-ences.
Note:
With the [ Reset ] button, you can reset the
custom-ised setting again.
- Or -
Press the [ Flat ] button for a linear sound
playback.
Press the [ Loudness ] button to switch
increasing the bass at low volume on or o .
Next, press [ ] . The setting is stored, the
current source is displayed again.
Sound settings
External audio/video sources SWC
External audio/video sources
The device features an external AV input for audio
and video playback:
AV-IN 1 is located under the cover at the front
of the device.
AV-IN 2 is implemented as a cinch socket on a
cable at the rear of the device. You can specify
the instal-lation location of the port during the
installation of the device.
Danger!
Increased risk of injury from connector.
In case of an accident, the protruding connec-tor
in the AV-IN socket may cause injuries. The use of
straight plugs or adapters leads to an increased
risk of injury.
Start the AV-IN mode with the button AV-IN 1 or
AV-IN 2.
The display shows the audio or video playback of
the AV source.
Steering wheel-mounted
controls (SWC)
Up to 10 functions of the device can be operated
via existing steering wheel-mounted controls.
This requires assigning the desired functions
to the buttons of the steering wheel-mounted
controls.
Note:
The SWC function operates with analogue control
signals (passive resistive matrix). Depending on
the vehicle type, you may require an additional
interface.
In the main menu (if necessary under Apps),
select the SWC app.
In the first step, assign the desired functions to
up to 10 placeholders:
Note:
You also have the option of setting the
equalizer using three frequency bands. In
the equalizer menu, press the button [ ]
and perform the setting as described.
Page 18

Appendix
18
Select one of the placeholders 1 - 10.
Select a function for this placeholder.
An assigned placeholder is identied by a check
mark. A selected function is identified by the
number of the placeholder.
Repeat these steps for every additional
function to be assigned to the steering
wheel-mounted controls.
In the next step, assign the assigned
placeholders to the buttons of the steering
wheel-mounted controls:
Tap on Study.
Placeholder 1 and the assigned function are
displayed.
Press a button of the remote control for
approx. 1 second.
The displayed function is assigned to the
button being pressed.
Tap on [ ] to assign the next function.
Note:
Tap on [
] to return to a previous
function and, if necessary to reassign it.
WLAN
The device can be connected with a network
via WLAN. In addition, the device can be used a
mobile WLAN hotspot.
Note:
If the device s connected with the Internet via
WLAN, you can used Internet-based services
and apps, e.g. the preinstalled App Store and
the “Browser” app. Both are located in the
APPS menu under “Apps”.
Establishing a WLAN connection
Activate WLAN in the system settings (see
the chapter “System settings”, “Network”
menu item).
Under the “Network” menu item, select the
WIFI with which you want to connect the
device, and enter the required password as
necessary.
Basic Settings
In the settings menu, you can adjust the basic
settings for the dierent functions of the device
to your requirements.
In the main menu, select the Settings app.
The settings menu is displayed, the General
sub-menu is activated.
1
Note:
Scroll through the list, if necessary, to access
the desired setting.
The settings display features the following
functions and displays:
①
Menu items
②
Change to the main menu
③
Currently selected menu item
④
Time
⑤
Submenu items
General
The following setting are possible:
∙ Select the reception region for the radio
reception.
∙ Setting illumination colour of buttons
∙ You can select the wall paper
∙ Choose screen blackout o, 15s or 30s.
∙ Switch conrmation beep on/o.
Video
If “Parking” is activated, video/pictures will not
be displayed during driving. Please set according
to local laws.
Time
Making settings for date and time:
∙ Activating/deactivating automatic time and
date setting via GPS.
∙ Manual time and date setting as well as time
zone selection
∙ Selecting time and date format
WLAN Basic Settings
Page 19

Appendix
ENGLISH
19
Other Mode
Basic Settings Useful information Technical data
Volumes
You can adjust the volume ratio for all audio
sources in the volume menu.
Disc
Select DVD audio language. Options available
depending on DVD disc.
Select DVD subtitle language. Options available
depending on DVD disc.
Select DVD menu language. Options available
depending on DVD disc.
KID SAF/G/PG/PG13/PGR/R/NC17/ADULT
Set password to restrict the play of discs.
Network
∙ Activating/deactivating WLAN
∙ Activating/deactivating portable wi hospot
∙ Setting up a mobile networks.
Personal
To setup Location access, Security, Language &
input, Factory data reset, All data erase, Accounts,
etc.
Device
Adjusting brightness
Managing the memory of the device and
connected data carriers
Managing installed apps
System settings
Accessibility
To setup accessibility related applications.
You need download a screen reader and establish
an account.
Software version
To view software version information.
Useful information
Warranty
We provide a manufacturer's warranty for
products bought within the European Union. For
devices pur-chased outside the European Union,
the warranty terms issued by our respective
responsible domestic agency are valid. The
warranty terms can be called up from www.
blaupunkt.com.
Service
If you ever need to use a repair service, you will
nd information about service partners in your
country under www.blaupunkt.com.
Technical data
Operating system Android 4.2.2
Voltage supply
Operating voltage: 10.8~16V
Current consumption
In operation: ≤15A
10 sec. after switch-o: ≤5mA
Page 20

Appendix
20
Controles - equipo
1
botón
Pulsación corta
: Prender dispositivo
Pulsación breve
: Mudo
Pulsación larga
: Apagar dispositivo
2 HOME
botón
Llama al menú principal
3 BACK
botón
Retorna a la pantalla anterior
4 VOL+/VOL-
botón
Ajusta el volumen
5 Lector d
e tarjetas microSD para datos de
navegación (bajo la tapa)
6
Entrada AUX-IN (bajo la tapa)
7
Puerto USB
Se accede solamente con la cubierta abierta
8
Lector de tarjetas microSD para medios.
(bajo la tapa)
9
botón
Adjust the display brightness
10 NAVI
botón
Con la tarjeta microSD insertada con infor-
mación de navegación:
Pulsación breve
: Iniciar la navegación
11
botón
(Expulsar)
Expulsa un DVD/CD
12
Receptor infrarrojo para el control remoto
13
Unidad de DVD/CD
14
Interfaz de usuario, pantalla táctil
15 Reset
botón
Se accede solamente con la cubierta abierta
Restaura los valores originales de fábrica del
dispositivo.
¡Precaución! ¡Todos los ajustes personales se
perderán!
1
2
3
4
7
6
8
5
11
10
9
12131415
Page 21

Appendix
21
ESPAÑOL
Controles – Control remoto
1. Botón SRC
Cambia entre radio, navegación y fuentes
disponibles
2.
/ EJECT
botón
Expulsa un DVD/CD
3. Botón INFO
Reproduciendo un DVD: Muestra número de
pista/capitulo, así como muestra/oculta el
tiempo actual de reproducción
4. Botón MENU
Reproduciendo DVD: Abre el menú de DVD /
retorna a la reproducción
5. Botón ZOOM
Reproduciendo DVD: Selecciona zoom de nivel
1-3, desactiva el zoom
6. Botón PIC
Abre conguración de brillo de pantalla
7. botón
Reproduciendo DVD: Empieza cámara lenta
(Aplicar a otros modelos)
8. botón
Reproduciendo DVD: Termina reproducción
9. botón
Breve pulsación en el menú principal: Atajo para la
conguración de fondo y abre el menú de ajustes
Breve pulsación en la aplicación activa: Abre
opciones
Larga pulsación: Función para la aplicación
Android actual (si disponible)
10. botón
Pulsación corta: Abre el menú principal
Pulsación larga: Muestra las aplicaciones activas
11. botón
Pausa/continua reproducción de medios
12. botón
Abre el menú de ajustes
13. Botón
Contesta una llamada
14. Botón
Finaliza/rechaza una llamada telefónica
15. Botones numéricos de 0 - 9
En el teclado: Entrada de número
Numero "0" para reproducción de medios: Dene
el título para repetición (excepto para transmisión
Bluetooth®)
16.
# /
Botón
En reproducción de medios: Dene la
reproducción aleatoria de pista (excepto para
trans-misión Bluetooth®)
En el teclado del teléfono: Introduce el carácter "#"
17.
* /
Botón
Pulsación corta: En radio: Escanea estaciones
almacenadas
En medios: Escanea pistas
En el teclado del teléfono: Introduce el carácter "*"
Pulsación larga: En radio: Escanea estaciones en la
banda actual
18. Botón
Disminuye el volumen
19. Botón OK
Conrma una selección
20. Botón
Aumenta el volumen
21.
/
Botones
En el menú principal: Alterna entre las líneas de la
aplicación
En menús de ajustes: Selecciona la entrada del
menú
12
14
15
4
6
8
10
2
7
9
11
16
5
3
1
13
22
18
19
21
24
26
28
30
23
25
27
29
31
17
20
Page 22

Appendix
22
En las pantallas: Alterna entre las áreas de
visualización
/
Botones:
En el menú principal: Selecciona un botón de
aplicación
En menús de ajustes: Cambia ajuste
En las pantallas: Selecciona el botón
Nota:
Conrme una selección con OK (32) en cada
caso.
22. Botón
Silencia el dispositivo/cancela el silencio
23.
/
botón
Pulsación corta: En radio: Cambia la frecuencia
en incrementos
En Medios: Selecciona pista anterior/siguiente
Pulsación larga: Búsqueda rápida
24. Botón
Pulsación corta: Retorna a pantalla anterior
Pulsación larga: Abre los ajustes de brillo de
pantalla
25. Botón
Borra la última entrada de teclado
26. Botón
Reproduciendo DVD: Repite la sección individual
(Aplicar a otros modelos)
27.
GOTO
botón
En Radio: Selecciona frecuencia
Reproduciendo DVD/Medios: Selecciona
número de pista/capítulo
28.
ANGLE
botón
Reproduciendo DVD: Selecciona ángulo de
visión de la cámara (si disponible)
29.
SUBTITLE
botón
Reproduciendo DVD: Selecciona idioma de
subtítulo
30.
AUDIO
botón
Reproduciendo DVD: Selecciona idioma de
reproducción
31.
/ POWER
botón
Encendido/apagado de la unidad
Controles – Control remoto Contenidos
Notas de seguridad ........................................... 23
Información sobre la limpieza
........................... 25
Información sobre la eliminación...................... 25
Suministro
........................................................... 25
Actualización de software
................................. 25
Funcionando el dispositivo................................ 25
Prendiendo/apagando ...............................................25
Volumen .
......................................................................... 25
Operación
............................................................ 25
Pantalla táctil.
................................................................. 25
Menú principal .
.............................................................26
Menú de aplicaciones..................................................26
modo de radio
................................................... 27
Reproduciendo radio
...................................................27
Elegir banco de memoria
........................................... 27
Sintonizar una estación
.............................................. 27
Guardando emisoras manualmente
...................... 27
Guardar emisoras automáticamente
.................... 28
Recorrer emisoras
......................................................... 28
Conguración de RDS
................................................. 28
Reproducción de medios DVD/CD/USB/
microSDHC
...................................................... 29
Información básica ....................................................... 29
Modo DVD/CD
............................................................... 29
Soporte de datos USB
.................................................29
Tarjetas MicroSDHC
......................................................30
Reproducción de películas DVD
.............................. 30
Reproducción de audio de DVD/CD, USB o
microSDHC
...................................................................... 31
Reproducción de vídeo de DVD/CD, USB o
microSDHC
...................................................................... 31
Reproducción de una imagen de DVD/CD, USB o
audioSDHC
...................................................................... 32
Modo Bluetooth .............................................. 32
Iniciando el modo Bluetooth .................................... 32
Registrando dispositivos Bluetooth
....................... 32
Modo de teléfono - Bluetooth
..................................33
Haciendo una llamada
............................................... 33
Historial de llamadas
................................................... 33
Conguración de Bluetooth
.....................................33
Reproducción de audio desde un smartphone
Android
.............................................................................34
Page 23

Appendix
23
ESPAÑOL
Contenidos notas de seguridad
Notas de seguridad
El Sistema de sonido automotriz ha sido fabricado
de acuerdo con la última tecnología y establecidas
directrices de seguridad. Aun así, puede haber peligros si no se observan las notas de seguridad en
estas instrucciones.
Estas instrucciones están destinadas a familiarizarte
con las funciones más importantes. La información
detallada se puede encontrar en www.blaupunkt.
com.
• Leaestasinstruccionescuidadosamentey
completamente antes de usar el Sistema de
sonido automotriz.
• Guardelasinstruccionesenunlugaraccesible
a todos los usuarios.
• SiempreentregueelSistemaaterceros
acompañado de estas instrucciones.
Además, observe las instrucciones de los dispositivos utilizados junto con ese Sistema de sonido
automotriz.
Símbolos utilizados
Estas instrucciones emplean los siguientes
símbolos:
¡PELIGRO!
Advierte sobre lesiones
¡PRECACUCIÓN!
Advierte sobre daños en la unidad de
DVD/CD
¡PELIGRO!
Advierte sobre el alto volumen
La marca CE conrma el cumplimento
de las directivas de la UE.
Identica un paso de secuenciación
• Identica un listado
PhoneLink ....................................................... 35
Vista general de PhoneLink ....................................... 35
Conectando con un teléfono Android
.................. 35
Conectando con el iPhone
........................................ 35
Ajustes de sonido ........................................... 36
Fuentes externas de audio y video
............... 36
Controles de volante (SWC)
........................... 37
WLAN
............................................................... 37
Ajustes básicos................................................ 37
Información útil
.............................................. 38
Datos técnicos
................................................. 38
Diagrama de conexión
................................... 39
Page 24

Appendix
24
Notas de seguridad
Carretera segura
Observe las siguientes notas sobre la seguridad
vial:
¡PELIGRO!
Riesgo de seguridad en carretera
al utilizar el dispositivo durante la
conducción.
¡El uso de las funciones del dispositivo durante la
conducción puede desviar su atención del tráco y
llevar a graves accidentes!
En particular, el uso de las siguientes funcion-es
inuye signicativamente en su atención como
operador del vehículo:
• Navegación (conguración, como entrada de
dirección, por ejemplo)
• Reproducción de video
• Uso de internet (a través del “Navegador”, por
ejemplo)
• Uso de un Smartphone conectado
Absténgase de estas y de todas funciones
adicionales que desvíen su atención del tráco
y de la operación del vehículo durante la
conducción.
Para usar esas funciones, pare en un lugar
adecuado y opere el dispositivo mientras el
vehículo esté parado.
• Utilice tu dispositivo de tal forma que
siempre puedas controlar con seguridad
el vehículo. En caso de duda, pare en un
lugar adecuado y opere su dispositivo en el
vehículo. Como conductor, no puedes utilizar
las aplicaciones que distraigan del tráco
(dependiendo del alcance de las funciones
del dispositivo, por ejemplo, ver videos,
introducir un destino).
• Siga las recomendaciones de conducción
durante la dirección de la ruta sólo si no
estás violando las reglamentaciones de
tráco! Señales y las normas de tráco tienen
siempre prioridad sobre recomendaciones de
conducción.
•
Siempre escuchar a un volumen moderado
para proteger su audición y ser capaz de
escuchar señales acústicas de advertencia
(por ejemplo, sirenas de policía). Durante las
fases de silencio (por ejemplo, al cambiar la
fuente de audio), el cambio de volumen no
es audible. No aumentar el volumen durante
esta fase de silencio.
Instrucciones generales de seguridad
Observar la siguiente nota para protegerse
contra lesiones:
No modique ni abra el dispositivo.
El dispositivo contiene un láser de clase 1 que
puede causar lesiones en los ojos.
Use como indicado
Este sistema de sonido de coche está diseñado
para la instalación y operación de un vehículo
con voltaje de sistema de vehículo de 12 V y
debe ser instalado en una ranura DIN. Observar
los límites de salida del dispositivo. Reparación e
instalación, si es necesario, deben realizarse por
un especialista.
Instrucciones de instalación
Puedes instalar el sistema de sonido de
coche usted mismo si tienes experiencia en la
instalación de sistemas de sonido automotriz y
estás muy familiarizado con el sistema eléctrico
del vehículo. Para ello, observe el diagrama de
conexión al nal de estas instrucciones.
Declaración de conformidad
Blaupunkt Technology GmbH declara que el
dispositivo cumple con los requisitos básicos
y las demás regulaciones pertinentes de la
Directiva 1999/5/EC.
La declaración de conformidad se puede
encontrar en la internet bajo www.blaupunkt.
com.
Page 25

Appendix
25
ESPAÑOL
notas de limpieza notas de eliminación Funcionando el dispositivo Operación
Información sobre la limpieza
Solventes, limpieza y fregado de agentes, así
como producto aerosol para cuidado de los
plásticos del salpicadero pueden contener
ingredientes que pueden dañar la supercie del
sistema de sonido automotriz.
Utilice sólo un paño seco o ligeramente
humedecido para limpiar el sistema de sonido
automotriz.
Información sobre la
eliminación
¡No tire su unidad vieja a la basura
doméstica!
Utilizar los sistemas de devolución y
recogida para desechar la unidad vieja, el control
remoto y las pilas gastadas.
Suministro
Se entrega con esa unidad:
• Sistemadesonidoautomotriz
• Controlremoto(bateríaincluida)
• AntenaGPS
• StickUSBparaWLAN(Wi-Fi)
• MicrófonoBluetoothexterno
• Manualdeinstrucciones
• Marcoplásticosencillo
• Conjuntodepequeñaspartes
• Materialdeinstalación(errospararemoción
de la unidad)
• Cableparaconexión
Actualización de software
Bajo www.blaupunkt.com, encontrará el
software más reciente para su dispositivo,
incluidas las instrucciones para la actualización
de software.
Actualizaciones de software se encuentran en:
http://www.blaupunkt.com/en/servicesupport/
car-audio/downloads/updates/
Funcionando el dispositivo
¡PRECAUCIÓN!
Tornillos de seguridad de transporte
Asegúrese de que los tornillos de jación para
transporte en la parte superior del dispositivo
sean removidos antes de la puesta en marcha del
dispositivo.
Prendiendo/apagando
Prendiendo/apagando
Pulse el botón
para prender la unidad.
Cuando prendida, pulse y mantenga el
botón
para apagar la unidad.
Prendiendo/apagando por la ignición (ACC)
Si el sistema de sonido automotriz está
conectado con el encendido del vehículo y fue
apagado a través de la botón
, va a prender
por la ignición (ACC).
Volumen
Ajuste del volumen
Puedes ajustar el volumen en incrementos de 0 (o)
a 40 (máxima).
Pulse
la VOL+/VOL- para cambiar el volumen.
Silenciando el sistema (Mute)
Pulse brevemente la
para silenciar el
dispositivo o para retornar al volumen anterior.
Operación
Pantalla táctil
Notas importantes:
No utilice objetos puntiagudos o duros, como
bolígrafos o plumas, para operar la pantalla
táctil.
El aparato presenta una pantalla táctil capacitiva
que pro-provee un control remoto y dispositivo de
botones (vea la sección “Controles” en el principio
de estas instrucciones) y permite el funcionamiento
del aparato.
Tocando
Para activar un control, por ejemplo, un botón,
un leve toque de la supercie de la pantalla es
suciente. No debes ejercer ninguna presión sobre
la supercie de la pantalla.
Page 26

Appendix
26
Operación
Menú de aplicaciones
Toque [ ] para entrar en el menú de aplicaciones.
1. EN EL COCHE
Muestra las principales fuentes.
2. APPS
Muestra las aplicaciones Android instaladas.
En la lista de menú, arrastre a izquierda/derecha
para desplazarse.
Toque y mantenga en un icono por más de 2
segundos para agregar un atajo al escritorio,
basta arrastrarlo y soltar en el escritorio. Para
borrar el atajo, toque, mantenga y arrástrelo
hacia el
[ ] en la parte superior, suéltelo
cuando esté rojo.
• Toquecorto:
Un toque corto en la supercie de la pantalla
es suciente para activar la mayoría de los
controles.
• Toquelargo:
Algunas funciones requieren un toque largo.
Coloque la punta del dedo sobre la supercie de pantalla durante aproximadamente 1
segundo.
Deslizar/arrastrar
Algunas funciones requieren deslizar el dedo sobre
la pantalla, por ejemplo:
• desplazandolistas,
• deniendoajustes(sliders).
Toque en la supercie de la pantalla y luego, mueva
su dedo sobre la supercie.
Zoom
Cuando se muestran imágenes y mapas (navegación), puede ampliar o reducir la vista (zoom):
Toque en el área de la pantalla de mapa con dos
dedos y coloque los dedos sobre la supercie.
. Acerque los dos dedos juntos (alejar / reducir) o
más separadas (zoom / ampliación).
Menú principal
ulsar el botón [ HOME ] para acceder al menú de
fuentes principal.
5
43
①
Barra de fuentes del sistema:
Toque y mantenga el centro de la barra y
arrastre izquierda para mostrar más iconos.
Toque el icono deseado para entrar en el
modo correspondiente.
②
Reloj.
③
Fuente actual de audio/video.
④
Muestra lista de aplicaciones.
⑤
Entra en el modo de ajustes.
Page 27

Appendix
27
ESPAÑOL
modo de radio
Radio
Reproduciendo radio
En el menú principal, presione el botón
[ Radio ] Se muestra el menú de reproducción
de radio.
La pantalla de radio cuenta con las siguientes
funciones y muestra:
①
Volver al menú principal
②
Indicador de banda de radio actual
③
Estación de radio predenida actual
④
Frecuencia actual
⑤
Reloj
⑥
Información de la emisora almacenada en la
predenición
⑦
Tocar para ver más botones en pantalla
⑧
Sintonía automática retrocediendo
Sintonizar retrocediendo (pulso largo)
⑨
Sintonía automática avanzando.
Sintonizar avanzando (pulso largo)
⑩
Recorrer estaciones predenidas
⑪
Cambiar de banda
12 13 14
15
16
⑫
Toque para un acceso rápido a la conguración
del ecualizador
⑬
Ingresar frecuencia directamente
⑭
Guardar emisoras automáticamente
⑮
Opciones de conguración de RDS
⑯
Para mostrar la lista PTY (puede no estar
disponible en su país)
Elegir banco de memoria
Hay bandas de frecuencia y bancos de memoria
diferentes. En cada banco de memoria se pueden
almacenar hasta 6 emisoras.
Toque el botón [ ] repetidamente hasta
que aparezca el banco de memoria deseado.
FM1 FM2 FM3 AM1 AM2 FM1
Sintonizar una estación
Sintonizar estaciones manualmente
Durante la sintonización manual, se cambiará la
frecuencia en pasos.
Toque el botón [ ] o [ ] por
aproximadamente 2 segundos para
sintonizar una estación más alta / baja.
Introducir la frecuencia directamente
Si se conoces la frecuencia de la emisora
deseada, puedes introducirla directamente a
través de la pantalla táctil.
Toque el botón [ ] para mostrar el
funcionamiento adicional.
Toque el botón [ ].
Se muestra un teclado numérico para
entrada de la frecuencia.
Introduzca la frecuencia de la emisora
deseada con el teclado numérico.
Toque el botón [ OK ].
Se muestra el menú de reproducción
de radio, la estación de la frecuencia se
reproduce.
Empezando búsqueda de estación por
sintonía
Toque brevemente [ ] o [ ] en la
interfaz de usuario para buscar una estación
superior / inferior. Para detener la búsqueda,
repita la operación anterior o presione otras
teclas con funciones de radio
Guardando emisoras manualmente
Seleccione el banco de memoria deseado
con el botón [ ].
Establezca la emisora deseada.
Toque uno de los botones de memoria [ P1 ] -
[ P6 ] por aproximadamente 2 segundos
para guardar la estación actual en el botón
seleccionado.
La estación se almacena
Page 28

Appendix
28
Modo de radio
Guardar emisoras automáticamente
(Travelstore)
Con Travelstore puedes buscar y guardar
automáticamente las 6 estaciones de FM con
mejor señal de la región en el banco de memoria
actual. Las estaciones almacenadas previamente
en este banco de memoria se eliminan en el
proceso.
Seleccione un banco de memoria.
Toque el botón [ ] para mostrar opciones
de funcionamiento adicionales.
Toque el botón [ TS ].
El sintonizador empieza la búsqueda
automática por sintonía. Después de
almacenar, la radio reproduce la posición
1 del banco de memoria seleccionado
previamente.
Nota:
Para la recepción de Europa: con prioridad
para información de tráco activada, se
almacenan únicamente estaciones de
información de tráco.
Recorrer emisoras
Puede usar la función scan para reproducir todas
las emisoras predenidas por unos segundos.
Toque el botón [ ].
Cada estación almacenada será reproducida
automáticamente durante 5 segundos.
Tocando el botón [ ] nuevamente
selecciona la estación actualmente
escaneada y la reproduce.
Conguración de RDS
Muchas emisoras de FM transmiten una señal
RDS (Radio Data System) además de su programa
en Europa que permite funciones adicionales,
tales como la visualización del nombre de la
estación de recepción.
RDS frecuencia alternativa : Cambia RDS AF
ON/OFF
Si RDS AF está activada, el dispositivo cambia
automáticamente a la frecuencia más fuerte.
Deshabilitar esa función si se experimenta
cambio constante de emisora.
RDS frecuencia alternativa: En la región
Europa, una emisora de FM puede identicar
anuncios sobre el tráco mediante una señal
RDS. Si está activada la prioridad para los
informes de tráfico, un informe de tráfico
se conecta automáticamente, incluso si el
sistema de sonido del coche no está en modo
de radio.
RDS Regional: Cambia RDS regional mode
on/off. Si se activa el modo regional, el
dispositivo cambia solamente a las frecuencias
alternativas de la estación que emitía el mismo
programa regional.
RDS Time: Cambia RDS time on/o. Con RDS
CT activado, el tiempo del dispositivo se ajusta
automáticamente a través de la señal RDS.
Deshabilitar esa función si se experimenta
cambio constante de hora.
Lista PTY: Se abre una lista de tipos de
programa.
Toque en el tipo de programa deseado
restringir la recepción de las estaciones
correspondientes.
Page 29

Appendix
29
ESPAÑOL
Reproducción de medios DVD/CD/USB/microSDHC
Reproducción de medios DVD/CD/
USB/microSDHC
Información básica
Soporte de datos reproductibles y medios
DVD/VCD/CDDA
DVD/CD-R/RWs
∙ Soporte de datos USB
∙ Tarjetas microSDHC
∙ ArchivosMP3oWMA,videosyfotos
Notas:
Para garantizar el funcionamiento correcto,
utilice solamente CDs con el logo de
Compact Disc y DVDs con el logo de DVD.
Blaupunkt no puede garantizar el correcto
funcionamiento de DVDs y CDs protegidos
contra copia y los DVD/CD, USB y tarjetas
microSD en blanco disponibles en el
mercado.
La reproducción de películas e imágenes
en la pantalla del dispositivo está permitida
sólo cuando el vehículo está detenido y se
aplica el freno de mano. El cable de “PARKING”
se debe conectar con la conexión del freno
de mano del vehículo. La reproducción
de películas en un monitor externo
(entretenimiento para el asiento trasero)
también es posible durante la conducción.
Tenga en cuenta la siguiente información cuando
prepareunsoportededatosMP3/WMA:
FormatosdeDVD/CD:DVD/CD-R/RW,Ø:12
cm
Formatos de DVD/CD de datos: ISO 9669
Joliet, niveles 1 y 2
Velocidad de grabación de CD: Max. 16x
(recomendado)
Formato USB / sistema de archivos: FAT/
FAT16/FAT32/NTFS
Sistema de archivos para tarjeta microSD:
FAT/FAT16/FAT32
Extensión para archivos de audio:
– .MP3 para archivos MP3
–.WMAparaarchivosWMA
ArchivosWMAsólosinGestiónDigitalde
Derechos(DRM) ycreadosconWindows
Media® Player 8 o posterior.
MP3 ID3 tags: Versión 1 y 2
Tasa de bits para crear archivos de audio:
– MP3: de 32 a 320 kbps
–WMA:de32a192kbps
Número máximo de archivos y carpetas:
– Hasta 40.000 archivos (dependiendo de la
estructura de archivos / carpetas)
Modo DVD/CD
Insertando un DVD/CD
¡Riesgo de daños graves a la unidad de DVD/
CD!
DVDs/CDs y DVDs/CDs con forma no circular y de
8 cm de diámetro (mini DVDs/CDs) no deben ser
utilizados.
No aceptamos ninguna responsabilidad por
cualquier daño a la unidad que puede ocurrir
como resultado del uso inadecuado de DVD y
CD.
Inserte el CD/DVD con su impreso lado para
arriba en la bandeja de DVD/CD hasta que
sienta una ligera resistencia.
El CD/DVD es automáticamente estirado y
comienza la reproducción.
Nota:
No debe dificultar o ayudar a la unidad
cuando está automáticamente estirando el
CD/DVD.
Expulsando un DVD/CD
Mantenga pulsado el botón para expulsar
un DVD/CD insertado.
Nota:
No debe dificultar o ayudar a la unidad
cuando está automáticamente estirando el
CD/DVD.
Soporte de datos USB
Ese dispositivo cuenta con tres puertos USB:
Puerto USB1 debajo de la tapa en la parte
frontal del dispositivo.
Puerto USB2 y USB3 en la parte posterior del
dispositivo.
Notas:
Utilizar los puertos USB 1, 2 y 3 para los
soportes de datos USB conteniendo los
medios.
Utilizar los puertos USB 2 o 3 para el USB de
WLANsuministrado.
Conectando un soporte de datos USB a la
parte frontal del dispositivo
Abra la tapa.
Inserte el soporte de datos USB en el puerto
USB.
Page 30

Appendix
30
Reproducción de DVD/CD/USB/microSDHC
El dispositivo cambia automáticamente al modo
USB. Se leen los datos, la reproducción comienza
con el primer archivo de medios reconocido por el
dispositivo.
Removiendo un soporte de datos USB
Apague la unidad. Desconecte el soporte de
datos USB.
Tarjetas MicroSDHC
Este dispositivo cuenta con un lector de tarjetas
microSDHC debajo de la tapa en la parte frontal
del dispositivo.
Insertando una tarjeta microSDHC
Abra la tapa.
Inserte la tarjeta microSDHC con la parte
etiquetada a la derecha (contactos a la
izquierda) y sus contactos primero el lector
de tarjeta hasta que encaje en su lugar.
El dispositivo cambia automáticamente al modo
de microSDHC. Se leen los datos, la reproducción
comienza con el primer archivo de medios
reconocido por el dispositivo.
Removiendo una tarjeta microSDHC
Si necesario, abra la tapa.
Empuje la tarjeta microSDHC hasta que se
desenganche.
Tire de la tarjeta microSDHC en el lector de
tarjetas.
Reproducción de películas DVD
El sistema de sonido puede reproducir vídeo DVD
y VCD. Después de insertar el DVD, la reproducción
se inicia automáticamente. Se muestra el menú de
DVD.
Se puede navegar en el menú de DVD tocando los
botones correspondientes en el menú de DVD en
la pantalla táctil. Después de comenzar la película
a través del menú del DVD, la película se muestra.
Se oculta el menú de reproducción de DVDs.
Brevemente, toque la pantalla táctil una
vez para mostrar el menú de reproducción
nuevamente.
Se muestra el menú de reproducción.
1
①
Volver al menú principal
②
Muestra opciones de funcionamiento
adicionales
③
Barra de progreso
④
Capítulo anterior
⑤
Reproducir/pausa
⑥
Capítulo siguiente
⑦
Muestra menú de DVD
⑧
Oculta opciones de funcionamiento
adicionales
⑨
Reproducción aleatoria
⑩
Reproducción de repetición
⑪
Toque para acceder a menú de ajustes de
ecualizador
⑫
Para entrar en menú de búsqueda
13
14
15
16
⑬
Selecciona canal de audio
⑭
Selecciona el ángulo de visión
⑮
Selecciona el idioma de los subtítulos
⑯
Oculta opciones de funcionamiento
adicionales
Page 31

Appendix
31
ESPAÑOL
Reproducción de audio de DVD/CD,
USB o microSDHC
Los principios de la reproducción de audio (MP3/
WMA)de soportesde datossonidénticospara
todas las fuentes.
Seleccione la fuente deseada a través del
menú principal. El dispositivo cambia a la
fuente deseada y comienza la reproducción.
Si la reproducción no se inicia con la reproducción
de audio,
Toque el botón [ ] para cambiar a la lista
de archivos / carpetas.
Toque el botón [ ] para mostrar todos los
archivos y carpetas del soporte de datos.
- O -
Toque el botón [ ] para mostrar todos los
archivos de audio del soporte de datos.
[ ] Cambia al siguiente nivel superior de la
carpeta.
[ ] inicia títulos.
Después de iniciar un título, se muestra el menú
de reproducción.
1
2 3 4 5 6
①
Volver al menú principal
②
Muestra opciones de funcionamiento
adicionales
③
Selección de título
④
Interrumpe la reproducción / continua la
reproducción
⑤
Selección de título
⑥
Muestra lista de archivos/carpetas
Toque en [ ] para mostrar operaciones de
funcionamiento adicionales en el menú de
reproducción.
Reproducción de DVD/CD/USB/microSDHC
⑦
Empieza y finaliza la función REPEAT
El modo REPEAT cambia cada vez que se toca
el botón [ ].
[ 1 ] Repetir sencillo: Reproduce la música
actual repetidamente.
[ ] Repetir carpeta: Reproduce la carpeta
actual repetidamente.
[ ] Repetir apagado: Cancela reproducción
repetida.
⑧
Reproducción aleatoria
⑨
Toque para acceder a ajustes de ecualizador
⑩
Muestra el teclado para introducir
directamente el número del título deseado.
Reproducción de vídeo de DVD/CD,
USB o microSDHC
Seleccione la fuente deseada a través del
menú principal.
El dispositivo cambia a la fuente deseada y
comienza la reproducción.
Si la reproducción no se inicia con la reproducción
de vídeo,
Toque el botón [ ] para cambiar a la lista
de archivos / carpetas.
Toque el botón [ ] para mostrar todos
archivos y carpetas.
- O -
Toque el botón [ ] para mostrar todos los
archivos de video del soporte de datos.
Nota:
Carpetas y videos se seleccionan y se
reproducen como se describe en la
reproducción de audio.
Si ha seleccionado una película, se inicia la
reproducción. Durante la reproducción de la
Page 32

Appendix
32
película, se oculta el menú de reproducción.
Brevemente, toque la pantalla táctil una vez
para mostrar el menú de reproducción otra
vez.
Se muestra el menú de reproducción.
1
7
①
Volver al menú principal.
②
Mostrar opciones de funcionamiento
adicionales.
③
Seleccionar película anterior.
④
Interrumpir la reproducción / continuar
reproducción.
⑤
Seleccionar próxima película
⑥
Llama al teclado de selección directa de la
película o tiempo.
⑦
Muestra el ecualizador.
Reproducción de una imagen de
DVD/CD, USB o audioSDHC
Seleccione la fuente deseada a través del
menú principal.
El dispositivo cambia a la fuente deseada y
comienza la reproducción.
Si la reproducción no se inicia con la reproducción
de una imagen,
Toque el botón [ ] para cambiar a lista de
archivos/carpetas.
Toque el botón [ ] para mostrar todos
archivos y carpetas del soporte de datos.
- O -
Toque el botón [ ] para mostrar todas
imágenes del soporte de datos.
Nota:
Carpetas y las imágenes se seleccionan y se
inician como se describe en la reproducción
de audio.
Reproducción de medios desde DVD/CD/USB/microSDHC
Modo Bluetooth
La función Bluetooth® permite registrar los
teléfonos celulares y dispositivos de reproducción
con el sistema de sonido automotriz.
Cuando se registra un teléfono celular con el
sistema de sonido automotriz, se pueden hacer
llamadas con la función integrada de manos
libres. Se pueden acceder a las listas de números
de marcado y la agenda del teléfono celular
registrado.
Si el dispositivo Bluetooth® conectad soporta
las funciones A2DP y AVRCP puede reproducir
música por el sistema de sonido y controlar la
reproducción.
Iniciando el modo Bluetooth
Tocar [ Teléfono ] en el menú principal para
acceder al modo Bluetooth del teléfono.
[ ] Para añadir nuevo dispositivo Bluetooth®.
[ ] Muestra menú de opciones.
Toque el botón [ Connect ] del dispositivo
Bluetooth® con el que desea establecer una
conexión.
Cuando el dispositivo está en rango, se
establece la conexión y aparece el menú del
dispositivo.
Toque el botón [ Delete ] para eliminar el
dispositivo Bluetooth® de la lista.
Registrando dispositivos Bluetooth
Si desea registrar un dispositivo con el sistema de
sonido automotriz por primera vez, proceda del
siguiente modo:
Asegúrese que el Bluetooth® esté activado
en el sistema de sonido automotriz y en el
dispositivo Bluetooth®.
En el menú de opciones del modo de
Bluetooth®, introduzca un código de
apareamiento (véase configuración de
Bluetooth®).
Busque por nuevos dispositivos/conexiones
desde su dispositivo Bluetooth®.
El sistema de sonido automotriz aparece
como “PDE 960” en la lista de dispositivos
Page 33

Appendix
33
ESPAÑOL
• Contestandounallamada
Puede contestar una llamada entrante pulsando
el botón [ ].
Toque el botón [ ] para rechazar una llamada
entrante.
Historial de llamadas
Accede al historial de llamadas tocando el botón
[
].
Luego seleccione un número desde llamadas
realizadas/perdidas/recibidas.
Conguración de Bluetooth
En el menú de opciones para Bluetooth®, usted
puede hacer ajustes para el modo de Bluetooth®.
En el menú Bluetooth, toque [ ].
Se muestra el menú de opciones.
Toque en la opción seleccionada para cambiar
la conguración.
Modo Bluetooth
Bluetooth®.
Establezca la conexión; puedes tener que
ingresar el código de apareamiento que
ingresaste anteriormente en el sistema de
sonido automotriz.
Se establece la conexión y aparece el menú del
dispositivo registrado.
Nota:
Si un teléfono está conectado con el sistema
de sonido automotriz, se muestra el icono de
Bluetooth® en el borde derecho superior de la
pantalla en todas las fuentes de audio y video.
Modo de teléfono - Bluetooth
Si ha conectado un teléfono con el sistema de
sonido de coche a través de Bluetooth®, aparece
el siguiente menú.
[ ] Muestra menú de opciones BT.
[ ] Muestra el catalogo telefónico.
[ ] Muestra lista de llamadas.
[ ] Activa marcación por voz.
[ ] Muestra menú de ajustes BT.
Haciendo una llamada
• Marcandounnúmero
Ingrese números por el teclado en pantalla.
Toque [ ]para borrar los dígitos.
Toque [ ] para marcar.
[ ] Cuelga la llamada.
[ ] Silencia la llamada (micrófono).
[ ] Muestra el teclado.
[ ] Transere la llamada al teléfono móvil.
• Marcaciónporvoz
Toque el botón [ ] para marcación por
voz.
Page 34

Appendix
34
Bluetooth Operations
Modo Bluetooth
Respuesta automática - Si “Respuesta
automática” del teléfono está activada, las
llamadas se contestan automáticamente.
micrófono externo - Micrófono externo
puede ser utilizado.
doble conexión -Habilita doble
conexión (2 teléfonos pueden conectarse
simultáneamente).
Clave PIN – La mayoría de los dispositivos
Bluetooth® solicitan el código de
emparejamiento antes de establecer la
conexión. Se pueden denir aquí.
Sincronización de libreta de teléfonos - Para
poder acceder a la agenda de un teléfono
conectado, usted debe primero sincronizar a
través de esta entrada de menú.
Toque [ ] para salir del menú de opciones.
Reproducción de audio a través de
transmisión Bluetooth
Si un dispositivo de transmisión de audio está
conectado con el sistema de sonido del coche a
través de Bluetooth®, puede reproducir la música a
través del sistema de sonido del coche y controlar la
reproducción.
Pulse el botón Transmisión para cambiar a la
reproducción de audio.
[ ] Presione brevemente: Selección de
título.
Pulsación larga: Búsqueda rápida.
[ ] Interrumpir la reproducción y continu-
ar la reproducción.
[
] Presione brevemente: Selección de
título.
Pulsación larga: Búsqueda rápida.
[
] Mostrar ecualizador.
Nota:
La aplicación reproductora de música ya
está pre-instalada en el dispositivo. Además,
debe instalarse la aplicación reproductora
de música de la aplicación Series 900 en su
teléfono inteligente. Se puede descargar en
Internet desde www.blaupunkt.com o buscar
por “Blaupunkt Music Player” en tu tienda de
aplicaciones.
Page 35

Appendix
35
ESPAÑOL
Bluetooth Operations
PhoneLink
Vista general de PhoneLink
El sistema operativo de la unidad de sonido
automotriz es Android que soporta la conexión a
teléfonos inteligentes.
Y también puedes controlar su teléfono por la
unidad, recibir llamadas, hacer llamadas, escuchar
música y asistir películas o ver fotos desde su
teléfono, al igual que utilizar la navegación por
internet también desde su teléfono directamente a
la pantalla de la unidad.
Nota:
No puedes controlar su iPhone por la pantalla de
la unidad. (la pantalla del iPhone solamente es
espejada en la pantalla de la unidad)
Conectando con un teléfono Android
Seleccione “Phone Link” en el menú principal
y seleccione “Android USB” en pantalla.
Habilitar [Depuración USB] en el teléfono
Android.
Las operaciones de entrada de [ajuste]
teléfono Android son los siguientes (ya que las
versiones de teléfono Android no son lo mismo,
aproximadamente tiene dos condiciones):
1) Existencia de [opciones de desarrollador]: haga
clic en [configuración adicional] - haga clic en
[opciones de desarrollador] - clic para abrir e
iniciar las [opciones de desarrollador] - click para
abrir [depuración USB] - seleccione para permitir.
2) Inexistencia de [opciones de desarrollador]:
Haz clic en el número de versión del sistema
(número de versión interior) 8 veces, luego
a configuración haga clic en [opciones de
desarrollador] - clic para abrir e iniciar las
[opciones de desarrollador] - click para abrir
[depuración USB] - seleccione para permitir.
Conexión Bluetooth.
Buscar dispositivos Bluetooth y seleccione este
sistema para conectar.
Conecte correctamente el cable USB.
La aplicación se instalará automáticamente.
Para la primera conexión con PhoneLink, si no
está instalada la aplicación de interconexión en el
Consejos:
• Parasuseguridaddeconducción,noutilicela
función durante la conducción.
• Paraunusonormal,Android4.0alaversión6.0
de Android se recomienda. Desde Android 2.3
X y a continuación la versión sistema carece de
apoyo pertinente, cuando se utiliza el sistema
de la versión para conectar el producto, algunas
funciones (tales como: reproducción de vídeo
móvil, etc.) no se muestre normalmente.
• Segúnlos diferentesformatosde los
programas de soporte “Media library” y “Video”
en los diferentes teléfonos, si no son copiados
propiamente al teléfono no es posible la
conexión y reproducción en pantalla. Según la
función de los diferentes teléfonos, no todos
los archivos de vídeo de todos los formatos se
pueden reproducir en la unidad.
• Porladiferenciaderendimientode los cables
de datos que hay en el mercado, se recomienda
usar los cables USB originales con el fin de
garantizar la estabilidad de la conexión.
• Debidoaladiferenciade rendimientodel
teléfono móvil, al conectar diferentes teléfonos
móviles, el rendimiento puede ser diferente.
Conectando con el iPhone
Seleccione “Phone Link” en el menú principal
yseleccione“iPhoneWiFi”enpantalla.
ActivarelWiFiyHotspotPersonalenelmenú
de ajustes de tu iPhone.
En la unidad Blaupunkt, seleccione el nombre
del hotspot de tu iPhone e introduzca la
contraseña– conecte porlaredWi-Fi–ver
“conectando a redes”.
Abra el centro de control de tu iPhone –
normalmente arrastrando para arriba en la
pantalla principal - y toque [AirPlay].
Seleccione [EC-Mirror], y active la función
“Mirroring”.
Después de conectar con éxito, el escritorio
de iPhone se mostrará en la pantalla de la
unidad.
Si no está conectado correctamente, reinicie la
WiFidetuiPhoneyactualizarlalistadepuntode
acceso de la unidad.
teléfono Android, el Phonelink pedirá instalar la
aplicación en el teléfono.
Si naliza la conexión.
(Si falla la conexión, favor reemplazar el cable USB
o re-conectar el cable USB o reiniciar el teléfono
Android y probar nuevamente).
Después de conectado operar como lo que
aparece en pantalla.
Page 36

Appendix
36
Ajustes de sonido
Distribución de volumen (fader/balance)
Usted puede ajustar la distribución de volumen en
el vehículo para todas las fuentes.
En la barra de control de la fuente de audio
seleccionada, toque el botón [
].
Se muestra el menú del ecualizador.
Toque el botón [ ].
Se muestra el menú de fader y balance.
Ajuste de fader y balance con [ ]/[ ] o
[ ]/[ ].
a continuación, toque [ ]. La conguración
se guarda, la fuente actual se muestra otra
vez.
Ecualizador
Usted puede ajustar el ecualizador para todas las
fuentes.
En la barra de control de la fuente de audio
seleccionada, toque el botón [
].
Se muestra el menú del ecualizador.
Seleccione un ecualizador preestablecido en
los botones.
- O -
Toque el botón [ User ] para ajustar el nivel de
las bandas de frecuencias disponibles según
tus preferencias.
Nota:
Tocando el botón [ Reset ], puedes reiniciar el
ajuste customizado nuevamente.
- O -
Toque el botón [ Flat ] para una reproducción
linear.
Toque el botón [ Loud ] para aumentar los
Ajustes de sonido
Fuentes externas de audio/video
Fuentes externas de audio y
video
El dispositivo cuenta con una entrada externa de
AV para reproducción de audio y video:
AV-IN 1 se encuentra debajo de la tapa en la
parte delantera del dispositivo.
AV-IN 2 implementa como una toma RCA en
un cable en la parte trasera del dispositivo.
Puede especificar la ubicación del puerto
durante la instalación del dispositivo.
¡Peligro!
Aumento del riesgo de lesión del conector.
En caso de accidente, el conector que sobresale
en la toma de AV-IN puede causar lesiones. El uso
de adaptadores o enchufes rectos conduce a un
mayor riesgo de lesión.
Iniciar el modo de AV-IN con el botón AV en 1 o 2
de AV-IN.
La pantalla muestra la reproducción de audio o
vídeo de la fuente de AV.
bajos a bajos volúmenes – puedes prenderlo
o apagarlo.
Luego, toque en [ ]. Se guarda el ajuste, la
fuente se actual se muestra nuevamente.
Nota:
También tienes la opción de ajuste del
ecualizador de tres bandas de frecuencia. En
el menú del ecualizador, presione el botón
[ ]y realice la configuración como se
describe.
Page 37

Appendix
37
ESPAÑOL
Controles de volante (SWC)
Hasta 10 funciones del dispositivo pueden
funcionar a través de los controles montados en
el volante. Esto requiere asignar las funciones
deseadas a los botones de los controles
montados en el volante.
Nota:
LafunciónSWCfuncionaconseñalesdecontrol
analógico (matriz pasiva resistiva). Dependiendo
del tipo de vehículo, puede requerir una interfaz
adicional.
En el menú principal (si es necesario en
aplicaciones),seleccionelaaplicaciónSWC.
En el primer paso, asignar las funciones deseadas
a hasta 10 marcadores de posición:
Seleccione uno de los marcadores de
posición 1-10.
Seleccione una función para este marcador
de posición.
Un marcador de posición asignada es
identicado por una marca de vericación. Una
función se identica por el número del marcador
de posición.
Repita estos pasos para cada función
adicional que se asignará a los controles del
volante.
En el siguiente paso, asignar a los lugares
asignados a los botones de los controles de
volante:
Puntee en estudio.
Marcador de posición 1 y la función
asignada se muestran.
Pulse un botón del control remoto durante
aprox. 1 segundo.
La función mostrada se asigna a la tecla.
Toque [ ] para asignar la próxima
función.
Nota:
Toque [
] para retornar a la función
anterior y, si necesario reasignarla.
WLAN
El dispositivo puede ser conectado con una red
atravésdeWLAN.Además,eldispositivopuede
serutilizadounpuntodeaccesoWLANmóvil.
Nota:
Si el dispositivo conectado con el Internet
víaWLAN,puedeusarserviciosbasados
en Internet y aplicaciones, por ejemplo, la
aplicación “Explorador”.
Ajustes básicos
IEn el menú de configuración, puede ajustar
la configuración básica para las diferentes
funciones del aparato a sus necesidades.
En el menú principal, seleccione
Conguración de la aplicación.
Se muestra el menú de configuración, se
activa el submenú General.
1
Note:
Desplácese por la lista, si es necesario, para
acceder al ajuste deseado.
La pantalla de conguración ofrece las siguientes
①
Elementos de menú
②
Cambio a menú principal
③
Elemento seleccionado en el menú
④
Hora
⑤
Elemento de Submenú
General
Es posible:
∙ Seleccionar la zona de radio para la recepción.
∙ Seleccionar el color de iluminación de los
botones.
∙ Seleccionar el papel tapiz.
∙ Elegir el tiempo de pantalla apagada, 15s o
30s.
∙ Pitido de conrmación de operaciones on/o.
Video
Si está activado el “Parking”, video/imágenes
no se mostrarán durante la conducción. Ajuste
según las leyes locales.
Hora
Hacer los ajustes de fecha y hora:
∙ Activación/desactivación automática fecha y
hora conguración vía GPS.
∙ Manual fecha y ajuste, así como tiempo de
selección de la zona.
∙ Formato de hora y fecha de selección.
SWC (Mandos al volante) WLAN Ajustes básicos
Page 38

Appendix
38
Other Mode
Ajustes básicos Información útil datos técnicos
Volúmenes
Puede ajustar el cociente del volumen de todas las
fuentes de audio en el menú volumen.
Disco
∙ Idioma de audio DVD seleccione. Opciones
disponibles según dto. de DVD.
∙ Idioma de subtítulos de DVD seleccione.
Opciones disponibles según dto. de DVD.
∙ Idioma seleccione DVD del menú. Opciones
disponibles según dto. de DVD.
∙ KID SAF/G/PG/PGJ13/PGR/R/NC17/ADULTO
∙ Dene contraseña para restringir la.
reproducción de discos.
Red
∙ paraactivar/desactivarWLAN.
∙ para activar/desactivar wi portátil hotspot.
∙ Establecer redes de telefonía móvil.
Personal
Para configurar el acceso de la ubicación,
seguridad, lenguaje & entrada, restablecer datos
de fábrica, borrar todos los datos, cuentas, etc.
Dispositivo
∙ Ajuste de brillo.
∙ Gestión de la memoria del dispositivo y
portadores de datos conectados.
∙ Gestión de instala aplicaciones.
Conguración del sistema
Accesibilidad
A conguración relacionado con aplicaciones de
accesibilidad.
Usted necesita descargar un lector de pantalla y
establecer una cuenta.
Versión de software
Para ver información de versión de software.
Volumen
Puede ajustar la relación de volumen para todas las
fuentes de audio en el menú de volumen.
Información útil
Garantía
Le ofrecemos una garantía del fabricante para
productos comprados legalmente, son válidas
las condiciones de garantía emitidas por nuestra
agencia nacional responsable respectiva. Las
condiciones de garantía pueden ser llamadas de
www.blaupunkt.com.
Servicio
Si necesita utilizar un servicio de reparación,
usted encontrará información acerca de socios
de servicio en su país bajo www.blaupunkt.com.
Datos técnicos
Sistema operativo Android 4.2.2
Tensión de alimentación
Voltaje de funcionamiento: 10.8~16V
Consumo de corriente
En operación: ≤15A
10 segundos después de desconectar:
≤5mA
Page 39

Appendix
39
ESPAÑOL
Device Connections
Diagrama de conexión
VIDEO OUT
USB3: Media/3G/WIFI
YELLOW
ILLUMI
P.ANT/CNT
External MIC
USB
MIC
Page 40

Appendix
40
Anexo
FCC Statement
1. This device complies with Part 15 of the FCC
Rules.Operation is subject to the following two
conditions:
(1) This device may not cause harmful
interference, and
(2) This device must accept any interference
received, in-cluding interference that may cause
undesired operation.
2. Changes or modifi cations not expressly
approved by the party responsible for
compliance could void the user's authority to
operate the equipment.
NOTE: This equipment has been tested and found
to comply with the limits for a Class B digital
device, pursu-ant to Part15 of the FCC Rules.
These limits are designed to provide reasonable
protection against harmful inter-ference in a
residential installation.This equipment generates
uses and can radiate radio frequency energy
and, if not installed and used in ac-cordance
with the instructions, may cause harmful interference to radio communications. However, there
is no guarantee that interference will not occur
in a particular installation. If this equipment
does cause harmful inter-ference to radio or
television reception, which can be de-termined
by turning the equipment o and on, the user is
encouraged to try to correct the interference by
one or more of the following measures:
Reorient or relocate the receiving antenna.
Increase the separation between the
equipment and receiver.
Connect the equipment into an outlet on
a circuit dif-ferent from that to which the
receiver is connected.
Consult the dealer or an experienced radio/TV
techni-cian for help.
Supported iPod/iPhone
devices
Our product can support below listed iPod/
iPhone generations:
• iPhone7Plus
• iPhone7
• iPhoneSE
• iPhone6sPlus
• iPhone6s
• iPhone6Plus
• iPhone6
• iPhone5s
• iPhone5c
• iPhone5
• iPodtouch(6thgeneration)
• iPodtouch(5thgeneration)
“Made for iPod” and “Made for iPhone” mean that
an electronic accessory has been designed to
connect specically to iPod, iPhone respectively,
and has been certifi ed by the developer to
meet Apple performance standards.Apple is not
responsible for the operation of this device or its
compliance with safety and regulatory standards.
Please note that the use of this accessory with
iPod, iPhone may aff ect wireless performance.
iPhone, iPod are trademarks of Apple Inc.,
registered in the U.S. and other countries.
Blaupunkt Technology Americas S.A.
Zona America Ruta 8 km
Costa Park, Montevideo, Uruguay
P/N:127075007591
There are no
restrictions of use
FCC Radiation Exposure
Statement
This equipment complies with FCC radiation
exposure limits set forth for an uncontrolled
environment. This equipment should be installed
and operated with minimum distance of 20
centimeters between the radiator and your body.
 Loading...