


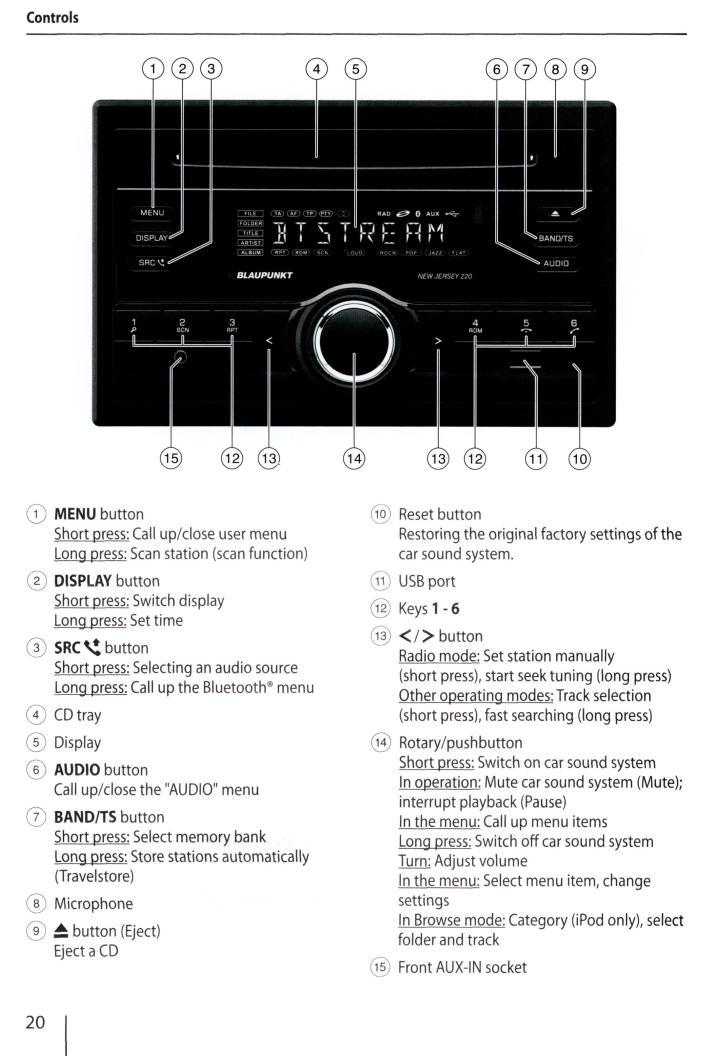
 Loading...
BLAUPUNKT
CAR RADIO NEW JERSEY
220
BT
Bedienungsund Einbauanleitung Operating and installation instructions Notice d'utilisation et de montage lnstrucciones de manejo e instalacion
lnstru~oes de servi~o e de montagem
Petunjuk Pengoperasian dan Pemasangan


Placing
the
device
in
operation
ITraffic
information
I
Radio
mode
Volume |
|
Adjusting the volume |
|
You can adjust the volume in steps from 0 (off) to |
|
SO |
(maximum). |
...- |
Turn the rotary/pushbutton@ to change the |
|
volume. |
Note: |
|
|
The |
volume is increased for the duration of |
|
the |
|
. |
switched-through traffic announcement |
||
You |
can adjust the minimum volume |
for |
traffic announcements (see the chapter "User |
||
settings·~ section "Making settings in |
the |
|
..VOLUME.. menu·~ menu item ..TA VOL..). |
|
|
Muting the car sound system |
(Mute) |
|
|
|
...- |
Briefly press the rotary/pushbutton |
@ |
to |
|
|
|
|||
|
mute the device or to reactivate the previous |
|||
|
volume. |
|
|
|
|
While it is muted, ..MUTE.. |
is flashing |
on |
the |
|
display. |
|
|
|
Setting the time |
|
button ® |
|
|
|
|
|
||||||||
...- |
Press |
the |
DISPLAY |
for |
approx. |
||||||||||
|
2 seconds to set the time. |
|
|
|
|
|
|
|
|||||||
...- |
Press |
the |
<I> |
button |
@ to |
change |
|||||||||
|
between hours and minutes. |
|
|
|
|
|
|
||||||||
|
The hour |
or minute |
display |
flashes |
if it |
is |
|||||||||
|
selected. |
|
|
|
|
|
|
|
|
|
|
|
|||
...- |
Turn |
the |
rotary/pushbutton |
@ |
to |
set |
the |
||||||||
|
hours or minutes. |
|
|
|
|
|
|
|
|
|
|
||||
...- |
Press |
the |
rotary/pushbutton @ |
to |
confirm |
||||||||||
|
the time set. |
|
|
|
|
|
|
|
|
|
|
||||
Traffic information |
|
|
|
|
|
|
|
||||||||
In the reception area ..EUROPE'~ an FM station can |
|||||||||||||||
identify traffic reports |
by means of an RDS signal. |
||||||||||||||
If priority for traffic reports is switched |
~n, a traf- |
||||||||||||||
fic report is automatically switched through, even |
|||||||||||||||
if the car |
sound system-is currently not |
in radio |
|||||||||||||
mode. |
|
|
|
|
|
|
|
|
|
|
|
|
|
||
If priority |
is |
switched |
on, |
the |
display |
shows |
the |
||||||||
|
a |
||||||||||||||
@ |
symbol. |
"TRAFFIC" |
is displayed |
during |
|||||||||||
|
|||||||||||||||
switched-through traffic |
announcement. |
|
|
|
|||||||||||
|
|
|
|
|
|
|
|
|
|||||||
The |
priority |
is activated and |
deactivated in |
the |
|||||||||||
user menu |
(see the chapter "User settings·~ sec- |
||||||||||||||
tion "Making settings in the "TUNER" menu·~ |
|
|
|||||||||||||
|
|
|
|
|
|
|
|
|
|
|
|
menu |
|||
item "TA"). |
|
|
|
|
|
|
|
|
|
|
|
|
|||
Radio mode |
|
|
|
|
|
|
|
|
||
RDS |
|
|
|
|
|
|
|
|
|
|
Many FM stations broadcast an RDS |
(Radio Data |
|||||||||
System) signal in addition |
to their |
programme |
||||||||
in |
the reception |
area ..EUROPE.. |
that |
allows |
the |
|||||
|
||||||||||
following additional functions: |
|
|
|
|
|
|
||||
• |
The station name is shown on the display. |
|
||||||||
• |
The car sound system |
recognises |
traffic |
an- |
||||||
|
nouncements |
and news broadcasts and |
can |
|||||||
|
automatically |
switch them through |
in other |
|||||||
|
operating modes (e.g. in |
|
|
|
. |
|
|
|||
|
USB mode) |
|
|
|
||||||
• |
Alternative frequency: If the |
AF |
function is |
|||||||
|
switched on, |
the car sound system automati- |
||||||||
|
cally tunes into the best receivable |
frequency |
||||||||
|
|
|
|
|||||||
|
for the station that is currently |
set. |
|
|
|
|
||||
|
|
|
|
|
|
|
||||
• |
Regional: At |
certain times, some |
radio |
sta- |
||||||
|
tions divide |
their programme |
into |
regional |
||||||
|
programmes |
providing |
different |
|
content. If |
|||||
|
the REGIONAL function |
is activated, |
the |
car |
||||||
|
sound system changes only to those alternate |
|||||||||
|
frequencies on which the same |
regional |
pro- |
|||||||
|
gramme is being broadcast. |
|
|
|
|
|
|
|||
The functions RDS, AF |
and REGIONAL |
are |
acti- |
|||||||
vated and deactivated |
in the user menu |
(see the |
||||||||
chapter "User settings.., section "Making |
settings |
|||||||||
in the "TUNER.. menu·~ menu items ..Ros·~ |
..AF.. and |
|||||||||
"REG..). |
|
|
|
|
|
|
|
|
|
|
24

Changing to radio mode |
|
|
|
|||||
...- |
Press the SRC \!button® |
repeatedly until |
||||||
|
"TUNER" is displayed: |
|
|
|
||||
|
Playback starts with the station |
|
that was |
|||||
|
played most recently. |
|
|
|
||||
Select memory bank |
0 |
|
|
|||||
...- |
Press the |
BANDITS button |
repeatedly |
|||||
|
until the desired memory bank is displayed: |
|||||||
|
FM1 ~ FM2 ~ FM3 |
~ AM1 ~ AM2 |
|
|||||
|
Note: |
|
|
|
|
|
|
|
|
Up to 6 stations can be stored in each mem- |
|||||||
|
ory bank. |
|
|
|
|
|
||
Tuning into a station |
|
|
|
|||||
There are various ways of tuning into a station: |
||||||||
Tuning into stations manually |
|
|
|
|||||
...- |
Briefly |
press the < I > button @ once or |
||||||
|
several |
times to incrementally change the |
||||||
|
frequency. |
|
|
|
|
|
||
Starting station seek tuning |
|
|
|
|||||
...- |
Press the <I> button @ for approx. 2 sec- |
|||||||
|
onds to start station seek tuning. |
|
|
|||||
|
The radio |
tunes into the |
next |
receivable |
||||
|
station. |
|
|
|
|
|
||
|
Notes: |
|
|
|
|
|
|
|
|
• |
For the reception area "EUROPE": |
In the FM |
|||||
|
|
waveband, only traffic information stations |
||||||
|
|
are tuned into if the priority for traffic infor- |
||||||
|
|
mation is switched on. |
|
|
|
|||
|
• |
The |
sensitivity of seek tuning |
can be ad- |
||||
|
|
justed |
(see the |
chapter |
"User |
settings", |
||
|
|
section |
"Making |
settings |
in the |
"TUNER" |
||
|
|
menu", menu item "DXILO"). |
|
|
||||
Radio mode
Storing stations or calling stored |
|
|||||||
station |
|
|
|
|
|
|
|
|
...- |
Select the desired memory bank. |
|
|
|
||||
...- |
If necessary, set the desired station. |
|
|
|||||
...- |
Press the station button 1 - 6 @ for |
approx. |
||||||
|
2 seconds |
to |
store the current station |
under |
||||
|
the button. |
|
|
|
|
|
||
|
-or- |
|
|
|
|
|
|
|
...- |
Briefly |
press the station button |
1 - 6 |
@ to |
||||
|
call up the stored |
station. |
|
|
|
|||
Scanning stations |
|
|
|
|||||
The |
scan function enables scanning the |
|
stored |
|||||
stations of the current waveband. |
|
|
|
|||||
...- |
Press the MENU button CD for approx. |
2 sec- |
||||||
|
onds to start scanning. |
|
|
|
||||
|
During the scan, the display shows the mem- |
|||||||
|
ory location |
and |
the current frequency or |
|||||
|
station name. |
|
|
CD to con- |
||||
...- |
Briefly |
press |
the |
MENU button |
||||
|
tinue listening to |
the station that is currently |
||||||
|
being scanned. |
|
|
|
|
|||
Storing stations automatically |
|
|
||||||
(Travelstore) |
|
|
|
|
|
|||
With Travelstore, you can automatically search for |
||||||||
and store all receivable the stations in the |
FM and |
|||||||
AM wavebands. Any stations that were previously |
||||||||
stored are deleted in the process. |
|
|
|
|||||
...- |
Select |
the |
desired waveband, e.g. |
FM 1 or |
||||
|
AM1. |
|
BANDITS button 0 |
|
|
|
||
..- |
Press |
the |
for |
approx. |
||||
|
2 seconds. |
|
|
|
|
|
|
|
|
The tuner |
starts the automatic |
station seek |
|||||
|
tuning; the display shows "TS". After storing is |
|||||||
|
completed, the stored stations are scanned in |
|||||||
|
the order of the storage locations. Afterwards, |
|||||||
|
the station in memory location 1of the FM 1or |
|||||||
|
AM 1 level is played back. |
|
|
|
||||
25
Radio mode ICD/MP3/WMA/iPod mode
PTY |
|
|
|
|
|
|
|
|
In the reception areas "EUROPE" and |
"NORTH |
AM" |
||||||
(North |
America), an |
FM |
station |
can |
transmit its |
|||
current |
programme |
type, e.g. |
CULTURE, |
POP, |
||||
JAZZ, ROCK, SPORT |
or SCIENCE. |
Hence, the |
PTY |
|||||
function allows a targeted search for broadcasts |
||||||||
of acertain programme type, e.g. for rock or sports |
||||||||
broadcasts. Note that PTY is not supported by all |
||||||||
stations. |
|
|
|
|
|
|
||
Selecting the programme type and starting |
||||||||
PTV seek tuning |
|
|
|
|
|
|||
To |
select |
a programme |
type, read |
the section |
||||
"Making |
settings in |
the |
"TUNER" menu'~ menu |
|||||
item "PTY" in the chapter |
"User settings". |
|
||||||
..- |
Select the desired programme type and press |
|||||||
|
the rotary/pushbutton @ to start the |
PTY |
||||||
|
seek tuning. |
|
|
|
|
|
||
|
As |
soon as a station with the |
desired |
pro- |
||||
|
gramme type is found, it remains being tuned |
|||||||
|
into. |
|
|
|
|
|
|
|
|
Note: |
|
|
|
|
|
||
|
If no |
station with the selected |
programme |
|||||
|
type is found, "PTY NONE" is briefly displayed |
|||||||
|
and 2 beeps can be heard. The radio will then |
|||||||
|
retune to the station that it played last. |
|
||||||
Switching the display |
® |
|
|
|||||
..- |
Press |
the DISPLAY |
button |
to toggle |
||||
|
between these two displays: |
|
|
|
||||
Display |
|
ABCDEF |
|
FM1 |
102.90 |
POP M |
|
CLK |
18:30 |
Meaning
Station name
Memory bank/frequency
Programme type, only if available
Time
CD/MP3/WMA/iPod mode |
|
|
|||||||||
Basic information |
|
|
|
|
|
|
|
||||
CD/MP3/WMA mode |
|
|
|
|
|
|
|
||||
This car sound system can be |
used to play audio |
||||||||||
COs (CODA) |
and CD-R/RWs with |
audio, MP3 |
or |
||||||||
WMA files as well as MP3 or WMA files on USB data |
|||||||||||
carriers. |
|
|
|
|
|
|
|
|
|
||
|
Notes: |
|
|
|
|
|
|
|
|
|
|
|
• |
To ensure proper functioning, use only COs |
|||||||||
|
|
with the Compact-Disc logo. |
|
|
|
||||||
|
• |
Blaupunkt |
cannot guarantee the |
flawless |
|||||||
|
|
function of copy-protected CDs and |
all |
CD |
|||||||
|
|
blanks and |
USB |
data carriers available |
on |
||||||
|
|
the market. |
|
|
|
|
|
|
|
||
Note |
the following information when preparing |
||||||||||
an MP3/WMA data carrier: |
|
|
|
|
|
|
|||||
• |
Naming of tracks and directories: |
|
|
|
|||||||
|
- |
Max. |
32 characters without the file exten- |
||||||||
|
|
sion |
".mp3" or ".wma" |
(the use |
of |
more |
|||||
|
|
characters |
reduces the |
number |
of |
tracks |
|||||
|
|
and folders that the car sound system can |
|||||||||
|
|
recognise) |
|
|
|
|
|
|
|
|
|
|
- |
No umlauts or special characters |
|
|
|
||||||
• |
CD formats: CD-R/RW, 0: |
12 em |
|
|
|
|
|||||
• |
CD data formats: ISO |
9669 Levell and |
2, Joliet |
||||||||
• |
CD burn speed: |
Max. |
16x |
(recommended) |
|
||||||
• |
USB format/file |
system: |
Mass |
storage device/ |
|||||||
|
FAT16/32 |
|
|
|
|
|
|
|
|
|
|
• |
File extension of audio files: |
|
|
|
|
|
|||||
|
- |
.MP3 for MP3 files |
|
|
|
|
|
|
|||
|
- |
.WMA for WMA files |
|
|
|
|
|
|
|||
• |
WMA files only without Digital |
Rights |
Manage- |
||||||||
|
ment (DRM) and created with Windows |
Media |
|||||||||
|
Player version 8 or later |
|
|
|
|
|
|
||||
• |
MP3 103 tags: Version 1and |
2 |
|
|
|
|
|||||
• |
Bitrate for creating audio files: |
|
|
|
|
||||||
|
- |
MP3: |
32 to |
320 kbps |
|
|
|
|
|
|
|
|
- |
WMA: 32 to 192 kbps |
|
|
|
|
|
||||
• |
Depending on |
the data |
structure on |
the USB |
|||||||
|
medium, up to 3,000 entries can be managed. |
||||||||||
26

iPod mode |
|
|
|
|||
You can connect numerous iPod and iPhone mod- |
||||||
els to the |
car sound system via the |
USB port and |
||||
control the audio playback from the car sound |
||||||
system. |
|
|
|
|
||
|
Note: |
|
|
|
||
|
A list |
of compatible iPod |
and iPhone models |
|||
|
is |
located |
at the end of |
these |
instructions. |
|
|
Blaupunkt |
cannot guarantee |
||||
|
the flawless |
|||||
|
function of |
other iPod and iPhone models. |
||||
|
|
|
|
|||
Use a suitable adapter cable to connect your iPod |
||||||
or |
iPhone |
with |
the USB port of the car sound |
|||
system. |
|
|
|
|
||
Changing to |
|
|
|
|
|
|
|
||||
mode |
|
CD/MP3/WMA/iPod |
|||||||||
|
|
\! button ® |
|
|
|
|
|||||
..- |
Press the SRC |
repeatedly until |
|||||||||
|
the |
desired audio source is displayed: |
|
||||||||
|
|
|
|
||||||||
|
• |
"CD": Inserted CD |
|
|
|
|
|
||||
|
|
|
|
|
|
|
|||||
|
|
"USB": Connected USB data carrier |
|
||||||||
|
• |
"IPOD": Connected iPod/iPhone |
|
||||||||
|
• |
"AUX": Connected external audio source |
|||||||||
|
Notes: |
|
|
|
|
|
|
|
|||
|
• |
The respective audio source can be select- |
|||||||||
|
|
||||||||||
|
|
ed only if a |
|
|
|
|
|
|
|
||
|
|
|
|
corresponding |
|
|
|
||||
|
|
a |
corresponding |
|
|
CD is inserted or |
|||||
|
|
device is connected. |
|||||||||
|
|
|
|
||||||||
|
|
|
|
|
|
||||||
|
• |
A connected iPod is |
initially |
selected un- |
|||||||
|
|
der "USB" and, as soon as the iPod is recog- |
|||||||||
|
|
nised, |
|
|
|
|
|
|
|
||
|
|
|
|
under "IPOD". |
|
|
|
|
|
||
|
• |
If |
the car sound |
system |
first |
has to read |
|||||
|
|
the |
|
|
|
|
|
|
|
||
|
|
|
|
data of aconnected device or data car- |
|||||||
|
|
rier before the playback, the display shows |
|||||||||
|
|
"READING". |
The |
duration |
of |
the reading |
|||||
|
|
depends on |
|||||||||
|
|
the |
data |
volume |
and |
design |
|||||
|
|
of the device or |
data |
carrier. |
If the |
device |
|||||
|
|
or |
data carrier is defective |
or the |
trans- |
||||||
|
|
ferred data cannot be played back, acorre- |
|||||||||
|
|
sponding message appears on the display |
|||||||||
|
|
(e.g. "ERROR"). |
|
|
|
|
|
|
|||
CD/MP3/WMA/iPod mode
Inserting/ejecting a CD |
|
|
|
|
|
||||||||||
Inserting a CD |
|
|
|
|
|
|
|
|
|
||||||
A |
Risk of severe damage to the CD |
|
|||||||||||||
|
|
|
|
drive! |
|
|
|
|
|
|
|
|
|||
|
---- |
Noncircular contoured COs (shape COs) |
|||||||||||||
and |
COs with a diameter of 8 em (mini COs) must |
||||||||||||||
not be used. |
|
|
|
|
|
|
|
|
|
|
|||||
We accept no responsibility for any damage to the |
|||||||||||||||
CD drive that |
may occur as |
a result of the use of |
|||||||||||||
unsuitable |
COs. |
|
|
|
|
|
|
|
|
|
|||||
|
|
Note: |
|
|
|
|
|
|
|
|
|
|
|
|
|
|
|
You must not hinder |
or assist the |
drive |
as it |
||||||||||
|
|
automatically |
|
|
|
|
|
|
|
|
|||||
|
|
|
|
|
|
|
draws in the CD. |
|
|
|
|
||||
..- |
|
Insert the |
CD with its |
printed side up into the |
|||||||||||
|
|
CD tray 0 until you feel a slight resistance. |
|||||||||||||
|
The drive |
automatically |
draws in the CD and |
||||||||||||
|
|
checks |
|
its |
data. Afterwards, |
the |
playback |
||||||||
|
|
starts in |
CD or MP3 mode. |
|
|
|
|
|
|||||||
|
Note: |
|
|
|
|
|
|
|
|
|
|
|
|
||
|
If |
the |
inserted CD |
cannot |
be played |
back, |
|||||||||
|
"ERROR" |
is |
briefly |
displayed |
and |
the |
radio |
||||||||
|
changes to radio mode. |
|
|
|
|
|
|
||||||||
Ejecting a CD |
|
|
|
|
|
|
|
|
|
|
|||||
|
Note: |
|
|
|
|
|
|
|
|
|
|
|
|
||
|
You must not hinder |
or |
assist |
the |
drive as it |
||||||||||
|
ejects the |
CD. |
|
|
|
|
|
|
|
|
|||||
..- |
Press the~ button® |
to eject an inserted |
CD. |
||||||||||||
|
Notes: |
|
|
|
|
|
|
|
|
|
|
|
|
||
|
• |
|
If a |
CD |
is |
ejected |
and not |
removed, |
the |
||||||
|
|
|
drive |
will |
automatically |
draw it back in |
|||||||||
|
|
|
|
|
|
|
|||||||||
|
|
|
again after approx. |
|
|
||||||||||
|
|
|
15 seconds. |
|
|
|
|||||||||
|
• |
|
You can also eject COs while the car sound |
||||||||||||
|
|
|
system |
is |
switched |
off or whilst another |
|||||||||
|
|
|
audio |
source is activated. |
|
|
|
|
|
||||||
|
|
|
|
|
|
|
|
|
|
||||||
27
Loading...