

Blaupunkt Nashville-DAB-35 Owners Manual
Radio / DAB / CD / SD/MMC / MP3
Nashville DAB35 7 645 660 310
Operating instructions
2
3
1
4
5
13
12
11
10
9
8
67
2
14

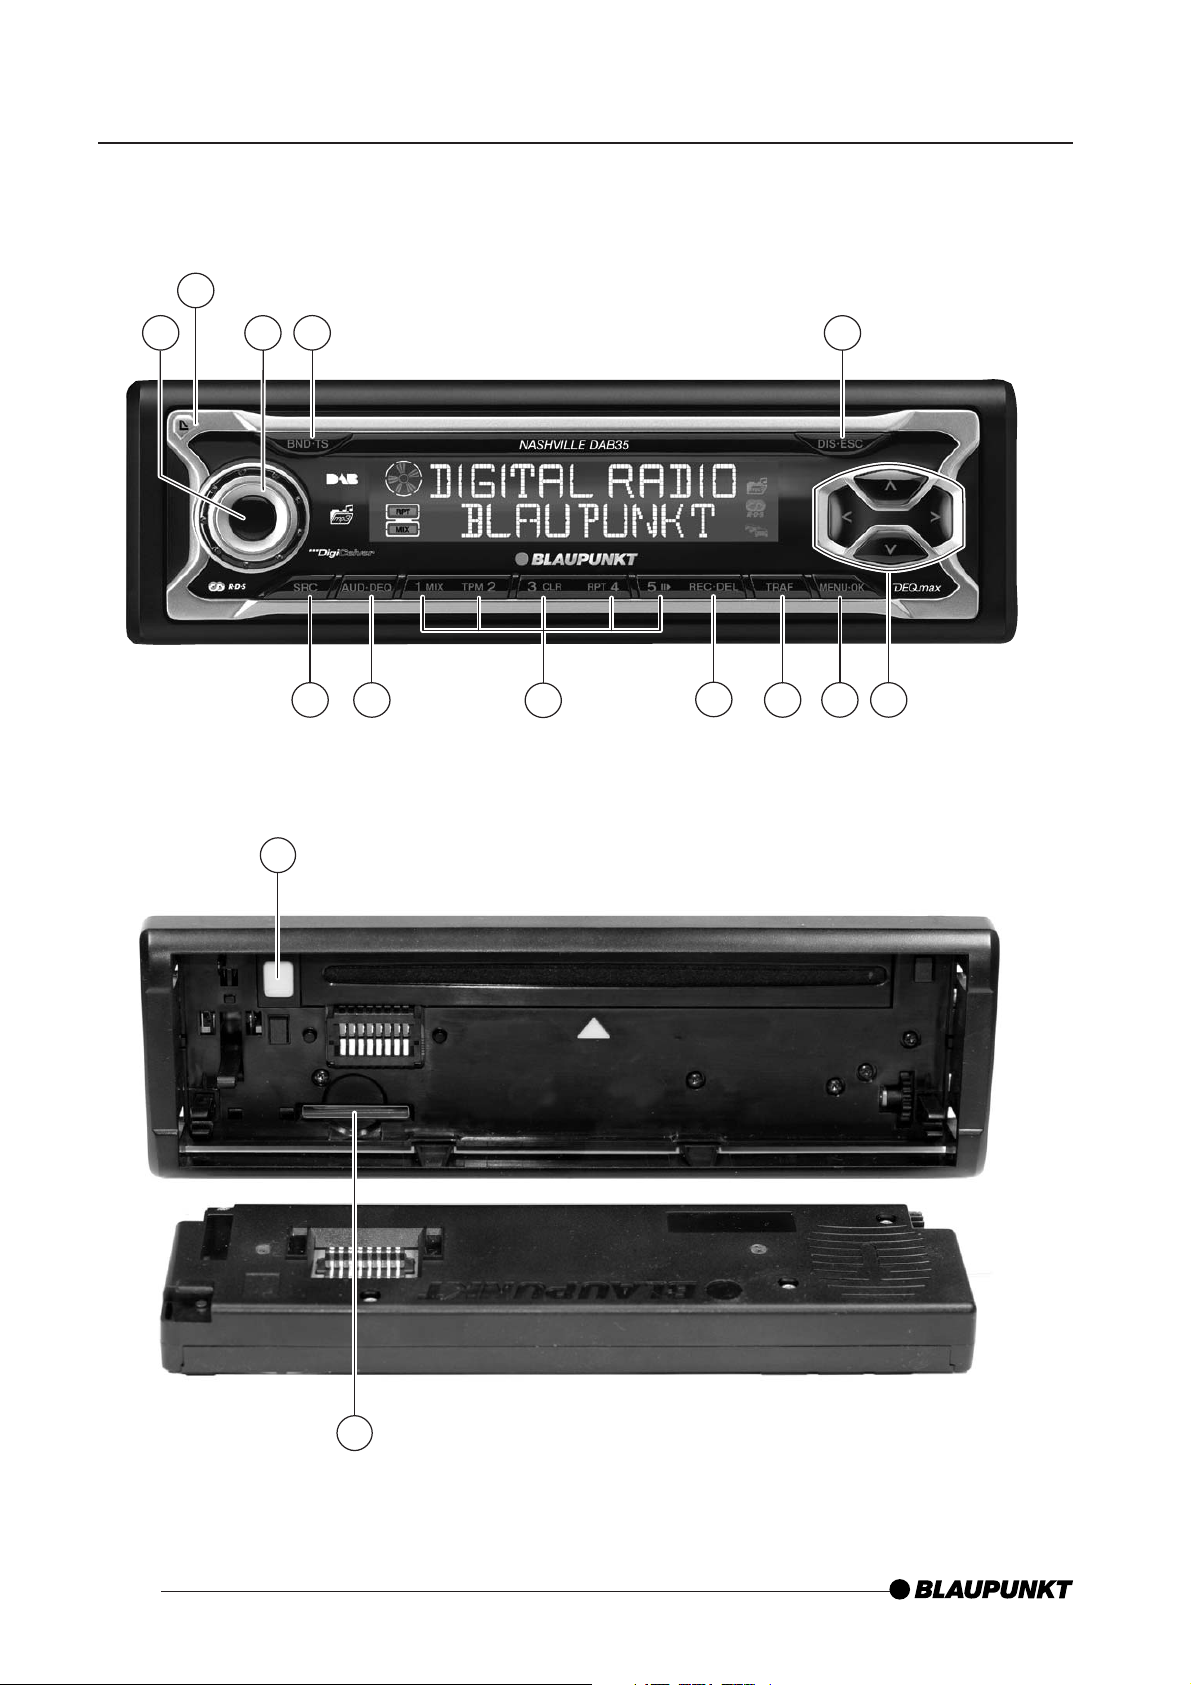
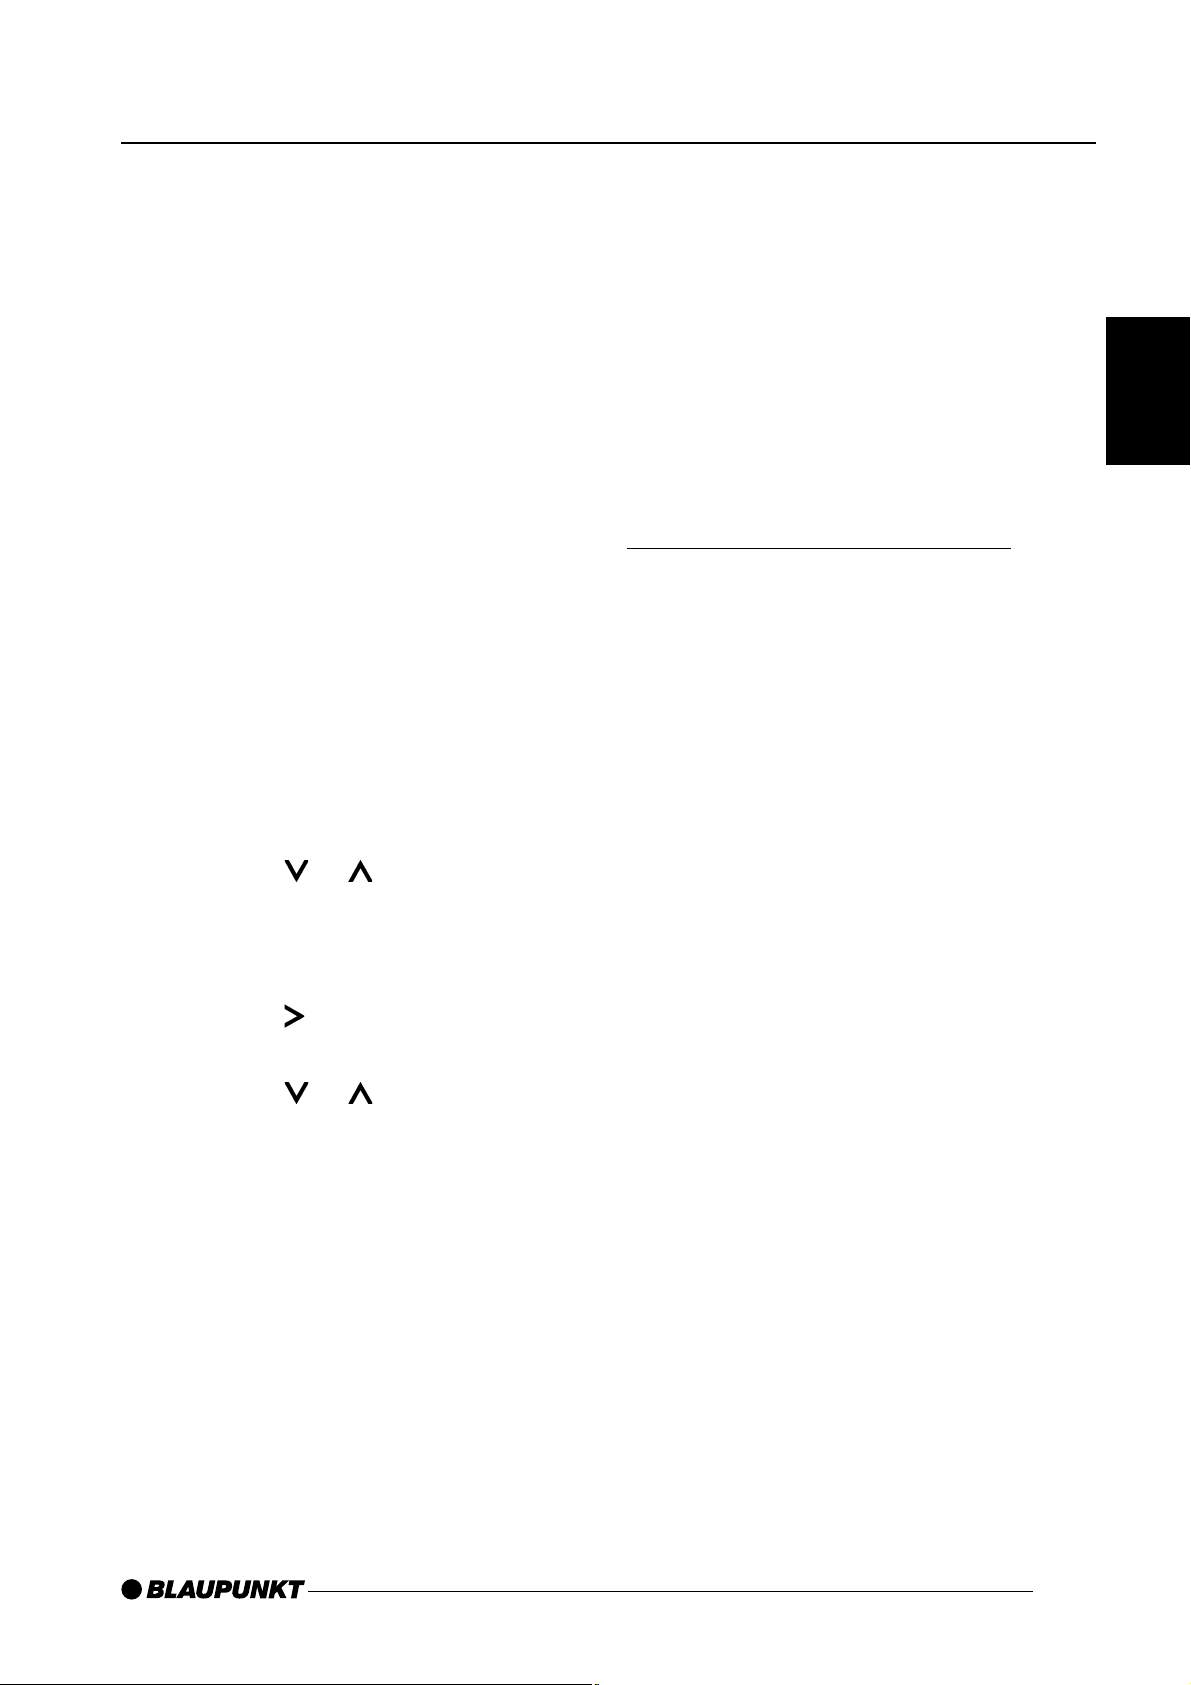
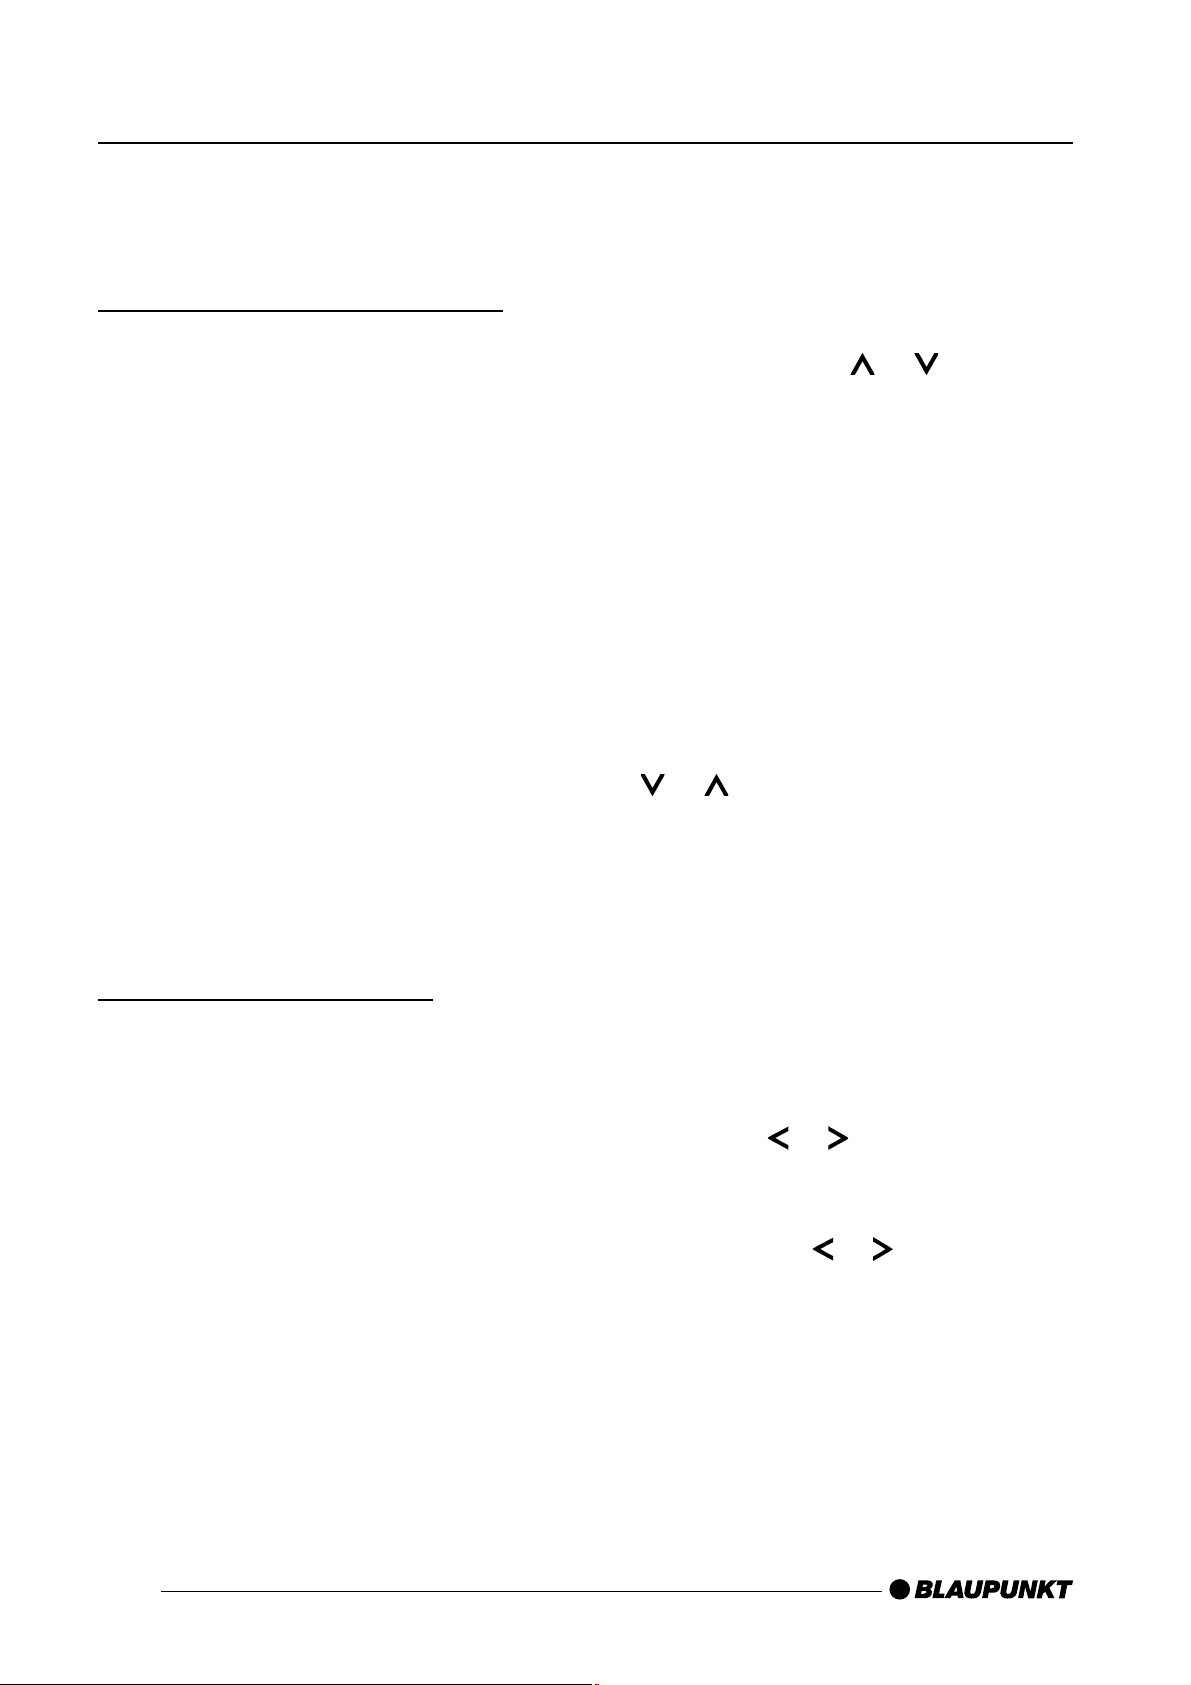
CONTROLS
1 Button to switch the device on/
off and operate the volume
mute feature.
2
3 Volume control.
4 BND•TS button.
5 DIS•ESC button to change the
button to open the flip-
release control panel.
Short press: Selects the FM
memory banks and the MW
and LW wavebands, selects the
DAB memory bank.
Long press: Starts the FM
Travelstore function and the
DAB Travelstore function.
display content and close
menus without saving changes.
8 TRAF button to switch traffic
information standby on/off.
9 REC•DEL button.
Short press: Starts a recording
from DAB to MMC.
Long press: Deletes the current
title in MMC mode.
: Buttons 1 - 5.
; AUD•DEQ button (Audio).
Short press: Sets bass, treble,
balance and fader.
Long press: Opens the
equalizer menu.
< SRC button to switch sources
between CD/MP3, SD/MMC,
CD changer (if connected) and
AUX.
6 Arrow buttons.
7 MENU•OK button
Short press: Calls up the
menus for basic settings and
confirms menu entries.
Long press: Starts the scan
function.
=
> Slot for SD/MMC or KeyCard.
, button to eject the CD from
the device.
66

CONTENTS
Notes and accessories ......... 69
Road safety .................................. 69
Installation .................................... 69
Installations .................................. 69
Activating/deactivating demo mode
.70
Detachable control panel
and KeyCard ......................... 70
Theft protection............................ 70
Detaching the control panel ......... 71
Attaching the control panel .......... 71
Keycard ....................................... 71
Keycard Damaged or Lost ........... 72
Looking after the KeyCard ........... 73
Switching on/off ................... 74
Adjusting the volume ............ 74
Setting the power-on volume ........ 74
DAB sub-programmes ................. 84
DAB radio text ............................. 85
Setting the length of the
programme names ....................... 85
Changing the display ................... 85
Radio mode........................... 86
Switching to radio mode .............. 86
Convenient RDS functions
(AF, REG) .................................... 86
Selecting the waveband/
memory bank ............................... 87
Tuning into a station ..................... 87
Setting the sensitivity of
station seek tuning ....................... 88
Storing stations ............................ 88
Storing stations automatically
(Travelstore) ................................. 88
ENGLISH
Quickly reducing the volume
(Mute) .......................................... 75
Telephone audio/navigation audio ... 75
Setting the volume of the
confirmation beep ........................ 76
Automatic sound .......................... 76
DAB mode............................. 77
Switching to DAB mode............... 77
Switching regional traffic
announcements on/off
(DAB TREG) ................................ 79
Selecting the memory bank .......... 80
Tuning into ensembles .................. 80
Selecting programmes ................. 81
Scanning receivable DAB
programmes (DAB-SCAN) .......... 81
Storing programmes .................... 81
Accessing stored programmes .... 82
DAB programme type (PTY) ........ 82
Setting the DAB waveband .......... 83
Switching between DAB and FM . 83
DAB Service following ................. 84
Listening to stored stations .......... 89
Scanning receivable stations
(SCAN) ........................................ 89
Setting the scanning time ............. 89
Programme type (PTY) ................ 89
Optimising radio reception ........... 91
SHARX ........................................ 91
Configuring the display ................ 92
Activating/deactivating
the radio text display .................... 92
Traffic information ................ 93
CD mode ............................... 94
Switching to CD mode................. 94
Selecting tracks ........................... 95
Fast track selection ...................... 95
Fast searching (audible) ............... 95
Random track play (MIX) .............. 95
Scanning tracks (SCAN) ............. 95
Repeating tracks (REPEAT) ......... 96
Changing the display ................... 96
Displaying CD text/CD name ....... 96
Naming CDs ................................ 97
67

CONTENTS
Traffic announcements in
CD mode ..................................... 99
Ejecting a CD .............................. 99
MP3 mode ............................. 99
Preparing an MP3 CD ................. 99
Switching to MP3 mode ............. 101
Configuring the display .............. 101
Selecting a directory .................. 101
Selecting tracks ......................... 102
Fast searching
(not in MP3 browse mode)......... 102
Random track play – MIX
(not in MP3 browse mode)......... 103
Scanning tracks – SCAN
(not in MP3 browse mode)......... 103
Repeating individual tracks
or whole directories – REPEAT
Playing recordings using
the device .................................. 112
Formatting SDs/MMCs .............. 113
Configuring the display .............. 114
Programming your favourite
tracks for an SD/MMC............... 114
Switching pre-record on/off ....... 114
CD-changer mode .............. 115
Switching to CD-changer mode . 115
Selecting CDs ........................... 115
Selecting tracks ......................... 115
Fast searching (audible) ............. 115
Changing the display ................. 115
Repeating individual tracks
or whole CDs (REPEAT) ............ 116
Random track play (MIX)............ 116
Scanning all tracks on all CDs
(not in MP3 browse mode)......... 103
Programming your favourite
tracks on an MP3 CD ................ 104
SD/MMC mode ................... 105
Inserting/removing SDs/MMCs.. 105
Switching to SD/MMC mode ..... 106
Configuring the display .............. 106
Selecting a directory .................. 106
Selecting tracks ......................... 107
Fast searching
(not in MP3 browse mode)......... 108
Random track play – MIX
(not in MP3 browse mode)......... 108
Scanning tracks – SCAN
(not in MP3 browse mode)......... 108
Repeating individual tracks or
whole directories – REPEAT
(SCAN) ...................................... 116
Naming CDs .............................. 117
CLOCK time ........................ 118
Sound.................................. 120
X-BASS ............................... 121
Equalizer ............................. 121
Adjusting the
display settings ................... 125
External audio sources ....... 126
Amplifier.............................. 127
TMC for dynamic
navigation systems ............. 127
Specifications ..................... 128
(not in MP3 browse mode)......... 108
Recording DAB programmes
onto SDs/MMCs ........................ 109
Making a timer-controlled
recording of a DAB programme . 111
68
NOTES AND ACCESSORIES
Notes and accessories
Thank you for choosing a Blaupunkt
product. We hope you enjoy using this
new piece of equipment.
Please read these operating instructions before using the equipment for
the first time.
The Blaupunkt editors are constantly
working on making the operating instructions clearer and easier to understand. However, if you still have any
questions on how to operate the device, please contact your dealer or the
telephone hotline for your country. You
will find the telephone number printed
at the back of this booklet.
We provide a manufacturer guarantee
for our products bought within the European Union. You can view the guarantee conditions at www.blaupunkt.de
or ask for them directly at:
Blaupunkt GmbH
Hotline
Robert Bosch Str. 200
31139 Hildesheim Germany
Installation
If you want to install your car sound
system yourself, please read the installation and connection instructions that
follow these operating instructions.
Installations
Use only accessories approved by
Blaupunkt.
DAB antenna
You need a special DAB antenna
in order to operate the Nashville
DAB 35. This can be a separate DAB
roof/window antenna or a DAB/AM/FM
combination antenna. You can obtain
further information from your Blaupunkt
dealer.
Remote control
The RC 08, RC 10, RC 10 H or
RC 12 H (available as optional accessories) remote control can be used to
safely and conveniently perform most
of the basic functions of your car sound
system.
ENGLISH
Road safety
Road safety has absolute pri-
ority. Only operate your car sound
system if the road and traffic conditions allow you to do so. Familiarise
yourself with the device before setting off on your journey. You should
always be able to hear police, fire
and ambulance sirens in good time
from inside your vehicle. For this
reason, listen to your car sound system at a suitable volume level during your journey.
You cannot switch the device on/off
using the remote control.
Amplifiers
You can use all Blaupunkt and Velocity
amplifiers.
CD changers
You can connect the following
Blaupunkt CD changers:
CDC A 08, IDC A 09 and CDC A 03.
69

NOTES AND
CONTROL PANEL/
ACCESSORIES
Activating/deactivating demo
mode
You can activate the so-called demo
mode at the device. In demo mode, the
different functions of the device are displayed as scrolling text.
➮ Press the MENU•OK button 7.
The display shows the menu.
➮ Press and hold the MENU•OK
button 7 pressed for more than
four seconds while the menu is
displayed to activate or deactivate
the demo mode.
KEYCARD
Detachable control panel
and KeyCard
Theft protection
The device is equipped with a detach-
able control panel (flip-release panel)
as a way of protecting your equipment
against theft. The device is worthless
to a thief without this control panel.
Protect your device against theft by
taking the control panel with you when-
ever you leave your vehicle. Do not
leave the control panel inside your ve-
hicle – not even in a hiding place.
Time-out (time window)
The device features a time-out function (time window).
For example, if you press the
MENU•OK button 7 and select a
menu item, the device switches back
after approx. 16 seconds after the last
button activation. The settings performed are saved.
The control panel has been designed
to be easy to use.
Notes:
● Never drop the control panel.
● Never expose the control panel
to direct sunlight or other heat
sources.
● Avoid direct skin contact with the
control panel’s electrical contacts.
If necessary, clean the contacts
with a lint-free cloth moistened
with cleaning alcohol.
70
CONTROL PANEL/KEYCARD
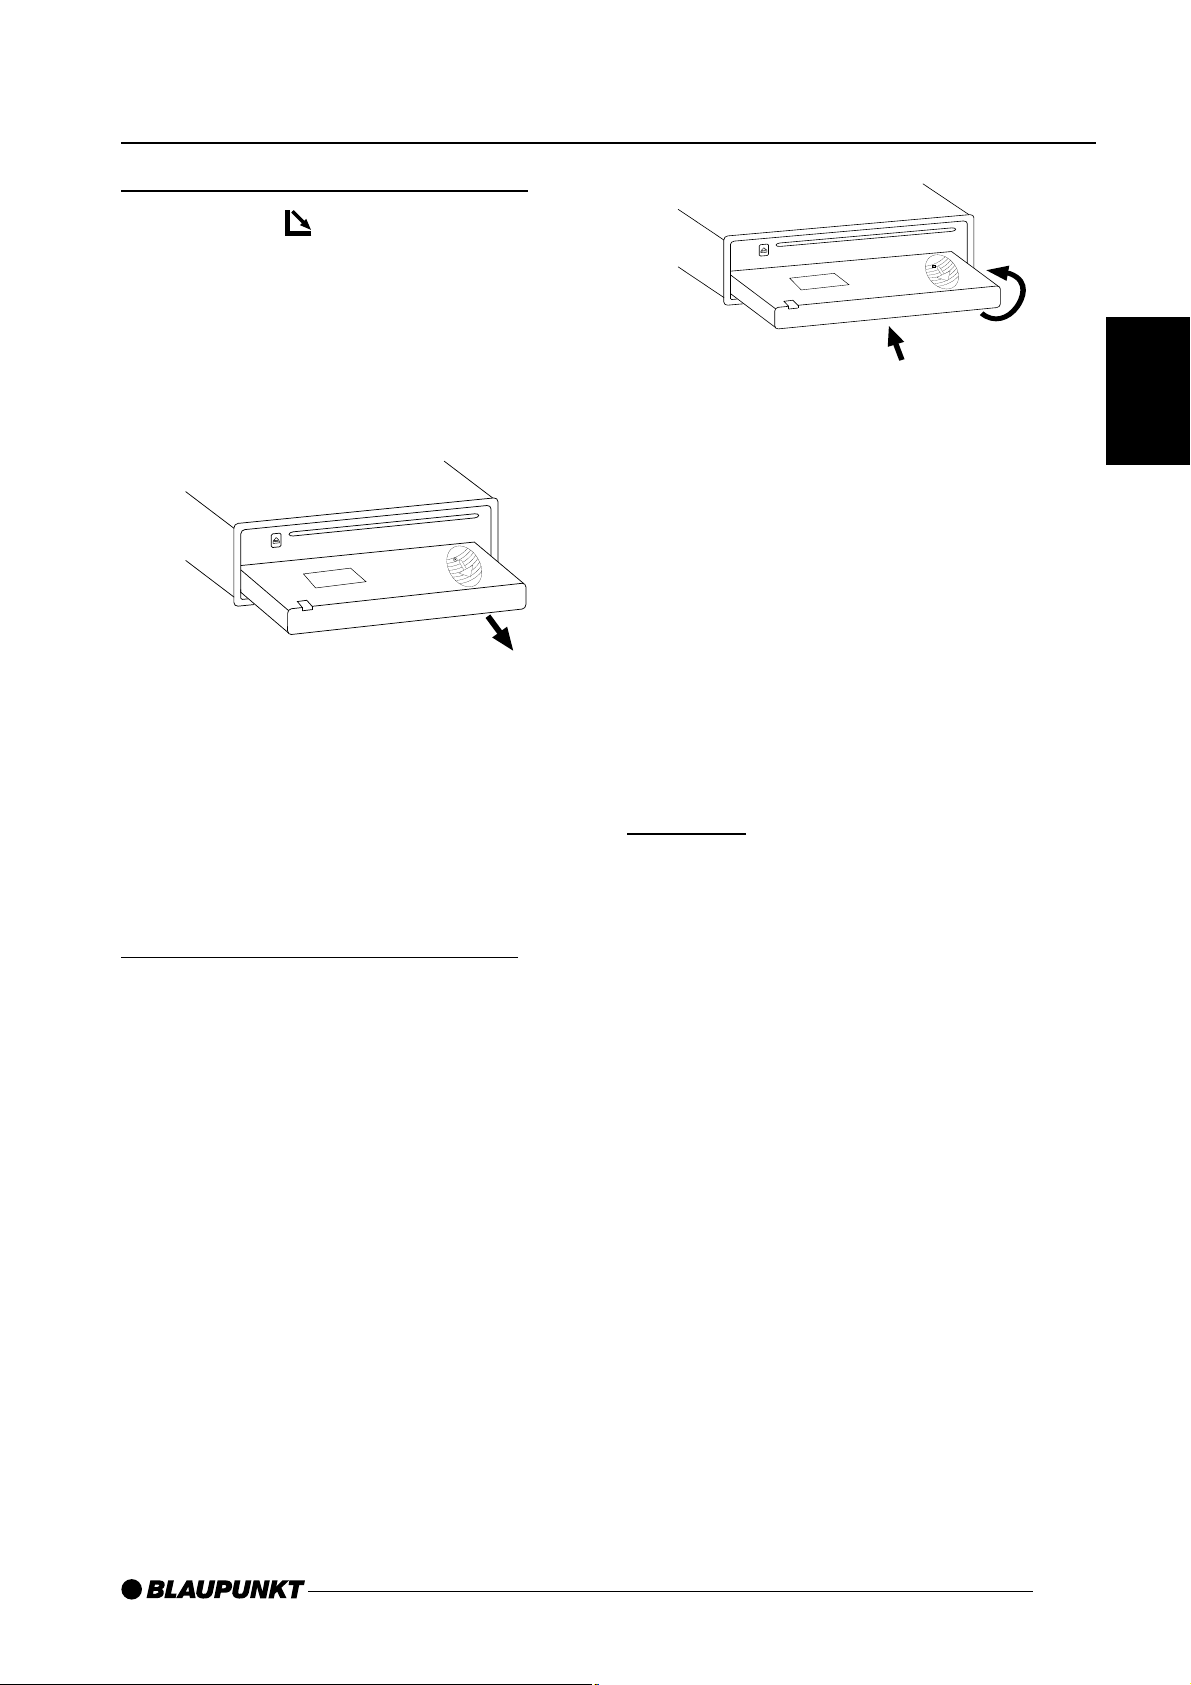
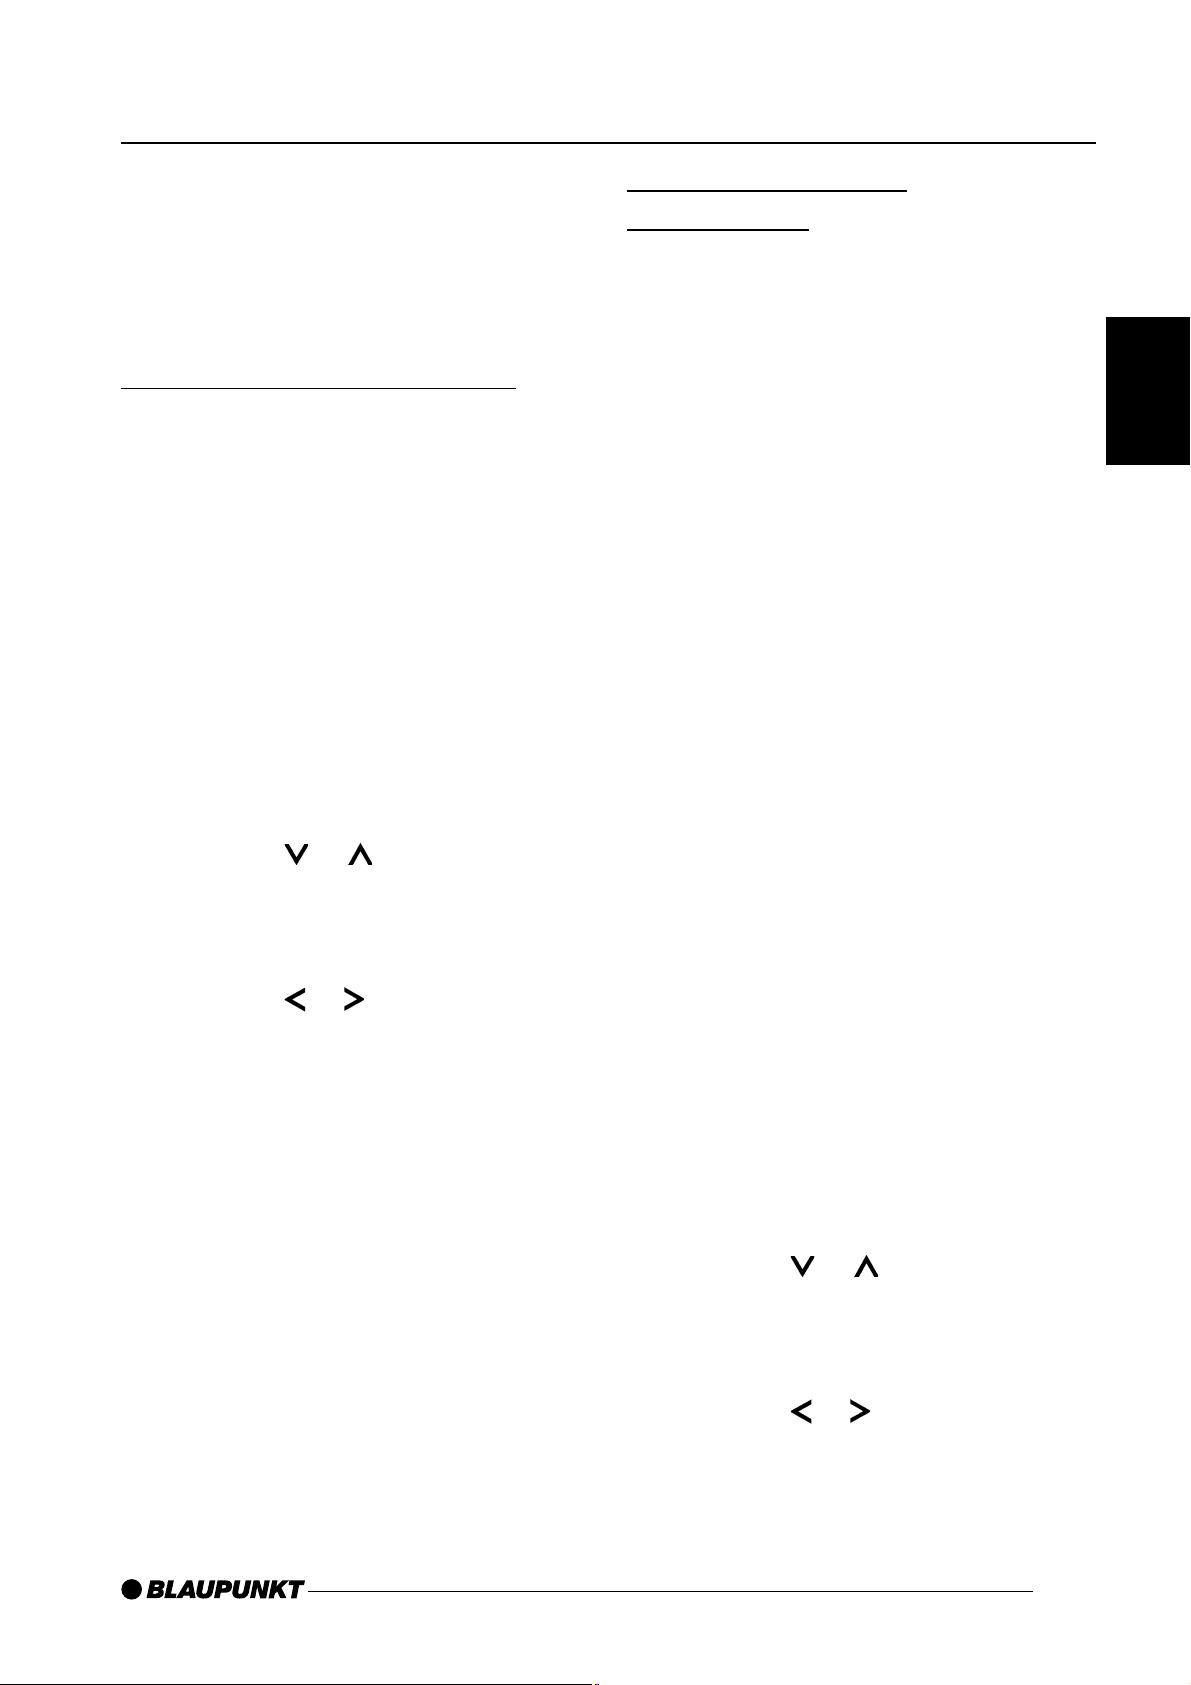
Detaching the control panel
Press the button 2.
➮
The control panel opens out towards
you.
➮ Hold the control panel by its right
side and then pull the control
panel straight out of the bracket.
Notes:
● All the current settings are saved.
● Any CD already inserted in the
device remains there.
2.
1.
ENGLISH
Note:
● When attaching the control panel,
make sure you do not press the
display.
If the device was still switched on when
you detached the control panel, it will
automatically switch on with the last
setting activated (radio, CD/MP3, SD/
MMC, CD changer or AUX) when the
panel is replaced.
Keycard
● The device switches off automati-
cally after approx. one minute.
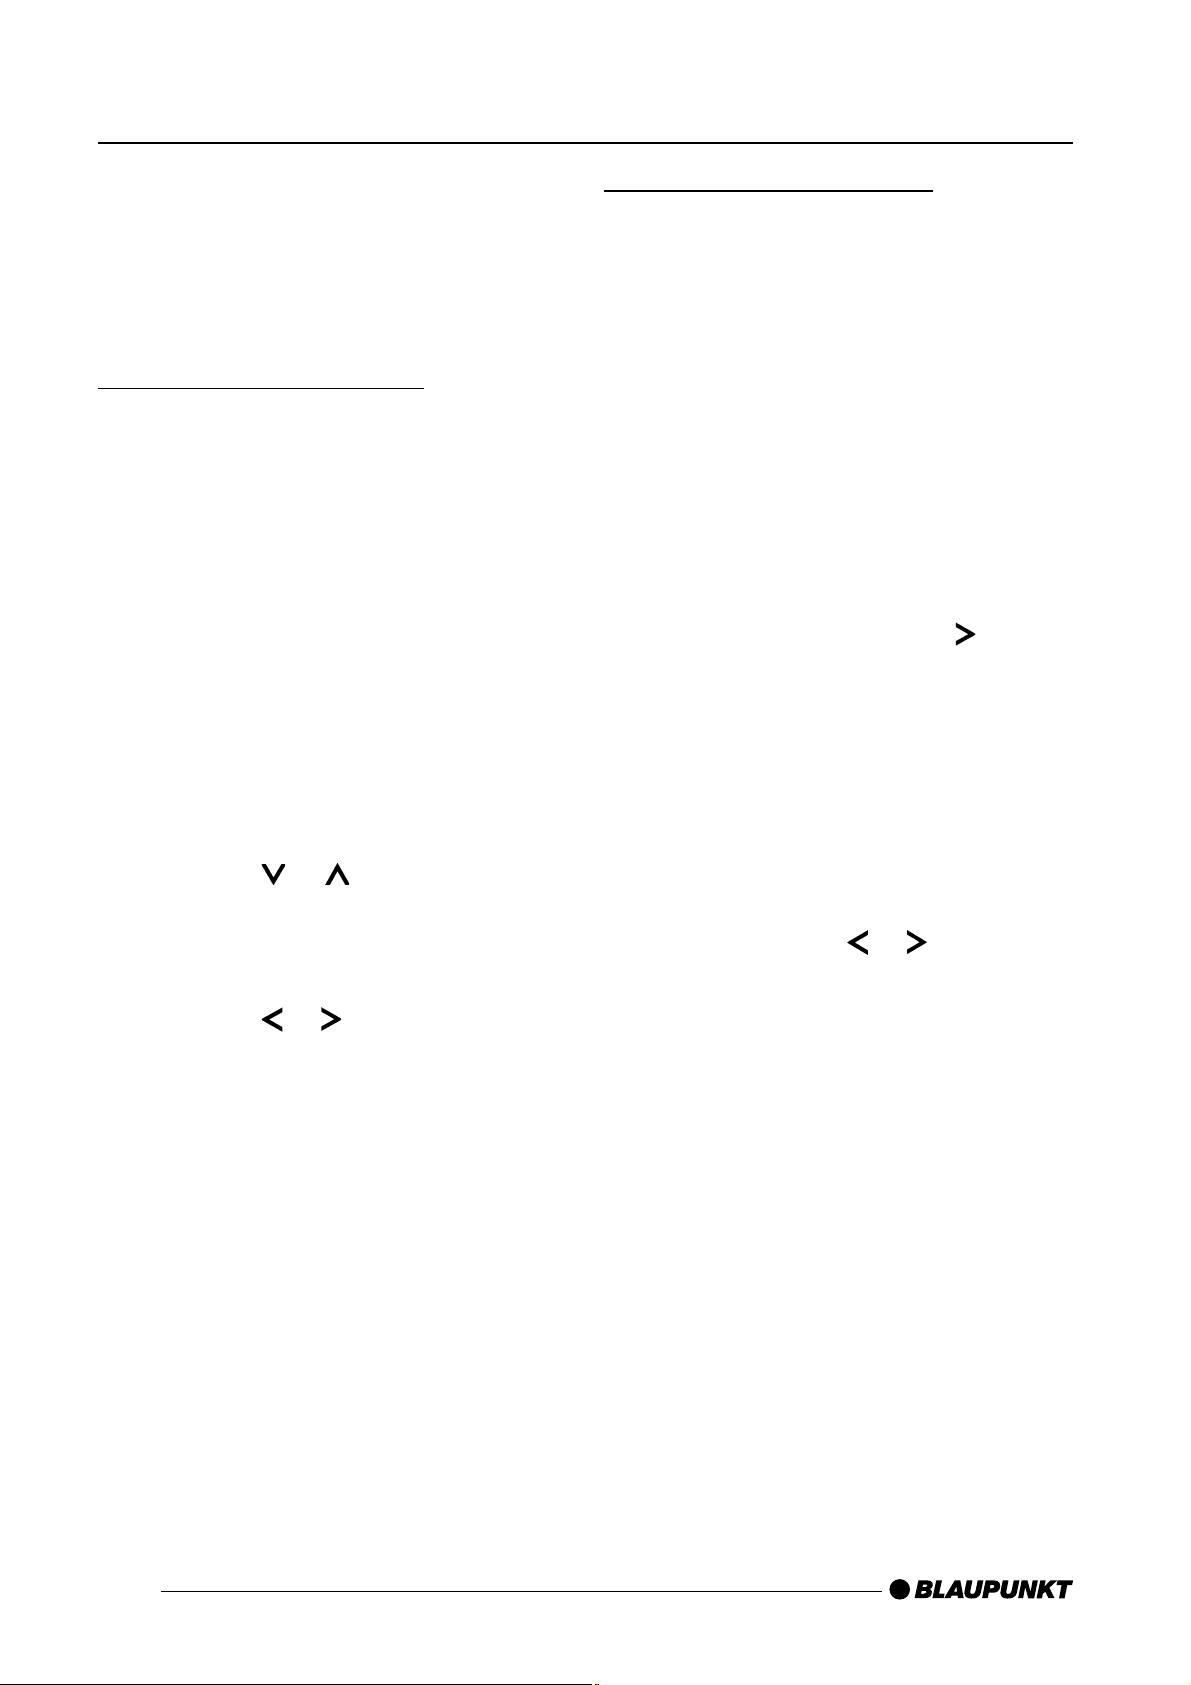
Attaching the control panel
Hold the control panel at approxi-
➮
mately right angles to the device.
➮ Slide the control panel into the
device’s guides that are positioned
on the left and right at the lower
edge of the housing. Push the
control panel carefully into the
bracket until it clicks into place.
➮ Flip up the control panel and care-
fully press it into the device until it
clicks into place.
In addition to the removable control
unit, your car radio is protected by a
keycard.
The keycard is required when you use
the unit for the first time. Afterwards you
only need the keycard if the unit has
been disconnected from the vehicle
power supply.
Note:
● Please remove the keycard from
the unit after using it for the first
time.
Without the keycard, the car radio
is worthless for thieves.
● Key the keycard in a safe place,
but not in the car.
● If you will be on the road for an ex-
tended period (e.g., vacation),
then take along the keycard so
71

CONTROL PANEL/KEYCARD
that you can restart the car radio if
necessary after it has been disconnected from the vehicle power
supply.
Inserting the KeyCard
To insert the KeyCard in the device,
➮ detach the detachable control
panel as described in the section
entitled “Detaching the control
panel”.
The slot for the KeyCard is located
behind the control panel >.
➮ Carefully insert the KeyCard (with
its contacts facing downwards and
its bevelled edge pointing to the
right) into the slot until you feel it
click into place.
➮ Attach the control panel again as
described in “Attaching the control
panel”.
“KEYCARD OK” appears briefly on the
display.
Removing the KeyCard
To remove the KeyCard from the
device,
➮ Carefully pull the KeyCard out of
the slot.
➮ Attach the control panel again as
described in “Attaching the control
panel”.
Keycard Damaged or Lost
After the unit has been disconnected
from the power supply, you will need
the keycard that belongs to your unit.
If the keycard is damaged or you have
lost it, then you need a new keycard.
You can acquire a new keycard at your
Blaupunkt dealer’s.
In order to use the new keycard, you
need the master code for your unit.
For security reasons, the master code
is obtainable only from your Blaupunkt
dealer or through Blaupunkt customer
service upon presentation of proof of
ownership.
Note:
● In order to determine the master
code, your Blaupunkt dealer or
Blaupunkt customer service will
need the model number and serial
➮ detach the detachable control
panel as described in the section
entitled “Detaching the control
panel”.
The slot for the KeyCard is located
behind the control panel >.
➮ Push against the KeyCard until
you feel it unlatch.
The KeyCard is ejected.
72
number of your Blaupunkt unit.
The model no. and serial no. are
found on the right side of the unit.
● In order to have the numbers on
hand without having to uninstall
the unit, please enter these in the
car radio passport on the last
page of these instructions for use
before installation of the unit.
CONTROL PANEL/KEYCARD
“Training” a New Keycard/Entering
the Master Code
If you have acquired a new keycard,
then you must first “train” it.
➮ Turn off the unit.
➮ Insert the new keycard that is un-
known to the unit.
➮ Close the control unit.
➮ Simultaneously press and hold
down the BND•TS button 4 and
the 1 MIX button :.
➮ Switch on the device by pressing
button 1.
“0000 MASTERCODE” appears on the
display.
Enter the four-digit master code that is
printed on the car radio passport as
follows:
Note:
● If you entered the master code
incorrectly three times, you must
wait for one hour. During this waiting period, “WAIT 1H” will appear
on the display and the device cannot be operated. Do not switch off
the device during this period. After
the hour has elapsed enter the
correct master code.
Looking after the KeyCard
Keeping the contacts free from dirt and
other particles will ensure that the KeyCard functions properly. Avoid making
direct skin contact with the contacts.
If necessary, clean the contacts of the
KeyCard with a lint-free cloth moistened with cleaning alcohol.
ENGLISH
➮ Press the or button 6
repeatedly until the first digit of
the master code appears on the
display.
➮ Press the button 6 to change
the input position.
➮ Press the or button 6
repeatedly until the second digit
of the master code appears on the
display. Then proceed in the same
way for all the digits of the master
code.
➮ If the master code is displayed
correctly, press the MENU•OK
button 7.
The new KeyCard is accepted as soon
as the device switches to playback
mode and “KEYCARD OK” appears
briefly on the display.
73

SWITCHING ON/OFF ADJUSTING THE VOLUME
Switching on/off
There are various ways of switching
the device on/off:
Switching on/off using the vehicle
ignition
The device will switch on/off simultaneously with the ignition if the device
is correctly connected to the vehicle’s
ignition and you did not switch the device off by pressing button 1.
Switching the device on/off using
the detachable control panel
➮ Detach the control panel.
The device switches off automatically
after approx. one minute.
➮ Attach the control panel again.
The device switches on. The last setting (radio, CD/MP3, SD/MMC, CD
changer or AUX) will be reactivated.
Switching on/off using button 1
➮ To switch on the device, press
button 1.
➮ To switch off the device, press and
hold down button 1 for longer
than two seconds.
The device switches off.
Note:
● To protect the vehicle battery, the
device will switch off automatically
after one hour if the ignition is off.
Adjusting the volume
Note:
● The internal amplifier can be
switched off. If the loudspeakers
do not emit any sound, please
read the section entitled “Switching the internal amplifier on/off” in
the “Amplifier” chapter.
You can adjust the volume in steps from
0 (off) to 50 (maximum).
To increase the volume,
➮ turn the volume control 3
clockwise.
To decrease the volume,
➮ turn the volume control 3
anticlockwise.
Setting the power-on volume
You can set the default volume level at
which the device plays when it is
switched on.
➮ Press the MENU•OK button 7.
➮ Press the or button 6
repeatedly until “VOLUME”
appears on the display.
➮ Press the MENU•OK button 7
to display the volume menu.
“ON VOLUME” and the currently set
value are displayed or “LAST VOL-
UME” is displayed.
➮ Adjust the power-on volume using
the
buttons 6 .
74
To help you adjust the setting more
easily, the device will increase or de-
crease the volume as you make your
changes.
ADJUSTING THE VOLUME
If you change the setting to “LAST
VOLUME”, the volume when the device switches on will be the same as
the volume level that was set the last
time you switched the device off.
Danger to hearing!
If the power-on volume is set to
maximum, the volume level can be
very high when the device is
switched on.
If the volume was set to maximum
before the device was switched off
and the power-on volume is set to
“LAST VOLUME”, the volume level
can be very high when the device is
switched on again.
Severe damage to your hearing can
be caused in both cases!
Telephone audio/navigation
audio
If your car sound system is connected
to a mobile telephone or a navigation
system, the sound system’s volume will
be muted as soon as you “pick up” the
phone or as soon as a navigation announcement is made. You will then hear
the caller or navigation announcement
over the car sound system’s loudspeakers. In order for this feature to
work, the mobile telephone or navigation system must be connected to the
car sound system as described in the
installation instructions.
You will need a cable for this with the
following Blaupunkt number: 7 607 001
503.
ENGLISH
When you have finished making your
changes,
➮ press the MENU•OK button 7
and then the DIS•ESC button 5
to exit the menu.
Quickly reducing the volume
(Mute)
You can quickly reduce the volume to
a preset level (Mute).
➮ Briefly press button 1.
“MUTE” appears on the display.
Cancelling mute
To return to your previously set volume
level,
➮ briefly press button 1 again.
You can find out from your Blaupunkt
dealer which navigation systems can
be used with your car sound system.
If the sound system receives a traffic
announcement during a telephone call
or whilst a navigation announcement
is being made, you will only be able to
hear the traffic announcement after the
call or navigation announcement is finished (in so far as the traffic announcement is still being broadcast). The traffic announcement is not recorded!
The volume with which telephone calls
or navigation announcements are
broadcast can be adjusted.
➮ Press the MENU•OK button 7.
➮ Press the or button 6
repeatedly until “VOLUME MENU”
appears on the display.
75
ADJUSTING THE VOLUME
➮ Press the MENU•OK button 7
to display the volume menu.
➮ Press the or button 6
repeatedly until “PHONE/NAVI”
appears on the display.
➮ Set your preferred volume level
using the
When you have finished making your
changes,
buttons 6.
➮ press the MENU•OK button 7
and then the DIS•ESC button 5
to exit the menu.
Note:
● You can use the volume control
3 to adjust the volume of telephone calls and navigation announcements whilst you are
listening to them.
➮ Adjust the volume using the
buttons 6. “0” means that the
beep is deactivated, “6” means
that the maximum beep volume is
set.
When you have finished making your
changes,
➮ press the MENU•OK button 7
and then the DIS•ESC button 5
to exit the menu.
Automatic sound
This feature automatically adjusts the
volume of the car sound system to suit
the speed at which the vehicle is travelling. In order for this to work, your car
sound system must be connected as
described in the installation instructions.
Setting the volume of the
confirmation beep
The system will output a confirmation
beep for some functions if you keep a
button pressed down for longer than
two seconds, for instance, when assigning a radio station to a station preset button. You can adjust the volume
of this beep.
➮ Press the MENU•OK button 7.
➮ Press the or button 6 re-
peatedly until “VOLUME MENU”
appears on the display.
➮ Press the MENU•OK button 7
to display the volume menu.
➮ Press the or button 6
repeatedly until “BEEP VOL”
appears on the display.
You can adjust the automatic volume
boost feature in six steps from (0 to 5).
➮ Press the MENU•OK button 7.
➮ Press the button 6 repeatedly
until “VOLUME MENU” appears
on the display.
➮ Press the MENU•OK button 7
to display the volume menu.
➮ Press the or button 6
repeatedly until “AUTO SOUND”
appears on the display.
➮ Set the volume adjustment level
using the
When you have finished making your
changes,
buttons 6.
➮ press the MENU•OK button 7
and then the DIS•ESC button 5
to exit the menu.
76

ADJUSTING THE VOLUME DAB MODE
Note:
● The optimum setting for the
speed-dependent volume adjustment feature depends on how
noise levels develop in your particular vehicle. You will need to test
various settings in order to find
out which is best suited to your
vehicle.
DAB mode
You can enjoy radio in digital audio
quality thanks to DAB (Digital Audio
Broadcast).
Note:
● You need a special DAB antenna
in order to operate the Nashville
DAB 35. This can be a separate
DAB roof/window antenna or a
DAB/AM/FM combination antenna. You can obtain further information from your Blaupunkt dealer.
Switching to DAB mode
If you are in Radio, CD/MP3, SD/MMC,
CD-changer or AUX mode,
ENGLISH
➮ press the SRC button < repeat-
edly until “DAB” appears on the
display.
In contrast with standard radio broadcasting, several programmes are
always broadcast over the same frequency for DAB. These programmes
are arranged in “ensembles”. An ensemble always contains several programmes.
In turn, a programme can additionally contain up to twelve sub-pro-
grammes. In the case of a sports station, for instance, various sports
events can be broadcast simultaneously as sub-programmes. If a programme has sub-programmes, you
will see a “
programme name.
✶” displayed in front of the
77
DAB MODE
DAB also offers further advantages:
NEWS
News reports (NEWS) are provided in
addition to the traffic announcements.
If you wish, you can allow the news
reports to be played. If the “DAB NEWS
ON” setting is activated, the current
programme will be interrupted when a
news report arrives, and the report will
be played. At the end of the news
report, the radio returns to the programme that you were listening to
before.
➮ Press the MENU•OK button 7.
➮ Press the MENU•OK button 7,
to display the DAB menu.
➮ Press the or button 6 re-
peatedly until “DAB NEWS ON” or
“DAB NEWS OFF” appears on the
display.
If you want to receive news reports,
select “DAB NEWS ON”. If you do not
want to listen to news reports, select
“DAB NEWS OFF”.
➮ Select the setting that you want
using the
When you have finished making your
changes,
buttons 6.
➮ press the MENU•OK button 7
and then the DIS•ESC button 5
to exit the menu.
WEATHER
Weather reports (WEATHER) are provided in addition to the traffic announcements. If you wish, you can allow the weather reports to be played. If
the “DAB WEAT ON” setting is activated, the current programme will be interrupted when a weather report arrives, and the report will be played. At
the end of the weather report, the radio returns to the programme that you
were listening to before.
➮ Press the MENU•OK button 7.
➮ Press the MENU•OK button 7,
to display the DAB menu.
➮ Press the or button 6 re-
peatedly until “DAB WEATHER
OFF” or “DAB WEATHER ON”
appears on the display.
If you want to receive weather reports,
select “DAB WEAT ON”. If you do not
want to listen to weather reports, select “DAB WEAT OFF”.
➮ Select the setting that you want
using the
When you have finished making your
changes,
buttons 6.
➮ press the MENU•OK button 7
and then the DIS•ESC button 5
to exit the menu.
78

DAB MODE
SPORT
Sports reports are provided in addition
to the traffic announcements, news
reports and weather reports. If you
wish, you can allow the sports reports
to be played. If the “DAB SPORT ON”
setting is activated, the current programme will be interrupted when a
sports report arrives, and the report will
be played. At the end of the news
report, the radio returns to the programme that you were listening to
before.
➮ Press the MENU•OK button 7.
➮ Press the MENU•OK button 7,
to display the DAB menu.
➮ Press the or button 6 re-
peatedly until “DAB SPORT ON”
or “DAB SPORT OFF” appears on
the display.
If you want to receive sports reports,
select “DAB SPORT ON”. If you do not
want to listen to sports reports, select
“DAB SPORT OFF”.
➮ Select the setting that you want
using the
When you have finished making your
changes,
buttons 6.
➮ press the MENU•OK button 7
and then the DIS•ESC button 5
to exit the menu.
Switching regional traffic
announcements on/off
(DAB TREG)
Since DAB frequencies are broadcast
over a large area of the country, the
situation might arise in which you receive traffic announcements that are
not relevant to your region.
In order to avoid this, the DAB transmitter service areas are divided into
regions.
➮ Press the MENU•OK button 7.
➮ Press the MENU•OK button 7,
to display the DAB menu.
➮ Press the or button 6
repeatedly until “DAB TREG OFF”
or “DAB TREG ON” appears on
the display.
If you want to receive announcements
that apply to specific regions, select
“DAB TREG ON”. If you only want to
receive non-regional announcements,
select “DAB TREG OFF”.
➮ Select the setting that you want
using the
When you have finished making your
changes,
buttons 6.
➮ press the MENU•OK button 7
and then the DIS•ESC button 5
to exit the menu.
ENGLISH
Note:
● You can interrupt a news, weather
or sports report whilst it is being
played by pressing the TRAF button 8. The general priority settings are retained and the next report will be played when it arrives.
Note:
● Since this function is not support-
ed by all broadcasters, it is possible that you will not receive any
traffic announcements if the
TA-REG function is activated.
If you do not receive any traffic
79
DAB MODE
announcements over an extended
period of time, please deactivate
the TA-REG function.
Selecting the memory bank
This device lets you store DAB
programmes in four memory banks
(D1, D2, D3 and DT).
Five programmes can be stored in
each memory bank.
➮ Briefly press the BND•TS button
4 to switch between the memory
banks.
Notes:
● If there are no programmes stored
in the DT memory bank yet, this
memory bank will not be displayed. In this case, first start a
Travelstore (see “Storing programmes”).
● You cannot select the DT memory
bank if the PTY function is activated.
Tuning into ensembles
With DAB, several programmes broadcasted over the same frequency are
always combined into an “ensemble”.
Selecting an ensemble
You can directly select ensembles that
you have received once already (for this
to work, the ensemble must be receivable).
➮ Briefly press the or button
6.
The name of the next or previous
known ensemble is displayed. The first
available programme in the ensemble
is played.
Ensemble seek tuning
You can find new ensembles using
seek tuning.
➮ For seek tuning downwards or
upwards, press and hold down the
or button 6 for longer than
two seconds.
The radio tunes into the next receivable ensemble. The ensemble name is
displayed briefly. The first available programme in the ensemble is played.
Manually tuning an ensemble
You can also tune into ensembles
manually.
Note:
● Since various programmes from
different ensembles are stored
automatically in the DT memory
bank, you cannot use the functions described here for tuning into
an ensemble whilst the DT memory bank is activated.
80
➮ Press the or button 6 during
seek tuning.
➮ You can now tune the radio manu-
ally using the
or button 6.

DAB MODE
Selecting programmes
After you have tuned into an ensemble, you can select a programme from
the ensemble.
➮ Select a programme from the en-
semble using the
buttons 6.
Scanning receivable DAB
programmes (DAB-SCAN)
You can use the scan function to play
all the receivable programmes briefly.
Starting DAB-SCAN
➮ In DAB mode, press and hold
down the MENU•OK button 7
for longer than two seconds.
Note:
● You cannot use the DAB scan
function whilst the DT memory
bank is activated.
Scanning begins. The name of the
current programme appears in the top
line and the name of the current ensemble appears in the bottom line.
“SCANNING...” appears on the display
whilst the radio switches to the next
ensemble.
Storing programmes
Storing programmes manually
➮ Select the memory bank that you
want.
➮ Tune into the ensemble that you
want.
➮ Select the programme that you
want to store.
➮ Press and hold down one of the
station buttons 1 - 5 : for longer
than two seconds to assign the
programme to that button.
Storing programmes automatically
(Travelstore)
The Travelstore function stores the first
five receivable programmes in alphabetical order and you can access them
directly using the station buttons. All the
other programmes that were stored in
the “DT” memory bank during the
Travelstore scan can be accessed alphabetically by pressing the
6 buttons. You can switch rapidly between the programmes if you press and
hold down the
er than two seconds.
buttons 6 for long-
ENGLISH
Stopping DAB-SCAN and
continuing listening to a
programme
➮ Press the MENU•OK button 7.
Scanning stops and the radio continues playing the programme that it tuned
into last. If you cancel the DAB-SCAN
whilst “SCANNING...” is being displayed, the radio will retune to the programme you were listening to last.
Notes:
● Any programmes that were previ-
ously stored in this memory bank
are deleted in the process.
● You cannot use the DAB Travel-
store feature if the PTY function is
activated.
➮ Press and hold down the BND•TS
button 4 for longer than two seconds.
81

DAB MODE
The storing procedure begins.
“TRAVELSTORE PLEASE WAIT” appears on the display. After the process
is completed, the programme that is
stored in location 1 of the “DT” memory bank will be played. “NO LIST” appears on the display if no programmes
were found during the Travelstore scan.
Accessing stored programmes
Select the memory bank.
➮
➮ Press the station button 1 - 5 :.
DAB programme type (PTY)
Besides transmitting the station name,
an increasing number of stations also
provide information on the type of programme that they are broadcasting.
Your car radio can receive and display
this information.
For example, the programme types can
be:
➮ Press the
switch DAB-PTY ON or OFF.
When you have finished making your
changes,
or
button 6 to
➮ press the MENU•OK button 7
and then the DIS•ESC button 5
to exit the menu.
Selecting a programme type and
starting seek tuning
➮ Press the
The current programme type appears
briefly on the display. If you do not make
a selection whilst this display is visible,
the normal DAB display will be used
again.
or
button 6.
➮ If you want to select another pro-
gramme type, you can do so by
pressing the
whilst this display is visible.
Or
or
button 6
CULTURE TRAVEL JAZZ
SPORT NEWS POP M
ROCK M DRAMA EASY M
You can use the PTY function to select
stations of a particular programme
type.
Switching DAB-PTY on/off
➮ Press the MENU•OK button 7.
➮ Press the MENU•OK button 7,
to display the DAB menu.
➮ Press the or button 6 re-
peatedly until “DAB PTY ON” or
“DAB PTY OFF” appears on the
display.
➮ Press one of the buttons 1 - 5 :
to select a programme type that is
assigned to one of these buttons.
The selected programme type appears
briefly on the display.
➮ Press the or button 6 to
start seek tuning.
The radio will then tune into the next
station that it finds that corresponds to
your selected programme type.
Assigning a programme type to a
station button
➮ Select a programme type using
the
or
button 6.
82
DAB MODE
➮ Press and hold the desired station
button 1 - 5 : for longer than two
seconds.
The programme type is stored on the
selected button 1 - 5 :.
Setting the DAB waveband
With the Nashville DAB35, you can
receive DAB programmes and ensembles on the following wavebands:
“Band 3” (174 - 240 MHz) and “LBand” (1452 - 1491 MHz). Since
some countries do not use both
wavebands, you can speed up seek
tuning by excluding the waveband
that is not supported.
➮ Press the MENU•OK button 7.
➮ Press the MENU•OK button 7, to
display the DAB menu.
➮ Press the or button 6
repeatedly until “DAB-BAND L”,
“DAB-BAND 3” or “DAB-BAND
BOTH” appears on the display.
Switching between
DAB and FM
You can select various settings for
switching between DAB and FM radio
mode. It might be necessary to switch
between DAB and FM radio if the DAB
or FM reception quality decreases
severely.
If you select the “DAB-FM-AUTO” setting, the device automatically tunes into
the FM frequency of the programme
currently being received (if the programme can be received on FM), or it
tunes into the DAB programme of the
FM station that is currently tuned (if the
station is available as a DAB programme).
With “DAB-FM-MANUAL”, the device
switches to the FM frequency of the
DAB programme being received if you
manually call up the FM radio mode
(if the programme can be received on
FM).
ENGLISH
➮ Press the
switch between the settings.
If “DAB-BAND L” or “DAB-BAND 3” is
set, only the selected waveband will be
used. If “DAB-BAND BOTH” is set, both
wavebands will be used.
When you have finished making your
changes,
or
button 6 to
➮ press the MENU•OK button 7
and then the DIS•ESC button 5
to exit the menu.
If you set “DAB-FM OFF”, the FM station that you listened to last will be
played when you switch to FM radio
mode (if the station can be received).
➮ Press the MENU•OK button 7.
➮ Press the MENU•OK button 7,
to display the DAB menu.
➮ Press the or button 6 re-
peatedly until “DAB-FM AUTO”,
“DAB-FM MANUAL” or “DAB-FM
OFF” appears on the display.
➮ Press the
switch between the settings.
or
button 6 to
83
DAB MODE
When you have finished making your
changes,
➮ press the MENU•OK button 7
and then the DIS•ESC button 5
to exit the menu.
DAB Service following
If the reception quality of the programme being received decreases, the
Nashville DAB35 can automatically
tune to the programme in another ensemble (if available). For this feature to
work, the “service following” function
must be activated.
Switching service following on/off
To use service following,
➮ Press the MENU•OK button 7.
➮ Press the MENU•OK button 7,
to display the DAB menu.
➮ Press the or button 6
repeatedly until “DAB SF ON” or
DAB sub-programmes
Some DAB programmes contain subprogrammes. Programmes that contain
sub-programmes are marked with a
“
✶” in front of the programme name. If
a programme contains sub-programmes, you can tune into them.
Selecting sub-programmes
To switch between the sub-programmes of a programme that you are tuned
into, you must first switch to sub-programme mode,
➮ press and hold down the button
6 for longer than two seconds.
SC will be displayed at the left edge of
the display to indicate that you are currently in sub-programme mode.
The name of the sub-programme is
displayed in the bottom display line.
To switch between the sub-programmes,
“DAB SF OFF” appears on the
display.
➮ Press the
switch between the settings.
When you have finished making your
changes,
or
button 6 to
➮ press the MENU•OK button 7
and then the DIS•ESC button 5
to exit the menu.
If Service following is activated, the
RDS symbol is displayed during DAB
mode.
Service following is deactivated when
the RDS symbol disappears.
➮ briefly press the
The radio tunes into the next or previous sub-programme and then exits the
sub-programme mode.
Note:
● Sub-programmes are so far only
supported by a few broadcasters.
or
button 6.
84

DAB MODE
DAB radio text
In addition to their programmes, some
stations broadcast additional information (e.g. news) as scrolling text on the
display.
Note:
● Since displaying radio texts can
distract you from the current road
and traffic situation, we ask you
kindly to deactivate the “DAB radio
text” function or to use it only
whilst the vehicle is stationary.
➮ Press the MENU•OK button 7.
➮ Press the MENU•OK button 7,
todisplay the DAB menu.
➮ Press the or button 6
repeatedly until “R-TXT ON” or
“R-TXT OFF” appears on the
display.
➮ Press the
between “RADIO TXT ON” and
“RADIO TXT OFF”.
When you have finished making your
changes,
or
6 to switch
➮ press the MENU•OK button 7
and then the DIS•ESC button 5
to exit the menu.
Setting the length of the
programme names
Most programmes use programme
names that are 8 characters long (as
you are already familiar with from RDS).
Some programmes use names that are
16 characters long, which cannot be
displayed in one go. If a programme
uses names that are 16 characters
long, you can either limit the name to
eight characters or display the 16-character name as scrolling text.
➮ Press the MENU•OK button 7.
➮ Press the MENU•OK button 7,
to display the DAB menu.
➮ Press the or button 6 re-
peatedly until “SRV NAME 8” or
“SRV NAME 16” appears on the
display.
➮ Press the
switch between “SRV NAME 8”
(8-digit display) and “SRV NAME
16” (16-digit display).
When you have finished making your
changes,
or
button 6 to
➮ press the MENU•OK button 7
and then the DIS•ESC button 5
to exit the menu.
Changing the display
You can choose from various display
options in DAB mode:
● “NORMAL MODE”:
First line: memory bank,
programme name and memory
location, if available.
Second line: Ensemble name.
● “CLOCK MODE”:
First line: memory bank,
programme name and memory
location, if available.
Second line: Ensemble channel,
clock time.
ENGLISH
85
 Loading...