

Page 1

Radio CD SD USB MP3 WMA
Memphis MP66 7 646 530 310
Operating and installation instructions
Notice d’emploi et de montage
Instrucciones de manejo e instalación
Instruções de serviço e de montagem
ጇѰЊཆ
사용 및 장착 설명서사용 및 장착 설명서
http://www.blaupunkt.com
Page 2

2
Page 3

Contents
Contents
About these instructions ..................6
For your safety ..................................6
Scope of delivery ..............................7
Warranty ...........................................7
Device Overview ...............................8
Controls .............................................8
Handheld remote control ...................9
Placing the device in operation ......10
Detaching/attaching the
control panel ...................................10
Switching the device on/off .............10
General functions ...........................12
Replacing the battery of the
handheld remote control .................12
Inserting a CD ..................................12
Inserting an MMC/SD card ..............12
Connecting the USB medium ...........13
Adjusting the volume .......................14
Muting the device ............................14
Operation with telephone ................14
Selecting an audio source ...............15
The tuner display..........................16
The audio CD display ...................16
The CD changer display ...............17
The MP3 display ...........................17
Overview of the operation..............18
Overview of the buttons ..................18
Overview of the functions MIX and
RPT ..................................................19
Switching Repeat title on/off
(RPT) ............................................20
Scanning titles (Scan) ..................20
Buttons for menu operation ............20
Example of a menu operation ..........21
Calling up a menu ........................21
Selecting a menu item in the
settings menu ...............................21
Changing and saving a setting ......21
Exiting a menu item ......................22
Operating the tuner ........................23
Selecting the memory bank .............23
Searching for stations ......................23
Manually searching for stations ....23
Automatically searching for
stations ........................................24
Storing stations ...............................25
Listening to stored stations .............25
Scanning all receivable stations
(Scan) ..............................................25
Set the device to the region
Europe, USA or Thailand ..............26
Changing the tuner settings
("Tuner" menu) ................................27
Changing the waveband (Band) ...27
Toggle between mono and
stereo operation (Mono) ..............27
Allowing alternative frequencies
(RDS) ...........................................28
Searching FM stations automatically
and storing them in the FMT
memory bank (Travelstore) ..........28
Activating/deactivating
improved reception (Hicut) ..........28
Changing the seek tuning
sensitivity (Sensitivity) .................29
Restricting station seek tuning
to certain programme contents
(Program Type) ............................29
Operating the integrated
CD player.........................................30
What features do MP3 or WMA CDs
have to have? ...............................30
ENGLISH
3
Page 4

Contents
Functions of the integrated CD
player if an audio CD is inserted ..31
Switching the CD text display
on/off (TXT) .................................32
Switching the scrolling text for
CD text on/off (SCL) ....................32
Operating the MP3/WMA player ....33
Showing all the information of
the current title (ALL) ..................34
Switching scrolling text on/off
(SCL) ............................................34
Selecting the title information
to be displayed (INF) ....................34
Selecting a title from a list
(Browser mode/playlist) ..............35
Operating the optional
CD changer......................................37
Selecting a CD from the CD
magazine (CD overview) ..............38
Changing the name of a CD in
the magazine of the CD changer
(CDN) ...........................................38
Changing basic settings in the
settings menu .................................39
Adjusting sound and balance
(Audio Settings)...............................40
Changing treble or bass
(Treble/Bass) ...............................40
Changing the volume distribution
(Balance/Fader) ...........................40
Changing the equalizer setting
(Digital Equalizer) ........................41
Calling up a user-defi ned equalizer
setting (User Equalizer) ...............41
Creating/changing a user-defi ned
equalizer setting (Adjust) .............42
Which equalizer setting is the
correct one? .................................44
Selecting a sound preset
(Presets) ......................................44
Setting the speed-dependent
volume increase (Auto Sound) .....44
Setting the bass increase
(X-Bass) ........................................45
Switching off the equalizer ..........45
Confi guring the preamplifi er output
for the subwoofer (Subout) .........45
Changing display settings
(Display Settings) ............................46
Changing the brightness
of the display for day/night
(Brightness) .................................46
Activating/deactivating the
screen saver (Screen Saver) ........46
Switching the welcome text
on/off (Turn On Text) ...................46
Changing images and animations
(SD Browser/USB Browser) .........47
Adjusting the display viewing angle
(Angle) .........................................48
Changing volume presettings
(Volume Settings) ............................49
Changing the volume presetting of
the telephone (Phone Volume) ....49
Changing the volume presetting of
the signal tone (Beep Volume) .....49
Changing the presetting of the
power-on volume (On Volume) .....50
Restoring the volume at switch-on
(Last Volume) ...............................50
Changing clock settings
(Clock Settings) ...............................51
Setting the time (Time Setting) ...51
Switching the time display
on/off with switched-off device
(Off Clock) ........................................51
Confi guring audio inputs
(Aux Settings) ..................................52
Switching the 24-hour time
display on/off (24 h Mode) ..........52
4
Page 5

Contents
Activating/deactivating audio
inputs (Auxiliary 1/2) ...................53
Renaming audio inputs
(Edit Auxiliary 1/2) .......................53
Changing special settings
(Various Settings) ............................54
Changing the welcome text
(Turn On Text) ..............................54
Switching the internal amplifi er
on/off (Internal Amp) ...................55
Resetting the device to factory
settings (Norm Set)......................55
Changing the scan time
(Scan Time) ..................................55
Displaying the serial number
(Serial Number) ...........................56
Error table .......................................56
Specifi cations .................................57
Glossary ..........................................58
Index ...............................................60
ENGLISH
Blaupunkt stands for technical know-how in mobile radio reception, for
precise navigation systems and fi rst-class sound. The blue dot made its
debut in 1923 as a seal of quality that was assigned after rigourous functional – and it still applies today. At that time as well as today, the blue
dot identifi es products of extraordinary quality.
5
Page 6
For your safety
About these instructions
Please read these instructions
and, in particular, the following
chapter, "For your safety", before
using the device!
serve the following instructions:
•
CD Changer, if available
•
Remote Control, if available
The software and hardware designations used in these instructions
are trademarks or registered
trademarks and, as such, are subject to legal regulations.
Please also ob-
For your safety
The device was manufactured
according to the state of the art
and established safety guidelines.
Even so, dangers may occur if you
do not observe these safety information:
➔
Read these instructions carefully and completely before using the device.
➔
Keep the instructions at a location so that they are always accessible to all users.
➔
Always pass on the device to
third parties together with
these instructions.
Use as directed
The device is designed for operation in a vehicle with 12 V vehicle
system voltage and must be installed in a DIN slot.
If you are installing device yourself
You may only install the device
yourself if you are experienced in
installing car sound systems and
are very familiar with the electrical system of the vehicle.
Observe the following!
Danger of injuries!
Do not open or modify
the device! The device
contains a Class 1 laser that
emits invisible laser radiation
which can cause injuries to your
eyes. The warranty is void if the
device has been opened.
Danger of accidents!
Operate the device only if
traffi c situation permits it!
Danger of hearing
damage!
Always listen at moderate
volume so that you can always
hear acoustic warning signals!
This will also help to protect your
hearing. The device briefl y switches to mute, e.g. while the CD
changer changes the CD or if you
6
Page 7

Scope of delivery
are switching the audio source.
Do not increase the volume during this mute phase
Danger to the device!
Do not insert any mini
CDs (8 cm diameter) and
shape CDs since they destroy the
drive!
Theft protection
Carry the control panel with you
in the supplied case whenever
you leave the vehicle.
Cleaning
Clean the device with a dry or
slightly moistened cloth. Do not
use any solvents, cleaning agents
or cleansers and no cockpit spray
and care product for plastic materials.
Scope of delivery
1 Memphis MP66
1 Handheld remote control
RC 12H
1 Case for the control panel
1 Operating instructions
1 Support frame
2 Disassembly bar
1 Guide pin
1 USB connecting cable
1 Preamplifi er cable
1 Loudspeaker connecting cable
1
Cable for voltage supply
and signal transmission
Warranty
The warranty terms issued by our
respective responsible domestic
agency are valid.
The warranty terms can be called
up under www.blaupunkt.com or
requested directly from:
Blaupunkt GmbH
Hotline
Robert-Bosch-Str. 200
D-31139 Hildesheim
Germany
ENGLISH
7
Page 8

Device Overview
Device Overview
Controls
1 button
for detaching the control panel
TUNER button
2
Selecting the tuner as audio
source
Opening the "Tuner"
Rocker switch
3
Tuner: Start the station seek
tuning
Settings menu: Change settings
On/Off button
4
Press short: Switch on/mute
Press long: Switch off
Volume control
5
8
6 NEXT button
Tuner: Select memory bank (FM1,
FM2, FM3, FMT)
Settings menu: Go to the next
menu page
MP3/WMA: Switch between
"PLAY", "BROWSER" and "PLAYLIST"
to < Softkeys
7
to select the function shown on
the display next to the respective
button
=
button
to eject/insert a CD
Display (see page 16 and 17)
>
Page 9
Device Overview
? MENU button
to call up the settings menu
@
ESC button
Settings menu: Confi rm menu
item and change to the display of
the audio source
Scan/Travelstore: Cancel
OK button
A
Press short: Confi rm menu item
and change to the next higher
menu level
Press long: Start scan/station
seek tuning
SRC button
B
Consecutively switching between
the available audio sources
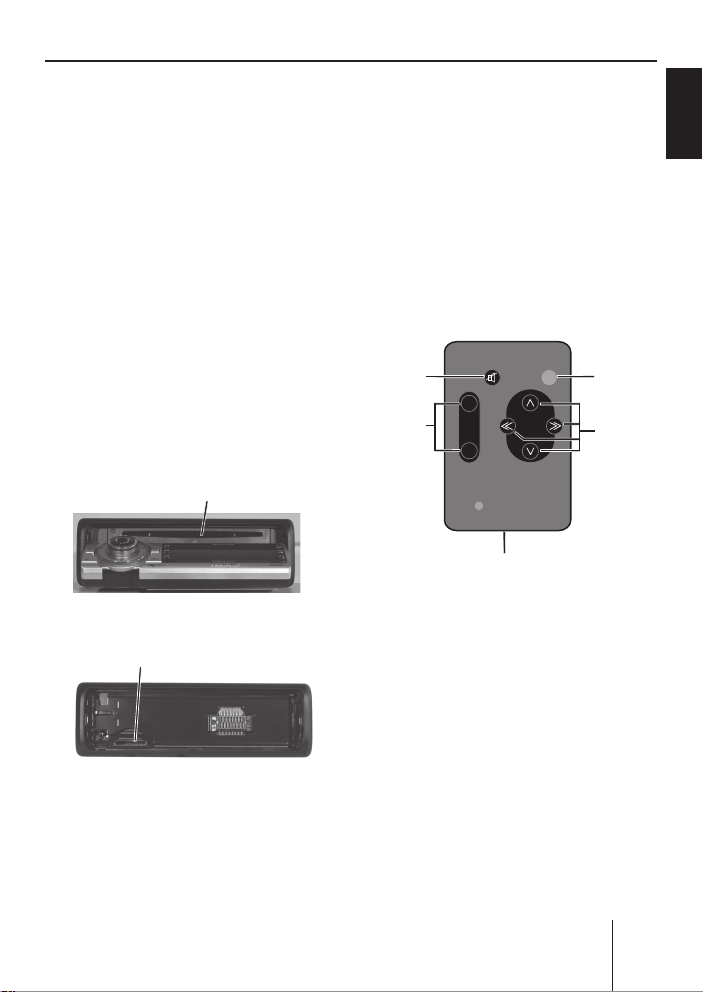
CD drive
C
D MMC/SD card slot
C
D
Handheld remote control
The RC 12H handheld remote
control contained in the scope of
delivery allows you to safely and
conveniently operate the basic
functions of your device. For this
purpose, a direct line of sight must
exist between the handheld remote
control and the device. Switching
the device on/off is not possible
with the handheld remote control.
SRC
GH
+
_
BLAUPUNKT
I
SELECT
E
VOLUME
F
E Select buttons
Same function as the rocker
switch 3
Loudspeaker buttons
F
G SRC button
Same function as the SRC
button B on the device
Mute button
H
Muting
Battery holder
I
Contains a CR 2025 3-V coin cell
(for changing the battery, see
page 12)
ENGLISH
9
Page 10
Placing the device in operation
Placing the device in
operation
Detaching/attaching the
control panel
You can detach the control panel
to protect against theft.
CAUTION!
Danger of theft!
The device is worthless to a thief
without the control panel.
Never keep the control panel
➔
in the vehicle, not even in a
hidden place; instead, carry it
with you in its case when you
leave the vehicle!
CAUTION!
Damage to the control
panel!
The control panel can be damaged
or malfunction if the following is
not observed:
Never drop the control panel.
➔
Never expose the control pan-
➔
el to direct sunlight or another
heat source.
Transport it exclusively in the
➔
supplied case.
➔
Do not touch the contacts on
the rear side with your fi ngers.
Clean the contacts of the con-
➔
trol panel regularly using a soft
cloth moistened with cleaning
alcohol.
To detach the control panel:
Press the
➔
The control panel opens to the
front on the left. The device
switches off automatically.
Detach the control panel.
➔
To attach the control panel:
Place the control panel in the
➔
slot with the right side fi rst.
➔
Next, carefully push the left
side to the back until the control panel engages.
button 1.
Switching the device on/off
To switch on the device:
Press the On/Off button
➔
The device plays the audio
source you previously listened
to.
Note:
If you switch on the device
without fi rst switching on the
vehicle ignition, the device automatically switches off after
one hour to save the vehicle
battery.
4.
10
Page 11

Placing the device in operation
To switch off the device:
Press and hold the On/Off but-
➔
4 for approx. two seconds.
ton
In addition, the device is automatically switched off as soon as you
switch of the vehicle ignition. If
you switch on the ignition again,
it also automatically switches on
the device again.
ENGLISH
11
Page 12

General functions
General functions
Replacing the battery of the
handheld remote control
Press the lock of the battery
➔
holder
the arrow and pull out the battery holder
time.
Replace the battery with a 3-V
➔
coin cell of type CR 2025.
➔
Insert the battery so that the
positive side points to the rear
side of the handheld remote
control.
Inserting a CD
Mini CDs (8 cm diameter) or
shape CDs damage the drive!
Insert only circular CDs with
➔
a 12-cm diameter into the CD
drive.
To insert an MP3, WMA or audio
CD, the device must be switched
on.
➔
Press the
The control panel opens. If a
CD is in the drive, it is ejected.
If you do not remove this CD, it
I in the direction of
I at the same
CAUTION!
Damage to CD drive from
unsuitable CDs!
button =.
is automatically pulled in again
after approx. 10 seconds.
➔
Insert the CD with its printed
side uppermost into the CD
C until you feel some re-
drive
sistance.
The CD is automatically drawn
in and the control panel closes.
This CD can now be selected
as audio source.
Note:
As long as the CD is in the
drive, the device stores track
and playing time of the CD
played last, and after calling up
the audio source, the playback
starts at the position where it
was interrupted.
Inserting an MMC/SD card
Note:
Blaupunkt cannot guarantee
the correct functioning of all
MMC/SD card available on the
market and, for this reason,
recommends the use of MMC/
SD cards manufactured by
SanDisk® or Panasonic®. The
cards must be formatted using
the FAT16 or FAT32 fi le system
and contain MP3 or WMA fi les.
➔
Remove the control panel as
described on page 10.
➔
Insert the MMC/SD card in the
card slot
D until it engages.
12
Page 13

General functions
The contacts of the card must
point down and to the rear.
Attach the control panel as de-
➔
scribed on page 10.
This MMC/SD card can now be
selected as audio source.
To remove the MMC/SD card:
Remove the control panel as
➔
described on page 10.
Push on the MMC/SD card un-
➔
til it disengages.
Pull the MMC/SD card out of
➔
the card slot
D.
Connecting the USB
medium
To be able to connect a USB stick
or a USB hard disk, the supplied
USB cable must be connected
to the rear side of the device before the installation as described
in the installation instructions.
This cable can be routed, for example, to the glove compartment
or a suitable place of the center
console.
Note:
Always switch off the device
before connecting or disconnecting your USB medium!
Connect the USB medium to
➔
the USB cable that is routed
from the rear side of the device.
The USB medium can now be
selected as audio source.
For the device to recognise the
USB medium, it must be specifi ed
as mass storage device and formatted using the FAT16 or FAT32
fi le system and contain MP3 or
WMA fi les. Blaupunkt cannot
guarantee the proper functioning of all USB media available on
the market. If extensive fi les are
stored on your USB medium, the
fi le search (see page 35) can be
slow.
ENGLISH
13
Page 14

General functions
Adjusting the volume
WARNING!
Danger from excessive
volume!
Excessive volume can damage
your hearing and you may fail to
hear acoustic warning signals!
Do not change the volume
➔
while the device changes the
CD in the CD changer or the
audio source.
Always set the device to a mod-
➔
erate volume.
➔
Turn the volume control
The current volume is shown
on the display and used for all
audio sources.
Note:
To preset the volume of a connected telephone (Phone) or
the signal tone (Beep), see
page 49.
5.
Muting the device
The device can be muted as follows:
➔
Briefl y press the On/Off button
4.
The display shows "MUTE".
To cancel the mute function:
➔
Briefl y press the On/Off but-
4 again or turn the volume
ton
control
5.
Operation with telephone
If a hands-free system is installed
in your vehicle or your cell phone
is connected to the device via a
Bluetooth adapter, the device responds as follows to incoming or
outgoing telephone calls:
•
The voice of the person calling
you is played back via the loudspeakers of the vehicle.
•
The display shows "Phone call".
•
The currently playing audio
source is muted.
•
During the telephone call, you
change the volume of the telephone call by means of the volume control
5.
14
Page 15

General functions
Selecting an audio source
The device features the following
audio sources:
•
Tuner
Integrated CD player (can play
•
audio CDs as well as CDs with
MP3 or WMA fi les)
•
MMC/SD card with MP3 or
WMA fi les
In addition, the following external
audio sources can be connected:
•
Either an optional CD changer
or AUX 1
•
AUX 2 (e.g. MiniDisc or external MP3 player)
•
USB stick with MP3 or WMA
fi les
To be able to select an external
audio source, it must be connected and contain audio data.
➔
Press the SRC button
peatedly until the display briefl y
shows the desired audio source.
B re-
ENGLISH
15
Page 16

General functions
The tuner display
C
FMT
92,8
MHz
D
4
5
6
EF
1
2
Radio Sun
3
D
A
B
16:13
A Main line
RDS station name or frequency
B Clock
C Level indicator
Memory bank (FMT, FM1 to FM3)
D Memory location for radio sta-
tions which can be selected
using the six softkeys
7 to <
E Info line 1
Frequency of the station
F Info line 2
Frequency unit (MHz or kHz)
The audio CD display
C
CD
02:19
Mix CD
EG
D
TRACK 06
D
A
B
16:13
SONG: Bob Marley - No woman no cry
F
A Main line
Track number
B Clock
C Level indicator
Audio source (CD)
D Functions which can be select-
ed using the softkeys
7 to <
E Info line 1
Playing time
F Info line 2
Activated audio functions
G Info line 3
CD text
16
Page 17

General functions
The CD changer display
C
CDC
02:19
EG
D
TRACK 05
D
A
B
16:13
DISC 01 ALICIAK
Mix All
F
A Main line
Track number
B Clock
C Level indicator
Audio source (CDC)
D Functions which can be select-
ed using the softkeys 7 to <
E Info line 1
Playing time
F Info line 2
Activated audio functions
G Info line 3
CD text or CD name
The MP3 display
A
B
C
D
MP3
16:13
Bob Marley
SONG: Bob Marley - No woman no cry
D
02:19
Mix All
EGF
A Main line
ID3 or fi le name
B Clock
C Level indicator
Audio source (MP3, MMC, USB)
D Functions which can be select-
ed using the six softkeys 7 to
<
E Info line 1
Playing time
F Info line 2
Activated audio functions
G Info line 3
Title information (e.g. ID3 or fi le
names)
ENGLISH
The MP3 display appears if a CD,
SD/MMC card or USB stick with
MP3 or WMA fi les is inserted and
selected as audio source. The corresponding MP3 medium is displayed on the level indicator
C.
17
Page 18
Overview of the operation
Overview of the operation
This chapter fi rst presents the buttons on the device.
It is followed by a description of the audio functions MIX, REPEAT, and
SCAN since their operation is identical for all audio sources.
The operation of the device menus is described starting on page 20.
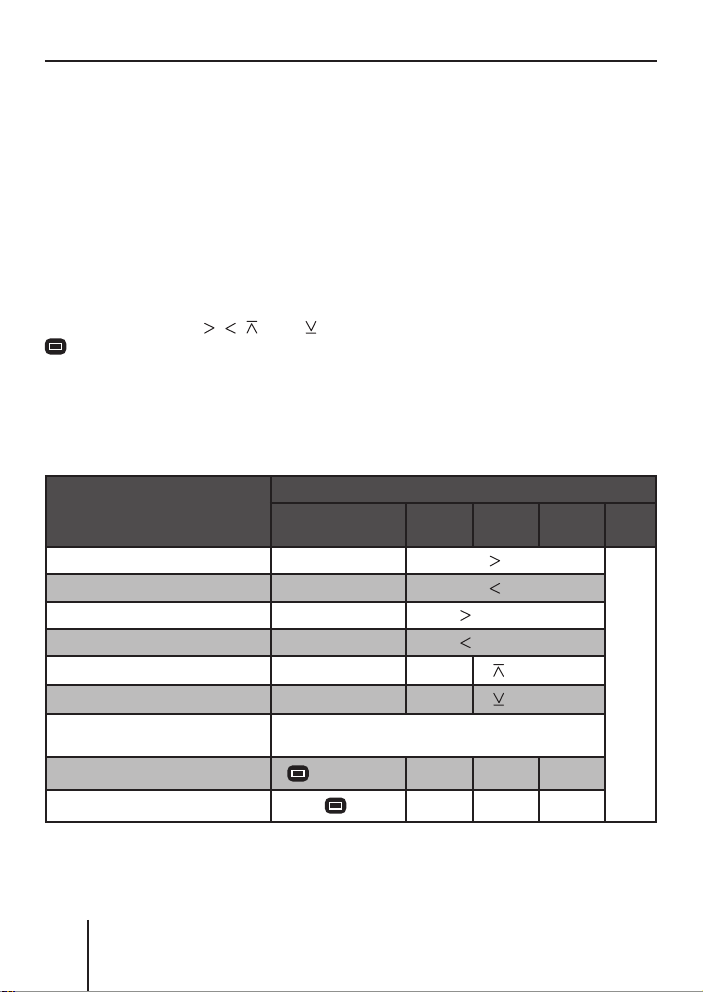
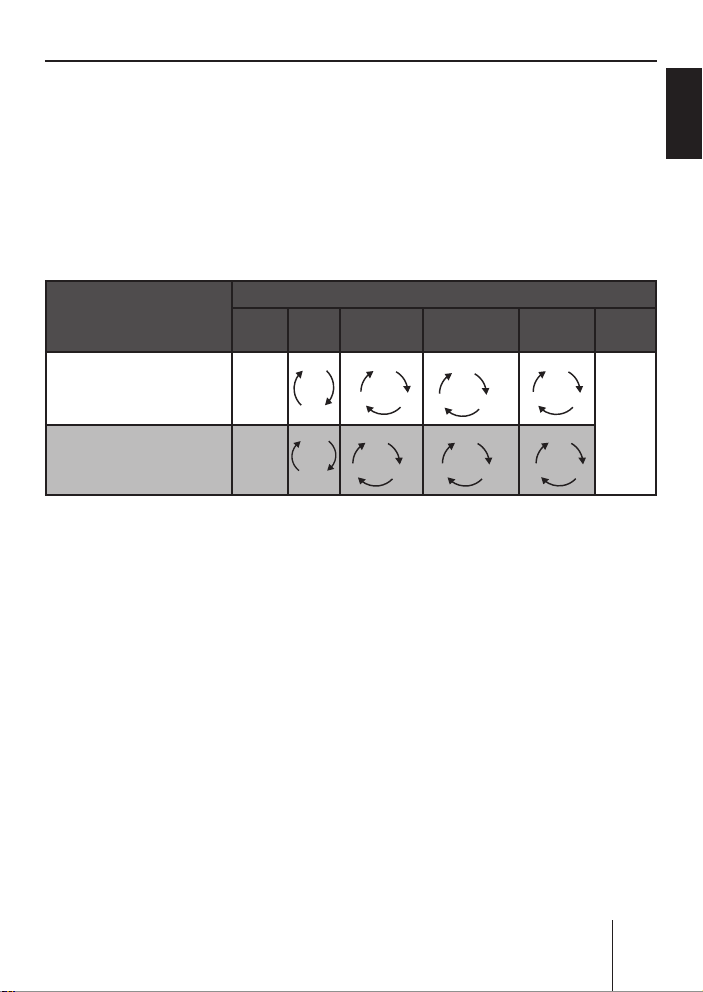
Overview of the buttons
Many basic functions during the playback of music, such as forwarding
and reversing music, are performed using the rocker switch
the four functions
, , , and ), the OK button A or the six softkeys
7 to <.
Note:
These functions are not shown on the display!
The following table shows the functions that can be performed by
these buttons.
Selectable audio sources
What do you want to do?
Forward
Reverse
Title forward
Title reverse
Previous CD/folder
Next CD/folder
Scan track/station
(see also page 20)
Play radio station
Store radio station
Tuner CD
– Hold
– Hold
–
–
––
––
Press OK for 2 seconds
Press short
Press
for 2 s
MP3/
WMA
pressed
pressed
Press short
Press short
–––
–––
3 (using
CDC AUX
Press short
Press short
operation possible of Memphis
No
18
Page 19
Overview of the operation
K
K
Overview of the functions MIX and RPT
The display of the active audio source can show up to six functions D
at the left and right edge of the display which you always operate using the same six softkeys
The different settings of a function are selected by repeatedly pressing
the same softkey.
The following table shows which settings are available for the functions
MIX and REPEAT.
7 to < independent of the audio source.
ENGLISH
Softkey next to the
audio function
MIX ( random track play)
(see also page 19)
RPT ( repeat mode )
(see also page 20)
Tuner CD MP3 CD
OFF
–
CD
OFF
–
TRACK
Switching random track play on/
off ( MIX)
Press the softkey
➔
7 (next to
"MIX").
The random track mode is
briefl y displayed.
•
"MIX CD": All tracks on the
current audio CD are played
in random order.
•
"MIX ALL": All tracks on all
CDs in the magazine of the
CD changer are played in
random order.
•
"MIX FOLDER": Up to 99 MP3
or WMA titles in the current
folder are played in random
order.
Selectable audio sources
USB/SD/
MMC
MEDIUM
CD
OFF
FOLDER
OFF
DIR
TRAC
"MIX MEDIUM": All MP3 or
•
FOLDER
OFF
DIR
OFF
TRAC
CDC AUX
OFF
ALL
CD
OFF
FOLDER
CD
WMA titles on the current
data carrier (CD, MMC/SD
card or USB stick) are played
in random order.
•
"MIX OFF": The random track
play is switched off. All titles
are played in the order in
which they are found on the
data carrier.
If you switched on random track
play, the selected random track
play mode is displayed on info
F and indicated by "MIX"
line 2
at the side of the display.
sible of Memphis
No operation pos-
19
Page 20

Overview of the operation
Switching Repeat title on/off
( RPT)
➔
Press the softkey 8 (next to
"RPT").
The repeat mode is briefl y displayed.
"REPEAT TRACK": The cur-
•
rent track is repeated until
you quit repeat.
•
"REPEAT DIR": All titles in the
current folder are repeated
until you quit repeat.
•
"REPEAT CD": All tracks on
the CD are repeated until you
quit repeat.
•
"REPEAT OFF": The repeat
mode is switched off. However, the playback does not
stop with the last track. After
the last title in the last folder, the playback is continued
with the fi rst title in the fi rst
folder.
The selected repeat mode is displayed on info line 2
cated by "RPT" at the side of the
display.
Scanning titles ( Scan)
You can scan all the titles of a
data carrier. The scan time is
selected in the settings menu
("Scan Time" menu item, see
page 54 and 55).
➔
Press and hold the OK button
A for approx. two seconds.
F and indi-
All titles are scanned. The display shows "SCAN" and the display of the active audio source.
To cancel the scan:
Press the OK button
➔
The playback of the current
title is continued.
A.
Buttons for menu operation
The device features menus which
allow you to change the presettings or make a selection. The display shows up to six menu items.
Each menu item is assigned to
one of the six softkeys
The following buttons are required to operate the menus:
•
The MENU button
the settings menu at any time.
•
If a menu consists of several
pages, you can consecutively scroll them using the NEXT
button
•
If "Tuner" is selected as the audio source, the TUNER button
2 calls up the "Tuner" menu.
•
The softkeys
to select the menu items that
are shown on the display next
to the corresponding button.
•
In some menus, the rocker
switch
setting of a menu item.
This setting is immediately effective and automatically stored.
6.
7 to < are used
3 is used to change the
7 to <.
? calls up
20
Page 21
Overview of the operation
You confi rm the setting with
•
the OK button
one higher menu level.
You also confi rm the displayed
•
setting with the ESC button
but you are leaving the menu
and return to the display of the
active audio source.
If you do not press any button,
•
the display of the active audio
source automatically appears
after approx. 16 seconds.
A and go back
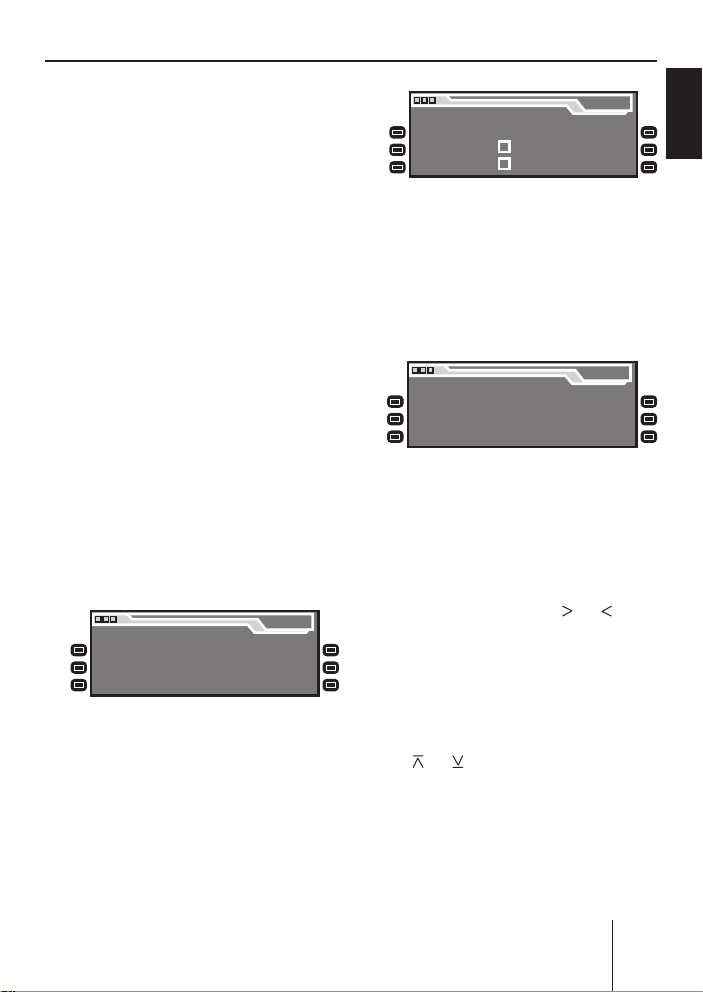
Example of a menu operation
@,
Brightness
Screen Saver
Turn On Text
Press the softkey 7 (next to
➔
"Brightness").
The current settings for dis-
play brightness for "Night" and
"Day" appear on the "Display"
menu. The "Night" menu item is
highlighted.
Night 08 Day 16
Display
SD Browser
USB Browser
Angle
Display
The following example from the
settings menu (Changing the display brightness) shows how to
operate the menus in general.
Calling up a menu
Press the MENU button ?.
➔
The settings menu is displayed.
Menu
Audio
Display
Volume
Settings
Settings
Settings
Clock
Aux
Various
Settings
Settings
Settings
Since you can adjust the display
brightness separately for night
and day, you must switch between the menu items "Night"
and "Day".
For this purpose, press the
➔
rocker switch
3 for or until
the desired menu item is highlighted.
Changing and saving a setting
To change the display brightness:
Selecting a menu item in the settings menu
➔
Press the softkey
8 (next to
"Display Settings").
The "Display" menu appears.
On the rocker switch
➔
or .
on
The setting takes effect imme-
diately (the display becomes
brighter or darker). The setting
3, press
is saved. If you do not press another button, the display of the
ENGLISH
21
Page 22

Overview of the operation
active audio source automatically appears after approx.
16 seconds.
Exiting a menu item
Press the OK button
➔
A to go
up one menu level.
Or press the ESC button
➔
to exit the menu and return to
the display of the active audio
source.
@
22
Page 23
Operating the tuner
Operating the tuner
After selecting "Tuner" as the audio source, the tuner display appears
(see page 16). The playback starts immediately with the previously
played station if the vehicle is within the reception area of this station.
1 Radio Kiss 494.1
2 Radio Sun 596.9
3 93.3 697.7
4
1 Radio Kiss
2 Radio Sun
3 93.3 6
1
Radio Kiss
25
Radio Sun
3
93.3
94.1
96.9
97.7
94.1
96.9
97.7
1
5
2
RADIO SUN
3
4
6
Selecting the memory
bank
The device features four memory banks ( FM1, FM2, FM3, and
FMT). You can store or call up six
stations at every memory bank.
To select the memory bank:
➔
Press the NEXT button
peatedly until the desired memory bank appears on the level
display
C of the tuner display.
6 re-
SRC
FMT
16:13
92,9
MHz
Note:
To automatically search for
FM stations and store them in
the FMT memory bank (Travelstore), see page 28.
Manually searching for stations
➔
While the tuner display appears, press on
rocker switch
The response of the tuner depends upon the settings in the
1
Radio Kiss
25
Radio Sun
3
93.3
4
1
Radio Kiss
2 5
5
6
Radio Sun
3
93.3
1
Radio Kiss
25
Radio Sun
3
93.3
94.1
96.9
97.7
94.1
96.9
97.7
94.1
96.9
97.7
or on the
3.
menus "RDS" (see page 28) and
Searching for stations
You can search for stations manually or automatically.
"Program Type" (see page 29).
•
If you selected a specifi c program type (PTY, e.g. news,
sports, classic, etc.) in the
ENGLISH
4
6
4
6
4
6
23
Page 24

Operating the tuner
"Program Type" menu, the
tuner automatically searches
the next station broadcasting this program type in the
selected direction. For this
purpose, the station must
be broadcasting the corresponding PTY identifi cation
as RDS service.
•
If you activated the automatic change to alternative frequencies in the "RDS" menu,
the tuner searches for the
same station on a different
frequency.
•
If you selected the "PTY OFF"
option in the "PROG TYP"
menu and deactivated the
automatic change to alternative frequencies in the "RDS"
menu, you can manually adjust the tuner in increments
of 100 kHz.
As soon as a station has been
located, it is played. The station
name appears on the display after
a few seconds if the station provides this RDS information.
You can now store this station
(see page 25) or restart the manual station seek tuning.
The tuner searches for the next
station in the current waveband in the selected direction.
The settings in the menus "Sensitivity" (see page 29) and "Program Type" (see page 29) are
incorporated.
As soon as a station is located,
the seek tuning stops and the located station is played. The station name appears on the display
after a few seconds if the station
provides this RDS information.
You can now store this station
(see the next section) or restart
the automatic station seek tuning.
Note:
If you press and hold
the rocker switch
or on
3, the auto-
matically seek tuning skips the
stations found until you release
the rocker switch again.
Automatically searching for
stations
➔
While the tuner display appears, press on
rocker switch
or on the
3.
24
Page 25

Operating the tuner
Storing stations
After locating a station, you can
store it as follows:
Select the desired memory
➔
bank (see page 23).
Press the softkey for approx.
➔
two seconds to which you
want to assign the station.
The station is stored. A signal
tone confi rms that the station
has been stored.
The display briefl y shows the
assignment of the six memory
locations of the current memory bank. The current station is
highlighted.
Note:
To automatically search for
FM stations and store them in
the FMT memory bank (Travelstore), see page 28.
Listening to stored stations
Select the desired memory
➔
bank (see page 23).
Briefl y press the softkey which
➔
is assigned to the station you
want to set up.
The display may briefl y show
the assignment of the six memory locations of the current
memory bank. The current station is highlighted. The desired
station is played back provided
that it can be received at the
current vehicle position.
Press the OK button
➔
the ESC button
16 seconds.
The tuner display shows the
frequency and possibly the
name of this station, provided
that the station broadcasts this
RDS information.
In addition, the memory location of the radio station
highlighted.
A or
@ or wait for
D is
Scanning all receivable
stations (Scan)
Select the waveband (FM, AM)
➔
whose receivable stations you
want to scan (see page 27).
Press and hold the OK button
➔
A for approx. two seconds.
The tuner searches for stations
in the current waveband. The
display shows "SCAN" every
two seconds.
As soon as the tuner has located a station, it is played and
the station name or the station
frequency appears on the display. The scan time can be set
as described on page 54 and
55 under "Scan Time".
After the frequency band has
been completely searched
once, the search stops and the
ENGLISH
25
Page 26

Operating the tuner
station located last is played
back.
You can do the following at any
time:
•
Store the currently scanned
station (see page 25),
cancel the scan by briefl y press-
•
ing the OK button
A.
Set the device to the region
Europe, USA or Thailand
The device is factory set to the
frequency ranges and station
technologies of the region in
which it was purchased. If this
setting is not correct, you can adjust the device as follows to the
different frequency ranges and
station technologies of Europe,
the United States or Thailand.
➔
Switch off the device.
➔
Hold the two softkeys
< pressed while switching on
9 and
the radio.
The "Area" menu opens.
➔
Press the softkey next to the
region in which you are using
the device.
➔
Press the OK button
A.
26
Page 27

Operating the tuner
Changing the tuner settings ( "Tuner" menu)
The "Tuner" menu allows you to change the basic settings of the tuner.
To open the "Tuner" menu:
Press the TUNER button
➔
The "Tuner" menu consists of two pages which can be toggled with the
NEXT button
6.
2. The "Tuner" menu appears.
ENGLISH
Changing the waveband ( Band)
The tuner can receive FM and AM.
To switch between these wavebands:
➔
In the "Tuner" menu, select the
"Band" menu item.
The "Band" menu appears.
➔
Select the desired band.
: This waveband is select-
•
ed. The previously played
station of this waveband is
played back.
: This waveband is not se-
•
lected.
You can now do the following in
this waveband:
Searching stations (see page
•
23)
•
Storing stations (see page 25)
•
Calling up stored stations (see
page 25)
Toggle between mono and stereo
operation ( Mono)
If you selected the "FM" waveband, you can toggle between
mono and stereo operation.
27
Page 28

Operating the tuner
Press the softkey 9 in the
➔
"Tuner" menu (next to "Mono").
: The mono operation is
•
activated. Weak, noisy stations are played back more
clearly.
: The stereo operation is
•
activated. You are listening in
stereo if the station broadcasts in stereo.
Note:
If you switch on the device, this
setting is automatically set to
stereo operation.
Allowing alternative frequencies
( RDS)
The device can automatically
switch to an alternative frequency
(AF) of the same station if the reception becomes poor.
➔
Press the softkey
"Tuner" menu (next to "RDS").
: The device automatical-
•
ly adjusts the best receivable
frequency of the station, provided that the station supports the "AF" RDS function.
•
: The device does not
change the frequency.
Searching FM stations automatically and storing them in the
FMT memory bank ( Travelstore)
You can automatically store the
six FM stations offering the
; in the
strongest reception in the region
in the FMT memory bank.
Press the softkey : in the
➔
"Tuner" menu (next to "Travelstore").
"Travelstore" appears on the
display. The tuner automatically searches for the six strongest FM stations and stores
them in the FMT memory bank.
After the storing is completed,
the radio plays the station at
memory location 1 of the FMT
level. Stations that were previously stored in the FMT memory bank are automatically deleted.
Activating/deactivating improved reception ( Hicut)
The Hicut function improves reception during poor radio reception (for FM only).
➔
Change to the second page of
the "Tuner" menu by pressing
the NEXT button
Press the softkey
➔
"Tuner" menu (next to "Hicut")
several times.
•
"1": The Hicut function is
switched on and has a low
response sensitivity. If the reception is very poor, the interference level is automatically decreased.
6.
7 in the
28
Page 29

Operating the tuner
"2": The Hicut function is
•
switched on and has a high
response sensitivity. If the reception is poor, the interference level is automatically
decreased.
•
"0": The Hicut function is
switched off.
Changing the seek tuning sensitivity ( Sensitivity)
The seek tuning sensitivity determines whether the automatic station seek tuning locates only
strong stations or also weaker
stations, which may be degraded
by a high noise level.
➔
Change to the second page of
the "Tuner" menu by pressing
the NEXT button
➔
Press the softkey
6.
9 in the
"Tuner" menu (next to "Sensitivity") several times.
The seek tuning sensitivity can
be adjusted in six increments.
•
"1": Low seek tuning sensitivity. During a station seek tuning (see page 23), only local
strong stations are found.
•
"6": High seek tuning sensitivity. Poor, remote stations
are also found.
Restricting station seek tuning
to certain programme contents
( Program Type)
Change to the second page of
➔
the "Tuner" menu by pressing
the NEXT button
Press the softkey
➔
6.
< in the
"Tuner" menu (next to "Program Type").
Scroll through the pages of
➔
the programme types with the
NEXT button
Press the softkey next to the
➔
6.
desired programme type.
Next, start a station seek tun-
➔
ing (see page 23).
ENGLISH
29
Page 30

Operating the integrated CD player
Operating the integrated CD player
The device can play the following
CD formats:
•
CD audio (some CDs with copy
protection cannot be played)
•
CD-R or CD-RW with MP3 or
WMA fi les (without DRM copy
protection only)
Note:
The quality of self-burnt CDs
fl uctuates due to different CD
blanks, CD burner software,
and burn speeds. For this reason, it is possible that the device cannot play some selfburnt CDs.
If you cannot play a CD-R/CD-RW:
•
Use blanks from a different manufacturer or a different colour,
•
burn CD-Rs at a lower speed.
What features do MP3 or WMA
CDs have to have?
The device can only play and display MP3 or WMA CDs with the
following features:
•
The CD-ROM may contain only
MP3 or only WMA fi les as well
as folders, but no other fi les
(including no CD audio fi les).
•
CD format: ISO 9660 (Level 1
or 2) or Joliet
Bit rate:
•
MP3: max. 320 kbit/s
WMA: max. 768 kbit/s
File extension: Must be ".MP3"
•
or ".WMA"
ID3 tags: Version 1 or 2
•
Max. 252 folders per CD with
•
max. 999 MP3 fi les per folder (fewer in case of long fi le
names: approx. 700 at 20 characters per fi le name)
•
File names may not contain
an umlaut or special character
and may not be longer than 32
characters.
•
WMA fi les with DRM (Digital
Rights Management, copy protection/playback restriction)
cannot be played! WMA fi les
with DRM offered by music
providers for download via the
Internet cannot be played by
the device. WMA fi les which
you create yourself, e.g. from
CD audio fi les, can be played.
30
Page 31

Operating the integrated CD player
Functions of the integrated CD player if an audio CD is inserted
After inserting an audio CD (see page 12) and selecting "CD" as the
audio source for the fi rst time (see page 15), "CD Reading" appears
on the display. Next, the audio CD display appears (see also page 16).
The playback starts.
ENGLISH
Mix Off
Repeat
Off
Menu item Abbr. Softkey Setting option See also
Random track play MIX
Repeat title RPT
Display CD text TXT
Scrolling text SCL
Mix CD
Repeat
Track
TRACK 06
SONG: Bob Marley - No woman no cry
SRC
16:13
02:19
Mix CD
Switch-on (Mix CD)
7
Switch-off (Mix Off)
Switch-on (Repeat Track)
8
Switch-off (Repeat Off)
Switch-on (CD Text On)
<
Switch-off (CD Text Off)
Switch-on (Scroll On)
;
Switch-off (Scroll Off)
CD
CD Text OffCD Text On
Scroll OffScroll On
Page 19
Page 20
Page 32
Page 32
31
Page 32

Operating the integrated CD player
Switching the CD text display
on/off ( TXT)
Some CDs support the display of
text information about artist, album, track, etc.
To switch the display of CD text
on/off:
➔
Press the softkey
"TXT").
The CD text status is briefl y
displayed.
•
"CD Text On": The CD text is
displayed on info line 3
•
"CD Text Off": The CD text is
not displayed.
Switching the scrolling text for
CD text on/off ( SCL)
The device can display CD text
statically or as scrolling text
(Scroll). To change the display of
CD text:
➔
Press the softkey
"SCL").
The CD text display status is
briefl y displayed.
•
"Scroll On": CD text is displayed as scrolling text, provided that the CD supports
CD text, the display of CD
text is switched on (see the
previous section), and the
CD text does not fi t on info
G of the display.
line 3
< (next to
G.
; (next to
"Scroll Off": CD text is not
•
displayed as scrolling text. If
the CD text does not fi t on
info line 3
appears incomplete.
G of the display, it
32
Page 33

Operating the MP3/WMA player
MMC
USB
y
y
Operating the MP3/ WMA player
After inserting a medium with MP3 or WMA fi les (CD, MMC/SD card,
or USB stick) (see pages 12 and 13) and selecting them as audio
source for the fi rst time (see page 15), "CD/MMC/USB Reading" appears on the display. Next, the MP3 display appears (see page 17).
The playback starts.
MIX
MIX
ALL
SCL
INF
Mix CD /
MEDIUM
REPEAT
Tra ck
7
8
<
;
:
Mix Off
Repeat
Off
Menu item Abbr. Softkey Setting option See
Random
track play
Repeat title RPT
Showing
infos
Scrolling
text
Selecting
info
FOLDER
Repeat
DIR
SRC
MP3
16:13
Bob Marley
Playing fi les of the folder (Mix FOLDER)
or data carrier (Mix CD or Mix MEDIUM) in
random order
Switch-off (Mix Off)
Repeating the current fi le (Repeat Track) or
fi les of the folder (REPEAT DIR)
Switch-off (Repeat Off)
All available information for the current title
scrolls once on info line 3
Switch-on (Scroll On)
Switch-off (Scroll Off)
Switching between DIR, SONG, ARTIST,
ALBUM, and FILE
02:19
Mix All
ARTIST: Bob Marley SONG: No woman no cry
FILE: Bob Marley - No woman no cry
G
Scroll OffScroll On
Page
19
Page
20
Page
34
Page
34
Page
34
ENGLISH
33
Page 34

Operating the MP3/WMA player
Showing all the information of
the current title ( ALL)
To show all the available information about the current title (e.g.
from ID3 tags) on the display:
➔
Press the softkey
"ALL").
All available information for the
current title scrolls once on
info line 3
Switching scrolling text on/off
( SCL)
The device can display the title information selected in the "INF"
menu item (see next section), either statically or as scrolling text.
To toggle between static display
and scrolling text:
➔
Press the softkey
"SCL").
•
If the scrolling text display is
switched on, the text scrolls
without interruption from
right to left on info line 3
•
If the scrolling text display is
switched off, no more than
the fi rst 32 characters are displayed on the info line 3
G.
< (next to
; (next to
G.
G.
Selecting the title information to
be displayed ( INF)
The device can display the following
title information on info line 3
Either information from
•
embedded data or ID3 tags
(artist, title, album, genre,
year), if available
•
Or fi le and folder name.
To select the title information to
be displayed:
➔
Press the softkey
(next to "INF").
The type of information to be
displayed is shown:
•
"DIR": Name of the folder in
which the currently playing
fi le is located
•
"SONG": Name of the current title
•
"ARTIST": Name of artist
•
"ALBUM": Name of album
•
"FILE": File name of current
title
: repeatedly
G:
34
Page 35

Operating the MP3/WMA player
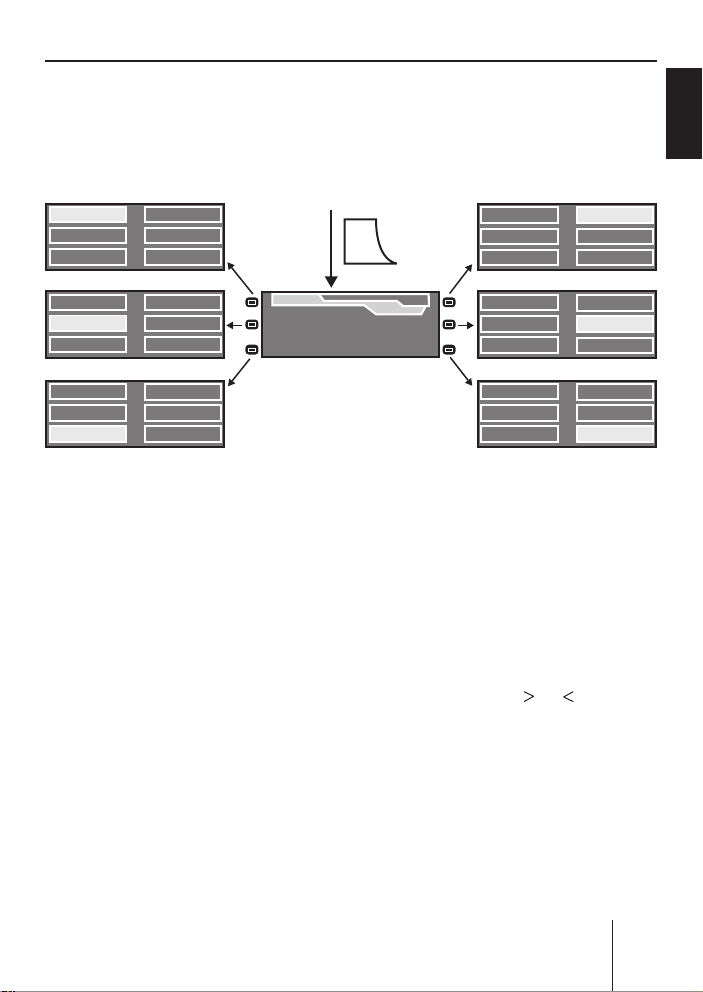
Selecting a title from a list ( Browser mode/ playlist)
During the MP3 or WMA playback, you can always switch between the
following modes using the NEXT button 6:
MP3 display (left part of the fi gure)
•
Browser mode (center part of the fi gure)
•
Playlist mode (right part of the fi gure)
•
Note:
The device can play playlists that were created with an MP3 manager, such as WinAmp® or Windows Media Player®. These playlists
must be present in the format M3U, PLS or RMP and stored in the
root directory of the data carrier!
ENGLISH
NEXT NEXTNEXT
Bob Marley - No woman
Bob Marley - Redemptio
Bob Marley - I shot the S
NEXT
Bob Marley - Buffallo Sol
OK
Rock
Ska
Reggae
Hip Hop
Bob Marley
SONG: Bob Marley - I shot the sherrif
16:13
MP3
02:19
The browser mode or the playlist
shows:
•
The currently playing fi le at the
top,
•
the next three fi les to be
played below it,
•
two arrowheads that are highlighted if you can scroll in the
corresponding direction.
Note:
The fi les are not played in alphabetical order, but in the or-
BROWSE
BROWSE
PL
list.m3u
PL
list2.m3u
PL
list3.m3u
PL
list4.m3u
OK
Annie Lennox - Walking
Eurythmics - Sweet Dream
Jaffa - Elevator
The Police - Roxanne
BROWSE
BROWSE
der in which they were physically stored on the data carrier.
This order is also displayed in
the browser mode.
In the browser mode and the
playlist mode, you can select fi les
or folders from the list as follows:
➔
On the rocker switch
3, press
or to scroll up or down.
➔
On the rocker switch
3, press
to change up to a higher-level
folder.
35
Page 36

Operating the MP3/WMA player
On the rocker switch 3, press
➔
or press the OK button A to
change up into a subfolder.
On the rocker switch 3, press
➔
or press the OK button A to
play a selected fi le.
36
Page 37

Operating the optional CD changer
Operating the optional CD changer
After inserting at least one CD in the CD changer magazine and selecting "CDC" as the audio source for the fi rst time (see page 15), "Magazine Scan" briefl y appears on the display. The CD overview appears
next. The playback starts.
You can toggle between the CD overview (top part of the fi gure) and
the CD changer display (center part of the fi gure) by using the NEXT
button
Mix Off Mix CD
6.
CDC
SRC
ALICIAK
MADONNA
BOBMARL
16:13
DISC 04
DISC 05
Next
DISC 06
DISC 07
DISC 08
NEXTNEXT
MIX ALL
CDC
Repeat
Off
Repeat
CD
Repeat
Tra ck
Track 05
16:13
DISC 01 ALICIAK
02:19
Mix All
Menu item Abbr. Softkey Setting option See
Random
track play
MIX
Playing all the titles of the CD (Mix CD) or the
7
magazine (Mix ALL) in random order
Switch-off (Mix Off)
Repeat title RPT
Repeating the current title (Repeat Track) or
8
the current CD (Repeat CD)
Switch-off (Repeat Off)
Editing CD
names
CDN
Entering, changing, deleting names for CDs
<
located in the changer magazine
CDC
16:13
DISC 09
DISC 10
Previous
Edit CD Name Clear CD Name
Press Key for more then 2 Sec
Clear ALL Names
Page
19
Page
20
Page
38
CDC
ENGLISH
37
Page 38

Operating the optional CD changer
Selecting a CD from the CD
magazine ( CD overview)
The CD overview shows:
Either the CD number (e.g.
•
"DISC 01")
•
or the name of the CD (you can
enter it as described in the following section)
•
or an empty position if the corresponding position of the
magazine is without a CD.
➔
If necessary, press the NEXT
button
6 to display the CD
overview.
➔
Press the softkey located next
to the number or next to the
name of the desired CD.
"Loading CD" appears briefl y
on the display. The playback
starts next with the fi rst track
of the CD.
Note:
If there are more than fi ve
CDs in the magazine of your
CD changer, press softkey
which is also located next to
the menu items "Next" and
"Previous", to toggle between
the display of the fi rst and last
fi ve CDs.
:,
Changing the name of a CD in
the magazine of the CD changer
( CDN)
You can assign a name to every
CD located in the CD changer.
The name can have up to seven
characters.
➔
Select the CD to which you
want to assign a name in the
CD overview as described in
the preceding section.
➔
Press the NEXT button
6 to
show the CD changer display.
➔
Press the softkey
< (next to
"CDN").
➔
Press the softkey
7 (next to
"Edit CD Name").
The text input appears. The
fi rst character of the name is
highlighted.
➔
On the rocker switch
peatedly press
3, re-
or to change
the highlighted character.
➔
On the rocker switch
3, press
to change to the next char-
acter.
➔
Press the OK button
A to fi n-
ish the text input and to store
the name entered.
Note:
To quit the text input without
changing the name, press the
ESC button
@.
38
Page 39

Changing basic settings in the settings menu
To delete the name of the current CD:
Press and hold the softkey <
➔
(next to "Clear CD Name") for
longer than two seconds.
"Clearing" briefl y appears on
the display.
To delete the names of all the
CDs located in the magazine of
the CD changer:
Press and hold the softkey
➔
;
(next to "Clear All Names") for
longer than two seconds.
"Clearing" briefl y appears on
the display.
Changing basic settings in the settings menu
The settings menu allows you to adjust basic device functions, such as
sound, power-on volume or display brightness, to your specifi c needs.
To open the settings menu:
➔
Press the MENU button
Audio
Treble
Balance
Fader
0
0
0
Bass
Digital Equaliser
Subout
+2
?. The settings menu appears.
Time Setting
MENU
Off Clock 24 h Mode
Clock
ENGLISH
Brightness
Screen Saver
Turn On Text
Phone Volume
Beep Volume2503
Display
SD Browser
USB Browser
Angle
Volume
On Volume 10
Last Volume
Audio
Display
Volume
Settings
Settings
Settings
Clock
Various
Menu
Settings
Aux
Settings
Settings
Auxiliary 2
Edit Auxiliary 2
Turn On Text
Internal Amp
Aux
Auxiliary 1
Edit Auxiliary 1
Various
Norm Set
Scan Time
Serial Number
39
Page 40

Changing basic settings in the settings menu
Adjusting sound and balance ( Audio Settings)
The "Audio Settings" menu provides extensive possibilities for adjusting the sound to your specifi c needs.
Press the MENU button ?. The settings menu appears.
➔
Press the softkey
➔
menu appears.
7 (next to "Audio Settings"). The "Audio Settings"
Changing treble or bass
( Treble/ Bass)
➔
Press the softkey
7 (next to
"Treble") or the softkey
(next to "Bass").
The corresponding sound control is displayed.
➔
On the rocker switch
to increase treble or bass.
or
➔
On the rocker switch
to decrease treble or bass.
or
3, press
3, press
40
<
Changing the volume distribution ( Balance/ Fader)
The balance controls the volume
distribution between left and right,
the fader between front and rear.
Press the softkey
➔
"Balance") or softkey
8 (next to
9 (next
to "Fader").
The volume distribution is dis-
played.
On the rocker switch
➔
3, press
on the desired direction.
The volume distribution chang-
es. The display shows the new
volume distribution.
Page 41

Changing basic settings in the settings menu
Changing the equalizer setting ( Digital Equalizer)
Your device features a digital 6-band equalizer. On the "Digital Equalizer" menu, you can adjust the sound to your vehicle and your specifi c
needs and eliminate problems, such as droning or poor voice comprehension.
➔
Press the MENU button
Press the softkey
➔
?. The settings menu appears.
7 (next to "Audio Settings"). The "Audio Settings"
menu appears.
➔
Press the softkey
; (next to "Digital Equalizer").
ENGLISH
Calling up a user-defi ned equalizer setting ( User Equalizer)
In the "User Equalizer" menu, you
can create, store and call up to
three user-defi ned equalizer settings ("User EQ 1 to 3").
➔
Press the softkey
7 (next to
"User Equalizer").
The "User EQ" menu appears.
➔
Press one of the three softkeys
7 to 9 (next to "User EQ 1",
"User EQ 2" or "User EQ 3").
: The corresponding user-
•
defi ned equalizer setting is
selected. The sound changes
accordingly.
: The corresponding user-
•
defi ned equalizer setting is
not selected.
➔
Press the softkey
: (next to
"User EQ Off") to switch off
the equalizer.
41
Page 42

Changing basic settings in the settings menu
Creating/changing a user-defi ned equalizer setting ( Adjust)
You can adjust the three different user-defi ned equalizer settings to
different situations, e.g. for the driver alone, for driver and passenger
or for passengers in the front and the rear.
➔
Select the user-defi ned equalizer setting which you want to create/
change as described in the preceding section.
➔
Press the softkey
< (next to "Adjust"). The "User EQ 1/2/3" menu
opens.
Microphone?
Place Micro 1
Adjust
Automatic Manual
Automatic:
You can automatically create one
of the three equalizer settings using a measurement microphone
(available as an accessory).
Before starting, ensure the following:
•
The measurement microphone
must be connected before installing the device as described
in the installation instructions of
the measurement microphone.
•
There must be true silence
during the measurement since
external noise falsify the measurement. For this reason, close
all windows, doors, and the
sliding sunroof. Switch off the
engine, but leave the ignition
switched on.
EQ Low 1
EQ Low 2
User EQ 1
The temperature inside the
•
EQ High 1
EQ High 2
EQ High 3
EQ High 4
vehicle must be below 55 °C.
•
All the loudspeakers must be
connected. The sound radiating from the loudspeakers
must not be obstructed by any
objects.
➔
Position the measurement microphone
•
for the driver only – 10 cm
next to the right ear of the
driver,
•
for driver and passenger –
exactly between both at the
head level,
•
for passengers in the front
and rear – at the head level
in the center of the vehicle.
User EQ 1
42
Page 43

Changing basic settings in the settings menu
Ensure that all passengers in
➔
the vehicle are sitting and remaining quiet.
Change to the "User Equalizer"
➔
menu and call up one of the
user-defi ned equalizer settings
("User EQ 1 to 3") as described
in the preceding section.
Open the "User EQ 1/2/3"
➔
menu as described on page 42.
Press the softkey
➔
7 (next to
"Automatic") and follow the instructions on the display.
After a 5-second countdown,
you hear the teat noise and the
display intermittently shows "Silence Please" and "Adjusting".
The automatic equalizer setting
fi nishes successfully if the display shows "Adjustment OK".
The equalizer setting is saved.
Any previously stored setting
under this equalizer setting is
overwritten. The new setting
can now be called up under the
corresponding equalizer setting ("User EQ 1 to 3").
➔
Insert a CD with which you are
very familiar.
➔
Adjust bass, treble, balance,
and fader to zero.
➔
Open the "User EQ 1/2/3"
menu as described on page 42.
➔
Press the softkey
< (next to
"Manual").
➔
First, select a frequency band
to be changed. First, change
the centre, then the treble, followed by the bass.
•
"EQ Low 1" to "2": To change
the bass (20 to 250 Hz).
"EQ High 1" to "4": To change
•
the centre or treble (320 to
20,000 Hz).
The frequency spectrum is displayed. if you already changed
the level in another frequency
band, this change is visible in
the frequency spectrum. The
current centre frequency (Hz)
is highlighted.
2000Hz -8dB Q 1 High 4
ENGLISH
EQ 1
Manual:
As an alternative, you can man-
ually create the equalizer setting without measurement microphone. In each of the six
frequency bands, you can select
one specifi c individual centre frequency and fi nely adjust its level
and quality factor Q.
Select the centre frequency to
➔
be changed by pressing on
on the rocker switch 3.
In the two frequency bands "EQ
Low 1" and "2", you can select
one centre frequency each from
20 to 250 Hz.
or
43
Page 44

Changing basic settings in the settings menu
In the four frequency bands
"EQ High 1" to "4", you can select one centre frequency each
from 320 to 20,000 Hz.
On the rocker switch 3, press .
➔
The level display (dB) is highlighted.
Select the level of the previ-
➔
ously set centre frequency by
pressing on
er switch
or on the rock-
3.
The level change is displayed
in the frequency spectrum. The
sound changes accordingly.
On the rocker switch 3, press .
➔
The quality factor Q is highlighted.
➔
Select the desired quality factor Q by pressing on
the rocker switch
•
"Q1": Low edge steepness,
or on
3.
wide fi lter bandwidth
•
"Q2": Medium edge steepness and fi lter bandwidth
•
"Q3": High edge steepness,
narrow fi lter bandwidth
The change is displayed in
the frequency spectrum. The
sound changes accordingly.
➔
Press the OK button
A.
Your user-defi ned equalizer setting is saved.
Which equalizer setting is the
correct one?
Sound impression
or problem
Unclean bass,
droning, unpleasant pressure
Very transparent,
aggressive sound,
no stereo effect
Muffl ed sound,
low transparency,
instruments do
not excel
Insuffi cient bass 50–100 approx.
Measure
Centre
frequen-
cy (Hz)
125–400 approx.
1000–
2500
8000–
12500
Level
(dB)
–4
approx.
–4 to –6
approx.
+4 to +6
+4 to +6
Selecting a sound preset ( Presets)
This menu item allows you to select one of the following sound
presets: Vocal, Disco, Rock, Jazz,
or Classic.
Press the softkey located next
➔
to the desired sound preset.
: The sound preset is se-
•
lected.
: The sound preset is not
•
selected.
Setting the speed-dependent
volume increase ( Auto Sound)
When you are driving faster, the
device can automatically increase
the volume to compensate for the
driving noise. In order for this to
work, the speedometer signal
must be connected as described
44
Page 45

Changing basic settings in the settings menu
in the installation instructions.
You can adjust this volume increase from 0 (no increase) to 5
(maximum increase).
Press the softkey
➔
9 (next to
"Auto Sound").
The "Auto Sound" menu appears.
Note:
If no increase is set, the display
shows "AUTO SND OFF".
➔
On the rocker switch
3, press
or to raise the volume in-
crease.
➔
On the rocker switch
3, press
or to lower the volume in-
crease.
Setting the bass increase ( X-Bass)
X-bass is a bass increase at low
volume. This bass increase can be
set in increments from 0 (no increase) to 6 (maximum increase)
for the following frequencies:
32 Hz, 40 Hz, 50 Hz, 63 Hz, or
80 Hz.
➔
Press the softkey
; (next to
"X-Bass").
The individual frequencies are
displayed as bars and the bass
increase as bar segment.
➔
On the rocker switch
3, press
or to select the desired fre-
quency.
➔
On the rocker switch
3, press
or to set the desired bass
increase.
Switching off the equalizer
Press the softkey
➔
: in the
"Digital Equalizer" menu (next
to "Off").
Confi guring the preamplifi er output for the subwoofer ( Subout)
If you want to use an additional
subwoofer, it can be adjusted to
the other loudspeakers.
You can adjust the level of the
Subout preamplifi er output in 13
increments from –6 dB (maxi mum
decrease) to +6 dB (maximum increase) for one of the following
cut-off frequencies: 80 Hz, 120
Hz, or 160 Hz.
➔
Press the softkey
: in the
"Audio Settings" menu (next
to "Subout").
The "Subout" menu appears.
➔
On the rocker switch
3, press
or to select the desired cut-
off frequency.
➔
On the rocker switch
3, press
or to set the desired level
of the preamplifi er output.
ENGLISH
45
Page 46

Changing basic settings in the settings menu
Changing display settings ( Display Settings)
In the "Display Settings" menu, you can adjust the display brightness
and the display contrast, among other things.
Press the MENU button ?. The settings menu appears.
➔
Press the softkey
➔
The "Display" menu appears.
8 (next to "Display Settings").
Changing the brightness of the
display for day/night (Brightness)
See page 21.
Activating/deactivating the
screen saver ( Screen Saver)
The screen saver can be called up
only if you activate the display of
the screen saver here.
➔
Press the softkey
8 (next to
"Screen Saver").
: You can call up the screen
•
saver instead of the display
of the audio source by pressing the ESC button
@.
46
Press any button to interrupt
the screen saver and show
the display of the active audio source again.
: The screen saver cannot
•
be called up.
Switching the welcome text
on/off ( Turn On Text)
After switch-on, the display shows
a brief animation. A welcome text
can be shown next. This text is
factory set to "The advantage in
your car!".
➔
Press the softkey
9 (next to
"Turn On Text").
Page 47

Changing basic settings in the settings menu
: The welcome text is
•
shown after switch-on.
: The welcome text is not
•
shown.
To change the welcome text, see
"Changing the welcome text (Turn
On Text)" on page 54.
Changing images and animations
( SD Browser/ USB Browser)
You can replace the following factory installed images and animations with your own:
•
The wallpaper which appears
when "AUX" is selected as audio source (the image is set to
a connector at the factory),
•
the screen saver,
•
the wallpaper which appears
if the radio is switched off and
the vehicle ignition is switched
on, and also the "Off Clock"
menu item in the "Clock Settings" menu as described on
page 51. The image is set to an
analogue clock at the factory.
For your images and animations
to be displayed, they must be created using the BMP fi le format.
For the images to be displayed
without distortion, they should
ideally have 270 x 96 pixels.
Animations consist of max. 20
BMP fi les that are automatically displayed in succession just
like single frames of a movie. All
BMP fi les of an animation must
be stored in a separate folder. No
other fi les may be stored in this
folder!
The images must be available as
a fi le on an MMC/SD card or USB
stick. The MMC/SD card must be
inserted or the USB stick must be
connected.
➔
Press the softkey
< (next to
"SD Browser") if the images are available on an MMC/
SD card. Press the softkey
;
(next to "USB Browser") if the
images are available on a USB
stick.
The fi le browser opens.
You can select a BMP fi le or a
folder from the list as follows:
➔
On the rocker switch
3, press
or to scroll up or down.
On the rocker switch
➔
3, press
to change up to a higher-level
folder.
On the rocker switch
➔
3, press
to change down to a sub-
folder.
Press the OK button
➔
A to
select the selected fi le or the
selected folder with the BMP
fi les of the animation.
The "PICTURE Download"
menu appears.
ENGLISH
47
Page 48

Changing basic settings in the settings menu
Press the softkey next to the
➔
image or the animation to be
replaced.
•
"Clock" replaces the wallpaper which appears if the radio
is switched off and the vehicle ignition is switched on,
•
"Minimal Mode" replaces the
screen saver,
•
"Aux" replaces the wallpaper
which appears if "AUX" is selected as audio source.
A progress bar illustrates the
transfer of the fi le. As soon as
the fi le has been transferred,
the display of the active audio
source appears. Your image or
animation now replaces the
factory setting.
Adjusting the display viewing
angle (Angle)
The angle at which the driver
looks at the display is dependent upon, among other things,
the installation position of the device, the seating position, and the
physical size of the driver. You
can adjust the display contrast to
your viewing angle as follows.
➔
Press the softkey
"Angle").
The "Angle" menu opens and
the current display contrast is
shown.
: (next to
On the rocker switch
➔
or to increase the display
contrast.
On the rocker switch 3, press
➔
or to decrease the display
contrast.
You can adjust the display
contrast in 13 increments from
–6 to +6.
3, press
48
Page 49

Changing basic settings in the settings menu
Changing volume presettings ( Volume Settings)
In the "Volume Settings" menu, select the volume presettings for traffi c announcements, the telephone, the signal tones, etc.
Press the MENU button ?. The settings menu appears.
➔
Press the softkey
➔
The "Volume Settings" menu appears. The volume presettings are
displayed as two-digit numbers. One of the two menu items "On Volume" or "Last Volume" is highlighted.
9 (next to "Volume Settings").
ENGLISH
Changing the volume presetting
of the telephone ( Phone Volume)
If the device puts a phone call
through, it always starts at the preset volume.
Press the softkey 8 (next to
➔
"Phone Volume").
The volume presetting for
phone calls appears.
➔
Adjust the desired volume
using the volume control
5 or the rocker switch 3
(increments 1 to 50).
During the phone call, you can
always change the volume by
means of the volume control
5.
Changing the volume presetting
of the signal tone ( Beep Volume)
If a signal tone sounds, you always hear it at the preset volume.
➔
Press the softkey
9 (next to
"Beep Volume").
The volume presetting for the
signal tone appears.
49
Page 50

Changing basic settings in the settings menu
Adjust the desired volume
➔
using the volume control
or the rocker switch
5
3 (incre-
ments 0 to 6).
You hear a signal tone at the se-
lected volume.
If you do not want to hear any
➔
signal tones, set the volume to
zero.
"BEEP OFF" appears on the display.
Changing the presetting of the
power-on volume ( On Volume)
You can confi gure the device so
that the playback after switch-on
always starts with the volume set
here. For this purpose, the "On
Volume" menu item must be highlighted.
➔
Press the softkey
< (next to
"On Volume").
The presetting for the power-
on volume appears.
➔
Adjust the desired volume
using the volume control
or the rocker switch
5
3 (incre-
ments 1 to 50).
If you open the "Volume Set-
tings" menu again, the "On Volume" menu item is highlighted.
Restoring the volume at switch-on
( Last Volume)
You can confi gure the device so
that the playback after switch-on
always starts with the previously selected volume. For this purpose, the "Last Volume" menu
item must be highlighted.
➔
Press the softkey
; (next to
"Last Volume").
"Last Volume active" briefl y ap-
pears on the display. If you
open the "Volume Settings"
menu again, the "Last Volume"
menu item is highlighted.
50
Page 51

Changing basic settings in the settings menu
Changing clock settings ( Clock Settings)
In the "Clock Settings" menu, you can set the clock of the device as
well as change the display options of the clock.
Press the MENU button ?. The settings menu appears.
➔
Press the softkey
➔
The "Clock" menu appears.
Setting the time ( Time Setting)
➔
Press the softkey
"Time Setting").
The currently set time appears.
The hours are highlighted.
➔
On the rocker switch
or to change the hours.
➔
On the rocker switch
to change to the minutes.
➔
On the rocker switch
or to change the minutes.
➔
Press the OK button
ish the input and to save the
time.
Note:
To quit the input without
changing the time, press the
ESC button
< (next to "Clock Settings").
7 (next to
3, press
3, press
3, press
A to fi n-
@.
Switching the time display on/off
with switched-off device ( Off Clock)
The time can be displayed while
the device is switched off, if the
vehicle ignition is switched on. To
switch this time display on/off:
➔
Press the softkey
8 (next to
"Off Clock").
: The time display is
•
switched on.
: The time display is
•
switched off.
ENGLISH
51
Page 52

Changing basic settings in the settings menu
Switching the 24-hour time display on/off ( 24 h Mode)
The time can be displayed using
the 12-hour or 24-hour format. To
switch between these two formats:
➔
Press the softkey
; (next to
"24 h Mode").
: The 24-hour format is
•
switched on.
: The 12-hour format (AM/
•
PM) is switched on.
Confi guring audio inputs ( Aux Settings)
Up to two external audio source, such as MiniDisc player or external
MP3 player, can be connected to the audio inputs Auxiliary 1 and Auxiliary 2. If you are connecting a CD changer, it occupies audio input Auxiliary 1 and you can also connect Auxiliary 2.
The audio sources Auxiliary 1 and Auxiliary 2 cannot be operated using
the Memphis. Only the volume can be changed.
➔
Press the MENU button
Press the softkey
➔
The "Aux" menu appears. The audio input Auxiliary 1 is displayed
only if no CD changer is connected.
?. The settings menu appears.
; (next to "Aux Settings").
AUXILIARY 2
Auxiliary 2 Name Source Edit
52
AUX
Aux Settings
Auxiliary 2
Edit Auxiliary 2
Auxiliary 1
Edit Auxiliary 1
Aux
AUXILIARY 1
Auxiliary 1 Name Source Edit
AUX
Page 53

Changing basic settings in the settings menu
Activating/deactivating audio
inputs ( Auxiliary 1/2)
Audio inputs, to which you are
connecting external audio sources, must be activated as follows.
➔
Press the softkey
< (next to
"Auxiliary 1") and/or the softkey
7 (next to "Auxiliary 2").
The status of the audio input is
displayed:
: The corresponding audio
•
input is activated and can be
selected as audio source using the SRC button
: The corresponding audio
•
B.
input is deactivated. It cannot even be selected as audio source if an external audio source is connected.
Renaming audio inputs
( Edit Auxiliary 1/2)
If you select an audio input as audio source, "Auxiliary 1" or "Auxiliary 2" appears on the display. To
change this name:
➔
Press the softkey
; (next to
"Edit Auxiliary 1") and/or the
softkey
8 (next to "Edit Auxili-
ary 2").
The text input appears. The
fi rst character of the name is
highlighted.
➔
On the rocker switch
peatedly press
3, re-
or to change
the highlighted character.
On the rocker switch
➔
3, press
to change to the next character. The name can have up to
16 characters.
➔
Press the OK button
A to fi n-
ish the text input and to store
the name entered.
Note:
To quit the text input without
changing the name, press the
ESC button
@.
ENGLISH
53
Page 54

Changing basic settings in the settings menu
Changing special settings ( Various Settings)
In the "Various Settings" menu, you can change the scan time for the
scan function and the welcome text.
Press the MENU button ?. The settings menu appears.
➔
Press the softkey
➔
The "Various Settings" menu appears.
: located next to the "Various Settings" menu item.
THE
ADVANTAGE I N
YOUR CAR!
Various Menu Norm Set
Various Settings
Turn On Text
Turn On Text
Internal Amp
Changing the welcome text
( Turn On Text)
When you switch on the device, a
welcome text appears. This text
is factory set to "The advantage in
your car!". To change this text:
➔
Press the softkey
7 (next to
"Turn On Text").
The text input appears. The
fi rst character of the welcome
text is highlighted.
➔
On the rocker switch
peatedly press
3, re-
or to change
the highlighted character.
Start Normset ?
Press softkey 4 for 2 sec to confirm
Variou s
Norm Set
Scan Time
Serial Number
➔
On the rocker switch
SCAN TIME 10 Sec
BP481530000002
SERIAL NUMBER OF RADIO
Various Menu
Scan time settings
Various Menu
3, press
to change to the next character. The welcome text can have
up to 35 characters.
➔
Press the OK button
A to fi n-
ish the text input and to store
the welcome text entered.
Note:
To quit the text input without
changing the welcome text,
press the ESC button
@.
54
Page 55

Changing basic settings in the settings menu
Switching the internal amplifi er
on/off ( Internal Amp)
If you connected the device to an
external power amplifi er via the
preamplifi er outputs (Preamp),
you can switch off the internal
amplifi er of the device as follows:
CAUTION!
No sound with switched-
off internal amplifi er!
If you switch off the internal amplifi er, you do not hear a sound
from the loudspeakers connected
to the device!
➔
Switch off the internal amplifi er only if you connected an
external power amplifi er to the
preamplifi er outputs (Preamp)
of the device and you connected your loudspeakers to this
power amplifi er:
➔
Press the softkey
8 (next to
"Internal Amp").
The status of the internal am-
plifi er is displayed:
: The internal amplifi er
•
is switched on. Loudspeakers connected to the device
play back the selected audio
source.
: The internal amplifi er is
•
switched off. Loudspeakers
connected to the device always remain mute. The loud-
speakers must be connected
to the external amplifi er.
Resetting the device to factory
settings ( Norm Set)
➔
Press the softkey
< (next to
"Norm Set").
The "Norm Set" menu appears.
➔
Press and hold the softkey <
for approx. two seconds.
"NORMSET ON" briefl y appears
on the display. The device is
reset to the factory settings.
Images and animations, which
you transferred to the device,
are deleted.
Note:
To exit the "Norm Set" menu
without resetting the device to
the factory settings, press the
OK button
@.
ton
A or the ESC but-
Changing the scan time
( Scan Time)
➔
Press the softkey
; (next to
"Scan Time").
The current scan time is dis-
played.
➔
On the rocker switch
peatedly press
3, re-
or to in-
crease the scan time.
➔
On the rocker switch
peatedly press
3, re-
or to de-
crease the scan time.
ENGLISH
55
Page 56

Error table
You can adjust scan times in increments of 5 seconds form 5 to
30 seconds.
➔
Press the softkey
"Serial Number").
The serial number is displayed.
: (next to
Displaying the serial number
( Serial Number)
Every device has a separate serial
number. To display this number:
Error table
If the device does not function properly, switch the device off and on
again.
If problems still persist, you can easily correct the following problems.
Problem Possible cause Possible remedy
The menus do not appear
as shown in these instructions.
The tuner cannot be adjusted to the frequencies listed
in the technical data
The display shows information about the device.
The device is always silent,
even though it is correctly
connected.
.
The device is not set to
your region.
The demo mode is activated.
The internal amplifi er is
switched off.
Set the device to your region
as described on page 26.
Briefl y press the MENU-
button
?, then press the
MENU button
hold it pressed for four seconds.
Switch on the internal
amplifi er as described
on page 55.
? again and
If problems still persist, please contact an authorised workshop or the
Blaupunkt customer service (see the last page).
56
Page 57

Specifi cations
Specifi cations
Weight approx. 1.5 kg
Voltage supply
Operating voltage: 10.5–14.4 V
Current consumption
In operation:
10 seconds after switch-off:
Amplifi er
Output power: 25 W RMS x 4 ch @ 14.4 V @ 4 ohm @ 1 % THD
Preamplifi er output (Preamp Out)
4 channels: 3 V
Input sensitivity
AUX inputs:
Telephone input:
Tuner
US frequency range FM:
AM:
Europe frequency range FM:
AM:
Thailand frequency range FM:
AM:
FM frequency response:
max. 10 A
< 3.5 mA
2 V / 6 kΩ
10 V / 1 kΩ
87.5–107.9 MHz (increments of 200 kHz)
530–1,710 kHz (increments of 10 kHz)
87.5–108 MHz (auto: increments of 100 kHz,
manual: increments of 50 kHz)
531–1,602 kHz (increments of 9 kHz)
87.5–108 MHz (auto: increments of 50 kHz,
manual: increments of 25 kHz)
531–1,602 kHz (increments of 9 kHz)
35–16,000 Hz
ENGLISH
FM mono sensitivity:
CD player
Frequency response: 20–20,000 Hz
Subject to technical changes!
< 17 dBf
57
Page 58

Glossary
Glossary
AF – Alternative frequency
The range of FM stations is limited. For this reason, FM programmes are distributed to different frequencies. The AF RDS
service sends these frequencies
to the tuner. If the reception deteriorates because the vehicle
leaves the reception area of a frequency, the tuner can automatically change to the best receivable frequency.
DEQmaxEx – Digital parametric equalizer with variable fi lter
quality
This function allows for a maximum of exact frequency optimisation, so that the sound spectrum
can be adjusted to the vehicle or
your individual taste.
Quality factor Q
It determines the fi lter quality of
the equalizer, i.e. the edge steepness and fi lter bandwidth, dependent upon the characteristic
frequency.
ID3 tags
ID3 tags contain additional information for MP3 fi les (e.g. artist,
title, album, genre, year).
Mass storage device
Format for storage media that can
permanently store large amounts
of data, such as USB removable
storage devices (USB stick or
USB hard disk).
MMC/SD card (Multimedia Card/
Secure Digital Card)
MMC/SD cards are memory card
formats that can be inserted in
card slot
vice can play MP3 and WMA fi les
stored on the memory cards.
MP3, WMA
MP3 and WMA are audio data formats that allow for high compression with little loss in quality.
Playlist
Playback list for MP3 or WMA
fi les In playlists, you determine
the order in which certain titles
should be played. They are created with an MP3 manager, such
as WinAmp® or Windows Media
Player®.
PTY – Program Type
The device searches only for stations with preselectable programme content (e.g. news, rock,
pop, sports, etc.).
The device automatically switches
through emergency and disaster
announcements (PTY 31).
D of the device. The de-
58
Page 59

Glossary
Root directory
Main directory of a data carrier.
The root directory contains all
other directories.
Subwoofer, Subout
Separate low-bass loudspeaker.
The device has a Subout preamplifi er output. You can connect
either an active subwoofer or a
separate power amplifi er with
subwoofer.
T-STORE – Travelstore
Automatic searching and storing
of the six strongest radio stations
received of the region.
Tuner
Receiving unit of the radio.
USB – Universal Serial Bus
USB is an interface for connecting external removable storage
devices to the device.
X-BASS
X-BASS allows for boosting the
bass at low volume levels. This
renders the sound richer even at
a low volume.
ENGLISH
59
Page 60

Index
Index
Symbole
24 h MODE 52
A
ADJUST 42
ALL 34
Alternative frequencies
Allowing 28
Amplifi er 55
AREA 26
Audio inputs
Activating 53
Confi guring 52
Renaming 53
AUDIO SETTINGS 40
Audio source 15
Tuner 23
AUTOMATIC 42
AUTO SOUND 44
AUXILIARY 53
AUX SETTINGS 52
B
BALANCE 40
BAND 27
BAND button 8, 20
BASS 40
Bass increase 45
BEEP VOLUME 49
Browser 35
Button for detaching the control panel
8
Buttons 8
Button to eject/insert a CD 8
C
CD
Changing the name of a CD in the
CD changer magazine 38
Inserting 12
Removing 12
Selecting from the CD changer
magazine 38
CD changer 37
Changing the name of a CD in the
magazine 38
Display 17
Functions 37
CD changer display 17
CD display 16
CD overview 38
CD player 30
Display 16
Functions 31
CD text 32
Clock 51
24-hour time display 51
Display with switched-off device 51
Setting
CLOCK SETTINGS 51
Control panel 10
Correcting errors 56
Correcting malfunctions 56
Country code 26
D
DIGITAL EQUALIZER 41
Display
Animation 47
Brightness 21
Images 47
Viewing angle 48
DISPLAY SETTINGS 46
51
Note:
Keywords in capital letters refer to menu items.
60
Page 61

Index
E
EDIT AUXILIARY 53
Equalizer 41, 45
Calling up a user-defi ned setting 41
Creating a user-defi ned setting 42
Settings recommendations 44
ESC button 9, 21
F
Factory settings 55
FADER 40
FM1, FM2, FM3, and FMT 23
Forward 18
H
Handheld remote control 9
Replacing the battery 12
HICUT 28
High Cut 28
I
Improved reception 28
INF 34
INTERNAL AMP 55
L
LAST VOLUME 50
M
MANUAL 43
Memory bank 23
Memory card
Inserting 12
Removing 12
Menu
Calling 21
Changing and saving settings 21
Exiting 22
Operate 20
Operating example 21
Selecting a menu item 21
Settings menu 39
Tuner 27
MENU button 9, 20
MIX 19
MMC card: see Memory card
MONO 27
Mono operation 27
MP3
Files on CD 30
MP3 display 17
MP3 player 33
Display 17
Functions 33
Muting 14
N
NEXT button 8, 20
NORM SET 55
O
OFF CLOCK 51
OK button 9, 18, 21
On/Off button 8
ON VOLUME 50
P
PHONE VOLUME 49
Playlist 35
PRESETS 44
PROGRAM TYPE 29
PTY 29
R
Random track play 19
RDS 28
Region
Adjust 26
Remote control 9
Replacing the battery 12
Repeat 19
Repeat mode 19
Repeat title 20
Replacing the battery of the remote
control 12
Reverse 18
Rocker switch 8, 9, 18
ENGLISH
61
Page 62

Index
RPT 19, 20
S
Safety 6
SCAN 20
SCAN TIME 55
Scan time 55
SCL 32, 34
SCREEN SAVER 46
Screen saver 46
SD BROWSER 47
SD card: see Memory card
Seek tuning sensitivity 29
SENSITIVITY 29
SERIAL NUMBER 56
Serial number 56
Settings menu 39
Skip title 18
Softkey 8, 18
Sound 40
Presetting 44
SRC button 9
Station
Calling 25
Scanning 25
Searching 23
Storing 25
Stereo operation 27
SUBOUT 45
Subwoofer 45
Switch-off 11
Switch-on 10
T
Telephone 14
TIME SETTING 51
Title information 34
Traffi c announcements 30
Travelstore 28
TREBLE 40
Tuner
Display 16
Functions 23
Tuner display 16
TURN ON TEXT 46, 54
TXT 32
U
USB BROWSER 47
USB medium
connecting 13
USER EQUALIZER
V
VARIOUS SETTINGS 54
Volume 14
At switch-on 50
Muting 14
Presetting 49
Speed-dependent increase 44
Volume control 8, 9
Volume distribution 40
VOLUME SETTINGS 49
W
Warranty 7
Waveband 27
Welcome text 46, 54
WMA
Files on CD 30
WMA player 33
Functions 33
X
X-BASS 45
41
62
Page 63

Inhalt
FRANÇAIS
63
Page 64

Inhalt
64
Page 65

Sommaire
Sommaire
À propos de cette notice ................68
Pour votre sécurité .........................68
Composition de la fourniture .........69
Garantie ..........................................69
Vue d'ensemble de l'appareil .........70
Éléments de commande ..................70
Télécommande portable ..................71
Mise en service de l'appareil ..........72
Enlever / mettre en place la façade .72
Allumer / éteindre l'appareil ............72
Fonctions générales ........................74
Remplacement de la pile de la
télécommande portable ..................74
Introduction du CD ..........................74
Introduction de la carte MMC/SD ....74
Raccordement d'un support USB ....75
Réglage du volume ...........................76
Mise en sourdine de l'appareil .........76
Fonctionnement avec le téléphone ..76
Sélection d'une source audio ..........77
L'affi chage du tuner .....................78
L'affi chage CD audio ....................78
L'affi chage du changeur de CD ....79
L'affi chage MP3 ............................79
Aperçu de la commande .................80
Aperçu des touches .........................80
Aperçu des fonctions MIX et RPT ....81
Activation / désactivation de la
répétition de titres (RPT) .............82
Lecture des intros (Scan) ............82
Touches de commande des menus ..82
Exemple d'utilisation du menu.........83
Appeler le menu ...........................83
Sélectionner l'option de menu
dans le menu réglage ...................83
Modifi er et mémoriser le réglage ..84
Quitter l'option de menu ..............84
Commande du tuner .......................85
Sélection d'un niveau de mémoire ..85
Recherche d'une station ..................85
Recherche manuelle d'une
station ..........................................85
Recherche automatique d'une
station ..........................................86
Mémorisation de stations ................87
Appel de stations mémorisées ........87
Balayage de toutes les stations
captables (Scan)..............................87
Réglage de l'appareil sur la
région Europe, USA ou Thaïlande ..88
Modifi er les réglages du tuner
(menu « Tuner »)..............................89
Changer la gamme d'ondes
(Band) ..........................................89
Basculer entre le mode mono
et le mode stéréo (Mono) ............90
Autoriser les fréquences
alternatives (RDS) ........................90
Recherche automatique de
stations FM et mémorisation dans
le niveau de mémoire
FMT (Travelstore) .........................90
Activation / désactivation de
l'amélioration de la réception
(Hicut) ..........................................90
Modifi
er la sensibilité de la
recherche (Sensitivity) .................91
Limiter la recherche de stations
à des contenus de programme
déterminés (Program Type) .........91
FRANÇAIS
65
Page 66

Sommaire
Utilisation du lecteur de
CD intégré .......................................92
Quelles doivent être les
caractéristiques des CD MP3
ou WMA ? .....................................92
Fonctions du lecteur de CD
intégré lorsqu'un CD audio est
introduit .......................................93
Activation / désactivation de
l'affi chage de texte CD (TXT)........94
Activation / désactivation du
défi lement de texte CD (SCL) ......94
Utilisation du lecteur MP3/WMA ...95
Affi chage de l'ensemble des
informations du titre actuel (ALL) ..96
Activation / désactivation du
défi lement de texte (SCL) ............96
Sélection des informations de
titre à affi cher (INF) .....................96
Sélection d'un titre à partir
d'une liste (mode navigateur
(Browser) / liste d'écoute
(Playlist)) .....................................97
Utilisation du changeur de CD
optionnel .........................................99
Sélection d'un CD à partir
du chargeur de CD
(aperçu des CD) .........................100
Modifi er le nom d'un CD
dans le chargeur du changeur
de CD (CDN) ..............................100
Modifi er les réglages de base du
menu réglage.................................101
Régler la sonorité et la balance
(Audio Settings).............................102
Modifi er les aiguës ou graves
(Treble / Bass) ...........................102
Modifi er la répartition du volume
(Balance / Fader) .......................102
Modifi er le réglage de l'égaliseur
(Digital Equalizer) ......................103
Appeler les réglages de
l'égaliseur défi nis par
l'utilisateur (User Equalizer) .......103
Créer / modifi er le réglage
d'égaliseur défi ni par
l'utilisateur (Adjust) ...................104
Quel réglage d'égaliseur
est le bon ? ................................107
Sélectionner le préréglage de
sonorité (Presets) ......................107
Régler l'amplifi cation du volume
sonore en fonction de la vitesse
(Auto Sound) ..............................107
Régler l'amplifi cation des
graves (X-Bass) ...........................107
Arrêt de l'égaliseur .....................108
Confi gurer la sortie préampli pour
les graves profonds (Subout) .....108
Modifi er les réglages d'affi chage
(Display Settings) ..........................109
Modifi er la luminosité de
l'affi chage pour le jour / la nuit
(Brightness) ...............................109
Activation / désactivation
de l'économiseur d'écran
(Screen Saver) ...........................109
Activation / désactivation du
texte d'accueil (Turn On Text) ....110
Modifi er les images et les
animations (SD Browser/USB
Browser) ....................................110
Adapter l'angle de vision de
l'affi chage (Angle) ......................111
Modifi er les préréglages du volume
sonore (Volume Settings) ..............112
Modifi er le préréglage du
volume sonore du téléphone
(Phone Volume) .........................112
66
Page 67

Sommaire
Modifi er le préréglage du
volume sonore du signal sonore
(Beep Volume) ...........................113
Modifi er le préréglage du volume à
l'enclenchement (On Volume) ....113
Rétablir le volume sonore à
l'enclenchement (Last Volume) ..113
Modifi er les réglages de l'heure
(Clock Settings) .............................114
Régler l'heure (Time Setting) .....114
Activer / désactiver l'affi chage
de l'heure lorsque l'appareil est
éteint (Off Clock) .......................114
Activer / désactiver l'affi chage
24 heures (24 h Mode)...............115
Confi gurer les entrées audio
(Aux Settings) ................................115
Activer / désactiver les entrées
audio (Auxiliary 1/2) ..................116
Renommer des entrées audio
(Edit Auxiliary 1/2) .....................116
Modifi er les réglages divers
(Various Settings) ..........................117
Modifi er le texte d'accueil
(Turn On Text) ............................117
Activer / désactiver l'amplifi cateur
interne (Internal Amp) ................118
Rétablir les réglages par défaut
de l'appareil (Norm Set).............118
Modifi er la durée de balayage
des stations / lecture des intros
(Scan Time) ................................118
Affi cher le numéro de série
(Serial Number) .........................119
Tableau des défauts ......................119
Caractéristiques techniques ........120
Glossaire .......................................121
Index alphabétique .......................123
FRANÇAIS
Blaupunkt est synonyme de compétence technique en réception radio
mobile, pour les systèmes de navigation précis et un son de première
classe. À ses débuts, le point bleu est apparu pour la première fois en
1923 comme label de qualité qui était attribué après de sévères contrôles de fonctionnement – et cette règle s'applique encore de nos jours.
Autrefois, comme maintenant, le point bleu distingue des produits d'une
qualité exceptionnelle.
67
Page 68

Pour votre sécurité
À propos de cette
notice
Lisez cette notice et en particulier le chapitre suivant « Pour votre sécurité » dans son intégralité avant d'utiliser l'appareil !
outre, veuillez respecter les instructions suivantes :
•
Changeur de CD, si présent
•
Télécommande, si présente
Les désignations logicielles et
matérielles mentionnées dans
la présente notice sont des marques ou des marques déposées,
et sont soumises en tant que telles aux disposition légales.
En
Pour votre sécurité
L'appareil a été fabriqué en fonction des connaissances techniques actuelles et selon les règles
techniques de sécurité reconnues.
Malgré cela, des dangers peuvent
survenir si vous ne respectez pas
ces informations de sécurité :
➔
Lisez cette notice avec soin et
intégralement avant d'utiliser
l'appareil.
➔
Conservez cette notice de façon à ce qu'elle soit accessible
à tout moment à tous les utilisateurs.
➔
Remettez toujours l'appareil à
un tiers avec cette notice.
Utilisation conforme
L'appareil est conçu pour le fonctionnement dans un véhicule disposant d'une tension de bord de
12 V et doit être intégré dans une
baie DIN.
Si vous montez vous-mêmes
l'appareil
Vous n'êtes autorisé à monter
l'appareil que si vous possédez
une expérience dans le montage
d'autoradios et disposez de bonnes connaissances en électricité
automobile.
Ce que vous devez respecter !
Risque de blessures !
Vous ne devez pas ouvrir
ni modifi er l'appareil !
L'appareil contient un laser de
classe 1, qui diffuse des rayons
laser invisibles pouvant vous blesser les yeux. Si vous ouvrez l'appareil, la garantie est annulée.
Risque d'accident !
Ne manipulez l'appareil
que si les conditions de
circulation le permettent !
Danger de troubles
auditifs !
Écoutez toujours à volume modéré de façon à pouvoir
toujours entendre les signaux sonores d'avertissement ! Vous pro-
68
Page 69

Composition de la fourniture
tégerez ainsi aussi votre système
auditif. L'appareil se met momentanément en sourdine, pendant que, p. ex., le changeur de
CD change le CD ou lorsque vous
commutez la source audio. N'augmentez pas le volume sonore pendant cette coupure momentanée
du son !
Danger pour l'appareil !
N'introduisez ni Mini CD
(diamètre 8 cm) ni Shape
CD (CD profi lés), sous peine de
détruire le lecteur !
Protection antivol
Transportez la façade de l'appareil dans l'étui fourni lorsque vous
quittez le véhicule.
Nettoyage
Nettoyez l'appareil avec un chiffon sec ou légèrement humide.
N'utilisez aucun solvant, détergent ou produit abrasif, ni de
bombe aérosol pour tableau de
bord ou produit d'entretien plastique.
Composition de la
fourniture
1 Memphis MP66
1 Télécommande portable
RC 12H
1 Étui pour la façade
1 Mode d'emploi
1 Cadre support
2 Étrier de démontage
1 Axe de guidage
1 Câble de raccordement USB
1 Câble de préamplifi cateur
1 Câble de raccordement des
haut-parleurs
Câble d'alimentation électrique
1
et de transmission de signaux
Garantie
Les conditions de garantie publiées par nos représentations nationales compétentes respectives
sont valables.
Vous pouvez consulter les conditions de garantie sur le site www.
blaupunkt.com ou les demander
directement auprès de :
Blaupunkt GmbH
Hotline
Robert-Bosch-Str. 200
D-31139 Hildesheim
Deutschland
FRANÇAIS
69
Page 70

Vue d'ensemble de l'appareil
Vue d'ensemble de l'appareil
Éléments de commande
1 Touche
de retrait de la façade
Touche TUNER
2
Sélectionner le tuner comme
source audio
Ouvrir le menu « Tuner »
Bouton à bascule
3
Tuner : démarrer la recherche de
stations
Menu réglage : modifi er les
réglages
Touche Marche/Arrêt
4
Pression courte : mise en
marche / mise en sourdine
Pression longue : arrêt
Bouton de réglage du volume
5
70
6 Touche NEXT
Tuner : sélectionner le niveau de
mémoire (FM1, FM2, FM3, FMT)
Menu réglage : passer à la page
de menu suivante
MP3/WMA : commuter entre
« PLAY », « BROWSER » et
« PLAYLIST »
à < Touches programmables
7
pour sélectionner la fonction, qui
est affi chée à côté de la touche
respective
=
Touche
d'éjection / introduction du CD
Affi cheur (voir pages 78 et 79)
>
Page 71

Vue d'ensemble de l'appareil
? Touche MENU
pour l'appel du menu réglage
@
Touche ESC
Menu réglage : confi rmer l'option
de menu et passer à l'affi chage de
la source audio
Scan/Travelstore : annuler
Touche OK
A
Pression courte : confi rmer
l'option de menu et passer au
niveau de menu immédiatement
supérieur
Pression longue : démarrer la
fonction Scan/recherche des
stations
Touche SRC
B
commuter successivement entre
les sources audio disponibles
Lecteur de CD
C
D Logement de carte MMC/SD
C
D
Télécommande portable
La télécommande portable
RC 12H fournie vous permet de
commander confortablement et
en toute sécurité les fonctions de
base de votre appareil. À cette fi n,
il doit y avoir une liaison visuelle
directe entre la télécommande
portable et l'appareil. La télécommande portable ne permet pas
d'allumer et d'éteindre l'appareil.
SRC
GH
+
_
BLAUPUNKT
I
SELECT
E
VOLUME
F
E Touches Select
même fonction que le bouton à
bascule 3
Touches de volume
F
G Touche SRC
même fonction que la touche
SRC B sur l'appareil
Touche Mute
H
mettre en sourdine
Porte-pile
I
contient une pile ronde 3 V CR
2025 (remplacement de la pile,
voir page 74)
FRANÇAIS
71
Page 72

Mise en service de l'appareil
Mise en service de
l'appareil
Enlever / mettre en place
la façade
Vous pouvez enlever la façade pour
protéger l'appareil contre le vol.
ATTENTION !
Risque de vol !
Sans la façade détachable, l'appareil n'a aucune valeur pour le voleur.
Ne conservez jamais la façade
➔
dans la voiture, même en un
endroit caché, mais emportez
la façade dans son étui en quittant le véhicule !
ATTENTION !
Endommagement de la
façade !
La façade sera endommagée ou ne
fonctionnera plus si vous ne respectez pas les règles suivantes :
Ne laissez pas tomber la faça-
➔
de par terre.
N'exposez jamais la façade di-
➔
rectement aux rayons du soleil
ou à d'autres sources de
chaleur.
➔
Transportez-la exclusivement
dans l'étui fourni.
Ne touchez pas les contacts de
➔
la face arrière avec les doigts.
Nettoyez régulièrement les
➔
contacts de la façade avec un
chiffon doux imbibé d'alcool de
nettoyage.
Pour enlever la façade :
Appuyer sur la touche
➔
La façade bascule vers l'avant,
à gauche. L'appareil s'éteint
automatiquement.
➔
Enlevez la façade.
Pour mettre en place la façade :
➔
Placez la façade d'abord avec
le côté droit dans la baie.
➔
Poussez ensuite le côté gauche
avec précaution vers l'arrière,
jusqu'à ce que la façade s'enclenche.
1.
Allumer / éteindre l'appareil
Pour allumer l'appareil :
➔
Appuyez sur la touche Marche/
4.
Arrêt
L'appareil restitue la source
audio, que vous avez écoutée
en dernier.
72
Page 73

Mise en service de l'appareil
Note :
Si vous allumez l'appareil sans
avoir mis auparavant le contact
du véhicule, l'appareil s'éteint
automatiquement après une
heure pour ménager la batterie
du véhicule.
Pour éteindre l'appareil :
Maintenez la touche Marche/Ar-
➔
4 enfoncée pendant env.
rêt
deux secondes.
En outre, l'appareil est éteint
automatiquement dès que vous
coupez le contact. Lorsque vous
remettez le contact, l'appareil
s'allume alors automatiquement.
FRANÇAIS
73
Page 74

Fonctions générales
Fonctions générales
Remplacement de la pile de
la télécommande portable
Poussez la fermeture du porte-
➔
I dans le sens de la fl è-
pile
che et sortez en même temps
le porte-pile
Remplacez la pile par une pile
➔
ronde 3 V du type CR 2025.
Introduisez la pile de telle sor-
➔
te que le pôle positif soit orienté vers l'arrière de la télécommande portable.
Introduction du CD
ATTENTION !
Destruction du lecteur
de CD par des CD inappropriés !
Les Mini CD (8 cm de diamètre)
et les Shape CD (CD profi lés) détruisent le lecteur !
➔
Introduisez uniquement des
CD circulaires de 12 cm de diamètre dans le lecteur de CD.
Pour introduire un CD MP3, WMA
ou audio, l'appareil doit être allumé.
➔
Appuyez sur la touche
La façade s'ouvre en bascu-
lant. Si un CD se trouve dans
I.
=.
le lecteur, celui-ci est éjecté.
Si vous ne retirez pas le CD, il
sera automatiquement réinséré
après 10 secondes environ.
Poussez le CD avec la face im-
➔
primée en haut dans le lecteur
C jusqu'à ce que vous sen-
CD
tiez une résistance.
Le CD est introduit automatiquement et la façade se ferme. À
présent, vous pouvez sélectionner ce CD comme source audio.
Note :
Tant que le CD se trouve dans
le lecteur, l'appareil mémorise
le titre et la durée de lecture
du dernier CD écouté et, après
l'appel de la source audio,
commence la lecture à l'endroit
où elle a été interrompue.
Introduction de la carte
MMC/SD
Note :
Blaupunkt ne peut garantir le
fonctionnement irréprochable
de l'ensemble des cartes MMC/
SD disponibles sur le marché
et, pour cette raison, recommande d'utiliser des cartes
MMC/SD de SanDisk® ou Panasonic®. Les cartes doivent
être formatées selon le système de fi chiers FAT16 ou FAT32
et contenir des fi chiers MP3 ou
WMA.
74
Page 75

Fonctions générales
Retirez la façade comme décrit
➔
en page 72.
Introduisez la carte MMC/SD
➔
dans le logement de carte
D,
jusqu'à ce qu'elle s'enclenche.
Les contacts de la carte doivent être orientés vers le bas
et vers l'arrière.
Installez la façade comme dé-
➔
crit en page 72.
À présent, vous pouvez sélec-
tionner cette carte MMC/SD
comme source audio.
Pour retirer la carte MMC/SD :
➔
Retirez la façade comme décrit
en page 72.
➔
Appuyez sur la carte MMC/SD,
jusqu'à ce qu'elle se désengage.
➔
Retirez la carte MMC/SD du logement de carte
D.
Raccordement d'un support
USB
Pour pouvoir raccorder un stick
USB ou un disque dur USB, le
câble USB fourni doit être raccordé au dos de l'appareil avant
le montage de ce dernier, comme décrit dans la notice de montage. Vous pouvez poser ce câble,
p. ex. dans la boîte à gants ou en
un endroit approprié de la console centrale.
Note :
Éteignez toujours l'appareil
avant de brancher ou débrancher un support USB !
Raccordez le support USB au
➔
câble USB, qui sort à l'arrière
de l'appareil.
À présent, vous pouvez sélectionner le support USB comme
source audio.
Afi n que l'appareil reconnaisse le
support USB, ce dernier doit être
spécifi é comme mémoire de masse (Mass Storage Device) et formaté selon le système de fi chiers
FAT16 ou FAT32 et contenir des
fi chiers MP3 ou WMA. Blaupunkt
ne peut pas garantir le fonctionnement irréprochable de l'ensemble des supports USB disponibles
sur le marché. Lorsque le support
USB contient une grande quantité
de données, la recherche de
fi chiers (voir page 97) peut
devenir lente.
FRANÇAIS
75
Page 76

Fonctions générales
Réglage du volume
AVERTISSEMENT !
Danger dû à un volume
sonore élevé !
Un volume sonore trop élevé endommage votre ouïe et vous n'entendrez pas les signaux sonores
d'avertissement !
Ne changez pas le volume so-
➔
nore pendant que l'appareil
change le CD dans le changeur
de CD, ou lorsqu'il change de
source audio.
Réglez toujours un volume mo-
➔
déré.
➔
Tournez le bouton de réglage
du volume
Le volume sonore courant est
affi ché sur l'affi cheur et est valable pour toutes les sources
audio.
Note :
Pour prérégler le volume sonore d'un téléphone raccordé
(Phone) et du signal sonore (Beep), voir à partir de la
page 112.
5.
Mise en sourdine de
l'appareil
Vous pouvez mettre l'appareil en
sourdine comme suit :
Appuyez brièvement sur la tou-
➔
che Marche/Arrêt
« MUTE » apparaît à l'affi chage.
Pour supprimer la mise en sourdine :
➔
Appuyez à nouveau brièvement
sur la touche Marche/Arrêt
ou tournez le bouton de réglage du volume
4.
4
5.
Fonctionnement avec
le téléphone
Si un kit mains-libres est monté
dans votre véhicule ou si votre
mobile est relié avec l'appareil au
moyen d'un adaptateur Bluetooth,
l'appareil réagit aux conversations
téléphoniques entrantes ou sortantes comme suit :
•
La voix de votre correspondant est diffusée par les hautparleurs du véhicule.
•
L'écran affi che « Phone call ».
•
La source audio que vous êtes
en train d'écouter est mise en
sourdine.
•
Pendant la conversation téléphonique, vous pouvez modifi er le volume sonore de la
conversation à l'aide du bouton
de réglage du volume
5.
76
Page 77

Fonctions générales
Sélection d'une source
audio
L'appareil dispose des sources
audio suivantes :
•
Tuner
Lecteur de CD intégré (peut
•
lire des CD audio et des CD
avec fi chiers MP3 ou WMA)
•
Carte MMC/SD avec fi chiers
MP3 ou WMA
En outre, vous pouvez raccorder
des sources audio externes :
•
Changeur de CD optionnel ou
AUX 1
•
AUX 2 (p. ex. lecteur MiniDisc
ou MP3 externe)
•
Stick USB avec fi chiers MP3 ou
WMA
Pour pouvoir sélectionner une
source audio externe, celle-ci doit
être raccordée et contenir des
données audio.
➔
Pressez la touche SRC
nombre de fois nécessaire
pour que la source audio souhaitée apparaisse à l'affi chage.
B le
FRANÇAIS
77
Page 78

Fonctions générales
L' affi chage du tuner
A
B
C
1
2
Radio Sun
3
D
16:13
FMT
92,8
MHz
EF
A Ligne principale
Nom ou fréquence de la station
émettrice RDS
B Heure
C Affi chage de niveau
Niveau de mémoire (FMT, FM1 à
FM3)
D Emplacement mémoire pour
les stations radio, que vous
pouvez sélectionner avec les
six touches programmables 7
à <
E Ligne d'information 1
Fréquence de la station
F Ligne d'information 2
Unité de fréquence (MHz ou kHz)
L'affi chage CD audio
D
4
5
6
TRACK 06
A
SONG: Bob Marley - No woman no cry
D
A Ligne principale
Numéro de titre
B Heure
C Affi chage de niveau
Source audio (CD)
D Fonctions, que vous pouvez
sélectionner avec les touches
programmables
E Ligne d'information 1
Durée de lecture
F Ligne d'information 2
Fonctions audio activées
G Ligne d'information 3
Texte du CD
B
16:13
Mix CD
F
7 à <
C
CD
02:19
D
EG
78
Page 79

Fonctions générales
L' affi chage du changeur de CD
A
B
C
CDC
16:13
TRACK 05
DISC 01 ALICIAK
D
02:19
Mix All
F
EG
A Ligne principale
Numéro de titre
B Heure
C Affi chage de niveau
Source audio (CDC)
D Fonctions, que vous pouvez
sélectionner avec les touches
programmables 7 à <
E Ligne d'information 1
Durée de lecture
F Ligne d'information 2
Fonctions audio activées
G Ligne d'information 3
Texte du CD ou nom du CD
L'affi chage MP3
D
A
Bob Marley
SONG: Bob Marley - No woman no cry
D
A Ligne principale
Nom ID3 ou nom de fi chier
B Heure
C Affi chage de niveau
Source audio (MP3, MMC, USB)
D Fonctions, que vous pouvez
sélectionner avec les six touches programmables
E Ligne d'information 1
Durée de lecture
F Ligne d'information 2
Fonctions audio activées
G Ligne d'information 3
Informations sur les titres (p. ex.
noms ID3 ou noms de fi chier)
B
16:13
C
MP3
02:19
Mix All
EGF
7 à <
D
FRANÇAIS
L'affi chage MP3 apparaît lorsqu'un CD, une carte SD/MMC
ou un stick USB avec fi chiers
MP3 ou WMA est introduit(e) et
sélectionné(e) en tant que source audio. Le support MP3 correspondant est affi ché dans l'affi chage de niveau
C.
79
Page 80

Aperçu de la commande
Aperçu de la commande
Dans le présent chapitre, vous allez vous familiariser dans un premier
temps avec les touches de l'appareil.
Ensuite seront décrites les fonctions audio MIX, REPEAT et SCAN, étant donné qu'elles sont utilisées de la même manière pour toutes les sources audio.
À partir de la page 82, vous apprendrez le maniement des menus de
l'appareil.
Aperçu des touches
De nombreuses fonctions de base relatives aux titres musicaux, telles que
l'avance ou le retour rapide de titres musicaux, sont commandées à l'aide
du bouton à bascule
che OK
A ou au moyen des six touches programmables 7 à <.
Note :
Ces fonctions ne sont pas affi chées sur l'affi cheur !
Le tableau suivant montre les fonctions, que vous pouvez exécuter au
moyen de touches.
Que voulez-vous faire ?
Avance rapide
Retour rapide
Saut de titre en avant
Saut de titre en arrière
CD / dossier précédent
CD / dossier suivant
Lecture des intros titre/station
(Scan) (voir également page 82)
Écouter la station radio
Enregistrer la station radio
3 (avec les quatre fonctions , , et ), de la tou-
Source audio sélectionnable
Tuner CD
– maintenir
– maintenir
– pression courte sur
– pression courte sur
––
––
pression 2 secondes sur OK
pression courte
sur
pression 2 s
MP3/
WMA
pression courte sur
pression courte sur
–– –
–– –
CDC AUX
Pas de commande possible sur Memphis
80
Page 81

Aperçu de la commande
K
K
Aperçu des fonctions MIX et RPT
Dans l'affi chage de la source audio active sont affi chées, au bord gauche et droit de l'affi cheur, jusqu'à six fonctions
piloter, indépendamment de la source audio, toujours avec les mêmes
six touches programmables
7 à <. Vous pouvez sélectionner les dif-
férents réglages d'une fonction en pressant plusieurs fois consécutivement la même touche programmable.
Le tableau suivant montre les réglages, qui existent pour les fonctions
MIX et REPEAT.
D, que vous pouvez
FRANÇAIS
Touche programmable
à côté de la fonction
audio
MIX ( lecture aléatoire)
(voir également page 81)
RPT ( mode de répétition )
(voir également page 82)
Tuner CD CD MP3
OFF
–
CD
OFF
–
TRACK
Activation / désactivation de la
lecture aléatoire ( MIX)
Appuyez sur la touche program-
➔
7 (à côté de « MIX »).
mable
Le mode de lecture aléatoire
est affi ché brièvement.
•
« MIX CD » : tous les titres
du CD audio actuel sont lus
selon un ordre aléatoire.
•
« MIX ALL » : tous les titres
sur l'ensemble des CD présents dans le chargeur du
changeur de CD sont lus selon un ordre aléatoire.
•
« MIX FOLDER » : jusqu'à 99
titres MP3 ou WMA présents
Source audio sélectionnable
FOLDER
OFF
DIR
OFF
TRAC
CD
USB/SD/
MMC
MEDIUM
OFF
OFF
DIR
FOLDER
TRAC
CDC AUX
OFF
ALL
CD
OFF
FOLDER
CD
dans le dossier actuel sont
lus selon un ordre aléatoire.
•
« MIX MEDIUM » : tous les
titres MP3 ou WMA présents
sur le support de données
actuel (CD, carte MMC/SD
ou stick USB) sont lus selon
un ordre aléatoire.
•
« MIX OFF » : la lecture aléatoire est désactivée. Tous les
titres sont lus dans l'ordre
dans lequel ils se trouvent
sur le support de données.
Lorsque vous avez activé la lecture aléatoire, le mode de lecture
aléatoire sélectionné est affi ché
Memphis
possible sur
Pas de commande
81
Page 82

Aperçu de la commande
dans la ligne d'information 2 F et
« MIX » est mis en surbrillance au
bord de l'affi cheur.
Activation / désactivation de la
répétition de titres ( RPT)
➔
Appuyez sur la touche program-
8 (à côté de « RPT »).
mable
Le mode de répétition est affi -
ché brièvement.
•
« REPEAT TRACK » : le titre
actuel est répété jusqu'à ce
que la répétition soit désactivée.
•
« REPEAT DIR » : tous les titres présents dans le dossier
actuel sont répétés jusqu'à
ce que la répétition soit désactivée.
•
« REPEAT CD » : tous les titres du CD sont répétés jusqu'à ce que la répétition soit
désactivée.
•
« REPEAT OFF » : le mode de
répétition est désactivé. Malgré cela, la lecture ne s'arrête pas au dernier titre. Après
le dernier titre du dernier
dossier, la lecture se poursuit avec le premier titre du
premier dossier.
Le mode de répétition sélectionné est affi ché dans la ligne d'information 2
surbrillance au bord de l'affi cheur.
F et « RPT » est mis en
Lecture des intros ( Scan)
Vous avez la possibilité d'écouter
successivement toutes les intros
d'un support de données pendant
quelques secondes. Vous pouvez
sélectionner la durée de lecture
des intros dans le menu réglage
(option de menu « Scan Time »,
voir pages 117 et 118).
➔
Maintenez la touche OK
foncée pendant env. deux secondes.
Toutes les intros des titres sont
lues ; « SCAN » et l'affi chage de
la source audio active apparaissent tour à tour sur l'affi cheur.
Pour annuler la fonction Scan :
➔
Appuyez sur la touche OK
La lecture du titre actuel est
poursuivie.
A en-
A.
Touches de commande des
menus
L'appareil dispose de menus, par
le biais desquels vous pouvez modifi er les préréglages ou effectuer
une sélection. Jusqu'à six options
de menu sont affi chées sur l'affi cheur. Chaque option de menu
est attribuée à l'une des six touches programmables
Vous avez besoin des touches suivantes pour la commande des menus :
7 à <.
82
Page 83

Aperçu de la commande
La touche MENU ? vous per-
•
met d'appeler à tout moment
le menu réglage.
Si un menu est constitué de
•
plusieurs pages, vous pouvez
naviguer successivement au
sein de ces pages à l'aide de la
touche NEXT
Si « Tuner » est sélectionné
•
6.
comme source audio, vous
appelez à l'aide de la touche
TUNER
Les touches programmables
•
à
2 le menu « Tuner ».
< vous permettent de sélec-
tionner les options de menu,
qui sont affi chées à côté de la
touche respective.
•
Dans certains menus, vous
pouvez modifi er le réglage
d'une option de menu à l'aide
du bouton à bascule
3.
Ce réglage est effectif immédiatement et mémorisé automatiquement.
La touche OK
•
A vous permet
de confi rmer le réglage affi ché
et de revenir d'un niveau de
menu en arrière.
•
La touche ESC
@ vous permet
également de confi rmer le réglage affi ché, mais vous quittez
le menu et revenez à l'affi chage
de la source audio active.
•
Si vous ne pressez aucune touche, l'affi chage de la source
audio active apparaît automa-
tiquement à l'affi chage après
env. 16 secondes.
Exemple d'utilisation du
menu
L'exemple suivant concernant le
menu réglage ( modifi cation de
la luminosité de l'affi cheur) vous
montre comment vous travaillez de
manière générale avec les menus.
Appeler le menu
7
Appuyez sur la touche MENU ?.
➔
Le menu réglage apparaît.
Audio
Display
Volume
Settings
Settings
Settings
Clock
Various
Sélectionner l'option de menu
dans le menu réglage
Appuyez sur la touche pro-
➔
grammable
8 (à côté de « Dis-
play Settings »).
Le menu « Display » apparaît.
Brightness
Screen Saver
Turn On Text
Appuyez sur la touche pro-
➔
grammable
SD Browser
USB Browser
Angle
7 (à côté de
« Brightness »).
Dans le menu « Display » ap-
paraissent les réglages actuels
Aux
FRANÇAIS
Menu
Settings
Settings
Settings
Display
83
Page 84

Aperçu de la commande
pour la luminosité de l'affi cheur
durant la nuit (« Night ») et durant le jour (« Day »). L'option
de menu « Night » est mise en
surbrillance.
Display
Night 08 Day 16
Étant donné que vous pouvez régler séparément la luminosité de
l'affi cheur pour la nuit et pour le
jour, vous devez commuter entre
les options de menu « Night » et
« Day ».
À cette fi n, appuyez à l'aide du
➔
bouton à bascule
3 sur ou
, jusqu'à ce que l'option de
menu souhaitée soit mise en
surbrillance.
Modifi er et mémoriser le réglage
Pour modifi er la luminosité de
l'affi cheur :
Appuyez à l'aide du bouton à
➔
bascule
3 sur ou .
Votre réglage est pris en compte immédiatement (l'affi cheur
devient plus lumineux ou plus
sombre, selon le réglage). Le
réglage est mémorisé. Si vous
ne pressez aucune autre touche, l'affi chage de la source
audio active apparaît automatiquement à l'affi chage après
env. 16 secondes.
Quitter l'option de menu
➔
Appuyez sur la touche OK
pour revenir d'un niveau de
menu en arrière.
Ou appuyez sur la touche ESC
➔
@ pour quitter le menu et re-
venir à l'affi chage de la source
audio active.
A
84
Page 85

Commande du tuner
Commande du tuner
Après avoir sélectionné « Tuner » comme source audio, l'affi chage du
tuner apparaît (voir page 78). La lecture commence immédiatement
avec la dernière station précédemment lue, dans la mesure où le véhicule se trouve dans la zone de réception de cette station.
1 Radio Kiss 494.1
2 Radio Sun 596.9
3 93.3 697.7
4
1 Radio Kiss
2 Radio Sun
3 93.3 6
1
Radio Kiss
25
Radio Sun
3
93.3
94.1
96.9
97.7
94.1
96.9
97.7
1
5
2
RADIO SUN
3
4
6
Sélection d'un niveau de
mémoire
L'appareil est pourvu de quatre
niveaux de mémoire ( FM1, FM2,
FM3 et FMT). Vous pouvez mémoriser ou appeler six stations sur
chaque niveau de mémoire.
Pour sélectionner le niveau de
mémoire :
➔
Appuyez sur la touche NEXT
le nombre de fois nécessaire
pour que le niveau de mémoire
souhaité apparaisse dans l'indication de niveau
ge du tuner.
C de l'affi cha-
SRC
FMT
16:13
92,9
MHz
Recherche d'une station
Vous pouvez rechercher les stations manuellement ou automatiquement.
Note :
Pour rechercher des stations
FM automatiquement et les
mémoriser sur le niveau de mémoire FMT (Travelstore), voir
6
page 90.
Recherche manuelle d'une station
➔
Pendant que l'affi chage du tuner est actif, appuyez à l'aide du
bouton à bascule
1
Radio Kiss
25
Radio Sun
3
93.3
4
1
Radio Kiss
2 5
5
6
Radio Sun
3
93.3
1
Radio Kiss
25
Radio Sun
3
93.3
94.1
96.9
97.7
94.1
96.9
97.7
94.1
96.9
97.7
4
FRANÇAIS
6
4
6
4
6
3 sur ou .
85
Page 86

Commande du tuner
La réaction du tuner dépend
des réglages effectués dans les
menu « RDS » (voir page 90) et
« Program Type » (voir page 91).
•
Si vous avez sélectionné dans
le menu « Program Type » un
type de programme déterminé (PTY, p. ex. informations,
sport, classique, etc.), le tuner recherche automatiquement dans le sens sélectionné la station la plus proche,
qui diffuse ce type de programme. À cette fi n, la station doit émettre le code PTY
approprié en tant que service RDS.
Si vous avez activé dans le
•
menu « RDS » le changement
automatique vers des fréquences alternatives, le tuner recherche la même station sur une autre fréquence.
Si vous avez sélectionné
•
dans le menu « PROG TYP »
l'option « PTY OFF » et désactivé dans le menu « RDS »
le changement automatique
vers des fréquences alternatives, vous pouvez régler le
tuner par pas de 100 kHz.
Dès qu'une station est trouvée,
celle-ci est diffusée. Le nom de la
station émettrice apparaît après
un court instant à l'affi chage,
dans la mesure où la station émet
cette information RDS.
À présent, vous pouvez mémoriser cette station (voir page 87) ou
redémarrer la recherche manuelle
de stations.
Recherche automatique d'une
station
➔
Pendant que l'affi chage du
tuner est actif, appuyez à l'aide
du bouton à bascule
.
ou
Le tuner recherche la station
suivante à l'intérieur de la gamme d'ondes actuelle dans le
sens choisi. Ce faisant, les réglages du menu « Sensitivity »
(voir page 91) et du menu
« Program Type » (voir page
91) sont pris en compte.
Dès qu'une station est trouvée,
la recherche s'arrête et la station
trouvée est diffusée. Le nom de la
station émettrice apparaît après
un court instant à l'affi chage,
dans la mesure où la station émet
cette information RDS.
À présent, vous pouvez mémoriser cette station (voir passage
suivant) ou redémarrer la recherche automatique de stations.
Note :
Si vous maintenez appuyé
sur le bouton à bascule 3,
la recherche automatique saute les stations trouvées jusqu'à
ce que vous relâchiez le bouton
à bascule.
3 sur
ou
86
Page 87

Commande du tuner
Mémorisation de stations
Après avoir trouvé une station,
vous pouvez la mémoriser comme
suit :
Sélectionnez le niveau de mé-
➔
moire souhaité (voir page 85).
➔
Appuyez pendant env. deux secondes sur la touche programmable, à laquelle vous souhaitez attribuer la station.
La station est mémorisée. Un
signal sonore confi rme que la
station a été mémorisée.
L'affi cheur indique brièvement
l'affectation des six emplacements du niveau de mémoire
actuel. La station actuelle est
mise en surbrillance.
Note :
Pour rechercher des stations
FM automatiquement et les
mémoriser sur le niveau de mémoire FMT (Travelstore), voir
page 90.
Appel de stations mémorisées
Sélectionnez le niveau de mé-
➔
moire souhaité (voir page 85).
Appuyez sur la touche pro-
➔
grammable, à laquelle vous
souhaitez attribuer une station.
L'affi cheur indique évent. brièvement l'affectation des six
emplacements du niveau de
mémoire actuel. La station actuelle est mise en surbrillance.
La station souhaitée est restituée dans la mesure où elle
peut être captée à la position
actuelle du véhicule.
➔
Appuyez sur la touche OK
ou la touche ESC
dez 16 secondes.
Dans l'affi chage du tuner apparaissent la fréquence ainsi
qu'évent. le nom de cette station, dans la mesure où la station émet ces informations RDS.
En outre, l'emplacement mémoire de la station de radio
est mis en surbrillance.
@ ou atten-
A
D
Balayage de toutes les stations captables (Scan)
Sélectionnez une gamme d'on-
➔
des (FM, AM), pour laquelle
vous souhaitez balayer les stations captables (voir page 89).
Maintenez la touche OK
➔
foncée pendant env. deux secondes.
Le tuner recherche des stations dans la gamme d'ondes
actuelle. Toutes les deux secondes apparaît « SCAN » à
l'affi chage.
Dès que le tuner a trouvé une
station, une intro de cette station est restituée et le nom ou
A en-
FRANÇAIS
87
Page 88

Commande du tuner
la fréquence de station apparaît sur l'affi cheur. Vous pouvez régler la durée de balayage
des stations comme décrit en
pages 117 et 118, sous « Scan
Time ».
Lorsque la bande de fréquences a été balayée complètement, la recherche s'arrête et
la dernière station trouvée est
restituée.
Vous pouvez à tout moment :
•
mémoriser la station, dont une
intro est actuellement restituée
(voir page 87),
interrompre le balayage des sta-
•
tions en appuyant brièvement
sur la touche OK
A.
Réglage de l'appareil sur la région Europe, USA ou Thaïlande
L'appareil est réglé en usine à la
gamme de fréquences et d'après
les technologies d'émetteurs de
la région, dans laquelle il a été
acheté. Si ce réglage n'est pas
correct, vous pouvez adapter l'appareil comme suit aux différentes
gammes de fréquences et technologies d'émetteurs utilisées en
Europe, aux USA ou en Thaïlande.
➔
Éteignez l'appareil.
➔
Maintenez les deux touches
programmables
9 et < enfon-
cées pendant que vous allumez
la radio.
Le menu « Area » s'ouvre.
➔
Appuyez sur la touche programmable à côté de la région,
au sein de laquelle vous utilisez l'appareil.
➔
Appuyez sur la touche OK
A.
88
Page 89

Commande du tuner
Modifi er les réglages du tuner ( menu « Tuner »)
Le menu « Tuner » vous permet de modifi er les réglages de base du
tuner. Pour ouvrir le menu « Tuner » :
➔
Appuyez sur la touche TUNER
l'écran.
Le menu « Tuner » se compose de deux pages, au sein desquelles vous
pouvez basculer de l'une à l'autre au moyen de la touche NEXT
2. Le menu « Tuner » apparaît à
6.
TUNER
FRANÇAIS
Band
FM
AM
0...2
1...6
Band
Mono
Hicut
Sensitivity16
Changer la gamme d'ondes
( Band)
Le tuner peut recevoir les gammes FM et AM. Pour basculer entre ces gammes d'ondes :
➔
Sélectionnez dans le menu « Tuner » l'option de menu « Band ».
Le menu « Band » apparaît.
➔
Sélectionnez la bande de votre choix.
: Cette gamme d'ondes est
•
sélectionnée. La dernière station écoutée de cette gamme
d'ondes est diffusée.
Tune r
RDS
Travel Store
NEXT
Tune r
Program Type
NEXT
: Cette gamme d'ondes
•
NEXT
PTY OFF
News
Inform
Travel Store
NEXT
n'est pas sélectionnée.
À présent, vous pouvez effectuer
les opérations suivantes dans la
gamme d'ondes :
rechercher des stations (voir
•
page 85),
mémoriser des stations (voir
•
page 87),
appeler des stations mémori-
•
sées (voir page 87).
NEXT
Sports
Talk
Rock
NEXT
PTY
89
Page 90

Commande du tuner
Basculer entre le mode mono et
le mode stéréo ( Mono)
Lorsque vous avez sélectionné la
gamme d'ondes « FM », vous pouvez basculer entre le mode mono
et le mode stéréo.
Appuyez dans le menu « Tuner »
➔
sur la touche programmable
(à côté « Mono »).
: Le mode mono est acti-
•
vé. Les stations faibles, bruitées, sont restituées de façon claire.
: Le mode stéréo est acti-
•
vé. Vous écoutez en stéréo,
dans la mesure où la station
émet en stéréo.
Note :
Lorsque vous allumez l'appareil,
ce réglage est défi ni automatiquement sur le mode stéréo.
Autoriser les fréquences alternatives ( RDS)
L'appareil peut passer automatiquement à une fréquence alternative (AF) de la même station lorsque la réception est mauvaise.
➔
Appuyez dans le menu « Tuner »
sur la touche programmable
(à côté de « RDS »).
: L'appareil règle automa-
•
tiquement la fréquence de la
station, dont la réception est
la meilleure, dans la mesure
où la station supporte la
fonction RDS « AF ».
9
;
: L'appareil ne change pas
•
la fréquence.
Recherche automatique de
stations FM et mémorisation
dans le niveau de mémoire
FMT ( Travelstore)
Vous pouvez mémoriser automatiquement les six stations FM les
plus puissantes de la région sur le
niveau de mémoire FMT.
➔
Appuyez dans le menu « Tuner »
sur la touche programmable
(à côté de « Travelstore »).
« Travelstore » apparaît à l'affi chage. Le tuner recherche
automatiquement les six stations FM les plus puissantes et
les mémorise sur le niveau de
mémoire FMT. À la fi n de la mémorisation, la station occupant
l'emplacement mémoire 1 du
niveau FMT est diffusée. Les
stations, qui étaient enregistrées auparavant sur le niveau
de mémoire FMT, sont automatiquement effacées.
Activation / désactivation de
l'amélioration de la réception
( Hicut)
La fonction Hicut améliore la qualité de la réception en cas de
mauvaise réception radio (uniquement en FM).
:
90
Page 91

Commande du tuner
Accédez à la deuxième page du
➔
menu « Tuner » en appuyant
sur la touche NEXT
Appuyez dans le menu
➔
6.
« Tuner » plusieurs fois sur la
touche programmable
7 (à
côté de « Hicut »).
•
« 1 » : La fonction Hicut est
activée et a une faible sensibilité de réponse. Le niveau
parasite est automatiquement abaissé lorsque la réception est très mauvaise.
•
« 2 » : La fonction Hicut est
activée et a une forte sensibilité de réponse. Le niveau parasite est automatiquement
abaissé lorsque la réception
est mauvaise.
•
« 0 » : La fonction Hicut est
désactivée.
Modifi er la sensibilité de la
recherche ( Sensitivity)
La sensibilité de la recherche défi nit si la recherche automatique
des stations ne s'arrête que sur
des stations puissantes ou aussi
sur des stations plus faibles éventuellement perturbées.
➔
Accédez à la deuxième page du
menu « Tuner » en appuyant
sur la touche NEXT
➔
Appuyez dans le menu « Tuner
6.
» plusieurs fois sur la touche
programmable
9 (à côté de
« Sensitivity »).
Vous pouvez régler la sensibilité de la recherche selon six niveaux.
•
« 1 » : Faible sensibilité de
recherche. Lors d'une recherche de stations (voir page
85), seules des stations locales puissantes sont trouvées.
•
« 6 » : Sensibilité de recherche élevée. Les stations distantes, plus faibles, sont également trouvées.
Limiter la recherche de stations
à des contenus de programme
déterminés ( Program Type)
➔
Accédez à la deuxième page du
menu « Tuner » en appuyant
sur la touche NEXT
➔
Appuyez dans le menu « Tu-
6.
ner » sur la touche program-
< (à côté de « Program
mable
Type »).
➔
Naviguez à l'aide de la touche
6 à travers les pages
NEXT
des types de programme.
➔
Appuyez sur la touche programmable située à côté du
type de programme souhaité.
➔
Démarrez ensuite une recherche de stations (voir page 85).
FRANÇAIS
91
Page 92

Utilisation du lecteur de CD intégré
Utilisation du lecteur
de CD intégré
L'appareil peut lire les formats
CD suivants :
•
CD audio (certains CD munis
d'une protection contre la copie ne peuvent pas être lus)
•
CD-R ou CD-RW avec fi chiers
MP3 ou WMA (uniquement
sans protection contre la copie DRM)
Note :
La qualité des CD gravés par
les utilisateurs varie en fonction des différents logiciel de
gravage de CD, des CD vierges et de la vitesse de gravage.
Pour cette raison, il est possible que l'appareil ne puisse pas
lire certains CD gravés par l'utilisateur.
Si vous ne pouvez pas lire un
CD-R/RW :
•
utilisez les CD vierges d'une
autre marque ou d'une autre
couleur,
•
gravez les CD-R à une vitesse
plus faible.
Quelles doivent être les caractéristiques des CD MP3 ou WMA ?
L'appareil ne peut lire et affi cher
correctement des CD MP3 ou
WMA que s'ils présentent les caractéristiques suivantes :
Le CD-ROM ne doit contenir
•
que des fi chiers MP3 ou WMA
et des dossiers, mais aucun
autre fi chier (ni de fi chiers CD
audio).
•
Format du CD : ISO 9660
(Level 1 ou 2) ou Joliet
•
Débit binaire :
MP3 : 320 kbits/s max.
WMA : 768 kbits/s max.
•
Extension de fi chier : doit être
« .MP3 » ou « .WMA »
•
Balises ID3 : version 1 ou 2
•
252 dossiers max. par CD avec
999 fi chiers MP3 max. par dossier (moins dans le cas de
noms de fi chier longs : env.
700 avec 20 caractères par
nom de fi chier)
•
Les noms de fi chier ne doivent
pas contenir de caractères spéciaux et leur longueur doit être
inférieure à 32 caractères.
•
Les fi chiers WMA avec DRM
(Digital Rights Management,
protection contre la copie /
restriction de lecture) ne peuvent pas être lus ! L'appareil
ne peut pas lire les fi chiers
WMA avec DRM, qui sont proposés au téléchargement sur
Internet par des fournisseurs
de musique. Les fi chiers WMA,
que vous générer vous-mêmes,
par exemple à partir de fi chier
audio CD, peuvent être lus.
92
Page 93

Utilisation du lecteur de CD intégré
Fonctions du lecteur de CD intégré lorsqu'un CD audio est introduit
Après avoir introduit un CD audio (voir page 74) et sélectionné pour
la première fois « CD » comme source audio (voir page 77), « CD Reading » apparaît à l'affi chage. Ensuite, l'affi chage CD audio apparaît
(voir également page 78). La lecture commence.
Mix Off
Repeat
Off
Option de menu Abr. Touche
Lecture aléatoire MIX
Répétition de titres RPT
Affi chage du texte
de CD
Défi lement de texte SCL
Mix CD
Repeat
Track
TRACK 06
SONG: Bob Marley - No woman no cry
TXT
pro-
gram-
mable
7
8
<
;
SRC
CD
16:13
02:19
Mix CD
Possibilité de réglage voir égale-
Activation (Mix CD)
Désactivation (Mix Off)
Activation (Repeat Track)
Désactivation (Repeat Off)
Activation (CD Text On)
Désactivation (CD Text Off)
Activation (Scroll On)
Désactivation (Scroll Off)
Scroll OffScroll On
CD Text OffCD Text On
Page 81
Page 82
Page 94
Page 94
FRANÇAIS
ment
93
Page 94

Utilisation du lecteur de CD intégré
Activation / désactivation de
l'affi chage de texte CD ( TXT)
Certains CD supportent l'affi chage d'informations textuelles
concernant les artistes, les albums, les titres, etc.
Pour activer / désactiver l'affi chage de texte CD :
Appuyez sur la touche program-
➔
< (à côté de « TXT »).
mable
L'état du texte CD est briève-
ment affi ché :
•
« CD Text On » : Le texte du
CD est affi ché dans la ligne
d'information 3
•
« CD Text Off » : Le texte du
CD n'est pas affi ché.
Activation / désactivation du
défi lement de texte CD ( SCL)
L'appareil peut affi cher le texte
CD de façon statique ou en tant
que défi lement de texte (Scroll).
Pour modifi er le mode d'affi chage
du texte CD :
➔
Appuyez sur la touche program-
; (à côté de « SCL »).
mable
L'état d'affi chage du texte CD
est brièvement affi ché :
•
« Scroll On » : le texte CD
est affi ché en tant que défi lement de texte, dans la mesure où le CD supporte la fonction de texte CD, l'affi chage
de texte CD est activé (voir
le passage précédent) et le
G.
texte CD ne rentre pas dans
la ligne d'information 3
l'affi cheur.
•
« Scroll Off » : le texte CD
n'est pas affi ché en tant que
défi lement de texte. Si le texte CD ne rentre pas dans la
ligne d'information 3
l'affi cheur, il n'apparaît pas
entièrement.
G de
G de
94
Page 95

Utilisation du lecteur MP3/WMA
MMC
USB
y
y
Utilisation du lecteur MP3/ WMA
Après avoir introduit un support contenant des fi chiers MP3 ou WMA
(CD, carte MMC/SD ou stick USB) (voir pages 74 et 75) et sélectionné
pour la première fois ce support comme source audio (voir page 77),
« CD/MMC/USB Reading » apparaît à l'affi chage. Ensuite apparaît l'affi chage MP3 (voir page 79). La lecture commence.
FRANÇAIS
Mix Off
Repeat
Off
Option de
menu
Lecture
aléatoire
Répétition
de titres
Affi chages
des infos
Défi lement
de texte
Sélection
de l'info
MIX
FOLDER
Repeat
DIR
Abr. Touche
MIX
RPT
ALL
SCL
INF
Mix CD /
MEDIUM
REPEAT
Tra ck
pro-
gram-
mable
7
8
<
;
:
SRC
MP3
16:13
Bob Marley
Lire les fi chiers du dossier (Mix FOLDER) ou du
support de données (Mix CD ou Mix MEDIUM)
selon un ordre aléatoire
Désactivation (Mix Off)
Répéter le fi chier actuel (Repeat Track) ou les
fi chiers du dossier (REPEAT DIR)
Désactivation (Repeat Off)
Toutes les informations disponibles sur le
titre actuel défi lent à une reprise sur la ligne
d'information 3
Activation (Scroll On)
Désactivation (Scroll Off)
Commutation entre DIR, SONG, ARTIST,
ALBUM et FILE
02:19
Mix All
Possibilité de réglage voir
G
ARTIST: Bob Marley SONG: No woman no cry
Scroll OffScroll On
FILE: Bob Marley - No woman no cry
Page
81
Page
82
Page
96
Page
96
Page
96
95
Page 96

Utilisation du lecteur MP3/WMA
Affi chage de l'ensemble des informations du titre actuel ( ALL)
Pour affi cher toutes les informations disponibles concernant le
titre actuel (p. ex. à partir des
tags ID3) sur l'affi cheur :
➔
Appuyez sur la touche program-
< (à côté de « ALL »).
mable
Toutes les informations dispo-
nibles sur le titre actuel défi lent à une reprise sur la ligne
d'information 3
Activation / désactivation du
défi lement de texte ( SCL)
L'appareil peut affi cher les informations sur les titres, que vous
avez sélectionnées dans l'option
de menu « INF » (voir passage
suivant), de façon statique ou en
tant que défi lement de texte.
Pour commuter entre l'affi chage
statique et le défi lement de texte :
➔
Appuyez sur la touche program-
; (à côté de « SCL »).
mable
•
Lorsque l'affi chage par défi lement de texte est activé, le
texte défi le de façon ininterrompue de droite à gauche
à travers la ligne d'informa-
G.
tion 3
•
Lorsque la fonction de défi lement de texte est désactivée,
les 32 premiers caractères
max. sont affi chés dans la
ligne d'information 3
G
G.
Sélection des informations de
titre à affi cher ( INF)
L'appareil peut affi cher les informations de titre suivantes dans la
ligne d'information 3
•
les informations issues de données intégrées ou de tags ID3
(artiste, titre, album, genre, année), dans la mesure où elles
sont disponibles
•
ou le nom de fi chier et le nom
de dossier.
Pour sélectionner l'information de
titre à affi cher :
➔
Appuyez plusieurs fois sur la
touche programmable
côté de « INF »).
Le type d'information à affi cher
apparaît à l'affi chage :
•
« DIR » : nom du dossier,
dans lequel se trouve le fi chier actuellement lu
•
« SONG » : nom du titre actuel
•
« ARTIST » : nom de l'artiste
•
« ALBUM » : nom de l'album
•
« FILE » : nom de fi chier du
titre actuel
G :
: (à
96
Page 97

Utilisation du lecteur MP3/WMA
Sélection d'un titre à partir d'une liste ( mode navigateur (Browser) /
liste d'écoute (Playlist))
Pendant la lecture MP3 ou WMA, vous pouvez à tout moment commuter entre les modes suivants à l'aide de la touche NEXT
Affi chage MP3 (partie gauche de la fi gure)
•
Mode navigateur (partie centrale de la fi gure)
•
Mode liste d'écoute (partie droite de la fi gure)
•
6 :
Note :
L'appareil est capable de lire des listes d'écoute, qui ont été créées
à l'aide d'un gestionnaire MP3 tel que WinAmp® ou Windows Media®
Player. Ces listes d'écoute doivent être au format M3U, PLS ou RMP
et être enregistrées dans le répertoire racine du support de données !
FRANÇAIS
NEXT NEXTNEXT
Bob Marley - No woman
Bob Marley - Redemptio
Bob Marley - I shot the S
NEXT
Bob Marley - Buffallo Sol
OK
Rock
Ska
Reggae
Hip Hop
Bob Marley
SONG: Bob Marley - I shot the sherrif
16:13
MP3
02:19
Le mode navigateur ou la liste
d'écoute indique :
•
en haut le fi chier, qui est en
train d'être lu,
•
au-dessous les trois prochains
fi chiers, qui sont lus,
•
deux fl èches, qui sont mises en
surbrillance lorsque vous pouvez effectuer un défi lement
dans le sens correspondant.
BROWSE
BROWSE
PL
list.m3u
PL
list2.m3u
PL
list3.m3u
PL
list4.m3u
OK
Annie Lennox - Walking
Eurythmics - Sweet Dream
Jaffa - Elevator
The Police - Roxanne
BROWSE
BROWSE
Note :
Les fi chiers ne sont pas lus
dans l'ordre alphabétique, mais
dans l'ordre, dans lequel ils ont
été enregistrés physiquement
sur le support de données. Cet
ordre est également affi ché
dans le mode navigateur.
Dans le mode navigateur et dans le
mode liste d'écoute, vous pouvez
sélectionner les fi chiers ou dossiers dans la liste, comme suit :
97
Page 98

Utilisation du lecteur MP3/WMA
Appuyez à l'aide du bouton à
➔
bascule
3 sur ou pour
faire défi ler l'affi chage vers le
haut ou vers le bas.
➔
Appuyez à l'aide du bouton à
bascule
3 sur afi n d'accé-
der à un dossier de niveau supérieur.
➔
Appuyez à l'aide du bouton à
bascule
sur la touche OK
3 sur ou appuyez
A pour accé-
der à un dossier de niveau inférieur.
➔
Appuyez à l'aide du bouton à
bascule
sur la touche OK
3 sur ou appuyez
A pour lire le
fi chier sélectionné.
98
Page 99

Utilisation du changeur de CD optionnel
Utilisation du changeur de CD optionnel
Après avoir introduit au moins un CD dans le chargeur du changeur de
CD et sélectionné pour la première fois « CDC » comme source audio
(voir page 77), « Magazine Scan » apparaît brièvement à l'affi chage.
Ensuite apparaît l'aperçu des CD. La lecture commence.
Vous pouvez commuter entre l'aperçu des CD (partie supérieure de la
fi gure) et l'affi chage du changeur de CD (partie centrale de la fi gure) à
l'aide de la touche NEXT
6.
FRANÇAIS
SRC
Mix Off Mix CD
Repeat
Off
Option de
ALICIAK
MADONNA
BOBMARL
MIX ALL
Repeat
CD
Abr. Touche
Repeat
Tra ck
menu
gram-
mable
Lecture
MIX
aléatoire
Répétition
RPT
de titres
Éditer les
CDN
noms de
CD
CDC
16:13
DISC 04
DISC 05
Next
Track 05
DISC 01 ALICIAK
NEXTNEXT
16:13
DISC 06
DISC 07
DISC 08
CDC
02:19
Mix All
Possibilité de réglage voir
pro-
Lire tous les titres du CD (Mix CD) ou du char-
7
geur (Mix ALL) selon un ordre aléatoire
Désactivation (Mix OFF)
Répéter le titre actuel (Repeat Track) ou le CD
8
actuel (Repeat CD)
Désactivation (Repeat OFF)
Entrer, modifi er, effacer les noms des CD, qui
<
se trouvent dans le chargeur de CD
CDC
16:13
DISC 09
DISC 10
Previous
Edit CD Name Clear CD Name
Press Key for more then 2 Sec
CDC
Clear ALL Names
Page
81
Page
82
Page
100
99
Page 100

Utilisation du changeur de CD optionnel
Sélection d'un CD à partir du
chargeur de CD ( aperçu des CD)
L'aperçu des CD indique :
le numéro de CD
•
(p. ex. « DISC 01 »)
•
ou le nom du CD (vous pouvez
entrer ce dernier comme décrit
dans le passage suivant)
•
ou un emplacement vide, lorsque la position correspondante
du chargeur est exempte de CD.
➔
Appuyez le cas échéant sur la
touche NEXT
6 pour affi cher
l'aperçu des CD.
➔
Appuyez sur la touche programmable se trouvant à côté
du numéro ou du nom du CD
souhaité.
« Loading CD » apparaît brièvement à l'affi chage. Ensuite
commence la lecture avec le
premier titre du CD.
Note :
Si votre changeur de CD
contient plus de cinq CD dans
le chargeur, appuyez sur la touche programmable
:, qui se
trouve à côté des options de
menu « Next » et « Previous »,
pour commuter entre l'affi chage des cinq premiers et des
cinq derniers CD.
Modifi er le nom d'un CD dans
le chargeur du changeur de CD
( CDN)
Vous pouvez attribuer un nom à
chaque CD se trouvant dans le
changeur de CD. Le nom peut
comporter un maximum de sept
caractères.
➔
Sélectionnez dans l'aperçu des
CD le CD, auquel vous souhaitez attribuer un nom, comme
décrit dans le passage précédent.
➔
Appuyez sur la touche NEXT
pour faire apparaître l'affi chage
du changeur de CD.
➔
Appuyez sur la touche programmable
< (à côté de
« CDN »).
➔
Appuyez sur la touche programmable
7 (à côté de « Edit
CD Name »).
La saisie du texte apparaît. Le
premier caractère du nom est
mis en surbrillance.
➔
Appuyez plusieurs fois à l'aide
du bouton à bascule
pour modifi er le caractère
ou
3 sur
mis en surbrillance.
➔
Appuyez à l'aide du bouton à
bascule
3 sur pour passer
au caractère suivant.
➔
Appuyez sur la touche OK
A
pour terminer la saisie du texte
et mémoriser le nom entré.
6
100
 Loading...