

Blaupunkt Memphis-MP-66 Owners Manual

Radio CD SD USB MP3 WMA
Memphis MP66 7 646 520 310
7 646 521 310
Operating and installation instructions

2

Contents
Contents
About these instructions ................70
For your safety ................................70
Scope of delivery ............................71
Warranty .........................................71
Device Overview .............................72
Controls ...........................................72
Placing the device in operation ......73
Detaching/attaching the control
panel ................................................73
Switching the device on/off .............74
General functions ...........................74
Inserting a CD ..................................74
Inserting an MMC/SD card ..............75
Connecting the USB medium ...........75
Adjusting the volume .......................76
Muting the device ............................76
Operation with telephone ................76
Selecting an audio source ...............77
The tuner display..........................78
The audio CD display ...................78
The CD changer display ...............79
The MP3 display ...........................79
Overview of the operation..............80
Overview of the buttons ..................80
Overview of the functions MIX,
RPT, and TA ......................................81
Switching random track play
on/off (MIX) .................................81
Switching Repeat title on/off
(RPT) ............................................82
Scanning titles (Scan) ..................82
Buttons for menu operation ............82
Example of a menu operation ..........83
Calling up a menu ........................83
Selecting a menu item in the
settings menu ...............................83
Changing and saving a setting ......84
Exiting a menu item ......................84
Operating the tuner ........................85
Searching for stations ......................85
Manually searching for stations ....85
Automatically searching for
stations ........................................86
Storing stations ...............................87
Listening to stored stations .............87
Scanning all receivable stations ......87
Set the device to the region
Europe, USA or Thailand ..............88
Changing the tuner settings
("Tuner" menu) ................................89
Changing the waveband (Band) ...89
Toggle between mono and
stereo operation (Mono) ..............90
Switching the display of radio
text on/off (Radio Text) ................90
Allowing alternative frequencies
(RDS) ...........................................90
Searching FM stations
automatically and storing them
in the FMT memory bank
(Travelstore) .................................90
Activating/deactivating improved
reception (Hicut) ..........................91
Allowing/preventing automatic
changing to other regional
programmes (Regional) ................91
Changing the seek tuning
sensitivity (Sensitivity)
Restricting station seek tuning
to certain programme contents
(Program Type) ............................92
.................92
67

Contents
Traffi c announcements (TA) ...........93
Receiving traffi c announcements .....93
Skipping a traffi c announcement .....93
Permanently switching the priority
of traffi c announcements on/off ......93
Operating the integrated
CD player.........................................95
What features do MP3 or
WMA CDs have to have? ...............95
Functions of the integrated CD
player if an audio CD is inserted ..96
Switching the CD text display
on/off (TXT) .................................97
Switching the scrolling text
for CD text on/off (SCL) ..............97
Operating the MP3/WMA player ....98
Showing all the information of
the current title (ALL) ..................99
Switching scrolling text on/off
(SCL) ............................................99
Selecting the title information
to be displayed (INF) ....................99
Selecting a title from a list
(Browser mode/playlist) ............100
Operating the optional CD
changer .........................................102
Changing the name of a CD
in the magazine of the CD
changer (CDN) ...........................103
Changing basic settings in the
settings menu ...............................104
Adjusting sound and balance
(Audio Settings).............................105
Changing treble or bass
(Treble/Bass) .............................105
Changing the volume
distribution (Balance/Fader) ......105
Changing the equalizer setting
(Digital Equalizer) ......................106
Calling up a user-defi ned
equalizer setting
(User Equalizer) .........................106
Creating/changing a user-
defi ned equalizer setting
(Adjust) ......................................107
Which equalizer setting is the
correct one? ...............................109
Selecting a sound preset
(Presets) ....................................110
Setting the speed-dependent
volume increase (Auto Sound) ...110
Setting the bass increase
(X-Bass) ......................................110
Switching off the equalizer ........110
Confi guring the preamplifi er
output for the subwoofer
(Subout) .....................................111
Changing display settings
(Display Settings) ..........................112
Changing the brightness of the
display for day/night
(Brightness) ...............................112
Activating/deactivating the
screen saver (Screen Saver) ......112
Switching the welcome text
on/off (Turn On Text) .................112
Changing images and animations
(SD Browser/USB Browser) .......113
Adjusting the display viewing
angle (Angle) ..............................114
Changing volume presettings
(Volume Settings) ..........................115
Changing the volume presetting
of traffi c announcements
(Traffi c Volume) ..........................115
Changing the volume presetting
of the telephone
(Phone Volume) .........................115
68

Contents
Changing the volume presetting
of the signal tone
(Beep Volume) ...........................116
Changing the presetting of the
power-on volume (On Volume) ...116
Restoring the volume at
switch-on (Last Volume) ............116
Changing clock settings (Clock
Settings) ........................................117
Setting the time (Time Setting) .117
Switching the time display
on/off with switched-off device
(Off Clock) .................................117
Confi guring audio inputs
(Aux Settings) ................................118
Switching the RDS
synchronisation of the clock
on/off (Auto Sync) .....................118
Switching the 24-hour time
display on/off (24 h Mode) ........118
Activating/deactivating audio
inputs (Auxiliary 1/2) .................119
Renaming audio inputs
(Edit Auxiliary 1/2) .....................119
Changing special settings
(Various Settings) ..........................120
Changing the welcome text
(Turn On Text) ............................120
Switching the internal amplifi er
on/off (Internal Amp) .................121
Resetting the device to factory
settings (Norm Set)....................121
Changing the scan time
(Scan Time) ................................121
Displaying the serial number
(Serial Number) .........................122
Error table .....................................122
Specifi cations ...............................123
Glossary ........................................124
Index .............................................127
Blaupunkt stands for technical know-how in mobile radio reception,
for precise navigation systems and fi rst-class sound. The blue dot
made its debut in 1923 as a seal of quality that was assigned after
rigourous functional – and it still applies today. At that time as well
as today, the blue dot identifi es products of extraordinary quality.
69
About these instructions
About these instructions
Please read these instructions
and, in particular, the following
chapter, "For your safety", before
using the device!
serve the following instructions:
•
CD Changer, if available
•
Remote Control, if available
Please also ob-
For your safety
The device was manufactured
according to the state of the art
and established safety guidelines.
Even so, dangers may occur if you
do not observe these safety information:
Read these instructions care-
➔
fully and completely before
using the device.
➔
Keep the instructions at a location so that they are always accessible to all users.
➔
Always pass on the device to
third parties together with
these instructions.
Use as directed
The device is designed for operation in a vehicle with 12 V vehicle
system voltage and must be installed in a DIN slot.
If you are installing device yourself
You may only install the device
yourself if you are experienced in
installing car sound systems and
are very familiar with the electrical system of the vehicle.
Observe the following!
Danger of injuries!
Do not open or modi-
fy the device! The device contains a Class 1 laser that
emits invisible laser radiation
which can cause injuries to your
eyes. The warranty is void if the
device has been opened.
Danger of accidents!
Operate the device only if
traffi c situation permits it!
Danger of hearing
damage!
Always listen at moderate volume so that you can always
hear acoustic warning signals!
This will also help to protect your
hearing. The device briefl y switches to mute, e.g. while the CD
changer changes the CD or if you
are switching the audio source.
Do not increase the volume during this mute phase
70

Scope of delivery
Danger to the device!
Do not insert any mini
CDs (8 cm diameter) and
shape CDs since they destroy the
drive!
Theft protection
Carry the control panel with you
in the supplied case whenever
you leave the vehicle.
Cleaning
Clean the device with a dry or
slightly moistened cloth. Do not
use any solvents, cleaning agents
or cleansers and no cockpit spray
and care product for plastic materials.
Disposal of old unit
(EU countries only)
Do not dispose of your old
device in the household trash!
Use the return and collection sys-
tems available to dispose of the
old device.
Scope of delivery
2 Disassembly bar
1 Guide pin
1 USB connecting cable
Note:
Remote controls are available
as optional equipment. You can
fi nd out from your Blaupunkt
dealer or on the Internet at
www.blaupunkt.com which remote controls can be used with
this device.
Warranty
We provide a manufacturer's warranty for products bought within
the European Union. For devices
purchased outside the European
Union, the warranty terms issued
by our respective responsible domestic agency are valid.
The warranty terms can be called
up under www.blaupunkt.com or
requested directly from:
Blaupunkt GmbH
Hotline
Robert-Bosch-Str. 200
D-31139 Hildesheim
1 Memphis MP66
1 Case for the control panel
1 Operating instructions
1 Support frame
71
Device Overview
Device Overview
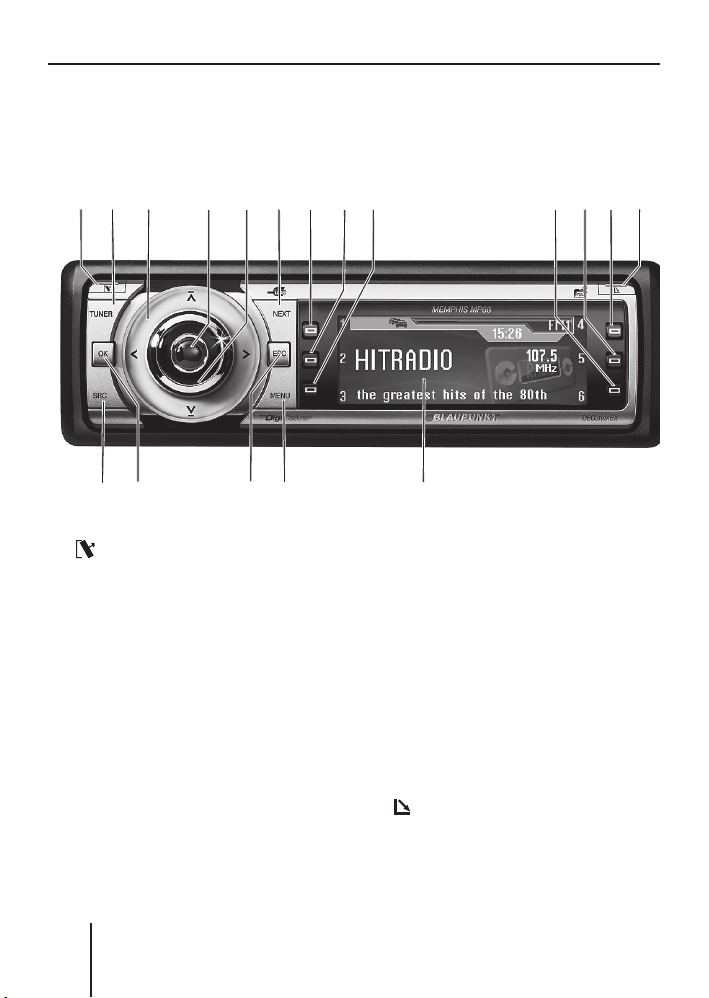
Controls
1 button
for detaching the control panel
2
TUNER button
Selecting the tuner as audio
source
Opening the "Tuner"
3
Rocker switch
Tuner: Start the station seek
tuning
Settings menu: Change settings
4
On/Off button
Press short: Switch on/mute
Press long: Switch off
5
Volume control
6 72143 5 9:;<=
? @AB
8
>
6 NEXT button
Tuner: Select memory bank
(FM1, FM2, FM3, FMT)
Settings menu: Go to the next
menu page
MP3/WMA: Switch between
"PLAY", "BROWSER" and
"PLAYLIST"
7
to < Softkeys
To select the function shown on
the display next to the respective
button
=
button
to eject/insert a CD
>
Display (see page 78 and 79)
72
Device Overview
? MENU button
to call up the settings menu
@
ESC button
Settings menu: Confi rm menu
item and change to the display of
the audio source
Scan/Travelstore: Cancel
A
OK button
Press short: Confi rm menu item
and change to the next higher
menu level
Press long: Start scan/station
seek tuning
B
SRC button
consecutively switching between
the available audio sources
C
CD drive
C
D MMC/SD card slot
D
Placing the device in
operation
Detaching/attaching the
control panel
You can detach the control panel
to protect against theft.
CAUTION!
Danger of theft!
The device is worthless to a thief
without the control panel.
Never keep the control pan-
➔
el in the vehicle, not even in a
hidden place; instead, carry it
with you in its case when you
leave the vehicle!
CAUTION!
Damage to the control
panel!
The control panel can be damaged or malfunction if the following is not observed:
Never drop the control panel.
➔
Never expose the control pan-
➔
el to direct sunlight or another
heat source.
Transport it exclusively in the
➔
supplied case.
73
General functions
Do not touch the contacts on
➔
the rear side with your fi ngers.
Clean the contacts of the con-
➔
trol panel regularly using a soft
cloth moistened with cleaning
alcohol.
To detach the control panel:
➔
Press the
The control panel opens to the
front on the left. The device
switches off automatically.
Detach the control panel.
➔
To attach the control panel:
Place the control panel in the
➔
slot with the right side fi rst.
➔
Next, carefully push the left
side to the back until the control panel engages.
button 1.
Switching the device
on/off
To switch on the device:
➔
Press the On/Off button
The device plays the audio
source you previously listened
to.
Note:
If you switch on the device
without fi rst switching on the
vehicle ignition, the device automatically switches off after
one hour to save the vehicle
battery.
4.
To switch off the device:
➔
Press and hold the On/Off but-
4 for approx. two sec-
ton
onds.
In addition, the device is automatically switched off as soon as you
switch of the vehicle ignition. If
you switch on the ignition again,
it also automatically switches on
the device again.
General functions
Inserting a CD
CAUTION!
Damage to CD drive from
unsuitable CDs!
Mini CDs (8 cm diameter) or
shape CDs damage the drive!
➔
Insert only circular CDs with
a 12-cm diameter into the CD
drive.
To insert an MP3, WMA or audio
CD, the device must be switched
on.
➔
Press the
button =.
74

General functions
The control panel opens. If a
CD is in the drive, it is ejected.
If you do not remove this CD, it
is automatically pulled in again
after approx. 10 seconds.
Insert the CD with its print-
➔
ed side uppermost into the CD
C until you feel some re-
drive
sistance.
The CD is automatically drawn
in and the control panel closes. This CD can now be selected as audio source.
Note:
As long as the CD is in the
drive, the device stores track
and playing time of the CD
played last, and after calling up
the audio source, the playback
starts at the position where it
was interrupted.
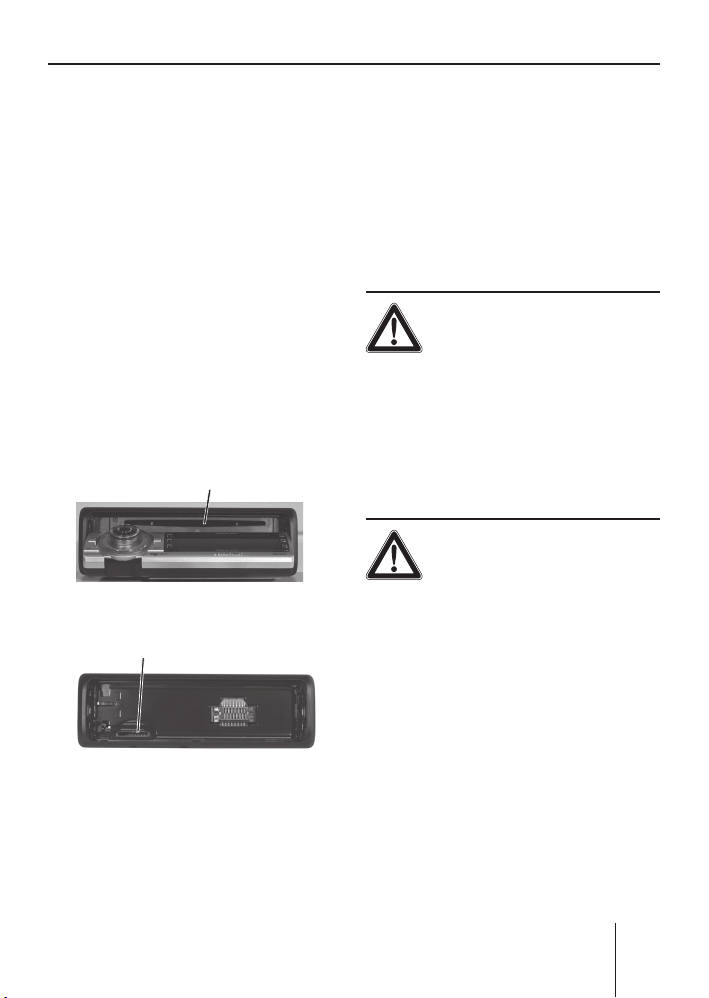
Inserting an MMC/SD card
Note:
Blaupunkt cannot guarantee
the correct functioning of all
MMC/SD card available on the
market and, for this reason,
recommends the use of MMC/
SD cards manufactured by
"SanDisk" or "Panasonic". The
cards must be formatted using
the FAT16 or FAT32 fi le system
and contain MP3 or WMA fi les.
Remove the control panel as
➔
described on page 9.
➔
Insert the MMC/SD card in the
card slot
The contacts of the card must
point down and to the rear.
Attach the control panel as de-
➔
scribed on page 9.
This MMC/SD card can now be
selected as audio source.
To remove the MMC/SD card:
Remove the control panel as
➔
described on page 9.
Push on the MMC/SD card un-
➔
til it disengages.
➔
Pull the MMC/SD card out of
the card slot
D until it engages.
D.
Connecting the USB
medium
To be able to connect a USB stick
or a USB 2.0 hard disk, the supplied USB cable must be connected to the rear side of the device before the installation as
described in the installation instructions. This cable can be routed, for example, to the glove compartment or a suitable place of
the center console.
Note:
Always switch off the device before connecting or disconnecting
the USB medium.
75

General functions
Connect the USB medium to
➔
the USB cable that is routed
from the rear side of the device.
The USB medium can now be
selected as audio source.
For the device to recognise the
USB medium, it must be specifi ed
as mass storage device and formatted using the FAT16 or FAT32
fi le system and contain MP3 or
WMA fi les. Blaupunkt cannot
guarantee the proper functioning of all USB media available on
the market. If extensive fi les are
stored on your USB 2.0 medium,
the fi le search (see page 100) can
be slow.
Adjusting the volume
WARNING!
Danger from excessive
volume!
Excessive volume can damage
your hearing and you may fail to
hear acoustic warning signals!
Do not change the volume
➔
while the device changes the
CD in the CD changer or the
audio source.
Always set the device to a mod-
➔
erate volume.
➔
Turn the volume control
The current volume is shown
on the display and used for all
audio sources.
Note:
To preset the volume of traffi c
announcements (Traf), a connected telephone (Phone) and
the signal tone (Beep), see
page 115 and 116.
5.
Muting the device
The device can be muted as follows:
Briefl y press the On/Off but-
➔
4.
ton
The display shows "MUTE".
To cancel the mute function:
Briefl y press the On/Off but-
➔
4 again or turn the volume
ton
control
5.
Operation with telephone
If a hands-free system is installed
in your vehicle or your cell phone
is connected to the device via a
Bluetooth adapter, the device responds as follows to incoming or
outgoing telephone calls:
•
The voice of the person calling
you is played back via the loudspeakers of the vehicle,
76

General functions
•
The display shows "Phone call".
•
The currently playing audio
source is muted.
•
During the telephone call, you
change the volume of the telephone call by means of the volume control
•
Traffi c announcements (TA) are
not automatically shown.
5.
To be able to select an external
audio source, it must be connected and contain audio data.
➔
Press the SRC button
peatedly until the display briefly shows the desired audio
source.
B re-
Selecting an audio source
The device features the following
audio sources:
•
Tuner
•
Integrated CD player (can play
audio CDs as well as CDs with
MP3 or WMA fi les)
•
MMC/SD card with MP3 or
WMA fi les
In addition, the following external
audio sources can be connected:
•
either an optional CD changer
or AUX 1
•
AUX 2 (e.g. MiniDisc or external MP3 player)
•
USB medium with MP3 or
WMA fi les
ENGLISH
77

General functions
The tuner display
A
1
2
Radio Sun
3
F
BD
C
16:13
Madonna in concert tonight
E
FMTTMC
92,8
MHz
F
4
5
6
GJ H
A TMC symbol¹)
B TA symbol
see page 93
C Main line
RDS station name or frequency
D Clock
E Level indicator
Memory bank (FMT, FM1 to FM3)
F Memory location for radio sta-
tions which can be selected
using the six softkeys
7 to <
G Info line 1
Frequency of the station
H Info line 2
Frequency unit (MHz or kHz)
I Info line 3
Radio text, if supported by the
station
The audio CD display
A
BD
C
16:13
TRACK 06
SONG: Bob Marley - No woman no cry
02:19
Mix CD
F
A TMC symbol¹)
B TA symbol
see page 93
C Main line
Track number
D Clock
E Level indicator
Audio source (CD)
F Functions which can be
selected using the softkeys
7 to <
G Info line 1
Playing time
H Info line 2
Activated audio functions
I Info line 3
CD text
E
F
CDTMC
GJ H
¹) The TMC symbol appears only if you connect an external navigation system
and it starts searching for TMC stations.
78

General functions
The CD changer display
A
TRACK 05
F
BD
C
16:13
DISC 01 ALICIAK
E
CDCTMC
02:19
Mix All
GJ H
F
A TMC symbol¹)
B TA symbol
see page 93
C Main line
Track number
D Clock
E Level indicator
Audio source (CDC)
F Functions which can be select-
ed using the softkeys
7 to <
G Info line 1
Playing time
H Info line 2
Activated audio functions
I Info line 3
CD text or CD name
The MP3 display²)
A
BD
C
Bob Marley
SONG: Bob Marley - No woman no cry
16:13
E
MP3TMC
02:19
Mix All
F
A TMC symbol¹)
B TA symbol
see page 93
C Main line
ID3 or fi le name
D Clock
E Level indicator
Audio source (MP3, MMC, USB)
F Functions which can be
selected using the six softkeys
7 to <
G Info line 1
Playing time
H Info line 2
Activated audio functions
I Info line 3
Title information (e.g. ID3 or fi le
names)
F
GJ H
²) The MP3 display appears of a CD, SD/MMC card or USB medium with MP3 or
WMA fi les is inserted and selected as audio source. The corresponding MP3
medium is displayed on the level indicator
E.
79

Overview of the operation
Overview of the operation
This chapter fi rst presents the buttons on the device.
It is followed by a description of the audio functions MIX, REPEAT, TA
and SCAN since their operation is identical for all audio sources.
The operation of the device menus is described starting on page 82.
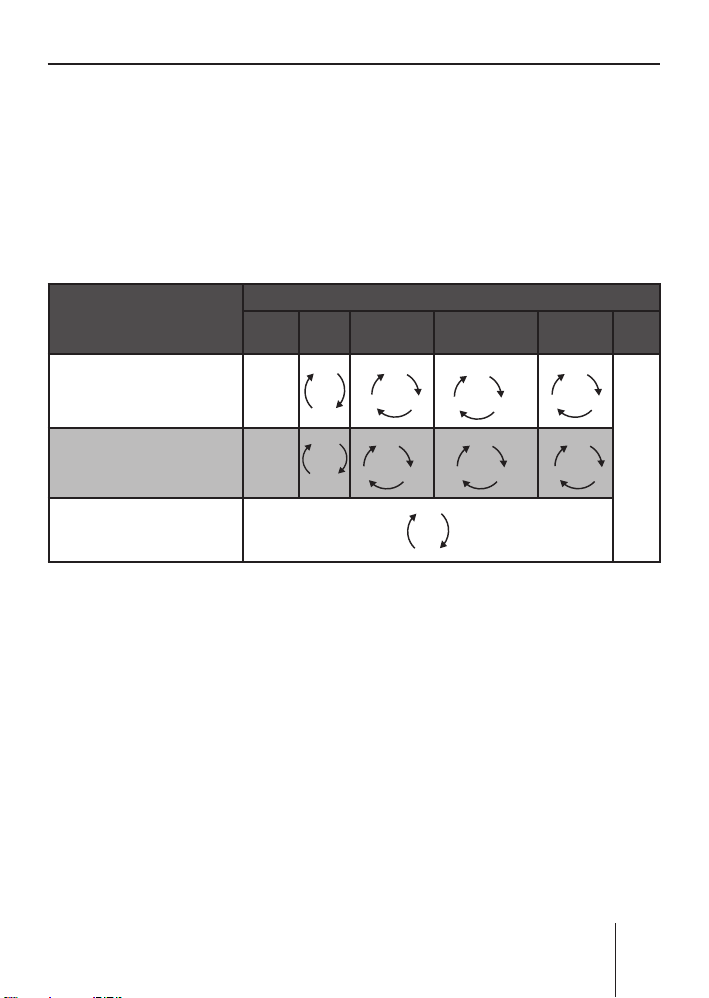
Overview of the buttons
Many basic functions during the playback of music, such as forwarding
and reversing music, are performed using the rocker switch
the four functions
, , , and ), the OK button A or the six softkeys
7 to <.
Note:
These functions are not shown on the display!
The following table shows the functions that can be performed by
these buttons.
Selectable audio sources
What do you want to do?
Forward
Reverse
Title forward
Title reverse
Previous CD/folder
Next CD/folder
Scan track/station
(see also page 82)
Play radio station
Store radio station
Tuner CD
–
– Hold
–
– Press short
––
––
Press OK for 2 s
Press short
Press
for 2 s
MP3/
WMA
Hold
pressed
pressed
Press short
–––
–––
3 (using
CDC AUX
Press short
Press short
No operation possible of Memphis
80
Overview of the operation
K
K
Overview of the functions MIX, RPT, and TA
The display of the active audio source can show up to six functions F
at the left and right edge of the display which you always operate using the same six softkeys
The different settings of a function are selected by repeatedly pressing
the same softkey.
The following table shows which settings are available for the functions MIX, REPEAT, and TA.
7 to < independent of the audio source.
Softkey next to the
audio function
MIX ( random trac
(see also page 81)
RPT ( repeat mode )
(see also page 82)
TA ( traffi c announcement)
(see also page 93)
k play)
Tuner CD MP3 CD
–
–
Switching random track play
on/off ( MIX)
Press the softkey
➔
7
(next to "MIX").
The random track mode is
briefl y displayed.
•
"MIX CD": All tracks on the
current audio CD are played
in random order.
•
"MIX ALL": All tracks on all
CDs in the magazine of the
OFF
CD
OFF
TRACK
Selectable audio sources
USB/SD/
MMC
MEDIUM
CDFOLDER
OFF
ON
DIR
FOLDEROFF
OFF
TRAC
DIR
OFF
OFF
TRAC
CD changer are played in
random order.
•
"MIX FOLDER": Up to 99 MP3
or WMA titles in the current
folder are played in random
order.
•
"MIX MEDIUM": All MP3 or
WMA titles on the current
data carrier (CD, MMC/SD
card or USB medium) are
played in random order.
CDC AUX
OFF
CDALL
OFF
CDFOLDER
No operation possible of
Memphis
81

Overview of the operation
"MIX OFF": The random track
•
play is switched off. All titles are played in the order in
which they are found on the
data carrier.
If you switched on random track
play, the selected random track
play mode is displayed on info
H and indicated by "MIX"
line 2
at the side of the display.
Switching Repeat title on/off
( RPT)
➔
Press the softkey
(next to "RPT").
The repeat mode is briefl y displayed.
•
"REPEAT TRACK": The current track is repeated until
you quit repeat.
•
"REPEAT DIR": All titles in the
current folder are repeated
until you quit repeat.
•
"REPEAT CD": All tracks on
the CD are repeated until you
quit repeat.
•
"REPEAT OFF": The repeat
mode is switched off. However, the playback does not
stop with the last track. After
the last title in the last folder, the playback is continued
with the fi rst title in the fi rst
folder.
8
The selected repeat mode is displayed on info line 2
cated by "RPT" at the side of the
display.
Scanning titles ( Scan)
You can scan all the titles of a
data carrier. The scan time is
selected in the settings menu
("Scan Time" menu item, see
page 120 and 121).
➔
Press and hold the OK button
A for approx. two seconds.
All titles are scanned. The display shows "SCAN" and the display of the active audio source.
To cancel the scan:
➔
Press the OK button
The playback of the current ti-
tle is continued.
H and indi-
A.
Buttons for menu
operation
The device features menus which
allow you to change the presettings or make a selection. The display shows up to six menu items.
Each menu item is assigned to
one of the six softkeys
The following buttons are required to operate the menus:
7 to <.
82
Overview of the operation
The MENU button ? calls up
•
the settings menu at any time.
•
If a menu consists of several pages, you can consecutively scroll them using the NEXT
button
•
If "Tuner" is selected as the audio source, the TUNER button
2 calls up the "Tuner" menu.
The softkeys
•
to select the menu items that
are shown on the display next
to the corresponding button.
•
In some menus, the rocker
switch
6.
7 to < are used
3 is used to change the
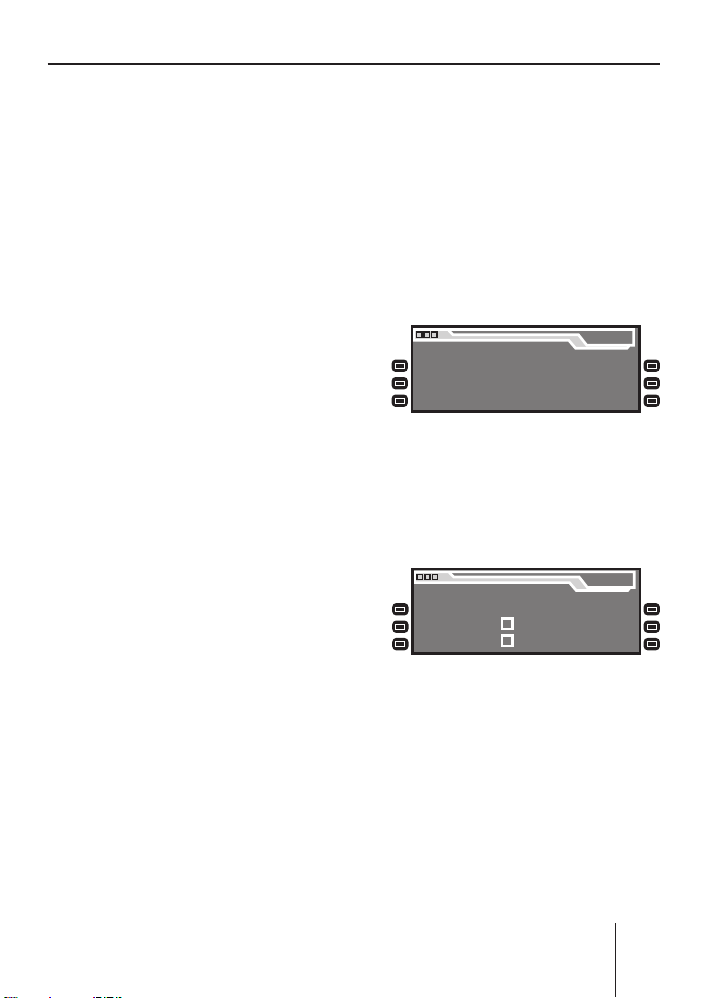
Example of a menu
operation
The following example from the
settings menu (Changing the display brightness) shows how to
operate the menus in general.
Calling up a menu
Press the MENU button ?.
➔
The settings menu is displayed.
Menu
Audio
Display
Volume
Settings
Settings
Settings
Clock
Aux
Various
Settings
Settings
Settings
setting of a menu item.
This setting is immediate-
ly effective and automatically
stored.
•
You confi rm the setting with
the OK button
A and go back
one higher menu level.
You also confi rm the displayed
•
setting with the ESC button
but you are leaving the menu
Selecting a menu item in the
settings menu
Press the softkey
➔
"Display Settings").
The "Display" menu appears.
@,
Brightness
Screen Saver
Turn On Text
8 (next to
Display
SD Browser
USB Browser
Angle
and return to the display of the
active audio source.
•
If you do not press any button,
the display of the active audio
source automatically appears
after approx. 16 seconds.
Press the softkey 7 (next to
➔
"Brightness").
The current settings for dis-
play brightness for "Night" and
"Day" appear on the "Display"
menu. The "Night" menu item is
highlighted.
83

Overview of the operation
Display
Night 08 Day 16
Since you can adjust the display
brightness separately for night
and day, you must switch between the menu items "Night"
and "Day".
➔
For this purpose, press the
rocker switch
3 for or until
the desired menu item is highlighted.
Changing and saving a setting
To change the display brightness:
➔
On the rocker switch
or .
on
3, press
The setting takes effect immediately (the display becomes
brighter or darker). The setting
is saved.
If you do not press another
button, the display of the active audio source automatically appears after approx. 16 seconds.
Exiting a menu item
➔
Press the OK button
A to go
up one menu level.
➔
Or press the ESC button
to exit the menu and return to
the display of the active audio
source.
84
@
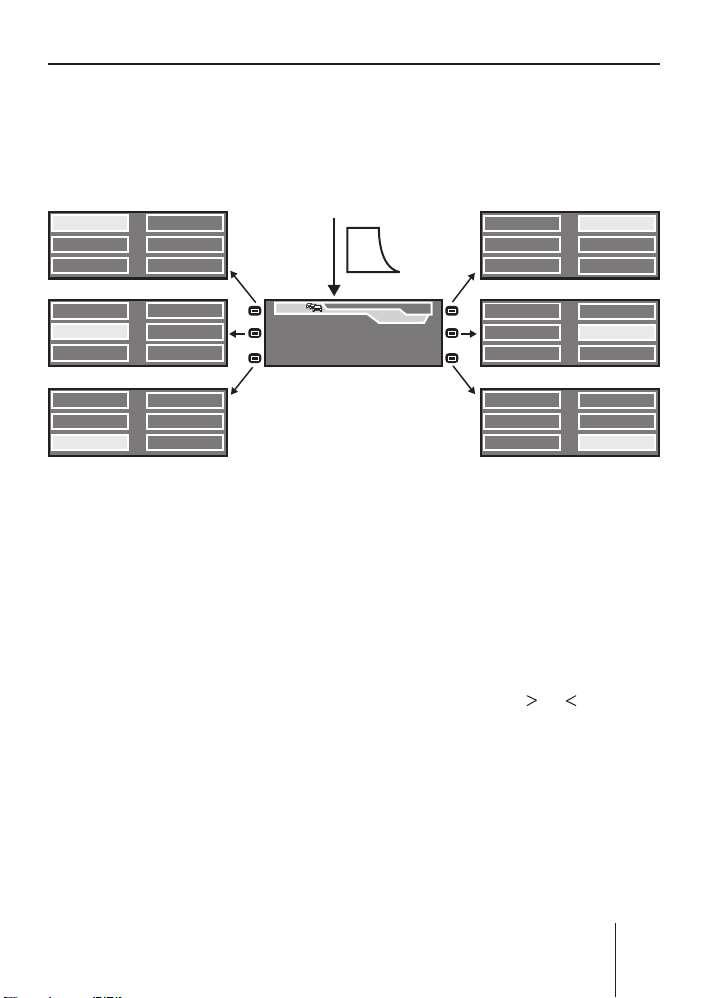
Operating the tuner
Operating the tuner
After selecting "Tuner" as the audio source, the tuner display appears
(see page 78). The playback starts immediately with the previously
played station if the vehicle is within the reception area of this station.
1 Radio Kiss 494.6
2 Radio Sun 596.2
3 93.4 697.7
4
1 Radio Kiss
2 Radio Sun
3 93.4 6
1
Radio Kiss
25
Radio Sun
3
93.4
94.6
96.2
97.7
94.6
96.2
97.7
1
5
2
RADIO SUN
3
4
6
Selecting the memory
bank
The device features four memory banks ( FM1, FM2, FM3, and
FMT). You can store or call up six
stations at every memory bank.
To select the memory bank:
➔
Press the NEXT button
6
repeatedly until the desired
memory bank appears on the
level display
E of the tuner
display.
Searching for stations
You can search for stations manually or automatically.
SRC
FMT
16:13
92,8
MHz
Note:
To automatically search for
FM stations and store them in
the FMT memory bank (Travelstore), see page 90.
Manually searching for stations
While the tuner display ap-
➔
pears, press on
rocker switch
The response of the tuner
depends upon the settings in the menus "RDS"
(see page 90) and "Program
Type" (see page 92).
•
If you selected a specifi c program type (PTY, e.g. news,
1
Radio Kiss
25
Radio Sun
3
93.4
4
1
Radio Kiss
2 5
5
6
Radio Sun
3
93.4
1
Radio Kiss
25
Radio Sun
3
93.4
94.6
96.2
97.7
94.6
96.2
97.7
94.6
96.2
97.7
4
6
4
6
4
6
or on the
3.
85

Operating the tuner
sports, classic, etc.) in the
"Program Type" menu, the
tuner automatically searches
the next station broadcasting this program type in the
selected direction. For this
purpose, the station must
be broadcasting the corresponding PTY identifi cation
as RDS service.
•
If you activated the automatic change to alternative frequencies in the "RDS" menu,
the tuner searches for the
same station on a different
frequency.
•
If you selected the "PTY OFF"
option in the "PROG TYP"
menu and deactivated the
automatic change to alternative frequencies in the "RDS"
menu, you can manually adjust the tuner in increments
of 100 kHz.
As soon as a station has been located, it is played. The station
name appears on the display after
a few seconds if the station provides this RDS information.
You can now store this station
(see the next section) or restart
the manual station seek tuning.
Automatically searching for
stations
While the tuner display ap-
➔
pears, press on
rocker switch
or on the
3.
The tuner searches for the next
station in the current waveband in the selected direction.
The settings in the menus
"Sensitivity" (see page 92) and
"Program Type" (see page 92)
are incorporated.
As soon as a station is located,
the seek tuning stops and the located station is played. The station name appears on the display
after a few seconds if the station
provides this RDS information.
You can now store this station
(see the next section) or restart
the automatic station seek tuning.
Note:
If you press and hold
the rocker switch
or on
3, the auto-
matically seek tuning skips the
stations found until you release
the rocker switch again.
86

Operating the tuner
Storing stations
After locating a station, you can
store it as follows:
Select the desired memory
➔
bank (see page 85).
Press the softkey for approx.
➔
two seconds to which you
want to assign the station.
The station is stored. A signal
tone confi rms that the station
has been stored.
The display briefl y shows the
assignment of the six memory
locations of the current memory bank. The current station is
highlighted.
Note:
To automatically search for
FM stations and store them in
the FMT memory bank (Travelstore), see page 90.
Listening to stored
stations
Select the desired memory
➔
bank (see page 85).
Briefl y press the softkey which
➔
is assigned to the station you
want to set up.
The display may briefl y show
the assignment of the six memory locations of the current
memory bank. The current station is highlighted. The desired
station is played back provided
that it can be received at the
current vehicle position.
Press the OK button
➔
ESC button
16 seconds.
The tuner display shows station name, frequency and radio text of this station, provided that the station broadcasts
RDS information.
In addition, the memory location of the radio station
highlighted.
@ or wait for
A or the
F is
Scanning all receivable
stations
Select the waveband (FM, MW,
➔
LW) whose receivable stations
you want to scan (see page 89).
Press and hold the OK button
➔
A for approx. two seconds.
The tuner searches for stations
in the current waveband. The
display shows "SCAN" every
two seconds.
As soon as the tuner has located a station, it is played and
the station name or the station
frequency appears on the display. The scan time can be set
as described on page 120 and
121 under "Scan Time".
After the frequency band has
been completely searched
87

Operating the tuner
once, the search stops and the
station located last is played
back.
You can do the following at any
time:
•
store the currently scanned
station (see page 87),
cancel the scan by briefl y press-
•
ing the OK button
A.
Set the device to the region
Europe, USA or Thailand
The device is factory set to the
frequency ranges and station
technologies of the region in
which it was purchased. If this
setting is not correct, you can adjust the device as follows to the
different frequency ranges and
station technologies of Europe,
the United States or Thailand.
➔
Switch off the device.
➔
Hold the two softkeys
< pressed while switching on
9 and
the radio.
The "Area" menu opens.
➔
Press the softkey next to the
region in which you are using
the device.
➔
Press the OK button
A.
88
 Loading...