

Page 1

Radio CD SD USB MP3 WMA
Memphis MP66 7 646 520 310
7 646 521 310
Operating and installation instructions
http://www.blaupunkt.com
Page 2

Inhalt
2
Page 3

Contents
Contents
About these instructions ................70
For your safety ................................70
Scope of delivery ............................71
Warranty .........................................71
Device Overview .............................72
Controls ...........................................72
Placing the device in operation ......73
Detaching/attaching the control
panel ................................................73
Switching the device on/off .............74
General functions ...........................74
Inserting a CD ..................................74
Inserting an MMC/SD card ..............75
Connecting the USB medium ...........75
Adjusting the volume .......................76
Muting the device ............................76
Operation with telephone ................76
Selecting an audio source ...............77
The tuner display..........................78
The audio CD display ...................78
The CD changer display ...............79
The MP3 display ...........................79
Overview of the operation..............80
Overview of the buttons ..................80
Overview of the functions MIX,
RPT, and TA ......................................81
Switching random track play
on/off (MIX) .................................81
Switching Repeat title on/off
(RPT) ............................................82
Scanning titles (Scan) ..................82
Buttons for menu operation ............82
Example of a menu operation ..........83
Calling up a menu ........................83
Selecting a menu item in the
settings menu ...............................83
Changing and saving a setting ......84
Exiting a menu item ......................84
Operating the tuner ........................85
Searching for stations ......................85
Manually searching for stations ....85
Automatically searching for
stations ........................................86
Storing stations ...............................87
Listening to stored stations .............87
Scanning all receivable stations ......87
Set the device to the region
Europe, USA or Thailand ..............88
Changing the tuner settings
("Tuner" menu) ................................89
Changing the waveband (Band) ...89
Toggle between mono and
stereo operation (Mono) ..............90
Switching the display of radio
text on/off (Radio Text) ................90
Allowing alternative frequencies
(RDS) ...........................................90
Searching FM stations
automatically and storing them
in the FMT memory bank
(Travelstore) .................................90
Activating/deactivating improved
reception (Hicut) ..........................91
Allowing/preventing automatic
changing to other regional
programmes (Regional) ................91
Changing the seek tuning
sensitivity (Sensitivity) .................92
Restricting station seek tuning
to certain programme contents
(Program Type) ............................92
67
Page 4

Contents
Traffi c announcements (TA) ...........93
Receiving traffi c announcements .....93
Skipping a traffi c announcement .....93
Permanently switching the priority
of traffi c announcements on/off ......93
Operating the integrated
CD player.........................................95
What features do MP3 or
WMA CDs have to have? ...............95
Functions of the integrated CD
player if an audio CD is inserted ..96
Switching the CD text display
on/off (TXT) .................................97
Switching the scrolling text
for CD text on/off (SCL) ..............97
Operating the MP3/WMA player ....98
Showing all the information of
the current title (ALL) ..................99
Switching scrolling text on/off
(SCL) ............................................99
Selecting the title information
to be displayed (INF) ....................99
Selecting a title from a list
(Browser mode/playlist) ............100
Operating the optional CD
changer .........................................102
Changing the name of a CD
in the magazine of the CD
changer (CDN) ...........................103
Changing basic settings in the
settings menu ...............................104
Adjusting sound and balance
(Audio Settings).............................105
Changing treble or bass
(Treble/Bass) .............................105
Changing the volume
distribution (Balance/Fader) ......105
Changing the equalizer setting
(Digital Equalizer) ......................106
Calling up a user-defi ned
equalizer setting
(User Equalizer) .........................106
Creating/changing a user-
defi ned equalizer setting
(Adjust) ......................................107
Which equalizer setting is the
correct one? ...............................109
Selecting a sound preset
(Presets) ....................................110
Setting the speed-dependent
volume increase (Auto Sound) ...110
Setting the bass increase
(X-Bass) ......................................110
Switching off the equalizer ........110
Confi guring the preamplifi er
output for the subwoofer
(Subout) .....................................111
Changing display settings
(Display Settings) ..........................112
Changing the brightness of the
display for day/night
(Brightness) ...............................112
Activating/deactivating the
screen saver (Screen Saver) ......112
Switching the welcome text
on/off (Turn On Text) .................112
Changing images and animations
(SD Browser/USB Browser) .......113
Adjusting the display viewing
angle (Angle) ..............................114
Changing volume presettings
(Volume Settings) ..........................115
Changing the volume presetting
of traffi c announcements
(Traffi c Volume) ..........................115
Changing the volume presetting
of the telephone
(Phone Volume) .........................115
68
Page 5

Contents
Changing the volume presetting
of the signal tone
(Beep Volume) ...........................116
Changing the presetting of the
power-on volume (On Volume) ...116
Restoring the volume at
switch-on (Last Volume) ............116
Changing clock settings (Clock
Settings) ........................................117
Setting the time (Time Setting) .117
Switching the time display
on/off with switched-off device
(Off Clock) .................................117
Confi guring audio inputs
(Aux Settings) ................................118
Switching the RDS
synchronisation of the clock
on/off (Auto Sync) .....................118
Switching the 24-hour time
display on/off (24 h Mode) ........118
Activating/deactivating audio
inputs (Auxiliary 1/2) .................119
Renaming audio inputs
(Edit Auxiliary 1/2) .....................119
Changing special settings
(Various Settings) ..........................120
Changing the welcome text
(Turn On Text) ............................120
Switching the internal amplifi er
on/off (Internal Amp) .................121
Resetting the device to factory
settings (Norm Set)....................121
Changing the scan time
(Scan Time) ................................121
Displaying the serial number
(Serial Number) .........................122
Error table .....................................122
Specifi cations ...............................123
Glossary ........................................124
Index .............................................127
Blaupunkt stands for technical know-how in mobile radio reception,
for precise navigation systems and fi rst-class sound. The blue dot
made its debut in 1923 as a seal of quality that was assigned after
rigourous functional – and it still applies today. At that time as well
as today, the blue dot identifi es products of extraordinary quality.
69
Page 6
About these instructions
About these instructions
Please read these instructions
and, in particular, the following
chapter, "For your safety", before
using the device!
serve the following instructions:
•
CD Changer, if available
•
Remote Control, if available
Please also ob-
For your safety
The device was manufactured
according to the state of the art
and established safety guidelines.
Even so, dangers may occur if you
do not observe these safety information:
Read these instructions care-
➔
fully and completely before
using the device.
➔
Keep the instructions at a location so that they are always accessible to all users.
➔
Always pass on the device to
third parties together with
these instructions.
Use as directed
The device is designed for operation in a vehicle with 12 V vehicle
system voltage and must be installed in a DIN slot.
If you are installing device yourself
You may only install the device
yourself if you are experienced in
installing car sound systems and
are very familiar with the electrical system of the vehicle.
Observe the following!
Danger of injuries!
Do not open or modi-
fy the device! The device contains a Class 1 laser that
emits invisible laser radiation
which can cause injuries to your
eyes. The warranty is void if the
device has been opened.
Danger of accidents!
Operate the device only if
traffi c situation permits it!
Danger of hearing
damage!
Always listen at moderate volume so that you can always
hear acoustic warning signals!
This will also help to protect your
hearing. The device briefl y switches to mute, e.g. while the CD
changer changes the CD or if you
are switching the audio source.
Do not increase the volume during this mute phase
70
Page 7
Scope of delivery
Danger to the device!
Do not insert any mini
CDs (8 cm diameter) and
shape CDs since they destroy the
drive!
Theft protection
Carry the control panel with you
in the supplied case whenever
you leave the vehicle.
Cleaning
Clean the device with a dry or
slightly moistened cloth. Do not
use any solvents, cleaning agents
or cleansers and no cockpit spray
and care product for plastic materials.
Disposal of old unit
(EU countries only)
Do not dispose of your old
device in the household trash!
Use the return and collection sys-
tems available to dispose of the
old device.
Scope of delivery
2 Disassembly bar
1 Guide pin
1 USB connecting cable
Note:
Remote controls are available
as optional equipment. You can
fi nd out from your Blaupunkt
dealer or on the Internet at
www.blaupunkt.com which remote controls can be used with
this device.
Warranty
We provide a manufacturer's warranty for products bought within
the European Union. For devices
purchased outside the European
Union, the warranty terms issued
by our respective responsible domestic agency are valid.
The warranty terms can be called
up under www.blaupunkt.com or
requested directly from:
Blaupunkt GmbH
Hotline
Robert-Bosch-Str. 200
D-31139 Hildesheim
1 Memphis MP66
1 Case for the control panel
1 Operating instructions
1 Support frame
71
Page 8
Device Overview
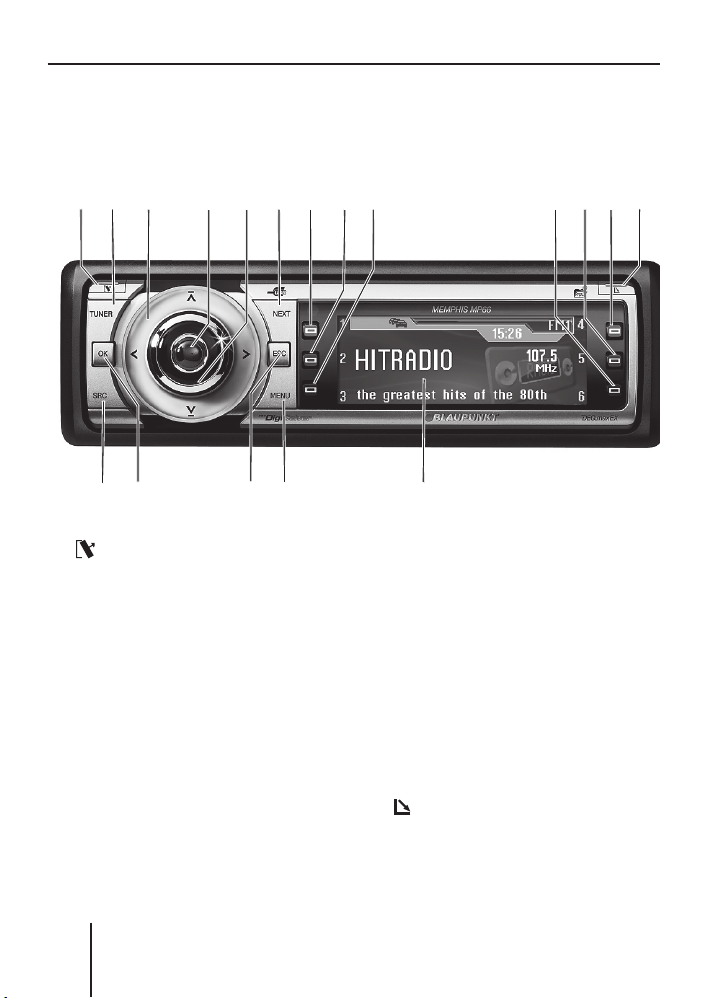
Device Overview
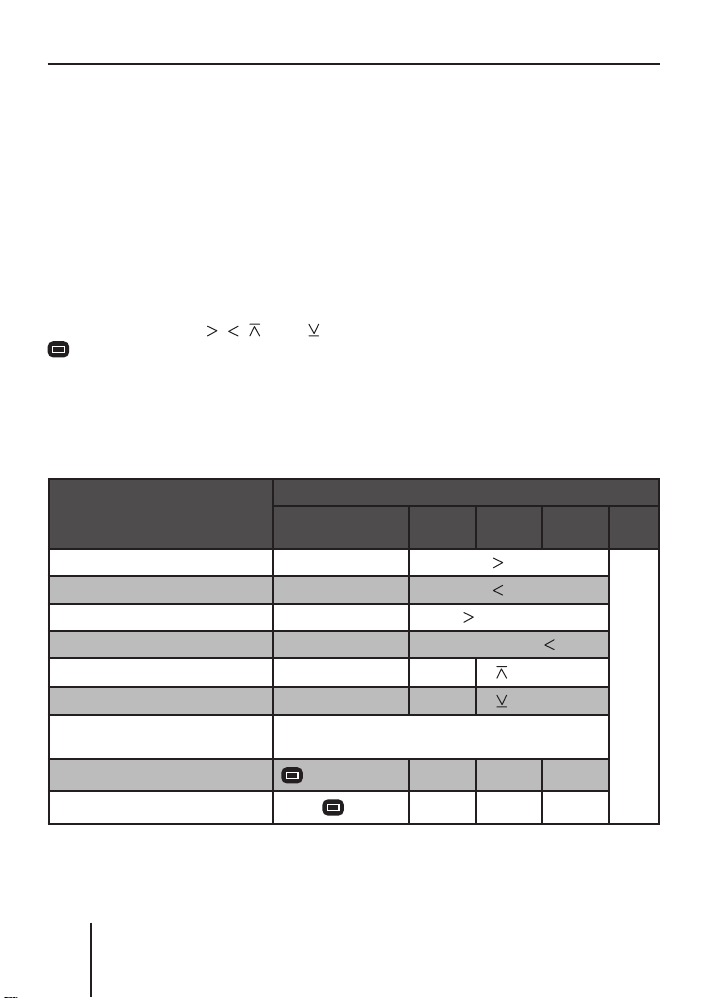
Controls
143
5
@AB
1 button
for detaching the control panel
TUNER button
2
Selecting the tuner as audio
source
Opening the "Tuner"
Rocker switch
3
Tuner: Start the station seek
tuning
Settings menu: Change settings
On/Off button
4
Press short: Switch on/mute
Press long: Switch off
Volume control
5
6
?
9:;<=
8
72
>
6 NEXT button
Tuner: Select memory bank
(FM1, FM2, FM3, FMT)
Settings menu: Go to the next
menu page
MP3/WMA: Switch between
"PLAY", "BROWSER" and
"PLAYLIST"
7
to < Softkeys
To select the function shown on
the display next to the respective
button
button
=
to eject/insert a CD
Display (see page 78 and 79)
>
72
Page 9
Device Overview
? MENU button
to call up the settings menu
@
ESC button
Settings menu: Confi rm menu
item and change to the display of
the audio source
Scan/Travelstore: Cancel
A
OK button
Press short: Confi rm menu item
and change to the next higher
menu level
Press long: Start scan/station
seek tuning
SRC button
B
consecutively switching between
the available audio sources
CD drive
C
C
D MMC/SD card slot
D
Placing the device in
operation
Detaching/attaching the
control panel
You can detach the control panel
to protect against theft.
CAUTION!
Danger of theft!
The device is worthless to a thief
without the control panel.
Never keep the control pan-
➔
el in the vehicle, not even in a
hidden place; instead, carry it
with you in its case when you
leave the vehicle!
CAUTION!
Damage to the control
panel!
The control panel can be damaged or malfunction if the following is not observed:
Never drop the control panel.
➔
Never expose the control pan-
➔
el to direct sunlight or another
heat source.
Transport it exclusively in the
➔
supplied case.
73
Page 10

General functions
Do not touch the contacts on
➔
the rear side with your fi ngers.
Clean the contacts of the con-
➔
trol panel regularly using a soft
cloth moistened with cleaning
alcohol.
To detach the control panel:
Press the
➔
The control panel opens to the
front on the left. The device
switches off automatically.
Detach the control panel.
➔
To attach the control panel:
Place the control panel in the
➔
slot with the right side fi rst.
➔
Next, carefully push the left
side to the back until the control panel engages.
button 1.
Switching the device
on/off
To switch on the device:
➔
Press the On/Off button
The device plays the audio
source you previously listened
to.
Note:
If you switch on the device
without fi rst switching on the
vehicle ignition, the device automatically switches off after
one hour to save the vehicle
battery.
4.
To switch off the device:
Press and hold the On/Off but-
➔
ton
4 for approx. two sec-
onds.
In addition, the device is automatically switched off as soon as you
switch of the vehicle ignition. If
you switch on the ignition again,
it also automatically switches on
the device again.
General functions
Inserting a CD
CAUTION!
Damage to CD drive from
unsuitable CDs!
Mini CDs (8 cm diameter) or
shape CDs damage the drive!
➔
Insert only circular CDs with
a 12-cm diameter into the CD
drive.
To insert an MP3, WMA or audio
CD, the device must be switched
on.
➔
Press the
button =.
74
Page 11

General functions
The control panel opens. If a
CD is in the drive, it is ejected.
If you do not remove this CD, it
is automatically pulled in again
after approx. 10 seconds.
Insert the CD with its print-
➔
ed side uppermost into the CD
C until you feel some re-
drive
sistance.
The CD is automatically drawn
in and the control panel closes. This CD can now be selected as audio source.
Note:
As long as the CD is in the
drive, the device stores track
and playing time of the CD
played last, and after calling up
the audio source, the playback
starts at the position where it
was interrupted.
Inserting an MMC/SD card
Note:
Blaupunkt cannot guarantee
the correct functioning of all
MMC/SD card available on the
market and, for this reason,
recommends the use of MMC/
SD cards manufactured by
"SanDisk" or "Panasonic". The
cards must be formatted using
the FAT16 or FAT32 fi le system
and contain MP3 or WMA fi les.
Remove the control panel as
➔
described on page 9.
Insert the MMC/SD card in the
➔
card slot
The contacts of the card must
point down and to the rear.
Attach the control panel as de-
➔
scribed on page 9.
This MMC/SD card can now be
selected as audio source.
To remove the MMC/SD card:
Remove the control panel as
➔
described on page 9.
Push on the MMC/SD card un-
➔
til it disengages.
➔
Pull the MMC/SD card out of
the card slot
D until it engages.
D.
Connecting the USB
medium
To be able to connect a USB stick
or a USB 2.0 hard disk, the supplied USB cable must be connected to the rear side of the device before the installation as
described in the installation instructions. This cable can be routed, for example, to the glove compartment or a suitable place of
the center console.
Note:
Always switch off the device before connecting or disconnecting
the USB medium.
75
Page 12

General functions
Connect the USB medium to
➔
the USB cable that is routed
from the rear side of the device.
The USB medium can now be
selected as audio source.
For the device to recognise the
USB medium, it must be specifi ed
as mass storage device and formatted using the FAT16 or FAT32
fi le system and contain MP3 or
WMA fi les. Blaupunkt cannot
guarantee the proper functioning of all USB media available on
the market. If extensive fi les are
stored on your USB 2.0 medium,
the fi le search (see page 100) can
be slow.
Adjusting the volume
WARNING!
Danger from excessive
volume!
Excessive volume can damage
your hearing and you may fail to
hear acoustic warning signals!
Do not change the volume
➔
while the device changes the
CD in the CD changer or the
audio source.
Always set the device to a mod-
➔
erate volume.
➔
Turn the volume control
The current volume is shown
on the display and used for all
audio sources.
Note:
To preset the volume of traffi c
announcements (Traf), a connected telephone (Phone) and
the signal tone (Beep), see
page 115 and 116.
5.
Muting the device
The device can be muted as follows:
Briefl y press the On/Off but-
➔
4.
ton
The display shows "MUTE".
To cancel the mute function:
Briefl y press the On/Off but-
➔
4 again or turn the volume
ton
control
5.
Operation with telephone
If a hands-free system is installed
in your vehicle or your cell phone
is connected to the device via a
Bluetooth adapter, the device responds as follows to incoming or
outgoing telephone calls:
•
The voice of the person calling
you is played back via the loudspeakers of the vehicle,
76
Page 13

General functions
•
The display shows "Phone call".
•
The currently playing audio
source is muted.
•
During the telephone call, you
change the volume of the telephone call by means of the volume control
•
Traffi c announcements (TA) are
not automatically shown.
5.
To be able to select an external
audio source, it must be connected and contain audio data.
➔
Press the SRC button
peatedly until the display briefly shows the desired audio
source.
B re-
Selecting an audio source
The device features the following
audio sources:
•
Tuner
•
Integrated CD player (can play
audio CDs as well as CDs with
MP3 or WMA fi les)
•
MMC/SD card with MP3 or
WMA fi les
In addition, the following external
audio sources can be connected:
•
either an optional CD changer
or AUX 1
•
AUX 2 (e.g. MiniDisc or external MP3 player)
•
USB medium with MP3 or
WMA fi les
ENGLISH
77
Page 14

General functions
The tuner display
A
1
2
Radio Sun
3
F
BD
C
16:13
Madonna in concert tonight
H
E
FMTTMC
92,8
MHz
F
4
5
6
GJ
A TMC symbol¹)
B TA symbol
see page 93
C Main line
RDS station name or frequency
D Clock
E Level indicator
Memory bank (FMT, FM1 to FM3)
F Memory location for radio sta-
tions which can be selected
using the six softkeys
7 to <
G Info line 1
Frequency of the station
H Info line 2
Frequency unit (MHz or kHz)
I Info line 3
Radio text, if supported by the
station
The audio CD display
A
BD
C
16:13
TRACK 06
SONG: Bob Marley - No woman no cry
F
02:19
Mix CD
H
A TMC symbol¹)
B TA symbol
see page 93
C Main line
Track number
D Clock
E Level indicator
Audio source (CD)
F Functions which can be
selected using the softkeys
7 to <
G Info line 1
Playing time
H Info line 2
Activated audio functions
I Info line 3
CD text
E
F
CDTMC
GJ
¹) The TMC symbol appears only if you connect an external navigation system
and it starts searching for TMC stations.
78
Page 15

General functions
The CD changer display
A
TRACK 05
F
BD
C
16:13
DISC 01 ALICIAK
H
E
CDCTMC
02:19
Mix All
GJ
F
A TMC symbol¹)
B TA symbol
see page 93
C Main line
Track number
D Clock
E Level indicator
Audio source (CDC)
F Functions which can be select-
ed using the softkeys
7 to <
G Info line 1
Playing time
H Info line 2
Activated audio functions
I Info line 3
CD text or CD name
The MP3 display²)
A
BD
C
Bob Marley
SONG: Bob Marley - No woman no cry
F
16:13
H
E
MP3TMC
02:19
Mix All
A TMC symbol¹)
B TA symbol
see page 93
C Main line
ID3 or fi le name
D Clock
E Level indicator
Audio source (MP3, MMC, USB)
F Functions which can be
selected using the six softkeys
7 to <
G Info line 1
Playing time
H Info line 2
Activated audio functions
I Info line 3
Title information (e.g. ID3 or fi le
names)
F
GJ
²) The MP3 display appears of a CD, SD/MMC card or USB medium with MP3 or
WMA fi les is inserted and selected as audio source. The corresponding MP3
medium is displayed on the level indicator
E.
79
Page 16
Overview of the operation
Overview of the operation
This chapter fi rst presents the buttons on the device.
It is followed by a description of the audio functions MIX, REPEAT, TA
and SCAN since their operation is identical for all audio sources.
The operation of the device menus is described starting on page 82.
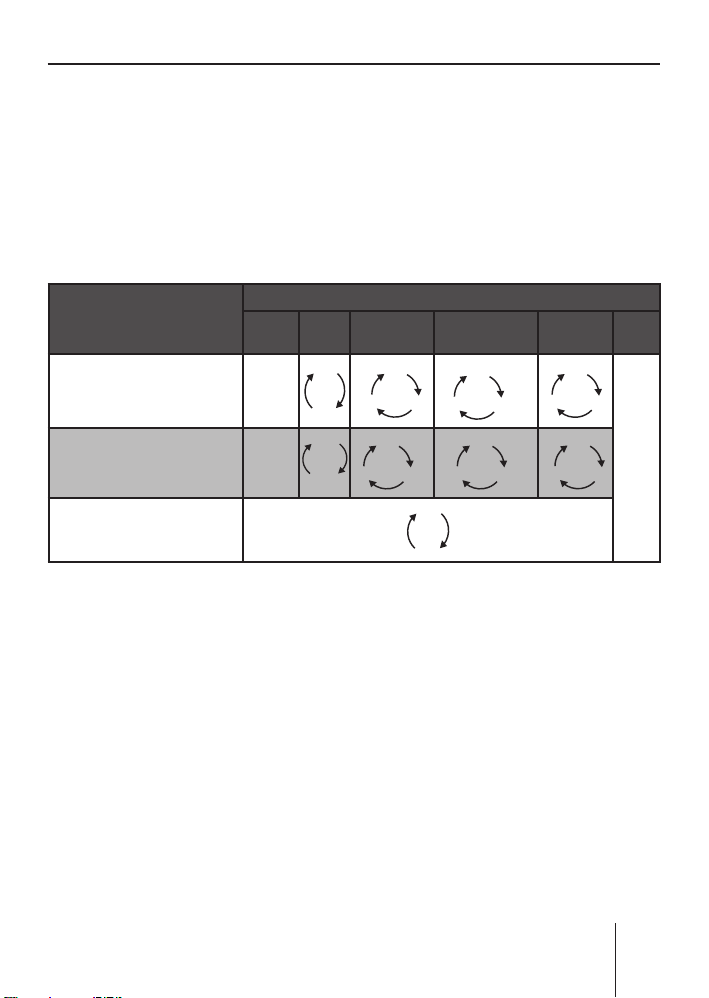
Overview of the buttons
Many basic functions during the playback of music, such as forwarding
and reversing music, are performed using the rocker switch
the four functions
, , , and ), the OK button A or the six softkeys
7 to <.
Note:
These functions are not shown on the display!
The following table shows the functions that can be performed by
these buttons.
Selectable audio sources
What do you want to do?
Forward
Reverse
Title forward
Title reverse
Previous CD/folder
Next CD/folder
Scan track/station
(see also page 82)
Play radio station
Store radio station
Tuner CD
– Hold
– Hold
–
– Press short
––
––
Press OK for 2 s
Press short
Press
for 2 s
MP3/
WMA
pressed
pressed
Press short
–––
–––
3 (using
CDC AUX
Press short
Press short
No operation possible of Memphis
80
Page 17
Overview of the operation
K
K
Overview of the functions MIX, RPT, and TA
The display of the active audio source can show up to six functions F
at the left and right edge of the display which you always operate using the same six softkeys
The different settings of a function are selected by repeatedly pressing
the same softkey.
The following table shows which settings are available for the functions MIX, REPEAT, and TA.
7 to < independent of the audio source.
Softkey next to the
audio function
MIX ( random track play)
(see also page 81)
RPT ( repeat mode )
(see also page 82)
TA ( traffi c announcement)
(see also page 93)
Tuner CD MP3 CD
–
–
Switching random track play
on/off ( MIX)
Press the softkey
➔
7
(next to "MIX").
The random track mode is
briefl y displayed.
•
"MIX CD": All tracks on the
current audio CD are played
in random order.
•
"MIX ALL": All tracks on all
CDs in the magazine of the
OFF
CD
OFF
TRACK
Selectable audio sources
USB/SD/
MMC
CD
OFF
ON
MEDIUM
OFF
DIR
FOLDER
OFF
TRAC
ALL
FOLDER
FOLDER
OFF
DIR
OFF
TRAC
CD changer are played in
random order.
•
"MIX FOLDER": Up to 99 MP3
or WMA titles in the current
folder are played in random
order.
•
"MIX MEDIUM": All MP3 or
WMA titles on the current
data carrier (CD, MMC/SD
card or USB medium) are
played in random order.
CDC AUX
OFF
CD
OFF
CD
No operation possible of
Memphis
81
Page 18

Overview of the operation
"MIX OFF": The random track
•
play is switched off. All titles are played in the order in
which they are found on the
data carrier.
If you switched on random track
play, the selected random track
play mode is displayed on info
H and indicated by "MIX"
line 2
at the side of the display.
Switching Repeat title on/off
( RPT)
➔
Press the softkey
(next to "RPT").
The repeat mode is briefl y displayed.
•
"REPEAT TRACK": The current track is repeated until
you quit repeat.
•
"REPEAT DIR": All titles in the
current folder are repeated
until you quit repeat.
•
"REPEAT CD": All tracks on
the CD are repeated until you
quit repeat.
•
"REPEAT OFF": The repeat
mode is switched off. However, the playback does not
stop with the last track. After
the last title in the last folder, the playback is continued
with the fi rst title in the fi rst
folder.
8
The selected repeat mode is displayed on info line 2
cated by "RPT" at the side of the
display.
Scanning titles ( Scan)
You can scan all the titles of a
data carrier. The scan time is
selected in the settings menu
("Scan Time" menu item, see
page 120 and 121).
➔
Press and hold the OK button
A for approx. two seconds.
All titles are scanned. The display shows "SCAN" and the display of the active audio source.
To cancel the scan:
➔
Press the OK button
The playback of the current ti-
tle is continued.
H and indi-
A.
Buttons for menu
operation
The device features menus which
allow you to change the presettings or make a selection. The display shows up to six menu items.
Each menu item is assigned to
one of the six softkeys
The following buttons are required to operate the menus:
7 to <.
82
Page 19
Overview of the operation
The MENU button ? calls up
•
the settings menu at any time.
If a menu consists of sever-
•
al pages, you can consecutively scroll them using the NEXT
button
If "Tuner" is selected as the au-
•
dio source, the TUNER button
2 calls up the "Tuner" menu.
The softkeys
•
to select the menu items that
are shown on the display next
to the corresponding button.
•
In some menus, the rocker
switch
6.
7 to < are used
3 is used to change the
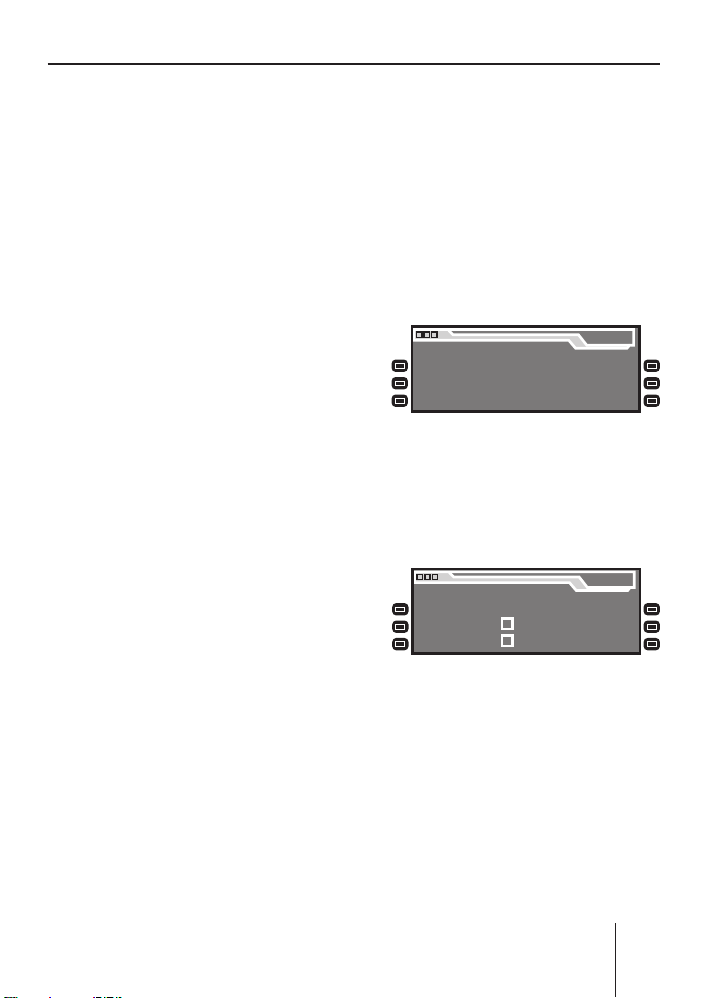
Example of a menu
operation
The following example from the
settings menu (Changing the display brightness) shows how to
operate the menus in general.
Calling up a menu
Press the MENU button ?.
➔
The settings menu is displayed.
Menu
Audio
Display
Volume
Settings
Settings
Settings
Clock
Aux
Various
Settings
Settings
Settings
setting of a menu item.
This setting is immediate-
ly effective and automatically
stored.
•
You confi rm the setting with
the OK button
A and go back
one higher menu level.
You also confi rm the displayed
•
setting with the ESC button
but you are leaving the menu
Selecting a menu item in the
settings menu
Press the softkey
➔
"Display Settings").
The "Display" menu appears.
@,
Brightness
Screen Saver
Turn On Text
8 (next to
Display
SD Browser
USB Browser
Angle
and return to the display of the
active audio source.
•
If you do not press any button,
the display of the active audio
source automatically appears
after approx. 16 seconds.
Press the softkey 7 (next to
➔
"Brightness").
The current settings for dis-
play brightness for "Night" and
"Day" appear on the "Display"
menu. The "Night" menu item is
highlighted.
83
Page 20

Overview of the operation
Display
Night 08 Day 16
Since you can adjust the display
brightness separately for night
and day, you must switch between the menu items "Night"
and "Day".
➔
For this purpose, press the
rocker switch
3 for or until
the desired menu item is highlighted.
Changing and saving a setting
To change the display brightness:
➔
On the rocker switch
or .
on
3, press
The setting takes effect immediately (the display becomes
brighter or darker). The setting
is saved.
If you do not press another
button, the display of the active audio source automatically appears after approx. 16 seconds.
Exiting a menu item
➔
Press the OK button
A to go
up one menu level.
➔
Or press the ESC button
to exit the menu and return to
the display of the active audio
source.
84
@
Page 21
Operating the tuner
Operating the tuner
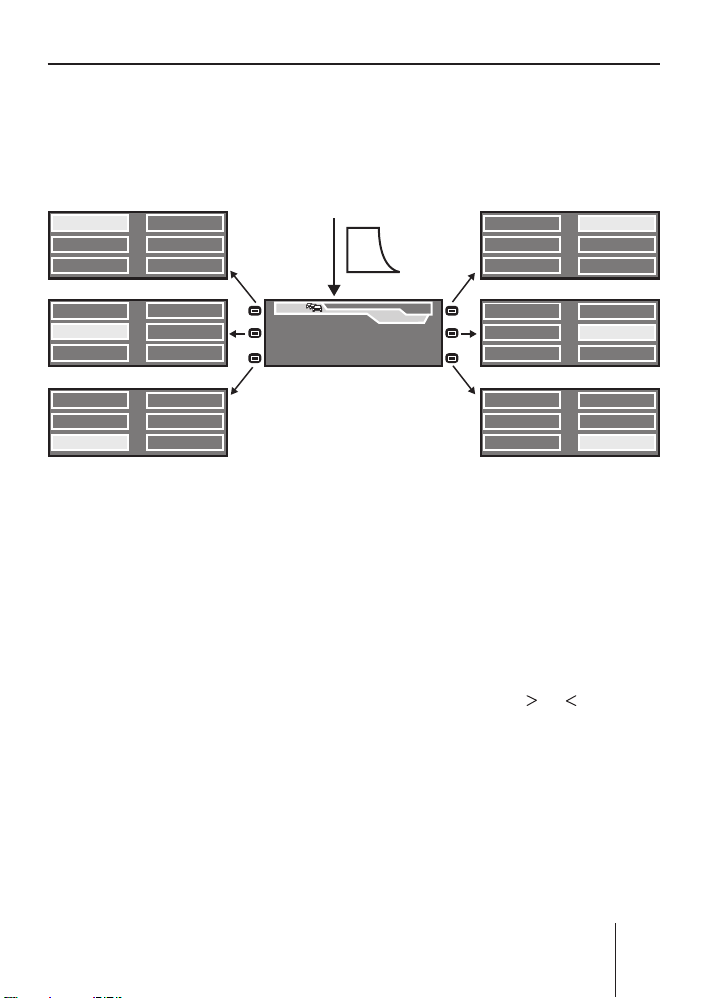
After selecting "Tuner" as the audio source, the tuner display appears
(see page 78). The playback starts immediately with the previously
played station if the vehicle is within the reception area of this station.
1 Radio Kiss 494.6
2 Radio Sun 596.2
3 93.4 697.7
4
1 Radio Kiss
2 Radio Sun
3 93.4 6
1
Radio Kiss
25
Radio Sun
3
93.4
94.6
96.2
97.7
94.6
96.2
97.7
1
5
2
RADIO SUN
3
4
6
Selecting the memory
bank
The device features four memory banks ( FM1, FM2, FM3, and
FMT). You can store or call up six
stations at every memory bank.
To select the memory bank:
➔
Press the NEXT button
6
repeatedly until the desired
memory bank appears on the
level display
E of the tuner
display.
Searching for stations
You can search for stations manually or automatically.
SRC
FMT
16:13
92,8
MHz
Note:
To automatically search for
FM stations and store them in
the FMT memory bank (Travelstore), see page 90.
Manually searching for stations
While the tuner display ap-
➔
pears, press on
rocker switch
The response of the tuner
depends upon the settings in the menus "RDS"
(see page 90) and "Program
Type" (see page 92).
•
If you selected a specifi c program type (PTY, e.g. news,
1
Radio Kiss
25
Radio Sun
3
93.4
4
1
Radio Kiss
2 5
5
6
Radio Sun
3
93.4
1
Radio Kiss
25
Radio Sun
3
93.4
94.6
96.2
97.7
94.6
96.2
97.7
94.6
96.2
97.7
4
6
4
6
4
6
or on the
3.
85
Page 22

Operating the tuner
sports, classic, etc.) in the
"Program Type" menu, the
tuner automatically searches
the next station broadcasting this program type in the
selected direction. For this
purpose, the station must
be broadcasting the corresponding PTY identifi cation
as RDS service.
•
If you activated the automatic change to alternative frequencies in the "RDS" menu,
the tuner searches for the
same station on a different
frequency.
•
If you selected the "PTY OFF"
option in the "PROG TYP"
menu and deactivated the
automatic change to alternative frequencies in the "RDS"
menu, you can manually adjust the tuner in increments
of 100 kHz.
As soon as a station has been located, it is played. The station
name appears on the display after
a few seconds if the station provides this RDS information.
You can now store this station
(see the next section) or restart
the manual station seek tuning.
Automatically searching for
stations
While the tuner display ap-
➔
pears, press on
rocker switch
or on the
3.
The tuner searches for the next
station in the current waveband in the selected direction.
The settings in the menus
"Sensitivity" (see page 92) and
"Program Type" (see page 92)
are incorporated.
As soon as a station is located,
the seek tuning stops and the located station is played. The station name appears on the display
after a few seconds if the station
provides this RDS information.
You can now store this station
(see the next section) or restart
the automatic station seek tuning.
Note:
If you press and hold
the rocker switch
or on
3, the auto-
matically seek tuning skips the
stations found until you release
the rocker switch again.
86
Page 23

Operating the tuner
Storing stations
After locating a station, you can
store it as follows:
Select the desired memory
➔
bank (see page 85).
Press the softkey for approx.
➔
two seconds to which you
want to assign the station.
The station is stored. A signal
tone confi rms that the station
has been stored.
The display briefl y shows the
assignment of the six memory
locations of the current memory bank. The current station is
highlighted.
Note:
To automatically search for
FM stations and store them in
the FMT memory bank (Travelstore), see page 90.
Listening to stored
stations
Select the desired memory
➔
bank (see page 85).
Briefl y press the softkey which
➔
is assigned to the station you
want to set up.
The display may briefl y show
the assignment of the six memory locations of the current
memory bank. The current station is highlighted. The desired
station is played back provided
that it can be received at the
current vehicle position.
➔
Press the OK button
ESC button
16 seconds.
The tuner display shows sta-
tion name, frequency and radio text of this station, provided that the station broadcasts
RDS information.
In addition, the memory location of the radio station
highlighted.
@ or wait for
A or the
F is
Scanning all receivable
stations
Select the waveband (FM, MW,
➔
LW) whose receivable stations
you want to scan (see page 89).
Press and hold the OK button
➔
A for approx. two seconds.
The tuner searches for stations
in the current waveband. The
display shows "SCAN" every
two seconds.
As soon as the tuner has located a station, it is played and
the station name or the station
frequency appears on the display. The scan time can be set
as described on page 120 and
121 under "Scan Time".
After the frequency band has
been completely searched
87
Page 24

Operating the tuner
once, the search stops and the
station located last is played
back.
You can do the following at any
time:
•
store the currently scanned
station (see page 87),
cancel the scan by briefl y press-
•
ing the OK button
A.
Set the device to the region
Europe, USA or Thailand
The device is factory set to the
frequency ranges and station
technologies of the region in
which it was purchased. If this
setting is not correct, you can adjust the device as follows to the
different frequency ranges and
station technologies of Europe,
the United States or Thailand.
➔
Switch off the device.
➔
Hold the two softkeys
< pressed while switching on
9 and
the radio.
The "Area" menu opens.
➔
Press the softkey next to the
region in which you are using
the device.
➔
Press the OK button
A.
88
Page 25

Operating the tuner
Changing the tuner settings ( "Tuner" menu)
The "Tuner" menu allows you to change the basic settings of the tuner.
To open the "Tuner" menu:
Press the TUNER button 2.
➔
The "Tuner" menu appears.
The "Tuner" menu consists of two pages which can be toggled with the
NEXT button 6.
TUNER
Band
Hicut
Regional
Sensitivity16
Traffic
Band
Mono
Program Type
FM
MW
LW
0...2
1...6
Changing the waveband ( Band)
The tuner can receive FM, AM,
and LW. To switch between these
wavebands:
➔
In the "Tuner" menu, select the
"Band" menu item.
The "Band" menu appears.
➔
Select the desired band.
: This waveband is select-
•
ed. The previously played
station of this waveband is
played back.
Tune r
Radio Text
RDS
NEXT
Travel Store
NEXT
Tune r
: This waveband is not se-
•
NEXT
PTY OFF
News
Affairs
Travel Store
NEXT
lected.
You can now do the following in
this waveband:
Searching stations
•
(see page 85)
Storing stations (see page 87)
•
•
Calling up stored stations
(see page 87)
NEXT
Info
Sport
Educate
NEXT
PTY
89
Page 26

Operating the tuner
Toggle between mono and stereo
operation ( Mono)
If you selected the "FM" waveband, you can toggle between
mono and stereo operation.
Press the softkey 9 in the
➔
"Tuner" menu (next to "Mono").
: The mono operation is
•
activated. Weak, noisy stations are played back more
clearly.
: The stereo operation is
•
activated. You are listening in
stereo if the station broadcasts in stereo.
Note:
If you switch on the device, this
setting is automatically set to
stereo operation.
Switching the display of radio
text on/off ( Radio Text)
➔
Press the softkey
"Tuner" menu (next to "Radio
Text").
: The radio text display is
•
switched on. Radio text is
displayed on info line 3
the tuner display, provided
that the station broadcasts
radio text.
: The radio text display is
•
switched off.
< in the
I of
Allowing alternative frequencies
( RDS)
The device can automatically
switch to an alternative frequency
(AF) of the same station if the reception becomes poor.
Press the softkey
➔
"Tuner" menu (next to "RDS").
: The device automatical-
•
ly adjusts the best receivable
frequency of the station, provided that the station supports the "AF" RDS function.
: The device does not
•
change the frequency.
Searching FM stations automatically and storing them in the
FMT memory bank ( Travelstore)
You can automatically store the
six FM stations offering the
strongest reception in the region
in the FMT memory bank.
➔
Press the softkey
"Tuner" menu (next to "Travelstore").
"Travelstore" appears on the
display. The tuner automatically searches for the six strongest FM stations and stores
them in the FMT memory bank.
After the storing is completed,
the radio plays the station at
memory location 1 of the FMT
level.
; in the
: in the
90
Page 27

Operating the tuner
Stations that were previously stored in the FMT memory
bank are automatically deleted.
Activating/deactivating improved reception ( Hicut)
The Hicut function improves reception during poor radio reception (for FM only).
Change to the second page of
➔
the "Tuner" menu by pressing
the NEXT button
Press the softkey
➔
"Tuner" menu (next to "Hicut")
several times.
•
"1": The Hicut function is
switched on and has a low
response sensitivity. If the reception is very poor, the interference level is automatically decreased.
•
"2": The Hicut function is
switched on and has a high
response sensitivity. If the reception is poor, the interference level is automatically
decreased.
•
"0": The Hicut function is
switched off.
6.
7 in the
Allowing/preventing automatic
changing to other regional programmes ( Regional)
Some stations divide their programmes into regional programmes with different contents
at certain times. You can use the
Regional function to prevent or
allow the device from switching
to alternative frequencies that
are transmitting a different programme content.
➔
Change to the second page of
the "Tuner" menu by pressing
the NEXT button
Press the softkey
➔
"Tuner" menu (next to "Regional").
: The Regional function is
•
switched on. The tuner does
not even switch to other
regional programmes if the
reception quality becomes
poor.
: The Regional function
•
is switched off. The tuner
switches to other regional
programmes if the reception
of the current programme is
too poor.
6.
8 in the
91
Page 28

Operating the tuner
Changing the seek tuning sensitivity ( Sensitivity)
The seek tuning sensitivity determines whether the automatic
station seek tuning locates only
strong stations or also weaker
stations, which may be degraded
by a high noise level.
➔
Change to the second page of
the "Tuner" menu by pressing
the NEXT button
Press the softkey
➔
6.
9 in the
"Tuner" menu (next to "Sensitivity") several times.
The seek tuning sensitivity can
be adjusted in six increments.
•
"1": Low seek tuning sensitivity. During a station seek tuning (see page 85), only local
strong stations are found.
•
"6": High seek tuning sensitivity. Poor, remote stations
are also found.
Restricting station seek tuning
to certain programme contents
( Program Type)
➔
Change to the second page of
the "Tuner" menu by pressing
the NEXT button
➔
Press the softkey
6.
< in the
"Tuner" menu (next to "Program Type").
➔
Scroll through the pages of
the programme types with the
NEXT button
Press the softkey next to the
➔
6.
desired programme type.
Next, start a station seek tun-
➔
ing (see page 85).
92
Page 29

Traffi c announcements
A traffi c information station
Traffi c announcements
(TA)
The device uses the RDS services TA and EON to play traffi c announcements even if you are currently listening to another audio
source. If you did not defi ne a
traffi c information station, the device can automatically switch to
a traffi c information station of
the same broadcasting network
for the duration of a traffi c announcement.
Receiving traffi c
announcements
As soon as the device receives a
traffi c announcement:
•
The traffi c announcement is
switched through using the volume defi ned in the settings
menu (see page 115),
•
The traffi c information display
appears for the duration of the
traffi c announcement.
Traf fic
TA OFF
Radio Sun Info
For the device to switch through
traffi c announcements:
•
The priority of traffi c announcements must be
switched on (see page 93),
TA EXIT
•
must be set or it must belong
to the same broadcasting network as the current station.
Skipping a traffi c
announcement
To cancel a traffi c announcement
without switching off the priority
of traffi c announcements:
➔
Press the softkey
"TA EXIT").
The current traffi c announcement is cancelled. The previously active audio source is
played again and the corresponding display appears. If a
traffi c announcement is broadcast again, the device automatically switches it through again.
< (next to
Permanently switching
the priority of traffi c
announcements on/off
The TA symbol B appears on the
display if the priority of traffi c announcements is switched on and
a traffi c information station is set.
You have three options to switch
the priority of traffi c announcements on or off:
93
Page 30

Traffi c announcements
First option (traffi c information
display)
Press the softkey 7 (next to
➔
"TA OFF") during the traffi c
announcement.
The current traffi c announcement is cancelled. The previously active audio source is
played again and the corresponding display appears. If a
traffi c announcement is broadcast again, the device does not
automatically switch it through.
Second option (TA on the display
of the audio source)
Ensure that the display of the
➔
audio source is shown.
Press the softkey 9
➔
(next to "TA").
The status is briefl y displayed.
•
"Traffi c Info On": Traffi c announcements are automatically switched through.
•
"Traffi c Info Off": Traffi c
announcements are not
switched through.
Third option ("Traffi c" in the
"Tuner" menu)
➔
Press the TUNER button
The "Tuner" menu appears.
2.
Press the softkey
➔
"Traffi c").
: Traffi c announcements
•
are automatically switched
through.
: Traffi c announcements
•
are not switched through.
7 (next to
94
Page 31

Operating the integrated CD player
Bit rate:
Operating the integrated CD player
The device can play the following
CD formats:
•
CD audio (some CDs with copy
protection cannot be played)
•
CD-R or CD-RW with MP3 or
WMA fi les (without DRM copy
protection only)
Note:
The quality of self-burnt CDs
fl uctuates due to different CD
blanks, CD burner software,
and burn speeds. For this reason, it is possible that the
device cannot play some selfburnt CDs.
If you cannot play a CD-R/CD-RW:
•
Use blanks from a different
manufacturer or a different
colour,
•
Burn CD-Rs at a lower speed.
What features do MP3 or WMA
CDs have to have?
The device can only play and display MP3 or WMA CDs with the
following features:
•
The CD-ROM may contain only
MP3 or only WMA fi les as well
as folders, but no other fi les
(including no CD audio fi les).
•
CD format: ISO 9660 (Level 1
or 2) or Joliet
•
MP3: max. 320 kbit/s
WMA: max. 768 kbit/s
File extension: Must be ".MP3"
•
or ".WMA"
ID3 tags: Version 1 or 2
•
Max. 252 folders per CD with
•
max. 999 MP3 fi les per folder (fewer in case of long fi le
names: approx. 700 at 20 characters per fi le name)
•
File names may not contain
an umlaut or special character and may not be longer than
32 characters.
•
WMA fi les with DRM (Digital Rights Management, copy
protection/playback restriction) cannot be played! WMA
fi les with DRM offered by music providers for download via
the Internet cannot be played
by the device. WMA fi les which
you create yourself, e.g. from
CD audio fi les, can be played.
95
Page 32

Operating the integrated CD player
Functions of the integrated CD player if an audio CD is inserted
After inserting an audio CD (see page 74) and selecting "CD" as the
audio source for the fi rst time (see page 77), "CD Reading" appears
on the display. Next, the audio CD display appears (see also page 78).
The playback starts .
Mix Off
Repeat
Off
Mix CD
Repeat
Track
SRC
16:13
TRACK 06
SONG: Bob Marley - No woman no cry
CD
02:19
Mix CD
CD Text OffCD Text On
Scroll OffScroll On
Traffic Info OnTraffic Info Off
Menu item Abbr. Softkey Setting option See also
Random track play MIX
Repeat title RPT
Priority for traffi c
announcements
Display CD text TXT
Scrolling text SCL
TA
Switch-on (Mix CD)
7
Switch-off (Mix Off)
Switch-on (Repeat Track)
8
Switch-off (Repeat Off)
Switch-on (Traffi c Info On)
9
Switch-off (Traffi c Info Off)
Switch-on (CD Text On)
<
Switch-off (CD Text Off)
Switch-on (Scroll On)
;
Switch-off (Scroll Off)
Page 81
Page 82
Page 93
Page 97
Page 97
96
Page 33

Operating the integrated CD player
Switching the CD text display
on/off ( TXT)
Some CDs support the display of
text information about artist, album, track, etc.
To switch the display of CD text
on/off:
➔
Press the softkey
(next to "TXT").
The CD text status is briefl y
displayed.
•
"CD Text On": The CD text is
displayed on info line 3
•
"CD Text Off": The CD text is
not displayed.
Switching the scrolling text for
CD text on/off ( SCL)
The device can display CD text
statically or as scrolling text
(Scroll). To change the display of
CD text:
➔
Press the softkey
(next to "SCL").
The CD text display status is
briefl y displayed.
•
"Scroll On": CD text is displayed as scrolling text, provided that the CD supports
CD text, the display of CD
text is switched on (see the
previous section), and the
CD text does not fi t on info
I of the display.
line 3
<
I.
;
"Scroll Off": CD text is not
•
displayed as scrolling text. If
the CD text does not fi t on
info line 3
appears incomplete.
I of the display, it
97
Page 34

Operating the MP3/WMA player
MMC
USB
y
y
Operating the MP3/ WMA player
After inserting a medium with MP3 or WMA fi les (CD, MMC/SD card,
or USB medium) (see pages 74 and 75) and selecting them as audio
source for the fi rst time (see page 77), "CD/MMC/USB Reading" appears on the display. Next, the MP3 display appears (see page 79).
The playback starts.
MIX
Mix Off
Repeat
Off
FOLDER
Repeat
DIR
Mix CD /
MEDIUM
REPEAT
Tra ck
Traffic Info OnTraffic Info Off
Menu item Abbr. Softkey Setting option See
Random track
play
Repeat title RPT
Priority for
traffi c announcements
Showing infos ALL
Scrolling text SCL
Selecting info INF
MIX
TA
7
8
9
<
;
:
SRC
MP3
16:13
Bob Marley
Playing fi les of the folder (Mix FOLDER) or
data carrier (Mix CD or Mix MEDIUM) in
random order
Switch-off (Mix Off)
Repeating the current fi le (Repeat Track) or
fi les of the folder (REPEAT DIR)
Switch-off (Repeat Off)
Switch-on (Traffi c Info On)
Switch-off (Traffi c Info Off)
All available information for the current title
scrolls once on info line 3 I
Switch-on (Scroll On)
Switch-off (Scroll Off)
Switching between DIR, SONG, ARTIST,
ALBUM, and FILE
02:19
Mix All
ARTIST: Bob Marley SONG: No woman no cry
FILE: Bob Marley - No woman no cry
Scroll OffScroll On
Page
81
Page
82
Page
93
Page
99
Page
99
Page
99
98
Page 35

Operating the MP3/WMA player
Showing all the information of
the current title ( ALL)
To show all the available information about the current title
(e.g. from ID3 tags) on the display:
➔
Press the softkey
(next to "ALL").
All available information for the
current title scrolls once on
info line 3
Switching scrolling text on/off
( SCL)
The device can display the title
information selected in the "INF"
menu item (see next section),
either statically or as scrolling text.
To toggle between static display
and scrolling text:
➔
Press the softkey
(next to "SCL").
•
If the scrolling text display is
switched on, the text scrolls
without interruption from
right to left on info line 3
•
If the scrolling text display is
switched off, no more than
the fi rst 32 characters are
displayed on the info line 3
I.
<
;
I.
I.
Selecting the title information to
be displayed ( INF)
The device can display the
following title information on
info line 3
•
Either information from embedded data or ID3 tags (artist,
title, album, genre, year), if
available
•
Or fi le and folder name.
To select the title information to
be displayed:
➔
Press the softkey
(next to "INF").
The type of information to be
displayed is shown:
•
•
•
•
•
I:
: repeatedly
"DIR": Name of the folder in
which the currently playing
fi le is located
"SONG": Name of the current title
"ARTIST": Name of artist
"ALBUM": Name of album
"FILE": File name of current
title
99
Page 36

Operating the MP3/WMA player
Selecting a title from a list ( Browser mode/ playlist)
During the MP3 or WMA playback, you can always switch between the
following modes using the NEXT button
MP3 display (left part of the fi gure),
•
Browser mode (center part of the fi gure),
•
Playlist mode (right part of the fi gure).
•
6:
Note:
The device can play playlists that were created with an MP3 manager, such as WinAmp or Microsoft Media Player. These playlists must
be present in the format M3U, PLS or RMP and stored in the root
directory of the data carrier!
NEXT NEXTNEXT
Bob Marley - No woman
Bob Marley - Redemptio
Bob Marley - I shot the S
NEXT
Bob Marley - Buffallo Sol
OK
Rock
Ska
Reggae
Hip Hop
Bob Marley
SONG: Bob Marley - I shot the sherrif
16:13
MP3
02:19
The browser mode or the playlist
shows:
•
The currently playing fi le at the
top,
•
the next three fi les to be
played below it,
•
two arrowheads that are highlighted if you can scroll in the
corresponding direction.
100
BROWSE
BROWSE
PL
list.m3u
PL
list2.m3u
PL
list3.m3u
PL
list4.m3u
OK
Annie Lennox - Walking
Eurythmics - Sweet Dream
Jaffa - Elevator
The Police - Roxanne
BROWSE
BROWSE
Note:
The fi les are not played in alphabetical order, but in the order in which they were physically stored on the data carrier.
This order is also displayed in
the browser mode.
Page 37

Operating the MP3/WMA player
In the browser mode and the
playlist mode, you can select fi les
or folders from the list as follows:
On the rocker switch
➔
3, press
or to scroll up or down.
On the rocker switch
➔
3, press
to change up to a higher-level
folder.
➔
On the rocker switch
3, press
or press the OK button A to
change up into a subfolder.
➔
On the rocker switch
3, press
or press the OK button A to
play a selected fi le.
101
Page 38

Operating the optional CD changer
Operating the optional CD changer
After inserting at least one CD in the CD changer magazine and selecting "CDC" as the audio source for the fi rst time (see page 77), "Magazine Scan" briefl y appears on the display. The CD overview appears
next. The playback starts.
You can toggle between the CD overview (top part of the fi gure) and
the CD changer display (center part of the fi gure) by using the NEXT
button
6.
SRC
Mix Off Mix CD
Repeat
Off
ALICIAK
MADONNA
BOBMARL
MIX ALL
Repeat
CD
Repeat
Tra ck
16:13
DISC 04
DISC 05
Next
Track 05
CDC
NEXTNEXT
16:13
DISC 01 ALICIAK
DISC 06
DISC 07
DISC 08
CDC
02:19
Mix All
CDC
16:13
DISC 09
DISC 10
Previous
Edit CD Name Clear CD Name
Press Key for more then 2 Sec
Clear ALL Names
Traffic Info OnTraffic Info Off
Menu item Abbr. Softkey Setting option See
Random
track play
MIX
Playing all the titles of the CD (Mix CD) or
7
the magazine (Mix ALL) in random order
Switch-off (Mix Off)
Repeat title RPT
Repeating the current title (Repeat Track) or
8
the current CD (Repeat CD)
Switch-off (Repeat Off)
Priority for
traffi c announcements
Editing CD
names
TA
CDN
Switch-on (Traffi c Info On)
9
Switch-off (Traffi c Info Off)
Entering, changing, deleting names for CDs
<
located in the changer magazine
CDC
Page
81
Page
82
Page
93
Page
103
102
Page 39

Operating the optional CD changer
Selecting a CD from the CD
magazine ( CD overview)
The CD overview shows:
•
either the CD number
(e.g. "DISC 01")
•
or the name of the CD (you can
enter it as described in the following section)
•
or an empty position if the corresponding position of the
magazine is without a CD.
➔
If necessary, press the NEXT
button
6 to display the CD
overview.
➔
Press the softkey located next
to the number or next to the
name of the desired CD.
"Loading CD" appears briefly on the display. The playback
starts next with the fi rst track
of the CD.
Note:
If there are more than fi ve
CDs in the magazine of your
CD changer, press softkey
which is also located next to
the menu items "Next" and
"Previous", to toggle between
the display of the fi rst and last
fi ve CDs.
:,
Changing the name of a CD in
the magazine of the CD changer ( CDN)
You can assign a name to every CD located in the CD changer.
The name can have up to seven
characters.
➔
Select the CD to which you
want to assign a name in the
CD overview as described in
the preceding section.
➔
Press the NEXT button
6 to
show the CD changer display.
➔
Press the softkey
<
(next to "CDN").
➔
Press the softkey
7
(next to "Edit CD Name").
The text input appears. The
fi rst character of the name is
highlighted.
➔
On the rocker switch
peatedly press
3, re-
or to change
the highlighted character.
➔
On the rocker switch
press
to change to the next
3,
character.
➔
Press the OK button
A to fi n-
ish the text input and to store
the name entered.
Note:
To quit the text input without
changing the name, press the
ESC button
@.
103
Page 40

Changing basic settings in the settings menu
To delete the name of the current CD:
Press and hold the softkey
➔
(next to "Clear CD Name") for
longer than two seconds.
"Clearing" briefl y appears on
the display.
<
To delete the names of all the
CDs located in the magazine of
the CD changer:
Press and hold the softkey
➔
(next to "Clear All Names") for
longer than two seconds.
"Clearing" briefl y appears on
;
the display.
Changing basic settings in the settings menu
The settings menu allows you to adjust basic device functions, such as
sound, power-on volume or display brightness, to your specifi c needs.
To open the settings menu:
➔
Press the MENU button
Audio
Treble
Balance
Fader
0
0
0
Bass
Digital Equaliser
Subout
+2
?. The settings menu appears.
Time Setting
MENU
Off Clock
Auto Sync
24 h Mode
Clock
Brightness
Screen Saver
Turn On Text
Traffic Volume
Phone Volume
Beep Volume
104
25
25
03
Display
SD Browser
USB Browser
Angle
Volume
On Volume 10
Last Volume
Audio
Display
Volume
Settings
Settings
Settings
Clock
Various
Menu
Settings
Aux
Settings
Settings
Auxiliary 2
Edit Auxiliary 2
Turn On Text
Internal Amp
Aux
Auxiliary 1
Edit Auxiliary 1
Various
Norm Set
Scan Time
Serial Number
Page 41

Changing basic settings in the settings menu
Adjusting sound and balance ( Audio Settings)
The "Audio Settings" menu provides extensive possibilities for adjusting the sound to your specifi c needs.
Press the MENU button ?. The settings menu appears.
➔
Press the softkey
➔
The "Audio Settings" menu appears.
77
7 (next to "Audio Settings").
Treb le
+2 +2
Audio Settings
77
Bass
Balance
0
Fade r
Treb le
Balance
Fade r
0
Changing treble or bass
( Treble/ Bass)
Press the softkey
➔
7 (next to
"Treble") or the softkey
(next to "Bass").
The corresponding sound control is displayed.
➔
On the rocker switch
press
or to increase treble
3,
or bass.
➔
On the rocker switch
press
or to decrease treble
3,
or bass.
<
+2
0
0
Digital Equaiizer
Subout
User Equalizer
+2
Presets
Auto Sound
Audio
Bass
Changing the volume distribution ( Balance/ Fader)
The balance controls the volume
distribution between left and
right, the fader between front and
rear.
➔
Press the softkey
8 (next to
"Balance") or softkey
(next to "Fader").
The volume distribution is displayed.
On the rocker switch
➔
on the desired direction.
The volume distribution chang-
es. The display shows the new
volume distribution.
DEQ
X-Bass
Off
Subout
0
32
Hz
9
3, press
105
Page 42

Changing basic settings in the settings menu
Changing the equalizer setting ( Digital Equalizer)
Your device features a digital 6-band equalizer. On the "Digital Equalizer" menu, you can adjust the sound to your vehicle and your specifi c
needs and eliminate problems, such as droning or poor voice comprehension.
➔
Press the MENU button
Press the softkey
➔
?. The settings menu appears.
7 (next to "Audio Settings"). The "Audio Settings"
menu appears.
➔
Press the softkey
; (next to "Digital Equalizer").
User EQ 1
User EQ 2
User EQ 3
Vocal
Disco
Rock
User EQ
Adjust
User EQ Off
Presets
Jazz
Classic
P-EQ Off
DEQ
Digital Equalizer
User Equalizer
Presets
Auto Sound
AUTO SND OFF
Calling up a user-defi ned equalizer setting ( User Equalizer)
In the "User Equalizer" menu, you
can create, store and call up to
three user-defi ned equalizer settings ("User EQ 1 to 3").
➔
Press the softkey
7 (next to
"User Equalizer").
The "User EQ" menu appears.
➔
Press one of the three softkeys
7 to 9 (next to "User EQ 1",
"User EQ 2" or "User EQ 3").
DEQ
X-Bass
Off
: The corresponding user-
•
defi ned equalizer setting is
selected. The sound changes
accordingly.
: The corresponding user-
•
defi ned equalizer setting is
not selected.
➔
Press the softkey
: (next to
"User EQ Off") to switch off
the equalizer.
4
63
X-BASS
Hz
106
Page 43

Changing basic settings in the settings menu
Creating/changing a user-defi ned equalizer setting ( Adjust)
You can adjust the three different user-defi ned equalizer settings to
different situations, e.g. for the driver alone, for driver and passenger
or for passengers in the front and the rear.
➔
Select the user-defi ned equalizer setting which you want to create/
change as described in the preceding section.
➔
Press the softkey
< (next to "Adjust"). The "User EQ 1/2/3" menu
opens.
Microphone?
Place Micro 1
Adjust
Automatic Manual
Automatic:
You can automatically create one
of the three equalizer settings using a measurement microphone
(available as an accessory).
Before starting, ensure the following:
•
The measurement microphone
must be connected before installing the device as described
in the installation instructions
of the measurement microphone.
•
There must be true silence
during the measurement since
external noise falsify the measurement. For this reason, close
all windows, doors, and the
sliding sunroof. Switch off the
engine, but leave the ignition
switched on.
EQ Low 1
EQ Low 2
User EQ 1
The temperature inside the
•
EQ High 1
EQ High 2
EQ High 3
EQ High 4
vehicle must be below 55 °C.
•
All the loudspeakers must be
connected. The sound radiating from the loudspeakers
must not be obstructed by any
objects.
➔
Position the measurement
microphone
•
for the driver only – 10 cm
next to the right ear of the
driver,
•
for driver and passenger
– exactly between both at
the head level,
•
for passengers in the front
and rear – at the head level
in the center of the vehicle.
User EQ 1
107
Page 44

Changing basic settings in the settings menu
Ensure that all passengers in
➔
the vehicle are sitting and remaining quiet.
Change to the "User Equaliz-
➔
er" menu and call up one of the
user-defi ned equalizer settings
("User EQ 1 to 3") as described
in the preceding section.
Open the "User EQ 1/2/3"
➔
menu as described on page
Manual:
As an alternative, you can
manually create the equalizer
setting without measurement
microphone. In each of the six
frequency bands, you can select
one specifi c individual centre
frequency and fi nely adjust its
level and quality factor Q.
➔
107.
Press the softkey
➔
7 (next to
➔
"Automatic") and follow the instructions on the display.
➔
After a 5-second countdown,
you hear the teat noise and the
display intermittently shows
"Silence Please" and "Adjusting".
➔
➔
The automatic equalizer setting
fi nishes successfully if the display shows "Adjustment OK".
The equalizer setting is saved.
Any previously stored setting
under this equalizer setting is
overwritten. The new setting
can now be called up under the
corresponding equalizer setting ("User EQ 1 to 3").
Insert a CD with which you are
very familiar.
Adjust bass, treble, balance,
and fader to zero.
Open the "User EQ 1/2/3"
menu as described on page
107.
Press the softkey
<
(next to "Manual").
First, select a frequency band
to be changed. First, change
the centre, then the treble, followed by the bass.
•
"EQ Low 1" to "2": To change
the bass (20 to 250 Hz).
"EQ High 1" to "4": To change
•
the centre or treble (320 to
20,000 Hz).
The frequency spectrum is displayed. if you already changed
the level in another frequency
band, this change is visible in
the frequency spectrum.
108
Page 45

Changing basic settings in the settings menu
The current centre frequency
(Hz) is highlighted.
2000Hz -8dB Q 1 High 4
Select the centre frequency to
➔
be changed by pressing on
on the rocker switch 3.
In the two frequency bands "EQ
Low 1" and "2", you can select
one centre frequency each from
20 to 250 Hz.
In the four frequency bands
"EQ High 1" to "4", you can select one centre frequency each
from 320 to 20,000 Hz.
On the rocker switch 3,
➔
press
.
The level display (dB) is highlighted.
Select the level of the previ-
➔
ously set centre frequency by
pressing on
er switch
or on the rock-
3.
The level change is displayed
in the frequency spectrum. The
sound changes accordingly.
➔
On the rocker switch
press
.
3,
The quality factor Q is highlighted.
EQ 1
➔
Select the desired quality factor Q by pressing on
the rocker switch
"Q1": Low edge steepness,
•
wide fi lter bandwidth
"Q2": Medium edge steep-
•
ness and fi lter bandwidth
"Q3": High edge steepness,
•
narrow fi lter bandwidth
or
The change is displayed in
the frequency spectrum. The
sound changes accordingly.
➔
Press the OK button
Your user-defi ned equalizer set-
ting is saved.
Which equalizer setting is the
correct one?
Sound impression or problem
Unclean bass,
droning, unpleasant pressure
Very transparent,
aggressive sound,
no stereo effect
Muffl ed sound,
low transparency,
instruments do
not excel
Insuffi cient bass 50–100 approx.
Measure
Centre
frequency (Hz)
125–400 approx. –4
1000–
2500
8000–
12500
or on
3.
A.
Level (dB)
approx.
–4 to –6
approx.
+4 to +6
+4 to +6
109
Page 46

Changing basic settings in the settings menu
Selecting a sound preset
( Presets)
This menu item allows you to select one of the following sound
presets: Vocal, Disco, Rock, Jazz,
or Classic.
➔
Press the softkey located next
to the desired sound preset.
: The sound preset is se-
•
lected.
: The sound preset is not
•
selected.
Setting the speed-dependent
volume increase ( Auto Sound)
When you are driving faster, the
device can automatically increase
the volume to compensate for the
driving noise. In order for this to
work, the speedometer signal
must be connected as described
in the installation instructions.
You can adjust this volume increase from 0 (no increase) to 5
(maximum increase).
➔
Press the softkey
9 (next to
"Auto Sound").
The "Auto Sound" menu appears.
Note:
If no increase is set, the display
shows "AUTO SND OFF".
On the rocker switch
➔
3, press
or to raise the volume in-
crease.
On the rocker switch 3, press
➔
or to lower the volume in-
crease.
Setting the bass increase
( X-Bass)
X-bass is a bass increase at low
volume. This bass increase can be
set in increments from 0 (no increase) to 6 (maximum increase)
for the following frequencies: 32 Hz,
40 Hz, 50 Hz, 63 Hz, or 80 Hz.
➔
Press the softkey
;
(next to "X-Bass").
The individual frequencies are
displayed as bars and the bass
increase as bar segment.
➔
On the rocker switch
3, press
or to select the desired fre-
quency.
On the rocker switch
➔
3, press
or to set the desired bass
increase.
Switching off the equalizer
Press the softkey
➔
: in the
"Digital Equalizer" menu
(next to "Off").
110
Page 47

Changing basic settings in the settings menu
Confi guring the preamplifi er output for the subwoofer ( Subout)
If you want to use an additional
subwoofer, it can be adjusted to
the other loudspeakers.
You can adjust the level of the
Subout preamplifi er output in
13 increments from –6 dB (maximum decrease) to +6 dB (maximum increase) for one of the
following cut-off frequencies:
s80 Hz, 120 Hz, or 160 Hz.
➔
Press the softkey
: in the
"Audio Settings" menu (next to
"Subout").
The "Subout" menu appears.
➔
On the rocker switch
press
or to select the de-
3,
sired cut-off frequency.
On the rocker switch
➔
press
or to set the desired
3,
level of the preamplifi er output.
111
Page 48

Changing basic settings in the settings menu
MMC
Changing display settings ( Display Settings)
In the "Display Settings" menu, you can adjust the display brightness
and the display contrast, among other things.
Press the MENU button ?. The settings menu appears.
➔
Press the softkey
➔
The "Display" menu appears.
8 (next to "Display Settings").
Display
Night 08 Day 16
Display Settings
Brightness
Screen Saver
Turn On Text
Changing the brightness of the
display for day/night (Brightness)
See page 83.
Activating/deactivating the
screen saver ( Screen Saver)
The screen saver can be called up
only if you activate the display of
the screen saver here.
➔
Press the softkey
8 (next to
"Screen Saver").
: You can call up the
•
screen saver instead of the
display of the audio source
by pressing the ESC but-
@.
ton
Rock
Ska
DCIM
Hip Hop
Display
SD Browser
USB Browser
Angle
Rock
Ska
DCIM
Hip Hop
ANGLE +6
Press any button to deactivate the screen saver and
show the display of the active audio source again.
: The screen saver cannot
•
be called up.
Switching the welcome text
on/off ( Turn On Text)
After switch-on, the display
shows a brief animation. A welcome text can be shown next.
This text is factory set to "The
advantage in your car!"
SD
USB
Angle
112
Page 49

Changing basic settings in the settings menu
Press the softkey 9 (next to
➔
"Turn On Text").
: The welcome text is
•
shown after switch-on.
: The welcome text is not
•
shown.
To change the welcome text, see
"Changing the welcome text (Turn
On Text)" on page 120.
Changing images and animations
( SD Browser/ USB Browser)
You can replace the following factory installed images and animations with your own:
•
the wallpaper which appears
when "AUX" is selected as audio source (the image is set to
a connector at the factory),
•
the screen saver,
•
the wallpaper which appears
if the radio is switched off and
the vehicle ignition is switched
on, and also the "Off Clock"
menu item in the "Clock Settings" menu as described on
page 117. The image is set to
an analogue clock at the factory.
For your images and animations
to be displayed, they must be created using the BMP fi le format.
For the images to be displayed
without distortion, they should
ideally have 270 x 96 pixels.
Animations consist of
max. 20 BMP fi les that are automatically displayed in succession
just like single frames of a movie. All BMP fi les of an animation
must be stored in a separate folder. No other fi les may be stored in
this folder!
The images must be available as
a fi le on an MMC/SD card or USB
medium. The MMC/SD card must
be inserted or the USB medium
must be connected.
➔
Press the softkey
< (next to
"SD Browser") if the images
are available on an MMC/SD
card.
Press the softkey
; (next to
"USB Browser") if the images are available on a USB medium.
The fi le browser opens.
You can select a BMP fi le or a
folder from the list as follows:
➔
On the rocker switch
press
or to scroll up or
3,
down.
On the rocker switch
➔
press
to change up to a
3,
higher-level folder.
On the rocker switch
➔
press
to change down to a
3,
subfolder.
Press the OK button
➔
A to
select the selected fi le or the
113
Page 50

Changing basic settings in the settings menu
selected folder with the BMP
fi les of the animation.
The "Picture Download" menu
appears.
Press the softkey next to the
➔
image or the animation to be
replaced.
"Clock" replaces the wallpa-
•
per which appears if the radio is switched off and the
vehicle ignition is switched
on,
•
"Minimal Mode" replaces the
screen saver,
•
"Aux" replaces the wallpaper
which appears if "AUX" is selected as audio source.
A progress bar illustrates the
transfer of the fi le. As soon as
the fi le has been transferred,
the display of the active audio source appears. Your image
or animation now replaces the
factory setting.
Adjusting the display viewing
angle (Angle)
The angle at which the driver
looks at the display is dependent upon, among other things,
the installation position of the device, the seating position, and the
physical size of the driver. You
can adjust the display contrast to
your viewing angle as follows.
Press the softkey : (next to
➔
"Angle").
The "Angle" menu opens and
the current display contrast is
shown.
On the rocker switch
➔
press
display contrast.
On the rocker switch
➔
press
display contrast.
You can adjust the display contrast in 13 increments from
–6 to +6.
or to increase the
or to decrease the
3,
3,
114
Page 51

Changing basic settings in the settings menu
Changing volume presettings ( Volume Settings)
In the "Volume Settings" menu, select the volume presettings for traffi c announcements, the telephone, the signal tones, etc.
Press the MENU button ?. The settings menu appears.
➔
Press the softkey
➔
The "Volume Settings" menu appears. The volume presettings are
displayed as two-digit numbers. One of the two menu items "On Volume" or "Last Volume" is highlighted.
9 (next to "Volume Settings").
Traf Volume
15
Phone Volume
25
Beep Volume
03
Volume Settings
Traffic Volume
Phone Volume
Beep Volume
Changing the volume presetting
of traffi c announcements ( Traffi c
Volume)
If the device puts a traffi c announcement through, you hear it
at the preset volume.
➔
Press the softkey
7 (next to
"Traffi c Volume").
The volume presetting for traf-
fi c announcements appears.
Adjust the desired volume
➔
using the volume control
or the rocker switch
5
3 (incre-
ments 1 to 50).
10
Volume
15
25
03
On Volume 10
Last Volume
Last Volume active
If a traffi c announcement is
broadcast, the device automatically puts it through at this
volume. During the traffi c announcement, you can always
change the volume by means of
the volume control
5.
Changing the volume presetting
of the telephone ( Phone Volume)
If the device puts a phone call
through, it always starts at the preset volume.
Press the softkey 8 (next to
➔
"Phone Volume").
On Volume
Last Volume
115
Page 52

Changing basic settings in the settings menu
The volume presetting for
phone calls appears.
Adjust the desired volume us-
➔
ing the volume control
the rocker switch
5 or
3 (incre-
ments 1 to 50).
During the phone call, you can
always change the volume by
means of the volume control
5.
Changing the volume presetting
of the signal tone ( Beep Volume)
If a signal tone sounds, you always hear it at the preset volume.
Press the softkey
➔
9 (next to
"Beep Volume").
The volume presetting for the
signal tone appears.
Adjust the desired volume
➔
using the volume control
or the rocker switch
5
3 (incre-
ments 0 to 6).
You hear a signal tone at the se-
lected volume.
If you do not want to hear any
➔
signal tones, set the volume to
zero.
"BEEP OFF" appears on the display.
"On Volume" menu item must be
highlighted.
Press the softkey
➔
< (next to
"On Volume").
The presetting for the power-
on volume appears.
Adjust the desired volume
➔
using the volume control
or the rocker switch
5
3 (incre-
ments 1 to 50).
If you open the "Volume Set-
tings" menu again, the "On Volume" menu item is highlighted.
Restoring the volume at switchon ( Last Volume)
You can confi gure the device so
that the playback after switch-on
always starts with the previously
selected volume. For this purpose, the "Last Volume" menu
item must be highlighted.
➔
Press the softkey
; (next to
"Last Volume").
"Last Volume active" briefl y
appears on the display. If you
open the "Volume Settings"
menu again, the "Last Volume"
menu item is highlighted.
Changing the presetting of the
power-on volume ( On Volume)
You can confi gure the device so
that the playback after switchon always starts with the volume
set here. For this purpose, the
116
Page 53

Changing basic settings in the settings menu
Changing clock settings ( Clock Settings)
In the "Clock Settings" menu, you can set the clock of the device as
well as change the display options of the clock.
Press the MENU button ?. The settings menu appears.
➔
Press the softkey
➔
The "Clock" menu appears.
:
00 00
Hours : Minutes
< (next to "Clock Settings").
Time Set
Clock Settings
Time Setting
Off Clock
Auto Sync
24 h Mode
Clock
Setting the time ( Time Setting)
Press the softkey
➔
7 (next to
"Time Setting").
The currently set time appears.
The hours are highlighted.
On the rocker switch
➔
press
or to change the
3,
hours.
On the rocker switch
➔
press
to change to the min-
3,
utes.
On the rocker switch
➔
press
or to change the min-
3,
utes.
Press the OK button
➔
A to fi n-
ish the input and to save the
time.
Note:
To quit the input without
changing the time, press the
ESC button
Switching the time display on/
@.
off with switched-off device
( Off Clock)
The time can be displayed while
the device is switched off, if the
vehicle ignition is switched on. To
switch this time display on/off:
➔
Press the softkey
8 (next to
"Off Clock").
: The time display is
•
switched on.
•
: The time display is
switched off.
117
Page 54

Changing basic settings in the settings menu
Switching the RDS synchronisation of the clock on/off
( Auto Sync)
The clock can automatically be
synchronised with the RDS time
signal, provided that a station is
set that broadcasts this RDS time
signal.
➔
Press the softkey
< (next to
"Auto Sync").
: The synchronisation is
•
switched on.
: The synchronisation is
•
Switching the 24-hour time display on/off ( 24 h Mode)
The time can be displayed using
the 12-hour or 24-hour format.
To switch between these two formats:
➔
Press the softkey
; (next to
"24 h Mode").
: The 24-hour format is
•
switched on.
: The 12-hour format
•
(AM/PM) is switched on.
switched off.
Confi guring audio inputs ( Aux Settings)
Up to two external audio source, such as MiniDisc player or external
MP3 player, can be connected to the audio inputs "Auxiliary 1" and
"Auxiliary 2". If you are connecting a CD changer, it occupies audio input "Auxiliary 1" and you can also connect "Auxiliary 2".
The audio sources "Auxiliary 1" and "Auxiliary 2" cannot be operated
using the Memphis. Only the volume can be changed.
➔
Press the MENU button
Press the softkey
➔
The "Aux" menu appears. The audio input "Auxiliary 1" is displayed
only if no CD changer is connected.
?. The settings menu appears.
; (next to "Aux Settings").
AUXILIARY 2
Auxiliary 2 Name Source Edit
118
AUX
Aux Settings
Auxiliary 2
Edit Auxiliary 2
Aux
Auxiliary 1
Edit Auxiliary 1
AUX
AUXILIARY 1
Auxiliary 1 Name Source Edit
Page 55

Changing basic settings in the settings menu
Activating/deactivating audio
inputs ( Auxiliary 1/2)
Audio inputs, to which you are
connecting external audio sources, must be activated as follows.
➔
Press the softkey
< (next to
"Auxiliary 1") and/or the soft-
7 (next to "Auxiliary 2").
key
The status of the audio input is
displayed:
: The corresponding audio
•
input is activated and can be
selected as audio source
using the SRC Taste
: The corresponding audio
•
B.
input is deactivated. It cannot even be selected as
audio source if an external
audio source is connected.
Renaming audio inputs
( Edit Auxiliary 1/2)
If you select an audio input as
audio source, "Auxiliary 1" or
"Auxiliary 2" appears on the display. To change this name:
➔
Press the softkey
; (next to
"Edit Auxiliary 1") and/or the
softkey
8 (next to "Edit Auxil-
iary 2").
The text input appears. The
fi rst character of the name is
highlighted.
➔
On the rocker switch
peatedly press
3, re-
or to change
the highlighted character.
On the rocker switch
➔
press
to change to the next
3,
character. The name can have
up to 16 characters.
➔
Press the OK button
A to fi n-
ish the text input and to store
the name entered.
Note:
To quit the text input without
changing the name, press the
ESC button
@.
119
Page 56

Changing basic settings in the settings menu
Changing special settings ( Various Settings)
In the "Various Settings" menu, you can change the scan time for the
scan function and the welcome text.
Press the MENU button ?. The settings menu appears.
➔
Press the softkey
➔
item.
The "Various Settings" menu appears.
: located next to the "Various Settings" menu
THE
ADVANTAGE I N
YOUR CAR!
Various Menu Norm Set
Various Settings
Turn On Text
Turn On Text
Internal Amp
Changing the welcome text
( Turn On Text)
When you switch on the device, a
welcome text appears. This text
is factory set to "The advantage in
your car!" To change this text:
➔
Press the softkey
7 (next to
"Turn On Text").
The text input appears. The
fi rst character of the welcome
text is highlighted.
➔
On the rocker switch
peatedly press
3, re-
or to change
the highlighted character.
Start Normset ?
Press softkey 4 for 2 sec to confirm
Variou s
Norm Set
Scan Time
Serial Number
➔
On the rocker switch
SCAN TIME 10 Sec
BP481530000002
SERIAL NUMBER OF RADIO
Various Menu
Scan time settings
Various Menu
3, press
to change to the next character. The welcome text can have
up to 35 characters.
➔
Press the OK button
A to fi n-
ish the text input and to store
the welcome text entered.
Note:
To quit the text input without
changing the welcome text,
press the ESC button
@.
120
Page 57

Changing basic settings in the settings menu
Switching the internal amplifi er
on/off ( Internal Amp)
If you connected the device to an
external power amplifi er via the
preamplifi er outputs (Preamp),
you can switch off the internal
amplifi er of the device as follows:
CAUTION!
No sound with switched-
off internal amplifi er!
If you switch off the internal amplifi er, you do not hear a sound
from the loudspeakers connected
to the device!
Switch off the internal amplifi -
➔
er only if you connected an external power amplifi er to the
preamplifi er outputs (Preamp)
of the device and you connected your loudspeakers to this
power amplifi er:
➔
Press the softkey
8 (next to
"Internal Amp").
The status of the internal am-
plifi er is displayed:
: The internal amplifi er
•
is switched on. Loudspeakers connected to the device
play back the selected audio
source.
: The internal amplifi er is
•
switched off. Loudspeakers
connected to the device always remain mute. The loudspeakers must be connected
to the external amplifi er.
Resetting the device to factory
settings ( Norm Set)
➔
Press the softkey
< (next to
"Norm Set").
The "Norm Set" menu appears.
➔
Press and hold the softkey <
for approx. two seconds.
"NORMSET ON" briefl y appears
on the display. The device is reset to the factory settings. Images and animations, which
you transferred to the device,
are deleted.
Note:
To exit the "Norm Set" menu
without resetting the device to
the factory settings, press the
OK button
@.
ton
A or the ESC but-
Changing the scan time
( Scan Time)
➔
Press the softkey
; (next to
"Scan Time").
The current scan time is dis-
played.
121
Page 58

Error table
On the rocker switch 3,
➔
repeatedly press
or to
increase the scan time.
On the rocker switch 3,
➔
repeatedly press
or to
decrease the scan time.
You can adjust scan times in increments of 5 seconds form 5 to
Displaying the serial number
( Serial Number)
Every device has a separate serial
number. To display this number:
➔
Press the softkey
: (next to
"Serial Number").
The serial number is displayed.
30 seconds.
Error table
If the device does not function properly, switch the device off and on
again.
If problems still persist, you can easily correct the following problems.
Problem Possible cause Possible remedy
The menus do not appear
as shown in these instructions.
The tuner cannot be adjusted to the frequencies listed
in the technical data.
The display shows information about the device.
The device is always silent,
even though it is correctly
connected.
The device is not set to
your region.
The demo mode is activated.
The internal amplifi er is
switched off.
Set the device to your
region as described on
page 88.
Press and hold the MENU
button
? for four seconds.
Switch on the internal
amplifi er as described on
page 121.
If problems still persist, please contact an authorised workshop or the
Blaupunkt customer service (see the last page).
122
Page 59

Specifi cations
Specifi cations
Weight approx. 1.5 kg
Voltage supply
Operating voltage: 10.5–14.4 V
Current consumption
In operation:
10 seconds after switch-off:
Amplifi er output power acc. to DIN 45324:
at 14.4 V:
max. power:
Preamplifi er output (Preamp Out)
4 channels: 3 V
Input sensitivity
AUX inputs:
Telephone input:
Tuner
FM waveband:
AM waveband:
LW waveband:
FM frequency response:
CD player
Frequency response: 20–20,000 Hz
Subject to technical changes!
max. 10 A
< 3.5 mA
4 x 25 W sine
4 x 45 W at 14.4 V
2 V / 6 kΩ
10 V / 1 kΩ
87.5–108 MHz
531–1602 kHz
153–279 kHz
35–16,000 Hz
123
Page 60

Glossary
Glossary
AF – Alternative frequency
The range of FM stations is limited. For this reason, FM programmes are distributed to different frequencies. The AF RDS
service sends these frequencies
to the tuner. If the reception deteriorates because the vehicle
leaves the reception area of a frequency, the tuner can automatically change to the best receivable frequency.
DEQmaxEx – Digital parametric equalizer with variable fi lter
quality
This function allows for a maximum of exact frequency optimisation, so that the sound spectrum
can be adjusted to the vehicle or
your individual taste.
EON – Enhanced Other Network
In case of a traffi c announcement
(TA), the device switches from
a non-traffi c information station
to a traffi c information station of
the same broadcasting network
(e.g. from NDR 3 to NDR 2).
After the traffi c announcement,
the system switches back to the
previously heard programme.
Quality factor Q
It determines the fi lter quality of
the equalizer, i.e. the edge steepness and fi lter bandwidth, dependent upon the characteristic
frequency.
ID3 tags
ID3 tags contain additional information for MP3 fi les (e.g. artist,
title, album, genre, year).
Mass storage device
Format for storage media that can
permanently store large amounts
of data, such as USB removable
storage devices (USB stick or
USB hard disk).
MMC/SD card (Multimedia Card/
Secure Digital Card)
MMC/SD cards are memory card
formats that can be inserted in
card slot
vice can play MP3 and WMA fi les
stored on the memory cards.
MP3, WMA
MP3 and WMA are audio data formats that allow for high compression with little loss in quality.
Playlist
Playback list for MP3 or WMA
fi les In playlists, you determine
the order in which certain titles
should be played.
D of the device. The de-
124
Page 61

Glossary
They are created with an MP3
manager, such as WinAmp or Windows Media Player.
PTY – Program Type
The device searches only for stations with preselectable programme content (e.g. news, rock,
pop, sports, etc.)
PTY 31
The car sound system automatically switches through emergency
and disaster announcements.
RDS – Radio Data System
RDS is a service of the radio stations. Besides the conventional
music and voice contributions,
additional information is broadcast in the form of encrypted digital signals which can be analysed
by the car sound system.
Note:
The RDS services are not supported by all radio stations!
REG – Regional
Activating the regional service
(REG ON) prevents switching
over to a frequency with better
reception of the adjacent regional
programme. This allows for continuously a regional programme
even in peripheral regions. The
disadvantage is that the station
may not be received without interferences.
Root directory
Main directory of a data carrier.
The root directory contains all
other directories.
Subwoofer, Subout
Separate low-bass loudspeaker.
The device has a Subout preamplifi er output. You can connect
either an active subwoofer or a
separate power amplifi er with
subwoofer.
TA – Traffi c Announcement
The car sound system switches
traffi c announcements through,
even if you are currently listening
to other sources (e.g. CD, AUX) or
the radio is muted.
TMC – Traffi c Message Channel
RDS data service for area-based
traffi c announcements. Digital
traffi c information data channel
with continuously updated data
about the traffi c situation. TMC
receivers allow for a selection of
the data fl ow with respect to direction of travel, area or type of
street. With a push of a button,
you have access to the most current tailor-made information at all
times.
125
Page 62

Glossary
Your device has a TMC output,
which you can use for connecting Blaupunkt navigation systems.
Please contact your authorised
Blaupunkt dealer for additional
information.
T-STORE – Travelstore
Automatic searching and storing
of the six strongest radio stations
received of the region.
Tuner
Receiving unit of the radio.
USB – Universal Serial Bus
USB is an interface for connecting external removable storage
devices to the car sound system.
X-BASS
X-BASS allows for boosting the
bass at low volume levels (loudness). This renders the sound
more natural even at a low volume.
126
Page 63

Index
Index
Symbole
24 h MODE 118
A
ADJUST 107
ALL 99
Alternative frequencies
Allowing 90
Amplifi er 121
AREA 88
Audio inputs
Activating 119
Confi guring 118
Renaming 119
AUDIO SETTINGS 105
Audio source 77
Tuner 85
AUTOMATIC 107
AUTO SOUND 110
AUTO SYNC 118
AUXILIARY 119
AUX SETTINGS 118
B
BALANCE 105
Band 89
BAND button 72, 83
BASS 105
Bass increase 110
BEEP VOLUME 116
Browser 100
Button for detaching the control panel
72
Buttons 72
Button to eject/insert a CD 72
C
CD
Changing the name of a CD in the
CD changer magazine 103
inserting 74
removing 74
Selecting from the CD changer
magazine 102
CD changer 102
Changing the name of a CD in the
magazine 103
Display 79
Functions 102
CD changer display 79
CD display 78
CD overview 103
CD player 95
Display 78
Functions 96
CD text 97
Clock 117
24-hour time display 118
Display with switched-off device
117
Setting 117
Synchronise with RDS 118
CLOCK SETTINGS 117
Control panel 73
Correcting errors 122
Correcting malfunctions 122
Country code 88
D
DIGITAL EQUALISER 106
Display
Animation 113
Brightness 83
Images 113
Viewing angle 114
DISPLAY SETTINGS 112
Note:
Keywords in capital letters refer to menu items.
127
Page 64

Index
E
EDIT AUXILIARY 119
EQUALISER 106, 110
Calling up a user-defi ned setting
106
Creating a user-defi ned setting 107
Settings recommendations 109
ESC button 73, 83
F
Factory settings 121
FADER 105
FM1, FM2, FM3, and FMT 85
Forward 80
H
HICUT 91
High Cut 91
I
Improved reception 91
INF 99
INTERNAL AMP 121
L
LAST VOLUME 116
M
MANUAL 108
Memory bank 85
Memory card
inserting 75
removing 75
Menu
Calling 83
Changing and saving settings 84
Exiting 84
Operate 82
Operating example 83
Settings menu 104
Tuner 89
MENU button 73, 83
MIX 81
MMC card: see Memory card
MONO 90
Mono operation 90
MP3
Files on CD 95
MP3 display 79
MP3 player 98
Display 79
Functions 98
Muting 76
N
NEXT button 72, 83
NORM SET 121
O
OFF CLOCK 117
OK button 73, 80, 83
On/Off button 72
ON VOLUME 116
P
PHONE VOLUME 115
Playlist 100
PRESETS 110
PROGRAM TYPE 92
PTY 92
R
RADIO TEXT 90
Radiotext 90
Random track play 81
RDS 90
Receiving a regional programme 91
Region
Adjust 88
REGIONAL 91
Repeat 81
Repeat mode 81
Repeat title 82
Reverse 80
Rocker switch 72, 80
RPT 81, 82
S
Safety 70
SCAN 82
128
Page 65

Index
SCAN TIME 121
Scan time 121
SCL 97, 99
SCREEN SAVER 112
Screen saver 112
SD BROWSER 113
SD card: see Memory card
Seek tuning sensitivity 92
SENSITIVITY 92
SERIAL NUMBER 122
Serial number 122
Settings menu 104
Skip title 80
Softkey 72, 80
Sound 105
Presetting 109
SRC button 73
Station
Calling 87
Scanning 87
Searching 85
Storing 87
Stereo operation 90
SUBOUT 111
Subwoofer 111
Switch-off 74
Switch-on 74
T
TA 81
Telephone 76
TIME SETTING 117
Title information 99
Traffi c announcements 81, 93
Switching the priority on/off 93
TRAFFIC VOLUME 115
Travelstore 90
TREBLE 105
Tuner
Display 78
Tuner display 78
TURN ON TEXT 112, 120
TXT 97
U
USB BROWSER 113
USB stick
connecting 75
USER EQUALISER 106
V
VARIOUS SETTINGS 120
Volume 76
At switch-on 116
Muting 76
Presetting 115
Speed-dependent increase 110
Volume control 72
Volume distribution 105
VOLUME SETTINGS 115
W
Warranty 71
Waveband 89
Welcome text 112, 120
WMA
Files on CD 95
WMA player 98
Functions 98
X
X-BASS 110
129
Page 66

Einbauanleitung • Installation instructions • Notice de montage • Istruzioni di installazione •
Inbowhandleiding • Monteringsanvisning
Einbauanleitung
Sicherheitshinweise
Für die Dauer der Montage und
des Anschlusses beachten Sie bitte folgende Sicherheitshinweise.
• Minuspol der Batterie abklemmen!
Dabei die Sicherheitshinweise des
Kfz- Herstellers beachten.
• Beim Bohren von Löchern darauf
achten, dass keine Fahrzeugteile beschädigt werden.
• Der Querschnitt des Plus- und Minus-
kabels darf 1,5 mm
schreiten.
• Fahrzeugseitige Stecker nicht an
das Radio anschließen!
• Die für Ihren Fahrzeugtyp erforder-
lichen Adapterkabel erhalten Sie im
BLAUPUNKT-Fachhandel.
• Je nach Bauart kann Ihr Fahrzeug
von dieser Beschreibung abweichen. Für Schäden durch Einbauoder Anschlussfehler und für Folgeschäden übernehmen wir keine
Haftung.
Sollten die hier aufgeführten Hin-
weise für Ihren Einbau nicht passen, so wenden Sie sich bitte an
Ihren Blaupunkt-Fachhändler, Ihren
Fahrzeughersteller oder unsere
Telefon-Hotline.
Bei Einbau eines Amplifi er oder
Changers müssen unbedingt erst die
Gerätemassen angeschlossen werden,
2
nicht unter-
bevor die Stecker für die Line-In- oder
Line-Out-Buchse kontaktiert werden.
Fremdgerätemassen dürfen nicht an
der Autoradiomasse (Gehäuse) angeschlossen werden.
Installation
instructions
Safety instructions
When carrying out installation
work and making connections please
observe the following safety instructions:
• Disconnect the negative terminal of
the battery! When doing so, please
observe the vehicle manufacturer’s
safety instructions.
• Make sure you do not damage vehi-
cle components when drilling any
holes.
• The cross sections of the positive
and negative cables must not be less
than 1.5 mm
• Do not connect the vehicle’s plug
connectors to the radio!
• You can obtain the adapter cable re-
quired for your vehicle type from any
BLAUPUNKT dealer.
• Depending on the model, your vehi-
cle may differ from the description
provided here. We accept no responsibility for any damages due to incorrect installation or connection or for
any consequential damages.
2
.
387
Page 67

If the information provided here is
not suitable for your specifi c installation requirements, please contact
your Blaupunkt dealer, your vehicle
manufacturer or our telephone hotline.
When installing an amplifi er or changer,
you must fi rst connect the device earth
connections before connecting the
plugs for the line-in or line-out jacks.
Earth connection of external devices
may not be connected to earth of car
sound system (housing).
Notice de montage
Consignes de sécurité
Respecter les consignes de sécurité suivantes pendant la durée du montage et du branchement.
• Débrancher le pôle (-) de la batterie !
Respecter les consignes de sécurité
du constructeur automobile !
• Veiller à n’endommager aucune piè-
ce du véhicule en perçant des trous.
• La section du câble (+) et (-) ne doit
pas dépasser 1,5 mm
• Ne pas brancher les connecteurs
du véhicule sur la radio !
• Les câbles d’adaptation nécessai-
res pour le type de véhicule sont
disponibles auprès des revendeurs
BLAUPUNKT.
• En fonction du modèle, votre véhi-
cule peut différer de cette description. Nous déclinerons toute responsabilité en cas de dommages causés
2
.
par des erreurs de montage ou de
connexion et en cas de dommages
consécutifs.
Si les indications décrites ici ne s’ap-
pliquent au montage que vous voulez
effectuer, adressez-vous à votre revendeur Blaupunkt, votre constructeur automobile ou notre service
d’assistance téléphonique.
Pour le montage d’un amplifi cateur ou
changeur, les masses d’appareil doivent être d’abord connectées avant de
connecter les fi ches pour les connecteurs Line In ou Line Out.
Les masses des appareils externes
ne doivent pas être raccordées à la
masse de l'autoradio (boîtier).
Istruzioni di
installazione
Note di sicurezza
Durante il montaggio e l’allacciamento osservate per favore le seguenti
istruzioni sulla sicurezza.
• Staccate il polo negativo della batte-
ria! Nel fare ciò osservate le istruzioni di sicurezza del fabbricante d’auto.
• Quando praticate dei fori, fate at-
tenzione a non danneggiare nessuna
parte dell’autovettura.
• La sezione dei cavi positivi e nega-
tivi non deve essere mai inferiore
a 1,5 mm
• Non collegate alla radio le spine
in dotazione di autovettura!
2
.
388
Page 68

• Richiedete ad un negoziante specializzato in articoli BLAUPUNKT il cavo
di adattamento richiesto per il vostro
modello di autovettura.
• A seconda del modello il Suo veicolo
può differire da questa descrizione.
Non forniamo garanzia per danni
derivanti da errori di montaggio o
di collegamento e per danni conseguenti.
Se le indicazioni qui elencate non
sono adatte al Suo montaggio, La preghiamo di rivolgersi al Suo rivenditore Blaupunkt, al fabbricante dell’auto
o alla nostra hotline telefonica.
Quando vengono montati un amplifi catore o un multilettore CD, bisogna
innanzi tutto allacciare le masse degli
apparecchi prima di eseguire la connessione delle spine con le prese line-in e
line-out.
Le masse di altri apparecchi non devono essere collegate alla massa dell'autoradio (involucro).
Inbowhandleiding
Adviezen voor de
veiligheid
Wilt u dedurende het monteren en aan-
sluiten de volgende veiligheidsadviezen
in acht nemen.
• De minpool van de batterij afklemmen! De veiligheidsadviezen van de
fabrikant in acht nemen.
• Bij het gaten boren erop letten dat
geen voertuigonderdelen worden
beschadigd.
• De dwarsdoorsnede van de plusen minkabel mag niet minder dan
2
zijn.
1,5 mm
• Stekker aan de voertuigkant niet
aan de radio aansluiten!
• de voor uw voertuig vereiste adapterkabel is bij de BLAUPUNKT-vakhandel verkrijgbaar!
• Afhankelijk van de uitvoering kan uw
auto afwijken van deze beschrijving.
Voor schade door fouten in montage
of aansluiting en schade als gevolg
daarvan aanvaarden wij geen aansprakelijkheid.
Mochten de hier vermelde aanwijzin-
gen voor de montage voor u niet van
toepassing zijn, dan kunt u contact
opnemen met uw Blaupunkt-vakhandel, uw autofabrikant of onze telefoon-hotline.
Bij inbouw van een versterker of cd-wisselaar moeten eerst de massacontacten
van de apparaten worden verbonden
voordat de stekkers voor de line-in- of
line-out-bussen worden aangesloten.
De massa van andere apparaten mag
niet aan de massa van de autoradio
(huis) worden aangesloten.
Monteringsanvisning
Skyddsanvisningar
Vänligen beakta följande skyddsanvisningar under pågående montage
och anslutning.
• Lossa polskon från batteriets minus-
pol! Följ därvid fordonstillverkarens
skyddsanvisningar.
389
Page 69

• Se till att inga av fordonets komponenter skadas i samband med borrning av hål.
• Plus- och minuskabelns ledningsarea måste vara minst 1,5 mm
2
.
• Fordonets stickkontakt får inte
anslutas till radion!
• Din BLAUPUNKT fackhandel tillhandahåller för resp fordonstyp erforderlig adapterkabel.
• Beroende på konstruktionstyp kan
fordonet avvika från denna beskrivning. Vi frånsäger oss allt ansvar för
skada eller följdskada pga. felaktig
montering eller anslutning.
Om här givna monteringsanvisning-
ar ej stämmer överens med faktiska
förhållanden, vänligen kontakta
Blaupunkt fackhandel, representant
för fordonets tillverkare eller vår telefonkundtjänst.
Vid montering av förstärkare eller cdväxlare måste först apparatstommen
jordas, innan stickpropparna ansluts till
in- eller utgångarna (hylstag line-in resp
line-out).
Jord från andra apparater får inte
anslutas till bilradions jord (höljet).
390
Page 70

Mitgelieferte Montage- und
Anschlussteile
Supplied Mounting Hardware
Materiel de montage fourni
Componenti di fi ssaggio comprese
nella fornitura
Meegeleverde montagematerialen
Medföljande monteringsdetaljer
Als Sonderzubehör erhältlich
Available as an optional accessory
Disponible en option
Reperibili come accessori extra
Als speciale accessoire verkrijgbaar
Tillval
Preamp,/Sub,/Center - out
A
B
USB cable 7 607 001 511
A
Microphones
cable
7 607 001 512
7 607 621 . . .
391
Page 71

Einbausätze
Installation kits
Kits de montage
Set di montaggio
Inbouwsets
Monteringssatser
1.
12V
2.
ca. 10 mm
7 608 . . . . . .
3.
392
0°- 30°
+/– 10°
+/– 10°
Page 72

4.
6. Ausbau / Removal / Démontage /
Smontaggio / Demontage /
Urmontering
Antenna
connection
5.
53
A
USB connection
182
165
1-20
7.
B
8 613 150 002
3.
1.
2.
2.
12V
393
Page 73

8.
D
9
10
8
7
5
6
4
3
1
2
C-1 C-2 C-3
1
10
4
7
13
345
16
9
12
15
14
11
17
5
7
6
8
7
6
8
6
3
2
58
1
234
1
2
19
18
C
20
B
10 Ampere
Aut. antenna
FB +12V / RC +12V
+12V Amplifier
*
max. 300 mA
A
AB
1 No connection 1 Speaker out RR+
2 Radio Mute 2 Speaker out RR3 Sub-out 3 Speaker out RF+
4 Permanent +12V 4 Speaker out RF5 Aut. antenna 5 Speaker out LF+
6 Illumination 6 Speaker out LF7 Kl.15/Ignition 7 Speaker out LR+
8 Masse/GND 8 Speaker out LR-
*
1 AUX 2 NF L
2 AUX 2 NF R
3 AUX 2 GND
4NC
5NC
6NC
7NC
8NC
9 MIC GND
10 MIC INPUT
D
C
C1 C2 C3
1 Line Out LR 7 Telefon NF in + 13 CDC-Data - In
2 Line Out RR 8 Telefon NF in - 14 CDC-Data - Out
3 Line Out / Ground 9 Radio Mute 15 Permanent +12V
4 Line Out LF 10 RC +12V 16 +12V
5 Line Out RF 11 Remote Control 17 Bus / GND
6 +12V Amplifier 12 RC - GND 18 AF / GND
*
*
*
19 CDC Line In - L
20 CDC Line In - R
*
*
Equalizer Amplifi er
394
Optional
(Remote Control Eye)
CD-Changer
Page 74

9.
Preamp./Sub./Center - out
7 607 001 512
A
LF
RF
RR
cable
LR
BN
Radio Mute
+
-
+
-
+
-
+
-
Sub out
3
1
4
2
4 Ohm
4 Ohm
4 Ohm
4 Ohm
5
6
+12V
7
8
Amplifi er
12V
12V
Relais
+12V
Kl. 15 +12V
12
V
Änderungen vorbehalten!
Subject to changes!
Sous réserve de modifi cations!
Modifi che riservate!
Wijzigingen voorbehouden!
Ändringar förbehålles!
395
Page 75

396
Page 76

Bitte den ausgefüllten Gerätepass sicher aufbewahren!
Please keep the fi lled-in radio pass in a safe place!
Prière de conserver soigneusement la carte d’autoradio remplie !
Tenete per favore il libretto di apparecchio, debitamente riempito, in un
posto sicuro!
Bewaar de ingevulde apparaatpas op een veilige plaats!
Vänligen förvara ifyllt apparatpass på säker plats!
397
Page 77

Country: Phone: Fax: WWW:
Germany (D) 0180-5000225 05121-49 4002 http://www.blaupunkt.com
Austria (A) 01-610 39 0 01-610 39 391
Belgium (B) 02-525 5444 02-525 5263
Denmark (DK) 44 898 360 44-898 644
Finland (FIN) 09-435 991 09-435 99236
France (F) 01-4010 7007 01-4010 7320
Great Britain (GB) 01-89583 8880 01-89583 8394
Greece (GR) 210 94 27 337 210 94 12 711
Ireland (IRL) 01-46 66 700 01-46 66 706
Italy (I) 02-369 62331 02-369 62464
Luxembourg (L) 40 4078 40 2085
Netherlands (NL) 0800 400 1010 0800 400 1040
Norway (N) 66-817 000 66-817 157
Portugal (P) 2185 00144 2185 00165
Spain (E) 902 52 77 70 91 410 4078
Sweden (S) 08-7501850 08-7501810
Switzerland (CH) 01-8471644 01-8471650
Czech. Rep. (CZ) 02-6130 0446 02-6130 0514
Hungary (H) 76 511 803 76 511 809
Poland (PL) 0800-118922 022-8771260
Turkey (TR) 0212-335 06 71 0212-346 00 40
USA (USA) 800-2662528 708-6817188
Brasil
(Mercosur) (BR) 0800 7045446 +55-19 3745 2773
Malaysia
(Asia Pacifi c) (MAL) +604-6382 474 +604-6413 640
Gerätepass
09/07 - CM-AS/SCS
dt, gb, fr, it, nl, sw)
(
Name: .....................................................................
Typ: ....................................................................
Memphis MP66
7 646 . . .
Serien-Nr: BP ................................................................
Blaupunkt GmbH, Robert-Bosch-Straße 200, D-31139 Hildesheim
8622404853
 Loading...