

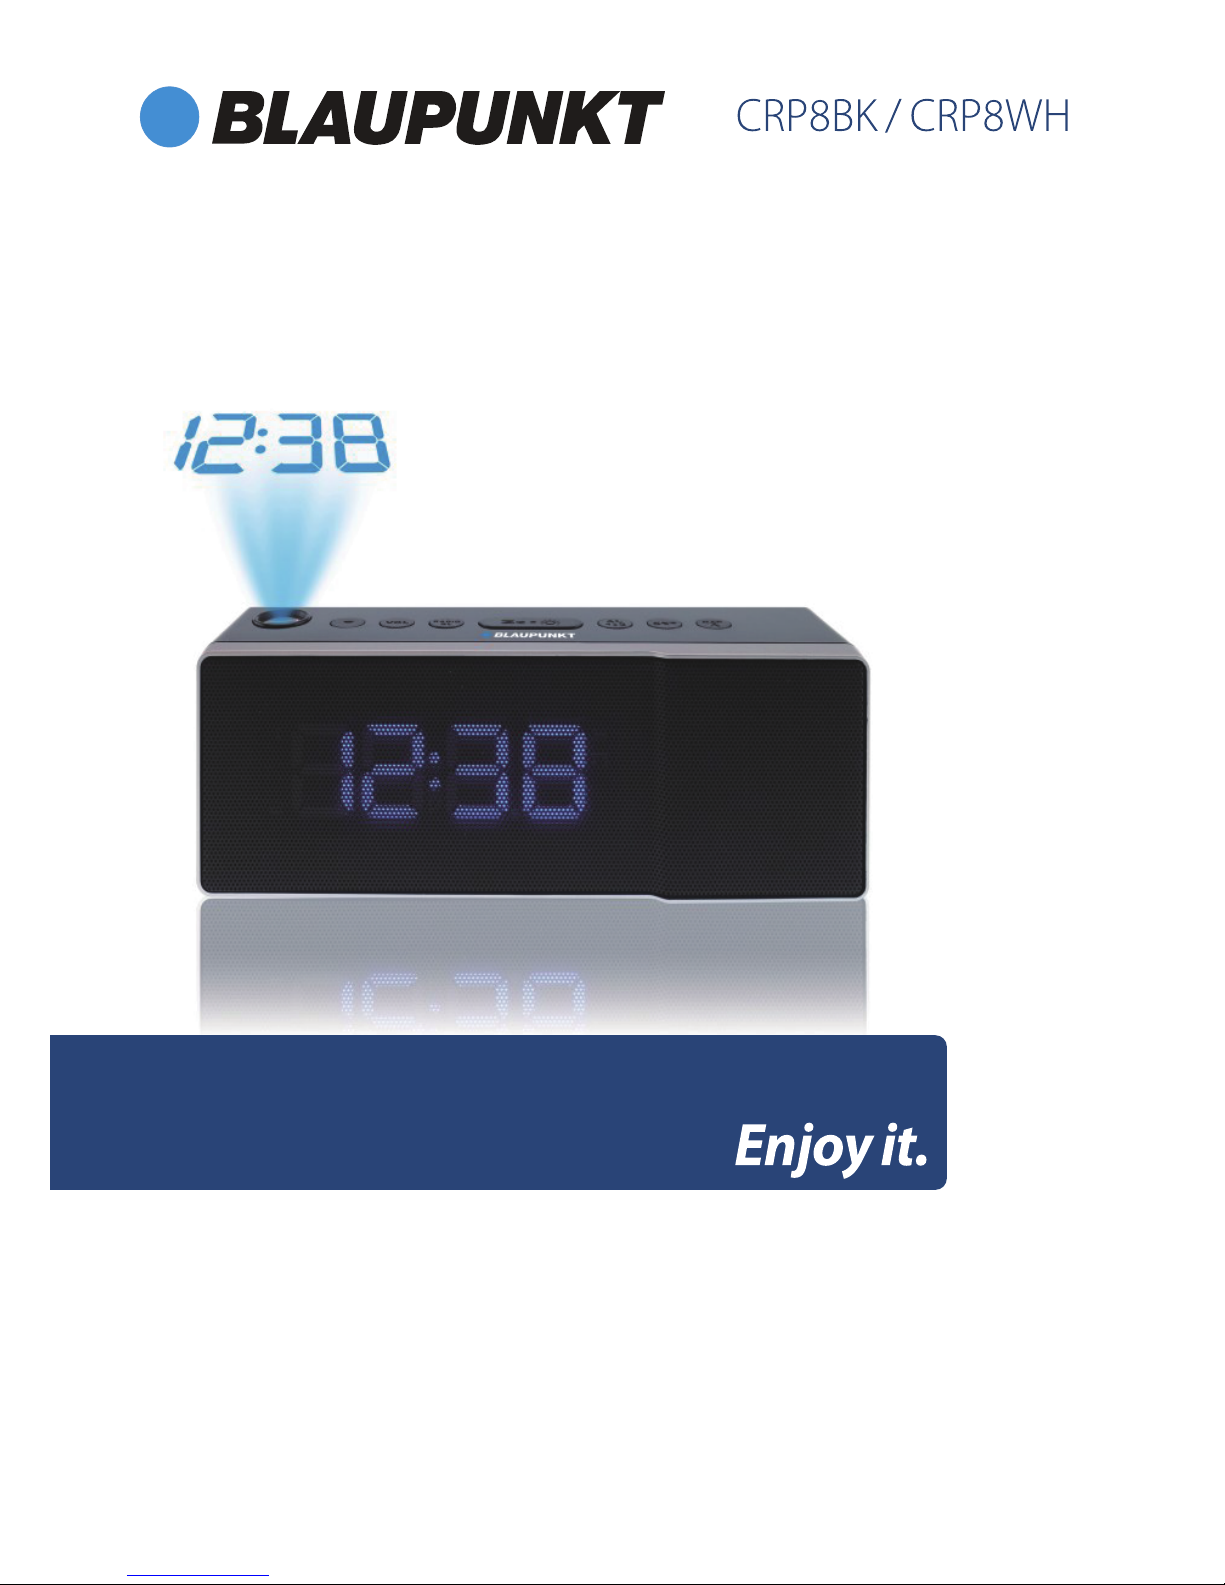
Blaupunkt CRP8BK, CRP8WH Owner's Manual
OWNER'S MANUAL
INSTRUKCJA OBSŁUGI
NÁVOD K POUŽITÍ
NÁVOD NA POUŽITIE
HASZNÁLATI UTASÍTÁS
Projection Clock radio with USB charging
Radiobudzik z projektorem i ładowaniem USB
Radiobudík s projektorem a USB nabíjením
Rádiobudík s projektorom a USB nabíjaním
Projektoros ébresztőórás rádió USB töltéssel


CRP8BK / CRP8WH
2
IMPORTANT NOTES
g This safety and operating instruction should be retained for future reference.
g The apparatus should not be exposed to dripping or splashing or placed in a
humid atmosphere such as a bathroom.
g Do not install the product in the following areas:
Places exposed to direct sunlight or close to radiators.
On top of other stereo equipment that radiate too much heat. ocking
ventilation or in a dusty area.
Areas where there is constant vibration.
Humid or moist places.
Do not place near candles or other naked flames.
g Operate the product only as instructed in this manual.
g Before turning on the power for the first time, make sure the power adaptor is
properly connected.
g Plug-in the USB stick directly or use an USB-extension cable which is not longer
than 25 cm.
For safety reasons, do not remove any covers or attempt to gain access to the inside of
the product. Refer any servicing to qualified personnel.
Do not attempt to remove any screws, or open the casing of the unit; there are no user
serviceable parts inside. Refer all servicing to qualified service personnel.
SAFETY INSTRUCTIONS
1. Read Instructions - All the safety and operating instructions must be read before the
product is operated.
2. Retain Instructions - The safety and operating instructions should be kept with the
product for future reference.
3. Heed warnings - All warnings on the product and in the operating instructions should
be adhered to.
4. Follow instructions - All operating and users’ instructions should be followed.
5. Water and moisture - To reduce the risk of fire or electric shock, do not expose the
product to train, dripping, splashing or excessive moisture such as in a sauna or bathroom.
Do not use this product near water, for example, near a bathtub, washbowl, kitchen sink,
laundry tub, in a wet basement or near a swimming pool (or similar).
6. Object and Liquid Entry - Never push objects of any kind into this product through
openings, as they may touch dangerous voltage points or short-circuit parts that could
result in a fire or electric shock. Never spill liquid of any kind on the product. Do not place
any object containing liquid on top of the product.
7. Servicing - Do not attempt to service this product yourself, as opening or removing
covers may expose you to dangerous voltage or other hazards. Refer all servicing to
qualified service personnel.
8. Replacement parts - When replacement parts are required, ensure that the service
technician has used replacement parts specified by the manufacturer or have the same
characteristics as the original part. Unauthorized substitutions may result in fire, electric
shock or other hazards.
ENGLISH

CRP8BK / CRP8WH
3
9. Place your clock radio on a stable surface, away from sources of direct sunlight or
excessive heat or moisture.
10. Protect your furniture when placing your units on a natural wood and lacquered finish
by using a cloth or protective material between it and the furniture.
11. Clean your unit with a soft cloth moistened only with mild soap and water. Stronger
agents such as Benzine, thinner or similar materials can damage the surface of the unit.
Make sure the unit is unplugged before cleaning.
12. Battery
1). The batteries must not be exposed to excessive heat such as sunshine, fire or the like.
2). The batteries should be drawn to the environmental aspects of battery disposal.
3). Battery usage CAUTION-to prevent battery leakage which may result in body injuries,
property damage, or damage to the apparatus:
-Install all batteries correctly, + and – as marked on the apparatus.
-Remove batteries when the unit is not used for a long time.
WARNING
This appliance is not intended for use by persons (including children) with reduced
physical sensory or mental capabilities, or lack of experience and knowledge, unless they
have been given supervision or instruction concerning use of the appliance by a person
responsible for their safety. Children should be supervised to ensure that they do not play
with the appliance.
1. The apparatus must not be exposed to dripping or splashing and that objects filled
with liquids, such as vases, must not be placed on the apparatus.
2. To prevent fire or shock hazard, do not expose this equipment to hot places, rain,
moisture or dust.
3. Do not locate this unit near any water sources e.g. taps, bathtubs, washing machines or
swimming pools. Ensure that you place the unit on a dry, stable surface.
4. Do not place this unit close to a strong magnetic field.
5. Do not place the unit on a amplifier or receiver.
6. Do not place this unit in a damp area as the moisture will affect the life of electric
components.
7. If the clock is brought directly from a cold to a warm location, or is placed in a very
damp room, moisture may condense on the lens inside the player. If this occurs, the
system will not operate properly. Please leave the system turned on for about an hour
until the moisture evaporates.
8. Do not attempt to clean the unit with chemical solvents as this might damage the finish.
Wipe with a clean, dry or slightly damp cloth.
CRP8BK / CRP8WH
4
NOTICE
This product complies with the radio interference requirements of the European
community.
Your products is designed an manufactured with high quality materials and components,
which can be recycled and reused.
When this crossed-out wheeled bin symbol is attached to a product it means that the
product is covered by the European Directive 2002/96/EC. Please inform yourself about
the local separate collection system for electrical and electronic products. Please cat
according to your local rules and do not dispose of your old products with your normal
household waste. Correct disposal of your old product helps to prevent potential
negative consequences for the environment and human health.
Your product contains batteries covered by the European Directive 2006/66/EC, which
cannot be dispose with normal household waste. Please inform yourself about the local
rules on separate collection of batteries because correct disposal helps to prevent
negative consequences for the environmental and human health.
Environmental information
All unnecessary packaging has been omitted. We have tried to make the packaging easy
to separate into three materials: cardboard(box), polystyrene foam(buffer) and poly
ethylene (bags, protective foam sheet). Your system consists of material which can be
recycled and reused if disassembled by a specialized company. Please observe the local
regulations regarding the disposal of packaging materials, exhausted batteries and old
equipment. Recording and playback of material might require consent. See Copyright Act
1956 and The Performer's Protection Acts 1958 to 1972.
ENGLISH
CRP8BK / CRP8WH
5
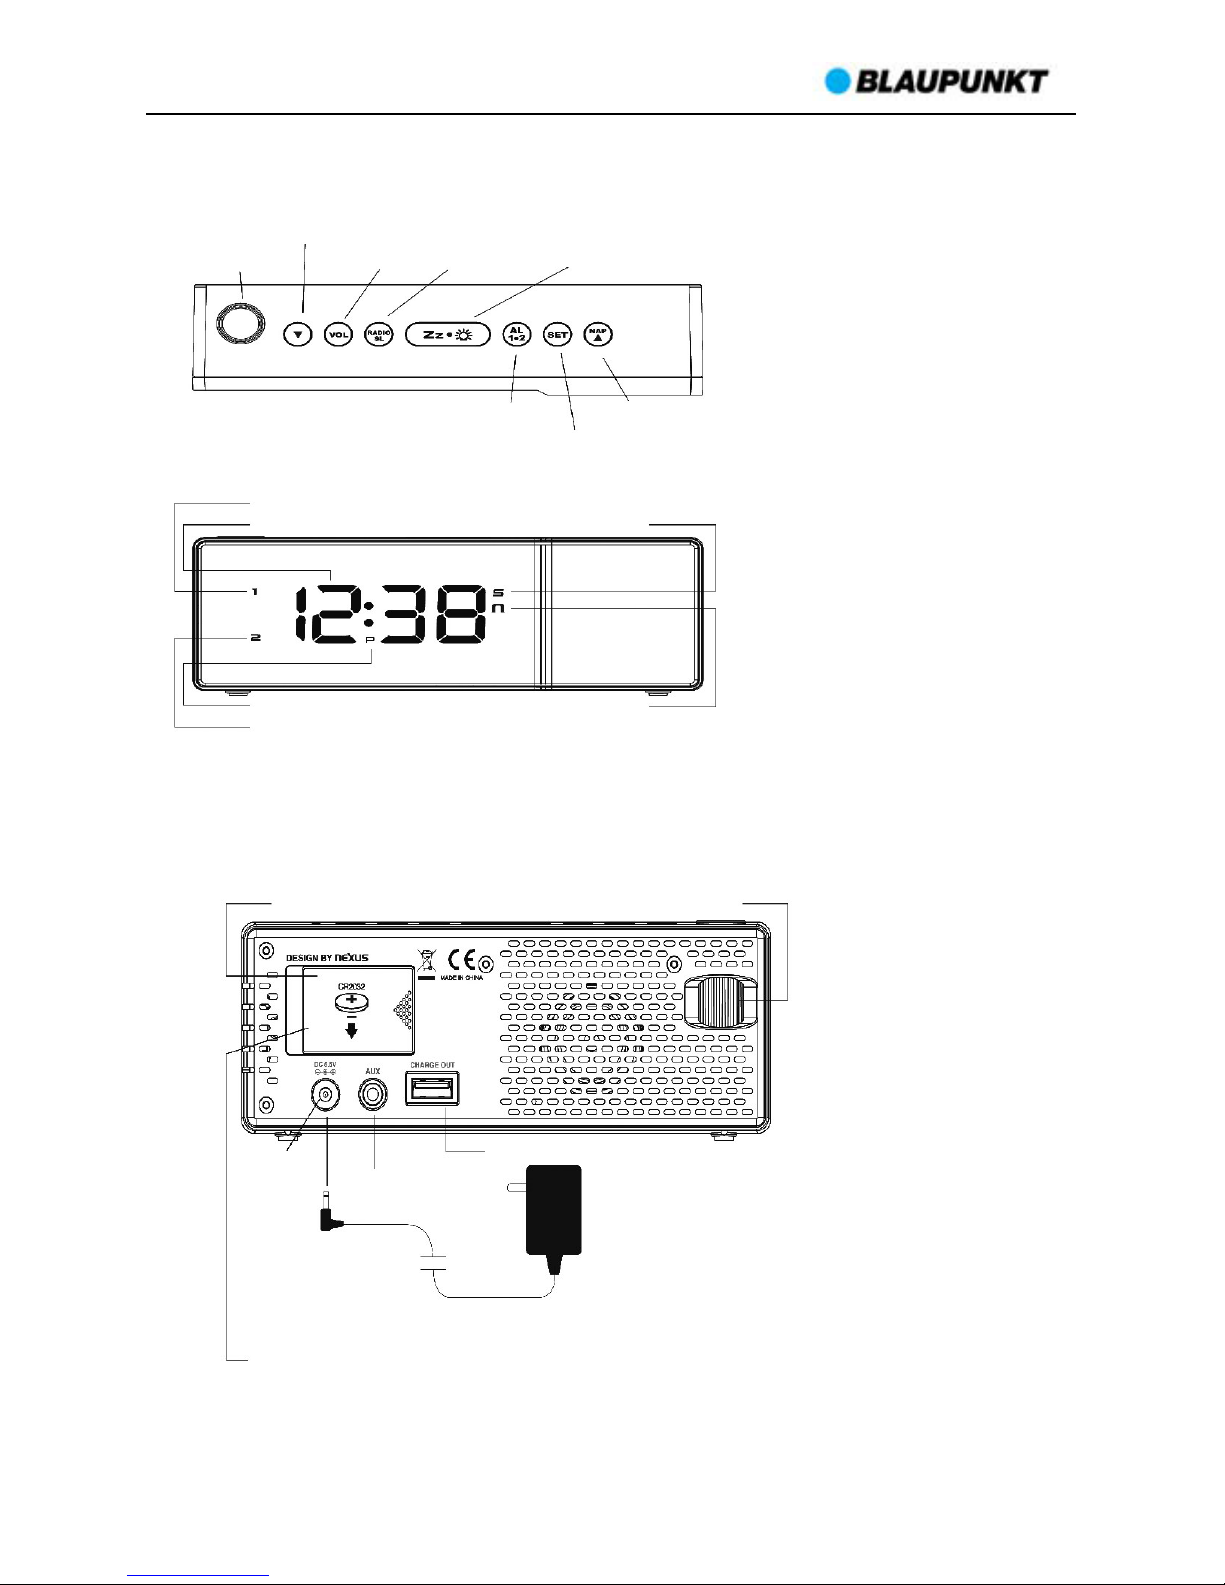
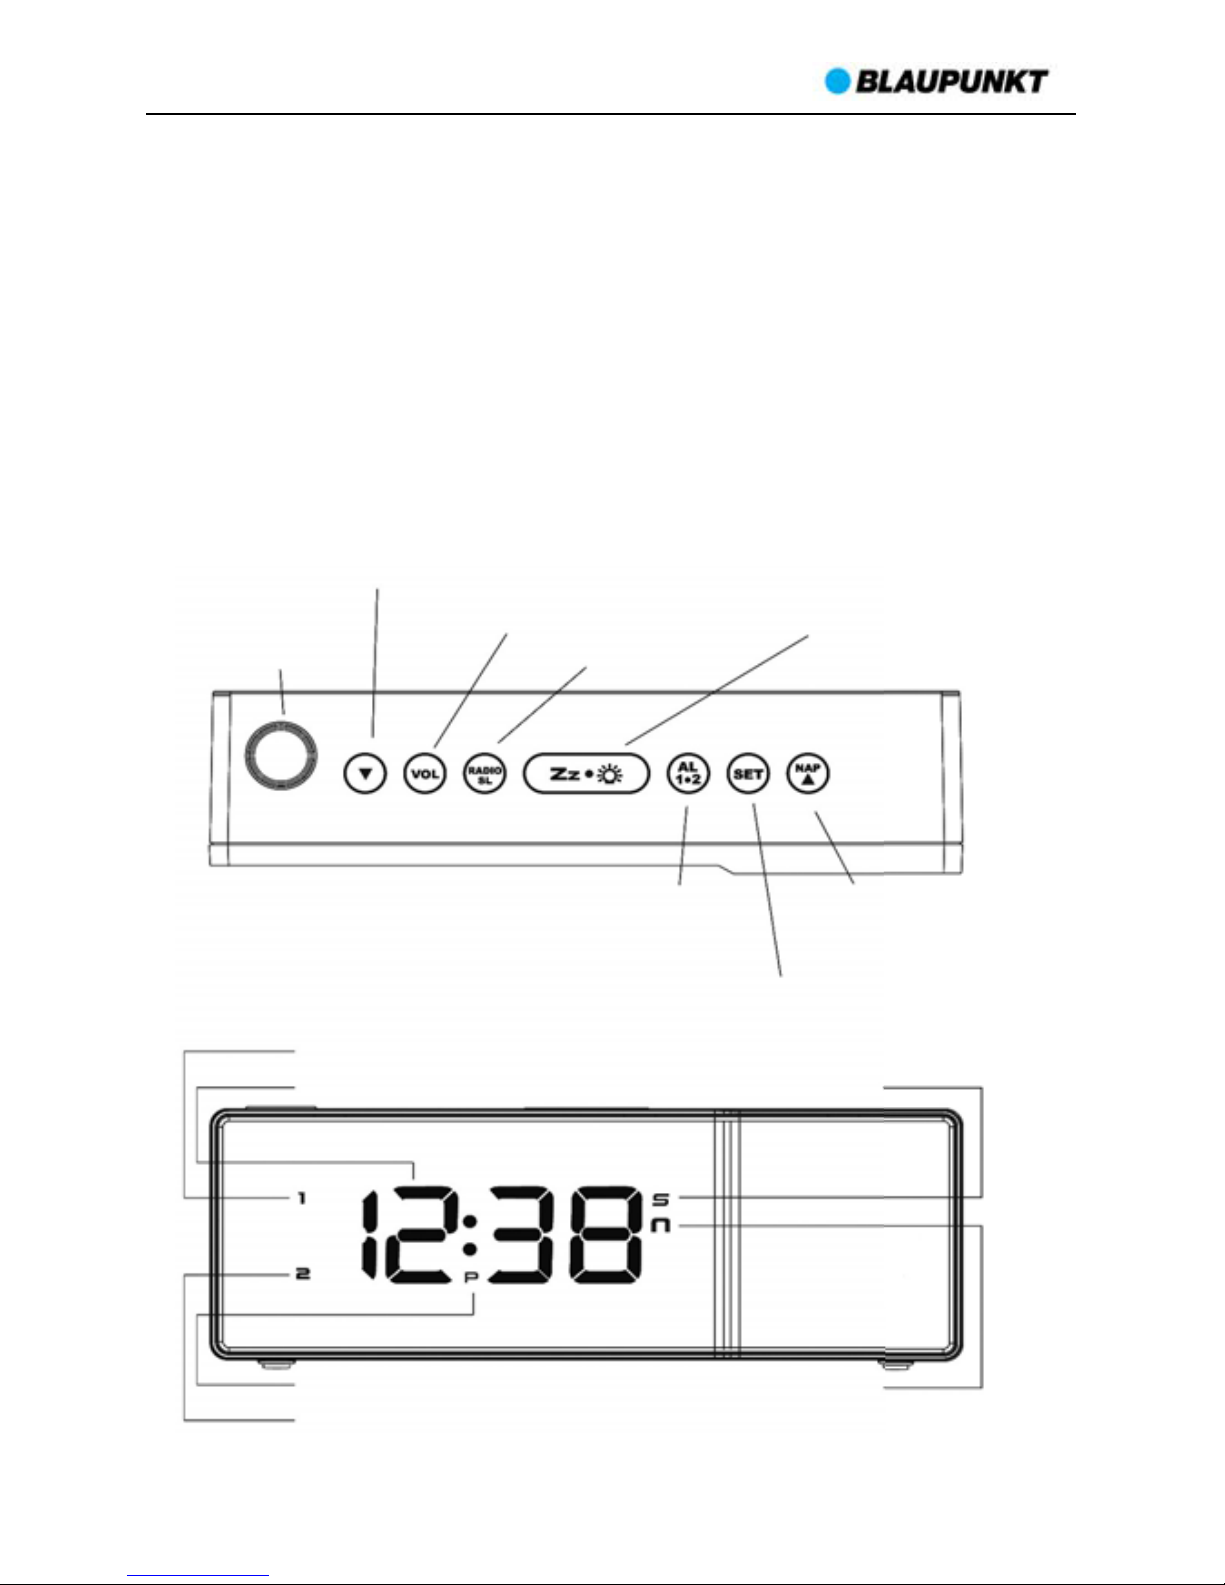
CONTROLS AND FUNCTION
TOP VIEW
FRONT VIEW
NAP/UP
PROJECTOR
DOWN/PROJEC TION
VOLUME RADIO/SLEEP SNOOZE/DIMMER
ALARM 1-2
SET/MEMORY
TIME
ALARM 1
ALARM 2
PIM INDICATOR
SLEEP
NAP TIMER
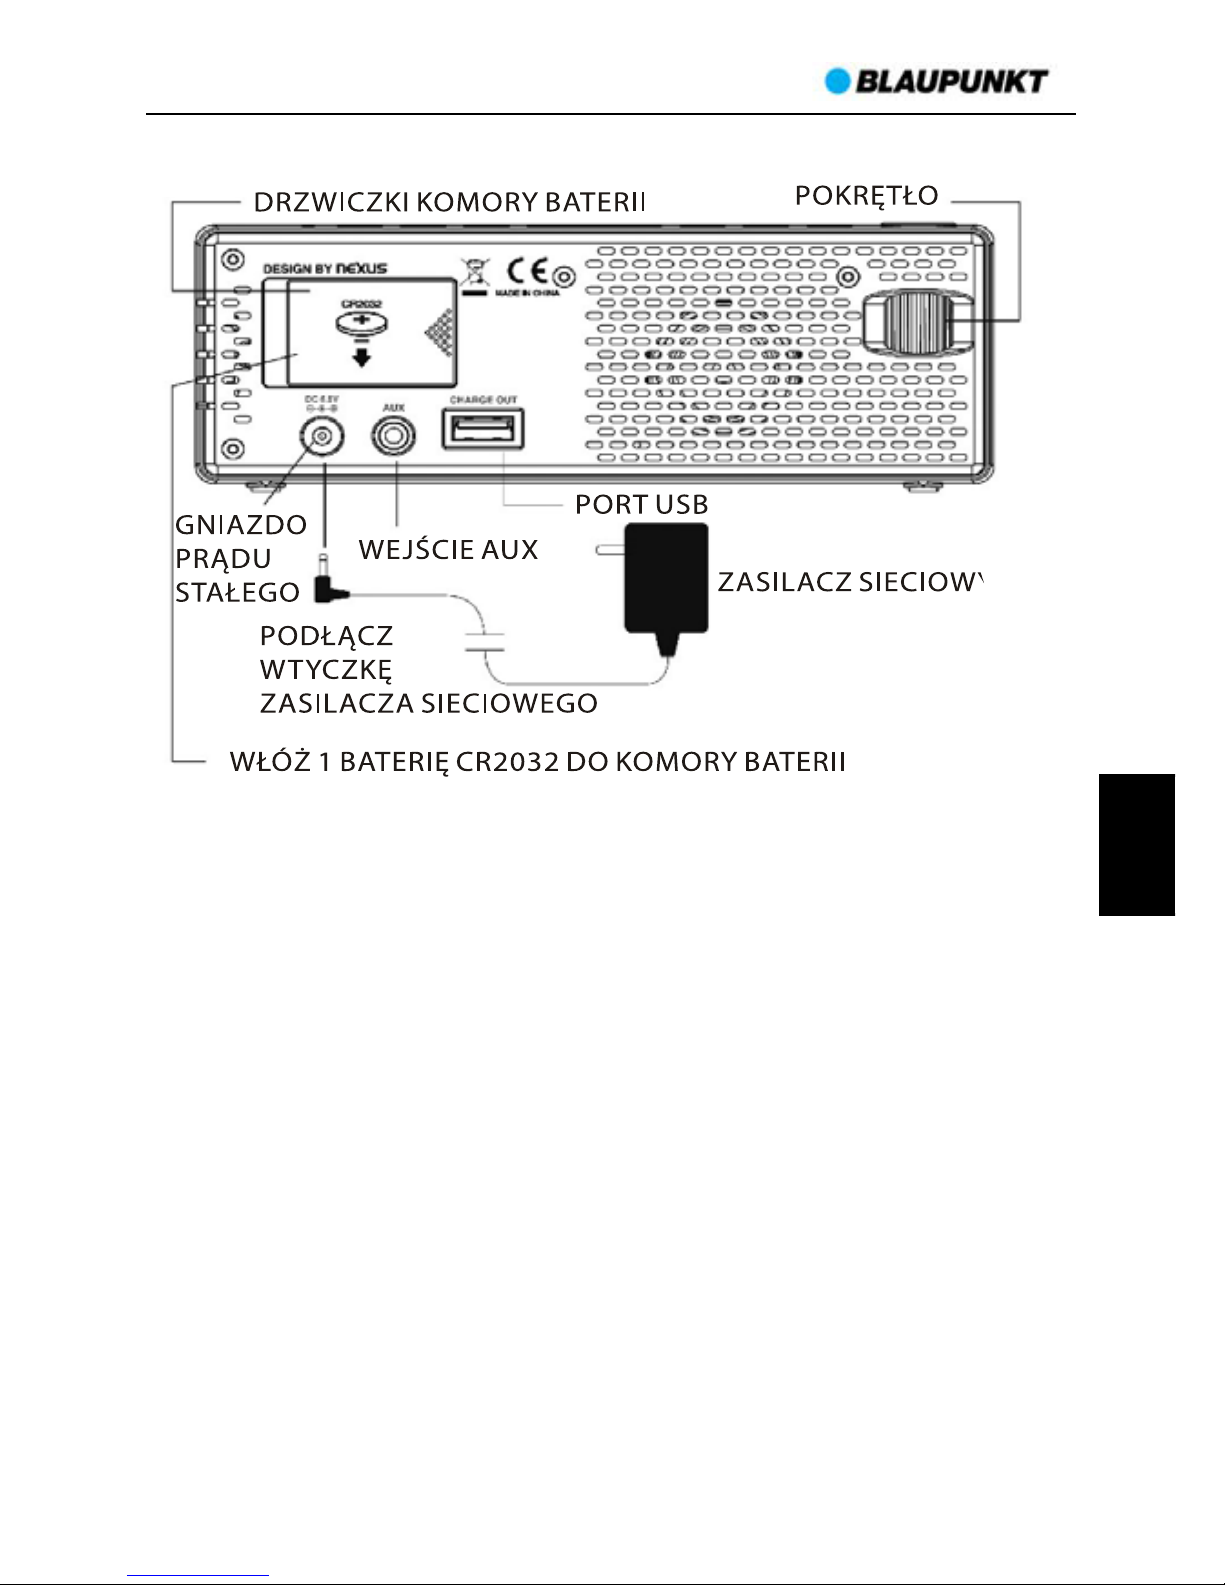
BATTERY DOOR
DC SOCKET
AUX LINE-IN
USB SOCKET (FOR CHARGI
ROTARY KNO
INSERT AC/DC
ADAPTOR JACK
AC/DC ADAPTO
THE BATTERY COMPARTMENT: INSERT 1 X CR2032 BA
INSIDE THE BATTERY COMPARTMENT
BACK VIEW

CRP8BK / CRP8WH
6
INSTALLATION
Plug the AC/DC adaptor to an AC household outlet, and then plug the DC jack to the back
of the unit. Your clock radio is ready to work for you.
BACKUP BATTERY INSTALLATION
Your clock radio requires one CR2032 lithium battery (not included) to provide backup
power to the clock in the event of a temporary power interruption.
1. Place your unit face down on a flat surface.
2. Slide and remove the battery cover at the bottom of your unit.
3. Insert one new CR2032 lithium battery into the battery compartment with the “+” side
facing up as indicated.
4. Replace the battery cover.
If AC power is interrupted, the LED display will go off and both the radio and the alarm
will not function. The backup battery will keep the time and all settings of your unit.
Make sure a fresh CR2032 lithium battery is used. A fresh CR2032 battery could backup
your clock continuously.
SETTING TIME, 12/24HR TIME AND THE SNOOZE DURATION
1. Press SET once, the hour digits flash. Press Ʒ or to set the current hour (hold to
advance rapidly).
2. Press SET again, the minute digits flash. Press Ʒ or to set minutes.
3. Press SET again, the display shows “24H” and flashes, press Ʒ or to select “12H” or
“24H” time format.
4. Press SET again, the display shows “05” and flashes, press Ʒ or to select your snooze
time from 5 to 60 minutes.
5. Press SET again or if no key pressed for approx. 10 seconds to exit the setting mode.
Note: when 12-hour time format is selected, the P (PM) icon will appear on the lower
middle time display to indicate the afternoon time; there is no AM indicator.
SETTING THE ALARMS
1. Press AL 1.2 once, the 1 icon and the hour digits flash. Press Ʒ or to set the alarm 1
hours.
2. Press AL 1.2 again to adjust minutes. Press Ʒ or to set the alarm 1 minutes.
3. Press AL 1.2 again, LED displays “OFF” (alarm off). To select wake to sound sources, press
Ʒ or to select :rd = wake-by-radio
bu = wake-by-buzzer
OFF = alarm off
4. Press AL 1.2 again, the 2 icon and the hour digits flash. Press Ʒ or to set the alarm 2
hours.
5. Repeat step 2) and 3) to set alarm 2.
6. Press AL1.2 again or no button around 10 seconds to exit alarm setting mode. When
wake-to-radio or wake-to-buzzer is selected, the related alarm is turned on, indicated by
appearance of the 1 and / or the 2 icon on the left side of the display.
ENGLISH

CRP8BK / CRP8WH
7
STOPPING AND RESETTING THE ALARM TO COME ON THE NEXT DAY
When alarm 1 or 2 is sounding, the related 1 or 2 icon flashes. Press the AL 1.2 once to
stop the alarm and reset it to come on the following day. After that 1 or 2 icon keep
lighting up on the display.
Note: When alarm is sounding, press the Ʒ / NAP or RADIO / SLEEP will activate the nap
timer or the radio and stop the alarm for the day. Do not plug in the AUX cable to the unit
overnight as this will prohibit the alarms from functioning.
SNOOZE OPERATION (default snooze duration is 5 minutes)
When alarm is sounding, presses
once, the alarm will be silenced and come on
again after the set snooze duration.
Note: if your second alarm activates while the first alarm is sounding or it is in the snooze
mode, the second alarm overrides the first alarm (the first alarm is reset to come on the
next day).
USING THE HI-LO DIMMER
Press
to adjust the brightness of the LED display. This can only be done when the
radio is off or the unit is not sounding.
USING THE NAP TIMER
The NAP Timer allows you to rest and automatically wake up in 5, 15, 30, 45, 60, 75 or 90
minutes.
1. Press Ʒ / NAP once, the display shows the nap icon and the default naptime “05” (5
minutes).
2. Press Ʒ / NAP again to select your desired naptime. It will exit to time display if no
button pressed for 5 seconds.
3. The nap icon lights up when the nap timer is counting. When the nap timer reaches 0,
the alarm will sound and the nap icon will flash. Press Ʒ / NAP once to stop the nap alarm,
the nap icon will go off.
Note: If the nap time is set up then your alarm is sounding, your nap time will be
cancelled automatically.
SETTING UP THE FM ANTENNA
Extend the FM wire antenna fully and vary the direction for best FM reception. Do not
strip, alter or attach to other antennas.
LISTENING TO THE FM RADIO
1. To turn on the radio, press SLEEP/RADIO once, the display shows “ON” and then the
radio frequency readings in Mhz.
2. Press Ʒ or to tune the radio to a desired station. Press and hold Ʒ or to scan for
the next clear station.
3. To adjust the volume, press VOL once, the display shows“L07”, press Ʒ or to adjust
volume from L01 (minimum) to L15 (maximum)
4. Press
to turn off the radio.

CRP8BK / CRP8WH
8
Remark: keep your radio away from fluorescent lamps or other electronic devices, which
may cause interference to the radio.
USING THE PRESET MEMORY
This clock radio features a total of 10 preset memories of FM stations. These allow you to
preset your favorite stations and access them quickly.
1. Turn on the radio and select a radio station you like to memorize.
2. Press and hold the SET appears and “01” flashes. Press SET once to store Memory 1.
3. Press Ʒ or to select another station you like to memorize. Then press and hold SET
appears and “01” flashes. Press Ʒ or once, “02” appears. Press SET once to store
Memory 02.
4. Repeat Step 2 to 3 to preset memories 3 through 10.
5. To access a preset station at any time, press the SET one at a time while the radio is on.
6. To edit a preset station, select another station and then repeat Step 2 to 4. This
overrides the original settings.
USING THE SLEEP TIMER
1. Press the RADIO/SLEEP twice to enter the sleep mode. The sleep icon “L” and the sleep
time “05” (5 minutes) and will flash on the display.
2. Press the RADIO/SLEEP again as needed to adjust the sleep timer from 15, 30, 45, 60, 75
or 90 minutes.
3. When the display changes back to show the time, press the RADIO/SLEEP once to show
the sleep time remaining.
4. The radio will play for the programmed sleep time and then shut off.
5. To turn off the radio before the sleep time has elapsed, press
once.
USING THE PROJECTION
Press once at the left side of your unit to turn on or off the projection.
When the projection is on, press and hold to flip the projected time upside down.
At the back of your unit, turn the rotary knob to rotate the projected time by 90 degree.
TO USE THE AUX FUNCTION TO PLAY MUSIC IN YOUR IPHONE, IPOD OR MP3
You could play the music in your iPhone, iPod or MP3 device by using the AUX function.
1. Plug in the AUX cable to the AUX Line-in socket at the back of your Radio Alarm Clock
and one end to the earphone socket of your iPhone, iPod or MP3 device.
2. Turn on your MP3, iPhone or iPod to play the music you like.
Note: when you plug in the AUX cable, it will no function of the RADIO/ SLEEP function,
volume of the unit can’t be adjusted when it in AUX function.Do not plug in the AUX cable
to the unit overnight as this will prohibit the alarms from functioning.
ENGLISH

CRP8BK / CRP8WH
9
USB charging your mobile phones:
Plug in the USB cable into the USB Charge Out port, then connect the opposite end to
your phones for changing.
Note: The USB charge spec. is 5.0V/500MA; the original USB cable is required for Charging.
There will cause some damages if illegal cable were using.
TROUBLE SHOOTING
If your clock displays irrelevant time or does not function properly, which maybe caused
by electro-static discharge or other interference, unplug the DC jack to disconnect the AC
power (and remove the backup battery). The clock radio will be reset to default settings
and you need to set it again.
SPECIFICATIONS
Alarm duration: 1 hour (3-minute on, 9-minute off interval)
Snooze duration: 5 to 60 minutes
Nap timer duration: 5 minutes Nap timer selections: 5, 15, 30, 45, 60, 75, 90 minutes to
OFF
Sleep timer selections: 5, 15, 30, 45, 60, 75, 90 minutes to OFF
Volume: L01 (minimum) to L15 (maximum)
Preset Memories of radio: 10
USB charging: 5V, 500Ma
Power adaptor: 5.5V, 550mA
Default settings:Time format: 24 hour
Time: 0:00
Alarm 1 and 2: 0:00
Volume: L07 (Level 7)
Snooze duration: 05 (5 minutes)

CRP8BK / CRP8WH
10
WAŻNE INFORMACJE
• Należy zachować instrukcję obsługi oraz informacje dotyczące bezpieczeństwa w celu
wykorzystania ich w przyszłości.
• Nie należy dopuszczać do tego, aby na urządzenie kapała lub wylewała się ciecz. Nie
wolno też używać go w wilgotnych miejscach, jak np. łazienka.
• Nie wolno instalować tego urządzenia w następujących miejscach:
• Wystawionych na bezpośrednie działanie promieni słonecznych lub w pobliżu
grzejników.
• Kłaść go na wierzchu innego sprzętu stereofonicznego który wydziela ciepło.
• Blokując wentylację lub w zapylonym miejscu.
• W miejscach narażonych na ciągłe drgania.
• W miejscach o wysokiej wilgotności.
• Nie wolno stawiać urządzenia w pobliżu świec lub otwartego ognia.• Urządzenia można
używać wyłącznie w sposób opisany w niniejszej instrukcji.
• Przed pierwszym włączeniem zasilania należy upewnić się, że zasilacz został prawidłowo
podłączony.
• Pamięć USB podłącza się bezpośrednio lub przy użyciu przedłużacza USB o długości do
25 cm.
Ze względów bezpieczeństwa nie należy demontować obudów ani uzyskiwać dostępu do
wnętrza urządzenia. Urządzenie powinno być naprawiane przez wykwalifikowany
personel serwisu.
Nie wolno rozkręcać urządzenia ani otwierać jego obudowy, gdyż wewnątrz nie ma
żadnych części, które mogłyby być naprawiane przez użytkownika. Konserwacją i naprawą
sprzętu zajmują się wyłącznie wykwalifikowani pracownicy serwisu.
INSTRUKCJE DOTYCZĄCE BEZPIECZEŃSTWA
1. Przeczytać instrukcje — przed korzystaniem z urządzenia należy przeczytać całość
instrukcji obsługi oraz informacje o bezpieczeństwie.
2. Zachować instrukcje — należy zachować instrukcje użytkowania i obsługi w celu
wykorzystania ich w przyszłości.
3. Przestrzegać ostrzeżeń — należy postępować zgodnie z wszystkimi ostrzeżeniami
zamieszczonymi na urządzeniu oraz zgodnie z instrukcją obsługi.
4. Przestrzegać instrukcji — należy postępować zgodnie z instrukcją obsługi oraz
wskazówkami dla użytkownika.
5. Woda i wilgoć — aby zmniejszyć zagrożenie pożarem lub porażeniem elektrycznym,
nie wolno narażać urządzenia na bezpośrednie działanie deszczu, wody i wilgoci, jak np. w
saunie czy w łazience. Nie używać niniejszego urządzenia w pobliżu wody, na przykład
obok wanny, umywalki, zlewu kuchennego lub balii, w wilgotnej piwnicy lub w pobliżu
basenu (lub w podobnych miejscach).
POLISH

CRP8BK / CRP8WH
11
6. Przedmioty i ciecze w urządzeniu — nie należy wciskać jakichkolwiek przedmiotów
przez otwory urządzenia, ponieważ mogą one zetknąć się z punktami niebezpiecznego
napięcia i podzespołami, co może wywołać pożar lub porażenie prądem. Pod żadnym
pozorem nie należy rozlewać jakichkolwiek cieczy na powierzchni urządzenia. Nie wolno
kłaść na wierzchu urządzenia przedmiotów zawierających ciecze.
7. Serwisowanie – nie należy próbować własnoręcznego przeglądania urządzenia.
Otwieranie pokrywy może spowodować kontakt z niebezpiecznym napięciem i narazić
użytkownika na inne niebezpieczeństwa. Konserwacją i naprawą sprzętu zajmują się
wyłącznie wykwalifikowani pracownicy serwisu.
8. Części zamienne — przy wymianie części należy sprawdzić, czy pracownik serwisu użył
części zamiennych zalecanych przez producenta lub też czy części są identyczne jak część
oryginalna. Dokonywanie wymiany na niezatwierdzone części grozi wybuchem pożaru,
porażeniem prądem elektrycznym lub innymi niebezpieczeństwami.
9. Należy umieścić radiobudzik na stabilnej powierzchni, z dala od bezpośredniego
nasłonecznienia lub źródeł ciepła I wilgoci.
10. Należy zabezpieczyć meble lakierowane lub wykonane z naturalnego drewna przed
ustawieniem na nich urządzenia, przez położenie obrusa lub materiału ochronnego.
11. Urządzenie można czyścić wyłącznie miękką szmatką zwilżoną wodą z roztworem
mydła. Benzyna, rozpuszczalnik oraz inne środki czyszczące mogą spowodować
uszkodzenie powierzchni urządzenia. Przed czyszczeniem należy się upewnić, że
urządzenie jest wyłączone.
12. Bateria
1) Baterie nie mogą być narażone na działanie nadmiernego ciepła, jak np. promieni
słonecznych, ognia itp.
2) Podczas utylizacji baterii należy zwrócić uwagę na aspekty ochrony środowiska.
3) PRZESTROGA dotycząca używania baterii: aby nie dopuścić do rozszczelnienia baterii,
które może spowodować obrażenia ciała bądź uszkodzenie urządzenia:
- Podczas wkładania baterii zwrócić uwagę na jej polaryzację (+ I -).
- Należy wyjąć baterie z urządzenia, gdy nie będzie ono używane przez dłuższy czas.
OSTRZEŻENIE
Urządzenie nie powinno być używane przez osoby (w tym dzieci) o obniżonej sprawności
fizycznej, sensorycznej lub umysłowej oraz osoby z niewystarczającą wiedzą i
doświadczeniem, jeśli nie znajdują się one pod nadzorem osoby odpowiedzialnej za ich
bezpieczeństwo i nie zostały poinstruowane jak bezpiecznie używać urządzenia.
Obecność osób dorosłych jest wymagana, jeśli urządzenie obsługują dzieci; pozwoli to
zapewnić bezpieczne korzystanie z urządzenia.
1. Nie należy dopuszczać do tego, aby na urządzenie kapała lub wylewała się ciecz, ani nie
należy stawiać na nim przedmiotów wypełnionych cieczami, takich jak wazony.
2. Aby uniknąć pożaru lub porażenia prądem elektrycznym, należy chronić urządzenie
przed gorącymi miejscami, działaniem deszczu, wilgoci I pyłu.
3. Nie wolno ustawiać urządzenia w pobliżu jakichkolwiek źródeł wody, np. kranów,
wanien, pralek lub basenów pływackich. Urządzenie należy ustawić na równym i
stabilnym podłożu.
CRP8BK / CRP8WH
12
4. Nie wolno narażać urządzenia na silne pole magnetyczne.
5. Nie wolno stawiać urządzenia bezpośrednio na wzmacniaczu lub amplitunerze.
6. Nie wolno stawiać urządzenia w wilgotnym miejscu, gdyż wilgoć ma szkodliwy wpływ
na podzespoły elektryczne.
7. Po wniesieniu urządzenia z zimnego do ciepłego miejsca lub do wilgotnego miejsca
może dojść do kondensacji wilgoci na soczewce wewnątrz odtwarzacza. W takiej sytuacji
urządzenie nie będzie działać prawidłowo. Należy pozostawić włączone urządzenie na
około jedną godzinę, aby umożliwić odparowanie wilgoci.
8. Nie wolno czyścić urządzenia rozpuszczalnikami chemicznymi, gdyż mogą one
zniszczyć lakier obudowy. Urządzenie wyciera się czystą, suchą lub nieznacznie zwilżoną
ściereczką.
UWAGA
Niniejsze urządzenie spełnia wymagania dyrektyw europejskich dotyczących zakłóceń
radiowych.
Produkt został wyprodukowany z wysokiej jakości materiałów i podzespołów, które
można poddać recyklingowi i ponownie użyć.
Jeśli na urządzeniu znajduje się znak przekreślonego kosza na śmieci, oznacza to, że
produkt jest objęty postanowieniami dyrektywy europejskiej 2002/96/WE. Należy
zapoznać się z wymaganiami dotyczącymi lokalnego systemu zbiórki odpadów
elektrycznych i elektronicznych. Należy postępować zgodnie z lokalnymi przepisami. Nie
wolno wyrzucać tego produktu razem ze zwykłymi odpadami domowymi. Prawidłowe
usunięcie starego produktu zapobiegnie potencjalnym negatywnym skutkom dla
środowiska naturalnego i zdrowia ludzkiego.
Urządzenie jest wyposażone w baterie objęte dyrektywą europejską 2006/66/WE. Baterii
nie wolno wyrzucać razem z odpadami gospodarstwa domowego. Należy zapoznać się z
lokalnymi przepisami dotyczącymi oddzielnej zbiórki baterii, ponieważ prawidłowa
utylizacja zapobiegnie potencjalnym negatywnym skutkom dla środowiska naturalnego i
zdrowia ludzkiego.
POLISH
CRP8BK / CRP8WH
13
Informacje o ochronie środowiska naturalnego
Opakowanie zawiera tylko niezbędne elementy. Dołożono wszelkich starań, aby trzy
materiały składowe opakowania były łatwe do oddzielenia: karton (pudełko), pianka
polistyrenowa (zabezpieczenia wewnątrz) i polietylen (torebki, arkusz ochronny).
Urządzenie wyprodukowano z materiałów, które można poddać recyklingowi i użyć
ponownie po ich demontażu przez wyspecjalizowaną rmę. Należy przestrzegać
lokalnych przepisów dotyczących utylizacji materiałów opakowa
niowych, zużytych baterii
i niepotrzebnych urządzeń.Nagrywanie i odtwarzanie materiałów może wymagać
uzyskania zgody. Patrz ustawa o prawach autorskich i prawach wykonawców/artystów.
PRZYCISKI I FUNKCJE
WIDOK Z GÓRY
WIDOK Z PRZODU
PROJEKTOR
STRZAŁKA W DÓŁ/PROJEKCJA
GŁOŚNOŚĆ (VOL)
RADIO/DRZEMKA
DRZEMKA/JASNOŚĆ
ALARM 1–2
SET/PAMIĘĆ
DRZEMKA (NAP)
/STRZAŁKA
W GÓRĘ
CZAS
ALARM 1
ALARM 2
WSKAŹNIK PM
DRZEMKA
TIMER DRZEMKI
CRP8BK / CRP8WH
14
INSTALACJA
Podłącz przewód zasilania do ściennego gniazda prądu przemiennego, a drugi koniec
kabla do gniazda z tyłu urządzenia. Radiobudzik jest gotowy do pracy.
INSTALOWANIE BATERII PODTRZYMANIA PAMIĘCI
Do podtrzymania pamięci radiobudzika na wypadek krótkotrwałego zaniku zasilania
używa się jednej baterii CR2032 (nie wchodzi w skład zestawu).
1. Połóż urządzenie na płaskiej powierzchni przednią częścią w dół.
2. Odsuń i zdejmij pokrywę baterii w dolnej części urządzenia.
3. Włóż nową baterię litową CR20
32 stykiem „+” skierowanym do góry (patrz rysunek).
4. Załóż pokrywę komory baterii.
Po zaniku zasilania sieciowego zgaśnie wyświetlacz LED i nie będą działać radio i alarmy.
Bateria zapewnia podtrzymanie pamięci daty i godziny w urządzeniu. Należy się upewnić,
że została użyta nowa bateria. Nowa bateria CR2032 umożliwia podtrzymanie pamięci
urządzenia przez ok. 3 dni.
USTAWIENIE GODZINY, FORMATU 12/24 GODZINY I CZASU TRWANIA DRZEMKI
1. Naciśnij raz przycisk SET; zaczną migać cyfry godzin. Naciśnij przycisk Ʒ lub
, aby
ustawić bieżącą godzinę (naciśnij i przytrzymaj przycisk, aby szybko zmieniać wartość).
POLISH
WIDOK Z TYŁU

CRP8BK / CRP8WH
15
2. Naciśnij ponownie przycisk SET; zaczną migać cyfry minut. Naciśnij przycisk Ʒ lub ,
aby ustawić minuty.
3. Naciśnij ponownie przycisk SET; na wyświetlaczu zacznie migać wskazanie „24H”.
Naciśnij przycisk Ʒ lub , aby wybrać format czasu „12H” lub „24H”.
4. Naciśnij ponownie przycisk SET; na wyświetlaczu zacznie migać wskazanie „05”. Naciśnij
przycisk Ʒ lub , aby wybrać czas drzemki z zakresu od 5 do 60 minut.
5. Naciśnij ponownie przycisk SET, aby zamknąć tryb ustawień. Ten tryb zostanie
zamknięty automatycznie po upłynięciu około 10 sekund od ostatniego naciśnięcia
przycisku.
Uwaga: po wybraniu 12-godzinnego formatu czasu na środku w dolnej części
wyświetlacza pojawi się ikona P (PM), wskazując czas po południu. Nie jest wyświetlany
wskaźnik czasu do południa (AM).
USTAWIENIE ALARMÓW
1. Naciśnij raz przycisk AL 1.2; zaczną migać ikona 1 i cyfry godzin. Naciśnij przycisk Ʒ lub
, aby ustawić godzinę alarmu 1.
2. Naciśnij ponownie przycisk AL 1.2, aby ustawić minuty. Naciśnij przycisk Ʒ lub , aby
ustawić minuty alarmu 1.
3. Naciśnij ponownie przycisk AL 1.2; na wyświetlaczu pojawi się wskazanie „OFF” (alarm
wyłączony). Naciśnij przycisk Ʒ lub , aby wybrać źródło sygnału budzenia:
rd = budzenie radiem
bu = budzenie brzęczykiem
OFF = alarm wyłączony
4. Naciśnij ponownie przycisk AL 1.2; zaczną migać ikona 2 i cyfry godzin. Naciśnij przycisk
Ʒ lub , aby ustawić godzinę alarmu 2.
5. Powtarzając kroki 2 i 3, ustaw alarm 2.
6. Naciśnij ponownie przycisk AL 1.2, aby zamknąć tryb ustawień alarmu. Ten tryb zostanie
zamknięty automatycznie po upłynięciu około 10 sekund od ostatniego naciśnięcia
przycisku. Po wybraniu budzenia radiem lub budzenia brzęczykiem zostanie włączony
właściwy alarm, jest on wskazywany pojawieniem się ikony 1 i/lub 2 z lewej strony
wyświetlacza.
WYŁĄCZANIE I ZEROWANIE ALARMU W CELU PRZESUNIĘCIA GO NA NASTĘPNY
DZIEŃ
Gdy zostanie odtworzony alarm 1 lub 2, zacznie migać ikona 1 lub 2. Naciśnij przycisk AL
1.2, aby wyłączyć alarm i przesunąć go na następny dzień. Ikona 1 lub 2 będzie się nadal
świecić na wyświetlaczu.
Uwaga: po odtworzeniu alarmu naciśnij przycisk Ʒ / NAP lub RADIO / SLEEP, aby
uaktywnić timer drzemki lub radio i wyłączyć alarm w danym dniu. Nie podłączaj
przewodu AUX-IN do urządzenia na noc, ponieważ spowoduje to wyciszenie funkcji
alarmu.
OBSŁUGA DRZEMKI (domyślne ustawienie to 5 minut)
Jednokrotne naciśnięcie przycisku
powoduje wyciszenie odtwarzanego alarmu i
powtórne jego uruchomienie po upłynięciu czasu trwania drzemki.
 Loading...