

Page 1

Operation Instructions
Verona CR 43
Page 2
1
3
8697
10542
18
16
1217 15 14 13 11
3
Page 3

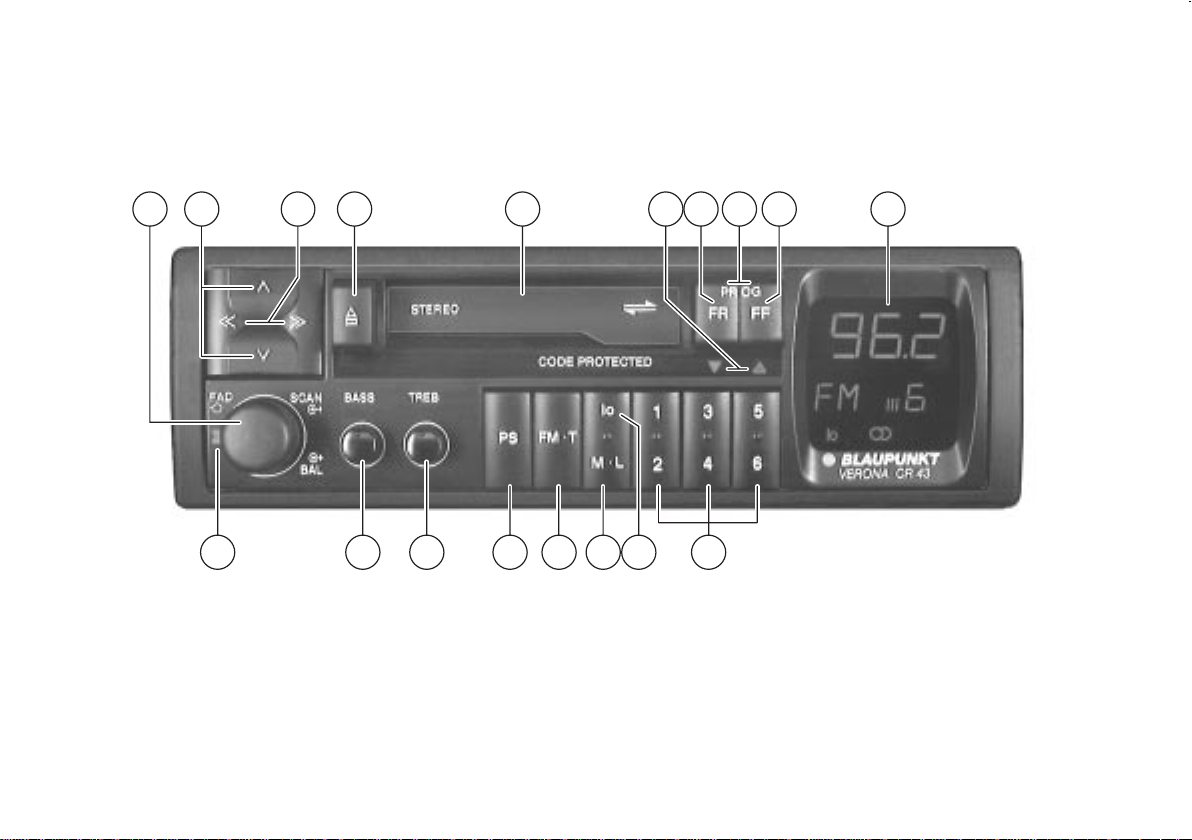
Front Panel Description
1 ON/OFF
Switch the set on/off by turning the
knob.
If “Cod” appears on the display, read
the chapter “Anit-Theft Coding” first.
Volume control:
By turning the knob
SCAN (search operation):
During radio reception, the stations are
briefly sampled by pressing the knob for
approx. one second.
Balance:
Pull knob and adjust left/right volume by
turning the knob.
/ rocker switch
2
Radio: Automatical station tuning
Coding: Read first the “Anti-Theft
Coding” chapter.
: Press rocker switch
to confirm your code
entry.
3 << / >> rocker switch
For fine tuning of the stations
Ejection of the tape
4
Press button firmly.
5 Cassette compartment
6 Track indication
- side A or 1 is played
- side B or 2 is played (reverse ope-
ration)
7 FR button (Fast Rewind)
Fast rewind of the tape.
Deactivate: press button FF.
8 PROG (Autoreverse)
For shifting to the other side of the tape
- press both buttons.
9 FF button (Fast Forward)
Fast forward of the tape
Deactivate: press button FR.
: Display for
frequency
waveband
preset button
storage level
; Preset buttons 1, 2, 3, 4, 5, 6
Store station - Keep button depressed
during radio operation until the station
becomes audible again.
Recall station - Briefly press the respective button.
Coding - Read the “Anti-Theft Coding”
chapter first.
Buttons 1 - 4: Use to enter a four-digit
code number.
Press each of the buttons until the fourdigit code to be found in the car radio
passport is represented on the display.
< lo rocker switch
Use this button to alter the sensitivity of
the automatic station seek operation.
lo lights up on the display - normal sensitivity
lo does not light up - high sensitivity
Additional function of the lo rocker
switch:
Switching from stereo to mono:
Press longer than 2 seconds.
DEUTSCH
ENGLISH
FRANÇAIS
ITALIANO
NEDERLAND
SVENSKA
ESPAGÑOL
stereo
seek tuning
(sensitivity)
13
PORTUGUES
Page 4

= M•L rocker switch (Medium wave -
Long wave)
Use this rocker switch to select either
medium wave (MW) or long wave (LW)
frequencies. To switch between these
wavebands simply press the rocker
switch again.
> FM•T button (Frequency Modulation)
This button is used for shifting between
the different FM storage levels I, II, III
and T (Travelstore - i.e. storing and
calling the six strongest stations of an
area).
Storing “T” - Press the FM •T button
until the seek tuning indication starts to
be displayed.
Recalling “T” - Press the FM•T button
? until T is indicated on the display.
Then briefly press the respective preset
button.“Balance” knob
To adjust the volume of the left and
right channel
? PS rocker switch (Preset Station Scan)
Pressing this button briefly samples all
memorized stations of the selected
waveband (FM, MW, LW or TS).
@ TREB (Treble)
to adjust trebles.
A BASS
to adjust basses.
B FAD (Fader)
(front/rear volume):
adjust using the lever.
14
Page 5

Contents
Important Notes............................ 16
What You Should Read By All Means! . 16
Safety Notes ......................................... 16
Road Safety ....................................... 16
Anti-Theft Coding......................... 16
Wrong Code Number Entered ........... 16
First-time Operation and Restart
Following Interruption of Power
Supply................................................ 16
Switching Code System Off............... 17
Switching the Code System Back On If
you wish to re-activate the anti-theft
code system: ..................................... 17
Optical indication of theft protection .. 17
Amplifier Section.......................... 17
ON/OFF ................................................ 17
Balance Control .................................... 17
Fader control......................................... 17
Radio Section ............................... 18
Selection of the Desired Waveband...... 18
Automatic Station Tuning...................... 18
Manual Tuning ...................................... 18
Adjusting the Station Seek Sensitivity... 18
Adjusting the local mode sensitivity ...... 18
Switching between Stereo and Mono ... 18
Storing a Station ................................... 19
Automatically Storing the Strongest
Stations ................................................. 19
Activating a Stored Station.................... 19
Briefly Sampling a Station..................... 19
Sampling Memorized Stations .............. 19
Tape Section................................. 20
Inserting the Tape ................................. 20
Removing the Tape............................... 20
Fast Forwarding/Rewinding of the Tape 20
Autoreverse........................................... 20
Care Notes............................................ 21
Appendix....................................... 21
Technical Data ...................................... 21
DEUTSCH
ENGLISH
FRANÇAIS
ITALIANO
NEDERLAND
SVENSKA
15
ESPAGÑOL
PORTUGUES
Page 6

Important Notes
Anti-Theft Coding
What You Should Read By All
Means!
Before starting to use your new car radio, you
should carefully read through the safety notes and the information about “Anti-Theft
Coding”.
Safety Notes
Road Safety
Being the driver of a motor vehicle you should
dedicate your full attention to the traffic around
you. Therefore always use your car stereo
such that you are able to cope with the
present traffic situation in any moment.
In difficult driving situations you should turn
your set off. Please take into account that at
a speed of 50 km/h you are almost covering
a distance of 14 m per second!
When adjusting the volume, always make
sure that acoustic signals from the outside
can still be heard in order to be able to react
to alert signals just as it is required by the
present situation.
16
Your radio is protected against theft by an
anti-theft coding system. If, once the unit has
been encoded, the power is disconnected
from the set (e.g. theft, disconnection of the
car battery or prior to installation), the set is
electronically blocked. It may only be used
again after the appropriate code number has
been entered (see car radio pass). Hence, a
coded set is of no use to a potential thief.
Wrong Code Number Entered
It should not be possible for thieves to ascertain the code number by trial-and-error. This
is why the set is blocked for a certain period
of time if an incorrect code number is entered. “---” would then appear in the display :.
This time period is 10 seconds following the
first three attempts, and is increased to 1
hour following subsequent attempts.
After 19 unsuccessful attempts “OFF” will
appear in the display : and the set can no
longer be started.
Note:
Keep your car radio pass, which contains the
code number, in a safe place in order to avoid
“unauthorized access” to your car radio. If
you lose your radio pass and have forgotten
your code number you will not be able to
restart the set after the power supply has
been interrupted. The only way to make the
set operable again is by sending the radio to
our central customer service workshop or to
one of our dealers in your vicinity.
First-time Operation and Restart Following Interruption of Power Supply
● Switch on set.
“Cod” will appear in the display :.
● Briefly press preset button 1 ;, “000”
will appear in the display :.
● Enter the code number from the Blaupunkt car radio pass:
Example: Code number is 1521
● - press preset button 1 ; once,
“1000” appears in the display :,
- press preset button 2 ; 5 times,
“1500” appears in the display :,
- press preset button 3 ; 2 times,
“1520” appears in the display :,
- press preset button 4 ; once,
“1521” appears in the display :.
● Confirm code number:
Press upper part of rocker switch
2.
Note:
Using preset button 1 the set can only be
adjusted to “1” or “0”. “0” is not indicated in the
display.
If you have entered and confirmed an incorrect code number, “---” will initially appear in
the display : and then, after a certain time
/
Page 7

Amplifier Section
period, “000”. Following this, it is essential
that you enter the correct code number.
Switching Code System Off
If you wish to switch the anti-theft code system off:
● turn off the radio,
● simultaneously press, and hold, preset
buttons 1 and 4 ;
● turn the set back on. “Cod” will then
appear in the display :.
● release the preset buttons 1 and 4 ;.
“000” then appears in the display :.
● Enter the code number that is in the
Blaupunkt car radio pass and confirm:
See example “First-time operation ...”.
The anti-theft coding system has now been
deactivated.
Switching the Code System Back On If
you wish to re-activate the anti-theft
code system:
● turn the radio off,
● simultaneously press, and keep de-
pressed, preset buttons 1 and 4 ;,
● turn the set back on. “Cod” briefly appears in the display : and then the set
is switched on.
The anti-theft code system is now activated.
Now whenever the set is turned on, “CODE”
will appear briefly in the display :.
Optical indication of theft protection
As optical warning of the encoded car radio,
the LED
6 flashes when the ignition is
switched off, provided the car radio has been
connected correspondingly.
For this, please see the corresponding installation instructions.
ON/OFF
For switching the set on,
● turn button 1 .
Your stereo is now ready for operation.
For switching the set off,
● turn button 1
.
Volume control
● turn button 1.
Balance Control
Use button 1 to balance the sound impres-
sion of the right and left channel speaker.
● Pull (lock in) button and turn.
After the adjustment
● slightly press button.
Fader control
If four loudspeaker are connected, the front/
rear sound impression of the loudspeakers
(fader) can also be modified using lever B.
Adjusting trebles
● turn button @.
Adjusting basses
● turn button A.
17
DEUTSCH
ENGLISH
FRANÇAIS
ITALIANO
NEDERLAND
SVENSKA
ESPAGÑOL
PORTUGUES
Page 8

Radio Section
Selection of the Desired Waveband
This radio allows you to choose between the
FM, MW and LW wavebands.
FM Selection
● Briefly press the FM•T rocker switch
>. “FM” is displayed in the display (for
Frequency Modulation).
MW or LW Selection
● Briefly press the M•L rocker switch =.
An “M” (for MW), or an “L” (for LW) will
then appear in the display.
If you wish to switch between MW and LW:
● press the M•L rocker switch = again.
The following instructions apply for all wavebands, as long as not otherwise indicated.
Automatic Station Tuning
Tuning of Subsequent Station
● Press rocker switch / 2 up. The
radio will automatically seek the next
station.
Tuning of Previous Station
● Press rocker switch
radio will automatically seek the previous station.
If the rocker switch
down/up, the seek operation continues
to be carried out quickly in the corresponding direction.
/ 2 down. The
/ 2 is held
Manual Tuning
It is also possible to tune in stations “by hand”
with this radio:
● Press rocker switch <</>> 3 to the left
or to the right. The frequency band is
scanned in small steps.
Adjusting the Station Seek
Sensitivity
You may also modify the sensitivity of the
automatic station seek operation.
For this:
● press lo rocker switch <.
If “lo” is indicated, only stations with
good reception conditions are captured
(lower sensitivity).
If “lo” is not indicated, stations with a
weaker reception are also captured
(higher sensitivity).
Adjusting the local mode sensitivity
In regions with extremely high station density, e.g. in Italy, the set allows you to switch
over the station seek sensitivity for the ocal
mode from “High” (adjusted ex works) to
“Low”. “Low” means that station seek tuning
only captures the most powerful stations.
For modifying the local mode:
● press button lo < longer than 8 secs.
The display : shows “L” for “Low”.
By pressing button lo < again longer than
8 secs., the set switches back to “High” (display : “H”).
When switching off the unit or when removing
the set with the QuickOut handle the set
remains in the last activated mode.
Switching between Stereo and
Mono
If you wish to switch between stereo and
mono:
● keep the lo button < pressed for long-
er than 2 seconds. The stereo symbol
will appear in the display : if the
stereo mode is activated.
The stereo function is activated auto-
matically when you turn your set on.
The set will automatically switch to
mono if reception is poor.
18
Page 9

Storing a Station
You can store one MW and LW station and 4
FM stations on each of the preset buttons ;.
The display will show you the selected waveband (FM, MW or LW) and preset button.
On FM, the display will also give you the
chosen storage level (I, II, III or T).
If you wish to change from one storage level
to another:
● press the FM•T button >.
If you wish to store a station:
● (for FM only) select the storage level.
To achieve this, press the FM•T button
> until I,II,III or T appears in the display :.
● tune in the station (see chapter Station
Tuning).
● press the desired preset button ; until
the radio resumes play (approx. 2 seconds).
The display : indicates which preset
button has been pressed.
The station has now been stored.
Note:
When tuning in an already stored station, the
display : will show the corresponding preset button for approx. five seconds and the
respective storage level.
Automatically Storing the Strongest Stations
(Travelstore)
With Travelstore, you have the opportunity to
automatically store the six most powerful FM
stations of your local reception area and have
them sorted according to their frequencies.
This feature is of special use while travelling.
● Press the FM•T rocker switch > for at
least two seconds.
The set searches for the next FM stations and sorts them on the “T” (Travelstore) storage level. Once the process
is finished, the car radio tunes in to the
first station.
If required, it is also possible to manually
store a station on the Travelstore level. If less
than five stations can be received, the free
buttons are represented by dashes for a
short period of time.
Activating a Stored Station
If required, the memorized stations can be
activated at a keystroke.
● Choose the storage level.
For this, press FM•T > until the display : shows I, II or III, or T.
● Briefly press the required preset button
;.
Briefly Sampling a Station
(Radio Scan)
Starting with the currently tuned in station,
you can have the following ones briefly sampled for approx. eight seconds each.
● Press the knob 1 for approx. 1 sec.
If the following station is found, it is
reproduced for approximately eight
seconds.The station’s frequency starts
blinking on display :; if it has already
been memorized, the corresponding
preset button and the storage level indicator starts blinking on display :. Subsequently, the set starts searching for
the next station.
For selecting a sampled station:
● Press the knob 1 once again. The
Scan function is off.
After the search operation has been concluded, and no station has been chosen, the
radio starts playing the station from which
Station Scan was started before.
Sampling Memorized Stations
All memorized stations of a waveband can be
briefly sampled.
● Press the PS rocker switch ?.
One after another, the car radio will
then start introducing all memorized
stations of the selected waveband.
19
DEUTSCH
ENGLISH
FRANÇAIS
ITALIANO
NEDERLAND
SVENSKA
ESPAGÑOL
PORTUGUES
Page 10

Tape Section
The set either samples the stations of
storage levels I-III or of the Travelstore
level “T”. This depends on the current
switching status.
If a preset button has no station allocated, this button is skipped.
To terminate this function:
● Press the PS rocker switch ? once
again.
The station currently sampled is
maintained.
Inserting the Tape
If you wish to play a cassette tape:
● switch the set on
● gently insert the cassette with side 1
upwards.
The tape will then be played in the direction
it was last played.
Track indication 6 indicates which side is
played.
- side A or 1 is played.
- side B or 2 is played (reverse operation).
Removing the Tape
If you wish to remove the tape:
● press the button 4. The tape is
then ejected.
Fast Forwarding/Rewinding of
the Tape
Fast Forward
● Press the FF (Fast Forward) button 9.
At the end of the tape the set will switch to
the other side and resume playing the
tape.
Fast Rewind
● Press the FR (Fast Rewind) button 7.
Once the tape has been completely
rewound, the set begins playing the
tape.
Stopping the Fast Rewind Operation
● Press the FF button 9.
Autoreverse
If, while a tape is playing, you wish to switch
to the other side of that tape:
● press the FF and FR buttons simultaneously.
At the end of the tape the set will automatically switch to the other side of the tape.
Note:
When playing stiff tapes it is also possible to
manually switch to the other side of the tape.
If this is the case, check the tape wound up to
that point; fast forwarding or rewinding often
helps in such cases.
20
Stopping the Fast Forward Operation
● Press the FR button 7.
Page 11

Appendix
Care Notes
We recommend C-60 and C-90 type tapes
for use in any automobile tape player; to
protect your tapes, store them in a cool place
away from dirt, dust, or excessive temperatures above 50° Celsius. In order to ensure
smooth tape operation, cold tapes should be
allowed to heat up a bit before they are
played. If dust collects on the audio head or
the rubber roller, problems related to rough
tape operation or poor sound quality may
occur after approx. 100 hours of operation.
For normal contamination, use a headcleaning cassette to remove the dust; for
more intensive contamination, use a cottonwool tip soaked with alcohol. Never use hard
tools!
Technical Data
Amplifier
Output power: 4 x 4.5 W watts RMS
acc. to DIN 45324/3.1
4 Ω
FM:
Sensitivity: 0.9 µV at 26 dB
signal-to-noise ratio
Frequency
response: 35 - 15 000 Hz (-3 dB)
Tape Section:
Frequency
response: 31.5 - 16 000 Hz (-3 dB)
DEUTSCH
ENGLISH
FRANÇAIS
ITALIANO
NEDERLAND
SVENSKA
Modifications reserved!
21
ESPAGÑOL
PORTUGUES
Page 12

DEUTSCH
ENGLISH
FRANÇAIS
ITALIANO
NEDERLAND
SVENSKA
Blaupunkt-Werke GmbH
Bosch Telecom
1/93 MC/VKD-Hi 3 D92 147 061 PM
13
ESPAGÑOL
PORTUGUES
 Loading...