

Page 1
O w ne r' s M a nu al
Ins trukc ja obsłu gi
N á v o d k obslu ze
Prí ručka vlast níka
Hasz ná lati ut as ít ás
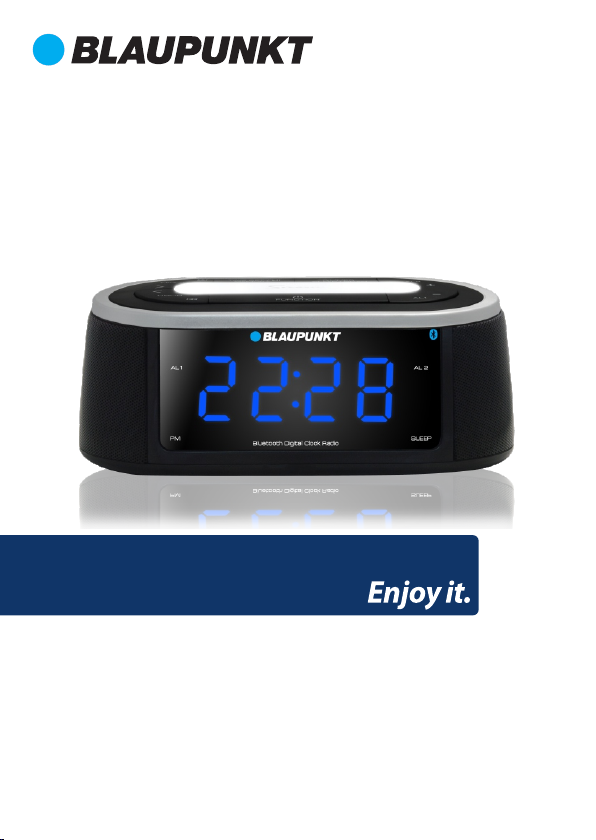
CR20BT
Radiobudzik z interfej sem Blu etoot h oraz dwoma portami ładowania USB
Dig itáln í radiobudí k s technologií Blu etooth a dvěma nabíjecí mi porty US B
Dig itáln e rádio s funkc iou Blu etooth, bud íkom a du álnym nabíjaním cez US B
Blu etoot h digital ala rm cloc k radio w ith dua l USB ch argin g
Rádió Bluetooth, digitális ébresztőóra és USB-t öltő fu nkció val
Page 2

Page 3

CR2 0BT
IMPORTANT NOTES
To achieve the utmost in enjoyment and performance, and in order to become familiar with its
features, please read this manual carefully before attempting to operate this product. This will
assure you years of trouble free performance and listening pleasure.
This safety and operating instruction should be retained for future reference.
The apparatus should not be exposed to dripping or splashing or placed in a humid
atmosphere such as a bathroom.
Do not install the product in the following areas:
Places exposed to direct sunlight or close to radiators.
On top of other stereo equipment that radiate too much heat.
Blocking ventilation or in a dusty area.
Areas where there is constant vibration.
Humid or moist places.
Do not place near candles or other naked flames.
Operate the product only as instructed in this manual.
Before turning on the power for the first time, make sure the power adaptor is properly
connected.
For safety reasons, do not remove any covers or attempt to gain access to the inside of the product.
Refer any servicing to qualified personnel.
Do not attempt to remove any screws, or open the casing of the unit; there are no user serviceable
parts inside. Refer all servicing to qualified service personnel.
SAFETY INSTRUCTIONS
1. Read Instructions - All the safety and operating instructions must be read before the product is
operated.
2. Retain Instructions - The safety and operating instructions should be kept with the product for
future reference.
3. Heed warnings - All warnings on the product and in the operating instructions should be
adhered to.
4. Follow instructions - All operating and users’ instructions should be followed.
5. Installation - Install in accordance with the manufacturer's instructions.
6. Power sources - This product should be operated only from the type of power source indicated
by the marking adjacent to the power cord entry. If you are not sure of the type of power supply
to your home, consult your product dealer or local power company.
7. Grounding or polarization - the product is not required to be grounded. Ensure that the plug is
fully inserted into the wall outlet or extension cord receptacle to prevent blade or pin exposure.
Some versions of the product are equipped with a power cord fitted with a polarized alternating
line plug (a plug having one blade wider than the other). This plug will fit onto the power outlet
only one way. This is a safety feature. If you are unable to insert the plug fully into the outlet, try
reversing the plug. If the plug should still fail to fit, contact your electrician to replace your
obsolete outlet. Do not defeat the safety purpose of the polarized plug. When using an
extension power-supply cord or a power-supply cord other than that supplied with the
appliance, it should be fitted with the appropriate molded plugs and carry safety approval
appropriate to the country of use.
8. Power cord protection - Power-supply cords should be routed so that they are not likely to be
walked on, kinked or pinched by items placed on or against them, paying particular attention to
cords from plugs, receptacles and the point where they exit from the product.
EN GLISH
1
Page 4

CR2 0BT
9. Overloading - Do not overload wall outlets, extension cords, or multiple sockets, as this can
result in a risk of fire or electric shock.
10. Ventilation - The product must be properly ventilated. Do not place the product on a bed, sofa,
or other similar surface. Do not cover the product with any items such as tablecloths,
newspapers, etc.
11. Heat - The product should be situated away from heat sources such as radiators, heat registers,
stoves, or other products, including amplifiers that produce heat. No naked flame sources, such
as lighted candles, should be placed on the apparatus.
12. Water and moisture - To reduce the risk of fire or electric shock, do not expose the product to
train, dripping, splashing or excessive moisture such as in a sauna or bathroom. Do not use this
product near water, for example, near a bathtub, washbowl, kitchen sink, laundry tub, in a wet
basement or near a swimming pool (or similar).
13. Object and Liquid Entry - Never push objects of any kind into this product through openings,
as they may touch dangerous voltage points or short-circuit parts that could result in a fire or
electric shock. Never spill liquid of any kind on the product. Do not place any object containing
liquid on top of the product.
14. Cleaning - Unplug the product from the wall outlet before cleaning. Dust in the woofer may be
cleaned with a dry cloth. If you wish to use an aerosol cleaning spray, do not spray directly on
the cabinet; spray onto the cloth. Be careful not to damage the drive units.
15. Attachments - Do not use attachments not recommended by the product manufacturer, as
they may cause hazards.
16. Accessories - Do not place this product on an unstable cart, stand, tripod, bracket or table. The
product may fall, causing serious injury to a child or adult, and serious damage to the product.
Use only with a cart, stand, tripod, bracket or table recommended by the manufacturer or sold
with the product. Any mounting of the product should follow the manufacturer’s instructions
and should use a mounting accessory recommended by the manufacturer.
17. Moving the product - A product and cart combination should be moved with care. Quick stops,
excessive force and uneven surfaces may cause the product and cart combination to overturn.
18. Unused periods - The power cord of the appliance should be unplugged from the outlet during
lightning storms or when the apparatus is left unused for a long period of time.
19. Servicing - Do not attempt to service this product yourself, as opening or removing covers may
expose you to dangerous voltage or other hazards. Refer all servicing to qualified service
personnel.
20. Please remove the power plug form the main power source or wall power source when not in
use. When plugged in to a power source, the system is in standby mode, so the power is not
entirely cut off.
21. Replacement parts - When replacement parts are required, ensure that the service technician
has used replacement parts specified by the manufacturer or have the same characteristics as
the original part. Unauthorized substitutions may result in fire, electric shock or other hazards.
22. Mains fuses - For continued protection against fire hazard, use fuses only of the correct type
and rating. The correct fuse specification for each voltage range is marked on the product.
23. Do not turn up the volume while listening to a section with very low level inputs or no audio
signals. If you do, the speaker may be damaged when a peak level section is suddenly played.
24. The only means of completely disconnecting the product from the power supply is by removing
the power cord from the wall outlet or the product. The wall outlet or the power cord entry to
the product must remain freely accessible at all times while the product is in use.
2
Page 5
CR2 0BT
25. Try to install the product near a wall socket or extension cord and shall be easily accessible.
26. The highest environmental temperature suitable for this product is 35°C.
27. ESD hints - The normal function of the product may be disturbed by strong Electro-Magnetic
Interference. If so, simply reset the product to resume normal operation by following the
instruction manual. In case the function could not resume, please use the product in other
location.
28. Battery
1). The batteries must not be exposed to excessive heat such as sunshine, fire or
the like.
2). The batteries should be drawn to the environmental aspects of battery
disposal.
3). Battery usage CAUTION-to prevent battery leakage which may result in body
injuries, property damage, or damage to the apparatus:
- Install all batteries correctly, + and – as marked on the apparatus.
- Do not mix batteries (old and new or carbon and alkaline, etc.)
- Remove batteries when the unit is not used for a long time.
WARNING
This appliance is not intended for use by persons (including children) with reduced physical sensory
or mental capabilities, or lack of experience and knowledge, unless they have been given
supervision or instruction concerning use of the appliance by a person responsible for their safety.
Children should be supervised to ensure that they do not play with the appliance.
1. The apparatus must not be exposed to dripping or splashing and that objects filled with liquids,
such as vases, must not be placed on the apparatus.
2. To prevent fire or shock hazard, do not expose this equipment to hot places, rain, moisture or
dust.
3. Do not locate this unit near any water sources e.g. taps, bathtubs, washing machines or
swimming pools. Ensure that you place the unit on a dry, stable surface.
4. Do not place this unit close to a strong magnetic field.
5. Do not place the unit on a amplifier or receiver.
6. Do not place this unit in a damp area as the moisture will affect the life of electric components.
7. If the clock is brought directly from a cold to a warm location, or is placed in a very damp room,
moisture may condense on the lens inside the player. If this occurs, the system will not operate
properly. Please leave the system turned on for about an hour until the moisture evaporates.
8. Do not attempt to clean the unit with chemical solvents as this might damage the finish. Wipe
with a clean, dry or slightly damp cloth.
NOTICE
EN GLISH
This product complies with the radio interference requirements of the European community.
3
Page 6
CR2 0BT
Your products is designed an manufactured with high quality materials and components, which can
be recycled and reused
When this crossed-out wheeled bin symbol is attached to a product it means that the product is
covered by the European Directive 2002/96/EC. Please inform yourself about the local separate
collection system for electrical and electronic products. Please cat according to your local rules and
do not dispose of your old products with your normal household waste. Correct disposal of your old
product helps to prevent potential negative consequences for the environment and human health.
Your product contains batteries covered by the European Directive 2006/66/EC, which cannot be
dispose with normal household waste. Please inform yourself about the local rules on separate
collection of batteries because correct disposal helps to prevent negative consequences for the
environmental and human health.
Environmental information
All unnecessary packaging has been omitted. We have tried to make the packaging easy to separate
into three materials: cardboard(box), polystyrene foam(buffer) and poly ethylene (bags, protective
foam sheet). Your system consists of material which can be recycled and reused if disassembled by a
specialized company. Please observe the local regulations regarding the disposal of packaging
materials, exhausted batteries and old equipment.
Recording and playback of material might require consent. See Copyright Act 1956 and The
Performer's Protection Acts 1958 to 1972.
The Blue tooth® word mar k and logos are regi stered trade marks owned by Bl uetooth SI G,Inc. and
any use of suc h marks by us is under li cense. Othe r trademark s and trade names ar e those of their
respe ctive owners .
4
Page 7
CR2 0BT
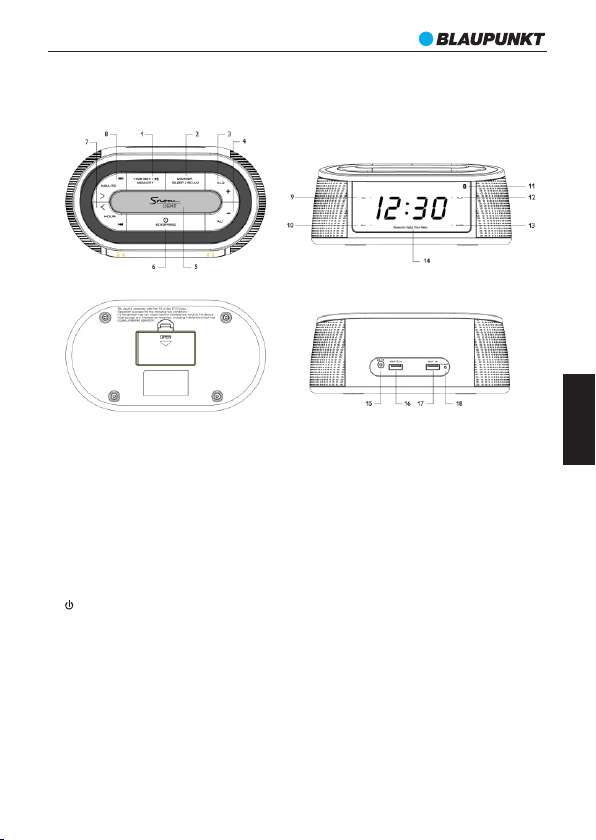
LOCATION OF CONTROL
EN GLISH
1. TI ME SE T / MEM ORY /PL AY/PAUS E
2. D IMME R/ SL EEP/ S CAN
3. VO LUME + / A l2
4. VO LUME - / A l1
5. S NOOZ E / NIG HT LI GHT
6. / F UNC TION
7. TU NING DOWN / HOUR / SKIP BACK WARD
8. TU NING UP / MI NUTE / SKIP FORWA RD
9. A L1 IND ICATO R
10. P M IND ICATO R
11. B LUE TOO TH IN DIC ATOR
12. A L2 IN DICAT OR
13. S LEE P IND ICATO R
14. D IGI TAL DI SPLAY
15. D C INP UT
16. U SB OU T 2.1A
17. U SB OU T 1A
18. F M ANT ENNA WI RE
5
Page 8

CR2 0BT
Powe r cauti on:
l Ris k of prod uct dam age! En sure th at the vo ltage o f power so urce co rrespo nds to
the r ating s pec on th e rating l abel of t he cloc k radio r ear pan el. Onl y the sup plied
DC p ower ada ptor is a llowe d to use on t his uni t.
l Ris k of elec tric sh ock! Wh en you unp lug the A C adap tor, alwa ys pull t he plug f rom
the s ocket . Never p ull the p ower cor d.
Uni t set up an d power on /off
Usi ng the su pplie d DC ada ptor con nect w ith the D C jack o n the rear p anel of u nit, an d the
ano ther te rmina l conne ct to the m ain powe r sourc e. The dis play wil l light u p when yo u set up
the p ower suc cessf ully.
Sho rt pres s the / FU NCT ION b utton to p ower on a nd ente r to the rad io mode , shot pr ess
the b utton a gain to s witch th e unit to B lueto oth mod e. Press a nd hold t he butt on will p ower
off t he unit t o stand by mode.
Volu me
On pl aying m ode (FM r adio or B lueto oth), s hort pr ess the A L2 + or A L1 – butt on can in creas e
or de creas e the volu me.
Time setting
1. On s tandb y mode, pr ess and h old TIM E SE T MEM ORY/ PLAY PAUS E butt on for
two s econd s till th e displ ay is blin king i n order to s tart t he time s ettin g.
2. Pre ss MIN UTE T UNIN G > or HO UR TUN ING < b utton to s elec t 24 or 12 ho urs
for mat; Pre ss TIM E SET M EMO RY/P LAY PAUS E butto n again t o confir m the
sel ectio n, and th e [00:0 0] or [12 :00] di git wil l blink o n displ ay in ord er to star t the
hou r and min ute set ting
3. Pre ss HOU R TUN ING < bu tton to a djust h our, and pr ess MI NUT E TUNI NG > but ton
to ad just de sired mi nute.
4. Pre ss TIM E SET M EMO RY/P LAY PL AUSE b utton a gain to co nfirm h our and m inute
set ting, o r the set ting wil l be conf irmed a utoma tical ly if no bu tton is u sed wit hin 3
sec onds. The n the tim e setti ng is com plete d.
Ala rm sett ing
Bef ore star t the al arm set ting, p lease m ake sure t hat you h ave set u p the clo ck time c orrec tly.
The u nit all ows you to s et up two s epara te alar m timer s. For the a larm so urce, yo u can sel ect
the F M radio o r buzze r.
1. Pre ss and ho ld FUN CTI ON bu tton 2 se cond til l enter t o stand by mode ; Press
and h old AL 1 + or AL2 - b utton fo r two sec onds ti ll the di splay t ime is bl inkin g in
ord er to ente r the ala rm sett ing mod e.
Pres s HOU R TUNI NG < or M INUT E TUNI NG > bu tton to ad just th e alarm t ime, an d
pre ss
6
Page 9

CR2 0BT
2. Pre ss HOU R TUN ING < or M INU TE TUN ING > b utton to a djust t he alar m time, a nd
pre ss the pre ss AL1 + o r AL2 - bu tton to c onfir m the sel ectio n; mean while t he
sym bol “ b” ( for bu zzer) or “ F”( for FM ra dio) wi ll blin k on disp lay whi ch mean s allow
you to s elec t alarm s ource.
3. Pre ss HOU R TUN ING < or M INU TE TUN ING > b utton to s witch t he alar m sourc e
bet ween bu zzer an d FM radi o, press t he AL1 + o r AL2 - bu tton to c onfir m the
sel ectio n, and en ter the a larm vo lume se tting i nterf ace.
4. Pre ss HOU R TUN ING < or M INU TE TUN ING > b utton to a djust t he alar m volum e
(05 ~15), a nd pres s AL1 + or A L2 - butt on agai n to conf irm and f inish t he alar m
set ting.
Not e:
a. The a larm in dicat ed dot wi ll light u p on disp lay whe n the ala rm is set u p
suc cessf ully.
b. When w e selec t the rad io as the a larm so urce, t he curr ent FM ra dio fre quenc y will
be se lecte d as the so urce.
c. The a larm so und wil l increa se up gra duall y when th e alarm t ime is up .
d. Whe n the ala rm is rin g up, shor t pres s the AL 1 + or AL2 - bu tton ca n cance l the
ala rm soun d; and th e alarm w ill rin g up agai n when th e alarm t ime is co ming up n ext
day.
e. In s tandb y mode, sh ort pr ess the A L1 + or AL 2 - butto n can tur n off or on t he alar m
fun ction .
f. Ple ase kin dly not e the clo ck and al arm set ting ti me only c an rema in when t he DC
powe r does no t remov e, or ins talle d the tim e backu p batter y powe r. Please r e
che ck and se t up the cl ock and a larm ti me afte r you rem ove the D C power.
g. Whe n the ala rm time i s coming u p, the al arm wil l ring up 6 0 minut es cont inuou sly in
cas e of ther e is no fur ther op erati on.
h. The s ettin g will be s elect ed and co nfirm ed auto matic ally du ring cl ock and a larm
set ting op erati on if the re is no but ton is us ed with in 3 seco nds.
Sno oze/ni ght lig ht ON/ OFF:
1. Whe n alarm s ounds , press S NOO ZE LIG HT bu tton to ac tivat e the sno oze tim e 9
min utes. The a larm wi ll rin g up again a fter 9 m inutes , and you w ill get a nothe r 9
min utes for s leepi ng. Mea nwhil e, the AL 1 or AL2 i ndica tor kee ps blin king o n
dis play.
2. You can s hort p ress the AL1 + or A L2 – butt on to can cel the s nooze fu ncti on.
3. Pre ss Snoo ze / Nigh t Light b utton c an turn o n or off th e Night L ight ex cept dur ing
ala rm ring u p and sno oze wor king mo de.
Bat tery ba ckup po wer and se tting m emor y
Bes ide to co nnect w ith DC a dapto r for cloc k and ala rm tim e keepi ng, you ca n insta ll 2pcs 1 .5
vol t (LR6 , UM-3 , AA) bat tery ( not inc luded ) into the b atter y comp artme nt on the b ottom o f
the
EN GLISH
7
Page 10

CR2 0BT
uni t for temp orar y time st orage.
Ple ase kin dly not e the bat tery po wer is fo r clock a nd alar m time ke eping, s ave the p re-us ed
vol ume and p reset F M stati on only.
Rem ark:
a. Pl ease in stall t he batte ry (no t inclu ded) ac cordi ng to pola rity s hown in side of th e
bat tery co mpar tment .
b. In t he event o f a power i nterr uptio n, the ba ckup ba ttery p ower ca n makes yo ur
clo ck sett ing con tinue to w ork. Th e clock d isplay w ill not l ight up . This a lso ena bles
you to m ove the s et from p lace to p lace wit hout re -set ting th e clock e very ti me.
c. The b ackup b atter y power i s only me ant to be us ed from s hort te mpora ry powe r
int errup tion. Fo r longe r durat ions, th e batte ry may b ecome ex haust ed or the re
may b e some de viati on in accu racy. Wh en the ba ttery i s exhau sted, i t shoul d be
rem oved fro m the set t o preven t leak age. If yo u do not wi sh to tak e advan tage of
the b atter y back- up syst em, your s et will w ork nor mally w ithou t a batte ry.
Howe ver, if di sconn ected f rom the m ains, th e clock f igure s will fl ash whe n the
mai ns are re -conn ected a nd you mu st re- set the c lock as d escri bed in th e time
set ting pa ragrap h.
d. Att entio n: batt eries s hould b e drawn to t he envi ronme ntal as pects o f batte ry
dis posal . Don't t hrow us ed batte ries i n dustb in. Plea se cont act and r efere nce your
loc al gover nment r equir ement o f batte ry recy cling .
e. The ba tter y shall n ot be exp osed to e xcessi ve heat s uch as su nshin e, fire or t he
lik e.
FM ra dio ope ration
Bef ore star t the FM r adio tu ning, p lease f ully ex tend an d adjus t the pos ition o f the FM
ant enna wi re; and tr y to move t he radi o next to t he wind ow for be tter si gnal rec eptio n.
1. En ter FM ra dio mod e
Sho rt pres s the / FU NCT ION b utton ca n turn o n the uni t and ente r to FM ra dio
mod e. The FM fr equen cy will s how on di splay.
2. Ma nual tu ne and au to scan
Sho rt pres s the MI NUT E TUNI NG > or H OUR TU NING < button c an incr ease or
dec rease t he FM rad io freq uency 0 .1MH z per ste p.
Pres s and hol d MIN UTE TU NIN G > or HOU R TUNI NG < bu tton for t wo seco nds can
aut o scan th e availa ble str ong FM s tatio n in upwar d or down ward fre quenc y, and
aut o play th e availa ble FM r adio.
3. Ra dio pre set
Pres s the MI NUT E TUNI NG > or H OUR TU NING < butto n to tune th e radio
fre quenc y and get t he desi red pre set stat ion, pr ess and h old the T IME S ET/
ME MORY /PL AY PAUS E butt on till t he “ PXX ” blin king on d ispla y; sho rt pres s the
MI NUTE TU NING > o r HOU R
8
Page 11

CR2 0BT
TU NING < b utton t o adjus t the pre set sta tion nu mber to s elect t he loca tion th at you
wan t to store ; shor t press th e TIME SET/ M EMO RY/P LAY PAUS E butto n again t o
con firm th e selec tion an d compl ete the p reset s ettin g. Repea t the ope ratio n to set up
oth er pres et stat ion.
In ra dio mod e, shor t press t he TIM E SET / MEMO RY/ PLAY PAUS E butt on repe atedly c an
pic k up and pl ay the pre set rad io.
Not e:
a. The u nit onl y can save u p to 20 pre set sta tions .
b. The pr eset ra dio sta tion wi ll lose w hen you re move th e DC ada ptor an d no
bac kup bat tery po wer.
c. To remo ve the pre -sto red FM st ation , pleas e save ano ther st ation i n its pla ce
d. The di splay w ill ret urn and s how the c lock in forma tion if t here is no f urth er
ope ratio n withi n 10 secon ds.
1. Aut o scan an d prese t opera tion.
In ra dio mod e, press a nd hold DIMM ER SL EEP / SCAN button f or 2 seco nds can
tun e and pre set the av ailab le radi o stati on auto matic ally.
Blu etoot h operat ion
The u nit inc ludes B lueto oth fun ction w hich al lows you t o audio s tream ing pla yback t he
mus ic from yo ur Blue tooth d evice .
1. Sh ort pre ss the / F UNC TION button e nter to B lueto oth mod e till th e “ bL” show
on di splay ; The blue c olor Bl uetoo th LED i ndica tor wil l blink i n fast sp eed on th e
rig ht top co rner of d isplay w hich me an the un it is rea dy to pai r, also a no tice so und
wil l come ou t from spe aker at s ame tim e.
2. Ac tivat e the Blu etooth f unct ion on you r Bluet ooth de vice li ke smar t phon e etc
(pl ease re ferenc e your Bl uetoo th devi ce manua l for thi s opera tion) a nd sear ch the
ava ilabl e Blueto oth dev ice.
3. Ch eck the B lueto oth men u list on yo ur devi ce, and s elect “ BL AUPU NKT CR20 BT”
for p airin g; The blu e color Bl uetoo th LED indic ator wil l blink i n low spe ed afte r
pai ring su ccess fully, a lso ano ther no tice so und wil l come out f rom spe aker at s ame
tim e.
4. Se lect an d play th e music f rom you r Blueto oth dev ice, th en the au dio can w irele ss
pla yback f rom the un it.
5. In B lueto oth mod e, you can p ress th e HOU R TUNI NG < or M INUT E TUNI NG >
but ton to ch ange th e previo us and ne xt trac k; And p ress the T IME S ET ME MOR Y/
PL AY PAUSE b utton fo r music p lay/p ause pl aying ; press th e AL2 +/ AL1 – to a djust
the v olume.
Not e:
The d igit di splay wi ll retu rn to sho w the tim e infor matio n if there i s no fur ther op erati on
a. wi thin 10 s econd s.
b. Ple ase inp ut “ 000 0” in ca se of a PO P passw ord requ ired in y our Blu etoot h devic e
dur ing pai ring.
c. Pl ease ki ndly no tes not a ll Blue tooth d evices a re guar antee d to be pai ring
suc cessf ully du e to diffe rent br and and d esign .
d. The b est work ing di stanc e of Blue tooth is w ithin 1 0 meter s witho ut any ob stacl e far
away f rom the u nit. Pl ease ma ke sure y our Blu etooth i s in this d istan ce.
EN GLISH
9
Page 12

CR2 0BT
Sle ep and di mmer
1. In p layin g mode (r adio or B lueto oth), s hort pr ess the D IMM ER SL EEP/ SCA N
but ton can a ctiva te the sl eep fun ction ; press t his but ton repe atedl y can sel ect the
sle ep time f rom foll owing c ircle . Selec t the des ired sl eep tim e and rem ain 2
sec onds, th e inter face o f displ ay will q uit from t he slee p setti ng mode a nd retu rn to
the p layin g mode. M eanwhi le, the S LEE P LED i ndica tor will l ight up o n the dis play
whi ch mean s the sle ep sett ing is su ccess a lready.
90> 8 0 > 70 > 60 >50 >40>3 0>20> 10
Pla ying mo de (FM or B lueto oth)
2. In s tandb y mode, s hort pr ess the D IMM ER SL EEP/ SCA N butto n can adj ust the
dis play ba cklig ht in hig h or low le vel bri ghtne ss. And th e back light l evel wil l be
kee ping in p layin g mode af ter set ting.
Not e:
a. In s leep mo de, sho rt pres s the DI MME R SLE EP/S CAN bu tton ca n check t he
rem ained s leep ti me, and th e unit wi ll swit ch to sta ndby mo de auto matic ally wh en
the s leep co untin g time is u p. Pleas e turn on t he unit a gain fo r playin g.
US B Charg ing
The u nit inc ludes d ual US B charg ing out put por t (1 x 5V/1 .0A, 1 x 5V /2.1A ) which a llow yo u to
con nect an d provi de power f or othe r devic e like US B type l amp, fa n or smar t phone , table t pc
etc.
Bef ore conn ect th e USB ch argin g port, p lease c heck th e requi red powe r spec on y our dev ice,
and u se your d evice su pplie d USB c able (n ot incl uded) f or conne ctio n. A charg ing sym bol or
fun ction i ndica tor wil l light u p on your d evice wh en the ch argin g conne ction i s succe ss.
Rem ark:
a. The c hargin g func tions fo r all pho nes or el ectro nic dev ices ar e not gua rante ed on
thi s unit.
b. Ple ase alw ays che ck the req uired c hargi ng rati ng spec o n your dev ice fir st, and
con nect wi th rela tive US B outp ut port f rom thi s unit.
c. Pl ease al ways use y our dev ice sup plied U SB cab le for ch arging c onnec tion .
d. The c hargin g time of y our dev ice is no t guara ntee due t o not sup plied r ating
cha rging U SB pow er sourc e for you r device .
Spe cific ation
Powe r Sourc e : DC 5V/ 3.5A, 1 00-24 0V ~50/ 60Hz
Bac kup bat tery po wer (fo r time ke eping o nly) : 2 x 1. 5V,
(si ze: LR 6, UM- 3, AA, n ot incl uded)
FM fr equen cy: 87 .5-10 8.0M Hz
Blu etoot h versio n : 2.1+ E DR
Blu etoot h worki ng dist ance : wi thin 10 m eters
US B Charg ing out put : DC 5 V, 1A X 1
Out put powe r : 2 x 1.8 W (RM S)
Powe r Consu mptio n : 5W
Sta ndby po wer cons umpti on: < 1W
(Pro duct i nforma tion is s ubjec t to chan ge with out pri or noti ce.)
10
DC 5 V, 2.1A X 1
Page 13

CR2 0BT
Troub le shoo ting:
A. The re have bi g backg round n oise on F M radio m ode.
a-1 : Pleas e fully e xtent t he FM ant enna, a nd adju st the an tenna d irect ion.
Ple ase move t he unit n ext to wi ndow.
a-2 : Pleas e try to tu ne othe r FM sta tion for l isten ing.
a-3 : Pleas e conta ct the se rvice c enter f or supp ort if th e probl em stil l remai ns.
B. The so und is ou tput in termi ttent ly in Blu etoot h mode.
b-1 : Pleas e try to m ove your B lueto oth dev ice more c lose to t he unit .
b-2 : Pleas e try to s top and tu rn off th e Bluet ooth fu ncti on, and re -pai ring fo r
pla ying.
b-3 : Pleas e conta ct the se rvic e center f or supp ort if th e probl em stil l remai ns.
C. The d ispla y canno t light up
c-1 : pleas e check i f the plu g of DC ad aptor w as conne cted p roper ly.
c-2 : Pleas e conta ct the se rvice c enter f or supp ort if th e probl em stil l remai ns.
D. The al arm set ting is n ot succ ess.
d-1 : pleas e refere nce the i nstru ction m anual f or the op erati on.
d-2 : Pleas e conta ct the se rvice c enter f or supp ort if th e probl em stil l remai ns.
EN GLISH
11
Page 14

12
Page 15

CR2 0BT
WAŻNE INF ORMACJE
Prosimy o przeczytanie tej instrukcji przed przystąpieniem do obsługi urządzenia, aby zapoznać się
z jego funkcjami i wykorzystać je zgodnie z przeznaczeniem. Zapewni to długotrwałą, bezawaryjną
obsługę urządzenia i przyjemność z użytkowania.
1. Należy zachować instrukcję obsługi oraz informacje dotyczące bezpieczeństwa w celu
wykorzystania ich w przyszłości.
2. Nie należy dopuszczać do tego, aby na urządzenie kapała lub wylewała się ciecz. Nie wolno też
używać go w wilgotnych miejscach, jak np. łazienka.
3. Nie wolno instalować tego urządzenia w następujących miejscach:
4. Wystawionych na bezpośrednie działanie promieni słonecznych lub w pobliżu grzejników.
5. Kłaść go na wierzchu innego sprzętu stereofonicznego który wydziela ciepło.
6. Blokując wentylację lub w zapylonym miejscu.
7. W miejscach narażonych na ciągłe drgania.
8. W miejscach o wysokiej wilgotności.
9. Nie wolno stawiać urządzenia w pobliżu świec lub otwartego ognia.
10. Urządzenia można używać wyłącznie w sposób opisany w niniejszej instrukcji.
11. Przed pierwszym włączeniem zasilania należy upewnić się, że zasilacz został prawidłowo
podłączony.
Ze względów bezpieczeństwa nie należy demontować obudów ani uzyskiwać dostępu do wnętrza
urządzenia. Urządzenie powinno być naprawiane przez wykwalifikowany personel serwisu.
Nie wolno rozkręcać urządzenia ani otwierać jego obudowy, gdyż wewnątrz nie ma żadnych części,
które mogłyby być naprawiane przez użytkownika. Konserwacją i naprawą sprzętu zajmują się
wyłącznie wykwalifikowani pracownicy serwisu.
INSTRU KCJE DOT YCZĄCE BEZPIECZEŃSTWA
1. Przeczytać instrukcje — przed korzystaniem z urządzenia należy przeczytać całość instrukcji
obsługi oraz informacje o bezpieczeństwie.
2. Zachować instrukcje — należy zachować instrukcje użytkowania i obsługi w celu
wykorzystania ich w przyszłości.
3. Przestrzegać ostrzeżeń — należy postępować zgodnie z wszystkimi ostrzeżeniami
zamieszczonymi na urządzeniu oraz zgodnie z instrukcją obsługi.
4. Przestrzegać instrukcji — należy postępować zgodnie z instrukcją obsługi oraz wskazówkami
dla użytkownika.
5. Instalacja — należy ustawić urządzenie zgodnie z instrukcjami producenta.
6. Źródła zasilania – urządzenie powinno być zasilane wyłącznie ze źródeł o parametrach
podanych na oznaczeniach na kablu zasilania. Jeżeli użytkownik nie jest pewien, jakiego rodzaju
zasilaniem dysponuje w domu, powinien skontaktować się ze sprzedawcą urządzenia lub
lokalnym dostawcą energii elektrycznej.
7. Uziemienie lub polaryzacja zasilania — urządzenie nie musi być uziemione. Należy upewnić
się, że wtyczka jest do końca włożona do gniazdka sieciowego lub przedłużacza, aby nie
dopuścić do odsłonięcia bolców lub styków. Niektóre wersje urządzenia mogą być wyposażone
w spolaryzowaną wtyczkę prądu przemiennego (z jednym bolcem szerszym). Tę wtyczkę można
włożyć do gniazdka sieciowego tylko w jeden sposób. Jest to funkcja zabezpieczająca. Jeśli nie
można włożyć wtyczki do gniazda, należy spróbować ją odwrócić. Jeśli wtyczka nadal nie pasuje
do gniazda, należy zlecić elektrykowi jego wymianę. Nie wolno zdejmować zabezpieczeń z
wtyczki spolaryzowanej. Gdy korzysta się z przedłużacza lub kabla zasilania innego niż
PO LISH
13
Page 16

CR2 0BT
dostarczony razem z urządzeniem, powinny mieć właściwe wtyczki oraz atest bezpieczeństwa
wymagany w danym kraju.
8. Zabezpieczenie kabla zasilania — kable zasilania należy poprowadzić w taki sposób, aby nie
można było po nich chodzić, przycisnąć lub przyciąć postawionymi przedmiotami. Zwrócić
szczególną uwagę na wtyczki, gniazdka sieciowe i miejsca, w którym kable są wyprowadzone z
urządzenia.
9. Przeciążanie — nie wolno przeciążać gniazdek ściennych, przedłużaczy i rozdzielaczy
elektrycznych, ponieważ grozi to wybuchem pożaru lub porażeniem prądem elektrycznym.
10. Wentylacja — urządzenie musi być poprawnie wentylowane. Nie wolno ustawiać urządzenia na
łóżku, sofie lub podobnych powierzchniach. Nie wolno przykrywać urządzenia obrusami,
serwetkami, gazetami itd.
11. Ciepło — nie ustawiać urządzenia w pobliżu źródeł ciepła, takich jak grzejniki, promienniki,
piece lub innych urządzeń (również wzmacniacze) wytwarzających ciepło. Nie stawiać na
urządzeniu zapalonych świec i innych źródeł otwartego ognia.
12. Woda i wilgoć — aby zmniejszyć zagrożenie pożarem lub porażeniem elektrycznym, nie wolno
narażać urządzenia na bezpośrednie działanie deszczu, wody i wilgoci, jak np. w saunie czy w
łazience. Nie używać niniejszego urządzenia w pobliżu wody, na przykład obok wanny,
umywalki, zlewu kuchennego lub balii, w wilgotnej piwnicy lub w pobliżu basenu (lub w
podobnych miejscach).
13. Przedmioty i ciecze w urządzeniu — nie należy wciskać jakichkolwiek przedmiotów przez
otwory urządzenia, ponieważ mogą one zetknąć się z punktami niebezpiecznego napięcia i
podzespołami, co może wywołać pożar lub porażenie prądem. Pod żadnym pozorem nie należy
rozlewać jakichkolwiek cieczy na powierzchni urządzenia. Nie wolno kłaść na wierzchu
urządzenia przedmiotów zawierających ciecze.
14. Czyszczenie — należy zawsze odłączyć urządzenie od gniazdka sieciowego przed
czyszczeniem. Kurz dookoła głośnika można usunąć suchą szmatką. Jeśli do czyszczenia ma być
użyty aerozol, nie należy kierować rozpylanego strumienia bezpośrednio na urządzenie, ale na
szmatkę. Należy uważać, aby nie uszkodzić jednostek napędowych.
15. Wyposażenie dodatkowe — nie wolno używać akcesoriów, które nie są dopuszczone przez
producenta, gdyż mogą stwarzać zagrożenie.
16. Akcesoria — nie wolno ustawiać urządzenia na niestabilnym wózku, stojaku, statywie,
wsporniku czy stole. Urządzenie może ulec przewróceniu i uszkodzeniu oraz spowodować
poważne obrażenia u dziecka lub osoby dorosłej. Należy używać wyłącznie wózków, stojaków,
statywów, wsporników i stołów określonych przez producenta albo sprzedawanych wraz z
urządzeniem. Montaż urządzenia należy przeprowadzać zgodnie z instrukcjami producenta,
przy użyciu zestawu montażowego zalecanego przez producenta.
17. Przenoszenie urządzenia — urządzenie umieszczone na wózku należy przesuwać bardzo
ostrożnie. Gwałtowne zatrzymanie, zbyt duża siła lub nierówne powierzchnie mogą
spowodować przewrócenie wózka wraz z urządzeniem.
18. Okres nieużywania urządzenia — kabel zasilania urządzenia należy odłączyć od gniazdka
sieciowego w trakcie burz z wyładowaniami atmosferycznymi lub gdy urządzenie nie będzie
używane przez dłuższy czas.
19. Serwisowanie – nie należy próbować własnoręcznego przeglądania urządzenia. Otwieranie
pokrywy może spowodować kontakt z niebezpiecznym napięciem i narazić użytkownika na
inne niebezpieczeństwa. Konserwacją i naprawą sprzętu zajmują się wyłącznie wykwalifikowani
pracownicy serwisu.
14
Page 17

CR2 0BT
20. Gdy urządzenie nie jest używane, należy odłączyć jego wtyczkę zasilania od gniazdka
sieciowego. Gdy urządzenie jest podłączone do źródła zasilania, znajduje się w trybie czuwania i
nie jest całkowicie wyłączone.
21. Części zamienne — przy wymianie części należy sprawdzić, czy pracownik serwisu użył części
zamiennych zalecanych przez producenta lub też czy części są identyczne jak część oryginalna.
Dokonywanie wymiany na niezatwierdzone części grozi wybuchem pożaru, porażeniem prądem
elektrycznym lub innymi niebezpieczeństwami.
22. Główne bezpieczniki — aby zabezpieczyć w sposób ciągły urządzenie przed pożarem, należy
używać bezpieczników właściwego typu i parametrów. Parametry bezpieczników w danym
zakresie napięcia są zaznaczone na urządzeniu.
23. Nie wolno zwiększać głośności przy słuchaniu części utworu o małej głośności lub przy braku
wejściowego sygnału audio. W innym wypadku może dojść do uszkodzenia głośnika przy
gwałtownym wzroście natężenia sygnału.
24. Jedynym sposobem całkowitego odłączenia urządzenia od źródła zasilania jest odłączenie kabla
zasilania z gniazdka zasilania lub z urządzenia. Gniazdko sieciowe lub wejście kabla zasilania do
urządzenia muszą być zawsze dostępne w trakcie używania produktu.
25. Urządzenie powinno się ustawić w pobliżu gniazdka sieciowego lub przedłużacza i w taki
sposób, aby zawsze było dostępne.
26. Maksymalna temperatura otoczenia urządzenia wynosi 35°C.
27. Wskazówki dotyczące wyładowań elektrostatycznych — jeśli działanie urządzenia jest
zakłócone wyładowaniami elektrostatycznymi, należy go wyłączyć i ponownie włączyć lub
przenieść urządzenie w inne miejsce.
28. Bateria
a. Baterie nie mogą być narażone na działanie nadmiernego ciepła, jak np. promieni
słonecznych, ognia itp.
b. Podczas utylizacji baterii należy zwrócić uwagę na aspekty ochrony środowiska.
c. Przestroga dotycząca używania baterii: aby nie dopuścić do rozszczelnienia baterii, które może
spowodować obrażenia ciała bądź uszkodzenie urządzenia:
• Podczas wkładania baterii zwrócić uwagę na jej polaryzację (+ I -).
• Nie wolno jednocześnie używać różnych baterii — starych i nowych baterii standardowych
i alkalicznych itd.
• Należy wyjąć baterie z urządzenia, gdy nie będzie ono używane przez dłuższy czas.
OSTRZEŻENIE
Urządzenie nie powinno być używane przez osoby (w tym dzieci) o obniżonej sprawności fizycznej,
sensorycznej lub umysłowej oraz osoby z niewystarczającą wiedzą i doświadczeniem, jeśli nie
znajdują się one pod nadzorem osoby odpowiedzialnej za ich bezpieczeństwo i nie zostały
poinstruowane jak bezpiecznie używać urządzenia. Obecność osób dorosłych jest wymagana, jeśli
urządzenie obsługują dzieci; pozwoli to zapewnić bezpieczne korzystanie z urządzenia.
1. Nie należy dopuszczać do tego, aby na urządzenie kapała lub wylewała się ciecz, ani nie należy
stawiać na nim przedmiotów wypełnionych cieczami, takich jak wazony.
2. Aby uniknąć pożaru lub porażenia prądem elektrycznym, należy chronić urządzenie przed
gorącymi miejscami, działaniem deszczu, wilgoci I pyłu.
3. Nie wolno ustawiać urządzenia w pobliżu jakichkolwiek źródeł wody, np. kranów, wanien, pralek
lub basenów pływackich. Urządzenie należy ustawić na równym i stabilnym podłożu.
3. Nie wolno narażać urządzenia na silne pole magnetyczne.
4. Nie wolno stawiać urządzenia bezpośrednio na wzmacniaczu lub amplitunerze.
PO LISH
15
Page 18
CR2 0BT
5. Nie wolno stawiać urządzenia w wilgotnym miejscu, gdyż wilgoć ma szkodliwy wpływ na
podzespoły elektryczne.
6. Po wniesieniu urządzenia z zimnego do ciepłego miejsca lub do wilgotnego miejsca może dojść
do kondensacji wilgoci na soczewce wewnątrz odtwarzacza. W takiej sytuacji urządzenie nie
będzie działać prawidłowo. Należy pozostawić włączone urządzenie na około jedną godzinę,
aby umożliwić odparowanie wilgoci.
7. Nie wolno czyścić urządzenia rozpuszczalnikami chemicznymi, gdyż mogą one zniszczyć lakier
obudowy. Urządzenie wyciera się czystą, suchą lub nieznacznie zwilżoną ściereczką.
UWAGA
Niniejsze urządzenie spełnia wymagania dyrektyw europejskich dotyczących zakłóceń radiowych.
Produkt został wyprodukowany z wysokiej jakości materiałów i podzespołów, które można poddać
recyklingowi i ponownie użyć.
Jeśli na urządzeniu znajduje się znak przekreślonego kosza na śmieci, oznacza to, że produkt jest
objęty postanowieniami dyrektywy europejskiej 2002/96/WE. Należy zapoznać się z wymaganiami
dotyczącymi lokalnego systemu zbiórki odpadów elektrycznych i elektronicznych. Należy
postępować zgodnie z lokalnymi przepisami. Nie wolno wyrzucać tego produktu razem ze
zwykłymi odpadami domowymi. Prawidłowe usunięcie starego produktu zapobiegnie
potencjalnym negatywnym skutkom dla środowiska naturalnego i zdrowia ludzkiego.
16
Page 19

CR2 0BT
Urządzenie jest wyposażone w baterie objęte dyrektywą europejską 2006/66/WE. Baterii nie wolno
wyrzucać razem z odpadami gospodarstwa domowego. Należy zapoznać się z lokalnymi przepisami
dotyczącymi oddzielnej zbiórki baterii, ponieważ prawidłowa utylizacja zapobiegnie potencjalnym
negatywnym skutkom dla środowiska naturalnego i zdrowia ludzkiego.
Informacje o ochronie środowiska naturalnego
Opakowanie zawiera tylko niezbędne elementy. Dołożono wszelkich starań, aby trzy materiały
składowe opakowania były łatwe do oddzielenia: karton (pudełko), pianka polistyrenowa
(zabezpieczenia wewnątrz) i polietylen (torebki, arkusz ochronny). Urządzenie wyprodukowano z
materiałów, które można poddać recyklingowi i użyć ponownie po ich demontażu przez
wyspecjalizowaną firmę. Należy przestrzegać lokalnych przepisów dotyczących utylizacji
materiałów opakowaniowych, zużytych baterii i niepotrzebnych urządzeń.
Nagrywanie i odtwarzanie materiałów może wymagać uzyskania zgody. Patrz ustawa o prawach
autorskich i prawach wykonawców/artystów.
Właś cic iele m znak ów tow arow ych i log o Blue toot h® jes t firm a Blue toot h SIG , Inc. U SA.
Uż ycie t y c h z n aków i logo podlega lic encji. Inne znaki i nazw y handlowe nale żą do odpowiednich
właścicie li.
PO LISH
17
Page 20

CR2 0BT
LOKALIZ ACJA ELEMENTÓW STEROWANIA
1. Pr zyci sk TIME SET/ MEM ORY
/od twarz ania/ pauz y
2. Pr zyci sk DIM MER / SLEE P/ SC AN
3. Pr zyci sk VOLU ME + / Al2
4. Pr zyci sk VOLU ME – / Al1
5. Pr zyci sk SNO OZE /lamp ki nocn ej
6. / F UNC TIO N
7. Pr zyci sk stro jenia w d ół pasm a/HO UR
/pr zejśc ia do pop rzedn iego ut woru
8. Pr zyci sk stro jenia w g órę pasm a/MI NUT E
/pr zejśc ia do nas tępne go utwo ru
9. WS KAŹ NIK A L1
10. W SKAŹ NIK P M
11. Wsk aźni k BLUE TOOT H
12. W SKAŹ NIK A L2
13. W SKAŹ NIK D RZE MKI
14. W YŚWI ETL ACZ C YFRO WY
15 . WE JŚC IE ZAS ILA CZA
SI ECIO WEG O
16 . Wyjś cie US B 2,1 A
17. Wy jście U SB 1A
18. A NTE NA
18
Page 21

CR2 0BT
Uwag i dotyc zące za silan ia:
l Zag rożeni e uszko dzeni a urząd zenia ! Należ y upew nić się, ż e napię cie źró dła zas ilani a
odp owiad a warto ści nap ięcia o znacz onej na p anelu t ylnym ra diobu dzik a. Radi obudz ik
moż na zasi lać tyl ko dost arczon ym raze m z nim zas ilacz em.
l Zag rożeni e poraż eniem e lektr yczny m! Podcz as wyci ągani a wtycz ki zas ilacz a sieci owego z
gni azdka ś cienn ego nal eży zaw sze cią gnąć za w tyczk ę. Nie wo lno cią gnąć za pr zewód
zas ilani a.
Konf iguro wanie o raz włąc zanie /wył ączan ie radi obudz ika
Podł ącz jed en koni ec prze wodu do starc zoneg o zasil acza do gn iazda n a panel u tylny m
rad iobud zika, a d rugi ko niec do g niazd ka siec ioweg o. Wskaźn ik zaśw ieci si ę po popr awnym
pod łącze niu zas ilani a.
Nac iśnij k rótko p rzyc isk / FU NCT ION, a by włąc zyć zas ilani e i uruch omić ra dio. Nac iśnij
pon ownie p rzyci sk, aby p rzełą czyć s ię w tryb B lueto oth. Na ciśni j i przy trzy maj prz ycisk , aby
wył ączyć u rząd zenie i p rzejś ć w tryb go towoś ci.
Gło śność
W try bie odt warz ania (r adio lu b Blueto oth) na ciśni j krót ko przy cisk A L2 + lub A L2 –, aby
zwi ększ yć lub zm niejs zyć poz iom gło śnośc i.
Ust awienie czas u
1. Gd y urząd zenie z najdu je się w tr ybie c zuwani a, naci śnij i pr zytr zyma j przez d wie sek undy
prz ycisk T IME S ET ME MORY /pau zy/od twar zania d o moment u, w któr ym na wy świet laczu
zac znie mi gać ust awien ie czas u.
2. Na ciśni j przyc isk MI NUT E TUNI NG > lub H OUR T UNIN G <, aby w ybrać 2 4- lub 12 -godz inny
for mat cza su.Nac iśnij p onown ie prz ycisk TI ME SE T ME MORY /pauz y/od twarz ania, a by
pot wierd zić wyb ór. Na wyś wietl aczu po jawi si ę wskaz anie [0 0:00] l ub [12: 00] w cel u
rozp oczęc ia usta wiani a godzi ny i minu t.
3. Na ciśni j przyc isk HO UR TUN ING < , aby ust awić go dzinę i p rzyci sk MIN UTE T UNIN G >, aby
ust awić mi nuty.
4. Na ciśni j ponow nie prz ycisk T IME S ET ME MORY /pauz y/od twarz ania, a by potw ierdz ić
ust awien ie godz iny i minu t. Usta wieni e zosta nie pot wierd zone au tomat ycznie p o 3
sek undow ej bezcz ynno ści. Us tawie nie cza su zosta ło ukoń czone .
Ust awienie alar mu
Prz ed przy stąpi eniem d o ustaw iania a larmu n ależ y upewn ić się, że z egar zo stał po prawni e
ust awiony. W ra diobu dzik u można us tawić d wa różn e czasy a larmu . Można te ż wybr ać, czy
jak o alarm b ędzie o dtwar zany sy gnał dź więko wy czy s tacja r adiowa FM.
19
PO LISH
Page 22

CR2 0BT
1. Na ciśni j i przy trzym aj prz ycisk F UNC TIO N przez 2 s ekund y, aby pr zejść w tr yb
czu wania .Naci śnij i pr zytr zymaj p rzez dw ie seku ndy pr zycis k AL1+ l ub AL2 – d o
mom entu, w k tórym n a wyświ etlac zu poja wi się us tawie nie cza su alar mu.
2. Na ciśni j przyc isk HO UR TUN ING < l ub MIN UTE T UNIN G >, aby u stawić c zas ala rmu;
nac iśnij p rzyci sk AL1 + l ub AL2 - , aby pot wierd zić wyb ór; w mi ędzyc zasie n a wyświ etlac zu
będ zie mig ać symb ol „ b” ( sygna ł dźwię kowy) l ub „ F” (st acja ra diowa F M), co oz nacza
wyb ranie ź ródła a larmu .
3. Na ciśni j przyc isk HO UR TUN ING < l ub MIN UTE T UNIN G >, aby p rzełą czać źró dło ala rmu
mię dzy syg nałem d źwię kowym a r adiem F M; naci śnij pr zyci sk AL1 + l ub AL2 -, a by
pot wierd zić wyb ór i uruc homić w ybór gł ośnoś ci alar mu.
4. Na ciśni j przyc isk HO UR TUN ING < l ub MIN UTE T UNIN G >, aby d ostoso wać gło śność
ala rmu (od 0 5 do 15); n aciśn ij pono wnie pr zycis k AL1 + lu b AL2 -, a by potw ierdz ić wybó r i
zak ończy ć ustaw ienie a larmu .
Uwag a:
a. Wsk aźnik u stawi onego a larmu z aświe ci się po p oprawn ym usta wieni u alarm u.
b. Po wy brani u radia j ako źró dła alar mu bie żąca st acja rad iowa bę dzie źr ódłem a larmu .
c. Gł ośnoś ć alarm u będzi e zwięk szana s topni owo w mom encie w ystąp ienia c zasu al armu.
d. Po od tworz eniu dź więk u alarm u naciś nij kró tko prz ycisk AL1+ lu b AL2– , aby wył ączy ć
dźw ięk. A larm wł ączy si ę ponow nie nas tępne go dnia o u stawi onej go dzini e.
e. W try bie czu wania n aciśn ij krót ko prz ycisk A L1+ lu b AL2– , aby włą czyć lu b wyłąc zyć
fun kcję al armu.
f. Nal eży pa mięta ć, że funk cja zeg ara i ala rmu jes t dostę pna tyl ko wted y, gdy urz ądzen ie
jes t zasil anie pr ądem st ałym/ z gniazd ka ści enneg o. W innym wy padku n ależ y
zai nstal ować ba terię po dtrz ymani a pamię ci. Po od łączen iu zasi lacza s iecio wego na leży
spr awdzić i p onown ie usta wić zeg ar i alar m.
g. Po na dejśc iu czas u alarm u dźwi ęk będz ie odtw arzan y przez 6 0 minut i w yłącz y się
aut omaty cznie, g dy nie zo stani e naciś nięty ż aden pr zyci sk.
h. Us tawie nie zost anie w ybran e i potwi erdzon e autom atycz nie, je śli pod czas us tawie nia
zeg ara i cza su alar mu żade n przyc isk nie z ostan ie naci śnięt y przez 3 s ekund y.
Włą czani e/wył ączan ie drze mki/l ampki n ocnej :
1. Po od tworz eniu dź więk u alarm u naciś nij prz ycis k SNOO ZE/l ampk i nocne j, aby włą czyć
drz emkę na 9 m inut. A larm zo stani e ponow nie odt worzo ny po 9 minu tach; m ożna
uzy skać w t en spos ób kole jną 9-m inutow ą drzem kę. W międ zycza sie wsk aźni k AL1 lu b
AL 2 miga na e krani e.
2. Mo żna nac isnąć k rótko p rzyc isk AL1 + lub AL 2–, aby w łącz yć lub wy łączy ć funkc ję
drz emki.
3. Na ciśni j przyc isk SN OOZ E/lam pki no cnej, ab y włącz yć lub w yłącz yć lamp kę
noc ną; nie d otycz y to mome ntu włą czeni a alarm u ani cza su drze mki.
Bate ria pod trzy mania p amięc i i ustawi eń
Opr ócz pod łączen ia zasi lacza s iecio wego w ce lu podt rzym ania us tawień z egara i a larmu ,
moż na zamo ntować w k omorz e bater ii na spo dzie ur ządze nia 2 bat erie 1, 5 V (L R6, UM -3, AA ,
bra k w zestaw ie), ab y zapew nić tym czaso we podt rzym anie pa mięci z egara.
Nal eży pam iętać , że bate rie słu żą wyłą cznie d o podtr zyma nia ust awien ia zega ra i alarm u,
ust awien ia głoś ności i z apisa nych sta cji rad iowyc h.
20
Page 23

CR2 0BT
Uwag a:
a. Ba terie ( nie wcho dzą w sk ład zes tawu) n ależy w łożyć , przes trzeg ając po lary zacji
pok azane j w komor ze bate rii.
b. Po za niku za silan ia siec iowego z apewn i to kont ynuac ję wsk azywa nia cza su po pow rocie
zas ilani a. Zega r nie będ zie wyś wietl any. Dzię ki tem u można te ż przen osić ra diobu dzik w
inn e miejs ce bez ut raty us tawie ń czasu.
c. Ba terie um ożliw iają je dynie c hwilo we podt rzyma nie pam ięci pr zy zan iku zas ilani a
sie cioweg o. Przy d ługot rwał ym uży waniu b aterie m ogą ule c rozła dowan iu, a to z kol ei
moż e mieć wp ływ na do kładn ość wsk azań cz asu. Ro złado wane ba terie n ależy w yjąć z
urz ądzen ia, aby n ie dopu ścić do w yciek u elekt rolit u. Jeżel i nie chc esz uż ywać
pod trzy mania p amięc i, możes z podłą czyć u rządz enie ty ko do gni azdka s iecio wego. Po
odł ączen iu radi obudz ika od za silan ia i jego p onowny m podłą czeni u cyfr y zegar a zaczn ą
mig ać i trze ba pono wnie us tawić c zas, co ob jaśni ono w roz dzial e dotyc zącym u stawi enia
cza su w nini ejsze j instr ukcji .
d. Uwa ga: pod czas ut yliz acji bat erii na leży z wróci ć uwagę n a aspek ty ochr ony śro dowisk a.
Nie w olno wy rzuca ć bater ii raze m z odpad ami dom owymi . Infor macje n a temat
rec yklin gu bate rii moż na uzy skać w sa morzą dzie lo kalny m.
e. Bat erie ni e mogą by ć naraż one na dz iałan ie nadm ierne go ciep ła, jak n p. promi eni
sło neczn ych, ogn ia itp.
Obs ługa rad ia FM
Prz ed przy stąpi eniem d o stroj enia st acji ra diowy ch nale ży całk owici e rozcią gnąć an tenę FM i
dos tosowa ć położ enie ur ządze nia, ab y zapew nić dob ry odb iór sta cji radi owych ( np. ust awić
rad io obok o kna).
1. Wybó r tryb r adia FM
Nac iśnij k rótko p rzyc isk / FU NCT ION, a by włąc zyć rad iobud zik i wyb rać tr yb radi a FM.
Czę stotl iwość F M pojaw i się na wy świet laczu .
2. St rojeni e ręczn e i autom atycz ne skan owanie s tacji
Kró tko nac iśnij p rzyci sk MI NUTE T UNIN G > lub H OUR TU NIN G <, aby sto pniow o dostr ajać
sta cje rad iowe z kr okiem c o 0,1 Mhz .
Nac iśnij i p rzyt rzyma j przy cisk M INUT E TUNI NG > lu b HOUR T UNI NG < prze z dwie
sek undy, ab y rozpoc ząć aut omaty czne sk anowa nie sta cji rad iowyc h w górę i w dó ł pasma ,
a nas tępni e odtwo rzyć do stępn ą stacj ę.
3. Za progra mowan a stacj a radiow a
Nac iśnij p rzyci sk MI NUTE T UNIN G > lub H OUR TU NIN G <, aby do stroić s ię do
czę stotl iwości s tacji r adiow ej; nac iśnij i p rzyt rzyma j przy cisk TI ME SE T/
ME MORY /odt warza nia/p auzy aż d o wyświ etlen ia miga jąceg o symbo lu „ PXX” n
wyś wietl aczu; n aciśn ij krót ko prz ycisk M INU TE TUN ING > lu b HOU R TUNI NG <, ab y
ust awić nu mer sta cji, po d którą ch ce się za progr amować d ostro joną st ację; n aciśn ij
pon ownie k rótko p rzyci sk TIM E SET / MEM ORY/ odtwa rzani a/pau zy, aby po twie rdzić
wyb ór i zako ńczyć p rogra mowan ie stac ji. Powt órz te cz ynnoś ci, aby z aprog ramowa ć
kol ejną st ację.
W try bie radi a nacis kaj ko lejno p rzyci sk TIM E SET M EMO RY/p auzy/ odtwa rzan ia, aby
wyb ierać i o dtwar zać zap rogra mowan e stacj e radiow e.
Uwag a:
a. Ur ządze nie umo żliwi a zapis anie ma ksyma lnie 20 s tacji F M.
b. Gdy n ie zain stalo wano ba terii i p o odłąc zeniu z asila cza sie cioweg o pamię ć stacj i
rad iowyc h zostan ie utra cona.
c. Aby u sunąć z apami ętaną s tację r adiow ą FM, za pisz in ną na jej m iejsce .
d. Je śli żad en przy cisk ni e zosta nie naciśn ięt y prze z 10 sek und, zo stani e
wyś wietl ony zeg ar.
PO LISH
21
Page 24

CR2 0BT
4. Ob sługa a utomat yczne go skan owani a i przes łuchi wania z aprogr amowa nych sta cji
W try bie radi a naciś nij i pr zytrz ymaj p rzyc isk DI MMER /SL EEP/ SCAN przez 2 s ekund y, aby
rozp ocząć a utoma tyczn e skan owanie i z apisy wani e stacj i radiow ych FM .
Obs ługa Bl uetoo th
Rad iobud zik wyp osażo no w funk cję Blu etoot h, dzię ki któr ej prze syłać s trumi eniow o muzyk ę
z inn ego urz ądzen ia z inte rfejs em Blue tooth .
1. Na ciska j krótk o przy cisk /F UNC TIO N, aby w ybrać tr yb Blu etoot h (do poj awien ia się
sym bolu „bL” n a wyśw ietla czu. Ni ebies ka diod a LED Bl uetoo th będz ie miga ć szyb ko w
pra wym, gó rnym rog u wyśw ietla cza; ozn acza to , że radio budzi k jest go towy do
par owania ; jedno cześn ie zost anie od tworz ony sygn ał dźw iękow y.
2. Ua ktywn ij funk cję Blu etoot h w drugi m urząd zeniu , jak np. sm artfo n itp. (p atrz in struk cja
obs ługi ur ządze nia) i zn ajdź to u rządz enie.
3. Sp rawdź li stę w men u Bluet ooth w dr ugim ur ządze niu i wyb ierz „BL AUPU NKT C R20B T” do
par owania . Nieb ieska d ioda L ED Blue tooth b ędzie m igać po woli po p omyśln ym
spa rowani u; jedn ocześ nie zos tanie o dtwor zony syg nał dź więko wy.
4. Wyb ierz mu zykę w u rządz eniu Bl uetoo th i rozpo cznij j ej odtw arzan ie. Rad iobud zik
odt worz y muzyk ę.
5. W tr ybie Bl uetoot h można n acisn ąć prz ycisk H OUR TU NIN G < lub MI NUT E TUNI NG >, ab y
wyb rać pop rzedn i lub nas tępny u twór. Nac iśnij p rzyc isk TIM E SET
ME MORY /odt warza nia/p auzy, ab y odtwa rzać l ub wstr zymać c hwilo wo odtw arzan ie
muz yki. N aciśn ij prz ycisk A L2 +/A L1 –, aby d ostos ować gł ośnoś ć.
Uwag a:
a. Je śli żad en prz ycisk ni e zosta nie nac iśnię ty prze z 10 sek und, zos tanie w yświe tlony z egar.
b. Wpis z „0 000”, gdy zos tanie w yświe tlony m onit o po danie h asła na d rugim u rządz eniu
Blu etoot h.
c. Ni e gwara ntuje s ię możli wości p omyśl nego sp arowan ia wsz ystki ch urzą dzeń Bl uetoo th
ze wz ględu n a różnor odnoś ć marek i k onstr ukcji .
d. Za sięg rob oczy i nterf ejsu Bl uetoo th wyno si ok. 1 0 metrów ( bez prz eszkó d międz y
urz ądzen iami) . Należ y upewn ić się, ż e urząd zenia B lueto oth zna jdują s ię w tej od legło ści.
Uśpi enie i pr zycie mnien ie wyśw ietla cza
1. W tr ybie od twarz ania (r adio lu b Bluet ooth) n aciśn ij krót ko prz ycisk D IMME R SLE EP/ SCAN ,
aby u aktyw nić fun kcję uś pieni a. Naci skaj k olejn o ten prz ycisk , aby wyb rać cza s uśpie nia w
nas tępuj ący spo sób. Wyb ierz żą dany cz as uśpie nia; je śli w cią gu 2 sek und nie zo stani e
wyk onana ż adna op eracj a, try b ustawi eń uśpi enia zo stani e anulo wany i na stąpi p owrót
do tr ybu odt warz ania. W mi ędzyc zasie d ioda L ED uśp ienia n a wyświ etlac zu włąc zy się, c o
ozn acza po myślne u stawi enie uś pieni a.
90> 8 0 > 70 > 60 > 50>40>3 0>2 0>10
Tryb odtw arzania ( rad io FM lu b Blu etoo th)
2. W tr ybie cz uwania n aciśn ij kró tko prz ycisk D IMM ER/S LEE P/SC AN, ab y ustaw ić pozi om
pod świet lenia w yświe tlacz a na nisk i lub wy soki. Po ziom po dświe tleni a zosta nie
zac howany p odcza s odtwa rzan ia po ust awieni u.
22
Page 25

CR2 0BT
Uwag a:
a. W tr ybie uś pieni a naciś nij kró tko prz ycisk DIMM ER SL EEP/ SCA N, aby sp rawdz ić pozos tały
cza s uśpie nia. Ra diobu dzik pr zejdz ie auto matyc znie w tr yb czuw ania po u płyni ęciu cz asu
uśp ienia . Należ y ponow nie włą czyć u rządz enie, ab y odtwa rzać mu zykę .
Ład owanie p rzez in terf ejs US B
Rad iobud zik wyp osażo no w dwa po rty (1 x 5 V/ 1,0 A, 1 x 5 V/2 ,1 A) do ła dowan ia innyc h
urz ądzeń z i nterf ejsem U SB, ja k np. lam pki US B, went ylato rki, sm artfo ny, tabl ety itp .
Prz ed użyc iem por tu do ład owani a należ y spraw dzić wy magan e param etry z asila nia na
urz ądzen iu i użyć k abla U SB, do starc zonego r azem z ur ządze niem (k abla ni e ma w zest awie) .
Podc zas pom yślne go łado wania n a urząd zeniu p ojawi si ę symbo l ładow ania lu b wskaź nik
fun kcji.
Uwag a:
a. Ni e gwara ntuje s ię pomyś lnego ł adowa nia wsz ystk ich tel efonów a ni urzą dzeń
ele ktron icznyc h.
b. Nal eży na jpier w zawsz e sprawd zić wy magan e param etry ła dowan ia na urz ądzen iu, a
pot em podł ączyć g o do właś ciweg o portu USB w ra diobu dziku .
c. Do ł adowan ia nale ży uż ywać ka bla US B dost arczon ego raz em z urzą dzeni em.
d. Ni e gwara ntuje s ię czas u ładowa nia urz ądzen ia zew wz ględu n a nieza pewni enie
zna miono wych pa ramet rów łado wania .
Dan e techn iczne
Źró dło zas ilani a: Prąd st ały 5 V/3, 5 A, 100– 240 V ~50/ 60 Hz
Bat eria ty lko do po dtrz ymani a pamię ci zega ra : 2 x 1, 5 V
(wi elkoś ć: LR6 , UM-3 , AA, ba terie n ie wchod zą w skł ad zest awu)
Czę stotl iwość F M: 87,5 –108, 0 MHz
Wers ja Blue tooth : 2.1+ E DR
Zas ięg rob oczy Bl uetoo th: mak s. 10 met rów
Ład owani e przez i nterf ejs US B: prąd s tały, 5 V, 1 A X 1/p rąd sta ły, 5 V, 2,1A X 1
Moc w yjści owa : 2 x 1, 8 W (RMS )
Pobó r energ ii: 5 W
Pobó r mocy w t rybie c zuwan ia : < 1 W
(Da ne tech niczn e produk tu mogą u lec zmi anie be z ostr zeżeni a.)
Roz wiązy wanie p roble mów:
A. Du że zakł óceni a podcz as odbi erani a stacj i FM.
a-1 : Całko wicie w ysuń an tenę FM i z mień je j ustaw ienie. U staw ur ządze nie w pob liżu
okn a.
a-2 : Dostr ój się do i nnej st acji FM .
a-3 : Jeśli p roble m nie ust ąpi, pro simy o ko ntakt z l okaln ym ser wisem .
B. Prz eryw any dźw ięk w tr ybie Bl uetoo th.
b-1 : Przes uń urzą dzeni e z funkc ją Blue tooth b liżej ra diobu dzik a.
b-2 : Zatrz ymaj i w yłącz f unkcj ę Bluet ooth, a n astęp nie spa ruj urz ądzen ia pono wnie w ce lu
odt warza nia.
b-3 : Jeśli p roble m nie ust ąpi, pr osimy o ko ntakt z l okal nym ser wisem .
C. Ni e włącz a się wyś wietl acz.
c-1 : Upewn ij się, ż e wtyczk a zasi lacza s iecio wego jes t dobr ze podł ączona .
c-2 : Jeśli p roble m nie ust ąpi, pro simy o ko ntakt z l okaln ym ser wisem .
D. Nie u daje si ę ustaw ić alar mu.
d-1 : patrz i nstru kcja ob sługi .
d-2 : Jeśli p roble m nie ust ąpi, pro simy o ko ntakt z l okaln ym ser wisem .
23
PO LISH
Page 26

CR2 0BT
Info rmacj a dla uży tkown ików o spo sobie p ostęp owani a
ze zu żytym s przęt em elek trycz nym i elek troni cznym .
Sym bol prz ekreś loneg o kołowe go kont enera n a odpad y umies zczony n a produ ktach
inf ormuj e, że zuży tego sp rzętu e lektr yczn ego i ele ktroni czneg o nie moż na wyr zucać w raz
z odp adami k omuna lnymi . W yrzu cając e lektro śmiec i do kont enera s twarz asz zag rożen ie dla
śro dowisk a.
Seg reguj ąc i prze kazuj ąc do prz etwor zenia , odzy sku, rec ykli ngu ora z utyli zacji z użyte
urz ądzen ia elek trycz ne i elek troni czne ch ronis z środow isko pr zed zan iecz yszcze niem
i ska żenie m, prz yczyn iasz si ę do zmni ejsze nia sto pnia wy korz ystan ia zaso bów nat uralny ch
ora z obniż enia ko sztów pr odukc ji nowy ch urzą dzeń.
Szc zegół owe info rmacj e o najbl iższy m punkc ie zbió rki mo żna uzy skać b ezpoś redni o od
spr zedawc y lub w fi rmie Bl aupun kt Audi o Compet ence Ce ntre, 2N -Ever pol Sp. z o. o., adre s:
02- 801 Warsz awa, Pu ławsk a 403A, t elefon : +48 22 33 1 99 59, e -mail :
inf o@bla upunk t-audi o.pl
24
Page 27

CR2 0BT
DŮLEŽITÉ UPOZORN ĚNÍ
K dosažení Vaší nejvyšší radosti z používání produktu a pro Vaše dokonalé seznámení s jeho
funkcemi, přečtěte si prosím pečlivě tento návod dříve, než jej začnete používat. Dokonalé
seznámení se s produktem Vám zajistí léta bezproblémového používání a potěšení z poslechu.
1. Tyto bezpečnostní a provozní pokyny uchovejte pro budoucí použití.
2. Přístroj nesmí být vystaven vodě a umístěn ve vlhkém prostředí (např. v koupelně).
3. Výrobek by neměl být umístěn:
4. na místech vystavených přímému slunečnímu záření nebo v blízkosti topných těles.
5. na jiných stereofonních zařízeních, která vyzařují příliš tepla.
6. na místech, kde by bylo zamezeno ochlazování přístroje pomocí jeho ventilátoru nebo v
prašném prostředí.
7. na místech, která konstantně vibrují.
8. na vlhkých a mokrých prostorách.
9. v blízkosti zapálených svíček nebo jiných zdrojů otevřeného ohně.
10. Výrobek používejte pouze podle pokynů v této příručce.
11.Před prvním zapnutím přístroje se ujistěte, že je napájecí kabel správně připojen.
12.Přes USB propojujte přímo, nebo použijte USB-prodlužovací kabel, který není delší než 25
cm.ČESKY
Z bezpečnostních důvodů neodstraňujte žádné kryty ani se nepokoušejte získat přístup k vnitřku
výrobku. Nepokoušejte se odstranit šroubky, nebo otevírat kryt jednotky.Servis produktu a veškeré
opravy vždy svěřte autorizovanému servisu a jeho kvalifikovanému personálu.
BEZPEČNOSTNÍ PO KYNY
1. Čtěte pokyny – před uvedením přístroje do provozu si přečtěte veškeré bezpečnostní a provozní
pokyny a návod k obsluze.
2. Uchovejte návod k obsluze – tento návod k obsluze uschovejte pro budoucí použití.
3. Dbejte varování – všechna varování na produktu a v návodu k obsluze je třeba dodržovat.
4. Postupujte podle pokynů – pokyny pro provoz a bezpečnostní pokyny je třeba dodržovat.
5. Instalace – instalujte výrobek v souladu s pokyny výrobce.
6. Napájecí zdroje – tento produkt napájejte pouze z druhu zdroje, který je uveden na napájecím
kabelu. Pokud si nejste jistí, jaký typ napájení máte doma, obraťte se na svého prodejce výrobků
nebo místní energetickou společnost.
7. Uzemnění nebo polarizace – výrobek nemusí být uzemněn. Ujistěte se, že zástrčka napájecího
kabelu je zcela zasunuta do elektrické zásuvky nebo do prodlužovacího kabelu tak, aby bylo
zamezeno vzniku přechodového odporu a tím možného rizika vzniku požáru. Používáte-li
prodlužovací napájecí kabel nebo neoriginální napájecí kabel od jiného výrobce, než který je
dodáván jako součást balení s výrobkem, musí být tento neoriginální kabel vybaven příslušnými
kontakty pro propojení s výrobkem a musí mít bezpečnostní schválení pro použití v dané zemi.
8. Ochrana napájecího kabelu – napájecí kabely by měly být vedeny tak, aby nebyly přehnuty,
stačeny předměty umístěnými na nebo proti nim, po napájecím kabelu by nemělo být chozeno.
Před těmito nežádoucími vlivy chraňte zejména konektory kabelů na zapojení do zásuvky a pro
napojení s produktem.
9. Přetížení – nepřetěžujte elektrické zásuvky, prodlužovací kabely nebo vícenásobné zásuvky,
následkem takového přetěžování je zvýšené riziko požáru nebo úrazu elektrickým proudem.
10. Větrání – výrobek musí být umístěn na řádně větrané místo. Nepok ládejte výrobek na postel,
pohovku, nebo jiný podobný povrch. Nezakrývejte výrobek věcmi, jako jsou ubrusy, noviny,
apod.
CZ ECH
25
Page 28

CR2 0BT
11. Teplo – tento produkt by neměl být umístěn v blízkosti zdrojů tepla, jako jsou radiátory,
regulátory tepla, kamna, zesilovače a jiná zařízení, která produkují teplo.
12. Na přístroji nesmí být umístěn žádný zdroj otevřeného ohně, například zapálené svíčky.Voda a
vlhkost – pro snížení rizika požáru nebo úrazu elektrickým proudem, nevystavujte výrobek
kapající, stříkající nebo tekoucí vodě a nadměrné vlhkosti, např. v sauně či koupelně.
Nepoužívejte tento výrobek v blízkosti vody, například u vany, umyvadla, dřezu, kádě, ve vlhkém
sklepě, v blízkosti bazénu apod.
13. Vniknutí předmětů a tekutin – nikdy nevkládejte jakékoli cizí předměty do otvorů výrobku,
mohly by se dotknout míst pod vysokým napětím nebo by mohly způsobit zkrat, což může vést
k požáru nebo úrazu elektrickým proudem. Nikdy nelijte jakoukoli tekutinu jakéhokoliv druhu
na výrobek ani do výrobku. Neumisťujte jakýkoli předmět obsahující tekutinu na povrch
výrobku (např. váza, sklenička s vodou apod.).
14. Čištění – před čištěním odpojte výrobek z elektrické zásuvky. Prach z přístroje odstraňujte
suchým hadříkem. Chcete-li používat aerosolové čisticí spreje, nestříkejte přímo na výrobek;
nastříkejte čisticí prostředek na hadřík a poté aplikujte. Dávejte pozor, aby nedošlo k poškození
hrací jednotky.
15. Příslušenství – nepoužívejte neoriginální příslušenství, které není doporučené výrobcem
produktu, neoriginální příslušenství může ohrozit bezpečné používání a funkci výrobku.
16. Umístění – neumísťujte výrobek na nestabilní vozík, stojan, trojnožku, konzolu nebo stolek.
Výrobek může spadnout a způsobit vážné zranění dětem nebo dospělým a může dojít k
vážnému poškození výrobku. Používejte pouze se stabilním vozíkem, stojanem, trojnožkou,
držákem nebo stolem, nebo zařízením doporučeným výrobcem nebo prodávaným spolu s
výrobkem. Pokud je nutná jakákoliv montáž výrobku, řiďte se pokyny výrobce a používejte
pouze montážní příslušenství doporučené výrobcem.
17. Manipulace s produktem – při přemisťování produktu na vozíku je nutno dodržovat opatrnost.
Prudká změna směru, prudké zastavení, vysoká rychlost nebo nerovný povrch můžou způsobit
převrhnutí vozíku a tím případné poškození produktu.
18. Období nepoužívání – pokud je zařízení delší dobu nepoužíváno musí být napájecí kabel
přístroje odpojen z elektrické zásuvky. Odpojte napájecí kabel z elektrické zásuvky během
bouřky.
19. Servis – nepokoušejte se o servis nebo o opravu tohoto přístroje svépomocí, otevření nebo
odstranění krytů přístroje vás může vystavit nebezpečí úrazu elektrickým proudem nebo jinému
nebezpečí. Veškeré opravy přístroje svěřte kvalifikovanému servisnímu personálu
autorizovaného servisu.
20. Prosím, pokud zařízení není v provozu, odpojte napájecí kabel z hlavního zdroje energie nebo z
elektrické zásuvky ve zdi. Ve chvíli, kdy je napájecí kabel zapojen ke zdroji elektrické energie, je
systém v pohotovostním režimu, to znamená, že přístroj není zcela vypnutý a proudí do něj
elektrická energie.
21. Náhradní díly – pokud jsou potřeba náhradní díly, ujistěte se, že servisní technik použil náhradní
díly, které jsou specifikované výrobcem nebo mají stejné vlastnosti jako originální díly.
Neoprávněná výměna může vést k požáru, úrazu elektrickým proudem nebo způsobit jiné
nebezpečí.
22. Síťové pojistky – pro trvalou ochranu proti požáru, používejte pouze správný typ pojistek.
Správná specifikace pojistek je pro každý rozsah napětí vyznačena na výrobku.
23. Nezvyšujte příliš hlasitost při poslechu pasáží s velmi nízkou úrovní hlasitosti nebo při náhlé
úplné absenci zvuku. Pokud tak učiníte, může ve chvíli opětovného zvýšení úrovně hlasitosti
přehrávané pasáže dojít k poškození reproduktorů.
26
Page 29

CR2 0BT
24. Pokud chcete přístroj úplně odpojit od napájení, musíte odpojit napájecí kabel od přístroje nebo
od elektrické zásuvky. Elektrická zásuvka nebo a vstup pro napájecí kabel k výrobku musí zůstat
volně přístupné po celou dobu používání přístroje v provozu.
25. Je vhodné umístit produkt do blízkosti elektrické zásuvky nebo prodlužovačky, které musí být
snadno přístupné.
26. Nejvyšší teplota prostředí vhodná pro tento výrobek je 35 ° C.
27. ESD tip – Pokud dojte k vyresetování přístroje nebo není obnoven jeho provoz z důvodu
elektrostatického výboje, je třeba výrobek vypnout, odpojit napájecí kabel a pak jej znovu
připojit, případně přesunout přístroj na jiné místo.
28. Baterie
1. Baterie nesmí být vystaveny nadměrnému teplu, jako například působení přímého
slunečního světla, ohně a podobně.
2. Používané baterie by měly být vhodné pro ekologickou likvidaci baterií.
3. UPOZORN ĚNÍ pro používání baterií – pro zamezení úniku elektrolytu z baterie, který může
způsobit poranění, poškození majetku nebo přístroje:
- Všechny baterie nainstalujte správně, + a - jak je vyznačeno na přístroji.
- Nekombinujte baterie (staré a nové nebo uhlíkové a alkalické apod.)
- Pokud nebudete přístroj delší dobu požívat, vyjměte baterie ven.
VAROVÁNÍ
Tento spotřebič není určen pro používání osobami (včetně dětí) se sníženými fyzickými, smyslovými
nebo duševními schopnostmi, nebo osobami bez patřičných zkušeností a znalostí, pokud jim nebyl
poskytnut dohled nebo instrukce týkající se použití spotřebiče osobou zodpovědnou za jejich
bezpečnost. Děti by měly být pod dozorem, aby se zajistilo, že si se spotřebičem nebudou hrát.
1. Přístroj nesmí být vystaven tekoucí, kapající nebo stříkající vodě. Předměty naplněné
kapalinami, jako jsou např. vázy, nesmí být umístěny na přístroji.
2. Aby nedošlo k požáru nebo úrazu elektrickým proudem, neumisťujte toto zařízení na horkých
místech, nevystavujte ho dešti, vlhkosti nebo prachu.
3. Neumisťujte tento přístroj v blízkosti jakýchkoliv zdrojů vody, např. kohouty, vany, pračky nebo
bazény. Ujistěte se, že je přístroj umístěn na suchém, stabilním povrchu.
4. Neumisťujte tento přístroj v blízkosti silného magnetického pole.
5. Nepokládejte přístroj na zesilovače nebo přijímače.
6. Neumisťujte tento přístroj na vlhkém prostředí, vlhkost bude mít vliv na životnost elektrických
komponent.
7. Pokud systém bezprostředně přemístíte z chladného do teplého prostředí, nebo pokud je
umístěn ve velmi vlhké místnosti, může dojít ke kondenzaci vlhkosti uvnitř přehrávače. Pokud k
tomu dojde, systém může být poškozen a nebude fungovat správně. Prosím, nechte systém
zapnutý přibližně po dobu jedné hodiny, dokud se vlhkost neodpaří.
8. Nečistěte jednotku chemickými rozpouštědly, ta mohou poškodit povrch zařízení. Přístroj otřete
čistým, suchým nebo lehce navlhčeným hadříkem.
9. Při odpojování napájecího kabelu ze zásuvky, tahejte přímo za zástrčku, nikdy ne za kabel.
10. Pokud je přístroj zapnut v blízkosti televizoru, může vlivem působení elektromagnetických vln
dojít k ovlivnění funkčnosti obou zařízení. Na televizní obrazovce se mohou objevit čáry,
rozpadat obraz, může být ovlivněn zvuk televizoru i přístroje, případně může být jak televizor,
tak přístroj zcela nefunkční. Tomu zamezíte umístěním přístroje v dostatečné vzdálenosti od
televizoru.
CZ ECH
27
Page 30

CR2 0BT
POZNÁMKA
Tento výrobek je ve shodě s požadavky Evropského společenství na rádiové rušení.
Naše produkty jsou navrženy a vyrobeny z vysoce kvalitních materiálů a komponent, které jsou
recyklovatelné a znovu použitelné.
Je-li tento symbol přeškrtnutého kontejneru uveden na výrobku, znamená to, že výrobek podléhá
směrnici EU 2002/96/ES. Informujte se prosím o místní systém sběru tříděného odpadu pro
elektrické a elektronické výrobky. Prosím řiďte se místními pravidly a nelikvidujte staré produkty
spolu s běžným komunálním odpadem. Správnou likvidací starého výrobku pomůžete předejít
možným negativním dopadům na životní prostředí a lidské zdraví.
Výrobek obsahuje baterie podléhající směrnici EU 2006/66/EC, které nelze vyhazovat do běžného
domovního odpadu. Informujte se prosím o místních pravidlech o sběru baterií, neboť správnou
likvidací pomůžete předcházet negativním důsledkům pro životní prostředí a lidské zdraví.
Informace týkající se životního prostředí
Výrobek je zabalen pouze v nezbytném obalu pro jeho ochranu. Snahou naší firmy je, aby byl
obalový materiál snadno rozdělitelný na tři materiály: lepenku (krabice), polystyrén (ochranné
balení) a polyethylen (sáčky, ochranné fólie z lehčeného plastu). Výrobek se skládá z materiálů, které
lze recyklovat a znovu použít v případě demontáže odbornou firmou. Dodržujte prosím místní
předpisy týkající se likvidace obalových materiálů, vybitých baterií a starého zařízení.
Na nahrávání a přehrávání materiálů může být vyžadován souhlas. Viz Zákon o Copyrightu Act 1956
a Zákon na ochranu umělců Sk 1958-1972.
Blue tooth® název i log o jsou regist rované obchod ní zná mky sp olečno sti Bl uetooth SIG , Inc. a
její po užití je za tížené li cencí. Os tatní obc hodní zná mky a jmén a jsou vlas tněny jeji ch vlast níky.
28
Page 31

CR2 0BT
UMÍSTĚNÍ OVLÁDACÍ CH PRVKŮ
CZ ECH
1. N ASTAV ENÍ Č ASU / PAM ĚŤ
/ PŘ EHR ÁVÁNÍ / PAU ZA
2. S TMÍ VAČ / REŽ IM SPÁ NKU
/ VYH LED ÁVÁNÍ
3. H LAS ITOS T + / Al2
4. H LAS ITOS T – / Al1
5. O DLOŽ ENÍ B UZE NÍ / NOČ NÍ
SV ĚTLO
6. / F UNKC E
7. L ADĚ NÍ DO LŮ / HOD INA
/ PŘ ESKO K ZPĚ T
8. L ADĚ NÍ NA HORU / MINU TA
/ PŘ ESKO K VPŘ ED
9. I NDI KÁTOR A L1
10. IN DIKÁT OR PM
11. IN DIKÁT OR BLU ETO OTH
12. IN DIKÁT OR AL 2
13. IN DIKÁT OR RE ŽIMU SPÁNK U
14. DI GITÁL NÍ DI SPL EJ
15. VS TUP N APÁJE NÍ DC
16. VÝS TUP U SB 2, 1 A
17. VÝS TUP U SB 1 A
18. KON EKT OR AN TÉNY FM
29
Page 32

CR2 0BT
Varování týkající se napájení:
l Riz iko poš kozen í výrob ku! Dbe jte, aby n apětí n apáje cího zd roje od povíd alo hod notě
uve dené na to vární m štítk u, kter ý se nac hází na z adní st raně rad iobud íku. Se z aříze ním se
smí p oužív at pouz e dodaný s tejno směrn ý napáj ecí ada ptér.
l Riz iko úra zu elek trick ým prou dem! Po kud odp ojuje te síťov ý adapt ér, vždy n ejdří ve odpo jte
zás trčku o d elekt rické z ásuvk y. Nikdy n etahe jte za na pájec í kabe l.
Nas tavení p řístr oje a zap nutí/ vypnu tí napá jení
Dod aný stejn osměr ný adapt ér připo jte ke konek toru DC na za dní stra ně příst roje a druhý
kon ektor přip ojte k síť ovému napá jecím u zdro ji. P o spr ávném přip ojení napá jení se ro zsvít í
dis plej.
Krá tce sti sknět e tlačí tko / FUN CTI ON. Ak tivuj e se nap ájení a p řístr oj přej de do rež imu
pos lechu r ozhla sovéh o vysíl ání. D alším k rátk ým sti skem to hoto tl ačítk a zaří zení p řepne te do
rež imu Bl uetoot h. Sti sknu tím a p řidrž ením t lačít ka se p řístr oj uve de do p ohotov ostní ho
rež imu.
Hla sitos t
V rež imu př ehrává ní (roz hlaso vé vys ílání FM nebo Bluet ooth) s e krát kým st iskem tlačí tka AL 2
+ neb o AL1 – zv ětšuj e resp. zm enšuj e hlasi tost.
Nas tavení č asu
1. Ch cete- li nast avit ča s, v poho tovost ním rež imu sti sknět e a na dvě se kundy p řidrž te
tla čítko T IME SE T ME MORY /PLAY PA USE, d okud ne začne b likat d isple j.
2. St iskem t lačít ka MIN UTE T UNIN G > nebo H OUR T UNIN G < vybe rte 24h odino vý nebo
12h odino vý form át času. D alším s tiske m tlačí tka TI ME SE T MEM ORY/ PLAY PAU SE
nas tavení p otvrď te. Na di splej i začne b likat h odnot a [00:0 0] nebo [ 12:00 ]. Nyní m ůžete
zač ít s nast avován ím hodi n a minut .
3. St iskem t lačít ka HOU R TUN ING < na stavt e hodin u. Pomoc í tlačí tka MI NUT E TUNI NG >
nas tavte p ožadov anou ho dnotu m inut.
4. Za daný ča s potvr ďte opět ovným s tiske m tlačí tka TIM E SE T MEM ORY/ PLAY PAUS E. Pok ud
neb ude do 3 se kund st isknu to žádn é tlačí tko, bu de vybr ané nas tavení a utoma ticky
pot vrzen o. Nast avení ča su je tím to doko nčeno.
Nas tavení b udíku
Před nas tavení m bu díku je nu tné nejdř íve s právn ě nas tavit čas. Zaří zení umožň uje nasta vit
dva n ezávi slé bu díky. J ak zdro j pro z vuk bu díku j e možné vybra t rozhl asové v ysíl ání FM n ebo
bzu čák.
1. Př idrže ním tla čítka / FU NCT ION na 2 s ekund y přejd ěte do po hotovo stníh o režim u.
Sti sknět e a na 2 seku ndy při držte t lačít ko AL1 + n ebo AL 2 –, doku d nezač ne blik at čas n a
dis pleji . Nyní js te v reži mu nast avení bu díku.
2. Pom ocí tla čítk a HOUR TU NING < n ebo MI NUT E TUNI NG > nas tavte č as budí ku. Pro
pot vrzen í výběr u stisk něte t lačít ko AL1 + n ebo AL 2 –. Na disp leji za čne bli kat sy mbol „b“
(pr o bzučák ) nebo „ F“ (pro r ozhla sové vy sílán í FM) – zna mená to, ž e máte mo žnost v ybrat
zdro j zvuk u budík u.
3. St iskem t lačít ka HOU R TUN ING < ne bo MIN UTE T UNIN G > lze pře pínat z droj zv uku bud íku
mez i bzučá kem a rozh lasov ým vys ílání m FM. Výbě r potvr ďte sti skem tl ačítk a AL1 + ne bo
AL 2 –. Poté př ejdet e k nastav ení hla sitos ti budí ku.
4. St iskem t lačít ka HOU R TUN ING < ne bo MIN UTE T UNIN G > nast avte hla sitos t budík u
(05 ~15). N astave ní pot vrdíte d alším s tiske m tlačí tka AL 1 + nebo A L2 –. Tím je n astav ení
bud íku dok ončen o.
30
Page 33

CR2 0BT
Pozn ámka:
a. Po ús pěšné m nasta vení bu díku se n a displ eji zob razí teč ka.
b. Je -li jak o zdroj z vuku bu díku na stave no rádi o, bude po užita a ktuál ně nast avená f rekve nce
rozh lasov ého vys ílání F M.
c. Ja kmile n astan e čas buz ení, hl asito st zvuk u budík u se bude p ostup ně zvy šovat .
d. Zvu k budík u je možn é ztiši t stisk em tlač ítka A L1 + neb o AL2 –. B udík zn ovu zazn í, jak mile
nas tane ča s buzen í násle dujíc ího dne.
e. Fun kci bud íku je mo žné v poh otovos tním re žimu za pnout n ebo vyp nout k rátký m stisk em
tla čítka AL1 + neb o AL2 –.
f. Upo zorňu jeme, že n astav ený čas a b udík zů stávaj í aktiv ní pouz e po dobu , kdy je
při pojen o stejn osměr né napá jení ne bo je pří stroj n apáje n ze zálož ní bate rie. Pok ud je
odp ojeno s tejno směrn é napáj ení, je n utné zk ontrol ovat a př ípadn ě znovu n astav it čas a
bud ík.
g. Ja kmile n astan e čas buz ení, bu de zvuk z nít tr vale po d obu 60 mi nut, po kud neb ude s
pří stroj em prove dena žá dná čin nost.
h. Bě hem nas tavová ní hodi n a budík u bude na stave ní vybr áno a pot vrzen o autom atick y,
pok ud nebu de do 3 sek und sti sknut o žádné t lačít ko.
Zap nutí/ vypnu tí odlo žení bu díku a no čního s větla :
1. Ja kmile z azní bu dík, j e možné st iskem t lačít ka SN OOZE LIGH T akti vovat 9m inuto vou
dob u odlož ení buze ní. Bud ík zazn í znovu z a 9 minut . Získ áte tak da lších 9 m inut sp ánku.
Běh em této d obu bud e na disp leji bl ikat in dikát or AL1 n ebo AL 2.
2. Fun kci odl ožení b udíku j e možné z rušit k rátký m stisk em tlač ítka A L1 + nebo AL2 –.
3. St iskem t lačít ka SNO OZE / N IGH T LIG HT můž ete zapn out neb o vypn out fun kci noč ního
svě tla s výj imkou d oby, kdy z ní budí k, a když j e aktiv ní reži m odlož ení bud íku.
Zál ožní na pájen í z bateri e a nasta vení pa měti
Kro mě př ipoje ní s tejno směrn ého a dapté ru p ro uc hován í nas taven í čas u a budík u je možn é
do b ateri ového prost oru na spod ní st raně p řístr oje vl ožit 2 bate rie 1 ,5 V (t yp LR 6, U M-3, AA)
(ne ní souč ástí do dávky ), kter é umožní d očasn é zacho vání ča su.
Upo zorňu jeme, že b ateri e slo uží p ouze k uc hován í nast avení ho din a bud íku a ulo žení
pře dnast avené hl asito sti a roz hlasov é stani ce FM.
Pozn ámka:
a. Př i vklád ání bat erie (n ení sou částí d odávk y) dávej te pozo r na pola ritu, k terá je u vedena v
bat eriové m prost oru.
b. Doj de-l i k výpad ku napá jení, z áložn í bater ie umož ňuje za chová ní nast avení ča su. Na
dis pleji s e nezob razí ho diny. Zál ožní ba terie r ovněž u možňuj e přemi sťová ní přís troje, a niž
by by lo nutn é pokaž dé znov u nastav ovat ča s.
c. Na pájen í ze zálož ní bate rie je ur čeno po uze k přek onání d oby, kdy j e dočas ně nedo stupn é
nap ájení z e sítě. Po kud má vý padek n apáje ní delš í trvá ní, bate rie se mů že vybí t nebo
můž e dojít k u rčitém u omeze ní přes nosti . Po vybi tí je nut né bater ii vyj mout, a by nedoš lo
k jej ímu vyt ečení . Pokud zá ložní b ateri i nechc ete pou žít, bu de přís troj pra covat n ormál ně.
Jes tliže v šak v tomt o přípa dě dojd e k odpoj ení od sí tě, bud ou po obn ovení na pájen í čísla
hod in blik at a bude n utné zn ovu nas tavit h odiny, j ak bylo po psáno v o dstav ci o nast avení
hod in.
d. Up ozorně ní: Při l ikvid aci bat erií do držuj te zása dy ochr any živo tního p rostř edí.
Nev yhazu jte pou žité ba terie d o odpad kového k oše. In forma ce o recy klaci b ateri í získ áte u
mís tních ú řadů.
e. Bat erie ne smí být v ystav ovány na dměrn ému tep lu, nap říkl ad přím ému slu neční mu zářen í,
pož áru neb o podob ně.
CZ ECH
31
Page 34

CR2 0BT
Posl ech roz hlasov ého vys ílání
Před la děním ro zhlas ového vy sílán í FM úplně v ysuňte a up ravte pol ohu anté nního pr utu.
Lep šího př íjmu vy sílán í je možn é dosáh nout pře sunut ím přís troje d o blízk osti ok na.
1. Pře pnutí d o režim u rozhl asovéh o vysíl ání FM
Krá tkým st iskem t lačít ka / F UNC TIO N přís troj zap nete a ak tivuj ete rež im příj mu
rozh lasov ého vys ílání F M. Na di splej i se zobra zí frek vence F M.
2. Ru ční a aut omatic ké ladě ní
Krá tkým st iskem t lačít ka MI NUTE T UNI NG > nebo HOUR T UNIN G < je mož né zvět šit res p.
zme nšit fr ekven ci FM s kro kem po 0, 1 Mhz.
Při držte n a dvě sek undy sti sknu té tlač ítko MI NUT E TUNI NG > neb o HOU R TUNI NG <.
Pří stroj au tomat icky pr ocház í frekv encem i ve vzest upném n ebo ses tupné m směru .
Jak mile na lezne d ostup nou sta nici F M, zahá jí se pře hráván í.
3. Pře dnast avení ro zhlas ových s tanic
Sti skem tl ačítk a MIN UTE TU NIN G > nebo H OUR TU NING < nalaď te frek venci po žadov ané
rozh lasov é stani ce, kter ou chce te ulož it do pam ěti. St iskně te a přid ržte tl ačítk o TIME S ET/
ME MORY /PL AY PAUS E, dok ud na dis pleji n ezačn e blika t „ PXX“. Krát kým sti skem tl ačítk a
MI NUTE TU NING > n ebo HO UR TUN ING < n astav te čísl o předna stave né rozh lasové
sta nice a da lším kr átkým s tiske m tlačí tka TI ME SE T / MEM ORY / P LAY PAUSE výběr
pot vrďte. P ředna staven í rozhl asové s tanice j e tímto d okonč eno. Pro u ložení d alšíc h stani c
zop akujt e výše uv edené k roky.
V reži mu rozhl asové ho vysí lání lz e opako vaným st iskem t lačít ka TIM E SET / MEMO RY /
PL AY / PAUSE z volit a z aháji t přehr ávání př ednas taven é rozhla sové st anice.
Pozn ámka:
a. Do p aměti p řístr oje je mo žné ulož it nejv ýše 20 ro zhlas ových s tanic .
b. Je -li odp ojen st ejnos měrný a daptér a d o přís troje ne ní vlož ena zál ožní ba terie,
pře dnast avení ro zhlas ových s tanic s e ztratí .
c. Pok ud chce te odst ranit u loženo u stani ci FM, u ložte n a její poz ici jin ou stan ici.
d. Je stliže n ebude p o dobu 10 s ekun d s příst rojem pr ovede na žádn á opera ce, na dis pleji s e
zob razí ho diny.
4. Aut omati cké lad ění a před nasta vení st anic
V reži mu rozhl asové ho vysí lání st iskně te a na 2 sek undy př idrž te tlač ítko DI MME R SLE EP /
SC AN. Za hájí se a utoma tické l adění ro zhlas ových s tanic a j ejich u ložen í do pamě ti.
Použ ití fun kce Blu etooth
Pří stroj je vyba ven f unkcí Blu etoot h, k terá vám umož ňuje do příst roje stre amovat hud bu z
vaš eho zař ízení v ybave ného tec hnolo gií Blu etoot h.
1. Kr átkým s tiske m tlačí tka / FU NCT ION př ejdět e do reži mu Blue tooth . Na disp leji se
zob razí „bL“. M odrý i ndiká tor rež imu Blu etooth v p ravém h orním r ohu dis pleje b ude
ryc hle bli kat. Z namen á to, že je př ístro j připra ven ke sp árová ní. Sou časně z azní z
rep rodukt oru zv ukový s ignál .
2. Ak tivuj te funk ci Blue tooth n a svém zař ízení , napří klad s martp honu ap od. (po stup
akt ivace j e popsá n v návodu k o bsluz e vašeh o zaříz ení Blu etoot h), a vyh ledej te dost upné
zař ízení B lueto oth.
3. Zk ontro lujte na s vém zař ízení s eznam z aříze ní Blue tooth a p ro spáro vání vy bert e zaříz ení
„B LAUP UNK T CR20 BT“. Modr ý indik átor f unkce Bl uetoo th bude p o úspěš ném spá rován í
pom alu bli kat a z rep roduk toru so učasn ě zazní d alší zv ukový s ignál .
4. Na s vém zař ízení B luetoo th vyb erte a za hajte p řehráv ání hud by. Hudb a bude
rep roduko vána be zdrát ově pros tředn ictví m příst roje.
5. V rež imu Blu etoot h můžete s tiske m tlačí tka HO UR TU NING < n ebo MI NUT E TUNI NG >
pře jít na pře dchoz í resp. ná sledu jící st opu. Tla čítko T IME S ET ME MORY / P LAY PAUS E
slo uží k zah ájení r esp. poz astave ní přeh ráván í. Tlačí tky AL 2 + / AL1 – se n astav uje
hla sitos t.
32
Page 35

CR2 0BT
Pozn ámka:
a. Je stliž e nebud e po dobu 1 0 sekun d s příst rojem p rovede na žádn á opera ce, na dig itáln ím
dis pleji s e zobra zí čas.
b. Pok ud bude te běhe m párová ní zaří zení Bl uetoo th požá dáni o he slo, zad ejte „0000 “.
c. Up ozorňu jeme, ž e vzhle dem k odl išné zn ačce a ko nstru kci nen í úspěš né spáro vání
gar antová no u všec h zaříz ení Blu etoot h.
d. Ne jlepš í provoz ní vzdá lenos t pro použ ití fun kce Blu etoot h je do 10 me trů od př ístro je bez
dal ších př ekáže k. Zaří zení Bl uetoo th umís těte v té to vzdál enost i.
Rež im spán ku a stmí vač
1. V rež imu pře hráván í (rozh lasové v ysílá ní nebo B lueto oth) lz e krátk ým sti skem tl ačítk a
DI MMER SLEE P/S CAN ak tivov at funkc i spánk u. Opak ovaný m stisk em toho to tlačí tka je
mož né volič d obu spá nku z ná sledu jícíc h možnos tí. Vybe rte po žadova nou dob u spánk u a
nec hejte j i zobraz enou na 2 s ekund y. Reži m nastav ení spá nku na di splej i zmizí a p řístr oj se
vrá tí do reži mu přeh ráván í. Na dis pleji s e souča sně rozs vítí in diká tor SL EEP, kter ý
sig naliz uje úsp ěšné na staven í režim u spánk u.
90 > 80 > 7 0 > 60 > 50 > 40 > 30 > 2 0 > 10
Rež im přeh ráván í (FM neb o Bluet ooth)
2. V poh otovos tním re žimu lz e krátk ým sti skem tl ačítk a DIM MER SL EEP /SCA N nast avit
int enzit u podsv ícení di splej e na vys okou ne bo nízk ou úrove ň. Po nast avení z ůstan e
int enzit a podsv ícení za chová na v reži mu přeh rávání .
Pozn ámka:
a. V rež imu spá nku lze k rátký m stisk em tlač ítka D IMM ER SL EEP/ SCAN zkont rolova t zbýva jící
dob u spánk u. Po uply nutí do by spán ku se pří stroj a utoma ticky v rátí do p ohotov ostní ho
rež imu. Chc ete- li přeh rávat, j e nutné p řístr oj opět z apnou t.
Nab íjení z aříze ní USB
Pří stroj je v ybave n dvěma p orty p ro nabí jení za řízen í prostř ednic tvím U SB (1 x 5 V / 1, 0 A, 1 x 5
V / 2,1 A ). Tyto port y je možné použ ít k n apáje ní a nabíj ení z aříze ní US B, j ako js ou na přík lad
lam py USB , ventil átor y, smart phony, t ablet y atd.
Pře d př ipoje ním zař ízen í k nab íjec ímu por tu US B zk ontro lujt e po žadav ky n a na páje ní
při pojov aného zař ízení . Pr o p řipoj ení použi jte kabe l U SB doda ný s vaš ím zaříz ením (ka bel
nen í součá stí do dávky ). Při ú spěšn ém přip ojení k nabíj ení se n a zaří zení zo brazí s ymbol nebo
ind ikáto r nabíj ení.
Pozn ámka:
a. Fun kce nab íjení t ohoto p řístro je nemu sí prac ovat u vš ech tel efonů a el ektro nický ch
zař ízení .
b. Nej dříve v ždy ově řte pož adavk y na napá jení př ipojo vanéh o zaříz ení a při pojte j ej k
odp ovída jícím u portu n a tomto p řístr oji.
c. Pro ú čely na bíjen í vždy po užijt e kabel U SB dod aný s vaš ím zaří zením .
d. Do ba nabí jení va šeho za řízen í není ga rantov ána vzh ledem k m ožným od lišný m
jme novit ým hodn otám na pájec ího zdro je vaše ho zaří zení.
CZ ECH
33
Page 36

CR2 0BT
Techn ické úda je
Ele ktric ké napá jení: 5 V DC/ 3,5 A,
100 –240 V ~50 /60 Hz
Zál ožní ba terie ( pouze pr o uchov ání čas u): 2 x 1,5 V,
vel ikost : LR6, U M-3, A A
(ne jsou so učást í dodáv ky)
Frek vence F M : 87, 5–108 ,0 MHz
Verz e Bluet ooth : 2,1 + E DR
Prov ozní vz dálen ost Blu etooth : do 10 m etrů
Nab íjecí v ýkon U SB: 5 V DC, 1 A x 1
Výk on: 2 x 1,8 W (R MS)
Pří kon: 5 W
Pří kon v poh otovos tním re žimu: < 1 W
(Tec hnick é údaje o v ýrobk u se moho u změni t bez pře dchoz ího upo zorně ní.)
Řeš ení pot íží:
A. V rež imu pří jmu rozh lasov ého vys ílání F M se vys kytuj e silný š um poza dí.
a-1 : Úplně v ysuňt e antén u FM nebo u pravt e její sm ěr. Přesu ňte pří stroj k ok nu.
a-2 : Pokust e se k posl echu na ladit j inou st anici F M.
a-3 : Jestl iže prob lém pře trvá vá, obra ťte se na s ervi sní stře disko .
B. Zvu k je v reži mu Blue tooth p řehráv án přer ušova ně.
b-1 : Zkust e přesu nout za řízen í Bluet ooth bl íže k pří stroji .
b-2 : Zkust e vypno ut a znov u zapno ut funk ci Blue tooth a z opaku jte pár ování.
b-3 : Jestl iže pro blém př etrvá vá, obr aťte se na s ervi sní stř edisk o.
C. Di splej n efung uje.
c-1 : Zkont roluj te, zda je s právn ě připo jen ste jnosm ěrný ada ptér.
c-2 : Jestl iže pro blém pře trvá vá, obra ťte se na s ervi sní stře disko .
D. Nel ze nast avit bu dík.
d-1 : Prostu dujte s i postu p nasta vení bu díku v ná vodu k obs luze.
d-2 : Jestl iže prob lém pře trvá vá, obra ťte se na s ervi sní stře disko .
5 V DC, 2 ,1 A x 1
34
Page 37

CR2 0BT
DÔLEŽITÉ UPOZORN ENIA
K dosiahnutiu Vašej najvyššej spokojnosti a radosti z používania našeho produktu, prečítajte si
prosím najskôr podrobne tento návod a zoznámte sa s jeho funkciami před tým, jako ho začnete
používať. To Vám zaistí roky bezproblémového výkonu produktu a pôžitok z hudby.
· Tieto bezpečnostné a prevádzkové pokyny uchovajte pre budúce
použitia.
· Prístroj nesmie byť vystavený vode a umiestnený vo vlhkom prostředí (napr. kúpelni).
· Výrobok nesmie byť umiestnený:
。na miestach vystavených priamemu slnečnému žiareniu alebo
v blízkosti kúrenia.
。ona iných stereofónnych zariadeniach, ktoré vyžiarujú príliš tepla
。ona miestach, kde bybolo obmedzené ochlaďovanie prístroja
pomocou jeho ventilátoru alebo v prašnom prostředí
。na miestach, ktoré konštantne vibrujú.
。vo vlhkých a mokrých priestoroch.
。v blízkosti zapálených sviečok alebo iných zdrojoch otvoreného ohňa.
。Výrobok používajte iba podľa pokynov v tejto príručke.
。Cez USB prepojujte priamo, alebo použite USB-predlžovací kábel,
ktorý nieje duší ako 25 cm.
Z bezpečnostných dôvodov neodstraňujte žiadne kryty ani sa nepokúšajte získať prístup k
vnútrajšku výrobku. Nepokúšajte sa odstrániť skrutky alebo otvárať kryt jednotky. Servis produktu a
všetky opravy vždy zverte autorizovanému servisu a jeho kvalifikovanému personálu.
BEZPEČNOSTNÉ PO KYNY
1 . Prečítajte si pozorne – pred uvedením prístroja do prevádzky si prečítajte všetky bezpečnostné a
prevádzkové pokyny a návod k použitiu.
2. Schovajte si návod k obsluhe - tento návod k obsluhe uschovajte pre budúce použitie.
3. Dbajte na varovania – všetky varovania na produkte a v návode k použitiu je treba dodržovať
4. Postupujte podla pokynov – pokyny pre provádzku a bezpečnostné pokyny je treba
dodržiavať.
5. Inštalácia – instalujte výrobok v súlade s pokynmi výrobca.
6. Napájacie zdroje – tento produkt napájajte iba zo zdroja zdroje, který je uvedený na napájacom
kabely. Ak si nieste istí, aký typ napájania máte doma, obráťte sa na svojho predajca výrobkov
alebo na miestnu energetickú spoločnost.
7. Uzemnenie a polarizácia – výrobok nemusí byť uzemnený. Uistita sa, ze zástrčka napájacieho
káblu je presne zasunutá do elektrickej zásuvky alebo do predlžovacieho káblu tak, aby bolo
zamedzené vzniku prechodného odporu a týp pádom možného rizika vzniku požiaru. Ak
používate predlžovací napájací kábel alebo neoriginálny napájací kábel od iného výrobca, než
ktorý je dodávaný ako súčasť balenia s výrobkom, musí byť tento neoriginálny kábel vybavený
príslušnými kontaktmi pre prepojenie s výrobkom a musí mať bezpečnostné schválenie pre
použitie v danej zemi.
8. Ochrana napájacieho káblu – napájacie káble by mali byť vedené tak, aby neboli pretrhnuté,
otočené okolo predmetov okolo nich alebo proti nim, po napájacom kábly nie je doporúčené
chodiť. Pred týmito nežiadnucimi vplynmi chráňte hlavne konektory káblov k zapojeniu do
zásuvky a pre napojenie s produktom.
9. Preťaženie – nepreťažujte elektrické zásuvky, predlžovacie káble či viacnásobné zásuvky,
následkom takéhoto preťažovania je zvýšené riziko poziaru ci úrazu elektrickým prúdom.
10. Vetranie – výrobok musí byť umiestnený na vetrané miesto. Nepok ladajte výrobok na posteľ,
pohovku alebo iný podobný povrch. Nezakrývajte výrobok vecmi, ako obrusmi, novinami apod.
11. Teplo – tento produkt by nemal byť umiestnený v blízkosti zdrojov tepla, , ako sú radiátory,
35
SLO VAK
Page 38

CR2 0BT
regulátory tepla, pece, zosilovače a iné zariadenia, ktoré produkujú teplo.Na prístroji nesmie byť
umiestnený žiadny zdroj otvoreného ohňa, napr. zapálenej sviečky.
12. Voda a vlhkosť – pre zníženie rizika požiaru alebo úrazu elektrickým prúdom, nevystavujte
výrobok kvapkajúcej, striekajúcej alebo tečúcej vode a nadmernej vlhkosti, napr. v sauni či
kúpelni. Nepoužívajte tento výrobok v blízkosti vody napríklad pri vani, umývadle, dreze, vo
vlhkej pivnici, v blízkosti bazénu apod.
13. Vniknutie predmetov a tekutín – nikdy nevkládajte akékoľvek cudzie predmety do otvorov
výrobku, mohli by sa dotknúť miest pod vysokým napetím alebo by mohli spôsobiť skrat, čo
môže viesť k požiaru alebo úrazu elektrickým prúdom. Nikdy nelejte akúkoľvek tekutinu
akéhokolvek druhu na výrobok alebo do výrobku. Neumiestňujte akýkolvek predmet obsahujúcí
tekutinu na povrch výrobku (napr. váza, pohár s vodou apod.).
14. Čištenie – pred čistením odpojte výrobok z elektrickej zásuvky. Prach z prístroja odstraňujte
suchou handričkou. Ak chcete používať aerosolové čistiace spreje, nestriekajte primo na
výrobok; naneste čistiaci prostriedok na handričku a následne aplikujte. Dávajte pozor, aby
nedošlo k poškodeniu hracej jednotky.
15. Príslušenstvo – nepoužívajte neoriginálne príslušenstvo, ktoré nieje doporučené výrobcom
produktu, neoriginálne príslušenstvo môže ohroziť bezpečné používanie a funkciu výrobku.
16. Umiestnenie – neumiestňujte výrobok na nestabilný vozík, stojan, trojnožku konzolu alebo
stolík. Výrobok môže spadnúť s spôsobiť vážne zranenia deťom či dospelým a môže doisť
k vážnemu poškodeniu výrobku. Používajte iba so stabilným vozíkom, stojanom, trojnožkou,
držiakom či na stole, alebo zariadením doporučeným výrobcom alebo predávaným spolu
s výrobkom. Ak je nutná akákoľvek montáž výrobku, riaďte sa pokynmi výrobcu a používajte iba
montážne príslušenstvo doporučené výrobcom.
17. Manipulácia s výrobkom – pri premiestňovaní produktu na vozíku je nutné dodržiavať
opatrnosť. Prudká zmena smeru, prudké zastavenie, vysoká rýchlosť alebo nerovný povrch môžu
spôsobiť prevrátenie vozíku a tým aj prípadné poškodenie produktu.
18. Obdobie nepoužívanie – ak nieje zariadenie dlhší čas používané, musí byť napájací kábel
prístroja odpojený z elektrickej zásuvky. Odpojte napájací kábel z elektrickej zásuvky počas
búrky.
19. Servis – nepokúšajte sa o servis alebo opravu tohoto prístroja svojvoľne, otvorenie alebo
odstránenie krytov prístroja vás môže vystaviť nebezpečiu úrazu elektrickým prúdom alebo
inému nebezpečiu. Všetky opravy prístroja zverte kvalifikovanému servisnému personálu
autorizovaného servisu.
20. Prosím, ak nieje v prevádzke, odpojte napájací kábel z hlavného zdroja energie, alebo
z elektrickej zásuvky. Vo chvíli, keď je napájací kábel zapojený do zdroja elektrickej energie, je
systém v pohotovostnom režime, to znamená, že prístroj nieje úplne vypnutý a prúdi do neho
elektrická energia.
21. Náhradné diely – ak sú potreba náhradné diely, uistite sa, že servisný technik použil náhradné
diely, ktoré sú špecifikované výrobcom alebo majú rovnaké vlastnosti jako originálne diely.
Neoprávnená výměna môže viesť k požiaru, úrazu elektrickým prúdom alebo spôsobiť iné
nebezpečie.
22. Sieťové poistky – pre trvalú ochranu proti požiaru, používajte iba správny typ poistiek. Správna
špecifikácia poistiek je pre každý rozsah napetia označená na výrobku.
23. Nezvyšujte príliš hlasitosť pri počúvaní pasáži s veľmi nízkou úrovňou hlasitosti alebo pri náhlej
úplnej absencii zvuku. Ak tak učiníte, môže vo chvíli opätovného zvýšenia úrovne hlasitosti
prehrávanej pasáže doisť k poškodeniu reproduktorov.
24. Ak chcete prístroj úplne odpojiť od napájania, musíte odpojiť napájací kábel od prístroja alebo
z elektrickej zásuvky. Elektrická zásuvka alebo vstup pre napájací kábel k výrobku musia
zostaťvolne prístupné po celý čas používania prístroja v prevádzke.
25. Je vhodné umiestniť produkt do blízkosti elektrickej zásuvky alebo predlžovačky, ktoré by mali
byť ľahko prístupné.
36
Page 39

CR2 0BT
26. Najvyššia teplota prostredia vhodná pre tento výrobok je 35 ° C.
27. ESD tip – Ak dojde k vyresetovaniu prístroja alebo nieje obnovená jeho prevádzka z dôvodu
elektrostatického výboja, je potreba výrobok vypnúť, odpojiť napájací kábel a potom ho znovu
pripojiť, prípadne presunúť na iné miesto.
28. Batérie
1. Batérie nesmú byť vystavené nadmernému teplu, ako napríklad pôsobeniu priameho
slnečného svetla, ohňa a podobne.
2. Používané batérie by mali byť vhodné pre ekologickú likvidáciu batérií.
3. UPOZORN ENIE pre používanie batérií – proti zamedzeniuúniku elektrolytu z batérie, ktorý
môže zpôsobiť poranenie, poškodenie majetku alebo prístroja:
-Všetky batérie nainštalujte správne, + a – ako je vyznačené na prístroji.
-Nekombinujte batérie (staré a nové alebo uhlíkové a alkalické apod.)
-Pokiaľ nebudete prístroj dlhší čas používať, vytiahnite ich z prístroja.
VAROVANIE
Tento spotrebič nieje určený pre používanie osobami (vrátane detí) so zníženými fyzickými,
zmyslovými nebo duševnými schopnosťami, alebo osobami bez patričných skúseností a vedomostí,
pokiaĺ im nebol poskytnutý dohľad alebo inštrukcie týkajúce se použitia spotrebiča osobou
zodpovednou za ich bezpečnosť. Deti by mali byť pod dozorom, aby bolo zaistené, že si so
spotrebičom nebudú hrať.
1. Prístroj nesmie byť vystavený tečúcej, kvapkajúcej či striekajúcej vode.
Predmety naplnené kvapalinou, ako sú napr. vázy, nesmú byť umiestnené na prístroji.
2. Aby nedošlo k požiaru alebo úrazu elektrickým prúdom, neumiestňujte toto zariadenie na
horúcich miestach, nevystavujte ho dažďu, vlhkosti alebo prachu.
3. Neumiestňujte tento prístroj v blízkosti akýchkoľvek zdrojov vody, napr. kohútiky, vane, pračky
alebo bazény. Uistite sa, že je prístroj umiestnený na suchom, stabilnom povrchu.
4. Neumiestňujte tento prístroj v blízkosti silného magnetického pola.
5. Nepokladajte prístroj na zosilovače alebo prímače.
6. Neumiestňujte tento prístroj do vlhkého prostredia, vlhkosť bude mať vplyv na životnosť
elektrických komponentov.
7. Ak systém bezprostredne premiestnite z chladného do teplého prostredia, alebo ak je
umiestnený vo veľmi vlhkom prostredí, môže dôisť ku kondenzácii vlhkosti vo vnútri prehrávača.
Ak k tomu dôjde, systém môže byť poškodený a nebude fungovať správne. Prosím, nechajte
systém zapnutý približne na hodinu, dokiaľ sa vlhkosť nevyparí.
8. Nečistite jednotku chemickými rozpúšťadlami, tie môžu poškodiť povrch zariadenia. Prístroj
otrite čistou, suchou alebo mierne navlhčenou handričkou.
9. Pri odpojovaní napájacieho káblu zo zásuvky, ťahajte priamo za zástrčku, nikdy nie za kábel.
10. Ak je prístroj zapnutý v blízkosti vášho televízoru, môže vplyvom pôsobenia
elektromagnetických vĺn doisť k ovplyvneniu funkčnosti oboch zariadení. Na televíznej
obrazovke sa môžu objaviť čiary, rozpadať sa obraz, môže byť ovplyvnený zvuk televízoru aj
prístroja, prípadne môže byť ak televízor, tak prístroj úplne nefunkčný. Tomu zamedzíte
umiestnením prístroja v dostatočnej vzdialenosti od televízora.
SLO VAK
POZNÁMKA
37
Page 40

CR2 0BT
Tento výrobok je v zhode s požiadavkami Evropského spoločenstva na rádiové rušenie.
Naše produkty sú navrhnuté a vyrobené z vysoko kvalitních materiálov a komponentov, ktoré sú
recyklovateľné a opäť použitelné.
Ak je tento symbol preškrtnutého kontajneru evedený na výrobku, znamená to, že výrobok
podlieha smernici EU 2002/96/ES. Informujte sa prosím na miestny systém zberu triedeného
odpadu pre elektrické a elektronické výrobky. Prosím riaďte sa miestnymi pravidlami a nelikvidujte
staré produkty spolu s bežným komunálnym odpadom. Správnou
likvidáciou starého výrobku pomôžete predísť možným negatívnym
dopadom na životné prostredie a ľudské zdravie.
Výrobok obsahuje batérie podliehajúce smernici EU 2006/66/EC, ktoré nieje možné vyhadzovať do
bežného domovného odpadu. Informujte sa prosím o miestnych pravidlách zberu batérií, pretože
správnou likvidáciou pomôžete predchádzať negatívnym dôsledkom pre životné prostredie a
ľudské zdravie.
Informácie týkajúce sa životného prostredia
Výrobok je zabalený len v nezbytnom obale pre jeho ochranu. Snahou našej firmy je, aby bol
obalový materiál jednoducho rozdeliteľný na tri materiály: lepenku (krabica), polystyrén (ochranné
balenie) a polyethylen (sáčiky, ochranné fólie z odľahčeného plastu). Výrobok se skladá z materiálov,
ktoré je možné recyklovať a znovu použíť v prípade demontáže odbornou firmou. Dodržujte
prosím miestne predpisy týkajúce sa likvidácie obalových materiálov, vybitých batérií a starého
zariadenia.
Na nahrávanie a prehrávanie materiálov môže býť vyžadovaný súhlas. Viz Zákon o Copyrightu Act
1956 a Zákon na ochranu umelcov Sk 1958-1972.
Bluet ooth® názov i logo sú registr ované obchod né z námky spoloč nosti Blueto oth SIG, Inc. a
jej pou žitie je zaťa žené licenc iou. Ostatn é obchodné zn ámky a mená sú vl astnené ich v lastník mi.
38
Page 41

CR2 0BT
UMIESTNENIE OVL ÁDACÍCH PRVKOV
SLO VAK
1. TI ME SE T / MEM ORY / PLAY/ PAUSE
2. D IMME R/ SL EEP/ S CAN
3. VO LUME + / A L2
4. VO LUME - / A L1
5. S NOOZ E / NIG HT LI GHT
6. / F UNC TION
7. L ADEN IE NA DOL / H OUR
/ PR ESKO ČIŤ D OZA DU
8. L ADEN IE NA HOR / M INU TE
/ PR ESKO ČIŤ D OPR EDU
9. I NDIK ÁTOR A L1
10. I NDI KÁTOR P M
11. I NDI KÁTOR F UNK CIE
BLU ETO OTH
12. I NDI KÁTOR A L2
13. I NDI KÁTOR S LEE P
14. D IGI TÁLNY D ISP LEJ
15. V STUP JEDN OSM ERNÉ HO
NA PÄTI A
16. V ÝSTU P USB 2 .1A
17. V ÝSTU P USB 1 A
18. F M ANT ÉNA
39
Page 42

CR2 0BT
Varov anie pr ed vyso kým nap ätím
l Riz iko poš koden ia prod uktu! U istit e sa, že na pätie zd roja el ektri ckej en ergie z odpove dá
špe cifik ácii me novit ého výk onu na št ítku s ho dnoto u menov itého v ýkonu n a zadno m
pan eli rád ia s hodi nami. S t outo jed notko u je povo lené po užíva ť iba ada ptér
jed nosme rného n apäti a, ktor ý je súča sťou do dávky.
l Riz iko zás ahu ele ktric kým prú dom! Pr i odpáj aní ada ptéra s tried avého n apätia v ždy
vyt iahni te zást rčku zo z ásuvk y. Nikdy n eťaha jte za na pájac í kábe l.
Nas taveni e a zapnu tie ale bo vyp nutie n apája nia jed notky
Dod aný ada ptér je dnosme rnéh o napäti a prip ojte k zás uvke je dnosm ernéh o napät ia na
zad nom pan eli jed notky a d ruhú ko ncovk u pripo jte k zdro ju napä tia. Po ú spešn om nast avení
nap ájani a sa disp lej rozs vieti .
Krá tkym st lačen ím tlač idla / F UNC TION z apnet e napáj anie a pr ejdet e do reži mu rádi a.
Opä tovným k rátk ym stla čením to hto tla čidla p repne te jedn otku do r ežimu B luetoo th.
Stl ačení m a podrž aním tl ačidl a jedno tku vyp nete do p ohoto vostn ého reži mu.
Hla sitos ť
Hla sitos ť môžete z vyšo vať ale bo zniž ovať kr átkym s tlače ním tla čidla A L2 + ale bo AL1 – v
rež ime preh rávan ia (FM rá dio ale bo Blue tooth ).
Nas taveni e času
1. V poh otovos tnom re žime st lačte t lačid lo TIM E SET M EMO RY/P LAY PAUS E a podr žte ho
stl ačené n a dve sek undy, ký m sa disp lej ner ozbli ká a neum ožní vá m tak zač ať nast avovať
čas .
2. Ak s i chcet e vybra ť medzi 2 4-hod inový m a 12-ho dinov ým form átom, st lačt e tlači dlo
MI NUTE TU NING > a lebo H OUR TU NIN G <. Opät ovným st lačen ím tlač idla TI ME SE T
ME MORY /PL AY PAUS E potv rďte sv oj výbe r. Na disp leji sa ro zblik á čísl o [00:0 0] alebo
[12 :00] a mô žete zač ať nast avovať h odiny a m inúty.
3. St láčan ím tlač idla H OUR TU NING < nastav te hodi nu a stlá čaním t lačid la MIN UTE T UNIN G
> nas tavte p ožadov anú min útu.
4. Op ätovný m stlač ením tl ačidl a TI ME SE T MEM ORY/ PLAY PAU SE pot vrďte n astave nie
hod ín a minú t. Ak do 3 se kúnd ne stlač íte žia dne tla čidlo, n astav enie sa p otvrd í
aut omati cky. Nas taven ie času s a tak dok ončí.
Nas taveni e budík a
Skô r než zač nete s na stavov aním bu díka, s kontr olujt e, či ste h odiny na stavi li na spr ávny čas .
Jed notka u možňu je nast aviť dv a samos tatné č asovač e budík a. Ako z droj bud íka mô žete
vyb rať FM rá dio ale bo bzuč iak.
1. St lačen ím a podr žaním t lačid la FUN CTI ON na 2 se kundy p rejde te do poh otovos tného
rež imu. Stl ačte a p održt e tlači dlo AL 1 + alebo A L2 - na dve s ekund y. Čas na di splej i sa
rozb liká , čo vám um ožní pre jsť do re žimu na stavov ania bu díka .
2. St láčan ím tlač idla H OUR TU NING < alebo M INU TE TUN ING > na stavt e čas bud íka a
stl ačení m tlači dla AL 1 + alebo A L2 - pot vrďte sv oj výbe r. Medzi tým bu de na dis pleji b likať
sym bol „b“ ( bzuči ak) ale bo „ F“ (FM rá dio), č o zname ná, že mô žete vy brať zdr oj budí ka.
3. St lačen ím tlač idla HO UR TU NING < a lebo M INU TE TUN ING > mô žete pre pínať m edzi
bzu čiako m a FM rádi om ako zd rojom b udíka . Stlač ením tl ačidl a AL1 + al ebo AL 2 pot vrdít e svoj vý ber a prej dete do r ozhra nia pre n astave nie hla sitos ti budí ka.
4. St láčan ím tlač idla H OUR TU NING < alebo M INU TE TUN ING > na stavt e hlasi tosť bu díka
(05 ~15) a op ätovný m stlač ením tl ačidl a AL1 + al ebo AL 2 - potvr ďte a dok ončit e
nas tavova nie bud íka.
40
Page 43

CR2 0BT
Pozn ámka:
a. V prí pade ús pešné ho nast aveni a budík a sa na dis pleji r ozsvi eti ind ikáto r prísl ušnéh o
bud íka.
b. Ak si a ko zdro j budík a vybe riete rá dio, za z droj bud íka bu de vybr atá akt uálna f rekve ncia
FM rá dia.
c. Ke ď nasta ne čas bu denia , zvuk bu díka s a postu pne zint enzív ňuje.
d. Kr átkym s tlače ním tla čidla A L1 + ale bo AL2 - p očas zv oneni a budík a môžet e zvone nie
zru šiť a bud ík bude z novu zv oniť v na stave nom čas e buden ia na nas leduj úci deň .
e. V poh otovos tnom re žime mô žete fun kciu bu díka v ypnúť a lebo za pnúť k rátky m stlače ním
tla čidla A L1 + ale bo AL2 - .
f. Upo zorňu jeme, že n astav enie ho dín a bud íka sa za chová l en v príp ade, že s a neprer uší
nap ájani e jedno smern ým napä tím ale bo vlože nými ba téria mi na zál ožné na pájan ie. Po
pre rušen í napáj ania je dnosm erným na pätím z novu sk ontro lujte a n astavt e čas hod ín a
bud íka.
g. Ke ď nasta ne čas bud enia, b udík bu de nepr etrži te zvo niť 60 mi nút, ak n evyko náte ži adnu
inú a kciu.
h. Na staven ie zost ane vy braté a au tomat icky sa p otvrd í počas o perác ie nast avovan ia hodí n
a bud íka, ak d o 3 sekún d nepou žijet e žiadn e tlači dlo.
Zap nutie a lebo vy pnuti e odlož enia bu denia a n očnéh o svetl a:
1. St lačen ím tlač idla SN OOZ E LIG HT poč as zvon enia bu díka a ktivu jete odl oženi e buden ia o
9 min út. Bud ík začn e znovu z voniť p o 9 minút ach a vy zí skate ď alšíc h 9 minút n a spáno k.
Med zitým b ude na di splej i blik ať indi kátor A L1 ale bo AL2 .
2. Kr átkym s tlače ním tla čidla A L1 + ale bo AL2 – m ôžete zr ušiť fu nkciu o dlože nia bud enia.
3. St lačen ím tlač idla Sn ooze / Ni ght Lig ht môžet e zapnú ť alebo v ypnúť n očné sv etlo, ak
prá ve nezv oní bud ík aleb o ak nie je a ktivov aný rež im odlož enia bu denia .
Zál ožné na pájan ie z batér ií a nast aveni e pamäte
Okr em prip ojeni a adapt éra jed nosme rného n apäti a na ucho vanie n astave nia hod ín a budí ka
môž ete tiež n ainšt alova ť 2 kusy 1, 5 V bat érií (L R6, U M-3, A A) (nie s ú súčas ťou dodá vky) d o
pri ehrad ky pre ba térie v d olnej č asti je dnotk y, čo vám um ožní do časne u chovať n astav enia
čas u.
Pri pomín ame, že na pájan ie baté riami s lúži na u chova nie nas taveni a času ho dín a bud íka,
uch ovani e použí vaného n astav enia hl asito sti a pre dnast avenej s tanic e FM.
Pozn ámka:
a. Ba térie ( nie sú sú časťo u dodávk y) nai nštal ujte po dľa pola rity v yznač enej v pr iehra dke pre
bat érie.
b. Zál ožné na pájan ie z baté rií môž e zaist iť zach ovanie n astav enia ho dín v prí pade
pre rušen ia napá jania . Displ ej hodí n sa neroz sviet i. Toto rieš enie vá m tiež um ožňuj e
pre súvať sú pravu z m iesta n a miest o bez opä tovné ho nast avovan ia hodí n po každ om
pre sune.
c. Zá ložné na pájan ie z baté rií je ur čené na p oužit ie len pr i krátk om doča snom pr eruše ní
nap ájani a. Pri dl hšom tr vaní sa b atéri a môže vy biť ale bo môže dô jsť k urč itej od chýlk e v
pre snost i nastav enia ča su. Ak sa b atéri e vybij ú, mali b y sa vybr ať zo súp ravy, ab y ste
pre dišli i ch vyte čeniu. A k nechc ete vyu žívať v ýhody z áložn ého sys tému s ba téria mi,
súp rava bud e fungo vať nor málne a j bez bat érií. A k však sú pravu o dpojí te od zdro ja
nap ájani a, po opä tovnom p ripo jení zdr oja zač nú čísl ice hod ín blik ať a hodi ny je nut né
zno vu nast aviť ta k, ako je t o opísa né v odse ku o nast avení ča su.
d. Up ozorne nie: Pr i batér iách je n utné pr ihlia dať na env ironm entál ne aspe kty lik vidá cie
bat érií. N evyha dzujt e batér ie do koš a na odpa dky. Ria ďte sa mi estny mi legi slatí vnymi
pre dpism i pre rec yklác iu baté rií.
e. Bat érie sa n esmú v ystavo vať nad merné mu tepl u, ako na príkl ad slne čnému ž iaren iu, ohň u
apo d.
SLO VAK
41
Page 44

CR2 0BT
Použ ívani e FM rádi a
Skô r než zač nete s la dením F M rádia , úplne v ytiah nite an ténu FM a s kúste p resun úť rádi o k
okn u, aby bo l príje m signá lu čo naj kvali tnejš í.
1. Pre chod do r ežimu F M rádia
Krá tkym st lačen ím tlač idla / F UNC TION m ôžete z apnúť j ednot ku a prej sť do rež imu FM
rád ia. Na di splej i sa zobra zí frek venci a FM.
2. Ma nuáln e laden ie a auto matick é vyhľ adávan ie
Krá tkym st lačen ím tlač idla M INUT E TUN ING > al ebo HO UR TUN ING < mô žete z vyšova ť
ale bo zniž ovať fre kvenc iu FM rá dia v kro koch po 0 ,1 Mhz.
Stl ačení m tlači dla MI NUTE TUN ING > a lebo H OUR TU NIN G < a podrž aním tl ačidl a
stl ačené ho na dve se kund y môžete s pusti ť autom atick é vyhľa dávan ie dost upných s taníc
FM so s ilným s ignál om v smer e zvyšu júcej s a alebo z nižuj úcej sa f rekve ncie a au tomat icky
pre hrávať d ostup né vysi elani e rádia F M.
3. Pre dnast aveni e rádia
Stl áčaní m tlači dla MI NUTE TU NING > a lebo H OUR TU NIN G < nalaď te frek venci u rádia a
pre jdite ta k k požad ovane j stani ci, kto rú chce te predn astav iť. Stl ačte tl ačidl o TIME S ET/
ME MORY /PL AY PAUS E a podr žte ho st lačen é až do rozs viete nia hlá senia „PX X“ na dis pleji .
Krá tkym st láčan ím tlač idla M INUT E TUN ING > al ebo HO UR TUN ING < n astavt e číslo
pre dnast avenej s tanic e a vyber te tak u miest nenie, v k torom c hcete s tanic u uloži ť.
Opä tovným k rátk ym stla čením tl ačidl a TIME SET/ M EMO RY/P LAY PAUS E potv rďte vý ber a
dok ončit e nasta venie pr ednas taven ej stan ice. Ak ch cete na stavi ť ďalši u predna stave nú
sta nicu, o perác iu zopak ujte.
Opa kovaný m krátk ym stl áčaní m tlači dla TIM E SET / MEM ORY/ PLAY PAU SE v rež ime rádi a
môž ete vyb rať a preh rávať v ysiel anie pr ednas tavene j rozhl asovej s tanic e.
Pozn ámka:
a. V jed notke j e možné u ložiť m aximá lne 20 pre dnast avenýc h staní c.
b. Ak ne máte k di spozí cii zál ožné na pájan ie z batér ií, pr i odpoj ení ada ptéra je dnosm ernéh o
nap ätia sa p redna staven á stani ca stra tí.
c. Ak c hcete od strán iť pred nasta venú FM s tanic u, ulož te na jej m iesto in ú stani cu.
d. Ak d o 10 sekú nd nevy konát e žiadn u operá ciu, na di splej i sa zobr azia in formá cie o
hod inách .
4. Aut omati cké vyh ľadáv anie a pre dnast avovan ie.
Stl ačení m a podrž aním tl ačidl a DIM MER SL EEP / SCA N v režim e rádia n a 2 sekun dy môžet e
aut omati cky nal adiť a pr ednas taviť do stupn ú rozhl asovú s tanic u.
Použ ívani e funkc ie Blue tooth
Súč asťou j ednot ky je aj fu nkcia B lueto oth, kt orá umož ňuje pr ehráv anie zv ukové ho stre amu
hud by zo zar iaden ia Blue tooth.
1. Kr átkym s tlače ním tla čidla / F UNC TIO N prejd ite do re žimu Bl uetoo th tak, a by sa na
dis pleji z obraz ilo hlá senie „bL“.V pr avom hor nom roh u displ eja bud e rých lo blik ať modr ý
LE D indik átor fu nkcie B lueto oth, kt orý na značu je, že jed notk a je prip ravená n a
spá rovani e, a z repr odukto ra záro veň zaz nie upo zorňuj úci zv uk.
2. Ak tivuj te funk ciu Blu etoot h vo svojo m zaria dení Bl uetoo th, ako j e naprí klad sm artf ón
atď. ( ďalši e infor mácie o t ejto op eráci i nájde te v prír učke k za riade niu Blu etoot h) a
vyh ľadaj te dost upné za riade nie Blu etoot h.
42
Page 45

CR2 0BT
3. Sk ontro lujte zo znam po nuky fu nkcie B lueto oth vo sv ojom za riade ní a vybe rte pol ožku
„B LAUP UNK T CR20 BT“ na s párova nie. Po ús pešno m spáro vaní bu de modr ý LED i ndiká tor
fun kcie Bl uetoo th poma ly blik ať a záro veň z repr odukt ora zaz nie upoz orňuj úci zv uk.
4. Vyb erte hu dbu v zar iaden í Bluet ooth a pr ehráv ajte ju. J ednot ka sa ta k môže pou žiť na
bez drôtov é prehr ávanie z vuku .
5. V rež ime Blu etoot h môžete s tlače ním tla čidla H OUR T UNIN G < aleb o MINU TE TU NING >
zme niť pre dchád zajúc u a nasle dujúc u sklad bu. Ak ch cete spu stiť al ebo poz astav iť
pre hrávan ie, stl ačte tl ačidl o TIME S ET ME MOR Y/ PL AY PAUS E. Ak ch cete nas taviť
hla sitos ť, stlá čajte t lačid lá AL2 +/ AL1 –.
Pozn ámka:
a. Ak d o 10 sekú nd nevy konát e žiadn u operá ciu, na č íslic ovom dis pleji s a zobra zia
inf ormác ie o čase.
b. Ak sa p očas pá rovan ia v zari adení B lueto oth pož aduje h eslo PO P, z adajt e hodno tu „ 0000“.
c. Up ozorňu jeme, ž e vzhľa dom na od lišno sti zna čiek a di zajnu n ie je mož né zaru čiť, že s a
dok ážu úsp ešne sp árova ť všetk y zaria denia B lueto oth.
d. Na jvhod nejši a pracov ná vzdi aleno sť pre fu nkciu B lueto oth je do 1 0 metrov, p ričom v
drá he sign álu nes mú byť žia dne pre kážk y. Zabez pečte , aby sa za riade nie Blu etoot h
nac hádza lo v rámc i tejto vz diale nosti .
Spá nok a stí šenie
1. Kr átkym s tlače ním tla čidla D IMM ER SL EEP/ SCA N v režim e prehr ávania ( rádio a lebo
Blu etoot h) môžet e aktiv ovať fu nkciu u loženi a na spán ok. Op akovan ým stlá čaním t ohto
tla čidla m ôžete v yberať č asy ulo ženia n a spáno k v znázo rneno m cykl e. Vyber te
pož adovan ý čas ulo ženia n a spáno k a počka jte 2 sek undy. Ro zhran ie disp leja pr ejde z
rež imu nas tavova nia čas u ulože nia na sp ánok do re žimu pr ehráv ania. M edzit ým sa na
dis pleji z obraz í indik átor LE D funk cie SL EEP, čo zna mená, ž e nasta venie ul oženi a na
spá nok bol o úspeš né.
2. Kr átkym s tlače ním tla čidla D IMM ER SL EEP/ SCA N v pohot ovost nom reži me môže te
nas taviť p odsvi eteni e displ eja na vy soký al ebo níz ky jas. Ú roveň po sviet enia sa p o
nas tavení z achov á v režim e prehr ávania .
Pozn ámka:
a. Kr átkym s tlače ním tla čidla D IMM ER SL EEP/ SCA N v režim e ulože nia na sp ánok môž ete
sko ntrol ovať čas d o ulože nia na sp ánok a po d osiah nutí ča su ulože nia na sp ánok sa
jed notka a utoma ticky p repne d o pohot ovost ného rež imu. Ak c hcete s pusti ť prehrá vanie ,
zno vu zapn ite jed notku.
Nab íjani e cez US B
Jed notka z ahŕňa v ýstu pný duál ny port USB na n abíja nie (1 x 5 V / 1,0 A , 1 x 5 V / 2,1 A ), ktor ý
vám u možňu je prip ojiť a na pájať i né zari adeni e, ako nap ríkl ad USB l ampu, v entil átor,
sma rtfón , table t atď.
Pred p ripoj ením k po rtu U SB na nab íjani e skont roluj te špec ifiká cie pož adova ného na pájan ia
na za riade ní a na pri pojen ie použ ite káb el USB dodaný s o zaria dením ( nie je sú časťo u
dod ávky) . V prí pade ús pešné ho prip ojeni a na nabí janie s a na zari adení r ozsvi eti sym bol
nab íjani a alebo i ndiká tor fun kcie.
90> 8 0 > 70 > 60 >50 >40>3 0>20> 10
Rež im preh rávan ia (FM al ebo Blu etoot h)
SLO VAK
43
Page 46

CR2 0BT
Pozn ámka:
a. Na bíjan ie pomo cou tej to jedno tky ni e je možn é zaruč iť pre vše tky tel efóny a lebo
ele ktron ické za riade nia.
b. Naj prv vž dy skon troluj te špec ifik áciu pož adova ného me novit ého výk onu nab íjani a v
zar iaden í a potom s a pripo jte pro stredn íctv om prís lušné ho výst upnéh o portu USB z te jto
jed notky.
c. Pri p ripoj ení na na bíjan ie vždy p oužív ajte ká bel US B doda ný so zar iaden ím.
d. Trva nie nab íjani a zaria denia n ie je mož né zaru čiť, pr etože me novit ý výko n zdroja
nab íjani a USB pr e zaria denie n ebol po skytn utý.
Špe cifik ácia
Zdro j napáj ania: j ednos merný, 5 V / 3, 5 A, 100 – 24 0 V ~50/60 H z
Zál ožné na pájan ie z batér ií (le n na uchov anie na stave nia čas u): 2 x 1,5 V,
(ve ľkosť : LR6, U M-3, A A, nie s ú súčas ťou dodá vky)
FM fr ekven cia: 87 ,5 – 108, 0 MHz
Verz ia Blue tooth : 2 .1+ ED R
Dos ah prip ojeni a Bluet ooth : do 1 0 metrov
Výs tup nap ájani a cez US B: jedn osmer né, 5 V, 1 A X 1
jed nosme rné nap ätie 5 V, 2,1 A X 1
Výs tupný v ýkon : 2 x 1, 8 W ( RMS )
Spo treba e nergie : 5 W
Spo treba v p ohotov ostno m režim e: < 1 W
(Pro dukto vé infor mácie s a môžu zm eniť be z predc hádza júceh o upozo rneni a.)
Rie šenie p roblé mov:
A. V rež ime FM rá dia poč uť siln ý šum na po zadí.
a-1 : Úplne v ytiah nite FM anténu a u pravt e nasme rovani e antén y. Presuň te jedn otku
bli žšie k ok nu.
a-2 : Skúst e si na poč úvani e nalad iť inú st anicu F M rádia .
a-3 : Ak prob lém stá le pretr váva , požiad ajte o po dporu s ervi sné str edisk o.
B. Výst up zvu ku v reži me Blue tooth j e preruš ovaný.
b-1 : Skúst e presu núť zar iaden ie Blue tooth b ližši e k jedno tke.
b-2 : Skúst e zasta viť a vyp núť fun kciu Bl uetoo th a zopa kovať p árovan ie na pre hrávan ie.
b-3 : Ak prob lém stá le pret rváva , požia dajte o p odpor u servi sné str edisk o.
C. Di splej s a nemôž e rozsvi etiť
c-1 : Skont roluj te, či je ko nekto r adapt éra jed nosme rného n apäti a správn e prip ojený.
c-2 : Ak prob lém stá le pretr váva , požia dajte o po dporu s ervi sné str edisk o.
D. Bud ík sa ned á úspeš ne nast aviť.
d-1 : Pozrit e si prír učku s po kynm i na použ ívanie .
d-2 : Ak prob lém stá le pretr váva , požiad ajte o po dporu s ervi sné str edisk o.
44
Page 47

CR2 0BT
FONTOS M EGJEGYZÉSE K
A legjobb élmény és teljesítmény eléréséhez, valamint a termék funkcióinak megismeréséhez
figyelmesen olvassa el a jelen kézikönyvet a termék üzembe helyezése előtt. Így készüléke évekig a
legjobb teljesítményt és zenei élményt nyújtja.
1. Őrizze meg a jelen biztonsági és használati utasításokat későbbi felhasználás céljából.
2. Ne tegye ki a készüléket párának vagy fröccsenésnek és nedves környezetnek (pl. fürdőszoba).
3. Ne helyezze a készüléket a következő helyekre:
4. Közvetlen napfénynek kitett vagy fűtőtestekhez közeli helyek.
5. Túl sok hőt sugárzó sztereóberendezések teteje.
6. Szellőzést akadályozó hely vagy poros terület.
7. Folyamatosan rezgő helyek.
8. Magas páratartalmú vagy nedves helyek.
9. Ne helyezze gyertyákhoz vagy más nyílt lánghoz közel.
10. Csak a használati útmutató szerint üzemeltesse a készüléket.
11. A készülék első bek apcsolása előtt győződjön meg arról, hogy megfelelően csatlakoztatta a
tápadaptert.
Biztonsági okokból ne távolítsa el a burkolatot, és ne kíséreljen meg hozzáférni a készülék
belsejéhez. A szervizelést bízza szakképzett szerelőre.
Ne próbálja meg eltávolítani a csavarokat vagy kinyitni a készülék házát; nem találhatók benne
szervizelhető alkatrészek. Az összes szervizelést bízza szakképzett szerelőre.
BIZTONS ÁGI UTASÍTÁSOK
1. Olvassa el az utasításokat – A készülék üzembe helyezése előtt olvassa el az összes biztonsági
és használati utasítást.
2. Őrizze meg az utasításokat – A biztonsági és használati utasításokat tartsa a készülékkel együtt
későbbi felhasználás céljából.
3. Fi gyelm eztet ések – A k észül éken, val amint a ha sznál ati uta sítás okban lé vő ö sszes
figyelmeztetést be kell tartani.
4. Tartsa be az utasításokat – Tartsa be az összes használati utasítást.
5. Üzembe helyezés – A gyártó utasításai szerint helyezze üzembe a készüléket.
6. Áramforrások – A terméket csak olyan típusú áramforrásról szabad üzemeltetni, amely fel van
tüntetve a tápkábel bemeneténél. Ha háztartásában nem található ilyen típusú áramforrás,
forduljon a termékkereskedőhöz vagy a helyi energiaszolgáltatóhoz.
7. Földelés és polarizáció – A terméket nem szükséges földelni. A csatlakozó teljesen bele legyen
dugva a hosszabbító k ábel aljzatába, hogy a dugasz érintkezői ne látszódjanak ki. A termék
egye s vál tozatai pol arizált , vá ltakozó veze tékcsat lakozój ú táp kábell el s zereltek (ol yan
csatlakozó, amelynek egyik pengéje szélesebb, mint a másik). Az ilyen típusú csatlakozók csak
egyféleképpen illeszthetők az aljzatba. Ez egy biztonsági funkció. Ha nem tudja teljesen
beilleszteni a csatlakozót az aljzatba, próbálja meg megfordítani csatlakozót. Ha a csatlakozót
így sem sikerül beilleszteni, forduljon villanyszerelőhöz az elavult aljzat cseréjét illetően. Ne
iktassa ki a polarizált csatlakozó biztonsági funkcióját. Ha tápkábel-hosszabbítót vagy egy nem a
készülékhez mellé kelt tápkábe lt használ, ügyeljen arra , hogy a kábel megfelelő formájú
csatlakozóval legyen felszerelve, és megfeleljen az adott országnak biztonsági előírásainak.
8. Tápkábel-védelem – A tápkábeleket úgy kell elvezetni, hogy azokra ne lépjenek rá, ne
hurkolódjanak, ne csípjék be őket a rájuk helyezett tárgyak, illetve ne feszüljenek nekik.
Fordítson különös figyelmet a kábelvégekre, dugaljakra és a termék csatlakozási pontjaira.
HU NGARIA N
45
Page 48

CR2 0BT
9. Túlterhelés – Ne terhelje túl a fali aljzatokat, a hosszabbító kábeleket és az elosztókat, mivel
ezek tüzet vagy áramütést okozhatnak.
10. Szellőzés – A termék szellőzése legyen megfelelő. Ne helyezze a terméket ágyra, kanapéra vagy
hasonló felületre. Ne takarja le a terméket olyan tárgyakkal, mint asztalterítő, újságpapír stb.
11. Hő – Ne helyezze a terméket hőforrások (pl. radiátorok, konvektorok, kályhák vagy egyéb
berendezések, többek között erősítők) mellé. Ne helyezzen nyílt lángot (pl. meggyújtott gyertya)
a készülékre.
12. Víz és nedvesség – A tűzveszély és az áramütés elkerülése érdekében ne tegye ki a készüléket
esőnek, fröccsenésnek vagy túlzott nedvességnek (pl. szauna vagy fürdőszoba). Ne használja a
készüléket víz közelében, mint például fürdőkád, mosdókagyló, mosogató, mosókonyha,
úszómedence közelében és nyirkos pincében.
13. Tárgyak és folyadékok – Ne nyomjon be tárgyakat a készülék nyílásaiba, mivel azok
hozzáérhetnek veszélyes feszültségpontokhoz vagy rövidzárlatot okozhatnak, és ez tűzhöz vagy
áramütéshez vezethet. Ne öntsön semmiféle folyadékot a készülékre. Ne helyezze olyan tárgy
tetejére, amely folyadékot tartalmaz.
14. Tisztítás – Tisztítás előtt húzza ki a készüléket a fali aljzatból. A mélyhangsugárzóban lévő port
száraz ruhával törölje ki. Ha aeroszolos tisztítóspray-t használ, ne permetezzen közvetlenül a
bú to rra , h ane m a r uhá ra p erm et ezz en . Üg ye lj en a rra , h ogy n e s ért se m eg a
meghajtóegységeket.
15. Tartozékok – Ne használjon olyan tartozékokat, amelyeket a gyártó nem javasol, mivel ezek
veszélyt okozhatnak.
16.Kiegészítők – Ne helyezze a terméket instabil kocsira, állványra, háromlábú állványra, tartóra
vagy asztalra, mivel a termék leeshet, és ez személyi (gyermek vagy felnőtt) sérülést vagy a
termék súlyos károsodását okozhatja. Csak a gyártó által javasolt vagy a termékhez mellékelt
kocsit, állványt, háromlábú állványt, tartót vagy asztalt használja. Csak a gyártó utasításai szerint
szerelje fel a terméket, és csak a gyártó által javasolt konzolt használja.
17. A termék mozgatása – A kocsira állított termék mozgatásakor nagyon óvatosan járjon el. A
gyor s m egállá s, túlz ott erő kifejt és v agy egy enetl en f elület a ko csira á llítot t te rmék
felborulásához vezethet.
18.Használaton kívüli időszakok – Húzza ki a készülék tápkábelét viharos időben, illetve ha a
készüléket hosszabb ideig nem használja.
19.Szervizelés – Ne próbálja meg szervizelni a készüléket, mivel a burkolatok k inyitása és
eltávolí tása sor án veszé lyes fesz ültségnek vagy más vesz élynek lehet kitéve. Az össze s
szervizelést bízza szakképzett szerelőre.
20.Ha nem hasz nálja a kés züléket, húzza ki a tápc satlakozót a fő áramforrás ból vagy fali
áramforrásból. A készülék akkor is áram alatt van, ha a készülék áramforráshoz csatlakozik, és a
rendszer készenléti üzemmódban van.
21.Cserealkatrészek – Ha cserealk atrészekre van szükség, a szerelőnek a gyár tó által előírt
cserealkatrészeket vagy az eredeti alkatrésszel azonos műszaki tulajdonságok kal rendelkező
cserealkatrészeket kell használnia. A nem engedélyezett cserealkatrészek tüzet, áramütést vagy
más veszélyt okozhatnak.
22. Hálózati biztosítékok – A tűzveszély folyamatos védelme érdekében csak a megfelelő típusú
és teljesítményű biztosítékokat használja. Az egyes feszültségtartományoknak megfelelő
biztosítékjellemzők fel vannak tüntetve a terméken.
23. Ne növelje a hangerőt, ha nagyon alacsony szintű a bemeneti jel, vagy egyáltalán nincs audiojel.
Ellenkező esetben a hangszóró károsodhat, ha hirtelen nagy hangerővel szólal meg a lejátszás.
46
Page 49

CR2 0BT
24. A termék tápellátása csak úgy szüntethető meg teljesen, ha kihúzza a tápkábelt a fali aljzatból
vagy a termékből. A termék használata közben mindig legyen könnyen hozzáférhető a fali aljzat
vagy a termék tápkábele.
25. Próbálja a terméket a fali aljzathoz vagy a hosszabbító kábelhez közel, egy könnyen
hozzáférhető helyen elhelyezni.
26. A készülék legfeljebb 35 °C környezeti hőmérséklet esetén üzemeltethető.
27. ESD tippek – Ha a készülék elektrosztatikus kisülés miatt alaphelyzetbe áll vagy nem reagál,
kapcsolja ki majd vissza, vagy tegye át egy másik helyre.
28. Akkumulátor
1. Ne tegye ki az akkumulátorokat túlzott hőnek, mint például napsütés, tűz vagy hasonló.
2. Az akkumulátorokat az akkumulátorok ártalmatlanítására vonatkozó környezetvédelmi
előírások figyelembe vételével kell ártalmatlanítani.
3. Akkumulátorhasználattal kapcsolatos FIGYE LMEZTETÉS – a testi sérülést, anyagi kárt vagy a
készülék károsodását okozó akkumulátorszivárgás megakadályozásához:
1. A készüléken lévő + és - jelöléseknek megfelelően, helyesen tegye be az összes
akkumulátort.
2. Ne használjon egyszerre különböző elemeket (régi és új, illetve karbon és alkáli stb.).
3. Vegye ki az akkumulátorokat, ha a készüléket hosszabb ideig nem használja.
FIGYELEM
A berendezést a csökkent fizikai vagy mentális képességekkel rendelkező személyek (beleértve a
gyerekeket is), vagy az olyan személyek, akik nem ismerik a berendezést, csak felügyelet mellett
vagy a biztonságukért felelő személy által előírt utasítások szerint használhatják. Gyermekek csak
felügyelet mellett használhatják a készüléket. A készülék nem játékszer.
1. Ne tegye ki a készüléket párának vagy fröccsenésnek, és ne helyezze olyan tárgyakra, amelyek
folyadékkal vannak töltve (pl. váza).
2. A tűz vagy áramütés megakadályozása érdekében ne tegye a készüléket forró helyre, és ne érje
eső, nedvesség vagy por.
3. Ne tegye a készüléket vízforrás közelébe (pl. csapok, fürdőkádak, mosógépek vagy
úszómedencék). A készülék száraz, stabil felületen legyen.
4. Ne tegye a készüléket erős mágneses mező közelébe.
5. Ne tegye a készüléket erősítőre vagy vevőkészülékre.
6. Ne tegye a készüléket nyirkos helyre, mivel a nedvesség kedvezőtlen hatással van az elektromos
alkatrészek élettartamára.
7. Ha az órát köz vetlenül hidegről melegre viszi át, vagy nagyon nyirkos helyre teszi, a lencse
belsején nedvesség képződhet. Ebben az esetben a rendszer nem működik megfelelően. Hagyja
a rendszert bekapcsolva körülbelül egy óráig, amíg a nedvesség el nem párolog.
8. Ne próbálja meg vegyi oldószerekkel tisztítani a készüléket, mivel ezek károsíthatják a felületét.
Tiszta, száraz vagy enyhén nedves ruhával törölje meg.
MEGJEGYZÉS
HU NGARIA N
A készülék megfelel az Európai Közösség rádióinterferenciára vonatkozó követelményeinek.
47
Page 50

CR2 0BT
A készülék kiváló minőségű, újrahasznosítható és újrafelhasználható anyagokból és alkatrészekből
készült.
Ha az áthúzott, kerekes szemetesláda szimbólum fel van tüntetve a készüléken, az azt jelenti, hogy a
készülék megfelel a 2002/96/EK európai irányelvnek. Kérjük, tájékozódjon az elektromos és
elektronikus készülékek helyi szelektív gyűjtésére vonatkozó előírásokról. Cselekedjen a helyi
törvényeknek megfelelően, és a kiselejtezett készülékeket gyűjtse elkülönítve a lakossági
hulladéktól. A feleslegessé vált készülék helyes kiselejtezésével segít megelőzni a
környezetszennyezést és a különféle egészségkárosodásokat.
A termék akkumulátorai megfelelnek a 2006/66/EK európai irányelv követelményeinek, ezért ne
kezelje őket háztartási hulladékként. Tájékozódjon a hulladékok szelektív gyűjtésének helyi
rendszeréről, mivel a megfelelő hulladékkezelés hozzájárul a környezetszennyezéssel és a különféle
egészségkárosodásokkal kapcsolatos következmények megelőzéséhez.
Környezetvédelemmel kapcsolatos tudnivalók
A term ék c somag olása ne m t artal maz fele slege s cs omago lóany agot. A cso magol ás h árom
kül önböz ő a nyagra os zthat ó fe l: kart on (dobo z), poli sztiré n h ab (védő bakok ) é s p oliet ilén
(ta sakok , védő hab lapok ). A re ndsze r újra haszn osíth ató és újr afelh aszná lható anya gokat
ta r tal ma z, h a a zo ka t eg y e rre s pe ci al iz áló do tt v ál la lat s ze re li s zé t. Ta rt sa b e a
cso mago lóan yagok , e lhas znál t ak kumu látor ok é s ré gi b eren dezé sek árt alma tlan ítás ára
von atkozó h elyi sz abály ozáso kat.
Biz onyos a nyago k felvé teléh ez és lejá tszás ához h ozzáj árulá s szük séges . Lásd az 1 956-o s
sze rzői jo gi, ill etve az 1 958–1 972-e s, a szel lemi tu lajdo n védelm ével fo glalk ozó tör vényt.
A Blu etoot h szó má rkaje lzés és l ogók a Bl uetoo th SIG , Inc. b ejegy zett véd jegye i, és eze n
űmá rkaje lzése ket eng edéll yel has ználj uk. Más v édjeg yek és má rkane vek a von atkoz ó
tul ajdon oshoz t artoz nak.
®
48
Page 51
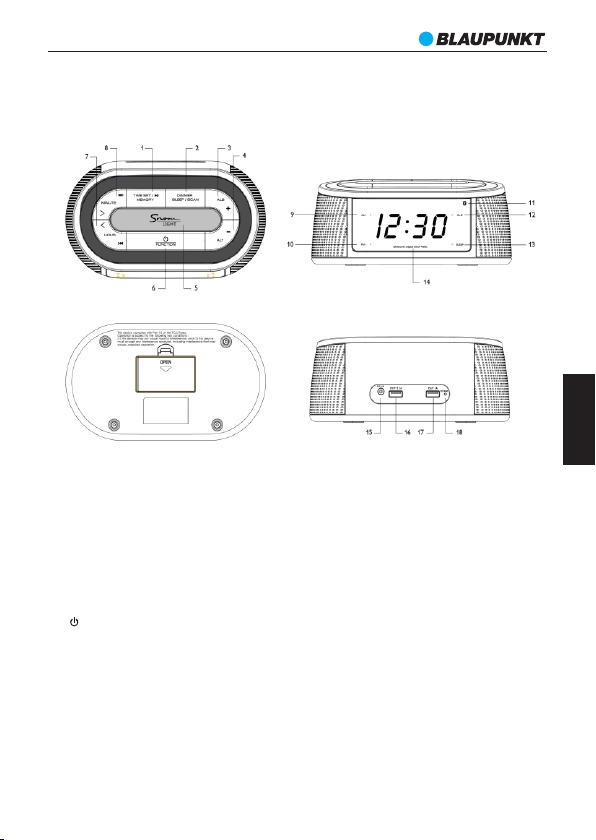
CR2 0BT
KE ZELŐ SZERVE K ELH ELYEZKED ÉSE
HU NGARIA N
1. TI ME SE T / MEM ORY / PLAY/ PAUSE
2. D IMME R/ SL EEP/ S CAN
3. VO LUME + / A l2
4. VO LUME - / A l1
5. S NOOZ E / NIG HT LI GHT
6. / F UNC TION
7. TU NING DOWN / HOUR / SKIP BACK WARD
8. TU NING UP / MI NUTE / SKIP FORWA RD
9. A L1 VIS SZAJ ELZ ŐJE
10. P M KIJ ELZ ÉSE
11. B LUE TOOTH
12. A L2 VIS SZA JEL ZŐJE
13. S LEE P (ALVÁS ) VISS ZAJ ELZ ŐJE
14. D IGI TÁLIS KIJE LZŐ
15. E GYE NÁRA MÚ BE MEN ET
16. U SB KI MEN T – 2,1 A
17. U SB KI MEN T – 1 A
18. F M-AN TEN NA
49
Page 52

CR2 0BT
Áram ellát ásra von atkoz ó figyel mezte tés:
l Fenn áll a ter mék ká rosodá sának v eszél ye! Győz ődjön m eg arró l, hogy a z áramfo rrás
fes zülts ége meg felel az ó rás rád ió háts ó panel jén lév ő címké n talál ható spe cifik áció knak .
A kés zülék hez csa k a mellé kelt D C-táp adapt er hasz nálha tó.
l Ára mütés veszél y! A háló zati ad apter l ecsat lakozt atása kor min dig a dug ónál fo gva húz za
ki a cs atlak ozót. S oha ne a tá pkábe lt húzz a.
A kész ülék üz embe he lyezé se, ille tve be - és kika pcsol ása
A mel lékel t egyen áramú ad apter e gyik vé gét csa tlako ztass a a készü lék hát lapjá n talál ható
egy enára mú jack c satlak ozóba , a másik v égét pe dig a fő ára mforr ásba. A k ijelz ő világ ítani
kez d, ha meg felelő en csat lakoz tatta a t ápell átást .
Nyo mja meg r öviden a / FUNC TIO N gomb ot a beka pcsol áshoz . A készü lék ekk or rádi ó
üze mmódb a lép. A gom b ismét elt meg nyomás ával vá lthat á t Bluet ooth üze mmódb a. Tartsa
len yomva a go mbot a ké szülé k késze nléti ü zemmó dba kap csolá sához .
Han gerő
Lej átszás k özben ( FM-r ádió va gy Blue tooth ) az AL2 + va gy AL1 – g omb röv id megny omásá val
növe lheti v agy csö kken theti a h angerő t.
Idő b eállí tása
1. Ké szenl éti üze mmódb an tart sa leny omva a TIM E SE T MEMO RY/ PLAY PAUS E gomb ot két
más odper cig, amí g a kije lző vill ogni ne m kezd az i dő beál lítás ához.
2. A M INUT E TUNI NG > vag y HOU R TUNI NG < gom bbal vá lassz a ki a 24 vag y 12 órás
idő formá tumot . A TI ME SE T MEM ORY/ PLAY PAU SE gomb i sméte lt megn yomásá val
hag yja jóv á a kivál asztá st, ekk or a [00: 00] vag y [12:0 0] szám ok vill ogni ke zdene k a
kij elzőn , majd el kezdh eti beá llíta ni az órá t és a perce t.
3. Az ó ra a HOU R TUN ING < go mbbal , a perc a MI NUT E TUNI NG > gom bbal ál lítha tó be.
4. Ny omja me g a TI ME SE T MEM ORY/ PLAY PAU SE gom bot a beá llítot t óra és pe rc
jóv áhagy ásához , vagy ha 3 m ásodp ercig n em tört énik go mbnyo más, a ren dszer
aut omati kusan j óváhag yja a beá llítá st. Ezz el befe jeződ ött az id ő beáll ítása .
Ébr eszté s beáll ítása
Az éb reszt és beál lítás a előtt g yőződj ön meg ar ról, ho gy megf elelő en állí totta be a z időt. A
kés zülék en két kü lön ébr eszté si idő ál líthat ó be. Az éb reszt ési han gként F M-rád ió vagy
han gjelz és vála szthat ó.
1. Tart sa lenyo mva a FU NCT ION go mbot 2 má sodpe rcig, a míg a kés zülék k észen léti
üze mmódb a nem vál t, ezut án tart sa leny omva az A L1 + vagy A L2 - gom bot két
más odper cig, ek kor a kij elző vi llogn i kezd, és m egnyí lik az éb reszté s beáll ítása ü zemmó d.
2. A H OUR TU NING < vagy MI NUT E TUNI NG > gom bbal ál lítsa b e az ébre sztés i dejét , majd
az A L1 + vagy A L2 - gom bbal ha gyja jóv á a kivá laszt ást, ek özben a „b” (hang jelzé s) vagy „F”
(FM -rádi ó) szim bólum v illog ni kezd a k ijelz őn, itt k ivál aszth atja az éb reszt ési han got.
3. Az H OUR T UNIN G < vagy M INU TE TUN ING > g ombba l válass za ki, h ogy az éb reszté si hang
han gjelz és és az FM -rádi ó legye n-e, ma jd az AL 1 + vagy A L2 - gomb m egnyom ásáva l
hag yja jóv á a kivál asztá st, és lé pjen to vább az éb reszt és hang erejé nek beá llítá sa
kép ernyőr e.
4. Az H OUR T UNIN G < vagy M INU TE TUN ING > g ombba l állíts a be az ébr eszté s hange rejét
(05 –15), m ajd a AL 1 + vagy AL 2 - gomb i smétel t megny omásá val hagy ja jóvá a b eállí tást,
és lé pjen ki a z ébres ztés be állít ása men üből.
50
Page 53

CR2 0BT
Meg jegyz és:
a. A ki jelző n egy ébr eszté sjelz ő pont jel enik me g, ha sik erese n beáll ított a az ébres ztést .
b. Ha az FM-rá diót vá laszt otta éb reszté si hang ként, a z aktuá lis FM -rádi ó frekve nciáj a fog
meg szóla lni.
c. Az é bresz tés han gereje f okoza tosan n ő az ébres ztés id eje ala tt.
d. Éb reszté s közbe n az ébre sztés a z AL1 + va gy AL2 - go mb rövi d megnyo másáv al állí tható
le. A z ébres ztés a köv etkez ő napon i smét me gszól al a beál lítot t időpo ntban.
e. Ké szenlé ti üzem módba n az AL1 + v agy AL 2 - gomb rö vid megn yomás ával ka pcsol ható ki
és be a z ébres ztés fun kció.
f. Felh ívjuk f igyel mét, ho gy az óra - és ébre sztés beáll ítás az e gyenár amú táp ellát ás
meg szűné sekor t örlőd ik, ki véve, ha n em hely eztek be t arta lék ele met az id őbeál lítás
meg tartá sához . Ellen őrizz e és állí tsa be az i dőt az eg yenár amú táp ellát ás megs zűnés e
utá n.
g. Ha n em tört énik go mbnyom ás, az éb reszt és 60 perc ig szól f olyam atosa n.
h. Ha 3 m ásodp ercig n em tört énik go mbnyom ás, a beá llítá s autom atiku san kiv álasz tásra é s
jóv áhagy ásra ker ül az óra - és ébre sztés beáll ítási m űvele t közben .
Szu ndi / éjs zakai f ény be- é s kikap csolá sa:
1. Éb reszté s közbe n nyomj a meg a SN OOZE LIGH T gomb ot a szun di akti válás ához. A s zundi
idő tarta ma 9 perc . Az ébre sztés 9 p erc utá n ismét m egszól al, és új abb 9 per ce lesz a z
alv ásra. E közben a z AL1 va gy AL2 v issza jelző je foly amatos an vill og a kij elzőn .
2. A sz undi fu nkció a z AL1 + va gy AL2 – g omb rövi d megny omásáv al törö lhető.
3. Az é jszak ai fény a S nooze / N ight Li ght gom bbal ka pcsol ható be é s ki, ki véve ébr eszté s
köz ben és sz undi üz emmód ban.
Tart alékel emes tá pellá tás és a me mória b eállí tása
Az eg yenár amú táp ellát ás csat lakozt atásá n kívü l az idő- é s ébres ztésb eállí tás úgy i s
meg tarth ató, ha 2 d arab 1,5 V- os (LR 6, UM -3, AA) e lemet ( nem a cso mag rés ze) hel yezne k a
kés zülék a lján ta lálha tó elem tartó ba.
Felh ívjuk f igyel mét, ho gy az ele mes táp ellát ás csak a z idő-, é bresz tés- és h angerő -beá llítá s,
ill etve a be állít ott FM- állom ások me gtar tásár a szolg ál.
Meg jegyz és:
a. Az e lemek et (nin cs mell ékelv e) az ele mtart óban fe ltünt etett p olari tásna k megfel elően
hel yezze be .
b. Ára mszün et eset én az ele mes táp ellát ás gond oskod ik az idő beáll ítás me gtart ásáró l.
Ekk or a kész ülék k ijelző je nem k apcso l be. Így l ehetős ége van a k észül éket eg yik hel yről a
más ikra át helye zni ané lkül, h ogy az id őt újra b e kelle ne állít ania.
c. A ta rtalé k elem cs ak rövi d ideig t artó ár amszü net ese tén kép es megt artan i a
beá llítá sokat . Hossz abb meg szak ítás es etén elő fordu lhat, h ogy az el em leme rül, vag y a
tár olt idő n em lesz p ontos. H a az elem l emerü lt, veg ye ki a kés zülék ből a szi várgá s
meg előzé se érdek ében. H a nem kí vánja k ihasz nálni a t arta lék ele m nyújto tta elő nyöket ,
kés zülék e elem né lkül is n ormál isan mű ködik . Azonb an a háló zatró l törté nő
lec satla kozta tás után i vissz acsat lakoz tatás kor az id ő számj egyei v illog ni kezd enek, é s az
órá t újra be k ell áll ítani a az Idő be állít ása című r észbe n leír tak sze rint.
d. Fig yelem :Az ele meket a z eleme k árta lmatl anítá sára von atkoz ó környe zetvé delmi
elő íráso k figye lembe vé telév el kell á rtalm atlan ítani . Ne dobj a az elem eket a há ztar tási
hul ladék ok közé. A z elem ek újrah aszno sítás ával k apcso latos el őírás okka l kapcs olatb an
ford uljon a h elyil eg ille tékes h atósá ghoz.
e. Óv ja az ele meket t úlzot t hőtől, m int pél dául na psüté s, tűz va gy haso nló.
HU NGARIA N
51
Page 54

CR2 0BT
FM- rádió h aszná lata
Az FM -rád ió hang olása e lőtt te ljese n húzza k i és állí tsa hel yzetb e az FM-a ntenn át.
Ame nnyib en lehe tősége v an rá, a ké szülé ket hel yezze a blakh oz köze l a jobb vét el érde kében .
1. FM -RÁ DIÓ üz emmód m egnyit ása
A / FU NCT ION go mb rövi d megnyo másáv al kapc solja b e a rádió t, és lép jen be az F M rád ió üzem módba . A kijel zőn meg jelen ik az FM- rádi fr ekven ciája .
2. Ma nuáli s hango lás és au tomati kus ker esés
Nyo mja meg r öviden a MINU TE TUN ING > v agy HO UR TUN ING < g ombot a z FM-rá dió
fre kvenc iáján ak 0,1 MH z érté kkel v aló növe léséh ez vagy c sökke ntésé hez.
Ha a M INUT E TUNI NG > vag y HOU R TUNI NG < gom bot két m ásodp ercig l enyomv a tart ja,
a kés zülék a g ombnyo másna k megfe lelő ir ányba n automa tikus an elke zdi ker esni az
elé rhető F M-áll omáso kat, é s autom atiku san lej átssz a őket.
3. Rá dióál lomás m entés e
A MI NUTE TU NING > v agy HO UR TUN ING < g ombba l hango lja be a me nteni k ívánt
rád ióáll omás fr ekven ciáját , tart sa lenyo mva a TIM E SE T/ MEM ORY/ PLAY PAU SE gom bot,
amí g a „P XX” felir at vill ogni ne m kezd a ki jelző n, a MIN UTE T UNIN G > vagy H OUR TU NIN G
< gom b rövid me gnyom ásával v álass za ki a pr ogramh ely szá mát, ah ová a rád ióáll omást
men teni kí vánja , majd nyo mja meg i smét a TI ME SE T/ ME MORY /PL AY PAUSE go mbot a
kiv álasz tás jóv áhagy ásáho z, ille tve a rádi óállo más pro gramh elyre m entésé nek
bef ejezés éhez. I sméte lje meg a z eljár ást a tov ábbi ál lomás ok menté séhez .
Rád ió üzem módba n a TI ME SE T/ ME MORY /PLAY PA USE go mb több szöri, r övid
meg nyomás ával vá laszt hatja k i és játs zhatj a le a memó riába n tárol t rádió állom ásoka t.
Meg jegyz és:
a. A ké szülé k csak 20 á llomá st tud tá rolni .
b. A men tett rá dióál lomás ok elve sznek , ha megs zűnik a z egyen áramú t ápell átás, és n incs a
kés zülék ben tar talé k elem.
c. Tárol t FM-rá dióál lomás f elülí rásáh oz ment sen egy ú j állom ást a hel yére.
d. A ki jelző v issza tér az óra kije lzésh ez, ha 10 m ásodp ercig ne m tört énik go mbnyom ás.
4. Aut omati kus ker esés és me ntés
Rád ió üzem módba n tart sa lenyo mva a TIM E SET / MEM ORY/ PLAY PAU SE gom bot 2
más odper cig, ek kor a kés zülék a utomat ikusa n megke resi és e ltáro lja az el érhet ő
rád ióáll omáso kat.
Blu etoot h haszn álata
A kés zülék B lueto oth fun kciój a lehet ővé tesz i, hogy B lueto oth esz közérő l zenét j átszh asson
le va lós ide jű hang folyam -tová bbítá ssal.
1. A / F UNC TION g omb röv id megny omásá val lép jen be a Bl uetoo th üzem módba , a
kij elzőn m egjel enik „bL” feli rat. Eg y hangj elzés k ísére tében a B lueto oth kék L ED
vis szaje lzője g yors üte mben vi llogn i kezd a ki jelző j obb fel ső sark ában, e z azt jel zi, hog y a
kés zülék k észen á ll a páros ításr a.
2. Ak tivál ja a Blue tooth f unkci ót Blue tooth es zközé n (pl. ok ostel efon stb . – az akti válás sal
kap csola tban ol vassa e l a Bluet ooth es zköz ké ziköny vét), é s keres sen elé rhető B lueto oth
esz közök et.
3. El lenőr izze az e szközö n az elér hető Bl uetoo th eszk özök li stájá t, és vál assza k i a
„B LAUP UNK T CR20 BT” lehe tőség et páro sítás ra. A sik eres pá rosítá st köve tően a Bl uetoo th
kék L ED vis szaje lzője – e gy hang jelzé s kísér etébe n – lassú ü tembe n kezd vi llogni .
4. A ze nét Blu etoot h eszköz én kell k ivál asztan ia és lej átsza nia, a ké szülé k pedig v ezeté k
nél küli mó don lej átssz a a tovább ított a udiót .
5. Bl uetoo th üzem módba n a HOUR T UNI NG < vagy M INU TE TUN ING > g ombba l válth at az
elő ző és köve tkező z enesz ámra, a TI ME SE T ME MORY / PLAY PAU SE gom bbal in dítha tja el /
szü netel tethe ti a zenel ejáts zást, é s az AL2 + /AL1 – g ombba l állít hatja b e a kíván t
han gerőt .
52
Page 55

CR2 0BT
Meg jegyz és:
a. A sz ámkij elző vi sszat ér az idő kijel zéshe z, ha 10 má sodpe rcig ne m törté nik gom bnyom ás.
b. Ame nnyib en Blue tooth e szköze POP je lszót k ér a páros ítás kö zben, a „00 00” száms ort adj a
meg .
c. Fel hívju k figye lmét, h ogy nem m inden B luetoo th eszk öz páro sítha tó a kész ülékk el a
kül önböz ő márká k és kiv itelek m iatt.
d. A Bl uetoot h hatót ávols ága 10 mé ter (ak adály ok nélk ül). Üg yelje n arra, h ogy Blu etooth
esz köze a hat ótávo lságo n belül l egyen .
Alvá s és fénye rő
1. Le játszá si üzem módba n (rádi ó vagy Bl uetoo th) nyom ja meg rö viden a D IMM ER
SL EEP/ SCA N gombo t az alvá s funkc ió akti válás ához, m ajd a gom b többs zöri
meg nyomás ával vá lassz a ki az alv ási idő t az aláb bi cikl us szer int. Vál assza k i a kíván t alvás i
idő t, majd v árjon 2 m ásodp ercet, e kkor a k ijelz ő kilép a z alvás b eállí tása üz emmód ból, és
vis szaté r leját szási ü zemmód ba. Ekö zben a S LEEP LED vi sszaj elzőj e világ ítani k ezd a
kij elzőn , ami azt j elent i, hogy a z alvás idő sik erese n beáll ításra k erült .
90> 8 0 > 70 > 60 > 50 > 40 > 3 0 > 20 > 10
Lej átszá si üzem mód (FM v agy Blu etoot h)
2. Ké szenl éti üze mmódb an a DIM MER S LEEP /SC AN gom b rövid me gnyom ásával á llíth atja
be a ki jelző h átter ének fén yerej ét: mag as vagy al acson y fényer őszin t. A beál lítás t
köve tően a k ijelz ő hátter e a kivál aszto tt fénye rőssé ggel fo g világ ítani l ejáts zási
üze mmódb an.
Meg jegyz és:
a. Al vás üze mmódb an a DIM MER S LEE P/SC AN gom b rövid me gnyom ásával e llenő rizhe ti,
hog y menny i idő mara dt hátr a a beáll ított a lvási dőből . Az alvá sidő le járta kor a kés zülék
aut omati kusan k észen léti üze mmódb a kapc sol. A le játszá shoz k apcso lja be a ké szülé ket.
Tölté s USB- n keres ztül
A kés zülék en talá lható e gy dupl a USB- töltő aljza t (1 x 5 V / 1,0 A, 1 x 5 V / 2,1 A ), amel lyel
kül önböz ő eszköz ök láth atók el á ramma l (péld ául US B-s lám pa, ven tilát or, okost elefo n,
táb lagép s tb.).
Az U SB-t öltőal jzath oz való c satla kozta tás elő tt elle nőriz ze a csat lakozt atni k ívánt es zköz
táp ellát ására vo natko zó spec ifiká cióit . Az esz közhöz m ellék elt US B-ká belt (n em a csom ag
rés ze) hasz nálja a c satla kozta tásho z. A tölt ésjel ző szimb ólum va gy egy vi sszaj elző vi lágít ani
kez d, ha a tölt és sike resen e lindu lt.
Meg jegyz és:
a. Ne m garan tálha tó, hogy m inden t elefon é s elekt ronik us eszk öz tölt hető ez zel a
kés zülék kel.
b. Mi ndig el lenőr izze az es zköz tá pellá tásár a vonat kozó spe cifik áció kat, és a k észül ék
meg felel ő kimen eti US B-al jzatáh oz csat lakoz tassa a z eszkö zt.
c. Mi ndig az e szköz höz mel lékel t USB- kábe lt haszn álja a tö ltésh ez.
d. A töl tés idő n em gara ntálh ató, miv el előf ordul hat, hog y az US B-töl tőalj zat nem t udja
lea dni a töl téshe z szüks éges tel jesít ményt .
HU NGARIA N
53
Page 56

CR2 0BT
Műs zaki ad atok
Ára mforrá s: DC, 5 V / 3,5 A, 1 00–24 0 V ~ 50/60 H z
Tápel látás t arta lék ele mről (c sak az id őbeál lítás m egtar tásáh oz): 2 x 1, 5 V,
(mé ret: LR 6, UM -3, AA , nem a cso mag rész e)
FM- frekv encia tarto mány : 87, 5–108 ,0MH z
Blu etoot h verzi ó: 2.1 + EDR
Blu etoot h hatótá volsá ga: 10 mé ter
US B-töl tési te ljesí tmény : Egyen áram, 5 V, 1A x 1
Egye náram , 5 V, 2,1 A x 1
Telje sítmé ny: 2 x 1,8 W (R MS)
Ára mfogya sztás : 5 W
Ára mfogya sztás k észen léti ál lapot ban: <1 W
(A ter méki nform ációk e lőzete s bejel entés n élkül v áltoz hatna k.)
Hib aelhá rítás :
A. Túl er ős a hátté rzaj F M-rád ió üzem módba n.
a-1 : Húzza k i telje sen az FM -ant ennát, é s állít sa be az an tenna i rányá t. Helye zze a
kés zülék et abla k mellé .
a-2 : Próbál jon áth angol ni egy má sik FM -állo másra .
a-3 : Fordul jon a sze rvizk özpon thoz, h a a probl éma tová bbra is f ennál l.
B. Sz akasz os a hang B lueto oth üzem módba n.
b-1 : Próbá lja meg k özeleb b helye zni a Blu etoot h eszkö zt a kész ülékh ez.
b-2 : Állít sa le és k apcso lja ki a Bl uetoo th funk ciót, é s páros ítsa új ra az eszk özöke t.
b-3 : Fordul jon a sze rviz közpon thoz, h a a probl éma tov ábbra is f ennál l.
C. A ki jelző n em vilá gít.
c-1 : Ellen őrizz e, hogy a z egyená ramú ad apter c satla kozój át megfe lelőe n csatl akozt atták e.
c-2 : Fordul jon a sze rvizk özpon thoz, h a a probl éma tová bbra is f ennál l.
D. Nem s ikerü lt beál lítan i az ébre sztés t.
d-1 : A helye s beáll ításs al kapc solat ban olv assa el a h aszná lati út mutató t.
d-2 : Fordul jon a sze rvizk özpon thoz, h a a probl éma tová bbra is f ennál l.
54
Page 57

55
Page 58

 Loading...