

Blaupunkt CR12 Owner's Manual

Owner's Manual
Instrukcja obsługi
Návod k obsluze
Príručka vlastníka
Használati útmutató
Alarm clock radio with out-door & in-door temperature
Radiobudzik z termometrem wewnętrznym i zewnętrznym
Radiobudík s měřením vnitřní a venkovní teploty
Rádio s budíkom a meraním vnútornej a vonkajšej teploty
Ébresztőórás rádió kültéri és beltéri hőmérsékletmérő funkcióval
CR12

CR12
1

CR12
2
CR12
3

CR12
4
CR12
5

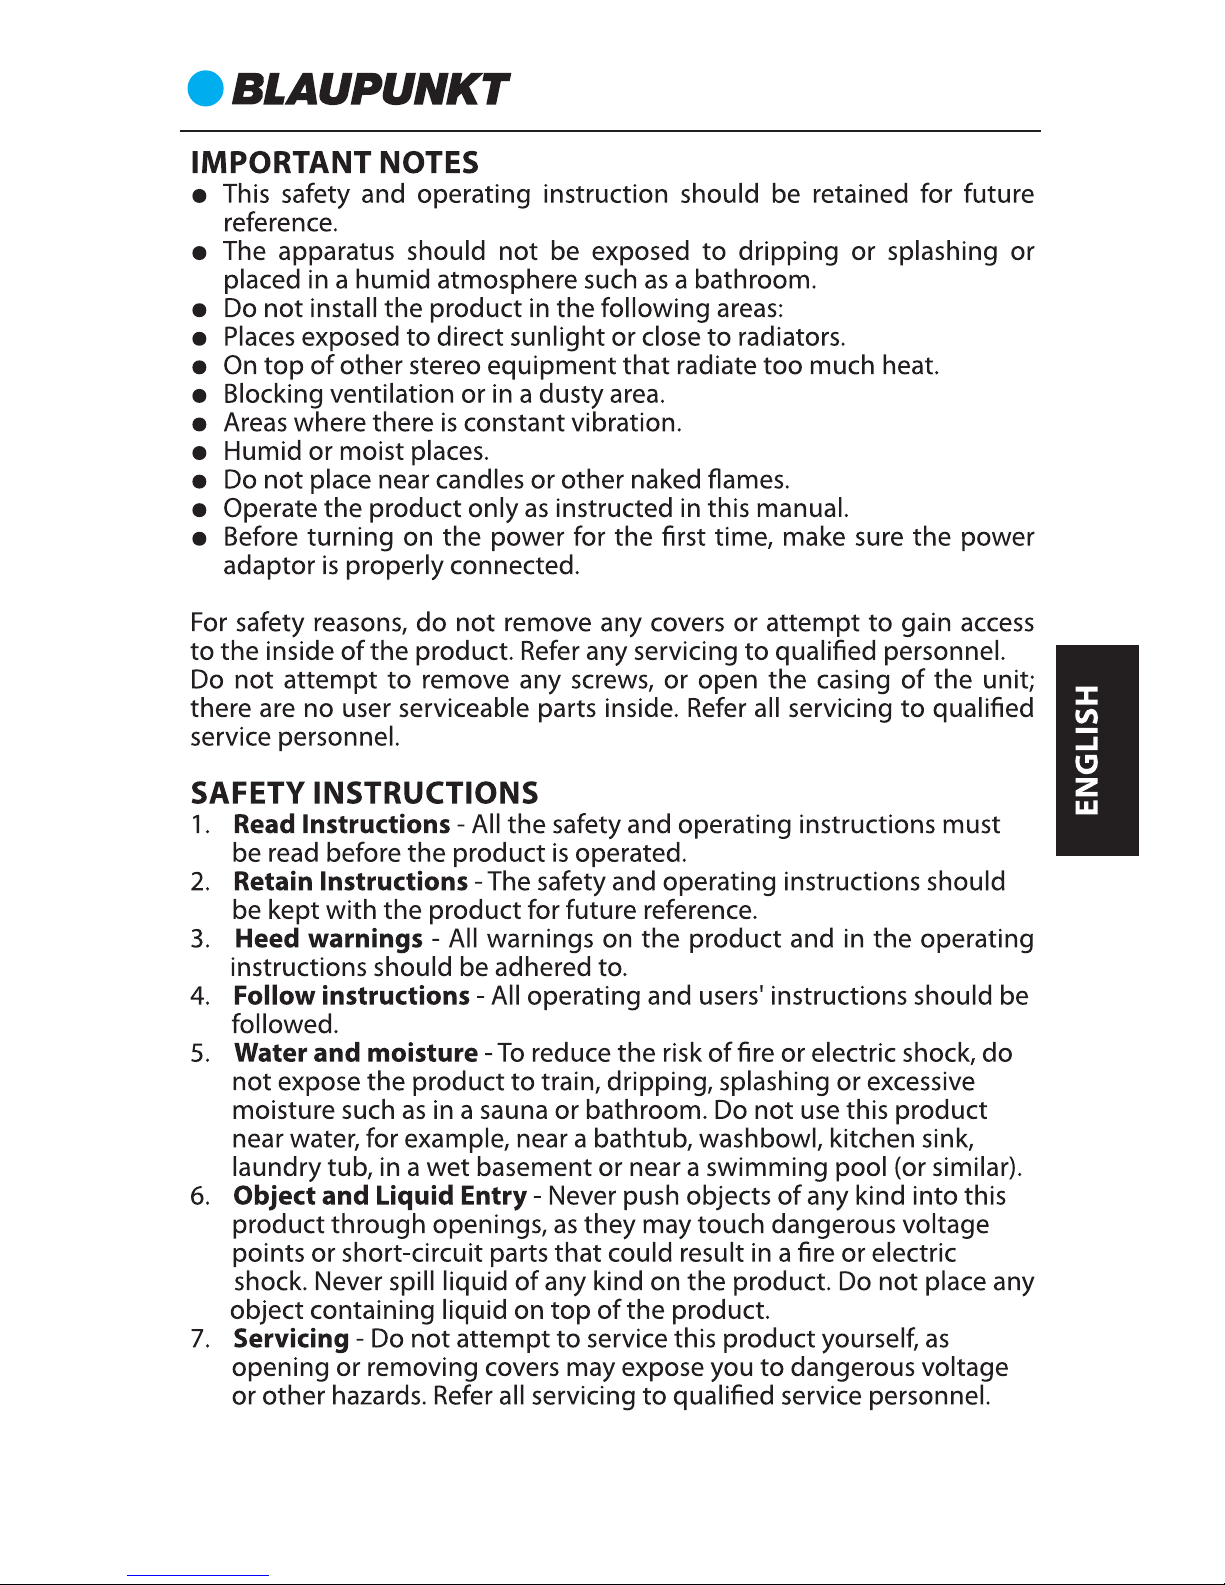
Power setting
Plug in the AC/DC adaptor to an AC household outlet, and then
plug the DC jack to the lower right back of the unit. Your unit is
ready to work for you.
Press RADIO/SLEEP button to enter radio mode, press the “ snooze”
button to standby unit into clock time mode.
Backup battery power installation
Your clock requires 1 x new CR2032 battery (not included) to
provide backup power to it in the event of a temporary power
interruption.
1. Place your clock face down on a flat and soft surface.
2. Slide and remove the battery cover at the back of your unit.
3. Insert 1 x new CR2032 battery (not included) into the battery
compartment by observing the correct “+” and “-“ polarity.
4. Slide and replace the battery cover.
If AC power is interrupted, the backup battery will keep the time
and all settings of your unit.
Outdoor temperature sensor installation
Keep your Clock Radio and wireless outdoor transmitter next to
each other. Slide open the battery cover at the back of your wireless
outdoor transmitter, then insert 2 x AAA alkaline batteries (not
included) to the battery compartment. Replace the battery cover.
Make sure the channel selector is set at position 1 (top position).
The enclosed outdoor transmitter only works with Channel 1.
Your weather station will receive data signal from the outdoor
transmitter in few seconds. Then place your outdoor transmitter in
a dry and shaded area outdoor.
Remarks:
Keep in mind that your outdoor sensor has a 60-meter open air
transmission with no obstructions. Actual transmission range will
vary depending on what is in the path of the signal. Each
obstruction (roof, walls, floors, ceilings, thick trees, etc.) will
effectively cut signal range in half.
CR12
6
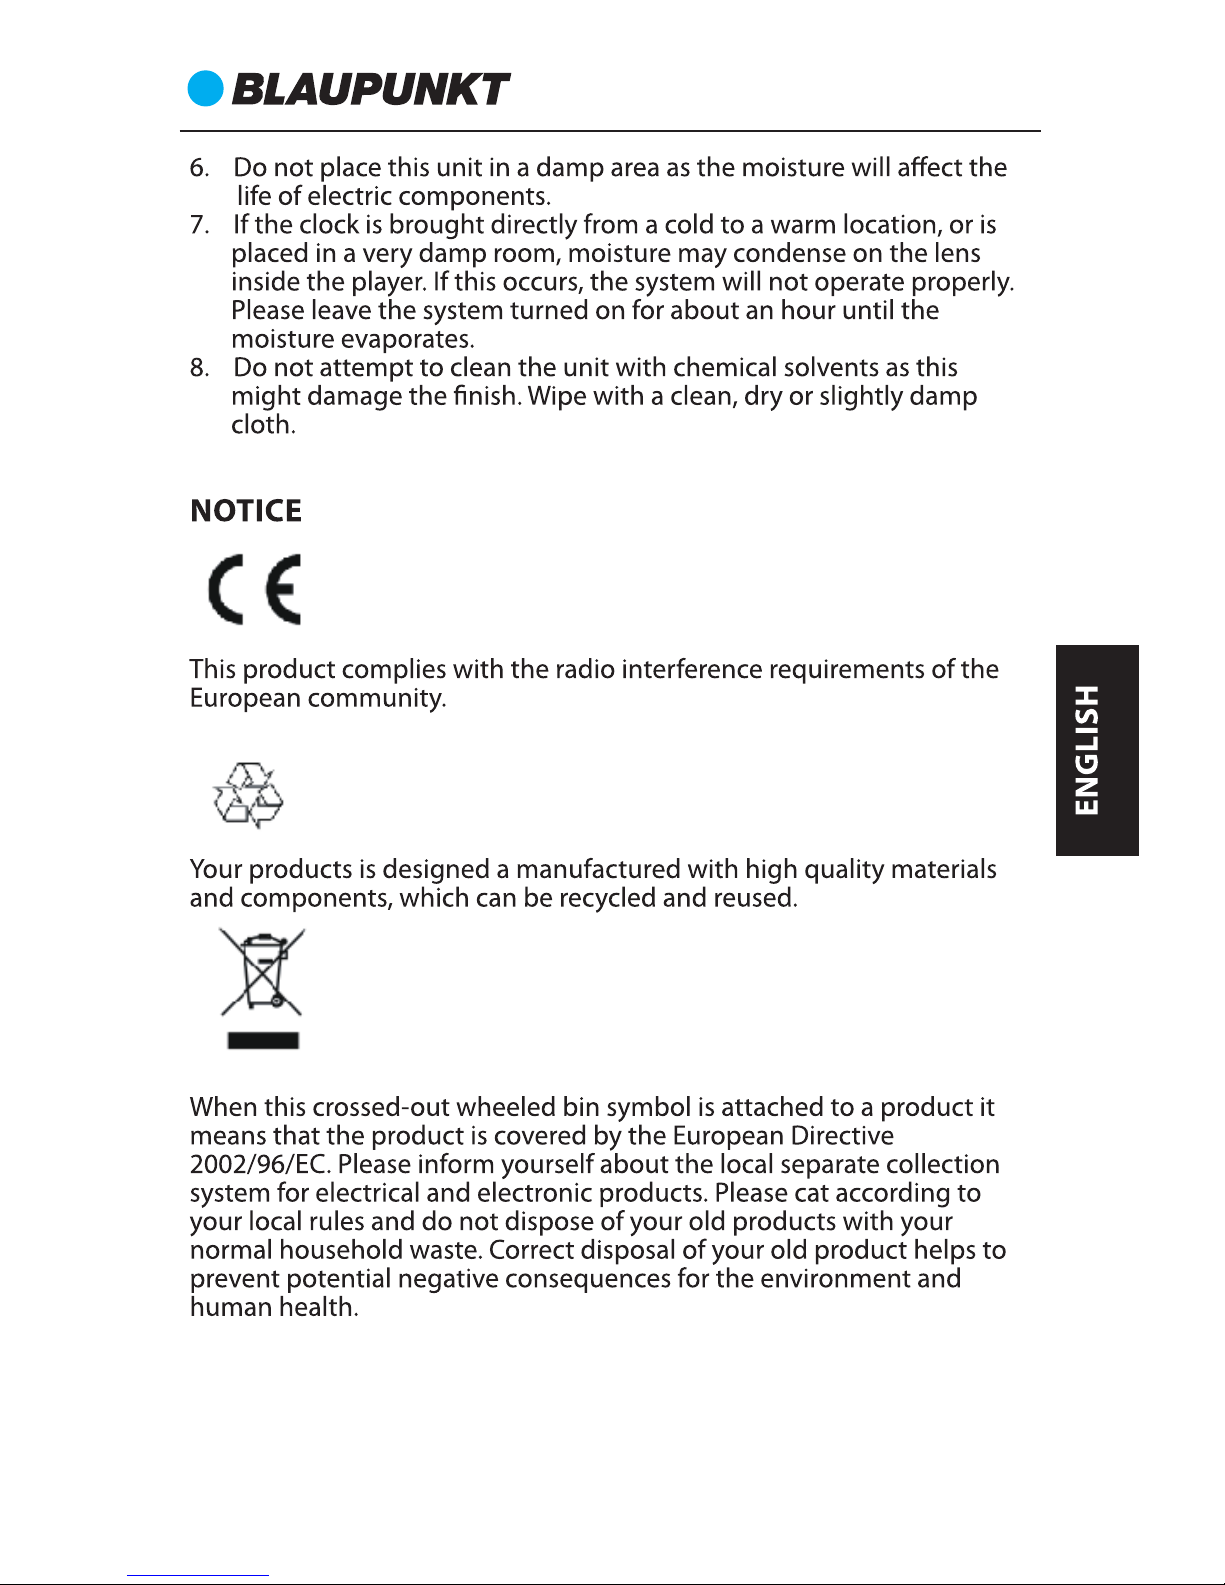
Insert the holder to the bottom of the outdoor transmitter for
desktop or insert it to the back of the transmitter for wall mount
purpose.
Time and snooze setting
1. Press and hold SET till the hour digits flash on display. Press or
to set the hours. Press and hold or will accelerate
setting at high speed.
2. Press SET once again, the minute digits will flash. Press or to
set the minutes. Press and hold or will accelerate setting
at high speed.
3. Press SET once again, the” 05” will flash. Press or to set
snooze duration (from 5 min to 60 min.).
4. Press SET again to complete set-up. If no key is pressed in
approximate 10 seconds at any time during set-up, the clock will
exit the set-up mode.
Note: Your clock is in 24-hour display format.
Alarm setting
1. At clock time mode, press and hold AL 1.2 button until A1 and
hour digits flash on display. Press or to set the desired
hour. Press and hold or to accelerate setting at high
speed.
2. Press AL 1.2 once again, A1 and minute digits will flash. Press
or to set desired minutes. Press and hold or to
accelerate setting at high speed.
3. Press AL 1.2 once again, A1 and “bu” (buzzer) will flash. press
or to select alarm source between “bu” and “rd”.
bu = wake-by-buzzer
rd = wake-by-radio
CR12
7

4. Press AL 1.2 once again until A2 and hour digits flash on display.
Please reference the above step 1~3 to complete the alarm 2
setting.
Please reference below to turn on or off the Alarm setting after
complete above operation.
1. Press AL 1.2 once to activate Alarm 1, A1 appears.
2. Press once again to activate Alarm 2, A2 appears.
3. Press once again to activate both Alarm 1 and 2. Both A1 and A2
appear.
4. Press once again to deactivate both alarms (both A1 and A2
disappear).
Note:
a. The alarm settings only start to work when the A1 or AL2 symbol
appears on display. Please do not forget to turn the relative
alarm after setting.
b. Please make sure the unit is keep connect with DC adaptor
power during alarm working. Please re-check or set up the alarm
in case of power interrupt.
Alarm sound cancellation
When alarm 1 or 2 is sounding, the related alarm icon will be
flashed. Press the AL 1.2 once to stop the alarm and reset it to come
on the following day. After that both A1 and/or A2 remain on the
display.
Snooze function activation (default snooze duration is 5
minutes)
When alarm is sounding, press once, the alarm will be
silenced and come on again after the set snooze duration.
Note: if your second alarm activates while the first alarm is
sounding or it is in the snooze mode, the second alarm will
overrides the first alarm (the first alarm is reset to come on the next
day).
FM radio operation
Before start to listen the radio, please try to move the unit next to
the window and extend the FM wire antenna fully in order to get
better FM signal reception. Please try to vary the direction of
antenna when the FM reception is not good. Do not strip, alter or
attach to other antennas.
1. To turn on the radio, please press RADIO/SLEEP button once,
the unit will start the radio playing after shows “ON” and come
with frequency information.
2. Short press / to tune the radio step by step in 0.1Mhz. Press
and hold / to auto scan the available station.
3. To adjust the volume, press VOL once, the display shows “L10”,
press / to adjust volume from L00 (minimum) to L15
(maximum)
CR12
8

4. Press to turn off the radio.
Remark: keep your radio away from fluorescent lamps or other
electronic devices, which may cause interference to the radio.
FM radio preset
This clock radio can save up to10 preset stations. These allow you to
preset your favorite stations and access them quickly.
1. Turn on the radio and select a radio station you like to
memorize.
2. Press and hold the SET until “P01” flashes. Press SET once to
store Memory 1.
3. Press or to select another station you like to memorize.
Then press and hold SET until “P01” flashes. Press / to
adjust the preset station number location that you
want to save , Press SET once to confirm the preset station
number.
4. Repeat Step 1 to 3 to preset other station.
5. To pick up preset station at any time, press the SET once at a
time in radio mode.
6. To edit a preset station, select another station and then repeat
Step 1 to 4. This operation will override the original settings.
Note: the preset station may lose when you disconnect the DC
power and without backup battery power installed. Please recheck the preset station in case of you interrupt the DC power.
Sleep
1. At RADIO mode, press and hold RADIO/SLEEP to enter the
sleep mode. The SL appear and the sleep time “05” (5 minutes)
flashes on the display.
2. Press the RADIO/SLEEP again as needed to adjust the sleep
timer from 5, 10, 15, 30, 45, 60, 75, 90 or OFF.
3. When the display changes back to show the time, press and
hold RADIO/SLEEP once to show the sleep time remaining.
4. The radio will play for the programmed sleep time and then
shut off.
5. To turn off the radio before the sleep time has elapsed, press
once.
Dimmer (display backlight adjustment)
Simply press to adjust the brightness (Hi/ Lo/ Off ) of the LCD
display. This can only be done when using adaptor.
CR12
9

Out-door and in-door temperature
The unit can detect the in-door temperature and show on display
automatically when we power on it. Meanwhile, will search the outdoor temperature signal automatically, and show it on display once
get the out-door temperature transmitter signal and within
working distance (up to 60 meters without obstacle)
When the outdoor temperature digits show “—“, the wireless
transmission is either interrupted or lost. Please try to follow up
below operation.
1. At clock time mode, press and hold button of the weather
station, “- -“ flashes and to start searching for the signal from the
outdoor transmitter.
2. Then press the RESET button of the outdoor transmitter.
3. If you continue to lose the outdoor temperature display, try
placing the outdoor transmitter in a different location until you
have smooth transmission of temperature data.
Specification
Alarm duration 1 hr
Snooze duration 5 to 60 minutes
Default settings:-
Time 0:00
Alarm 1 and 2 6:00
Snooze duration 05 (5 minutes)
Indoor Temp. Range 0℃ to +50℃ (+32℉ to +122℉)
Outdoor Temp. Range -50℃ to + 70℃ (-58℉ to +158℉)
Out of Range Display Temperature: HH.H/ LL.L
Outdoor Temperature Interval every 1 minute
Temperature Resolution 1℃
Transmission frequency 433MHz
Transmission Distance Up to 60 meters (open air with no
obstructions)
Trouble shooting
1. Background noise in FM station
a. Please try to move the unit next window or adjust the
antenna direction for bettere reception.
b. Please tune to other station for listening.
c. Please contact local sevice center for support if problem
remains.
2. The out-door tempeature is missing.
a. Please reference the IM to check the out-door termperature
transmitter or reset the unit.
b. Please contact local sevice center for support in problem
remains.
CR12
10
CR12
11
CR12
12

CR12
13
CR12
14
CR12
15
Informacja dla użytkowników o sposobie postępowania ze
zużytym sprzętem elektrycznym I elektronicznym.
Sy mb o l p r ze k re śl on e go k o ł ow eg o ko nt en e r a na o dp ad y
umieszczony na produktach informuje, że zużytego sprzętu
elektrycznego i elektronicznego nie można wyrzucać wraz z
odpadami komunalnymi. Wyrzucając elektrośmieci do kontenera
stwarzasz zagrożenie dla środowiska. Segregując i przekazując do
prz e two rze n ia, odz ys k u, recy kl ingu ora z u tyl iza cji zuży te
urządzenia elektryczne i elektroniczne chronisz środowisko przed
zanieczyszczeniem i skażeniem, przyczyniasz się do zmniejszenia
stopnia wykorzystania zasobów naturalnych oraz obniżenia
kosztów produkcji nowych urządzeń. Szczegółowe informacje o
najbliższym punkcie zbiórki można uzyskać bezpośrednio od
sprzedawcy lub w firmie Blaupunkt Competence Centre, 2N-
Everpol Sp. z o.o., ul. Puławska 403A, 02-801 Warszawa, tel. +48 22
331 9959, email: info@blaupunkt-audio.pl
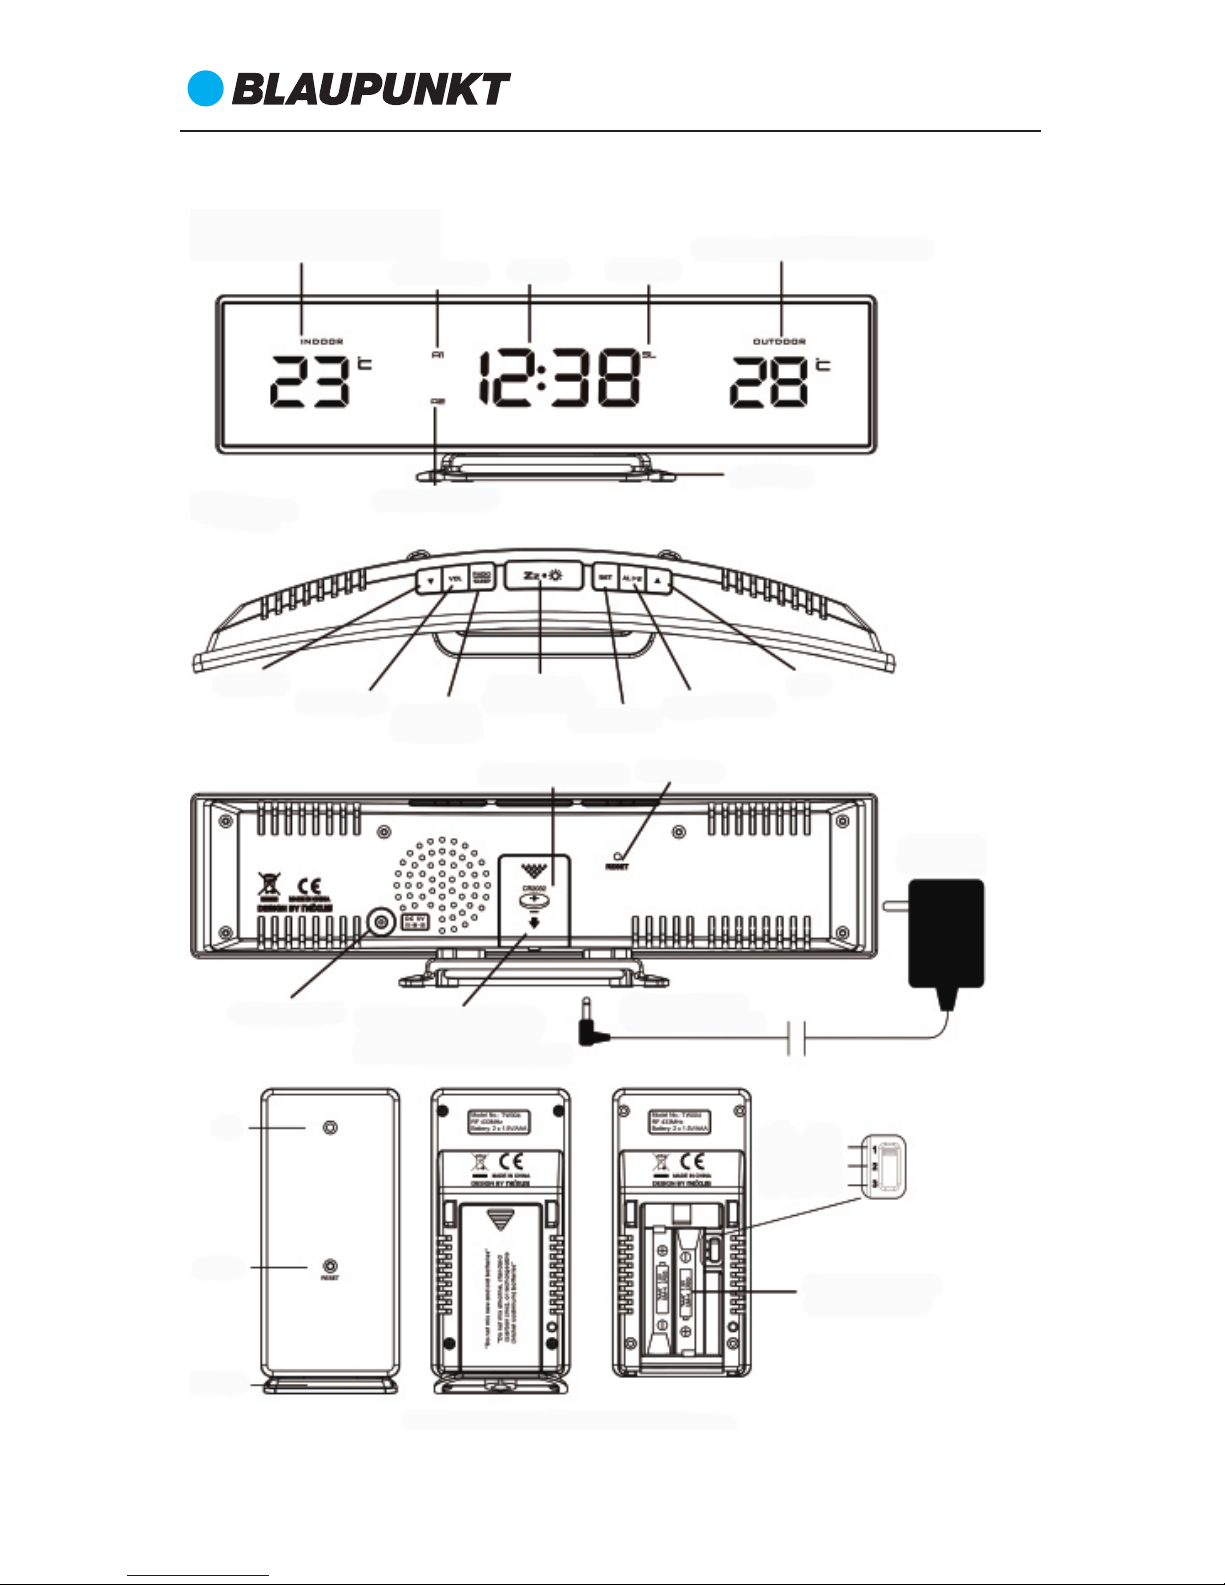
Położenie elementów sterujących
Widok z przodu
Widok z góry
Widok z tyłu
CZ UJNIK TE MPERATU RY ZEWNĘ TRZ NEJ
TEMPERATURA WEWNĘTRZNA
CZAS
Włączony ALARM 1
Włączony ALARM 2
TEMPERATURA ZEWNĘTRZNA
SLEEP
STOJAK
DÓŁ
VOLUME
Przycisk RADIO/SLEEP
Przycisk
DRZEMKA
/JASNOŚĆ
Przycisk SET
Przycisk AL 1.2
W GÓRĘ
DRZWICZKI KOMORY BATERII
ZASILACZ
SIECIOWY
PODŁĄCZYĆ WTYCZKĘ
ZASILACZA SIECIOWEGO
GNIAZDO PRĄDU STAŁEGO
WŁOŻYĆ 1 BATERIĘ CR2032
DO Ś RODKA
KOMORY B ATERII
Dioda
LED
STOJAK
KANAŁ 1
KANAŁ 2
KANAŁ 3
WŁÓŻ 2 BATERIE AAA
Przycisk RESET
Przycisk
RESET
CR12
16

Włączenie zasilania
Podłącz przewód zasilania do ściennego gniazda prądu
przemiennego, a drugi koniec kabla do gniazda w prawym, dolnym
rogu z tyłu urządzenia. Radiobudzik jest gotowy do pracy.
Naciśnij przycisk RADIO/SLEEP, aby uruchomić tryb radia. Naciśnij
przycisk drzemki, aby przełączyć urządzenie w tryb zegara.
Instalowanie baterii podtrzymania pamięci
Do podtrzymania pamięci radiobudzika na wypadek
krótkotrwałego zaniku zasilania używa się 1 baterii CR2032 (nie
wchodzi w skład zestawu).
1. Połóż urządzenie na płaskiej i miękkiej powierzchni przednią
częścią w dół.
2. Odsuń i zdejmij pokrywę baterii z tyłu urządzenia.
3. Włóż 1 baterię CR2032 (brak w zestawie) do komory baterii,
zwracając uwagę na polaryzację (znaki +/–).
4. Załóż ponownie pokrywę baterii.
Bateria zapewnia podtrzymanie pamięci daty i godziny w
urządzeniu po zaniku zasilania sieciowego.
Instalacja czujnika temperatury zewnętrznej
Ułóż obok siebie radiobudzik i bezprzewodowy nadajnik
temperatury zewnętrznej. Otwórz pokrywę komory z tyłu
bezprzewodowego nadajnika temperatury zewnętrznej i włóż 2
alkaliczne baterie AAA (brak w zestawie) do komory. Załóż
ponownie pokrywę komory baterii.
Upewnij się, że przełącznik wyboru kanału jest ustawiony w
położeniu 1 (górnym). Dołączony nadajnik bezprzewodowy pracuje
tylko na kanale 1.
W ciągu kilku sekund stacja pogodowa zacznie odbierać sygnał z
nadajnika bezprzewodowego. Następnie umieść czujnik
bezprzewodowy w suchym i zacienionym miejscu na zewnątrz.
Uwagi:
Należy pamiętać, że zasięg transmisji bezprzewodowego czujnika
temperatury wynosi 60 metrów (bez przeszkód). Rzeczywisty zasięg
transmisji zależy od przeszkód znajdujących się na drodze sygnału.
Każda przeszkoda (dach, ściana, strop, grube drzewo itp.) zmniejsza
zasięg sygnału o połowę.
CR12
17
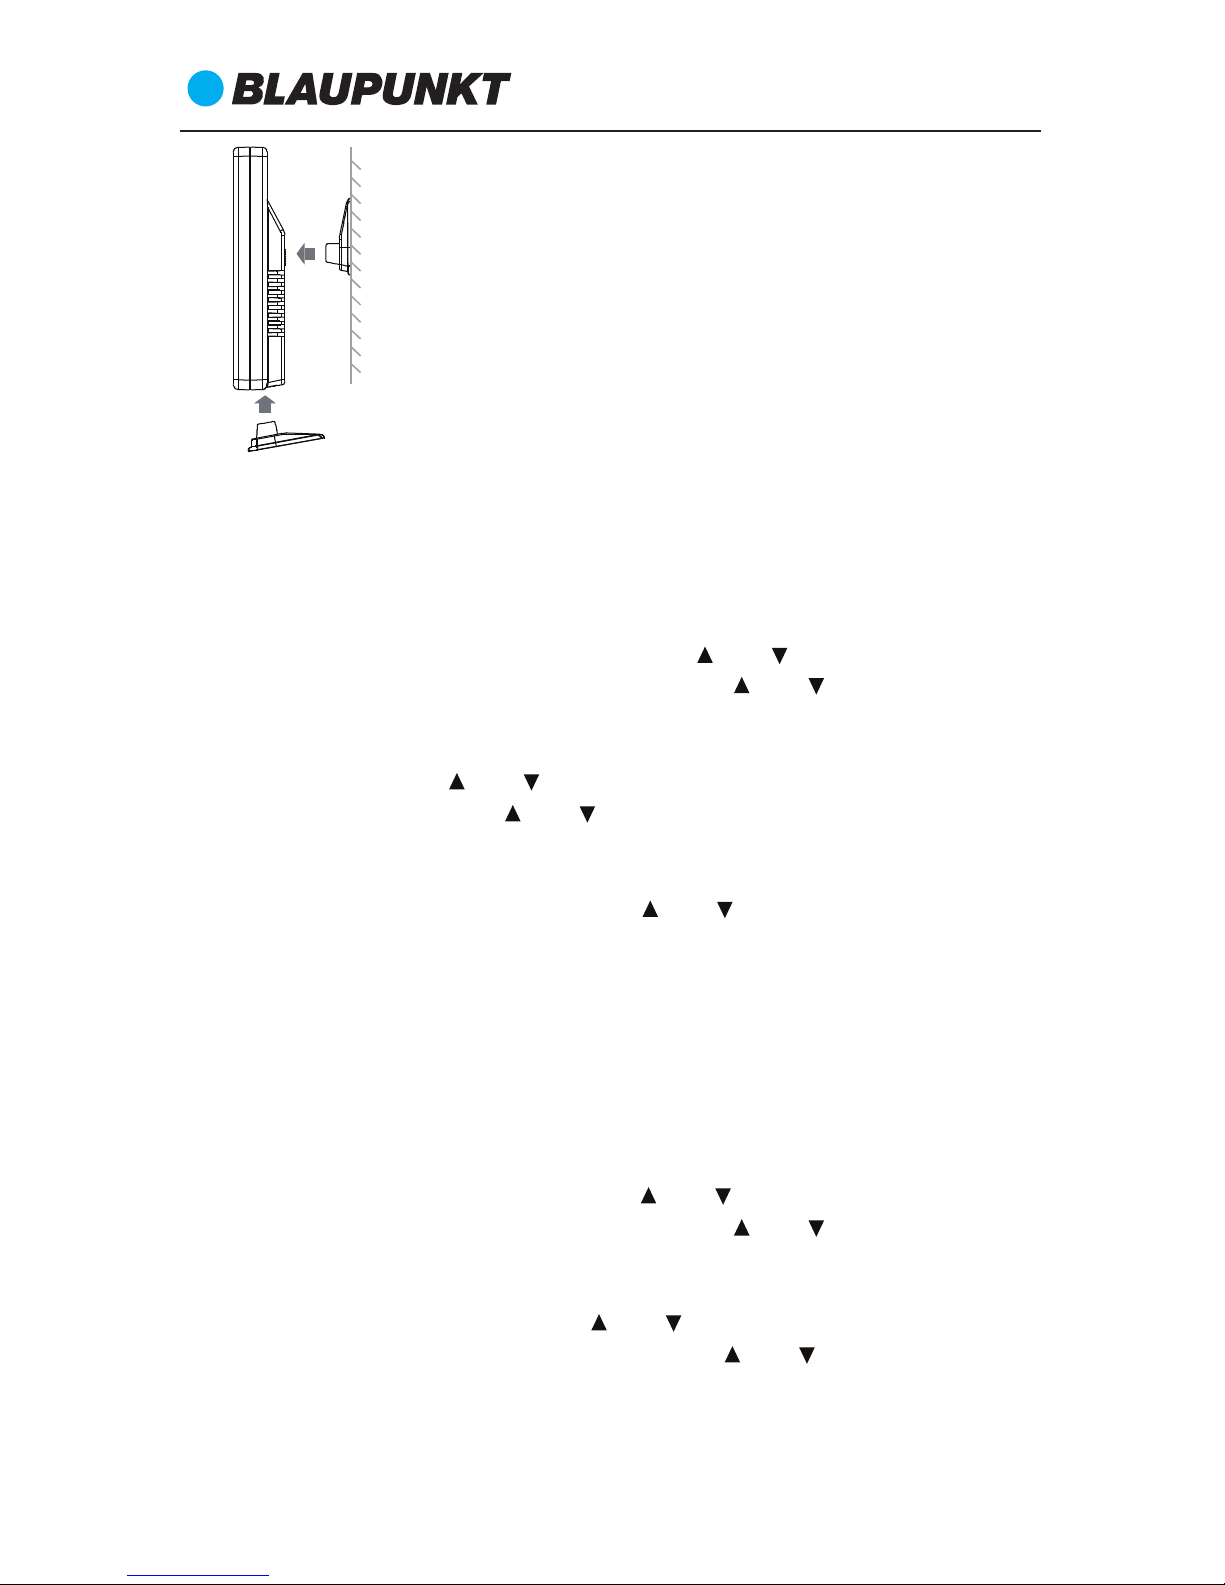
Umieść uchwyt w dolnej części bezprzewodowego czujnika
temperatury w celu postawienia go na biurku lub z tyłu czujnika,
aby zamontować go na ścianie.
Ustawienie czasu i drzemki
1. Naciśnij i przytrzymaj przycisk SET; na wyświetlaczu zaczną
migać cyfry godzin. Naciśnij przycisk lub , aby ustawić
godziny. Naciśnij i przytrzymaj przycisk lub , aby zwiększyć
szybkość ustawienia czasu.
2. Naciśnij ponownie przycisk SET; zaczną migać cyfry minut.
Naciśnij przycisk lub , aby ustawić minuty. Naciśnij i
przytrzymaj przycisk lub , aby zwiększyć szybkość
ustawienia czasu.
3. Naciśnij ponownie przycisk SET; na wyświetlaczu zacznie migać
wskazanie 05. Naciśnij przycisk lub , aby ustawić czas
trwania drzemki (w zakresie od 5 min do 60 min).
4. Naciśnij ponownie przycisk SET, aby ukończyć ustawianie. Jeśli
w ciągu 10 sekund podczas ustawiania nie zostanie naciśnięty
żaden przycisk, zegar wyjdzie z trybu ustawiania.
Uwaga: zegar jest wyświetlany w formacie 24-godzinnym.
Ustawienie alarmu
1. Gdy jest wyświetlany zegar, naciśnij i przytrzymaj przycisk AL
1.2 aż do wyświetlenia symbolu A1 i migania cyfr godziny na
wyświetlaczu. Naciśnij przycisk lub ,aby ustawić żądaną
godzinę. Naciśnij i przytrzymaj przycisk lub , aby zwiększyć
szybkość ustawienia czasu.
2. Naciśnij ponownie przycisk AL 1.2; zaczną migać cyfry minut i
symbol A1. Naciśnij przycisk lub , aby ustawić żądane
minuty. Naciśnij i przytrzymaj przycisk lub , aby zwiększyć
szybkość ustawienia czasu.
CR12
18

3. Naciśnij ponownie przycisk AL 1.2; zacznie migać symbol A1 i
„bu” (sygnał dźwiękowy). Naciśnij przycisk lub , aby wybrać
źródło dźwięku budzenia: „bu” lub „rd”.
bu = budzenie brzęczykiem
rd = budzenie radiem
4. Naciśnij ponownie przycisk AL 1.2; zaczną migać cyfry minut i
symbol A2. Powtarzaj czynności z kroków 1–3, aby ustawić
alarmu 2.
Wykonaj poniższe czynności, aby włączyć lub wyłączyć
ustawienie alarmu po ukończeniu powyższych czynności.
1. Naciśnij jeden raz przycisk AL 1.2, aby włączyć alarm 1; zostanie
wyświetlony symbol A1.
2. Naciśnij ponownie przycisk, aby włączyć alarm 2; zostanie
wyświetlony symbol A2.
3. Naciśnij ponownie przycisk, aby włączyć alarm 1 i 2. Zostaną
wyświetlone oba symbole A1 i A2.
4. Naciśnij ponownie przycisk, aby wyłączyć oba alarmy (znikną
oba symbole A1 i A2).
Uwaga:
a. Ustawienia alarmu działają tylko wtedy, gdy symbol A1 lub A2 są
wyświetlone na wyświetlaczu. Należy pamiętać o włączeniu
żądanego alarmu po jego ustawieniu.
b. Aby działała funkcja alarmu, radiobudzik musi być stale
podłączony do zasilania sieciowego. Po odłączeniu zasilacza
sieciowego należy sprawdzić lub ponownie ustawić alarmy.
Wyłączenie dźwięku alarmu
Gdy zostanie odtworzony alarm 1 lub 2, zacznie migać związana z
nim ikona. Naciśnij przycisk AL 1.2, aby wyłączyć alarm i przesunąć
go na następny dzień. Po wykonaniu tej czynności na wyświetlaczu
pozostanie symbol A1 i/lub A2.
Obsługa funkcji drzemki (domyślne ustawienie to 5 minut)
Jednokrotne naciśnięcie przycisku powoduje wyciszenie
odtwarzanego alarmu i powtórne jego uruchomienie po upłynięciu
czasu trwania drzemki.
Uwaga: jeśli drugi alarm zostanie odtworzony w trakcie
odtwarzania pierwszego alarmu lub gdy trwa jego czas drzemki,
drugi alarm ma wyższy priorytet niż pierwszy (pierwszy alarm jest
zerowany i przesuwany na następny dzień).
CR12
19
 Loading...