

Page 1
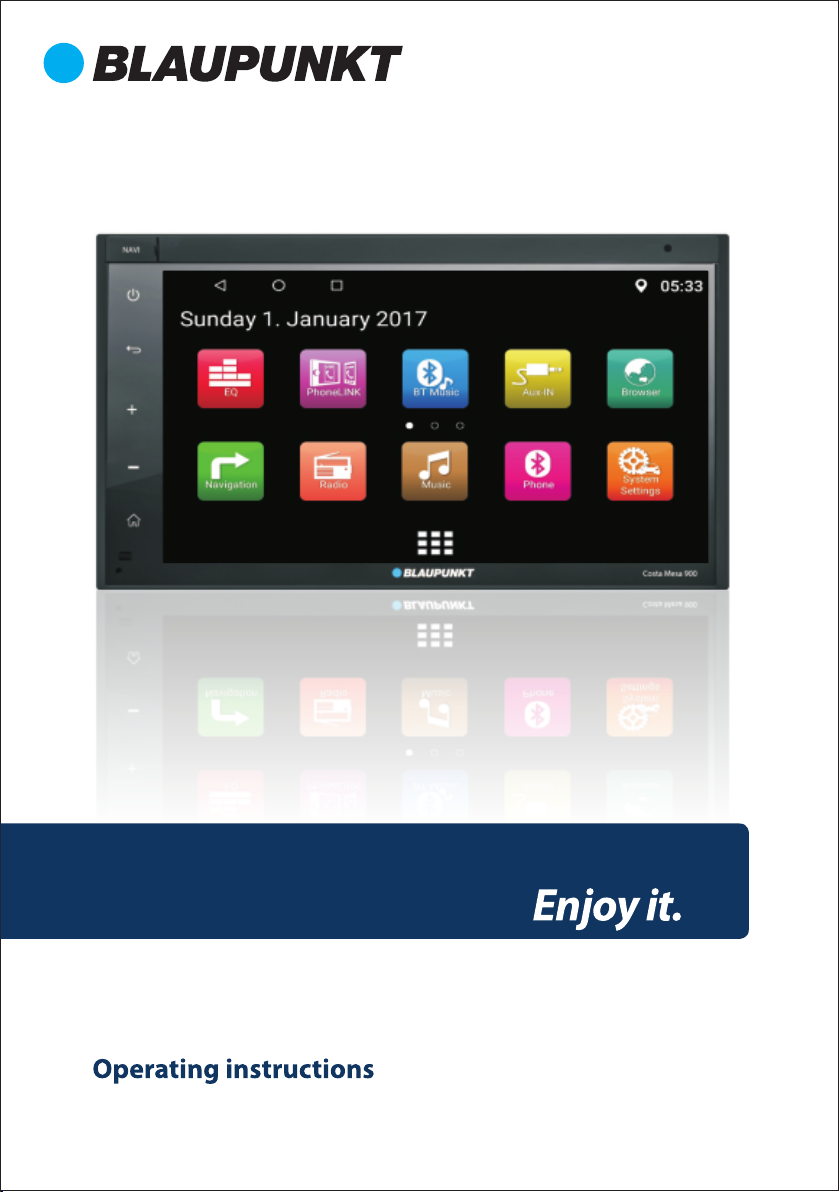
CAR MULTIMEDIA
COSTA MESA 900
Page 2
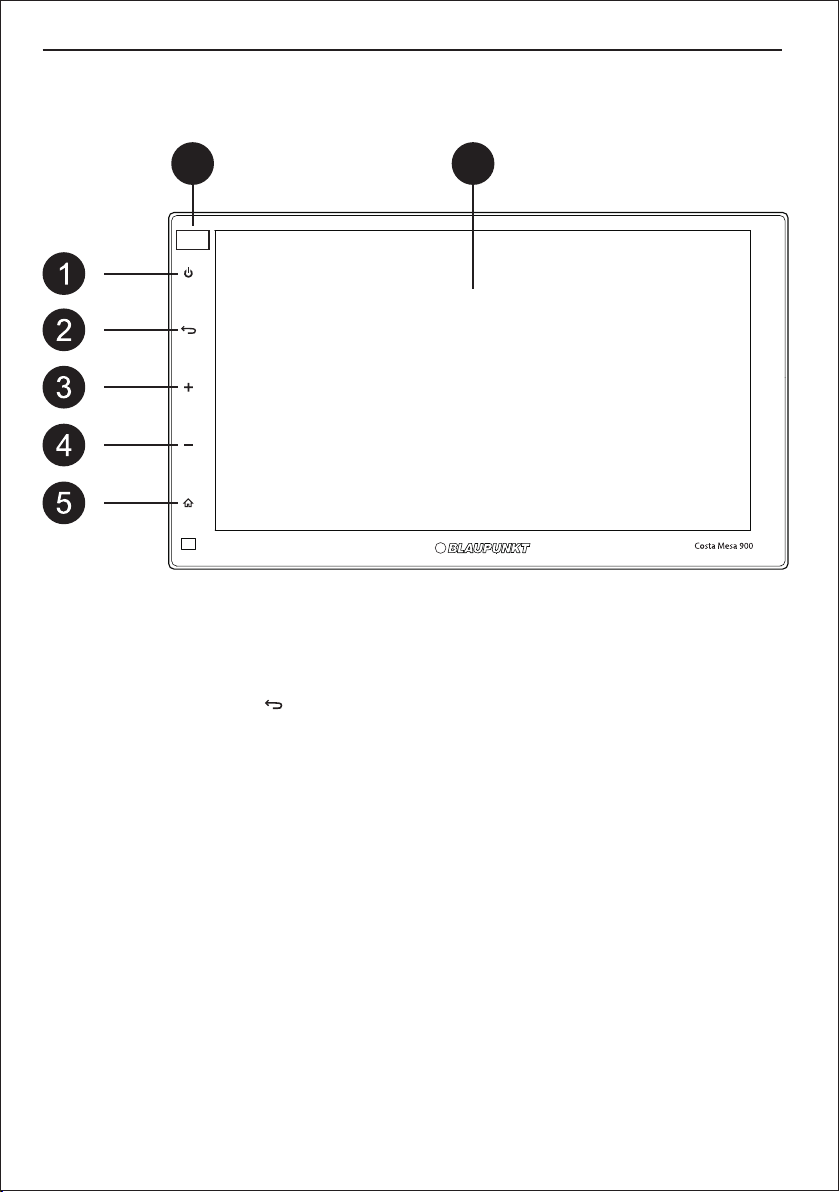
Panel Introduction
The agship product of the 'Symphony Series', Costa Mesa 900 features a brilliant 6.75-inch
capacitive display with a high-end tuner and runs on Android OS Version 6.0
7 6
NAVI
1. In any state, press this button to power on/off the device / light touch to
mute audio output
2. Press this button to return to the previous page. Under any interface, tap
the icon [ ] to return to the previous page.
3. Press this button to increase audio volume
4. Press this button to decrease audio volume
5. Press this button to go to home menu
6. Touch & slide the top row of the icons to the left or right to show more
pages / icons.
7. Micro SD card slot for Navigation
Page 3
1
2
3
4
5
6
7
8
34
33
32
31
30
29
28
9
10
11
27
11
12
13
14
15
26
12
13
25
24
14
16
17
23
15
16
17
22
18
19
Random track play / Shuffle
20
18
19
21
20
21
22
23
Adjust volume
24
25
1
2
3
4
5
6
7
8
9
26
Tune into stations manually; select title,
Fast Search
27
Equalizer
28
29
30
Calling up direct input for FM transmitter track,
31
32
33
10
34
Page 4

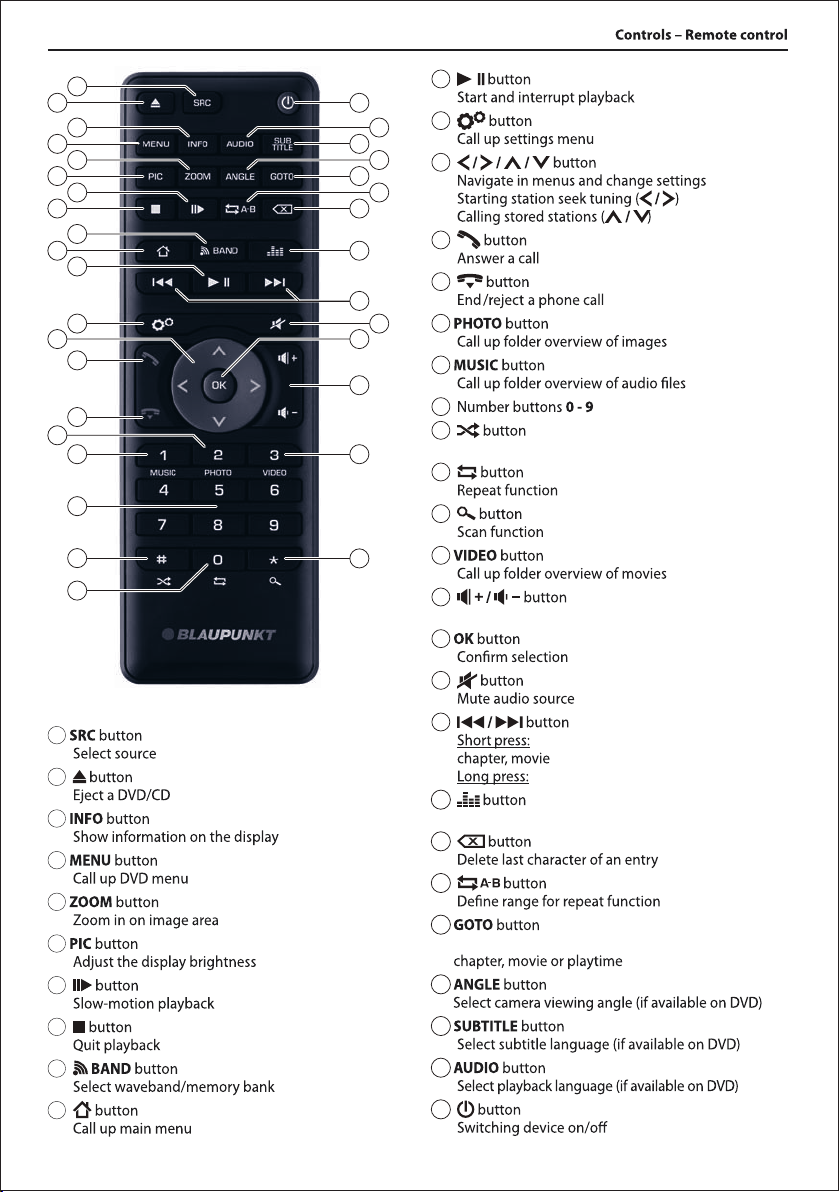
Controls – Remote control | Contents
Contents
Safety notes 05
Symbols used 05
General Warning 05
Road safety 05
Instructions to read this User Manual 06
Declaration of conformity 06
Cleaning the unit 06
Disposal notes 06
Warning 06
Scope of delivery 06
Placing the device in operation 07
Instructions to the panel buttons 07
Switching on/off with the touch 07
Switch on/off via vehicle Ignition 07
Main menu 07
Volume 07
Main interface 07
Radio Function 09
Radio function operation 09
Setting the reception area 09
Tuning Into a station 09
Storing stations manually 09
Scanning stations 10
Band Switch 10
Tune and Seek 10
Auto Seek and Store stations 10
Select memory bank 10
Sound settings 10
Sound settings 10
Equalizer settings 10
Audio distribution (fader/balance) 10
Navigation Function 11
Navigation settings 12
Take me home 12
Route 12
Favourites 12
History 12
Navigation settings 13
Phone Feature 13
Making a call via Bluetooth 13
Dialling 14
Answer a call 14
View Call History 14
View Phone Book 14
Play Music 15
Bluetooth Music Function 15
USB Music Function 15
Audio from USB 16
Video from USB 16
Features 17
PhoneLink 17
Phone debugging 18
Play store 19
Browsing the internet 20
Video 20
Pictures 20
SWC 20
File explorer 21
Clock 21
Live wall papers 22
Wall papers 22
Aux-In 22
Blackout 22
Device Settings 23
WiFi Settings 23
Portable WiFi Hotspot Settings 23
Storage info 23
Apps 24
Adding an account 24
Language input settings 24
Date & time settings 24
Device information 24
System Settings 25
Common settings 25
Navigation software setting 25
Backlight setting 25
Radio setting 26
Default volume setting 26
Steering Wheel Learning 26
FLAC Codec 26
Memory clean 26
Useful information 27
Warranty 27
Service 27
Connection Diagram 28
USB Support Files 29
FCC information 32
Page 5
Safety notes
Safety notes
The car audio system is manufactured according to
recommended and established safety guidelines in a
state of the art facility. Even so, dangers may occur if
you do not observe the safety notes in their instruction
manual.
These instructions are intended to familiarise you with
the most important functions. A detailed explanation
can also be found on the website under the URL:
https://www.blaupunkt.com/in
Ÿ For best results, please read the user manual
carefully and completely before using the car audio
system.
Ÿ Always keep the user manual accessible to all users.
Ÿ Always handover the car audio system to any third
party along with these instructions.
Ÿ In addition, observe the instructions of the devices
used in combination with this car audio system.
Symbols used
Below are the symbols used in this user manual, please
go through them carefully:
CAUTION:
Warns about possibilities of any injuries that
might occur.
DANGER:
Warns about damages to the DVD/CD drive
(Not applicable to all Series 900 Model)
LOUD VOLUME:
Warns about high volume
The CE mark conrms the compliance with EU
G directives.
ü Identies a sequencing step
Ÿ Identies a listing
General Warning
To avoid any injury or damage to yourself, your car and
others, please make sure to do as following. Observe
the following note to protect yourself against injuries:
Ÿ Do not modify or open the device. Do not do any
unauthorised modication to the device. In case you
need any assistance, please visit the nearest services
centre. The device should be open by an authorised
person only.
Ÿ Use as Directed: this car audio system is intended
for installation and operation in a vehicle with 12V
vehicle system voltage and must be Installed in a
2DIN slot. Observe the output limits of the device.
Only an authorised specialist should perform repairs
and installation, if necessary.
Ÿ Installation Instructions: You may only install the
car audio system yourself if you are experienced in
installing car audios systems, and are very familiar
with the electrical system of the vehicle. For this
purpose, observe the connection diagram at the
end of these instructions. For self-installation make
sure you have the right tools with you.
Ÿ Use your device in such a way that you can always
safely control your vehicle. In case of doubt, stop
at a suitable location and operate your device while
the vehicle is parked. As the driver, you must not use
the applications that will distract you from traffic
(depending on the scope of functions of the device,
e.g. viewing videos, searching for a destination)
( Na vig at ion eq ui pp ed ra di os an d o t he r
downloaded application)
Ÿ Follow driving recommendations during the
route guidance only if you are not violating any
tr affic regu lati ons : Tra ffic si gns and traffi c
regulations always have priority over d riving
recommendations.
Ÿ Always listen at moderate volume to protect your
hearing and to be able to hear warning signals (e.g.
police sirens and other external alerts while driving).
During mute phases (e.g. when changing the audio
source), changing the volume is not advisable. Do
not increase the volume during this mute phase.
Ÿ Do not ingest the battery, chemical burn hazard
¡ T he r emote control is provided with a
coin/button cell battery. This battery is charged
and if this button battery is swallowed, it can
cause severe internal burns & may lead to death
in 2 hours.
¡ Keep new & used batteries away from the reach of
children.
¡ If the batter y compartment does not close
securely, stop using the product & keep it away
from the reach of children.
¡ If you think batteries might have been swallowed
or placed inside any part of the body, seek
immediate medical attention.
Road safety
Observe the following notes about road safety:
To avoid any injury or damage to yourself, your car and
others, please make sure to do as following. Observe
the following note to protect yourself against injuries:
Ÿ Before using this unit, please read all related
instructions carefully.
Ÿ Any damage to this unit caused by improper
operations will void the warranty.
05
Page 6

Safety notes
Ÿ In order to drive safely and not break traffic rules,
please do not watch videos or operate the unit while
driving.
Ÿ The below-listed applications while driving the
vehicle may divert your attention form the traffic
situation and may lead to serious accidents:
¡ Using the navigation feature like entering the
destination address
¡ Video playback or watching any kind of video
¡ Usage of internet via the browser
¡ Use of connected phone via PhoneLINK
¡ Usin g P lay Sto re or any ot her inst alled
application via Play Store
Ÿ You are advised to refrain from any activity which
could possibly divert your attention while driving.
The best way to use these applications is when your
vehicle is parked in a safe location.
Ÿ To avoid short circuit, please do not dispose the unit
into the water and please do not place or leave any
kind of metal object (such as a coin or metal tools) in
the unit.
Ÿ Please operate the unit as per this Manual, it is not
allowed to open the unit for maintenance; In case if
maintenance is required, please seek professional
help.
Ÿ After the car engine is off, please do not use the car
audio for a long time, otherwise, the battery could
be drained.
Instructions to read this User Manual
Illustrations are used in this manual to explain
operations and precautions. The illustrations used in
this manual are only for reference, please take the
actual unit as standard.
Marks
Mark for important preventive measures; please
read carefully to prevent any injury.
Ma rk for a sp eci al e xplan ati on, aux iliar y
interpretation, imitation and references.
Mark for additional information to operate this
unit. Warm notes: When there is any difference
between the Manual and the actual unit, please
take the actual units
as standard.
Cleaning notes
Ÿ Solvents, cleaning and scouring agents as well as
dashboard spray and plastics care products may
contain ingredients that will damage the surface &
screen of the audio system.
Ÿ Use only a dry or slightly moistened cloth for
cleaning the audio system.
Disposal notes
Ÿ Do not dispose of your old unit/batteries in the
household trash.
Ÿ Use the return and collection systems available to
dispose of the old device, the remote control and
exhausted batteries.
Scope of delivery
The scope of delivery includes:
Ÿ Car audio system
Ÿ Remote control (Including battery)
Ÿ GPS antenna
Ÿ External Bluetooth microphone
Ÿ Small parts set, installation material
Ÿ Screws and fasteners
Ÿ Connecting cables
Declaration of conformity
Blaupunkt India Pvt. Ltd. declares that the device
complies with the basic requirements and the other
relevant regulations of the Directive 1999/5/EC. The
declaration of conformity can be found on the website
under www.blaupunkt.com
06
Page 7
Placing the device in operation
Switching on/off with the touch button
To switch-on. Touch the button (For switch off, hold
the button pressed for more than 2 seconds.
Turn the unit on/off with ignition switch
Turn the unit on:
When the ignition switch is at ACC ON position, press
the button [ ] on the panel to turn the unit on.
Turn the unit off:
When the unit is ON, long-press the button [ ] on the
panel for more than 2s, to turn off the unit.
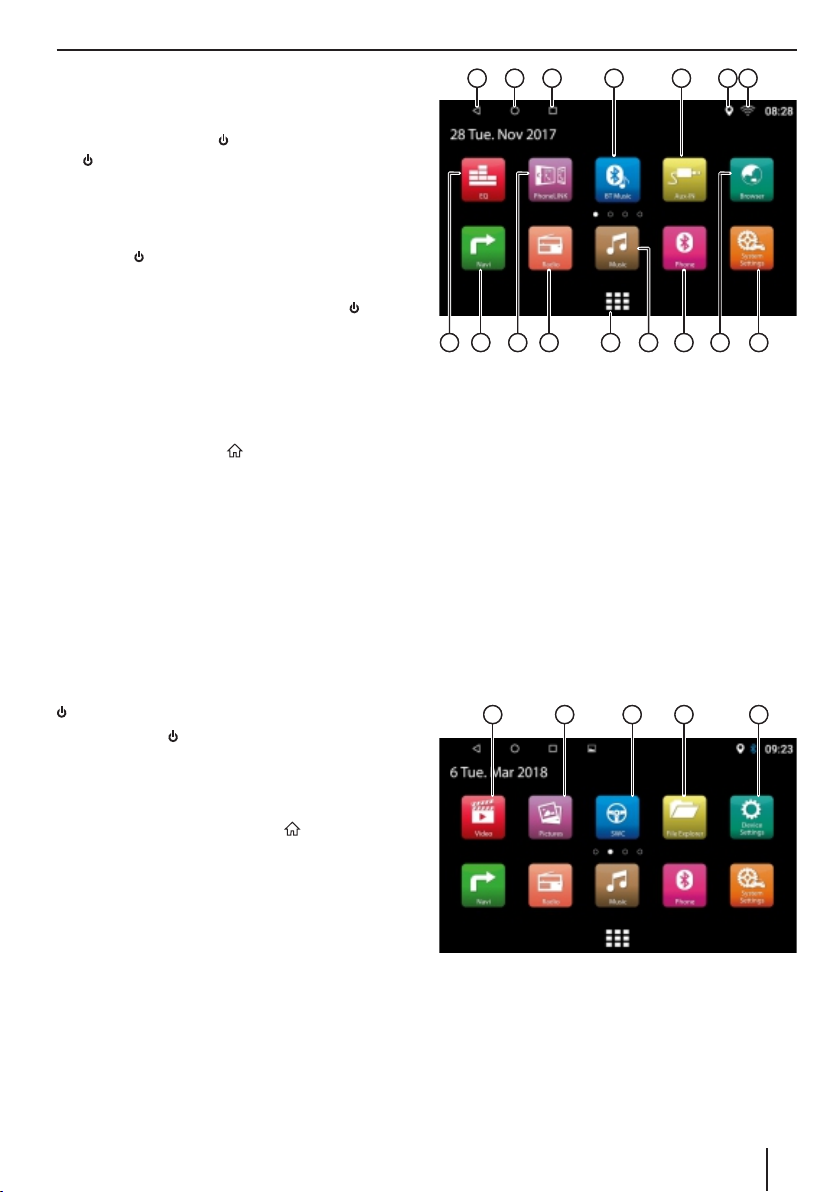
Main menu (Home)
In the main menu, please touch the buttons on the
touchscreen to call up different sources and operating
modes
In any source, press the button. The main menu
(home page) is displayed. As long as you do not select a
new audio source, the last a ctive audio source
continues to play. Note: The icons used in these
instructions are intended to facilitate the explanation
and actual details may vary in your device.
Volume
You can adjust the volume in steps from 0 (minimum)
to 40 (maximum).
Touch the button + to raise volume and – button to
lower the volume
You can mute the car audio system by touching the
icon while playing music.
Briey press the button to unmute the device or to
return the previous volume.
Placing the device in operation
11
12 13 14 15
6
1. Go to the previous page
2. Go to home page / Main menu
3. See history of pages opened
4. Displays the location icon
5. Displays Wi-Fi icon
6. Sound equalizer settings
7. PhoneLINK
8. Bluetooth music
9. Aux-IN
10. Open web browser
11. Start navigation
12. Play music from le
13. Connect via Bluetooth
14. Play FM/AM Radio
15. Manage System Settings
16. Access All Apps on Device
7
11
12
17 18 19 20
8 9
16
14 15
13 10
21
Main Interface
After the unit is turned on, the system will enter Radio
mode by default, then tap the icon to enter the main
interface.
17. Play videos from le
18. View pictures from le
19. Steering wheel control
20. File explorer
21. Manage device settings
07
Page 8

Placing the device in operation
22
23
22. View clock / Set time
23. View/set Live wallpapers
24. Blackout screen
25. View wallpapers
11
12 13 14 15
6
25
24
8 10
Tap the icon [Screen Off] in the main interface to turn
the screen off; then tap any area of the screen to turn
the screen on. This is the recommended screen while
driving; this will not distract the driver while the vehicle
is in motion.
1
11
1
12
1
7
13
1
9
14
The grid icon at the bottom is a quick view to all tabs.
(To see more options swipe on the screen)
1. Wallpaper settings
2. Video settings
3. System Settings
4. Steering wheel control
5. Lunch radio
6. Open Play store
7. View pictures
8. PhoneLINK
9. Phone Make / Receive Calls
10. Play Music
11. Navigation
12. Live wallpapers
13. File explorer
14. Sound equalizer
15. e-Manual
08
1
15
Page 9
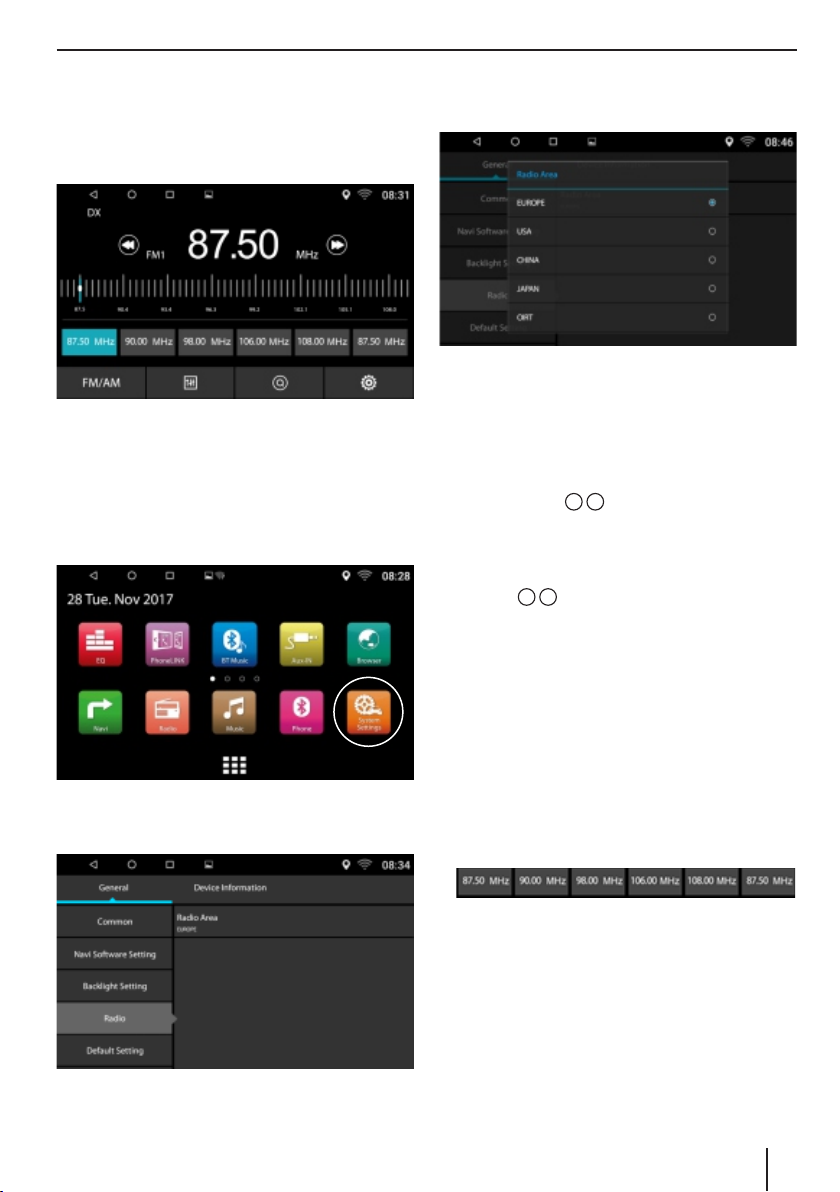
Radio Function
Radio function
Radio function operation
Touch the icon [Radio] in the main interface to enter
the Radio interface.
Setting the reception area
This car audio system is designed for operation In
different regions with different frequency ranges and
station technologies. The factory default of the
reception area is 'EUROPE'. If you operate the car audio
system in Asia. You may leave the setting to 'EUROPE' to
set a suitable reception area on the menu:
Ÿ Select the 'Radio' option
Ÿ The current setting is displayed as 'EUROPE' region'.
Please leave it at the current setting.
Ÿ Select on the Radio region button to display the list
of available reception areas.
Ÿ Select the desired reception area by double clicking.
Ÿ The list is hidden, the selected reception area is set.
Ÿ The main menu is displayed again.
Tuning Into a station
Ÿ Briey press the 7 8 button once or several times
to change the frequency in Increments.
Ÿ You can select broadcast frequency directly by
touch and drag on the frequency bar.
Ÿ The frequency selected is played back on the radio.
Ÿ Press the 7 8 button for approx. 2 seconds to start
station seek tuning.
Ÿ The radio tunes into the next receivable station.
Note: For the reception area Europe: In the FM
waveband, only traffic information (TA) stations are
tuned into if the priority for traffic information feature
is switched on.
Ÿ
Ÿ On the home page, press the (System Settings) icon.
The settings menu is displayed.
Ÿ At the top area of the Settings menu. Press the
(General) button.
Storing stations manually
Ÿ Select the desired memory bank with the FM/AM
button.
Ÿ Set the desired station.
Ÿ Press one of the memory buttons for approx. 2
seconds to store the current station at the button.
Ÿ The station is stored and can be switched by
selecting the desired station.
With this device, you can automatically search for and
store 6 FM stations offering the strongest reception in
the region in the current memory bank. Any previously
stored stations in this memory bank are deleted In the
process.
09
Page 10
Radio Function | Sound settings
Scanning stations
You can use the scan function to play all the receivable
stations of the current wave band for a few seconds.
Long press the 7 8 button. The seek tuning searches
for stations In the current waveband. Each receivable
station is played for a few seconds in the process.
Band Switch
Tap the band icon to switch the radio bands FM/AM
among FM1/FM2/FM3/AM1/AM2.
Tune and Seek
Short press the icon 7 8 to tune point by point; Long
press the icon 7 8 to seek manually; It will stop
seeking when a station sought.
Auto Seek and Store stations
Long-press the icon L to auto seek, and auto store the
sought stations. During seek, tap the icon L again to
stop seeking.
18 stations will be stored in FM band (6
stations in FM1 / FM2 / FM3 each band); 12
stations will be stored in AM band (6 stations
in AM1 / AM2 each band). The system will
stop seeking after one-circle seeking.
Ÿ Start radio mode
Ÿ Select memory bank
Ÿ Tune Into a station
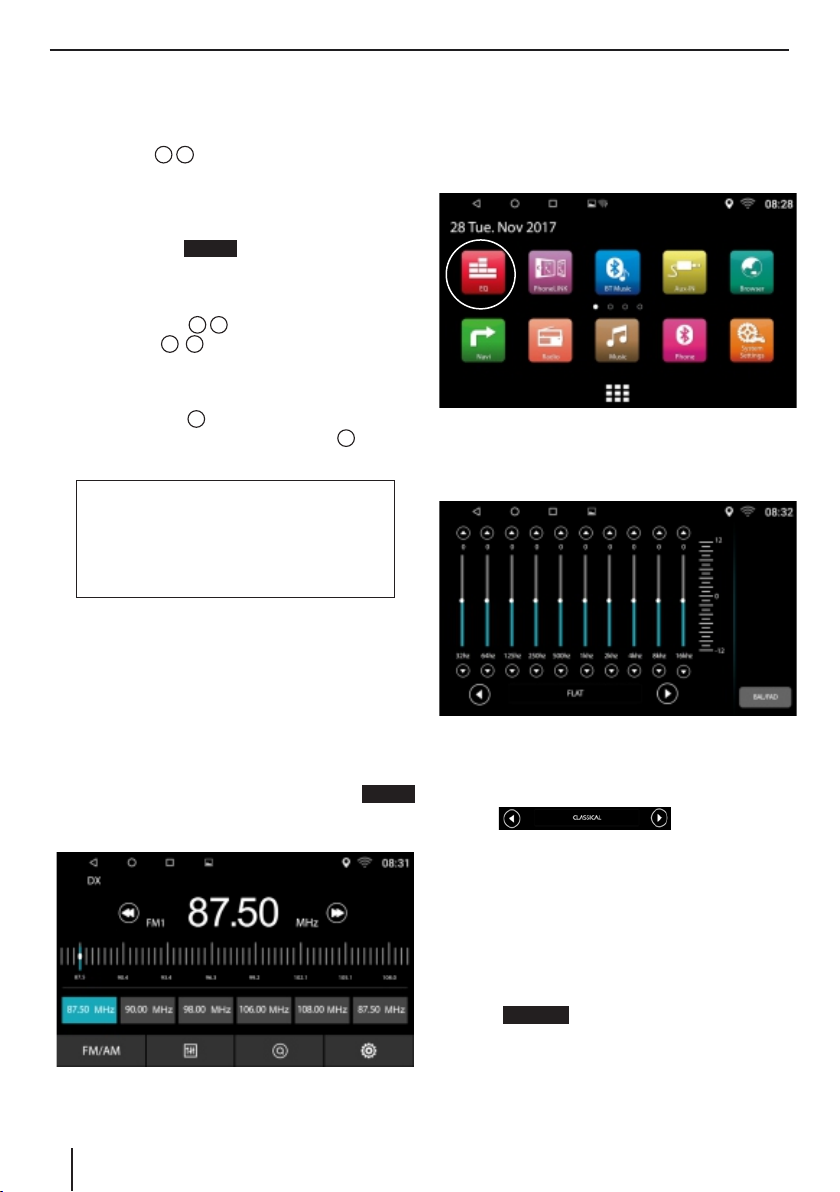
Sound Setting
Equalizer settings:
In the main menu or on the control bar of the current
audio source. Press the (Equalizer) button. To manage
the Equalizer settings Select 'EQ ' form the main menu .
The equalizer menu is displayed. You can adjust the
equalizer for all sources. The 10-band equaliser allows
the user to ne tune reproduced sound to suit
individual taste.
Select memory bank
On the home screen, your will nd the 'Radio' icon.
Touch the 'Radio' icon to enjoy the radio on the go.
Different memory banks and wave bands are available
Up to 6 stations can be stored in each memory
bank.FM1+FM2+FM3/AM1+AM2. Press the FM/AM
button repeatedly until the desired memory bank is
displayed.
10
This option offers simplied sound turning and
displays 6 bands. The 'Custom' setting allows you to
ne-tune the music just right to your taste. The options
available to you are listed below.
Click on left & right arrows
to choose the right EQ setting for the genre of music.
Ÿ Pop
Ÿ Rock
Ÿ Classical
Ÿ Jazz
Ÿ Flat
Ÿ Custom
Audio Distribution (fader/balance)
Press the to adjust the Balance (L-R) & Fader BAL/FAD
(Front-Rea r) bands according to the p assenger
preferences.
Ÿ Left Front
Ÿ Left Rear
Ÿ Right Front
Page 11

Ÿ Right Front
Ÿ Touch the blue dot to adjust your preference OR use
the arrow keys to adjust your preference.
Ÿ The Bal and Fad reading will be displayed on the top
right of the screen.
Ÿ Once you have achieved your desired setting touch
the return tab to return to the previous menu. It’s
recommended to leave the Balance/Fader at 0-0.
Ÿ You can also use the Touch the button + to raise
volume and – button to lower the volume on the
device panel to adjust the volume
OR
Ÿ Slide down from the upper-right area of the main
interface to adjust sound volume directly.
Sound settings | Navigation Function
Navigation Function
This device is equipped with navigation on board.
Insert the mSD card (sold separately) into the map slot
in front and type your destination. Follow turn-by-turn
voice-guided commands to get to your destination
hassle-free.
Because of the rapid development of the urban
construction and the road planning, the navigation
map company constantly updates the navigation map.
If the route directed by the navigation map is found to
not conform with the actual road condition or the
actual traffic control condition, please drive the car as
per the actual road condition, traffic control and traffic
rules.
Steps to open the navigation:
Ÿ Insert SD card in the Navigation Slot
Ÿ Tap the icon [Navigation] in the main interface to
enter the navigation interface.
Ÿ Enter the desired destination using the input key.
Ÿ Enable to nd the destination via various search
functions of the navigation software.
Ÿ After the destination is set, the system will plan the
route and begin navigating.
11
Page 12

Navigation Function
In the area that the driver is familiar with, it may be
more advisable for the driver to drive by himself than to
rely on the navigation system.
Navigation settings
There are ve icons to enhance your navigation
experie nce a nd ease your ever yday us e of the
navigation feature.
Click on the icon at the bottom left to expose the
features listed below:
Touch on the icon the access the rich navigation
features:
Take me home:
Set the address and use this option to plan your route
back to home.
Route:
This tab shows vital information about your current trip
in session.
Favourites:
Here you can store your favourite or frequently
travelled destinations. This will save you time in
inputting the address every time.
Ÿ
Ÿ Take me home: Auto detects your location and plans
your route back home
Ÿ Route: Show the rip stats
Ÿ Favourites: You can save your favourite/frequently
travelled locations
Ÿ History: Shows your trip history
Ÿ Setting: General navigation settings
12
History:
Check your travel history and places travelled. This is
quite helpful in computing the travel done by you in
the recent past.
Page 13

Navigation Function | Phone Feature
Navigation setting:
Several settings are available to may your ride safer and
comfortable. Like the Speed alert and the safety
camera alert. Please keep them checked for a good
ri de. You ca n also dea cti vate t he opt ions by
unchecking them.
In case of error
In normal condition, the error of satellite signal
reception is about 7 meters, while in several situations,
some error may still occur after the auto-correcting of
the software, at these moments, the driver should pay
attention to the road condition and drive according to
the actual road condition.
Note: Using environ ment of navigati on
system can be complicated and varying, the
system operation may have some issues (such
as failing to enter the map interface, no image
et c. ) w he n en co unte re d by a l a rg e
electromagnetic disturbance. It will require a
re-start operation to deal with these issues.
Phone Feature
Please be aware that using a hand-held phone while
driving is an offence. You can use this device to make &
receive call hands-free. However, it is suggested to
make minimal use of this feature & talk only when in
great need of talking to someone. Talking while driving
may divert your attention from traffic conditions
ahead.
Making a call via Bluetooth
For the rst time to pair the mobile and the unit, it is
required to operate as below instructions:
Ÿ Turn the Bluetooth of the mobile on;
Ÿ Search the Bluetooth device with the mobile or the
unit, and connect - Device name is C900;
Ÿ A prompt message will show on the mobile, input
the password 0000 and Conrm on the mobile;
Ÿ After pairing successfully, the system will enter the
interface below:
ü After the unit is powered off and on, the Bluetooth
of the u ni t w il l c on ne ct th e mobile last
disconnected.
ü After pairing successfully, the icon [Å] showing the
connecting status on the upper-right corner of the
screen will turn White.
ü Device name and the pin to connect is available on
the interface
lt is required to turn on the function "Visible to
all nearby Bluetooth devices" on the mobile,
and then the unit will be able to nd the
mobile Bluetooth device.
13
Page 14

Navigation Function | Phone Feature
Dialling
After the mobile is connected to the unit successfully,
input a series of numbers via the numeric buttons on
the screen, and then tap the icon [Å] to make a call.
During dialling, if a wrong number was input, you may
tap the icon [ ] to delete one by one, or long-press the
icon [ ] to delete all. As is shown in below interface:
You may also make a call via your mobile directly.
Tap the [ ] icon to answer a call.
You may also answer or refuse a call via your mobile
directly.
View Call History
Tap the [ ] icon in Bluetooth interface to enter the call
history interface as shown below:
Touch the [ ] icon, the numeric keyboard will pop up.
Touch this icon again & the number keyboard will
disappear;
Touch the [ ] icon to hang up a call.
Tap the [ ] icon to switch call audio between mobile
microphone and car audio.
Tap the [ ] icon to activate Mute mode.
You may also hang up a call via your phone directly.
Answer a call
When there is an incoming call, the system will switch
to Bluetooth interface automatically
As shown in the interface below:
14
Touch the [ ] icon to switch between Outgoing call /
Missed call / Incoming call.
View Phone Book
Touch the [ ] icon in Bluetooth mode to enter the
below interface.
Note: After Bluetooth is connected successfully, the
system will send a request message to the mobile
[Android would like to access your contacts and call
history. Give access to Android?] Press Yes on your
mobile, the unit will begin to download the phonebook;
After downloading successfully, the call history &
phonebook of the mobile will display on the unit.
Page 15

Play Music
Play Music
Touch the music icon - this application is for music
stored on the device or USB.
Once you insert a USB drive the device will auto search
for music les and display option to play music and
browse play list.
Touch the [Blueto oth m usic] i con to e nter the
following interface.
Depending on the model o f the mobile phone, you
may need to press start to play music les via your
mobile.
USB Music Function
The music formats supported by this unit include MP3,
M4A, WAV, AMR, WMA, OGG, AAC, MID etc.
Touch this icon, you can shuffle your music play list.
9
Touch this icon to play the previous song.
Play or pause the currently played song
9
Move to next song in the playlist
Quick search the song of your choice.
Open and browse the available playlist of songs.
Bluetooth Music Function
The Bluetooth music function allows user to directly
stream music stored on their mobile devices to the
radio.
When playing a music le that is not supported, the
system will prompt "fail to play as the le format is not
supported". Touch the [Music] icon in the main
interface to enter below interface:
Tap the icon [9] / [:] to play previous/next song.
Tap the icon [;] to switch between Pause/Play
USB data carrier
This device features a USB port (Type A)at the Rear.
Basic information
Costa Mesa 900 comes equipped with 3 Rear USB ports
(Type A). The Hardwired USB port allows for quick
charging of portable devices (up to 2A) and the other 2
via a patch harness upto 1.5A.
For safety reasons, playback of movies and images on
the integrated monitor is allowed only while the
vehicle is parked and the handbrake is applied. The
BRAKE'cable must be connected with the handbrake
connection of the vehicle (see Connection diagram at
15
Page 16

Play Music
the end of these instructions). Movie playback on a
Rear Seat Monitor is possible while driving.
Notes:
Ÿ Blaupunkt cannot guarantee awless function of
USB data carriers and microSD cards available on
the market.
Audio playback from USB
The principles of audio playback (MP3/WMA) from data
carriers are identical for all sources. Select the desired
source via the main menu. The device changes to the
desired source and the playback starts.
Video playback from USB
Select the desired source from the main menu. The
device changes to the desired source and the playback
starts.
Important: Please do not watch video while driving.
16
Page 17

General Feature
General Feature
Instructions on PhoneLINK
The PhoneLINK feature mirrors the phone screen on
the head unit. Please note PhoneLINK feature is
available for Android/iOS phones only for this model.
You can access apps, emails & messages while on the
go.
Touch the icon [PhoneLINK] on the main interface to
enter the interface below:
To activate Pho neL INK pleas e fo llow de taile d
instructions on the next paper to turn on USB
debugging.
iPhone PhoneLINK operation
Ÿ Turn on the hotspot on the iPhone:
Ÿ Turn on the iPhone hotspot in [Settings], record the
hotspot name and password;
Ÿ Turn on WiFi in [Settings] on the unit, search the
iPhone hotspot, input password and connect.
Ÿ Open the Shortcuts control bar on the mobile, nd
Airplay - EC - Mirror to turn on Mirror switch and
connect.
Note: After the Mobile and the unit connected
successfully, the unit will display the mobile screen.
PhoneLINK.: New PhoneLINK feature allows
you to connect your Android Smartphone to
this Blaupunkt. Touchscreen radio using your
mobile phone data cable.
Enjoy all functions & applications on your
Android phone via the in-dash radio.
Ÿ View your smartphone images on the radio
display
Ÿ Play music from your phone
Ÿ N av ig a te w it ho u t t ou c hi n g y ou r
smartphone (google maps)
Ÿ Access your phone contacts & apps
Ÿ Check your Email / Messages
'Check compatibility with your Android phone
before purchase.
17
Page 18

Please follow the below instructions to turn on debugging on your phone.
Some steps may be different on different phones please also refer to your mobile phone instruction manual.
1. Go to Settings
2. About Phone 3. Build Number
4. Tap on Build no for
6 to 8 times
7. Turn on Developer
Option
5 & 6. You will now see Developer mode activated
under Developer Option
8. Switch on USB Debugging,
Say OK to the message
9. USB debugging is
now ON
18
After the above connect the USB cable to radio & mobile
Page 19

Powered by Android & featuring the Google Play store,
the Brilliant Costa Mesa 900 is Wi-Fi ready to connect to
any available Hotspot letting you enjoy online content
like Youtube, web browsing and your favourite Internet
radio on the device itself.
To access the Play Store, Open quick menu. You will nd
the Play Store Icon. This will launch the application.
General Feature
You will get a default prompt to 'Automatically back up
device data'. You may choose or skip this option.
You are ready to enjoy Play Store on the move. Left
swipe for more options and Play Store settings.
Google Play (previously Android Market) is a digital
distribution service operated and developed by
Google. It serves as the official app store for the
Android operating system, allowing users to browse
and download applications developed with the
An dro id s oftware development kit (S DK) an d
published through Google.
You can enjoy a var iety of apps, which can be
downloaded through Google Play.
For the initial setup, add your existing Google account.
In case you do not have one, you can create one right
here.
Fill in the details and click on 'Accept' to proceed
further.
The navigation system is equipped to work with the
regional navigation system - MapmyIndia (via mSD
card) as well as Google Maps (via PhoneLINK).
Please Note: The Play Store service is a complimentary
service. The service provider reserves the right to
withdraw the service without giving any prior notice.
19
Page 20

General Feature
Browsing the internet
You can browse the internet using the browser option
shown below.
In order to browse the internet to follow the steps
shown below.
Ÿ For the rst time use, you will get the screen shown
above.
Ÿ Add an existing account or set up a new account
Ÿ Then using the touchscreen and input keys you can
browse the web.
Ÿ Check your emails and view websites.
Pictures
You can view pictures saved in the USB and other
collaborative locations. Click on the [Pictures] icon to
launch this feature.
To view pictures from your les select 'Folders' You can
also view picture s from you other sources li ke
Moments, Dropbox, Google Drive and Picasa.
SWC (Steering wheel control)
Videos:
Click on the 'Video' icon on the main interface to launch
the videos from the connected USB drive.
The available videos will be displayed here. Select the
video to be played.
20
Steering wheel control allows you up to eight functions
that can be operated via existing steering wheelmounted controls. This requires assigning the desired
function to the buttons on the SWC.
Note: The SWC function operates with analog control
signals, depending on the vehicle type an additional
interface may be required.
Page 21

Ÿ Select the SWC icon form the main interface
Ÿ Assign the desired function up to 8 placeholders
(Select any from 1 to 8)
Ÿ The assigned placeholder is identied by the check
mark and the selected function is identied by
placeholder number
Ÿ Repeat the steps to assign the additional function to
the SWC controls
Ÿ Thereafter assign the relevant placeholders to the
buttons of steering wheel-mounted controls
Ÿ Tap on 'Begin Learn' to start
Ÿ Placeholder 1 and the assigned functio n are
displayed
Ÿ Pr ess any butto n of the rem ote control for
approximately 1 second
Ÿ The displayed function is assigned to the button
being pressed
Ÿ Tap on the to assign the next function
Ÿ You can tap the to return to a previous function
²
±
and reassign if needed.
General Feature
When you tap on the 'sd card' tab you get to see
content from the different folders you have. Select the
desired folder to access your les.
The 'udisk3' tab allows you to see different les
available to you and makes access easier.
Clock
Touch the clock icon to display the clock screen.
File Explorer
The 'File Explorer' icon on the main interface allows you
to browse the content of your les used on the device
The 'Classify' tab can help you quickly identify the les
you are looking for based on its classication. The
options available range from Apk, Image, Video, music
or any other type.
The clock will continue displaying until the user touch
on the screen or turns the device off.
21
Page 22

General Feature
Live Wallpapers
Live wallpapers feature allows you to select dynamic
wallpapers as per your preference. Select the 'Live
wallpapers' icon from the main interface
List of live wallpapers will be displayed. Select your
preference, the live wallpaper will be set.
AUX in
Connect the video RCA to video input socket and the
audio RCA’s (L+R) to the audio input RCA’s, tap the icon
[AUX-IN] in the main inter face to enter AUX-IN
interface.
Warning: Do not watch Video while driving
Blackout
There is a blackout feature in this radio. Tap on
[Blackout] tab to enable a dark screen. The music
continues to play in the background and the screen
appears to be off. This can help you concentrate while
driving at night.
Wallpapers
Wallpape rs fea tu re all ows you to selec t st atic
wall paper s as per your p reference. Se lec t the
[ Wa ll pa pers] i con f rom t he m ai n i nter fa ce.
List of wallpapers will be displayed, swipe to explore
more. Select your desired wallpaper, swipe left or right
to preview the wallpapers
After you selec t a wallpaper, tap the icon [Set
wallpaper], the selected wallpaper will be set.
22
Page 23

Device Settings
Device Settings
In the 'Device Settings icon you will nd a various
settings that you will need to access from time to time.
The important options available here are
Ÿ WiFi Settings
Ÿ Portable WiFi Hotspot Settings
Ÿ Storage info
Ÿ Apps
Ÿ Adding an account
Ÿ Language input settings
Ÿ Date & time settings
WiFi Settings
connects automatically for all subsequent attempts.
Portable WiFi Hotspot Settings
With the [Portable WiFi hotspot option], you can create
an Internet connection to connect your mobile or the
mobile of your co-passenger. Here are the steps listed.
Ÿ Switch on the [Portable WiFi hotspot option] with
the button shown here . Please note: Once the
'Portable WiFi hotspot option' is checked the WiFi
on your device will auto disconnect.
Ÿ You should get a pop-up window. This should show
the connection details
Ÿ Check the [Show Password] option, The password
will be displayed. Enter this password in your mobile
to connect.
Ÿ You can share the password wi th th e fellow
passengers allowing t hem to conn ect to the
Portable WiFi hotspot on your device.
To change the [Portable WiFi hotspot] password.
Ÿ Check the 'Show Password] option.
Ÿ Touch the password, an input key will appear
Ÿ Choose the password of your choice & select 'Done’
Ÿ The password will get changed.
Ÿ Switch on the 'WiFi option 'with this button . This
will search and display all the available connections
of the range.
Ÿ If you get a prompt for a password 'Input password',
Enter password at this time.
Ÿ Click on connect to establish secure connections
Ÿ In case you get an error, touch the 'forget' tab and try
to connect again.
Ÿ Once the connection is established the device
Storage info
Under the [Storage] you can see the space available in
the internal storage.
23
Page 24

General Feature
Apps
With the 'Apps' tab user can get quick access to all the
Apps available and downloaded and installed from
Google Play Store.
Adding an account
'Add an existing Gmail account in here; in case you do
not have one you can also create a new account right
from the option available in this section.
Date & time settings
Ÿ You can choose to synchronize the date and time
with the GPS by keeping the adjacent box checked.
If you wish to set your own time, then uncheck the
tick and the set date and set time will be activated.
Input your desired date & time.
Ÿ You can choose to use the 12 hours or 24 hours' time
display as per your preference by a tab on the button
at the bottom.
Device information
Language input settings
Manage you Language and keyboard input options
form the 'language and input' tab.
24
Under the 'Device information' you can get the
following details:
Ÿ Device model number: Costa Mesa 900
Ÿ Android version: 6.0
Ÿ Memory capacity: 1GB| 16GB
Ÿ Storage capacity: 16 GB
Page 25

System settings
System Settings
In the 'System Settings,' you will nd a various settings
which you will need to access from time to time. Tap the
icon the explore and make the required settings.
General setting you the following options are available,
all of them are explained further in the manual.
Ÿ Common settings
Ÿ Navigation software setting
Ÿ Backlight setting
Ÿ Radio setting
Ÿ Default volume setting
Ÿ Steering Wheel Learning
Common Settings
Navigation Software Setting
Ÿ Navi Software Settings' allows you to select the Map
source, manage Navigation audio mixing & adjust
the volume of voice guidance prompt.
Ÿ Touc h the Nav iga tio n mix ing to ac tivate &
deactivate.
Ÿ Drag the bar to increase & decrease the voice
guidance prompt volume
Backlight setting
Under the 'Common settings', you can do the following,
touch to activate and deactivate.
Ÿ Parking settings
Ÿ Illumination
Ÿ Beep settings
Ÿ Reverse Camera Monitor
Ÿ Reverse Audio Mute
The intensity of the backlight can be set by moving the
seek bar towards the left or right.
25
Page 26

General Feature
Radio Setting
Ÿ The current setting is displayed as 'EUROPE' region'.
You should leave it to the current setting.
Ÿ Select on the Radio region button to display the list
of available reception areas.
Ÿ Selec t the desired reception area by double-
clicking.
Ÿ The list is hidden, the selected reception area is set.
Ÿ The main menu is displayed again.
Default Volume Setting
Steering Wheel Learning
Along with the [SWC] icon available on the main
interface, you can manage the Steering wheel control
form this tab. SWC allows you up to 8 functions that can
be paired via existing steering wheel mounted
controls. This requires assigning the desired function
the buttons on the SWC
FLAC Codec
Free Lossless Audio Codec: an audio format. Flac allows
you to play uncompressed audio les without any loss.
This device can read FLAC les (Via front USB).
Memory Clean
Under the [Default setting], you will nd the start up
volume tab. Scroll on the seek bar to adjust the default
volume.
26
Touch and drag the screen form the top down, you will
get quick options which include [Memory Clean] you
ca n delete the cac he wh ich will imp rove th e
performance of the device.
Page 27

Useful information
Warranty
We provide manufacturer's warranty for products
bought within the India. For devices purchased
outside the India, the warranty terms issued by our
respective responsible domestic agency is valid.
Warranty terms can be viewed at
www.blaupunkt.com.
Register ONLINE within 15 days of PURCHASE to
activate WARRANTY.
The procedure to activate the warranty is given below;
Thank you for buying Blaupunkt
Model: Palm Beach 550
Serial No.:
BP76103550000001
Please activate the e-warranty within 15 days of purchase.
To activate your e-warranty, please follow the below steps:
Service
If your device should need service, you can nd
information about service partners at
www.blaupunkt.com
OR
Email: Support@blaupunkt.in
OR
Call 1800 209 6820 for the location of an authorized
service center near you.
SERIAL <space> <serial number> to 07760962759
Step 1. Please send SMS
Step 2. In response to the sent SMS, you should
receive back a link via SMS, please Click on it
Step 3. Complete a simple form to register
your product & activate e-warranty.
E-user manual is available at www.blaupunkt.com
or upon completion of registration, follow
the link at the bottom on the page to download.
Should you require further assistance,
please call: Customer Support 1800 209 6820
Thank You!!
27
Page 28

Connection Diagram
Reserved
interface
WiFi antenna
(optional)
GPS antenna
(optional)
F
A
B
D
FM/AM antenna
D
D1 D2
1
2
3
4
5
6
7
8
3
14
16
17
Note: Be sure the unit is connected to a 12V DC power supply with negative ground.
Remark: For users, please take the actual function of product as the standard.
C
D1:AUX/RCA audio and video Input or output
D2:USB signal(optional), reverse control and reverse video input
D3:NC
D4:BREAK
D5:NC
D6D5D3 D4
D6:EXTERNAL MICPHONE
1
2
Orange
3
4
5
6
7
8
SWC
3
1
3
2
3
NC NC
NC
NC
Automatic antenna
ILL
B+
GND
13
8
4
7
14
5
9
10
16
17
6
18
191520
11
12
28
Page 29

Multimedia Support list
Part I: Multimedia Processing
Multimedia Support listMultimedia Support list
Video Decoding
MPEG1
MPEG2
MPEG4
xvid
H.264
AVS/AVS+
H.263
WMV1
WMV2
WMV3/VC-1
VP6
VP8
MJPEG
Sorenson Spark
VP9
H265
Profile
MP/HL
MP/HL
SP/ASP L5
N/A
BP/MP/HP
JiZhun
BP
N/A
N/A
SP/MP/AP
6.0/6.1/6.2
N/A
N/A
Video Encoding Max Resolution
JPEG
H.264
4096 x 4096
1920x1080
Max Resolution
1920x1080
1920x1080
1920x1080
1920x1080
1920x1080
1920x1080
1920x1080
1920x1080
1920x1080
1920x1080
1920x1080
1920x1080
1920x1080
1920x1080
1280x720
1280x720
Max Bit Rate
Performance
1080p@45fps
1080p@45fps
1080p@45fps
1080p@45fps
1080p@45fps
1080p@45fps
1080p@45fps
1080p@45fps
1080p@45fps
1080p@30fps
1080p@45fps
1080p@45fps
1080p@30fps
1080p@45fps
720p@30fps
720p@30fps
Max Frame Rate
1080p@45fps
Max Bit Rate
100Mbps
100Mbps
100Mbps
100Mbps
60 Mbps
30Mbps
100Mbps
100Mbps
100Mbps
100Mbps
40Mbps
40Mbps
60Mbps
100Mbps
2Mbps
2Mbps
Remarks
4:2:0/4:2:2
Support 16M pixel
Simple/Main/High Prole
CAVLC/CABAC
Codec
MP3
OGG
FLAC
APE
AAC
AMR
Prole
All
Q1 - Q10
Level 0 - Level 8
Max Bit Rate
320Kbps
500Kbps
1.60Mbps
950Kbps
448Kbps
Max Sample Rate
48000
48000
48000
48000
48000
48000
Remarks
29
Page 30

Multimedia Support list
T3 Multimedia support list
Part II. Container
Container
MKV
AVI
TS/TP
MP4/M4V
MOV
VOB
PMP
MPG
Audio Video Max Bit Rate
MP3
MP3
MP3
AAC
FLAC
OGG
MP3
MP3
AAC
MP3
AAC
AAC
MP3
MP3
MP2
MP3
AAC
MP3
AAC
MP3
AAC
MP2
MP3
AAC
MP2
MP3
AAC
MP2
MP3
MP3
AAC
MP3
AAC
MP1/2
MP1/2
MPEG2
WMV9
Xvid
H.264
H.264
H.264
H.264
Xvid
H.264
H.264
MPEG2
WMV7/8/9
VC - 1
MJPEG
H263
MPEG2
MPEG2
MPEG2
H.264
H.264
VC - 1
VC - 1
Xvid
H.264
H.264
Xvid
H.264
H.264
Xvid
H.264
Xvid
Xvid
H.264
H.264
MPEG2
MPEG2
80 Mbps
80 Mbps
50 Mbps
80 Mbps
80 Mbps
80 Mbps
80 Mbps
80 Mbps
Multi Audio Switch
Support
N.A
Support
N.A
N.A
Support
N.A
N.A
Subtitle
UTF8/ASS/SSA/
ACSII/sub
UTF8/ASS/SSA/
ACSII/sub
UTF8/ASS/SSA/
ACSII/sub
UTF8/ASS
/SSA/ACSII/sub
UTF8/ASS
/SSA/ACSII/sub
UTF8/ASS
/SSA/ACSII/sub
UTF8/ASS
/SSA/ACSII/sub
UTF8/ASS
/SSA/ACSII/sub
30
Page 31

T3 Multimedia support list
Part II. Container
Multimedia Support list
Container
M2TS
FLV
WMV
WebM
PHOTO
Audio Video Max Bit Rate
MP3
MP3
AAC
AAC
MP3
AAC
MP3
AAC
MP3
AAC
MP3
AAC
MPEG2
H.264
H.264
VC - 1
H.264
H.264
H.264
H.264
VP6
VP6
VC - 1
VC - 1
WMV7
WMV8
VP8
VP8
50 Mbps
80 Mbps
80 Mbps
80 Mbps
Part III. Photo
Container
JPEG
BMP
GIF
PNG
Prole
Baseline
All
89a/87A
All
Max Resolution
65536x65536
2.5M pixels
2.5M pixels
2.5M pixels
Multi Audio Switch
Support
N.A
N.A
Support
Subtitle
UTF8/ASS
/SSA/ACSII/sub
UTF8/ASS
/SSA/ACSII/sub
UTF8/ASS
/SSA/ACSII/sub
UTF8/ASS/SSA/
ACSII/sub
Remarks
UTF8/ASS
/SSA/ACSII/sub
31
Page 32

This device incorporates copy protection technology
that is protected by U.S. patents and other intellectual
pr ope rty rights of Rovi Co rpo rat ion . Rev ers e
engineering and disassembly are prohibited.
Win dows® und Windows Media® are registered
trademarks of the Microsoft Corporation in the U.S.A.
and/or other countries.
This product is protected by certain intellectual
property rights of Microsoft. Use or distribution of such
technology outside of this product is prohibited
without a license from Microsoft.
The Bluetooth® word mark and logos are registered
trademarks owned by Bluetooth SIG, Inc.
Manufactured under license from Dolby
Laboratories.
“Dolby" and the double-D symbol are trademarks of
Dolby Laboratories.
FCC Statement
1. This device complies with Part 15 of the FCC Rules.
Operation is subject to the following two conditions:
(1) This device may not cause harmful interference.
(2) This device must accept any interference received,
including interference that may cause undesired
operation.
2. Changes or modications not expressly approved by
the party responsible for compliance could void the
ser's authority to operate the equipment.
NOTE: This equipment has been tested and found to
comply with the limits for a Class B digital device,
pursuant to Part 15 of the FCC Rules. These limits are
designed to provide reasonable protection against
harmful interference in a residential installation.
This equipment generates uses and can radiate radio
frequency energy and, if not installed and used in
accordance with the instructions, may cause harmful
interference to radio communications. However, there
is no guarantee that interference will not occur in a
particular installation. If this equipment does cause
harmful interference to radio or television reception,
which can be determined by turning the equipment
off and on, the user is encouraged to try to correct the
interference by one or more of the following measures:
Reorient or relocate the receiving antenna.
–
Increase the separation between the equipment
–
and receiver.
Connect the equipment into an outlet on a circuit
–
different from that to which the receiver is
connected.
Consult the dealer or an experienced radio/TV
–
technician for help.
FCC Radiation Exposure Statement
This equipment complies with FCC radiation exposure
limits set forth for an uncontrolled environment. This
equipment should be installed and operated with
minimum distance of 20 centimeters between the
radiator and your body.
32
© 2017 All rights reserved by Blaupunkt. This material maybe
reproduced, copied or distributed for personal use only.
Page 33

Blaupunkt India Private Limited
47, Atlanta Society, Nariman Point
Mumbai‐ 400 021. Maharashtra. India.
www.blaupunkt.com
 Loading...