

Page 1
Radio CD SD/MMC MP3
Bremen MP76 7 646 829 310
Operating and installation instructions
Mode d’emploi et de montage
Instrucciones de manejo e instalación
Instruções de serviço e de montagem
Инструкция по эксплуатации и установке
ጇѰЊཆ
사용 및 장착 설명서사용 및 장착 설명서
http://www.blaupunkt.com
Page 2
2
34 5
1
67
8910111213
14
2
Page 3

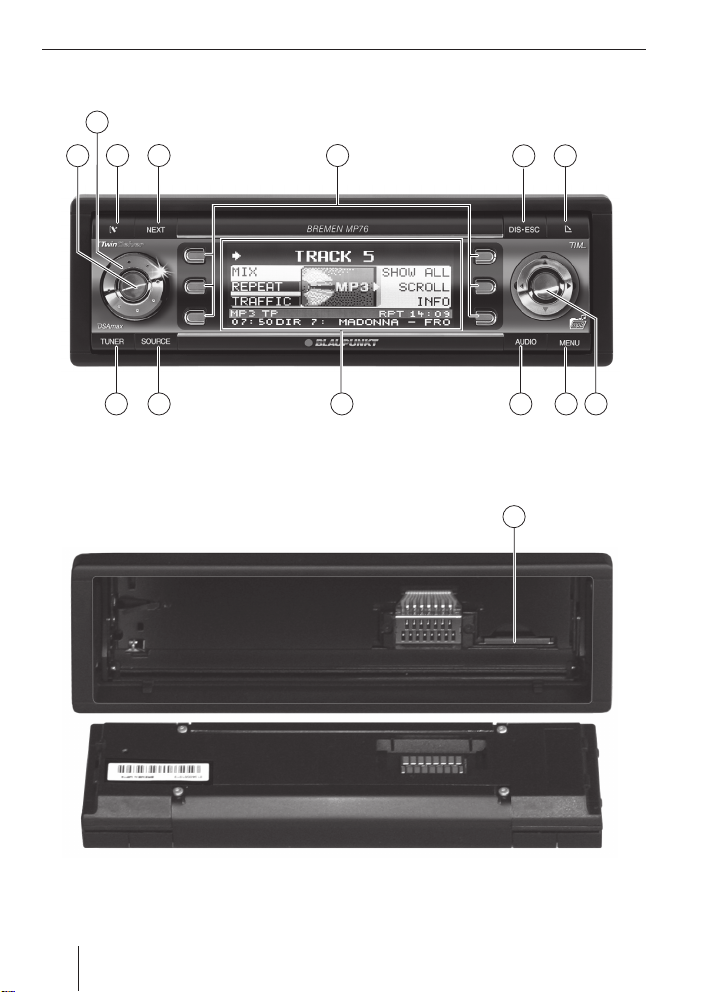
Controls
1 Button to switch the device on and off
Muting the device
2 Volume control
button to unlock the detachable
3
control panel
4 NEXT button to display additional pag-
es of a menu
Changing the memory bank in radio
mode
5 Softkeys, the function of the softkeys
is dependent upon the respective content of the display
6 DIS•ESC button to change the display
and exit menus
button to open the foldable and de-
7
tachable control panel
8 Joystick and OK button
9 MENU button to call up the menu for
the basic settings (short press)
Switching demo mode on/off (long
press)
: AUDIO button for setting bass, tre-
ble, balance, fader and X-BASS (short
press)
Calling up DSA Max equalizer (long
press)
; Display
< SOURCE button to start the CD or CD
changer playback or Compact Drive
MP3 (only if connected) or to start the
radio mode
or
Playback of an external audio source
(only if connected)
= TUNER button for direct selection of
radio mode
Calling up the radio function menu
(only possible in radio mode)
> Slot for MMC/SD
ENGLISH
3
Page 4

Contents
Notes and accessories ........................ 6
International telephone information .... 6
Road safety ..................................... 6
Safety note .....................................6
Installation ......................................6
Accessory .......................................7
Optional equipment (not part of the
scope of delivery) ............................7
Activating/deactivating demo mode.... 7
Theft protection ................................ 7
Detachable control panel .................. 7
Detaching the control panel ............... 7
Attaching the control panel ................8
Switching on/off ................................ 8
Switching on/off using button
Switching on/off using the vehicle igni-
tion ................................................8
Volume .............................................9
Setting the power-on volume ............. 9
Risk of injury! .................................. 9
Mute .............................................. 9
Telephone audio .............................. 9
Navigation audio ............................ 10
Sound and volume relationship ......... 11
Adjusting the bass ......................... 11
Adjusting the treble ........................ 11
Setting the left/right volume ratio
(balance) ......................................12
Adjusting the front/rear volume ratio
(fader) ......................................... 12
X-BASS ...........................................12
Display ............................................13
Adjusting the viewing angle ............. 13
Adjusting the display brightness ....... 13
Setting the button illumination colour .. 13
Setting the display illumination colour .. 14
Adjusting the spectrum analyser ...... 15
Inverting display contents ...............15
1 ..... 8
Radio mode .....................................15
Adjusting the tuner......................... 15
Setting the number of antennas ....... 16
Switching to radio mode ................. 16
Selecting static/dynamic radio mode
(FM only) ...................................... 16
Convenient RDS functions (AF, REG) .. 17
Selecting the waveband/
memory bank ................................18
Tuning into a station ....................... 19
Setting the sensitivity of
station seek tuning ......................... 19
Scanning receivable stations (SCAN) 20
Setting the scanning time ................ 20
Storing stations .............................20
Storing stations automatically (Travel-
store) .......................................... 21
Listening to stored stations ............. 21
Programme type (PTY) .................. 21
Optimising radio reception .............. 22
Activating/deactivating the radio text
display ......................................... 23
TIM – Traffi c Information Memory ..... 23
Switching TIM on/off ...................... 24
Playing stored traffi c announcements 24
Recording traffi c announcements .....25
Setting the timer ............................ 25
Selecting timers ............................ 26
Traffi c information ........................... 26
Switching traffi c information priority
on/off .......................................... 26
Setting the volume for traffi c announce-
ments ..........................................27
CD mode ......................................... 27
Risk of severe damage to
the CD drive! ................................27
Starting CD mode, inserting a CD ..... 27
Ejecting a CD................................. 28
Selecting tracks ............................. 28
Fast searching (audible) .................. 28
4
Page 5

Contents
Random track play (MIX) ................. 28
Repeating tracks (REPEAT) ............. 28
Scanning tracks (SCAN).................. 28
Displaying CD text .......................... 29
Adjusting the scrolling text ..............29
Traffi c announcements in CD mode .. 29
MP3 mode ....................................... 30
Preparing an MP3 CD ..................... 30
Inserting/removing MMCs/SDs ........ 31
Inserting an MMC/SD ..................... 31
Removing an MMC/SD .................... 31
Switching to MMC/SD mode ............ 31
Activating the MP3 mode of CD ........ 32
Operation during the MP3 mode ...... 32
Selecting tracks ............................. 32
Fast searching (audible) .................. 33
Scanning tracks (SCAN).................. 33
Random track play (MIX) ................. 33
Repeating individual tracks or
whole directories (REPEAT) ............. 33
Confi guring the display ................... 34
CD changer mode (optional) ............. 35
Switching to CD-changer mode ........ 35
Selecting CDs ................................ 35
Selecting tracks ............................. 35
Fast searching (audible) .................. 35
Scanning tracks (SCAN).................. 35
Repeating individual tracks or
whole CDs (REPEAT) ...................... 36
Random track play (MIX) ................. 36
Naming CDs ..................................36
Clock – time ....................................38
Setting the time ............................. 38
Permanent time display .................. 39
DSA Max –Digital Sound Adjustment .. 39
Switching DSA on/off ..................... 39
Automatically calibrating
the equalizer .................................40
Viewing vehicle acoustics with/without
equalizer ...................................... 41
Manually changing the graphical
equalizer ...................................... 41
Selecting the Equalizer ................... 42
Resetting the equalizer ................... 42
Selecting a sound presetting
(Preset) ........................................42
Adjusting the stage effect ................ 43
Selecting a sound effect .................. 43
DNC ................................................ 44
Calibrating DNC ............................. 44
Switching DNC off .......................... 44
Selecting a DNC increase ................ 45
Subwoofer and centre speaker ......... 45
Adjusting the subwoofer increase ..... 45
Adjusting the subwoofer phase
position ........................................46
Setting the low-pass fi lter ................ 46
Setting the subsonic fi lter ...............46
Adjusting the centre speaker ...........47
Adjusting high-pass fi lters for
front/rear .....................................47
Crossover ..................................... 48
TMC for dynamic navigation systems ... 48
Amplifi er/Sub-Out ........................... 49
Switching the internal amplifi er
on/off .......................................... 49
External audio sources ..................... 49
Switching the AUX input on/off ........ 50
Naming the AUX input ..................... 50
Miscellaneous .................................51
Entering a switch-on message .......... 51
Displaying the serial number ............ 51
Resetting the device ....................... 51
Specifi cations .................................52
Installation instructions ................. 362
ENGLISH
5
Page 6
Notes and accessories
Notes and accessories
Thank you for choosing a Blaupunkt product. We hope you enjoy using this new piece
of equipment.
Please read these operating instructions
before using the equipment for the fi rst
time.
International telephone
information
If you have any questions regarding the operation of your car radio or if you require
further information, please do not hesitate
to call us!
The information hotline numbers are printed on the last page of these instructions.
Road safety
Road safety has absolute priority.
Only operate your car sound system
쏅
if the road and traffi c conditions
allow you to do so.
Familiarise yourself with the device
쏅
before setting off on your journey.
You should always be able to hear police, fi re and ambulance sirens in good
time from inside your vehicle.
쏅
For this reason, listen to your car
sound system at a suitable volume
level during your journey.
Safety note
The car sound system and the
control panel of the device (fl ip-release
panel) warm up during operation.
쏅
For this reason, touch the fl ip-release panel only at non-metallic surfaces for removal purposes.
쏅
If you want to uninstall the car sound
system, let it cool down fi rst.
Installation
If you want to install your car sound system
yourself, please read the installation and
connection instructions that follow these
operating instructions.
6
Page 7

Notes and accessories Theft protection
Accessory
Remote control
Remote control RC-12H included. You can
operate all basic functions of your car radio
safely and comfortably by means of the remote control.
You cannot switch the device on or off with
the remote control.
Optional equipment
(not part of the scope of delivery)
Use only accessories approved by Blaupunkt.
Amplifi ers
You can use all Blaupunkt and Velocity amplifi ers.
CD changers
The following CD changers are available
as accessories for the devices: CDC A 03,
CDC A 08 and IDC A 09.
Activating/deactivating demo
mode
The device is supplied from the factory with
demo mode activated. The various functions of the device are displayed graphically as animations in the display during
demo mode. You can also deactivate demo
mode.
Press and hold down the MENU button
쏅
9 for longer than four seconds to activate/deactivate demo mode.
Theft protection
Detachable control panel
The device is equipped with a detachable
control panel (fl ip-release panel) as a way
of protecting your equipment against theft.
The device is worthless to a thief without
this control panel.
Protect your device against theft by taking
the control panel with you whenever you
leave your vehicle. Do not leave the control
panel inside your vehicle - not even in a hiding place.
The control panel has been designed to be
easy to use.
Notes:
•
Never drop the control panel.
•
Never expose the control panel to direct sunlight or other heat sources.
•
Store the control panel in the supplied case.
•
Avoid direct contact with the control
panel’s electrical contacts. If necessary, clean the contacts with a lintfree cloth and some alcohol.
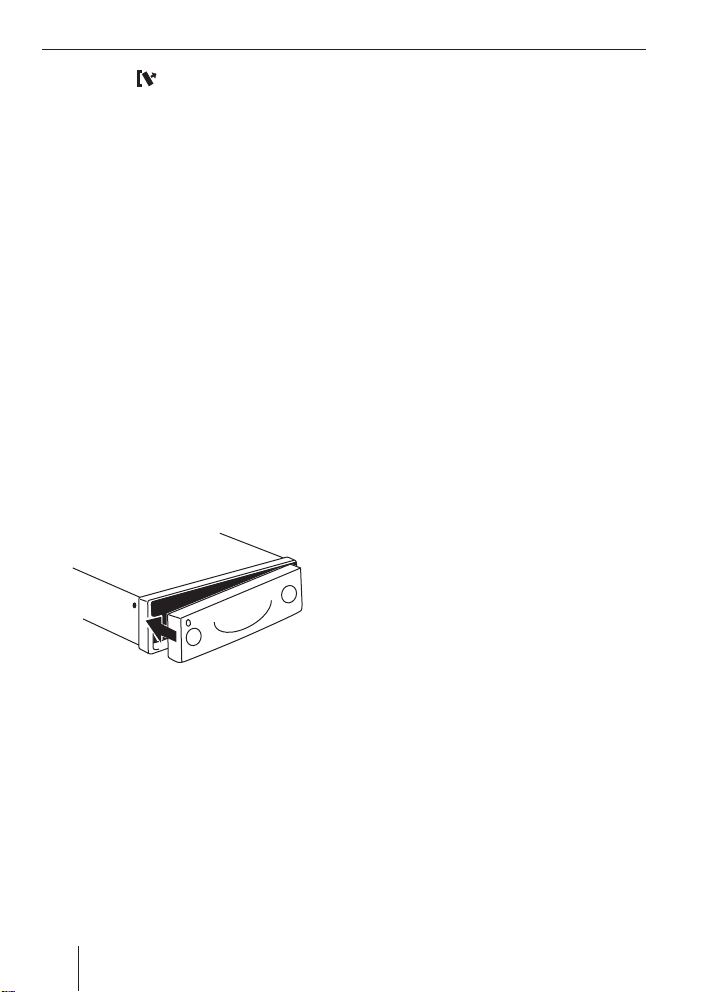
Detaching the control panel
3
ENGLISH
7
Page 8
Theft protection Switching on/off
쏅
Press the
The locking mechanism of the control panel
is unlocked.
쏅
Pull the control panel straight out of the
device and to the left.
Notes:
•
After removing the control panel
from the device, the device switches
off.
•
All the current settings are saved.
•
Any CD already inserted in the device remains there.
button
3.
Switching on/off
There are various ways of switching the device on/off:
Switching on/off using button 1
To switch on the device, press button
쏅
1.
The device switches on.
To switch off the device, press and
쏅
hold down button 1 for longer than
two seconds.
The device is switched off.
Attaching the control panel
Push the control panel into the guides
쏅
of the device from the left to the right.
Carefully push the left side of the con-
쏅
trol panel into the device until it clicks
into place.
Note:
When attaching the control panel, make
sure you do not push on the display.
8
Switching on/off using the
vehicle ignition
The device will switch on/off simultaneously with the ignition if the device is correctly
connected to the vehicle’s ignition and you
did not switch the device off by pressing
button 1.
The device can also be switched on with
switched-off ignition.
Press the button 1.
쏅
Note:
To protect the vehicle battery, the device will switch off automatically after
one hour if the ignition is off.
Page 9

Volume
Volume
You can adjust the volume in steps from 0
(off) to 50 (maximum).
To increase the volume,
turn the volume control 2 clockwise.
쏅
To decrease the volume,
turn the volume control 2 counter-
쏅
clockwise.
Setting the power-on volume
You can set the default volume level at which
the device plays when it is switched on.
Press the MENU button 9.
쏅
Press the softkey 5 with the display
쏅
label "VOLUME".
Press the softkey 5 with the display
쏅
label "ON VOL".
Adjust the desired volume with volume
쏅
control 2.
쏅
Press the OK joystick 8 or the MENU
button 9 to exit the menu.
The settings are saved.
Note:
The volume played last before switchoff can also be selected as the poweron volume. For this purpose, press the
softkey with the display label "LAST
VOL" in the Volume menu
Risk of injury!
If the power-on volume is set to
maximum, the volume level can be very
high when the device is switched on!
If the volume was set to maximum before the device was switched off and the
power-on volume is set to "LAST VOL",
the volume level can be very high when
the device is switched on again!
Severe damage to your hearing can be
caused in both cases!
Mute
You can decrease the volume abruptly.
Briefl y press button 1.
쏅
The display shows "MUTE".
Cancelling mute
Briefl y press button 1 again
쏅
or
turn the volume control 2.
쏅
Telephone audio
If your car sound system is connected
with a cell phone, "picking" up the phone automatically mutes the car sound system and the
call is layed back via the loudspeakers
of the card sound system. For this purpose, the cell phone must be connected to the device as described in the installation instructions.
If the sound system receives a traffi c announcement during a telephone call, you
will only be able to hear the traffi c announcement after the call is fi nished (in so
far as the traffi c announcement is still being
broadcast).
ENGLISH
9
Page 10

Volume
If the sound system receives a call during
a traffi c announcement, the playback
of the traffi c announcement is interrupted
and the call is answered.
You can adjust the volume with which the
telephone calls are answered.
Press the MENU button 9.
쏅
Press the softkey 5 with the display
쏅
label "VOLUME".
Press the softkey 5 with the display
쏅
label "PHONE" to set the volume.
Adjust the desired volume with volume
쏅
control 2.
Press the OK joystick 8 or the MENU
쏅
button 9 to exit the menu.
The settings are saved.
Note:
During the phone call, you can always
change the volume by means of the volume control 2.
Navigation audio
Instead of a second external audio source
("AUX2", see "External audio sources"), you
can also connect a navigation system.
If your car sound system is connected to
navigation system, the voice output of the
navigation is "mixed" in with the current audio source and played back using the loudspeakers of the car sound system.
For this purpose, the navigation system be
connected to the car sound system as described in the installation instructions and
switched on in the menu.
You can fi nd out from your Blaupunkt dealer
which navigation systems can be used with
your car sound system.
Activating the navigation audio
You can connect either a second external
audio source or a navigation system to this
device. For this purpose, you must defi ne
in the menu which device has been connected.
Press the MENU button 9.
쏅
Press the softkey 5 with the display
쏅
label "AUX".
The AUX menu is displayed.
If you connected a navigation system,
쏅
press the softkey 5 with the display
label "NAV/AUX2" repeatedly until the
setting "NAVIGATION ON" appears.
Press the OK joystick 8 or the MENU
쏅
button 9 to exit the menu.
The settings are saved.
10
Page 11

Volume Sound and volume relationship
Adjusting the navigation minimum
volume
You can set the volume level at which the
navigation announcements are mixed in.
Note:
Adjust the volume at the navigation system to the maximum value. If interferences occur during playback, slightly
reduce the volume at the navigation
system.
Press the MENU button 9.
쏅
Press the softkey 5 with the display
쏅
label "VOLUME".
Press the softkey 5 with the display
쏅
label "NAVI DIFF" to set the volume.
Adjust the desired volume with volume
쏅
control 2.
Press the OK joystick 8 or the MENU
쏅
button 9 to exit the menu.
The settings are saved.
Note:
During the voice output, you can always
change the volume by means of the volume control 2. This setting applies
to the current voice output and is not
stored.
Sound and volume
relationship
Note:
You can perform separate adjustments
for bass and treble for each audio
source.
Adjusting the bass
Press the AUDIO button :.
쏅
"AUDIO MENU" appears on the display.
Press the softkey 5 with the display
쏅
label "BASS".
Move the joystick 8 up or right to in-
쏅
crease the bass or down or left to decrease the bass.
When you have fi nished making your changes,
쏅
press the OK joystick 8 or the AUDIO
button :.
Adjusting the treble
Press the AUDIO button :.
쏅
"AUDIO MENU" appears on the display.
Press the softkey 5 with the display
쏅
label "TREBLE".
Move the joystick 8 up or right to in-
쏅
crease the treble or down or left to decrease the treble.
When you have fi nished making your changes,
쏅
press the OK joystick 8 or the AUDIO
button :.
ENGLISH
11
Page 12

Sound and volume relationship X-BASS
Setting the left/right volume
ratio (balance)
To adjust the balance, press the AUDIO
쏅
button :.
"AUDIO MENU" appears on the display.
Press the softkey 5 with the display
쏅
label "BALANCE".
Move the joystick 8 up or right or
쏅
down or left to adjust the right/left volume distribution.
When you have fi nished making your
changes,
press the OK joystick 8 or the AUDIO
쏅
button :.
Adjusting the front/rear volume
ratio (fader)
To adjust the fader, press the AUDIO
쏅
button :.
"AUDIO MENU" appears on the display.
Press the softkey 5 with the display
쏅
label "FADER".
Move the joystick 8 up or right or
쏅
down or left to adjust the front/rear volume distribution.
When you have fi nished making your
changes,
쏅
press the OK joystick 8 or the AUDIO
button :.
X-BASS
X-Bass allows for boosting the bass at low
volume levels. The X-Bass boost (Level) can
be set in steps ranging from 0 to 6 for one
of the following frequencies: 32 Hz, 40 Hz,
50 Hz, 63 Hz or 80 Hz. Selecting 0 deactivates the X-Bass function.
Press the AUDIO button :.
쏅
"AUDIO MENU" appears on the display.
Press the softkey 5 with the display
쏅
label "X-BASS".
Move the joystick 8 to the left or the
쏅
right to select the frequency to be increased.
Move the joystick 8 up to increase
쏅
the X-BASS or down to decrease the
X-BA SS.
When you have fi nished making your
changes,
press the OK joystick 8 or the AUDIO
쏅
button :.
12
Page 13

Display
You can adjust the display to suit the installation position in your vehicle and to suit
your needs.
Adjusting the viewing angle
Press the MENU button 9.
쏅
Press the softkey 5 with the display
쏅
label "DISPLAY".
Press the softkey 5 with the display
쏅
label "ANGLE".
Move the joystick 8 up or right or
쏅
down or left to adjust the viewing
angle.
Press the OK joystick 8 or the MENU
쏅
button 9 to exit the menu.
The settings are saved.
Adjusting the display brightness
If your car sound system is connected as
described in the installation instructions,
the display brightness switches with the
headlights. The display brightness can be
adjusted separately for day and night in increments from 1-16.
Display
쏅
Set the desired value by moving the joystick 8 up or down.
쏅
Press the OK joystick 8 or the MENU
button 9 to exit the menu.
The settings are saved.
Setting the button illumination
colour
You can set the colour in which the buttons
of the device are illuminated.
16 colours are available.
Press the MENU button 9.
쏅
Press the softkey 5 with the display
쏅
label "DISPLAY".
Press the softkey 5 with the display
쏅
label "KEYCOLOR".
Move the joystick 8 up or right or
쏅
down or left to adjust a colour. Every
movement of the joystick selects a different colour.
Press the OK joystick 8 or the MENU
쏅
button 9 to exit the menu.
The settings are saved.
ENGLISH
Display brightness
Press the MENU button 9.
쏅
Press the softkey 5 with the display
쏅
label "DISPLAY".
Press the softkey 5 with the display
쏅
label "BRIGHT".
The top line of the display shows "DAY" and
"NIGHT" together with the current values.
Move the fl ashing selection mark be-
쏅
hind "DAY" or "NIGHT" by moving the
joystick 8 to the left or the right.
13
Page 14

Display
Setting the display illumination
colour
When setting the display illumination, you
can choose one of four preset colours or
you can mix a colour yourself from the RGB
spectrum (red-green-blue) or you can select a colour during a colour scan.
Selecting a preset colour
Four different colours are already stored in
the device. "Ocean" (blue), "Amber", "Sunset" (red-orange) and "Nature" (green) are
available. Select a colour that best suits
your vehicle interior.
Press the MENU button 9.
쏅
Press the softkey 5 with the display
쏅
label "DISPLAY".
Press the softkey 5 with the display
쏅
label "COLOR".
Press the softkey 5 with the display
쏅
label of the desired colour.
Press the OK joystick 8 or the MENU
쏅
button 9 to exit the menu.
The settings are saved.
Mixing a colour for the display
illumination
To customise the display illumination to suit
your taste, you can mix a colour yourself
using the three primary colours red, green
and blue.
Press the MENU button 9.
쏅
Press the softkey 5 with the display
쏅
label "DISPLAY".
Press the softkey 5 with the display
쏅
label "COLOR".
쏅
Press the softkey 5 with the display
label "USER".
쏅
The following menu allows you to defi ne
the components of the three colours
red, green and blue. For this purpose,
repeatedly press the corresponding
softkey 5 until the colour displayed
corresponds to your taste.
쏅
Press the OK joystick 8 or the MENU
button 9 to exit the menu.
The settings are saved.
Selecting a display illumination colour
during a colour scan
쏅
Press the MENU button 9.
쏅
Press the softkey 5 with the display
label "DISPLAY".
쏅
Press the softkey 5 with the display
label "COLOR".
쏅
Press the softkey 5 with the display
label "COL-SCAN".
The device starts changing the display illumination colour.
쏅
If you want to select one of the colours,
press the softkey 5
label "SAVE".
If you want to return to the previous
쏅
menu without changing the colour,
press the softkey with the display label
"BREAK".
Press the OK joystick 8 or the MENU
쏅
button 9 to exit the menu.
The settings are saved.
with the display
14
Page 15

Display Radio mode
Adjusting the spectrum analyser
The spectrum analyser on your display
shows the output level of the car sound system. If the spectrum analyser is switched
on, it is automatically displayed if you do
not press a key for a while during the playback of an audio source.
You can also deactivate the spectrum analyser.
Switching the spectrum analyser on/off
Press the MENU button 9.
쏅
Press the softkey 5 with the display
쏅
label "DISPLAY".
쏅
Press the softkey 5 with the display
label "SPECTRUM" repeatedly until the
desired setting "SPECTRUM OFF" or
"SPECTRUM ON" appears in the top
line of the display.
쏅
Press the OK joystick 8 or the MENU
button 9 to exit the menu.
The settings are saved.
Inverting display contents
You can invert the display representation.
Press the MENU button 9.
쏅
Press the softkey 5 with the display
쏅
label "DISPLAY".
Press the softkey 5 with the display
쏅
label "INVERT".
Press the OK joystick 8 or the MENU
쏅
button 9 to exit the menu.
The settings are saved.
Radio mode
This device is equipped with an RDS radio
receiver. Many of the receivable FM stations
broadcast a signal that not only carries the
programme but also additional information
such as the station name and programme
type (PTY).
The station name appears on the display
as soon as the tuner receives it. The programme type can be displayed upon request. For further information, please
read the section entitled "Programme type
(PTY)".
Adjusting the tuner
To ensure proper functioning of the tuner,
the device must be set for the region in
which you are located. You can select between Europe and America (USA). The tuner is factory-set to the region in which it was
sold. If you experience problems with your
radio reception, please check this setting.
Press the MENU button 9.
쏅
Press the softkey 5 with the display
쏅
label "TUNER".
Press the softkey 5 with the display
쏅
label for the desired region, "AREA
EUR" or "AREA USA".
Press the OK joystick 8 or the MENU
쏅
button 9 to exit the menu.
The settings are saved.
ENGLISH
15
Page 16

Radio mode
Setting the number of antennas
This device is equipped with two RDS radio
receivers (TwinCeiver). You can connect
one or two antennas to the device. If two
antennas are used (strongly recommended, the second antenna is part of the scope
of delivery) a directional receiption of the
station being received is possible in DDA
radio mode. In most cases, the directional
receiption signifi cantly improves the reception quality.
Note:
To ensure proper functioning of the
tuner, the main antenna must be connected to the bottom antenna socket.
To set the number of antennas,
press the MENU button 9.
쏅
Press the softkey 5 with the display
쏅
label "TUNER".
Press the softkey 5 with the display
쏅
label "ONE ANTE" if one antenna is connected to the device.
Or
Press the softkey 5 with the display
쏅
label "TWO ANTE" if two antennas are
connected to the device.
Press the OK joystick 8 or the MENU
쏅
button 9 to exit the menu.
The settings are saved.
Switching to radio mode
If the device is in the operating modes CD/
MP3 or CD changer/Compact Drive,
press the TUNER button =.
쏅
The basic radio menu for selecting the station is displayed. The functions of the radio
mode are controlled via the radio function
menu. You reach the radio function menu
by pressing the TUNER button = again in
radio mode.
Selecting static/dynamic radio
mode (FM only)
You can select from two modes for FM radio
mode:
Static radio mode
("PRESETS" and "DDA")
In the static radio mode, four memory banks
(FM1, FM2, FM3 and FMT) are available in
FM mode. You can store six stations in each
of these memory banks. The receiving unit
automatically adjusts the best receivable
frequency of the station for each of the
stored stations.
PRE mode (static)
If you connected only one antenna to the
device and set it up in the setup menu (see
"Setting the number of antennas"), the device plays back the confi gured station with
one tuner and searches for the best frequency of the adjusted station with the second tuner (with activated RDS function).
16
Page 17

Radio mode
Digital Directional Antenna mode –
DDA (static)
If you connected two antennas to the device and set them up in the setup menu
(see "Setting the number of antennas"),
the adjusted station is received with both
antennas in DDA radio mode. In the process, the TwinCeiver continuously analyses
the signals of both antennas and calculates
a "clean signal" from them to reduce reception interferences. This process developed
by Blaupunkt corresponds to a directional
aerial with respect to its mode of operation.
Particularly in areas with reception interferences due to refl ections from buildings,
mountains, etc., the reception quality is signifi cantly improved. In exceptional cases,
e.g. reception of two different stations on
the same frequency, it may lead to an undesirable reception behaviour. In such a case,
you should select the dynamic radio mode
(see "Selecting the radio mode" below).
Dynamic radio mode
In dynamic radio mode, fi ve levels (DL1 DL5) are available. While the adjusted station is being played back, the second reception searches for receivable stations in the
background and displays all receivable stations with short name next to the softkeys
on the memory bank. The station are constantly updated so that you can always access receivable stations.
Selecting the radio mode
To select between the modes static and dynamic,
쏅
press the TUNER button = in radio
mode.
The display shows the radio function
menu.
쏅
Press the NEXT button 4.
The display shows the second page of the
radio function menu.
쏅
Press the softkey 5 with the display
label "TUNER 2".
쏅
Press the softkey 5 with the display
label "DYN LIST" for the dynamic radio
mode.
쏅
Press the softkey 5 with the display
label "DDA" or "PRESETS" for one of the
static radio modes.
쏅
Press the OK joystick 8 or the MENU
button 9 to exit the menu.
The settings are saved.
Convenient RDS functions
(AF, REG)
The convenient RDS functions AF (Alternative Frequency) and REG (Regional) extend
your radio’s range of functions (in FM mode
only).
AF: If the RDS function is activated, the
•
radio automatically tunes into the best
receivable frequency for the station
that is currently set.
ENGLISH
17
Page 18

Radio mode
REG: At certain times, some radio sta-
•
tions divide their programme into regional programmes providing different
content. You can use the REG function
to prevent the car radio from switching to alternative frequencies that are
transmitting a different regional programme content.
Note:
REG must be activated/deactivated separately in the radio functions
menu.
Switching the RDS function on/off
If you want to use the convenient RDS functions (AF and REG),
press the TUNER button = in radio
쏅
mode.
The display shows the radio function
menu.
Press the softkey 5 with the display
쏅
label "RDS" repeatedly until the desired setting "RDS ON" or "RDS OFF"
appears.
To change back to the basic radio menu,
press the TUNER button = or the OK
쏅
joystick 8.
The settings are saved.
The display shows the radio function
menu.
쏅
Press the softkey 5 with the display
label "REGIONAL" repeatedly until
"REGIONAL ON" or "REGIONAL OFF"
appears.
쏅
press the TUNER button = or the OK
joystick 8.
The settings are saved.
Selecting the waveband/memory
bank
This device can receive programmes broadcast over the FM frequency range as well as
the MW, LW and SW (AM) wavebands. Four
memory banks are available for the FM
waveband and one memory bank each for
the wavebands MW, LW and SW.
In dynamic radio mode, up to fi ve levels are
available.
Six stations can be stored in each memory
bank.
Note:
If your device is set to the region USA,
you can select between the wavebands
FM and AM. In addition, the memory
banks AM1, AM2, and AMT are available for the AM waveband.
Switching REG on/off
To use the convenient RDS function REG,
press the TUNER button = in radio
쏅
mode.
Press the NEXT button 4 to display
쏅
the second page of the radio function
menu.
18
Selecting a waveband
To select an FM, MW, LW or SW waveband,
press the TUNER button = in radio
쏅
mode.
The display shows the radio function
menu.
Page 19

Press the softkey 5 with the display
쏅
label "BAND".
Press the softkey 5 with the display
쏅
label "FM" for the FM waveband.
Press the softkey 5 with the display
쏅
label "MW" for the MW waveband.
쏅
Press the softkey 5 with the display
label "LW" for the LW waveband.
쏅
Press the softkey 5 with the display
label "SW" for the SW waveband.
The basic radio menu of the selected waveband is displayed.
Selecting the FM memory bank
To switch between the FM memory banks
FM1, FM2, FM3 and FMT,
쏅
press the NEXT button 4 repeatedly
until the display shows the desired
memory bank.
The memory banks are called in sequence
from FM1 to FM2, FM3 and FMT.
Note:
If your device is set to the region USA
and you selected the AM waveband,
you can use the NEXT button 4 to select from the AM memory banks AM1,
AM2 and AMT.
Tuning into a station
There are various ways of tuning into a station.
Automatic station seek tuning
Move the joystick 8 up or down.
쏅
The radio tunes into the next receivable station.
Radio mode
Tuning into stations manually
You can also tune into stations manually.
Note:
You can only tune into stations manually if the RDS function is deactivated.
Move the joystick 8 to the left or the
쏅
right.
Browsing through broadcasting
networks (FM only)
If a radio station provides several programmes, you have the option of browsing
through its so-called "broadcasting network".
Note:
The convenient RDS function must be
activated before you can use this feature. When using this feature, you will
only be able to switch to stations that
you have received once before already.
쏅
Move the joystick 8 to the left or the
right.
Setting the sensitivity of station
seek tuning
You can choose whether the radio should
only tune into stations providing good reception or whether it can also tune into
those with a weak reception.
press the TUNER button = in radio
쏅
mode.
The display shows the radio function
menu.
Press the NEXT button 4.
쏅
ENGLISH
19
Page 20

Radio mode
Note:
If you call up the radio function menu in
the MW or LW radio mode, the softkey
with the display label "SENS" is on the
fi rst page.
Press the softkey 5 with the display
쏅
label "SENS".
Press the softkey 5 with the display
쏅
label "FM" or "AM" to set the sensitivity
for "FM" or "AM".
Move the joystick 8 up or right or
쏅
down or left to set the sensitivity.
You can adjust the sensitivity in increments
from 1 to 6. "Sensitivity 1" is the lowest,
"Sensitivity 6" the highest sensitivity for
very remote stations.
쏅
Press the OK joystick 8 or the MENU
button 9 to exit the menu.
The settings are saved.
Scanning receivable stations
(SCAN)
You can use the scan function to play all the
receivable stations briefl y. You can set the
scanning time in the menu to between 5
and 30 seconds.
Starting SCAN
Press and hold down the OK joystick
쏅
8 for longer than two seconds.
Scanning begins. "SCAN" appears briefl y
on the display followed by a fl ashing display
of the current station name or the frequency of the station.
Cancelling SCAN and continuing
listening to a station
Press the OK joystick 8.
쏅
Scanning stops and the radio continues
playing the station that it tuned into last.
Setting the scanning time
Press the MENU button 9.
쏅
Press the softkey 5 with the display
쏅
label "VARIOUS".
Press the softkey 5 with the display
쏅
label "SCANTIME".
Move the joystick 8 up or right or
쏅
down or left to set the scan time.
Press the OK joystick 8 or the MENU
쏅
button 9 to exit the menu.
The settings are saved.
Note:
The defi ned scanning time is also applied by the system to scanning carried
out in CD/MP3 and CD-changer mode.
Storing stations
Storing stations manually
Select the desired FM memory bank
쏅
(FM1, FM2, FM3, FMT) or one of the
wavebands (MW, LW or SW).
Tune into the desired station as de-
쏅
scribed under "Tuning into a station".
Press and hold down one of the six
쏅
softkeys for longer than two seconds to
which you want to assign the station.
20
Page 21

Radio mode
Storing stations automatically
(Travelstore)
You can automatically store the six stations
offering the strongest reception in the region (FM only). The stations are stored in
the FMT memory bank.
Notes:
If your device is set to the region USA,
•
you can also start the Travelstore in
the AM radio mode. The stations are
then stored on the AMT level.
•
Any stations that were previously
stored in this memory bank are deleted in the process.
Starting the Travelstore function
쏅
Press the TUNER button = in radio
mode.
The display shows the radio function menu.
쏅
Press the softkey 5 with the display
label "T-STORE".
The storing procedure begins. "TRAVEL
STORE" appears on the display. After the
process has completed, the radio will play
the station that is stored in memory location
one of the FMT (or AMT) memory bank.
Listening to stored stations
Select the memory bank or waveband.
쏅
Press the softkey 5 with the display
쏅
label of the station name or the frequency of the desired station.
Programme type (PTY)
Besides transmitting the station name,
some FM stations also provide information on the type of programme that they are
broadcasting. Your car radio can receive
and display this information.
For example, the programme types can be:
CULTURE TRAVEL JAZZ
SPORT NEWS POP
ROCK CLASSICS
You can use the PTY function to select sta-
tions of a particular programme type.
PTY-EON
If you specify the programme type and start
seek tuning, the radio will switch from the
current station to a station of the selected
programme type.
Notes:
If the tuner does not fi nd a station
•
that corresponds to the selected programme type, you will hear a beep
and "NO PTY" appears briefl y in the
display. The radio will then retune to
the station that it received last.
If the tuned radio station or another
•
station on the broadcasting network
broadcasts your selected programme
type at a later point in time, the radio
will automatically switch from the
currently tuned station or from CD/
MP3 mode or CD-changer mode to
the station whose programme type
matches the one you selected.
ENGLISH
21
Page 22

Radio mode
Activating PTY
To use the PTY function,
press the TUNER button = in radio
쏅
mode.
The display shows the radio function
menu.
Press the NEXT button 4.
쏅
Press the softkey 5 with the display
쏅
label "PROG TYP".
If PTY is activated, the display shows the
current programme type. PTY is illuminated on the display. The programme types are
shown next to the softkeys 5.
Deactivating PTY
To deactivate the PTY function,
press the softkey 5 with the display
쏅
label "PTY OFF" while the programme
types are displayed.
Selecting a programme type and
starting seek tuning
The PTY menu has several pages on which
the known programme types are displayed.
To scroll through the individual pages of the
PTY menu,
press the NEXT button 4 until the de-
쏅
sired programme type is displayed next
to one of the softkeys.
Press the softkey 5 with the desired
쏅
programme type.
Move the joystick 8 up or right or
쏅
down or left to start the seek tuning.
The radio will then tune into the next
receivable station that it fi nds that corresponds to your selected programme type.
If the tuner does not fi nd a station that corresponds to the selected programme type,
you will hear a beep and "NO PTY" appears
briefl y in the display. The radio will then retune to the station that it received last.
If you want to return to the display of the
programme types,
쏅
call up the second page of the radio function menu again and press
the softkey 5 with the display label
"PROG TYP".
Optimising radio reception
Treble reduction feature during
interference (HiCut)
The HiCut function causes a reduction of
the interferences during poor radio reception. If interference occurs, the system automatically reduces the treble thus reducing the interference level.
Adjusting HiCut
press the TUNER button = in radio
쏅
mode.
The display shows the fi rst page of the radio
function menu.
Press the NEXT button 4.
쏅
Press the softkey 5 with the display
쏅
label "HIGH CUT" repeatedly until the
desired setting appears.
"HICUT 0" means that no automatic reduction of the treble and interference level will
be made; "HICUT 2" means that a maximum
reduction will be made.
Press the OK joystick 8 or the TUNER
쏅
button = to exit the menu.
The settings are saved.
22
Page 23

Radio mode TIM – Traffi c Information Memory
Activating/deactivating the
radio text display
Some stations use the RDS signal to broadcast scrolling texts known as radio texts.
You can allow radio texts to be displayed or
you can block them.
쏅
Press the TUNER button = in radio
mode.
The display shows the radio function
menu.
쏅
Press the softkey 5 with the display
label "R-TEXT" repeatedly until the desired setting "RADIO TEXT ON" or "RADIO TEXT OFF" appears.
쏅
press the TUNER button = or the OK
8.
joystick
The settings are saved.
TIM – Traffi c Information
Memory
The device features a digital voice memory
which allows for automatically recording up
to four traffi c announcements. The maximum length for recorded messages is four
minutes.
If the TIM function is activated, all traffi c announcements that are received two hours
after the last switch-off of the device are
recorded. In addition, you can also set two
fi xed times (Timer). All traffi c announcements that are broadcast 30 minutes before and 90 minutes after the specifi ed
time on the selected traffi c announcement
program are recorded. This function is particularly useful if you are using your car at
fi xed times.
If the last message is older than six hours,
all messages are deleted.
If a new traffi c announcement arrives during the TIM playback, the playback is interrupted and the new message is recorded.
Risk of damage to the motorised
antenna in a car wash. An automatic motorised antenna remains extended if TIM is activated and you switch
off the device. In a car wash, the extended motorised antenna may cause damages. For further information, please
read the section entitled "Switching TIM
off".
ENGLISH
23
Page 24

TIM – Traffi c Information Memory
Switching TIM on/off
If the car sound system is switched on, you
can switch the TIM functions on or off.
In radio mode, hold the TUNER button
쏅
= pressed for longer than two sec-
onds.
The TIMPLAY menu is displayed.
If traffi c announcements were recorded,
the last message is played. The most current message has the number "TIM1". The
station name/frequency appears in the top
line of the display and the time of the recording in the bottom line.
"TIM" and the number of the message appear next to the top two softkeys on both
sides of the display.
If no messages are recorded, "NO TIM"
briefl y appears on the display.
Switching TIM off
If you want to switch TIM off,
In radio mode, hold the TUNER button
쏅
= pressed for longer than two sec-
onds.
The TIMPLAY menu is displayed.
Press the NEXT button 4.
쏅
The TIMSET menu again.
Press the softkey 5 with the display
쏅
label "TIM ON" repeatedly until "TIM
RECORD OFF" appears on the display.
press the TUNER button = or the OK
쏅
joystick 8.
The settings are saved.
Note:
If you do not switch on the device for
more than 72 hours, the TIM function
is automatically switched off.
Switching TIM on
If you want to switch TIM on again,
쏅
in radio mode, hold the TUNER button
= pressed for longer than two seconds.
The TIMPLAY menu is displayed.
쏅
Press the NEXT button 4.
The TIMSET menu again.
쏅
Press the softkey 5 with the display
label "TIM ON" repeatedly until "TIM
RECORD ON" appears on the display.
쏅
Press the TUNER button = or the OK
joystick 8.
The settings are saved.
Note:
After switching off the device with the
vehicle ignition or the button 1, the
current status "TIM ON" or "TIM OFF"
briefl y appears on the display.
Playing stored traffi c
announcements
To play the stored traffi c announcements,
in radio mode, hold the TUNER button
쏅
= pressed for longer than two sec-
onds.
The TIMPLAY menu is displayed.
If traffi c announcements were recorded,
the last message is played. The most current message has the number "TIM1". The
24
Page 25

TIM – Traffi c Information Memory
station name/frequency appears in the top
line of the display and the time of the recording below it. After the fi rst message, all
additional messages are played in ascending order.
If no messages are recorded, "NO TIM
AVAILABLE" briefl y appears on the display.
After the last message, the system switches
back to the previous operating mode.
If you want to return to the radio mode without fi rst listening to all messages,
press the TUNER button = or the OK
쏅
joystick 8.
Selecting the TIM message
"TIM" and the number of the message appear next to the top two softkeys on both
sides of the display.
If you want to listen to one of the displayed
messages without playing the other messages:
쏅
Press the softkey 5 with the corresponding display label "TIM1", "TIM2",
"TIM3" or "TIM4".
Recording traffi c
announcements
If the device is switched on, traffi c announcements are automatically recorded
if a traffi c information station is received
and the priority for traffi c announcements
is switched on.
If you are listening to a station that does
not broadcast traffi c information and you
switch off the device while the TIM function
is switched on, the device automatically
searches for a traffi c information station.
Setting the timer
If TIM is switched off, the traffi c announcements of a set traffi c information station
are recorded for 2 hours after switching off
the device. In addition, you can set two timers that record all traffi c announcements
30 minutes before and 90 minutes after the
adjusted time. The timer is based on the
system time. How to set the system time is
described in the chapter "Clock - Time".
To adjust one of the timers,
in radio mode, hold the TUNER button
쏅
= pressed for longer than two seconds.
The TIMPLAY menu is displayed.
Press the NEXT button 4.
쏅
The TIMSET menu again.
Press the softkey 5 with the display
쏅
label "TIMER1" for the fi rst timer or
"TIMER2" for the second timer.
The display shows the adjusted time, the
hours are fl ashing.
Move the joystick 8 up or down and
쏅
adjust the hour.
Move the joystick 8 right and change
쏅
the entry position.
The minutes fl ash.
Move the joystick 8 up or down and
쏅
adjust the minutes.
To save the settings,
press the TUNER button = or the OK
쏅
joystick 8.
The settings are saved.
ENGLISH
25
Page 26

TIM – Traffi c Information Memory Traffi c information
During the TIM readiness, a connected motorised antenna is extended.
Note:
It is absolutely necessary to switch off
TIM before entering a car wash. For
instructions, please read the section
"Switching TIM off" in this chapter.
Selecting timers
After you have set the timers, you can select
between the two timers. The timer which
you adjusted last is always active.
To select a timer,
in radio mode, hold the TUNER button
쏅
= pressed for longer than two seconds.
The TIM PLAY menu is displayed.
Press the NEXT button 4.
쏅
The TIMSET menu again.
Press the softkey 5 with the display
쏅
label "TIMER1" to select the fi rst timer
or "TIMER2" to select the second timer.
press the TUNER button = or the OK
쏅
joystick 8.
The settings are saved.
Traffi c information
Your device is equipped with an RDS-EON
receiver. EON (Enhanced Other Network)
is the transmission of station information
within a broadcasting network.
Whenever a traffi c announcement (TA) is
broadcast, the system switches automatically from a station that does not provide
traffi c reports to the appropriate traffi c information station within the broadcasting
network that does.
Once the traffi c report has been played, the
system will switch back to the programme
that you were listening to before.
Switching traffi c information
priority on/off
Press the TUNER button = in radio
쏅
mode.
The display shows the radio function
menu.
Press the softkey 5 with the display
쏅
label "TRAFFIC" repeatedly until the
desired setting "TRAFFIC INFO ON" or
"TRAFFIC INFO OFF" appears.
Note:
The TA menu is displayed during a traf-
fi c announcement.
To interrupt the current traffi c announce-
ment,
press the softkey 5 with the display
쏅
label "TA EXIT".
If you want to switch off the priority for traf-
fi c announcements in general,
press the softkey 5 with the display
쏅
label "TA OFF".
26
Page 27
Traffi c information
Notes:
You will hear a warning beep:
If you leave the reception area of a
•
traffi c information station that you
are currently listening to.
If you leave the reception area of a
•
traffi c information station that the
system is tuned into while listening
to a CD, and the subsequent automatic seek tuning cannot fi nd a new
traffi c information station.
If you retune the radio from a traffi c
•
information station to a station that
does not broadcast traffi c information.
If you hear the warning beep, you can
either switch off traffi c information priority or tune into a station that broadcasts traffi c information.
Setting the volume for traffi c
announcements
Press the MENU button 9.
쏅
Press the softkey 5 with the display
쏅
label "VOLUME".
Press the softkey 5 with the display
쏅
label "TRAFFIC".
Adjust the desired volume with volume
쏅
control 2.
쏅
Press the OK joystick 8 or the MENU
button 9 to exit the menu.
CD mode
You can use this device to play standard audio CDs with a diameter of 12 cm.
CD-Rs and CD-RWs ("self-burned" CDs) can
usually be played. Due to the varying quality of CD blanks, however, Blaupunkt cannot guarantee a faultless function.
To ensure proper functioning, use only CDs
with the Compact-Disc logo. Copy-protected CDs can cause playback problems.
Blaupunkt cannot guarantee the proper
functioning of copy-protected CDs!
Risk of severe damage
to the CD drive!
CD singles with a diameter of 8 cm and
noncircular contoured CDs (shape CDs)
must not be used.
We accept no responsibility for any damage to the CD drive that may occur as a
result of the use of unsuitable CDs.
Starting CD mode, inserting a CD
If there is no CD inserted in the device,
press the
쏅
The control panel opens out towards you.
Push the CD into the CD tray with the
쏅
printed side facing up.
The drive draws in the CD.
You must not hinder or assist the drive as it
draws in the CD.
The control panel automatically closes.
The CD menu is displayed and the CD play-
back starts.
button 7.
ENGLISH
27
Page 28

CD mode
If a CD is already inserted in the device,
press the SOURCE button < repeat-
쏅
edly until CD mode is displayed.
The CD menu is displayed, the playback
starts at the point where it was interrupted.
Ejecting a CD
press the button 7.
쏅
The control panel opens to the front, the CD
is ejected.
쏅
Carefully remove the CD.
쏅
Press the
The control panel closes.
button 7.
Selecting tracks
Move the joystick 8 in one direction
쏅
(up and right for the next or down and
left for the previous track) until the
number of the desired track appears
on the display.
Pressing the joystick 8 once down or left
restarts the current track.
Fast searching (audible)
To fast search backwards or forwards,
hold the joystick 8 pressed in one
쏅
direction (up and right for forwards or
down and left for backwards) until fast
searching starts.
Random track play (MIX)
Press the softkey 5 with the display
쏅
label "MIX".
"MIX CD" briefl y appears on the display.
The next track being played is randomly selected.
Cancelling MIX
Press the softkey 5 with the display
쏅
label "MIX" again.
"MIX OFF" briefl y appears on the display.
Repeating tracks (REPEAT)
Press the softkey 5 with the display
쏅
label "REPEAT".
"REPEAT TRACK" briefl y appears on the
display. The track is repeated continuously
until you deactivate REPEAT.
Cancelling Repeat
Press the softkey 5 with the display
쏅
label "REPEAT" again.
"REPEAT OFF" briefl y appears on the display. Normal playback is then resumed.
Scanning tracks (SCAN)
You can scan (briefl y play) all the tracks on
the CD.
Press and hold down the OK joystick
쏅
8 for longer than two seconds.
The next titles of the CD are scanned in ascending order.
28
Note:
You can set the scanning time. For
further information, please read the
section entitled "Setting the scanning
time" in the "Radio mode" chapter.
Page 29

CD mode
Cancelling Scan and continuing listening
to a track
To end the scanning process,
press the OK joystick 8.
쏅
The currently scanned track will then continue to be played normally.
Displaying CD text
Some CDs include CD text. The CD text
might contain the names of the artist, album and tracks.
You can allow the CD text to be displayed as
scrolling text in the bottom line every time
you switch to another track.
If the inserted CD does not contain CD text,
"NO TEXT" is briefl y shown on the display
with CD text switched on.
Switching CD text on/off
Press the softkey 5 with the display
쏅
label "TEXT" repeatedly until "CD TEXT
ON" or "CD TEXT OFF" appears.
Adjusting the scrolling text
You can allow the CD text to be displayed as
scrolling text in the bottom line of the display.
Traffi c announcements in CD
mode
Press the softkey 5 with the display
쏅
label "TRAFFIC" repeatedly until the
desired setting "TRAFFIC INFO ON" or
"TRAFFIC INFO OFF" appears.
ENGLISH
Switching CD scrolling text on/off
Press the softkey 5 with the dis-
쏅
play label "SCROLL" repeatedly until
"SCROLL ON" (scrolling text is switched
on) or "SCROLL OFF" appears.
29
Page 30
MP3 mode
MP3 mode
You can play MP3 fi les stored on an MMC/
SD (Multimedia Card/Secure Digital) or on
a CD-R/CD-RW. You can write data onto
the MMC/SD that you want to use with the
Bremen MP76 with the help of a standard
MMC/SD read and write device and your
PC.
Preparing an MP3 CD
The various combinations of CD burners,
CD burning software and CD blanks may
lead to problems arising with the device’s
ability to play certain CDs. If problems occur with your own burned CDs, you should
try another brand of CD blank or choose another colour of CD blank.
The format of the CD must be ISO 9660
Level 1 or Level 2 or Joliet. Other formats
cannot be played reliably.
Avoid multi-sessions. If you write more than
one session onto the CD, only the fi rst session is recognised.
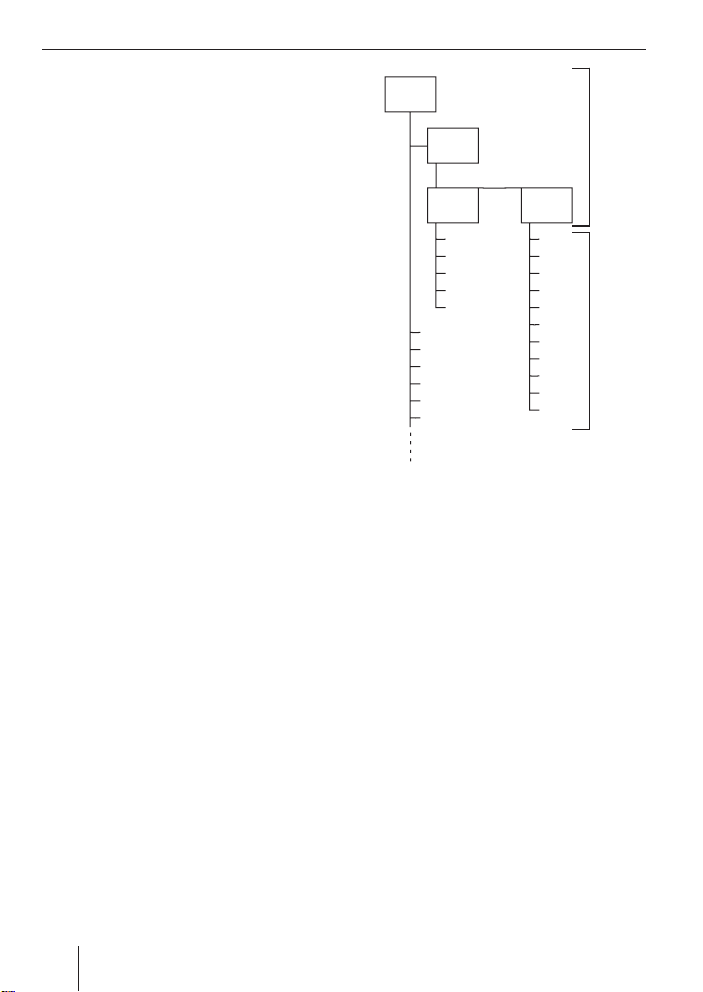
You can create a maximum of 127 directories on a CD. You can use this device to access each of these directories.
Each directory can contain up to 254 individual titles (tracks) and subdirectories
which can be selected individually. The directory depth may contain up to 8 levels.
D01
T001
T002
T003
T004
T005
T006
T007
T008
T009
T010
T011
A
B
D02
D03
T001
T002
T003
T004
T005
T001
T002
T003
T004
T005
T006
A Directories
B Tracks · Files
You can name each directory using a PC.
The device is capable of displaying the directory name. Name the directories and
tracks using your CD burner software. The
software’s instruction manual will provide
details on how to do this.
Note:
When naming directories and tracks,
you should avoid using accents and
special characters.
If you like your fi les to be in the correct order, you should use burner software that
places fi les in alphanumerical order. If your
software does not provide this feature you
also have the option of sorting the fi les
manually. For this purpose, you must enter a number in front of each fi le name, e.g.
D04
30
Page 31

MP3 mode
"001", "002", etc. The leading zeros must
also be entered.
MP3 tracks can contain additional information such as the artist, album and track
names (ID3 tags). This device can display
ID3 tags (version 1).
This device can only play MP3 fi les that
have the ".MP3" fi le extension.
Notes:
To ensure uninterrupted playback:
Do not try changing the fi le extension
•
to ".MP3" of any fi les other than MP3
fi les and then attempt to play them!
Do not use mix-mode CDs with non-
•
MP3 data and MP3 tracks.
Do not use mix-mode CDs containing
•
audio tracks and MP3 tracks.
Inserting/removing MMCs/SDs
The MMC/SD slot > is located below the
detachable control panel, to the right of the
contacts. To insert/remove an MMC/SD,
you must remove the control panel. For further information, please read the section
"Detachable control panel".
Notes:
Blaupunkt cannot guarantee the
•
correct functioning of all MMC/SD
cards available on the market and,
for this reason, recommends the use
of MMC/SD cards manufactured by
"SanDisk" or "Panasonic". The cards
maximum size should be 512 MB,
since the function cannot always be
ensured at larger storage capacities.
The cards must be formatted using
the FAT16 fi le system and contain
MP3 fi les.
•
In order to optimise the device’s access to the data on the MMCs/SDs,
you should store no more than 20
directories and a maximum of 200
fi les on an MMC/SD.
Inserting an MMC/SD
Detach the control panel.
쏅
Insert the MMC/SD with its labelled
쏅
side uppermost and its contacts fi rst
into the SD/MMC slot >, until you feel
the MMC/SD click into place.
쏅
Attach the control panel again.
Removing an MMC/SD
Detach the control panel.
쏅
Carefully push the MMC/SD into the slot
쏅
> until you feel a slight resistance.
The MMC/SD is now unlatched.
Carefully pull the MMC/SD out of the
쏅
slot.
쏅
Attach the control panel again.
Switching to MMC/SD mode
Press the Source button < repeatedly
쏅
until the display shows "MMC".
Playback begins with the fi rst track that the
device detects.
31
ENGLISH
Page 32

MP3 mode
Activating the MP3 mode of CD
MP3 mode of CD is activated in the same
way as normal CD mode. For insertion,
please read the section entitled "Starting
CD mode/Inserting a CD" in the chapter
"CD mode".
Press the Source button < repeatedly
쏅
until the display shows "MP3".
Playback begins with the fi rst track that the
device detects.
Operation during the MP3 mode
Selecting from directory list
You can display a list of all directories of the
inserted CD or MMC/SD and conveniently
select from them. The directories are displayed with the names that you used when
you burned the CD or created the MMC/
SD.
During the MP3 playback, press the
쏅
NEXT button 4.
The track list of the current directory is displayed.
Press the joystick 8 left or right to
쏅
change into the directory list.
Press the joystick 8 up or down to
쏅
scroll through the list.
If you want to select a directory from
쏅
the list, move the selection mark onto
the desired directory and press the OK
joystick 8.
The lost of tracks of the selected directory
is displayed.
Move the selection mark onto the de-
쏅
sired track and press the OK joystick
8.
쏅
Press the NEXT button 4 to redisplay
the MP3 main menu.
Selecting a directory with the joystick
To move up or down to another directory,
쏅
Press the joystick 8 repeatedly up or
down until the number of the desired
directory appears in the fi rst position
in the top line of the display.
Note:
The device automatically skips any
directories that do not contain MP3
fi les. For example, if you listen to tracks
from directory D01 and select the next
directory with the joystick 8, the directory D02, which does not contain
any MP3 tracks (see illustration), is
skipped and D03 is played. The display
then automatically changes from "D02"
to "D03".
Selecting tracks
Selecting a track from the track list
You can display a list of all tracks of the current directory and conveniently select a
track from it.
To display the track list, press the NEXT
쏅
button 4.
Press the joystick 8 up or down to
쏅
"scroll" through the track list.
If you want to select a track from the
쏅
list, move the selection mark onto the
desired track and press the OK joystick
8.
Press the NEXT button 4 to redisplay
쏅
the MP3 main menu.
32
Page 33

MP3 mode
Selecting a track with the joystick
To move up or down to another track in the
current directory,
move the joystick 8 right for the next
쏅
or left for the previous track until the
number of the desired track appears
on the display.
Pressing the joystick 8 once left restarts
the current track.
Fast searching (audible)
To fast search backwards or forwards,
press the joystick 8 left or right and
쏅
hold it pressed until fast searching
backwards or forwards begins.
Scanning tracks (SCAN)
You can scan all the tracks on the CD/SD/
MMC.
Press and hold down the OK joystick
쏅
8 for longer than two seconds.
The next titles of the CD/SD/MMC are
scanned in ascending order.
Note:
You can set the scanning time. For
further information, please read the
section entitled "Setting the scanning
time" in the "Radio mode" chapter.
Cancelling Scan and continuing listening
to a track
To end the scanning process,
press the OK joystick 8.
쏅
The currently scanned track will then continue to be played normally.
Random track play (MIX)
To play the tracks in the current directory in
random order,
press the softkey 5 with the display
쏅
label "MIX".
"MIX DIR" appears briefl y on the display.
To play the tracks contained in all the direc-
tories on the inserted MP3-CD/SD/MMC in
random order,
press the softkey 5 with the display
쏅
label "MIX" again.
"MIX CD/SD/MMC" briefl y appears on the
display.
Cancelling MIX
To cancel MIX,
press the softkey 5 with the display
쏅
label "MIX" repeatedly until "MIX OFF"
appears on the display.
Repeating individual tracks or
whole directories (REPEAT)
Press the softkey 5 with the display
쏅
label "REPEAT".
"REPEAT TRACK" briefl y appears on the
display.
To repeat the whole directory,
press the softkey 5 with the display
쏅
label "REPEAT" again.
"REPEAT DIR" briefl y appears on the dis-
play.
ENGLISH
33
Page 34

MP3 mode
Cancelling Repeat
To stop the current track or current directory from being repeated,
press the softkey 5 with the display
쏅
label "REPEAT" repeatedly until "REPEAT OFF" briefl y appears on the display.
Confi guring the display
You have different options of displaying the
name of the artist, the track and the album
(ID3 tag) or the directory and the fi le. The
information from the ID3 tag (album, artist and track) can be displayed only if they
were saved while creating the CD or the
MP3 fi le.
The track name is always displayed in the
top line of the display during playback. In
the process, the track name is displayed
once as scrolling text after a track change
and subsequently shortened to 16 digits, if
necessary, and displayed.
Note:
If the track name from the ID3 tag is not
available, the fi le name is displayed
For the bottom line of the display (info line),
you can select from the display of different
information.
Selecting information in the info line
In the bottom line of the display (info line),
you can select from the display of the different MP3 information, such as track, artist, album or directory number (DIR) or fi le
name.
Press the softkey 5 with the display
쏅
label "INFO" repeatedly until the desired display appears in the bottom line
of the display.
Note:
If the information about artist, track
and album is not available as ID3 tag,
they cannot be selected.
Display all the information of a fi le once
To display all the available information of a
track as well as the name of the directory
and the fi le once as scrolling text,
press the softkey 5 with the display
쏅
label "SHOW ALL".
If available, the information is displayed
once as scrolling text in the info line. During
the display, "SHOW ALL" is fl ashing.
Adjusting the scrolling text
You can select whether the display you defi ned under "Selecting information in the
info line" should be shown as scrolling text
("SCROLL ON") or once only ("SCROLL
OFF").
Press the softkey 5 with the display
쏅
label "SCROLL" repeatedly until the desired setting appears.
You can scan all the tracks on the CD/SD/
MMC.
Press and hold down the OK joystick
쏅
8 for longer than two seconds.
The next tracks are scanned in ascending
order.
Note:
You can set the scanning time. For
further information, please read the
section entitled "Setting the scanning
time" in the "Radio mode" chapter.
34
Page 35

CD changer mode
CD changer mode
(optional)
The CD changers/Compact Drive MP3s that
can be used with this device can be found in
the chapter "Accessories" in these instructions or obtained from your specialist Blaupunkt dealer.
Note:
Information on handling CDs, inserting
CDs and operating the CD changer can
be found in the operating instructions
supplied with your CD changer.
Switching to CD-changer mode
Press the SOURCE button < repeat-
쏅
edly until the CD changer menu is displayed.
Playback continues at the point at which
it was last interrupted. If the magazine is
removed from the CD changer and reinserted, the CD magazine is "scanned" fi rst,
the playback starts with the fi rst track of the
fi rst CD recognised by the CD changer.
Selecting CDs
To move up or down to another CD,
press the softkey 5 with the display
쏅
label of the desired CD (CD1 - CD10). If
necessary, use the softkey 5 with the
display label "NEXT" or "PREVIOUS" to
change between the "pages" of the basic CD changer menu
or
press the joystick 8 repeatedly up or
쏅
down until the number of the desired
CD appears on the display.
Selecting tracks
To move down or up to another track on the
current CD,
press the joystick 8 repeatedly left
쏅
or right until the number of the desired
track appears on the display.
Pressing the joystick 8 once left restarts
the current track.
Fast searching (audible)
To fast search forwards or backwards,
press the joystick 8 left or right and
쏅
hold it pressed until fast searching
backwards or forwards begins.
Scanning tracks (SCAN)
You can scan (briefl y play) all the tracks on
the CD.
Press and hold down the OK joystick
쏅
8 for longer than two seconds.
The next titles of the CD are scanned in as-
cending order.
Note:
You can set the scanning time. For
further information, please read the
section entitled "Setting the scanning
time" in the "Radio mode" chapter.
Cancelling Scan and continuing listening
to a track
To end the scanning process,
Press the OK joystick 8.
쏅
The currently scanned track will then continue to be played normally.
ENGLISH
35
Page 36

CD-changer mode
Repeating individual tracks or
whole CDs (REPEAT)
To repeat the current track,
press the NEXT button 4.
쏅
The display shows the CD changer function
menu.
Press the softkey 5 with the display
쏅
label "REPEAT".
"REPEAT TRACK" briefl y appears on the
display.
To repeat the entire CD,
press the softkey 5 with the display
쏅
label "REPEAT" again while the CD
changer function menu is displayed.
"REPEAT CD" briefl y appears on the display.
Cancelling Repeat
To stop the current track or current CD from
being repeated,
press the softkey 5 with the display
쏅
label "REPEAT" repeatedly while the
CD changer function menu is displayed
until "REPEAT OFF" briefl y appears on
the display.
Random track play (MIX)
To play the tracks on the current CD in random order,
Press the NEXT button 4.
쏅
The display shows the CD changer function
menu.
Press the softkey 5 with the display
쏅
label "MIX".
"MIX CD" appears on the display.
To play all of the tracks on all inserted CDs
in random order,
Press the softkey 5 with the display
쏅
label "MIX" again.
"MIX ALL" appears on the display.
Cancelling MIX
To cancel MIX,
쏅
press the softkey 5 with the display
label "MIX" repeatedly until "MIX OFF"
briefl y appears on the display.
Naming CDs
The car sound system allows you to assign
names for up to 99 CDs so that you can recognise them more easily (not with Compact
Drive MP3). The names can be a maximum
of seven characters long.
"FULL" appears on the display if you try to
assign more than 99 names.
36
Entering/editing CD names
Listen to the CD to be named.
쏅
Press the NEXT button 4.
쏅
The display shows the CD changer function
menu.
Page 37

Press the softkey 5 with the display
쏅
label "CD NAME".
The current name of the CD is displayed in
the top line of the display. If you have not
yet named the CD, seven underscores "_"
are displayed.
Press the softkey 4 with the display
쏅
label "EDIT".
You are now in the editing mode. The fi rst
text input position fl ashes.
Move the joystick 8 up or down and
쏅
select your characters. If you want an
empty space, simply select the underscore.
Move the joystick 8 left or right and
쏅
change the entry position.
To save the name, press the OK joystick
쏅
8.
Deleting a CD name
Listen to the CD whose name you want
쏅
to delete.
Press the NEXT button 4.
쏅
The display shows the CD changer function
menu.
Press the softkey 5 with the display
쏅
label "CD NAME".
Press and hold the softkey 5 with
쏅
the display label "CLEAR CD" for longer
than two seconds.
The CD name is deleted.
CD-changer mode
Deleting all CD names
Listen to a CD.
쏅
Press the NEXT button 4.
쏅
The display shows the CD changer function
menu.
Press the softkey 5 with the display
쏅
label "CD NAME".
Press and hold the softkey 5 with
쏅
the display label "CLEAR ALL" for longer than two seconds.
The CD names are deleted.
ENGLISH
37
Page 38

Clock – time
Clock – time
Setting the time
The time can be set automatically via the
RDS signal. If no station supporting this
function can be received, you can also set
the time manually.
Setting the time automatically
To set the time automatically,
press the MENU button 9.
쏅
Press the softkey 5 with the display
쏅
label "CLOCK".
Press the softkey 5 with the display
쏅
label "AUTOSYNC" repeatedly until
"AUTOSYNC ON" appears on the display.
"AUTOSYNC ON" means that the time is automatically set via the RDS signal.
Setting the clock manually
To set the time, press the MENU but-
쏅
ton 9.
Press the softkey 5 with the display
쏅
label "CLOCK".
Press the softkey 5 with the display
쏅
label "TIME".
The hours and minutes are displayed in the
top line of the display. The hours fl ash.
Set the hours by moving the joystick
쏅
8 up or down.
To set the minutes,
쏅
press the joystick 8 right.
The minutes fl ash.
쏅
Set the minutes by moving the joystick
8 up or down.
쏅
Press the OK joystick 8 or the MENU
button 9 to exit the menu.
The settings are saved.
Setting the date
To set the date,
쏅
press the MENU button 9.
쏅
Press the softkey 5 with the display
label "CLOCK".
쏅
Press the softkey 5 with the display
label "DATE".
The top line of the display shows the year
(YY), month (MM) and day (DD).
The input position for the year fl ashes.
쏅
Set the year (e.g. "06" for 2006) by
moving the joystick 8 up or down.
쏅
Press the joystick 8 right to move the
input position to the month.
쏅
Set the month by moving the joystick
8 up or down.
쏅
Press the joystick 8 right to move the
input position to the day.
쏅
Set the day by moving the joystick 8
up or down.
Press the OK joystick 8 or the MENU
쏅
button 9 to exit the menu.
The settings are saved.
38
Page 39

Clock – time DSA Max – Equalizer
Permanent time display
You can show the time of the device on
the display with switched-off device and
switched on vehicle ignition.
Press the MENU button 9.
쏅
Press the softkey 5 with the display
쏅
label "CLOCK".
Press the softkey 5 with the display
쏅
label "OFFCLOCK".
"SHOW CLOCK" means that the time is displayed, "HIDE CLOCK" means that the time
is not displayed.
DSA Max –
Digital Sound Adjustment
This device features a means for digital
sound calibration (DSA Digital Sound Ad-
justment).
Three self-calibrating user equalizers (EQ1,
EQ2 and EQ3) are available for this purpose. Each user equalizer consists of a
graphical 27-band equalizer.
Each user equalizer features for channels
(front left/right and rear left/right).
The equalizers EQ1 - EQ3 can be adjusted
automatically using the supplied calibration
microphone.
The values of the graphical equalizer that
are determined automatically can also be
changed manually.
For additional sound optimisation, you also
have access to a dynamic driving noise
compensation (DNC), different presettings
for music styles (Preset EQ), stage effects
and sound effects.
Switching DSA on/off
Switching DSA off
To deactivate the entire equalizer,
press and hold the AUDIO button :
쏅
for longer than two seconds.
The display shows the DSA menu.
Press the softkey 5 with the display
쏅
label "OFF".
"DSA OFF" appears on the display.
ENGLISH
39
Page 40

DSA Max – Equalizer
Note:
You can separately switch each module
of the equalizer on or off in the respective menu (user EQ, sound presetting,
DNC, stage effect and sound effect).
Switching DSA on
To reactivate the equalizer,
press and hold the AUDIO button :
쏅
for longer than two seconds.
The display shows the DSA menu.
Press the softkey 5 with the display
쏅
label "USER EQ".
Select an equalizer setting.
쏅
Automatically calibrating the
equalizer
You can perform and save electronic calibrations for three different situations (not
possible if crossover is set), e.g.:
EQ 1 For the driver alone
EQ 2 For the driver and front passenger
EQ 3 For the front and rear occupants
Hold the microphone in the appropriate position while the calibration is taking place.
The position of the calibration microphone
for Situation 1 (e.g. for the driver alone) is
at the height of the driver’s head, approx.
10 centimetres next to the right ear.
For Situation 2, the calibration microphone
should be positioned at head height between the driver and the front passenger.
For Situation 3, you should position the
calibration microphone at head height in
the centre of the vehicle interior (left/right,
front/rear).
Really quiet surroundings are required for
the calibration. Any extraneous noise will
distort the measured values. lose all windows, doors, and the sliding sunroof during
the calibration. You should be sitting in the
driver's seat.
Note:
The sound radiating from the loud-
speakers must not be obstructed by
any objects. All the loudspeakers must
be connected. The calibration micro-
phone must be connected to the de-
vice, the calibration of the equalizer
should be performed before the DNC
calibration.
To calibrate an equalizer,
press and hold the AUDIO button :
쏅
for longer than two seconds.
Press the softkey 5 with the display
쏅
label "USER EQ".
Press the softkey 5 with the display
쏅
label of the equalizer ("EQ-1", "EQ-2"
or "EQ-3") to be calibrated.
Press the softkey 5 with the display
쏅
label "ADJUST".
Press the softkey 5 with the display
쏅
label "AUTO ADJ".
A countdown is running on the display. Dur-
ing this time, you can position the calibration microphone. After the countdown expires, the calibration is performed.
Use the same procedure for all equal-
쏅
izers.
After the calibration is complete, the menu
of the selected equalizer is displayed
again.
40
Page 41

DSC Max – Equalizer
Viewing vehicle acoustics with/
without equalizer
You can view the determined values for the
vehicle acoustics. When viewing the settings, you can select between the equalizer
view without equalization ("PRE EQ") and
with equalization ("POST EQ").
Press and hold the AUDIO button :
쏅
for longer than two seconds.
Press the softkey 5 with the display
쏅
label "USER EQ".
Press the softkey 5 with the display
쏅
label of the equalizer to be viewed.
Press the softkey 5 with the display
쏅
label "ADJUST".
Press the softkey 5 with the display
쏅
label "MANUAL".
You can view the settings of the equalizer
separately for the front and the rear loudspeakers.
Note:
If you already changed the graphical
equalizer manually or if you have not yet
performed a calibration, the softkeys
described below cannot be selected.
If you want to select the view of the equalizer without equalization,
Press the softkey 5 with the display
쏅
label "VIEW PRE" on the left side of the
display for front or on the right side for
rear.
The setting of the equalizer is displayed.
If you want to select the view of the equal-
izer with equalization,
press the softkey 5 with the display
쏅
label "VIEWPOST" on the left side of
the display for front or on the right side
for rear.
The setting of the equalizer is displayed.
To exit the view,
쏅
press the OK joystick 8 or the AUDIO
button :.
Manually changing the graphical
equalizer
The automatically determined values of the
graphical equalizer can also be changed
manually.
press and hold the AUDIO button :
쏅
for longer than two seconds.
Press the softkey 5 with the display
쏅
label "USER EQ".
Press the softkey 5 with the display
쏅
label of the equalizer to be set.
Press the softkey 5 with the display
쏅
label "ADJUST".
Press the softkey 5 with the display
쏅
label "MANUAL".
You can adjust the equalizer separately for
the front and rear loudspeakers.
Press the softkey 5 with the display
쏅
label "FRONT EQ" for the front loud-
speakers or "REAR EQ" for the rear
loudspeakers.
The settings of the graphical equalizer are
displayed.
To select the frequency,
press the joystick 8 left or right until
쏅
the desired frequency is displayed.
Set the level for the frequency by mov-
쏅
ing the joystick 8 up or down.
ENGLISH
41
Page 42

DSC Max – Equalizer
While you are adjusting the equalizer, the
values are graphically shown on the display.
Perform all settings for both channels
쏅
as described above.
Press the OK joystick 8 or the AUDIO
쏅
button : to exit the menu.
The settings are saved.
Selecting the Equalizer
After the calibration or the manual adjustment:
Press and hold the AUDIO button :
쏅
for longer than two seconds.
Press the softkey 5 with the display
쏅
label "USER EQ".
Press the softkey 5 with the display
쏅
label of the equalizer to be used.
Press the OK joystick 8 or the AUDIO
쏅
button : to exit the menu.
The settings are saved.
Resetting the equalizer
All automatically determined values of the
selected equalizer can be reset.
press and hold the AUDIO button :
쏅
for longer than two seconds.
Press the softkey 5 with the display
쏅
label "USER EQ".
Press the softkey 5 with the display
쏅
label of the equalizer to be reset.
Press the softkey 5 with the display
쏅
label "ADJUST".
쏅
Press and hold the softkey 5 with the
display label "CLEAR" for longer than
two seconds.
The automatically determined values of the
equalizer are deleted.
Press the OK joystick 8 or the AUDIO
쏅
button : to exit the menu.
The settings are saved.
Selecting a sound presetting
(Preset)
You can select sound presets for different
music types. For a perfect sound, the presettings are "added" to the settings of the
active user, i.e. the user EQs are optimised
through the presettings for the various music styles.
Presettings for the following music styles
are available:
VOCAL
•
DISCO
•
ROCK
•
JAZZ
•
CLASSIC
•
The settings for these music styles have already been programmed.
Press and hold the AUDIO button :
쏅
for longer than two seconds.
Press the softkey 5 with the display
쏅
label "PRESET".
Press the softkey 5 with the display
쏅
label of the sound presetting to be
used.
Press the OK joystick 8 or the AUDIO
쏅
button : to exit the menu.
The settings are saved.
42
Page 43

Adjusting the stage effect
You can activate a stage effect that "relocates" the music in front of the driver or
front passenger. This gives the impression
of being directly in front of a stage. To refi ne this effect, you can change the virtual
distance to your loudspeakers.
Selecting the stage effect
Press and hold the AUDIO button :
쏅
for longer than two seconds.
Press the softkey 5 with the display
쏅
label "CH DELAY".
Press the softkey 5 with the display
쏅
label "ON" to activate the stage effect.
Press the softkey 5 with the display
쏅
label "OFF" to deactivate the stage effect.
Press the softkey 5 with the display
쏅
label "LRSWAP" to mirror the settings.
Press the softkey 5 with the display
쏅
label "ADJUST" to set the distance of
the loudspeakers.
A submenu appears. For further information, please read the next section.
Changing the virtual distance of the
loudspeakers
To further optimise the stage effect, you
can adjust the distance of the individual
loudspeakers built into the vehicle with respect to the left front seat. You can adjust
the distance to the front and to the rear
loudspeakers from 0-275 cm.
쏅
Press the softkey 5 with the display
label "ADJUST" in the "Digital Staging
Menu".
DSC Max – Equalizer
Select the softkey with the assignment
쏅
of the loudspeaker for which you want
to set the distance.
"RR" is right rear, "LR" left rear, "RF" right
front and "LF" left front.
If crossover is activated, different symbols
appear ("Lhigh" for "LF", "Rhigh" for "RF",
"Llow" for "LR" and "Rlow" for "RR").
쏅
Turn the volume control 2 or move
the joystick 8 to set the distance.
쏅
Press the OK joystick 8 or the AUDIO
button : to exit the menu.
The settings are saved.
Selecting a sound effect
You can select from different sound effects
for your music:
CATHEDRAL
•
THEATER
•
CONCERT
•
CLUB
•
STADIUM
•
The sound effects have already been programmed.
Press and hold the AUDIO button :
쏅
for longer than two seconds.
Press the softkey 5 with the display
쏅
label "EFFECTS".
Press the softkey 5 with the display
쏅
label of the sound effect to be used.
If you do not want to use any sound effects,
press the softkey 5 with the display
쏅
label "OFF".
Press the OK joystick 8 or the AUDIO
쏅
button : to exit the menu.
The settings are saved.
ENGLISH
43
Page 44

DNC
DNC
Dynamic Noise Covering
DNC allows for raising a volume when driving that is considered pleasant for a nondriving vehicle.
The increase differs according to frequency
ranges, dependent upon the noise development of the vehicle.
Hence, volume and sound remain at a
pleasant level even with changing noise
developments. Short-term noises, such as
those while crossing railways, are not considered.
Calibrating DNC
A calibration via the measurement microphone is required for vehicle-specifi c operation. The DNC calibration should be performed after the DSA calibration. Before
the calibration, you should permanently
attach the calibration microphone with the
supplied Velcro tape near the console, but
not in the fl oor area, at droning points or at
the heating/ventilation.
The opening of the calibration microphone
must point to the direction of the passenger compartment. The calibration should
be performed at a quiet location with the
engine switched off. The doors, windows
and sunroof must remain closed, and you
should be seated in the driver’s seat.
Starting the DNC calibration
Press and hold the AUDIO button :
쏅
for longer than two seconds.
Press the softkey 5 with the display
쏅
label "DNC".
Press the softkey 5 with the display
쏅
label "ADJUST".
A countdown is running on the display. After the countdown expires, the calibration
is performed.
쏅
Press the OK joystick 8 or the AUDIO
button : to exit the menu.
Switching DNC off
To deactivate the DNC,
press and hold the AUDIO button :
쏅
for longer than two seconds.
Press the softkey 5 with the display
쏅
label "DNC".
Press the softkey 5 with the display
쏅
label "OFF".
"DNC OFF" appears on the display.
To reactivate the DNC,
select a DNC increase (DNC1 - DNC5).
쏅
Press the OK joystick 8 or the AUDIO
쏅
button : to exit the menu.
The settings are saved.
44
Page 45

DNC Subwoofer and centre speaker
Selecting a DNC increase
You can adjust the DNC increase, i.e. the
sensitivity of the increase in volume and
sound, in fi ve increments.
The setting "DNC 1" is suitable for vehicles
with loud engines and bass-loaded music.
The setting "DNC 5" is suitable for vehicles
with quiet engines and for classical music.
You will need to test various settings to fi nd
the most suitable one for your taste.
To select a DNC increase,
press and hold the AUDIO button :
쏅
for longer than two seconds.
Press the softkey 5 with the display
쏅
label "DNC".
Press the softkey 5 with the display
쏅
label "LEVEL".
Adjust the increase using the joystick
쏅
8.
Press the OK joystick 8 or the AUDIO
쏅
button : to exit the menu.
The settings are saved.
Subwoofer and centre
speaker
You can connect a subwoofer and a centre
speaker to this device.
To further optimise the sound when using a
subwoofer and centre speaker, you can adjust a low-pass fi lter for the subwoofer and
one high-pass fi lter each for front and rear.
Adjusting the subwoofer
increase
You can adjust a permanent volume increase or decrease for the connected subwoofer from -6 to +6 and thereby increase
or decrease the bass response of the subwoofer. The setting to be selected depends
upon the installation position and installation location of the subwoofer in your vehicle. You may need to test various settings to
fi nd the most suitable one for your taste.
Press the AUDIO button :.
쏅
"AUDIO MENU" appears on the display.
Press the softkey 5 with the display
쏅
label "SUBOUT".
Press the softkey 5 with the display
쏅
label "GAIN".
Move the joystick 8 up or right to in-
쏅
crease the level or down or left to decrease the level.
When you have fi nished making your changes,
쏅
press the OK joystick 8 or the AUDIO
button :.
ENGLISH
45
Page 46

Subwoofer and centre speaker
Adjusting the subwoofer phase
position
You can adjust the phase position of the
subwoofer output to your subwoofer and
select between "-135°" and "180°" in increments of 45°.
Press the AUDIO button :.
쏅
"AUDIO MENU" appears on the display.
Press the softkey 5 with the display
쏅
label "SUBOUT".
Press the softkey 5 with the display
쏅
label "PHASE".
Move the joystick 8 to select from the
쏅
possible settings.
When you have fi nished making your
changes,
쏅
press the OK joystick 8 or the AUDIO
button :.
Setting the low-pass fi lter
The low-pass fi lter allows you to defi ne a
frequency up to which the subwoofer will
operate. All signals above the defi ned frequency are "cut off" and not passed on to
the subwoofer.
You can select from the frequencies
"40 Hz", "50 Hz", "63 Hz" and "100 Hz". If
your subwoofer features a built-in low-pass
fi lter, you can also select the setting "FLAT"
and thereby forward all frequencies to the
subwoofer.
Please adjust this setting to the frequency
range and the capabilities of your subwoofer. For further details, please read the documentation of the subwoofer.
Press the AUDIO button :.
쏅
"AUDIO MENU" appears on the display.
Press the softkey 5 with the display
쏅
label "SUBOUT".
Press the softkey 5 with the display
쏅
label "LOWPASS".
Move the joystick 8 to select from the
쏅
possible settings.
When you have fi nished making your
changes,
press the OK joystick 8 or the AUDIO
쏅
button :.
Setting the subsonic fi lter
To avoid interferences from extremely low
frequencies, you can use the subsonic fi lter
to limit the low-frequency response of the
device. This is particularly useful for small
subwoofers. The setting of the subsonic fi lter suppresses all frequencies below the defi ned frequency. When setting the subsonic
fi lter, you should orient yourself by means
of the loudspeaker setup of your vehicle.
You can select from the frequencies "20 Hz",
"25 Hz", "32 Hz" and "40 Hz". In addition, you can set the quality factor "Q" for
the selected frequency in fi ve increments:
"Q1"=0.5, "Q2"=0.7, "Q3"=0.9, "Q4"=1.1
and "Q5"=1.3.
If you select the setting "FLAT", the frequency response of the device is not affected.
Press the AUDIO button :.
쏅
"AUDIO MENU" appears on the display.
Press the softkey 5 with the display
쏅
label "SUBOUT".
Press the softkey 5 with the display
쏅
label "SUBSONIC".
46
Page 47

Subwoofer and centre speaker
Move the joystick 8 left or right to se-
쏅
lect among the available frequencies.
Move the joystick 8 up or down to
쏅
select the desired quality factor for the
defi ned frequency.
When you have fi nished making your
changes,
press the OK joystick 8 or the AUDIO
쏅
button :.
Adjusting the centre speaker
You can select the frequency at which a
connected centre speaker should be controlled.
You can select from the frequencies
"200 Hz", "400 Hz", "800 Hz", "1600 Hz"
and "3200 Hz". If you select the setting
"FLAT", all frequencies are output via the
centre speaker, including bass. This setting should be selected only if your centre
speaker features a built-in high-pass fi lter.
In addition to the frequency, you can adjust
the level for the centre speaker.
Press the AUDIO button :.
쏅
"AUDIO MENU" appears on the display.
Press the NEXT button 4.
쏅
"AUDIO MENU 2" appears on the display.
Press the softkey 5 with the display
쏅
label "CENTRE".
Press the joystick 8 left or right to
쏅
adjust the frequency for the centre
speaker.
Press the joystick 8 up or down to ad-
쏅
just the level for the centre speaker.
When you have fi nished making your
changes,
press the OK joystick 8 or the AUDIO
쏅
button :.
Adjusting high-pass fi lters for
front/rear
You can adjust a separate high-pass fi lter for
the front and the rear channel that fi lters all
frequencies below the adjusted frequency
so that the fi ltered frequencies are played
only by a connected subwoofer.
If you select the setting "FLAT", no frequencies are fi ltered and all signals are forwarded to the loudspeakers. The setting "AUTO"
automatically adjusts the high-pass fi lter to
the value defi ned for the low-pass fi lter.
Press the AUDIO button :.
쏅
"AUDIO MENU" appears on the display.
Press the NEXT button 4.
쏅
"AUDIO MENU 2" appears on the display.
Press the softkey 5 with the display
쏅
label "HIPASS F" for setting the front
high-pass fi lter.
Or
Press the softkey 5 with the display
쏅
label "HIPASS R" for setting the rear
high-pass fi lter.
Press the joystick 8 left or right to
쏅
adjust the frequency for the high-pass
fi lter.
When you have fi nished making your changes,
press the OK joystick 8 or the AUDIO
쏅
button :.
ENGLISH
47
Page 48

Subwoofer and centre speaker TMC
Crossover
In crossover mode, the high frequencies are
played via the front channels and the low
frequencies via the rear channels.
Press the AUDIO button :.
쏅
"AUDIO MENU" appears on the display.
Press the NEXT button 4.
쏅
"AUDIO MENU 2" appears at the bottom of
the display.
Press the softkey 5 with the display
쏅
label "CROSSOVR".
Crossover is now adjusted.
To be able to use the crossover mode, you
must set the high-pass fi lter and the lowpass fi lter.
Press the softkey 5 with the display
쏅
label "HIPASS" for setting the high-pass
fi lter.
Press the joystick 8 left or right to
쏅
adjust the frequency for the high-pass
fi lter.
Press the softkey 5 with the display
쏅
label "LOWPASS" for setting the low-
pass fi lter.
Press the joystick 8 left or right to
쏅
adjust the frequency for the high-pass
fi lter.
The settings are automatically saved.
TMC for dynamic navigation
systems
TMC stands for "Traffi c Message Channel". Traffi c reports are broadcast digitally
via TMC, which means they can be used
by compatible navigation systems during
route planning. Your car sound system has a
TMC output, which you can use for connecting Blaupunkt navigation systems. You can
fi nd out from your Blaupunkt dealer which
navigation systems can be used with your
car sound system.
48
Page 49

Amplifi er / Sub-Out External audio sources
Amplifi er/Sub-Out
The car sound system provides connections that allow you to connect external
amplifi ers. In addition, you can connect a
subwoofer to the integrated low-pass fi lter
of the device. For this purpose, the amplifi er and subwoofer must be connected as
described in the installation instructions.
We recommend you use well-matched
products from the Blaupunkt or Velocity
product ranges.
Switching the internal amplifi er
on/off
If you are using external amplifi ers, you can
switch off the device’s internal amplifi er
("Internal Amp Off" setting).
Note:
Please check this setting if the loudspeakers do not emit any sound.
Press the MENU button 9.
쏅
Press the softkey 5 with the display
쏅
label "VARIOUS".
Press the softkey 5 with the display
쏅
label "AMP ON" repeatedly until the desired setting "INTERNAL AMP ON" or
"INTERNAL AMP OFF" appears.
If the internal amplifi er is switched on, the
softkey "AMP ON" is highlighted in dark.
Press the OK joystick 8 or the MENU
쏅
button 9 to exit the menu.
The settings are saved.
External audio sources
You can connect up to two external audio
sources to the device. Audio sources can,
for example, be portable CD players, Mini
Disc players or MP3 players.
The fi rst external audio source can be connected instead of a CD changer (AUX1).
The second external audio source (AUX2)
can be connected in addition to the CD
changer or AUX1.
Instead of AUX2, you can connect a navigation system. For further details, read the
section "Navigation audio" in the chapter
"Adjusting the volume".
To be able to use the AUX inputs, you must
activate the AUX inputs in the setup menu.
If you want to connect an external audio
source, you will need an adapter cable. This
cable is available from a specialised Blaupunkt dealer.
ENGLISH
49
Page 50

External audio sources
Switching the AUX input on/off
Press the MENU button 9.
쏅
Press the softkey 5 with the display
쏅
label "AUX".
The AUX menu is displayed.
If no CD changer is connected and you want
to connect an external audio source,
press the softkey 5 with the display
쏅
label "AUX1".
With every press of the softkey "AUX1", you
can switch between the settings "AUXILIARY 1 ON" and "AUXILIARY 1 OFF".
If no navigation system is connected and
you want to connect an external audio
source,
press the softkey 5 with the display
쏅
label "NAV/AUX2".
With every press of the softkey "NAV/
AUX2", you can switch between the settings
"AUXILIARY 2 ON" and "NAVIGATION ON".
Note:
If a CD changer is connected, the input
"AUX1" cannot be changed.
Press the OK joystick 8 or the MENU
쏅
button 9 to exit the menu.
The settings are saved.
Naming the AUX input
You can name the AUX inputs, to be better
able to assign them during the source selection with the SOURCE button < (e.g., you
can use the device name of the connected
device).
Press the MENU button 9.
쏅
Press the softkey 5 with the display
쏅
label "AUX".
The AUX menu is displayed.
Press the softkey 5 with the display
쏅
label "EDIT" under "AUX1" or "NAV/
AUX2".
The display shows the standard text for the
selected input. The input mark is at the beginning of the line and fl ashing.
To enter a name,
press the joystick 8 left or right to
쏅
move the input mark.
Set the desired letter by pushing the
쏅
joystick 8 up or down.
After entering the name, press the OK
쏅
joystick 8 or the MENU button 9 to
exit the menu.
The settings are saved.
Note:
If the AUX inputs are activated, they can
be selected using the SOURCE button
<.
50
Page 51

Miscellaneous
Miscellaneous
Entering a switch-on message
If you switch on the device, a brief message
is shown on the display as scrolling text.
This text is factory set to "BLAUPUNKT-THE
ADVANTAGE IN YOUR CAR". Instead, you
can enter your own text of up to 35 characters.
Press the MENU button 9.
쏅
Press the softkey 5 with the display
쏅
label "VARIOUS".
Press the softkey 5 with the display
쏅
label "ON MSG".
The display shows the standard text for the
switch-on message. The input mark is at the
beginning of the line and fl ashing.
To input a different text,
press the joystick 8 left or right to
쏅
move the input mark.
Set the desired letter by pushing the
쏅
joystick 8 up or down.
After entering the message, press the
쏅
OK joystick 8 or the MENU button 9
to exit the menu.
The settings are saved.
Displaying the serial number
You can display the serial number of the
device.
Press the MENU button 9.
쏅
Press the softkey 5 with the display
쏅
label "VARIOUS".
Press the softkey 5 with the display
쏅
label "SER NUM".
The serial number of the device is displayed
in the top line of the display.
Press the OK joystick 8 or the MENU
쏅
button 9 to exit the menu.
Resetting the device
You can reset the device to the factory-preset parameters. All personal settings are
lost in the process.
Press the MENU button 9.
쏅
Press the softkey 5 with the display
쏅
label "VARIOUS".
Press and hold the softkey 5 with the
쏅
display label "NORMSET" for longer
than two seconds.
The device switches off and automatically
on again.
ENGLISH
51
Page 52

Specifi cations
Specifi cations
Amplifi er
Output power: 4 x 18 watts sine
at 14.4 V and
1% distortion factor
at 4 ohms.
4 x 26 watts sine
in accordance with
DIN 45324 at
14.4 V at 4 ohms.
4 x 50 watts max.
power
Tuner
Wavebands:
FM: 87.5 – 108 MHz
MW: 531 – 1 602 kHz
LW: 153 – 279 kHz
SW: 5.85 – 6.30 MHz
(49-m band)
FM frequency response:
20 – 16,000 Hz
CD
Frequency response:
15 – 20,000 Hz
Pre-amp out
4 channels: 4 V / < 1 kΩ
AUX input
Input sensitivity: 1.2 V / 10 kΩ
Weight 1.45 kg
52
Subject to changes!
Page 53

Eléments de commande
1 Touche pour allumer ou éteindre l'ap-
pareil et couper le son
2 Bouton pour le réglage du volume
3 Touche
pour déverrouiller la façade
amovible
4 Touche NEXT pour affi cher la page sui-
vante d'un menu et
changer de niveau de mémoire en
mode radio
5 Touche programmables, la fonction des
touches varie en fonction du contenu
de l'affi cheur
6 Touche DIS•ESC pour modifi er l'affi -
chage sur l'écran et quitter les menus
7 Touche
pour ouvrir la façade bascu-
lante et amovible
8 Joystick et touche OK
9 Touche MENU, appeler le menu des ré-
glages de base (pression brève)
activer/désactiver le mode démo (pression longue)
: Touche AUDIO pour régler les basses,
les aiguës, la balance, le fader et la
fonction X-BASS (pression brève) et
appeler l'égaliseur DSA Max (pression
longue)
; Affi cheur
< Touche SOURCE pour démarrer le
lecteur de CD/changeur de CD ou le
Compact Drive MP3 (uniquement si
raccordé) ou démarrer le mode radio
ou
démarrer la lecture d'une source audio
externe (uniquement si raccordée)
= Touche TUNER pour sélectionner di-
rectement le mode radio
Appel du menu des fonctions radio
(possible uniquement en mode radio)
> Fente d'insertion des cartes MMC/SD
FRANÇAIS
53
Page 54

Sommaire
Remarques et accessoires ................ 56
Informations concernant les numéros
de téléphones internationaux .......... 56
Sécurité routière ............................ 56
Consigne de sécurité ...................... 56
Montage ....................................... 56
Accessoire .................................... 57
Accessoires spéciaux (non fournis) .. 57
Activation et désactivation du mode
démo ........................................... 57
Protection antivol ............................ 57
Façade amovible ............................ 57
Retrait de la façade ........................ 57
Mise en place de la façade ............... 58
Allumer/éteindre ............................. 58
Allumer/éteindre avec la touche
Allumer/éteindre par l'intermédiaire
du contact .................................... 58
Volume sonore ................................. 59
Réglage du volume sonore à
l'allumage ..................................... 59
Risque de blessure ! .......................59
Coupure du son (Mute) ................... 59
Téléphone raccordé à l'appareil ....... 59
Système de navigation raccordé à
l'appareil ......................................60
Tonalité et répartition spatiale du
volume sonore ................................. 61
Réglage des basses ........................61
Régler les aiguës ............................ 61
Réglage de la répartition gauche/
droite du volume sonore (Balance) .......62
Réglage de la répartition avant/
arrière du volume sonore (Fader) ..... 62
X-BASS ...........................................62
Affi cheur......................................... 63
Réglage de l'angle de lecture ............ 63
Réglage de la luminosité de l'affi cheur ..63
Réglage de la couleur de l'éclairage
des touches .................................. 63
Réglage de la couleur de l'éclairage
de l'affi cheur ................................. 64
54
1 .. 58
Réglage de l'analyseur de spectre ..... 65
Inversion de l'affi chage ...................65
Mode radio ...................................... 66
Réglage du tuner ............................ 66
Réglage du nombre d'antennes ........ 66
Activation du mode radio ................ 67
Sélection du mode radio statique
ou du mode radio dynamique
(uniquement FM) ........................... 67
Fonctions confort RDS (AF, REG) ..... 68
Sélection de la gamme d'ondes et
du niveau de mémoire .................... 69
Réglage des stations....................... 70
Réglage de la sensibilité de
la recherche de stations .................. 70
Balayage des stations (SCAN) .......... 71
Réglage de la durée d'écoute lors
du balayage...................................71
Mémorisation des stations .............. 71
Mémorisation automatique des
stations (Travelstore) ..................... 71
Appel d'une station mémorisée ........72
Type de programme (PTY) ..............72
Optimisation de la réception radio .... 73
Affi chage du texte radio .................. 73
TIM – Traffi c Information Memory ..... 74
Activation/désactivation de
la fonction TIM ............................... 74
Lecture des messages d'information
routière enregistrés ........................ 75
Enregistrement des messages
d'information routière ..................... 75
Réglage des minuteries ................... 76
Sélection des minuteries ................. 76
Informations routières .....................77
Activation et désactivation de la
diffusion prioritaire des informations
routières.......................................77
Réglage du volume sonore pour
les informations routières................77
Mode CD ......................................... 78
Risque d'endommagement du
lecteur CD ! ..................................78
Page 55

Sommaire
Activation du mode CD, mise en
place des CD ................................. 78
Ejection du CD .............................. 78
Sélection des titres ........................ 78
Recherche rapide (audible) ............. 79
Lecture aléatoire des titres (MIX) ...... 79
Répétition de titres (REPEAT) .......... 79
Balayage des titres (SCAN) .............. 79
Affi chage du texte de CD .................79
Réglage du défi lement du texte ........80
Informations routières en mode CD .. 80
Mode MP3 ....................................... 80
Préparation du CD MP3 .................. 80
Introduction et retrait des cartes
MMC/SD ......................................81
Introduction des cartes MMC/SD...... 82
Retrait des cartes MMC/SD ............. 82
Activation du mode MMC/SD ........... 82
Activation du mode MP3 sur CD ....... 82
Commandes en mode MP3.............. 82
Sélection des titres ........................ 83
Recherche rapide (audible) ............. 83
Balayage des titres (SCAN) .............. 84
Lecture aléatoire des titres (MIX) ...... 84
Répétition de titres ou de répertoires
complets (REPEAT) ........................84
Réglage de l'affi chage ..................... 84
Mode changeur de CD (option) ......... 86
Activation du mode changeur de CD... 86
Sélection d'un CD .......................... 86
Sélection des titres ........................ 86
Recherche rapide (audible) ............. 86
Balayage des titres (SCAN) .............. 86
Lecture de titres ou de CD complets
(REPEAT) .....................................87
Lecture aléatoire des titres (MIX) ...... 87
Attribution d'un nom aux CD ............ 87
Clock – Heure .................................. 89
Réglage de l'heure .......................... 89
Affi chage permanent de l'heure ....... 90
DSA Max –Digital Sound Adjustment 90
Activation/désactivation du DSA ...... 90
Etalonnage automatique de l'égaliseur . . 91
Visualisation de l'acoustique du
véhicule avec ou sans égaliseur ........ 92
Modifi cation manuelle des
égaliseurs graphiques ..................... 92
Sélection des égaliseurs ................. 93
Remise à zéro des égaliseurs ........... 93
Sélection des préréglages de
tonalité (Preset) ............................ 93
Réglage des effets de scène ............. 94
Sélection de l'ambiance sonore ........ 95
DNC - Dynamic Noise Covering ......... 95
Etalonnage du DNC ........................95
Désactivation du DNC ..................... 96
Sélection d'un relèvement DNC ........ 96
Subwoofer et haut-parleur central .... 97
Réglage du relèvement pour
le subwoofer .................................97
Réglage de la phase du subwoofer .... 97
Réglage du fi ltre passe-bas .............. 97
Réglage du fi ltre subsonique ............ 98
Réglage du haut-parleur central
« Centerspeaker » ..........................98
Réglage des fi ltres passe-haut pour
l'avant et l'arrière ...........................99
Crossover ..................................... 99
TMC pour les systèmes
de navigation dynamiques .............. 100
Amplifi cateur/Sub-Out ................... 101
Activation/désactivation de
l'amplifi cateur interne ................... 101
Sources audio externes .................. 101
Activation/désactivation
des entrées AUX .......................... 101
Attribution d'un nom aux entrées AUX . . 102
Divers ........................................... 103
Entrée du message à l'allumage ...... 103
Affi chage du numéro de série.........103
Réinitialisation de l'appareil. .......... 103
Caractéristiques techniques ........... 104
Notice de montage ......................... 362
FRANÇAIS
55
Page 56

Remarques et accessoires
Remarques et accessoires
Nous vous remercions d’avoir porté votre
choix sur un produit Blaupunkt. Nous espérons que votre nouvel appareil vous donnera entière satisfaction.
Prenez soin de lire ce mode d’emploi
avant d’utiliser l’appareil pour la première fois.
Informations concernant
les numéros de téléphones
internationaux
Si vous avez des questions concernant le
fonctionnement de votre autoradio ou si
vous avez besoin d’informations supplémentaires, n’hésitez pas à nous contacter!
Les numéros des services d’assistance sont
imprimés sur la dernière page de ce mode
d’emploi.
Sécurité routière
La sécurité routière est impéra-
tive.
Utilisez votre appareil uniquement
쏅
si la situation routière le permet.
Familiarisez-vous avec l'appareil
쏅
avant de prendre la route.
Les avertisseurs sonores de la police,
des sapeurs-pompiers et des services
de secours doivent être perçus à temps
dans le véhicule.
쏅
Soyez donc toujours à l'écoute de
votre programme à un volume adéquat.
Consigne de sécurité
L'autoradio et sa façade basculante (Flip-Release-Panel) chauds lorsque l'appareil fonctionne.
쏅
Par conséquent, pour enlever la
façade basculante, saisissez-la uniquement par les parties non-métalliques.
쏅
Si vous souhaitez déposer l'autoradio, laissez-le d'abord refroidir.
56
Montage
Si vous voulez monter vous-même l'autoradio, reportez-vous aux consignes de montage et de branchement à la fi n du mode
d'emploi.
Page 57

Remarques et accessoires Protection antivol
Accessoire
Télécommande
Télécommande RC-12H incluse. Vous pouvez gérer toutes les fonctions de base de
votre autoradio en toute sécurité et confortablement à partir de la télécommande.
Vous ne pouvez pas éteindre ou allumer
l’appareil avec la télécommande.
Accessoires spéciaux
(non fournis)
Utilisez uniquement les accessoires spéciaux agréés par Blaupunkt.
Amplifi cateur
Il est possible d'utiliser tous les amplifi cateurs Blaupunkt et Velocity.
Changeur CD (Changer)
Vous pouvez compléter votre appareil avec
un des changeurs de CD suivants disponibles dans les magasins d'accessoires :
CDC A 03, CDC A 08 et IDC A 09.
Activation et désactivation du
mode démo
Le mode démo de l'appareil est activé par
défaut. En mode démo, les différentes
fonctions de l'appareil sont représentées
de manière graphique sur l'affi cheur. Vous
pouvez bien sûr désactiver le mode démo.
Appuyez sur la touche MENU 9 pen-
쏅
dant plus de quatre secondes pour activer ou désactiver le mode démo.
Protection antivol
Façade amovible
Votre appareil est équipé d'une façade amovible (Flip-Release-Panel) qui le protège
contre le vol. Sans cette façade, l'appareil
n'a aucune valeur pour le voleur.
Protégez votre appareil contre le vol en
enlevant la façade amovible chaque fois
que vous quittez votre véhicule. Ne laissez
jamais la façade dans le véhicule, même en
la cachant bien.
La forme de la façade assure une manipulation simple.
Remarques :
•
Ne laissez pas tomber la façade par
terre.
•
N'exposez pas la façade directement
au soleil ou à d'autres sources de
chaleur.
•
Conservez la façade dans l'étui
fourni.
•
Evitez de toucher directement les
contacts de la façade. Nettoyez si
nécessaire les contacts au moyen
d'un chiffon non pelucheux, imprégné d'alcool.
Retrait de la façade
3
FRANÇAIS
57
Page 58

Protection antivol Activation/désactivation
Appuyez sur la touche
쏅
La façade est déverrouillée.
Enlevez la façade de l'appareil en la ti-
쏅
rant tout droit, puis vers la gauche.
Remarques :
Une fois la façade enlevée, l'appareil
•
s'éteint.
•
Toutes les fonctions que vous avez
défi nies sont mémorisées.
•
Un CD inséré reste dans l'appareil.
3.
Mise en place de la façade
Poussez la façade de la gauche vers la
쏅
droite dans la rainure de guidage de
l'appareil.
쏅
Appuyez sur le côté gauche de la façade
jusqu'à ce que celle-ci s'encliquette.
Remarque :
N'appuyez pas sur l'affi cheur pour mettre en place la façade.
Allumer/éteindre
Plusieurs possibilités vous sont offertes
pour allumer ou éteindre l'appareil.
Allumer/éteindre avec la touche
1
Pour allumer l'appareil, appuyez sur la
쏅
touche 1.
L'appareil s'allume.
Pour éteindre l'appareil, appuyez sur
쏅
la touche 1 pendant plus de deux secondes.
L'appareil s'éteint.
Allumer/éteindre par
l'intermédiaire du contact
Si l'appareil est correctement relié au réseau de bord et s'il n'a pas été éteint par
l'intermédiaire de la touche 1, vous pouvez l'allumer ou l'éteindre en mettant ou en
coupant le contact.
Vous pouvez également allumer l'appareil
sans mettre le contact.
Appuyez sur la touche 1.
쏅
Remarque :
Pour protéger la batterie du véhicule,
l'appareil s'éteint automatiquement au
bout d'une heure quand le contact est
coupé.
58
Page 59

Volume sonore
Volume sonore
Le volume est réglable de 0 (volume désactivé) à 50 (volume maximal).
Pour augmenter le volume,
tournez le bouton de réglage du volume
쏅
2 vers la droite.
Pour diminuer le volume,
tournez le bouton de réglage du volume
쏅
2 vers la gauche.
Réglage du volume sonore à
l'allumage
Vous pouvez régler le volume qui sera sélectionné automatiquement à la mise en marche de l'appareil.
Appuyez sur la touche MENU 9.
쏅
Appuyez sur la touche programmable
쏅
5 identifi ée par « VOLUME » sur l'affi cheur.
Appuyez sur la touche programmable
쏅
5 identifi ée par « ON VOL » sur l'affi cheur.
Réglez le volume sonore souhaité avec
쏅
le bouton 2.
쏅
Appuyez sur la touche OK du joystick
8 ou sur la touche MENU 9 pour
quitter le menu.
Les réglages sont mémorisés.
Remarque :
Vous pouvez sélectionner le dernier
volume sonore réglé avant l'extinction
comme volume sonore à l'allumage.
Appuyez pour cela sur la touche programmable identifi ée par « LAST VOL »
sur l'affi cheur dans le menu Volume.
Risque de blessure !
Le volume sonore à l'allumage
de l'appareil peut être très élevé s'il est
réglé au maximum !
Le volume à l'allumage de l'appareil peut
être très élevé si vous l'avez réglé au
maximum et sélectionné « LAST VOL »
comme valeur du volume à l'allumage !
Dans ces deux cas, vous risquez de subir des troubles graves de l'audition.
Coupure du son (Mute)
Vous pouvez diminuer rapidement le volume sonore (Mute).
Appuyez brièvement sur la touche 1.
쏅
« MUTE » apparaît sur l'affi cheur.
Désactivation de la coupure du son
(Mute)
Appuyez de nouveau brièvement sur la
쏅
touche 1
ou
쏅
tournez le bouton de réglage du volume
2.
Téléphone raccordé à l'appareil
Si votre téléphone portable est raccordé à
l'appareil, le son de celui-ci est coupé automatiquement lorsque vous « décrochez »
et la communication s'effectue par l'intermédiaire des haut-parleurs du véhicule. Le
téléphone portable doit pour cela être raccordé à l'appareil comme décrit dans la notice de montage.
FRANÇAIS
59
Page 60

Volume sonore
Si un message d'information routière est
diffusé au cours d'une communication téléphonique, vous ne pourrez l'entendre
qu'une fois la communication terminée
pour autant qu'il soit encore diffusé.
Si un appel téléphonique est reçu au cours de
la diffusion d'un message d'information routière, la diffusion est interrompue et la communication téléphonique peut avoir lieu.
Vous pouvez régler le volume sonore avec
lequel la communication téléphonique doit
s'effectuer.
Appuyez sur la touche MENU 9.
쏅
Appuyez sur la touche programmable
쏅
5 identifi ée par « VOLUME » sur l'affi cheur.
Appuyez sur la touche programmable
쏅
5 identifi ée par « PHONE » sur l'affi cheur pour accéder au réglage du volume sonore.
Réglez le volume sonore souhaité avec
쏅
le bouton 2.
Appuyez sur la touche OK du joystick
쏅
8 ou sur la touche MENU 9 pour
quitter le menu.
Les réglages sont mémorisés.
Remarque :
Vous pouvez également régler le volume sonore pendant la communication
téléphonique avec le bouton 2.
Système de navigation raccordé
à l'appareil
Vous pouvez raccorder un système de navigation à la place d'une deuxième source
audio externe (« AUX2 », voir « Sources
audio externes »).
Si un système de navigation est raccordé
à l'appareil, les instructions vocales de
navigation se « superposent » à la source
audio écoutée et sont diffusés par les hautparleurs du véhicule.
Le système de navigation doit pour cela être
raccordé à l'appareil comme décrit dans la
notice de montage et être activé dans le
menu.
Consultez votre revendeur Blaupunkt pour
connaître les systèmes de navigation utilisables avec votre appareil.
Activation d'un système de navigation
raccordé à l'appareil
Vous pouvez raccorder une deuxième source audio ou un système de navigation à cet
appareil. Vous devez préciser dans le menu
le type d'appareil raccordé.
Appuyez sur la touche MENU 9.
쏅
Appuyez sur la touche programmable
쏅
5 identifi ée par « AUX » sur l'affi cheur.
Le menu AUX apparaît.
Si vous avez raccordé un système de
쏅
navigation, appuyez sur la touche programmable 5 identifi ée par « NAV/
AUX2 » sur l'affi cheur autant de fois
qu'il est nécessaire pour faire apparaître « NAVIGATION ON ».
60
Page 61

Volume sonore Tonalité et répartition spatiale du volume sonore
Appuyez sur la touche OK du joystick
쏅
8 ou sur la touche MENU 9 pour
quitter le menu.
Les réglages sont mémorisés.
Réglage du volume sonore minimal pour
la navigation
Vous pouvez régler le volume sonore des
instructions vocales de navigation.
Remarque :
Réglez le volume sonore sur le système
de navigation au maximum. Si des distorsions se produisent, diminuez légèrement le volume sonore sur le système
de navigation.
Appuyez sur la touche MENU 9.
쏅
Appuyez sur la touche programmable
쏅
5 identifi ée par « VOLUME » sur l'affi cheur.
Appuyez sur la touche programmable
쏅
5 identifi ée par « NAVI DIFF » sur l'affi cheur pour accéder au réglage du volume sonore.
Réglez le volume sonore souhaité avec
쏅
le bouton 2.
Appuyez sur la touche OK du joystick
쏅
8 ou sur la touche MENU 9 pour
quitter le menu.
Les réglages sont mémorisés.
Remarque :
Vous pouvez également régler le volume sonore pendant la diffusion d'une
instruction vocale avec le bouton 2.
Ce réglage est valable pour l'instruction vocale du moment et n'est pas mémorisé.
Tonalité et répartition
spatiale du volume sonore
Remarque :
Vous pouvez régler les basses et les
aiguës pour chaque source audio séparément.
Réglage des basses
Appuyez sur la touche AUDIO :.
쏅
« AUDIO MENU » apparaît sur l'affi cheur.
Appuyez sur la touche programmable
쏅
5 identifi ée par « BASS » sur l'affi cheur.
Actionnez le joystick 8 vers le haut
쏅
ou la droite pour relever le niveau des
basses ou vers le bas ou la gauche pour
l'abaisser.
Une fois le réglage effectué,
쏅
appuyez sur la touche OK du joystick
8 ou sur la touche AUDIO :.
Régler les aiguës
Appuyez sur la touche AUDIO :.
쏅
« AUDIO MENU » apparaît sur l'affi cheur.
Appuyez sur la touche programmable
쏅
5 identifi ée par « TREBLE » sur l'affi cheur.
Actionnez le joystick 8 vers le haut
쏅
ou la droite pour relever le niveau des
aiguës ou vers le bas ou la gauche pour
l'abaisser.
Une fois le réglage effectué,
쏅
appuyez sur la touche OK du joystick
8 ou sur la touche AUDIO :.
FRANÇAIS
61
Page 62

Tonalité et répartition spatiale du volume sonore X-BASS
Réglage de la répartition gauche/
droite du volume sonore (Balance)
Pour régler la balance, appuyez sur la
쏅
touche AUDIO :.
« AUDIO MENU » apparaît sur l'affi cheur.
Appuyez sur la touche programmable
쏅
5 identifi ée par « BALANCE » sur l'affi cheur.
Actionnez le joystick 8 vers le haut
쏅
ou la droite ou vers le bas ou la gauche
pour régler la répartition gauche/droite
du volume sonore.
Une fois le réglage effectué,
appuyez sur la touche OK du joystick
쏅
8 ou sur la touche AUDIO :.
Réglage de la répartition avant/
arrière du volume sonore (Fader)
Pour régler le fader, appuyez sur la
쏅
touche AUDIO :.
« AUDIO MENU » apparaît sur l'affi cheur.
Appuyez sur la touche programmable
쏅
5 identifi ée par « FADER » sur l'affi cheur.
Actionnez le joystick 8 vers le haut
쏅
ou la droite ou vers le bas ou la gauche
pour régler la répartition avant/arrière
du volume sonore.
Une fois le réglage effectué,
appuyez sur la touche OK du joystick
쏅
8 ou sur la touche AUDIO :.
X-BASS
La fonction X-BASS relève le niveau des
basses à faible volume. Vous pouvez régler
un relèvement par paliers entre 0 et 6 des
basses (X-Bass) pour une des fréquences
pivots suivantes : 32 Hz, 40 Hz, 50 Hz,
63 Hz ou 80 Hz. Si vous sélectionnez 0, la
fonction X-BASS est désactivée.
Appuyez sur la touche AUDIO :.
쏅
« AUDIO MENU » apparaît sur l'affi cheur.
Appuyez sur la touche programmable
쏅
5 identifi ée par « X-BASS » sur l'affi cheur.
Actionnez le joystick 8 vers la gau-
쏅
che ou la droite pour sélectionnez la
fréquence sur laquelle vous souhaitez
effectuer un relèvement.
Actionnez le joystick 8 vers le haut
쏅
pour augmenter le niveau du relèvement X-BASS ou vers le bas pour le diminuer.
Une fois le réglage effectué,
appuyez sur la touche OK du joystick
쏅
8 ou sur la touche AUDIO :.
62
Page 63

Affi cheur
Affi cheur
Vous pouvez régler l'affi cheur en fonction
de la position de montage de l'appareil et
en fonction de vos besoins.
Réglage de l'angle de lecture
Appuyez sur la touche MENU 9.
쏅
Appuyez sur la touche programmable
쏅
5 identifi ée par « DISPLAY » sur l'affi cheur.
Appuyez sur la touche programmable
쏅
5 identifi ée par « ANGLE » sur l'affi cheur.
Actionnez le joystick 8 vers le haut
쏅
ou la droite ou vers le bas ou la gauche
pour régler l'angle de lecture.
Appuyez sur la touche OK du joystick
쏅
8 ou sur la touche MENU 9 pour
quitter le menu.
Les réglages sont mémorisés.
Réglage de la luminosité de
l'affi cheur
Si votre appareil a été branché conformément aux instructions de la notice de montage, la luminosité de l'affi cheur change si
l'éclairage extérieur du véhicule est allumé
ou non. Vous pouvez régler la luminosité
séparément pour la nuit et pour le jour par
paliers de 1 à 16.
Luminosité de l'affi cheur
Appuyez sur la touche MENU 9.
쏅
Appuyez sur la touche programmable
쏅
5 identifi ée par « DISPLAY » sur l'affi cheur.
Appuyez sur la touche programmable
쏅
5 identifi ée par « BRIGHT » sur l'affi cheur.
« DAY » et « NIGHT » apparaissent avec les
valeurs de luminosité correspondantes sur
la ligne supérieur de l'affi cheur.
Déplacer la marque de sélection qui
쏅
clignote derrière « DAY » ou « NIGHT
» en actionnant le joystick 8 vers la
gauche ou la droite.
Entrez la valeur souhaitée. Actionnez
쏅
pour cela le joystick 8 vers le haut ou
le bas.
Appuyez sur la touche OK du joystick
쏅
8 ou sur la touche MENU 9 pour
quitter le menu.
Les réglages sont mémorisés.
Réglage de la couleur de
l'éclairage des touches
Vous pouvez régler la couleur de l'éclairage
des touches.
Vous avez le choix entre 16 couleurs.
Appuyez sur la touche MENU 9.
쏅
Appuyez sur la touche programmable
쏅
5 identifi ée par « DISPLAY » sur l'affi cheur.
Appuyez sur la touche programmable
쏅
5 identifi ée par « KEYCOLOR » sur
l'affi cheur.
Actionnez le joystick 8 vers le haut
쏅
ou la droite ou vers le bas ou la gauche
pour régler une couleur. La couleur
change avec chaque impulsion donnée
au joystick.
Appuyez sur la touche OK du joystick
쏅
8 ou sur la touche MENU 9 pour
quitter le menu.
Les réglages sont mémorisés.
63
FRANÇAIS
Page 64

Affi cheur
Réglage de la couleur de
l'éclairage de l'affi cheur
Pour l'éclairage de l'affi cheur, vous avez la
possibilité de sélectionner une des quatre
couleurs préréglées, de créer une couleur
par mélange des couleurs de base du spectre RVB (rouge, vert et bleu) ou de sélectionner une couleur par recherche.
Sélection d'une couleur préréglée
Quatre nuances de couleur différentes sont
mémorisées dans l'appareil. Les couleurs
disponibles sont « Ocean » (bleu), « Amber
» (ambre), « Sunset » (rouge orange) et «
Nature » (vert). Choisissez la couleur qui
s'accorde le mieux avec l'équipement de
votre véhicule.
Appuyez sur la touche MENU 9.
쏅
Appuyez sur la touche programmable
쏅
5 identifi ée par « DISPLAY » sur l'affi cheur.
Appuyez sur la touche programmable
쏅
5 identifi ée par « COLOR » sur l'affi cheur.
Appuyez sur la touche programmable
쏅
5 identifi ée par le nom de la couleur
souhaitée.
Appuyez sur la touche OK du joystick
쏅
8 ou sur la touche MENU 9 pour
quitter le menu.
Les réglages sont mémorisés.
Création d'une couleur d'éclairage de
l'affi cheur
Pour personnaliser l'éclairage de l'affi cheur,
vous avez la possibilité de créer une couleur
par mélange des trois couleurs de base rouge, vert et bleu.
Appuyez sur la touche MENU 9.
쏅
Appuyez sur la touche programmable
쏅
5 identifi ée par « DISPLAY » sur l'affi cheur.
Appuyez sur la touche programmable
쏅
5 identifi ée par « COLOR » sur l'affi cheur.
Appuyez sur la touche programmable
쏅
5 identifi ée par « USER » sur l'affi cheur.
Dans le menu que vous avez ouvert,
쏅
vous pouvez déterminer les proportions des trois couleurs de base rouge,
bleu et vert. Appuyez pour cela sur la
touche programmable correspondante
5 autant de fois qu'il est nécessaire
pour que la couleur affi chée corresponde à vos attentes.
Appuyez sur la touche OK du joystick
쏅
8 ou sur la touche MENU 9 pour
quitter le menu.
Les réglages sont mémorisés.
Sélection d'un couleur d'éclairage de
l'affi cheur par recherche
쏅
Appuyez sur la touche MENU 9.
쏅
Appuyez sur la touche programmable
5 identifi ée par « DISPLAY » sur l'affi cheur.
쏅
Appuyez sur la touche programmable
5 identifi ée par « COLOR » sur l'affi cheur.
쏅
Appuyez sur la touche programmable
5 identifi ée par « COL-SCAN » sur
l'affi cheur.
L'appareil commence à changer la couleur
de l'éclairage de l'affi cheur.
64
Page 65

Si vous souhaitez sélectionner une des
쏅
couleurs proposée, appuyez sur la touche programmable 5 identifi ée par
« SAVE » sur l'affi cheur.
Si vous souhaitez revenir dans le menu
쏅
précédent sans changer la couleur,
appuyez sur la touche programmable
identifi ée par « BREAK » sur l'affi cheur.
Appuyez sur la touche OK du joystick
쏅
8 ou sur la touche MENU 9 pour
quitter le menu.
Les réglages sont mémorisés.
Réglage de l'analyseur de spectre
L'analyseur de spectre indique le niveau de
sortie de l'appareil sur l'affi cheur. Lorsqu'il
est activé, il apparaît automatiquement
pendant la diffusion d'une source audio si
vous n'actionnez aucune touche pendant
un certain temps.
Vous également désactiver l'analyseur de
spectre.
Activation/désactivation de l'analyseur
de spectre
Appuyez sur la touche MENU 9.
쏅
Appuyez sur la touche programmable
쏅
5 identifi ée par « DISPLAY » sur l'affi cheur.
Appuyez sur la touche programmable
쏅
5 identifi ée par « SPECTRUM » sur
l'affi cheur autant de fois qu'il est nécessaire pour faire apparaître « SPECTRUM
OFF » (désactivation) ou « SPECTRUM
ON » (activation) sur la ligne supérieure
de l'affi cheur.
Affi cheur
쏅
Appuyez sur la touche OK du joystick
8 ou sur la touche MENU 9 pour
quitter le menu.
Les réglages sont mémorisés.
Inversion de l'affi chage
Vous pouvez faire apparaître l'affi chage en
négatif.
Appuyez sur la touche MENU 9.
쏅
Appuyez sur la touche programmable
쏅
5 identifi ée par « DISPLAY » sur l'affi cheur.
Appuyez sur la touche programmable
쏅
5 identifi ée par « INVERT » sur l'affi cheur.
Appuyez sur la touche OK du joystick
쏅
8 ou sur la touche MENU 9 pour
quitter le menu.
Les réglages sont mémorisés.
FRANÇAIS
65
Page 66

Mode radio
Mode radio
Cet appareil est équipé d'un récepteur RDS.
De nombreuses stations FM émettent un signal qui contient, en plus du programme,
des informations telles que le nom de la station et le type de programme (PTY).
Le nom de la station apparaît sur l'affi cheur
dès sa réception. Le type de programme
peut être affi ché sur demande. Consultez
pour cela la section « Type de programme
(PTY) ».
Réglage du tuner
Pour garantir un fonctionnement sans problème de la partie radio, réglez l'appareil
sur la région dans laquelle vous vous trouvez. Vous pouvez régler Europe ou Amérique (USA). Le tuner est réglé d'usine sur
la région dans laquelle l'appareil est vendu.
En cas de problème de réception radio, vérifi ez d'abord ce réglage.
Appuyez sur la touche MENU 9.
쏅
Appuyez sur la touche programmable
쏅
5 identifi ée par « TUNER » sur l'affi cheur.
Appuyez sur la touche programma-
쏅
ble 5 identifi ée sur l'affi cheur par
la région souhaitée, « AREA EUR » ou
« AREA USA ».
Appuyez sur la touche OK du joystick
쏅
8 ou sur la touche MENU 9 pour
quitter le menu.
Les réglages sont mémorisés.
Réglage du nombre d'antennes
Cet appareil est équipé de deux récepteurs
radio RDS (TwinCeiver). Vous pouvez lui
raccorder une ou deux antennes. Si vous
utilisez deux antennes (ce qui est instamment recommandé, la deuxième antenne
faisant partie de l'équipement fourni), une
réception dirigée de la station réglée est
possible en mode radio DDA. La réception
dirigée améliore sensiblement la qualité de
réception dans la majorité des cas.
Remarque :
Pour garantir un fonctionnement sans
problème du tuner, l'antenne principale
doit être raccordée à la prise d'antenne
inférieure.
Pour régler le nombre d'antennes,
appuyez sur la touche MENU 9.
쏅
Appuyez sur la touche programmable
쏅
5 identifi ée par « TUNER » sur l'affi cheur.
Appuyez sur la touche programmable
쏅
5 identifi ée par « ONE ANTE » sur l'affi cheur si une seule antenne est raccordée à l'appareil.
Ou
Appuyez sur la touche programmable
쏅
5 identifi ée par « TWO ANTE » sur
l'affi cheur si deux antennes sont raccordées à l'appareil.
Appuyez sur la touche OK du joystick
쏅
8 ou sur la touche MENU 9 pour
quitter le menu.
Les réglages sont mémorisés.
66
Page 67

Mode radio
Activation du mode radio
Si l'appareil se trouve en mode CD/MP3 ou
Changeur de CD/Compact Drive,
appuyez sur la touche TUNER =.
쏅
Le menu de base radio qui permet de sélectionner les stations apparaît. Les fonctions
du mode radio sont commandées par l'intermédiaire du menu des fonctions radio.
Vous pouvez accéder au menu des fonctions radio en appuyant de nouveau sur la
touche TUNER = dans le mode radio.
Sélection du mode radio statique
ou du mode radio dynamique
(uniquement FM)
En FM, vous avez le choix entre deux mode
radio différents :
Mode radio statique
(« PRESETS » et « DDA »)
Dans le mode radio statique, vous disposez
de quatre niveaux de mémoire en mode FM
(FM1, FM2, FM3 et FMT). Vous pouvez mémoriser six stations dans chaque niveau de
mémoire. La partie réceptrice règle automatiquement pour chaque station mémorisée la fréquence pour laquelle la qualité de
réception sera la meilleure au moment où
vous sélectionnez la station.
Mode PRE (statique)
Si une seule antenne est raccordée à l'appareil et que le réglage correspondant a été
effectué (voir « Réglage du nombre d'antenne »), un des tuners diffuse la station réglée
tandis que le deuxième tuner cherche en
permanence la fréquence pour laquelle la
qualité de réception de la station réglée sera
la meilleure (si la fonction RDS est activée).
Mode Digital Directional Antenna –
DDA (statique)
Si deux antennes sont raccordées à l'appareil et que le réglage correspondant a été
effectué (voir « Réglage du nombre d'antenne »), la station réglée est reçue avec
les deux antennes en mode DDA. Le TwinCeiver analyse en permanence les signaux
des deux antennes et en déduit un « signal
propre » afi n de réduire les perturbations
dans la réception. Le principe de fonctionnement de ce procédé développé par Blaupunkt s'apparente à celui d'une antenne
directive. La qualité de la réception est
nettement meilleure, en particulier dans les
zones où la réception est perturbée par des
réfl exions sur les bâtiments, les montagnes,
etc. Dans des cas exceptionnels, par exemple en cas de réception de deux stations
différentes qui utilisent la même fréquence,
des comportements inattendus peuvent se
manifester. Dans ce genre de situation, sélectionner le mode radio dynamique (voir
« Sélection du mode radio » ci-après).
Mode radio dynamique
Dans le mode radio dynamique, vous disposez de cinq niveaux (DL1 - DL5). Pendant que la station réglée est diffusée, le
deuxième récepteur cherche en arrière plan
toutes les stations qui peuvent être reçues
et affecte leur nom abrégé aux touches programmables. La sélection de stations est
réactualisée en permanence de manière à
ce que vous puissiez toujours accéder aux
stations qui peuvent être reçues.
FRANÇAIS
67
Page 68

Mode radio
Sélection du mode radio
Pour sélectionner le mode radio statique ou
le mode radio dynamique,
appuyez sur la touche TUNER =.
쏅
Le menu des fonctions radio apparaît sur
l'affi cheur.
Appuyez sur la touche NEXT 4.
쏅
La deuxième page du menu des fonctions
radio apparaît sur l'affi cheur.
Appuyez sur la touche programmable
쏅
5 identifi ée par « TUNER 2 » sur l'affi cheur.
Appuyez sur la touche programmable
쏅
5 identifi ée par « DYN LIST » sur l'affi cheur pour sélectionner le mode radio
dynamique.
Appuyez sur la touche programma-
쏅
ble 5 identifi ée par « DDA » ou
« PRESETS » sur l'affi cheur pour sélectionner le mode radio statique correspondant.
쏅
Appuyez sur la touche OK du joystick
8 ou sur la touche MENU 9 pour
quitter le menu.
Les réglages sont mémorisés.
Fonctions confort RDS (AF, REG)
Les fonctions confort RDS AF (fréquence
alternative) et REG (régional) élargissent
l'éventail des performances de votre appareil (uniquement en FM).
AF : l'appareil se règle automatiquement
•
sur la fréquence la plus puissante de la
station dont vous êtes à l'écoute quand
la fonction confort RDS est activée.
REG : quelques stations partagent à
•
certaines heures leur programme avec
des programmes régionaux différents.
68
La fonction REG empêche que l'appareil ne change sur les fréquences alternatives qui diffusent un autre contenu
de programme régional.
Remarque :
REG doit être activé ou désactivé séparément dans le menu des fonctions
radio.
Activation et désactivation des
fonctions confort RDS
Pour bénéfi cier des fonctions confort RDS
AF et REG,
appuyez, en mode radio, sur la touche
쏅
TUNER =.
Le menu des fonctions radio apparaît sur
l'affi cheur.
Appuyez sur la touche programmable
쏅
5 identifi ée par « RDS » sur l'affi cheur
autant de fois qu'il est nécessaire pour
faire apparaître « RDS ON » (activation)
ou « RDS OFF » (désactivation).
Pour accéder au menu de base radio,
appuyez sur la touche TUNER = ou
쏅
sur la touche OK du joystick 8.
Les réglages sont mémorisés.
Activation/désactivation de REG
Pour bénéfi cier de la fonction confort RDS
REG,
appuyez, en mode radio, sur la touche
쏅
TUNER =.
Appuyez sur la touche NEXT 4 pour
쏅
accéder à la deuxième page du menu
des fonctions radio.
Le menu des fonctions radio apparaît sur
l'affi cheur.
Page 69

Appuyez sur la touche programmable
쏅
5 identifi ée par « REGIONAL » sur
l'affi cheur autant de fois qu'il est nécessaire pour faire apparaître « REGIONAL
ON » (activation) ou « REGIONAL OFF »
(désactivation).
Appuyez sur la touche TUNER = ou
쏅
sur la touche OK du joystick 8.
Les réglages sont mémorisés.
Sélection de la gamme d'ondes
et du niveau de mémoire
Cet appareil vous permet de recevoir les
émissions des gammes d'ondes FM ou AM
(OM ou PO, OL ou GO et OC). Quatre niveaux de mémoire sont disponibles pour
la gamme d'ondes FM et un niveau de mémoire pour chacune des gammes d'ondes
OM (PO), OL (GO) et OC.
Dans le mode radio dynamique, vous disposez de cinq niveaux.
Six stations peuvent être mémorisées sur
chaque niveau de mémoire.
Remarque :
Si votre appareil est réglé pour la région
USA, vous avez le choix entre les gammes d'ondes FM et AM. Pour la gamme
d'ondes AM, vous disposez des niveaux
de mémoire AM1, AM2 et AMT.
Sélection de la gamme d'onde
Pour sélectionner une des gammes d'ondes
FM, OM, OL et OC,
appuyez, en mode radio, sur la touche
쏅
TUNER =.
Le menu des fonctions radio apparaît sur
l'affi cheur.
Mode radio
Appuyez sur la touche programmable
쏅
5 identifi ée par « BAND » sur l'affi cheur.
Appuyez sur la touche programmable
쏅
5 identifi ée par « FM » sur l'affi cheur
pour la gamme FM.
Appuyez sur la touche programmable
쏅
5 identifi ée par « MW » sur l'affi cheur
pour la gamme OM (PO).
Appuyez sur la touche programmable
쏅
5 identifi ée par « LW » sur l'affi cheur
pour la gamme OL (GO).
Appuyez sur la touche programmable
쏅
5 identifi ée par « SW » sur l'affi cheur
pour la gamme OC.
Le menu de base radio de la gamme d'ondes sélectionnée apparaît.
Sélection d'un niveau de mémoire FM
Pour sélectionner un des niveaux de mémoire FM : FM1, FM2, FM3 ou FMT,
appuyez sur la touche NEXT 4 autant
쏅
de fois qu'il est nécessaire pour faire
apparaître le niveau de mémoire souhaité sur l'affi cheur.
Les niveaux de mémoire apparaître dans
l'ordre FM1, FM2, FM3 et FMT.
Remarque :
Si votre appareil est réglé pour la région
USA et que vous avez sélectionné la
gamme d'ondes AM, vous pouvez également appuyer sur la touche NEXT 4
pour sélectionner un des niveaux de
mémoire AM : AM1, AM2 et AMT.
FRANÇAIS
69
Page 70

Mode radio
Réglage des stations
Vous avez plusieurs possibilités pour régler
une station.
Recherche automatique des stations
Actionnez le joystick 8 vers le haut ou
쏅
le bas.
La station suivante qui peut être reçue est
réglée.
Recherche manuelle de stations
Vous avez également la possibilité de rechercher les stations manuellement.
Remarque :
La recherche manuelle de stations n'est
possible que si la fonction confort RDS
est désactivée.
Actionnez le joystick 8 vers la gauche
쏅
ou la droite.
Défi lement des chaînes de stations
(uniquement en FM)
Si une station offre plusieurs programmes,
vous avez la possibilité de faire défi ler ce
que l'on appelle la « chaîne de stations ».
Remarque :
Pour pouvoir utiliser cette fonction, la
fonction confort RDS doit être activée.
Vous ne pouvez passer à des stations
que si celles-ci ont déjà été captées une
fois.
Actionnez le joystick 8 vers la gauche
쏅
ou la droite.
Réglage de la sensibilité de la
recherche de stations
Vous pouvez régler la recherche de manière
à ce qu'elle ne porte que sur les stations
puissantes ou qu'elle porte sur toutes les
stations.
Appuyez, en mode radio, sur la touche
쏅
TUNER =.
Le menu des fonctions radio apparaît sur
l'affi cheur.
Appuyez sur la touche NEXT 4.
쏅
Remarque :
Si vous appelez le menu des fonctions
radio dans le mode radio en OM (PO)
ou OL (GO), la touche programmable
identifi ée par « SENS » sur l'affi cheur
se trouve sur la première page.
Appuyez sur la touche programmable
쏅
5 identifi ée par « SENS » sur l'affi cheur.
Appuyez sur la touche programmable
쏅
5 identifi ée par « FM » ou « AM » sur
l'affi cheur pour régler la sensibilité pour
les gammes d'ondes « FM » ou « AM ».
Actionnez le joystick 8 vers le haut
쏅
ou la droite ou vers le bas ou la gauche
pour régler la sensibilité.
Vous pouvez régler la sensibilité par paliers
entre 1 et 6. « Sensitivity 1 » représente la
sensibilité la plus faible, « Sensitivity 6 » la
plus grande, pour la réception des stations
éloignées.
Appuyez sur la touche OK du joystick
쏅
8 ou sur la touche MENU 9 pour
quitter le menu.
Les réglages sont mémorisés.
70
Page 71

Mode radio
Balayage des stations (SCAN)
La fonction Scan permet de balayer toutes
les stations pouvant être reçues. Vous pouvez régler la durée de diffusion des stations
entre 5 et 30 secondes dans le menu.
Démarrage du balayage des stations
(SCAN)
Appuyez sur la touche OK du joystick
쏅
8 pendant plus de deux secondes.
Le balayage démarre. « SCAN » apparaît
brièvement sur l'affi cheur, puis le nom ou
la fréquence de la station réglée sur le moment est affi ché.
Arrêt du balayage (SCAN), écoute de la
station réglée sur le moment
Appuyez sur la touche OK du joystick
쏅
8.
Le balayage des stations s'arrête et la dernière station réglée reste active.
Réglage de la durée d'écoute lors
du balayage
Appuyez sur la touche MENU 9.
쏅
Appuyez sur la touche programmable
쏅
5 identifi ée par « VARIOUS » sur l'affi cheur.
Appuyez sur la touche programmable
쏅
5 identifi ée par « SCANTIME » sur l'affi cheur.
Actionnez le joystick 8 vers le haut
쏅
ou la droite ou vers le bas ou la gauche
pour régler la durée d'écoute lors du
balayage.
Appuyez sur la touche OK du joystick
쏅
8 ou sur la touche MENU 9 pour
quitter le menu.
Les réglages sont mémorisés.
Remarque :
La durée la durée d'écoute lors du balayage des stations est également valable pour le balayage des titres en mode
CD/MP3 et changeur de CD.
Mémorisation des stations
Mémorisation manuelle des stations
Sélectionnez le niveau de mémoire
쏅
souhaité FM1, FM2, FM3 ou FMT ou
une des gammes d'ondes OM (PO), OL
(GO) ou OC.
Réglez la station souhaitée comme dé-
쏅
crit dans la section « Réglage des stations ».
Appuyez sur la touche programmable à
쏅
laquelle vous souhaitez affecter la station et maintenez-la appuyée pendant
plus de deux secondes.
Mémorisation automatique des
stations (Travelstore)
Vous avez la possibilité de mémoriser automatiquement les six stations les plus puissantes de la région (uniquement en FM).
La mémorisation s'effectue au niveau de
mémoire FMT.
Remarques :
Si votre appareil est réglé pour la
•
région USA, vous pouvez également
démarrer la fonction Travelstore en
AM. Les stations sont alors mémorisées dans le niveau AMT.
Les stations déjà mémorisées sur ce
•
niveau de mémoire seront effacées.
Démarrage de la fonction Travelstore
Appuyez, en mode radio, sur la touche
쏅
TUNER =.
71
FRANÇAIS
Page 72

Mode radio
Le menu des fonctions radio apparaît sur
l'affi cheur.
Appuyez sur la touche programmable 5
쏅
identifi ée par « T-STORE » sur l'affi cheur.
La mémorisation commence. « TRAVEL
STORE » apparaît sur l'affi cheur. Une fois la
mémorisation terminée, la station qui fi gure
à la première place du niveau FMT (ou AMT)
est diffusée.
•
Appel d'une station mémorisée
Sélectionnez le niveau de mémoire ou
쏅
la gamme d'ondes.
Appuyez sur la touche programmable
쏅
5 identifi ée sur l'affi cheur par le nom
ou la fréquence de la station souhaitée.
Type de programme (PTY)
En plus de leur nom, certaines stations FM
transmettent également des informations
sur le type de programme qu'elles diffusent. Ces informations peuvent être reçues
et affi chées par votre appareil.
Ces types de programmes sont par exemple :
CULTURE TRAVEL JAZZ
SPORT NEWS POP
ROCK CLASSICS
Cette fonction PTY vous permet de sélec-
tionner directement des stations diffusant
un certain type d'émission.
PTY-EON
Lorsque le type de programme est sélectionné et la recherche démarrée, l'appareil
passe de la station diffusée sur le moment
à une station proposant le type de programme sélectionné.
Remarques :
Un bip retentit et « NO PTY » appa-
•
raît sur l'affi cheur pendant un court
72
Activation de la fonction PTY
Pour utiliser la fonction PTY,
appuyez, en mode radio, sur la touche
쏅
TUNER =.
Le menu des fonctions radio apparaît sur
l'affi cheur.
Appuyez sur la touche NEXT 4.
쏅
Appuyez sur la touche programmable
쏅
5 identifi ée par « PROG TYP » sur l'affi cheur.
Si la fonction PTY est activée, le type de
programme actuel est affi ché. PTY apparaît sur le visuel. Les types de programme
apparaissent en face des touches programmables 5.
Désactivation de la fonction PTY
Pour désactiver la fonction PTY,
appuyez sur la touche programmable
쏅
5 identifi ée par « PTY OFF » sur l'affi cheur lorsque les types de programmes
sont affi chés.
Sélection d'un type de programme et
démarrage de la recherche
le menu PTY comporte plusieurs pages sur
lesquelles les types de programme connus
instant si aucune station diffusant le
type de programme sélectionné n'a
été trouvée au terme de la recherche. La dernière station écoutée est
de nouveau réglé.
Si la station réglée ou une autre station de la chaîne de stations diffuse
par la suite le type de programme
souhaité, l'appareil passe automatiquement de la station en cours
d'écoute, ou du mode CD/MP3 ou
Changeur CD, à la station qui diffuse
le type de programme souhaité.
Page 73

Mode radio
sont indiqués. Pour passer d'une page du
menu PTY à une autre,
appuyez sur la touche NEXT 4 autant
쏅
de fois qu'il est nécessaire pour que
le type de programme souhaité apparaisse en face d'une touche programmable.
쏅
Appuyez sur la touche programmable
5 identifi ée par le type de programme souhaité.
쏅
Actionnez le joystick 8 vers le haut
ou la droite ou vers le bas ou la gauche
pour démarrer la recherche.
La station suivante qui diffuse le type de
programme souhaité est réglée.
Un bip retentit et « NO PTY » apparaît sur
l'affi cheur pendant un court instant si aucune station diffusant le type de programme
sélectionné n'a été trouvée au terme de la
recherche. La dernière station écoutée est
de nouveau réglé.
Pour revenir à l'affi chage des types de programme,
쏅
appelez la deuxième page du menu des
fonctions radio et appuyez sur la touche programmable 5 identifi ée par
« PROG TYP » sur l'affi cheur.
Optimisation de la réception
radio
Réduction des aiguës en cas de
perturbations (HiCut)
La fonction HiCut entraîne une diminution
des bruits parasites en cas de mauvaise
réception. Les aiguës et par conséquent le
niveau de perturbation sont automatiquement réduits en présence de parasites.
Réglage de la fonction HiCut
Appuyez, en mode radio, sur la touche
쏅
TUNER =.
La première page du menu des fonctions
radio apparaît.
Appuyez sur la touche NEXT 4.
쏅
Appuyez sur la touche programmable
쏅
5 identifi ée par « HIGH CUT » sur l'affi cheur autant de fois qu'il est nécessaire
pour faire apparaître le réglage souhaité.
« HICUT 0 » signifi e pas de réduction, « HICUT 2 » entraîne la réduction automatique
la plus forte des aiguës et du niveau de perturbation.
Appuyez sur la touche OK du joystick
쏅
8 ou sur la touche TUNER = pour
quitter le menu.
Les réglages sont mémorisés.
Affi chage du texte radio
Certaines stations se servent également du
signal RDS pour transmettre des textes défi lant sur l'affi cheur, nommés « textes radio
». Vous pouvez autoriser ou bloquer l'affi chage des textes radio.
Appuyez, en mode radio, sur la touche
쏅
TUNER =.
Le menu des fonctions radio apparaît sur
l'affi cheur.
Appuyez sur la touche programmable
쏅
5 identifi ée par « R-TEXT » sur l'affi cheur autant de fois qu'il est nécessaire
pour faire apparaître « RADIO TEXT
ON » (activation) ou « RADIO TEXT
OFF » (désactivation).
Appuyez sur la touche TUNER = ou
쏅
sur la touche OK du joystick 8.
Les réglages sont mémorisés.
73
FRANÇAIS
Page 74

TIM – Traffi c Information Memory
TIM – Traffi c Information
Memory
L'appareil comporte une mémoire vocale
numérique dans laquelle jusqu'à quatre
messages d'information routière peuvent
être enregistrés automatiquement. La durée maximale des messages enregistrés est
de quatre minutes.
Lorsque la fonction TIM est activée, tous les
messages d'information routière reçus pendant les deux heures qui suivent l'extinction
de l'appareil sont enregistrés. Vous pouvez
en outre régler deux heures fi xes (minuteries). Tous les messages diffusés par la station avec informations routières sélectionnée 30 minutes avant et 90 minutes après
l'heure réglée sont enregistrés. Cette fonction est particulièrement utile lorsque vous
utilisez votre véhicule à heure fi xe.
Lorsque le dernier message a plus de six
heures d'existence, tous les messages sont
effacés.
Si un nouveau message d'information routière arrive lors de la lecture de la mémoire
TIM, la lecture est interrompue et le nouveau message est enregistré.
Risque d'endommagement de
l'antenne mémorisée dans une
station de lavage. Une antenne motorisée automatique reste sortie lorsque la
fonction TIM est activée et que vous éteignez l'appareil. L'antenne peut alors
être endommagée par la station de lavage. Consultez dans ce cas la section
« Désactivation de la fonction TIM ».
Activation/désactivation de la
fonction TIM
Vous pouvez activer ou désactiver la fonction TIM lorsque l'appareil est allumé.
Maintenez, en mode radio, la touche
쏅
TUNER = appuyée pendant plus de
deux secondes.
Le menu TIMPLAY apparaît.
Si des messages d'information routière ont
été enregistrés, le dernier message est lu.
Le message le plus récent porte le numéro
« TIM1 ». Le nom ou la fréquence de la station apparaît sur la ligne supérieure de l'affi cheur et l'heure de l'enregistrement sur la
ligne juste en dessous.
Les deux touches programmables supérieures (une de chaque côté) sont identifi ées
par « TIM » et le numéro du message.
Si aucun message n'est enregistré, « NO
TIM » apparaît brièvement sur l'affi cheur.
Désactivation de la fonction TIM
Si vous souhaitez désactiver la fonction
TIM,
maintenez, en mode radio, la touche
쏅
TUNER = appuyée pendant plus de
deux secondes.
Le menu TIMPLAY apparaît.
Appuyez sur la touche NEXT 4.
쏅
Le menu TIMSET apparaît.
Appuyez sur la touche programmable 5
쏅
identifi ée par « TIM ON » sur l'affi cheur
autant de fois qu'il est nécessaire pour
faire apparaître « TIM RECORD OFF ».
Appuyez sur la touche TUNER = ou
쏅
sur la touche OK du joystick 8.
Les réglages sont mémorisés.
74
Page 75

TIM – Traffi c Information Memory
Remarque :
Si vous n'allumez pas l'appareil pendant plus de 72 heures, la fonction TIM
est désactivée automatiquement.
Activation de la fonction TIM
Si vous souhaitez réactiver la fonction TIM,
maintenez, en mode radio, la touche
쏅
TUNER = appuyée pendant plus de
deux secondes.
Le menu TIMPLAY apparaît.
Appuyez sur la touche NEXT 4.
쏅
Le menu TIMSET apparaît.
쏅
Appuyez sur la touche programmable
5 identifi ée par « TIM ON » sur l'affi cheur autant de fois qu'il est nécessaire
pour faire apparaître « TIM RECORD
ON ».
쏅
Appuyez sur la touche TUNER = ou
sur la touche OK du joystick 8.
Les réglages sont mémorisés.
Remarque :
Lorsque vous éteignez l'appareil en
coupant le contact ou en appuyant sur
la touche 1, le statut actuel de la fonction TIM, « TIM ON » ou « TIM OFF », apparaît brièvement sur l'affi cheur.
Lecture des messages d'information routière enregistrés
Pour écouter les messages d'information
routière enregistrés,
maintenez, en mode radio, la touche
쏅
TUNER = appuyée pendant plus de
deux secondes.
Le menu TIMPLAY apparaît.
Si des messages d'information routière ont
été enregistrés, le dernier message est lu.
Le message le plus récent porte le numéro
« TIM1 ». Le nom ou la fréquence de la station apparaît sur la ligne supérieure de l'affi cheur et l'heure de l'enregistrement sur la
ligne juste en dessous. Une fois le premier
message lu, les autres messages sont lus
dans un ordre allant du plus récent au plus
ancien.
Si aucun message n'est enregistré, « NO
TIM AVAILABLE » apparaît brièvement sur
l'affi cheur.
Une fois le dernier message lu, le mode de
fonctionnement précédent est réactivé.
Pour revenir au mode radio sans écouter les
messages,
쏅
appuyez sur la touche TUNER = ou
sur la touche OK du joystick 8.
Sélection des messages TIM
Les deux touches programmables supérieures (une de chaque côté) sont identifi ées
par « TIM » et le numéro du message.
Si vous souhaitez écouter un message en
particulier sans écouter les autres :
쏅
Appuyez sur la touche programmable 5 correspondante. Les touches
sont identifi ées par « TIM1 », « TIM2 »,
« TIM3 » ou « TIM4 » sur l'affi cheur.
Enregistrement des messages
d'information routière
Lorsque l'appareil est allumé, les messages d'information routière sont enregistrés
automatiquement si une station avec informations routières est captée et si la priorité
est donnée aux informations routières.
FRANÇAIS
75
Page 76

TIM – Traffi c Information Memory
Si vous avez réglé une station qui ne diffuse
pas de messages d'information routière et
que vous éteignez l'appareil alors que la
fonction TIM est activée, une station avec
informations routières est cherchée automatiquement.
Réglage des minuteries
Lorsque la fonction TIM est activée, tous les
messages d'une station avec informations
routières réglée sont enregistrés pendant
les deux heures qui suivent l'extinction de
l'appareil. En outre, vous pouvez régler
deux minuteries avec lesquelles tous les
messages diffusés 30 minutes avant et 90
minutes après l'heure réglée sont enregistrés. Les minuteries dépendent du système
d'horloge. Pour régler le système d'horloge,
consultez la section « Clock – Heure ».
Pour régler une des minuteries,
maintenez, en mode radio, la touche
쏅
TUNER = appuyée pendant plus de
deux secondes.
Le menu TIMPLAY apparaît.
Appuyez sur la touche NEXT 4.
쏅
Le menu TIMSET apparaît.
Appuyez sur la touche programmable
쏅
5 identifi ée sur l'affi cheur par « TIMER1 » pour la première minuterie et
par « TIMER2 » la deuxième minuterie.
L'heure réglée apparaît sur le visuel, le nombre des heures clignote.
Actionnez le joystick 8 vers le haut ou
쏅
le bas pour régler le nombre des heures.
쏅
Actionnez le joystick 8 vers la droite
pour passer au réglage suivant.
Le nombre des minutes clignote.
76
Actionnez le joystick 8 vers le haut ou le
쏅
bas pour régler le nombre des minutes.
Pour enregistrer les réglages,
appuyez sur la touche TUNER = ou
쏅
sur la touche OK du joystick 8.
Les réglages sont mémorisés.
Lorsque la fonction TIM est
activée une antenne motorisée
raccordée est sortie.
Remarque :
Désactivez impérativement la fonction
TIM avant de passer le véhicule dans
une station de lavage. Consultez pour
cela la section « Désactivation de la
fonction TIM » dans ce chapitre.
Sélection des minuteries
Après que vous avez réglé les minuteries,
vous pouvez sélectionner l'une d'entre elles. La minuterie réglée en dernier est toujours celle qui est activée.
Pour sélectionner une autre minuterie,
maintenez, en mode radio, la touche
쏅
TUNER = appuyée pendant plus de
deux secondes.
Le menu TIMPLAY apparaît.
Appuyez sur la touche NEXT 4.
쏅
Le menu TIMSET apparaît.
Appuyez sur la touche programmable
쏅
5 identifi ée sur l'affi cheur par « TI-
MER1 » pour sélectionner la première
minuterie et par « TIMER2 », pour sé-
lectionner la deuxième minuterie.
Appuyez sur la touche TUNER = ou
쏅
sur la touche OK du joystick 8.
Les réglages sont mémorisés.
Page 77

Informations routières
Votre appareil est équipé d'un récepteur RDSEON. EON (Enhanced Other Network) sousentend la transmission d'informations sur les
stations à l'intérieur d'une chaîne de stations.
En cas d'informations routières (TA), l'appareil passe automatiquement d'une station qui
ne diffuse pas d'informations routières à la
station correspondante de la chaîne de stations qui diffuse des informations routières.
Une fois l'information routière transmise, la
station précédente est de nouveau réglée.
Activation et désactivation
de la diffusion prioritaire des
informations routières
Appuyez, en mode radio, sur la touche
쏅
TUNER =.
Le menu des fonctions radio apparaît sur
l'affi cheur.
Appuyez sur la touche programmable
쏅
5 identifi ée par « TRAFFIC » sur l'affi cheur autant de fois qu'il est nécessaire
pour faire apparaître « TRAFFIC INFO
ON » (activation) ou « TRAFFIC INFO
OFF » (désactivation).
Remarque :
Pendant la diffusion d'une information
routière, le menu TA est affi ché.
Pour interrompre la diffusion de l'information routière,
appuyez sur la touche programmable
쏅
5 identifi ée par « TA EXIT » sur l'affi cheur.
Si vous souhaitez désactiver de manière
générale la priorité des informations routières,
Informations routières
쏅
appuyez sur la touche programmable
5 identifi ée par « TA OFF » sur l'affi cheur.
Remarques :
Vous entendez un bip d'avertissement,
•
lorsque vous quittez la zone de couverture de la station avec informations routières que vous êtes en train
d'écouter.
•
lorsqu'en écoutant un CD, vous
quittez la zone de couverture de la
station avec informations routières
et que la recherche automatique ne
trouve ensuite aucune autre station
avec informations routières.
•
lorsque vous passez d'une station
avec informations routières à une
station ne diffusant pas d'informations routières.
Désactivez ensuite la fonction de priorité aux informations routières ou mettez-vous à l'écoute d'une station offrant
des informations routières.
Réglage du volume sonore pour
les informations routières
Appuyez sur la touche MENU 9.
쏅
Appuyez sur la touche programmable
쏅
5 identifi ée par « VOLUME » sur l'affi cheur.
Appuyez sur la touche programmable
쏅
5 identifi ée par « TRAFFIC » sur l'affi cheur.
Réglez le volume sonore souhaité avec
쏅
le bouton 2.
Appuyez sur la touche OK du joystick
쏅
8 ou sur la touche MENU 9 pour
quitter le menu.
FRANÇAIS
77
Page 78

Mode CD
Mode CD
Cet appareil vous permet de lire des CD audio
du commerce d'un diamètre de 12 cm.
En règle générale, il est possible de lire les
CD-R et les CD-RW (CD gravés par l'utilisateur). En raison des différentes qualités des
supports CD, Blaupunkt n'est cependant
pas en mesure de garantir un fonctionnement sans problème avec ces CD.
Pour éviter tout problème de fonctionnement, utilisez uniquement de CD portant
le logo Compact-Disc. Des problèmes de
lecture sont possibles avec les CD équipés
d'une protection contre la copie. Blaupunkt
ne peut garantir le bon fonctionnement de
ses appareils avec des CD protégés contre
la copie !
Risque d'endommagement du lecteur CD !
Il n'est pas possible d'utiliser des CD single de 8 cm de diamètre et les « shape
CD » (de forme autre que circulaire).
Nous déclinons toute responsabilité en
cas d'endommagement du lecteur CD
dû à l'utilisation de CD inappropriés.
Activation du mode CD, mise en
place des CD
S'il n'y a pas encore de CD dans le lecteur,
appuyez sur la touche
쏅
La façade bascule vers l'avant.
Introduisez le CD, face imprimée tour-
쏅
née vers le haut, dans la fente.
Le CD est entraîné dans le lecteur.
7.
L'insertion du CD doit s'effectuer sans entrave et sans intervention de votre part.
La façade se referme automatiquement.
Le menu CD apparaît et la lecture du CD
commence.
Si un CD se trouve déjà dans le lecteur,
appuyez sur la touche SOURCE <
쏅
autant de fois qu'il est nécessaire pour
faire apparaître le mode CD.
Le menu CD est affi ché, la lecture du CD
reprend à l'endroit où elle a été interrompue.
Ejection du CD
Appuyez sur la touche 7.
쏅
La façade bascule vers l'avant, le CD est
éjecté.
Retirez le CD avec précaution.
쏅
Appuyez sur la touche
쏅
La façade se referme.
7.
Sélection des titres
Actionnez le joystick 8 dans la direc-
쏅
tion approprié (vers le haut ou la droite
pour le titre suivant ou vers le bas ou la
gauche pour le titre précédent) autant
de fois qu'il est nécessaire pour faire ap-
paraître le titre souhaité sur l'affi cheur.
En actionnant une seule fois le joystick 8
vers le bas ou la gauche, la lecture du titre
en cours reprend depuis le début.
78
Page 79

Mode CD
Recherche rapide (audible)
Pour effectuer une recherche rapide en arrière ou en avant,
actionnez le joystick 8 dans la direc-
쏅
tion appropriée (vers le haut ou la droite pour la recherche en avant ou vers
le bas ou la gauche pour la recherche
en arrière) et maintenez-le dans cette
position jusqu'à ce que la recherche rapide commence.
Lecture aléatoire des titres (MIX)
Appuyez sur la touche programma-
쏅
ble 5 identifi ée par « MIX » sur l'affi cheur.
« MIX CD » apparaît brièvement sur l'affi cheur. Le titre qui sera lu ensuite sera sélectionné de manière aléatoire.
Désactivation de la fonction MIX
Appuyez de nouveau sur la touche pro-
쏅
grammable 5 identifi ée par « MIX »
sur l'affi cheur.
« MIX OFF » apparaît brièvement sur l'affi cheur.
Répétition de titres (REPEAT)
Appuyez sur la touche programmable
쏅
5 identifi ée par « REPEAT » sur l'affi cheur.
« REPEAT TRACK » apparaît brièvement sur
l'affi cheur. Le titre est répété jusqu'à ce que
la fonction REPEAT soit désactivée.
Désactivation de la fonction Repeat
Appuyez de nouveau sur la touche pro-
쏅
grammable 5 identifi ée par « REPEAT
» sur l'affi cheur.
« REPEAT OFF » apparaît brièvement sur
l'affi cheur. La lecture se poursuit normalement.
Balayage des titres (SCAN)
Vous avez la possibilité d'écouter successivement le début de tous les titres du CD.
Appuyez sur la touche OK du joystick
쏅
8 pendant plus de deux secondes.
Les titres suivants du CD sont lus dans un
ordre croissant.
Remarque :
La durée de balayage des titres est réglable. Pour plus de détails concernant
le réglage de la durée d'écoute lors du
balayage des titres, consultez le paragraphe « Réglage de la durée d'écoute
lors du balayage » dans la section «
Mode radio ».
Arrêt de la fonction Scan, écoute d'un titre
Pour arrêter le balayage des titres,
쏅
appuyez sur la touche OK du joystick
8.
La lecture du titre en cours continue.
Affi chage du texte de CD
Certains CD proposent un « texte de CD
». Il peut s'agir du nom de l'interprète, du
nom de l'album et du titre.
Vous pouvez faire défi ler le texte correspondant à chaque titre du CD sur la ligne inférieure de l'affi cheur.
Si le CD introduit ne comporte pas de
texte, « NO TEXT » apparaît brièvement sur
l'affi cheur si la fonction texte de CD est activée.
FRANÇAIS
79
Page 80

Mode CD Mode MP3
Activation et désactivation de la
fonction texte de CD
Appuyez sur la touche programmable
쏅
5 identifi ée par « TEXT » sur l'affi cheur
autant de fois qu'il est nécessaire pour faire apparaître « CD TEXT ON » (activation)
ou « CD TEXT OFF » (désactivation).
Réglage du défi lement du texte
Vous pouvez faire défi ler le texte du CD sur
la ligne inférieure de l'affi cheur.
Activation/désactivation du défi lement
du texte de CD
Appuyez sur la touche programmable
쏅
5 identifi ée par « SCROLL » sur l'affi cheur autant de fois qu'il est nécessaire pour faire apparaître « SCROLL
ON » (activation du texte défi lant) ou
« SCROLL OFF » (désactivation du texte défi lant).
Informations routières en
mode CD
Appuyez sur la touche programmable
쏅
5 identifi ée par « TRAFFIC » sur l'affi cheur autant de fois qu'il est nécessaire
pour faire apparaître « TRAFFIC INFO
ON » (activation) ou « TRAFFIC INFO
OFF » (désactivation).
Mode MP3
Votre appareil vous permet de lire les fi chiers MP3 enregistrés sur une carte MMC/
SD (MultiMedia-Card/Secure Digital) ou
sur un CD-R/CD-RW. Vous pouvez enregistrer les fi chiers sur les cartes MMC/SD avec
un lecteur/enregistreur MMC/SD du commerce et votre PC pour les lire ensuite avec
votre appareil Bremen MP76.
Préparation du CD MP3
La combinaison « graveur CD », « logiciel de
gravure de CD » et « CD vierge » peut occasionner des problèmes de lecture de CD.
Si des problèmes surviennent avec des CD
gravés, il est conseillé de choisir un autre fabricant de CD vierges ou une autre couleur
de CD vierge.
Le format du CD doit être ISO 9660 level
1/level 2 ou Joliet. Les autres formats ne
peuvent être lus en toute fi abilité.
Evitez les multisessions. Si vous enregistrez
plus d'une session sur les CD, seule la première session sera reconnue.
Vous pouvez créer un maximum de 127 répertoires sur un CD. Ces répertoires peuvent être sélectionnés individuellement
avec cet appareil.
Chaque répertoire peut comporter jusqu'à
254 titres (Tracks) et sous-répertoires qui
peuvent être sélectionnés individuellement. La structure ne doit pas comporter
plus de 8 niveaux.
80
Page 81

D01
D02
D03
T001
T002
T003
T004
T005
T001
T002
T003
T004
T005
T006
A Répertoires
B Titres · Fichiers
Chaque répertoire peut être nommé au
moyen du PC. Le nom du répertoire peut
être visualisé sur l'affi cheur de l'appareil.
Nommez les répertoires et les titres en
fonction des possibilités de votre logiciel de
gravage. Pour de plus amples informations,
consultez le guide d'utilisation du logiciel.
Remarque :
Il est conseillé de ne pas utiliser de caractères spéciaux (trémas, accents,
etc.) dans les noms des répertoires et
des titres.
Si vous attachez une importance à ce que
vos fi chiers soient enregistrés dans l'ordre,
vous devez utiliser un logiciel de gravage qui
range les fi chiers dans un ordre alphanumérique. Si le logiciel dont vous disposez n'offre
pas cette fonction, vous avez aussi la possibi-
D04
T001
T002
T003
T004
T005
T006
T007
T008
T009
T010
T011
A
B
Mode MP3
lité de trier les fi chiers manuellement. Pour
ce faire, vous devez insérer un numéro, par
exemple « 001 », « 002 », etc. devant chaque nom, sans omettre les zéros du début.
Les titres MP3 peuvent aussi contenir des informations telles que le nom de l'interprète,
de l'album et le titre (tags ID3). Cet appareil
peut affi cher les tags ID3 de la version 1.
Pour pouvoir être lus par cet appareil, les
fi chiers MP3 doivent comporter l'extension
« .MP3 ».
Remarques :
Pour garantir une lecture sans problèmes,
•
n'essayez pas d'ajouter l'extension «
.MP3 » à des fi chiers autres que les
fi chiers MP3 et de les lire !
•
N'utilisez pas des CD comportant un
mélange de données autres que MP3
et de titres MP3.
•
N'utilisez pas des CD comportant un
mélange de titres audio et de titres
MP3 (Mix-Mode CD).
Introduction et retrait des cartes
MMC/SD
La fente MMC/SD > se trouve en dessous
de la façade amovible, à droite des contacts.
Pour introduire ou retirer une carte MMC/
SD, vous devez enlever la façade. Consultez
pour cela la section « Façade amovible ».
Remarques :
Blaupunkt ne peut garantir un fonc-
•
tionnement sans problème de l'ensemble des cartes MMC/SD disponibles sur le marché et, pour cette
raison, recommande d'utiliser des
FRANÇAIS
81
Page 82

Mode MP3
cartes MMC/SD de « SanDisk » ou «
Panasonic ». Vous ne devriez pas utiliser des cartes dont la capacité est
supérieure à 512 MBytes, le fonctionnement des cartes de capacité plus
grande ne pouvant pas toujours être
garanti. Les cartes doivent être formatées dans le système de fi chier FAT16
et comporter des fi chiers MP3.
•
Pour un accès optimal aux MMC/SD,
il est conseillé d'enregistrer un maximum de 20 répertoires et de 200 fi chiers sur une carte MMC/SD.
Introduction des cartes MMC/SD
Enlevez la façade.
쏅
Introduisez la carte MMC/SD, face im-
쏅
primée tournée vers le haut et contacts
en avant, dans la fente MMC/SD > et
enfoncez la carte jusqu'à ce qu'elle se
verrouille.
쏅
Remettez la façade en place.
Retrait des cartes MMC/SD
Enlevez la façade.
쏅
Poussez la carte MMC/SD avec pré-
쏅
caution dans la fente > jusqu'à ce
que vous rencontriez une légère résistance.
La carte MMC/SD est maintenant déverrouillée.
쏅
Retirez la carte MMC/SD avec précaution de la fente.
쏅
Remettez la façade en place.
Activation du mode MMC/SD
Appuyez sur la touche SOURCE <
쏅
autant de fois qu'il est nécessaire pour
faire apparaître « MMC » sur l'affi cheur.
82
La lecture commence par celle du premier
titre identifi é par l'appareil.
Activation du mode MP3 sur CD
Le mode MP3 sur CD est activé comme le
mode CD normal. Pour l'introduction du
CD, consultez le paragraphe « Activation du
mode CD, mise en place des CD » dans la
section « Mode CD ».
Appuyez sur la touche SOURCE <
쏅
autant de fois qu'il est nécessaire pour
faire apparaître « MP3 » sur l'affi cheur.
La lecture commence par celle du premier
titre identifi é par l'appareil.
Commandes en mode MP3
Sélection dans la liste des répertoires
Vous pouvez affi cher la liste de tous les
répertoires du CD ou de la carte MMC/SD
qui se trouve dans l'appareil et effectuer
confortablement votre sélection. Les répertoires apparaissent avec les noms que vous
leur avez donné lorsque vous avez gravé le
CD ou enregistré la carte MMC/SD.
Appuyez sur la touche NEXT 4 pen-
쏅
dant la lecture MP3.
La liste des titres du répertoire en cours apparaît.
Actionnez le joystick 8 vers la gauche
쏅
ou la droite pour passer dans la liste
des répertoires.
Actionnez le joystick 8 vers le haut ou
쏅
le bas pour parcourir la liste.
Pour sélectionner un répertoire dans la
쏅
liste, déplacez la marque de sélection
jusqu'au répertoire souhaité et appuyez
sur la touche OK du joystick 8.
Page 83

Mode MP3
La liste des titres du répertoire sélectionné
apparaît.
Déplacez la marque de sélection jus-
쏅
qu'au titre souhaité et appuyez sur la
touche OK du joystick 8.
Appuyez sur la touche NEXT 4 pour
쏅
affi cher de nouveau le menu principal
MP3.
Sélection des répertoires avec le
joystick
Pour passer à un répertoire précédent ou
suivant,
actionnez le joystick 8 vers le haut ou
쏅
le bas autant de fois qu'il est nécessaire
pour faire apparaître le numéro du répertoire souhaité en première place sur
la ligne supérieure de l'affi cheur.
Remarque :
Tous les répertoires qui ne contiennent
pas de fi chiers MP3 seront automatiquement ignorés. Lorsque vous écoutez par exemple les titres du répertoire
D01 et que vous sélectionnez le répertoire suivant avec le joystick 8, le répertoire D02, qui ne contient pas de
fi chiers MP3 (voir fi gure), sera ignoré
et le répertoire D03 sera sélectionné.
L'affi chage passe automatiquement de
« D02 » à « D03 ».
Sélection des titres
Sélection d'un titre de la liste
Vous pouvez affi cher la liste des titres du
répertoire en cours et effectuer confortablement la sélection d'un titre.
Pour affi cher la liste des titres, appuyez
쏅
sur la touche NEXT 4.
쏅
Actionnez le joystick 8 vers le haut ou
le bas pour parcourir la liste des titres.
쏅
Pour sélectionner un titre dans la liste,
déplacez la marque de sélection jusqu'au titre souhaité et appuyez sur la
touche OK du joystick 8.
쏅
Appuyez sur la touche NEXT 4 pour
affi cher de nouveau le menu principal
MP3.
Sélection des titres avec le joystick
Pour passer à un titre précédent ou suivant
du répertoire en cours,
쏅
actionnez le joystick 8 vers la droite
(sélection des titres suivants) ou la gauche (sélection des titres précédents)
autant de fois qu'il est nécessaire pour
faire apparaître le numéro du titre souhaité sur l'affi cheur.
En actionnant une seule fois le joystick 8
vers la gauche, la lecture du titre en cours
reprend depuis le début.
FRANÇAIS
Recherche rapide (audible)
Pour effectuer une recherche rapide en arrière ou en avant,
actionnez le joystick 8 vers la gauche
쏅
(recherche en arrière) ou la droite (recherche en avant) et maintenez-le dans
cette position jusqu'à ce que la recherche rapide démarre.
83
Page 84

Mode MP3
Balayage des titres (SCAN)
Vous avez la possibilité d'écouter successivement le début de tous les titres enregistrés sur le support (CD/SD/MMC).
Appuyez sur la touche OK du joystick
쏅
8 pendant plus de deux secondes.
Les titres suivants du support (CD/SD/
MMC) sont lus dans un ordre croissant.
Remarque :
La durée de balayage des titres est réglable. Pour plus de détails concernant
le réglage de la durée d'écoute lors du
balayage des titres, consultez le paragraphe « Réglage de la durée d'écoute
lors du balayage » dans la section «
Mode radio ».
Arrêt du balayage (SCAN), écoute du
titre en cours
Pour arrêter le balayage des titres,
appuyez sur la touche OK du joystick
쏅
8.
La lecture du titre en cours continue.
Lecture aléatoire des titres (MIX)
Pour que les titres du répertoire sélectionné
soient lus dans un ordre aléatoire,
appuyez sur la touche programmable
쏅
5 identifi ée par « MIX » sur l'affi cheur.
« MIX DIR » apparaît sur l'affi cheur.
Pour lire dans un ordre aléatoire tous les
titres de tous les répertoires du support introduit (CD MP3/SD/MMC),
appuyez de nouveau sur la touche pro-
쏅
grammable 5 identifi ée par « MIX »
sur l'affi cheur.
« MIX CD/SD/MMC » apparaît sur l'affi cheur.
Désactivation de la fonction MIX
Pour désactiver la fonction MIX,
쏅
appuyez sur la touche programmable
5 identifi ée par « MIX » sur l'affi cheur
autant de fois qu'il est nécessaire pour
faire apparaître « MIX OFF ».
Répétition de titres ou de
répertoires complets (REPEAT)
Appuyez sur la touche programmable
쏅
5 identifi ée par « REPEAT » sur l'affi cheur.
« REPEAT TRACK » apparaît brièvement sur
l'affi cheur.
Pour répéter le répertoire complet,
appuyez de nouveau sur la touche
쏅
programmable 5 identifi ée par « RE-
PEAT ».
« REPEAT DIR » apparaît brièvement sur
l'affi cheur.
Désactivation de la fonction Repeat
Pour arrêter la répétition du titre en cours
ou du répertoire sélectionné,
쏅
appuyez sur la touche programmable
5 identifi ée par « REPEAT » sur l'affi cheur autant de fois qu'il est nécessaire
pour faire apparaître « REPEAT OFF ».
Réglage de l'affi chage
Vous avez plusieurs possibilités pour affi cher le titre, le nom de l'interprète ou le
nom de l'album (ID3 Tag), du répertoire
ou du fi chier. Les informations contenues
dans le ID3 Tag (album, interprète et titre)
apparaissent uniquement si elles ont été
enregistrées lors du gravage du CD ou de la
création du fi chier MP3.
84
Page 85

Mode MP3
Pendant la lecture, le titre apparaît toujours sur la ligne supérieure de l'affi cheur.
Le titre défi le d'abord une fois en entier au
changement de titre, puis reste affi ché de
manière stationnaire avec 16 caractères au
maximum .
Remarque :
Si le titre ne fi gure pas dans le ID3 Tag,
le nom du fi chier est affi ché
Sur la ligne inférieure de l'affi cheur (ligne
d'information), vous pouvez sélectionner
diverses informations.
Sélection des informations affi chées sur
la ligne d'information
Sur la ligne inférieure de l'affi cheur (ligne
d'information), vous pouvez sélectionner
les informations MP3, telles que le titre, le
nom de l'interprète ou de l'album, le numéro du répertoire (DIR) ou le nom du fi chier.
Appuyez sur la touche programmable
쏅
5 identifi ée par « INFO » autant de
fois qu'il est nécessaire pour faire apparaître l'affi chage souhaité sur la ligne
inférieure de l'affi cheur.
Remarque :
Si le titre, le nom de l'interprète ou le
nom de l'album ne fi gurent pas dans ID3
Tag, vous ne pouvez pas les affi cher.
Affi chage unique de toutes les
informations d'un fi chier
Pour faire défi ler une fois toutes les informations disponibles sur un titre ou les noms
du répertoire ou du fi chier,
appuyez sur la touche programmable
쏅
5 identifi ée par « SHOW ALL » sur
l'affi cheur.
Les informations défi lent une fois sur la ligne
inférieure de l'affi cheur pour autant qu'elles soient disponibles. Pendant ce temps,
« SHOW ALL » clignote sur l'affi cheur.
Réglage du défi lement du texte
Vous avez la possibilité de régler l'affi chage
tel que décrit dans la section « Sélection
des informations affi chées sur la ligne d'information » pour qu'il défi le en permanence
(« SCROLL ON ») ou qu'il n'apparaisse
qu'une fois (« SCROLL OFF ») sur l'affi cheur.
Appuyez sur la touche programmable
쏅
5 identifi ée par « SCROLL » sur l'affi cheur autant de fois qu'il est nécessaire pour faire apparaître le réglage
souhaité.
Vous avez la possibilité d'écouter successivement le début de tous les titres enregistré
sur le support (CD/SD/MMC).
Appuyez sur la touche OK du joystick
쏅
8 pendant plus de deux secondes.
Les titres suivants sont lus dans un ordre
croissant.
Remarque :
La durée de balayage des titres est réglable. Pour plus de détails concernant
le réglage de la durée d'écoute lors du
balayage des titres, consultez le paragraphe « Réglage de la durée d'écoute
lors du balayage » dans la section
« Mode radio ».
FRANÇAIS
85
Page 86

Mode changeur de CD
Mode changeur de CD
(option)
Pour connaître les modèles de changeurs de
CD ou de Compact Drive MP3 compatibles
avec cet appareil, consultez le chapitre « Accessoires » de ce mode d'emploi ou adressez-vous à votre revendeur Blaupunkt.
Remarque :
Pour toutes informations sur la manipulation des CD, leur introduction et l'utilisation du changeur CD, consultez le
mode d'emploi de votre changeur CD.
Activation du mode changeur
de CD
Appuyez sur la touche SOURCE <
쏅
autant de fois qu'il est nécessaire pour
faire apparaître le mode changeur de
CD.
La lecture démarre à l'endroit où elle a été
interrompue. Si le magasin a été retiré du
changeur de CD puis remis en place, il est
d'abord « analysé », puis la lecture commence avec le premier titre du premier CD
que le changeur de CD identifi é.
Sélection d'un CD
Pour passer à un CD précédent ou suivant,
appuyez sur la touche programmable
쏅
5 identifi ée sur l'affi cheur par le numéro de CD souhaité (CD1 - CD10).
Passez si nécessaire d'une page du
menu de base du changeur de CD à
l'autre en appuyant sur la touche programmable 5 identifi ée par « NEXT »
(page suivante) ou « PREVIOUS » (page
précédente)
86
ou
actionnez le joystick 8 vers le haut ou
쏅
le bas autant de fois qu'il est nécessaire
pour faire apparaître le numéro de CD
souhaité sur l'affi cheur.
Sélection des titres
Pour passer à un tire précédent ou suivant
du CD actuel,
actionnez le joystick 8 vers la gauche
쏅
ou la droite autant de fois qu'il est nécessaire pour faire apparaître le numéro de titre souhaité sur l'affi cheur.
En actionnant une seule fois le joystick 8
vers la gauche, la lecture du titre en cours
reprend depuis le début.
Recherche rapide (audible)
Pour effectuer une recherche rapide en
avant ou en arrière,
actionnez le joystick 8 vers la gauche
쏅
(recherche en arrière) ou la droite (recherche en avant) et maintenez-le dans
cette position jusqu'à ce que la recherche rapide démarre.
Balayage des titres (SCAN)
Vous avez la possibilité d'écouter successivement le début de tous les titres du CD.
Appuyez sur la touche OK du joystick
쏅
8 pendant plus de deux secondes.
Les titres suivants du CD sont lus dans un
ordre croissant.
Remarque :
La durée de balayage des titres est réglable. Pour plus de détails concernant
le réglage de la durée d'écoute lors du
balayage des titres, consultez le para-
Page 87

Mode changeur de CD
graphe « Réglage de la durée d'écoute
lors du balayage » dans la section «
Mode radio ».
Arrêt du balayage (SCAN), écoute du
titre en cours
Pour arrêter le balayage des titres,
appuyez sur la touche OK du joystick
쏅
8.
La lecture du titre en cours continue.
Lecture de titres ou de CD
complets (REPEAT)
Pour démarrer la répétition du titre en
cours,
appuyez sur la touche NEXT 4.
쏅
Le menu des fonctions du changeur de CD
apparaît.
Appuyez sur la touche programmable
쏅
5 identifi ée par « REPEAT » sur l'affi cheur.
« REPEAT TRACK » apparaît brièvement sur
l'affi cheur.
Pour répéter le CD complet,
appuyez de nouveau sur la touche pro-
쏅
grammable 5 identifi ée par « REPEAT
» sur l'affi cheur alors que le menu des
fonctions du changeur de CD est affi ché.
« REPEAT CD » apparaît brièvement sur l'affi cheur.
Désactivation de la fonction Repeat
Pour désactiver la répétition du titre ou du
CD sélectionné,
appuyez, alors que le menu des fonc-
쏅
tions du changeur de CD est affi ché, sur
la touche programmable 5 identifi ée
sur l'affi cheur par « REPEAT » autant de
fois qu'il est nécessaire pour faire apparaître « REPEAT OFF » un court instant.
Lecture aléatoire des titres
(MIX)
Pour que les titres du CD sélectionné soient
lus dans un ordre aléatoire,
appuyez sur la touche NEXT 4.
쏅
Le menu des fonctions du changeur de CD
apparaît.
Appuyez sur la touche programma-
쏅
ble 5 identifi ée par « MIX » sur l'affi -
cheur.
« MIX CD » apparaît sur l'affi cheur.
Pour que les titres de tous les CD du maga-
sin soient lus dans un ordre aléatoire,
쏅
appuyez de nouveau sur la touche pro-
grammable 5 identifi ée par « MIX »
sur l'affi cheur.
« MIX ALL » apparaît sur l'affi cheur.
Désactivation de la fonction MIX
Pour désactiver la fonction MIX,
쏅
appuyez sur la touche programmable
5 identifi ée par « MIX » sur l'affi cheur
autant de fois qu'il est nécessaire pour
faire apparaître « MIX OFF ».
Attribution d'un nom aux CD
Pour faciliter l'identifi cation des CD, votre
appareil vous offre la possibilité d'attribuer
un nom à 99 CD (pas aux Compact Drive
MP3). Ces noms ne doivent pas avoir plus
de sept caractères.
Si vous essayez d'entrer plus de 99 noms,
« FULL » apparaît alors sur l'affi cheur.
87
FRANÇAIS
Page 88

Mode changeur de CD
Entrée et modifi cation des noms de CD
Démarrez la lecture du CD que vous
쏅
souhaitez nommer.
Appuyez sur la touche NEXT 4.
쏅
Le menu des fonctions du changeur de CD
apparaît.
Appuyez sur la touche programmable
쏅
5 identifi ée par « CD NAME » sur l'affi cheur.
Le nom du CD actuel apparaît sur la ligne
supérieure de l'affi cheur. Si le CD n'a pas
encore de nom, sept traits de soulignement
« _ » apparaissent sur l'affi cheur.
Appuyez sur la touche programmable
쏅
4 identifi ée par « EDIT » sur l'affi cheur.
Le mode édition est activé. Le premier point
d'entrée clignote.
Actionnez le joystick 8 vers le haut ou
쏅
le bas pour sélectionner le caractère à
entrer. Sélectionnez le trait de soulignement ( _ ) pour créer un espace.
Actionnez le joystick 8 vers la gauche
쏅
ou droite pour passer au point d'entrée
suivant.
Pour mémoriser le nom, appuyez sur la
쏅
touche OK du joystick 8.
Appuyez sur la touche programmable
쏅
5 identifi ée par « CLEAR CD » sur
l'affi cheur pendant plus de deux secondes.
Le nom du CD est effacé.
Effacement des noms de tous les CD
Démarrez la lecture d'un CD.
쏅
Appuyez sur la touche NEXT 4.
쏅
Le menu des fonctions du changeur de CD
apparaît.
Appuyez sur la touche programmable
쏅
5 identifi ée par « CD NAME » sur l'affi cheur.
Appuyez sur la touche programmable
쏅
5 identifi ée par « CLEAR ALL » sur
l'affi cheur pendant plus de deux secondes.
Les noms des CD sont effacés.
Effacement du nom d'un CD
Démarrez la lecture du CD dont vous
쏅
souhaitez effacer le nom.
Appuyez sur la touche NEXT 4.
쏅
Le menu des fonctions du changeur de CD
apparaît.
Appuyez sur la touche programmable
쏅
5 identifi ée par « CD NAME » sur l'affi cheur.
88
Page 89

Clock – Heure
Réglage de l'heure
L'heure peut être réglée automatiquement
par l'intermédiaire du signal RDS. Si aucune
station qui propose cette fonction ne peut
être reçue, vous pouvez régler l'heure manuellement.
Réglage automatique de l'heure
Pour que l'heure soit réglée automatiquement,
appuyez sur la touche MENU 9.
쏅
Appuyez sur la touche programmable
쏅
5 identifi ée par « CLOCK » sur l'affi cheur.
Appuyez sur la touche programmable
쏅
5 identifi ée par « AUTOSYNC » sur
l'affi cheur autant de fois qu'il est nécessaire pour faire apparaître « AUTOSYNC ON ».
« AUTOSYNC ON » signifi e que l'heure
sera réglée automatiquement par l'intermédiaire du signal RDS.
Réglage manuel de l'heure
Pour régler l'heure, appuyez sur la tou-
쏅
che MENU 9.
Appuyez sur la touche programmable
쏅
5 identifi ée par « CLOCK » sur l'affi cheur.
Appuyez sur la touche programmable
쏅
5 identifi ée par « TIME » sur l'affi cheur.
Les nombres des heures et des minutes apparaissent sur la ligne supérieure de l'affi cheur. Le nombre des heures clignote.
Clock – Heure
쏅
Actionnez le joystick 8 vers le haut ou
le bas pour régler le nombre des heu-
res.
Pour régler le nombre des minutes,
쏅
actionnez le joystick 8 vers la droite.
Le nombre des minutes clignote.
쏅
Actionnez le joystick 8 vers le haut ou
le bas pour régler le nombre des minu-
tes.
쏅
Appuyez sur la touche OK du joystick
8 ou sur la touche MENU 9 pour
quitter le menu.
Les réglages sont mémorisés.
Réglage de la date
Pour régler la date,
쏅
appuyez sur la touche MENU 9.
쏅
Appuyez sur la touche programmable
5 identifi ée par « CLOCK » sur l'affi -
cheur.
쏅
Appuyez sur la touche programmable
5 identifi ée par « DATE » sur l'affi -
cheur.
L'année (YY), le mois (MM) et le jour (DD)
apparaissent sur la ligne supérieure de l'affi cheur.
Le point d'entrée de l'année clignote.
쏅
Actionnez le joystick 8 vers le haut ou
le bas pour régler l'année (par ex. « 06
» pour 2006).
쏅
Actionnez le joystick 8 vers la droite
pour passer au point d'entrée du mois.
쏅
Actionnez le joystick 8 vers le haut ou
le bas pour régler le mois.
쏅
Actionnez le joystick 8 vers la droite
pour passer au point d'entrée du jour.
FRANÇAIS
89
Page 90

Clock – Heure DSA Max – Egaliseur
Actionnez le joystick 8 vers le haut ou
쏅
le bas pour régler le jour.
Appuyez sur la touche OK du joystick
쏅
8 ou sur la touche MENU 9 pour
quitter le menu.
Les réglages sont mémorisés.
Affi chage permanent de l'heure
Vous pouvez affi cher l'heure en permanence sur l'appareil même lorsque celui-ci est
éteint et que le contact est coupé.
Appuyez sur la touche MENU 9.
쏅
Appuyez sur la touche programmable
쏅
5 identifi ée par « CLOCK » sur l'affi cheur.
Appuyez sur la touche programmable
쏅
5 identifi ée par « OFFCLOCK » sur
l'affi cheur.
« SHOW CLOCK », signifi e que l'heure sera
affi chée, « HIDE CLOCK » signifi e qu'elle ne
sera pas affi chée.
DSA Max –
Digital Sound Adjustment
Cet appareil comporte un système numérique d'étalonnage du son (DSA Digital
Sound Adjustment).
Vous disposez ainsi de trois égaliseurs utilisateur à auto-étalonnage (EQ1, EQ2 et
EQ3). Chaque égaliseur utilisateur consiste
en un égaliseur graphique à 27 bandes.
Chaque égaliseur utilisateur propose quatre canaux (avant droit/gauche et arrière
droit/gauche).
Les égaliseurs EQ1 - EQ3 peuvent être étalonnés automatiquement à l'aide du microphone d'étalonnage livré.
Les valeurs mesurées automatiquement de
l'égaliseur graphique peuvent également
être modifi ées manuellement.
Pour parfaire l'optimisation du son, vous
disposez en outre d'un système de masquage dynamique des bruits parasites (DNC),
de divers préréglages en fonction du type
de musique (Preset EQ), d'effets de scène
et d'ambiances sonores.
90
Activation/désactivation du DSA
Désactivation du DSA
Pour désactiver l'ensemble des égaliseurs,
appuyez sur la touche AUDIO : pen-
쏅
dant plus de deux secondes.
Le menu DSA apparaît sur l'affi cheur.
Appuyez sur la touche programmable
쏅
5 identifi ée par « OFF » sur l'affi cheur.
« DSA OFF » apparaît sur l'affi cheur.
Page 91

DSC Max – Egaliseur
Remarque :
Vous pouvez activer ou désactiver séparément chaque module de l'égaliseur
(EQ utilisateur, préréglage de tonalité,
DNC, effet de scène et ambiance sonore) dans le menu correspondant.
Activation du DSA
Pour réactiver l'égaliseur,
appuyez sur la touche AUDIO : pen-
쏅
dant plus de deux secondes.
Le menu DSA apparaît sur l'affi cheur.
Appuyez sur la touche programmable
쏅
5 identifi ée par « USER EQ » sur l'affi cheur.
Sélectionnez un réglage d'égaliseur.
쏅
Etalonnage automatique de
l'égaliseur
Vous pouvez effectuer un étalonnage électronique et le mémoriser pour trois situations différentes (pas possible si Crossover
est réglé), par ex. :
EQ 1 pour le conducteur seul
EQ 2 pour le conducteur et le passager
avant
EQ 3 pour le conducteur et les passa-
gers avant et arrière
Pendant l'étalonnage, tenez le microphone
à la position correspondante.
Pour la situation 1 (exemple du conducteur
seul), placez le microphone directement à
hauteur de l'oreille droite du conducteur, à
10 cm environ de celle-ci.
Pour la situation 2, placez le microphone à
hauteur d'oreille entre le conducteur et le
passager avant.
Pour la situation 3, vous devriez placer le
microphone au centre de l'habitacle (droite/
gauche, avant/arrière), à hauteur d'oreille .
L'étalonnage nécessite un environnement
vraiment calme. Les bruits étrangers faussent les résultats de la mesure. Les vitres,
les portes et le toit ouvrant doivent être
fermés pendant l'étalonnage. Vous devriez
vous asseoir sur le siège conducteur pendant cette opération.
Remarque :
Le rayonnement des haut-parleurs ne
doit pas être gêné par des objets. Tous
les haut-parleurs doivent être raccor-
dés. Le microphone d'étalonnage doit
être raccordé à l'appareil, l'étalonnage
de l'égaliseur devrait être effectué
avant celui du DNC.
Pour étalonner l'égaliseur,
appuyez sur la touche AUDIO : pen-
쏅
dant plus de deux secondes.
Appuyez sur la touche programmable
쏅
5 identifi ée par « USER EQ » sur l'af-
fi cheur.
Appuyez sur la touche programmable
쏅
5 identifi ée sur l'affi cheur par le nu-
méro de l'égaliseur (« EQ-1 », « EQ-2 » ou
« EQ-3 ») que vous souhaitez étalon-
ner.
Appuyez sur la touche programmable
쏅
5 identifi ée par « ADJUST » sur l'af-
fi cheur.
Appuyez sur la touche programmable
쏅
5 identifi ée par « AUTO ADJ » sur l'af-
fi cheur.
Un compte à rebours défi le sur l'affi cheur.
Pendant ce temps, vous avez la possibilité
de positionner le microphone d'étalonnage.
FRANÇAIS
91
Page 92

DSC Max – Egaliseur
Un fois le compte à rebours terminé, l'étalonnage commence.
Procédez de la même manière pour
쏅
tous les égaliseurs.
Une fois l'étalonnage terminé, le menu de
l'égaliseur sélectionné réapparaît.
Visualisation de l'acoustique du
véhicule avec ou sans égaliseur
Vous pouvez visualiser les valeurs relevées
pour l'acoustique du véhicule. Lorsque
vous visualisez les réglages, vous pouvez
sélectionner la vue de l'égaliseur sans correction (« PRE EQ ») ou avec correction
(« POST EQ »).
Appuyez sur la touche AUDIO :
쏅
pendant plus de deux secondes.
Appuyez sur la touche programmable
쏅
5 identifi ée par « USER EQ » sur l'affi cheur.
Appuyez sur la touche programmable 5
쏅
identifi ée sur l'affi cheur par le numéro de
l'égaliseur que vous souhaitez visualiser.
Appuyez sur la touche programmable
쏅
5 identifi ée par « ADJUST » sur l'affi cheur.
Appuyez sur la touche programmable 5
쏅
identifi ée par « MANUAL » sur l'affi cheur.
Vous pouvez visualiser les réglages de l'égaliseur séparément pour les haut-parleurs
avant et arrière.
Remarque :
Si vous avez déjà modifi é manuellement l'égaliseur graphique ou si vous
n'avez pas encore effectué d'étalonnage, les touches programmables décrites ci-après ne peuvent pas être sélectionnées.
92
Si vous souhaitez visualiser l'égaliseur sans
correction,
쏅
appuyez sur la touche programmable
5 identifi ée par « VIEW PRE » sur le
côté gauche de l'affi cheur pour l'avant
ou sur le côté droit pour l'arrière.
Le réglage de l'égaliseur apparaît.
Si vous souhaitez visualiser l'égaliseur avec
correction,
쏅
appuyez sur la touche programmable
5 identifi ée par « VIEWPOST » sur le
côté gauche de l'affi cheur pour l'avant
ou sur le côté droit pour l'arrière.
Le réglage de l'égaliseur apparaît.
Pour quitter la visualisation,
쏅
appuyez sur la touche OK du joystick
8 ou sur la touche AUDIO :.
Modifi cation manuelle des
égaliseurs graphiques
Vous pouvez également modifi er manuellement les valeurs mesurées automatiquement de l''égaliseur graphique.
Appuyez sur la touche AUDIO : pen-
쏅
dant plus de deux secondes.
Appuyez sur la touche programmable
쏅
5 identifi ée par « USER EQ » sur l'af-
fi cheur.
Appuyez sur la touche programmable
쏅
5 identifi ée sur l'affi cheur par le nu-
méro de l'égaliseur que vous souhaitez
régler.
Appuyez sur la touche programmable
쏅
5 identifi ée par « ADJUST » sur l'af-
fi cheur.
Appuyez sur la touche programmable
쏅
5 identifi ée par « MANUAL » sur l'af-
fi cheur.
Page 93

DSC Max – Egaliseur
Vous pouvez régler séparément l'égaliseur
pour les haut-parleurs avant et arrière.
Appuyez sur la touche programma-
쏅
ble 5 identifi ée sur l'affi cheur par
« FRONT EQ » pour les haut-parleurs
avant ou « REAR EQ » pour les hautparleurs arrière.
Les réglages de l'égaliseur graphique apparaissent.
Pour sélectionner la fréquence,
actionnez le joystick 8 vers la gauche
쏅
ou la droite jusqu'à ce que la fréquence
souhaitée soit affi chée.
쏅
Actionnez le joystick 8 vers le haut
ou le bas pour régler le niveau souhaité
pour la fréquence.
Pendant que vous réglez l'égaliseur, la valeur apparaît sous forme graphique sur l'affi cheur.
쏅
Effectuez tous les réglages décrits précédemment pour les deux canaux.
쏅
Appuyez sur la touche OK du joystick
8 ou sur la touche AUDIO : pour
quitter le menu.
Les réglages sont mémorisés.
Sélection des égaliseurs
Après l'étalonnage ou le réglage manuel.
Appuyez sur la touche AUDIO : pen-
쏅
dant plus de deux secondes.
Appuyez sur la touche programmable
쏅
5 identifi ée par « USER EQ » sur l'affi cheur.
Appuyez sur la touche programmable
쏅
5 identifi ée sur l'affi cheur par le numéro de l'égaliseur que vous souhaitez
utiliser.
쏅
Appuyez sur la touche OK du joystick
8 ou sur la touche AUDIO : pour
quitter le menu.
Les réglages sont mémorisés.
Remise à zéro des égaliseurs
Vus pouvez remettre à zéro toutes les valeurs déterminées automatiquement pour
l'égaliseur sélectionné.
Appuyez sur la touche AUDIO : pen-
쏅
dant plus de deux secondes.
Appuyez sur la touche programmable 5
쏅
identifi ée par « USER EQ » sur l'affi cheur.
쏅
Appuyez sur la touche programmable 5
identifi ée sur l'affi cheur par le numéro de
l'égaliseur que vous souhaitez remettre à
zéro.
쏅
Appuyez sur la touche programmable 5
identifi ée par « ADJUST » sur l'affi cheur.
쏅
Appuyez sur la touche programmable
5 identifi ée par « CLEAR » sur l'affi cheur pendant plus de deux secondes.
Toutes les valeurs déterminées automatiquement pour l'égaliseur sont annulées.
쏅
Appuyez sur la touche OK du joystick
8 ou sur la touche AUDIO : pour
quitter le menu.
Les réglages sont mémorisés.
Sélection des préréglages de
tonalité (Preset)
Vous pouvez sélectionner des préréglages
de tonalité pour différents styles de musique. Pour une sonorité optimale, les préréglages sont « ajoutés » aux réglages de l'égaliseur utilisateur activé, ce qui veut dire que
les égaliseurs utilisateur sont optimisés par
les préréglages de tonalité pour les différents styles de musique.
93
FRANÇAIS
Page 94

DSA Max – Egaliseur
Des préréglages de tonalité sont proposés
pour les styles de musique suivants :
VOCAL
•
DISCO
•
ROCK
•
JAZZ
•
CLASSIC
•
Les paramètres s'appliquant à ces styles de
musique sont défi nis par défaut.
Appuyez sur la touche AUDIO : pen-
쏅
dant plus de deux secondes.
Appuyez sur la touche programmable
쏅
5 identifi ée par « PRESET » sur l'affi cheur.
Appuyez sur la touche programmable
쏅
5 identifi ée par sur l'affi cheur par le
préréglage de tonalité que vous souhaitez utiliser.
쏅
Appuyez sur la touche OK du joystick
8 ou sur la touche AUDIO : pour
quitter le menu.
Les réglages sont mémorisés.
Réglage des effets de scène
Vous pouvez activer un effet de scène qui
« place » la musique devant le conducteur et
le passager avant. Vous avez ainsi l'impression de vous trouver devant la scène. Pour
affi ner cet effet, vous avez la possibilité de
modifi er virtuellement votre éloignement
par rapport aux haut-parleurs.
Sélection de l'effet de scène
Appuyez sur la touche AUDIO : pen-
쏅
dant plus de deux secondes.
쏅
Appuyez sur la touche programmable
5 identifi ée par « CH DELAY » sur l'affi cheur.
94
Appuyez sur la touche programmable
쏅
5 identifi ée par « ON » sur l'affi cheur
pour activer l'effet de scène..
Appuyez sur la touche programmable
쏅
5 identifi ée par « OFF » sur l'affi cheur
pour désactiver l'effet de scène.
Appuyez sur la touche programmable
쏅
5 identifi ée par « LRSWAP » pour inverser les réglages.
Appuyez sur la touche programmable
쏅
5 identifi ée par « Adjust » sur l'affi cheur pour régler l'éloignement virtuel
par rapport aux haut-parleurs
Un sous-menu apparaît. Pour son utilisation, consultez la section suivante :
Modifi cation de l'éloignement virtuel
par rapport aux haut-parleurs
Pour parfaire l'optimisation de l'effet de
scène, vous pouvez régler l'éloignement
de la place avant gauche par rapport aux
différents haut-parleurs montés dans le
véhicule. Vous pouvez régler l'éloignement
par rapport aux haut-parleurs avant et par
rapport aux haut-parleurs arrière entre
0 et 275 cm.
Dans « Digital Staging Menu », appuyez
쏅
sur la touche programmable 5 identifi ée par « ADJUST » sur l'affi cheur.
Sélectionnez la touche programmable
쏅
correspondant au haut-parleur dont
vous souhaitez modifi er l'éloignement.
« RR » pour arrière droit, « LR » pour arrière gauche, « RF » pour avant droit et « LF »
pour avant gauche.
Si le Crossover est activé, d'autres symboles apparaissent (« Lhigh » pour « LF »,
« Rhigh » pour « RF », « Llow » pour « LR » et
« Rlow » pour « RR »).
Page 95

DSA Max – Egaliseur DNC
Tournez le bouton de réglage du volume
쏅
2 ou actionnez le joystick 8 pour régler l'éloignement.
Appuyez sur la touche OK du joystick
쏅
8 ou sur la touche AUDIO : pour
quitter le menu.
Les réglages sont mémorisés.
Sélection de l'ambiance sonore
Vous pouvez sélectionner différentes ambiances sonore pour la reproduction de la
musique :
EGLISE (CATHEDRAL)
•
THEATRE (THEATER)
•
SALLE DE CONCERT (CONCERT)
•
CLUB (CLUB)
•
STADE (STADIUM)
•
Ces ambiances sonores sont préprogrammées.
Appuyez sur la touche AUDIO : pen-
쏅
dant plus de deux secondes.
Appuyez sur la touche programmable
쏅
5 identifi ée par « EFFECTS » sur l'affi cheur.
Appuyez sur la touche programmable
쏅
5 identifi ée sur l'affi cheur par l'ambiance sonore que vous souhaitez utiliser.
Si vous ne souhaitez pas utiliser d'ambiance
sonore,
appuyez sur la touche programmable
쏅
5 identifi ée par « OFF » sur l'affi cheur.
Appuyez sur la touche OK du joystick
쏅
8 ou sur la touche AUDIO : pour
quitter le menu.
Les réglages sont mémorisés.
DNC - Dynamic Noise
Covering
Dynamic Noise Covering – Masquage dyna-
mique des bruits parasites
Le DNC permet de relever pendant la mar-
che le niveau de volume sonore ressenti
comme agréable lorsque le véhicule est à
l'arrêt.
Le relèvement s'effectue différemment sur
plusieurs bandes de fréquences en fonction du développement des bruits parasites
dans le véhicule.
Le volume et l'image sonore sont réglés
de manière à conserver une intelligibilité
agréable même lorsque le développement
des bruits parasites se modifi e. Les bruits
parasites brefs (lors d'une traversée de
rails, par exemple) ne sont pas pris en
considération.
Etalonnage du DNC
Pour que le système fonctionne correctement dans le véhicule, vous devez l'étalonner par l'intermédiaire du microphone
d'étalonnage. Nous vous prions d'effectuer
l'étalonnage du DNC avant celui du DSA.
Avant de procéder à l'étalonnage, montez le
microphone d'étalonnage à proximité de la
console centrale avec la bande velcro jointe, en proscrivant cependant le plancher,
les endroits qui résonnent et le chauffage
ou la ventilation .
L'ouverture du microphone doit être orienté
vers le passager. L'étalonnage devrait être
effectué dans un endroit calme, moteur à
l'arrêt. Fermez les portes, les vitres et le
toit ouvrant et prenez place sur le siège du
conducteur pendant l'étalonnage.
95
FRANÇAIS
Page 96

DNC
Démarrage de l'étalonnage du DNC
Appuyez sur la touche AUDIO : pen-
쏅
dant plus de deux secondes.
Appuyez sur la touche programmable
쏅
5 identifi ée par « DNC » sur l'affi cheur.
Appuyez sur la touche programmable
쏅
5 identifi ée par « ADJUST » sur l'affi cheur.
Un compte à rebours défi le sur l'affi cheur.
Un fois le compte à rebours terminé, l'étalonnage commence.
Appuyez sur la touche OK du joystick
쏅
8 ou sur la touche AUDIO : pour
quitter le menu.
Désactivation du DNC
Pour désactiver le DNC,
appuyez sur la touche AUDIO : pen-
쏅
dant plus de deux secondes.
Appuyez sur la touche programmable
쏅
5 identifi ée par « DNC » sur l'affi cheur.
Appuyez sur la touche programmable
쏅
5 identifi ée par « OFF » sur l'affi -
cheur.
« DNC OFF » apparaît sur l'affi cheur.
Pour réactiver le DNC,
sélectionnez un relèvement DNC
쏅
(DNC1 - DNC5).
Appuyez sur la touche OK du joystick
쏅
8 ou sur la touche AUDIO : pour
quitter le menu.
Les réglages sont mémorisés.
Sélection d'un relèvement DNC
Vous pouvez sélectionner le relèvement
DNC, c'est-à-dire le relèvement du volume
et de l'image sonore, sur cinq niveaux.
Le réglage « DNC 1 » convient à un véhicule
dont le moteur est bruyant et à une musique
avec trop de basses. Le réglage « DNC 5 »
convient à un véhicule dont le moteur est
silencieux et à la musique classique. Faites
des essais pour trouver le réglage qui vous
convient.
Pour sélectionner un relèvement DNC,
appuyez sur la touche AUDIO : pen-
쏅
dant plus de deux secondes.
Appuyez sur la touche programmable
쏅
5 identifi ée par « DNC » sur l'affi cheur.
Appuyez sur la touche programmable
쏅
5 identifi ée par « LEVEL » sur l'affi cheur.
Réglez le relèvement avec le joystick
쏅
8.
Appuyez sur la touche OK du joystick
쏅
8 ou sur la touche AUDIO : pour
quitter le menu.
Les réglages sont mémorisés.
96
Page 97

Subwoofer et haut-parleur central
Subwoofer et haut-parleur
central
Vous pouvez raccorder un subwoofer et un
haut-parleur central Centerspeaker) à cet
appareil.
Pour parfaire l'optimisation de la tonalité
lorsque vous utilisez un subwoofer et un
haut-parleur central, vous pouvez régler un
fi ltre passe-bas pour le subwoofer et un fi ltre passe-haut pour l'avant et l'arrière.
Réglage du relèvement pour le
subwoofer
Vous pouvez régler un relèvement ou un
abaissement entre -6 et +6 du volume sonore pour le subwoofer et accentuer ou
adoucir la reproduction des basses par le
subwoofer. Le réglage à sélectionner dépend de l'emplacement et de la position
de montage du subwoofer dans le véhicule.
Faites au besoin des essais pour trouver le
réglage qui vous convient.
Appuyez sur la touche AUDIO :.
쏅
« AUDIO MENU » apparaît sur l'affi cheur.
Appuyez sur la touche programmable
쏅
5 identifi ée par « SUBOUT » sur l'affi cheur.
Appuyez sur la touche programmable
쏅
5 identifi ée par « GAIN » sur l'affi cheur.
Actionnez le joystick 8 vers le haut ou
쏅
la droite pour relever le niveau ou vers
le bas ou la gauche pour l'abaisser.
Une fois le réglage effectué,
appuyez sur la touche OK du joystick
쏅
8 ou sur la touche AUDIO :.
Réglage de la phase du
subwoofer
Vous pouvez régler la phase de la sortie
du subwoofer entre « -135° » et « 180° »
par paliers de 45° pour l'adapter à votre
subwoofer.
Appuyez sur la touche AUDIO :.
쏅
« AUDIO MENU » apparaît sur l'affi cheur.
Appuyez sur la touche programmable
쏅
5 identifi ée par « SUBOUT » sur l'affi cheur.
Appuyez sur la touche programmable
쏅
5 identifi ée par « PHASE » sur l'affi cheur.
Actionnez le joystick 8 pour sélec-
쏅
tionner le réglage approprié.
Une fois le réglage effectué,
쏅
appuyez sur la touche OK du joystick
8 ou sur la touche AUDIO :.
Réglage du fi ltre passe-bas
Le fi ltre passe-bas vous permet de défi nir
la fréquence jusqu'à laquelle le subwoofer doit travailler. Tous les signaux dont
la fréquence est supérieure à celle réglée
sont « coupés » et ne sont pas transmis au
subwoofer.
Vous pouvez sélectionner une des fréquence de coupure suivante : « 40 Hz », « 50 Hz »,
« 63 Hz » et « 100 Hz ». Si votre subwoofer comporte déjà un fi ltre passe-bas, vous
pouvez également sélectionner le réglage
« FLAT » et transmettre ainsi toutes les fréquences au subwoofer.
Accordez ce réglage à la bande passante
et aux possibilités de votre subwoofer.
FRANÇAIS
97
Page 98

Subwoofer et haut-parleur central
Consultez pour cela la documentation du
subwoofer.
Appuyez sur la touche AUDIO :.
쏅
« AUDIO MENU » apparaît sur l'affi cheur.
Appuyez sur la touche programmable
쏅
5 identifi ée par « SUBOUT » sur l'af-
fi cheur.
Appuyez sur la touche programmable
쏅
5 identifi ée par « LOWPASS » sur l'af-
fi cheur.
Actionnez le joystick 8 pour sélec-
쏅
tionner le réglage approprié.
Une fois le réglage effectué,
appuyez sur la touche OK du joystick
쏅
8 ou sur la touche AUDIO :.
Réglage du fi ltre subsonique
Pour éviter les distorsions dues aux fréquences extrêmement basses, vous pouvez activer le fi ltre subsonique et limiter la
bande passante de l'appareil vers le bas.
Cela est en particulier nécessaire avec les
petits subwoofers. Lorsque le fi ltre subsonique est activé, toutes les fréquences inférieures à la fréquence réglée pour le fi ltre
sont supprimées. Vous devriez régler le fi ltre subsonique en fonction de l'équipement
en haut-parleurs de votre véhicule.
Vous disposez des fréquences suivantes :
« 20 Hz », « 25 Hz », « 32 Hz » et « 40 Hz
». Vous disposez en outre d'un réglage du
facteur de qualité « Q » sur cinq niveaux :
« Q1 »=0.5, « Q2 »=0.7, « Q3 »=0.9, « Q4
»=1.1 et « Q5 »=1.3.
Avec le réglage « FLAT », vous n'infl uencez
pas la bande passante de l'appareil.
쏅
Appuyez sur la touche AUDIO :.
« AUDIO MENU » apparaît sur l'affi cheur.
Appuyez sur la touche programmable
쏅
5 identifi ée par « SUBOUT » sur l'affi cheur.
쏅
Appuyez sur la touche programmable
5 identifi ée par « SUBSONIC » sur
l'affi cheur.
쏅
Actionnez le joystick 8 vers la gauche
ou la droite pour sélectionner la fréquence appropriée.
쏅
Actionnez le joystick 8 vers le haut
ou le bas pour sélectionner le facteur
de qualité souhaité pour la fréquence
réglée.
Une fois le réglage effectué,
쏅
appuyez sur la touche OK du joystick
8 ou sur la touche AUDIO :.
Réglage du haut-parleur central
« Centerspeaker »
Vous pouvez sélectionner la fréquence à
partir de laquelle un haut-parleur central
raccordé devra travailler.
Vous disposez des fréquences suivantes :
« 200 Hz », « 400 Hz », « 800 Hz »,
« 1600 Hz » et « 3200 Hz ». Si vous sélectionnez le réglage « FLAT », toutes les fréquences, y compris les basses, seront reproduites par le haut-parleur central. Vous
ne devriez sélectionner ce réglage que si le
haut-parleur central est équipé d'un fi ltre
passe-haut.
98
Page 99

Subwoofer et haut-parleur central
En plus de la fréquence, vous pouvez régler
le niveau pour le haut-parleur central.
Appuyez sur la touche AUDIO :.
쏅
« AUDIO MENU » apparaît sur l'affi cheur.
Appuyez sur la touche NEXT 4.
쏅
« AUDIO MENU 2 » apparaît sur l'affi cheur.
Appuyez sur la touche programmable
쏅
5 identifi ée par « CENTRE » sur l'affi cheur.
Actionnez le joystick 8 vers la gauche
쏅
ou la droite pour régler la fréquence
pour le haut-parleur central.
Actionnez le joystick 8 vers le haut ou
쏅
le bas pour régler le niveau pour le haut
parleur central.
Une fois le réglage effectué,
appuyez sur la touche OK du joystick
쏅
8 ou sur la touche AUDIO :.
Réglage des fi ltres passe-haut
pour l'avant et l'arrière
Vous pouvez régler un fi ltre passe-haut séparé pour chacun des canaux avant et arrière. Ces fi ltres coupent les fréquences qui
se trouvent en dessous de la fréquence réglée de manière à ce que celles-ci ne soient
plus reproduites que par un subwoofer raccordé.
Si vous sélectionnez le réglage « FLAT »,
aucune fréquence n'est coupée et toutes
les fréquences seront transmises aux hautparleurs. Avec le réglage « AUTO », le fi ltre
passe-haut est automatiquement adapté au
réglage du fi ltre passe-bas que vous avez
effectué.
Appuyez sur la touche AUDIO :.
쏅
« AUDIO MENU » apparaît sur l'affi cheur.
Appuyez sur la touche NEXT 4.
쏅
« AUDIO MENU 2 » apparaît sur l'affi cheur.
Appuyez sur la touche programmable
쏅
5 identifi ée par « HIPASS F » sur l'affi cheur pour effectuer le réglage du fi ltre
passe-haut pour l'avant.
Ou
Appuyez sur la touche programmable
쏅
5 identifi ée par « HIPASS R » sur l'affi cheur pour effectuer le réglage du fi ltre passe-haut pour l'arrière.
쏅
Actionnez le joystick 8 vers la gauche
ou la droite pour régler la fréquence
pour le fi ltre passe-haut.
Une fois le réglage effectué,
쏅
appuyez sur la touche OK du joystick
8 ou sur la touche AUDIO :.
Crossover
Dans le mode Crossover, les fréquences
aiguës sont reproduites par les canaux
avant et les fréquences basses par les canaux arrière.
Appuyez sur la touche AUDIO :.
쏅
« AUDIO MENU » apparaît sur l'affi cheur.
Appuyez sur la touche NEXT 4.
쏅
« AUDIO MENU 2 » apparaît en bas sur l'affi cheur.
Appuyez sur la touche programmable
쏅
5 identifi ée par « CROSSOVR »
Le Crossover est alors réglé.
Pour pouvoir utiliser le mode Crossover,
vous devez régler les fi ltre passe-haut et
passe-bas correspondants.
FRANÇAIS
99
Page 100

Subwoofer et haut-parleur central TMC
Appuyez sur la touche programmable
쏅
5 identifi ée sur l'affi cheur par « HI-
PASS » pour régler le fi ltre passe-haut.
Actionnez le joystick 8 vers la gauche
쏅
ou la droite pour régler la fréquence
pour le fi ltre passe-haut.
Appuyez sur la touche programmable
쏅
5 identifi ée sur l'affi cheur par « LOW-
PASS » pour régler le fi ltre passe-bas.
Actionnez le joystick 8 vers la gauche
쏅
ou la droite pour régler la fréquence
pour le fi ltre passe-bas.
Les réglages sont mémorisés automatique-
ment.
TMC pour les systèmes de
navigation dynamiques
TMC signifi e « Traffi c Message Channel ».
Cette fonction permet de transmettre numériquement les informations routières
qui peuvent être utilisées par systèmes de
navigation adéquats pour planifi er les itinéraires. Votre appareil dispose d'une sortie
TMC à laquelle il est possible de relier un
système de navigation Blaupunkt. Consultez votre revendeur Blaupunkt pour connaître les systèmes de navigation utilisables
avec votre appareil.
100
 Loading...