

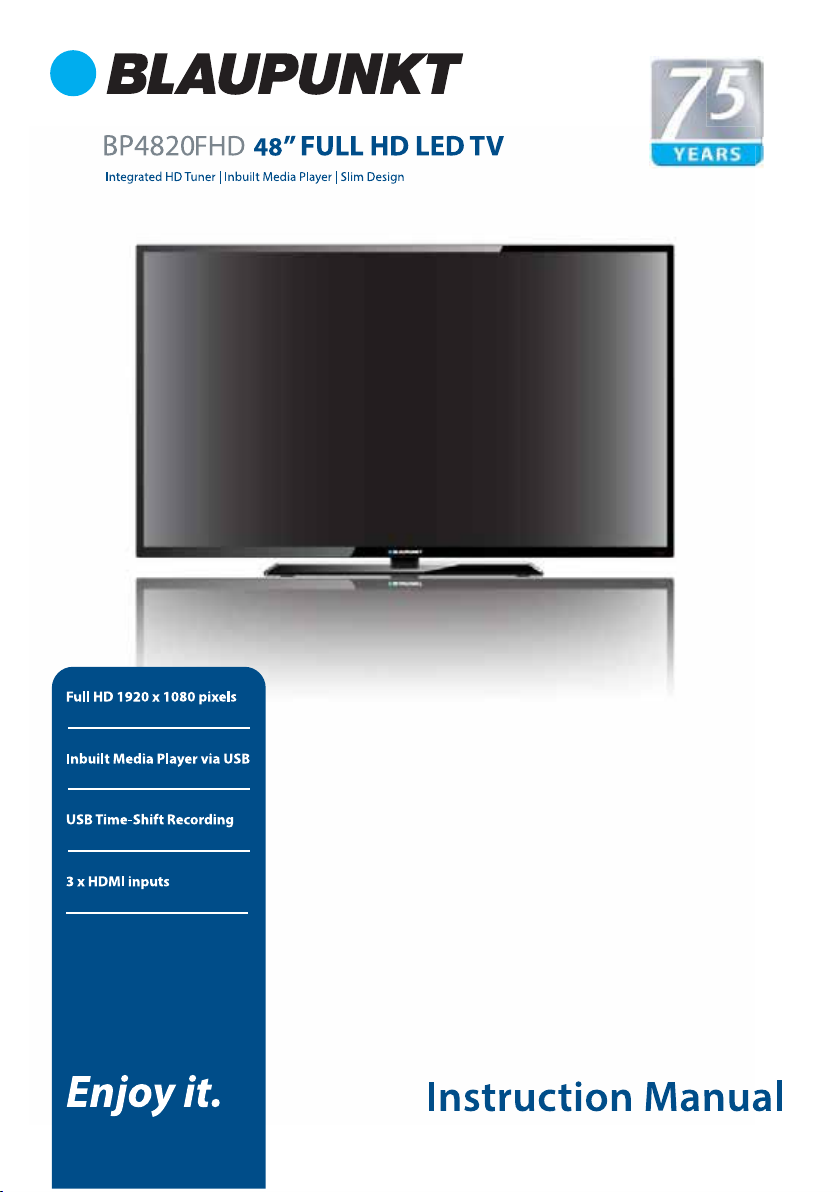
Page 1
Page 2
please contact Customer Support at
www.blaupunkt-australia.com.au
Manual Scan
Channel Edit
Signal Information
Lock System
Setup Setting
OSD Language
Audio Language
Subtitle
Teletext
Blue Screen
Mode Setting
Time Settings
PVR Settings
First Time Setup
Reset
20
20
20
21
22
22
22
22
22
22
22
22
23
23
23
Page 3
Viewing Texts
24
25
26
27
28
29
30
31
31
33
33
34-35
36
36
36
37
38
39
42
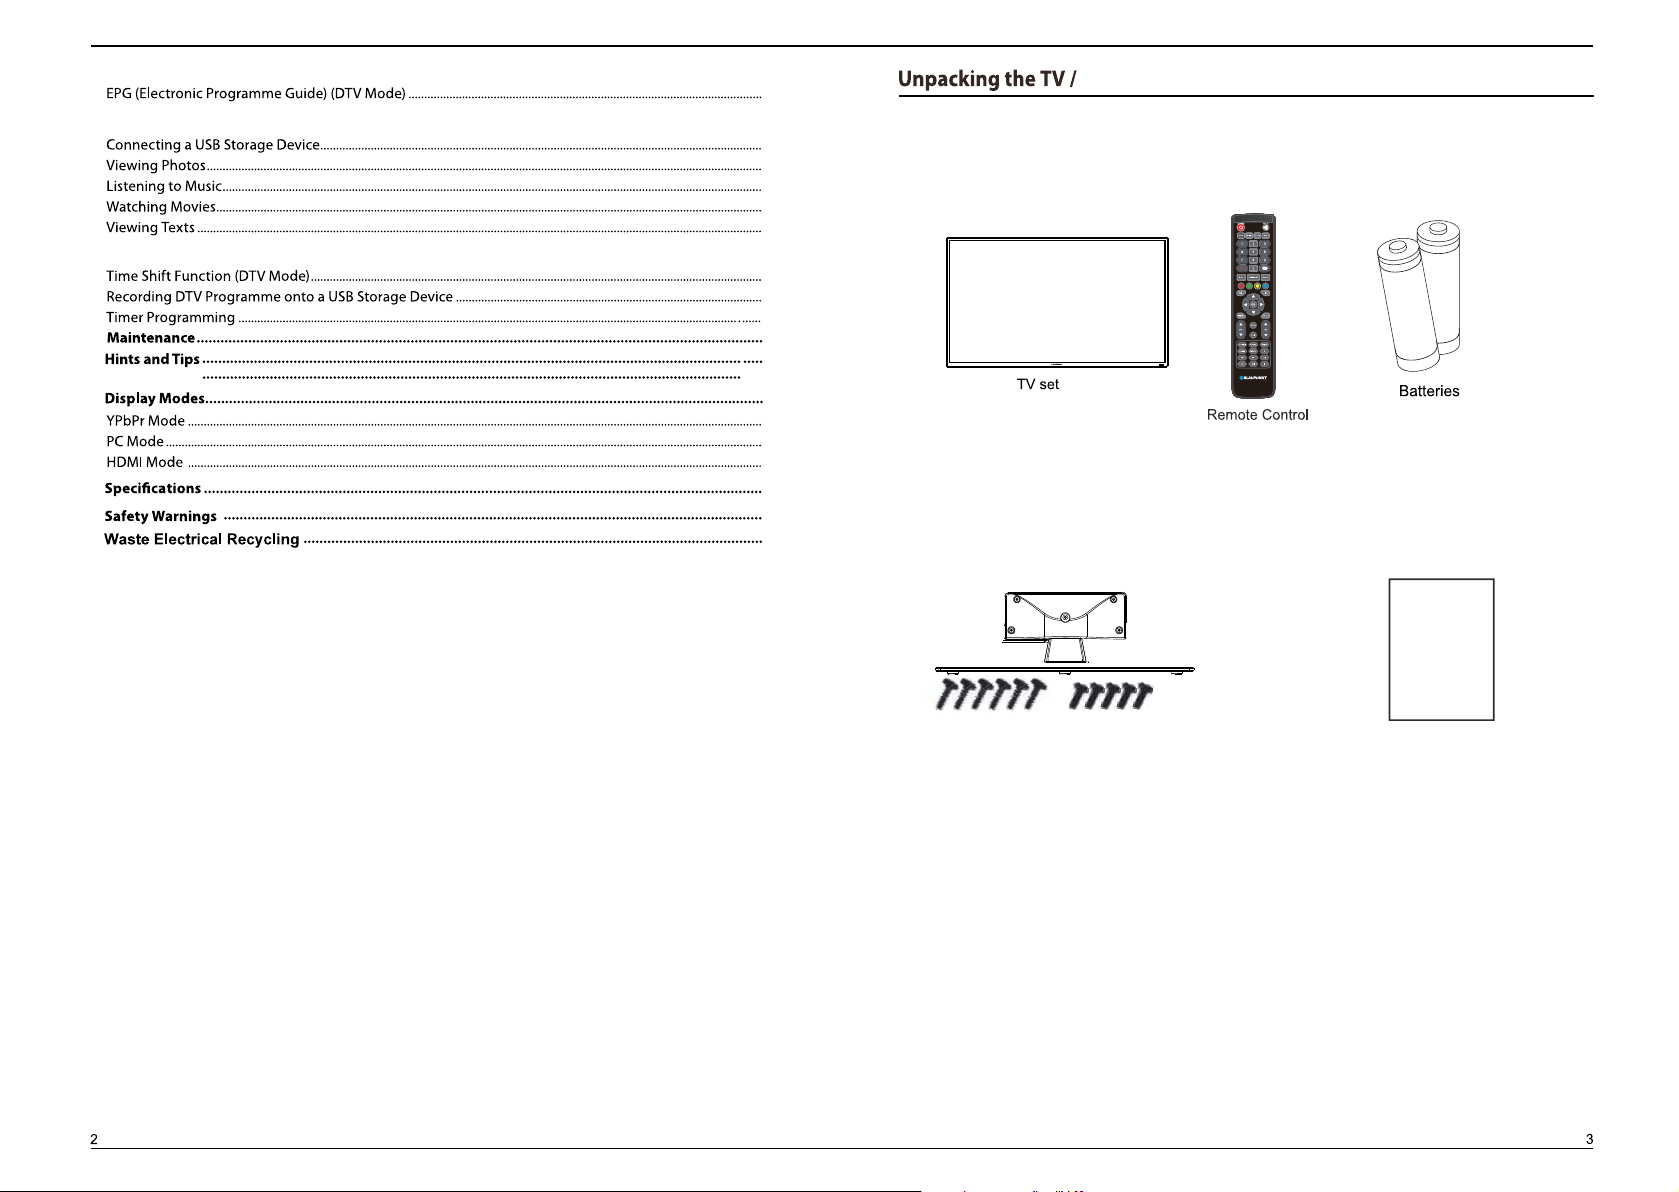
Accessories
User Manual
BB 4*12
BM4*14
Neck/Stand / Screws
User Manual
Page 4
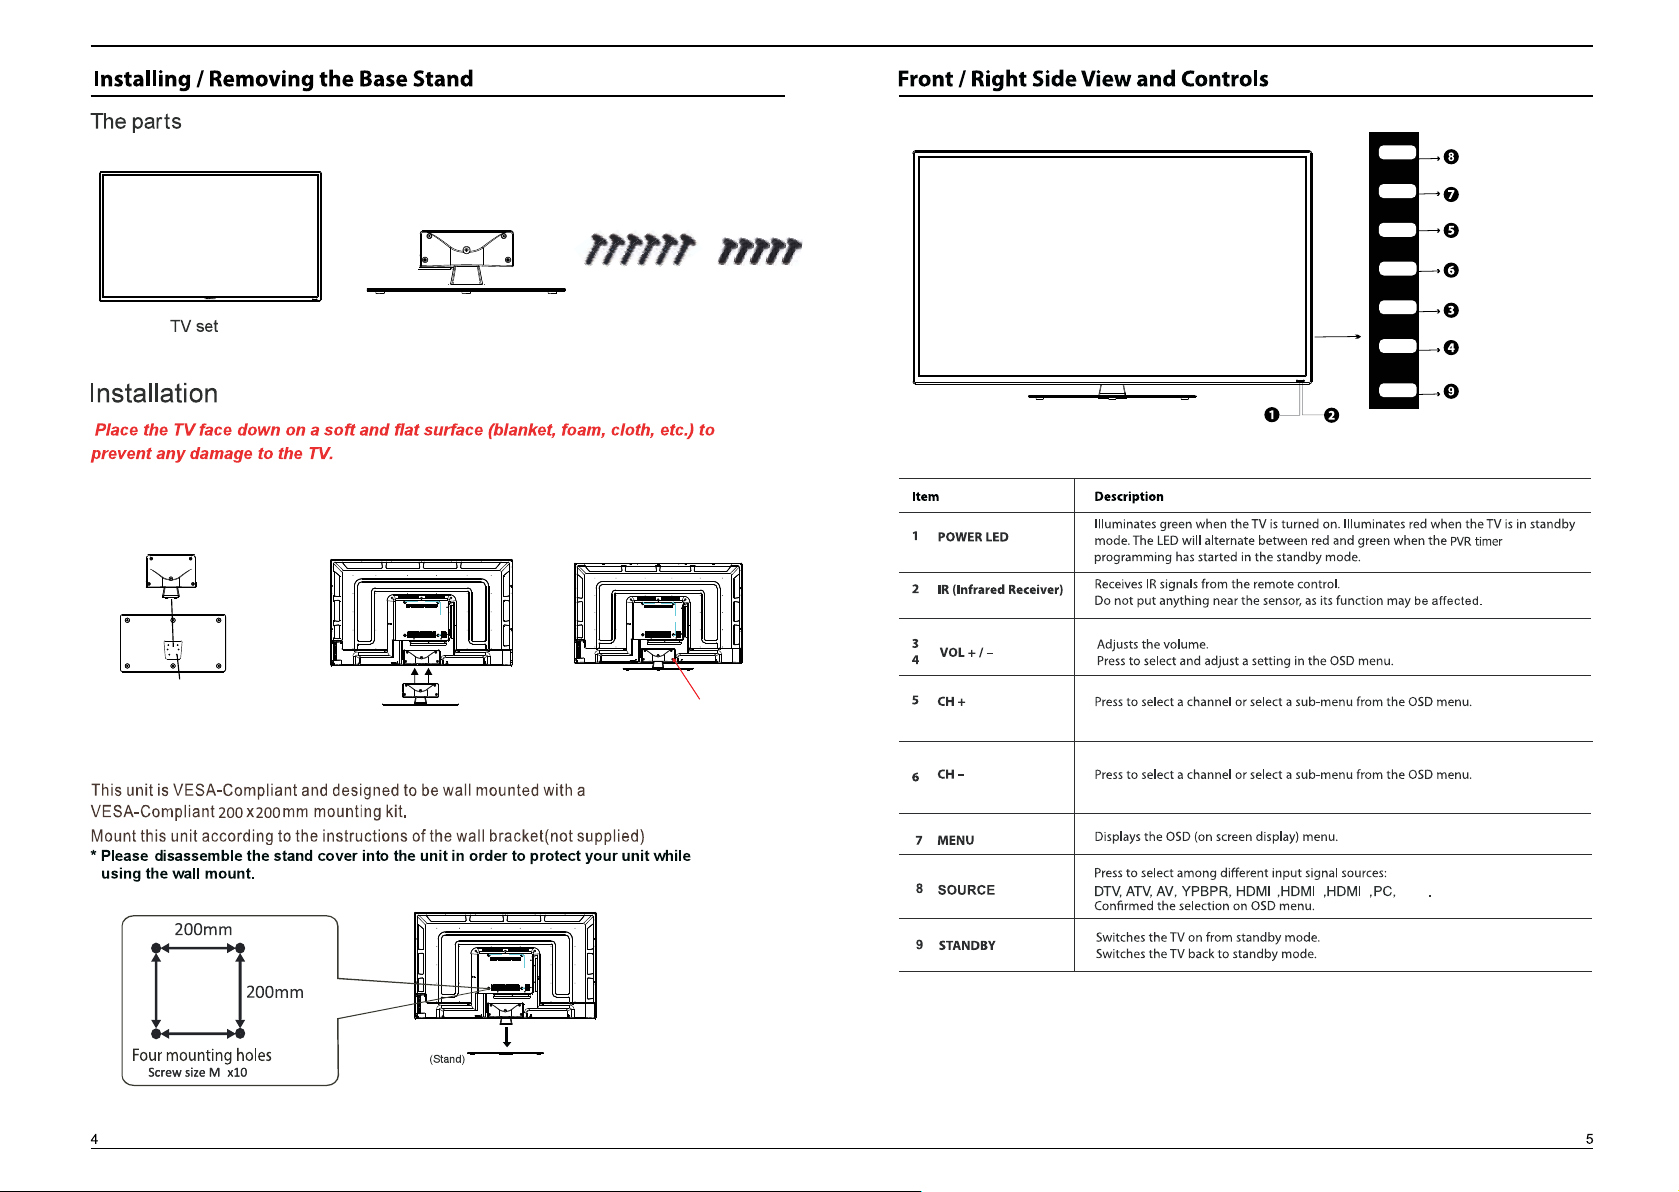
SOURCE
MENU
CH+
Fix the neck to the stand with
6 pcs BB4*12 screws as image 1.
BB4x12(6pcs)
image 1
Neck/Stand
2.Fix the neck to the
TV unit as image 2.
image 2
BB4*12
Screws
3.Insert 5 pcs BM4*14
screws as image 3
BM4x14(5pcs)
image 3
BM4*14
CH-
VOL+
VOL-
STANDBY
123
USB
6
Page 5
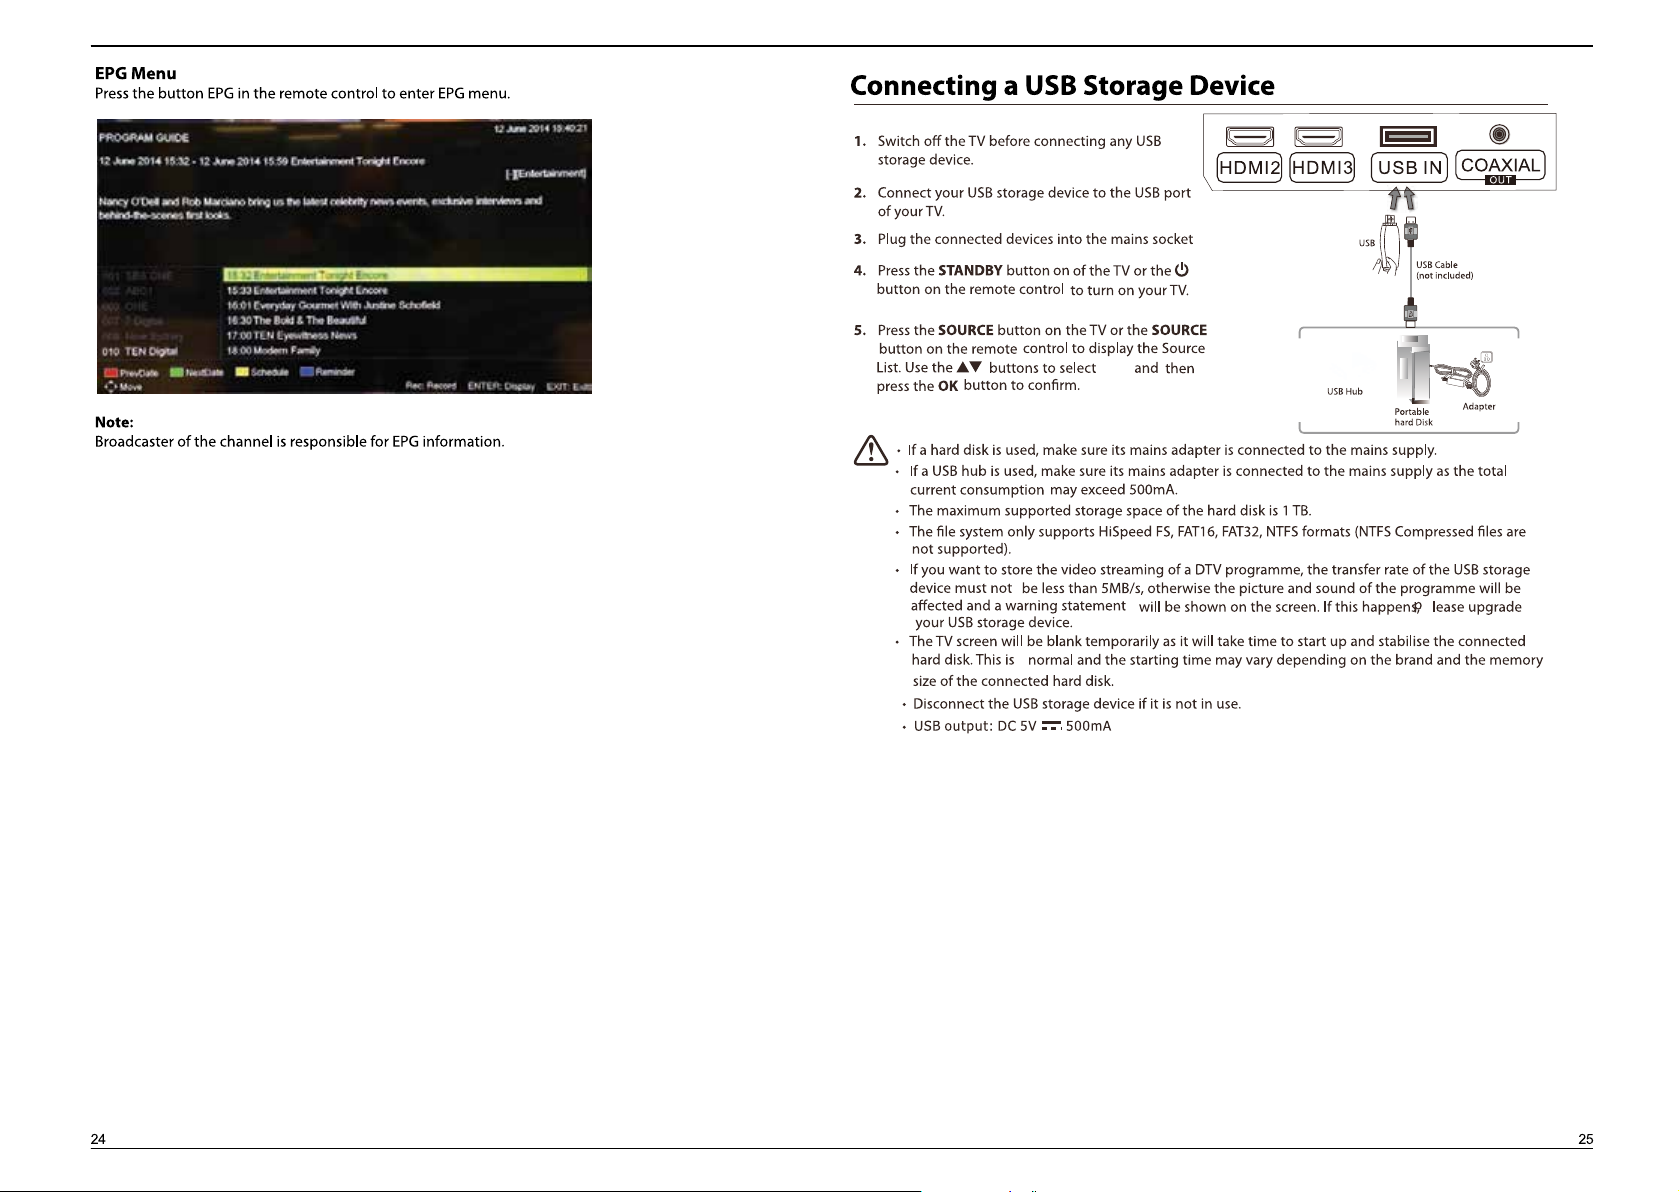
AV IN
T
U
O
COAXIAL
USB IN
HDMI3
2
HDMI
1
RLVIDEO
Y
Pb/Cb Pr/Cr
COMPONENT IN
AUDIO VGA
PC IN
RF IN
HDMI
OUT
COAXIA
F I
R
N
L
Page 6
MUTE
Press this button for mute sound,
press this button again for resume
audio listening
press this button to hold the
Freeze
picture,press again for cancel hold.
Lock System
Press this button to select
the picture mode directly
Use in Text ,DTV and TV
Press this button to view the detail
information of the signal in ATV/DTV
mode
Press this button to select the sound
mode directly
Stop
Rec Start to record
Back to Firsttime
setup menu
Evenlist Enter the scheduled
recording list.
USB
D-Setup
Enter the DVD setup menu
(Not used on this Mode).
Select your favourite program.
DVD Eject (Not used on this Mode).
Nicam key
Pause/Play/Timeshift
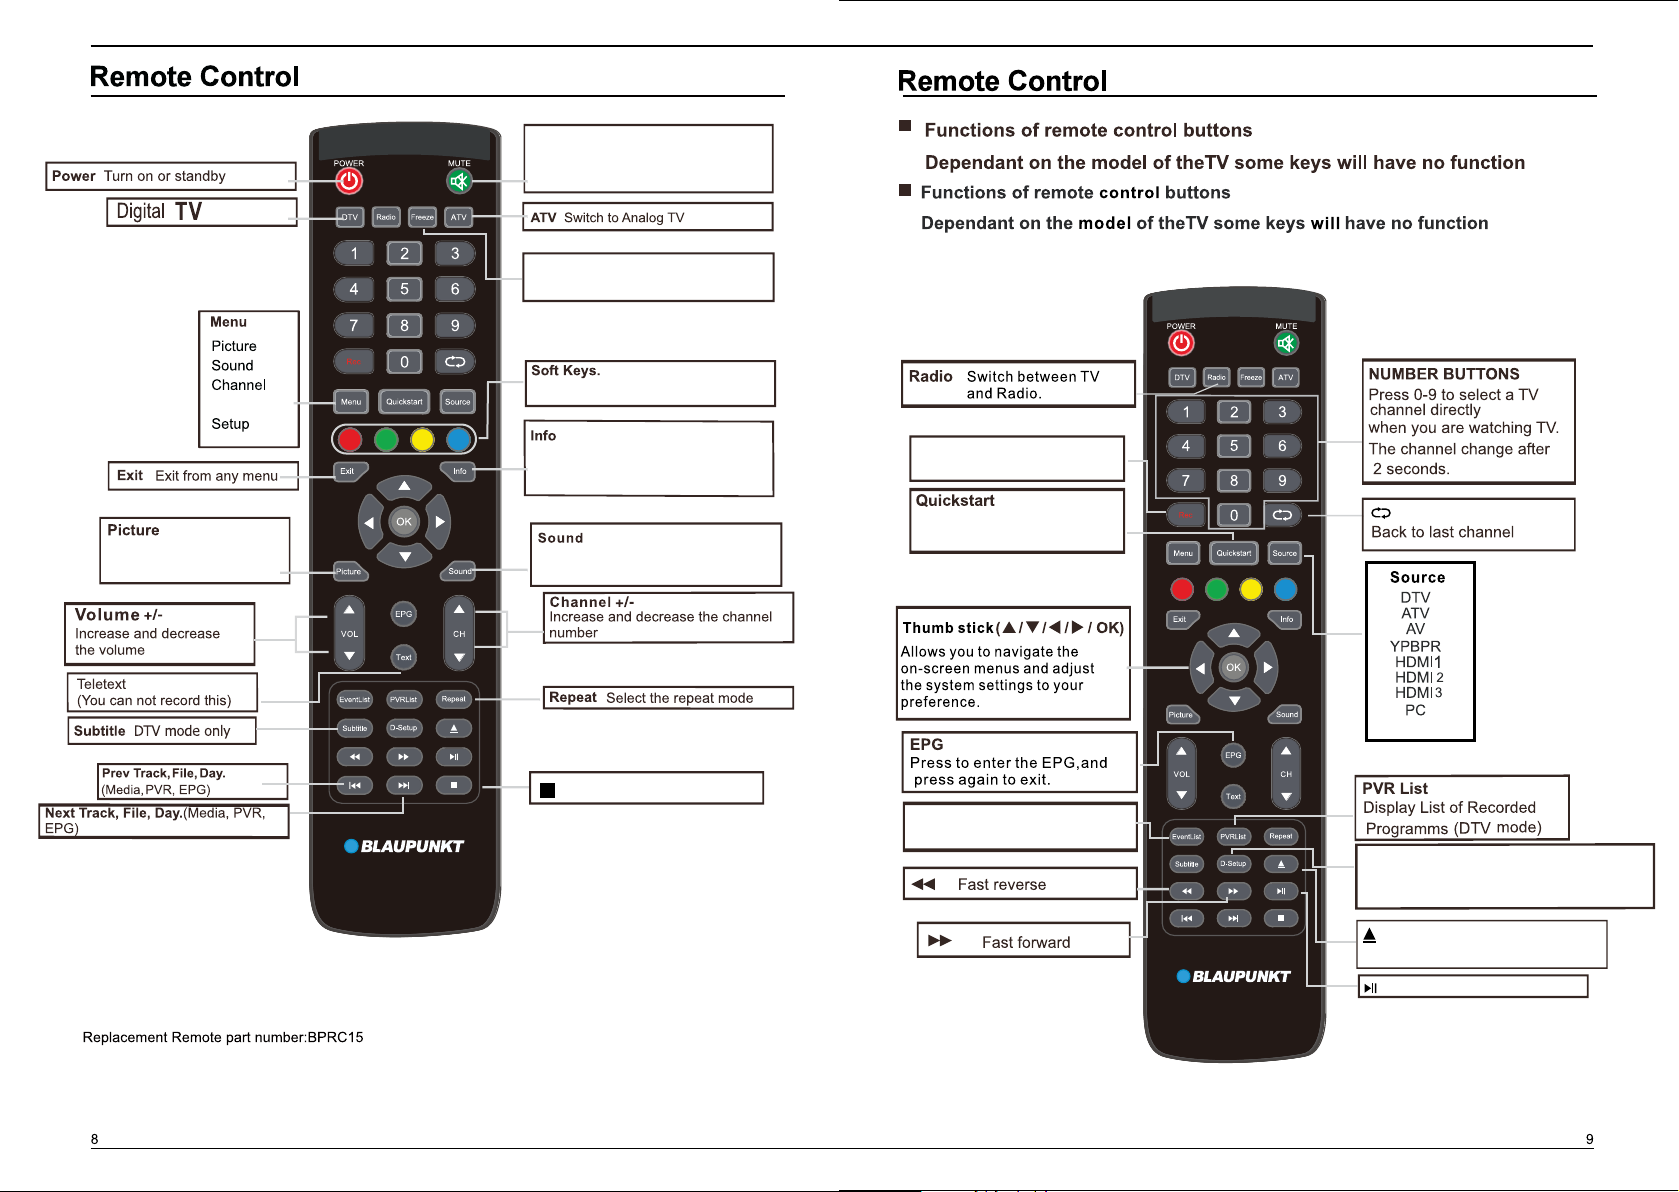
Remote Code:807F
Page 7
RLVIDEO
Page 8
Page 9

Enter the master password “8888”in the Lock system,
then select clear lock option to clear your previous password .
123
USB
SOURCE
YPbPr
1
2
3
USB
21
If this is the first time you are turning on the TV and there are no programs in the TV memory,
The
First time
following options to finish the first
1. OSD language : Select your language.
2.Mode setting :
3.Country : Select your country
4.Auto scan: Select your TV service.
5.LCN : Set the LCN to ON/OFF.
Ensure your aerial , cable or dish is plugged in to the TV ,then select the start option and
press OK button , the TV will start to install the service you have selected.
setup menu will appear on the screen, press the button to select the
time setup.
Select the TV mode.
Page 10

eh t r e t ne o t no t t ub r o KO eht s s e rp neht , no i t po s gn i t t e s C P t ce l e s o t no t t ub eht s se r P
Saturation
Hue
and then press the OK button to confirm.
and then press the OK button to confirm.
and then press the OK button to confirm.
,
and then press the OK button to confirm.
and then press the OK button to confirm.
Hue
Personal
FULL
,
,
,
,
Advanced Settings
Press OK button or button to
activate the advaned setting
menu.
NR: Press the button to
select the NR mode from
Medium/Strong/off/Weak.
MEPG NR: Press the button
to select the MEPG NR mode from
Medium/Strong/off/Weak.
Dynamic Contrast: Press the
button to select the Dynamic
Contrast: mode from Medium/
Strong/off/Weak.
PC setting
)edom CP no e l ba l i ava y l nO( t e s o t u n em b u s
Page 11

Personal
Frequency
C
End Time
1.Press the evenlist button enter scheduled record
setting lists,you can also enter the scheduled record
list via press the PVR button to enter PVR Settings,
then select the scheduled Record.
Press the OK button to select the following options.
Onec/Daily/Weekly/Weekday/off.
Press the buttons to select
the channel.
Press the buttons to select the
Year/Month/Date,then press the number buttons on the remote to adjust the Hour and
Minutes ,then select save to finish the adjustment of the Start Time.
Press the buttons to select the Year/Month/Date,then press the number buttons on
the remote to adjust the Hour and Minutes ,then select save to finish the adjustment of
the End Time.
,
and then press the OK button to confirm.
,
and then press the OK button to confirm.
and then press the OK button to confirm.
EQ setting Press the OK or button to activate the EQ setting Menu.
AVL Press the button to select ON/OFF.
SPDIF
Audio Description Press OK or button to enter the Audio description menu to set the
Audio mode to ON/OFF.
Sound Type Press the button to cycle among sound type:stereo/Dual l/Dual ll/ Mixed.
Auto Scan
To select auto scan mode ( DTV/ATV/ DTV+ATV)
OK
1. Press
2. Press button to highlight country and mode options.
Country: Press the button to select your country.
Mode :Press the button to cycle among the TV
mode: ATV/DTV/DTV+ATV.
ATV mode: Select ATV to scan all available analogue
channels and store them, To exist the tuning menu
,
by press Exit, To skip the tuning menu by press the menu button.
DTV mode: Select DTV to scan all available DTV channels and store them. To exist the tuning menu by
press Exit, To skip the tuning menu by press the menu button
ATV+DTV: Select ATV+DTV to scan all available DTV and ATV channels and store it. To exist the tuning
menu by press Exit, To skip the tuning menu by press the menu button
3. Press the Start button for Auto scan your service.
4. Press the Menu button to return back to the main menu.
5. Press the Exit button to exit the menu.
or button to enter Auto scan Menu .
Auto Scan
Country New Zealand
Mode DTV
Start
Adjust
Page 12

Digital Manual Scan
USB
press the button to view Pre./Next
page,press the number button on the remote
control to view the page directly, press the
button to view the Pre./Next text file.press the
blue button to enter the Quick Menu.
Only supported TXT format.
If this folder also contains music files,you can select a music to play on music menu,
then back to view your text,
so that you can listen to the music at the same time
Press the
1.
scan screen,select a channel number by press
the button or using the number Buttons on the
remote control.the Frequency and Strength of the
signal indication bars are below,if the strength is too
weak, the TV may fail to tune into this channel.
then press the start to begin the search.
2. Press button to select the Manual scan mode.
Digital Manual Scan:
Manual scan screen,select a channel number by
pressing the button or using the number buttons
on the remote control,then press the start to begin
the search. To exit the tuning menu by press Exit.
Analog Manual Scan: Press ok or button to enter
Analog Scan: Input the channel frequency by using the number buttons on the remote control.
Channel to save: Store the current channel
Start: Press this button to begin the search.,and press the Exist button to exit the tuning menu.
3.Press the Menu button to return back to the mani menu.
4.Press the Exit button to exit the Menu.
or button to enter Digital Manual
OK
Press ok or button to enter
then press the button to select the following options.
Analog Manual scan screen.
Channel edit
1. Press OK or button to enter Channel edit Menu .
2.
edit
Lock system
Lock
Lock System
Lock options.
Enable:
Channel Locks:
Lock Keypad:
New password: Use the 0-9 button to input 4-digit as the new password, then repeat the 4-digit to confirm
the new password.
Press button to select channel Locks,then press OK or button to enter sub-menu.
to lock channel according to then instruction.
Rating:
Set to prevent it from being used by your children, or other unexpected usage.
Press the button to select Lock Keypad, then press the button to select ON/OFF
Press the button to select Hotel mode ,then
channel edit
No block: Turn off parental lock.
Block G+ - Block All+: Turn on Parental Lock and set the parental rating level to show
programs below the level, while a password controls access to higher-level programs.
Press the button to select the Parental Rating,
then press the button to select No Block / Block G+.../Block ALL+.
or
Signal Information
Press the OK or button to see the detail information about the signal. Only available when there is
signal on DTV mode.
Clear Lock: Press ok or button to clear the Lock.
Press the button to select Clear lock ,then
Page 13

OSD language: Press the button to select the menu language.
USB
Supported file formats: MP3/AAC/M4A/WAV.
Supported Audio decoder:MPEG-1 layer3/MPEG-2
layer3 /AAC/HE-AAC V1/HE-AAC V2/LPCM/ADPCM
Play/Prev./Next/FB/FF/Plause.
press the blue button to enter the Quick Menu.
Audio Language:
Press the OK or button to select the Audio language sub-menu
to select the Audio language.
OK
First time setup:
Press ok or button to activate the first time setup menu.
Reset:
Press ok or button to select the factory reset item, then select the YES to set.
Subtitle:
Press the OK or button to enter sub-menu to select the subtitle language.
Teletext:Press the OK or button to enter teletext menu to adjust telext settings
( Only available on ATV and DTV mode)
Blue screen : Press the button to select ON/OFF.
Mode setting: Press the button to select store mode /home mode.
Time settings:Press the OK or button to enter Time Setting menu.,and select the following time
setup options.
OSD Time:
Sleep Timer:
30s/60s/off.
/5/15/...120/240
Auto Sleep:
/ button on TV unit
were
3,4 5
If you want to cancel the Auto sleep when the reminder screen pop up,
press any buttons can cancel it.
Time Zone:
press
Time: Press OK or button to enter the Time menu to adjust the time.
Press OK or button to enter the region menu, select your region and confirm it by
OK button.
Page 14
USB
Page 15

First time setup:
Press ok or button to activate the first time setup menu.
Reset:
Press ok or button to select the factory reset item, then select the YES to set.
OK
USB
Press the Info button to display the function bar,
press the ok to play/pause the picture,
press the button to rotate the picture when the
picture in pause condition,press the button to
view the Pre./Next picture.press the blue button to
enter the Quick Menu.
If this folder also contains music files,you can select a music
to play on music menu, then back to view your photo,
so that you can listen to the music at the same time while viewing your photo.
USB
Supported file formats: MP3/AAC/M4A/WAV.
Supported Audio decoder:MPEG-1 layer3/MPEG-2
layer3 /AAC/HE-AAC V1/HE-AAC V2/LPCM/ADPCM
press the blue button to enter the Quick Menu.
Play/Prev./Next/FB/FF/Plause.
Page 16

Lock system
Enable:
Rating:
Channel Locks:
Lock Keypad:
channel edit
Lock System
Lock options.
Lock
Press button to select channel Locks,then press OK or button to enter sub-menu.
to lock channel according to then instruction.
Set to prevent it from being used by your children, or other unexpected usage.
Press the button to select Lock Keypad, then press the button to select ON/OFF
Press the button to select the Parental Rating,
then press the button to select No Block / Block G+.../Block ALL+.
or
New password: Use the 0-9 button to input 4-digit as the new password, then repeat the 4-digit to confirm
the new password.
Clear Lock: Press ok or button to clear the Lock.
USB
Press the button to select Hotel mode ,then
Press the button to select Clear lock ,then
No block: Turn off parental lock.
Block G+ - Block All+: Turn on Parental Lock and set the parental rating level to show
programs below the level, while a password controls access to higher-level programs.
Supported file formats and decoder is as follow:
File format
Video Audio
AVI
MPEG MPEG-1 MP/MPEG-2 MP
MPEG4
TS
MKV
FLV H.264 MP@Level 4/H.264 HP@Level 4
MPEG-1/MPEG-2 MP/MPEG-4 SP/MPEG-4
ASP/MPEG-4 XVID/H.264 MP@Level
4/H.264 HP@Level 4
MPEG-4 SP/MPEG-4 ASP/MPEG-4 XVID/H.264
MP@Level 4/H.264 HP@Level 4
MPEG-1/MPEG-2 MP/H.264 MP@Level 4/H.264
HP@Level 4
MPEG-1/MPEG-2 MP/MPEG-4 SP/MPEG-4
ASP/MPEG-4 XVID/H.264 MP@Level 4/H.264
HP@Level 4
Decoder
MPEG-1
Layer2/MPEG-1
Layer3/MPEG-2
Layer3/AC -3/AAC-
LC/HE-AAC V1/HE-AAC
V2
press the button to view Pre./Next
page,press the number button on the remote
control to view the page directly, press the
button to view the Pre./Next text file.press the
blue button to enter the Quick Menu.
Only supported TXT format.
If this folder also contains music files,you can select a music to play on music menu,
then back to view your text,
USB
so that you can listen to the music at the same time
Next/FB/FF/Plause.
Play/Prev./
press the blue button to enter the Quick Menu.
Page 17

Auto Scan
To select auto scan mode ( DTV/ATV/ DTV+ATV)
1. Press
OK
or button to enter Auto scan Menu .
2. Press button to highlight country and mode options.
Country: Press the button to select your country.
Mode :Press the button to cycle among the TV
mode: ATV/DTV/DTV+ATV.
ATV mode: Select ATV to scan all available analogue
channels and store them, To exist the tuning menu
by press Exit, To skip the tuning menu by press the menu button.
DTV mode: Select DTV to scan all available DTV channels and store them. To exist the tuning menu by
press Exit, To skip the tuning menu by press the menu button
ATV+DTV: Select ATV+DTV to scan all available DTV and ATV channels and store it. To exist the tuning
menu by press Exit, To skip the tuning menu by press the menu button
3. Press the Start button for Auto scan your service.
4. Press the Menu button to return back to the main menu.
5. Press the Exit button to exit the menu.
Adjust
Auto Scan
Country New Zealand
Mode DTV
Start
Press the button to display time shift bar.
Frequency
C
End Time
1.Press the evenlist button enter scheduled record
setting lists,you can also enter the scheduled record
list via press the PVR button to enter PVR Settings,
then select the scheduled Record.
Press the OK button to select the following options.
Onec/Daily/Weekly/Weekday/off.
Press the buttons to select
the channel.
Press the buttons to select the
Year/Month/Date,then press the number buttons on the remote to adjust the Hour and
Minutes ,then select save to finish the adjustment of the Start Time.
Press the buttons to select the Year/Month/Date,then press the number buttons on
the remote to adjust the Hour and Minutes ,then select save to finish the adjustment of
the End Time.
Page 18

Advanced Settings
Press OK button or button to
activate the advaned setting
menu.
NR: Press the button to
select the NR mode from
Medium/Strong/off/Weak.
MEPG NR: Press the button
to select the MEPG NR mode from
Medium/Strong/off/Weak.
Dynamic Contrast: Press the
button to select the Dynamic
Contrast: mode from Medium/
Strong/off/Weak.
eh t r e t ne o t no t t ub r o KO eht s s e rp neht , no i t po s gn i t t e s C P t ce l e s o t no t t ub eht s se r P
FULL
PC setting
)edom CP no e l ba l i ava y l nO( t e s o t u n em b u s
Page 19

Enter the master password “8888”in the Lock system,
1
2
3
123
YPbPr
SOURCE
USB
USB
21
then select clear lock option to clear your previous password .
Page 20

1920 x 1080
/Dot to Dot/Full
Page 21

BP4820FHD
48"
300
5000:1
120W
MAX
293k6Wh
7W+7W
1095.9x92.1x641.4mm
1095.9x250x683.2mm
13.6
3
Page 22

Rec Start to record
Back to Firsttime
setup menu
USB
D-Setup
Pause/Play/Timeshift
Evenlist Enter the scheduled
recording list.
Enter the DVD setup menu
(Not used on this Mode).
Select your favourite program.
DVD Eject (Not used on this Mode).
Nicam key
Page 23

Page 24

For more information and Customer support visit:
www.blaupunkt-australia.com.au
 Loading...