

Page 1

G-S ensor
Bui lt-in G PS
140 °Wide An gle Len s
Sup port up to 64 G B SDHC
BP 3.0 D GPSFH
1131 5 99 130 00 1
Page 2

Page 3

Index
English------------------------------------------------------------ 1—18
Deutsch--------------------------------------------------------- 19—36
Français--------------------------------------------------------- 37—54
Polski------------------------------------------------------------ 55—72
Español----------------------------------------------------------73—90
Português -----------------------------------------------------91—108
Nederlands --------------------------------------------------109—126
Italiano-------------------------------------------------------127—144
Suomi---------------------------------------------------------145—162
čeština ------------------------------------------------------- 163 180
Român--------------------------------------------------------181—198
Русский------------------------------------------------------ 199—216
—
Page 4

Page 5

User manual
1
Page 6

Bef ore using th e produ ct, ple ase read thi s manua l caref ully.
The m anual i s to guide you r usage o f this produ ct specia lly.
Caution:
1. Please strictly abide by the relevant national law. This product can not be used for illegal
purposes; otherwise take the responsibility by yourself.
2. Please insert the micro SD card in right direction to avoid damage the card or DVR. If DVR
writes'Please Insert SD Card Again', please enter into setting menu and format micro SD
card. If it is still the same, please change another micro SD card.
Note: Format micro SD card will delete all files. Please backup the important files before
format it.
3. Recommend to use CLASS 6 or above micro SD card. Owing to 64GB micro SD card doesn't
have unified standard in the market, not all 64GB micro SD card can be compatible to this
DVR.Please test it on DVR before purchase.
4. It is suggested to backup files in micro SD card once a week. This product is not the
exclusive storage device, so please backup the important files timely to avoid files is
missing.
5. Please check the bracket carefully after installation to avoid damage.
6. The working time of the built-in battery will shrink with the using time increased. If the DVR
will not work for a long time, please charge it every two months to avoid over-discharged
which shortens lifespan of battery.
7. Please do not take the product under the moist environment. It is not waterproof.
8. Please do not take pictures or movie directly to the sun.
9. Please do not use this product in excessive dust environment in case of the lens and other
components to be contaminated and affect the video quality. Please keep lens clean with
soft cloth or exclusive wipes.
10. This product belongs to precision electronic products which can not bear heavy hit and
do not use it in high magnetic and electronic working environment.
11. Working temperature for this device is -10℃-50℃ and storage temperature is -20℃
-70℃. Continuous exposure to direct sunlight for an extended period of time, may
cause the device to malfunction, color change, housing and image distortion,
especially in locked cars where cabin temperature exceeds 70℃.
2
Page 7

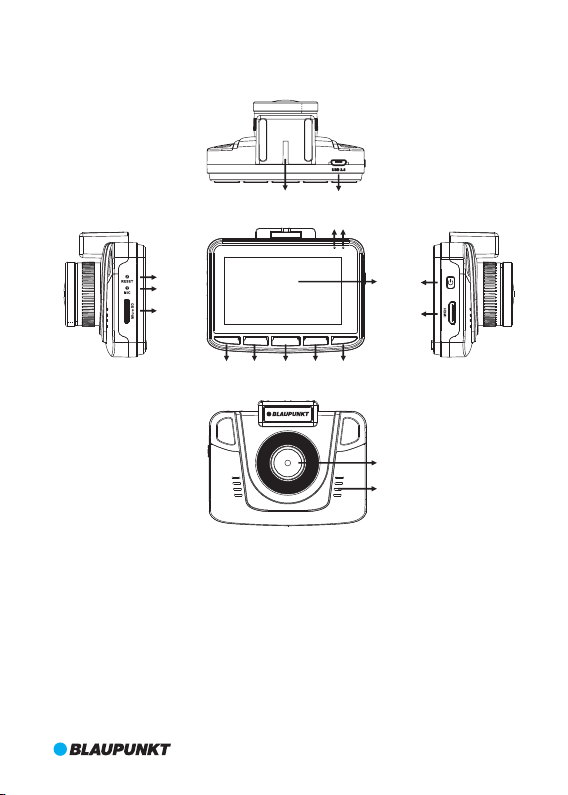
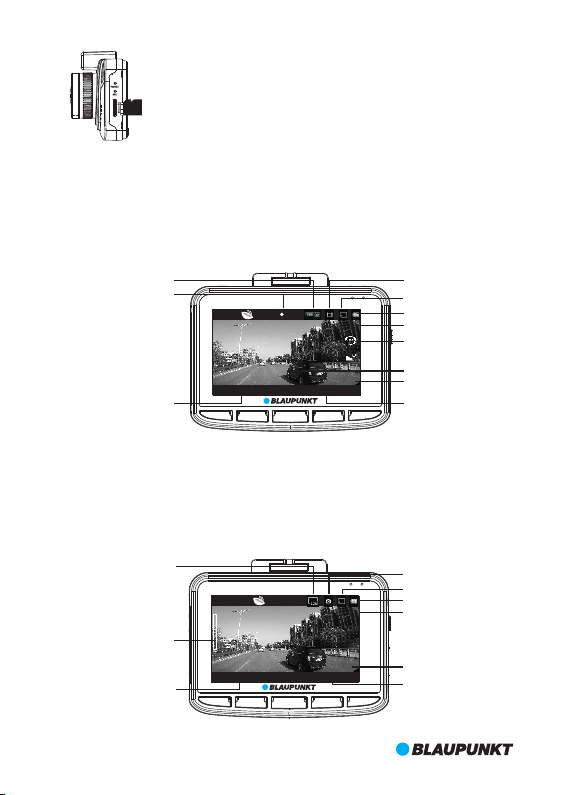
1. Structure
2
1
13
12
3
4
5
1. Bracket Hole
2. USB Port
3. RESET
4. Microphone
5. Micro SD Card Slot
6. UP Key
UP MEN U
OK MODE DOWN
6 7 8 9 10
1
4
m
0
°
m
W
0
.
i
d
3
e
=
f
A
;
n
2
.
g
2
l
/
e
F
7. MENU
Key
8. OK Key
9. MODE Key
10.DOWN Key
11.LCD
12.Working Indicator Light
11
14
15
16
17
13.Power Indicator Light
14.ON/OFF Key
15.HDMI Output
16.Lens
17.Speaker
3
Page 8
2. Features
1. Support multiple video resolutions, such as 1080P, 720P and etc with superior video and
image quality;
2. Support 60fps for high-speed recording;
3. High definition CMOS lens module with wide viewing angle;
4. Built-in microphone/speaker;
5. With Voice/Mute Recording shortcut Key;
6. With LCD OFF shortcut Key;
7. Support high capacity micro SD card;
8. Support seamless loop recording and as recording as charging;
9. Automatically take video when car engines on and turn off when car engines off;
10.Support motion detection;
11.Support SOS and G-Sensor to prevent important files from being overwritten;
12.Support HDMI output;
13.Support parking monitoring function;
14.Support GPS tracking function;
15.Support driver ID;
16.Support multi-language.
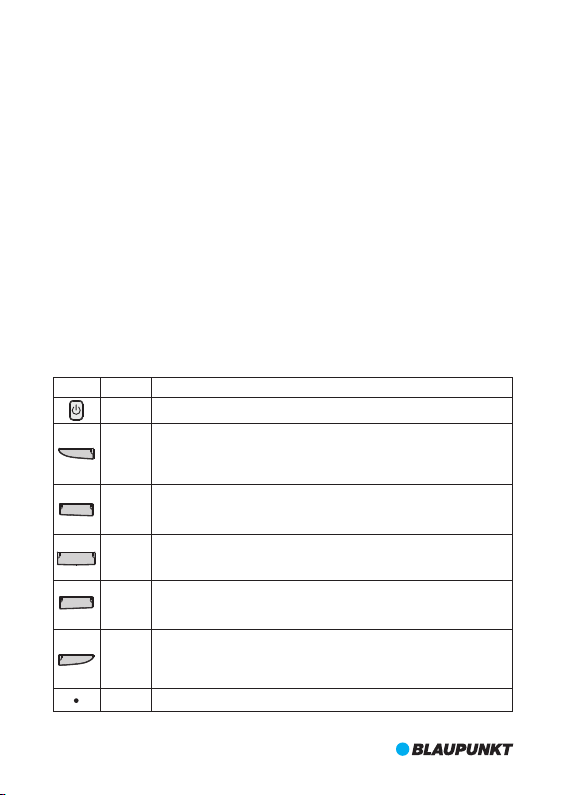
3. Key Definition and Function
Picture
UP
MENU
OK
MODE
DOWN
Function
Definition
Long press to power on/off.
ON/OFF
In Movie or standby mode, short press UP key to turn on/off voice recording;
In Still Capture mode, short press UP key to zoom in; In setting mode and
UP
preview mode, short press UP key to select; In video playing or pause status,
short press UP key to fast backward.
In standby mode, short press MENU key to enter into setting mode and press
it again to quit when setting is completed; I n recording, short press MENU key
MENU
to activate SOS function, and press it again to deactivate.
In Movie mode, short press OK key to pause or record; In Still Capture mode,
short press OK key to take photo; In Playback mode, short press OK key to play
OK
video/pause; In setting mode, short press OK key to confirm.
In standby mode,short press MODE key to switch Movie/Still Capture/Playback
MODE
mode; In setting mode, short press MODE key to switch different mode menu;
In playback mode, short press MODE key to back to preview mode.
In Movie mode, short press DOWN key to turn on/off LCD OFF; In Still Capture
mode, short press DOWN key to zoom out; In setting mode and preview mode,
DOWN
short press DOWN key to select; In video playing or pause status, short press
DOWN key to fast forward.
RESET
Pock it when DVR software crashes down.
4
Page 9
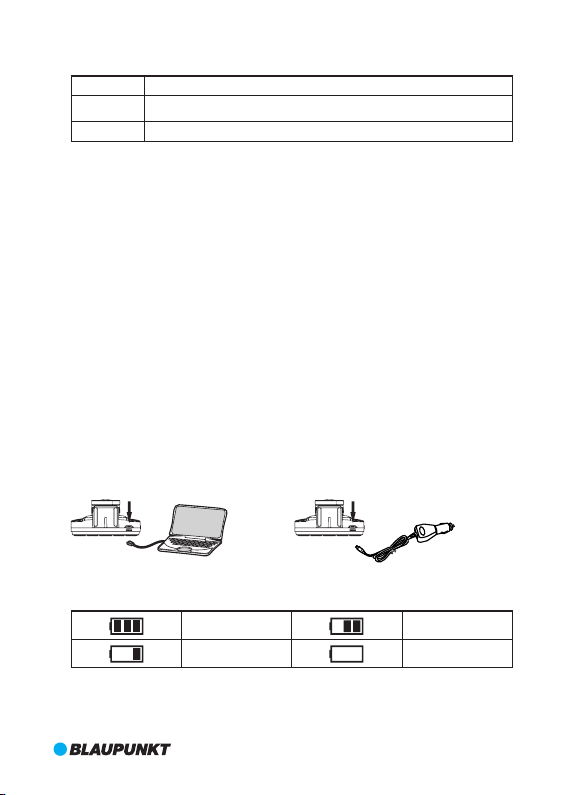
4. Indicator Light Definition
Indicator Light
Definition
Long steady on means DVR is charging; Af ter full charge, red light is off.
Red
Long steady on means DVR is in standby mode; flicking means DVR is recording.
Green
5. Function
I.ON/OFF
(1)Power on
A. In off state, long press ON/OFF key for 3 seconds to power on and start recording automatically with green light flashing.
B. DVR is connecting with car charger to start recording.
Note: If there is a pop-up window to show 'SD card is not inserted', please insert micro SD
card before use. When micro SD card is inserted in power on status, DVR will automatically
power off.
(2)Power OFF
A. In working status, long press ON/OFF key for 3 seconds to power off.
B. In working status, DVR will automatically save the current file and power off automatically
when unplug the car charger.
C. In low battery status, DVR will automatically save the current file and power off
automatically.
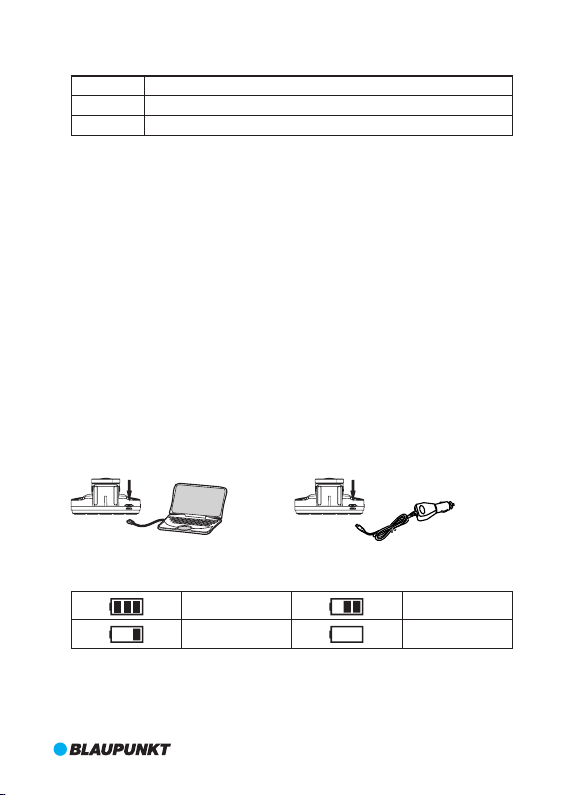
II.Battery Charging
(1)Two ways to charge
A.with USB cable B.with car charger(suggested)
(2) Batte ry Stat us Defi nitio n
Full
Low
Medium
Empty
III .Micr o SD Card I nsert ion
Straightly insert micro SD card into the slot as indicated below until hearing 'click' sound.
5
Page 10
Pop u p Micro SD Card : Push f orwar d micro SD card first a nd the n take it
out( it is s uggest ed to do it with DVR of f)
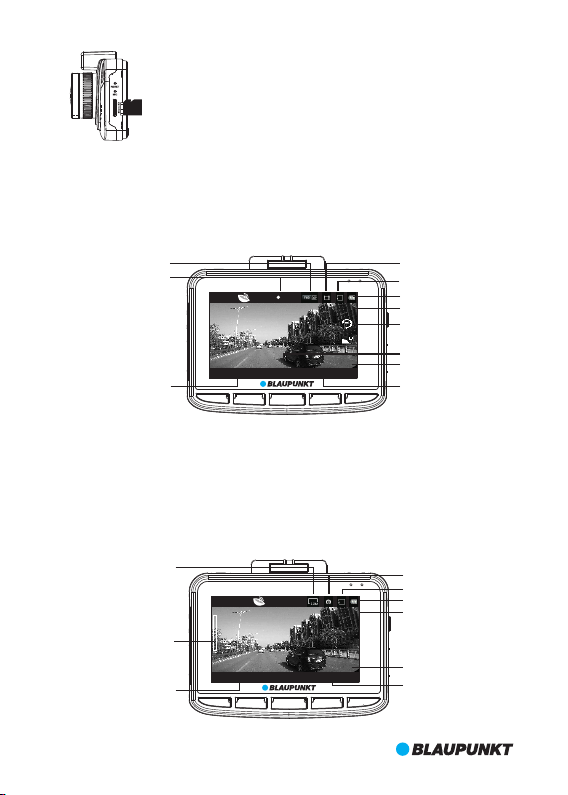
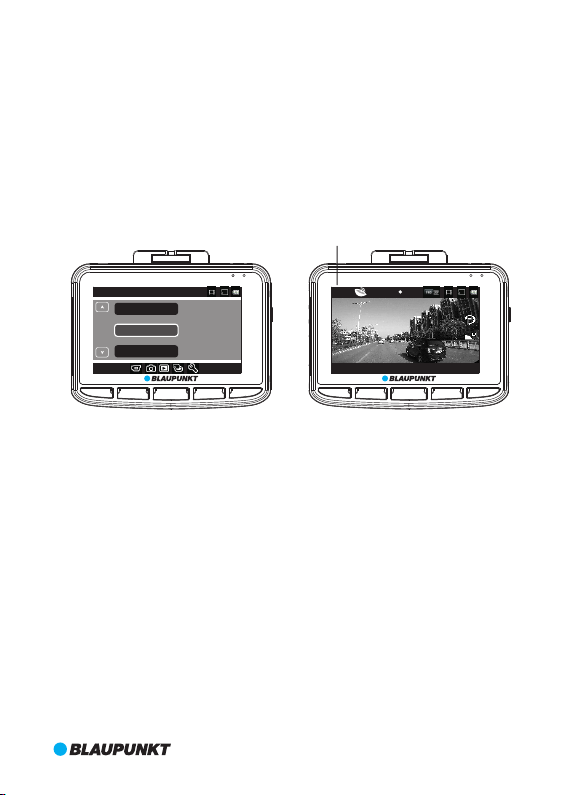
IV.Movie Mode
Power on DVR to enter into movie mode directly with green light flashing. Short press OK
key to saved the current file and stop recording. The DVR enters into standby mode with
green indicator light steady on. In standby mode, short press OK key to restart recording.
Resolution&Frame
Recording
REC
EV:0. 00
Movie Mode
Micro SD Card in
Battery Status
Exposure
Movie Clip Time
BP 3.0 FH D GPS 0 KM/ H ACD 1010
Time & Date
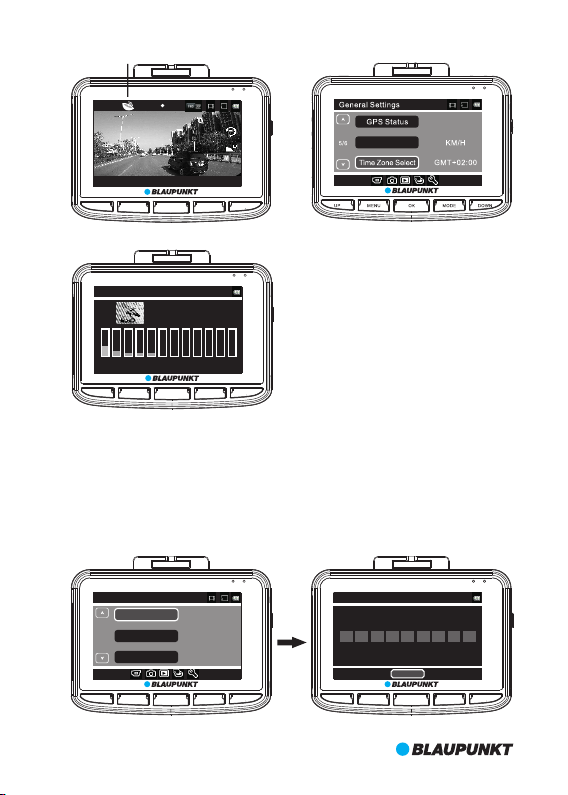
V.Still Capture Mode
In standby mode, shor t press MODE key to enter into still capture mode and press OK key
to take photos.
In still capture mode, short press UP or DOWN key to zoom in or zoom out (Max. x 4).
2015 /09/0 8 15:12 :45 0:0 1:44
UP MENU
OK MOD E DOWN
Image Size
Digital Zoom
Time & Date
T
W
1X
2015 /09/0 8 15:12 :45 181 9
UP MENU
EV:0. 00
ACD 101 0
OK MOD E DOWN
Speed
Driver ID
Movie Time
Still Capture Mode
Micro SD Card in
Battery Status
Exposure
Driver ID
Photo Left
6
Page 11
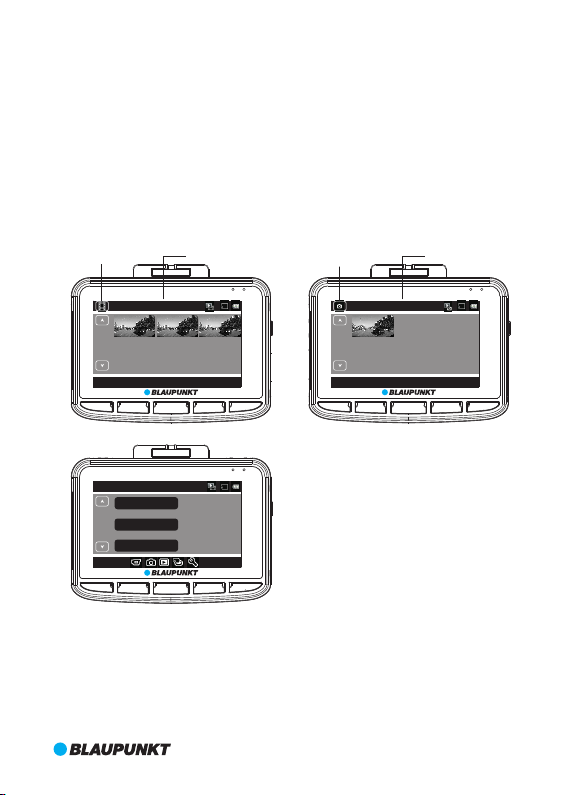
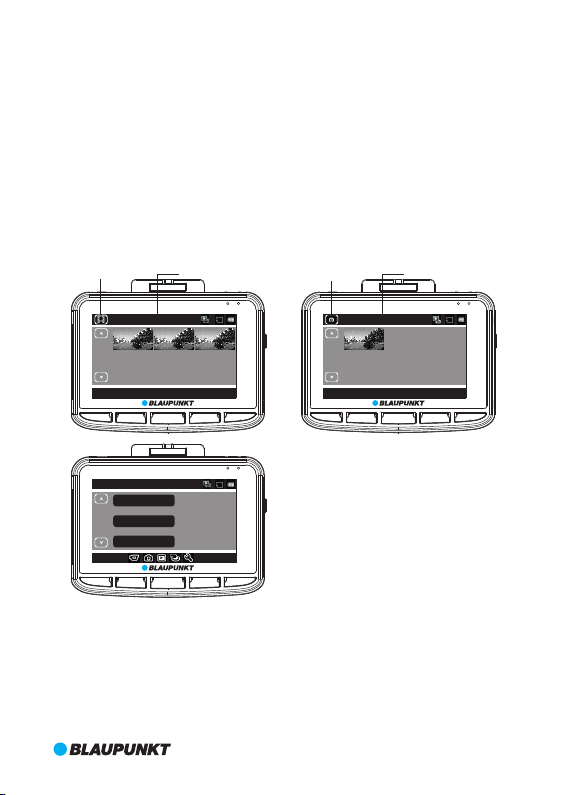
VI.Playback and Preview Mode
A. In standby mode,short press MODE key twice to enter into preview mode.Short press UP
or DOWN key to select the video file and then press OK key to play. I n video playing status,
short press UP key to fast reverse and DOWN key to fast forward (max. x8). Press OK key to
pause in video playing status. Short press MODE key to stop playing and go back to
preview mode.
In preview mode, short press MODE key to preview photos. Short press UP or DOWN key to
select the photos. OK key is pressed for full-screen preview and press UP or DOWN key to
go to next or previous photo.
B. In preview mode, short press MENU key to enter into playback mode to adjust volume,
delete or protect files. Short press UP or DOWN key to select 'Volume', 'Delete' or 'Protect',
and press OK key to enter into submenu. Short press UP or DOWN key to select and OK key
for confirmation. Then short press MENU key to quit and go back to preview mode.
Movie Preview Current Movie
Photo Preview
Current Photo
100_ DSC/P ICT00 11.AVI
3
/
3
2015 /09/0 8 15:12 :45 [00 :01:4 4]
UP MENU
Play back
1/1
UP MENU
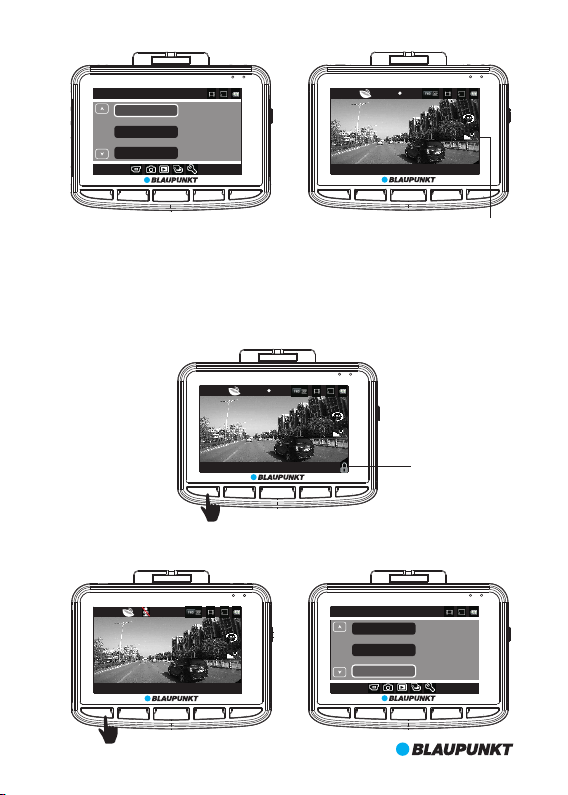
VII. G-SENSOR
In movie mode, the car brakes suddenly or is hit heavily, G-sensor will be ac tivated to
prevent the current video clip from being overwritten. Three-step sensitivity (high,
medium, low) are to cater for different car owners and can be set in 'Protect Level' in
General Settings.
Note: If G-sensor is activated to work in the first 10seconds of the video clip,the current and
previous video clip are saved. If in the last 10seconds of the video clip,the current and the
next video clip are saved. If in the middle of video clip, only the current video clip is saved.
Volum e
Delete
Prot ect
OK MOD E DOWN
5
OK MOD E DOWN
100_ DSC/P ICT00 11.JPG
3
/
3
2015 /09/0 8 15:12 :45
UP MENU
OK MOD E DOWN
7
Page 12

Gene ral Set tings
Prot ect Lev el
4/6
Parking Monitoring
Moti on Dete ction
UP MENU
Midd le
Off
Off
OK MOD E DOWN
REC
BP 3.0 FH D GPS 0 KM/ H ACD 1010
2015 /09/0 8 15:12 :45 0:0 1:44
UP MENU
OK MOD E DOWN
EV:0. 00
VIII.SOS
In movie mode, short press MENU key to lock the current file manually in case of the
important file is overwritten in loop recording. Press MENU key again to unlock the current
file.
Note: If SOS is ac tivated to work in the first 10 seconds of the video clip, the current and
previous video clip are saved. If in the last 10 seconds of the video clip, the current and the
next video clip are saved. If in the middle of video clip, only the current video clip is saved.
REC
EV:0. 00
BP 3.0 FH D GPS 0 KM/ H ACD 1010
2015 /09/0 8 15:12 :45 0:0 1:44
UP MENU
IX.Voice/Mute Recording
In standby or movie mode, short press UP shortcut key to be voice recording or mute
recording, or press MENU key to go to Movie Mode to set up.
STBY
BP 3.0 FH D GPS 0 KM/ H ACD 1010
2015 /09/0 8 15:12 :45 0:0 1:44
UP MENU
OK MOD E DOWN
EV:0. 00
OK MOD E DOWN
Movi e Mode
2/3
UP MENU
Motion event REC
Movi e Off Time
Soun d Recor d
SOS ON
1min
5sec
On
OK MOD E DOWN
8
G-sensor Sensitivity
Page 13
X.Parking Monitoring
Enter into General Setting to turn on parking monitoring function and there are three-step
settings(High, Middle and Low).Middle is suggested when parking monitoring turning on.
When parking monitoring is at work, DVR will show 'P' on the top left.
A. After the car engines off, DVR will be automatically power off too, but once DVR detects
vibration, it will power on automatically and record 10 seconds and then turn off again. If
other functions are working at same time,parking monitoring is top priority.
B.When parking monitoring turning on while driving, DVR will power on automatically
once it detects vibration and record circlely with the first file locked.
Note: Saved file will be saved until users delete from micro SD card.
Go to General Setting to turn off parking monitoring and 'P' will disappear.
Parking Monitoring ON
Gene ral Set tings
Prot ect Lev el
Parking Monitoring
4/6
Moti on Dete ction
UP MENU
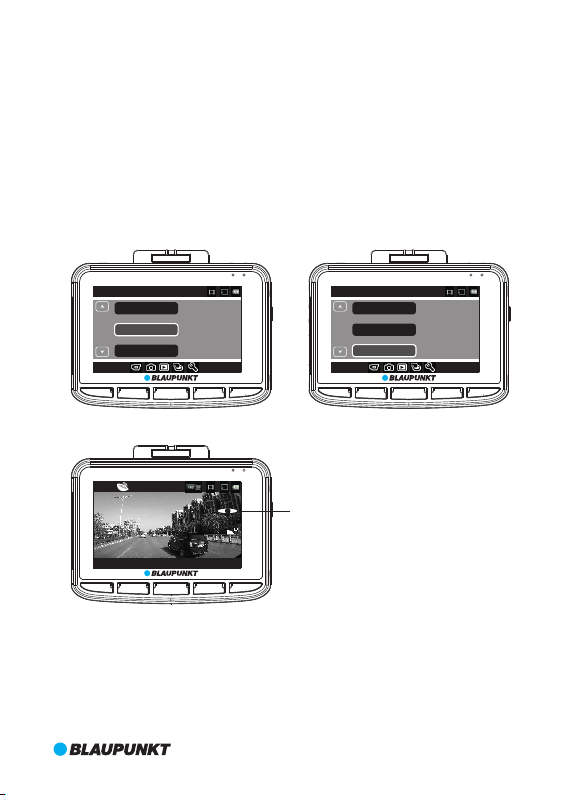
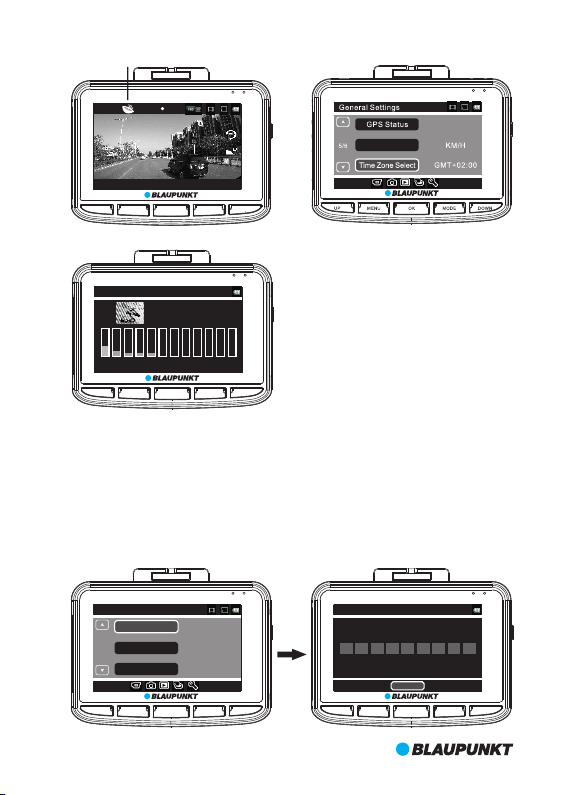
XI.GPS Tracking
This DVR is built in GPS module and can record the driving track, longitude and latitude
information as well as real-time speed, which are very important driving information.
When DVR is on, it will position automatically. There is GPS status icon on the top left.
When it turns green, GPS positions successfully; when it is red, GPS is still in positioning
status. Please go to GPS status in Gerneral Settings to view detailed GPS information.
Please select correct time zone before use this function. Please enter into General Settings
to set it up. After GPS positions successfully, GPS satellite time will synchronize to show on
the screen.
Note: Please position outdoor. GPS is hard to position indoor because of weak GPS signal.
Driving track can be reviewed with exclusive GPS player. Please refer to 'Part 7 BP GPS VP
3.0 Instruction'.
High
Midd le
Off
OK MOD E DOWN
P
BP 3.0 FH D GPS 0 KM/ H ACD 1010
2015 /09/0 8 15:12 :45 0:0 1:44
UP MENU
REC
EV:0. 00
OK MOD E DOWN
9
Page 14
GPS Status Icon
REC
EV:0. 00
Speed Unit
BP 3.0 FH D GPS 0 KM/ H ACD 1010
2015 /09/0 8 15:12 :45 0:0 1:44
UP MENU
GPS St atus
02 0 5 06 09 12 20 2 0 00 00 00 00 00
UP MENU
XII.Driver ID
In standby mode, short press MENU key to enter into settings, and press MODE key to go
to General Settings. Select 'Driver ID Settings' and press OK key to input numbers. There
are total 9 characters available and press UP/DOWN key to select '0-9', 'A-Z', '.' and space.
After confirmation, press OK key to go to next character or back to General Settings.
OK MOD E DOWN
LAT : N 22 36' 3 5"
LON: E 113 5 1' 7"
USE: 4
09 0 0 00 00 00 0043 3 0 26 26 26 00
OK MOD E DOWN
Gene ral Set tings
Driv er ID Set tings
Driv er ID Set tings
2/6
UP MENU
Date F ormat
Lang uage
YYYY M M DD
Engl ish
OK MOD E DOWN
A C D 1 0 1 0 .
OK
UP MENU
OK MOD E DOWN
10
Page 15
XIII.Motion Detection
In standby mode, press MENU key to enter into setting in Movie Mode and select 'Motion
Event REC' to choose recording time of every movie clip in motion detection.
After confirmation, press OK key to quit 'Motion Event REC' and then press MODE key to go
to General Settings. Select 'Motion detection' and press OK key to select the sensitivity.
Here are 3 steps sensitivity, 'High', Middle' and 'Low'. Middle is suggested when motion
detection turning on. Press OK key to confirm and then press MENU key to quit. DVR starts
to automatically countdown from 9 second to activate motion detection. I f there is any
movement detected, DVR will record automatically in preseted recording time of movie
clip. In motion detection mode, press any key to quit and go back to standby mode. Press
MODE key 4 times can go back to mode detection mode again.
To turn off motion detection, please go to General Settings.
Movi e Mode
Movi e Off Time
Motion Event REC
2/3
Soun d Recor d
UP MENU
P
BP 3.0 FH D GPS 0 KM/ H ACD 1010
2015 /09/0 8 15:12 :45 0:0 1:44
UP MENU
OK MOD E DOWN
STBY
OK MOD E DOWN
5sec
1min
Gene ral Set tings
Prot ect Lev el
Parking Monitoring
4/6
On
EV:0. 00
Moti on Dete ction
UP MENU
Motion Detection Icon
Midd le
Off
Midd le
OK MOD E DOWN
11
Page 16
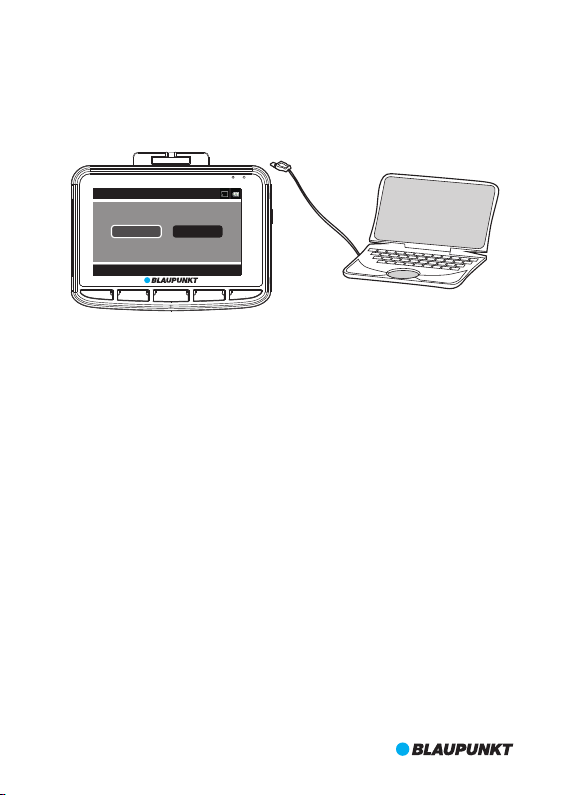
XIV.Video and Photo Management
Please go to General Settings to select USB Function before connecting with the computer
via USB cable in the package. Here are two options, 'MSDC' and 'PC Cam'.
1)MSDC is for video and photo backup and delete.
2)PC Cam is for video call.
USB Fu nctio n
PC Cam
MSDC
USB Fu nctio n
UP MENU
OK MOD E DOWN
12
Page 17

6. System setting Table
Category
Resolution
Movie Quality
Movie Clip Time
Movie Off Time
Motion event REC
Sound Record
Exposure
Still Image Size
Still Quality
Exposure
White Balance
ISO Sensitivity
Color
Volume
Delete
Protect
Format SD card
SD Card INFO
Beep
Power Off
Clock Settings
Driver ID Settings
Date Format
Setting
Menu
Mode
Movie
Mode
Still
Capture
Playback
Media Tool
General
Settings
Sub-Category
1920X1080 30fps
1280x720 30fps
1280x720 60fps
640x480 30fps
Super Fine/Fine
Off/1min/3min/5min
0min/5sec/30sec/1min/3min
5sec/10sec/30sec/1min
On/Off
-2~+2
12M/8M/5M/3M/2M/1.2M/VGA
Super Fine/Fine
-2~+2
Auto/Daylight/Cloudy/Fluoresc./
Fluoresc.1/ Fluoresc.2/Incandesc.
Auto/ISO100/ISO200/ISO400
Natural/Vivid/Pale
1~10
Delete One/Delete All
Protect One/Protect All/Unprotect
One/Unprotect All
YES/NO
Time/Photo Left
On/Off
Never/1min/5min
YYYY MM DD HH MM SS
0~9/A~Z/'.'/space
None/YYYY MM DD/MM DD YYYY/
DD MM YYYY
Remark
Default:
1920X1080
30fps
Default:
Super Fine
Default:1min
Default: 5sec
Default:1min
Default:On
Default:0
Default:12M
Default:
Super Fine
Default:0
Default: Auto
Default: Auto
Default: Natural
Default: 5
Default:Never
Default: DD
MM YYYY
13
Page 18

English/Français/Deutsch/Italiano/
Polski/Português/Español/
Nederlands/Suomi
50HZ/60HZ
MSDC/PC Cam
Off/1min/3min
Off/High/Middle/Low
Off/High/Middle/Low
Off/Low/Middle/High
GPS Positioning Information
KM/H MPH
On/Off
GMT-12:00/GMT-11:00/GMT-10:00/
GMT-09:00/GMT-08:00/GMT-07:00/
GMT-06:00/GMT-05:00/GMT-04:00/
GMT-03:30/GMT-03:00/GMT-02:00/
GMT-01:00/GMT/GMT+01:00/
GMT+02:00/GMT+03:00/
GMT+03:30/GMT+04:00/
GMT+04:30/GMT+05:00/
GMT+05:30/GMT+05:45/
GMT+06:00/GMT+06:30/
GMT+07:00/GMT+08:00/
GMT+09:00/GMT+09:30/
GMT+10:00/GMT+11:00/
GMT+12:00/GMT+13:00
YES/NO
Current Software Version
Setting
Menu
General
Settings
Language
Frequency
USB Function
LCD Power Save
Protect Level
Parking Monitoring
Motion Detection
GPS Status
Speed Unit
Daylight Saving
Time
Time Zone Select
Reset Setup
FW Version
7. BP G PS VP 3.0 Instruction
I. Installation
① Install GPS player-”BP GPS VP 3.0” on MAC OS
Double click 'BP GPS VP 3.0.zip' to install automatically.
② Install GPS player-”BP GPS VP 3.0” on WINDOWS OS
Copy 'BP GPS VP 3.0.zip' to desktop and unzip to 'BP GPS VP 3.0'.
II. How to Start
① In MAC OS, double click “BP GPS VP 3.0” to start.
② In WINDOWS OS, double click ‘BP GPS VP 3.0.exe’ to start.
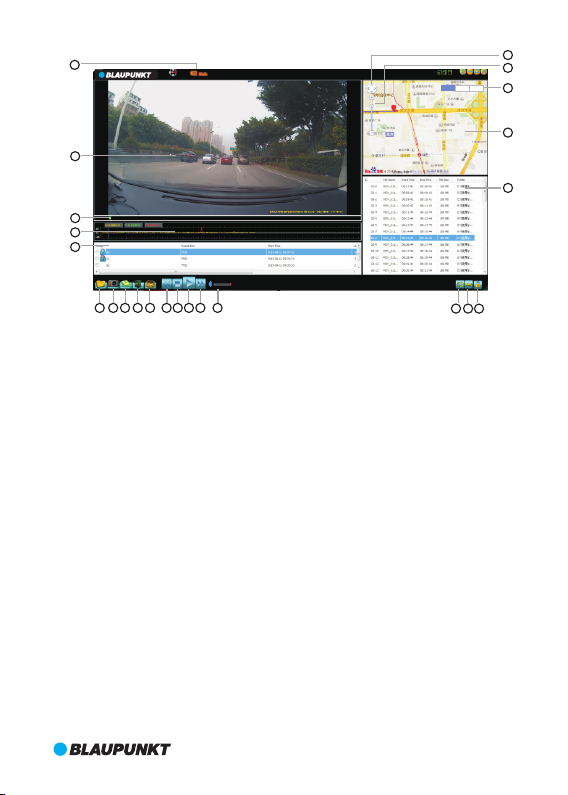
III.User Interface Definition
Here's user inter face of BP GPS VP 3.0 WINDOWS version. MAC version is almost same.
14
Default:
English
Default: MSDC
Default:Off
Default: Middle
Default: Off
Default: Off
Default: Off
Page 19
1
2
3
4
5
23
22
Plane Map
3D Map
Satellite Map
21
20
19
6 7 8 9 10 11
① Driving Speed: show real-time driving speed; double click to switch KM/H and MPH
② Video Play Window: double click any place in this window to view in full screen mode;
double click again, it will be back to the current mode
③ Scroll Bar: show the current point of the video; drag it to move forward or backward
④ Real-time G-sensor Information
⑤ Video Group: Videos taken in sequence will be one group
⑥ Select Video to Play
⑦ Image Capture: capture the current point of the video
⑧ Save to: select one video from Video List to save it into one folder on PC
⑨ Delete: select one video from Video List to delete
⑩ Settings: select language
1
⑩ Fast Backward: 0.9/0.8/0.7/0.6/0.5/0.4/0.3 times
2
⑩ Stop
3
⑩ Play/Pause
4
⑩ Fast Forward: 1.2/1.4/1.6/1.8/2.0/2.4/2.8/3.2/3.6/4.0 times
5
⑩ Volume
6
⑩ Autoplay: click to play next video automatically after finish; click again to turn it off
7
⑩ Save to KML Format: select one video from Video List to save it in KML format
8
⑩ Unlock Video: select one locked video from Video List to unlock it
9
⑩ Video List: show video size, length and etc.; double click the video to play
20
⑩ Map Window: show real-time movement track of vehicle with internet
21
⑩ MapType: plane map/satellite map/3D map
22
⑩ Map Scroll Bar: drag it to zoom in and out
23
⑩ Direction Navigation
12 13 14 15
16 17 18
Note: all windows can be dragged to adjust
15
Page 20

8. Product Specification
Specification may change due to upgrade without prior notice. Please take the objects as
standard.
LCD Size
CMOS Sensor
Viewing Angle
Video Resolution
Image Resolution
Minimum Illumination
Video Format
Image Format
Memory Card
Memory Card Capacity
Digital zoom
Frequency
Output
Power Port
Battery Capacity
Microphone/Speaker
Loop Recording
LCD Off
Parking Monitoring
G-Sensor&SOS
Motion Detection
Parking Monitoring
GPS Tracking
Driver ID
Language
DVR N.W.
DVR Size
16
2.7” HD TFT screen(16:9)
OV2710
140° diagonal ultra wide viewing angle
1920X1080 30fps/1280x720 30fps/1280x720 60fps/640x480 30fps
12M/8M/5M/3M/2M/1.2M/VGA
1 LUX
AVI/H.264
JPG
Micro SD Card
Max. 64GB
X4
50HZ/60HZ
HDMI
USB 5V 1000mA
600mAH
Built-in
Off/1min/3min/5min
Support
Support
Support
Support
Support
Support
Support
English/Français/Deutsch/Italiano/Polski/Português/Español/
Nederlands/Suomi
105g
81.4(L)X64.7(W)X41.0(H)mm
Page 21
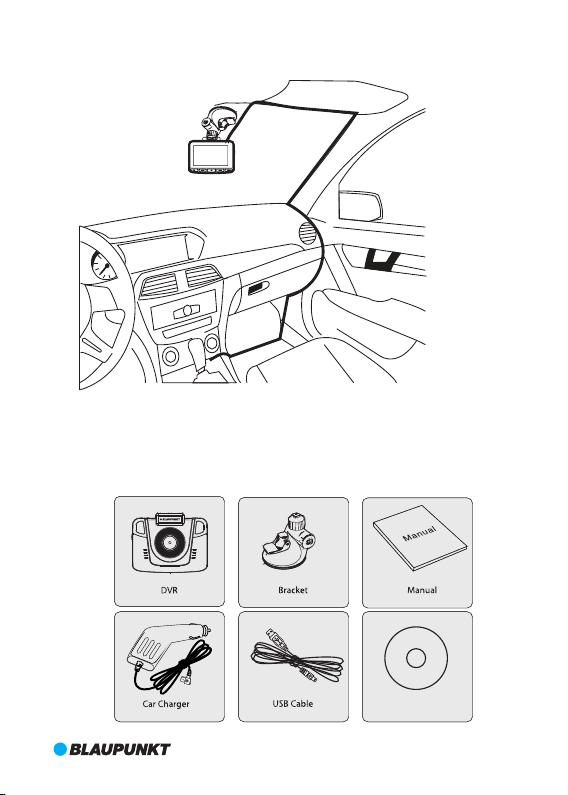
9. Cabling Ins truction
10 Accessories.
The following accessories are for reference only. Please take objects as standard. The right
to change without prior notice is reserved.
1
4
m
0
°
m
W
0
.
i
d
3
e
=
f
A
;
n
2
.
g
2
l
/
e
F
GPS P layer D VD
171819
Page 22

Page 23

Bedienungsanleitung
Page 24

Lesen Si e diese B edien ungsa nleit ung sor gfält ig durc h, bevor Sie d as
Produk t in Betr ieb neh men.
Die B edien ungsa nleit ung füh rt Sie durc h den Geb rauch d er spez ielle n
Funk tione n diese s Produkts.
Achtung:
1. Halten Sie sich strikt an die entsprechenden gesetzlichen Vorschriften in Ihrem Land.
Dieses Produkt darf nicht für illegale Zwecke eingesetzt werden, andernfalls übernehmen
Sie allein die Verantwortung.
2. Setzen Sie die microSD-Karte richtig herum ein, um ein Beschädigung der Karte oder der
Autokamera zu vermeiden. Wenn die Autokamera die Meldung „ Bitte setzen Sie die
SD-Karte erneut ein“ anzeigt, rufen Sie das Menü „Einstellungen“ auf
und formatieren Sie die microSD-Karte. Wenn die Meldung immer noch angezeigt wird,
verwenden Sie eine andere microSD-Karte.
Hinweis: Das Formatieren der microSD-Karte löscht alle Dateien. Bitte sichern Sie vor dem
Formatieren alle wichtigen Dateien.
3.Wir empfehlen die Verwendung von microSD-Karten der Klasse 6 oder höher. Da es auf dem
Markt keinen einheitlichen Standard für 64 GB microSD-Karten gibt, sind nicht alle 64 GB
microSD-Karten mit dieser Autokamera kompatibel. Bitte testen Sie sie mit dieser
Autokamera vor dem Kauf.
4. Es ist ratsam, die Dateien auf der microSD-Karte einmal pro Woche zu sichern. Dieses
Produkt ist nicht ausschließlich ein Speichergerät. Sichern Sie deshalb wichtige Dateien
rechtzeitig, um Dateiverluste zu vermeiden.
5. Überprüfen Sie die Halterung nach der Installation sorgfältig, um Schäden zu vermeiden.
6. Die Betriebsdauer des integrierten Akkus nimmt im Laufe der Zeit ab. Wenn die Autokamera
längere Zeit nicht benutzt wird, laden Sie sie alle zwei Monate auf, um eine übermäßige
Entladung zu vermeiden, welche die Lebensdauer des Akkus verkürzt.
7. Setzen Sie das Produkt nicht einer feuchten Umgebung aus. Es ist nicht wasserdicht.
8. Bitte bei der Aufnahme von Bildern oder Filmen das Objektiv nicht direkt auf die Sonne
richten.
9. Nehmen Sie dieses Produkt nicht in übermäßig staubigen Umgebungen in Betrieb. Dies
kann das Objektiv und andere Komponenten verunreinigen und die Videoqualität negativ
beeinflussen. Reinigen Sie das Objektiv mit einem weichen Tuch oder speziellen Reinigung
stüchern.
10. Dieses Produkt ist ein elektronisches Präzisionsprodukt. Setzen Sie es keinen kräftigen
Stößen aus und benutzen Sie es nicht in der Nähe von starken magnetischen und
elektrischen Feldern.
11. Arbeitstemperatur für dieses Gerät ist -10 ℃ -50 ℃ und Lagertemperatur beträgt
-20 ℃ -70 ℃. Kontinuierlich direkter Sonneneinstrahlung über einen längeren
Zeitraum, kann das Gerät zu Fehlfunktionen führen, Farbwechsel , Gehäuse und
Bildverzerrungen , insbesondere in verschlossenen Autos, bei denen
Kabinentemperatur 70 ℃ übersteigt.
20
Page 25
1. Aufbau
2
1
13
12
3
4
5
1.Öffnung für Halterung
2.USB-Port
3.Taste RESET
4.Mikrofon
5.microSD-Kartenschlitz
6.Taste UP (Aufwärts)
UP MEN U
OK MODE DOWN
6 7 8 9 10
1
4
m
0
°
m
W
0
.
i
d
3
e
=
f
A
;
n
2
.
g
2
l
/
e
F
7. Taste MENU (Menü)
8. Taste OK
9. Taste MODE (Modus)
10. Taste DOWN (Abwärts)
11. LCD
12. Aktivitätsanzeige
11
14
15
16
17
13. Betriebsanzeige
14. Taste EIN/AUS
15. HDMI-Ausgang
16. Objektiv
17. Lautsprecher
21
Page 26

2. Merkmale
1. Unterstützt mehrere Videoauflösungen mit hervorragender Video- und Bildqualität, wie
zum Beispiel 1080P, 720P usw;
2. Unterstützt 60 Fps für die Aufzeichnungen mit hoher Geschwindigkeit;
3. Hochauflösendes CMOS-Objektivmodul mit weitem Blickwinkel;
4. Integriertes Mikrofon/Lautsprecher;
5. Mit Tastenkombination Sprachaufnahme/Stummschaltung;
6. Mit Tastenkombination LCD AUS;
7. Unterstützt microSD-Karten mit hoher Kapazität;
8. Unterstützt nahtlose Endlosvideoaufzeichnung und Aufzeichnung während des Aufladens;
9. Automatische Videoaufnahme bei laufendem Motor und automatisches Ausschalten nach
Abstellen des Motors;
10. Unterstützt Bewegungserkennung;
11. Unterstützt SOS (Notfall) und G-SENSOR, um da Überschreiben wichtiger Dateien zu
verhindern;
12. Unterstützt HDMI-Ausgang;
13. Unterstützt Parkplatz-Überwachungsfunktion;
14. Unterstützt GPS-Track ing-Funktion;
15. Unterstützt Fahrer-ID;
16. Unterstützt mehrere Sprachen.
3. Tastend efini tione n und -fu nktio nen
Bild
UP
MENU
OK
MODE
DOWN
22
Funktion
Definition
Halten Sie zum Ein- oder Ausschalten die Taste länger gedrückt.
EIN/AUS
Drücken Sie im Film- oder Standby-Modus kurz die Taste UP, um die Sprachaufzeichnung
ein- oder auszuschalten. Drücken Sie zum Einzoomen im Fotoaufnahmemodus kurz
UP
die Taste UP. Drücken Sie zur Auswahl im Einstell- und Vorschaumodus kurz die Taste
(Aufwärts)
UP. Drücken Sie für den schnellen Rücklauf während der Videowiedergabe oder im
Pausezustand kurz die Taste UP.
Drücken Sie im Standby-Modus kurz die Taste MENU, um den Einstellmodus aufzurufen
und drücken Sie die Taste erneut, um ihn wieder zu verlassen, wenn die Einstellungen
MENU
abgeschlossen sind. Drücken Sie während der Aufzeichnung kurz die Taste MENU, um
(Menü)
die SOS-Funktion zu aktivieren. Erneutes Drücken deaktiviert die Funktion wieder.
Drücken Sie im Filmmodus kurz die Taste OK, um die Aufzeichnung vorübergehend anzuhalten
oder fortzusetzen. Drücken Sie im Aufzeichnungsmodus kurz die Taste OK, um Foto
OK
aufzunehmen. Drücken Sie im Wiedergabemodus kurz die Taste OK, um ein Video abspielen/
vorübergehend anzuhalten. Drücken Sie im Einstellmodus zur Bestätigung kurz die Taste OK.
Drücken Sie im Standby-Modus kurz die Taste MODE, um zwischen dem Modus Film/
Fotoaufnahme/Wiedergabe zu wechseln. Drücken Sie im Einstellmodus kurz die Taste
MODE
MODE, um die unterschiedlichen Modusmenüs zu wechseln. Drücken Sie im
(Modus)
Wiedergabemodus kurz die Taste MODE, um zum Vorschaumodus zurückzukehren.
Drücken Sie im Filmmodus kurz die Taste DOWN, um das LCD ein- oder auszuschalten.
Drücken Sie zum Herauszoomen im Fotoaufnahmemodus kurz die Taste DOWN.
DOWN
Drücken Sie zur Auswahl im Einstell- und Vorschaumodus kurz die Taste DOWN.
(Abwärts)
Drücken Sie für den schnellen Vorlauf während der Videowiedergabe oder im
Pausezustand kurz die Taste DOWN.
RESET
Drücken Sie diese Taste, wenn die Software der Autokamera abgestürzt ist.
Page 27
4. De finit ion der Anzeigelampen
Anzeigelampe
Definition
Leuchtet während des Aufladens der Autokamera. Nach dem vollständigen
Rot
Aufladen erlischt die rote Lampe.
Leuchtet im Standby-Modus der Autokamera. Wenn sie blinkt, zeichnet die Autokamera auf.
Grün
5. Funktion
I.EIN/AUS
(1)Einschalten
A. Drücken Sie im ausgeschalteten Zustand die Taste EIN/AUS für 3 Sekunden,um die Autokamera
einzuschalten und die Aufzeichnung automatisch zu starten. Die grüne Anzeigelampe blinkt.
B. Die Autokamera wurde an ein KFZ-Ladegerät angeschlossen, um die Aufzeichnung zu starten.
Hinweis: Wenn sich ein Popup-Fenster mit der Meldung „SD-Karte nicht eingelegt öffnet“
öffnet, setzen Sie vor der Inbetriebnahme eine microSD-Karte ein. Wenn die microSD-Karte
bei eingeschalteter Autokamera eingesetzt wird, schaltet sich diese automatisch aus.
(2) Ausschalten
A.Drücken Sie im eingeschalteten Zustand die Taste EIN/AUS für 3 Sekunden, um die
Autokamera auszuschalten.
B. Die Autokamera speichert im eingeschalteten Zustand automatisch die aktuelle Datei und
schaltet beim Trennen des KFZ-Ladegeräts automatisch aus.
C. Bei niedrigem Akkustand speichert die Autokamera die aktuelle Datei und schaltet sich
automatisch aus.
II.Akku aufladen
(1)Zwei Auflademöglichkeiten
A.Mit USB-Kabel B.Mit KFZ-Ladegerät (empfohlen)
(2) Defin ition d es Akkulad estan ds
Voll
Niedrig
III .Eins etzen d er micr oSD-K ar te
Stecken Sie die microSD-Karte in der angegebenen Richtung gerade in den Schlitz, bis Sie
ein „Klickgeräusch“ hören.
Halbvoll
Leer
23
Page 28
Ent nehme n der mi croSD -Kart e: Drü cken Si e zuer st auf d ie micr oSD-
Kar te und n ehmen Sie sie ansch ließe nd hera us (Es i st rats am, zu vor die
Auto kamera auszu schal ten).
IV.Filmmodus:
Schalten Sie die Autokamera direkt in den Filmmodus. Die Anzeigelampe blinkt grün.
Drücken Sie zum Speichern der aktuellen Datei und zum Beenden der Aufzeichnung kurz
die Taste OK. Die Autokamera ruft den Standby-Modus auf. Die grüne Anzeigelampe
leuchtet durchgehend. Drücken Sie im Standby-Modus die Taste OK, um die Aufzeichnung
erneut zu starten.
Auflösung&Rahmen
Aufnahme
REC
EV:0. 00
Filmmodus
Micro SD-Karte in
Batteriestatus
Belichtung
Filmclipdauer
BP 3.0 FH D GPS 0 KM/ H ACD 1010
Zeit & Datum
V. Foto-Aufnahmemodus
Drücken Sie im Standby-Modus kurz die Taste MODE, um den Foto-Aufnahmemodus
aufzurufen. Drücken Sie die Taste OK, um Fotos aufzunehmen.
Drücken Sie im Foto-Aufnahmemodus kurz die Taste UP oder DOWN, um die Ansicht zu
vergrößern oder zu verkleinern (max. 4-fach).
2015 /09/0 8 15:12 :45 0:0 1:44
UP MENU
OK MOD E DOWN
Fotogröße
Digitaler Zoom
Zeit & Datum
T
W
1X
2015 /09/0 8 15:12 :45 181 9
UP MENU
EV:0. 00
ACD 101 0
OK MOD E DOWN
Geschwindigkeit
Fahrer-ID
Filmzeit
Foto
Micro SD-Karte in
Batteriestatus
Belichtung
Fahrer-ID
Foto Left
24
Page 29
VI.Wiedergabe- und Vorschaumodus
A. Drücken Sie im Standby-Modus kurz zweimal die Taste MODE, um den Vorschaumodus
aufzurufen. Drücken Sie zur Auswahl der Videodatei kurz die Taste UP oder DOWN und dann die
Taste OK, um die Wiedergabe zu starten. Drücken Sie während der Videowiedergabe kurz die
Taste UP, um den schnellen Rücklauf zu starten und starten Sie den schnell Vorlauf mit der Taste
DOWN (max. 8-fach). Drücken Sie die Taste OK für die Wiedergabe oder zum vorübergehenden
Anhalten. Drücken Sie kurz die Taste MODE, um die Wiedergabe zu beenden und zum
Vorschaumodus zurückzukehren.
Drücken Sie im Vorschaumodus kurz die Taste MODE, um die Foto-Vorschau zu starten. Wählen Sie mit
der Taste UP oder DOWN die Fotos aus. Durch Drücken der Taste OK wird die Vorschau im Vollbildmodus
und durch Drücken der Taste UP oder DOWN wird das vorige oder nächste Foto angezeigt.
B.Drücken Sie im Vorschaumodus kurz die Taste MENU, um den Wiedergabemodus zum
Anpassen der Lautstärke, Löschen oder Schützen der Dateien aufzurufen. Drücken Sie kurz die
Taste UP oder DOWN. Wählen Sie „Lautstärke“, „Löschen“ oder „Schützen“ aus und drücken Sie die
Taste OK, um das Untermenü aufzurufen. Drücken Sie zum Auswählen kurz die Taste UP oder
DOWN und bestätigen Sie mit der Taste OK. Drücken Sie anschließend zum Verlassen und zur
Rückkehr zum Vorschaumodus kurz die Taste MENU.
Filmvorschau Aktuelle Film
Fotovorschau
Aktuelle Foto
100_ DSC/P ICT00 11.AVI
3
/
3
2015 /09/0 8 15:12 :45 [00 :01:4 4]
UP MENU
Play back
1/1
UP MENU
VII. G-SENSOR
Wenn das Auto im Filmmodus plötzlich bremst oder es zu einem schweren Aufprall kommt,
wird der G-Sensor aktiviert, um zu verhindern, dass der aktuelle Videoclip überschrieben wird.
Die dreistufige Empfindlichkeitseinstellung (hoch, mittel, niedrig) ist für unterschiedliche PKWBesitzer gedacht und kann unter „Schutzstufe“ in „Allgemeine Einstellungen“ eingestellt
werden.
Hinweis: Wenn der G-Sensor während der ersten 10 Sekunden des Videoclips aktiviert wird,
werden der aktuelle und der vorige Videoclip gespeicher t. Während der letzten 10 Sekunden
des Videoclips werden der aktuelle und der nächste Videoclip gespeichert. In der Mitte des
Videoclips wird nur der aktuelle Videoclip gesichert.
Volum e
Delete
Prot ect
OK MODE D OWN
5
OK MODE D OWN
100_ DSC/P ICT00 11.JPG
3
/
3
2015 /09/0 8 15:12 :45
UP MENU
OK MODE D OWN
25
Page 30
Gene ral Set tings
Prot ect Lev el
4/6
Parking Monitoring
Moti on Dete ctio
UP MENU
VIII.SOS
Drücken Sie im Filmmodus kurz die Taste MENU, um die aktuelle Datei manuell zu sperren,
damit während der Endlo saufzeichnung diese möglic herweise w ichtige Datei nicht
überschrieben wird. Drücken Sie zum Entsperren der aktuellen Datei erneut die Taste MENU.
Hinweis: Wenn SOS während der ersten 10 Sekunden des Videoclips aktiviert wird, werden
der aktuelle und der vorige Videoclip gespeichert. Während der letzten 10 Sekunden des
Videoclips werden der aktuelle und der nächste Videoclip gespeichert. In der Mitte des
Videoclips wird nur der aktuelle Videoclip gesichert.
IX.Sprachaufzeichnung/Stummschaltung
Drücken Sie im Standby- oder Filmmodus für die Sprachaufzeichnung oder Stummschaltung
kurz die Schnelltaste UP oder drücken Sie die Taste MENU, um den Filmmodus einzurichten.
Midd le
Off
Off
OK MOD E DOWN
BP 3.0 FH D GPS 0 KM/ H ACD 1010
2015 /09/0 8 15:12 :45 0:0 1:44
UP MENU
BP 3.0 FH D GPS 0 KM/ H ACD 1010
2015 /09/0 8 15:12 :45 0:0 1:44
UP MENU
REC
EV:0. 00
OK MOD E DOWN
REC
EV:0. 00
OK MOD E DOWN
G-Sensor-Empfindlichkeit
SOS auf
UP MENU
26
STBY
BP 3.0 FH D GPS 0 KM/ H ACD 1010
2015 /09/0 8 15:12 :45 0:0 1:44
OK MOD E DOWN
EV:0. 00
Movi e Mode
Movi e Off Time
2/3
Motion event REC
Soun d Recor d
UP MENU
1min
5sec
On
OK MOD E DOWN
Page 31

X.Parkplatz-Überwachung
Schalten Sie die Parkplatz-Überwachungsfunktion in „General Settings“ ein. Sie finden dort
drei Einstellungen (Hoch, Mittel und Niedrig). Mittel vorgeschlagen wird beim Einparken
Überwachung einschalten.Wenn die Parkplatz-Über wachung aktiviert wurde, zeigt das
Display der Autokamera oben links ein „P“ an.
A. Nach dem Abstellen des Automotors schaltet sich die Autokamera automatisch aus, aber
sobald die Autokamera eine Erschütterung erkennt, schaltet sie sich automatisch ein, nimmt
10 Sekunden lang auf und schaltet sich dann wieder aus. Wenn andere Funktionen zur
gleichen Zeit arbeiten, Parküberwachung ist oberste Priorität.
B. Beim Einparken Überwachung einschalten während der Fahrt, wird DVR Einschalten
automatisch, sobald es Vibration und Aufzeichnung circlely mit der ersten Datei erkennt
gesperrt.
Diese Datei bleibt gespeichert, bis sie der Benutzer von microSD-Karte löscht.
Schalten Sie die Parkplatz-Überwachung in „General Settings“ aus. Die Anzeige „P“ erlischt.
Parkplatz-Überwachung auf
Gene ral Set tings
Prot ect Lev el
Parking Monitoring
4/6
Moti on Dete ction
UP MENU
XI.GPS-Tracking
Diese Autokamera ist mit einem integrierten GPS-Modul ausgestattet und kann die Fahrstrecke,
Informationen zum Längen- und Breitengrad sowie die Echtzeit-Geschwindigkeit aufzeichnen,
die sehr wichtige Informationen zur Fahrt sind.
Wenn die Autokamera eingeschaltet ist, wird ihre Position automatisch erfasst. Es wird oben links
das GPS-Statussymbol angezeigt. Wenn es grün aufleuchtet, war die Positionserfassung über
GPS erfolgreich. Wenn es rot aufleuchtet, versucht GPS immer noch die Position zu erfassen.
Gehen Sie in „General Settings“ zu GPS-Status, um detaillierte GPS-Informationen anzuzeigen.
Wählen Sie die richtige Zeitzone aus, bevor Sie diese Funktion verwenden. Rufen Sie „General
Settings“ zum Einrichten auf. Nach dem die Positionserfassung über GPS erfolgreich war, wird
die GPS-Satellitenzeit synchronisiert und auf dem Bildschirm angezeigt.
Hinweis: Bitte die Position im Freien erfassen. Mit GPS ist es wegen der schwachen GPSSignale schwierig, die Position in Innenräumen zu erfassen. Die Fahrtstrecke kann mit einem
externen GPS-Player überprüf t werden. Bitte schlagen unter „Teil 7 BP GPS VP 3.0 Anleitung“
nach.
High
Midd le
Off
OK MODE DO WN
P
BP 3.0 FH D GPS 0 KM/ H ACD 1010
2015 /09/0 8 15:12 :45 0:0 1:44
UP MENU
REC
EV:0.0 0
OK MODE DO WN
27
Page 32
GPS-Status-Symbol
REC
EV:0. 00
Speed Unit
BP 3.0 FH D GPS 0 KM/ H ACD 1010
2015 /09/0 8 15:12 :45 0:0 1:44
UP MENU
GPS St atus
02 0 5 06 09 12 20 2 0 00 00 00 00 00
UP MENU
XII.Fahrer-ID
Drücken Sie im Standby-Modus kurz die Taste MENU, um die Einstellungen aufzurufen und
gehen Sie mit der Taste MODE zu „General Settings“. Wählen Sie „Fahrer-ID-Einstellungen“ und
rufen Sie mit der Taste OK die Zahleneingabe auf. Es stehen insgesamt 9 Stellen für Zeichen
zur Verfügung. Wählen Sie mit der Taste UP/DOWN „0-9“, „A-“Z, „.“ und das Leerzeichen aus.
Gehen Sie nach der Bestätigung mit der Taste OK zum nächsten Zeichen oder zurück zu
„General Settings“.
OK MOD E DOWN
LAT : N 22 36' 3 5"
LON: E 113 5 1' 7"
USE: 4
09 0 0 00 00 00 0043 3 0 26 26 26 00
OK MOD E DOWN
Gene ral Set tings
Driv er ID Set tings
Driv er ID Set tings
2/6
UP MENU
Date F ormat
Lang uage
YYYY M M DD
Engl ish
OK MOD E DOWN
A C D 1 0 1 0 .
OK
UP MENU
OK MOD E DOWN
28
Page 33

XIII.Bewegungserkennung
Drücken Sie im Standby-Modus die Taste MENU, um die Einstellungen im Filmmodus
aufzurufen. Wählen Sie Bewegungsereignis aufzeichnen, um die Aufnahmedauer für jeden
Filmclip bei der Bewegungserkennung festzulegen.
Drücken Sie nach der Bestätigung die Taste OK, um Bewegungsereignis aufzeichnen zu
Beenden und gehen Sie dann mit der Taste MODE zu „General Settings“. Wählen Sie
Bewegungserkennung und drücken Sie die Taste OK zum Auswählen der Empfindlichkeit.
Hier gibt 3 Empfindlichkeitsstufen, Hoch, Mittel und Niedrig. Mittel vorgeschlagen wird, wenn
die Bewegungserkennung einschalten.Bestätigen Sie mit der Taste OK und beenden Sie dann
mit der Taste MENU. Die Autokamera beginnt automatisch einen Countdown von 9 Sekunden
bis zur Aktivierung der Bewegungserkennung. Wenn eine Bewegung erkannt wurde, zeichnet
der Autokamera automatisch einen Filmclip mit der festgelegten Dauer auf. Drücken Sie im
Bewegungserkennungsmodus zum Beenden eine beliebige Taste und kehren Sie zum
Standby-Modus zurück. Drücken Sie viermal die Taste MODE, um den Erkennungsmodus
wieder aufzurufen.
Gehen Sie zum Ausschalten der Bewegungserkennung zu „General Settings“.
Movi e Mode
Movi e Off Time
Motion Event REC
2/3
Soun d Recor d
UP MENU
P
BP 3.0 FH D GPS 0 KM/ H ACD 1010
2015 /09/0 8 15:12 :45 0:0 1:44
UP MENU
OK MOD E DOWN
STBY
OK MOD E DOWN
5sec
1min
Gene ral Set tings
Prot ect Lev el
Parking Monitoring
4/6
On
EV:0. 00
Moti on Dete ction
UP MENU
Bewegungserkennung Icon
Midd le
Off
Midd le
OK MOD E DOWN
29
Page 34

XIV.Videos und Fotos verwalten
Gehen Sie zu „General Settings“ und wählen Sie die USB-Funktion, bevor Sie die
Verbindung mit dem Computer über das mitgelieferte USB-Kabel herstellen. Hier gibt es
zwei Möglichkeiten, „MSDC“ und „PC-Cam“.
1)MSDC wird zur Sicherung von Videos und Fotos und zum Löschen verwendet.
2)PC-Cam wird zum Aufrufen von Videos verwendet.
USB Fu nctio n
PC Cam
MSDC
USB Fu nctio n
UP MENU
OK MOD E DOWN
30
Page 35

6. Systemeinstellungstabelle
Kategorie
Auflösung
Filmqualität
Filmclipdauer
Film-Auszeit
Bewegungsereignis
aufzeichnen
Tonaufzeichnung
Belichtung
Fotogröße
Fotoqualität
Belichtung
Weißabgleich
ISO-Empfindlichkeit
Farbe
Lautstärke
Löschen
Schutz
SD Karte
formatieren
Informationen zur
SD Karte
Piepton
Ausschalten
Uhrzeiteinstellungen
Einstellung Fahrer-ID
Datumsformat
1920x1080 30 Fps
1280x720 30 Fps
1280x720 60 Fps
640x480 30 Fps
Super gut/Gut
Aus, 1 Min., 3 Min., 5 Min.
0 Min./5 Sek./30 Sek./1 Min./3 Min.
5 Sek./10 Sek./30 Sek./1 Min.
Ein/Aus
-2 bis +2
12M/8M/5M/3M/2M/1,2M/VGA
Super gut/Gut
-2 bis +2
Automatisch/Tageslicht/Bewölkt/
Neonlicht/Neonlicht 1/Neonlicht 2/
Glühlampe
Auto/ISO100/ISO200/ISO400
Natürlich/Lebendig/Blass
1 bis 10
Eine löschen/Alle löschen
Eine schützen/Alle
schützen/Eine freigeben/Alle freigeben
Ja/Nein
Zeit/Fotos übrig
Ein/Aus
Nie/1 Min./5 Min.
JJJJ MM TT HH:MM
0-9/A~Z/'.'/Leerzeichen
Kein/JJJJ MM TT/
MM TT JJJJ/TT MM JJJJ
MenüEinstell
ungen
Modus
Filmmodus:
Foto
Wiedergabe
Medienwerk
zeug
Allgemeine
Einstellungen
Unterkategorie Anmerkung
Standardeinstellung:
1920x1080 30 Fps
Standardeinstellung:
Super
Standardeinstellung:
1 Min.
Standardeinstellung:
5 Sek.
Standardeinstellung:
1 Min.
Standardeinstellung:
Ein
Standardeinstellung:
0
Standard:12M
Standardeinstellung:
Super
Standardeinstellung:
0
Standardeinstellung:
Automatisch
Standardeinstellung:
Auto
Standardeinstellung:
Natürlich
Standardeinstellung:
5
Standardeinstellung:
Nie
Standardeinstellung:
TT/MM/JJJJ
31
Page 36

MenüEinstell
ungen
Allgemeine
Einstell
ungen
Sprache
Frequenz
USB-Funktion
LCD Energie sparen
Schutzstufe
ParkplatzÜberwachung
Bewegungserkennung
GPS-Status
Speed Einheit
Sommerzeit
Zeitzonenauswahl
Einrichtung
zurücksetzen
FW-Version
English/Français/Deutsch/Italiano/
Polski/Português/Español/
Nederlands/Suomi
50 Hz/60 Hz
MSDC/PC Cam
Aus, 1 Min., 3 Min.
Aus/Hoch/Mittel/Niedrig
Aus/Hoch/Mittel/Niedrig
Aus/Niedrig/Mittel/Hoch
Informationen zur GPSStandortbestimmung
KM/H MPH
Ein/Aus
GMT-12:00/GMT-11:00/GMT-10:00/
GMT-09:00/GMT-08:00/GMT-07:00/
GMT-06:00/GMT-05:00/GMT-04:00/
GMT-03:30/GMT-03:00/GMT-02:00/
GMT-01:00/GMT/GMT+01:00/
GMT+02:00/GMT+03:00/
GMT+03:30/GMT+04:00/
GMT+04:30/GMT+05:00/
GMT+05:30/GMT+05:45/
GMT+06:00/GMT+06:30/
GMT+07:00/GMT+08:00/
GMT+09:00/GMT+09:30/
GMT+10:00/GMT+11:00/
GMT+12:00/GMT+13:00
Ja/Nein
Aktuelle Firmwareversion
Standardeinstellung:
English
Standardeinstellung:
MSDC
Standardeinstellung:
Aus
Standardeinstellung:
Mittel
Standardeinstellung:
Aus
Standardeinstellung:
Aus
Standardeinstellung:
Aus
7. BP G PS VP 3.0 Anleitung
I. IInstallation
① Installation des GPS-Players - "BP GPS VP 3.0" auf MAC OS
Doppelklicken Sie auf "BP GPS VP 3.0.zip ', um ihn automatisch zu installieren.
② Installation des GPS-Players-”BP GPS VP 3.0” auf WINDOWS OS
Kopieren Sie 'BP GPS VP 3.0.zip"auf den Desktop und entpacken Sie die Datei als"BP GPS VP 3.0'.
II. Beginn der Installation
① In MAC OS auf "BP GPS VP 3.0" doppelklicken, um die Installation zu beginnen.
② Im Betriebssystem WINDOWS auf "BP GPS VP 3.0.exe doppelklicken, um die Installation zu
beginnen.
III.Festlegung der Benutzeroberfläche
Dies ist die Benutzeroberfläche der BP GPS VP 3.0 Windows-Version.Die MAC-Version ist fast dieselbe.
32
Page 37

1
2
3
4
5
23
22
Plane Map
3D Map
Satellite Map
21
20
19
6 7 8 9 10 11
①Fahrgeschwindigkeit:Anzeige der Echtzeit-Fahrgeschwindigkeit;Doppelklick zum Umschalten
von km/h und MPH
②Video-Wiedergabefenster: Doppelklicken Sie auf eine beliebige Stelle in diesem Fenster, um
den Vollbildmodus einzuschalten; Doppelklicken Sie erneut, um wiede in den Ausgangsmodus
zurückzukehren
③Bildlaufleiste: Zeigt den aktuellen Punkt des Videos; ziehen, um nach vorn oder hinten zu
verschieben
④Echtzeit-G-Sensor Informationen
⑤Video-Gruppe: Videos, die in Folge aufgenommen werden, gehören zu einer Gruppe
⑥Wählen Sie das abzuspielende Video
⑦Bilderfassung: Erfassung des aktuellen Punkts des Videos
⑧Speichern unter: Wählen Sie ein Video aus der Videoliste, um es in einen Ordner auf dem PC
zu speichern
⑨Löschen: Wählen Sie ein Video aus der Video Liste, um es zu löschen
⑩Einstellungen: Wählen Sie die Karte und die Sprache
1
⑩Schnellrücklauf 0,9/0,8/0,7/0,6/0,5/0,4/0,3-mal
2
⑩Stopp
3
⑩Wiedergabe/Pause
4
⑩Schnellvorlauf: 1,2 / 1,4 / 1,6 / 1,8 / 2,0 / 2,4 / 2,8 / 3,2 / 3,6 / 4,0-mal
5
⑩Lautstärke
6
⑩Automatische Wiedergabe: Klicken, um das nächste Video nach Ablauf des vorhergehenen
automatisch wiederzugeben; erneut klicken, um diese Funktion zu deaktivieren
7
⑩in KML-Format speichern: Wählen Sie ein Video aus der Videoliste aus, um es im KML-Format
zu speichern
8
⑩Video entsperren:wählen Sie einen gesperrtes Video aus der Videoliste,um es zu entsperren
9
⑩Videoliste:Anzeige der Video-Größe,Länge usw.:doppelklicken Sie auf das Video,um es abzuspielen
20
⑩Kartenfenster: Anzeige in Echtzeit der Bewegungsbahn des Fahrzeugs mit Internetanschluss
21
⑩Kartentyp: Flugzeugkarte/Satellitenkarte/3D-Karte
22
⑩Karte - Bildlaufleiste: zum Vergrößen und Verkleinern ziehen
23
⑩Navigationsrichtung
Hinweis: Alle Fenster können durch Ziehen angepasst werden.
12 13 14 15
16 17 18
33
Page 38

8. Technischen Daten des Produkts
Die technischen Daten können sich wegen Aktualisierungen ohne vorherige Ankündigung
ändern. Betrachten Sie die Daten als Standard.
LCD-Größe:
CMOS-Sensor
Betrachtungswinkel
Videoauflösung
Bildauflösung
Mindestbeleuchtung
Videoformat
Bildformat
Speicherkarte
Speicherkartenkapazität
Digitaler Zoom
Frequenz
Ausgang
Stromversorgungsanschluss
Batteriekapazität
Mikrofon/Lautsprecher
Schleifenaufzeichnung
LCD aus
Parkplatz-Überwachung
G-Sensor&SOS
Bewegungserkennung
Parkplatz-Überwachung
GPS-Tracking
Fahrer-ID
Sprache
Nettogewicht der
Autokamera
Abmessungen der
Autokamera
34
2,7" (7 cm) HD TFT-Bildschirm (16:9)
OV2710
140° diagonaler, ultrabreiter Betrachtungswinkel
1920x1080 30 Fps/1280x720 30 Fps/1280x720 60 Fps/640x480 30 Fps
12M/8M/5M/3M/2M/1,2M/VGA
1 LUX
AVI/H.264
JPG
microSD-Karte
Max. 64 GB
X4
50 Hz/60 Hz
HDMI
AC 5 V, 1000 mA
600 mAh
Integriert
Aus, 1 Min., 3 Min., 5 Min.
Unterstützt
Unterstützt
Unterstützt
Unterstützt
Unterstützt
Unterstützt
Unterstützt
English/Français/Deutsch/Italiano/Polski/Português/Español/
Nederlands/Suomi
105g
81,4 (L) x 64,7 (B) x 41,0 (H) mm
Page 39

9. Anweisung zur Verk abelung
10 Zubehör.
Das folgende Zubehör dient nur zu Referenzzwecken. Betrachten Sie die Artikel als
Standardzubehör. Recht auf Änderungen ohne vorherige Ankündigung vorbehalten.
1
4
m
0
°
m
W
0
.
i
d
3
e
=
f
A
;
n
2
.
g
2
l
/
e
F
353637
Page 40

Page 41

Manuel d'utilisation
Page 42

Veui llez li re attenti vemen t les ins truct ions ci -aprè s avant d'ut ilise r ce produit .
Le prése nt manu el est conçu p our gui der vot re utilisa tion de c e produit
spé ciale ment.
Attention :
1. Veuillez respecter scrupuleusement la législation nationale en vigueur. Ce produit ne peut
servir à des fins illégales ; dans le cas contraire, assumez-en la responsabilité.
2. Veuillez insérer la carte micro SD dans le sens correct afin d'éviter d'endommager la carte
ou le DVR. Si le DVR affiche « Veuillez insérer Carte SD à nouveau », veuillez accéder au menu
des paramètres, puis formatez la carte micro SD. Si le même message s'affiche toujours,
veuillez remplacer la carte par une autre carte micro SD.
Remarque : Le formatage de la carte micro SD efface tous les fichiers. Veuillez sauvegarder
les fichiers importants avant de procéder au formatage.
3. Nous vous recommandons d'utiliser une carte micro SD de CLASSE 6 ou supérieure. En
raison de l'absence de normes unifiées concernant les cartes micro SD de 64 Go sur le
marché, la carte micro SD de 64 Go peut ne pas être compatible avec ce DVR. Veuillez la
tester sur le DVR avant un achat éventuel.
4. Il est recommandé de sauvegarder les fichiers contenus sur la carte micro SD une fois par
semaine. Ce produit n'est pas un périphérique de stockage exclusif. En conséquence,
veuillez sauvegarder les fichiers importants en temps opportun afin d'éviter des pertes
éventuelles de fichiers.
5. Veuillez vérifier soigneusement l'état du support après installation afin d'éviter des
dommages éventuels.
6. L'autonomie de la pile intégrée se réduit avec l'augmentation du temps d'utilisation. Si vous
ne comptez pas utiliser le DVR pendant une période prolongée, veuillez le recharger tous
les deux mois afin de prévenir une décharge excessive qui réduit la durée de vie de la pile.
7. Veuillez ne pas exposer le produit à un environnement humide. Il n'est pas étanche.
8. Veuillez ne pas prendre des photos ou enregistrer une vidéo directement au soleil.
9. Veuillez ne pas utiliser ce produit dans un environnement présentant des poussières
excessives ; cela risque de contaminer la lentille et d'autres composants et d'affecter la
qualité de la vidéo. Veuillez garder propre la lentille à l'aide d'un chiffon doux ou des
nettoyages exclusifs.
10. Ce produit fait partie des produits électroniques de précision qui ne peuvent supporter
des chocs violents. En outre, ne l'utilisez pas dans un environnement de travail hautement
magnétique et électronique.
11. Température de fonctionnement de cet appareil est de -10 ℃ -50 ℃ et la température
de stockage est de -20 ℃ -70 ℃. l'exposition à la lumière solaire directe Continu
pendant une période de temps prolongée, peut entraîner un dysfonctionnement de
changement de couleur, le logement et la distorsion d'image, en particulier dans des
voitures fermées où la température de la cabine dépasse 70 ℃.
38
Page 43

1. Structure
2
1
13
12
Orifice du support
1.
2. Port USB
3. RESET
4. Micro
Logement de la
5.
carte micro SD
6. Touche UP
3
4
5
UP MEN U
6 7 8 9 10
0
.
3
=
f
;
2
.
2
/
F
Touche MENU
7.
8. Touche OK
9. Touche MODE
10.Touche DOWN
11.Écran LCD
12.Témoin de fonctionnement
OK MODE DOWN
1
4
m
0
°
m
W
i
d
e
A
n
g
l
e
11
14
15
16
17
Témoin d'alimentation
13.
14.Touche ON/OFF
15.Sortie HDMI
16.Lentille
17.Haut-parleur
39
Page 44

2. Fonctions
1. Prend en charge plusieurs résolutions vidéo, notamment 1080P, 720P, etc., et offre des
vidéos et images de qualité supérieure ;
2. Prend en charge 60 fps pour un enregistrement à grande vitesse ;
3. Module de lentille CMOS Haute définition avec un large angle de visualisation ;
4. Micro/haut-parleur intégré ;
5. Muni d'une touche de raccourci pour enregistrement vocal/en sourdine ;
6. Muni d'une touche de raccourci de LCD OFF ;
7. Prend en charge des cartes micro SD de grande capacité ;
8. Prend en charge l'enregistrement en boucle sans heurts ainsi l'enregistrement en cours de
charge ;
9. Enregistre automatiquement des vidéos lorsque le moteur de voiture est en marche et
s'éteint lorsque le moteur de voiture est coupé ;
10. Prend en charge la détection de mouvements ;
11. Prend en charge SOS et Capteur gravitationnel afin d'empêcher l'écrasement de
fichiers importants ;
12. Prend en charge la sortie HDMI ;
13. Prend en charge la fonction Surveillance de stationnement ;
14. Prend en charge la fonction Localisation GPS ;
15. Prend en charge l'identifiant du conducteur ;
16. Prend en charge plusieurs langues.
3. Dé finit ion et fonction clés
Image
UP
MENU
OK
MODE
DOWN
40
Fonction
Définition
Exercez une pression prolongée sur cette touche pour mettre sous/hors tension.
ON/OFF
En mode Cinéma ou Veille, appuyez brièvement sur la touche UP pour activer/désactiver
l'enregistrement vocal ; en mode Capture d'image fixe, appuyez brièvement sur la touche
UP pour exécuter un zoom avant ; en mode Réglage et en mode Aperçu, appuyez
UP
brièvement sur la touche UP pour sélectionner ; en état de lecture vidéo ou de mise
en pause, appuyez brièvement sur la touche UP pour effectuer un retour rapide.
En mode Veille, appuyez brièvement sur la touche MENU pour accéder au mode
Réglage, puis appuyez dessus à nouveau pour quitter ce mode au terme du réglage ;
MENU
en cours d'enregistrement, appuyez brièvement sur la touche MENU pour activer la
fonction SOS, puis appuyez dessus à nouveau pour la désactiver.
En mode Cinéma, appuyez brièvement sur la touche OK pour mettre en pause ou enregistrer ;
en mode Capture d'image fixe, appuyez brièvement sur la touche OK pour prendre une photo ;
OK
en mode Lecture, appuyez brièvement sur la touche OK pour jouer de la vidéo/mettre en pause ;
en mode Réglage, appuyez brièvement sur la touche OK pour confirmer votre choix.
En mode Veille, appuyez brièvement sur la touche MODE pour basculer entre mode
Cinéma/Capture d'image fixe/Lecture ; en mode Réglage, appuyez brièvement sur la
MODE
touche MODE pour basculer entre les différents menus du mode ; en mode Lecture,
appuyez brièvement sur la touche MODE pour revenir mode aperçu.
En mode Cinéma, appuyez brièvement sur la touche DOWN pour activer/désactiver
l'écran LCD OFF ; en mode Capture d'image fixe, appuyez brièvement sur la touche
DOWN pour exécuter un zoom arrière ; en mode Réglage et en mode Aperçu, appuyez
DOWN
brièvement sur la touche DOWN pour sélectionner ; en état de lecture vidéo ou de mise
en pause, appuyez brièvement sur la touche DOWN pour effectuer une avance rapide.
RESET
Appuyez dessus lorsque le logiciel DVR se plante.
Page 45

4. Dé finit ion du voyant lumineux.
Voyant
lumineux
Définition
Il reste allumé fixe signifie que le DVR est en cours de charge ; à la charge
Rouge
complète, le voyant lumineux rouge s'éteint.
Il reste allumé fixe signifie que le DVR est en mode Veille ; scintillant signifie
Vert
que le DVR effectue un enregistrement.
5. Fonction
I.ON/OFF
(1) Mise sous tension
A. Lorsque l'appareil est éteint, appuyez longuement sur la touche ON/OFF pendant 3
secondes pour le mettre sous tension et démarrer l'enregistrement automatiquement
avec le voyant lumineux vert clignotant .
B. Le DVR est en cours de connexion avec la charge de la voiture pour démarrer
l'enregistrement. Remarque : En cas d'affichage d'une fenêtre contextuelle affichant le
message « Carte SD non insérée », veuillez insérer la carte micro SD avant utilisation.
Lorsque vous insérez la carte micro SD avec l'appareil sous tension, le DVR se met
automatiquement hors tension.
(2)Mise hors tension
A. En mode de fonctionnement, appuyez longuement sur la touche ON/OFF pendant 3
secondes pour mettre l'appareil hors tension .
B. En mode de fonctionnement, le DVR sauvegarde automatiquement le fichier en cours,
puis se met automatiquement hors tension lorsque vous débranchez le chargeur de voiture.
C. En cas de niveau de charge faible des piles, le DVR sauvegarde automatiquement le fichier
en cours, puis se met hors tension automatiquement.
II.Charge de la pile
(1)Deux méthodes de charge
A.à l'aide du câble USB B.à l'aide du chargeur de voiture (suggérée)
(2) Défin ition d e l'ind ic ation d 'état d e charg e des pil es
Charge complète
Charge faible
Charge moyenne
Vide
III .Inse rtion d e la c arte mi cro SD
Insérez directement la carte micro SD dans l'emplacement prévu à cet effet, tel qu'indiqué
ci-après jusqu'à ce vous entendiez un « clic » sonore.
41
Page 46

Car te mic ro SD su rgiss ant : Pou r comm encer, p ousse z sur la carte
micr o SD, pu is sor tez-l a (il es t recom mandé de le fa ire lor sque l e
DVR e st étei nt)
IV.Mode Cinéma
Mettez le DVR sous tension pour accéder directement au mode Cinéma avec le voyant
lumineux vert clignotant. Appuyez brièvement sur la touche OK pour sauvegarder le fichier
en cours et interrompre l'enregistrement. Le DVR accède au mode Veille avec le voyant
lumineux vert allumé fixe. En mode Veille, appuyez brièvement sur la touche OK pour
recommencer l'enregistrement.
Résolution &Cadre
Enregistrement
REC
EV:0. 00
Mode Cinéma
Carte Micro SD
État de la batterie
Exposition
Durée du Clip vidéo
BP 3.0 FH D GPS 0 KM/ H ACD 1010
Heure&Date
V.Mode Capture d'image fixe
En mode Veille, appuyez brièvement sur la touche MODE pour accéder au mode Capture
d'image fixe, puis appuyez sur la touche OK pour prendre des photos.
En mode Capture d'image fixe, appuyez brièvement sur la touche UP ou DOWN pour
exécuter un zoom avant ou un zoom arrière (Max. x 4).
2015 /09/0 8 15:12 :45 0:0 1:44
UP MENU
OK MOD E DOWN
Taille de l'image fixe
Zoom numérique
Heure&Date
T
W
1X
2015 /09/0 8 15:12 :45 181 9
UP MENU
EV:0. 00
ACD 101 0
OK MOD E DOWN
La vitesse
Identifiant du conducteur
Le temps du film
Capture d'image fixe
Carte Micro SD
État de la batterie
Exposition
Identifiant du conducteur
La photo de gauche
42
Page 47

VI.Mode Lecture et Aperçu
A.En mode Veille, appuyez brièvement à deux reprises sur la touche MODE pour accéder au
mode Aperçu. Appuyez brièvement sur la touche UP ou DOWN pour sélectionner le fichier vidéo,
puis appuyez sur la touche OK pour jouer. Pendant la lecture de la vidéo, appuyez brièvement sur
la touche UP pour retour rapide et sur la touche DOWN pour un effectuer une avance rapide
(max. x 8). Appuyez sur la touche OK pour mettre en pause la lecture vidéo. Appuyez brièvement
sur la touche MODE pour interrompre la lecture et retourner au mode Aperçu.
En mode Aperçu, appuyez brièvement sur la touche MODE pour prévisualiser des photos.
Appuyez brièvement sur la touche UP ou DOWN pour sélectionner les photos. Appuyez sur la
touche OK pour une prévisualisation plein écran, puis appuyez sur la touche UP ou DOWN pour
passer à la photo suivante ou précédente.
B.En mode Aperçu, appuyez brièvement sur la touche MENU pour accéder au mode Lecture afin
de régler le volume, supprimer ou protéger des fichiers. Appuyez brièvement sur la touche UP ou
DOWN pour sélectionner « Volume », « Delete » (Supprimer) ou « Protect » (Protéger), puis
appuyez sur la touche OK pour accéder au sous-menu. Appuyez brièvement sur la touche UP ou
DOWN pour sélectionner, puis sur la touche OK pour confirmer votre choix. Ensuite, appuyez
brièvement sur la touche MENU pour quitter et retourner au mode Aperçu.
Aperçu du film Film actuel
Photo Preview
Photo actuelle
100_D SC/PI CT0011 .AVI
3
/
3
2015 /09/0 8 15:12 :45 [00 :01:4 4]
UP MEN U
Play back
1/1
UP MEN U
VII. G-SENSOR (Capteur gravitationnel)
En mode Cinéma, en cas de freinage soudain de la voiture, le Capteur gravitationnel est activé
pour empêcher un écrasement du clip vidéo en cours. Sensibilité en trois étapes (élevée,
moyenne, faible) pour satisfaire aux besoins des différents des propriétaires de voiture et peut
être défini sur « Protect Level » (Niveau de protection) dans Paramètres généraux.
Remarque : En cas d'activation du Capteur gravitationnel pour fonctionner dans les 10 premières
secondes du clip vidéo, le clip vidéo en cours et le précédent sont sauvegardées. Dans les 10
dernières secondes du clip vidéo, le clip vidéo en cours et le suivant sont sauvegardées. En milieu
de clip vidéo, seul le clip vidéo en cours est sauvegardé.
Volum e
Delete
Prot ect
OK MODE DOWN
5
OK MODE DOWN
100_D SC/PI CT0011 .JPG
3
/
3
2015 /09/0 8 15:12 :45
UP MEN U
OK MODE DOWN
43
Page 48

Gene ral Set tings
Prot ect Lev el
4/6
Parking Monitoring
Moti on Dete ctio
UP MENU
Midd le
Off
Off
OK MOD E DOWN
REC
BP 3.0 FH D GPS 0 KM/ H ACD 1010
2015 /09/0 8 15:12 :45 0:0 1:44
UP MENU
OK MOD E DOWN
EV:0. 00
VIII.SOS
En mode Cinéma, appuyez brièvement sur la touche MENU pour verrouiller manuellement le
fichier en cours en cas d'écrasement d'un fichier important en enregistrement en boucle.
Appuyez à nouveau sur la touche MENU pour déverrouiller le fichier en cours.
Remarque : En cas d'activation de la fonction SOS pour fonctionner dans les 10 premières
secondes du clip vidéo, le clip vidéo en cours et le précédent sont sauvegardées. Dans les 10
dernières secondes du clip vidéo, le clip vidéo en cours et le suivant sont sauvegardées. En
milieu de clip vidéo, seul le clip vidéo en cours est sauvegardé.
REC
EV:0. 00
BP 3.0 FH D GPS 0 KM/ H ACD 1010
2015 /09/0 8 15:12 :45 0:0 1:44
UP MENU
IX.Enregistrement vocal/en sourdine
En mode Veille ou Cinéma, appuyez brièvement sur la touche de raccourci UP pour effectuer un
enregistrement vocal ou un enregistrement en sourdine, ou appuyez sur la touche MENU pour
accéder au mode Cinéma pour effectuer une configuration.
STBY
BP 3.0 FH D GPS 0 KM/ H ACD 1010
2015 /09/0 8 15:12 :45 0:0 1:44
UP MENU
OK MOD E DOWN
EV:0. 00
OK MOD E DOWN
Movi e Mode
2/3
UP MENU
Movi e Off Time
Motion event REC
Soun d Recor d
G-sensor Sensibilité
SOS ON
OK MOD E DOWN
44
1min
5sec
On
Page 49

X.Surveillance de stationnement
Entrez dans les Paramètres généraux pour activer la fonction Surveillance de stationnement.
Réglages en trois étapes disponibles (Élevé, Moyen et Bas). Moyen est suggéré lorsque la
surveillance de stationnement allumer. Lorsque la surveillance de stationnement est en cours de
fonctionnement, le DVR affiche « P » dans le coin supérieur gauche.
A. Après la coupure du moteur de la voiture, le DVR se met hors tension automatiquement
également ; mais dès que le DVR détectera des vibrations, il se mettra automatiquement sous
tension et enregistrera pendant 10 secondes, puis se mettra à nouveau hors tension. Si d'autres
fonctions fonctionnent en même temps, la surveillance de stationnement est la priorité absolue.
B. Lorsque la surveillance de stationnement allumer pendant la conduite, le DVR sous tension
automatiquement dès qu'il détecte les vibrations et enregistrer circlely avec le premier fichier
verrouillé.
Ce fichier enregistré sera sauvegardé jusqu'à ce qu'un utilisateur le supprime de la carte micro
SD.
Accédez aux Paramètres généraux pour désactiver la fonc tion Surveillance de stationnement et
« P » disparaîtra.
Surveillance de stationnement ON
Gene ral Set tings
Prot ect Lev el
Parking Monitoring
4/6
Moti on Dete ction
UP MENU
XI. Localisation GPS
Ce DVR dispose d'un module GPS intégré et peut enregistrer le parcours de conduite, les
informations relatives à la longitude et à la latitude ainsi que la vitesse en temps réel, qui
constituent des informations de conduite très importantes.
Lorsque le DVR est en marche, il se positionne automatiquement. Une icône d'état du GPS
s'affiche dans le coin supérieur gauche. Lorsqu'il devient vert, le GPS se positionne avec succès ;
lorsqu'il est rouge, le GPS est toujours en état de positionnement. Veuillez aller à l'état du GPS
dans les Paramètres généraux pour afficher les informations GPS détaillées.
Veuillez sélectionner le fuseau horaire correct avant d'utiliser cette fonction. Veuillez accéder
aux Paramètres généraux pour la configurer. Après positionnement avec succès du GPS, l'heure
du satellite GPS se synchronise pour s'afficher sur l'écran.
Remarque : Veuillez positionner à l'extérieur. Le GPS est difficile à positionner à l'intérieur en
raison du signal GPS faible. Le parcours de conduite peut être examiné à l'aide du lecteur
exclusif GPS. Veuillez vous référer à la section « Partie 7 Instructions BP GPS VP 3.0 ».
High
Midd le
Off
OK MOD E DOWN
P
BP 3.0 FH D GPS 0 KM/ H ACD 1010
2015 /09/0 8 15:12 :45 0:0 1:44
UP MENU
REC
EV:0. 00
OK MOD E DOWN
45
Page 50

Statut GPS Icônel
REC
EV:0. 00
Speed Unit
BP 3.0 FH D GPS 0 KM/ H ACD 1010
2015 /09/0 8 15:12 :45 0:0 1:44
UP MENU
GPS St atus
02 0 5 06 09 12 20 2 0 00 00 00 00 00
UP MENU
XII.Identifiant du conducteur
En mode Veille, appuyez brièvement sur la touche MENU pour accéder aux paramètres, puis
appuyez sur la touche MODE pour accéder aux Paramètres généraux. Sélectionnez «
Paramètres de l'identifiant du conducteur », puis appuyez sur la touche OK pour entrer les
nombres. 9 caractères disponibles au total ; appuyez sur la touche UP/DOWN pour
sélectionner « 0 à 9 », « A à Z », « . » et espace. Après confirmation, appuyez sur la touche OK
pour passer au caractère suivant ou retourner aux Paramètres généraux.
OK MOD E DOWN
LAT : N 22 36' 3 5"
LON: E 113 5 1' 7"
USE: 4
09 0 0 00 00 00 0043 3 0 26 26 26 00
OK MOD E DOWN
Gene ral Set tings
Driv er ID Set tings
Driv er ID Set tings
2/6
UP MENU
Date F ormat
Lang uage
YYYY M M DD
Engl ish
OK MOD E DOWN
A C D 1 0 1 0 .
OK
UP MENU
OK MOD E DOWN
46
Page 51

XIII.Détection de mouvements :
En mode Veille, appuyez sur la touche MENU pour accéder aux paramètres en mode Cinéma,
puis sélectionnez « Motion Event REC » (Enregistrement des événements de mouvements)
pour choisir l'heure d'enregistrement de tous les clips vidéo en détection de mouvements.
Après confirmation, appuyez sur la touche OK pour quitter « Motion Event REC », puis
appuyez sur la touche MODE pour accéder aux Paramètres généraux. Sélectionnez «
Détection de mouvements », puis appuyez sur la touche OK pour sélectionner la sensibilité. 3
niveaux de sensibilité disponibles : « Élevé », « Moyen » et « Bas ». Moyen est suggéré lorsque
la détection de mouvement de rotation sur. Appuyez sur la touche OK pour confirmer votre
choix, puis appuyez sur la touche MENU pour quitter. Le DVR démarre automatiquement le
compte à rebours à partir de 9 secondes pour activer la détec tion de mouvements. Si aucun
mouvement n'est détecté, le DVR enregistre automatiquement à l'heure d'enregistrement
prédéfinie de clip vidéo En mode. Détection de mouvements, appuyez sur n'importe quelle
touche pour quitter et retourner au mode Veille. Appuyez à 4 reprises sur la touche MODE
pour pouvoir retourner au mode Détection.
Pour désactiver la détection de mouvements, veuillez accéder aux Paramètres généraux.
Movi e Mode
Movi e Off Time
Motion Event REC
2/3
Soun d Recor d
UP MENU
P
BP 3.0 FH D GPS 0 KM/ H ACD 1010
2015 /09/0 8 15:12 :45 0:0 1:44
UP MENU
OK MOD E DOWN
STBY
OK MOD E DOWN
5sec
1min
Gene ral Set tings
Prot ect Lev el
Parking Monitoring
4/6
On
EV:0. 00
Moti on Dete ction
UP MENU
Détection de mouvements Icônel
Midd le
Off
Midd le
OK MOD E DOWN
47
Page 52

XIV.Gestion des vidéos et photos
Veuillez accéder aux Paramètres généraux pour sélectionner la fonction USB avant de
d'établir la connexion avec l'ordinateur via le câble USB livré. Deux options disponibles : «
MSDC » et « PC Cam ».
1) MSDC est pour la sauvegarde ou la suppression de vidéos et photos.
2) PC Cam est pour les appels vidéo.
USB Fu nctio n
PC Cam
MSDC
USB Fu nctio n
UP MENU
OK MOD E DOWN
48
Page 53

6. Tableau des paramètres système
Catégorie
Résolution
Qualité Cinéma
Durée du Clip
vidéo
Durée du Clip
désactivée
Enregistrement
d'événements de
mouvements
Enregistrement
sonore
Exposition
Taille de l'image
fixe
Qualité de l'image
fixe
Exposition
Équilibre des
blancs
Sensibilité ISO
Color (Couleur)
Volume
Supprimer
Protéger
Formater la carte
SD
INFOS carte SD
Signal sonore
Mise hors tension
Réglage de
l'horloge
Paramètres de
l'identifiant
du conducteur
Format de la date
1 920 X 1 080 30 fps
1 280 x 720 30 fps
1 280 x 720 60 fps
640 x 480 30 fps
Super fin/Fin
Off/1 mn/3 mn/5 mn
0 mn/5 s/30 s/1 mn/3 mn
5 s/10 s/30 s/1 mn
Activé/Désactivé
- 2 à + 2
12 Mo/8 Mo/5 Mo/3 Mo/2 Mo/
1,2 Mo/VGA
Super fin/Fin
- 2 à + 2
Automatique/Lumière du jour/
Nuageux/Fluoresc./ Fluoresc.1/
Fluoresc.2/Incandesc.
Automatique/ISO100/ISO200/
ISO400
Naturel/Vif/Pâle
1~10
Supprimer un/Supprimer tout
Protéger un/Protéger tout/Laisser
un sans protection/Laisser tout
sans protection
OUI/NON
Délai/Photo restant
Activé/Désactivé
Jamais/1 mn/5 mn
AAAA MM JJ HH MM SS
0 à 9/A à Z/« . »/espace
Néant/AAAA MM JJ/MM DD AAAA/
JJ MM AAAA
Paramètres
Menu
Mode
Mode
Cinéma
Capture
d'image
fixe
Lecture
Outil
Support
Généralités
Paramètres
Sous-catégorie
Remarque
Par défaut :
1 920 X 1 080
30 fps
Par défaut :
Super fin
Par défaut : 1 mn
Par défaut : 5 s
Par défaut : 1 mn
Par défaut : Activé
Par défaut : 0
Par défaut : 12 Mo
Par défaut :
Super fin
Par défaut : 0
Par défaut :
Automatique
Par défaut :
Automatique
Par défaut :
Naturel
Par défaut : 5
Par défaut : Jamais
Par défaut :
JJ/MM/AAAA
49
Page 54

English/Français/Deutsch/Italiano/
Polski/Português/Español/
Nederlands/Suomi
50 HZ/60 HZ
MSDC/PC Cam
Désactivé/1 mn/3 mn
Désactivé/Élevé/Moyen/Bas
Désactivé/Élevé/Moyen/Bas
Désactivé/Bas/Moyen/Élevé
Informations relatives au
positionnement du GPS
KM/H MPH
Activé/Désactivé
GMT-12h00/GMT-11h00/GMT-10h00/
GMT-09h00/GMT-08h00/GMT-07h00/
GMT-06h00/GMT-05h00/GMT-04h00/
GMT-03h30/GMT-03h00/GMT-02h00/
GMT-01h00/GMT/GMT+01h00/
GMT+02h00/GMT+03h00/GMT+03h30/
GMT+04h00/GMT+04h30/GMT+05h00/
GMT+05h30/GMT+05h45/GMT+06h00/
GMT+06h30/GMT+07h00/GMT+08h00/
GMT+09h00/GMT+09h30/GMT+10h00/
GMT+11h00/GMT+12h00/GMT+13h00
OUI/NON
Version du logiciel actuel
Paramètres
Menu
Généralités
Paramètres
Langue
Fréquence
Fonction USB
Économie d'énergie
de l'écran LCD
Niveau de
protection
Surveillance
de stationnement
Détection
de mouvements :
État du GPS
Unit de vitesseé
l'heure d'été
Sélection de
fuseau horaire
Configuration de
la Réinitialisation
Version FW
7. Instructions BP GPS VP 3.0
I. Installation
① Installer le lecteur GPS « BP GPS VP 3.0 » sur MAC OS
Double-cliquer sur « BP GPS VP 3.0.zip » pour l'installer automatiquement.
② Installer le lecteur GPS « BP GPS VP 3.0 » sur WINDOWS OS
Copier « BP GPS VP 3.0.zip » sur le bureau et extraire dans « BP GPS VP 3.0 ».
II. Démarrage
① Dans MAC OS, double-cliquer sur « BP GPS VP 3.0 » pour démarrer.
② Dans WINDOWS OS, double-cliquer sur « BP GPS VP 3.0.exe » pour démarrer.
III.Définition de l'interface utilisateur
Voici l'interface utilisateur de la version WINDOWS de BP GPS VP 3.0. La version MAC est
quasiment identique.
50
Par défaut :
Anglais
Par défaut :
MSDC
Par défaut :
Désactivé
Par défaut :
Moyenne
Par défaut :
Désactivé
Par défaut :
Désactivé
Par défaut :
Désactivé
Page 55

1
2
3
4
5
23
22
Plane Map
3D Map
Satellite Map
21
20
19
6 7 8 9 10 11
① Vitesse de conduite : affiche la vitesse de conduite en temps réel ; double -cliquer pour
basculer entre KM/H et MPH
② Fenêtre de lecture vidéo : double-cliquer à n'importe quel endroit de cette fenêtre pour
afficher en mode plein écran ; double-cliquer à nouveau pour revenir au mode habituel
③Barre de défilement : affiche l'endroit actuel de la vidéo ; la faire glisser pour avancer ou reculer
④ Information en temps réel du capteur de l'accéléromètre
⑤Groupe de vidéos : Les séquences de vidéos capturées feront partie d'un seul groupe
⑥Sélectionner vidéo à lire
⑦Capture d'image : capture l'emplacement actuel de la vidéo
⑧Enregistrer sous:sélectionner une vidéo dans la liste de vidéos pour l'enregistrer dans un fichier du PC
⑨Supprimer : sélectionner une vidéo dans la liste de vidéos pour la supprimer
⑩Paramètres : sélectionner la carte et la langue
1
⑩Retour rapide : 0.9/0.8/0.7/0.6/0.5/0.4/0.3 fois
2
⑩Stop
3
⑩ Lecture/Pause
4
⑩Avance rapide : 1.2/1.4/1.6/1.8/2.0/2.4/2.8/3.2/3.6/4.0 fois
5
⑩Volume
6
⑩ Lecture automatique : cliquer pour lire automatiquement la vidéo suivante après la fin ;
cliquer à nouveau pour désactiver
7
⑩ Enregistrer au format KML : sélectionner une vidéo dans la liste de vidéos et l'enregistrer au
format KML
8
⑩ Déverrouiller vidéo : sélectionner une vidéo verrouillée dans la liste de vidéos pour la
déverrouiller
9
⑩ Liste de vidéos : affiche la taille des vidéos, leur longueur etc. ; double-cliquer sur la vidéo
pour la lire
20
⑩ Fenêtre de la carte : affiche en temps réel le déplacement du véhicule avec internet
21
⑩Type de carte : carte aérienne/carte satellite/carte 3D
22
⑩Barre de défilement carte : la faire glisser pour effectuer un zoom avant et un zoom arrière
23
⑩Direction de navigation
Remarque : il est possible d'ajuster toutes les fenêtres en les faisant glisser
12 13 14 15
16 17 18
51
Page 56

8. Caractéristiques techniques du produit
Les caractéristiques peuvent changer en raison d'une mise à niveau sans préavis. Veuillez
prendre les objets comme standard.
Dimensions de l'écran LCD
Capteur CMOS
Angle de visualisation
Résolution vidéo
Résolution des images
Eclairage minimal
Format vidéo
Format des images
Carte mémoire
Capacité de la
carte mémoire
Zoom numérique
Fréquence
Sortie
Port d'alimentation
Niveau de charge
de la batterie
Micro/Haut-parleur
Enregistrement en boucle
Écran LCD éteint
Surveillance
de stationnement
Fonctions G-Sensor et SOS
Détection de mouvements
Surveillance de
stationnement
Localisation GPS
Identifiant du conducteur
Langue
DVR N.W.
Dimensions du DVR
52
Écran TFT HD 2,7 po (16:9)
OV2710
Angle de visualisation très large de 140° (diagonal )
1 920x1 080 30 fps/1 280x720 30 fps/1 280x720 60 fps/640x480 30 fps
12 Mo/8 Mo/5 Mo/3 Mo/2 Mo/1,2 Mo/VGA
1 LUX
AVI/H.264
JPG
Carte micro SD
64 Go max.
x 4
50 HZ/60 HZ
HDMI
USB 5 V 1 000 mA
600 mAH
Intégré
Activé/1 mn/3 mn/5 mn
Prend en charge
Prend en charge
Prend en charge
Prend en charge
Prend en charge
Prend en charge
Prend en charge
English/Français/Deutsch/Italiano/Polski/Português/Español/
Nederlands/Suomi
105g
81,4 (L) x 64,7 (l) x 41,0 (H) mm
Page 57

9. Instructions relatives au câblage
10 Accessories.
Les accessoires suivants sont proposés à titre de référence exclusivement. Veuillez prendre
les objets comme standard. Nous nous réservons le droit de procéder à des modifications
sans préavis.
1
4
m
0
°
m
W
0
.
i
d
3
e
=
f
A
;
n
2
.
g
2
l
/
e
F
535455
Page 58

Page 59

Instrukcja obsługi
Page 60

Przed rozpo częci em użyt kowan ia produkt u prosi my o uważne pr zeczyta nie
nin iejsz ej inst rukcj i.
Ins trukc ja ma na ce lu prz ypomi nanie s pecja lnego w ykorzys tywania t ego
pro duktu.
Przestroga:
1. Należy ściśle przestrzegać stosowanych przepisów lokalnego prawa. Ten produkt nie może
być używany do celów niezgodnych z prawem; w przeciwnym razie odpowiedzialność
bierze na siebie użytkownik.
2. Kartę mikro SD należy wkładać do gniazda właściwą stroną, aby nie uszkodzić karty lub
rejestratora. Jeśli na ekranie kamery pojawi się komunikat „Please Insert SD Card Again”,
należy otworzyć menu ustawień i sformatować kartę mikro SD. Jeśli to nie pomoże, należy
użyć innej karty mikro SD.
Uwaga: Sformatowanie karty mikro SD spowoduje skasowanie wszystkich znajdujących się
na niej plików. Przed sformatowaniem należy wykonać kopie zapasowe ważnych plików.
3. Zaleca się używanie kart mikro SD typu CLASS 6 lub lepszych. Kar ty mikro SD 64 GB nie
posiadają jednolitej normy, obowiązującej na całym rynku, więc nie wszystkie karty SD
tego typu będą kompatybilne z tym rejestratorem. Przed zakupem należy przetestować
taką kartę za pomocą tego rejestratora.
4. Zaleca się raz w tygodniu wykonywanie kopii zapasowych plików, przechowywanych na
karcie mikro SD. Ten produkt nie jest urządzeniem pamięci masowej, więc ważne pliki
należy okresowo kopiować w inne miejsce, aby ich nie utracić.
5. Po wykonaniu montażu należy dokładnie sprawdzić wspornik, aby uchronić się przed
uszkodzeniami.
6. Czas pracy wbudowanego akumulatora będzie maleć wraz ze wzrostem czasu użytkowania
urządzenia. Jeśli rejestrator nie będzie używany przez długi czas, wewnętrzny akumulator
należy doładowywać co dwa miesiące w celu uniknięcia nadmiernego rozładowania,
skracającego jego żywotność.
7. Produktu nie należy umieszczać w wilgotnym środowisku. Produkt nie jest wodoszczelny.
8. Nie należy wykonywać zdjęć lub filmów pod słońce.
9. Produktu nie należy używać w miejscach o dużym zapyleniu, mogących pokryć soczewki
i inne elementy, co wpłynie na pogorszenie jakości obrazu. Soczewki należy czyścić za
pomocą miękkiej szmatki lub specjalnych chusteczek.
10. Ten produkt należy do grupy precyzyjnych urządzeń elektronicznych, które nie są odporne
na silne uderzenia i nie należy ich używać w pobliżu silnych pól magnetycznych i
działających urządzeń elektrycznych.
11.
Zakres temperatury pracy tego urządzenia wynosi -10 ℃ --50 ℃, a zakres temperatury
przechowywania wynosi -20 ℃ -70 ℃. Ciągłe narażenie na bezpośrednie działanie
promieni słonecznych przez dłuższy okres czasu, może powodować nieprawidłową
pracę urządzenia, zmianę kolorów, zniekształcenia obrazu oraz odkształcenie się
obudowy, szczególnie w zamkniętych samochodach, w kabinie których temperatura
przekracza 70 ℃.
56
Page 61

1. Bu dowa
2
1
13
12
3
4
5
1. Otwór wspornika
2. Port USB
3. Przycisk [RESET]
4. Mikrofon
Gniazdo karty
5.
mikro SD
6. Przycisk [UP]
UP MEN U
OK MODE DOWN
6 7 8 9 10
1
4
m
0
°
m
W
0
.
i
d
3
e
=
f
A
;
n
2
.
g
2
l
/
e
F
7. Przycisk [MENU]
8. Przycisk [OK]
9. Przycisk [MODE]
10. Przycisk [DOWN]
11. Ekran LCD
Wskaźnik aktywności
12.
rejestratora
11
14
15
16
17
13.Wskaźnik zasilania
14.Przycisk [ON/OFF]
15.Gniazdo [HDMI]
16.Obiektyw
17.Głośnik
57
Page 62

2. Cechy
1. Obsługa wielu rozdzielczości wideo, takich 1080P, 720P, itd. zapewniająca doskonałą
jakość zdjęć i filmów.
2. Zapis z prędkością 60 klatek/s, zapewniający zapis z dużą prędkością;
3. Wysokiej jakości, szerokokątny obiektyw CMOS;
4. Wbudowany mikrofon i głośnik;
5. Skróty klawiszowe do wykonywania zapisu dźwięku lub wyciszania;
6. Skrót klawiszowy do wyłączania ekranu LCD;
7. Obsługa kart mikro SD o dużej pojemności;
8. Płynny zapis w pętli oraz zapis w trakcie ładowania;
9. Automatyczne włączanie zapisu obrazu w chwili uruchomienia silnika samochodu i
wyłączanie zapisu po wyłączeniu silnika;
10.Czujnik ruchu;
11.Czujnik grawitacyjny (G-sensor) i funkcja SOS, chroniąca ważne pliki przed nadpisaniem;
12.Wyjście HDMI;
13.Monitoring parkowania;
14.Funkcja śledzenia GPS;
15.Obsługa identyfikatora kierowcy;
16.Wielojęzyczny system operacyjny.
3. Opis przycisków i ich funkcje
Przycisk
UP
MENU
OK
MODE
DOWN
Funkcja
Nazwa
Przytrzymać wciśnięty, aby włączyć lub wyłączyć zasilanie.
ON/OFF
W trybie filmowania lub gotowości (STANDBY) krótkie naciśnięcie tego przycisku
włącza lub wyłącza zapis dźwięku; w trybie fotografowania krótkie naciśnięcie
powiększa obraz (ZOOM IN); w trybie ustawień i podglądu krótkie naciśnięcie służy do
UP
wybierania parametrów, w trybie odtwarzania obrazu lub w stanie wstrzymania
(PAUZA) krótkie naciśnięcie przesuwa zapis w przód.
W trybie gotowości krótkie naciśnięcie włącza tryb edycji ustawień, a ponowne
naciśnięcie wyłącza ten tryb po ich zakończeniu; w trybie zapisu naciśnięcie tego
MENU
przycisku włącza funkcję SOS, a kolejne naciśnięcie wyłącza tę funkcję.
W trybie filmowania krótkie naciśnięcie wstrzymuje lub uruchamia zapis; w trybie
fotografowania krótkie naciśnięcie umożliwia wykonanie zdjęcia; w trybie odtwarzania
OK
krótkie naciśnięcie uruchamia lub wstrzymuje odtwarzanie filmu; w trybie ustawień
krótkie naciśnięcie zatwierdza wprowadzone zmiany.
W trybie gotowości krótkie naciśnięcie przełącza tryb filmowania, fotografowania,
przechwytywania lub odtwarzania; w trybie edycji krótkie naciśnięcie włącza menu
MODE
innego trybu; w trybie odtwarzania krótkie naciśnięcie umożliwia powrót do trybu
podglądu.
W trybie filmowania lub gotowości krótkie naciśnięcie tego przycisku włącza lub
wyłącza ekran LCD; w trybie fotografowania krótkie naciśnięcie zmniejsza obraz
(ZOOM OUT); w trybie ustawień i podglądu krótkie naciśnięcie służy do wybierania
DOWN
parametrów, w trybie odtwarzania obrazu lub w stanie wstrzymania krótkie naciśnięcie
przesuwa zapis do tyłu.
RESET
Przycisk należy wcisnąć, gdy system operacyjny rejestratora zawiesi się
58
Page 63

4. Opis stanu wskaźnika
Opis
Kolor
Czerwony
Światło ciągłe sygnalizuje ładowanie rejestratora; po całkowitym naładowaniu
wewnętrznego akumulatora dioda gaśnie.
Światło ciągłe sygnalizuje, że rejestrator znajduje się w trybie gotowości; światło
Zielony
migające oznacza, że urządzenie rejestruje.
5. Funkcje
I.Przycisk [ON/OFF]
(1)Włączanie zasilania
A.Jeśli urządzenie jest wyłączone, wciśnięcie przycisku [ON/OFF] na 3 sekundy spowoduje
włączenie zasilania i automatyczne uruchomienie zapisu, a diodowy wskaźnik będzie migać
kolorem zielonym.
B.Rejestrator jest podłączony do ładowarki samochodowej w celu uruchamiania zapisu.
Uwaga: Jeśli okno dialogowe wyświetla komunikat „SD card is not inserted”, przed
rozpoczęciem pracy należy włożyć kartę mikro SD. Jeśli karta mikro SD zostanie włożona
przy włączonym zasilaniu, rejestrator wyłączy się automatycznie.
(2)Wyłączanie zasilania
A.W trybie pracy wciśnięcie na 3 sekundy przycisku[ON/OFF]spowoduje wyłączenie zasilania.
B. Jeśli w trybie pracy zostanie odłączona ładowarka samochodowa, to rejestrator
automatycznie zachowa bieżący plik i automatycznie wyłączy zasilanie.
C. Przy niskim poziomie naładowania akumulatora rejestrator automatycznie zachowa
bieżący plik i automatycznie wyłączy zasilanie.
II.Ładowanie akumulatora
(1)Dwie metody ładowania
A. Kablem USB B. Ładowarką samochodową (zalecana)
(2) Wskaź nik sta nu nała dowan ia
Całkowicie
naładowany
Niski poziom
naładowania
III .Wkła danie k arty mi kro SD
W pokazany niżej sposób równo włożyć kartę mikro SD do gniazda, aż do usłyszenia
„kliknięcia”.
Średni poziom
naładowania
Rozładowany
59
Page 64

Wyjm owanie karty mikro SD: Naj pier w wcisn ąć kar tę mik ro SD,
a nas tępni e wyci ągnąć ( zalec a się wy jmowa nie kar ty SD p rzy
wył ączon ym zasi laniu )
IV.Tryb filmowania
Włączyć zasilanie rejestratora, aby od razu uruchomić tryb rejestrowania; wskaźnik miga
kolorem zielonym. Nacisnąć krótko przycisk [OK], aby zachować bieżący plik i przerwać
zapis. Rejestrator przejdzie w tryb gotowości; wskaźnik będzie świecić kolorem zielonym. W
trybie gotowości nacisnąć krótko przycisk [OK], aby ponownie uruchomić zapis.
Filmowanie
Rozdzielczość&klatka
Nagrywanie
REC
EV:0. 00
Filmowanie
Gni azdo ka rt mic roSD
Stan baterii
Ekspozycja
Czas trwania klipu
BP 3.0 FH D GPS 0 KM/ H ACD 1010
Czas I data
V.Tryb fotografowania
W trybie gotowości nacisnąć krótko przycisk [MODE], aby włączyć tr yb fotografowania i
nacisnąć przycisk [OK], aby wykonać zdjęcie.
W trybie fotografowania prz yciskami [UP] i [DOWN] można powiększać lub zmniejszać
obraz (maksymalnie 4-krotnie).
2015 /09/0 8 15:12 :45 0:0 1:44
UP MENU
OK MOD E DOWN
Prędkość
Dane kierowcy
Pozo stałe z djęci a
60
Rozmiar obrazu
Zoom cyfrowy
Czas & Data
T
W
1X
2015 /09/0 8 15:12 :45 181 9
UP MENU
OK MOD E DOWN
ACD 101 0
EV:0. 00
Tryb ciągłego
przechwytywania
Wejście karty micro SD
Stan baterii
Ekspozycja
Dane kierowcy
Zdjęcia pozostałe
Page 65

VI.Tryb odtwarzania i podglądu
A. W trybie gotowości nacisnąć dwukrotnie krótko przycisk [MODE], aby włączyć tryb podglądu.
Krótkimi naciśnięciami przycisków [UP] i [DOWN] można wybrać plik wideo i nacisnąć przycisk
[OK], aby uruchomić odtwarzanie.
UP służy do szybkiego przewinięcia filmu do tyłu a prz ycisku DOWN do przodu (max. x8
Nacisnąć przycisk [OK], aby wstrzymać odtwarzanie filmu. Nacisnąć krótko przycisk [MODE], aby
przerwać odtwarzanie i wrócić do trybu podglądu.
W trybie podglądu nacisnąć krótko przycisk [MODE], aby przeglądać zdjęcia. Nacisnąć krótko
przycisk [UP] lub [DOWN], aby wybrać zdjęcie. Naciśnięcie przycisku [OK] umożliwia podgląd w
trybie pełnoekranowym, a naciśnięcie przycisku [UP] lub [DOWN] wybranie, odpowiednio,
następnego lub poprzedniego zdjęcia.
B.W trybie podglądu nacisnąć krótko przycisk [MENU], aby uruchomić tr yb odtwarzania z
możliwością regulacji głośności oraz usuwania lub chronienia plików. Nacisnąć krótko przycisk
[UP] lub [DOWN], aby zaznaczyć opcję „Volume”, „Delete” lub „Protect” i nacisnąć przycisk [OK],
aby otworzyć daną opcję. Nacisnąć krótko przycisk [UP] lub [DOWN], aby wybrać i prz ycisk [OK],
aby zatwierdzić. Następnie nacisnąć krótko przycisk [MENU], aby wrócić do trybu podglądu.
Podgląd filmu Aktualny film
W trybie odtwarzanie wideo krótkie naciśnięcie przycisku
Podg ląd fil mu
Bie żące zd jęcie
).
100_D SC/PI CT0011 .AVI
3
/
3
2015 /09/0 8 15:12 :45 [00 :01:4 4]
UP MENU
Play back
1/1
UP MENU
VII. Czujnik grawitacyjny
Gwałtowne hamowanie lub przyspieszanie samochodu, gdy rejestrator jest w trybie filmowania,
spowoduje uruchomienie czujnika grawitacyjnego, chroniącego bieżący k lip wideo przed
nadpisaniem. Trzystopniowa (wysoka, średnia, niska) czułość ma na celu usatysfakcjonowanie
posiadaczy różnych samochodów i można ją ustawić za pomocą parametru „Protect Level” w
ustawieniach ogólnych.
Uwaga: Jeśli czujnik grawitacyjny zostanie uruchomiony w pierwszych dziesięciu sekundach
rejestrowania klipu wideo, zachowane zostaną klip bieżący i poprzedni. Jeśli stanie się to w ostatnich
dziesięciu sekundach rejestrowania klipu wideo, zachowane zostaną klip bieżący i następny. W
przypadku aktywacji czujnika w środku klipu wideo, zachowany zostanie tylko bieżący klip.
Volum e
Delete
Prot ect
OK MO DE DOWN
5
OK MO DE DOWN
100_D SC/PI CT0011 .JPG
3
/
3
2015 /09/0 8 15:12 :45
UP MENU
OK MO DE DOWN
61
Page 66

Gene ral Set tings
Prot ect Lev el
4/6
Parking Monitoring
Moti on Dete ctio
UP MENU
Midd le
Off
Off
OK MOD E DOWN
REC
BP 3.0 FH D GPS 0 KM/ H ACD 1010
2015 /09/0 8 15:12 :45 0:0 1:44
UP MENU
OK MOD E DOWN
EV:0. 00
VIII.Funkcja SOS
W trybie filmowania nacisnąć krótko przycisk [MENU], aby ręcznie zablokować bieżący plik, aby
ważny plik nie został nadpisany podczas zapisu w pętli. Nacisnąć ponownie przycisk [MENU], aby
odblokować bieżący plik.
Uwaga: Jeśli funkcja SOS zostanie uruchomiona w pierwszych dziesięciu sekundach rejestrowania
klipu wideo, zachowane zostaną klip bieżący i poprzedni. Jeśli stanie się to w ostatnich dziesięciu
sekundach rejestrowania klipu wideo, zachowane zostaną klip bieżący i następny. W przypadku
aktywacji czujnika w środku klipu wideo, zachowany zostanie tylko bieżący klip.
REC
EV:0. 00
BP 3.0 FH D GPS 0 KM/ H ACD 1010
2015 /09/0 8 15:12 :45 0:0 1:44
UP MENU
IX.Zapis dźwięku lub wyciszanie dźwięku
W trybie gotowości lub filmowania, nacisnąć krótko przycisk [UP], aby rejestrować dźwięk lub go
wyciszyć albo nacisnąć przycisk [MENU], aby przejść do trybu filmowania w celu zmiany ustawień.
STBY
BP 3.0 FH D GPS 0 KM/ H ACD 1010
2015 /09/0 8 15:12 :45 0:0 1:44
UP MENU
OK MOD E DOWN
EV:0. 00
OK MOD E DOWN
Movi e Mode
2/3
UP MENU
Movi e Off Time
Motion event REC
Soun d Recor d
Czułość czujnika - G
SOS włączony
OK MOD E DOWN
62
1min
5sec
On
Page 67

X.Monitoring parkowania
Wejść ustawienia ogólne, aby włączyć funkcję monitoringu parkowania i wybrać jedną z trzech
opcji („High”, „Middle” lub „Low”). 'Pośredni' jest sugerowany gdy monitoring parkingowy jest
włączony. Gdy Monitoring parkowania jest włączony, w lewym, górnym rogu ekranu
wyświetlana jest litera „P”.
A. Po wyłączeniu silnika samochodu, również rejestrator automatycznie wyłączy swoje
zasilanie, ale gdy wykryje wibracje, automatycznie włączy zasilanie i wykona 10-sekundowy
zapis, a następnie ponownie wyłączy zasilanie. Jeśli pozostałe funkcje działają w t ym samym
czasie, monitoring parkingowy ma najwyższy priorytet.
B. G dy mon itoring par kingowy uru chomi się podc zas ja zdy, reje strator włąc zy si ę
automatycznie po wykryciu wibracji i zapisze zabezpieczony plik.
Uwaga: Zabezpieczony plik zostanie zapisany dopóki użytkownik nie usunie go z kar ty micro
SD.
Przejdź do ustawień ogólnych aby wyłączyć monitorowanie parkingowe, symbol "P" zniknie.
Monitoring parkingowy włączony
Gene ral Set tings
Prot ect Lev el
Parking Monitoring
4/6
Moti on Dete ction
UP MENU
XI.Śledzenie GPS
Ten rejestrator posiada wbudowany moduł GPS, umożliwiający rejestrowanie trasy i informacji
o długości i szerokości geograficznej, jak również prędkości w czasie rzecz ywistym, które to
dane są ważne dla kierującego.
Po włączeniu rejestrator pozycjonuje się automatycznie. W lewym, górnym rogu ekranu
wyświetlana jest ikona stanu systemu GPS. Gdy ma kolor zielony, pozycja GPS jest ustalona; gdy
ma kolor czer wony, system GPS wciąż się pozycjonuje. Szczegółowe informacje GPS można
znaleźć w ustawieniach ogólnych.
Przed użyciem tej funkcji należy określić właściwą strefę czasową. W tym celu należy wejść w
ust awie nia og ólne . Po po myśln ym ok reśl eniu poz ycji GP S, u rząd zeni e z osta nie
zsynchronizowane z czasem satelitów GPS, który będzie pokazywany na ekranie.
Uwaga: Pozycjonowanie należy wykonywać na zewnątrz budynków. Trudno ustalić pozycję GPS
wewnątrz budynku z powodu słabego sygnału GPS. Trasę GPS można przeglądać za pomocą
dedykowanego odtwarzacza GPS. Należy zapoznać się z instrukcji obsługi BP GPS
VP 3.0.
High
Midd le
Off
OK MOD E DOWN
P
BP 3.0 FH D GPS 0 KM/ H ACD 1010
2015 /09/0 8 15:12 :45 0:0 1:44
UP MENU
Rozdział 7
REC
EV:0. 00
OK MOD E DOWN
63
Page 68

Ikona statusu GPS
REC
EV:0. 00
Speed Unit
BP 3.0 FH D GPS 0 KM/ H ACD 1010
2015 /09/0 8 15:12 :45 0:0 1:44
UP MENU
GPS St atus
02 0 5 06 09 12 20 2 0 00 00 00 00 00
UP MENU
XII.Identyfikator kierowcy
W tr ybie filmowania nacisnąć krótko przycisk [MENU], aby wejść w ustawienia, a następnie
nacisnąć przycisk [MODE], aby wejść w ustawienia ogólne. Wybrać opcję „Drive ID Settings” i
nacisnąć przycisk [OK], aby wprowadzić znaki. Przyciskami [UP] i [DOWN] można wprowadzić
maksymalnie 9 znaków, mając do wyboru cyfry (0 – 9), wielkie litery (A – Z), kropkę i spację. Po
wybraniu znaku nacisnąć pr zycisk [OK], aby przejść do następnego lub wrócić do ustawień
ogólnych.
OK MOD E DOWN
LAT : N 22 36' 3 5"
LON: E 113 5 1' 7"
USE: 4
09 0 0 00 00 00 0043 3 0 26 26 26 00
OK MOD E DOWN
Gene ral Set tings
Driv er ID Set tings
Driv er ID Set tings
2/6
UP MENU
Date F ormat
Lang uage
YYYY M M DD
Engl ish
OK MOD E DOWN
A C D 1 0 1 0 .
OK
UP MENU
OK MOD E DOWN
64
Page 69
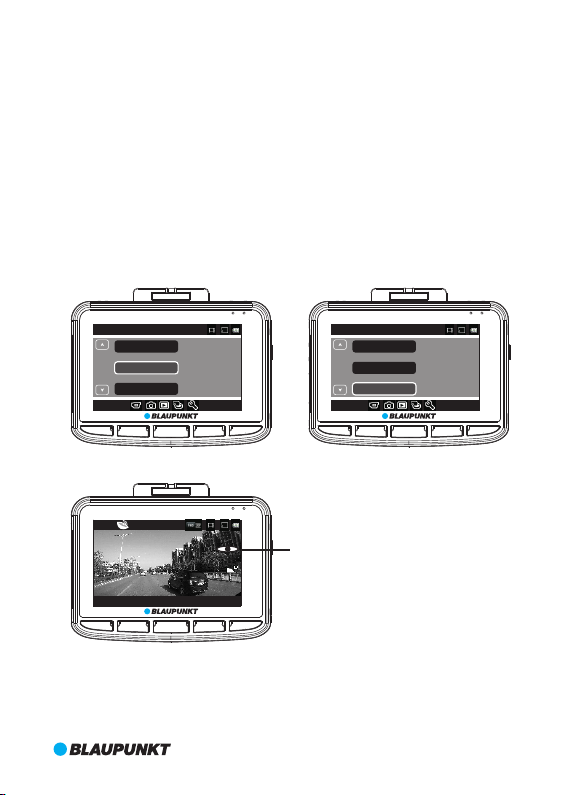
XIII.Detekcja ruchu
W tr ybie filmowania nacisnąć przycisk [MENU], aby wejść do ustawień tego trybu i wybrać
opcję „Motion Event REC” w celu określenia czasu zapisu poszczególnych klipów wideo w
ramach detekcji ruchu.
Po wybraniu opcji nacisnąć przycisk [OK], aby wyłączyć opcję „Motion Event REC”, a następnie
przycisk [MODE], aby wrócić do ustawień ogólnych. Zaznaczyć opcję „Motion Detection” i
nacisnąć przycisk [OK], aby określić czułość. Dostępne są trzy poziomy czułości „High”,
„Middle” i „Low”. 'Pośredni' jest sugerowany gdy detekcja ruchu jest włączona.Nacisnąć
przycisk [OK], aby zatwierdzić, a następnie nacisnąć prz ycisk [MENU], aby wyłączyć edycję.
Rejestrator zacznie automatycznie odliczać od 9 sekund, aby uruchomić detekcję ruchu. Jeśli
wykryje jakikolwiek ruch, automatycznie zostanie włączony zapis k lipów o ok reślonej
wcześniej długości. W trybie detekcji ruchu naciśnięcie dowolnego klawisza spowoduje
wyłączenie tego trybu i przejście do tr ybu gotowości. Nacisnąć 4 razy przycisk [MODE], aby
wrócić ponownie do trybu detekcji ruchu.
Aby wyłączyć detekcję ruchu, należy zmienić ustawienia ogólne.
Movi e Mode
Movi e Off Time
Motion Event REC
2/3
Soun d Recor d
UP MENU
P
BP 3.0 FH D GPS 0 KM/ H ACD 1010
2015 /09/0 8 15:12 :45 0:0 1:44
UP MENU
OK MOD E DOWN
STBY
OK MOD E DOWN
5sec
1min
Gene ral Set tings
Prot ect Lev el
Parking Monitoring
4/6
On
EV:0. 00
Moti on Dete ction
UP MENU
Ikona detekcji ruchu
Midd le
Off
Midd le
OK MOD E DOWN
65
Page 70

XIV.Zarządzanie klipami i zdjęciami
Przed połączeniem rejestratora z komputerem za pomocą dołączonego kabla USB, należy
wejść w ustawienia ogólne, aby określić funkcje USB. Istnieją dwie opcje: „MSDC” i „PC
Cam”.
1)Opcja MSDC służy do zachowywania i usuwania klipów wideo oraz zdjęć.
2)Opcja PC Cam umożliwia połączenia wideo.
USB Fu nctio n
PC Cam
MSDC
USB Fu nctio n
UP MENU
OK MOD E DOWN
66
Page 71

6. Tabela ustawień systemowych
Opcja
Rozdzielczość
Jakość obrazu
Długość klipu
Odstęp
Zapis z czujnika
ruchu
Zapis dźwięku
Ekspozycja
Wielkość zdjęcia
Jakość zdjęcia
Ekspozycja
Balans bieli
Czułość ISO
Kolory
Głośność
Usuwanie
Ochrona
Format karty SD
Info karty SD
Dźwięk
Wyłączanie
zasilania
Ustawienia zegara
Edycja
identyfikatora
Format daty
1920x1080; 30 kl/s
1280x720; 30 kl/s
1280x720; 60 kl/s
640x480; 30 kl/s
Doskonała/Dobra
Off/1 min/3 min/5 min
0 min/5 s/30 s/1 min/3 min
5 s/10 s/30 s/1 min
Tak/Nie
-2~+2
12M/8M/5M/3M/2M/1,2M/VGA
Doskonała/Dobra
-2~+2
Auto/Jasny dzień/Zchmurzenie/
Świetlówki/ Świetlówki 1/
Świetlówki 2/Lampy żarowe.
Auto/ISO100/ISO200/ISO400
Naturalne/Jaskrawe/Blade
1~10
Delete One/Delete All
Chroń jeden/Chroń wszystko/Nie
chroń jednego/Nie chroń niczego
TAK/NIE
Czas/Po lewej
Tak/Nie
Nigdy/1 min/5 min
RRRR MM DD GG MM SS
0~9/A~Z/ . /spacja
Brak/RRRR MM DD/
MM DD RRRR/DD MM RRRR
Menu
ustawień
Tryb
Filmowanie
Fotografo-
wanie
Odtwarzanie
Narzędzia
Ustawienia
ogólne
Subopcja
Uwagi
Domyślnie:
1920x1080
30 kl/s
Domyślnie:
Doskonała
Domyślnie: 1 min
Domyślnie: 5 s
Domyślnie: 1 min
Domyślnie: Tak
Domyślnie: 0
Domyślnie: 12M
Domyślnie:
Doskonała
Domyślnie: 0
Domyślnie: Auto
Domyślnie: Auto
Domyślnie:
Natural
Domyślnie: 5
Domyślnie: Nigdy
Domyślnie:
DD MM RRRR
67
Page 72

Menu
ustawień
Ustawienia
ogólne
Język
Częstotliwość
Funkcja USB
Wyłączanie
ekranu LCD
Poziom ochrony
Monitoring
parkowania
Detekcja ruchu
Status GPS
Jednostka
prędkości
Czas letni
Wybieranie strefy
czasowej
Reset systemu
Wersja systemu
English/Français/Deutsch/Italiano/
Polski/Português/Español/
Nederlands/Suomi
50 HZ/60 HZ
MSDC/PC Cam
Nie/1 min/3 min
WYŁ./Wysoki/Średni/Niski
WYŁ./Wysoki/Średni/Niski
WYŁ./Niska/Średnia/Wysoka
Informacja o pozycjonowaniu GPS
KM/H MPH
Tak/Nie
GMT-12:00/GMT-11:00/GMT-10:00/
GMT-09:00/GMT-08:00/GMT-07:00/
GMT-06:00/GMT-05:00/GMT-04:00/
GMT-03:30/GMT-03:00/GMT-02:00/
GMT-01:00/GMT/GMT+01:00/
GMT+02:00/GMT+03:00/GMT+03:30/
GMT+04:00/GMT+04:30/GMT+05:00/
GMT+05:30/GMT+05:45/GMT+06:00/
GMT+06:30/GMT+07:00/GMT+08:00/
GMT+09:00/GMT+09:30/GMT+10:00/
GMT+11:00/GMT+12:00/GMT+13:00
TAK/NIE
Bieżąca wersja systemu operacyjnego
Domyślnie:
English
Domyślnie: MSDC
Domyślnie: Nie
Domyślnie: Średni
Domyślnie: WYŁ.
Domyślnie: WYŁ.
Domyślnie: Nie
7. Instrukcja BP GPS VP 3.0
I. Instalacja
① Zainstaluj odtwarzacz GPS -”BP GPS VP 3.0” w systemie operacyjnym MAC
Dwukrotnie kliknij plik 'BP GPS VP 3.0.zip', aby zainstalować automatycznie.
② Zainstaluj odtwarzacz GPS -”BP GPS VP 3.0” w systemie operacyjnym WINDOWS
Skopiuj plik 'BP GPS VP 3.0.zip' na pulpit i rozpakuj go w 'BP GPS VP 3.0'.
II. Jak rozpocząć
①W systemie operacyjnym MAC dwukrotnie kliknij “BP GPS VP 3.0”, aby rozpocząć.
② W systemie operacyjnym WINDOWS OS dwukrotnie kliknij 'BP GPS VP 3.0.exe', aby rozpocząć.
III.Opis interfejsu użytkownika
Tutaj pokazano interfejs użytkownika BP GPS VP 3.0, wersję dla systemu WINDOWS. Wersja
dla system MAC jest niemal identyczna.
68
Page 73

1
2
3
4
5
23
22
Plane Map
3D Map
Satellite Map
21
20
19
6 7 8 9 10 11
① Prędkość jazdy : pokaż prędkość jazdy w czasie rzecz ywistym; dwuk rotnie kliknij, aby
przełączyć z KM/H na MPH i odwrotnie
②Okno odtwarzacza wideo: dwukrotnie kliknij w dowolne miejsce w oknie, aby wyświetlić tryb
pełnoekranowy; kliknij ponownie dwukrotnie, aby powrócić do trybu bieżącego
③ Pasek przewijania: pokaż bieżący punkt nagrania wideo; przeciągnij go, aby przesunąć
nagranie do przodu lub wstecz
④Informacje w czasie rzeczywistym z czujnika G
⑤Grupa wideo: kolejne nagrania wideo znajdą się w jednej grupie
⑥Wybierz nagranie wideo do odtworzenia
⑦Przechwyt obrazu: przechwyć bieżący punkt nagrania wideo
⑧Zapisz w: wybierz jedno nagranie wideo z listy nagrań, aby je zapisać w jednym folderze komputera
⑨Usuń: wybierz jedno nagranie wideo z listy nagrań, aby usunąć
⑩Ustawienia: wybierz mapę i język
1
⑩Szybkie przewijanie wstecz: 0,9/0,8/0,7/0,6/0,5/0,4/0,3 razy
2
⑩Stop
⑩Odtwarzanie/Pauza
3
4
⑩Szybkie przewijanie do przodu: 1,2/1,4/1,6/1,8/2,0/2,4/2,8/3,2/3,6/4,0 razy
⑩Głośność
5
6
⑩Automatyczne odtwarzanie: kliknij, aby automatycznie odtworz yć kolejne nagranie po zakońc
zeniu; kliknij ponownie, aby je wyłączyć
7
⑩Zapisz w formacie KML: wybierz jedno nagranie wideo z listy nagrań, aby je zapisać w formacie KML
8
⑩Odblokuj wideo: wybierz jedno zablokowane nagranie wideo z listy nagrań, aby je odblokować
⑩Lista nagrań wideo: pokaż rozmiar nagrania wideo, jego długość itp.; aby odtworzyć nagranie,
9
kliknij dwukrotnie
20
⑩Okno mapy: pokaż trasę pojazdu w czasie rzeczywistym w Internecie
21
⑩Typ mapy: mapa lotnicza / mapa satelitarna / mapa 3D
22
⑩Pasek przewijania mapy: przeciągnij go, aby powiększyć lub zmniejszyć
23
⑩Kierunek nawigacji
Uwaga: wszystkie okna można przeciągać w celu ich dostosowania
Zapraszamy do odwiedzenia oficjalnej strony internetowej www.blaupunkt.com I
www.blaupunkt.de aby pobrać najnowszą wersję programu BP GPS VP 3.0 jeśli wystapią problemy
z prawidłowym działaniem.
12 13 14 15
16 17 18
69
Page 74

8. Sp ecyfikacja produktu
W związku z możliwością aktualizacji, specyfikacja może zmienić się bez powiadomienia.
Podane dane należy traktować jako standardowe.
Wielkość ekranu LCD
Matryca CMOS
Kąt widzenia
Rozdzielczość wideo
Rozdzielczość zdjęć
Minimalne oświetlenie
Format wideo
Format zdjęć
Karta pamięci
Pojemność karty pamięci
Zbliżenie cyfrowe
Częstotliwość
Wyjście
Port zasilania
Pojemność akumulatora
Mikrofon/Głośnik
Zapis w pętli
Wyłączanie ekranu LCD
Monitoring parkowania
Czujnik grawitacyjny
i funkcja SOS
Detekcja ruchu
Monitoring parkowania
Śledzenie GPS
Identyfikator kierowcy
Język
Waga netto rejestratora
Gabaryty rejestratora
70
2,7” HD TFT (16:9)
OV2710
140°; diagonalny, bardzo szeroki kąt widzenia
1920X1080 30fps/1280x720 30fps/1280x720 60fps/640x480 30fps
12M/8M/5M/3M/2M/1.2M/VGA
1 luks
AVI/H.264
JPG
Mikro SD
Max. 64 GB
x4
50 HZ/60 HZ
HDMI
USB 5 V 1000 mA
600 mAH
Wbudowane
Off/1min/3min/5min
Tak
Tak
Tak
Tak
Tak
Tak
Tak
English/Français/Deutsch/Italiano/Polski/Português/Español/
Nederlands/Suomi
105 g
81,4 (dł) x 64,7 (szer.) x 41,0 (wys.) mm
Page 75

9. Instrukcja okablowania
10 Akcesoria.
Niżej wymienione akcesoria są tylko odniesieniem. Należy traktować jako standardowe.
Zastrzega się możliwość wprowadzania zmian bez powiadomienia.
1
4
m
0
°
m
W
0
.
i
d
3
e
=
f
A
;
n
2
.
g
2
l
/
e
F
71
Page 76

72
Page 77

Manual del usuario
73
Page 78

Antes de u sar el pr oduct o, lea atentame nte este man ual de in struc cione s.
El ma nual es u na guía p ara el us o espec ial de es te product o.
Precaución:
1. Cíñase estrictamente a las leyes nacionales relevantes. Este producto no puede utilizarse
para propósitos ilegales; de lo contrario, usted asume la responsabilidad por su cuenta propia.
2. Inserte la tarjeta micro SD según la dirección correcta, para evitar daños a la tarjeta o DVR.
Si el equipo DVR indica ''Please Insert SD Card Again'', ingrese al menú de ajustes y formatee
la tarjeta micro SD. Si sigue estando igual, cambie la tarjeta micro SD por otra.
Nota: Formatear la tarjeta micro SD eliminará todos los archivos contenidos en ella.
Respalde todos los archivos importantes antes de formatearla.
3. Se recomienda el uso de una tarjeta micro SD CLASE 6 o superior. Las tarjetas micro SD de
64 GB de capacidad no poseen un estándar unificado, por lo que no todas las tarjetas
micro SD de 64 GB de capacidad serán compatibles con este equipo DVR. Pruebe la tarjeta
en el equipo DVR antes de comprarla.
4. Se recomienda respaldar los archivos de la tarjeta micro SD al menos una vez a la semana.
Este producto no es el dispositivo de almacenamiento exclusivo; por lo tanto, respalde los
archivos importantes de manera oportuna para así evitar la pérdida de los mismos.
5. Para evitar daños, compruebe cuidadosamente la abrazadera después de instalar.
6. El tiempo operativo de la batería integrada se reducirá al aumentar el tiempo de uso. Si el
equipo DVR no se utilizará por un periodo de tiempo extenso, cárguelo cada dos meses
para así evitar una descarga excesiva que reduzca la vida útil de la batería.
7. No use el producto en un entorno húmedo. No es a prueba de agua.
8. No tome fotografías ni filme directamente el sol.
9. No utilice este producto en un entorno excesivamente polvoriento para que el lente y los
demás componentes no se contaminen ni afecten la calidad del vídeo. Mantenga limpio el
lente con un paño suave o paños desechables.
10. Este producto es del tipo electrónico de precisión; por lo tanto, no lo impacte con fuerza
ni lo use en un campo electrónico o magnético fuerte.
11. Temperatura de trabajo de este dispositivo es de -10 ℃ -50 ℃ y la temperatura de
almacenamiento es de -20 ℃ -70 ℃. la exposición continua a la luz solar directa
durante un período prolongado de tiempo, puede hacer que el dispositivo no
funcione correctamente, cambio de color, la vivienda y la distorsión de la imagen,
especialmente en vehículos cerrados donde la temperatura de la cabina exceda de
70 ℃.
74
Page 79

1. Estructura
2
1
13
12
Orificio para la
1.
abrazadera
2. Puerto USB
3. RESET
4. Micrófono
Ranura para
5.
tarjetas SD
6. Tecla UP
3
4
5
7. Tecla MENU
8. Tecla OK
9. Tecla MODE
10.Tecla DOWN
11.LCD
12.
UP MEN U
OK MODE DOWN
6 7 8 9 10
1
4
m
0
°
m
W
0
.
i
d
3
e
=
f
A
;
n
2
.
g
2
l
/
e
F
Luz indicadora de
funcionamiento
11
14
15
16
17
Luz indicadora
13.
de encendido
Tecla ON/OFF
14.
(encendido/apagado)
15.Salida HDMI
16.Lente
17.Altavoz
75
Page 80

2. Características
1. Compatible con múltiples resoluciones de vídeo, tales como 1080p, 720p, etc. con calidad
de imagen y vídeo superiores;
2. Compatible con grabación de vídeo de alta velocidad a 60fps;
3. Módulo con lente CMOS de alta definición, con ángulo de visión amplio;
4. Micrófono/altavoz integrados;
5. Con tecla de acceso directo a Grabar/Silenciar;
6. Con tecla de acceso directo para apagar la pantalla LCD;
7. Compatible con tarjetas Micro SD de alta capacidad;
8. Compatible con grabación continua y mientras se carga;
9. Graba vídeo automáticamente cuando el motor del automóvil se enciende y deja de
grabar automáticamente después de apagar el motor;
10. Compatible con detección de movimiento;
11. Compatible con SOS y Sensor G para evitar que se sobrescriban archivos importantes;
12. Compatible con salida HDMI;
13. Compatible con funciones de monitoreo de estacionamiento;
14. Compatible con funciones de rastreo por GPS;
15. Compatible con ID del conductor;
16. Compatible con varios idiomas.
3. De finic ión y función de las teclas
Imagen
UP
MENU
OK
MODE
DOWN
Función
Definición
Mantenga presionado para encender/apagar.
ON/OFF
En una película o en modo de espera, presione brevemente para encender/
desactivar la grabación con voz; en modo de captura estática, presione
UP
brevemente para acercar la vista; en modo de configuración, presione
brevemente para seleccionar; en modo de reproducción de vídeo o en estado
de pausa, presione brevemente para retroceder rápidamente.
En modo espera, presione brevemente para ingresar al modo de configuración
y presione nuevamente para salir tras haber completado la configuración; en
MENU
modo de grabación, presione brevemente para activar la función SOS y
presione nuevamente para desactivarla.
En modo película, presione brevemente para pausar o grabar; en modo de
captura estática, presione brevemente para tomar una fotografía; en modo de
OK
reproducción, presione brevemente para reproducir o pausar el vídeo; en modo
de configuración, presione brevemente para confirmar.
En modo de espera, presione brevemente para cambiar entre los modos
película/captura estática/reproducción; en modo de configuración, presione
MODE
brevemente para cambiar a otro menú de modo; en modo de reproducción,
presione brevemente para volver al modo de previsualización.
En una película o en modo de espera, presione brevemente para encender/
desactivar la pantalla LCD; en modo de captura estática, presione brevemente
para alejar la vista; en modo de configuración, presione brevemente para
DOWN
seleccionar; en modo de reproducción de vídeo o en estado de pausa,
presione brevemente para adelantar rápidamente.
RESET
Presiónelo cuando el software DVR deje de funcionar.
76
Page 81

4. De finic ión de la s luces indicado ras
Luz indicadora
Definición
Estática encendida significa que el DVR está grabando; tras cargarse por
Rojo
completo, la luz roja se apaga.
Estática encendida significa que el DVR está en modo de espera; si parpadea
Verde
significa que está grabando.
5. Función
I.ON/OFF
(1)Encendido
A. Cuando está apagado, presione durante 3 segundos para encender y comenzar a grabar
automáticamente con luz verde parpadeante.
B. El DVR se está conectando al cargador del coche para comenzar a grabar.
Nota: Aparece una ventana emergente para indicar ''SD card is not inserterd'', inserte la
tarjeta micro SD antes de usar el producto. Si la tarjeta Micro SD se inserta en el equipo DVR
en estado operativo, éste se apagará automáticamente.
(2)Apagado
A. En estado operativo, presione la tecla ON/OFF durante 3 segundos para apagar.
B. En estado operativo, el DVR automáticamente guardará el archivo actual y se apagará al
desconectarse del cargador del coche.
C. En estado de batería baja, el equipo DVR automáticamente guardará el archivo actual y
se apagará.
II.Carga de la batería
(1)Existen dos métodos de carga
A.con cable USB B.con el cargador del coche (recomendado)
(2) D efini ción de l estad o de la bat er ía
Llena
Baja
Media
Vacía
III .Inse rción d e la t arjet a micro S D
Inserte la tarjeta micro SD en la ranura, en la dirección indicada, hasta que escuche un
sonido ''clic''.
77
Page 82

Ext racci ón de la t arjet a Micr o SD: Em puje la tarje ta mic ro SD y lu ego
sáqu ela (s e recom ienda hacerl o con el equip o DVR ap agado )
IV.Modo película
Encienda el equipo DVR para ingresar al modo película directamente con luz verde
parpadeante. Presione la tecla OK para guardar el archivo actual y dejar de grabar. El DVR
entra en modo espera con luz verde estática. En modo espera, presione brevemente la tecla
''OK'' para comenzar a grabar.
Resolución & Marco
Grabación
REC
EV:0. 00
Modo película
La tarjeta Micro SD en
Estado de la batería
Exposición
Calidad de la película
BP 3.0 FH D GPS 0 KM/ H ACD 1010
Hora y fecha
V.Modo de captura estática
En modo espera, presione brevemente la tecla MODE para ingresar al modo de captura
estática y presione OK para tomar fotografías.
En modo de captura estática, presione brevemente la tecla UP o DOWN para acercar o
alejar la vista (Máx. 4x).
Tamaño de la imagen
estática
Zoom digital
Hora y fecha
2015 /09/0 8 15:12 :45 0:0 1:44
UP MENU
T
W
1X
2015 /09/0 8 15:12 :45 181 9
UP MENU
OK MOD E DOWN
OK MOD E DOWN
EV:0. 00
ACD 101 0
Velocidad
ID del conductor
Tiempo de película
Captura estática
La tarjeta Micro SD en
Estado de la batería
Exposición
ID del conductor
Foto de la izquierda
78
Page 83

VI.Reproducción y modo de previsualización
A. En modo de espera, presione brevemente la tecla MODE dos veces para ingresar al modo de
previsualización. Presione brevemente UP o DOWN para seleccionar el archivo de vídeo y luego
presione OK para reproducir. En estado de reproducción de vídeo, presione brevemente la tecla
UP para retroceder rápidamente y la tecla DOWN para adelantar rápidamente (máx. 8x). Presione
OK para pausar en modo de reproducción de vídeo. Presione brevemente la tecla MODE para
detener la reproducción y volver al modo de previsualización.
En modo de previsualización, presione brevemente la tecla MODE para previsualizar fotografías.
Presione la tecla UP o DOWN para seleccionar las fotografías. La tecla OK se presiona para ver una
previsualización en pantalla completa y presione la tecla UP o DOWN para avanzar o retroceder a
la fotografía siguiente o anterior.
B.En modo de previsualización, presione brevemente la tecla MENU para ingresar al modo de
reproducción y ajustar el volumen, eliminar o proteger archivos. Presione brevemente la tecla UP
o DOWN para seleccionar ''Volumen'', ''Borrar'' o ''Proteger'' y luego presione OK para ingresar al
submenú. Presione brevemente la tecla UP o DOWN para seleccionar y luego presione OK para
confirmar. Presione brevemente la tecla MENU para salir y volver al modo de previsualización.
Previa de la película
Película actual
Vista previa de la foto
Foto actual
100_ DSC/P ICT00 11.AVI
3
/
3
2015 /09/0 8 15:12 :45 [00 :01:4 4]
UP MENU
Play back
1/1
UP MENU
VII. SENSOR G
El sensor G se activa en el modo película, cuando los frenos del vehículo se activan bruscamente
o sufren un golpe; esto sirve para evitar que el clip actual se sobrescriba. La sensibilidad en tres
pasos (alta, media y baja) se adapta a distintos tipos de conductores y puede configurarse en la
sección ''Nivel de protección'' en los ajustes generales.
Nota: Si el sensor G se activa para funcionar en los primeros 10 segundos del clip de vídeo, el clip
actual y anterior se guardan. Si se activa para funcionar en los últimos 10 segundos del clip de
vídeo, el clip actual y anterior se guardan. SI se activa en la mitad del clip de vídeo, se guardará
solo el vídeo actual.
Volum e
Delete
Prot ect
OK MOD E DOWN
5
OK MOD E DOWN
100_ DSC/P ICT00 11.JPG
3
/
3
2015 /09/0 8 15:12 :45
UP MENU
OK MOD E DOWN
79
Page 84

Gene ral Set tings
Prot ect Lev el
4/6
Parking Monitoring
Moti on Dete ctio
UP MENU
Midd le
Off
Off
OK MOD E DOWN
REC
BP 3.0 FH D GPS 0 KM/ H ACD 1010
2015 /09/0 8 15:12 :45 0:0 1:44
UP MENU
OK MOD E DOWN
EV:0. 00
VIII.SOS
En modo película, presione brevemente la tecla MENU para bloquear el archivo actual
manualmente en caso de que sean archivos importantes que no desee sobrescribir. Presione
nuevamente la tecla MENU para desbloquear el archivo actual.
Nota: Si la opción SOS se activa en los primeros 10 segundos del clip de vídeo, el clip actual y
anterior se guardan. Si se activa para funcionar en los últimos 10 segundos del clip de vídeo,
el clip actual y anterior se guardan. SI se activa en la mitad del clip de vídeo, se guardará solo
el vídeo actual.
REC
EV:0. 00
BP 3.0 FH D GPS 0 KM/ H ACD 1010
2015 /09/0 8 15:12 :45 0:0 1:44
UP MENU
IX.Grabación con voz/en silencio
En modo de espera o película, presione brevemente la tecla UP para grabar con voz o en
silencio; o bien presione MENU para entrar al modo película y realizar ajustes.
STBY
BP 3.0 FH D GPS 0 KM/ H ACD 1010
2015 /09/0 8 15:12 :45 0:0 1:44
UP MENU
OK MOD E DOWN
EV:0. 00
OK MOD E DOWN
Movi e Mode
2/3
UP MENU
G-sensor Sensibilidad
SOS en
Movi e Off Time
Motion event REC
Soun d Recor d
OK MOD E DOWN
80
1min
5sec
On
Page 85

X. Monitoreo de estacionamiento
Ingrese a los ajustes generales para activar la función de monitoreo de estacionamiento, la
cual posee tres niveles (alto, medio y bajo). Se sugiere medio, cuando la supervisión de
estacionamiento de encender. Al estar en funcionamiento el monitoreo de estacionamiento,
el DVR indicará ''P'' en la parte superior izquierda.
A. Cuando se apague el motor del coche, el DVR se apagará automáticamente también, pero
cuando éste detecte vibraciones, se encenderá automáticamente y grabará durante 10
segundos para luego volver a apagarse. Si otras funciones están trabajando al mismo tiempo,
el seguimiento de estacionamiento es la máxima prioridad.
B.Cuando el monitoreo de estacionamiento encender mientras se conduce, el DVR se
encenderá automáticamente una vez que detecta la vibración y el registro circlely con el
primer archivo bloqueado.
Este archivo se guardará hasta que el usuario lo borre desde la tarjeta SD.
Vaya a los ajustes generales para desactivar el monitoreo de estacionamiento; aparecerá la
indicación ''P''.
Monitoreo de estacionamiento en
Gene ral Set tings
Prot ect Lev el
Parking Monitoring
4/6
Moti on Dete ction
UP MENU
XI.Rastreo mediante GPS
Este equipo DVR posee un módulo GPS integrado que puede registrar información de
conducción de gran importancia, como la ruta, longitud y latitud, así como también la
velocidad en tiempo real.
Cuando el DVR está encendido, calculará la posición automáticamente. Hay un icono de
estado GPS en la parte superior izquierda. Cuando se vuelve de color verde, el GPS realiza un
posicionamiento exitoso; cuando se vuelve de color rojo, indica que aún está intentando
encontrar su posición. Consulte el estado GPS en los ajustes generales para ver información
GPS detallada.
Seleccione la zona horaria correcta antes de utilizar esta función. Ingrese a los ajustes
generales para realizar la configuración. Tras realizar correctamente el posicionamiento por
GPS, la hora del satélite se sincronizará y aparecerá en la pantalla.
Nota: Realice el posicionamiento en exteriores. Cuesta mucho realizar el posicionamiento
mediante GPS en interiores, ya que la señal es débil. La ruta de conducción puede revisarse
con el reproductor de GPS exclusivo. Consulte '’Parte 7 Instrucciones BP GPS VP 3.0''.
High
Midd le
Off
OK MOD E DOWN
P
BP 3.0 FH D GPS 0 KM/ H ACD 1010
2015 /09/0 8 15:12 :45 0:0 1:44
UP MENU
REC
EV:0. 00
OK MOD E DOWN
81
Page 86

GPS Icono Estado
REC
EV:0. 00
Speed Unit
BP 3.0 FH D GPS 0 KM/ H ACD 1010
2015 /09/0 8 15:12 :45 0:0 1:44
UP MENU
GPS St atus
02 0 5 06 09 12 20 2 0 00 00 00 00 00
UP MENU
XII.ID del conductor
En modo espera, presione brevemente la tecla MENU para ingresar a los ajustes y luego
presione la tecla MODE para ingresar a los ajustes generales. Seleccione ''Ajustes de ID del
conductor'' y presione la tecla OK para ingresar los números. Hay un total de 9 caracteres
disponibles; presione la tecla UP/DOWN para seleccionar entre 0-9, A-Z, - y espacio. Tras
confirmar, presione la tecla OK para ir al siguiente caracter o para volver a los ajustes
generales.
OK MOD E DOWN
LAT : N 22 36' 3 5"
LON: E 113 5 1' 7"
USE: 4
09 0 0 00 00 00 0043 3 0 26 26 26 00
OK MOD E DOWN
Gene ral Set tings
Driv er ID Set tings
Driv er ID Set tings
2/6
UP MENU
Date F ormat
Lang uage
YYYY M M DD
Engl ish
OK MOD E DOWN
A C D 1 0 1 0 .
OK
UP MENU
OK MOD E DOWN
82
Page 87

XIII.Detección de movimiento
En modo espera, presione la tecla MENU para ingresar a los ajustes del modo película y
seleccione ''Grabación de evento de movimiento'' para seleccionar el tiempo de grabación
de cada clip de vídeo en la detección de movimiento.
Tras confirmar, presione la tecla OK para salir de ''Grabación de evento de movimiento'' y
presione la tecla MODE para entrar a los ajustes generales. Seleccione ''Detección de
movimiento'' y presione OK para seleccionar la sensibilidad. Hay 3 niveles de sensibilidad:
alta, media y baja. Se sugiere Media, cuando la detección de movimiento de encender.
Presione la tecla OK para confirmar y luego presione la tecla MENU para salir. El DVR
comienza una cuenta regresiva automáticamente de 9 segundos para activar la detección
de movimiento. En caso de detectar movimiento, el DVR grabará automáticamente
durante el tiempo de grabación preestablecido. En modo de detección de movimiento,
presione cualquier tecla para volver al modo de espera. Presione la tecla MODE 4 veces
para volver nuevamente al modo de detección de movimiento.
Para apagar la detección de movimiento, entre a los ajustes generales.
Movi e Mode
Movi e Off Time
Motion Event REC
2/3
Soun d Recor d
UP MENU
P
BP 3.0 FH D GPS 0 KM/ H ACD 1010
2015 /09/0 8 15:12 :45 0:0 1:44
UP MENU
OK MOD E DOWN
STBY
OK MOD E DOWN
5sec
1min
Gene ral Set tings
Prot ect Lev el
Parking Monitoring
4/6
On
EV:0. 00
Moti on Dete ction
UP MENU
Icono de detección de movimiento
Midd le
Off
Midd le
OK MOD E DOWN
83
Page 88

XIV.Gestión de fotos y vídeos
Entre a los ajustes generales para seleccionar la Función USB antes de conectarse al
ordenador mediante el cable USB incluido en el empaque. Hay dos opciones: MSDC y PC
Cam.
1) MSDC es para respaldar y eliminar vídeos o fotos.
2) PC Cam es para videollamadas.
USB Fu nctio n
PC Cam
MSDC
USB Fu nctio n
UP MENU
OK MOD E DOWN
84
Page 89

6. Tabla de configuración del sistema
Ajuste
Menú
Modo
Modo
película
Captura
estática
Reprodu
cción
Herramienta
de medios
General
Ajustes
Categoría
Resolución
Calidad de la
película
Tiempo del clip
de vídeo
Tiempo del desacti
vación de la película
Grabación de evento
de movimiento
Grabación con
sonido
Exposición
Tamaño de la
imagen estática
Calidad estática
Exposición
Balance de
blancos
Sensibilidad ISO
Color
Volumen
Borrar
Proteger
Formatear tarjeta
SD
INFO de la tarjeta
SD
Bip
Apagado
Ajustes del reloj
Ajustes de ID del
conductor
Formato de la
fecha
Sub categoría
1920X1080 30fps
1280x720 30fps
1280x720 60fps
640x480 30fps
Súper fino/fino
Desact./1min/3min/5min
0min/5seg/30seg/1min/3min
5seg/10seg/30seg/1min
Activado/desactivado
-2~+2
12M/8M/5M/3M/2M/1.2M/VGA
Súper fino/fino
-2~+2
Auto/Luz de día/Nublado/
Fluorescente/ Fluorescente.1/
Fluorescente.2/Incandescente
Auto/ISO100/ISO200/ISO400
Natural/Vívido/Pálido
1~10
Borrar uno/borrar todo
Proteger uno/Proteger todo/
Desproteger uno/Desproteger todo
SÍ/NO
Hora/fotografía dejada
Activado/desactivado
Nunca/1min/5min
AAAA MM DD HH MM SS
0~9/A~Z/'.'/espacio
Ninguno/AAAA MM DD/
MM DD AAAA/DD MM AAAA
Consideración
Predeterminado:
1920X1080 30fps
Predeterminado:
Súper fino
Predeterminado:
1 min
Predeterminado:
5seg
Predeterminado:
1 min
Predeterminado:
Activado
Predeterminado:
0
Predeterminado:
12M
Predeterminado:
Súper fino
Predeterminado:
0
Predeterminado:
Auto
Predeterminado:
Auto
Predeterminado:
Natural
Predeterminado:
5
Predeterminado:
Nunca
Predeterminado:
DD MM AAAA
85
Page 90

English/Français/Deutsch/Italiano/
Polski/Português/Español/
Nederlands/Suomi
50 HZ/60 HZ
MSDC/PC Cam
Desact./1min/3min
Desactivado/Alto/Medio/Bajo
Desactivado/Alto/Medio/Bajo
Desact./Bajo/Medio/Alto
Información de posicionamiento
mediante GPS
KM/H MPH
Activado/desactivado
GMT-12:00/GMT-11:00/GMT-10:00/
GMT-09:00/GMT-08:00/GMT-07:00/
GMT-06:00/GMT-05:00/GMT-04:00/
GMT-03:30/GMT-03:00/GMT-02:00/
GMT-01:00/GMT/GMT+01:00/
GMT+02:00/GMT+03:00/GMT+03:30/
GMT+04:00/GMT+04:30/GMT+05:00/
GMT+05:30/GMT+05:45/GMT+06:00/
GMT+06:30/GMT+07:00/GMT+08:00/
GMT+09:00/GMT+09:30/GMT+10:00/
GMT+11:00/GMT+12:00/GMT+13:00
SÍ/NO
Versión actual del software
Ajuste
Menú
General
Ajustes
Idioma
Frecuencia
Función USB
Ahorro de energía
de LCD
Nivel de
protección
Monitoreo de e
stacionamiento
Detección de
movimiento
Estado del GPS
Unidad de
velocidad
Horario de verano
Selección de la
zona horaria
Restablecer
configuración
Versión de FW
7. Instrucciones BP GPS VP 3.0
I. Instalación
① Instalar reproductor GPS - "BP GPS VP 3.0" en MAC OS
Haga doble clic en ''BP GPS VP 3.0.zip' para instalar automáticamente.
② Instalar reproductor GPS - "BP GPS VP 3.0" en WINDOWS OS
Copiar 'BP GPS VP 3.0.zip' en el escritorio y descomprimir en 'BP GPS VP 3.0'.
II. Cómo iniciar
① En Mac OS, haga doble clic en "BP GPS VP 3.0" para iniciar.
② En WINDOWS OS, haga doble clic en 'BP GPS VP 3.0.exe' para iniciar.
III.Definición de interfaz de usuario
Aquí está la interfaz de usuario de la versión de WINDOWS de BP GPS VP 3.0. La versión de
MAC es casi igual.
86
Predeterminado:
English
Predeterminado:
MSDC
Predeterminado:
desact.
Predeterminado:
Medio
Predeterminado:
Apagado
Predeterminado:
Apagado
Predeterminado:
desact
Page 91

1
2
3
4
5
23
22
Plane Map
3D Map
Satellite Map
21
20
19
6 7 8 9 10 11
① Velocidad de conducción: muestra la velocidad de conducción en tiempo real; haga doble clic
para cambiar KM/H y MPH
② Ventana de reproducción de vídeo: haga doble clic en cualquier lugar de esta ventana para
ver en pantalla completa; haga doble clic de nuevo, se volverá al modo actual
③ Barra de desplazamiento: muestra el punto actual del vídeo; arrástrelo a avanzar o retroceder
④ Información en tiempo real del G-sensor
⑤ Grupo de vídeo: los vídeos tomados en secuencia serán un grupo
⑥ Seleccione vídeo para reproducir
⑦ Captura de imagen: capturar el punto actual del vídeo
⑧ Guardar en: seleccione un vídeo de la Lista de Vídeos para guardarlo en una carpeta en el PC
⑨ Eliminar: seleccione un vídeo de la Lista de Vídeos para eliminar
⑩ Ajustes: seleccione un mapa y el idioma
1
⑩ Retroceso rápido: 0.9/0.8/0.7/0.6/0.5/0.4/0.3 veces
2
⑩ Detener
3
⑩ Reproducir / Pausa
4
⑩ Avance rápido: 1.2/1.4/1.6/1.8/2.0/2.4/2.8/3.2/3.6/4.0 veces
5
⑩ Volumen
6
⑩ Reproducción automática: haga clic para reproducir el siguiente vídeo automáticamente
después de finalizar; haga clic de nuevo para apagarlo
7
⑩ Guarde en formato KML: seleccione un vídeo de la Lista de Vídeos para guardarlo en formato
KML
8
⑩ Desbloquear vídeo: seleccione un vídeo bloqueado de la Lista de Vídeos para desbloquearlo
9
⑩ Vídeos: mostrar tamaño, longitud, etc. de vídeo; haga doble clic en el vídeo para reproducir
20
⑩ Ventana de mapa: muestra la pista de movimiento en tiempo real del vehículo con Internet
21
⑩ Tipo de mapa: mapa de plano/mapa de satélite/mapa 3D
22
⑩ Barra de desplazamiento de mapa: arrastre para acercar y alejar
23
⑩ Navegación de dirección
Nota: todas las ventanas se pueden arrastrar para ajustar
12 13 14 15
16 17 18
87
Page 92

8. Especificaciones del producto
La especificación puede cambiar debido a actualizaciones sin previo aviso. Tome los objetos
como estándares.
Tamaño de la pantalla LCD
Sensor CMOS
Ángulo de visión
Resolución de vídeo
Resolución de la imagen
Iluminación mínima
Formato de vídeo
Formato de la imagen
Tarjeta de memoria
Capacidad de la tar
jeta de memoria
Zoom digital
Frecuencia
Salida
Puerto de alimentación
Capacidad de la batería
Micrófono/altavoz
Grabación continua
LCD apagado
Monitoreo de
estacionamiento
Sensor G y SOS
Detección de movimiento
Monitoreo de
estacionamiento
Rastreo mediante GPS
ID del conductor
Idioma
DVR N.W.
Tamaño del equipo DVR
88
Pantalla TFT HD de 2,7” (16:9)
OV2710
Ángulo de visión diagonal ultra ancho de 140°
1920X1080 30fps/1280x720 30fps/1280x720 60fps/640x480 30fps
12M/8M/5M/3M/2M/1.2M/VGA
1 LUX
AVI/H.264
JPG
Tarjeta Micro SD
Máx. 64 GB
X4
50 HZ/60 HZ
HDMI
USB 5 V 1000 mA
600 mAH
Integrado
Desact./1min/3min/5min
Apoyo
Apoyo
Apoyo
Apoyo
Apoyo
Apoyo
Apoyo
English/Français/Deutsch/Italiano/Polski/Português/Español/
Nederlands/Suomi
105 g
81,4(largo)X64,7(ancho)X41,0(alto) mm
Page 93

9. Instrucción de cableado
10 Accesorios.
Los siguientes accesorios son solo para su referencia. Tome los objetos como estándar.
Derechos reservados para cambiar el diseño y especificaciones sin previo aviso.
1
4
m
0
°
m
W
0
.
i
d
3
e
=
f
A
;
n
2
.
g
2
l
/
e
F
GPS Reproductor de DVD
89
Page 94

90
Page 95

Manual do Utilizador
91
Page 96

Antes de u tiliz ar o prod uto, lei a atent amente est as inst ruçõe s.
O man ual des tina- se a orie ntar a su a utili zação d este produ to espe cífico.
Atenção:
1. Deve cumprir rigorosamente as leis nacional aplicáveis. Este produto não pode ser utilizado
para fins ilícitos; caso contrário, assuma pessoalmente a responsabilidade.
2. Insira o cartão micro SD na direção correta para evitar danificar o cartão ou o DVR. Se o DVR
mostrar 'Please Insert SD Card Again' (Inserir o cartão SD novamente), entre no menu de
configuração e formate o cartão micro SD. Se acontecer o mesmo, use outro cartão micro SD.
Nota: Formatar o cartão micro SD irá apagar todos os ficheiros. Faça um backup (cópia de
segurança) dos ficheiros importantes antes de o formatar.
3. Recomenda-se a utilização de um cartão micro SD de CLASSE 6 ou superior. Devido a que
os cartões micro SD de 64GB não têm um standard unificado no mercado, nem todos os
cartões micro SD de 64GB são compatíveis com este DVR. Deve testá-lo no DVR antes da
compra.
4. Sugerimos que faça um backup dos ficheiros num cartão micro SD uma vez por semana.
Este produto não é um dispositivo de armazenamento exclusivo, por isso deve fazer o
backup dos ficheiros importantes em tempo útil para evitar o desaparecimento de ficheiros.
5. Verifique o suporte com cuidado após a instalação para evitar danos.
6. O tempo de duração da bateria embutida vai diminuir com aumento do tempo de utilização.
Se o DVR não for usado durante um longo período de tempo, carregue-o a cada dois meses
para evitar o excesso de descarga que encurta a vida útil da bateria.
7. Não levar o produto para ambientes húmidos. Não é à prova de água.
8. Não tirar fotos ou filmar diretamente para o sol.
9. Não use este produto em ambientes com poeira excessiva para que as lentes e outros
componentes não sejam contaminados, o que iria afetar a qualidade do vídeo. Mantenha
a lente limpa com um pano macio ou uma esponja exclusivos.
10. Este produto pertence aos produtos eletrónicos de precisão que não suportam pancadas
fortes e não deve ser usado em ambientes de trabalho magnético e eletrónico elevado.
11. Temperatura de trabalho para este dispositivo é de -10 ℃ -50 ℃ e temperatura de
armazenamento é de -20 ℃ -70 ℃. a exposição contínua à luz solar direta durante
um longo período de tempo, pode causar uma avaria no dispositivo, mudança de
cor, habitação e distorção da imagem, especialmente em veículos fechados onde a
temperatura da cabina exceder 70 ℃.
92
Page 97

1. Estrutura
2
1
13
12
3
4
5
1. Furo do Suporte
2. Porta USB
3. RESET
4. Microfone
Ranhura do Cartão
5.
Micro SD
6. Tecla UP (para cima)
11
14
15
UP MEN U
OK MODE DOWN
6 7 8 9 10
1
4
m
0
°
m
W
0
.
i
d
3
e
=
f
A
;
n
2
.
g
2
l
/
e
F
16
17
7. Tecla de MENU
8. Tecla OK
9. Tecla MODE (MODO)
Tecla DOWN
10.
(para baixo)
11.LCD
Luz indicadora
13.
de energia
Tecla ON/OFF
14.
(ligado/desligado)
15.Saída HDMI
16.Lente
17.Altifalante
12.Luz Indicadora de Funcionamento
93
Page 98

2. Funcionalidades
1. Suporta múltiplas resoluções de vídeo, como 1080p, 720p etc., com vídeo e qualidade
da imagem superior;
2. Suporta 60fps para gravação de alta velocidade;
3. Módulo de lente CMOS de alta definição com amplo ângulo de visão;
4. Microfone/altifalante embutidos;
5. Com tecla de atalho de Gravação Com Som/Mute;
6. Com tecla de atalho para LCD OFF;
7. Suporta cartão micro SD de alta capacidade;
8. Suporta gravação em loop seamless e como gravação durante o carregamento;
9. Grava automaticamente um vídeo quando o motor do carro é ligado e quando é desligado;
10. Suporta deteção de movimento;
11. Suporta SOS e G-Sensor para evitar que os ficheiros importantes sejam substituídos;
12. Suporta saída HDMI;
13. Suporta a função de monitorização de estacionamento;
14. Suporta a função de GPS tracking;
15. Suporta a ID do condutor;
16. Suporta múltiplos idiomas.
3. De finiç ão e Função das Teclas
Imagem
UP
MENU
OK
MODE
DOWN
Função
Definição
Pressão longa para ligar/desligar.
ON/OFF
Em modo de Filme ou standby, faça uma pressão curta na tecla UP para ligar/desligar a
gravação de voz; Em modo de Still Capture, faça uma pressão curta na tecla UP para
aumentar o zoom; Em modo de configuração e de pré-visualização, faça uma pressão
UP
curta na tecla UP para selecionar; Em reprodução de vídeo ou em estado de pausa, faça
uma pressão curta na tecla UP para retroceder.
Em modo de espera, faça uma pressão curta na tecla MENU para entrar no modo de
configuração e pressione novamente para sair quando a configuração estiver
MENU
concluída; Na gravação, faça uma pressão cur ta na tecla MENU para ativar a função de
SOS, e pressione novamente para a desativar.
No modo Filme (Movie), faça uma pressão curta na tecla OK para pausar ou gravar;
No modo de Still Capture, faça uma pressão curta na tecla OK para tirar uma foto;
OK
No modo de Reprodução, faça uma pressão curta na tecla OK para reproduzir vídeo/
pausa; No modo de configuração, faça uma pressão curta na tecla OK para confirmar.
Em modo de espera, faça uma pressão curta na tecla MODE para alternar os modos de
Filme/Still Capture/Reprodução; No modo de configuração, faça uma pressão curta na
MODE
tecla MODE para mudar para um modo de menu diferente; No modo de reprodução,
faça uma pressão curta na tecla MODE para voltar ao modo de pré-visualização.
No modo Filme, faça uma pressão curta na tecla DOWN para ligar/desligar o LCD OFF;
No modo Still Capture, faça uma pressão curta na tecla DOWN para diminuir o zoom;
No modo de configuração e modo de pré-visualização, faça uma pressão curta na
DOWN
tecla DOWN para selecionar; Em reprodução de vídeo ou no estado de pausa, faça
uma pressão curta na tecla DOWN para avançar rapidamente.
RESET
Usar quando o software do DVR não funcionar.
94
Page 99

4. De finiç ão da Luz indicadora
Luz indicadora
Vermelho
Definição
Ligada e fixa significa que o DVR está a carregar; Após a carga completa, a luz
vermelha é desligada.
Ligada fixa significa que o DVR está em modo de standy; intermitente significa
Verde
que o DVR está a gravar.
5. Função
I.ON/OFF
(1) Ligar
A. No estado desligado, faça uma pressão longa na tecla ON/OFF durante 3 segundos para
ligar e começar a gravar automaticamente com a luz verde intermitente.
B. O DVR está a ligar-se à carga do carro para iniciar a gravação.
Nota: Se aparecer uma janela pop-up a mostrar ‘o cartão SD não está inserido', insira o cartão
micro SD antes de usar. Quando o cartão micro SD é inserido
no estado ligado, o DVR irá desligar-se automaticamente.
(2)Desligar
A. Em estado de funcionamento, pressione e mantenha a tecla ON/OFF durante 3 segundos
para desligar.
B. Em estado de funcionamento, o DVR irá automaticamente salvar o ficheiro atual e desligarse automaticamente quando desligado do carregador do carro.
C. No estado de bateria fraca, o DVR irá automaticamente salvar o ficheiro atual e desligarse automaticamente.
II.Carregamento da Bateria
(1)Duas formas de carregar
A.com cabo USB B.com o carregador do carro (sugerido)
(2) Defin ição do e stado d a bater ia
Cheia
Fraca
Meia
Vazia
III .Inse rção do c artão M ic ro SD.
Insira o cartão micro SD diretamente na ranhura conforme indicado abaixo até ouvir um
"clique".
95
Page 100

Eje tar o ca rtão M icro SD : Prim eiro em purre o cartã o micr o SD para a
fren te e, em segui da, ret ire- o (deve f azê-l o com o D VR desl igado )
IV.Modo de Filme (Movie Mode)
Ligue o DVR para entrar diretamente no modo de filme com a luz verde intermitente. Faça
uma pressão curta na tecla OK para salvar o ficheiro atual e parar a gravação. O DVR entra
em modo de standby com o indicador luminoso verde ligado fixo. Em modo de standby,
pressione rapidamente a tecla OK para reiniciar a gravação.
Resolução& Quadro
Gravação
REC
EV:0. 00
Modo Filme
Micro SD Card no
Estado da bateria
Exposição
Qualidade do filme
BP 3.0 FH D GPS 0 KM/ H ACD 1010
Data e Hora
V.Modo de Still Capture (imagem fixa)
Em modo de standby, faça uma pressão curta na tecla MODE para entrar em modo de Still
Capture e pressione a tecla OK para tirar fotos.
Em modo de Still Capture, faça uma pressão curta na tecla UP ou DOWN para aumentar ou
diminuir o zoom (Max. X 4).
Tamanho da imagem
fixa
Zoom digital
Data e Hora
2015 /09/0 8 15:12 :45 0:0 1:44
UP MENU
T
W
1X
2015 /09/0 8 15:12 :45 181 9
UP MENU
OK MOD E DOWN
OK MOD E DOWN
EV:0. 00
ACD 101 0
Velocidade
ID do condutor
Hora de filme
Modo de Still Capture
(imagem fixa)
Micro SD Card no
Estado da bateria
Exposição
ID do condutor
Photo Left
96
 Loading...