

Page 1
VELOCITY POWER
BMW PLUG & PLAY
SPEAKER UPGRADE
BM 1402 CM4 BM 1402 CU4
Operating and Installation Instructions
Page 2
INTRODUCTION SPECIFICATION
Proper system planning is vital in order to maximize the
device’s performance and road safety. Plan your instal
lation carefully to avoid compromising performance
reliability of the system. Consult an authorized Blaupunkt
delaler for installation or reparation. Read the manual
carefullt before operating the device for the rst time.
Safety Notes
Ensure to folow below safety notes during installation
and wiring connection: -
•
Disconnect the negative terminal of the battery. Refer
to the safety notes of the vehcle manufacturer.
•
Ensure positions of the holes are nowhere near the ve
hicle component to avoid any damage during drilling.
Ensure cross section of the cable is no less than
•
2.5mm if the positive and negative cables are too
long.
Incorrect installation may result in malfunction of the
•
device or the car sound system.
Installation and Connection Instructions
Select a dry and well-ventilated location to install
•
the device.
The device must not be installed in overly exposed
•
location such on therear shelf, rear seat etc.
The installation location must be suitable for screw
•
holes and have stable ground support.
Disclaimer
In no event shall Blaupunkt be liable for any direct,
indirect, punitive, incidental, special consequential
damages to property or life and whatsoever arising out
of or connected with the use or misuse of our products.
USA & CANADA: This product is not intended for sale in
the United States and Canada. If purchased in the U.S. or
Canada, this product is purchased on as-is basis. No
warranty, whether expressed or implied is provided in
the U.S. or Canada.
-
Voltage Supply
Use the supplied power extension cable to connect to
•
the positive battery terminal.
Firmly and carefully connect the ground lead to a bare
•
metal point on the vehicle chassis.
The control of the device should be a two-channel
•
control, either via the preamplier output of the car
sound system.
A control solely via the right or left channel is also
•
possible since the low-frequency portion of the music
-
is generally identical on both channels.
Recycling and Disposal
Do not dispose of your old unit in the
household trash!
Use the return and collection systems
available to dispose of the old device.
This manual may be updated from time to time
without any notice.
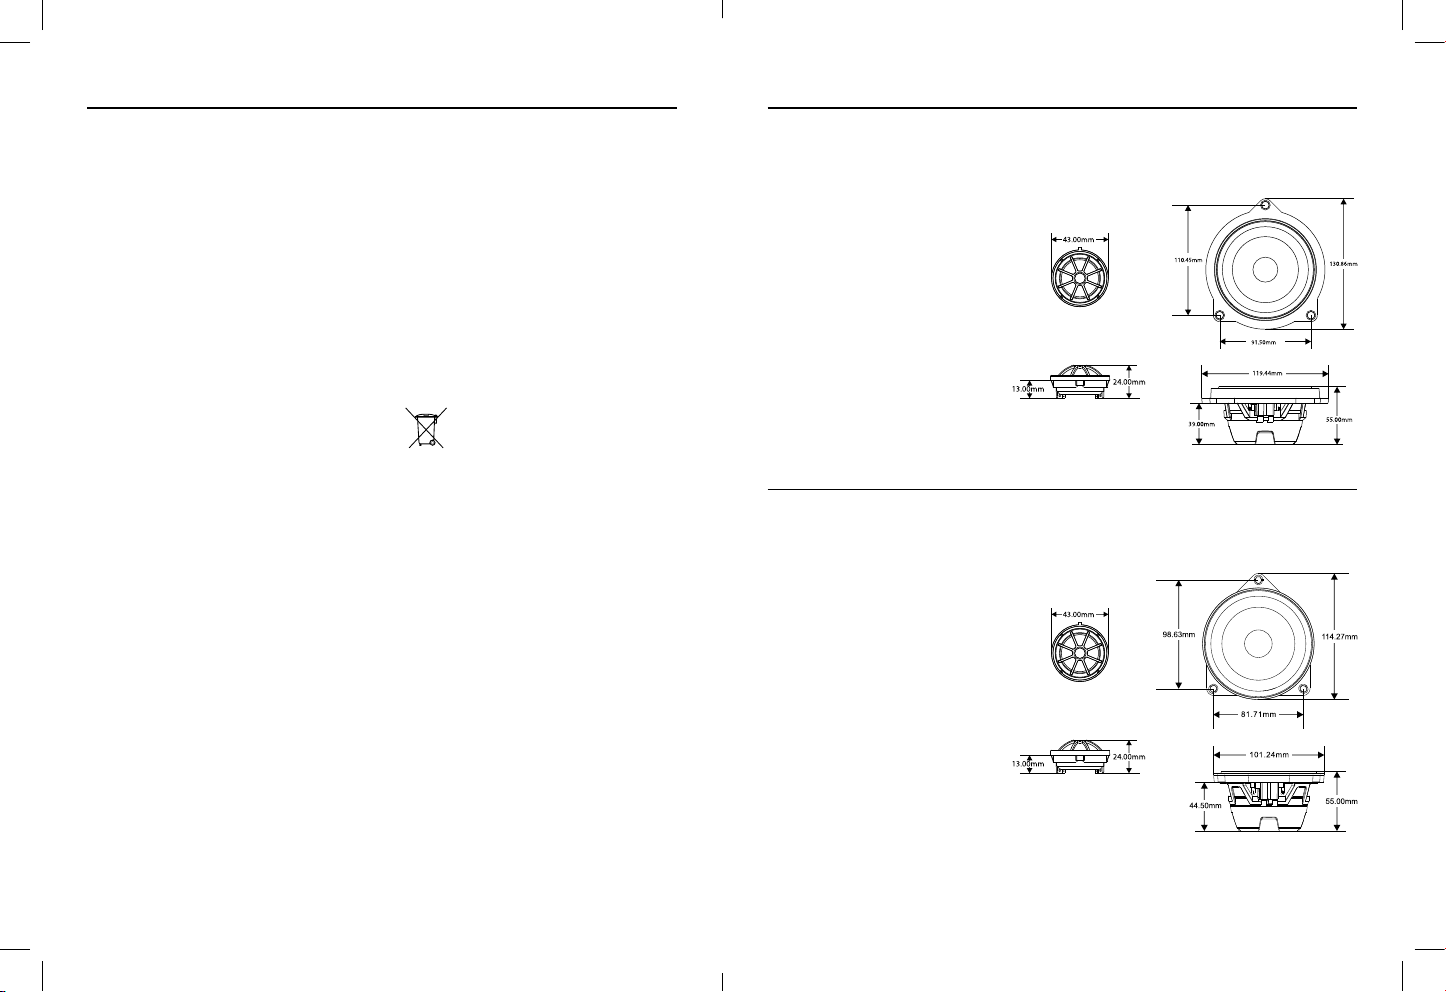
BM 1420 CM4
Pair of 4” BMW direct t plug & play subwoofer to upgrade OE speaker installed for selected BMW models with paper
cone material including installation instruction.
•
Normal output power (RMS) : 30W
•
Max. output power : 60W
•
Sensitivity : 86dB
•
Impedance : 4ohms
•
Frequency response : 80Hz – 20,000Hz
•
Surround : Rubber
•
Magnet type : Neodymium magnet
•
Mounting depth : 39mm
•
Diameter hole : 129.5mm
•
Overall height : 55mm
Tweeter
Mid-range
BM 1420 CU4
Pair of 4” BMW direct t plug & play subwoofer to upgrade OE speaker installed for selected BMW models with paper
cone material including installation instruction.
•
Normal output power (RMS) : 30W
•
Max. output power : 60W
•
Sensitivity : 86dB
•
Impedance : 4ohms
•
Frequency response : 80Hz – 20,000Hz
•
Surround : Rubber
•
Magnet type : Neodymium magnet
•
Mounting depth : 44.5mm
•
Diameter hole : 114.3mm
•
Overall height : 55mm
Tweeter
Mid-range
1
2
Page 3

INSTALLATION INSTALLATION
Reference vehicle is 2015 BMW 5-series. (For illustration purpose only)
Mid-range speakers
1. Carefully remove the trim piece with the help of door
trim removal to prevent damage
2. Lift up the trim piece before slowly slide outward
to release the trim from the door panel as seen in
photograph
4. Note that the door panel is xed by numerous plastic
clips, carefully pull the door away and disconnect all
wiring doorlatch cables. Be very careful to avoid the
damage of the plastic clips during door panel removal
6. Remove all 3 screws that hold the mid-range speaker
7. Side by side comparison of OE speaker and Blaupunkt speaker
5. Remove front door card
3. Remove the door handle
8. Install Blaupunkt speaker using the original screws
3 4
Page 4

INSTALLATION
Tweeter
1. Carefully remove original tweeter housing. (Wind down window for easy installation)
2. Replace the tweeter and insert the foam to the triangle housing. (Door triangle housing has speaker grill and
holder for tweeter which is not included in the Blaupunkt speaker)
3. Finally, reconnect the wirings and door latch cables, ressemble the removed parts back on to the door and tighten
the door panel’s screw rmly
COMPATIBILITY LIST
BM 1402 CM4/ BM 1402 CU4 can be installed in the following list of car models :
BM 1402 CM4
Series
Model
1 series
E81(3-door)
E82 (Coupé)
E87 (5-door)
E88 (Cabriolet)
3 series
E90 (Limousine)
E91 (Touring)
E92 (Coupé)
E93 (Cabriolet)
BM 1402 CU4
Series
Model
1 series
E81(3-door)
E82 (Coupé)
E87 (5-door)
F20 (5-door)
F21 (3-door)
2 series
F22 (Coupé)
F87 (M2)
3 series
E90 (Limousine)
F34 (Gran Turismo)
F80 (M2)
4 series
F32 (Coupé)
F33 (Cabriolet)
F36 (Gran Coupé)
F82 (M4)
5 series
E60 (Limousine)
E61 (Touring)
F07 (Gran Turismo)
F11 (Touring)
G31 (Touring)
6 series
F06 (Gran Coupé)
F13 (Cabriolet)
Mounting Position
Front door
Front door
Front door
Front door/ Rear side panel
Front door
Front door/ Rear door
Front door/ Rear side panel
Front door/ Rear side panel
Mounting Position
Rear door
Rear door
Rear door
Rear deck
Rear deck
Rear deck
Rear deck
Rear deck
Rear deck
Rear deck
Rear deck
Rear deck
Rear deck
Rear deck
Front door/ Center/
Rear deck
Front door/ Center/
Rear roof
Front door/ Center/
Rear roof
Rear roof
Rear roof
Rear deck
Rear deck
Series
5 series
6 series
X1
Series
7 series
X1
X3
X5
X6
Z4
i8
Mini
Model
F10 (Limousine)
F11 (Touring)
E63 (Coupé)
E64 (Cabriolet)
F12 (Coupé)
F13 (Cabriolet)
E84 (SUV)
Model
E65 (Limousine)
E66 (Limousine L)
F01 (Limousine)
F02 (Limousine L)
G11 (Limousine)
G12 (Limousine L)
E84 (SUV)
E83 (SUV)
F25 (SUV)
E70 (SUV)
F15 (SUV)
F85 (SUV)
E71 (SUV)
F16 (SUV)
E89 (Roadster)
L15 (Roadster)
R60 (Countryman)
R61 (Paceman)
Mounting Position
Front door/ Rear door
Front door/ Rear door
Front door/ Rear side panel
Front door/ Rear side panel
Rear side panel
Rear side panel
Front door
Mounting Position
Front door/ Center
Front door/ Center
Front door/ Rear door/
Rear deck
Front door/ Rear door/
Rear deck
Rear deck
Rear deck
Rear deck
Front door/ Rear door
Rear roof
Front door/ Rear door
Rear roof
Rear roof
Front door/ Rear door
Rear roof
Front door/ Rear door
Rear side panel
Front door/ Rear door
Front door/ Rear door
65
Page 5

BM 1402 CM4
1 111 17 007 02 01
Designed and engineered by Blaupunkt Competence Centre
BM 1402 CU4
1 111 17 008 02 01
 Loading...