

Black Widow Eclipse MGP-1A Owner's Manual
e
C
Black Widow
Audio Designs
Eclipse Series
MGP-1A Modeling Guitar Preamp
Drive
Crunch
Rod
ModEuroRecto Hot
Bright
UK800 Mod
CitrusCali
Bright
Clean
Vintage
Vintage
A
US
UK
Class
InputMod
Eclipse Series
MGP-1A Modeling Guitar Preamp
Owner’s Manual
January 2015
Deep
Deep
Bright
Drive
Driv
Crunch
runch
Normal

Contents
Safety Instructions ii
Introduction iii
Getting Acquainted 1
Getting Started 2
Included Items 2
Quick Start 2
Power Section 3
Front Panel Controls 4
Rear Panel 7
The Clean Channel 9
The Models 9
US Vintage 9
UK Vintage 10
Class A 10
Contents
Tone Tips 11
The Clean Channel 12
The Models 12
Cali 12
UK800 13
Citrus 14
Tone Tips 15
The Drive Channel 16
The Models 16
Recto 16
Hot Rod 17
Euro 17
Tone Tips 18
Model Summary 19
MIDI 20
MIDI Mode 20
Assigning a Program 21
Changing the MIDI Channel 21
Omni Mode 22
MIDI Notes 22
Tubes 23
Warranty and Repair 24
Certificates of Compliance 25
MGP-1A Modeling Guitar Preamplifier Owner’s Manual
i
i

• Read these instructions.
• Keep these instructions.
• Heed all warnings.
Safety Instr
Safety Instructions
This symbol warns the user of dangerous voltages levels localized within the
enclosure.
• Follow all instructions.
• Do not use this apparatus near water.
• Clean only with dry cloth.
• Do not block any ventilation openings. Install in accordance with the manufacturer’s instructions.
• Do not install near any heat sources such as radiators, heat registers, stoves, or other apparatus (including ampliers) that produce heat.
• Do not defeat the safety purpose of the polarized or grounding-type plug. A polarized plug has two blades with one wider than the other.
A grounding type plug has two blades and a third grounding prong. The wide blade or the third prong are provided for your safety. If the
provided plug does not t into your outlet, consult an electrician for replacement of the obsolete outlet.
• Protect the power cord from being walked on or pinched particularly at plugs, convenience receptacles, and the point where they exit
from the apparatus.
• Only use attachments/accessories specied by the manufacturer.
• Unplug this apparatus during lightning storms or when unused for long periods of time.
• Refer all servicing to qualied service personnel. Servicing is required when the apparatus has been damaged in any way, such as
power-supply cord or plug is damaged, liquid has been spilled or objects have fallen into the apparatus, the apparatus has been exposed
to rain or moisture, does not operate normally, or has been dropped.
• To insure proper ventilation always make sure there is at minimum four inches (101.6mm) of space behind the rear of the apparatus. The
ventilation should not be impeded by covering the ventilation openings with items, such as newspapers, tablecloths, curtains, etc. Do not
impede ventilation by placing objects on top of the apparatus which extend past the rear edge of its cabinet.
This symbol advises the user to read all accompanying literature for safe
operation of the unit.
• No naked ame sources, such as lighted candles, should be placed on the apparatus.
• The apparatus shall not be exposed to dripping or splashing and no objects lled with liquids, such as vases, shall be placed on the
apparatus.
• WARNING: To prevent damage, re or shock hazard, do not expose this unit to rain or moisture.
• The AC plug is the mains disconnect. The plug should remain accessible after installation.
• WARNING: EU: permission from the Supply Authority is needed before connection.
• WARNING: Always make sure proper load is connected before operating the amplier. Failure to do so could pose a shock hazard and
may result in damage to the amplier.
• Do not expose amplier to direct sunlight or extremely high temperatures.
• Always insure the amplier is properly grounded. Always unplug AC power cord before changing fuse, tubes or removing chassis. Use
only same type and rating when replacing fuse.
• Avoid direct contact with heated tubes. Keep amplier away from children.
• To avoid damaging your speakers and other playback equipment, turn off the power of all related equipment before making the
connections.
• Do not use excessive force when handling buttons, switches and controls. Do not use solvents such as benzene or paint thinner to clean
the unit.
• Black Widow Audio Designs products are capable of producing very high sound pressure levels which may cause temporary or
permanent hearing damage. Use care when setting and adjusting volume levels during use.
MGP-1A Modeling Guitar Preamplifier Owner’s Manual
ii
ii

Introduction
Thank you for purchasing the MGP-1A Modeling Guitar Preamplifier! The MGP-1A is the world’s first
All-Tube Modeling Preamplifier offering an extensive collection of the most sought after preamplifiers
all in one unit.
Unlike digital devices which use digital signal processing to emulate what a given amplifier would
do to your guitar signal, our patent-pending VEnuM™ All-Tube Modeling Technology actually re-
configures the internal vacuum tube circuitry to give you authentic tube tone. There are no solid-state
or digital devices in the signal path to degrade the quality of sound.
VEnuM® All-Tube Modeling Technology changes the breakup characteristics, harmonic generation,
gain and filtering characteristics to ensure the tone is as close to the originals as possible. The only
thing we didn’t model was the noise, hiss, and hum.
The MGP-1A is a 3 channel preamplifier where each channel has 6 selectable Models that have been
chosen as history’s best representatives of those channels. Each model has its own unique circuitry
and its own tone stack assuring authentic tone.
In addition, each model has a number of unique selectable features which provide further control
over the tone of that model. All together, this combines for a total of 264 all-tube, all-analog
preamplifier circuits.
Introduction
Design Philosophy
The primary goal of the MGP-1A Modeling Guitar Preamplifier to combine the best qualities of digital amp
modeling and tube circuitry. Digital amp modeling gives you tons of tonal options in small packages, where tubes
give you great tone and feel.
We’ve taken a “product first, no-compromise” approach to the design of the MGP-1A resulting in a performance
not typical of traditional tube amplifiers. Every single detail has been well thought out.
Contrary to digital devices, the MGP-1A was designed from the ground up to be extremely effortless to use and
to look and feel like a tube preamp. Each knob and switch has a dedicated function (except some MIDI controls)
so it is easy to find your way around the unit.
Tube circuits often get knocked for excessive noise, hiss and buzz; however, much of this is due to economics
rather than the fault of the tubes themselves. We’ve designed as much noise out of the MGP-1A as possible. The
result is a cleaner, sweeter sound at every setting with far more note articulation than you are probably used to.
Additionally, we’ve taken many measures to extend tube life; you’ll notice the tubes in the MGP-1A will last longer
than in other tube devices. Vacuum tubes can be very reliable and long lasting devices. This doesn’t seem to be
the popular view these days, no doubt thanks (again) to budget tube designs.
We also wanted the MGP-1A to be extremely rugged and reliable, so many design aspects and component
choices were made with dependability in mind. However, should anything happen to your unit, rest assured our
goal is to have the best customer service in the business.
Finally, a device like this is designed to inspire you. Fantastic sound quality, ease of use, low noise, reliability
and a solid feel are all purposely designed to make your guitar playing experience an effortless one. We believe
effortlessly sounding your best makes you to play your best.
Whether it’s the studio or the stage, the MGP-1A Modeling Guitar Preamp will no doubt be a centerpiece of your
rig for years to come.
MGP-1A Modeling Guitar Preamplifier Owner’s Manual
iii
iii

Getting Acq
Before we explain the controls and what they do, there’s a couple of things you should know about
how the MGP-1A operates. Sure, it looks like a standard 3-channel guitar preamplifier, but there’s
much more going on behind the scenes to make All-Tube Preamplifier Modeling a reality.
Warm LED
The MGP-1A comes equipped with a Warm LED which notifies you when the tubes have had adequate time to
warm up and the unit can be switched out of Standby Mode.
Standby Mode
The Standby Mode of the MGP-1A is not like your average guitar amplifier’s Standby Mode. Like most
amplifiers, the tube’s high voltage is switched off but at the same time the tube heater voltage is reduced. This
not only conserves energy but is great for tube health (prevents cathode poisoning). The auxiliary power supplies
are also switched off so more energy is conserved, only the front panel power supply is running normally.
NOTE: Even though the tubes aren’t seeing high voltage, a portion of the high voltage supply remains active in
Standby Mode. It is not safe to open the unit when the unit is receiving power for ANY reason.
Auto-Save
Getting Acquainted
You’ll notice the MGP-1A automatically saves your last settings per Model. For instance, if you have a tone you
love on US Vintage, but want to check out UK Vintage, next time you return to US Vintage the feature settings
will all be how you left them. This is so you don’t have to remember where that really cool setting was, leaving you
free to explore the unit.
Similarly, the unit powers up to its last known state. This includes all Channel and Model settings. We’ve done
this to assure ease of use; even if the power goes out, you can start up right where you left off.
InPhase™ Phase Correction
Our InPhase™ Phase Correction circuitry eliminates one of the most common problems with tube amplifiers.
Every gain stage in a tube amplifier inverts the phase of the signal it is amplifying. If you have an odd number of
gain stages (usually in the mid-gain channels), the input signal will be out of phase with the output signal. This is
not normally a problem when playing by yourself, but is a huge deal when other instruments are added to the mix.
If two guitars are out of phase with each other, frequencies will cancel out and the result is both guitars will sound
weak. This is especially common with medium gain channels being mixed with either low or high gain channels.
Your MGP-1A always outputs the signal in phase with the input signal assuring phase issues are never a problem.
Output Levels
Each Model will have different output levels, so the output may jump, sometimes quite drastically, as you are
changing settings and Models. This is done for authenticity, as some Models may send higher levels to their
respective power amplifiers as part of their sound. However, the Volume controls of the MGP-1A are designed
to be extremely transparent, so don’t be afraid to use them.
Speaking of levels, its extremely important to set levels correctly in any system. Generally, the first device in the
signal chain should do as much of the amplifying as possible, so set the Volume controls of the MGP-1A as high
as you can while still respecting the receiving device. This maximizes your signal-to-noise ratio which is essential
to getting the most from any audio system.
MGP-1A Modeling Guitar Preamplifier Owner’s Manual
1
1

Getting Sta
Included Items
• MGP-1A Modeling Guitar Preamplifier
• MGP-1A Owner’s Manual
• Power Cord
• FS-3 Foot Switch
• 5-Pin MIDI Cable
Quick Start
1. Carefully unpack your unit. If there is any damage to the shipping packaging or box, please inspect the unit for
damage. Should you find anything, please contact us immediately!
2. Make sure the Voltage Selection Switch is set to the correct mains voltage in your area.
WARNING: Incorrect voltage settings will result in damage to the unit.
3. Carefully fit the unit in your rack and secure with 4 rack mounting screws. For optimum results with all rack mount
systems, invest in some rack isolation tabs. Installed correctly, these can make a huge difference in overall
system noise performance.
Getting Started
4. Hook up the FS-3 Foot Switch using the supplied 5-Pin MIDI cable from the foot switch to the FS-3 jack on the
rear of the unit. If you have a MIDI controller, please use the MIDI IN jack as the FS-3 jack does not receive MIDI
data.
5. Connect a 1/4” TS cable into the output jack, and connect the opposite end of this cable to one of the following:
•Apoweramplifier(forliveandstudiouse)
•Aspeakersimulator(fordirectrecording)
•Asoundcard/interfaceinput(fordirectrecordingwhenusedwithcabinetimpulses)
•Aneffectsprocessororanythingelsethatacceptsalinelevelsignal
6. Connect a guitar cable to one of the two input jacks. Needless to say, plug your guitar into the other end.
7. Connect the power cord to the AC input on the rear of the unit and to a mains outlet.
8. Turn the Power Switch on. The Black Widow Audio Designs logo will light up indicating the unit is powered on.
One minute after the unit is powered on, the front panel “Warm” LED will come on. This LED indicates the tubes
have warmed up and the unit is ready to play.
9. Flip the Standby Switch in the “off” position and enjoy the ride!
WARNING: With the power cord attached, mains voltage is present inside the unit. To change a tube or
an internal fuse, check TWICE to ensure the power cable is not attached AND the Black Widow Audio
Designs logo is not lit on the front panel. Wait an additional 10 minutes after you’ve verified the power
cord is detached before removing the top cover to allow any capacitors to fully discharge.
MGP-1A Modeling Guitar Preamplifier Owner’s Manual
2
2

Getting Sta
Black Widow
Audio Designs
Standby
Wa rm
MIDI
Learn
|
O
Getting Started
Bright
UK
US
Clean
Crunch
MGP-1A Modeling Guitar Preamp
Eclipse Series
Drive
Vintage
A
CitrusCa li
UK800 Mod
Rod
Class
Vintage
InputMod
Deep
Bright EQ
Deep
Bright
ModEuroRecto Hot
Normal Bass Mid
Crunch MidBass Treble Volume
Drive MidBass Treble Volume
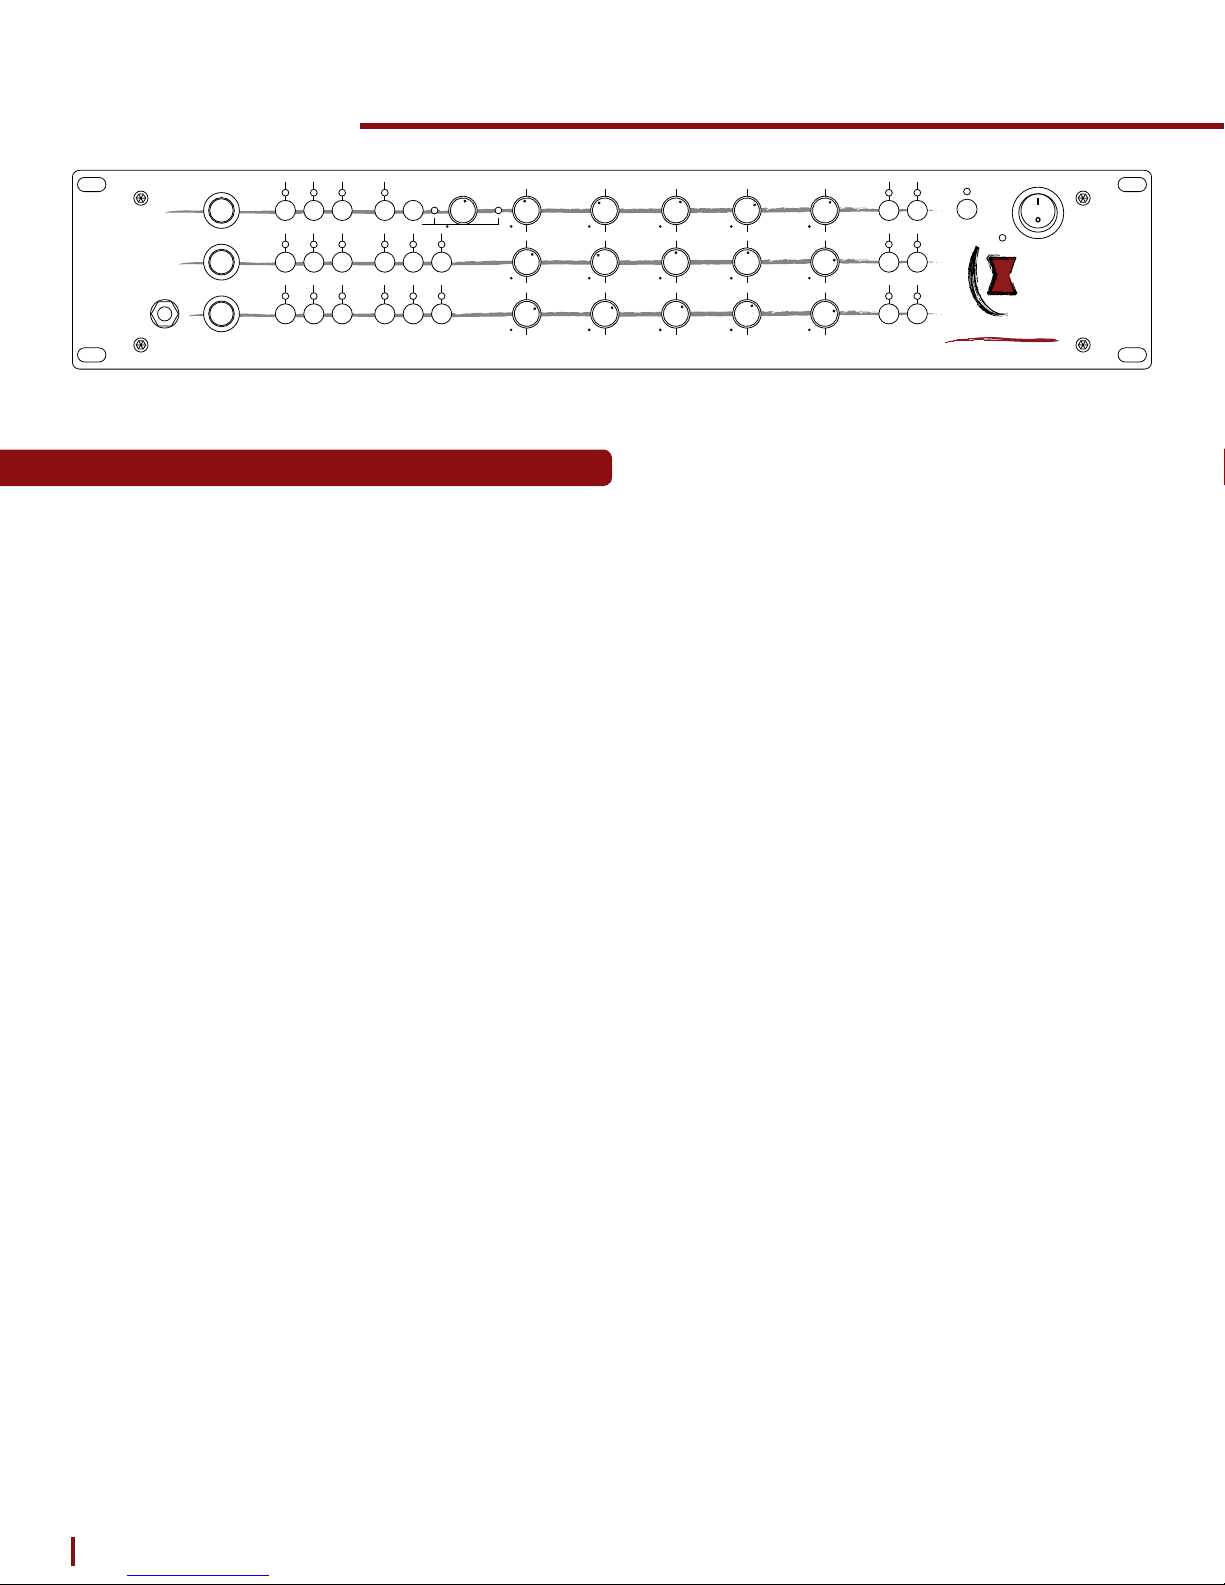
MGP-1A Front Panel
Power Section
Power Indicator
When the Power Switch (rear) is on, the Black Widow Audio
Designs hourglass logo will illuminate indicating power is applied to
the unit and it is ready for operation.
Standby Switch
Treble Volume
Standby
|
EQ
Alt
EQ
Learn
Alt
EQ
Alt
EQ
Black Widow
Audio Designs
MIDI
Shift
Shift
EQ
Shift
Warm
O
The Standby Switch has two purposes. One is to let the tubes heat
up before voltage is applied and the other is to conserve power
when not in use.
Standby disconnects the high voltage fed to the tubes, turns off the
auxiliary switching supply, and reduces the voltage supplied to the
heaters to extend their life.
If the MGP-1A will remain inactive for long periods of time, we
recommend turning the power off instead of using Standby.
Warm LED
The Warm LED alerts you that the MGP-1A’s preamp tubes have
had sufficient time to warm up for optimum use. Please wait until the
Warm LED is lit to take the unit out of standby.
MIDI Button and LED
When held for 2 seconds, the MIDI button is used to enter and exit the MGP-1A’s MIDI programming mode.
The MIDI LED will illuminate to provide visual indication that the unit is ready to be programmed. See the MIDI
section for an in-depth explanation.
MGP-1A Modeling Guitar Preamplifier Owner’s Manual
3
3
Getting Sta
Getting Started
Bright
UK
US
Clean
Crunch
MGP-1A Modeling Guitar Preamp
Eclipse Series
Drive
Vintage
A
CitrusCa li
UK800 Mod
Rod
Class
Vintage
InputMod
Deep
Bright EQ
Deep
Bright
ModEuroRecto Hot
Normal Bass Mid
Crunch MidBass Treble Volume
Drive MidBass Treble Volume
Treble Volume
EQ
Alt
EQ
Learn
Alt
EQ
Alt
EQ
Black Widow
Audio Designs
MIDI
Shift
Shift
EQ
Shift
Standby
Warm
MGP-1A Front Panel
Front Panel Controls
The MGP-1A’s channel controls are nearly identical, with the Clean Channel being the
exception. We will cover these controls and their function in this section so you know what
they do. This will come in handy later in the manual when we reference these controls and their
Model-specific functionality.
Front Input
The Front Input allows you to plug your guitar into the front panel. If a cable is inserted here, it will disable the
Rear Input. This is great for studio use as it allows players to easily plug into permanent rack fixtures.
|
O
Channel Switches
The Channel Switches are the 3 large push button switches labelled, Clean, Crunch and Drive. Use these
switches to select the channel you would like to activate. The switch will light up indicating which channel is
currently active. Channels can also be changed via the included FS-3 foot switch or with MIDI.
Model Switches
The Model Switches (US Vintage, UK Vintage, Cali, Euro, etc.) select which Model is active for each channel.
An LED above each switch will indicate which Model is currently active. When a new Model is selected, you will
notice that all or some of the other switch LEDs will change. This is because the MGP-1A stores the last state
each Model was in (Mod, EQ Shift, Alt. EQ, etc.) and recalls those settings.
NOTE: Settings on an inactive channel can be changed at any time. This may be useful in a live setting where
different songs use different Models and settings and need to be quickly changed.
Mod Switches
The Mod Switch activates the Mod (Short for “Modification”) feature. This is essentially a second bank of
Models, calling up a Model that is related to the base Model currently selected.
MGP-1A Modeling Guitar Preamplifier Owner’s Manual
4
4

Getting Sta
Front Panel Controls (continued)
Getting Started
Warm
Standby
|
O
Bright
UK
US
Clean
Crunch
MGP-1A Modeling Guitar Preamp
Eclipse Series
Drive
Vintage
A
CitrusCa li
UK800 Mod
Rod
Class
Vintage
InputMod
Deep
Bright EQ
Deep
Bright
ModEuroRecto Hot
Normal Bass Mid
Crunch MidBass Treble Volume
Drive MidBass Treble Volume
Treble Volume
EQ
Alt
EQ
Learn
Alt
EQ
Alt
EQ
Black Widow
Audio Designs
MIDI
Shift
Shift
EQ
Shift
MGP-1A Front Panel
Input Switch (Clean Channel Only)
The MGP-1A’s Clean Channel is unique in that it is a Dual-Input Topology like the classic amplifiers of yesteryear.
These amps had two input channels, usually one for guitar and one for bass, each with their own gain control.
The output of these controls was mixed together and they shared a common second stage and tone stack.
The Input Switch routes the guitar signal to the selected input channel, Bright, Normal, or Bridged. To change
channels on the originals, you would have to physically plug your guitar into the desired input jack. The Input
Switch does this for you and an LED will light up telling you which input, Bright or Normal, is active.
When both the Bright and Normal LEDs are lit, the unit is in Bridged mode. In Bridged mode, the inputs are
tied together and the input signal is sent to both the Bright and Normal channels simultaneously. This is the old
“jumpered input trick”, which gives a slight gain boost and allows you to change the character of the tone using
the Bright and Normal gain controls, kind of similar to an active EQ (albeit one with distortion!).
Bright and Normal Gain Controls
Bright and Normal control the gain for their respective Clean channel inputs. Like on the originals however, they
are interactive with each other and both remain “active” regardless of which input you are using. This is normal
and allows for some unique things:
• Use the inactive channel’s control as a tone control. For instance, with the Bright channel active, you can add
a little bottom to the tone by increasing the Normal control.
• This can also be used as a boost. To compensate for the extra bottom end, reduce the bass control slightly.
• Get the tone of single input amplifiers by setting the inactive control to minimum. Use the Bright Input for an
amp with a “Bright” switch engaged, Normal for an amp with the “Bright” switch off.
It goes without saying that in Bridged mode, both controls are fully active. You can use this not just for gain but
for changing the balance and character of the overall tone as well.
Crunch and Drive Gain Controls
Crunch and Drive are the gain controls for the Crunch and Drive channels, respectively. For the Crunch channel,
the Crunch knob will get you anything from clean to heavy distortion tones. The Drive control will take you from
overdrive and crunch tones all the way to white hot metal tones.
Bass Controls
Bass adjusts the low frequency level of the corresponding channel.
MGP-1A Modeling Guitar Preamplifier Owner’s Manual
5
5
 Loading...