

Page 1
1
Standard Features
The system has the following standard features:
• (2) 1-button remote controls
• Two Built-in relays for starter and/or fuel system
disable
• LED indicator
• Valet switch
• Passive or active arming
• Ignition trigger
Optional Features
The system has many optional features that may require
additional parts and/or labor.
• Remote keyless entry (Door lock/unlock)
• Optional third circuit defeat output
• Illuminated entry
• Horn honk
• Anti-carjacking
• Selectable parking light/horn output
Adding or Deleting Remote Controls
Follow the steps below to code a replacement transmitter into the system (maximum of 4). If there are
less than 4 transmitters, code the last transmitter
multiple times to fill all 4 transmitter slots and force
any lost or stolen transmitters out of the system.
To enter Code Learning Mode:
1. Turn ignition key on, off, on, off, and leave on
within 5 seconds.
• The LED will will flash 3 times.
2. Press and hold the valet switch for 2 seconds.
• The LED will will flash 5 times.
3. Release the valet switch.
4. Program all desired remotes by pressing the
button on each of the transmitters.
• The LED will will flash after the system has
learned each transmitter.
5. Turn off the ignition.
Passive Vehicle Immobilizer System
Owner / Installation Manual
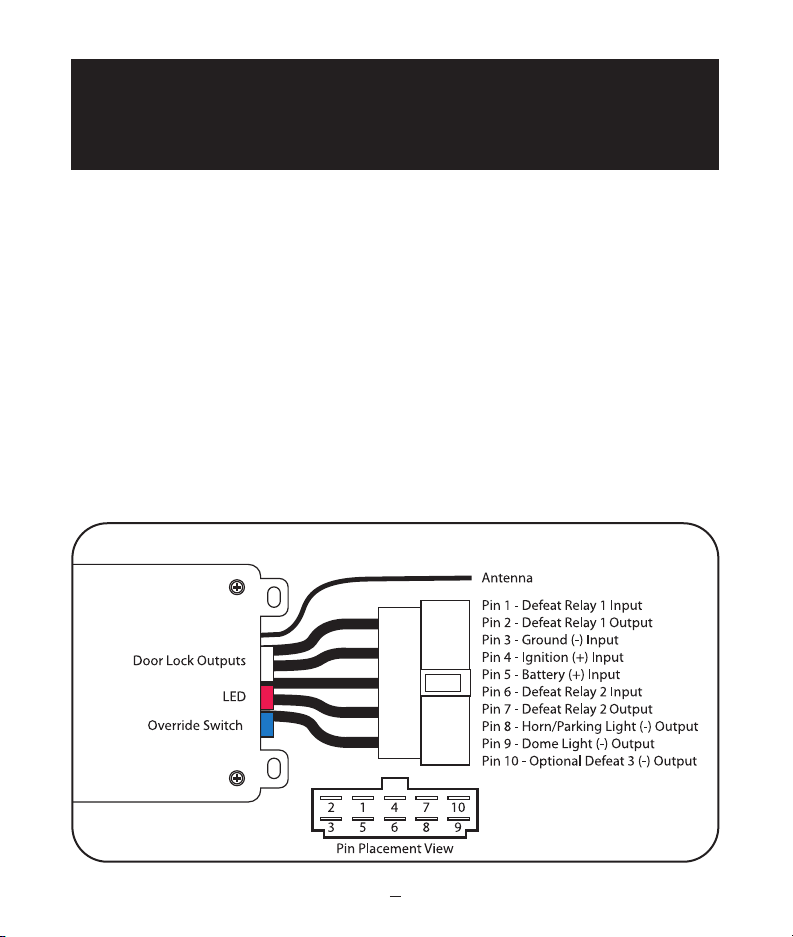
Wiring Diagram
Page 2

• Pin 1 - Defeat Relay 1 Input. Locate the vehicle
starter and verify correct operation of the circuit
using a multimeter. Cut this wire then verify that the
vehicle does not crank. Connect the key side of the
wire to Pin 1. Connect the opposite wire to Pin 2.
• Pin 2 - Defeat Relay 1 Output.See Pin 1 description.
• Pin 3 - Ground input (-). Connect to a solid chassis ground that is clean and free of paint or dirt.
• Pin 4 - Ignition input (+). Connect to the main ignition wire that switches +12V and does not drop out
during cranking.
• Pin 5 - +12V Battery Input. Connect the red fused
wire on the main harness to a constant +12V source.
• Pin 6 - Defeat Relay 2 Input. Defeat Relay 2 can be
used for an additional circuit defeat such as a fuel
pump relay. This allows multiple points of protection.
• Pin 7 - Defeat Relay 2 Output.See Pin 6 description.
• Pin 8 - Horn Honk output (-). Connect to a relay
to honk the vehicle’s horn or flash the parking lights
for Arm, Disarm, and Anti-Carjacking indications.
• Pin 9 - Dome Light output (-). Connect to a relay
for dome light activation. This wire may also be programmed as a Factory Alarm Disarm Output.
• Pin 10 - Optional Defeat 3 Output (-). Connect to
a relay for optional circuit defeat. When the unit activates the circuit disable relays, this wire provides a
ground output to activate a 3rd circuit defeat such as
ignition.
Plug in Connectors:
3-Pin White Connector: Plug-in connector port for
door lock harness or optional door lock relay module (PDLM-3).
• BLUE WIRE - negative unlock output (-).
• RED WIRE - +12V low current output (+) for relay
modules, or inverters. 100mA relay trigger only. Do
NOT use as a power source for door lock relays.
• GREEN WIRE - negative lock output (-).
2-Pin Red Connector: Plug-in connector port for
LED. Mount LED in an area where it may be easily seen
from either side of the vehicle.
2-Pin Blue Connector: Plug-in connector port for
Valet switch. Mount the switch in an area that is easily accessible from the driver’s position.
System Operation
ARMING OPERATION
To arm the system manually, press the transmitter
button.
• The horn will chirp once.*
• The doors will lock.*
• The starter and other selected circuits will be
disabled.
• The LED will start flashing slowly,indicating the
system is armed.
* If Installed
If the ignition is turned on while the system is armed,
the Ignition Trigger will begin honking the horn for 30
seconds. Press the transmitter button or use the
Emergency Override procedure to disarm the system.
PASSIVE ARMING
The Passive Arming feature allows the system to arm
automatically after turning off the ignition.
To arm the system passively turn off the ignition:
1. After 5 seconds:
• The LED will start flashing quickly to indicate
the system is about to arm.
2. After 10 seconds:
•The horn will chirp once.
• The doors will lock.
• The LED will flash slowly to indicate that the
system is armed. The system can also be
armed at any time by pressing the transmitter
button.
NOTE: The system may be armed at any time by
pressing the transmitter button. If the Auto Transmit
Mode is enabled, the Passive Arming feature will be
delayed until the trasmitter is out of range.
DISARMING OPERATION
To disarm the system press transmitter button.
• The horn will chirp twice.
• The doors will unlock.
2
Page 3

• The optional illuminated entry feature will turn
on the dome light for 30 seconds (if programmed
for Factory Alarm Disarm,the system will pulse the
factory disarm wire). *
* If Installed
AUTO TRANSMIT MODE
The Auto Transmit mode allows complete hands-free
operation of the system. The Passive Arming feature
automatically arms the system after the remote
transmitter is out of range of the vehicle.
To enable or disable Auto Transmit mode press the
transmitter button and hold for 5 seconds.
• The LED will flash once to indicate Auto
Transmit mode is on.
• The LED will flash twice to indicate Auto
Transmit mode is off.
During normal operation, every time the transmitter
button is pressed, the LED will blink to indicate the
current status of the Auto Transmit Mode.
Passive Arming with Auto Transmit:
1. Make sure the remote is set for Auto Transmit.
2. Walk away from the vehicle. The system will
not passively arm if the transmitter is within
range of the vehicle and set for Auto Transmit.
• The Passive Arming feature will automatically
arm the system once the transmitter is out
of range of the vehicle.
To disarm the system if armed passively:
1. Walk up to the vehicle.
2. Once the transmitter is within range of the
vehicle:
•The horn will chirp twice.
• The doors will unlock.
• The LED will stop flashing and the system
will disarm. The system can also be disarmed
by pressing the transmitter button.
NOTE: If the system was armed manually, it must
also be disarmed manually. This allows the Auto
Transmit Mode to not interfere and cause unwanted
disarming when the vehicle is parked in very close
proximity.
HORN CHIRPS
For audible confirmation of the ARM and DISARM
functions, the horn can be programmed to chirp. This
feature requires the optional horn output to be connected,
and programmed during installation.
IGNITION LOCK
The ignition locking feature allows the doors to
automatically lock and unlock when the ignition key is
turned on and off. This feature may be disabled during
installation.
VALET MODE
When the system is placed into the Valet Mode, the
system can still be armed, but the Passive Arming /
Auto Transmit functions will be disabled.
To enter or exit Valet Mode:
1. Turn the ignition key on.
2. Press and hold the valet switch for 5 seconds.
• The LED will turn on solid indicating the
system is in Valet Mode.
• The LED will turn off and exit Valet Mode.
EMERGENCY OVERRIDE
If the transmitter becomes lost or fails to operate,
the system can be disarmed by using the emergency
override feature.
To override the system:
1. Enter the vehicle.
2. Turn on the ignition key.
3. Press the Valet switch for 10 seconds.
• The disabled circuits will be re-enabled and
the vehicle can be driven.
ANTI-CARJACKING FEATURE
With the Anti-Carjacking feature enabled and the
ignition on, if the transmitter is moved out of range of
the vehicle for more than 90 seconds, the horn will
begin chirping for 15 seconds indicating the anticarjacking feature has been triggered. If the
transmitter is not moved back within range, the horn
will continue to sound for 5 minutes, and the circuit
disable outputs will activate. In the event of a
transmitter problem, the Anti-Carjacking feature can
be deactivated using the Emergency Override.
3
Page 4

4
© DLC, Inc.
65-IMM Rev. 1, 07/02
Remote Programmable Features
To change programmable feature:
1. Turn off the Auto Transmit mode.*
2. Turn on the ignition.
3. Wait 2 seconds.
4. Within 10 seconds press valet switch 5 times.
• The LED flashes 3 times indicating the system
is now in program mode.
5. Press valet switch the number of times that
equal to the feature you wish to change.
(Example: to turn feature #3 off press the valet
switch 3 times).
• The LED will flash each time the switch is
pushed.
6. Press the transmitter button to reverse the
current setting.
7. Turn off the ignition.
*
If the Auto Transmit mode is left on, the
programmable features may be reset to the
default settings or undesired operation may result.
NOTE: You must re-enter program mode for each
feature you wish to change.
Programmable Features
Program #1: Ignition Lock
On = Ignition auto lock
Off = No ignition auto lock
Program #2: Passive Unlock
On = Passive w/unlock
Off = Passive no unlock
Program #3: Normal/Silent Arming
On = Silent operation
Off = Normal operation
Program #4: Door Unlock Pulse
On = Single
Off = Double
Program #5: Door Lock Pulse Length
On = 0.7 second door lock/unlock pulse
Off = 3 second door lock/unlock pulse
Program #6: Wire # 9 Output on Disarm
On = Dome Light Output for 30 seconds
Off = Factory Alarm DisarmOutput
Program #7: Anti-Carjack Feature
On = Anti-Carjacking Enabled
Off = Anti-Carjacking Disabled
Default Reset
To reset all programmable features to the factory
default settings:
1. Turn on the ignition.
2. Wait 2 seconds.
3. Within 10 seconds press valet switch 5 times.
• The LED flashes four times indicating the system is now in program mode.
4. Press the transmitter button once. The LED
will flash 4 times and all programmable features
will be reset to the On position.
Remote Programmable Features:
Step Function On (Default) Off
1. Ignition Lock On Off
2. Passive Unlock On Off
3. Normal/Silent Arming Silent Normal
4. Door Unlock Pulse Single Double
5. Door Lock Pulse Length .75 Seconds 3 Seconds
6. Wire #9 Output on Disarm Dome Light Output Factory Alarm Disarm
7. Anti-Carjack Feature Enabled Disabled
 Loading...