

Page 1
OPERATION MANUAL
Intensity Pro
Windows
™
March 2009
Mac OS X
™
Page 2

2
Overview
Contents
Overview
Contents 2
Welcome 3
Introducing Intensity Pro 4
Using for Capture and Playback
Installation for Capture and Playback 5
Third Party Applications 8
Blackmagic Design Applications 16
Supported File Formats 23
Troubleshooting 24
Connection Diagrams
Typical Intensity Pro Setup 25
Intensity Pro Connections 26
Intensity Pro S-Video Connections 27
Intensity Pro NTSC/PAL Connections 28
Connecting to an HDMI HDTV 29
Monitoring using Intensity Pro 30
Setup for Blackmagic On-Air 31
Warranty
12 Month Limited Warranty 32
Page 3

3
Overview
Welcome
Thank you for purchasing Intensity Pro.
We hope you share our dream of making the video industry truly creative by allowing everyone
access to the highest quality video and sound. Intensity Pro includes the same high quality video
technology used in all Blackmagic Design video cards, so you won’t be limited creatively.
I have always felt that everyone should have the possibility of self-actualization through creative
expression. When you think about it, creativity, design and the arts are the true essence of humanity
and is what makes us unique as a species. Television is a wonderful creative medium because it
overloads the senses with exciting vision and sound, while being easy for viewers to experience.
Until now, the high quality video required for feature films, music videos, television commercials
and episodic television production required massive equipment costs. Unfortunately this turned
the television industry into an exclusive club. I think one of the most exciting things we have done
at Blackmagic Design is make the highest quality video available to all of us - so now your creative
abilities can make you the world’s best.
We are really excited about what you’ll do with your new Intensity Pro!
The instruction manual you’re reading now contains all the information you’ll need for installing your
Intensity Pro card, plus extra instructions on using it as a powerful HDMI based editing, design and
effects solution. Please take the time to check it out as there are lots of tips and tricks to help you.
Before you install Intensity Pro, please visit our support page at www.blackmagic-design.com to
download the latest updates to this instruction manual and Intensity driver software. We have more
helpful tech notes on our support page, and you might find a newer version of the software and
manual than was included on the CD with your Intensity Pro card.
Lastly, please register your Intensity Pro serial number with us, when you download the latest Intensity
driver software, so we can keep you updated when new software is released.
Perhaps you can even send us your latest “show reel” of work completed on your Intensity Pro and
any ideas for changes to the Intensity software. We are constantly working on new features and
improvements, so we would really love to hear from you!
Grant Petty
CEO, Blackmagic Design
Page 4
4
Overview
Introducing Intensity Pro
Intensity Pro features the latest HDMI technology for the highest quality capture and playback on
PCI Express computers with Mac OS X or Windows XP. Now you can edit using big-screen HDMI
televisions and video projectors, or capture uncompressed quality directly from HDV cameras.
True HDMI digital connections
Intensity Pro features HDMI input for connecting cameras and digital set-top boxes for the highest
quality uncompressed capture. Get the highest quality capture possible from HDV cameras by
capturing from the camera’s image sensor and bypassing the HDV compression chip. Because edit
software cannot play back to HDV cameras for monitoring, Intensity Pro is ideal for monitoring
uncompressed HD, or HDV and even DV edits on big screen televisions and video projectors.
Analog connections
Intensity Pro includes analog video and audio connections for capture and playback from analog
equipment. Capture from VHS or DVD players via the NTSC/PAL input, or switch to analog Y,Cr,Cb
for capture in high quality component video in SD or HD. Featuring analog audio, Intensity Pro can
connect to VHS and S-Video decks, DVD players, set top boxes, HDV cameras and many more.
Now you can playback to televisions and monitors in NTSC/PAL , analog component or HDMI.
Go beyond HDV video quality
HDV video compression suffers from not being full 1920 HD resolution, with the extra processing
required making editing difficult. Now you can capture and playback full resolution HDTV
uncompressed video for true broadcast and feature film quality editing, totally eliminating HDV &
DV compression quality problems.
Professional video standards
Instantly switch between HD and SD video standards including HDTV 1080i/59.94, 1080i/50,
720p/59.94, 720p/50, NTSC and PAL. Intensity Pro allows capture in professional file formats which
are fully compatible with Blackmagic Design’s DeckLink and Multibridge capture cards.
Compatible with all video software
Compatible with QuickTime
™
and DirectShow™, Intensity Pro can use a wide range of video software
for video capture and playback in either standard definition or high definition 4:2:2. Use Final
Cut Studio™ on Mac OS X™ or Premiere Pro™ on Windows XP™ for editing, then combine Adobe
After Effects™ and Photoshop™ for broadcast design and paint. Then finish your job by using DVD
authoring software to give your clients a DVD.
Copy protected video
HDMI video sources may output copy protected encrypted video. By law Intensity Pro is not allowed
to capture from copy protected HDMI sources, such as HDCP encrypted video and DVD players.
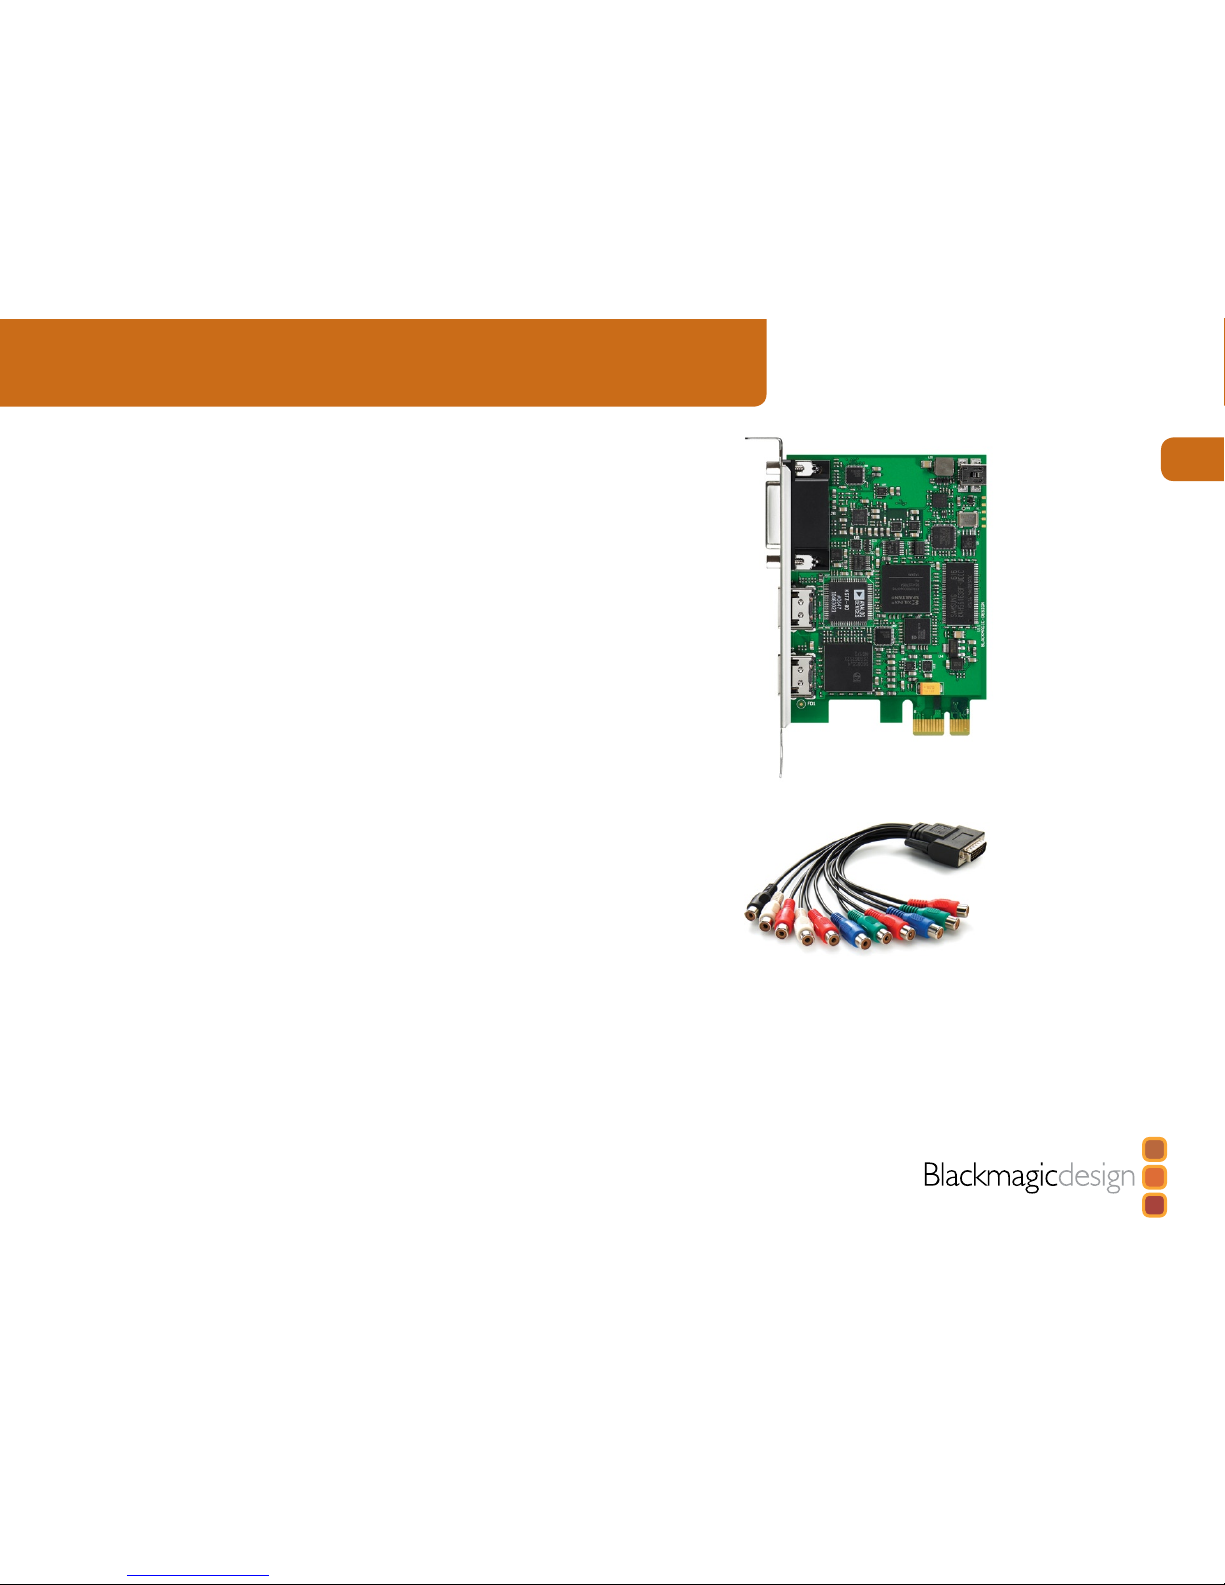
Intensity Pro PCI Express card.
Intensity Pro break-out cable.
Page 5

5
Using for Capture and Playback
Installation for Capture and Playback
Connecting to your PCIe Mac or PC
1. Shut down and remove the power plug from the back of your computer. This is a safety precaution
before opening your computer. Ensure that you are statically discharged by using a static strap.
2. Remove the side cover of your computer to gain access to the PCI Express slots.
3. Remove your Intensity Pro card from the protective static bag making sure you don’t touch the
gold connectors on the base of the card.
4. Find a spare PCI Express slot within the computer, any slot will do. Intensity Pro is a PCI Express
1 lane card and is compatible with 1,4,8 and 16 lane PCIe slots. Remove the metal port access
cover and it’s screw from the back of your computer.
5. Insert your Intensity Pro PCI Express card and ensure it clicks firmly into place.
6. Secure the card with a screw and replace the side cover of your computer.
7. Connect HDMI devices, such as HDV cameras to Intensity Pro’s HDMI input.
8. Connect HDMI compatible large screen televisions or projectors to the HDMI output.
Note: This is also a great time to install disk arrays and extra memory into your computer.
Connect HDMI devices.
Video Out
Video In
Connect HDMI devices.
Break-out
cable
Page 6
6
Using for Capture and Playback
Installation for Capture and Playback
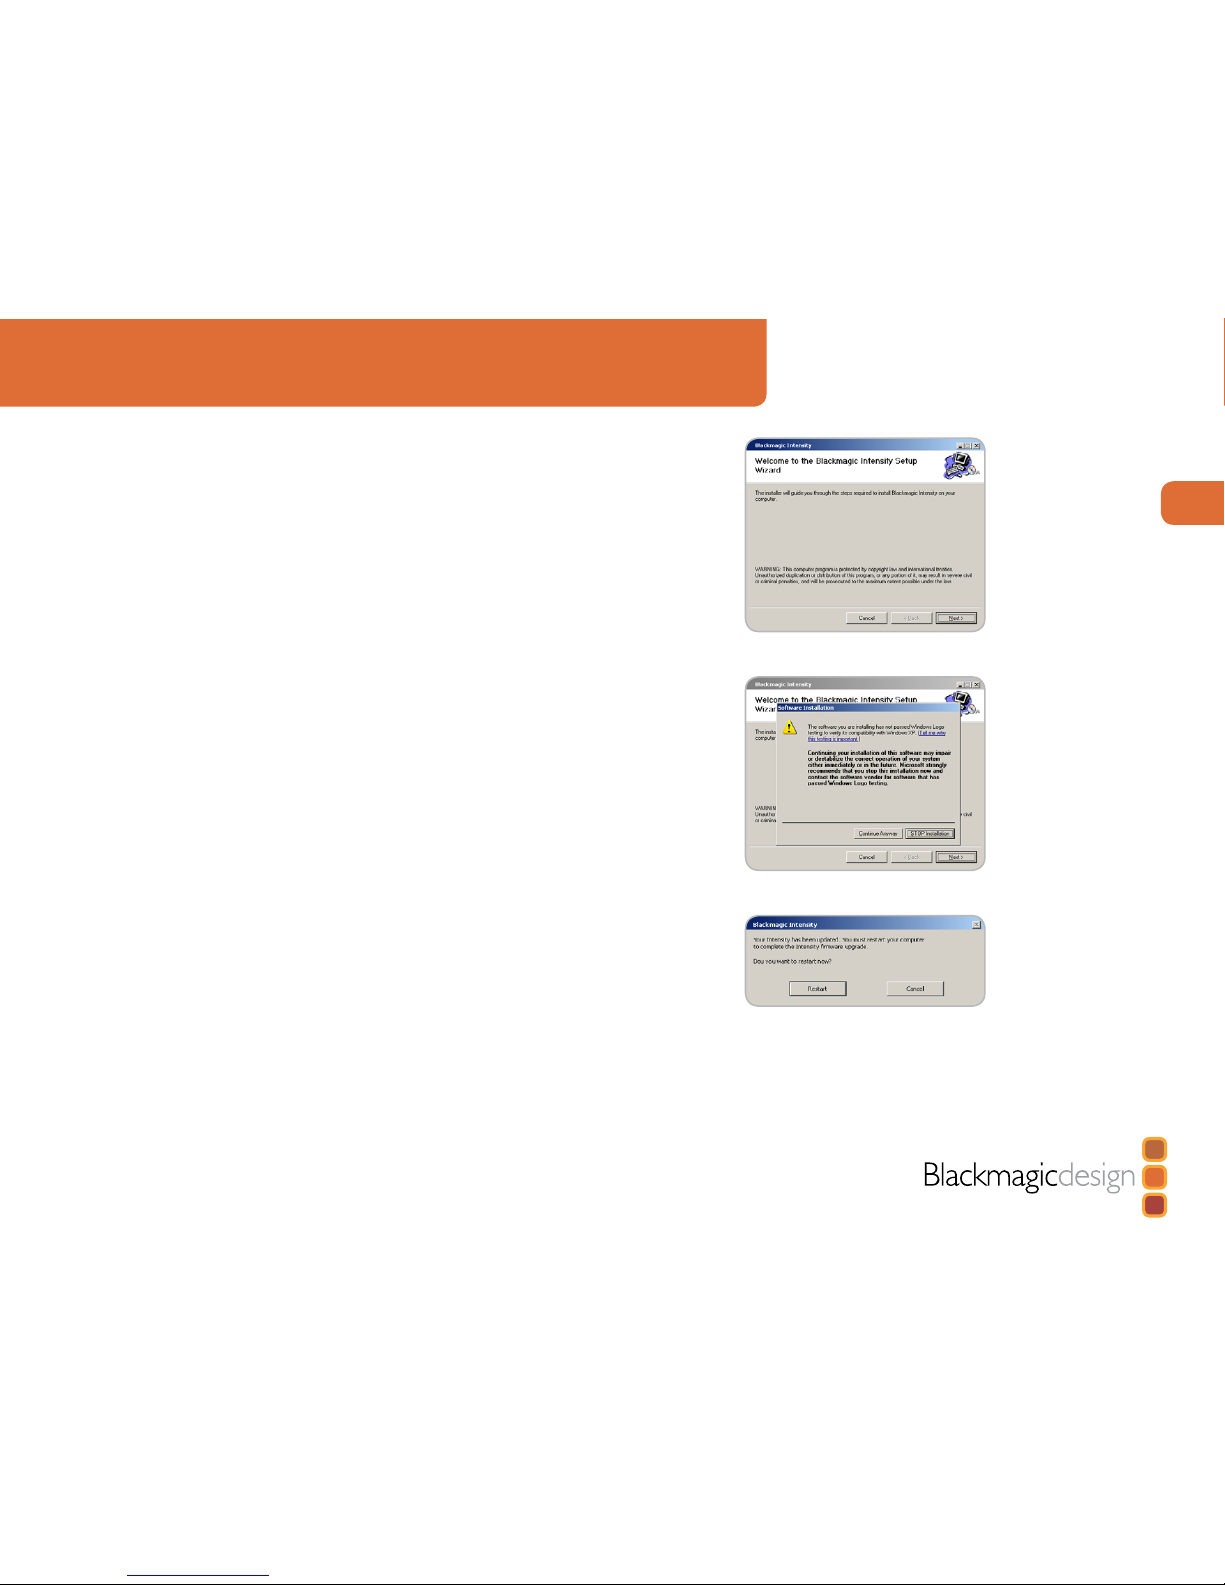
Installing the software for Windows XP
Contents
The Intensity software installer will install the following components for you:
Blackmagic Intensity drivers.
Premiere Pro
™
Easy Setups, presets and enablers.
Blackmagic Disk Speed Test.
Blackmagic Capture
Note: Before installing any software or hardware you will need administrator privileges. Make sure
that your applications such as Adobe Premiere Pro
™
and QuickTime™ are installed before running
the Intensity installer.
Intensity software
1. The CD supplied with your Intensity Pro contains the Intensity software. Before you install, check
you have the latest driver. Visit www.blackmagic-design.com/support/software
2. Open the “Intensity Installer” folder and launch the “Intensity Installer” application.
3. Click
Next, Continue Anyway and Next buttons and the drivers will be installed.
4. Now restart your machine to enable the new software drivers.
Intensity Setup Wizard.
Click “Continue Anyway”.
Restart your PC!
Page 7
7
Using for Capture and Playback
Installation for Capture and Playback
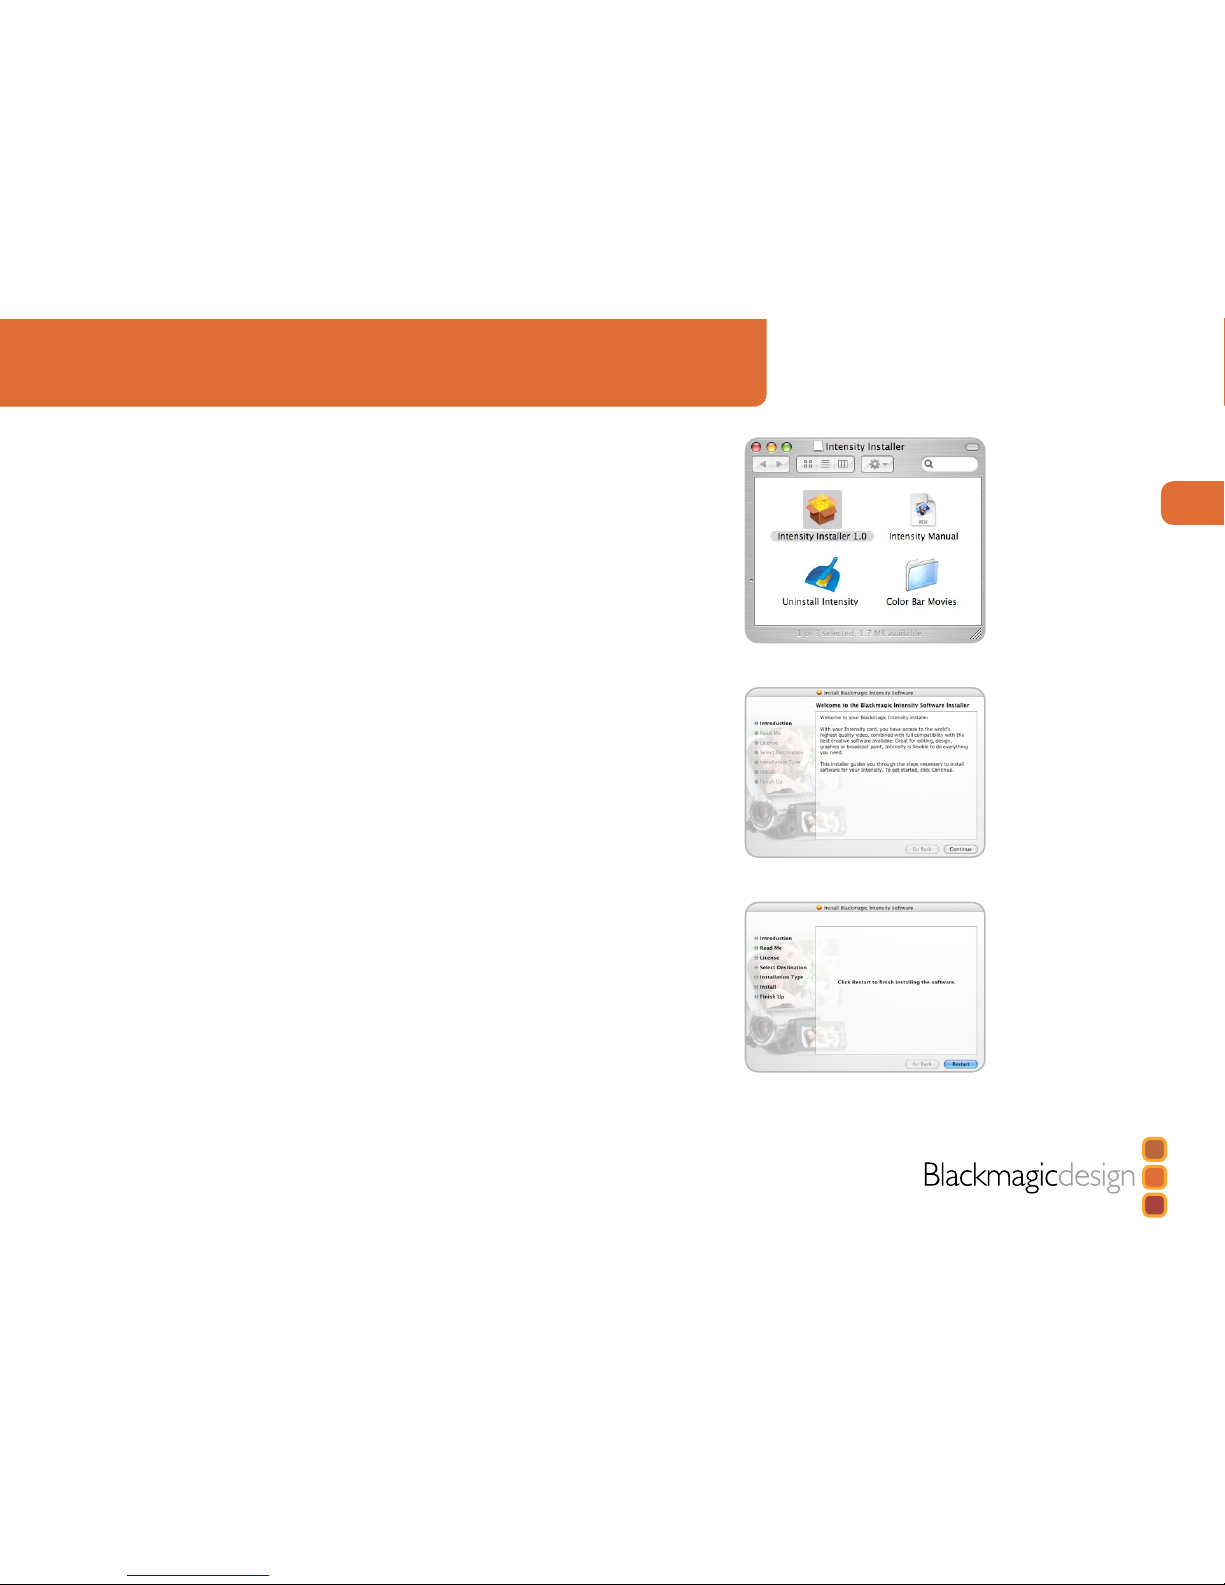
Installing the software for Mac OS X
Contents
The Intensity software installer will install the following components for you:
Blackmagic Intensity drivers.
Blackmagic QuickTime
™
codecs.
Final Cut Pro
™
Easy Setups, presets and enablers.
Blackmagic Disk Speed Test.
Blackmagic On-Air for live production.
Note: Before installing any software or hardware you will need administrator privileges. Make sure
that your applications such as Final Cut Pro are installed before running the Intensity installer. If you
want to use the included On-Air software for live mixing you will need to install two Intensity cards,
as one is used for each of the two connected HDMI cameras.
Intensity software
1. The CD supplied with your Intensity Pro contains the Intensity software. Before you install, check
you have the latest driver. Visit www.blackmagic-design.com/support/software
2. Open the “Intensity Installer” disk image and launch the “Intensity Installer” application.
3. Click
Continue, Agree and Install buttons and the drivers will be installed on your system.
4. Now restart your machine to enable the new software drivers.
Intensity Installer components.
Follow install prompts.
Restart your Mac!
Page 8

8
Using for Capture and Playback
Third Party Applications
Adobe Premiere Pro CS4 v4.0.1
Adobe Premiere Pro™ is a powerful real-time video and audio non-linear editing application. Full
presets for Premiere Pro are included with the Blackmagic driver software and will be automatically
loaded into your system during the installation process. Premiere Pro must be installed on your
system before running the Blackmagic driver installer.
Premiere Pro CS4 introduced the ability to capture and playback with sequences of different formats
within the one project. For example, Intensity cards can capture 1080i59.94, 1080i50 and NTSC
video to corresponding sequences within the one Premiere Pro CS4 project.
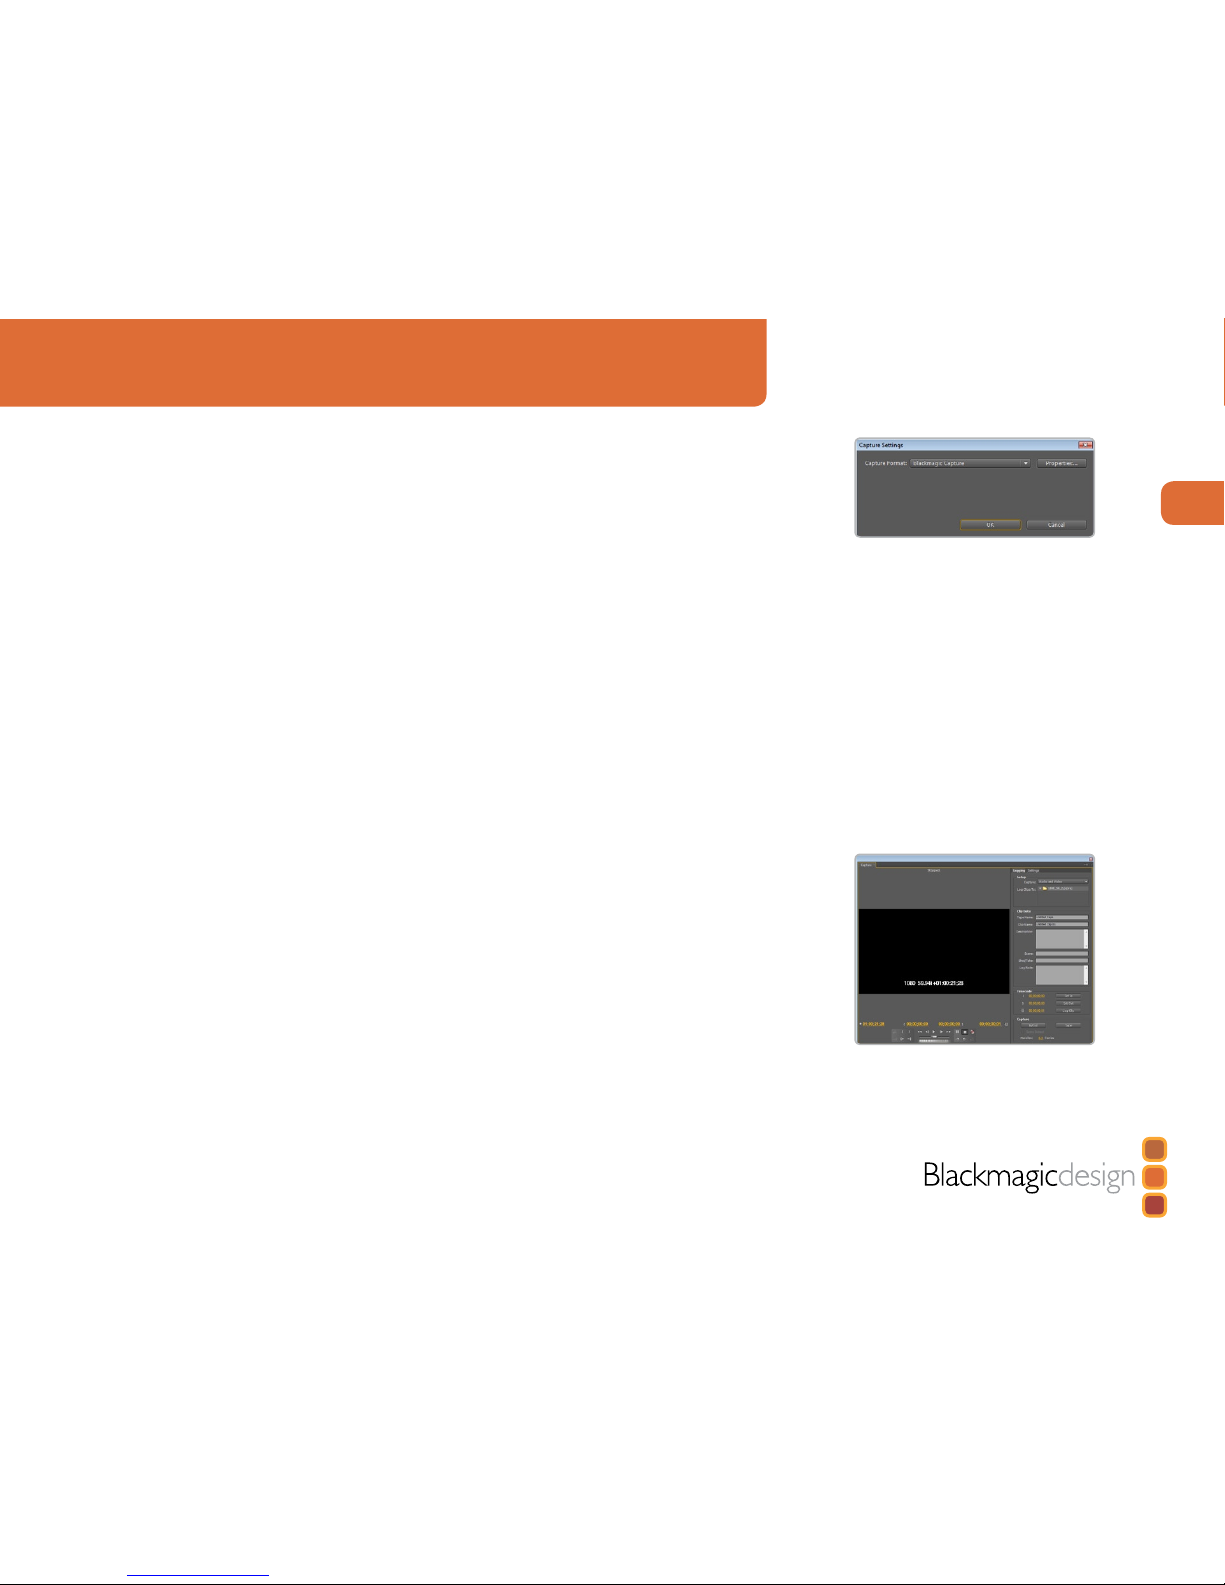
Setting Up
1. Launch Premiere Pro CS4 v4.0.1.
2. Create a
New Project and set the Capture Format to Blackmagic Capture.
3. Click on the Properties button and then choose from the desired properties for your project.
The Video Standard can be set to
NTSC, PAL, HD720 or HD1080. The Video Format can be
uncompressed or compressed and you should also specify the number of audio channels to be
captured. Now click OK.
4. Select your disk array as the Location for your media.
5. Type the name of your project and click
OK.
6. The New Sequence window will appear and you will usually want to select a sequence preset which
matches the preset you chose for the project, e.g. Blackmagic Design>HD1080>MotionJPEG>
Interlaced>59.94i.
7. You may wish to use the default sequence name or rename it. Then click
OK.
Audio
Blackmagic software features support for multiple channels of audio in Premiere Pro CS4 using
the new Blackmagic audio plugin. Blackmagic audio hardware is automatically chosen when a
new project is created and the capture format is set to Blackmagic Capture. The choice of audio
hardware can also be configured through
Edit > Preferences > Audio Hardware. The ASIO
Settings button serves no function as ASIO audio is not used for capture or playback.
You may also wish to visit
Edit > Preferences > Audio Output Mapping to select the mix of the
multi-channel audio. Set Map Output for to either Blackmagic Audio or Blackmagic Audio
(CS4)
as both are the same as each other. Intensity cards support 2 channels of audio.
Adobe Premiere Pro.
New Sequence
Audio Output Mapping.
Page 9
9
Using for Capture and Playback
Third Party Applications
Device Control
Device control is provided by Premiere Pro and is independent of Intensity. No support is provided
by Blackmagic Design for device control problems in conjunction with Intensity cards. Questions
relating to device control should be referred to Premiere Pro support and the relevant camera and
deck vendors.
Premiere Pro includes DV/HDV Device Control which may be used to control some cameras and
decks with a Firewire connection. FireWire is also known as IEEE 1394 and i.LINK. Logging clips,
batch capture and export to tape are only possible if some form of device control is available, e.g.
FireWire or third party serial device control. Device control is only useful with video tape devices
such as HDV cameras or decks.
Player Settings
The default player should be switched from Adobe Player to Blackmagic Design Playback. The
choice of player settings can be configured through
Edit > Preferences > Player Settings.
Playback
As a quick test to make sure everything is connected correctly, use the Premiere Pro test media
(bars and tone). Copy to your disk array, a test clip which matches the format of your project e.g.
HD1080i MotionJPEG. Take your media from within the Premiere Pro project and drop it on to
the timeline. You should now see the image on both your computer desktop and the output
of your Intensity card. If you can’t see any video on your HDMI or analog outputs, check the
connections again and ensure you have the correct output settings configured in the Blackmagic
Control Panel. HDMI and analog outputs are always active.
Note: Your HDMI display needs to be powered on before starting your PC. If necessary, restart
your PC to ensure Intensity Pro detects the display during startup.
Capture
To capture choose:
File > Capture [F5]
To immediately capture, click the red record button [G].
Note: If you can’t see video in the capture video, switch off your video source (e.g. camera or
deck) then switch it back on to ensure it detects the Intensity card.
Device Control.
Capture.
Page 10
10
Using for Capture and Playback
Third Party Applications
Apple Final Cut Pro
Apple Final Cut Pro™ is a powerful real-time video and audio non-linear editing application. In
conjunction with your new Intensity Pro, Final Cut Pro will allow you to work in every video standard
from DV up to uncompressed 4:2:2 high definition video.
“Easy Setups” for Final Cut Pro will have been added automatically during the Intensity installation
process if Final Cut Pro is previously installed. It’s important to install Final Cut Pro before installing
the Intensity software.
Note: If necessary, reinstall the Intensity software after installing Final Cut Pro.
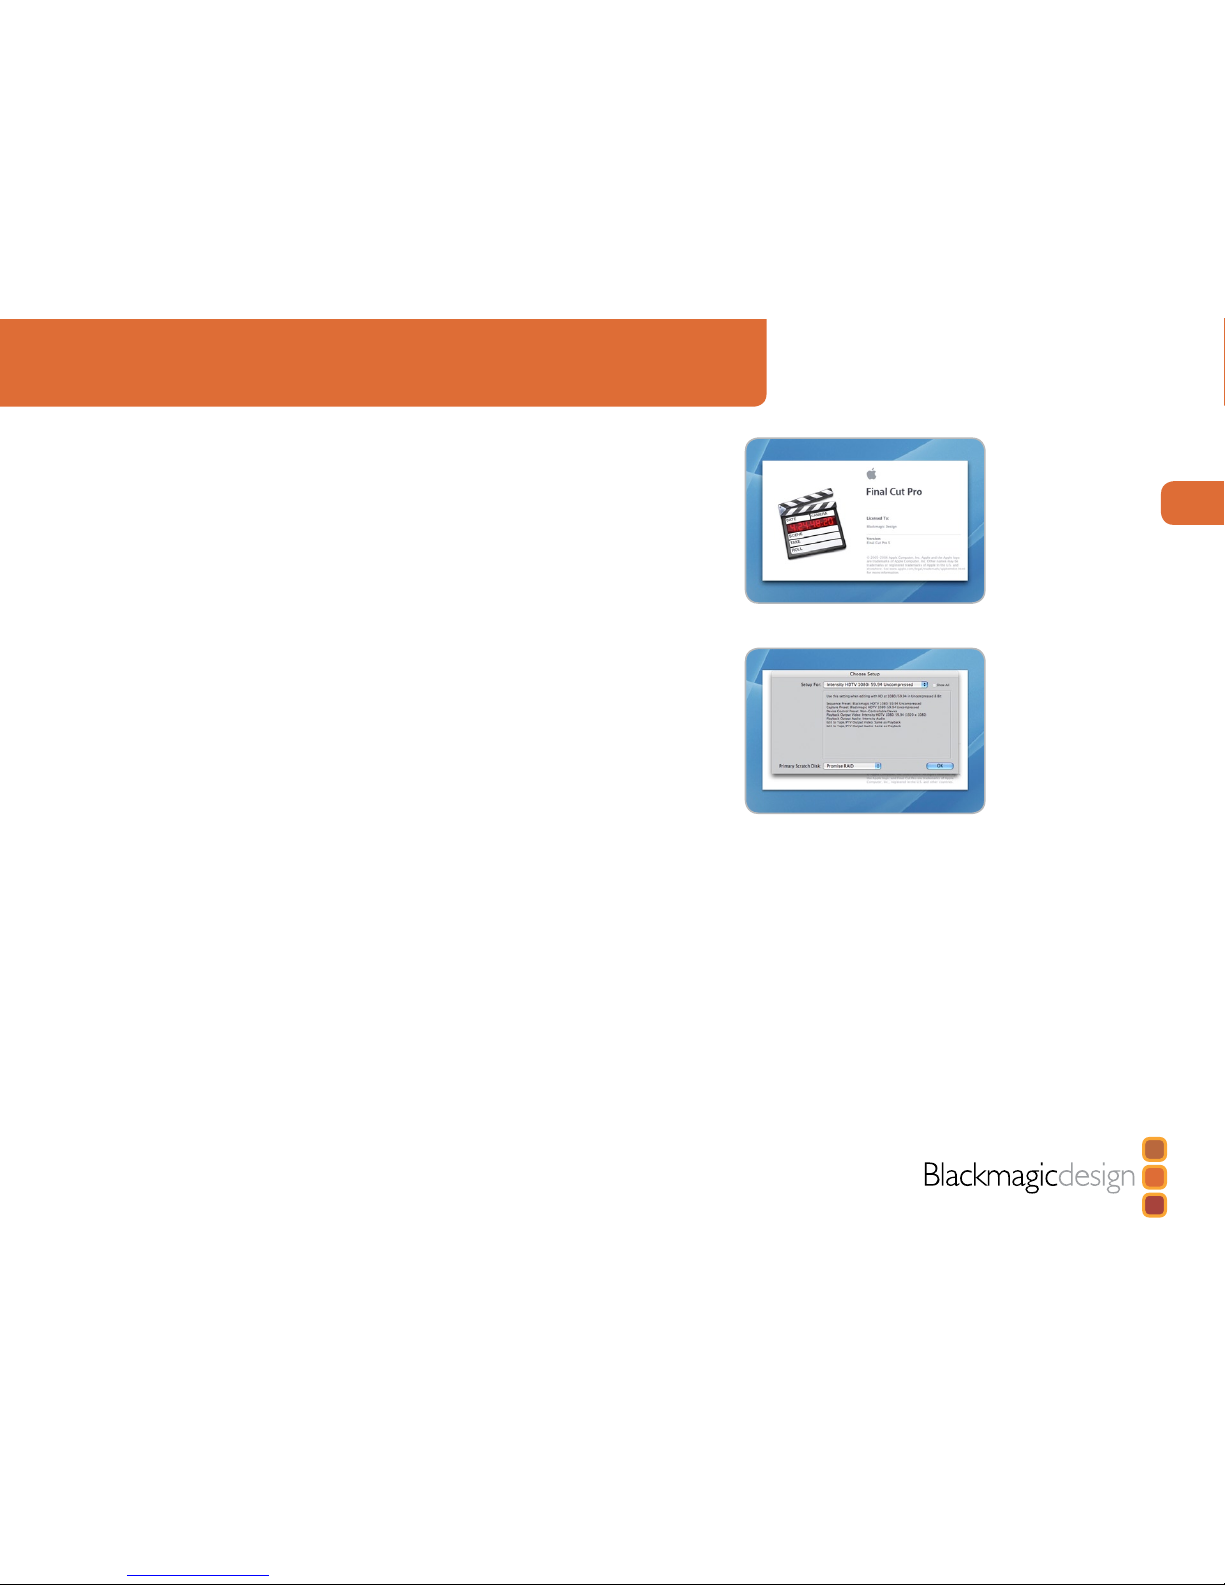
Setting up
1. Launch Final Cut Pro.
2. The Easy Setup window will appear.
3. Click on the popup menu named
Setup for and select a relevant Intensity Easy Setup.
For each TV format (NTSC, PAL and HDTV) you will find a range of compressed and uncompressed
file formats you can choose. For example, if you are working in NTSC format, you could choose
one of the following “Easy Setups”:
Intensity NTSC Uncompressed
Intensity NTSC - DV
The “Easy Setup” you choose will be dictated partly by the speed of your disk array and partly
by whether you already have movie clips in a particular format. If you have a fast disk array, you
can choose uncompressed video for the highest quality video. If you only have a single disk
for storage, you could choose either DV, DV50, DVCPRO HD or JPEG for professional quality
compression. JPEG often looks better but unfortunately Apple have not yet implemented RT
Effects with JPEG. If you need to add RT Effects, then DV, DV50 or DVCPRO HD would be a
better choice.
4. Click on the popup menu named
Primary Scratch Disk and select your disk array from the
popup menu. Then click OK.
5. Final Cut Pro will finish launching.
Final Cut Pro.
“Easy Setup” options.
Page 11

11
Using for Capture and Playback
Third Party Applications
Apple Final Cut Pro
Capture from non-controllable devices
Video sources including AVCHD cameras, VHS tape players and security cameras do not provide
any method of device control and are classified as non-controllable devices. For this reason,
after selecting an Intensity Easy Setup, Final Cut Pro will sometimes warn that device control
is set to “non-controllable device”. This is as expected. Click
OK and then create a project with
these settings.
To capture video from a non-controllable device, choose
File > Log & Capture. (Command
+ 8). Press play on your video source and then press the Now button in the Log and Capture
window. Final Cut Pro will show you a preview of the video you are capturing. Press the ‘esc’ key
at the top left of your keyboard when you wish to stop capturing.
Configuring controllable devices
The following information provides methods for using Intensity in conjunction with controllable
devices. Device control is provided by Final Cut Pro and is independent of Intensity. No support
is provided by Blackmagic Design for device control problems in conjunction with Intensity
cards. Questions relating to device control should be referred to Final Cut Pro support and the
relevant camera and deck vendors.
DV cameras include FireWire device control which can be enabled in the
Audio/Video Settings
> Device Control Presets
of Final Cut Pro 6.0. Select a preset by clicking in the far left column
so that a checkmark appears next to FireWire NTSC or FireWire PAL . Click OK. Open the
“Log and Capture” window and you should now be able to control the tape in the DV camera via
FireWire and capture video and audio via your Intensity card.
HDV cameras include FireWire device control. However Final Cut Pro 6.0 only enables the use
of HDV FireWire device control when HDV video is being captured via FireWire. Fortunately
the following method can be used to control most HDV cameras which support HDV>DV down
conversion on their FireWire output. Set the HDV camera to output standard definition DV on its
FireWire output. This can be achieved using the “i.LINK CONV” setting on Sony cameras and
the “DV LOCKED” setting on the Canon HV20. In Final Cut Pro, go to
Audio/Video Settings >
Device Control Presets
. Select a preset by clicking in the far left column so that a checkmark
appears next to the desired preset. Choose the FireWire NTSC preset if you are working
in HD720p59.94 or HD1080i59.94 video. Choose the FireWire PAL preset if you are working
in HD720p50 or HD1080i50 video. Click OK . Open the Log and Capture window and you should
now be able to control the tape in the HDV camera via FireWire and capture video and audio
via your Intensity card.
The Sony HVR-M25U deck can be controlled and used with an Intensity card using the same
instructions detailed above for HDV cameras.
Log and Capture.
Logging a clip.
Page 12

12
Using for Capture and Playback
Third Party Applications
Apple Final Cut Pro
The JVC BR-HD50 deck features RS-422 device control which can be used to control the deck while
capturing HDMI video and audio with Intensity. Final Cut Pro can control the deck via RS-422 using
a Keyspan USB Twin Serial Adapter (USB to MiniDin8 serial ports) partnered with an Addenda
SC-M/9M Mac-to-RS-422 cable. The total cost for these two serial items is under US$100.
On the deck, go to the REMOTE [2/2] Menu screen and set CONTROLLER SEL (0209) to TYPE 7
for use with NLE systems. In Final Cut Pro, go to
Audio/Video Settings > Device Control
Presets
and create a new preset by duplicating an existing preset and then changing the settings
as follows.
Name: JVC HDTV 720p 59.94 (NTSC), or JVC HDTV 720p 50 (PAL)
Protocol: Sony RS-422
Audio Mapping: 2 Channels
Time Source: LTC + VITC
Port: Select the Keyspan port which is connected to the deck.
Frame rate: 29.97 (NTSC) or 50 (PAL)
Default Timecode: Non-Drop Frame
Click
OK to complete the creation of the preset. Click in the far left column so that a checkmark
appears next to the new JVC preset. Click OK . Open the “Log and Capture” window and you
should now be able to control the JVC BR-HD50 deck via RS-422 and capture video and audio
via your Intensity card. While this deck also features FireWire, it does not support HDV>DV
down conversion on its FireWire output and so RS-422 is the only option for device control with
Final Cut Pro 6.0 when capturing via Intensity.
Capture from controllable devices
To capture, choose
File > Log & Capture . (Command + 8) Your video deck or camera will
respond in the same way as a clip in the timeline, via the “<spacebar>”, “j”, “k” and “l” keys.
It is important to set the correct tape number for your clip. To immediately capture, click the
Capture Now
button.
If you wish to log the clip, enter the desired “in” and “out” points using either the “i” and “o”
keys on your keyboard, or manually by typing in the timecode and clicking
Log Clip. If you have
the “Prompt” checkbox selected, Final Cut Pro will now ask you to name the clip. Name it and
click OK ; the clip will appear in your browser with a diagonal red line indicating that it’s “offline”.
Repeat this until you have logged all of the clips you wish to capture in a batch.
Note: When capturing sequential clips from tape, Final Cut Pro will automatically suggest a name
for each clip based on the previous clip. So, if your first clip is called “Mary, MCU”, Final Cut Pro
will suggest the next clip be called “Mary, MCU 01” etc. This can make logging large numbers
of clips much faster.
Page 13

13
Using for Capture and Playback
Third Party Applications
Apple Final Cut Pro
Batch Capture
Select the clips you wish to capture by drag selecting or shift-click. Choose
File > Batch Capture
or click on the Batch button in the “Logging” tab of the “Log & Capture“ window. (Control + C)
To set handles on the clips, go to and choose
File > Batch Capture (Control + C). Enable the
“Add Handles” box to capture additional frames (“handles”) before and after the “In” and
“Out” points of a clip.
RT Extreme Real Time Effects
Real Time Effects are one of the great features of Final Cut Pro, and with your Intensity you are
fully compatible with Apple’s RT Extreme
™
.
Batch Capture.
Page 14

14
Using for Capture and Playback
Third Party Applications
Adobe After Effects
It’s very easy to setup playback and rendering in Adobe After Effects™ for a complete broadcast and
design workstation that connects direct to decks for capture and playback of clips. Intensity also
supports real time preview while working on your compositions.
First, open Adobe After Effects
™
and select the television standard frame size and frame rate you
wish to work with.
How to use Intensity as a Preview Output Frame Buffer
To allow your Adobe After Effects
™
composition to be displayed in real-time from your
Intensity Card, go to Edit > Preferences > Video Preview. Set the Output Device to
Blackmagic Video Output and then select the desired Blackmagic RGB output mode. This lets
you view your Adobe After Effects™ compositions in video colorspace on your broadcast monitor
as you work. This means you will always see the correct color and interlace when working, and
you don’t have to wait until your composition is rendered to see what it looks like when output as
video.
Create a New Composition
Go to the “Composition” menu and select
Composition > New Composition (Control + n) In the
dialogue box, select an appropriate television standard from the pulldown menu. Click OK
Rendering
When you have completed your composition, you will need to render to a pixel format supported
by Intensity. Below is a list of supported codecs:
AVI codecs
Blackmagic HD 8 bit 4:2:2
Blackmagic SD 8 bit 4:2:2
Blackmagic 8 bit MJPEG
QuickTime codecs
Blackmagic 8 bit
Blackmagic 8 bit (2Vuy)
Apple Photo-JPEG
Apple DV - NTSC
Apple DV - PAL
Adobe After Effects.
Video Preview preferences.
Output Modes.
Page 15

15
Using for Capture and Playback
Image Capture.
Adobe Photoshop.
Image Export.
Third Party Applications
Adobe Photoshop
Intensity Pro includes Adobe Photoshop™ plug-ins, so you can directly capture and output still
frames from within the Photoshop application itself. If you’re working with HD/SD, you can even
import and export 16 bit Photoshop images for full quality.
Import an image into Photoshop
1. From Photoshop select
File > Import > Blackmagic Image Capture
2. Select the “Video Input Format” and the “Image Bit Depth” and select Capture Image
Export an image from Photoshop
1. Select
File > Export > Blackmagic Image Export
2. Select Video Output Format and then Output Image
Note: Once you have set the options in the “Export” window, each subsequent export will not
display the window, so you can grab output frames much faster. However if you would like to change
your export formats, hold the Alt key for PC or Option key for Mac, when selecting export.
How to create alpha channels for keying
Check the On-Air (Mac) section of this manual for information on creating alpha channels in Adobe
Photoshop and preparing graphics for keying over live video.
Page 16

16
Using for Capture and Playback
Blackmagic Design Applications
Blackmagic On-Air 2.0 for Mac Pro
Blackmagic On-Air is an exciting new utility which turns two Intensity cards into a live video mixer
so you can easily mix between two HDMI cameras, such as the Sony HDR-HC3 Handycam®. Simply
plug two Intensity cards into your Mac OS X Intel based computer and you get all the advantages
of live HD video production.
Live production gives you instant results, because all mixing is live and when your event is complete,
you have a finished television program ready to burn to DVD, or distribute via the internet. Live
production is much easier than spending hours in a dark edit suite, so people who are not trained
in video can get the advantages of professional video production.
Unfortunately one of the side effects of low cost non linear editing is the art of live television
production is being lost! On-Air is perfect, because it uses NLE video cards for live production.
Live production is simply more fun. You’re flying by the seat of your pants and you can’t help but
get emotionally connected to the event you’re editing as it unfolds before you. Mistakes aren’t a
problem as you can also record to the video tape in each camera and drop those shots in later!
Blackmagic On-Air is a self contained two camera television studio designed to feature a complete
interface within a single application window that fits on a 20 inch computer monitor. With two
Intensity cards installed in the same machine, you can plug-in two cameras with HDMI and see the
camera-view in the window, along with a graphics key input and the main program view.
Exciting new low-cost HDV cameras with HDMI outputs, means that anyone with a PCI Expressbased Mac and a 1600 x 1000 pixels resolution computer monitor can perform SD or HD editing.
The first step is to launch Blackmagic On-Air and open the
Preferences. Set the Video format to
match the output of your cameras, e.g. HDTV 1080i 59.94 or 720p 50. Decide whether you want
to capture uncompressed video, or if you don’t have a disk array, you can capture professional
compressed video such as DV, DV50, JPEG or DVCPRO HD to your internal disk drive.
Page 17

17
Using for Capture and Playback
Numbering of Intensity cards.
Connect cameras using HDMI.
Blackmagic Design Applications
Blackmagic On-Air 2.0 for Mac Pro
Use two HDV cameras with HDMI output. Connect Camera 1 to Intensity card 1, and Camera 2
to Intensity card 2. Remember, Intensity card 1 is always the higher card in the PCIe slot and the
furthest from the CPU. (See diagram on page 27)
The Blackmagic On-Air interface will preview live video from Camera 1 and Camera 2 combined
with real-time program monitoring via the single window interface.
To capture live video using Intensity Pro
1. Select
Preferences > Video Format Select either 720p or 1080i compressed or uncompressed
video and frame rate.
2. Select
Capture Location For compressed video you can select your internal disk, however for
uncompressed video you will need to select an external disk array.
3. Give your movie a filename.
4. Select audio source from
Intensity Audio or Intensity Audio 2 This option allows you to
choose which camera provides the best audio source for your live capture i.e. Camera 1 being
Intensity Audio, or Camera 2 being Intensity Audio 2.
5. Now choose mono or stereo audio by selecting
Channel 1 or Channel 2
1
2
Page 18

18
Using for Capture and Playback
Video from “Camera 2”.
Blackmagic Design Applications
Blackmagic On-Air 2.0 for Mac Pro
Your setup is now complete. Experiment with transitioning from Camera 1 to Camera 2, or between
cameras and black (BLK), or even add a graphic (G) to your camera feed. For a smooth transition
between cameras, set the number of frames for the transition and use the AUTO TRAN button.
To cut between cameras
1. Select
CUT to quickly switch cameras, or use the t-bar to manually transition between Camera 1
and Camera 2.
2. Click on the
REC button to record your mixed video to disk. Click STOP when you no longer wish
to capture to disk. The captured QuickTime movies can be played back immediately and will
include any mixes you have performed including graphics and fade to black.
Automatic transitions
One of the great features of Blackmagic On-Air is that it allows you to transition between Camera 1
and Camera 2 as either a
CUT, a controlled transition using the t-bar or as a dissolve “transition”
using a set number of frames.
Because the transition time is set in frames, video captured in 720p will need 60 frames for 1 second
dissolve. For 1080i/59.94 you will need 30 frames for a 1 second dissolve, and for 1080i/50, 25 frames
for a 1 second dissolve.
Easy A-B mode video mixing
Blackmagic On-Air features two separate modes of mixing which you can select between based on
your past experience. Easy A-B mode mixing is the simplest, and is often the method people use
first because it’s easy to use. With Easy A-B mode, you select one camera on the top row and one
on the bottom, and then move the t-bar up and down. When the t-bar is up, you see the camera
selected on the top row, and with the t-bar down, you see the bottom row camera. On-Air defaults
to this mode.
Professional mode video mixing
This mode is based on how television broadcasters use production switchers, and is preferred by
people with professional live production experience. In this mode, the bottom row is called the
“program” row, and the top row is called the “preview” row. Whatever camera is selected on the
bottom row, it is always the one on-air. The top row has the camera selected that will be chosen
when the t-bar is moved, or when the cut or transition button is pressed. Try it, and you will see how
it works. This method of mixing is preferred by professionals, because when a live event gets busy,
you always know what button to press to get a camera on-air - the bottom program row. This mode
of mixing make sure you know what’s on-air at all times in mission critical use at important events.
Video from “Camera 1”.
25 frame dissolve.
Page 19

19
Using for Capture and Playback
Blackmagic Design Applications
Blackmagic On-Air 2.0 for Mac Pro
How to include a graphic or title
If you want to add a logo to your captured video, Blackmagic On-Air will enable you to over-lay a
corporate logo or title over your live video. The third “camera” window is actually an image well for
dropping in a graphic. If your graphic has an alpha it will automatically blend over live video.
1. Select or create a logo with an alpha channel, and save it in a format such as Photoshop, TIF
or Targa that supports an alpha channel. The next page has some instructions on preparing
graphics for video keying.
2. Drag and drop the logo into the
Graphic panel of Blackmagic On-Air. Your logo will now appear
in the bottom left window of Blackmagic On-Air.
3. To enable the over-layed graphic, simply select
G for graphic on either “Camera 1” or “Camera 2”
depending on which source you prefer.
4. Now you can easily transition from camera to the graphic. Reverse the transition to have the
graphic fade away.
Insert logo or graphic.
Graphic over live video.
Page 20

20
Using for Capture and Playback
Blackmagic Design Applications
Blackmagic On-Air 2.0 for Mac Pro
How to create alpha channels for keying
1. Open your logo in Photoshop. 2. To make your graphic easier to see, make a new layer, fill
it with white and send to the back.
3. Duplicate the logo layer. 4. Select the bottom logo and apply the minimum filter.
This will expand the graphic slightly so it keys better.
5. Select the layer transparency from the top logo by
command or control clicking on the layer thumbnail and
click Save selection as channel.
6. Flatten and save with alpha channels. Your graphic will be
in RGBA format for On-Air or NLE use.
Page 21

21
Using for Capture and Playback
Blackmagic Design Applications
Using Blackmagic Disk Speed Test to check your disk (PC)
If you want to check your disk array speed for uncompressed video, Blackmagic Disk Speed Test
can be run to check the array speed and provide the results in video frame rates. This makes
it much easier to understand how various disk arrays will handle video capture and playback at
various video resolutions and frame rates.
Disk Speed Test provides more accurate results for large disk arrays, as often the manufacturer
provided speed results only check small data blocks; so you only get an indication of the cache
speed of the disk and not the sustained data rate of the disk. Video uses sustained data rates and
only Disk Speed Test provides a long burst of data for more accurate results.
When using Disk Speed Test, you need to account for disk seeking, so it’s best to add a healthy
margin to the results. If a disk array tests at 32 frames per second HD 1080, it doesn’t mean you can
do 29.97 HD capture and playback, as the margin is too tight. When checking the results, look at the
8 bit YUV 4:2:2 video sections, as Intensity Pro uses the 8 bit uncompressed video format.
Disk Management.
Building uncompressed disk arrays (PC)
When you’re working with uncompressed HD video, the internal hard disk will not be fast
enough. You need a high speed disk array. These can be purchased pre-built, or you can build
your own using two hard disks for SD or at least eight hard disks for HD. The first step is to install
and connect the hard disks.
If you intend to run your disk array as a software stripe, you will need to make sure that “host RAID”
is disabled. Use the “Disk Management” tool in “Computer Management” within Windows XP
™
to set up your software RAID, or refer to third party instructions when using pre-configured
hardware RAIDs.
Further information can be obtained via the Windows XP
™
Help and Support. Search and review the
section on “Dynamic Disks”. This section will provide you with information on configuration steps
on striping your disk array. Due to disk seeks, when calculating the data rates required for your disk
system, it is a good idea to add a safety margin due to fluctuations in disk speed. Disk speeds can
be increased by adding more disks. Serial ATA (SATA) disks can reduce to half their speed as they
become full, so in a 2-disk SATA array you should aim for a 100% safety margin. In an 8-disk SATA
array, a 30% safety margin should be adequate. Generally the more disks in the array, the better.
Note: Other vendors and third parties may provide different data rates for uncompressed video, the
above recommendations are tested for use with Intensity Pro.
Disk Speed RAID results after testing a disk array.
Page 22

22
Using for Capture and Playback
Blackmagic Design Applications
Using Blackmagic Disk Speed Test to check your disk (Mac)
If you want to check your disk array speed, Blackmagic Disk Speed Test can be run to check the array
speed, and to provide the results in video frame rates. This makes it much easier to understand
how various disk arrays will handle video capture and playback at various video resolutions and
frame rates.
Disk Speed Test provides more accurate results for large disk arrays, as often the manufacturer
provided speed results only check small data blocks, so you only get an indication of the cache
speed of the disk and not the sustained data rate of the disk. Video uses sustained data rates and
only Disk Speed Test provides a long burst of data for more accurate results.
When using Disk Speed Test, you need to account for disk seeking, so it’s best to add a healthy
margin to the results. If a disk array tests at 32 frames per second HD 1080, it doesn’t mean you can
do 29.97 HD capture and playback, as the margin is too tight. When checking the results, look at the
8 bit YUV 4:2:2 video sections, as Intensity Pro uses the 8 bit uncompressed video format.
Using the Apple Xserve RAID Disk Array
When you’re working with uncompressed HD video, your internal hard disk will not be fast
enough. In this case you need a high speed disk array, such as the Apple Xserve RAID. The Apple
Xserve RAID works great for both SD and HD when fully populated with 14 disks and at least 512 MB
of RAM for each RAID controller. For maximum performance and stable capture and playback with
uncompressed video we recommend the following settings:
Check
Use Controller Write Cache
Uncheck Allow Host Cache Flushing
Check Use Drive Write Cache
Uncheck Use Steady Streaming Mode
Set “Read Prefetch” to 128 Stripes (8 MB/disk) — If you observe dropped frames or jerky
video, try 8 Stripes (512 KB/disk) as recommended by Apple.
Note: No single setting will work for all sizes and brands of disks.
These are the settings we have found delivers stable capture and playback with uncompressed
video. Other settings might also provide optimal performance and we recommend you check with
your local reseller before changing settings if you’re unsure of what these controls do.
Disk Speed RAID results after testing a disk array.
Apple Xserve RAID preferences.
Page 23

23
Using for Capture and Playback
Supported File Formats
Data Rates for Capture and Playback
The data rates for uncompressed video are quite high, and listed below are minimum recommended
disk requirements for uncompressed and compressed standard definition and high definition video.
Supported standards: HDTV 1080i/59.94, 1080i/50, 720p/59.94, 720p/50, NTSC and PAL.
Compressed Video
Standard Definition – Mac OS X
Frame Size MB per second MB per minute GB per hour
720x486/29.97fps (NTSC) 4.6 275.4 16.1
720x576/25fps (PAL) 4.6 275.4 16.1
Standard Definition JPEG – Windows XP
Frame Size MB per second MB per minute GB per hour
720x486/29.97fps (NTSC)* 5.1 306 17.93
720x576/25fps (PAL)* 4.8 288 16.88
High Definition DVCPro HD – Mac OS X
1280x720p/59.94fps 14 837.9 49.1
1920x1080/50i 14 837.9 49.1
1920x1080/59.94i 14 837.9 49.1
High Definition JPEG – Windows XP
1280x720p/59.94fps* 5 300 17.58
1920x1080/50i* 11 660 38.67
1920x1080/59.94i* 13.19 791.21 46.36
Uncompressed Video
Standard Definition 4:2:2
Frame Size MB per second MB per minute GB per hour
720x486/29.97fps (NTSC) 21.5 1288 75.5
720x576/25fps (PAL) 21.2 1274.4 75
High Definition 4:2:2
1280x720p/59.94fps 106.8 6409.7 375.6
1920x1080/50i 100.3 6020.5 352.8
1920x1080/59.94i 120 7199.9 421.9
* Typical rates.
Page 24

24
Using for Capture and Playback
Troubleshooting
Using your Intensity Pro as a capture and playback card is exciting, but also complex due to the
huge range of different software applications. Video data rates are also very high, so the disk array
you use for uncompressed video storage can have a big impact on your system’s performance.
Information about a wide range of disk array solutions and compatible application software would
be outside the scope of this manual, however there are three ways to get more information.
1. Check out the Blackmagic Design website www.blackmagic-design.com/support for the latest
support information. We have a huge number of technical notes covering all the common
questions we are asked.
2. Call your reseller. Your reseller will have the latest technical updates from Blackmagic Design
and should be able to give you immediate assistance. We also recommend you check out the
support options your dealer offers as they can arrange various support plans based on your
workflow requirements. Your reseller will also understand your disk array configuration, and as
disk array problems account for around 90% of support questions with NLE systems, your reseller
or disk array vendor will be able to provide expert help.
3. The next option is to email us with your questions.
www.blackmagic-design.com/support/contact
Note: Please provide us with as much information as possible regarding your technical problem and
system specifications so that we may try to reproduce your problem quickly. Also please let us know
how to reproduce any problem you’re having, so we can try it on our test systems before replying
to your email.
Page 25

25
Connection Diagrams
Typical Intensity Pro Setup
Intensity Pro uses HDMI for connecting video cameras, televisions and projectors to your computer
for use with popular editing and design applications. Intensity Pro captures video in real-time directly
from the HDMI output on HDV cameras, and will playback directly to large screen HDTVs or HD
projectors for client-monitoring and editing.
HDTV
Camera Outputs
HDMI In
HDMI Out
Page 26

26
Connection Diagrams
Intensity Pro Connections
Intensity Pro features high quality analog component RCA type connectors, and HDMI for use
with a massive range of video cameras, televisions and projectors. Intensity Pro captures video in
real time directly from the HDMI or analog component outputs of HDV cameras. Real time playback
for client-monitoring and editing using large screen HDTVs or HD projectors is easy using the HDMI
and analog component outputs.
HDMI 4:2:2 Output
Break-out cable
D-sub 26 connector
HDMI 4:2:2 Input
B-Y Input
Y Input
R-Y Input
B-Y Output
Y Output
R-Y Output
(L) Audio Input
(unbalanced analog)
(R) Audio Input
(unbalanced analog)
(L) Audio Output
(unbalanced analog)
(R) Audio Output
(unbalanced analog)
SPDIF/AES Output
Page 27

27
Connection Diagrams
Intensity Pro S-Video Connections
Intensity Pro’s high quality analog component RCA type connectors can be used for S-video capture
and playback using a simple S-video to RCA adapter cable, as shown below.
B-Y Input
Y Input
S-Video
S-Video Input
B-Y Output
S-Video
R-Y Output
S-Video Output
Set input.
Set output.
Page 28

28
Connection Diagrams
Intensity Pro NTSC/PAL Connections
Intensity Pro’s high quality analog component RCA type connectors can be used for NTSC/PAL
capture and playback of composite video. Simply connect consumer RCA cables to Intensity Pro’s
break out cable using the following configuration.
B-Y Input
Y Input
R-Y Input
Input
B-Y Output
Y Output
R-Y Output
Output
(L) Audio Input
(unbalanced analog)
(R) Audio Input
(unbalanced analog)
(L) Audio Output
(unbalanced analog)
(R) Audio Output
(unbalanced analog)
SPDIF/AES Output
NTSC/PAL
Set input and ouput.
Page 29

29
Connection Diagrams
Intensity Pro
Connection to an HDMI HDTV
This example shows Intensity Pro connected to a consumer HDTV with HDMI input. Connect the
HDMI cable from the video output on your Intensity Pro card into the HDMI video input on your HDTV
for high definition monitoring.
AUDIO OUT
DIGITAL OUT
(OPTICAL)
AUDIO
VIDEO
S VIDEO
R
L
R
L
AUDIO
R
L
P
R
P
B
Y
L
R
IN
RGB
PC IN
AUDIO
HDMI
IN AUDIO
CONTROLS
VIDEO IN HD/DVD IN
IN OUT
HDTV with HDMI
Page 30

30
Connection Diagrams
Monitoring using Intensity Pro
When using a large screen HDTV with an HDMI input, Intensity Pro can be used to client-monitor in
either NTSC/PAL (4:3 and 16:9) or High Definition (1080i and 720p) formats.
NTSC/PAL
NTSC/PAL
4:3
16:9
Desktop
High Definition
Desktop
1080i
720p
Page 31

31
Connection Diagrams
1
2
Setup for Blackmagic On-Air
Blackmagic On-Air is a live video mixer that uses two Intensity cards. This application can live-edit
between two HDV cameras recording directly to your local disk or external disk array.
Computer Display
Camera 2
Camera 1
Page 32

32
Warranty
12 Month Limited Warranty
Blackmagic Design warrants that this product will be free from defects in materials and workmanship
for a period of 1 year from the date of purchase. If a product proves to be defective during this
warranty period, Blackmagic Design, at its option, either will repair the defective product without
charge for parts and labor, or will provide a replacement in exchange for the defective product.
In order to obtain service under this warranty, you the Customer, must notify Blackmagic Design
of the defect before the expiration of the warranty period and make suitable arrangements for
the performance of service. The Customer shall be responsible for packaging and shipping the
defective product to a designated service center nominated by Blackmagic Design, with shipping
charges pre paid. Customer shall be responsible for paying all shipping charges, insurance, duties,
taxes, and any other charges for products returned to us for any reason.
This warranty shall not apply to any defect, failure or damage caused by improper use or improper
or inadequate maintenance and care. Blackmagic Design shall not be obligated to furnish service
under this warranty: a) to repair damage resulting from attempts by personal other than Blackmagic
Design representatives to install, repair or service the product, b) to repair damage resulting from
improper use or connection to incompatible equipment, c) to repair any damage or malfunction
caused by the use of non Blackmagic Design parts or supplies, or d) to service a product that has
been modified or integrated with other products when the effect of such a modification or integration
increases the time or difficulty of servicing the product. THIS WARRANTY IS GIVEN BY BLACKMAGIC
DESIGN IN LIEU OF ANY OTHER WARRANTIES, EXPRESS OR IMPLIED. BLACKMAGIC DESIGN
AND ITS VENDORS DISCLAIM ANY IMPLIED WARRANTIES OF MERCHANTABILITY OR FITNESS
FOR A PARTICULAR PURPOSE. BLACKMAGIC DESIGN’S RESPONSIBILITY TO REPAIR OR
REPLACE DEFECTIVE PRODUCTS IS THE WHOLE AND EXCLUSIVE REMEDY PROVIDED TO
THE CUSTOMER FOR ANY INDIRECT, SPECIAL, INCIDENTAL OR CONSEQUENTIAL DAMAGES
IRRESPECTIVE OF WHETHER BLACKMAGIC DESIGN OR THE VENDOR HAS ADVANCE NOTICE
OF THE POSSIBILITY OF SUCH DAMAGES. BLACKMAGIC DESIGN IS NOT LIABLE FOR
ANY ILLEGAL USE OF EQUIPMENT BY CUSTOMER. BLACKMAGIC IS NOT LIABLE FOR ANY
DAMAGES RESULTING FROM USE OF THIS PRODUCT. USER OPERATES THIS PRODUCT AT
OWN RISK.
Copyright 2009 Blackmagic Design. All rights reserved. ‘Blackmagic Design’, ‘DeckLink’, ‘HDLink’,
‘Workgroup Videohub’, ‘Multibridge Pro’, ‘Multibridge Extreme’, ‘Intensity’ and ‘Leading the creative
video revolution’ are registered trademarks in the US and other countries. All other company and
product names may be trade marks of their respective companies with which they are associated.
 Loading...