

Page 1
Installation and Operation Manual
Blackmagic
Web Presenter
April 2017
English, 日本語, Français, Deutsch, Español, 中文,
한국어, Русский, Türkçe, Italiano and Português.
Page 2

Languages
To go directly to your preferred language, simply click on the hyperlinks listed in the
contents below.
English 3
日本語 27
Français 52
Deutsch 77
Español 102
中文 97
한국어 121
Русский 146
Türkçe 171
Italiano 195
Português 220
Page 3

English
Welcome!
Thank you for purchasing your Blackmagic Web Presenter!
With Blackmagic Web Presenter, our design goal was to make Internet based broadcasting
andeven calling using video for presentations dramatically easier. Unlike our traditional capture
cards, which are designed for post production, Blackmagic Web Presenter is quite different
because it transforms the SDI and HDMI video inputs into USB video that uses the webcam
driver that’s built into your computer.
What this means is that any SDI or HDMI video source now looks the same as a regular webcam
and any software that works with a webcam will now work with professional broadcast quality
products. With webcam support built into all video streaming and calling software, it means that
you have a very large choice of what streaming platform you can use.
Unlike capture cards that send all the pixels in the video source to the computer, Blackmagic
Web Presenter actually reduces the video resolution down to 720p and can even reduce the
video frame rate down to 20, 15, 10 or 5 frames per second when directed to by the software.
This means you get very high quality HD video in 16:9 aspect ratio, but you also get the lowest
data rate to ensure you can stream video reliably and with regular internetconnections.
But Blackmagic Web Presenter is way more than a USB webcam source for SDI and HDMI
video sources, as it also includes a 2 input live switcher so you can do simple multi camera
broadcasts or presentations. All you need to do is add the optional Teranex Mini SmartPanel
and you can then press the 1 and 2 buttons to live switch between sources. ButtheTeranex
Mini Smart Panel also includes video preview, audio meters, input video standard and USB
frame rate information too!
Please check the support page on our website at www.blackmagicdesign.com for the latest
version of this manual and for updates to your Blackmagic Web Presenter’s internal software.
Also when downloading software, please register with your information so we can keep you
updated when new software is released. We are continually working on new features and
improvements, so we would love to hear from you!
Grant Petty
CEO Blackmagic Design
Page 4

Contents
Blackmagic Web Presenter
Getting Started 5
Plugging in Power 5
Plugging in Video 5
Plugging in Audio 6
Connecting to your Computer 6
Setting Blackmagic Web Presenter as your Webcam 6
Using Blackmagic Web Presenter with Third Party Software 7
Using Blackmagic Web Presenter with Skype 7
Using Blackmagic Web Presenter to Stream with YouTube Live 8
To set your Web Presenter as a new device 8
Setting up a YouTube Live streaming channel 10
Using Teranex Mini Smart Panel 12
Installing Teranex Mini Smart Panel 12
Smart Panel Features 13
Settings 13
Video Input 13
Transition 14
Audio Mixer 15
Setup 17
Changing the Video Input using Switches 17
Teranex Mini Rack Shelf 18
Using the Built in Switcher 18
Using Camera Tally 19
Blackmagic Web Presenter Setup Utility 20
Appendix 22
Help 24
Regulatory Notices and SafetyInformation 25
Warranty 26
Page 5

Getting Started
Web Presenter
Blackmagic
Plugging in Power
Getting started with your Blackmagic Web Presenter is quick and easy! All you need to do
isconnect power, connect your video and audio, then connect the unit to your computer.
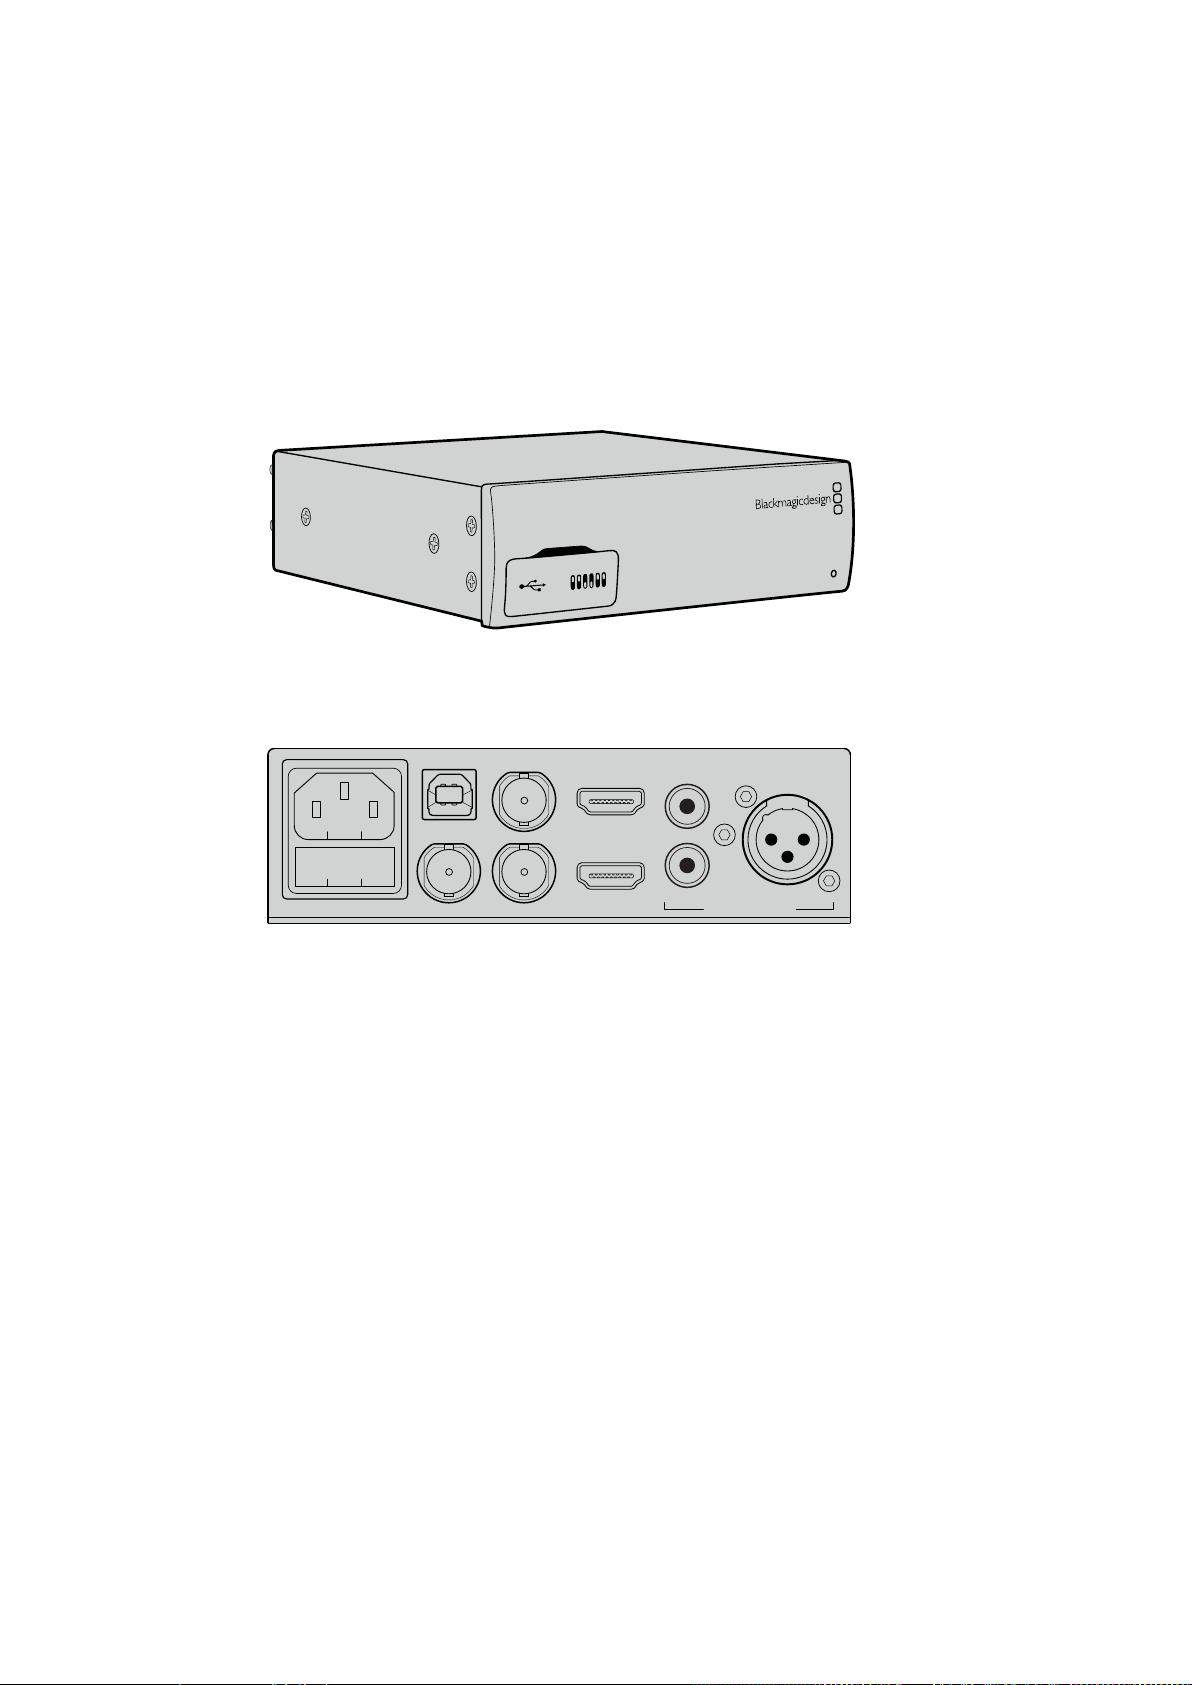
To supply power, plug a standard IEC power cable into your Blackmagic Web Presenter’s
powerinput on the rear panel. When powered, the status indicator at the bottom right corner
of your Web Presenter’s front panel will illuminate.
Blackmagic
Web Presenter
Blackmagic Web Presenter supports 12G-SDI and will automatically
switch between SD, HD and Ultra HD all the way up to 2160p60
SDI PGM OUT
USB WEB CAM
SDI IN SDI LOOP OUT
Connect power to your Blackmagic Web Presenter’s
rearpanel using a standard IEC power cable
HDMI LOOP OUT
HDMI IN
STEREO IN
L
R
LINE/MIC IN
ANALOG AUDIO IN
Plugging in Video
Next, plug your source video into the Blackmagic Web Presenter’s SDI or HDMI video inputs.
You might notice there are both loop SDI and loop HDMI outputs and you can use these
outputs if you want to connect Web Presenter in line with a video connection to other equipment.
For example, you could loop the SDI output to a deck or monitor or you could connect Web
Presenter in between a computer’s HDMI output and the HDMI input of a video projector.
There is also a program SDI output and this will output video after the SDI and HDMI switch, but
before the down conversion to 720p video. This SDI program output is the same resolution as
the video inputs, so is perfect for connecting to a deck for master recording.
Blackmagic Web Presenter supports 12G-SDI and will automatically switch between SD, HD and
Ultra HD all the way up to 2160p60 when the video input changes. This means you can input
virtually any video signal and it will convert the signal to 720p video for the USB video, which is
both high quality but also very low data rate for streaming video. What this means is you can do
your production in higher resolution 1080 HD or Ultra HD but the web presenter will take care
of lowering the resolution and frame rate for you, all within the single unit.
Getting Started
5
Page 6
Plugging in Audio
Web Presenter
Blackmagic
SDI PGM OUT
L
STEREO IN
The SDI and HDMI inputs include audio, however there are also 2 additional analog audio
inputs. The XLR audio input is a mono input that lets you plug in microphones. It’s a single
channel mono input because microphones are mono and when you connect to this balanced
XLR audio input the audio will be sent to both left and right audio channels internally. The
second analog audio input is a HiFi input using RCA connectors. This input is good for
computer audio or audio from a music source such as smartphone, music player, audio mixer or
even a CD player.
All audio sources will be connected to an internal stereo audio mixer and all blended together.
If you don’t want audio to be included from any specific audio source, then please ensure you
disconnect the analog audio sources, or turn down audio from HDMI sources such as
computers. Otherwise any audio on any of the inputs will be blended together and sent to the
USB audio output.
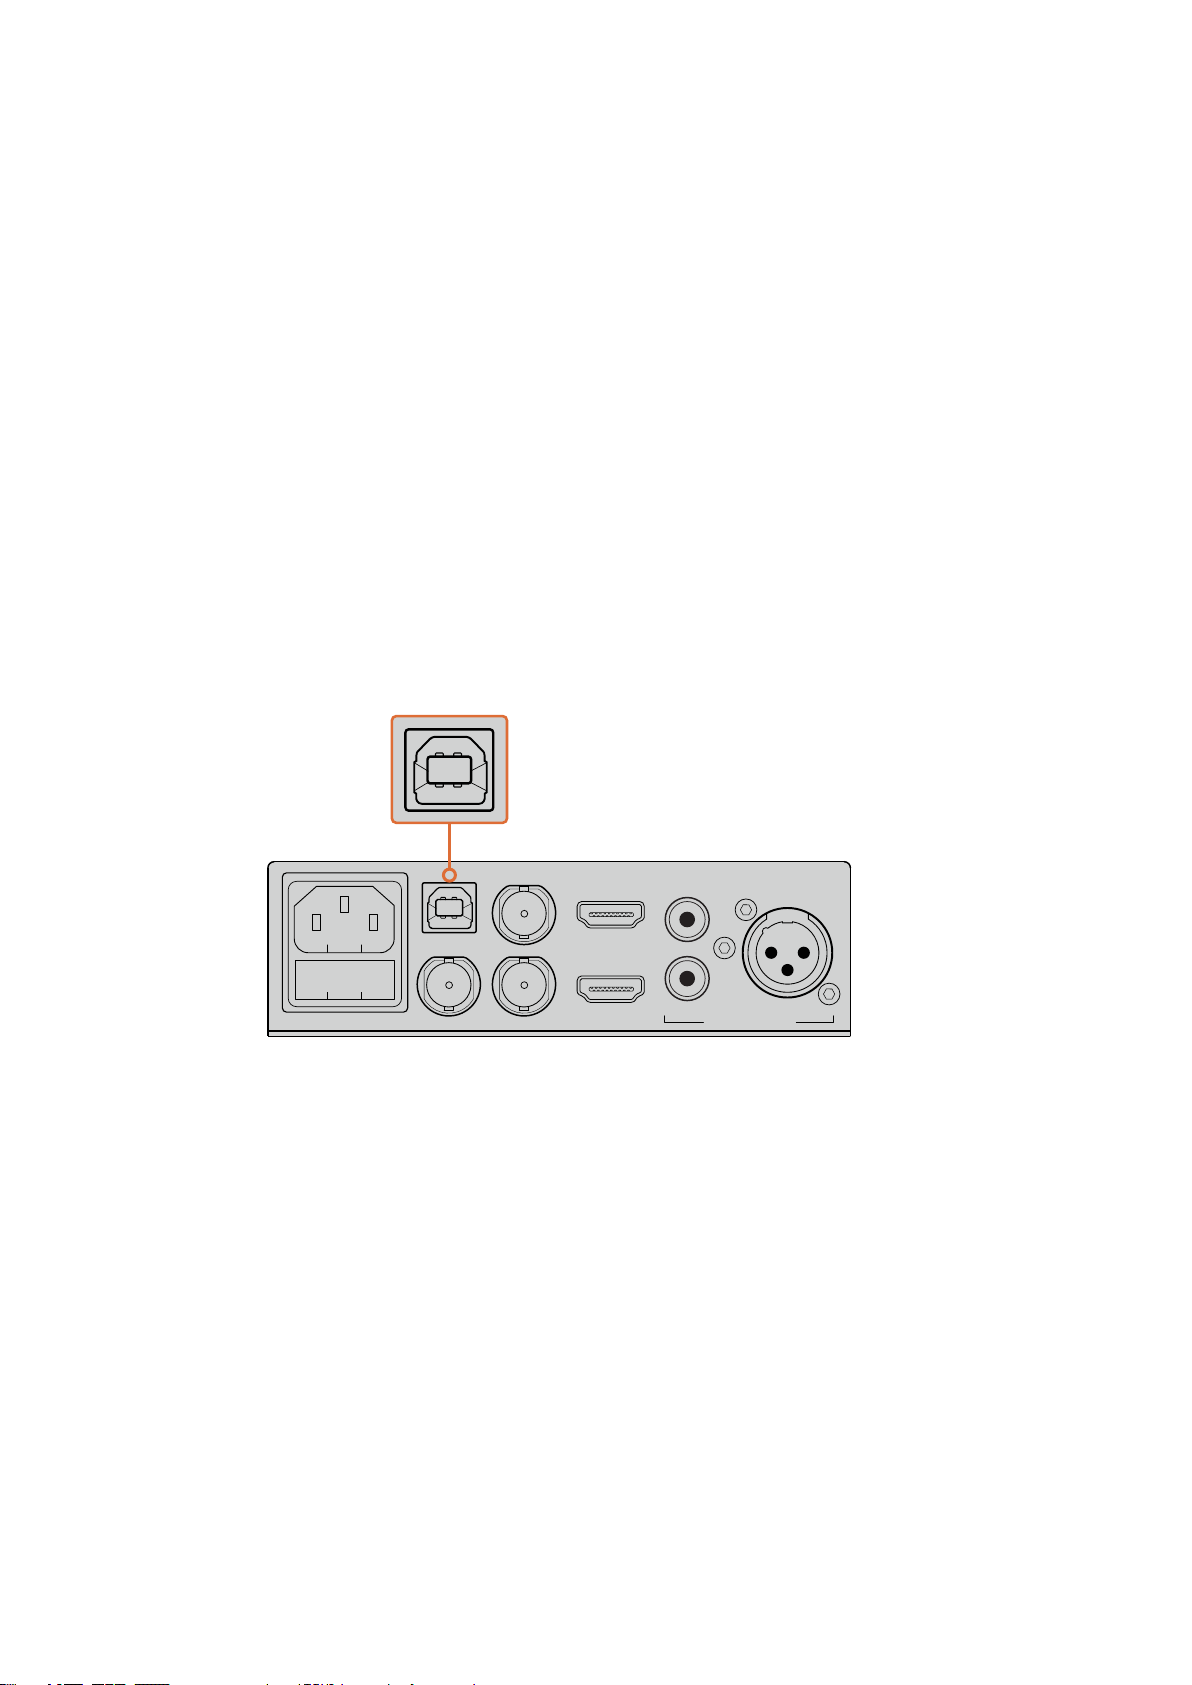
Connecting to your Computer
Now that you have plugged in your video and audio sources, connect your Blackmagic
WebPresenter to your computer via its USB port. Your computer will instantly recognise the unit
as a USB webcam source.
SDI PGM OUT
USB WEB CAM
SDI IN SDI LOOP OUT
Connect your Blackmagic Web Presenter to your
computer via the USB port on the rear panel
HDMI LOOP OUT
HDMI IN
STEREO IN
L
R
LINE/MIC IN
ANALOG AUDIO IN
Setting Blackmagic Web Presenter as your Webcam
Finally, choose your Blackmagic Web Presenter as your webcam using your desired video
conferencing or third party streaming software, such as Skype, Open Broadcaster,
XSplitBroadcaster or Periscope.
For information on using Blackmagic Web Presenter with Skype and YouTube Live, refer to the
‘Using Blackmagic Web Presenter with Skype’ and ‘Using Blackmagic Web Presenter to Stream
with YouTube Live’ sections in this manual.
That’s all there is to getting started! You are now ready to start broadcasting amazing high
quality video with mixed audio online! Please keep reading this manual for more information
such as tally features, changing settings and installing an optional Teranex Mini Smart Panel.
Getting Started
6
Page 7
Using Blackmagic Web Presenter with Third Party Software
Using Blackmagic Web Presenter with Skype
To use Blackmagic Web Presenter with Skype, first download the Skype software and install it
on your computer. The Skype software is free and can be downloaded from www.skype.com
1 Once installed on your computer, launch Skype.
2 Open the preferences under Skype>Preferences and select ‘audio/ video’.
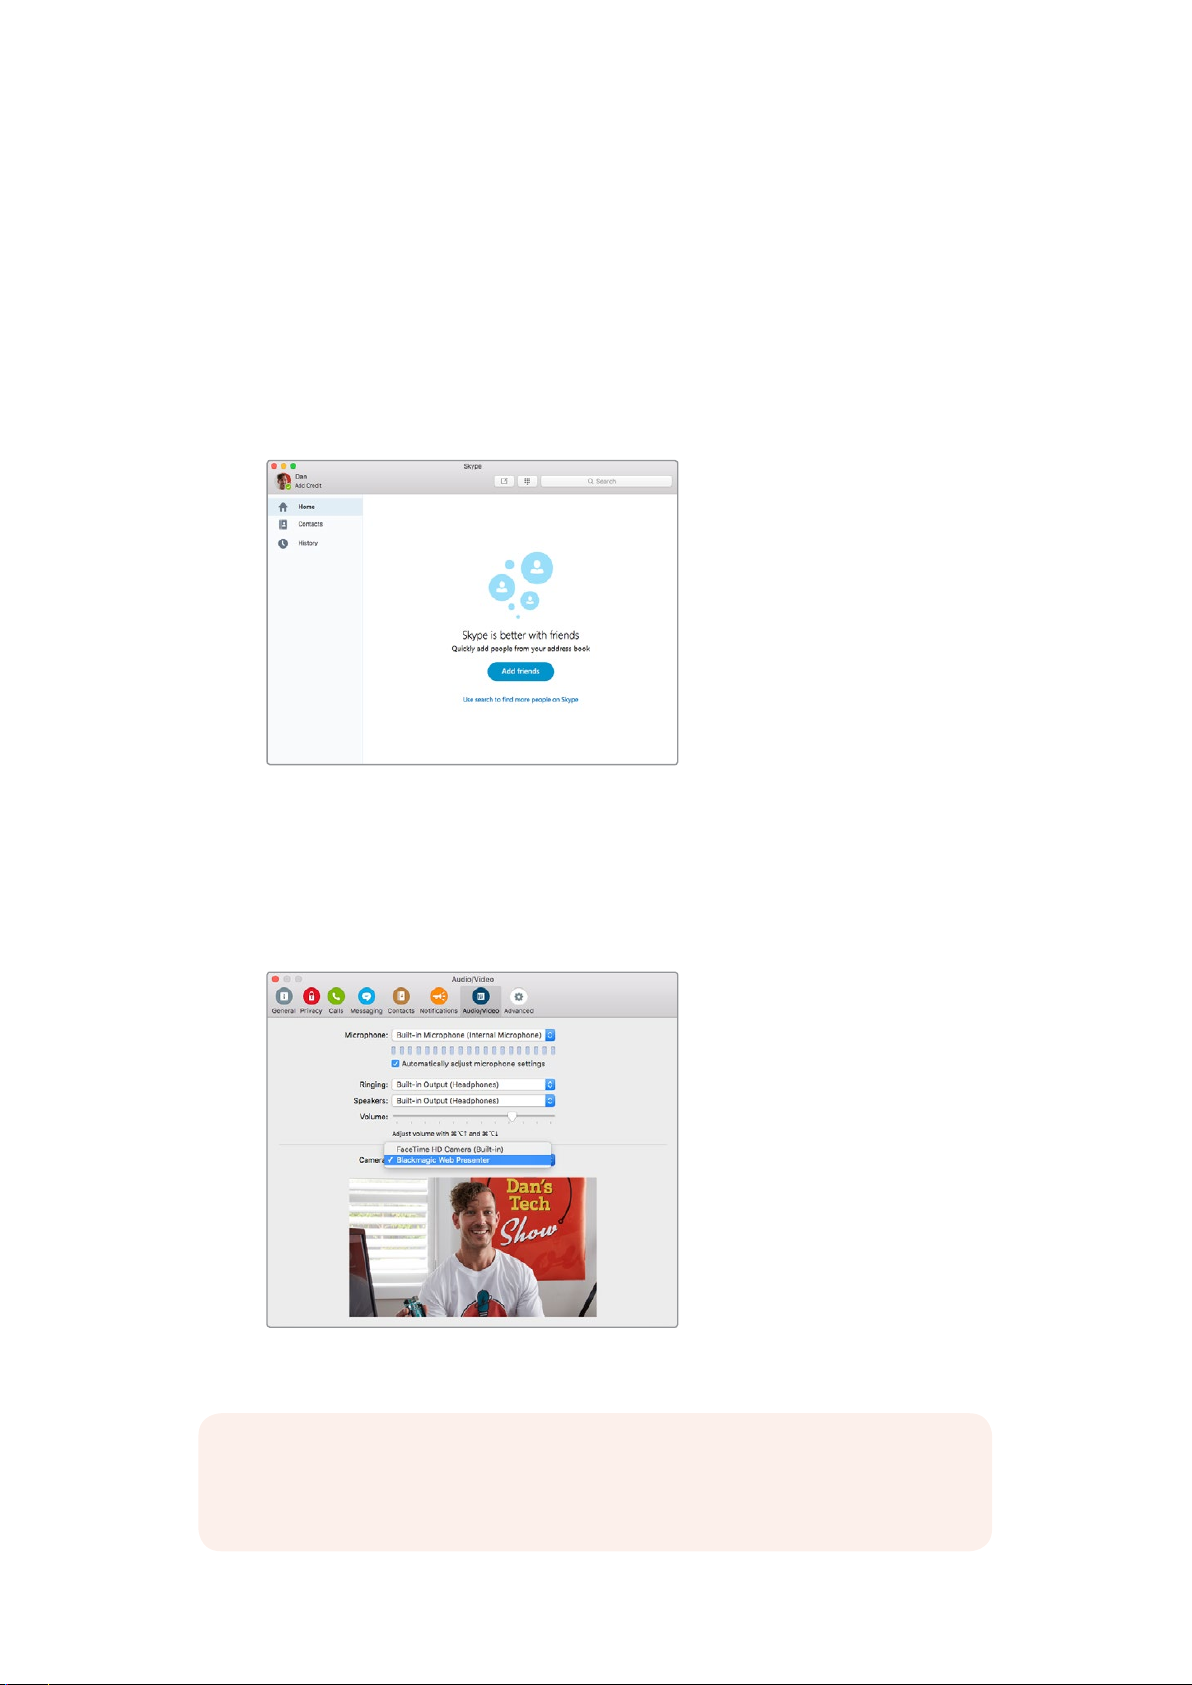
3 If your computer has a webcam it will be selected by default, and the Skype preview
window will show the image from the webcam. By clicking on the ‘Camera’ drop
down menu, you can select Blackmagic Web Presenter from the list. Once selected,
you will see the source video connected to your Web Presenter appear in the Skype
preview window.
Select Blackmagic Web Presenter from
the ‘Camera’ drop down menu
NOTE In Skype’s preferences window, you may noticed that your image is reversed
from left to right. This is normal as Skype presents users with a mirror image of
themselves for preview purposes. Your video calls themselves will not be reversed.
Using Blackmagic Web Presenter with Third Party Software
7
Page 8
4 In the ‘Microphone’ drop down menu, select Blackmagic Web Presenter
asyouraudio source.
That’s all you need to do, and if you make a Skype call you will be using the source video that
you have connected to Blackmagic Web Presenter.
NOTE The process of setting up Skype to work with Blackmagic Web Presenter is
thesame on both a Mac OS and Windows computer. For more information refer to the
Skype website: www.skype.com
Using Blackmagic Web Presenter to Stream with YouTube Live
Open Broadcaster is free software that works very well for streaming to YouTube Live and can
be downloaded from: https://obsproject.com.
To set your Web Presenter as a new device
Once installed on your computer, launch the software.
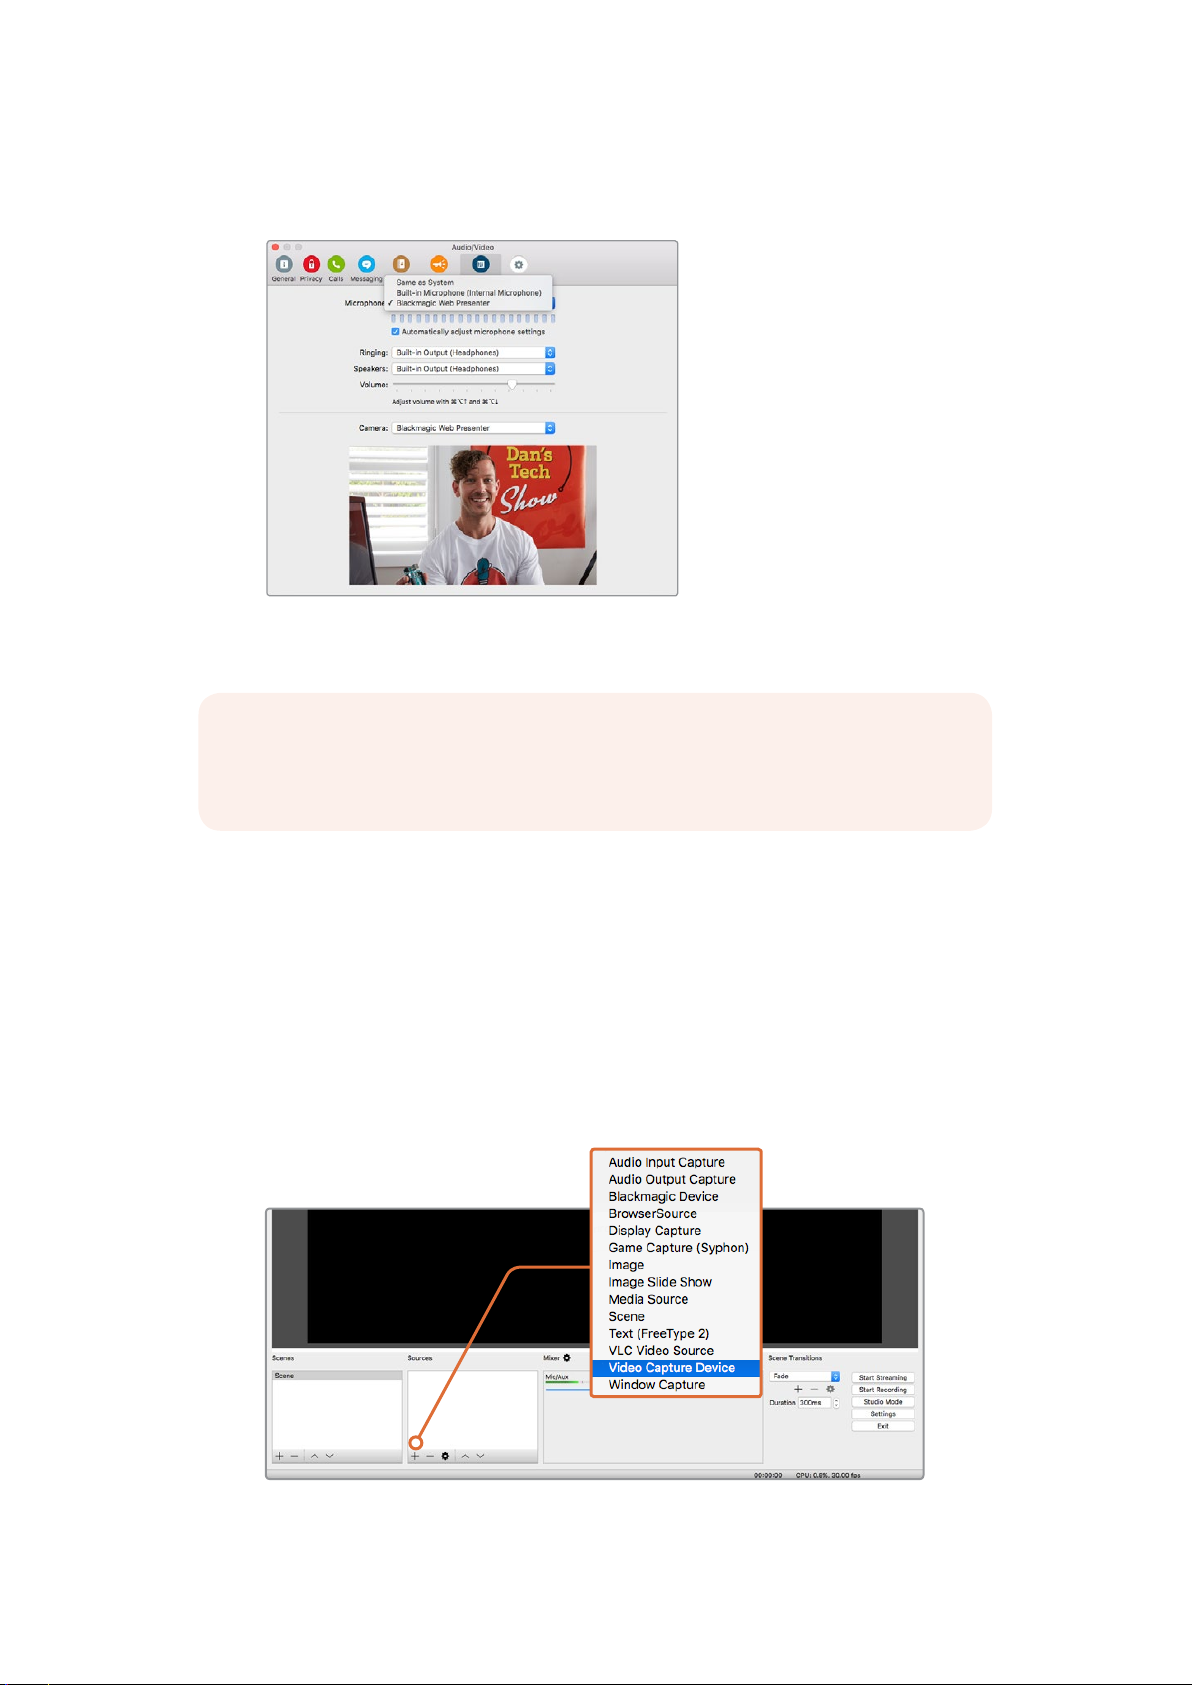
1 Click on the ‘+’ button in the ‘sources’ box to add a source and select‘videocapture
device’. A pop up dialog box will give you the option to create a new source.
Select ‘video capture device’ from the list of sources and create
a new source for your Blackmagic Web Presenter
Using Blackmagic Web Presenter with Third Party Software
8
Page 9
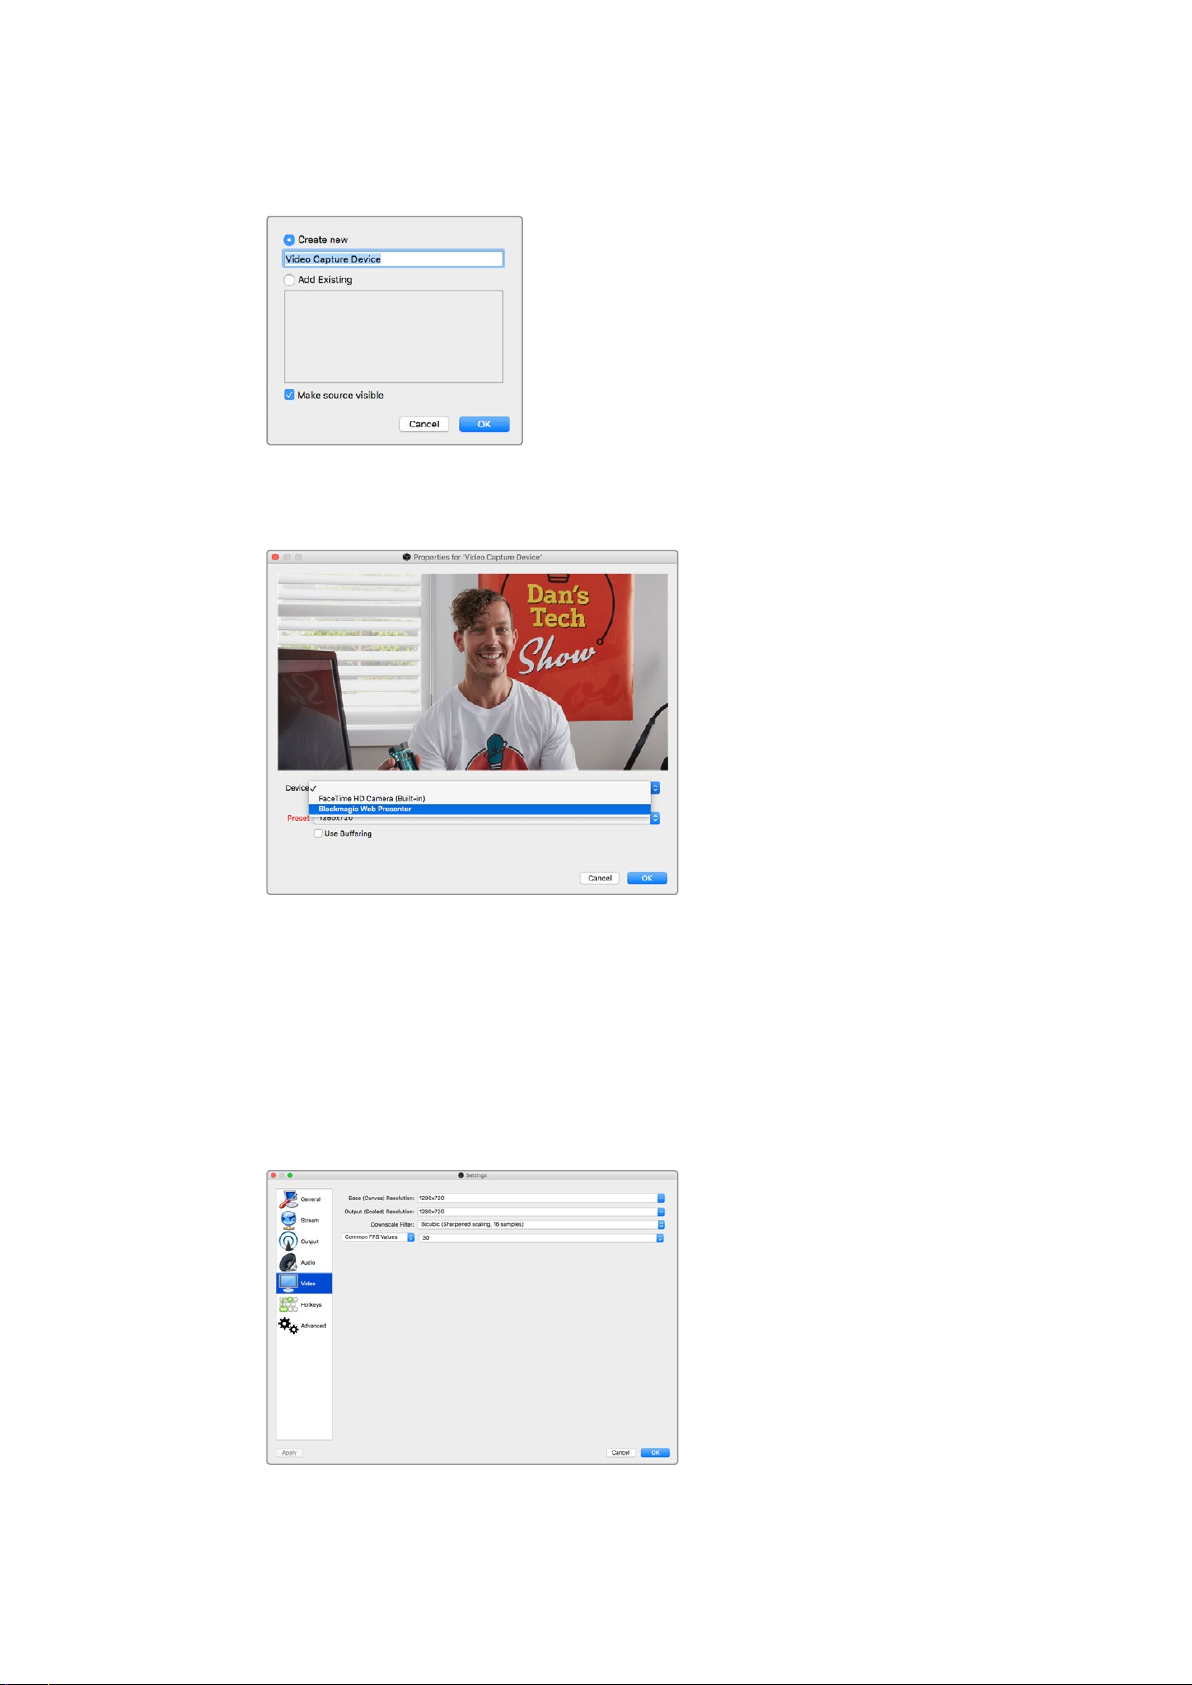
2 Select ‘create new’ in the pop up dialog box and click ‘ok’.
3 In the properties window for the new device, select your Blackmagic Web Presenter
from the ‘device’ drop down menu and click ‘ok’.
4 Follow the same process for audio. Click on the ‘+’ button in the ‘sources’ box
to add a source and select ‘audio input capture’. Select ‘create new’ in the pop
up dialog box and click ‘ok’. In the properties window for the new device, select
‘BlackmagicWebPresenter’ from the ‘device’ drop down menu and click ‘ok’.
5 Now open the preferences located under OBS>Preferences and click on the
‘video’ tab.
6 Set your base ‘canvas’ resolution to 1280 x 720 and your output ’scaled’ resolution
to1280 x 720, and click ‘ok’. This will allow you to see the input video full screen.
Using Blackmagic Web Presenter with Third Party Software
9
Page 10
Setting the base ‘canvas’ and ‘scaled’ resolution to 1280 x 720 lets you
view the input video full screen
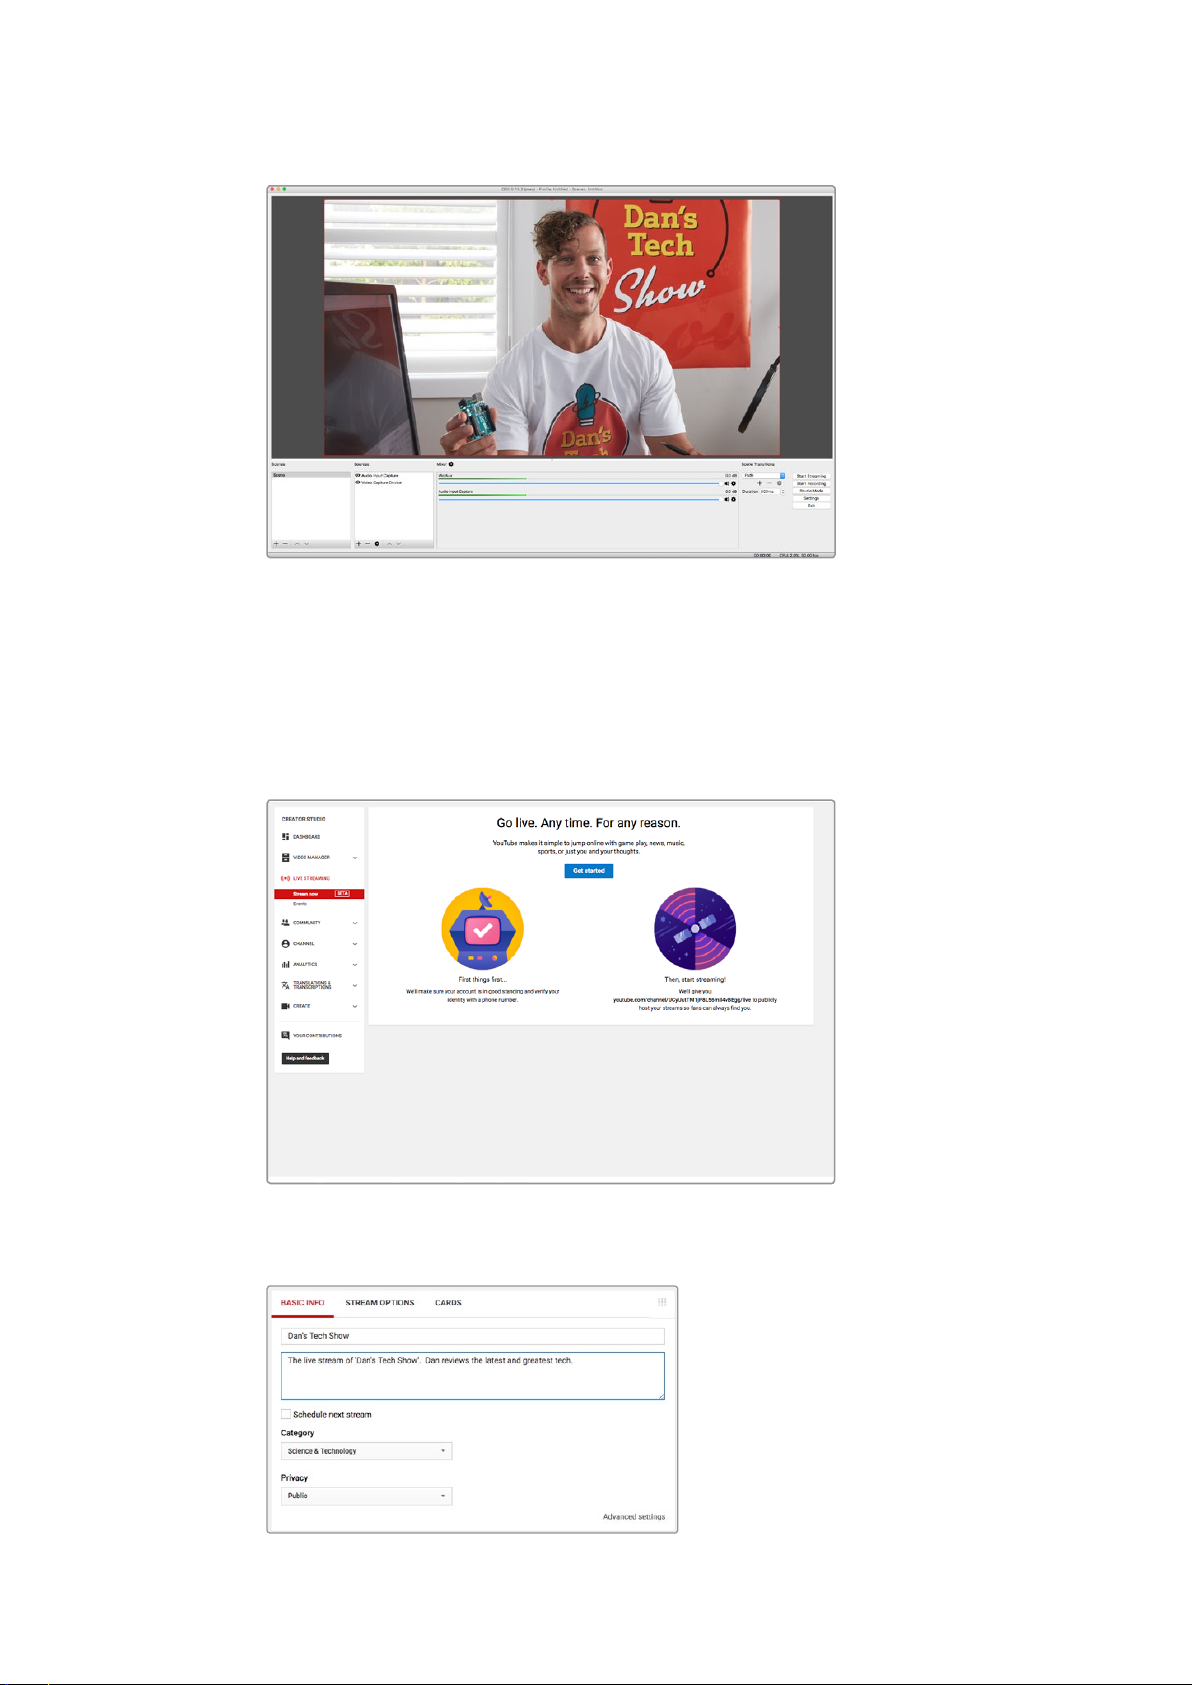
Setting up a YouTube Live streaming channel
Now you need to create a YouTube live streaming channel. In your browser, go to
www.youtube.com/live_dashboard and sign in or create a new Google account.
1 Select live streaming on the left hand side, and then click ‘get started’.
2 Type in the details about your stream and choose if you would like to make it
a public or a private stream.
Using Blackmagic Web Presenter with Third Party Software
10
Page 11

3 Click ‘reveal’ at the bottom of the page. Highlight the stream key, right click and select
copy. It’s important to copy this information because in the next step we will paste this
key into the OpenBroadcaster software.
4 In the Open Broadcaster software, go to preferences and select the stream tab. Select
YouTube as your service and paste the stream key into the ‘stream key’ text field.
5 Click the start stream button in the main window of the Open Broadcaster software and
you should now be broadcasting your stream.
6 Back in your web browser, your stream’s status will change to ‘online’ and you can now
see your live stream.
Using Blackmagic Web Presenter with Third Party Software
11
Page 12
NOTE The process of setting up the Open Broadcaster software to work with
1
2
SET
VIDEO
MENU
AUDIO
Video Format
525i59.95 NTSC
USB
25 fps
Video Format
525i59.95 NTSC
USB
25 fps
Blackmagic Web Presenter is the same on both a Mac OS and Windows
computer. Formore information refer to https://obsproject.com.
Using Teranex Mini Smart Panel
An optional Teranex Mini Smart Panel can be mounted to the front of your Web Presenter,
replacing the original front panel. The Smart Panel buttons allow you to switch sources, together
with a built in LCD so you can monitor the input video and status information, such as the input
video source, video format, plus the USB output frame rate.
Installing Teranex Mini Smart Panel
Installing your optional Smart Panel is easy and because the panels are hot swappable, you
don’t even need to turn off your Blackmagic Web Presenter when installing it.
1 Remove the two M3 screws on each side of your Web Presenter’s basic front panel
using a Pozidriv 2 screwdriver and gently pull the panel away from the front of your
Web Presenter.
2 On the inside of the basic panel, you’ll notice a small clear plastic tube attached to
the bottom corner. This tube directs light from the LED inside the Web Presenter to
illuminate the status indicator on the basic panel. This tube should stay attached to the
basic front panel.
TIP If reattaching the basic front panel, make sure the light tube is aligned with
the slot in the front of the unit.
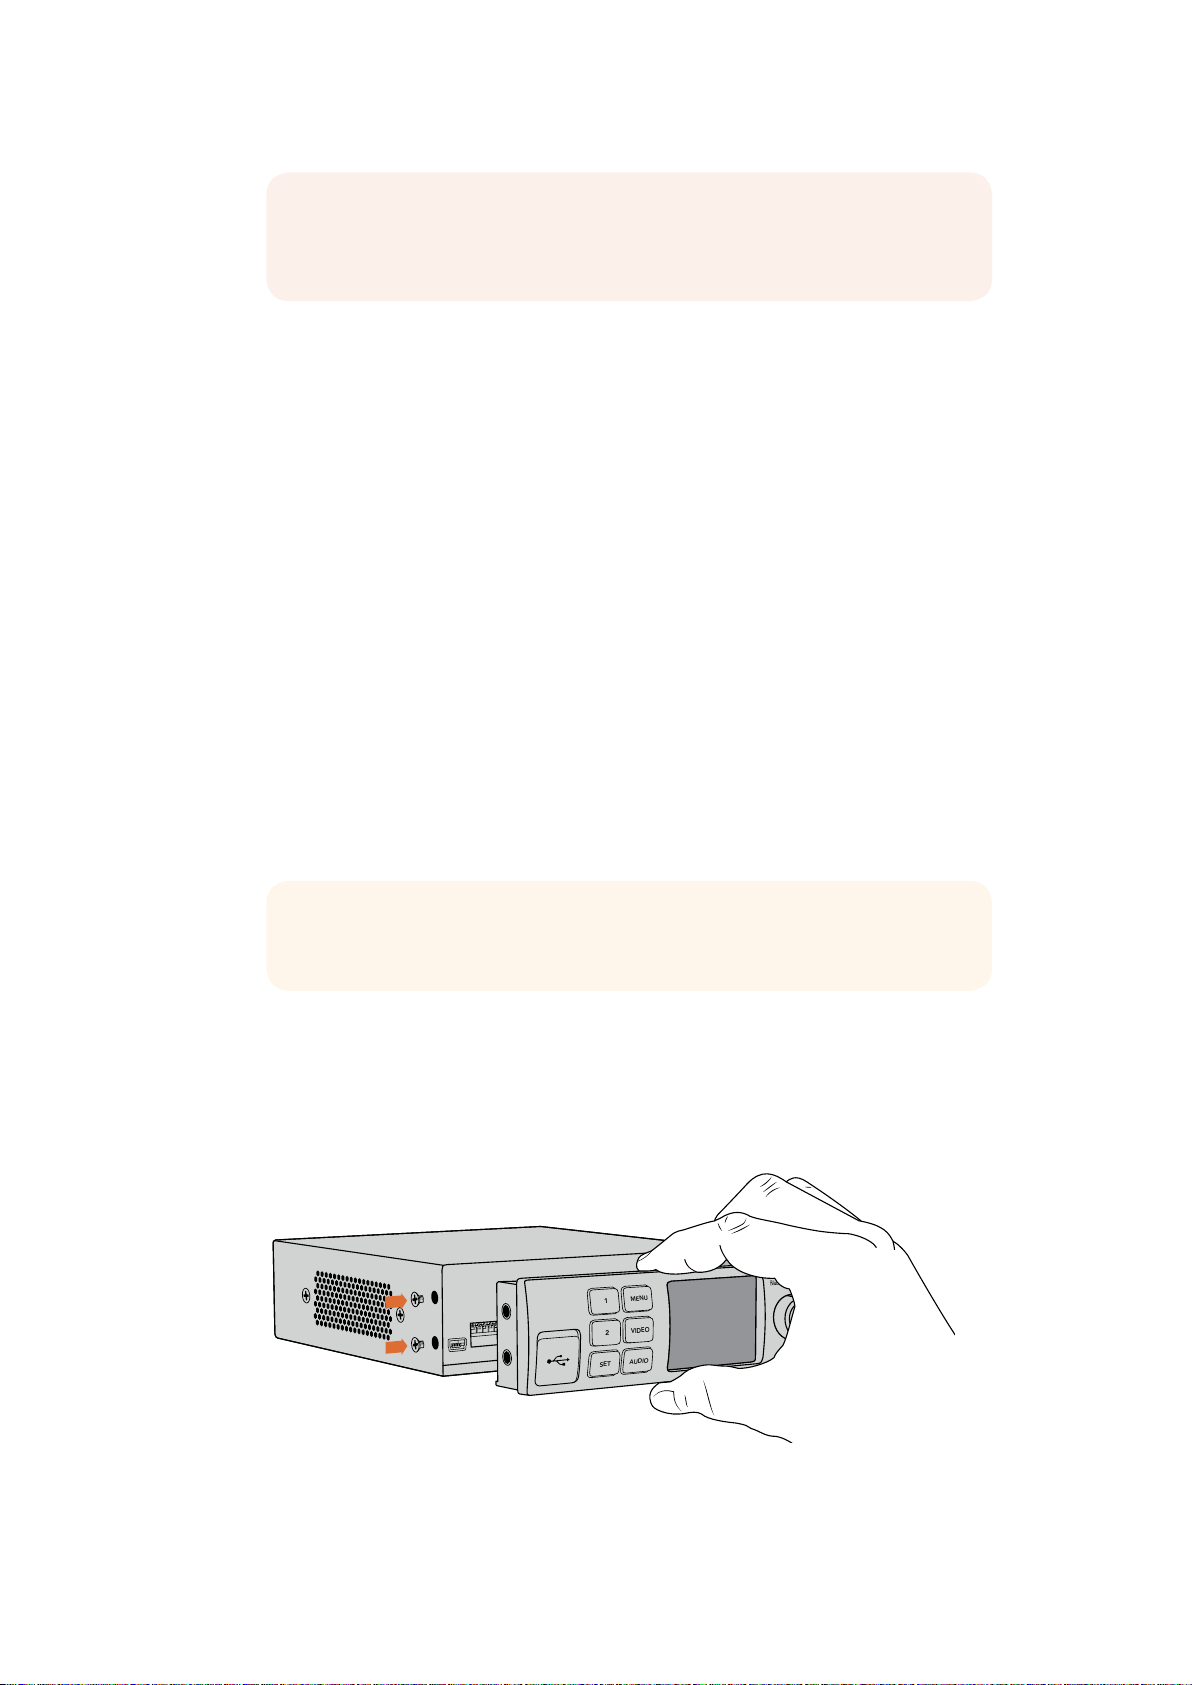
3 Align the connector on the rear of the Smart Panel with the adjoining connector on
the face of your Blackmagic Web Presenter and gently push the Smart Panel towards
the unit until the connectors are firmly seated. The Smart Panel should make a firm
connection and fit neatly inside the face of your Web Presenter.
4 Re-insert the M3 screws from the original panel.
When installing the Teranex Mini Smart Panel to your Blackmagic WebPresenter, holding the panel
with your fingers and thumb positioned above and below the connector will help guide it into place
Using Teranex Mini Smart Panel
12
Page 13

If your Blackmagic Web Presenter is installed in a Teranex Mini Rack Shelf, you will need to
1 MENU
2 VIDEO
SET AUDIO
Video Format
525i59.94 NTSC
Source
HDMI
USB
30 fps
remove the Web Presenter from the rack shelf to access the front panel screws. See the ‘Teranex
Mini RackShelf’ section for more information. Your Web Presenter’s USB port is still accessible
with theSmart Panel attached. To access the port, simply open the rubber USB dust cover.
Smart Panel Features
Control Buttons
1 and 2 buttons
When the smart panel is attached, the switching feature is enabled on your Blackmagic Web
Presenter. This means when you are broadcasting, you can press buttons 1 and 2 to switch
between the SDI and HDMI input sources. Pressing ‘1’ will select the SDI input, and pressing ‘2’
will select the HDMI input.
Video Format
1 MENU
2 VIDEO
SET AUDIO
Source
HDMI
525i59.94 NTSC
USB
30 fps
The Teranex Mini Smart Panel enables the switcher feature on your Web Presenter, so you can
press buttons 1 and 2 to live switch between the SDI and HDMI input sources
Settings
When a Teranex Mini Smart Panel is attached to your Web Presenter, you can change settings
such as transition durations, audio mix settings and more. Simply press the ‘menu’ button to
open the settings menu, then use the rotary knob and set button to navigate through the menu
and change a setting.
To move back to the previous menu item, simply press the menu button again. Keep pressing
the menu button to return to the home screen.
Video Input
Your Blackmagic Web Presenter can be set to automatically detect when an input is plugged in
and will set the program output accordingly. You can also set your Web Presenter to use only
the SDI or HDMI input. These settings can also be changed using the built in switches when the
original basic front panel is attached. Refer to the ‘changing the video input using switches’
section for more information.
TIP If you want to change a video setting, you can bypass the main menu and go
straight to the video settings by pressing the ‘video’ button on the front control panel.
Settings
13
Page 14

Auto
Choose this setting if you want your Web Presenter to automatically select the SDI or
HDMI input when a video source is connected. If both SDI and HDMI video sources are
connected, your Web Presenter will automatically select the SDI input.
SDI
Choose this setting if you want to set your Web Presenter to use only the SDI input.
HDMI
Choose this setting if you want to set your Web Presenter to use only the HDMI input.
Use the video input settings to choose which input
you want to use, or select auto for Blackmagic Web
Presenter to automatically detect the video source
TIP If a video signal is received via the video input other than what you have selected,
a black screen will be displayed. Simply select the appropriate input, or set your Web
Presenter to auto.
Transition
When switching a live broadcast using the switcher feature in your Blackmagic Web Presenter,
the default transition is a half second cross dissolve, but you can change the duration of the
transition if you want to. You can even set your Web Presenter to use a dip or cut transition!
The transition settings let you choose which
transition type and duration you want to use
Settings
14
Page 15

Cut
To use a straight cut when switching between video sources, select the cut
transition type.
Mix
The mix transition is a cross dissolve. This means one video source will smoothly
transition to the other over a set duration. Change the duration by selecting one of the
mix presets.
Dip
The dip transition is similar to a mix, however, the transition will first smoothly dip to
black, then to the other video source. Choose one of the dip duration presets in the
menu list.
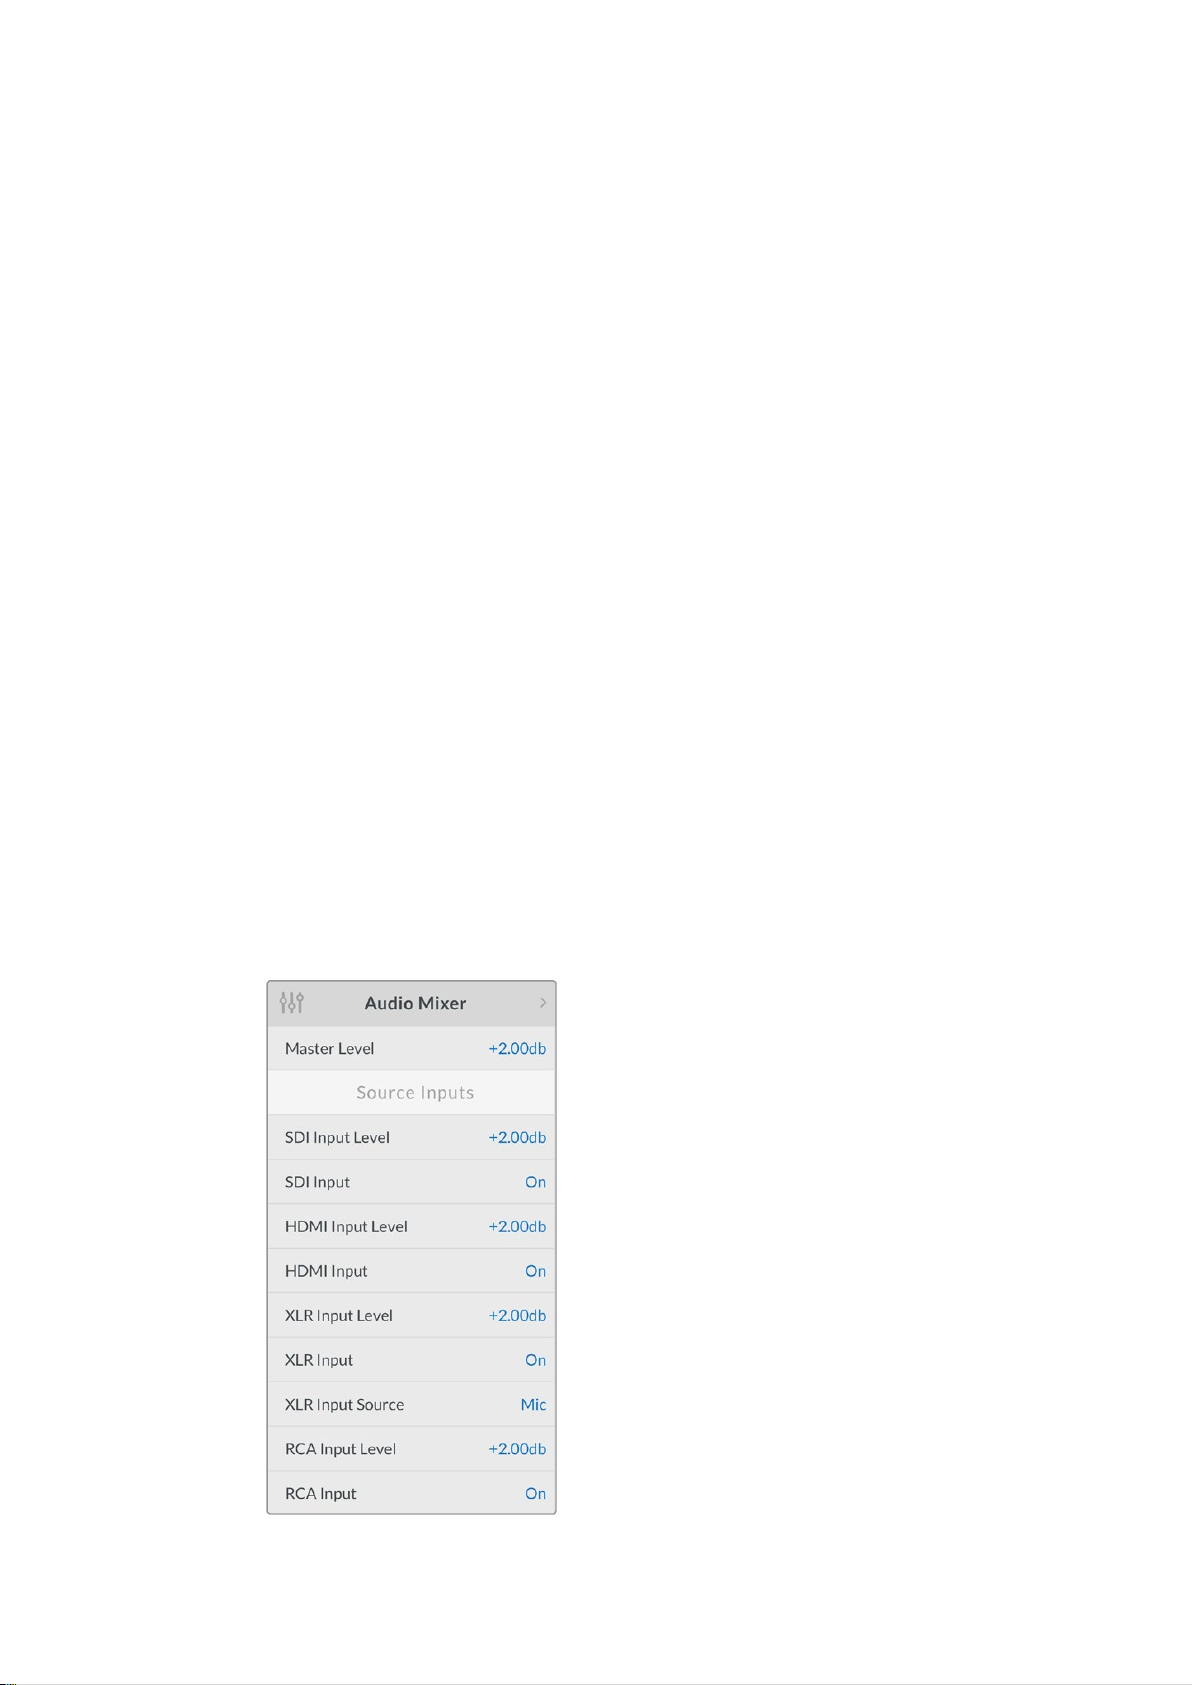
Audio Mixer
The audio mixer settings let you control the mix of your audio. For example, turning the audio
for each input on or off, changing the level of the audio for each input, or setting the XLR input
level to mic or line level audio. Turn the rotary knob clockwise or counterclockwise to adjust
a setting.
TIP If you want to change an audio setting, you can bypass the main menu and go
straight to the audio settings by pressing the ‘audio’ button on the front control panel.
Master Level
Turn the rotary knob to increase or decrease the audio level for the program output. This
setting affects the overall volume for the entire master sound mix being broadcasted.
SDI Input Level
Use this setting to adjust the strength of the audio level for the SDI video input.
SDI Input
Turn the rotary knob to set the SDI input audio to on, off, or audio follows video.
ON
When set to ‘on’, audio for the SDI input will always be present in the program audio.
Use the SDI input level setting to increase or decrease the audio level.
OFF
Set the SDI input to ‘off’ if you don’t want audio from the SDI input to be included in the
program audio.
AFV
When set to audio follows video, the audio for the SDI input will only be present in the
master program audio when the SDI video input is switched to the program output.
HDMI Input Level
Lets you adjust the strength of the audio level for the HDMI video input.
Settings
15
Page 16
HDMI Input
Turn the rotary knob to set the HDMI input audio to on, off, or audio follows video.
ON
When set to ‘on’, audio for the HDMI input will always be present in the program
audio. Use the HDMI input level setting to increase or decrease the audio level.
OFF
Set the HDMI input to ‘off’ if you don’t want audio from the HDMI input to be included in
the program audio.
AFV
When set to audio follows video, the audio for the HDMI input will only be present in the
master program audio when the HDMI video input is switched to the program output.
XLR Input Level
Lets you adjust the strength of the audio level for the XLR audio input source.
XLR Input
Turns the XLR input audio on or off.
XLR Input Source
Use this setting to set the input source level to mic or line level audio.
The signal strength from a microphone is typically at a lower level compared to levels from
audio playback equipment. To compensate for the lower signal strength, Blackmagic Web
Presenter can be set to ‘mic’ level audio which boosts the input signal. For audio equipment
other than a microphone, set the XLR input level to ‘line’.
RCA Input Level
Adjusts the strength of the audio level for the RCA audio input source.
RCA Input
Turns the RCA input audio on or off.
Turn audio for each input on or off, and
adjust levels using the audio mixer settings
Settings
16
Page 17
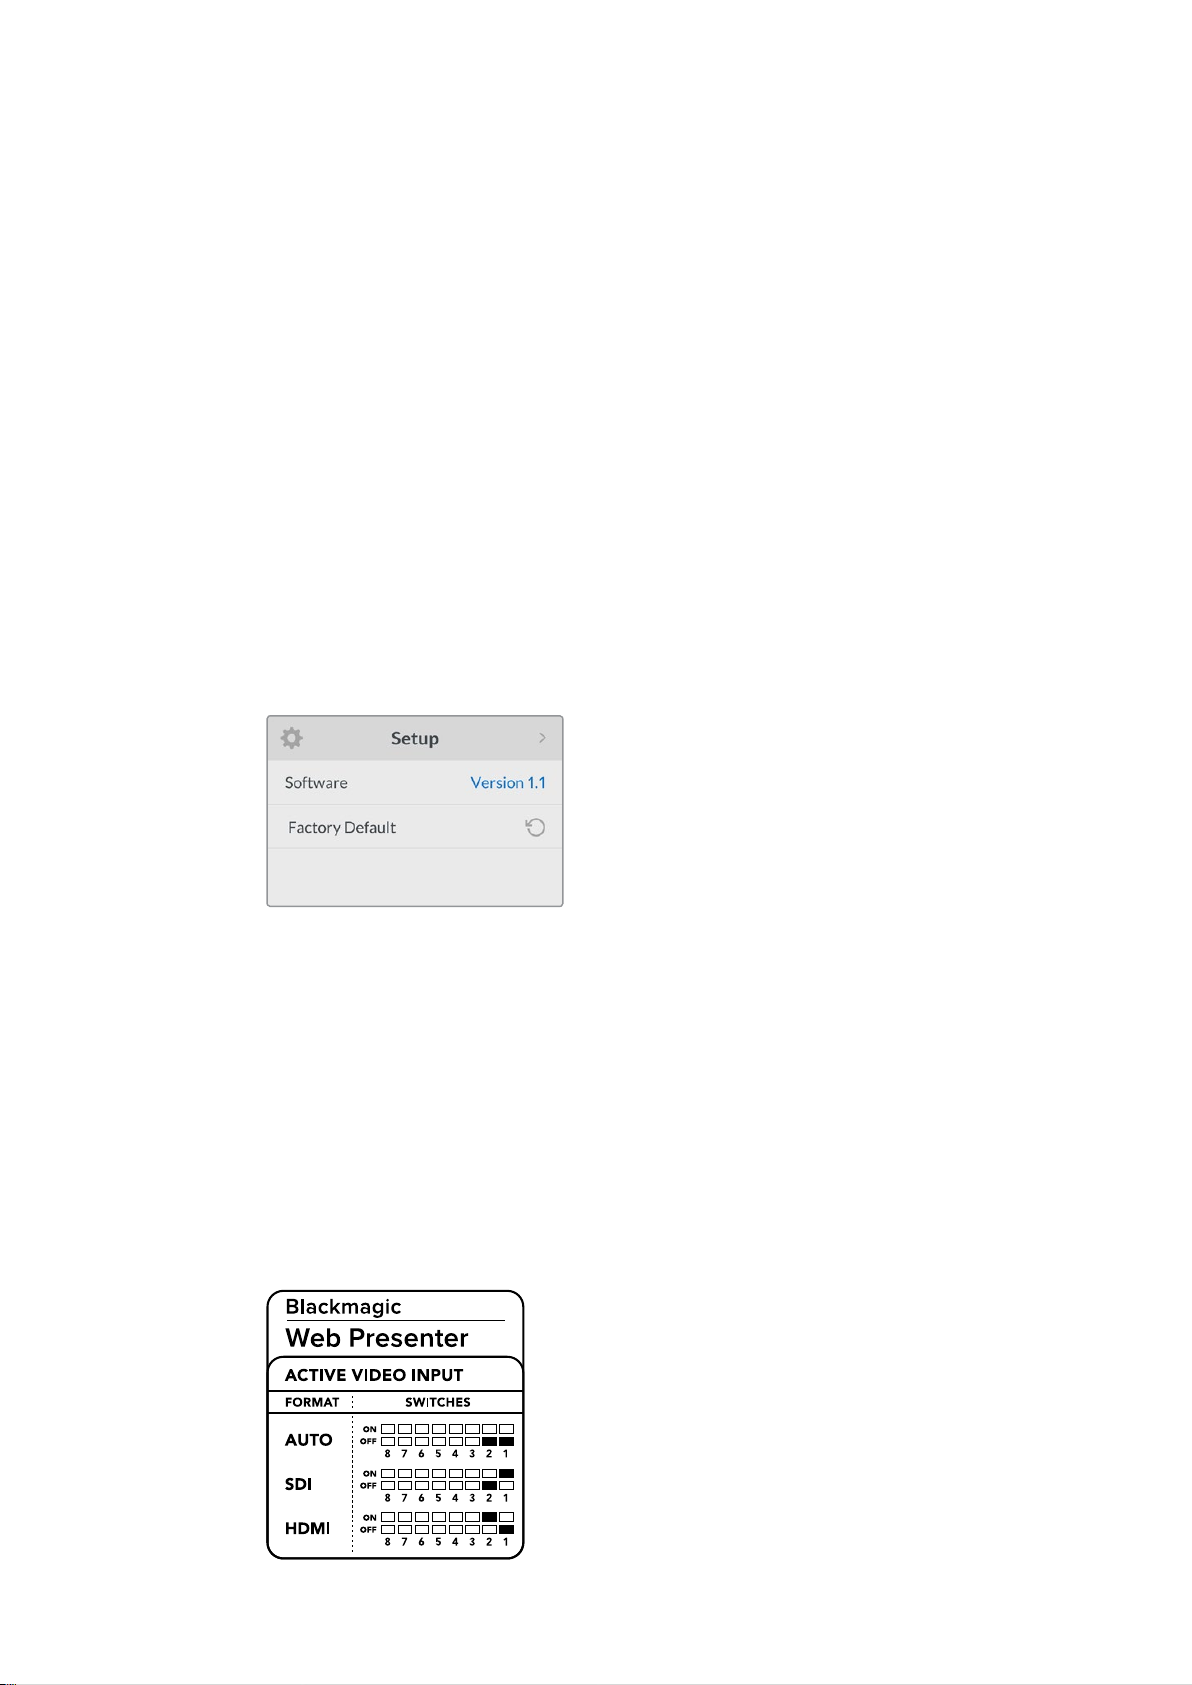
Setup
Use the setup settings to check the software version currently installed on your Web Presenter.
You can also restore your Web Presenter to its default settings.
Software
The software setting lets you check the software version currently installed on your
Blackmagic Web Presenter.
Factory Default
The factory default setting is helpful if you want to start a new project with all the
settings on your Web Presenter set to their original default state.
To reset your Web Presenter:
1 Press the menu button and navigate to the ‘setup’ settings using the rotary knob. Press
‘set’ to enter the menu.
2 Select ‘factory default’ and press the ‘set’ button.
3 Cancel or confirm the reset.
If you confirm the reset, your Web Presenter will now display a ‘resetting’ indicator. When the
reset is complete, the LCD will return to the home screen and all the settings will now be set to
their original default state.
The setup settings can be used to check the software version
currently installed on your Blackmagic Web Presenter, or
resetting your Web Presenter to its original default state
Changing the Video Input using Switches
Your Blackmagic Web Presenter has small switches accessible via the basic front panel that lets
you set the video input to SDI, HDMI or auto. When a Teranex Mini Smart Panel is attached, the
switches are overridden by the smart panel LCD menu settings.
Changing a setting using switches is easy! Simply move the relevant switches up or down to the
on or off position using the tip of a pen. Refer to the switch legend printed on the base of your
Web Presenter to see the correct switch positions for your desired input.
Changing the Video Input using Switches
17
Page 18
AUTO
Set switches 1 and 2 to ‘OFF’. Choose this setting if you want your Web Presenter to
automatically select the SDI or HDMI input when a video source is connected. If both
SDI and HDMI video sources are connected, your Web Presenter will automatically
select the SDI input.
SDI
Set switch 2 to ‘OFF’ and 1 to ‘ON’. Choose this setting if you want to set your Web
Presenter to use only the SDI input.
HDMI
Set switch 2 to ‘ON’ and 1 to ‘OFF’. Choose this setting if you want to set your Web
Presenter to use only the HDMI input.
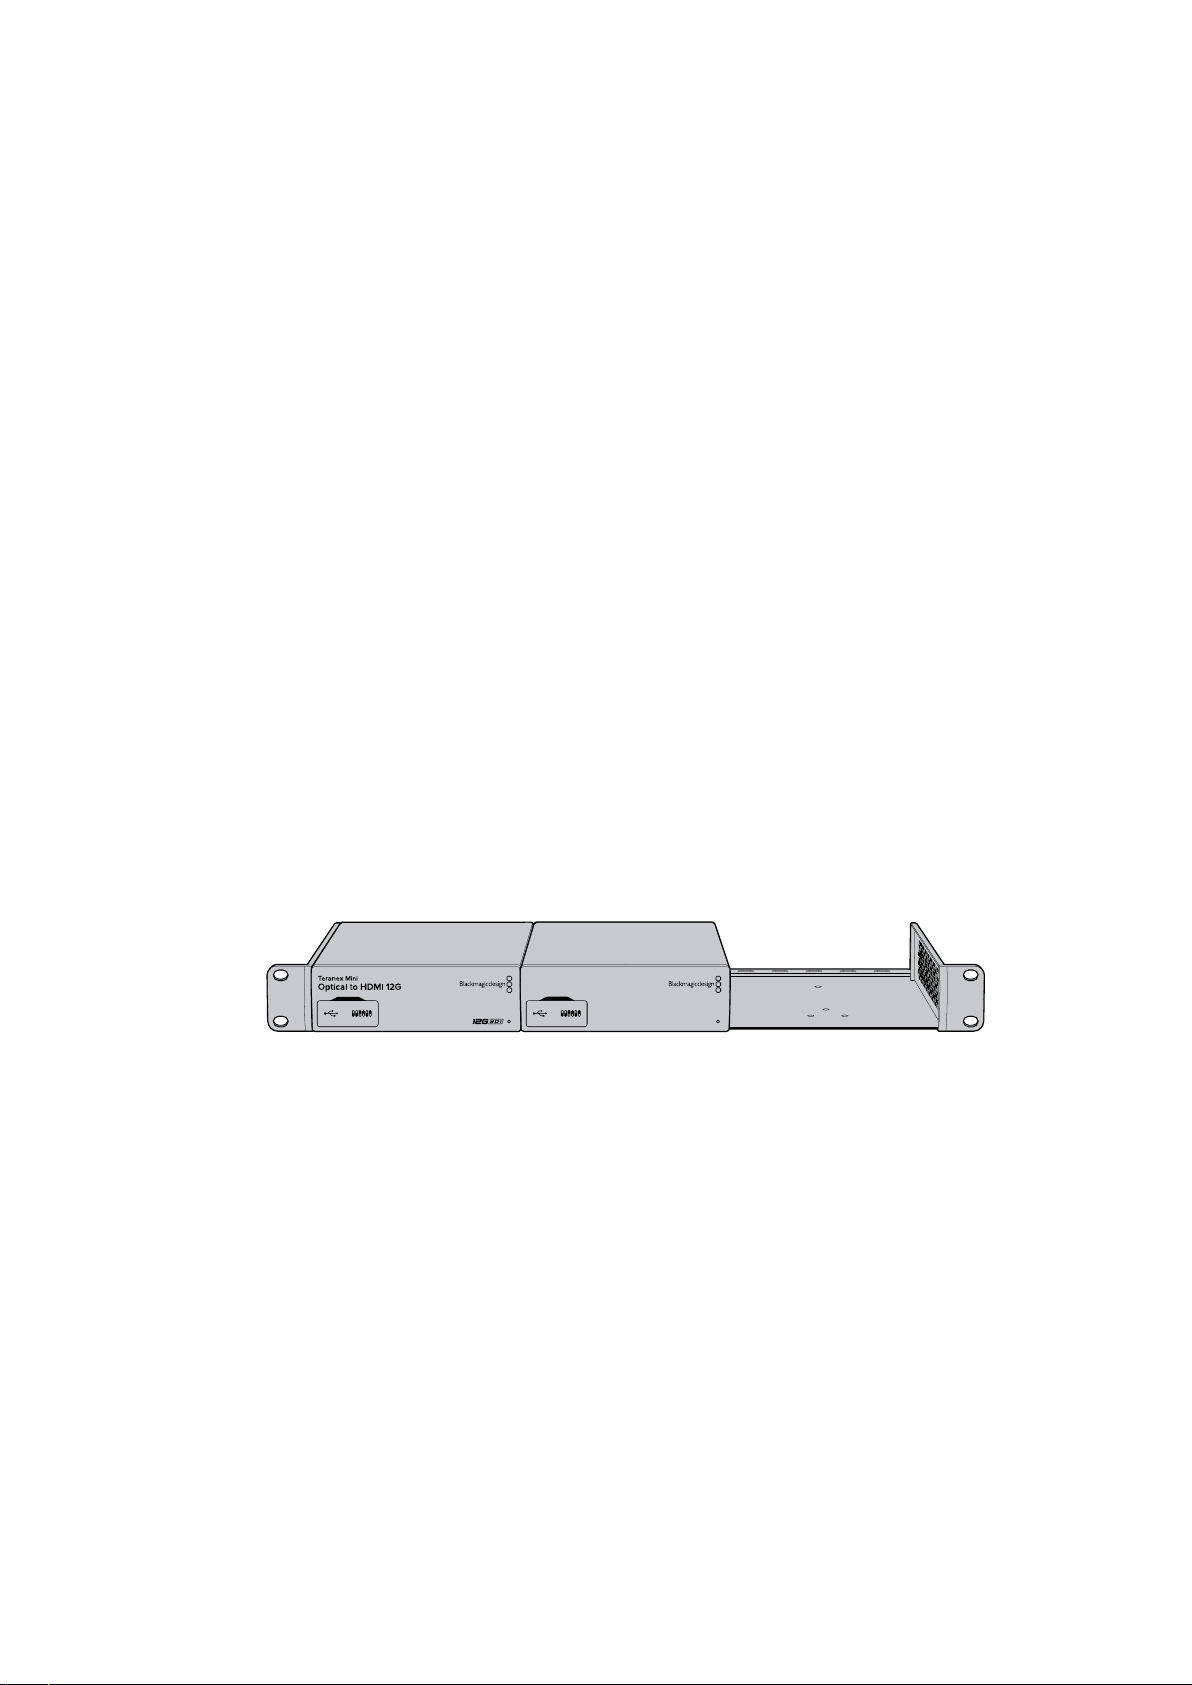
Teranex Mini Rack Shelf
Teranex Mini Rack Shelf is a 1 RU shelf that lets you install your Blackmagic Web Presenter into a
broadcast rack or road case. Your Web Presenter is so small, you can install it next to other
Blackmagic Design equipment that shares a similar form factor, such as Teranex Mini converters,
Blackmagic MultiView 4 and HyperDeck Studio Mini. For example, installing a Blackmagic Web
Presenter together with two HyperDeck Studio Minis gives you one unit to play back your video
sources, and provides another unit for recording the program output from your Web Presenter. This
modular design lets you build your own custom video solutions that are portable and easy to use!
Installing your Blackmagic Web Presenter into a Teranex Mini Rack Shelf is as easy as removing
the unit’s rubber feet, if installed, and fastening the unit to the base of the shelf using the
supplied screws. The Teranex Mini Rack Shelf ships with two original blank panels which you
can use to cover gaps if you don’t need to install additional Blackmagic Design equipment.
For more information check the Blackmagic Design website at www.blackmagicdesign.com.
Blackmagic
Web Presenter
Teranex Mini Rack Shelf lets you rack mount your Blackmagic Web Presenter
with other Blackmagic Design equipment that shares the same form factor,
such as Teranex Mini Converters and HyperDeck Studio Mini
Using the Built in Switcher
Blackmagic Web Presenter features a built in 2 input live switcher. However, to take advantage
of this feature you need to install the Teranex Mini Smart Panel. This panel adds an LCD screen
and pushbutton controls that you can use to control the built in switcher. Once the Teranex Mini
Smart Panel is installed, the switcher feature will be enabled.
When both SDI and HDMI video sources are connected, the HDMI input will be resynchronized
so that both inputs can be transitioned without glitches. This is what makes the Web Presenter
able to do live switching.
To operate the built in switcher, simply press the 1 on the front panel to select SDI as the video
source or the button marked 2 to select the HDMI video source. Once selected, the Web
Presenter will perform a transition. You could connect a computer with a slide show to the HDMI
Using the Built In Switcher
18
Page 19
input and a camera to the SDI source and do very professional live presentation shows for your
1 MENU
2 VIDEO
Video Format
525i59.94 NTSC
Source
HDMI
USB
30 fps
audience, simply by switching using the 1 and 2 buttons. You can also confirm the current input,
the video preview and audio levels on the LCD screen.
Video Format
1 MENU
2 VIDEO
SET AUDIO
When switching a live broadcast using Blackmagic WebPresenter with a Teranex Mini Smart
Panel attached, press the 1 and2buttons to switch between the SDI and HDMI inputs
Source
HDMI
525i59.94 NTSC
USB
30 fps
NOTE The default transition is a half second mix, however, if you have a Teranex Mini
Smart Panel attached, you can choose a different duration or transition type in the LCD
menu Transition settings. For more information, refer to the ‘Settings’ section in this manual.
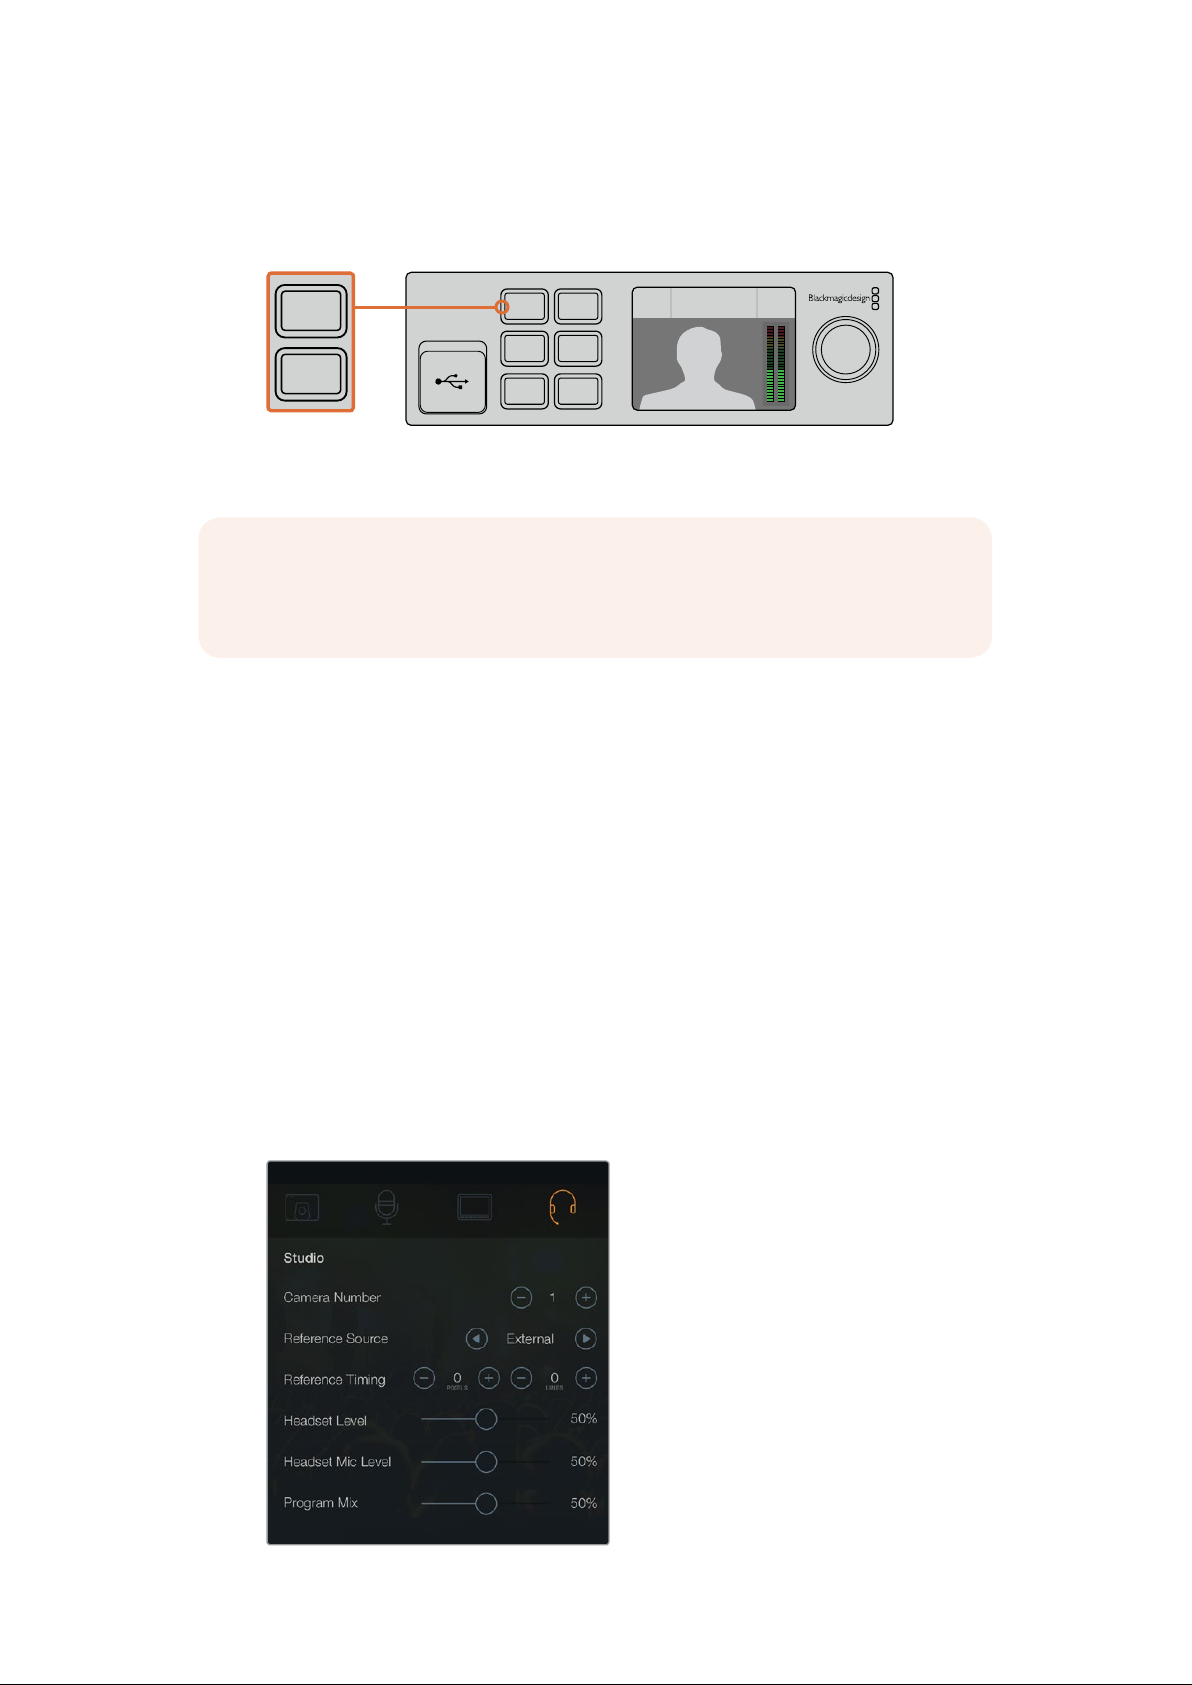
Using Camera Tally
Blackmagic Design studio cameras and ATEM switchers include a tally feature where the tally
information is sent from the switcher to the camera via the program return feed from the
switcher to the camera. Your Blackmagic Web Presenter also includes this tally feature so you
can see which camera is “on air” when you are using the switcher feature on the web presenter.
Using tally is quite simple and all you need to do is connect the SDI output of a Blackmagic
Design Studio Camera to your web presenter as an SDI video source and then connect the
program output of the web presenter back to the camera progam SDI input. Now when you
select the program button on the camera you can see the web presenter’s program video on the
camera. But what’s even more exciting is the tally information is now being sent to the camera.
The SDI video input is tally “camera 1” and the HDMI input is tagged as “camera 2”. So what this
means is that in your camera’s settings, you will need to set the camera number. In this case we
are using the SDI input for the camera, then the camera should be set to camera 1. Once this
has been set, and you press the 1 button on the front panel of the web presenter, you should
see the tally illuminate on the camera.
Set the camera number to ‘1’ for Blackmagic Studio Camera
connected via SDI in the ‘studio’ tab of the LCD menu
Using Camera Tally
19
Page 20
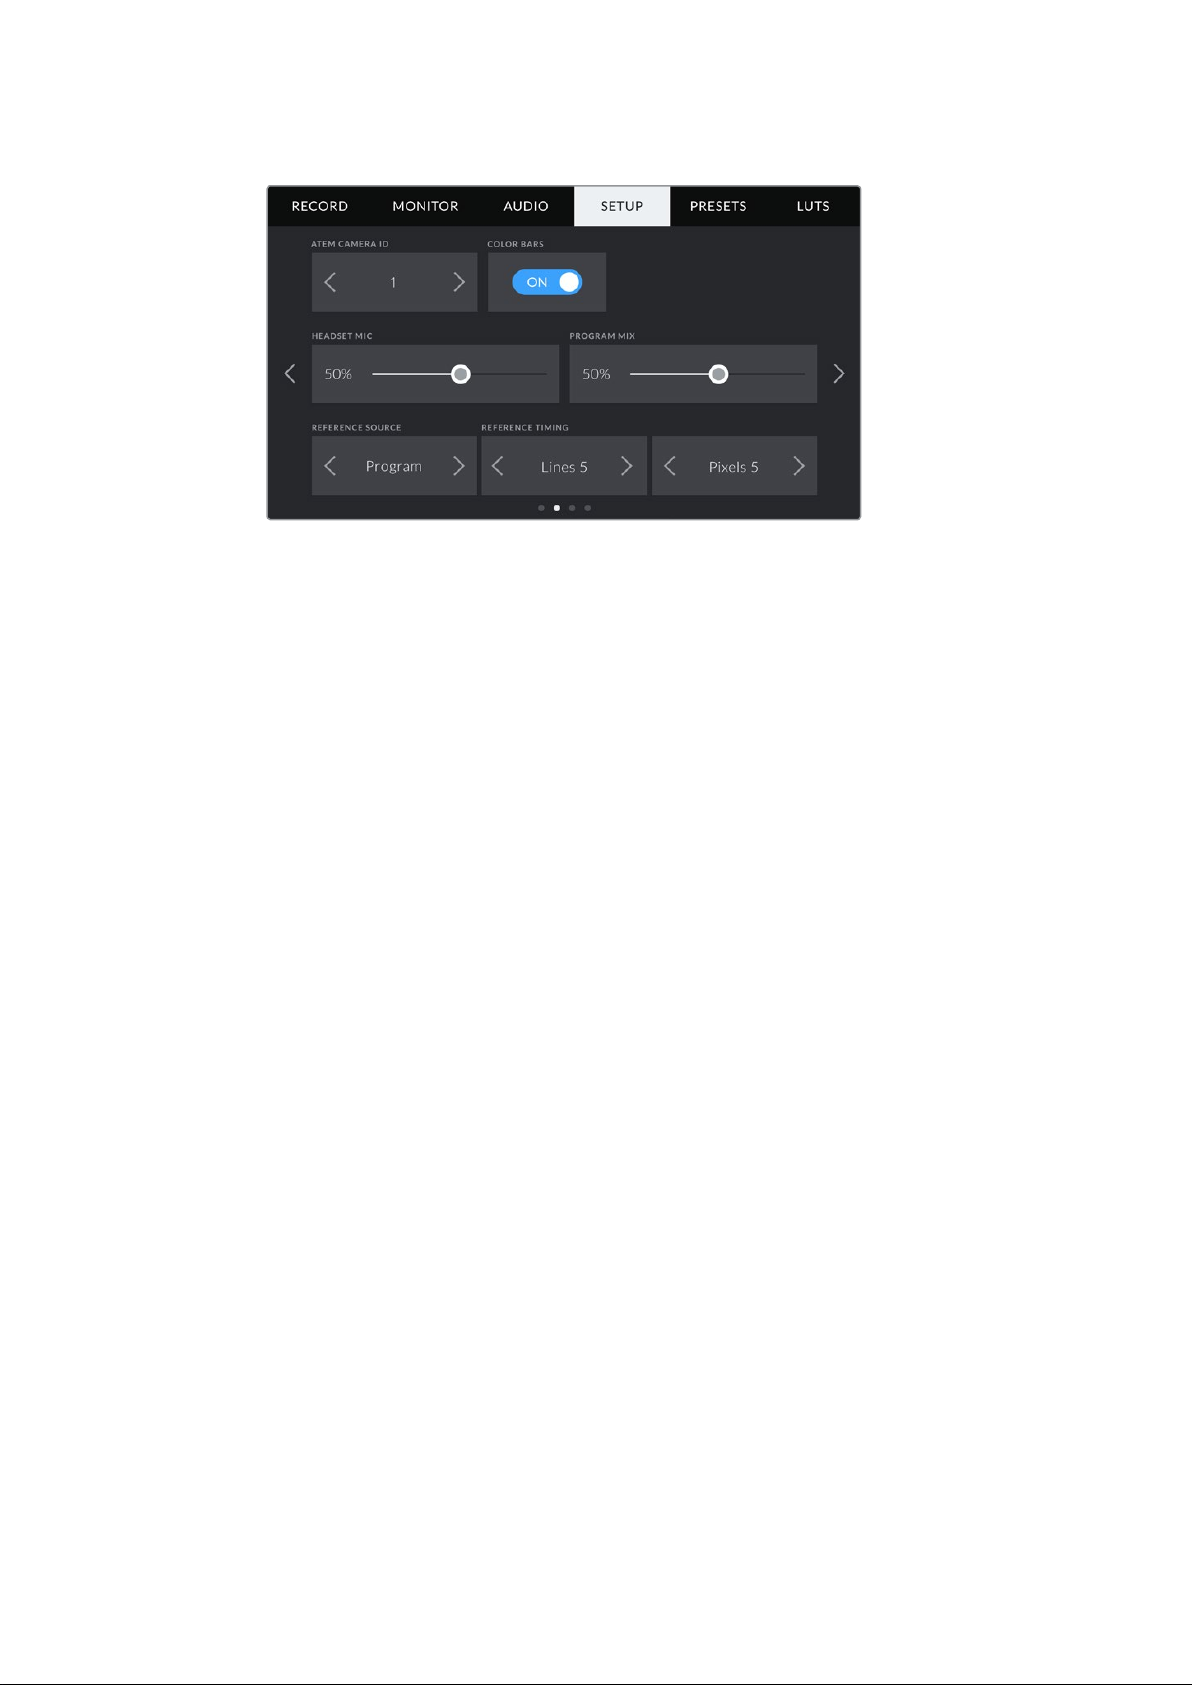
Set the camera number to ‘1’ for Blackmagic URSA Mini
connected via SDI in the ‘setup’ tab of the LCD menu
If you are doing a presentation, it can be extremely helpful for the presenter to see a nice
clearred tally indicator on the camera they are using when they are on air. This makes it easy
for them to know when they are live. Imagine having a Blackmagic URSA Mini with
BlackmagicURSA Studio Viewfinder combination and the presenter can see that big red tally
indicator when they are on air. It’s a very powerful combination!
The tally feature is supported on Blackmagic Studio Camera, Blackmagic Micro Studio Camera
and Blackmagic URSA Mini models of cameras. For more details on setting up tally, refer to the
‘Backmagic URSA and URSA Mini’ and ‘Blackmagic Studio Camera’ manuals which can be
downloaded from www.blackmagicdesign.com/support
Blackmagic Web Presenter Setup Utility
Occasionally, updates for your Blackmagic Web Presenter’s internal software will be available
on the Blackmagic Design website. Updates are installed on your Web Presenter via the
Blackmagic Web Presenter Setup utility. We recommend downloading the setup utility and
updating your Web Presenter so you can benefit from new features and improvements.
To update the internal software using Mac OS:
1 Download and unzip Blackmagic Web Presenter Setup.
2 Open the resulting disk image and launch the Blackmagic Web Presenter Setup
Installer.
Follow the onscreen instructions.
3 After installation, connect your Web Presenter to the computer via the USB connector
on the front panel. Lift open the plastic dust cover to access the USB connector.
4 Launch Blackmagic Web Presenter Setup and follow any onscreen prompt to update
the internal software. If no prompt appears, the internal software is up to date and there
is nothing further you need to do.
Blackmagic Web Presenter Setup Utility
20
Page 21

To update the internal software using Windows:
1 Download and unzip Blackmagic Web Presenter Setup.
2 You should see a Blackmagic Web Presenter Setup folder containing this manual and
the Blackmagic Web Presenter Setup installer. Double click the installer and follow the
onscreen prompts to complete the installation.
3 After installation, connect your Web Presenter to the computer via the USB connector
on the front panel. Lift open the plastic dust cover to access the USB connector.
4 Launch Blackmagic Web Presenter Setup and follow any onscreen prompt to update
the internal software. If no prompt appears, the internal software is up to date and there
is nothing further you need to do.
Download the latest setup utility for your BlackmagicWeb Presenter from the
Blackmagic Design support center at www.blackmagicdesign.com/support
Blackmagic Web Presenter Setup Utility
21
Page 22

Appendix
Blackmagic Embedded Tally Control Protocol
Version 1.0 (30/04/14)
This section is for third party developers or users who may wish to add support for the
Blackmagic Embedded Tally Control Protocol to their products or system. It describes the
protocol for sending tally information embedded in the non active picture region of a digital
video stream.
Data Flow
A master device such as a broadcast switcher embeds tally information into its program feed
which is broadcast to a number of slave devices such as cameras or camera controllers. The
output from the slave devices is typically fed back to the master device, but may also be sent to
a video monitor.
The primary flow of tally information is from the master device to the slaves. Each slave device
may use its device id to extract and display the relevant tally information.
Slave devices pass through the tally packet on their output and update the monitor tally status,
so that monitor devices connected to that individual output may display tally status without
knowledge of the device id they are monitoring.
Assumptions
Any data alignment / padding is explicit in the protocol. Bit fields are packed from LSB first.
Blanking Encoding
One tally control packet may be sent per video frame. Packets are encoded as a SMPTE 291M
packet with DID/SDID x51/x52 in the active region of VANC line 15. A tally control packet may
contain up to 256 bytes of tally information.
Packet Format
Each tally status consists of 4 bits of information:
uint4
bit 0: program tally status (0=off, 1=on)
bit 1: preview tally status (0=off, 1=on)
bit 2-3: reserved (0x0)
The first byte of the tally packet contains the monitor device tally status and a version number.
Subsequent bytes of the tally packet contain tally status for pairs of slave devices. The
masterdevice sends tally status for the number of devices configured/supported, up to a
maximum of 510.
struct tally
uint8
bit 0: monitor device program tally status (0=off, 1=on)
bit 1: monitor device preview tally status (0=off, 1=on)
bit 2-3: reserved (0b00)
bit 4-7: protocol version (0b0000)
Appendix
22
Page 23
uint8[0]
bit 0: slave device 1 program tally status (0=off, 1=on)
bit 1: slave device 1 device preview tally status (0=off, 1=on)
bit 2-3: reserved (0b00)
bit 4: slave device 2 program tally status (0=off, 1=on)
bit 5: slave device 2 preview tally status (0=off, 1=on)
bit 6-7: reserved (0b00)
uint8[1]
bit 0: slave device 3 program tally status (0=off, 1=on)
bit 1: slave device 3 device preview tally status (0=off, 1=on)
bit 2-3: reserved (0b00)
bit 4: slave device 4 program tally status (0=off, 1=on)
bit 5: slave device 4 preview tally status (0=off, 1=on)
bit 6-7: reserved (0b00)
. . .
Slave Device
(1)
Master Device
Slave Device
(2)
Slave Device
(3)
Monitor Device
Byte 7 MSB 6 5 4 3 2 1 0 LSB
0 Version
(0b0)
1 Reserved
(0b0)
2 Reserved
(0b0)
3 ...
Version
(0b0)
Reserved
(0b0)
Reserved
(0b0)
Version
(0b0)
Slave 1
Preview
Slave 3
Preview
Version
(0b0)
Slave 1
Program
Slave 3
Program
Reserved
(0b0)
Reserved
(0b0)
Reserved
(0b0)
Reserved
(0b0)
Reserved
(0b0)
Reserved
(0b0)
Monitor
Preview
Slave 0
Preview
Slave 2
Preview
Monitor
Program
Slave 0
Program
Slave 2
Program
Appendix
23
Page 24

Help
Getting Help
The fastest way to obtain help is to go to the Blackmagic Design online support pages and
check the latest support material available for your Blackmagic Web Presenter.
Blackmagic Design Online Support Pages
The latest manual can be found at the Blackmagic Design support center at
www.blackmagicdesign.com/support.
Blackmagic Design Forum
The Blackmagic Design forum on our website is a helpful resource you can visit for more
information and creative ideas. This can also be a faster way of getting help as there may
already be answers you can find from other experienced users and Blackmagic Design staff
which will keep you moving forward. You can visit the forum at https://forum.blackmagicdesign.com
Contacting Blackmagic Design Support
If you can’t find the help you need in our support material or on the forum, please use the “Send
us an email” button on the support page to email a support request. Alternatively, click on the
“Find your local support team” button on the support page and call your nearest Blackmagic
Design support office.
Help
24
Page 25

Regulatory Notices and SafetyInformation
Regulatory Notices
Disposal of waste of electrical and electronic equipment within the European union.
The symbol on the product indicates that this equipment must not be disposed of with
other waste materials. In order to dispose of your waste equipment, it must be handed
over to a designated collection point for recycling. The separate collection and recycling
of your waste equipment at the time of disposal will help conserve natural resources and
ensure that it is recycled in a manner that protects human health and the environment.
Formore information about where you can drop off your waste equipment for recycling,
please contact your local city recycling office or the dealer from whom you purchased
the product.
This equipment has been tested and found to comply with the limits for a Class A
digitaldevice, pursuant to Part 15 of the FCC rules. These limits are designed to provide
reasonable protection against harmful interference when the equipment is operated in a
commercial environment. This equipment generates, uses, and can radiate radio
frequency energy and, if not installed and used in accordance with the instructions,
maycause harmful interference to radio communications. Operation of this product in a
residential area is likely to cause harmful interference, in which case the user will be
required to correct the interference at personal expense.
Operation is subject to the following two conditions:
1 This device may not cause harmful interference.
2 This device must accept any interference received, including interference that may
cause undesired operation.
Connection to HDMI interfaces must be made with high quality shielded HDMI cables.
Safety Information
This equipment must be connected to a mains socket outlet with a
protectiveearthconnection.
To reduce the risk of electric shock, do not expose this equipment to
drippingorsplashing.
This equipment is suitable for use in tropical locations with an ambient
temperatureofup to 40ºC.
Ensure that adequate ventilation is provided around the product and is not restricted.
When rack mounting, ensure the ventilation is not restricted by adjacent equipment.
No operator serviceable parts inside. Refer servicing to your local Blackmagic Design
service centre.
Use only at altitudes not more than 2000m above sea level.
Regulatory Notices and Safety Information
25
Page 26

Warranty
36 Month Limited Warranty
Blackmagic Design warrants that Blackmagic Web Presenter will be free from defects in
materials and workmanship for a period of 36 months from the date of purchase excluding
connectors, cables, fiber optic modules, fuses and batteries which will be free from defects in
materials and workmanship for a period of 12 months from the date of purchase. If the product
proves to be defective during this warranty period, Blackmagic Design, at its option, either will
repair the defective product without charge for parts and labor, or will provide a replacement in
exchange for the defective product.
In order to obtain service under this warranty, you the Customer, must notify Blackmagic Design
of the defect before the expiration of the warranty period and make suitable arrangements for
the performance of service. The Customer shall be responsible for packaging and shipping the
defective product to a designated service center nominated by Blackmagic Design, with
shipping charges pre paid. Customer shall be responsible for paying all shipping charges,
insurance, duties, taxes, and any other charges for products returned to us for any reason.
This warranty shall not apply to any defect, failure or damage caused by improper use or
improper or inadequate maintenance and care. Blackmagic Design shall not be obligated to
furnish service under this warranty: a) to repair damage resulting from attempts by personnel
other than Blackmagic Design representatives to install, repair or service the product, b) to
repair damage resulting from improper use or connection to incompatible equipment, c) to
repair any damage or malfunction caused by the use of non Blackmagic Design parts or
supplies, or d) to service a product that has been modified or integrated with other products
when the effect of such a modification or integration increases the time or difficulty of servicing
the product. THIS WARRANTY IS GIVEN BY BLACKMAGIC DESIGN IN LIEU OF ANY OTHER
WARRANTIES, EXPRESS OR IMPLIED. BLACKMAGIC DESIGN AND ITS VENDORS DISCLAIM
ANY IMPLIED WARRANTIES OF MERCHANTABILITY OR FITNESS FOR A PARTICULAR
PURPOSE. BLACKMAGIC DESIGN’S RESPONSIBILITY TO REPAIR OR REPLACE DEFECTIVE
PRODUCTS IS THE WHOLE AND EXCLUSIVE REMEDY PROVIDED TO THE CUSTOMER FOR
ANY INDIRECT, SPECIAL, INCIDENTAL OR CONSEQUENTIAL DAMAGES IRRESPECTIVE OF
WHETHER BLACKMAGIC DESIGN OR THE VENDOR HAS ADVANCE NOTICE OF THE
POSSIBILITY OF SUCH DAMAGES. BLACKMAGIC DESIGN IS NOT LIABLE FOR ANY ILLEGAL
USE OF EQUIPMENT BY CUSTOMER. BLACKMAGIC IS NOT LIABLE FOR ANY DAMAGES
RESULTING FROM USE OF THIS PRODUCT. USER OPERATES THIS PRODUCT AT OWN RISK.
© Copyright 2017 Blackmagic Design. All rights reserved. ‘Blackmagic Design’, ‘DeckLink’, ‘HDLink’, ‘Workgroup Videohub’,
‘Multibridge Pro’, ‘Multibridge Extreme’, ‘Intensity’ and ‘Leading the creative video revolution’ are registered trademarks in the
US and other countries. All other company and product names may be trade marks of their respective companies with which
they are associated.
Thunderbolt and the Thunderbolt logo are trademarks of Intel Corporation in the U.S. and/or other countries.
Warranty
26
Page 27

インストール/オペレー ション マニュアル
Blackmagic
Web Presenter
2017年4
日本語
月
Page 28

ようこそ
このたび は
Blackmagic Web Presenter
きわ 簡 単 にすること が 私たちの目標でした。ポストプロダクション向 けの 従 来の キャプチャーカードとは
異なり、
ラ・ド ラ イバ ー を 使 う
つまり、
フトウェアであれ ば プ ロ仕 様の製品を使って放 送品 質のストリーミングが 行えるのです。あらゆるビデ オス
トリーミン グ や 通話ソフトウェアがウェブカメラに 対 応してい ることを踏まえると、非 常に 幅 広い 選 択肢の
中からストリーミングのプラットフォームを選べることになります。
ビデオソースの全ピクセ ル をコンピューターに送るキャプチャーカ ードとは異 なり、
Presenter
ムレートも
ビデオを最も低いデータレートで、通常のインターネット接続を使って確実にストリームできることを意
味しま す。
しかし、
実 力 があります。2系統の入 力を搭載したライブスイッチャーとしても機能するので、シンプルなマルチカ
ム放送やプレゼンなどにも使 用できます。オプションの
タン1と2を押 すとソース 間 の ラ イブ スイッチングが 行 え ま す。
ビュー、オーディオメーター、入力ビデオフォーマット、
Blackmagic Web Presenter
を使うことで、インターネットでの放 送やビデオ通 話を使ったプレゼンをひと
Blackmagic Web Presenterは、SDI
USB
ビデオに変換します。
SDIやHDMI
はビデオの解像度を
20fps、15fps、10fps、5fps
Blackmagic Web PresenterはSDIやHDMI
ビデオソースが一般的なウェブカメラの映像として認識され、ウェブカメラが使えるソ
720p
をお買い求めいただき誠にありがとうございました。
および
まで 落とします。また、ソフトウェアのコマンドに従い 、ビデオのフレー
に 下 げ る こ と も で き ま す 。こ れ は 、
HDMI
ビデ オ入 力をコンピューター の 内 蔵ウェブカメ
Blackmagic Web
16:9
アスペクトレシ オ の高 品 質
ビデオソースを
Teranex Mini SmartPanel
USB
USB
ウェブ カ メラソース にする 以 上の
を 追 加 す る だ け で 、ボ
Teranex Mini Smart Panel
フレームレート情 報も表 示します。
は、ビデオプレ
HD
弊 社ウェブ サ イト
確認し、
をダウンロードする際にユーザー登 録していただければ、新しいソフトウェアのリリース時にお知らせい
たします。私たちは常に新機能の開発および製品の改善に努めていますので、ユーザーの皆様からご意
見をいた だ け れば 幸 いで す。
グ ラント・ペ ティ
Blackmagic Design CEO
Blackmagic Web Presenter
www.blackmagicdesign.com/jp
の内部ソフトウェアをアップデートしてください 。また、ソフトウェア
のサポートページで当マニュアルの最新バージョンを
Page 29

目次
BlackmagicWebPresenter
はじめに
電源の接続
ビデオの接続
オー ディオの 接 続
コンピューターと接 続
Blackmagic Web Presenter
サードパーティ製 ソフトウェア で
SkypeでBlackmagic Web Presenter
YouTub e LiveでBlackmagic Web Presenter
Web Presenter
YouTub e
TeranexMiniSmartPanel
Teranex Mini Smart Panel
Smart Panel
を 新 し い デ バイス として 設 定 する
でライブストリーミング・チャンネルを作成 する
の機能
をウェブ カメラとして 設 定
BlackmagicWebPresenter
を使用
を使ったストリーミング
を使う
の装着
を使用
30
30
30
31
31
31
32
32
33
33
35
37
37
38
設定
ビデオ入力(
ト ラ ン ジ シ ョ ン(
オ ー ディ オ ミ キ サ ー(
セ ッ ト ア ッ プ(
スイッチを使用してビデオ入力を変更
TeranexMiniRackShelf
内蔵スイッチャーを使う
カメラ タリー を 使う
BlackmagicWebPresenterSetupUtility
付属書
ヘルプ
規制に関する警告および安全情報
保証
Video Input
Transition
Setup
)
)
Audio Mixer
)
)
38
38
39
40
42
42
43
43
44
45
47
49
50
51
Page 30
はじめに
Web Presenter
Blackmagic
電源の接続
Blackmagic Web Presenter
は簡単に使 用開始できます!電 源につなぎ、ビデオおよびオーディオを接続し、
コンピュー ター にユ ニットを 接 続 するだ け です。
電源を供給するには、
続 し ま す。電 源 供 給 が 開 始 さ れ る と 、
Blackmagic Web Presenter
Web Presenter
Blackmagic
Web Presenter
Blackmagic Web Presenterは12G-SDI
2160p60
(最大
まで)の自動 切り替えに対応しています。
USB WEB CAM
SDI IN SDI LOOP OUT
をサ ポートしており、SD、HD、
SDI PGM OUT
のリアパ ネル の 電 源入 力に標 準
のフロントパネルの 右下が光ります。
HDMI LOOP OUT
HDMI IN
Ultra HD
STEREO IN
L
R
ANALOG AUDIO IN
LINE/MIC IN
IEC
電 源 ケーブル を 接
標準
IEC
電 源ケーブルで
Blackmagic Web Presenter
に電源を供給
ビデオの接続
ソースビデオを
およびル ープ
Blackmagic Web PresenterのSDI
HDMI
出力があるのが 確認できるはずです。これらは、
る際に入力端子に応じて使用できます。例えば、
Presenter
プ ロ グ ラム
をコンピューター の
SDI
出力も搭 載されてい るので、
ダウンコンバージョンせ ず に出力します。この
HDMI
出力とビデオプロジェクターの
SDI
および
SDI
プログラム出力はビデオ入力と同じ解像度なので、デッ
キに接続してマスターの収録を行うのに最 適です。
Blackmagic Web Presenterは12G-SDI
HD
の
2160p60
(最大
USB
ビデオに信号を変換するのです。
まで)を自動的に切り替えます。つまり、事実上あらゆるビデオ信号を入力でき、
をサ ポートしており、ビデオ入 力 が 変わった 場 合に 、SD、HD、
720p
で は 高 い 品 質 を 保 ち な が ら 、極 め て 低 い デ ー タ レ ー トで ス
トリーミングが 行えます。これにより、高解像 度 の
使って解 像 度および フレ ームレートの ダ ウンコンバージョンを行えます。
HDMI
または
ビデオ入力に接続します。ループ
Web Presenter
SDI
出力をデッキやモニターにル ープしたり、
HDMI
HDMI
のスイッ チン グ が 行わ れ た ビ デ オ を
1080 HDやUltra HD
で制作を行い、
SDI
を他の機器に接続す
入力の間に接続できます。
720p
Web Presenter
出力
Web
に
Ultra
720p
を
はじめに
30
Page 31

オーディオの接続
Web Presenter
Blackmagic
SDI PGM OUT
L
STEREO IN
SDI
オーディオ入力は、マイクを接続できるモノ入力です。このバランス
および
HDMI
入 力 は オーディオも含 み ま す が 、ア ナログ オーディオ入 力端 子 も2つ 搭 載して いま す。
XLR
オ ー デ ィ オ 入 力 は 、マ イ ク が モ ノ
XLR
なので1チャンネルのモノ入力となっており、接 続すると内部で左右両方のオーディオチャンネルにオーディ
オが送られます。もう1つのアナログ オーディオ入 力は
RCA
コネクター を 使用 する
HiFi
入力です。この入力
は 、コンピュー ターのオー ディオや、スマートフォン、ミュージックプ レ イヤー 、オー ディオミキサ ー 、さら
にはCDプレイヤーなどの 音 楽ソースからのオーディオに適しています。
すべてのオーディオソースは内蔵ステレオオーディオミキサーに接続され 、ブレンドされます。特定のオー
ディオソースからのオーディオを含めたくない 場 合、アナログオーディオソースは接 続 を外し、コンピュー
ターなどの
オ が ブレンド さ れ 、
HDMI
ソースの オー ディオは 音量を下げ てください 。そうしてい ないと、すべ ての入 力オーディ
USB
オーディオ出力に送信されます。
コンピューターと接 続
ビデ オ及びオー ディオソースが 接 続されたので、
ターに接 続してください 。コンピューターは、
スであると瞬時に認識します。
Blackmagic WebPresenterをUSB
Blackmagic WebPresenterをUSB
ポートでコ ン ピ ュ ー
ウェブ カ メラ の ビ デ オソー
SDI PGM OUT
USB WEB CAM
SDI IN SDI LOOP OUT
Blackmagic WebPresenter
をリアパネル の
BlackmagicWebPresenter
HDMI LOOP OUT
HDMI IN
USB
ポートでコンピューターに接続
をウェブ カメラとして 設 定
最後に、任 意のビデオ会 議またはサードパーティ製のストリーミングソフトウェア(
Broadcaster、XSplit Broadcaster、Periscope
な ど )で
STEREO IN
L
R
LINE/MIC IN
ANALOG AUDIO IN
Blackmagic Web Presenter
Skype、Open
をウェブ カ メラとし
て選 択しま す。
Skype
Blackmagic Web Presenter
YouTub e LiveでのBlackmagic Web Presenter
および
を 使 用 す る 」お よ び「
の 使 用 方 法 は 、当 マ ニ ュ ア ル の「
YouTub e LiveでBlackmagic Web Presenter
Skype
で
を使った ス
トリーミング」の セクションを参照してください。
これで 必 要な 準 備が 整いました!極めて 高 品 質のビ デ オにオーディオをミックスして、オンラインで放 送
が 始 められます。当マニュアルには 、タリー 機能 、設 定の 変更、オプ ションの
Teranex Mini Smart Panel
の 装 着に 関 する 情 報 が 後 述されて いま す。
はじめに
31
Page 32

サードパーティ製ソフトウェアで
BlackmagicWebPresenter
SkypeでBlackmagicWebPresenter
SkypeでBlackmagic Web Presenter
ピューター にインストール しま す。
で きま す。
1
コンピューター にインストールしたら 、
2Skype>PreferencesでPreferences
を 使 用 す る に は 、ま ず
Skype
のソフトウェア は 無 料 で
Skype
を 開 き 、「
を使用
Skype
のソフトウェア を ダウンロードしコン
を立 ち 上 げ ます。
Audio/Video
」を 選 択 し ま す 。
を使用
www.skype.com
からダウンロ ード
3
コン ピュー タ ー にウェブ カメラが つ いてい る 場合 、デ フォルトで 選 択 さ れ 、そ のウェブ カメラ か ら
の画像が
をクリックし、リストから
に接 続されたソースビデオ が
ド ロ ッ プ ダ ウ ン メ ニ ュ ー の「
Skype
のプレビューウィンドウに 表 示されます。ドロップダ ウンメニューの「
Blackmagic Web Presenter
Skype
のプ レビューウィンド ウ に 表 示 さ れま す。
Camera
Blackmagic Web Presenter
」か ら
を選択します。選択されると、
を選択
Web Presenter
Camera
」
Skype
メモ
しょう。
常な状態です。ビデオコール自体は左右が逆になることはありません。
の環 境 設定ウィンドウで、イメージ が 左右 逆 に なっていることに気づくで
Skype
はプレビュー用にユーザーのミラーイメージを使用するため、これは正
サ ードパー ティ製 ソフトウェ ア で
BlackmagicWebPresenter
を使用する
32
Page 33

4
ド ロ ッ プ ダ ウ ン メ ニュ ー の「
ソースとして選 択します。
Microphone
」を クリ ッ ク し 、
Blackmagic Web Presenter
をオー ディオ
これで 準 備が 整 い ました 。
ビデオが使われます。
Blackmagic Web PresenterでSkype
メモ
コ ン ピ ュ ー タ ーで も 同 じ で す。詳 細 は
Skype
で電 話 をか ける 場 合、
を使用する際の設定方法は、
Skype
Blackmagic Web Presenter
のウェブサイトをご確認ください:
YouTubeLiveでBlackmagicWebPresenter
ストリーミング
Open Broadcaster
ロード できま す。
WebPresenter
コンピューターにインストールしたら、ソフトウェアを立ち上げます。
1
ソ ー ス を 追 加 す る に は 、「
択します。ポ ップ アップ で 新規ソース作成 の オプ シ ョン が 表 示され ま す。
は 無 料ソフトウェア で
https://obsproject.com/
を新しいデバイスとして設 定する
Sources
YouTub e Live
」の「+」 ボ タ ン を ク リ ッ ク し 、「
のストリーミングに最 適です。こちらからダウン
に接 続さ れ たソース
Mac OSでもWindows
www.skype.com
を使った
Video Capture Device
」を 選
ソースのリストから「
Blackmagic Web Presenter
Video Capture Device
を 新 規のソース に 設 定しま す。
」を 選 択 し 、
サ ードパー ティ製 ソフトウェ ア で
BlackmagicWebPresenter
を使用する
33
Page 34

2
ポップアップ で「
Create new
」 を 選 択 し 、「OK」を クリ ッ ク し ま す 。
3
新しいデバイスのための「
Blackmagic Web Presenter
4
オーディオの設 定も上記と同 様 に行います。ソースを追 加 するには、「
を ク リ ッ ク し 、「
Audio Input Capture
Properties
」 ウ ィ ン ド ウ で 、「
を 選 択 し 、「OK」を クリ ッ ク し ま す 。
」を選 択します。ポップ アップ で「
Device
「OK」をクリックしま す。新しい デバイスのプ ロパ ティウィンドウで、「
メニューから
5OBS>Preferences
Blackmagic Web Presenter
Preferences
にある
を 開 き 、「
を 選 択 し 、「OK」を クリ ッ ク し ま す 。
Video
」タ ブ を ク リ ッ ク し ま す 。
」ド ロ ッ プ ダ ウ ン メ ニ ュ ー か ら
Sources
」内 の「+」ボ タ ン
Create new
Device
」ド ロ ッ プ ダ ウ ン
」を 選 択 し 、
Base (Canvas) Resolution」を1280 x 720
6
「
1280 x 720
に し 、「OK」をクリックしま す。こ れで、入 力ビデ オ が フルスクリーン で 表示されるように
なります。
に 設 定 し て 、「
サ ードパー ティ製 ソフトウェ ア で
Output (Scaled) Resolution
BlackmagicWebPresenter
」を
を使用する
34
Page 35

Base Canvas
入力ビデ オがフルスクリーン で 表 示されます。
および
Scaled
の解像度を
1280 x 720
に設 定 すると
YouTu be
でライブストリーミング・チャンネルを作成する
YouTub e
dashboard
1
左 側 の「
2
ストリーミングの詳細を入 力し、ストリーミングのプライバシー設 定を「
から選 択しま す。
でライブストリーミングのチャンネルを作成します。ブラウザで、
に行き、
Google
ア カ ウ ン ト に ロ グ イ ン す る か 、新 規 作 成 し ま す。
Live streaming
」 を 選 択 し 、「
Get started
」を クリ ッ ク し ま す 。
www.youtube.com/live_
Public
」ま た は「
Private
」
サ ードパー ティ製 ソフトウェ ア で
BlackmagicWebPresenter
を使用する
35
Page 36

3
ペ ー ジ の 一 番 下 の「
コピーを選択します。次の手順でこの
Reveal
」を クリ ッ ク し ま す 。
KeyをOpenBroadcaster
ので、この情報をコピーすることは重要な作 業です。
4
OpenBroadcaster
YouTub e
で
のソフトウェア で、
を 選 択 し 、先 ほ ど の
Preferences
Stream keyを「Stream key
Stream key
に行き、
Stream
」の フ ィ ー ル ド に ペ ー ス ト し ま す 。
を ハ イ ラ イ ト し 、右 ク リ ッ ク し て 、
のソフトウェアにペーストする
のタブ を 選 択しま す。
Service
5OpenBroadcaster
のソフトウェアのメインウィンド ウに あ る 、
ると、ストリーミング放送 が 始まります。
6
ウェブブラウ ザに戻ると、ストリーミングのステ ータスが「
グが 行わ れてい る のが 確 認で きま す。
Start Stream
Online
」に変わり、ライブストリーミン
ボタンをクリックす
サ ードパー ティ製 ソフトウェ ア で
BlackmagicWebPresenter
を使用する
36
Page 37

Blackmagic Web PresenterでOpen Broadcaster
1
2
SET
VIDEO
MENU
AUDIO
Video Format
525i59.95 NTSC
USB
25 fps
Video Format
525i59.95 NTSC
USB
25 fps
メモ
方法は、
認くださ い:
Mac OSでもWindows
https://obsproject.com.
コ ン ピ ュ ー タ ーで も 同 じ で す。詳 細 は ウ ェブ サ イ ト を ご 確
ソフトウェア を 使 用 する際 の設 定
TeranexMiniSmartPanel
Web Presenter
は 、オ プ シ ョ ン の
ナル のフロントパ ネル を取り 外 して付け 替え ま す。
Teranex Mini Smart Panel
Smart Panel
を使う
をマ ウ ントで きま す。
の ボ タ ン は 、内 蔵
Web Presenter
LCD
を 使 用してソース間
のオリジ
のスイッチングが行えるので、入力ビデオとステータス情報(入力ビデオソース、ビデオフォーマット、
出力フレ ームレートなど )がモニタリング で きま す。
TeranexMiniSmartPanel
オプ ションの
Web Presenter
1
2
Smart Panel
の装着は簡単です。ホットスワップに対応しているので、装着の際に
の電 源 をオフにする 必要 はありま せ ん 。
ポジドライブ2ドラ イバ ー を使 用して、
2
つずつあるM3ネ ジ を 取 り 外 し ま す 。さ ら に
ベーシックパネル の内 側 の下 隅 に 透 明 のプラスチックチューブが付いています。この部品は、
Web Presenter
内部の
LED
か ら の 光 が 、ベ ー シ ッ ク パ ネ ル の ス テ ー タ ス 情 報 を 照 ら す よ う に す る
の装着
Web Presenter
Web Presenter
Blackmagic
のオリジナルフロントパネルの両側面に
のフロントパネルをゆっくりと外します。
ものです。この 部品 をベーシックパネルから外さないようにしてください 。
作業のコツ オリジナルのベーシックパネルを再度取り付ける場合 は、ライトチューブが
ユ ニット前 面でスロットと 揃うようにしてくだ さ い。
3
Smart Panel
の背面のコネクターと
ユニットに向かってコネクターが固定されるまでゆっくりと押します。
固定され 、
Web Presenter
の前面にきれいに収まります。
Web Presenter
の前 面のコネクターを合わせ、
Smart Panel
Smart Panel
がしっかりと
USB
を
4
オリジ ナルパ ネ ルで 使 用 して い たM3ネジで
Teranex Mini Smart PanelをBlackmagic Web Presenter
親指と他の指を 使い
Smart Panel
を 持 ってく だ さい 。正 し い 位 置 に 取 り 付 け や すく な り ま す 。
Smart Panel
を固 定しま す。
に 装 着 す る 際 は 、コ ネ ク タ ー の 上 下 で
TeranexMiniSmartPanel
を使う
37
Page 38

Web PresenterをTeranex Mini Rack Shelf
1 MENU
2 VIDEO
SET AUDIO
Video Format
525i59.94 NTSC
Source
HDMI
USB
30 fps
Web Presenter
照してください 。
を ラ ッ ク か ら 取 り 外 す 必 要 が あ り ま す 。詳 細 は「
Web PresenterのUSB
に取り付け てい る場合、フロントパネルのネジを取り外すには
Teranex Mini Rack Shelf
ポートは 、
Smart Panel
を取り付け て い る状 態で も 使 用 で きま す。
ポートは、ゴム製のダストカバーを開くだけでアクセスできます。
」セ ク シ ョ ン を 参
USB
SmartPanel
の機能
コントロールボタン
1
ボタンおよび2ボタン
Smart Panel
が 取り付けられると
Blackmagic Web Presenter
り ま す 。つ ま り 、放 送 中 に1ボタンおよび2ボタンを押 すことで
「1」ボ タ ン を 押 すと
Teranex Mini Smart PanelでWeb Presenter
1
ボタ ンと2ボタンを押 すことで、
SDI
入 力 を 選 択 し 、「2」ボ タ ン を 押 すと
SDIとHDMI
のスイッ チ ャー 機 能 が 使 用可 能 。
入 力ソ ースを ライ ブ スイッチン グ で きま す。
1 MENU
2 VIDEO
SET AUDIO
設定
のスイッ チン グ 機 能 が 使 用 で き る ように な
SDIとHDMI
HDMI
入力ソースが切り替えられます。
入 力を 選択しま す。
Video Format
Source
HDMI
525i59.94 NTSC
USB
30 fps
Teranex Mini Smart PanelをWeb Presenter
クス設 定などの設定を変更できます。「
に取り 付 け て い れ ば、トランジ ションの 長さ、オー ディオミッ
MENU
」ボ タ ン を 押 し て 設 定 メ ニ ュ ー を 開 き 、回 転 ノ ブ と「
SET
」
ボタンを使ってメニューをナビゲートし、設 定を変更します。
1
つ 前 の メ ニ ュ ー ア イ テ ム に 戻 る に は 、も う 1 度 「
MENU
」 ボ タ ン を 押 し ま す 。「
MENU
」ボ タ ン を 押 し 続 け る
とホームスクリーンに戻ります。
ビ デ オ 入 力(
Blackmagic Web Presenter
設定するように設定できます。また、
VideoInput
)
は、入力が接続された際に自動的に検出し、それに従ってプログラム出力を
SDI
入 力 の み 、あ る い は
HDMI
入力のみを使用するように設 定するこ
ともできます。これらの 設 定は 、オリジ ナルの ベーシックパネル を取り付けてい る 時 に 内 蔵スイッチを使
用して変 更で きま す。詳 細 は「スイッチ を 使 用 してビ デ オ入 力を 変 更 」の セクションを 参 照してくだ さ い 。
作業のコツ ビデオ設定を変えたい時は、メインメニューに行かなくても、フロントコントロール
パ ネ ル の「
VIDEO
」ボタンを押すと直接ビデオ設定に行けます。
設定
38
Page 39

オ ー ト(
ビデオソースが接続された時に、
場合は、この設定を選択します。
Presenter
SDI
Web PresenterがSDI
HDMI
Web PresenterがHDMI
ビデ オ入力設定で は 、使 用する入 力を 選 択したり、
Blackmagic Web Presenter
選 択 するオートに設 定したり で き ま す。
Auto
)
は自動的に
Web PresenterがSDI/HDMI
SDIとHDMI
SDI
入 力を 選択しま す。
入力のみ使用するよう設定したい場合は 、この設 定を選 択します。
入力のみ使用するよう設定したい場合は 、この設 定を選 択します。
が自 動 的 にビデオソ ースを
を自動で選択するよう設定したい
ビデ オソースが両方 接 続されている 場 合、
Web
作業のコツ 選 択したビデオ入力以 外のビデオ入力から信号を受信した場 合、スクリーンは 黒くな
り ま す。適 切 な 入 力 を 選 択 する か 、
トランジション(
Blackmagic Web Presenter
トのトラン ジ シ ョン は
することもできます。ディップおよびカット・トランジションを
Transition
のスイッ チャー 機 能を 使 用してラ イ ブ 放 送を スイッ チン グ する 場 合、デ フォル
0.5
秒のクロスディゾルブになっていますが、長さやトランジションのタイプを変更
Web Presenter
)
をオートに 設 定してくださ い 。
Web Presenter
で 使 用 でき ま す!
トランジション 設 定で 、使 用した いトランジ
ションのタイプ お よび 長 さ を 選 択しま す。
設定
39
Page 40

カ ッ ト(
ビデオソースをストレートに切り替えたい場合は、カット・トランジションを選択します。
Cut
)
ミ ッ ク ス(
ミックストランジ ションは 、クロ スディゾルブと同じです。設 定した 時 間内 で1つのビデオソース
から別のソースへ、スムーズに切り替わります。ミックス・プリセットを選 択することでトランジシ
ョンの 長さを 変 更で きます。
デ ィ ッ プ(
ディップ・トランジションはミックス・トランジションと似ています。ディップ・トランジションで
は、まずスムーズにブラックへ切り替わり、その後、次のビデオソースに切り替わります。メニュー
リストでディップの 長 さのプリセットを 選 択します。
オーディオミキサー(
オー ディオミキサー設 定で は、オー ディオのミキシング をコントロ ールで きます。例 え ば 、各入 力 の オー
ディオのオン/オフおよびオーディオレベルの変更、
回転ノブ を時計回り/反 時 計 回 り に 回 して 、設 定 を 調 整 し ま す 。
作業のコツ オーディオ 設定を 変 え たい時 は 、メインメニューに行 か なくても、フロントコント
ロ ー ル パ ネ ル の「
マ ス タ ー レ ベ ル(
回転ノブ を回してプログラム出力のオーディオレベ ル を調整します。この設 定は、放 送するマスターサウ
ンド・ミ ッ クス 全 体 の ボ リ ュ ーム に 影 響 しま す。
Mix
)
Dip
)
AUDIO
」ボ タ ン を 押 すと 直 接 オ ー ディオ 設 定 に行 けま す。
MasterLevel
AudioMixer
)
)
XLR
入力レベル の
mic/line
レベルへの設定が可能です。
SDI
入 力 レ ベ ル(
この設 定は、
SDI
入 力(
回 転 ノブ を 回して、
ON
設 定 が「ON」に な っ て い る 場 合 、
ます。
OFF
SDI
しま す。
AFV
設 定 が「
り 替 わって い る 時 に の み 、
HDMI
入 力 レ ベ ル(
この設 定は、
SDIInputLevel
SDI
ビデオ入力のオーディオレベルを調整します。
SDIInput
SDI
入 力 の オーディオ をプログラムオー ディオに使 用したくない 場 合、
AFV(Audio follow video
HDMI
)
)
SDI
入力オーディオをオン/オフ
SDI
入力レベル設定で、オーディオレベルを調整できます。
SDI
入 力 の オーディオ がマスタープ ロ グ ラム オーディオ で使 用されます。
HDMIInputLevel
ビデオ入力のオーディオレベルを調整します。
)
/AFV
で 切り替えま す。
入 力 の オーディオ が常にプ ロ グ ラム オー ディオに 使 用され
)」に な って い る 場 合 、
SDI
ビデオ入力がプログラム出力に切
SDI
入 力 を「
OFF
」に 設 定
設定
40
Page 41

HDMI
入 力(
HDMIInput
回 転 ノブ を 回して、
ON
設 定 が「ON」に な っ て い る 場 合 、
れま す。
OFF
HDMI
HDMI
入力のオーディオをプログラムオーディオに使用したくない場合、
しま す。
AFV
設 定 が「
AFV(Audio follow video
切 り 替 わって い る 時 にの み 、
用され ま す。
)
HDMI
入力オーディオをオン/オフ
HDMI
/AFV
で 切り替えま す。
入 力 の オーディオ が常にプ ロ グ ラム オー ディオに 使 用さ
入力レベル設定で、オーディオレベルを調整できます。
)」に な って い る 場 合 、
HDMI
入 力 の オーディオ がマスタープ ロ グ ラム オーディオ で使
HDMI
HDMI
入 力 を「
OFF
」に 設 定
ビデオ入力がプログラム出力に
XLR
入 力 レ ベ ル(
この設 定は、
XLR
入 力(
XLR
入 力 オー ディオの オン/オフを 切 り 替 え ま す。
XLR
入 力 ソ ー ス(
こ の 設 定 は 、入 力 ソ ー ス レ ベ ル を
XLRInputLevel
XLR
オーディオ入力ソースのオー ディオレベ ル を調整します。
XLRInput
)
XLRInputSource
)
)
Mic/Line
レベ ル オー ディオ に 設 定しま す。
一般的に、マイクからの信号強度は、オーディオ再生機器からの信号に比べて弱くなっています。信号の
弱さを補うには 、
れます。マイク以外のオーディオ機器を使用する場合は
RCA
入 力 レ ベ ル(
RCA
オーディオ入力ソースのオー ディオレベ ル を調整します。
RCA
入 力(
RCA
入 力 オー ディオの オン/オフを 切 り 替 え ま す。
Blackmagic Web Presenterを「Mic
RCAInputLevel
RCAInput
)
)
」レベルオーディオに設定すると入力信号が増幅さ
XLR
入 力 レ ベ ル を「
line
」に 設 定 し ま す 。
オー ディオミキサ ー 設 定で は、各 入 力 の オー ディオ
のオン/オフの切り替え、レベルの調整が可能。
設定
41
Page 42

セ ッ ト ア ッ プ(
Setup
)
セ ッ トア ッ プ 設 定 で は 、現 在
で き ま す 。ま た 、
WebPresenter
1
2
「
3
リセットをキャン説あるいは確定します。
リセットを確定すると、
LCD
と
はホームスクリーンに変わり、すべ ての設 定 がオリジ ナルのデ フォルトの状 態になりま す。
Web Presenter
ソ フ ト ウ ェ ア(
ソフトウェア設定では、現在
ジョンを確 認で きま す。
工場出荷時デフォルト(
工 場 出荷 時 デフォルト設 定は 、
プロジェクトを始めたい時に便利です。
をリ セ ットす る:
MENU
「
定しま す。
」 ボ タ ン を 押 し 、 回 転 の 部 を 使 っ て セ ッ ト ア ッ プ 設 定 へ 行 き ま す 。「
Factory Default
Web Presenter
をデ フォルト設 定に 戻 すこと が できます。
Software
Web Presenter
)
FactoryDefault
」 を 選 択 し 、「
にインストールされているソフトウェアのバージョンを確認
Web Presenter
Web Presenter
SET
」ボ タ ン を 押 し ま す。
Reetting
は 、「
にインストールされているソフトウェアのバー
)
のすべての設定をデフォルト設定に戻して新しい
」インジケーターを表示します。リセットが 完了する
SET
」ボ タ ン を 押 し て 確
セ ッ ト ア ッ プ 設 定 で は 、現 在
されているソフトウェアのバージョンを確認したり、
WebPresenter
をデ フォルト の 状 態に 戻 すこと が できま す。
Web Presenter
にインストール
スイッチを使用してビデオ入力を変更
Blackmagic Web Presenter
SDI/HDMI/
を
スマートパネルの
スイッチを使った設定変更は簡単です!ペン先などを使って関連するスイッチを上下に動 かし、オン/オフ
のポジションに設定するだけです。
参照して、使用したい入 力の 位 置 に スイッチを動かします。
オートに設 定で きます。
LCD
はベーシックパネルからミニスイッチにアクセスでき、これを使ってビデオ入力
Teranex Mini Smart Panel
メニュー によりオーバー ラ イドされ ま す。
Web Presenter
の底面にスイッチ情報が記載されているので、それを
を 取 り 付 け て い る 場 合 、こ れ ら の ス イ ッ チ は
スイッチを使用してビデオ入力を変更
42
Page 43

オ ー ト(
ス イ ッ チ 1 、2 を「
HDMI
スが両方接続されている場合、
SDI
ス イッ チ 2 を「
るよう設定したい場 合は、この設定を選択します。
HDMI
ス イッ チ 2 を「ON」に 、ス イ ッ チ 1 を「
するよう設定したい場 合は、この設定を選択します。
Auto
)
OFF
」に設定します。ビデオソースが接続された時に、
を自動で選択するよう設定したい場合は、この設定を選択します。
Web Presenter
OFF
」に 、ス イ ッ チ 1 を「ON」に 設 定 し ま す 。
OFF
は自動的に
」に 設 定 し ま す 。
TeranexMiniRackShelf
Web PresenterがSDI/
SDIとHDMI
SDI
入 力を 選択しま す。
Web PresenterがSDI
Web PresenterがHDMI
入力のみ使用す
ビデオソー
入力のみ使用
Teranex Mini Rack Shelfは、1U
Presenter
Blackmagic MultiView 4、HyperDeck Studio Mini
Web Presenterを2台のHyperDeck Studio Mini
い 、も う1台が
可能 で 使い方が簡単なビデオソリューションをカスタマイズで きます。
Teranex Mini Rack ShelfへのBlackmagic Web Presenter
ゴム製の足部を取り外し(使用されている場合)、
取り 付 けま す。
Design
詳細は、
は非常に小型なので、同じ形状の他の
Web Presenter
The Teranex Mini Rack Shelf
機器を1台だけ使用している場合でもラックの隙間を埋められます。
Blackmagic Design
Teranex Mini Rack Shelfは、Blackmagic Web Presenterと、Teranex Mini ConverterやHyperDeck
Studio Mini
な ど 、同 じ サ イ ズ の 他 の
サイズの棚なので放 送 用ラックやロードケースに設置できます。
Blackmagic Design
な ど )と 一 緒 に マ ウ ン ト で き ま す 。例 え ば 、
と一緒に取り付けることで、1台がビデオソースの再生を行
からのプログラム出力の収録を行えます。モジュラー方式なので、持ち運び
の取り付け は 非常 に 簡単で す。
Teranex Mini Rack Shelf
には、オリジナルのカバーパネルが2つ含まれており、
ウェブ サイト
www.blackmagicdesign.com/jp
Blackmagic
Web Presenter
Blackmagic Design
製品と並べてマウントできます。
内 蔵 スイッチャ ー を 使う
Teranex Mini
機 器(
の底にユニットを同梱のネジで
を 参 照してください 。
コンバー ターや
Blackmagic
Web Presenter
Web
の
Blackmagic
Blackmagic Web Presenterは、2
使用するには 、
蔵スイッチャーをコントロールで きるプッシュボタンコントロールを搭載しています。
Panel
を 装 着すると ス イッ チ ャー 機 能 が 使 え る よう に なり ま す。
SDIとHDMI
することなく入力をトランジションで きます。これにより、
可 能 と なって い ま す。
内 蔵 ス イ ッ チ ャ ー を 使 用 す る に は 、フ ロ ン ト パ ネ ル の 「1」ボ タ ン を 押 すと
「2」ボ タ ン を 押 すと
ジションを実行します。
を 接 続 す る と 、「1」ボ タ ン お よ び「2」ボ タ ン を 使 っ た ス イ ッ チ ン グ が で き る の で 、極 め て 高 度 な ラ イ ブ プ レ
ゼンテーションが行えます。また、現在使われている入力、ビデオプレビュー、オーディオレベルが
クリーン で 確 認で きま す。
Teranex Mini Smart Panel
ビデ オソースの両方 が 接続されている 場 合、
HDMI
系統の入力を搭載したスイッチャー機能を内蔵しています。この機能を
を 取 り 付 け る 必 要 が あ りま す。同 パ ネ ル は
HDMI
入力が再同期されるので、グリッチが発生
Web Presenter
がビ デ オソース に 選択され ま す。ソースを 選 択する と、
HDMI
入 力に コンピューターから のスライドショ ー を 接続し 、
を 使っ た ライブ ス イッ チン グ が
SDI
がビデオソースに選択され、
LCD
Teranex Mini Smart
Web Presenter
SDI
内 蔵 ス イッ チ ャ ー を 使う
ス ク リ ー ン と 、内
はトラン
ソース にカメラ
LCD
ス
43
Page 44

1 MENU
1 MENU
2 VIDEO
Video Format
525i59.94 NTSC
Source
HDMI
USB
30 fps
2 VIDEO
SET AUDIO
Source
HDMI
Video Format
525i59.94 NTSC
USB
30 fps
Teranex Mini Smart Panel
使用して、ライブ放 送のスイッチング を行う場 合、1ボタ ンと2ボタンを
SDI
押すと、
入力と
を装 着した
HDMI
入力の切り替え が 可能。
メモ デ フォルト のトランジション は
ていれば、
LCD
メニュー のトラン ジ ション設 定で 長さやトランジションの タイプ を 変 更で きます。
Blackmagic WebPresenter
0.5
秒 のミックスで す。
を
Teranex Mini Smart Panel
詳細は、このマニュアルの「設定」セクションを参照してください。
カメラタリー を 使う
Blackmagic Design Studio Camera
情報は、スイッチャーからカメラへプログラムリターンフィードを介して送信されます。
Presenter
は、このタリー機能も搭載しているのでスイッチャー機能を使 用している際に、どのカメラがオ
ンエ ア なの か 確 認で き ま す。
タリーはとても簡単に使用できます。
SDI
ビデ オソースとして 接 続し、
Web Presenter
カメラのプログラムボタンを選 択すると、
さ ら に 、タ リ ー 情 報 も カ メ ラ に 送 信 さ れ ま す 。
SDI
ビデオ入力がタリーの「
Camera 1」でHDMI
メラ番 号を設 定する 必要 が ありま す。カメラを
定 さ れ て い る 必 要 が あ り ま す 。こ の 設 定 が 終 わ る と
カメラ の タリー が点 灯しま す。
ATE M
および
スイッチャーは 、タリー 機能 を搭 載 してい ま す。タリー
Blackmagic Design Studio CameraのSDI
のプ ログラム 出 力を カ メラ の
Web Presenter
入 力 が「
SDI
のプログラムビデオがカメラで確認できます。
Camera 2
入力で接続している場合、カメラは「
Web Presenter
SDI
」で す 。つ ま り 、 カ メ ラ の 設 定 画 面 で カ
のフロントパ ネ ル の1ボタンを押すと
出力を
入 力に 接続 するだ けで す。
を取り付 け
Blackmagic Web
Web Presenter
Camera 1
」に 設
の
SDI
で 接 続して い る
Studio
「
」タ ブ の カ メ ラ 番 号 に「1」を 選 択 し ま す。
Blackmagic Studio CameraのLCD
メニューで、
カメラタリー を 使 う
44
Page 45

SDI
で 接 続して い る
SETUP
「
プレゼンを行う際 に 、オン エアの カメラにはっきりとした 赤 い タリー インジ ケ ー ターが 確認 で きるのは 出
演者にとって大きな助けになります。これにより、ライブになっているか簡単に把握できます。
URSA MiniとBlackmagicURSA Studio
るタリーインジケーター の赤いライトを確 認できると想像してみてください 。非常に パワフルなコンビ
ネ ー ショ ン で す!
」タ ブ の
Blackmagic URSA MiniのLCD
ATE M
カメラIDに「1」を 選 択 し ま す。。
のビューファインダーを使用し、出演者 がオンエア状態を表 示す
メニューで、
Blackmagic
タリー機能は、
カメラでサポートしています。タリーの設定に関する詳細は、
Blackmagic Studio Camera
www.blackmagicdesign.com/jp/support
Blackmagic Studio Camera、Blackmagic Micro Studio Camera 、Blackmagic URSA Mini
Backmagic URSA、Backmagic URSA Mini
のマ ニュアルでご 確認ください 。
で ダウン ロ ード で きま す。
Blackmagic Design
サポートセンター
BlackmagicWebPresenterSetupUtility
Blackmagic Web Presenter
ダウンロ ード で きま す。アップ デ ートは
にインスト ールされ ま す。
最新または 改 善された機 能 を 使 用することをお勧 めします。
MacOS
で内部ソフトウェアをアップデートする:
1Blackmagic Web Presenter Setup
2
ディスクイメー ジ を 開 いて
スクリ ーン上の 指 示 に 従い ま す。
3
インストールで き たら
に接続します。プラスチック製のダストカバーを開くと
4Blackmagic Web Presenter Setup
をアップ デ ートします。内 蔵 ソフトウェアが最 新 で 何もする 必 要が ない 場 合、指 示は 表 示され
ません。
の内部ソフトウェアのアップデートは 、
Blackmagic Web Presenter Setup Utility
Setup Utility
Blackmagic Web Presenter Setup Installer
Web Presenter
を ダ ウ ン ロ ードして
を ダ ウ ン ロ ードして 解 凍しま す。
をフロントパ ネル の
を起 動し、画 面に表 示される指示に従って内部ソフトウェア
Blackmagic Web Presenter
Blackmagic Design
USB
コネクター経由でコンピューター
USB
コネクターにアクセスで きます。
ウェブ サイトか ら
Web Presenter
経由で
をアップデ ートし 、
を 起 動しま す。
、
BlackmagicWebPresenterSetupUtility
45
Page 46

Windows
で内部ソフトウェアをアップデートする:
1Blackmagic Web Presenter Setup
を ダ ウ ン ロ ードして 解 凍しま す。
2
同マニュアル および
Presenter Setup
Blackmagic Web Presenter Setup
インストーラ ー を 含む
Blackmagic Web
フ ォ ル ダ ー が 確 認 で き ま す 。イ ン ス ト ー ラ ー を ダ ブ ル ク リ ッ ク し 、画 面 に 表 示 さ
れる指示に従ってインストールします。
3
インストールで き たら
Web Presenter
をフロントパ ネル の
に接続します。プラスチック製のダストカバーを開くと
4Blackmagic Web Presenter Setup
を起 動し、画 面に表 示される指示に従って内部ソフトウェア
USB
コネクター経由でコンピューター
USB
コネクターにアクセスで きます。
をアップ デ ートします。内 蔵 ソフトウェアが最 新 で 何もする 必 要が ない 場 合、指 示は 表 示され
ません。
Blackmagic Web Presenter Setup Utilityは、Blackmagic Design
最新の
セ ン タ ー(
www.blackmagicdesign.com/jp/support
)で ダ ウ ン ロ ー ド で き ま す 。
サポート
BlackmagicWebPresenterSetupUtility
46
Page 47

付属書
Blackmagic
BlackmagicEmbeddedTallyControlProtocol
(
バー ジョン
当セクションは、サードパーティのデベロッパー、あるいは 製 品/システム に
リーコントロール・プロトコル用のサポートを追 加したいユーザー のためのセクションで す。デジタルビ
デオ・ストリームの非アクティブ 画像 範囲にエンベッドされたタリー情 報を送信 するプロトコルにつ
いて 記 載 して い ま す。
1.0(14/04/30
エンベデッド・タリーコントロール・プロトコル
)
)
Blackmagic
エ ン ベ デ ッ ド・タ
データフロー
放送 用スイッチャーなどのマスター デバイスは 、タリー情 報をプログラムフィードにエンベッドして、カメ
ラ、カメラコントローラ ーなどの複 数のスレ ーブ デバイスに送 信します。スレーブデバイスからの 出 力は 、
一般 的にはマスター デバイスへと戻されます が、ビデオモニターへ送 信されることもあります。
タリー情 報のプライマリーフローは 、マスターデバイスからスレーブデバイスへのフローです。各スレーブ
デバイスは、デバイスIDを 使 用して関 連のタリ ー 情 報 を抽 出・表示しま す。
スレーブ デバイスは 、タリーパケットを そ の まま出 力して、モ ニターのタリーステータスをアップ デ ートしま
す 。そ の た め 、モ ニ タ ー の デ バ イ スIDが分からなくても、スレーブデバイスの出 力に接 続したモニターにタ
リー 情 報 が 表示 さ れ ること が ありま す。
前提
あら ゆ るデ ー タア ライメ ント/パ デ ィ ン グ は プ ロ ト コ ル で 明 確 に 定 義 さ れ て い ま す 。ビ ッ トフ ィ ー ル ド は 、最 下
位 ビ ッ ト(
LSB
)から割り当てられます。
ブランキング・エンコーディング
各ビデオフレームにつき、1つ の タリーコ ントロ ール パ ケットが 送 信 され ま す。パ ケ ット は 、
アクティブ範 囲 に、
ロ ー ル パ ケ ットに は 、
DID/SDID x51/x52
を使い、
256
バイトまで のタリー 情 報が 含 まれ ます。
SMPTE 291M
パ ケ ッ トで エ ン コ ー ド さ れ ま す 。タ リ ー コ ン ト
VANC line 15
の
パケットフォ ーマット
各タリーステ ータスは
ユニット
タリーパケットの 最 初 のバイトには 、モニター デバイスのタリーステータス およびバー ジョン
番 号 が含 ま れ ます。
タリーパケットの残りのバイトには 、2つのスレーブデバイスのタリーステー タスが含まれます。マスター
デ バ イ ス は 、最 大
タリー 構 造
ユ ニット
4-bit
の 情 報で 構 成さ れま す:
4
bit 0
: プ ロ グ ラ ム ・タ リ ー ス テ ー タ ス(
bit 1
: プ レ ビ ュ ー ・ タ リ ー ス テ ー タ ス(
bit 2-3
: リ ザ ー ブ(
510
までのサポートデバイスのタリーステー タスを送 信 で きます。
8
bit 0
: モニターデバイス・プログラム・タリーステータス(
bit 1
: モニターデバイス・プレビュー・タリーステ ー タス(
bit 2-3
: リ ザ ー ブ(
bit 4-7
: プ ロ ト コ ル バ ー ジ ョ ン(
0x0
0b00
)
)
0b0000
0=off、1=on
0=off、1=on
)
)
)
0=off、1=on
0=off、1=on
)
)
付属書
47
Page 48

ユ ニット
8[0]
bit 0
bit 1
bit 2-3
bit 4
bit 5
bit 6-7
ユ ニット
bit 0
bit 1
bit 2-3
bit 4
bit 5
bit 6-7
. .
Master Device
: スレーブデバイス1プ ロ グ ラ ム ・タ リ ー ス テ ー タ ス(
: スレーブ デバイス1プ レ ビ ュ ー ・ タ リ ー ス テ ー タ ス(
: リ ザ ー ブ(
0b00
)
: スレーブデバイス2プ ロ グ ラ ム ・タ リ ー ス テ ー タ ス(
: スレ ーブ デバイス2プ レ ビ ュ ー ・ タ リ ー ス テ ー タ ス(
: リ ザ ー ブ(
0b00
)
8[1]
: スレーブデバイス3プ ロ グ ラ ム ・タ リ ー ス テ ー タ ス(
: スレーブ デバイス3プ レ ビ ュ ー ・ タ リ ー ス テ ー タ ス(
: リ ザ ー ブ(
0b00
)
: スレーブデバイス4プ ロ グ ラ ム ・タ リ ー ス テ ー タ ス(
: スレ ーブ デバイス4プ レ ビ ュ ー ・ タ リ ー ス テ ー タ ス(
: リ ザ ー ブ(
0b00
)
.
Slave Device
(1)
Slave Device
(2)
0=off、1=on
0=off、1=on
0=off、1=on
0=off、1=on
0=off、1=on
0=off、1=on
0=off、1=on
0=off、1=on
)
)
)
)
)
)
)
)
バイト7
0
1
2
3 ...
Slave Device
(3)
MSB 6 5 4 3 2 1 0LSB
バージョン
(0b0)
リザーブ
(0b0)
リザーブ
(0b0)
バージョン
(0b0)
リザーブ
(0b0)
リザーブ
(0b0)
バージョン
(0b0)
スレーブ 1
プレビュー
スレーブ 3
プレビュー
バージョン
(0b0)
スレーブ 1
プログラム
スレーブ 3
プログラム
リザーブ
(0b0)
リザーブ
(0b0)
リザーブ
(0b0)
リザーブ
(0b0)
リザーブ
(0b0)
リザーブ
(0b0)
Monitor Device
モニター
プレビュー
スレーブ 0
プレビュー
スレーブ 2
プレビュー
モニター
プログラム
スレーブ 0
プログラム
スレーブ 2
プログラム
付属書
48
Page 49

ヘ ルプ
ヘ ルプライン
すぐに情 報 が 欲 しい方は 、
の 最 新 サポート情 報を確 認で きま す。
BlackmagicDesign
最 新 のマニュアル は 、
com/jp/support
BlackmagicDesign
弊 社ウェブ サ イトの
きる有益なリソースです。経験豊富なユーザーや
の解決 策が 公 開されていますので、このフォーラムを参 考にすることで、現在の 問 題 をすばやく解決でき
る こ と が あ り ま す 。ぜ ひ ご 利 用 く だ さ い 。
からアクセスで きま す。
BlackmagicDesign
サポートペー ジ やフォーラムで 必要 な 情 報を得られなかった場 合 は 、サ ポートページの「メールを 送 信」
ボタンを使 用して、サ ポートのリクエストをメール送 信してください 。あるいは 、サポート ページの「お住
まいの地 域のサポートオフィス」をクリックして、お住まいの 地 域の
に電 話でお問い 合 わ せください 。
Blackmagic Design
オンライン サポートページ
Blackmagic Design
サ ポートセンターでご 確 認くださ い 。
フォー ラム
Blackmagic Design
フォーラムは、様々な情報やクリエイティブなアイデアを共有で
Blackmagic
サポートへの 連 絡
オンラインサポート ページ で、
Blackmagic Design
フォーラムには 、
ス タ ッ フ に よ っ て 、す で に 多 く の 問 題
http://forum.blackmagicdesign.com
Blackmagic Design
Blackmagic Web Presenter
www.blackmagicdesign.
サ ポー ト オ フィス
ヘルプ
49
Page 50

規制に関する警告および安全情報
規制に関する警告
欧州連合内での電気機器および電子機器の廃棄処分
製品に記載されている記号は、当該の機器を他の廃 棄物と共に処分してはならないことを示し
ています。機器を廃 棄するには、必ずリサイクルのために指定の回収場 所に引き渡してください。
機器の廃 棄において個 別 回 収とリサイクルが行われ ることで、天 然 資 源の保護につな がり、健
康と環 境を守る方法でリサイクルが 確 実に行われるようになります。廃 棄する機器のリサイクル
のための回収場所に関しては、お住いの地方自治体のリサイクル部門、または製品を購入した
販売業者にご 連 絡ください。
この機器は、
認されています。これらの制限は、商用環境で機器を使用している場合に有害な干渉に対する
妥当な保護を提供するためのものです。この機器は無線周波エネルギーを生成、使用、放出す
る 可 能 性 が あ り ま す。ま た 、指 示 に 従 って イ ン ス ト ー ル お よ び 使 用 し な い 場 合 、無 線 通 信 に 有 害
な干 渉 を引き起こす恐 れがあります。住宅 地 域 で 当 製 品を使 用すると有害な 干 渉を引き起こす
可能性があり、その場合はユーザーが自己責任で干渉に対処する必要があります。
動作は次の2つを条件とします:
1
本 機 は 、有 害 な 干 渉 を 起 こ さ な い 。
2
HDMI
りま す。
安全情報
この機器は、必ず保護接地のあるコンセントに接続してください。
感電のリスクを減らすため、水が跳 ね たり、滴るような 場 所には 置 かないでください 。
この機器は、周囲温度が最高40度までの熱帯地区での使用に適しています。
通気 が 妨げら れ ないように 、当 製品 の 周 囲 は 通気 に十 分 な スペースを開 けるようにしてください 。
ラックマウントする場合は 、隣接 する 機 器により通 気 が妨 げられ ないようにしてください。
FCC
規定の第15部 に 準 拠 し 、ク ラ スAデジタル機器の制限に適合していることが確
本機は希望しない動作を発生しかねない干渉を含む、いかなる受信干渉も受け入れる
必要がある。
イ ン タ ー フ ェ ース へ の 接 続 は 、必 ず 高 品 質 の シ ー ル ド
HDMI
ケーブルを使用する必要があ
ユーザーが保守できる部品はありません。サービスに関しては、お近くの
のサービスセンターにお問い合わせください。
2000m
海抜
以上では使 用しないでください。
規制に関する警告および安全情報
Blackmagic Design
50
Page 51

保証
36
ヶ月限 定 保 証
Blackmagic Design
は 、お 買 い 上 げ の 日 か ら36ヶ月間 、
Blackmagic Web Presenter
の部品および仕上 が
りに つ いて 瑕 疵 がない ことを 保証しま す。しかし、コ ネクター 、ケ ーブル、光ファイバー モ ジュール 、ヒュー
ズ、バッテリーについては 、それらの 部 品および 仕上 がりに瑕疵 がないことに対する保 証は12ヶ月 間 です。
この保証期間内に製品に瑕疵が見つかった場合、
Blackmagic Design
は弊社の裁量において部品代およ
び人件費無料で該当製品の修理、あるいは製品の交換のいずれかで対応いたします。
この保証に基づいたサービスを受ける際、お客 様は必ず保証期限終了前に
Blackmagic Design
に瑕疵を
通知し、適応する保証サービスの手続きを行ってください。お客様の責任において不良品を梱包
Blackmagic Design
し、
す。理 由 の 如 何 を 問 わ ず、
が指定するサポートセンターへ配送 料 前 払で送 付いただきますようお願い致しま
Blackmagic Design
への製品返送のための配送料、保険、関税、税金、その他
すべ ての 費 用 は お客 様の自己 負 担と なりま す。
不適切な使用、または不十分なメンテナンスや取扱いによる不具合、故障、損傷に対しては、この保証は
適用されません。a) 製 品 の イ ン ス ト ー ル や 修 理 、サ ー ビ ス を 行 う
Blackmagic Design
販売代理人以外の
者によって生じた損傷の修理、b)不適切な使用や互換性のない機器への接続によって生じた損傷の修
Blackmagic Design
理、c)
改造や他製品との統合により時間増加や製品の機能低下が生じた場合のサービス。この保証は
Design
が保証するもので、明示または黙示を問わず他の保 証すべてに代わるものです。
とその販売社は、商品性と特定目的に対する適合性のあらゆる黙示保証を拒否します。
の部品や供給品ではない物を使用して生じたすべての損傷や故障の修理、d)
Blackmagic
Blackmagic Design
Blackmagic Design
の不良品の修 理あるいは交換の責任が、特別に、間接的、偶発的、または結果的に生じる損害に対し
Blackmagic Design
て、
かに関わらず、お 客様に提 供される完 全 唯一の救 済手 段となりま す。
機器のあらゆる不法 使 用に対して責任を負いません。
あるいは販売社がそのような損害の可能性についての事前通知を得ているか否
Blackmagic Design
Blackmagic Design
は本製品の使用により生じる
はお 客 様による
あらゆる損害に対して責任を負いません。使用者は自己の責任において本製品を使用するものとします。
© Copyright 2017 Blackmagic Design
Workgroup Videohub
「
米国ならびにその他諸国での登録商標です。その他の企業名ならびに製品名全てはそれぞれ関連する会社の登録商標である可能
性 が ありま す。
Thunderbolt
および
」 、「
Thunderbolt
著 作 権 所 有 、 無 断 複 写 ・ 転 載 を 禁 じ ま す 。「
Multibridge Pro
のロゴは、米国またはその 他諸国の
Multibridge Extreme
」 、「
」 、「
Intel Corporation
Blackmagic Design
Intensity
」 、「
DeckLink
Leading the creative video revolution
の 登 録 商標です。
」 、「
」 、「
HDLink
」、
」は 、
保証
51
Page 52

Manuel d'utilisation et d'installation
Blackmagic
Web Presenter
Février 2017
Français
Page 53

Bienvenue
Nous vous remercions d'avoir fait l'acquisition d'un Blackmagic Web Presenter.
Lorsque nous avons conçu le Blackmagic Web Presenter, nous souhaitions faciliter la diffusion sur
Internet et les appels vidéo. Contrairement aux cartes d'acquisition standard, conçues pour la postproduction, le Blackmagic Web Presenter transforme les entrées SDI et HDMI en vidéo USB qui
utilise le pilote webcam intégré à votre ordinateur.
Ainsi, n'importe quelle source vidéo SDI ou HDMI apparaît comme un signal de webcam
standard. De plus, tout logiciel qui fonctionne avec une webcam prendra désormais en charge
les produits de qualité professionnelle. Comme tous les logiciels de streaming et d'appels vidéo
sont compatibles avec les signaux de webcam, vous avez désormais le choix entre différentes
plates-formes de diffusion.
Contrairement aux cartes d'acquisition qui envoient les pixels de la source vidéo à l'ordinateur, le
Blackmagic Web Presenter réduit la résolution vidéo à 720p. Il peut même réduire la fréquence
d'images à 20, 15, 10 ou 5 i/s lorsque le logiciel le demande. Vous obtenez donc de la vidéo HD
d'excellente qualité au format 16:9 à un débit très faible afin de pouvoir diffuser de la vidéo de
manière fiable.
Toutefois, le Blackmagic Web Presenter offre bien plus qu’une conversion des signaux SDI et HDMI
en signal webcam USB, car il comprend un mélangeur de production en direct à deux entrées afin
de créer des émissions ou des présentations multicaméras simples. Pour ce faire, il suffit d'ajouter
un Teranex Mini Smart Panel en option et d'appuyer sur les boutons 1 et 2 pour commuter les
sources. Le Teranex Mini Smart Panel intègre également un aperçu de la vidéo et des vumètres,
ainsi que des informations sur le standard vidéo de l'entrée et la fréquence d'images USB.
Consultez notre page d’assistance sur www.blackmagicdesign.com/fr pour obtenir la dernière
version du manuel et les mises à jour du logiciel interne du Blackmagic Web Presenter. Enfin,
veuillez enregistrer votre équipement lors du téléchargement du logiciel afin d’être tenu informé de
la sortie des mises à jour logicielles. Nous souhaitons continuer à améliorer nos produits, n'hésitez
donc pas à nous faire part de vos commentaires !
Grant Petty
PDG de Blackmagic Design
Page 54

Sommaire
Blackmagic Web Presenter
Mise en route 55
Brancher l'alimentation 55
Brancher la vidéo 55
Brancher l'audio 56
Connecter l'appareil à un ordinateur 56
Configurer le Blackmagic Web Presenter en tant que webcam 56
Utiliser le Blackmagic Web Presenter avec un logiciel tiers 57
Utiliser le Blackmagic Web Presenter avec Skype 57
Utiliser le Blackmagic Web Presenter pour diuser des vidéos sur YouTube Live 58
Configurer le Web Presenter en tant que nouvel appareil : 58
Configurer une chaîne sur YouTube Live 60
Utiliser le Teranex Mini Smart Panel 62
Installer le Teranex Mini Smart Panel 62
Caractéristiques du Smart Panel 63
Paramètres 63
Entrée vidéo 63
Transition 64
Menu Audio Mixer 65
Menu Setup 67
Modifier l’entrée vidéo à l’aide des interrupteurs 67
Teranex Mini Rack Shelf 68
Utiliser le mélangeur intégré 68
Utiliser le voyant tally de la caméra 69
Utilitaire Blackmagic Web Presenter Setup 70
Appendix 72
Assistance 74
Avis règlementaires et informations de sécurité 75
Garantie 76
Page 55

Mise en route
Web Presenter
Blackmagic
Brancher l'alimentation
Il est très facile de mettre en route le Blackmagic Web Presenter ! Il suffit de le brancher à une
source d'alimentation, de connecter une source vidéo et audio et de connecter l'appareil à votre
ordinateur.
Pour alimenter l'appareil, branchez un câble d'alimentation CEI standard au connecteur
d'alimentation situé sur le panneau arrière du Blackmagic Web Presenter. Lorsqu'il est alimenté, le
voyant situé en bas à droite du panneau avant s'allume.
Blackmagic
Web Presenter
Le Blackmagic Web Presenter prend en charge le 12G-SDI et commute
automatiquement entre les standards SD, HD et Ultra HD, jusqu'à 2160p60.
SDI PGM OUT
USB WEB CAM
SDI IN SDI LOOP OUT
Branchez le panneau arrière du Blackmagic Web Presenter à une
source d'alimentation à l'aide d'un câble IEC standard.
HDMI LOOP OUT
HDMI IN
STEREO IN
L
R
LINE/MIC IN
ANALOG AUDIO IN
Brancher la vidéo
Branchez ensuite la source vidéo à l’entrée vidéo SDI ou HDMI du Blackmagic Web Presenter. Vous
avez sans doute remarqué que l’appareil est doté de sorties SDI et HDMI en boucle. Ces sorties
permettent de connecter le Web Presenter à d’autres appareils avec une connexion vidéo. Vous
pouvez par exemple relier la sortie SDI à un enregistreur ou à un moniteur, ou encore connecter le
Web Presenter entre la sortie HDMI d’un ordinateur et l’entrée HDMI d’un vidéoprojecteur.
Le Blackmagic Web Presenter est également doté d'une sortie programme SDI qui achemine la
vidéo après la commutation SDI et HDMI, mais avant la down-conversion en vidéo 720p. Cette sortie
utilise la même résolution que les entrées vidéo, elle est donc parfaite pour connecter un
enregistreur afin d'enregistrer le master.
Le Blackmagic Web Presenter prend en charge le 12G-SDI et commute automatiquement entre les
standards SD, HD et Ultra HD, jusqu'à 2160p60 lorsque l'entrée vidéo change. Ainsi, vous pouvez
utiliser tout type de signal vidéo, car l'appareil convertit le signal en vidéo 720p USB bas débit
d'excellente qualité pour la diffusion. Cela signifie que vous pouvez réaliser votre production en
résolution plus élevée, par exemple HD 1080 ou Ultra HD, et le Web Presenter réduit la résolution et
la fréquence d'images à lui tout seul !
Mise en route
55
Page 56

Brancher l'audio
Web Presenter
Blackmagic
SDI PGM OUT
L
STEREO IN
Les entrées SDI et HDMI intègrent l'audio, toutefois, le Blackmagic Web Presenter est également
doté de deux entrées audio analogique. L'entrée audio XLR est une entrée mono qui vous permet
de brancher des micros. C'est un canal mono, car les micros sont mono. Lorsque vous connectez
cette entrée audio XLR symétrique, l'audio est envoyé aux canaux gauche et droit. La deuxième
entrée audio analogique est une entrée HiFi qui utilise des connecteurs RCA. Cette entrée est
parfaite pour l'audio provenant d'un ordinateur ou l'audio provenant d'une source audio telle qu'un
smartphone, un lecteur audio, un mixeur audio ou un lecteur de CD.
Toutes les sources audio sont connectées à un mixeur audio stéréo interne pour être mélangées.
Sivous souhaitez ne pas inclure l'audio d'une source spécifique, assurez-vous que les sources audio
analogiques sont déconnectées, ou désactivez l'audio des sources HDMI, par exemple celui des
ordinateurs. Dans le cas contraire, l'audio de toutes les entrées sera mélangé et envoyé vers la
sortie audio USB.
Connecter l'appareil à un ordinateur
Une fois les sources audio et vidéo connectées, branchez le Blackmagic Web Presenter à votre
ordinateur via le port USB. L'ordinateur reconnaîtra immédiatement l'appareil comme étant une
source vidéo webcam.
SDI PGM OUT
USB WEB CAM
SDI IN SDI LOOP OUT
Connectez le Blackmagic Web Presenter à votre
ordinateur via le port USB situé sur le panneau arrière.
HDMI LOOP OUT
HDMI IN
STEREO IN
L
R
LINE/MIC IN
ANALOG AUDIO IN
Configurer le Blackmagic Web Presenter en tant que webcam
Configurez le Blackmagic Web Presenter en tant que webcam à l'aide du logiciel de
vidéoconférence ou de diffusion tiers souhaité, par exemple Skype, Open Broadcaster, XSplit
Broadcaster ou Periscope.
Pour obtenir plus d'informations concernant l'utilisation du Blackmagic Web Presenter avec Skype et
YouTube Live, consultez les sections « Utiliser le Blackmagic Web Presenter avec Skype » et
« Utiliser le Blackmagic Web Presenter pour diffuser des vidéos sur YouTube Live » de ce manuel.
C'est tout ce que vous devez savoir pour démarrer ! Vous êtes à présent prêt à diffuser de la vidéo
et de l'audio d'excellente qualité en ligne ! Poursuivez la lecture de ce manuel pour obtenir de plus
amples informations concernant le tally, la modification des paramètres et l'installation d'un Teranex
Mini Smart Panel en option.
Mise en route
56
Page 57

Utiliser le Blackmagic Web Presenter avec un logiciel tiers
Utiliser le Blackmagic Web Presenter avec Skype
Pour utiliser le Blackmagic Web Presenter avec Skype, commencez par télécharger le logiciel Skype
et installez-le sur votre ordinateur. Ce logiciel est gratuit. Il peut être téléchargé sur le site
www.skype.com
1 Une fois installé, ouvrez-le.
2 Allez dans les préférences de Skype et sélectionnez audio/vidéo.
3 Si votre ordinateur est doté d'une webcam, celle-ci sera sélectionnée par défaut. La
fenêtre de prévisualisation de Skype affiche alors l'image de la webcam. Cliquez sur le
menu déroulant Caméra et sélectionnez Blackmagic Web Presenter dans la liste. Une fois
l'appareil sélectionné, la source vidéo connectée au Web Presenter s'affiche dans la fenêtre
de prévisualisation de Skype.
Sélectionnez Blackmagic Web Presenter dans le menu déroulant Caméra.
REMARQUE Dans la fenêtre des préférences de Skype, vous remarquerez que l’image est
inversée de gauche à droite. C’est tout à fait normal, car Skype affiche une image miroir en
tant qu’image de prévisualisation. Vos appels vidéo ne seront pas pour autant inversés.
Utiliser le Blackmagic Web Presenter avec un logiciel tiers
57
Page 58

4 Dans le menu déroulant Microphone, sélectionnez Blackmagic Web Presenter en tant que
source audio.
Voilà ! C'est tout ce qu'il y a à faire. Lors d'un appel Skype, vous utiliserez la source vidéo connectée
au Blackmagic Web Presenter.
REMARQUE La configuration de Skype avec le Blackmagic Web Presenter est la même sur
Mac OS et sur Windows. Pour plus d’informations, consultez le site Internet de Skype :
www.skype.com.
Utiliser le Blackmagic Web Presenter pour diffuser des vidéos sur YouTube Live
Open Broadcaster est un logiciel libre qui permet de diffuser des vidéos sur YouTube Live. Il peut
être téléchargé sur : https://obsproject.com.
Configurer le Web Presenter en tant que nouvel appareil :
Une fois installé sur votre ordinateur, lancez le logiciel.
1 Cliquez sur le bouton + dans la fenêtre Sources pour ajouter une source puis sélectionnez
Périphérique de capture vidéo. Une fenêtre apparaît proposant de créer une
nouvelle source.
Sélectionnez Périphérique de capture vidéo dans la liste des sources et
créez une nouvelle source avec le Blackmagic Web Presenter.
Utiliser le Blackmagic Web Presenter avec un logiciel tiers
58
Page 59

2 Sélectionnez Créer une nouvelle source dans la fenêtre et cliquez sur Ok.
3 Dans la fenêtre Propriétés du nouvel appareil, sélectionnez Blackmagic Web Presenter à
l'aide du menu déroulant Périphérique. Cliquez sur Ok.
4 Répétez cette opération pour sélectionner l’audio. Cliquez sur le bouton + dans la fenêtre
Sources puis sélectionnez Capture de l’audio entrant. Sélectionnez Créer une nouvelle
source dans la fenêtre et cliquez sur OK. Dans la fenêtre Propriétés du nouvel appareil,
sélectionnez Blackmagic Web Presenter à l’aide du menu déroulant Périphérique et
cliquez sur OK.
5 Ouvrez les préférences OBS>Préférence et cliquez sur l'onglet Vidéo.
6 Réglez Résolution de base (canvas) sur 1280 x 720 et Résolution de sortie (mise à
l’échelle) sur 1280 x 720. Cliquez sur OK. Ce réglage permet de voir la vidéo entrante
en plein écran.
Utiliser le Blackmagic Web Presenter avec un logiciel tiers
59
Page 60

Réglez Résolution de base (canvas) et Résolution de sortie
(mise à l’échelle) sur 1280x720 pour voir la vidéo en plein écran.
Configurer une chaîne sur YouTube Live
Pour créer une chaîne sur YouTube Live : Dans votre navigateur, allez sur
www.youtube.com/live_dashboard et connectez-vous ou créez un compte Google.
1 Sélectionnez Diffusion en direct en haut à gauche, puis cliquez sur Premier pas.
2 Saisissez les informations générales de votre programme et choisissez
s'il est public ou privé.
Utiliser le Blackmagic Web Presenter avec un logiciel tiers
60
Page 61

3 Cliquez sur le bouton Afficher en bas de la page. Surlignez la clé de flux, faites un clic
droit et choisissez Copier. Il est important de copier ces informations, car au cours de la
prochaine étape, il vous faudra coller cette clé dans le logiciel OpenBroadcaster.
4 Dans le logiciel Open Broadcaster, allez sur Préférence et sélectionnez l'onglet Flux.
Sélectionnez le service YouTube et collez la clé dans le champ Clé de stream.
5 Cliquez sur le bouton Commencer le streaming dans la fenêtre principale du logiciel Open
Broadcaster. Vous devriez être en train de diffuser le flux.
6 Sur YouTube Live, l'état du flux change sur En direct. Vous pouvez maintenant voir votre flux
en direct.
Utiliser le Blackmagic Web Presenter avec un logiciel tiers
61
Page 62

REMARQUE La configuration du logiciel Open Broadcaster avec le Blackmagic
1
2
SET
VIDEO
MENU
AUDIO
Video Format
525i59.95 NTSC
USB
25 fps
Video Format
525i59.95 NTSC
USB
25 fps
WebPresenter est la même sur Mac OS et sur Windows. Pour plus d’informations,
consultez le site Internet : https://obsproject.com.
Utiliser le Teranex Mini Smart Panel
Le Teranex Mini Smart Panel en option remplace le panneau avant d’origine du Web Presenter. Les
boutons du Smart Panel permettent de faire commuter les sources. Il est également équipé d’un
écran LCD pour visualiser l’entrée vidéo et les informations d’état, notamment le signal d’entrée
vidéo, le format et la fréquence d’images de la sortie USB.
Installer le Teranex Mini Smart Panel
L'installation du Smart Panel en option est simple, et comme il est échangeable à chaud, vous n'avez
même pas besoin d'éteindre le Blackmagic Web Presenter pour l'installer.
1 À l'aide d'un tournevis Pozidriv 2, dévissez les deux vis M3 placées de chaque côté du
panneau avant et retirez-le doucement.
2 À l’intérieur du panneau d’origine, dans un coin de la base, vous trouverez un petit tube en
plastique transparent. Ce tube permet de diriger la lumière de la LED située à l’intérieur du
Web Presenter et d’allumer le voyant sur le panneau d’origine. Ce tube doit rester attaché
au panneau avant d’origine.
CONSEIL Lorsque vous rattachez le panneau avant d’origine, veillez à ce que le
tube soit aligné avec la fente située sur l’avant de l’appareil.
3 Alignez le connecteur situé sur la face arrière du Smart Panel avec le connecteur
correspondant sur la face avant du Blackmagic Web Presenter et poussez doucement
le Smart Panel vers l'appareil jusqu'à ce que les connecteurs soient fermement
enfoncés. Le Smart Panel doit être correctement aligné avec le Web Presenter et être
fermement enfoncé.
4 Vissez de nouveau les vis M3 du panneau d'origine.
Pour installer correctement le Teranex Mini Smart Panel sur le
Blackmagic Web Presenter, tenez le panneau entre vos doigts et votre pouce
afin d’aligner le Smart Panel à la façade du Blackmagic Web Presenter
Utiliser le Teranex Mini Smart Panel
62
Page 63

Si le Blackmagic Web Presenter est monté sur le Teranex Mini Rack Shelf, l'appareil devra être
1 MENU
2 VIDEO
SET AUDIO
Video Format
525i59.94 NTSC
Source
HDMI
USB
30 fps
enlevé du rack avant de retirer les vis. Pour plus d'informations, consultez la section « Teranex Mini
Rack Shelf ». Le port USB du Web Presenter est accessible même lorsque le Smart Panel est
attaché. Pour y accéder, soulevez simplement le volet en caoutchouc.
Caractéristiques du Smart Panel
Boutons de contrôle
Boutons 1 et 2
Lorsque le Smart Panel est attaché, la fonction de commutation est activée sur le Blackmagic Web
Presenter. Ainsi, lorsque vous diffusez des vidéos en direct, appuyez sur les boutons 1 et 2 pour
commuter sur les entrées SDI et HDMI. Appuyez sur 1 pour sélectionner l'entrée SDI et sur 2 pour
sélectionner l'entrée HDMI.
Video Format
1 MENU
2 VIDEO
SET AUDIO
Source
HDMI
525i59.94 NTSC
USB
30 fps
Le Teranex Mini Smart Panel permet de transformer votre Web Presenter
en véritable mélangeur. Vous pouvez appuyer sur les boutons 1 et 2 pour
faire des commutations en direct entre les sources SDI et HDMI.
Paramètres
Lorsqu’un Teranex Mini Smart Panel est installé sur le Web Presenter, vous pouvez modifier des
paramètres tels que la durée de la transition, le mixage audio et autres. Il suffit d’appuyer sur le
bouton Menu afin d’ouvrir le menu de paramétrage, puis d’utiliser la molette et le bouton Set afin
de naviguer dans les menus et de modifier les paramètres souhaités.
Pour revenir en arrière dans le menu, il suffit d’appuyer à nouveau sur le bouton Menu. Appuyez
plusieurs fois sur le bouton Menu pour revenir à l’écran d’accueil.
Entrée vidéo
Il est possible de configurer le Blackmagic Web Presenter afin qu’il détecte automatiquement le
branchement d’une entrée et qu’il règle la sortie de programme en conséquence. Vous pouvez
également configurer le Web Presenter afin qu’il n’utilise que l’entrée SDI ou HDMI. Ces paramètres
peuvent également être modifiés à l’aide des interrupteurs intégrés, lorsque le panneau avant
d’origine est installé. Pour plus d’informations, consultez la section « Modifier l’entrée vidéo à l’aide
des interrupteurs » de ce manuel.
CONSEIL Si vous souhaitez modifier un paramètre vidéo, vous pouvez vous rendre
directement sur les paramètres vidéo en appuyant sur le bouton Video du panneau avant,
sans passer par le menu principal.
Paramètres
63
Page 64

Auto
Choisissez ce paramètre si vous souhaitez que le Web Presenter sélectionne
automatiquement l’entrée SDI ou HDMI lorsqu’une source vidéo est connectée. Si une
source SDI et une source HDMI sont connectées, le Web Presenter sélectionnera
automatiquement l’entrée SDI.
SDI
Choisissez ce paramètre si vous souhaitez que le Web Presenter n’utilise que l’entrée SDI.
HDMI
Choisissez ce paramètre si vous souhaitez que le Web Presenter n’utilise que l’entrée HDMI.
Allez sur le paramètre Video Input pour choisir l’entrée que vous
souhaitez utiliser, ou sélectionnez Auto pour que le Blackmagic
Web Presenter détecte automatiquement la source vidéo.
CONSEIL Lorsqu’un signal vidéo est reçu via une autre entrée vidéo que celle sélectionnée,
un écran noir s’affiche. Il suffit alors de sélectionner l’entrée appropriée, ou de régler le Web
Presenter sur Auto.
Transition
Lorsque vous commutez un programme en direct à l’aide de la fonction mélangeur du Blackmagic
Web Presenter, la transition réglée par défaut est un fondu enchaîné d’une demi-seconde. Vous
pouvez toutefois changer la durée de la transition si vous le souhaitez. Vous pouvez également
configurer le Web Presenter afin qu’il effectue une transition dip ou cut !
Les paramètres de la transition vous permettent de choisir
le type de transition et la durée souhaités.
Paramètres
64
Page 65

Transition Cut
Si vous souhaitez effectuer une coupe franche entre les sources vidéo, sélectionnez la
transition Cut.
Transition Mix
La transition Mix est un fondu enchaîné. C’est une transition progressive d’une source à
l’autre pour une durée prédéterminée. Pour modifier sa durée, sélectionnez un des
préréglages Mix.
Transition Dip
La transition Dip ressemble à la transition Mix. Cependant, lors d’une transition Dip, la
première source est fondue au noir avant que la deuxième source apparaisse. Pour modifier
sa durée, sélectionnez un des préréglages Dip.
Menu Audio Mixer
Les paramètres du menu Audio Mixer permettent de contrôler le mixage audio. Vous pouvez par
exemple, activer ou désactiver l’audio de chaque entrée, modifier le niveau audio des entrées, ou
régler le niveau de l’entrée XLR sur micro ou ligne. Tournez la molette vers la gauche ou vers la
droite pour ajuster un paramètre.
CONSEIL Si vous souhaitez modifier un paramètre audio, vous pouvez vous rendre
directement sur les paramètres audio en appuyant sur le bouton Audio du panneau avant,
sans passer par le menu principal.
Paramètre Master Level
Tournez la molette pour augmenter ou réduire le niveau audio de la sortie de programme. Ce
paramètre affecte le volume général du mixage son diffusé.
Paramètre SDI Input Level
Utilisez ce paramètre pour ajuster le niveau audio de l’entrée vidéo SDI.
Paramètre SDI Input
Tournez la molette pour activer ou désactiver l’audio de l’entrée SDI, ou pour choisir la fonction
Audio Follow Video.
ON
Lorsque ce paramètre est réglé sur On, l’audio de l’entrée SDI sera toujours présent dans
l’audio du programme. Utilisez le paramètre SDI Input Level pour augmenter ou réduire le
niveau audio.
OFF
Réglez l’entrée SDI sur Off si vous ne souhaitez pas inclure l’audio de l’entrée SDI à l’audio
de programme.
AFV
Lorsque ce paramètre est activé, l’audio de l’entrée SDI ne sera intégré au programme que
si l’entrée vidéo SDI est commutée sur la sortie de programme.
Paramètre HDMI Input Level
Utilisez ce paramètre pour ajuster le niveau audio de l’entrée vidéo HDMI.
Paramètres
65
Page 66

Paramètre HDMI Input
Tournez la molette pour activer ou désactiver l’audio de l’entrée HDMI, ou pour choisir la fonction
Audio Follow Video.
ON Lorsque ce paramètre est réglé sur On, l’audio de l’entrée HDMI sera toujours présent
dans l’audio du programme. Utilisez le paramètre HDMI Input Level pour augmenter ou
réduire le niveau audio.
OFF Réglez l’entrée HDMI sur Off si vous ne souhaitez pas inclure l’audio de l’entrée HDMI
à l’audio de programme.
AFV Lorsque ce paramètre est activé, l’audio de l’entrée HDMI ne sera intégré au
programme que si l’entrée vidéo HDMI est commutée sur la sortie de programme.
Paramètre XLR Input Level
Utilisez ce paramètre pour ajuster le niveau audio de la source audio XLR.
Paramètre XLR Input
Active ou désactive l’audio de l’entrée XLR.
Paramètre XLR Input Source
Utilisez ce paramètre pour régler le niveau de la source d’entrée sur micro ou ligne.
L’intensité d’un signal provenant d’un micro est typiquement plus faible que celle provenant de
matériel de lecture audio. Pour compenser cette faible intensité, le Blackmagic Web Presenter peut
être réglé sur Mic afin d’amplifier le signal d’entrée. Si vous utilisez du matériel audio autre qu’un
micro, réglez le niveau de l’entrée XLR sur Line.
Paramètre RCA Input Level
Utilisez ce paramètre pour ajuster le niveau audio de l’entrée audio RCA.
Paramètre RCA Input
Active ou désactive l’audio de l’entrée RCA.
Activez ou désactivez l’audio de chaque entrée, ou ajustez les
niveaux audio à l’aide des paramètres Audio Mixer.
Paramètres
66
Page 67

Menu Setup
Utilisez les paramètres du menu Setup pour vérifier la version du logiciel installée sur le Web
Presenter. Vous pouvez également restaurer le Web Presenter sur sa configuration par défaut.
Paramètre Software
Ce paramètre permet de vérifier la version du logiciel installée sur le Blackmagic Web
Presenter.
Paramètre Factory Default
Ce paramètre est utile si vous souhaitez commencer un nouveau projet et régler le Web
Presenter sur sa configuration par défaut.
Pour réinitialiser le Web Presenter :
1 Appuyez sur le bouton Menu et naviguez jusqu’au menu Setup à l’aide de la molette.
Appuyez sur Set pour entrer dans le menu.
2 Appuyez sur Factory Default, puis sur Set.
3 Annulez ou confirmez la réinitialisation.
Si vous confirmez la réinitialisation, le Web Presenter affiche le message Resetting. Une fois la
réinitialisation terminée, l’écran LCD affiche l’écran d’accueil et tous les paramètres seront réglés sur
leur état d’origine.
Utilisez les paramètres du menu Setup pour vérifier la
version du logiciel installée sur le Web Presenter, ou pour
réinitialiser le Web Presenter sur sa configuration par défaut.
Modifier l’entrée vidéo à l’aide des interrupteurs
Les petits interrupteurs situés sur le panneau avant d’origine du Blackmagic Web Presenter vous
permettent de régler l’entrée vidéo sur SDI, HDMI ou sur Auto. Si vous installez un Teranex Mini Smart
Panel en option, les paramètres choisis avec ce dernier primeront sur la position des interrupteurs.
Modifier un paramètre à l’aide des interrupteurs est un vrai jeu d’enfant ! Il suffit de déplacer
l’interrupteur vers le haut ou vers le bas avec la pointe d’un stylo. Veuillez consulter la légende
imprimée sur la base du Web Presenter afin de positionner correctement les interrupteurs pour les
entrées souhaitées.
Modifier l’entrée vidéo à l’aide des interrupteurs
67
Page 68

AUTO
Réglez les interrupteurs 1 et 2 sur Off. Choisissez ce paramètre si vous souhaitez que le
Web Presenter sélectionne automatiquement l’entrée SDI ou HDMI lorsqu’une source vidéo
est connectée. Si une source SDI et une source HDMI sont connectées, le Web Presenter
sélectionnera automatiquement l’entrée SDI.
SDI
Réglez l’interrupteur 2 sur Off et l’interrupteur 1 sur On. Choisissez ce paramètre si vous
souhaitez que le Web Presenter n’utilise que l’entrée SDI.
HDMI
Réglez l’interrupteur 2 sur On et l’interrupteur 1 sur Off. Choisissez ce paramètre si vous
souhaitez que le Web Presenter n’utilise que l’entrée HDMI.
Teranex Mini Rack Shelf
Le Teranex Mini Rack Shelf mesure une unité de rack, ainsi, si vous choisissez d’y installer un
Blackmagic Web Presenter, vous pourrez l'utiliser dans un rack broadcast ou dans une caisse de
transport. Le Web Presenter peut être installé sur le Teranex Mini Rack Shelf aux côtés d'autres
appareils Blackmagic Design de la même taille, vous pouvez ainsi l’utiliser avec un convertisseur
Teranex Mini, un MultiView 4 ou un HyperDeck Studio Mini. Installez, par exemple, un Blackmagic
Web Presenter avec deux HyperDeck Studio Mini pour lire les vidéos et pour enregistrer la sortie du
programme du Web Presenter. Ce design modulaire vous permet de créer des solutions
personnalisées qui sont portables et faciles à utiliser.
L'installation du Blackmagic Web Presenter sur le Teranex Mini Rack Shelf est extrêmement rapide. Il
suffit de retirer les pieds en caoutchouc du Web Presenter et de les visser sur les pas de vis du rack.
Le Teranex Mini Rack Shelf est vendu avec deux panneaux avant que vous pouvez utiliser pour
couvrir les zones vides du rack.
Pour plus d’informations, consultez le site Internet de Blackmagic Design :
www.blackmagicdesign.com/fr.
Blackmagic
Web Presenter
Le Blackmagic Web Presenter peut être installé sur un Teranex Mini Rack Shelf avec un autre appareil
BlackmagicDesign de la même taille, par exemple un convertisseur Teranex Mini ou un HyperDeck Studio Mini.
Utiliser le mélangeur intégré
Le Blackmagic Web Presenter comprend un mélangeur de production en direct à deux entrées.
Cependant, pour pouvoir l'utiliser, il faut tout d'abord installer le Teranex Mini Smart Panel. Ce
panneau comprend un écran LCD et des boutons de contrôle que vous pouvez utiliser pour contrôler
le mélangeur intégré. Une fois le Teranex Mini Smart Panel installé, le mélangeur pourra être utilisé.
Lorsque les sources SDI et HDMI sont connectées, l'entrée HDMI est synchronisée avec l’entrée SDI
afin de réaliser des commutations propres. Cette fonctionnalité permet au Web Presenter d’effectuer
des commutations en direct.
Pour sélectionner les sources vidéo, appuyez sur le bouton 1 du panneau avant pour choisir le signal
SDI ou sur le bouton 2 pour choisir le signal HDMI. Une fois sélectionné, le Web Presenter effectuera
une transition. Vous pouvez brancher un ordinateur à l’entrée HDMI et une caméra au port SDI pour
Utiliser le mélangeur intégré
68
Page 69

réaliser des présentations en direct de qualité professionnelle, simplement à l’aide des boutons 1 et
1 MENU
2 VIDEO
Video Format
525i59.94 NTSC
Source
HDMI
USB
30 fps
2. Vous pouvez également visualiser l’entrée utilisée, la vidéo et les niveaux audio à l’écran.
Video Format
1 MENU
2 VIDEO
SET AUDIO
Lorsque vous effectuez des commutations pour une émission broadcast
avec le Blackmagic Web Presenter et le Teranex Mini Smart Panel, il suffit
d’appuyer sur les boutons 1 et 2 pour commuter les entrées SDI et HDMI.
Source
HDMI
525i59.94 NTSC
USB
30 fps
REMARQUE La transition réglée par défaut est un fondu enchaîné d’une demi-seconde.
Toutefois, si vous avez installé un Teranex Mini Smart Panel sur le Web Presenter, vous
pouvez choisir une durée différente ou un type de transition différent dans les paramètres
du menu Transition de l’écran LCD. Pour plus d’information, consultez la section
«Paramètres » de ce manuel.
Utiliser le voyant tally de la caméra
Les Blackmagic Studio Camera et les mélangeurs ATEM comprennent une fonction tally qui permet
d'envoyer les informations du mélangeur à la caméra via le flux de programme. Lorsque vous utilisez
le mélangeur, le Blackmagic Web Presenter prend également en charge le signal tally qui permet
d'indiquer quelle caméra est à l'antenne.
Le tally est très simple à utiliser. Il suffit de connecter la sortie SDI de la Blackmagic Studio Camera à
l’entrée SDI du Web Presenter, puis de connecter la sortie de programme du Web Presenter à
l'entrée de programme SDI de la caméra. Désormais, quand vous appuyez sur le bouton Programme
de la caméra, la vidéo provenant du Web Presenter s'affiche sur la caméra. De plus, les informations
du tally sont envoyées vers la caméra.
L'entrée vidéo SDI s'appelle Camera 1 et l'entrée HDMI s'appelle Camera 2. Pour configurer le numéro
de la caméra, allez dans les paramètres de la caméra. Ici, nous utilisons l'entrée SDI pour recevoir les
signaux de la caméra, il faut donc régler la caméra sur Camera 1. Une fois que cela a été réglé, appuyez
sur le bouton 1 du panneau avant du Web Presenter. Le voyant tally s'allume alors sur la caméra.
Réglez la Blackmagic Studio Camera connectée au port
SDI sur 1 dans l'onglet Studio du menu à l'écran.
Utiliser le voyant tally de la caméra
69
Page 70

Réglez la Blackmagic Studio Camera connectée au port
SDI sur 1 dans l'onglet Setup du menu à l'écran.
Si vous filmez une présentation, le présentateur sera sans doute content de pouvoir identifier quelle
caméra est à l'antenne grâce à ce voyant tally. Il peut ainsi facilement savoir quand il est à l'antenne.
Et si vous utilisez une Blackmagic URSA Mini avec un Blackmagic URSA Studio Viewfinder, le
présentateur pourra facilement voir le grand voyant tally. C’est très efficace !
Les Blackmagic Studio Camera, Blackmagic Micro Studio Camera et les Blackmagic URSA Mini
prennent en charge le tally. Pour en savoir plus sur l'installation du tally, consultez les manuels
« Blackmagic URSA et URSA Mini » et « Blackmagic Studio Camera ». Vous pouvez les télécharger
sur le site Internet www.blackmagicdesign.com/fr/support.
Utilitaire Blackmagic Web Presenter Setup
De temps en temps, des mises à jour pour le Blackmagic Web Presenter seront disponibles sur le
site Internet de Blackmagic Design. Ces mises à jour sont installées sur le Web Presenter via
l’utilitaire Blackmagic Web Presenter Setup. Nous vous recommandons de télécharger l’utilitaire et
de mettre à jour votre Web Presenter afin de bénéficier des fonctions les plus récentes et de toutes
les améliorations disponibles.
Pour mettre à jour le logiciel interne avec Mac OS :
1 Téléchargez et dézippez le Blackmagic Web Presenter Setup.
2 Ouvrez l’image disque et lancez le programme d’installation Blackmagic Web
Presenter Setup.
Suivez les instructions affichées à l’écran.
3 Une fois l’installation terminée, connectez le Web Presenter à votre ordinateur via le port
USB situé sur le panneau avant. Pour y accéder, soulevez simplement la protection en
plastique.
4 Lancez le Blackmagic Web Presenter Setup et suivez les instructions affichées à l’écran
pour mettre à jour le logiciel interne. Si aucune information n’apparaît, le logiciel interne
est à jour.
Utilitaire Blackmagic Web Presenter Setup
70
Page 71

Pour mettre à jour le logiciel interne avec Windows :
1 Téléchargez et dézippez le Blackmagic Web Presenter Setup.
2 Le dossier Blackmagic Web Presenter Setup contenant ce manuel et le programme
d’installation Blackmagic Web Presenter Setup devrait apparaître. Double-cliquez sur
le programme d’installation et suivez les instructions affichées à l’écran pour terminer
l’installation.
3 Une fois l’installation terminée, connectez le Web Presenter à votre ordinateur via le port
USB situé sur le panneau avant. Pour y accéder, soulevez simplement la protection en
plastique.
4 Lancez le Blackmagic Web Presenter Setup et suivez les instructions affichées à l’écran
pour mettre à jour le logiciel interne. Si aucune information n’apparaît, le logiciel interne
est à jour.
Téléchargez la dernière version de l’utilitaire pour le Blackmagic Web Presenter à partir
de la page d’assistance Blackmagic sur www.blackmagicdesign.com/fr/support.
Utilitaire Blackmagic Web Presenter Setup
71
Page 72

Appendix
Blackmagic Embedded Tally Control Protocol
Version 1.0 (30/04/14)
Cette section est réservée aux développeurs ou aux utilisateurs qui souhaiteraient ajouter une prise
en charge du Blackmagic Embedded Tally Control Protocol à leurs produits ou systèmes. Cette
dernière décrit le protocole permettant d'envoyer des informations tally intégrées à la zone inactive
de l'image d'un flux vidéo numérique.
Flux de données
Un appareil maître tel qu'un mélangeur intègre les informations tally dans son flux de programme qui
est diffusé à un nombre d'appareils esclaves tels que des caméras ou des contrôleurs de caméras.
Le signal de sortie provenant des appareils esclaves est en général acheminé vers l'appareil maître,
mais il peut également être envoyé vers un moniteur vidéo.
Le flux primaire d'informations tally est à partir de l'appareil maître vers les esclaves. Chaque
appareil esclave peut utiliser son identification de périphérique pour extraire et afficher les
informations tally pertinentes.
Les appareils esclaves font passer le paquet tally sur leur sortie et mettent à jour l'état du tally du
moniteur, afin que les moniteurs connectés à cette sortie individuelle puissent afficher l'état du tally
sans connaître l'identification de périphérique de l'appareil qu'ils contrôlent.
Suppositions
Tout alignement des données / remplissage est explicite dans le protocole. Les champs de bits sont
regroupés avec le bit le moins significatif en premier.
Codage de la suppression
Un paquet de contrôle tally peut être envoyé par image vidéo. Un paquet de contrôle tally peut
contenir jusqu'à 256 octets d'informations tally.
Format du paquet
Chaque état tally consiste en 4 bits d'information :
uint4
bit 0: program tally status (0=off, 1=on)
bit 1: preview tally status (0=off, 1=on)
bit 2-3: reserved (0x0)
Le premier octet du paquet tally contient l'état du tally du moniteur ainsi qu'un numéro de version.
Les octets suivants du paquet tally contiennent l'état du tally pour les paires d'appareils esclaves.
L'appareil maître envoie l'état du tally pour le nombre d'appareils configurés / pris en charge, jusqu'à
un maximum de 510.
struct tally
uint8
bit 0: monitor device program tally status (0=off, 1=on)
bit 1: monitor device preview tally status (0=off, 1=on)
bit 2-3: reserved (0b00)
bit 4-7: protocol version (0b0000)
Appendix
72
Page 73

uint8[0]
bit 0: slave device 1 program tally status (0=off, 1=on)
bit 1: slave device 1 device preview tally status (0=off, 1=on)
bit 2-3: reserved (0b00)
bit 4: slave device 2 program tally status (0=off, 1=on)
bit 5: slave device 2 preview tally status (0=off, 1=on)
bit 6-7: reserved (0b00)
uint8[1]
bit 0: slave device 3 program tally status (0=off, 1=on)
bit 1: slave device 3 device preview tally status (0=off, 1=on)
bit 2-3: reserved (0b00)
bit 4: slave device 4 program tally status (0=off, 1=on)
bit 5: slave device 4 preview tally status (0=off, 1=on)
bit 6-7: reserved (0b00)
. . .
Slave Device
(1)
Master Device
Slave Device
(2)
Slave Device
(3)
Monitor Device
Byte 7 MSB 6 5 4 3 2 1 0 LSB
0 Version
(0b0)
1 Reserved
(0b0)
2 Reserved
(0b0)
3 ...
Version
(0b0)
Reserved
(0b0)
Reserved
(0b0)
Version
(0b0)
Slave 1
Preview
Slave 3
Preview
Version
(0b0)
Slave 1
Program
Slave 3
Program
Reserved
(0b0)
Reserved
(0b0)
Reserved
(0b0)
Reserved
(0b0)
Reserved
(0b0)
Reserved
(0b0)
Monitor
Preview
Slave 0
Preview
Slave 2
Preview
Monitor
Program
Slave 0
Program
Slave 2
Program
Appendix
73
Page 74

Assistance
Obtenir de l'aide
Le moyen le plus rapide d'obtenir de l'aide est de consulter les pages d'assistance en ligne de
Blackmagic Design et de consulter les informations les plus récentes concernant votre Blackmagic
Web Presenter.
Pages d'assistance en ligne de Blackmagic Design
Les dernières versions du manuel peuvent être consultées sur la page d’assistance technique de
Blackmagic Design : www.blackmagicdesign.com/fr/support.
Forum Blackmagic Design
Le forum Blackmagic Design est une source d'information utile qui offre des idées innovantes pour
vos productions. Cette plate-forme d’aide vous permettra également d’obtenir des réponses rapides
à vos questions, car un grand nombre de sujets peuvent avoir déjà été abordés par d'autres
utilisateurs. Pour vous rendre sur le forum : http://forum.blackmagicdesign.com
Contacter le service d'assistance de Blackmagic Design
Si vous ne parvenez pas à trouver l'aide dont vous avez besoin dans les pages d’assistance ou sur
notre forum, veuillez utiliser l'option « Envoyez-nous un email », accessible sur la page d'assistance
pour envoyer une demande d'aide par email. Vous pouvez également cliquer sur le bouton «Trouver
un support technique » situé sur la page d'assistance et ainsi contacter le centre d'assistance
technique Blackmagic Design le plus proche de chez vous.
Assistance
74
Page 75

Avis règlementaires et informations de sécurité
Avis règlementaires
Élimination des déchets d'équipements électriques et électroniques au sein de l'Union
européenne.
Le symbole imprimé sur cet appareil indique qu'il ne doit pas être jeté avec les autres déchets.
Cet appareil doit être déposé dans un point de collecte agréé pour être recyclé. Le tri,
l'élimination et le recyclage séparés de vos équipements usagés permettent de préserver les
ressources naturelles et de s'assurer que ces équipements sont recyclés dans le respect de la
santé humain et de l'environnement. Pour plus d'informations quant aux lieux d'éliminations
des déchets d'équipements électriques, vous pouvez contacter votre mairie ou le service
local de traitement des ordures ménagères.
Cet appareil a été testé et reconnu conforme aux normes applicables aux appareils
informatiques de Classe B, en vertu de l'article 15 des réglementations de la FCC. Ces
limitations sont conçues pour fournir une protection raisonnable contre les interférences
nocives dans un environnement commercial. Cet appareil génère, utilise et émet de l'énergie
de fréquences radio et peut, en cas d'installation ou d'utilisation non conforme aux
instructions, engendrer des interférences nuisibles au niveau des communications radio.
L'utilisation de cet appareil dans une installation résidentielle peut entraîner des interférences
nuisibles, lesquelles devront être corrigées aux frais de l'utilisateur.
L'utilisation de cet appareil est soumise aux deux conditions suivantes :
1 Cet appareil ne peut causer d'interférences nuisibles.
2 Cet appareil doit accepter toute interférence reçue, notamment celles pouvant entraîner
un dysfonctionnement.
Les connexions aux interfaces HDMI doivent être effectuées avec des câbles HDMI blindés
d’excellente qualité.
Informations de sécurité
Cet appareil doit être connecté à une prise secteur équipée d'un conducteur de protection.
Afin de réduire le risque de décharge électrique, ne pas éclabousser ou renverser de liquide
sur cet appareil.
Cet appareil peut être utilisé dans un climat tropical lorsque la température ambiante
n'excède pas 40°C.
Veillez à ce que l'espace autour du produit soit suffisant afin de ne pas compromettre la
ventilation.
Lorsque vous installez l'appareil sur rack, veillez à ce que la ventilation ne soit pas compromise
par les autres équipements.
Les pièces de cet appareil ne sont pas réparables par l'opérateur. Toute opération d'entretien
doit être effectuée par un centre de service Blackmagic Design.
Cet appareil ne peut être utilisé qu'à une altitude inférieure à 2000 mètres.
Avis règlementaires et informations de sécurité
75
Page 76

Garantie
Garantie limitée à 36 mois
Par la présente, Blackmagic Design garantit que le Blackmagic Web Presenter sera exempt de
défauts matériels et de fabrication pendant une durée de 36 mois à compter de la date d'achat, ceci
excluant les connecteurs, câbles, ventilateurs, modules à fibre optique, fusibles, claviers et batteries
qui seront exempts de défauts matériels et de fabrication pendant une durée de 12 mois à compter
de la date d'achat. Si le produit s’avère défectueux pendant la période de garantie, Blackmagic
Design peut, à sa seule discrétion, réparer le produit défectueux sans frais pour les pièces et la
main-d’œuvre, ou le remplacer.
Pour se prévaloir du service offert en vertu de la présente garantie, il vous incombe d’informer
Blackmagic Design de l’existence du défaut avant expiration de la période de garantie, et de
prendre les mesures nécessaires pour l’exécution des dispositions de ce service. Le consommateur
a la responsabilité de s’occuper de l’emballage et de l'expédition du produit défectueux au centre
de service nommément désigné par Blackmagic Design, en frais de port prépayé. Il incombe au
consommateur de payer tous les frais de transport, d’assurance, droits de douane et taxes et toutes
autres charges relatives aux produits qui nous auront été retournés, et ce quelle que soit la raison.
La présente garantie ne saurait en aucun cas s’appliquer à des défauts, pannes ou dommages
causés par une utilisation inappropriée ou un entretien inadéquat ou incorrect. Blackmagic Design
n’a en aucun cas l’obligation de fournir un service en vertu de la présente garantie : a) pour réparer
les dommages résultant de tentatives de réparations, d’installations ou tous services effectués par
du personnel non qualifié par Blackmagic Design, b) pour réparer tout dommage résultant d'une
utilisation inadéquate ou d'une connexion à du matériel incompatible, c) pour réparer tout dommage
ou dysfonctionnement causés par l’utilisation de pièces ou de fournitures n’appartenant pas à la
marque de Blackmagic Design, d) pour examiner un produit qui a été modifié ou intégré à d’autres
produits quand l’impact d’une telle modification ou intégration augmente les délais ou la difficulté
d’examiner ce produit. CETTE GARANTIE REMPLACE TOUTE GARANTIE EXPLICITE OU TACITE.
BLACKMAGIC DESIGN ET SES REVENDEURS DÉCLINENT EXPRESSÉMENT TOUTE GARANTIE
TACITE DE COMMERCIALISATION OU D'ADÉQUATION À UNE FIN PARTICULIÈRE. LA
RESPONSABILITÉ DE BLACKMAGIC DESIGN POUR RÉPARER OU REMPLACER UN PRODUIT
S'AVÉRANT DÉFECTUEUX CONSTITUE LA TOTALITÉ ET LE SEUL RECOURS EXCLUSIF PRÉVU ET
FOURNI AU CONSOMMATEUR POUR TOUT DOMMAGE INDIRECT, SPÉCIFIQUE, ACCIDENTEL OU
CONSÉCUTIF, PEU IMPORTE QUE BLACKMAGIC DESIGN OU SES REVENDEURS AIENT ÉTÉ
INFORMÉS OU SE SOIENT RENDU COMPTE AU PRÉALABLE DE L'ÉVENTUALITÉ DE CES
DOMMAGES. BLACKMAGIC DESIGN NE PEUT ÊTRE TENU POUR RESPONSABLE DE TOUTE
UTILISATION ILLICITE DU MATÉRIEL PAR LE CONSOMMATEUR. BLACKMAGIC DESIGN N'EST PAS
RESPONSABLE DES DOMMAGES RÉSULTANT DE L'UTILISATION DE CE PRODUIT. LE
CONSOMMATEUR UTILISE CE PRODUIT À SES SEULS RISQUES.
© Copyright 2017 Blackmagic Design. Tous droits réservés. 'Blackmagic Design’, ‘DeckLink’, ‘HDLink’, ‘Workgroup Videohub’,
‘Multibridge Pro’, ‘Multibridge Extreme’, ‘Intensit y’ et ‘Leading the creative video revolution’ sont des marques déposées aux États-Unis
et dans d'autres pays. Tous les autres noms de société et de produits peuvent être des marques déposées des sociétés respectives
auxquelles ils sont associés.
Thunderbolt et le logo Thunderbolt sont des marques déposées d'Intel Corporation aux États- Unis et/ou dans d'autres pays.
Garantie
76
Page 77

Installations- und Bedienungsanleitung
Blackmagic
Web Presenter
April 2017
Deutsch
Page 78

Willkommen!
Vielen Dank, dass Sie sich zum Kauf eines Blackmagic Web Presenters entschieden haben!
Unser Ziel war es, den Blackmagic Web Presenter so zu designen, dass er internetbasiertes
Broadcasting und sogar Videokonferenzen mit Präsentationen extrem vereinfacht. Der Blackmagic
Web Presenter unterscheidet sich enorm von unseren traditionellen, für die Postproduktion
konzipierten Aufzeichnungskarten. Er wandelt SDI- und HDMI-Eingaben in USB-Videosignale um
und bedient sich dabei des in Ihren Computer integrierten Webcam-Treibers.
Das bedeutet, dass sich ab sofort jede SDI- oder HDMI-Quelle als reguläre Webcam tarnen
kann. So lässt sich jede mit Webcams kompatible Software nun auch mit professionellen Geräten
in Broadcastqualität verwenden. Und da alle Videostreaming- und Anruf-Softwares Webcams
unterstützen, haben Sie eine riesige Auswahl an Plattformen, die Sie verwenden können.
Anders als Capture-Karten, die alle Pixel der Videoquelle an den Computer senden, reduziert der
Blackmagic Web Presenter die Videoauflösung auf 720p. Auch die Video-Framerate verringert
er bei entsprechendem Befehl durch die Software auf 20, 15, 10 oder 5 Frames pro Sekunde.
Auf diese Weise erhalten Sie Video im 16:9-Format in sehr hoher HD-Qualität. Gleichzeitig sorgt
er für geringstmögliche Datenraten. So wird gewährleistet, dass Sie Videos auch über reguläre
Internetverbindungen zuverlässig streamen können.
Doch der Blackmagic Web Presenter ist viel mehr als nur eine USB-Webcam-Tarnung für SDI- und
HDMI-Videoquellen. Er enthält nämlich auch einen Livemischer mit zwei Eingängen, mit dem Sie
mühelos Mehrkamera-Sendungen oder Präsentationen kreieren können. Alles, was Sie dafür
benötigen, ist das optionale Teranex Mini Smart Panel. Über die Tasten 1 und 2 lässt sich live
zwischen Quellen hin und her schneiden. Das Teranex Mini Smart Panel unterstützt darüber hinaus
eine Videovorschau, Audiopegelmeter sowie die Anzeige von Eingabevideonormen und USBFrameraten.
Bitte sehen Sie auf der Support-Seite unter www.blackmagicdesign.com/de nach der aktuellsten
Auflage der Bedienungsanleitung sowie Aktualisierungen der Produktsoftware Ihres Blackmagic
Web Presenters. Bitte registrieren Sie beim Herunterladen von Software auch Ihre Kontaktdaten,
damit wir Sie über neue Versionen informieren können. Da wir ständig an neuen Features und
Verbesserungen arbeiten, freuen wir uns jederzeit von Ihnen zu hören.
Grant Petty
CEO Blackmagic Design
Page 79

Inhaltsverzeichnis
Blackmagic Web Presenter
Erste Schritte 80
Anschließen an das Stromnetz 80
Anschließen von Videoquellen 80
Anschließen von Audio 81
Anschließen an Ihren Computer 81
Den Blackmagic Web Presenter als Webcam einstellen 81
Einsatz des Blackmagic Web Presenters mit Fremdhersteller-Software 82
Einsatz des Blackmagic Web Presenters mit Skype 82
Einsatz des Blackmagic Web Presenters mit YouTube Live 83
Den Blackmagic Web Presenter als neues Gerät einrichten 83
Einrichten eines YouTube Live Streaming-Kanals 85
Einsatz des Teranex Mini Smart Panels 87
Installation eines Teranex Mini Smart Panels 87
Funktionsmerkmale des Smart Panels 88
Einstellungen 88
Videoeingabe 88
Übergänge 89
Audiomixer 90
Setup 92
Ändern des Videoeingangs per Switches 92
Teranex Mini Rack Shelf 93
Einsatz des eingebauten Mischers 94
Arbeiten mit Kamera-Tally 94
Blackmagic Web Presenter Setup Dienstprogramm 96
Anhang 97
Hilfe 99
Gesetzliche Vorschriften und Sicherheitshinweise 100
Garantie 101
Page 80

Erste Schritte
Web Presenter
Blackmagic
Anschließen an das Stromnetz
Der Einstieg mit Ihrem Blackmagic Web Presenter ist ganz einfach! Sie brauchen bloß ein Stromkabel
einzustecken, Ihre Video- und Audioquelle anzuschließen und das Gerät an Ihren Computer
zu koppeln.
Stecken Sie hierfür ein standardmäßiges IEC-Kabel in die Strombuchse am Geräterücken Ihres
Blackmagic Web Presenters. Wird das Gerät mit Strom versorgt, leuchtet das
Statusindikatorlämpchen in der unteren rechten Ecke der Frontblende Ihres Web Presenters auf.
Blackmagic
Web Presenter
Der Blackmagic Web Presenter unterstützt 12G-SDI-Datenraten und schaltet
automatisch zwischen SD, HD und Ultra HD bis 2160p/60 um
SDI PGM OUT
USB WEB CAM
SDI IN SDI LOOP OUT
Schließen Sie Ihren Blackmagic Web Presenter mit einem
regulären IEC-Stromkabel an das Stromnetz an
HDMI LOOP OUT
HDMI IN
STEREO IN
L
R
LINE/MIC IN
ANALOG AUDIO IN
Anschließen von Videoquellen
Koppeln Sie als nächstes Ihr Quellvideo an die SDI- oder HDMI-Anschlüsse Ihres Blackmagic Web
Presenters. Sie werden feststellen, dass es sowohl SDI- als auch HDMI-Durchschleifausgänge gibt.
Diese können Sie verwenden, wenn Sie Ihren Web Presenter zusammen mit einer Videoverbindung
an weiteres Equipment koppeln wollen. Sie könnten die SDI-Ausgabe bspw. an eine MAZ oder einen
Monitor durchschleifen. Oder schalten Sie den Web Presenter per HDMI zwischen einen Computer
und einen Videoprojektor.
Zusätzlich gibt es einen SDI-Programmausgang. Der gibt Video nach der SDI- und HDMIUmschaltung, jedoch noch vor der Abwärtskonvertierung zu 720p-Video aus. Somit hat die SDIProgrammausgabe dieselbe Auflösung wie die Videoeingaben und eignet sich damit perfekt zur
Weiterleitung an eine MAZ zur Masteraufzeichnung.
Der Blackmagic Web Presenter unterstützt 12G-SDI und schaltet automatisch zwischen SD, HD und
Ultra HD bis 2160p/60 um, wenn sich die Videoeingabe ändert. D.h. dass so gut wie jedes
eingehende Videosignal für die Ausgabe über USB nach 720p gewandelt wird. Dieses Format hat
nicht nur eine hervorragende Qualität sondern auch extrem niedrige Datenraten fürs Streaming. Das
bedeutet für Sie: Sie können Ihre Produktion in höher aufgelöstem 1080 HD oder Ultra HD
fertigstellen und der Web Presenter kümmert sich um die Downkonvertierung der Auflösung und
Framerate– und das alles in ein und demselben Gerät.
Erste Schritte
80
Page 81

Anschließen von Audio
Web Presenter
Blackmagic
SDI PGM OUT
L
STEREO IN
Die SDI- und HDMI-Eingänge unterstützen Ton. Es gibt jedoch auch zwei zusätzliche Eingänge für
analoges Audio. Der XLR-Audioeingang ist ein Monoeingang, an den Sie Mikrofone anschließen
können. Es handelt sich um einen einkanaligen Mono-Eingang, da Mikrofone immer mono sind.
Wenn Sie den Mikrofonton daher an diesen symmetrischen XLR-Audioeingang anschließen, wird er
intern sowohl an den linken als auch den rechten Audiokanal gesendet. Der zweite Analogaudioeingang ist ein als RCA-Buchsen ausgeführter HiFi-Eingang. Dieser Eingang eignet sich für
Computerton und Audio von Musikquellen wie Smartphones, Musikplayern, Audiomixern und sogar
CD-Playern.
Alle Audioquellen werden hierüber an den internen Stereo-Audiomixer weitergeleitet und dort
gemischt. Wenn Sie den Ton einer bestimmten Audioquelle nicht mit einbeziehen wollen,
vergewissern Sie sich bitte, dass Sie die Verbindung der Analogaudioquellen trennen oder den Ton
von HDMI-Quellen wie Computern ausschalten. Andernfalls wird der Ton von allen Eingängen
gemischt und an den USB-Audioausgang gesendet.
Anschließen an Ihren Computer
Da nun alle Video- und Audioquellen verbunden sind, können Sie Ihren Blackmagic Web Presenter
über den USB-Port an Ihren Computer anschließen. Ihr Computer erkennt das Gerät sofort als
Videoquelle in Form einer USB-Webcam.
SDI PGM OUT
USB WEB CAM
SDI IN SDI LOOP OUT
Koppeln Sie Ihren Blackmagic Web Presenter über den USB-Port am Geräterücken an Ihren Computer
HDMI LOOP OUT
HDMI IN
STEREO IN
L
R
LINE/MIC IN
ANALOG AUDIO IN
Den Blackmagic Web Presenter als Webcam einstellen
Wählen Sie nun Ihren Blackmagic Web Presenter als Webcam in Verbindung mit Ihrer gewünschten
Videokonferenz- oder Fremdanbieter-Streaming-Software wie Skype, Open Broadcaster, XSplit
Broadcaster oder Periscope.
Weitere Informationen zum Einsatz des Blackmagic Web Presenters mit Skype und YouTube Live
finden Sie in den Abschnitten „Einsatz des Blackmagic Web Presenters mit Skype“ und „Einsatz des
Blackmagic Web Presenters mit YouTube Live“ in diesem Handbuch.
Für den Einstieg war das schon alles. Sie sind jetzt startklar fürs Streamen von atemberaubenden
hochwertigen Videos mit gemischtem Ton. Bitte lesen Sie weiter, um zusätzliche Informationen zu
Tallyfunktionen, Einstellungsänderungen und zur Installation des optionalen Teranex Mini Smart
Panels zu erhalten.
Erste Schritte
81
Page 82

Einsatz des Blackmagic Web Presenters mit Fremdhersteller-Software
Einsatz des Blackmagic Web Presenters mit Skype
Um den Blackmagic Web Presenter in Verbindung mit Skype nutzen zu können, muss zunächst die
Skype-Software auf Ihrem Computer installiert werden. Skype ist kostenfrei und kann von
www.skype.com heruntergeladen werden.
1 Öffnen Sie Skype nach der Installation.
2 Gehen Sie zu „Skype“ > „Einstellungen“ und wählen Sie „Audio/Video“.
3 Sollte Ihr Computer über eine Webcam verfügen, wird diese automatisch ausgewählt.
Das Skype-Vorschaufenster zeigt daraufhin das Bild der Webcam an. Wenn Sie auf das
Drop-down-Menü neben „Kamera“ klicken, können Sie den Blackmagic Web Presenter
aus der Liste auswählen. Daraufhin wird Ihnen das an den Web Presenter angeschlossene
Quellvideo im Skype-Vorschaufenster angezeigt.
Wählen Sie den Blackmagic Web Presenter aus dem Drop-down-Menü „Kamera“
HINWEIS Vielleicht ist Ihnen aufgefallen, dass Ihr Bild im Einstellungsfenster von Skype
seitenverkehrt ist. Das ist normal, da Skype seinen Nutzern zu Vorschauzwecken ein
Spiegelbild anzeigt. Ihre Videoanrufe werden aber nicht seitenverkehrt dargestellt.
Einsatz des Blackmagic Web Presenters mit Fremdhersteller-Software
82
Page 83

4 Im Drop-down-Menü neben „Mikrofon“ können Sie den Blackmagic Web Presenter als
Audioquelle auswählen.
Mehr müssen Sie nicht machen. Sollten Sie jetzt einen Skype-Anruf tätigen, wird die an Ihren
Blackmagic Web Presenter angeschlossene Videoquelle eingesetzt.
HINWEIS Die Vorgehensweise, wie Sie Skype für den Einsatz mit dem Blackmagic Web
Presenter einrichten, ist auf einem Mac OS Computer dieselbe wie auf einem Windows
Computer. Weitere Informationen finden Sie auf der Skype Website: www.skype.com
Einsatz des Blackmagic Web Presenters mit YouTube Live
Open Broadcaster ist eine kostenfreie Software, die sich sehr gut fürs Streamen über YouTube Live
eignet und über folgenden Link heruntergeladen werden kann: https://obsproject.com.
Den Blackmagic Web Presenter als neues Gerät einrichten
Öffnen Sie die Software nach der Installation.
5 Klicken Sie auf den „+“-Button in der Quellen-Box, um eine Quelle hinzuzufügen und wählen
Sie „Videoaufnahmegerät“. Ein Pop-up-Dialogfenster bietet Ihnen daraufhin die Möglichkeit,
eine neue Quelle zu kreieren.
Wählen Sie „Videoaufnahmegerät“ aus der Quellenliste und erstellen Sie eine neue Quelle für den
Blackmagic Web Presenter
Einsatz des Blackmagic Web Presenters mit Fremdhersteller-Software
83
Page 84

6 Markieren Sie die Option „Neu erstellen“ in der Dialogbox und klicken Sie auf „OK“.
7 Wählen Sie im Eigenschaftenfenster des neu erstellten Geräts Ihren Blackmagic Web
Presenter aus dem Drop-down-Menü neben „Gerät“ aus und klicken Sie auf „OK“.
8 Folgen Sie denselben Schritten für Audio. Klicken Sie auf den „+“-Button in der Quellen-
Box, um eine Quelle hinzuzufügen und wählen Sie „Audio Eingabe Aufnahme“. Markieren
Sie die Option „Neu erstellen“ in der Dialogbox und klicken Sie auf „OK“. Wählen Sie im
Eigenschaftenfenster des neu erstellten Geräts Ihren Blackmagic Web Presenter aus dem
Drop-down-Menü neben „Gerät“ aus und klicken Sie auf „OK“.
9 Öffnen Sie nun die Einstellungen unter „OBS“ > „Einstellungen“ und klicken Sie auf den
„Video“-Tab.
10 Geben Sie für „Basis (Leinwand) Auflösung“ und „Ausgabe (skaliert) Auflösung“ jeweils die
Option „1280x720“ vor und klicken Sie auf „OK“. Das ermöglicht es Ihnen, das Eingabevideo
im Vollbildformat zu sehen.
Einsatz des Blackmagic Web Presenters mit Fremdhersteller-Software
84
Page 85

Wenn Sie für Leinwand- und Skalierauflösung „1280x720“ vorgeben, können Sie die Videoeingabe
im Vollbildformat sehen
Einrichten eines YouTube Live Streaming-Kanals
Nun ist es an der Zeit, einen YouTube Live Streaming-Kanal zu erstellen. Gehen Sie in Ihrem Browser
zu www.youtube.com/live_dashboard und loggen Sie sich ein bzw. erstellen Sie ein neues
Google-Konto.
1 Klicken Sie links auf „Livestreaming“ und anschließend auf „Jetzt starten“.
2 Vervollständigen Sie die Angaben zu Ihrem Stream und legen Sie fest, ob er
öffentlich oder privat sein soll.
Einsatz des Blackmagic Web Presenters mit Fremdhersteller-Software
85
Page 86

3 Klicken Sie auf den „Anzeigen“-Button am unteren Rand der Seite. Markieren Sie den
Streamschlüssel und wählen Sie dann per Rechtsklick „Kopieren“. Das Kopieren dieser
Information ist notwendig, weil der Schlüssel im nächsten Schritt in die Open Broadcaster
Software eingefügt werden muss.
4 Gehen Sie in der Open Broadcaster Software unter „Einstellungen“ zum „Stream“-Tab.
Wählen Sie unter „Plattform“ YouTube aus und fügen Sie den Schlüssel in das Feld
„Streamschlüssel“ ein.
5 Klicken Sie anschließend im Hauptfenster der Open Broadcaster Software auf den Button
„Streaming starten“. Ihr Stream sollte daraufhin gesendet werden.
6 Zurück im Browser ändert sich Ihr Streaming-Status zu „Online“ und Sie können Ihren Live-
Stream sehen.
Einsatz des Blackmagic Web Presenters mit Fremdhersteller-Software
86
Page 87

HINWEIS Die Vorgehensweise, wie Sie Open Broadcaster für den Einsatz mit dem
1
2
SET
VIDEO
MENU
AUDIO
Video Format
525i59.95 NTSC
USB
25 fps
Video Format
525i59.95 NTSC
USB
25 fps
Blackmagic Web Presenter einrichten, ist auf einem Mac OS dieselbe wie auf einem Windows
Computer. Weitere Einzelheiten finden Sie unter: https://obsproject.com.
Einsatz des Teranex Mini Smart Panels
Das optionale Teranex Mini Smart Panel lässt sich an der Vorderseite Ihres Blackmagic Web
Presenters anbringen und ersetzt die standardmäßige Frontblende. Die Tasten des Smart Panels
erlauben das Mischen von Quellen. Über das LCD können Sie eingehendes Video sowie
Statusinformationen wie Videoeingabequelle, Videoformat und USB-Ausgabe-Framerate
überprüfen.
Installation eines Teranex Mini Smart Panels
Die Installation Ihres optionalen Smart Panels ist einfach. Panel und Frontblende sind während des
Betriebs austauschbar, d.h. Ihr Blackmagic Web Presenter braucht während der Installation nicht
ausgeschaltet zu werden.
1 Entfernen Sie die zwei M3-Schrauben auf beiden Seiten der Frontblende Ihres Blackmagic
Web Presenters mithilfe eines PZ-Schraubendrehers der Größe 2. Nehmen Sie die Blende
vorsichtig von der Vorderseite Ihres Web Presenters ab.
2 In der unteren Ecke der Innenseite der Standardblende befindet sich ein transparentes
Plastikröhrchen. Dieses Röhrchen leitet das Licht der LED im Innern des Web Presenters
an den Statusindikator der Standardblende weiter und erleuchtet diesen. Belassen Sie das
Röhrchen daher an der Standardfrontblende.
TIPP Sollten Sie die Standardfrontblende erneut anbringen, vergewissern Sie sich, dass das
Lichtröhrchen auf den Schlitz an der Vorderseite des Geräts ausgerichtet ist.
3 Richten Sie die Verbinder an der Rückseite des Smart Panels auf deren Gegenstücke an der
Front Ihres Blackmagic Web Presenters aus. Drücken Sie das Smart Panel leicht gegen das
Gerät, bis die Verbinder fest sitzen. Das Smart Panel sollte präzise angelegt sein und fest an
der Vorderseite Ihres Web Presenters einrasten.
4 Setzen Sie die vorhandenen M3-Schrauben der Frontblende wieder ein.
Wenn Sie das Teranex Mini Smart Panel zur Installation oberhalb bzw. unterhalb des Verbinders zwischen
Finger und Daumen halten, lässt es sich leichter aufsetzen
Einsatz des Teranex Mini Smart Panels
87
Page 88

Wenn Ihr Blackmagic Web Presenter in einer Teranex Mini Rackwanne installiert ist, nehmen Sie ihn
1 MENU
2 VIDEO
SET AUDIO
Video Format
525i59.94 NTSC
Source
HDMI
USB
30 fps
aus dem Rack heraus, um an die Schrauben der Frontblende zu gelangen. Weitere Informationen
finden Sie im Abschnitt „Teranex Mini Rack Shelf“. Auf den USB-Port des Web Presenters kann auch
bei Verwendung des Smart Panels zugegriffen werden. Öffnen Sie einfach die USBGummiabdeckung, um an den Port zu gelangen.
Funktionsmerkmale des Smart Panels
Bedientasten
Die Tasten 1 und 2
Bei installiertem Smart Panel wird die Mischfunktion Ihres Blackmagic Web Presenters aktiviert.
Wenn Sie also ein Programm übertragen, können Sie mithilfe der Tasten 1 und 2 zwischen SDI- und
HDMI-Eingabequellen hin und her schalten. Taste 1 selektiert den SDI-Eingang, Taste 2 hingegen
den HDMI-Eingang.
Video Format
1 MENU
2 VIDEO
SET AUDIO
Source
HDMI
525i59.94 NTSC
USB
30 fps
Das Teranex Mini Smart Panel aktiviert die Mischerfunktion auf Ihrem Web Presenter, sodass Sie
per Druck auf die Tasten 1 und 2 live zwischen SDI- und HDMI-Eingabequellen schneiden können
Einstellungen
Mit einem Teranex Mini Smart Panel an Ihrem Web Presenter lassen sich Übergangsdauern,
Audiomixereinstellungen u.v.m. ändern. Drücken Sie einfach die MENU-Taste, um auf das
Einstellungsmenü zuzugreifen. Navigieren Sie zum Ändern von Einstellungen anschließend mithilfe
des Drehknopfs und der SET-Taste durch das Menü.
Ein weiterer Druck auf die MENU-Taste bringt Sie zum vorherigen Menüpunkt zurück. Drücken Sie
die MENU-Taste wieder und wieder, bis Sie zurück zum Homescreen gelangen.
Videoeingabe
Ihr Blackmagic Web Presenter kann unter „Video Input“ so eingestellt werden, dass er
angeschlossene Eingaben automatisch erkennt und die Programmausgabe entsprechend anpasst.
Sie haben aber auch die Möglichkeit, nur die SDI- oder HDMI-Anschlüsse Ihres Web Presenters zu
nutzen. Die Einstellungen hierfür lassen sich mithilfe der integrierten Switches ändern, sollte die
originale Standardblende angebracht sein. Weitere Informationen finden Sie im Abschnitt „Ändern
des Videoeingangs per Switches“.
TIPP Wenn Sie eine Videoeinstellung ändern möchten, können Sie das Hauptmenü per
Druck auf die VIDEO-Taste an der Frontblende überspringen und sofort zu den
Videoeinstellungen gelangen.
Einstellungen
88
Page 89

Auto
Nutzen Sie diese Einstellung, wenn Sie möchten, dass der Web Presenter den SDI- oder
HDMI-Eingang je nach angeschlossener Videoquelle automatisch wählt. Sollte sowohl eine
SDI- als auch eine HDMI-Quelle angeschlossen sein, schaltet der Web Presenter
automatisch auf den SDI-Eingang.
SDI
Mit dieser Einstellung nutzt der Web Presenter ausschließlich den SDI-Eingang.
HDMI
Mit dieser Einstellung nutzt der Web Presenter ausschließlich den HDMI-Eingang.
Nutzen Sie die Videoeingabe-Einstellungen, um den
gewünschten Eingang festzulegen, oder wählen Sie „Auto“, damit der
Blackmagic Web Presenter die Videoquelle automatisch erkennt
TIPP Sollte ein Videosignal über jenen Eingang empfangen werden, der nicht ausgewählt
ist, wird schwarzer Bildschirminhalt angezeigt. Wählen Sie in diesem Fall einfach den
entsprechenden Eingang oder stellen Sie Ihren Web Presenter auf „Auto“.
Übergänge
Beim Mischen einer Live-Übertragung mit der integrierten Mischerfunktion Ihres Blackmagic Web
Presenters wird der Standardübergang mit einer gängigen halbsekündigen Blende ausgeführt. Die
Dauer und Übergangsart können Sie bei Bedarf jedoch unter „Transition“ ändern. Ihr Web Presenter
führt sogar Dip- und Cut-Übergänge aus.
Anhand der Übergangseinstellungen „Transition“
können Sie den Blendentyp und die Dauer wählen
Einstellungen
89
Page 90

Cut
Wenn Sie zwischen Videoquellen sauber hin und her schneiden wollen, wählen Sie den
Schnittübergang „Cut“.
Mix
Der Übergang „Mix“ ist eine normale Cross-Blende. Das bedeutet, dass die eine
Videoquelle innerhalb einer festgelegten Zeit sanft in die andere überblendet. Ändern sie
die Übergangsdauer, indem Sie eine der Mix-Voreinstellungen wählen.
Dip
Der Dip-Übergang ähnelt einem Mix. Hierbei wird jedoch zunächst sanft nach Schwarz
geblendet und anschließend zur nächsten Videoquelle. Wählen Sie eine der
Voreinstellungen für die Dauer des Dip-Übergangs aus der Menüliste.
Audiomixer
Die Audiomixereinstellungen geben Ihnen die Kontrolle über Ihren Ton. Hier können Sie bspw. den
Ton für jeden Eingang aktivieren bzw. deaktivieren, die Tonpegel anpassen oder den XLREingabepegel auf Mic oder Line Level einstellen. Drehen Sie den Drehregler im oder gegen den
Uhrzeigersinn, um die Einstellung anzupassen.
TIPP Wenn Sie eine Audioeinstellung ändern möchten, können Sie das Hauptmenü per
Druck auf die AUDIO-Taste an der Frontblende überspringen und sofort zu den
Audioeinstellungen gelangen.
Master Level
Benutzen Sie den Drehregler, um den Audiopegel für die Programmausgabe anzuheben oder zu
senken. Diese Einstellung wirkt sich auf die Gesamtlautstärke der gesendeten MasterAbmischung aus.
SDI Input Level
Legen Sie mithilfe dieser Einstellung die Stärke der Audiopegel für die SDI-Videoeingabe fest.
SDI Input
Mit dem Drehregler lässt sich der Ton für den SDI-Eingang auf ON, OFF und AFV (Audio folgt
Video) stellen.
ON
Wird die Einstellung ON gewählt, ist der Ton des SDI-Eingangs immer im Programmaudio
enthalten. Über die Einstellung „SDI Input Level“ lässt sich der Audiopegel für die
Programmausgabe anheben oder senken.
OFF
Stellen Sie den SDI-Eingang auf OFF, wenn Sie nicht möchten, dass der Ton vom SDIEingang in den Programmton integriert wird.
AFV
Ist die Option Audio folgt Video aktiviert, wird der Ton des SDI-Eingangs nur dann im
Master-Programmton zu hören sein, wenn die SDI-Videoeingabe auf den
Programmausgang geschaltet ist.
HDMI Input Level
Legen Sie mithilfe dieser Einstellung die Stärke der Audiopegel für die HDMI-Videoeingabe fest.
Einstellungen
90
Page 91

HDMI Input
Mit dem Drehregler lässt sich der Ton für den HDMI-Eingang auf ON, OFF und AFV (Audio folgt
Video) stellen.
ON
Wird die Einstellung ON gewählt, ist der Ton des HDMI-Eingangs immer im Programmaudio
enthalten. Über die Einstellung „HDMI Input Level“ lässt sich der Audiopegel für die
Programmausgabe anheben oder senken.
OFF
Stellen Sie den HDMI-Eingang auf OFF, wenn Sie nicht möchten, dass der Ton vom HDMIEingang in den Programmton integriert wird.
AFV
Ist die Option Audio folgt Video aktiviert, wird der Ton des HDMI-Eingangs nur dann im
Master-Programmton zu hören sein, wenn die HDMI-Videoeingabe auf den
Programmausgang geschaltet ist.
XLR Input Level
Legen Sie mithilfe dieser Einstellung die Stärke der Audiopegel für die XLR-Audioeingabequelle fest.
XLR Input
Schaltet den Ton der XLR-Eingabe ein bzw. aus.
XLR Input Source
Stellen Sie den Pegel der Eingabequelle auf Mic oder Line Level ein.
Die Signalstärke eines Mikrofons liegt in der Regel unter der von Audiowiedergabegeräten. Um die
geringere Signalstärke zu kompensieren, kann der Tonpegel des Blackmagic Web Presenters auf
„Mic“ gestellt werden. Dadurch wird das Eingabesignal verstärkt. Stellen Sie den XLR-Eingabepegel
für alle anderen Geräte, die keine Mikrofone sind, auf „Line“.
RCA Input Level
Legen Sie mithilfe dieser Einstellung die Stärke der Audiopegel für die RCA-Audioeingabequelle fest.
RCA Input
Schaltet den Ton der RCA-Eingabe ein bzw. aus.
Schalten Sie den Ton für jeden Eingang ein oder
aus und passen Sie die Pegel unter „Audio Mixer“ an
Einstellungen
91
Page 92

Setup
Überprüfen Sie anhand der „Setup“-Einstellungen, welche Softwareversion derzeit auf Ihrem Web
Presenter installiert ist. Darüber hinaus können Sie Ihren Web Presenter auf seine
Werkseinstellungen zurücksetzen.
Software
Über die „Software“-Einstellung können Sie überprüfen, welche Softwareversion derzeit auf
Ihrem Web Presenter installiert ist.
Factory Default
Wenn Sie mit einem neuen Projekt beginnen möchten, kann es hilfreich sein, den Web
Presenter auf seine Werkseinstellungen zurückzusetzen.
So setzen Sie den Web Presenter auf seine Werkseinstellungen zurück:
1 Drücken Sie die MENU-Taste und navigieren Sie mithilfe des Drehreglers zu „Setup“.
Drücken Sie die SET-Taste, um den Menüpunkt aufzurufen.
2 Wählen Sie „Factory Default“ und drücken Sie die SET-Taste.
3 Nun haben Sie die Möglichkeit, die Aktion zu bestätigen oder abzubrechen.
Bestätigen Sie die Aktion, zeigt Ihr Web Presenter den Indikator „Resetting“ an. Ist der Vorgang
abgeschlossen, kehrt das LCD zum Homescreen zurück und alle Einstellungen sind auf ihren
Werkszustand zurückgesetzt.
Überprüfen Sie unter „Setup“ die derzeitig auf Ihrem
Blackmagic Web Presenter installierte Softwareversion oder setzen
Sie den Web Presenter auf seine Werkseinstellungen zurück
Ändern des Videoeingangs per Switches
Ihr Blackmagic Web Presenter verfügt über kleine Switches, auf die Sie von der Standardfrontblende
aus zugreifen können. Stellen Sie die Videoeingabe hierüber auf SDI, HDMI oder AUTO ein. Ist ein
Teranex Mini Smart Panel installiert, werden die Funktionen der Switches über das LCD-Menü der
optionalen Frontblende gesteuert.
Das Ändern von Einstellungen per Switches ist kinderleicht! Bringen Sie die Switches mithilfe einer
Stiftspitze einfach je nach Bedarf in ihre ON- oder OFF-Position. Die korrekten Switch-Positionen für
den gewünschten Eingang finden Sie in der Switch-Legende, die am Boden des Web Presenters
abgedruckt ist.
Ändern des Videoeingangs per Switches Anhang
92
Page 93

AUTO
Stellen Sie Switches 1 und 2 auf OFF. Nutzen Sie diese Einstellung, wenn Sie möchten, dass
der Web Presenter den SDI- oder HDMI-Eingang je nach angeschlossener Videoquelle
automatisch wählt. Sollte sowohl eine SDI- als auch eine HDMI-Quelle angeschlossen sein,
schaltet der Web Presenter automatisch auf den SDI-Eingang.
SDI
Stellen Sie Switch 2 auf OFF und Switch 1 auf ON. Mit dieser Einstellung nutzt der Web
Presenter ausschließlich den SDI-Eingang.
HDMI
Stellen Sie Switch 2 auf ON und Switch 1 auf OFF. Mit dieser Einstellung nutzt der Web
Presenter ausschließlich den HDMI-Eingang.
Teranex Mini Rack Shelf
Die Teranex Mini Rack Shelf ist eine 1-HE-Rackwanne mithilfe derer Sie Ihren Blackmagic Web Presenter
in einem Broadcast-Rack oder Road-Case installieren können. Der Web Presenter ist so klein, dass er
zusammen mit anderem Blackmagic Design Equipment ähnlicher Größe wie bspw. Teranex Mini
Konvertern, dem Blackmagic MultiView 4 und einem HyperDeck Studio Mini im Rack installiert werden
kann. Der Blackmagic Web Presenter bietet Ihnen zum Beispiel in Verbindung mit zwei HyperDeck
Studio Minis die Möglichkeit, Ihre Videoquellen wiederzugeben, während die Programmausgabe des
Web Presenters aufgezeichnet wird. Dank dieses Modulardesigns können Sie sich Ihre ganz eigenen
Videolösungen zusammenstellen. Die sind nicht nur portabel, sondern auch bedienfreundlich!
Um Ihren Blackmagic Web Presenter in einer Teranex Mini Rack Shelf zu installieren, brauchen Sie
nur– falls vorhanden– die Gummifüße zu entfernen und das Gerät an den unteren
Montagebohrungen auf die Trägerplatte der Rackwanne festzuschrauben. Die Teranex Mini Rack
Shelf wird mit zwei Standard-Zierblenden geliefert. Wenn Sie also nicht alle Plätze in der Rackwanne
mit weiterem Blackmagic Design Equipment besetzen, verdecken Sie die verbleibenden Lücken
einfach mit den Zierblenden.
Weitere Informationen finden Sie auf der Blackmagic Design Website unter www.blackmagicdesign.com/de
Blackmagic
Web Presenter
Mit dem Teranex Mini Rack Shelf können Sie Ihren Blackmagic Web Presenter zusammen mit weiteren Blackmagic
Design Produkten derselben Größe im Rack montieren. Dazu zählen bspw. die Teranex Mini Konverter sowie der
HyperDeck Studio Mini
Teranex Mini Rack Shelf
93
Page 94

Einsatz des eingebauten Mischers
1 MENU
2 VIDEO
Video Format
525i59.94 NTSC
Source
HDMI
USB
30 fps
Der Blackmagic Web Presenter hat einen eingebauten Mischer mit zwei Eingängen an Bord. Für den
Zugriff auf diese Funktion, ist jedoch die Installation des Teranex Mini Smart Panels notwendig. Das
Panel erweitert den Web Presenter um einen LCD-Bildschirm und Drucktasten zur Bedienung des
eingebauten Mischers. Sobald das Teranex Mini Smart Panel installiert ist, wird die Mischerfunktion
aktiviert.
Wenn sowohl SDI- als auch HDMI-Videoquellen angeschlossen sind, wird der HDMI-Eingang
synchronisiert. So kann unterbrechungsfrei zwischen beiden Eingängen hin und her geschnitten
werden. Genau das macht den Web Presenter zum Livemischer.
Wenn Sie vom eingebauten Mischer Gebrauch machen möchten, drücken Sie am Smart Panel
einfach die Taste 1, um SDI als Videoquelle zu wählen oder auf Taste 2, um die HDMI-Videoquelle zu
selektieren. Sobald eine der beiden Tasten angewählt ist, führt der Web Presenter einen Übergang
aus. Sie könnten bspw. einen Computer mit einer Slide-Show an den HDMI-Eingang und eine
Kamera an die SDI-Quelle anschließen. So gelingen Ihnen professionelle Live-Präsentationen,
indem Sie einfach zwischen den Tasten 1 und 2 hin und her wechseln. Über das LCD können Sie die
derzeitige Eingabe, Videovorschau und die Audiopegel noch einmal überprüfen.
Video Format
1 MENU
2 VIDEO
SET AUDIO
Source
HDMI
525i59.94 NTSC
USB
30 fps
Drücken Sie beim Mischen einer Live-Sendung mit dem Blackmagic Web Presenter die
Tasten 1 und 2 am Teranex Mini Smart Panel, um zwischen SDI- und HDMI-Eingaben zu schneiden
HINWEIS Der Standardübergang ist eine Mix-Blende von einer halben Sekunde. Ist jedoch
das Teranex Mini Smart Panel installiert, können Sie im LCD-Menü unter „Transition“ eine
alternative Zeitspanne und Übergangsart auswählen. Weitere Informationen erhalten Sie im
Abschnitt „Einstellungen“ in diesem Handbuch.
Arbeiten mit Kamera-Tally
Blackmagic Design Studiokameras und ATEM Mischer verfügen über eine Tallyfunktion. Hierbei
werden Tallyinformationen über einen Programm-Return-Feed vom Mischer an die Kamera
gesendet. Auch Ihr Blackmagic Web Presenter bietet diese Funktion. So können Sie bei
Verwendung der Mischerfunktion immer sehen, welche Kamera gerade auf Sendung ist.
Die Verwendung der Tallyfunktion ist recht simpel. Koppeln Sie dazu einfach den SDI-Ausgang einer
Blackmagic Studio Camera an Ihren Web Presenter und anschließend den Programmausgang des
Web Presenters zurück an den Kameraprogramm-SDI-Eingang. Wenn Sie nun die PGM-Taste an der
Kamera drücken, erscheint das Programmvideo des Web Presenters auf der Kamera. Doch das Tolle
ist: Ab sofort werden Tallyinformationen zur Kamera geschickt.
Der SDI-Videoeingang dient als Tally für „Camera 1“ und der HDMI-Eingang für „Camera 2“. Deshalb
muss die Kameranummer in den Kameraeinstellungen vorgegeben werden. In diesem Beispiel
benutzen wir für die Kamera den SDI-Eingang. Demnach sollte die Kamera auf „Camera 1“ eingestellt
sein. Ist das getan, drücken Sie die Taste 1 an der Frontblende des Web Presenters. Daraufhin sollte
das Tally an der Kamera aufleuchten.
Arbeiten mit Kamera-Tally
94
Page 95

Stellen Sie die Kameranummer für die via SDI verbundene
Blackmagic Studio Camera auf dem LCD im „Studio“-Tab auf „1“ ein
Stellen Sie die Kameranummer für die via SDI verbundene Blackmagic URSA Mini auf
dem LCD im „Setup“-Tab auf „1“ ein
Bei einer Präsentation kann es für den Vortragenden sehr hilfreich sein, an der jeweiligen On-AirKamera ein klares rotes Tally zu sehen. So weiß er jederzeit, wann er auf Sendung ist. Auch bei einer
Blackmagic URSA Mini in Verbindung mit einem Blackmagic URSA Studio Viewfinder profitieren
Moderatoren von einem großen roten Tally. Eine praktische Lösung!
Die Tallyfunktion wird von der Blackmagic Studio Camera, der Blackmagic Micro Studio Camera und
der Blackmagic URSA Mini unterstützt. Weitere Informationen zum Einrichten der Tallyfunktion finden
Sie in den Handbüchern „Blackmagic URSA und Blackmagic URSA Mini“ sowie „Blackmagic Studio
Camera“. Diese können unter www.blackmagicdesign.com/de/support heruntergeladen werden.
Arbeiten mit Kamera-Tally
95
Page 96

Blackmagic Web Presenter Setup Dienstprogramm
Hin und wieder werden auf der Blackmagic Design Website Aktualisierungen für die
Produktsoftware Ihres Blackmagic Web Presenters zur Verfügung gestellt. Diese Aktualisierungen
werden über das Blackmagic Web Presenter Setup Dienstprogramm auf Ihrem Web Presenter
installiert. Wir empfehlen Ihnen, das Setup-Dienstprogramm für die Aktualisierung Ihres Web
Presenters herunterzuladen, damit Sie immer von neuen Funktionen und Optimierungen
profitieren können.
So aktualisieren Sie die Produktsoftware unter Mac OS:
1 Laden Sie Blackmagic Web Presenter Setup herunter und entpacken Sie die Datei.
2 Öffnen Sie das Disk-Image, das daraufhin erscheint und starten Sie den Blackmagic Web
Presenter Setup Installer.
Folgen Sie den Anweisungen auf dem Bildschirm.
3 Koppeln Sie Ihren Web Presenter nach abgeschlossener Installation über den USB-Port an
der Frontblende an den Computer. Entfernen Sie die Staubschutzkappe aus Gummi, um auf
den USB-Port zugreifen zu können.
4 Starten Sie Blackmagic Web Presenter Setup und folgen Sie etwaigen
Bildschirmanweisungen, die Produktsoftware zu aktualisieren. Sollte keine Meldung
erscheinen, ist die Produktsoftware auf dem neuesten Stand und Sie müssen nichts
weiter tun.
So aktualisieren Sie die Produktsoftware unter Windows:
1 Laden Sie Blackmagic Web Presenter Setup herunter und entpacken Sie die Datei.
2 Sie sollten nun den Blackmagic Web Presenter Setup Ordner sehen, der dieses Handbuch
und den Blackmagic Web Presenter Setup Installer enthält. Starten Sie den Installer per
Doppelklick und folgen Sie den Anweisungen auf dem Bildschirm, um die Installation
abzuschließen.
3 Koppeln Sie Ihren Web Presenter nach abgeschlossener Installation über den USB-Port an
der Frontblende an den Computer. Entfernen Sie die Staubschutzkappe aus Gummi, um auf
den USB-Port zugreifen zu können.
4 Starten Sie Blackmagic Web Presenter Setup und folgen Sie etwaigen
Bildschirmanweisungen, die Produktsoftware zu aktualisieren. Sollte keine Meldung
erscheinen, ist die Produktsoftware auf dem neuesten Stand und Sie müssen nichts
weiter tun.
Die neueste Version des Setup-Dienstprogramms für Ihren Blackmagic Web Presenter erhalten
Sie im Blackmagic Design Support-Center unter www.blackmagicdesign.com/de/support
Blackmagic Web Presenter Setup Dienstprogramm
96
Page 97

Anhang
Blackmagic Embedded Tally Control Protocol
Version 1.0 (30/04/14)
Dieser Abschnitt richtet sich an Fremdentwickler oder Benutzer, die ihr System um Unterstützung
des eingebetteten Tallysteuerungsprotokolls „Blackmagic Embedded Tally Control Protocol“
erweitern wollen. Er beschreibt das Protokoll zur Übermittlung von Tallydaten, die in den inaktiven
Bildbereich eines digitalen Videodatenstroms eingebettet werden.
Datenstrom
Ein Mastergerät, wie beispielsweise ein Broadcast-Mischer, bettet Tallydaten in seinen ProgrammFeed ein, der dann an eine Reihe von Slave-Geräten, wie Kameras oder Kamerasteuergeräte,
übermittelt wird. Die von Slave-Geräten ausgehenden Signale werden normalerweise zum MasterGerät zurückgeführt, können jedoch auch an einen Videomonitor übermittelt werden.
Der primäre Tallydatenstrom ist der vom Master-Gerät an die Slave-Geräte gesandte. Jedes SlaveGerät darf seine Geräte-ID einsetzen, um relevante Tallydaten zu extrahieren und anzuzeigen.
Slave-Geräte durchlaufen die an ihren Ausgängen anliegenden Tallydatenpakete und aktualisieren
den Tallystatus des Monitors. Dies bewirkt, dass ein an den jeweiligen Ausgang angeschlossenes
Monitorgerät den Tallystatus anzeigt, ohne die ID des kontrollierten Geräts zu kennen.
Prämissen
Datenausrichtung bzw. Padding wird im Protokoll ersichtlich. Die Bit-Felder werden ausgehend von
den niederwertigsten (LSB) gepackt.
Kodierung über Austastlücken (Blanking)
Pro Videoeinzelbild kann ein Tallysteuerpaket übermittelt werden. Die Kodierung von Paketen
erfolgt als SMPTE 291M Paket mit DID/SDID x51/x52 im aktiven Bereich von VANC-Zeile 15. Ein
Tallysteuerpaket kann bis zu 256 Bytes Tallyinformationen enthalten.
Paketformat
Jeder Tallystatus besteht aus einer Datenmenge von 4 Bits:
uint4
bit 0: program tally status (0=off, 1=on)
bit 1: preview tally status (0=off, 1=on)
bit 2-3: reserved (0x0)
Das erste Byte des Tallypakets enthält den Tallystatus des Monitorgeräts und eine Versionsnummer.
Darauffolgende Bytes eines Tallypakets enthalten den Tallystatus für Paare von Slave-Geräten. Das
Master-Gerät übermittelt den Tallystatus für die Anzahl der konfigurierten bzw. unterstützten Geräte
bis zu maximal 510 Stück.
struct tally
uint8
bit 0: monitor device program tally status (0=off, 1=on)
bit 1: monitor device preview tally status (0=off, 1=on)
bit 2-3: reserved (0b00)
bit 4-7: protocol version (0b0000)
Anhang
97
Page 98

uint8[0]
bit 0: slave device 1 program tally status (0=off, 1=on)
bit 1: slave device 1 device preview tally status (0=off, 1=on)
bit 2-3: reserved (0b00)
bit 4: slave device 2 program tally status (0=off, 1=on)
bit 5: slave device 2 preview tally status (0=off, 1=on)
bit 6-7: reserved (0b00)
uint8[1]
bit 0: slave device 3 program tally status (0=off, 1=on)
bit 1: slave device 3 device preview tally status (0=off, 1=on)
bit 2-3: reserved (0b00)
bit 4: slave device 4 program tally status (0=off, 1=on)
bit 5: slave device 4 preview tally status (0=off, 1=on)
bit 6-7: reserved (0b00)
. . .
Slave Device
(1)
Master Device
Slave Device
(2)
Slave Device
(3)
Monitor Device
Byte 7 MSB 6 5 4 3 2 1 0 LSB
0 Version
(0b0)
1 Reserved
(0b0)
2 Reserved
(0b0)
3 ...
Version
(0b0)
Reserved
(0b0)
Reserved
(0b0)
Version
(0b0)
Slave 1
Preview
Slave 3
Preview
Version
(0b0)
Slave 1
Program
Slave 3
Program
Reserved
(0b0)
Reserved
(0b0)
Reserved
(0b0)
Reserved
(0b0)
Reserved
(0b0)
Reserved
(0b0)
Monitor
Preview
Slave 0
Preview
Slave 2
Preview
Monitor
Program
Slave 0
Program
Slave 2
Program
Anhang
98
Page 99

Hilfe
Hilfestellung
Am schnellsten erhalten Sie Hilfe online über die Support-Seiten der Website von Blackmagic
Design. Sehen Sie dort nach dem aktuellsten Support-Material für Ihren Blackmagic Web Presenter.
Blackmagic Design Online Support Seiten
Die aktuellste Version der Bedienungsanleitung finden Sie im Blackmagic Design Support Center
unter www.blackmagicdesign.com/de/support.
Blackmagic Design Forum
Das Blackmagic Design Forum auf unserer Website ist eine praktische Ressource, die Sie für mehr
Information und kreative Ideen aufsuchen können. Manchmal finden Sie dort schnellere Lösungen,
da möglicherweise bereits Antworten auf ähnliche Fragen von anderen erfahrenen Anwendern und
Blackmagic Design Mitarbeitern vorliegen, die Ihnen weiterhelfen. Das Forum finden Sie unter http://
forum.blackmagicdesign.com.
Kontaktaufnahme mit Blackmagic Design Support
Wenn unser Support-Material oder das Forum Ihnen nicht wie gewünscht hilft, gehen Sie bitte auf
unsere Support-Seite und schicken Sie uns Ihre Anfrage über „Senden Sie uns eine E-Mail“. Oder
klicken Sie auf „Finden Sie Ihr lokales Support-Team“ und rufen Sie Ihre nächstgelegene Blackmagic
Design Support Stelle an.
Hilfe
99
Page 100

Gesetzliche Vorschriften und Sicherheitshinweise
Gesetzliche Vorschriften
Entsorgung von elektrischen und elektronischen Geräten innerhalb der Europäischen Union.
Das auf dem Produkt abgebildete Symbol weist darauf hin, dass dieses Gerät nicht zusammen
mit anderen Abfallstoffen entsorgt werden darf. Altgeräte müssen daher zur
Wiederverwertung an eine dafür vorgesehene Sammelstelle übergeben werden. Mülltrennung
und Wiederverwertung von Altgeräten tragen zum nachhaltigen Umgang mit natürlichen
Ressourcen bei. Gleichzeitig wird sichergestellt, dass die Wiederverwertung nicht zulasten der
menschlichen Gesundheit und der Umwelt geht. Weitere Informationen zur Entsorgung von
Altgeräten sowie zu den Standorten der zuständigen Sammelstellen erhalten Sie von Ihren
örtlichen Müllentsorgungsbetrieben sowie vom Händler, bei dem Sie dieses Produkt
erworben haben.
Dieses Gerät wurde geprüft und entspricht den Grenzwerten für Digitalgeräte der Klasse A
gemäß Abschnitt 15 der FCC-Bestimmungen für Funkentstörung. Diese Grenzwerte dienen
dem angemessenen Schutz gegen schädliche Störungen bei Betrieb des Geräts in einer
kommerziellen Einrichtung. Geräte dieser Art erzeugen und verwenden Hochfrequenzen und
können diese auch ausstrahlen. Bei Nichteinhaltung der Installations- und
Gebrauchsvorschriften können sie zu Störungen beim Rundfunkempfang führen. Der Betrieb
solcher Geräte im Wohnbereich führt mit großer Wahrscheinlichkeit zu Funkstörungen. In
diesem Fall kann vom Betreiber verlangt werden, selbst für die Beseitigung solcher Störungen
aufzukommen.
Der Betrieb unterliegt den folgenden zwei Bedingungen:
1 Dieses Gerät darf keine schädigenden Störungen hervorrufen und
2 Dieses Gerät muss alle Störungen annehmen, einschließlich Störungen, die einen
unerwünschten Betrieb zur Folge haben.
Verbindungen zu HDMI-Schnittstellen müssen über hochwertige abgeschirmte HDMI-Kabel
hergestellt werden.
Sicherheitshinweise
Dieses Gerät muss an ein vorschriftsmäßig geerdetes Stromnetz angeschlossen werden.
Um das Risiko eines elektrischen Schlages zu verringern, setzen Sie das Gerät weder Tropfen
noch Spritzern aus.
Das Gerät eigent sich für den Einsatz in tropischen Gebieten mit einer Umgebungstemperatur
von bis zu 40ºC.
Achten Sie auf eine ausreichende Luftzufuhr um das Gerät herum, sodass die Belüftung nicht
eingeschränkt wird.
Achten Sie bei der Installation im Rack, dass die Luftzufuhr nicht durch andere Geräte
eingeschränkt wird.
Es befinden sich keine durch den Anwender zu wartenden Teile im Inneren des Gehäuses.
Wenden Sie sich für die Wartung an ein Blackmagic Design Service-Center in Ihrer Nähe.
Nicht in Höhen von über 2000m über dem Meeresspiegel einsetzen
Gesetzliche Vorschriften und Sicherheitshinweise
100
 Loading...