

Page 1
Installation and Operation Manual
Blackmagic
VideoAssist
July 2017
English, 日本語, Français, Deutsch, Español,
中文, 한국어, Русский
and
Italiano.
Page 2
Languages
To go directly to your preferred language, simply click on the hyperlinks listed in the
contents below.
English 3
日本語 55
Français 108
Deutsch 161
Español 214
中文 267
한국어 320
Русский 373
Italiano 426
Page 3

Welcome!
Thank you for purchasing your Blackmagic Video Assist.
We are extremely excited to have designed the Blackmagic Video Assist family of products.
We think they are the perfect solution to help you shoot better video on any type of camera.
Your video assist combines the best of our monitoring and recording technologies for on
set monitoring and professional recording into easy to use very compact products.
English
Blackmagic Video Assist models can be mounted on your camera, or with the underside
fold out stand you can use them on a desk for general deck and monitoring use. That’s
perfect for use as a master recorder for a live production switcher.
Blackmagic Video Assist has a 6G-SDI input so it will monitor Ultra HD. Blackmagic Video
Assist 4K records Ultra HD on two SD cards for continuous recording and is also a powerful
audio recorder, so you can mix analog audio into the SDI or HDMI recording. Your video
assist is a very versatile monitor and recorder that you can use with any camera and on
any project.
This instruction manual contains all the information you need to start using your video assist.
Please check the support page on our website at www.blackmagicdesign.com for the
latest version of this manual and for updates to your video assist’s software. Keeping
your software up to date will ensure you get all the latest features! When downloading
software, please register with your information so we can keep you updated when new
software is released. We are continually working on new features and improvements,
so we would love to hear from you!
Grant Petty
CEO Blackmagic Design
Page 4

Contents
Blackmagic Video Assist
Getting Started 5
Plugging in Power 5
Plugging in Video 6
Plugging in Audio 6
Inserting SD Cards 7
Recording 8
Remote Control via the LANC Connector 8
Continuous Recording 8
Recording Clean HDMI
fromDSLR Cameras 9
Playback 9
Settings 10
Changing Settings using the
Touchscreen 10
Volume and Analog Audio Levels 17
Storage, Monitor, Display,
Audio and Setup Settings 18
Monitoring using on screen meters 23
Video Scopes 24
About SD Cards 29
Choosing a Fast SD Card 29
Formatting SD Cards
usingyour Video Assist 29
Formatting SD Cards using a Computer 30
Working with Files from SD Cards 32
Checking Disk Speed 32
Blackmagic Video Assist Setup 33
Video Settings 33
About Settings 33
Changing the Language 33
Using DaVinci Resolve 36
Introducing DaVinci Resolve 36
Importing your Clips 36
Editing your Clips 37
Trimming Clips 38
Mapping Keyboard Shortcuts 39
Adding Transitions 40
Adding Titles 41
Adding Audio Tracks 41
Color Correcting your Clips 42
Using Scopes 43
Secondary Color Correction 44
Qualifying a Color 45
Adding a Power Window 45
Tracking a Window 46
Using Plugins 47
Mastering your Edit 48
Post Production Workflow 49
Working with 3rd Party Software 49
Using Final Cut Pro X 49
Using Avid Media Composer 50
Using Adobe Premiere Pro CC 51
Using Autodesk Smoke 2013 51
Help 53
Warranty 54
Page 5
Getting Started
Plugging in Power
Getting started with your video assist is as simple as plugging in power, connecting your video
source, plugging in your audio and inserting an SD card.
This section shows you how to get started including:
■
Plugging in Power
■
Plugging in Video
■
Plugging in Audio
■
Inserting SD cards
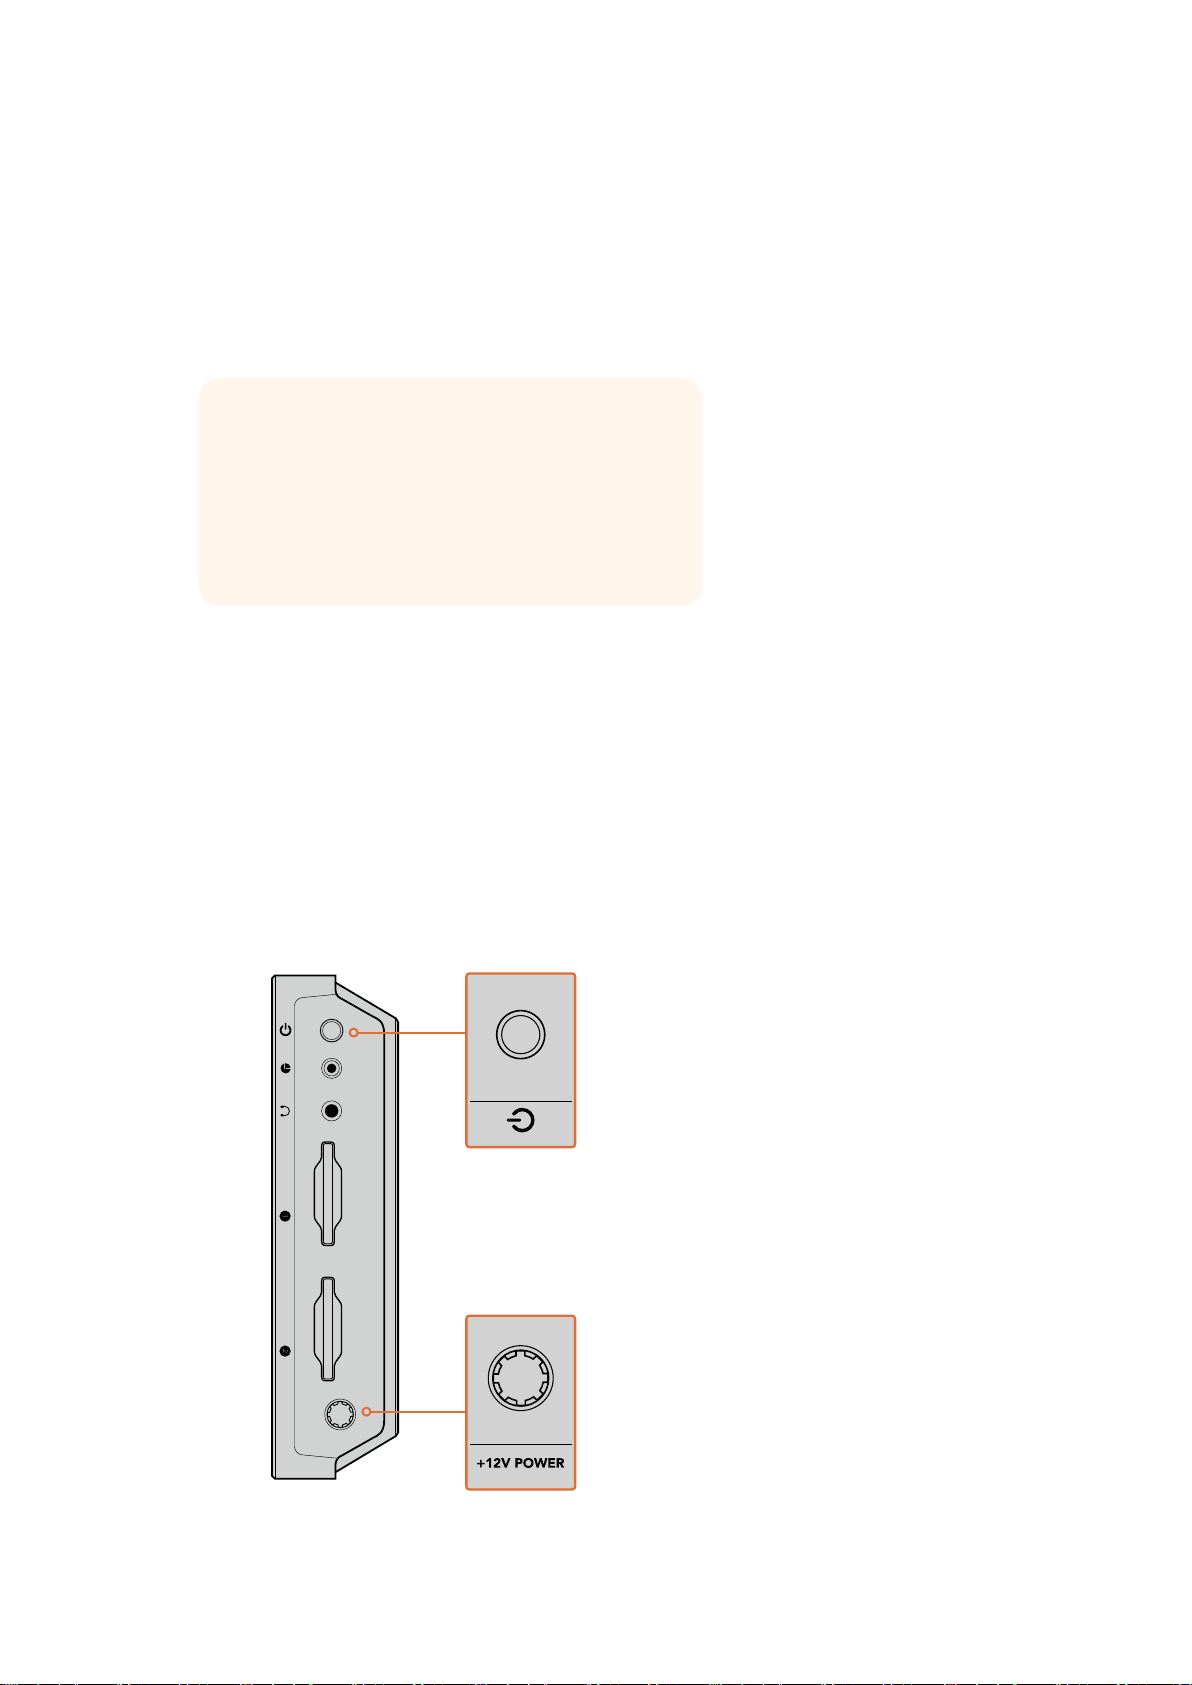
To supply power, plug in the supplied power adapter to your video assist’s power input on
theright side panel.
With external power connected, you can also charge two LP-E6 type Lithium-Ion batteries,
which can be mounted to battery slots 1 and 2onthe back panel. To plug an LP-E6 type battery
into your video assist, gently press thebattery against the inside top edge of the battery slot,
then slide the battery down against the back panel until you feel it click and lock into place.
Press the battery release button on the top panel to remove a battery. For more information
onbattery use andhow to monitor the battery power remaining, refer to the ‘settings’ section in
this manual.
To power on the unit, press the power button on the right side panel. Pressand hold
topower off.
SD CARD SD CARD +12V POWER
Connect external power to the +12V power input.
Press the power button to turn the unit on.
Getting Started
5
Page 6
Blackmagic Video Assist 4K
SD CARD SD CARD +12V POWER
SD CARD SD CARD +12V POWER
PUSH
ANALOG AUDIO IN
PUSH
SDI OUT
SDI IN
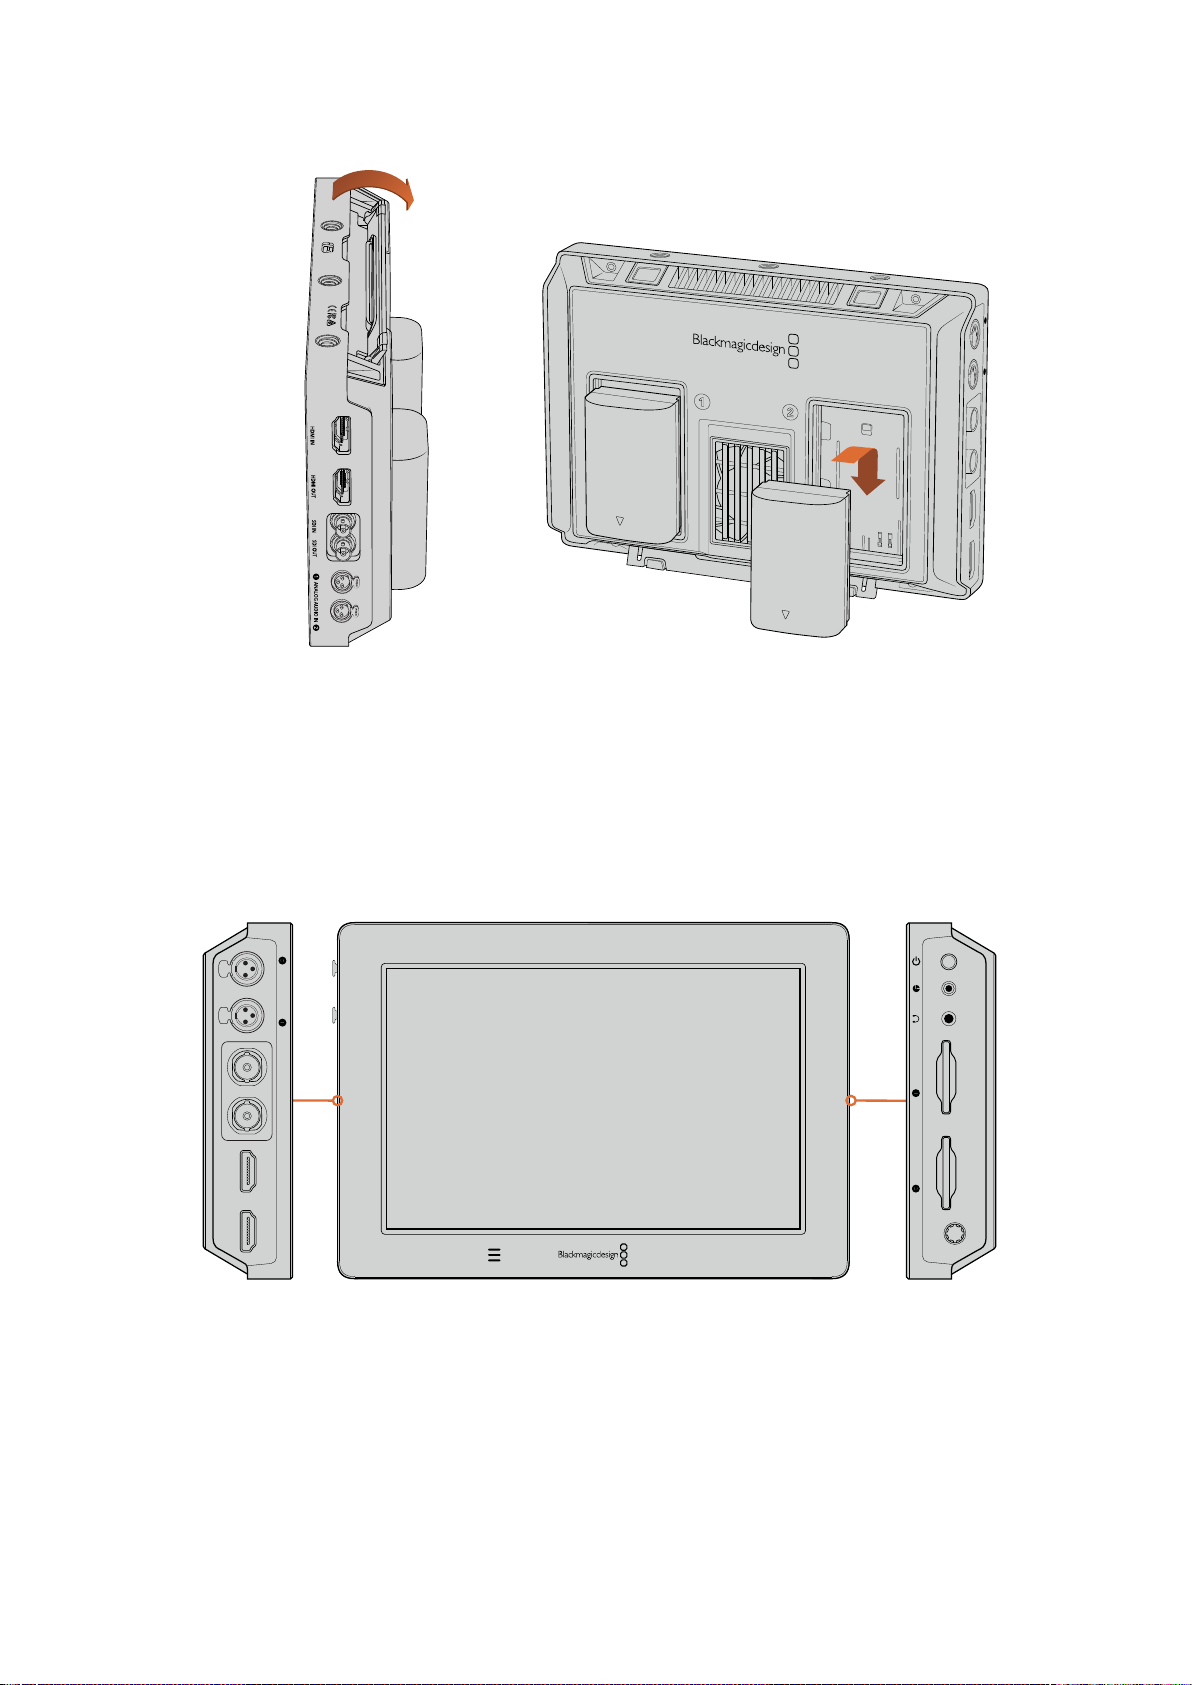
HDMI IN HDMI OUT
A kickstand is provided so you can mount the
unit on your desk. Simply lift the edge of the
Your video assist uses common
LP-E6 type batteries.
stand and gently swing it into the open position.
Plugging in Video
The next step is to plug your SDI or HDMI source videointo the MiniBNC, BNC or HDMIinput.
The unit will auto detect the SDI or HDMI input depending on what you connect first. Mini BNC
to regular BNC cables can be purchased from your nearest professional video equipment
stores. Mini BNC connectors are also commonly known as DIN1.0/2.3 connectors.
PUSHPUSH
ANALOG AUDIO IN
SD CARD SD CARD +12V POWER
HDMI IN HDMI OUT SDI IN SDI OUT
Connect your source video to the SDI or HDMI input on the left side. Connect an HDMITV or SDI monitor by
plugging into the HDMI or SDI output. You can listen to the audio on your clips during recording and playback
by plugging a headset into the headset jack. On Blackmagic Video Assist 4K you can also listen to your audio
during playback via the built in speaker below the LCD.
Plugging in Audio
When plugging in your video, audio is also connected as it’s embedded in the SDI or HDMI
video signal. However, Blackmagic Video Assist 4K also has built in mini XLR connectors so you
can plug in external balanced analog audio as well.
Getting Started
6
Page 7
NOTE On Blackmagic Video Assist 4K you can set the audio settings to record analog
channels 1 and 2, orchoose one channel analog audio and one channel SDI or
HDMIaudio, depending on your source video. For more information about analog audio
andadjusting levels refer to ‘Audio Settings’ in the ‘Settings’ section.
Inserting SD Cards
To start recording clips, you need to insert a compatible SD card.
For high quality HD recording, we recommend high speed UHS-I SD cards. However, if you are
recording standard definition or lower bit rate, lower quality compression you might be able to
use slower cards. Generally the faster the cards, the better.
If you are recording Ultra HD on Blackmagic Video Assist 4K, then we recommend high speed
UHS-II type SD cards. These cards need to be capable of write speeds above 110MB/s for
recording up to Ultra HD 2160p30. Blackmagic Video Assist 4K also has two SD card slots. You
can record to either one, or insert two SD cards for continuous recording or fast media
change overs.
Before using your cards, you will need to format them to either HFS+ or exFATformats. It’s easy
to format your media via the ‘storage’ settings. Refer to the ‘settings’ section for more
information on storage settings.
If you want to, you can format your cards using a Mac OS or Windows computer. When using
your media on Mac OS then you can use HFS+ which is the Mac disk format. If you are using
Windows then you should use exFAT format, which is the Windows disk format and Mac OS
computers can also read exFAT format.
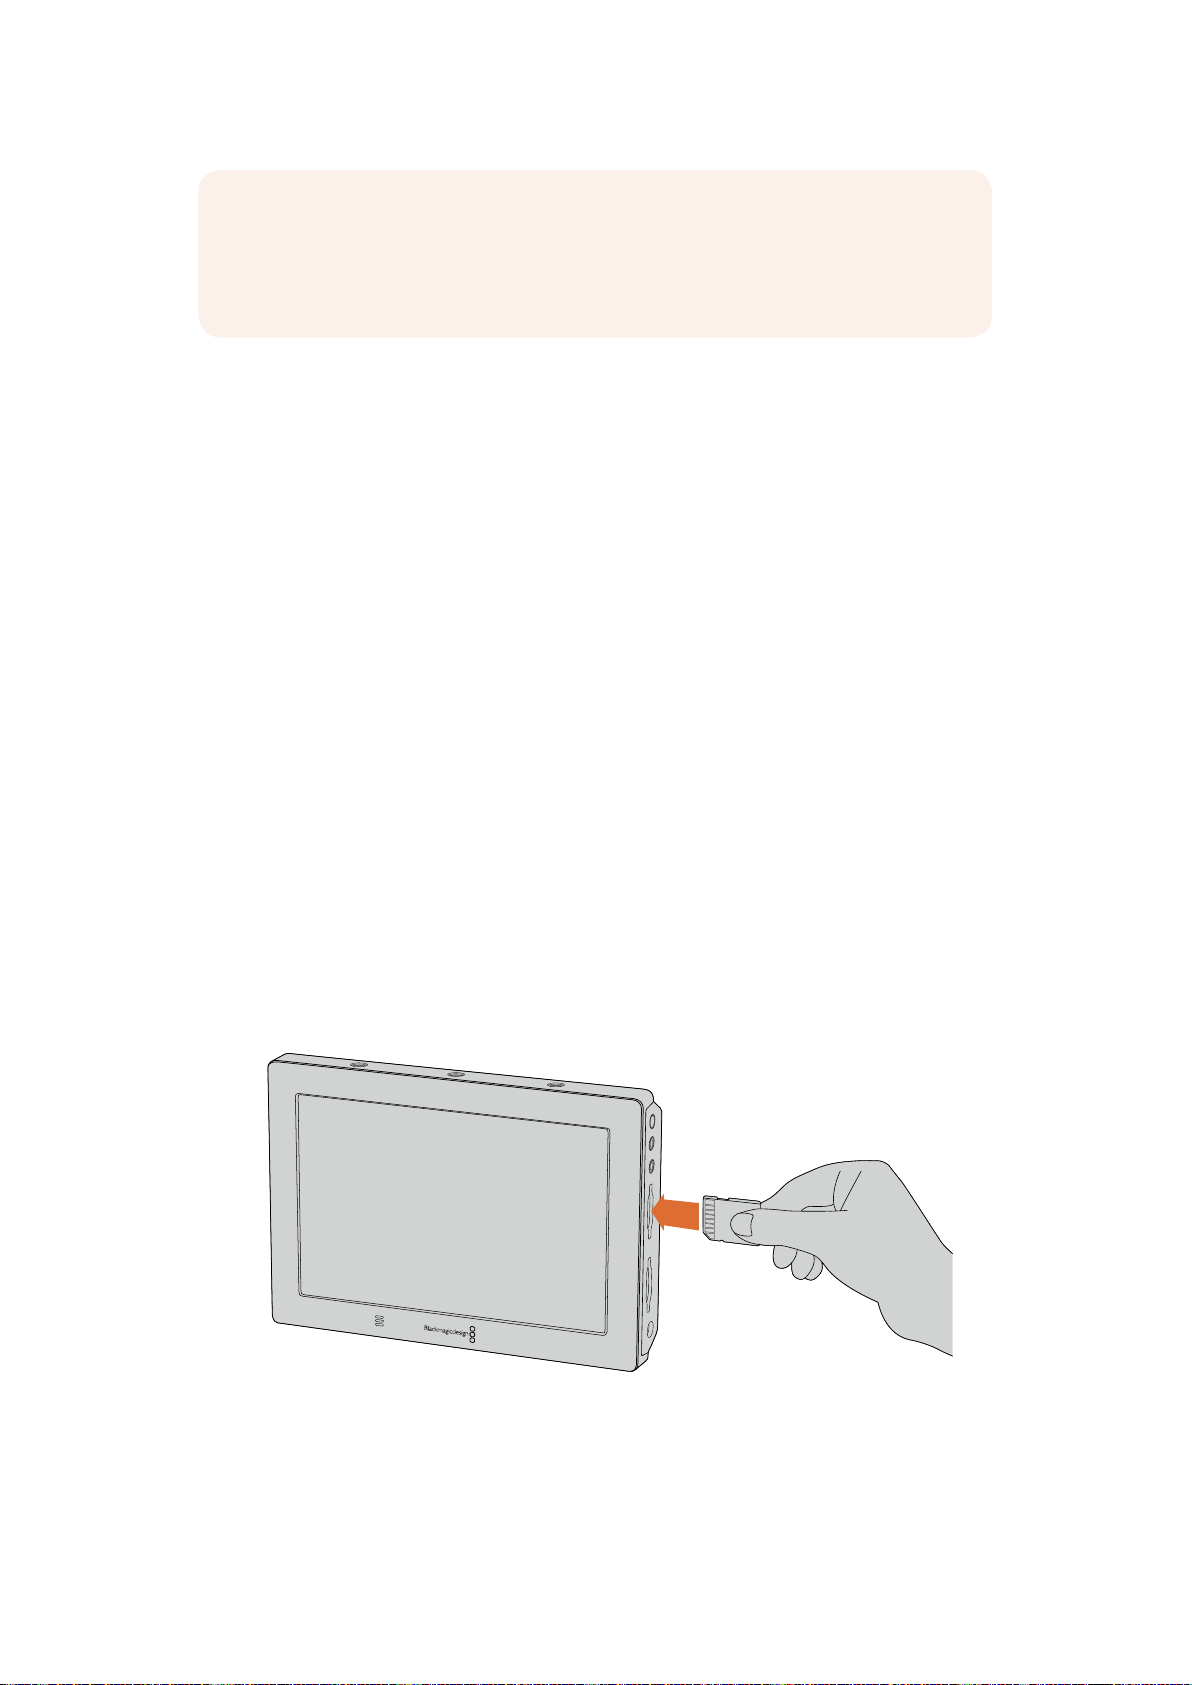
To plug in an SD card:
1 Hold the card with gold connectors facing the LCD and align it with the SD card slot.
2 Gently push the card into the slot until you feel it lock firmly into place.
To remove the card, gently push until you feel it click, then release. The card will eject a short
distance, allowing you to hold the edge of the card and remove it from the slot.
To start recording you’ll need to insert an HFS+ or exFAT formatted UHS-I or UHS-II SD card.
You can easily format your SDcard using the ‘storage’ settings in the touchscreen menu.
That’s all there is to getting started. With power, video and a formatted SD card you can now
start recording!
Getting Started
7
Page 8
Recording
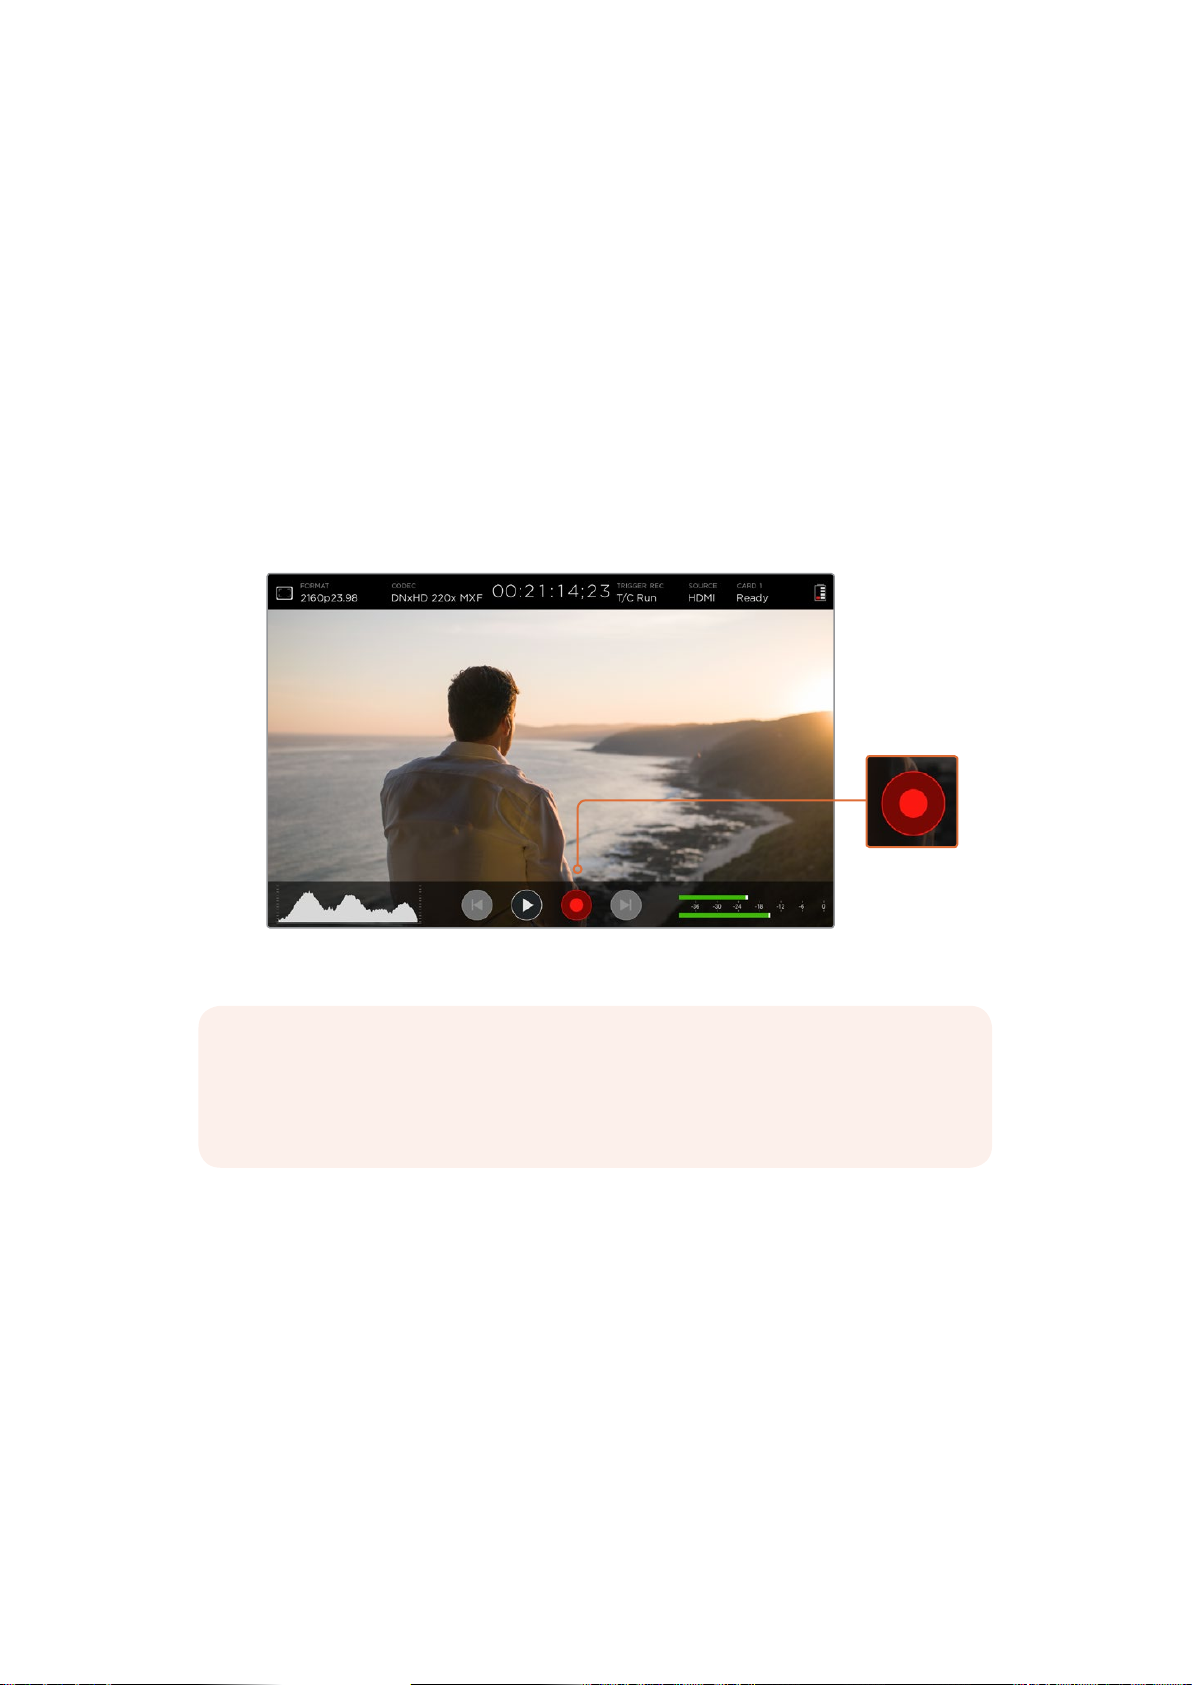
To start recording straight away, simply swipe the touchscreen up or down to reveal the on
screen display, then tap the circular ‘record’ icon at the bottom of the LCD. The ‘record’ icon will
become a square ‘stop’ icon during recording. Tap the stop icon to stop recording.
While recording, the timecode counter in the status strip will continuously update, showing you
the duration of your clip. When the on screen display is hidden on your video assist, a small record
indicator will be displayed at the bottom of the LCD so you can easily confirm you’re recording.
You can record your clips to QuickTime files using AppleProRes and Avid DNx codecs.
You can also set your video assist to use ‘timecode’ or ‘SDI/HDMI start/stop’ trigger recording.
This lets you start and stop recording triggered by information received via the HD-SDI or HDMI
signal. For information on how to set your chosen codec, or to enable trigger recording, refer to
the ‘settings’ section in this manual.
To start recording, simply swipe the touchscreen up or down to reveal the on
screen meters, then tap the ‘record’ icon. Tap again to stop recording.
NOTE When recording from an HDMI or SDI camera, make sure the output is clean
with overlays turned off as any overlays that are present in your camera’s video output
will be recorded with your image. Please refer to the section titled ‘recording clean
HDMI from DSLR cameras’ for more information.
Remote Control via the LANC Connector
On Blackmagic Video Assist 4K you can start and stop recording remotely using an external
LANC controller. Simply plug the LANC controller into the 2.5mm LANC input on the right side
of the unit.
Continuous Recording
Blackmagic Video Assist 4K supports continuous recording using 2 SD card slots. If you are
recording an important event and you don’t want to stop recording, simply insert a formatted
SDcard in slot 2. When the first card is full, your video assist will automatically switch over to
the second card. There will be no frames dropped in the process. For example, ifthe first
segment on card 1 stopped at 00:40:01:00, the recording on the second card will start at
00:40:01:01.
Recording
8
Page 9

When editing your clips on the timeline, simply place the second clip against the tail of the
firstand they will play through the recording as if it is one complete clip.
Having SD cards inserted in both slots also lets you quickly change media. If you want to stop
recording at a defined moment, you can simply stop recording, choose ‘card 2’ in the storage
settings, then tap record again.
TIP For continuous recording or fast slot change overs using Blackmagic Video
Assist4K, make sure your cards are formatted before you start your recording.
Recording Clean HDMI fromDSLR Cameras
Some DSLR cameras record 8-bit video internally, and some can provide a clean video image
via their HDMI output. By plugging the DSLR camera’s HDMI output into your video assist, you
can bypass the camera’s internal compression and record using high quality 10-bit ProRes or
Avid DNx codecs. Some DSLR cameras can output 10-bit 4:2:2, which is higher quality video
than their internally recorded 8-bit 4:2:0 compression.
Many DSLR cameras are also limited to short recording durations, so an added benefit of
recording externally is bypassing these recording limitations. This is particularly helpful when
recording live events or interviews for documentaries.
To make the most of this feature, you will need to set your camera to output a clean image with
overlays turned off. This is normally done by changing your DSLR camera’s HDMI output
settings so it does not show any status information in the video signal. This is important
because if there are any overlays visible in your image via the HDMI output they will be
recorded in your video, which you probably don’t want.
To check the DSLR camera overlays are not visible:
1 Swipe the touchscreen up or down to hide the on screen meters so you can monitor
only your DSLR camera’s image. OnBlackmagic Video Assist 4K the status display at
the top of the LCD is independent and separate from the image. This means you can
monitor the entire image cleanly andstill have the status display visible.
2 With the on screen meters hidden, carefully check the DSLR camera’s output video
does not show any information other than your clean video image. If you can see
camera overlays on your video assist’s LCD, change the HDMI output or display menu
settings on your camera so HDMI overlays are turned off.
With a clean HDMI output from your camera you can now record better quality video!
Playback
Swipe the touchscreen up or down to reveal the on screen meters, then tap the playback
transport control icons at the bottom of the LCD.
To play your clips, tap the ‘play’ icon.
During playback, tap the ‘pause’ icon to momentarily ‘freeze’
the playback on a frame of video. Tap again to resume playback.
You can skip backwards or forwards through your clips by repeatedly
tapping the forward or reverse skip icons. Tapping reverse skip once will
restart the current clip.
Playback
9
Page 10
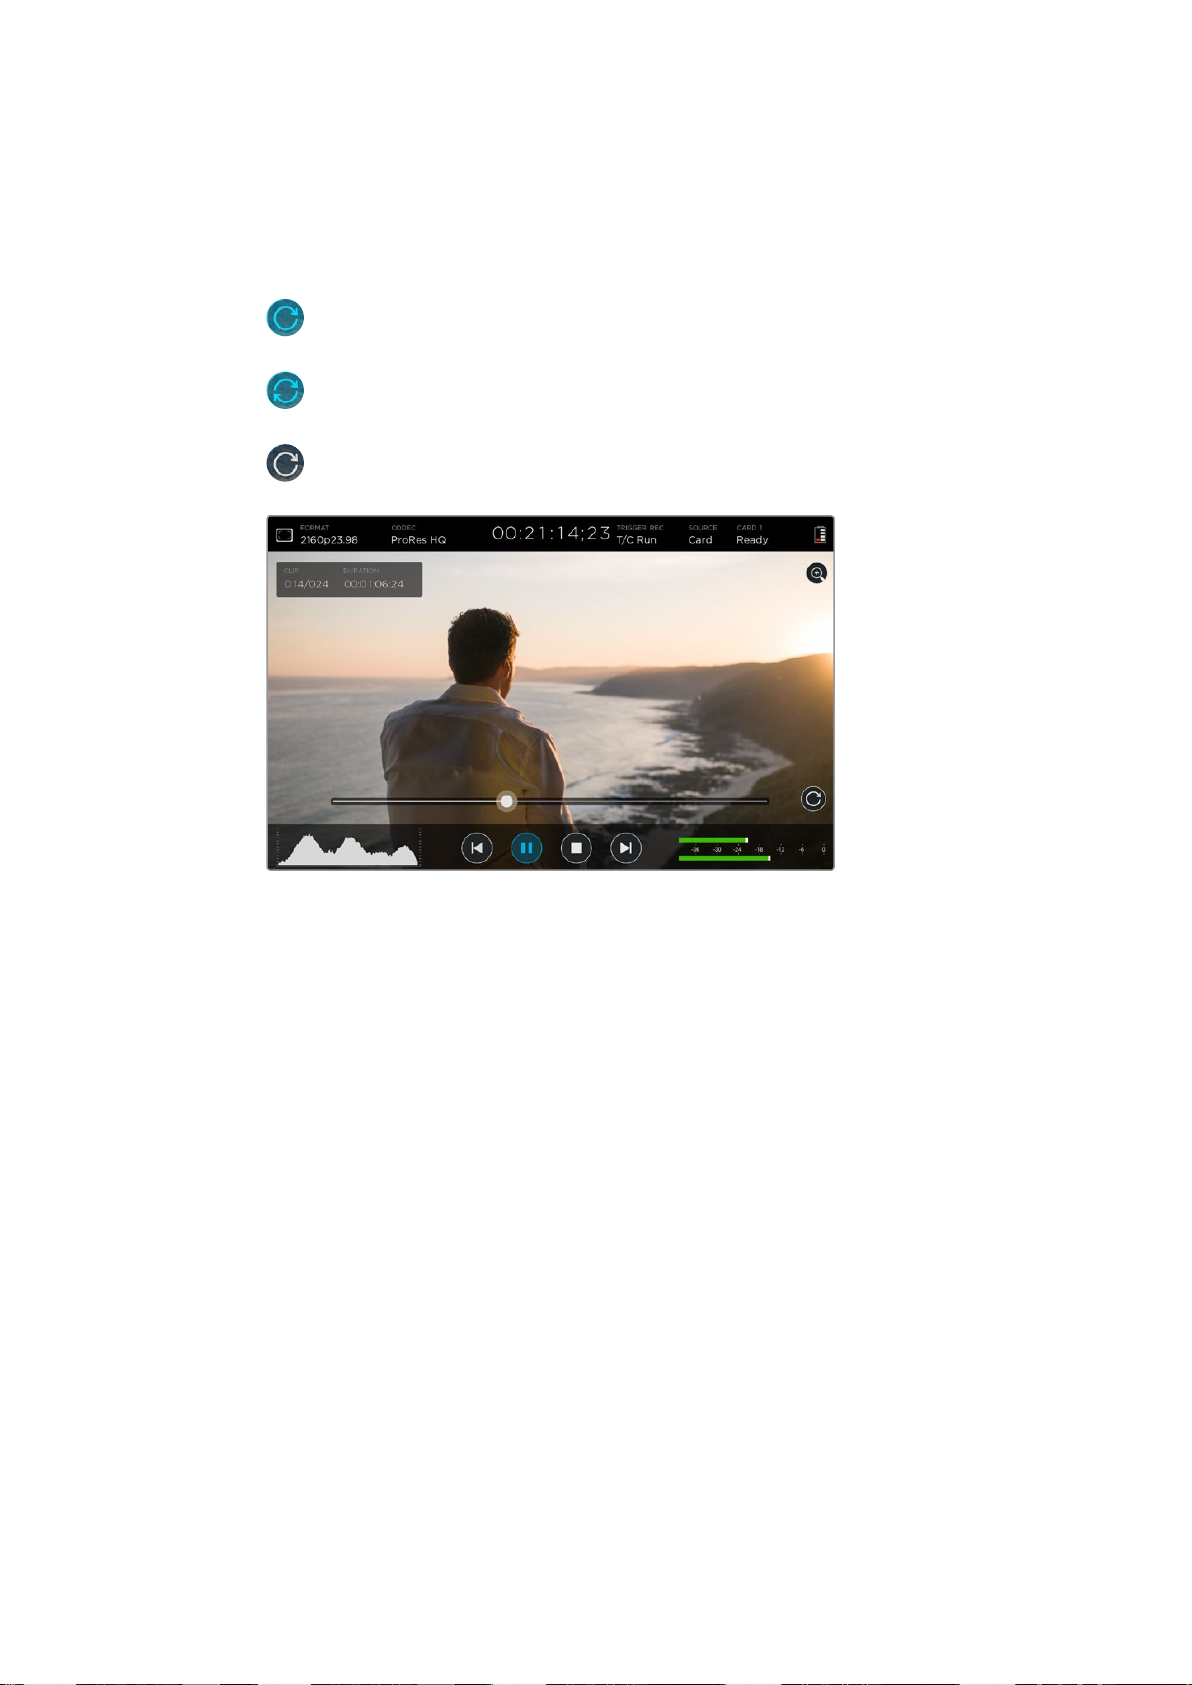
During playback you can scrub your clip forwards or backwards by dragging the scrubbing
slider left or right. Tap the LCD to reveal or hide the slider.
Looping playback
Tap the loop icon once to set your video assist
to play back the current clip on a continuous loop.
Tap again to play all your
recorded clips on a continuous loop.
Tap a third time to turn loop off.
Shuttle through your clip by dragging the scrubbing slider forwards or backwards. During
playbackmode, a panel will appear near the top left corner of the screen. This panel displays the
number of clips recorded on your SD card, the current clip being played and the duration of the clip.
Settings
Changing Settings using the Touchscreen
Your video assist features a built in touchscreen. The touchscreen is used to monitor your video
and audio, plus change settings.
You can change most settings by tapping on the icons in the status strip at the top of the LCD.
Audio settings, such as levels adjustment or headphone volume, can be adjusted by swiping
the touchscreen up or down to reveal the on screen meters at the bottom of the LCD, then
tapping the audio meters.
Tap outside of the settings to hide a settings window. Swipe left or right, or tap the ‘back’ icon
to hide the storage settings.
To change settings:
1 Tap the setting you wish to change in the status strip or on screen meters.
For example, if you want to set the recording codec, tap the codec indicator in the
status strip to open the codec settings. If you want to adjust audio levels, simply tap on
the audio meters.
2 In your chosen settings window, tap the menu buttons, arrows or slider icons to choose
from the available settings. Tap outside the window to close the settings.
Settings
10
Page 11

Overlays
Tap the overlays icon to open the zebra, focus peaking, guides and grid settings.
Thesesettings let you display overlays on the LCD to help with exposure, focus, composition
and framing when connected to a camera.
Overlay features are not visible via the SDI or HDMI output.
Zebra
The zebra feature helps you achieve optimum exposure by displaying diagonal lines over areas
of the video that exceed your set zebra level. For example, if you set the zebra level to 100%,
you’ll know that any area of the image displaying the zebra pattern will be clipped. If you set the
zebra to 90%, you can feel confident that you have some extra exposure headroom to protect
the highlights in your shot.
TIP You can also set the zebra to highlight areas of your image that represent specific
video levels on a waveform, for example setting the zebra for 50% means you can
visually identify which regions of your image will appear at approximately 50% on a
waveform scope.
To turn the zebra feature on and change the zebra level, tap the left and right arrows or drag
the slider in the ‘zebra’ setting.
Focus Peaking and Focus Assist
Focus peaking and focus assist settings give you powerful tools to help focus your images fast.
Focus peaking displays edge lines on the sharpest areas of the image. Sensitivity settings let
you change how strong the lines are.
To turn edge lines on and change the sensitivity settings, tap the left and right arrows or drag
the slider left or right. Sensitivity levels include ‘low’, ‘medium’ or ‘high’. In images with lots of
detail and high contrast, the lines can be distracting, so in these conditions you can select ’low’
or ‘medium’. Alternatively, for low contrast shots with less detail, select ‘high’ so the lines are
stronger and easier to see.
Changing the color of the edge lines can also make them easier to see in conditions where
their color may match the image. To change the color, simply tap the left and right arrows in the
‘focus line color’ setting.
Edge lines are extremely effective. They can be so pronounced that you can even monitor the
depth of your focal plane, plus watch it move closer or further into your shot as you adjust your
camera’s focus ring.
For more information on selecting focus assist tools, refer to the ‘monitor settings’ section in
this manual.
Guides
The frame guides feature provides aspect ratio overlays for various cinema, television and
online standards. Tap the ‘guides’ menu button, then tap the left or right arrows, or drag the
slider icon left or right to choose a guide or to turn the guides off.
Settings
11
Page 12
You can choose from the following frame guides:
HDTV
Displays action and title safe regions of your image within a 1.78:1 aspect ratio
compatible with 16:9 HD television and computer screens.
4:3
Displays the 4:3 aspect ratio compatible with SD televisionscreens, or to help frame
shots when using 2xanamorphic adapters.
2.40:1, 2.39:1 and 2.35:1
Displays the broad widescreen aspect ratio compatible with anamorphic or flat
widescreen cinema presentation. The three widescreen settings differ slightly based
on the changing cinema standards over time. 2.39:1 is one of the most prominent
standards in use today.
1.85:1
Displays another common flat widescreen cinema aspect ratio. This ratio is slightly
wider than HDTV, but not as wide as 2.39:1.
Grid
The grid feature displays a ‘thirds’ overlay with two vertical and horizontal lines placed in each
third of the image. Tap ‘on’ or ‘off’ to view or hide the thirds overlay.
Thirds are an extremely powerful tool to help compose your shots. For example, the human eye
typically looks for action near the points where the lines intersect, so it’s helpful to frame key
points of interest in these zones.
TIP An actor’s eyeline is commonly framed along the top third of the screen,
so you can use the top horizontal third to guide your framing. Thirds are also
useful to maintain framing consistency between shots.
2.39:1 frame guides are useful for framing shots to suit a popular
flat widescreen cinema format.
False Color
The false color feature displays color overlays on your image that represent exposure values.
The color values correspond to optimum exposure settings, for example pink for Caucasian skin
tones and green for 38.4% middle grey. False color is also helpful to know when shadows and
highlights are near clipping or clipping.
Settings
12
Page 13

With a range of tonal values on the LCD at once, this gives you a broader overview of your
exposure which you can use to refine lighting on set, or make exposure changes to
compensate.
We have included a chart in this section that shows how the colors correspond to specific
tonal values.
False Color Chart
Video Format and Frame Rate
Input video resolution and frame rate is displayed in the ‘Format’ section of the status strip. For
example, 2160p29.97, 2160p25, 1080p59.94, etc.
The following video input and output formats are supported:
Supported Input and Output Formats
6G-SDI Input and Output
525i59.94 NTSC, 625i50 PAL
720p50, 720p59.94, 720p60
1080PsF23.98, 1080PsF24
1080i50, 1080i59.94, 1080i60
1080p23.98, 1080p24, 1080p25, 1080p29.97, 1080p30, 1080p50, 1080p59.94, 1080p60
2160p23.98, 2160p24, 2160p25, 2160p29.97, 2160p30
HDMI Input and Output
525i59.94 NTSC, 625i50 PAL
720p50, 720p59.94, 720p60
1080i50, 1080i59.94, 1080i60
1080p23.98, 1080p24, 1080p25, 1080p29.97, 1080p30, 1080p50, 1080p59.94, 1080p60
2160p23.98, 2160p24, 2160p25, 2160p29.97, 2160p30 (Blackmagic Video Assist 4K)
Codec
Tap the ‘codec’ indicator to open the relevant settings, then tap the arrow icons or slider to make your
selection. The codecs available depend on the model you are using. For example, both models can
record HD video to Apple ProRes and Avid DNxHD codecs with a range of bit rates. Blackmagic
Video Assist 4K also lets you choose ProRes and DNxHR codecs for Ultra HD recording.
ProRes codecs are recorded as QuickTime files. DNx files can be recorded as QuickTime or
native MXF files. Refer to the table in this section for more details regarding the codec options.
Settings
13
Page 14

Supported Codecs
Clips are recorded as QuickTime files except for DNx MXF files where MXF appears in
the codec name.
Blackmagic Video Assist Blackmagic Video Assist 4K
Codecs Bit Depth Codecs Bit Depth
ProRes 422 HQ 10 ProRes 422 HQ 10
ProRes 422 10 ProRes 422 10
ProRes 422 LT 10 ProRes 422 LT 10
ProRes Proxy 10 ProRes Proxy 10
DNxHD 220x 10 DNxHD 220x 10
DNxHD 145 8 DNxHD 145 8
DNxHD 45 8 DNxHD 45 8
DNxHD 220x MXF 10 DNxHR HQX 10
DNxHD 145 MXF 8 DNxHR SQ 8
DNxHD 45 MXF 8 DNxHR LB 8
– – DNxHD 220x MXF 10
– – DNxHD 145 MXF 8
– – DNxHD 45 MXF 8
– – DNxHR HQX MXF 10
– – DNxHR SQ MXF 8
– – DNxHR LB MXF 8
Timecode
The timecode counter displays the duration of your clips in hours:minutes:seconds:frames.
Trigger Record
Tap the ‘trigger record’ indicator to select between timecode run or SDI/HDMI trigger recording.
This lets you start and stop recording triggered by information received over the SDI or HDMI
connection. To disable trigger recording, select ‘never’.
T/C Run
When timecode run is selected, your video assist will start recording as soon asit
detects running timecode from your SDI or HDMI source. Recording will stop when the
timecode has ceased. This feature is useful when connecting cameras that don’t
support SDIstart/stop trigger recording. You may need to set your camera’s timecode
setting to ‘record run’ to make sure timecode only runs while your camera is recording.
If your camera’s timecode isset differently, for example time of day timecode, the
timecode is always running and will continuously trigger the recording on your
video assist.
Settings
14
Page 15
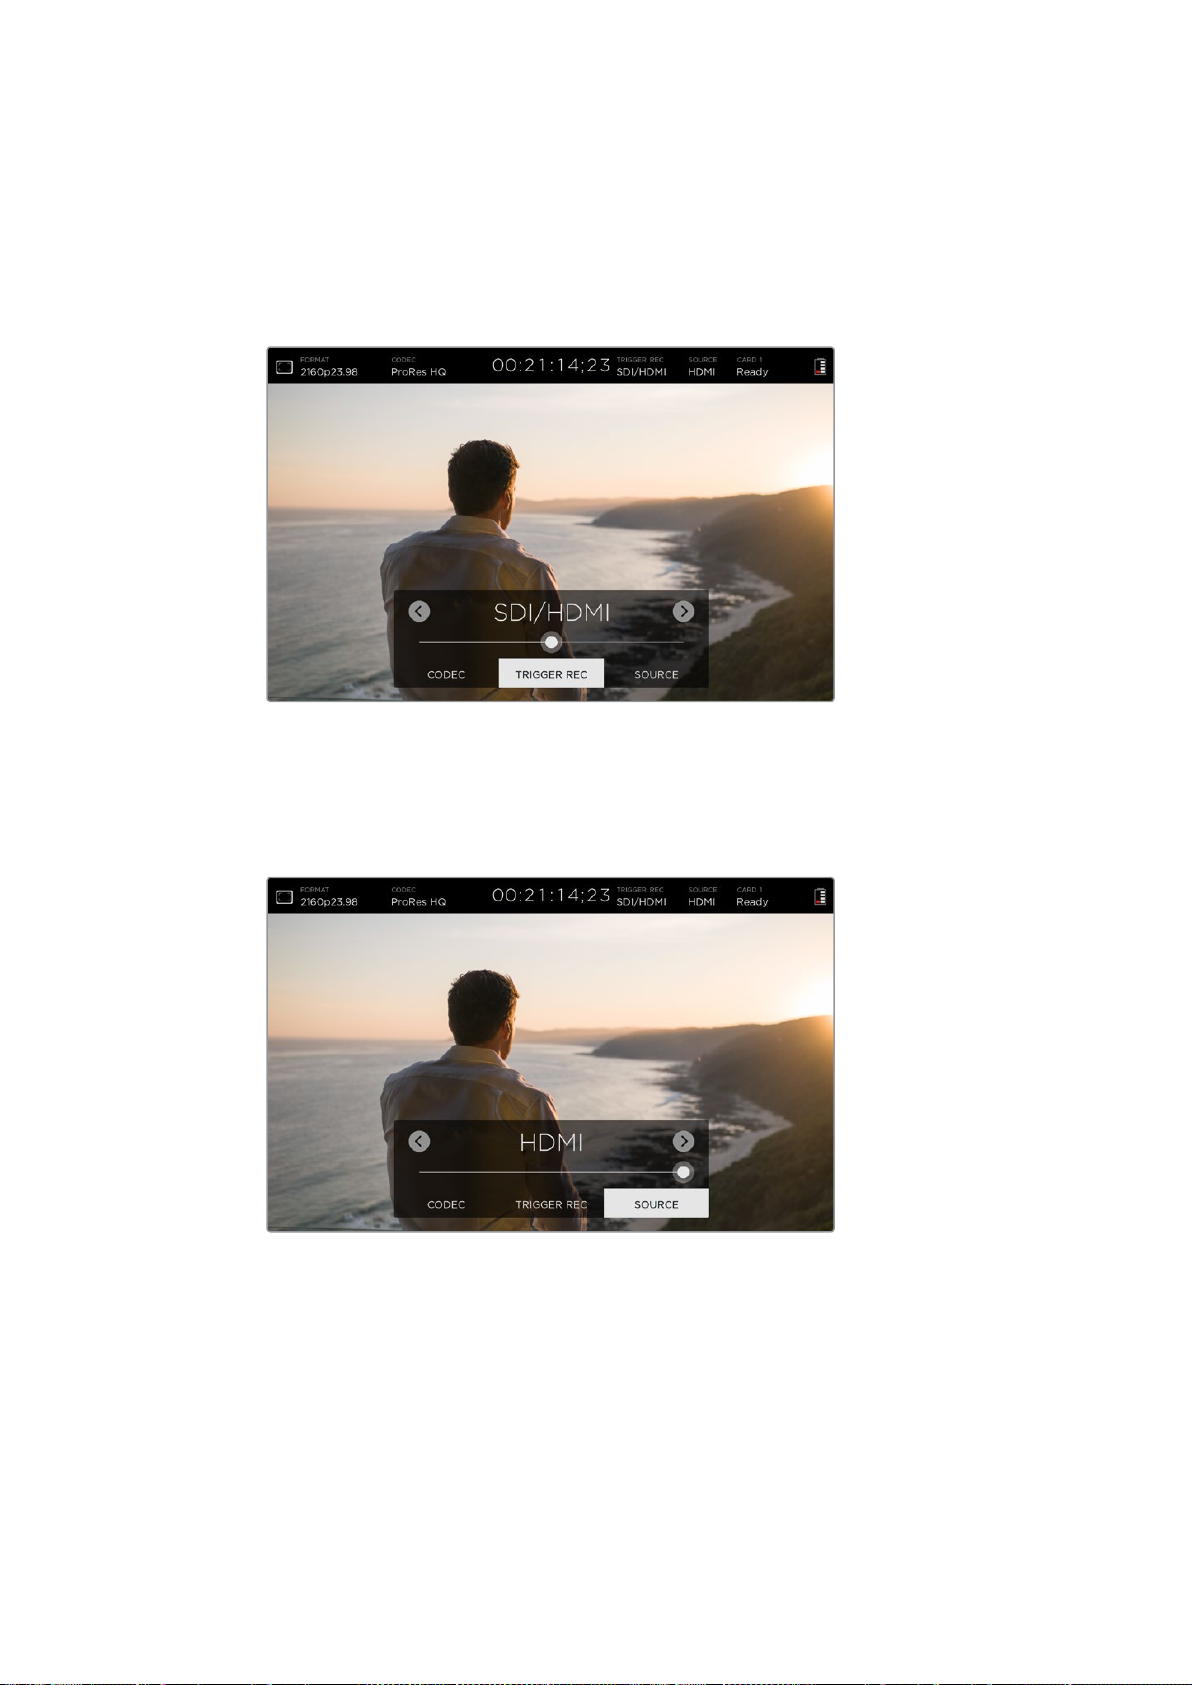
SDI/HDMI
This setting will set your video assist to start and stop recording when you press the
record start and stop button on your camera. For SDI/HDMI start/stop trigger recording
you will need to use a camera that can trigger the record function via HD-SDI or HDMI.
Cameras which support trigger recording may include menu options such as ‘trigger
rec’, HD-SDI remote I/F’ or ‘SDI remote start/stop trigger’.
Source
Displays the connected SDI or HDMI input source. The unit will use the first source connected.
If you have another source connected, your video assist will swap over to the other if the signal
from the original source is lost for a brief period of time. This can be useful for redundancy if you
need to run a back up signal.
Card
Displays the status of the SD card currently selected in the storage settings.
Blackmagic Video Assist 4K has 2 SD card slots. To choose a card to record to:
1 Tap the ‘card’ status or swipe the touchscreen left or right to open the
‘storage’ settings.
2 In the storage settings simply tap the ‘card 1’ or ‘card 2’ icon near the top left of the
touchscreen.
You can also format your cards in the storage settings by tapping the ‘format card’ icon
underneath the information for each card.
Settings
15
Page 16
Below is a list of the different indicators that may appear in the card status. The status
indicators are:
Loading
When inserting an SD card, the indicator will display ‘loading’ to let you know the unit is
verifying your card.
Ready
When a formatted SD card is verified, the status will display ‘ready’ to indicate your card
is ready to record.
Format
If your SD card needs to be initialized, the indicator will flash ‘format’ to prompt you to
format the card. Tap the ‘card’ indicator or swipe the touchscreen left or right to open
the ‘storage’ settings where you can format your card. For more information refer to the
‘about SD cards’ section.
No card
This indicator is displayed when there is no card inserted in the selected SD card slot.
Card full
The ‘card full’ indicator will flash for approximately three minutes prior to stopping
record when an SD card has used its maximum recording space.
When your card is full, the indicator will turn solid red and the recording will stop.
Yourvideo assist will then save the last recorded file.
If you have a formatted card in slot 2 of Blackmagic Video Assist 4K, the unit will
automatically switch over to slot 2 and continue recording to your second card.
Record Time Remaining
While in playback mode, the status indicator will display the record time remaining
foryour SD card.
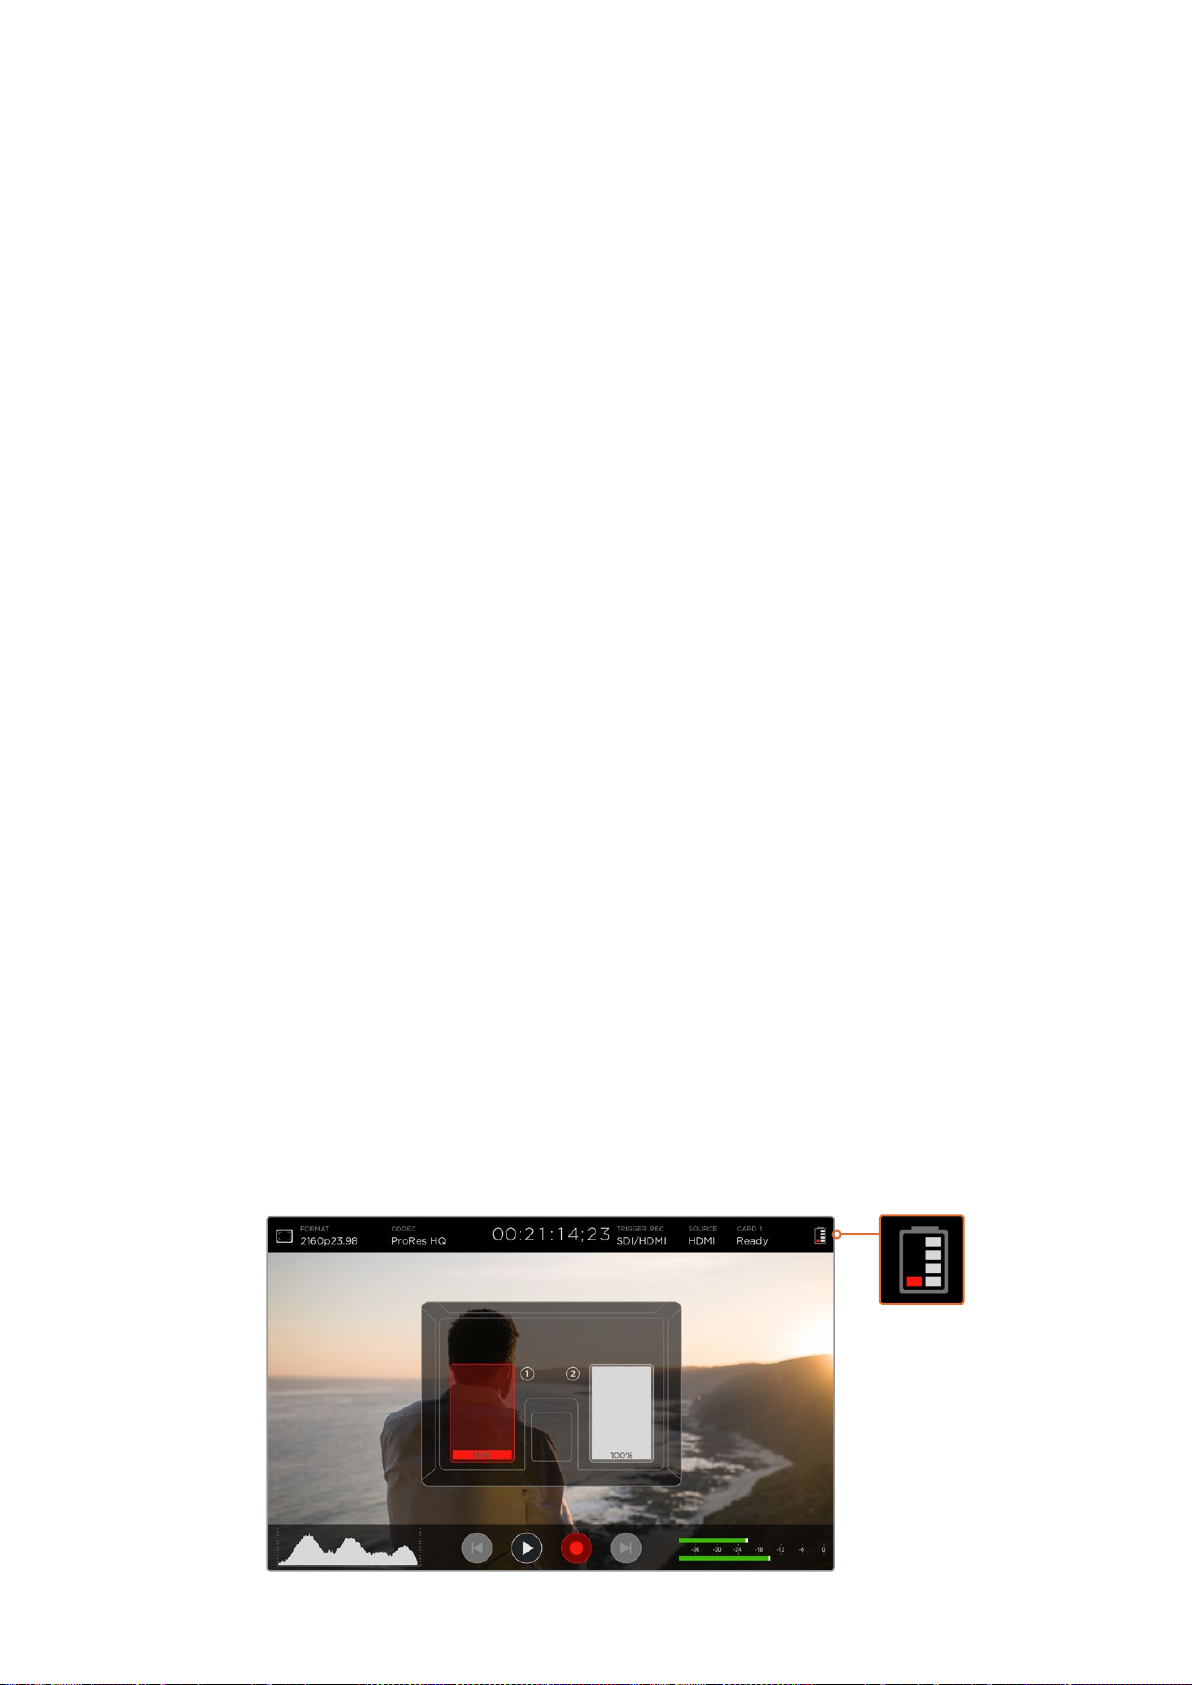
Battery Level Remaining
Displays the amount of power remaining in your batteries. Tap the battery icon to open a larger
display with more precise information about your battery levels.
During operation, your video assist will use the battery with the lowest charge first, then swap
over to the other when depleted without interruption. When recharging batteries, both will
charge simultaneously. Batteries will take approximately 3 hours to fully charge when not in use
depending on battery type and conditions.
On Blackmagic Video Assist, two fully charged Canon LP-E6 batteries will supply power for
approximately 180 minutes of record time. Blackmagic Video Assist 4K will run on two fully
charged batteries for approximately 80 minutes of record time.
Settings
16
Page 17
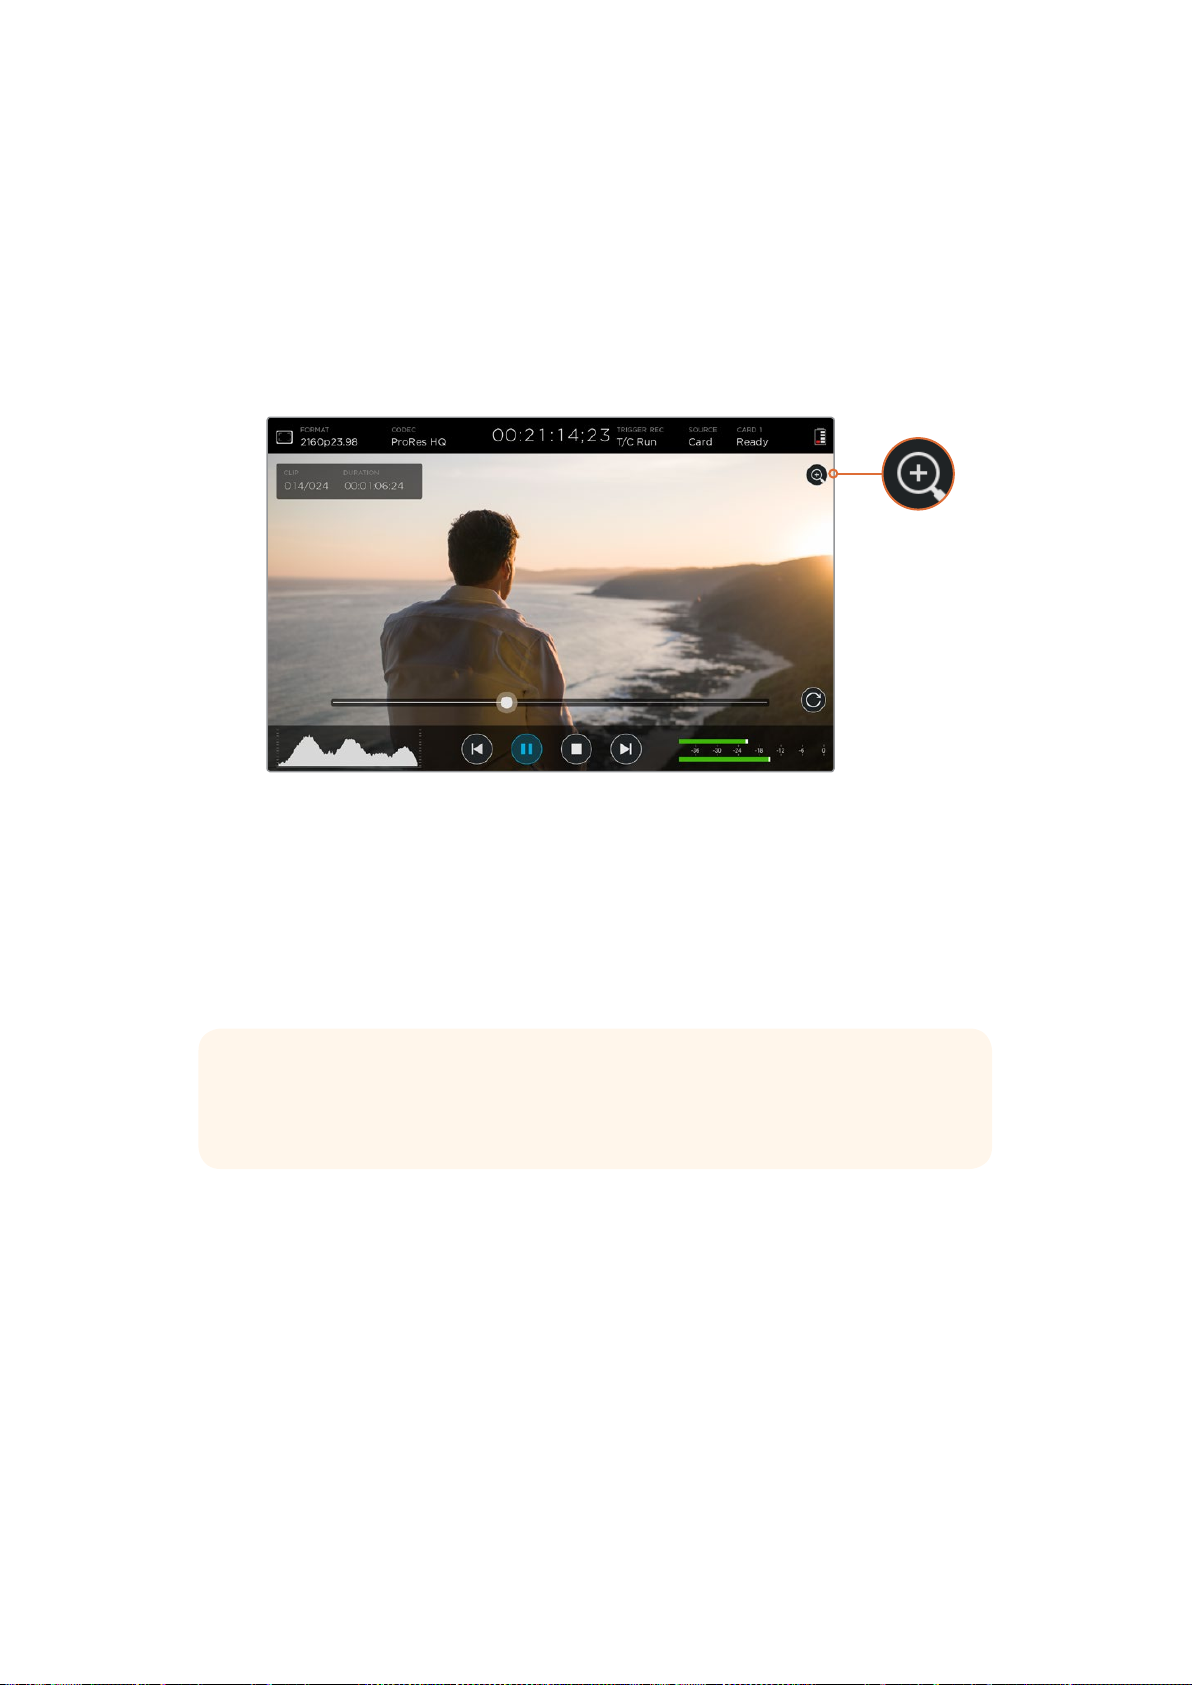
Zoom
The zoom feature lets you zoom into your image so you can carefully check your focus when
connected to a camera, or study fine details in your video image. The zoom feature can be
used when framing a shot before recording, or during playback, but is disabled while
recording a clip.
To turn the zoom feature on, simply tap the zoom icon located underneath the battery level
remaining indicator. To turn zoom off, tap the icon again. The zoom feature can be used when
monitoring Ultra HD or HD video.
Volume and Analog Audio Levels
Speaker Volume
To adjust the volume for the built in speaker on Blackmagic Video Assist 4K, swipe the LCD up
or down to reveal the on screen meters, then tap the audio meters to open the volume and
analog audio level settings. Simply drag the volume slider to increase or decrease the volume.
TIP To avoid potential feedback when a microphone is connected, the speaker is
enabled during playback, but is disabled while your Blackmagic Video Assist 4K is
recording or monitoring the video input.
Headphone Volume
To adjust the headphone volume, simply tap on the audio meters at the bottom right of the on
screen display. On Blackmagic Video Assist 4K, the speaker volume setting will change to
‘headphone’ as soon as you plug in a pair of headphones, then you can adjust the volume just
as you would for the speaker volume.
Analog Audio levels
On Blackmagic Video Assist 4K, analog audio levels via the XLR inputs can be adjusted by dragging
the sliders for each input. The level range you can adjust on each input is +10dB to +65dB.
Settings
17
Page 18
To record optimum audio without clipping, adjust the sliders on each input until the levels are
peaking between -20 and -12dBFS on the XLR input audio meters.
Refer to the ‘monitoring using on screen meters’ section for more information.
Storage, Monitor, Display, Audio and Setup Settings
Swipe the touchscreen left or right to open additional settings and information. Here you can
monitor storage information for your SD card, format your card, adjust monitor and display
settings, plus change the date and time. On Blackmagic Video Assist 4K, you can also adjust
audio settings. To hide the settings and return to your video image, swipe left or right, or tap the
‘back’ icon at the bottom left corner on Blackmagic Video Assist 4K.
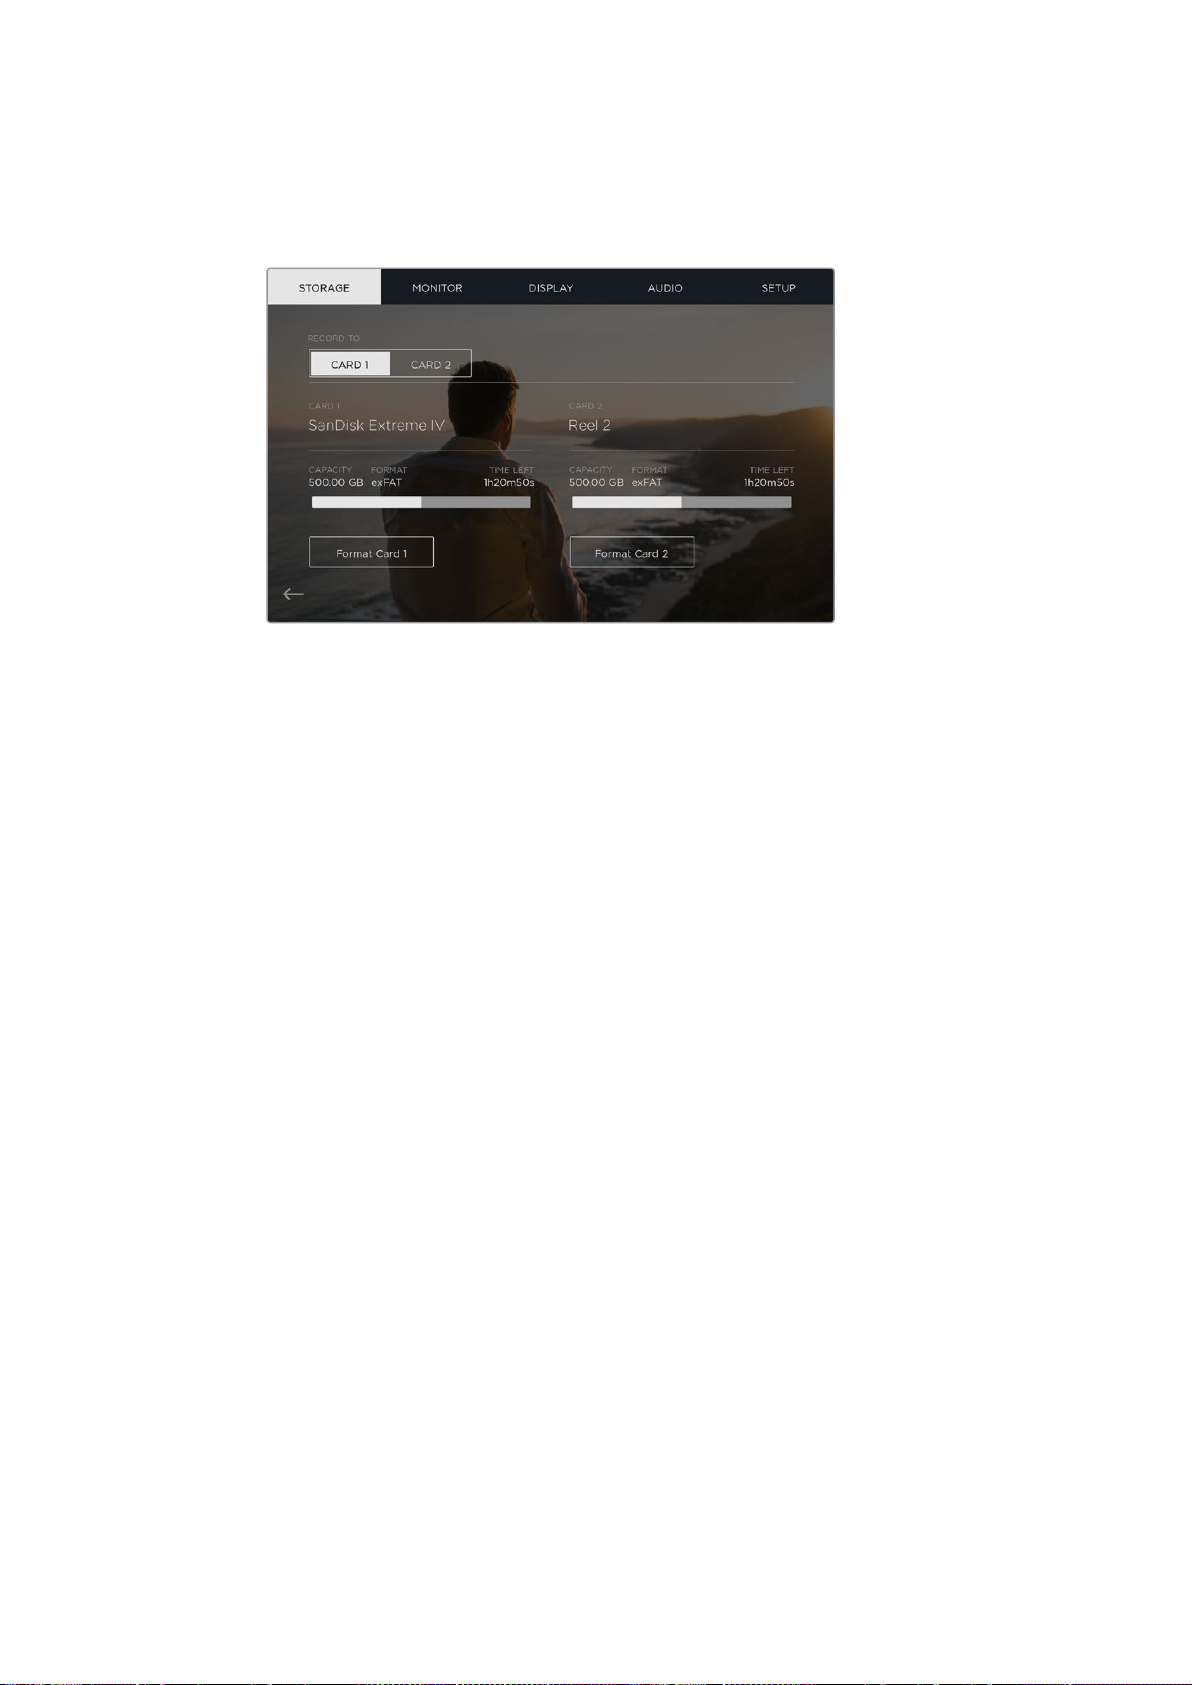
Storage Settings
The storage settings let you monitor the capacity of your inserted SD cards, format type, for
example HFS+ or exFAT, and the amount of free space available. You can also format your cards
directly using your video assist. For information on formatting SD cards, refer to the ‘about
SDcards’ section.
Settings
18
Page 19
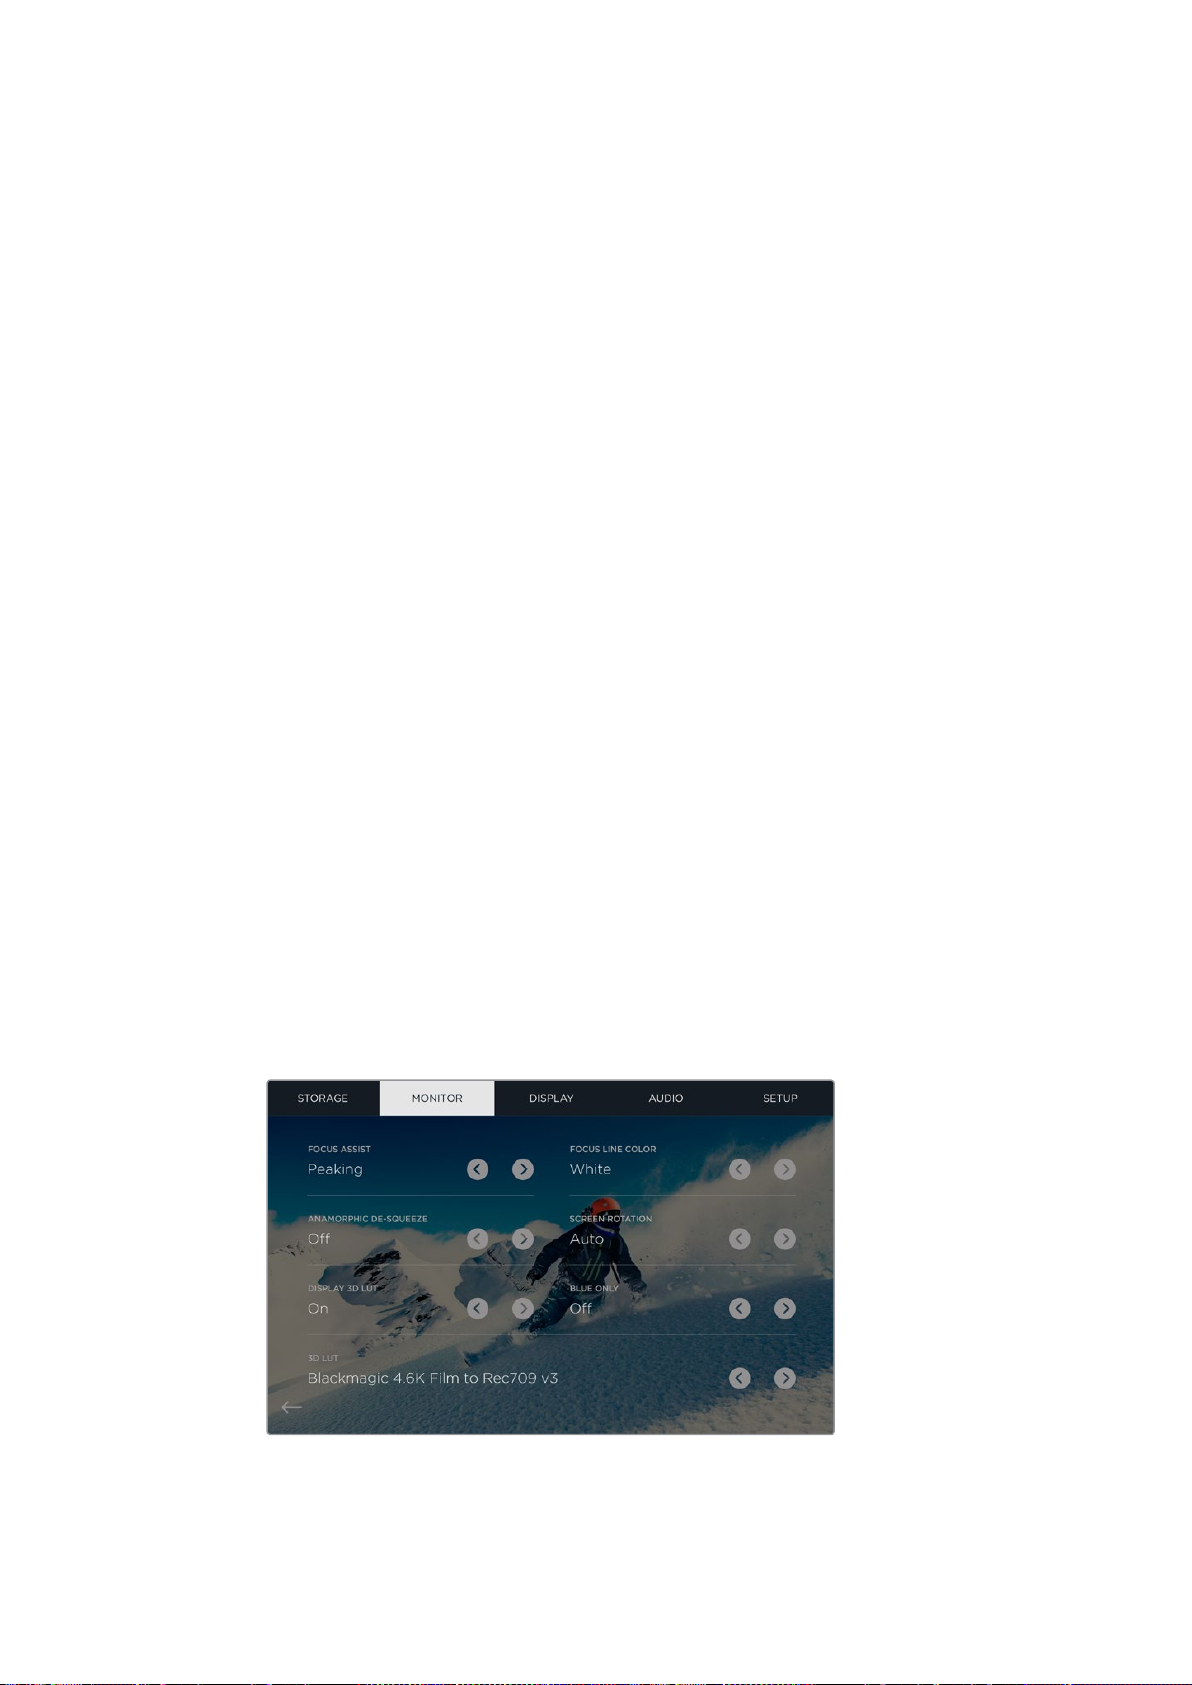
Monitor Settings
In the monitor settings, you can choose from two different types of focus assist tools, enable
anamorphic de-squeeze and blue only, plus change the rotation of the display based on the
physical positioning of the unit.
Focus Assist
Select ‘lines’ to display colored outlines around sharp areas of the image, or ‘peaking’
to display exaggerated sharpening detail around the areas of the image that
are in focus.
Focus Line Color
This setting lets you change the color of the focus assist lines to green, red, blue, or
white. Changing the color of the focus assist lines can help make them easier to see
against similar colors in your image.
Anamorphic De-squeeze
Blackmagic Video Assist 4K features an ‘anamorphic de-squeeze’ setting. This allows
you to correctly display horizontally ‘squeezed’ images from a camera using an
anamorphic lens. The de-squeeze amount required to correct your image will vary, as
each anamorphic lens has a different squeeze factor. You can select the de-squeeze
amount of ‘1.33x’, ‘1.66x’, ‘2x’ to correspond with the level of squeeze on different
anamorphic lenses. Select ‘off’ to disable the setting.
Screen Rotation
If you want to disable the automatic display rotation, simply set this setting to ‘none’.
Now the display will stay locked to the current position even if you turn it upside down.
You can also set the display to flip 180º. This will keep it locked to that position and is
helpful when the unit is mounted to a camera rig in an upside down position.
To enable the automatic screen rotation, select ‘auto’.
Blue Only
Blackmagic Video Assist 4K features a ‘blue only’ mode that displays only the blue
channel, represented as a black and white image. If there is noise in a digital video
signal, it is most visible within the blue channel, so you can easily check for noise by
using this feature. The black and white image can also be used for assistance when
checking camera focus. To enable ‘blue only’ mode, select ‘on’.
Set the ‘Display 3D LUT’ setting to ‘on’ and tap the left or right
arrows in the ‘3D LUT’ setting to select which 3D LUT to display
when monitoring your input source or during playback
Settings
19
Page 20
Display 3D LUT
Your video assist can display the input video with 3D LUTs applied to the image. A 3D LUT is
only used on the display and not actually recorded into the video itself, so you don’t need to
worry that your recorded image will have the look permanently applied. However, if you want to
apply the same LUT to your image in DaVinci Resolve, you can simply import the exact same
LUT .cube file used in your video assist into DaVinci Resolve and apply it to your grade.
This gives you powerful options such as matching a look in post that you monitored on set, or
conforming to a specific color profile. Refer to the DaVinci Resolve instruction manual for more
information on how to use 3D LUTs in your color correction, including exporting LUTs as .cube
files so you can import them into your video assist.
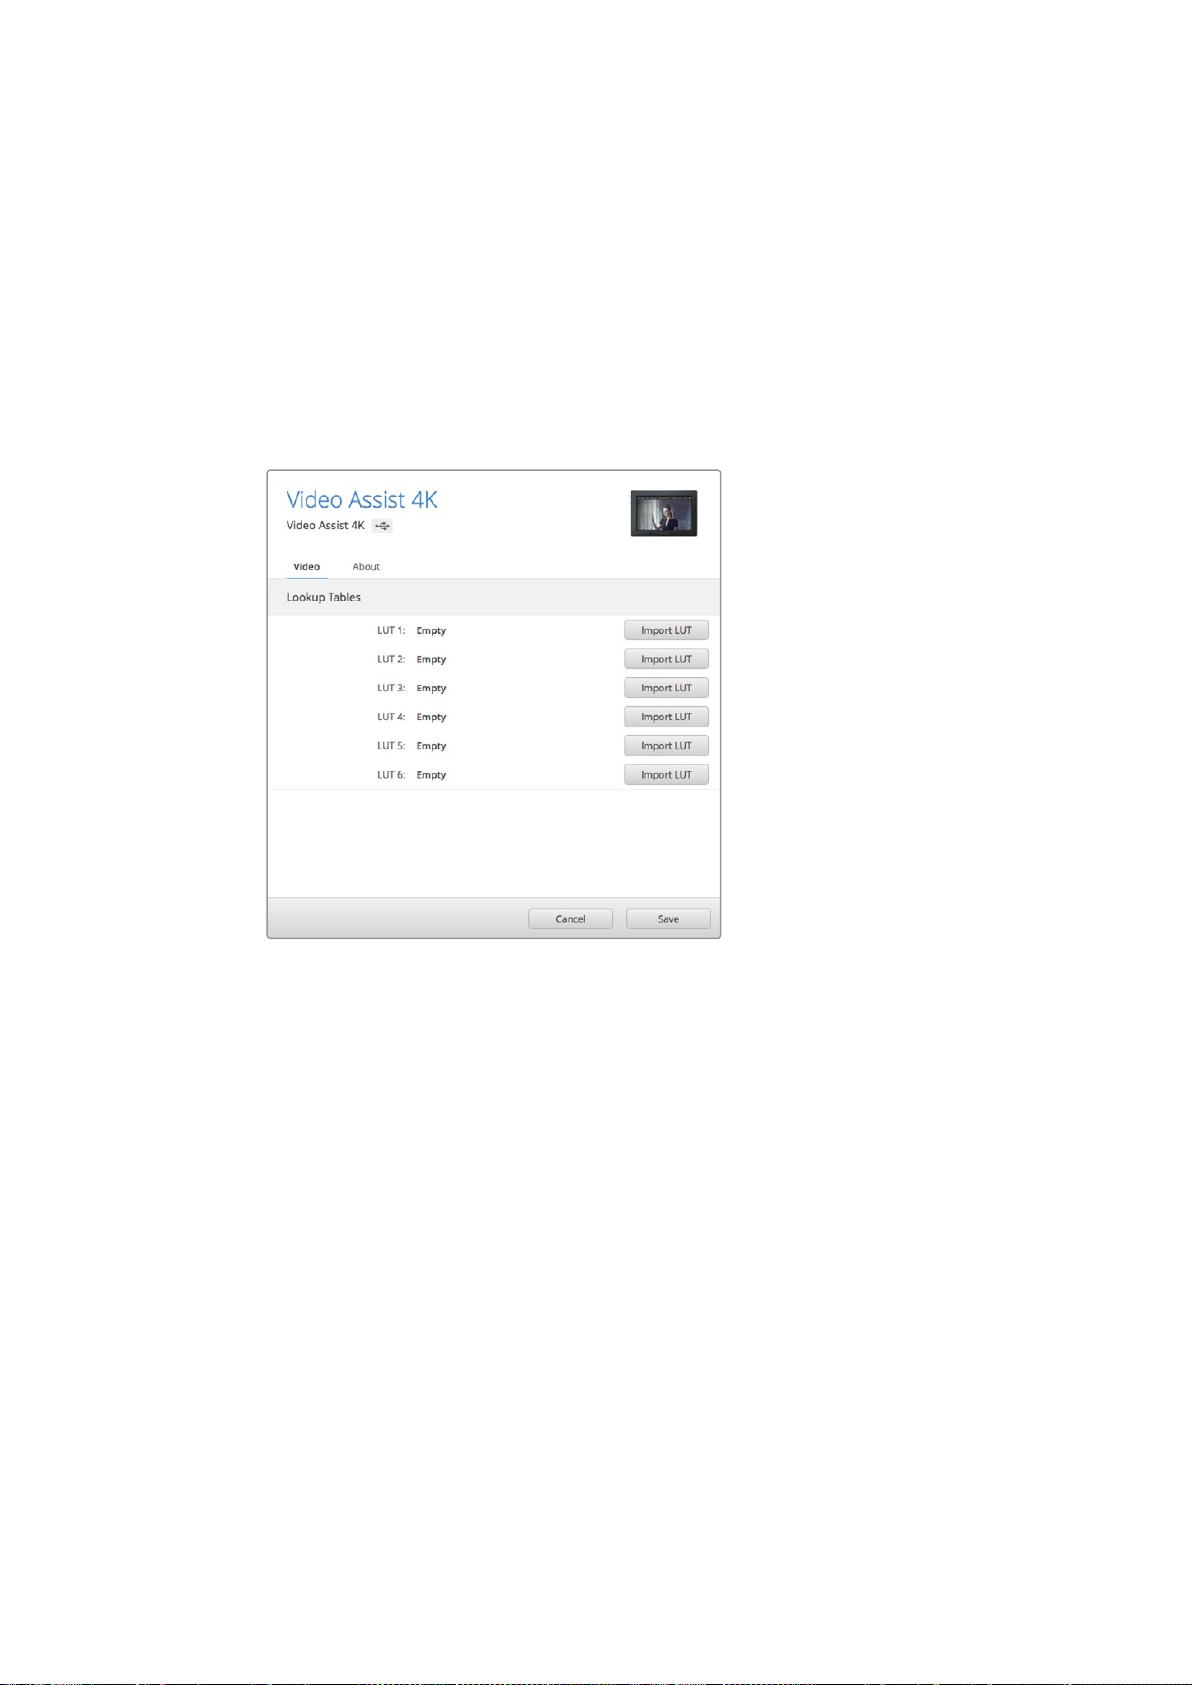
You can import up to six 3D LUTs using the
Blackmagic Video Assist Setup software utility.
To import a 3D LUT:
1 Connect your video assist to a computer with Blackmagic Video Assist Setup installed.
2 Launch the setup software and open the settings for your video assist by clicking on
the circular settings icon.
3 In the ‘video’ tab, you will see 6 empty slots you can use to import 3D LUTs. Simply
click on the ‘import LUT’ button for an empty slot and choose a LUT .cube file from your
computer. Click ‘open’ to confirm your selection.
4 Make sure you ‘save’ your new settings by clicking the ‘save’ button on the bottom
right corner.
To monitor your video using LUTs:
1 Open the ‘monitor’ settings on your video assist by swiping left or right on the
touchscreen, then tapping ‘monitor’ in the menu bar.
2 Turn the ‘Display 3D LUT’ setting to ‘on’ by tapping its left or right arrows. Tap again to
disable the LUTs.
3 In the ‘3D LUT’ setting, tap its left or right arrows to select the slot you imported the LUT
into, or keep tapping to select a different one if you have other LUTs in different slots.
Swipe left or right, or tap the ‘back’ arrow at the bottom left of the touchscreen, to return to your
source image. Now you can monitor your input video with the 3D LUT applied. You can even
use 3D LUTs when monitoring playback.
Settings
20
Page 21
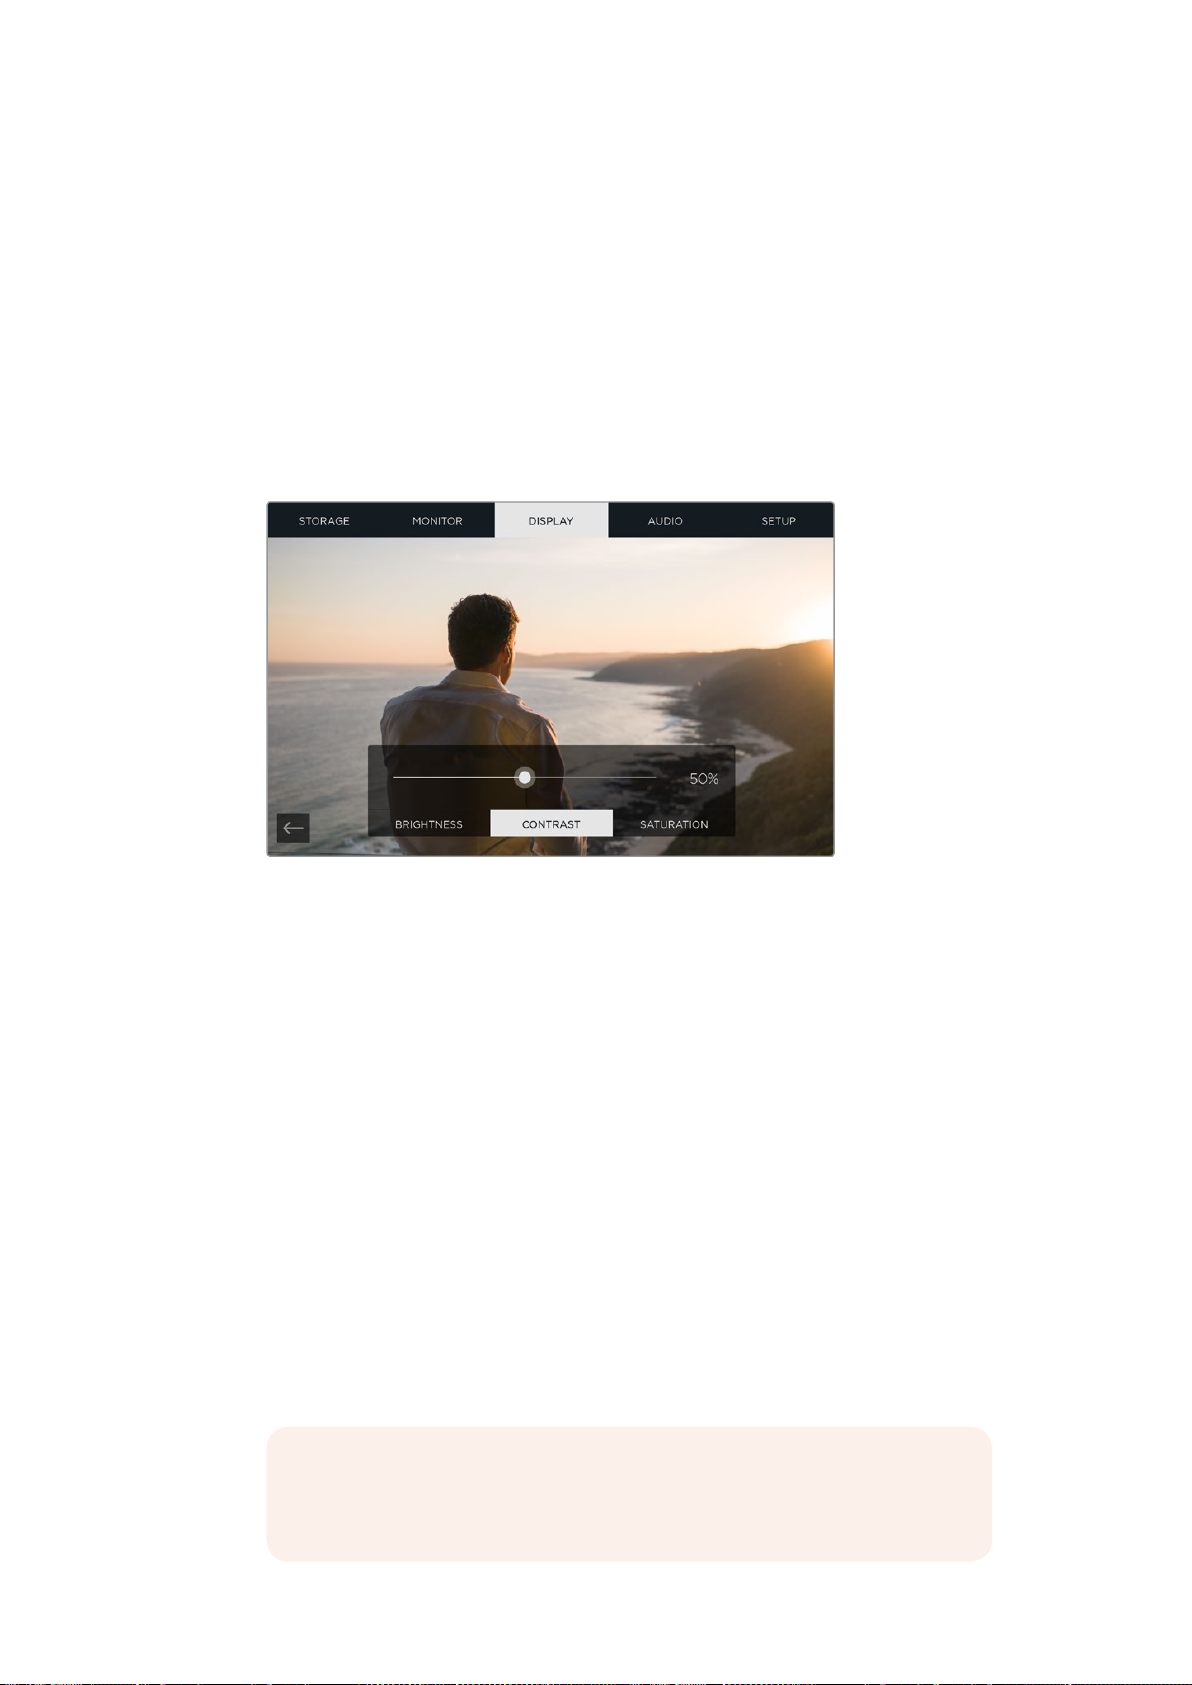
Display Settings
Tap the ‘display’ setting icon to open the display settings. Here you can easily adjust the
LCDbrightness, contrast and saturation. Tap the setting you want to adjust, then drag the slider
icon to the left or right.
Brightness
Adjusts the general brightness of the LCD. For example, if you are outside in bright
conditions, increase the LCD brightness to make it easier to view.
Contrast
Increases or decreases the range between the bright and dark areas of the image.
High contrast can reveal detail and depth in the image, and low contrast can make the
image appear soft and flat.
Saturation
Increases or decreases the amount of color in your displayed image.
All settings will be remembered when the unit is powered off. It’s also worth mentioning that
any changes to these particular settings will affect the image displayed on the LCD, but not your
recorded video.
Audio Settings
Blackmagic Video Assist 4K is also a powerful audio recorder. Each XLR input has independent
settings such as:
1 XLR Line, XLR Mic or Video
When connecting professional audio equipment other than microphones to the analog
XLR inputs, make sure you set the recording level to ‘XLR line’. Most professional audio
equipment outputs ‘line’ level audio which is a stronger signal compared to ‘mic’ level.
Alternatively, when connecting microphones to the XLR inputs, set the respective input
to ‘XLR mic’ level. This is because microphones typically output a signal that is slightly
weaker in strength compared to equipment with line level output, so the signal is
boosted slightly by your Blackmagic Video Assist 4K to optimize the recording level.
If you want to bypass the XLR analog inputs and maintain the embedded SDI or
HDMIchannels 1 and 2 from your source video, select ‘video’.
NOTE Blackmagic Video Assist 4K remembers your settings even after power
cycling. Make sure you reset your audio settings when changing your
connections.
Settings
21
Page 22
2 XLR Padding
If you are shooting in a noisy environment or near unpredectably loud sounds, you can
set the XLR padding feature to ‘on’. This will drop your audio levels down by a small
amount and give you slightly more range in levels which may help you prevent clipping.
If you are shooting in normal audio conditions, set this feature to ‘off’.
3 Phantom Power
When connecting microphones that are not self powered, you can power them using
phantom power via the XLR connector. Simply turn the setting to ‘on’.
NOTE Make sure you have phantom power turned ‘OFF’ when using
microphones that are battery powered as some battery powered microphones
can be damaged when phantom power is supplied.
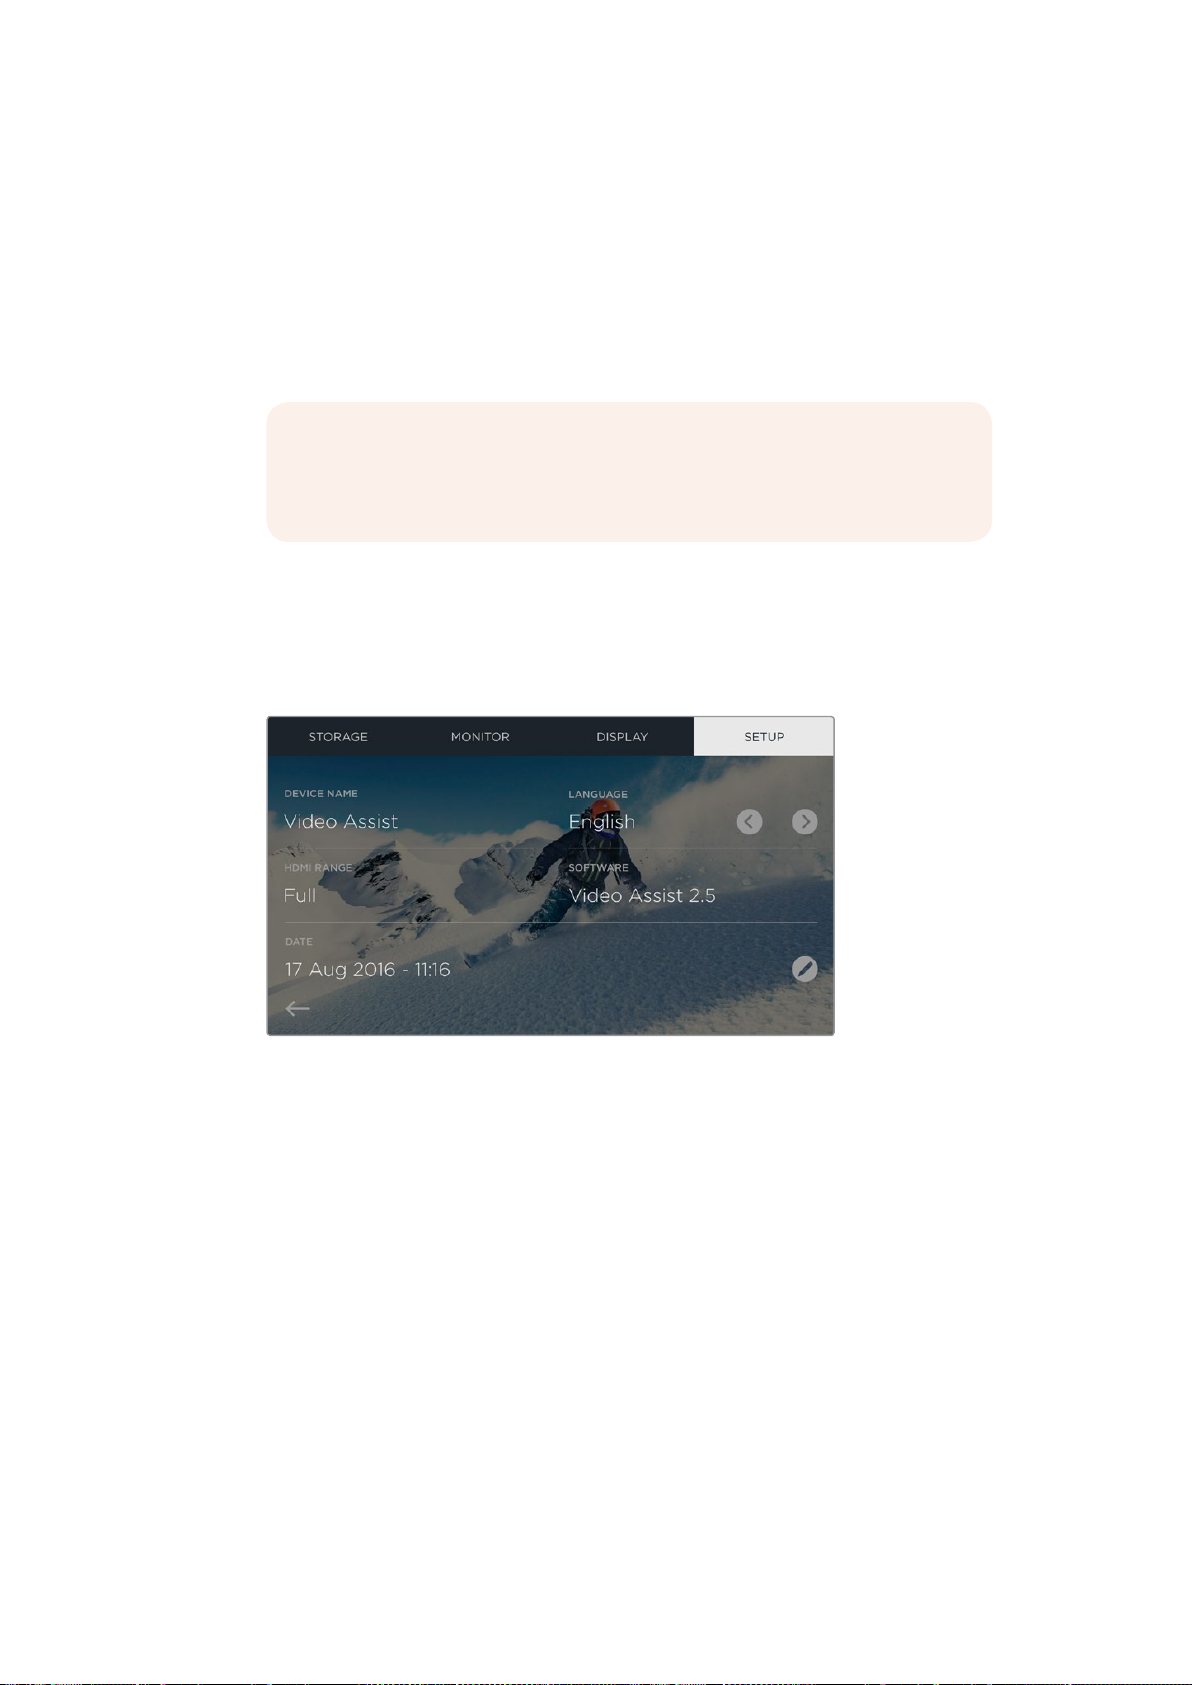
Setup Settings
Setup lets you set the language, set the date and time for your video assist’s internal clock, plus
displays the device name, and the internal software version currently installed on the unit.
Video Assist also has a setting for HDMI range.
The setup settings page on Video Assist has an additional ‘HDMI range’ setting
Language
Tap the left or right arrows to switch between ‘English’ and a different language that you have
loaded. Refer to ‘Blackmagic Video Assist Setup’ for more information.
HDMI Range
The Video Assist HD model has an HDMI range selector, which allows you to specify the type
of signal being input to the unit. For an accurate display of your image, the input range you
select on your Video Assist HD needs to match the output range for the signal being output
from your source. For example, select ‘full’ when your source video is being output as full data
range, or ‘video’ when your source video is being output as video range.
Select ‘auto’ if you are not sure which setting to choose, and the selection will be made
automatically by the unit. Note that Blackmagic Video Assist 4K does not have this setting and
selects the HDMI range automatically.
Setting the Date and time
When these settings are maintained and accurate, useful information is recorded in your clip
files to inform you of the date and time each clip was recorded.
Settings
22
Page 23
To adjust the date and time settings:
1 Tap the ‘pen’ icon to edit the settings.
2 Tap the day, month, year or time edit arrows to change a setting.
3 Tap ‘save’ to confirm the change.
Monitoring using on screen meters
Your video assist features useful on screen meters such as a histogram and audio levels meter
so you can check your exposure and luminance range on cameras, plus monitor the level of
your source audio.
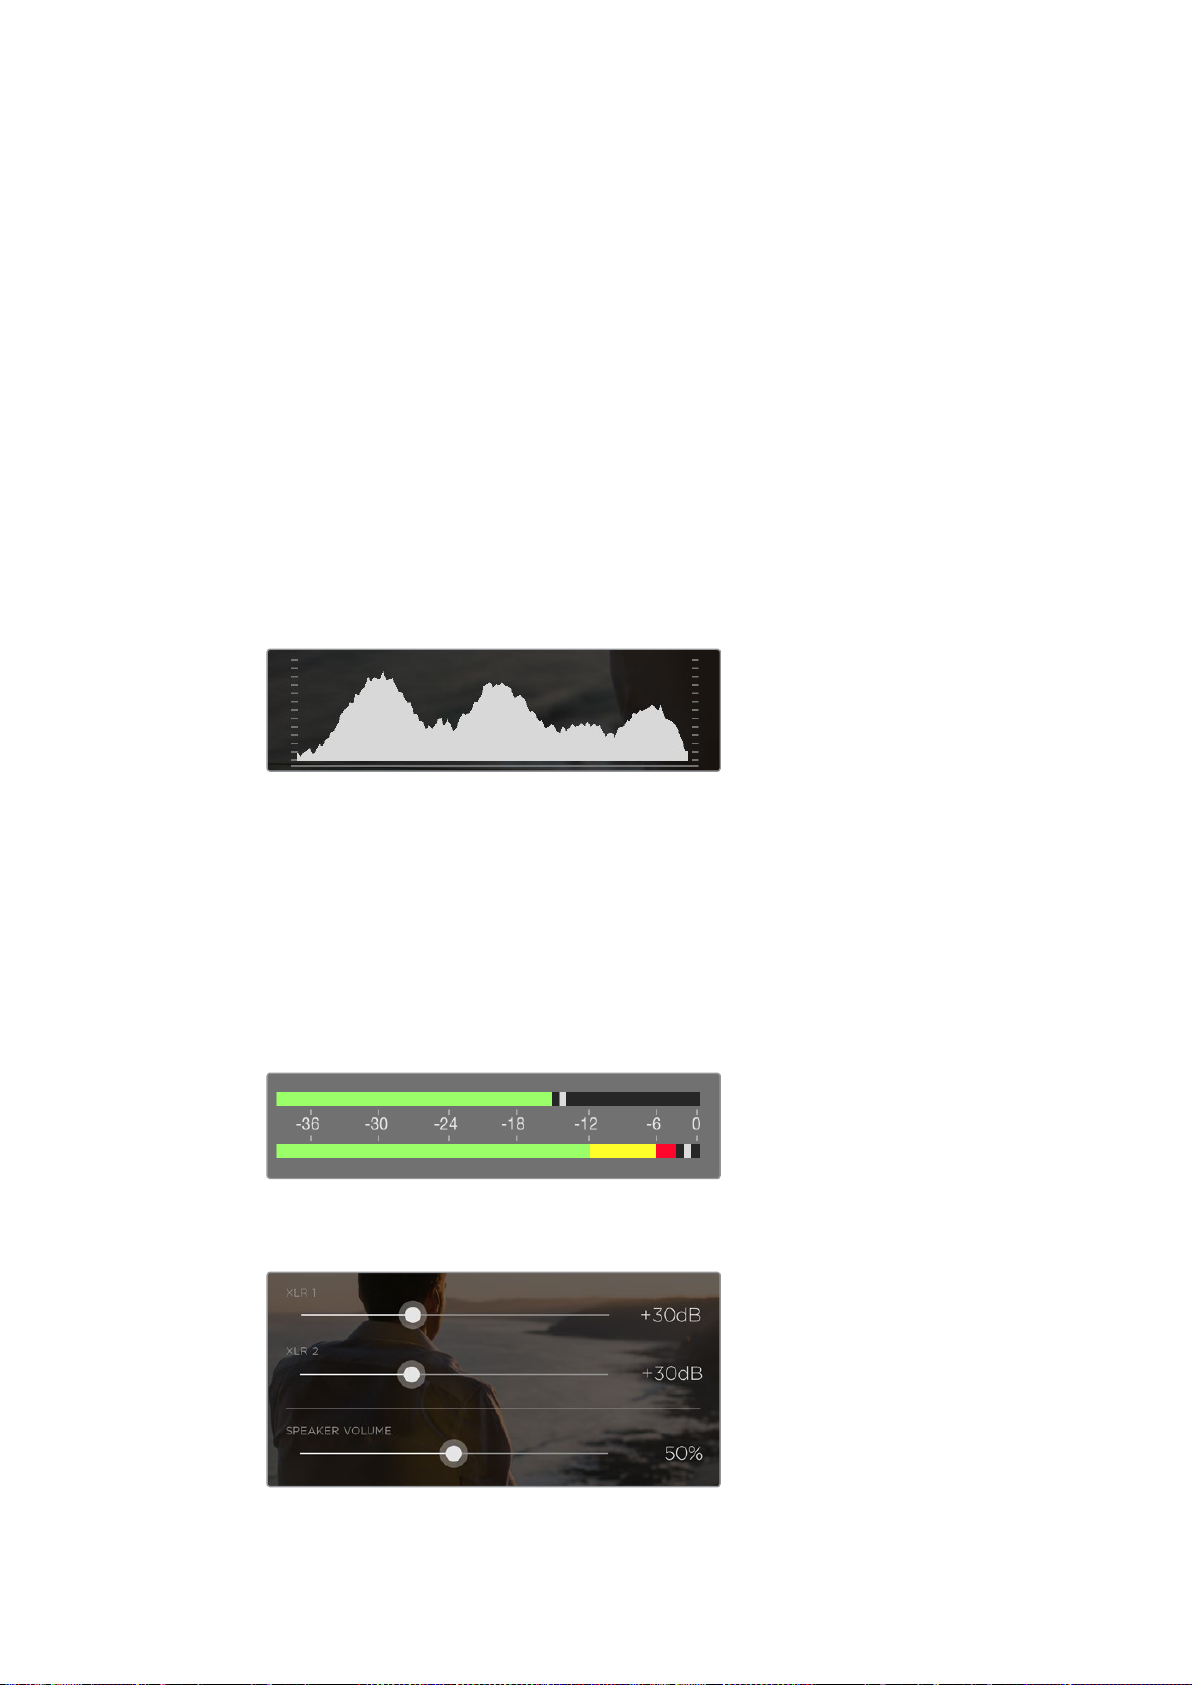
Histogram
The left side of the on screen meters displays a histogram showing the distribution of the
luminance in your video. Pure black is on the far left side of the display and pure white is on the
far right of the display. When the video signal sharpens to a point at the bottom edges within
these limits you’ll know your shadows and highlights are not clipping, which means details in
the tonal ranges of your video are preserved.
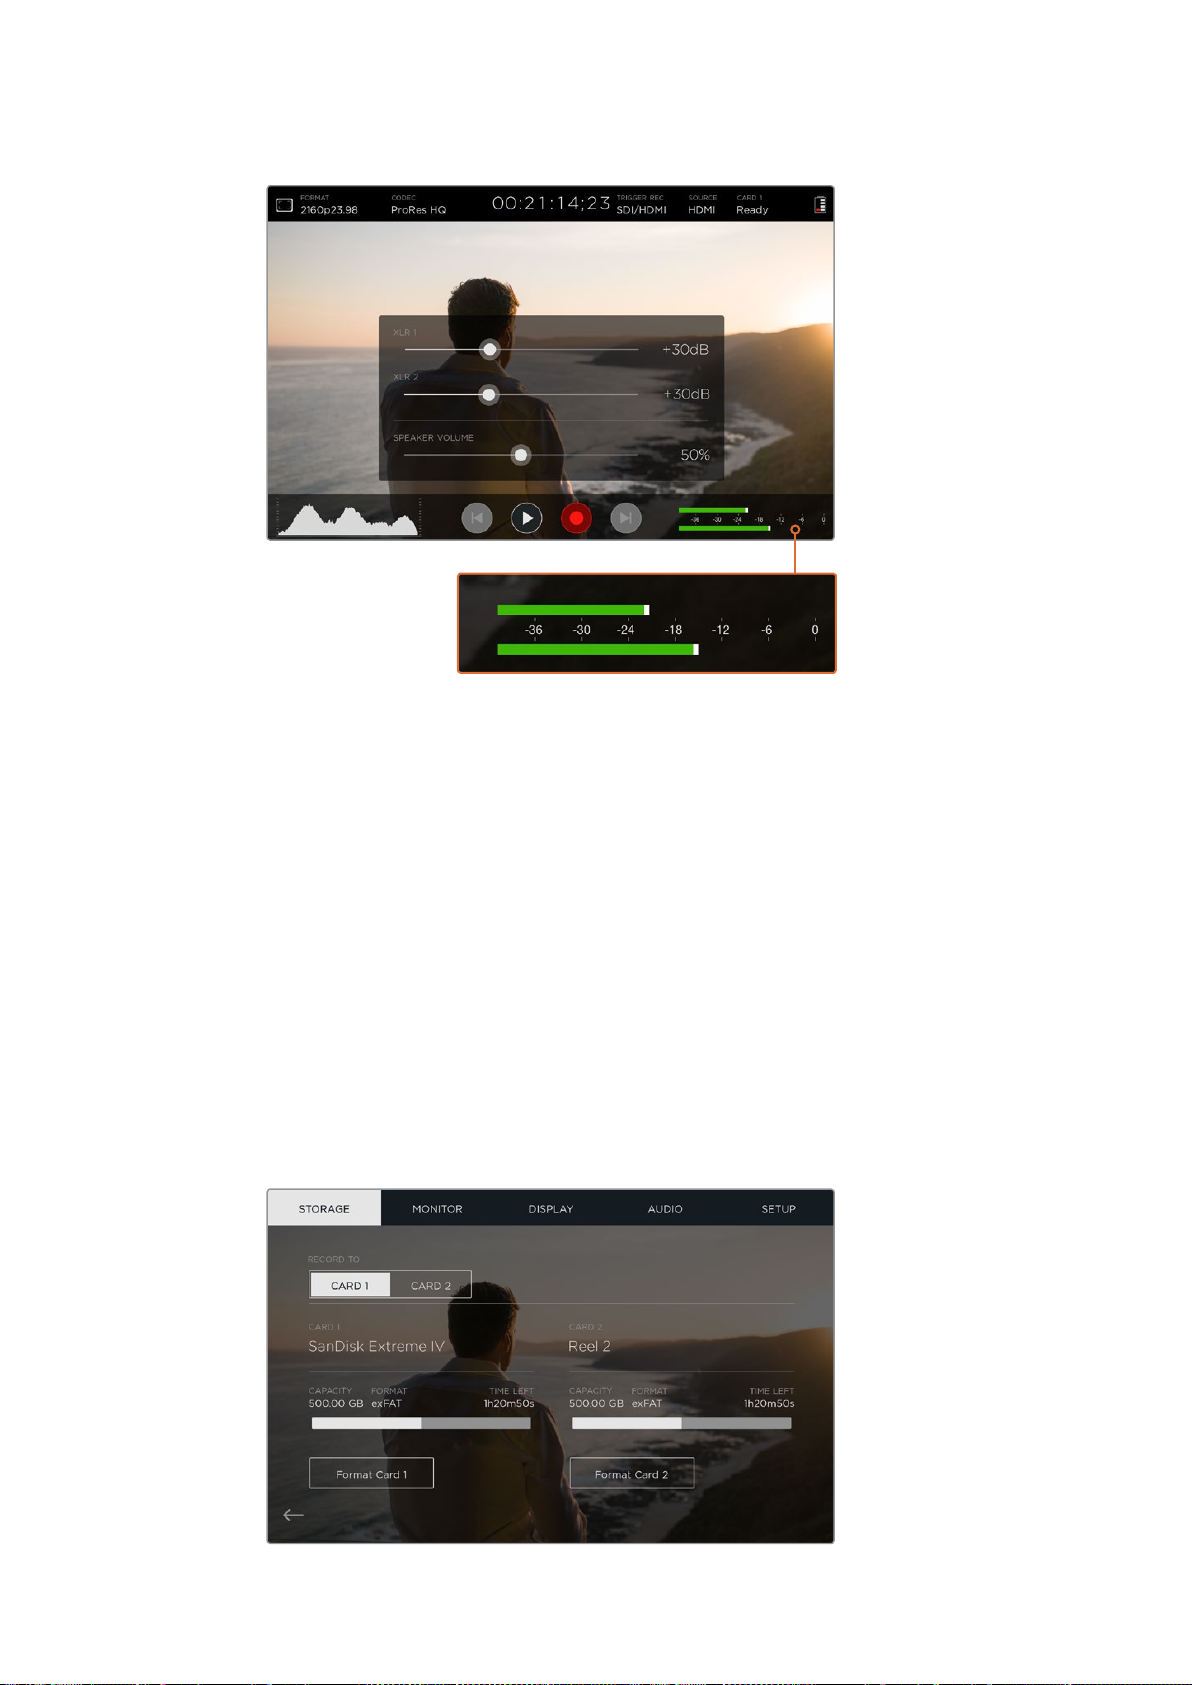
Audio Meters
The right side of the on screen meters displays audio meters showing audio levels for channels
1and 2 of the input source. The display is calibrated to dBFS units and features peak hold
indicators which stay visible for a short time so you can clearly see the maximum levels reached.
To achieve optimum audio quality, ensure your audio levels do not reach 0 dBFS. This is the
maximum level, meaning that any audio that exceeds this level will be clipped, resulting in
distortion. Ideally your peak audio levels should fall in the upper end of the green zone,
between -20 and -12dBFS. If your peaks enter into the yellow or red zones, corresponding to
-12and -6dBFS your audio is in danger of clipping.
Channel 1 on top with the peak audio levels falling in the upper end of
the green zone and levels in danger of clipping on channel 2
On Blackmagic Video Assist 4K, tap on the audio meters to reveal
the analog audio level sliders. Drag the sliders left and right
to decrease or increase the audio levelsfor each channel.
Settings
23
Page 24
To adjust your analog audio levels on Blackmagic Video Assist 4K, simply tap the audio meter
and then drag the sliders for each channel left or right.
NOTE To record audio plugged into the XLR connectors on Blackmagic Video
Assist4K, select ‘XLR line’ or ‘XLR mic’ in the audio settings.
Video Scopes
Blackmagic Video Assist 4K has a set of four real time video scopes that you can use to monitor
the internal data levels of your video signal. You can choose to display a waveform, parade,
vectorscope or histogram. Using these scopes you can monitor your tonal balance and check
the levels of your video to avoid crushing your blacks and clipping the highlights, plus monitor
any potential color cast in your clips.
Each scope provides an accurate graphical analysis of the various characteristics of the video
signal, showing you the relative strength and range of individual video components including
luma, chroma, saturation, hue, and the red, green, and blue channels that together, comprise
the color and contrast of your video signal.
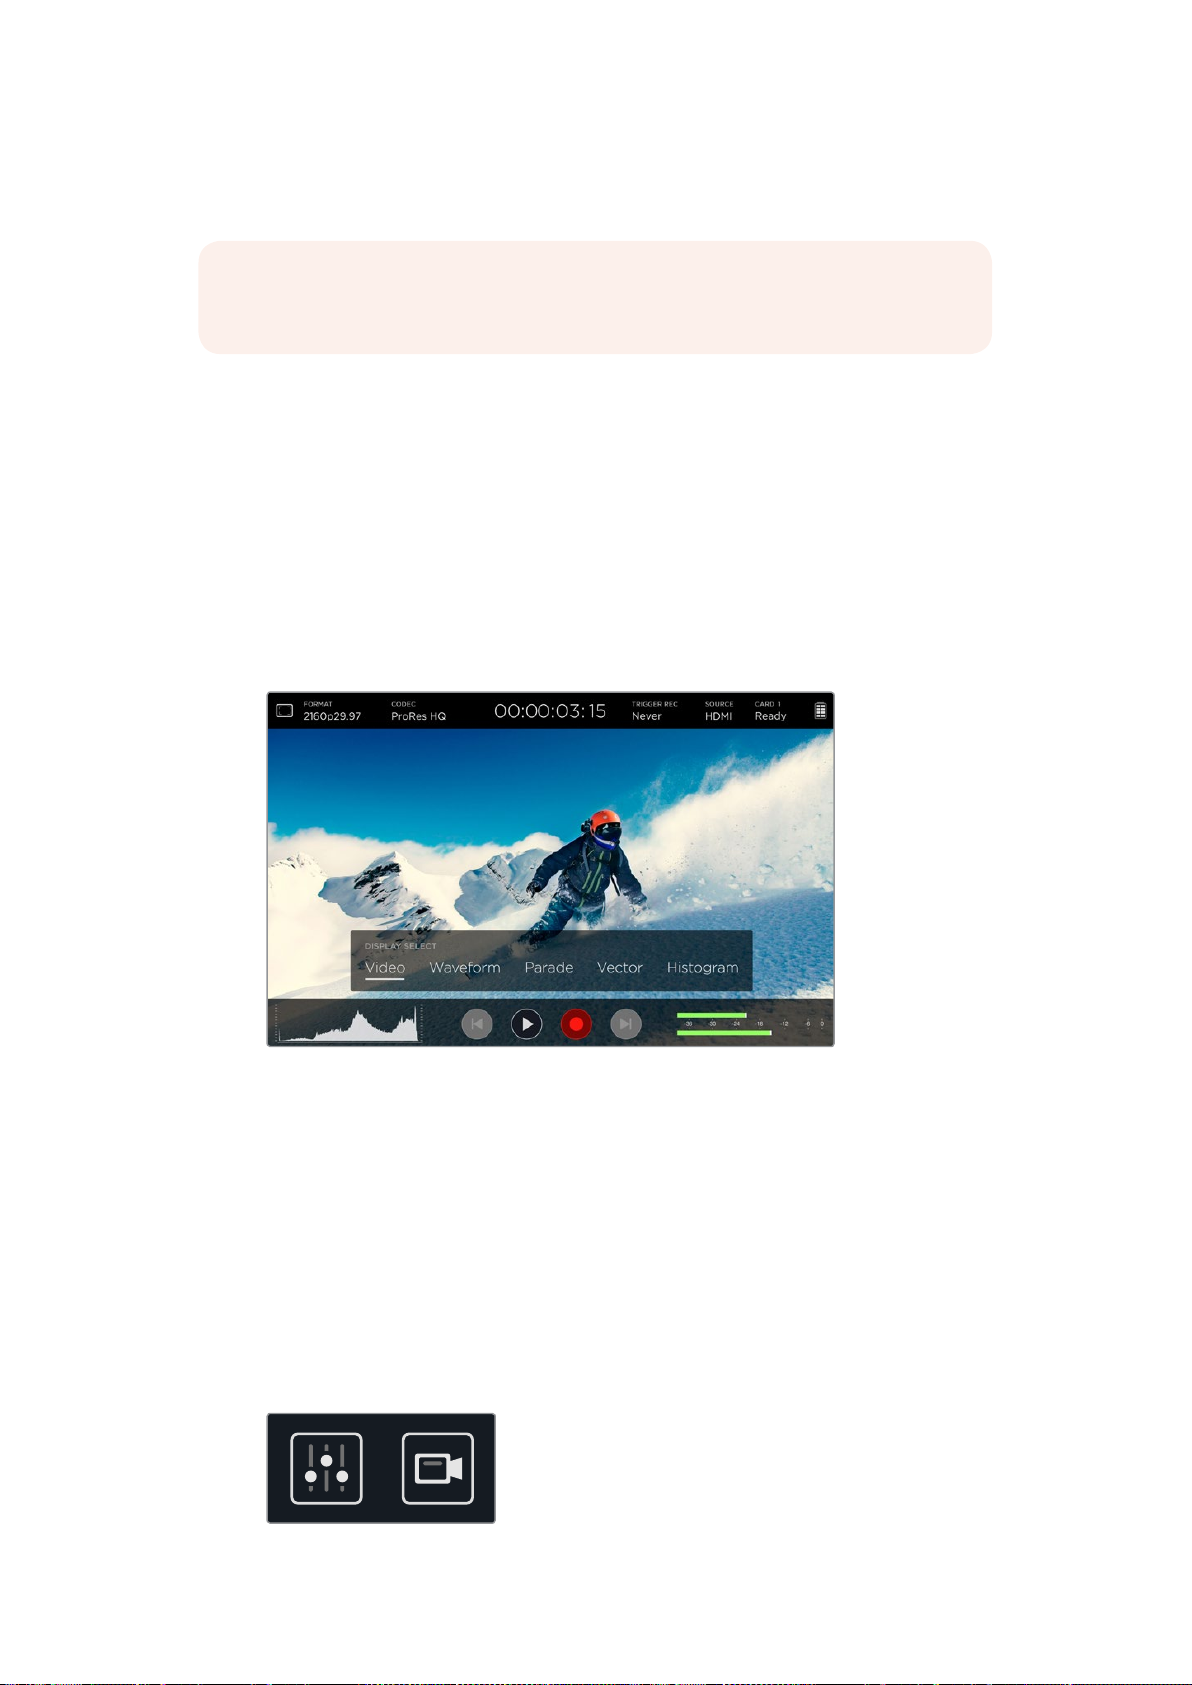
The video scopes menu bar showing the scope display options
Enabling the scopes
To access the video scopes, tap the histogram in the lower left of the screen on
yourVideo Assist 4K. This will open the ‘display select’ menu bar at the bottom of the
screen. From here, you can choose the scope you want, for example, waveform,
parade, vectorscope or histogram. To view the video image without a scope,
select ‘video’.
Tap outside of the ‘display select’ menu bar to close the menu.
Adjusting the scopes
With a scope selected, tap inside the image to open the adjustment sliders and
video icon.
The adjustment sliders and video icons
Settings
24
Page 25
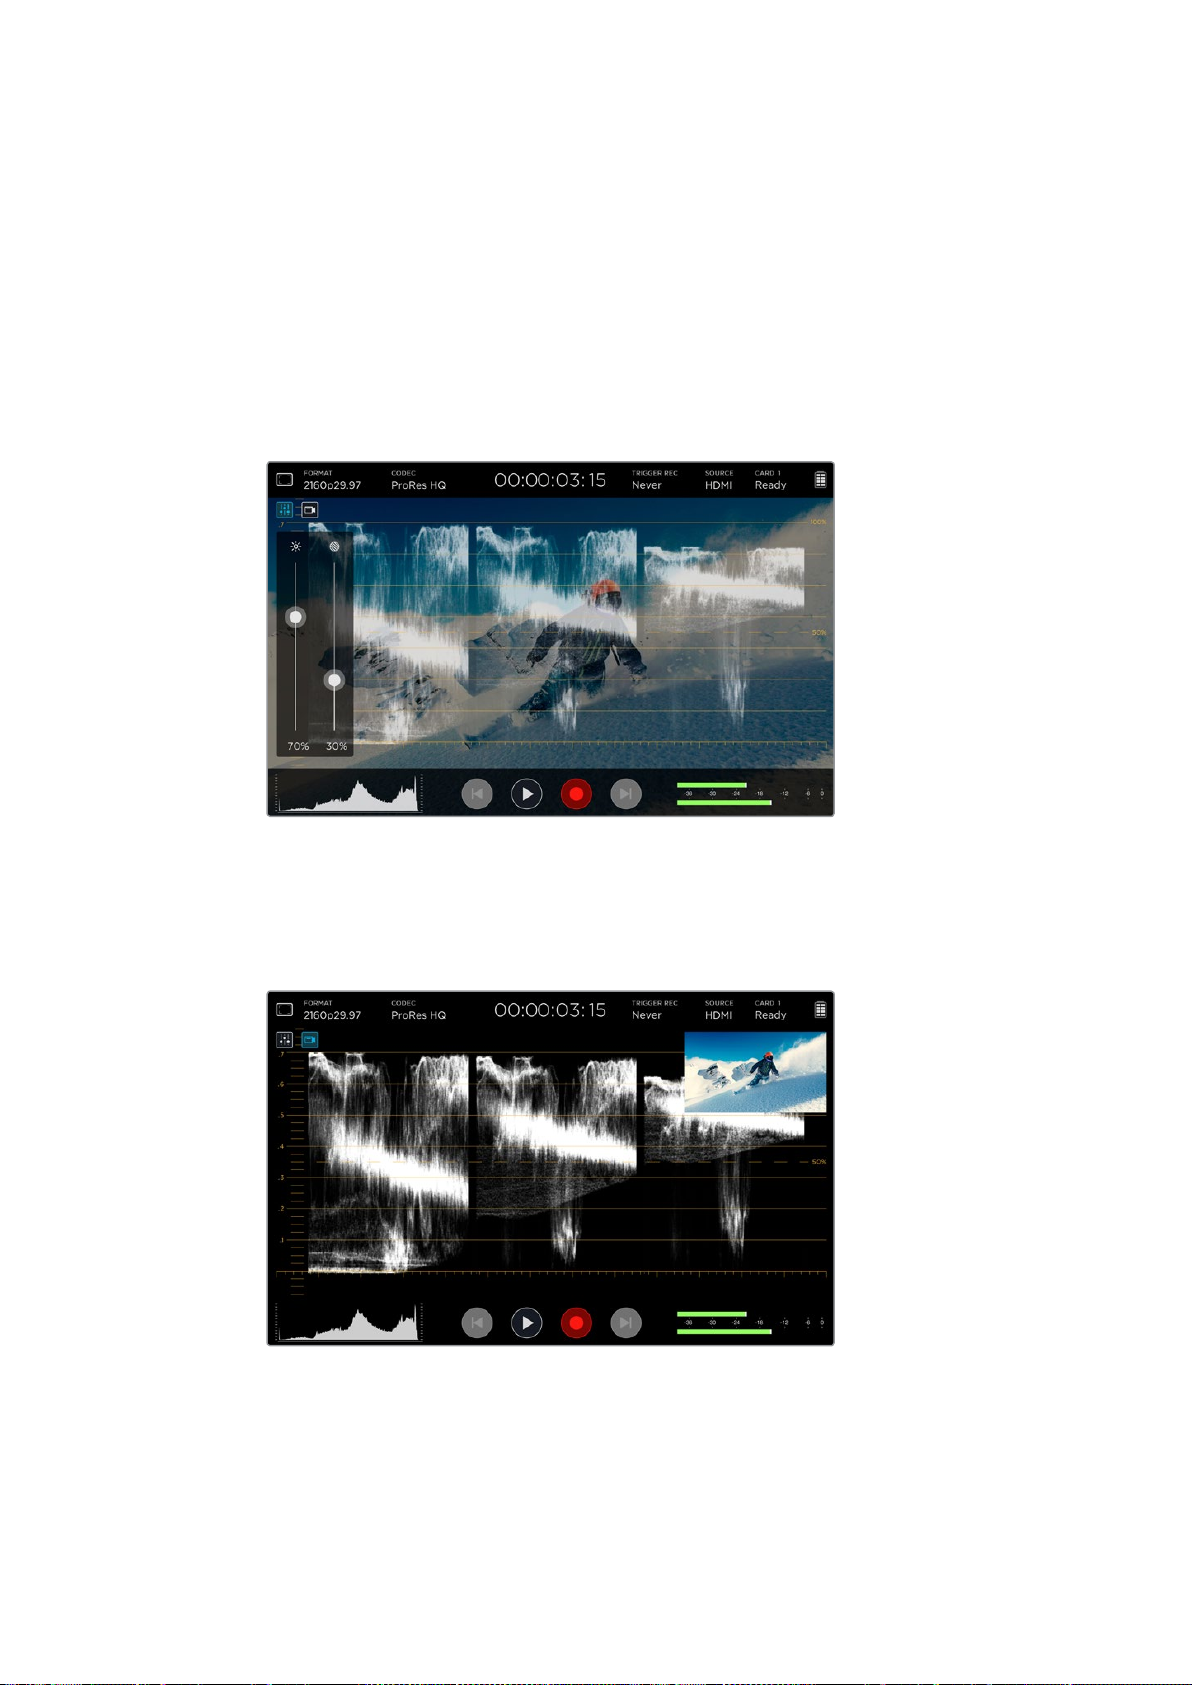
Tapping the adjustment sliders icon opens the brightness and opacity sliders on the left
of screen.
The two sliders let you refine the brightness and opacity of the scope against the
underlying video image.
Brightness – Adjust the brightness to make fine details in the scope graph more or
less defined.
Opacity – Adjust the opacity to set the amount of transparency for the scope.
Making adjustments to both settings lets you find the perfect combination so you can
monitor the video and scopes at the same time.
Lowering the opacity slider allows you to see the video
image and the scope at the same time
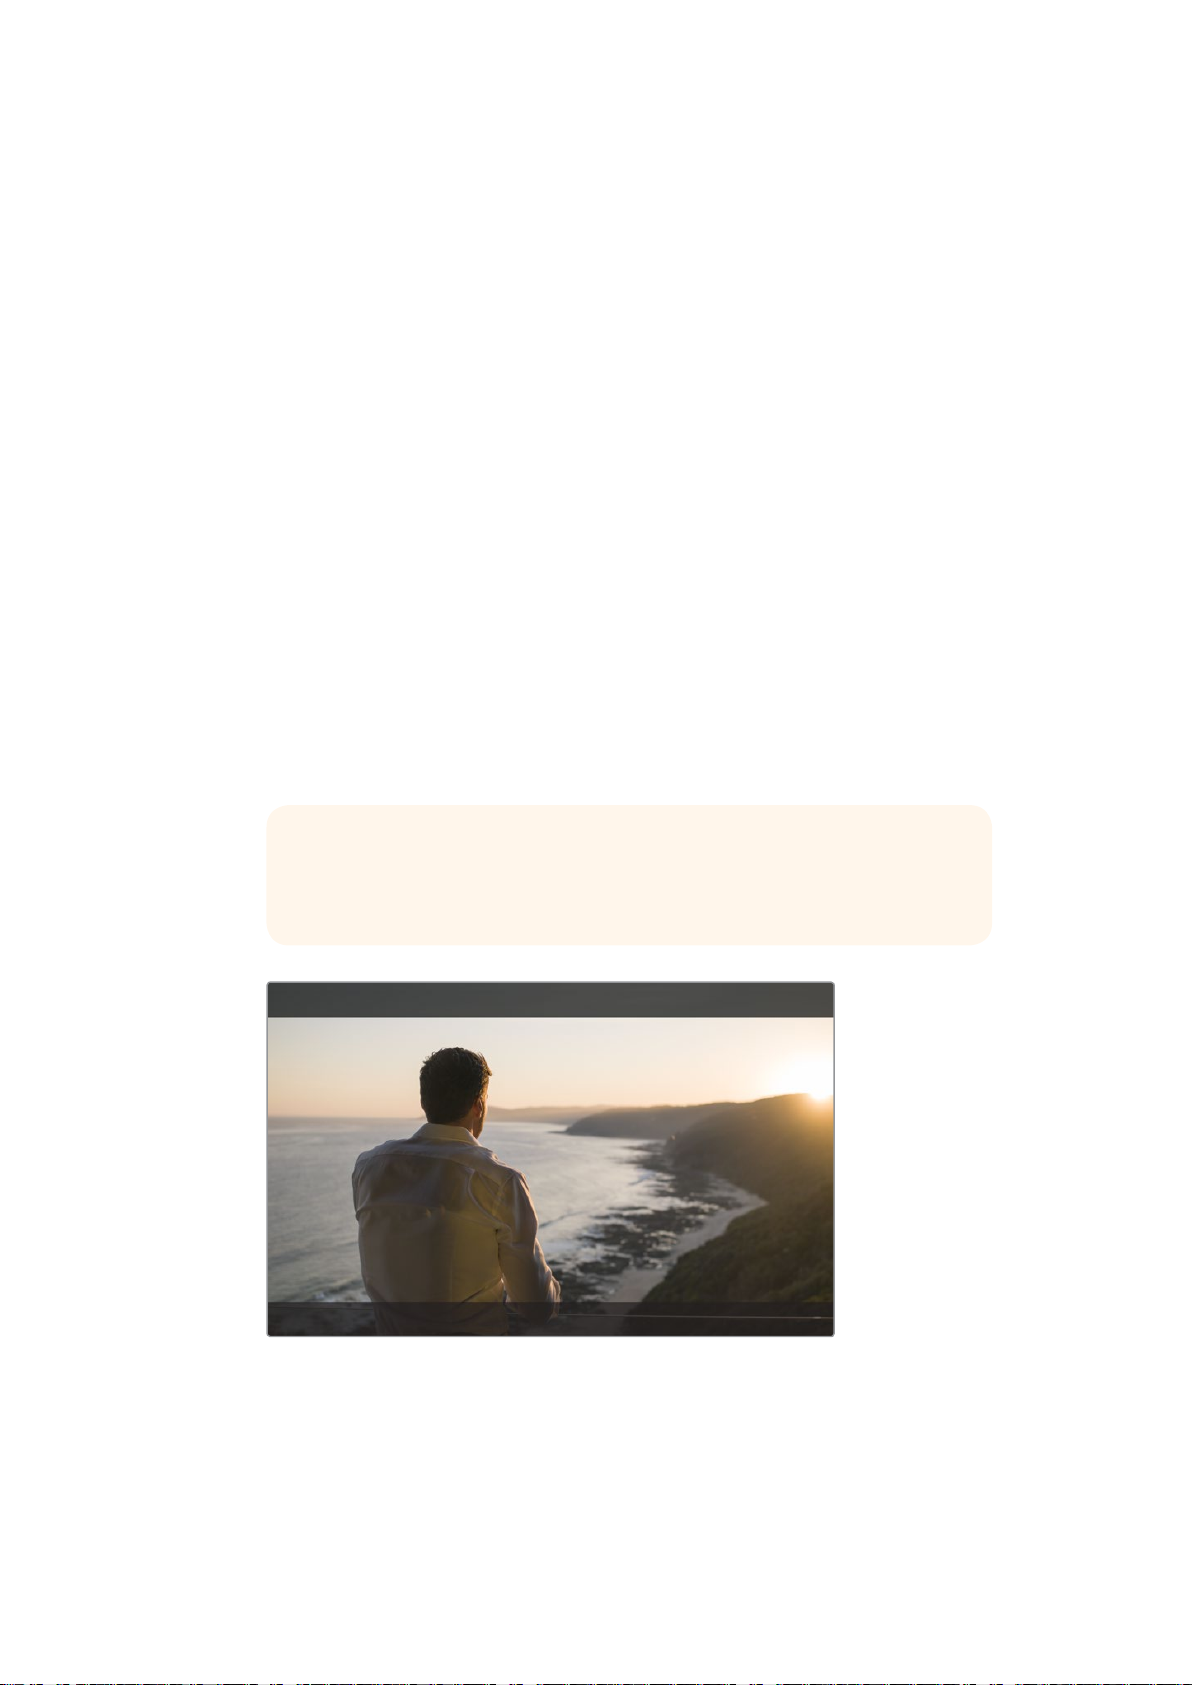
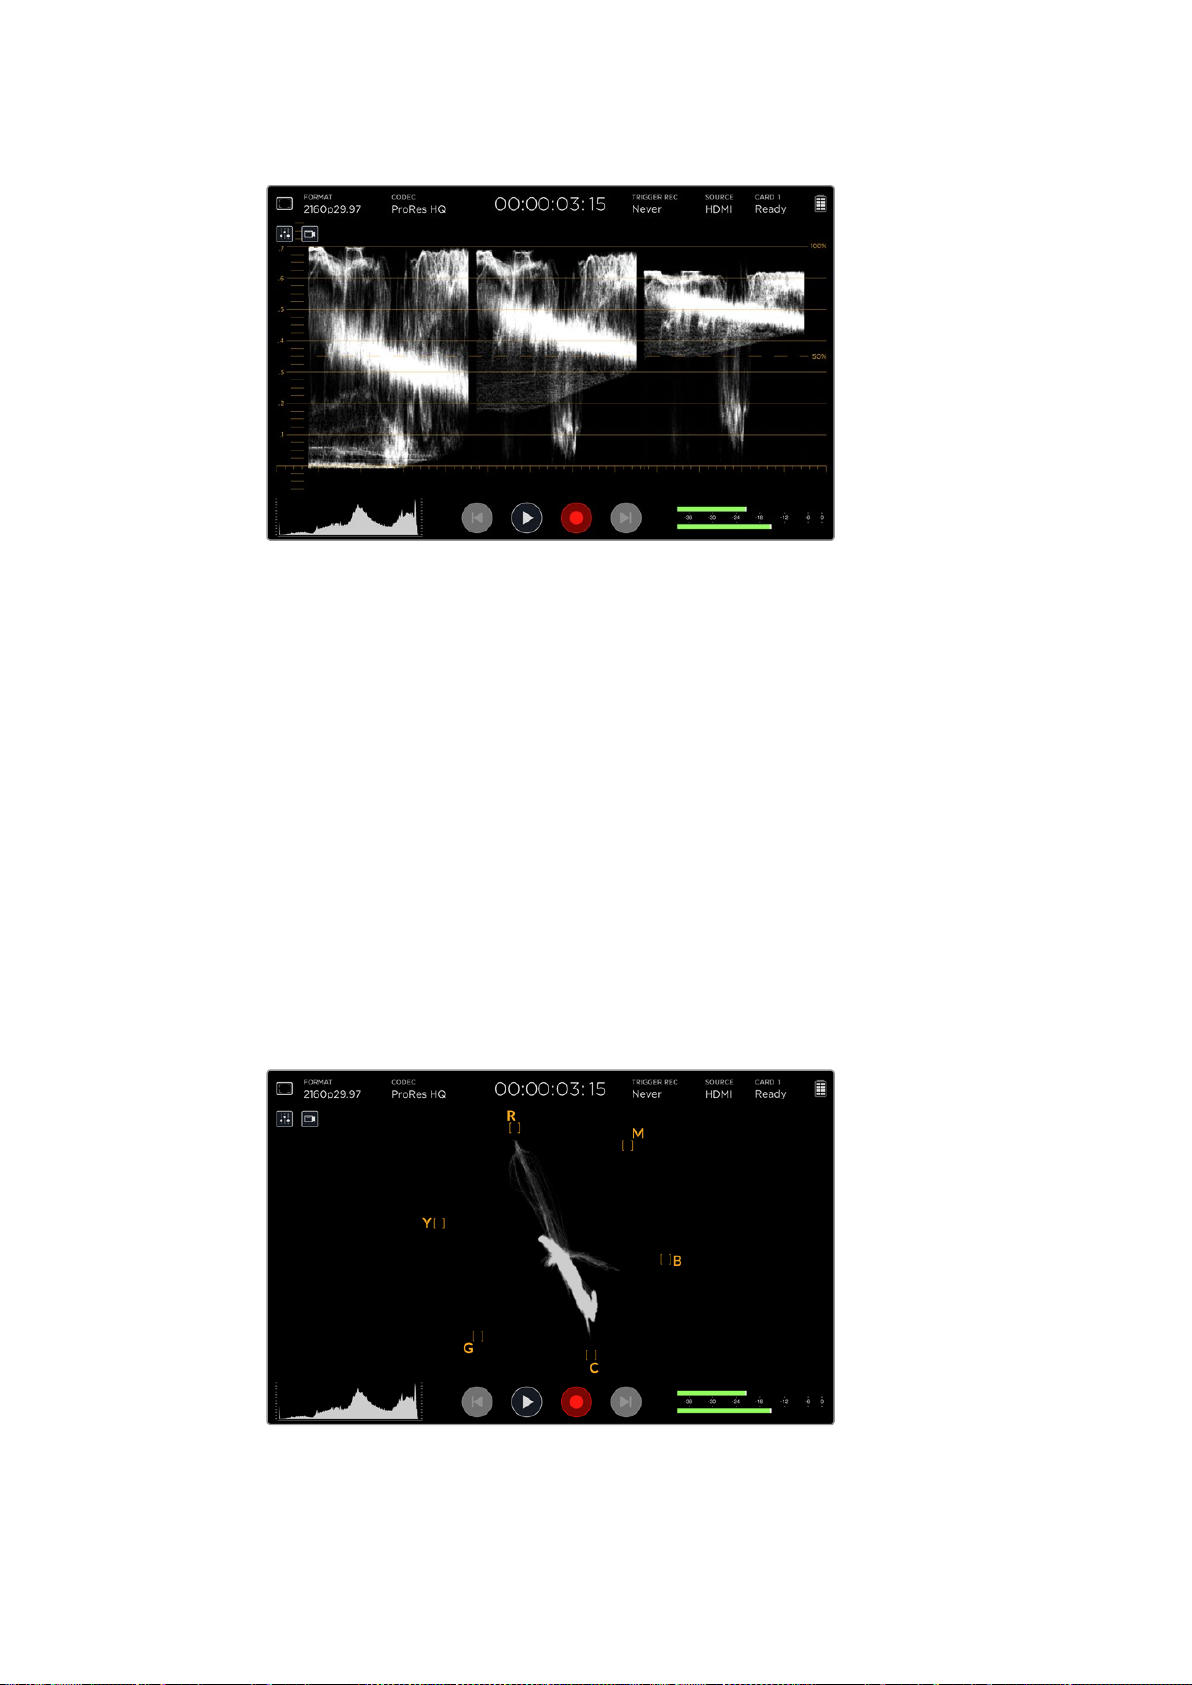
Tapping the video icon displays the scopes full screen, while displaying the video
image in the top right corner. This provides another option to view both scopes and the
video image at the same time, but lets you study the scopes in greater detail.
Tapping the video icon will display the scopes full screen with
the video image in the top right corner of the screen
Settings
25
Page 26

Waveform
The waveform display provides a digitally encoded waveform similar to traditional luminance
waveform monitors, which is used to monitor the luma or brightness levels of your video signal.
The bottom of the graph indicates the black level, or shadows, of the image, while the top of the
graph indicates the white level, or highlights. The range between the top and bottom of the
graph indicates the overall contrast ratio of the image you’re evaluating. Depending on your
footage, your waveform will look different. If you are monitoring video which is high contrast,
you might not see any values in the mid grays.
For perfect video levels without clipping, you will want to make sure the blacks in your
waveform do not drop below 0% and the whites do not exceed 100%. If the levels exceed these
boundaries, the video image will be clipping and you will see the results as lost detail in the
shadows and highlights of your image.
The waveform monitor is a graphical representation of the image, showing luma values
corresponding to the same horizontal position within the video image. For example, if filming an
outdoor scene where the left side of your sky is overexposed, you will see the left side of the
waveform graph above 100%.
The waveform display showing luminance values
RGB Parade
The RGB parade shows separate waveforms displaying the luminance of each red, green and
blue color channel. By showing a comparison of each channel, the parade scope makes it
possible to monitor the levels of each channel, plus spot color casts by comparing the
highlights, midtones and shadows between each channel. For example, if the shadows are
higher in the blue channel, your blacks will have a shade of blue to them.
Having the ability to see how the differences between all the tonal ranges compare within each
channel gives you an extremely detailed overview of color in your image. You can immediately
spot white balance issues and color casts, and because the parade scope shows a waveform
for each channel, you can also see if one specific color channel is clipping, which you may not
see if you are looking at a single combined waveform.
The three separate RGB waveforms follow the same principles displayed in the waveform
scope, with the top, middle and bottom positions representing the highlights, mid tones and
shadows along the horizontal axis of the video image.
Settings
26
Page 27
The RGB parade displays separate waveforms displaying
theluminance of the red, green and blue channels
Vectorscope
The vectorscope measures the overall range of color hue and saturation within an image.
Blackmagic Video Assist 4K has a traditional vectorscope, emulating a trace drawn graph, with
100 percent color bar saturation targets positioned at the graticule markers surrounding the graph.
Heavily saturated colors in the frame stretch those parts of the graph closer to the edge, while
less saturated colors remain closer to the center of the vectorscope, which represents 0
saturation. By judging how many parts of the vectorscope graph branch out at different angles,
you can see how many hues there are in the image, with the specific angle of each part of the
graph showing you which hues they are.
Additionally, by judging how well centered the middle of the vectorscope graph is relative to the
center of the vectorscope, you can get an idea of whether there is a color imbalance in the
image. For example, if the vectorscope graph is off centered, the direction in which it leans lets
you know that there is a color cast or tint in your image.
While color balance can be monitored on both the RGB parade display and vectorscope
display, color balance issues will often be easier to see in the vectorscope display.
The vectorscope displays the overall range of
color hue and saturation within the image
Settings
27
Page 28

TIP When monitoring a video signal that contains skin tone, you will want to keep
yourwarm color saturation along a line at approximately 10 o’clock on the vectorscope.
Thisis known as the “fleshtone line” and is based on the color of blood beneath the
skin’s surface. The fleshtone line is therefore applicable to all skin pigmentations and is
the best way to ensure the skin tones look natural.
Histogram
The histogram shows the distribution of the luminance or the black to white information along a
horizontal scale, and lets you monitor how close the detail is to being clipped in the blacks or
whites of the video. The histogram also lets you see the effects of gamma changes in the video.
The left edge of the histogram displays shadows, or blacks, and the far right displays highlights,
or whites. If monitoring the image from a camera, when you close or open the lens aperture you
will notice the information in the histogram moves to the left or right accordingly. You can use
this to check ‘clipping’ in your image shadows and highlights, and also for a quick overview of
the amount of detail visible in the tonal ranges. For example, a tall and broad range of
information around the middle section of the histogram corresponds to good exposure for
details in the midtones of your image.
Your video is likely being clipped if the information bunches to a hard edge at 0% along above
100% on the horizontal scale. Video clipping is undesirable when you are shooting, as detail in
the blacks and whites must be preserved if you subsequently want to perform color correction
in a controlled environment. When shooting, try to maintain your exposure so information falls
off gradually at the edges of the histogram with most forming around the middle. This will give
you more freedom later to adjust colors without whites and blacks appearing flat and lacking
in detail.
The histogram shows the distribution of the luminance, or the
black to white information along a horizontal scale
Settings
28
Page 29

About SD Cards
Choosing a Fast SD Card
It’s important to use high speed UHS-II SD cards for Ultra HD and HD recording, or UHS-1 cards
for HD recording. These cards are rated for fast data speeds and support larger storage sizes.
For Ultra HD recording on Blackmagic Video Assist 4K, you will need to use the fastest UHS-II
cards available. We have included a table below that shows the latest compatible SD cards for
recording Ultra HD, HD and SD video. It’s worth regularly checking the latest version of this
manual for more up to date information and can always be downloaded from the Blackmagic
Design website at www.blackmagicdesign.com/support
The following table contains SD cards we have tested and are able to record video up to a
given maximum format on Blackmagic Video Assist 4K.
Compatible SD Cards
Maximum Supported Format Manufacturer / Model Size
Ultra HD 2160p30 inc MXF Transcend SDXC UHS II 180MB/s 64GB
Ultra HD 2160p30 inc MXF Lexar SDXC UHSII 2000x 300MB/s 64GB
Ultra HD 2160p30 inc MXF Lexar SDHC UHSII 2000x 300MB/s 32GB
Ultra HD 2160p30 inc MXF Toshiba Exceria Pro SDXC UHSII 64GB
Ultra HD 2160p30 Delkin Devices SD SDHC UHSII 250MB/s 32GB
Ultra HD 2160p30 SanDisk Extreme Pro SDXC UHSII 280MB/s 64GB
HD 1080p60 inc MXF SanDisk Extreme Pro UHS I 95MB/s 64GB
HD 1080p60 Lexar SDHC UHS II 1000x 150MB/s 32GB
HD 1080p60 Lexar SDXC UHS II 1000x 150MB/s 64GB
HD 1080p60 Lexar SDXC UHS II 1000x 150MB/s 128GB
HD 1080p60 Lexar SDXC UHS II 1000x 150MB/s 256GB
HD 1080p30 inc MXF Lexar SDHC UHS I 633x 95MB/s 32GB
HD 1080p30 inc MXF Lexar SDXC UHS I 633x 95MB/s 64GB
Most UHS-I and UHS-II SD cards should be fast enough to record compressed HD video up to
60 frames per second, however it’s worth testing your card’s record speed to be sure. You can
do this using Blackmagic Disk Speed Test software which can be downloaded from the
Blackmagic Design support center. For information on using Disk Speed Test, refer to ‘checking
disk speed’ in this section of the manual.
Formatting SD Cards usingyour Video Assist
It’s very easy to format your SD card using the storage settings. You can format your card using
HFS+ or exFAT formats.
HFS+ is also known as Mac OS Extended. It is the recommended format as it supports
“journaling”. Data on journaled media is more recoverable and less likely to be corrupted.
HFS+is natively supported by Mac OS.
About SD Cards
29
Page 30
ExFAT is supported natively by Mac OS and Windows without needing to purchase any
additional software. However, exFAT does not support journaling which means data is less
protected against the rare event your media card is corrupted.
Your video assist can format your SD cards in HFS+ or
exFATformats using the ‘storage’ settings. Swipe the touchscreen
left or right to open the ‘storage’ settings menu.
To format your SD card:
1 Swipe the touchscreen left or right, or tap the card status display to open the
storage settings.
2 Tap the ‘format card’ icon. On Blackmagic Video Assist 4K, tap the icon that
corresponds with your selected card. For example, ‘format card 1’ or ‘format card 2’.
3 Tap the left and right arrows to select your desired HFS+ or exFAT format type, then tap
the ‘format card’ icon again.
4 A warning will appear asking you to confirm the format. If your SD card contains data
already recorded, make sure you back it up before formatting as this action cannot be
undone. Tap ‘format card’ to continue, or ‘cancel’ to cancel the format.
5 A progress bar shows you the progress of the format. ‘Formatting complete’ will appear
when the format is done.
6 Tap the ‘ok’ icon to return to the storage settings.
Formatting SD Cards using a Computer
SD cards can also be formatted using a Mac OS or Windows computer.
Preparing SD Cards on a Mac OS computer
Use the ‘disk utility’ application included with Mac OS to format or initialize your SD card in the
HFS+ or exFAT formats. If your SD card already has files recorded on them, remember to back
up your media as all data will be lost when it is formatted.
1 Plug an SD card into your computer’s SD card slot or via an SD card reader.
2 Go to ‘applications/utilities’ and launch ‘disk utility’.
3 Click on the disk icon of your SD card and then click the ‘erase’ tab.
4 Set the format to ‘Mac OS extended (journaled)’ or “exFAT”.
5 Type a ‘name’ for the new volume and then click ‘erase’. Your SD card will quickly be
formatted and made ready for use.
About SD Cards
30
Page 31

Use ‘disk utility’ on Mac OS to erase your SD card in the Mac OS extended (journaled) or exFAT format.
Preparing SD Cards on a Windows computer
The ‘format’ dialog box can format an SD card in the exFAT format on a Windows PC. Remember
to back up anything important from your media as all data will be lost when it is formatted.
1 Plug an SD card into your computer’s SD card slot or via an SD card reader.
2 Open the ‘start menu’ or ‘start screen’ and choose ‘computer’. Right-click on
your SD card.
3 From the contextual menu, choose ‘format’.
4 Set the file system to ‘exFAT’ and the allocation unit size to 128 kilobytes.
5 Type a volume label, select ‘quick format’ and click ‘start’.
6 Your SD card will quickly be formatted and made ready for use.
Use the ‘format’ dialog box feature in Windows
toformat your SD card in the exFAT format
About SD Cards
31
Page 32

Working with Files from SD Cards
HDMI
You can access your ProRes or DNx files straight from your SD cards with any Mac OS or
Windows computer that features an SD card slot or by using an SD card reader.
1 Remove the SD card from your video assist and insert it into the SDcard slot of your
computer, or SD card reader. The SD card can be accessed the same way as you
would an external hard drive, USB drive or any other media storage device attached to
your computer.
2 Double click on the SD card to open it and you should see a list of QuickTime or
MXFmovie files.
3 Now you can simply drag the files you want from the card onto your desktop or another
hard drive, or you can access the files straight from the card using your NLE software.
4 Before you physically remove the SD card from the SD card slot, it’s always a good idea
to eject the card safely using either Mac OS or Windows first.
Insert your SD card into any computer with an
SDcard slot to access your clips immediately.
Checking Disk Speed
Blackmagic Disk Speed Test is a fun application that measures the read and write performance
of storage media, then displays the results using video formats.
If you have ever wondered whether your storage media is suitable for recording (“write”) or
playback (“read”) of a particular video format, you can use Disk Speed Test to find out. Test the
performance of your media drives with a single click of the ‘start’ button! Disk Speed Test will
even show you how many streams of video your storage is capable of handling.
Blackmagic Disk Speed Test software is available to download from the Blackmagic Design
support center at www.blackmagicdesign.com/support.
Use Blackmagic Disk Speed Test to find
out the performance of your SD card.
Blackmagic Disk Speed Test interface.
About SD Cards
32
Page 33

Blackmagic Video Assist Setup
Blackmagic Video Assist Setup contains two configuration tabs labeled ‘video’ and ‘about’.
These tabs let you import 3D LUTs into your video assist, change the name of the unit, and set
the language of your video assist’s user interface.
Video Settings
3D LUTs can be imported into your video assist so you can display the video with color
corrected looks applied. 3D LUTs can be generated as .cube files in DaVinci Resolve and you
can find more information in the DaVinci Resolve manual.
Refer to the ‘storage, monitor, display, audio and setup settings’ section in this manual for
information on 3D LUTs and how to import them using Blackmagic Video Assist Setup.
The video settings let you import 3D LUTs into your video assist
About Settings
Use this tab to view information about your video assist such as the currently installed internal
software, and the name of the unit.
To change the name, click inside the ‘name’ edit box and type in a new name using your
computer keyboard.
Changing the Language
To change the language of your video assist’s user interface, click on the current language drop
down menu and select a new language you would like to use.
To confirm your selection, click ‘load’. Your chosen language will now be displayed on your
video assist.
Blackmagic Video Assist Setup
33
Page 34

Choose a new language from the language settings drop down menu
Your video assist’s user interface can be displayed in several different languages
Updating the Internal Software
Ocasionally, updates for your video assist’s internal software will be available on the
Blackmagic Design website. We recommend downloading the software and updating your
video assist so you can benefit from new features and improvements.
To update the internal software using Mac OS:
1 Download and unzip Blackmagic Video Assist Setup.
2 Open the resulting disk image and launch the Blackmagic Video Assist Setup Installer.
Follow the onscreen instructions.
3 After installing the latest Blackmagic Video Assist Setup, connect a USB cable from
your Video Assist to your computer.
Blackmagic Video Assist Setup
34
Page 35

4 Launch Blackmagic Video Assist Setup and follow any onscreen prompt to update the
internal software. If no prompt appears, the internal software is up to date and there is
nothing further you need to do.
To update the internal software using Windows:
1 Download and unzip Blackmagic Video Assist Setup.
2 You should see a Blackmagic Video Assist Setup folder containing this manual and
the Blackmagic Video Assist Setup installer. Double-click the installer and follow the
onscreen prompts to complete the installation.
3 After installing the latest Blackmagic Video Assist Setup, connect a USB cable from
your video assist to your computer.
4 Launch Blackmagic Video Assist Setup and follow any onscreen prompt to update the
internal software. If no prompt appears, the internal software is up to date and there is
nothing further you need to do.
To update the internal software on your video assist, pluginto your
computer via the USB port, then download and launch thelatest
Blackmagic Video Assist Setup. Follow any on screen prompts. Ifno
prompt appears, your internal software is already up to date.
Blackmagic Video Assist Setup
35
Page 36

Using DaVinci Resolve
Introducing DaVinci Resolve
Recording clips with your video assist is only part of the process of creating film and television
content, and just as important is the process of media backup and management as well as
editing, color correction and encoding final master files. DaVinci Resolve for Mac OS and
Windows is included with your video assist so you have a complete solution for recording and
post production!
After connecting your SD card to your computer, you can use DaVinci Resolve’s ‘clone’ tool in
the ‘media’ page, to create running backups as you shoot. This is recommended as any type of
media is susceptible to becoming damaged or developing a fault so creating backups ensures
your shots will be immune to loss. Once you have used DaVinci Resolve to back up your media,
you can then add your clips into the DaVinci media pool, then edit, color correct, and finish your
production without ever having to leave DaVinci Resolve.
DaVinci Resolve will help you adjust your clips to get any kind of look you are after. DaVinci
Resolve is the same tool used on most major blockbuster movies, so it’s much more than a
simple NLE software tool, as it has extremely advanced technology built in for high end digital
film. You get the advantage of this technology when you use DaVinci Resolve to edit and color
correct your work.
Included here is information on how to get started using DaVinci Resolve with your recorded
clips. Of course, DaVinci Resolve is extremely advanced and includes a lot more features than
you immediately see when first looking at its user interface. To learn more about how to use
DaVinci Resolve, please check for the DaVinci Resolve instruction manual pdf file on the
DaVinci Resolve software SD card, or check online for the many training courses and tutorial
videos available.
Importing your Clips
To start editing your clips, you’ll first need to import them into the media pool:
1 Launch DaVinci Resolve. If this is the first time you’ve opened DaVinci Resolve, wait
for the Project Manager to appear, and double click the ‘untitled project’ icon in the
project manager window. If the log in window appears, that means you have the
Resolve multi-user environment enabled. In this case, click Add New at the bottom left
of the log in window and create a new user by entering a user name and clicking Setup
New User. Then double-click the user icon to proceed to the Project Manager. Now
click ‘new project’, enter a title for your project and click ‘create’.This will add your new
project to the project manager. Double click on your project to open it.
Using DaVinci Resolve
36
Page 37

2 You’ll now see the ‘media’ page with a ‘media storage’ browser at the top left. The
‘media storage’ browser displays all your linked media folders from where you’ll drag
your clips and drop them into the media pool.
3 If your clip folder doesn’t appear in the library, you’ll need to add it. This is easily
done by clicking on preferences in the DaVinci Resolve title bar and clicking on the
‘add’ button in the ‘media storage’ tab. Browse to and select a drive or folder path,
click ‘open’, restart DaVinci Resolve and reopen your project to refresh the ‘media
storage’ settings.
4 In the ‘media storage’ browser, click on your newly added clip folder. Now simply drag
your clips from your storage folder and drop them into the media pool. If your project
settings are different to your clip settings, you’ll be prompted to either change the
project settings to match your clips, or leave the settings as they are. To get started
quickly, click ‘change’. Now your project settings match your clips.
To import your clips, simply drag them from the ‘media storage’ browser and drop
them into the media pool. You can also drag and drop files from your desktop.
Editing your Clips
With your clips in the media pool, click on the ‘edit’ tab to open the edit page.
Now you can start building your edit!
1 You’ll first need to create a new timeline. Right click anywhere within the media
pool and choose Timelines > New Timeline. When the dialog box appears, click the
‘create’ button.
To start editing your clips, you’ll need to create a new timeline.
Thetimeline is the stage upon which all your editing will take place.
Using DaVinci Resolve
37
Page 38

2 Double click a clip in the media pool to open the clip in the source viewer. Use the
mouse pointer to scrub the play head in the source viewer left and right until you find
the start frame you want for the clip. Mark the in point with the ‘I’ shortcut. Do the same
for the end frame using the ‘O’ shortcut.
3 Go to the timeline and position the timeline play head where you want your clip to
be inserted.
4 To insert the clip onto the timeline, click inside the source viewer then drag the mouse
pointer across to the timeline viewer. A list of edit options will appear. Select the type of
edit you want.
Your clip will be placed onto the timeline using the edit type you selected. You’ll find a
description of each edit type and how to use them in the DaVinci Resolve manual.
A faster way to add clips to your edit is by dragging them from the media pool and dropping
them directly onto the timeline where you can adjust your in and out points, position your clips,
try different plug in effects, titles, and more. This particular workflow is like using the timeline as
an artist’s palette.
The ‘edit’ page. You can trim your clips, change their order, move them
around and add transitions between them using the timeline editor.
Trimming Clips
When editing clips you’ll want to trim them to include only the specific actions you want in each
shot. There are various ways, but the easiest is to adjust the clips’ in and out points on
the timeline:
1 After adding clips to your timeline, hover your mouse pointer over the start of a clip until
the pointer becomes a ‘trim’ icon.
2 When the ‘trim’ icon appears, click on the start of your clip and drag it forwards or
backwards to trim the in point. Watch the timeline monitor as you trim to find the
edit point.
3 Now click and drag the end of your clip to adjust the out point.
The zoom slider is located above the timeline, to the right of the tools that are centered in the
toolbar. By dragging the slider left and right you can zoom in and out of your timeline to make
fine adjustments.
Using DaVinci Resolve
38
Page 39

Turning the ‘snapping’ feature off is handy when fine tuning edits, but it’s a helpful feature to
keep your clips held tightly against each other, so it’s worth turning back on once you’re done.
Press the ’N’ key to quickly turn snapping on or off.
The ‘edit’ page. You can trim your clips, change their order, move them
around and add transitions between them using the timeline editor.
Mapping Keyboard Shortcuts
If you are familiar with keyboard shortcuts using other editing software, you can easily map your
own in DaVinci Resolve to increase speed and optimise your workflow.
To map your own keyboard shortcuts:
1 Click on the project setting ‘gear’ icon at the bottom right of your DaVinci workspace,
then select ‘keyboard mapping’ from the settings list.
2 Select the shortcut you want to change from the categories provided, for example
timeline cut and paste shortcuts will be in the ‘edit’ category.
3 Click on the shortcut once to highlight the setting. Double click on the shortcut to
enable the change.
4 Press your new shortcut keys on the keyboard. If you make a mistake you can easily
undo the change by clicking the ‘undo’ icon next to the setting.
5 Click ‘save’ to confirm your new shortcut setting.
Trim your clips by dragging their start and end points left or right.
The‘snapping’ feature can be turned off when making fine adjustments.
Using DaVinci Resolve
39
Page 40

Adding Transitions
A transition is a visual effect used to bridge one clip to another in a pleasing way, for example
dissolves, wipes, dips to color, and more. These can add a layer of excitement to your edit.
Transitions don’t always have to be joining two clips, for example you can apply a dissolve
transition to the end of one clip to create a quick and easy fade to black.
The transitions palette contains many types of transition effects.
To add a dissolve transition between two clips:
1 Make sure there are two clips edited right next to one another on the timeline. Click the
‘effects library’ button in the UI toolbar at the top of the ‘edit’ page, and make sure the
‘toolbox’ panel is open.
2 Click on the ‘cross dissolve’ transition, drag it to your timeline and hover it over the edit
point between two clips. You’ll see the mouse pointer highlight both the end section of
the first clip, and the start of the second. Drop the transition onto the clips. It’s important
both clips have enough length before and after their edit points to make room for
the dissolve.
You now have a smooth transition mixing from one clip to the other. If you want to adjust the
length of the transition you can lengthen or shorten its start and end point using a similar
approach to trimming a clip. Hover your mouse pointer over the start or end of the transition
until the transition ‘trim’ icon appears, then drag it left or right.
Simply drag and drop transitions between adjoining clips.
Using DaVinci Resolve
40
Page 41

Adding Titles
It’s easy to create titles for your edit. You can place a title on any video track just as you would a
clip. If you run out of tracks you can easily add new ones by right clicking next to an existing
track name and selecting ‘add track’.
To create a title:
1 Scroll down towards the middle of the toolbox in the ‘effects library’ located underneath
the media pool and you’ll see the ‘titles’ generators. Use the scroll bar to reveal more
‘titles’ options.
2 Drag and drop a text title on the empty video track above the clip you want the title
to appear. You can even drop your title next to a clip on Video 1 if you just want it to
appear over black. To see the title, make sure the timeline playhead is on the title.
3 Double click on the title clip. The ‘inspector’ will appear showing you the settings for
your title. Type your title into the ‘text’ field.
You can choose from a variety of fonts and adjust the appearance of your title by changing
settings such as color, size, alignment, position, and more. Transitions can be added to titles,
just like they can for clips.
Drag a title type from the ‘titles’ palette and drop it on an empty track.
Adding Audio Tracks
If you want to mix a large sound edit with lots of sound effects and music, you can easily add
more audio tracks when you need them.
To add an audio track:
1 Right click next to the name of the last audio track on your timeline and select
‘add track’.
2 Select the type of audio track you want, such as stereo, mono, 5.1 or adaptive.
Your new audio track will appear on the timeline.
This can be handy when you want to separate your audio elements into individual tracks for a
sound mix, for example voice, sound effects, and music.
Using DaVinci Resolve
41
Page 42

Refer to the DaVinci Resolve manual for more information on how you can use all the powerful
editing tools.
To add a new audio or video track, right click next to a track name
andselect ‘add track’. For audio, select the track type you want.
Color Correcting your Clips
Once you have edited your sequence of clips, you can start color correcting. This is best begun
after you have finished editing your sequence so you can maintain a consistent look, but part of
the fun of DaVinci Resolve is being able to move between the edit and color page to make fine
adjustments and discover new creative choices.
With the ‘color’ page you get absolute control over the look of your clips.
First, click on the ‘color’ tab to open the ‘color’ page.
You’ll see the color wheels, curves palettes and general color correction tools as well as the
preview and nodes window. Don’t feel overwhelmed by the vast array of features in front of you,
they are all there to help you get the most amazing looking pictures. The DaVinci Resolve
manual will show you exactly what the tools are for and how to use them in easy to follow steps.
You’ll learn the same techniques the professionals use in high end color correction facilities.
Using DaVinci Resolve
42
Page 43

Generally, the first thing you’ll want do is optimize the shadows, mid tones and highlights in your
clips. In other words adjust the ‘lift’, ‘gamma’ and ‘gain’ settings. This will help get your pictures
looking their brightest and best with a clean, uniform starting point from where you can begin
grading the ‘look’ of your film.
Using Scopes
Most colorists make creative color choices by focusing on the emotion and the look they want
their program to have and then simply work using the monitor to achieve that look. You can look
at everyday objects and how different types of light interact with them to generate ideas on
what you can do with your images with a little practice.
Another way to color grade is to use the built in scopes to help you balance shots. You can
open a single video scope by clicking the ‘scope’ button, which is the second from the right on
the palette toolbar. You can choose to display a waveform, parade, vectorscope and histogram.
Using these scopes you can monitor your tonal balance, check the levels of your video to avoid
crushing your blacks and clipping the highlights, plus monitor any color cast in your clips.
The ‘color wheels’ palette contains the ‘lift’, ‘gamma’ and ‘gain’ controls which will generally
constitute your first adjustment. These should resemble controls you’ve seen in other
applications for doing color and contrast adjustments. For more accurate control of each color
using a mouse, you can change the color wheels to ‘primaries bars’ which let you adjust each
color and luminance channel for the lift, gamma and gain controls separately. Simply select
‘primaries bars’ from the drop down menu near the top right of the color wheels.
The parade scope helps you optimize highlights, mid tones and shadows.
The ‘lift, ‘gamma’, ‘gain’ and ‘offset’ color wheels give youtotal control over the
color and tonal balance of your clips. To make auniform adjustment to all colors for
each tonal region, drag thedial underneath the color wheels back and forth.
Using DaVinci Resolve
43
Page 44

1 Adjusting the ‘lift’
With your first clip selected on the color timeline, click on the ‘lift’ dial underneath the
first color wheel. Slide it back and forth and watch how it affects your image. You’ll
see the brightness of the dark regions of your picture increase and decrease. Set it to
where you want the dark areas to look their best. If you decrease the lift too much,
you’ll lose details in the blacks and you can use the parade scope to help avoid this.
The optimal position for blacks on the waveform is just above the bottom line of the
parade scope.
2 Adjusting the ‘gain’
Click on the ‘gain’ dial and slide it back and forth. This adjusts the highlights which are
the brightest areas of your clip. The highlights are shown on the top section of the
waveform on the parade scope. For a brightly lit shot, these are best positioned just
below the top line of the waveform scope. If the highlights rise above the top line of the
waveform scope, they will clip and you will lose details in the brightest regions of
your image.
3 Adjusting the ‘gamma’
Click on the ‘gamma’ dial underneath the color wheel and slide it back and forth. As
you increase the gamma you’ll see the brightness of the image increase. Notice the
middle section of the waveform will also move as you adjust the gamma. This
represents the mid tones of your clip. The optimal position for mid tones generally falls
between 50 to 70% on the waveform scope. However, this can be subjective based on
the look you are creating and the lighting conditions in the clip.
You can also use the curves palette to make primary color corrections. Simply click to create
control points on the diagonal line inside the curve graph, and drag them up or down to adjust
the master RGB contrast at different areas of image tonality. The optimum points to adjust are
the bottom third, mid, and top third of the curve line.
There are many more ways of doing primary color correction in DaVinci Resolve. Check the
DaVinci Resolve manual to learn how to use them all.
The curves palette is another tool you can use to make primary color corrections,
or enhance specific areas of your clip when using a power window.
Secondary Color Correction
If you want to adjust a specific part of your image then you need to use secondary corrections.
The adjustments you have been doing up until now using the color wheels and lift, gamma and
gain adjustments affect the whole image at the same time and so they are called primary color
corrections.
Using DaVinci Resolve
44
Page 45

However if you need to adjust specific parts of your image, say for example you wanted to
improve the color in the grass in a scene, or you wanted to deepen the blue in a sky, then you
can use secondary corrections. Secondary color corrections are where you select a part of the
image and then adjust just that part. With nodes, you can stack multiple secondary corrections
so you can keep working parts of your image until everything is just right! You can even use
windows and tracking to allow the selections to follow movement in your images.
Qualifying a Color
Often you’ll find a specific color in your clip can be enhanced, for example grass by the side of
a road, or the blue in a sky, or you may need to adjust color on a specific object to focus the
audience’s attention on it. You can easily do this by using the HSL qualifier tool.
Use the HSL qualifier feature to select specific colors in your image. This is
handy when you want to make areas of your image ‘pop’, to add contrast, or
to help draw the audience’s attention to cer tain areas of your shot.
To qualify a color:
1 Add a new serial node.
2 Open the ‘qualifier’ palette and make sure the ‘color range’ sample eyedropper tool
is selected.
3 Click on the color in your clip you want to affect.
Usually you’ll need to make some adjustments to soften the edges of your selection
and limit the region to only the desired color. Click on the ‘highlight’ button to see your
selection.
4 Adjust the ‘width’ control in the ‘hue’ window to broaden or narrow your selection.
Experiment with the high, low and softness controls to see how to refine your selection. Now
you can make corrections to your selected color using the color wheels or custom curves.
Sometimes your selection can spill into areas of the shot you don’t want to affect. You can easily
mask out the unwanted areas using a power window. Simply create a new window and shape it
to select only the area of color you want. If your selected color moves in the shot, you can use
the tracking feature to track your power window.
Adding a Power Window
Power windows are an extremely effective secondary color correction tool that can be used to
isolate specific regions of your clips. These regions don’t have to be static, but can be tracked
to move with a camera pan, tilt or rotation, plus the movement of the region itself. For example,
you can track a window on a person in order to make color and contrast changes just to that
person without affecting his/her surroundings. By making corrections like this you can influence
the audience’s attention on areas you want them to look at.
Using DaVinci Resolve
45
Page 46

Use power windows to mask out areas you don’t want to be
affected by the HSL qualifier secondary adjustments.
To add a power window to your clip:
1 Add a new serial node.
2 Open the ‘window’ palette and select a window shape by clicking on a shape icon.
Your selected window shape will appear on the node.
3 Resize the shape by clicking and dragging the blue points around the shape. The pink
points adjust the edge softness. You can position the shape by clicking the center
point and moving it to the area you want to isolate. Rotate the window using the point
connected to the center.
Now you can make color corrections to your image in just the area you want.
Power windows let you make secondary corrections
to specific parts of your image.
Tracking a Window
The camera, object or area in your shot may be moving, so to make sure your window stays on
your selected object or area, you’ll need to use DaVinci Resolve’s powerful tracking feature.
The tracker analyzes the pan, tilt, zoom and rotation of the camera or object in your clip so you
can match your windows to that movement. If this isn’t done, your correction can move off the
selected target and call attention to itself, which you probably don’t want.
Using DaVinci Resolve
46
Page 47

You can track objects or areas in your clip using the tracker
feature so power windows can follow the action.
To track a window to a moving object:
1 Create a new serial node and add a power window.
2 Go to the start of your clip and position and size the window to highlight just the object
or area you want.
3 Open the ‘tracker’ palette. Select the pan, tilt, zoom, rotate, and perspective 3D
settings appropriate for the movement in your clip by checking or unchecking the
relevant ‘analyse’ checkboxes.
4 Click on the ‘forward’ arrow to the left of the checkboxes. DaVinci Resolve will now
apply a cluster of tracking points on your clip and then step through the frames to
analyze the movement. When the tracking is done, your power window will follow the
path of the movement in your clip.
Most of the time automatic tracking is successful, but scenes can be complex and sometimes
an object can pass in front of your selected area, interrupting or affecting your track. This can
be solved manually using the keyframe editor. Refer to the DaVinci Resolve manual to
find out more.
Using Plugins
While making secondary color corrections you can also add OpenFX plugins to create fast,
interesting looks and effects using the ‘color’ page, or imaginative transitions and effects on
your clips on the ‘edit’ page. OFX plugins can be purchased and downloaded from third
partysuppliers.
OFX plugins are a quick and easy way to create imaginative and interesting looks.
Using DaVinci Resolve
47
Page 48

After installing a set of plugins, you can access them on the color page by opening the OpenFX
inspector to the right of the ‘node editor’ Simply click the ‘OpenFX’ button to open the OpenFX
inspector, create a new serial node and drag and drop a plugin onto the new node. If the plugin
has editable settings, you can adjust these in the adjoining ‘settings’ panel.
In the ‘edit’ page you can add plugin generators and transitions to clips by opening the
‘OpenFX’ panel in the ‘effects library’ and dragging your selected plugin onto the video track
above your clip on the timeline.
Mastering your Edit
So now you’ve edited, color corrected and graded your clips you’ll want to export a render of
your edit in the ‘deliver’ page. This page lets you select the range of clips you want to export,
plus the format, codec and resolution you want. You can export in many types of formats such
as QuickTime, AVI, MXF and DPX using codecs such as 8-bit or 10-bit uncompressed RGB/YUV,
ProRes, DNxHD, H.264 and more.
To export a single clip of your edit:
1 Click on the ‘deliver’ tab to open the deliver page.
2 Go to the ‘render settings’ window on the top left of the page. In the ‘format’ settings,
select ‘single clip’. You can now choose from a number of export presets, for example
YouTube, Vimeo and audio presets, or you can set your own export settings manually
by leaving it set to the default ‘custom’ preset and entering your own parameters. For
this example, select YouTube, then click on the arrow next to the preset and select the
1080p video format.
3 The frame rate will be locked to your project frame rate setting.
4 Underneath the presets you will see the timeline filename and the target location for
your exported video. Click the ‘browse’ button and choose the location where you want
to save your exported file.
5 Immediately above the timeline, you’ll see an options box with ‘entire timeline’ selected.
This will export the entire timeline, however you can select a range of the timeline if
you want to. Simply choose ‘in/out range’ and then use the ‘i’ and ‘o’ hot key shortcuts
to choose the in and out points in your timeline.
6 Go to the bottom of the ‘render settings’ and click on the ‘add to render queue’ button.
The ‘deliver’ page is where you export your edit. You can select
from many different video formats and codecs
Using DaVinci Resolve
48
Page 49

Your render settings will be added to the render queue on the right side of the page. Now all
you have to do is click ‘start render’ and monitor the progress of your render in the
render queue.
When your render is complete you can open the folder location, double click on your new
rendered clip and watch your finished edit.
After adding your render settings to the render queue,
click the ‘start render’ button to export your edit.
Post Production Workflow
Working with 3rd Party Software
If you have your own favourite editing software you’d like to use, you can easily copy your clips
to an internal/external drive or RAID and then import your clips into the software.
If you want to, you can even edit your clips directly from the SD card.
Using Final Cut Pro X
To edit Apple ProRes clips using Final Cut Pro X, you need to create a new project
matchingyour clips’ video format and frame rate. For this example, clips are set using
ProRes422 1080p25.
1 Launch Final Cut Pro X, go to the menu bar and select ‘file/new project’. A window
willopen containing project settings.
2 Name your project and select the ‘custom’ checkbox.
3 Set the ‘video properties’ settings to 1080p HD, 1920x1080 and 25p.
4 Set your ‘audio and render properties’ settings to ‘stereo, 48kHz, and Apple ProRes 422
5 Click ‘ok’.
Post Production Workflow
49
Page 50

To import your clips into your project, go to the menu bar and select ‘file/import/media’. Choose
your clips from your SD Card. You can now drag your clips onto the timeline for editing.
Final Cut Pro X project settings.
Using Avid Media Composer
To edit your clips using Avid Media Composer 7, create a new project matching the clip’s video
format and frame rate. For this example, clips are set using 1080i59.94.
1 Launch Media Composer and the ‘select project’ window will appear. Click the ‘new
project’ button.
2 In the ‘new project’ window name your project.
3 Go to the ‘format’ dropdown menu and select 1080i/59.94.
4 Go to the ‘color space’ dropdown menu and select YCbCr 709.
5 Go to the ‘raster dimension’ dropdown menu and select 1920x1080. Click ‘ok’.
6 Select ‘tools>background services’ and click the ‘start’ button if background services
are not already running and then click ‘ok’.
7 Select the media bin where you wish to import your files.
8 Select ‘file>AMA link…’ and select the files that you wish to import and then click ‘ok’.
When the clips appear within the media bin you can drag your clips onto the timeline and
begin editing.
Setting the project name and project
options in Avid Media Composer 7.
Post Production Workflow
50
Page 51

Using Adobe Premiere Pro CC
To edit your clips using Adobe Premiere Pro CC, you need to create a new project
matchingyour clips’ video format and frame rate. For this example, clips are set using
ProRes422HQ 1080p25.
1 Launch Adobe Premiere Pro CC. In the ‘welcome’ window select ‘create new/new
project’. A window will open containing project settings.
2 Name your project. Choose the location for your project by clicking ‘browse’ and
selecting your desired folder. Once you’ve selected your location folder click ‘ok’ in the
‘welcome’ window.
3 Go to the Adobe Premiere Pro CC menu bar, select ‘file/import’ and choose the clips
you want to edit. Your clips will appear in the ‘project’ window.
4 Drag the first clip you wish to edit onto the ‘new item’ icon at the bottom right of the
‘project’ window. A new sequence will be created matching your clip settings.
You can now drag your clips onto the sequence timeline for editing.
Setting the project name and project options
in Adobe Premiere Pro CC.
Using Autodesk Smoke 2013
To edit your clips using Autodesk Smoke 2013, create a new project matching the clips’ video
format, bit depth, frame type and frame rate. For this example, clips were recorded using
ProRes 422 HQ 1080p25.
1 Launch Smoke and the project and user settings window will appear. Click on the ‘new’
button under the project heading.
2 The ‘create new project’ window will open. Name your project.
3 From the resolution dropdown menu, select 1920x1080 HD 1080.
4 Make sure bit depth is set to 10-bit and frame type is progressive.
5 From the config template dropdown menu select 1920x1080@25000p.cfg.
6 Leave the ‘preferred format’ set to ProRes 422 HQ and click ‘create’.
7 Click on the ‘new’ button under the user heading.
8 When the ‘create new user profile’ window opens, type your user name and
click ‘create’.
Post Production Workflow
51
Page 52

9 When the project and user settings window reopens, click the start button.
10 From the menu bar, select ‘file>import>file’ and select your clips to import.
11 Once the clips appear in the media library you can drag your clips
onto the timeline and begin editing.
Setting the project name and project
options in Autodesk Smoke 2013.
Post Production Workflow
52
Page 53

Help
Getting Help
The fastest way to obtain help is to go to the Blackmagic Design online support pages and
check the latest support material available for your video assist.
Blackmagic Design Online Support Pages
The latest manual, software and support notes can be found at the Blackmagic Design support
center at www.blackmagicdesign.com/support.
Blackmagic Design Forum
The Blackmagic Design forum on our website is a helpful resource you can visit for more
information and creative ideas. This can also be a faster way of getting help as there may
already be answers you can find from other experienced users and Blackmagic Design staff
which will keep you moving forward. You can visit the forum at https://forum.
blackmagicdesign.com
Contacting Blackmagic Design Support
If you can’t find the help you need in our support material or on the forum, please use the “Send
us an email” button on the support page to email a support request. Alternatively, click on the
“Find your local support team” button on the support page and call your nearest Blackmagic
Design support office.
Checking the Software Version Currently Installed
To check which version of Blackmagic Video Assist software is installed on your computer,
open the About Blackmagic Video Assist Setup window.
On Mac OS, open Blackmagic Video Assist Setup from the Applications folder.
Select About Blackmagic Video Assist Setup from the application menu to reveal the
version number.
On Windows 8, open Blackmagic Video Assist Setup from the Blackmagic Video Assist
Setup tile on your Start page. Click on the Help menu and select About Blackmagic
Video Assist Setup to reveal the version number.
In Windows 8.1, select the down arrow icon from the ‘start’ screen, and scroll down
to the Blackmagic Design folder. From here you can launch Blackmagic Video
Assist Setup.
In Windows 10, click the start button and select ‘all apps’. Scroll down to the Blackmagic
design folder. From here you can launch Blackmagic Video Assist Setup.
How to Get the Latest Software Updates
After checking the version of Blackmagic Video Assist Setup software installed on your
computer, please visit the Blackmagic Design support center at
www.blackmagicdesign.com/support to check for the latest updates. While it is usually a good
idea to run the latest updates, it is wise to avoid updating any software if you are in the middle
of an important project.
Help
53
Page 54

Warranty
12 Month Limited Warranty
Blackmagic Design warrants that this product will be free from defects in materials and
workmanship for a period of 12 months from the date of purchase. If a product proves to be
defective during this warranty period, Blackmagic Design, at its option, either will repair the
defective product without charge for parts and labor, or will provide a replacement in exchange
for the defective product.
In order to obtain service under this warranty, you the Customer, must notify Blackmagic Design
of the defect before the expiration of the warranty period and make suitable arrangements for
the performance of service. The Customer shall be responsible for packaging and shipping the
defective product to a designated service center nominated by Blackmagic Design, with
shipping charges pre paid. Customer shall be responsible for paying all shipping charges,
insurance, duties, taxes, and any other charges for products returned to us for any reason.
This warranty shall not apply to any defect, failure or damage caused by improper use or
improper or inadequate maintenance and care. Blackmagic Design shall not be obligated to
furnish service under this warranty: a) to repair damage resulting from attempts by personnel
other than Blackmagic Design representatives to install, repair or service the product, b) to repair
damage resulting from improper use or connection to incompatible equipment, c) to repair any
damage or malfunction caused by the use of non Blackmagic Design parts or supplies, or d) to
service a product that has been modified or integrated with other products when the effect of
such a modification or integration increases the time or difficulty of servicing the product. THIS
WARRANTY IS GIVEN BY BLACKMAGIC DESIGN IN LIEU OF ANY OTHER WARRANTIES,
EXPRESS OR IMPLIED. BLACKMAGIC DESIGN AND ITS VENDORS DISCLAIM ANY IMPLIED
WARRANTIES OF MERCHANTABILITY OR FITNESS FOR A PARTICULAR PURPOSE.
BLACKMAGIC DESIGN’S RESPONSIBILITY TO REPAIR OR REPLACE DEFECTIVE PRODUCTS IS
THE WHOLE AND EXCLUSIVE REMEDY PROVIDED TO THE CUSTOMER FOR ANY INDIRECT,
SPECIAL, INCIDENTAL OR CONSEQUENTIAL DAMAGES IRRESPECTIVE OF WHETHER
BLACKMAGIC DESIGN OR THE VENDOR HAS ADVANCE NOTICE OF THE POSSIBILITY OF
SUCH DAMAGES. BLACKMAGIC DESIGN IS NOT LIABLE FOR ANY ILLEGAL USE OF
EQUIPMENT BY CUSTOMER. BLACKMAGIC IS NOT LIABLE FOR ANY DAMAGES RESULTING
FROM USE OF THIS PRODUCT. USER OPERATES THIS PRODUCT AT OWN RISK.
© Copyright 2017 Blackmagic Design. All rights reserved. ‘Blackmagic Design’, ‘DeckLink’, ‘HDLink’, ‘Workgroup Videohub’,
‘Multibridge Pro’, ‘Multibridge Extreme’, ‘Intensity’ and ‘Leading the creative video revolution’ are registered trademarks in the
US and other countries. All other company and product names may be trade marks of their respective companies with which
they are associated.
Warranty
54
Page 55

インストール/オペレーションマニュアル
Blackmagic
VideoAssist
2017年6
日本語
月
Page 56

ようこそ
このたび は
私たちは
同製品が、あらゆる種類のカメラを使用した撮 影における最高のソリューションになると考えてい
ます。
使い勝手の良いコンパクトな製品でオンセットモニタリングやプロ仕様の収録を実現できます。
Blackmagic Video Assist
使えば 、デスク上で 通 常のモニターとしても使 用で きます。また同製 品は、ライブプロダクション
スイッチャー用のマスターレコーダーとしての使用にも最 適です。
Blackmagic Video Assistは、6G-SDI
Blackmagic Video Assist 4Kは、2枚のSD
ルなオーディオレコーダーにも対応しているため、アナログオーディオを
に組み込むこともできます。
ジェクトで あ らゆ るカメラと 使 用 で きま す。
このマニュアルには 、
弊 社ウェブサイト
ジョンおよび
アップデートすることで、常に 最 新の 機 能をお 使 いいただけ ます。ソフトウェアをダウンロードす
る際にユーザー登録していただければ、新しいソフトウェアのリリース時にお知らせいたします。
私たちは常に新機能の開 発および製品の改善に努めていますので、ユーザーの皆様からご意見
をいた だ け れ ば 幸 いで す。
Blackmagic Video Assist
Blackmagic Video Assist
Video Assist
には、最高レベルのモニタリングおよび収録テクノロジーが詰め込まれており、
はカメラにマ ウントして使 用で きる一方 、底 面 の 折り畳 み式 スタンド を
Video Assist
www.blackmagicdesign.com/jp
Video Assist
をお買い求めいただき誠にありがとうございます。
シリーズを開発で きたことを非常に嬉しく思って います。また
入 力を 搭 載して い る ので
カードに
Video Assist
ソフトウェアの 最 新アップデートを 確 認してください 。ソフトウェアを
は 非 常 に 万 能 な モ ニ タ ー 兼 レ コ ー ダ ー で 、あ ら ゆ る プ ロ
を使用する上で必要な情報がすべて記載されています。
Ultra HD
の サ ポ ー ト ペ ー ジ で 、マ ニ ュ ア ル の 最 新 バ ー
Ultra HD
の モ ニタリン グ が 可 能 で す。
を継続的に収録します。またパワフ
SDI
あるいは
HDMI
収録
BlackmagicDesignCEO
グ ラ ン ト・ ペ テ ィ
Page 57

目次
BlackmagicVideoAssist
58
はじめに
電源の接続
ビデオの接続
オー ディオの 接 続
SD
カードの 挿入
収録
LANC
接続 経 由のリモートコントロール
継続的な収録
DSLR
カメラ か らクリーン な
再生
設定
タッ チスクリーン で 設 定 を 変 更
ボリュームおよびアナログオーディオレベル
ストレージ、モ ニター、ディスプレ イ、
オ ー デ ィ オ 、セ ッ ト ア ッ プ 設 定
オンス クリーンメー ター を 使った
モニタリング
ビデオスコープ
SD
カードについて
高速のSDカード を 選 ぶ
Video AssistでSD
コンピュー ターでSDカ ード をフォ ーマット
SD
カード ファイルで の 作業
ディス ク ス ピ ー ド の 確 認
カ ード をフォ ーマット
HDMI
を収録
内部ソフトウェアのアップデート
58
DaVinciResolve
59
DaVinci Resolve
59
クリップの読み込み
60
クリップの編集
61
クリップのトリム
61
タイトル の 追 加
61
オー ディオトラックの 追 加
62
クリップのカラーコレクション
62
スコープの使用
セカンダリーカラーコレクション
63
カラーの特 定
63
Power Window
70
ウィンド ウ のトラ ッキン グ
71
プラ グインの 使 用
編 集 のマスタリン グ
76
ポストプロダクション・ワークフロー
77
サードパー ティ製ソフトウェ アの 使 用
82
Final Cut Pro X
82
Avid Media Composer
82
Adobe Premiere Pro CC
83
Autodesk Smoke 2013
85
ヘルプ
85
の使用
について
を追加
を使う
を使う
を使う
を使う
87
89
89
89
90
91
94
94
95
96
97
98
98
99
100
101
102
102
102
103
104
104
106
BlackmagicVideoAssistSetup
86
保証
107
Page 58

はじめに
電源の接続
Video Assist
簡単に使用できます。
この セクション で は 以下に つ いて 説 明 しま す:
■
■
■
■
電源を供給するには、同梱の電源アダプターを
接 続しま す。
外部電源を接 続 すると、2つの
バックパネルのバッテリースロット1、2にマ ウントで き ま す。
接続するには、バッテリースロットの内 側上部に バッテリーを軽く押し当て、カチッと音がして固 定され
るまで、バックパネルに沿って下にスライドさせます。バッテリー を取り外すには、トップパネル のバッテリー
リリース ボタンを押します。バッテリーの使 用 、バッテリー 残 量 の 確 認に関 する詳細は、このマニュアル
の「設定」セクションを参照してください。
電源をオンにするには、右サイドパネル の電源ボタンを押します。オフにするには同ボタンを長 押しします。
は、電源を接 続して、ビデオソースとオーディオを接 続し、SDカードを差し込むだけで
電源の接続
ビデオの接続
オー ディオの 接 続
SD
カードの 挿入
Video Assist
LP-E6
タイプのリチウムイオンバッテリー の 充 電もできます。バッテリー は
の右サイドパネルに付いている電源入力に
LP-E6
タイプのバッテリーを
Video Assist
に
SD CARD SD CARD +12V POWER
外部 電源を+
電源ボタンを押すと、電源がオンに
なります。
12V
電源 入力に接続 。
はじめに
58
Page 59

Blackmagic Video Assist 4K
SD CARD SD CARD +12V POWER
SD CARD SD CARD +12V POWER
PUSH
ANALOG AUDIO IN
PUSH
SDI OUT
SDI IN
HDMI IN HDMI OUT
キ ッ ク ス タ ン ド が 付 い て い る の で 、ユ ニ ッ ト
をデスク上にマウントできます。スタンド
の端を上げてゆっくり開きます。
ビデオの接続
次のステップでは、
Assist
は、最初に接続されたソースに基づいて
SDI/HDMI
ソースビデオを、ミニ
へのケーブルは、お近くの映像機器専門店で購入可能です。ミニ
とも 呼 ば れ て い ま す。
PUSHPUSH
ANALOG AUDIO IN
HDMI IN HDMI OUT SDI IN SDI OUT
BNC、BNC
SDI/HDMI
入 力 を 自 動 検 出 し ま す 。ミ ニ
、ま た は
BNC
コネクター は 、
Video Assist
は一般 的な
タイプのバッテリー を 使 用。
HDMI
入 力に 接 続 します。
BNC
から通常の
DIN 1.0/2.3
コネクター
SD CARD SD CARD +12V POWER
LP-E6
Video
BNC
ソースビデオを左 サイドの
SDI/HDMI
入 力 に 接 続 します。
HDMI/SDI
出力を
HDMI
テレビある
いはSDモ ニタ ー に 接 続 します。ヘッドセ ットジャックにヘッドセット を 接 続 す れ ば 、収 録/
再生中にクリップのオーディオを聴くことができます。
LCD
の下 に あ る 内 蔵 スピー カ ーで、再 生 中 に オ ー ディ オ を 聞くこともで きます。
オーディオの接続
オー ディオは
続 さ れ ま す 。し か し 、
SDI/HDMI
ビデオ信号にエンベッドされているため、ビデオを接続すると、オーディオも接
Blackmagic Video Assist 4KはXLR
Blackmagic Video Assist 4K
では、
コネクターも搭載しているので、外部バランスア
ナログオーディオを接 続することもできます。
はじめに
59
Page 60

Blackmagic Video Assist 4K
メモ
アナ ロ グ オー ディオを1チャンネル 、
スビデ オに応じたオーディオ設 定 が 可能 で す。アナログ オー ディオおよびレベル の 調 整 に関す
る詳細は、「 設 定」セクションの「オー ディオ設 定 」を参照してください。
SD
カードの挿入
ク リ ッ プ の 収 録 を 開 始 す る に は 、互 換 性 の あ るSDカードを挿入する必 要があります。
で は 、ア ナ ロ グ チ ャ ン ネ ル1および2を 収 録 す る か 、あ る い は
SDI
または
HDMI
オー ディオを1チ ャ ン ネ ル 選 択 す る な ど 、ソ ー
高品質のHD収 録 に は 、高 速 の
録する場合は低速のカードでも使用可能ですが、一般的には、高速であればあるほど良い品質が
得られ ま す。
Blackmagic Video Assist 4KでUltra HD
Ultra HD 2160p30
する 必 要 が あります。
か1枚に収 録したり、2枚のカードを挿入して継続的な収録や迅速なメディア変更が可能です。
SD
カ ー ド は 、使 用 前 に
ジ」設定で簡単にメディアをフォーマットできます。ストレージ設定に関する詳細は、「設定」セクション
を 参 照 してくだ さ い 。
Mac OS
また、
Mac OS
を
ているのであれば、
コンピュー ター は
SD
で 使 用 する場 合、
カ ー ド の 挿 入:
1
金のコネクターが
並べ ま す。
2
カードが固定されるまで、ゆっくりとカードをスロットに押し込みます。
までの収 録を行う場合、これらのカードは、
Blackmagic Video Assist 4Kは、2つのSD
あるいは
Windows
Windows
ex FAT
UHS-I SD
HFS+
あるいは
コンピューターを使ってカードをフォーマットすることもできます。メディア
Mac
の ディス ク フ ォ ーマットで あ る
フォ ー マ ット を 読 み 込 むこ とも可 能 で す。
LCD
の方を向くようにSDカード を持ち、SDカ ードス ロットと 直 線 に なる ように
カードを推奨します。SDや 、低 ビ ッ ト レ ー ト 、低 品 質 の 圧 縮 で 収
を 収 録 す る 場 合 は 、高 速
ex FAT
フォ ー マ ット に フォーマットする 必 要 が あります。「ストレ ー
の ディス ク フォ ーマットで あ る
UHS-II
タイプのSDカードを推奨します。
110MB/s
カードスロットを搭載しています。どちら
HFS+
ex FAT
フォ ーマット を 使 用してくだ さ い 。
以 上の書き込みスピードに対応
を 使 用 で きま す。
Windows
を使 用し
Mac OS
カードを取り出すには、カチッと音がするまで押してリリースします。カードがイジェクトされるので、
カードの端を持ってスロットから取り出します。
収録を開始するには、
タ ッ チ ス ク リ ー ン メ ニ ュ ー の「 ス ト レ ー ジ 」設 定 を 使 ってSDカ ード を 簡 単 にフォーマットで き ま す。
HFS+
あるいは
ex FAT
にフォ ー マットした
UHS-I
または
UHS-II SD
カード を挿入しま す。
収録を始めるのに必要な作業はこれだけです。電源を入れ、ビデオとフォーマットされたSDカード
あ れ ば 収 録 を 開 始 で き ま す!
はじめに
60
Page 61

収録
すぐに 収 録 を開 始 するに は 、タッチスクリーンを 上下 に スワ イプして オンスクリーンディスプレ イを 表 示し 、
LCD
画 面 の 下にあ る丸い 収 録 アイコンを タップします。収 録 中 、収 録 アイコン は 、四 角 い 停止アイコンに
なります。停 止 アイコ ン を タップ すると収 録 を 停止で きま す。
収 録 中 、ステ ー タス・ストリップのタイムコード カウンター は 継 続 的にアップデ ートされ 、クリップの 長さ
を 表 示しま す。
LCD
ターが
Video Assist
画面の下に表示されるので、収録中であることを確認できます。
のオンスクリーンディスプレイが見えない場合でも、小さな 収 録インジケー
Apple ProRes
または、
で き ま す 。こ れ に よ り 、
きます。選択したコーデックの設 定、トリガー収 録の有効 化に関する詳 細 は 、このマニュアルの「設定 」セ
クシ ョン を 参 照してくださ い 。
Video Assist
収 録 を 開 始 するに は 、タッチスクリーンを上下にスワ イプしてオンスクリーンメー ター を 表 示し 、
収録アイコンをタップします。撮影を停止するには、収録ボタンをもう一 度 タップしま す。
Avid DNx
または
を「タイムコード」または「
HD-SDIやHDMI
コーデックを使 用して
QuickTime
SDI/HDMI
信号経由で受け取った情報をトリガーとして、収録を開始/停止で
ファイル にクリップ を 収 録 しま す。
」情 報 に 基 づ く ト リ ガ ー 収 録 に 設 定 す る こと も
HDMI/SDI
メモ
ことを確認してください。カメラのビデオ出力にオーバーレイが付いていると、イメージと共にオー
バーレイが収 録されてしまいます。 詳細は、「
を 参 照 してくだ さ い 。
LANC
Blackmagic Video Assist 4K
LANC
接続経由のリモートコントロール
コントローラーを製品の右側にある
カメラから収録する場合、オーバーレイ機能がオフになっており、出力がクリーンな
は 、外 部
DSLR
カメラ か らクリーン な
LANC
コントローラーを使 用して収録をリモートで開 始/停止で きます。
2.5mm LANC
入 力に 接 続 するだ け で す。
HDMI
を 収 録 」セ ク シ ョ ン
継続的な収録
Blackmagic Video Assist 4Kは、2つのSD
要なイベ ントなど を 撮 影して おり、収 録 を 途 中 で止 め たくない 場 合 は 、フォーマットしたSDカ ード を ス ロット
2
にも 挿入しま す。1枚目のカ ードが フル に なると 、
この過 程でフレームがドロップすることはありませ ん。例えば 、1枚目の カ ード の 最 初 の セグメントが
00:40:01:00
で 終 わったとすると、2枚目のカードは
カードスロットを使用した継続的な収録に対応しています。重
Video Assist
00:40:01:01
は自動的に2枚目の カ ードに切り替えま す。
で 始 まりま す。
収録
61
Page 62

タイムライン上で クリップ を 編 集 する際、2つ目 の クリップ を1つ目 の 末 尾に 置 くと 、1つの 完 全 なクリップとして
再生 で きます。
SD
カードを 両 方 のス ロットに入れておくことで、メディアを 迅 速 に変 更することもで きま す。決まった 瞬 間
に収 録 を 停止したい 場 合、収 録を停止して、ストレージ 設 定 で「カード2」を 選 択 し 、再 び 収 録 ボ
タン を タップ しま す。
作業のこつ
く切り替える 場 合は、収録前にカードがフォーマットされていることを確認してください。
DSLR
DSLR
ます。
10-bit ProRes
出 力 で き る も の が あ り ま す 。こ れ は 、内 部 収 録 の
また、
限を回 避 できることで す。このメリットは 、ライブイベントやドキュメンタリー 用 の インタビューを収 録 す
る際 に特 に 役 立ちます。
この機能を最 大限に 活用するには 、オーバーレイ機 能 をオフにして、クリーンなイメージを出力するよう
カメラ を 設 定 する 必 要 が ありま す。一 般 的 に 、カメラの
号 に ステー タ ス 情 報 が 表 示 さ れ なくなりま す。
ビデオにも記録されてしまうため、この設定は非常に重要です。
DSLR
カメラ か らクリーン な
に よ って は 、
DSLR
DSLR
のオーバーレイが表示されないか確認する:
1
タッチスクリーンを上 か下 に スワ イプしてオンスクリーンメー ターを隠し 、
ジだけをモニタリングできる状 態にします。
るス テ ー タ ス 表 示 は イメ ー ジ か ら 独 立して い ま す。つ まり、イメー ジ 全 体 を クリ ーン に モ ニ タリン
グでき、ステータス表示も確認することができます。
Blackmagic Video Assist 4K
8-bit
ビデオを内部収録したり、
あるいは
HDMI
Avid DNx
カメラ の
カメラでは短時間の収録しかできません。外部収録のもう1つ の メ リ ッ ト は 、こ れ ら の 収 録 制
Video Assist
出力を
コ ー デ ック を 使って 収 録 可 能 で す。
で継続的な収録をする場合や収録スロットをすばや
HDMI
HDMI
を収録
HDMI
出力からクリーンなビデオイメージを出力したりし
に接続すれば、カメラの内部圧縮を回避して、高品質の
DSLR
カ メラ に よ って は
8-bit 4:2:0
出力経由のイメージ上でオーバーレイが見えていると、
よりも 高い 品 質 で す。
HDMI
出力設定でこの設定を変更でき、ビデオ信
Blackmagic Video Assist 4K
では、
DSLR
カメラ の イメー
LCD
10-bit 4:2:2
の上部 にあ
を
2
オンス クリーンメ ー ターが 隠 れ た 状 態 で、クリーン な ビ デ オイメージ 以 外 の 情 報 が
出 力ビ デ オに 表 示 され ない か 慎 重 に 確 認しま す。
示 さ れ る 場 合 、カ メ ラ で
レイ機 能 を オ フ にしま す。
カメラ か らクリーン な
HDMI
出 力 あ る い は ディス プ レ イメ ニュー 設 定 を 変 更 して、
HDMI
出力が出力されていれば、高品質ビデオを収録できます。
Video AssistのLCD
にカメラオー バーレ イが 表
再生
タッチスクリーンを上下にスワイプしてオンスクリーンメーター を 表 示し、
ートコントロール を タップ しま す。
クリップ を再生するには 再 生 アイコンをタップします。
再生中、ビデオを特定のフレームで一時的にフリーズさせたい場合は、一時停止アイ
コン を タップ しま す。もう 一 度タップ する と再 生 を開 始しま す。
次 ク リ ッ プ の 頭 出 し/前クリップの 頭 出しボタンを繰り返しタップ すると、クリップを前
後にスキップ で きます。前クリップの頭 出しボタンを1回 押 す と 、現 在 の ク リ ッ
プの頭に戻ります。
再生中 、スクラブ スラ イダー を 左 右 にドラッグ すると 、クリップ を 前 後 に スクラブ で きます。
するとスラ イダー を 表 示/非 表 示 にで き ま す。
LCD
画 面 の下にあ るトランス ポ
DSLR
HDMI
LCD
カメラ の
オーバー
をタップ
収録
62
Page 63

ループ 再生
ル ー プ ア イ コ ン を タ ッ プ す る と 、
しま す。
も う1度タップ するとすべての収 録クリップを 継 続 的にループ 再 生します。
3回目のタップでループ再生機能がオフになります。
スクラブスライダー を 前 後にドラッグ して、クリップ をシャトルコントロ ール。
再生モードの場 合、スクリーンの左上にパネルが表示されます。このパネルは、
SD
カードに収録されたクリップの数、再生中のクリップ、クリップの長さを表示します。
Video Assist
は現在のクリップを継続的にループ再生
設定
タッチスクリーンで 設 定を 変 更
Video Assist
ングや設定の変更が可能です。
LCD
の下にあるステ ータス・ストリップのアイコンをタップすることで、ほとんどの設 定 を 変 更できます。
レベル 調 整 や ヘッドフォン・ボリュームなどのオーディオ 設 定 は、タッチ クリーンを上下 に スワ イプして オ
ンス クリーン メー タ ー を
設定ウィンドウを隠すには、設定の外側をタップします。ストレージ設定を隠すには左右にスワイプ、ま
た は「 戻 る 」ア イ コ ン を タ ッ プ し ま す 。
設 定 の 変 更:
1
ステータス・ストリップ、あるいはオンスクリーンメーターで変 更したい設 定 をタップします。
2
はタッチスクリーンを内 蔵しています。このタッチスクリーンを 使 用して、ビデオのモニタリ
LCD
に表示させ、オー ディオメーターをタップすることで変 更できます。
例え ば 、収録コーデックを設 定したい場 合 は 、ステータス・ストリップのコーデックインジケー ター
をタップしてコーデック設定を開きます。オーディオレベルを調整したい場合は、オーディオメー
ター をタップしま す。
選 択した 設 定 ウィンド ウ でメニューボタン、矢 印 、スライダーアイコンをタップし、選 択 可 能 な 設
定の 中 から 、使 用 する 設 定を 選 択します。ウィンドウの 外 を タップ すると 、設 定 が 閉 じま す。
再生
63
Page 64

オーバーレイ
オーバーレ イ アイコンをタップ すると、ゼブ ラ、フォーカスピー キング、ガ イド、グリッドの設 定が 表示されます。
これらの設 定を使うと、カメラを接 続した際にオーバーレイを
フレーミング に役立てることができます。
LCD
に表 示して、露出 、フォーカス、構成、
オーバーレイは、
ゼブラ
ゼブラ 機 能 は 、映像 内 で 設 定した ゼ ブラレベルを超えた箇所に 斜 線 を 表 示して、最 適 露 出の設 定をサ ポー
ト し ま す 。 例 え ば 、ゼ ブ ラ レ ベ ル を
さ れ ま す 。ゼ ブ ラ を
防 ぎ やすくなりま す。
作業のこつまた、イメージ内の特定のビデオレベルの部分をハイライトするようゼブラを設定
することも可能です。例えば、ゼブラレベルを50%に設定すると、波形スコープでおよそ50%で
表 示 され る エリア を 視 覚 的 に確 認 で きます。
ゼブラ機能をオンにしてゼブラレベルを調整するには、「ゼブラ」設定の左右矢印ボタンをタップするか
スライダーをドラッグします。
フォーカスピーキングおよびフォーカスアシスト
フォーカスピーキングお よびフォーカス アシスト設 定は、イメージのフォーカスをスピーディに合 わ せるた
めのパワフルなツールです。フォーカスピー キングは、イメージ内の最もシャープ な エリアにエッジライン
を 表 示しま す。感 度 調 整 で、ラインの 強さを 変 更 で きます。
エッジラインをオンにして感 度レ ベルを調 整するには 、左右矢印をタップするかスライダーを左右にドラッ
グ し ま す 。 感 度 レ ベ ル は 「 低 」 、「 中 」 、「 高 」 の3段 階 から選 択 で きます。コントラストが 高くディテール が
多いイメージでは、ピーキング機能が邪魔になる場合もあります。その場合は設定を「低」または「中」にし
ます。ま た 、コントラストが 低くディテール が 少ないショットで は「 高 」に設 定 するとライン が 強くなり
見 えやすくなりま す。
SDI
HDMI
および
90%
に設定すると、露出設定に余裕ができるのでハイライトのクリッピングが
出力では表示されません。
100%
に設定すると、クリップされるイメージ部分にゼブラ模様が表示
エッジラインの色が イメージの色と同じ場合、エッジラインの色を変えることで見やすくできます。色を変
えるに は 、「フォーカスラインカラー」設 定 で 左 右の 矢 印をタップします。
エッジラインは非常に効果的な機 能です。エッジラインは目立つため、焦点面の深度も正確にモニタリン
グできます。また 、カメラのフォーカスリングを調 整して、エッジラインを確 認しながらショット内での
遠 近を 調 整 で きま す。
フォーカスアシストツールの選択に関する詳細は、このマニュアルの「モニター設 定」セクション
を 参 照 してくだ さ い 。
ガイド
フレームガイドには、様々な映画、テレビ、オンライン標準のアスペクトレシオが含まれます。まず「ガイ
ド」メニューボタンをタップして、次に左右の矢印をタップするかスライダーアイコンを左右にドラッグし
てガイドを 選 択 あるい は ガ イド 機 能 をオフにしま す。
設定
64
Page 65

以下のフレームガイドから選 択 できます:
HDTV
1.78:1
のアスペクトレシオ で、画 像 のアクションおよびタイトルのセーフエリアを表示します。
HD
テレビおよびコンピュータースクリーンと互換。
4:3
4:3
のアスペクトレシオを表示します。SDテレビ スクリ ーンと 互 換 。2xアナ モ ルフィッ ク アダ プタ ー
を使 用している場 合 、フレーミング をサポート。
2.40:1、2.39:1、2.35:1
フラット・ワイドスクリーンのアスペクトレシオを表示します。アナモ ルフィック、あるいはフラッ
ト・ ワ イ ド ス ク リ ー ン シ ネ マと 互 換 。こ の3つ の ワ イド ス ク リ ーン 設 定 は 、時 間 と 共 に 変 わ る シ ネ
マ 標 準 の 変 更 に 応 じ て 若 干 異 なって い ま す。
1.85:1
もう1つの 一 般的なフラット・ワイドスクリーンのシネマアスペクトレシオを表示します。この比 率は、
HDTV
より若 干 幅 広く、
2.39:1
ほど広くは ありま せん 。
グリッド
2.39:1
は、今日最も多く使用されている規格です。
16:9
グリッド機能は、縦横各2本のライン で 画面を均 等 に3分割する
3x3
グリッドのオーバーレイを表 示しま
す。「オン」、「オフ」をタップするとオーバーレイの表 示/非 表 示 を 切り替えら れ ま す。
3x3
グリッドの設 定は、非常にパワフルなツールでショットの構成をサ ポートします。例えば、人 間の目は
一 般 的に、ライン が 交わるポイントの近くで 起こるアクションに注目するの で、
3x3
グ リ ッ ド 設 定 は 、こ れ
ら の エリ ア に 重 要 な ポイント を 置くサ ポートに なりま す。
作業のこつ俳 優 の 目 は 一 般 的 に スクリ ーン の上 か ら
ので、上の 横ラインをフレーミングガイドとして使 用 で きま す。
1/3
のラインにフレーミングされる
3x3
グ リ ッ ド 設 定 は 、別
々のショットでフレーミングの一貫 性を保つのに役 立 ちます。
2.39:1
フレ ーム ガ イドは 、ポピ ュラ ーなフラットワイド スクリーンの
映 画フォ ー マットのフレ ー ミ ン グ に便 利 で す。
フォルスカラー
フォルスカラー機能は、露光指数 を示すカラーオーバーレイをイメージに 表示できます。色値は、最適露
出設 定に対応します。例えば、白色人種の肌のトーンはピンク、
38.4
%の中間グレーはグリーンで表示さ
れます。フォルスカラー機能は、シャドウおよびハイライトがクリッピングされている/されそうな場 合を
把 握 するの に 役 立 ちま す。
設定
65
Page 66

LCD
には幅広い色調の値があるため、同機能で露出をより広範に確認することで、現場の照明をより緻
密に調整したり、露出を変更することができます。
カラーオーバーレイと、それ に 対 応 する 特定の 色 調 の 値 を 示 すチ ャートが 同 セクション に 記 載され
ていま す。
フォルス カ ラー チャート
ビ デ オ フォー マ ット/フレームレート
入 力ビデオ 解 像 度および フレ ームレートは 、ステ ー タス・ストリップの「フォーマット」の セクション に 表
示 さ れ ま す 。例 え ば 、
以下のビデオ入力/出 力 フォ ー マ ットが サ ポ ートされて い ます。
対 応 入 出 力フォ ーマット
6G-SDI
2160p29.97、2160p25、1080p59.94
入出力
など で す。
525i59.94 NTSC、625i50 PAL
720p50、720p59.94、720p60
1080PsF23.98、1080PsF24
1080i50、1080i59.94、1080i60
1080p23.98、1080p24、1080p25、1080p29.97、1080p30、1080p50、1080p59.94、1080p60
2160p23.98、2160 p24、2160p25、2160p29.97、2160p30
HDMI
入出力
525i59.94 NTSC、625i50 PAL
720p50、720p59.94、720p60
1080i50、1080i59.94、1080i60
1080p23.98、1080p24、1080p25、1080p29.97、1080p30、1080p50、1080p59.94、1080p60
2160p23.98、2160 p24、2160p25、2160p29.97、2160p30 (Blackmagic Video Assist 4K
)
コー デック
まず「コー デック」インジ ケーター をタップして関 連の 設 定を開き、次 に 矢 印アイコンかスライダーをタッ
プして選択します。使用可能なコーデックは、使用しているモデルにより異なります。例えば、両モデルと
もHDビデオを様々なビットレートで
Video Assist 4Kは、Ultra HD
収録用に
Apple ProResとAvid DNxHD
ProRes/DNxHR
コーデックを選択することも可能です。
コーデックで収 録できます。
Blackmagic
ProRes
コー デックは
MXF
ブ
ファイルとして収 録 可 能です。コー デックオプションに関する 詳 細 は 、このセクションに含 ま れ る
QuickTime
ファイルとして 収 録 され ま す。
DNx
ファイル は
QuickTime
あるい は ネイティ
表 を 参 照してくだ さ い 。
設定
66
Page 67

対応コーデック
クリップ を
QuickTime
ProRes 422 HQ 10 ProRes 422 HQ 10
ProRes 422 10 ProRes 422 10
ProRes 422 LT 10 ProRes 422 LT 10
ProRes Proxy 10 ProRes Proxy 10
DNxHD 220x 10 DNxHD 220x 10
DNxHD 145 8 DNxHD 145 8
DNxHD 45 8 DNxHD 45 8
DNxHD 220x MXF 10 DNxHR HQX 10
DNxHD 145 MXF 8 DNxHR SQ 8
DNxHD 45 MXF 8 DNxHR LB 8
– – DNxHD 220x MXF 10
フ ァ イ ル とし て 収 録 。例 外 的 に
DNx MXF
ファイルはコーデック名に
MXF
と表示 。
BlackmagicVideoAssist BlackmagicVideoAssist4K
コー デック ビット深 度 コーデック ビット深 度
– – DNxHD 145 MXF 8
– – DNxHD 45 MXF 8
– – DNxHR HQX MXF 10
– – DNxHR SQ MXF 8
– – DNxHR LB MXF 8
タイム コ ード
タ イ ム コ ー ド カ ウ ン タ ー は 、ク リ ッ プ の 長 さ を 、時 間:分:秒:フレ ー ムで 表 示しま す。
トリガー 収 録
「トリガー収 録」インジケーターをタップしてタイムコードトリガー(タイムコード)、あるいは
ト リ ガ ー(
SDI/HDMI
)収 録のどちらか を 選 択します。これにより、
SDI/HDMI
インターフェースで 受 け 取っ
た 情 報 を ト リ ガ ー と し て 、収 録 を 開 始/停 止 で き ま す。ト リ ガ ー 収 録 を 無 効 化 す る に は「 オ フ」を 選 択 し ま す 。
タイムコ ード
「 タ イ ム コ ー ド」を 選 択 す る と 、
Video Assistは、SDI
または
HDMI
ソース か ら の タ イム コ ード を 検
出するとすぐに収録を開始します。タイムコードが停止すると、収録を停止します。この機能は、
SDI開始/
停止トリガ ー 収 録 に 対 応 して い な い カメラ に 接 続 している 際 に 便 利 です。カ メラ の タイ
ムコード 設 定 を 、カメラの 収 録 中 に の み進 む よう設 定 する 必 要 が あ る 場 合 が ありま す。カメラの
タイム コ ード が 別 の 設 定( 例:時 刻 タイムコ ー ド )にな って い る 場 合 、タイム コード は 常 に 進 んで
いるため 、
Video Assist
の収録は継続的にトリガーされます。
SDI/HDMI
設定
67
Page 68

SDI/HDMI
このオプションでは、カメラの収録 開始/停止ボタンを押すのと合わせて、
開始/停止する よう設 定 で きます。
HDMI
トリガ ー 収 録 、
Video Assist
SDI/HDMI開始/
経 由 でトリガ ーで きる カメラ が 必 要で す。トリガ ー 収 録 を サ ポートしているカメラ に は 、通常 、
HD-SDI
リモート
I/F、SDI
リモート開 始/停止トリガーなどのメニューがあります。
停止トリガー収録では、収録機能を
の収録を
HD-SDI/
ソース
接 続した
別のソースが 接続されている場合、
別 のソース に切り替えます。バックアップの 信 号 が 必 要 な 場 合 に冗 長 性 を 得られ る ので 便 利 で す。
SDI/HDMI
入 力ソ ース が 表 示され ま す。
Video Assist
Video Assist
はオリジナルソースの信号が一定の時間失われると、
は 、最 初 に 接 続 し た ソ ース を 使 用 し ま す 。
カード
現在ストレージ設定で選択されているSDカード のステ ー タスを 表 示します。
Blackmagic Video Assist 4Kは、2つのSD
1
「カード」ステー タスをタップ するか 、タッチスクリーンを左 右にスワイプして「ストレ ー ジ」設 定 を
開きます。
ストレージ設定でタッチスクリーンの左上にある「カード1」あ る い は「 カ ー ド2」の ア イ コ ン
をタップしま す。
2
またストレージ設定で、描くカード情報の下にある「カードのフォーマット」アイコンをタップす
るとカードをフォーマットすることもできます。
カードスロットを搭 載しています。収録するカードを 選 択:
設定
68
Page 69

以下のリストは、カードステータスに表示されるその他のインジケーターです。ステータスインジ
ケーター は 以 下 の 通 りで す:
ロード中
SD
カード を挿入すると、インジケー ターは「ロ ード 中」と表 示して、
カードを検証中であることを示します。
準備完了
フォ ー マ ット済 み のSDカードが 検 証され たら 、ステ ー タスに「 準備 完 了」と表示され 、カードが
収 録可 能 な ことを 示 します。
フォ ー マ ット
SD
カードを初 期 化する 必 要が ある 場 合、インジケー ターは「フォーマット」と表 示し、カ ード をフォー
マットするよう示します。「カード」インジケーターをタップするかタッチスクリーンを左 右にスワ
イプして、「ストレージ」設定を開き、カードをフォーマットします。詳細は「SDカードについて」
の セ ク シ ョンを 参 照してください 。
カードなし
選 択したSDカードスロットにカードが 挿入されていない場 合、インジケーターは「カード なし」
と表 示 しま す。
フル
使 用してい るSDカードが収録スペースをすべて使用して収録が終了するおよそ3分 前 に「 フ ル 」
のインジケーターが点 滅します。
Blackmagic Video Assist
が
カードが フルになるとインジケーターは赤くなり収録 が 停止します。
したファイル を 保 存 します。
Blackmagic Video Assist 4K
スロット2に切り替わり、2枚目の カ ードに 収 録 を 続 けま す。
残り収録時間
再生モ ード で は 、SDカードの残り収録時間がステータスインジケーターに表示されます。
のスロット2にフォーマットしたカードが入っている場合、自動的に
Video Assist
は最後に収録
バッテリー 残 量
バッテリー残量を表 示します。バッテリーアイコンをタップして大きいディスプレイを開くとバッテリーレ
ベル を正 確 に 確 認 で きま す。
操作中、
く切り替えます。バッテリーを充電する際は両 方のバッテリーを同時に充 電します。バッテリーは、種 類
や状態によりますが、使用していない場合はフル充電に約3時 間 必 要 で す。
Blackmagic Video Assistで2つのCanon LP-E6
収録が可能です。
能 で す。
Video Assist
Blackmagic Video Assist 4Kは、2
は残 量が少ない方のバッテリーを先に使 用し、次にもう一方のバッテリーに間 断 な
バッテリーがフルに充電されている場合、およそ
つのフル充電バッテリーでおよそ80分の収録が可
180
分の
設定
69
Page 70

拡大
ズー ム 機 能 は 、カ メラを 接 続 して い る 際 にイメー ジ を ズームして、フォ ーカ スを 確 認 したり 、ビ デ オイメー
ジのディテールを確認したりできます。ズーム機能は、収録前のショットのフレーミングや再生中に使用
で きま す。クリップの 収 録 中は ズーム 機 能 が 無 効 に なりま す。
ズーム機能をオンにするには、バッテリー残量インジケーターの下にあるズームアイコンをタップします。
ズームをオフにするには、同じアイコンをもう一度タップします。ズーム機能は、
オの モ ニタリン グ 時 に使 用 で きます。
Ultra HD
およびHDビデ
ボリュームおよびアナログオーディオレベル
スピー カ ー ボ リューム
Blackmagic Video Assist 4K
ンスクリーンメーター を 表 示 させ、オーディオメー ターをタップしてボ リュームおよび アナ ロ グ オーディオ
レ ベ ル 設 定 を 開 きま す。ボ リュー ム スライダー をドラッ グ して ボ リュームを 上 げ 下 げ しま す。
メモスピーカーは再生中に有効になりますが、
録/モニタリング する際 は 無 効 に なります。これは 、マイクが 接 続 さ れてい る 際 のハウリン
グ を 避 けるた めで す。
の 内 蔵 ス ピ ー カ ーボ リュームを 調 整 するに は 、
Blackmagic Video Assist 4K
ヘッド フォン ボ リューム
ヘッドフォンボリュームを調整するには 、スクリーンディスプレイの右 下にあるオーディオメーター をタッ
プしま す。
が ヘッド フ ォン ボ リューム 設 定 に 変 わ る ので 、ス ピ ー カ ーボ リュームと同 じように 調 整 で き ま す。
Blackmagic Video Assist 4K
では 、ヘッドフォンを差し込むと直ぐにスピーカーボリューム設定
アナログオーディオレベル
Blackmagic Video Assist 4K
オレベルを調整できます。各入力で調整できるレベル範囲は、
では、各入 力のスライダーをドラッグして
+10dB~+65dB
LCD
を上下に スワ イ プ して オ
でビデオ入力を収
XLR
入 力 経由 のア ナログ オーディ
です。
設定
70
Page 71

クリッピングされることなく最適なオーディオを収 録 するには、レベルが
XLR
るよう
詳 細 は 、「オンスクリーンメーター を 使った モ ニタリング」の セクションを 参 照してください 。
入力オーディオメーターで各入力のスライダーを調整します。
-20と-12dBFS
の間 でピークにな
ス ト レ ー ジ 、モ ニ タ ー 、デ ィ ス プ レ イ 、
オ ー デ ィ オ 、セ ッ ト ア ッ プ 設 定
タッチスクリーンを左 右 に スワイプして追 加 設 定 お よび インフォメーションを開きま す。この 画 面でSDカー
ドのストレージ情 報の 確 認 、カード のフォーマット、モニター 調 整、ディスプレイ設 定、日 付/時刻の設定
が 可 能 で す。
ジに戻るには、左右にスワイプするか、あるいは
コン を クリックしま す。
ストレー ジ 設 定
ス ト レ ー ジ 設 定 で は 、挿 入 し たSDカードの容量、フォーマットのタイプ(
確 認 で き ま す 。ま た
ト に 関 す る 詳 細 は「SDカ ー ド に つ い て 」の セ ク シ ョン を 参 照 し て く だ さ い 。
Blackmagic Video Assist 4K
Video Assist
で直 接カードをフォーマットすることも可能です。SDカードのフォ ーマッ
では、オーディオ設定も可能です。設定を隠してビデオのイメー
Blackmagic Video Assist 4K
の 左 下 に あ る「 戻 る 」ア イ
HFS+、ex FAT
)、残 り ス ペ ー ス を
設定
71
Page 72

モニター 設 定
モニター 設 定 で は 、2種類のフォーカスアシストツールのいず れかを選択でき、「アナモ ルフィックデスク
イーズ」および「ブル ーのみ」を有 効にできます。さらに、ユニットの物理的な位置に応じてスクリーンを
回 転 で き ま す。
フォーカスアシスト
「ライン」を選 択 すると、イメージ に含まれるシャープ な 領 域にカラ ー の輪 郭 が 表 示され ま す。
「ピーキング」を選択すると、焦点が合っているイメージ領域のディテールが過剰に鮮明化
されて表示されます。
フォーカスラインカラー
フォーカスアシストのカラ ー を 緑、赤 、青、白から選 択 で きます。フォーカスアシストの 色が イ
メージの色と似ている場合、フォーカスアシストの色を変えると見やすくなります。
アナモルフィックデスクイーズ
Blackmagic Video Assist 4K
能は、アナモルフィックレンズを使用したカメラからの水平方向にスクイーズされたイメージを
正確に 表 示します。各アナモルフィックレンズは 異 なるスクイーズファクターを使 用しているの
で、イメージを正確に表示するために必要なデスクイーズの量はそれぞれ異なります。アナモル
フィックレンズのスクイーズのレベルに応じて、デスクイーズの量を「
ら 選 択 で き ま す 。設 定 を オ フ に す る に は「 オ フ」を 選 択 し ま す 。
スクリーン回 転
ディスプレ イの自動 回 転 を 無 効 にしたい 場 合は、「オフ」を選 択してください 。スクリーンが 現 在
の位置でロックされ、上下を逆さまにしても回転しません。
は、アナモルフィック デスクイーズ設定に対応しています。この機
1.33x
」 、「
1.66x
」 、「2x」か
ディス プ レ イは
する設 定は 、
180
度反転させて設定することもできます。ディスプレイを
Video Assist
を上下 逆 さまにカメラリグ に マ ウ ントす る 場 合 に 便 利 です。
180
度反転してロック
スクリーンの自動回転を有 効 にするには 、「オート」を選 択してください 。
ブルー のみ
Blackmagic Video Assist 4K
は「ブル ーのみ」モードを搭載しており、ブルーチャンネルのみを
表示する白黒のイメージを表示します。デジタルビデオ信号にノイズがある場合、ブルーチャン
ネルで 最も際 立って表示されるため、この機 能を使 用 することでノイズのチェックを簡単に行え
ます。カメラ のフォ ーカスの 確 認 のた め に 、白黒 の イメー ジ を 使 用 することもで きま す。「ブル ー
の み 」を 有 効 に す る に は「 オ ン 」を 選 択 し て 下 さ い 。
入力ソースのモニタリングや再生中に使用する3D
設 定 を 「 オ ン 」 に し 、「3D
LUT
」設 定の左 右の矢印のいずれか をタップします。
LUT
の 選 択 は 、「3D
LUT
を表示」
設定
72
Page 73

3DLUT
Video Assist
を表示
は、入力ビデオのイメージに3D
LUT
を適用して表示できます。3D
LUT
は ディス プ レ イに 表
示されるだけで、実際にビデオには収録されないので、収録されたイメージが恒 久的に「焼付く」心配は
必 要 あ り ま せ ん 。し か し 、
たのと同じ
LUT .cube
ファイル を
DaVinci Resolve
DaVinci Resolve
LUT
で同じ
をイメージに適 用したい場合、
に読み込むだけでグレードに適用できます。
Video Assist
で使っ
これは、撮影現 場でモニターしたルックをポストでマッチさせ たり、特 定のカラープロファイルに 適 合さ
せたりできる有効なオプションです。詳細は、
3D LUT
の 使 い 方 を 参 照してくだ さ い 。
DaVinci Resolve
LUTを.cube
のマニュアルのカラーコレクションでの
ファイルで 書 き出し 、
Video Assist
に読み込む方法
も説 明されていま す。
Blackmagic Video Assist Setup
Video Assist
3DLUT
を 読 み 込 む:
1Video Assist Setup
2
セットアップ 用 の ソ フトウェア を 立 ち 上 げ たら 、丸い 設 定 アイコ ン をクリックして
に最大6つの3D
をインストールしたコンピューターと
ソフトウェアユーティリティを 使うと、
LUT
をロ ード で きま す。
Video Assist
を接 続しま す。
Video Assist
の
設 定を 開 きま す。
3
「 ビ デ オ 」タ ブ に 、3D
Import LUT
ト の「
も う 一 度「
4
右 下 の「
LUT
を使 用してビデオを モニタリング する:
1
タッチスクリーンを左右どちらかにスワイプし、メニューバーにある「モニター」をタップして、
Video Assist
2
左 右 ど ち ら か の 矢 印 を タ ッ プ し て 、「3D
Open
Save
」ボタンをクリックして 新しい 設 定 を 保 存 してください 。
のモニター設 定を開きます。
LUT
の読 み込 みに使 用 する6つのスロットがあります。空いているスロッ
」ボタンを クリックして、コンピューター上の
」を クリ ッ ク し て 、選 択 を 確 定 し ま す 。
LUT
を 表 示 」設 定 を「 オ ン 」に し ま す 。
LUT .cube
ファイル を 選 択しま す。
LUT
を無 効にする
に は 、も う 一 度 タ ッ プ し て く だ さ い 。
3
「3D
ま た は 、他 の
LUT
」設 定 で 、左 右 ど ち ら か の 矢 印 を タ ッ プ し て
LUT
が別のスロットにある場合は、タップし続けて別のものを選択してください。
LUT
を読み込んだスロットを選択します。
ソースの イメージ に 戻るには 、左 右 のどちらかにスワイプ するか、タッチスクリーンの 左 下にある「戻 る」
矢 印 を ク リ ッ ク し ま す 。こ れ で 、3D
タリングする 際 にも 、3D
LUT
LUT
が適 用された入力ビデオでモニタリングができます。再生をモニ
が 使 え ま す。
設定
73
Page 74

ディスプレ イ設 定
「 ディスプ レ イ」アイコン を クリッ クして ディス プ レ イ 設 定を 開 きま す。こ こ で は
トラスト、サチュレーションを簡単に調整できます。調整したい設定をタップし、スライダーアイコンを左
右にドラッグします。
明るさ
LCD
全体の明るさを調整します。例えば、野外の明るい環境で作業する場合は
上げ ると見 や すくなりま す。
コントラスト
イメージ の 明 る い/暗い エリアの幅 を 調 整します。高コントラストではイメージの ディテ ールおよ
び奥行きが詳細になり、低コントラストではイメージがソフト/フラット に なります。
LCD
の明るさおよびコン
LCD
の明るさを
彩度
表示するイメージの色量を上げ下げします。
Video Assist
表示されるイメージに影響しますが、収録するビデオには影響しません。
の電 源を切るとすべての設 定が保存されます。これらの 特 定の設 定を変 更すると、
オー ディオ設 定
Blackmagic Video Assist 4K
うな 独 立した 設 定 に 対 応 し ま す:
1XLR
ライン、
マイク 以 外 の プ ロ 仕 様 オ ー ディ オ 機 器を ア ナ ロ グ
XLR
が「
インレベルのオーディオを出力します。これはマイクレベルと比べてより強い信号になります。
ま た 、マ イ ク を
ます。これは、一般的にマイクは、ラインレベル出力の機器と比べてわずかに弱い信号を出力す
るためです。このため
にします。
XLR
アナログ入 力を回避して、ソースビデオのエンベッド
したい場合は、「ビデオ」を選択します。
メモ
変更する際は必ずオーディオ設定を再設定してください。
XLR
ライン」に設定されていることを確認してください。多くのプロ仕様オーディオ機 器はラ
Blackmagic Video Assist 4K
は 、パ ワ フ ル な オ ー デ ィ オ レ コ ー ダ ー で も あ り ま す 。各
マ イ ク 、ビ デ オ
XLR
入力に接続している場合は、収録レベル
XLR
入力に接続している場合は、それぞれの入力を「
Blackmagic Video Assist 4K
は、電源を切っても設定を記憶しています。接続を
は マ イク 信 号 を 増 幅して 収 録に 適 し た レ ベ ル
SDI
あるいは
XLR
入力は以下のよ
XLR
マ イ ク 」レ ベ ル に 設 定 し
HDMI
チャンネル1、2を残
LCD
に
設定
74
Page 75

2XLR
パッド
騒がしい 環境や、予測 不 可 能 な 大きい音の 近くで撮影する場 合、
XLR
パディング機 能をオンに
できます。これにより、オーディオレベルを少量落とすことができるので、レベルの範囲がわず
かに広がり、クリッピングの防止になります。通常の環境で撮 影している場合は、同機能を
オフにしてください 。
3
ファンタム 電 源
電 源を 内 蔵して い な いマイクを 接 続してい る 場 合、
XLR
コ ネクター 経 由 で フ ァンタム 電 源を 使っ
て給 電 で きま す。設定をオンにしてください。
メモバッテリー給電式のマイクを使用する場合は、必ずファンタム電源を「
てください。バッテリー 給 電 式のマイクによっては、ファンタム電源が供 給 されることで
故 障 の 原 因となる場 合 が ありま す。
セットアップ 設 定
セットアップ 設 定 で は 、
言語、現 在インストールされている内部ソフトウェアのバージョンなどが表示されます。
Video Assist
の内 部 クロックの日 付と時 刻 を設 定 できます。他にもデバイス名 、
OFF
」に し
Video Assist
の セ ッ ト ア ッ プ 設 定 の ペ ー ジ に は「
HDMI
レン ジ 」設 定 が あ り ま す。
言語
左 右 の 矢 印 の い ず れ か を タ ッ プ す る と 、「
Blackmagic Video Assist Setup
「
HDMI
レンジ
Video AssistのHD
モデルは
」セ ク シ ョ ン を 参 照 し て く だ さ い 。
HDMI
レンジを選択できるので、ユニットに入力されている信号の種類を指
定できます。イメージを正確に表示するには、
English
」と そ の 他 の 言 語 を 切 り 替 え ら れ ま す 。 詳 細 は 、
Video AssistのHD
モ デ ル で 選 択してい る入 力レンジ が 、
ソースから出力されている信号の 出力レンジと一致している必要があります。例えば 、ソースビデオが フ
ルデ ータレンジとして出力されている場 合は「フル」を 選 択し、ビデオレンジとして出力されている 場 合 は
「ビデオ」を選択します。
選択すべき設定がわからない場合は「自動」を選択すると、自動的に設定が選択されます。
Video Assist 4K
は、この設定を搭載していません。そのため、
HDMI
レンジは自動的に選択されます。
Blackmagic
日付と時 刻 を 設 定
これらの設定を正確に設定していると、クリップファイルに便利な情報が記録され、各クリップが収録さ
れた日付/時 刻 を 確 認 で きま す。
設定
75
Page 76

日付/時 刻 設 定 を 調 整 す る:
1
ペン の アイコンを クリックしま す。
2
日 、月 、年 、時 刻 の 矢 印 を タ ッ プ し て 設 定 を 変 更 し ま す 。
3
「保存」をタップして変更を保存します。
オンスクリーンメーターを使った
モニタリング
Video Assist
カメラの露 出 お よびルミナンスレンジ の 確 認 や、ソース オー ディオレベ ル のモニタリングが 可 能で す。
は、ヒストグラム、オーディオレベルメーターなどの便利なスクリーンメーターを搭 載しており、
ヒストグ ラム
スクリーンメーターの左 側 にはヒストグラムが 表 示され 、ビデ オのルミナンス分布が確 認 できます。完 全
なブラックはヒストグラムの左端で、完全なホワイトは右端になります。これらの範 囲内で、ビデオ信号
がある 程 度底 部でシャープになっている 場 合、シャドウおよびハイライト部分はクリッピングされておら
ず、ビデオのすべてのトーンレンジのディテールが保 存されています。
オー ディオメー ター
スクリーンメーターの右側にはオー ディオメーターが表 示 され 、入 力ソースの チャンネル1および2のオー
ディオレベルが確認できます。単位は
され る ので、最大レベルに達したことがはっきりと確 認できま す。
最 適 な 音 質 を 得 る た め に は 、オ ー デ ィ オ レ ベ ル が
ベルなので、これを超えるオーディオはクリップされ、歪みの原因となります。ピークオーディオレベル
-20から-12dBFS
は、
-12
が
る可 能 性 が ありま す。
から
-6dBFS
のグリーンのゾーン内の上限に近い位置に収まることが理想的です。ピークレベル
のイエロー/レッドのゾーンになる場 合は、オーディオクリッピングが生じ
dBFS
で表示され、ピークホールド・インジケーターはしばらく表 示
0dBFS
を越えない ようにしてください。
0dBFS
は最 高レ
グリーンの上限 内に位 置しているチャンネル1のピークオーディオレベル
(上部 )、クリッピング する可能性があるチャンネル2(下部)
Blackmagic Video Assist 4K
するとアナログ オ ー デ ィ オ レ ベ ル・ス ラ イ ダ ー が 表 示 さ れ ま す。
スライダー を 左 右にドラッグ して、各チャンネルのオー ディオ
レベ ル を上げ 下げ で きま す。
で は 、オ ー デ ィ オ メ ー タ ー を タ ッ プ
設定
76
Page 77

Blackmagic Video Assist 4K
チャンネル のスライダーを左 右にドラッグ します。
Blackmagic Video Assist 4KのXLR
メモ
オ ー ディ オ 設 定 画 面 で「
でア ナログ オーディオレベル 調 整 するには、オー ディオメー ターをタップして各
コネクター に接 続 さ れ た オー ディオを収 録 するには 、
XLR
ラ イ ン 」ま た は「
ビデオスコープ
XLR
マ イ ク 」を 選 択 し ま す。
Blackmagic Video Assist 4Kは4
データレ ベ ル をモニタリングで きます。スコープの 表 示は 、波 形 、パレード、ベクトルスコープ、ヒストグ
ラムから選 択 で きます。これらのスコープは 、トーンのバランスの モニタリング、黒つぶ れや白 飛 びを防ぐ
ためのビデオレベルの確認、クリップ内の色かぶりチェックなど、様々な用途に使用できます。
各スコープはビデオ信号の様々な特性を正確なグラフィックで分析するため、ビデオ信号のカラーやコ
ントラストを構成する輝度、彩度、色飽和度、色相、赤/緑/青チャンネルなど、各ビデオコンポーネントの
相 対 的 強 弱 度 やレンジ を 確 認 で きま す。
ビデオスコープ のメニューバー のスコープの 表 示 オ プ ション
種類のリアルタイムビデオスコープを搭載しており、ビデオ信号の内部
スコープ を有 効 にする
ビデオスコープは、
「ディスプレ イ 選 択 」メニューバー が 画 面の底 部 に表 示 さ れ ま す。このメニューで、波 形 、パレー
ド、ベクトルスコープ、ヒストグラムから使 用 するス コープ を 選 びます。スコープ を 使わずにビ デ
オ を 表 示 す る に は「 ビ デ オ 」を 選 択 し ま す 。
「ディスプレイ選択」の外をタップ するとメニューが閉じます。
スコープの 調 整
スコープを 選 択したら、イメージ 内をタップして調整 スライダーおよび ビデオアイコンを開きます。
調 整 スラ イダー とビ デ オ アイコン
Video Assist 4K
の画面の左下のヒストグラムをタップしてアクセスします。
設定
77
Page 78

調整スライダーをタップすると画面左側に明度および不透明度スライダーが開きます。
この2つのスライダーを使い、下に表示されているビデオに対するスコープの明度と不透明度
を調 整しま す。
明度 – 明度を変更してスコープのグラフの詳細部分の表示を調整します。
不透明度 – 不透明度を変更してスコープの透明性を変更します。
これらの設 定を調整して、ビデオのモニタリングとスコープの使 用を同時に行う際の環 境を
完 璧に 設 定 で きま す。
不透 明度スライダーを下げると、ビデオとスコープが同時に確認できます。
ビデオアイコンをタップするとスコープがフルスクリーン表示となり、ビデオが右上に表示され
ます。これにより、ビデオとスコープを同時に確認する際に、スコープをさらに詳細
にチェックで きま す。
ビデオアイコンをタップしてスコープをフルスクリーン表示、ビ デオを右上に 表示 。
設定
78
Page 79

波形
波形は 、従 来型のルミナンス波 形モニターのような、デジタルエンコードされた波 形 を 表 示し、ビデ オ信
号 の 輝 度 ま た は 明 度 の レ ベル の モ ニタリン グ に使 用しま す。
グラフの下端はイメージの黒レベル(シャドウ)を示し、上端は白レベル(ハイライト)を示します。グラフ
の上 端 と下 端 の 範 囲 が 、イメー ジ 全 体 のコ ントラスト比 を 表 して い ま す。フッテ ージ によって波 形 は 異 なっ
た見 え 方になりま す。コントラストが 高いビデオをモニタリングしてい る 場 合、中 間 グ レ ー に値 が 表 示 さ
れ な い可 能 性 が あ りま す。
クリッピングを発生させずに理 想的なビデオレベルを得るには 、波形の黒レベルが0%未 満 、白 レ ベ ル が
100%
を超 過しないようにしてください 。これらの 値を越えると、イメージはクリッピングされ 、シャドウと
ハイライトのディテールが失われます。
波形モニターはイメージをグラフ化したもので、輝度の 値を表 示します。これはビデオの水平方向の 位 置
を反映しています。例えば、屋外での撮影で左側の空が露出過多の場合、波 形グラフの左側が
超 え た 値 を 示 します。
100%
を
輝度の 値 を表示する波 形
RGB
パレード
RGB
パレードは赤、緑、青チャンネルの輝度を個別に波形として表示します。各チャンネルの比較を表示
するので、
イラ イト、ミッドト ーン、シャドウを 比 較 する ことで 色 か ぶ り を 見つける こともで き ま す。例 え ば 、青 チャン
ネルのシャドウが高い場 合、ブラックに青みがかかります。
各チャンネル内の全トーンレンジ を比較して、違いを確認で きるので、イメージのカラーを詳細に確認で
きます。パレードスコープでは各チャンネルの波 形が確認できるので、ホワイトバランスの問題や色かぶ
りが瞬時に見つけられます。また、各チャンネルが複合された単一の波形では気づけないような、特定の
カラー チャンネル にお けるクリッピ ン グも 確 認 で きます。
3つのRGB
ン、シャドウを示し、イメージの水平方向の位置も反映します。
RGB
パレードでは各チャンネルのレベルのモニタリングができます。また、各チャンネルのハ
波形は、波形スコープと同じ原理で表示されます。上部、中部、下部がハイライト、ミッドトー
設定
79
Page 80

RGB
パレ ードは 赤/緑/青チャンネルの輝度を個別に波形として表示
ベクトルスコ ープ
ベクトルスコープはイメージの 色 相および 彩 度の全 範 囲を測定します。
来型のベクトルスコープを搭載しており、トレース式グラフのように表示されます。グラフを囲むセーフ
ティマーカーに
100%
を上限とするカラーバー彩度のターゲットが配置されています。
フレームに含まれるカラーの彩度が極めて高い場合、グラフ内の対応する部分は端に向かって引き延ば
されて表 示 さ れ ま す。彩度 が 低 い カ ラ ー は ベクトルス コ ープ 中 心 付 近 にとど まります。ベクトルス コ ープ
の中心は彩度が0の状態です。ベクトルスコープグラフの異なる角度において何ヶ所が 突 出しているかを
数えることで、イメージに含まれる色相の数を確認できます。また、突出した部分の角度でそれぞれ
の 色 相 が 分 かりま す。
さらに、グラフの中心が、ベクトルスコープの中心にあるかどうかを確認することで、イメージ内のカラー
不均衡の有無を把握できます。例えば、ベクトルスコープのグラフが中心からずれている場合は、傾きの
角度でイメージ内に色かぶりや偏りがあることを確認できます。
Blackmagic Video Assist 4K
は従
カラ ーバランスは
RGB
パレ ード 表 示 とベクトルスコープ 表 示 の 両 方 で モ ニタリン グが 可 能 で す が、ベ クト
ルスコープ表示の方がカラーバランスの問題を確認しやすいことがあります。
ベクトルスコープはイメージの色 相とサチュレーションの 全 範 囲を表示
設定
80
Page 81

作業のこつ 肌のトーンを含むビデオ信号をモニタリングする際は、ベクトルスコープ上の10時く
らい の 線 に沿って、温 か いカラ ーサチュレ ーションを 保 つと良 いで しょう。これは 、「フレッシュ
トーン・ライン」と呼ばれ、皮 膚の下にある血液の色に基づいたラインです。したがって、フレッ
シュト ーン・ラ イ ン は 、あ ら ゆ る 肌 の 色 に 適 用 す る こと が で き 、肌 の ト ーン を 自 然 な 色 に 見
せること が で きま す。
ヒストグラム
ヒストグラムは ルミナンス分布(ブラック-ホワイトの情報 )を水平スケールで 表 示 するので、ビデオのブ
ラックや ホワイト部 分で ディテ ールが クリッピング さ れ る可能 性 を 確 認 で きます。また 、ヒストグラムで
は、ビデオのガンマ変 更の効果 が 確認できます。
ヒストグラム 表 示 の左 側 は シ ャド ウ(ブラック)で、右 側 は ハイラ イト( ホ ワ イト)になりま す。カメラ か ら
のイメージをモニタリングしていて、レンズアパーチャーの開閉を行なった場合、ヒストグラムの情報が
開閉に応じて左右に動くことが確認できます。これを使い、イメージのシャドウ/ハイライトの クリッピ ン
グ を チェックで きま す。また、トーンレン ジ で 表 示 さ れ るディテ ール の 量を 簡 単 に 確 認 で きま す。例え ば 、
ヒストグラムの中央部周辺にある高くて幅広い情報は、イメージのミッドトーンのディテールの露出が適
切な値であることを意味します。
水 平 ス ケ ー ル の 両 端(0%または
100%
周辺)に多くの情報が表示されている場合、ビデオがクリッピング
している可能性があります。撮影時に生じるビデオのクリッピングは悪い結果につながりかねません。こ
れ は 、後 に 管 理 さ れ た 環 境 で カ ラ ー コ レ ク シ ョ ン を 行 う 場 合 、ブ ラ ッ ク/ホワイトのディテ ールが 必ず 維 持
されている必要があるためです。撮影中は、ヒストグラムの中央部で情報が多くなり、両端に行くに従っ
て徐々に少なくなるように露 出を維持してください。これにより、ホワイトとブラックが フラットに見え、
ディテールが損失することがないので、後でカラーコレクションを行う際に制限が生じません。
ヒストグラムは 水平方 向にルミナンス分布(ブラックからホワイト情報)を表 示
設定
81
Page 82

SD
カードについて
高速のSDカードを選ぶ
Ultra HD
これらのカードは 高 速データスピードに対応しており、大 容 量 ストレージをサポートしています。
Blackmagic Video Assist 4KでUltra HD
この セクションには、
す。定期的に当マニュアルの 最 新バージョンを確 認し、常に新しい 情 報を入手することをお勧めします。
マニュ アル は
ド で きま す。
下 の 表 は 、弊 社 が テ ス ト を 行 っ たSDカ ー ド の リストで す。
ぞれ表記されたフォーマットでの収録が可能です。
対応SDカード
およびHD収録には高 速
Ultra HD/HD/SD
Blackmagic Design
最 大 対 応 フォ ーマット メーカー /モデル サイズ
Ultra HD 2160p30 inc MXF Transcend SDXC UHS II 180MB/s 64GB
Ultra HD 2160p30 inc MXF Lexar SDXC UHSII 2000x 300MB/s 64GB
Ultra HD 2160p30 inc MXF Lexar SDHC UHSII 2000x 300MB/s 32GB
Ultra HD 2160p30 inc MXF Toshiba Exceria Pro SDXC UHSII 64GB
Ultra HD 2160p30 Delkin Devices SD SDHC UHS II 250MB/s 32GB
Ultra HD 2160p30 SanDisk Extreme Pro SDXC UHSII 280MB/s 64GB
HD 1080p60 inc MXF SanDisk Extreme Pro UHS I 95MB/s 64GB
UHS-II
カード を、HD収録には
を 収 録 す る 場 合 は 、最 高 速
ビデオの収録に使用できる最新SDカード のリスト を 記 載していま
ウ ェ ブ サ イ ト(
www.blackmagicdesign.com/jp/support
UHS-1
カード を 使 用 する ことが 重 要で す。
UHS-II
カードを使用してください。
Blackmagic Video Assist 4K
)で ダ ウ ン ロ ー
の 使 用 時 に 、そ れ
HD 1080p60 Lexar SDHC UHS II 1000x 150MB/s 32GB
HD 1080p60 Lexar SDXC UHS II 1000x 150MB/s 64GB
HD 1080p60 Lexar SDXC UHS II 1000x 150MB/s 128GB
HD 1080p60 Lexar SDXC UHS II 1000x 150MB/s 256GB
HD 1080p30 inc MXF Lexar SDHC UHS I 633x 95MB/s 32GB
HD 1080p30 inc MXF Lexar SDXC UHS I 633x 95MB/s 64GB
UHS-I/UHS-II SD
多くの
度をテストすることをお勧めします。
ソフトウェアを ダ ウンロードして、このテストを行ってください 。
関 す る 詳 細 は 、同 セ ク シ ョ ン の「 デ ィ ス ク ス ピ ー ド の 確 認 」を 参 照 し て く だ さ い 。
カードは
VideoAssistでSD
SD
カードはストレージ設 定を使って簡単にフォーマットできます。SDカ ードのフォ ーマット は
ex FAT
は
HFS+は「Mac OS Extended
奨されるフォーマットです。ジャーナルメディアのデータは修復しやすく、破損する可能性が低くなります。
HFS+はMac OS
から選 択 で きま す。
でネイティブ サ ポ ートさ れてい ま す。
60fps
までの圧縮HDビデオの収録に対応できますが、念のため記録速
Blackmagic Design
サ ポートセンターで
Blackmagic Disk Speed Test
Blackmagic Disk Speed Test
の使用に
カ ードをフォ ーマット
HFS+
また
」としても知られており、ジャー ナリン グ を サ ポートして いるため 、使 用 が 推
SD
カードについて
82
Page 83

ex FATはMac OS
要 は あ りま せ ん 。一 方 、
場合にデータを失う可能性が 高くなります。
および
Windows
ex FAT
によりネイティブサポートされており、ソフトウェアを別 途 購 入する必
はジ ャーナリング に 対 応していないため、メディアカ ードや
SSD
が 破 損した
Video Assist
タッチスクリーンを 左 右にスワイプして「ストレージ」メニューを 開 いてください 。
SD
カ ー ド を フ ォ ー マ ットす る:
1
タッチスクリーンを左右にスワイプするか、カード状況ディスプレイをタップしてストレージ設定
( スト レ ー ジ )を 開 き ま す。
2
「カードのフォーマット」アイコンをタップします。
を フ ォ ー マ ッ ト 」ま た は「 カ ー ド2をフォーマット」から、選択したカードに対応する方のアイ
コン を タップ しま す。
3
左右の矢 印 ボタンをタップしてフォーマットを「
「カードのフォーマット」アイコンをタップしま す。
4
選択したフォーマットを確認するメッセージ が 表示されます。この作 業は取り消せないため、
カードにすでにデ ー タが 書 き込まれてい る 場 合は 、カード をフォーマットする前に必ず デ ー タを
バ ッ ク ア ッ プ し て く だ さ い 。カ ー ド を フ ォ ー マ ッ ト す る に は「 カ ー ド の フ ォ ー マ ット 」を 、キ ャ ン セ
ル す る に は「 キ ャ ン セ ル 」を タ ッ プ し ま す。
5
フォーマットの進 行 状 況 が プ ロ グレスバー に 表示されます。フォーマットが完了すると「フォー
マ ッ ト が 完 了 し ま し た 。」と 表 示 さ れ ま す 。
6
「OK」アイコンをタップしてストレージ設 定に戻ります。
のストレ ージ 設 定 で、SDカード を
HFS+
ex FAT
または
Blackmagic Video Assist 4K
HFS+
」ま た は「
コンピューターでSDカ ードをフォ ーマット
SD
カードは 、
Mac OS/Windows
コンピューターからでもフォーマットで きます。
にフォ ーマットで き ま す。
ex FAT
」 か ら 選 択 し 、も う 一 度
で は 、「 カ ー ド
1
SD
MacOS
Mac OS
マットま た は 初 期 化 し ま す。フォ ーマットす る と すべ ての デ ー タが 消 去さ れ るた め 、SDカードにファイルが
記録されている場合は、必ずメディアをバックアップしてから作業を行ってください。
コンピュー ターでSDカードを準備する
に同 梱されている
1SD
カードをコンピューター のSDカ ー ド ス ロ ッ ト 、あ る い はSDカードリーダーに差し込みます。
2Applications/Utility
3
使用するSDカードのディスクアイコンをクリックし、「
4Formatを「Mac OS Extended (Journaled)
5
ボリューム名を入力し、「
で きる 状 態 に なりま す。
Disk Utility
へ行き、
Erase
アプリケーションを使って、SDカード を
Disk Utility
」を クリ ッ ク し ま す 。SDカ ー ド が す ば や くフ ォ ー マ ット さ れ 、使 用
を 起 動 します。
」あ る い は「
Erase
ex FAT
HFS+
あるいは
」タ ブ を ク リ ッ ク し ま す 。
」に 設 定 し ま す 。
ex FAT
でフォー
SD
カードについて
83
Page 84

Mac OSのDisk Utility
あるいは
ex FAT
にフォ ー マットします。
を 使 用して、SDカード を
Mac OS Extended(Journaled
)
Windows
Windows PCではFormat
コンピュー ターでSDカードを準備する
ダイア ログ ボックスで、SDカード を
ex FAT
でフォ ーマットで きま す。フォ ー マット
するとすべてのデータが消去されるので、重要なデータは事前にバックアップしてください。
1SD
カードをコンピューター のSDカ ー ド ス ロ ッ ト 、あ る い はSDカードリーダーに差し込みます。
2
スタートメニューまたは スタートスクリーンを開き、「コンピューター」を選 択します。使 用 する
カード を右 クリックしま す。
3
コ ン テ ク ス ト メ ニ ュ ー か ら「
4
フ ァ イ ル シ ス テ ム を「
5
ボ リ ュ ー ム ラ ベ ル を 入 力 し て「
6SD
カードがすばやくフォーマットされ、使用できる状態になります。
Format
」を 選 択 し ま す 。
ex FAT
」に 設 定 し 、ユ ニ ッ ト サ イ ズ 配 分 を
Quick Format
」 を 選 択 し 、「
128
キロ バイトに設 定しま す。
Start
」を クリ ッ ク し ま す 。
SD
WindowsのFormat
SSDをex FAT
にフォ ー マットします。
ダイアロ グボックス機能を使 用して、
SD
カードについて
84
Page 85

SD
HDMI
カードファイルで の 作 業
SD
カードの
SD
カードリーダーからアクセスできます。
ProRes/DNx
Video AssistからSD
1
ダー に挿入しま す。SDカードへのアクセスは 、外 付 け のハードドライブ、
ンピューター に 接 続した 他 のメディアストレ ー ジ デバイスでSDカード を 使 用 する 場 合と 同 じ で す。
2SD
カ ー ド を ダ ブ ル クリックして 開くと 、
示され ま す。
3
使 用 した いファイル をSDカードからデスクトップやそ の 他 のハードドライブにドラッグします。
NLE
または
とも可 能 で す。
SD
4
カード をSDカードスロットから物理的に取り出す前に、
安 全 に 取り出すようにしてください 。
ファイル に は 、SDカ ードス ロットを 搭 載した
カ ー ド を 取 り 出 し 、コ ン ピ ュ ー タ ー のSDカ ードス ロットもし くはSDカードリー
( ノ ン リ ニ ア 編 集 )ソ フ ト ウ ェ ア か ら 、SDカード上のファイルに直 接アクセスするこ
QuickTime
Mac OS
MXF
または
Mac OS/Windows
Windows
または
USB
ド ラ イ ブ 、あ る い は コ
ム ー ビ ーフ ァ イ ル のリスト が 表
、あ る い は
で イジェクトして
SD
カードスロットの付いたコンピューターにSDカ ー ド を 挿 入 し 、ク リ ッ プ に ア ク セ ス し ま す 。
ディスクスピードの 確 認
Blackmagic Disk Speed Test
デオフォーマット別で表示するアプリケーションです。
ストレージメディアが、特定のビデオフォーマットの収録(書き込み)あるいは再生(読み込み)に適して
いるか知りたい 場合は 、
メディアドライブの 性 能をテストできます!また
も表 示しま す。
Blackmagic Disk Speed Test
きま す。
www.blackmagicdesign.com/jp/support
は 、ストレージメディアの読 み込 み/書 き 込 み ス ピ ー ド を 計 測 し 、結 果 を ビ
Disk Speed Test
ソフトウェアは 、
の 使 用 が 最 適 で す 。「
Disk Speed Test
Blackmagic Design
STA RT
」ボ タ ン を ク リ ッ ク す る だ け で 、
は 、ストレージが 扱 えるビ デオストリーム 数
サポートセンター からダウンロードで
Blackmagic Disk Speed Tes t
SD
カード の 性 能 を 確 認 で きます。
を 使 用して、
Blackmagic Disk Speed
Tes t
の イ ン タ ーフ ェ ース
SD
カードについて
85
Page 86

BlackmagicVideoAssistSetup
Blackmagic Video Assist Setup
Video Assistへの3D LUT
は、
可 能 で す。
Video
の設定
Video Assistに3D LUT
DaVinci Resolveで.cube
てくだ さい 。
3D LUTや、Blackmagic Design Video Assist Setup
このマニュアル の「ストレ ージ、モニター、ディスプレ イ、オー ディオ、セットアップ 設 定 」セクションを参 照し
てくだ さい 。
を読み込み、ビデオにカラーコレクションを適用して表示できます。3D
ファイルとして生成できます。詳細は
に は 、「
の読 み込 み 、デバイス 名 の 変 更、ユー ザー インターフェースの 言 語 の 変 更 などが
Video
About」の2
」と「
を使用してそれらを読み込む方法に関する詳細は、
つのタブがあります。これらのタブで
LUT
DaVinci Resolve
マニュ アル を 参 照し
は、
Video
「
」タ ブ で3D
About
の設定
このタブでは、使用している
ルされている内部ソフトウェア、デバイス名などが含まれます。
Name
「
」ボックスをクリックし、コンピュー ター の キ ー ボード で 新しい 名前を入 力 で きます。
LUTをVideo Assist
Video Assist
に関する情報を確認できます。これらの情報には、現在インストー
に読み込み
言語の変更
Video Assist
ダウンメ ニュー をクリックし、新 たに使 用したい言 語 を選 択します。
Load
「
のユーザー イン ターフェースで 使 用 する言 語 を 変 更 するには 、現 在 の 言 語 が 表 示 さ れ たドロップ
」を クリ ッ ク し て 、選 択 を 確 定 し ま す 。
Video Assist
に選択した言語が表示されます。
BlackmagicVideoAssistSetup
86
Page 87

言 語 設 定ドロップ ダ ウンメ ニューで 他の言語を選択
Video Assist
のユーザーインターフェースは複数の言語で表示できます。
内部ソフトウェアのアップデート
Video Assist
ます。このソフトウェアをダウンロードして
使用することをお勧 めします。
MacOS
1Blackmagic Video Assist Setup
2
3
内部ソフトウェアのアップデートは 、
で内部ソフトウェアをアップデートする:
ディス ク イメ ー ジ を 開 き 、
上の 指 示 に従 い ま す。
Blackmagic Video Assist Setup
最新の
ンピ ュー ターを 接 続 します。
Blackmagic Video Assist Setup Installer
Blackmagic Design
Video Assist
を ダ ウ ン ロ ードして 解 凍しま す。
をインストールしたら 、
ウェブ サイトか らダ ウンロ ードで き
をアップデートし、最新または改善された機能を
を 起 動 し ま す。ス ク リ ー ン
USB
ケーブルで
BlackmagicVideoAssistSetup
Video Assist
とコ
87
Page 88

4Blackmagic Video Assist Setup
を起 動し、画面に表示される指示に従って内部ソフトウェアを
アップデートします。内 蔵 ソフトウェアが最 新 で 何もする必 要 が ない 場 合 、指 示 は 表
示されません。
Windows
で内部ソフトウェアをアップデートする:
1Blackmagic Video Assist Setup
2
マニュ アル および
Assist Utility
Blackmagic Video Assist Setup
フォルダーが確認できます。インストーラーをダブルクリックし、画面に表示される
指示に従ってインストールします。
3
Blackmagic Video Assist Setup
最新の
ンピ ュー ターを 接 続 します。
Blackmagic Video Assist Setup
4
プデートします。内蔵ソフトウェアが最新で何もする必要がない場合、指示は表示されません。
を ダ ウ ン ロ ードして 解 凍しま す。
インストーラ ー を 含む、
をインストールしたら 、
USB
ケーブルで
Blackmagic Video
Video Assist
とコ
を起 動し、画面に表示される指示に従って内 部ソフトウェアをアッ
Video Assist
最新の
内部ソフトウェアがすでに最新の状態である場合は、指示は表示されません。
の内 部ソフトウェアを アップデートするには、
Blackmagic Video Assist Utility
をダ ウン ロード/起動して、画面上の指示に従います。
USB
ポートでコンピューターに接続し、
BlackmagicVideoAssistSetup
88
Page 89

DaVinciResolve
の使用
DaVinciResolve
Video Assist
管 理 、編 集 、カラーコレクション、最 終マスターファイル のエンコードと同 様 にとても重 要です。
Mac OS/Windows
(
完 結 型 ソリュー シ ョン で す!
SD
カードをコンピューターに接続したら、
撮影を行いながら継続的にバックアップを作成できます。使用するメディアはその種類にかかわらず、
破損や不具合が生じる可能性があります。ショットの損失を防ぐため、常にデータのバックアップを作成
する ことをお 勧 めしま す。
クリップを 追 加して、編集やカラーコレクション、作品のフィニッシング まで、すべての 作業 を
Resolve
を 使 用 し た 収 録 は 、映 画/テレビコンテンツ制作の過程のひとつであり、メディアのバックアップ、
対 応 )が 同 梱 さ れ る
で 行 えます。
について
Video Assist
DaVinci Resolve
は、収録からポストプロダクションまでをサポートする
DaVinci Resolve
でメディアをバックアップしたら、
のメデ ィアペ ー ジ で クロ ーン ツ ー ル を 使 用 して、
DaVinci
のメデ ィア プ ー ル に
DaVinci Resolve
DaVinci
DaVinci Resolve
Resolve
イエンドのデジタルフィルム用に極めて高度なテクノロジーを搭載しています。
すれ ば、最 先端のテクノロジーを利用した編集やカラーコレクションが 実現します。
このセクションでは、収録したファイルに
には極めて高度なテクノロジーが採用されており、その機能の多くはユーザーインターフェースを一目見
ただけでは分 かりません。
ドの
々なトレーニングコ ースやガイドビデオ を参 考にしてください。
は 、多 くの 大 ヒ ッ ト 映 画 で 使 用 さ れ て い ま す 。シ ン プ ル な
DaVinci Resolve
でクリップを調整すれば、目的に応じたあらゆる 種 類 のルックを実現で きます。
NLE
ソ フ ト ウ ェ ア ツ ー ル と は 異 な り 、ハ
DaVinci Resolve
DaVinci Resolve
DaVinci Resolve
インストラクション・マニュアル を 参 照してください 。または、インター ネット上の様
の使 用に関 する詳細は、
を 使 用 する方 法 を説 明しま す。
DaVinci Resolve
DaVinci Resolve
ソフトウェアSDカー
DaVinci
を使用
クリップの 読 み 込 み
クリップの 編 集を 始 めるには 、クリップ を メディアプール に 読 み 込 む 必 要 が ありま す。
1DaVinci Resolve
ジャーが表示されるのを待ちます。表示されたら、「
ク し ま す。ロ グ イ ン ウ ィ ン ド ウ が 表 示 さ れ る 場 合 は 、
ています。この場 合は、ログインウィンドウの左下にある「新規追加」をクリックして、ユーザー
名を入力し、「ユーザーセットアップを保存」をクリックして新規ユーザーを作成します。作成し
たユーザーアイコンをダブルクリックすると、プロジェクトマネージャーに進みます。「新規プロ
ジ ェ ク ト 」を クリ ッ ク し て 、プ ロ ジ ェ クト の タ イ ト ル を 入 力 し 、「 作 成 」を ク リ ッ ク し ま す 。こ れ で 新
規プ ロ ジェクトが プ ロジェクトマネ ー ジ ャ ー に 追 加さ れ ました 。プ ロ ジェクトを開くに は 、アイコ
ンをダ ブルクリックします。
2
「メディア」ページ が 開 き、左 上 に は「メディアストレージ」ブラウ ザ が 表 示されます。メディアス
トレージ ブラウザ には 、リンクされたすべてのメディアが 表 示 さ れ ま す。ここからクリップをメデ
ィア プール にドラッグ&ドロップできます。
を 起 動 します。
DaVinci Resolve
を 初 め て 起 動 す る 場 合 は 、プ ロ ジ ェ ク ト マ ネ ー
Untitled Project
Resolve
の複 数ユーザー 環 境が 有 効 になっ
」ア イ コ ン を ダ ブ ル ク リ ッ
DaVinciResolve
の使用
89
Page 90

3
クリップのフォルダーがライブラリに表示されない場合は、フォルダーを追加する必要があります。
DaVinci Resolve
タ イ ト ル バ ー の「 環 境 設 定 」を ク リ ッ ク し て 、メ デ ィア ス ト レ ー ジ タ ブ の「 追 加 」
ボタンを押すことで 簡単に追 加 できます。ドライブ あるいはフォルダーパ スをブラウズ/選択する
に は 、「 開 く 」 を ク リ ッ ク し て
DaVinci Resolve
を再起動し、再度プロジェクトを開くと「メディア
ス ト レ ー ジ 」設 定 が 更 新 さ れ ま す。
4
「メディア ストレ ージ」ブ ラウ ザ で、新しく追 加した クリップ フォルダー をクリックしま す。ストレ ー
ジフォルダーのクリップをドラッグして、メディアプールにドロップします。プロジェクト設定が
クリップ 設 定と異 なる 場 合 は 、画 面 にプ ロ ンプトが 表 示 され 、クリップ に合わ せ てプ ロ ジェクト
設定を変 更するか 、設定をそのままにするか を選 択できます。すぐに作 業を始 めたい場 合は「変
更 」をクリックします。これで、プ ロジェクト設 定 がクリップと一 致 しました 。
クリップを読 み込むに は 、メディアストレ ージ ブラウ ザ の クリップ をメディアプールにドラッグ&
ドロップ します。デ スクトップ上にあるファイル をドラッグ&ドロップ することもできます。
クリップの 編 集
メディアプールにメディアを入れたら 、「エディット」タブ を クリックしてエディットページ を 開 きます。
こ れ で 、編 集 を 開 始 で き ま す!
1
はじめに 、新しい タイムラインを作 成 する 必 要が あります。メディアプール 内で 右クリックし、
「タ イムラ イン」>「 新 規 タ イムラインを 作 成 」を 選 択 しま す。ダイア ロ グ ボックス が 表示 さ れ たら 、
「新 規タイムラインを 作成」ボタンを押します。
クリップの 編 集を始めるに は 、新 規タイムライン を 作 成 す
る必要があります。タイムラインとは 、すべ ての 編 集を 行 う
ステ ージ で す。
DaVinciResolve
の使用
90
Page 91

2
メディアプールのクリップをダブルクリックしてクリップをソースビューアで開きます。ソースビューア
の再生ヘッドをマウスで左右に動かし、そのクリップの開始点として使用したい位置を見つけます。
「I」ショートカットで、イン点としてマークします。同じように、「O」シ ョ ー ト カ ッ ト で 最 後 の フ
レームを 指 定しま す。
3
タイムラインで、クリップ を 挿入したい 位 置 に 再 生ヘッドを 合 わ せます。
4
クリップをタイムラインに挿入するには、ソースビューアの中でクリックし、マウスでドラッグしてタイムラ
インビューアにドロップしま す。編 集 オ プ シ ョン が 表 示さ れ たら 、目 的 に 応じて 編 集 の 種 類 を 選 択しま す。
選 択した 編 集の種 類に応じて、クリップがタイムラインに 挿入されます。編 集の種 類 および それぞ れ の 使
用方法については、
クリップを 編 集 にすば やく追 加 するには、メディアプールからクリップ をドラッグ して、タイムラインに直
接 ド ロ ッ プ し ま す 。そ の 後 、イ ン 点/アウト点や クリップの 位 置を 調 整したり、エフェクトや タイトルで 各 種
プラグインを 使 用したりで きます。このワークフローは、タイムラインをアーティストのパレットとして使
用 するような 感 覚 で す。
DaVinci Resolve
マニュ ア ル を 参 照してください 。
「エディット」ペー ジ。 タイムラインエ ディター を 使 用して、クリップのトリム、
順番の変更、移動、トランジションの追加などが可能です。
クリップのトリム
クリップの 編 集 で は 、クリップ をトリムして、各 ショットの 必 要 なシーンのみを 使 用で きます。クリップのト
リムには 様 々な 方 法 が ありま す が、タイムラインで クリップの イン点/アウト点を調整する方法が最も
簡 単 で す。
1
クリップ をタイムライン に 追 加したら、マウス の カ ーソル を クリップの 開 始 点に合 わ せます。ポ イ
ン タ ー が「 トリ ム 」ア イ コ ン に な り ま す 。
2
「トリム 」アイコン が 表 示され たら、クリップの開 始 点 を クリックして 順 方 向/逆方向にドラッグし、
イン点をトリムしま す。タイムラインビューアを確認しながらトリムして、編 集 点を決定します。
3
さらに、クリップの終了点をクリック&ドラッグして、アウト点を調整します。
ズームスライダーはタイムラインの上、中央に集まったツール群の右側にあります。ズームスライダーを左
右にドラッグ すると、タイムラインが 拡 大/縮 小 さ れ 、細 か い 調 整 が し や す く な り ま す 。
「スナップ」機能は、編集を微調整する場合はオフにします。この機能では、隣り合うクリップの開始点
と終了点を隙 間なく結合しやすくできるため、微 調 整が 終 わったらオンにしておくと便利です。スナップ
機能のオン/オ フ は「N」キ ー で 簡 単 に 切 り 替 え ら れ ま す 。
DaVinciResolve
の使用
91
Page 92

「エディット」ペー ジ。タイムライン エディター を 使 用して、クリップのトリム 、
順番の変更、移動、トランジションの追加などが可能です。
キーボードショートカットのマッピング
他の編 集ソフトウェア で 使 用するキーボードショートカットに馴 染 み が あ れ ば 、
自のマッピングを簡 単に行 い 、ワークフロー のスピードと正 確 性をアップできます。
自分専用のキーボードショートカットをマッピングする:
1DaVinci Resolve
ます。さら に 設 定 リストか ら「キ ーボード マッピン グ」を 選 択しま す。
2
表示されるカテゴリーの中から、変更したいショートカットを選 択します(例:タイムラインのカッ
ト/ペ ー ス ト の シ ョ ー トカ ッ ト は「 編 集 」カ テ ゴ リ ー に あ り ま す )。
3
ショートカットをクリックすると、設 定がハイライトされます。ショートカットをダ ブルクリックすると、
設 定を 変 更 で きま す。
4
キーボードを 使 用して、新しいショートカットキーを 押します。間 違ってしまった場 合 は 、設定
の右 側にある「やり直し」アイコンをクリックして、変 更を簡 単にやり直せます。
5
新しいショートカット設定を確 認して、「保 存」を押します。
ワークスペースの右下にある、プロジェクト設定の「ギア」アイコンをクリックし
DaVinci Resolve
でも独
クリップの 開 始 点/終了点を左右にドラッグしてトリムします。
「スナップ」機能は、微調整の際にはオフにできます。
DaVinciResolve
の使用
92
Page 93

トランジションの追 加
トランジ ション は 、1つの クリップから次のクリップへの移 行 を様々な 方 法で 演 出するビジュアル エフェク
ト で す 。ト ラ ン ジ シ ョ ン を 追 加 す る こ と で 、編 集 を さ ら に 魅 力 的 な も の に で き ま す 。ト ラ ン ジ シ ョ ン は 、常
に2つのクリップ をつな げ るもの で はありません 。例えば 、「ディゾ ルブ」トランジ ションを クリップの 終 了
点に加えれば、スピーディで簡単なフェード・トゥ・ブラックを 作 成 で きます。
「トランジ ション」パレットには、様々なトランジ ションエフェクトが 含まれていま す。
2
つのクリップの 間 にディゾルブ・トランジションを追 加:
1
タイムラ イン上 に2つのクリップがあり、それらが隣り合っていることを確 認します。エディットペー
ジ上 部 、UIツー ルバー の「エ フェクトライブラリ」ボタンを クリックして、「ツ ールパ ネル」
ボッ クスを 開 きま す。
2
「クロス D」トランジ ションをクリックして、タイムラインにドラッグし、2つのクリップの間の編
集点に重ねます。マウスポインターが、1つ目の クリップ の 終 了点 と 、2つ目 の クリップの 開 始 点 を
ハイラ イトします。トランジ ションをこれらのクリップの上にドロップします。ディゾルブ・トラン
ジションを成功させるには、編集点の前後で、各クリップに十分な長さがあることが重要です。
これで、1つの クリップ か ら 次のクリップへ のな め らか なトランジション が 得 られ ま す。トランジ ション の 長
さを 調 整 したい 場 合 は 、クリップ をトリムする 際 と 同じように 、トランジションの 開 始 点/終了点 を 変 更 で
きます。マウス ポインターをトランジションの開 始 点/終 了 点 に 重 ね る と 、ト ラ ン ジ シ ョ ン「 ト リ ム 」ア イ コ
ンが表示され 、左 右にドラッグできます。
トランジションは、隣り合うクリップの間に簡 単にドラッグ&ドロップで きます。
DaVinciResolve
の使用
93
Page 94

タイトル の 追 加
タ イ ト ル は 簡 単 に 作 成 し て イメ ー ジ に 追 加 で き ま す 。ク リ ッ プ の 場 合 と 同 様 、あ ら ゆ る ビ デ オ ト ラ ッ ク に タ
イトルを 配 置できます。トラックが 足りない場 合は 、既存のトラックのトラック名エリアを右クリックして
「トラックを追加」を選択し、簡単にトラックを追加できます。
タイトル を 作 成 す る:
1
メディアプールの下、「エフェクトライブラリ」のツールボックスの中間あたりまでスクロールして
下がると、「タイトル」ジェネレーターがあります。スクロールバーを 使 用して、「タイトル」のオプ
ションを 表 示しま す。
2
タイトル を 表 示させ たいクリップの上に空のビ デオトラックを作成し、テキストタイトルをドラッ
グ&ドロップします。ブラックを背 景にタイトルを表 示 する 場 合 は 、「
タイトルをドロップ することもできます。タイトルを表示するには 、タイムラインの再生ヘッドを
タイトル に 重 ね ま す。
3
タイトルクリップを ダ ブルクリックします。「インスペクタ」が 開き、タイトルの 設 定が 表 示されます。
「テキスト」欄にタイトルを入力します。
様々なフォントの中から選択し、カラー、サイズ、配置、位置などの設定を変更してタイトルの表示方法を
変更できます。クリップの場合と同様、タイトルにもトランジションを追加できます。
Video 1
」の クリ ッ プ の 隣 に
「タイトル」パレットからタイトルの種類をドラッグし、空のトラックにドロップします。
オーディオトラックの追加
サウンドエフェクトや 音 楽 を多く含む サウンドファイル をミックスしたい 場 合 、オー ディオトラックを 必 要
に 応じて 簡 単 に 追 加 で き ま す。
オ ー デ ィ オトラ ッ ク を 追 加 す る:
1
タイムラインでオーディオトラックのトラック名エリアを右クリックし、「トラックを追 加 」
を 選 択しま す。
2
「 ス テ レ オ 」 、「 モ ノ 」 、「
新しいオーディオトラックがタイムラインに表示されます。
この 機能 は 、声、サウンドエフェクト、音 楽 など、オー ディオ素 材 を 別々のトラックに分 け て サ ウンドミッ
クスを行 い た い 場 合 に便 利 で す。
5.1
」 、「 適 応 」 か ら 、 必 要 に 応 じ た 種 類 の オ ー デ ィ オ ト ラ ッ ク を 選 択 し ま す 。
DaVinciResolve
の使用
94
Page 95

パワフルな 編 集ツール の 使 用 に 関 する 詳 細 は 、
新しい オー ディオ/ビデ オトラックを追 加 するには 、トラック名の 隣 で右クリックし、
「トラック を 追 加 」を 選 択しま す。オー ディオトラックで は 、トラックの 種 類 を 選 択しま す。
クリップのカラーコレクション
DaVinci Resolve
マニュ ア ル を 参 照してください 。
クリップのシーケンスの 編 集が 終 わったら、カラーコレクションを開 始できます。ルックの一貫 性を 保 つ
ため 、カラーコレクションはシーケンスの編 集 が 終 わってから行うのが 最 善です。しかし、
の面白い点は、編集 ページとカラーページを行き来して、微調 整などを行い 、新しいクリエイティブな発
見 が 得 ら れ ること で す。
「カラー」ページ で は 、クリップのルックを完 全にコントロールできます。
DaVinci Resolve
はじめに、「カラー」タブをクリックしてカラーページを開きます。
カラーホイール、カーブパレット、カラーコレクションツール全般、プレビューウィンドウ、ノードウィンドウが
表示されます。表示される膨大なツール群に戸惑う必要はありません。これらはすべて、ユーザーが素晴
らしい映像を作成するのを手助けする機能です。
容/使い方を簡単な ステップ で 紹 介していま す。ハイエンドのカラーコレクションスタジオで専門家 が 用
いる のと同じテクニッ クを 習 得 で きま す。
DaVinci Resolve
マ ニ ュ ア ル で は 、す べ て の ツ ー ル の 内
DaVinciResolve
の使用
95
Page 96

一般的にカラーコレクションは、クリップのシャドウ、中間トーン、ハイライトの最適化から作業を始めます。
つ ま り 、「 リ フ ト 」 、「 ガ ン マ 」 、「 ゲ イ ン 」 の 設 定 を 調 整 し ま す 。 こ の 作 業 は 、 ク リ ー ン で 均 等 な 作 業 開 始 点
を作成し、映 像のカラーグレーディングを開始して、最も優れたルックを得るために役立ちます。
スコープの使用
クリエイティブなカラー選択を行う際、カラリストの多くは作品に持たせたい 感 情/ルックに焦点を当て、
モニターを使用してそのルックを完成させます。日常的なオブジェクト、それらと相互作用する様々な光を見
ることで、映 像 に対してどのような効果を加えられるか、実験しながらアイデアを生み出すことができます。
カラーグレーディングのもう一つのやり方に、内 蔵 スコープを 使 用してショットのバランスを取る方法が
あります。ビ デ オスコープは「スコープ」ボタンをクリックして開きます。「スコ ープ」ボタンは、パレットツール
バーで 右 か ら2番目の ボタン で す。 スコ ープの 表 示は 、波 形 、パレード、ベクトルスコ ープ、ヒストグラム
から選 択 で きます。これらのスコープは 、トーンのバランスをモニタリングしたり、ビデオレ ベ ルを確 認し
て黒つぶ れや白飛 び を 避 け たり、クリップ内で の 色 か ぶりをチェックしたりなど、様々な目的で
使 用 で きま す。
「 カ ラ ー ホ イ ー ル 」 に は 、 一 般 的 に 最 初 の 調 整 に 使 用 す る 「 リ フ ト 」 、「 ガ ン マ 」 、「 ゲ イ ン 」 の コ ン ト ロ ー ル が あ
り ま す 。こ れ ら は 、カ ラ ー/コントラスト調整を行う他のアプリケーションのコントロールと同 様 に使 用で
きます。マウスを使って各カラーをより正確にコントロールするには 、カラーホイールを「プライマリー・バー」
に変更します。プライマリーバーは、リフト、ガンマ、ゲインを別々にコントロールして各カラーおよびルミナン
スチャンネルを調整できます。カラーホイールの右上にあるドロップダウンメニューから「プライマリー・バー」
を 選 択してください 。
パレードスコープは 、ハイライト、中 間トーン、シャドウの最適化に役 立ちます。
リフト、ガンマ、ゲイン、オフセットのカラーホイールで、クリップのカラーおよびトーン
のバランスを完全にコントロールできます。各トーン領域のすべてのカラーに同じ調整
を加 えたい 場 合 は 、カラーホイールの下のダイヤルを前 後にドラッグします。
DaVinciResolve
の使用
96
Page 97

1
「 リ フ ト 」の 調 整
カラ ー ペ ージのタイムラインで 最初 の クリップ を選 択し、1つ 目 の カ ラ ー ホ イ ー ル の 下 に あ る「 リ
フト」ダイヤル をクリックしま す。 ダイヤル を前 後にスライドし、イメージ へ の 影 響を確 認します。
イメージ 内の暗い領域で明るさが増 減 するの が分かります。暗い領 域の明るさを、最適なレベ
ルに設定します。リフトを下げ過ぎるとブラックのディテールが失われます。これを避けるには、
パレードスコープが役に立ちます。波形で見るブラックの最適な位置は、パレードスコープの
底 辺の すぐ上で す。
2
「 ゲ イ ン 」の 調 整
「ゲイン」ダイヤル をクリックして、前 後 に スライドしま す。クリップの 最 も明るい部 分 であるハイ
ライトを調 整 で きます。ハイライトは 、パ レード ス コ ープの 波 形 の 一 番上 の 部 分 に 表 示 され ま す。
照明 が 明るいショットでの 最 適 な位置は 、波形スコープの一番上のラインのすぐ下です。ハイラ
イトが波 形スコープの一番上のラインを超えている場合、それらはクリップされ、イメージ内の
最も明るい領域のディテールが失われます。
3
「 ガ ン マ 」の 調 整
カ ラ ー ホ イー ル の 下 の「 ガ ン マ 」ダ イ ヤ ル を ク リ ッ ク し て 、前 後 に ス ラ イド し ま す 。ガ ン マ の 値 を
上げ ると、イメー ジ の 明 るさが上 昇 しま す。ガ ンマ を 調 整 すると、波 形 の 中 間 の 部 分 も 動 きま す。
この部分は、クリップの中間トーンを示しています。中間トーンの最適な位置は、通常、波形スコープ
50-70%
の
位 置 に 設 定 で きま す。
また 、カーブパレットを 使 用してプライマリーカラーコレクションを行えます。カ ーブグラフの斜線 をクリッ
クしてコントロールポイントを作成します。それらを 上下にドラッグして、イメージ色調の異なるエリアの
マスター
上から3分の1です。
RGB
の間です。作成するルックやクリップの照明条 件に応じて、目的や好みに合わせた
コントラストを 調 整します。調 整に最 適な ポイントは 、カーブラインの下から3分の1、中 間 、
DaVinci Resolve
Resolve
マニュ ア ル を 参 照してください 。
「カーブ」パレットは 、プライ マリーコレクションや、
の特 定の部分を強調する際 に使 用 できる、もうひとつのツールです。
でプ ライマリーカラーコレクションを行う方 法 は他にもたくさんあります。詳細 は 、
Power Window
で クリップ
DaVinci
セカンダリーカラーコレクション
イメージの特定の部分を調整したい場合は、セカンダリーコレクションを使 用する必要があります。カラ
ー ホ イ ー ル 、リ フ ト/ガンマ/ゲインを使用してこれまでに行った調整はイメージ全体に同時に適用される
ため 、プライマリーカラーコレクションと 呼 ば れま す。
DaVinciResolve
の使用
97
Page 98

一方、あるシーンの芝生のカラーや 空のブル ーのみを変更するなど、イメージの特定の部分を調 整 する必
要がある場合は、セカンダリーコレクションを使用します。セカンダリーカラーコレクションでは、イメー
ジを部分的に選択し、その部分のみを調整できます。ノードを使用して複数のセカンダリーコレクション
を重ねられ るため、すべてを別々に 調 整して完 璧なイメージ を 作 成 できます! さらにウィンドウやトラッ
キングなどの機能で、イメージ内の動きを追跡できます。
カラーの特定
道路の側の芝生や空のブル ーなどクリップ内のカラーを強調したり、対象物のカラーを調 整してオーディエ
ンスの注意を引いたりなど、特定のカラーを強 調することで様々な効果が得られます。
ツ ー ル を 使 用 す れ ば 、カ ラ ー を 簡 単 に 特 定 で き ま す 。
HSL
クオリファイアーを 使 用して、イメージ 内の 特 定のカラー を 選 択 で きます。
この機能は、イメージを部分 的 に 際 立 た せ た り 、シ ョ ッ ト の 特 定 の 部 分 に
オー ディエ ンスの注 意を 集 め た い 場 合 などに役 立 ちま す。
HSL
クオリファイアー
カラーを特定する:
1
新しいシリアルノードを 追 加しま す。
2
「クオリファイ アー」パレットを開 き、「 選 択 範 囲 」で「ピッカー」ツール を選 択します。
3
クリップ 内の 調 整した い カラー を クリックします。
通常、選択した領域のエッジを滑らかにし、目的のカラーのみに制限するには多少の調整が必
要で す。選択した 領 域 を 確 認 する に は 、「ハイラ イト」ボタンを押しま す。
4
「色 相 」ウィンドウの「幅 」コントロール を 調 整して、選 択する色 相 の 幅を調 整 しま す。
High、Low
ホイールまたは カスタムカーブを使 用して、選 択したカラーへのコレクションが 開 始できます。
時おり、作業の影響を与えたくない領域のカラーもわずかに選択されてしまう場合があります。その場合
Power Window
は
目的のカラーの部分に合わせて形を整えるだけです。選 択したカラーに動きがある場合は、トラッキング
機 能 を 使 用して
PowerWindow
Power Window
ョン・ツールです。分離する領域は静止している必要はなく、カメラのパン、ティルト、回転、さらにはその
領域の動き自体に合わせてトラッキングできます。例えば、人物に合わせたウィンドウをトラッキングして、
周囲に影 響 を与えず、その人物のカラーとコントラストのみを調 整 で きます。このようなカラーコレクショ
ンを行うことで、オーディエンスの注意を集めたい部分のみを強調できます。
、ソ フ ト ネ ス コ ン ト ロ ー ル を 調 整 し て 、選 択 領 域 へ の 影 響 を 確 認 し て く だ さ い 。こ れ で 、カ ラ ー
を使 用して、必 要 ない領 域 を簡単にマスクで きます。新しいウィンドウを作成したら 、
Power Window
を 追 跡 で きま す。
を追加
は、クリップの特定の領域を分離できる、極めて効率的なセカンダリー・カラーコレクシ
DaVinciResolve
の使用
98
Page 99

HSL
クオリファイアー に よるセカンダリーコレクションを適 用したくな い 部 分 は 、
Power Window
でマスク で き ま す。
クリップ に
PowerWindow
1
新しいシリアルノードを 追 加しま す。
2
「ウィンドウ」パレットを開き、シェイプ アイコンをクリックしてウィンドウシェイプを選択します。
を 追 加 す る:
選 択したウィンド ウ シェイ プ がノードに 表 示 さ れま す。
3
シェイプの周りの青いポイントをクリック&ドラッグして、シェイプの サイズを 調 整します。ピ ン
クのポイントでは、エッジのソフトネスを調整できます。作成したシェイプは、中央のポイントを
クリック&ドラッグして位置を変更し、分 離したい領域 に合わせられます。中央のポイントとつ
ながったポイントでは、シェイプを回転できます。
これで、必要な領域のみに制限したカラーコレクションが可能です。
Power Window
を適用できます。
を使 用して、イメージ内の 特 定の 部 分 にセカンダリーコレクション
ウィンドウのトラッキング
カメラや被 写体 、ショットの一部に 、動きがある場合 があります。そのため、
な ト ラ ッ キ ン グ 機 能 を 使 用 し て 、ウ ィ ン ド ウ に 対 象 物/部分を 追 跡させる必要があります。トラッキング 機
能 は 、カ メ ラ/対 象 物 のパン、ティルト、回 転 を 分 析 するため 、それらの 動きにウィンドウをマッチで きます。
この作業を行っていない 場 合は、選択したターゲットからカラーコレクションが 外れ 、望ましい 結 果 が 得
られ ない ことが ありま す。
DaVinci Resolve
DaVinciResolve
のパ ワフル
の使用
99
Page 100

トラッキン グ 機 能 で 対 象 物/部分 を追 跡 で きるため、
Power Window
が アクションを 追 い ま す。
動く対象物のウィンドウをトラッキングする:
1
新しいシリアルノードを作 成し、
2
クリップを開始点に合わせ、ウィンドウの位置・サイズを調整し、目的の対象物/部分のみ
Power Window
に焦 点を 合 わ せ ます。
3
「トラッカー」パレットを開きます。「分析」設定のパン、ティルト、ズーム、回 転、遠 近3Dから、
クリップ内の 動きに 最 適 なものを選 択し、チェックボックスをオンにします。
を 追 加 しま す。
4
チェックボックスの左にある順 方 向 へ の 矢 印 をクリックします。
DaVinci Resolve
がトラッキン グ
ポイントをクリップに適用し、動きを分析しながら以 降のフレームへと進みます。トラッキング
が終わると、
Power Window
がクリップ 内 の 動きのパ スを 追 跡しま す。
トラッキングはほとんどの場 合に成 功しますが、複雑なシーンや、選択した領域の前を障害物が 通るケー
スでは、トラッキングに影 響が出る 場 合 があります。この問 題は 、キーフレームエディターを 使 用して解決
できます。詳 細については、
DaVinci Resolve
マニュ ア ル を 参 照してください 。
プラグインの 使 用
セカンダリーカラーコレクションでは、
ラー」ページで はスピーディで魅力的なルックやエフェクトを「エディット」ページで は想像 力に富んだト
ランジションやエフェクトを 作 成 しましょう。サードパー ティ製 の
使 用 で きま す。
OpenFX
プラ グインの 追 加 が 可 能 です。プラグインを 追 加して「カ
OFX
プラ グインを購 入/ダウンロ ードして
OFX
プラグインを使用して、想像 力に富んだ魅力的なルックをすばやく簡単に作成できます。
DaVinciResolve
の使用
100
 Loading...