

Page 1
Installation and Operation Manual
Blackmagic Cameras
English, 日本語, Français, Deutsch, Español, 中文 and 한국어
Mac OS X
Windows
July 2014
™
™
Page 2

Blackmagic Cameras
English
日本語
Français
Deutsch
Español
中文
한국어
3
44
86
128
170
212
254
Page 3

Welcome
Thank you for purchasing your Blackmagic Camera!
We have worked hard to produce three cameras that have been
designed from the ground up to fit any kind of workflow. Our new
Pocket Cinema Camera is a Super 16 digital film camera with 13
stops of dynamic range that is small enough to take anywhere.
The Cinema Camera records uncompressed CinemaDNG
RAW files for pristine images and our new Production Camera
4K is a Super 35 Ultra HD 4K camera with a global shutter and
6G-SDI output.
Our cameras are designed to produce files that are "flat", which
means they preserve the wide dynamic range from the sensor,
as well as standard file formats that work with all video software.
This allows you to make creative decisions by using the included
DaVinci color correction software!
We think this means you get a cinema style shooting experience
where you capture and preserve more of the image so you have
as many creative options as possible. We have also included large
screens on our cameras for easy focus and metadata entry. We
hope you connect to our cameras in creative ways and produce
some amazing looking images! We are extremely excited to see
what creative work you produce!
Grant Petty
CEO Blackmagic Design
Page 4

Contents
Blackmagic Cameras
12
15
16
Getting Started
Introducing Blackmagic Cameras 5
Attaching a Lens 7
Turning Your Camera On 7
Inserting an SD Card 9
Inserting an SSD 9
Recording 10
Playing Back Clips 11
About SSDs
Choosing a Fast SSD 12
Preparing SSDs for Recording 13
About SD Cards
Preparing SD Cards for Recording 15
Choosing a Fast SD Card 15
Connections
Blackmagic Pocket Cinema Camera 16
Blackmagic Cinema Camera and Production Camera 4K 17
275
28
33
38
39
Entering Metadata
What is the Slate? 27
Camera Video Output
Waveform Monitoring using Thunderbolt 28
Using Blackmagic UltraScope 29
Monitoring using SDI 32
Post Production Workflow
Working with Files from SSDs 33
Working with Files from SD Cards 33
Editing your Clips 34
Using Final Cut Pro X 35
Using Avid Media Composer 36
Using Adobe Premiere Pro CC 36
Using Autodesk Smoke 2013 37
Blackmagic Camera Utility
Attaching Accessories
18
Settings
Camera Settings 18
Audio Settings 20
Recording Settings 21
File Naming Convention 23
Display settings 24
Adjusting Settings 25
Status Strip 26
41
43
Help
Warranty
Page 5
5
OK
MENU
IRIS FOCUS
OK
MENU
IRIS FOCUS
Getting Started
Getting Started
1 2
4
Introducing Blackmagic Cameras
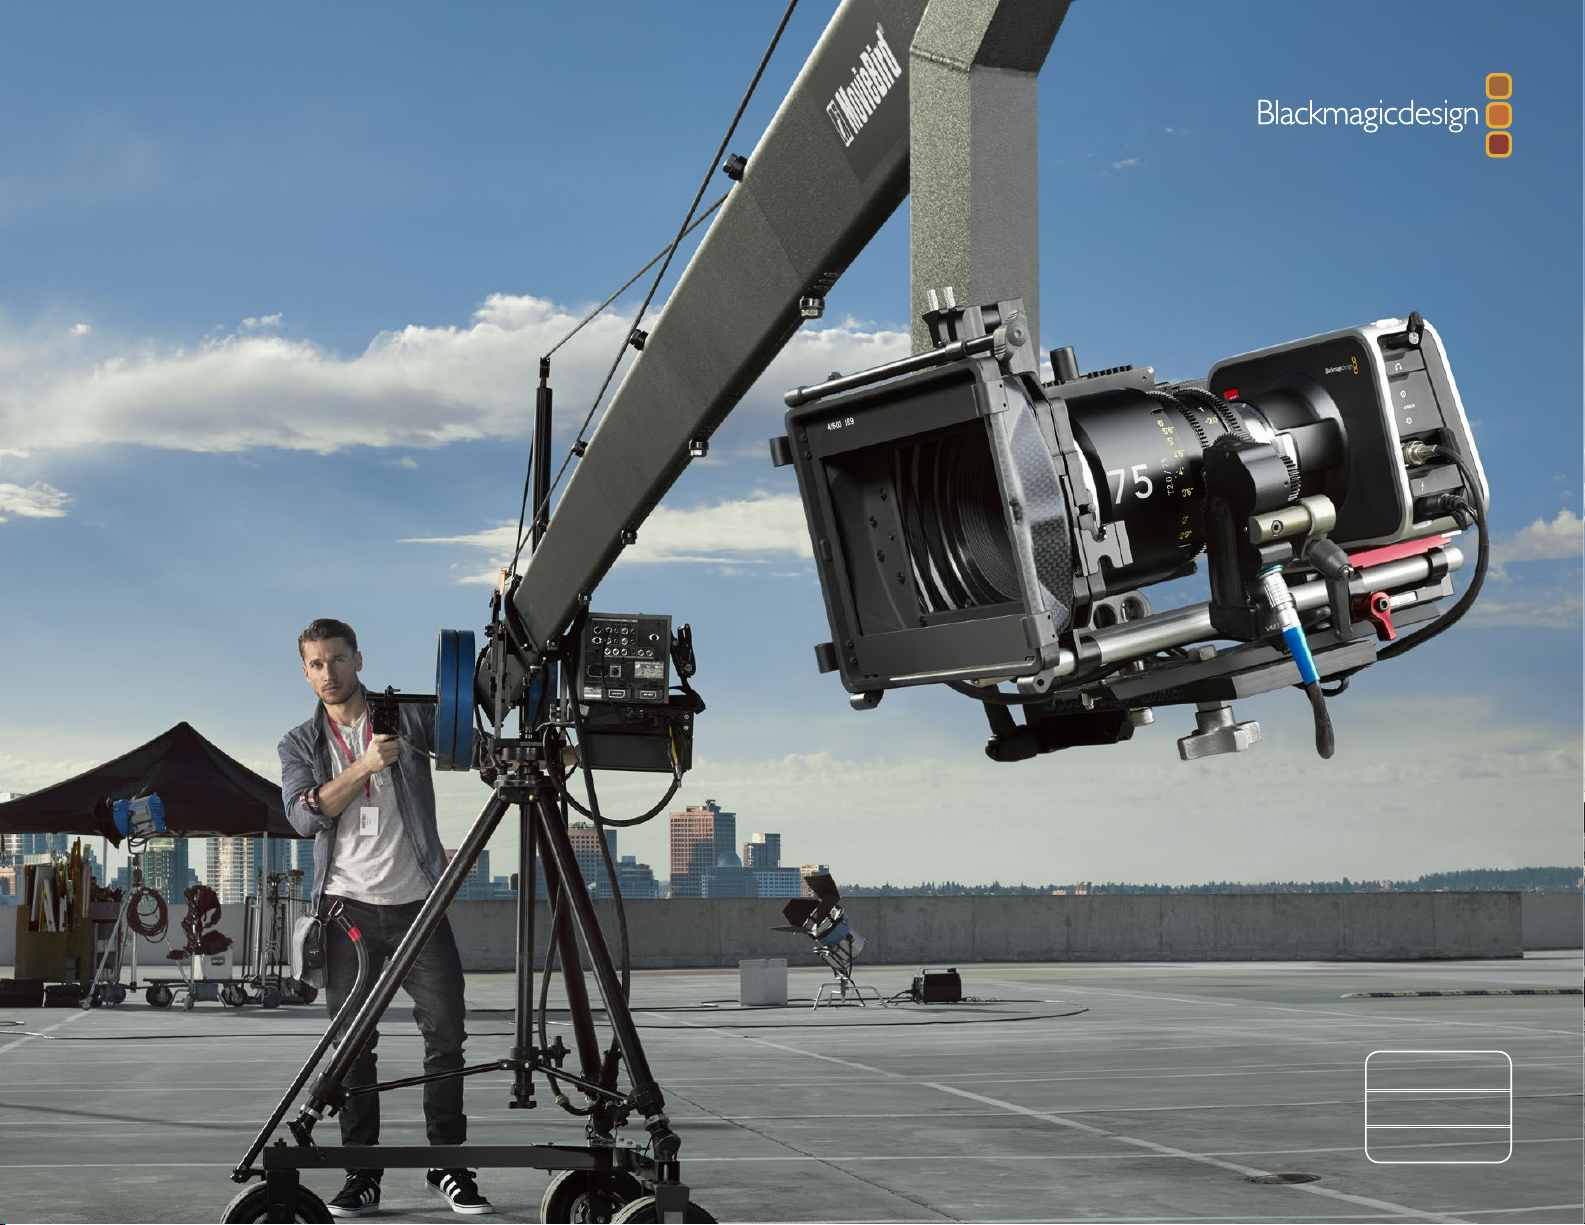
Blackmagic Pocket Cinema Camera Features
1. RECORD BUTTON
Press this button to record clips to your SD card. See page 10.
2. TRANSPORT CONTROL
3
5
6
7
8
9
Use these buttons to play, skip or shuttle clips. See page 11.
3. LENS MOUNT
Micro Four Thirds lens mount for a wide selection of lenses. See page 7.
4. BATTERY TERMINAL
Open the battery door via the release button to:
Insert and remove the rechargeable Lithium Ion battery. See pag e 7.
Insert a SDHC or SDXC card for recording. See pag e 9.
Access the USB Mini-B port for software configuration and updates. See page 38.
5. LANC REMOTE
The 2.5mm stereo jack for LANC remote control supports record start and stop, iris control, and manual focus.
See page 16.
6. HEADPHONES
3.5 mm stereo headphone jack connection. See page 16.
7. AUDIO IN
3.5mm stereo jack for mic or line level audio. See pages 16 and 20.
IRIS FOCUS
MENU
10 11
OK
8. HDMI OUT
Micro HDMI port for monitoring or outputting video to a switcher. See page 16.
9. POWER
0.7mm 12 – 20V power input for power and battery charging. See page 16.
10. LCD
Watch the LCD while recording or playing back a clip. See page 26.
11. CONTROL BUTTONS
Use these buttons for power, menu navigation, iris control, focus peaking, auto focus and LCD zoom.
Page 6
6
Getting Started
1
2 4
3
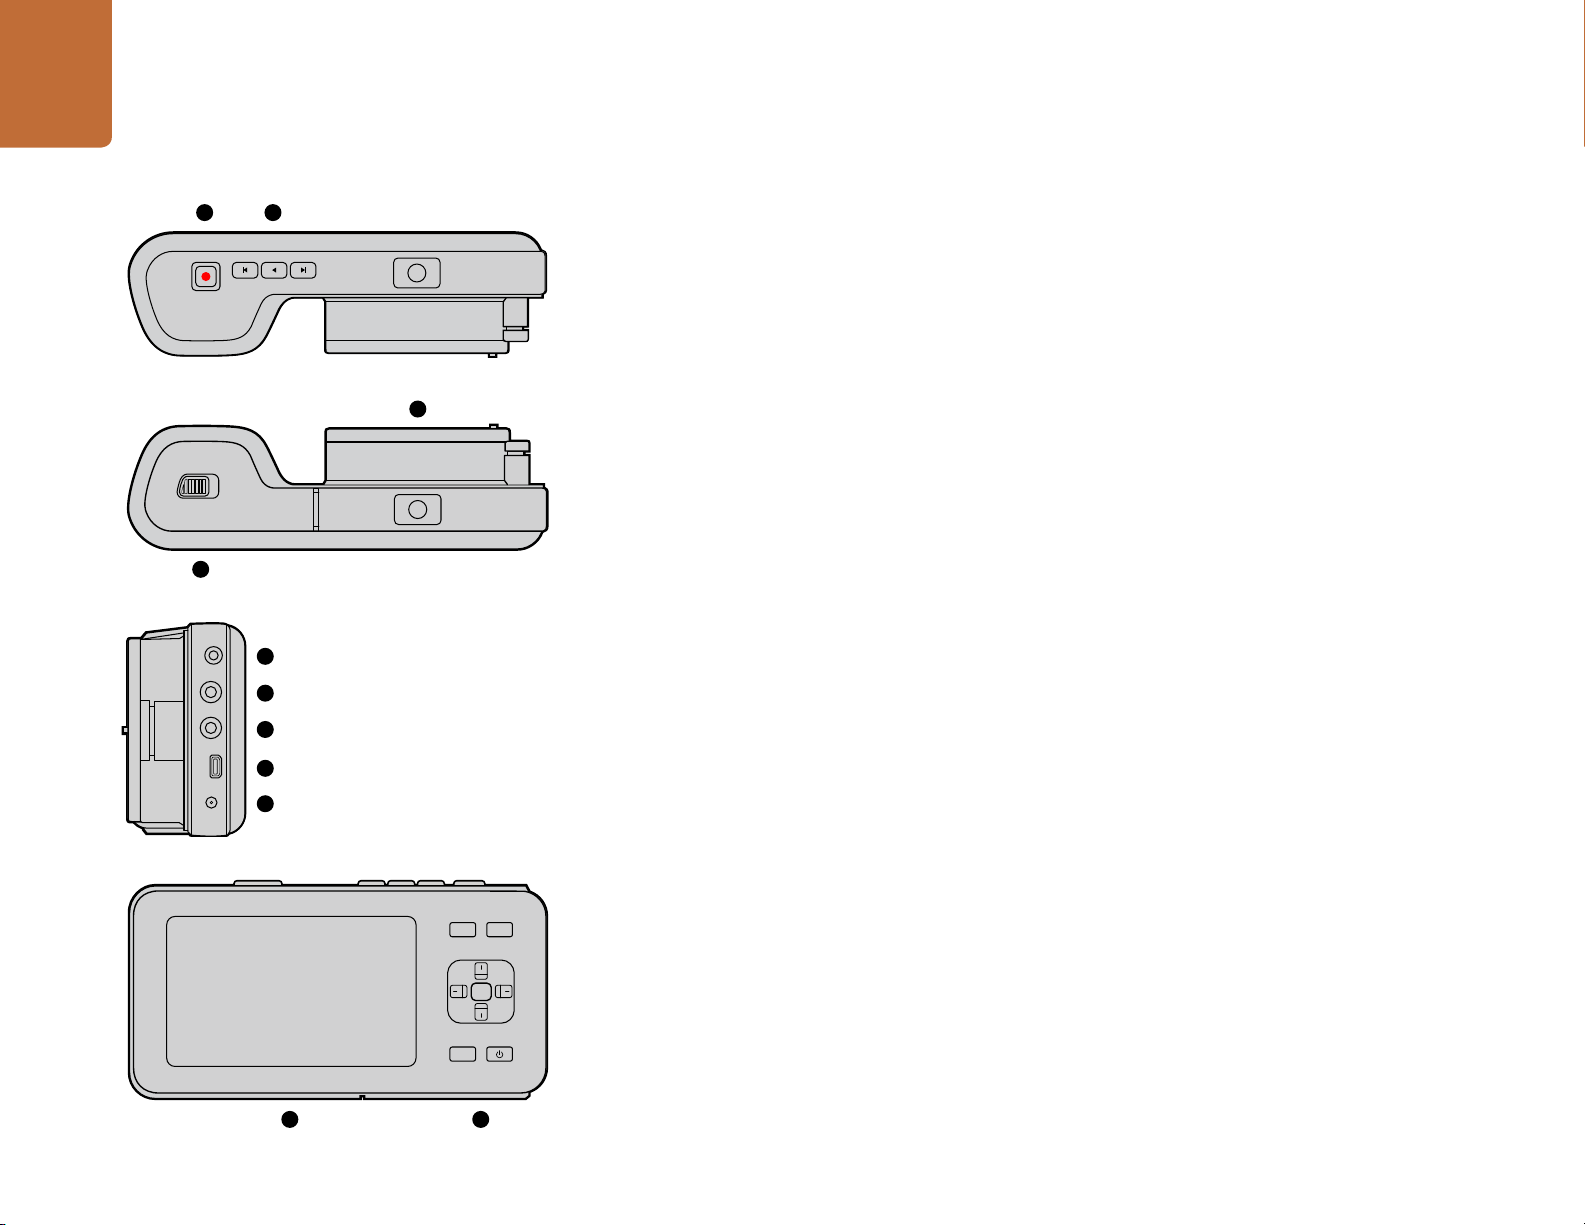
Blackmagic Cinema Camera and Production Camera 4K Features
1. RECORD BUTTON
Record clips to your SSD. See page 10.
2. IRIS BUTTON
The Iris button activates electronic iris control on the EF Cinema Camera and the Production Camera 4K. Adjust the
aperture of your lens by pressing the forward and reverse skip/shuttle playback buttons. See page 25.
3. TOUCHSCREEN LCD
Watch the LCD monitor while recording or playing back a clip, or when using the menu. See page 27.
4. FOCUS BUTTON
Press the Focus button for focus peaking on the LCD. See page 25.
5. TRANSPORT CONTROLS
Press these buttons to stop, skip/shuttle, or play your clips. See page 11.
6. MENU BUTTON
Access the menu on the LCD.
7. POWER BUTTON
Press the power button to turn on the Blackmagic Cinema Camera. Press and hold the button to turn the camera
off. See page 8.
8. LANC REMOTE
The 2.5mm stereo jack for LANC remote control suppor ts record start and s top, iris control and manual foc us. See pa g e 17.
1 5 6 7
8
9
10
11
12
13
9. HEADPHONES
3.5 mm stereo headphone jack connection. See page 17.
10. AUDIO IN
2 x 1/4 inch balanced TRS phono jacks for mic or line level audio. See pages 17 and 20.
11. SDI OUT
SDI output for connecting to a switcher or to DaVinci Resolve via capture device for live grading. See pages 17 and 34.
12. THUNDERBOLT CONNECTION
Blackmagic Cinema Camera outputs 10-bit uncompressed 1080 p HD. Production Camera 4K also outputs compressed
Ultra HD 4K. Use the Thunderbolt connection for HD UltraScope waveform monitoring and streaming video to a
Thunderbolt compatible computer. See pages 17 and 28.
13. POWER
12 – 30V power input for power supply and battery charging. See pages 8 and 17.
Page 7
7
Getting Started
HDMI
12V
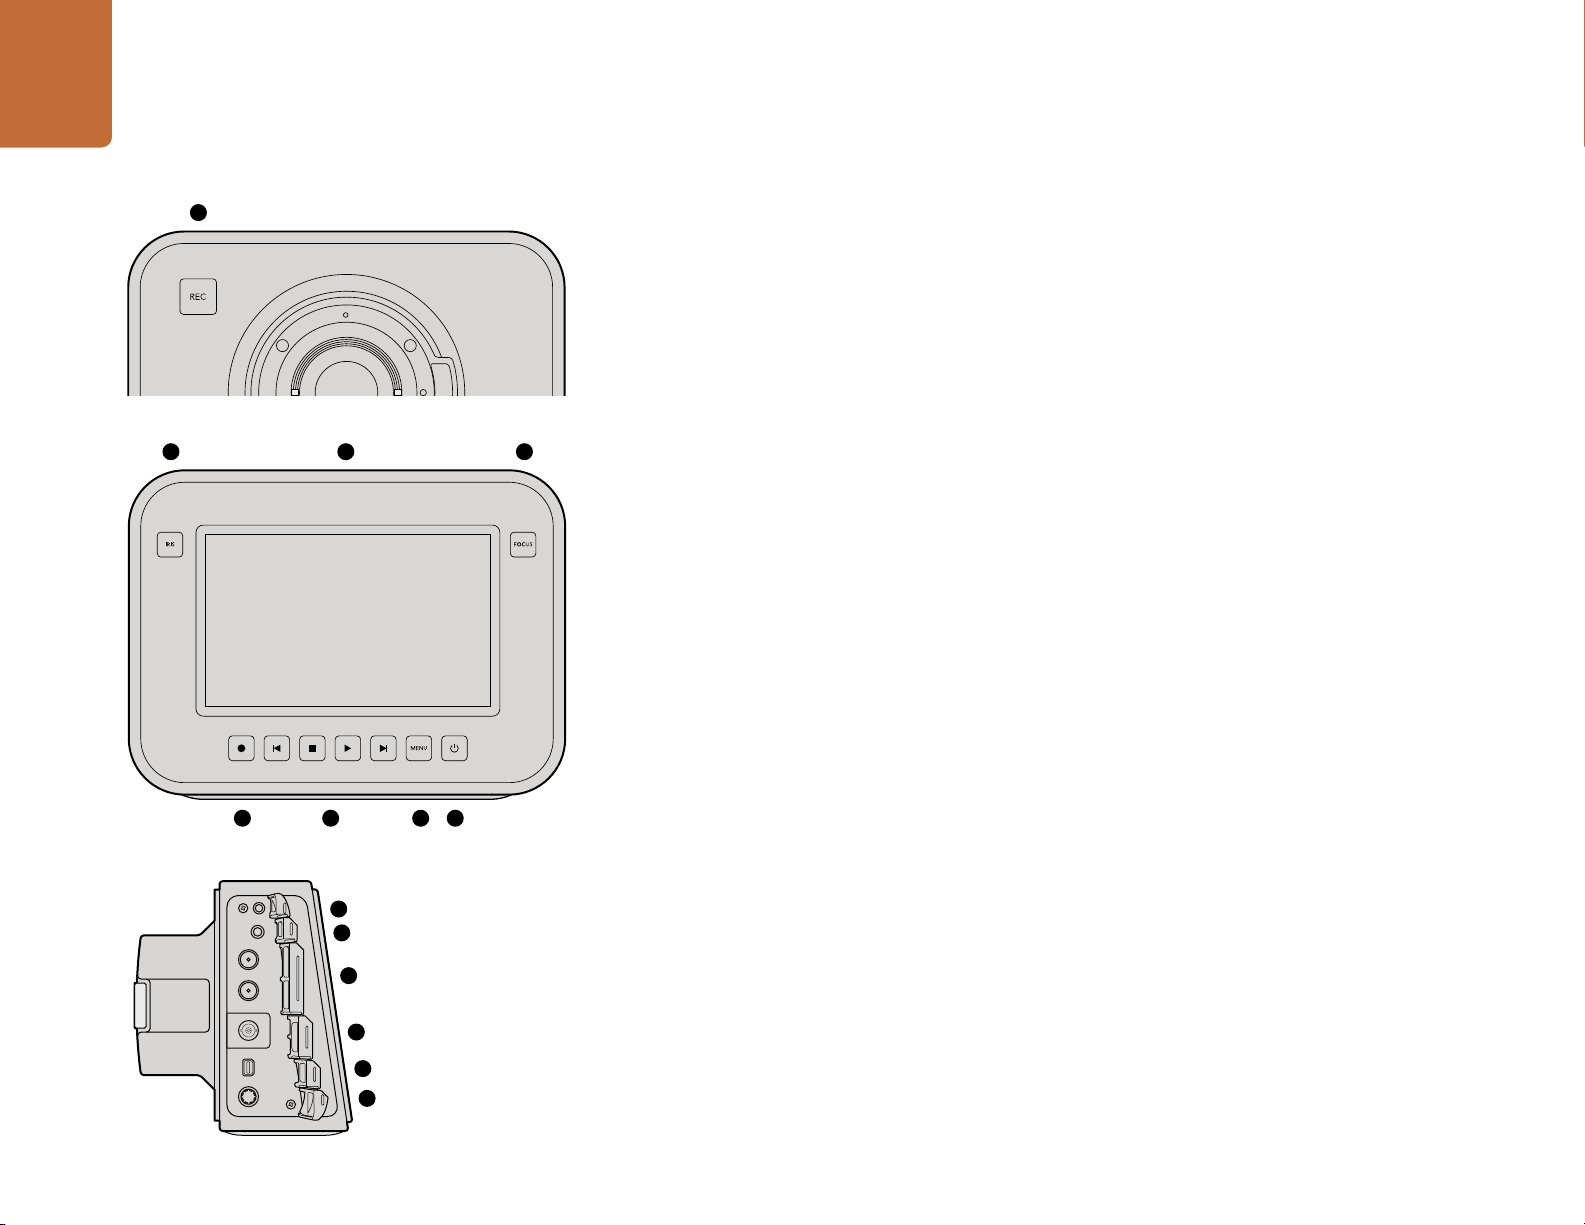
Attaching and removing a lens on Pocket Cinema Camera
Attaching and removing a lens on Cinema Camera and
Production Camera 4K
Attaching a Lens
Getting started with your Blackmagic Camera is as simple as attaching a lens and turning the camera
on. To remove the protective dust cap from the lens mount, hold down the locking button and rotate
the cap counterclockwise until it is released. We recommended you always turn off your Blackmagic
HDMI
12V
Camera prior to attaching or removing a lens.
To attach a lens:
Step 1. Align the dot on your lens with the dot on the camera mount. Many lenses have either a blue,
red or white dot or some other indicator.
Step 2. Twist the lens clockwise until it locks into place.
Step 3. To remove the lens, hold down the locking button, rotate the lens counterclockwise until its
dot or indicator reaches the 12 o’clock position and gently remove.
When no lens is attached to the camera, the sensor is exposed to dust and other debris so you'll want
to keep the dustcap on whenever possible.
Turning Your Camera On
Pocket Cinema Camera
Before you can operate Pocket Cinema Camera, you need to insert the battery.
Inserting the battery into Pocket Cinema Camera
Step 1. On the under side of the camera, push the door release towards the lens to access the battery
terminal.
Step 2. With the gold contacts facing into the terminal and the white arrow facing the lens, hook the
lip of the battery under the orange tab and insert the battery until you feel it press into place.
Push the orange tab to release the battery.
Step 3. Close the door to the battery terminal and slide the door release to the right to lock it.
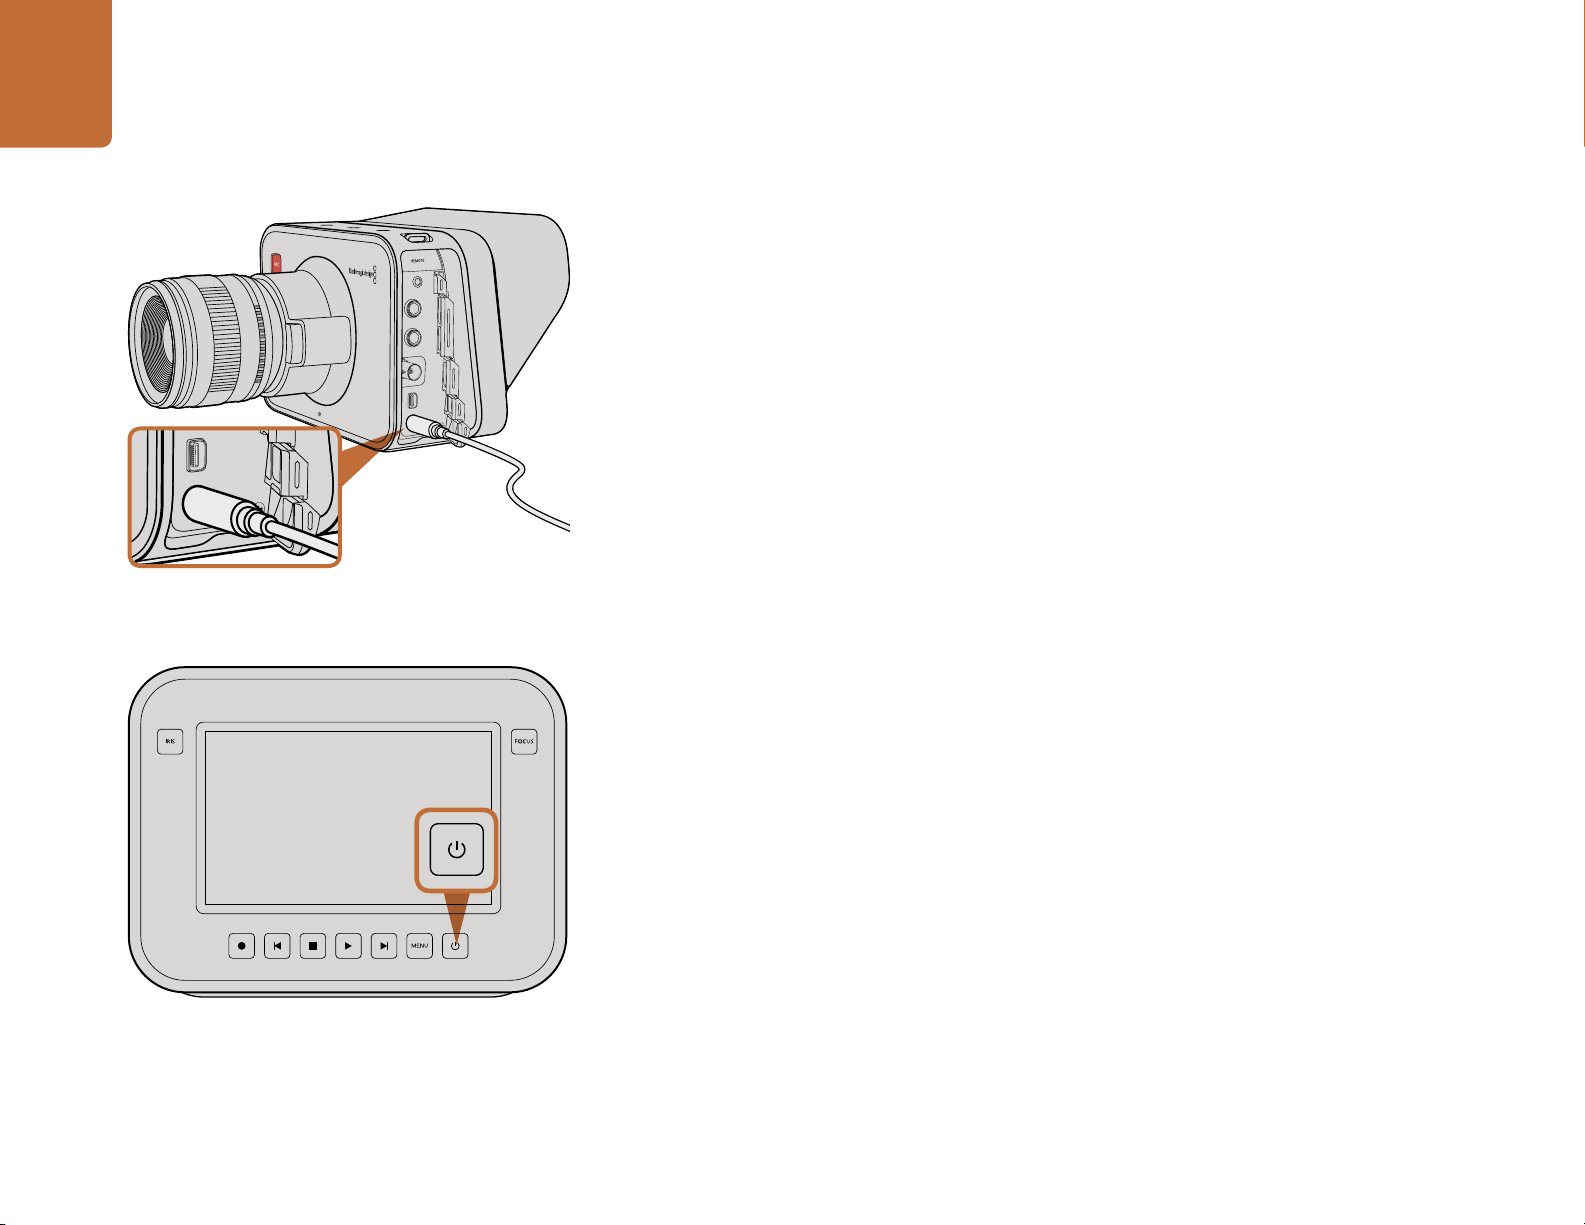
Step 4. Press the power button on the bottom right of the back panel. The status strip will appear
along the bottom of the LCD.
Step 5. Press and hold the power button to switch off the camera.
Congratulations! You are now ready to insert an SD card and start recording!
Page 8
8
Getting Started
Use the supplied power adapter to charge the internal battery
and power the camera.
Cinema Camera & Production Camera 4K
Cinema Camera and Production Camera 4K have internal batteries that can be charged using the supplied
power adapter. The camera can be charged and operated while connected via external power and will
switch between power sources without any interruption.
You can also charge the camera via a powered USB connection, however it takes longer to charge so
we recommend using the power adapter when possible.
Step 1. Press the power button below the touchscreen. The status strip will appear along the bottom
of the LCD.
Step 2. Press and hold the power button to switch off the camera.
Congratulations! You are now ready to insert an SSD and start recording!
Press and hold the power button to turn the camera on or off.
Page 9
9
Getting Started
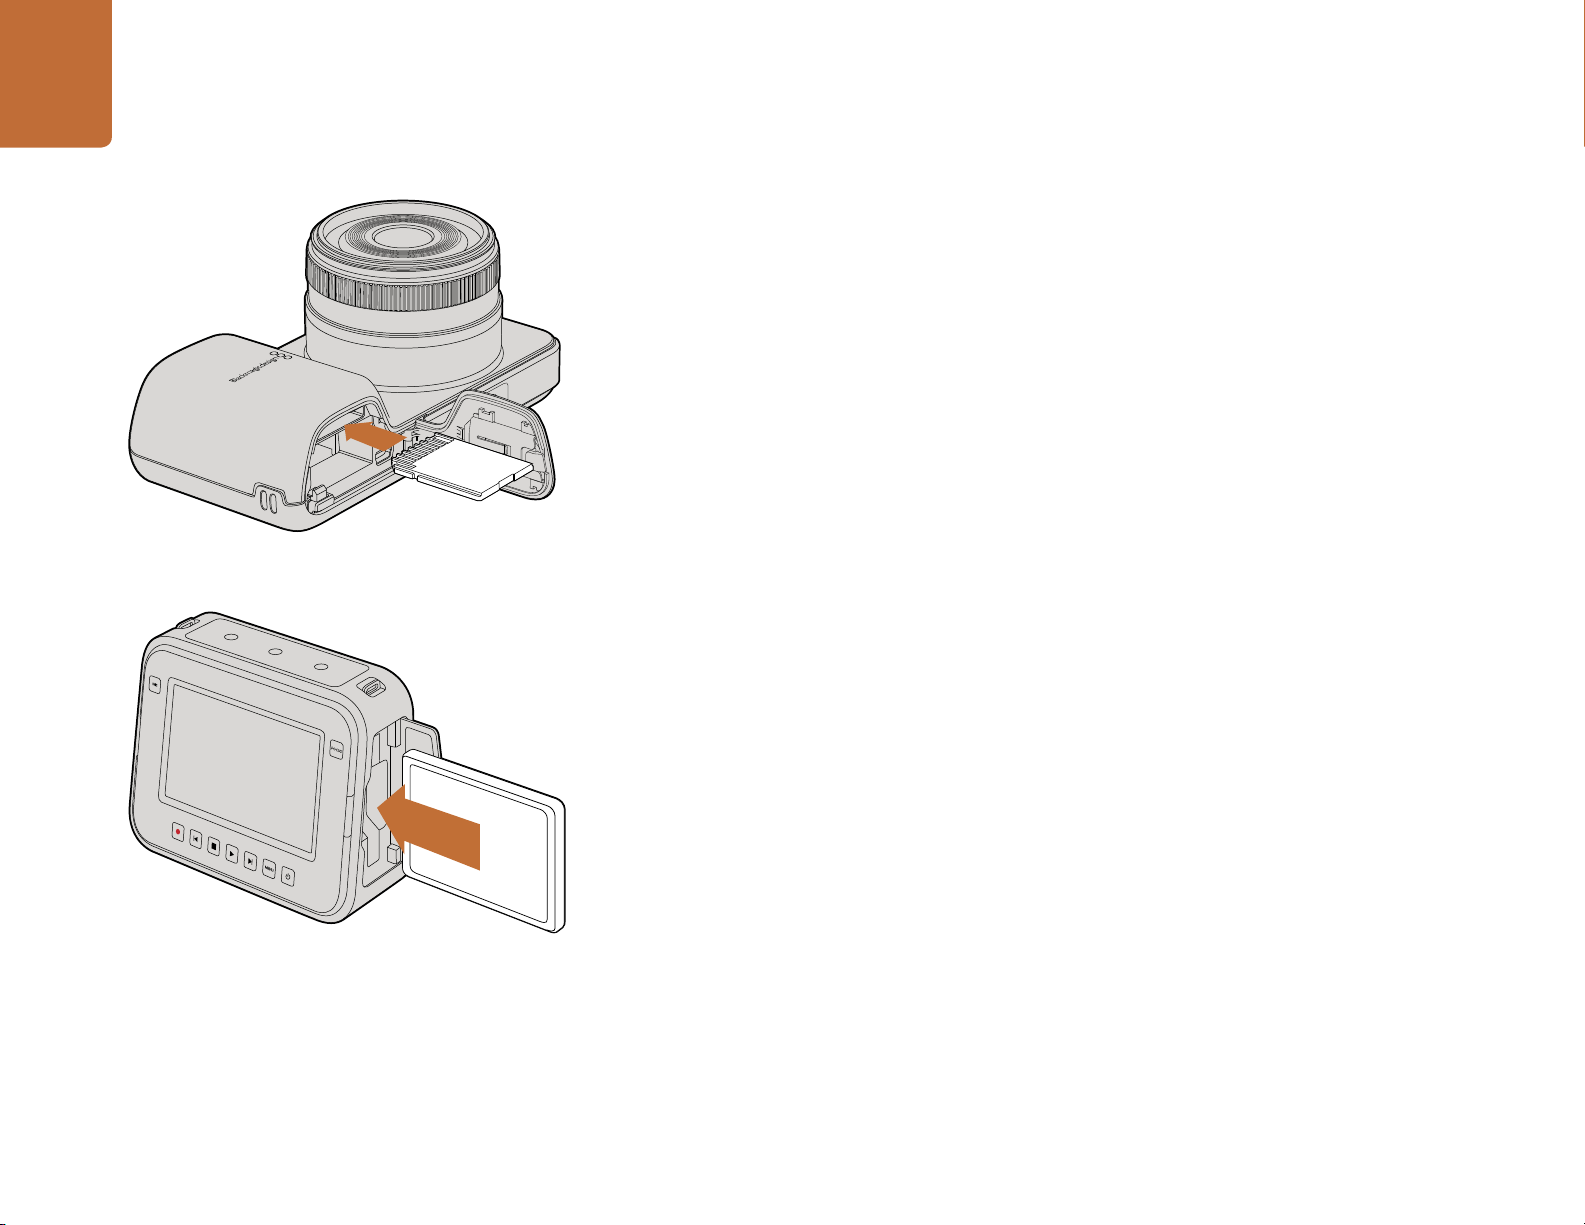
Inserting an SD card into the Pocket Cinema Camera.
Inserting an SD Card
You can insert an SDXC or SDHC card into Blackmagic Pocket Cinema Camera:
Step 1.
On the under side of the camera, push the door release towards the lens to access the
battery terminal.
Step 2. With the gold contacts on the SD card facing towards the lens, insert the SD card until you
feel it lock into place. Push on the SD card to release it.
Step 3. Close the door to the battery terminal and slide the door release to the right to lock it.
Step 4. Power on the camera. The status strip will display a moving dot while the camera checks the
SD card and then it will say READY.
The supplied SD card is for software installation only and not suitable for video recording. You'll find a
list of recommended SD cards on page 15.
Inserting an SSD
You can insert a 2.5" 9.5 mm SSD formatted in either the HFS+ or exFAT file systems into Cinema Camera
and Production Camera 4K:
Step 1. Open the SSD door on the right hand side of the camera.
Inserting an SSD into the Cinema Camera and the Production
Camera 4K.
Step 2. With the gold SATA contacts facing towards the camera door, insert the SSD until you feel it
press into place. Close the SSD door.
Step 3. Power on the camera. The status strip will display a moving dot while the camera checks the
SSD and then it will say READY.
You'll find a list of recommended SSDs on page 12.
Page 10

10
Getting Started
Recording
Press the REC button on your camera to begin recording immediately. Press REC again to stop recording.
Choosing the Recording Format
Blackmagic cameras record to several different formats, depending on which model you are using.
You may decide to experiment to see which format best suits your workflow.
Press the REC button on the top of Pocket Cinema Camera.
Press the REC button on the front face
or
on the transport control on the back of Cinema Camera and
Production Camera 4K.
Blackmagic Pocket
Cinema Camera
Apple ProRes 422 (HQ) Apple ProRes 422 (HQ) Apple ProRes 422 (HQ)
Apple ProRes 422 Apple ProRes 422 Apple ProRes 422
Apple ProRes 422 LT Apple ProRes 422 LT Apple ProRes 422 LT
Apple ProRes 422 Proxy Apple ProRes 422 Proxy Apple ProRes 422 Proxy
Lossless compressed
CinemaDNG RAW
You can choose from 4 different Apple ProRes formats. This lets you fit more video on your SSD or SD
card. ProRes 422 (HQ) provides the highest quality video with the lowest compression. Alternatively,
ProRes 422 Proxy gives you far more recording time with greater compression.
To select your desired video format:
Step 1. Press the MENU button.
Step 2. Select the RECORDING menu and use the selection arrows to set the desired recording format.
Step 3. Press the MENU button to exit.
Your camera is now ready to record in the video format you have selected. The current recording format
is shown on the left of the status strip on the LCD.
Blackmagic Cinema Camera Blackmagic Production
Camera 4K
CinemaDNG RAW 2.5K Lossless compressed CinemaDNG
RAW
Avid DNxHD
Page 11

11
Getting Started
Blackmagic Cameras Supported Video Formats
To immediately view your recorded clip on a Blackmagic
Camera simply press the Play button on the transport
controls.
Blackmagic Pocket
Cinema Camera
1920 x 1080p23.98 2400 x 1350 12-bit RAW 2.5K 3840 x 2160p23.98
1920 x 1080p24 1920 x 1080p23.98 3840 x 2160p24
1920 x 1080p25 1920 x 1080p24 3840 x 2160p25
1920 x 1080p29.97 1920 x 1080p25 3840 x 2160p29.97
1920 x 1080p30 1920 x 1080p29.97 3840 x 2160p30
Blackmagic Cinema Camera Blackmagic Production
Camera 4K
1920 x 1080p30 1920 x 1080p23.98
1920 x 1080i50 (output) 1920 x 1080p24
1920 x 1080i59.94 (output) 1920 x 1080p25
1920 x 1080p29.97
1920 x 1080p30
1920 x 1080i50 (output)
1920 x 1080i59.94 (output)
Playing Back Clips
Once you have recorded your video, you can use the transport control buttons to play back your video
on the LCD.
Press the play button once for instant playback and you'll see your video on the LCD and on any display
connected to the HDMI or SDI output. Hold down the forward or reverse buttons to fast forward or
reverse through the clip. Playback will finish when the end of the current clip is reached.
The controls of your camera work just like a CD player, so pressing the forward button will skip to the
start of the next clip. Press the reverse button once to go to the start of the current clip or press twice
to skip back to the start of the previous clip.
Page 12
About SSDs
12
About SSDs
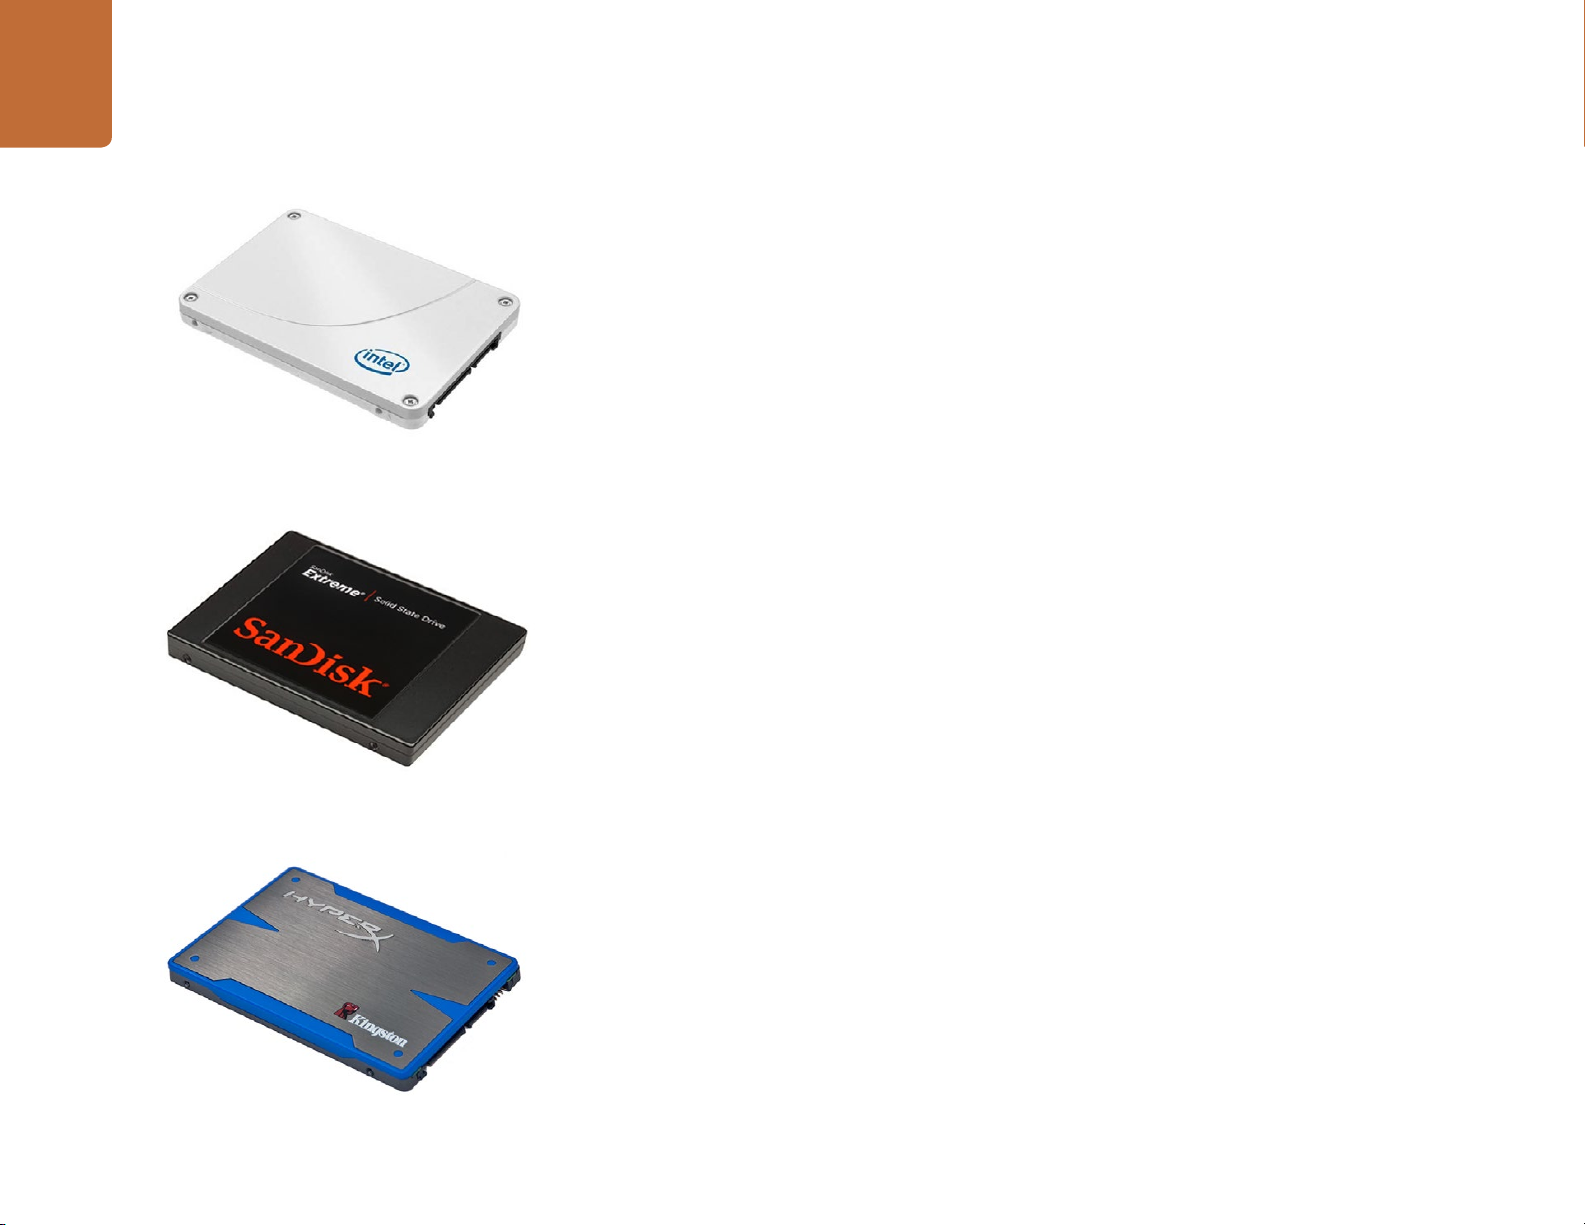
Intel 335 Series 240GB SSD
Sandisk Extreme 480GB SSD
Choosing a Fast SSD
When working with high data rate video it's important to carefully check the SSD you would like to use.
This is because some SSDs can have up to 50% lower write speed than the manufacturer’s claimed speed,
so even though the disk specifications claim an SSD is fast enough to handle video, in reality the disk is
not fast enough for real time video recording.
The following SSDs are recommended for 2.5K RAW CinemaDNG capture or compressed video capture:
Intel 335 Series 240GB SSD
Intel 520 Series 240GB SSD
Intel 520 Series 480GB SSD
Intel 530 Series 180GB SSD
Intel 530 Series 240GB SSD
Kingston 240 GB HyperX 3K
Kingston 480 GB HyperX 3K
Kingston 240 GB SSDNow KC300
Kingston 480 GB SSDNow KC300
Sandisk Extreme 240GB
Sandisk Extreme 480GB
PNY 240GB Prevail SSD (firmware 5.0.2)
OWC 120GB Mercury Extreme Pro 6G (Firmware Rev 5.0.7)
OWC 240GB Mercury Extreme Pro 6G (Firmware Rev 5.0.6)
OWC 480GB Mercury Extreme Pro 6G (Firmware Rev 5.0.6)
Digistor 128GB SSD Professional Video Extreme (pre-formatted ExFat)
Digistor 240GB SSD Professional Video Series (pre-formatted ExFat)
Digistor 480GB SSD Professional Video Series (pre-formatted ExFat)
Angelbird 240GB AV Pro (Firmware 2.54)
ADATA XPG SX900 256GB
Kingston HyperX 240GB SSD
In addition to the above, these SSDs work ONLY for compressed video capture:
Crucial 256GB M4 (firmware 000F)
OCZ Agility 3 240GB
Sandisk Extreme 120GB
If your SSD is dropping frames, try a different SSD or use a compressed HD recording format such as
ProRes or DNxHD for lower data rates. Check the Blackmagic Design website for the latest information.
Page 13
13
About SSDs
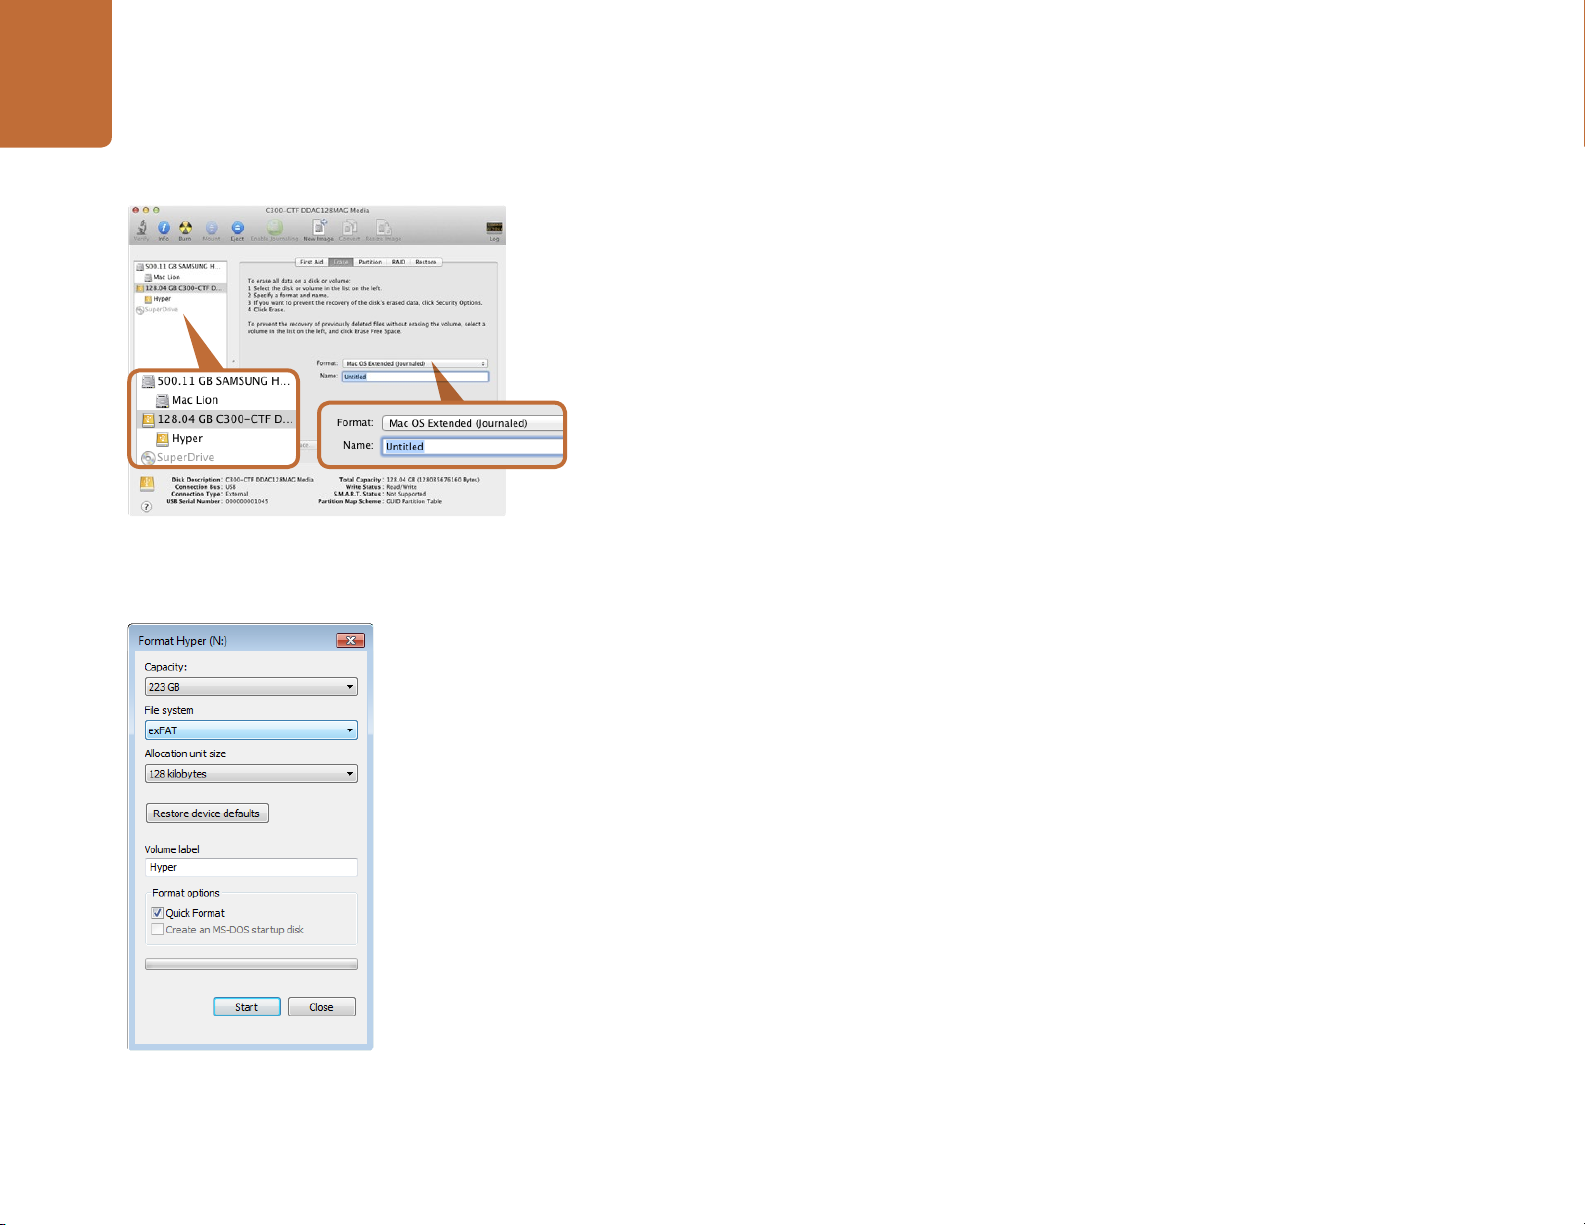
Use Disk Utility on Mac OS X to erase your SSD in the
Mac OS Extended (Journaled) or exFAT format.
Preparing SSDs for Recording
SSDs used by Cinema Camera and Production Camera 4K must be formatted as either HFS+ or exFAT.
These disk formats allow long clips to be recorded as single files.
HFS+ is also known as Mac OS Extended. It is the recommended format as it supports "journaling".
In the event of a hardware or software malfunction, data on a journaled SSD is more quickly recovered
and less likely to be corrupted. HFS+ is natively supported by Mac OS X.
ExFAT is supported natively by Mac OS X and Windows without needing to purchase any additional
software. However exFAT does not support journaling which means data is less protected against
corruption, and less likely to be recovered in the rare event of a hardware or software malfunction.
Preparing SSDs on a Mac OS X computer
Use the Disk Utility application included with Mac OS X to format your drive in the HFS+ or exFAT formats.
Remember to back up anything important from your SSD as all data will be lost when it is formatted.
Step 1. Connect the SSD to your computer with an external dock or cable adapter and dismiss any
message offering to use your SSD for Time Machine backups.
Step 2. Go to Applications/Utilities and launch Disk Utility.
Step 3. Click on the disk icon of your SSD and then click the Erase tab.
Use the Format dialog box feature in Windows to format your
SSD in the exFAT format.
Step 4. Set the Format to "Mac OS Extended (Journaled)" or "exFAT".
Step 5. Type a Name for the new volume and then click Erase. Your SSD will quickly be formatted and
made ready for use.
Preparing SSDs on a Windows computer
The Format dialog box can format a drive in the exFAT format on a Windows PC. Remember to back up
anything important from your SSD as all data will be lost when it is formatted.
Step 1. Connect the SSD to your computer.
Step 2. Open the Start Menu or Start Screen and choose Computer. Right-click on your SSD.
Step 3. From the contextual menu, choose Format.
Step 4. Set the file system to "exFAT" and the allocation unit size to 128 kilobytes.
Step 5. Type a volume label, select "Quick Format" and click "Start".
Step 6. Your SSD will quickly be formatted and made ready for use.
Page 14
14
About SSDs
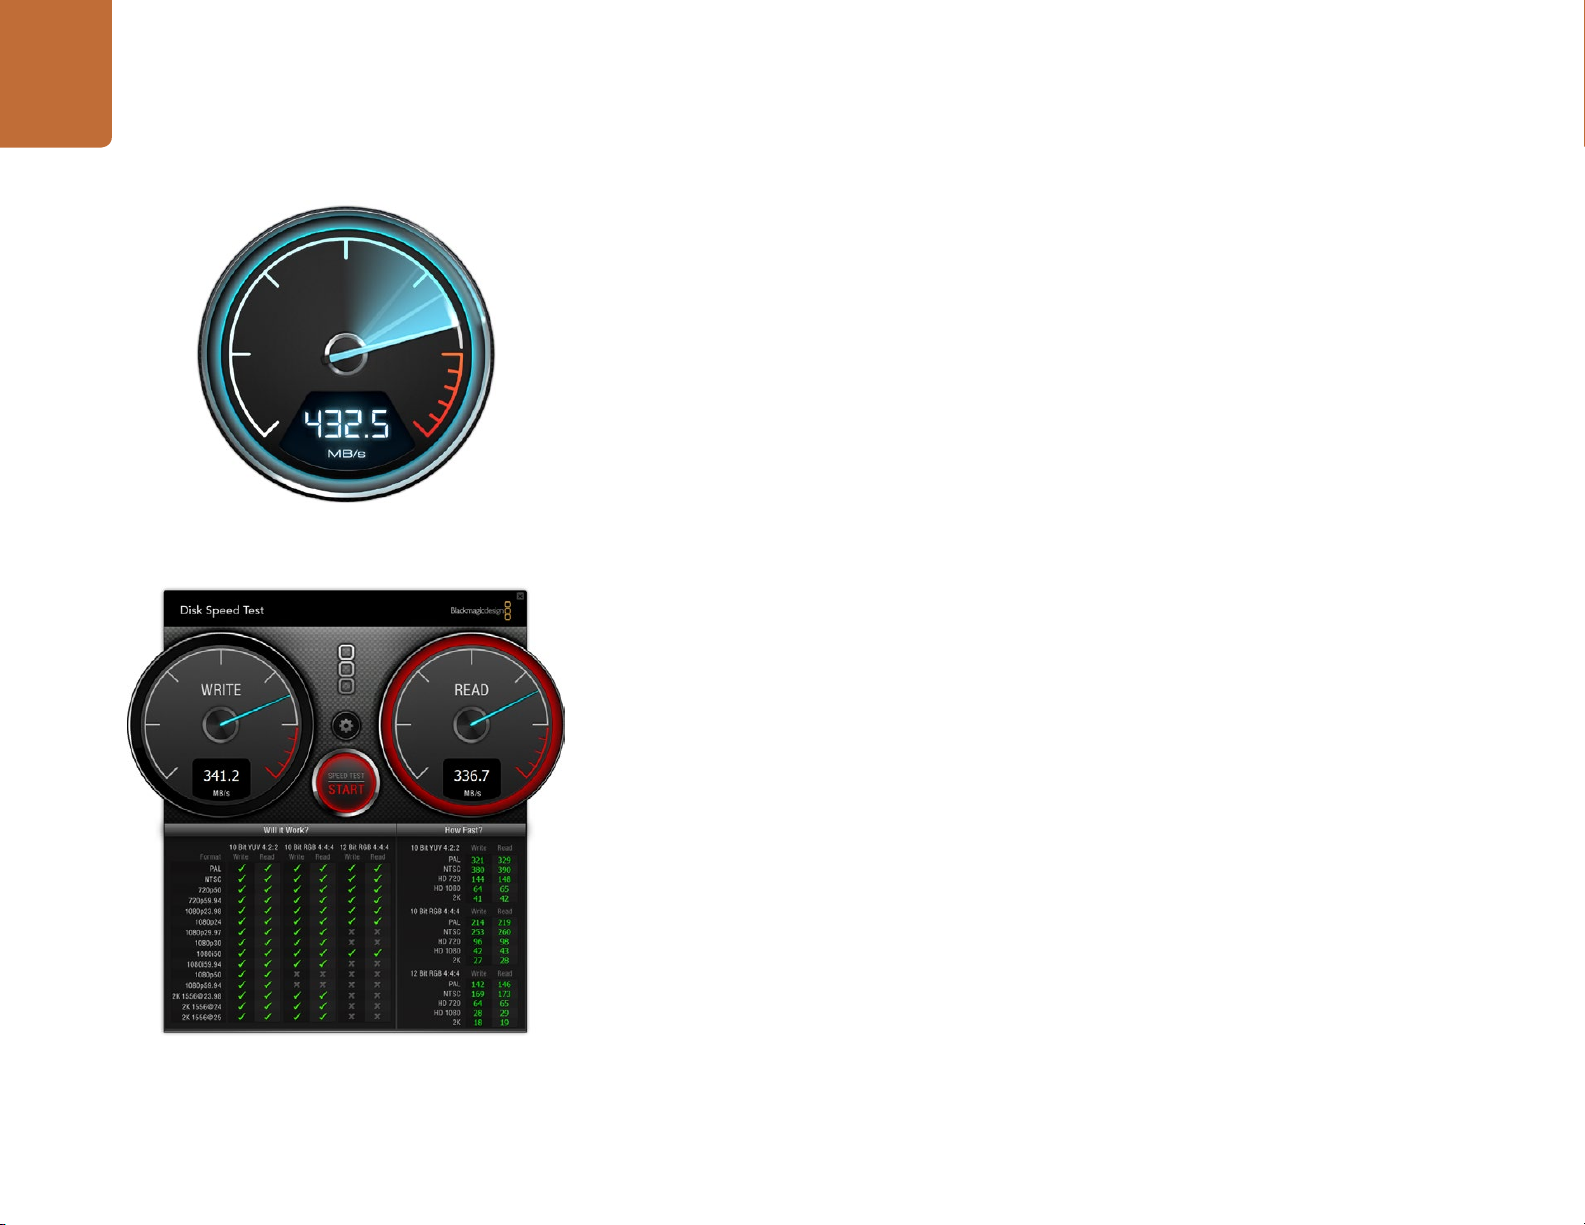
Checking Disk Speed
Blackmagic Disk Speed Test is a fun application that measures the read and write performance of storage
media, then displays the results using video formats.
If you have ever wondered whether your hard drive is suitable for recording ("write") or playback (“read”)
of a particular video format, you can use Disk Speed Test to find out. Test the performance of your media
drives with a single click of the Start button! Disk Speed Test will even show you how many streams of
video your storage is capable of handling.
Disk Speed Test is included free in the Blackmagic Camera Software Utility supplied with your Blackmagic
Cinema Camera and Production Camera 4K. The Blackmagic Camera Software Utility can also be
downloaded from our website free of charge.
Use Disk Speed Test to find out the performance of your
media drives.
Disk Speed Test interface.
Page 15

About SD Cards
15
About SD Cards
Preparing SD Cards for Recording
SD cards used by Blackmagic Pocket Cinema Camera must be formatted as HFS+ or exFAT. These disk
formats allow long clips to be recorded as single files. ExFAT is supported by both Windows and Mac
OS X computers.
Preparing SD Cards on a Mac OS X computer
Use the Disk Utility application included with Mac OS X to format your SD card in the HFS+ or exFAT format.
Remember to back up anything important from your SD card as all data will be lost when it is formatted.
Step 1. Plug your SD card into your computer's SD card slot or SD card reader.
Step 2. Go to Applications/Utilities and launch Disk Utility.
Step 3. Click on the disk icon of your SD card and then click the Erase tab.
Step 4. Set the Format to "Mac OS Extended (Journaled)" or "exFAT".
Step 5. Type a Name for the new volume and then click Erase. Your SD card will quickly be formatted
and made ready for use.
Preparing SD Cards on a Windows computer
The Format dialog box can format a drive in the exFAT format on a Windows PC.
Step 1. Plug your SD card into your computer's SD card slot or SD card reader.
Step 2. Open the Start Menu or Start Screen and choose Computer. Right-click on your SD card.
Step 3. From the contextual menu, choose Format.
Step 4. Set the file system to "exFAT" and the allocation unit size to 128 kilobytes.
Step 5. Type a volume label, select "Quick Format" and click "Start".
Step 6. Your SD card will quickly be formatted and made ready for use.
Choosing a Fast SD Card
It's important to use SDHC and SDXC cards with Blackmagic Pocket Cinema Camera. These cards are
rated for fast data speeds and support larger storage sizes.
Recommended SDHC and SDXC cards include:
Delkin Devices 16GB Elite SDHC UHS-I
Delkin Devices 32GB Elite SDHC UHS-I
Please check the tech notes on the Blackmagic Design website for the latest information.
Sandisk 64GB Extreme SDXC UHS-I
Sandisk 128GB Extreme SDXC UHS-I
Sandisk 16GB Extreme Pro SDHC UHS-I
Sandisk 64GB Extreme Pro SDHC UHS-I
Page 16
Connections
HDMI
12V
16
Connections
Blackmagic Pocket Cinema Camera
LANC Remote Control
The remote port on your camera is used to remotely control record starting and stopping, iris adjustments
and manual focus adjustments when using a compatible lens.
The port is a 2.5 mm stereo jack using the standard LANC protocol.
Headphones
Monitor audio while recording or playing back clips by plugging your headphones into the 3.5mm
stereo headphones jack.
Audio In
The 3.5mm stereo audio connector accepts microphone or line level audio. It's important to select the
appropriate setting or your audio may sound too quiet or too loud. The camera automatically switches
to line level if the audio is too loud for a sustained period.
HDMI Out
The micro HDMI port outputs 10-bit uncompressed HD1080p video, even while recording. It can be
used to output video to routers, monitors, capture devices, broadcast switchers and other HDMI devices.
Power
Use the 0.7mm 12 – 20V power input for connecting your power supply and to charge the battery.
USB
Use the USB port to connect your Blackmagic Pocket Cinema Camera to your computer and update
the internal software. The USB port can be found inside the battery compartment.
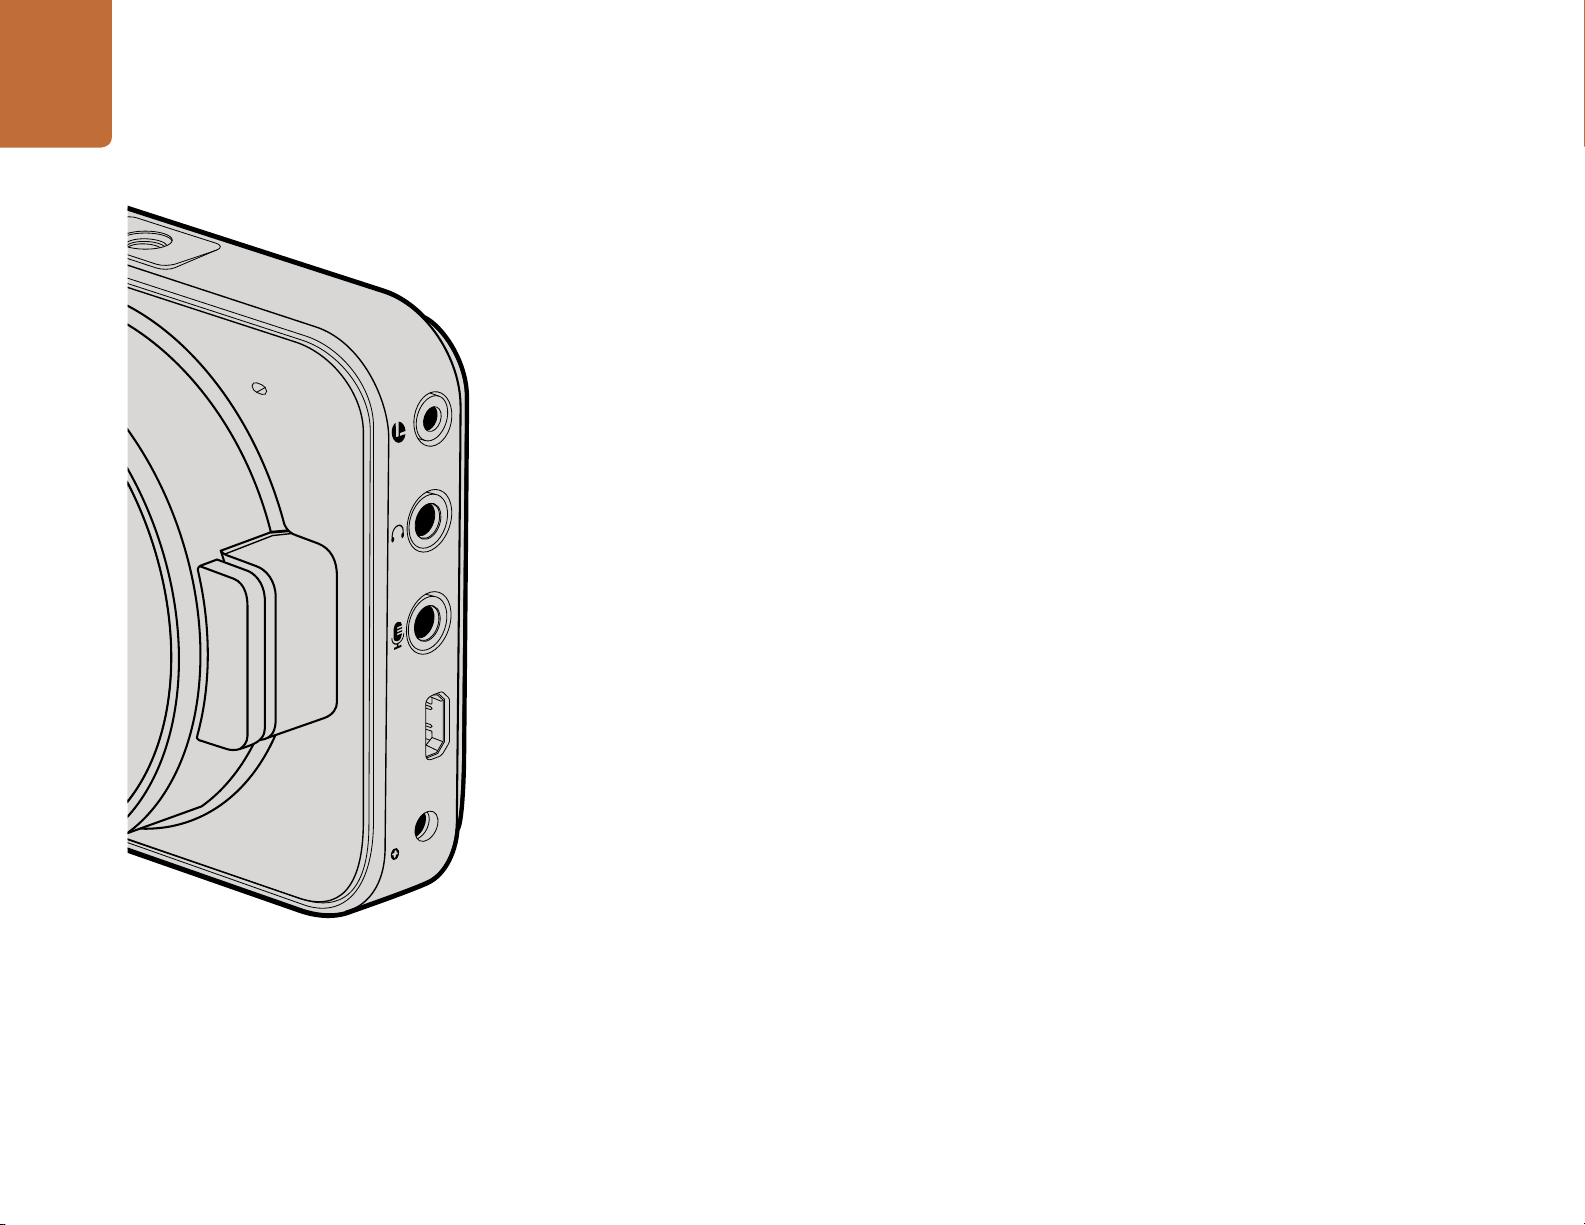
Page 17

17
Connections
Blackmagic Cinema Camera and Production Camera 4K
LANC Remote Control
The remote port on your camera is used to remotely control record starting and stopping, iris adjustments
and manual focus adjustments when using a compatible lens.
The port is a 2.5 mm stereo jack using the standard LANC protocol.
Headphones
Monitor audio while recording or playing back clips by plugging your headphones into the 3.5mm
stereo headphones jack.
Audio In
The 1/4 inch TRS Phone audio connectors accept microphone or line level audio. It's important to select
the appropriate setting or your audio may sound too quiet or too loud. The camera automatically switches
to line level if the audio is too loud for a sustained period.
SDI Out
Blackmagic Cinema Camera supports 3G-SDI so it can be used to output uncompressed 10-bit 4:2:2
video to routers, monitors, SDI capture devices, broadcast switchers and any other SDI devices.
Production Camera 4K supports 6G-SDI, so it can be used to connect to any SDI monitor as well as 4K
switchers such as ATEM Production Studio 4K.
Thunderbolt
When connected to a Mac OS X or Windows computer with Thunderbolt technology, your Cinema
Camera or Production Camera 4K can be used as a powerful solution for waveform monitoring and
color correction. Blackmagic Cinema Camera's Thunderbolt port always outputs 10-bit uncompressed
HD1080p video. Production Camera 4K's Thunderbolt port matches the SDI output, which can be 10-bit
uncompressed HD1080p or Ultra HD 4K.
Power
Use the 12 – 30V power input for connecting your power supply and to charge the internal battery.
USB
Use the USB port to connect your Blackmagic Cinema Camera or Production Camera 4K to your computer
and update the internal software. Open the SSD door to access the USB port.
Page 18
Settings
18
Settings
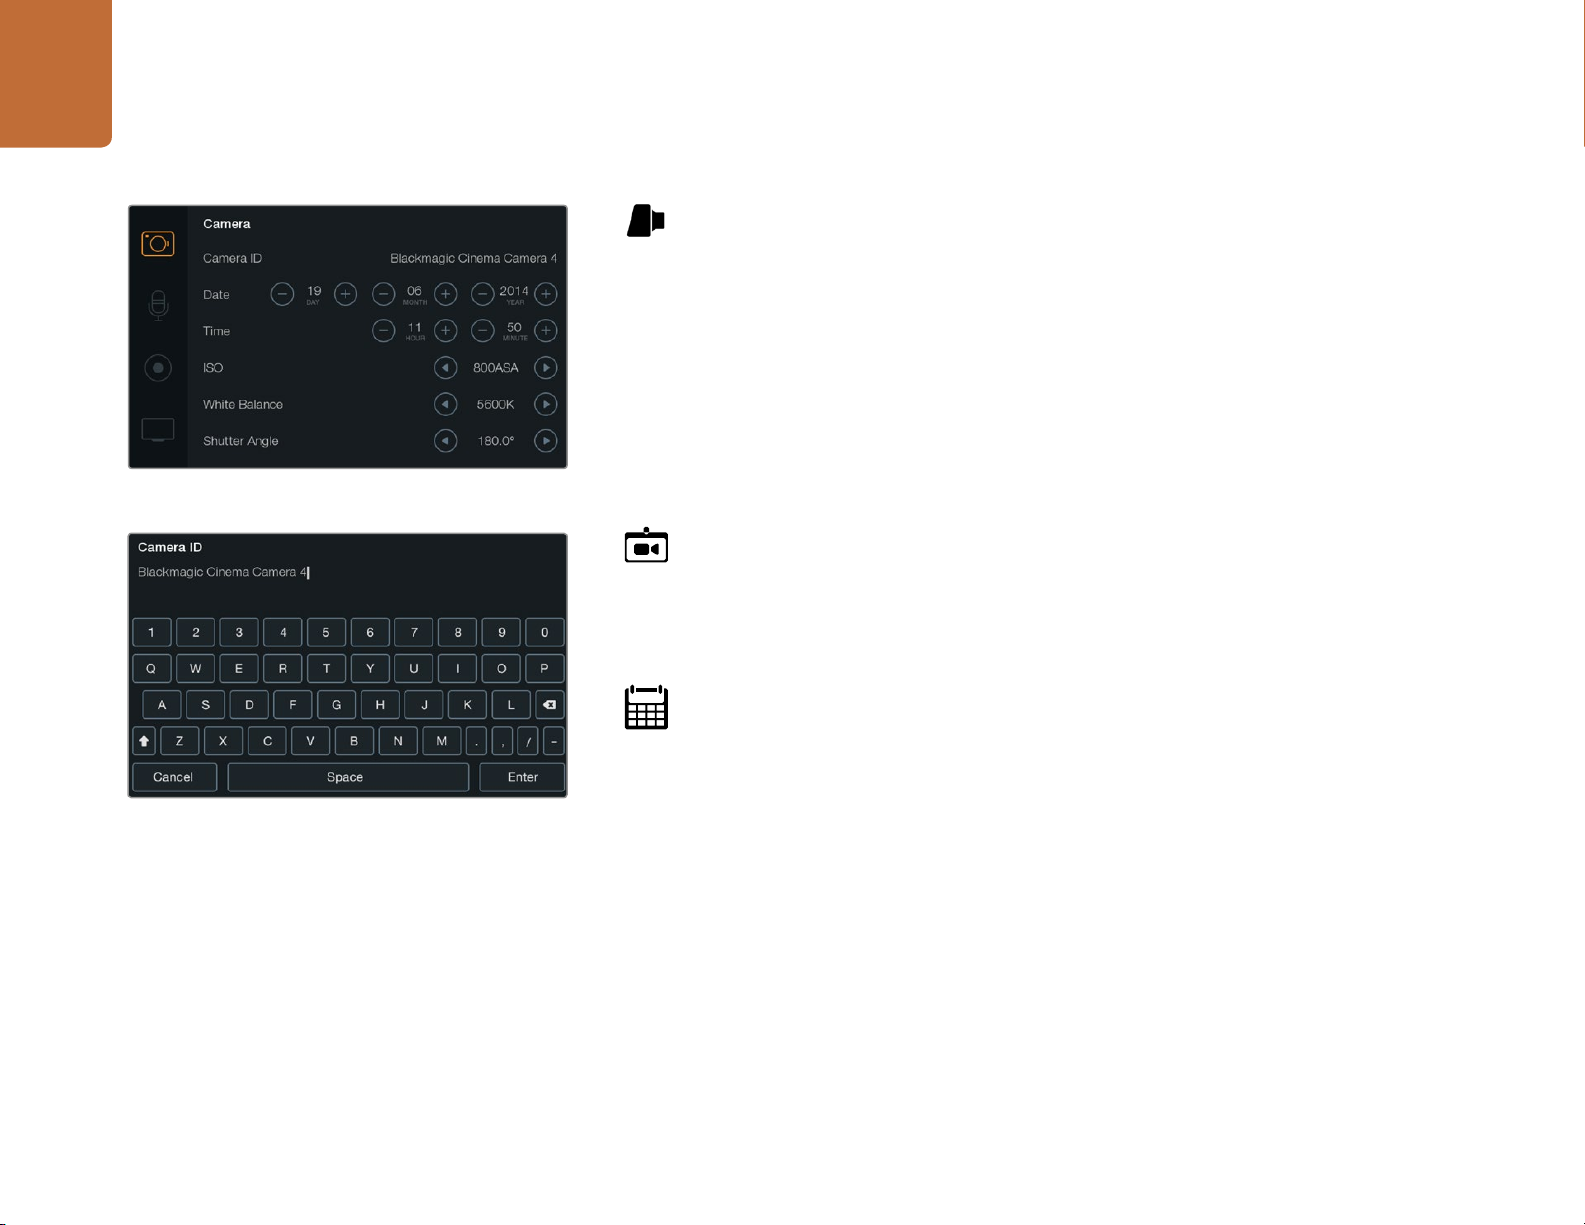
The Camera Settings screen
Camera Settings
To configure settings on your Blackmagic camera, press the MENU button.
Pocket Cinema Camera
Press the up and down buttons to highlight each settings menu. Press OK to enter a settings
menu. Use the left and right directional arrows to adjust values and the up and down arrows to
move between settings. Press Menu again to return to selecting between main settings pages.
Press Menu again to exit.
Cinema Camera & Production Camera 4K
Tap or slide the relevant arrows and icons on the touchscreen to change values or switch between
settings menus.
Camera ID
If using more than one Blackmagic Camera, it's helpful to set each camera's ID which will be
included with any metadata recorded with your clips. Set the camera ID with the onscreen
keyboard. When you have finished entering a new camera ID, select the Enter button to save, or
select Cancel to discard any changes.
Setting Date and Time
To set date and time on your Pocket Cinema Camera, select the + or - buttons to change the
year, month and day settings.
You can change the camera ID with the onscreen keyboard
Time is set to 24 hour format on Blackmagic Cameras. To set the time, select the + and - keys to
make adjustments to the time. If traveling with your Blackmagic Camera, remember to change
the date and time to local time zones.
If you have your Blackmagic Camera stored for long periods, the time may need to be reset.
It is always a good idea to check the time and date prior to recording. When connecting your
camera to your computer via USB and launching Blackmagic Camera Utility, your computer's
time is synced to your camera.
Page 19
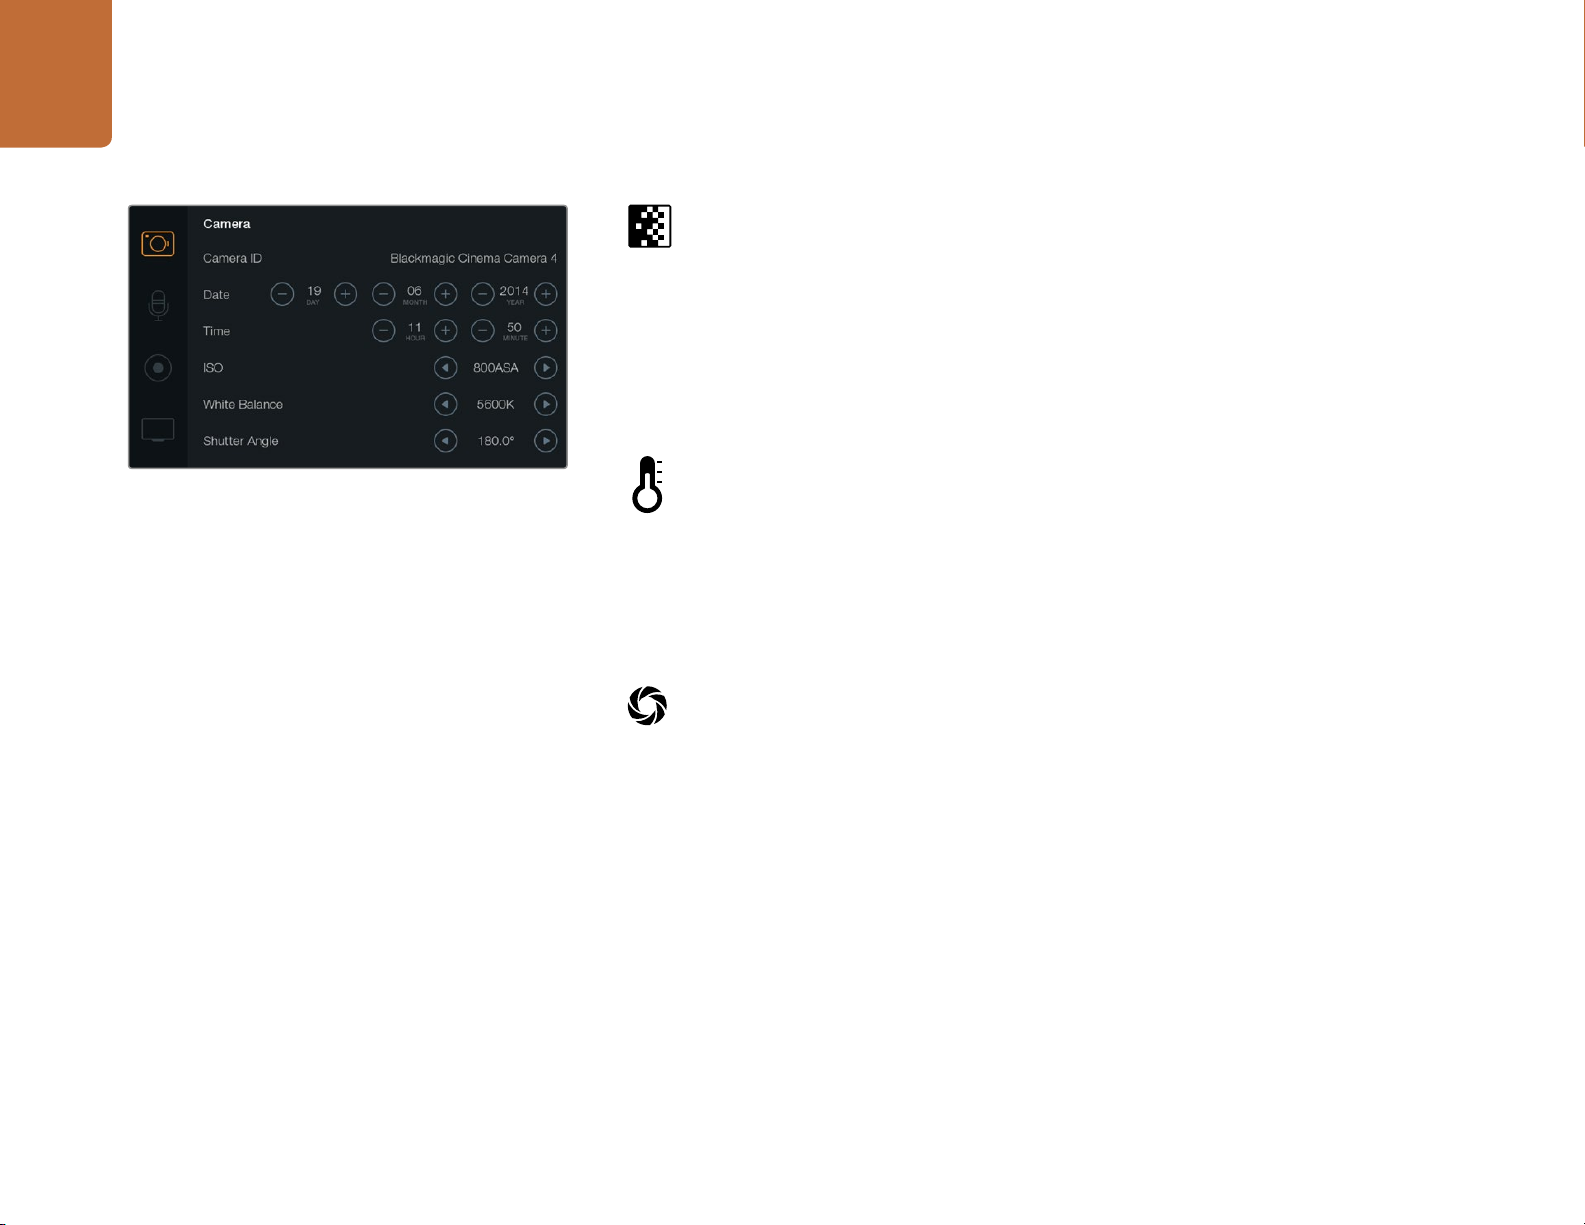
19
Settings
The Camera Settings screen
ISO
ISO settings are helpful when you are shooting in a variety of light conditions. The optimum ISO
setting for the Pocket Cinema Camera and Cinema Camera is 800ASA. For Production Camera
4K the optimum ISO setting is 400ASA.
Depending on your situation, however, you may choose a lower or higher ISO setting. For example,
in low light conditions 1600ASA would be suitable but may introduce some visible noise. In bright
conditions 400ASA would be best to record richer colors.
Adjust the ISO settings using the arrow icons in the menu.
White Balance
Your Blackmagic Camera includes 6 white balance presets for a variety of color temperature
conditions. These are:
3200K for tungsten light
4500K for fluorescent light
5000K, 5600K, 6500K and 7500K for a variety of daylight conditions such as time of day.
Adjust the White Balance settings using the arrow icons in the menu.
Shutter Angle
Shutter angle complements the ISO setting by regulating the amount of light on the sensor. 180
degrees is the optimum shutter angle, however as lighting conditions change you may need to
adjust accordingly. For example, 360 degrees is considered 'wide open' and allows maximum
light onto the sensor. This is useful for low light conditions. If you notice lights are flickering, 172.8
degrees will minimize this effect when shooting 24p in countries with 50 hertz power supplies.
Adjust the Shutter Angle settings using the arrow icons in the menu.
Page 20

20
Settings
Audio Settings
To adjust audio input and audio monitoring settings on your Blackmagic Camera, press the
MENU button and select the microphone icon to the left of the display.
Microphone Input
Microphone input adjusts the recording levels of the built in microphone. Move the audio slider
left or right to increase or decrease levels. Pocket Cinema Camera has a built in stereo microphone
and Cinema Camera and Production Camera 4K have built in mono microphones. The built in
microphones record to audio channels 1 and 2 when no external audio source is connected.
The Audio Settings screen
Channel 1 and 2 Input Levels
External audio connectors accept audio at microphone level or line level. It's important to select
Mic or Line level audio as appropriate to avoid your external audio sounding almost inaudible
or too hot and distorted.
Set the external audio input levels by using the left and right arrows. To prevent damage, the
camera will automatically switch to line level input if the input levels are over the limit for a
sustained period of time.
Channel 1 Input Level
Move the audio slider icon left or right to increase or decrease levels for channel 1. The external
audio input overrides the built in microphone and is recorded to audio channel 1.
Channel 2 uses Channel 1 Input
Select Yes if you only have channel 1 input and want to record the same external audio to channels
1 and 2. You can leave this set to No if you only want to record one channel of audio.
Channel 2 Input Level
Move the audio slider icon left or right to increase or decrease levels for channel 2. The external
audio input overrides the built in microphone and is recorded to audio channel 2.
Headphone and Speaker Volume
When headphones are connected, a headphone icon will be displayed. When no headphones
are detected, a speaker icon will be displayed. Headphones will always be active when recording
or playing back, however speakers will only work when playing back. Move the volume slider left
or right to increase or decrease audio monitoring levels.
Page 21
21
Settings
The Recording Settings screen
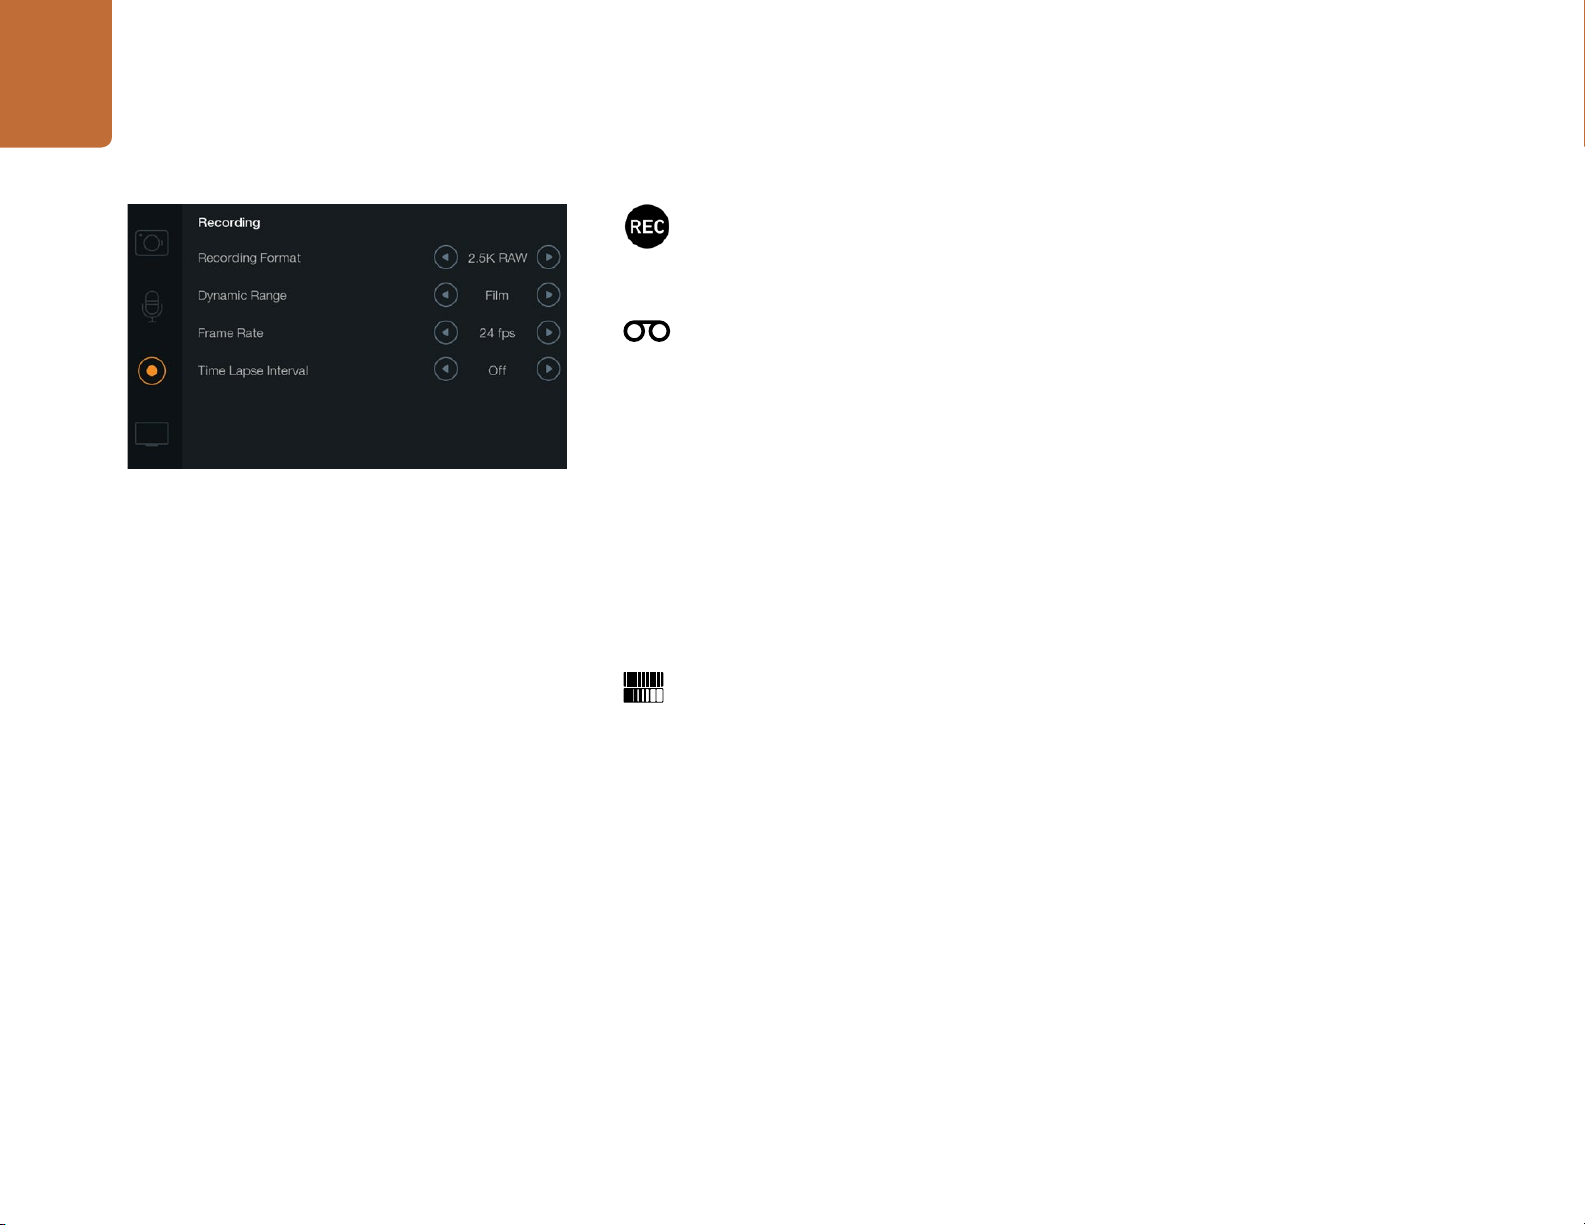
Recording Settings
The recording settings are used to set the video format recorded to your SD card or SSD. Press
the MENU button and touch the circular RECORD icon to access the Recording settings menu.
Recording Format
Pocket Cinema Camera
Touch the left and right arrow buttons to switch between ProRes HQ, ProRes 422, ProRes LT,
ProRes Proxy or RAW recording formats.
Cinema Camera
Touch the arrow icons to switch between 2.5K RAW, ProRes HQ, ProRes 422, ProRes LT, ProRes
Proxy or DNxHD recording formats.
Production Camera 4K
Touch the arrow icons to switch between HD formats such as ProRes HQ, ProRes 422, ProRes
LT and ProRes Proxy, or switch between 4K ProRes HQ, 4K ProRes 422, 4K ProRes LT, 4K ProRes
Proxy or 4K RAW recording formats.
Dynamic Range
Blackmagic Cameras have two dynamic range settings:
Film
The film setting shoots video using a log curve and gives you 13 stops of dynamic range on
both Pocket Cinema Camera and Cinema Camera, or 12 stops on Production Camera 4K.
The Film dynamic range setting maximizes the information in your video signal to help you get
the most out of color grading software, such as DaVinci Resolve. When recording in CinemaDNG
RAW formats, only the Film dynamic range setting is available.
Video
The video setting uses the REC709 standard for high definition video. This lets you work faster by
recording directly to the compressed video formats your camera supports, which are compatible
with popular post production software.
Adjust the dynamic range settings using the arrow icons in the menu.
Page 22
22
Settings
Frame Rate
Your Blackmagic Camera has five different frame rate settings for shooting common film and
video frame rates: 23.98 fps, 24 fps, 25 fps, 29.97 fps, 30 fps.
Adjust the frame rate setting using the arrow icons in the menu.
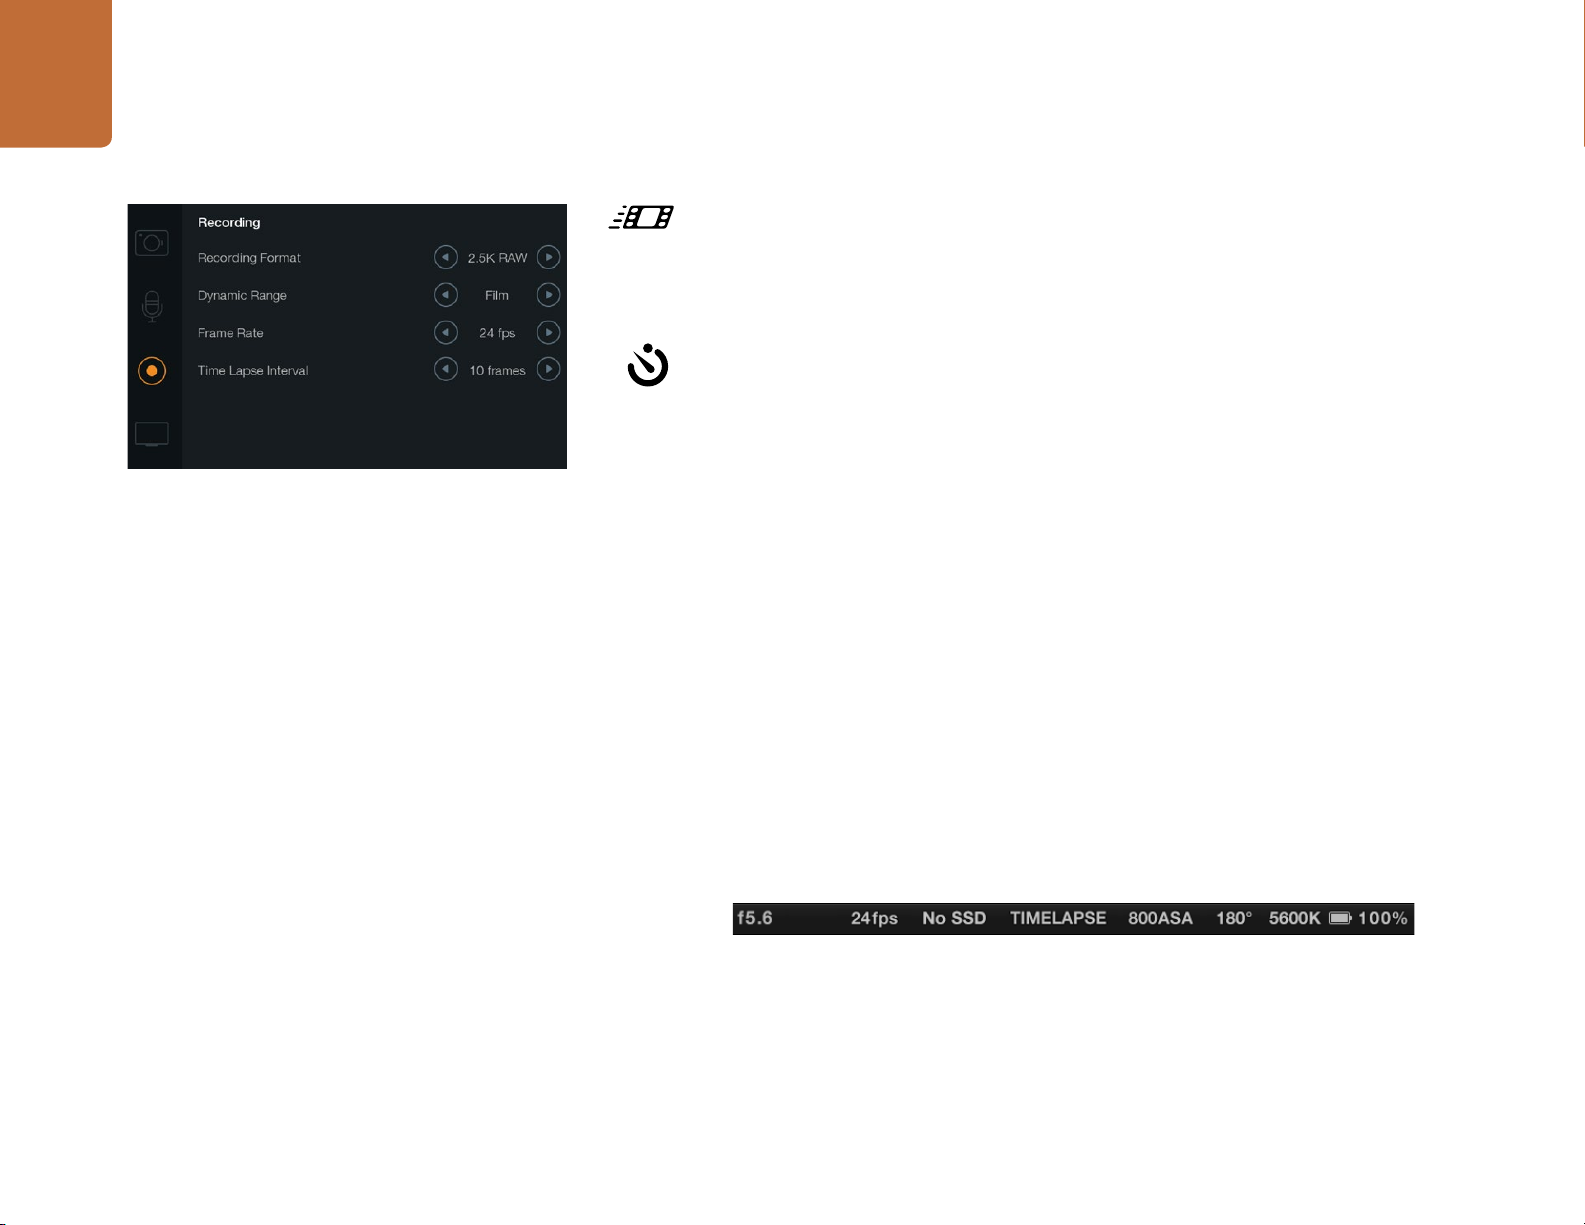
Time Lapse Interval
This setting allows you to record a still frame at the following intervals:
Frames: 2 - 10
Seconds: 1 - 10, 20, 30, 40, 50
The Recording Settings screen
Minutes: 1 - 10
For example, you can set the camera to record a still frame every 10 frames, 5 seconds, 30 seconds,
5 minutes etc.
The Time Lapse feature offers many creative options. For example, if the Time Lapse interval is
set to record a frame at 2 frame intervals, this will give your recorded video a high speed effect
when played back.
The format of each still frame is based on your recording format, so if you set the camera to record
in ProRes 422 (HQ), the Time Lapse setting will maintain this format. The frame rate will be based
on the video frame rate you have set the camera to, i.e., 24fps, so your time lapse footage can be
incorporated into your workflow easily.
When the REC button is pressed in Time Lapse mode, a "TIME LAPSE" message will replace
the timecode in the status strip and on the SDI or HDMI output for 2 seconds before reverting
back to the normal timecode display. The timecode counter updates when a frame of video is
recorded, meaning the rate of timecode increments depends on the Time Lapse interval setting.
Use the arrow icons to choose a Time Lapse interval or leave it set to Off if you do not want to
use the Time Lapse feature.
Page 23

23
Settings
File Naming Convention
Pocket Cinema Camera
Pocket Cinema Camera uses the following file naming convention when recording video.
[Camera ID]_[Reel Number]_[yyyy-mm--dd]_[hhmm]_C[Clip number].mov
The table below shows an example of how this would appear on the LCD:
BMC01_1_2012-08-08_1631_C0002.mov
BMC01_1_ 2012-08-08_1631_C0 0 02.mov
BMC01_1_2012-08-08_1631_C0002.mov
BMC01_1_2012-08-08_1631_C0002.mov
BMC01_1_2012-08-08_1631_C0002.mov Time (16:31pm - 24hrs)
BMC01_1_2012-08-08_1631_C0002.mov Clip Number
For CinemaDNG files, the folder of the image sequence will also be named the same way.
QuickTime Movie Filename
Camera ID
Reel Number
Date (2012 Aug 08)
Blackmagic Cinema Camera and Production Camera 4K
Clips are recorded to your SSDs in the CinemaDNG RAW format or to a ProRes or DNxHD QuickTime
movie, depending upon which recording format you have chosen. Blackmagic Cinema Camera and
Production Camera 4K use the following file naming convention when recording video.
[Camera ID]_[Reel Number]_[yyyy-mm--dd]_[hhmm]_C[Clip number].mov
The table below shows an example of how this would appear on the camera's touchscreen:
BMC01_1_2012-08-08_1631_C0002.mov
BMC01_1_ 2012-08-08_1631_C0 0 02.mov
BMC01_1_2012-08-08_1631_C0002.mov
BMC01_1_2012-08-08_1631_C0002.mov Date (2012 Aug 08)
BMC01_1_2012-08-08_1631_C0002.mov Time (16:31pm - 24hrs)
BMC01_1_2012-08-08_1631_C0002.mov Clip Number
QuickTime Movie Filename
Camera ID
Reel Number
For CinemaDNG files, the folder of the image sequence will also be named the same way.
Page 24
24
Settings
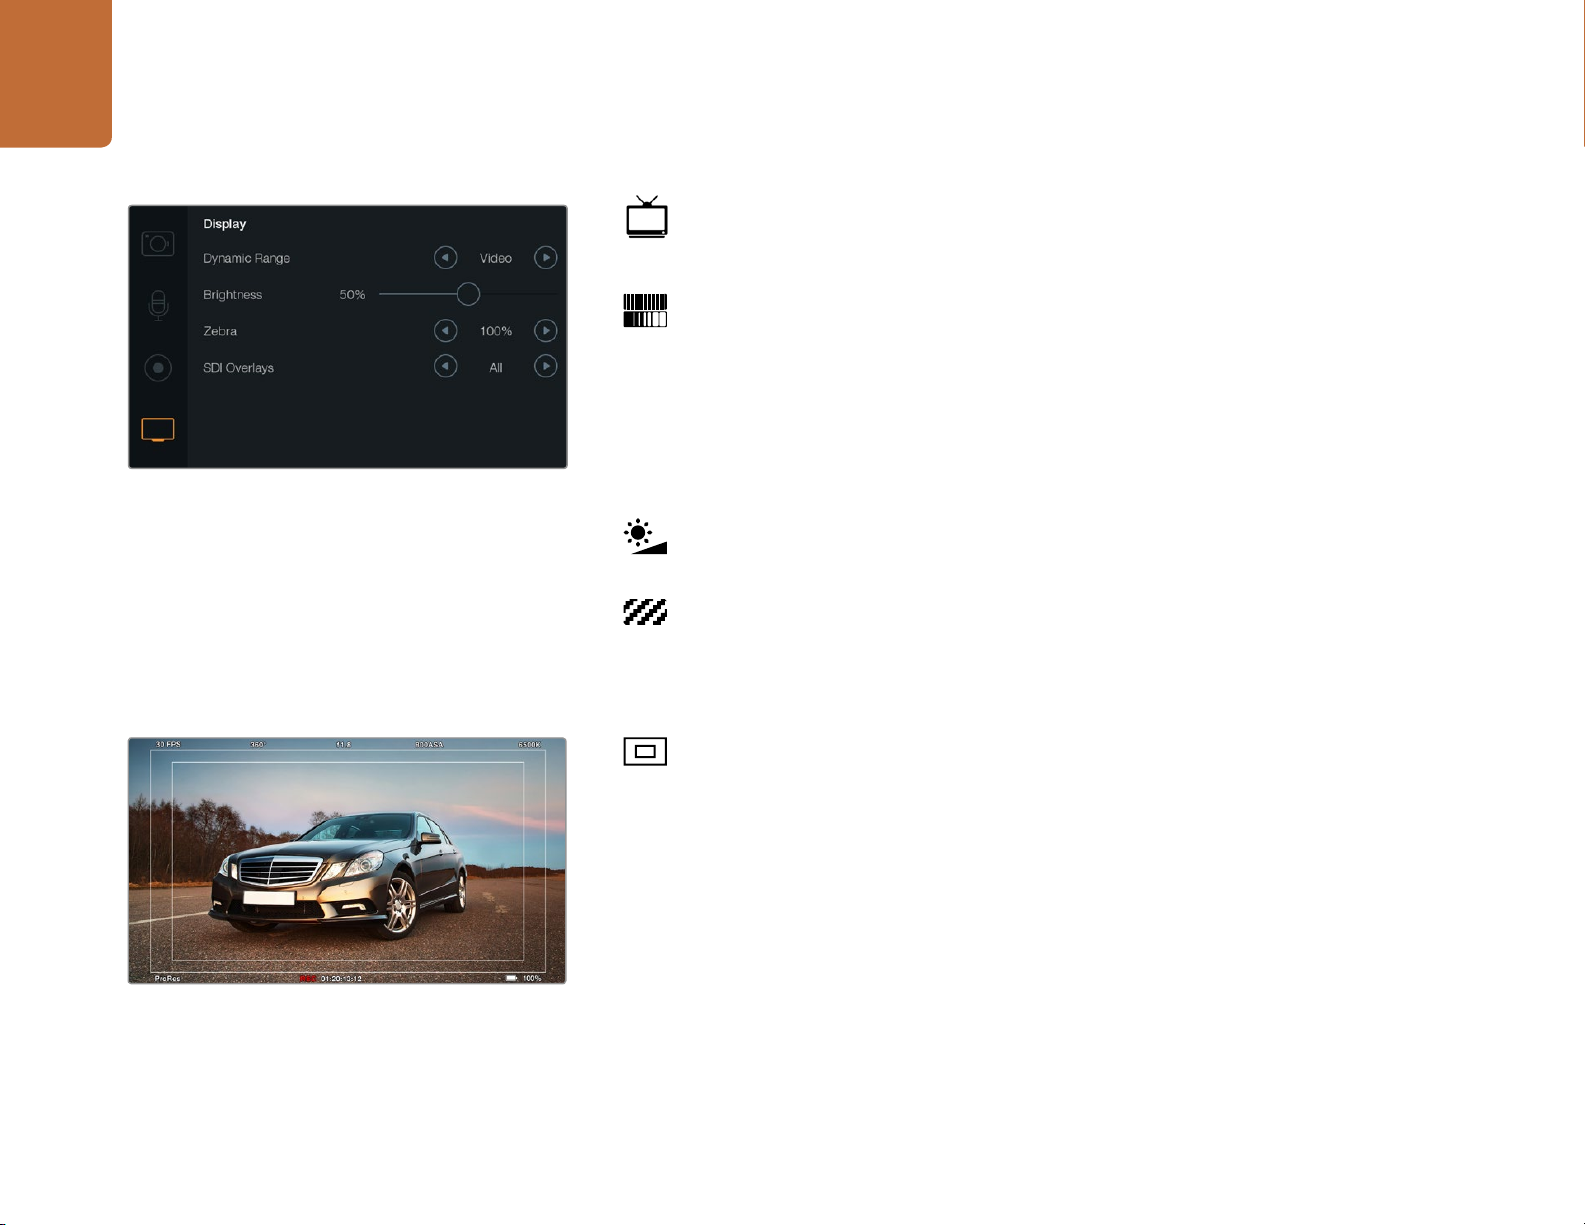
Display settings
To adjust the display settings for the LCD, press the MENU button and select the television icon.
Dynamic Range
The LCD allows you to view your video as you are recording. You can set the dynamic range of
the LCD by selecting Video or Film.
The dynamic range setting of the LCD is independent to the dynamic range set in the recorder
settings. Some people prefer to monitor video with the LCD set to Video even when the recording
format is set to Film.
Display Settings screen on Cinema Camera and
Production Camera 4K
SDI/HDMI Overlays set to display on an external monitor
Adjust the dynamic range setting of the LCD using the arrow icons in the menu.
Brightness
Move the slider icon left or right to adjust brightness settings for the LCD.
Zebra
Blackmagic Cameras have a zebra feature which gives an indication of exposure levels. Diagonal
lines will appear across any part of the video that exceeds the zebra exposure level.
Turn zebra on and select the desired zebra warning level by using the left and right arrows.
SDI/HDMI Overlays
You can monitor your video on an external display using the HDMI port on Pocket Cinema Camera,
or the SDI port on Cinema Camera and Production Camera 4K.
The SDI or HDMI Overlays setting lets you display useful information on your monitor. Use the
arrow icons to select which overlays to display on your SDI or HDMI feed.
All: displays both frame guides and recording information.
Status: displays only the recording information, such as f-stop number, frame rate, battery life etc.
Guides: displays only the frame guides.
Off: gives you a clean feed.
Page 25
25
IRIS FOCUS
Settings
IRIS FOCUS
OK
MENU
On Pocket Cinema Camera, press the IRIS button, then use
the up and down directional buttons to adjust aperture
control. Press the FOCUS button for focus peaking.
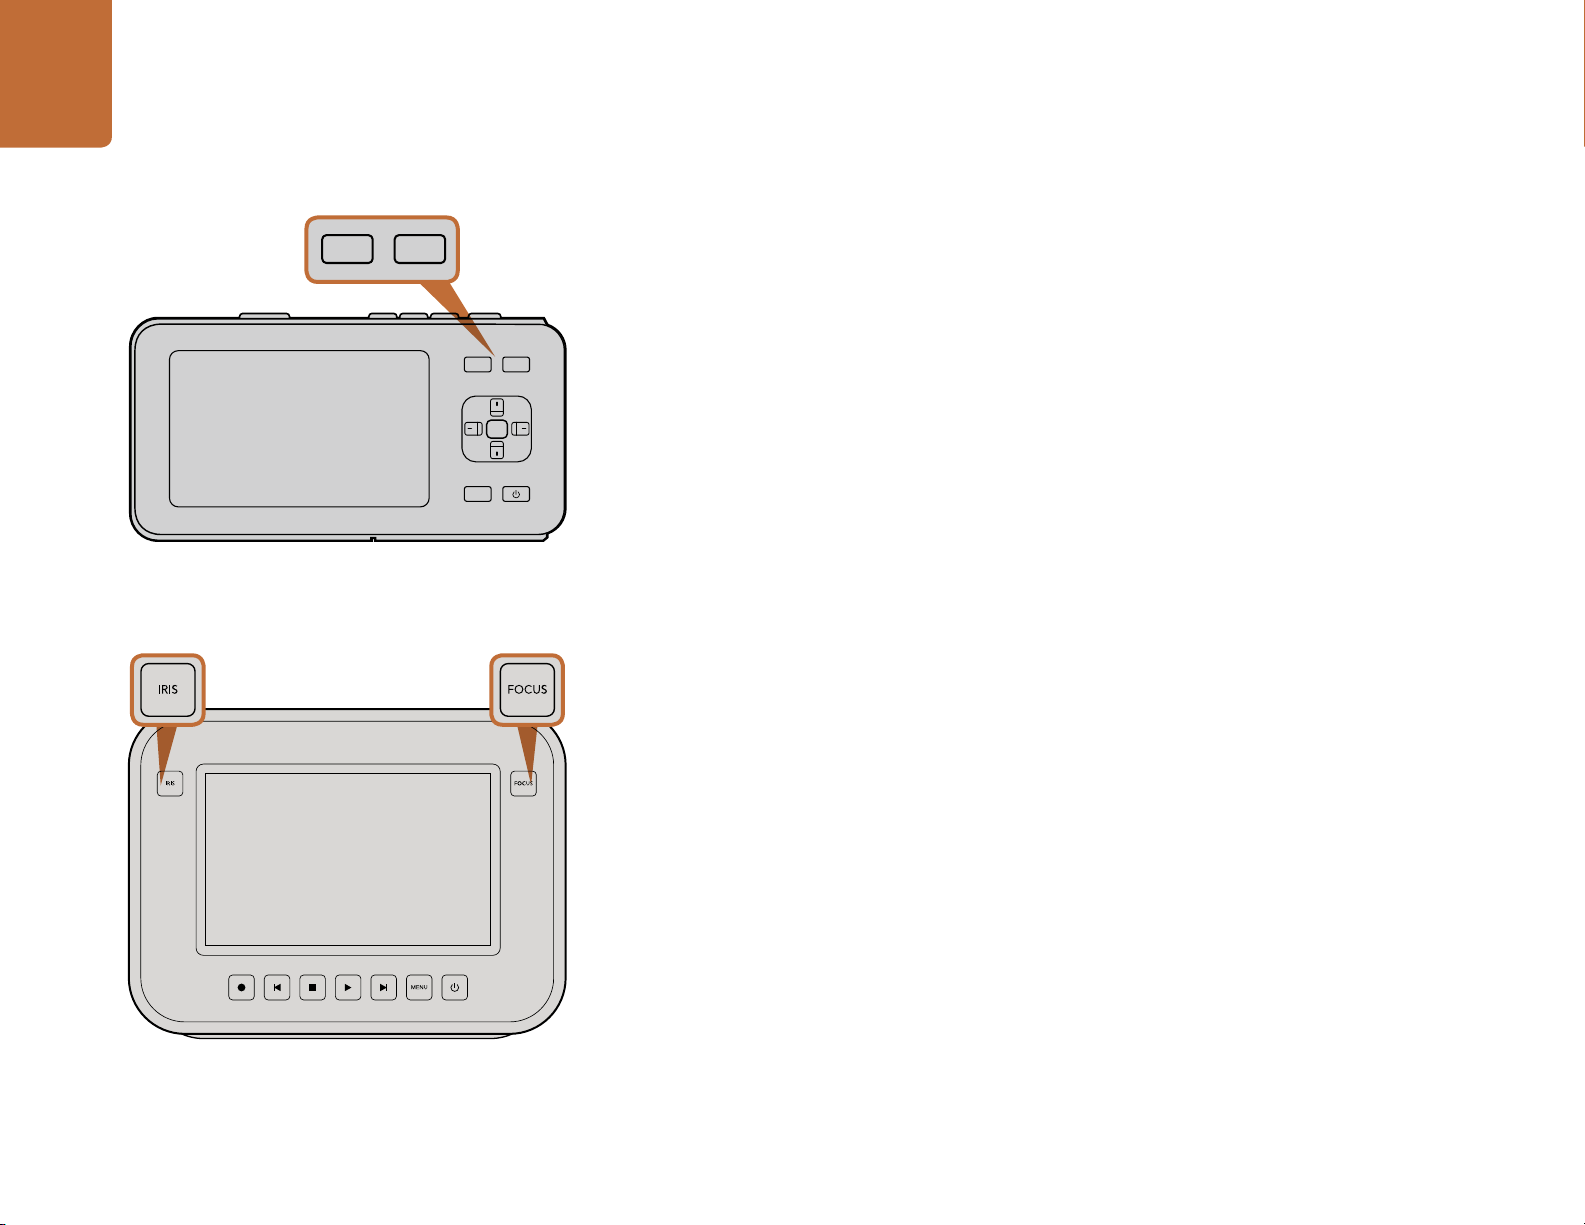
Adjusting Settings
Blackmagic Pocket Cinema Camera, Cinema Camera EF and Production Camera 4K support electronic
lens control, which allows you to adjust lens controls from the camera such as aperture and autofocus.
Cinema Camera MFT has a passive lens mount if you want to use manual lenses without electronic control.
The focus peaking feature creates a yellow edge around the sharpest parts of the image so you can easily
confirm your focus. Focus peaking is only visible on the LCD and does not affect your recorded picture.
Iris Button
When using Video dynamic range settings, a single press of the Iris button will set an average exposure
based on the highlights and shadows in your shot. When using Film dynamic range settings, pressing
the IRIS button sets your exposure to the brightest highlight in your shot.
To set your aperture manually on Pocket Cinema Camera press the up and down directional buttons
on the back panel.
To set your aperture manually on Cinema Camera and Production Camera 4K press the forward and
reverse buttons on the transport controls.
Focus Button on Pocket Cinema Camera
When using Pocket Cinema Camera with an autofocus lens press the FOCUS button for focus peaking
or autofocus. Press the FOCUS button once to auto focus. A quick double press of the FOCUS button
activates focus peaking.
When using a manual lens, press the FOCUS button once for focus peaking.
Focus Button on Cinema Camera and Production Camera 4K
When using Blackmagic Cinema Camera or Production Camera 4K, press the FOCUS button for focus
peaking.
Focus Zoom
When using Pocket Cinema Camera, double press OK to zoom in for adjusting focus at the 1:1 pixel
scale. Double press OK again to zoom out.
On Cinema Camera and Production Camera 4K, double tap the touchscreen display to zoom into the
image for adjusting focus at the 1:1 pixel scale. Double tap the display again to zoom out.
On Cinema Camera and Production Camera 4K, press the
IRIS button, then use the transport controls to adjust aperture
control. Press the FOCUS button for focus peaking.
Page 26

26
Settings
Image Stabilizer
Pocket Cinema Camera, Cinema Camera EF and Production Camera 4K support the image stabilizer (IS)
feature found in many active lenses. Simply set the Stabilizer switch to ON to use it with your camera. If your
lens also features a Stabilizer Mode switch, set it to the appropriate mode for still shots or for movement.
When using battery power, the camera will only activate the image stabilizer while recording, as the lens
draws additional power from the camera to operate the image stabilizer. When external power is connected
to the camera, the image stabilizer will be active any time you set the lens stabilizer switch to ON.
Status Strip
Your chosen settings are always displayed on a status strip, which runs the length of the LCD, showing
a convenient summary of the camera's current settings.
Battery Life Indicator
When the remaining charge drops below 25% capacity, the status strip will show the battery status in
red to warn you that battery life is running low.
1 2 3 4
1. Recording Format
2. F-Stop
3. Frame Rate
4. SD/SSD Status
5. Timecode
6
5 8 97
6. ISO Setting
7. Shutter Angle
8. White Balance
9. Battery Life Indicator
SD/SSD Activity Icons
The status strip displays important information showing the state of the inserted media.
Moving Dots
No SD/SSD This means no media is detected or present in the camera.
Ready Ready to Record.
Rec Recording.
Rec flashing Dropped Frames were detected.
Disk Full Flashes when SD card or SSD is almost full.
Playback mode Displays play, fast forward and reverse icons.
Time Displays the duration of the current shot while recording. When playing back
When you see the moving dots, the camera is checking and preparing the media.
clips from an SD card or SSD, this shows the time of the clip.
Page 27
Entering Metadata
27
Entering Metadata
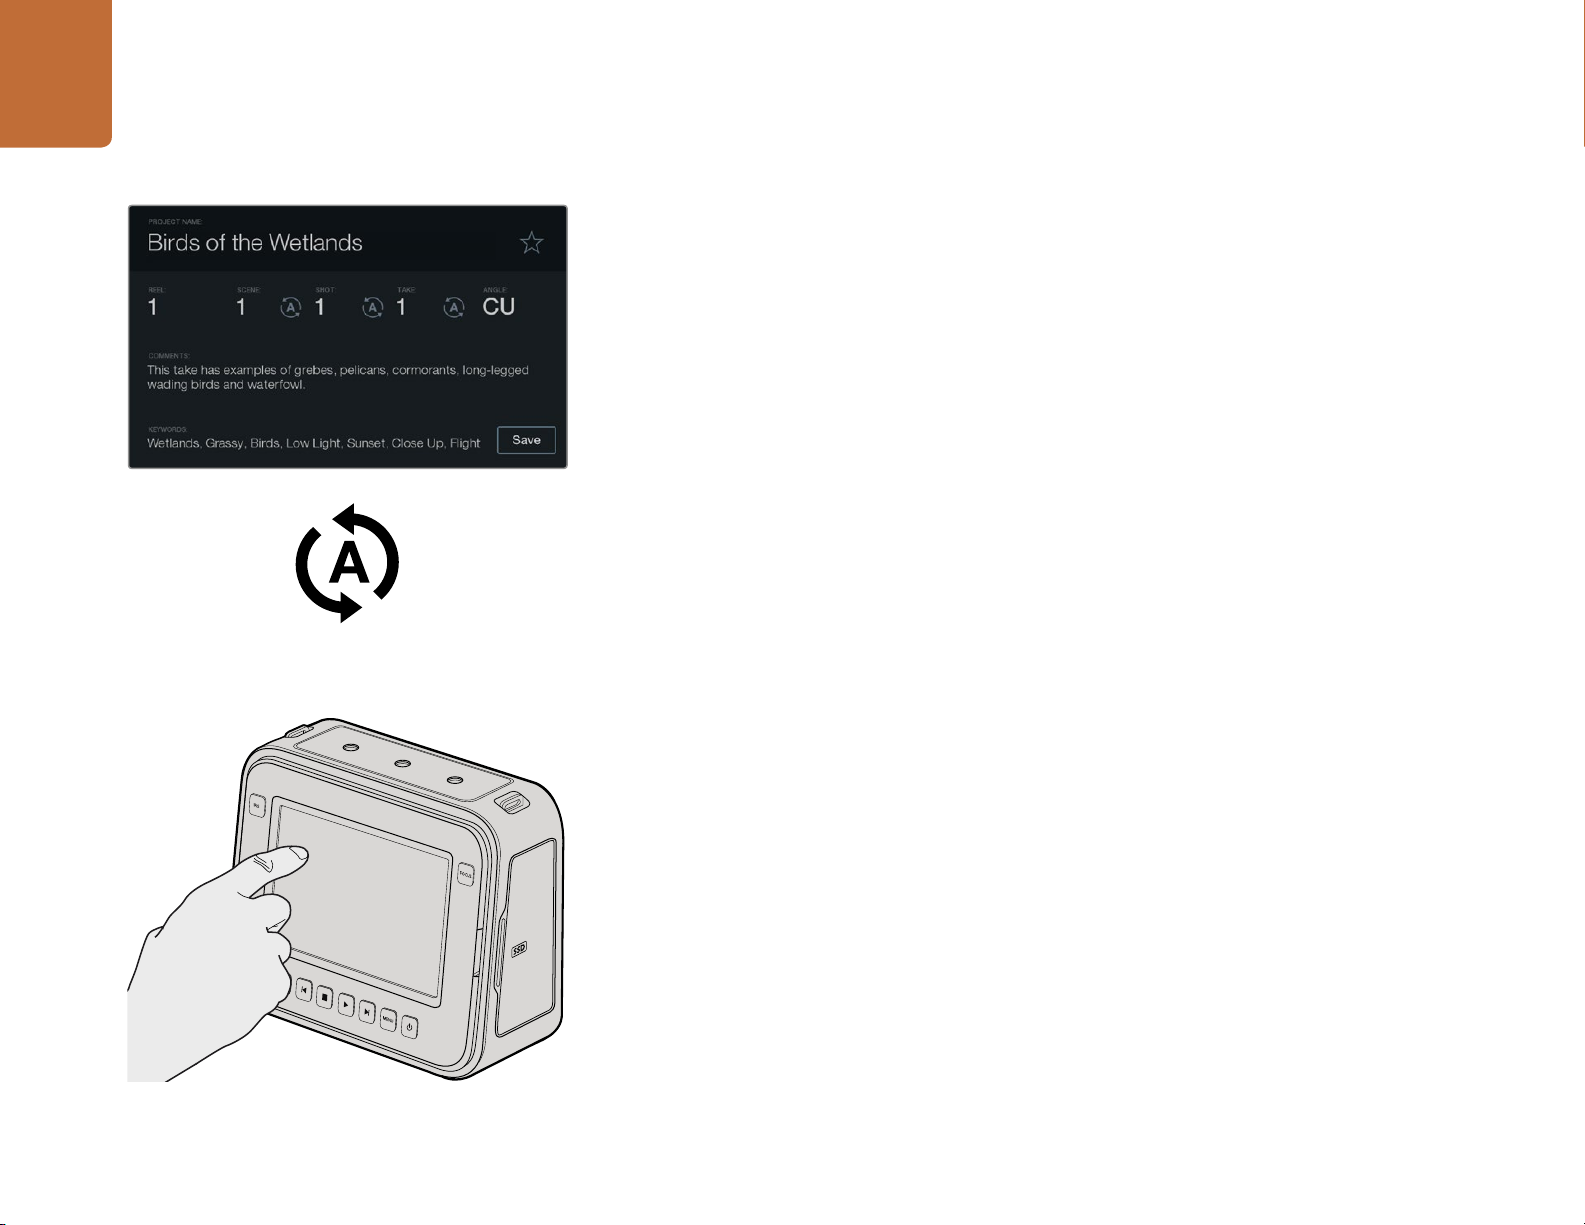
The Slate
Select the auto-increment icon if you want the scene, shot
or take number to auto-increment.
What is the Slate?
The LCD on your Blackmagic camera has many purposes, one of which is to allow you to easily log
metadata directly into the camera using the Slate feature. Metadata is stored in the recorded files and
is easily accessed by editing software.
Pocket Cinema Camera
Step 1. Press OK once to make the slate appear.
Step 2. Use the directional buttons to select the text you wish to change and press OK. An onscreen
keyboard will appear. Use the directional buttons to select characters on the keyboard and
press OK to confirm each character selection.
Step 3. Once you have typed in your information, select Save and press OK to return to the metadata
screen.
Step 4. If you want the scene, shot or take number to auto-increment, select the corresponding auto-
increment icon so it is illuminated and press OK.
Entering words into the Keywords field allows them to be used as search terms in your library database.
This may be particularly useful for large projects with lots of material. The use of keywords narrows down
the number of clips to search through, saving valuable time when you are editing.
On Cinema Camera and Production Camera 4K you can simply
tap the display once with your finger and the slate will appear.
All metadata is compatible with popular software such as Final Cut Pro X and DaVinci Resolve.
Cinema Camera & Production Camera 4K
Step 1. Tap the touchscreen once to make the slate appear.
Step 2. To enter or change details, tap the text you wish to change and an onscreen keyboard will
appear. Type in the desired information and press the save button.
Step 3. If you want the scene, shot or take number to auto-increment, tap the corresponding auto-
increment icon so it is illuminated. Tap it again if you want to turn off the auto-increment feature.
Entering words into the Keywords field will allow you to use them as search terms in your library database.
This may be particularly useful for large projects where you have lots of material. The use of keywords
narrows down the number of clips to search through, saving valuable time when you are editing.
All metadata is compatible with popular software such as Final Cut Pro X and DaVinci Resolve.
Page 28
Camera Video Output
28
Camera Video Output
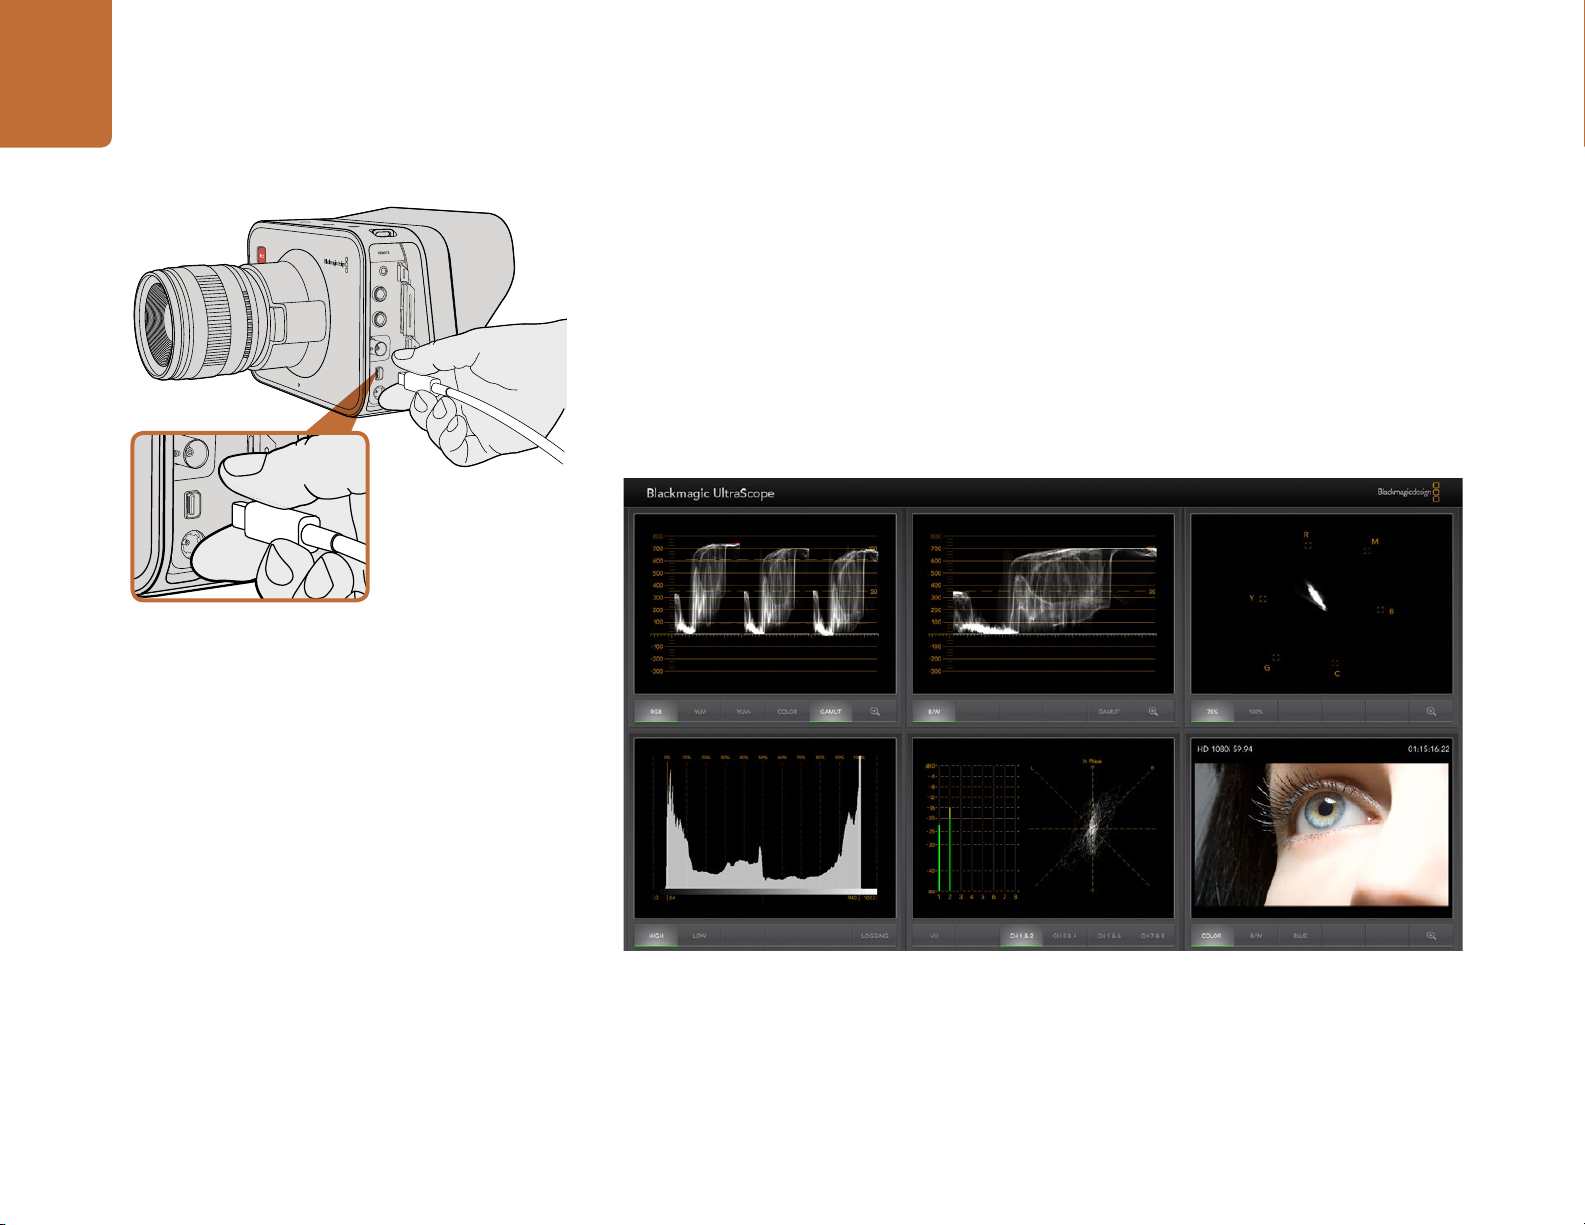
Waveform Monitoring using Thunderbolt
When connected to a Mac OS X or Windows computer with Thunderbolt technology, your Cinema
Camera or Production Camera 4K can be used as a powerful solution for waveform monitoring. Blackmagic
Cinema Camera's Thunderbolt port always outputs uncompressed 10-bit 1080p HD video. Production
Camera 4K matches the SDI output in either 10-bit 1080p HD or compressed Ultra HD 4K. For waveform
monitoring using Production Camera 4K set the recording format to HD.
The Blackmagic Camera Utility installs Blackmagic UltraScope software for waveform monitoring of
your camera during recording and playback. Blackmagic UltraScope allows you to monitor almost every
aspect of the video you record with your Cinema Camera or Production Camera 4K.
Connect to your computer via the Thunderbolt port of your
Cinema Camera or Production Camera 4K.
Blackmagic UltraScope software gives you accurate waveform monitoring via Thunderbolt.
Page 29
29
Camera Video Output
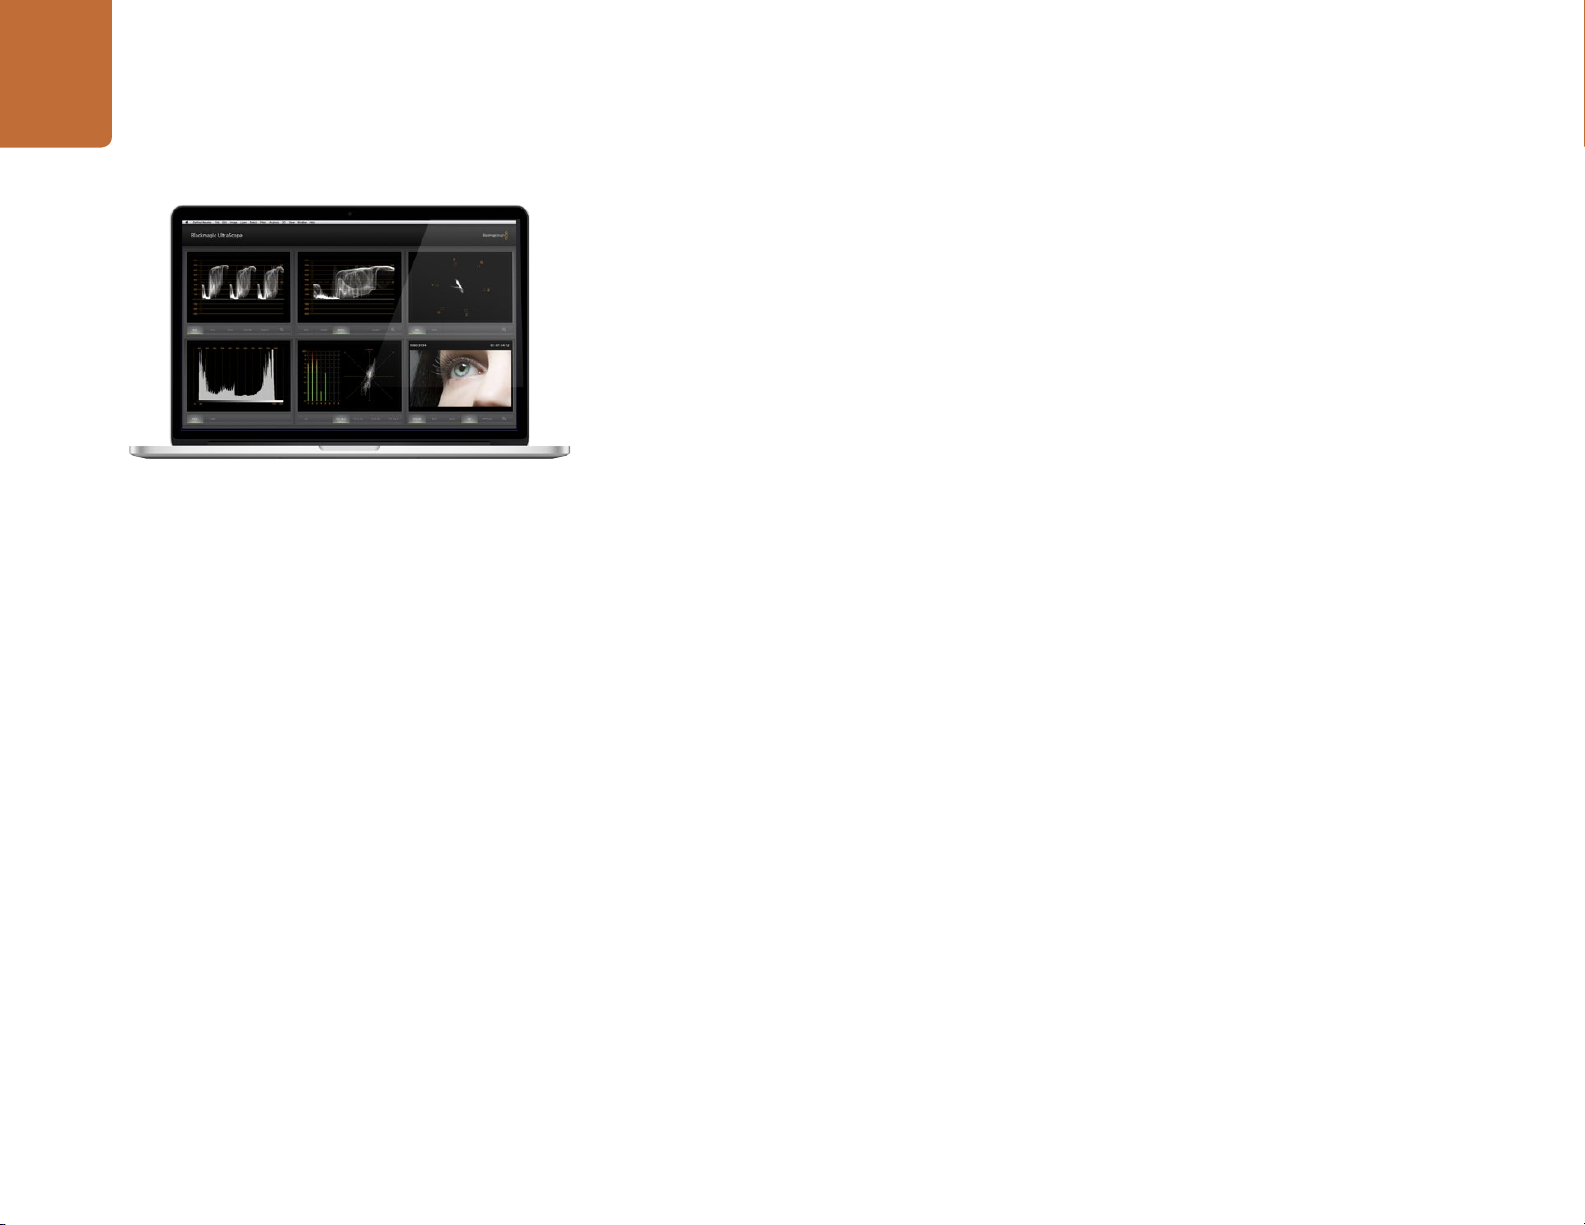
Blackmagic UltraScope - Full Screen View
Using Blackmagic UltraScope
What is Blackmagic UltraScope?
Blackmagic UltraScope software provides waveform monitoring of the video output from your Cinema
Camera or Production Camera 4K.
Previously, broadcast quality television and post production scopes were incredibly expensive and
bulky solutions that only let you see one scope at a time on a tiny screen! Some scopes look ugly and
unappealing to your client. With Blackmagic UltraScope, you get 6 wonderful scopes to monitor all
aspects of your video signal, perfect for checking levels on your camera while shooting. Any camera
adjustments are immediately seen using Blackmagic UltraScope!
Simply connect a Thunderbolt cable from your camera to the Thunderbolt port on your computer, turn
on your camera and launch UltraScope!
Installation Requirements
The Blackmagic UltraScope software interface requires a computer display with a minimum resolution
of 1280 x 800 pixels to view two scopes simultaneously. Blackmagic Design recommends viewing all
6 scopes simultaneously by using a computer display resolution of 1920 x 1200 or 1920 x 1080 pixels.
Please see the support pages at www.blackmagicdesign.com for a comprehensive list of the latest
minimum system requirements for Blackmagic UltraScope.
Understanding Blackmagic UltraScope Views
Blackmagic UltraScope has two different views available depending on your workflow needs and screen
resolution. You have the choice of viewing six displays in “Full Screen” view, or for more compact viewing,
choose any 2 displays in “2-up” view.
The display view can be selected from the
Choose
can quickly switch between Full Screen view and 2-up view by using the hot key CMD-F on Mac OS X,
or CTRL F on Windows.
In 2-up view, select the desired left and right scopes by opening the
anywhere in the UltraScope window. Make your selections from the
If you want the scopes to swap sides, select the left or right view and set it to be the same as the
other view. The scopes will swap sides because the 2-up view never displays the same scope in both the
left and right views.
Full Screen to enter Full Screen view. If this option is unchecked, 2-up view will be displayed. You
View menu.
View menu or by right-clicking
Left View
and
Right View
menu options.
Page 30

30
Camera Video Output
2-Up view
Screen Resolution Requirements for Display Views
Full Screen view: 1920 x 1200 pixels or 1920 x 1080 pixels. If your monitor doesn’t support these
resolutions, then Full Screen view will not be available.
2-up view: minimum resolution of 1280 x 800 pixels.
Blackmagic UltraScope Displays
Blackmagic UltraScope software is a great tool for maintaining accurate video and audio levels from your
Blackmagic camera so you can make the most of your digital footage in post-production. Scopes used to
monitor your levels include Vectorscope, RGB Parade, Histogram and Audio Metering Display.
RGB Parade Display
RGB parade displays the red, green and blue channels of your Blackmagic camera’s image. If one of the
channels is elevated, it will indicate the presence of a color cast. For instance, any excessive elevation
of a color channel will indicate that your white balance is incorrect.
You may want a certain color effect in your shot, for example when using a colored filter on your lens,
like a warming filter. An elevated red channel will be normal, but you can also check the other color
channels aren’t being overly crushed. The same applies if using intensely colored gels on your lights.
Remember that any “look” you create in camera can be easily enhanced during post-production using
a vectorscope and RGB parade in DaVinci Resolve.
RGB Parade Display
The waveform of the RGB parade is great for checking if your Blackmagic camera’s image is clipped or
crushed. Any clipping of highlights will be visible by a flat horizontal line at 100 IRE, or the upper level
of your scope. Clipping results in a loss of image detail, so if there is image detail in your highlights that
you want to preserve, adjust your lighting or exposure accordingly. Remember, it’s easy to clip out image
information during color grading in DaVinci Resolve, but if detail is not present in the original exposure
then it cannot be recovered in the grade.
Page 31

31
Camera Video Output
Vectorscope Display
Vectorscope is useful for monitoring the color balance and saturation of your Blackmagic camera’s
video signal. If your signal has a dominant green color cast then the majority of image information will
be located towards the green area of the vectorscope. In comparison, an image with a neutral color
balance will have information evenly distributed around the center.
The center of the vectorscope represents zero saturation. The further an objec t is from the center, the more
saturated it appears. For example, if shooting green screen for compositing, you want the green screen to
be as saturated as legally possible to achieve the best key or matte. Broadcast legal colors are maintained
by ensuring the saturation levels don’t go beyond the graticule boxes on your vectorscope display.
Vectorscope Display
Histogram Display
The vectorscope can also be used to check your camera’s white balance on location. When zooming into
a white object so it fills the camera’s frame, the vectorscope will show a cluster of information. Correct
white balance will display information evenly clustered around the center. Adjust your camera’s white
balance setting to see how it affects the display.
Histogram Display
Using Histogram is another way to check for clipping, crushing and image contrast in your Blackmagic
camera signal. The horizontal axis represents the luminance range with black on the left (0 in a 10 bit
image) and white on the right (1023 in a 10 bit image). Clipping is displayed as image information clustered
at the 1023 mark. Crushing is displayed as information clustered at the 0 mark. An image with good
contrast will display information covering the entire horizontal axis, whereas a low contrast image will
display information predominantly in the middle.
Audio Metering Display
Audio metering display shows you the audio levels embedded in your Blackmagic Camera's video signal.
The 2 channels of embedded audio are displayed in either dBFS or VU format. dBFS is essentially a meter
of the overall digital audio signal and is common on modern digital equipment. The VU meter shows
average signal levels, is easy to use and very common on older equipment.
To monitor your audio levels, watch the VU meter and ensure the levels never peak above 0dB. Peaking
above 0dB means your audio is clipping.
You can also monitor audio phase and balance using the audio metering display.
Audio Metering Display
Page 32

32
Camera Video Output
Monitoring using SDI
Blackmagic Cinema Camera supports 3G-SDI so it can be used to output uncompressed 10-bit 4:2:2
video to routers, monitors, SDI capture devices, broadcast switchers and other SDI devices.
Production Camera 4K supports 6G-SDI, so it can be used to connect to any SDI monitor as well as 4K
switchers such as ATEM Production Studio 4K.
Connecting to Video Switchers
The SDI output allows you to use your camera as a television production camera. You can connect the SDI
output directly to production switchers for studio work or to ATEM Camera Converters to convert your
signal to optical so you can send it hundreds of meters to a broadcast truck for live production on location.
If you have selected to record in 25 or 29.97 fps and set the SDI overlays to Off, the SDI output will be set
to 1080i50 and 1080i59.94 respectively. This allows you to work with most switchers, which only support
interlaced high definition formats.
Connect a SDI cable from the BNC port of your Cinema
Camera or Production Camera 4K to any SDI device.
Connecting to Monitors
SDI monitoring can be really handy when accessing the LCD is impractical, such as when secured high
on a jib arm, on a crane, or mounted on a vehicle.
Monitoring information is displayed on your SDI output by adjusting the SDI Overlays options in the
Display Settings menu. SDI Overlays provide frame guides and information such as recording details
and camera settings. If you simply want to monitor your shots, you can always turn overlays off for a
clean SDI output.
Connect the SDI output to SDI monitors for full 10-bit uncompressed monitoring or Blackmagic SmartScope
Duo for live waveform monitoring.
Page 33

Post Production Workflow
33
Post Production Workflow
Edit directly from the SSD by removing it from your
camera and mounting it on your computer using an eSATA
Thunderbolt dock or USB 2.0 docking cable.
Working with Files from SSDs
To import your clips from a SSD:
Step 1. Remove the SSD from your Cinema Camera or Production Camera 4K.
Step 2. You can mount the SSD to your Mac OS X or Windows computer using either an eSATA or
Thunderbolt dock. You can also use an eSATA to USB adapter cable to plug the SSD straight
into a USB port on your computer. However, USB 2.0 is not fast enough to edit video in real
time so this is not a recommended way to transfer files.
Step 3.
Double click on the SSD to open it and you should see a list of QuickTime movie files or folders
that contain your CinemaDNG RAW image files. Depending on the format you chose to record
in, you might have a mixture of files, but they will all use the same naming convention.
Step 4.
Now you can simply drag the files you want from the SSD onto your desktop or another hard
drive, or you can access the files straight from the SSD using your NLE software. CinemaDNG
RAW files are saved to the SSD as separate DNG images for each frame. This is an open
format and you can use many software applications to view your RAW 2.5K images as a
video sequence.
Step 5. Before you unplug the SSD from your computer, it's always a good idea to eject the SSD safely
using either Mac OS X or Windows first.
HDMI
Insert your SD card into any computer with an SD card slot to
access your clips immediately.
Working with Files from SD Cards
You can access your ProRes or CinemaDNG files straight from your SD card with any Mac OS X or Windows
computer that features an SD card slot or by using an SD card reader.
Step 1. Remove the SD card from your Pocket Cinema Camera and insert it into the SD card slot of
your computer, or SD card reader. The SD card can be accessed the same way as you would an
external hard drive, USB drive or any other media storage device attached to your computer.
Step 2.
Double click on the SD card to open it and you should see a list of QuickTime movie files
or folders which contain your CinemaDNG RAW image files. Depending on the format you
chose to record in, you might have a mixture of files and folders, but they will all use the same
naming convention.
Step 3. Now you can simply drag the files you want from the SD card onto your desktop or another
hard drive, or you can access the files straight from the SD card using your NLE software.
Step 4.
Before you physically remove the SD card from the SD card slot, it's always a good idea to eject
the SD card safely using either Mac OS X or Windows first.
Page 34

34
Post Production Workflow
Editing your Clips
To edit your clips using your favorite editing software, you can copy your clips to an internal/external
drive or RAID and then import your clips into the software. Or import your clips directly from your SD
card, or from your SSD using an external SATA adaptor, SSD Dock or docking cable.
VIDEO DATA
RAW FILM DATA
RAW Wide Dynamic Range - With Blackmagic Cinema Camera,
a wide dynamic range is captured with all details preserved
Using RAW Files with DaVinci Resolve
CinemaDNG RAW clips may appear washed out or over exposed due to the high levels of information
within them. To edit your RAW clips, they first need to be converted with a look that emulates standard
video, or you can perform a proper grade and edit your graded clips. You can perform a basic
conversion by importing your RAW clips into DaVinci Resolve and applying a look up table (LUT).
The LUT will apply a basic color grade to emulate a standard video appearance. The graded clips are
typically exported using ProRes settings and used as proxies until the final color grade, which will occur
after the edit.
To convert your RAW clips using DaVinci Resolve:
Step 1. Create a new project and set your video resolution and frame rate to match your RAW video
clips. In this example we’ll use the 1080p format with a frame rate of 25.
Step 2. Import your CinemaDNG RAW clips into the Media Pool.
Step 3. Go to Project Settings and set your Input Settings to Scale Entire Image to Fit.
Step 4.
Step 5. Select the White Balance setting most suitable for your material.
Step 6. Set Color Space to BMD Film and likewise set Gamma to BMD Film.
To apply the LUT, go to Project Settings/Look Up Tables, and set 3D Output Look Up Table to Blackmagic
Cinema Camera Film to Rec709.
Go to Project Settings/Camera Raw and select CinemaDNG from the dropdown menu. Select
Decode Using to Project.
Final Color Graded Shot - The details are enhanced and the
highlights are managed so your shots look cinematic!
This will apply the LUT to every shot in the timeline. Click on the Color tab and check the results. The
images should exhibit improved color and contrast.
Page 35

35
Post Production Workflow
DaVinci Resolve project settings.
At the very minimum do a quick check of the timeline for shots with excessive exposure or color issues.
When you're satisfied with the appearance of the clips in the timeline, you’re ready to export your clips
to ProRes.
To export your clips:
Step 1.
Click on the Deliver tab, go to the Easy Setup menu and select Export to Final Cut Pro.
By default this preset will render Apple ProRes 422 (HQ).
Step 2. Set Render Timeline As: to Individual Source Clips.
Step 3. Ensure Render Each Clip With a Unique Filename is deselected.
Step 4. Enable the Render Audio checkbox, select your audio channels and set to a bit depth of 24.
Step 5. Under Render Job To: click Browse. Choose a new folder for your converted clips.
Step 6. Click Add Job.
Step 7. Click Start Render.
Upon completion of the render you will have a folder that contains each individual clip from the Resolve
timeline. The converted clips can now be imported into your editing software. You can always make
adjustments to your grade by exporting an XML from your editing software.
Final Cut Pro X project settings.
Using Final Cut Pro X
To edit Apple ProRes 422 (HQ) clips using Final Cut Pro X, you need to create a new project matching
your clips’ video format and frame rate. For this example, clips are set using ProRes 422 (HQ) 1080p25
camera settings.
Step 1. Launch Final Cut Pro X, go to the Menu bar and select File/New Project. A window will open
containing project settings.
Step 2. Name your project and select the Custom checkbox.
Step 3. Set the Video Properties settings to 1080p HD, 1920x1080 and 25p.
Step 4. Set your Audio and Render Properties settings to Stereo, 48kHz, and Apple ProRes 422 (HQ)
Step 5. Click OK.
To import your clips into your project, go to the Menu bar and select File/Import/Media. Choose your
clips from your SSD or SD Card.
You can now drag your clips onto the timeline for editing.
Page 36

36
Post Production Workflow
Using Avid Media Composer
To edit your DNxHD clips using Avid Media Composer 7, create a new project matching the clip’s video
format and frame rate. For this example, clips are set using DNxHD 1080i59.94 camera settings.
Setting the project name and project options in Avid Media
Composer 7.
Step 1.
Step 2. In the New Project window name your project.
Step 3. Go to the Format dropdown menu and select 1080i/59.94.
Step 4. Go to the Color Space dropdown menu and select YCbCr 709.
Step 5. Go to the Raster Dimension dropdown menu and select 1920x1080. Click OK.
Step 6. Select Tools>Background Services and click the "Start" button if background services are not
Step 7. Select the media bin where you wish to import your files.
Step 8. Select File>AMA Link... and select the files that you wish to import and then click "OK."
When the clips appear within the media bin you can drag your clips onto the timeline and begin editing.
Launch Media Composer and the Select Project window will appear. Click the New Project button.
already running and then click "OK."
Using Adobe Premiere Pro CC
To edit your Apple ProRes 422 (HQ) or DNxHD clips using Adobe Premiere Pro CC, you need to create
a new project matching your clips’ video format and frame rate. For this example, clips are set using
ProRes 422 (HQ) 1080p25 camera settings.
Step 1. Launch Adobe Premiere Pro CC. In the Welcome window select Create New/New Project.
A window will open containing project settings.
Step 2. Name your project. Choose the location for your project by clicking Browse and selecting your
desired folder. Once you’ve selected your location folder click OK in the Welcome window.
Setting the project name and project options in Adobe
Premiere Pro CC.
Step 3. Go to the Adobe Premiere Pro CC Menu bar, select File/Import and choose the clips you want
to edit. Your clips will appear in the Project window.
Step 4. Drag the first clip you wish to edit onto the New Item icon at the bottom right of the Project
Window. A new sequence will be created matching your clip settings.
You can now drag your clips onto the sequence timeline for editing.
Page 37

37
Post Production Workflow
Using Autodesk Smoke 2013
To edit your clips using Autodesk Smoke 2013, create a new project matching the clips’ video format,
bit depth, frame type and frame rate. For this example, clips were shot using ProRes 422 (HQ) 1080p25
camera settings.
Step 1. Launch Smoke and the Project and User Settings window will appear. Click on the New button
under the project heading.
Step 2. The Create New Project window will open. Name your project.
Step 3. From the resolution dropdown menu, select 1920x1080 HD 1080.
Step 4. Make sure bit depth is set to 10-bit and frame type is Progressive.
Step 5. From the Config Template dropdown menu select 1920x1080@25000p.cfg.
Step 6. Leave the Preferred Format set to ProRes 422 (HQ) and click Create.
Ste p 7. Click on the New button under the User heading.
Step 8. When the Create New User Profile window opens, type your user name and click Create.
Step 9. When the Project and User Settings window reopens, click the Start button.
Step 10. From the menu bar, select File>Import>File and select your clips to import.
Setting the project name and project options in Autodesk
Smoke 2013.
St e p 11. Once the clips appear in the media library you can drag your clips onto the timeline and
begin editing.
Page 38

Blackmagic Camera Utility
38
Blackmagic Camera Utility
How to Update Your Camera Software on Mac OS X
After downloading the Blackmagic Camera Utility software and unzipping the downloaded file, open
the resulting disk image to reveal its contents.
Launch the Blackmagic Camera Installer and follow the onscreen instructions.
How to Update Your Camera Software on Windows
After downloading the Blackmagic Camera Utility software and unzipping the downloaded file,
you should see a Blackmagic Camera Utility folder containing this PDF manual and the Blackmagic
Camera Utility installer.
Double-click the installer and follow the onscreen prompts to complete the installation.
How to Update the Camera Software
After installing the latest Blackmagic Camera Utility on your computer, connect a USB cable between
the computer and the camera. On Pocket Cinema Camera, the mini USB 2.0 port is located inside the
battery terminal. On Cinema Camera and Production Camera 4K, the mini USB 2.0 port is located
behind the SSD door.
Launch the Blackmagic Camera Utility and follow any onscreen prompt to update the camera software.
The mini-USB 2.0 port can be found behind the battery
terminal door on Pocket Cinema Camera.
The mini-USB 2.0 port can be found behind the SSD door on
Cinema Camera and Production Camera 4K.
Page 39

Attaching Accessories
39
Attaching Accessories
Pocket Cinema Camera wrist strap.
Option 1.
Option 2.
Wrist Strap
Pocket Cinema Camera comes with a wrist strap for convenient carrying of the camera when on the
move from location to location.
To fasten, loop the string on the end of the strap through the ring on the camera, located to the bottom
right of the LCD. Loop the rope end of the wrist strap back through the string, making a secure knot.
Sun Shield
Cinema Camera and Production Camera 4K include a detachable sun shield to shade the touchscreen
in bright conditions and ensure optimum viewing is possible at all times.
Line up the sun shield's locking tabs and gently push into the camera.
To remove the sun shield either:
Option 1. Hold the top of the shield in the middle and gently pull out, making sure it releases evenly
on both sides.
Option 2.
Using your thumbs, gently press the side locking tabs outwards using equal pressure and
pull out the shield. Do not pull the sun shield out one side at a time, as you may damage
the locking tabs.
Cinema Camera and Production Camera 4K carry strap.
Carry Strap
Cinema Camera and Production Camera 4K come with a carry strap for convenient carrying of the
camera when on the move from location to location.
To fasten, loop the end of the strap through the metal hook on the top of the camera, and secure through
the plastic clasp to the desired length.
Page 40

40
Attaching Accessories
Camera Handles
Optional handles for Cinema Camera and Production Camera 4K allow shooting in locations where
you need to move around quickly with your camera. The handles let you steady your shot and keep up
with the action!
On the underside of the camera, locate the ¼” screw thread and insert the guide pin, locking the handles
to the camera.
Page 41

Help
41
Help
Getting Help
The fastest way to obtain help is to go to the Blackmagic Design online support pages and check the
latest support material available for your camera.
Blackmagic Design Online Support Pages
The latest manual, software and support notes can be found at the Blackmagic Support Center at
www.blackmagicdesign.com/support.
Contacting Blackmagic Design Support
If you can't find the help you need in our support material, please use the "Send request" button on the
support page for your camera to email a support request. Alternatively, call your nearest Blackmagic
Design support office at www.blackmagicdesign.com/company.
Checking the Software Version Currently Installed
To check which version of Blackmagic Camera Utility software is installed on your computer, open the
About Blackmagic Camera Utility window.
On Mac OS X, open Blackmagic Camera Utility from the Applications folder. Select About
Blackmagic Camera Utility from the application menu to reveal the version number.
On Windows, open Blackmagic Camera Utility from your Start menu or Start Screen. Click on
the Help menu and select About Blackmagic Camera Utility to reveal the version number.
How to Get the Latest Software Updates
After checking the version of Blackmagic Camera Utility software installed on your computer, please visit
the Blackmagic Support Center at www.blackmagicdesign.com/support to check for the latest updates.
While it is usually a good idea to run the latest updates, it is wise to avoid updating any software if you
are in the middle of an important project.
Battery Replacement
Cinema Camera and Production Camera 4K's built in battery is not user-servicable. Should the battery
require replacement, you will need to send it to your nearest Blackmagic Design service center for
replacement. If the camera is outside of its warranty period, the battery replacement will incur a small
service fee for the cost of the battery, labor and return of the camera to you. Please contact Blackmagic
Design Support to find out details of where to send your camera, how to package it safely and how
much the replacement will cost in your country.
Page 42

42
Help
FAN
Replacing the Fan
Cinema Camera and Production Camera 4K each contain a fan, which is necessary for cooling. If you
detect the fan is not working, or is making a strange noise, switch off the camera and order a replacement
fan by contacting Blackmagic Design Support. You should use an anti-static strap to avoid damaging
the camera while opened.
To replace the fan:
Step 1. Switch off the camera and remove any external cables.
Step 2.
Place the camera upside down on a bench, with the tripod hole facing up, and the touchsceen
facing towards you. You will see a metal panel labelled "Fan". This panel is attached to a fan
module inside the camera. Remove the four screws from this panel using a number 01 size
Phillips head screwdriver. Thread-locking fluid has been applied to the screws which will require
additional force to unscrew them. Keep the screws as you will need them again.
Step 3. Gently lift the fan module up and out of the camera, taking care NOT to pull the wires that
connect to the inside of the camera. Accidentally pulling on these wires could cause them to
become unplugged from an inaccessible location inside the camera, which would need to be
fixed by a Blackmagic Design service center.
Step 4. Locate the white plastic plug a short distance along the wires from the fan. Pull the plug apart
using both hands so that no stress is placed on the wires that continue inside the camera. You
can now discard the old fan module.
Step 5. Connect the white plastic plug to the wires of the replacement fan module. Reinstate the fan
module in its hole with the "Fan" label the right way up. The fan module can only be installed
in one orientation. Reinstate the four screws into the fan plate to finish replacing the fan.
Step 6. Switch on the camera and you should feel a gentle flow of air coming from the vent holes in
the fan module.
Page 43

Warranty
43
Warranty
12 Month Limited Warranty
Blackmagic Design warrants that this product will be free from defects in materials and workmanship for
a period of 12 months from the date of purchase. If a product proves to be defective during this warranty
period, Blackmagic Design, at its option, either will repair the defective product without charge for parts
and labor, or will provide a replacement in exchange for the defective product.
In order to obtain service under this warranty, you the Customer, must notify Blackmagic Design of the
defect before the expiration of the warranty period and make suitable arrangements for the performance
of service. The Customer shall be responsible for packaging and shipping the defective product to a
designated service center nominated by Blackmagic Design, with shipping charges pre paid. Customer
shall be responsible for paying all shipping charges, insurance, duties, taxes, and any other charges for
products returned to us for any reason.
This warranty shall not apply to any defect, failure or damage caused by improper use or improper or
inadequate maintenance and care. Blackmagic Design shall not be obligated to furnish service under
this warranty: a) to repair damage resulting from attempts by personnel other than Blackmagic Design
representatives to install, repair or service the product, b) to repair damage resulting from improper
use or connection to incompatible equipment, c) to repair any damage or malfunction caused by the
use of non Blackmagic Design parts or supplies, or d) to service a product that has been modified or
integrated with other products when the effect of such a modification or integration increases the time
or difficulty of servicing the product. THIS WARRANTY IS GIVEN BY BLACKMAGIC DESIGN IN LIEU OF
ANY OTHER WARRANTIES, EXPRESS OR IMPLIED. BLACKMAGIC DESIGN AND ITS VENDORS DISCLAIM
ANY IMPLIED WARRANTIES OF MERCHANTABILITY OR FITNESS FOR A PARTICULAR PURPOSE.
BLACKMAGIC DESIGN’S RESPONSIBILITY TO REPAIR OR REPLACE DEFECTIVE PRODUCTS IS THE
WHOLE AND EXCLUSIVE REMEDY PROVIDED TO THE CUSTOMER FOR ANY INDIRECT, SPECIAL,
INCIDENTAL OR CONSEQUENTIAL DAMAGES IRRESPECTIVE OF WHETHER BLACKMAGIC DESIGN
OR THE VENDOR HAS ADVANCE NOTICE OF THE POSSIBILITY OF SUCH DAMAGES. BLACKMAGIC
DESIGN IS NOT LIABLE FOR ANY ILLEGAL USE OF EQUIPMENT BY CUSTOMER. BLACKMAGIC IS
NOT LIABLE FOR ANY DAMAGES RESULTING FROM USE OF THIS PRODUCT. USER OPERATES THIS
PRODUCT AT OWN RISK.
© Copyright 2013 Blackmag ic Design. All rights reser ved. ‘Blackmagic Design’, ‘DeckLink ’, ‘HDLin k’, ‘Workgroup V ideohub’, ‘Mul tibridge
Pro’, ‘Multib ridge Ex treme’, ‘Intensi ty’ and ‘Lea ding the crea tive video rev olution’ are re gistered t rademark s in the US and oth er countrie s.
All other company and product names may be trade marks of their respective companies with which they are associated.
Page 44

インストール/オペレ ー ション マニュアル
Blackmagic Cameras
日本語
Mac OS X
Windows
2014 年7
月
™
™
Page 45

ようこそ!
このたび は
とうございました。
あらゆる形態 のワークフローに対応可能な3モ デル の カメラを皆 様 にお
届けするため、 私たちはこれまで努力を重ねてきました。 新製品の
Pocket Cinema Camera
たスーパー16デジタルフィルムカメラで、 どこへで も 携 帯 で きるサ イ
ズ で す。
ファイルでクリーンなイメージを収録します。 また、 新製品
Production Camera 4K
に対応した スーパー35
Blackmagic Design
うデザインされています。 つまり、 センサーが捉えたイメージは広い
ダイナミックレンジを保持しています。 また、 生成されたファイルは、
あらゆるビデオソフトウェアと動作する標準フォーマットで記録されま
す。 同梱の
れば 、 クリエイティビティの幅 が 一 層 広 が ることでしょう!
Blackmagic Design
記録 するシネマスタイルの撮 影 が 可能となり、 クリエイティビティに妥
協することはありません。 また、 カメラには大きなスクリーンが搭載さ
れ、簡単にフォーカス合わせやメタデータ入力ができます。 ユーザーの
皆様が、 弊社のカメラを使い、 クリエイティブで素晴らしい映像を作ら
れることを願って止みません。 皆様のオリジナリティ溢れる作品を拝見
することを、 心より楽しみにしています。
Blackmagic Camera
Pocket Cinema Camera
Ultra HD 4K
のカメラは、 「フラット」なファイルを生成するよ
DaVinici Resolve
のカメラで、 ディテールに富んだ映像を捉えて
をお買い求めいただき誠にありが
は、 13ストップ の ダイナミックレン ジ に 対 応 し
は、 グローバルシャッターおよび
カラ ーコレ クションソフトウェアを 使 用 す
は、 非圧縮
カメラ で す。
CinemaDNG RAW
6G-SDI
出力
Blackmagic Design CEO
グ ラ ン ト・ペ テ ィ
Page 46

目次
BlackmagicCameras
47
54
57
58
はじめに
Blackmagic Camera
レンズ の 取り付 け
カメラ の 電 源 を 入 れる
SD
カードを挿入する
SSD
を挿入する
撮影する
クリップ を 再 生 する
SSD
について
SSD
高速の
撮影用に
SD
カードについて
撮影用にSDカードを準備する
高速のSDカードを選 ぶ
を選ぶ
SSD
について
を準備する
接続
Blackmagic Pocket Cinema Camera
Blackmagic Cinema Camera
および
47
49
49
51
51
52
53
54
55
57
57
Production Camera 4K 59
58
69
70
75
80
81
メタデ ー タ入 力
スレートとは
カメラのビ デ オ出 力
Thunderbolt
Blackmagic UltraScope
SDI
を 使ってモ ニタリン グ
を 使って波 形 モ ニタリン グ
を使う
ポストプロダクションワークフロー
SSD
ファイルで の 作 業
SD
カードファイルでの 作業
クリップの 編 集
Final Cut Pro X
Avid Media Composer
Adobe Premiere Pro CC
Autodesk Smoke 2013
を使う
を使う
を使う
を使う
BlackmagicCameraUtility
アクセ サリ
69
70
71
74
75
75
76
77
78
78
79
60
設定
カ メ ラ 設 定(
オ ー デ ィ オ 設 定(
レ コ ー ダ ー 設 定(
ファイル 名 定 義
ディス プ レ イ 設 定
設定の調整
ステータス・ストリップ
Camera Settings
)
Audio Settings
Recorder Settings
(Display Setting
)
)
)
60
62
63
65
66
67
68
83
85
ヘ ルプライン
保証
Page 47

はじめに
OK
MENU
IRIS FOCUS
OK
MENU
IRIS FOCUS
47
はじめに
1 2
4
Blackmagic Camera
Blackmagic Pocket Cinema Camera
1.
録 画ボタン
について
の機能
録 画 ボ タ ン を 押してクリップ をSDカードに収 録 。 52ページ参 照。
2.
トランス ポートコントロール
クリップを再生、 スキップ、 頭出し。 53ページ参 照。
3
3.
レンズマウント
マイクロフォ ー サ ーズ・レンズ マ ウ ントで 幅 広 い 種 類 のレン ズ に 対 応 。 49ページ参 照。
4.
バッテリー挿入 口
解除ボタンでバッテリーカバーを開きます:
充電式のリチウムイオンバッテリーを挿入/取 り 外 し 。 49ページ参照。
SDHC
あるいは
ソフトウェア 設 定 およびアップデ ート用の
5.LANC
5
6
7
8
9
LANC
マニュアルフォーカスをサポート。 58ページ参 照。
6.
3.5 mm
7.
mic/line
リモート
リモートコントロール用の
ヘッド フォン
ステレオヘッドフォンジャック接 続 。 58ページ参 照。
オー ディオ入 力
レベルオー ディオ 用 の
SDXC
カードを挿入して収録。 51ページ参照。
USB Mini-B
2.5 mm
ステレオジャックは、 録画の開始および停止、 アイリスコントロール、
3.5mm
ステレオジャック。 58、 62ページ参 照。
ポートにアクセス。 80ページ参照。
IRIS FOCUS
MENU
10 11
OK
8.HDMI
モニタリング および スイッチャー 送 信 用 のマイクロ
9.
電源およびバッテリー充電用の
電源
出力
0.7mm 12 – 20V DC
HDMI
ポート。 58ページ参 照。
入力。 58ページ参 照。
10.LCD
収録または再生中のクリップを
11.
コントロー ルボタン
LCD
で確認。 68ページ参 照。
電源、 メニュー操作、 アイリスコントロール、 フォーカスピーキング、 自動フォーカス、
LCD
ズーム 用のボタン。
Page 48

48
はじめに
1
2 4
3
Blackmagic Cinema Camera
1.
録 画ボタン
クリップ を
2.IRIS
IRIS
SSD
に収録。 52ページ参 照。
ボタン
ボタンは 、 EFモデルの
Cinema Camera
および
Production Camera 4K
Production Camera 4K
および
前後の頭 出しボタンでレンズのアパーチャーを調整します。 67ページ参 照。
3.
タッチスクリーン
収録または再生中のクリップや、 メニューを
4.FOCUS
FOCUS
5.
トランス ポートコントロール
ボタン
ボタンを押して、 フォーカスピーキングを
LCD
LCD
で確認。 69ページ参 照。
LCD
に表示します。 67ページ参 照。
クリップの停止、 クリップ前後の頭出し、 再生ボタン。 53ページ参 照。
6.MENU
LCD
7.
電 源 ボタン を 押 して、
50
8.LANC
LANC
ボタン
上のメニューにアクセスしま す。
電 源 ボタン
Blackmagic Cinema Camera
ページ参 照。
リモート
リモートコントロール用の
をオンにします。 オフにするには、 同ボタンを長押しします。
2.5 mm
ステレオジャック端子は、 録画の開始および停止、 アイリスコントロール、
マニュアルフォーカスをサポートします。 59ページ参 照。
の機能
のアイリスの電 子制御をオンにします。
1 5 6 7
8
9
10
11
12
13
9.HEADPHONES
3.5 mm
ステレオヘッドフォンジャック接 続 。 59ページ参 照。
10.AUDIOIN
mic/line
レベルオー ディオ 用 の
11.SDI
出力
1/4
インチのバランス
TRS
フォン ジ ャ ック 端 子 。 59、 62ページ参 照。
スイッチャーへ接続したり、 キャプチャーデバイス経由で
合などに運 用するための
12.THUNDERBOLT
Blackmagic Cinema Cameraは10-bit
を出力しま す。
Thunderbolt
SDI
出力。 59、 62ページ参 照。
接続
非圧縮
UltraScope
接続は
1080p HD
を 使ってのHD波 形 モ ニタリングや、
ターで の キ ャプ チャーなどに 使 用 。 59、 71ページ参 照。
13.POWER
電源およびバッテリー充電用の12 –
30V DC
入力はAC電源及び内蔵バッテリー充電用として使用。 50、 59ページ参 照。
DaVinci Resolve
を出力、
Production Camera 4K
のライブグレーディング機能を使用する場
Ultra HD 4K
は圧縮
Thunderbolt
対応のコンピュー
Page 49

49
はじめに
Pocket Cinema Camera
HDMI
12V
のレンズ の 取 り 付 け/取り外し
レンズの 取り付 け
Blackmagic Camera
ダストキャップを外すには、 ロックボタンを押しながら、 反時計回りに回します。 レンズの取り付け、 取り外し時は、
Blackmagic Camera
HDMI
12V
レン ズ を 取 り 付 ける:
ステップ 1. レンズ上のドット(点)とカメラのマウント部分のドットを合わせます。 多くのレンズには、 青、 赤、 白のドッ
ステップ 2. レンズ が マウントにロッ ク す る ま で 時 計 回 りに 回 します。
ステップ 3. レンズを外すときは、 ロックボタンを押しながら、 レンズを反時計回りに12時の位置まで回し、 ゆっ
レンズを装着していないときは、 センサーがゴミや埃にさらされています。 常にダストキャップを付けてセンサーを
保 護 す る ようにしてく だ さ い 。
は、 レンズを取り付け、 電源を入れるだけで簡単に使用できます。 レンズマウントから保護用の
の電源を
トか、 その他の目印がついています。
くり 外 しま す。
Off
にしてくだ さ い 。
カメラの 電 源 を 入 れ る
Cinema Camera
取り付け/取り外し
Pocket Cinema Camera
および
Production Camera 4K
にバッテリーを挿入
のレンズ の
Pocket Cinema Camera
Pocket Cinema Camera
ステップ 1. カメラの下部にあるカバーを押し、 レンズの方向に開いて、 バッテリー挿入口にアクセスします。
ステップ 2. 金の接触部を挿入方向に、 白い矢印をレンズに向けて、 バッテリーのへりをオレンジ色のタブの下に引っ
掛け、 バッテリーを所定の位置に挿入します。 バッテリーを取り外すには、 オレンジ色のタブを押します。
ステップ 3. バッテリー挿入口のカバーを閉じ、 カバーをスライドさせてロックします。
ステップ 4. バックパネルの右下にある電源ボタンを押します。
示され ま す。
ステップ 5. 電源を切るときは、 電源ボタンを長押しします。
あとはSDカードを挿入するだけで、 撮影の準備は完了です!
を使う前に、 本体にバッテリーを挿入します。
LCD
ス ク リ ー ン の 下 方 に ス テ ー タ ス・ス ト リ ッ プ が 表
Page 50

50
はじめに
同梱のACアダプターで、 電源を供給し、 バッテリーを充電します。
Cinema Camera
Cinema Camera
きま す。 AC電源を接続しながら充電および使用が可能で、 電源の供給元は、 中断することなく切り替えることが
できま す。
USB
経由でもカメラを充電できますが、 充電に時間がかかるため、 ACアダ プター の 使 用 をお 勧 めしま す。
ステップ 1. タッチスクリーンの下にある電源ボタンを押します。
ステップ 2. 電源を切るときは、 電源ボタンを長押しします。
SSD
あとは
を挿入するだけで、 撮影の準備は完了です!
および
および
表 示 さ れ ます。
Production Camera 4K
Production Camera 4K
は、 バッテリーを内蔵しており、 同梱のACアダプターで充電 が で
LCD
ス ク リ ー ン の 下 方 に ス テ ー タ ス・ス ト リ ッ プ が
電源ボタンを長押しするとカメラの電源がオン/オ フ に な り ま す 。
Page 51

51
はじめに
Pocket Cinema CameraにSD
カードを挿 入
SD
カードを挿入する
Blackmagic Pocket Cinema Camera
ステップ1. カメラの下部にあるカバーを押し、 レンズの方向に開いて、 バッテリー挿入口にアクセスします。
ステップ 2. SDカード の 金 の 接 触 部 をレンズに 向 けて、 SDカードを所定の位置まで挿入します。 SDカードを取り出
すには、 SDカード を 押しま す。
ステップ 3. バッテリー挿入口のカバーを閉じ、 カバーをスライドさせてロックします。
ステップ 4. カメラ の 電 源 を入れま す。 カメラがSDカ ー ド を 確 認 して い る 間 、 ス テ ー タ ス・ス ト リ ッ プ に は 動 く ド ッ ト
が表示され、 その後「
同梱のSDカードは、 ソフトウェアインストール用なので、 ビデオ収録には適しません。 推奨SDカードは 、 58ペー
ジ を 参 照 してくだ さ い 。
SSD
を挿入する
Cinema Camera
9.5mm厚のSSD
インチ
ステップ 1. カ メラ の 右 側の
ステップ 2. 金の
ステップ 3. カメラの 電 源 を入れ ま す。 カメラ が
示され、 その後「
SSD
推奨
は、 54ペー ジ を 参 照してください 。
Production Camera 4K
および
を 使 用 で き ま す:
SSD
SATA
接触部を
ドアを開きま す。
SSD
READY
SDXC、 SDHD
は、
READY
」と 表 示 さ れ ま す 。
は、
ドアに向けて
」と 表 示 さ れ ま す 。
SSD
SSD
カ ード を 使 用 で きま す:
HFS+
を所 定の位 置まで挿入し、
を確認している間、 ステータス・ストリップには動くドットが表
および
ex FAT
ファ イルシス テムで フォーマットし た
SSD
ドアを閉じま す。
2.5
Cinema Camera
SSD
に
を挿入
Production Camera 4K
および
Page 52

52
はじめに
撮 影する
カメラ の
撮 影 フォ ーマットを 選 択 する
Blackmagic Camera
トを 選 択 してください 。
REC
ボタンを押すとすぐに撮影できます。 撮影を停止するには、
は、 モデルによって異なる複数のフォーマットで撮影します。 ワークフローに適したフォーマッ
REC
ボタン を再 度 押 してく だ さい 。
Pocket Cinema Camera
正面に付 いている
あるいは
Cinema Camera
トランス ポ ートコントロ ール の
上部の
REC
ボタン を押します。
Production Camera 4K
および
REC
ボタン を押します。
REC
ボタン を押します。
の
Blackmagic Pocket
Cinema Camera
Apple ProRes 422 (HQ) Apple ProRes 422 (HQ) Apple ProRes 422 (HQ)
Apple ProRes 422 Apple ProRes 422 Apple ProRes 422
Apple ProRes 422 LT Apple ProRes 422 LT Apple ProRes 422 LT
Apple ProRes 422 Proxy Apple ProRes 422 Proxy Apple ProRes 422 Proxy
Lossless
CinemaDNG RAW
4つのApple ProRes
ProRes 422 (HQ)
録 が 可 能 で す。
ビ デ オフォ ー マ ット を 選 択:
ステップ 1.
ステップ 2.
ステップ 3. 再度
これで、 選択したフォーマットで撮影が可能です。 選択した撮影フォーマットは、
側 に 表 示 さ れ ま す。
圧縮
フォーマットから選択できるので、 より多くの映像を
は、 低圧縮で最高品質のビデオを得られます。
MENU
ボタ ンを 押しま す。
REC
メニューを選択し、 選択矢印で使用したいフォーマットを設定します。
MENU
ボタ ン を 押してメ ニュー 画 面 か ら 出 ま す。
Blackmagic Cinema Camera Blackmagic Production
Camera 4K
CinemaDNG RAW 2.5K Visually lossless
CinemaDNG RAW
Avid DNxHD
SSD
あるいはSDカードに保 存 で きます。
ProRes 422 Proxy
圧縮
は、 高い圧縮率で長時間の収
LCD
の ス テ ー タ ス・ス ト リ ッ プ の 左
Page 53

53
はじめに
Blackmagic Camera
には、 トランスポートコントロールの再 生 ボタンを押してください。
で、 撮影したクリップをすぐに確認する
Blackmagic Camera
Blackmagic Pocket
Cinema Camera
1920 x 1080p23.98 2400 x 1350 12-bit RAW 2.5K 3840 x 2160p23.98
1920 x 1080p24 1920 x 1080p23.98 3840x2160p24
1920 x 1080p25 1920 x 1080p24 3840 x 2160p25
1920 x 1080p29.97 1920 x 1080p25 3840 x 2160p29.97
1920 x 1080p30 1920 x 1080p29.97
対 応ビ デ オ フォ ーマット
Blackmagic Cinema Camera Blackmagic Production
1920 x 1080p30
出力
出力
Camera 4K
3840 x 2160p30
1920 x 1080p23.98
1920 x 1080p24
1920 x 1080p25
1920 x 1080p29.97
1920 x 1080p30
出力
出力
クリップ を 再 生 す る
カメラ のトランス ポ ートコント ロ ールボタンを 使 って、 撮 影 した ビ デ オを
再生 ボタンを押 すと、
巻き戻しするときは、 早送り、 巻き戻しボタンを長押しします。 クリップを最後まで再生すると、 再生は停止します。
カメラ のコントロ ール は 、 CDプレーヤーと同じように操作できます。 早送りボタンを1回押すと、 次のクリップに飛び
ます。 巻き戻しボタンを1回押すと、 現在のクリップの頭に戻り、 2回押すと前のクリップの頭に戻ります。
LCD
や、
HDMI/SDI
出力に接続したディスプレイでビデオを確認できます。 クリップを早送り、
LCD
で再 生 で きま す。
Page 54

SSD
について
54
SSD
Intel 335 Series 240GB SSD
Sandisk Extreme 480GB SSD
について
高速の
高デ ー タレ ートビ デ オを扱う 際 、 使 用 する
書き込 みスピードより、 実 際 のスピード が50%以上遅い場合があるためです。 ディスクの仕様書に、 ビデオを扱う
のに十分なスピードが記 載されていても、 実際はリアルタイムのビデオ撮 影では書き込みスピードが追いつかないこ
とが ありま す。
以下は、
上記に加え、 以下の
お使いの
HD
SSD
を選ぶ
SSD
を慎重に選ぶことが重要です。 これは、 メーカーが提示する
2.5K RAW CinemaDNG
Intel 335 Series 240GB SSD
Intel 520 Series 240GB SSD
Intel 520 Series 480GB SSD
Intel 530 Series 180GB SSD
Intel 530 Series 240GB SSD
Kingston 240 GB HyperX 3K
Kingston 480 GB HyperX 3K
Kingston 240 GB SSDNow KC300
Kingston 480 GB SSDNow KC300
Sandisk Extreme 240GB
Sandisk Extreme 480GB
PNY 240GB Prevail SSD (firmware 5.0.2)
OWC 120GB Mercury Extreme Pro 6G (Firmware Rev 5.0.7)
OWC 240GB Mercury Extreme Pro 6G (Firmware Rev 5.0.6)
OWC 480GB Mercury Extreme Pro 6G (Firmware Rev 5.0.6)
Digistor 128GB SSD Professional Video Extreme (pre-formatted ExFat)
Digistor 240GB SSD Professional Video Series (pre-formatted ExFat)
Digistor 480GB SSD Professional Video Series (pre-formatted ExFat)
Angelbird 240GB AV Pro (Firmware 2.54)
ADATA XPG SX900 256GB
SSD
は圧縮ビデオキャプチャーにのみ使用できます。
Crucial 256GB M4 (firmware 000F)
OCZ Agility 3 240GB
Sandisk Extreme 120GB
SSD
でコマ落ちが発生する場合、 別の
収録フォーマットを使用してください。 最新の情報は、
キャプ チ ャーまた は 圧 縮ビデ オ キャプチャー に 推 奨さ れ る
SSD
を使用するか、
Blackmagic Design
ProResやDNxHD
SSD
SSD
です。
などデータレートの 低 い 圧 縮
ウェブ サ イト を 参 照してくだ さ い 。
の
Kingston HyperX 240GB SSD
Page 55

55
SSD
について
Mac OS XのDisk Utility
Extended(Journaled
)あ る い は
を使 用 して 、
exFAT
SSDをMac OS
にフ ォ ー マ ットし ま す。
撮影用に
Cinema Camera
さい。 これらのディスクフォーマットは、 長尺のクリップを単一のファイルで収録できます。
HFS+
は、
同フォーマットを推奨します。 ジャーナリングされた
いはソフトウェアに不具合が生じた場合でも、 比較的スピーディに回復します。
ィブ サ ポートさ れています。
ex FAT
は、
りません。 しかし、
ウェアあるいはソフトウェアに不具合が生じた場合、 回復はむずかしくなります。
Mac OS X
Mac OS X
ます。 フォーマットすると、
さい。
ステップ 1.
ステップ 2.
ステップ 3. 使 用する
ステップ 4.
ステップ 5. ボリューム名を入力し、 「
SSD
を準 備する
Production Camera 4K
および
Mac OS
拡張フォーマットとしても知られています。
Mac OS X
コンピューターで
に同 梱されている
SSD
を、 外部ドックあるいはケーブルアダプターでコンピューターに接 続します。
バッ ク アップ に 使 用する と い うメッセー ジ は 拒 否 し ま す。
Applications/Utility
Formatを「Mac OS S Extended (Journaled)
りま す。
Windows
および
ex FAT
は、 ジャーナリングに対応していないため、 データが破損する可能性は高くなり、 ハード
によりネイティブサポートされており、 ソフトウェアを別 途 購入する 必要はあ
SSD
Disk Utility
SSD
のすべ ての データが消去される ので、 重要な デ ー タは 事 前にバックアップしてくだ
へ行き、
SSD
のディスクアイコンをクリックし、 「
で使用する
を準 備 する
アプリケーションは、 ドライブを
Disk Utility
Erase
」を クリ ッ ク し ま す。
SSD
SSD
のデータはデータ破損の可能性が低く、 ハードウェアある
を 起 動しま す。
」あ る い は「
HFS+
は、
HFS+
Erase
および
は、 「ジャーナリング」に対応しているので、
HFS+
」タ ブ を ク リ ッ ク し ま す 。
ex FAT
SSD
がフォーマットされ、 使用できる状態にな
ex FAT
でフォ ー マ ットしてくだ
HFS+
は、
あるいは
」に 設 定 し ま す 。
ex FAT
Mac OS X
によりネイテ
でフォーマットで き
SSDをTime Machine
WindowsのFormat
使 用 し て 、
SSDをexFAT
ダイアログ ボックス機 能 を
にフ ォ ー マ ットし ま す。
Windows
Windows PC
SSD
ステップ 1.
ステップ 2. 「
ステップ 3. メニューから
ステップ 4. ファイルスタイルを「
ステップ 5. ボリュームラベルを入力して、 「
ステップ 6.
コンピューターで
Format
では、
のすべ ての データが消去される ので、 重要な デ ー タは 事 前にバックアップしてください。
SSD
をコンピューターに接 続します。
Start Menu
ックしま す。
SSD
がフォーマットされ、 使用できる状態になります。
SSD
を準 備 する
ダイアロ グ ボックスで、 ドライブを
」あ る い は「
Format
StartScreen
を 選 択します。
ex FAT
」に設定し、 ユニットサイズ配分を
」を開き、 コンピューターを選択します。 使用する
Quick Format
ex FAT
でフォ ー マットで きま す。 フォ ー マットすると、
128
キロバイトに 設 定しま す。
」を選択し、 「
Start
」を クリ ッ ク し ま す。
SSD
を右クリ
Page 56

56
SSD
について
ディスク スピード を 確 認 す る
Blackmagic Disk Speed Test
マットで 表 示 す る ア プ リケー シ ョン で す。
ハードドライブが、 特定のビデオフォーマットの収録(書き込み)あるいは再生(読み込み)に適しているか知りたい
Disk Speed Test
場合、
Disk Speed Test
Disk Speed Test
Blackmagic Camera Software Utility
弊社のウェブサイトから無償でダウンロードも可能です。
は、 ストレージが扱えるビデオストリーム数も表示します。
は、
は 、 ストレ ージメディアの読み込 み/書き込みスピードを計測し、 結果をビデオフォー
を使えば、 スタートボタンを押すだけで、 メディアドライブの性能をチェックできます。 また、
Blackmagic Cinema Camera
に無償で含まれています。
Production Camera 4K
および
Blackmagic Camera Software Utility
に同 梱されている
は、
Disk Speed Test
ドライブ の 性 能をチェックできま す。
Disk Speed Test
を 使 ってメディア
イン タ ーフ ェ ー ス
Page 57

SD
カードにつ いて
57
SD
カードについて
撮影用にSDカードを準 備 する
Pocket Cinema Camera
フォーマットは、 長尺のクリップを単一のファイルで収録できます。
ター に よりサ ポートさ れています。
Mac OS X
Mac OS X
す。 フォーマットすると、
ステップ 1.SDカードをコンピューターのSDカードスロット、 あるいはSDカードリーダーに差し込みます。
ステップ 2.
ステップ 3. 使 用するSDカードのディスクアイコンをクリックし、 「
ステップ 4.
ステップ 5. ボリューム名を入力し、 「
Windows
Windows PC
ステップ 1.SDカードをコンピューターのSDカードスロット、 あるいはSDカードリーダーに差し込みます。
ステップ 2. 「
ステップ 3. メニューから
ステップ 4. ファイルスタイルを「
ステップ 5. ボリュームラベルを入力して、 「
ステップ 6.SDカードがフォーマットされ、 使用できる状態になります。
コンピューターでSDカードを準 備 する
に同 梱されている
Applications/Utility
Formatを「Mac OS S Extended (Journaled)
ます。
コンピューターでSDカードを準 備 する
では、
クリックしま す。
で使用するSDカードは 、
Disk Utility
SSD
のすべ ての データが消去される ので、 重要 な データは事前にバックアップしてください 。
Format
ダイアロ グ ボックスで、 ドライブ を
Start Menu
」あ る い は「
Format
アプリケーションを使って、 SDカードを
へ行き、
Erase
StartScreen
を 選 択します。
ex FAT
」に設定し、 ユニットサイズ配分を
HFS+
Disk Utility
」を クリ ッ ク し ま す。
」を開き、 コンピューターを選択します。 使用するSDカードを右
Quick Format
ex FAT
および
ex FAT
を 起 動しま す。
」あ る い は「
SSD
ex FAT
」を選択し、 「
でフォーマットしてください。 これらのディスク
Windows
は、
HFS+
あるいは
Erase
」タ ブ を ク リ ッ ク し ま す 。
ex FAT
」に 設 定 し ま す 。
が フォーマットさ れ 、 使 用 で きる 状 態 に なり
でフォーマットで き ま す。
128
キロバイトに 設 定しま す。
Start
」を クリ ッ ク し ま す。
および
ex FAT
Mac OS X
でフォ ー マットしま
コンピュー
高速のSDカードを選 ぶ
Blackmagic Pocket Cinema Camera
SDHC、 SDXC
SDHC
推奨
Delkin Devices 16GB Elite SDHC UHS-I
Delkin Devices 32GB Elite SDHC UHS-I
最新の情報は、
カードを 使 用 してく だ さ い 。
SDXC
および
カードは以下の通りです:
Blackmagic Design
には、 高速データスピードを誇り、 大容量ストレージサイズに対応した
Sandisk 64GB Extreme SDXC UHS-I
Sandisk 128GB Extreme SDXC UHS-I
ウェブサイトのサポートノートを参 照してください 。
Sandisk 16GB Extreme Pro SDHC UHS-I
Sandisk 64GB Extreme Pro SDHC UHS-I
Page 58

接続
HDMI
12V
58
接続
Blackmagic Pocket Cinema Camera
LANC
リモ ートコントロ ール
カメラのリモートポートは、 録画の開始および停止、 アイリスコントロール、 互換性を持つレンズのマニュアルフォ
ーカ スをサ ポートして い ま す。
リモートポートは、 標 準
LANC
プロトコ ル の
ヘッド フォン
3.5 mm
ステレオヘッド フォン ジ ャック 端 子 に ヘッドフォン を 接 続し、 クリップ の 収 録/再生中に オー ディオモ ニタリング
が 可 能 で す。
オー ディオ入 力
mic/line
レベルオー ディオ 用 の
さすぎたりすることがあります。
レベ ル に 切 り 替えま す。
HDMI
出力
HDMI
マイク ロ
キャプチャーデバイス、 放送スイッチャー、 その他の
ポートは、 収録中も
3.5mm
Pocket Cinema Camera
10-bit
2.5mm
ステレオジャックです。
ステレオジャック。 適切な設定が選択されていないと、 音量が大きすぎたり小
line
非圧縮HD
は、 音量が大きすぎる場合、 持続時間中、 自動的に
1080p
ビデオを出力します。 ビデオをルーター、 モニター、
HDMI
デバ イスに出 力 する 際 に 使 用 しま す。
電源
電源およびバッテリー充電用の
USB
USB
ポートで、
デ ートが 可 能 で す。
Blackmagic Pocket Cinema Camra
USB
ポートは、 バッテリー収納部の内部にあります。
0.7mm 12 – 20V DC
入力はDC電源及び内蔵バッテリー充電用に使用。
をコンピューターに接 続すると、 内蔵ソフトウェアのアップ
Page 59

59
接続
Blackmagic Cinema Camera
LANC
リモ ートコントロ ール
カメラのリモートポートは、 録画の開始および停止、 アイリスコントロール、 互換性を持つレンズのマニュアルフォー
カスをサ ポ ートしています。
リモートポートは、 標 準
LANC
プロトコ ル の
および
2.5mm
ステレオジャックです。
Production Camera 4K
ヘッド フォン
3.5 mm
ステレオヘッド フォン ジ ャック 端 子 に ヘッドフォン を 接 続し、 クリップ の 収 録/再生中に オー ディオモ ニタリング
が 可 能 で す。
オー ディオ入 力
mic/line
レベルオー ディオ 用 の
音量が大きすぎたり小さすぎたりすることがあります。
4K
は、 音量が大きすぎる場合、 持続時間中、 自動的にラインレベルに切り替えます。
SDI
出力
Blackmagic Cinema Camera
SDI
キャプチャーデバイス、 放送スイッチャー、 その他の
Production Camera 4K
などの4Kスイッチャーに接続できます。
1/4
は、 3G−
は、 6G−
TRS
インチ
SDI
フォンオーディオ接続 端 子。 適切な設 定が 選 択されていないと、
Blackmagic Cinema Camera
SDI
をサポートしており、 非圧縮
をサポートしており、 あらゆる
10bit 4:2:2
SDI
デバ イスに出 力 で き ま す。
SDI
モニター、 そして
Production Camera
および
ビデ オをル ーター、 モニター、
ATEM Production 4K
Thunderbolt
Cinema Camera
ピュー ター に 接 続すると、 波 形モニタリング/カラーコレクションのパ ワフルなソリューションとして使 用 で きます。
Blackmagic Cinema CameraのThunderbolt
Production Camera 4KのThunderbolt
4K
を出力しま す。
Production Camera 4K
および
は、
ポートは、 常に
ポートは 、
Thunderbolt
10-bit
SDI
出力にマッチし、
Mac OC X
対応の
非圧縮HD
10-bit
Windows
および
1080p
ビデ オ を 出 力します。
非圧縮 HD
1080p
コン
あるいは
Ultra HD
電源
電源およびバッテリー充電用の12 –
30V DC
USB
USB
ポートで、
内 蔵 ソフトウェ アの アップ デ ート が 可 能 で す。
Blackmagic Cinema Camera
電源は内蔵バッテリー充電用及び電源供給時用。
Production Camra 4K
および
SSD
ドアを開いて
USB
をコンピューターに接 続すると、
ポートにアクセスしてください。
Page 60

設定
60
設定
カメラ設 定 ス クリ ーン
カメラIDをオンス クリーンキ ー ボ ードで 変 更
カ メ ラ 設 定(
Blackmagic Camera
PocketCinemaCamera
アップ/ダウンボタンを使って各設定メニューをハイライトします。 設定メニューへ行くには、 「OK」を 押 し て
ください。 左右の矢印ボタンで設定値を調整し、 アップ/ダウン矢 印で 各 設 定に移 動します。 メインの 設 定ペ
ー ジ へ 戻 る に は「
CinemaCamera
タッチスクリーンで、 矢 印 やアイコンを タップ/スライドすることで、 設定値を調整したり、 設定メニューを
切り 替 えることが で きま す。
Camera Settings
を設定するには、 「
MENU
」ボタンを再度押します。 「
および
ProductionCamera4K
)
MENU
」ボ タ ン を 押 し て く だ さ い 。
MENU
」ボタンを再度押すと、 メニュー画面から出ます。
Camera ID
Blackmagic Camera
複数の
したクリップのメタデータにも含 まれます。 オンスクリーンの キ ー ボードでカメラIDを設定できます。 新しい
カメラIDを入力したら、 「
は 破 棄 さ れ ま す。
を使用している場合、 カメラIDを設 定しておくと便利です。 カメラIDは、 収録
Enter
」ボ タ ン で 新 し い カ メ ラIDを保存しましょう。 「
Cancel
」を押すと、 変更
日付と時 刻を設 定
Pocket Cinema Camera
Blackmagic Camera
刻を変更します。
Blackmagic Camera
を開 始する前に 、 日にちおよび 時 刻を常に確 認するようにしてください。
に接 続して
Blackmagic Camera Utility
で日付と時刻を設定するには、 「+」「–」ボタンで年、 月、 日にちを変更します。
は、 24時間フォーマットに設定されています。 時刻を設 定するには「+」「–」ボ タ ン で 時
Blackmagic Camera
を長期に渡り使用していなかった場合、 時刻の再設定が必要な場合があります。 撮影
を海 外に持ち運 ぶ 際は、 現 地の日付および時 刻に合わせてください。
USB
経由でカメラをコンピューター
を起動すると、 カメラの時刻はコンピューターの時刻と同期します。
Page 61

61
設定
カメラ設 定 ス クリ ーン
ISO
様々な照明条件下で撮影している場合、
Cinema Camera
照明条件の中で、 最も低い
しかし、 状況に応じて、
160 0ASA
カラーを得るために、
メニュー の矢 印 アイコ ン で
WhiteBalance
Blackmagic Camera
タングステン光用
蛍光灯用
時間帯などの日光条件に応じた
メニュー の 矢 印アイコンでホワ イトバランス設 定 を 調 整 できます。
ShutterAngle
シャッターアングルは、 センサーの露光量を調整することで、
アングルですが、 照明条件が変更すると、 照明条件に応じてシャッターアングルを変更する必要があります。
例えば、 シャッターアングル
の撮影に最適です。 電源が50ヘルツ電源の国において
ルは、 フリッカーを最小限に抑えます。
メニューの矢印アイコンで シャッターアングル設 定を調整 できます。
にとって、 最適な
ISO
を 選 択します。
ISO
設定を変更したほうがよい場合もあります。 例えば、 照明量が少ない場合は、
が適していますが、 ノイズが発生することもあります。 照明量が多く、 明るい場合は、 よりリッチな
400ASA
は、 様々な色温度条件用に、 6つ の ホ ワ イ ト バ ラ ン ス ・プ リ セ ッ ト を 用 意 し て い ま す 。
4500K
が 適 して い ま す。
ISO
を調整できます。
3200K
360
度は露光が最大限でセンサーの光量を最大限に活かせるので、 低照明条件で
ISO
設 定 は 非 常に役 立ちま す。
ISO
設定は、
800ASA
5000K、 5600K、 6500K、 7500K
24p
Production Camera 4K
です。
ISO
で撮 影する 場 合は、
Pocket Cinema Camera
設 定 を補 完しま す。
172.8
および
では、 使用できる
180
度は最適シャッター
度 の シ ャッ タ ーア ン グ
Page 62

62
設定
オーディオ設定スクリーン
オ ー デ ィ オ 設 定(
Blackmagic Camera
ボタンを押して、 ディスプレ イの左側 にあるマイクアイコンを 選 択してください。
Audio Settings
でオー ディオ入 力および オーディオモニタリング 設 定 を 調 整 するには 、 「
)
MENU
」
Microphone Input
マ イ ク 入 力(
動かすことで、レベル を上げ 下げできます。
Camera
ースが 接 続されてい ない場合、オーディオチャンネル1、2に 収 録しま す。
Microphone Input
Production Camera 4K
および
)は、内蔵マイクの収録レベルを調整します。オーディオのスライダーを左右に
Pocket Cinema Camera
は、内蔵モノマイクに対応しています。内蔵マイクは、外部オーディオソ
は 、内 蔵 ス テ レ オ マ イ ク 、
Cinema
Channel 1 and 2 Input Levels
外 部 オーディオコネクター は 、
いと、 外部オーディオの音が聞き取れなかったり、 あるいはピークノイズが発生したりします。
左右の矢印ボタンで外部オーディオ入力のレベルを設定します。 入力レベルが持続時間の限 度を超えている
場合、 ダメージを防ぐために、 カメラは自動的に
Channel1Input
オーディオのスライダーアイコンを左右に動かすことで、 チャンネル1のレベルを上げ下げできます。 外付け
オーディオ入力は、 内蔵マイクより優先され、 オーディオチャンネル1に 収 録 さ れ ま す。
Channel2usesChannel1Input
チャンネル1入力のみを使 用しており、同じ外部オーディオをチャンネル1と2で 収 録 し た い 場 合 、「
しま す。1つのチャンネルだけを収録したい場合は「No」に し ま す。
Channel2Input
オーディオのスライダーアイコンを左右に動かすことで、 チャンネル2のレベルを上げ下げできます。 外付け
オーディオ入力は、 内蔵マイクより優先され、 オーディオチャンネル2に 収 録 さ れ ま す。
レベル
レベル
mic/line
レベルオーディオに対応しています。
line
レベ ル入 力 に 切 り 替えま す。
mic/line
を 適 切 に 選 択してい な
Yes
」を 選 択
Headphone and Speaker Volume
ヘッドフォンを接続している場合、 ヘッドフォンアイコンが表示されます。 ヘッドフォンが検出されない場合は、
スピーカーアイコンが表示されます。 ヘッドフォンは、 収録、 再生中常にオンになりますが、 スピーカーは再生
中のみオンになります。 ボリュームスライダーを左右に動かすことで、 オーディオモニタリングのレベルを上げ
下げ で きま す。
Page 63

63
設定
収録設定スクリーン
レ コ ー ダ ー 設 定(
収録設定は、 SDカード
して、 「
REC
」アイコンでレコーダー設 定 メニューを開いてください。
Recorder Settings
/SSD
への収 録ビデオフォーマットを設定する際に使 用します。 「
Recording Format
PocketCinemaCamera
左右の 矢 印 ボタンで、
トを 切り替 え ま す。
CinemaCamera
矢 印 アイコンをタッチして、
DNxHD
収 録フォ ー マットを 切 り 替 え ま す。
ProductionCamera4K
矢 印 アイコンをタッチして、
ト、 そして4K
トを 切り替 え ま す。
ProRes HQ、 4K ProRes 422、 4K ProRes LT、 4K ProRes Proxy、 4K RAW
ProRes HQ、 ProRes 422、 ProRes LT、 ProRes Proxy
2.5K RAW、 ProRes HQ、 ProRes 422、 ProRes LT
ProRes HQ、 ProRes 422、 ProRes LT、 ProRes Proxy
Dynamic Range
Blackmagic Camera
Film
Film
設定は、
ストップ、
はコントラストレベ ル を広げる ので、
用で きます。
のみ に な りま す。
Production Camera 4Kは12
には、 2つ の ダイナ ミックレン ジ 設 定 が ありま す:
log
カ ーブ を 使 って ビ デ オ を 収 録 し ま す。
CinemaDNG RAW
フォーマットで収録する場合、 使用できるのは
)
MENU
」ボ タ ン を 押
、 そして
Pocket Cinema Camera
ストップ の ダイナ ミックレン ジ に 対 応してい ま す。 ダイナミッ クレンジ
DaVinci Resolve
などの カラー グ レ ー ディング ソフトウェ ア を 最 大 限 に 活
RAW
収 録フォーマッ
ProRes Proxy
、
などのHDフォーマッ
収 録フォーマッ
Cinema Cameraは13
および
Film
ダイナ ミッ クレン ジ 設 定
、
Video
Video
設定は、 HDビデオ用に
ビデオフォーマットで直接収録するため、 スピーディに作業できます。 これらのフォーマットは、 ポピュラー
な ポ ストプ ロ ダク ション・ソフト ウ ェ アと 互 換 性 が あ りま す。
メニュー の 矢 印アイコンで ダイナミックレンジ 設 定を 調 整できま す。
REC709
標準規格を使用します。 この場合、 カメラがサポートしている圧縮
Page 64

64
設定
収録設定スクリーン
Frame Rate
Blackmagic Camera
25 fps、 29.97 fps、 30 fps の5
メニューの矢印アイコンでフレームレート設 定 を調 整 できます。
は、 一般的なフィルム/ビデオフレームレートでの撮影用に、
種類のフレームレート設定があります。
23.98 fps、 24 fps
、
Time Lapse Interval
タイムラプス・インターバルは 、 スチルフレームを以 下の インターバ ルで撮 影できます。
10
10
50
SDI/HDMI
ProRes 422 (HQ)
24fps
TIME LAPSE
出 力 にもオーバーレイさ れ ま す。 2秒後に、 もとのタイムコード表示に
に設定
など、 カメラ
」と い う
フレ ー ム: 2 -
秒: 1 – 10、 20、 30、 40、
分: 1 -
例えば、 10フレーム 、 5秒、 30秒、 5分ごとにスチルフレームを撮 影するように設 定可能 です。
タイムラプス機能を使用することで、 クリエイティブ・オプションが広がります。 タイムラプス・インターバル
を2フレームごとに撮影するよう設定し、 撮影したビデオを通常のスピードで再生すれば、 ストロボ効果のよ
うな映像が得られます。
各スチルフレームのフォーマットは、 収録フォーマットに基づいています。 カメラを
している場合、 タイムラプス設定は同じフォーマットになります。 フレームレートは、
で設定したビデオフレームレートに基づいているので、 タイムラプスフッテージをワークフローに簡単に取り
込むことが で き ま す。
タイムラプスモードで録画ボタンを押すと、 ステータス表示のタイムコードの場所に「
メッセージが表示され、
戻ります。 タイムコードカウンターは、 ビデオフレームの収録時に変更します。 つまり、 タイムコードは、
タイムラプスインターバルの設 定 に応じて、 異なるレートで増えていきます。
矢 印 アイコンで
Time Lapse Interval
を選択します。 タイムラプス機能を使用しない場合は、 オフにできます。
Page 65

65
設定
ファイル 名 定 義
Pocket Cinema Camera
Pocket Cinema Camera
[Camera ID]_[Reel Number]_[yyyy-mm--dd]_[hhmm]_C[Clip number].mov
以下の表は、
BMC01_1_2012-08-08_1631_C0002.mov QuickTime Movie Filename
BMC01_1_2012-08-08 _1631_C0002.mov Camera ID
BMC01_1_2012-08-08_1631_C0002.mov Reel Number
BMC01_1_2012-08-08_1631_C0002.mov Date (2012 Aug 08)
BMC01_1_2012-08-08_1631_C0002.mov Time (16:31pm - 24hrs)
BMC01_1_2012-08-08_1631_C0002.mov Clip Number
LCD
は、 ビデ オ撮影時に生 成されるファイルに対して以下の定義を採用します。
スクリーンに実際に表示されるファイル名の 例です:
CinemaDNG
ファイルを 使 用する場 合、 イメージシ ー ケンスのフォルダも同 様に定義されます。
Blackmagic Cinema Camera and Production Camera 4K
クリップは、 ユーザーが選択したフォーマットに応じて、
DNxHD QuickTime
は、 ビデオ撮 影時に以下のファイル命名規則を採用します。
[Camera ID]_[Reel Number]_[yyyy-mm--dd]_[hhmm]_C[Clip number].mov
以下の表は、 カメラのタッチスクリーンに実際に表示されるファイル名表記の例です:
BMC01_1_2012-08-08_1631_C0002.mov QuickTime Movie Filename
BMC01_1_2012-08-08 _1631_C0002.mov Camera ID
BMC01_1_2012-08-08_1631_C0002.mov Reel Number
BMC01_1_2012-08-08_1631_C0002.mov Date (2012 Aug 08)
BMC01_1_2012-08-08_1631_C0002.mov Time (16:31pm - 24hrs)
BMC01_1_2012-08-08_1631_C0002.mov Clip Number
CinemaDNG
ムービーで
ファイルを 使 用する場 合、 イメージシ ー ケンスのフォルダも同 様に定義されます。
SSD
に 収 録 さ れ ま す。
CinemaDNG RAW
Blackmagic Cinema Camera
フォーマット、 あるいは
Production Camera 4K
および
ProRes
、
Page 66

66
設定
Cinema Camera
ディス プ レ イ 設 定 ス クリーン
外部モニター の
および
SDI/HDMI
Production Camera 4K
オーバーレイ
の
ディスプレ イ設 定
LCD
のディスプレイ設定を調整するには、 「
(Display Setting
MENU
」ボタンを押してモニターアイコンを選 択します。
)
Dynamic Range
撮影中に
ナミッ クレンジ を 設 定しま す。
LCD
ットを
メニュー の矢 印 アイコ ン で
LCD
スクリーンでプレビューできます。 「
のダイナミックレンジ設定は、 レコーダー設定のダイナミックレンジから独立しています。 収録フォーマ
Film
に設 定して い ても 、
LCD
でのモニタリングの設 定を、
LCD
の ダイナミックレンジ 設 定 を 可 変 調 整できます。
Video
」あ る い は「
Video
Film
」を 選 択 し て 、
にする ことも可 能 で す。
LCD
表 示 の ダイ
Brightness
スライダーアイコンを左 右に動 かすことで、
LCD
の明度設定を調整できます。
Zebra
Blackmagic Camera
た箇所は、 斜線が表示されます。
ゼブラ機能をオンにして、 左右の矢印アイコンでゼブラ警告レベルを選択してください。
のゼブラ機能は、 露出レベルの目安を表示します。 ゼブラ露出レベル(
100%
SDI/HDMI Overlays
Pocket Cinema CameraのHDMI
ポートを使用して、 外部ディスプレイでモニタリングできます。
SDI/HDMI
ドに 表 示 する オーバーレ イの 種 類 を 選 択してくだ さ い 。
All:
Status: F
Guides:
Off:
オーバーレイ設定は、 モニターにビデオの情報を表示します。 矢印アイコンで
セーフティゾーンおよび撮影情 報を全て表示
値、 フレームレート、 バッテリー残量などの撮影情報を表示
セーフティゾーンを表示
情報表示なし。 クリーンフィードのみを表示。
ポート、
Cinema Camera
Production Camera 4KのSDI
および
SDI/HDMI
)を 超 え
フィー
Page 67

67
IRIS FOCUS
設定
IRIS FOCUS
OK
MENU
Pocket Cinema Cameraの「IRIS
ンでアパーチャーコントロールを調整します。 フォーカスピーキン
グ を 表 示 す る 場 合 は 、 「
」ボタンを押し、 上下の矢印ボタ
FOCUS
」ボ タ ン を 押 し ま す 。
設定の調整
Blackmagic Pocket Cinema Camera、 Cinema Camera EF、 Production Camera 4K
応しており、 アパーチャー、 オートフォーカスなどをカメラからコントロールできます。
電子制御には対応しておらず、 パッシブ方式のレンズマウントでマニュアルレンズを使用します。 フォーカスピーキン
グ機能は、 画像の最もシャープな部分を黄色く縁取りするので、 フォーカスが合っているか簡単に確認できます。
フォー カスピーキングは 、
IRIS
ボタン
Video
ダイナミックレンジを使用している場合、 「
た平均の露出が適用されます。
最も明るいハイライトに露出が適 用されます。
Pocket Cinema Camera
を押しま す。
Cinema Camera
コントロールの 早送り、 巻き戻しボタンを押します。
および
Pocket Cinema Cameraの「FOCUS
Pocket Cinema Camera
グ/オートフォーカスが可能です。 「
フォーカスピーキングがオンになります。
マニュアルレンズを使用している場合、 「
LCD
スクリーン上のみに表示され、 撮影した映像には影響ありません。
IRIS
」ボ タ ン を1回押せば、 ショットのハイライトおよび暗部に基づい
Film
ダイナミックレンジ設定を使用している場合、 「
でアパー チャーをマニュアルで 設 定 するには 、 バックパネルにある上下の 矢 印 ボタン
Production Camera 4K
でアパーチャーをマニュアルで設定するには、 トランスポート
」ボ タ ン
でオートフォーカスレンズを使用している場合、 「
FOCUS
」ボ タ ン を1回押すとオートフォーカスが、 「
FOCUS
」ボ タ ン を1回 押 すとフォーカスピー キン グ が オンになりま す。
FOCUS
は、 レンズの電子制御に対
Cinema Camera MFT
IRIS
」ボタンを押せば 、 ショットの
」ボ タ ン で フ ォ ー カ ス ピ ー キン
FOCUS
」ボ タ ン を2回 押 すと
は、
Cinema Camera
ボタンを押し、 トランスポートコントロールのボタンでアパー
チャーコントロールを調整します。 フォーカスピーキングを表
示 す る 場 合 は 、 「
Production Camera 4Kの「IRIS
および
FOCUS
」ボ タ ン を 押 し ま す 。
」
Cinema Camera
Blackmagic Cinema Camera
押すとフォーカスピーキングが オンに なります。
および
Production Camera 4K
あるいは
Production Camera 4K
FOCUS
の「
を使用している場合、 「
」ボ タ ン
フォーカス ズーム
Pocket Cinema Camera
フォーカスを調整できます。 ズームアウトするには、 「OK」ボ タ ン を 再 度2回 押 しま す。
Cinema Camera
ズーム イン して、
を 使 用 し て い る 場 合「OK」ボ タ ン を2回押すと、 ズームインして、
Production Camera 4K
および
1:1
ピクセルスケールでフォーカスを調整できます。 再度ダブルタップすると、 ズームアウトします。
を使 用している場 合、 タッチスクリーンをダブルタップすると、
FOCUS
」ボ タ ン を1回
1:1
ピクセ ルスケールで
Page 68

68
設定
イメージスタビライザー
Pocket Cinema Camera、 Cinema Camera EF、 Production Camera 4K
に見ら れるイメージスタビライザー(IS)機能に対応しています。 スタビライザー機能を使用するには、 レンズにつ
いているスイッチをオンにするだけです。 使用しているレンズがスタビライズのスイッチを搭載している場合は、
三脚を使った撮影、 または手持ちで撮影などの状況に応じてスタビライズ機能のオン/オフを切り替えましょう。
バッテリー電源を使用している場合、 撮影中にのみイメージスタビライザーが作動します。 これは、 イメージスタビ
ライザーを稼働させるために、 レンズが余分に電力を使用するためです。 外部電源をカメラに接続している場合、
レンズのスタビライザースイッチをオンにすると、 イメージスタビライザーは常に作動します。
は、 多くのアクティブ方式レンズ
ス テ ー タ ス・ス ト リ ッ プ
選択した設定は、 常にステータス・ストリップに表示されます。 ステータス・ストリップは、
カメラ の 現 行 の 設 定 を 表 示 します。
バッテリー残 量インジケー ター
バッテリー 残 量が25%以下になると、 ステータス・ストリップのバッテリー残量は赤く表示され、 バッテリー残量が少
ないことを警 告 しま す。
LCD
スクリーンの下 方 部 に
1 2 3 4
1.
収録フォーマット
2. F
値
3.
収録フレームレート
4. SD/SSD
5.
タイム コ ード
ステー タス
6
5 8 97
6. ISO
設定
7.
シャッターアングル
8.
ホワ イトバ ラン ス
9.
バッテリー残量
SD/SSD
ステータス・ストリップは、 挿入しているメディアに関する重要な情報を表示します。
ドットの 移 動 ドットが移動している場合、 カメラはメディアの確認/準 備 を 行 って い ま す。
NoSD/SSD
Ready
Rec
Rec
DiskFullSD
再生モード 再生、 早送り、 巻き戻しアイコンを表示します。
Time
アイコン
カメラでメディアが検出されない、 挿入されていない状態です。 フォーマットされていない
挿入した場 合にも同じように表示されます。
録 画の 準 備 が で き て い ま す。
録 画 中 で す。
が点滅 コマ落ちが検出されました。
カード、
録画中に、 現在のショットの長さを表示します。 クリップをSDカードあるいは
場合、 クリップの時間を表示します。
SSD
が フル になる 前 に 点 滅 します。
SSD
から再生している
SD/SSD
を
Page 69

メタデ ータ入 力
69
メタデ ー タ入 力
スレート
シーン、ショット、テイクの番号を自動的に増加させたい場合は、
オートインクレメント・アイコンを選択。
スレートとは
Blackmagic CameraのLCD
直接ロギングできるスレート機能があります。 メタデータは、 収録したファイルに保存され、 編集ソフトウェアで簡
単にアク セ スできま す。
Pocket Cinema Camera
ステップ 1. 「OK」ボタンを押すと、 スレートが表示されます。
ステップ 2. 矢印ボタンで変更したいテキストを選択し、 「OK」ボタンを押すと、 スクリーン上にキーボードが表
示されます。 矢印ボタンでキーボード上の文字を選択し、 「OK」ボタンで選択した各文字を確定しま
す。
ステップ 3. 必要な情報を入力したら、 「
ステップ 4. シーン、 ショット、 テイク番号は、 自動的に番号が増加(オートインクレメント)するように設定する
ことも可能です。 任意のオートインクレメント・アイコンを選択し、 それが光ったら、 「OK」ボ タ ン を
押しま す。
キーワードに打ち込んだ文字は、 ライブラリ・データベースで検索語として使用できます。 この機能は、 多くの素材
を使用する大規模なプロジェクトにおいて非常に役立ちます。 キーワードを使用することで、 検索するクリップの数
が減るため、 編集時に貴重な時間を節約できます。
すべ てのメタデ ー タ は 、
スクリーンは様々な機能を搭載していますが、 そのうちの1つに、 メタデータをカメラに
Save
」を選択し、 「OK」ボ タ ン で メ タ デ ー タ ス ク リ ー ン に 戻 り ま す。
Final Cut Pro X、 DaVinci Resolve
など、 ポピュラーなソフトウェアと互換性があります。
Cinema Camera
指 で ディス プ レ イ を1回 タップ す ると ス レ ートが 表 示 さ れ ま す。
Production Camera 4K
および
では、
Cinema Camera
ステップ 1. タッチスクリーンをタップすると、 スレートが表示されます。
ステップ 2. 情報を入力/変更する際は、 変更したいテキストをタップするとスクリーン上にキーボードが 表 示されま
ステップ 3. シーン、 ショット、 テイク番号は、 自動的に番号が増加(オートインクレメント)するように設定する
キーワードに打ち込んだ文字は、 ライブラリ・データベースで検索語として使用できます。 この機能は、 多くの素材
を使用する大規模なプロジェクトにおいて非常に役立ちます。 キーワードを使用することで、 検索するクリップの数
が減るため、 編集時に貴重な時間を節約できます。
すべ てのメタデ ー タ は 、
および
す。必要な情報を入力し、 「
ことも可能です。 オートインクレメント・アイコンをタップすると光ります。 オートインクレメント機 能
をオフにするには、 再度タップします。
Production Camera 4K
Save
」ボ タ ン を 押 し ま す 。
Final Cut Pro X、 DaVinci Resolve
など、 ポピュラーなソフトウェアと互換性があります。
Page 70

カメラの ビデオ 出力
70
カメラ のビデ オ出 力
使用中 のコンピュー ター に、
Camera 4KをThunderbolt
Cinema Camera/Production
で接続。
Thunderbolt
Cinema Camera
コンピューター に 接 続 すると 、 波 形モニタリングのパ ワフルなソリューションとして使 用 で きま す。
Cinema Camera Thunderbolt
4K
SDI
は、
て波形モニタリングを行う場合は、 収録フォーマットをHDに設 定して 下さい 。
カメラユーティリティ・ソフトウェアの
UltraScope
モニタリング が 可能 で、
リング できま す。
出力を
ソフトウェ アも同 時 にインストール さ れ ます。
を 使って 波 形 モ ニタリン グ
Production Camera 4K
および
ポートは、 常に非圧縮
10-bit 1080p HD
Cinema Camera
あるいは 圧 縮
Blackmagic Camera Utility
は、
Ultra HD 4K
Production Camera 4K
および
Thunderbolt
10-bit 1080p HD
Blackmagic UltraScope
対応の
にマッチングしま す。
をインストールすると、
Mac OC X
ビデ オ を 出 力します。
は、 収録/再生中にカメラの波形
で収 録したビ デ オをあらゆ る側 面 か らモ ニタ
Windows
および
Production Camera 4K
Blackmagic
Blackmagic
Production Camera
を使 用し
Blackmagic UltraScope
Thunderbolt
は 、
接続で正確な波形表示が可能。
Page 71

71
カメラ のビデ オ出 力
Blackmagic UltraScope -
フ ル ス ク リ ーン・ビ ュ ー
Blackmagic UltraScope
Blackmagic UltraScope
Blackmagic UltraScope
モニタリングが 可能 で す。
従来、 放送局品質のテレビ/ポストプ ロダクション 用 スコープは 非 常に 高 価 で場 所を取るソリューション だった上、 小
さな ス クリ ーン で1度に1種類のスコープしか確 認できませんでした。 また、 スコープによっては見栄えの悪いものも
あり、 クライアントに悪印象を与えていました。
あらゆる面からモニタリングできるので、 撮影中にカメラのレベルを確認するのに最適です。 カメラでどのような調
整 を 行 って も 、
カメラ に 接 続した
UltraScope
インストール 要 件
Blackmagic UltraScope
クセ ル のコン ピュー ター 解 像 度 が 必 要 で す。
クセル のコンピューターディスプレイで6つのスコープを同時に確認することを推奨します。
www.blackmagicdesign.com/jp
トを 参 照してください 。
Blackmagic UltraScopede
Thunderbolt
を 起 動しま す。
Blackmagic UltraScope
Blackmagic UltraScope
設 定 が あ りま す。 6つのディスプレイを表示する「フルスクリーン」ビュー、 そして2つのディスプレイを 表 示するコンパ
2-Up
ク ト な「
フルス ク リ ー ン・ビ ュ ー を 表 示 す る に は フ ル ス ク リ ー ン(
いない場 合は、
で、 フルスクリーン・ビューと
2-Up
示させたい左右のスコープを選択します。 左 ビ ュ ー(
選 択 できま す。
左右のスコープを入れ替えたい場合は、 左右どちらかのビューを選択して、 もう1つ のス コ ープ と 同 じ 設 定 に し てく だ
さい。
」ビューです。 これらのディスプレイ・ビューは、 ビ ュ ー(
2-Up
ビューが表示されます。 また、
ビューで は 、 ビ ュ ー(
2-Up
ビューでは、 左右同じスコープを表示することはできないので、 スコープが入れ替わります。
とは
ソフトウェアを 使 うと 、
ケーブルを、 コンピューターの
ソフトウェアの インターフェースで2つのスコープを同時に確認するには、 最低
のビューとは
には、 ワークフローのニーズやスクリーン解像度に応じて選択できる2つの異なるビュー
2-Up
View
を使う
Cinema Camera
Blackmagic UltraScope
で直ちに確認できるのです!
Blackmagic design
のサポートページで、 最新の
Full Screen
Mac OS XではCMD−F、 WindowsではCTRL−F
ビューを簡単に切り替えられます。
)メニューを開くか、 あるいは
Left View
Production Camera 4K
および
は、 6つの優れたスコープでビデ オ信号を
Thunderbolt
は、 解像度
Blackmagic UltraScope
)を 選 択します。 フルスクリーン・ビューを選択して
UltraScope
)と右 ビ ュー(
ポートに繋ぎ、 カメラをオンにして
1920 x 120 0
最低システム要件の総合リス
View
)メニュー か ら 選 択しま す。
ウィンドウ内を右クリックすることで、 表
Right View
)のメニュー オプション か ら
のビデ オ出力の波形
、 あるいは
128 0 x 800
1920 x 1080
のホットキ ー
ピ
ピ
Page 72

72
カメラ のビデ オ出 力
スコープ表示に必要なスクリーン解像度要件
フ ル ス ク リ ー ン・ビ ュ ー:
対応していない場合、 フルスクリーン・ビューを表示できません。
2-Up
ビュー:最低解像度は
1920 x 1200
1280 x 800
ピ ク セ ル 、 あ る い は
ピクセル
1920 x 1080
ピクセル モニター がこれらの 解 像 度 に
2-Up
ビュー
RGB
パレード表示
Blackmagic UltraScope
Blackmagic UltraScope
ポストプロダクションの段階でデジタル映像データを最大限に活用することができます。 モニタリング用のスコープに
は、 ベクトルスコープ、
RGB
パレード表 示
RGB
パレードは 、
が他より高くなっている場合、 色かぶりの状態であることを示します。 例えば、 1つの カラ ー チ ャン ネ ル が 過 剰 に高
いと、 ホワイトバランスが適切ではありません。
レンズ にウォ ー ミング フィル ターなどの カ ラ ーフィル ター を 使 用して、 シ ョットで 特 定のカラ ーエフェクトを 使 いたい こと
もあるでしょう。 レッドチャンネルを強調しても、 他のカラーチャンネルが過度に潰れていないかどうかを
ドで確認できます。 照明ゲルを使用している場合も同様です。 ポストプロダクションの段階でベクトルスコープ、
RGB
パレードを使うことで、 カメラで作成したあらゆる「ルック」を、
RGB
パレードの 波 形は 、
100IRE
びは、
原因となるので、 ハイライト部分に保存したいディテールがある場合は、 照明や露出を調整してください。
Resolve
でカラーグレーディングする際に意図的に白飛びさせることは簡単ですが、 オリジナルにディテールが存在
しない場合、 グレーディングで回復させることはできません。
Blackmagic
のフラットな横線、 あるいはスコープの上位で確認できます。 白飛びは、 イメージのディテールを損なう
ディス プ レ イ
ソフトウェアを 使 用 す れば 、
RGB
パレード、 ヒストグラム、 オーディオメーターディスプレイが含まれます。
カメラの映像のレッド、 グリーン、 ブルーのチャンネルを表示します。 1つの チ ャン ネ ル
Blackmagic
カメラの映 像の白飛びや黒潰れを確認するのに最適です。 ハイライトの白飛
Blackmagic
カメラ で 正 確 なビデ オ/オー ディオレ ベル を 保 ち 、
DaVinci Resolve
で簡単に改善できるのです。
RGB
パレー
DaVinci
Page 73

73
カメラ のビデ オ出 力
ベクトル スコ ープ 表 示
ヒストグ ラム 表 示
ベクトル ス コ ープ 表 示
ベクト ル ス コ ープ は 、
です。 信号がグリーンに色かぶりしている場合、 画像情報の大部分は、 ベクトルスコープでグリーンのエリアに偏り
ます。 一方、 カラーバランスがニュートラルな場合、 中心から均一に分布します。
ベクトルスコープの中心は、 サチュレーションゼロを意味します。 中心から離れるにつれ、 サチュレーションが高くな
ります。 例えば、 合成用にグリーンスクリーンで撮影する場合、 最高品質のキーあるいはマットを作成するためには、
グリーンスクリーンのサチュレーションをリーガルな範囲で可能な限り上げ たいでしょう。 ベクトルスコープ表示 で、
サチュレーションレベルがグリッドボックスを超えないように保つことで、 放送用のリーガルカラーを維持できます。
ベクトルスコープはまた、 ロケ現場でカメラのホワイトバランスを確認する最にも使用できます。 カメラフレーム一杯
まで白いオブジェクトにズームしていくと、 ベクトルスコープにクラスター状に表示されます。 ホワイトバランスを修
正すると、 情報が中心から均一に分配されます。 ホワイトバランス設 定を調整し、 ディスプレイへの影響を確 認して
ください 。
Blackmagic
カメラのビデオ信号のカラーバランスおよびサチュレーションのモニタリングに最適
ヒストグラム 表 示
ヒ ストグ ラムを 使 って、
トグラムの横軸は、 左側がブラック(
ます。 白飛びは、
表示されます。 適切なコントラストの映像は、 情報がヒストグラムの横軸全体をカバーするように表示されますが、
低コントラストの映像は、 情報の大部分が中央部に表示されます。
Blackmagic
1023
のラインに画像情報が密集して表示されます。 黒潰れは、 0のラインに画像情報が密集して
カメラ信号の白飛びや黒潰れ、 画像コントラストを確認することもできます。 ヒス
10bit
画像で0)、 右側がホワイト(
10bit
画像で
1023
)のルミナンスレンジ を表し
オー ディオメーター表 示
オーディオメーター表示は、
2
チャンネルのエンベデッドオーディオが、
タルオーディオ信号全般のメーターで、 近代的なデジタル機 器に一般的に見られます。 VUメーターは 、 信号の平均
レベルを表示し、 簡単に使用できます。 従来型の機器に一般的に見られます。
オー ディオレ ベル を モニタリング する 際 は、 VUメー タ ー を 確 認 してピー ク が
ピークが
また 、 オー ディオメー ター 表 示 でオー ディオフェーズやオー ディオバランスをモニタリング することも可 能 で す。
0dB
を超 えると、 オー ディオにクリッピングが 発 生します。
Blackmagic Camera
dBFS
のビデオ信号にエンベッドされたオーディオのレベルを表示します。
あるいはVUフォーマットで表示されます。
0dB
を 超 え な い ように してく だ さい 。
dBFS
は、 原則的にデジ
オーディオメーター表示
Page 74

74
カメラ のビデ オ出 力
Cinema Camera、 Production Camera 4KのBNC
ポ ー ト か ら 、
SDI
ケーブルをあらゆる
SDI
デバイスに接続。
SDI
を 使ってモ ニタリング
Blackmagic Cinema Camera
SDI
キャプチャーデバイス、 放送スイッチャー、 その他の
Production Camera 4K
などの4Kスイッチャーに接続できます。
は、
3G-SDI
は、
6G-SDI
をサポートしており、 非圧縮
をサポートしており、 あらゆる
10bit 4:2:2
SDI
デバ イスに出 力 で き ま す。
SDI
モニター、 そして
ビデ オをル ーター、 モニター、
ATEM Production 4K
ビ デ オ スイッチ ャ ー に 接 続
SDI
出力を使えば、 カメラをテレビプロダクションカメラとして使用できます。
に直接接続してスタジオで作業ができます。 あるいは
換すれば、 中継車から何百メートル離れていてもロケ現場でライブプロダクションが可能です。
Blackmagic Cinema Cameraで25 fps
SDI
出力はそれぞ れ 、
のみに対応したスイッチャーでも使用が 可能となります。
1080i50、 1080i59.94
あるいは
に設定されます。 この設定により、 インターレースHDフォ ー マット
ATEM Camera Converter
29.97 fps
で 撮 影して、
SDI
SDI
出力をプ ロダクションスイッチャー
に接続して信号を光ファイバーに変
オーバーレイをオフにすると、
モニターに接 続 する
カメラ の
LCD
ディス プ レ イ 設 定 メ ニュー の
ニタリングに役立つ情報が
ーバーレイ設定をオフにして、 クリーン
SDI
Duo
LCD
スクリーンでもモニタリングが可能ですが、 鳥瞰撮影やカーマウント、 クレーンマウントの使用など、
スクリーンを確認しづらい、 あるいは確認することが不可能な状況では、
SDI
オーバーレイ設定を使用すると、 フレームガイド、 撮影情報、 カメラ設定など、モ
SDI
フィードに表示されます。 単にショットをモニタリングしたい場合は、 いつでも
SDI
フィード を 出 力 で き ま す。
SDI
出力を
に接続すれば、 波形のライブモニタリングが可能です。
モニターに接続して、 フル
10bit
非圧縮モニタリングを実現しましょう!
SDI
モニタリングが非常に役立ちます。
Blackmagic SmartScope
SDI
オ
Page 75

ポストプロダクションワークフロー
75
ポ ストプ ロ ダクシ ョン ワ ー ク フ ロ ー
SSD
ファイルで の 作 業
SSD
からクリップをイン ポート:
ステップ 1.
ステップ 2.
ステップ 3.
SSD
を カ メ ラ か ら 取 り 出 し 、
USB2.0
ドッキングケ ーブルを使ってコンピュー タ ー に マウントし、
直接編集できます。
SD
カードスロットの付いたコンピューターにSDカードを挿 入し、
クリップ にアクセ スしま す。
eSATA Thunderbolt
HDMI
ドックまたは
ステップ 4. 使 用 した いファイルを
ステップ 5.
SD
カードファイルで の 作 業
SD
カード ス ロ ット の 付 い た
ProRes
ら
ステップ 1.
ステップ 2.SDカ ード を ダ ブ ル クリックして 開 くと、
ステップ 3. 使 用した いファイル をSDカードからデスクトップや そ の 他 のハードドライブにドラッグします。
ステップ 4.SDカードをSDカードスロットから物理的に取り出す前に、
および
Cinema Camera
eSATA
あるいは
ES ATA - USB
ます。
ることも可能です。 しかし、
USB 2.0
に
SSD
を ダ ブ ル クリッ クして 開 くと 、
ジファイルの入ったフォルダが表示されます。 撮影時に選択したフォーマットによっては、 異なる種類
のファイルが 存 在します が、 すべ てのファイル は同 一 のファイル 名 定 義 に 従っています。
ニア編集)ソフトウェアで、 直接
ファイルは 、 フレームごとに別個の
ォ ー マ ッ ト な の で 、様 々 な ソ フ ト ウ ェ ア を 使 用 し て
こと が できま す。
SSD
をコンピューターから取り外す 前に、
してください 。
CinemaDNG
Pocket Cinema CameraからSD
ドリー ダー に 挿入します。 SDカードは、 外付けのハードドライブ、
接 続したその 他 のメディアストレ ージデバイスで 使 用 する場 合と同 様 に アクセ スできます。
イメージファイルの入ったフォルダが表示されます。 撮影時に選択したフォーマットによっては、 異な
る 種 類のファイルが 存 在します が、 すべ てのファイル は同 一 のファイル 名 定 義 に 従っています。
NLE
(ノンリニア編集)ソフトウェアで、 直接SDカードのファイルにアクセスす ることも 可 能 で す。
に 取 り 出 すよう に してくだ さい 。
あるいは
Thunderbolt
を使うことは推 奨しま せん。
Mac OS X/windows
ファイル に 直 接アクセスで きま す。
Production Camera 4KからSSD
ドック を 使 用 して
アダプターケーブルを使用して、
USB 2.0
QuickTime
SSD
からデスクトップやその他のハードドライブにドラッグします。
SSD
のファイル にアクセスすることも可 能 です。
DNG
コンピューター、 あるいはSDカードリーダーを使うと、 SDカードか
カードを取り出し、 コンピューターのSDカードスロットもしくはSDカー
SSDをMac OS X/Windows
の速 度はリアルタイム編 集 には不 十 分 なため 、 ファイルの転 送
ムービーファイルのリスト、 あるいは
イメージとして
RAW 2.5K
Mac OS X/Windows
QuickTime
ムービーファイルのリスト、 あるいは
を取り 出しま す。
コンピューターにマウントし
SSD
をコンピューター の
SSD
に保存されます。 同ファイルはオープンフ
イメージ をビデオシー ケンスとして確認 する
でイジェクトして安全に取り出すように
USB
ドライブ、 あるいはコンピューターに
Mac OS X/Windows
USB
ポートに 直 接 接 続 す
CinemaDNG RAW
NLE
(ノンリ
Cinema DNG RAW
CinemaDNG RAW
でイジェクトして 安 全
イメー
Page 76

76
ポ ストプ ロ ダクシ ョン ワ ー ク フ ロ ー
クリップ の 編 集
お気に入りの編集ソフトウェアでクリップを編集するには、 クリップを内蔵/外付けドライブまたは
て、 ソフトウェアにインポートします。 あるいは、 クリップをSDカードから直 接 イン ポートしたり、 外 部
プター、
SSD
ドック、 ドッキングケーブ ル を 使 用して
SSD
から直 接 イン ポートしたりすることもできます。
RAID
にコピーし
SATA
アダ
VIDEO DATA
RAW FILM DATA
RAW
ワイドダイナ ミックレンジ –
Camera
は 、 広 い ダ イ ナ ミ ッ ク レ ン ジ で 映 像 を 捉 え 、 デ ィ テ ー ル
を保 持します。
Blackmagic Cinema
DaVinci ResolveでRAW
CinemaDNG RAW
報が含まれているためです。
に変換する必要があります。 あるいは、 先にグレーディングを行い、 グレーディング済みのクリップを編集します。
ベーシックな色変換をしたい場合は、
LUT
(
)を 適 用 し ま す。
ングしたクリップは、 一般的に
ロキシとして使 用 さ れ ます。
RAW
クリップ を
ステップ 1. 新しいプロジェクトを開き、 ビデ オ解像度およびフレームレートを使用する
ステップ 2.
ステップ 3. 「
ステップ 4. 「
ステップ 5. 使 用 す る 素 材 に 最 も 適 し た「
ステップ 6. 「
LUT
を適用するには、 「
Blackmagic Cinema Camera Film to Rec709
を「
これで、 タイムライン上のすべ ての ショットに
さい 。 映 像 の カラー および コントラストに向 上 が 見ら れ ま す。
クリップは一見、 色褪せあるいは露出過多のように見えますが、 これはクリップにハイレベルな情
RAW
LUT
は基本的なカラーグレードを適用して、 一般的なビデオのルックにします。 グレーディ
DaVinci Resolve
せて設定します。 ここでは解像度を
CinemaDNG RAW
Project Settings
Project Settings
択します。 「
Color Space
Decode Using
」を「
Project Settings
ファイル を 使 用
ファイルクリップを編集するには、 まずクリップを一般的なビデオのようなルック
RAW
クリップ を
ProRes
設定でエクスポートされ、 編集後に行う最終のカラーグレーディングまでプ
で 変 換:
クリップ をメディアプールにインポートします。
」へ行き、 「
Camera Raw
」の「
」を「
White Balance
BMD Film
」に、 「
」の「
LUT
DaVinci Resolve
1080p
、 フレームレートを25に設 定します。
Input Settings
」タブへ行き、 ドロップダウンメニューから「
Project
Look Up Tabl e s
」に 設 定 し ま す 。
が適用されます。 「
」を「
」に 設 定 し ま す 。
」設 定 を 選 択 し ま す。
Gamma
にインポートして、 ルックアップテーブル
Scale Entire Image to Fit
BMD Film
」を「
」へ行き、 「3D
」に 設 定 し ま す 。
Output Look Up Tabl e
Color
」タブ を クリックして 結 果 を 確 認 してくだ
RAW
ビ デ オクリップ に 合 わ
」に 設 定 し ま す 。
CinemaDNG
」
」を 選
グレー ディン グ 済 み の 最 終 ショット – ディテール および
ハイライトが修正され、 シネマライクなショットを得られます!
Page 77

77
ポ ストプ ロ ダクシ ョン ワ ー ク フ ロ ー
露出過多や色の問題などがないか、 タイムラインでショットの最低限の確認をします。 タイムライン上のクリップの
ルックに納得したら、 クリップを
クリップ を エクス ポ ートす る
ステップ 1. 「
ステップ 2. 「
ステップ 3. 「
ステップ 4. 「
ステップ 5. 「
ステップ 6. 「
ステップ 7. 「
レンダ リン グが 終 了 す ると、
ソフトウェアにイン ポートできま す。 編 集ソフトウェアから
結果を調整できます。
ProRes
にエクス ポートします。
Deliver
」タ ブ を ク リ ッ ク し て「
このプリセットをデフォルト設 定のままで 使 用すると、
Render Timeline As:
Render Each Clip With a Unique Filename
Render Audio
設 定 します。
Render job To:
す。
Add Job
Start Render
」チェックボックスをオンにし、 オーディオチャンネルを選択して、 ビット深度を24に
」の「
」を クリ ッ ク し ま す。
」を クリ ッ ク し ま す。
Resolve
Easy Setup
Individual Source Clips
」を「
Browse
」を クリックしま す。 変 換 した クリップ 用 に 新し いフォルダ を 選 択しま
タイムライン上の各クリップがフォルダに入ります。 変換したクリップは、 編集
」メニューへ行き、 「
」が選 択されていないことを確認します。
XML
をエクスポートすることで、 いつでもグレー ディング
Export to Final Cut Pro
Apple ProRes 422 (HQ)
」に 設 定 し ま す 。
」を 選 択 し ま す 。
でレンダ リン グ しま す。
DaVinci Resolve
Final Cut Pro
のプロジェクト設定画面
のプロジェクト設定画面
Final Cut Pro X
Final Cut Pro XでApple ProRes 422 (HQ)
ムレートにマッチする新しいプロジェクトを作成する必要があります。 ここでは、 クリップを
1080p25
ステップ 1.
ステップ 2. プロジェクトに名前を付け、 「
ステップ 3. 「
ステップ 4. 「
ステップ 5. 「OK」を クリ ッ ク し ま す。
クリップ をプロジェクトにインポートするには 、 「
はSDカ ードか らクリップ を 選 択しま す。
クリップをタイムラインにドラッグ して 編 集しましょう 。
としま す。
Final Cut Pro
定を 含 む ウィンドウが 開きま す。
Video Properties
Audio and Render Properties
を使う
を 起 動 し て「
」設 定 を
クリップを編集するには、 クリップのビデオフォーマットおよびフレー
Menu
」バーへ行き、 「
Custom
」チェックボックスを選択します。
1080p HD、 1920×1080、 25p
」設 定 を
Stereo、 48kHZ、 Apple ProRes 422 (HQ)
Menu
」バーへ行き、 「
File/New Project
に設 定します。
File/Import/Media
」を選択します。 プロジェクト設
ProRes 422 (HQ)
に設 定します。
」を 選 択 し ま す 。
SSD
また
Page 78

78
ポ ストプ ロ ダクシ ョン ワ ー ク フ ロ ー
Avid Media Composer 7
を設定
でプ ロ ジェクト 名 および オプショ ン
Avid Media Composer
Avid Media Composer 7でDNxHD
マッチする新しいプロジェクトを作成します。 ここでは、 クリップを
ステップ 1.
ステップ 2. 「
ステップ 3. 「
ステップ 4. 「
ステップ 5. 「
ステップ 6.
ステップ 7. ファイルをイン ポートするメディアビ ンを選 択します。
ステップ 8.
Media Composer
リックしま す。
New Project
Format
Color Space
Raster Dimension
Tools
>
「OK」ボ タ ン を ク リ ッ ク し ま す。
File
>
メディアビ ンにクリップ が 表 示 さ れ たら、 クリップをタイムライン にドラッグ して 編 集しましょう。
」ウィンドウでプロジェクトに名前を付けます。
」ド ロ ッ プ ダ ウ ン メ ニ ュ ー で「
」ド ロ ッ プ ダ ウ ン メ ニ ュ ー で「
Background Service
AMA Link...
Adobe Premiere Pro CC
Adobe Premiere Pro CCで Apple ProRes 422 (HQ)
フォーマットおよびフレームレートにマッチする新しいプロジェクトを作成する必要があります。 ここでは、 クリップ
ProRes 422 (HQ) 1080p25
を
ステップ 1.
ステップ 2. プロジェクトに名前を付けます。 「
ステップ 3.
ステップ 4. 最初に編集したいクリップを、 「
クリップをシ ー ケンス・タイムライン にドラッグして 編 集しましょう。
Adobe Premiere Pro CC
プ ロジェ クト設 定 を 含 むウィンドウ が 開 きま す。
クトの保 存 先 を選択します。 保存先 を選 択したら
Adobe Premiere Pro CC
します。 「
ます。クリップの 設 定 に 合 った 新しいシ ー ケンス が 作 成されま す。
としま す。
Project
を使う
クリップ を 編 集 す る に は 、 クリップのビ デ オ フォ ーマットお よび フレ ー ムレ ー トに
DNxHD 1080i59.94
を 起 動 す る と「
」ド ロ ッ プ ダ ウ ン メ ニ ュ ー で「
を選 択し、インポートしたいファイルを選 択して「OK」を クリ ッ ク し ま す。
Select Project
1080i/59.94
を 選 択 し 、 バ ッ ク グ ラ ウ ン ド サ ー ビ ス が 起 動 し て い な け れ ば 、「
」ウィンドウが表示されるので、 「
」を 選 択 し ま す 。
YCbCr 709
」を 選 択 し ま す 。
1920×1080
」を選択し、 「OK」を クリ ッ ク し ま す。
としま す。
New Project
Start
を使う
あるいは
を 起 動しま す。
Browse
のメニューバー へ行 き、 「
」ウ ィ ン ド ウ に ク リ ッ プ が 表 示 さ れ ま す 。
Project
DNxHD
クリップ を 編 集 す る に は 、 クリップのビ デ オ
Welcome
」ウ ィ ン ド ウ の 右 下 に あ る
ウ ィ ン ド ウ で「
」ボタン を クリックして使 用するフォルダ を 選 び、 プ ロジェ
Welcome
File/Import
Create New Project
ウ ィ ン ド ウ の「OK」を クリ ッ ク し ま す。
」を選択して編集したいクリップを選択
New Item
アイコンの上にドラッグし
」を 選 択 し ま す 。
」を ク
」、
Adobe Premiere Pro CC
を設定
でプ ロ ジェクト 名 および オプショ ン
Page 79

79
ポ ストプ ロ ダクシ ョン ワ ー ク フ ロ ー
Autodesk Smoke 2013
Autodesk Smoke 2013
およびフレームレートにマッチする新しいプロジェクトを作成します。 ここでは、 クリップを
1080p25
ステップ 1.
ステップ 2. 「
ステップ 3. 「
ステップ 4. ビット 深 度 が
ステップ 5. 「
ステップ 6. 「
ステップ 7. ユ ー ザ ー ヘ デ ィ ン グ の 下 に あ る「
ステップ 8. 「
ステップ 9. 「
ステップ
ステップ
としま す。
Smoke
グ の「
10.
メニューバーから
11.
メディアライブ ラリー にクリップが 表 示 さ れ たら、 クリップをタイムライン にドラッグ して 編 集しましょう。
でクリップを編集するには、 クリップのビデオフォーマット、 ビット深度、 フレームタイプ
を 起 動 す る と「
New
」ボ タ ン を ク リ ッ ク し ま す。
Create New Project
Resolution
Config Temp late
Preferred Format
Create New User Profile
Project and User Settings
」ド ロ ッ プ ダ ウ ン メ ニ ュ ー で「
10bit
を使う
Project and User Settings
」ウィンドウが 開 きま す。 プロジェクトに 名 前 を 付 け ま す。
に、 フレームタイプが「
」ド ロ ッ プ ダ ウ ン メ ニ ュ ー で「
ProRes 422 (HQ)
」を「
New
」ボ タ ン を ク リ ッ ク し ま す。
」ウィンドウが開くので、 ユーザー名を入力し、 「
」ウィンドウが再び表示されるので、 「
File > Import > File
を選 択し、 インポートするクリップを 選 択します。
」ウィンドウが表示されます。 プロジェクトヘディン
1920×1080 HD 1080
Progressive
1920x1080@25000p.cfg
」に し た ま ま「
」を選択します。
」に 設 定 さ れ て い る こ と を 確 認 し ま す。
Create
」を クリ ッ ク し ま す。
」を 選 択 し ま す 。
Create
Start
」ボ タ ン を ク リ ッ ク し ま す。
ProRes 422 (HQ)
」を クリ ッ ク し ま す。
Autodesk Smoke 2013
を設定
でプ ロ ジェクト 名 および オプショ ン
Page 80

Blackmagic Camera Utility
80
BlackmagicCameraUtility
Mac OS X
Blackmagic Camera Utility
コン テン ツ を 表 示しま す。
Blackmagic Camera
Windows
Blackmagic Camera Utility
Blackmagic Camera Utility
インストーラーをダブルクリックし、 画面に表示される指示に従ってインストールします。
でカメラソフトウェアをアップデートする
をダウンロードし、 ダウンロードしたファイルを解凍します。 ディスクイメージを開き、
インストーラーを起動し、 画面に表示される指示に従います。
でカメラソフトウェアをアップデートする
をダウンロードし、 ダウンロードしたファイルを解凍します。 この
インストー ラ ー が入った
Blackmagic Camera Utility
フォル ダが 表 示 さ れ ま す。
カメラソフトウェアをアップデ ート
コンピューター に 最 新の
続しま す。
Camera
Blackmagic Camera Utility
Pocket Cinema Cameraの Mini USB2.0
Production Camera 4Kの Mini USB 2.0
および
Blackmagic Camera Utility
をインストールし、
ポートは、 バッテリー挿入口の横にあります。
ポートは 、
を起 動し、 画面に表示される指 示に従ってカメラソフトウェアをアップデートします。
USB
ケーブルでコンピューターとカメラを接
SSD
スロットドアの 内 側 に あ ります。
PDF
マニュ アル と
Cinema
Pocket Cinema CameraのMini USB 2.0
リー挿入口の横に付いています。
Cinema Camera
ポ ー ト は 、
SSD
Production Camera 4Kの Mini USB 2.0
および
ドアの内側 に付いてい ます。
ポ ー ト は 、 バ ッ テ
Page 81

アクセサ リ
81
アクセ サリ
Pocket Cinema Camera
オプション
オプション
2
のリストストラップ
1
リストストラップ
Pocket Cinema Camera
大 変 便 利 で す。
ストラ ップ を 装 着す る に は 、 ストラップの 紐 の 端 を
ロープ部の先端を紐に通し、 しっかりと固定します。
にはリストストラップが 同 梱されます。 リストストラップは 、 撮 影 現 場 を 移 動 する際 に 、
LCD
スクリーンの右 下にあるリング に 通しま す。 ストラップの
サンシールド
Cinema Camera
光を遮断することで、 常に最適な条件でタッチスクリーンを確認できます。
サンシールドの固定タブの位置を合わせてゆっくりとカメラに取り付けます。
サンシ ー ルド の 外 し方:
オプ ション1 サンシールド上部 の 真 ん 中を押さえて ゆっくりと外しま す。 両 サ イドを 均 等 に外 すようにしてくださ い 。
オプ ション2 両手の親指で、 両サイドの固定タブを均等に外側に押し、 サンシールドを外します。 サンシールドの
どちらか片方だけを引っ張って外すと、 固定タブが破損する原因となります。
Production Camera 4K
および
は、 取り外し可能なサンシールドが付いています。 明るい環境でも
キ ャリーストラップ
Cinema Camera
撮影現場を移動する際に、 大変便利です。
ストラップを装着するには、 ストラップの端をカメラ上部にあるメタル性フックに通し、 プラスチックの留め具でスト
ラップの長さを調整します。
Production Camera 4K
および
には キ ャリーストラップ が 付 い て いま す。 キ ャリーストラップ は 、
Cinema Camera
キャリ ー ストラ ップ
Production Camera 4K
および
の
Page 82

82
アクセ サリ
カメラハ ンドル
別売されている、
す必要のある現場でも簡単に撮影できます。 ハンドルを使うことでショットを固定しながら、 被写体の動きを捉える
こと が できま す。
カメラ の下 部 に
Cinema Camera
1/4
イン チ の ネジ を合 わ せ 、 ガイドピ ンを 挿 入してハンドル をカメラ に 固 定します。
Production Camera 4K
および
用のハンドルを使うと、 カメラをすばやく動か
Page 83

ヘルプ ライン
83
ヘルプライン
ヘルプライン
すぐに情報 が 欲しいかたは、
ポート情 報 を確 認 できます。
Blackmagic Design Online Support Pages
最新のマニュアル、 ソフトウェア、 サポートノートは、
サポートセンターで確 認 できます。
Blackmagic Design
サポートページで必要な情報を得られなかった場合は、
を送信」ボタンでリクエストをメール送信してください。 あるいは、
わせください。 各国のオフィスはこちらのページを参照してください。
現在インストールされているソフトウェアのバージョンを確 認 する
どのバージョンの
About Blackmagic Camera Utility
「
Blackmagic Camera Utility
Mac OS X
ン メ ニ ュ ー か ら「
Windows
プ メ ニ ュ ー を ク リ ッ ク し て「
では、 アプリケーションフォルダーから「
では 、 スタートメニューあるいはスタート画面から「
Blackmagic Design
オンライン サ ポートペ ージで、
www.blackmagicdesign.com/jp/support のBlackmagic
サポートへ 連 絡する
Blackmagic Camera
ソフトウェアがコンピューターにインストールされているか 確 認 するには、
」ウ ィ ン ド ウ を 開 き ま す 。
About Blackmagic Camera Utility
About Blackmagic Camera Utility
Blackmagic Design
www.blackmagicdesign.com/jp/company
Blackmagic Camera Utility
」を選 択し、 バージョンを確 認してください。
Blackmagic Camera Utility
」を選 択し、 バージョンを確 認してください。
Blackmagic Camera
のサポートページにある「リクエスト
オフィスに電話でお問い合
」を 開 き ま す 。 ア プ リ ケ ー シ ョ
の最新サ
」を開きます。 ヘル
最 新 のソフトウェアを 入手 する
コンピューター にインストールされた
サ ポ ー ト セ ン タ ー(
してください。 常に最新のソフトウェアを使用することを推奨しますが、 重要なプロジェクトの実行中は、 ソフトウェア
のア ップ デ ートは 行 わ な い方 がよいで しょう 。
www.blackmagicdesign.com/jp/support
Blackmagic Camera Utility
)で 最 新 の ソ フト ウ ェ ア・ア ッ プ デ ー ト を チ ェ ッ ク
のバージョンを 確 認 した 後、
Blackmagic
バッテリーの交 換
Cinema Camera
ッテリー交換が必要な場合は、 最寄りの
さい。 保証期間を過ぎている場合、 バッテリー交換には、 バッテリー費、 人件費、 カメラの送料を含むサービス
料金が発生します。 カメラの発送、 梱包、 費用に関する詳細は、 最寄りの
い合 わ せください 。
Production Camera 4K
および
の内 蔵 バッテリーは 、 お客様ご自身で 修 理することはできません。バ
Blackmagic Design
サービスセンター に 送 付して 修 理 を 依 頼してくだ
Blackmagic Design
サポートまでお問
Page 84

84
ヘルプライン
FAN
ファン の 交 換
Cinema Camera
たり、 おかしな音がする場合は、 カメラの電源を切って
さい。 カメラのダメージを防ぐため、 ファンを交換する際は、 静電気防止ストラップを使用してください。
ファンの 交 換:
ステップ 1. カメラの電源を切り、 ケーブルを取り外します。
ステップ 2. 作業台の上で、 カメラを上下逆さまにします。 三脚用の穴が上を向き、 タッチスクリーンが自分の方を
向くようにしてください。 「
内 部 の フ ァン・モ ジ ュ ー ル と 繋 がって い ま す。
のネジを 外 します。
ネジには、 ゆるみ止めの水 溶 性 塗 布 加工 が 施されており、 きつく締まっています。 ネジはまた使 用す
るので、なくさない ように保 管してください。
ステップ 3. ファン・モジュールをゆっくり持ち上げ、 カメラから取り出します。 カメラの内部と接続しているワイヤ
ーを引っ張らないようにしてください。 誤って引っ張ってしまうとワイヤーが外れます。 ワイヤーはカメ
ラ内部のアクセス不可の部分に接続されているので、
が 必 要 に なりま す。
ステップ 4. ファンの近くに、 ワイヤーに沿って白いプラスチックのプラグが付いています。 カメラ内部と繋がって
いるワイヤーに力が加わらないよう、 両手を使ってプラグを外します。 これで古いファン・モジュール
を取り出し、 廃棄できます。
ステップ 5. 新しいファン・モジュールのワイヤーに白いプラスチックのプラグを接続します。 ファン・モジュールを
元の位置に戻します。 このとき「
この向きでしか 挿入できません。 4つのネジでパネルを締めればファンの交換は完了です。
ステップ 6. カメラの電源を入れます。 ファン・モジュールの通風孔から空気 がゆっくりと流れて来るのが確認でき
ます。
Production Camera 4K
および
には、 冷却ファンが内蔵されています。 ファンに不具合が生じ
Blackmagic Design
Fan
」と記載されたメタルのパネルが確認できます。 このパネルは、 カメラ
No.01
サイズのプラスドライバーを使って、 同パネルの4つ
Blackmagic Design
Fan
」のラベルが右側に来るようにします。 ファン・モジュールは、
サ ポ ートに代 替 の ファンを 発 注 してく だ
サー ビ スセン ターでの 修 理
Page 85

保証
85
保証
12
ヶ月限 定保 証
Blackmagic Design
証します。 この保証期間内に製品に瑕疵が見つかった場合、
は、 お買い上げの日から12ヶ月間、 本製品の部品および仕上がりについて瑕疵がないことを保
Blackmagic Design
は弊社の裁量において部品代およ
び人件費無料で該当製品の修理、 あるいは製品の交換のいずれかで対応いたします。
この保証に基づいたサービスを受ける際、 お客 様は 必ず保証 期限終了前に
適応する保証サービスの手続きを行ってください。 お客様の責任において不良品を梱包し、
Blackmagic Design
Blackmagic Design
に瑕 疵を通 知し、
が
指定するサポートセンターへ配送料前払で送付いただきますようお願い致します。 理由の如何を問わず、
Blackmagic Design
への製品返送のための配送料、 保険、 関税、 税金、 その他すべての費用はお客様の自己負担
とな りま す。
不適切な使用、 または不十分なメンテナンスや取扱いによる不具合、 故障、 損傷に対しては、 この保証は適用さ
れません。
インストールや修理、 サービスを行う
切な使用や互換性のない機器への接続によって生じた損傷の修理、 c)
Blackmagic Design
はこの保証で、 以下に関してサービス提供義務を負わないものとします。 a)製 品 の
Blackmagic Design
販売代理人以外の者によって生じた損傷の修理、 b)不 適
Blackmagic Design
の部品や 供 給品では ない
物を使用して生じたすべての損傷や故障の修 理、 d)改造や 他製品との統合により時間増加や製品の機 能低下が生じ
た場合のサービス。 この保証は
代 わ る も の で す。
否しま す。
Blackmagic Design
Blackmagic Design
的 に 生じる 損 害 に 対して、
いるか否かに関わらず、 お客様に提供される完全唯一の救済手段となります。
機器のあらゆる不法使用に対して責任を負いません。
Blackmagic Design
が保証するもので、 明示または黙示を問わず他の保 証すべてに
とその販売社は、 商品性と特定目的に対する適合性のあらゆる黙示保証を拒
の不良品の修理あるいは交換の責任が、 特別に、 間接的、 偶発的、 または結果
Blackmagic Design
あるいは販売社がそのような損害の可能性についての事前通知を得て
Blackmagic Design
Blackmagic Design
は本製品の使用により生じるあらゆる損
はお 客 様 による
害に対して責任を負いません。 使用者は自己の責任において本製品を使用するものとします。
© Copyright 2013 Blackmagic Design
Workgroup Videohub
「
米国ならびにその他諸国での登録商標です。 その他の企業名ならびに製品名全てはそれぞれ関連する会社の登録商標である可能性があります。
」、 「
著作権所有、 無断複写・転載を禁じます。 「
Multibridge Pro
Multibridge Extreme
」、 「
」、 「
Intensity
Blackmagic Design
Leading the creative video revolution
」、 「
」、 「
DeckLink
」、 「
HDLink
」、
」は 、
Page 86

Manuel d’utilisation et d’installation
Blackmagic Cameras
Français
Mac OS X
Windows
juillet 2014
™
™
Page 87

Bienvenue
Nous vous remercions d'avoir fait l'acquisition d'une
Caméra Blackmagic!
Nous avons travaillé dur pour produire trois caméras conçues
pour s'adapter à tous les types de workflow. Notre nouvelle Pocket
Cinema Camera est une caméra digitale au format super 16 avec
une plage dynamique de 13 diaphragmes suffisamment compacte
pour que vous l'emmeniez partout avec vous. La Cinema Camera
enregistre des fichiers RAW non compressés CinemaDNG pour
des images irréprochables. Notre Production Camera 4K est une
caméra de type Super 35 Ultra HD 4K avec un obturateur global
et une sortie 6G-SDI.
Nos caméras sont conçues pour produire des fichiers bruts ce qui
signifie qu'ils préservent l’ensemble de la plage dynamique du
capteur, ainsi que des formats de fichier standards compatibles
avec tous les logiciels vidéo. En utilisant le logiciel de correction
de couleurs DaVinci inclus, vous avez donc la possibilité de prendre
des décisions créatives !
Vous obtenez une expérience de prise de vue de style
cinématographique, ce qui vous permet de capturer plus et de
mieux préserver l'image. Vous avez ainsi l'embarras du choix pour
les options créatives. Nous avons aussi inclus des écrans larges sur
nos appareils pour un focus facilité et la saisie de métadonnées.
Nous espérons que vous allez vous exprimer et produire des
images splendides avec nos caméras ! Nous brûlons d'impatience
de découvrir vos créations !
Grant Petty
PDG de Blackmagic Design
Page 88

Sommaire
Caméras de Blackmagic
89
96
99
100
Mise en route
Introduction aux caméras Blackmagic Cameras 89
Monter un objectif 91
Mise en route de votre caméra 91
Insertion d’une carte SD 93
Insertion de SSD 93
Enregistrement 94
Lecture de séquences 95
À propos des disques SSD
Choisir un SSD rapide 96
Préparation des disques SSD à l’enregistrement 97
À propos des cartes SD
Préparation des cartes SD à l’enregistrement 99
Choisir une carte SD rapide 99
Connexions
Blackmagic Pocket Cinema Camera 100
Blackmagic Cinema Camera et Production Camera 4K 101
111
112
117
122
123
Saisie des métadonnées
Qu’est-ce qu’un Slate? 111
Sortie vidéo pour la caméra
Monitoring des formes d’onde avec Thunderbolt 112
Utilisation de Blackmagic UltraScope 113
Monitoring avec SDI 116
Workflow pour la post-production
Travaillez avec des fichiers à partir de disques SSD 117
Travailler avec des fichiers à partir de cartes SD 117
Édition de vos séquences 118
Utilisation de Final Cut Pro X 119
Utilisation d’Avid Media Composer 120
Utilisation d'Adobe Premiere Pro CC 120
Utilisation d’Autodesk Smoke 2013 121
Blackmagic Camera Utility
Fixation des accessoires
102
Paramètres
Camera Settings : Paramètres de la caméra 102
Audio Settings : Paramètres Audio 104
Recorder Settings : Paramètres d’enregistrement 105
Convention pour nommer un fichier 107
Display Settings : Paramètres d’affichage 108
Ajustement des paramètres 109
Bandeau d’informations 110
125
127
Aide
Garantie
Page 89

Mise en ro ute
OK
MENU
IRIS FOCUS
OK
MENU
IRIS FOCUS
89
Mise en route
1 2
4
5
6
7
8
9
Introduction aux caméras Blackmagic Cameras
Caractéristiques de la Blackmagic Pocket Cinema Camera
1. BOUTON D'ENREGISTREMENT
Cliquez sur ce bouton pour enregistrer vos séquences sur votre carte SD. Voir page 94.
2. COMMANDES DE TRANSPORT
Utilisez ces boutons pour lire vos enregistrements, sauter une séquence ou naviguer entre les vidéos. Voir page 95.
3
IRIS FOCUS
OK
MENU
3. MONTURE D'OBJECTIF
Système d’objectif Micro quatre tiers (« Micro Four Thirds ») pour une large sélection d'objectifs. Voir page 91.
4. COMPARTIMENT BATTERIE
Ouvrir le compartiment de la batterie en appuyant sur le bouton d’ouverture pour :
insérer et retirer une batterie rechargeable au Lithium. Voir page 91.
insérer une carte SDHC ou SDXC pour l’enregistrement. Voir page 93.
accéder au port USB Mini-B pour la configuration et les mises à jour du logiciel. Voir page 122.
5. LANC REMOTE
Le jack stéréo 2,5mm pour les télécommandes LANC prend en charge le démarrage et l’arrêt d’enregistrement, le
contrôle de focale et la mise au point manuelle. Voir page 100.
6. CASQUE
Connecteur pour prise jack 3,5 mm de casque stéréo. Voir page 100.
7. AUDIO IN
Prise jack stéréo 3,5 mm pour microphone ou entrée audio « line ». Voir pages 100 et 104.
8. HDMI OUT
Port micro HDMI pour le monitoring ou la sortie vers un mélangeur vidéo. Voir page 100.
9. ALIMENTATION
Entrée 0,7mm 12 – 20V DC pour l’alimentation et le chargement de la batterie. Voir page 100.
10. ÉCRAN LCD
Regardez l’écran LCD tout en enregistrant ou en relisant les séquences. Voir page 110.
11. BOUTONS DE CONTRÔLE
Utilisez ces boutons pour l’alimentation, le menu de navigation, le contrôle de la focale, le focus peaking, l’auto focus
et le zoom écran LCD.
10 11
Page 90

90
Mise en route
1
2 4
1 5 6 7
3
Caractéristiques des Blackmagic Cinema Camera et Production Camera 4K
1. BOUTON D'ENREGISTREMENT
Enregistrez des séquences sur votre disque SSD. Voir page 94.
2. BOUTON IRIS
Le bouton iris active le contrôle de l’iris électronique sur les appareils EF Cinema Camera et Production Camera 4K.
Ajustez l’ouverture de votre objectif en appuyant sur les boutons avance, retour, skip/shuttle playback. Voir page 109.
3. ÉCRAN TACTI
Regardez l’écran LCD tout en enregistrant ou en rejouant une séquence, ou lorsque vous utilisez le menu de sélection.
Voir pa g e 111.
4. BOUTON FOCUS
Appuyez sur le bouton Focus pour utiliser la fonction « focus peaking » sur l’écran LCD. Voir page 109.
5. COMMANDES DE TRANSPORT
Appuyez sur ces boutons pour arrêter, skip/shuttle, ou lire vos séquences. Voir page 95.
6. BOUTON MENU
Accédez au menu sur l’écran LCD.
7. BOUTON ALIMENTATION
Appuyez sur ce bouton pour la mise en marche de la Blackmagic Cinema Camera. Appuyez et maintenez le bouton
enfoncé pour éteindre l’appareil. Voir page 92.
8. LANC REMOTE
Le jack stéréo de 2,5mm pour les télécommandes LANC prend en charge le démarrage et l’arrêt d’enregistrement,
le contrôle de la focale et la mise au point manuelle. Voir page 101.
9. C ASQU E
Connecteur pour jack 3,5 mm de casque stéréo. Voir page 101.
LE LCD
8
9
10
10. AUDIO IN
2 x 1/4 inch balanced TRS phono jacks pour mic ou niveaux audio. Voir pages 101 et 104.
11. SDI OUT
Sortie SDI pour vous connecter à un mélangeur ou à DaVinci Resolve via un périphérique de capture pour l’étalonnage
de couleur en direct. Voir pages 101 et 118.
11
12
13
12. CONNEXION THUNDERBOLT
La Blackmagic Cinema Camera prend en charge le format 1080p HD non compressé 10 bits. La Production Camera 4K
prend également en charge l’Ultra HD 4K. Utilisez la connexion Thunderbolt pour le monitoring UltraScope waveform et
la vidéo HD en streaming pour un ordinateur avec interface Thunderbolt. Voir pages 101 et 112.
13. ALIMENTATION
Entrée 12 – 30V DC pour l’alimentation et le chargement de la batterie. Voir pages 86 et 101.
Page 91

91
Mise en route
HDMI
12V
Monter un objectif
La mise en route de votre Caméra Blackmagic est aussi simple que monter un objectif et allumer l’appareil.
Pour retirer le cache de protection contre la poussière de la monture d'objectif, maintenez enfoncé le bouton
de verrouillage et tournez le cache dans le sens inverse des aiguilles d’une montre jusqu'à ce qu'il soit libéré.
HDMI
12V
Nous vous conseillons d’éteindre systématiquement votre Caméra Blackmagic avant de monter ou d’ôter
un objectif.
Attacher et retirer un objectif sur la Pocket Cinema Camera
Attacher et retirer un objectif sur la Cinema Camera et
Production Camera 4K
Pour monter un objectif :
Étape 1. Alignez le point indiqué sur votre objectif avec celui de la monture. De nombreux objectifs ont un
point bleu, rouge ou blanc ou un autre indicateur.
Étape 2. Tournez l’objectif dans le sens des aiguilles d’une montre jusqu’à ce qu’il s'emboîte correctement.
Étape 3. Pour retirer l’objectif, appuyez sur le bouton de verrouillage « locking » et tournez l’objectif dans le
sens inverse des aiguilles d’une montre jusqu’à ce que le point atteigne la position de midi puis
retirez-le délicatement.
Si aucun objectif n’est assemblé à la caméra, le capteur est exposé à la poussière et à d’autres débris. Il vous
est alors conseillé de conserver le cache anti-poussière autant que possible.
Mise en route de votre caméra
Pocket Cinema Camera
Avant de pouvoir utiliser la Pocket Cinema Camera, il vous faut installer une batterie.
Étape 1. Ouvrez le clapet de retenue situé en dessous de la caméra, pour accéder à la batterie.
Étape 2. Avec les contacts métalliques dorés tournés vers le fond du compartiment de la batterie et la flèche
blanche dirigée vers l’objectif, glissez la batterie dans la languette orange et insérez la batterie
jusqu’à ce qu’elle soit en place. Appuyez sur la languette orange pour retirer la batterie.
Étape 3. Fermez le clapet du compartiment de la batterie et glissez le bouton de fermeture sur la droite pour
le verrouiller.
Insérer une batterie sur la Pocket Cinema Camera
Étape 4. Appuyez sur le bouton d’alimentation situé en bas à droite à l’arrière de l’appareil. Le bandeau
d’informations s’affiche alors en bas de l’écran.
Étape 5. Maintenez le bouton d’alimentation enfoncé pour éteindre la caméra.
Félicitations ! Il est maintenant temps d’insérer une carte SD et de commencer votre enregistrement !
Page 92

92
Mise en route
Cinema Camera & Production Camera 4K
Cinema Camera et Production Camera 4K disposent de batteries internes qui peuvent être chargées en
utilisant l’alimentation continue fournie.
La caméra peut être mise en charge et utilisée tout en étant connec tée à une alimentation continue. Elle peut
être basculée entre les différentes sources de courant sans interruption.
Vous pouvez aussi recharger la caméra par le biais d’une connexion USB alimentée. Le temps de charge est
cependant plus long.
Nous vous recommandons donc d’utiliser l’alimentation continue dès que possible.
Étape 1. Appuyez sur le bouton d’alimentation situé en dessous de l’écran tactile. Le bandeau d’informations
s’affiche au bas de l’écran LCD.
Étape 2. Maintenez le bouton d’alimentation enfoncé pour éteindre la caméra.
Félicitations ! Il est maintenant temps d’insérer un disque SSD et de commencer votre enregistrement !
Utilisez l’alimentation continue fournie pour recharger la
batterie interne et allumer la caméra.
Appuyez et maintenez le bouton d’alimentation enfoncé
pour allumer ou éteindre la caméra.
Page 93

93
Mise en route
Insérer une carte SD dans la Pocket Cinema Camera
Insertion d’une carte SD
Vous pouvez insérer une carte SDXC ou SDHC dans la Blackmagic Pocket Cinema Camera :
Étape 1. En dessous de la caméra, poussez la porte de verrouillage en direction de l’objectif pour accéder
au compartiment de la batterie.
Étape 2. Avec les contacts dorés sur la carte SD en direction de l’objectif, insérez la carte SD jusqu’à ce
qu’elle soit en place. Appuyez sur la carte SD pour la retirer.
Étape 3. Fermez le compartiment de la batterie et faites glisser la porte de retenue pour la verrouiller.
Étape 4. Allumez la caméra. Le bandeau d’informations affiche un point en mouvement pendant que la
caméra vérifie la carte SD. READY s’affiche à l’écran une fois que la carte est prête à l’emploi.
La car te SD qui vous a été fournie est destinée à l’installation du logiciel seulement. Elle n’est pas recommandée
pour l’enregistrement de vidéos. Vous trouverez une liste de carte SD recommandées par Blackmagic Design
page 100.
Insertion de SSD
Vous pouvez insérer un disque 2.5" 9.5 mm SSD aux fomats HFS+ ou exFAT dans vos Cinema Camera et
Production Camera 4K :
Insérer une carte SSD dans une Cinema Camera et une
Production Camera 4K
Étape 1. Ouvrez le disque SSD situé sur le côté droit de la caméra.
Étape 2. Avec les contacts dorés SATA orientés en direction du compartiment de la caméra, insérez votre
disque SSD jusqu’à ce qu’il soit en place. Puis fermez le clapet SSD.
Étape 3. Allumez la caméra. Le bandeau d’informations affiche un point en mouvement pendant que la
caméra vérifie le SSD. READY s’affiche ensuite à l’écran.
Vous trouverez une liste de SSD recommandées par Blackmagic Design page 96.
Page 94

94
Mise en route
Enregistrement
Appuyez sur le bouton REC de votre caméra pour démarrer l’enregistrement immédiatement. Appuyez sur
REC à nouveau pour cesser l’enregistrement.
Choisir le format d’enregistrement
Les caméras Blackmagic enregistrent sous différents formats, en fonction du modèle que vous utilisez.
N’hésitez pas à essayer différents formats pour voir celui qui convient le mieux à vos besoins.
Pressez le bouton REC au dessus de la Pocket Cinema Camera
Pressez le bouton REC sur le devant de l’appareil
ou
sur la commande de transport à l’arrière des Cinema Camera
et Production Camera 4K.
Blackmagic Pocket
Cinema Camera
Apple ProRes 422 (HQ) Apple ProRes 422 (HQ) Apple ProRes 422 (HQ)
Apple ProRes 422 Apple ProRes 422 Apple ProRes 422
Apple ProRes 422 LT Apple ProRes 422 LT Apple ProRes 422 LT
Apple ProRes 422 Proxy Apple ProRes 422 Proxy Apple ProRes 422 Proxy
Format compressé sans perte
de qualité CinemaDNG RAW
Vous avez le choix entre 4 formats Apple ProRes différents. Cela vous permet d'avoir plus de vidéo sur
votre SSD ou carte SD. Le format ProRes 422 (HQ) fournit une vidéo de la plus haute qualité avec une faible
compression. Autrement, le format ProRes 422 Proxy vous offre un temps d'enregistrement plus long avec
une compression plus importante.
Pour sélectionner le format vidéo voulu :
Étape 1. Pressez le bouton MENU.
Étape 2. Sélectionnez le menu REC et utilisez les flèches de sélection pour configurer le format
d’enregistrement désiré.
Étape 3. Appuyez sur le bouton MENU pour quitter.
Blackmagic Cinema Camera Blackmagic Production
Camera 4K
CinemaDNG RAW 2.5K Format compressé sans perte de
qualité de l’image CinemaDNG RAW
Avid DNxHD
Votre caméra est à présent prête à enregistrer dans le format vidéo que vous avez sélectionné. Le format
d’enregistrement actuel s’affiche en bas du bandeau d’informations de votre écran LCD.
Page 95

95
Mise en route
Formats vidéo supportés par les Caméras Blackmagic
Pour visualiser immédiatement votre séquence enregistrée
sur une Blackmagic Camera, appuyez simplement sur le
bouton Play.
Blackmagic Pocket
Cinema Camera
1920 x 1080p23.98 1920 x 1080p23.98 3840 x 2160p23.98
1920 x 1080p24 1920 x 1080p24 3840x2160p24
1920 x 1080p25 1920 x 1080p25 3840 x 2160p25
1920 x 1080p29.97 1920 x 1080p29.97 3840 x 2160p29.97
1920 x 1080p30 1920 x 1080p30 3840 x 2160p30
Blackmagic Cinema Camera Blackmagic Production
Camera 4K
1920 x 1080i50 Sortie 1920 x 1080p23.98
1920 x 1080i59.94 Sortie 1920 x 1080p24
1920 x 1080p25
1920 x 1080p29.97
1920 x 1080p30
1920 x 1080i50 Sortie
1920 x 1080i59.94 Sortie
Lecture de séquences
Une fois que vous avez enregistré votre vidéo, vous pouvez utiliser les boutons de contrôle de la caméra pour
lire vos vidéos sur l'écran LCD.
Appuyez une fois sur le bouton de lecture (« play ») pour lire instantanément votre vidéo sur l'écran LCD et
sur tout écran connecté à la sortie HDMI ou SDI. Maintenez les touches avant ou arrière pour avancer ou
reculer dans l’enregistrement. La lecture se terminera lorsque la fin de l’enregistrement actuel est atteinte.
Les commandes de votre caméra fonctionnent comme un lecteur CD, pressez ainsi le bouton avance
rapide pour passer directement au début de la séquence suivante. Appuyez une fois sur le bouton
arrière pour retourner au début de la séquence en cours ou appuyez deux fois pour revenir au début de
l’enregistrement précédent.
Page 96

À propos des disques SSD
96
À propos des disques SSD
Intel 335 Series 240GB SSD
Sandisk Extreme 480GB SSD
Choisir un SSD rapide
Lorsque vous travaillez avec de la vidéo à haut débit de données, il est important de vérifier soigneusement le
disque SSD que vous souhaitez utiliser. Certains disques SSD peuvent avoir une vitesse d'écriture jusqu'à 50%
inférieure à la vitesse revendiquée par le fabricant, et même si les spécifications du disque SSD prétendent qu’il
est assez rapide pour traiter la vidéo, en réalité, le disque n'est pas assez rapide pour l'enregistrement vidéo en
temps réel.
Les disques SSD suivants sont recommandés pour la capture CinemaDNG 2.5K RAW ou de la capture vidéo
compressée :
Intel 335 Series 240GB SSD
Intel 520 Series 240GB SSD
Intel 520 Series 480GB SSD
Intel 530 Series 180GB SSD
Intel 530 Series 240GB SSD
Kingston 240 GB HyperX 3K
Kingston 480 GB HyperX 3K
Kingston 240 GB SSDNow KC300
Kingston 480 GB SSDNow KC300
Sandisk Extreme 240GB
Sandisk Extreme 480GB
PNY 240GB Prevail SSD (firmware 5.0.2)
OWC 120GB Mercury Extreme Pro 6G (Firmware Rev 5.0.7)
OWC 240GB Mercury Extreme Pro 6G (Firmware Rev 5.0.6)
OWC 480GB Mercury Extreme Pro 6G (Firmware Rev 5.0.6)
Digistor 128GB SSD Professional Video Extreme (pre-formatted ExFat)
Digistor 240GB SSD Professional Video Series (pre-formatted ExFat)
Digistor 480GB SSD Professional Video Series (pre-formatted ExFat)
Angelbird 240GB AV Pro (Firmware 2.54)
ADATA XPG SX900 256GB
Kingston HyperX 240GB SSD
Les disques SDD suivants fonctionnent UNIQUEMENT pour la capture vidéo compressée :
Crucial 256GB M4 (firmware 000F)
OCZ Agility 3 240GB
Sandisk Extreme 120GB
Si votre SSD n’est pas assez rapide, essayez-en un autre ou passez à un format d'enregistrement HD compressé
comme le ProRes ou le DNxHD pour obtenir un débit de données plus faible. Merci de vous rendre sur le site de
Blackmagic Design pour les dernières informations.
Page 97

97
À propos des disques SSD
Préparation des disques SSD à l’enregistrement
Les disques SSD utilisés par les Cinema Camera et Production Camera 4K doivent être au format HFS+ ou au
format exFAT.
Ces formats de disque permettent d’enregistrer de longues séquences de fichiers uniques.
Le format HFS+ est également connu comme le format Mac OS Étendu. C'est le format recommandé car il supporte
la journalisation. Dans le cas d'une panne de matériel ou de logiciel, les données sur un disque SSD journalisé
seront plus rapidement récupérées et moins susceptibles d'être corrompues en premier lieu. Le HFS + est supporté
nativement par Mac OS X.
Le format E xFAT est supporté nativement par Mac OS X et Windows sans avoir besoin d'acheter un logiciel supplémentaire.
Cependant exFAT ne supporte pas la journalisation, ce qui signifie que les données sont plus sujettes à être corrompues,
et moins susceptibles d'être récupérées dans le cas d’un dysfonctionnement matériel ou logiciel.
Utilisez l'Utilitaire de disque sous Mac OS X pour formater/
effacer votre disque SSD au format Mac OS étendu journalisé
ou au format exFAT.
Utilisez la fonctionnalité de la boîte de dialogue Formater de
Windows pour formater votre disque SSD au format exFAT.
Préparation d’un disque SSD sur un ordinateur Mac OS X
L'utilitaire de disque fourni avec Mac OS X peut formater un disque au format exFAT ou HFS+. Assurez-vous de
sauvegarder auparavant les informations importantes contenues dans le disque SSD, car toutes les données seront
détruites quand il sera formaté.
Étape 1. Connectez le disque SSD à votre ordinateur avec une station d'accueil externe ou à l’aide d’un câble et fermez
un éventuel message vous proposant d'utiliser votre disque SSD pour les sauvegardes de Time Machine.
Étape 2. Allez dans Applications puis Utilitaires et lancez l'application Utilitaire de disque.
Étape 3. Cliquez sur l'icône de votre disque SSD puis cliquez sur l'onglet Effacer.
Étape 4. Définissez le format sur « Mac OS étendu (journalisé) » ou « exFAT ».
Étape 5. Tapez un nom pour le nouveau volume, puis cliquez sur Effacer. Votre disque SSD va rapidement être
formaté et prêt à l'emploi.
Préparation du disque SSD sur un ordinateur Windows
Vous pouvez formater un disque au format exFat à partir de la boîte de dialogue « formater » d’un ordinateur
Windows. Assurez-vous de sauvegarder auparavant les informations importantes contenues dans le disque SSD,
car toutes les données seront détruites quand il sera formaté.
Étape 1. Connectez le disque SSD à votre ordinateur.
Étape 2. Ouvrez le menu Démarrer ou l’écran d’accueil et choisissez ordinateur. Faites un clic droit sur votre
disque SSD.
Étape 3. Dans le menu contextuel, choisissez Formater
Étape 4. Définissez le système de fichiers sur «exFAT » et la taille d'unité d'allocation à 128 kilo-octets.
Étape 5. Entrez un nom de volume et sélectionnez « Formatage rapide » et cliquez sur « Démarrer ».
Étape 6. Votre disque SSD va rapidement être formaté et prêt à l'emploi.
Page 98

98
À propos des disques SSD
Vérification de la vitesse du disque
Blackmagic Disk Speed Test est une application amusante à utiliser qui mesure les performances de lecture
et d'écriture des supports de stockage dans des formats vidéo.
Si vous vous êtes déjà demandé si votre disque dur est adapté pour l’enregistrement («écriture») et la lecture
(«read ») d'un format vidéo en particulier, vous pouvez utiliser Disk Speed Test pour découvrir les per formances
de vos lecteurs multimédias d’un simple clic sur le bouton Démarrer ! Disk Speed Test va même vous montrer
combien de flux de vidéo votre espace de stockage est capable de manipuler !
Disk Speed Test est inclus gratuitement dans la suite d’utilitaires Blackmagic Camera Software Utility fournie
avec les modèles Blackmagic Cinema Camera et Production Camera 4K. La suite Blackmagic Camera Software
Utility peut être téléchargée gratuitement à partir de notre site Web.
Utilisez Disk Speed Test pour découvrir les performances
de vos disques durs multimédias.
Disk Speed Test interface.
Page 99

À propos d es cartes SD
99
À propos des cartes SD
Préparation des cartes SD à l’enregistrement
Les cartes SD utilisées par Pocket Cinema Camera doivent être au format HFS+ ou exFAT. Ces formats de
disque permettent d’enregistrer de longues séquences des fichiers uniques. ExFAT est supporté à la fois par les
ordinateurs Windows et Mac OS X.
Préparation d’une carte SD sur un ordinateur Mac OS X
L'utilitaire de disque fourni avec Mac OS X peut formater un disque au format exFAT ou HFS+. Assurez-vous
de sauvegarder auparavant les informations importantes contenues dans la carte SD, car toutes les données
seront détruites quand il sera formaté.
Étape 1. Insérez votre carte SD dans l’emplacement SD ou le lecteur de carte SD.
Étape 2. Allez dans Applications puis Utilitaires et lancez l'application Utilitaire de disque.
Étape 3. Cliquez sur l'icône de votre disque SSD puis cliquez sur l'onglet Effacer.
Étape 4. Définir le format sur « Mac OS étendu (journalisé) » ou «exFAT».
Étape 5. Tapez un nom pour le nouveau volume, puis cliquez sur Effacer. Votre disque SSD va rapidement
être formaté et prêt à l'emploi.
Préparation du disque SSD sur un ordinateur Windows
Vous pouvez formater un disque au format exFat à partir de la boîte de dialogue « formater » d’un PC/
Ordinateur Windows.
Étape 1. Insérez votre carte SD dans l’emplacement SD ou le lecteur de carte SD.
Étape 2. Ouvrez le menu Démarrer ou L’écran d’accueil et choisissez ordinateur. Faites un clic droit sur
votre carte SD.
Étape 3. Dans le menu contextuel, choisissez Formater.
Étape 4. Définissez le système de fichiers sur «exFAT» et la taille d'unité d'allocation à 128 kilo-octets.
Étape 5. Entrez un nom de volume et sélectionnez « Formatage rapide » et cliquez sur « Démarrer ».
Étape 6. Votre carte SD peut être formatée rapidement et prête à l’emploi rapidement.
Choisir une carte SD rapide
Il est important d’utiliser des cartes SDHC et SDXC avec la Blackmagic Pocket Cinema Camera car ces cartes
sont reconnues pour leur rapidité de transfert d’information et pour leur grande capacité de stockage.
Nous vous recommandons d’utiliser les cartes SDHC et SDXC suivantes :
Delkin Devices 16GB Elite SDHC UHS-I
Delkin Devices 32GB Elite SDHC UHS-I
Veuillez consulter les spécifications techniques sur le site Internet de Blackmagic Design pour vous tenir au
courant des toutes dernières informations.
Sandisk 64GB Extreme SDXC UHS-I
Sandisk 128GB Extreme SDXC UHS-I
Sandisk 16GB Extreme Pro SDHC UHS-I
Sandisk 64GB Extreme Pro SDHC UHS-I
Page 100

Connexions
HDMI
12V
100
Connexions
Blackmagic Pocket Cinema Camera
LANC Remote Control
Le port LANC de votre caméra peut être utilisé pour contrôler à distance le démarrage et l’arrêt de votre
enregistrement, pour l’ajustement de la focale et pour la mise au point manuelle lorsque vous utilisez un
objectif compatible.
Le port est un jack stéréo de 2,5 mm qui utilise un protocole LANC.
Casque
Contrôlez votre audio durant l’enregistrement ou la lecture de vos séquences en branchant vos écouteurs à
la prise de casque stéréo de 2,5 mm.
Audio In
Le connecteur stéréo de 3,5mm accepte les microphones ou les entrées audio « line ». Il est important de
choisir le réglage approprié. Sinon, votre audio peut paraître insuffisant ou trop fort. La caméra bascule
automatiquement au niveau « line » si le son audio est trop fort pendant une période prolongée.
HDMI Out
Le port micro HDMI de votre Pocket Cinema Camera transmet des vidéos HD1080p d'une résolution de
1920 x 1080 durant l’enregistrement. Il est utilisable pour acheminer vos vidéos à des routeurs, moniteurs,
appareils de capture, mélangeurs de diffusion et d’autres appareils HDMI.
Alimentation
Utilisez une sortie 0,7mm 12 – 20V DC pour connecter votre alimentation et charger la batterie.
USB
Utilisez le port USB pour connecter votre Blackmagic Pocket Cinema Camera à votre ordinateur et mettre
à jour le logiciel interne. Le port USB se trouve à l’intérieur du compartiment de la batterie.
 Loading...