

Page 1

Installation and Operation Manual
Blackmagic
MultiDock
July 2019
English, 日本語, Français, Deutsch, Español,
中文, 한국어, Italiano, Português and Türkçe.
Page 2

Languages
To go directly to your preferred language, simply click on the hyperlinks listed in the
contents below.
English 3
日本語 17
Français 32
Deutsch 47
Español 62
中文 77
한국어 92
Italiano 107
Português 122
Türkçe 137
Page 3

English
Welcome
Blackmagic MultiDock is an extremely fast SSD and HDD docking solution that lets you
mount up to 4 x 2.5” drives on your Mac or Windows PC. Using USB-C and Thunderbolt
technology, Blackmagic MultiDock is capable of handling multiple simultaneous commands
between drives, and gives you reliable video editing, color grading and transfer of your
media. SSDs have no moving parts, so they are very fast and unbelievably robust. You can
even stripe drives as a RAID for increased performance!
This instruction manual contains all the information you need to start using your Blackmagic
MultiDock disk array.
Please check the support page at www.blackmagicdesign.com for the latest version of
this manual and support notes. Keeping up to date will always ensure you get all the latest
features. When downloading software, please register with your information so we can
keep you updated when new software is released. We are constantly working on new
features and improvements, so we would love to hear from you!
Grant Petty
CEO Blackmagic Design
Page 4

Contents
Blackmagic MultiDock
Getting Started 5
Introducing MultiDock 5
Connecting to your Computer 6
Plugging in your Drives 6
Using Blackmagic MultiDock 7
Identifying Drives 7
Formatting Drives 8
Formatting your Drives on Mac OS 8
Formatting your Drives on Windows 9
Configuring Blackmagic MultiDock 10G 10
Fast SSDs for Video 10
Setting up a RAID for High Speed Performance andDataSecurity 11
RAID Level 0 for High Speed Performance 11
RAID Level 1 for Data Security 11
Configuring a RAID using Mac OS and Windows 11
Unplugging your Drives 12
Ejecting a drive on Mac OS 12
Ejecting a drive on a Windows PC 12
Help 13
Regulatory Notices 14
Safety Information 15
Warranty 16
Page 5
Getting Started
Introducing MultiDock
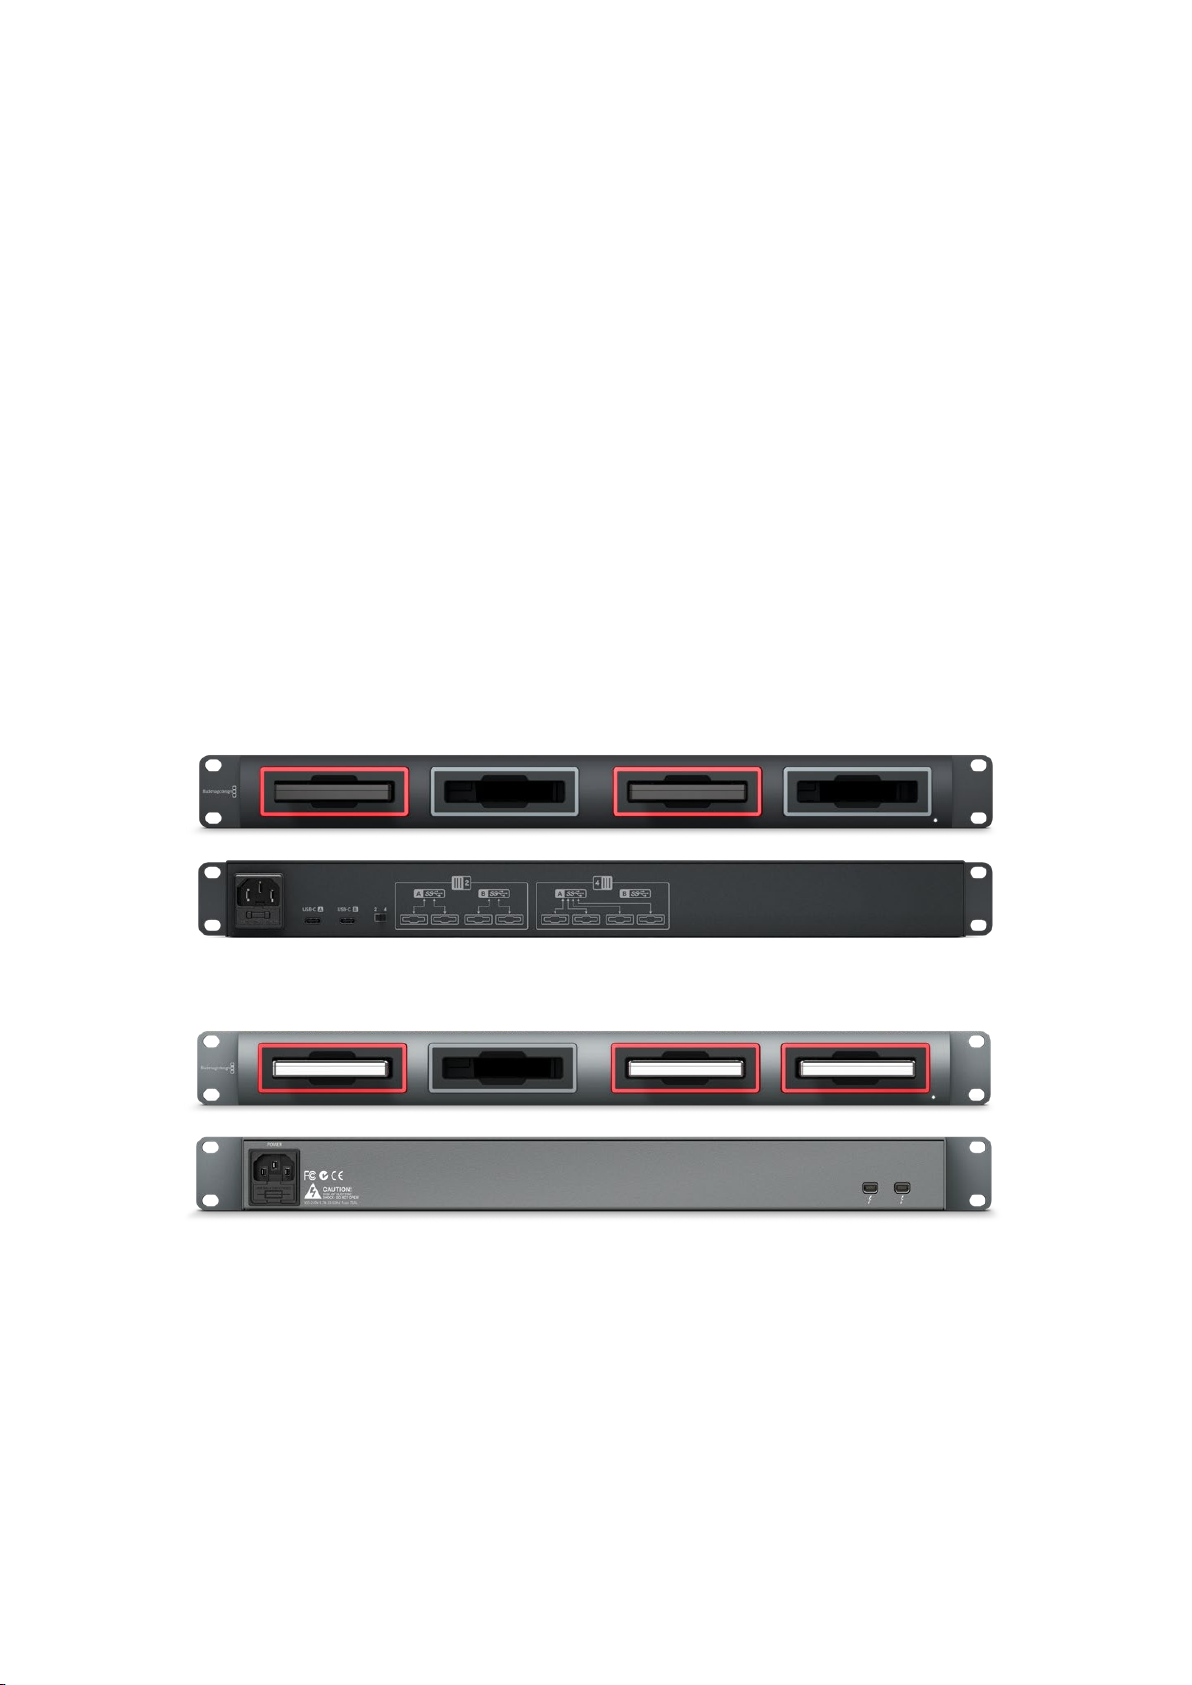
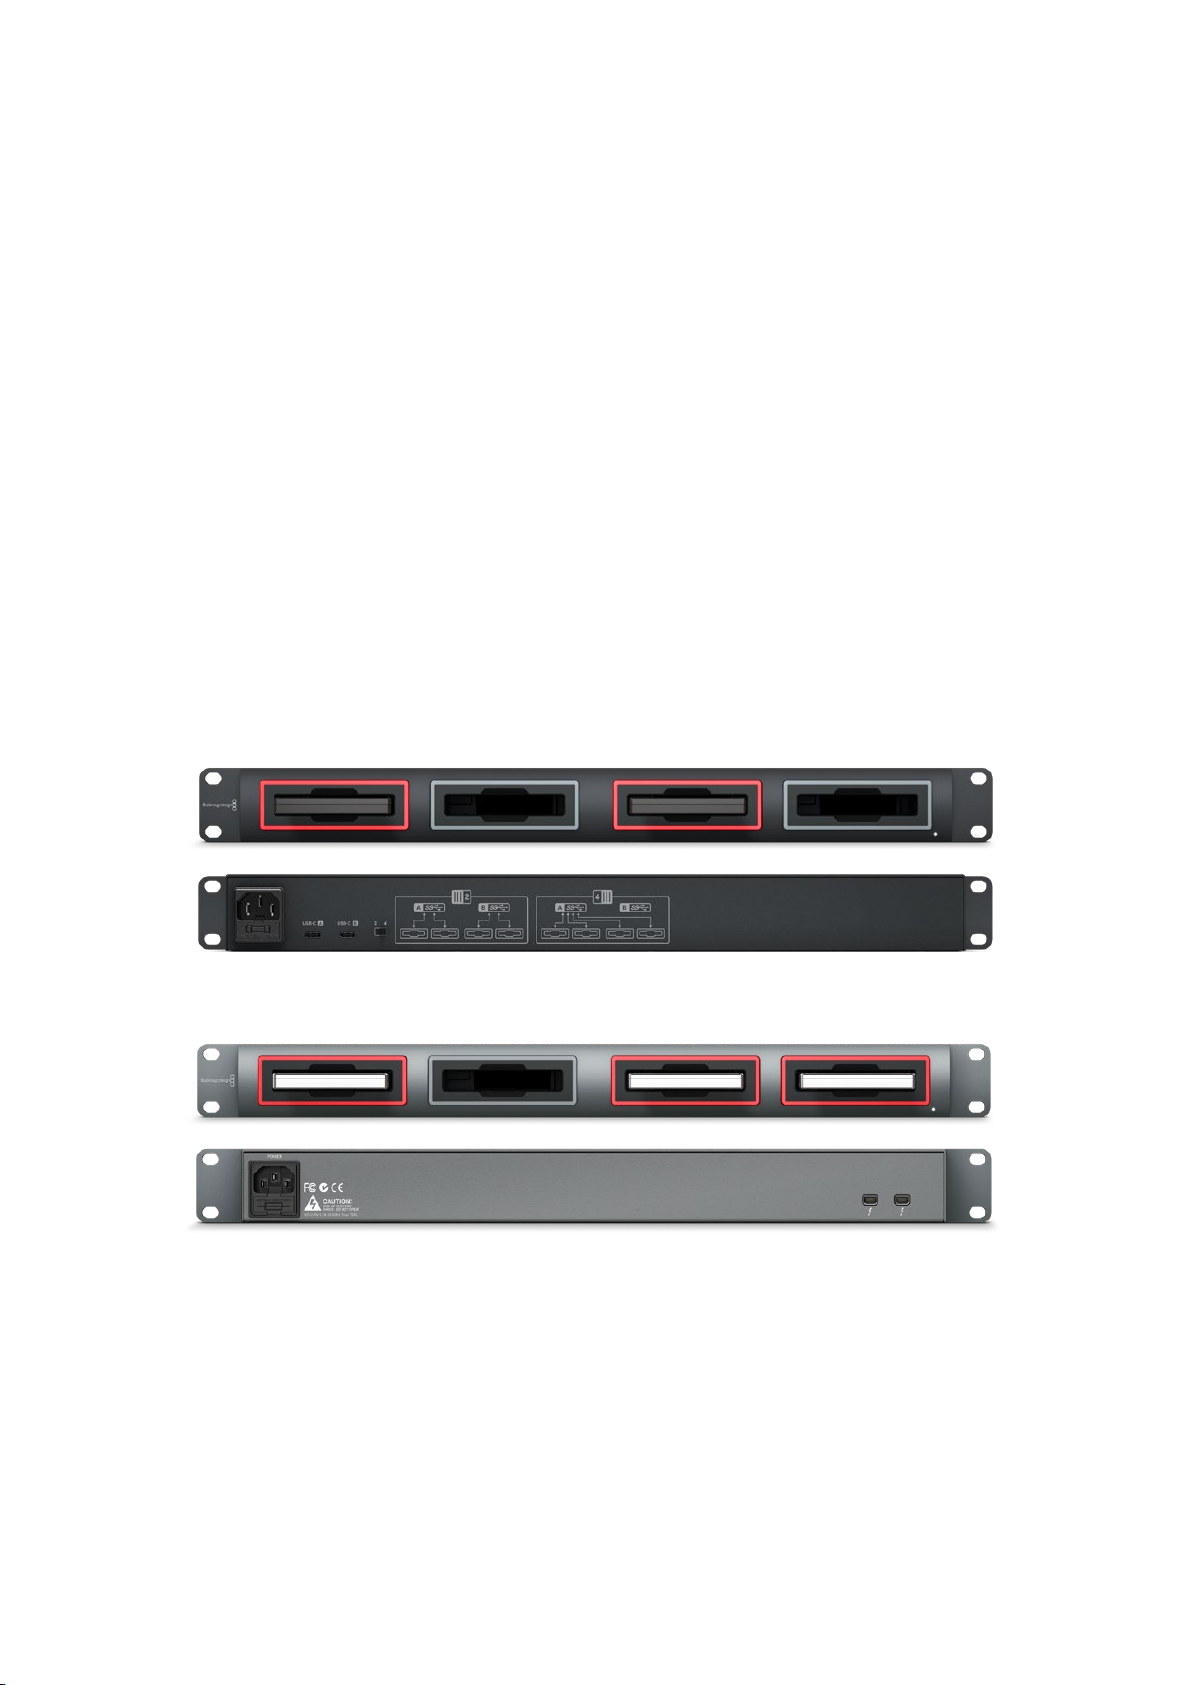
Blackmagic MultiDock is an attractive rack mountable docking station that lets you
simultaneously mount up to 4 x 2.5” Solid State Drives or Hard Disk Drives to your computer.
Blackmagic MultiDock and Blackmagic MultiDock 10G are perfect for video post production
tasks such as editing, color grading, or any task that requires large video files to be stored on
multiple drives. By minimizing the time spent swapping external drives, Blackmagic MultiDock
allows you more time to focus on your creative work.
Blackmagic MultiDock uses USB 3.1 and Thunderbolt™ 2 technology, which provides a super
fast connection to your computer up to 10 and 20Gb/s respectively. Each drive bay has a
completely independent SATA 3 disk interface for high performance. Blackmagic MultiDock 10G
can even be configured as two independent docks so you can access the drives from two
separate pieces of equipment.
A RAID can be configured by simply plugging in multiple disks and using your operating system
disk utility software to “stripe” or “mirror” the disks into a single storage volume.
This operation manual is designed to give you all the information you need to help you get the
most out of your Blackmagic MultiDock.
Blackmagic MultiDock 10G provides USB 3.1 read and write speeds up to 10Gb/s
Blackmagic MultiDock provides Thunderbolt 2 data transfer speeds up to 20Gb/s
5Getting Started
Page 6
Connecting to your Computer
CAUTION!
RISK OF ELECTRIC
SHOCK- DO NOT OPEN!
100-240V 1.7A 50-60Hz Fuse T5AL
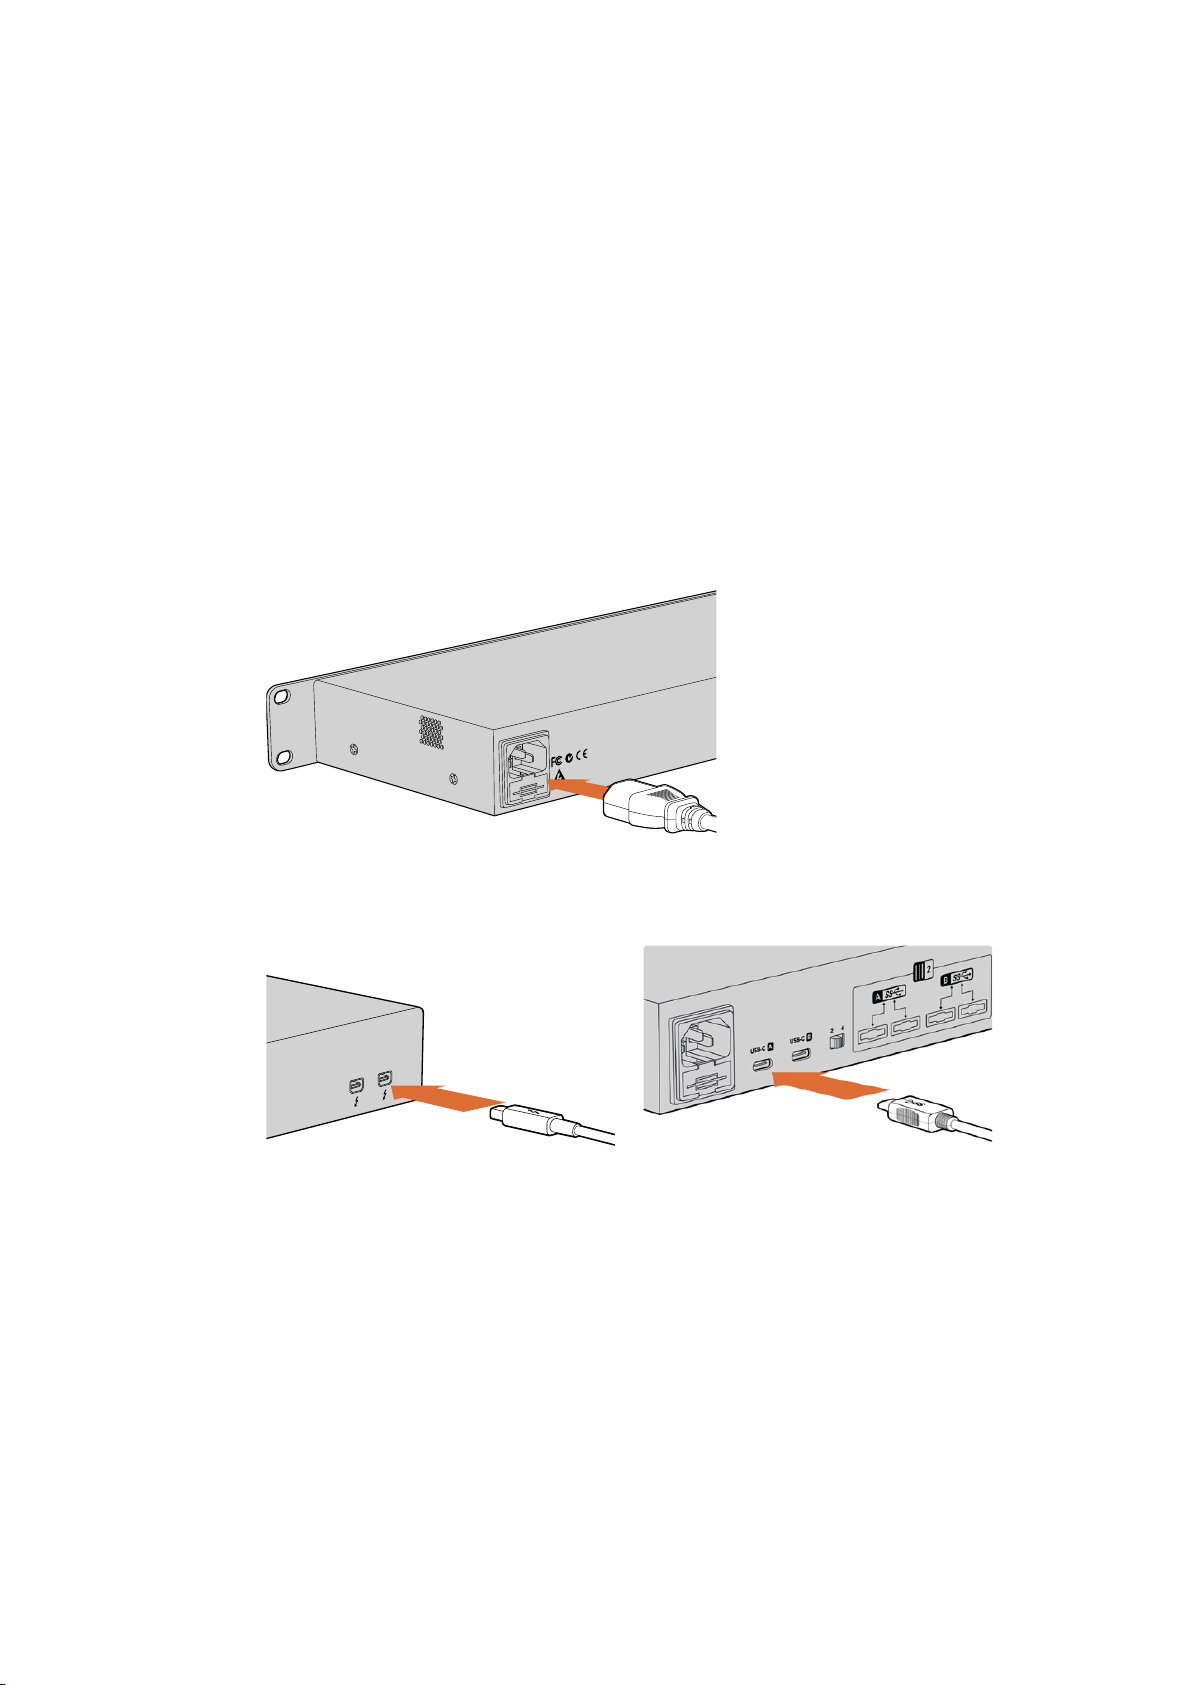
The first thing you’ll want to do is power your Blackmagic MultiDock and connect to
your computer!
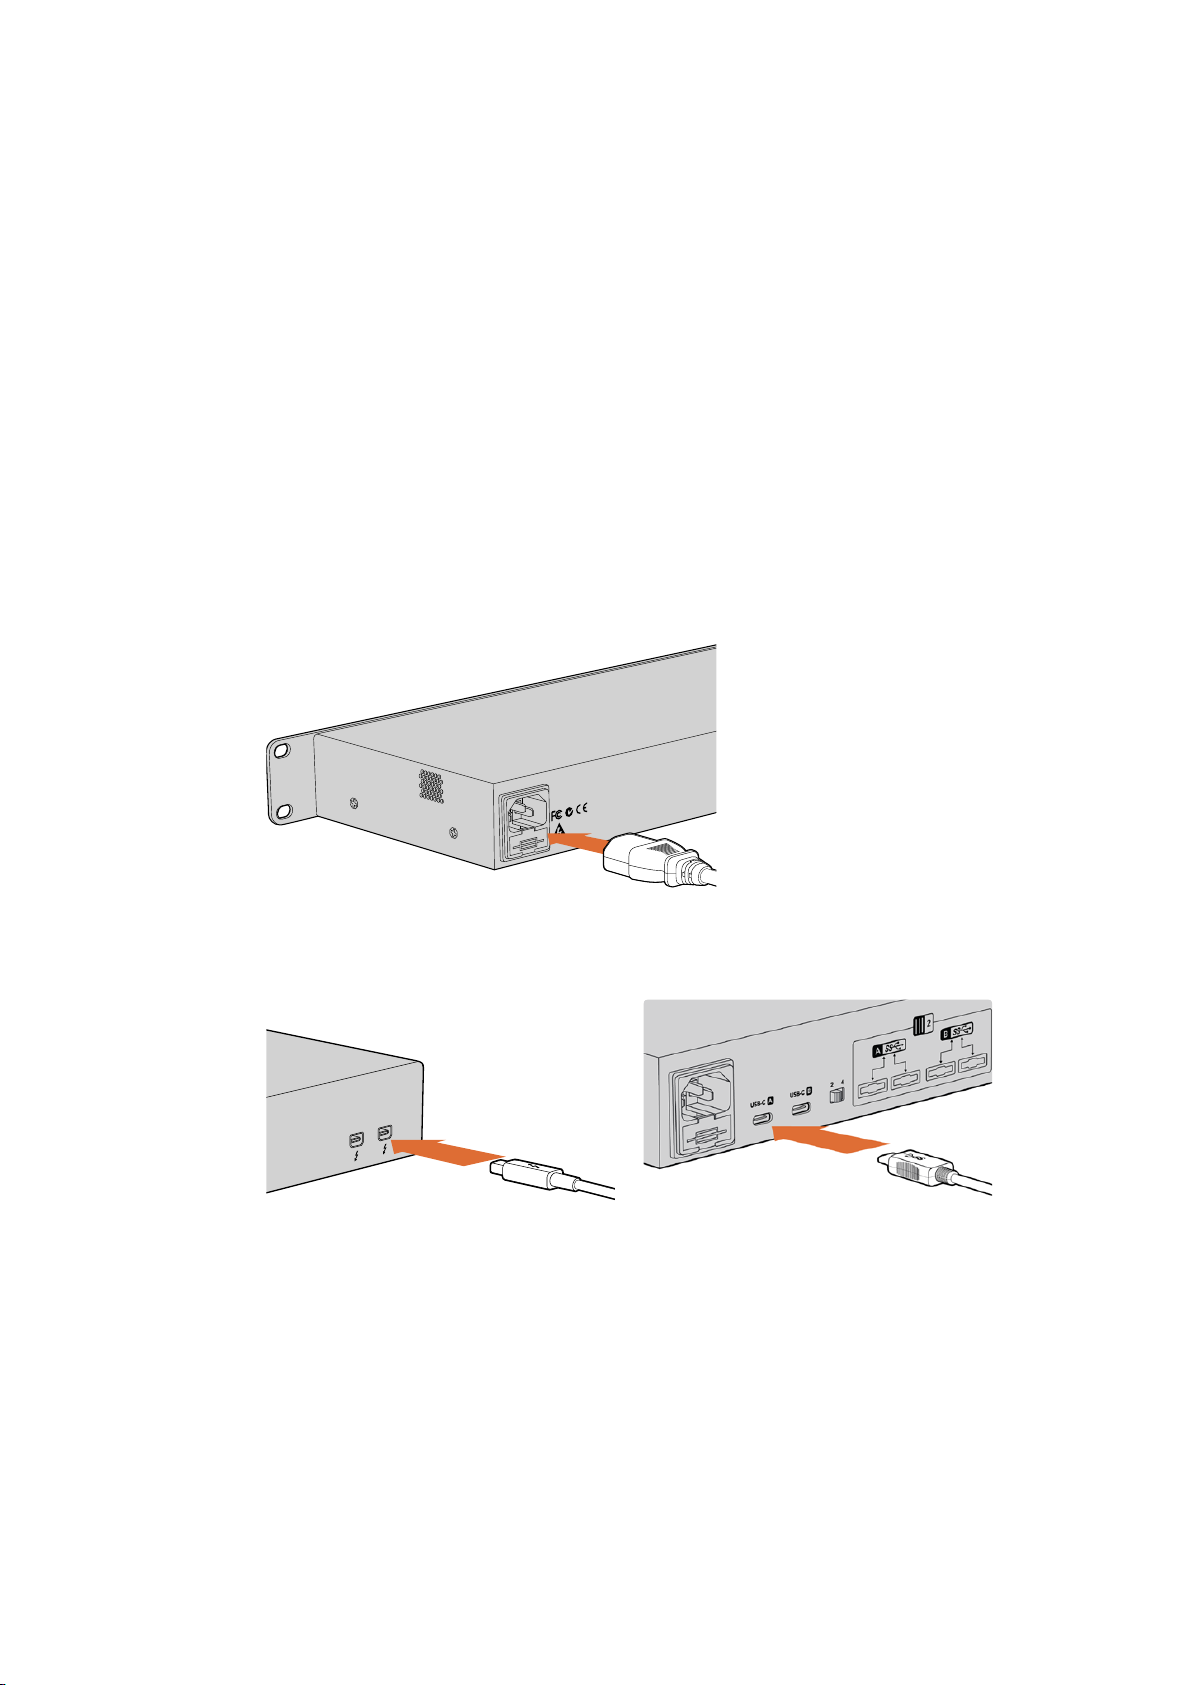
Plug your power source into Blackmagic MultiDock’s mains power input using a standard IEC
cable and connector. The power indicator on the front panel will illuminate when power
is supplied.
On Blackmagic MultiDock 10G, connect the USB-C A port to your computer via a USB-C cable.
The switch on the rear of the unit lets you configure Blackmagic MultiDock 10G as a single dock
using all four drives, or as two independent dual-drive docks. This means you can access two
drives from two separate computers via the two separate USB-C ports. Refer to the ‘Configuring
Blackmagic MultiDock 10G’ section for more information.
On the original Blackmagic MultiDock, connect one of the Thunderbolt ports to your computer’s
Thunderbolt port using a Thunderbolt cable. If your computer only has a single Thunderbolt
port, you can use the additional Thunderbolt port on your MultiDock to attach a RAID or
other device.
Connect your power supply to Blackmagic MultiDock
using a standard IEC power cable and connector.
Connect Blackmagic MultiDock to your Mac or Windows PC using a Thunderbolt or USB-C cable
Plugging in your Drives
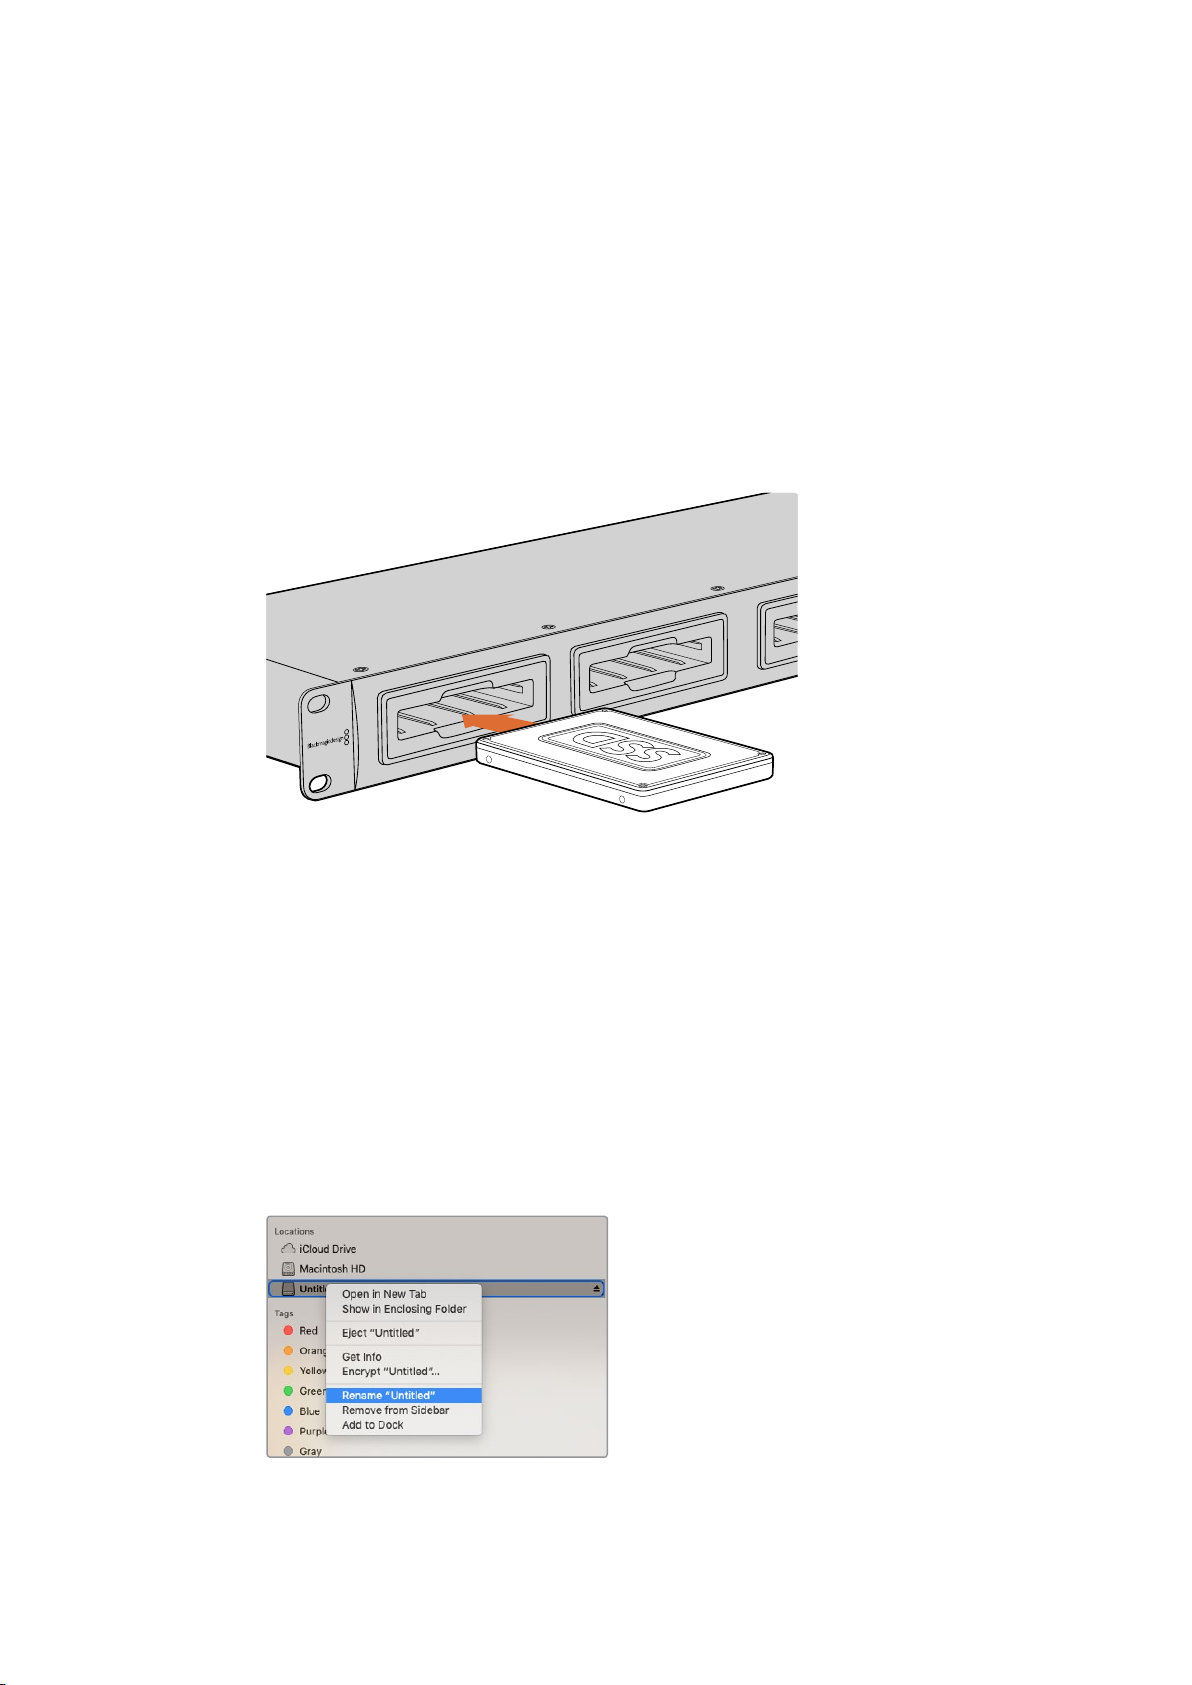
Blackmagic MultiDock uses formatted 2.5” SSDs and HDDs.
To plug in your drive:
1 Hold the drive so its gold SATA contacts are facing down and towards the drive bay.
2 Gently push the drive into the drive bay until you feel it slot into place.
6Getting Started
Page 7
The drive bay’s red LED will briefly illuminate when a drive is detected. When a solid state drive
or hard disk drive is being read or written to, the drive bay’s LED will flash according to the level
of disk activity.
When plugging in formatted SSDs or HDDs, they will be recognized by your computer
and mounted.
On Mac OS, your drives will appear on your desktop.
To find your drive on a Windows PC, click the File Explorer icon in the task bar and navigate to
‘this PC’ in the left hand column.
Now that you have plugged in your power source, connected to a computer and plugged in
your drives, you can start using Blackmagic MultiDock.
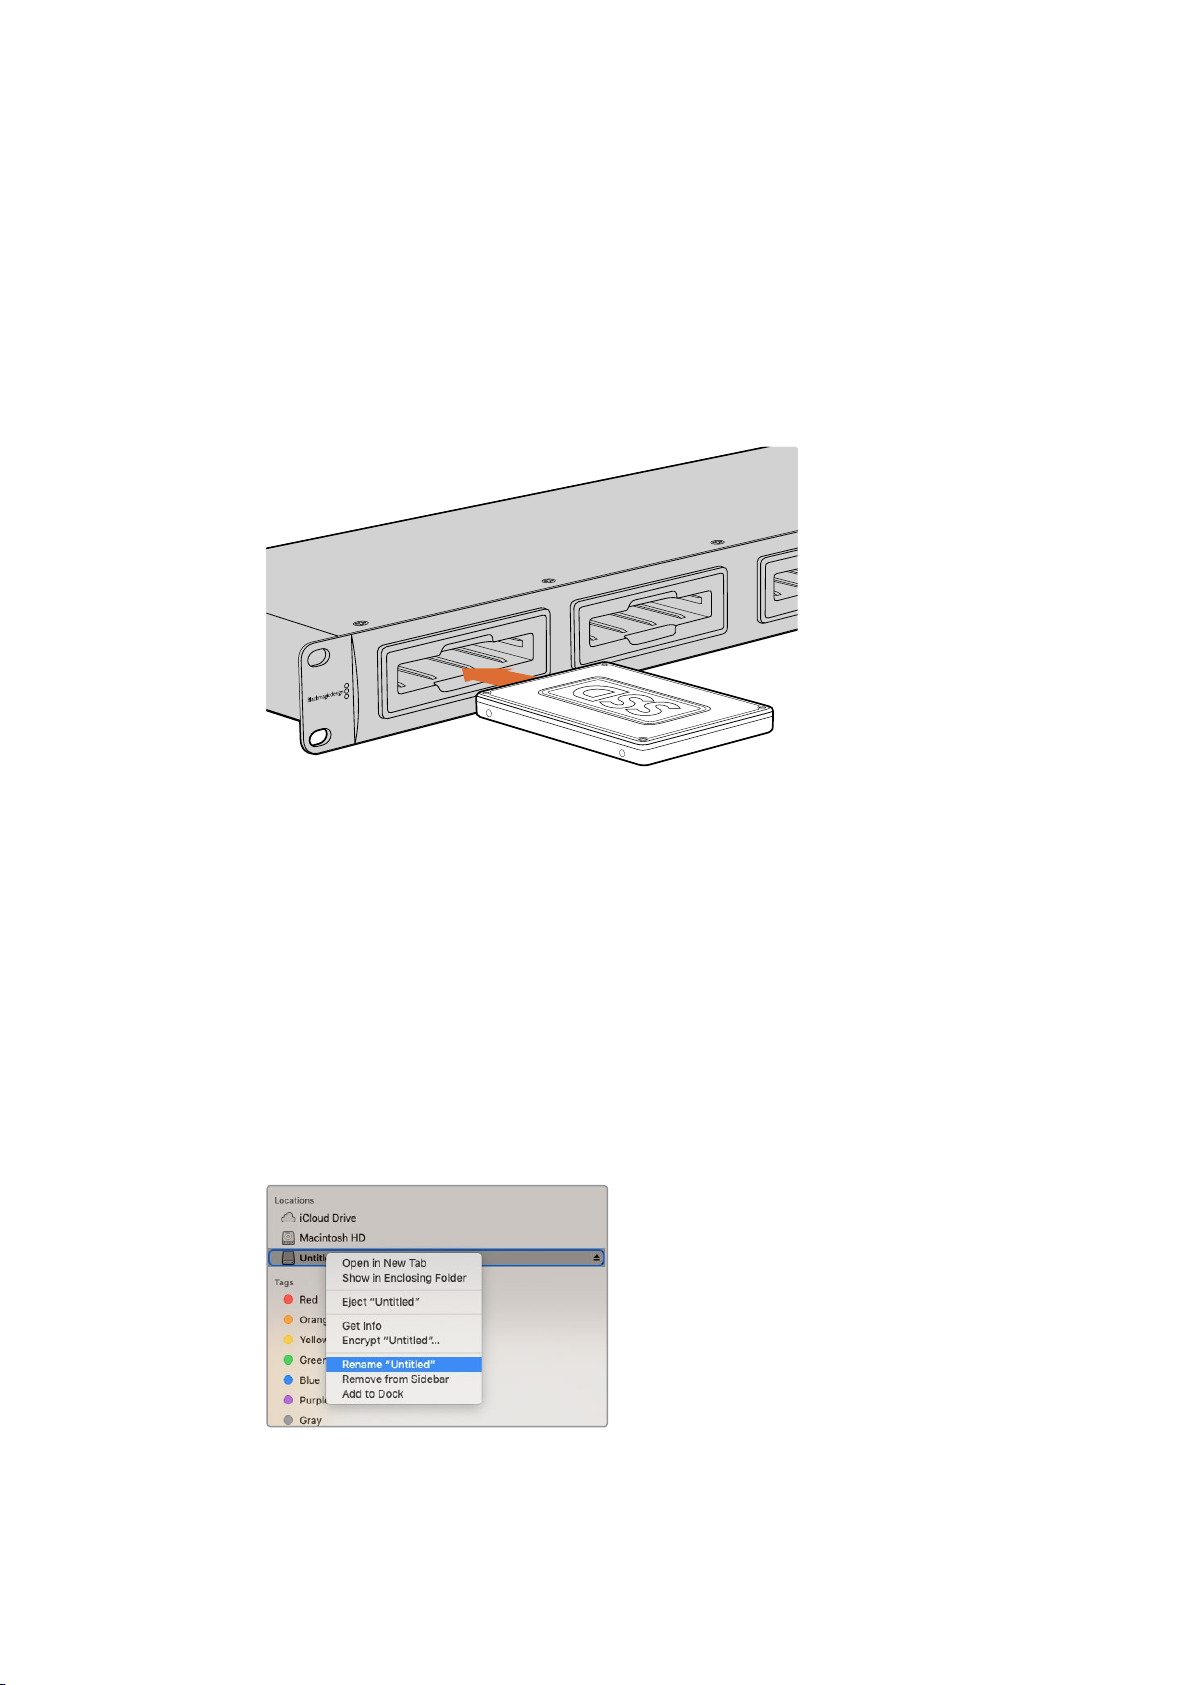
Plug SSDs or HDDs into any of Blackmagic MultiDock’s 4 drive bays.
Using Blackmagic MultiDock
Identifying Drives
Blackmagic MultiDock has 4 independent drive bays. We recommend naming or renaming your
drives so you can easily identify them. You can name your drives when formatting using the
Disk Utility application on Mac OS, or Windows Disk Management on Windows. Renaming
your drive is as easy as right clicking on your drive in Mac OS Finder or Windows File Explorer.
It’s also helpful to physically label your drives so you can visually identify the drive in each
drive bay.
You can easily rename your drives using Finder
in Mac OS or Windows File Explorer
7Using Blackmagic MultiDock
Page 8

Formatting Drives
You can use any 2.5” SSD or HDD with Blackmagic MultiDock. New drives need to be formatted
so your computer can read and write to the them. Your Blackmagic MultiDock formats drives
using the HFS+ and exFAT formats. These disk formats allow large file sizes and long video
clips captured as single files.
HFS+
This format is also known as Mac OS Extended and is natively supported by Mac OS. HFS+
supports “journaling” which means your data is more likely to be recovered in the rare event of
corruption, or a hardware or software malfunction.
ExFAT
This format is supported natively by Mac OS and Windows. ExFAT does not support journaling
which means data is less likely to be recovered in the event of corruption, or a hardware or
software malfunction.
You can format drives at any time, even if you already have data written on them. However,
formatting a drive deletes all its data so be sure to back up anything important on your drive
before it is formatted.
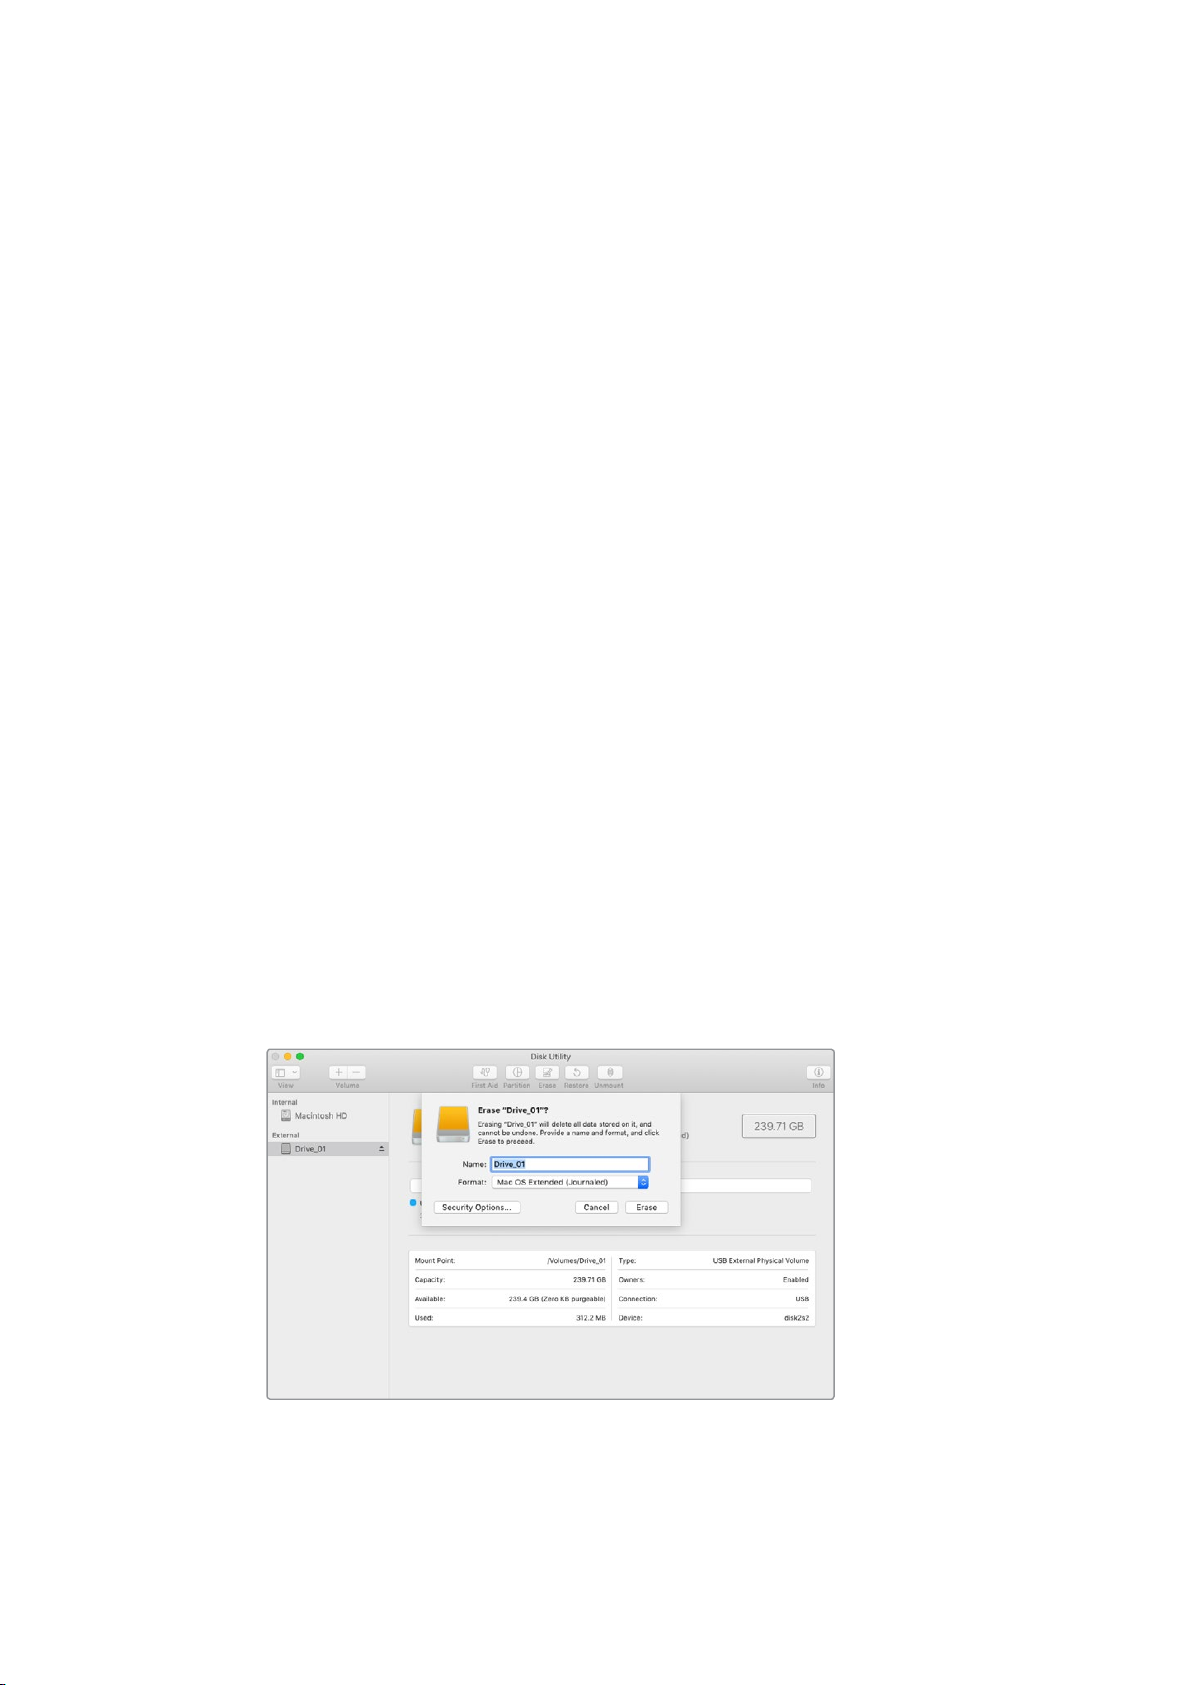
Formatting your Drives on Mac OS
The Disk Utility application included with Mac OS can format a drive in the HFS+ or
exFAT formats.
1 Go to applications/utilities and launch Disk Utility.
2 On the left of the window you’ll see a list of icons for your connected drives. Click on
the disk icon for your new drive.
3 Select the ‘erase’ tab in Disk Utility’s top menu.
4 Type a ‘name’ for the new volume.
5 Select Mac OS Extended (Journaled) or exFAT from the ‘format’ drop down menu and
then click ‘erase’. Your new drive will quickly be formatted and made ready for use with
Blackmagic MultiDock.
Use Disk Utility on Mac OS to format, or erase, your drive
in the Mac OS Extended (Journaled) or exFAT format.
8Using Blackmagic MultiDock
Page 9
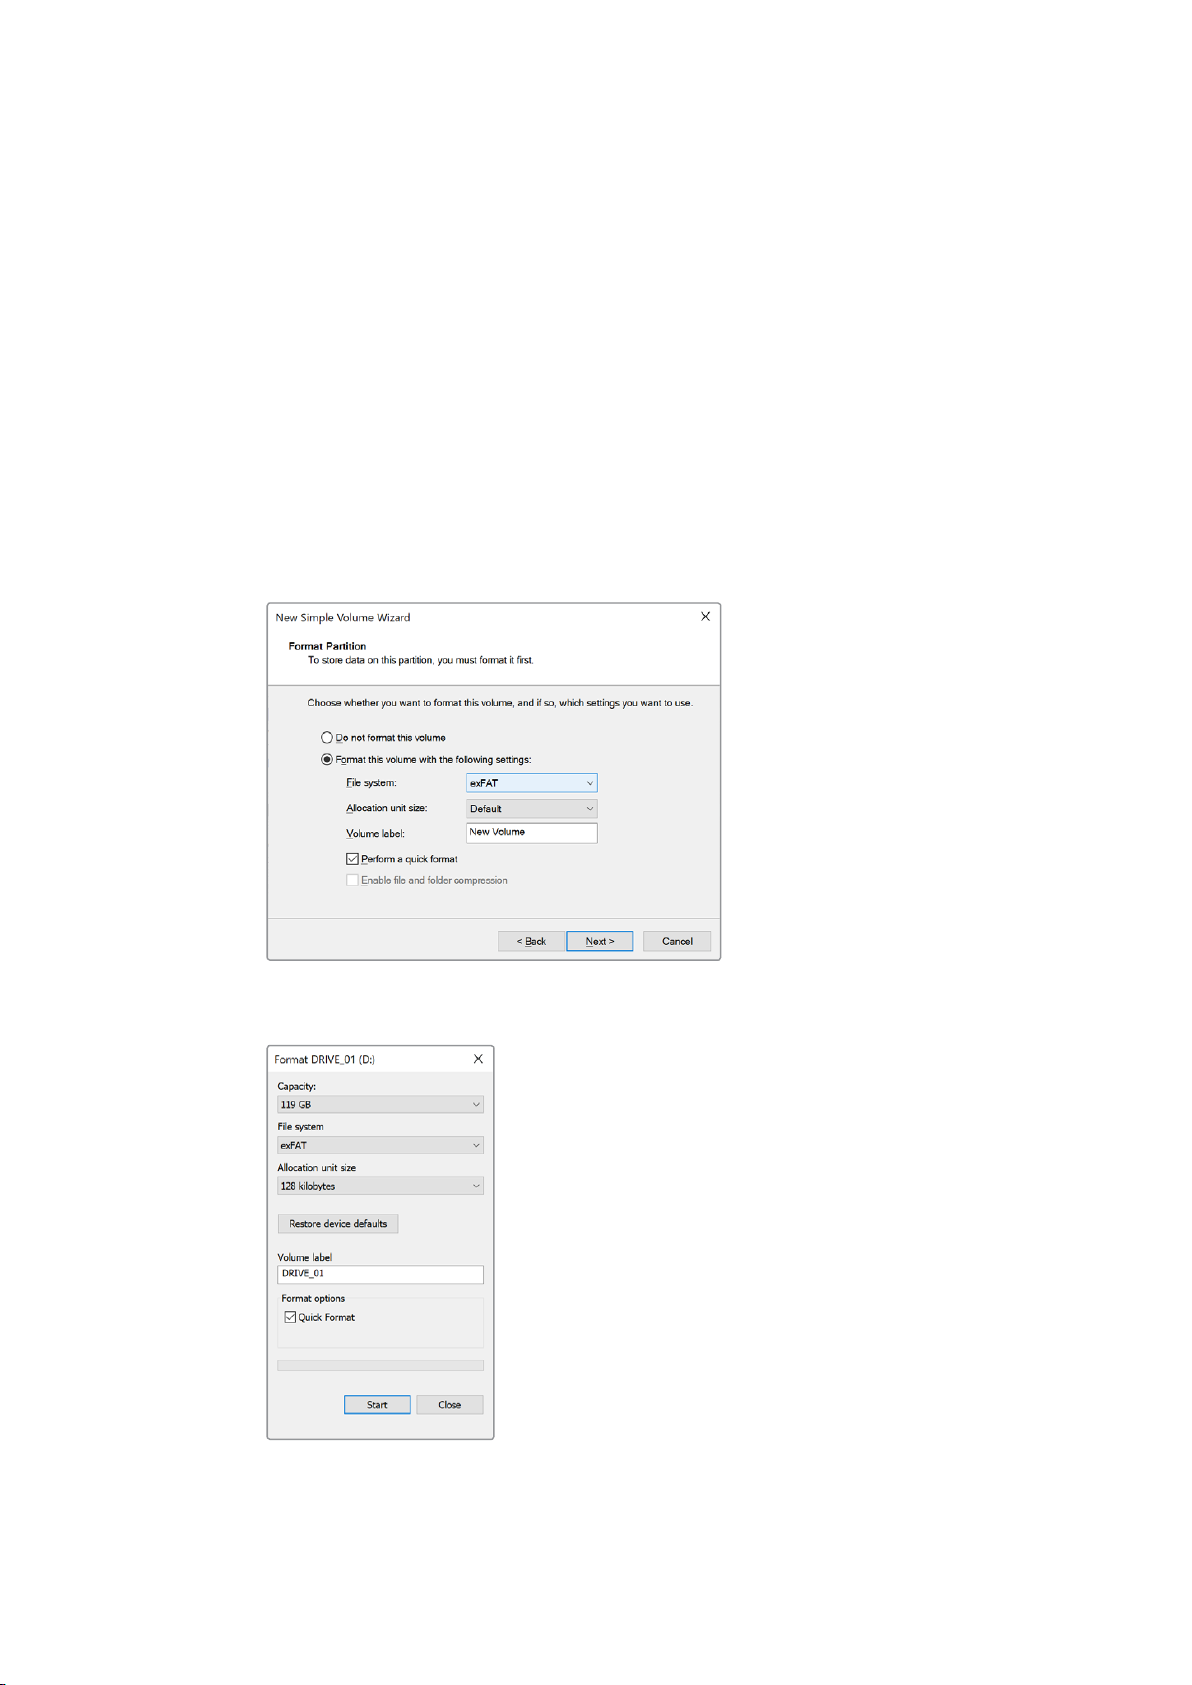
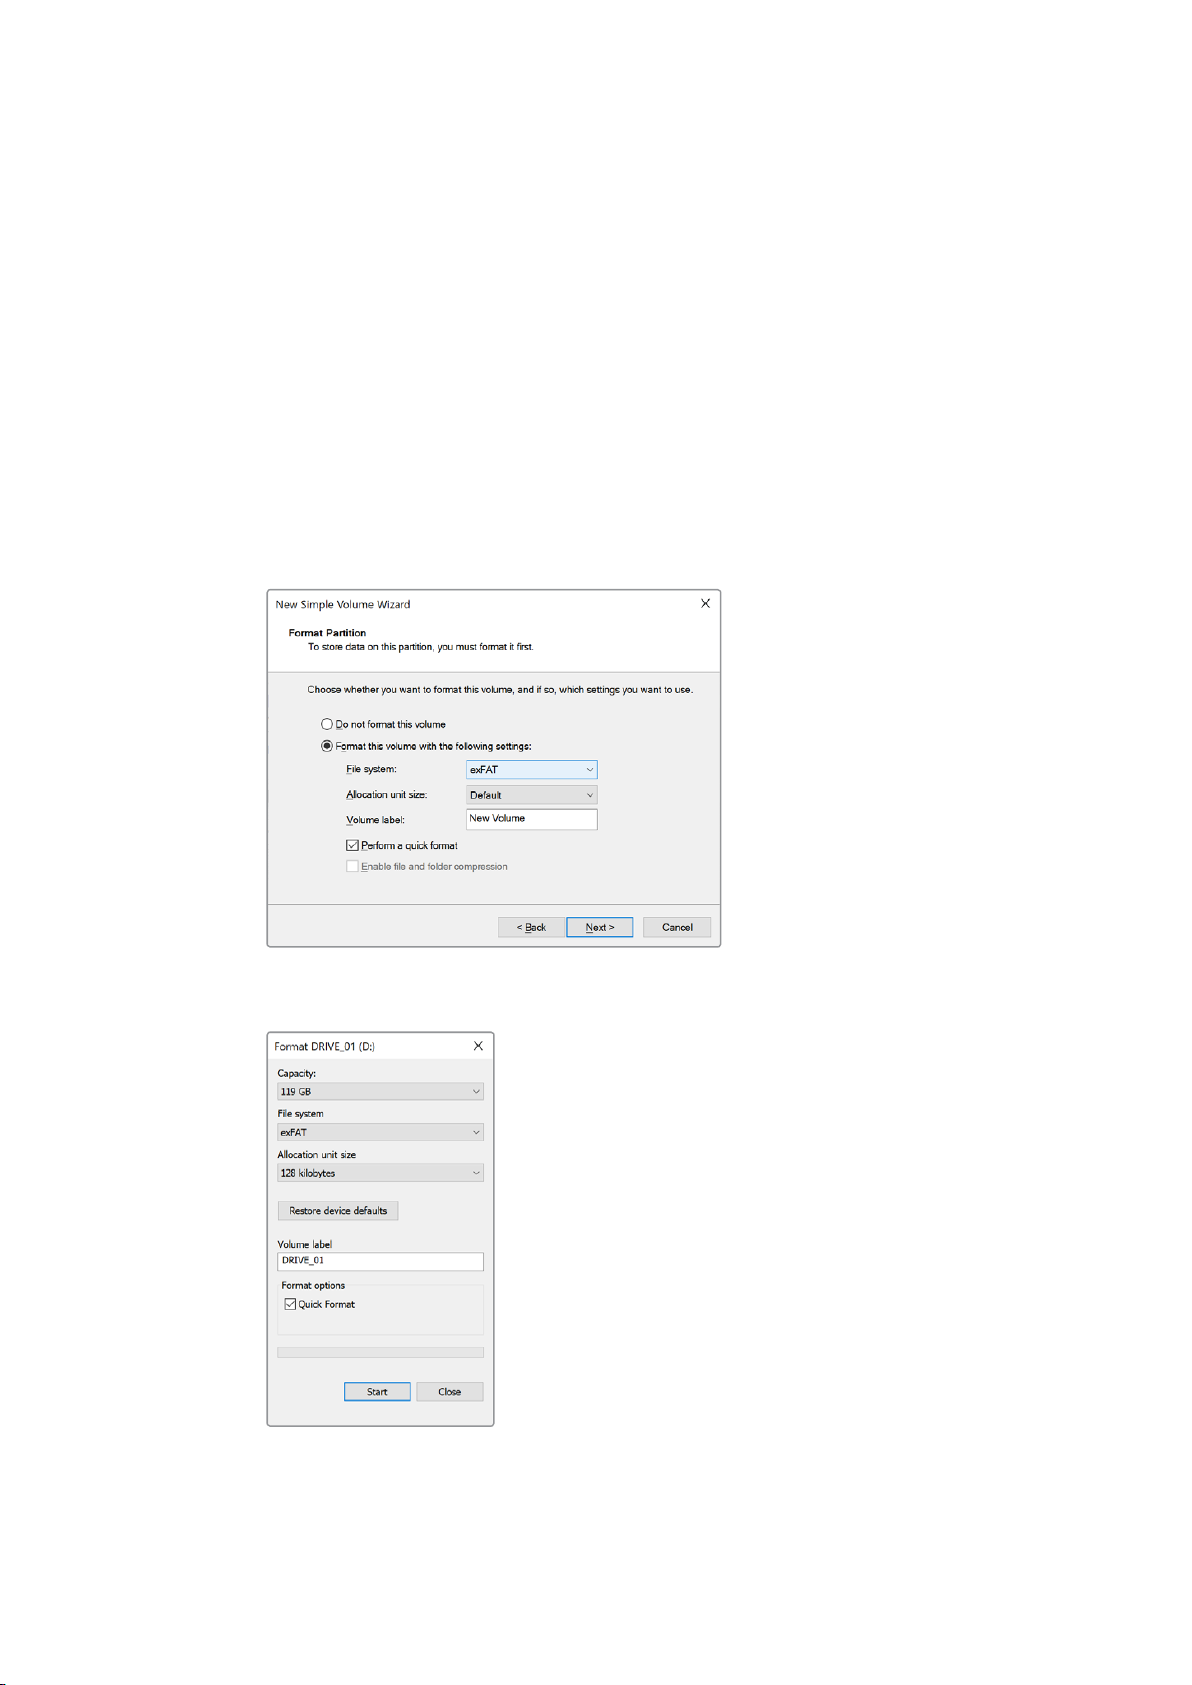
Formatting your Drives on Windows
Windows uses the Disk Management application to format a new drive in the exFAT format.
1 Plug your new drive into Blackmagic MultiDock.
2 Go to Control Panel/System and Security/Administrative Tools/Computer Management/
Disk Management.
3 Right click on your new drive from the list of connected drives and select New Simple
Volume. New unformatted drives will be described as Unallocated.
4 A window will open asking for the volume size. Leave the volume size defaulted to the
drive’s maximum capacity. Click Next.
5 Assign a drive letter and click Next.
6 Set the file system to exFAT. Type a volume label, select ‘Perform a quick format’
and click Next. Your new drive will quickly be formatted and made ready for use with
Blackmagic MultiDock.
Use Volume Wizard on Windows to format your drive.
You can also format drives in the exFAT format using
the Format dialog box feature in Windows. It can
be found by right clicking on the drive’s icon.
9Using Blackmagic MultiDock
Page 10
Configuring Blackmagic MultiDock 10G
SS SS
A B
2
SS SS
A B
4
Blackmagic MultiDock 10G can be configured as a single unit with 4 drives, or as two
independent dual-drive docks. This means you can have two separate devices connected to
your MultiDock with each USB-C ports controlling two drive bays. For example, you may have
two computers, or two Blackmagic HyperDeck Extreme 8K HDRs, recording and playing back
files simultaneously using one single Blackmagic MultiDock 10G!
On the rear panel you will see a drive bay configuration switch. To configure your Blackmagic
MultiDock 10G as a single unit with 4 drives, set the configuration switch to ‘4’ and connect your
your cable to the USB port labelled ‘USB-C A’. To configure your MultiDock as two separate
dual-drive units, set the switch to ‘2’. The ‘USB-C A’ port will now access only the first two drive
slots and you can connect to the third and forth drive slots via the ‘USB-C B’ port.
Set the drive bay configuration switch
on the rear panel to 2 or 4 to operate
your MultiDock as a single 4 bay unit,
or as two independent dual-drive units.
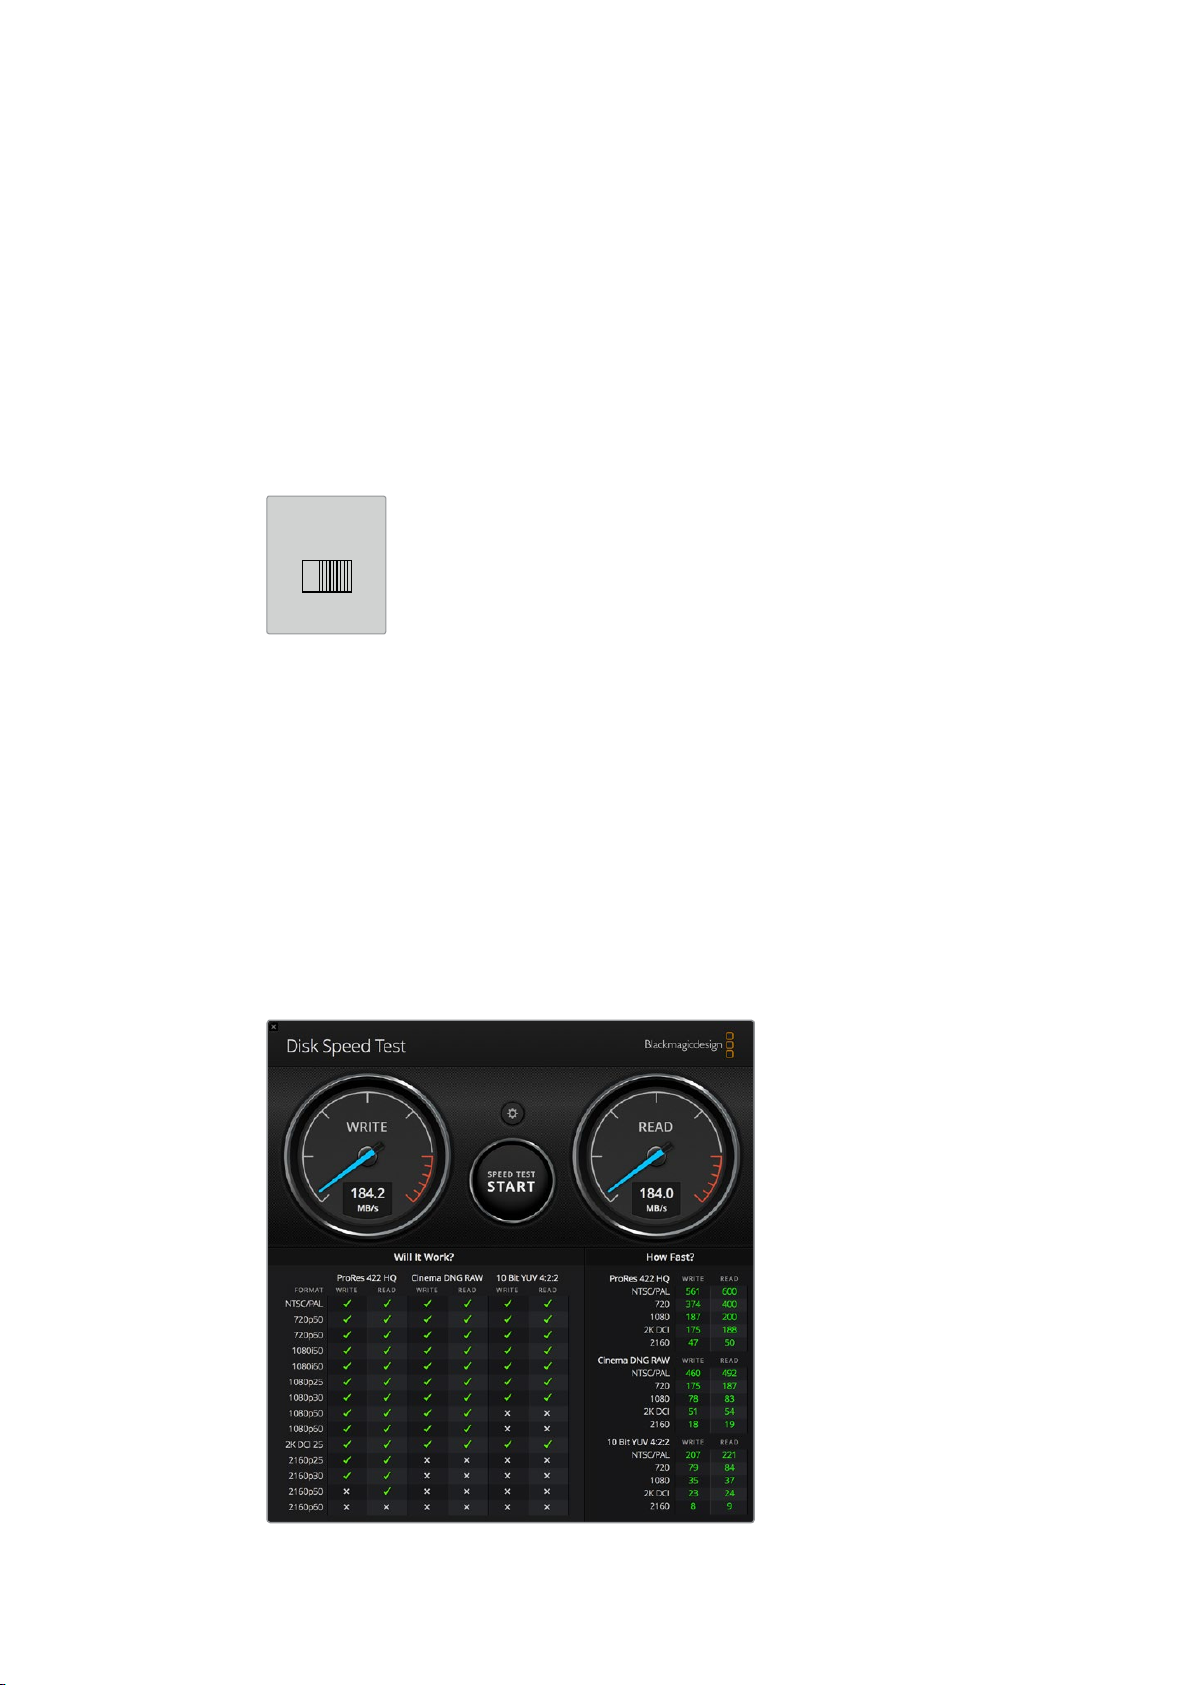
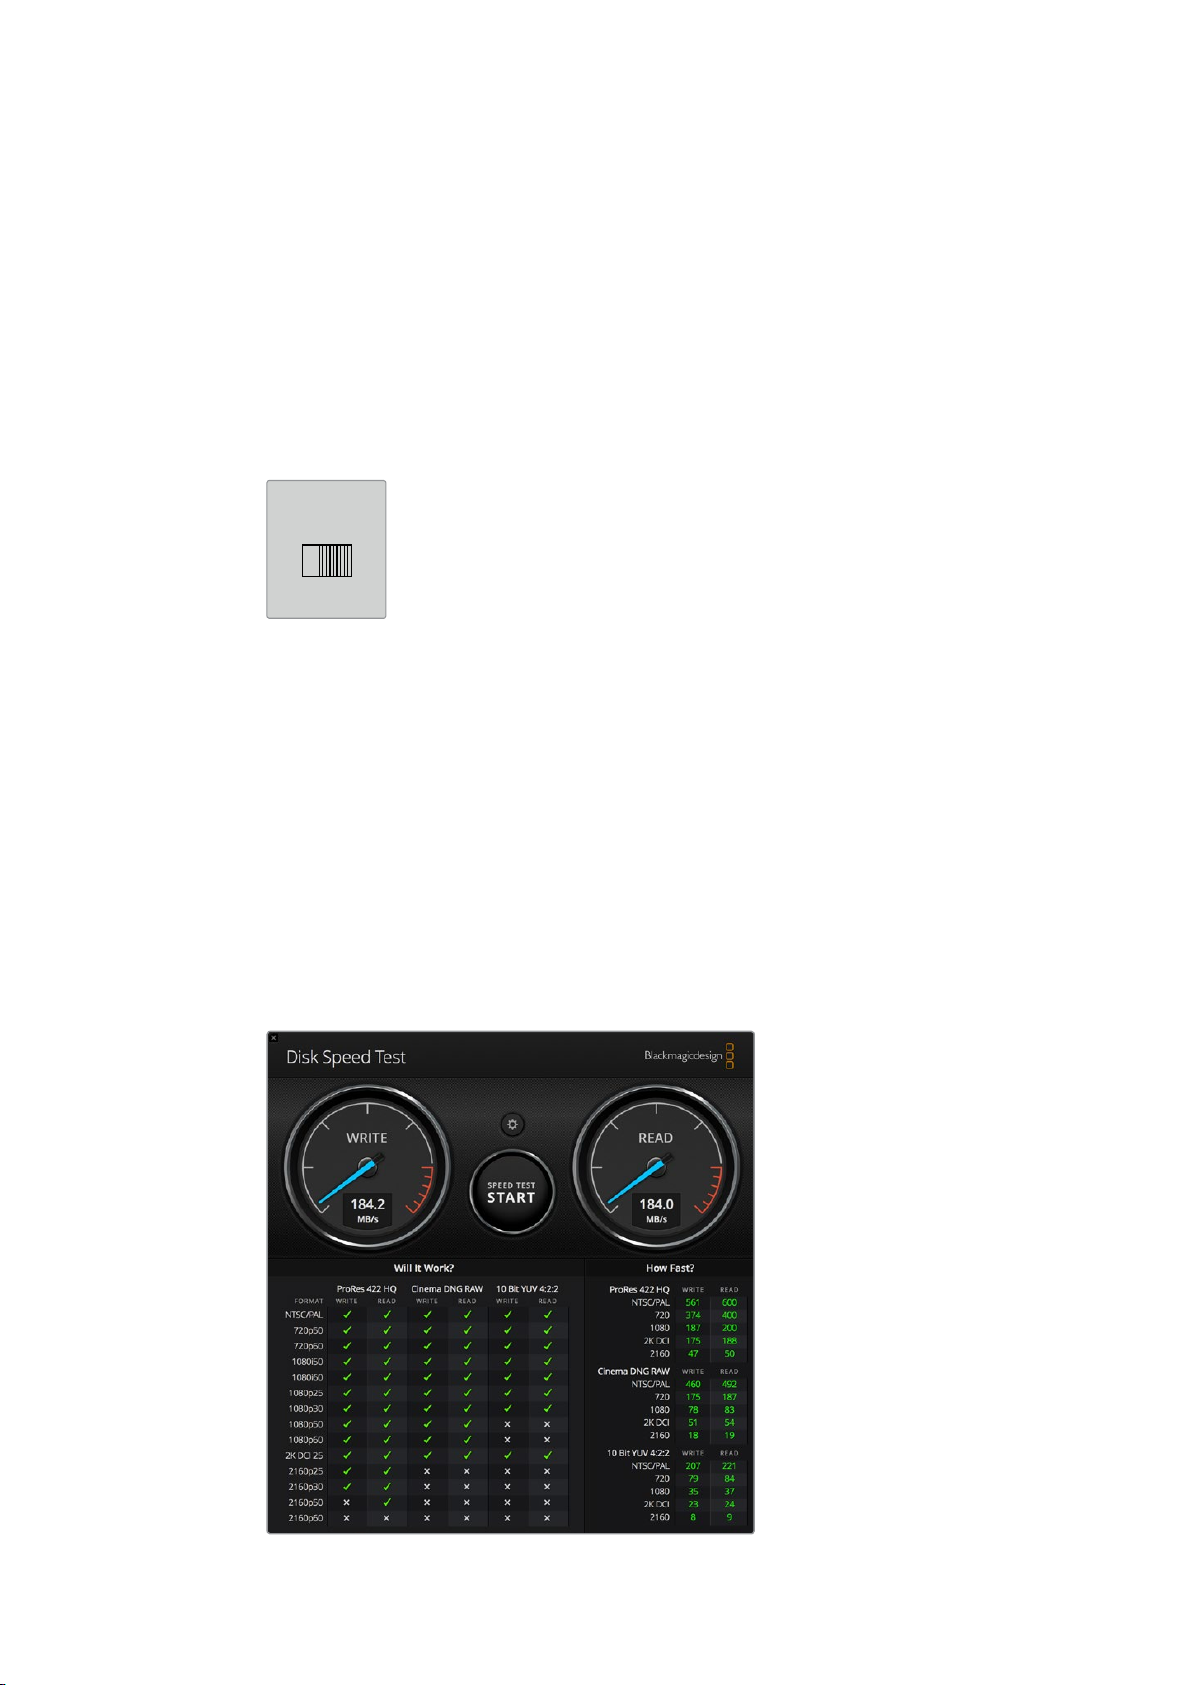
Fast SSDs for Video
You can use any 2.5” SSD or HDD with Blackmagic MultiDock for every day tasks. When
working with video files using higher resolutions and lower compression rates, such as
compressed 4K and 8K video, we recommend using an SSD with high write speeds. For higher
compression rates, such as ProRes LT or H.265 Low, lower write speeds are needed.
You can use Blackmagic Disk Speed Test to measure the read and write performance of your
storage media to make sure it is fast enough for your needs. Disk Speed Test is included with
Desktop Video software or available as a standalone application via the App store for macOS.
10Using Blackmagic MultiDock
Page 11

Setting up a RAID for High Speed Performance
andDataSecurity
Blackmagic MultiDock supports two of the most common RAID configurations, RAID 0 and
RAID 1. A RAID, or Redundant Array of Independent Disks, can provide increased speeds or
stronger data security. For example, RAID level 0 stripes your drives together so they are
recognized by your computer as one single drive to increase performance. RAID level 1
configures two drives so one is always mirrored by the other, which increases data security.
NOTE Striping your drives as a RAID shares data over a set of drives which requires
careful management. It’s also worth noting that if you’re striping drives as a RAID,
stripe only a set of SSDs or a set of HDDs, not a combination of both.
RAID Level 0 for High Speed Performance
When using HDDs for uncompressed video capture and playback, it’s beneficial to stripe
2to4drives together as a RAID. Sharing the data amongst a pair of drives doubles the total
capacity, plus decreases their workload, so you get faster performance. Similarly, configuring 3or
4 drives as a RAID level 0 triples or quadruples, their total drive capacity. For example, acomputer
will recognize 4 x 1 terabyte drives striped using RAID 0 as one single 4 terabyte drive.
When drives are striped together in a RAID set, be careful not to unplug any of the drives while
your computer is powered, otherwise you may lose all your data. When using RAID, eject the
drives and disconnect the MultiDock from your computer before removing or swapping drives.
SSDs can also be striped together as RAID 0, however, performance increases are generally limited
to workflows using large sequential files, such as reading and writing Ultra HD, 4K, or uncompressed
video files. For general every day tasks, the performance increase is negligible so you should
probably use single SSDs.
When detecting drives, Blackmagic MultiDock looks for drive names, not drive bays, therefore
aset of drives configured as a RAID can be plugged into any of Blackmagic MultiDock’s 4
drive bays.
RAID Level 1 for Data Security
Blackmagic MultiDock has 4 drive bays which let you configure 2 pairs of mirrored SSDs or
HDDs. A mirrored pair of drives are recognized as one single drive. Using RAID level 1 gives
youan immediate back up as you write data to the drive. If one drive fails, the other is
instantlyavailable.
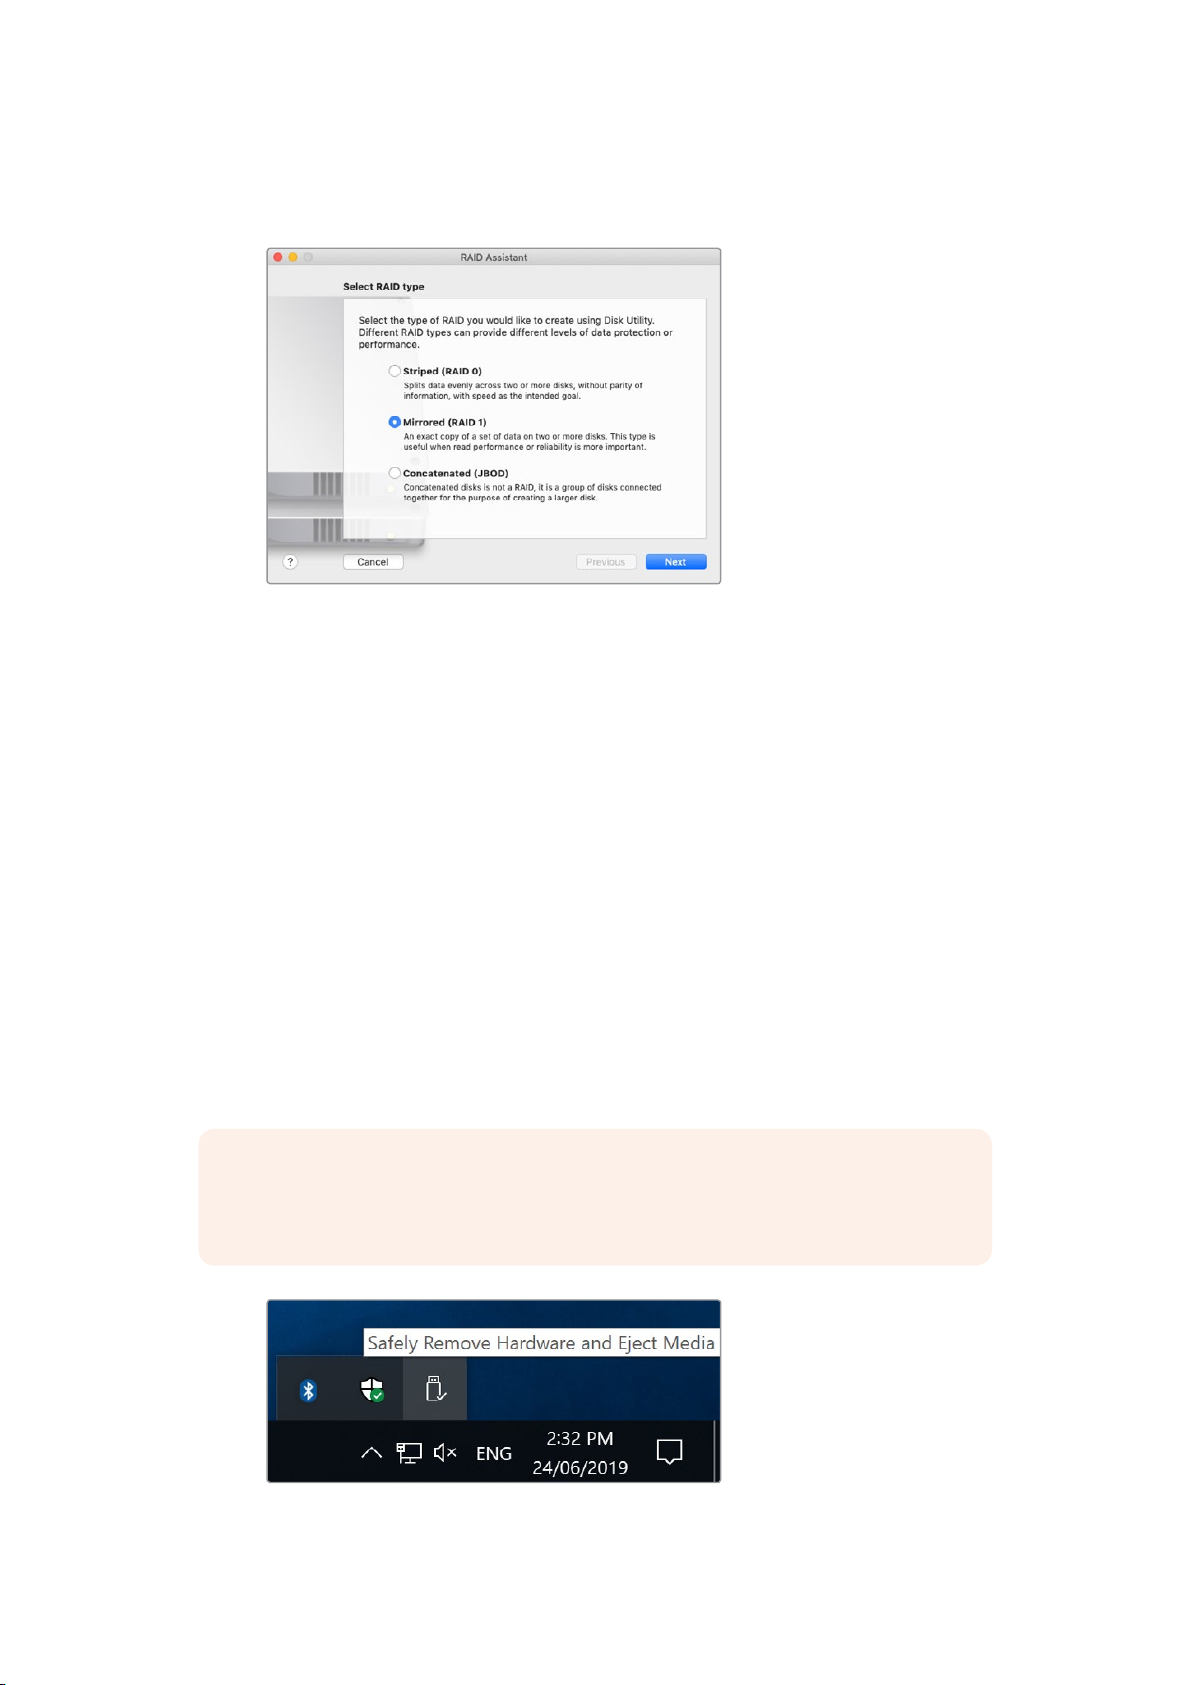
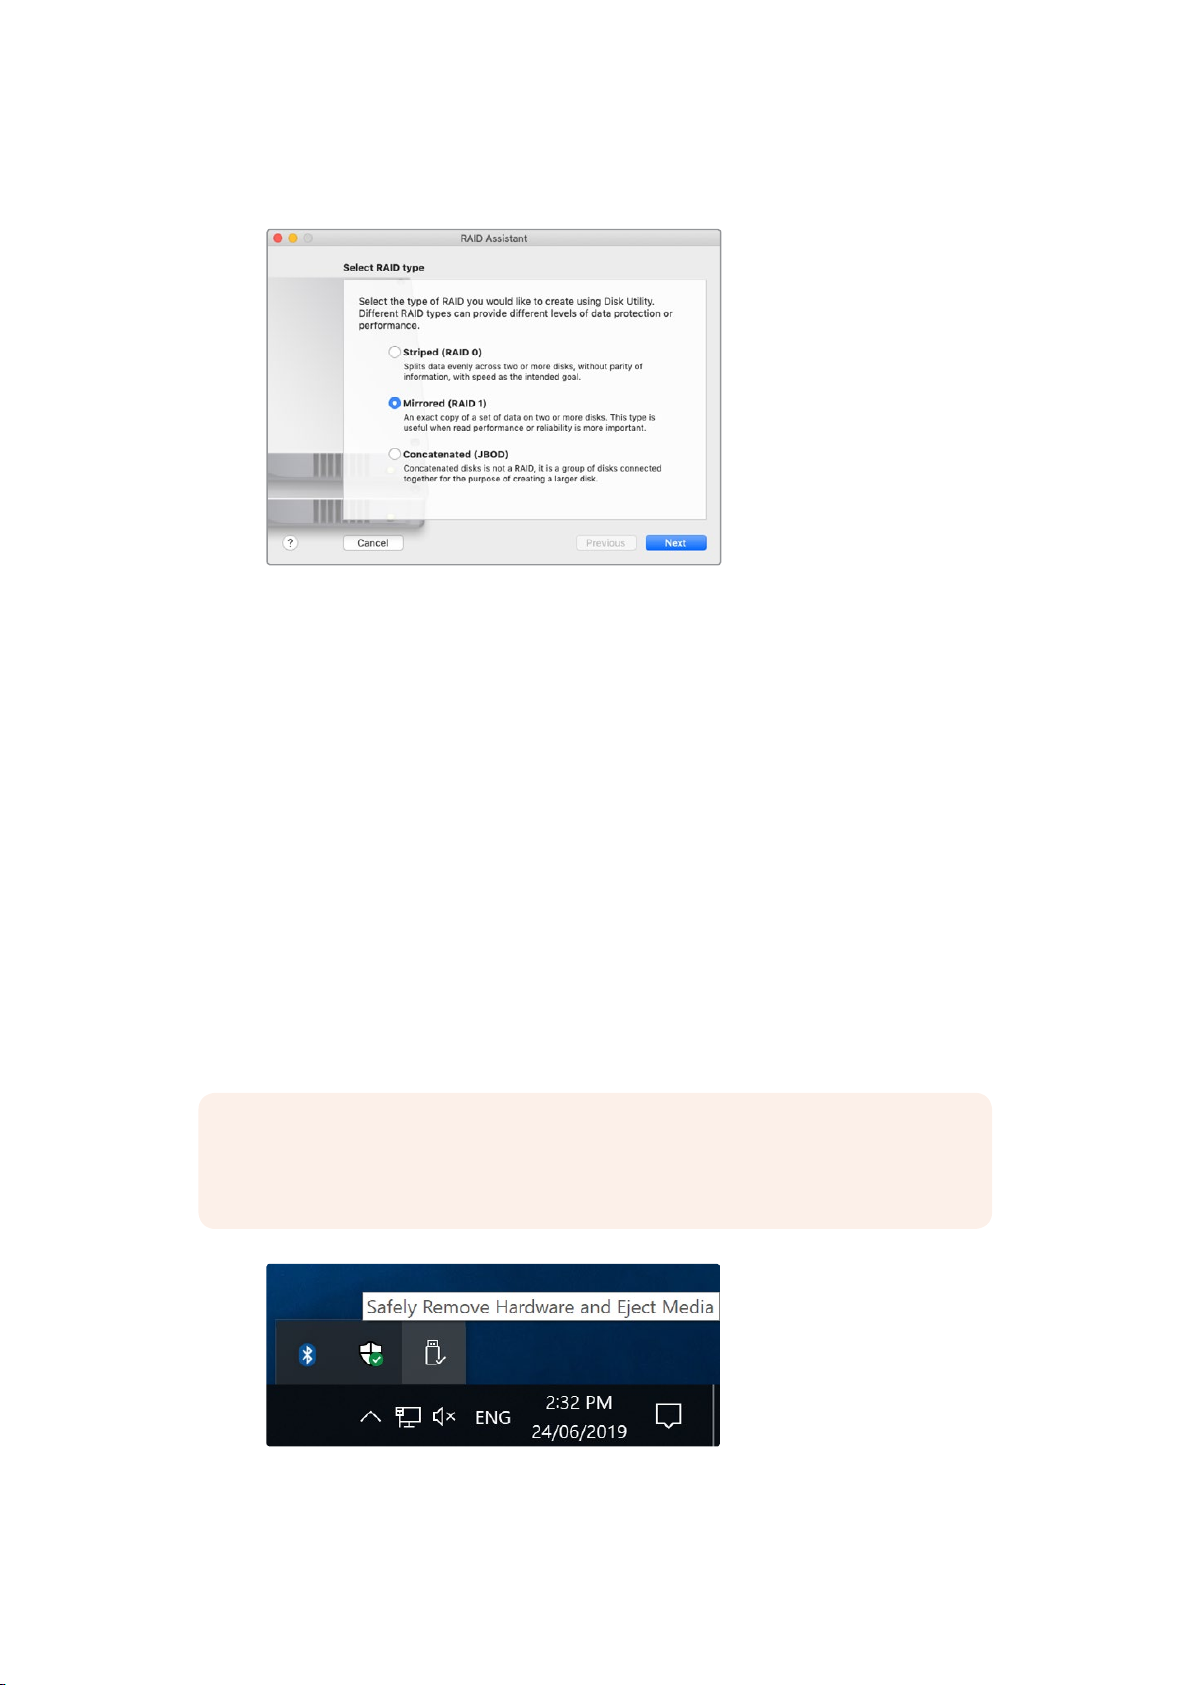
Configuring a RAID using Mac OS and Windows
To configure a RAID, use the RAID Assistant tool in Disk Utility on Mac OS. On Windows, you
can configure a RAID on the original Blackmagic MultiDock using Windows Disk
Management utility.
You’ll find the Mac OS Raid Assistant by launching applications/utilities/disk utility and selecting
‘RAID assistant’ from the file menu. Windows Disk Management can be opened by opening
thecontrol panel, then selecting Administrative Tools/Computer Management/Storage/Disk
Management.
11Using Blackmagic MultiDock
Page 12
For detailed information on how to configure a RAID, refer to your operating system’s
online support.
Select ‘mirrored’ using RAID assistant on Mac OS to configure your drives as RAID 1.
Unplugging your Drives
Make sure your drives have been properly ejected before removing them from their drive bays.
HDDs have longer initialize and shut down times compared to SSDs. This is because HDDs use
spinning discs to store data which take time to reach speed.
Ejecting a drive on Mac OS
Right click on the drive icon on your desktop and select “eject [drive_name]”. Blackmagic
MultiDock’s drive bay LED will flash briefly and your drive will disappear from the desktop.
Yourdrive is now ready to be unplugged from Blackmagic MultiDock.
Ejecting a drive on a Windows PC
Click on the ‘Safely Remove Hardware and Eject Media’ icon at the bottom right of your
desktop. A list of drives and devices will appear above the icon. Click on the drive you wish
toeject. Blackmagic MultiDock’s drive bay LED will flash briefly, and your drive will disappear
fromthe device list on the desktop. Your drive is now ready to be unplugged from
BlackmagicMultiDock.
NOTE When using a RAID it’s important eject the drives before unplugging the RAID
set. Never unplug a drive from a RAID set while the computer is operating or you’ll
risk data loss.
Always eject your media before unplugging from your computer.
12Using Blackmagic MultiDock
Page 13

Help
Getting Help
The fastest way to obtain help is to go to the Blackmagic Design online support pages and
check the latest support material available for your video assist.
Blackmagic Design Online Support Pages
The latest manual and support notes can be found at the Blackmagic Design support center
at www.blackmagicdesign.com/support.
Blackmagic Design Forum
The Blackmagic Design forum on our website is a helpful resource you can visit for more
information and creative ideas. This can also be a faster way of getting help as there may
already be answers you can find from other experienced users and Blackmagic Design staff
which will keep you moving forward. You can visit the forum at
https://forum.blackmagicdesign.com
Contacting Blackmagic Design Support
If you can’t find the help you need in our support material or on the forum, please use the
“Send us an email” button on the support page to email a support request. Alternatively,
click on the “Find your local support team” button on the support page and call your nearest
Blackmagic Design support office.
13Help
Page 14
Regulatory Notices
Disposal of Waste of Electrical and Electronic Equipment Within the European Union.
The symbol on the product indicates that this equipment must not be disposed of with
other waste materials. In order to dispose of your waste equipment, it must be handed
over to a designated collection point for recycling. The separate collection and
recycling of your waste equipment at the time of disposal will help conserve natural
resources and ensure that it is recycled in a manner that protects human health and
theenvironment. For more information about where you can drop off your waste
equipment for recycling, please contact your local city recycling office or the dealer
from whom you purchased the product.
This equipment has been tested and found to comply with the limits for a Class A
digitaldevice, pursuant to Part 15 of the FCC rules. These limits are designed to provide
reasonable protection against harmful interference when the equipment is operated
inacommercial environment. This equipment generates, uses, and can radiate radio
frequency energy and, if not installed and used in accordance with the instructions,
maycause harmful interference to radio communications. Operation of this product in
aresidential area is likely to cause harmful interference, in which case the user will be
required to correct the interference at personal expense.
Operation is subject to the following two conditions:
1 This device may not cause harmful interference.
2 This device must accept any interference received, including interference that
may cause undesired operation.
ISED Canada Statement
This device complies with Canadianstandards for Class A digital apparatus.
Any modifications or use of this product outside its intended use could void
compliance to these standards.
This equipment has been tested for compliance with the intended use in a
commercial environment. If the equipment is used in a domestic environment,
it may cause radio interference.
14Regulatory Notices
Page 15

Safety Information
For protection against electric shock, the equipment must be connected to a mains socket
outlet with a protective earth connection. In case of doubt contact a qualifiedelectrician.
To reduce the risk of electric shock, do not expose this equipment to dripping orsplashing.
o
Product is suitable for use in tropical locations with an ambient temperature of up to 40
Ensure that adequate ventilation is provided around the product and that it is not restricted.
When rack mounting, ensure that the ventilation is not restricted by adjacent equipment.
No operator serviceable parts inside product. Refer servicing to your local Blackmagic Design
service center.
Use only at altitudes not more than 2000m above sea level.
State of California statement
This product can expose you to chemicals such as trace amounts of polybrominated biphenyls
within plastic parts, which is known to the state of California to cause cancer and birth defects
or other reproductive harm.
For more information go to www.P65Warnings.ca.gov.
C.
15Safety Information
Page 16

Warranty
12 Month Limited Warranty
Blackmagic Design warrants that this product will be free from defects in materials and
workmanship for a period of 12 months from the date of purchase. If a product proves to be
defective during this warranty period, Blackmagic Design, at its option, either will repair the
defective product without charge for parts and labor, or will provide a replacement in exchange
for the defective product.
In order to obtain service under this warranty, you the Customer, must notify Blackmagic Design
of the defect before the expiration of the warranty period and make suitable arrangements for
the performance of service. The Customer shall be responsible for packaging and shipping the
defective product to a designated service center nominated by Blackmagic Design, with
shipping charges pre paid. Customer shall be responsible for paying all shipping charges,
insurance, duties, taxes, and any other charges for products returned to us for any reason.
This warranty shall not apply to any defect, failure or damage caused by improper use or
improper or inadequate maintenance and care. Blackmagic Design shall not be obligated to
furnish service under this warranty: a) to repair damage resulting from attempts by personnel
other than Blackmagic Design representatives to install, repair or service the product, b) to
repair damage resulting from improper use or connection to incompatible equipment, c) to
repair any damage or malfunction caused by the use of non Blackmagic Design parts or
supplies, or d) to service a product that has been modified or integrated with other products
when the effect of such a modification or integration increases the time or difficulty of servicing
the product.
THIS WARRANTY IS GIVEN BY BLACKMAGIC DESIGN IN LIEU OF ANY OTHER WARRANTIES,
EXPRESS OR IMPLIED. BLACKMAGIC DESIGN AND ITS VENDORS DISCLAIM ANY IMPLIED
WARRANTIES OF MERCHANTABILITY OR FITNESS FOR A PARTICULAR PURPOSE.
BLACKMAGIC DESIGN’S RESPONSIBILITY TO REPAIR OR REPLACE DEFECTIVE PRODUCTS IS
THE WHOLE AND EXCLUSIVE REMEDY PROVIDED TO THE CUSTOMER FOR ANY INDIRECT,
SPECIAL, INCIDENTAL OR CONSEQUENTIAL DAMAGES IRRESPECTIVE OF WHETHER
BLACKMAGIC DESIGN OR THE VENDOR HAS ADVANCE NOTICE OF THE POSSIBILITY OF
SUCH DAMAGES. BLACKMAGIC DESIGN IS NOT LIABLE FOR ANY ILLEGAL USE OF
EQUIPMENT BY CUSTOMER. BLACKMAGIC IS NOT LIABLE FOR ANY DAMAGES RESULTING
FROM USE OF THIS PRODUCT. USER OPERATES THIS PRODUCT AT OWN RISK.
© Copyright 2019 Blackmagic Design. All rights reserved. ‘Blackmagic Design’, ‘DeckLink’, ‘HDLink’, ‘Workgroup Videohub’,
‘Multibridge Pro’, ‘Multibridge Ex treme’, ‘Intensity’ and ‘Leading the creative video revolution’ are registered trademarks in the
US and other countries. All other company and product names may be trade marks of their respective companies with which
they are associated.
16Warranty
Page 17

インストール/オペレーション マニュアル
Blackmagic
MultiDock
2019年7月
日本語
Page 18

ようこそ
Blackmagic MultiDockは 、最 大 4枚までの2.5インチドライブ を Mac/Windowsコンピューターにマウ
ン ト で き る 、極 め て 高 速 な SSD/HDDド ッ キ ン グ・ソ リ ュ ー シ ョン で す 。Blackmagic MultiDockは、USB
および
Thunderbolt
転送における信頼性の高いソリューションであり、複数のドライブで異なるコマンドを同時に実行でき
ます。
SSD
は可動部品がないため、非常に高速で、高い堅牢性が特徴です。複数のドライブをストライ
ピングしてRAIDを構成し、パフォーマンスをさらに向上させることも可能です!
このインストラクション・マニュアルには、Blackmagic MultiDockディスクアレイを使用する上で必
要なすべての情報が記載されています。
テクノロジーを搭載しているため、ビデオ編集、カラーグレーディング、メディアの
弊 社のウェブサイト
ュアルおよびサポートノートをご確認ください。サポートページを定期的に確認することで、常に最
新の機能をお使い頂けます。ソフトウェアをダウンロードする際にユーザー登録していただければ、
新しいソフトウェアのリリース時にお知らせいたします。常に新機能の開発および製品の改善に努め
ていますので、ユーザーの皆様からご意見をいただければ幸いです。
Blackmagic Design CEO
グ ラ ン ト・ペ テ ィ
www.blackmagicdesign.com/jp
のサポートページで、最新バージョンのマニ
Page 19

目次
Blackmagic MultiDock
はじめに 20
MultiDock
コンピューターに接続 21
ドライブの挿入 21
Blackmagic
ドライブの識別 22
ドラ イブをフ ォーマット 23
Mac
Windows
Blackmagic
ビデオ用の高速SSD 25
RAID
RAID
RAID
Mac
ドライブを取り出す 27
Mac
Windows
ヘルプ 28
規制に関する警告 29
安全情報 30
保証 31
について 20
MultiDockを使う 22
OSでドライブ をフォ ー マット 23
でドライブ を フォー マット 24
MultiDock10Gのコンフィギュレ ー ション 25
を構成してパフォーマンスの高速化とデータの保護 26
レベル0でパフォーマンスを高速化 26
レベル1でデータを保護 26
OS/WindowsでRAIDを構成 26
OSでドライブをイジェ クトす る 27
でドライブをイジェクトする 27
Page 20
はじめに
MultiDock
Blackmagic MultiDockは 、最 大 4枚 の ソ リ ッ ド ス テ ー ト ・ ド ラ イ ブ( SSD)ま た は ハ ー ド デ ィ ス ク ・ド ラ イ ブ を
コンピューター にマウントできる 、魅 力 的 なドッキング ステーションで 、ラックマウントに対 応しています。
Blackmagic MultiDockおよびBlackmagic MultiDock 10Gは、編集やカラーグレーディングなどの映像ポ
ストプロダクションタスクだけでなく、大容量ビデオファイルを複数ドライブに保存する、あらゆるタスクに
最 適です。Blackmagic MultiDockでは、外付けドライブを交換する時間を最小限に抑えられるため、クリ
エイティブな作業に今まで以上に専念できます。
Blackmagic MultiDockは、USB 3.1とThunderbolt™ 2テクノロジーを搭載しており、それぞれ最大10Gb/s
と
20Gb/s
クインターフェースが搭載されており、高いパフォーマンスが 得られます。
2つの独 立したドックとしても使用できるため 、 2つの機器のドライブにアクセスできます。
複 数 のディスクを 挿 入し、オペレーティングシステムのディスクユーティリティ・ソフトウェアを 使 用して
RAID
を構成することで、複数のディスクを1つのストレ ージボリュームとして ” ストライピング ”また は ”ミラー
リング”できます。
このオペレーション・マニュアルには、 Blackmagic MultiDockの機能を最大限に活用するために必要なす
べての情報が記載されています。
について
の超高速でコンピューターに接続できます。各ドライブベイには完全に独立した
Blackmagic MultiDock 10G
SATA 3
ディス
は、
BlackmagicMultiDock10GのUSB3.1経由の読み込みおよび書き込み速度は最大10Gb/s
Blackmagic
MultiDockのThunderbolt2経由のデータ転送速度は最大20Gb/s
はじめに
20
Page 21
コンピューターに接続
CAUTION!
RISK OF ELECTRIC
SHOCK- DO NOT OPEN!
100-240V 1.7A 50-60Hz Fuse T5AL
はじめに、Blackmagic MultiDockに電源を入れ、コンピューターに接続します。
標準IECケ ーブ ルとコネクタ ー を 使 用して、 Blackmagic MultiDockの主電源入力に電源を接続します。電源
が供給されると、フロントパネルの電源インジケーターが点灯します。
Blackmagic MultiDock 10Gは、USB-C
ットの 背 面 に あ る スイッチ で、
あるいは2つの独 立した デュアルドライブ のドックに 設 定 できます。つまり、2つの個別の
で2つの個別のコンピューターから、2つのドライブにアクセスできます。詳細は「
Blackmagic MultiDock 10Gを4
ケ ー ブ ル で コ ン ピ ュ ー タ ー と「
つ全てのドライブを使 用する単 一のドック、
USB-C A
」ポ ー ト を 接 続 し ま す 。ユ ニ
USB-C
ポート経 由
Blackmagic MultiDock
10Gのコンフィギュレー ション 」セクションを参 照してください。
オリジナルモデルの
つをコンピューター の Thunderboltポ ー ト に 接 続 し ま す 。コ ン ピ ュ ー タ ー の Thunderboltが 1つの場
合は、MultiDockのもう一 方 の Thunderboltポートを 使 用 して RAIDまたは 他 のデバイスを 接 続 できます。
標準IEC電 源ケーブルとコネクターでBlackmagicMultiDockに給電
Blackmagic MultiDockは、Thunderbolt
ケ ーブ ル を 使 用して、
Thunderbolt
ポートの1
BlackmagicMultiDockとMac/WindowsコンピューターをThunderbolt/USB-Cケーブル で接続
ドライブの 挿入
Blackmagic MultiDockで は 、フ ォ ー マ ッ ト さ れ た 2.5インチのSSDまたはHDDを使 用します。
ドライブを挿 入 する:
1 ド ラ イ ブ を 持 ち 、金 の SATA接触部を下にしてドライブベイに向けます。
2 ドライブをドライブベイに差し込み、スロットにしっかりと収まるまでゆっくりと押します。
はじめに
21
Page 22
ドライブ が 検 出されると、ドライブベイの 赤い
み 中 、ド ラ イ ブ ベ イ の LEDはディスクの動作に応じて点滅します。
LED
が一時的に点灯します。
SSD/HDD
の読み込みや書き込
フォ ー マ ットさ れ た
Max OSでは、ドライブはデスクトップに表示されます。
Windowsで は 、タ ス ク バ ー の File Explorerア イ コ ン を ク リ ッ ク し て 、左 側 の「 This PC」に 進 み ま す 。
これで、電源とコンピューターへの接続、ドライブの挿入が完了し、
備が整いました。
BlackmagicMultiDockの4つのドライブベ イにSSD/HDDを挿入
SSD/HDDを挿入すると、コンピューターに認識され、マウントされます。
Blackmagic MultiDock
を使用する準
Blackmagic MultiDock
を使う
ドライブの 識別
Blackmagic MultiDock
ドライブに名前を付けたり、変更することをお勧めします。ドライブの名前付けは、
アプリケーション、WindowsではWindows Disk Managementを使用して、ドライブのフォーマットの際
に実行できます。ドライブの名前の変更は、
ブを右 クリックするだけで 実 行 できます。さらにドライブに 実 際 にラベルを貼り付 けることで、各ドライブベ
イのドライブ を見て識 別 できます。
ドライブ 名は、MacOSのFinderまたはWindowsの
FileExplorerで簡単に変更可能
には独立した4つのドライブベイが あります。ドライブ を特定しやすくするため に、
Mac OSではDisk Utility
Mac OSのFinder
または
WindowsのFile Explorer
で 、ド ラ イ
BlackmagicMultiDockを使う
22
Page 23
ドライブをフォーマット
Blackmagic MultiDock
ューターで読み込み/書き込みが実行できるよう、フォーマットする必要があります。
は、ドライブ のフォーマットに HFS+およびexFATを 使 用 し ま す 。こ れ ら の デ ィ ス ク フ ォ ー マ ッ ト は 、サ イ ズ の 大
きなファイルや、単 一 のファイル にキャプチャーされた長 尺 ビデオクリップを扱 え ます。
HFS
+
で は 、あ ら ゆ る 種 類 の2.5インチ
SSD/HDD
を 使 用 で き ま す 。新 し い ド ラ イ ブ は 、コ ン ピ
Blackmagic MultiDock
HFS+はMac OS Extendedとしても知 ら れて おり、 Mac OSでネイティブ サポートされています。 HFS+
はジャーナリングをサポートしています。これは、データの破損またはハードウェア/ソフトウェアに不具合
が生じた場合、データ復旧の可能性が高くなる機能です。
exFAT
exFATはMac OSおよび Windowsで ネイティブ サ ポ ートされています。 exFATは ジャー ナリング に 対 応し
ていないため、データの破損またはハードウェア/ソフトウェアに不具合が生じた場合、データの復旧が難
しくなりま す。
ドライブ のフォーマットは、ドライブ にすでにデータが書き込まれている場合を含 め、いつでも実 行 できま
す。しかし、ドライブをフォーマットするとすべてのデータが消去されるため、大切なデータは必ず事前に
バック ア ップ を 取ってくだ さ い 。
MacOSでドライブ をフォーマット
Mac OSの Disk Utilityア プ リ ケ ー シ ョ ン で 、ド ラ イ ブ を HFS+または exFATでフォーマットできます。
1 Applications/Utilityへ行き、Disk Utilityを起動します。
2
ウィンドウの左側に、現在接続されているドライブのアイコンのリストが表示されます。新しいドライ
ブのディスクアイコンをクリックします。
3 Disk Utilityのトップメニューで「Erase」を 選 択 し ま す 。
4 新しいボリュームの名前を「 Name」に 入 力 し ま す 。
5
「
Format
」ド ロ ッ プ ダ ウ ン メ ニ ュ ー か ら「
「
Erase
」をクリックします。新しいドライブがすば やくフォーマットされ、
使用可能になります。
Mac OS Extended (Journaled
) 」か「
exFAT
」を 選 択 し て 、
Blackmagic MultiDock
で
MacOSのDiskUtilityで 、ド ラ イ ブ を MacOSExtended(Journaled)
exFATフォ ー マット にフォ ーマット 、ある い は 消 去し ます。
または
BlackmagicMultiDockを使う
23
Page 24
Windowsでドライブ をフォーマット
Windowsでは、Disk Managementアプリケーションを使 用して新しいドライブを exFATでフォーマットしま す。
1 新しいドライブをBlackmagic MultiDockに 挿 入します。
2
Control Panel>System and Security>Administrative Tools>Computer Management
Disk Managementに 進みます。
3
接 続されているドライブのリストで該 当のドライブ を右クリックし、「
します。フォーマットされてい ない新しいドライブ が「Unallocated」と し て 表 示 さ れ ま す 。
4
ボリュームのサイズを確認するウィンドウが表示されます。ボリュームサイズは、ドライブの最大容量
で あ る デ フ ォ ル ト の ま ま に し ま す 。「 Next」をクリックします。
5 ド ラ イ ブ 文 字 を 割 り 当 て 、「 Next」をクリックします。
6 ファイルシステムを exFATに 設 定 し ま す 。ボ リ ュ ー ム ラ ベ ル を 入 力 し て「 Perform a quick Format」
を 選 択 し 、「 Next」をクリックします。新しいドライブがすば やくフォーマットされ、 Blackmagic
MultiDockで使用可能になります。
New Simple Volume
」を 選 択
>
WindowsのVolumeWizardでドライブ をフォ ー マット
exFATで のドライブ の フォ ー マット は 、Windowsの
Format」ダイアログ ボックスでも 実行で きます。これは、
「
ドライブ のアイコンを右クリックすると 表示されます。
BlackmagicMultiDockを使う
24
Page 25
BlackmagicMultiDock10Gのコンフィギュレ ー ション
SS SS
A B
2
SS SS
A B
4
Blackmagic MultiDock 10Gは、4
ドライブ のドックに 設 定 できます。つまり、
ドライブベイを2つ ず つ 使 用 で き ま す 。例 え ば 、2台のコンピューターまたは2台の
Extreme 8K HDRを、1台のBlackmagic MultiDock 10Gに接続し、収録と再生を同時に実行できます。
つのドライブを 搭 載した単一のドック、あるいは2つの 独 立したデュアル
MultiDockの各USB-C
ポートに2台の個別の機器を接続して、
Blackmagic HyperDeck
リアパネルにドライブベイのコンフィギュレーション用スイッチが 搭 載されています。
10Gを4
つのドライブの単一ユニットとして設定する場合は、コンフィギュレーション用スイッチを「4」に し
て 、ケ ー ブ ル を「
として設定する場合は、スイッチを「2」 に し ま す 。 こ れ に よ り 、「
のみにアクセスす るようになり、3つ目と 4つ目のドライブスロットには「 USB- C B」からアクセスします。
USB-C A
リアパネルにある、ドライブベイのコンフィギュレーション用
スイッ チ を
単一ユニット、あるいは 独 立したデュアルドライブの
2つのユニ ットとして使 用でき ます。
2または4に 切り 替えて、4ベイの
」と ラ ベ ル の 付 い た
USB
ポートに接 続します。2つの 独 立 したデュアルドライブ
USB-C A
」は 最 初 の2つのドライブスロット
Blackmagic MultiDock
ビデオ用の高速SSD
Blackmagic MultiDock
や8Kビデオなど、圧縮率の低い、高解像度のビデオファイル扱う場合は、書き込み速度の速い
用を推 奨します。
必 要ありません。
で は 、あ ら ゆ る 種 類 の2.5インチ
ProRes LTやH.265
低など、圧縮率の高いファイルでは、それほど速い書き込み速度は
SSD/HDD
を日々の作業に使用できます。圧 縮
SSD
の使
4K
Blackmagic Disk Speed Test
度に対応しているか確認できます。Disk Speed Testは、Desktop Videoソフトウェアに 同 梱されてい ま
す 。ま た は 、
macOS用にApp Store
は、ストレージメディアの読み込みと書き込みの性能を測定し、十分な速
から、スタンドアロンのアプリケーションとしてダウンロードできます。
BlackmagicMultiDockを使う
25
Page 26

RAID
を構成してパフォーマンスの高速化とデータの保護
Blackmagic MultiDockは、最も一般的なRAID構成である RAID 0とRAID 1をサ ポ ートしてい ます。
RAID(Redundant Array of Independent Disks)は、速度またはデータの安全性を向上できます。
例えば、
識 さ せ る こ と で 、パ フ ォ ー マ ン ス が 改 善 し ま す 。 RAIDレベル1では、2枚 のドライブ に同時に同じ内 容を書き
込むことで、データの安全性が向上します。
RAID
レベル0では 、複 数のドライブをストライピングし、1つのドライブとしてコンピューター に認
メモ ドライブを
ため、慎重な管理が必要です。また、ドライブをRAIDとしてストライピングする場合は、SSDのみ
の セ ッ ト 、あ る い は HDDのみのセットをストライピングし、それらを組み合わせないでください。
RAID
としてストライピングすると、データが複数のドライブに分けて保 存される
RAIDレベル0でパフォーマンスを高速化
HDD
を使用して非圧縮ビデオのキャプチャー・再生を行う場合、2〜4枚のドライブを
ピングすると効果的です。データを2枚のドライブに分配すると、総容量が2倍 に な り 、そ れ ぞ れ の 負 荷 も 軽
減されるため、パフォーマンスが高速 化します。同じように、3〜4枚 のドライブを RAIDレベル0として構成
すると、ドライブの総容量がそれぞれ3倍、4倍 に な り ま す 。例 え ば 、 1TBのドライブ 4枚をRAID 0でストラ
イピングすると、コンピューターはそれを
複 数のドライブを RAIDとしてストライピングする際 、コンピューターの電源がオンの状 態でドライブを抜か
ないでください。データが失われる可能性があります。
換の前に、ドライブをイジェクトし、コンピューターからMultiDockの 接 続 を 外 してください 。
SSDもRAID 0
ビデオファイルの読み込み/書き込みなど、連続した大きなファイルを使用するワークフローに限られてい
ます。日常的な通常のタスクでは、パフォーマンスの向上があまり見られないため、SSDは単体で使用す
る方 が 良いでしょう。
ドライブを検出する 際 、 Blackmagic MultiDockはドライブベイでなく、ドライブ名を 探します。そのため、RAID
を構成する複 数のドライブは、 Blackmagic MultiDockの4つのドライブベイのどれにでも挿入できます。
としてストライピングできますが、通常、パフォーマンスの向上は、
4TBのドライブ 1枚 として 認 識します。
RAID
を使用している際は 、ドライブの取り出しや交
RAID
としてストライ
Ultra HD、4K
、非圧縮
RAIDレベル1でデータを保護
Blackmagic MultiDockには4
コンフィギュレーションできます。ミラ ーリングされたドライブのペアは、1枚のドライブとして認識されま
す。
RAID
レベル1では、ドライブにデ ータを書き込 むと同時にバックアップ が 得られます。1枚のドライブに
不具合が生じても、もう1枚 を すぐに 使 用で きます
つのドライブベイが あり、ミラーリングされた
SSD/HDDの2
組 の ペアとして
MacOS/WindowsでRAIDを構成
Mac OS
をオリジ ナル モデル の Blackmagic MultiDockのRAID構 成に 使 用します。
Mac OSのApplications> Utilities>Disk Utilityで 、フ ァ イ ル メ ニ ュ ー「 RAID Assistant」を 選 択 し ま
す。
Management>Storage>Disk Managementの 順 に 選 択します。
では、
Disk UtilityのRAID Assistant
Windows Disk Management
を使用します。
は 、コ ン ト ロ ー ル パ ネ ル を 開 き 、
Windows
では、
Windows Disk Management
Administrative Tools>Computer
BlackmagicMultiDockを使う
26
Page 27
RAIDの構成に関する詳細は、オペレーティングシステムのオンラインサポートを参照してください。
ドライブをRAID1として 設 定 する には、MacOSのRAIDAssistantで「 Mirrored」を 選 択
ドライブを取り出す
ドライブをドライブベイから取り出す前に 、ドライブ が 適 切 にイジェクトされていることを確 認してくださ
い。
HDDはSSD
ディスクにデータを保存するので、回転の開始/停止に時間がかかるためです。
と比較して、初期化およびシャットダウン時間が長くなります。これは、
HDD
は回 転する
MacOSでドライブをイジェクトする
デスクトップでドライブのアイコンを右クリックし、「Eject [ドライブ名]」を選択します。Blackmagic MultiDock
のドライブベイの LEDが一時的に点滅し、デスクトップに表示されたドライブが消えます。Blackmagic
MultiDockからドライブを取り出 す 準 備ができました 。
Windowsでドラ イブをイジェクトする
デスクトップの右下、「ハードウェアを安全に取り出してメディアを取り出す」アイコンをクリックします。アイコ
ンの 上 にドライブとデバイスのリストが 表 示 されます。イジェクトするドライブ をクリックします。
MultiDock
消えます。Blackmagic MultiDockか らドラ イブ を 取 り出す準 備 が で きました 。
のドライブベイの
メモ RAIDを使用する際は、 RAIDセットを取り出す前に必ずドライブをイジェクトしてください。
コンピューター の作動中は
る可能性があります。
LED
が一時的に点滅し、デスクトップのデバイスリストに表示されたドライブが
RAID
セットからドライブを取り出さないでください。データが損失す
Blackmagic
コンピューターから取り出す前に、必ずメディアをイジェクトしてください。
BlackmagicMultiDockを使う
27
Page 28

ヘルプ
ヘルプライン
すぐに情報が必要な方は、Blackmagic Designオンラインサポートページ で、Blackmagic MultiDockの
最新サポート情報を確認できます。
BlackmagicDesignオンラインサポートページ
最新のマニュアルおよびサポートノートは、
Designサポートセンターで 確 認できます。
BlackmagicDesignフォーラム
弊 社 ウェブ サ イトの
る有益なリソースです。経験豊富なユーザーや
解決策が公開されていますので、このフォーラムを参考にすることで、現在の問題をすばやく解決できるこ
と が あ り ま す 。ぜ ひ ご 利 用 く だ さ い 。 Blackmagicフォー ラムには 、 http://forum.blackmagicdesign.com
からアクセスできます。
Blackmagic Design
BlackmagicDesignサポートへの連絡
サポートページやフォーラムで必要な情報を得られなかった場合は、サポートページの「メールを送信」
ボタンを使 用して、サポートのリクエストをメール 送 信してください。あるいは、サポートページの「お住ま
いの地域のサポートオフィス」をクリックして、お住まいの地域の
電話でお問い合わせください。
www.blackmagicdesign.com/jp/supportのBlackmagic
フォーラムは 、様 々な情報やクリエイティブ なアイデアを共有でき
Blackmagic Design
スタッフによって、すでに多くの問題の
Blackmagic Design
サ ポ ー ト オフィス に
ヘルプ
28
Page 29
規制に関する警告
欧州連合内での電気機器および電子機器の廃棄処分
製品に記載されている記号は、当該の機器を他の廃棄物と共に処分してはならないことを示して
います。機器を廃棄するには、必ずリサイクルのために指定の回収場所に引き渡してください。機
器の廃棄において個別回収とリサイクルが行われることで、天然資源の保護につながり、健康と
環境を守る方法でリサイクルが確実に行われるようになります。廃棄する機器のリサイクルのた
めの回収場所に関しては、お住まいの地方自治体のリサイクル部門、または製品を購入した販売
業者にご連絡ください。
ISED
この機器は、
認されています。これらの制限は、商用環境で機器を使用している場合に有害な干渉に対する妥
当な保護を提供するためのものです。この機器は無線周波エネルギーを生成、使用、放出する可
能性があります。また、指示に従ってインストールおよび使用しない場合、無線通信に有害な干渉
を引き起こす恐れがあります。住宅地域で当製品を使用すると有害な干渉を引き起こす可能性が
あり、その場合はユーザーが自己責任で干渉に対処する必要があります。
動作は次の
FCC
規定の第15部 に 準 拠 し 、ク ラ スAデジタル機器の制限に適合していることが確
2つ を 条 件 とし ま す:
1 本機は、有害な干渉を起こさない。
2
本機は希望しない動作を発生しかねない干渉を含む、いかなる受信干渉も受け入れる必要が
ある。
Canada
ステートメント
本機は、カナダのクラスAデジタル機器の規格に準拠しています。
本機のいかなる改造、あるいは目的の用途以外での使用は、これらの規格への順守を無効に
することが あります。
本機は、商用環境で目的の用途に順守した使用においてテストを行なっています。非商用環
境で使用された場合、無線妨害を引き起こす可能性があります。
規制に関する警告
29
Page 30

安全情報
感電を避けるため、当製品は必ずアース端子付きコンセントに接続してください。不確かな場合は、資格を
持つ電気技師に連絡してください。
感電のリスクを減らすため、水が跳ねたり、滴るような場所には置かないでください。
この製品は、周囲温度が最高
通気が妨げられないように、この製品の周囲は通気に十分なスペースを開けるようにしてください。
ラックマウントする場合は、隣接する機器により通気が妨げられないようにしてください。
この製品の内部には、ユーザーが保守できる部品はありません。サービスに関しては、お近くの
40度までの熱帯地区での使用に対応しています。
Blackmagic
Designのサービスセンターにお問い合わせください。
海抜
2000m以上では 使用しないでください。
カリフォルニア州ステ ートメント
この製品のユーザーは、プラスチック部品内の微量の多臭素化ビフェニルなどの化学物質にさらされる可
能性があります。カリフォルニア州は、多臭素化ビフェニルは発がん性があり、先天異常や生殖機能へ危
害を及ぼす物質であると認識しています。
詳細は、以下のウェブサイトをご確認ください。
www.P65Warnings.ca.gov
安全情報
30
Page 31

保証
12
ヶ月限定保証
Blackmagic Designは、お買い上げの日から12ヶ月間、本製品の部品および仕上がりについて瑕疵がない
ことを保証します。この保証期間内に製品に瑕疵が見つかった場合、
おいて部品代および人件費無料で該当製品の修理、あるいは製品の交換のいずれかで対応いたします。
Blackmagic Design
は弊社の裁量に
この保証に基づいたサービスを受ける際、お客様は必ず保証期限終了前に
通知し、保証サービスの手続きを行ってください。お客様の責任において不良品を梱包し、
Design
が指定するサポートセンターへ配送料前払で送付いただきますようお願い致します。理由の如何
を問わず、 Blackmagic Designへの製品返送のための配送料、保険、関税、税金、その他すべての費用は
お客 様 の自己負担となります。
不適切な使用、または不十分なメンテナンスや取扱いによる不具合、故障、損傷に対しては、この保証は
適用されません。
します。a)製品のインストールや修理、サービスを行う
って生じた損傷の修理、b)不適切な使用や互換性のない機器への接続によって生じた損傷の修理、
c)Blackmagic Design
造や他製品との統合により時間増加や製品の機能低下が生じた場合のサービス。
この保証は
です。
Blackmagic Design
します。
的に生じる損害に対して、Blackmagic Designあるいは販売社がそのような損害の可能性についての事
前通知を得ているか否かに関わらず、お客様に提供される完全唯一の救済手段となります。
Blackmagic Design
Blackmagic Design
の部品や供給品ではない物を使用して生じたすべての損傷や故障の修理、d)改
Blackmagic Design
とその販売社は、商品性と特定目的に対する適合性のあらゆる黙示保証を拒否
の不良品の修理あるいは交換の責任が、特別に、間接的、偶発的、または結果
はこの保証で、以下に関してサービス提供義務を負わないものと
Blackmagic Design
が保証するもので、明示または黙示を問わず他の保証すべてに代わるもの
Blackmagic Design
に瑕疵を
Blackmagic
販売代理人以外の者によ
Blackmagic
Designはお客様による機器のあらゆる不法使用に対して責任を負いません。Blackmagic Designは本製
品の使用により生じるあらゆる損害に対して責任を負いません。使用者は自己の責任において本製品を使
用するものとします。
© Copyright 2019 Blackmagic Design 著作権所有、無断複写・転載を禁じます。「Blackmagic Design」、「DeckLink」、
「HDLink」、「Workgroup Videohub」、「Multibridge Pro」、「Multibridge Extreme」、「Intensity」、「Leading the creative
video revolution」は、米国ならびにその他諸国での登録商標です。その他の企業名ならびに製品名全てはそれぞれ関連する会社の
登録商標である可能性があります。
保証
31
Page 32

Manuel d'installation et d’utilisation
Blackmagic
MultiDock
Juillet 2019
Français
Page 33

Chère cliente, cher client,
Le Blackmagic MultiDock est une station d’accueil pour SSD et disque dur (HDD) compatible
avec Mac et PC, qui dispose de 4 lecteurs pour disques de 2,5". Grâce à sa technologie
USB-C et Thunderbolt, le Blackmagic MultiDock peut prendre en charge simultanément de
nombreuses opérations entre les différents disques. Il vous permet également de monter vos
vidéos, de les étalonner et de transférer vos médias de façon fiable. Les SSD ne reposent
pas sur des éléments mécaniques, ils sont donc rapides et incroyablement robustes. Il
est également possible d'assembler les disques en système RAID pour de meilleures
performances.
Ce manuel d'utilisation contient toutes les informations nécessaires relatives à l'installation et
l'utilisation de votre matrice de disques Blackmagic MultiDock.
N’oubliez pas de consulter notre page d’assistance sur www.blackmagicdesign.com/fr pour
obtenir la dernière version de ce manuel et d’autres informations relatives au produit. Des mises
à jour régulières permettent d’utiliser les fonctions les plus récentes. Enfin, veuillez enregistrer
votre équipement lors du téléchargement du logiciel afin que nous puissions vous tenir
informés des mises à jour. Nous souhaitons continuellement améliorer nos produits, n'hésitez
donc pas à nous faire part de vos commentaires !
Grant Petty
PDG de Blackmagic Design
Page 34

Sommaire
Blackmagic MultiDock
Mise en route 35
MultiDock 35
Connecter l'appareil à un ordinateur 36
Insérer vos disques 36
Utiliser le Blackmagic MultiDock 37
Identifier des disques 37
Formater les disques 38
Formater vos disques sous Mac OS 38
Formater vos disques sous Windows 39
Configurer le Blackmagic MultiDock 10G 40
SSD rapides pour la vidéo 40
Installer un RAID pour des performances haut débit et une
sécurisation des données 41
RAID de niveau 0 pour une performance haut débit 41
RAID de niveau 1 pour la sécurisation des données 41
Configurer un RAID sous Mac OS X et Windows 41
Éjecter vos disques 42
Éjecter un disque sous Mac OS 42
Éjecter un disque sur un PC Windows 42
Assistance 43
Avis règlementaires 44
Informations de sécurité 45
Garantie 46
Page 35

Mise en route
MultiDock
Le Blackmagic MultiDock est une station d'accueil au format rack qui permet de connecter jusqu'à
4 SSD ou HDD de 2,5" à votre ordinateur.
Le Blackmagic MultiDock et le Blackmagic MultiDock 10G sont la solution idéale pour les opérations
de post-production vidéo, telles que le montage, l'étalonnage, ou toutes autres opérations
nécessitant le stockage de fichier vidéo de grande taille sur plusieurs lecteurs. En réduisant le
temps passé à installer et à désinstaller les disques externes, le Blackmagic MultiDock vous permet
de concentrer vos efforts sur la partie créative de votre travail.
Le Blackmagic MultiDock utilise la technologie USB 3.1 et Thunderbolt™ 2, dont le débit ultra rapide
atteint respectivement 10 et 20Gb/s. Chaque lecteur dispose d'une interface de disque SATA 3
indépendante pour d’incroyables performances. Le Blackmagic MultiDock 10G peut même être
configuré en tant que deux stations indépendantes pour accéder à vos disques depuis deux
équipements.
Un système RAID peut être configuré en constituant un seul volume de stockage à partir de
plusieurs disques durs en bande ou en mirroir depuis l'utilitaire de disque de votre système.
Ce manuel d’utilisation contient toutes les informations nécessaires pour exploiter au maximum votre
Blackmagic MultiDock.
Le Blackmagic MultiDock 10G offre une vitesse de lecture et d’écriture USB 3.1 jusqu’à 10Gb/s
Le Blackmagic MultiDock offre une vitesse de transfert des données Thunderbolt 2 jusqu’à 20Gb/s
35Mise en route
Page 36

Connecter l'appareil à un ordinateur
CAUTION!
RISK OF ELECTRIC
SHOCK- DO NOT OPEN!
100-240V 1.7A 50-60Hz Fuse T5AL
Pour mettre en marche votre Blackmagic MultiDock, branchez-le à votre ordinateur.
Branchez le Blackmagic MultiDock à une source d'alimentation à l'aide du câble et du connecteur
IEC standard. Le voyant lumineux situé sur le panneau avant s’allume lorsque l’appareil est branché.
Sur le Blackmagic MultiDock 10G, connectez le port USB-C A à votre ordinateur via un câble USB-C.
L’interrupteur situé à l’arrière de l’appareil vous permet de configurer le Blackmagic MultiDock 10G
en une seule station à 4 disques, ou en deux stations indépendantes avec chacune 2 logements
pour disque. Ainsi, vous pouvez accéder indépendamment à deux disques depuis deux ordinateurs
via les deux ports USB-C. Pour plus d'informations, consultez la section « Configurer le Blackmagic
MultiDock 10G ».
Sur le modèle Blackmagic MultiDock original, connectez un des ports Thunderbolt au port
Thunderbolt de l’ordinateur à l’aide d’un câble Thunderbolt. Si votre ordinateur ne possède qu'un
seul port Thunderbolt, vous pouvez utiliser le deuxième port du MultiDock pour connecter un
système RAID ou un autre appareil.
Branchez le Blackmagic MultiDock à une source d'alimentation
à l'aide du câble et du connecteur IEC standard.
Branchez le Blackmagic MultiDock à votre ordinateur Mac ou PC
Windows à l'aide d’un câble Thunderbolt ou USB-C.
Insérer vos disques
Le Blackmagic MultiDock prend en charge les SSD et les HDD de 2,5" formatés.
Pour insérer votre disque:
Mainenez les contacts dorés du disque SATA orientés vers le bas.
1
2 Insérez le disque dans le logement jusqu'à ce qu'il soit correctement en place.
36Mise en route
Page 37

Une fois le disque détecté, la lumière rouge qui entoure chaque logement s'allume pendant
quelques secondes. Lorsqu'un SSD ou un HDD est utilisé, cette lumière clignote en fonction de
l'activité du disque.
Lorsque vous insérez des SSD ou HDD formatés, ils sont automatiquement détectés par votre
ordinateur.
Sur Mac OS, les disques s’affichent sur le bureau.
Sur Windows, cliquez sur l’icône de l’Explorateur de fichiers dans la barre des tâches et naviguez
jusqu’à Ce PC dans la colonne de gauche.
Une fois que votre Blackmagic MultiDock est branché à une source d'alimentation et qu'il est
connecté à votre ordinateur, il est prêt à être utilisé.
Insérez les SSD ou HDD dans l'un des 4 logements du Blackmagic MultiDock.
Utiliser le Blackmagic MultiDock
Identifier des disques
Le Blackmagic MultiDock comporte 4 logements pour disque indépendants. Nous vous conseillons
de renommer les disques afin de les identifier facilement. Vous pouvez également renommer vos
disques lors du formatage à l'aide de l'Utilitaire de disque sur Mac OS, ou de la Gestion des disques
sur Windows. Renommer des disques est extrêmement simple, il suffit de faire un clic droit sur
l'icône du disque dans le Finder de Mac OS ou l’Explorateur de fichiers Windows. Vous pouvez
également choisir d’écrire directement le nom sur vos disques pour les identifier facilement.
Vous pouvez facilement renommer vos disques à l'aide du Finder
de Mac OS X ou de l'Explorateur de fichiers Windows.
37Utiliser le Blackmagic MultiDock
Page 38

Formater les disques
Le Blackmagic MultiDock prend en charge tout type de SSD ou de HDD de 2,5". Les nouveaux
disques doivent être formatés avant de pouvoir lire et écrire des données. Votre Blackmagic
MultiDock formate les disques en utilisant les formats HFS+ et exFAT. Ces formats permettent de
stocker des fichiers uniques dont la taille est très élevée.
HFS+
Ce format est également connu sous le nom de Mac OS Extended et il est pris en charge par
Mac OS. Il prend en charge la « journalisation », les données auront donc plus de chances d'être
récupérées en cas de problèmes, ou de dysfonctionnement matériel ou logiciel.
ExFAT
Ce format est pris en charge nativement par Mac OS et Windows. Il ne prend pas en charge la
« journalisation », les données seront donc moins susceptibles d'être récupérées en cas de
problèmes, ou de dysfonctionnement matériel ou logiciel.
Vous pouvez formater vos disques à tout moment, même si des données y sont déjà inscrites.
Cependant, formater un disque entraîne la suppression de toutes les données. Faites donc bien
attention de sauvegarder toutes les données importantes avant de formater votre disque.
Formater vos disques sous Mac OS
Utilisez l'utilitaire de disque de Mac OS pour formater un support au format HFS+ ou exFAT.
1 Allez dans le menu Applications/Utilitaires et lancez l'utilitaire de disque.
2 À gauche de la fenêtre, les icônes de vos différents disques s'affichent. Cliquez sur l'icône
de votre nouveau disque.
3 Sélectionnez l'onglet Effacer dans le menu de l'utilitaire de disque.
4 Saisissez un nom pour le nouveau volume.
5 Sélectionnez Mac OS étendu (journalisé) ou exFAT depuis le menu déroulant Format, puis
cliquez sur Effacer. Votre nouveau disque est alors rapidement formaté et prêt à être utilisé
avec le Blackmagic MultiDock.
Utilisez l'utilitaire de disque sur Mac OS pour formater ou effacer
votre disque en Mac OS étendu (journalisé) ou exFAT.
38Utiliser le Blackmagic MultiDock
Page 39

Formater vos disques sous Windows
Sous Windows, le formatage d'un nouveau disque au format exFat est effectué à l'aide du
gestionnaire de disques.
1 Insérez le nouveau disque dans le Blackmagic MultiDock.
2 Allez sur Panneau de configuration/Système et sécurité/Outils d'administration/Gestion de
l'ordinateur/Gestion des disques.
3 Faites un clic droit sur l’icône de votre nouveau disque, et sélectionnez Nouveau volume
simple. Les nouveaux disques non formatés sont indiqués comme étant Non alloués.
4 Indiquez la taille du volume dans la fenêtre qui s'affiche. Laissez la taille du volume par
défaut, il s’agit de la capacité maximum du disque. Cliquez sur Suivant.
5 Attribuez une lettre de disque et cliquez sur Suivant.
6 Configurez le système de fichiers sur exFat. Saisissez un nom de volume, sélectionnez
l’option Effectuer un formatage rapide, puis cliquez sur Suivant. Votre nouveau disque est
alors rapidement formaté et prêt à être utilisé avec le Blackmagic MultiDock.
Utilisez l’assistant de volume sur Windows pour formater votre disque.
Vous pouvez également formater votre disque au format exFat à l'aide de la boîte de dialogue
Formatage de Windows. Pour la faire apparaître, faites un clic droit sur l'icône du disque.
39Utiliser le Blackmagic MultiDock
Page 40

Configurer le Blackmagic MultiDock 10G
SS SS
A B
2
SS SS
A B
4
Le Blackmagic MultiDock 10G peut être configuré comme une station à 4 disques, ou comme deux
stations indépendantes à 2 disques chacune. Ainsi, vous pouvez connecter deux appareils de
manière indépendante à votre MultiDock à l’aide des ports USB-C qui contrôlent chacun deux
disques. Par exemple, vous pouvez enregistrer et lire des fichiers simultanément sur deux
ordinateurs ou deux Blackmagic HyperDeck Extreme 8K HDR, avec un seul Blackmagic
MultiDock 10G.
À l’arrière du panneau, vous trouverez un interrupteur de configuration de la station. Pour configurer
un Blackmagic MultiDock 10G en tant qu’un seul appareil à 4 disques, réglez l’interrupteur sur 4 et
connectez votre câble au port USB intitulé USB-C A. Pour configurer votre MultiDock en deux
appareils indépendants à 2 disques chacun, réglez l’interrupteur sur 2. Le port USB-C A accèdera
seulement aux deux premiers logements pour disque, et vous pouvez connecter le troisième et
quatrième logement via le port USB-C B.
Réglez l’interrupteur du panneau arrière sur 4 pour opérer votre MultiDock comme un seul
appareil à quatre disques, ou sur 2 pour avoir deux appareils à deux disques chacun.
SSD rapides pour la vidéo
Vous pouvez utiliser n'importe quel SSD ou HDD de 2,5" pour effectuer des tâches courantes avec
le Blackmagic MultiDock. Lorsque vous travaillez avec des fichiers vidéo à haute résolution et à taux
de compression bas, comme des vidéos 4K ou 8K compressées, nous vous recommandons d’utiliser
un SSD à vitesse d’écriture élevée. Pour des taux de compression plus élevés, comme le ProRes LT
ou le H.265 Low, des vitesses d’écriture plus basses sont requises.
Vous pouvez utiliser le Blackmagic Disk Speed Test pour mesurer les performances de lecture et
d’écriture de votre support de stockage. Le Disk Speed Test est inclus avec le logiciel Desktop
Video ou disponible en application autonome via l’App store pour macOS.
40Utiliser le Blackmagic MultiDock
Page 41

Installer un RAID pour des performances haut débit et une sécurisation des données
Le Blackmagic MultiDock prend en charge deux des configurations RAID les plus communes,
RAID 0 et RAID 1. Un RAID (Redundant Array of Independent Disks) est un regroupement redondant
de disques indépendants qui peut fournir des vitesses plus élevées ou une plus grande sécurité des
données. Par exemple, le RAID de niveau 0 assemble vos disques en bande pour qu'ils soient
reconnus par l'ordinateur en tant qu'un seul disque et ainsi augmenter leur performance. Le RAID de
niveau 1 configure les deux disques en dupliquant les données du premier disque sur le deuxième,
ce qui sécurise vos données.
REMARQUE L'assemblage de vos disques en un système RAID répartit vos données sur
plusieurs disques et nécessite une gestion prudente. Il est judicieux de n'assembler qu'un
lot de SSD ou de HDD et non un mélange des deux supports.
RAID de niveau 0 pour une performance haut débit
Lorsque vous utilisez des HDD pour la capture et la lecture de vidéo non compressée, nous
recommandons de créer un système RAID comprenant 2 à 4 disques. La répartition des
données sur deux disques double la capacité totale du système et réduit sa charge de travail,
vous obtenez ainsi de meilleures performances. De même, la configuration d'un système RAID
de niveau 0 comprenant 3 ou 4 disques triple ou quadruple la capacité totale du système. Par
exemple, un ordinateur reconnaîtra 4 disques de 1 téraoctet assemblés à l'aide d'un RAID 0 en
tant qu'un seul disque de 4 téraoctets.
Lorsque les disques sont assemblés en un système RAID, ne retirez pas les disques si votre
ordinateur est allumé pour éviter de perdre toutes vos données. Lorsque vous utilisez un RAID,
éjectez les disques et déconnectez le MultiDock de votre ordinateur avant de retirer ou de
remplacer les disques.
Les SSD peuvent également être assemblés en un RAID 0, toutefois, l'amélioration de
performance est limitée aux workflows qui utilisent de gros fichiers séquentiels tels que la
lecture et l'écriture de fichiers vidéo non compressés, Ultra HD ou 4K. Pour les tâches
courantes, l'amélioration de performance est négligeable, il est donc préférable d'utiliser
un seul SSD.
Lorsqu'il détecte des disques, le Blackmagic MultiDock recherche le nom des disques, et non
pas les logements. Par conséquent, un lot de disques configuré en tant que RAID peut être
inséré dans n'importe quel logement du Blackmagic MultiDock.
RAID de niveau 1 pour la sécurisation des données
Le Blackmagic MultiDock intègre quatre logements qui vous permettent de dupliquer les données
contenues sur 2 paires de SSD ou de HDD. Deux disques dont les données ont été dupliquées sont
reconnus en tant qu'un seul disque. L'utilisation d'un RAID de niveau 1 vous offre une sauvegarde
instantanée lorsque vous écrivez des données sur le disque. En cas de crash sur le premier disque,
le deuxième est instantanément disponible.
Configurer un RAID sous Mac OS X et Windows
Pour configurer un RAID sur Mac OS, utilisez l’Assistant RAID dans l’utilitaire de disque. Sur
Windows, vous pouvez configurer un RAID sur le Blackmagic MultiDock original à l’aide de l’utilitaire
de Gestion des disques
Pour trouver l’Assistant RAID sur Mac OS, lancez Applications/Utilitaires/Utilitaire de disque, puis
sélectionnez Assistant RAID depuis le menu de fichiers. Pour ouvrir le gestionnaire de disque de
Windows, cliquez sur le panneau de configuration, puis sélectionnez Outils d'administration/Gestion
de l'ordinateur/Stockage/Gestion des disques.
41Utiliser le Blackmagic MultiDock
Page 42

Pour obtenir de plus amples informations sur la configuration d'un RAID, veuillez consulter le support
technique en ligne de votre système d'exploitation.
Sélectionnez «En mirroir» dans l’Assistant RAID sur Mac OS pour configurer vos disques en RAID 1.
Éjecter vos disques
Veillez à ce que vos disques aient été correctement éjectés avant de les retirer de leur logement.
Les HDD disposent d’une durée d'initialisation et de déconnexion plus longue que les SSD car ils
stockent les données sur des plateaux tournants qui prennent du temps à atteindre la vitesse
appropriée.
Éjecter un disque sous Mac OS
Faites un clic droit sur l'icône disque située sur votre bureau et sélectionnez Éjecter [Nom_du_
disque]. La LED qui entoure le logement MultiDock contenant le disque clignote brièvement et
l’icône du disque disparaît du bureau. Votre disque peut à présent être retiré du Blackmagic
MultiDock.
Éjecter un disque sur un PC Windows
Cliquez sur l'icône Retirer le périphérique en toute sécurité, situé en bas à droite de votre bureau.
Une liste des disques et du matériel connectés apparaîtra au-dessus de l'icône. Cliquez sur le
disque que vous souhaitez éjecter. La LED qui entoure le logement MultiDock contenant le disque
clignote brièvement et le disque disparaît de la liste de matériel sur le bureau. Votre disque peut à
présent être retiré du Blackmagic MultiDock.
REMARQUE Lorsque vous utilisez un RAID, il est important d’éjecter les disques avant de
débrancher le système RAID. N'éjectez jamais un disque d'un système RAID si l'ordinateur
est allumé au risque de perdre des données.
Éjectez toujours vos supports avant de les débrancher de votre ordinateur.
42Utiliser le Blackmagic MultiDock
Page 43

Assistance
Obtenir de l'aide
Le moyen le plus rapide d'obtenir de l'aide est d'accéder aux pages d'assistance en ligne de
Blackmagic Design et de consulter les dernières informations concernant votre MultiDock.
Pages d'assistance en ligne de Blackmagic Design
Les dernières versions du manuel et les notes d'assistance peuvent être consultées sur la page
d’assistance technique de Blackmagic Design : www.blackmagicdesign.com/fr/support.
Forum Blackmagic Design
Le forum Blackmagic Design est une source d'information utile qui offre des idées innovantes pour
vos productions. Cette plateforme d’aide vous permettra également d’obtenir des réponses rapides
à vos questions, car un grand nombre de sujets peuvent avoir déjà été abordés par d'autres
utilisateurs. Pour vous rendre sur le forum: http://forum.blackmagicdesign.com
Contacter le service d'assistance de Blackmagic Design
Si vous ne parvenez pas à trouver l'aide dont vous avez besoin dans nos pages d'aide ou sur les
forums, veuillez utiliser l'option « Envoyer un email », accessible sur la page d'assistance pour
envoyer une demande d'assistance par email. Vous pouvez également cliquer sur le bouton
« Trouver un support technique » situé sur la page d'assistance pour contacter le centre d'assistance
technique Blackmagic Design le plus proche de chez vous.
43Assistance
Page 44

Avis règlementaires
Élimination des déchets d'équipements électriques et électroniques au sein de l'Union
européenne.
Le symbole imprimé sur ce produit indique qu'il ne doit pas être jeté avec les autres
déchets. Cet appareil doit être déposé dans un point de collecte agréé pour être recyclé.
Le tri, l'élimination et le recyclage séparés de vos équipements usagés permettent de
préserver les ressources naturelles et d'assurer le recyclage de ces équipements dans le
respect de l’homme et de l'environnement. Pour obtenir plus d'informations sur les points
de collecte pour recycler votre appareil, veuillez contacter l'organisme responsable du
recyclage dans votre région ou le revendeur du produit.
Cet équipement a été testé et déclaré conforme aux limites imposées aux appareils
numériques de classe A, en vertu du chapitre 15 des règles de la FCC. Ces limites ont pour
objectif d'assurer une protection suffisante contre les interférences nuisibles lorsque
l'équipement est utilisé dans un environnement commercial. Cet appareil génère, utilise et
émet de l'énergie de fréquences radio et peut, en cas d'installation ou d'utilisation non
conforme aux instructions, engendrer des interférences nuisibles au niveau des
communications radio. L'utilisation de cet équipement en zone résidentielle est susceptible
de provoquer des interférences nuisibles, auquel cas il sera demandé à l'utilisateur de
corriger ces interférences à ses frais.
L'utilisation de cet appareil est soumise aux deux conditions suivantes :
1 Cet appareil ne doit pas causer d'interférences nuisibles.
2 Cet appareil doit accepter toute interférence reçue, y compris les interférences pouvant
entraîner un dysfonctionnement.
Déclaration de ISDE Canada
Cet appareil est conforme aux normes canadiennes relatives aux appareils numériques
de Classe A.
Toute modification ou utilisation de ce produit en dehors de son utilisation prévue peut
annuler la conformité avec ces normes.
Cet équipement a été testé pour être en conformité avec une utilisation prévue dans un
environnement commercial. Si cet équipement est utilisé dans un environnement
domestique, il peut provoquer des interférences radio.
44Avis règlementaires
Page 45

Informations de sécurité
Pour une protection contre les décharges électriques, cet appareil doit être connecté à une prise
secteur équipée d'un conducteur de protection. En cas de doute, veuillez contacter un
électricien qualifié.
Afin de réduire le risque de décharge électrique, ne pas éclabousser ou renverser de liquide sur
cet appareil.
Cet appareil peut être utilisé dans un climat tropical lorsque la température ambiante n'excède
pas 40ºC.
Veillez à ce que l'espace autour du produit soit suffisant afin de ne pas compromettre la ventilation.
Lorsque vous installez l'appareil sur rack, veillez à ce que la ventilation ne soit pas compromise par
les autres équipements.
Les pièces de cet appareil ne sont pas réparables par l'opérateur. Toute opération d'entretien doit
être effectuée par un centre de service Blackmagic Design.
Cet appareil ne peut être utilisé qu'à une altitude inférieure à 2000 mètres.
Déclaration de l’État de Californie
Ce produit est susceptible de vous exposer à des produits chimiques, dont des traces de
polybromobiphényle dans les parties en plastique, reconnu par l’État de Californie comme étant
responsable de cancers, d’anomalies congénitales ou d’autres effets nocifs sur la reproduction.
Pour de plus amples informations, veuillez vous rendre sur www.P65Warnings.ca.gov.
45Informations de sécurité
Page 46

Garantie
Garantie limitée à 12 mois
Par la présente, Blackmagic Design garantit que ce produit sera exempt de défauts matériels et de
fabrication pendant une durée d'un an à compter de la date d'achat. Si un produit s’avère défectueux
pendant la période de garantie, Blackmagic Design peut, à sa seule discrétion, réparer le produit
défectueux sans frais pour les pièces et la main-d'œuvre, ou le remplacer.
Pour se prévaloir du service offert en vertu de la présente garantie, il vous incombe d’informer
Blackmagic Design de l’existence du défaut avant expiration de la période de garantie, et de
prendre les mesures nécessaires pour l’exécution des dispositions de ce service. Le consommateur
a la responsabilité de s’occuper de l’emballage et de l'expédition du produit défectueux au centre
de service nommément désigné par Blackmagic Design, en frais de port prépayé. Il incombe au
Consommateur de payer tous les frais de transport, d’assurance, droits de douane et taxes et toutes
autres charges relatives aux produits qui nous auront été retournés et ce quelle que soit la raison.
La présente garantie ne saurait en aucun cas s’appliquer à des défauts, pannes ou dommages
causés par une utilisation inappropriée ou un entretien inadéquat ou incorrect. Blackmagic Design
n’a en aucun cas l’obligation de fournir un service en vertu de la présente garantie : a) pour réparer
les dommages résultant de tentatives de réparations, d’installations ou tous services effectués par
du personnel non qualifié par Blackmagic Design, b) pour réparer tout dommage résultant d'une
utilisation inadéquate ou d'une connexion à du matériel incompatible, c) pour réparer tout dommage
ou dysfonctionnement causé par l’utilisation de pièces ou de fournitures n’appartenant pas à la
marque de Blackmagic Design, d) pour examiner un produit qui a été modifié ou intégré à d’autres
produits quand l’impact d’une telle modification ou intégration augmente les délais ou la difficulté
d’examiner ce produit.
CETTE GARANTIE REMPLACE TOUTE GARANTIE EXPLICITE OU IMPLICITE. BLACKMAGIC DESIGN
ET SES REVENDEURS DÉCLINENT EXPRESSÉMENT TOUTE GARANTIE IMPLICITE DE
COMMERCIALISATION OU D'ADAPTATION QUEL QU’EN SOIT LE BUT. LA RESPONSABILITÉ DE
BLACKMAGIC DESIGN POUR RÉPARER OU REMPLACER UN PRODUIT S'AVÉRANT DÉFECTUEUX
CONSTITUE LA TOTALITÉ ET LE SEUL RECOURS EXCLUSIF PRÉVU ET FOURNI AU
CONSOMMATEUR POUR TOUT DOMMAGE INDIRECT, SPÉCIFIQUE, ACCIDENTEL OU
CONSÉCUTIF, PEU IMPORTE QUE BLACKMAGIC DESIGN OU SES REVENDEURS AIENT ÉTÉ
INFORMÉS OU SE SOIENT RENDU COMPTE AU PRÉALABLE DE L'ÉVENTUALITÉ DE CES
DOMMAGES. BLACKMAGIC DESIGN NE PEUT ÊTRE TENU POUR RESPONSABLE DE TOUTE
UTILISATION ILLICITE OU ABUSIVE DU MATÉRIEL PAR LE CONSOMMATEUR. BLACKMAGIC
DESIGN N'EST PAS RESPONSABLE DES DOMMAGES RÉSULTANT DE L'UTILISATION DE CE
PRODUIT. LE CONSOMMATEUR UTILISE CE PRODUIT À SES SEULS RISQUES.
© Copyright 2019 Blackmagic Design. Tous droits réservés. 'Blackmagic Design’, ‘DeckLink’, ‘HDLink’, ‘Workgroup Videohub’,
‘Multibridge Pro’, ‘Multibridge Extreme’, ‘Intensity’ et ‘Leading the creative video revolution’ sont des marques déposées aux
États-Unis et dans d'autres pays. Tous les autres noms de société et de produit s peuvent être des marques déposées des sociétés
respectives auxquelles ils sont associés.
46Garantie
Page 47

Installations- und Bedienungsanleitung
Blackmagic
MultiDock
Juli 2019
Deutsch
Page 48

Willkommen
Die Blackmagic MultiDock ist eine extrem schnelle SSD- und HDD-Docking-Lösung zum
Mounten von bis zu vier 2,5-Zoll-Laufwerken auf Ihrem Mac- oder Windows-PC. Die mit
USB-C- und Thunderbolt-Technologie bestückte Blackmagic MultiDock Station hat die
Kapazität, mehrere gleichzeitige Befehle zwischen Laufwerken zu handhaben. Sie bietet
Ihnen Zuverlässigkeit für Videoschnitt, Farbkorrektur und Transfers Ihrer Medien. SSDs sind
Festkörperspeicher und haben als solche keine beweglichen Teile – das macht sie sehr
schnell und unglaublich robust. Um die Leistung weiter zu steigern, können Sie auch mehrere
Laufwerke zusammen in einem RAID-Array betreiben
In dieser Bedienungsanleitung finden Sie alles, was Sie zur Inbetriebnahme Ihrer Blackmagic
MultiDock als Laufwerksverbund benötigen.
Bitte sehen Sie auf der Support-Seite unter www.blackmagicdesign.com/de nach der
aktuellsten Ausgabe dieses Handbuches und Support-Hinweisen. Halten Sie sich auf dem
Laufenden, um immer Zugriff auf die neuesten Features haben. Bitte registrieren Sie sich
beim Herunterladen von Software mit Ihren Kontaktdaten, damit wir Sie über neue Versionen
informieren können. Wir arbeiten ständig an neuen Features und Verbesserungen und würden
wir uns über Ihr Feedback freuen!
Grant Petty
CEO Blackmagic Design
Page 49

Inhaltsverzeichnis
Blackmagic MultiDock
Erste Schritte 50
Einführung zur MultiDock 50
Eine MultiDock an Ihren Computer anschließen 51
Einschieben Ihrer Laufwerke 51
Betrieb der Blackmagic MultiDock 52
Laufwerke erkennen 52
Laufwerke formatieren 53
Ihre Laufwerke unter macOS formatieren 53
Ihre Laufwerke unter Windows formatieren 54
Die Blackmagic MultiDock10G konfigurieren 55
Schnelle SSDs für Video 55
Einen RAID-Verbund für Hochgeschwindigkeitsleistung und
Datensicherheit einrichten 56
RAID-Level0 für Hochgeschwindigkeitsleistung 56
RAID-Level 1 für Datensicherheit 56
Einen RAID-Verbund unter macOS und Windows konfigurieren 56
Laufwerke entfernen 57
Ein Laufwerk unter macOS auswerfen 57
Ein Laufwerk unter Windows auswerfen 57
Hilfe 58
Gesetzliche Vorschriften 59
Sicherheitshinweise 60
Garantie 61
Page 50

Erste Schritte
Einführung zur MultiDock
Die Blackmagic MultiDock ist eine attraktive rackmontierbare Dockingstation. Sie können damit bis zu
vier 2,5-Zoll-SSDs (Solid State Drives = Festkörperspeicher) oder HDDs (Hard Disk Drives =
Festplattenlaufwerke) gleichzeitig auf Ihrem Computer mounten.
Die ursprüngliche Blackmagic MultiDock und die Blackmagic MultiDock10G sind beide ideal für
Postproduktionsaufgaben wie Videoschnitt, Farbkorrektur oder sonstige, die die Speicherung großer
Videodateien auf mehreren Laufwerken erfordern. Ihr Einsatz minimiert den Zeitaufwand für das
Wechseln externer Festplatten und gibt Ihnen mehr Zeit für Ihre kreative Arbeit.
Die in die beiden Blackmagic MultiDock Modelle verbaute USB-3.1- bzw. Thunderbolt™-2-Technologie
sorgt für eine superschnelle 10- bzw. 20-Gbit/s-Verbindung zu Ihrem Computer. Jeder
Laufwerksschacht verfügt über eine völlig separate SATA-3-Festplattenschnittstelle für hohe
Leistung. Die Blackmagic MultiDock10G kann sogar als zwei selbstständige Dockingstationen
konfiguriert werden, sodass Sie von zwei verschiedenen Geräten auf die Laufwerke
zugreifen können.
Ein RAID-Verbund lässt sich konfigurieren, indem man einfach mehrere Laufwerke einschiebt und
diese mit dem Datenträger-Dienstprogramm („Disk Utility“) Ihres Betriebssystems zu einem einzelnen
Speichervolumen zusammenschließt.
In dieser Bedienungsanleitung finden Sie alle für den optimalen Betrieb Ihrer Blackmagic MultiDock
nötigen Informationen.
Die Blackmagic MultiDock10G leistet mit USB3.1 Lese- und Schreibgeschwindigkeiten bis zu 10Gbit/s
Die Blackmagic MultiDock leistet mit Thunderbolt2 Datenübertragungsraten bis zu 20Gbit/s
50Erste Schritte
Page 51

Eine MultiDock an Ihren Computer anschließen
CAUTION!
RISK OF ELECTRIC
SHOCK- DO NOT OPEN!
100-240V 1.7A 50-60Hz Fuse T5AL
Versorgen Sie Ihre Blackmagic MultiDock im ersten Schritt mit Strom und schließen Sie sie dann an
Ihren Computer an.
Schließen Sie die Blackmagic MultiDock mit einem regulären IEC-Kabel und -Stecker an das
Stromnetz an. Bei bestehender Stromzufuhr leuchtet die Stromversorgungsleuchte an der
Frontblende auf.
Verbinden Sie bei der Blackmagic MultiDock10G den USB-C-A-Port über ein USB-C-Kabel mit Ihrem
Computer. Die Blackmagic MultiDock10G kann über einen Schalter hinten am Gehäuse wahlweise als
einzelne Dockingstation konfiguriert werden, die alle vier Laufwerke verwendet, oder als zwei
selbstständige Docks mit zwei Laufwerken. Letzteres gibt Ihnen die Möglichkeit, über die beiden
separaten USB-C-Ports von zwei separaten Computern auf die beiden Laufwerke zuzugreifen.
Näheres finden Sie im Abschnitt „Die Blackmagic MultiDock10G konfigurieren“.
Verbinden Sie beim ursprünglichen Blackmagic MultiDock Modell die Thunderbolt-Ports der
Dockingstation und Ihres Computers mit einem Thunderbolt-Kabel. Falls Ihr Computer nur über einen
Thunderbolt-Port verfügt, können Sie einen RAID-Verbund oder ein anderes Gerät an den zweiten
Thunderbolt-Port Ihrer MultiDock anschließen.
Schließen Sie Ihre Blackmagic MultiDock mit einem regulären IECStromkabel und -Stecker an eine Stromquelle an
Verbinden Sie Ihre Blackmagic MultiDock über ein ThunderboltKabel mit Ihrem Mac- oder Windows-PC
Einschieben Ihrer Laufwerke
Die Blackmagic MultiDock verwendet formatierte 2,5-Zoll-SSDs und HDDs.
So schieben Sie Ihr Laufwerk ein:
Halten Sie das Laufwerk mit den goldfarbenen SATA-Kontakten nach unten in Richtung des
1
Laufwerksschachtes.
2 Schieben Sie das Laufwerk sachte in den Laufwerksschacht, bis es einrastet.
51Erste Schritte
Page 52

Sobald ein Laufwerk erkannt wird, leuchtet kurz die rote Laufwerksschacht-LED auf. Während des
Lese- oder Schreibvorgangs einer SSD oder HDD blinkt die LED des Laufwerksschachts und zeigt so
die jeweilige Laufwerksaktivität an.
Werden formatierte Laufwerke eingelegt, so erkennt Ihr Computer diese und installiert sie.
Auf macOS-Computern werden Ihre Laufwerke auf Ihrem Schreibtisch angezeigt.
Um ein Laufwerk auf einem Windows-PC zu finden, klicken Sie auf das Explorer-Symbol in der
Taskleiste. Navigieren Sie dann in der linken Spalte zu „Dieser PC“.
Nachdem Sie Ihr Gerät an eine Stromquelle und einen Computer angeschlossen und Laufwerke
eingeschoben haben, können Sie Ihre Blackmagic MultiDock einsetzen.
Schieben Sie SSDs oder HDDs in einen beliebigen der vier
Laufwerksschächte Ihrer Blackmagic MultiDock ein.
Betrieb der Blackmagic MultiDock
Laufwerke erkennen
Die Blackmagic MultiDock Station verfügt über vier separate Laufwerksschächte. Zur leichteren
Erkennung einzelner Laufwerke empfehlen wir, diese zu benennen bzw. umzubenennen. Ihre
Laufwerke lassen sich bei der Formatierung mithilfe des Datenträger-Dienstprogramms unter macOS
oder der Datenträgerverwaltung unter Windows benennen. Die Umbenennung eines Laufwerks
erfolgt per einfachem Rechtsklick auf das entsprechende Laufwerk im Finder oder Windows Explorer.
Ein weiterer Tipp: Beschriften Sie auch die physikalischen Laufwerke, damit Sie in den Schächten
befindliche Laufwerke visuell besser erkennen.
Laufwerke kann man im macOS Finder oder Windows Explorer leicht umbenennen
52Betrieb der Blackmagic MultiDock
Page 53

Laufwerke formatieren
Sie können mit der Blackmagic MultiDock beliebige 2,5-Zoll-SSDs oder HDDs benutzen. Neue
Laufwerke müssen zunächst formatiert werden, damit Ihr Computer sie lesen und beschreiben kann.
Ihre Blackmagic MultiDock formatiert Laufwerke in den Formaten HFS+ und exFAT. Diese
Laufwerksformate gestatten die Aufzeichnung von großen Dateien und langen Videoclips in
einzelnen Dateien.
HFS+
Dieses Format wird auch als Mac OS Extended bezeichnet und nativ von macOS unterstützt. Da HFS+
kein Journaling unterstützt, sind gespeicherte Daten im Fall einer Datenkorruption oder eines
Hardware- bzw. Softwarefehlers mit geringerer Wahrscheinlichkeit wiederherstellbar.
ExFAT
Dieses Format wird nativ von macOS und Windows unterstützt. ExFAT unterstützt kein Journaling.
Darum sind gespeicherte Daten im Fall einer Datenkorruption oder eines Hardware- bzw.
Softwarefehlers mit geringerer Wahrscheinlichkeit wiederherstellbar.
Laufwerke sind selbst dann jederzeit formatierbar, wenn sie bereits mit Daten beschrieben sind. Beim
Formatieren eines Laufwerks werden alle darauf befindlichen Daten gelöscht. Erstellen Sie deshalb
unbedingt ein Backup dieser Daten, ehe Sie formatieren.
Ihre Laufwerke unter macOS formatieren
Mithilfe des im macOS-Betriebssystem enthaltenen Datenträger-Dienstprogramms ist Ihr Laufwerk in
HFS+ oder exFAT formatierbar.
1 Gehen Sie zu „Programme“ > „Dienstprogramme“ und starten Sie das Datenträger-
Dienstprogramm.
2 Links im Fenster wird eine Liste mit den Symbolen Ihrer angeschlossenen Laufwerke
angezeigt. Klicken Sie für ein neues Laufwerk auf das Laufwerkssymbol.
3 Wählen Sie die Registerkarte „Löschen” im obersten Menü des Datenträger-
Dienstprogramms.
4 Geben Sie einen Namen für den neuen Datenträger ein.
5 Wählen Sie Mac OS Extended (Journaled) oder exFAT aus dem Auswahlmenü „Formatieren“
und klicken Sie dann auf „Löschen“. Ihr neues Laufwerk wird schnell formatiert und für den
Betrieb mit der Blackmagic MultiDock fertiggestellt.
Verwenden Sie das Datenträger-Dienstprogramm unter macOS, um Ihr Laufwerk im
Format Mac OS Extended (Journaled) oder exFAT zu formatieren oder zu löschen
53Betrieb der Blackmagic MultiDock
Page 54

Ihre Laufwerke unter Windows formatieren
Unter Windows wird ein neues Laufwerk mithilfe der Datenträgerverwaltungsanwendung in
exFAT formatiert.
1 Schieben Sie ein neues Laufwerk in die Blackmagic MultiDock ein.
2 Gehen Sie zu „Systemsteuerung“ > „System und Sicherheit“ > „Verwaltung“ >
„Computerverwaltung“ > „Datenträgerverwaltung“.
3 Rechtsklicken Sie in der Liste der angeschlossenen Laufwerke auf Ihr neues Laufwerk und
wählen Sie „Neues einfaches Laufwerk“ aus. Neue, unformatierte Laufwerke werden als
„Nicht zugeordnet“ gekennzeichnet.
4 Das sich nun öffnende Fenster erfragt die Größe des Speicherbereichs (Volume). Belassen
Sie die Volume-Größe wie voreingestellt auf der maximalen Laufwerkskapazität. Klicken Sie
auf „Weiter“.
5 Weisen Sie dem Laufwerk einen Buchstaben zu und klicken Sie auf „Weiter“.
6 Geben Sie als Dateisystem exFAT vor. Geben Sie eine Volume-Kennung ein, wählen Sie
„Schnellformatierung durchführen“ aus und klicken Sie auf „Weiter“. Ihr neues Laufwerk wird
schnell formatiert und für den Betrieb mit der Blackmagic MultiDock fertiggestellt.
Verwenden Sie den Formatierungsassistenten unter Windows, um Ihr Laufwerk zu formatieren
Unter Windows können Laufwerke auch über das Dialogfeld „Formatieren“ in exFAT
formatiert werden. Es ist per Rechtsklick auf das Laufwerkssymbol auffindbar
54Betrieb der Blackmagic MultiDock
Page 55

Die Blackmagic MultiDock10G konfigurieren
SS SS
A B
2
SS SS
A B
4
Die Blackmagic MultiDock10G lässt sich als einzelne Dockingstation für vier Laufwerke oder als zwei
selbstständige Stationen mit je zwei Laufwerken konfigurieren. So können Sie zwei separate Geräte
an Ihre MultiDock anschließen und über ihre beiden USB-C-Ports je zwei Laufwerksschächte steuern.
Denkbar wäre bspw. ein Szenario, in dem unter Einsatz einer einzelnen Blackmagic MultiDock10G
Dateien über zwei Computer oder zwei Blackmagic HyperDeck Extreme8KHDR Rekorder
gleichzeitig aufgezeichnet und wiedergegeben werden.
An der Gehäuserückseite befindet sich ein Schalter zum Konfigurieren der Laufwerksschächte. Um
Ihre Blackmagic MultiDock10G als einzelne Dockingstation mit vier Laufwerken zu konfigurieren,
setzen Sie den Konfigurationsschalter auf „4“. Schließen Sie dann ein Kabel an den mit „USB-C A“
gekennzeichneten Port an. Um Ihre MultiDock als zwei selbstständige Stationen mit zwei Laufwerken
zu konfigurieren, setzen Sie den Schalter auf „2“. Nun greift der „USB-C A“-Port nur auf die ersten
beiden Laufwerksschächte zu. Über den „USB-C B“-Port können Sie den dritten und vierten
Laufwerksschacht für weitere Geräte benutzen.
Um Ihre MultiDock als zwei selbstständige Stationen mit zwei Laufwerken oder als einzelne ViererStation zu konfigurieren, setzen Sie den Konfigurationsschalter an der Rückseite auf „2“ bzw. „4“
Schnelle SSDs für Video
Mit einer Blackmagic MultiDock können Sie beliebige 2,5-Zoll-SSDs oder HDDs benutzen. Für
Videodateien mit höheren Auflösungen und niedrigen Kompressionsraten, bspw. komprimiertes
4K- und 8K-Material, empfehlen wir den Einsatz von SSDs mit hohen Schreibgeschwindigkeiten. Bei
höheren Kompressionsraten wie ProResLT oder H.265Low sind niedrigere Schreibgeschwindigkeiten erforderlich.
Anhand der Blackmagic Anwendung Disk Speed Test können Sie die Schreib- und Leseleistung Ihrer
Speichermedien messen und sich vergewissern, dass diese Ihre Anforderungen erfüllt. Disk Speed
Test ist in die Desktop Video Software integriert oder als selbstständige Anwendung über den
macOS App-Store erhältlich.
55Betrieb der Blackmagic MultiDock
Page 56

Einen RAID-Verbund für Hochgeschwindigkeitsleistung und Datensicherheit einrichten
Die Blackmagic MultiDock unterstützt die gebräuchlichsten RAID-Konfigurationen RAID0 und RAID1.
Ein als RAID (Redundant Array of Independent Disks) bezeichneter Datenträgerverbund kann
schnellere Geschwindigkeiten oder erhöhte Datensicherheit liefern. Beispielsweise werden mit
RAID-Level0 Ihre Laufwerke im Verbund zusammengeschlossen. Das wirkt leistungssteigernd, weil
Ihr Computer sie dann als ein einzelnes Laufwerk erkennt. RAID-Level1 konfiguriert zwei Laufwerke
so, dass eines immer vom anderen gespiegelt wird. Dies sorgt für mehr Datensicherheit.
HINWEIS Bei einem Zusammenschluss von Laufwerken in einem RAID-Verbund („Striping“)
werden Daten über einen Satz von Laufwerken hinweg verteilt. Dies erfordert eine
sorgfältige Verwaltung. Wenn Sie mehrere Laufwerke zu einem RAID-Verbund
zusammenschließen, tun sie dies entweder nur mit SSDs oder nur mit HDDs, aber nicht mit
einer Kombination beider.
RAID-Level0 für Hochgeschwindigkeitsleistung
Beim Einsatz von HDDs (Festplattenlaufwerken) für die Erfassung und Wiedergabe von
unkomprimiertem Video ist es vorteilhaft, zwei bis vier Laufwerke zu einem RAID zu verbinden. Die
Verteilung von Daten auf zwei Laufwerke verdoppelt die Gesamtkapazität und reduziert die
Arbeitslast der einzelnen Laufwerke. Das beschleunigt die Leistung. Entsprechend ergibt sich aus der
Konfiguration von drei oder vier Laufwerken zu einem Level-0-RAID-Verbund eine Verdrei- bzw.
Vervierfachung der gesamten Laufwerkskapazität. Beispiel: Im Verbund als Level-0-RAID liest ein
Computer vier 1-Terabyte-Laufwerke als ein einzelnes 4-Terabyte-Laufwerk.
Bei in einem RAID-Verbund zusammengeschlossenen Laufwerken darf keines dieser Laufwerke bei
eingeschaltetem Computer ausgeworfen werden, da dies den Verlust Ihrer gesamten Daten riskiert.
Werfen Sie bei Einsatz eines RAID zunächst die Laufwerke aus und trennen Sie Ihre MultiDock von
Ihrem Computer, ehe Sie Laufwerke entfernen oder wechseln.
SSDs können auch zu einem Level-0-RAID zusammengeschlossen werden. Leistungssteigernd wirkt
dies jedoch nur bei Workflows mit großen sequenziellen Dateien, z.B. beim Lesen und Schreiben von
Ultra-HD-, 4K- oder unkomprimierten Videodateien. Für allgemeine Tagesaufgaben ist die hierbei
erlangte Leistungsverbesserung derart unerheblich, dass Sie wahrscheinlich besser beraten sind,
Ihre SSDs nicht zusammenzuschließen, sondern Sie als einzelne SSDs einzusetzen.
Zur Erkennung von Laufwerken sucht die Blackmagic MultiDock nach Laufwerksnamen statt nach
Laufwerksschächten. Somit kann ein als RAID-Verbund konfigurierter Laufwerkssatz an einen
beliebigen der vier Blackmagic MultiDock Schächte angeschlossen werden.
RAID-Level 1 für Datensicherheit
Die Blackmagic MultiDock verfügt über vier Laufwerksschächte. Sie können also zwei Paare
gespiegelter SSDs oder HDDs konfigurieren. Ein gespiegeltes Laufwerkspaar wird als einzelnes
Laufwerk erkannt. Beim Aufzeichnen von Daten auf dieses Laufwerk besorgt ein Level-1-RAIDVerbund die sofortige Datensicherung. Sollte ein Laufwerk ausfallen, ist das andere sofort
einsatzbereit.
Einen RAID-Verbund unter macOS und Windows konfigurieren
Verwenden Sie zur Konfiguration eines RAID unter macOS im Datenträger-Dienstprogramm den
RAID-Assistenten. Unter Windows konfigurieren Sie einen RAID-Verbund auf dem Blackmagic
MultiDock Originalmodell mithilfe der Windows-Datenträgerverwaltung.
Unter macOS finden Sie den RAID-Assistenten so: Öffnen Sie „Programme“ > „Dienstprogramme“ >
„Datenträger-Dienstprogramm“ und wählen Sie im Dateienmenü den RAID-Assistenten. Die
Windows-Datenträgerverwaltung öffnen Sie so: Klicken Sie auf „Systemsteuerung” und wählen Sie
56Betrieb der Blackmagic MultiDock
Page 57

dann „Verwaltungstools” > „Computerverwaltung” > „Speicherung” > „Datenträgerverwaltung”.
Weitere Informationen zur Konfiguration eines RAID-Verbunds finden Sie im Online-Support der
jeweiligen Betriebssysteme.
Unter macOS konfigurieren Sie Ihre Laufwerke mithilfe des
RAID-Assistenten als RAID1, indem Sie die Option „Gespiegelt“ wählen
Laufwerke entfernen
Vergewissern Sie sich, dass Ihre Laufwerke ordnungsgemäß ausgeworfen wurden, ehe Sie sie aus
den jeweiligen Schächten entnehmen. Im Vergleich zu SSDs (Festkörperspeicher) dauert das
Initialisieren und Herunterfahren von HDDs (Festplattenlaufwerke) länger. Dies liegt an den im Inneren
von HDDs rotierenden Platten, die eine Weile brauchen, bis sie ihre Geschwindigkeit erreichen.
Ein Laufwerk unter macOS auswerfen
Führen Sie einen Rechtsklick auf dem Laufwerkssymbol auf Ihrem Schreibtisch aus und wählen Sie
„Auswerfen“. Der Laufwerksschacht der Blackmagic MultiDock blinkt dann kurz auf und Ihr Laufwerk
verschwindet vom Schreibtisch. Ihr Laufwerk kann jetzt aus der Blackmagic MultiDock
entnommen werden.
Ein Laufwerk unter Windows auswerfen
Klicken Sie unten rechts auf Ihrem Schreibtisch auf das Symbol „Hardware sicher entfernen und
Datenträger auswerfen“. Über dem Symbol erscheint jetzt eine Liste mit Laufwerken und Geräten.
Klicken Sie das auszuwerfende Laufwerk an. Die Laufwerksschacht-LED der Blackmagic MultiDock
blinkt dann kurz auf und Ihr Laufwerk verschwindet vom Schreibtisch. Ihr Laufwerk kann jetzt aus der
Blackmagic MultiDock entnommen werden.
HINWEIS Beim Einsatz eines RAID-Verbunds ist es wichtig, die Laufwerke auszuwerfen,
ehe der Verbund entfernt wird. Entfernen Sie ein Laufwerk niemals bei eingeschaltetem
Computer, da dies zu Datenverlusten führen kann.
Werfen Sie immer zuerst Ihre Datenträger aus, ehe Sie den RAID trennen
57Betrieb der Blackmagic MultiDock
Page 58

Hilfe
So erhalten Sie Hilfe
Am schnellsten erhalten Sie Hilfe online über die Support-Seiten der Blackmagic Design Website.
Sehen Sie dort nach dem aktuellsten Support-Material für Ihre Blackmagic MultiDock.
Blackmagic Design Online-Support-Seiten
Die aktuellste Version der Bedienungsanleitung und der Support-Hinweise finden Sie im Blackmagic
Support Center unter https://www.blackmagicdesign.com/de/support.
Blackmagic Design Forum
Das Blackmagic Design Forum auf unserer Website ist eine praktische Ressource für weitere Information
und kreative Ideen. Manchmal finden Sie dort schnellere Lösungen, da möglicherweise bereits hilfreiche
Antworten auf ähnliche Fragen von anderen erfahrenen Anwendern und Blackmagic Design
Mitarbeitern vorliegen. Das Forum finden Sie unter http://forum.blackmagicdesign.com.
Kontaktaufnahme mit dem Blackmagic Design Support
Wenn unser Support-Material oder das Forum Ihnen nicht wie gewünscht hilft, gehen Sie bitte auf
unsere Support-Seite und schicken Sie uns Ihre Anfrage über „Senden Sie uns eine E-Mail“. Oder
klicken Sie auf „Finden Sie Ihr lokales Support-Team“ und rufen Sie Ihre nächstgelegene
Blackmagic Design Support Stelle an.
58Hilfe
Page 59

Gesetzliche Vorschriften
Entsorgung von elektrischen und elektronischen Geräten innerhalb der Europäischen Union.
Das auf dem Produkt abgebildete Symbol weist darauf hin, dass dieses Gerät nicht
zusammen mit anderen Abfallstoffen entsorgt werden darf. Altgeräte müssen daher zur
Wiederverwertung an eine dafür vorgesehene Sammelstelle übergeben werden.
Mülltrennung und Wiederverwertung von Altgeräten tragen zum nachhaltigen Umgang mit
natürlichen Ressourcen bei. Gleichzeitig wird sichergestellt, dass die Wiederverwertung
nicht zulasten der menschlichen Gesundheit und der Umwelt geht. Weitere Informationen zur
Entsorgung von Altgeräten sowie zu den Standorten der zuständigen Sammelstellen
erhalten Sie von Ihren örtlichen Müllentsorgungsbetrieben sowie vom Händler, bei dem Sie
dieses Produkt erworben haben.
Dieses Gerät wurde geprüft und entspricht den Grenzwerten für Digitalgeräte der KlasseA
gemäß Abschnitt15 der FCC-Bestimmungen für Funkentstörung. Diese Grenzwerte dienen
dem angemessenen Schutz vor schädlichen Störungen bei Betrieb des Geräts in einer
gewerblichen Umgebung. Geräte dieser Art erzeugen und verwenden Hochfrequenzen und
können diese auch ausstrahlen. Bei Nichteinhaltung der Installations- und
Gebrauchsvorschriften können sie zu Störungen beim Rundfunkempfang führen. Der Betrieb
solcher Geräte in Wohngebieten führt mit großer Wahrscheinlichkeit zu Funkstörungen.
In diesem Fall kann vom Betreiber verlangt werden, selbst für die Beseitigung solcher
Störungen aufzukommen.
Der Betrieb unterliegt den folgenden zwei Bedingungen:
1 Dieses Gerät darf keine schädigenden Störungen hervorrufen.
2 Das Gerät muss unanfällig gegenüber beliebigen empfangenen Störungen sein,
einschließlich solcher, die einen unerwünschten Betrieb verursachen.
ISED-Zertifizierung für den kanadischen Markt
Dieses Gerät erfüllt die kanadischen Vorschriften für digitale Geräte der KlasseA.
Jedwede an diesem Produkt vorgenommene Änderung oder unsachgemäße
Verwendung kann die Konformitätserklärung zum Erlöschen bringen.
Dieses Gerät wurde geprüft und erfüllt die Bestimmungen zum Einsatz in einem
gewerblichen Umfeld. Bei Einsatz des Geräts in einer häuslichen Umgebung verursacht
es möglicherweise Funkstörungen.
59Gesetzliche Vorschriften
Page 60

Sicherheitshinweise
Zum Schutz vor Stromschlag muss das Gerät an ein vorschriftsmäßig geerdetes Stromnetz
angeschlossen werden. Kontaktieren Sie im Zweifelsfall einen Elektrofachmann.
Um das Risiko eines elektrischen Schlags zu verringern, setzen Sie das Gerät weder Tropfen noch
Spritzern aus.
Das Produkt eignet sich für den Einsatz in tropischen Gebieten mit einer Umgebungstemperatur von
bis zu 40ºC.
Sorgen Sie rund um das Gerät für eine angemessene und unbehinderte Luftzufuhr.
Achten Sie bei der Installation im Rack darauf, dass die Luftzufuhr nicht durch andere Geräte
eingeschränkt wird.
Im Inneren des Produkts befinden sich keine durch den Anwender zu wartenden Teile. Wenden Sie
sich für die Wartung an ein Blackmagic Design Service-Center in Ihrer Nähe.
Nicht in Höhen über 2000m über dem Meeresspiegel einsetzen.
California Proposition65
Plastikteile dieses Produkts können Spuren von polybromierten Biphenylen enthalten. Im USamerikanischen Bundesstaat Kalifornien werden diese Chemikalien mit Krebs, Geburtsfehlern und
anderen Schäden der Fortpflanzungsfähigkeit in Verbindung gebracht.
Weitere Informationen finden Sie unterwww.P65Warnings.ca.gov.
60Sicherheitshinweise
Page 61

Garantie
12 Monate eingeschränkte Garantie
Für dieses Produkt gewährt die Firma Blackmagic Design eine Garantie auf Material- und
Verarbeitungsfehler von 12Monaten ab Kaufdatum. Sollte sich ein Produkt innerhalb dieser
Garantiezeit als fehlerhaft erweisen, wird die Firma Blackmagic Design nach ihrem Ermessen das
defekte Produkt entweder ohne Kostenerhebung für Teile und Arbeitszeit reparieren oder Ihnen das
defekte Produkt ersetzen.
Zur Inanspruchnahme der Garantieleistungen müssen Sie als Kunde Blackmagic Design über den
Defekt innerhalb der Garantiezeit in Kenntnis setzen und die entsprechenden Vorkehrungen für die
Leistungserbringung treffen. Es obliegt dem Kunden, für die Verpackung und den bezahlten Versand
des defekten Produkts an ein spezielles von Blackmagic Design benanntes Service Center zu sorgen
und hierfür aufzukommen. Sämtliche Versandkosten, Versicherungen, Zölle, Steuern und sonstige
Abgaben im Zusammenhang mit der Rücksendung von Waren an uns, ungeachtet des Grundes, sind
vom Kunden zu tragen.
Diese Garantie gilt nicht für Mängel, Fehler oder Schäden, die durch unsachgemäße Handhabung
oder unsachgemäße oder unzureichende Wartung und Pflege verursacht wurden. Blackmagic Design
ist im Rahmen dieser Garantie nicht verpflichtet, die folgenden Serviceleistungen zu erbringen: a)
Behebung von Schäden infolge von Versuchen Dritter, die Installation, Reparatur oder Wartung des
Produkts vorzunehmen, b) Behebung von Schäden aufgrund von unsachgemäßer Handhabung oder
Anschluss an nicht kompatible Geräte, c) Behebung von Schäden oder Störungen, die durch die
Verwendung von nicht Blackmagic-Design-Ersatzteilen oder -Verbrauchsmaterialien entstanden sind,
d) Service für ein Produkt, das verändert oder in andere Produkte integriert wurde, sofern eine solche
Änderung oder Integration zu einer Erhöhung des Zeitaufwands oder zu Schwierigkeiten bei der
Wartung des Produkts führt.
ÜBER DIE IN DIESER GARANTIEERKLÄRUNG AUSDRÜCKLICH AUFGEFÜHRTEN ANSPRÜCHE
HINAUS ÜBERNIMMT BLACKMAGIC DESIGN KEINE WEITEREN GARANTIEN, WEDER
AUSDRÜCKLICH NOCH STILLSCHWEIGEND. DIE FIRMA BLACKMAGIC DESIGN UND IHRE
HÄNDLER LEHNEN JEGLICHE STILLSCHWEIGENDEN GARANTIEN IN BEZUG AUF AUSSAGEN ZUR
MARKTGÄNGIGKEIT UND GEBRAUCHSTAUGLICHKEIT FÜR EINEN BESTIMMTEN ZWECK AB. DIE
VERANTWORTUNG VON BLACKMAGIC DESIGN, FEHLERHAFTE PRODUKTE ZU REPARIEREN
ODER ZU ERSETZEN, IST DIE EINZIGE UND AUSSCHLIESSLICHE ABHILFE, DIE GEGENÜBER DEM
KUNDEN FÜR ALLE INDIREKTEN, SPEZIELLEN, NEBEN- ODER FOLGESCHÄDEN ZUR VERFÜGUNG
GESTELLT WIRD, UNABHÄNGIG DAVON, OB BLACKMAGIC DESIGN ODER DER HÄNDLER VON DER
MÖGLICHKEIT SOLCHER SCHÄDEN ZUVOR IN KENNTNIS GESETZT WURDE. BLACKMAGIC
DESIGN IST NICHT HAFTBAR FÜR JEGLICHE WIDERRECHTLICHE VERWENDUNG DER GERÄTE
DURCH DEN KUNDEN. BLACKMAGIC HAFTET NICHT FÜR SCHÄDEN, DIE SICH AUS DER
VERWENDUNG DES PRODUKTS ERGEBEN. NUTZUNG DES PRODUKTS AUF EIGENE GEFAHR.
© Copyr ight 2019 Blac kmagic Desig n. Alle Rechte vo rbehalten. „ Blackmagi c Design“, „Deck Link“, „HDLink“, „Workgroup Videohub“,
„Multibridge Pro“, „Multibridge Extreme“, „Intensity“ und „Leading the creative video revolution“ sind eingetragene Warenzeichen
in den USA und in anderen Ländern. Alle anderen Unternehmens- und Produktnamen sind möglicherweise Warenzeichen der
jeweiligen Firmen, mit denen sie verbunden sind.
61Garantie
Page 62

Manual de instalación y funcionamiento
Blackmagic
MultiDock
Julio 2019
Español
Page 63

Bienvenido
El dispositivo Blackmagic MultiDock brinda la posibilidad de almacenar contenidos rápidamente
en hasta cuatro unidades de disco rígido (HDD) o estado sólido (SSD) de 2.5 pulgadas y
conectarlas a cualquier equipo Mac o Windows. Gracias a la tecnología Thunderbolt y USB-C,
permite procesar varias instrucciones en forma simultánea entre soportes de almacenamiento,
así como editar, etalonar y transferir imágenes con una calidad extraordinaria. Los discos SSD
son sumamente rápidos y resistentes, ya que no contienen partes móviles. Incluso es posible
vincularlos a fin de conformar un sistema RAID y, de esta manera, lograr un mayor rendimiento.
Este manual contiene toda la información necesaria para instalar y utilizar el dispositivo
Blackmagic MultiDock.
En nuestra página de soporte, encontrarás la versión más reciente del manual, así como
material de apoyo adicional. Recuerda mantener el dispositivo actualizado para poder acceder
a nuevas prestaciones. Por último, no olvides registrarte al descargar las actualizaciones,
a fin de que podamos mantenerte informado sobre nuevos lanzamientos. Trabajamos
constantemente para desarrollar herramientas innovadoras y superarnos, de modo que nos
encantaría conocer tu opinión.
Grant Petty
Director ejecutivo de Blackmagic Design
Page 64

Índice
Blackmagic MultiDock
Primeros pasos 65
Introducción 65
Conectar equipos informáticos 66
Insertar unidades de almacenamiento 66
Uso del dispositivo Blackmagic MultiDock 67
Identificar unidades 67
Formatear unidades 68
Formatear unidades en equipos Mac 68
Formatear unidades en equipos Windows 69
Configuración del modelo Blackmagic MultiDock 10G 70
Unidades SSD recomendadas 70
Crear un sistema RAID para obtener mayor velocidad
y seguridad 71
RAID0 para una mayor velocidad 71
RAID1 para una mayor seguridad de datos 71
Crear un sistema RAID en equipos Mac y Windows 71
Desconectar unidades 72
Expulsar unidades en equipos Mac 72
Expulsar unidades en equipos Windows 72
Ayuda 73
Normativas 74
Seguridad 75
Garantía 76
Page 65

Primeros pasos
Introducción
El dispositivo Blackmagic MultiDock es una solución para bastidores de diseño atractivo que
permite conectar hasta cuatro unidades de disco rígido (HDD) o estado sólido (SSD) de 2.5 pulgadas
a cualquier equipo informático.
Resulta ideal para procesar el material en la etapa de posproducción, la que incluye tareas de
edición, etalonaje y cualquier otra que requiera almacenar archivos de gran tamaño en varias
unidades. Por otra parte, brinda la posibilidad de dedicar más tiempo al proceso creativo, ya que
evita cambiar frecuentemente los soportes de almacenamiento externos.
La tecnología USB3.1 y Thunderbolt2 que ofrecen los dispositivos MultiDock permite alcanzar una
velocidad de transferencia de hasta 10 y 20Gb/s, respectivamente. Asimismo, cada compartimiento
cuenta con una interfaz SATA 3 completamente independiente, a fin de proporcionar un mayor
rendimiento. Por su parte, el modelo Blackmagic MultiDock10G puede configurarse como dos
unidades individuales, de modo que es posible acceder a ellas desde dos equipos distintos.
También es posible crear una estructura RAID conectando múltiples unidades y vinculándolas
mediante el programa utilitario para discos del sistema operativo instalado en el equipo.
Este manual brinda toda la información necesaria para aprovechar al máximo las prestaciones
del producto.
El modelo Blackmagic MultiDock 10G ofrece velocidades de lectura de hasta 10 Gb/s mediante conexiones USB 3.1.
El modelo Blackmagic MultiDock ofrece velocidades de lectura de hasta 20Gb/s mediante conexiones
Thunderbolt2.
65Primeros pasos
Page 66

Conectar equipos informáticos
CAUTION!
RISK OF ELECTRIC
SHOCK- DO NOT OPEN!
100-240V 1.7A 50-60Hz Fuse T5AL
Lo primero que debe hacer es conectar el dispositivo a una red de suministro eléctrico y a un
equipo informático.
Conecte la fuente de alimentación a la entrada correspondiente del dispositivo mediante un cable
IEC convencional. Se encenderá una luz que indica la conexión a la fuente de suministro eléctrico
correspondiente.
En el modelo Blackmagic MultiDock 10G, utilice un cable USB-C para conectar el puerto USB-C A al
equipo informático. El interruptor en la parte trasera permite configurar el dispositivo como una sola
unidad para cuatro discos, o como dos independientes para dos discos. Es decir, es posible acceder
a dos discos desde dos equipos informáticos diferentes mediante los dos puertos USB-C
disponibles. Consulte el apartado Configuración del modelo Blackmagic MultiDock 10G para
obtener más información al respecto.
En el modelo original Blackmagic MultiDock, utilice un cable Thunderbolt para conectar el
dispositivo al equipo informático. Si este tiene un solo puerto, se puede emplear el otro para
conectar un sistema RAID o cualquier otro dispositivo.
Conecte la fuente de alimentación al dispositivo mediante un cable IEC convencional.
Utilice un cable USB-C o Thunderbolt para conectar el dispositivo a un equipo Mac o Windows.
Insertar unidades de almacenamiento
El modelo Blackmagic MultiDock es compatible con unidades HDD y SSD de 2.5 pulgadas.
Para insertar una unidad:
Sostenga la unidad con los contactos dorados (SATA) hacia abajo y orientados hacia el
1
compartimiento del dispositivo.
2 Empuje la tarjeta con suavidad hasta que calce firmemente en su lugar.
66Primeros pasos
Page 67

El led rojo se encenderá momentáneamente al detectar la unidad. Al transferir datos o leer archivos,
el led se enciende en forma intermitente según el nivel de actividad.
Cuando se insertan unidades formateadas, el equipo las reconoce automáticamente.
En el sistema operativo macOS, el ícono de la unidad aparecerá en el escritorio.
Para encontrar el disco en un equipo Windows, haga clic en el explorador de archivos en la barra de
herramientas y seleccione la opción Este equipo en la columna izquierda.
Después de conectar el dispositivo a la fuente de alimentación y a un equipo informático e insertar
las unidades, estará listo para comenzar a utilizarlo.
Inserte unidades HDD o SSD en cualquiera de los cuatro compartimientos.
Uso del dispositivo Blackmagic MultiDock
Identificar unidades
El dispositivo Blackmagic MultiDock cuenta con cuatro compartimientos independientes para
unidades SSD. Recomendamos asignar un nombre específico a cada unidad para identificarla
fácilmente. Esto puede realizarse al formatearla mediante el programa utilitario correspondiente en
equipos Mac o Windows. Para ello, simplemente haga clic con el botón derecho sobre el ícono de la
unidad en el Finder (Mac) o en el explorador de archivos (Windows). Asimismo, puede resultar útil
identificar los discos con una etiqueta cuando se encuentran en el dispositivo.
Es posible asignar un nombre a la unidad mediante el Finder
(Mac) o el explorador de archivos (Windows).
67Uso del dispositivo Blackmagic MultiDock
Page 68

Formatear unidades
El dispositivo es compatible con unidades HDD o SSD de 2.5 pulgadas. Para que el equipo
informático pueda almacenar datos en una unidad nueva y acceder a ellos, primero es necesario
formatearla, ya sea en HFS+ o exFAT, las dos opciones disponibles. Estos sistemas permiten
procesar archivos de gran tamaño y clips de larga duración.
HFS+
Este formato también es conocido como Mac OS Extended y se utiliza en el sistema operativo
macOS. Permite llevar a cabo un registro al transferir los datos, de modo que es más probable que
estos puedan recuperarse en caso de mal funcionamiento del sistema o la unidad.
ExFAT
Este formato es utilizado por los sistemas operativos macOS y Windows. A diferencia del sistema
HFS+, no realiza un registro de la transferencia de datos, de modo que es menos probable que
estos puedan recuperarse en caso de mal funcionamiento del sistema o la unidad.
La unidad puede formatearse en cualquier momento, incluso si contiene datos. Sin embargo, al
llevar a cabo este procedimiento, se borrarán todos sus contenidos, por lo que es recomendable
realizar un respaldo de cualquier información importante previamente.
Formatear unidades en equipos Mac
Utilice el programa Utilidad de Discos, incluido en el sistema operativo macOS, para formatear
unidades empleando el sistema HFS+ o exFAT.
1 Haga clic en Aplicaciones, luego en Utilidades y a continuación ejecute el programa
Utilidad de Discos.
2 Sobre el margen izquierdo, verá una lista de íconos correspondientes a las unidades
conectadas. Haga clic sobre el ícono de la unidad nueva.
3 Haga clic en la pestaña Borrar ubicada en la parte superior de la ventana.
4 Escriba un nombre para la nueva unidad.
5 Seleccione la opción Mac OS Extended (con registro) o exFAT en el menú Formato y luego
haga clic en Borrar. Se dará formato a la unidad rápidamente y quedará lista para usar.
El programa Utilidad de Discos en equipos Mac permite formatear unidades
mediante las opciones Mac OS Extended (con registro) o exFAT.
68Uso del dispositivo Blackmagic MultiDock
Page 69

Formatear unidades en equipos Windows
En equipos Windows, la unidad se puede formatear mediante la aplicación Administración de discos.
1 Inserte la unidad en el dispositivo.
2 Seleccione Panel de control > Herramientas administrativas > Administración de equipos
> Almacenamiento > Administración de discos.
3 Haga clic sobre la unidad en la lista de dispositivos conectados y seleccione Nuevo
volumen simple. El espacio de las unidades sin formato aparece como no asignado.
4 Se abrirá una nueva ventana para seleccionar el tamaño del volumen. Acepte el valor
predeterminado para utilizar la capacidad máxima de la unidad. Haga clic en Siguiente.
5 Asigne una letra a la unidad y haga clic en Siguiente.
6 Seleccione ex FAT como sistema de archivos. Escriba un nombre para la unidad, seleccione
Formato rápido y haga clic en Siguiente. Se dará formato a la unidad rápidamente y
quedará lista para usar.
Para formatear una unidad en Windows, utilice la aplicación Asistente para nuevo volumen.
Utilice el cuadro de diálogo Formato en Windows para formatear unidades mediante el sistema
exFAT. Para acceder a este, haga clic con el botón derecho sobre el ícono de la unidad.
69Uso del dispositivo Blackmagic MultiDock
Page 70

Configuración del modelo Blackmagic MultiDock 10G
SS SS
A B
2
SS SS
A B
4
El modelo Blackmagic MultiDock 10G puede configurarse como una sola unidad para cuatro discos
o como dos independientes para dos discos. Por lo tanto, es posible contar con dos equipos
distintos conectados al dispositivo mediante cada puerto USB-C, a fin de acceder a dos unidades
desde cada uno. Por ejemplo, puede haber dos equipos informáticos o dos dispositivos Blackmagic
HyperDeck Extreme8KHDR, grabando y reproduciendo archivos simultáneamente con una sola
unidad Blackmagic MultiDock10G.
En el panel trasero, se incluye un interruptor para establecer el funcionamiento de los
compartimientos. A fin de configurar el dispositivo como una sola unidad para cuatro discos, sitúe el
interruptor en la opción 4 y conecte el cable al puerto USB-CA. Por el contrario, para configurar el
dispositivo como dos unidades independientes para dos discos cada una, sitúe el interruptor en la
posición 2. Como resultado, el puerto USB-CA solo brindará acceso a los dos primeros discos, por
lo que es posible conectar los otros dos mediante el puerto USB-CB.
Sitúe el interruptor en la posición 2 o 4 para utilizar el dispositivo como dos unidades
independientes para dos discos cada una, o como una para cuatro discos.
Unidades SSD recomendadas
El dispositivo es compatible con unidades HDD o SSD de 2.5 pulgadas. En caso de trabajar con
imágenes de alta resolución y una tasa de compresión baja, por ejemplo en 4K y 8K, recomendamos
usar unidades SSD cuya velocidad de escritura sea rápida. Para formatos con mayor compresión,
tales como ProResLT o H.265 (baja compresión), es preciso una menor velocidad de escritura.
Es posible emplear la aplicación Blackmagic Disk Speed Test para medir el rendimiento de lectura y
escritura de los soportes de almacenamiento, a fin de asegurarse de que cumplan con los requisitos
necesarios. Esta se incluye con el programa Desktop Video, y también está disponible en el App
Store para equipos Mac.
70Uso del dispositivo Blackmagic MultiDock
Page 71

Crear un sistema RAID para obtener mayor velocidad y seguridad
El dispositivo Blackmagic MultiDock es compatible con las configuraciones RAID0 y RAID1, dos de
las más habituales. Una estructura RAID (matriz redundante de discos independientes) puede
ofrecer una mayor velocidad o seguridad de datos. Por ejemplo, la configuración RAID0 permite
fragmentar los datos en bloques que se almacenan en las unidades, las cuales son reconocidas
como un solo disco por el equipo informático. Por otro lado, la configuración RAID1 consiste en dos
unidades idénticas, de forma que una siempre respalda los contenidos de la otra. Esto hace posible
incrementar la seguridad de los datos.
NOTA: Al configurar un sistema RAID, es preciso gestionar las unidades con cautela, ya
que se comparten los datos entre ellas. Cabe destacar también que, al crear esta
estructura, solo es posible vincular discos de un mismo tipo, es decir, SSD o HDD, y no una
combinación de ellos.
RAID0 para una mayor velocidad
A fin de capturar y reproducir contenidos en formatos sin compresión, recomendamos crear un
sistema RAID que incluya entre 2 y 4 unidades HDD. Al compartir los datos, se obtiene el doble de
capacidad de almacenamiento y además disminuye la carga de trabajo, lo cual redunda en una
mayor velocidad. Del mismo modo, al crear una estructura RAID0 con 3 o 4 unidades, se triplica o
cuadriplica la capacidad total. Por ejemplo, en una configuración RAID 0, el equipo informático
reconocerá 4 unidades de 1TB como un disco de 4TB.
Al combinar discos en un sistema RAID, tenga cuidado de no desconectarlos mientras el equipo
informático se encuentra encendido. De lo contrario, podría perder todos los datos almacenados.
Siempre es necesario apagar el equipo antes de extraer o cambiar las unidades.
También es posible crear un sistema RAID0 con unidades SSD. Sin embargo, las mejoras en el
rendimiento se verán limitadas al procesamiento de archivos de gran tamaño, por ejemplo, al
transferir contenidos UHD, 4K o en formatos sin comprimir. Por lo tanto, para realizar tareas diarias,
probablemente sea mejor emplear una sola unidad SSD.
Al detectar las unidades, el dispositivo busca los nombres asignados a estas, de modo que es
posible conectar un sistema RAID a cualquiera de los compartimientos disponibles.
RAID1 para una mayor seguridad de datos
El modelo Blackmagic MultiDock dispone de cuatro compartimientos que permiten utilizar dos pares
de unidades HDD o SSD, que son reconocidos como un solo disco. Un sistema RAID1 realiza un
respaldo simultáneo de los datos al transferirlos a la unidad. Si una de ellas falla, la otra estará
disponible.
Crear un sistema RAID en equipos Mac y Windows
Para configurar un sistema RAID en equipos Mac, utilice la herramienta Asistente de RAID, en la
aplicación Utilidad de Discos. En Windows, es posible crearlo para el modelo Blackmagic MultiDock
original mediante el programa utilitario Administración de discos.
Para abrir el Asistente de RAID en Mac, seleccione Aplicaciones > Utilidades > Utilidad de Discos >
Archivo. Para abrir el programa utilitario en Windows, seleccione Panel de control > Herramientas
administrativas > Administración de equipo] > Almacenamiento] > Administración de discos.
71Uso del dispositivo Blackmagic MultiDock
Page 72

Consulte las páginas de soporte técnico correspondientes a su sistema operativo para obtener más
información al respecto.
Seleccione la opción Reflejado en el Asistente de RAID en
equipos macOS para configurar un sistema RAID1.
Desconectar unidades
Asegúrese de haber expulsado la unidad del sistema operativo antes de extraerla de su
compartimiento. Nótese que el tiempo que demoran los discos HDD en iniciarse y apagarse es
mayor que el de las unidades SSD. Esto se debe a que el disco debe girar y alcanzar una velocidad
determinada antes de poder procesar los datos.
Expulsar unidades en equipos Mac
Haga clic sobre el ícono de la unidad en el escritorio y seleccione Expulsar. El led del
compartimiento correspondiente en el dispositivo parpadeará por unos instantes y el ícono
desaparecerá del escritorio. Una vez finalizado este procedimiento, es posible quitar la unidad.
Expulsar unidades en equipos Windows
Haga clic en el ícono Quitar hardware de forma segura en la parte inferior derecha del escritorio.
Verá una lista de dispositivos. A continuación, haga clic en el que desee desconectar. El led del
compartimiento correspondiente en el dispositivo parpadeará por unos instantes y el ícono
desaparecerá de la lista. Una vez finalizado este procedimiento, es posible quitar la unidad.
NOTA: Al utilizar un sistema RAID, es importante expulsar las unidades correctamente
antes de extraerlas. Nunca retire un disco mientras el equipo se encuentra en
funcionamiento. De lo contrario, podría perder los datos almacenados.
Es importante expulsar una unidad antes de retirarla del equipo informático.
72Uso del dispositivo Blackmagic MultiDock
Page 73

Ayuda
Ayuda
Visite nuestra página de soporte técnico a fin de obtener ayuda rápidamente y acceder al material
de apoyo más reciente para los productos descritos en este manual.
Página de soporte técnico
Las versiones más recientes del manual, el software y el material de apoyo están disponibles en el
nuestra página de soporte técnico.
Foro
El foro de Blackmagic Design permite compartir ideas creativas y constituye un recurso útil para
obtener más información sobre nuestros productos. Por otra parte, brinda la posibilidad de
encontrar rápidamente respuestas suministradas por usuarios experimentados o por el personal de
Blackmagic Design. Para acceder al foro, visite la página http://forum.blackmagicdesign.com.
Cómo ponerse en contacto con Blackmagic Design
Si no encuentra la ayuda que necesita, solicite asistencia técnica mediante el botón
Enviar correo electrónico, situado en la parte inferior de nuestra página de soporte técnico. De
manera alternativa, haga clic en el botón Soporte técnico local para acceder al número telefónico
del centro de atención más cercano.
73Ayuda
Page 74

Normativas
Desecho de equipos eléctricos y electrónicos en la Unión Europea
Este símbolo indica que el dispositivo no debe desecharse junto con otros residuos
domésticos. A tales efectos, es preciso llevarlo a un centro de recolección para su posterior
reciclaje. Esto ayuda a preservar los recursos naturales y garantiza que dicho
procedimiento se realice protegiendo la salud y el medioambiente. Para obtener más
información al respecto, comuníquese con el distribuidor o el centro de reciclaje
más cercano.
Según las pruebas realizadas, este equipo cumple con los límites indicados para
dispositivos digitales Clase A, en conformidad con la sección 15 de las normas establecidas
por la Comisión Federal de Comunicaciones. Esto permite proporcionar una protección
razonable contra interferencias nocivas al operar el dispositivo en un entorno comercial.
Este equipo usa, genera y puede irradiar energía de radiofrecuencia, y si no se instala o
utiliza de acuerdo con el manual de instrucciones, podría ocasionar interferencias nocivas
para las comunicaciones radiales. El funcionamiento de este equipo en una zona
residencial podría ocasionar interferencias nocivas, en cuyo caso el usuario deberá
solucionar dicho inconveniente por cuenta propia.
El funcionamiento de este equipo está sujeto a las siguientes condiciones:
1 El dispositivo no debe causar interferencias nocivas.
2 El dispositivo debe admitir cualquier interferencia recibida, incluidas aquellas que
pudieran provocar un funcionamiento incorrecto del mismo.
Declaración ISED (Canadá)
Este dispositivo cumple con las normas del gobierno de Canadá relativas a equipos
digitales clase A.
Cualquier modificación o uso indebido del mismo podría acarrear un incumplimiento de
dichas normas.
Este equipo cumple con las normas descritas anteriormente al emplearse en entornos
comerciales. Nótese que podría ocasionar interferencia radial al utilizarlo en ambientes
domésticos.
74Normativas
Page 75

Seguridad
Para evitar el riesgo de descarga eléctrica, este equipo debe enchufarse a una toma de corriente
que disponga de un cable a tierra. Ante cualquier duda, póngase en contacto con un electricista
capacitado.
A fin de reducir el riesgo de descarga eléctrica, evite exponer el equipo a goteras o salpicaduras.
Este equipo puede utilizarse en climas tropicales, a una temperatura máxima de 40 °C.
Compruebe que haya suficiente ventilación en torno a la unidad.
Al instalar el equipo en un bastidor, verifique que el dispositivo contiguo no impida la ventilación.
La reparación de los componentes internos del equipo no debe ser llevada a cabo por el usuario.
Comuníquese con nuestro centro de atención más cercano para obtener información al respecto.
Evite utilizar el equipo a una altura mayor de 2000 metros.
Declaración del Estado de California
Este producto puede exponer al usuario a trazas de compuestos químicos, tales como
polibromobifenilos (PBB), encontradas en las partes de plástico, que el Estado de California
reconoce como causantes de cáncer, anomalías congénitas o daños reproductivos.
Consulte el sitio www.P65Warnings.ca.gov para obtener más información al respecto.
75Seguridad
Page 76

Garantía
12 meses de garantía limitada
Blackmagic Design garantiza que el producto adquirido no presentará defectos en los materiales o
en su fabricación por un período de 12 meses a partir de la fecha de compra. Si el producto resulta
defectuoso durante el período de validez de la garantía, Blackmagic Design podrá optar por
reemplazarlo o repararlo sin cargo alguno por concepto de piezas y/o mano de obra.
Para acceder al servicio proporcionado de acuerdo con los términos de esta garantía, el Cliente
deberá dar aviso del defecto a Blackmagic Design antes del vencimiento del período de garantía y
encargarse de los arreglos necesarios para la prestación del mismo. El Cliente será responsable del
empaque y el envío del producto defectuoso al centro de servicio técnico designado por
Blackmagic Design y deberá abonar las tarifas postales por adelantado. El Cliente será responsable
de todos los gastos de envío, seguros, aranceles, impuestos y cualquier otro importe que surja con
relación a la devolución de productos por cualquier motivo.
Esta garantía carecerá de validez ante defectos o daños causados por un uso indebido del
producto, o por falta de cuidado y mantenimiento. Blackmagic Design no tendrá obligación de
prestar el servicio estipulado en esta garantía para (a) reparar daños provocados por intentos de
personal ajeno a Blackmagic Design de instalar el producto, repararlo o realizar un mantenimiento
del mismo; (b) reparar daños resultantes del uso de equipos incompatibles o conexiones a los
mismos; (c) reparar cualquier daño o mal funcionamiento provocado por el uso de piezas o
repuestos no suministrados por Blackmagic Design; o (d) brindar servicio técnico a un producto que
haya sido modificado o integrado con otros productos, cuando dicha modificación o integración
tenga como resultado un aumento de la dificultad o el tiempo necesario para reparar el producto.
ESTA GARANTÍA OFRECIDA POR BLACKMAGIC DESIGN REEMPLAZA CUALQUIER OTRA
GARANTÍA, EXPRESA O IMPLÍCITA. POR MEDIO DE LA PRESENTE, BLACKMAGIC DESIGN Y SUS
DISTRIBUIDORES RECHAZAN CUALQUIER GARANTÍA IMPLÍCITA DE COMERCIALIZACIÓN O
IDONEIDAD PARA UN PROPÓSITO PARTICULAR. LA RESPONSABILIDAD DE BLACKMAGIC
DESIGN EN CUANTO A LA REPARACIÓN O SUSTITUCIÓN DE PRODUCTOS DEFECTUOSOS
CONSTITUYE UNA COMPENSACIÓN COMPLETA Y EXCLUSIVA PROPORCIONADA AL CLIENTE
POR CUALQUIER DAÑO INDIRECTO, ESPECIAL, FORTUITO O EMERGENTE, AL MARGEN DE QUE
BLACKMAGIC DESIGN O SUS DISTRIBUIDORES HAYAN SIDO ADVERTIDOS CON ANTERIORIDAD
SOBRE LA POSIBILIDAD DE TALES DAÑOS. BLACKMAGIC DESIGN NO SE HACE RESPONSABLE
POR EL USO ILEGAL DE EQUIPOS POR PARTE DEL CLIENTE. BLACKMAGIC DESIGN NO SE HACE
RESPONSABLE POR DAÑOS CAUSADOS POR EL USO DE ESTE PRODUCTO. EL USUARIO UTILIZA
EL PRODUCTO BAJO SU PROPIA RESPONSABILIDAD.
© Copyright 2019 Blackmagic Design. Todos los derechos reservados. Blackmagic Design, DeckLink, HDLink, Videohub Workgroup,
Multibridge Pro, Multibridge Extreme, Intensity y «Leading the creative video revolution» son marcas registradas en Estados
Unidos y otros países. Todos los demás nombres de compañías y productos pueden ser marcas comerciales de las respectivas
empresas a las que estén asociados.
76Garantía
Page 77

安装操作手册
Blackmagic
MultiDock
2019年7月
中文
Page 78

欢迎辞
Blackmagic MultiDock是一款快速SSD和HDD硬盘坞解决方案,它可在您的Mac
和Windows PC上挂载多达4块2.5英寸硬盘。Blackmagic MultiDock采用USB-C
和Thunderbolt技术,可同时处理多块硬盘的多个命令,并能为您提供可靠的视频剪
辑、调色以及媒体文件转换工作。
而且有着高强度的特性,您甚至可以将多块硬盘条带化之后组成
获得更高性能!
SSD
由于没有机械结构,因此运行起来快速稳定,
RAID
磁盘阵列使用,
本操作手册包含了使用
请登陆我公司网站
以及相关技术支持信息。请注意定时更新以便获得最新功能。下载软件时,请注册您
的相关信息,以便我们发布新软件时能及时通知您。我们将不断致力于产品的功能开
发和性能改进,诚挚期待您的意见和建议!
Grant Petty
Blackmagic Design首席执行官
Blackmagic MultiDock磁盘阵列所需之全部信息。
www.blackmagicdesign.com/cn
的支持页面获得最新版操作手册
Page 79

目录
Blackmagic MultiDock
入门 80
MultiDock简介 80
连接到计算机 81
连接您的硬盘 81
使用BlackmagicMultiDock 82
识别硬盘 82
格式化硬盘 83
在MacOS系统上格式化硬盘 83
在Windows系统上格式化硬盘 84
配置BlackmagicMultidock10G 85
用于视频的高速SSD 85
组建RAID获得高速性能和数据安全 86
组建RAID0获得高速性能 86
组建RAID1获得数据安全 86
使用MacOS和Windows计算机配置RAID 86
断开硬盘连接 87
在MacOS上弹出硬盘 87
在WindowsPC上弹出硬盘 87
帮助 88
监管告知 89
安全信息 90
保修 91
Page 80

入门
MultiDock
Blackmagic MultiDock
硬盘挂载到您的计算机上。
Blackmagic MultiDock和Blackmagic MultiDock 10G
作,还适合于需要在多个硬盘上存储大型视频文件时使用。它能够最大程度地减少更换外挂硬盘的时
间,让您将更多时间专注于创意工作。
Blackmagic MultiDock采用USB 3.1和Thunderbolt™ 2
和20Gb/s的传输速度。它的每个硬盘插槽都具备完全独立的SATA 3硬盘接口,因此能带来极高的性能表
现。
Blackmagic MultiDock 10G
您只需连接多块硬盘,并使用您操作系统上的磁盘工具软件将它们“条带化”或“镜像”为一个存储卷,
便可以完成配置并获得RAID。
本操作手册包含了使用
用这一产品。
简介
是一款外形优雅的机架式硬盘坞,它能够同时将4块2.5英寸固态硬盘或机械
十分适合用于剪辑和调色等视频后期制作工
技术,连接到计算机上可分别获得上至
甚至可以配置成为两个独立的硬盘坞,从而使用来自两个单独设备的硬盘。
Blackmagic MultiDock
所需的全部信息,其目的是为了让您更充分高效地使
10Gb/s
BlackmagicMultiDock10G的USB3.1
BlackmagicMultiDock的Thunderbolt2
接口可提供高达
接口可提供高达
10Gb/s
20Gb/s
的读写速度。
的数据传输速度。
入门
80
Page 81

连接到计算机
CAUTION!
RISK OF ELECTRIC
SHOCK- DO NOT OPEN!
100-240V 1.7A 50-60Hz Fuse T5AL
在开始使用前,您要做的第一件事就是开启Blackmagic MultiDock并连接到您的计算机!
请使用标准
IEC
电源线和插头为
Blackmagic MultiDock
前面板的电源提示灯会亮起。
如使用
Blackmagic MultiDock 10G
MultiDock 10G
双盘位硬盘坞,这样就可以通过两个独立的
机身后侧设有一个开关,可用来将设备配置成为一台四盘位的硬盘坞,或者两台独立的
,请将使用
USB-C
USB-C
端口使用来自两台单独计算机的硬盘。更多介绍请
参考“配置Blackmagic MultiDock 10G”部分的内容。
如使用原版
算机的
Blackmagic MultiDock
Thunderbolt
端口。如果您的计算机只具备一个
,请使用
Thunderbolt
Thunderbolt端口用于连接RAID或其他设备。
的主电源输入口连接电源。成功连接电源后,
线缆将
USB-C A
电缆将其中一个
Thunderbolt
端口连接计算机。
Thunderbolt
端口,可以将
Blackmagic
端口连接到计
MultiDock
的另一个
请使用标准
使用
Thunderbolt或USB-C
电源线和插头为
IEC
BlackmagicMultiDock
连接线将
BlackmagicMultiDock
连接电源。
连接到您的
连接您的硬盘
Blackmagic MultiDock可使用格式化后的2.5英寸SSD和HDD。
连接您的硬盘:
1
将硬盘的金色
2
将硬盘轻轻推入硬盘插槽内,直至完全插入到位。
SATA
接触点向下对准并朝向硬盘插槽。
Mac或WindowsPC
。
入门
81
Page 82

硬盘插槽的红色
时,硬盘插槽的LED灯会根据硬盘的运作情况闪烁。
LED
提示灯会短暂亮起,表示已检测到硬盘。当设备对固态硬盘或硬盘进行读写操作
插入格式化的
如使用
如使用
找到硬盘。
完成电源连接,连接了计算机,并完成了硬盘挂载之后,您就可以开始使用
SSD或HDD硬盘后,您的计算机将会识别并挂载这些硬盘。
Mac OS,您的硬盘将会显示在桌面上。
Windows PC,可点击任务栏里的“文件资源管理器”图标,然后导航到左侧栏的“此电脑”即可
Blackmagic MultiDock
将
SSD或HDD插入BlackmagicMultiDock
四个硬盘插槽中的任意一个。
了。
使用Blackmagic MultiDock
识别硬盘
Blackmagic MultiDock有4
用
Mac OS
如果要对硬盘进行重命名,只需要在
击该硬盘即可。同时,在您的硬盘上贴上标识也十分的有用,这样您就可以直观地将每个硬盘插槽中
的硬盘加以区分。
系统的磁盘工具或
要更改硬盘的名称,
只要到
MacOS
个独立的硬盘插槽。为便于区分,我们建议您为您的硬盘命名。您可以使
Windows
系统的“访达”或
系统的磁盘管理工具对硬盘进行格式化,并同时为它们命名。
Mac OS
Windows
系统的“访达”或
系统的“文件资源管理器”中操作即可。
Windows
系统的“文件资源管理器”中右
使用Blackmagic MultiDock
82
Page 83

格式化硬盘
Blackmagic MultiDock
的计算机上进行读写操作。您的
磁盘格式可存储较大的文件,在单个文件上可采集较长的视频片段。
HFS
+
该格式也被称为“
当发生系统错误或软硬件故障时,您的数据相对较易恢复。
ExFAT
这是
Mac OS和Windows
件故障时,您的数据相对不易恢复。
任何时候您都可以格式化硬盘,甚至可以格式化已经写有数据的硬盘。但是,格式化硬盘将删除硬盘
上的所有数据,因此开始格式化前请务必备份所有重要资料。
可以使用任何2.5英寸
Mac OS
扩展格式”,是
系统原生支持的格式。
SSD和HDD
Blackmagic MultiDock
Mac OS
系统原生支持的格式。
ExFAT
。新的硬盘需要经过格式化处理后才能在您
能将硬盘格式化为
不支持日志功能,因此当发生系统错误或软硬
HFS+和exFAT
HFS
+支持“日志”功能,因此
格式。这些
在MacOS系统上格式化硬盘
Mac OS系统自带的“磁盘工具”应用程序可以将硬盘格式化为HFS+或exFAT格式。
1
进入“应用程序/实用工具”界面,运行“磁盘工具”程序。
2
窗口左侧会列出所有连接的硬盘的图标。点击您的新硬盘所对应的图标。
3
选择磁盘工具顶部菜单的“抹掉”标签。
4
键入新的宗卷名称。
5
从“格式”下拉菜单中选择“
盘会迅速格式化,以备
使用
MacOS
的磁盘工具将硬盘格式化或改写成
MacOS
扩展(日志式)格式或
Mac OS
扩展(日志式)”或“
Blackmagic MultiDock
格式。
exFAT
使用。
exFAT
”,然后点击“抹掉”。新的硬
使用Blackmagic MultiDock
83
Page 84

在Windows系统上格式化硬盘
Windows系统可通过磁盘管理程序将新硬盘格式化为exFAT格式。
1
将新的硬盘插入
2
到“控制面板”/“系统和安全”/“管理工具”/“计算机管理”/“磁盘管理”。
3
在显示有连接的硬盘列表上右击新硬盘,并选择“新建简单卷”。新的未经格式化的硬盘会被
Blackmagic MultiDock
。
描述为“未分配”。
4
系统会打开一个窗口询问卷大小。请将卷大小设置为默认值,以获得硬盘最大容量。点击
“下一步”。
5
指派硬盘代表字母并点击“下一步”。
6
将文件系统设置为
会迅速格式化,以备
exFAT
。键入卷标,选择“快速格式化”,然后点击“下一步”。您的新硬盘
Blackmagic MultiDock
使用。
使用
Windows
在
Windows
您只需右击该硬盘图标就可找到该选项。
系统的卷向导来格式化您的硬盘。
计算机上可使用格式化对话框功能将硬盘格式化为
exFAT
格式。
使用Blackmagic MultiDock
84
Page 85

配置BlackmagicMultidock10G
SS SS
A B
2
SS SS
A B
4
Blackmagic MultiDock 10G
就可以将两台独立的设备连接到
备两台计算机或两台Blackmagic HyperDeck Extreme 8K HDR,使用一台Blackmagic MultiDock
可被配置成一台四盘位的硬盘坞,或者两台独立的双盘位硬盘坞,这样
MultiDock
上,每个
USB-C
端口各控制两个硬盘插槽。比如您可以配
10G同时记录和播放文件!
设备后面板设有硬盘插槽配置开关。要将
硬盘坞,请将配置开关设置到“4”,并将线缆连接到标有“
Blackmagic MultiDock 10G
USB-C A”的USB
配置成使用四个硬盘的单台
端口。要将
Blackmagic
MultiDock 10G配置成两台独立的双盘位硬盘坞,可将开关设置到“2”。此时“USB-C A”端口只负责
前两个硬盘插槽,您可以通过“
将设备后面板的硬盘插槽配置开关
2或4
后,您的
设置为
可分别作为一台四盘位硬盘坞
或两台独立的双盘位硬盘坞运行。
USB-C B”端口来第三个和第四个硬盘插槽。
MultiDock
用于视频的高速SSD
您可以通过
Blackmagic MultiDock
使用任何2.5英寸
SSD或HDD
来处理日常工作。使用如压缩4K和
8K视频等分辨率较高且压缩率较低的视频文件时,我们建议您使用写入速度较高的SSD。ProRes LT
或H.265 Low等压缩率较高的格式则需要较低的写入速度。
您可以使用
的需求。
Blackmagic Disk Speed Test
Desktop Video
软件内附
Disk Speed Test
测速软件来检测存储介质的读写性能,以确保速度足以满足您
,您也可通过
macOS App Store
单独下载该程序。
使用Blackmagic MultiDock
85
Page 86

组建
RAID
获得高速性能和数据安全
Blackmagic MultiDock支持两类最为常见的RAID配置,分别为RAID 0和RAID 1. “RAID”也叫“独立
磁盘冗余阵列”,它可以提供更高的速度或更强的数据安全。比如,
因此计算机会将这些硬盘识别为一个存储体从而提高性能。RAID 1可将两个硬盘配置为互相镜像的一
个存储体,增强了数据的安全性。
备注
将您的多个硬盘条带化为一个
注意的是,硬盘条带化为
RAID
RAID
在一系列硬盘间共享数据时需要谨慎处理。还需要
时,您只能条带化多个
SSD
或多个
RAID 0
可将您的多个硬盘条带化,
HDD
,而不能将二者混合。
组建RAID0获得高速性能
当使用
HDD
来采集和播放无压缩视频时,将2到4个硬盘条带化为一个
硬盘间共享数据使得总的存储容量变成双倍,而且还降低了工作量,因此您可以获得更快的性能。同
样的道理,将三个或四个硬盘配置为一个
硬盘条带化为一个RAID 0后,计算机会把它们当成1个4TB的硬盘来使用。
RAID 0
,总硬盘容量可达三倍或四倍。举个例子,4个
RAID
是非常有好处的。在两个
1TB
当多个硬盘被条带化为一个
的数据。如使用RAID,在移除或更换硬盘之前您需要先安全弹出硬盘并将MultiDock和计算机断开连接。
多个
SSD
也可以条带化为一个
流程,如读写
计,因此您可能只需要使用单块SSD。
Ultra HD、4K
Blackmagic MultiDock
作为一个RAID使用时,可将它们插入Blackmagic MultiDock四个硬盘插槽中的任意位置。
RAID
时,切记不要在计算机开机状态下断开任何硬盘,否则您可能丢失所有
RAID 0
或无压缩视频文件等。对于一般的日常操作,其性能提高几乎可以忽略不
检测硬盘时会按照硬盘名称(不是硬盘插槽)进行搜索,因此在配置一组硬盘
,但其性能的提高通常都受限于某些涉及大型视频序列文件工作
组建RAID1获得数据安全
Blackmagic MultiDock
被识别成一个单独的硬盘。RAID 1可以让您在往硬盘写入数据的同时立即备份数据。倘若一个硬盘出
现问题,还可以立即使用另一个上的数据。
有四个硬盘插槽,可以让您配置两对镜像
SSD或HDD
。镜像后的一对硬盘将
使用MacOS和Windows计算机配置RAID
配置
RAID
时,可使用
“磁盘管理”实用程序在原版Blackmagic MultiDock上配置RAID。
通过运行“应用程序”/“实用工具”/“磁盘工具”并从文件菜单中选择“RAID助理”即可找到Mac OS
的“Raid助理”。想要打开Windows磁盘管理,只要打开控制面板,然后选择“管理工具”/“计算机管
理”/“存储”/“磁盘管理”。
Mac OS
系统“磁盘工具”中的“
RAID
助理”工具。如使用
Windows
系统,可使用
使用Blackmagic MultiDock
86
Page 87

更多关于如何配置RAID的信息,可参阅您计算机操作系统的在线支持内容。
使用选择
MacOS
系统的“
助理”选择“镜像”可将硬盘配置为
RAID
RAID1
。
断开硬盘连接
从硬盘插槽移除硬盘前,务必要确保您的硬盘已安全退出。相对
和关闭时间。这是由于HDD使用的是旋转盘片来存储数据,因此需要一定的时间来达到传输速度。
在MacOS上弹出硬盘
右击桌面硬盘图标,再选择“弹出(硬盘名称)”。
闪烁,然后桌面上的硬盘图标会消失。现在,您就可以将硬盘从Blackmagic MultiDock中取出了。
Blackmagic MultiDock
在WindowsPC上弹出硬盘
点击桌面右下角的“安全移除硬件并弹出媒体”图标。图标上会出现一个硬盘和设备的列表。点击您想
要弹出的硬盘。
设备列表中消失。现在,您就可以将硬盘从Blackmagic MultiDock中取出了。
备注
组件上取出硬盘,否则您可能会面临丢失数据的危险。
Blackmagic MultiDock
使用
RAID
时,请务必先弹出硬盘,再断开
上硬盘插槽的
RAID
LED
连接。千万不要在计算机运行时从
SSD
来说,
HDD
需要较长的初始化
上硬盘插槽的
灯会短暂闪烁,然后该硬盘会从桌面上的
LED
灯会短暂
RAID
请务必先弹出存储介质,再断开它与计算机的连接。
使用Blackmagic MultiDock
87
Page 88

帮助
获得帮助
获得帮助最快捷的方法是登陆
关最新支持材料。
Blackmagic Design
在线支持页面,浏览
Blackmagic MultiDock
的相
BlackmagicDesign在线支持页面
请登陆Blackmagic Design支持中心www.blackmagicdesign.com/cn/support获得最新版操作手册
以及技术答疑文章。
BlackmagicDesign论坛
您可以登陆我们的网站访问
是获取帮助的一个捷径,因为论坛中不乏经验丰富的用户和
您答疑解惑。访问论坛 http://forum.blackmagicdesign.com
联系BlackmagicDesign支持中心
如果我们提供的支持信息无法解答您的疑问,请到支持页面下点击“给我们发送电子邮件”按钮即可发
送技术支持请求。或者,您也可以点击支持页面下的“查找您所在地区的支持团队”按钮,致电您所在
地区的Blackmagic Design支持中心获得帮助。
Blackmagic Design
论坛,获得更多信息和有用的创意资源。访问论坛也
Blackmagic Design
的员工,他们都能为
帮助
88
Page 89

监管告知
在欧盟范围内处置电子垃圾和电子设备的注意事项。
根据产品所附的提示标志,本设备不得与其它废弃材料共同处置。处置废弃设备时,必须交给
指定收集点进行回收。对废弃设备进行单独收集并回收能够节省自然资源,且回收方式不会
损害环境和人体健康。获取更多关于废弃设备回收点的信息,请联系您所在城市的回收站,
或当时购买设备的经销商。
加拿大
本设备经过测试,符合
商业环境中的设备提供合理保护,使其免受有害干扰的影响。本设备可生成、使用且辐射射
频能量,如果未按照安装手册来安装和使用本设备,则可能导致对无线电通信的有害干扰。
在住宅区运行本产品可能会产生有害干扰,在这种情况下将由用户自行承担消除干扰的费用。
必须满足以下条件后方可操作:
1
设备不会造成有害干扰。
2
设备必须能够承受任何干扰,包括可能导致意外操作的干扰。
ISED
认证声明
本设备符合加拿大
任何对本产品的改装或预期用途之外的使用均可能导致相关标准认证无效。
本设备经检测符合商业环境使用要求。在家用环境中,本设备可能会造成无线电干扰。
FCC
规则的第15部分对A类数字设备的限制。这些限制旨在为运行于
A类数码产品的相关标准。
监管告知
89
Page 90

安全信息
为避免触电,设备必须连接在配有保护地线的电源插座。如有疑问,请与具有相关资质的电
工进行确认。
为了降低触电风险,请勿将设备放在会滴水或溅水的地方。
本产品适合在环境温度低于
确保设备四周留有足够的空间,不受阻碍。
安装在机架上时,确保相邻设备不会影响通风。
设备内部没有操作人员可维护的零件。维修服务请联系当地
请在海拔高度
加利福尼亚安全声明
该产品可能会让您暴露在塑料部件中所含的微量多溴化联苯等化学物质下,此类物质已被加
州政府认定为可能导致癌症、先天畸形或其他遗传危害的物质。
详情请访问网址
2000米以下的地区使用。
www.P65Warnings.ca.gov。
40ºC的热带地区使用。
Blackmagic Design服务中心。
安全信息
90
Page 91

保修
个月有限保修
12
Blackmagic Design
内出现质量问题,
为确保消费者有权享受本保修条款中的服务,如遇产品质量问题请务必在保修期内联系
Design
心进行维修,运费由消费者承担并预先支付。若消费者因任何原因退货,所有运费、保险费、关税等
各项税务以及其他费用均由消费者承担。
本保修条款不适用于任何因使用、维护不当或保养不周造成的缺陷、故障或损坏。根据本保修服
务,
进行的安装、维修或保养所造成的损坏进行维修,2. 对因使用不当或连接到不兼容设备所造成的损
坏进行维修,3. 对因使用了非
4
修所需时间或保养难度)。
本保修条款由
DESIGN
DESIGN
DESIGN
设备进行非法使用,
并妥善安排保修事宜。消费者应将缺陷产品包装并运送到
Blackmagic Design
. 对经过改装或和其他产品进行组装的产品进行保养维修(因为产品经改装或组装后会增加保养维
及其供应商对任何有关适销性及就特定用途的适用性等隐含保证不作任何担保。
负责为消费者提供缺陷产品的维修或更换服务是完整和排他性补救措施,不论
或其供应商是否事先获悉发生间接、特殊、偶然或必然损坏等损坏的可能性。若消费者对本
保证本产品自购买之日起12个月内不会有材料和工艺上的缺陷。若本产品在保修期
Blackmagic Design
可选择为产品提供免费修理或更换零部件,或者更换缺陷产品。
Blackmagic Design
的保修服务范围不包括以下内容:1. 对由非
Blackmagic Design
BLACKMAGIC DESIGN
生产的零部件所导致的损坏或故障进行维修,及
提供,它可取代所有其他明示或隐含的保修。
Blackmagic Design
BLACKMAGIC
BLACKMAGIC
BLACKMAGIC
BLACKMAGIC DESIGN
概不负责。对因使用本产品造成的损失,
BLACKMAGIC
Blackmagic
的指定服务中
专门人员
DESIGN概不负责。本产品的操作风险由用户自行承担。
© 版权所有 2019 Blackmagic Design. 保留一切权利。“Blackmagic Design”、“DeckLink”、“HDLink”、“Workgroup Videohub”、“Multibridge
Pro”、“Multibridge Extreme”、“Intensity”以及“Leading the creative video revolution”均为美国及其他国家的注册商标。所有其他公司
名称及产品名称可能是其他所有者的注册商标。
保修
91
Page 92

사용 설명서
Blackmagic
MultiDock
2019년 7
한국어
월
Page 93

환영합니다
Blackmagic MultiDock은 초고속 SSD 및 HDD 도킹 솔루션으로서 2.5인치 드라이브를 최대
4개까지 Mac/Windows 컴퓨터에 연결할 수 있습니다. 이 제품은 USB-C와 Thunderbolt
기술을 채용하여 드라이브 간 여러 개의 동시 명령을 수행할 수 있으며 안정적인 비디오 편집,
컬러 그레이딩, 미디어 전송 기능을 제공합니다.
놀라울 만큼 안정적입니다. 또한 성능 향상을 위해 드라이브를
있습니다!
SSD는 가동부가 없어서 속도가 굉장히 빠르고
RAID 방식으로 스트라이핑할 수도
본 사용 설명서에는
담겨있습니다.
또한 자사 웹사이트
설명서와
통해 모든 신규 기능을 사용할 수 있습니다. 소프트웨어를 다운로드할 때 사용자 정보를 등록하시면
새로운 소프트웨어가 출시될 때마다 업데이트 소식을 받아보실 수 있습니다. 저희는 새로운 기능 및
제품 향상을 위해 끊임없이 노력하고 있으며 항상 고객 여러분의 의견을 기다립니다!
Blackmagic Design의 CEO 그랜트 패티
DaVinci Resolve 관련 업데이트를 확인하실 수 있습니다. 최신 소프트웨어 업데이트를
Blackmagic MultiDock 디스크 어레이 사용에 필요한 모든 정보가
www.blackmagicdesign.com/kr 고객지원 페이지에서 최신 버전의 사용
Page 94

목차
Blackmagic MultiDock
시작하기 95
MultiDock 소개 95
컴퓨터에 연결하기 96
드라이브 연결하기 96
Blackmagic MultiDock 사용하기 97
드라이브 확인하기 97
드라이브 포맷하기 98
Mac OS에서 드라이브 포맷하기 98
Windows에서 드라이브 포맷하기 99
Blackmagic MultiDock 10G 환경 설정하기 100
비디오를 위한 빠른 SSD 100
초고속 성능과 데이터 보안을 위한 RAID 설정 101
초고속 성능을 위한 RAID 레벨 0 101
데이터 보안을 위한 RAID 레벨 1 101
Mac OS와 Windows에서 RAID 설정하기 101
드라이브 분리하기 102
Mac OS에서 드라이브 추출하기 102
Windows PC에서 드라이브 추출하기 102
지원 103
규제 사항 104
안전 정보 105
보증 106
Page 95

시작하기
MultiDock
멋진 디자인의 랙 마운트형 도킹 솔루션인 Blackmagic MultiDock은 4개의 2.5인치 SSD 또는 하드
디스크 드라이브를 컴퓨터에 동시 연결할 수 있습니다.
Blackmagic MultiDock은 편집, 컬러 그레이딩 등 용량이 큰 비디오 파일을 여러 개의 드라이브에
저장해야 하는 모든 작업에 탁월한 제품으로, 특히 비디오 후반 제작에 최적입니다. 이 제품을 사용하면
외장 드라이브를 교체하는 데 걸리는 시간을 최소화할 수 있어 창의적인 업무에 더욱 집중할 수 있습니다.
Blackmagic MultiDock은 초고속의 USB 3.1 및 Thunderbolt™ 2 기술을 사용하여 컴퓨터 연결 시 각각
10Gb/s와 20Gb/s의 속도를 제공합니다. 드라이브 베이마다 각기 완전히 독립적으로 작동하는 SATA 3
최대
디스크 인터페이스가 탑재되어 있어 디스크 성능을 높여줍니다.
통해 두 대의 도크로 나누어 두 대의 장치가 각 도크의 드라이브에 접속하도록 만들 수도 있습니다.
여러 개의 디스크를 연결한 뒤 사용 중인 운영 체제의 디스크 유틸리티 소프트웨어를 통해 단일 저장
볼륨으로 스트라이핑 또는 미러링하면 손쉽게
본 설명서는 사용자들이
소개
Blackmagic MultiDock 10G는 환경 설정을
RAID를 설정할 수 있습니다.
Blackmagic MultiDock을 최대한 활용할 수 있도록 모든 관련 정보를 제공합니다.
Blackmagic MultiDock 10G는 USB 3.1 사용 시 최대 10Gb/s의 읽기/쓰기 속도를 제공합니다.
Blackmagic MultiDock 10G는 최대 20Gb/s의 Thunderbolt 2 데이터 전송 속도를 제공합니다.
시작하기
95
Page 96

컴퓨터에 연결하기
CAUTION!
RISK OF ELECTRIC
SHOCK- DO NOT OPEN!
100-240V 1.7A 50-60Hz Fuse T5AL
제일 먼저 Blackmagic MultiDock의 전원을 켜고 컴퓨터에 연결하세요.
IEC 표준 케이블과 커넥터를 통해 Blackmagic MultiDock의 주 전원 입력에 전원을 연결하세요. 전원이
공급되면 전면 패널의 전원 표시장치에 불이 들어옵니다.
USB-C 케이블을 사용하여 Blackmagic MultiDock 10G의 USB-C A 포트와 컴퓨터를 연결하세요.
Blackmagic MultiDock 10G의 후면 스위치를 통해 한 대의 도크에서 4개의 드라이브를 모두 사용할
것인지, 혹은 두 대의 개별 도크로 설정하여 각 도크에서 두 개의 드라이브를 사용할 것인지 정할 수
있습니다. 두 대의 도크로 설정 시 두 개의
있습니다. 더 자세한 정보는 [
Blackmagic MultiDock 10G 환경 설정하기] 부분을 참고하세요.
Blackmagic MultiDock 기존 모델에서는 Thunderbolt 케이블을 사용하여 Thunderbolt 포트와
컴퓨터를 연결했습니다. 사용 중인 컴퓨터에
Thunderbolt 단자를 사용하여 RAID 또는 다른 장비를 추가로 연결할 수 있습니다.
USB-C 포트를 통해 컴퓨터 두 대에 개별적으로 연결할 수
Thunderbolt 포트 하나만 있을 경우 MultiDock의
IEC 표준 전원 케이블과 커넥터를 통해 Blackmagic MultiDock에 전원을 연결하세요.
Thunderbolt 또는 USB-C 케이블을 통해 MultiDock을 Mac/Windows 컴퓨터에 연결하세요.
드라이브 연결하기
Blackmagic MultiDock은 포맷된 2.5인치 SSD 및 HDD를 사용합니다.
드라이브 연결하기
의 금색 접촉 부분이 아래로 향한 상태에서 드라이브 베이 쪽을 향하도록 합니다.
SATA
1
제대로 장착될 때까지 드라이브 베이에 부드럽게 집어넣습니다.
2
시작하기
96
Page 97

드라이브가 감지되면 드라이브 베이 LED에 빨간불이 잠시 들어옵니다. SSD 또는 HDD가 읽기/쓰기 수행 시
디스크 활동 정도에 따라 드라이브 베이의
포맷된 드라이브를 삽입하면 컴퓨터가 드라이브를 인식해 드라이브 장착이 완료됩니다.
Mac OS에서는 ‘데스크톱’에 드라이브가 나타납니다.
Windows 컴퓨터에서는 작업 표시줄에서 파일 탐색기를 클릭하여 열면 왼편의 ‘내 컴퓨터’ 하위에
드라이브가 나타납니다.
LED가 깜빡이는 속도가 달라집니다.
전원 공급, 컴퓨터 연결, 드라이브 장착이 모두 성공적으로 완료되었으므로 이제
실행할 수 있습니다.
Blackmagic MultiDock의 드라이브 베이 4곳 중 한 곳에 SSD 또는 HDD를 삽입합니다.
Blackmagic MultiDock을
Blackmagic MultiDock 사용하기
드라이브 확인하기
Blackmagic MultiDock에는 4개의 개별 드라이브 베이가 있습니다. 드라이브를 쉽게 구분할 수 있도록
드라이브명을 입력 또는 변경하는 것이 좋습니다. 디스크 유틸리티(
용)에서 디스크 포맷 시 드라이브 이름을 입력할 수 있습니다. 드라이브명을 변경할 때에는 파인더(Mac)
혹은 파일 탐색기(
라벨을 붙여 드라이브를 구분하는 것도 좋은 방법입니다.
Mac OS의 파인더 또는 Windows의 파일 탐색기에서 손쉽게 드라이브명을 변경하세요
Windows)에서 오른쪽 마우스를 클릭 후 새 이름을 입력합니다. 드라이브 자체에 직접
Mac용) 또는 디스크 관리(Windows
Blackmagic MultiDock 사용하기
97
Page 98

드라이브 포맷하기
모든 종류의 2.5인치 SSD 혹은 HDD를 Blackmagic MultiDock에 사용할 수 있습니다. 드라이브를
포맷해야만 컴퓨터가 드라이브를 읽고 쓸 수 있습니다.
형식으로 드라이브를 포맷합니다. 이 디스크 포맷을 사용하면 용량이 크고 시간이 긴 비디오 클립을 단일
파일로 캡처할 수 있습니다.
HFS+
Mac OS Extended로도 알려진 HFS+는 Mac OS에서 기본 지원됩니다. HFS+는 저널링을 지원하기
때문에 드문 경우이긴 하지만 데이터가 손상되거나 혹은 하드웨어 및 소프트웨어에 문제가 생기더라도
데이터가 회복될 가능성이 큽니다.
ExFAT
이 포맷은 Mac OS와 Windows에서 기본 지원됩니다. ExFAT는 저널링을 지원하지 않기 때문에
데이터가 손상되거나 하드웨어 및 소프트웨어에 문제가 생길 경우 데이터가 복구될 가능성이 작습니다.
드라이브에 이미 데이터를 저장했더라도 언제든지 해당 드라이브를 포맷할 수 있습니다. 하지만
드라이브를 포맷하면 저장된 모든 데이터가 삭제되므로 중요한 정보는 포맷 전에 반드시 백업해 두시기
바랍니다.
Mac OS에서 드라이브 포맷하기
Mac OS에 포함된 ‘디스크 유틸리티’를 사용하여 드라이브를 HFS+ 또는 exFAT 형식으로 포맷하세요.
Blackmagic MultiDock은 HFS+와 exFAT
응용 프로그램 > 유틸리티로 이동해 디스크 유틸리티를 실행하세요.
1
왼편에 있는 아이콘 목록에서 연결된 드라이브를 확인할 수 있습니다. 새로운 드라이브의
2
아이콘을 클릭하세요.
디스크 유틸리티 상단 메뉴에서 ‘지우기’를 선택하세요.
3
‘이름’ 란에 새 볼륨의 이름을 입력합니다.
4
드롭다운 메뉴에서 ‘Mac OS Extended (Journaled)’ 또는 ‘exFAT’를 선택 후 ‘지우기’
Format
5
버튼을 클릭하세요.
완료됩니다.
SSD가 빠르게 포맷되면서 Blackmagic MultiDock을 위한 사용 준비가
Mac OS의 디스크 유틸리티를 사용하여 ‘Mac OS Extended (Journaled)’ 또는 ‘exFAT’
형식으로 포맷하거나 데이터를 삭제할 수 있습니다
Blackmagic MultiDock 사용하기
98
Page 99

Windows에서 드라이브 포맷하기
Windows에서는 ‘디스크 관리’ 응용프로그램을 통해 새로운 드라이브를 ex FAT 형식으로 포맷할 수
있습니다.
Blackmagic
1
제어판에서 관리 도구 -> 컴퓨터 관리 -> 저장소 -> 디스크 관리로 이동합니다.
2
연결된 드라이브 목록에서 새 드라이브를 우클릭해 ‘새 단순 볼륨’을 선택합니다. 포맷되지 않은
3
새 드라이브는 ‘할당되지 않음’이라고 나타납니다.
볼륨 크기를 묻는 창이 나타납니다. 볼륨 크기는 드라이브의 최대 용량으로 기본 설정되어
4
있으니 그대로 두면 됩니다. ‘다음’을 클릭합니다.
드라이브 이름을 설정하고 ‘다음’을 클릭합니다.
5
파일 시스템을 exFAT로 설정합니다. 볼륨 라벨을 입력하고 ‘빠른 포맷’을 선택한 뒤 ‘시작’을
6
클릭합니다.
MultiDock에 새로운 드라이브를 삽입하세요.
SSD가 빠르게 포맷되면서 Blackmagic MultiDock을 위한 사용 준비가 완료됩니다.
Windows의 볼륨 마법사를 사용하여 드라이브를 포맷하세요.
Windows의 포맷 다이얼로그 박스 기능을 통해서도 드라이브를 exFAT 형식으로
포맷할 수 있습니다. 드라이버 아이콘을 우클릭하면 이 기능을 사용할 수 있습니다.
Blackmagic MultiDock 사용하기
99
Page 100

Blackmagic MultiDock 10G 환경 설정하기
SS SS
A B
2
SS SS
A B
4
Blackmagic MultiDock 10G는 한 대의 도크에서 4개의 드라이브를 모두 사용하거나, 혹은 두 대의
도크에서 각 두 개씩의 드라이브를 사용하도록 설정할 수 있습니다. 즉
MultiDock에 연결해 각 장치가 두 개씩의 드라이브 베이를 제어하도록 할 수 있습니다. 예를
장치를
들어 컴퓨터 두 대, 혹은
연결하여 녹화와 재생을 동시에 수행할 수 있습니다.
Blackmagic HyperDeck Extreme 8K HDR 두 대를 MultiDock 10G 한 대와
USB-C 포트를 사용하여 두 대의
후면 패널에는 드라이브 베이 구성을 선택할 수 있는 스위치가 있습니다.
한 대의 도크로 설정하여
USB-C A’라고 표시된 포트에 연결합니다. MultiDock을 두 대의 장비로 나누어 드라이브를 두 개씩 사용할
‘
때는 스위치를 ‘
슬롯은 ‘
2’에 놓습니다. 그러면 ‘USB-C A’ 포트는 1, 2번째 드라이브 슬롯과 통신하고 3, 4번째
USB-C B’포트와 통신하게 됩니다.
MultiDock을 4베이용 유닛 한 대로 사용할지, 혹은 2베이용 유닛 두 대로
사용할지 결정하기 위해 후면 패널의 드라이브 베이 구성 스위치를 ‘
4개의 드라이브 모두를 사용할 때는 해당 스위치를 ‘4’에 놓고 USB 케이블은
Blackmagic MultiDock 10G를
2’ 또는 ‘4’로 설정하세요
비디오를 위한 빠른 SSD
Blackmagic MultiDock에 모든 종류의 2.5인치 SSD나 HDD를 사용해 일상 업무를 처리할 수 있습니다.
4K 압축 포맷 또는 8K 비디오 같이 고해상도 및 저압축 영상 파일을 작업할 때는 쓰기 속도가 높은 SSD
카드 사용을 권장합니다.
낮아야 합니다.
Blackmagic Disk Speed Test 프로그램을 통해 현재 사용 중인 저장 미디어의 읽기와 쓰기 속도를
측정해 보면 현재 미디어의 속도가 적당한지 판단할 수 있습니다.
소프트웨어에 포함되어 있으며 앱스토어나
ProRes LT나 H.265 Low 같은 고압축 영상 파일을 작업할 때는 쓰기 속도가
Disk Speed Tes t는 Desktop Video
macOS를 통해 단독 애플리케이션으로도 사용할 수 있습니다.
Blackmagic MultiDock 사용하기
100
 Loading...