

Blackmagicdesign Blackmagic Converters, Mini Converter, Mini Converter Heavy Duty, Battery Converter Installation And Operation Manual
Installation and Operation Manual
Blackmagic Converters
Mac OS X
Windows
November 2013
™
™

Welcome
Welcome
Thank you for purchasing Blackmagic Converters for your
production needs.
Blackmagic Mini Converters, Mini Converter Heavy Duty
and Battery Converters give you a solution for virtually any
conversion you could need. Mini Converters convert analog to
digital, digital to analog, SDI to audio, audio to SDI, up, down
and cross conversion, SDI distribution, and can even provide
a sync generator for locking all your video equipment to the
same reference signal. Mini Converter Heavy Duty gives you
the same conversions in a super tough design that's perfect
for use on location and Battery Converters let you work on
location with or without external power.
This instruction manual contains all the information you need
to start using your Blackmagic Converters.
Please check the support page on our web site at
www.blackmagicdesign.com for the latest version of this
manual and for updates if your Blackmagic Converter
has internal software. Keeping your internal software up
to date will always ensure you get all the latest features.
When downloading software, please register with your
information so we can keep you updated when new software
is released. We are constantly working on new features and
improvements, so we would love to hear from you!
Grant Petty
CEO Blackmagic Design
Contents
Blackmagic Converters
4
7
11
14
17
20
23
27
Getting Started
Introducing Blackmagic Converters 4
Plugging in Power 5
Plugging in Video 5
Plugging in Audio 5
Applying Settings using Mini Switches 6
Applying Settings using Blackmagic Converter Utility 6
Mini Converter SDI to Analog
Mini Converter Analog to SDI
Mini Converter SDI to HDMI
Mini Converter HDMI to SDI
Mini Converter SDI to Audio
Mini Converter Audio to SDI
Mini Converter Optical Fiber
38
42
44
48
51
54
57
58
59
60
61
Mini Converter SDI Multiplex 4K
Mini Converter SDI to HDMI 4K
Mini Converter Heavy Duty SDI to Analog
Mini Converter Heavy Duty Analog to SDI
Mini Converter Heavy Duty SDI to HDMI
Mini Converter Heavy Duty HDMI to SDI
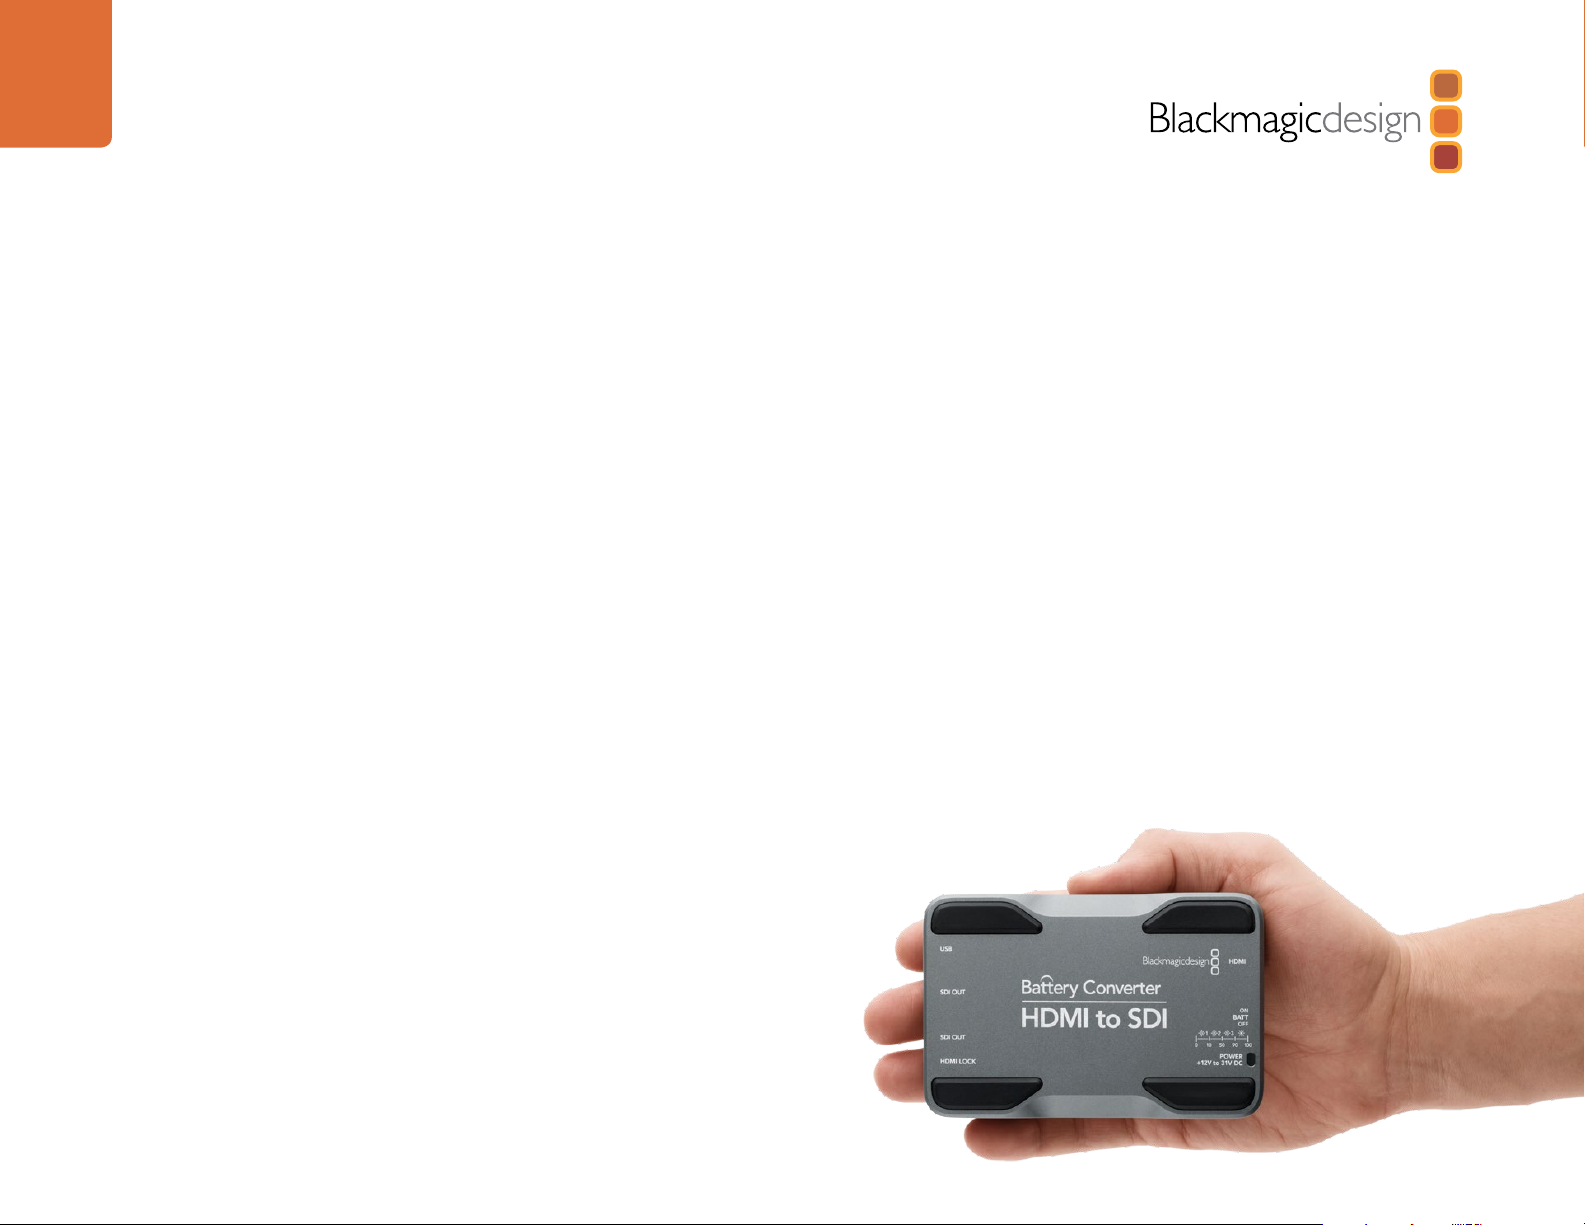
Battery Converter SDI to HDMI
Battery Converter HDMI to SDI
Using Blackmagic Converter Utility
Help
Warranty
28
29
34
37
Mini Converter Optical Fiber 4K
Mini Converter UpDownCross
Mini Converter Sync Generator
Mini Converter SDI Distribution
4
Getting Started
Getting Started
Introducing Blackmagic Converters
Blackmagic Converters are compact and affordable SDI converters for broadcast, studio and video
production environments. Converters provide automatic switching between SD, HD and even Ultra HD 4K
on relevant models. Low SDI jitter and SDI re-clocking allows the longest SDI cable lengths.
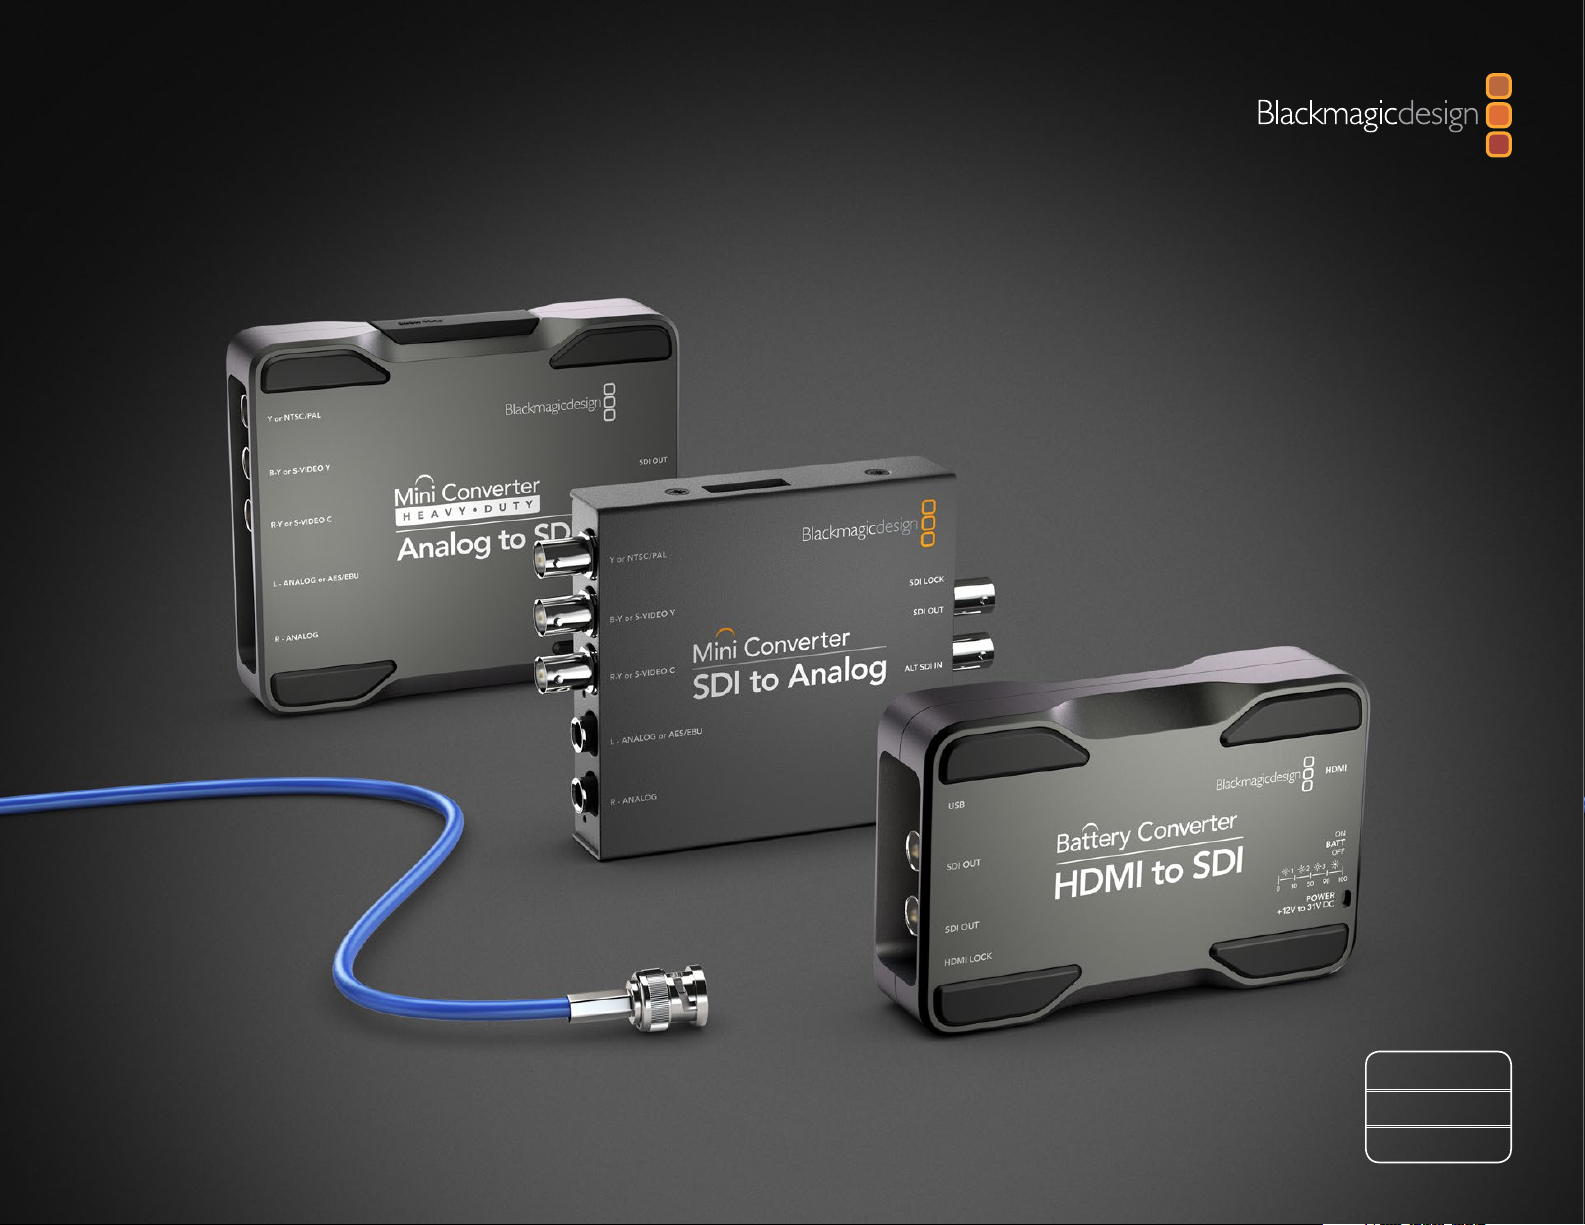
Blackmagic Converters are available in 3 designs. Mini Converter, Mini Converter Heavy Duty and Battery
Converter.
Mini Converter is a sturdy and lightweight design.
Mini Converter
Mini Converter Heavy Duty
Battery Converter
Mini Converter Heavy Duty is robust, ultra strong, and capable of withstanding the harshest
environments.
Battery Converter is ultra strong with an internal rechargeable battery for operating in the field
without external power.
Simple mini switches select input and output settings. The mini switch legend printed on the back of your
converter provides all the information you need.
A 12V power supply is included with international socket adapters. Specified models can also be battery
operated using your own 12 - 31 V DC power supply and software updates are installed via the converter's
USB port. Blackmagic Converters provide the following conversions:
Conversion Mini Converter Mini Converter Heavy Duty Battery Converter
SDI to Analog • •
Analog to SDI • •
HDMI to SDI • • •
SDI to HDMI • • •
SDI to HDMI 4K •
SDI to Audio •
Audio to SDI •
Optical Fiber •
Optical Fiber 4K •
UpDownCross •
Sync Generator •
SDI Distribution •
SDI Multiplex 4K •
5
Getting Started
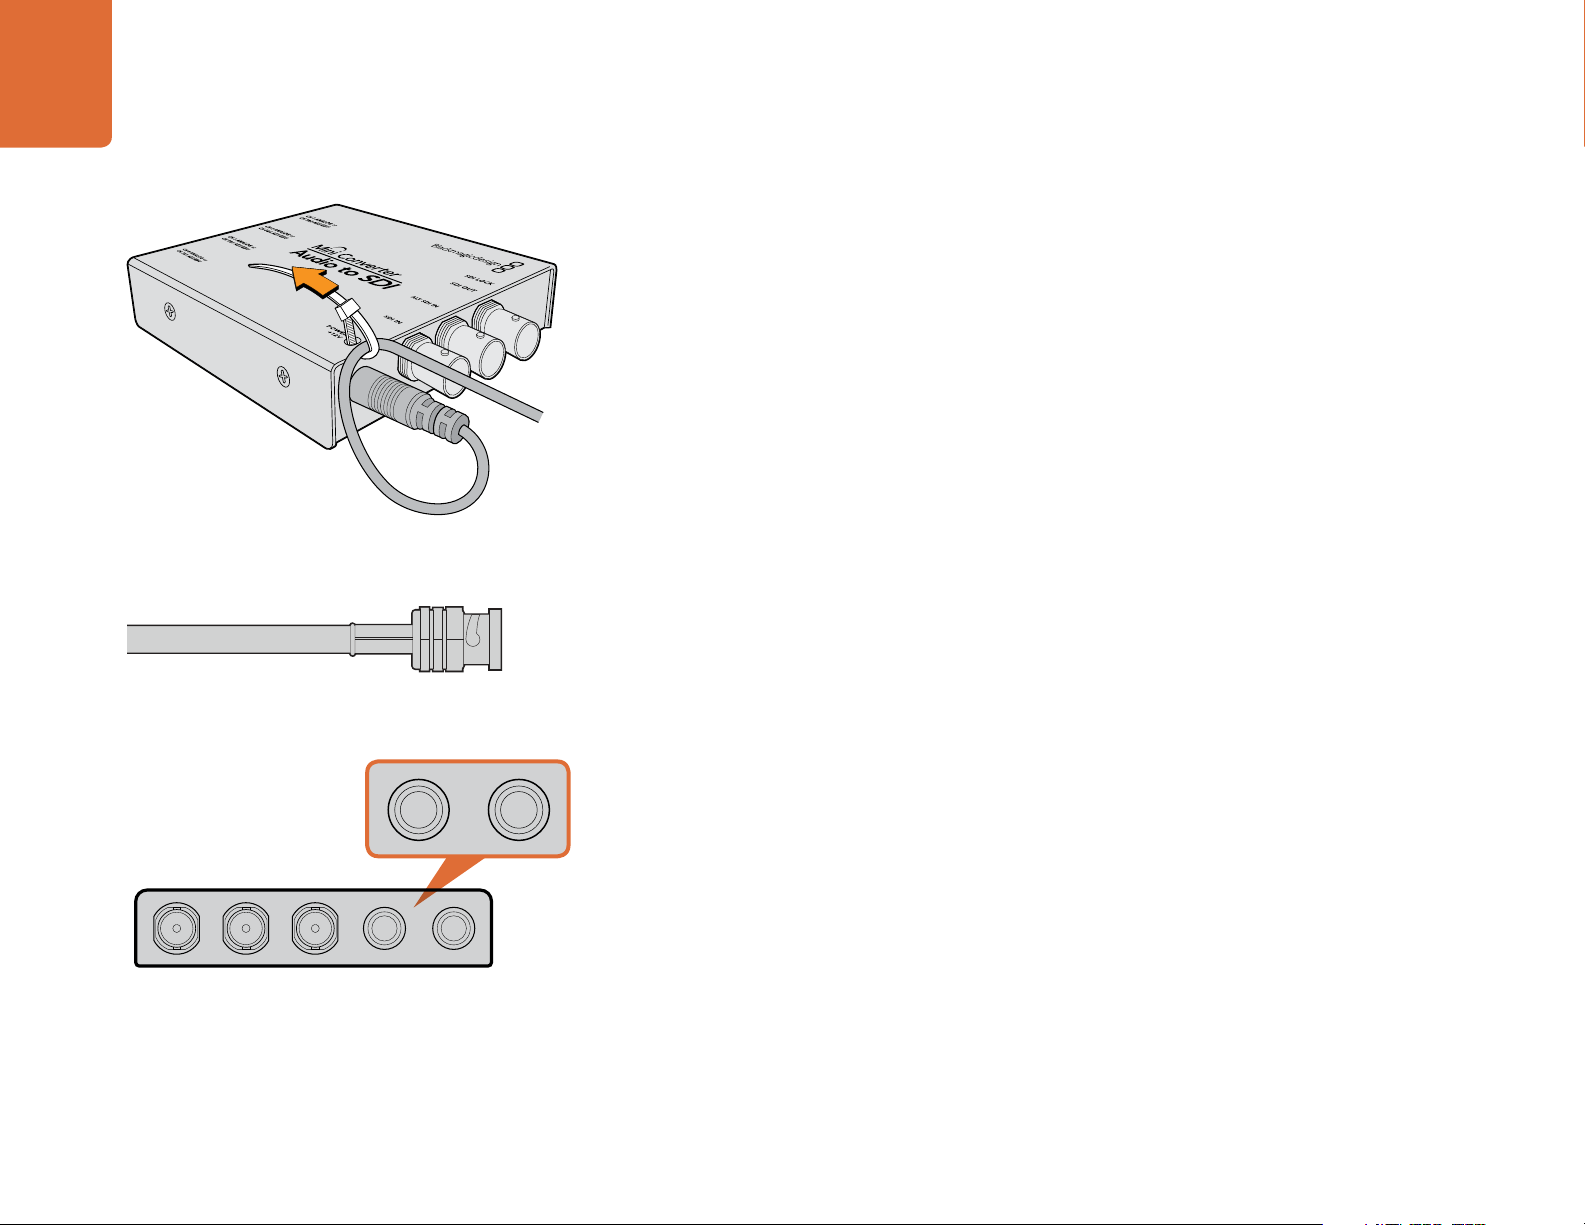
Locking the power cable to the converter’s cable tie point
prevents accidental disconnection.
BNC connectors carry SDI video signals with embedded audio.
Plugging in Power
Plug in the 12 volt power supply using the socket adapter for your country. The cable tie point is for securing
the power connection to your converter.
If you are using a Battery Converter with access to external power, we recommend using external power
unless you need to use the built in battery. This will maximize the life of the battery and ensure your Battery
Converter is fully charged when you need it.
Plugging in Video
Plug your source video into your converter's video input and plug the video output into your destination
equipment. Third party adapters are commonly available to connect any video equipment using alternative
connectors such as RCA.
The next step is to plug in audio.
Plugging in Audio
If you're using embedded audio in SDI, optical fiber SDI or HDMI, audio is already connected via the video
input. If using external analog or digital audio, plug into your converter's TRS audio inputs or outputs. Third
party adapters are commonly available to connect any audio equipment using alternative connectors such
as XLR.
Connect external analog or digital audio to your converter's TRS
audio connectors.
Now configure any required settings using the mini switches.
6
1ON2 3 4 5 6 7 8
Getting Started
1ON2 3 4 5 6 7 8
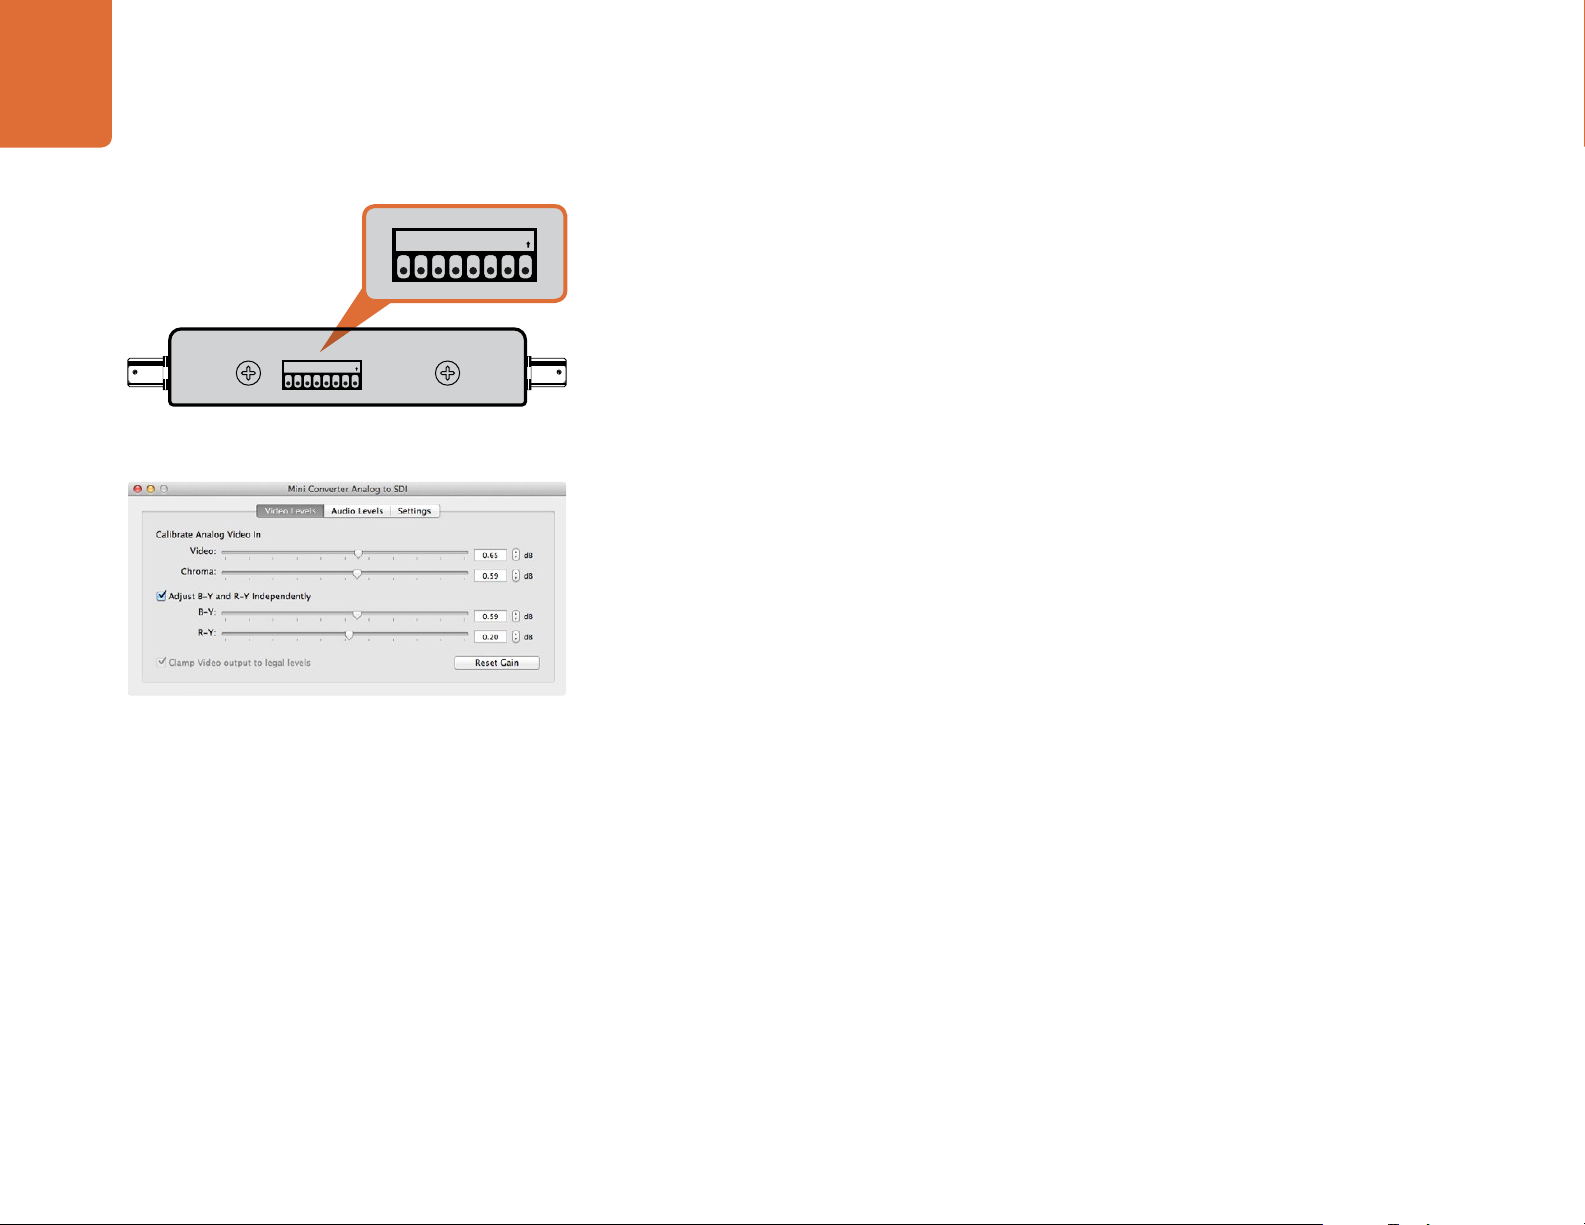
Internal settings are applied by adjusting mini switches with a pen.
Blackmagic Converter Utility lets you adjust analog video levels,
audio levels and conversion settings.
Applying Settings using Mini Switches
Many models of Mini Converter and Mini Converter Heavy Duty have mini switches used to configure
internal settings. Change your settings using the tip of a pen.
On models with mini switches, you'll find a switch settings diagram printed on their base. Ensure your switch
settings correspond to the legend by observing the mini switch numbers from 8 to 1, left to right. The
numbers on the switches will appear upside down.
For a comprehensive description of the mini switches and their settings, refer to your converter model in
this manual.
Applying Settings using Blackmagic Converter Utility
Similar to mini switches, the included Converter Utility software for Mac OS X and Windows provides
adjustment settings.
The Converter Utility interface is composed of three panes for Video Levels, Audio Levels and Settings.
Settings not relevant to your converter model will be grayed out and inactive.
Analog video and audio levels, plus AES/EBU audio levels can be adjusted. Any adjustments will
immediately be saved to your Blackmagic Converter. This means that if power is lost, the new settings will
be re-established as soon as power is restored.
7
Mini Converter SDI to Analog
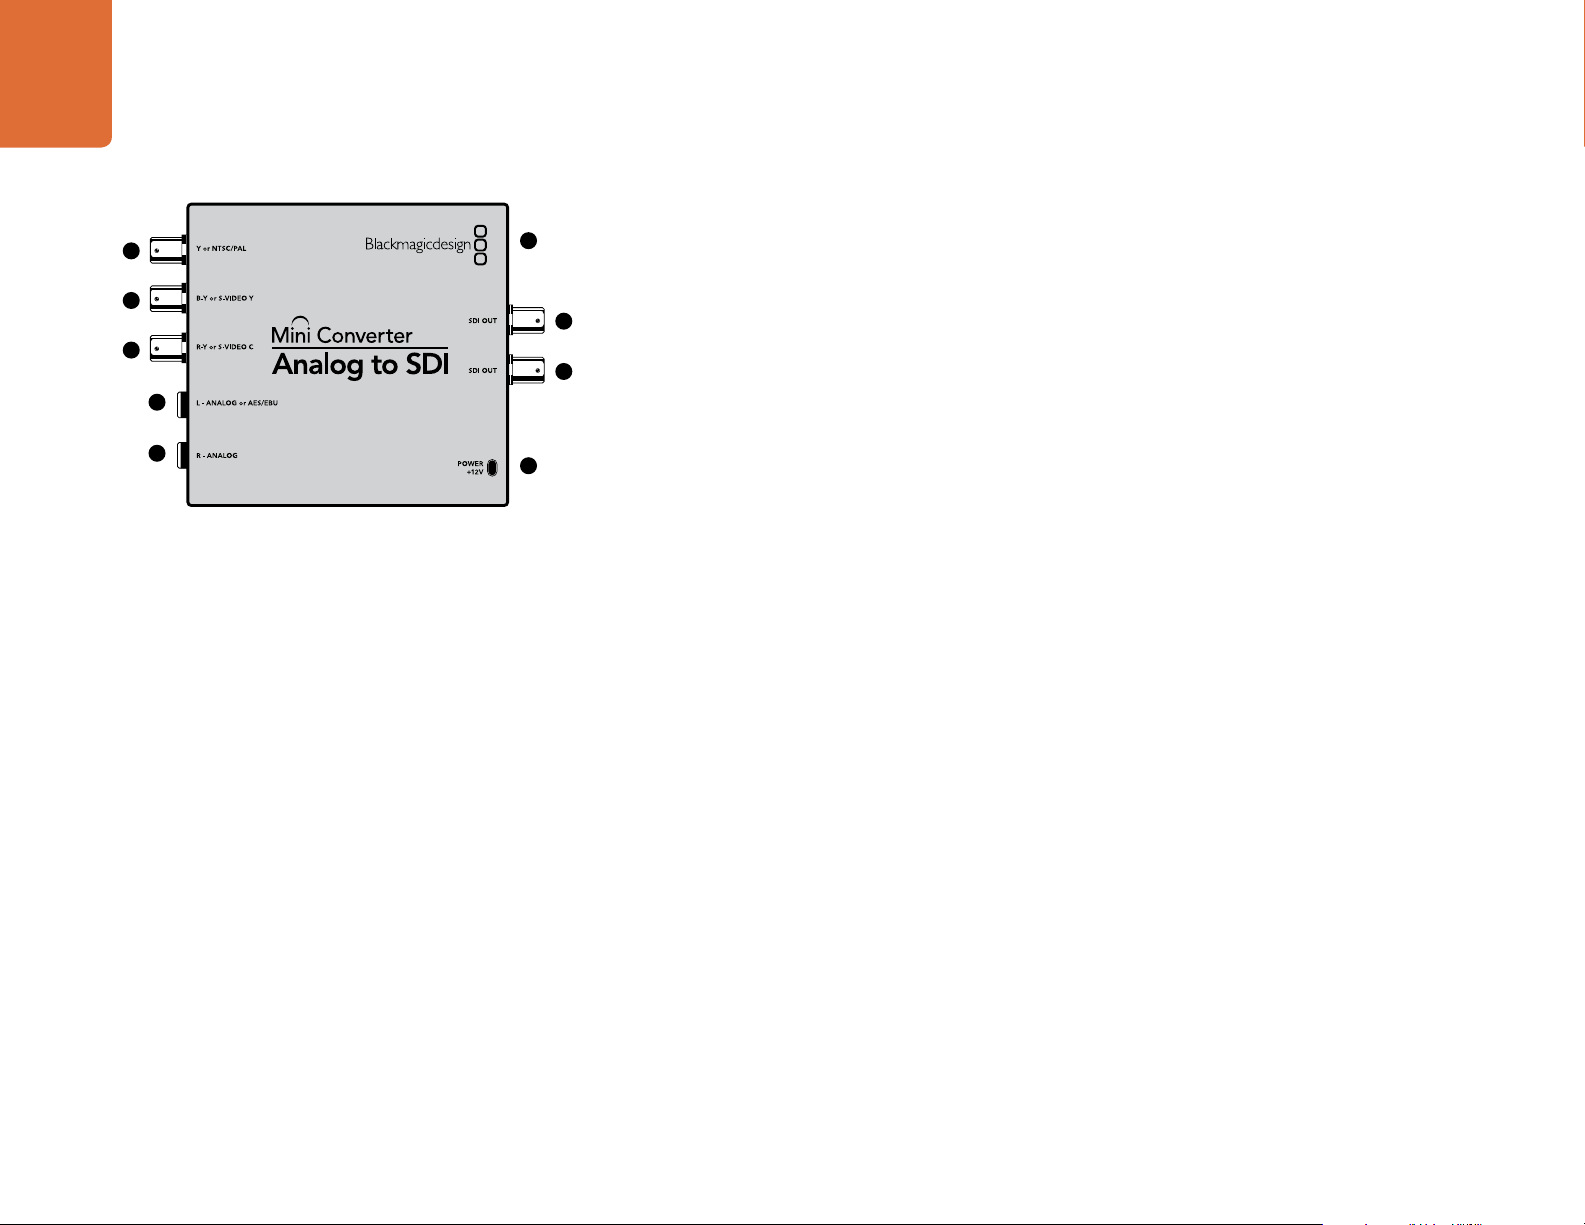
Mini Converter SDI to Analog
1
2
3
4
5
6
Convert from SD/HD-SDI to analog component, NTSC and PAL video out, plus balanced AES/EBU and
analog audio out. Your converter easily connects to analog video monitors and decks such as Betacam SP
7
8
9
and VHS. A hardware down converter lets you connect HD-SDI video to SD analog equipment. You can
even output pairs of analog audio from 16 de-embedded SDI audio channels.
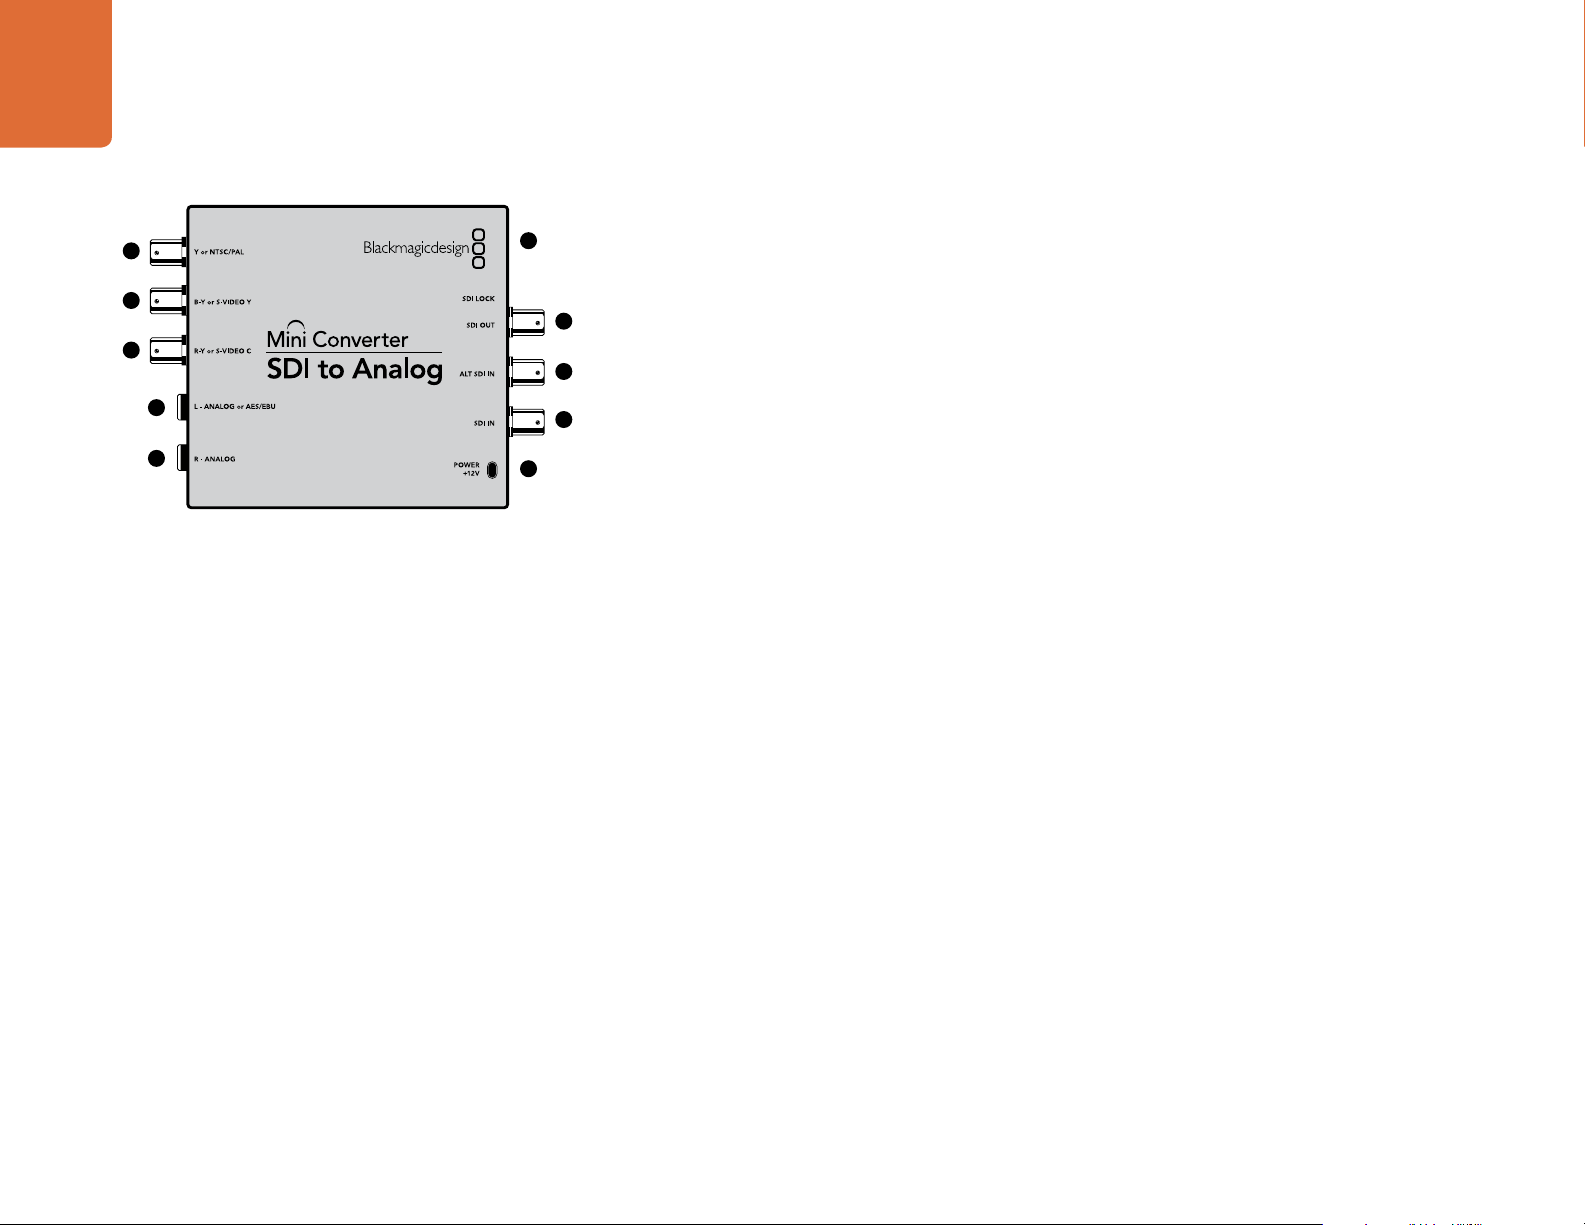
Connectors
1. Y or NTSC/PAL
Analog component Y, or composite NTSC/PAL output on a BNC connector.
10
2. B-Y or S-VIDEO Y
Analog component B-Y, or S-Video Y output BNC connector.
3. R-Y or S-VIDEO C
Analog component R-Y, or S-Video C output BNC connector.
4. L - ANALOG or AES/EBU
Balanced left channel analog audio, or AES/EBU digital audio output on a 1/4" TRS connector.
5. R - ANALOG
Balanced right channel analog audio output 1/4" TRS connector.
6. MINI-B USB PORT
Connects to the Converter Utility software via your Mac OS X or Windows computer. The Mini Converter’s
internal software is also updated using the USB port.
Blackmagic Mini Converter SDI to Analog
7. SDI OUT
SDI video output on a BNC connector.
8. ALT SDI IN
Redundant SDI input is provided as an optional back up.
9. SDI IN
Primary SDI input.
10. POWER +12V
12 volt power supply input.
8
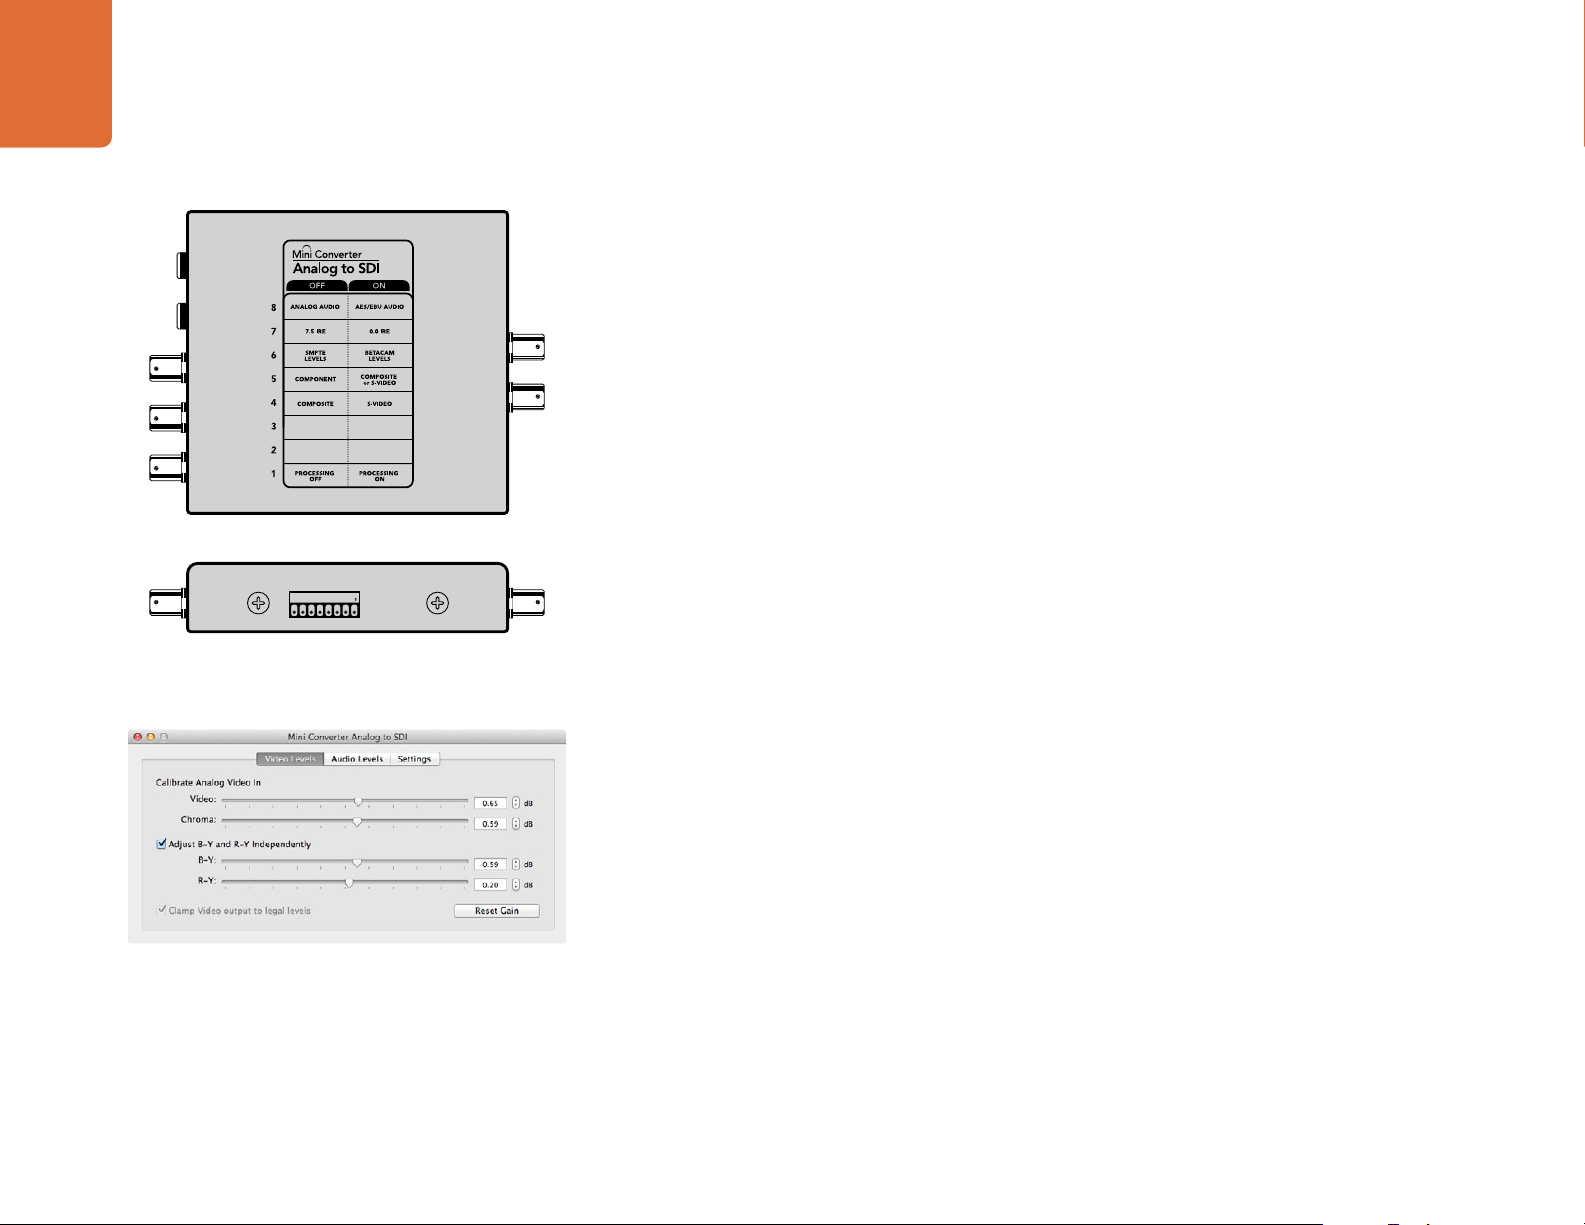
Mini Converter SDI to Analog
Mini Switches
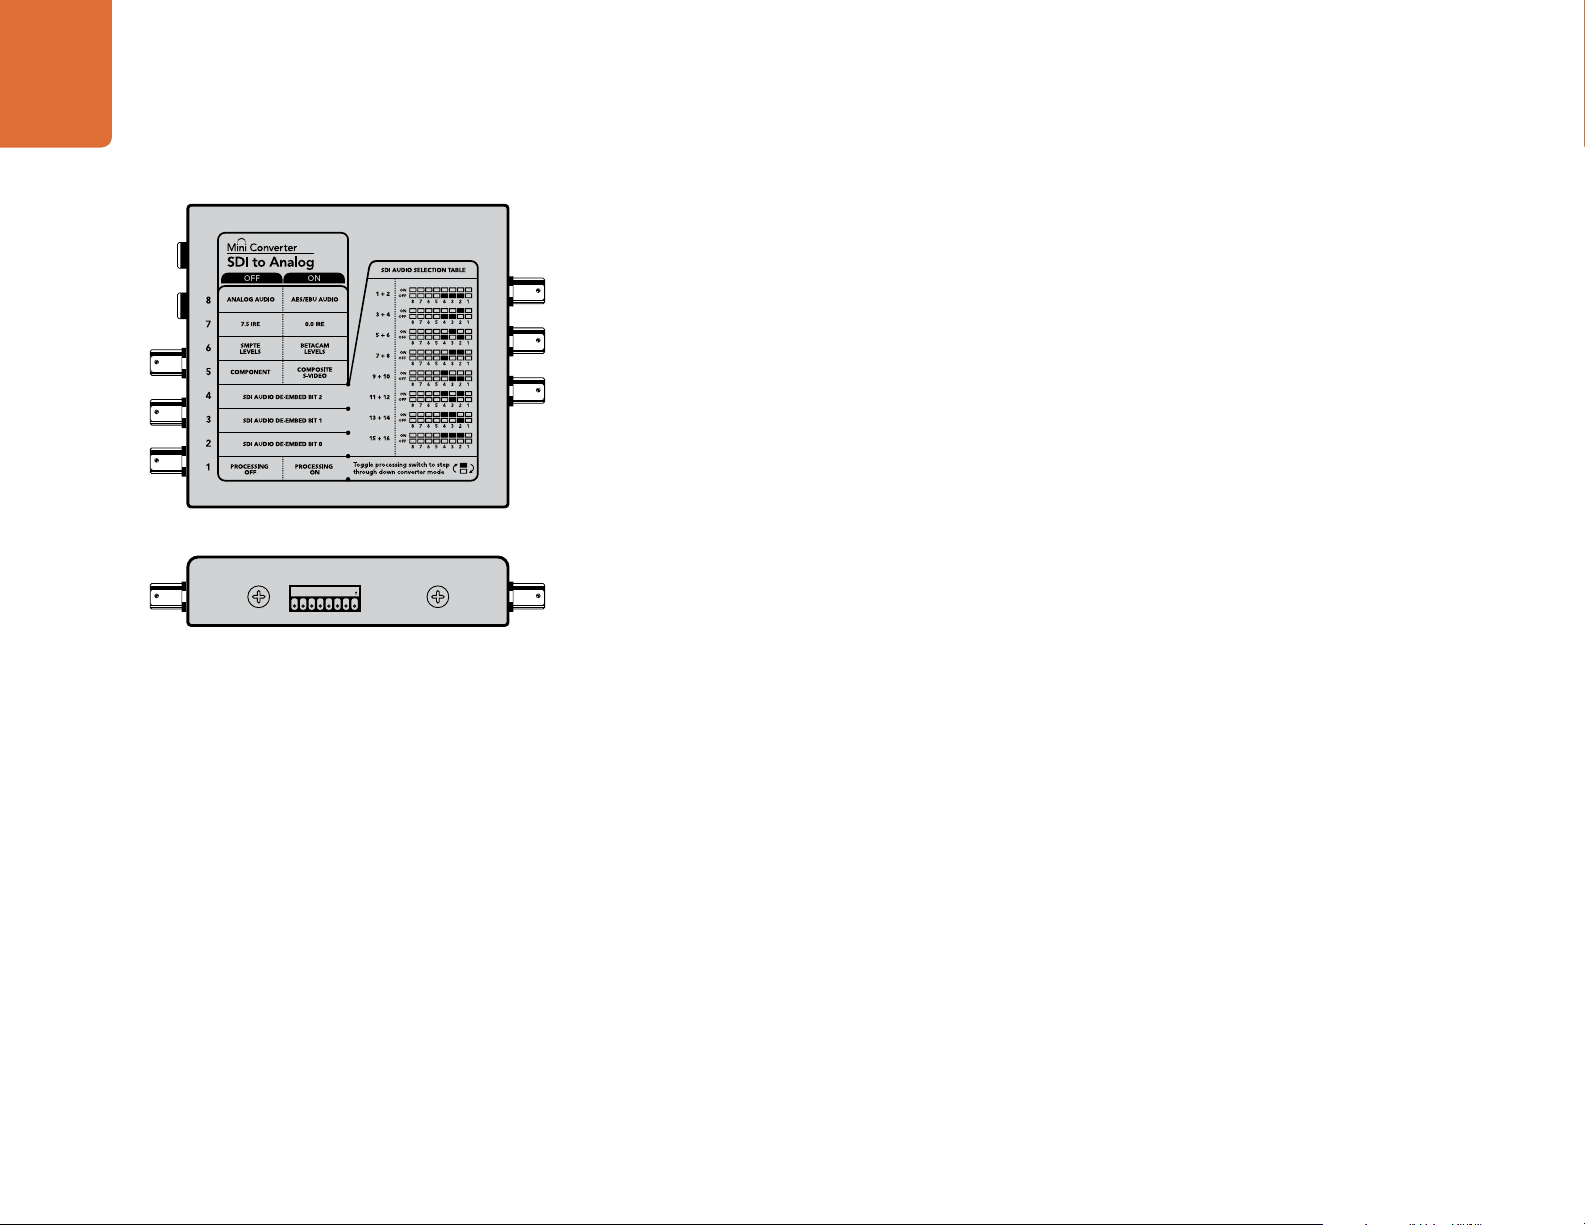
Mini Converter SDI to Analog’s mini switches provide the following settings:
Switch 8 - Analog Audio, AES/EBU Audio
Set switch 8 to OFF to select balanced analog audio, or to ON for digital AES/EBU audio output.
Switch 7 - 7.5 IRE - 0.0 IRE
The USA and countries using NTSC with 7.5 setup should set switch 7 to OFF. If you’re working in countries
not using 7.5 setup, set switch 7 to ON. This setting only affects composite or S-Video outputs.
Switch 6 - SMPTE Levels - Betacam Levels
Set switch 6 to OFF for SMPTE levels, or ON for Betacam levels. SMPTE levels are more common and even
Betacam SP decks can use SMPTE levels, so only switch this to Betacam if you are sure that Betacam levels
are being used.
1ON2 3 4 5 6 7 8
Change your converter's internal settings by adjusting the mini
switches using the tip of a pen.
Switch 5 - Component, Composite or S-Video
Set switch 5 to OFF to select analog component video output, or ON for composite and S-Video outputs.
To display the HD video input on the S-Video and composite outputs, down conversion must be set to ON.
Component analog video supports both HD and SD video.
Switch 4 - SDI Audio De-Embed Bit 2
Switches 4, 3 and 2 are grouped together to provide 8 ON/OFF combinations. Having eight different
combinations allows eight independent pairs of audio channels to be de-embedded from your SDI input.
Switch 3 - SDI Audio De-Embed Bit 1
See switch 4 description.
Switch 2 - SDI Audio De-Embed Bit 0
See switch 4 description.
Switch 1 - Processing Off - Processing On
Down convert HD to SD with 3 types of aspect ratios by cycling through switch 1. For example, each time
you cycle between Off and On you apply anamorphic, center cut or letterbox aspect ratios. Leaving switch
1 set to OFF bypasses the down converter and outputs in HD.
When connected to the Blackmagic Converter Utility via USB, your down conversion settings are controlled
by the software. If you want the converter to remember your software settings, disconnect from the
computer, power cycle your converter and set your down conversion using mini switch 1.
9
Mini Converter SDI to Analog
Mini Switch Settings Example:
Experiment with the mini switches by setting your Blackmagic Mini Converter to output high definition
component video and analog audio channels 1 and 2 by setting switches 8, 5, 4, 3 and 2 to the OFF position
SDI Audio Selection Table
Audio Channels Switch 4 Switch 3 Switch 2 Switch Diagram
1 and 2 OFF OFF OFF
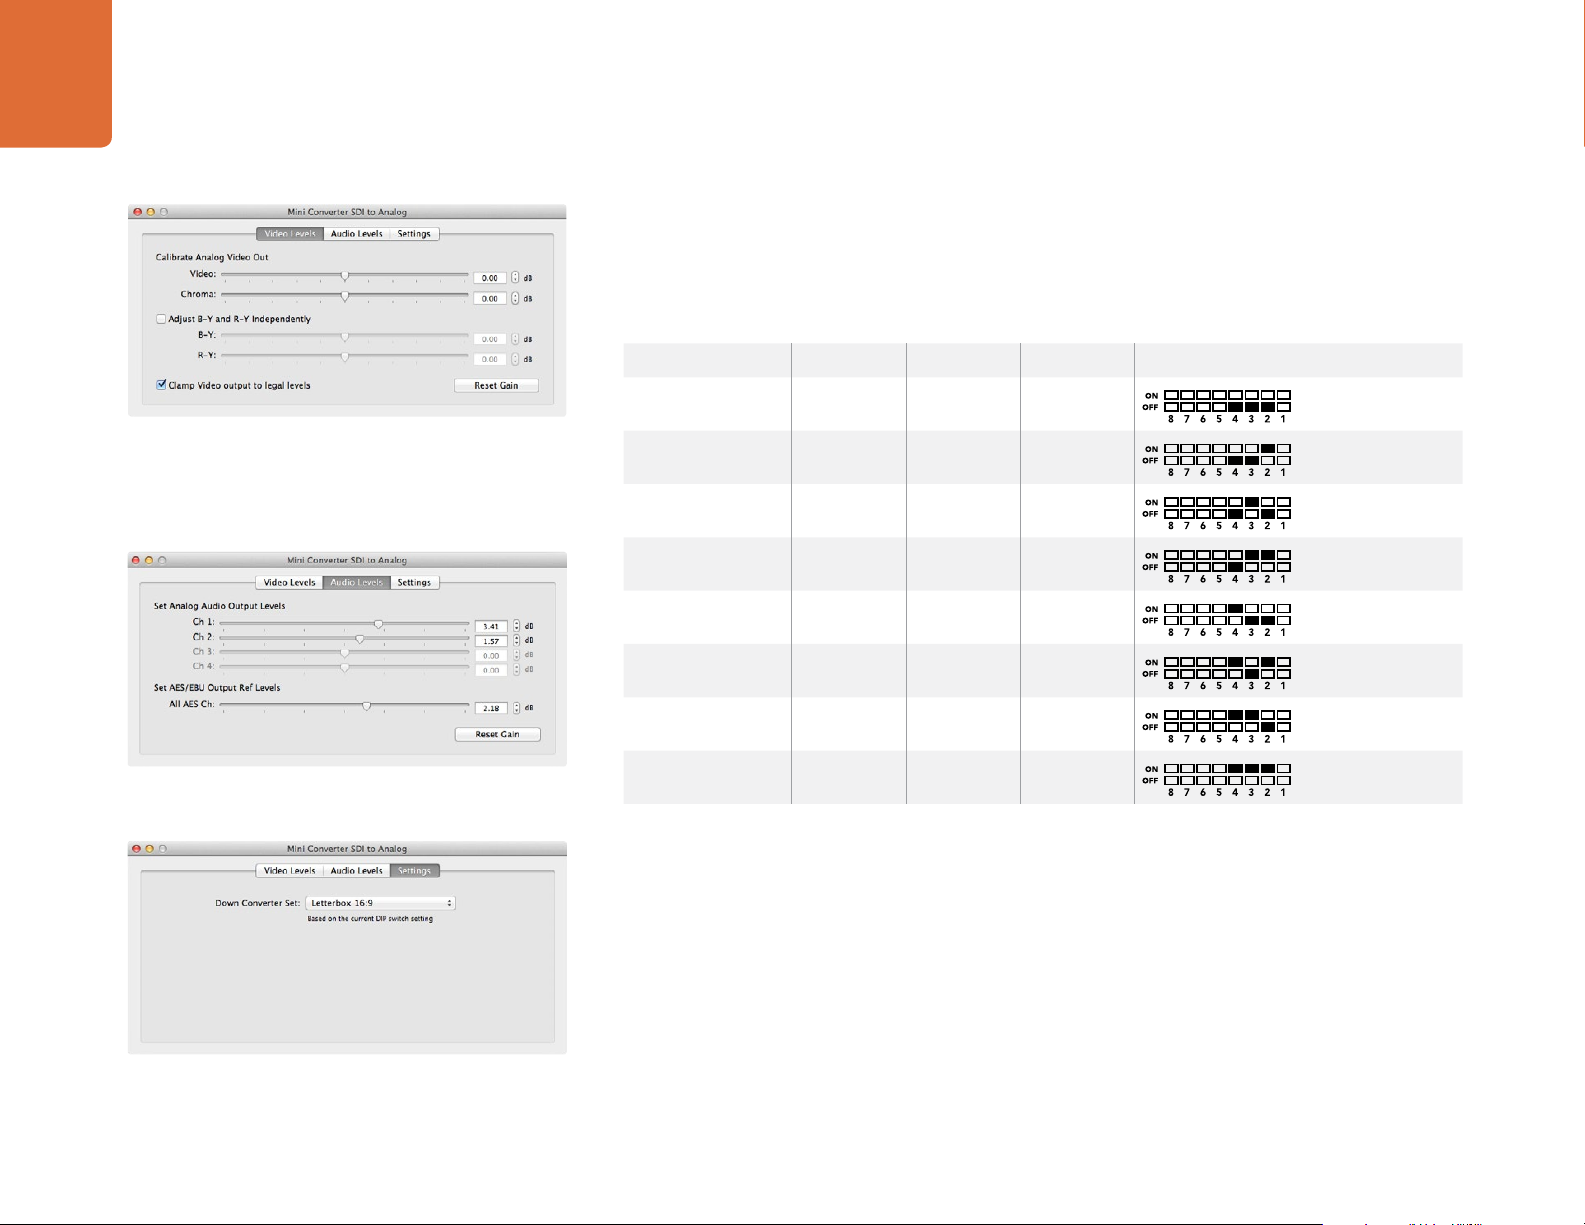
Adjust analog video levels using Blackmagic Converter Utility.
The Clamp Video output to legal levels setting is checked
by default. This setting ensures your analog output is a true
representation of the SDI input. Adjusting video levels may result
in illegal colors.
Adjust audio levels using Blackmagic Converter Utility.
3 and 4 OFF OFF ON
5 and 6 OFF ON OFF
7 and 8 OFF ON ON
9 and 10 ON OFF OFF
11 and 12 ON OFF ON
13 and 14 ON ON OFF
15 and 16 ON ON ON
Blackmagic Converter Utility Settings
The Converter Utility software complements your mini switch settings by providing supplementary
adjustment options.
The Video Levels pane lets you adjust the analog video luminance and chroma levels, and the B-Y and R-Y
component chroma levels independently.
The Audio Levels pane lets you adjust audio levels for your selected analog channels or AES/EBU audio
reference levels.
Adjust down conversion settings using Blackmagic Converter
Utility.
The Settings pane lets you select down conversion aspect ratio options. When your converter is not
connected to Converter Utility software, the mini switches take priority. You will need to set mini switch 1 if
you want to retain your aspect ratio settings after disconnecting from the Converter Utility software.
10
Mini Converter SDI to Analog
.
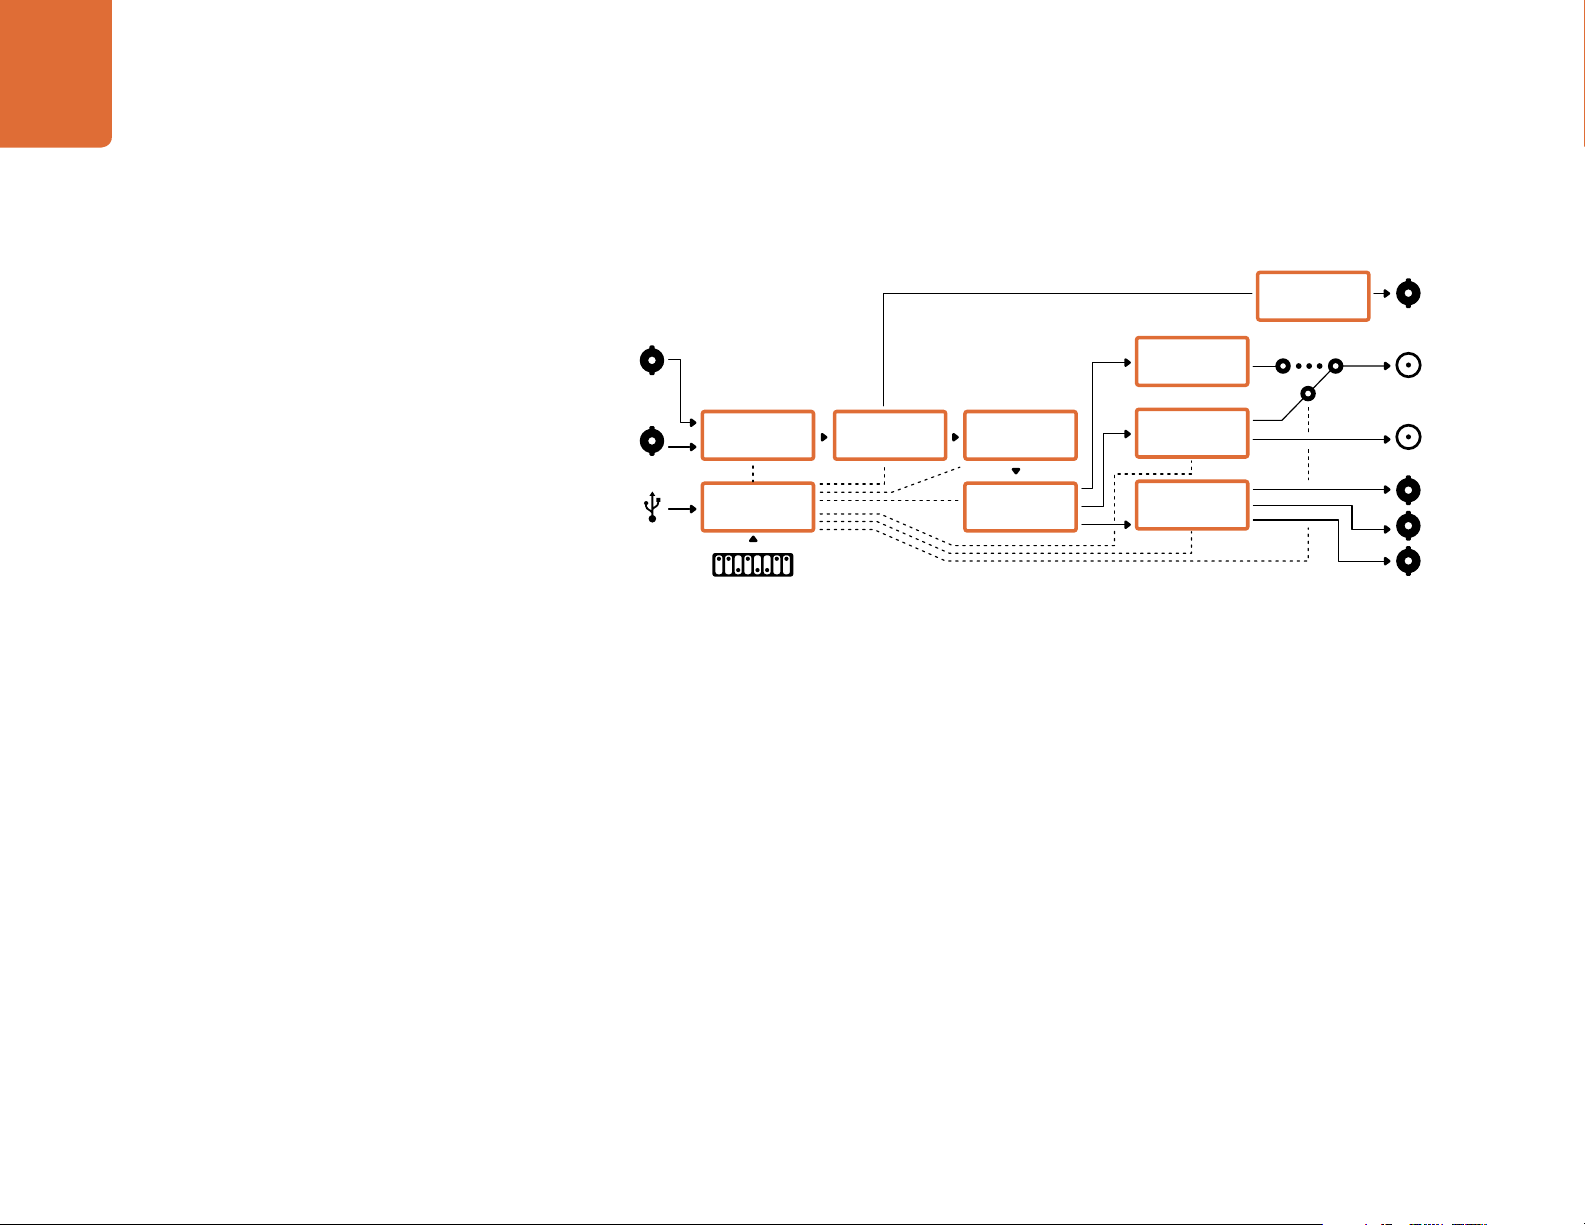
Mini Converter SDI to Analog Block Diagram
SDI In
Alt SDI In
USB
Input automatically
detects between SD,
HD-SDI and 3Gb/s SDI
Redundant
Input Automatic
Change Over
Central
Processor and
Firmware
Mini Switches
Equalizer,
Re-Clocker and
10 bit De-Serializer
10 bit HD to
SD Down
Converter
SDI Audio
De-Embedder
AES/EBU
Audio Formatter
Audio Digital to
Analog with
Balanced Output
12 Bit Digital to
Analog SD/HD
Video Converter
Component output can switch
Automatic SDI/
HD-SDI/3G HD-
SDI Cable Driver
Analog or AES/EBU
Audio Out Switch
to S-Video and composite
Loop SDI
Out
Left Analog Out
or AES/EBU Out
Right Analog Out
Y
R-Y
B-Y
Mini Converter Analog to SDI
11
Mini Converter Analog to SDI
1
2
3
4
5
6
7
8
9
Blackmagic Mini Converter Analog to SDI
Convert video and audio from analog equipment such as Betacam SP decks, HDV cameras and game
consoles to SD/HD-SDI video. A choice of analog and digital formats is supported, including component
SD/HD, S-Video, or composite NTSC and PAL. The converter’s HD-SDI outputs include the option to
embed digital AES/EBU or analog audio.
Connectors
1. Y or NTSC/PAL
Analog component Y, or composite NTSC/PAL input on a BNC connector.
2. B-Y or S-VIDEO Y
Analog component B-Y, or S-Video Y input BNC connector.
3. R-Y or S-VIDEO C
Analog component R-Y, or S-Video C input BNC connector.
4. L - ANALOG or AES/EBU
Balanced left channel analog audio, or AES/EBU digital audio input on a 1/4" TRS connector.
5. R - ANALOG
Balanced right channel analog audio input 1/4" TRS connector.
6. MINI-B USB PORT
Connects to the Converter Utility software via your Mac OS X or Windows computer. The Mini Converter’s
internal software is also updated using the USB port.
7. SDI OUT
SDI video output on a BNC connector.
8. SDI OUT
Secondary SDI output.
9. POWER +12V
12 volt power supply input.
12
Mini Converter Analog to SDI
Mini Switches
Mini Converter Analog to SDI’s mini switches provide the following settings:
Switch 8 - Analog Audio, AES/EBU Audio
Set switch 8 to OFF to select balanced analog audio, or to ON for digital AES/EBU audio input.
Switch 7 - 7.5 IRE - 0.0 IRE
The USA and countries using NTSC with 7.5 setup should set switch 7 to OFF. If you’re working in countries
not using 7.5 setup, set switch 7 to ON. This setting only affects composite or S-Video outputs.
Switch 6 - SMPTE Levels - Betacam Levels
This setting selects between SMPTE or Betacam video levels. Set switch 6 to OFF for SMPTE levels, or to
ON for Betacam levels. SMPTE levels are more common and even Betacam SP decks can use SMPTE levels
so only switch this to Betacam if you are sure that Betacam levels are being used.
1ON2 3 4 5 6 7 8
Change your converter's internal settings by adjusting the mini
switches using the tip of a pen.
Adjust analog video levels using Blackmagic Converter Utility.
Switch 5 - Component, Composite or S-Video
Set switch 5 to OFF to select analog component video input, or to ON for composite video and S-Video
analog inputs.
Switch 4 - Composite - S-Video
Set switch 4 to OFF to select composite video input, or to ON for S-Video input.
Switch 1 - Processing Off - Processing On
This switch is not used.
Mini Switch Settings Example: Experiment with the mini switches by setting your Blackmagic Mini
Converter to Component Video and Analog Audio output by setting switches 8 and 5 to the OFF position.
Blackmagic Converter Utility Settings
The Converter Utility software complements your mini switch settings by providing supplementary
adjustment options.
The Video Levels pane lets you adjust the analog video luminance and chroma levels, and the B-Y and R-Y
component chroma levels independently.
The Audio Levels pane lets you adjust audio levels for analog channels or AES/EBU reference levels.
13
Mini Converter Analog to SDI
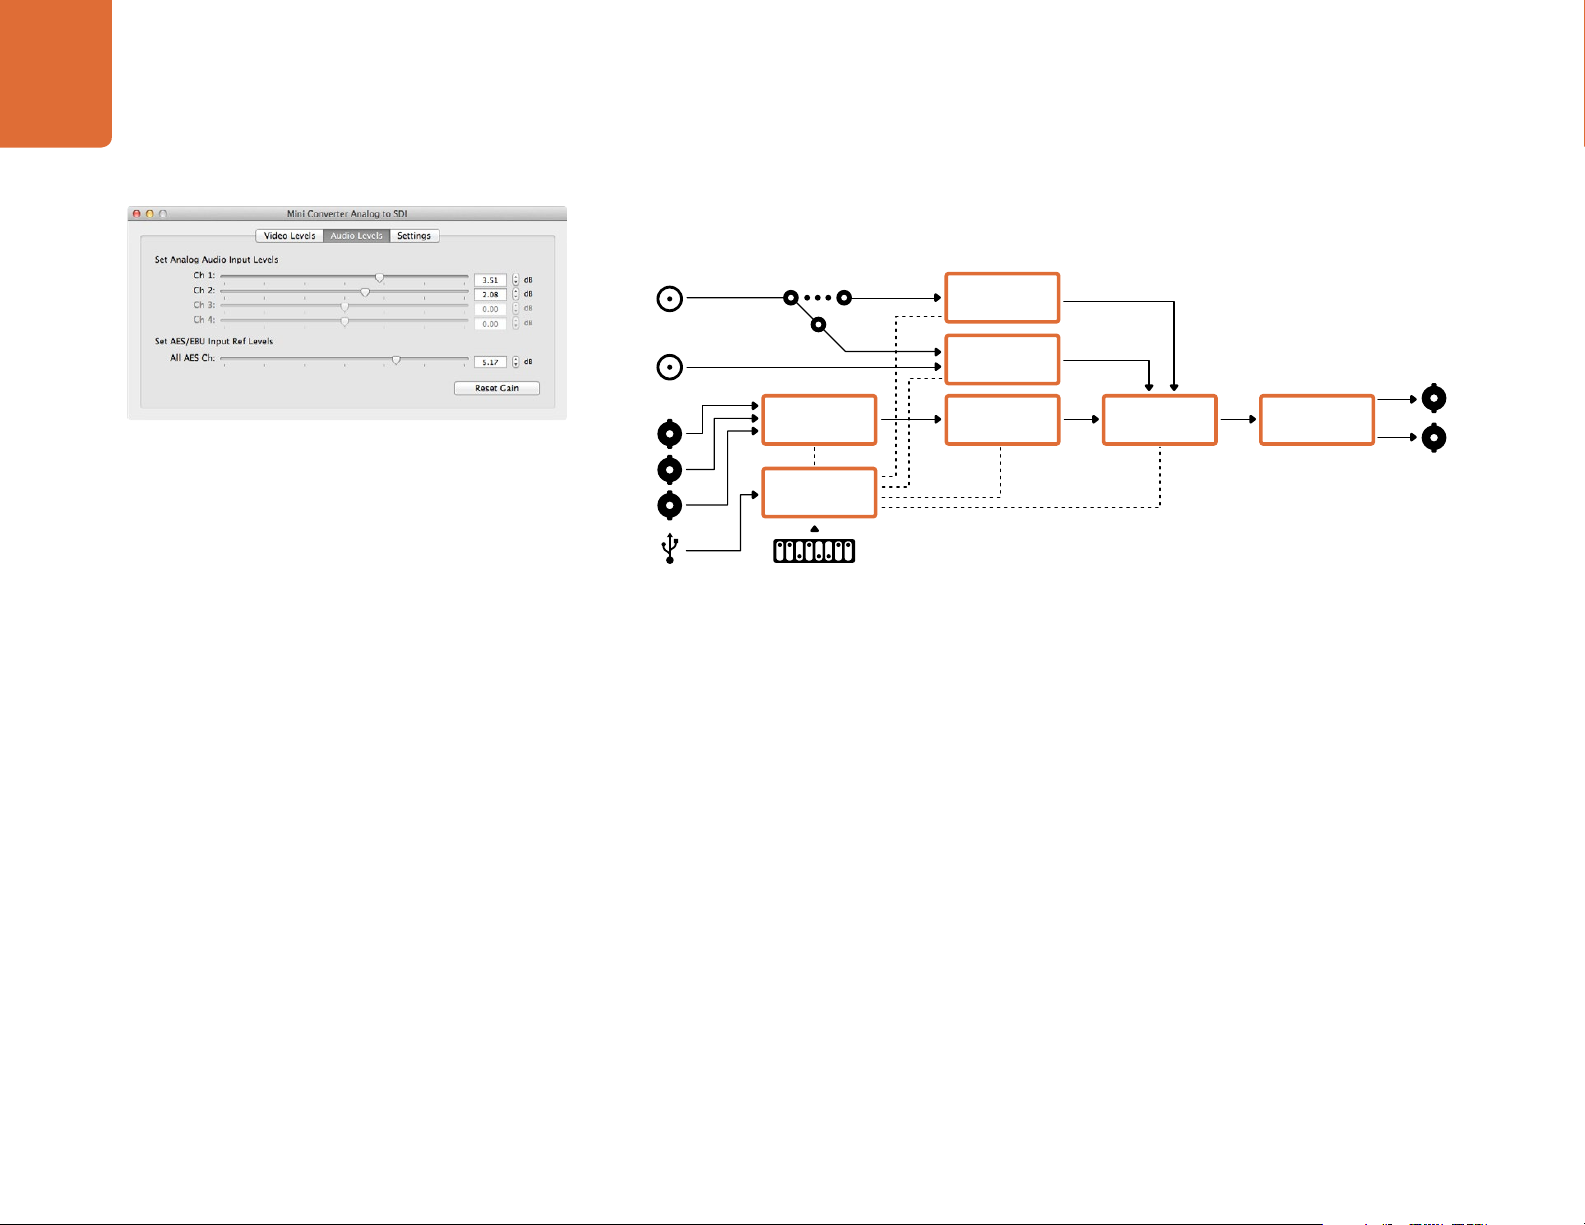
Mini Converter Analog to SDI Block Diagram
Left Analog In
or AES/EBU
Right Analog In
Adjust audio levels using Blackmagic Converter Utility.
Y
R-Y
B-Y
USB
Analog or AES/EBU
Audio Switch
12 bit Digital to
Analog SD/HD
Video Converter
Central
Processor and
Firmware
Mini Switches
AES/EBU
Sample Rate
Converter
Audio Analog to
Digital from
Balanced Input
Customizable
Video Processor
Component input can switch to
S-Video and Composite
SDI Audio
Embedder
Automatic SDI/
HD-SDI/3G HD-
SDI Cable Driver
SDI Out
SDI Out
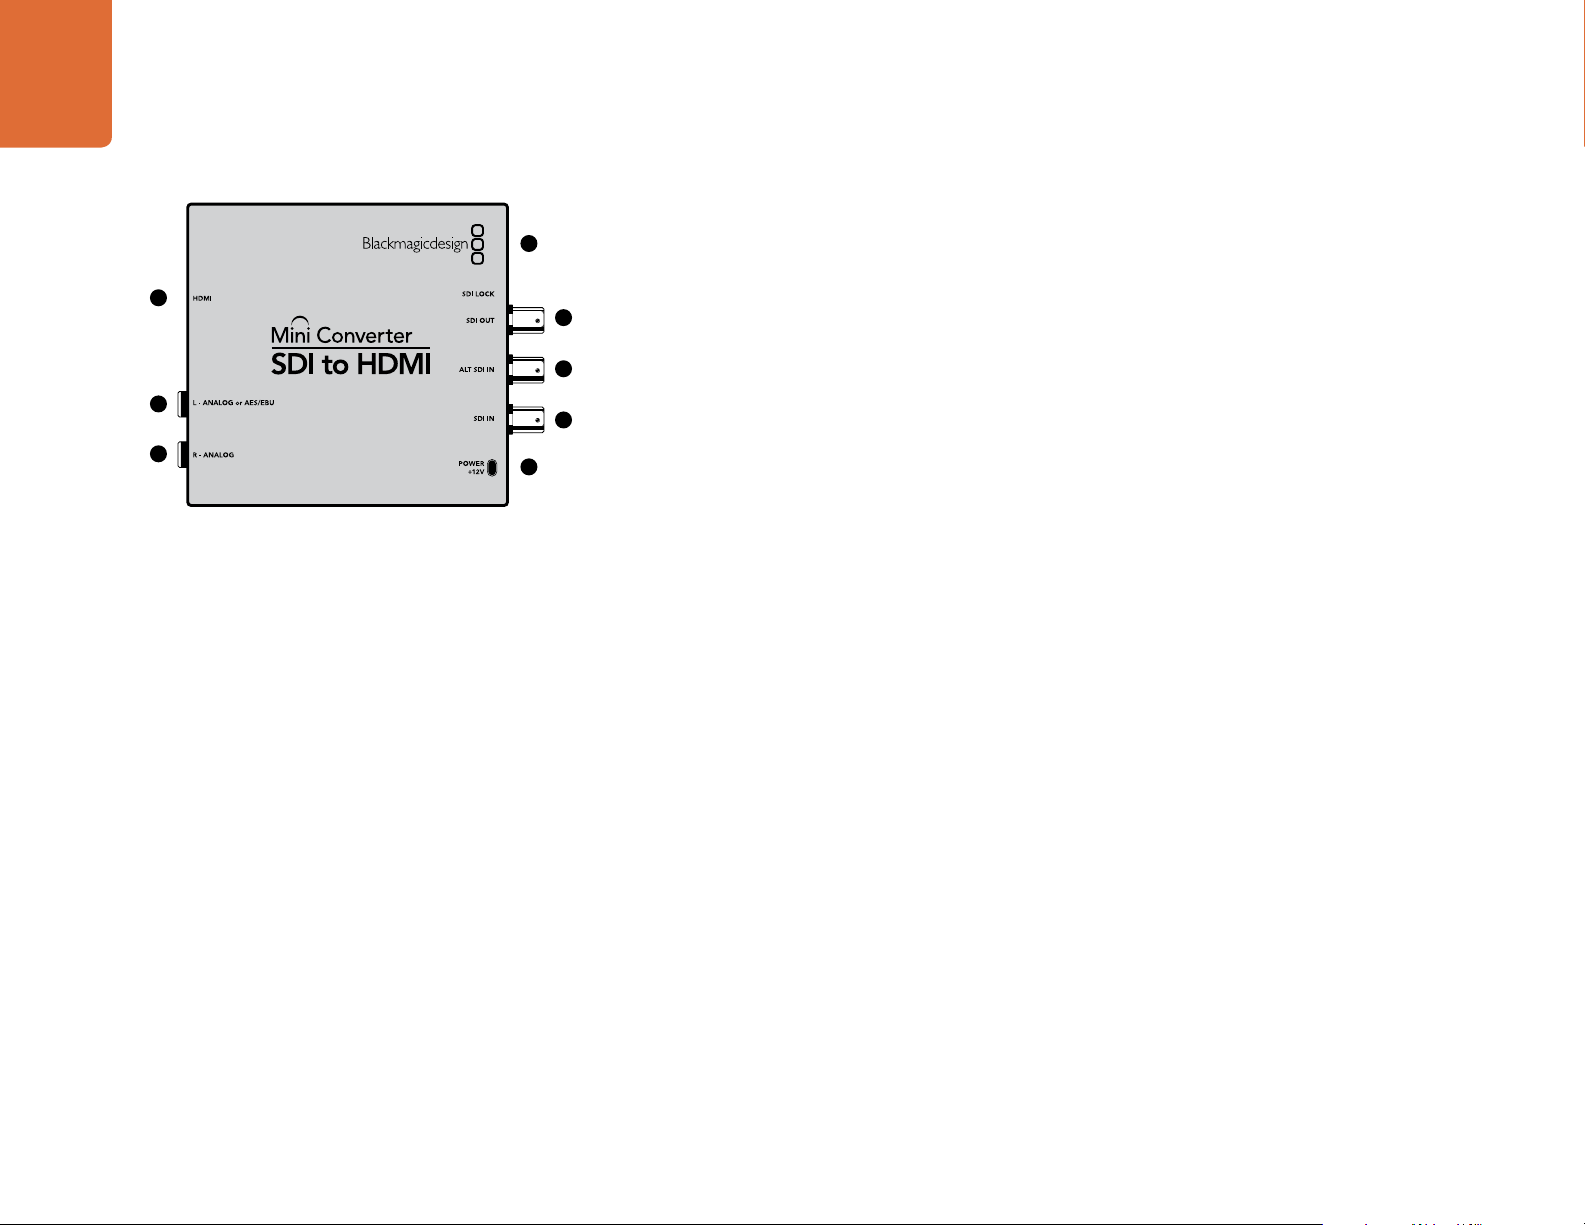
Mini Converter SDI to HDMI
14
Mini Converter SDI to HDMI
Blackmagic Mini Converter SDI to HDMI
4
1
2
3
5
6
7
8
Connect a huge range of HDMI displays and video projectors to SDI based equipment. Your Mini Converter
SDI to HDMI automatically detects between SD/HD/3G-SDI and converts to HDMI with embedded audio,
plus balanced AES/EBU or analog audio out.
Connectors
1. HDMI
HDMI type A video output.
2. L - ANALOG or AES/EBU
Balanced left channel analog audio, or AES/EBU digital audio output on a 1/4" TRS connector.
3. R - ANALOG
Balanced right channel analog audio output 1/4" TRS connector.
4. MINI-B USB PORT
Connects to the Converter Utility software via your Mac OS X or Windows computer. The Mini Converter’s
internal software is also updated using the USB port.
5. SDI OUT
SDI video output on a BNC connector.
6. ALT SDI IN
Redundant SDI input is provided as an optional back up.
7. SDI IN
Primary SDI input.
8. POWER +12V
12 volt power supply input.

15
Mini Converter SDI to HDMI
Mini Switches
Mini Converter SDI to HDMI’s mini switches provide the following settings:
Switch 8 - Analog Audio, AES/EBU Audio
Set switch 8 to OFF to select balanced analog audio, or to ON for digital AES/EBU audio output.
Switch 4 - SDI Audio De-Embed Bit 2
Switches 4, 3 and 2 are grouped together to provide 8 ON/OFF combinations. Having eight different
combinations allows eight independent pairs of audio channels to be de-embedded from your SDI input
and output to HDMI, analog or AES/EBU audio.
Switch 3 - SDI Audio De-Embed Bit 1
See switch 4 description.
Switch 2 - SDI Audio De-Embed Bit 0
1ON2 3 4 5 6 7 8
Change your converter's internal settings by adjusting the mini
switches using the tip of a pen.
See switch 4 description.
SDI Audio Selection Table
Audio Channels Switch 4 Switch 3 Switch 2 Switch Diagram
1 and 2 OFF OFF OFF
3 and 4 OFF OFF ON
5 and 6 OFF ON OFF
7 and 8 OFF ON ON
9 and 10 ON OFF OFF
11 and 12 ON OFF ON
13 and 14 ON ON OFF
15 and 16 ON ON ON

16
Mini Converter SDI to HDMI
SDI Audio Selection Table
Switch 1 - Processing Off - Processing On
This switch is not used.
Mini Switch Settings Example: Experiment with the mini switches by setting your Blackmagic Mini
Converter to de-embed SDI audio channels 1 and 2 and output to analog by setting switches 8, 4, 3 and 2
to the OFF position.
Blackmagic Converter Utility Settings
Adjust audio levels using Blackmagic Converter Utility.
The Clamp Video output to legal levels setting is checked
by default. This setting ensures your analog output is a true
representation of the SDI input. Adjusting video levels may result
in illegal colors.
The Converter Utility software complements your mini switch settings by providing supplementary
adjustment options.
The Audio Levels pane lets you adjust audio levels for the selected analog channels or AES/EBU
reference levels.
Mini Converter SDI to HDMI Block Diagram
SDI In
Alt SDI In
USB
Input automatically
detects between SD,
HD-SDI and 3G-SDI
Redundant
Input Automatic
Change Over
Central
Processor and
Firmware
Equalizer,
Re-Clocker and
10 bit De-Serializer
Customizable
Video Processor
SDI Audio
De-Embedder
AES/EBU
Audio Formatter
Audio Digital to
Analog with
Balanced Output
HDMI Video and
Audio Formatter
Automatic SDI/
HD-SDI/3G HD-
SDI Cable Driver
Analog or AES/EBU
Audio Out Switch
Loop SDI
Out
Left Analog Out
or AES/EBU Out
Right Analog Out
HDMI Out
Mini Switches
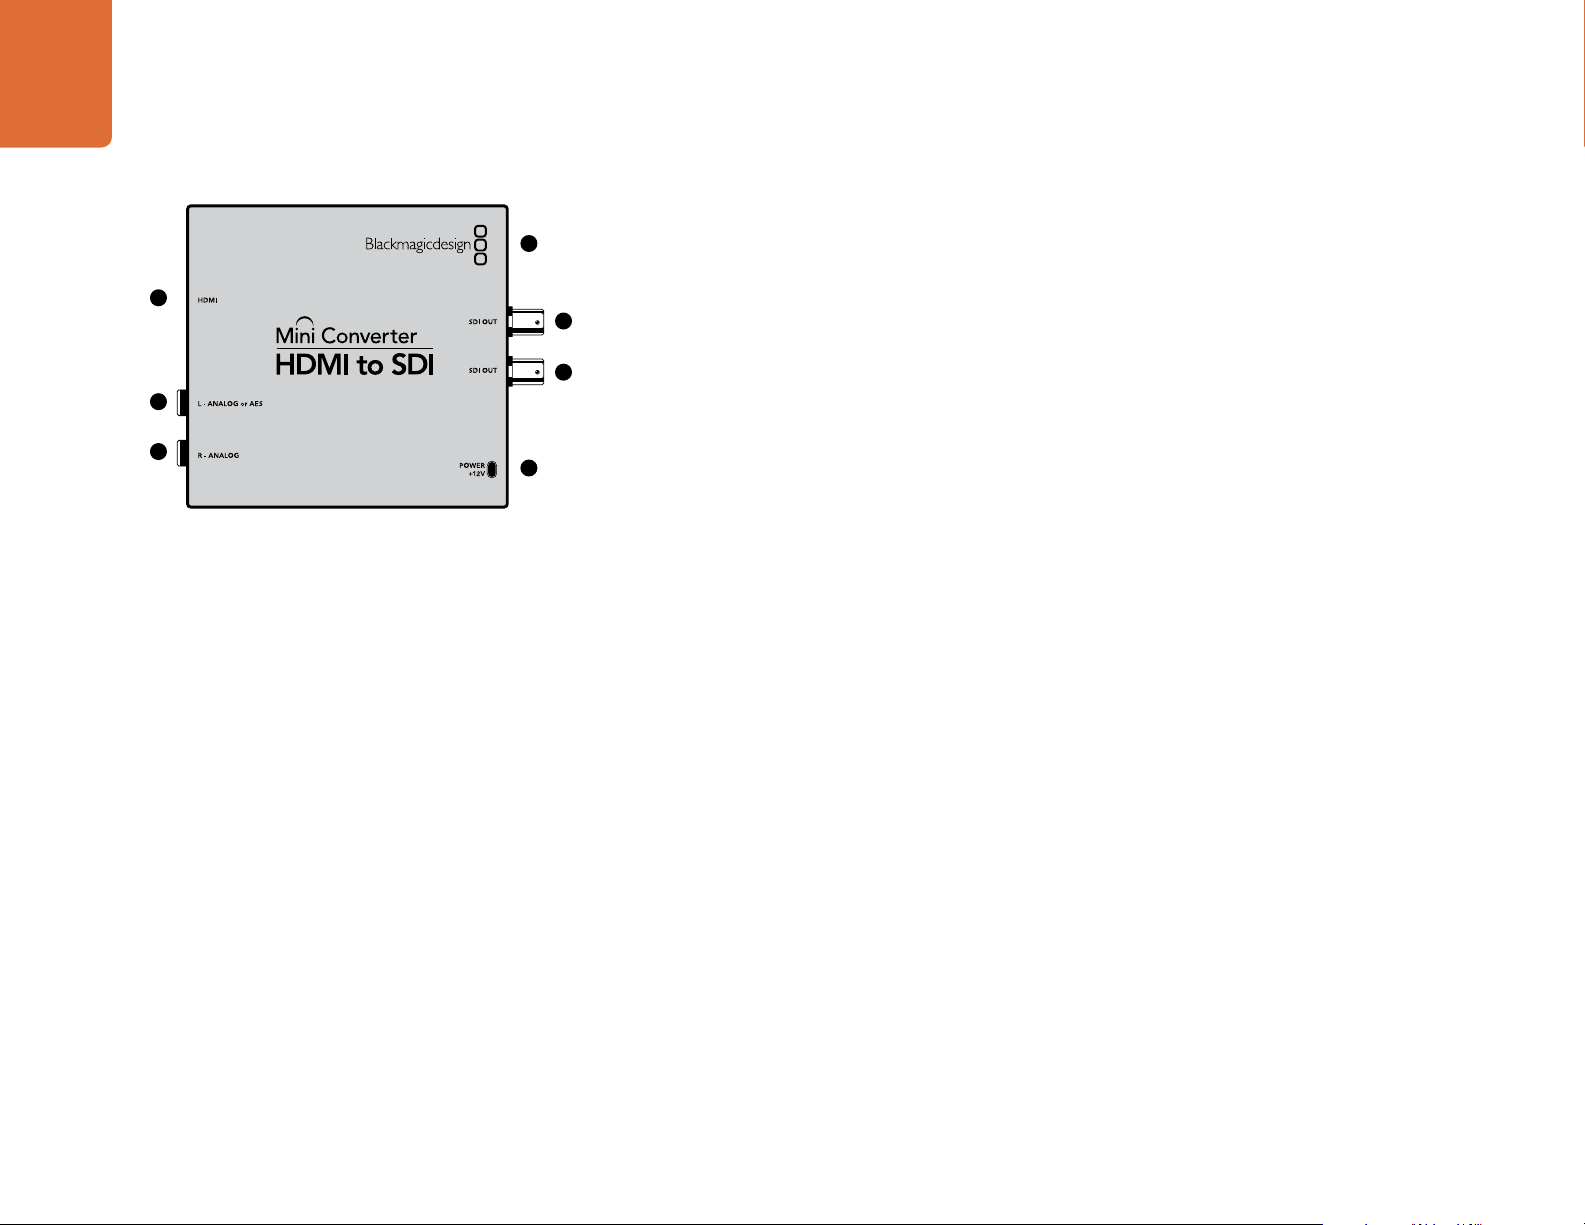
Mini Converter HDMI to SDI
17
Mini Converter HDMI to SDI
Blackmagic Mini Converter HDMI to SDI
4
1
5
6
2
3
7
Convert HDMI outputs from devices such as HDV cameras and game consoles to SDI with the choice to
embed audio from HDMI, AES/EBU or balanced analog audio inputs. This means you can send video
signals from HDMI over SDI using the longest SDI cables. You can even add SDI outputs to computers with
HDMI compatibility. This converter also includes HD to SD down conversion.
Connectors
1. HDMI
HDMI type A video input.
2. L - ANALOG or AES/EBU
Balanced left channel analog audio or AES/EBU digital audio input on a 1/4" TRS connector.
3. R - ANALOG
Balanced right channel analog audio output 1/4" TRS connector.
4. MINI-B USB PORT
Connects to the Converter Utility software via your Mac OS X or Windows computer. The Mini Converter’s
internal software is also updated using the USB port.
5. SDI OUT
SDI video output on a BNC connector.
6. SDI OUT
Secondary SDI output.
7. POWER +12V
12 volt power supply input.
18
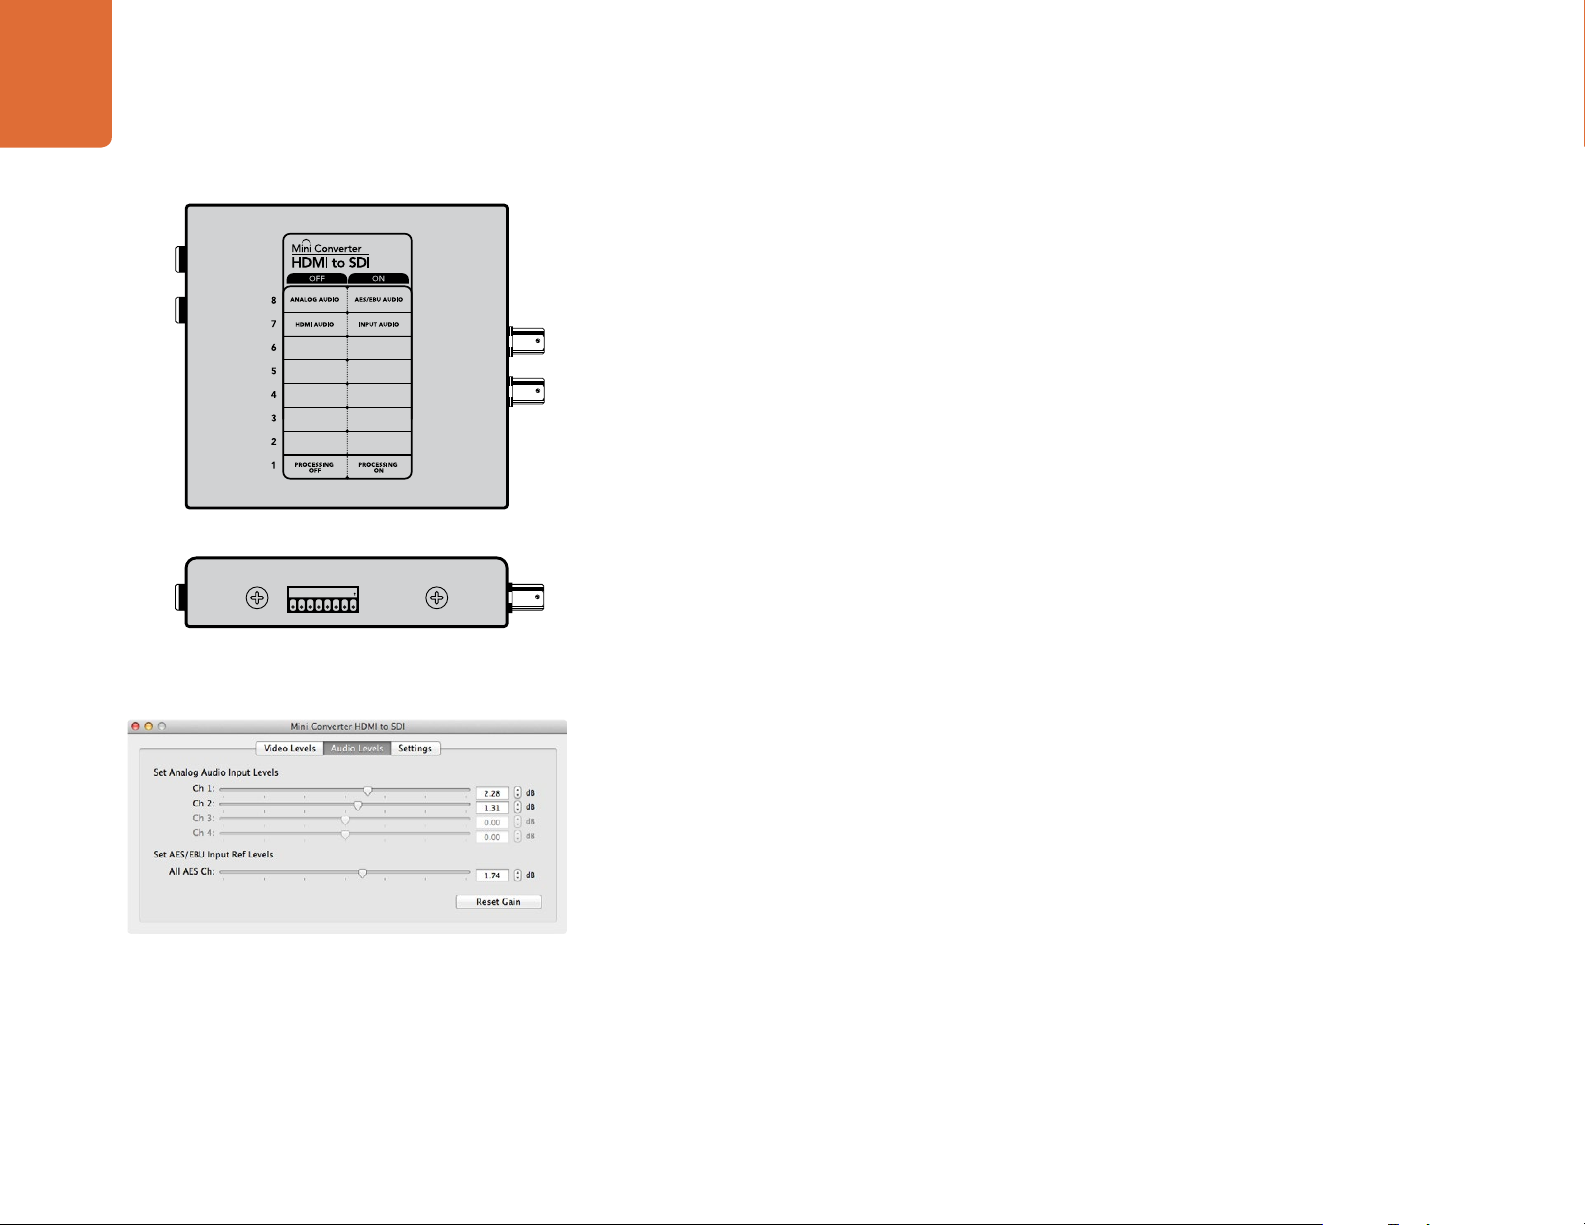
Mini Converter HDMI to SDI
Mini Switches
Mini Converter HDMI to SDI’s mini switches provide the following settings:
Switch 8 - Analog Audio, AES/EBU Audio
Set switch 8 to OFF to select balanced analog audio, or to ON for digital AES/EBU audio input. To use these
inputs Switch 7 must also be set to ON.
Switch 7 - HDMI Audio - Input Audio
Set switch 7 to OFF to select embedded HDMI audio, or to ON for analog or AES/EBU audio.
Switch 1 - Processing Off - Processing On
Down convert HD to SD with 3 types of aspect ratios by cycling through switch 1. For example, each time
you cycle between OFF and On you apply anamorphic, center cut or letterbox aspect ratios. Leaving switch
1 set to OFF bypasses the down converter and outputs in HD.
1ON2 3 4 5 6 7 8
Change your converter's internal settings by adjusting the mini
switches using the tip of a pen.
Converter Utility can be used to adjust audio levels.
When connected to the Blackmagic Converter Utility via USB, your down conversion settings are controlled
by the software. If you want the converter to remember your software settings, disconnect from the
computer, power cycle your converter and set your down conversion using mini switch 1.
Blackmagic Converter Utility Settings
The Converter Utility software complements your mini switch settings by providing supplementary
adjustment options.
The Audio Levels pane lets you adjust audio levels for analog channels or AES/EBU audio reference levels.
19
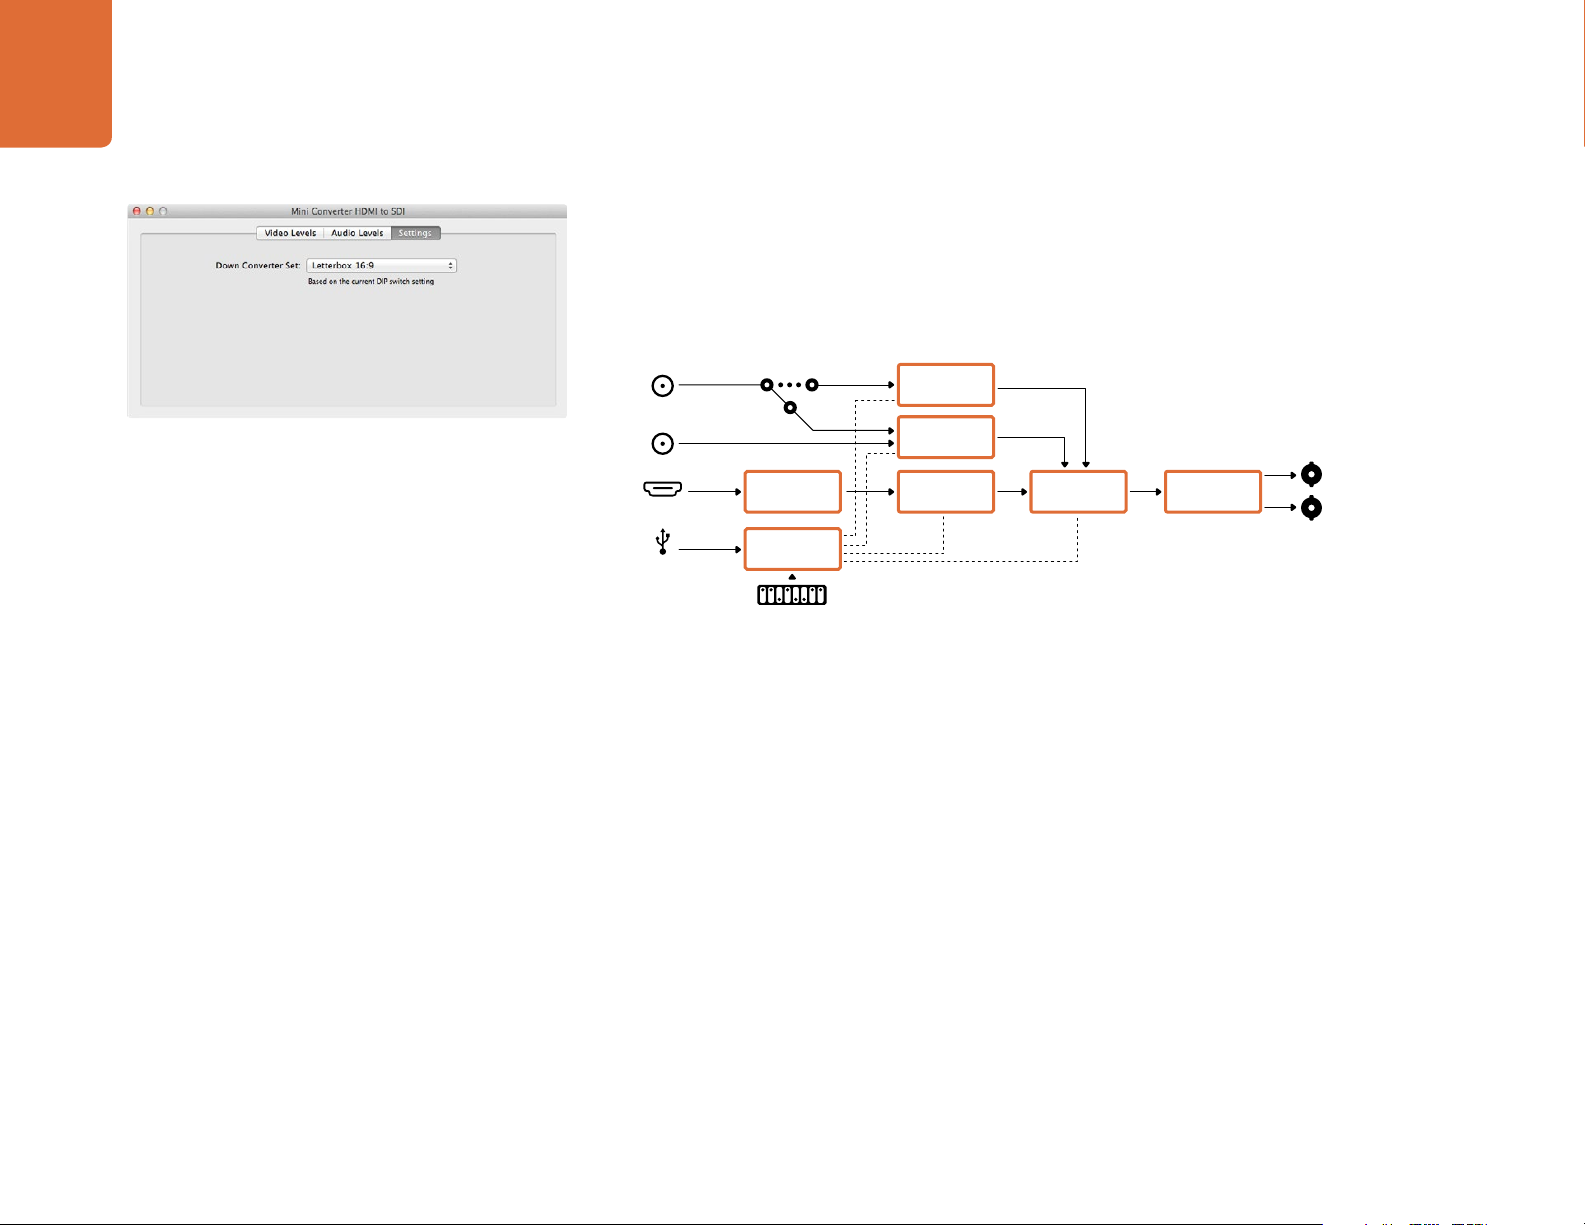
Mini Converter HDMI to SDI
The Settings pane lets you select down conversion aspect ratio options. However, your settings will need
to be set by mini switch 1 if you want to retain them after disconnecting your converter from the Converter
Utility software.
Mini Converter HDMI to SDI Block Diagram
Left Analog In
or AES/EBU
Adjust down conversion settings using Blackmagic Converter
Utility.
Right Analog In
HDMI In
USB
Analog or AES/EBU
Audio Switch
HDMI Video and
Audio Decoder
Central
Processor and
Firmware
Mini Switches
AES/EBU
Sample Rate
Converter
Audio Analog to
Digital with
Balanced Input
Customizable
Video Processor
SDI Audio
Embedder
Automatic SDI/
HD-SDI/3G HD-
SDI Cable Driver
SDI Out
SDI Out
 Loading...