

BIAS Peak - 2.6 User Manual

Software User’s Guide
Version 2.6
Berkley Integrated Audio Software, Inc.
1370 Industrial Ave., Suite A
Petaluma, CA 94952
707.782.1866
http://www.bias-inc.com
BIAS Technical Support
707.782.1866
Monday-Friday 9AM–5PM PST
or
support@bias-inc.com

BY INSTALLING AND USING THE PROVIDED
SOFTWARE, YOU ARE AGREEING TO BECOME
BOUND BY THE TERMS OF THIS AGREEMENT,
WHICH INCLUDES THE SOFTWARE LICENSE AND
THE SOFTWARE DISCLAIMER OF WARRANTY
(collectively the "Agreement"). CLICK "QUIT" ON
THE FOLLOWING DIALOG IF YOU DO NOT AGREE
WITH THIS AGREEMENT. THIS AGREEMENT
CONSTITUTES THE COMPLETE AGREEMENT
BETWEEN YOU AND BIAS, INC. IF YOU DO NOT
AGREE TO THE TERMS OF THIS AGREEMENT, DO
NOT USE THE SOFTWARE ON THE DISKS INCLUDED
IN THIS PACKAGE AND PROMPTLY RETURN THE
UNOPENED PACKAGE AND THE OTHER MATERIALS
(INCLUDING WRITTEN MATERIALS, BINDERS OR
OTHER CONTAINERS) THAT ARE PART OF THIS
PRODUCT TO THE PLACE WHERE YOU OBTAINED
THEM FOR A FULL REFUND.
BIAS SOFTWARE LICENSE
1. GRANT OF LICENSE. In consideration of payment
of the LICENSE fee, which is part of the price you paid
for this product, BIAS, as Licensor, grants to you, the
LICENSEE, a nonexclusive right to use and display this
copy of a BIAS software program (hereinafter the
"SOFTWARE") an a single COMPUTER (i.e., with a
single CPU) at a single location. BIAS reserves all
rights not expressly granted to LICENSEE.
2. OWNERSHIP OF SOFTWARE. As the LICENSEE, you
own the magnetic or other physical media on which
the SOFTWARE is originally or subsequently recorded
or fixed, but BIAS retains title and ownership of the
SOFTWARE recorded on the original disk copy(ies)
and all subsequent copies of the SOFTWARE,
regardless of the form or media on which the original
and other copies may exist. This License is not a sale
of the original SOFTWARE or any copy.
3. COPY RESTRICTIONS. This SOFTWARE and the
accompanying written materials are copyrighted.
Unauthorized copying of the SOFTWARE, including
SOFTWARE that has been modified, merged, or
included with other software, or of the written
materials is expressly forbidden. You may be held
legally responsible for any copyright infringement that
is caused or encouraged by your failure to abide by the
terms of this License. Subject to these restrictions,
and if the SOFTWARE is not copy-protected, you may
make one (1) copy of the SOFTWARE solely for
backup purposes. You must reproduce and include
the copyright notice on the backup copy.
4. USE RESTRICTIONS. As the LICENSEE, you may
physically transfer the SOFTWARE from one computer
to another provided that the SOFTWARE is used on
only one computer at a time. You may not electronically transfer the SOFTWARE from one computer to
another over a network. You may not distribute
copies of the SOFTWARE or accompanying written
materials to others. You may not modify, adapt,
translate, reverse engineer, decompile, disassemble, or
create derivative works based on the SOFTWARE. You
may not modify, adapt, translate, or create derivative
works based on the written materials without the prior
written consent of BIAS.
5. TRANSFER RESTRICTIONS. This SOFTWARE is
licensed only to you, the LICENSEE, and may not be
transferred to anyone without the prior written
consent of BIAS. Any authorized transferee of the
SOFTWARE shall be bound by the terms and conditions of this Agreement. In no event may you transfer,
assign, rent, lease, sell, or otherwise dispose of the
SOFTWARE on a temporary or permanent basis except
as expressly provided herein.
6. TERMINATION. This License is effective until
terminated. This License will terminate automatically
without notice from BIAS if you fail to comply with any
provision of this License. Upon termination you shall
destroy the written materials and all copies of the
SOFTWARE, including modified copies, if any.
7. UPDATE POLICY. BIAS may create, from time to
time, updated versions of the SOFTWARE. At its
option, BIAS will make such updates available to the
LICENSEE and transferees who have paid the update
fee and registered the software with BIAS.
8. MISCELLANEOUS. This Agreement is governed by
the law of the State of California.
DISCLAIMER OF WARRANTY AND LIMITED WARRANTY
THE SOFTWARE AND ACCOMPANYING WRITTEN
MATERIALS (INCLUDING INSTRUCTIONS FOR USE)
ii
Peak User’s Guide

ARE PROVIDED "AS IS" WITHOUT WARRANTIES OF
ANY KIND. FURTHER, BIAS DOES NOT WARRANT,
GUARANTEE, OR MAKE ANY REPRESENTATIONS
REGARDING THE USE, OR THE RESULTS OF THE
USE, OF THE SOFTWARE OR WRITTEN MATERIALS IN
TERMS OF CORRECTNESS, ACCURACY, RELIABILITY,
CURRENTNESS, OR OTHERWISE. THE ENTIRE RISK
AS TO THE RESULTS AND PERFORMANCE OF THE
SOFTWARE IS ASSUMED BY YOU, AND NOT BIAS OR
ITS DEALERS, DISTRIBUTORS, AGENTS, OR EMPLOYEES, YOU AGREE TO ASSUME THE ENTIRE COST OF
ALL NECESSARY SERVICING, REPAIR, OR CORRECTION.
BIAS warrants to the original LICENSEE that the
disk(s) on which the SOFTWARE is recorded is free
from defects in materials and workmanship under
normal use and service for a period of ninety (90) days
from the date of delivery as evidenced by a copy of the
receipt and. Further, BIAS hereby limits the duration
of any implied warranty(ies) on the disk to the
respective periods stated above. Some states do not
allow limitations on duration of an implied warranty,
so the above limitation may not apply to you.
BIAS' entire liability and your exclusive remedy as to
disk(s) shall be, at BIAS' option, either (a) return of
the purchase price or (b) replacement of the disk that
does not meet BIAS' Limited Warranty and which is
returned to BIAS with a copy of the receipt. If failure
of the disk has resulted from accident, abuse, or
misapplication, BIAS shall have no responsibility to
replace the disk or refund the purchase price. Any
replacement disk will be warranted for the remainder
of the original warranty period or thirty (30) days,
whichever is longer.
THE ABOVE ARE THE ONLY WARRANTIES OF ANY
KIND, EITHER EXPRESS OR IMPLIED, INCLUDING
BUT NOT LIMITED TO THE IMPLIED WARRANTIES
OF MERCHANTABILITY AND FITNESS FOR A
PARTICULAR PURPOSE, THAT ARE MADE BY BIAS
CONCERNING THE BIAS PRODUCT. NO ORAL OR
WRITTEN INFORMATION OR ADVICE GIVEN BY BIAS,
ITS DEALERS, DISTRIBUTORS, AGENTS, OR EMPLOYEES SHALL CREATE A WARRANTY OR IN ANY WAY
INCREASE THE SCOPE OF THIS WARRANTY, AND
YOU MAY NOT RELY ON ANY SUCH INFORMATION
OR ADVICE. THIS WARRANTY GIVES YOU SPECIFIC
LEGAL RIGHTS. YOU MAY HAVE OTHER RIGHTS
WHICH VARY FROM STATE TO STATE.
NEITHER BIAS NOR ANYONE ELSE WHO HAS BEEN
INVOLVED IN THE CREATION, PRODUCTION, OR
DELIVERY OF THIS PRODUCT SHALL BE LIABLE FOR
ANY DIRECT, INDIRECT, CONSEQUENTIAL, OR
INCIDENTAL DAMAGES (INCLUDING DAMAGES FOR
LOSS OF BUSINESS PROFITS, BUSINESS INTERRUPTION, LOSS OF BUSINESS INFORMATION, AND THE
LIKE) ARISING SUCH DAMAGES. BECAUSE SOME
STATES DO NOT ALLOW THE EXCLUSION OR
LIMITATION OF LIABILITY FOR CONSEQUENTIAL OR
INCIDENTAL DAMAGES, THE ABOVE LIMITATION
MAY NOT APPLY TO YOU.
This Disclaimer of Warranty and Limited Warranty is
governed by the laws of the State of California.
U.S. GOVERNMENT RESTRICTED RIGHTS
The SOFTWARE and documentation is provided with
RESTRICTED RIGHTS. Use, duplication, or disclosure
by the Government is subject to restrictions as set
forth in subdivision (b)(3)(ii) of The Rights in
Technical Data and Computer Software clause at
252.227-7013.
Contractor/manufacturer is BIAS (Berkley Integrated
Audio Software), Inc/1370 Industrial Avenue, Suite A,
Petaluma, CA 94952.
Should you have any questions concerning this
Agreement, or if you desire to contact BIAS for any
reason, please contact in writing:
BIAS Customer Sales and Service, 1370 Industrial Ave.,
Suite A, Petaluma, CA 94952.
Credits:
Peak Software:
Steve Berkley
Time Compression/Expansion Software:
Earl Vickers (aka The Sound Guy™)
Mercutio MDEF from Digital Alchemy, Copyright ©
Ramon M. Felciano 1992-2000, All Rights Reserved.
Table of Contents
iii

ASIO and VST are trademarks of Steinberg Software
und Hardware GmbH.
CD-related data through the Internet from the
CDDB™ Music CD Database.
Copyright 1999, 2000 CDDB Inc. CDDB Client
Software. Copyright 1999, 2000 CDDB Inc.
CDDB-Enabled, CDDB, CDDB2 and the CDDB Logo
are trademarks of CDDB, Inc.
Disc Recognition Service and DRS are service marks of
CDDB, Inc.
IDR dithering and noise-shaping technology licensed
from K.S. Waves Ltd.
User’s Guide:
Steve Berkley, Bruce Bennett, Montara Creative
Group, Ray Brunelle, and Heather Perkins
Package Design:
Montara Creative Group
Special Thanks to:
J. Mark Andrus, Michael Barrett, Robbie Berman, Bruce
Bennett, Ray Brunelle, Andrew Calvo, Will Carpmill,
Chris Clanin, Luke DeLalio, Dennie Edwards, Tom
Erbe, Terje Finstad, Daniel Fisher, Kelly Fitz, Mikail
Grahm, Brian Hamilton, Tom Hays, Gary Hobish,
Brent Hurtig, Matt Isaacson, Carson Kendall, Paul
Korntheuer, peer landra, Jeremy J. Lee, Ray Legnini,
Igor Len, Randy M., Jose Ignacio Martin, Christophe
Masson, Riccardo Mazza, Ron Macleod, Peter McCabe,
David McIntyre, Melvin & Milo Mole, Jeff Moore , Itai
Neoran, NIN, Drayson Nowlan, Martin O'Donnell, Larry
Oppenheimer, Heather Perkins, Dan Phillips, Scott
Plunkett, Gene Porfido, Les Quindipan, Bob Rice, Brad
Sarno, Arne Schulze, Seva, Eli Shauriki, Ronen
Shloush, Craig Snoke, Alex Stahl, M. Stevens, Morten
Stjernholm, Mark Tinley, Rudy Trubitt, Tsvika, Earl
Vickers, Zac Wheatcroft, Charles Wiltgen, Michael
Winter, Doug Wright, & Tsuyoshi Yasukawa.
iv
Peak User’s Guide

Contents
Chapter 1: Introducing Peak 3
Welcome! ............................................................................................................................................................................... 3
Peak Features:........................................................................................................................................................................................... 3
Who Is Peak Designed For?................................................................................................................................................... 4
What’s New in Peak 2.6? ........................................................................................................................................................ 4
New in Peak 2.5 ..................................................................................................................................................................... 4
Minimum System Requirements .......................................................................................................................................... 4
Maximizing Peak Performance.............................................................................................................................................. 5
About Your User’s Guide ...................................................................................................................................................... 5
About Peak LE ........................................................................................................................................................................ 6
Using Online Help ................................................................................................................................................................. 7
Conclusion ............................................................................................................................................................................. 8
Chapter 2: Installing and Configuring Peak 11
Installing Peak ........................................................................................................................................................................ 11
Authorization ......................................................................................................................................................................... 12
Making Audio Connections .................................................................................................................................................. 12
PCI and PCMCIA Audio Cards ................................................................................................................................................................. 13
Using the Inputs and Outputs of a Third-Party Audio Card .................................................................................................................. 14
ASIO and DAE ........................................................................................................................................................................ 15
USB and Firewire Audio Interfaces ...................................................................................................................................... 15
Conclusion ............................................................................................................................................................................. 15
Chapter 3: Peak Basics 19
Introduction........................................................................................................................................................................... 19
A Brief Explanation of Digital Audio..................................................................................................................................... 19
About Disk-Based Recording and Editing ............................................................................................................................20
Creating a New Peak Document........................................................................................................................................... 21
Opening Existing Audio Documents.................................................................................................................................... 21
Opening “Dual Mono” Files .................................................................................................................................................. 22
Dragging and Dropping Folders, Disks, and CD Audio Tracks .......................................................................................... 23
Saving and Closing Documents ............................................................................................................................................ 23
Using the Save As... and Save A Copy As... Commands ......................................................................................................................... 24
Peak Windows and Palettes .................................................................................................................................................. 25
Peak Audio Document Window .............................................................................................................................................................. 26
The Peak Cursor Palette ..........................................................................................................................................................................26
The Contents Palette ...............................................................................................................................................................................27
Setting Preferences................................................................................................................................................................ 27
Setting Peak’s Playback Parameters ........................................................................................................................................................ 28
Show Marker Time ................................................................................................................................................................................... 29
Auditioning ............................................................................................................................................................................................... 29
Blending ....................................................................................................................................................................................................30
Choosing Colors for the Audio Document Window.............................................................................................................................. 30
The Toolbar ............................................................................................................................................................................ 33
Quitting Peak ......................................................................................................................................................................... 34
Conclusion ............................................................................................................................................................................. 35
Table of Contents
v

Chapter 4: Playback and Recording 39
Recording and Playback using the Apple Sound Manager ................................................................................................. 39
Preparing Peak for Recording ............................................................................................................................................... 39
Proper Levels for Recording .................................................................................................................................................................... 39
Record Settings ...................................................................................................................................................................... 40
The Record Dialog ................................................................................................................................................................ 43
Recording ............................................................................................................................................................................... 44
Importing a Track From an Audio CD (CD Audio Extraction) ........................................................................................... 45
ASIO ....................................................................................................................................................................................... 47
Installing ASIO Drivers .............................................................................................................................................................................47
Playback with ASIO................................................................................................................................................................ 47
Recording with ASIO ............................................................................................................................................................................... 48
Digidesign’s DAE ................................................................................................................................................................... 49
Configuring DAE ...................................................................................................................................................................................... 50
Special Notes for Digidesign systems equipped with an dedicated SCSI bus ..................................................................................... 50
Playback of audio documents using DAE with Peak ..............................................................................................................................50
Recording audio documents using DAE with Peak ............................................................................................................................... 50
Playing Audio with Peak ........................................................................................................................................................ 51
The Transport Buttons ............................................................................................................................................................................. 51
Triggering Playback of Multiple Audio Documents ............................................................................................................................... 52
Conclusion ............................................................................................................................................................................. 52
Chapter 5: Editing 55
Editing Audio with Peak ........................................................................................................................................................ 55
The Audio Document Window............................................................................................................................................. 55
An Audio Waveform ................................................................................................................................................................................. 56
A Selection ................................................................................................................................................................................................ 57
A Marker.................................................................................................................................................................................................... 57
A Loop ....................................................................................................................................................................................................... 58
Audio Between Adjacent Markers ........................................................................................................................................................... 58
Audio Info Area ........................................................................................................................................................................................58
Audio Info dialog ......................................................................................................................................................................................58
The Info Strip .........................................................................................................................................................................58
Cursor Location Display .......................................................................................................................................................................... 59
Progress Bar .............................................................................................................................................................................................. 59
Time Display ............................................................................................................................................................................................. 59
Meters ....................................................................................................................................................................................................... 59
Selecting Audio ...................................................................................................................................................................... 60
Auditioning Audio ................................................................................................................................................................. 61
Scrubbing ............................................................................................................................................................................... 61
Using Unlimited Undo and Redo ......................................................................................................................................... 63
Using the Edits Command to Undo a Series of Actions ........................................................................................................................ 63
Essential Editing Functions ...................................................................................................................................................64
Scratch Disks ............................................................................................................................................................................................ 64
Clearing the Clipboard to Reclaim Disk Space ...................................................................................................................................... 64
Cutting Audio ........................................................................................................................................................................................... 64
Deleting Audio .........................................................................................................................................................................................65
Copying Audio .......................................................................................................................................................................................... 65
Pasting Audio ............................................................................................................................................................................................ 65
Replacing Audio .......................................................................................................................................................................................66
Inserting Audio ......................................................................................................................................................................................... 66
Cropping a Selection ............................................................................................................................................................................... 66
New Document from Selection ...............................................................................................................................................................66
vi
Peak User’s Guide

Silencing a Selection ................................................................................................................................................................................ 66
Inserting Silence into a Document ......................................................................................................................................................... 67
Show Edits ............................................................................................................................................................................. 67
Using Crossfades and Blending to Smooth Edits ................................................................................................................ 67
Creating Fade-ins and Fade-outs .......................................................................................................................................... 69
Creating and Using Markers ................................................................................................................................................. 70
Creating Markers ...................................................................................................................................................................................... 71
Regions ................................................................................................................................................................................... 73
Creating Loops ...................................................................................................................................................................... 74
Crossfading Loops ................................................................................................................................................................. 75
Using Loop Surfer™ ............................................................................................................................................................. 77
Using the Guess Tempo and Threshold commands to find tempo .....................................................................................................78
Using the Loop Tuner ........................................................................................................................................................... 79
Exporting Regions ................................................................................................................................................................. 79
Editing QuickTime Soundtracks in Peak ............................................................................................................................. 81
Conclusion ............................................................................................................................................................................. 82
Chapter 6: Playlists and CD Burning 85
Introduction........................................................................................................................................................................... 85
Regions ................................................................................................................................................................................... 85
Creating a Playlist .................................................................................................................................................................. 87
Modifying Playlist Events ......................................................................................................................................................................... 89
The Nudge Regions Dialog ...................................................................................................................................................................... 90
Applying Plug-In Effects to Playlist Events ........................................................................................................................... 90
Creating a New Audio Document from a Playlist ................................................................................................................ 91
Exporting the Playlist as a Text Document .......................................................................................................................... 91
Saving and Opening Playlists ................................................................................................................................................ 92
Burning Audio CDs from Peak Playlists ............................................................................................................................... 92
Peak’s Playlist and Toast ........................................................................................................................................................................... 92
Regions and the JAM Image file format .................................................................................................................................................. 93
Conclusion ............................................................................................................................................................................. 93
Chapter 7: DSP 97
Introduction........................................................................................................................................................................... 97
Processing Audio with Peak’s DSP tools .............................................................................................................................. 97
Peak’s Audio Processing Tools .............................................................................................................................................. 97
Add ............................................................................................................................................................................................................ 97
Amplitude Fit ............................................................................................................................................................................................ 98
Change Duration ...................................................................................................................................................................................... 98
Change Gain ............................................................................................................................................................................................. 99
Change Pitch ............................................................................................................................................................................................ 100
Convert Sample Rate ............................................................................................................................................................................... 100
Convolve ................................................................................................................................................................................................... 101
Crossfade Loop ........................................................................................................................................................................................ 101
Dither ........................................................................................................................................................................................................ 102
Invert ......................................................................................................................................................................................................... 102
Fade In & Fade Out ..................................................................................................................................................................................102
Find Peak .................................................................................................................................................................................................. 103
Gain Envelope .......................................................................................................................................................................................... 103
Loop Tuner ............................................................................................................................................................................................... 104
Mono To Stereo/Stereo To Mono ............................................................................................................................................................ 104
Mix ............................................................................................................................................................................................................. 105
Table of Contents
vii

Modulate ................................................................................................................................................................................................... 106
Normalize ................................................................................................................................................................................................. 106
Panner ....................................................................................................................................................................................................... 107
Phase Vocoder .......................................................................................................................................................................................... 107
Rappify ...................................................................................................................................................................................................... 108
Repair Click ...............................................................................................................................................................................................108
Repair Clicks ............................................................................................................................................................................................. 108
Remove DC Offset ....................................................................................................................................................................................110
Reverse Boomerang ................................................................................................................................................................................. 110
Reverse ...................................................................................................................................................................................................... 110
Swap Channels ......................................................................................................................................................................................... 111
Threshold .................................................................................................................................................................................................111
Conclusion ............................................................................................................................................................................. 112
Chapter 8: Plug-Ins 115
Introduction........................................................................................................................................................................... 115
Processing Audio with Premiere and AudioSuite Plug-Ins ................................................................................................. 115
Adobe Premiere Format Plug-Ins ......................................................................................................................................... 115
Installing Adobe Premiere Plug-ins ......................................................................................................................................................... 115
Premiere Plug-in Memory Settings ......................................................................................................................................................... 116
Premiere Plug-In Preview Time ............................................................................................................................................................... 116
RealTime Premiere Plug-In Processing ................................................................................................................................................... 117
Premiere Envelope ................................................................................................................................................................................... 117
TDM Plug-Ins ......................................................................................................................................................................... 118
Bouncing your TDM plug-in assignments .............................................................................................................................................. 119
Using TDM plug-ins with the Batch File Processor ...............................................................................................................................119
AudioSuite Plug-Ins ............................................................................................................................................................... 120
VST Plug-Ins ........................................................................................................................................................................... 120
Bouncing your VST plug-in assignments ................................................................................................................................................ 121
Recording though VST plug-ins .............................................................................................................................................................. 121
Using VST plug-in with the Batch File Processor ................................................................................................................................... 122
Conclusion ............................................................................................................................................................................. 122
Chapter 9: Batch File Processor and Apple Events 125
Introduction........................................................................................................................................................................... 125
Batch File Processor .............................................................................................................................................................. 125
Peak’s Audio Librarian Tools ................................................................................................................................................. 128
Apple Events™ Support .......................................................................................................................................................................... 128
Conclusion ............................................................................................................................................................................. 130
Chapter 10: Samplers 133
Introduction........................................................................................................................................................................... 133
Working with SMDI Samplers............................................................................................................................................... 133
SMDI Samplers supported in Peak ......................................................................................................................................................... 133
(at time of printing): ................................................................................................................................................................................ 133
SMDI Samplers ......................................................................................................................................................................................... 133
A note about the Yamaha A3000 ............................................................................................................................................................. 136
Working with the Roland S-760 Sampler ............................................................................................................................. 136
Working with AKAI samplers ................................................................................................................................................ 138
MIDI Sample Dump Standard .............................................................................................................................................. 139
MIDI Sample Dump Standard
Error Messages & Troubleshooting ........................................................................................................................................................ 140
viii
Peak User’s Guide

Working with Ensoniq EPS16+ and ASR-10 Samplers ....................................................................................................... 141
How Samples are stored in Ensoniq Samplers ......................................................................................................................................141
Ensoniq Sampler Dialog Basics ............................................................................................................................................................... 142
Auditioning Wavesamples already in the Ensoniq Sampler .................................................................................................................. 143
Changing Parameters and Keyranges ..................................................................................................................................................... 143
Ensoniq List Menu ....................................................................................................................................................................................143
Ensoniq Info Menu ...................................................................................................................................................................................145
Ensoniq Options Menu ............................................................................................................................................................................ 145
Ensoniq Error Messages and Troubleshooting ...................................................................................................................................... 145
Conclusion ............................................................................................................................................................................. 146
Chapter 11: Peak Menus 149
File Menu ............................................................................................................................................................................... 149
New ........................................................................................................................................................................................................... 149
Open... ...................................................................................................................................................................................................... 149
Close ......................................................................................................................................................................................................... 150
Close All .................................................................................................................................................................................................... 150
Save ........................................................................................................................................................................................................... 150
Save As... ................................................................................................................................................................................................... 151
Save A Copy As... ...................................................................................................................................................................................... 151
Import CD Track ...................................................................................................................................................................................... 151
Import Dual Mono ................................................................................................................................................................................... 152
Export Dual Mono .................................................................................................................................................................................... 152
Export Regions ......................................................................................................................................................................................... 152
Export as Text... ........................................................................................................................................................................................ 153
Batch Processor... ..................................................................................................................................................................................... 153
Recently Opened Documents ................................................................................................................................................................. 154
Quit ........................................................................................................................................................................................................... 154
Edit Menu ............................................................................................................................................................................... 155
Undo ......................................................................................................................................................................................................... 155
Redo .......................................................................................................................................................................................................... 155
Edits... .......................................................................................................................................................................................................155
Cut ............................................................................................................................................................................................................. 155
Copy .......................................................................................................................................................................................................... 155
Paste .......................................................................................................................................................................................................... 156
Replace ......................................................................................................................................................................................................156
Insert ......................................................................................................................................................................................................... 156
Insert Silence ............................................................................................................................................................................................ 156
Silence ....................................................................................................................................................................................................... 156
Delete ........................................................................................................................................................................................................156
Delete Except Audio ................................................................................................................................................................................ 156
Crop .......................................................................................................................................................................................................... 156
Clear Clipboard ........................................................................................................................................................................................156
Select All ................................................................................................................................................................................................... 156
Insertion Point at Selection Start/End .................................................................................................................................................... 157
Set Selection ............................................................................................................................................................................................. 157
Select Loop ............................................................................................................................................................................................... 157
Previous Selection/Next Selection .......................................................................................................................................................... 157
Action Menu........................................................................................................................................................................... 157
Zoom Out ................................................................................................................................................................................................. 157
Zoom In .................................................................................................................................................................................................... 157
Increase Vertical Zoom ............................................................................................................................................................................ 158
Decrease Vertical Zoom ...........................................................................................................................................................................158
Fit Selection .............................................................................................................................................................................................. 158
Zoom Out All the Way.............................................................................................................................................................................. 158
Table of Contents
ix

Zoom at Sample Level ............................................................................................................................................................................. 158
Zoom at Sample Level (End) ................................................................................................................................................................... 158
Snap Selection to Zeros ........................................................................................................................................................................... 158
Loop This Selection .................................................................................................................................................................................158
Nudge Loop Backward ............................................................................................................................................................................ 158
Nudge Loop Forward ............................................................................................................................................................................... 158
New Marker .............................................................................................................................................................................................. 158
New Region .............................................................................................................................................................................................. 159
Markers to Regions .................................................................................................................................................................................. 159
Nudge ........................................................................................................................................................................................................159
Go To .........................................................................................................................................................................................................160
Loop Surfer ............................................................................................................................................................................................... 160
Guess Tempo ............................................................................................................................................................................................ 160
Audio Menu ........................................................................................................................................................................... 161
Rewind ...................................................................................................................................................................................................... 161
Play ............................................................................................................................................................................................................ 161
Play Selection ............................................................................................................................................................................................161
Play w/Auditioning ................................................................................................................................................................................... 161
Pause ......................................................................................................................................................................................................... 161
Stop ........................................................................................................................................................................................................... 161
Stop & Extend Selection .......................................................................................................................................................................... 161
Fast-Forward ............................................................................................................................................................................................. 161
Record ....................................................................................................................................................................................................... 161
Record Settings ........................................................................................................................................................................................162
SMPTE Sync .............................................................................................................................................................................................. 165
Arm External Sync .................................................................................................................................................................................... 165
Hardware Settings .................................................................................................................................................................................... 165
Meters ....................................................................................................................................................................................................... 165
DSP Menu .............................................................................................................................................................................. 166
Add ............................................................................................................................................................................................................ 166
Amplitude Fit ............................................................................................................................................................................................ 166
Change Duration ...................................................................................................................................................................................... 167
Change Gain ............................................................................................................................................................................................. 167
Change Pitch ............................................................................................................................................................................................ 167
Convert Sample Rate ............................................................................................................................................................................... 168
Convolve ................................................................................................................................................................................................... 168
Crossfade Loop ........................................................................................................................................................................................ 168
Dither ........................................................................................................................................................................................................ 168
Invert ......................................................................................................................................................................................................... 168
Fade In & Fade Out ..................................................................................................................................................................................168
Find Peak .................................................................................................................................................................................................. 169
Gain Envelope .......................................................................................................................................................................................... 169
Loop Tuner ............................................................................................................................................................................................... 169
Mono To Stereo/Stereo To Mono ............................................................................................................................................................ 169
Mix ............................................................................................................................................................................................................. 170
Modulate ................................................................................................................................................................................................... 170
Normalize ................................................................................................................................................................................................. 170
Panner ....................................................................................................................................................................................................... 171
Phase Vocoder .......................................................................................................................................................................................... 171
Rappify ...................................................................................................................................................................................................... 171
Repair Click ...............................................................................................................................................................................................172
Repair Clicks ............................................................................................................................................................................................. 172
Remove DC Offset ....................................................................................................................................................................................173
Reverse Boomerang ................................................................................................................................................................................. 173
Reverse ...................................................................................................................................................................................................... 173
Swap Channels ......................................................................................................................................................................................... 173
x
Peak User’s Guide

Threshold .................................................................................................................................................................................................173
Sampler Menu........................................................................................................................................................................ 174
Send to Sampler ....................................................................................................................................................................................... 174
Revert from Sampler ................................................................................................................................................................................ 174
Send All to Sampler ................................................................................................................................................................................. 174
Revert All from Sampler ........................................................................................................................................................................... 174
AKAI Sampler ............................................................................................................................................................................................174
Ensoniq Sampler Transfer ........................................................................................................................................................................ 174
Roland S-760 Sampler .............................................................................................................................................................................. 175
E-mu, Ensoniq ASR-X, Kurzweil, Peavey, Yamaha Sampler ...................................................................................................................175
SMDI Sampler ...........................................................................................................................................................................................175
MIDI SDS .................................................................................................................................................................................................. 175
Plug-Ins Menu ........................................................................................................................................................................ 176
Preference Menu ................................................................................................................................................................... 176
Time Units ................................................................................................................................................................................................ 176
Sample Units .............................................................................................................................................................................................176
Colors ........................................................................................................................................................................................................ 176
Use Loop in Playback ............................................................................................................................................................................... 177
Scroll During Play ..................................................................................................................................................................................... 177
Move Waveform During Playback ........................................................................................................................................................... 177
Compute File Max dB .............................................................................................................................................................................. 177
Show Edits ................................................................................................................................................................................................ 177
Show Marker Times ................................................................................................................................................................................. 177
Show Overview ........................................................................................................................................................................................ 177
Scratch Disks ............................................................................................................................................................................................ 177
Auto-Import Dual Mono .......................................................................................................................................................................... 178
Audio Info ................................................................................................................................................................................................. 178
Dynamic Scrub Time ............................................................................................................................................................................... 179
Auto Snap To Zero ....................................................................................................................................................................................179
Blending ....................................................................................................................................................................................................179
Auditioning ............................................................................................................................................................................................... 179
Fade In Envelope .....................................................................................................................................................................................179
Fade Out Envelope ..................................................................................................................................................................................179
Premiere Envelope ................................................................................................................................................................................... 180
Sampler... .................................................................................................................................................................................................. 180
DSP Preferences ....................................................................................................................................................................................... 180
Movie Sound Tracks ................................................................................................................................................................................. 180
Playback Preferences ................................................................................................................................................................................180
Plug-In Memory ........................................................................................................................................................................................ 181
Shortcuts & Toolbar ................................................................................................................................................................................. 181
Auto-Balloon Help ....................................................................................................................................................................................182
Speak Help ...............................................................................................................................................................................................182
Window Menu ....................................................................................................................................................................... 182
The Toolbar .............................................................................................................................................................................................. 182
The Peak Cursor Palette ..........................................................................................................................................................................183
The Contents Palette ...............................................................................................................................................................................183
Movie .........................................................................................................................................................................................................183
Playlist ....................................................................................................................................................................................................... 183
Tile Windows ............................................................................................................................................................................................ 184
Stack Windows .........................................................................................................................................................................................184
Links Menu............................................................................................................................................................................. 184
Help Menu ............................................................................................................................................................................. 184
Table of Contents
xi

Appendix 1: Keyboard Shortcuts and Actions 187
Keyboard Shortcuts ............................................................................................................................................................... 187
File ............................................................................................................................................................................................................. 187
Edit ............................................................................................................................................................................................................ 187
Action ........................................................................................................................................................................................................ 188
Audio ......................................................................................................................................................................................................... 188
Preference .................................................................................................................................................................................................188
Window ..................................................................................................................................................................................................... 188
Peak Actions ........................................................................................................................................................................... 190
Useful Peak Actions, General................................................................................................................................................................... 190
Audio Document Window, General ........................................................................................................................................................190
Playback .................................................................................................................................................................................................... 190
Scrubbing .................................................................................................................................................................................................. 190
Selections ..................................................................................................................................................................................................190
Views ......................................................................................................................................................................................................... 190
Markers, Loops, and Regions ..................................................................................................................................................................190
Playlist ....................................................................................................................................................................................................... 191
Loops ........................................................................................................................................................................................................ 191
VST Plug-Ins .............................................................................................................................................................................................. 191
The Cursor Palette ................................................................................................................................................................................... 191
The Contents Palette ...............................................................................................................................................................................192
The Movie Window .................................................................................................................................................................................. 192
Appendix 2: Troubleshooting 193
Before Calling For Help ........................................................................................................................................................ 193
Typical Problems and Solutions ............................................................................................................................................ 193
Appendix 3: Encoding RealAudio, Shockwave and MP3 Files 199
RealAudio ............................................................................................................................................................................... 199
Options ..................................................................................................................................................................................................... 200
ShockWave ............................................................................................................................................................................. 202
Encoding MP3 files ................................................................................................................................................................ 203
Glossary 207
Index 215
xii
Peak User’s Guide

Chapter 1
Introducing Peak

2
Peak User’s Guide

Chapter 1:
Introducing Peak
Welcome!
BIAS Peak™ is an advanced audio application that
provides superior tools for editing and processing
digital audio on the Macintosh computer. Peak was
specifically designed to meet the needs and demands
of audio professionals. By combining high-quality
direct-from-disk digital audio editing features with a
lightning fast, completely nondestructive editing
environment, Peak provides unsurpassed audio
editing power, and makes a superb addition to
multitrack audio applications programs such as BIAS
Deck and Digidesign’s Pro Tools®. Peak also offers
advanced sampler support, and works directly with
many popular MIDI sampling keyboards and rackmount samplers.
Peak Features:
• Direct-to-disk recording and playback at all sample
rates supported by the sound hardware on your
Macintosh, or supported through third-party audio
hardware
• User-configured waveform display
• Support for commonly used audio document
formats, including AIFF, Sound Designer II™, Red
Book, QuickTime™, Wave, RealAudio™, Shockwave™, MPEG-3 (MP3), SUN .au, and System 7
Sound formats
• Completely nondestructive file-based editing with
unlimited undo and redo
• Professional editing abilities, including userdefinable fade curves, silence, and complete
support for cut/copy/paste with multiple undo
• By using an application that supports Apple
Events, such as Filemaker Pro™ or HyperCard™,
you can catalog your Peak sound files and audition
them from within the application
• Support for third-party digital audio hardware,
such as the Digidesign™ or Mark of the Unicorn
digital audio boards, through the Macintosh Sound
Manager and ASIO
• Support for 8, 16, 24, and 32 bit audio files
• Support for playback and recording through
Digidesign DAE™
• Support for third-party Adobe Premiere™,
AudioSuite™, TDM™, and VST™ Plug-Ins,
allowing you to add advanced signal processing
features to Peak. Plug-Ins from companies such as
BIAS, Waves™, Arboretum™, and Cycling ‘74™ can
be used to empower Peak with digital filtering,
noise reduction, reverb, equalization, and other
effects in real time
• The ability to create audio CDs from a Peak
Playlists using Roxio Toast™, which is bundled
with Peak
• SMPTE synchronization
• Sophisticated Tools for looping, including Loop
Surfer, Loop Tuner, and Guess Tempo
• Sampler Support
• Playlist editing and mastering
• Customizable Toolbar
• QuickTime Movie window with scrubbing
• Real Audio 5.0 support
1
™
Introducing Peak
3

Who Is Peak Designed For?
Peak is designed for a wide variety of users, ranging
from composers and multimedia producers to sound
designers and remix editors. Peak’s comprehensive
recording, editing, looping, and processing capabilities
make it a powerhouse tool for virtually any aspect of
digital audio production. If you are interested in sound
and possess imagination and creativity, Peak is for you.
What’s New in Peak 2.6?
• Automatic truncatation of file names for audio
documents created by Export Regions and Import
CD if they are longer than 31 characters.
• And more!
New in Peak 2.5
Version 2.5 of Peak software presented several new
features and enhancements, including:
• New user interface
• VST Plug-In Support for playback and recording
Version 2.6 of Peak software has several new features
and enhancements, including:
• WAVES Audiotrack and Vbox SE VST plug-ins.
• Pressing control-arrow keys scrolls the audio
display left or right.
• Swap Channels DSP command to reverse the left
and right channels in a stereo selection.
• Improved Edit Marker dialog, with more options
for time units.
• Disable all VST plug-ins after bouncing.
• Compatible with DAE 5.1.
• Monitor ASIO devices through the Sound Manager.
• Option in the Import CD dialog to open files after
importing from CD.
• Flattening Quicktime movies when creating
QuickTime files to play on both Macintosh and
Windows operating systems.
• 160kbps and 192kbps MP3 and Shockwave export
options.
• Allows aliases to point to the VstPlugIns folder, the
ASIO Drivers folder, or the Peak Plug-Ins folder.
• Support for more third-party SCSI cards and
Samplers
• Support for the CDDB™ online CD Data Base
when using the Import CD Audio
• Dither
• Improved Guess Tempo
• Improved metering
• Single instance Repair Click
• Save A Copy As . . .
• New floppy-less, user-friendly registration and
authorization
Minimum System Requirements
To use Peak you will need:
• Any PowerPC-equipped Macintosh or PowerPCequipped PowerBook or G3/G4 Macintosh
• 64MB of RAM
• Sound Manager version 3.3 or later
• Macintosh System Software 7.6.1 or later (8.6
recommended)
4
Peak User’s Guide

• QuickTime version 3.0.2 or later
network.
• QuickTime PowerPlug™ installed in the Extensions
folder
• A hard drive with 18ms or faster average seek time
• A 13-inch or larger monitor (color is recom-
mended)
The optimal system for use with Peak software is a
Power Macintosh with AV (Audio Visual) features and
32MB or more of RAM available to run Peak. The Peak
application runs in native mode on Power Macintosh
and G4 computers. Peak can also take advantage of
ASIO and DAE compatible sound cards in addition to
sound cards with Apple Sound Manager drivers.
Maximizing Peak's Performance
To get the best performance out of Peak and your
Macintosh, do the following.
To maximize Peak performance:
• Use a minimal number of System Extensions.
Extensions can slow down your Macintosh by using
precious processor cycles. In particular, turn off
System Extensions such as menu bar clocks and
screen savers that are in constant operation. To
set up a dedicated set of extensions for Peak,
duplicate your Mac OS Base extensions set in the
extensions manager and rename it (something like
Peak_set), restart your computer with this
extensions set and install Peak, enable the
additional extensions required for Peak to run,
and, restart your computer with this updated
extensions set.
• Use the Memory control panel to set the
Macintosh’s disk cache to at least 384k (usually the
Mac’s default setting is fine). Turn Virtual Memory
Off.
• Allocate additional RAM to Peak if possible, using
the Finder’s Get Info command. (Select Peak in
the Finder, choose Get info from the Finder’s
Special menu, and enter the desired amount in the
Preferred Size field. Make sure you allocate more
RAM than the amount indicated in the Minimum
Size field!)
• Optimize your hard drive. (See Chapter 3 to learn
about proper hard disk maintenance.)
About Your User’s Guide
Peak is designed to be simple and intuitive. Your
User’s Guide is designed to help you set up and use
Peak for digital recording and editing as quickly and
easily as possible.
This User’s Guide assumes that you are familiar with
standard Macintosh operating techniques, including:
• Setting up, starting, and using your Macintosh
• Choosing commands from menus
• Double-clicking, selecting, Shift-selecting, and
dragging with the mouse
• Opening, copying, saving and deleting files
• Opening, closing, scrolling, moving, re-sizing, and
selecting Macintosh windows
1
• Set your monitor to no more than thousands of
colors (256 colors is recommended for older
Macs).
• Turn File Sharing off, unless you need it.
• Disconnect your Macintosh from any networks and
turn off AppleTalk, unless you need to be on a
If you don’t know how to perform these tasks, please
refer to your Macintosh User’s Guide and spend a little
time learning about your Macintosh before going any
further. This will make using Peak much easier and
more enjoyable.
Introducing Peak
5

The Chapters in your Peak User’s Guide are arranged in
the order in which you would typically perform tasks
when embarking on an audio production project:
• Chapter 1 introduces you to Peak and explains
some of the requirements for using Peak software
• Chapter 2 explains how to install Peak software and
configure your Macintosh for recording and
playback
• Chapter 3 introduces you to some basic concepts of
digital audio and disk-based recording, as well as
basic Peak operations
• Appendix 2 provides a troubleshooting guide for
commonly encountered problems
• Appendix 3 describes how to use Peak’s
RealAudio™, Shockwave™ Audio Encoder, and
MP3 encoding to prepare audio for streaming over
the internet
• A Glossary and an Index complete your Peak
User’s Guide
Look for important tips and notes whenever
you see this exclamation mark.
• Chapter 4 explains how to record and playback
audio to and from hard disk in Peak using the Apple
Sound Manager, ASIO, and DAE. It also explains
how to import audio from compatible CD-ROM
drives
• Chapter 5 introduces you to the concepts and
techniques of nondestructive editing with Peak
• Chapter 6 explains how to create regions and
sequence their playback using Playlists, as well as
how to use Peak Playlists to burn audio CDs
• Chapter 7 explains how to use Peak’s native DSP
tools
• Chapter 8 explains how to use third-party Premiere,
TDM, AudioSuite, and VST plug-ins to enhance
Peak’s audio production capabilities
• Chapter 9 explains how to use Peak’s Batch File
Processor as well as how to use Apple Events for file
management
• Chapter 10 explains how to import samples directly
from compatible samplers (to edit or process the
audio using all of Peak’s functions) and send the
modified sample back to the sampler
About Peak LE
If you are using the limited edition of Peak, not all
features will be available. Specifically, the following
features are not available in Peak LE:
• 24 and 32 bit support
• Crossfades, DSP effects, and Gain Adjustment in
Peak LE Playlists
• Loop Surfer™ and Loop Tuner
• Customizable Keyboard Shortcuts
• Customizable Toolbar
• Remove DC Offset
• Pitch Change
• DAE/TDM/AudioSuite support
• VST plug-in support
• SMPTE sync
• Import Dual Mono
• Meters Dialog
• Chapter 11 describes each of the commands found
in Peak’s menus
• Appendix 1 lists the default Keyboard Shortcuts for
Peak
6
Peak User’s Guide
• QuickTime movies
• Batch File Processor
• Up to three Premiere plug-ins only with three
second preview limit
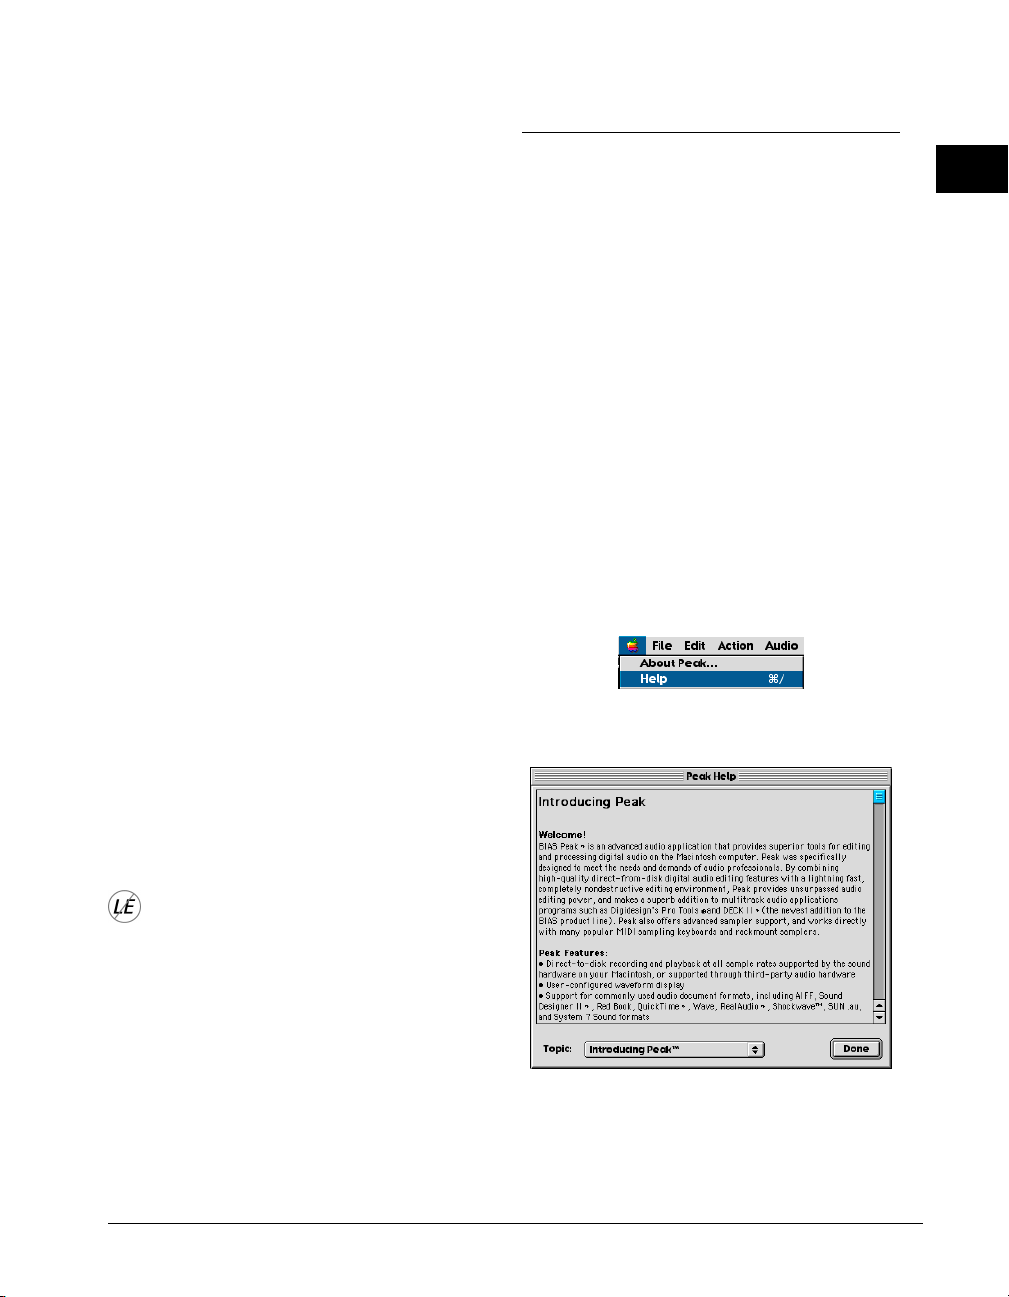
• Export Regions
• Sampler Support
• Convolve
• Modulate
• Add
• Amplitude Fit
• Change Duration
• Crossfade Loop
• Dither
• Find Peak
• Mono To Stereo
• Stereo To Mono
• Phase Vocoder
• Rappify
• Repair Clicks
• Swap Channels
• Threshold
Using Online Help
Peak provides two types of online help. The first type,
Balloon Help, can be activated by selecting Show
Balloons from the Macintosh’s Balloon Help menu in
the Finder. Balloon Help will show you the functions
of each menu item as you move the mouse across
different menu items. If you enable Speak Help under
Peak’s Preference menu, the Balloon Help for items in
the Toolbar will be “spoken” by your computer using
the Apple Speech Manager. Also, if you hold the
mouse cursor over a Toolbar icon for 2 seconds, the
Balloon Help for that icon’s function will appear.
The second type of online help is available via the
Apple menu’s Help item. This help system gives you
detailed information about how to use the Peak
software.
Online Help is available in the Apple menu
1
• Recording Notepad
• Recording Input Levels
• Specialized Apple Events for Playback from a
database such as FileMaker Pro
Features that are not supported in Peak LE or
Peak SE will show this icon in the manual. LE
features will also appear grayed out in their
menus.
About Peak SE
Peak SE is functionally the same as Peak LE but adds
sampler support.
Online Help
Introducing Peak
7

Conclusion
Now that you know a little about Peak, proceed to the
next chapter to learn how to install your software and
get started using it.
8
Peak User’s Guide

Chapter 2
Installing and Configuring Peak

Peak User’s Guide10
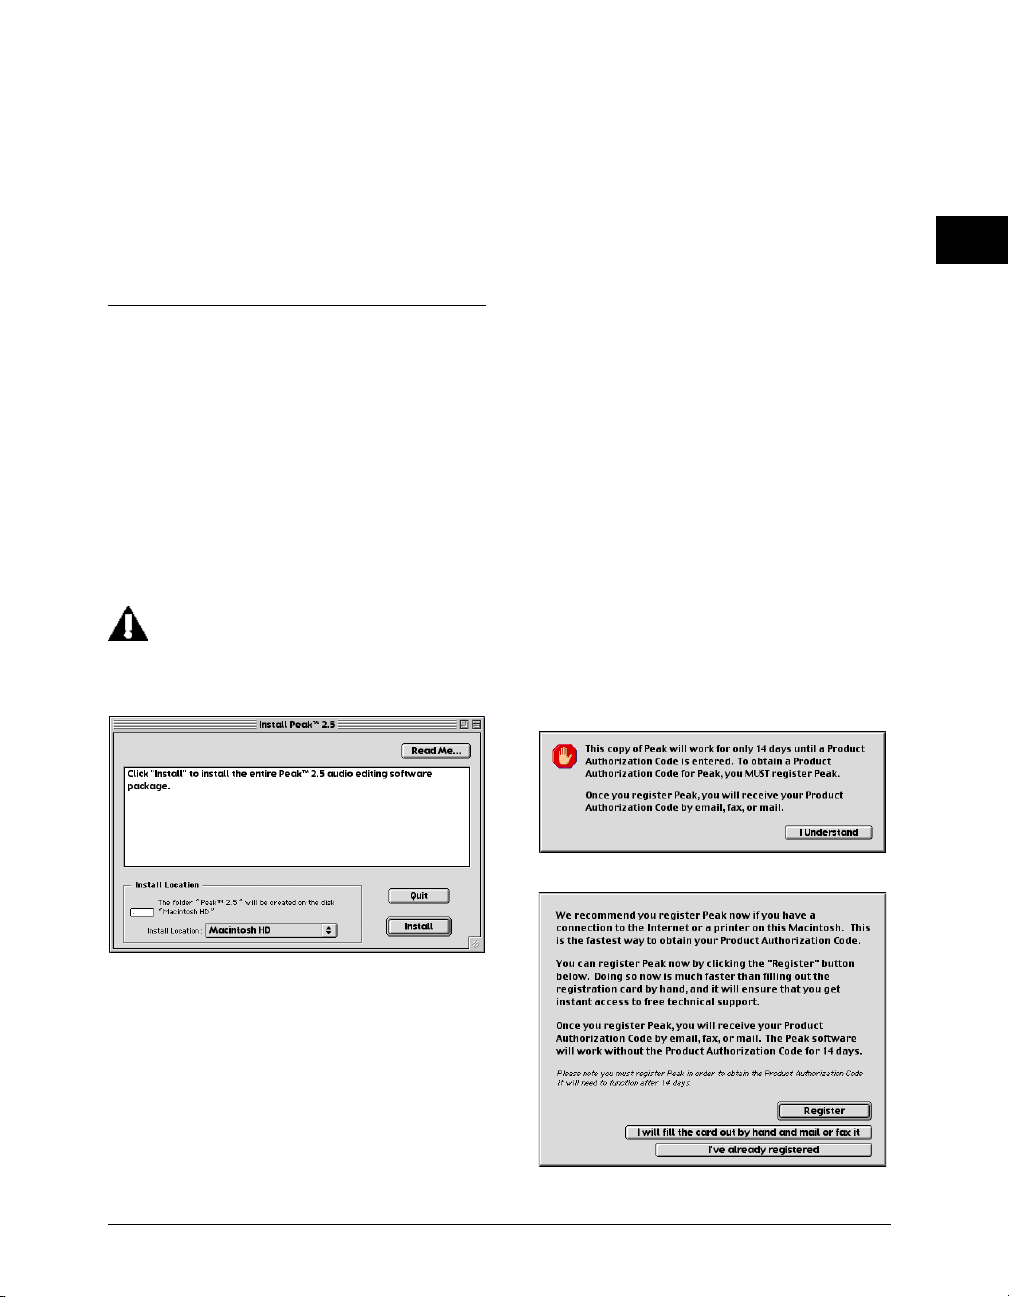
Chapter 2:
Installing and
Configuring Peak
2
double-click the Install Peak icon.
Installing Peak
Peak’s auto-installer software makes installation very
easy.
Your complete Peak system consists of:
• CD-ROM Installer
• Peak serial number and Product Authorization Code
(PAC)
Before you install Peak, please check the
Minimum System Requirements on Page 4 of
this Users Guide.
3. When the Installer dialog appears, read the Read
Me for late-breaking information concerning the
Installer, then click Continue to proceed.
4. Select where you would like to install Peak, using
the Switch Disk pop-up menu.
5. Click Install at the bottom right of this dialog.
6. After you have clicked Install, follow the on-screen
instructions. Peak will be installed into a folder
named Peak 2.5 on your selected hard disk.
7. At the end of the installation, the installer will
allow you to register Peak electronically, which
you may find more convenient than mailing your
registration card.
The Installer dialog
To install Peak:
1. If you are using any virus-protection software, turn
it off or temporarily remove it, and restart your
Macintosh.
2. Insert the Peak Install CD-ROM in your CD-ROM
drive, open the Product Installers folder, and
Peak Basics
11
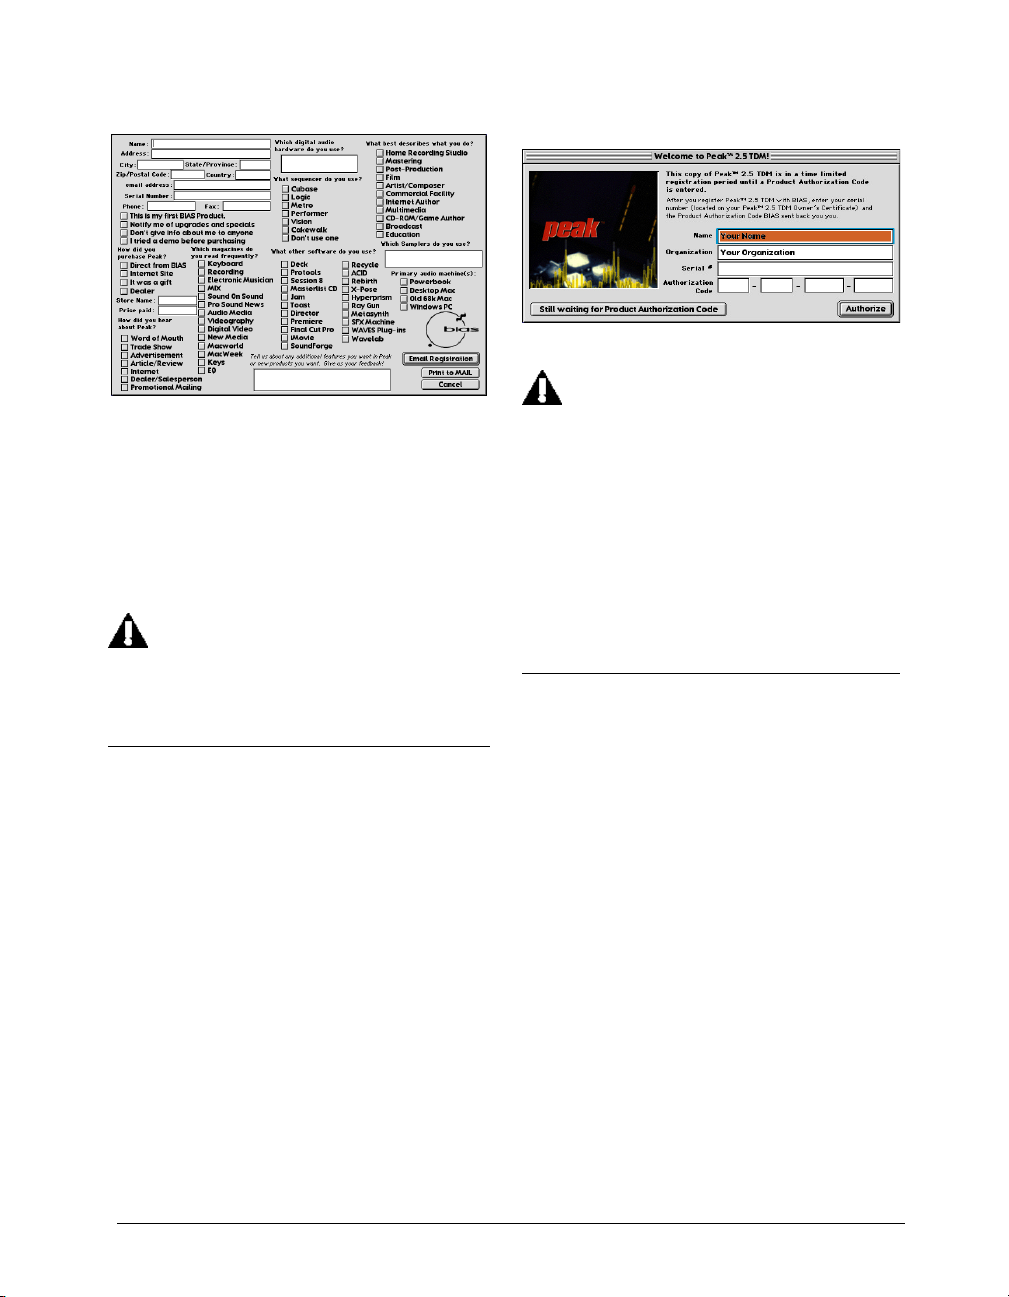
8. When the installation is complete, a message will
appear indicating that the installation was
successful. Click Quit to quit the Installer, or click
Continue to install copies additional copies (don't
forget to turn back on any virus-protection
software that you may be using the next time you
restart the computer).
If you don't register Peak, you will not be
eligible for technical support and you won't be
notified about updates, upgrades and other
important news from BIAS!
Serial number, and Product Authorization Code.
The Peak Authorization dialog
Send in Your Registration Card! After you have
installed Peak, please send in the Registration
Card included with your software to receive
your Product Authorization Code, free
technical support, software updates and
notification of upgrades.
Peak will run, fully functional, in Registration Mode for
14 days. This allows you the time necessary to register
you product and get the Product Authorization Code
from BIAS.
Making Audio Connections
Authorization
Peak must be authorized to work on your Macintosh.
To authorize Peak, you will need your Product
Authorization Code (PAC) in addition to the serial
number that appears on your Peak Owner’s Certificate.
BIAS will provide you with your Product Authorization
Code when you register Peak. You must register Peak
in order to obtain your Product Authorization Code;
Peak will not launch after the 14 day registration
period unless you authorize Peak with your Name,
Organization, Serial Number, and Product Authorization Code!
When you first launch Peak, it will prompt you to
authorize it by entering your Name, Organization,
Peak User’s Guide12
While it is possible to listen to Peak using a
Macintosh’s built-in speaker (or headphones, as might
be the case with a PowerBook), most people will
prefer to listen through a better quality external
speaker system.
It is very easy to set up audio connections between
your Macintosh and a mixer or speaker system. Your
exact setup will differ slightly depending on whether
you are using the built-in sound input and output
connectors on your Macintosh, or those of a plug-in
audio recording/playback card. Instructions for each
case are given below.
Using the Macintosh’s Built-in Inputs and
Outputs
If you wish to use your Macintosh’s built-in audio
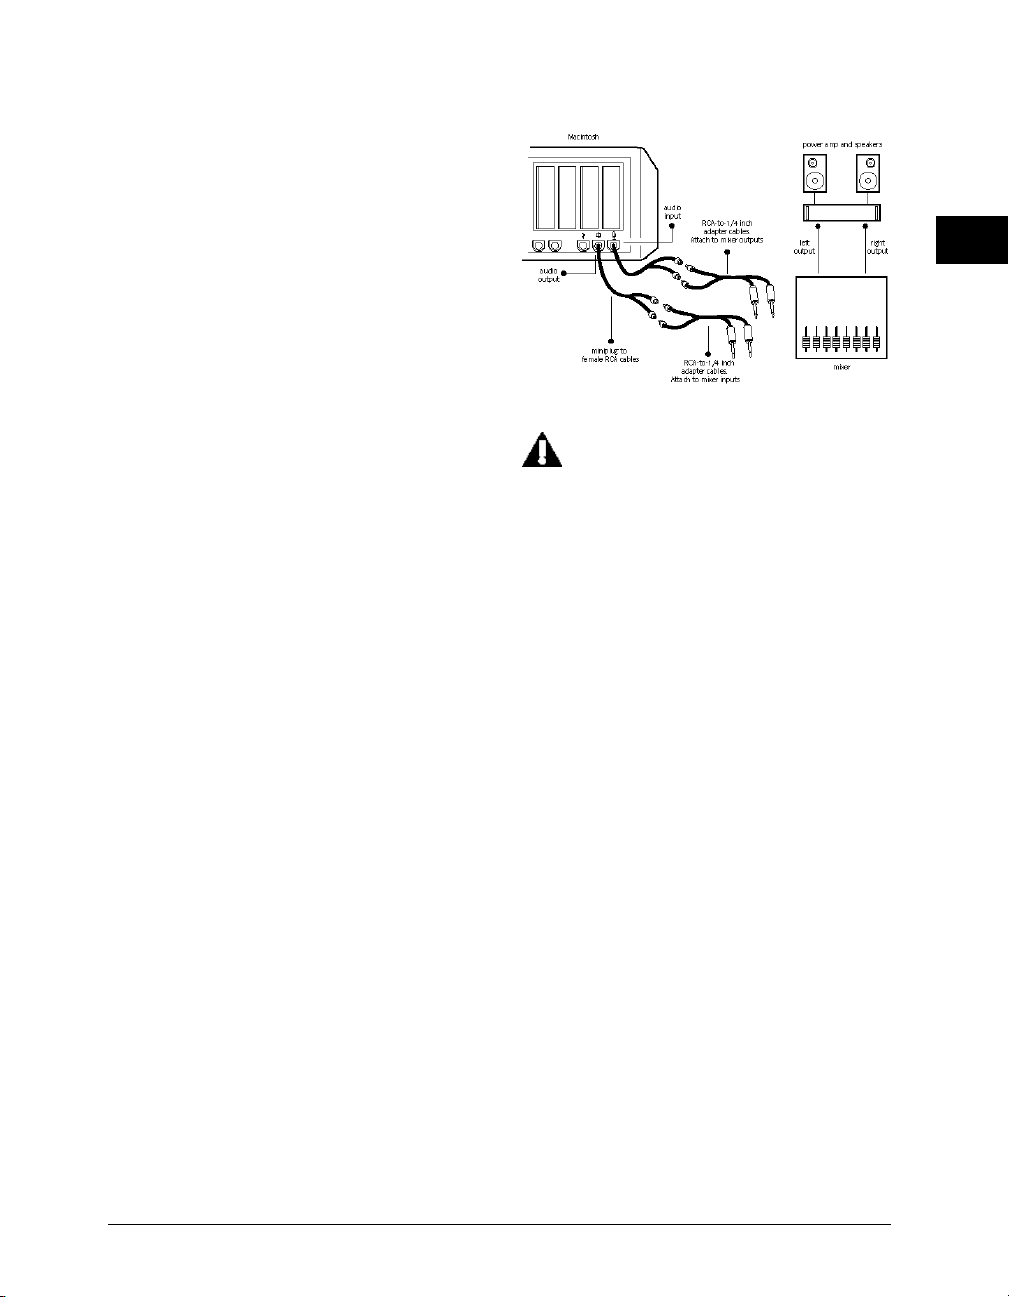
inputs and outputs for recording and playback, do the
following:
1. Turn down the volume on your playback system.
Peak can be used with a variety of playback
systems, including:
• a stereo receiver or amplifier and speakers
• a mixer, amplifier, and a pair of speakers
• a mixer and a pair of amplified (self-powered)
speakers
• or simply a pair of amplified (self-powered)
speakers, smaller versions of which are often called
“multimedia” speakers.
2. Connect your audio source output to the
Macintosh's audio input connector. Your audio
source can be one of a variety of devices, such as:
•a cassette or DAT deck output
•a mixer output
•a stereo receiver line output (such as “tape deck
record” output)
2
For advanced users: Certain professional
mixing consoles, DAT decks, or other audio
sources may have a nominal output level of
+4dBu, whereas the Macintosh expects to
see a nominal -10dBu level. Be aware that
you may need to adjust your mixers output
levels accordingly to prevent overloading
the Macintosh’s input; or alternately, you
may need to use a “+4 to -10” line-matching
transformer.
•an instrument line output (such as the output of a
synthesizer).
The audio input jacks on most Macs are a standard
mini-plug (1/8-inch) connector. Most source outputs
are either 1/4 inch “phone” connectors or RCA
connectors. To make this connection, you may need
to use an 1/4-inch to mini-plug or RCA to mini-plug
cable or adapter.
3. Connect your Macintosh’s audio output to your
playback system’s input. The Macintosh’s audio
output jack is a standard stereo mini-plug (1/8inch) connector. Most mixer, receiver, and
amplified speaker inputs are equipped with 1/4inch, RCA, or mini-plug jacks. To make this
connection, you may need to use a mini-plug to
1/4-inch or mini-plug to RCA cable or adapter.
4. Raise the volume on your mixer or playback
system. Your system should now be properly
configured and ready for recording and
playback.
PCI and PCMCIA Audio Cards
If you have a Sound Manager-compatible record/
playback card (such as the Digidesign AudioMedia
III or the MOTU PCI-324) or ASIO compatible (such
as the Yamaha DSP Factory or the Digigram VX
Peak Basics
13
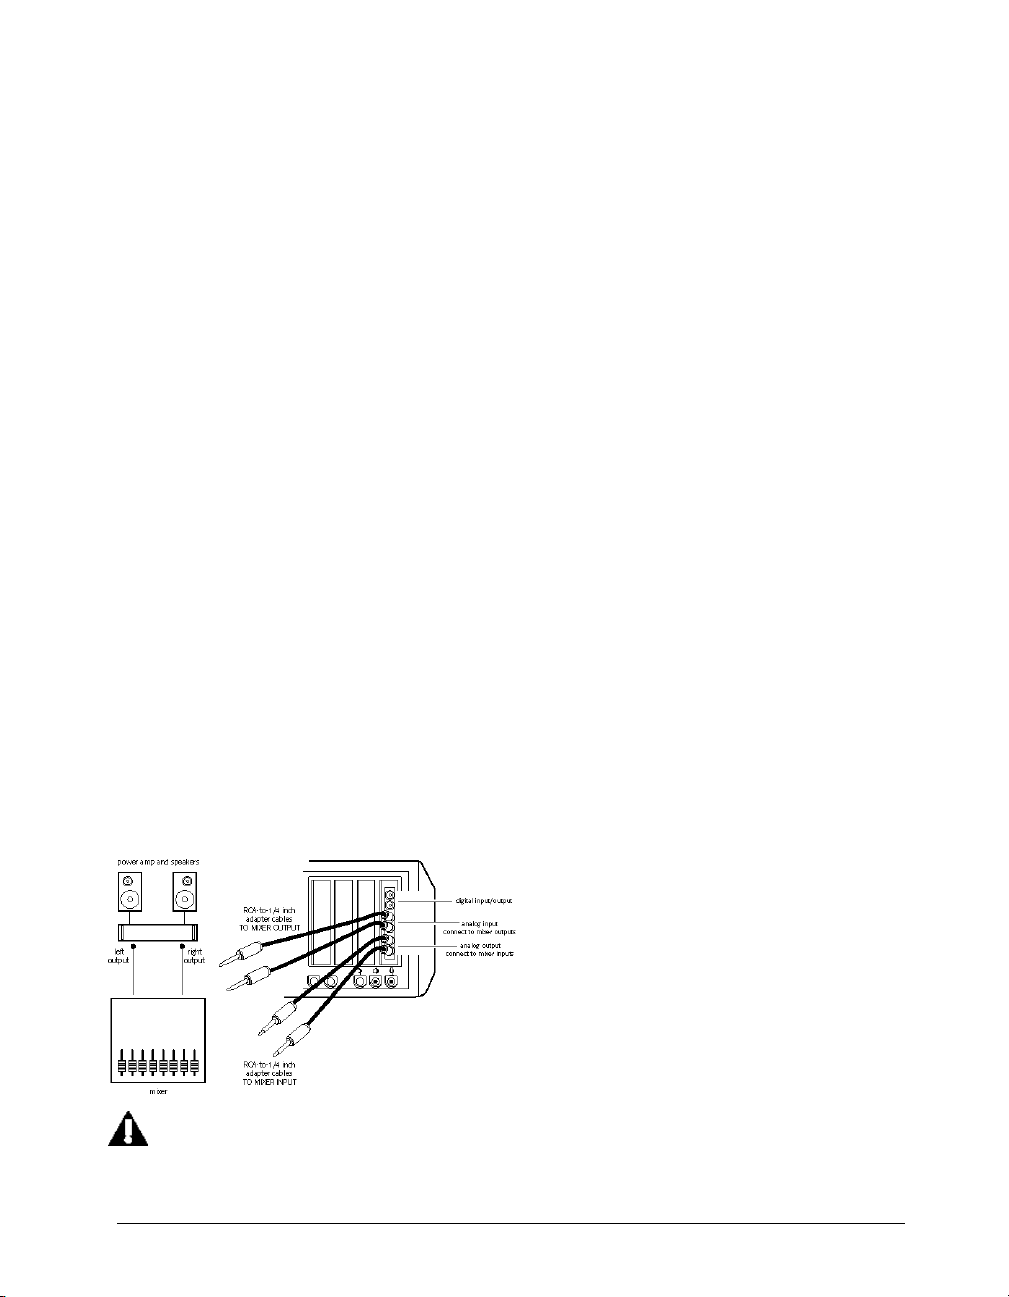
Pocket) installed in your computer and wish to use its
input and output capabilities instead of your
Macintosh’s built-in capabilities, do the following:
1. Turn down the volume on your mixer or playback
system.
2. Make sure that you have installed the plug-in
audio card into one of the available expansion
slots inside your Macintosh. If you are not sure
how to do this, please refer to the instructions that
came with your Macintosh and the audio card
itself.
3. Install the Sound Manager and/or ASIO drivers for
your sound card. Please refer to the installation
instructions for your sound card on how to do
this.
4. Connect your mixer’s output to the audio cards
input connectors. (Some audio cards have an
external interface box which contains the input
connectors.)
5. Connect your audio cards outputs to your mixer’s
(or playback systems) input. Note that some audio
expansion cards have an external interface box
which contains the output connectors.
inputs on your mixer and to have the auxiliary
or bus sends from the mixer go to the inputs of
the computer. Instruments you want to record
you patch into other channel inputs on the
mixer and you can then route them out the
auxiliary or bus sends on the mixer to be
recorded by the computer. The mixer’s main
outputs go to the amplifier/speakers.
Using the Inputs and Outputs of a ThirdParty Audio Card
Peak supports many Sound Manager compatible, ASIO
compatible, and DAE compatible third-party audio
cards, including those made by Digidesign, Digigram,
and Mark of the Unicorn. In order to effectively use
these cards with Peak, you will need to make sure you
have installed the sound manager drivers supplied by
the manufacturer (the Peak installation disk includes
Apple Sound Manager drivers for some hardware,
though most hardware manufacturers include their
own drivers). If you haven’t already installed your
sound cards sound manager drivers, please do so now.
In most cases, you will need to place the card’s sound
manager driver extension in your System folder’s
Extensions folder. After you have done this, restart
your computer.
6. Raise the volume on your mixer or playback
system. Your system should now be properly
configured and ready for recording and playback.
A typical mixer/computer configuration is to
have the computer outputs go to channel
Peak User’s Guide14
Please see Chapter 4: Playback and Recording for a
detailed description of how to configure Peak to
playback and record using the Apple Sound Manager.
If your sound card also has an ASIO 1.0 driver or a
backwards compatible ASIO 2.0 driver you will want to
put it into Peak’s ASIO Drivers folder.
If you have Digidesign hardware that supports DAE
3.4.x or Digidesign TDM hardware that supports DAE
3.4.x or later, you will want to be sure to install the
correct version of the DAE and the DigiSystem Init as
well as the Digidesign Sound Manger Drivers.
To use a third-party audio card’s outputs for previewing Premiere-format plug-ins, the Open dialog, and the
Import CD Audio dialog:
1. Choose Sound Out from the Sound Control Panel
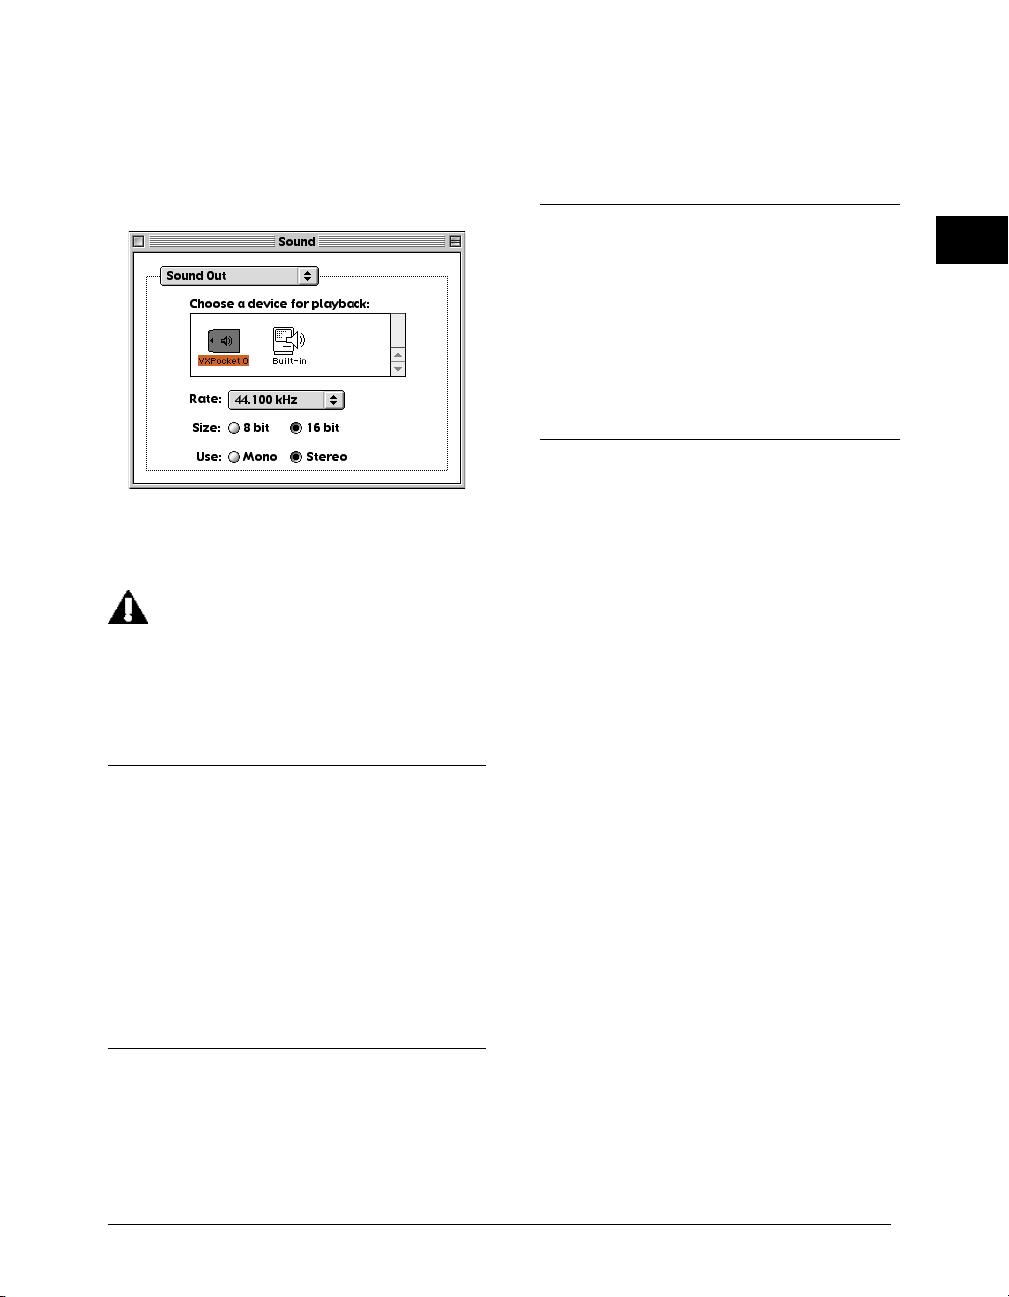
pop-up menu.
2. Select audio card (Digigram’s VX Pocket is shown
in this example) as the sound output device.
interfaces such as the Tascam US-428. Peak also
supports compatible Firewire audio interfaces, such
as the MOTU-828.
The Apple Sound Control Panel
3. Close the Sound window when you have finished.
The settings you make in the Sound Control
Panel's Sound Output panel will only affect
playback through Premiere plug-ins, the Open
dialog, and the Import CD Audio dialog. For
playback, you will need to select your audio
card in Peak's Sound Out menu.
ASIO and DAE
Conclusion
Now that you have installed Peak and configured
the Macintosh Sound Manager for recording and
playback, proceed to the next chapter to learn
several basic concepts and functions essential to
using Peak.
2
Peak also supports ASIO 1.0 and DAE 3.4 or later. If
you want to use Peak with your sound card via ASIO,
place the ASIO driver for your sound card in the Peak
ASIO Drivers folder. For DAE, simply install DAE 3.4 or
later. For more detail on using Peak with ASIO and/or
DAE supported sound cards, please read Chapter 4:
Playback and Recording.
USB and Firewire Audio Interfaces
Mac OS 9.0.4 supports USB Audio on iMacs, iBooks,
B/W G3s, and G4s. Peak supports USB audio with
Peak Basics
15

Peak User’s Guide16
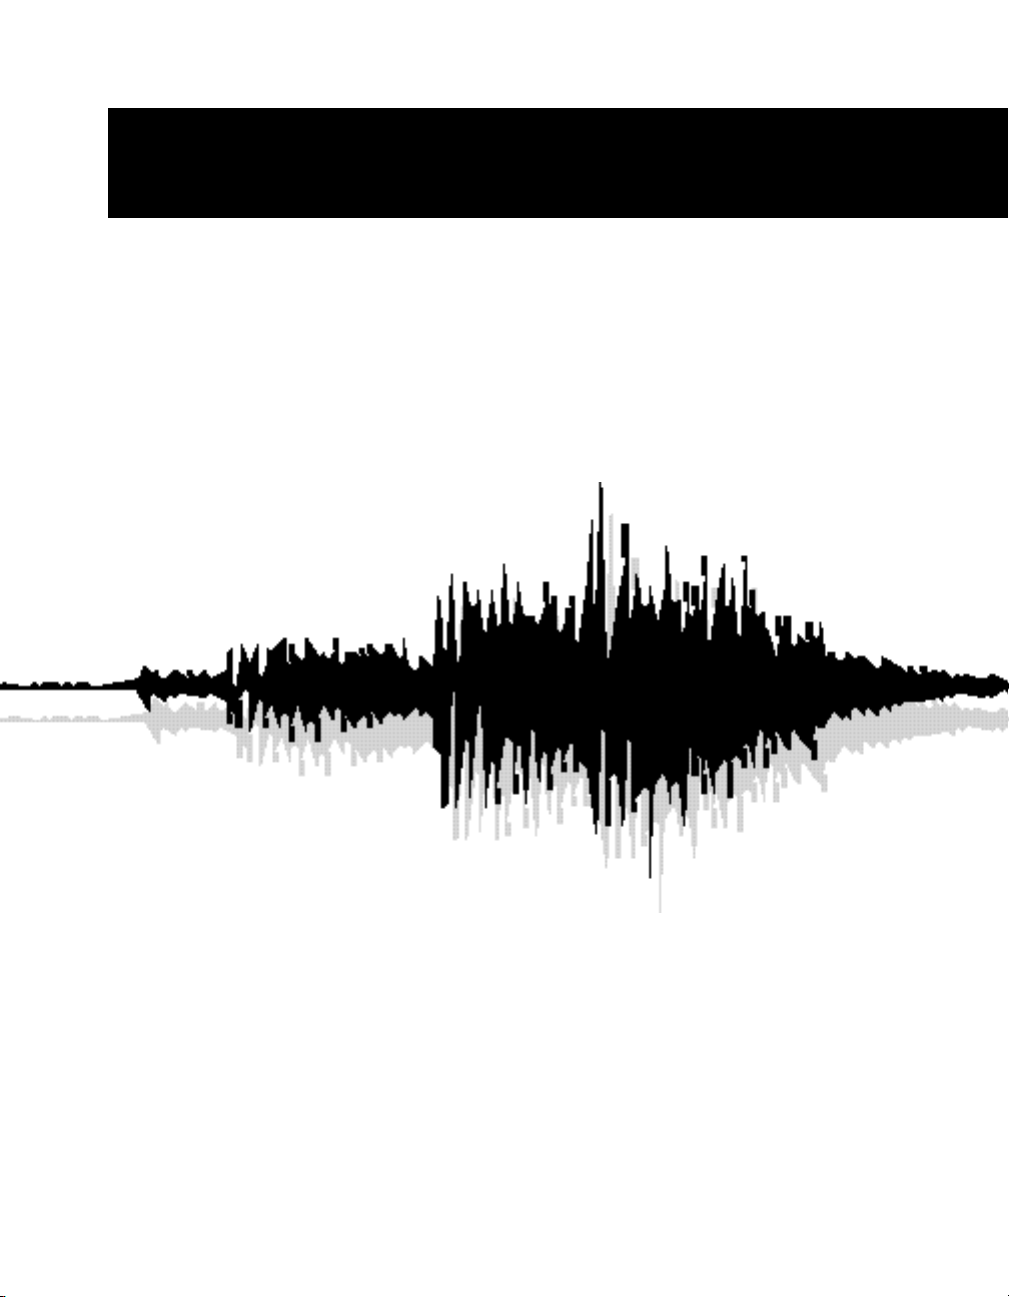
Chapter 3
Peak Basics

Peak User’s Guide18
 Loading...