

Page 1

Software User’s Guide
Version 3.0
Berkley Integrated Audio Software, Inc.
1370 Industrial Ave., Suite A
Petaluma, CA 94952
707.782.1866
http://www.bias-inc.com
BIAS Technical Support
707.782.1865
Monday-Friday 9AM–5PM PST
or
Page 2

BY INSTALLING AND USING THE PROVIDED
SOFTWARE, YOU ARE AGREEING TO BECOME
BOUND BY THE TERMS OF THIS AGREEMENT,
WHICH INCLUDES THE SOFTWARE LICENSE AND
THE SOFTWARE DISCLAIMER OF WARRANTY
(collectively the "Agreement"). CLICK "QUIT" ON
THE FOLLOWING DIALOG IF YOU DO NOT AGREE
WITH THIS AGREEMENT. THIS AGREEMENT
CONSTITUTES THE COMPLETE AGREEMENT
BETWEEN YOU AND BIAS, INC. IF YOU DO NOT
AGREE TO THE TERMS OF THIS AGREEMENT, DO
NOT USE THE SOFTWARE ON THE DISKS INCLUDED
IN THIS PACKAGE AND PROMPTLY RETURN THE
UNOPENED PACKAGE AND THE OTHER MATERIALS
(INCLUDING WRITTEN MATERIALS, BINDERS OR
OTHER CONTAINERS) THAT ARE PART OF THIS
PRODUCT TO THE PLACE WHERE YOU OBTAINED
THEM FOR A FULL REFUND.
BIAS SOFTWARE LICENSE
1. GRANT OF LICENSE. In consideration of payment
of the LICENSE fee, which is part of the price you paid
for this product, BIAS, as Licensor, grants to you, the
LICENSEE, a nonexclusive right to use and display this
copy of a BIAS software program (hereinafter the
"SOFTWARE") an a single COMPUTER (i.e., with a
single CPU) at a single location. BIAS reserves all
rights not expressly granted to LICENSEE.
2. OWNERSHIP OF SOFTWARE. As the LICENSEE, you
own the magnetic or other physical media on which
the SOFTWARE is originally or subsequently recorded
or fixed, but BIAS retains title and ownership of the
SOFTWARE recorded on the original disk copy(ies)
and all subsequent copies of the SOFTWARE,
regardless of the form or media on which the original
and other copies may exist. This License is not a sale
of the original SOFTWARE or any copy.
3. COPY RESTRICTIONS. This SOFTWARE and the
accompanying written materials are copyrighted.
Unauthorized copying of the SOFTWARE, including
SOFTWARE that has been modified, merged, or
included with other software, or of the written
materials is expressly forbidden. You may be held
legally responsible for any copyright infringement that
is caused or encouraged by your failure to abide by the
terms of this License. Subject to these restrictions,
and if the SOFTWARE is not copy-protected, you may
make one (1) copy of the SOFTWARE solely for
backup purposes. You must reproduce and include
the copyright notice on the backup copy.
4. USE RESTRICTIONS. As the LICENSEE, you may
physically transfer the SOFTWARE from one computer
to another provided that the SOFTWARE is used on
only one computer at a time. You may not electronically transfer the SOFTWARE from one computer to
another over a network. You may not distribute
copies of the SOFTWARE or accompanying written
materials to others. You may not modify, adapt,
translate, reverse engineer, decompile, disassemble, or
create derivative works based on the SOFTWARE. You
may not modify, adapt, translate, or create derivative
works based on the written materials without the prior
written consent of BIAS.
5. TRANSFER RESTRICTIONS. This SOFTWARE is
licensed only to you, the LICENSEE, and may not be
transferred to anyone without the prior written
consent of BIAS. Any authorized transferee of the
SOFTWARE shall be bound by the terms and conditions of this Agreement. In no event may you transfer,
assign, rent, lease, sell, or otherwise dispose of the
SOFTWARE on a temporary or permanent basis except
as expressly provided herein.
6. TERMINATION. This License is effective until
terminated. This License will terminate automatically
without notice from BIAS if you fail to comply with any
provision of this License. Upon termination you shall
destroy the written materials and all copies of the
SOFTWARE, including modified copies, if any.
7. UPDATE POLICY. BIAS may create, from time to
time, updated versions of the SOFTWARE. At its
option, BIAS will make such updates available to the
LICENSEE and transferees who have paid the update
fee and registered the software with BIAS.
8. MISCELLANEOUS. This Agreement is governed by
the law of the State of California.
DISCLAIMER OF WARRANTY AND LIMITED WARRANTY
THE SOFTWARE AND ACCOMPANYING WRITTEN
MATERIALS (INCLUDING INSTRUCTIONS FOR USE)
ii
Peak User’s Guide
Page 3

ARE PROVIDED "AS IS" WITHOUT WARRANTIES OF
ANY KIND. FURTHER, BIAS DOES NOT WARRANT,
GUARANTEE, OR MAKE ANY REPRESENTATIONS
REGARDING THE USE, OR THE RESULTS OF THE
USE, OF THE SOFTWARE OR WRITTEN MATERIALS IN
TERMS OF CORRECTNESS, ACCURACY, RELIABILITY,
CURRENTNESS, OR OTHERWISE. THE ENTIRE RISK
AS TO THE RESULTS AND PERFORMANCE OF THE
SOFTWARE IS ASSUMED BY YOU, AND NOT BIAS OR
ITS DEALERS, DISTRIBUTORS, AGENTS, OR EMPLOYEES, YOU AGREE TO ASSUME THE ENTIRE COST OF
ALL NECESSARY SERVICING, REPAIR, OR CORRECTION.
BIAS warrants to the original LICENSEE that the
disk(s) on which the SOFTWARE is recorded is free
from defects in materials and workmanship under
normal use and service for a period of ninety (90) days
from the date of delivery as evidenced by a copy of the
receipt and. Further, BIAS hereby limits the duration
of any implied warranty(ies) on the disk to the
respective periods stated above. Some states do not
allow limitations on duration of an implied warranty,
so the above limitation may not apply to you.
BIAS' entire liability and your exclusive remedy as to
disk(s) shall be, at BIAS' option, either (a) return of
the purchase price or (b) replacement of the disk that
does not meet BIAS' Limited Warranty and which is
returned to BIAS with a copy of the receipt. If failure
of the disk has resulted from accident, abuse, or
misapplication, BIAS shall have no responsibility to
replace the disk or refund the purchase price. Any
replacement disk will be warranted for the remainder
of the original warranty period or thirty (30) days,
whichever is longer.
THE ABOVE ARE THE ONLY WARRANTIES OF ANY
KIND, EITHER EXPRESS OR IMPLIED, INCLUDING
BUT NOT LIMITED TO THE IMPLIED WARRANTIES
OF MERCHANTABILITY AND FITNESS FOR A
PARTICULAR PURPOSE, THAT ARE MADE BY BIAS
CONCERNING THE BIAS PRODUCT. NO ORAL OR
WRITTEN INFORMATION OR ADVICE GIVEN BY BIAS,
ITS DEALERS, DISTRIBUTORS, AGENTS, OR EMPLOYEES SHALL CREATE A WARRANTY OR IN ANY WAY
INCREASE THE SCOPE OF THIS WARRANTY, AND
YOU MAY NOT RELY ON ANY SUCH INFORMATION
OR ADVICE. THIS WARRANTY GIVES YOU SPECIFIC
LEGAL RIGHTS. YOU MAY HAVE OTHER RIGHTS
WHICH VARY FROM STATE TO STATE.
NEITHER BIAS NOR ANYONE ELSE WHO HAS BEEN
INVOLVED IN THE CREATION, PRODUCTION, OR
DELIVERY OF THIS PRODUCT SHALL BE LIABLE FOR
ANY DIRECT, INDIRECT, CONSEQUENTIAL, OR
INCIDENTAL DAMAGES (INCLUDING DAMAGES FOR
LOSS OF BUSINESS PROFITS, BUSINESS INTERRUPTION, LOSS OF BUSINESS INFORMATION, AND THE
LIKE) ARISING SUCH DAMAGES. BECAUSE SOME
STATES DO NOT ALLOW THE EXCLUSION OR
LIMITATION OF LIABILITY FOR CONSEQUENTIAL OR
INCIDENTAL DAMAGES, THE ABOVE LIMITATION
MAY NOT APPLY TO YOU.
This Disclaimer of Warranty and Limited Warranty is
governed by the laws of the State of California.
U.S. GOVERNMENT RESTRICTED RIGHTS
The SOFTWARE and documentation is provided with
RESTRICTED RIGHTS. Use, duplication, or disclosure
by the Government is subject to restrictions as set
forth in subdivision (b)(3)(ii) of The Rights in
Technical Data and Computer Software clause at
252.227-7013.
Contractor/manufacturer is BIAS (Berkley Integrated
Audio Software), Inc/1370 Industrial Avenue, Suite A,
Petaluma, CA 94952.
Should you have any questions concerning this
Agreement, or if you desire to contact BIAS for any
reason, please contact in writing:
BIAS Customer Sales and Service
1370 Industrial Ave., Suite A
Petaluma, CA 94952
Table of Contents
iii
Page 4

Credits
Peak Software: Steve Berkley
Time Compression/Expansion Software: Earl Vickers
(aka The Sound Guy
™
)
User’s Guide: Bruce Bennett, Steve Berkley
Special Thanks to:
J. Mark Andrus, Michael Barrett, Robbie Berman, Bruce
Bennett, Ray Brunelle, BT, Andrew Calvo, Will
Carpmill, Chris Clanin, Jason Davies, Luke DeLalio,
Dennie Edwards, Tom Erbe, Terje Finstad, Daniel
Fisher, Kelly Fitz, Mikail Grahm, Brian Hamilton, Tom
Hays, Morris Hayes, Gary Hobish, Walter Horat, Brent
Hurtig, Matt Isaacson, Carson Kendall, Paul
Korntheuer, peer landra, Jeremy J. Lee, Ray Legnini,
Igor Len, Randy M., Jose Ignacio Martin, Christophe
Masson, Riccardo Mazza, Ron Macleod, David Mash,
Peter McCabe, David McIntyre, Melvin & Milo Mole,
Jeff Moore , Itai Neoran, NIN, Drayson Nowlan, Martin
O'Donnell, Larry Oppenheimer, Heather Perkins, Dan
Phillips, Scott Plunkett, Gene Porfido, Les Quindipan,
Ralph, Bob Rice, Brad Sarno, Arne Schulze, Seva, Eli
Shauriki, Ronen Shloush, Craig Snoke, Stefan
Sozomenu, Alex Stahl, M. Stevens, Morten Stjernholm,
Mark Tinley, David Torn, David Tremblay, Rudy
Trubitt, Tsvika, Earl Vickers, Zac Wheatcroft, Charles
Wiltgen, Michael Winter, Doug Wright, and Tsuyoshi
Yasukawa.
ASIO and VST are trademarks of Steinberg Software
und Hardware GmbH.
iv
Peak User’s Guide
Page 5

Contents
Chapter 1: Introducing Peak 3
Peak Features ......................................................................................................................................................................... 3
Who Is Peak Designed For?................................................................................................................................................... 4
What’s New in Peak 3.0? ........................................................................................................................................................ 4
Minimum System Requirements for OS 8.6–9.2 ................................................................................................................. 4
Minimum System Requirements for OS X.1 ........................................................................................................................ 5
Maximizing Peak’s Performance ........................................................................................................................................... 5
Differences between Peak 3.0 on OS 8.6–9.2 and OS X.1 .................................................................................................. 5
VST ............................................................................................................................................................................................................ 5
ASIO .......................................................................................................................................................................................................... 5
CoreAudio .................................................................................................................................................................................................6
Graphical User Interface .......................................................................................................................................................................... 6
About Your User’s Guide ...................................................................................................................................................... 6
About Peak LE ........................................................................................................................................................................ 7
About Peak DV.......................................................................................................................................................................................... 7
Using Online Help ................................................................................................................................................................. 8
Conclusion ............................................................................................................................................................................. 8
Chapter 2: Installing and Configuring Peak 11
Installing Peak ........................................................................................................................................................................ 11
Authorization ......................................................................................................................................................................... 11
Making Audio Connections .................................................................................................................................................. 12
Third-Party Audio Interfaces ................................................................................................................................................................... 13
ASIO ....................................................................................................................................................................................... 14
CoreAudio .............................................................................................................................................................................. 14
USB and FireWire Audio Interfaces ...................................................................................................................................... 14
Conclusion ............................................................................................................................................................................. 14
Chapter 3: Peak Basics 17
Introduction........................................................................................................................................................................... 17
A Brief Explanation of Digital Audio..................................................................................................................................... 17
About Disk-Based Recording and Editing ............................................................................................................................18
Creating a New Peak Document........................................................................................................................................... 19
Opening Existing Audio Documents.................................................................................................................................... 19
Opening “Dual Mono” Files .................................................................................................................................................. 20
Dragging and Dropping Folders, Disks, and CD Audio Tracks .......................................................................................... 21
Saving and Closing Documents ............................................................................................................................................ 21
Using the Save As and Save A Copy As Commands ............................................................................................................................... 22
Peak Windows and Palettes .................................................................................................................................................. 23
Peak Audio Document Window .............................................................................................................................................................. 23
Transport Window ....................................................................................................................................................................................25
Progress Bar .............................................................................................................................................................................................. 25
Cursor Palette ........................................................................................................................................................................................... 26
Contents Palette ....................................................................................................................................................................................... 27
Setting Preferences................................................................................................................................................................ 28
Setting Peak’s Playback Parameters ........................................................................................................................................................ 29
Show Marker Times ................................................................................................................................................................................. 30
Table of Contents
v
Page 6

Auditioning ............................................................................................................................................................................................... 30
Blending ....................................................................................................................................................................................................30
Choosing Colors for the Audio Document Window.............................................................................................................................. 31
The Toolbar ............................................................................................................................................................................ 35
Quitting Peak ......................................................................................................................................................................... 35
Conclusion ............................................................................................................................................................................. 36
Chapter 4: Playback and Recording 39
Recording and Playback using the Apple Sound Manager ................................................................................................. 39
Preparing Peak for Recording ............................................................................................................................................... 39
Proper Levels for Recording .................................................................................................................................................................... 39
Record Settings ...................................................................................................................................................................... 40
CoreAudio .............................................................................................................................................................................. 43
Playback with CoreAudio ......................................................................................................................................................................... 43
Recording with CoreAudio ...................................................................................................................................................................... 44
ASIO ....................................................................................................................................................................................... 45
Installing ASIO Drivers .............................................................................................................................................................................45
Playback with ASIO .................................................................................................................................................................................. 45
Recording with ASIO ............................................................................................................................................................................... 46
Playing Audio with Peak ........................................................................................................................................................ 47
The Transport Controls ........................................................................................................................................................................... 47
Triggering Playback of Multiple Audio Documents ...............................................................................................................................48
The Record Dialog ................................................................................................................................................................ 48
Recording ............................................................................................................................................................................... 49
Importing a Track From an Audio CD (CD Audio Extraction) ........................................................................................... 50
Conclusion ............................................................................................................................................................................. 51
Chapter 5: Editing 55
Editing Audio with Peak ........................................................................................................................................................ 55
The Audio Document Window............................................................................................................................................. 55
An Audio Waveform ................................................................................................................................................................................. 56
A Selection ................................................................................................................................................................................................ 56
A Marker.................................................................................................................................................................................................... 57
A Loop ....................................................................................................................................................................................................... 57
Audio Between Adjacent Markers ........................................................................................................................................................... 58
Audio Info Area ........................................................................................................................................................................................58
Audio Info dialog ......................................................................................................................................................................................58
Selecting Audio ...................................................................................................................................................................... 58
Auditioning Audio ................................................................................................................................................................. 59
Scrubbing ............................................................................................................................................................................... 59
Using Unlimited Undo and Redo ......................................................................................................................................... 61
Using the Edits Command to Undo a Series of Actions ........................................................................................................................ 61
Essential Editing Functions ...................................................................................................................................................62
Scratch Disks ............................................................................................................................................................................................ 62
Clearing the Clipboard to Reclaim Disk Space ......................................................................................................................................63
Cutting Audio ........................................................................................................................................................................................... 63
Deleting Audio .........................................................................................................................................................................................63
Copying Audio .......................................................................................................................................................................................... 63
Pasting Audio ............................................................................................................................................................................................ 63
Replacing Audio .......................................................................................................................................................................................64
Inserting Audio ......................................................................................................................................................................................... 64
Cropping a Selection ............................................................................................................................................................................... 64
vi
Peak User’s Guide
Page 7

New Document from Selection ...............................................................................................................................................................64
Silencing a Selection ................................................................................................................................................................................ 65
Inserting Silence into a Document ......................................................................................................................................................... 65
Show Edits ............................................................................................................................................................................. 65
Using Crossfades and Blending to Smooth Edits ................................................................................................................ 66
Creating Fade Ins and Fade Outs ......................................................................................................................................... 67
Creating and Using Markers ................................................................................................................................................. 69
Regions ................................................................................................................................................................................... 72
Creating Loops ...................................................................................................................................................................... 73
Crossfading Loops ................................................................................................................................................................. 74
Using Loop Surfer ................................................................................................................................................................. 75
Using the Guess Tempo and Threshold commands to find tempo ..................................................................................................... 77
Using Loop Tuner .................................................................................................................................................................. 77
Exporting Regions ................................................................................................................................................................. 77
Editing QuickTime Soundtracks in Peak ............................................................................................................................. 79
Conclusion ............................................................................................................................................................................. 80
Chapter 6: Playlists and CD Burning 83
Introduction........................................................................................................................................................................... 83
Regions ................................................................................................................................................................................... 83
Creating a Playlist .................................................................................................................................................................. 85
Modifying Playlist Events ......................................................................................................................................................................... 87
The Nudge Regions Dialog ...................................................................................................................................................................... 87
Applying VST Plug-Ins to the Playlist.................................................................................................................................... 88
Creating a New Audio Document from a Playlist ................................................................................................................ 89
Exporting the Playlist as a Text Document .......................................................................................................................... 89
Saving and Opening Playlists ................................................................................................................................................ 90
Burning Audio CDs from Peak Playlists ............................................................................................................................... 90
Peak’s Playlist and Toast ...........................................................................................................................................................................90
Regions and the JAM Image file format .................................................................................................................................................. 90
Conclusion ............................................................................................................................................................................. 91
Chapter 7: DSP 95
Introduction........................................................................................................................................................................... 95
Processing Audio with Peak’s DSP Tools.............................................................................................................................. 95
Peak’s Audio Processing Tools .............................................................................................................................................. 95
Add ............................................................................................................................................................................................................ 95
Amplitude Fit ............................................................................................................................................................................................ 96
Change Duration ...................................................................................................................................................................................... 96
Change Gain ............................................................................................................................................................................................. 97
Change Pitch ............................................................................................................................................................................................ 98
Convert Sample Rate ............................................................................................................................................................................... 98
Convolve ................................................................................................................................................................................................... 99
Crossfade Loop ........................................................................................................................................................................................ 99
Invert ......................................................................................................................................................................................................... 100
Fade In & Fade Out ..................................................................................................................................................................................100
Find Peak .................................................................................................................................................................................................. 100
Gain Envelope .......................................................................................................................................................................................... 101
Loop Tuner ............................................................................................................................................................................................... 101
Mono To Stereo/Stereo To Mono ............................................................................................................................................................102
Mix ............................................................................................................................................................................................................. 103
Modulate ................................................................................................................................................................................................... 103
Table of Contents
vii
Page 8

Normalize ................................................................................................................................................................................................. 104
Panner ....................................................................................................................................................................................................... 104
Phase Vocoder .......................................................................................................................................................................................... 104
Rappify ...................................................................................................................................................................................................... 105
Repair Click ...............................................................................................................................................................................................106
Repair Clicks ............................................................................................................................................................................................. 106
Remove DC Offset ....................................................................................................................................................................................107
Reverse Boomerang ................................................................................................................................................................................. 107
Reverse ......................................................................................................................................................................................................108
Swap Channels ......................................................................................................................................................................................... 108
Threshold .................................................................................................................................................................................................108
Conclusion ............................................................................................................................................................................. 109
Chapter 8: VST Plug-Ins 113
Introduction........................................................................................................................................................................... 113
Installing VST Plug-Ins........................................................................................................................................................... 113
Organizing VST Plug-ins with Folders .....................................................................................................................................................113
Peak and Vbox SE .................................................................................................................................................................. 113
The Vbox Matrix .................................................................................................................................................................... 114
Box Controls ............................................................................................................................................................................................. 114
Moving Plug-Ins ........................................................................................................................................................................................ 116
Changing Input Routing .......................................................................................................................................................................... 116
Creating Serial Effects Chains .................................................................................................................................................................. 116
Creating Parallel Effects Chains ............................................................................................................................................................... 116
The Vbox Window ................................................................................................................................................................. 117
Master Wet/Dry Controls ......................................................................................................................................................................... 117
Master Input/Output Levels .................................................................................................................................................................... 117
Loading and Restoring Vbox Presets ...................................................................................................................................................... 117
A/B Comparisons .....................................................................................................................................................................................117
Vbox Preferences ......................................................................................................................................................................................118
Editing VST Plug-In Parameters ............................................................................................................................................ 118
BIAS Freq .................................................................................................................................................................................................. 118
Bouncing VST Plug-Ins .......................................................................................................................................................... 118
VST Envelope ........................................................................................................................................................................................... 119
VST Plug-In Delays ................................................................................................................................................................ 119
Recording Through VST Plug-Ins ......................................................................................................................................... 120
Using VST Plug-Ins with the Batch File Processor .............................................................................................................. 120
VST Effects in Peak LE and DV.............................................................................................................................................. 120
Conclusion ............................................................................................................................................................................. 121
Chapter 9: Batch File Processor and Apple Events 125
Introduction........................................................................................................................................................................... 125
Batch File Processor .............................................................................................................................................................. 125
Peak’s Audio Librarian Tools ................................................................................................................................................. 128
Apple Events Support .............................................................................................................................................................................. 128
Conclusion ............................................................................................................................................................................. 130
viii
Peak User’s Guide
Page 9

Chapter 10: Samplers 133
Introduction........................................................................................................................................................................... 133
Working with SMDI Samplers............................................................................................................................................... 133
SMDI Samplers ......................................................................................................................................................................................... 133
A note about the Yamaha A3000 ............................................................................................................................................................. 136
Conclusion ............................................................................................................................................................................. 136
Chapter 11: Peak Menus 139
File Menu ............................................................................................................................................................................... 139
New ........................................................................................................................................................................................................... 139
Open ......................................................................................................................................................................................................... 139
Close ......................................................................................................................................................................................................... 140
Close All .................................................................................................................................................................................................... 140
Save ........................................................................................................................................................................................................... 140
Save As ...................................................................................................................................................................................................... 141
Save A Copy As ......................................................................................................................................................................................... 141
Import CD Track ...................................................................................................................................................................................... 141
Import Dual Mono ................................................................................................................................................................................... 141
Export Dual Mono .................................................................................................................................................................................... 141
Export Regions ......................................................................................................................................................................................... 142
Export as Text ........................................................................................................................................................................................... 142
Batch Processor ........................................................................................................................................................................................ 142
Recently Opened Documents ................................................................................................................................................................. 143
Quit ........................................................................................................................................................................................................... 143
Edit Menu ............................................................................................................................................................................... 143
Undo ......................................................................................................................................................................................................... 143
Redo .......................................................................................................................................................................................................... 144
Edits ..........................................................................................................................................................................................................144
Cut ............................................................................................................................................................................................................. 144
Copy .......................................................................................................................................................................................................... 144
Paste .......................................................................................................................................................................................................... 144
Replace ......................................................................................................................................................................................................144
Insert ......................................................................................................................................................................................................... 144
Insert Silence ............................................................................................................................................................................................ 144
Silence ....................................................................................................................................................................................................... 145
Delete ........................................................................................................................................................................................................145
Delete Except Audio ................................................................................................................................................................................ 145
Crop .......................................................................................................................................................................................................... 145
Clear Clipboard ........................................................................................................................................................................................145
Select All ................................................................................................................................................................................................... 145
Insertion Point at Selection Start/End .................................................................................................................................................... 145
Set Selection ............................................................................................................................................................................................. 145
Select Loop ............................................................................................................................................................................................... 145
Previous Selection/Next Selection .......................................................................................................................................................... 145
Action Menu........................................................................................................................................................................... 146
Zoom Out ................................................................................................................................................................................................. 146
Zoom In .................................................................................................................................................................................................... 146
Increase Vertical Zoom ............................................................................................................................................................................ 146
Decrease Vertical Zoom ...........................................................................................................................................................................146
Fit Selection .............................................................................................................................................................................................. 146
Zoom Out All the Way.............................................................................................................................................................................. 146
Zoom at Sample Level ............................................................................................................................................................................. 146
Zoom at Sample Level (End) ................................................................................................................................................................... 146
Snap Selection to Zeros ........................................................................................................................................................................... 147
Table of Contents
ix
Page 10

Loop This Selection .................................................................................................................................................................................147
Nudge Loop Backward ............................................................................................................................................................................ 147
Nudge Loop Forward ............................................................................................................................................................................... 147
New Marker .............................................................................................................................................................................................. 147
New Region .............................................................................................................................................................................................. 147
Markers to Regions .................................................................................................................................................................................. 147
Nudge ........................................................................................................................................................................................................148
Go To ......................................................................................................................................................................................................... 148
Loop Surfer ............................................................................................................................................................................................... 148
Guess Tempo ............................................................................................................................................................................................ 149
Audio Menu ........................................................................................................................................................................... 149
Stop/Rewind ............................................................................................................................................................................................. 149
Play/Pause ................................................................................................................................................................................................. 149
Play Selection ............................................................................................................................................................................................149
Play w/Auditioning ................................................................................................................................................................................... 149
Stop & Extend Selection .......................................................................................................................................................................... 150
Fast-Forward ............................................................................................................................................................................................. 150
Record ....................................................................................................................................................................................................... 150
Record Settings ........................................................................................................................................................................................150
Hardware Settings .................................................................................................................................................................................... 152
Meters ....................................................................................................................................................................................................... 152
DSP Menu .............................................................................................................................................................................. 153
Add ............................................................................................................................................................................................................ 153
Amplitude Fit ............................................................................................................................................................................................ 153
Change Duration ...................................................................................................................................................................................... 154
Change Gain ............................................................................................................................................................................................. 154
Change Pitch ............................................................................................................................................................................................ 154
Convert Sample Rate ............................................................................................................................................................................... 155
Convolve ................................................................................................................................................................................................... 155
Crossfade Loop ........................................................................................................................................................................................ 155
Invert ......................................................................................................................................................................................................... 155
Fade In & Fade Out ..................................................................................................................................................................................155
Find Peak .................................................................................................................................................................................................. 155
Gain Envelope .......................................................................................................................................................................................... 156
Loop Tuner ............................................................................................................................................................................................... 156
Mono To Stereo/Stereo To Mono ............................................................................................................................................................156
Mix ............................................................................................................................................................................................................. 157
Modulate ................................................................................................................................................................................................... 157
Normalize ................................................................................................................................................................................................. 157
Panner ....................................................................................................................................................................................................... 157
Phase Vocoder .......................................................................................................................................................................................... 158
Rappify ...................................................................................................................................................................................................... 158
Repair Click ...............................................................................................................................................................................................158
Repair Clicks ............................................................................................................................................................................................. 158
Remove DC Offset ....................................................................................................................................................................................159
Reverse Boomerang ................................................................................................................................................................................. 160
Reverse ......................................................................................................................................................................................................160
Swap Channels ......................................................................................................................................................................................... 160
Threshold .................................................................................................................................................................................................160
Sampler Menu........................................................................................................................................................................ 161
Send to Sampler ....................................................................................................................................................................................... 161
Revert from Sampler ................................................................................................................................................................................ 161
Send All to Sampler .................................................................................................................................................................................. 161
Revert All from Sampler ........................................................................................................................................................................... 161
E-mu, Ensoniq ASR-X, Kurzweil, Peavey, Yamaha Sampler ................................................................................................................... 161
x
Peak User’s Guide
Page 11

VST Plug-Ins Menu ................................................................................................................................................................ 162
VST Plug-Ins .............................................................................................................................................................................................. 162
Bounce ...................................................................................................................................................................................................... 162
Preference Menu ................................................................................................................................................................... 162
Time Units ................................................................................................................................................................................................ 163
Sample Units .............................................................................................................................................................................................163
Colors ........................................................................................................................................................................................................ 163
Use Loop in Playback ............................................................................................................................................................................... 163
Scroll During Play ..................................................................................................................................................................................... 163
Move Waveform During Playback ........................................................................................................................................................... 163
Compute File Max dB .............................................................................................................................................................................. 163
Show Edits ................................................................................................................................................................................................ 163
Show Marker Times ................................................................................................................................................................................. 164
Show Overview ........................................................................................................................................................................................ 164
Scratch Disks ............................................................................................................................................................................................ 164
Auto-Import Dual Mono .......................................................................................................................................................................... 164
Audio Info ................................................................................................................................................................................................. 164
Dynamic Scrub Time ............................................................................................................................................................................... 165
Auto Snap To Zero .................................................................................................................................................................................... 165
Blending ....................................................................................................................................................................................................165
Auditioning ............................................................................................................................................................................................... 166
Fade In Envelope .....................................................................................................................................................................................166
Fade Out Envelope ..................................................................................................................................................................................166
VST Envelope ........................................................................................................................................................................................... 166
Sampler ..................................................................................................................................................................................................... 166
DSP Preferences ....................................................................................................................................................................................... 166
Movie Sound Tracks ................................................................................................................................................................................. 167
Playback Preferences ................................................................................................................................................................................167
Shortcuts & Toolbar ................................................................................................................................................................................. 168
Auto-Balloon Help ....................................................................................................................................................................................168
Floaters .....................................................................................................................................................................................................168
Window Menu ....................................................................................................................................................................... 169
Transport ................................................................................................................................................................................................... 169
Toolbar ...................................................................................................................................................................................................... 169
Cursor Palette ........................................................................................................................................................................................... 169
Contents Palette ...................................................................................................................................................................................... 169
Movie ......................................................................................................................................................................................................... 170
Playlist ....................................................................................................................................................................................................... 170
Tile Windows ............................................................................................................................................................................................ 170
Stack Windows .........................................................................................................................................................................................170
Links Menu............................................................................................................................................................................. 170
Help Menu ............................................................................................................................................................................. 170
Appendix 1: Keyboard Shortcuts and Actions 173
Keyboard Shortcuts ............................................................................................................................................................... 173
File ............................................................................................................................................................................................................. 173
Edit ............................................................................................................................................................................................................ 173
Action ........................................................................................................................................................................................................ 174
Audio ......................................................................................................................................................................................................... 174
Preference ................................................................................................................................................................................................. 174
Window ..................................................................................................................................................................................................... 174
Peak Actions ........................................................................................................................................................................... 176
Useful Peak Actions, General................................................................................................................................................................... 176
Audio Document Window, General ........................................................................................................................................................176
Table of Contents
xi
Page 12

Playback .................................................................................................................................................................................................... 176
Scrubbing .................................................................................................................................................................................................. 176
Selections ..................................................................................................................................................................................................176
Views ......................................................................................................................................................................................................... 176
Markers, Loops, and Regions ..................................................................................................................................................................176
Playlist ....................................................................................................................................................................................................... 177
Loops ........................................................................................................................................................................................................ 177
VST Plug-Ins .............................................................................................................................................................................................. 177
The Cursor Palette ................................................................................................................................................................................... 177
The Contents Palette ...............................................................................................................................................................................178
The Movie Window .................................................................................................................................................................................. 178
Appendix 2: Troubleshooting 179
Before Calling For Help ........................................................................................................................................................ 179
Glossary 183
Index 191
xii
Peak User’s Guide
Page 13
Chapter 1
Introducing Peak
Page 14

2
Peak User’s Guide
Page 15

Chapter 1:
Introducing Peak
1
BIAS Peak™ is an advanced audio application that
provides superior tools for editing and processing
digital audio on the Macintosh computer. Peak was
specifically designed to meet the needs and demands
of audio professionals. By combining high-quality
direct-from-disk digital audio editing features with a
lightning fast, completely nondestructive editing
environment, Peak provides unsurpassed audio
editing power, and makes a superb addition to
multitrack audio applications programs, such as BIAS
Deck™. Peak offers advanced sampler support, and
works directly with many popular MIDI sampling
keyboards and rackmount samplers. Peak is also the
perfect audio complement to digital video editing
programs, such as iMovie™ and Final Cut Pro™.
Peak Features
• Direct-to-disk recording and playback at all sample
rates supported by the sound hardware on your
Macintosh, or supported through third-party audio
hardware
• User-configured waveform display
• Support for commonly used audio document
formats, including AIFF, Sound Designer II™,
WAVE, QuickTime™, Raw, System 7 Sound, Sonic
AIFF, Paris™, JAM Image, AU, and MP3 formats
• Completely nondestructive file-based editing with
unlimited undo and redo
• Professional editing abilities, including userdefinable fade curves, silence, and complete
support for cut/copy/paste with multiple undo and
redo
• By using an application that supports Apple
Events, such as FileMaker Pro™, you can catalog
your Peak sound files and audition them from
within the application
• Support for third-party digital audio hardware,
such as M-Audio™ or Mark of the Unicorn™
digital audio interfaces, through Core Audio,
Macintosh Sound Manager, and ASIO
• Support for 8-, 16-, 24-, and 32-bit audio files
• Support for third-party VST™ Plug-Ins, allowing
you to add advanced signal processing features to
Peak. Plug-Ins from companies such as BIAS,
Cycling `74™, Steinberg™, and Waves™ can be
used with Peak for digital filtering, noise reduction, reverb, equalization, and other effects in real
time
• The ability to create audio CDs from a Peak Playlist
using Roxio Toast™ Light, which is included with
Peak
• Sophisticated Tools for looping, including Loop
Surfer™, Loop Tuner™, and Guess Tempo™
• Sampler Support
• Playlist editing and mastering
• Customizable Toolbar and Keyboard Shortcuts
• QuickTime Movie window with scrubbing
Introducing Peak
3
Page 16

Who Is Peak Designed For?
Peak is designed for a wide variety of users, ranging
from composers and multimedia producers to sound
designers and remix editors. Peak’s comprehensive
recording, editing, looping, and processing capabilities
make it a powerhouse tool for virtually any aspect of
digital audio production. If you are interested in sound
and possess imagination and creativity, Peak is for you.
Minimum System Requirements for OS 8.6–9.2
To use Peak you will need:
• Any PowerPC-equipped or G3/G4 Macintosh,
including PowerBooks
• 96 MB of RAM
• Sound Manager version 3.4 or later
• Macintosh System Software 8.6 or later
What’s New in Peak 3.0?
Version 3.0 of Peak software has several new features
and enhancements, including:
• Support for OS X.1
• New “Aqua” Graphic User Interface (GUI)
• Redone cursor palette with X, Y, DTR, Sel, and
BPM, with the ability to type in X, Sel, BPM values
(BPM entry is quick way to create loops with a
given tempo)
• New growable, floating Transport window
• New contents window is growable and supports
sorting
• Support for Apple's new CoreAudio framework
under OS X
• Integrated Vbox interface for working with VST
plug-ins
• Bundled with BIAS Freq™ VST Plug-In (carbonized)
• QuickTime version 4 or later
• QuickTime PowerPlug™ installed in the Extensions
folder
• CarbonLib 1.4 or later
• A hard drive with 18ms or faster average seek time
• A 13-inch or larger monitor (color is recom-
mended)
The optimal system for use with Peak software is a
Macintosh G4 computer and 64 MB or more of RAM
available to run Peak. If you have a Macintosh G4
computer, use the G4 optimized version of Peak to
take advantage of the G4’s Velocity Engine. Peak runs
in native mode on Power Macintosh and G4 computers, and can take advantage of ASIO compatible sound
cards in addition to sound cards with Apple Sound
Manager drivers.
Macintosh PowerPC Nubus computers are not
supported by Peak 3.0.
• Improved sample rate conversion quality
• New Floaters preference to specify which windows
have floating behavior and which do not
• Full support for Navigation Services when opening
and saving documents
4
Peak User’s Guide
Page 17

• Turn File Sharing off, unless you need it.
Minimum System Requirements for OS X.1
To use Peak with OS X.1 you will need:
• Any G3/G4 Macintosh or PowerBook (including
iMac and iBook)
• Mac OS X.1
• 128 MB RAM
• A hard drive with 18ms access time or better
• Color Monitor, minimum 640x480 resolution
• CoreAudio support of third-party hardware for
playback requires drivers from hardware manufacturer
Maximizing Peak’s Performance
To get the best performance out of Peak and your
Macintosh running OS 8.6–9.2, do the following.
To maximize Peak performance:
• Use a minimal number of System Extensions.
Extensions can slow down your Macintosh by using
precious processor cycles. In particular, turn off
System Extensions such as menu bar clocks and
screen savers that are in constant operation. To set
up a dedicated set of extensions for Peak,
duplicate your Mac OS Base extensions set in the
extensions manager and rename it (something like
Peak_set), restart your computer with this
extensions set and install Peak, enable the
additional extensions required for Peak to run,
and, restart your computer with this updated
extensions set.
• Set your monitor to no more than thousands of
colors (256 colors is recommended for older
Macintoshes).
• Disconnect your Macintosh from any networks and
turn off AppleTalk, unless you need to be on a
network.
• Use the Memory control panel to set the
Macintosh’s disk cache to at least 384k (usually the
Mac’s default setting is fine). Turn Virtual Memory
Off.
• Allocate additional RAM to Peak if possible, using
the Finder’s Get Info command. (Select Peak in
the Finder, choose Get info from the Finder’s
Special menu, and enter the desired amount in the
Preferred Size field. Make sure you allocate more
RAM than the amount indicated in the Minimum
Size field!)
• Optimize your hard drive. (See Chapter 3 to learn
about proper hard disk maintenance.)
Differences between Peak 3.0 on OS
8.6–9.2 and OS X.1
The carbonized version of Peak 3.0 will run on both
Mac OS X.1 and older Mac OS 8.6–9.2. There are some
differences in features because of the differences in
capabilities of the newer operating system and the
older operating system. These differences are
described below.
VST
Peak 3.0 requires VST plug-ins to be carbonized if they
are to be used with Peak 3.0 on OS X.1. Peak 3.0 can
access both carbonized and non-carbonized VST plugins when used under OS 8.6–9.2. Contact your plug-in
manufacturer for availability of carbonized versions of
their plug-ins.
ASIO
Peak 3.0 allows you to use ASIO 1.0 drivers to record
and playback audio when Peak 3.0 is used under OS
8.6–9.2. ASIO 1.0 technology is not compatible with
1
Introducing Peak
5
Page 18

the newer driver model in OS X.1, called CoreAudio.
CoreAudio
Peak 3.0 allows you to use CoreAudio for playback and
recording when Peak 3.0 is used under OS X.1. Peak
will play and record audio through the CoreAudio
device selected in the CoreAudio dialog. CoreAudio
has numerous advantages, including low latency,
shared drivers across applications, and support for
high bit-depths and sample rates.
Graphical User Interface
The Graphical User Interface (GUI) for Peak 3.0 looks
slightly different when Peak 3.0 is used on OS X.1 v.
OS 8.6–9.2. The OS X.1 GUI incorporates new OS X
large application icons, and more of an aqua look and
feel across the GUI. Examples include the transport
button highlight colors, transport meters, and pinstriped theme backgrounds. Throughout this User’s
Guide there will be graphics that display dialogs,
windows, and menus from either OS X.1 or OS 8.6–
9.2.
About Your User’s Guide
Peak is designed to be simple and intuitive. Your
User’s Guide is designed to help you set up and use
Peak for digital recording and editing as quickly and
easily as possible.
This User’s Guide assumes that you are familiar with
standard Macintosh operating techniques, including:
• Setting up, starting, and using your Macintosh
• Choosing commands from menus
• Double-clicking, selecting, Shift-selecting, and
dragging with the mouse
• Opening, copying, saving and deleting files
• Opening, closing, scrolling, moving, re-sizing, and
selecting Macintosh windows
If you don’t know how to perform these tasks, please
refer to your Macintosh User’s Guide and spend a
little time learning about your Macintosh before going
any further. This will make using Peak much easier
and more enjoyable.
The Chapters in your Peak User’s Guide are arranged
in the order in which you would typically perform
tasks when embarking on an audio project:
• Chapter 1 introduces you to Peak and explains
some of the requirements for using Peak software
• Chapter 2 explains how to install Peak software
and configure your Macintosh for recording and
playback
• Chapter 3 introduces you to some basic concepts
of digital audio and disk-based recording, as well
as basic Peak operations
• Chapter 4 explains how to record and playback
audio to and from hard disk in Peak using the
Apple Sound Manager, ASIO, and Core Audio. It
also explains how to import audio from compatible CD-ROM drives
• Chapter 5 introduces you to the concepts and
techniques of nondestructive editing with Peak
• Chapter 6 explains how to create regions and
sequence their playback using Playlists, as well as
how to use Peak Playlists to burn audio CDs
• Chapter 7 explains how to use Peak’s native DSP
tools
• Chapter 8 explains how to use VST plug-ins with
Vbox SE to enhance Peak’s audio production
capabilities
• Chapter 9 explains how to use Peak’s Batch File
Processor as well as how to use Apple Events for
file management
• Chapter 10 explains how to import samples
directly from compatible samplers (to edit or
process the audio using all of Peak’s functions)
6
Peak User’s Guide
Page 19

and send the modified sample back to the sampler
• Convolve
• Chapter 11 describes each of the commands found
in Peak’s menus
• Appendix 1 lists the default Keyboard Shortcuts for
Peak
• Appendix 2 provides a troubleshooting guide for
commonly encountered problems
• A Glossary and an Index complete your Peak
User’s Guide
Look for important tips and notes whenever
you see this exclamation mark.
About Peak LE
If you are using the limited edition of Peak, not all
features will be available. Specifically, the following
features are not available in Peak LE:
• 24 and 32 bit support
• Crossfades and VST effects in Peak LE Playlists
• Limited to a single VST insert without Vbox
integration
• Loop Surfer™ and Loop Tuner
• Customizable Keyboard Shortcuts
• Customizable Toolbar
• Remove DC Offset
• Pitch Change
• Import Dual Mono
• Meters Dialog
• QuickTime movies
• Batch File Processor
• Export Regions
• Sampler Support
• Modulate
1
• Add
• Amplitude Fit
• Change Duration
• Crossfade Loop
• Dither
• Find Peak
• Mono To Stereo
• Stereo To Mono
• Phase Vocoder
• Rappify
• Repair Clicks
• Swap Channels
• Threshold
• Recording Notepad
• Recording Input Levels
• Specialized Apple Events for Playback from a
database such as FileMaker Pro
Features that are not supported in Peak LE will
show this icon in the manual. Features
unavailable in Peak LE will appear grayed out
in their menus.
About Peak DV
Peak DV is equivalent to Peak LE except:
• Includes 11 free VST plug-ins: (BIAS Freq,
Freeverb, mda De-ess, mda Delay, mda Dynamics,
mda Leslie, mda Overdrive, mda MultiBand, mda
Limiter, mda RoundPan, and mda Stereo)
• Support for a QuickTime movie window
• Includes Change Duration DSP function
Introducing Peak
7
Page 20
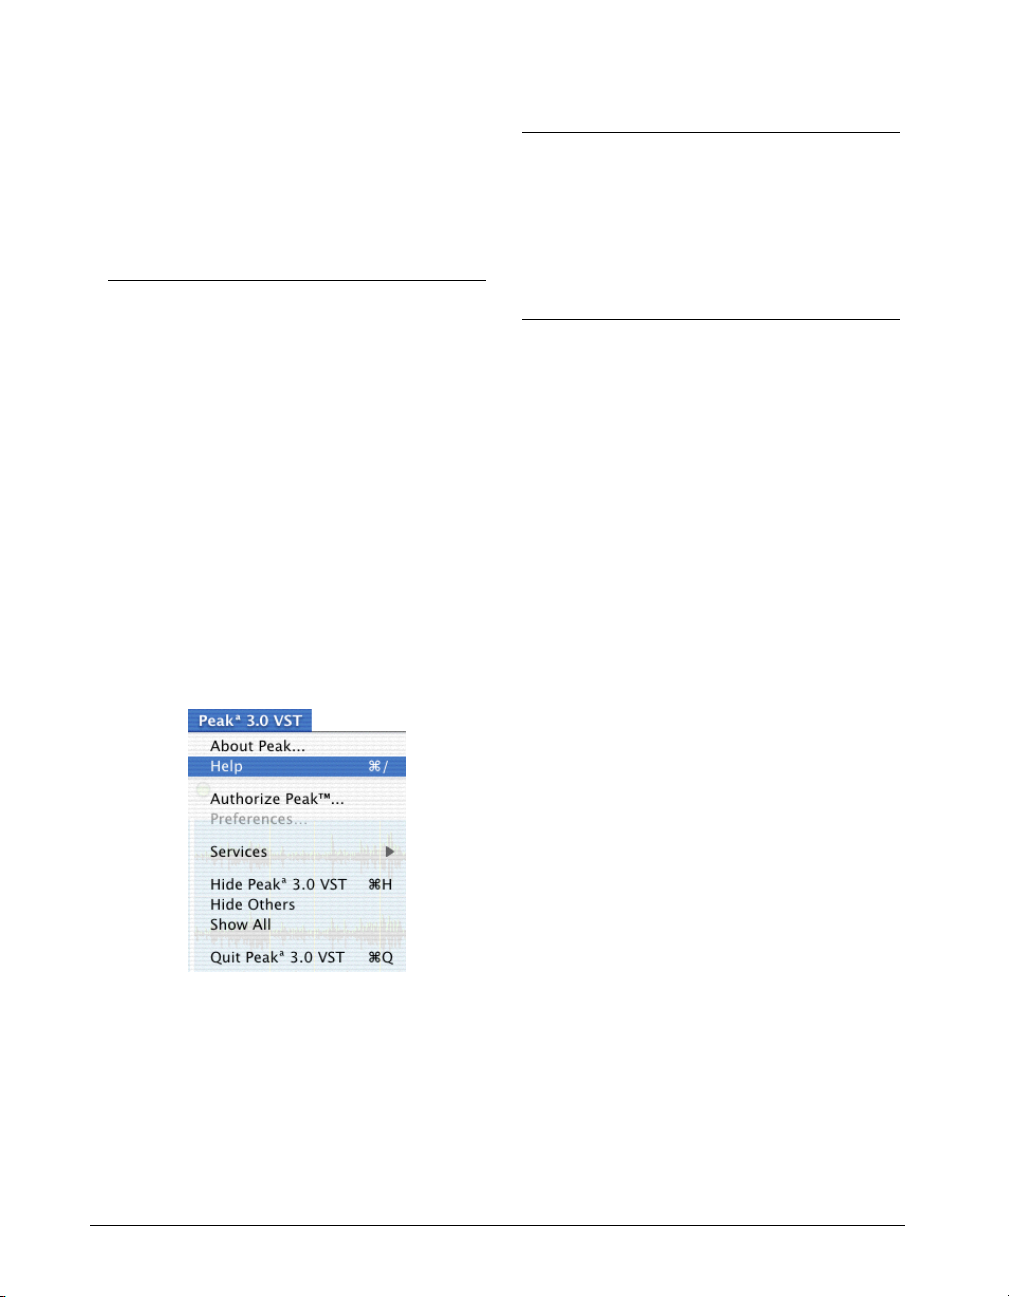
• Sample rate conversion limited to 48 kHz
• Batch file processing
• No Playlist support
Conclusion
• No support for looping
Using Online Help
Peak provides two types of online help. The first type,
Balloon Help. Balloon Help will show you the
functions of each menu item as you move the mouse
across different menu items. If you hold the mouse
cursor over a Toolbar icon for 2 seconds, the Balloon
Help for that icon’s function will appear.
The second type of online help is available under the
Peak menu on OS X.1, and under the Apple menu on
OS 8.6–9.2. Choosing Help will launch your browser
and load the BIAS documentation page where you can
access BIAS Tutorials and User’s Guides.
Now that you know a little about Peak, proceed to the
next chapter to learn how to install your software and
get started using it.
Online Help is available in the Peak menu
You can also use the Links menu to access BIAS
documentation and technical support online.
8
Peak User’s Guide
Page 21
Chapter 2
Installing and Configuring Peak
Page 22

Peak User’s Guide10
Page 23

Chapter 2:
Installing and
Configuring Peak
Installing Peak
Peak’s auto-installer software makes installation very
easy.
Your complete Peak system consists of:
• CD-ROM Installer
• Peak serial number and Product Authorization Code
(PAC)
Before you install Peak, please check the
Minimum System Requirements on Page 4 of
this Users Guide.
To install Peak:
1. If you are using any virus-protection software, turn
it off or temporarily remove it, and restart your
Macintosh.
2
7. At the end of the installation, the installer will
allow you to register Peak electronically, which
you may find more convenient than mailing your
registration card.
8. When the installation is complete, a message will
appear indicating that the installation was
successful. Click Quit to quit the Installer, or click
Continue to install copies additional copies (don't
forget to turn back on any virus-protection
software that you may be using the next time you
restart the computer).
If want to run Peak on the same computer, but
alternate between different operating systems
(e.g., switching between OS X.1 and OS 9.2.2),
separate copies of Peak will need to be
installed and authorized on each OS. Peak will
not operate under classic mode in OS X.1.
Authorization
2. Insert the Peak Install CD-ROM in your CD-ROM
drive, open the Product Installers folder, and
double-click the Install Peak icon.
3. When the Installer dialog appears, read the Read
Me for late-breaking information concerning the
Installer, then click Continue to proceed.
4. Select where you would like to install Peak, using
the Switch Disk pop-up menu.
5. Click Install at the bottom right of this dialog.
6. After you have clicked Install, follow the on-screen
instructions. Peak will be installed into a folder
named Peak 3.0 on your selected hard disk.
Peak must be authorized to work on your Macintosh.
To authorize Peak, you will need your Product
Authorization Code (PAC) in addition to the serial
number that appears on your Peak Owner’s Certificate.
BIAS will provide you with your Product Authorization
Code when you register Peak.
You must register Peak in order to obtain your
Product Authorization Code; Peak will not
launch after the 14 day registration period
unless you authorize Peak with your Name,
Organization, Serial Number, and Product
Authorization Code!
Peak Basics
11
Page 24
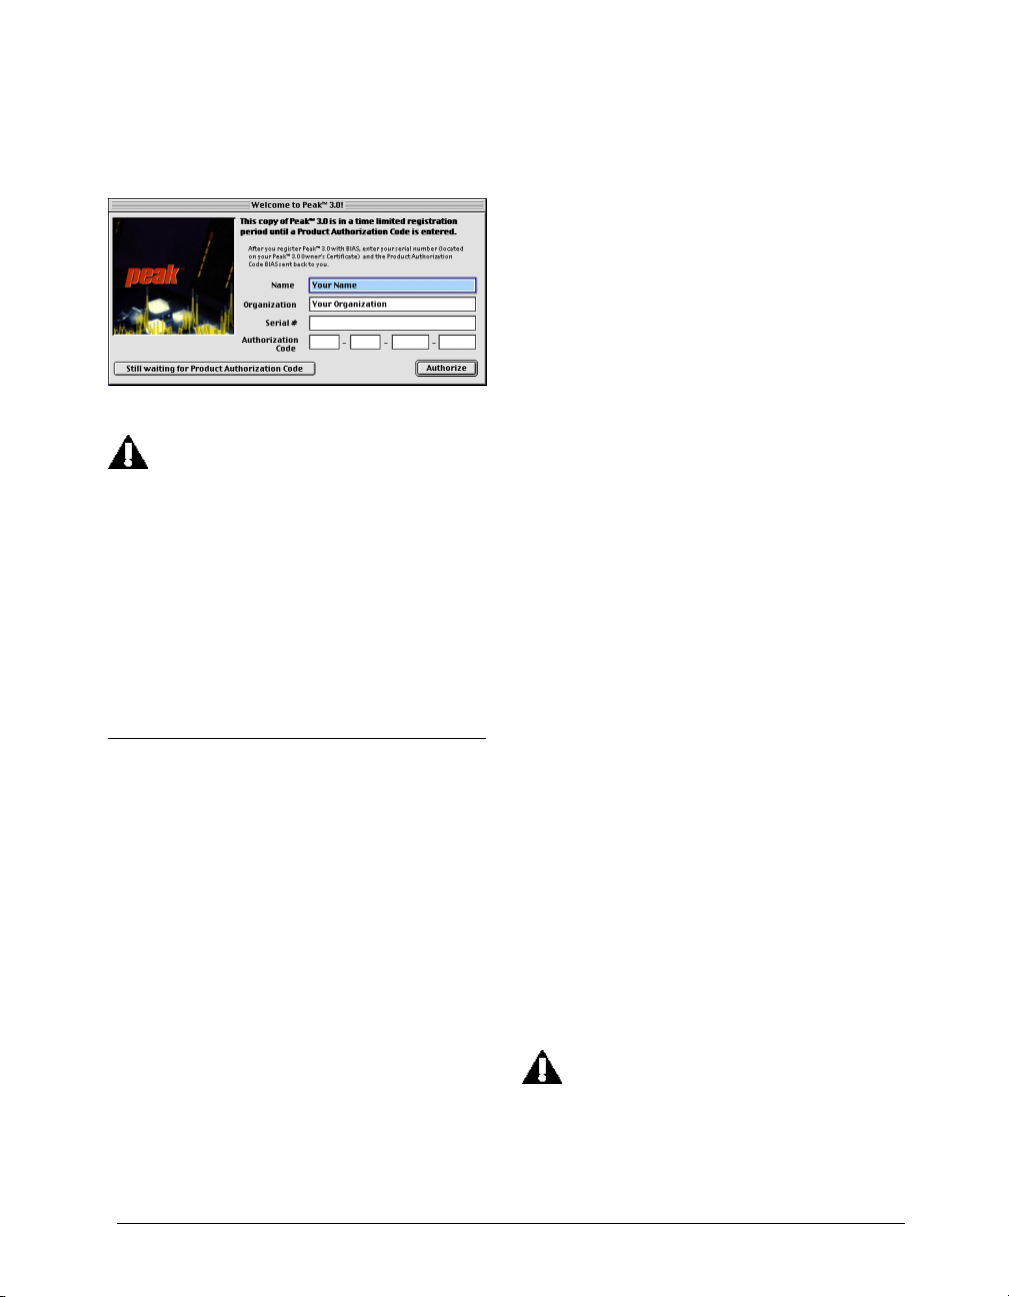
When you first launch Peak, it will prompt you to
authorize it by entering your Name, Organization,
Serial number, and Product Authorization Code.
Using the Macintosh’s Built-In Inputs and
Outputs
If you wish to use your Macintosh’s built-in audio
inputs and outputs for recording and playback, do the
following:
1. Turn down the volume on your playback system.
Peak can be used with a variety of playback
systems, including:
• headphones
Peak Authorization dialog
Send in Your Registration Card! After you have
installed Peak, please send in the Registration
Card included with your software to receive
your Product Authorization Code, technical
support, software updates, and notification of
upgrades.
Peak will run, fully functional, in Registration Mode for
14 days. This allows you the time necessary to register
you product and get the Product Authorization Code
from BIAS.
Making Audio Connections
While it is possible to listen to Peak using a
Macintosh’s built-in speaker or headphones, most
people will prefer to listen through a better quality
external speaker system.
It is very easy to set up audio connections between
your Macintosh and a mixer or speaker system. Your
exact setup will differ slightly depending on whether
you are using the built-in sound input and output
connectors on your Macintosh, or those of a thirdparty audio interface.
• a stereo receiver or amplifier and speakers
• a mixer, amplifier, and a pair of speakers
• a mixer and a pair of amplified (self-powered)
speakers
• or simply a pair of amplified (self-powered)
speakers, smaller versions of which are often called
“multimedia” speakers.
2. Connect your audio source output to the
Macintosh's audio input connector. Your audio
source can be one of a variety of devices, such as:
•a cassette or DAT deck output
•a mixer output
•a stereo receiver line output (such as “tape deck
record” output)
•an instrument line output (such as the output of a
synthesizer or guitar preamp)
The Mac’s audio input and output jacks are standard
stereo mini-plug (1/8-inch) connector. Most mixer,
receiver, and amplified speaker inputs are equipped
with XLR, 1/4-inch, RCA, or mini-plug jacks. To make
the proper connection, you may need to use an
adapter.
Newer Macintoshes may not have a built-in
sound input in which case you will have to use
a third-party audio interface for sound input.
Peak User’s Guide12
Page 25
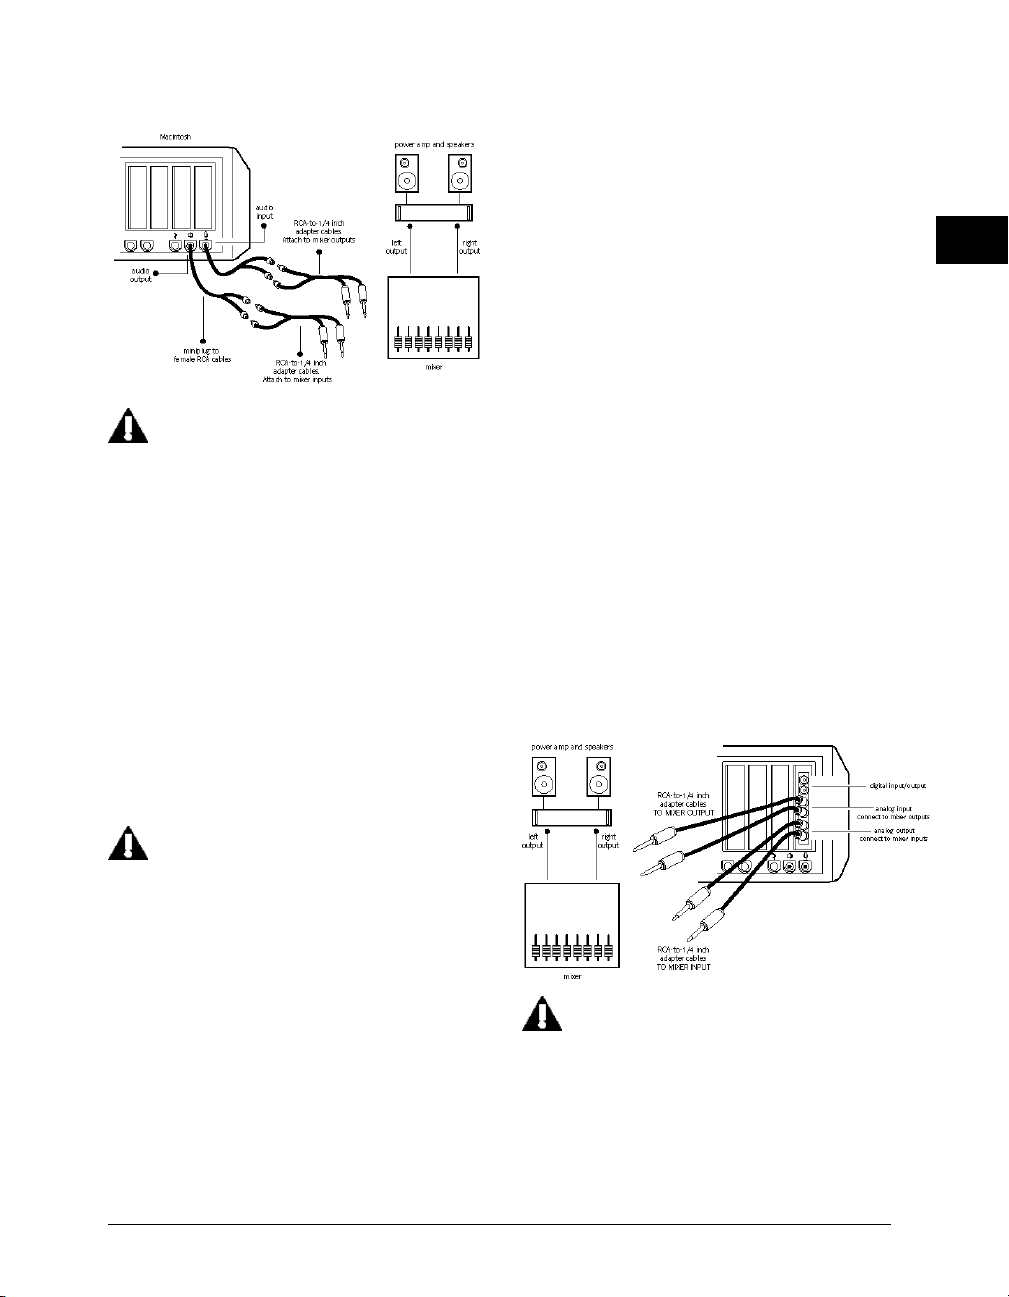
For advanced users: Certain professional
mixing consoles, DAT decks, or other audio
sources may have a nominal output level of
+4 dBu, whereas the Macintosh expects to see
a nominal –10 dBV level. Be aware that you
may need to adjust your mixer’s output levels
accordingly to prevent overloading the
Macintosh’s input; or alternately, you may
need to use a “+4 to –10” line-matching
transformer.
3. Connect your Mac’s audio output to your playback
system’s input.
Third-Party Audio Interfaces
If you have a Sound Manager-compatible, ASIOcompatible, or CoreAudio-compatible PCI, PCMCIA
(CardBus), USB, or FireWire audio interface installed
in your computer and wish to use its inputs and
outputs, do the following:
1. Turn down the volume on your mixer or playback
system.
2. Make sure that you have installed the third-party
audio interface according to the manufacturer’s
instructions.
3. Install the Sound Manager, ASIO, and CoreAudio
drivers for your audio interface according to the
manufacturer’s instructions.
4. Connect your source’s outputs to the inputs of
your audio interface.
5. Connect the outputs of your audio interface to the
inputs of your mixer or playback systems
6. Raise the volume on your mixer or playback
system. Your system should now be properly
configured and ready for recording and playback.
2
4. Connect your playback system’s output (typically
an auxiliary or bus send) to your Mac’s audio
input.
Be very careful to avoid feedback loops (the
audio signal feeds back into itself) when
recording. Feedback can damage both your
equipment and your hearing.
5. Raise the volume on your mixer or playback
system. Your system should now be properly
configured and ready for recording and playback.
Peak Basics
A typical mixer/computer configuration is to
have the computer outputs go to channel
inputs on your mixer and to have the auxiliary
or bus sends from the mixer go to the inputs of
the computer. Instruments you want to record
you patch into other channel inputs on the
mixer and you can then route them out the
13
Page 26
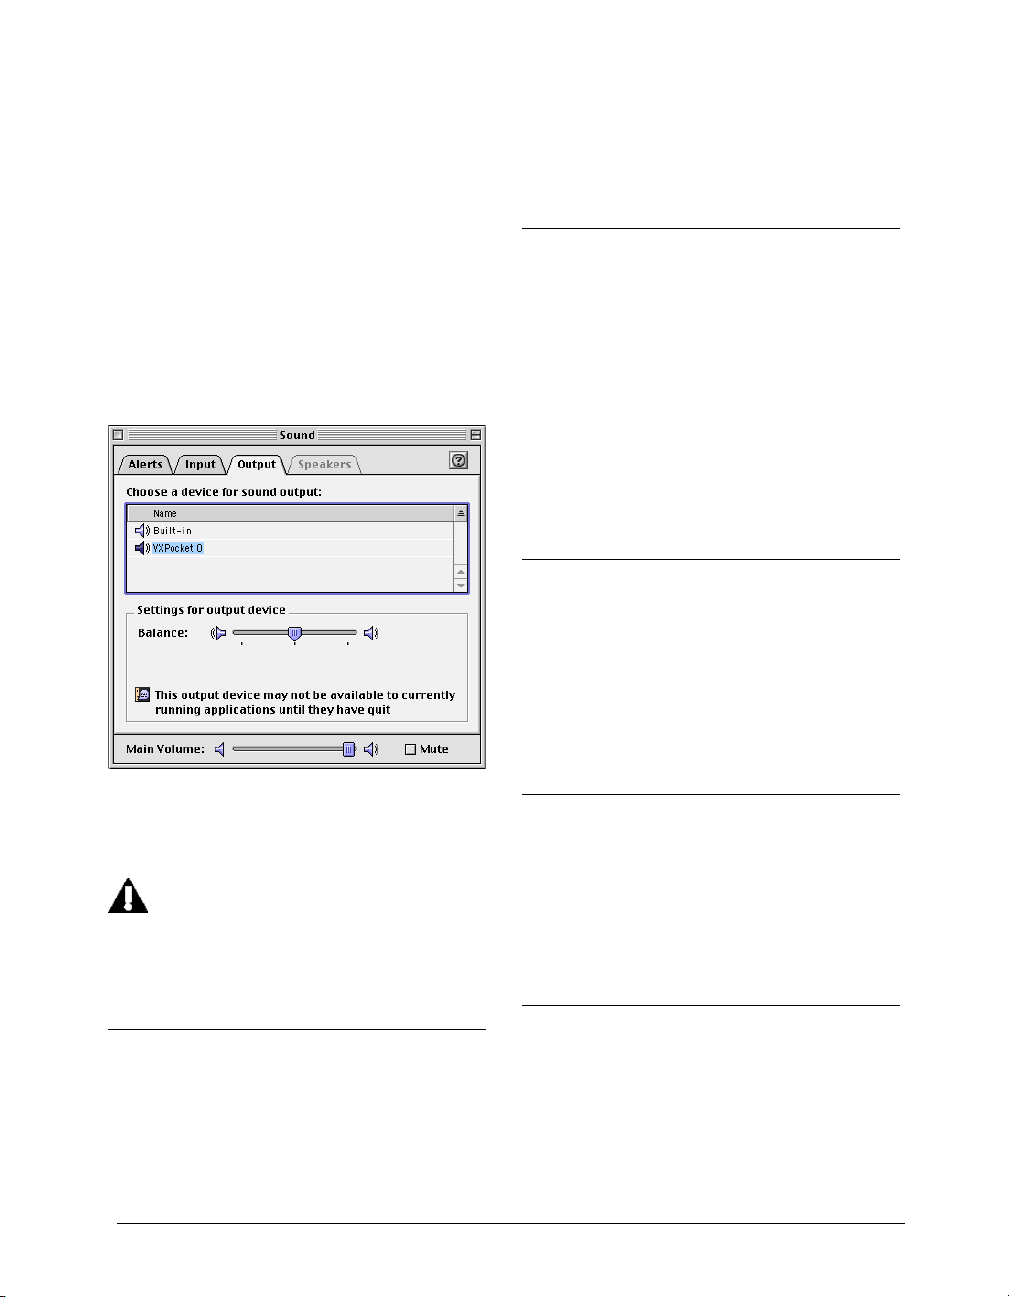
auxiliary or bus sends on the mixer to be
recorded by the computer. The mixer’s main
outputs go to the amplifier/speakers.
To use a third-party audio interface for previewing
audio (OS 8.6–9.2 only):
1. Choose Sound Out from the Sound Control Panel
pop-up menu.
the interface in the ASIO Drivers folder, which is in the
Peak folder, and launch Peak. For more detail on using
Peak with ASIO-compatible audio interfaces, please
read Chapter 4: Playback and Recording.
CoreAudio
2. Select your audio interface (Digigram’s VX Pocket
is shown in this example) as the sound output
device.
The Apple Sound Control Panel
3. Close the Sound window when you have finished.
The settings you make in the Sound Control
Panel's Sound Output panel will only effect
playback through the Import CD Audio dialog.
For playback, you will need to select your
audio interface in Peak's Sound Out menu.
Peak can use CoreAudio when running under OS X.1.
If you want to use a CoreAudio-compatible third-party
audio interface with Peak, install the CoreAudio driver
for the interface in the Peak Plug-Ins folder, which in
the Peak folder, and launch Peak. Be sure to consult
the manufacturer’s instructions when installing your
audio interface. For more detail on using Peak with a
CoreAudio-compatible audio interface, please read
Chapter 4: Playback and Recording.
USB and FireWire Audio Interfaces
Mac OS 9.0.4 or later supports USB Audio on iMacs,
iBooks, B/W G3s, and G4s. Peak supports USB audio
with interfaces such as the Tascam US-428. Peak also
supports compatible FireWire audio interfaces, such as
the MOTU-828.
Conclusion
Now that you have installed Peak, and installed and
configured any third-party audio interface and its
drivers, proceed to the next chapter to learn several
basic concepts and functions essential to using Peak.
ASIO
Peak supports ASIO 1.0 when running under OS 8.6–
9.2. If you want to use an ASIO-compatible third-party
audio interface with Peak, place the ASIO driver for
Peak User’s Guide14
Page 27
Chapter 3
Peak Basics
Page 28

Peak User’s Guide16
Page 29

Chapter 3: Peak Basics
Introduction
This chapter explains several key Peak concepts and
functions, including how to open, close, and save
audio documents.
A Brief Explanation of Digital Audio
called digital sampling to convert analog electrical
signals into numbers.
3
Digital sampling is the sonic equivalent of taking a
snapshot. By taking thousands of little digital samples
per second and storing them to a hard drive, an A/D
converter can capture an accurate sample-by-sample
representation of a sound, much like a movie is a
frame-by-frame representation of a moving image. The
number of samples taken of the audio in a second is
called the sample rate.
If you are new to digital hard-disk-based recording,
you may wish to acquaint yourself with a few of the
principles behind digital audio before you dive into
using Peak software. This section explains a few key
concepts that will give you a good general understanding of how Peak does what it does.
What we hear as sound is actually a pattern of
pressure waves that move through the air. The
frequency of these waves determines the pitch of the
sound — how low or high it sounds. Sound frequency
is measured in cycles per second, or Hertz (Hz). The
range of human hearing is generally considered to be
from about 20 Hz at the low end to 20 kHz at the high
end. In practice, however, most adults hear only as
high as 12 kHz to 18 kHz, especially those of us who
may have spent more time than we should have with
headphones or at loud rock concerts.
Sampling and Sample Rate
Your Peak software-equipped Macintosh computer
stores audio digitally. This means that analog electrical
signals from microphones or other sources are
converted into numbers by a circuit called an analogto-digital converter and stored on hard disk. The
analog-to-digital (A/D) converter uses a technique
The sample rate determines the recording’s upper
frequency response. A higher sample rate delivers
higher frequency response. As a rule of thumb, a
digital recording’s upper frequency response is
roughly half of its sample rate (known as the Nyquist
frequency). The audio on compact discs, for example,
is recorded at 44,100 samples each second, or
44.1 kHz. This sample rate is the standard for
professional-quality digital audio, and provides an
upper-end frequency response of approximately half
the sample rate (known as the Nyquist frequency):
22.5 kHz, somewhat higher than most people’s
hearing range.
Bit Resolution
Another factor that affects the quality of the audio is
the resolution of each sample. The greater the
resolution, the better the quality. To use an analogy
from the film world, just as image resolution and
quality increase with film size (8 millimeter film is
much lower in image quality than 70 millimeter film)
greater bit resolution (8-bit, 16-bit, 24-bit, and 32-bit)
results in better fidelity digital audio. Audio CDs have a
resolution of 16-bits.
Peak Basics
17
Page 30

In practice, the bit resolution determines the
recording’s dynamic range—that is, how many distinct
steps you have to describe a sound’s level, from quiet
to loud. For instance, an 8-bit recording has 256 (28)
levels available, which is the equivalent of 48 decibels
(dB) of dynamic range. On the other hand, a 16-bit
recording has 65,536 (216) levels available, equivalent
to 96 dB dynamic range. (The rule of thumb for
determining the dynamic range in decibels is to take
the bit rate and multiply it by 6.)
About Disk-Based Recording and Editing
If you are new to hard-disk-based recording, you will
be impressed by the power and control that Peak
software provides for recording and editing digital
audio. You will encounter several new concepts and
techniques for using a disk-based system such as Peak.
Perhaps the most important among these is the
concept of nondestructive manipulation of audio.
Nonlinear Versus Linear Recording
Nondestructive audio manipulation is possible thanks
to the nature of Peak’s recording medium: a hard disk
instead of a roll of analog tape. Unlike analog tape,
which is a linear recording medium, hard disks
provide a nonlinear, or random -access medium. This
is because audio is stored on hard disk as digital
information which the hard disk can access immediately or randomly (hence the term “random-access”),
simply by moving its read/write head to the appropriate location and reading the appropriate data. This
allows you to perform such miraculous feats as cutting
and pasting “pieces of sound” and rearranging material
long after it has been recorded.
Nondestructive Editing
Perhaps most impressive is the fact that with diskbased audio production you need not actually modify
the original source material in any way to accomplish
these feats. In most cases, by cutting and pasting you
are in reality only asking the hard disk to access
portions of the audio file in a slightly different order.
Since Peak doesn’t normally cut up, move around, or
delete the actual recording on the hard drive, it’s said
to be a nondestructive editing system. Peak does not
rewrite the file until you choose to save your edits.
Other manipulations, such as playing audio material
backwards, can be accomplished by reading the data in
reverse order. The power and flexibility of disk-based
audio production software such as Peak far surpasses
the capabilities of traditional analog audio production
tools.
Hard Disk Storage Requirements
The actual recording of audio to hard disk requires a
significant amount of storage. This is directly affected
by the sample rate and bit resolution at which you
record: the higher the fidelity, the greater the
requirements for storage. As a guideline, 16-bit,
44.1 kHz audio requires roughly 5 megabytes of
storage per minute of mono recording. Stereo 16-bit,
44.1 kHz audio requires roughly 10 megabytes per
minute. Stereo 24-bit, 44.1 kHz audio requires roughly
15 megabytes per minute.
Hard Disk Maintenance
Because audio recording and playback is a hard diskintensive task, it is important that your hard drive be in
good operating condition. In the computer world, this
means keeping it from becoming fragmented by using
hard drive maintenance software. Fragmentation
occurs as your hard drive begins to run out of
contiguous (uninterrupted) space where it can write
files. If the data that makes up a file is stored at a
single location on your drive, it is much easier and
faster for your drive to find the data and read it.
However, as contiguous space runs out, the drive may
not be able to write the entire file in one location and
instead must fragment the file by writing pieces of it at
various locations in whatever smaller open areas it can
find. This requires that the drive search near and far to
read the pieces of the file. Too much fragmentation
can lead to errors in recording and playback as the
Peak User’s Guide18
Page 31

hard drive struggles to keep up with the demands of
your audio application.
In general, you should keep your hard disk below
10% fragmentation. Most hard drive maintenance
software packages let you monitor the degree of
fragmentation on your drive and defragment it by
rewriting files into contiguous blocks of data. In
addition to defragmenting your drive regularly, you
should also back up your files and reformat your
drive on a regular basis to keep your system in top
operating condition. By doing this, you will ensure
maximum performance from your Macintosh and
Peak software and keep your studio running
smoothly.
Now that you understand some of the basic principles
behind digital audio and disk-based recording, take a
few moments to learn some of the basic operations of
Peak. These are covered in the sections that follow.
Creating a New Peak Document
Peak will allow you to create an empty audio file of
zero duration by choosing a new mono or stereo
document. However, you would typically record a
new audio file in Peak or open an existing audio file
into Peak for editing. Peak allows you to have
multiple audio documents open at the same time.
To create a new audio document:
• Choose New (-N) from the File menu or
Toolbar. This command provides a hierarchical
menu which allows you to choose either a mono
or stereo format for the new document.
Opening Existing Audio Documents
Peak allows you to open audio files created in a
variety of common audio formats including AIFF,
Sound Designer II, WAVE, QuickTime, Raw, System 7
Sound, Sonic AIFF, Paris, JAM Image, AU, and MP3.
3
Opening WAVE files
The Macintosh recognizes files using a “type” and
“creator.” WAVE files are recognized by some audio
applications with a type “.WAV,” while others
recognize only “WAVE” as the type.
Peak, along with Apple’s QuickTimesoftware and
most other Multimedia applications, recognize WAVE
files of the type “WAVE,” but not of type “.WAV.” You
can use ResEdit or other third-party applications to
ensure your WAVE files have the correct type prior to
opening them with Peak.
Opening Compressed Audio Documents
AIFF/AIFC and QuickTime files with compression
such as MACE 3:1, MACE 6:1, IMA 4:1, QDesign, or
Alaw are compatible with Peak.
To open an audio file:
1. Choose Open (-O) from the File menu.
2. In the dialog that appears, locate the file that you
wish to open. From this dialog, you can open
AIFF, Sound Designer II, WAVE, QuickTime, Raw,
System 7 Sound, Sonic AIFF, Paris, JAM Image, AU,
and MP3 formatted audio files.
Creating a new Peak document
Peak Basics
19
Page 32
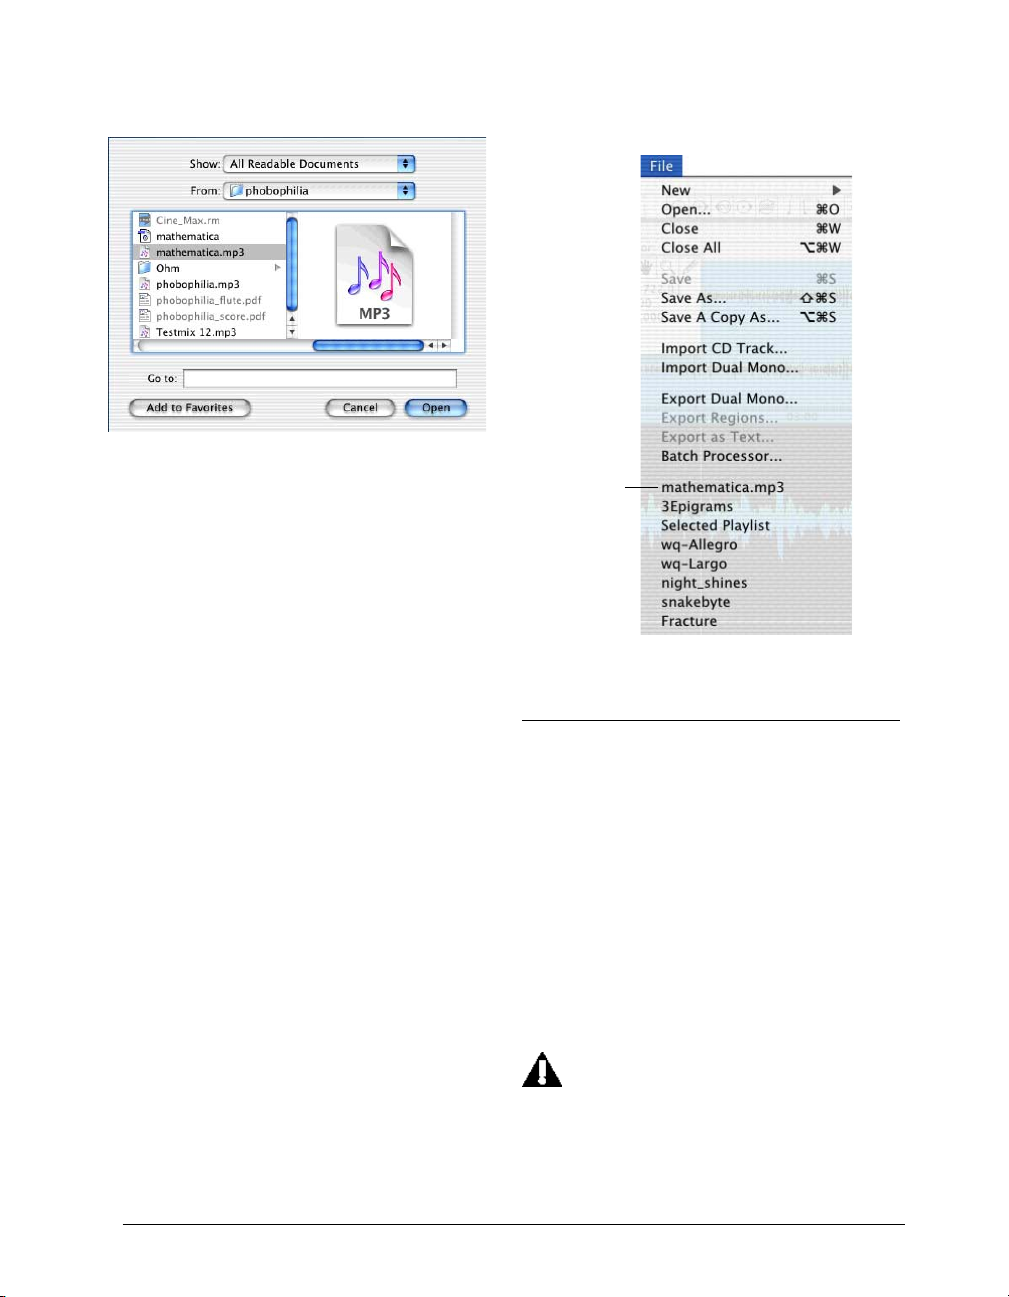
Open dialog in OS X.1
3. When you find the file you wish to open, click the
Open button and Peak will open the audio file into
a new audio window, displaying an overview of the
entire sound. Shift-click or -click to open
multiple files.
recent documents
Recently Opened Documents
Peak automatically remembers up to the last eight
audio documents that you have opened and keeps a
list of these at the bottom of the File dialog. This
allows you to easily select a document’s name and
reopen it without having to search on your hard drive.
Peak can find and open a document even if you have
changed its location on your hard drive. If you change
the name of the file, the next time you open Peak, it
will automatically update the name in its internal list.
Recently opened documents in the File menu
Opening “Dual Mono” Files
Certain audio applications, such as BIAS Deck, do not
directly support stereo interleaved files, and instead
use “dual mono” files, which comprise the right and
left channels of stereo material. Peak allows you to
open such dual mono files, and in the process creates
a new interleaved stereo audio document. Because
Peak actually writes a new stereo audio file to disk, this
conversion process requires hard disk space equivalent to the two original mono files.
Please note that the Import Dual Mono
command requires that both files be mono files
and have the same sample rate.
Peak User’s Guide20
Page 33

To open a dual mono file:
1. Choose Import Dual Mono from the File menu.
This feature is particularly useful when used
with Peak’s Batch File Processor.
2. In the dialog that appears, locate the desired files.
3. Select either half of the dual mono file and click
Open. Peak imports the first file and then prompts
you for the second.
4. Select the second audio file and click Open. When
Peak has finished creating the new stereo audio
document you can begin editing.
For simpler importing of Dual Mono files, turn
on the Auto Import Dual Mono feature in the
Preference menu. With this feature activated,
you can automatically import dual mono files
by choosing Open from the File menu and
selecting one of the dual mono file’s channels.
Peak will then create a new stereo document
containing both channels. Please note that
these dual mono files must have exactly the
same file name with the suffix “.L” for the left
channel and “.R” for the right channel.
Peak also allows you to export your stereo audio
documents in Dual Mono format, which means that
it’s easy to import dual mono tracks from BIAS Deck
into Peak, edit and process them within Peak, and
then export them as Dual Mono files to be reincorporated into your Deck sessions.
Dragging and Dropping Folders, Disks, and CD Audio Tracks
In addition to opening individual documents by
dragging and dropping them onto the Peak
application’s icon, you can drag and drop entire
folders or disks onto the Peak application’s icon. The
contents of the disk or folder(s) will be scanned for
audio documents that Peak can open, such as AIFF,
Sound Designer II, WAVE, QuickTime, MP3, and so on.
Peak allows you to drag a CD audio track directly onto
the Peak icon or open the track directly from the
Open command under the File menu or Toolbar.
When you import a CD track using one of these two
methods, the entire track will be imported. If you do
not want to import an entire audio track, you can still
use the Import CD track command under the File
menu (covered in Chapter 4).
Saving and Closing Documents
It is good practice to save regularly throughout a
project to avoid losing valuable work in the event of a
power failure or other unfortunate occurrence. The
Save command saves the changes you have made to
your audio document by writing it to your hard disk.
The Save command cannot be undone. If you want to
be able to continue to undo your edits, use the Save a
Copy As command under the file menu.
Peak allows you to save your audio documents in a
variety of common audio file formats, each of which is
described below. Be aware that different formats allow
different information to be stored with the file. Peak
preserves this information unless you save the file into
a different file format. Saving a file in a format different
from its original format may, however, cause some
information stored in the file to be discarded.
Peak supports the following audio file formats:
• AIFF: This is Apple’s Audio Interchange File
Format. It is also Peak’s default file format and is
supported by many Macintosh software applications.
• Sound Designer II: This is Digidesign’s audio file
format for its digital audio products. Use this
format if you wish to use an audio document in a
Digidesign audio application.
3
Peak Basics
21
Page 34
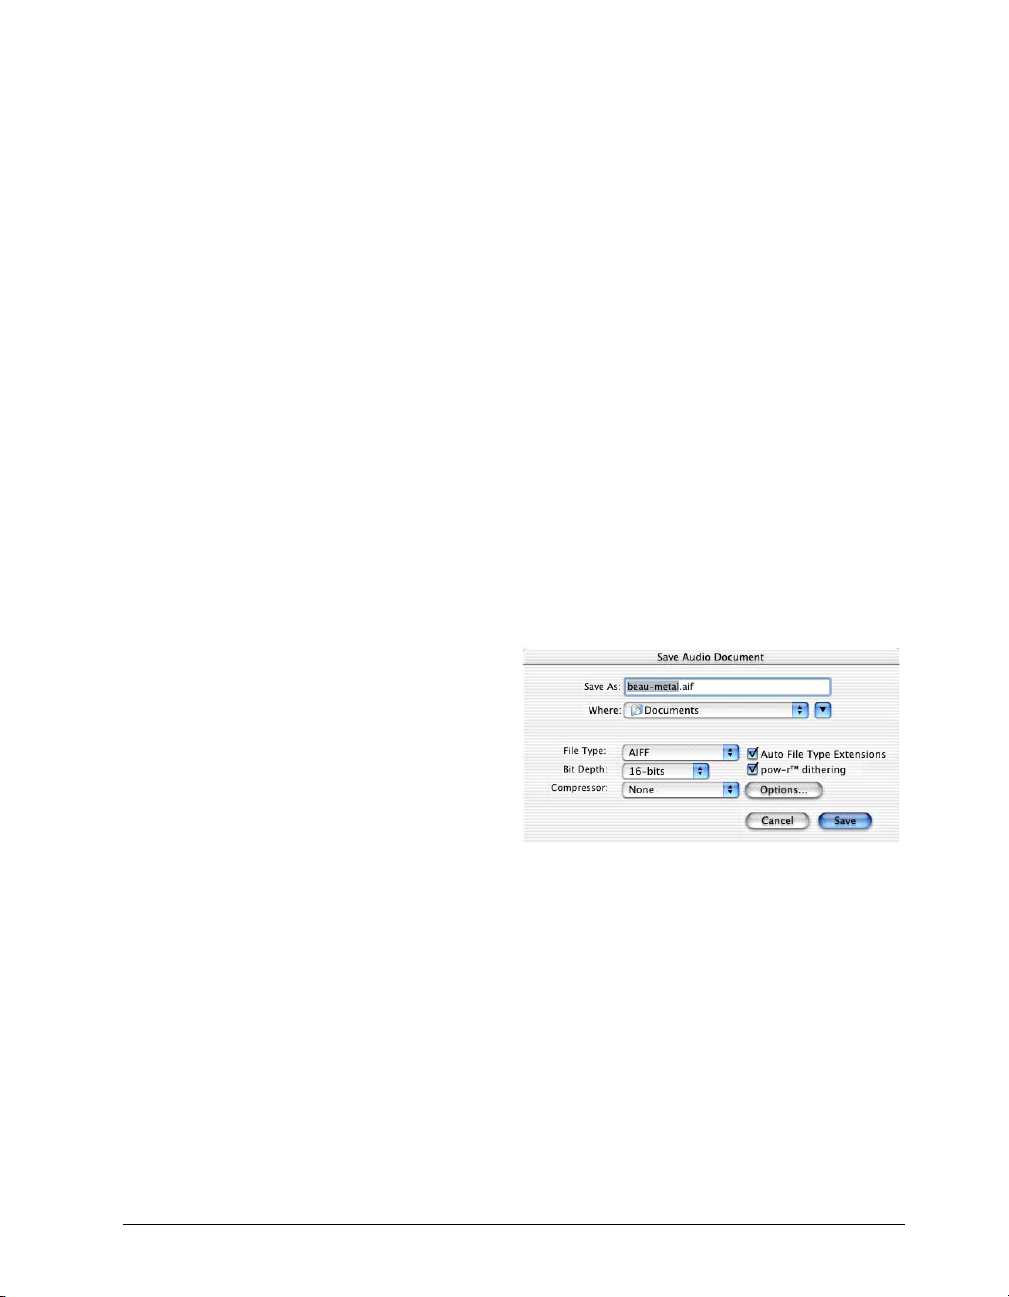
• WAVE: This is Microsoft’s Windows Audio File
Format. It is supported by many Windows software
applications and some Macintosh applications. The
WAVE format is best if you plan to use an audio
document in an application that supports or
requires WAVE format files.
•
QuickTime: This is Apple’s audio file format for
QuickTime-based multimedia. It is supported by
all Macintosh software applications that support
QuickTime. The QuickTime format is best if you
plan to use an audio document in multimedia
applications that support QuickTime, such as
Macromedia Director™.
• Raw: This is the header-less raw file format that
may be useful for some game platforms.
Using the Save As and Save A Copy As Commands
The Save As command allows you to save a copy of
the current document under a different name, or in a
different location on your hard disk. Since the Save As
command closes the current document and lets you
keep working on the renamed copy, it is useful for
saving successive stages of a project. This allows you
to save each major step under a different name. Later
you can retrace your steps should you want to go back
to an earlier version. The Save A Copy As command
will save a copy of the file you are working on, but it
will keep the copy you are working on open. This
allows you to continue working on your audio and
still be able to undo any edits you executed prior to
using the Save A Copy As command.
• System 7 Sounds: This the Apple audio file format
used for Macintosh Operating System Sounds.
• JAM image files: This is the JAM audio image file
format. JAM audio image files may be created in
Peak and used in Roxio JAM for burning audio
CDs.
• Sonic AIFF: The file format used by Sonic Solutions
audio workstations.
• .paf: This is the file format used by E-mu’s Paris
audio system. Note this file format favors mono
and dual mono files.
• .au: This file format is commonly used on the
World Wide Web and in Java audio applets. It is
supported by many platforms and programs.
• MP3: This saves your document in MP3 format.
To save a Peak document:
1. Choose Save from the File menu or press -S on
your keyboard.
2. Select a file format from the pop-up File Type
menu. AIFF is Peak’s default audio file format.
3. Enter a name for the new audio document, select
where you want to save the new file, and then click
Save.
To save an audio document under another name:
1. Choose Save As (Shift--S) or Save A Copy As
(Option--S) from the File menu. The Save dialog
appears:
The Save dialog
2. Select the desired file format from the File Type
pop-up menu. AIFF is Peak’s default audio file
format.
3. If you wish to save the audio document to a
different bit depth resolution, click the bit depth
pop-up. It is strongly recommended that you
enable the pow-r™ dithering option if you are
saving to a lower bit depth (e.g., 24-bit to 16-bit).
4. Enter a name for the new audio document, select
where you want to save the new file, and click
Save.
Peak User’s Guide22
Page 35
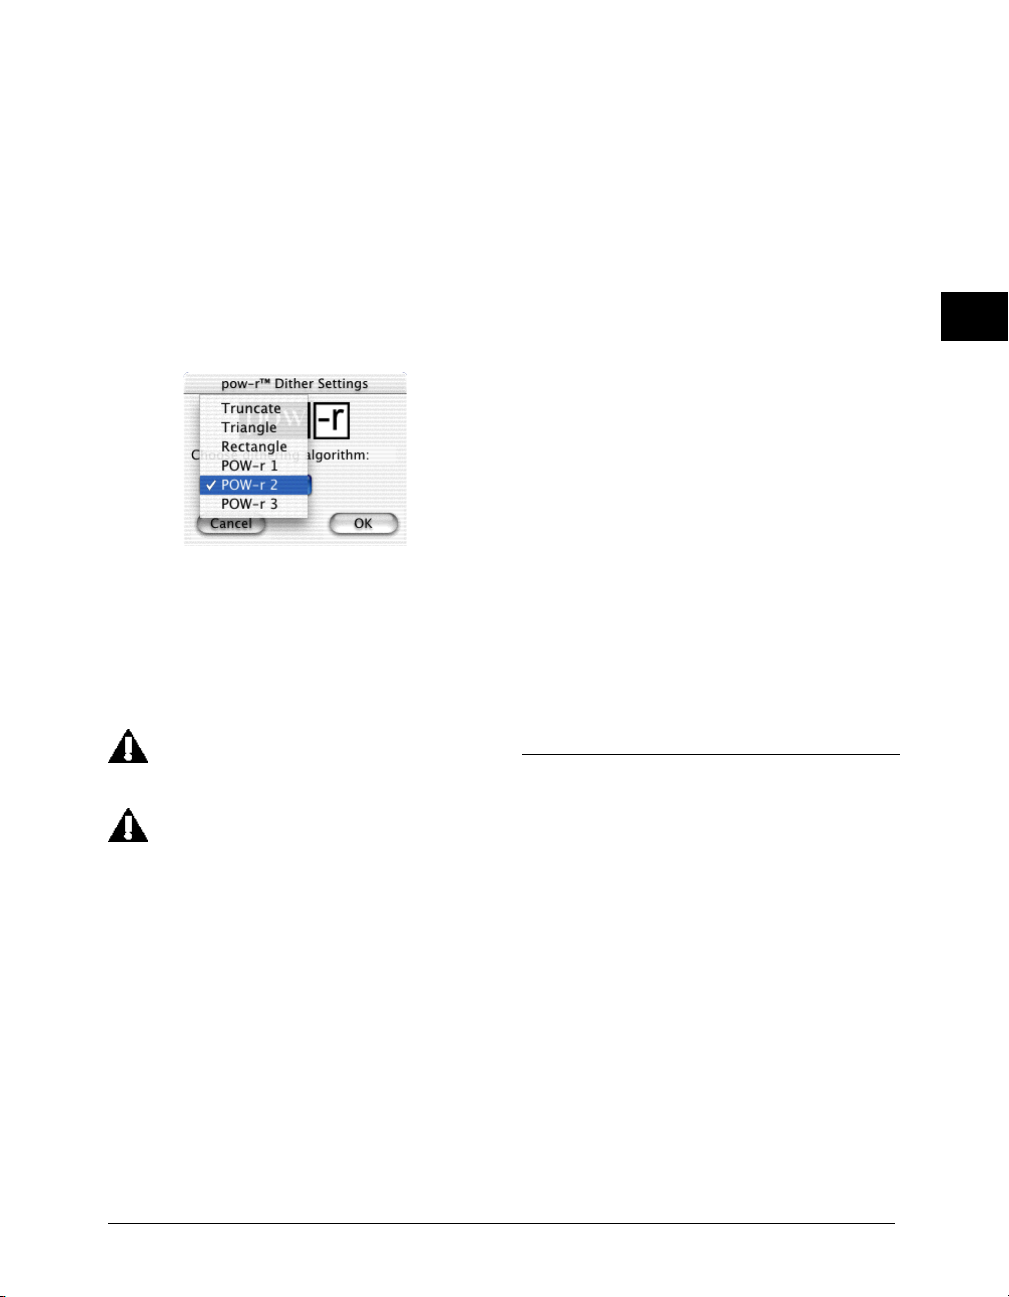
Using pow-r Dithering
If you are saving to a lower bit depth (e.g., 24-bit to
16-bit), it is strongly recommended that you enable
the pow-r dithering option. Choose the pow-r Dither
Settings from the Preference menu to adjust the
settings for pow-r dither. For mono files, or stereo
files with a narrow stereo field (e.g., recordings of solo
instruments), use POW-r 1; for more stereophonically
complex material, use POW-r 2; for full-spectrum
audio with a wide stereo field, use POW-r 3.
The pow-r™ Dither Settings dialog
Saving Compressed Audio Documents
AIFF/AIFC and QuickTime files with compression
such as MACE 3:1, MACE 6:1, IMA 4:1, QDesign, or
Alaw are compatible with Peak.
You can only Save with file compression using
AIFF or QuickTime file formats.
User Tip: Audio compression should be the last
step in mastering your audio documents.
Decompressing and re-compressing audio
documents will degrade their sound quality
each time they are re-compressed, so it is best
not to save with compression until all editing
and mastering has been completed.
To save an audio document with compression:
1. Choose Save As (Shift--S) from the File menu.
The Save As dialog appears.
2. Choose the audio compressor you wish to use
from the Compressor pop-up menu. Some
compression formats only work with 8-bit or 16bit data, so the compression options may be
grayed out, depending on your setting in the bit
depth pop-up menu. Some of the types of
available audio file compression include: MACE
3:1, MACE 6:1, QDesign Music, ALaw 2:1, 32-bit
Floating Point, 64-bit Floating Point, IMA 4:1, 24-bit
integer, 32-bit integer, 16-bit Little Endian, and 16bit Big Endian.
3. Click the Options button to adjust the settings for
the specified compression format, and then click
OK.
4. Type the name of the new audio document, select
the folder you wish to save the audio document,
and click Save.
Closing Audio Documents
To close a file in Peak, choose Close from the File
menu (-W). If you have made any changes to your
document since the last time you saved, Peak will ask
you if you want to save them. If you do, choose Yes; if
you do not, choose No. If you change your mind and
wish to continue your session, choose Cancel.
To close all files currently open in Peak, choose Close
All from the File menu (-Option-W).
Peak Windows and Palettes
There are several windows and palettes when you
open Peak that either appear by default or are
available to you under Peak’s Windows menu.
Windows that appear in Peak by default include an
audio document window for each audio file you have
open. Windows and palettes that you can turn on or
off include the Transport, the Toolbar, the Cursor
Palette, the Contents Palette, and the Movie Window.
This section will cover the basic function of these Peak
Windows and Palettes.
Peak Audio Document Window
Peak Audio Document windows contain a Waveform
Display, an Audio File Info Bar and a Max Level
3
Peak Basics
23
Page 36
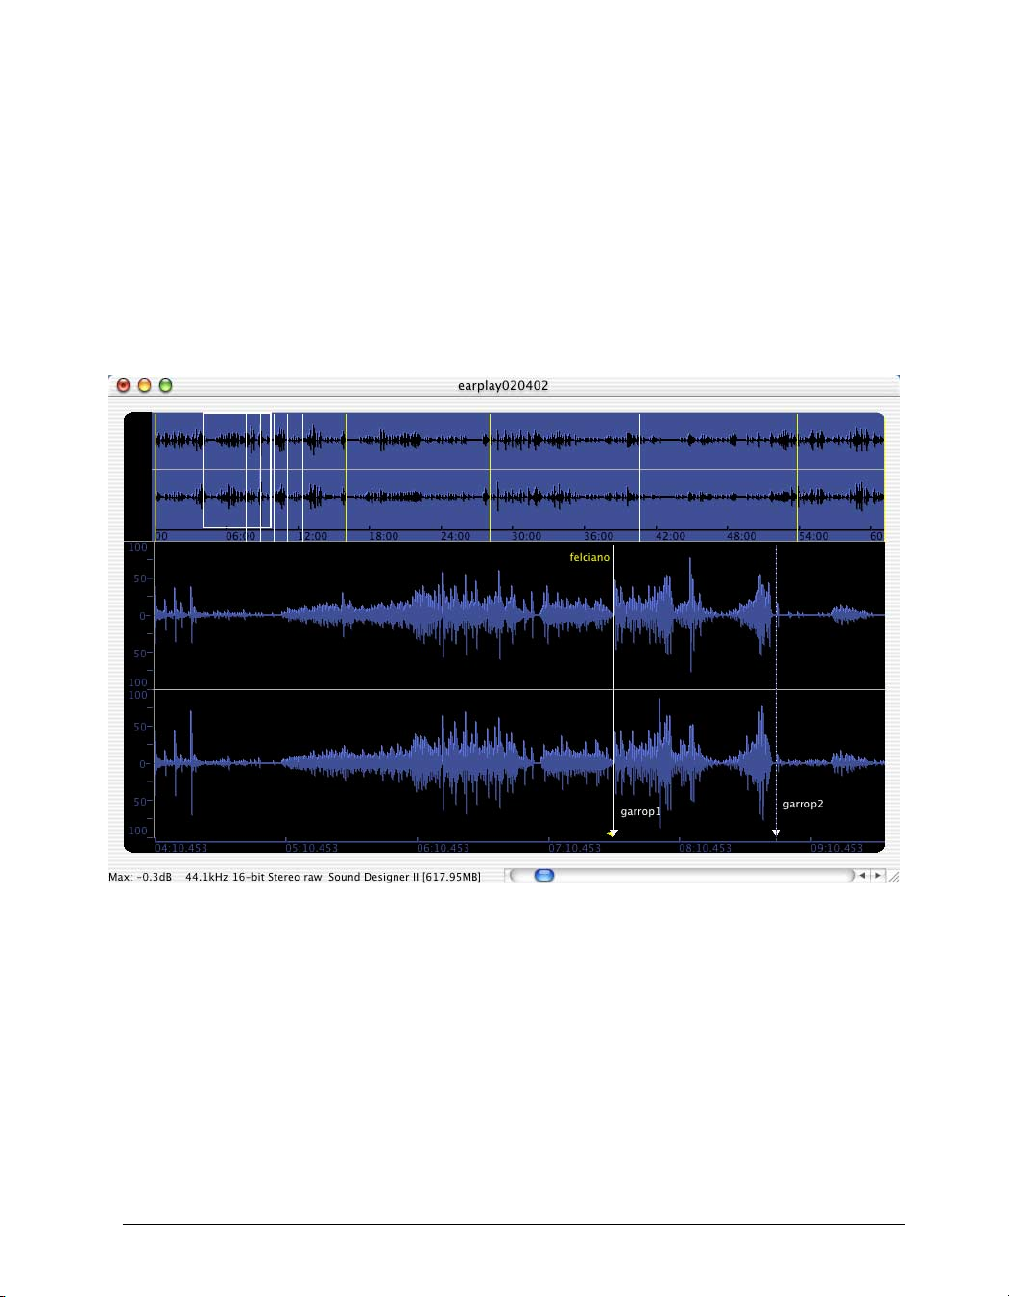
Indicator in the lower left corner. The Waveform
Display is a graphic representation of the audio file,
the Audio File Info Bar shows the sample rate, bit
resolution, file format and file size of the audio file,
and the Max Level Indicator shows the highest
amplitude level in the audio file. On top of the Audio
Document window is the File Overview, if it is enabled
under the Peak Preference menu. The Audio Window
is described in more detail in Chapter 5.
The Audio Document window
Peak User’s Guide24
Page 37
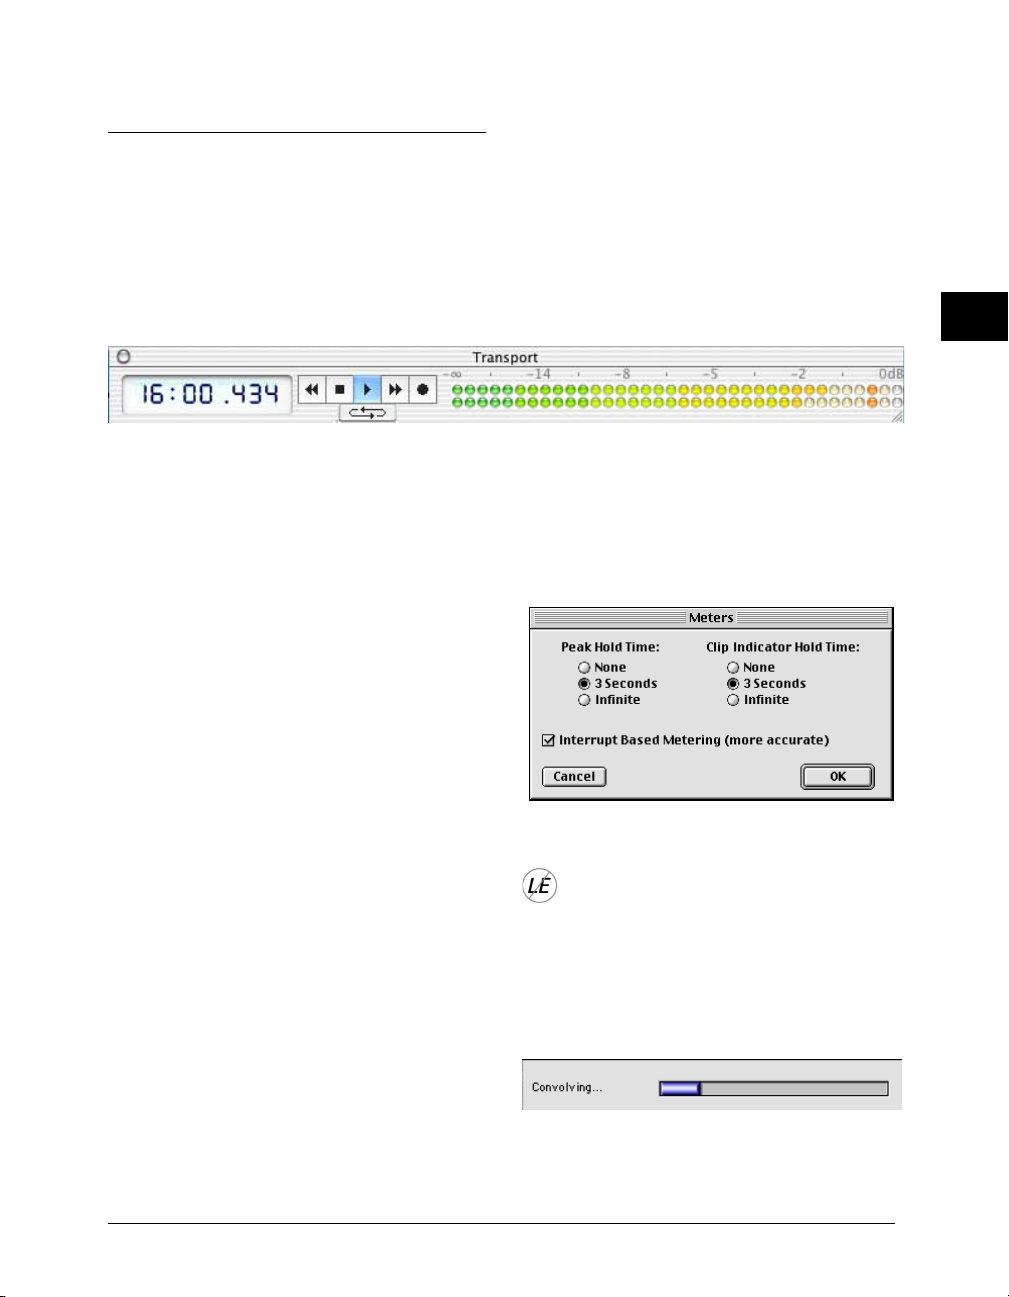
Transport Window
The Transport window is a floating, re-sizable window.
It contains three areas: a time display showing elapsed
time, the Transport controls (Return to Zero, Stop,
Play, Go to End, Record, and Loop during playback),
and audio level meters with clip/peak indicators.
Time Display
The Time Display is like a counter. It shows elapsed
time and tracks the “playback head” as audio plays.
Clicking on the waveform when playback is stopped
will cause the current cursor location to appear in the
Time Display. This display will also show the time
remaining while performing Open, Save or DSP
processing actions.
Meters
Peak’s meters are much like the VU or LED meters on
a mixing board or tape recorder. They are bar graph
meters that show the relative volume or loudness of
the audio as it plays. They are also designed to show
peak volume and whether the signal has “clipped,” or
distorted.
3
and selecting a hold time causes the indicator to pause
for easy reading of any clipping or distortion that
occurs during playback. Setting the Peak Hold and Clip
Indicator Hold Times to None turns these features off.
Meters dialog
The Meters dialog
You can configure the Meters display by choosing
Meters from the Audio menu, or by clicking the
appropriate button in the Toolbar. Using the Meters
dialog, you can select the Peak Hold time and Clip
Indicator Hold Time. The Peak Hold indicators appear
as yellow bars at the far right of each of the bar graphs
as audio plays, and selecting a hold time causes the
indicator to pause for easy reading of the peak value
during playback. The Clip Indicators appear as red
bars at the far right of each of the bar graphs as audio
plays, and are triggered when audio distorts, or “clips”,
The Meters dialog is not available in Peak LE.
Progress Bar
The Meters display changes to a progress bar during
audio processing, and while saving or opening audio
files.
Progress bar
Peak Basics
25
Page 38
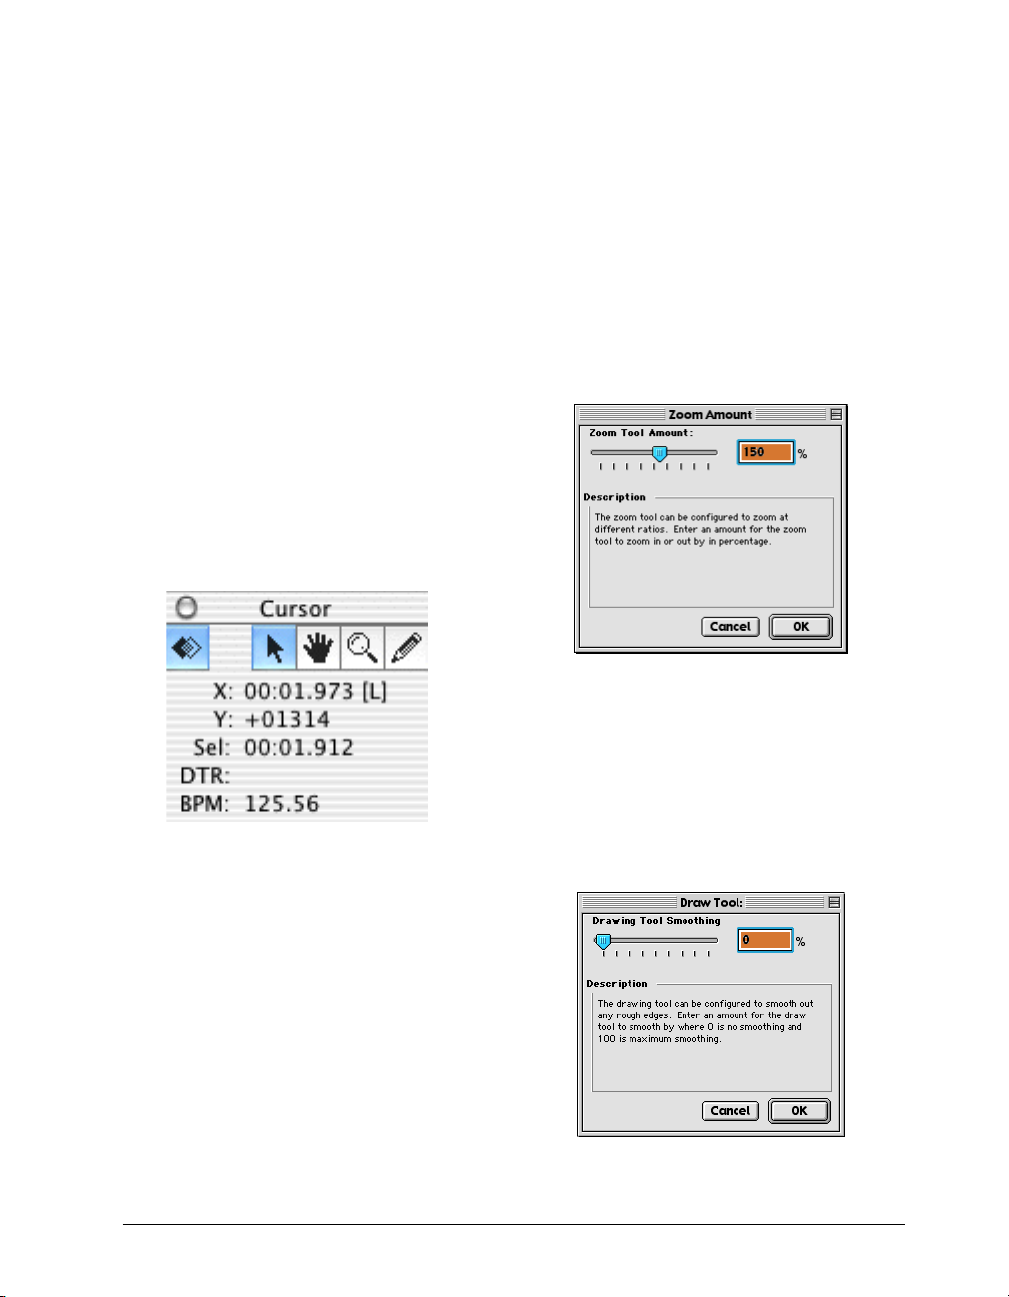
Cursor Palette
Peak has a floating Cursor Palette that contains several
useful functions. Along the top right side of the palette
are four different icons representing different cursor
modes. The default cursor is a standard Arrow Cursor.
You can also use the cursor palette to select a Hand
Cursor for moving a waveform within its window, a
Pencil Tool for drawing directly on the waveform at
the sample level, and a Magnifying Glass Tool for
zooming the waveform view in and out. The ESC key
on your computer keyboard will toggle through the
four cursor modes. In the top left corner of the Cursor
Palette there is a button that toggles Blending on and
off. To access any of these cursors or functions, just
click on the corresponding icon in the Cursor Palette.
To change the cursor tool, click on a new icon. The
Blending function is discussed in more detail in
Chapter 5.
Magnifying Glass (“Zoom Tool”)
To use the Magnifying Glass tool, simply click on the
tool in the Cursor Palette, then move the cursor over
the waveform. A “plus” (+) sign will appear inside the
Magnifying Glass. Click on the waveform to zoom in;
each click of the mouse will zoom in farther. To zoom
out, option-click on the waveform. A “minus” (-) sign
will appear in the Magnifying Glass, and you can click
on the waveform to zoom out. Double-clicking on the
Magnifying Glass will open the Zoom Amount dialog
where you can specify the Zoom Amount.
The Zoom Amount dialog
The Peak Cursor Palette
Arrow Cursor Tool
The Cursor Tool is the default tool. It is the standard
“arrow” tool that lets you click and select on-screen
items.
Hand Tool
The Hand Tool lets you grab and move a waveform
around in its window.
Peak User’s Guide26
Pencil Tool
The Pencil Tool lets you draw directly on the
waveform at the sample level. This is very useful for
drawing out clicks in the waveform. Double-click on
the Pencil Tool icon in the Cursor Palette for the
Drawing Tool Smoothing Settings.
The Draw Tool dialog
Page 39
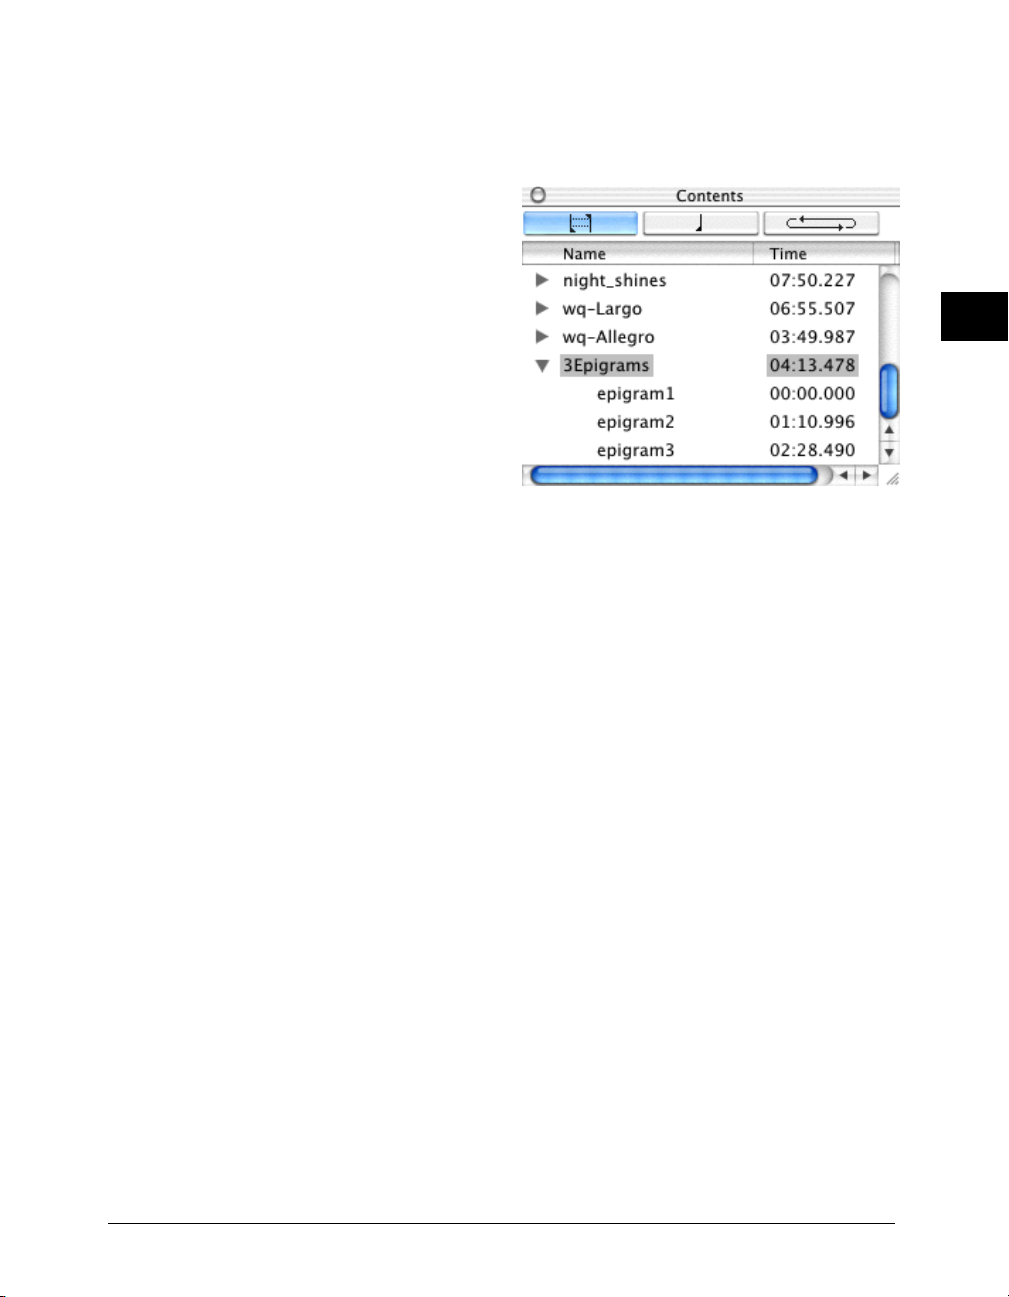
Cursor and Selection Information
The bottom half of the Cursor palette displays the X
(time) and Y (amplitude) coordinates of the cursor
point, Sel: the duration of any currently selected
audio), DTR (Distance to Reference Marker), and
BPM: the tempo in beats per minute. You can type a
value in for the X, Sel, and BPM parameters.
item in the Contents window will bring up the Edit
Region or Edit Marker dialog.
Here is how to read the cursor and selection
information that appears in the Cursor Location
display.
Y = the current cursor position along the vertical
scale (amplitude) or start point of a selection
X = the current cursor position in the currently
specified time units (Samples, Min:Sec:ms,
SMPTE, or Bars|Beats)
[L] = the cursor is currently positioned over the left
channel of the audio
[R] = the cursor is currently positioned over the
right channel of the audio
DTR = distance in the currently specified time units
(Samples, Min:Sec:ms, SMPTE, or Bars|Beats) to
the nearest reference marker
Sel = the duration of the current selection in the
currently specified time units (Samples,
Min:Sec:ms, SMPTE, or Bars|Beats)
+ or – = indicates positive or negative phase
BPM = beats per minute
The time format displayed in this field depends on
which time format (Samples, Min:Sec:ms, SMPTE, or
Bars|Beats) you have chosen with the Time Units
command under the Preference menu.
3
The Peak Contents Palette
To resize the Contents Palette:
• Click and drag on the lower right hand corner of
the Contents window to resize the Contents
Palette.
To resize columns in the Contents Palette:
• Click and drag to the right of the column’s title bar
that you want to resize. For example, to make the
Name column wider, click and drag the line
between Name and Time to the right.
To sort columns in the Contents Palette:
• Click the title of the column by which you want to
sort. For example, to sort by Time, click on Time.
To change the sort order in the Contents Palette:
• Click the sort order button to the right of the
column titles on OS 8.6–9.2, or click the column
title on OS X.1.
Contents Palette
Peak has a floating Contents Palette that will display
all Regions, Markers, and Loops contained in any open
audio documents. There are three tabs at the top of
the palette that allow you to select which items to
view–from left to right: the Region Tab, the Marker
Tab and the Loop Tab. Option-double-clicking on any
Peak Basics
27
Page 40
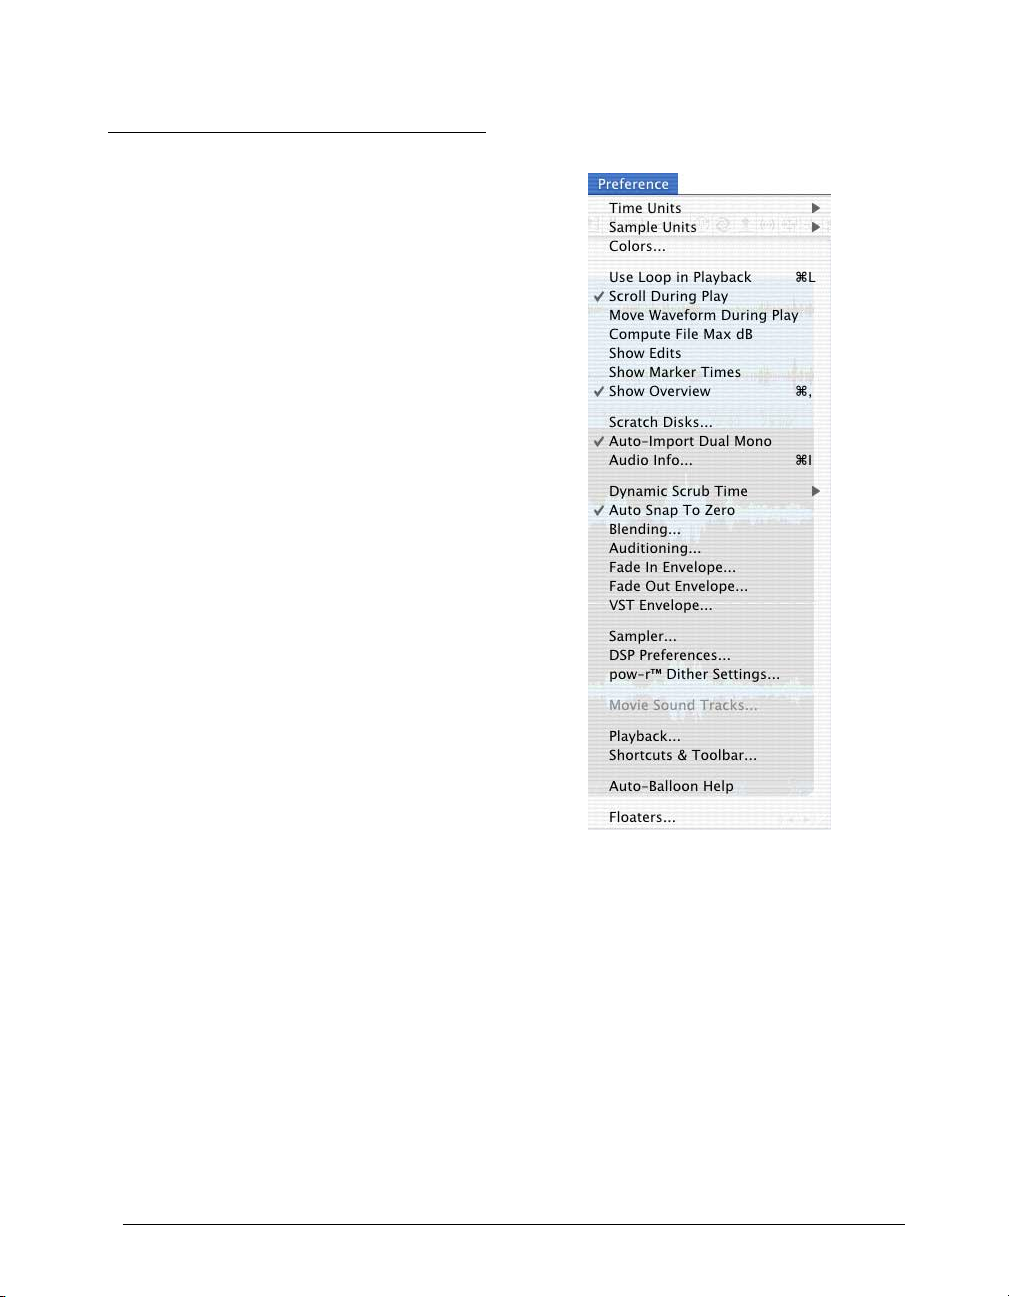
Setting Preferences
You can customize a number of Peak’s parameters so
you can work with the program in a way that best suits
you. Most of these parameters are found in the
Preference menu. These include the controls for
playing back audio documents, the selection of the
icons in the Toolbar, and the colors that you want for
the audio document window. Once you have set these
preferences as you like, they will stay that way until
you decide to change them again. This section
explains how to set several of these parameters. For
any menu items not covered here, please refer to
Chapter 11: Peak Menus. There you will find explanations of each command in the Preference menu and
other Peak menus. Items from the Preference menu
are also covered throughout this manual where their
discussion is relevant.
The Preference menu
Peak User’s Guide28
Page 41
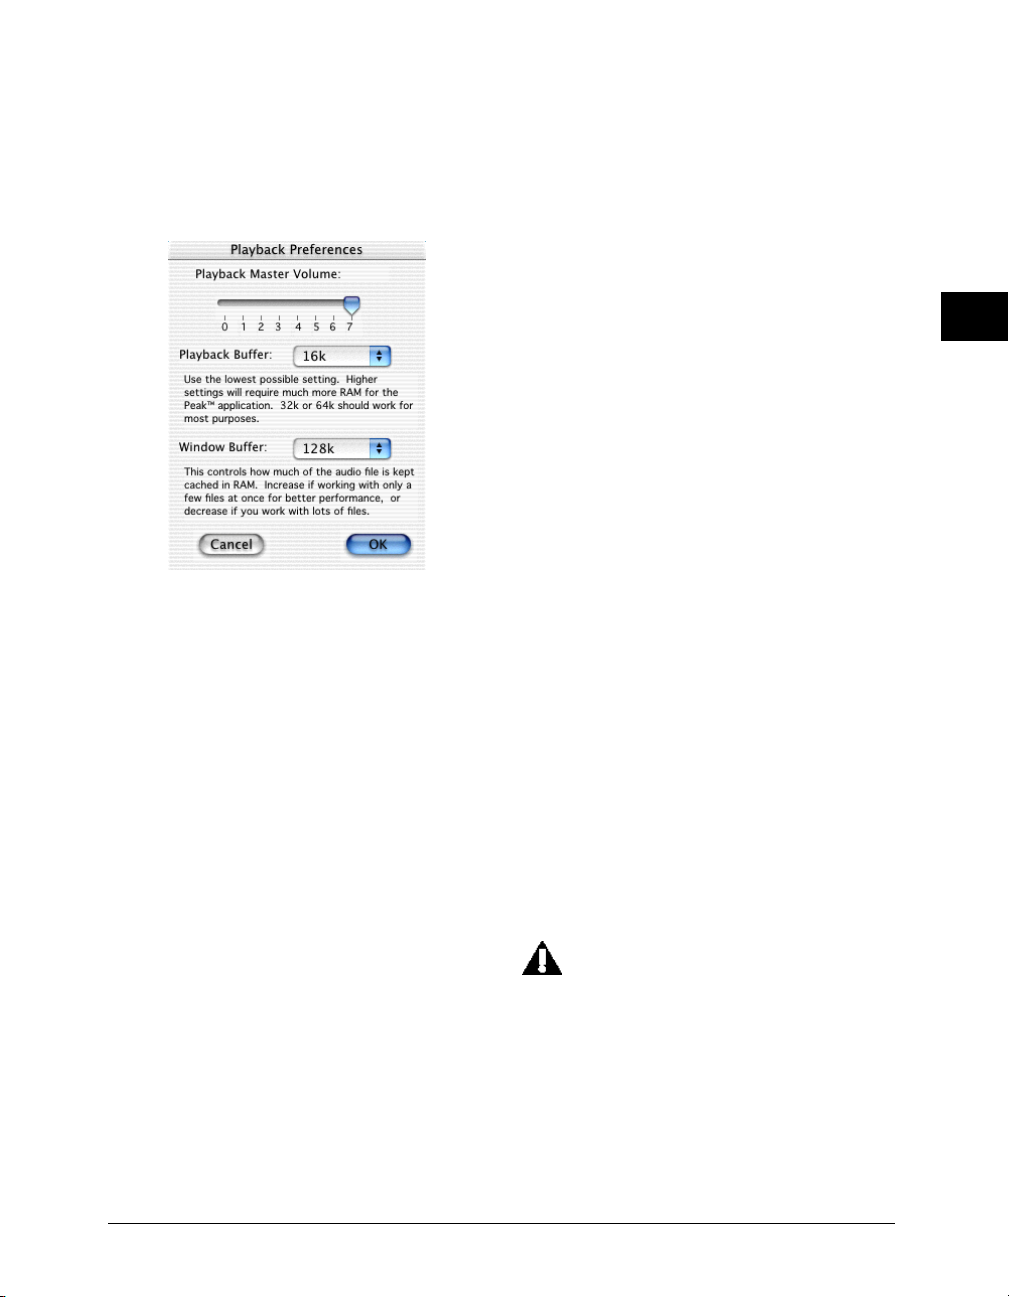
Setting Peak’s Playback Parameters
Peak’s Playback Preferences dialog allows you to
control the master output volume, hard disk playback
buffer size, and window buffer size.
Peak Playback Preferences dialog
Playback Master Volume
Peak provides a master volume control for audio
playback. In the Playback Preferences dialog, set Peak’s
output volume to the level that you desire by adjusting
the slider or entering a number value from 0 (silent) to
7 (loudest). If you are controlling your playback
volume with the volume control of your playback
system, you’ll probably want to leave the output level
set to 7.
Playback Buffer
Peak allows you to control the amount of RAM the
program uses when playing back audio documents. In
general, lower is better. A playback buffer of 32k is a
good place to start. If you are experiencing clicks in
your playback, working with fragmented files, using
processor-intensive real-time DSP, or are using a slow
hard drive, you may need a larger playback buffer
setting.
Window Buffer
Peak also allows you to control the amount of RAM the
program uses to cache audio data and the size of each
processing chunk. Use larger values if you are working
with a few large files, and smaller values if you are
working with many smaller files.
Dynamic Scrub Time
Peak provides a unique audio auditioning technique
called dynamic scrubbing. This feature is very useful
for precisely pinpointing and selecting a desired
location in an audio document. Dynamic scrubbing
allows you to drag the mouse forward or backward
over a waveform while Peak plays a short loop
(between 10 and 600 milliseconds) at the scrub
location. When you have found the location you are
looking for, let go of the mouse and the insertion
point will be exactly where you want it to be. Peak
allows you to choose the length of this playback loop
with the Dynamic Scrub Time command in the
Preference menu. You can also select Tape-Style
Scrubbing in this dialog. For a full description of
scrubbing audio in Peak, please see Chapter 5.
To select a loop duration for dynamic scrubbing:
1. Choose Dynamic Scrub Time from the Preference
menu, and choose a duration from the hierarchical
submenu. Typically, a value of between 40 to 80
milliseconds works well.
2. You can also select Tape-Style Scrubbing by
selecting it in this submenu. To deselect TapeStyle Scrubbing, just click any duration value in the
submenu.
Tape-Style Scrubbing requires Sound Manager
3.3 or later and is not available when using
ASIO or CoreAudio.
Scroll During Playback
With the Scroll During Playback command enabled,
Peak will “scroll” through the audio document as
playback progresses. This allows you to visually follow
the progress of audio playback. A check next to this
menu item indicates that it is enabled.
3
Peak Basics
29
Page 42
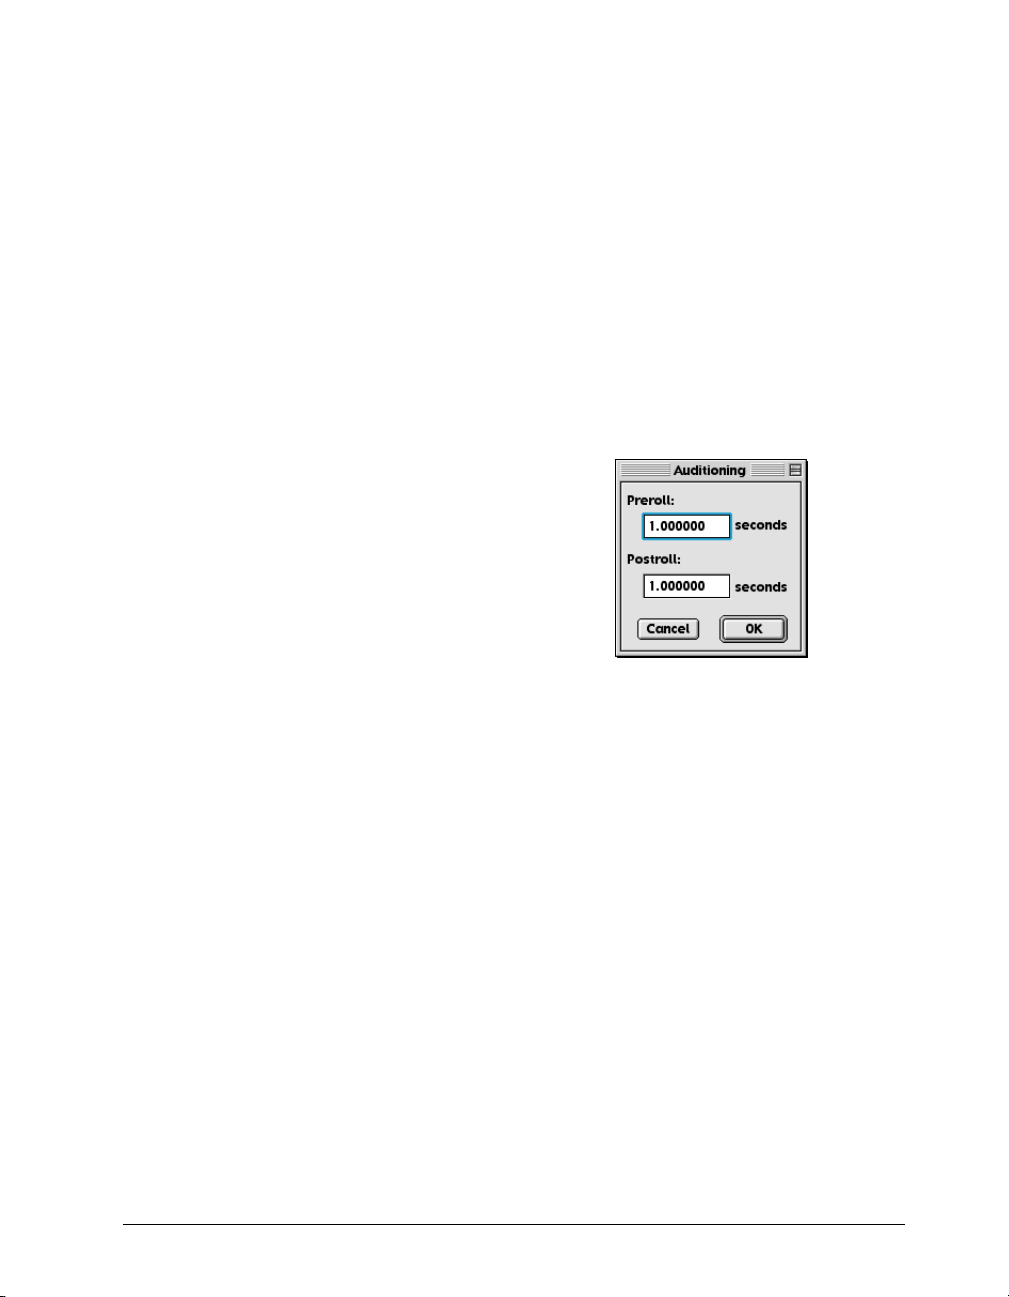
To enable Scroll During Playback:
1. Select Scroll During Play from the Preference
menu. A check next to this item indicates it is
enabled.
2. To disable Scroll During Playback, simply re-select
Scroll During Play from the Preference menu. The
absence of a check next to this item indicates it is
disabled.
Move Waveform During Playback
With the Move Waveform During Play command
enabled, Peak will move the waveform under the
cursor as playback progresses, so that the playbar is
always in the middle of the waveform display. A check
next to this menu item indicates that it is enabled.
To enable Move Waveform During Playback:
1. Select Move Waveform During Play from the
Preference menu. A check next to this item
indicates it is enabled.
2. To disable Move Waveform During Playback,
simply re-select Move Waveform During Play from
the Preference menu. The absence of a check next
to this item indicates it is disabled.
Show Marker Times
With the Show Marker Times command enabled, all
Peak markers will show a time value as well as the
marker name.
To enable Show Marker Times:
1. Select Show Marker Times from the Preference
menu. A check next to this item indicates it is
enabled.
2. To disable Show Marker Times, simply deselect
Show Marker Times from the Preference menu.
The absence of a check next to this item indicates
it is disabled.
Auditioning
Peak’s Auditioning command allows you to audition a
selection along with a specific amount of audio
preceding or following it. The Auditioning dialog
allows you to select a desired amount of pre-roll or
post-roll when you play the selection. To play a
selection with the selected amount of pre- and postroll, press Control-Spacebar.
To configure Auditioning:
• Select Auditioning from the Preference menu.
Enter the desired amount of Pre-roll and Post-roll
into the dialog boxes. Click OK to exit the dialog.
The Auditioning dialog
Blending
Blending is an automatic crossfade function with a
user-editable envelope. Peak can apply blending to
areas of an audio document when they are modified
by cutting, deleting, or other editing processes in
order to smooth abrupt transitions between waveform
amplitudes. It can be very useful for creating a smooth
transition between edits that would otherwise sound
too abrupt. If you have cut, pasted, or inserted audio
into a document, you may wish to enable blending to
smooth things out a bit. It can be toggled on or off by
choosing the Blending command from the Preference
menu, or by clicking the Blend enable/disable button
on the Cursor Palette, or by using the caps lock key on
your keyboard.
Peak User’s Guide30
Page 43

To configure blending:
1. Select Blending from the Preference menu. Enter
the Duration over which you wish Blending to
occur into the dialog box.
2. To edit the Blending Envelope, click on the Edit
Blending Envelope button. Click OK to exit the
dialog.
For detailed instructions on how to use blending or
how to edit the blending crossfade envelope, see
Chapter 5: Editing.
Auto-Import Dual Mono
Certain audio applications, such as BIAS Deck and
Digidesign’s Pro Tools, do not directly support
interleaved stereo files, and instead use “dual mono”
files–a pair of files, one for the left channel and one
for the right channel. These files have typically been
exported with the suffix “.L” for the left channel, and
the suffix “.R” for the right channel. Auto-Import Dual
Mono, when selected, will allow you to select just one
channel of the dual mono file in the Open dialog.
Peak will automatically “grab” the other half of the file,
and convert both files into a single stereo Peak
document.
Please note that the Import Dual Mono
command requires that both files be mono
files, have the same sample rate and bit depth,
and the must have the exact same name
followed by the suffixes “.L” and “.R”.
To enable Auto-Import Dual Mono:
1. Select Auto-Import Dual Mono from the Preference menu. A check next to this item indicates it
is enabled.
Choosing Colors for the Audio Document Window
Peak allows you to customize the colors used to
display the elements in audio documents. You can use
this dialog to set the background color, waveform
color, and colors for markers and loops. You can select
either a preset color combination, or individual colors
for each element in the audio document window, as
well as picking your own custom colors from a color
palette. You can also choose to have the waveform
display shading for a 3-D look, as well as select the
amount of shading. Changes made using the Colors
dialog affect both the current audio document’s
colors, and any subsequent new audio document’s
colors.
To customize the colors and shading of the waveform
display:
1. Choose Colors from the Preference menu.
2. To select a preset color combination, click the
Theme pop-up menu and choose the preset that
you desire.
3. Alternatively, to select individual colors for each
element in the audio document window, choose
Custom from the Theme pop-up menu and then
select the desired colors from the Background,
Waveform, Markers, Loops, and Regions pop-up
menus.
4. If you wish, you can use this dialog to further
customize any element in the audio document
window. Pick an element to customize, choose
Custom from the Theme pop-up menu, and select
User Color. A standard Macintosh color palette will
appear. Use this wheel to select any color you
wish. Click OK to return to the Colors dialog.
3
2. To disable Auto-Import Dual Mono, simply reselect Auto-Import Dual Mono from the Preference menu. The absence of a check next to this
item indicates it is disabled.
5. You can also customize the degree of shading, or
darkness, of audio selections in the waveform
display. Use the Selection Shading slider or enter a
percentage in the number box to choose the
degree of shading you wish to see in selected
portions of audio.
Peak Basics
31
Page 44
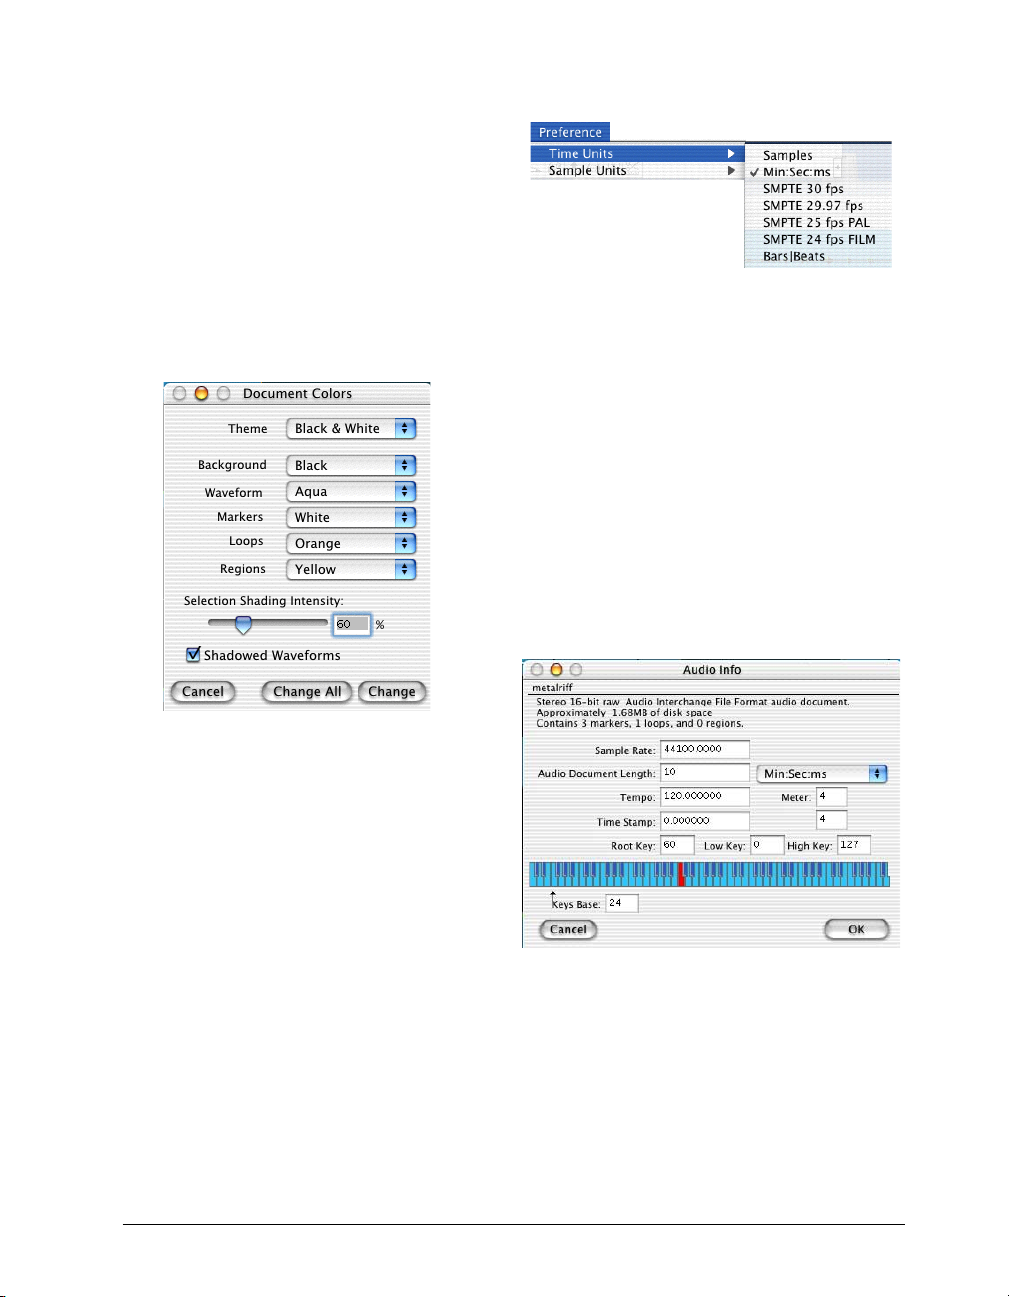
6. Another way to enhance the look of audio
waveforms in Peak is by giving them a 3-D look.
Use the Shadowed Waveform checkbox to turn the
waveform shadow on or off.
7. To close this dialog, click Change (to change one
color) or Change All (to change the colors for all
open audio documents). The audio document
window is now set to the colors and look you’ve
selected.
Choosing a time format with the Units command
Audio File Meter, Tempo, and Timestamp
Settings
If your audio document is using bars |beats as its
units, you will want to tell Peak what the tempo of the
audio document is. Use the Audio Info command from
the Preference menu—or enter the BPM in the Cursor
palette—to set the tempo of the audio document. You
can also enter the meter of an audio document using
the Audio Info dialog. The numerator represents the
number of beats per measure, and the denominator
represents the value of a beat, where 4=quarter note,
8=eight note, 16=sixteenth note, and so forth.
The Colors dialog
Choosing a Time Format
The Units command allows you to choose a time
format for the audio timeline in Peak’s audio
document window. You can choose samples, seconds,
SMPTE frames, and Bars|Beats. The format you
choose will depend on the nature of the project that
you are working on.
To choose Peak’s time format:
1. Choose Time Units from the Preference menu.
2. From the submenu, choose the time format that
you desire: samples, Min:Sec:ms, SMPTE frames,
or Bars|Beats. The timeline in Peak’s audio
document window and Transport switches to the
format that you choose.
Peak User’s Guide32
Audio Document Info
You may also enter a timestamp for the audio
document in seconds. If the audio document has a
timestamp, then the displayed time in an audio
document will be offset from this time rather than
starting at zero. For example, if the timestamp for an
audio document is four seconds, then the first sample
in the audio document will appear in the audio
Page 45
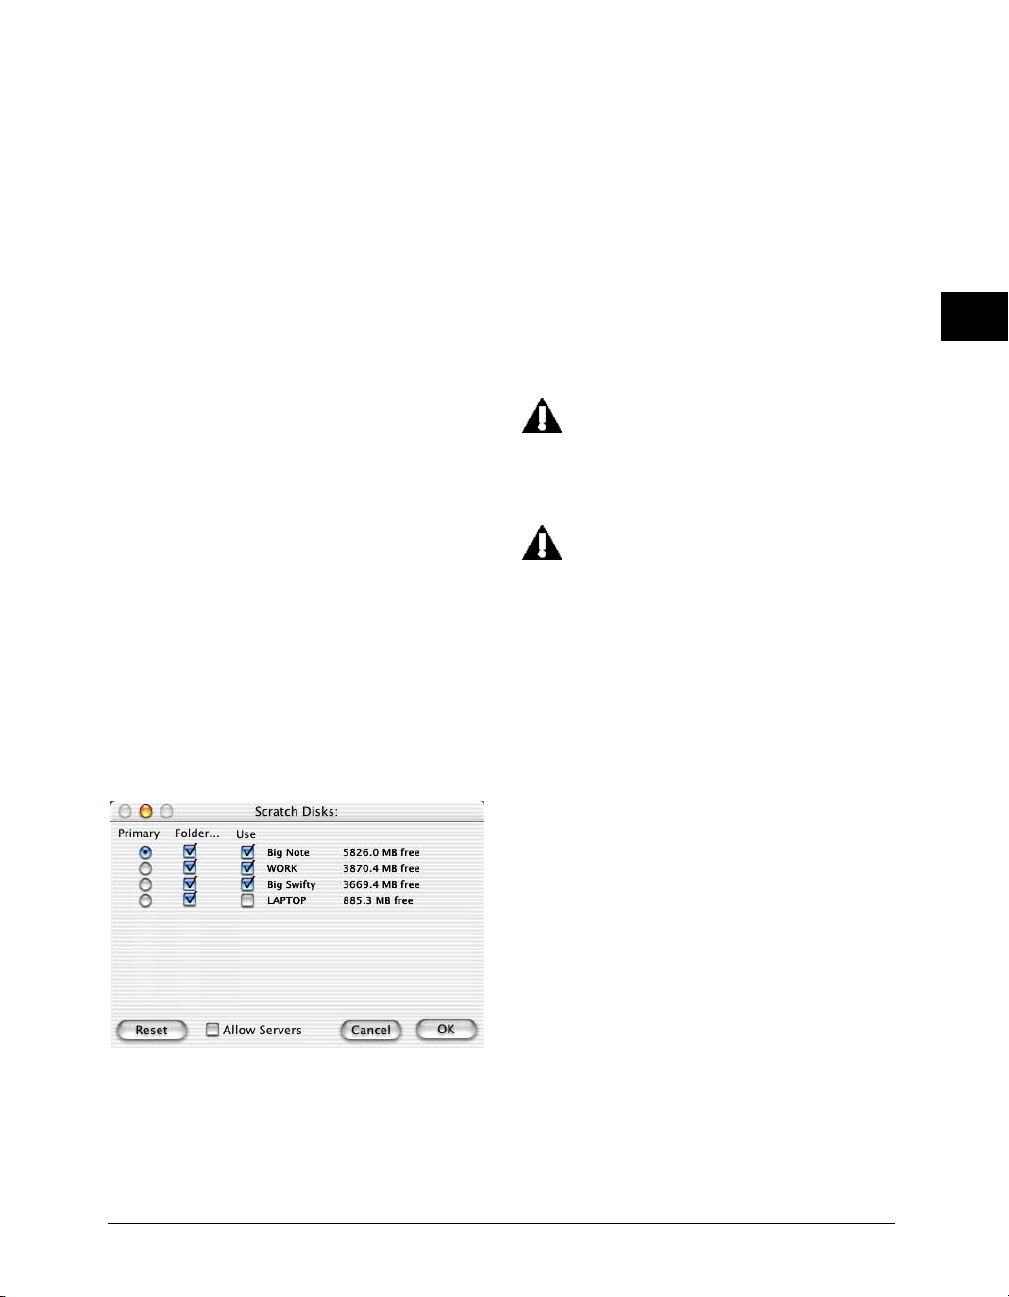
document with a time of 4 seconds instead of zero
seconds.
Choosing a Scratch Disk
Because audio data can be very large, Peak utilizes a
portion of your hard disk’s free space to hold audio
data that has been cut or copied, as well as for
temporary or scratch files for undo purposes. If your
hard disk is short on space, you may not be able to
cut, copy, or modify large selections. If you have more
than one hard drive attached to your Macintosh, the
Scratch Disks command in the Preference menu allows
you to choose the hard drives (or “scratch disks”) that
you wish to use for these temporary files. Peak allows
you to select which disk you want to have as your
default, or “Primary” disk for this purpose–usually you
would select the disk that has the most free space. If
you are connected to a file server, you can utilize
available storage on the server by clicking the Allow
Servers checkbox. Any available servers will then
appear in the Scratch Disks pop-up menu. This feature
is recommended only if you have access to a high
speed Ethernet, Media Net, or other fast server.
To choose a scratch disk for temporary files:
1. Choose Scratch Disks from the Preference menu.
The Scratch Disks dialog appears.
creates temporary files by clicking the checkboxes
next to the drives in the list. To choose the
Primary Disk, or the default disk for temporary
files, click on the Primary button next to that disk.
If you are connected to a file server and would like
to use storage available there as well, enable the
Allow Servers checkbox.
3. Click OK to close this dialog. Peak will use the disk
you have selected as your Primary scratch disk,
and, if it becomes full, will then use the other disks
you’ve chosen.
The hard drive with the original audio file
must have the equivalent amount of free space
(i.e., a 60MB file would require that there be an
additional 60MB of free space on the hard
drive on which the file resides).
When running Peak under OS 9 or later
(including OS X) you must have write
permissions for the selected Scratch Folders
and Disks or else Peak will report an error.
Contact your System Administrator if you need
assistance changing Directory or Disk
permissions.
Keyboard Shortcuts
Peak allows you to customize any Peak menu item
with a keyboard shortcut. To change your keyboard
shortcuts, go to the Preference menu and select the
Shortcuts and Toolbar item. Under OS 8.6 –9.2 the
keyboard shortcuts are stored in a preference file in
the System Folder’s Preferences folder, called Peak 3.0
Shortcuts; under OS X.1, this preference file is stored
in Users/UserName/Library/Preference/. Peak’s default
Keyboard Shortcuts are listed in Appendix 1 at the end
of this manual.
3
The Scratch Disks dialog
2. The Scratch Disks dialog will show all hard drives
currently connected to your Macintosh. Choose
the hard drive(s) that you wish Peak to use when it
To add a new Keyboard Shortcut
1. Choose Shortcuts & Toolbar under the Preference
menu.
2. Scroll through the list of menu items, or, with the
list box selected, simply type in the first few letters
of the menu item you wish to assign. Then click on
Peak Basics
33
Page 46

the name of the Peak menu item you wish to
assign a new keyboard shortcut.
6. Open the supplied “Peak Shortcuts Template”
FileMaker Pro template.
3. Use the Shortcut Key box to enter the letter you
wish to use for a shortcut. You may select the
Command, Option, Shift or Control keys as
additional modifiers by clicking on the checkboxes
in this dialog.
4. Close the Shortcuts & Toolbar dialog.
To remove a Keyboard Shortcut
1. Choose Keyboard Shortcuts under the Preference
menu.
2. Scroll through the list of menu items, and click on
the name of the Peak menu item for which you
wish to remove a keyboard shortcut.
3. Click on the Clear button.
4. Close the Keyboard Shortcuts dialog.
User-defined Keyboard Shortcuts and Toolbox
customization are not supported in Peak LE.
Making a Keyboard Shortcuts “Cue Card”
Its easy to make a “cue card” that you can keep on
your desk with all the Peak shortcuts you’ve assigned.
Using the supplied FileMaker Pro template, you can
import all of your shortcuts from a text file describing
each keyboard shortcut generated from Peak.
7. Choose Import Records from the File menu in
FileMaker Pro.
8. In the pop-up menu at the bottom of the Open
dialog in FileMaker Pro, choose Tab-Delimited.
9. Find the shortcuts text document you saved in
step 3 and click Open.
10. FileMaker Pro will add the records to the
database.
11. Use the Print option in FileMaker Pro’s File menu
to print out your keyboard shortcuts.
You can also sort the imported keyboard shortcut
commands by description or shortcut. Consult your
FileMaker Pro User’s Guide for more information on
importing records, sorting records, and printing.
To Create A Custom “Cue Card” of your Keyboard
Shortcuts:
1. Choose Shortcuts under the Preference menu.
2. Click on the Save As Text button.
3. Enter the name of the keyboard shortcuts text file
you wish to save, and choose the disk and folder
you wish to save into. Click Save.
4. Switch to the Finder and Launch FileMaker Pro.
5. Choose Open from the File menu in FileMaker
Pro.
Peak User’s Guide34
Page 47
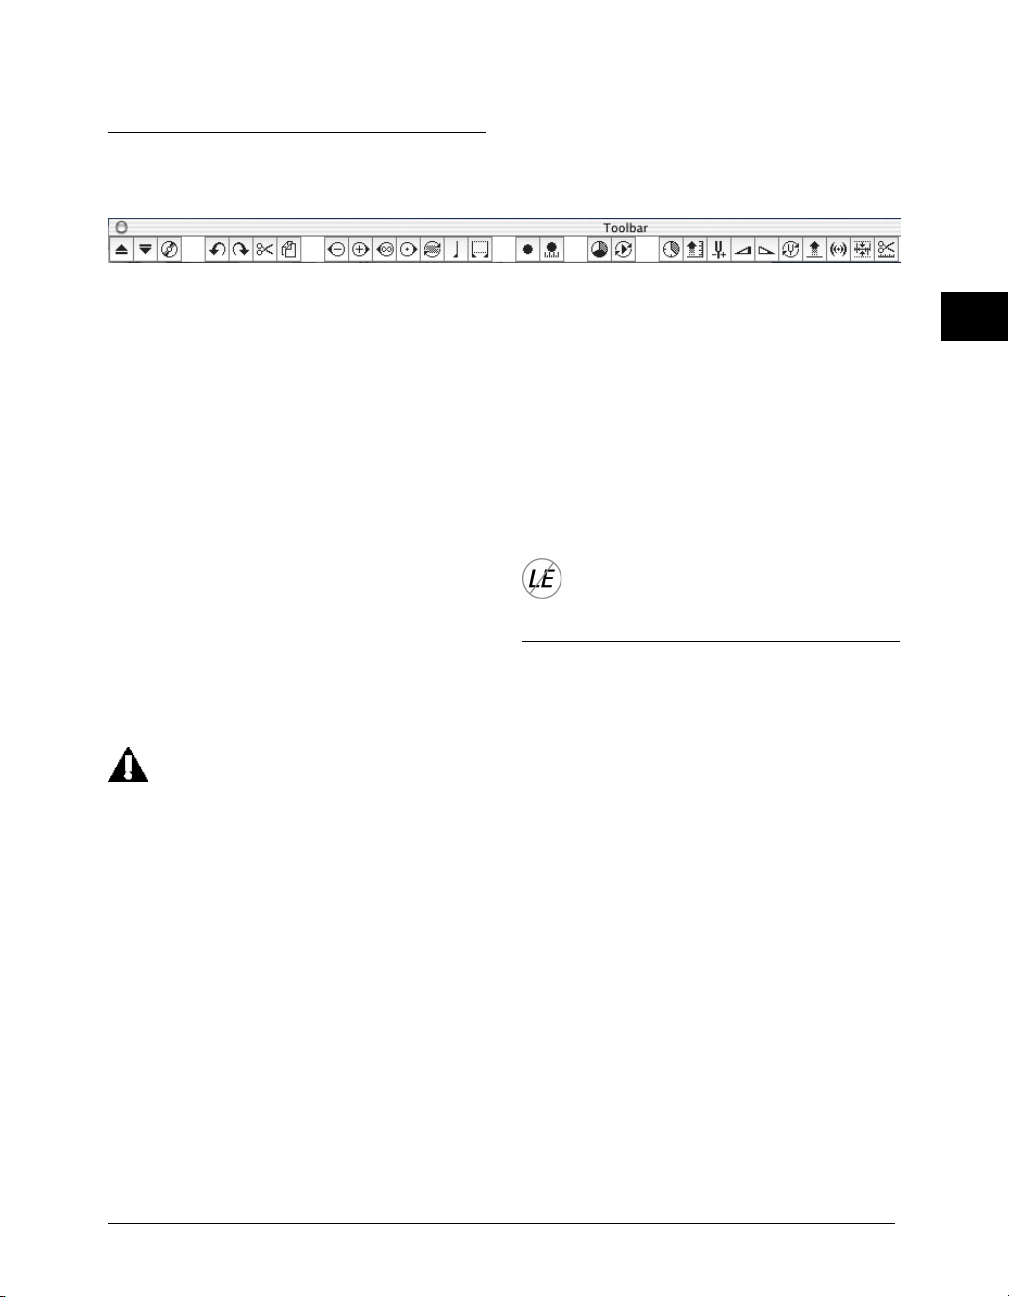
The Toolbar
Peak allows you to select almost any Peak command
for the Toolbar. The Shortcuts & Toolbar menu allows
you to group together the functions you use most
often, so that you can simply click a button instead of
going to the menus. For example, if you frequently use
Normalize and Pitch Change, you can choose to have
the icons for these functions in the Toolbar, so that all
you have to do to use one of them is to make an audio
selection and click a button. The Toolbar is an easy
way to make your work in Peak faster and more
efficient, allowing you to customize the program to
suit the way you work.
To add or subtract items from the Toolbar, use the
Shortcuts & Toolbar item under the Preference menu.
When running under OS 8.6–9.2, Toolbar selections
are stored in a Preference file in the System Folder’s
Preference Folder, called “Peak 3.0 Shortcuts.”
You can “grow” or “shrink” the Toolbar by
clicking on the plus (+) and minus (-) signs in
the vertical gray bar on the right of the
Toolbar.
To remove an icon from the Toolbar
1. Choose Shortcuts & Toolbar under the Preference
menu.
2. Scroll through the list of menu items ,and click on
the name of the Peak menu item you wish to
remove from the Toolbar.
3. Click on the checkbox to uncheck the item you
wish to remove..
4. Close the Keyboard Shortcuts dialog.
Customizable Toolbar is not supported in Peak
LE.
Quitting Peak
When you have finished a project or wish to end an
editing session, the Quit command allows you to quit
Peak and return to the Finder. If you haven’t saved
changes, Peak will warn you before allowing you to
quit.
3
To add a new icon to the Toolbar
1. Choose Shortcuts & Toolbar under the Preference
menu.
2. Scroll through the list of menu items, and click on
the name of the Peak menu item you wish to have
appear in the Toolbar.
3. Click on the “Place In Toolbar” checkbox to select
the icon to add to the Toolbar. If there is no icon,
the menu item cannot be placed in the Toolbar.
4. Close the Keyboard Shortcuts dialog.
To quit Peak:
• Under OS 9 or earlier, choose Quit from the File
menu (-Q).
• Under OS X.1 or later, choose Quit from the Peak
menu (-Q).
If you have made any changes to your document since
the last time you saved, Peak will ask you if you want
to save them. If you do, choose Yes; if you don’t,
choose No. If you change your mind and wish to
continue your session, choose Cancel.
Peak Basics
35
Page 48

If you wish to close all currently open windows
without saving, hold down the Option key and
click Don’t Save.
Conclusion
You now know how to create, open, import audio
files, export, close, and save Peak documents. You also
know how to set the preferences for operating Peak.
The next chapter explains how to use your Peak
software to record audio to disk.
Peak User’s Guide36
Page 49
Chapter 4
Playback and Recording
Page 50

38 Peak User’s Guide
Page 51
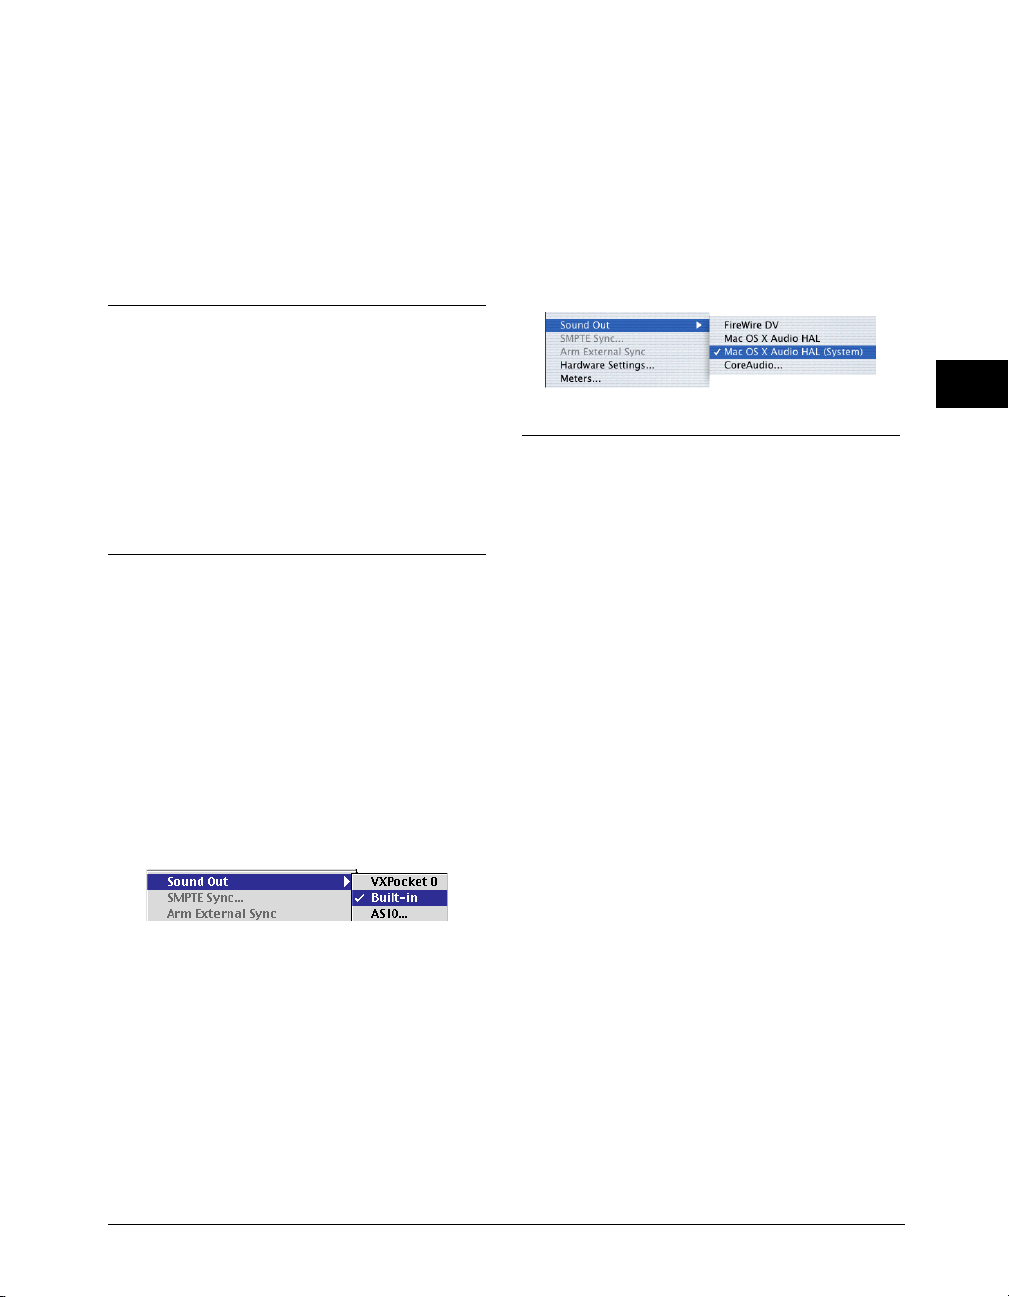
Chapter 4: Playback and Recording
In this chapter you’ll learn how to record and playback
audio with Peak. Peak allows you to capture sound
from external sources through your Macintosh’s builtin audio input or by using third-party audio hardware.
If your Macintosh is equipped with a CD-ROM drive,
you can also import audio directly from an audio CD.
Peak will also let you record and playback via
CoreAudio and ASIO.
Recording and Playback using the Apple Sound Manager
Peak will play and record through the Apple Sound
Manager by default running under OS 8.6–9.2. Choose
Built-In for Sound Out under the Audio menu and
Peak will play through the Macintosh Built-In Sound. If
you are using third-party audio hardware, its Sound
Manager driver (if installed) will also appear in the
Sound Out submenu.
The Sound Out submenu under the Audio menu running OS 8.6–9.2
Mac OS X Audio HAL is the Apple Sound Manager on
OS X. If you are running Peak on OS X.1, select
FireWire DV to use any supported Digital Video (DV)
device—such as a camcorder—connected to a FireWire
port, Mac OS X Audio HAL (System) to use the
Macintosh Built-In Sound, or Mac OS X Audio HAL to
use the audio device which is selected for output in
the Sound System Preferences.
The Sound Out submenu under the Audio menu running OS X.1
Preparing Peak for Recording
Before you begin recording, you must set several
parameters for the audio that you wish to record. If
you followed the instructions in Chapter 2, your
system’s basic recording and playback setup should
already be configured properly. At this point, you may
simply select Record Settings from the Audio menu or
Toolbar to confirm or configure recording parameters,
and then you can begin using Peak to record audio to
your hard disk.
Proper Levels for Recording
To obtain the best possible fidelity when recording
digital audio, it is important to record your audio
signal at the highest possible level without introducing
clipping (distortion). The reasons for this are twofold:
If your audio input level is too low, the recorded audio
may contain a significant amount of noise which can
manifest itself as hiss. Conversely, if your audio input
level is too high, it may clip and cause audible
crackling or other types of distortion. You should
avoid digital distortion at all costs because unlike its
analog counterpart — which can sometimes sound
“warm” and appealing — digital distortion sounds
terrible. In order to prevent this from happening,
always leave a little headroom (6 dB or so) when you
set levels so that you don’t hit maximum input levels
and clip.
4
Playback and Recording
39
Page 52
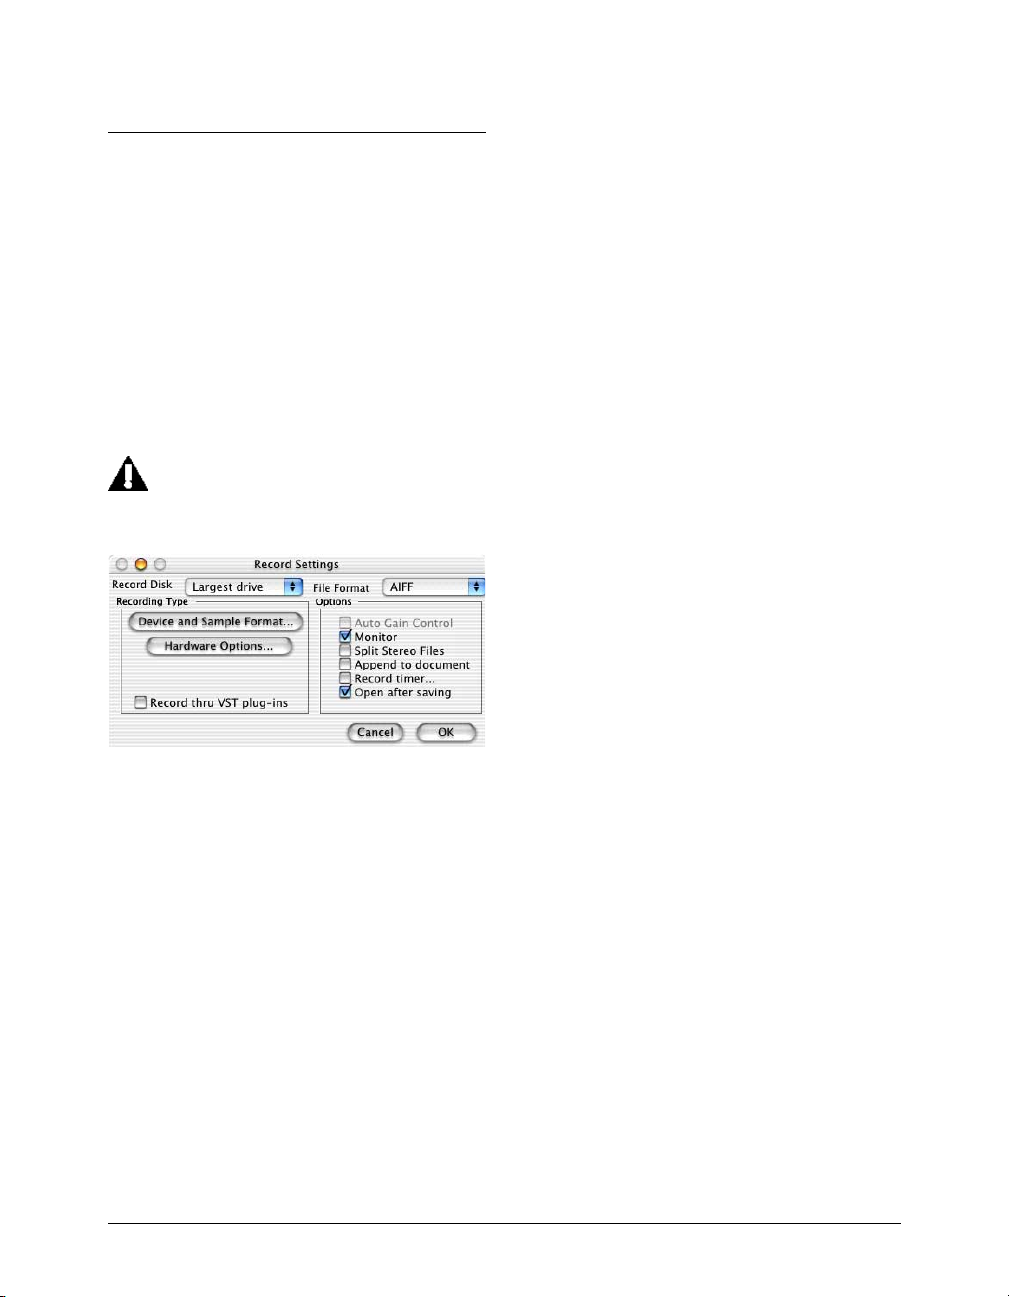
Record Settings
available to your Macintosh unless you select
otherwise.) Peak requires that you save the audio file
to the same drive on which it was recorded.
When you select Record Settings from the Audio menu
(Option-R) or Toolbar, the Record Settings dialog
appears. This dialog is used to configure your settings
for recording with Peak. The Record Settings dialog is
basically the same for ASIO, Apple Sound Manager, or
CoreAudio. However, the Device and Sample Format
and Hardware Options buttons will open dialogs
appropriate to the audio engine you are using with
Peak.
Please note that the settings you choose here
override any previously set with the Apple
Sound Control Panel.
The Record Settings dialog
You will notice several pop-up menus, buttons, and
checkboxes in the Record Settings dialog. These allow
you to select which hard drive to record to, what file
format you’d like to record in, sampling rate, source
input, and so on. You may also wish to record through
VST plug-ins. The next few paragraphs describe how to
set all of these parameters using the Record Settings
dialog.
Record Disk
The Record Disk pop-up menu allows you to choose
which hard drive you would like to record to. If you
have more than one hard drive connected to your
Macintosh, use this pop-up to select your record drive.
(This option will default to the largest drive currently
File Format
The File Format pop-up menu allows you to select the
file format for the incoming audio. You can choose
from AIFF or Sound Designer II. If you need the newly
recorded audio file to be in a different format, you can
always use the Save As function to save it as a another
format once recording is complete. If you do not
select a file format for recording, Peak will default to
AIFF.
Auto Gain Control checkbox
The Auto Gain Control checkbox allows you to disable
the Automatic Gain Control feature used by the Sound
Manager with some Macintosh microphone inputs. If
the recording device you are using supports this
feature, check the Auto Gain Control checkbox.
Monitor checkbox
The Monitor checkbox allows you to monitor the
audio throughput while you are recording.
Split Stereo Files checkbox
The Split Stereo Files checkbox allows you to record
the incoming stereo audio as dual mono files rather
than a single stereo file. Dual mono files are used in
programs like Pro Tools, or BIAS Deck, so this option
is useful if you need to record dual mono files (i.e.,
split stereo).
Append to document checkbox
The Append to document checkbox allows you to
record into an existing audio document. To record
new audio into an existing document, place the
insertion point in the existing audio document at the
point where you want to insert the new audio. If the
insertion point is at the beginning of the file, the newly
recorded audio will be inserted at the beginning of the
file. If the insertion point is at the end of the file, the
newly recorded audio will be appended to the end of
40 Peak User’s Guide
Page 53
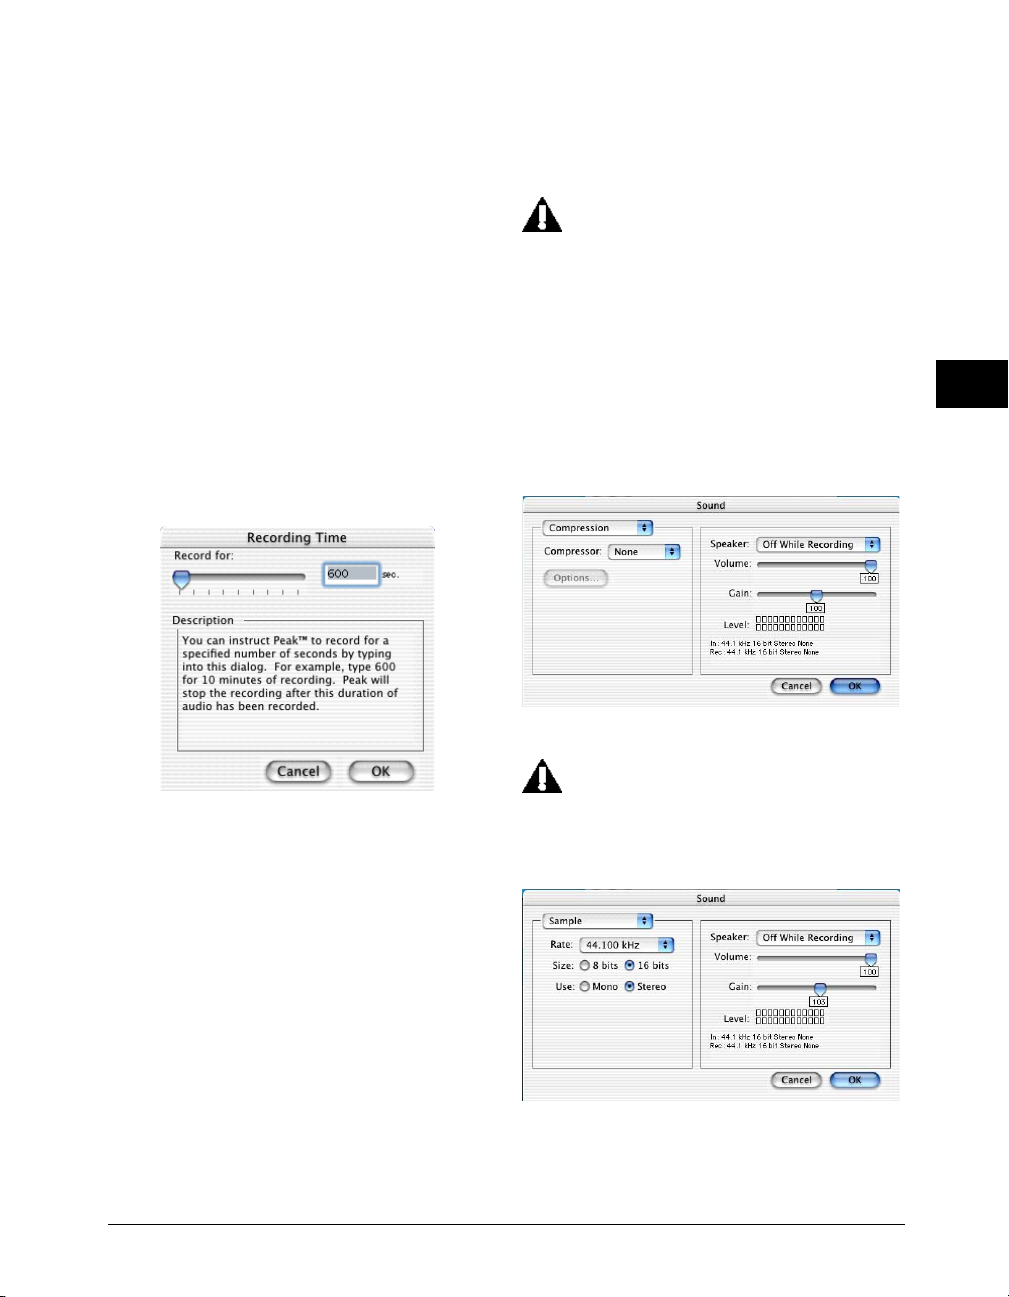
the existing file. If the insertion point is somewhere in
the middle of the file, the newly recorded audio will be
inserted at that point. If you make a selection of audio,
the Append to document feature will allow you to
replace the current audio with newly recorded audio
from the beginning of the selection through the end of
the document or wherever you stop the recording.
Record timer checkbox
The Record timer checkbox allows you to designate a
specific duration for recording. Peak will stop
recording after this set time and then open the Save
dialog for your audio recording. Checking the Record
timer checkbox will bring up the Recording Time
dialog. In the Recording Time dialog, designate the
duration for recording in seconds and click OK.
right side of the dialog, a Speaker select pop-up,
Volume and Gain controls, and an audio input level
meter.
The Speaker pop-up at the right of the Sound
dialog can be set to Speaker On, Speaker Off,
or On While Recording. Selecting Speaker On
will allow you to monitor audio to adjust the
input levels prior to as well as during
recording, while On While Recording will only
allow you to monitor levels while you are
actually recording. As you might expect,
Speaker Off will mute the outputs completely.
Compression
4
The Recording Time dialog
Open after saving checkbox
The Open after saving checkbox determines whether
the audio document is opened in Peak after it is
recorded.
Device and Sample Format
Clicking on the Device and Sample Format button will
open different dialogs depending on which audio
engine Peak is using (i.e., Sound Manager, CoreAudio
or ASIO). If Peak is using the Apple Sound Manager,
clicking the Device and Sample Format button opens
the Sound dialog. The Sound dialog contains a pop-up
menu that bring up three sub-dialogs, and, on the
Playback and Recording
The Sound dialog: Compression
The compression option is not supported in
Peak, so leave Compression set to none.
Sample
The Sound dialog: Sample
41
Page 54
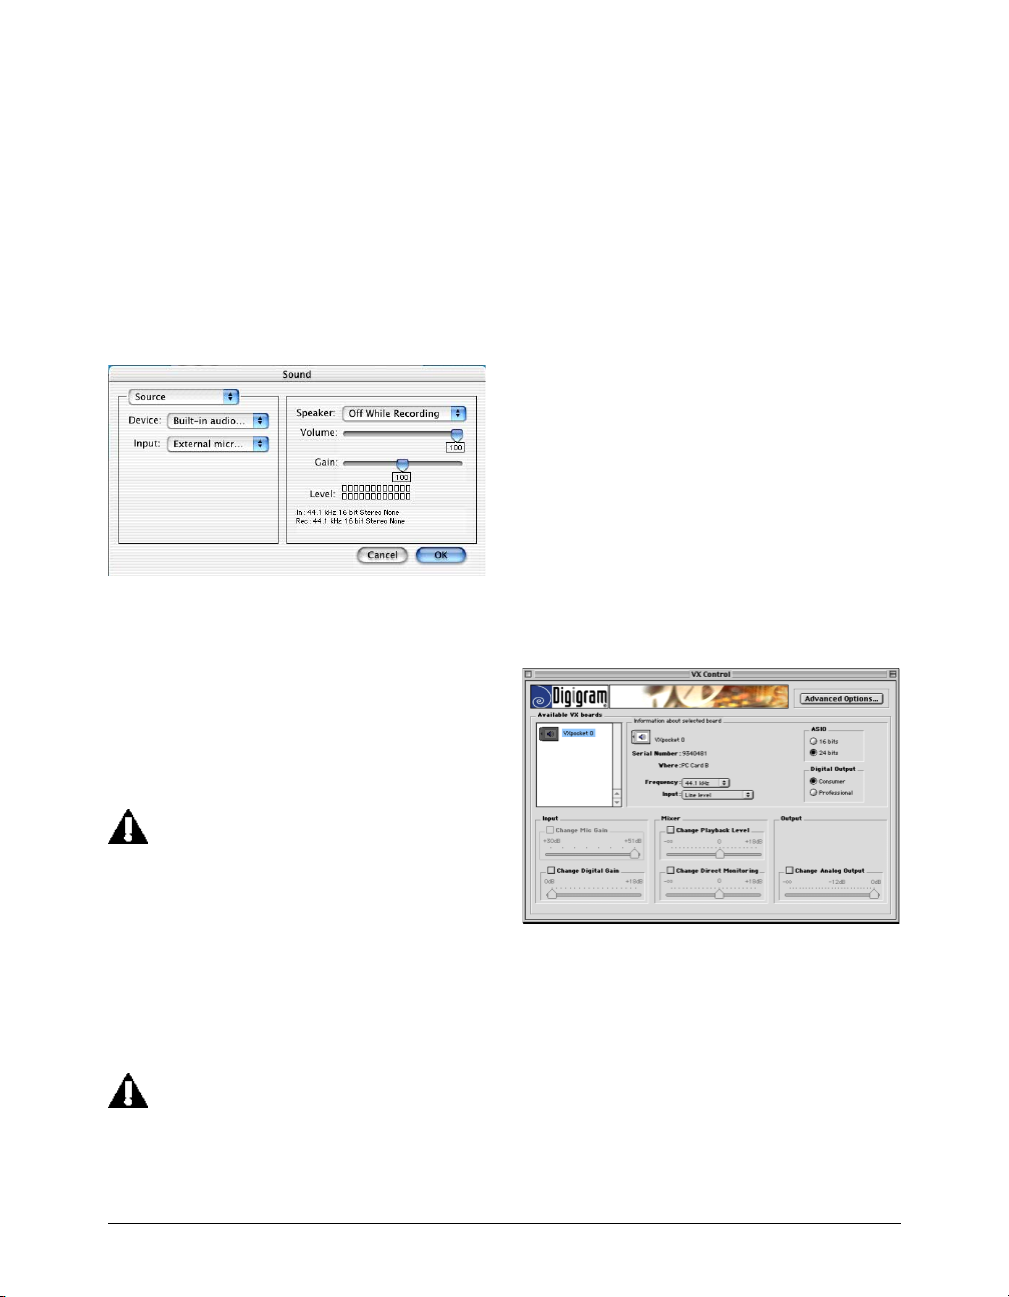
Selecting Sample from the Sound dialog pop-up menu
allows you to choose the sample rate and bit depth, as
well as whether the incoming audio will be recorded
as a Stereo or Mono file. To some degree, the choices
that appear here will depend on your audio hardware.
For more information on bit-depths and sample rates,
see the Glossary.
Source
The Sound dialog: Source
Selecting Source from the Sound dialog pop-up menu
allows you to select and configure the audio input you
wish to use for recording. If you are using third-party
audio hardware with your Macintosh, you can select it
as the input device using the Device pop-up. Use the
Input pop-up to select the hardware inputs you wish
to record through.
Peak via the Apple Sound Manager. If the
sound card’s Sound Manager drivers have
been correctly installed it will appear in the
Apple Sound Control Panel for Sound In and
Sound Out as well as under Peak’s Sound Out
submenu under the Audio menu and in the
Source Device and Sample Format dialog
accessible from Peak’s Record Settings dialog
under the Audio menu.
Hardware Options
Clicking on the Hardware Options button in the
Record Settings dialog brings up a dialog appropriate
to the audio hardware that you are using with your
Macintosh. Note that in many instances there may be
no settings for a given device (including the Apple
Built-In Sound). Some audio hardware drivers have
control panels or utility applications that will launch
when you click on the Hardware Options button. The
VX Control dialog for the Digigram VX Pocket is shown
below, but the actual third-party dialog will differ
depending on the specific audio hardware you have.
Your exact setup will differ slightly depending
on the input device that you are using with
Peak. You can use either your Macintosh’s
built-in audio inputs, or, if you are using thirdparty audio hardware, you may wish to use its
audio inputs and outputs.
Once you have configured the options in the Sound
dialog to your liking, click OK to return to the
Recording Settings dialog.
If you are using third-party audio hardware,
be sure that you have correctly installed its
Sound Manager drivers in your active
extensions folder so that it will be available to
42 Peak User’s Guide
VX Control dialog
Record Through VST Plug-In
If you have VST plug-ins installed in your Peak
VstPlugIns folder, you can record through them in
real-time when using ASIO or CoreAudio. This is useful
if you want to use a noise reduction, equalizing, or
dynamics plug-in during recording.
Page 55
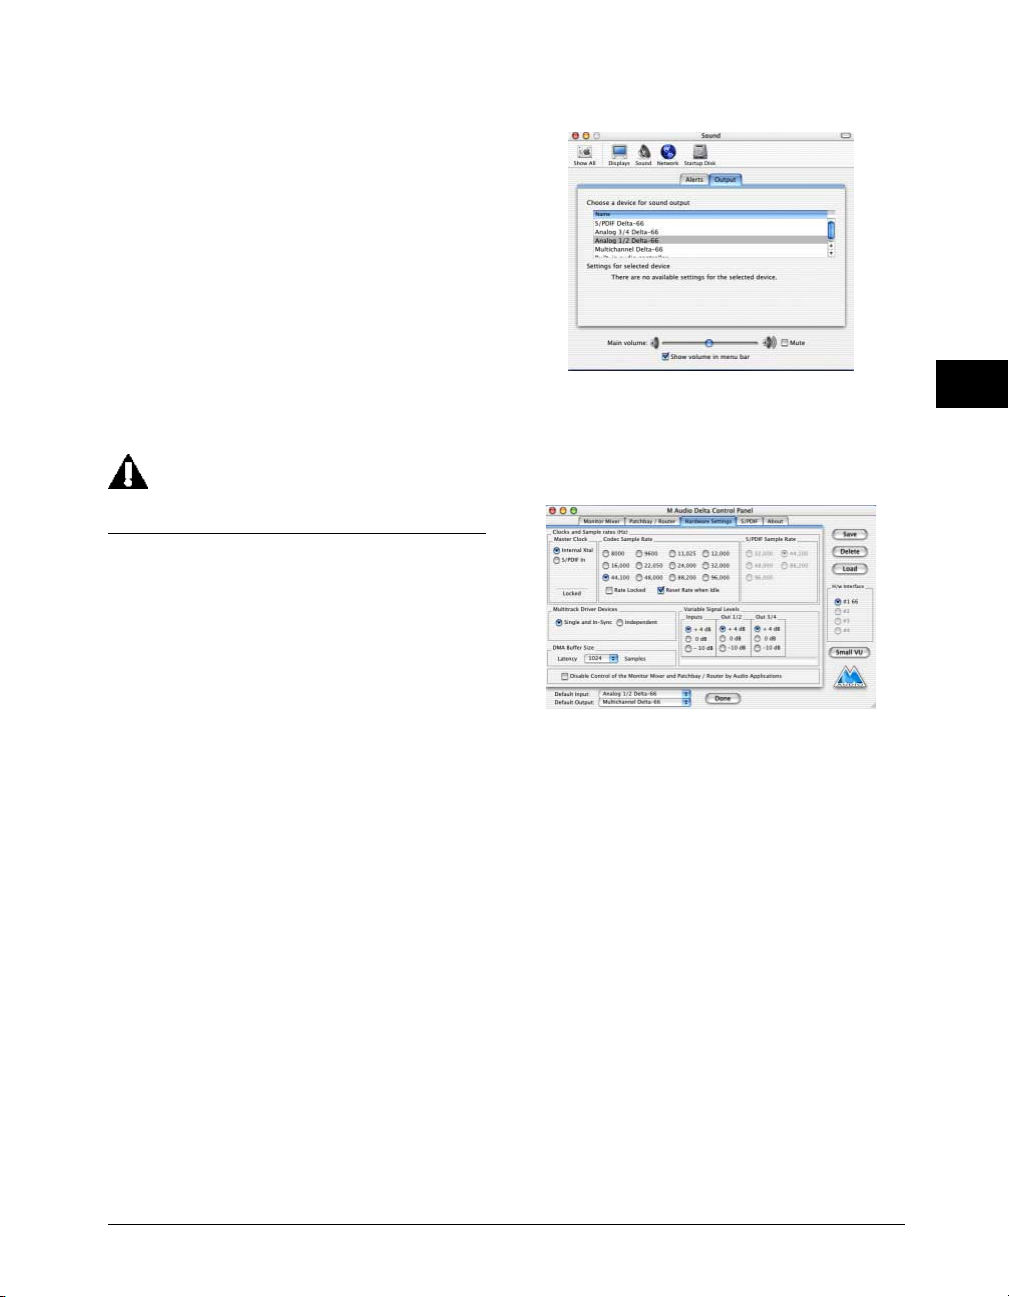
To configure Peak to record through VST Plug-Ins:
1. Go to the Plug-Ins menu and open and configure
the VST Plug-In(s) you wish to record through.
2. Select Record Settings from the Audio menu. The
Record Settings dialog will appear.
3. Check the Record through VST Plug-Ins checkbox
and click OK.
4. Select Record from the Audio menu (-R) or
Toolbar. You are now ready to record audio
through the VST Plug-In(s).
5. Be sure to disable the active VST Plug-In(s) after
you have made the recording.
Peak can only record through VST Plug-Ins
when using ASIO or CoreAudio.
CoreAudio
Peak supports CoreAudio under OS X.1. CoreAudio
can be used with the Built-In Sound on your
Macintosh, or with any third-part audio interface that
has support CoreAudio drivers. If you have a thirdparty audio interface, install its CoreAudio driver
according to the manufacturer’s instructions (for
example, the M-Audio Delta series). Be sure to reboot
your computer after installing any new CoreAudio
driver software. If the audio interface has it’s own
utility or configuration software, be sure to configure it
prior to launching Peak.
Playback with CoreAudio
To use Peak with Core Audio:
1. If applicable, install your third-party audio
interface and its software according to the
manufacturer’s instructions.
OS X.1 System Preferences Sound Output
5. Configure the audio interface’s own utility
software or control panel.
Hardware Settings: M-Audio Delta Control Panel
6. Launch Peak.
7. Choose CoreAudio from the Sound Out submenu
under the Audio menu.
8. Select the Clock Source, Sample Rate, and Play
Through outputs in the CoreAudio Playback
dialog. Click OK, or for further options, click the
More button.
4
2. Reboot your Macintosh under OS X.1.
3. Launch the OS X.1 System Preferences, and
choose Sound.
4. Select your third-party audio interface for Output.
Playback and Recording
43
Page 56
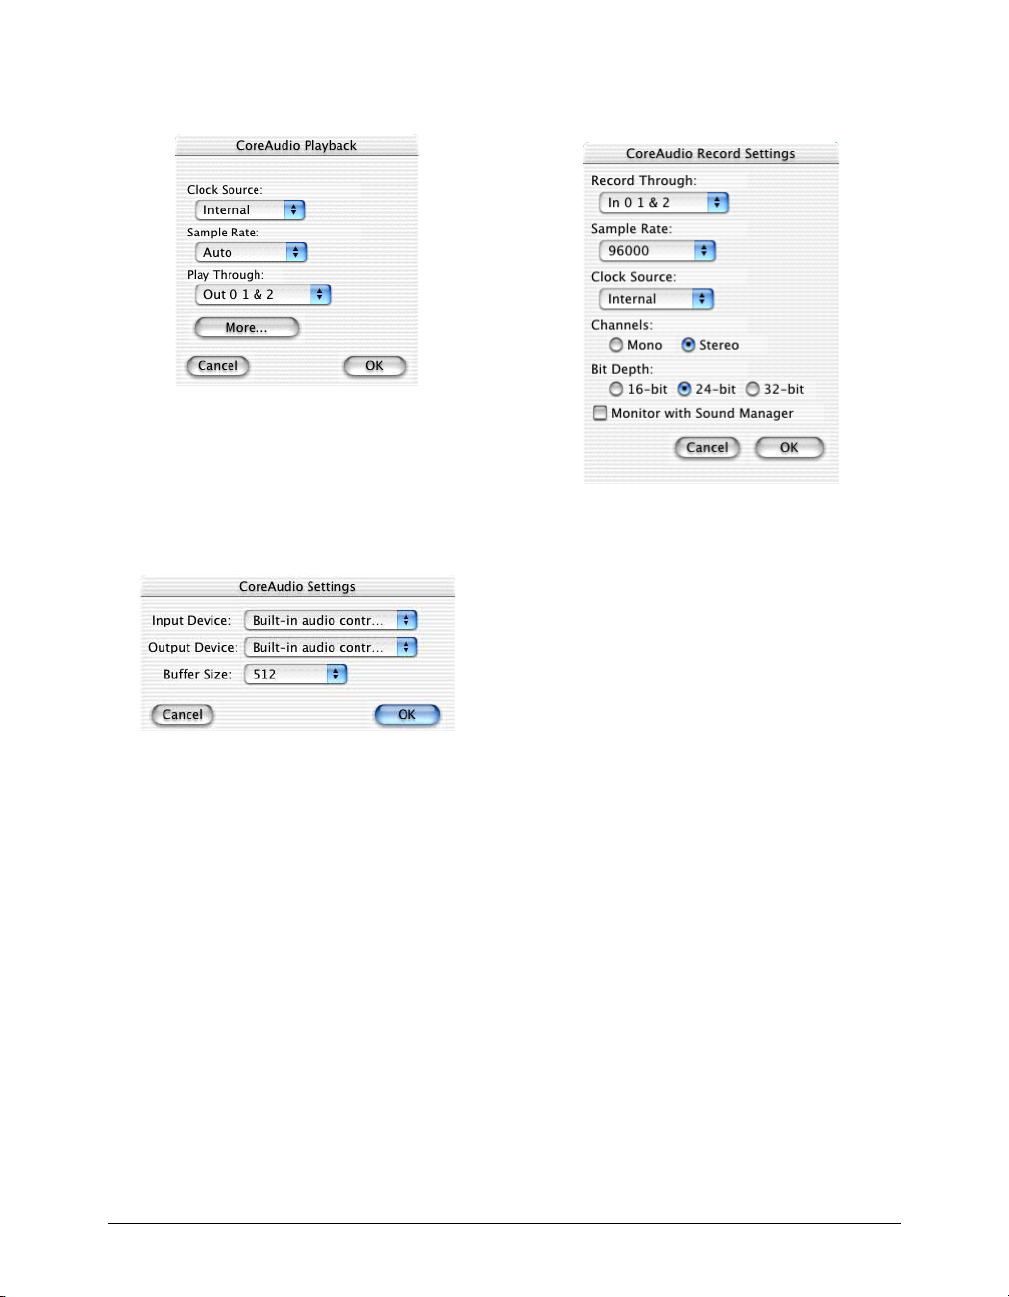
CoreAudio Playback dialog
9. Select the Input Device, Output Device, and Buffer
Size. Click OK to close the CoreAudio Settings
dialog and click OK again to close the CoreAudio
Playback dialog.
CoreAudio Record Settings dialog
2. Select the input source to Record Through, the
Sample Rate, Clock Source, Channels (Mono or
Stereo), and Bit Depth.
3. Click OK.
Peak is now configured for recording with CoreAudio.
CoreAudio Settings
Peak is now configured for playback with CoreAudio.
Recording with CoreAudio
To record in Peak with CoreAudio you will first need
to have configured Peak for playback with CoreAudio.
Once Peak is configured for playback with CoreAudio
you can go to the Record Settings dialog and configure
Peak for recording with CoreAudio. The Record
Settings dialog can be accessed from under the Audio
menu (Option-R) as well as from the Toolbar.
To configure Peak to record with CoreAudio:
1. Click on Device and Sample Format and the
CoreAudio Recording Settings dialog will appear.
44 Peak User’s Guide
Record Through
Using the CoreAudio Record Through pop-up menu
you can choose the source for recording.
Sample Rate
Using the CoreAudio Sample Rate pop-up menu you
can select the sample rate at which you wish to record.
Some sample rates may not be available depending on
the limitations of the audio card and its CoreAudio
driver. Please note that if you are recording from a
digital source you will want to be sure that you record
at the same sample rate as your digital source. For
more information on sample rates, see the Glossary.
Channels
You may also choose to record a mono or stereo file
using the radio buttons under the Channels heading.
Page 57
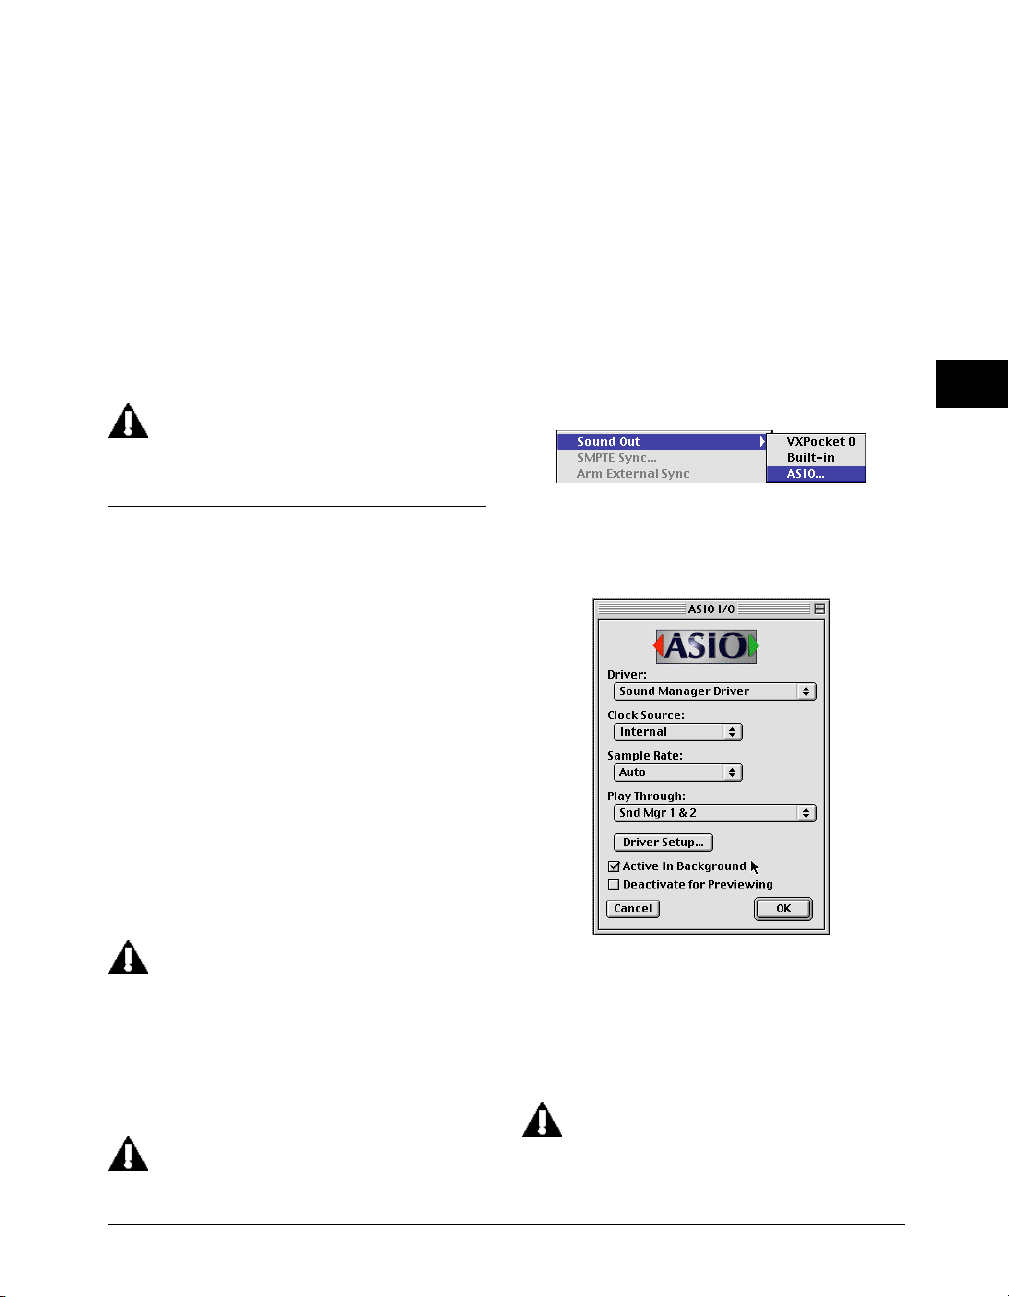
Bit Depth
Choose the bit depth using the radio buttons under
the Bit Depth heading. Please note that you will be
limited to recording at bit depths that are supported
by your audio hardware and its CoreAudio driver. For
more information on bit depths, see the Glossary.
Monitor with Sound Manager
Enable the Monitor with Sound Manager checkbox to
monitor recording through the Apple Sound Manager
while recording through CoreAudio.
Be sure to set the Clock Source to digital in the
CoreAudio dialog if you plan to record via
CoreAudio from a digital source.
needs to be configured using the MOTU PCI-324
Console and the PCI-324 Cuemix Console prior
to launching Peak. The Yamaha DSP Factory
requires that you be running MixTest prior to
launching Peak and selecting the DS2416 ASIO
driver. Other cards, such as the M-Audio Delta
series, may similarly require software utilities
provided by the card’s manufacturer.
Playback with ASIO
To select the ASIO driver for playback, select ASIO
from the Sound Out submenu under Peak’s Audio
menu.
The Sound Out submenu
4
ASIO
Peak supports ASIO 1.0 for recording and playback of
audio through your ASIO-compatible audio hardware.
ASIO is a standard technology for routing audio
between sound cards and software application
developed by Steinberg Software und Hardware,
GmBH. ASIO, unlike the Apple Sound Manager,
supports bit depths beyond 16-bits and sample rates
beyond 65 kHz. Most audio hardware currently
available has ASIO drivers and many of these support
higher bit-depths and sample rates. For a complete
current list of third-party audio hardware that have
ASIO drivers and are compatible with Peak, please visit
the BIAS Web site at:
http://www.bias-inc.com
ASIO is not available under OS X.1.
Installing ASIO Drivers
To install the audio hardware’s ASIO driver for use
with Peak, drag and drop the ASIO driver into Peak’s
ASIO Drivers folder. When you launch Peak, it will load
and recognize the sound card’s ASIO driver.
Some audio hardware needs to be configured
prior to launching Peak. The MOTU PCI-324
The ASIO dialog appears.
The ASIO dialog
Driver
Choose the driver for your ASIO supported audio
hardware from the ASIO Driver pop-up menu.
It is important to note that many ASIO drivers
support playback through only a limited
number of sample rates. For this reason, using
Playback and Recording
45
Page 58
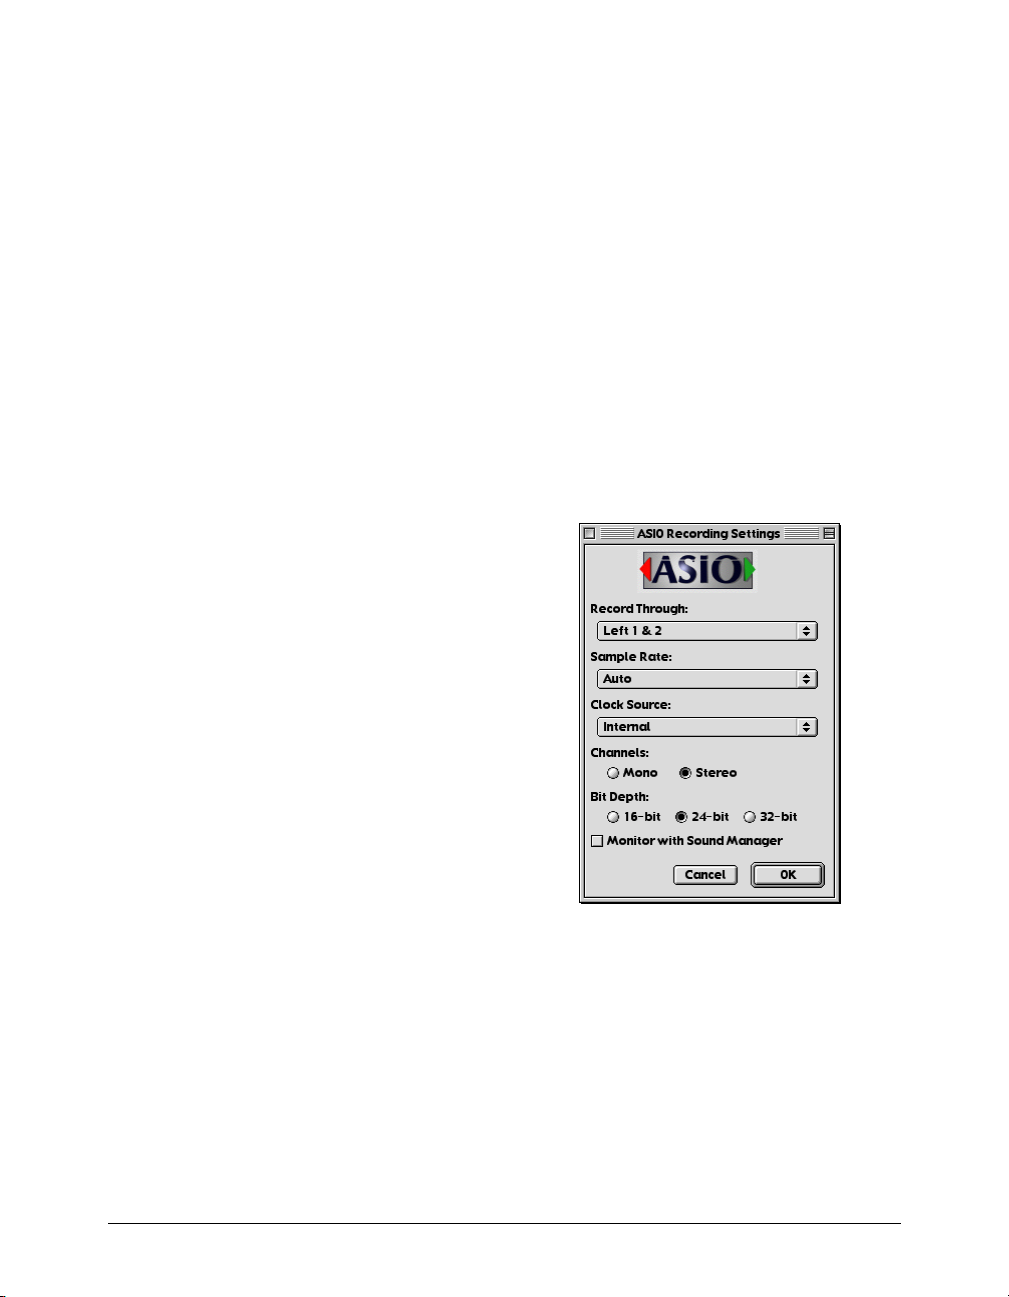
ASIO drivers for playback will require that
your audio files are at sample rates supported
by the driver you are using.
Clock Source
You may choose the clock source for digital sync using
the ASIO Clock Source pop-up menu.
Sample Rate
Choose the sample rate for playback using the ASIO
Sample Rate pop-up menu.
Play Through
Choose what channels you wish Peak to playback
through using the ASIO Play Through pop-up menu.
Driver Setup
Clicking on Driver Setup in the ASIO dialog will launch
a control panel for certain ASIO supported audio
hardware, such as Digidesign Direct IO. However,
some drivers will either not have control panels or
they will have setup utilities that need to be configured prior to launching Peak and cannot be accessed
from within Peak.
Recording with ASIO
To record in Peak with ASIO you will first need to have
configured Peak for playback with ASIO. Once Peak is
configured for playback with ASIO you can go to the
Record Settings dialog and configure Peak for
recording with ASIO. The Record Settings dialog can
be accessed from under the Audio menu (Option-R) as
well as from the Toolbar. Clicking on the Hardware
Options button in the Record Settings dialog will
launch the ASIO driver’s control panel if one is
available.
To configure Peak to record with ASIO:
1. Click on Device and Sample Format and the ASIO
Recording Settings dialog will appear.
Active In Background
The ASIO Active in Background checkbox enables the
ASIO driver to operate in the background while Peak is
in the background. If you are running more than one
audio application using the same ASIO driver, you will
want to disable ASIO Active in background.
Deactivate for Previewing
The ASIO Deactivate for Previewing checkbox
deactivates the ASIO driver when the Apple Sound
Manager is being used for previewing (e.g., when
previewing in the Import CD Audio). You will want to
enable Deactivate for Previewing if you are using both
the audio card’s ASIO driver and its Sound Manager
driver.
46 Peak User’s Guide
The ASIO Record Settings dialog
2. Select the input source to Record Through, the
Sample Rate, Clock Source, Channels (Mono or
Stereo), and Bit Depth.
3. Click OK.
Peak is now configured for recording with ASIO.
Page 59
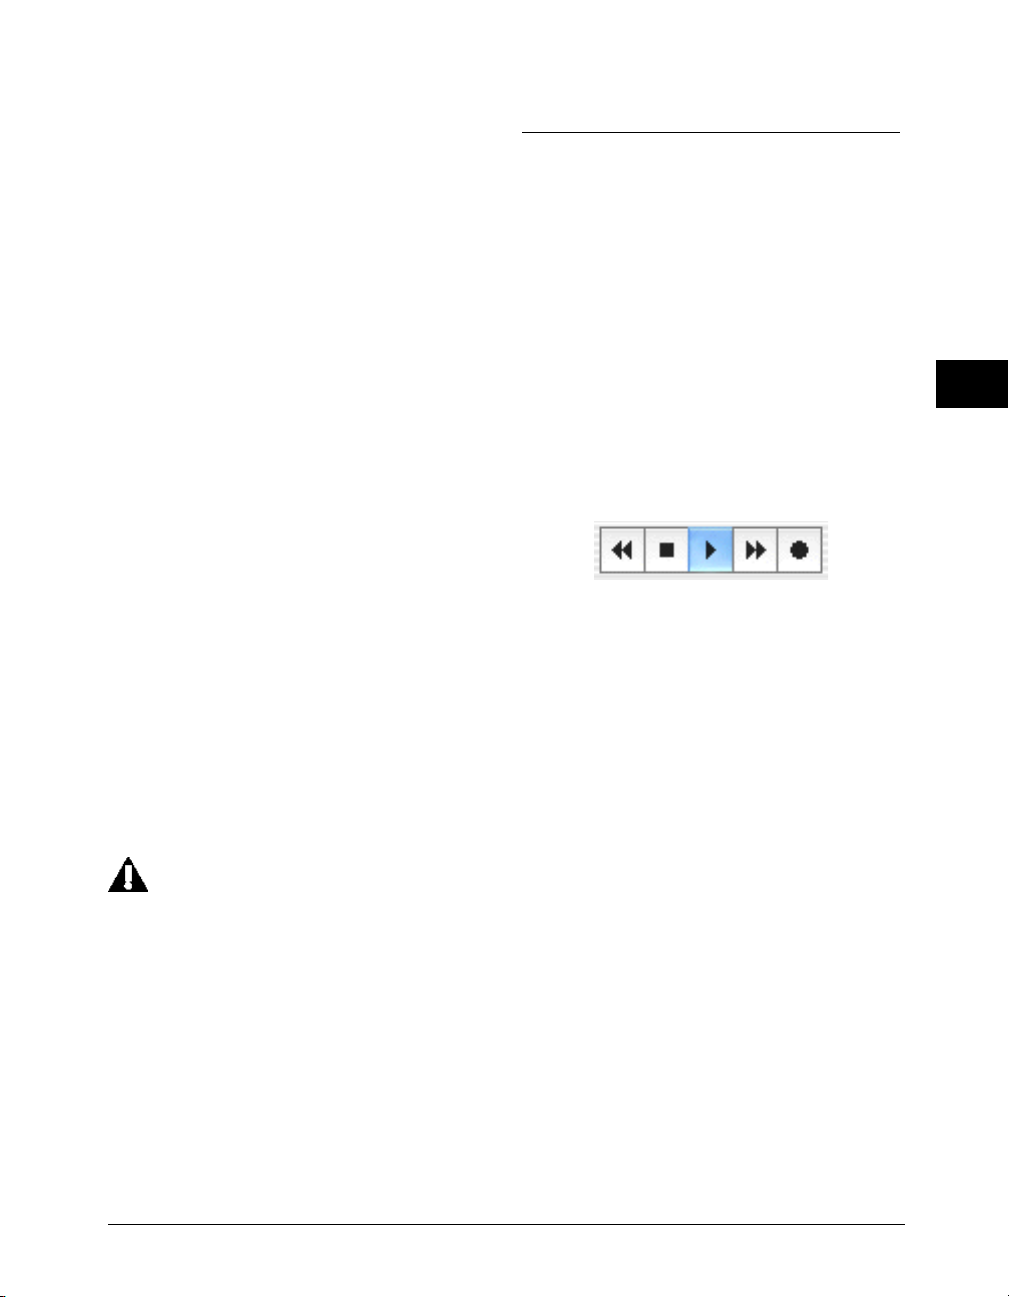
Record Through
Using the ASIO Record Through pop-up menu you can
choose the source for recording.
Playing Audio with Peak
Sample Rate
Using the ASIO Sample Rate pop-up menu you can
select the sample rate at which you wish to record.
Some sample rates may not be available depending on
the limitations of the audio card and its ASIO driver.
Please note that if you are recording from a digital
source you will want to be sure that you record at the
same sample rate as your digital source. For more
information on sample rates, see the Glossary.
Channels
You may also choose to record a mono or stereo file
using the radio buttons under the Channels heading.
Bit Depth
Choose the bit-depth using the radio buttons under
the Bit Depth heading. Please note that you will be
limited to recording at bit depths that are supported
by your audio hardware and its ASIO driver. For more
information on bit depths, see the Glossary.
Monitor with Sound Manager
Enable the Monitor with Sound Manager checkbox to
monitor recording through the Apple Sound Manager
while recording through ASIO.
Be sure to set the Clock Source in the ASIO
dialog to digital if you plan to record via ASIO
from a digital source.
Once you have configured Peak for Playback and
Recording using either the Apple Sound Manager,
ASIO, or CoreAudio, you can start to playback and
record audio with Peak.
The Transport Controls
The Transport Controls that appear in the Transport
window are useful tools for initiating both playback
and recording. They function much as the controls on
a tape recorder would. As they appear below, from left
to right, they are Return to Zero, Stop, Play, Go to
End, and Record.
The Transport Controls
To start playback from the beginning of a document:
1. Press the Spacebar, or click the Play button in the
Transport. Playback begins from the beginning of
the document.
2. To stop playback, press the Spacebar again or click
the Stop button in the Transport.
To rewind playback to the beginning of a document:
• Click the Stop button twice, or click the Rewind
button in the Transport. You can also press the
Return key if playback has been stopped.
To start playback from a specific point in a document:
1. Click the cursor at the desired location in the
audio document and press -Spacebar on your
computer keyboard. Playback begins from the
cursor location and continues to the end of the
document.
4
2. Alternatively, double-click the mouse at the
desired location in the audio document. Playback
begins from the location that you double-clicked
Playback and Recording
47
Page 60
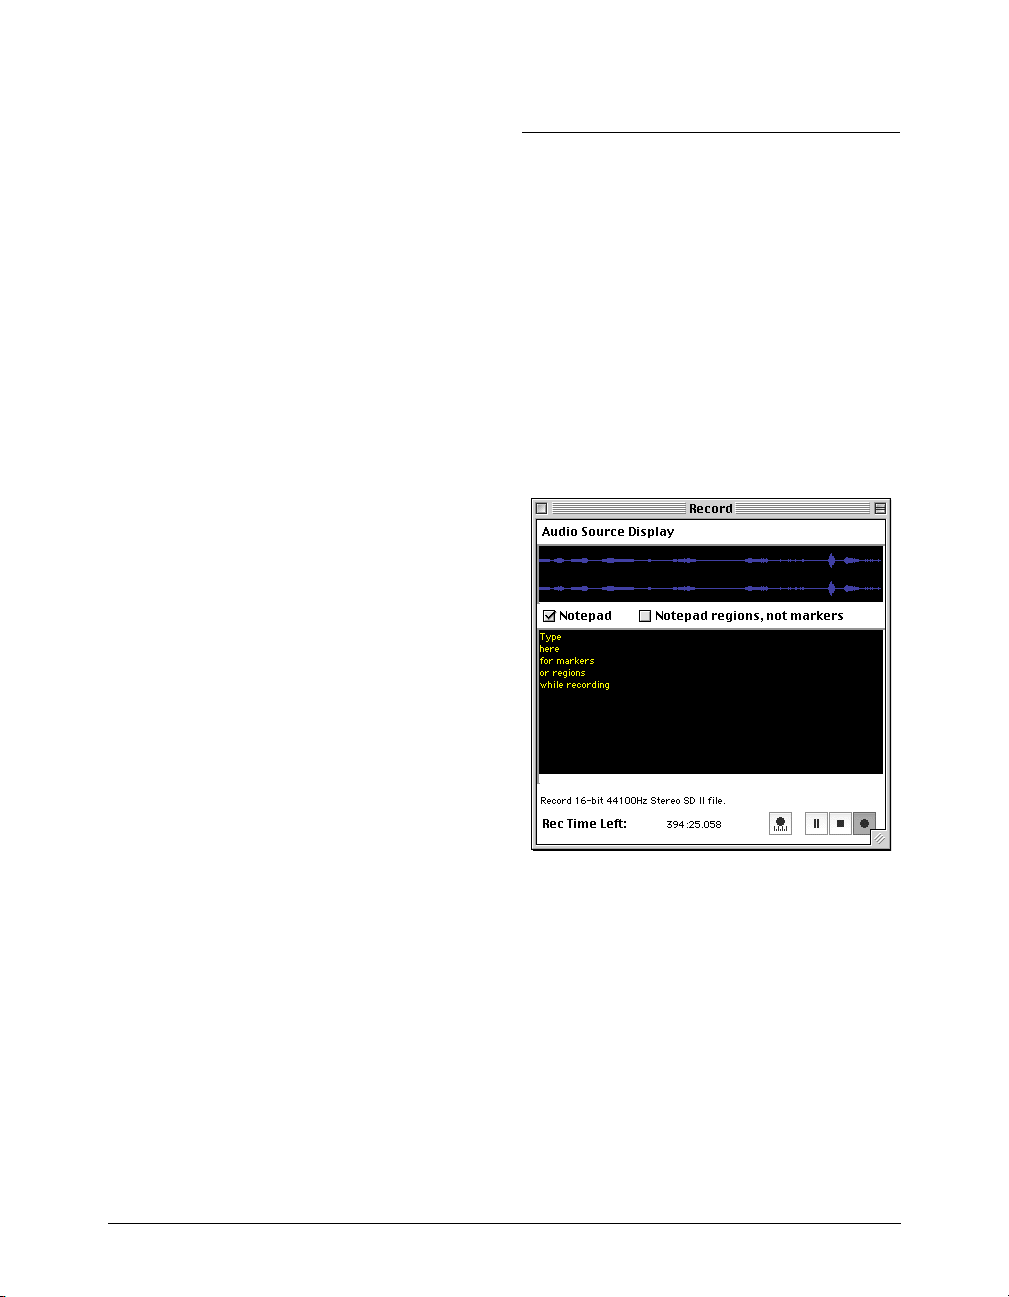
and continues to the end of the document.
3. You can also click anywhere in the Audio
Waveform Overview to begin playback from that
point.
4. To stop playback, press the Spacebar.
Triggering Playback of Multiple Audio Documents
As explained earlier, Peak allows you to have multiple
audio documents open at the same time. Peak assigns
each of these documents a number based on the order
in which it was opened. Peak provides you with a
convenient way of triggering playback of any open
audio document by pressing a number key on your
computer keyboard. This can be a very useful feature
for applications such as “live” sound effects playback,
since you can open multiple audio documents and
play them from your Macintosh keyboard.
To trigger sequential playback of multiple audio
documents:
1. Open several audio documents, taking note of the
number that Peak assigns them in the Windows
menu. (This is based on the order in which the
documents were opened.)
The Record Dialog
When you select Record from the Audio menu (-R)
or Toolbar, the Record dialog appears. There are
transport buttons along the bottom to Start, Pause and
Stop the recording, an Audio Source display that
shows you the waveform as it is being recorded, and a
Notepad window. There are also text displays showing
you the sample rate, bit depth, and number of
channels you selected in the Record Settings dialog, as
well as the amount of time you have left to record on
the selected Record Disk.
2. Press the number which corresponds to the
document(s) you wish to play. (Note: the numeric
keypad will not work for this function, you must
use the numbers at the top of the keyboard). You
don’t need to wait until a document has finished
playing to press the next number: typing a
numerical sequence on your keyboard will “cue
up” all of the corresponding files. They will then
play in the order you choose.
3. If you wish to stop playback and jump to the next
document in line, press the Return key. Peak
initiates playback of the next document in
sequence.
48 Peak User’s Guide
The Record dialog
The Notepad feature in the Record dialog allows you
to type in text descriptions, transcribe a recording, or
type in comments called Notepad Cues at specific
points during the recording of an audio document.
The Notepad feature is available from the Record
dialog and may be used once a recording starts.
If you enable the Notepad checkbox, you can create
markers while recording. Each time you press the
Return key, a new Notepad Cue (marker) is generated
for the current recording time. You may then begin
Page 61

typing text to describe the audio recording at that time
(i.e., naming the marker). When you hear the next
significant event in the recording, press the Return key
to create another cue, and so forth.
When you are finished recording, Peak will create
markers in the audio document that correspond to
each Notepad Cue you have entered. If you also
enable the Notepad regions, not markers checkbox,
Peak will create regions during recording.
Notepad Cues are not available in Peak LE.
6. Adjust the output of your audio source so that its
signal registers relatively high on the meters but
never hits top (indicated by the red Clip Indicators.). Remember to always leave 6 dB or so of
headroom on the meters so that you don’t clip.
Use the yellow and orange meter lights and red
Clip indicators to help you make this adjustment.
7. Click the Record button in the Record dialog. You
are now recording to disk. You should see the
audio waveform begin to scroll in the Audio
Source Display window.
4
8. To stop recording, click the Stop button. To
pause, click the Pause button.
Recording
To start recording:
1. Turn down the volume of your instrument or
audio source.
2. Connect the instrument or audio source to the
audio input jack on the rear of your Macintosh. If
you are using an audio card, use the connectors
on this card; however, many audio cards have an
external interface box which contains the input
and output connectors, if this is the case, use
these.
3. Choose Record Settings from the Audio menu
(Option-R) or Toolbar, and configure the settings
as described in the previous section. Make sure
that you have checked Monitor in the Record
Settings dialog and Speaker on during Recording
in the Device and Sample Format dialog, so that
you can listen to your audio source as it is
recorded into Peak.
4. Select Record from the Audio menu ( -R) or the
Record button in the Transport. The Record dialog
will open.
9. Once you have stopped recording, the Save dialog
appears and prompts you to name the audio
document. You must save the audio document to
the same hard drive you selected in the Record
Settings dialog. Enter a name and click Save. Peak
automatically saves the document in the audio file
format you selected in the Record Settings dialog.
If you wish to later save the document in a
different audio file format, use the Save As
command.
To play back the recording:
1. Press the Spacebar on your computer keyboard.
Playback begins.
2. To stop playback, press the Spacebar again.
3. To start playback from a specific point in the
recording, with the Cursor Tool selected in the
Cursor Palette, double-click on the waveform at
the point from which you want playback to begin,
or click the mouse at the desired point and press
the Spacebar.
5. Play your instrument or audio source. You should
see the signal levels register on Peak’s Audio
Meters in the Transport window.
Playback and Recording
49
Page 62
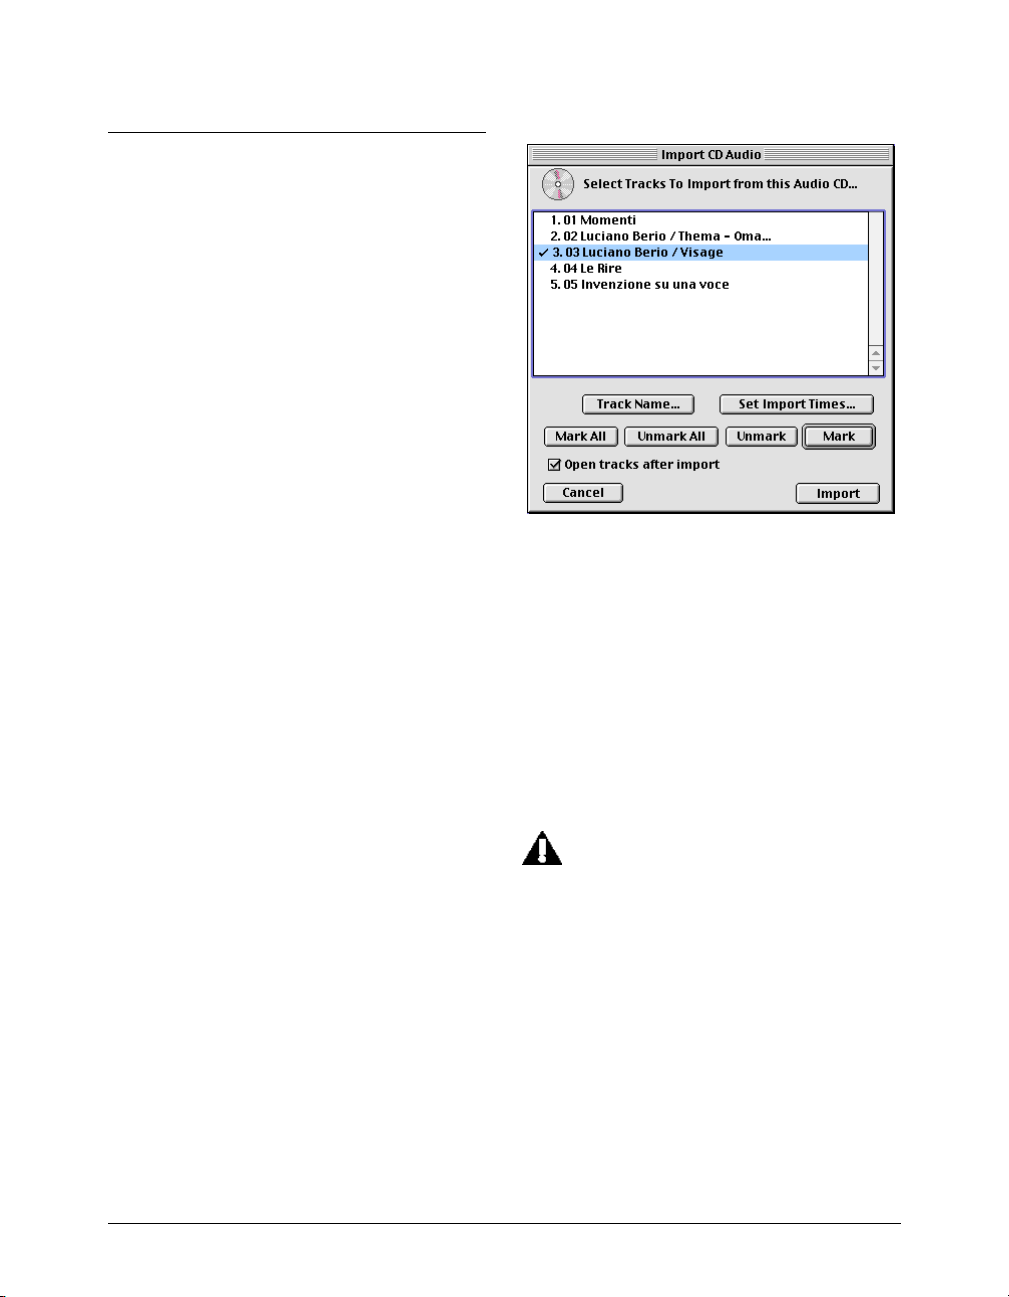
Importing a Track From an Audio CD (CD Audio Extraction)
If you own a Macintosh computer that is equipped
with a compatible CD-ROM drive and Apple’s Sound
Manager software (version 3.3 or later), you can use
Peak to import audio directly from an audio CD. This
process is sometimes referred to among multimedia
developers as audio extraction, or audio-across-SCSI. If
you own an Apple or non-Apple external CD-ROM
drive, you may also be able to take advantage of this
feature.
Please note that not every CD-ROM drive supports
audio extraction, and that even among drives of the
same model, one drive’s firmware (the internal
operating software) may support audio extraction,
while another’s may not. If you are unsure as to
whether or not your drive supports Apple-standard
audio extraction, your best bet is to try the instructions that follow. If this doesn’t work, please contact
the CD-ROM drive’s manufacturer to establish whether
your drive (and your drive’s firmware) will support
Apple-standard audio extraction.
To import tracks from an audio CD:
1. Insert an audio CD in your CD-ROM drive.
Import CD Audio dialog
4. To name a selected CD track, click the Track Name
button. If have iTunes installed and are connected
to the internet, Peak will recognize the track
names by their ISRC codes as they are registered
on the CDDB™ online CD database.
5. To select only a portion of the track, click on Set
Import Times button or double-click on the track
in the list. The Audio CD Import Options dialog
will appear.
2. Choose Import CD Track from the File menu or
click the CD button in the Toolbar.
3. In the dialog that appears, select the CD track that
you wish to import and click Mark. You may mark
multiple tracks for import. If you wish to import all
of the tracks on the CD, click on the Mark All
button.
50 Peak User’s Guide
Audio CD Import Options are not supported
under OS X.1.
Page 63
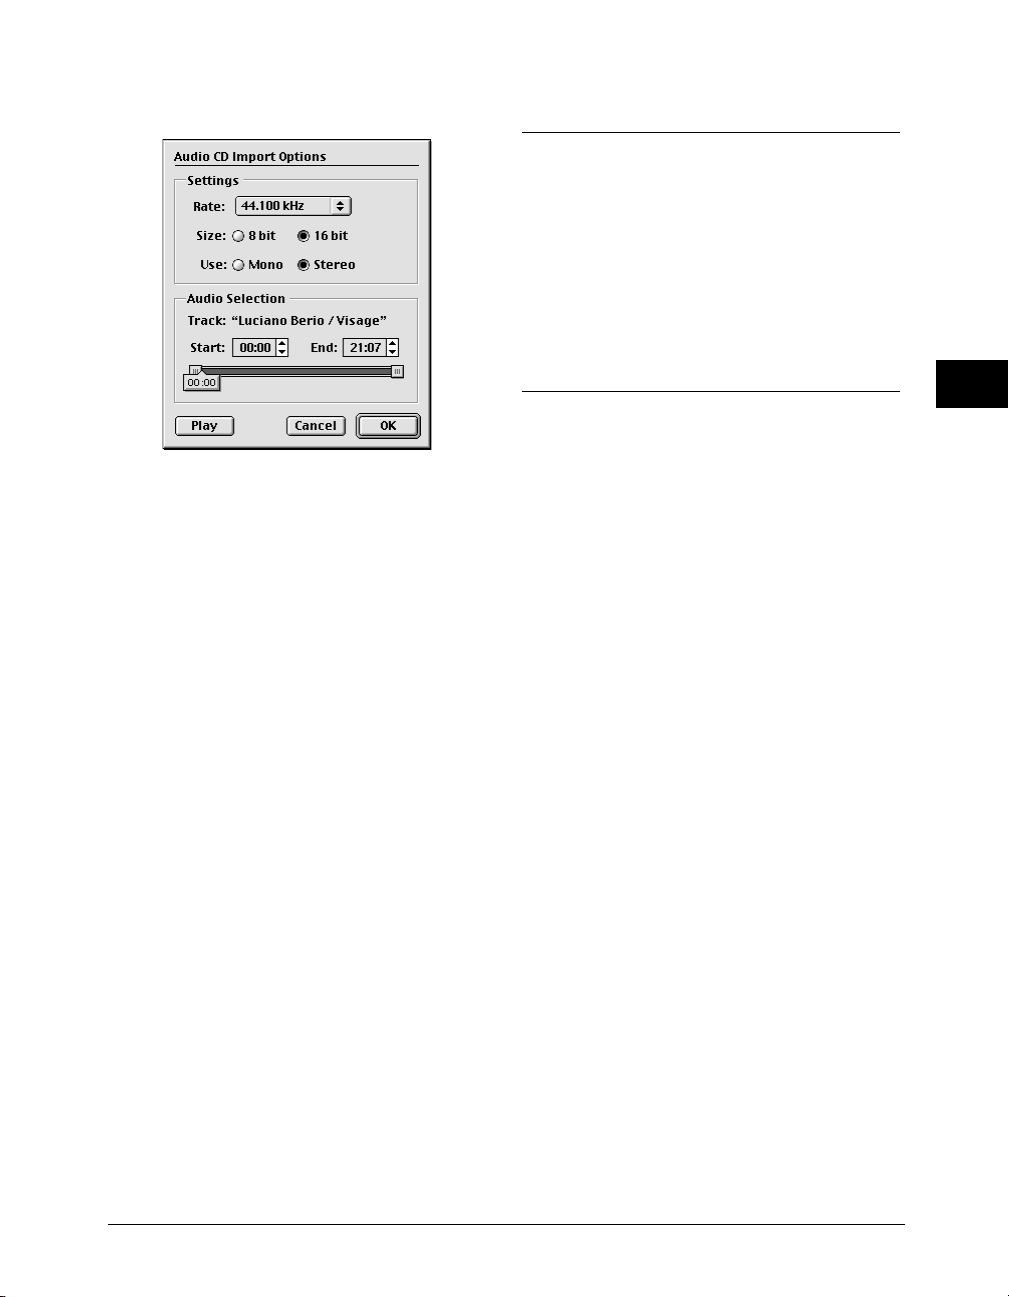
Audio CD Import Options dialog
4. In this dialog that appears, select the desired
sample rate, resolution, and format. By adjusting
the Start and End time controls at the bottom of
this dialog you can import the entire CD track, or a
just specific portion of the track. The slider in this
dialog assists you in locating start and end times.
Click Play to audition the CD track (or selected
portion of the CD track). Click OK when you are
happy with the selection.
Conclusion
You have now learned how to record and playback
audio to and from hard disk using the Apple Sound
Manager, CoreAudio, and ASIO. You have also learned
how to import audio tracks from CDs. In the next
chapter, you will learn how to edit audio with Peak’s
powerful set of digital editing tools.
4
5. Check the Open tracks after importing checkbox if
you want the CD track(s) you are importing to
open in Peak. If you prefer to import the CD
track(s) straight to disk, be sure to deselect the
Open tracks after importing checkbox.
6. Click the Import button in the Import CD Audio
dialog to import the selected tracks and the Save
dialog appears. Use the pop-up menu at the top of
the dialog to navigate to the hard drive where you
wish to save the audio file. Click Save to save the
file to disk. Peak will save the file(s) in the AIFF audio
format.
Playback and Recording
51
Page 64

52 Peak User’s Guide
Page 65
Chapter 5
Editing
Page 66

Peak User’s Guide54
Page 67

Chapter 5: Editing
This chapter introduces you to the concept of digital
audio editing. You will learn how to do digital audio
editing with Peak’s many powerful digital editing tools.
Editing Audio with Peak
Peak provides you with a powerful interactive,
nondestructive environment for editing and manipulating audio. In this environment, not only are virtually
all editing actions completely “undo-able” and “redoable,” but they can be performed interactively while
audio playback is engaged.
Interactive Editing
Interactive editing means that you can cut, paste, loop,
and process audio with DSP functions and Plug-Ins
even while playing back the very audio that you are
editing. For example, you can start playback, cut a
selection of audio and paste or insert it later in the
document, and when Peak reaches the location of the
inserted audio, it will play it as if it were there all
along. This revolutionary capability makes Peak a
supremely fast and flexible audio production tool that
makes conventional recording and editing methods,
such as analog tape and a razor blade or Sound
Designer, seem primitive and archaic by comparison.
Nondestructive Editing
Peak’s nondestructive editing capabilities mean that
the edits you perform to an audio document do not
permanently change the original source recording
until you finally save the document. Thus, you can cut,
copy, paste, fade in and out of, and otherwise
completely change a recording, and still be able to
return back to square one — the original untouched
state of the recording — up until the time that you
save the document to disk. At that time, all edits are
permanently written into the document.
Unlimited Undo and Redo
As an editing session progresses, Peak maintains an
internal list of the edits that you perform. Changes that
you make to an audio document are not permanently
applied to the file until you ultimately save it. This is
what gives Peak its unprecedented unlimited undo and
redo capability. Through the use of the Macintosh’s
standard Undo and Redo commands, you can undo or
redo your actions sequentially, or by using the Edits
command, using a “playlist-style” editing event list.
This is a very exciting technology that allows you to
maintain complete creative freedom of choice—right
up until the last moment before you save your project
to disk.
The Audio Document Window
The heart of Peak’s powerful editing capabilities is the
audio document window. The audio document
window provides you with a “window into sound,”
allowing you to make good use of both your eyes and
ears to perform extremely precise editing tasks. The
Audio Document window gives you a time-domain
representation of sound, that is, you see the amplitude
of the sound over time.
5
Editing
55
Page 68
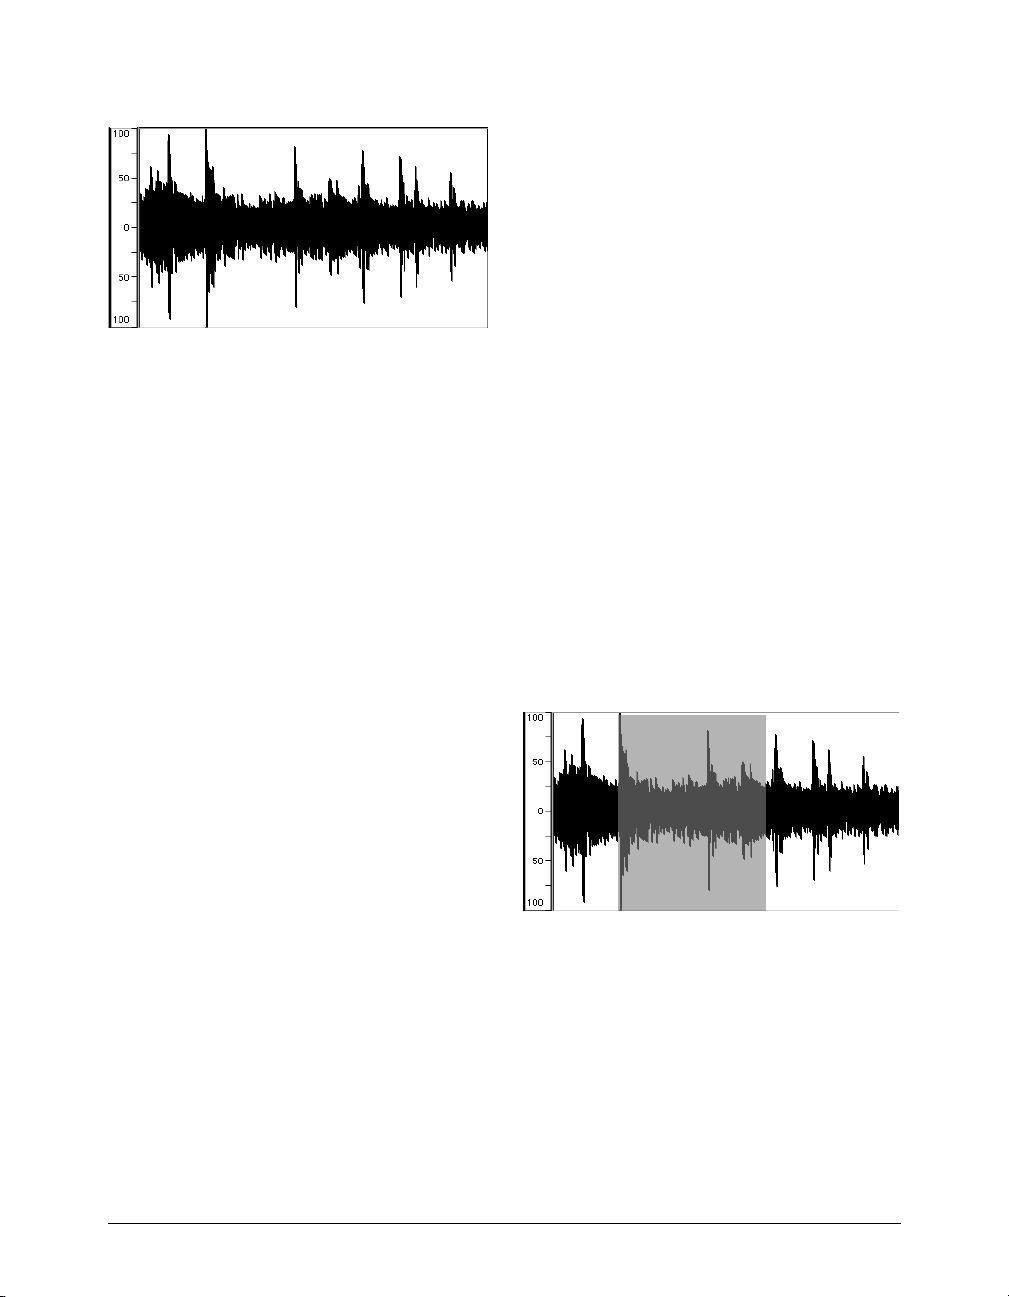
An audio waveform
An Audio Waveform
If you have never seen sound displayed in a visual
format before, it may not be immediately obvious how
to “read” an audio waveform. It is actually quite easy to
navigate through a recording with a waveform as your
road map. The peaks in the waveform are areas of high
amplitude (loud spots). The valleys in the waveform
are areas of low amplitude (quiet spots). If the audio
material is music with a pronounced, regular beat, it is
generally very easy to pick out where the beats are
simply by looking for peaks. Using this information,
and the guidelines given shortly in the “A Selection”
section, you will be able to successfully locate and
select a desired portion of the audio document and
perform the edits that you wish. The cursor marks the
current location, and also serves as an insertion point.
Audio Waveform Overview
Peak provides an Overview display of the entire audio
waveform along the top of the screen under the menu
bar. This provides you with a convenient visual
reference of the overall document when you are
editing only a portion in the audio document window.
The highlighted area in the Overview display shows
the area of the audio waveform currently visible in the
audio document window. If desired, you can hide the
Overview display to allow the audio document window
to occupy more of the computer screen.
To show the Audio Waveform Overview:
• The Overview display appears along the top of the
audio document window under the title bar.
Check Show Overview in the Preference menu or
Toolbar. A check next to this item indicates it is
enabled.
To hide the Audio Waveform Overview:
• To hide the Audio Waveform Overview, uncheck
Show Overview in the Preference menu or
Toolbar.
Vertical Scaling
Peak allows you to control the vertical magnification of
audio waveforms. This feature is useful if you are
editing and viewing a document with very quiet audio
material.
To increase the vertical scaling magnification:
• Hold the Control key down and press the Up
Arrow key.
To decrease the vertical scaling magnification:
• Hold the Control key down and press the Down
Arrow key.
Peak User’s Guide56
A waveform with selected audio
A Selection
A selection is just what it sounds like: a portion of
audio that you have selected by clicking and dragging
with the mouse. You must select audio in order to
perform an editing action on it. To make good
selections for editing, the best rule of thumb is to
begin a selection just before a peak in the waveform
and end it just after a peak in the waveform. In other
Page 69
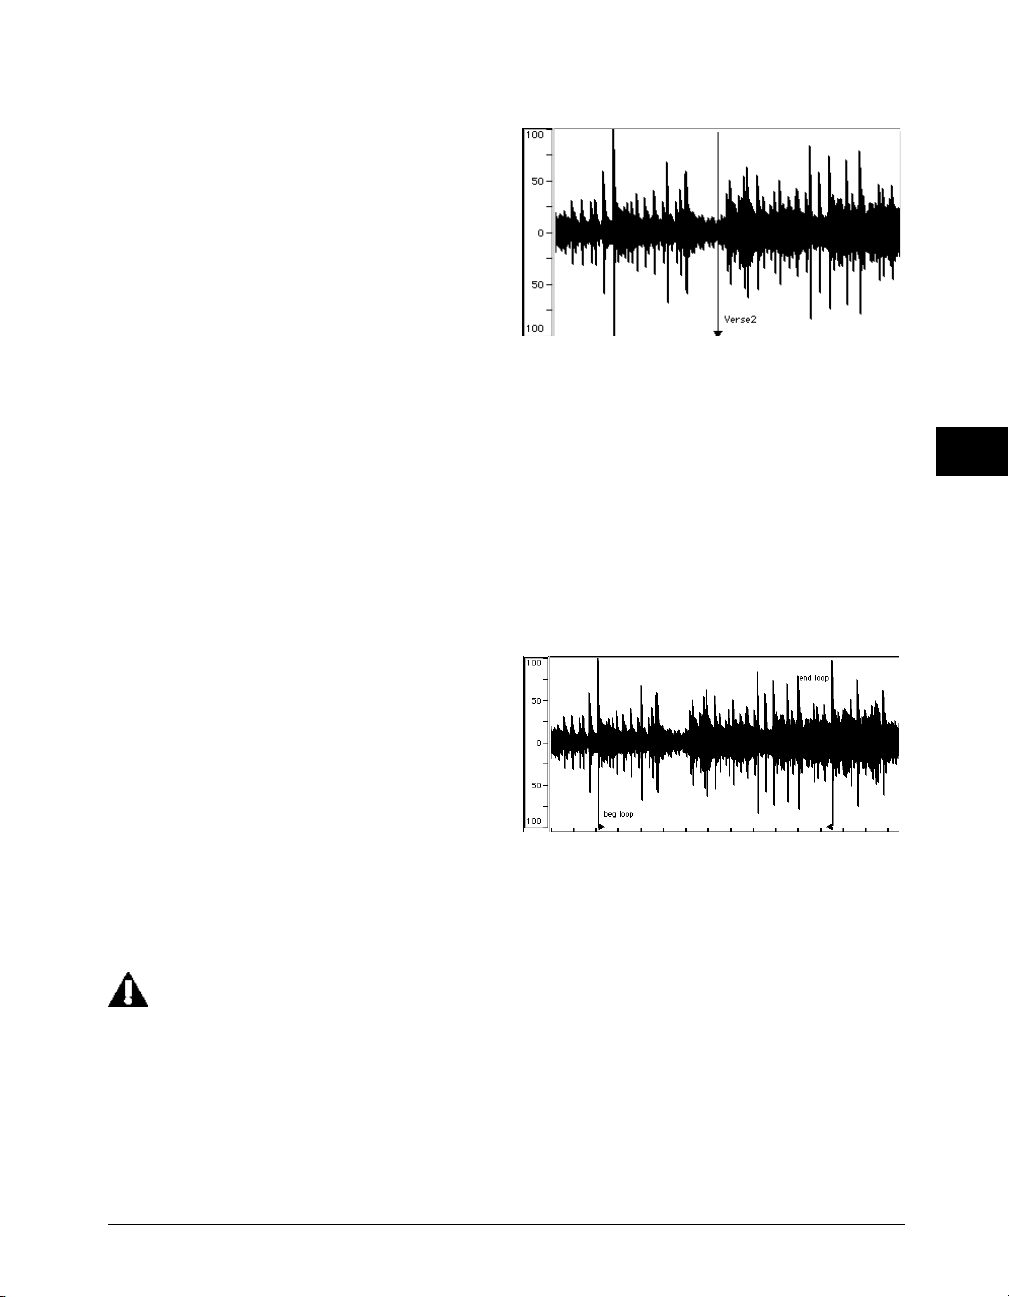
words, try to make selections start and end in areas of
low amplitude (“valleys” in the waveform).
It is also important, when possible, to begin and end a
selection at a point where the waveform meets the
zero crossing line (the center line through the
waveform). This helps you avoid creating pops and
clicks if you later cut or paste the audio because the
point at which the waveform meets the zero crossing
is a point of no amplitude in the sound wave. Pops and
click generally only occur if you make a careless
selection and begin or end on a portion of the sound
wave where the amplitude is high (where the
waveform is high above the center point). Enable
Auto-Snap to Zero in the Preferences menu to have
Peak nudge your selection to the nearest zero
crossings automatically.
The Zoom In function helps you make very precise
selections by letting you zoom in to a higher magnification and select exactly the portion of the waveform
you desire. Also, once you have made a selection, you
can adjust the beginning or the end of the current
selection by holding down the Shift key and clicking
with the mouse. Your selection will be shortened or
lengthened accordingly.
A waveform with a Marker (named “Verse2”)
A Marker
A marker can be placed in a document to identify a
point of importance. A marker appears as a line with a
solid triangular base. Peak allows you to place markers
into a document in order to mark a given location or
region in a document for later selection, navigation, or
editing. Markers can be moved, named and renamed,
“anchored” to a particular location on a waveform, and
given other attributes. The use of markers is covered
in greater detail later in this chapter.
5
Channel Independent Processing
To select only the Left channel, move the cursor over
it. The cursor will show a small “L” at the insertion
point. To select only the Right channel, move the
cursor over it. The cursor will show a small “R” at the
insertion point. You can process one channel of an
audio document using Peak’s native DSP or third-party
plug-ins.
Peak allows you to select and process the left
and right channels of a stereo file independently, but you cannot edit (i.e., Cut, Paste,
Delete, etc.) the left and right channels of a
stereo file independently.
A waveform with loop markers
A Loop
A loop refers to a section of audio that is bounded on
either side by loop markers. In the illustration above,
the area that falls between the loop markers “beg
loop” and “end loop” is looped. Loops are used to
sustain or repeat a section of audio. They can be used
for material that you intend to transfer to a sampler, or
simply for playback within Peak itself. Peak allows you
to create one loop per audio file.
Editing
57
Page 70
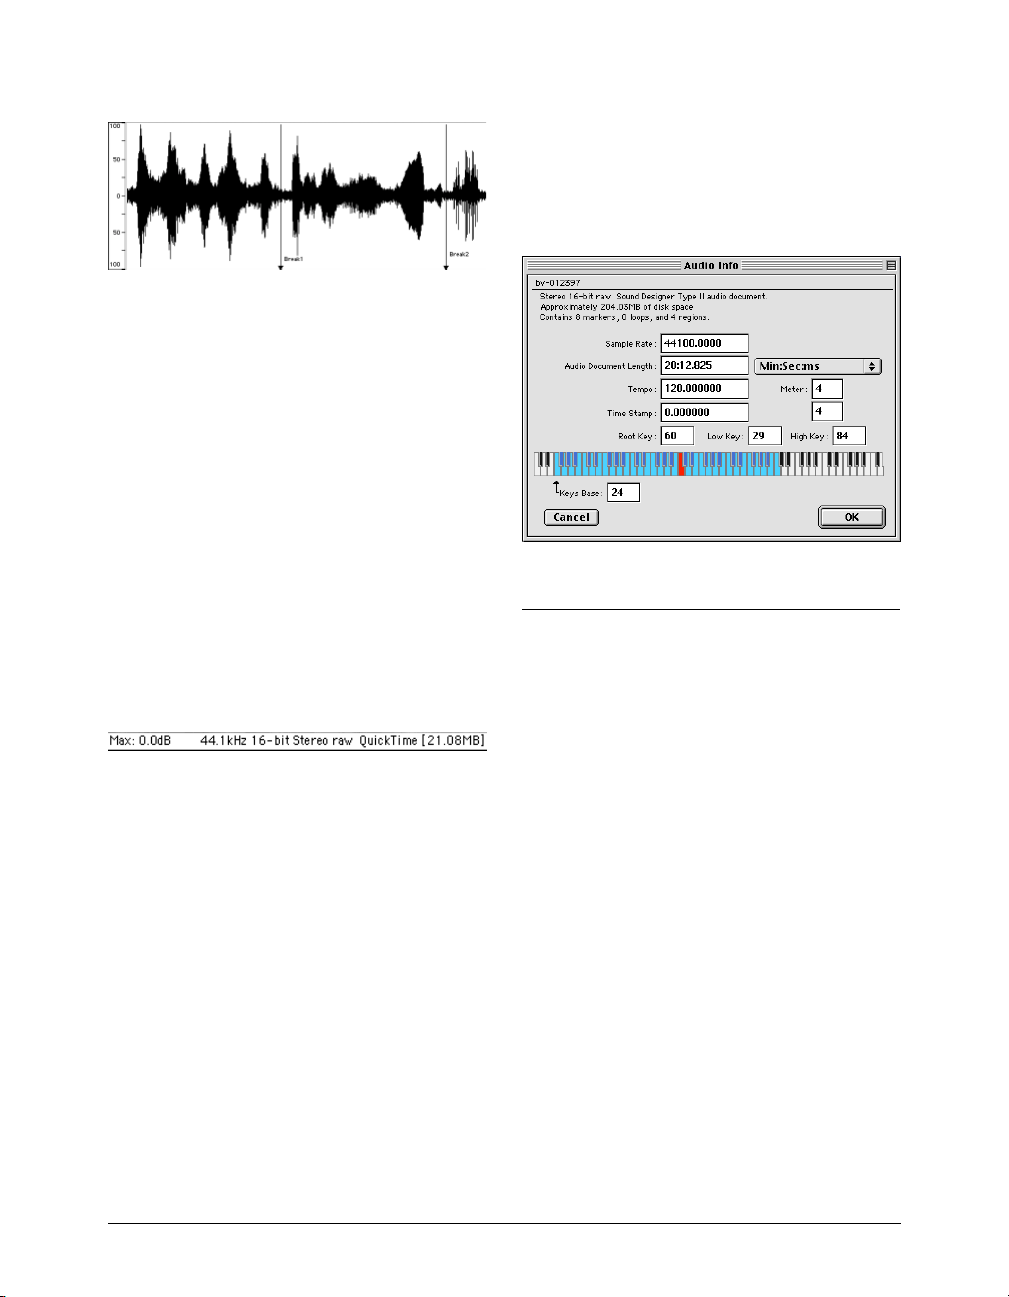
A waveform with 2 adjacent markers (named “Break #1 and Break
#2)
Audio Between Adjacent Markers
Audio between adjacent markers refers to a section of
audio that is bounded by markers. In the illustration
above, the area that falls between the Break #1 and
Break #2 markers is audio between markers. (Note: A
selection of audio between markers is different than
an audio Region. Regions are described later in this
chapter, as well as in Chapter 6, Playlists and Audio CD
Burning.)
Audio Info Area
In the lower left corner of each Peak Audio Document
is the Audio Info Area. The Info Area shows the
maximum amplitude, sample rate, bit resolution, file
format, and file size of the audio file.
Audio Info Area
Clicking on the Max dB section of the Audio Info Area
will open the Change Gain dialog, so that you can
change the gain for the entire audio file, or the current
selection. For more information on the Change Gain
DSP function, please refer to Chapter 7, DSP. Clicking
on any other portion of the Audio Info Area will open
the Audio Info dialog.
Audio Info dialog
Selecting Audio Info from the Preference menu ( -I),
will open the Audio Info dialog. The Audio Info dialog
allows you to change the sample rate, duration, root
key (for use in a sample playback instrument), and
high and low key range. Note that by changing the
sample rate, the pitch and duration of the audio will
be affected. (To change the sample rate of an audio
document without changing the pitch, use the Sample
Rate Conversion command from the DSP menu, or
click on the appropriate Toolbar icon.) The Audio Info
dialog is described in more detail later in this chapter,
as well as in Chapter 11: Menus.
Audio Info dialog
Selecting Audio
In order to perform any type of editing action on an
audio document, first you must select the portion of
the document that you wish to modify. Peak has
several techniques for making and modifying
selections.
To make a selection with the mouse:
• Click the cursor at the desired location in the
audio document and drag to select the desired
range.
To extend or shorten a selection:
1. Make a selection with the mouse as explained
above.
2. Hold down the Shift key and click on the end of
the selection that you wish to modify.
3. Drag the mouse to extend or shorten the
selection. When you are satisfied with the length
of the selection, release the mouse.
Peak User’s Guide58
Page 71
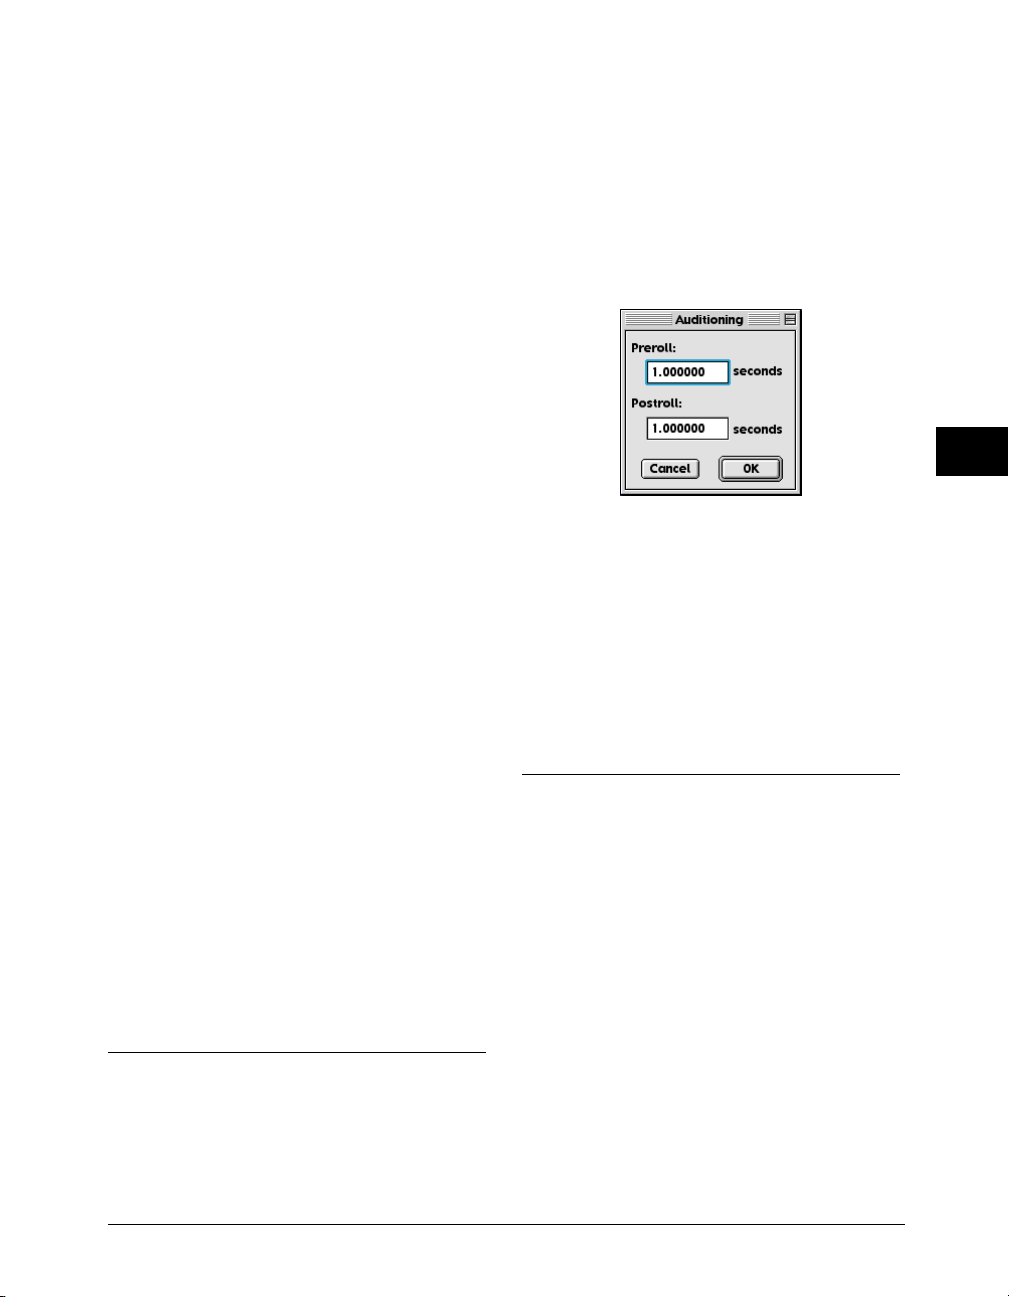
To select audio between two markers:
1. Hold down the Command key () and click
anywhere in between two markers. (Markers are
explained in detail in the next section.) Peak
selects the audio between the markers.
2. If there are additional markers in the document
and you wish to extend the selection to encompass other portions of audio that fall between the
markers, hold down the Shift key and the
Command key, and click between another two
markers. The selection will extend from the
originally selected audio to the audio that you just
added.
actually including this material in the selection itself.
Peak’s Auditioning command allows you to do this by
specifying a desired amount of pre-roll or post-roll
when you play the selection.
To audition audio with pre-roll or post-roll:
1. Choose Auditioning from the Preference menu.
The Auditioning dialog appears.
3. Repeat as desired to navigate to and select
additional audio between markers.
To select audio between two markers with the Tab key:
1. Create markers at several locations in the
document with one of the techniques explained in
the next section.
2. Press the Tab key on your computer keyboard.
Peak selects the portion of the waveform that lies
between the first two markers in the document.
3. Press the Tab key again to select the portion of
audio between the next two markers. (If you hold
down the Shift key while tabbing the selection
through the audio file, you can add each successive area to the selection.)
4. Repeat as desired to navigate to and select
additional audio.
To select all audio in a document:
• Choose Select All from the Edit menu or press -A
on your Macintosh keyboard.
Auditioning Audio
It is often useful to audition a selection along with just
a bit of audio preceding or following it—without
5
The Auditioning dialog
2. Enter the desired amount of pre-roll and post-roll
and click OK.
3. Click the cursor in the audio document and drag
to select the desired range.
4. Press Control-Spacebar. Peak plays the selection,
adding the amount of pre-roll and post-roll that
you specified.
Scrubbing
Dynamic Scrubbing
Peak provides a unique audio auditioning technique
called dynamic scrubbing. This feature is very useful
for precisely pinpointing and selecting a desired
location in an audio document. Dynamic scrubbing
allows you to drag the mouse forward or backward
over a waveform while Peak plays a short loop
(between 10 and 600 milliseconds) at the scrub
location. When you have found the location you are
looking for, you can commence editing. Peak allows
you to choose the length of this playback loop with
the Dynamic Scrub Time command in the Preference
menu. Peak provides two type of dynamic scrubbing:
Editing
59
Page 72
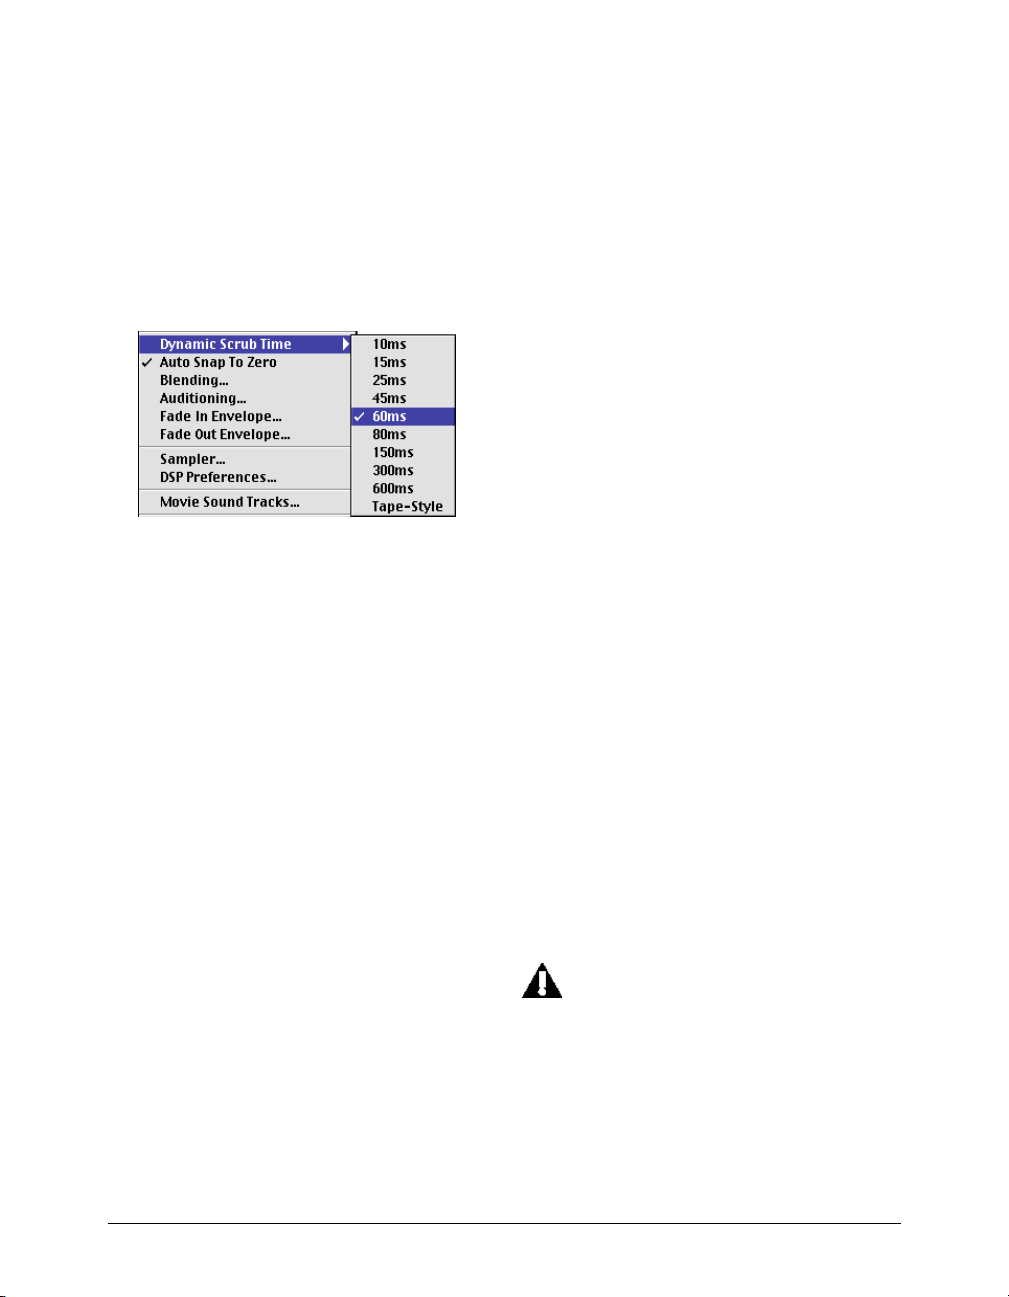
dynamic shuttle scrubbing and dynamic jog scrubbing.
Both are described below.
To select a loop duration for dynamic scrubbing:
• Choose Dynamic Scrub Time from the Preference
menu, and choose a duration from the hierarchical
submenu. Typically, a value of between 40 to 80
milliseconds works well.
Setting the Dynamic Scrub feature’s loop time
You can control the direction (forward or backward)
of playback by dragging the mouse forwards or
backwards. This scrubbing mode affords a greater
degree of control when you are “zoomed out” in the
audio document window.
To use dynamic “jog” scrubbing:
1. Hold down the Control key and Option key and
drag the mouse across an area of the audio
document in the audio document window. As you
drag the mouse, Peak engages playback while it
loops a short portion of the audio at the insertion
point. Dragging the cursor farther away from the
current insertion point increases the velocity of
scrubbing.
2. Release the mouse button to stop scrubbing. The
insertion point will be exactly where you left off
scrubbing.
To use dynamic “Shuttle-type” scrubbing:
1. Hold down the Control key and click and drag the
mouse across an area of the audio document in
the audio document window. As you drag the
mouse, Peak plays a short loop of the audio at the
insertion point. You can control the tempo and
direction (forward or backward) of playback by
dragging the mouse slower or faster, forwards, or
backwards.
2. Release the mouse button to stop scrubbing. The
insertion point will be exactly where you left off
scrubbing.
3. To make a selection starting at the current scrub
point, stop scrubbing, hold down the Shift key,
and click the mouse to extend the selection from
the insertion point to the desired location.
Jog Scrubbing
Peak provides a variation of the dynamic scrubbing
feature which is similar to a technique known in
recording studios as jog scrubbing. With this technique, Peak actually engages playback and moves
through the file at its normal pace, but allows you to
control the playback point by dragging the mouse.
3. To make a selection starting at the current scrub
point, stop scrubbing, hold down the Shift key,
and click the mouse to extend the selection from
the insertion point to the desired location.
Since jog scrubbing mode is engaged by pressing the
Option key in combination with the Control key, it is
possible to toggle back and forth between jog and
shuttle modes simply by pressing or releasing the
Option key.
Tape-Style Scrubbing
In addition to dynamic scrubbing feature, Peak
provides tape-style scrubbing. To enable tape-style
scrubbing, set the Dynamic Scrub Time under the
Preference menu to Tape-Style.
Tape-style Scrubbing requires Sound Manager
version 3.3 or later. Please also note that
QuickTime 4.0.1 does not support tape-style
scrubbing. If you are running QuickTime 4.0.1
you will want to update to a more current
version of QuickTime.
Peak User’s Guide60
Page 73

To start tape-style scrubbing:
• Hold down the Control key on your keyboard, and
then click and drag the mouse at the location
where you wish to begin scrubbing.
To deactivate tape-style scrubbing:
• Release the mouse and Control key.
To control tape speed in tape-style scrubbing:
1. As you drag the mouse towards the right,
scrubbing speed will increase.
To undo an action:
1. Perform an edit (such as cutting audio or moving a
marker).
2. Choose Undo from the Edit menu (-Z) or
Toolbar. The action is undone.
3. You can continue undoing actions until you return
to the original state of the audio document (the
state at which it was last saved). When there are no
actions left to undo, the Undo menu item will
appear grayed out.
2. As you drag the mouse toward the left, scrubbing
will slow down.
3. If you drag the mouse to the left of the point
where you started scrubbing, the scrub direction
will change from forward playback to backwards
playback.
The playback bar will show the scrubbing speed at the
top of the playbar. Playback speed can vary from
minus four times (–4.0x) to four times (+4.0x)
original playback speed.
Using Unlimited Undo and Redo
Peak maintains an internal list of the edits that you
perform during the course of an editing session. These
changes are not permanently applied to the file until
you save it. This gives Peak unlimited undo and redo
capability. Through the use of the Macintosh’s
standard Undo and Redo commands, you can undo
and redo your actions sequentially; or by using the
Edits command, using a “playlist-style” editing event
list. This powerful capability allows you to maintain
complete creative freedom of choice—right up until
the last moment before you save your project to disk.
The only limitation in using Redo is that if you insert a
new action when a redo action is available, you will no
longer be able to redo. Remember, as soon as you
perform an editing action other than Undo in Peak,
Redo is no longer available.
To redo an action:
1. If you wish to redo the action that was undone,
choose Redo from the Edit menu (-Y) or
Toolbar. The action is redone.
2. You can continue redoing actions until there are
none left to redo. When there are no actions left to
redo, the Redo menu item will appear grayed out.
Using the Edits Command to Undo a Series of Actions
Peak’s Edits command provides you with a second
unique and powerful method of undoing virtually any
number of editing actions performed on an audio
document since you last saved it. You can think of the
Edits command as a kind of “event list-based” undo
with a list of all your editing actions since you last
saved. Using this list, you can navigate back in time to
the point at which you performed a particular edit,
and if you wish, undo it. Once you have returned to an
earlier state in the project, you are free to start editing
from that point on.
Be aware that if you do go back to a past
action and perform a different action at that
state in the project, any edits that originally
occurred after will be gone, and you won’t be
able to redo them.
5
Editing
61
Page 74
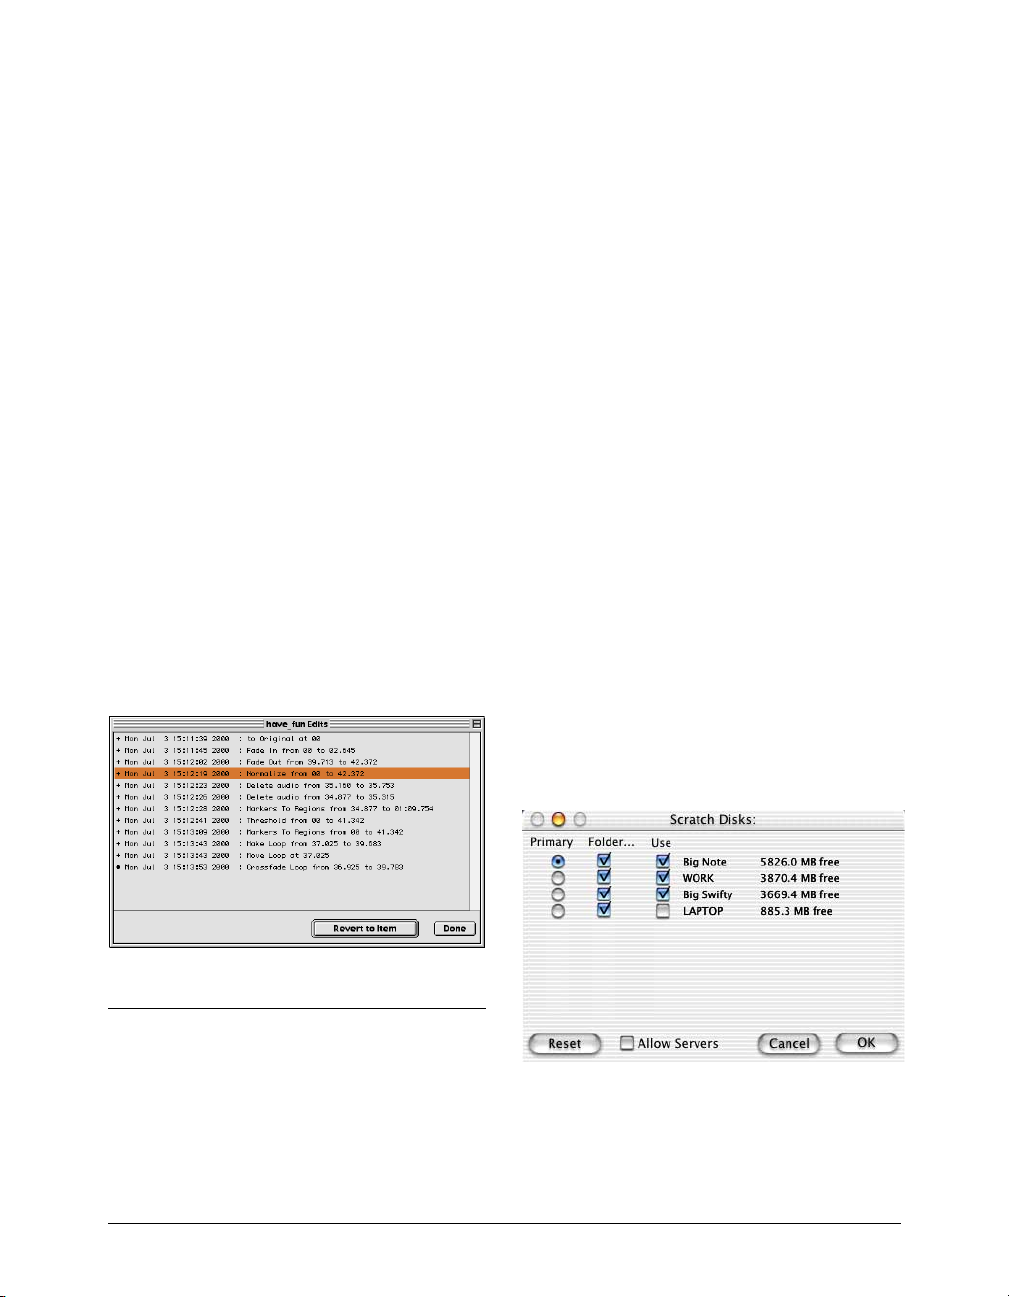
To use the Edits command to return to or undo an
action:
1. Perform several edits. (Don’t use the Save
command or you won’t be able to undo any edits
that occurred before you saved.)
2. Choose Edits from the Edit menu. A dialog
appears listing the edits you have performed since
you last saved the document.
This section explains how to use each of these
functions.
Because Peak allows you to have multiple audio
documents open at the same time, it is possible to
conveniently cut, copy, paste, and insert audio between
documents. This makes combining material from
several audio documents very fast and easy.
3. In the list, double-click on the description of the
action you wish to return to (or click the Revert to
Item button). Peak returns the document to the
state it was in at the time of that edit.
4. If you wish to undo a particular action, locate the
action that immediately precedes the one you wish
to undo, and double-click it. Peak returns the
document to that state.
5. When you have finished, click Done.
Please note that Peak will remain in the state of the
action that you last selected in the Edits dialog. If you
begin new edits from this point, you will change the
original sequence of edits that followed this point in
the editing session.
Scratch Disks
Because audio data can be very large, Peak utilizes a
portion of your hard disk’s free space to hold audio
data that has been cut or copied, as well as for
temporary or scratch files for undo purposes. If you
have more than one hard drive attached to your
Macintosh, the Scratch Disks command in the
Preference menu allows you to choose the hard drives
(or “scratch disks”) that you wish to use for these
temporary files. Peak allows you to select which disk
you want to have as your default, or “Primary” disk for
this purpose--ideally you would select the disk that has
the most free space. If you are connected to a file
server, you can utilize available storage on the server by
clicking the Allow Servers checkbox (that is if you have
a very fast server connection). Any available servers will
then appear in the Scratch Disks pop-up menu. This is
recommended only if you have access to a high-speed
ethernet, Media Net, or other fast server.
The Edits dialog
Essential Editing Functions
Peak supports all of the Macintosh’s essential editing
functions such as cut, copy, and paste and provides
several more specifically designed for audio editing.
Peak User’s Guide62
The Scratch Disks dialog
Page 75

Clearing the Clipboard to Reclaim Disk Space
If you no longer need the clipboard contents, you can
free up the disk space occupied by the clipboard by
choosing the Clear Clipboard command from the Edit
menu.
To delete a selection:
1. Click the cursor at the desired location in the
audio document and drag to select the desired
range.
2. Press the Delete key, or click the Delete button on
the Toolbar.
Cutting Audio
The Cut command ( -X) allows you to cut a selected
range out of a audio document. Audio that occurs after
the cut slides over to fill in the gap. By cutting and
pasting “pieces” of audio, you can freely rearrange
material in an audio document. This can be a powerful
tool for creating audio remixes for music-oriented
applications, as well as an indispensable tool for
general sound design tasks. When you cut a selection,
the Macintosh holds the cut audio data in its internal
memory (the Clipboard) in case you wish to paste it
elsewhere. Because all real time editing you do with
Peak is nondestructive, the audio isn’t actually
removed from the original audio document until you
finally save the file to disk with the Save command. At
that time, all edits are saved and any changes that you
have made are permanently saved to the audio
document.
To cut a selection:
1. Click the cursor at the desired location in the
audio document and drag to select the desired
range.
2. Choose Cut from the Edit menu ( -X) or
Toolbar.
3. The selected range is removed from the audio
document(s) and held on the Clipboard. Audio
occurring after the cut slides over to fill in the gap.
3. The selection is removed from the audio
document. Audio occurring after the deleted
section slides over to fill in the gap.
Copying Audio
The Copy command ( -C) copies the current
selection to the Macintosh’s Clipboard (or internal
memory buffer) so that you can paste it, insert it, or
use it with optional “Clipboard-based” processing such
as Add, Convolve, Mix, and Modulate. As with the Cut
command, copying and pasting “pieces” of audio,
allows you to freely rearrange material in a document.
This can be a powerful tool for creating audio remixes
for music-oriented applications, and an indispensable
tool for sound design.
To copy a selection:
1. Click the cursor at the desired location in the
audio document and drag to select the desired
range.
2. Choose Copy from the Edit menu ( -C) or
Toolbar.
3. The selection is copied to the Clipboard.
At this point, you can use either the Paste or Insert
commands to place the copied audio into an audio
document. Each of these commands are explained
below.
5
Deleting Audio
If you wish to remove a section of audio from an audio
document without using the Cut command, you can
use the Delete key, or the Delete button on the
Toolbar. As with the Cut command and other editing
functions, the audio isn’t actually removed from the
original audio document until you save the file to disk.
Pasting Audio
The Paste command ( -V) allows you to paste the
contents of the Clipboard into a location that you
choose by placing an insertion point. Pasting audio
deletes any selected audio and inserts the clipboard
audio at the insertion point. Blending can be used
with the Paste command if you have made a selec-
Editing
63
Page 76

tion—the Pasted audio will be crossfaded with the
audio on either side of the selection according to the
Blending Envelope and Duration.
By cutting and pasting pieces of audio, you can freely
rearrange material in an audio document. In musical
applications, this gives you the freedom to entirely
“rewrite” compositions by changing the order of
things, repeating desired sections, and so on. In sound
design applications, this gives you the power to
“compose” with sound by creating audio collages.
To paste audio into an audio document:
1. Click the cursor at the point where you wish to
paste the audio data in an audio document or
make a selection of audio you want to delete and
replace with the contents of the clipboard.
2. Choose Paste from the Edit menu ( -V) or
Toolbar.
The Clipboard contents are pasted into the audio
document(s), beginning immediately after the
insertion point. Any selected audio at the location of
the paste is overwritten when the pasted data is
inserted into the audio document.
Replacing Audio
The Replace command allows you to paste audio data
over existing audio–to paste audio into an audio
document without pushing all data to the right of the
insertion point farther to the right (later in time) to
accommodate the newly pasted audio. The Replace
command is useful for “laying over” a portion of audio
while maintaining the timing of the original document.
To replace audio into an audio document:
1. Click the cursor at the point where you wish to
replace the audio data in an audio document.
2. Choose Replace from the Edit menu or Toolbar.
All data to the right of the replaced audio
maintains their time position.
Inserting Audio
The Insert command ( -D) allows you to paste audio
data into an audio document without overwriting any
existing data at the insertion point. When you paste
data with the Insert command, all data to the right of
the insertion point or selection start is pushed farther
to the right (later in time) to accommodate the newly
pasted audio. The Insert command is one of Peak’s
most useful tools for restructuring the contents of an
audio document. It is particularly good for “composing
on the fly” since it allows you to cut and insert pieces of
audio—musical phrases, riffs, or simply textural
sounds—to create a composition or soundscape.
To insert audio into an audio document:
1. Click the cursor at the point where you wish to
insert the audio data in an audio document.
2. Choose Insert from the Edit menu ( -D) or
Toolbar. All data to the right of the insertion point
is pushed farther to the right (later in time) to
accommodate the newly pasted range.
Cropping a Selection
The Crop command ( -`) allows you to make a
selection in an audio document and quickly and easily
remove all other audio from the audio document
except the selection. The Crop command is a
particularly useful tool for editing material to be used
as samples or sound effects, since it allows you to
isolate and save just the desired portion of a recording.
To crop a selection:
1. Click the cursor at the desired location in the audio
document and drag to select the desired range.
2. Choose Crop from the Edit menu ( -`) or
Toolbar.
All audio but the selection is removed from the audio
document.
New Document from Selection
The New Document from Selection command will
automatically create a new Audio Document containing
Peak User’s Guide64
Page 77
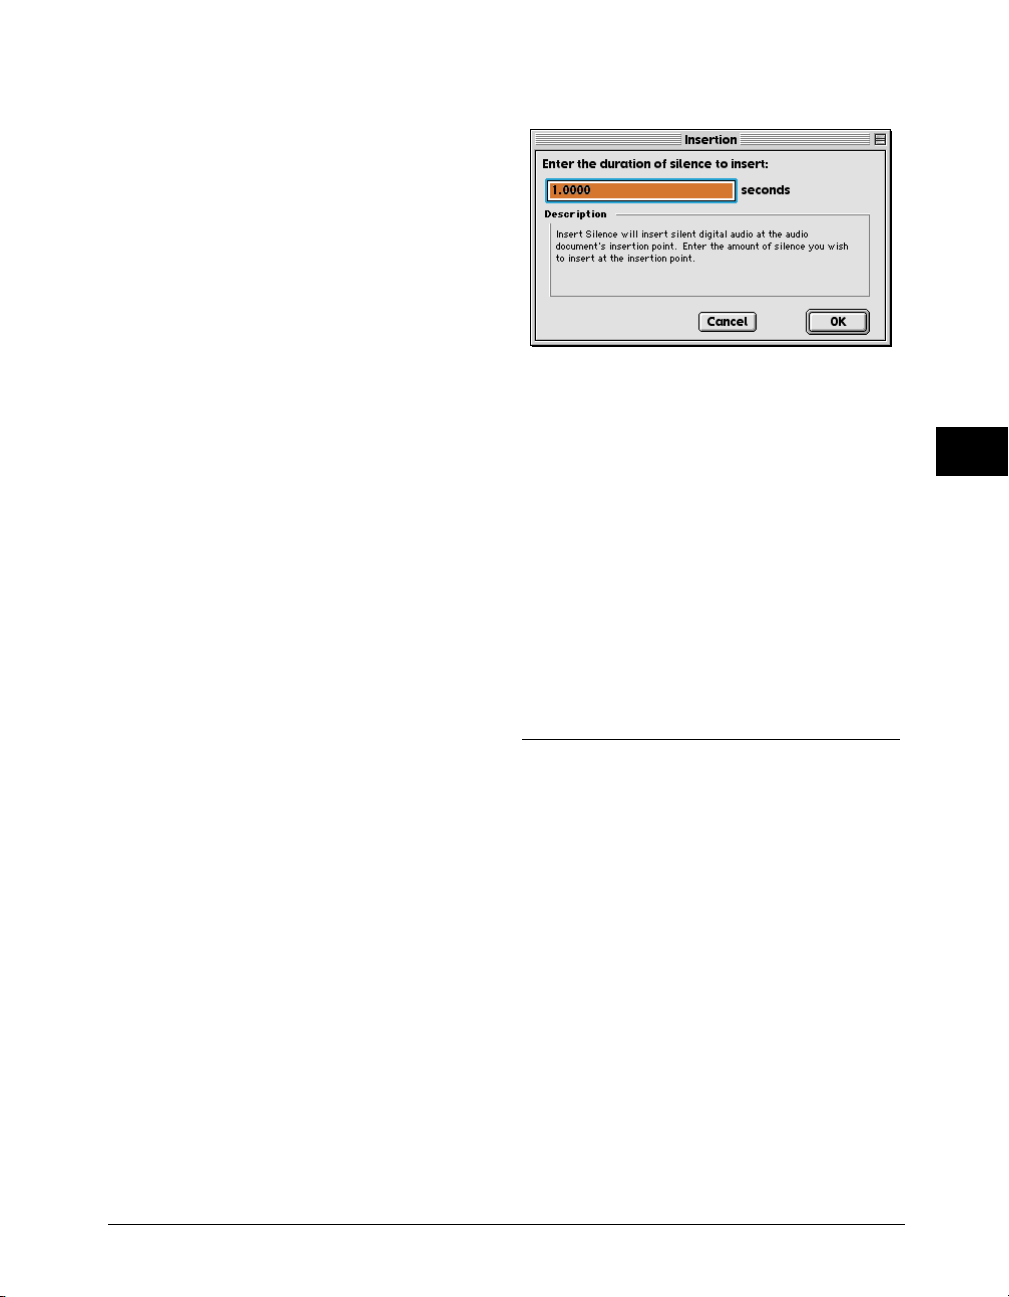
the selected audio from the source document.
To create a new document from a selection:
1. Make a selection in any open audio document that
you want to have as its own document.
2. Choose Document from Selection from the New
submenu under the File menu (Control--N).
3. A new audio document will be created with the
selected audio.
Silencing a Selection
The Silence command ( -E) replaces the selected
audio in the audio document’s selection with silence.
This feature is very useful for silencing nonessential
portions of a recording that contain an unusual
amount of noise. This can be used very successfully
with spoken material such as dialog or narration to
remove noise between words or during pauses in
speech. It can also be used to remove pops or clicks
that occur in such material.
To silence a selection:
1. Click the cursor at the desired location in the
audio document and drag to select the desired
range.
The Insert Silence dialog
To insert silence of a specific duration into a document:
1. Click the cursor at the desired location in the
audio document.
2. Choose Insert Silence from the Edit menu or
Toolbar.
3. In the dialog that appears, enter the amount of
silence that you wish to insert into the audio
document.
Peak inserts the specified amount of silence into the
document.
5
2. Choose Silence from the Edit menu ( -E) or
Toolbar.
The selected audio is replaced with silence.
Inserting Silence into a Document
The Insert Silence command allows you to insert a
specific amount of silence into an audio document at
the current insertion point. This feature is very useful
for inserting pauses of a desired duration into a
recording, and can be particularly useful in adjusting
the timing or rhythm of spoken material such as dialog
or narration. When you choose this command, Peak
will prompt you to enter the amount of silence you
wish to insert. You can enter this value in samples,
milliseconds, or seconds. All audio occurring after the
insertion point is moved later in time by the amount of
the silence that you insert.
Show Edits
When you enable the Show Edits command Peak
indicates areas of an audio document that you have
edited by enclosing these areas with hatched lines.
This provides you with a convenient visual reference
to portions of the document that have been affected
by your editing actions. Once you save a document,
the edits are saved, and these indicators will no longer
appear.
To enable Show Edits:
• Choose Show Edits from the Preference menu. A
check next to this item indicates it is enabled.
Editing
65
Page 78
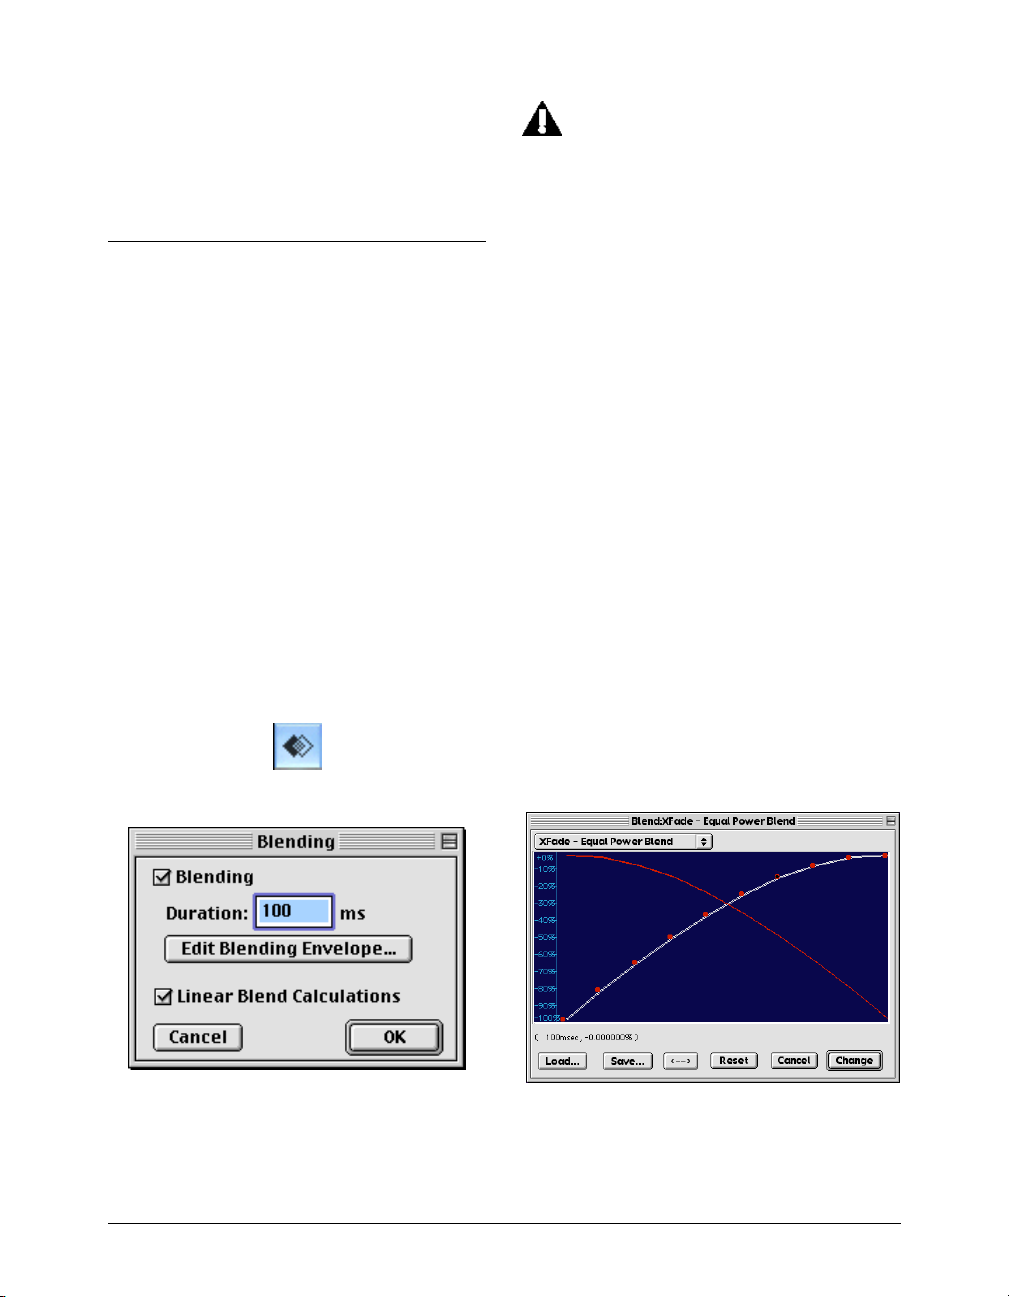
To disable Show Edits:
• Choose Show Edits again from the Preference
menu. The absence of a check next to this item
indicates it disabled.
Be aware that Blending can interfere with
certain DSP processes available under Peak’s
DSP menu, such as Fade In/Out and Normalize.
You will typically only want to enable Blending
only when you intend to make an edit in which
Blending may be desirable.
Using Crossfades and Blending to Smooth Edits
Blending is an automatic crossfade function with a
user-editable envelope. Peak can apply blending to
areas of an audio document where they are modified
by cutting, deleting, pasting, or other editing
processes in order to smooth abrupt transitions
between waveform amplitudes. It can be very useful
for creating a smooth transition between edits that
would otherwise sound too abrupt. If you are going to
edit (i.e., Cut, Paste, Delete, etc.) a document, you
may wish to enable blending to smooth things out a
bit. You can toggle blending on or off by choosing the
Blending from under the Preferences menu, or by
clicking the Blend enable/disable button in the Cursor
Palette (Caps Lock key) or in the Toolbar.
The Blending Enable/Disable button in the Cursor palette
To enable blending and set blending parameters:
1. Choose Blending from the Preference menu or
Toolbar, or Option-click on the Blending button in
the Cursor Palette. The Blending dialog appears.
2. Click the Blending checkbox to turn this feature
on.
3. Enter a value in milliseconds in the Duration field.
Peak will apply a crossfade of this duration across
the edit.
4. If you wish to edit the shape of the crossfade that the
blending function applies, click the Edit Blending
Envelope.
5. Peak’s Crossfades are calculated logarithmically to
preserve volume levels for crossfaded material. If
you want Peak to calculate the Blending Crossfade
linearly, check the Linear Blend Calculations
checkbox.
6. Click OK when you have finished.
The Blending dialog
The Blending Envelope Editor
Peak User’s Guide66
Page 79

To select and edit the blending envelope:
1. Choose Blending from the Preference menu and
click the Edit Blending Envelope button. The
Blending Envelope Editor appears. The envelope
shape shown here represents the shape of the
crossfade. Peak also comes with several commonly
used preset envelopes that appear in the pop-up
at the top of all of Peak’s Envelope Editing
windows (see also Editing a Fade In/Out Envelope). These are stored in the Peak Envelopes
folder in your Peak folder.
2. Click anywhere on the line and a new moveable
“breakpoint” will appear.
3. Drag the breakpoint to the desired location.
4. Continue creating and dragging breakpoints until
you have created the envelope that you desire. If
you wish to delete a breakpoint, click on it with
the cursor and press the Delete key on your
computer keyboard.
5. If you wish to reverse the shape of the envelope
you have created, click the “<–>” button. This
creates a mirror image of the envelope.
6. If you would like to save your custom envelope for
later use, click on the Save button before exiting
the envelope editor. Your custom envelopes will
be stored in the Peak Envelopes folder, and will
appear in the pop-up at the top of the envelope
editor.
7. When you are satisfied with your new envelope
shape, click Change to confirm your edits and
close the envelope editor. Peak will use this
envelope until you change it again.
Note that the Blending Envelope will only be
applied to an edit if it is configured prior to
making the edit.
If Linear Blend Calculations is checked in the
Blending dialog, the Equal Power X-fade
envelope is very effective for a smooth
crossfade that will not result in a dip in the
energy of the audio data.
Creating Fade Ins and Fade Outs
Peak allows you to create fade ins or fade outs at any
point in an audio document. Fade ins/outs can be very
useful for smoothly fading in or out of an audio
document, or for fading out of one type of audio
material into another. Very short fade ins can also be
useful for smoothing or removing clicks and pops in a
recording. Peak allows you to control the exact
“shape” of the fade in/out by providing you with
preset envelope shapes as well as very precise userdefinable envelope controls for the fade. Peak also
comes with several commonly used preset envelopes
that appear in the pop-up at the top of the Envelope
Editing windows. These are stored in the Peak
Envelopes folder in your Peak folder.
To create a Fade In:
1. Click the cursor at the desired location in the
audio document and drag to select the range you
desire. The Fade In will be applied to the audio
within this selection.
2. Choose Fade In Envelope from the Preference
menu.
3. In the dialog that appears, you can use the default
envelope, edit the envelope, or load any envelopes
included with Peak or that you have created
yourself. (“Editing Fade In/Fade Out Envelopes” is
covered in the next section.)
4. Choose Fade In from the DSP menu. Peak applies
the Fade In to the selection you have made in the
audio document.
5. To hear the completed Fade In, press OptionSpacebar. You will hear the selected audio
complete with your Fade In.
To create a Fade Out:
1. Click the cursor at the desired location in the
audio document and drag to select the range you
5
Editing
67
Page 80
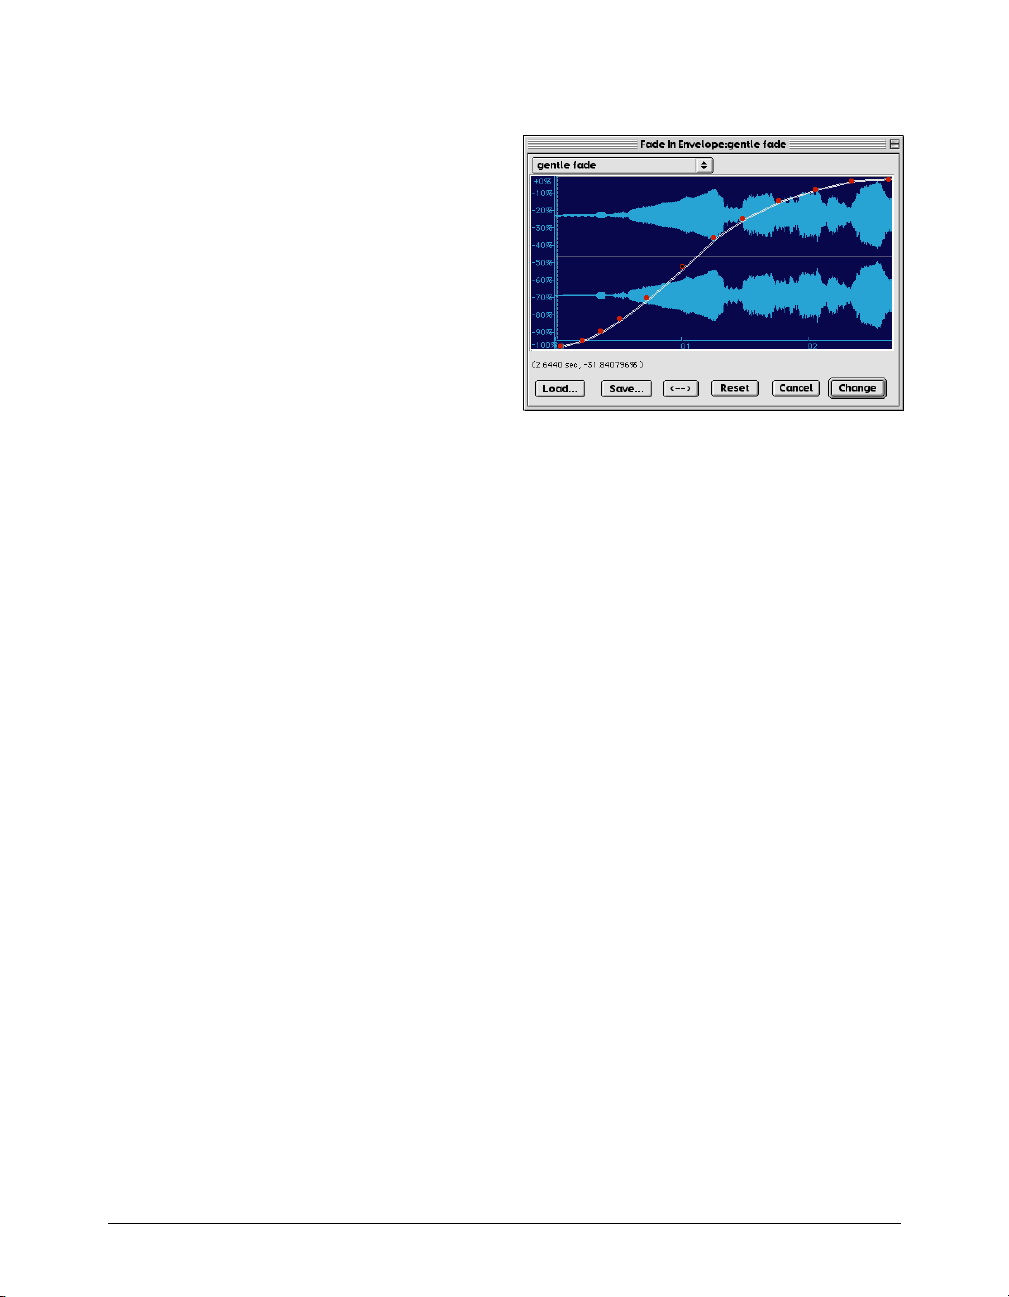
desire. The Fade Out will be applied to the
selected audio.
2. Choose Fade Out Envelope from the Preference
menu.
3. In the dialog that appears, you can use the
envelope, create your own, or load any envelopes
that you have saved to your hard disk. (“Editing
Fade In/Fade Out Envelopes” is covered in the
next section.)
4. Choose Fade Out from the DSP menu. Peak
applies the Fade Out to the selection you have
made in the audio document.
5. To hear the Fade Out, press Option-Spacebar. You
will hear the selected audio complete with your
Fade Out.
Editing a Fade In/Fade Out Envelope
Peak allows you to control the exact shape of Fade Ins/
Outs by providing you with controls for editing the
Fade In/Out envelope. These are found in the Fade In
Envelope and Fade Out Envelope commands in the
Preference menu.
To edit and save a Fade In/Fade Out envelope:
1. Choose Fade In Envelope (or Fade Out Envelope)
from the Preference menu. The Fade Envelope
Editor appears. The envelope shape shown here
represents the shape of the fade, and overlays the
selected audio to show where the curve is
graphically applied to the waveform representation of the audio.
The Fade Envelope Editor (a Fade In is shown)
2. Click anywhere on the line and a new moveable
“breakpoint” will appear.
3. Drag the breakpoint to the desired location on the
envelope’s curve.
4. Continue creating and dragging breakpoints until
you have created the fade envelope that you desire.
If you wish to delete a breakpoint, click on it with
the cursor and press the Delete key on your
computer keyboard.
5. If you wish to reverse the shape of the envelope
you have created, click the “<–>” button. This
creates a mirror image of the envelope.
6. If you would like to save your custom envelope for
later use, click on the Save button before exiting
the envelope editor. Your custom envelopes will be
stored in the Peak Envelopes folder, and will
appear in the pop-up at the top of the envelope
editor.
7. When you are satisfied with your new envelope
shape, click Change to confirm your edits and close
the envelope editor. Peak will use this envelope
every time you apply a Fade In (or Fade Out) until
you change it again.
Peak User’s Guide68
Page 81
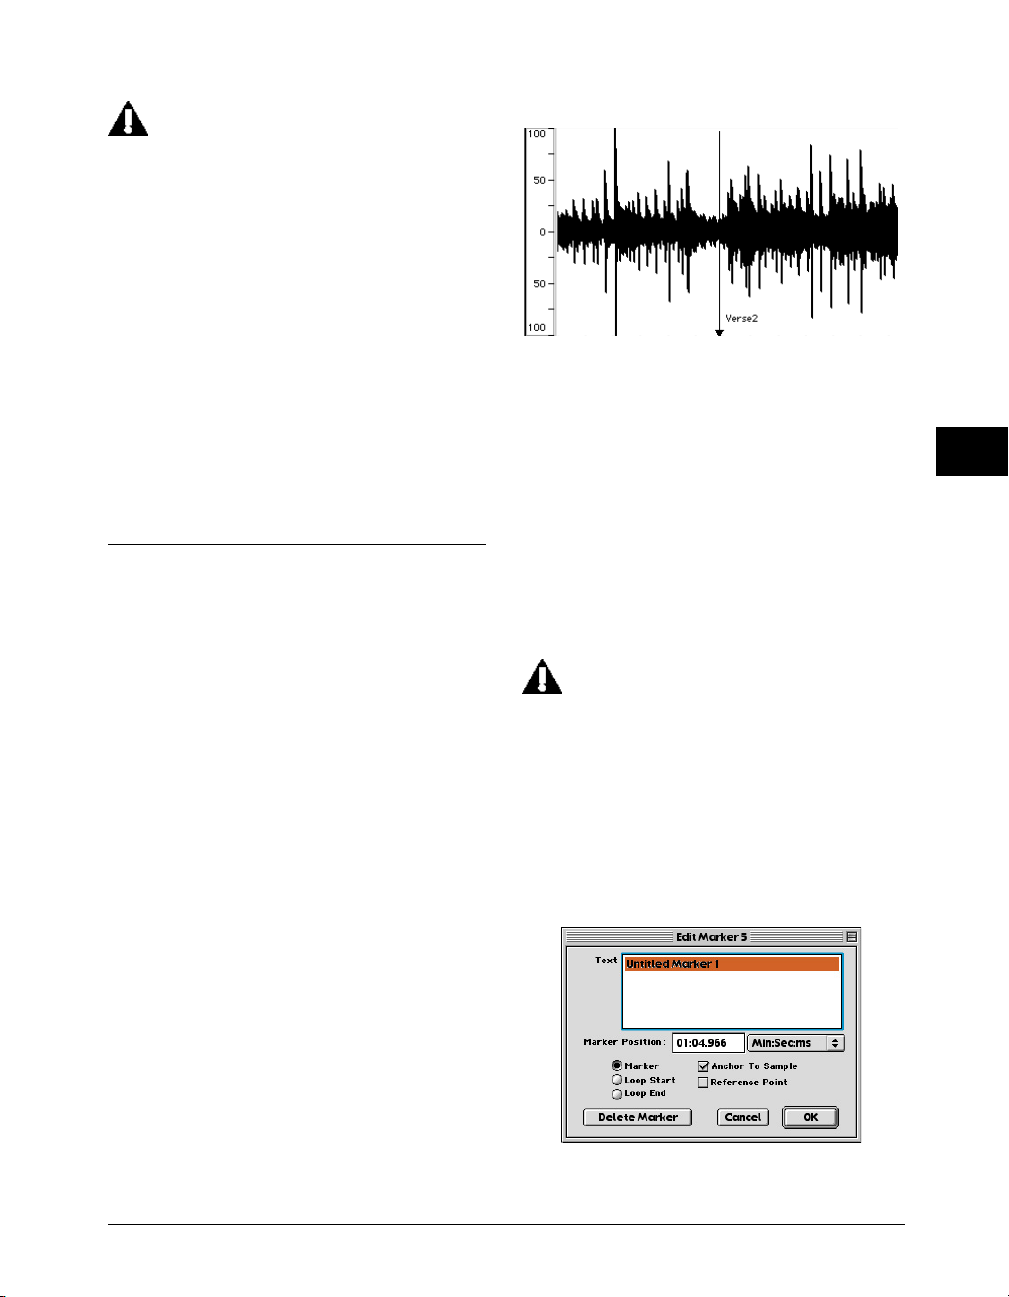
Note that the Fade In/Fade Out Envelope will
only be applied to a selection if it is configured
prior to applying the Fade In/Fade Out DSP
function.
To load a Fade In/Fade Out envelope:
1. Choose Fade In Envelope (or Fade Out Envelope)
from the Preference menu. The envelope editor
appears.
2. Click the Load button.
3. In the dialog that appears, locate and select the
fade envelope that you desire, and click Open.
4. Click Change to confirm this new envelope and
close the envelope editor. Peak will use this
envelope until you change it again.
Creating and Using Markers
Peak has a very powerful set of features to control the
placement and modification of markers. Markers are
locations in an audio document that you define as
important. By marking specific locations in a recording, you can navigate easily to a location for selection,
editing or playback purposes.
Markers can also be made into loops. Loops are used
to sustain or repeat a section of audio. They can be
used for material that you intend to transfer to a
sampler, or simply for playback within Peak itself. Peak
allows you to create one loop per audio file. Loops are
covered in detail later in this chapter.
A marker in the Waveform Display
Creating Markers
As we’ll describe in detail on the next few pages, there
are two ways to create markers: by dropping them “on
the fly” during playback, or by defining them with the
mouse when playback is stopped. Of the two, the
mouse method is perhaps the more precise. However,
since it is possible to fine tune the location of a marker
at any time by dragging it (or by using the Edit Marker
dialog, explained later). Both methods work equally
well.
Remember that if Auto Snap To Zero is enabled
the insertion point will snap to the nearest
zero-crossing. This will cause your marker be
placed at the nearest zero crossing when you
use the mouse to create or place a marker.
Once you have created a marker, you can assign or
edit the marker’s attributes in the Edit Marker dialog.
Double-click the triangular base of the marker to open
the Edit Marker dialog.
5
The Edit Marker dialog
Editing
69
Page 82

Text
You may wish to give markers meaningful names (up
to 256 characters long) based on their locations in an
audio document. Peak gives markers default numeric
names based on the name of the audio document and
the order in which the marker was defined. To name
or rename a marker, simply type the new name in to
the Text field of the Edit Marker dialog.
the insertion or deletion, so that the marker remains
with the particular portion of audio you want it to be
associated with. By enabling the Anchor feature for a
marker, you can assure that Peak will “tie” the marker
to a location on a waveform, causing it to stay with that
location even when audio is inserted or deleted into
the document. By default, Peak enables this feature for
markers, loops and regions.
You can easily find any marker, region, or
loop that you have named by simply typing the
first few letters of its name. For example, if you
want to locate a marker called “Solo,” just type
s-o-l, and Peak will automatically scroll to the
marker called “Solo.” If you hit Enter or Return
after typing the characters, Peak will also
automatically place the insertion point at that
marker. If more than one marker matches the
letters you type in, Peak will locate the first
marker with that name. (Note that numerical
marker name entries will only work from the
keypad, not the numbers keys along the top of
your keyboard.)
Marker Position
The Marker Position field allows you to move a marker
to a specific time location in an audio document by
entering the desired value. The pop-up menu to the
right of this field allows you to choose a time format
(samples, minutes:seconds:miliseconds, etc.) for the
value that you enter in the Marker Position field.
Marker, Loop Start, and Loop End
These three radio-style buttons allow you to define
whether the marker is a regular marker or a loop
marker. If you choose to designate the marker as loop
marker, you can define it as either the loop start or the
loop end by clicking on the corresponding radio
button. Remember, Peak allows only one loop per
audio file.
Anchor To Sample
When you insert or delete audio that is near a marker,
you may want the marker to move with that particular
location on the waveform. This will compensate for
Reference Point
By defining a marker as a reference point, you can use
the marker as a reference when you make selections
or move other markers. Selecting or dragging the
marker will then automatically display the distance to
the closest reference marker in whatever time format
(samples or seconds) is currently selected in the Peak
application. This may be useful, for instance, if you
know that you want a particular sound event (such as
a car door slam) to happen a certain number of
seconds before or after another sound event (such as a
tire squeal).
Delete Marker
The Delete Marker button allows you to remove the
currently selected marker from an audio document.
The following section explains how to create markers
and define their attributes.
To create a marker when playback is stopped:
1. Click the mouse at the desired location in the
audio document. A dotted vertical line appears,
indicating the insertion point.
2. Press -M on your computer keyboard or choose
New Marker from the Action menu or Toolbar.
Peak will drop a marker at that location.
To create a marker during playback:
1. Begin playback of an audio document.
2. At the desired point during playback, press -M
on your computer keyboard. Peak will drop a
marker at that location.
Peak User’s Guide70
Page 83
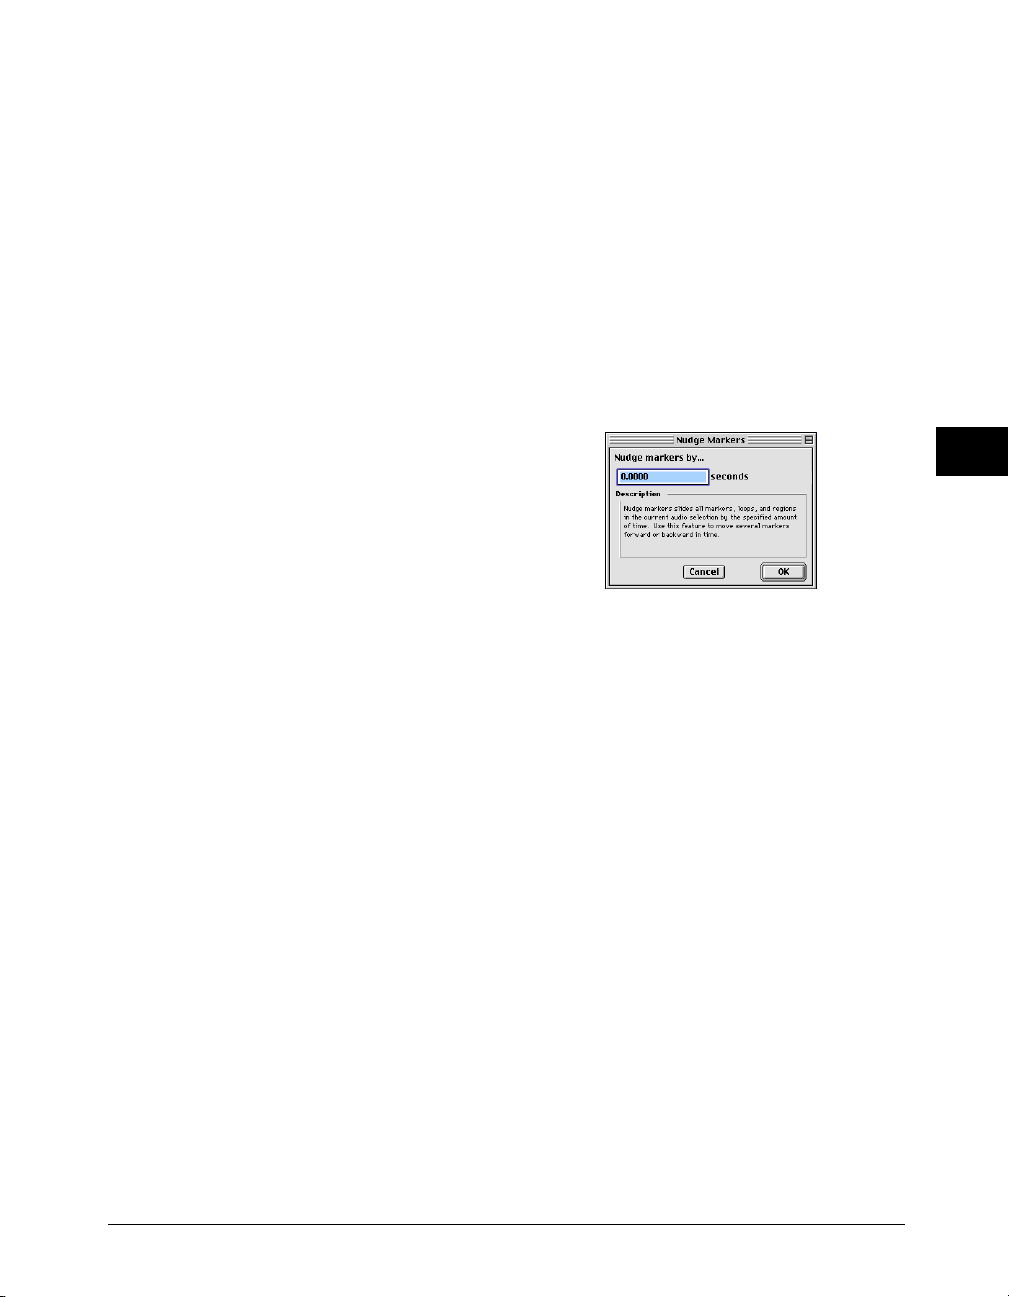
3. Repeat as desired as playback continues. Each
marker will appear at the appropriate location in
the audio document window.
To create a marker using dynamic scrubbing:
1. Hold down the Control key (or Control-Option for
jog-type scrubbing) and drag the mouse across the
desired location to scrub playback.
2. At the desired point during playback, release the
mouse to stop scrubbing.
3. Press -M on your computer keyboard. Peak will
drop a marker at that location.
To name a marker or set other marker attributes:
1. Double-click on the triangular base of the marker
that you wish to edit. The Edit Marker dialog
appears.
3. In the Position field, enter the precise time
location that you wish to move the marker to.
4. Click OK to close this dialog. Peak moves the
marker to the location you entered in the dialog.
To nudge a marker or a selection of markers to a new
location:
1. Make a selection that includes the marker (or
markers) that you wish to nudge.
2. Choose Nudge Markers from the Action menu or
Toolbar. The Nudge Markers dialog appears.
5
2. Enter a name for the marker.
3. Change other attributes of the marker as desired.
For an explanation of each of these attributes,
refer to the beginning of this section.
4. When you have finished, click OK to close the Edit
Marker dialog. The marker now has the attributes
you selected.
To move a marker to a new location:
1. Click on the triangular base of the marker and drag
it to the desired location.
2. To make a marker’s position snap to a zerocrossing (the point at which a waveform crosses
the center phase line) as you drag it, hold down
the Shift key while you drag.
To move a marker to a new location numerically:
1. Double-click on the triangular base of the marker.
The Edit Marker dialog appears.
2. Choose the desired time units (samples, seconds,
or milliseconds ) from the time format pop-up
menu.
The Nudge Markers dialog
3. In the Nudge Markers by field, enter the number
of seconds (positive or negative) by which you
wish to nudge the marker.
4. Click OK to close this dialog. Peak nudges the
marker by the value you entered in the dialog.
To delete a marker:
1. Double-click the triangular base of the marker.
The Edit Marker dialog appears.
2. Click the Delete button. The marker is deleted
from the audio document.
3. Click OK to close the Edit Marker dialog.
To delete markers in a Selection:
1. Make a selection in the audio document that
contains the markers you want to delete.
2. Choose Delete All Except Audio (Option-Delete)
from the Action menu and all markers, regions,
and loops in the selection will be deleted.
Editing
71
Page 84
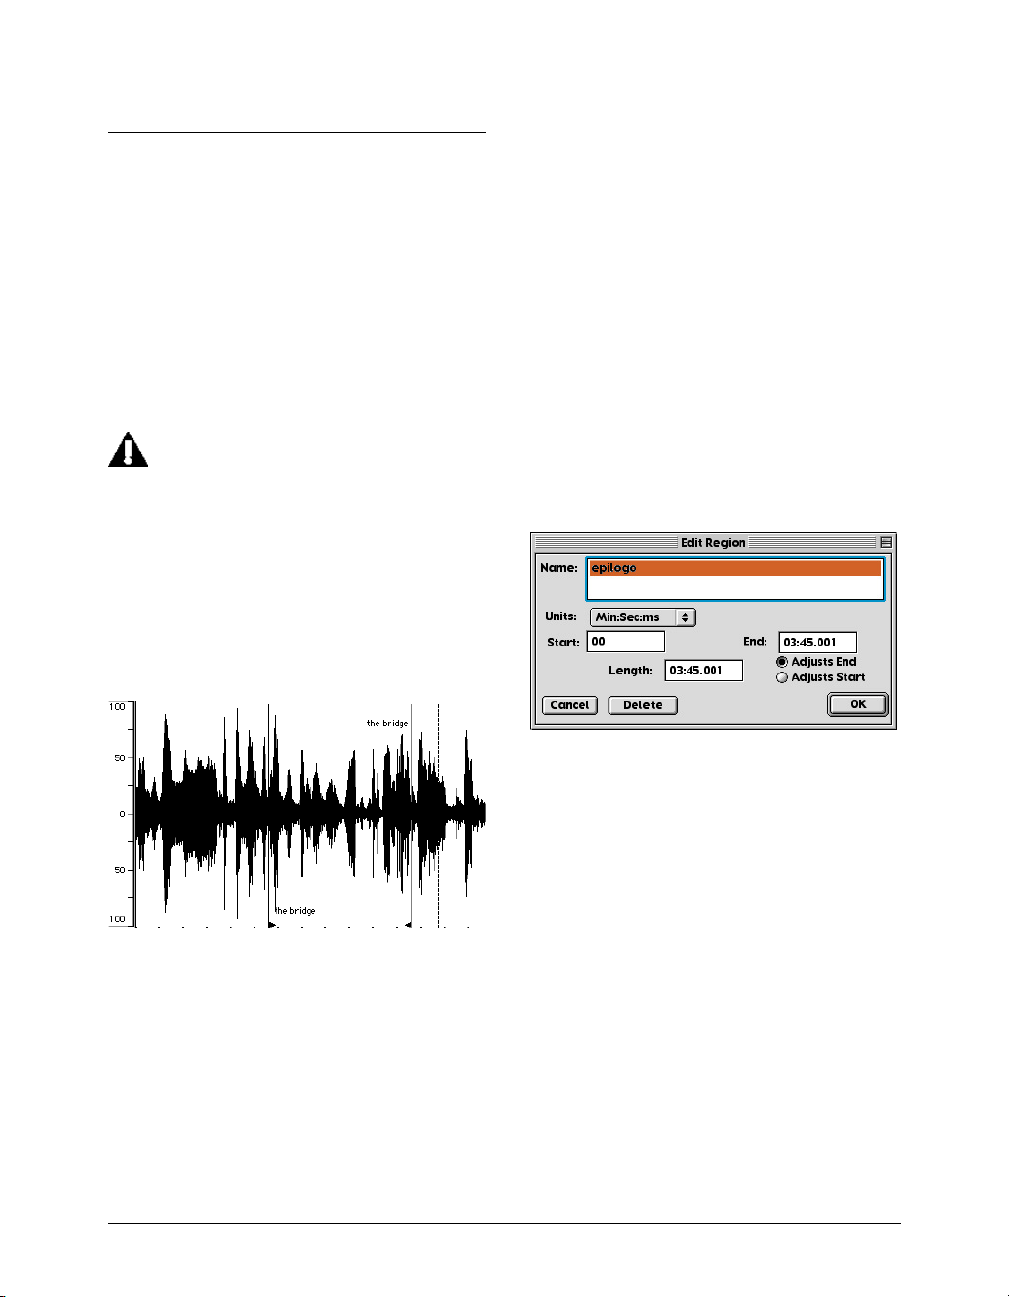
Regions
To modify the length of the Region by changing the
start or end:
• Drag the start or end marker of the Region in the
audio document window.
Regions are portions of an audio document defined by
Region Markers using the New Region command from
the Action menu ( -Shift-R) or Toolbar. Regions
present in currently open audio documents will be
listed in the Contents window.
Peak’s use of Regions will be discussed further in the
chapter on Playlists and CD Burning.
Regions can be saved only into AIFF and Sound
Designer II files created by Peak. However,
Peak will also read Regions stored from other
programs in Sound Designer II files. The
method Peak uses to store Regions in AIFF files
is specific to Peak and is not necessarily
supported by other software applications. If
you are using Regions with other programs,
you will want to store your files as Sound
Designer II files.
To move a Region without changing its length:
• Hold down the Option key and drag either the start
or end marker of the Region.
To edit a Region’s start, end, or length manually:
1. Double-click on either the start or end marker of
the Region in the audio document window. The
Edit Region dialog will appear.
2. Enter new values for Start, End, or Length times,
then click OK.
The Edit Region dialog
To change the name of a Region:
1. Double-click on either the start or end marker of
the Region in the audio document window. The
Edit Region dialog will appear.
An audio Region (named “the bridge”)
To define a new Region:
1. Make a selection in an opened audio document.
2. Choose New Region from the Action menu (-
Shift-R) or Toolbar.
3. Type the name of the Region and click OK. The
new Region will appear in the audio document.
Peak User’s Guide72
2. Type the new name of the Region into the dialog
and click OK.
To locate a Region:
• Command-click on audio document’s Title bar to
display a pop-up menu listing all regions, markers
and loops; or, type the first few letter of the
Region’s name, or from the Contents Palette.
Page 85

Palette, and start playback by pressing the
Spacebar on your keyboard.
Creating Loops
If you’re editing music or other rhythmically-based
material, it is generally a good idea to test a selection
to make sure it contains an even number of beats
before you cut, copy, or paste it. A good way to do this
is to loop the selection and listen to the loop as it
plays. As described in the next section, Peak includes
Loop Surfer, which can automate the process of
finding a rhythmically “correct” length of audio to
loop, assuming you know the tempo and the number
of beats you wish to loop. You can also use the Loop
Tuner, found in the DSP menu, to adjust the loop start
and end points. The Loop Tuner is also described in
the next section.
Loops are useful in material that you plan to transfer
to a sampler. Loop markers created with Peak are
recognized by samplers as sustain loops. Peak allows
you to create only one loop per audio document.
To play a loop in Peak, select Use Loop in Playback
command (-L) from the Preference menu or click
the loop button on the Cursor Palette, begin playback,
and when Peak reaches the loop, it will continue to
repeat until you stop playback. If Use Loop in Playback
is not enabled, Peak will simply play right through the
loop to the end of the audio document or selection.
To create a loop from a selection:
1. Click the cursor at the desired location in the
audio document and drag to select the range you
want.
2. Choose Loop This Selection from the Action menu
(-Shift-”-”) or Toolbar. Your selection is now
looped. Loop markers appear at the beginning and
end of the loop.
3. To listen to the loop, choose the Use Loop in
Playback command (-L) from the Preference
menu (a check next to this menu item indicates it
is enabled), or click the Loop button on the Cursor
4. You can interactively fine tune a loop by dragging
the loop start or end markers while loop playback
is engaged. As you drag a loop marker to a new
location, Peak will adjust the playback loop to
reflect the changes you make. You can also use the
Loop Tuner to call up a dialog that allows you to
visually fine tune the loop, and even play the loop
while adjusting it to listen to the changes.
To change regular markers into loop markers:
1. Create markers in a audio document.
2. Double-click on the triangular base of the marker
that you wish to define as the loop start point. The
Edit Marker dialog appears.
3. Click the Loop Start button and click OK. The
marker becomes a Loop Start marker.
4. Double-click on the triangular base of the marker
that you wish to define as the loop end point. The
Edit Marker dialog appears.
5. Click the Loop End button and click OK. The
marker becomes a Loop End marker. You have
now defined a loop in your audio document.
To move a pair of loop markers together:
• Hold down the Option key and drag one of the
loop markers to the desired location. Both
markers move in tandem as you drag.
To listen to the loop only:
1. Choose Select Loop (-“-”) from the Edit menu to
select the loop.
2. Make sure loop playback is enabled using the Use
Loop in Playback command from the Preference
menu (a check next to this menu item indicates it
is enabled), or by pressing the Loop button on the
Cursor Palette.
3. Press the Spacebar to begin playing back the loop.
5
Editing
73
Page 86
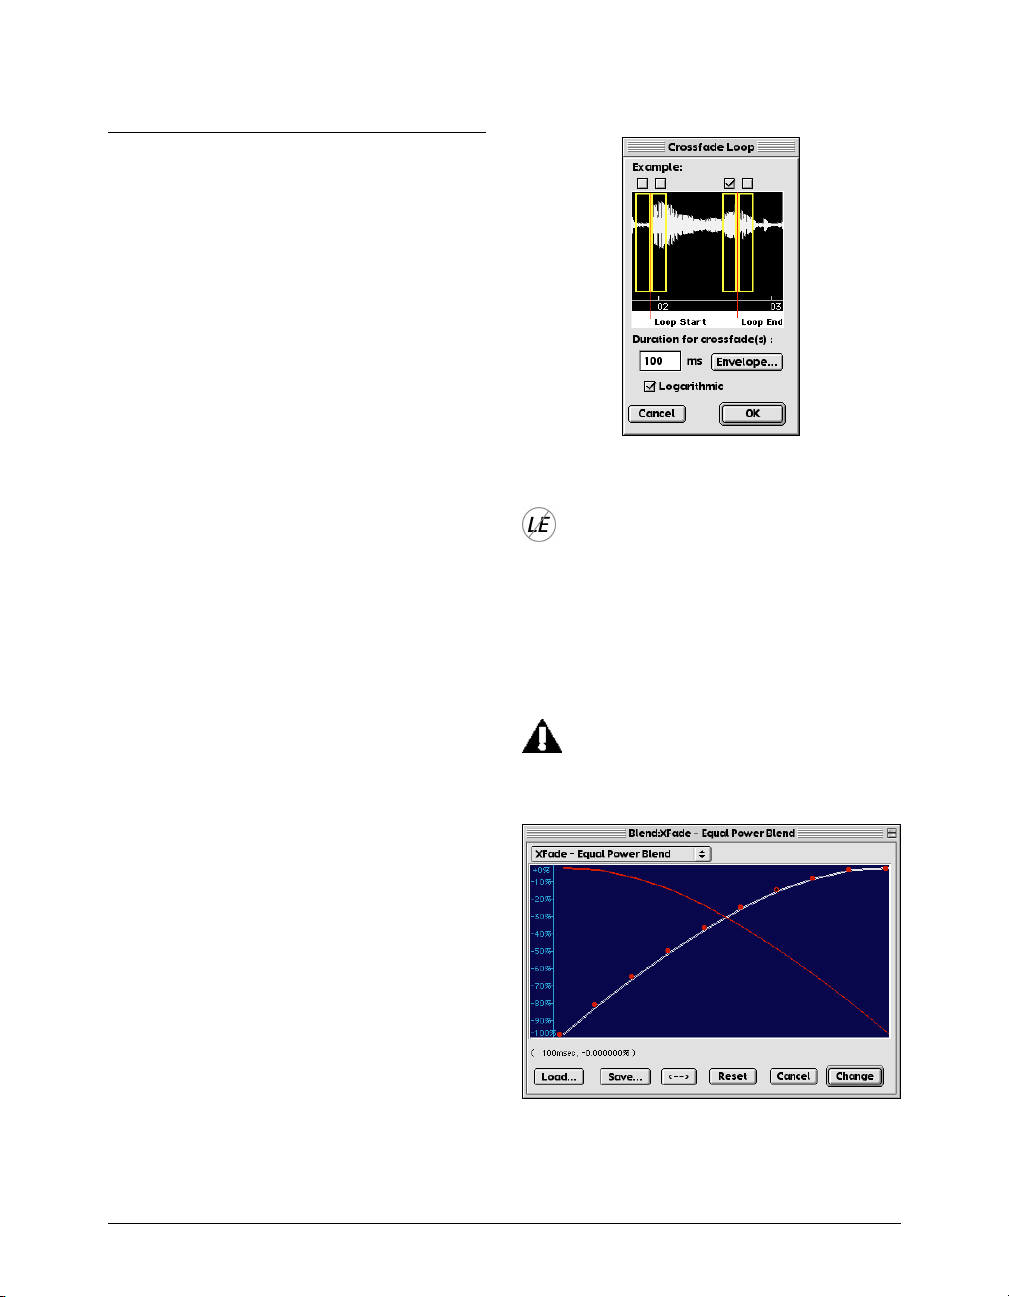
Crossfading Loops
Peak allows you to crossfade the start and end points
of a loop. Crossfading a loop can be very useful for
smoothing the transition between the end of the loop
and its beginning as it repeats. Peak allows you to
control the envelope of the crossfade, the duration,
and other parameters in the Crossfade Loop dialog.
To Crossfade a Loop:
1. Create a new loop or choose and existing loop.
2. Select the loop by -clicking between the loop
markers.
3. Choose Crossfade Loop from the DSP menu or the
Toolbar.
4. The Crossfade Loop dialog appears.
5. Choose where you want crossfades to be applied
using the check boxes along the top of the
Crossfade Loop dialog. Typically, the default for
this works well.
6. Enter the Duration for the crossfade(s) in
milliseconds.
7. Check whether or not you want the crossfade
calculated logarithmically or not (i.e., linearly).
The Crossfade Loop dialog
The Crossfade Loop dialog is not available in
Peak LE.
To edit a Crossfade Loop Envelope:
• Click on the Envelope button in the Crossfade
Loop dialog and the Blending Envelope Editor
appears.
Note that this is the same Blending Envelope
Editor that is accessed from the Blending
dialog.
The Bending Envelope Editor
Peak User’s Guide74
Page 87
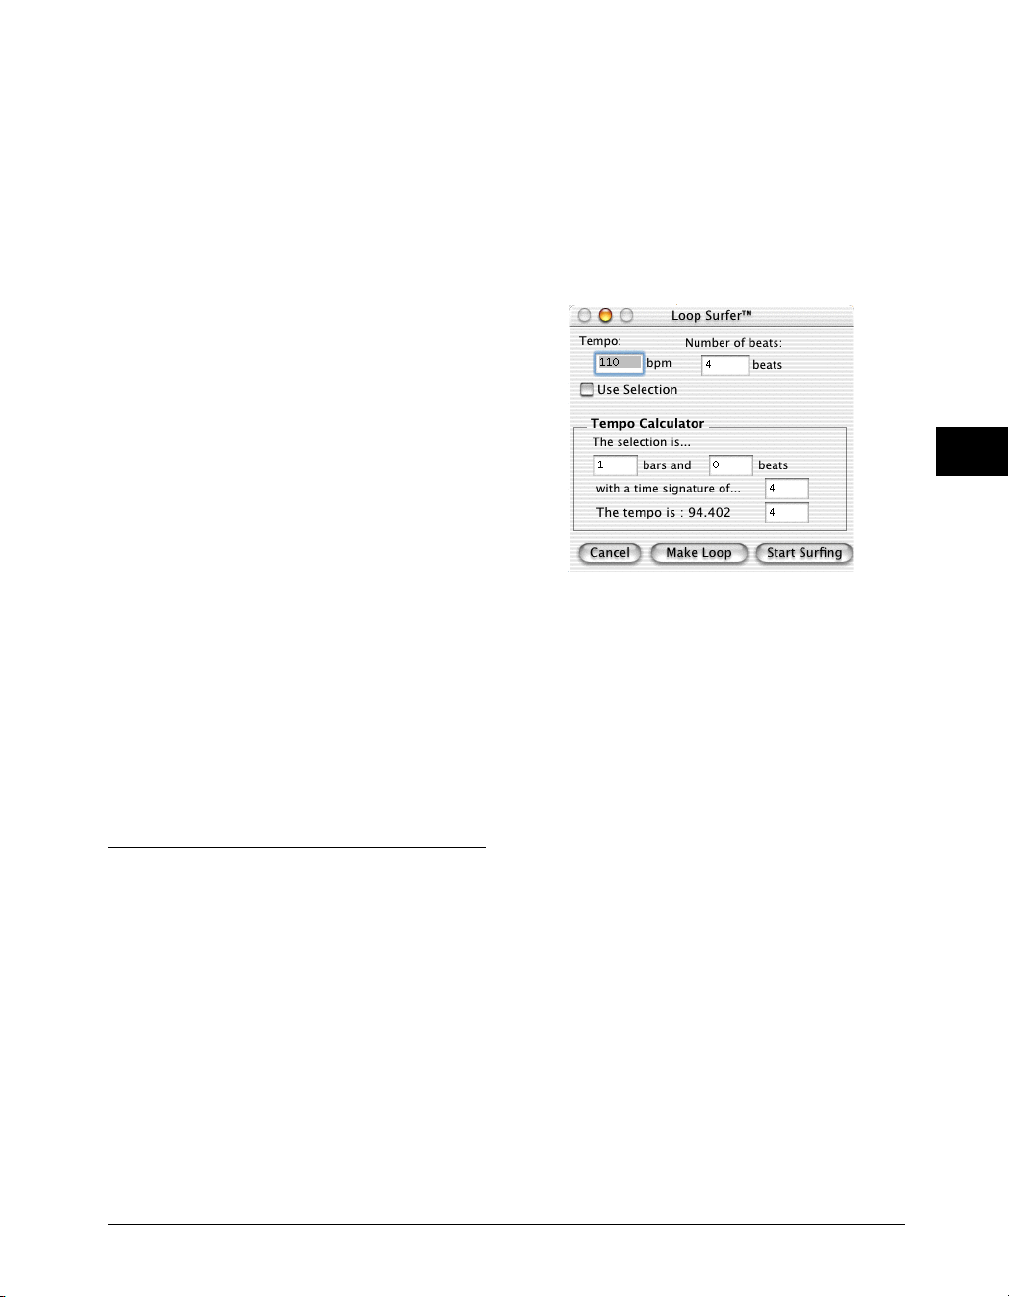
2. Click anywhere on the line and a new moveable
“breakpoint” will appear.
3. Drag the breakpoint to the desired location.
4. Continue creating and dragging breakpoints until
you have created the envelope that you desire. If
you wish to delete a breakpoint, click on it with
the cursor and press the Delete key on your
computer keyboard.
5. If you wish to reverse the shape of the envelope
you have created, click the “<–>” button. This
creates a mirror image of the envelope.
6. If you would like to save your custom envelope for
later use, click on the Save button before exiting
the envelope editor. Your custom envelopes will
be stored in the Peak Envelopes folder, and will
appear in the pop-up at the top of the envelope
editor.
To use Loop Surfer based on a musical tempo:
1. Place the cursor where you wish to begin the loop
(it’s okay to place it approximately, rather than
exactly, where you wish to start).
2. Choose Loop Surfer from the Action menu (-J).
The Loop Surfer dialog appears.
5
7. When you are satisfied with your new envelope
shape, click Change to confirm your edits and
close the envelope editor. Peak will use this
envelope until you change it again.
To hear the completed crossfade, choose Select Loop
from the Edit menu, select Use Loop in Playback from
the Preference menu or click the Loop button on the
Toolbar, and press the Spacebar. You will hear the
loop, complete with your crossfade.
Using Loop Surfer
Peak’s Loop Surfer feature automates some of the
steps for setting up loop points. Loop Surfer allows
you to “Loop Surf” (adjust your loops during playback)
quickly, easily and in a musically intuitive manner.
If you’re working with music, and know the music’s
tempo in beats per minute, you can use Loop Surfer to
create a loop which lasts for a rhythmically “correct”
length of time.
The Loop Surfer dialog
3. Type in the music’s tempo. If you are not sure of
the tempo, you can use the Tempo Calculator to
determine the tempo. Simply select a portion of
audio, and type in the number of bars and beats in
the selection. The calculator will determine the
tempo based on your selection. If you are unsure,
and have used a drum machine or sequencer to
create the music, you might wish to refer back to
its settings determine the time signature and
tempo. Additionally, you can use the Threshold
command from the DSP menu to select a portion
of audio that should correspond to the beat; see
“To use Loop Surfer based on a selection” below.
4. Type in the number of beats that you wish the
loop to last. The beats are based upon quarternotes, in terms of musical time. For instance, if
your song was in a 4/4 time signature, typing “4”
beats would mean the loop would be one measure
in length; if the song were in 7/4 time, typing “14”
would mean the loop would be two measures in
length. (If you are interested in exploring
syncopations, however, there’s no reason why you
can’t type a beat value that doesn’t correspond to
Editing
75
Page 88

the time signature, such as “5” if the music is
actually in “3/4” time.)
5. If you then select the Start Surfing button (the
default), Peak will automatically:
a) close the Loop Surfer dialog box;
b) extend the selection from the cursor insertion point to
a calculated length, based upon the tempo and
number of beats;
c) change the cursor insertion point to a Loop Start
marker;
d) drop a Loop End marker at the end of the newly
calculated selection;
e) turn on (if it hasn’t already been turned on) the Use
Loop In Playback option under the Preference menu.
f) begin looped playback of the audio selection, stopping
only once you hit your keyboard’s Spacebar or press
Stop on the Toolbar.
6. If you select the Make Loop button, Peak will
automatically:
a) close the Loop Surfer dialog box;
b) extend the selection from the cursor insertion point to
a calculated length, based upon the tempo and
number of beats;
c) change the cursor insertion point to a Loop Start
marker;
d) drop a Loop End marker at the end of the newly
calculated selection;
e) turn on (if it hasn’t already been turned on) the Use
Loop In Playback option under the Preference menu.
f) At this point, you must start playback manually using
the Spacebar or the Toolbar if you wish to begin Loop
Surfing.
While you’re Loop Surfing (adjusting your loop during
playback), you’re free to perform all of the standard
looping functions as described in the previous section,
including adjusting the Loop Start and End points
during playback. Most importantly, however, since
you’ll now have a selection that lasts for a period of
time that matches the beat, try moving the markers in
tandem, by holding down the Option key and clicking
and dragging one of the loop markers to the desired
location with the mouse. You’ll find it’s a great way to
set up interesting rhythms and syncopations! Peak’s
interactive editing capabilities also allow you to use the
Loop Surfer dialog while a loop plays to adjust the
tempo, beats and so on.
If you’re not working with music (or if you simply don’t
know the tempo of the music you’re working with),
you might choose to Loop Surf based upon a selection
(or use the Threshold feature), rather than starting at a
cursor insertion point.
To use Loop Surfer based on a selection:
1. Place the cursor where you wish to begin the loop,
and using the mouse, select the portion of audio
you wish to loop. (You can make your selection in
a variety of other ways, also, as described earlier,
including selecting between markers by -clicking
with the mouse).
2) Select Loop Surfer from the Action menu. The
Loop Surfer dialog appears.
3) If you check the Use Selection box and select either
the Start Surfing or Make Loop button, Peak will
automatically:
a) close the Loop Surfer dialog box;
b) extend the selection from the cursor insertion point to
a calculated length, based upon the tempo and number
of beats;
c) change the cursor insertion point to a Loop Start
marker;
d) drop a Loop End marker at the end of the newly
calculated selection;
e) turn on (if it hasn’t already been turned on) the Use
Loop In Playback option under the Preference menu;
f) begin looping and playing. The selection will begin
looped playback (if you have selected Start Surfing);
or
g) wait for you to start playback manually using the
Spacebar or the Toolbar if you wish to begin Loop
Surfing (if you have selected Make Loop).
Loop Surfer is not available in Peak LE.
Peak User’s Guide76
Page 89
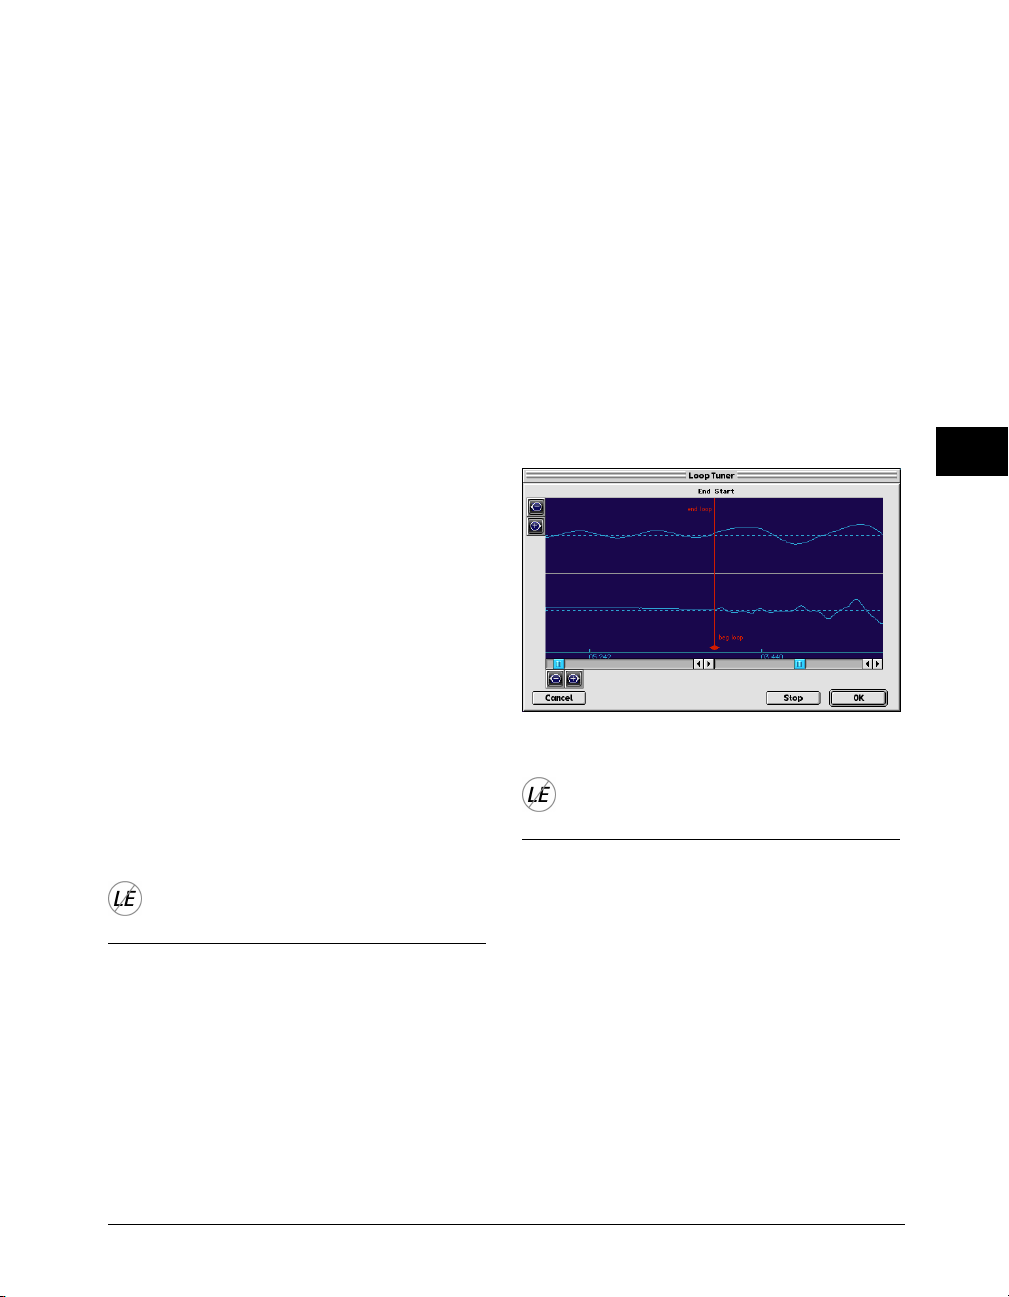
Using the Guess Tempo and Threshold commands to find tempo
If you are working with music and don’t know the
tempo–and your music has a relatively pronounced or
obvious beat–you can use the Guess Tempo command
to have Peak automatically guess the tempo of a
selection. Make a selection and choose Guess Tempo
from the Action menu. There will be a pause while
Peak scans your selection and calculates the tempo for
you. A dialog will then appear showing you the
estimated tempo in BPM, or beats per minute. You can
then enter the estimated tempo in BPM in the Loop
Surfer dialog’s Tempo field or in the Audio Information dialog’s Tempo field.
You can also use the Threshold command (described
later in this chapter) to define a number of markers or
Regions based on amplitude peaks. If you then select
audio with start and end points that correspond to
these sections, you should have a selection that
precisely matches the musical beat. Using Loop Surfer,
you could then automate the process of looping the
selection by following the steps described directly
above.
Toolbar, and a dialog will appear. The waveform
display in the Loop Tuner dialog shows the Start and
End points of the loop, which you can visually adjust
with the scroll bars at the bottom of the window. The
two zoom buttons–magnifying glass icons–in the
upper left of the Loop Tuner dialog allow you to adjust
the vertical zoom up of the waveform. The two zoom
buttons in the lower left hand corner of the Loop
Tuner dialog allow you to adjust the zoom view in and
out all the way down to the sample level. You can
listen to the effects of the adjustments as you make
them by clicking on the Play button. To exit this
dialog, click on OK to accept the changes, or Cancel to
leave the original loop unaffected.
5
Guess Tempo works best with audio selections that
contain one full measure of audio with pronounced
attacks on the beats, which appear visually on the
waveform as taller sections of the audio. Using the
Normalize feature on the selection prior to Guess
Tempo can improve the accuracy of its deduction.
Guess Tempo is not available in Peak LE.
Using Loop Tuner
Peak’s Loop Tuner provides a way to visually line up
the start and end points of your loop to get a smooth
transition at the loop points. Loop Tuner also allows
you listen to the effects of these adjustments as you
make them. If you wish to “tune” a loop you’ve made,
simply select Loop Tuner from the DSP menu or
The Loop Tuner dialog
Loop Tuner is not available in Peak LE.
Exporting Regions
If you have placed markers or Regions in an audio
document, Peak’s Export Regions command allows
you to export those regions from the source document and save each of these regions as a separate
audio document. This feature is very convenient if you
wish to divide a larger file into regions and transfer
them as samples into a sample playback instrument, or
divide a live concert record into regions and export
those regions as separate files. Furthermore, you can
use Peak’s Batch File Processor to process a file's
Editing
77
Page 90
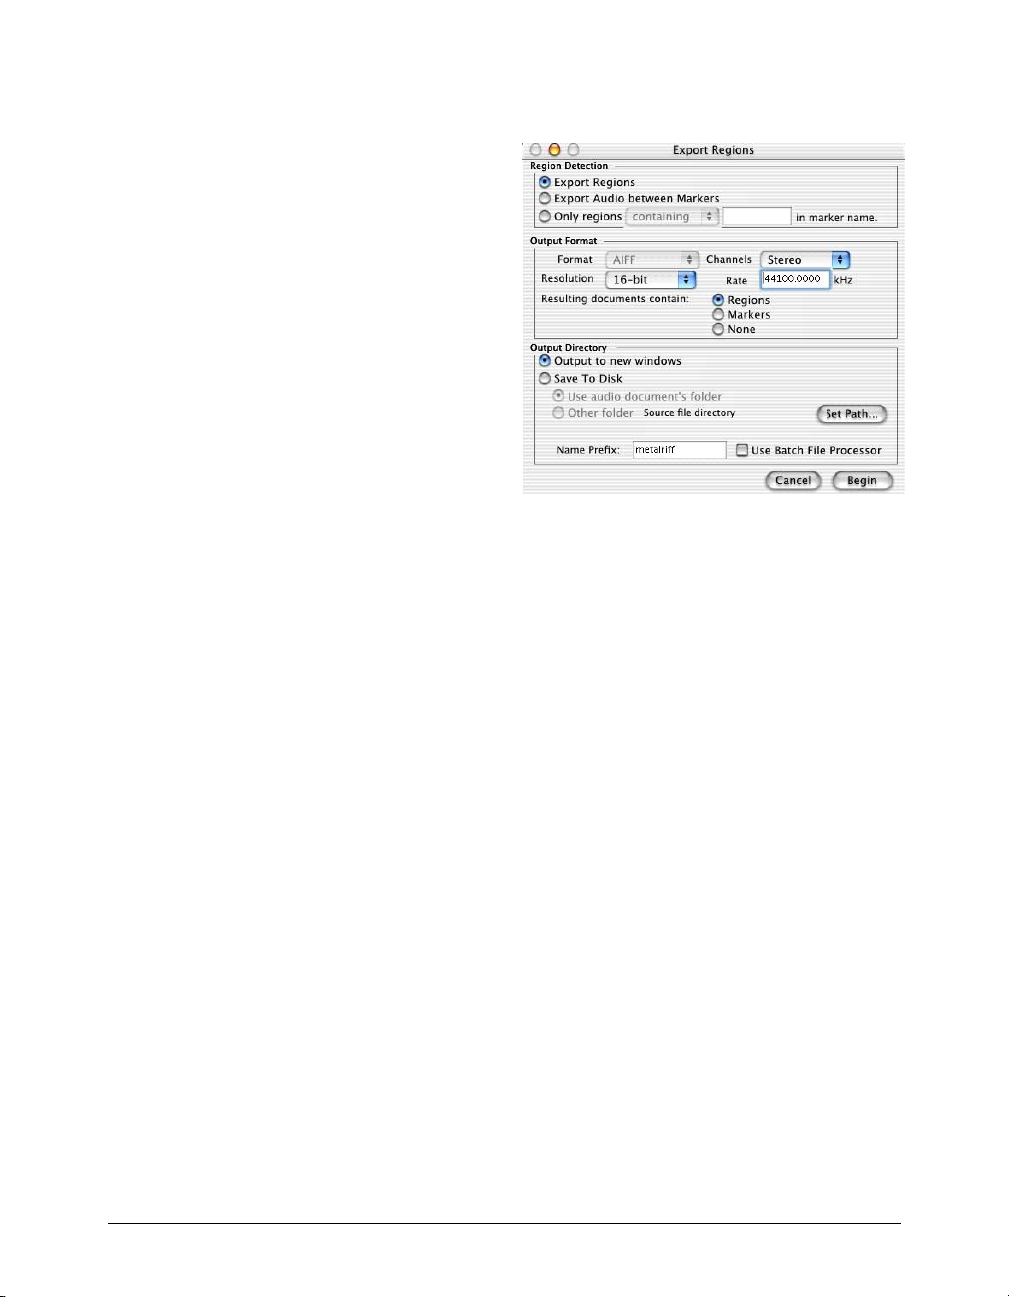
regions with any of Peak’s DSP functions and third
party plug-ins during the automatic exporting of
regions into new files.
To export regions from an audio document:
1. Select the regions that you wish to export. (You
can use the Tab key, Shift-Tab, or if you wish to
select the entire document, press -A.)
2. Choose Export Regions from the File menu.
3. In the Export Regions dialog, choose the
parameters that you wish to use for selecting the
regions to export.
4. Using the Region Detection options, choose which
regions are to be exported.
5. Using the Output Format options, choose the
format and resolution you wish for the exported
regions.
6. Using the Output Directory options, choose the
destination for the exported regions.
7. If you wish the newly exported regions to appear
as new open Peak documents, choose Output to
new windows.
8. To save the exported regions to disk, select Save
To Disk and choose whether you would like to
save the regions into the same folder as the source
files, or to a different folder. If you prefer to save
to a new folder, use the Set Path button.
9. To export the regions, click Begin. Peak exports
each of the regions into its own audio document.
The Export Regions dialog
Region Detection area
To export all regions in an audio document, click the
Export Regions button. To export audio between
adjacent markers, click the Export Audio between
Markers button. To export only regions that are
bounded by specific marker names, click the Only
Regions button and enter the parameters that you wish
to use to select the desired regions. For instance, if you
wish to only export only regions bounded by markers
with the word “hit” in them, click the pop-up menu,
choose containing, and type the word “hit” in the field
next to the pop-up. Conversely, if you wish export all
regions except those with the word “hit” in them, click
the pop-up menu, choose not containing, and type the
word “hit” in the field next to the pop-up menu.
Output Format area
Choose the file format, bit depth resolution, and Stereo
or Mono from these pop-up menus for the resulting
exported audio documents. You can set the Sample
rate in kHz for the resulting files in the Rate field
(please note that this will not do sample rate conversions). You can also designate whether the resulting
audio documents contain Regions or Markers or not.
Peak User’s Guide78
Page 91
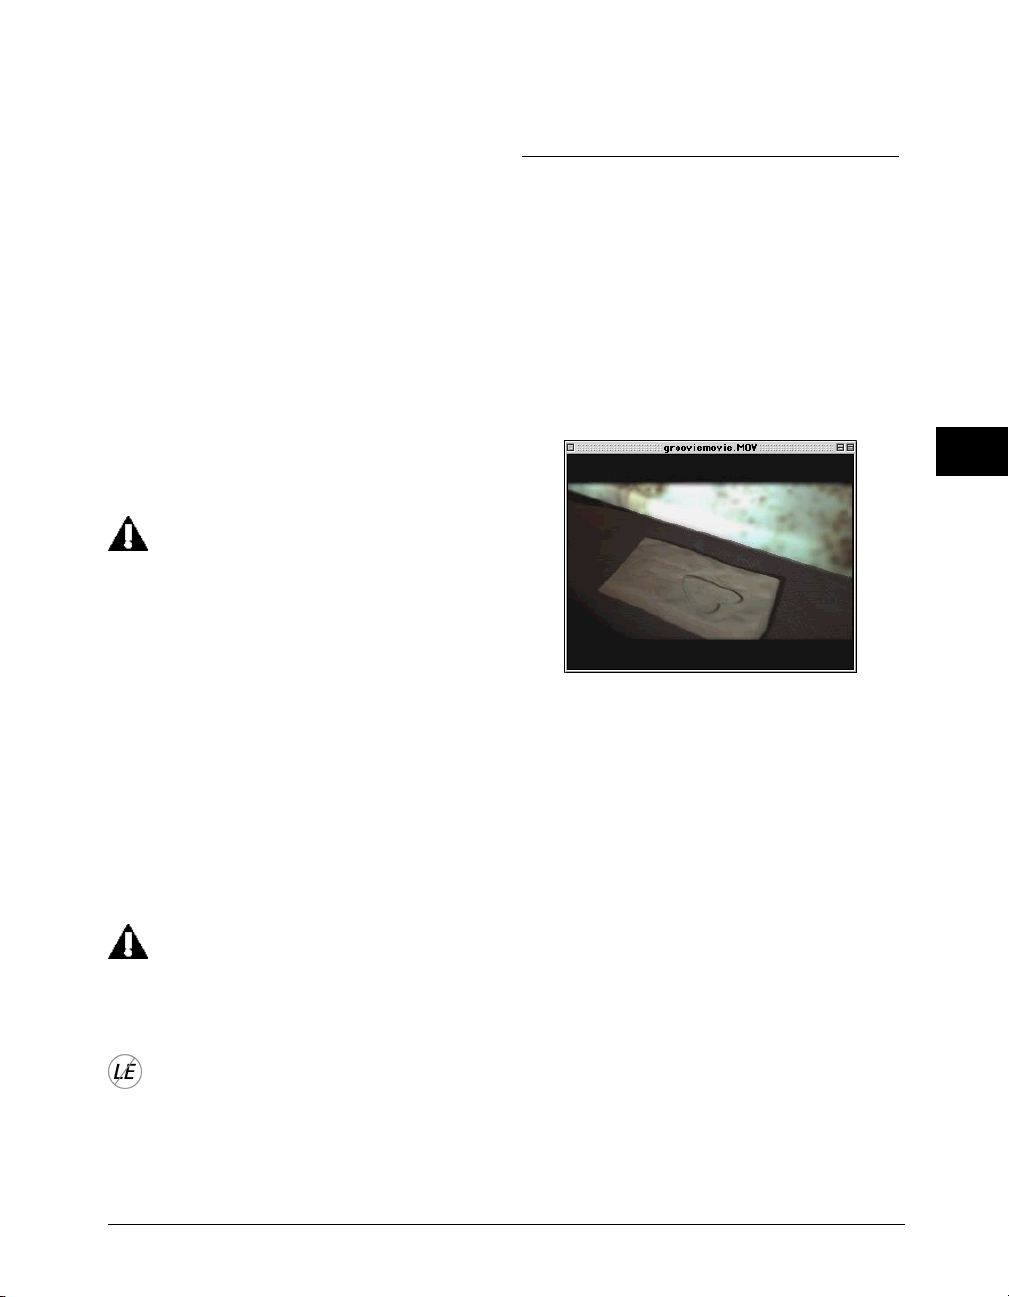
Output Directory area
Resulting audio documents can either be output to
new open audio document windows or saved to the
hard drive. Choose Output to new windows if you
want to have the resulting audio documents open in
Peak or choose Save To Disk if you just want to write
the new audio files to disk without opening them in
Peak. If you Save To Disk, you can simply choose to
use the original audio document’s folder or you can
specify another folder on you hard drive(s) to save the
resulting audio documents by choosing Set Path. The
Name Prefix field allows you to include a specified
prefix to all the resulting audio documents. The
default prefix is the name of the file. Each and every
one of the resulting audio documents will be named
with the prefix plus the name of the individual region.
Be aware that the Name Prefix plus the name
of the region being exported cannot exceed the
maximum number of characters for a file
name allowed by the Mac OS or Peak will
return an error and the Region will not be
saved.
Editing QuickTime Soundtracks in Peak
Peak allows you to edit QuickTime movie soundtracks.
While you cannot edit QuickTime video in Peak, you
can use Peak as a full-featured audio post-production
tool for QuickTime movies. This makes Peak an ideal
tool for editing and cleaning up soundtracks, as well as
adding sound effects or music to QuickTime movies.
5
Another exciting feature of the Export Regions
function is that you can Export Regions through Peak’s
Batch File Processor. First configure the Batch File
Processor and turn it on, then, go to Export Regions
and check the Use Batch File Processor checkbox.
When you begin exporting regions, each region
exported will be processed by the DSP processes you
choose in the Batch File Processor dialog (see Chapter
7: DSP & Plug-Ins).
Do not save the output of the Batch File
Processor to input directory (i.e., a folder that
is or is inside a folder of files that are being
Batch Processed).
Export Regions is not available in Peak LE.
The Peak Movie Window
How to open and edit QuickTime sound tracks in Peak:
1. Select Open from the Edit menu (-O) or
Toolbar.
2. In the dialog that appears, locate the QuickTime
movie that you wish to open.
3. Click the Open button, and Peak will open the
QuickTime movie in a movie window, and open
the movie’s audio track in an audio document
window. Use the QuickTime Sound Tracks from
the Preferences menu to Enable or Disable the
movie’s other audio tracks. You can also use this
dialog to toggle multiple soundtracks contained in
a movie on and off to check balances or “solo”
certain tracks. Click on the Set button to accept
the changes, or Cancel to leave the movie
unaffected. To toggle the Movie Window on or off,
choose Movie from the Window menu. A check
next to this item indicates it is enabled.
Editing
79
Page 92
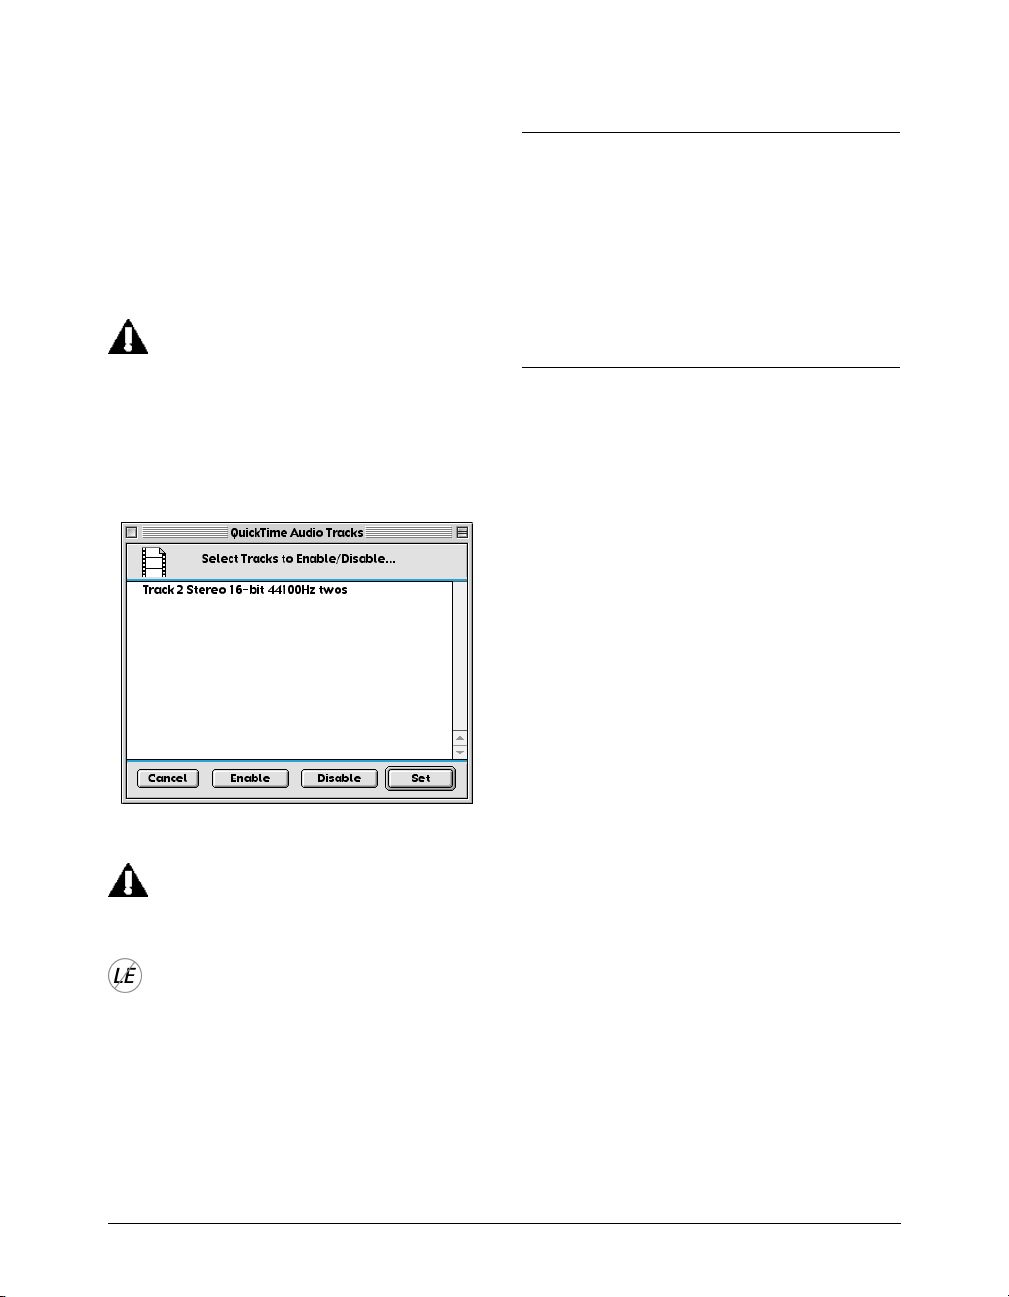
4. You may now edit the movie’s audio track as you
would any other audio document. The movie will
“scrub” along with the audio, and the placement of
the insertion point in the audio document window
will also scroll the movie to that point.
5. When you are finished editing the QuickTime
sound track, use Peak’s “Save As” command to
save the movie with its new sound track.
Peak will not allow you to import QuickTime
movies that have no audio tracks. If you want
to add audio to a QuickTime movie that has
no audio tracks, use MoviePlayer first to add
audio tracks (even empty ones) to the movie,
save the movie, and then open the movie in
Peak.
Conclusion
You have now learned how to manipulate audio with
Peak’s various editing tools, including how to work
with Markers, Loops, and Regions. In the next chapter
you will learn more about the use of Regions in
Playlists.
The Movie Sound Tracks dialog
Be Careful not to change the duration of the
audio using cut, delete, or insert, as this will
cause the audio and video to fall out of sync.
QuickTime Movie support is not available in
Peak LE. Peak LE can open and edit QuickTime audio, but it will not open the QuickTime
Movie window.
Peak User’s Guide80
Page 93
Chapter 6
Playlists and Audio CD Burning
Page 94

82 Peak User’s Guide
Page 95

Chapter 6: Playlists and CD Burning
Introduction
This chapter explains how to use Peak’s Playlist feature
to sequence audio events. A Playlist is a list of Regions
strung together in a specific order. The Peak Playlist is
merely a set of instructions that tell the hard disk
which regions to “read” in what order. Playlist editing
does not permanently alter the original audio data on
your hard disk. No matter how many changes you
make, your original recordings remain intact. This type
of nondestructive editing is one of Peak’s most
significant and powerful features.
When you edit an audio file within Peak’s Playlist
window you are not really deleting, moving, replacing,
and adding actual audio as you would if you were
cutting and splicing analog tape. Instead, Peak is
merely creating a “map” of your audio file. This map,
or “playlist,” simply describes the order in which you
want portions of the recording to be played. If you’d
like to hear the middle of a song first, the end next
and the beginning last, then so be it. Peak will read
(e.g., play) from the hard disk (where the audio data is
stored) from any number of possible points designated by Region markers, and these Regions can be
auditioned in the Playlist in any number of possible
arrangements.
Playlist editing allows you can adjust and re-sequence
segments of audio (e.g., Regions) with fluidity and
ease. Edits can be heard as soon as you perform them.
In addition, Peak allows you to apply VST plug-ins to
playlist events. Peak’s Playlist offers a fast, flexible, and
powerful approach to editing and processing digital
audio.
Peak also lets you burn Track At Once (TAO) and Disk
At Once (DAO) audio CDs from Playlists using Roxio
Toast™ (Roxio Toast Lite comes bundled with Peak).
You can also use Peak’s Playlist to create a Jam Image
file for burning DAO, audio CDs using Roxio’s JAM™
(JAM is sold separately). Please consult Roxio for
compatible CD-Burners using either Toast or JAM. You
can also bounce (i.e., write to disk) your Peak Playlist
as a Sound Designer II file and then import the Playlist
Events as Regions into Digidesign’s MasterList CD or
Emagic’s WaveBurner.
Regions
The audio events that are played back in a Playlist are
Regions—portions of an audio document defined
using the New Region command from the Action
menu (-Shift-R) or Toolbar. A Region is defined by
Region Markers in the audio document window. All
Regions defined in open audio documents will also be
listed in the Contents Palette.
Two of the main windows you will use to organize
Regions are the Contents Palette and the Playlist. The
Contents Palette is available under the Window menu,
and will show all of the regions in open audio
documents at a glance. You can drag and drop Region
names from the Contents Palette into the Playlist. To
display all of the regions in open documents, click on
the left “tab” of the named Audio Document listed in
the Contents Palette. If you drag and drop an Audio
Document’s name from the Contents Palette into the
Playlist, it will add all the Regions in that Audio
Document to the Playlist.
6
Playlists & CD Burning
83
Page 96
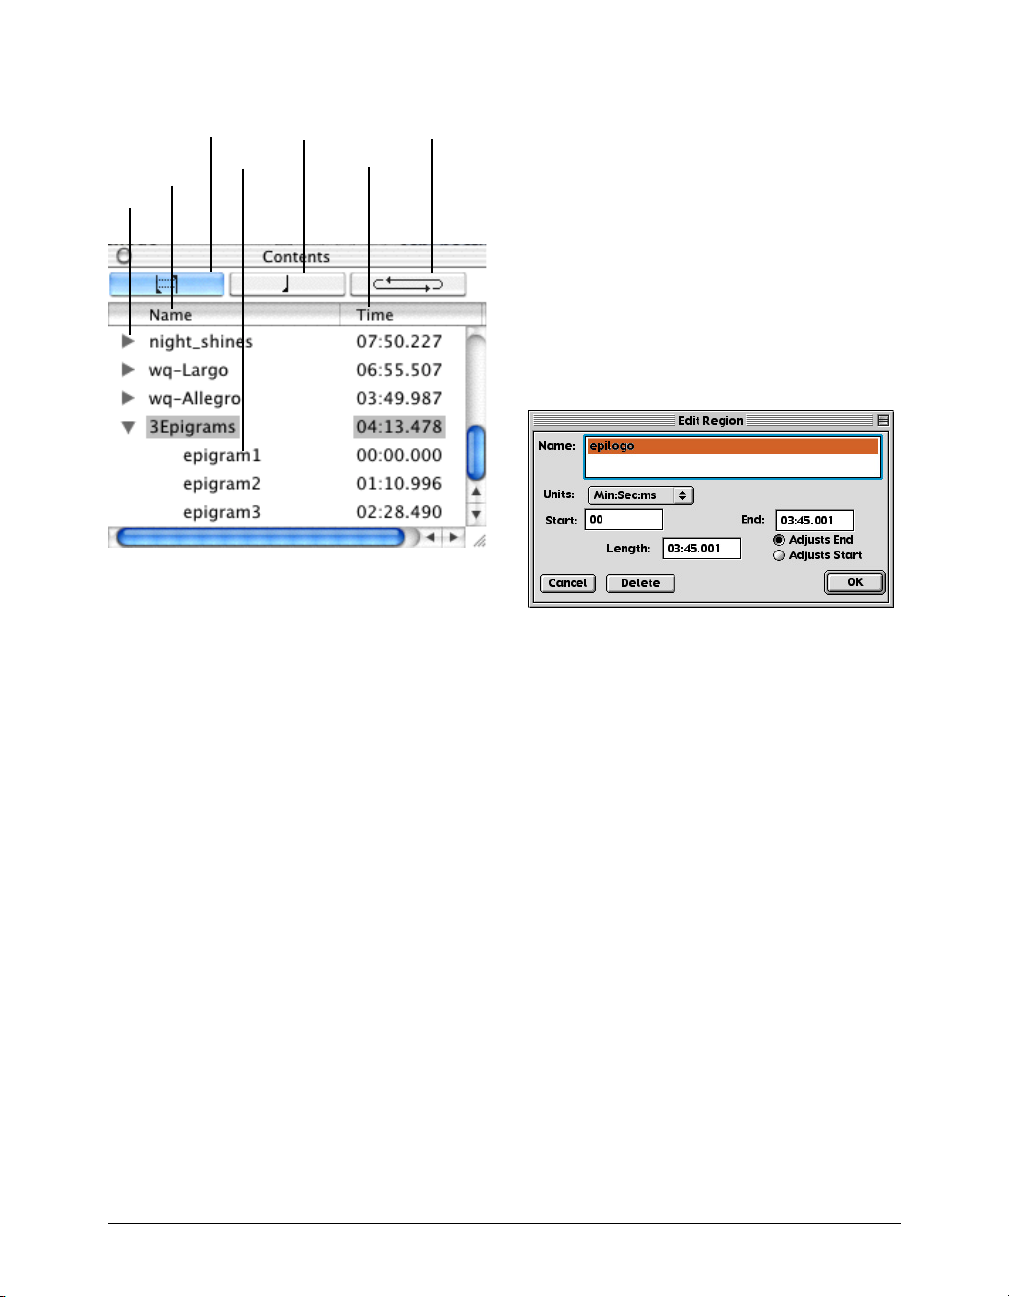
Show Regions
Button
Audio
Document
Name
Tab
The Contents Palette
Region
Name
Show Markers
Button
Region Start
Time
Show Loops
Button
To move the start and end points of the region
together:
• Option-drag on the start or end marker of the
Region.
To change the name of a Region:
1. Double-click on either the start or end marker of
the Region in the audio document window, or
Option-double-click on the Region name in the
Contents Palette. The Edit Regions dialog will
appear.
Regions can only be saved in AIFF, Sound Designer II,
and JAM Image file formats created by Peak. However,
Peak will also read Regions stored from other
programs in Sound Designer II files. The method Peak
uses to store Regions in AIFF files is specific to Peak
and is not supported by other software applications. If
you are planning to use Regions created with Peak in
other programs, you will usually want to save your files
in Sound Designer II file format.
To define a new Region:
1. Make a selection in an opened audio document.
2. Choose New Region from the Action menu or
Toolbar. The Edit Regions dialog will appear.
3. Type the name of the Region and click OK. The
new Region will appear in the audio document.
To modify the length of the Region by changing the
start or end:
• Drag the start or end marker of the Region in the
audio document window.
The Edit Regions dialog
2. Type the new name of the Region into the dialog
and click OK.
To move a Region without changing its length:
• Hold down the Option key and drag either the
start or end marker of the Region.
To edit a Region’s start, end, or length manually:
1. Double-click on either the start or end marker of
the Region in the audio document window or
Option-double-click on the Region name in the
Contents Palette. The Edit Region dialog will
appear.
2. Enter new values for Start, End, or Length times,
then click OK.
To locate a Region:
• Double-click the Region you wish to locate in the
Contents Palette. The audio document will scroll
automatically to display the region and the Region
84 Peak User’s Guide
Page 97
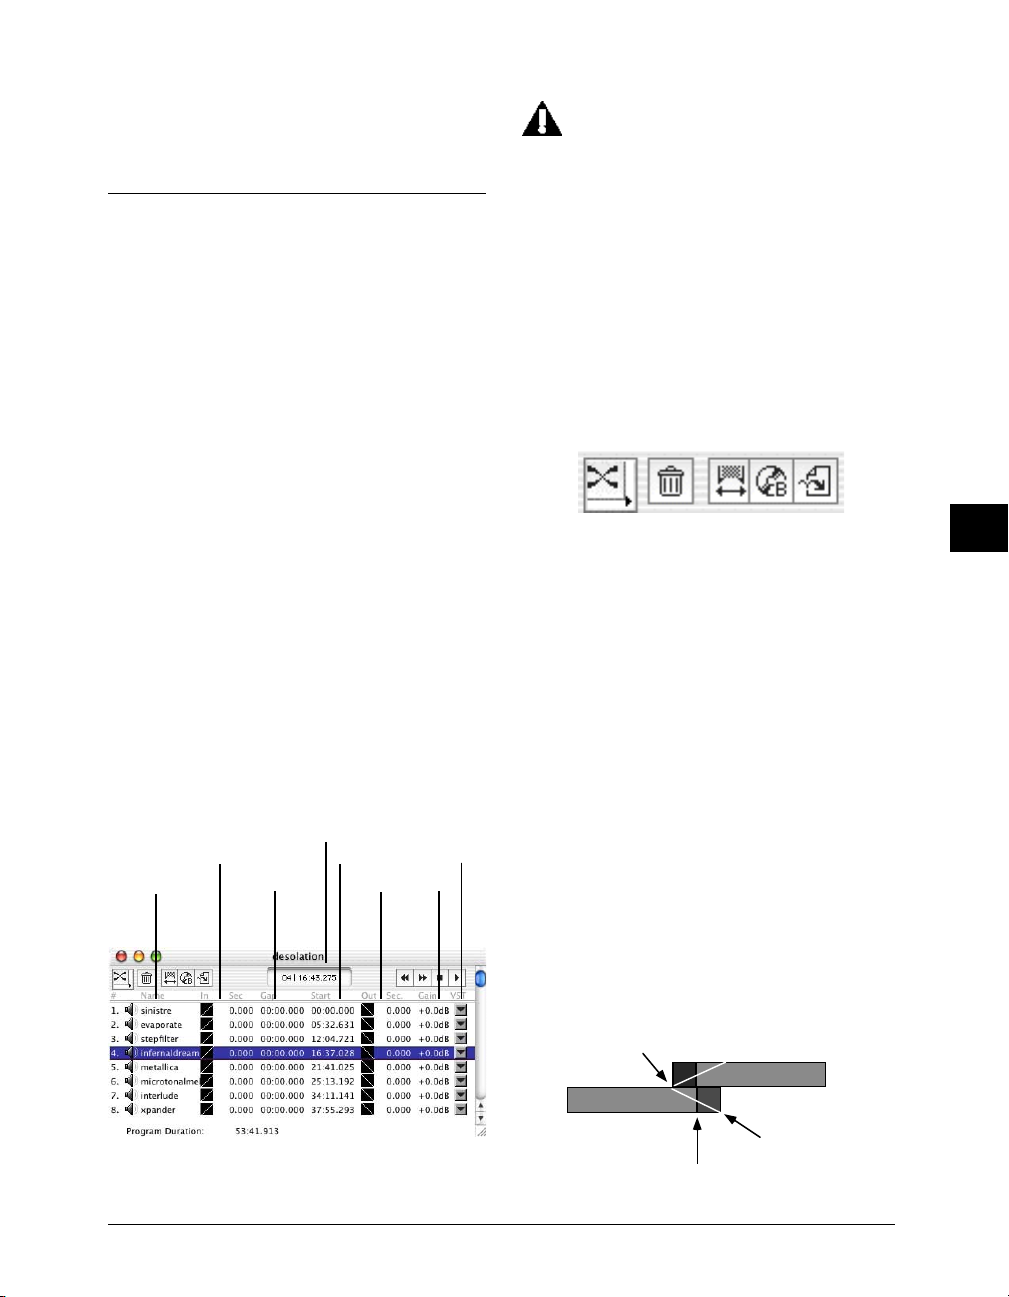
will become the current selection in the audio
document.
Creating a Playlist
To create a new Playlist:
• Select Playlist Document from the New submenu
under the File menu (-Shift-P). An empty playlist
document will appear. The top of the playlist has
category titles for each column of information. The
bottom of the playlist shows total duration of the
playlist.
To add an item to the playlist:
1. Make sure the Playlist is the front-most document
in Peak (-P). Select the Contents Palette from
the Window menu if it is not already open.
2. Drag and drop the names of the Regions from the
Contents Palette into the Playlist to add Regions to
the Playlist. Each Region you add to the Playlist
becomes a Playlist Event. The center of the Playlist
window shows Playlist Events as a sequential list.
You may use Regions from multiple audio
documents. Any audio documents containing
Regions used in the current Playlist must be open
in Peak to be available to the Playlist.
Time Display
Crossfade In Start Time
Playlist Event
Gap Time
Crossfade Out
Gain
VST
All audio documents referenced by the Playlist
must have the same sample rate, number of
channels (i.e., mono or stereo), and bit-depth.
The controls along the top of the Playlist window give
you access to most of the Playlist functions. There are
transport controls at the top right of the window that
allow you to audition the Playlist from the currently
selected Region, or Playlist Event. There is a time
display in the middle of the window. From left to right,
the icons in the upper left of the Playlist window are
Crossfade Select, Delete, Nudge Regions, Burn CD,
and Bounce Playlist buttons.
Playlist Icons
A playlist event has several properties that can be
modified: crossfade in, gap time, crossfade out, gain,
and VST plug-ins. Since the transitions between one
audio event to another can be abrupt, a playlist
crossfade can be used to smooth the transition from
one audio event to another.
Crossfades between Playlist Events fade out the first
region while fading in the next region. Each Playlist
Event has separate controls for crossfade in, crossfade
out, crossfade-in time, and crossfade-out time. The
curve stored in crossfade in is used to fade in the
current region. The curve stored in crossfade out is
used to fade out into the next region.
6
The Playlist Document window
Crossfades are stored on disk and are computed
before playback. When a crossfade is being calculated,
the watch cursor may appear.
next region's crossfade in
first region
Playlists & CD Burning
....next region
first region's crossfade ou
end of region
85
Page 98

The illustration above shows how crossfades are used
in playlist events. The audio material from each region
overlaps beyond the region boundaries. Overlapping
areas are darker in the illustration above. The white
diagonal lines correspond the crossfade in and out
curves. As the first region ends, the next region’s audio
material begins to fade in. When the next region
begins playing, the first region continues to fade out.
It is very important to understand that the
Region marker in the referenced Audio
Document is the exact midpoint of the fade.
Consequently, there must be sufficient audio
date on either side of the Region marker. That
is, if you have a 60 second crossfade between
two Playlist Events, there must be at least 30
seconds of audio data following the end Region
marker of the first Playlist Event and at least 30
seconds of audio data proceeding the begin
Region marker of the second Playlist Event.
Using the separate crossfade in and crossfade out
curves, Peak provides you with the flexibility to create
many common crossfade types. These include “Linear
Crossfade,” “Equal Power Crossfade,” “Slow in but fast
out Crossfade,” “Fast in but slow out crossfade,” and
“Overlap transition.” Peak is also flexible in allowing
you to control crossfade in and crossfade out
durations separately. All crossfades are based on
overlapping audio from the previous or subsequent
regions and then mixing the overlapping material after
applying the crossfade curves.
A linear crossfade actually sounds like an equal power
crossfade (i.e., no loss of energy in the audio signal),
since Peak playlist crossfades are calculated logarithmically.
A Playlist event’s gain setting can be used to control
the balance of the event in a Playlist. You may need to
raise the volume or lower the volume of some Playlist
events to maintain a proper balance of volume levels.
You can make adjustments to the gain of individual
Playlist Events as you playback the Playlist.
Be careful not to set a Playlist event’s gain too
high as you may overload the signal and cause
clipping to occur. You may also introduce
clicks between Playlist events if the difference
in gain between the two playlist events is too
large. Crossfades can help smooth these
transitions.
To select items in the Playlist:
• Click on the item in the Playlist that you wish to
select. You may use the Shift key to select several
items in the Playlist.
To hear the playlist:
• To hear your playlist, use the Play button in the
Playlist window. The Playlist will begin playback
from the current selected playlist event.
To preview transitions between Regions
1. Select the playlist event in which you wish to hear
the transition.
2. Use the Playlist’s Play button or press the Spacebar
while holding down the Command key (). The
pre-roll setting from the Auditioning dialog under
the Preference menu will be used to audition from
the end of the previous playlist event through the
transition into the selected playlist event.
To scrub in the Playlist window:
• While playing audio in a Playlist, hold down the
control key and press the forward or reverse
buttons in the playlist. The audio will advance
"CD-style" in larger increments. Release the mouse
when you find the spot you wish to hear. This is
useful for moving around quickly in the Playlist's
audio to test gain levels and VST effects for
potential clipping. You can also click and drag
right or left in the Playlist Window’s Time Display.
To select next or previous Playlist event:
• With the Playlist as the front-most window (-P),
you can use the arrow keys (up and down arrows)
to select the next or previous playlist event. While
86 Peak User’s Guide
Page 99
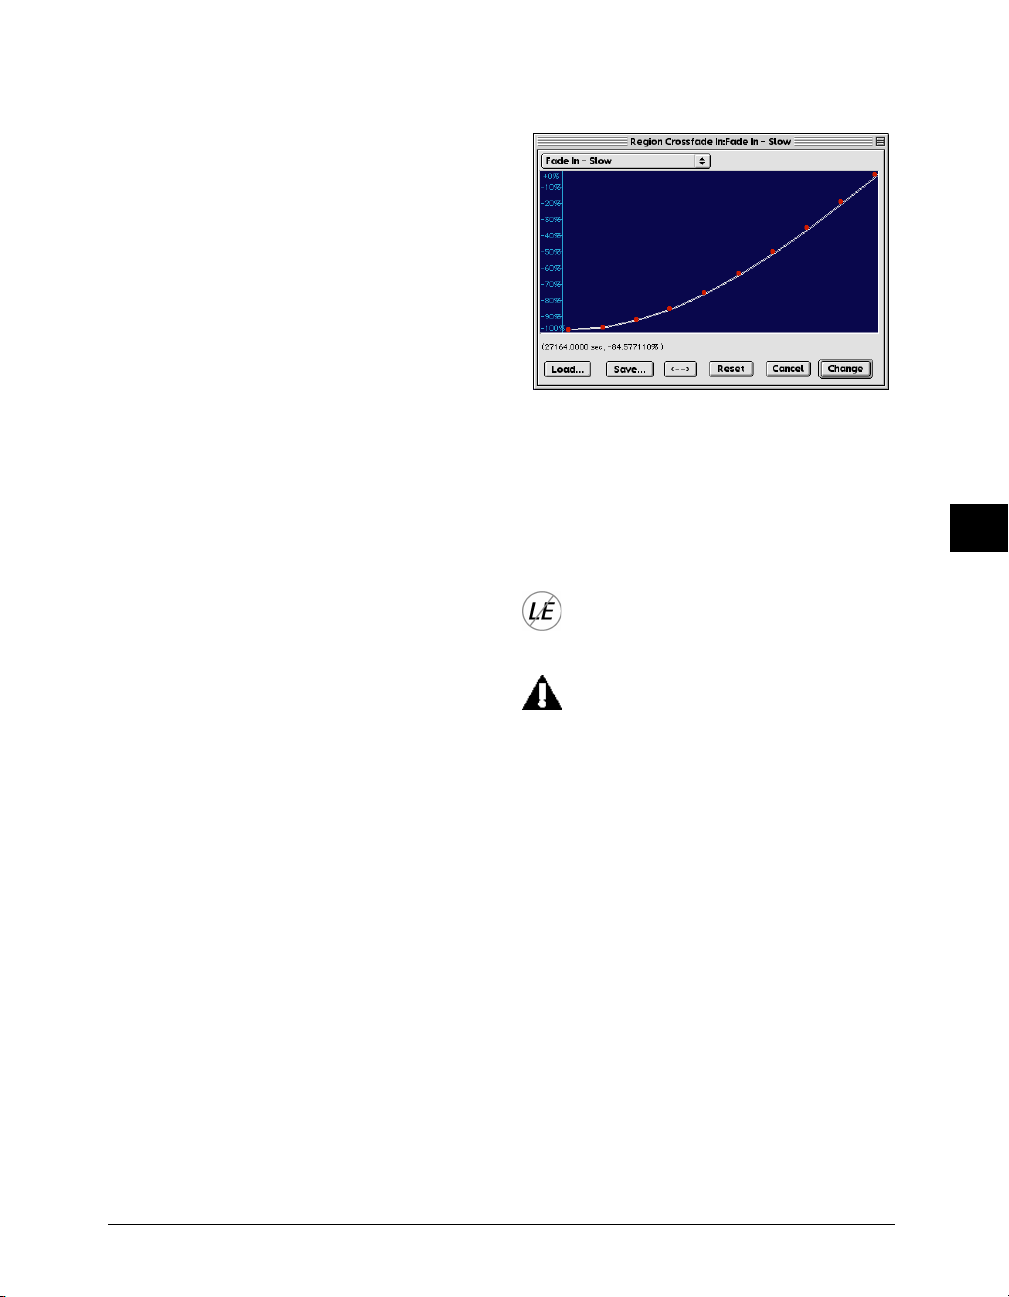
playing audio in a Playlist, you can use the arrow
keys to move playback to the next or previous
event in the Playlist during playback. Note that the
arrow keys don't work with the control key to
scrub during playback. You can also use the Tab
key to select the next Playlist event, even during
playback.
Modifying Playlist Events
To move items in the playlist:
• Click and drag the Playlist event to the new
location. A green line will indicate the new
position for the playlist event. Release the mouse
button when the green line is at the location you
wish to place the event.
To delete items in the Playlist:
1. Select the Playlist event you wish to delete by
clicking on it.
2. Press the Delete key on your keyboard, or click on
the Trash Can icon in the Playlist window. The
event will be removed from the playlist, and the
audio events below the event will move up. This
operation will, of course, decrease the length of
the Playlist.
To edit a crossfade in or out:
• Double-click on the Playlist event’s Crossfade In or
Crossfade Out icon. The Fade Envelope Editor
dialog will appear, where you may edit the Fade
Envelope for that particular Playlist Event’s Fade In
or Fade Out.
Fade Envelope Editor
To change Crossfade In or Out duration
• Double-click on the Playlist event Crossfade In
time or Crossfade Out time. A dialog will prompt
you to enter the duration in seconds for the
Playlist Event’s Crossfade In or Out.
Crossfades are not available in Peak LE
Playlists.
The default setting for crossfade duration in
Peak Playlists is 0.
To modify the gap time:
• Double-click on the Playlist event Gap Time (i.e.,
the time between the beginning of one Playlist
Event and the end of the previous one). A dialog
will prompt you to enter the desired Gap Time for
the selected Playlist Event.
The Nudge Regions Dialog
The Nudge Regions function is useful for fine-tuning
the start and end times of Regions in the Playlist as
well as adjusting the crossfade times. Access the
Nudge Regions dialog by clicking on the Nudge
Regions icon in the Playlist window. In this dialog you
can dynamically adjust start and end times of selected
regions by scrolling in the windows, and listen to the
changes as you make them by clicking on the Play
button.
6
Playlists & CD Burning
87
Page 100
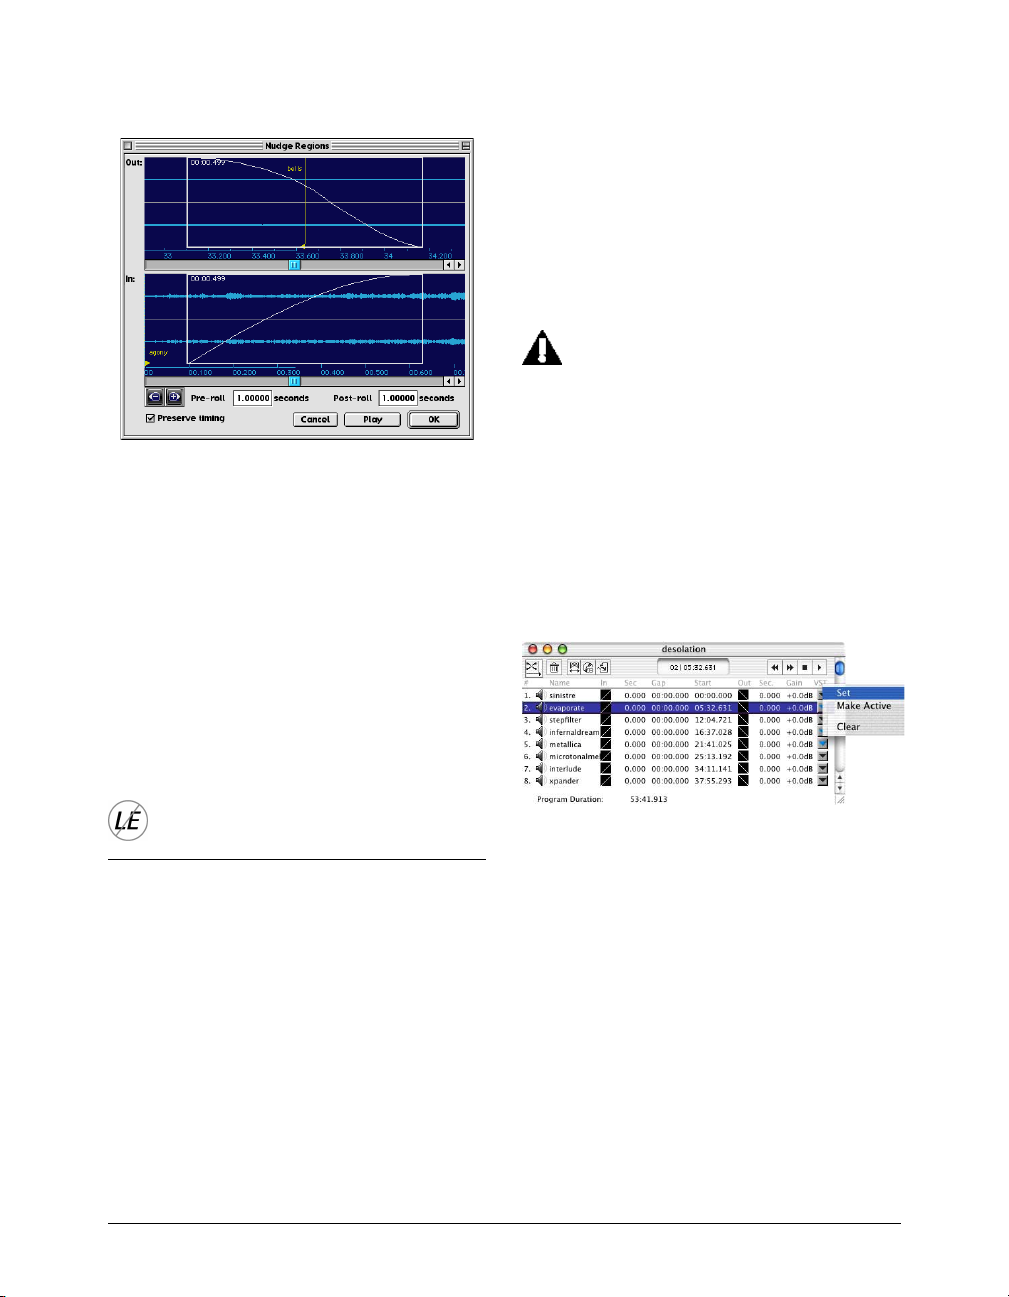
The Nudge Regions dialog
You can set the Pre-roll and Post-roll in seconds for
auditioning the crossfade. If the Preserve Timing
checkbox is checked, the duration between the Region
markers will remain fixed. If the Preserve Timing
checkbox is not checked, the Region markers can be
moved independently of one another. The Zoom tools
at the left of the window allow you to zoom in to the
sample level, or out for a larger view. You can also
allocate region Pre-roll and post-roll times in this
dialog. By clicking and dragging in the window, you
can adjust the fade times for the Fade Out (on top)
and the Fade In (on the bottom).
3. Configure Vbox SE with the desired VST plug-ins.
Use the Playlist VST Plug-Ins pop-up menu to take a
“snapshot” of the current Vbox VST plug-ins configuration for a particular Playlist Event. A snapshot is the
current arrangement of VST plug-ins in Vbox, along
with their settings (e.g., master input and output
levels, wet/dry mix, and so on).
Note that clicking may occur between Playlist
Events if VST plug-ins are loaded or unloaded
when changing from one snapshot to the next.
This is because Vbox bypasses the audio stream
when making plug-ins active or inactive.
Therefore, it is recommended that if you want
to use different VST plug-in configurations for
each Playlist Event, configure Vbox with all the
plug-ins you want to use for all Playlist Events,
and then create snapshots for each Playlist
Event with the plug-ins the you don’t want to
use on that Playlist Event muted or bypassed.
Nudge Regions is not available in Peak LE
Applying VST Plug-Ins to the Playlist
Playlist VST Plug-Ins pop-up menu
To take a “snapshot” of the current VST plug-in
settings:
• Select Set from the Playlist VST Plug-Ins pop-up
Peak will let use VST plug-ins on any Playlist event in
real-time. For more information on using VST plug-ins
with Peak, see Chapter 8: Plug-Ins.
To apply VST effects to a Playlist Event:
To make a Playlist Event’s “snapshot” active:
• Select Make Active from the Playlist VST Plug-Ins
1. Bring the playlist to the foreground by selecting
Playlist from the Windows menu (-P).
2. Choose VST Plug-Ins from the VST Plug-Ins menu
to open Vbox SE.
88 Peak User’s Guide
menu for an individual Playlist event to take a
snapshot and assign it to this playlist event.
pop-up menu to activate the snapshot for the
specific Playlist event in Vbox.
 Loading...