

Page 1

SoundSaver
Quick Start Guide
Version 1.0
Page 2

INSTALL LICENSE AGREEMENT
This legal document is an agreement between you, the end user
(“YOU” or “LICENSEE”), and Berkley Integrated Audio Software, Inc.
(“BIAS”). BY CLICKING “INSTALL” ON THE FOLLOWING DIALOG,
YOU ARE AGREEING TO BECOME BOUND BY THE TERMS OF
THIS AGREEMENT, WHICH INCLUDES THE SOFT WARE LICENSE
AND THE SOFT WARE DISCLA IMER OF WARRANT Y (collectively
the “Agreement”). CLICK “QUIT” ON THE FOLLOWING DIALOG
IF YOU DO NOT ACCEPT THE TERMS OF THIS AGREEMENT.
THIS AGREEMENT CONSTITUTES THE COMPLETE AGREEMENT
BETW EEN YOU AND BIAS. IF YOU DO NOT AGREE TO THE
TERMS OF THIS AGREEMENT, DO NOT USE OR REGISTER THE
SOFTWARE AND PROMPTLY RETURN THE SOFTWARE AND THE
OTHER M ATERIALS (INCLUDING WRITTEN M ATERIALS, BINDERS
OR OTHER CONTAINERS) THAT ARE PART OF THIS PRODUCT TO
THE PLACE WHERE YOU OBTAINED THEM FOR A FULL R EFUND.
YOUR USE OF THIS SOFTWARE SHALL CONSTITUTE ACCEPTANCE
OF THIS AGREEMENT, AND ONCE YOU HAVE REGISTERED THE
SOFTWARE YOU MAY NOT RETURN IT.
1. BIAS SOFTWARE L ICENSE
BIAS offers two distinct license options – SINGLE USER and MULTI-
USER SINGL E SITE. If you have purchased a single user license, the
license ter ms in section 1a apply to you. I f you have purchased a
multi-user si ngle site license (e.g. 5 user lab pack), the license terms in
section 1b apply to you.
1a. GR ANT OF LICENSE (SINGLE USER). In consideration of
payment of the single user license fee, which is part of the
price you paid for this product, BI AS, as Licensor, grants to
you, LICENSEE, a nonexclusive license to use and display this
copy of a BIAS software program (the “SOFTWARE”) and
accompanying user documentation (“DOCUMENTATION”).
LICENSEE may install and authorize the SOFTWARE on one
COMPUTER, provided that (a) the COMPUTER is owned by
(or leased to) and under exclusive control of the Licensee; (b)
the SOFTWARE shall NOT be used simultaneously on more
than one COMPUTER at a time, and (c) any COMPUTER(S)
with BIAS Software installed shall not be sold, rented, leased,
loaned or otherwise be removed from the LICENSEE’s
possession without fi rst removing and deauthorizing
the Software, except as provided in Paragraph 6 ( below)
pertaining to “TRANSFER RESTRICTIONS.” BIAS reserves all
rights not expressly granted to LICENSEE.
1b. GRANT OF LICENSE (MULTI-USER SINGLE SITE LICENSE). In
consideration of payment of the multi-user single site license
fee, which is part of the price you paid for this product,
BIAS, as Licensor, grants to you, LICENSEE, a nonexclusive
license to use and display this copy of the Software and
Documentation. LICENSEE may install and authorize the
SOFTWARE on a number of COMPUTERS equal to or less
than the number of licenses purchased (e.g. a 5 User Lab
Pack allows up to 5 BIAS SOFTWARE licenses at a single
SITE to be simultaneously installed, authorized, and used
on up to 5 COMPUTERS at said SITE), provided that (a) each
COMPUTER is owned by (or leased to) and under exclusive
control of the Licensee; (b) the SOFTWARE shall NOT be
used simultaneously on more COMPUTERS at a time than
the number of licenses purchased as part of the multi-user
single site license, and (c) any COMPUTER(S) with BIAS
Software installed shall not be sold, rented, leased, loaned
or otherwise be removed from the LICENSEE’s possession
without fi rst removing and deauthorizing the Software, except
as provided in Paragraph 6 (below) pertaining to “TRANSFER
RESTRICTIONS.” BIAS reserves all rights not expressly
granted to LICENSEE.
2. SOFTWARE AUTHORIZATION. You must register and
AUTHORIZE this SOFT WARE either online (via the included
BIAS Authorization Manager software) or by phone (1-800775-2427 +1-707-782-1866). Once the SOFTWARE is registered
and AUTHOR IZED, it may not be returned.
3. OWNERSHIP OF SOFTWARE AND DOCUMENTATION. As
LICENSEE, you own the media on which the SOFTWARE and
DOCUMENTATION are originally or subsequently recorded or
fi xed, but BIAS retains title and ownership of the SOFTWARE
and DOCUMENTATION and all subsequent copies of the
SOFTWARE and DOCUMENTATION, regardless of the form
or media on which the original and other copies may exist.
This License is not a sale of the original SOFT WARE or any
copy or sale of the original DOCUMENTATION.
4. COPY RESTRICTIONS. This SOFTWARE and the
DOCUMENTATION are copyrighted. Unauthorized copying
of the SOFTWARE, including SOFTWAR E that has been
modifi ed, merged, or included with other software, or of
the DOCUMENTATION is expressly forbidden. You may
be held legally responsible for any copyright infringement
that is caused or encouraged by your failure to abide by the
terms of this License. Subject to these restrictions, and if
the SOFTWARE is not copy-protected, you may make one (1)
copy of the SOFTWARE solely for backup purposes. You must
reproduce and include the copyright notice on the backup
copy.
5. USE RESTRICTIONS. As the LICENSEE, you may physically
transfer the SOFTWARE from one computer to another
provided that the SOFTWARE is used on only one computer
at a time if you have purchased a single user license or, if
you have purchased a multi-user single site license, on up to
the number of computers for which you have purchased a
license at one time. You may not electronically transfer the
SOFTWARE from one computer to another over a network.
You may not distribute copies of the SOFTWARE or the
DOCUMENTATION to others. You may not modify, adapt,
translate, reverse engineer, decompile, disassemble, or create
derivative works based on the SOFTWARE. You may not
modify, adapt, translate, or create derivative works based on
the DOCUMENTATION without the prior written consent of
BIAS.
6. TRANSFER RESTRICTIONS. This SOFTWARE is licensed
only to you, LICENSEE, and may not be assigned or otherwise
transferred to anyone, whether voluntary or by operation
SoundSaver Quick Start Guideii
Page 3

of law, without the prior written consent of BIAS. Any
authorized transferee of the SOFTWARE must agree to be
bound by the terms and conditions of this Agreement, or the
transfer shall be invalid. In no event may you transfer, assign,
rent, lease, sell, or otherwise dispose of the SOFT WARE on a
temporary or permanent basis except as expressly provided
herein.
7. LICENSE TO U.S. GOVERNMENT. If LICENSEE is an agency
or instrumentality of the United States Government, the
SOFTWARE and DOCUMENTATION are “commercial
computer software” and “commercial computer
software documentation”, and pursuant to FAR 12.212
or DFARS 227.7202, and their successors, as applicable,
use, reproduction and disclosure of the Software and
Documentation are governed by the terms of this Agreement.
8. TERMINATION. This License is effective until terminated.
This License will terminate automatically without notice from
BIAS if you fail to comply with any provision of this License.
Upon termination you shall destroy the DOCUMENTATION
and all copies of the SOFTWARE, including modifi ed copies, if
any.
9. UPDATE POLICY. BIAS may create, from time to time,
updated versions of the SOFTWARE. At its option, BIAS will
make such updates available to LICENSEE and transferees
who have paid the update fee and returned the registration
card to BIAS.
10. BIAS PRODUCT SUPPORT.
Unlimited Complimentary Self Help Options
If you have questions about installing or using your BIAS
products, please check the manual or user guide fi rst, and
you will fi nd answers to most of your questions there. If you
need further assistance, please check the support section of
the BIAS web site, which contains answers to frequently asked
questions, troubleshooting tips, and more:
http://www.bias-inc.com/support/faq/
Limited Complimentary Technical Assistance
Ninety days of complimentary technical support assistance for
up to three incidents is available with the initial purchase of
current Type 1 BIAS products (Peak Pro, Peak Pro XT, Master
Perfection Suite, SoundSoap Pro).
Ninety days of complimentary technical support assistance
for a single incident is available with the initial purchase of
current Type 2 BIAS products (SoundSaver, Peak Express,
Peak LE, SoundSoap, PitchCraft EZ).
The support period begins when the product is initially
registered and authorized.
Type 3 products (OEM versions) and legacy products (Deck,
Deck LE, Deck SE) are excluded.
An additional thirty days of complimentary technical support
assistance for a single incident, beginning on the expiration
of the initial ninety days of complimentary support described
above, is available with the purchase of paid upgrades to
current Type 1 and Type 2 BIAS products.
To receive e-mail or telephone technical support, you will
need a valid serial number and must be registered for a
current BIAS product. Please keep your original product
serial number (located on your original owner’s certi fi cate) in
a safe place as it will be required for support.
Customers who prefer support by email, please use the
contact form on the BI AS website:
http://www.bias-inc.com/support/contact.php
Customers who prefer support by telephone, (connect and toll
charges apply), please have your computer running and close
by the phone and call us at:
+1-707-782-1865
(9AM-5PM Monday-Friday PST – excluding BIAS holidays)
Fee-based Technical Support Options
Fee-based Support is available for those customers whose
support period has expired (i.e., all complimentary technical
support incidents have been used, or product is no longer
a current version) or for Type 3 (OEM version) customers.
Please call:
+1-707-782-1865
(9AM-5PM Monday-Friday PST – excluding BIAS holidays)
For customers living outside of North America, please contact
your local BI AS distributor, or contact BIAS directly. A list of
BIAS distributors may be found at:
http://www.bias-inc.com/distributors.html
Legacy Products
BI AS does not support legacy products. Legacy products
are sold as-is, and will not be developed further. Refunds
are not available for legacy products. Before purchasing
a legacy product, BIAS encourages researching system
requirements, as well as downloading and using a trial version
to ensure system compatibility. Users of legacy products may
fi nd useful support information in the BIAS User Forums,
provided by other users – BIAS User Forums are not an
offi cial resource for obtaining technical support.
BI AS Support Policy and Hours
BI AS, Inc. support policy and hours are subject to change
without notice.
Sales and Non-Technical Customer Service
For product information, sales, and other non-technical
customer service, please email or call:
US: 1-800-775-BIAS (2427)
Internationa l: +1-707-782-1866
License Agreement iii
Page 4

(9AM-5PM Monday-Friday PST – excluding BIAS holidays)
No technical support is available at the numbers or email
address above.
11. MISCELLANEOUS. This Agreement is governed by the law
of the State of California, without regard to conicts of law
principles.
DISCL AIMER OF WAR RANT Y AND LIMI TED WARRA NTY
THE SOF TWARE AN D DOCUMENTAT ION (INCLUDING I NSTRUCTIONS
FOR USE) ARE PROVIDED “AS IS” W ITHOUT WARRA NTIES OF AN Y KIND.
FURT HER, BIAS DOES NOT WAR RANT, GUAR ANTEE , OR MAKE A NY
REPR ESENTATIONS RE GARDING TH E USE, OR THE RESULTS OF TH E USE,
OF THE SOF TWARE OR DOCU MENTATION IN T ERMS OF CORRECTNESS,
ACCUR ACY, REL IABILI TY, CURREN TNESS, OR OTHERWISE. THE ENTI RE
RISK A S TO THE RESULTS AND PERFOR MANCE OF THE SOFT WARE IS
ASSUM ED BY YOU, AND NOT BI AS OR ITS DEAL ERS, DISTRIBUTOR S,
AGENTS, OR E MPLOYEES. YOU AGREE TO ASSU ME THE ENTI RE COST OF
ALL N ECESSARY SERVICING, REPA IR, OR CORRECTION.
BIAS warra nts to the origina l LICENSEE that t he media upon which the
SOFTWARE is recorded and the BIA S Key (USB dongle), if applica ble, are free
from defects in mater ials and workmanship under normal use and ser vice
for a period of ninety (9 0) days from the date of delivery as evidenced by a
copy of your receipt. Further, BIAS hereby limit s the duration of any impl ied
warra nty(ies) on the media to the resp ective periods st ated above. Some
states do not a llow limitation s on duration of an implie d warranty, so the
above lim itation may not apply to you.
BIAS’ entire liability and your e xclusive remedy as to the media shall be, at
BIAS’ option, either (a) return of the purch ase price or (b) replacement of
the media t hat does not meet BIA S’ Limited Warra nty and which is retu rned
to BIA S with a copy of the receipt. If f ailure of the media h as resulted from
accident, abuse, or misappl ication, BIAS shall have no responsibility to replace
the media or r efund the purchase price. Any replacement med ia will be
warra nted for the remainder of the origi nal warrant y period or thirty (30)
days, whichever is longer.
THE A BOVE ARE TH E ONLY WARRA NTIES OF AN Y KIND, EIT HER
EXPR ESS OR IMPLIE D, INCLUDING BUT NOT LIMITED TO T HE IMPLIED
WARR ANTIES OF MERCH ANTABIL ITY AND F ITNESS FOR A PART ICULAR
PURPO SE, THAT AR E MADE BY BIAS CONCER NING THE BI AS PRODUCT.
NO ORA L OR WRITT EN INFORM ATION OR ADVICE GI VEN BY BIAS, ITS
DEALERS, DISTR IBUTORS, AGENTS, OR EMPLOYEES SH ALL CRE ATE A
WARR ANTY OR IN ANY WAY INCRE ASE THE SCOPE OF TH IS WARRA NTY,
AND YOU M AY NOT RELY ON AN Y SUCH INFORM ATION OR ADVICE. THIS
WARR ANTY GI VES YOU SPECIFIC L EGAL RIGHTS. YOU MAY H AVE OTH ER
RIGHTS WHICH VARY FROM STATE TO STATE.
NEIT HER BIAS NOR A NYONE ELSE W HO HAS BEEN IN VOLVED IN THE
CREATION, PRODUCTION, OR DEL IVERY OF TH IS PRODUCT SHAL L BE
LIA BLE FOR ANY DI RECT, INDIRECT, CONSEQUEN TIAL, OR INCIDE NTAL
DAMAGES (INC LUDING DAMAGE S FOR LOSS OF BUSINESS PROFITS,
BUSINE SS INTERRUPTION, LOSS OF BUSIN ESS INFORM ATION, AND
THE LIKE). BECAUSE SOM E STATES DO NOT AL LOW THE EXCLUSION
OR LIMITATION OF L IABILI TY FOR CONSEQUENTIA L OR INCIDENTA L
DAMAGES, THE ABOVE LIMITATION M AY NOT APPLY TO YOU.
Should you have any questions concerning this Agreement, or i f you desire to
contact BI AS for any reason, please contact in writing:
BIAS Customer Sales and Ser vice
121 H Street
Petaluma, CA 94952
USA
© 2010 Marin Audio Technolog y, LLC. A ll Rights Reser ved Worldwide.
Exclusively licensed to Berkley Integrated Audio Softwa re, Inc. (“BIAS”). All
other trademarks propert y of their respective holders. All features, prices,
specications, a nd offers are subject to c hange. Certain features such as
the number of si multaneous plug-ins or t racks are dependent on specic
versions of BI AS software, along with CPU, operat ing system equirement s and
capabil ities.
BIAS assumes no responsibi lity for or guara ntees of third-party sof tware or
hardwa re specications, features, or compatibi lity with BIA S products.
SoundSaver uses TagLi b (http://developer.kde.org/~wheeler/taglib.html),
LA ME (www.mp3dev.org), and libsnd le, released under the GNU Lesser
General Public License, either version 2.1 or optionally version 3 (htt p://www.
gnu.org/copyleft/ lesser.html).
Credits
SoundSaver Software:
Steve Berk ley, Eric Eizenman, Dan Spirlock, Bil l Preder, Eric Johnson,
Guiller mo Garcia
Quick Start Guide:
Zac Wheatcroft
Special Thanks to:
Jason Davies, Chri stine Berkley, Jeremy A suncion, Cory Stück, B en Ventura,
Peter Mar tinelli, Lisa Stefan, Victor Cebrero s, Thom Butler, Victor Salce do,
Barr y Diament, Steve Dan ielson, Anthony Ianucci, Kai-Hsuan James Johnson,
Robert Goldstein, Roycee Mar tin, Mike Theiss, Michael Coar, Luke Slater,
Anthony Roach, Jaime y Walki ng Bear, Dan Lyke, John Gat ski, Kanji Murai,
Gio Benedett i, Gary Taylor , Matt Evans, Christopher Campbell, Bob Sykes,
Glenn Lorbecki, Evan Sal ke, Dr. Fred Bashour, Reg Rogers, Jeff Lewis, Heather
Perkins, Ken Loge, Paul Pierron, Chandler Coyle, Scott Thatcher, Set h Aicklen,
Mart in Gelland, Andre Torres, Br ian Valley, Frank Mig liorelli, Jim Holley, Artur
L. , Lee Ho cker, Mark Johnson, Stephen M anders, Robert Kjonaas.
This Di sclaimer of Warr anty and Limited Warrant y is governed by the laws of
the State of Ca lifornia, without regard to conic ts of law principles.
SoundSaver Quick Start Guideiv Table of Contents
Page 5

Table of Contents
Chapter 1: Introducing SoundSaver
Welcome!............................................................................................................................................................................................................7
SoundSaver Features.......................................................................................................................................................................................7
Who is Sou ndSave r Desig ned For?...............................................................................................................................................................8
Mi nimum System Req uirements..................................................................................................................................................................8
Ab out Your Quick Star t Guid e.......................................................................................................................................................................8
Conclusion..........................................................................................................................................................................................................9
Chapter 2: Installation, Registration, and Authorization
Installing SoundSaver...................................................................................................................................................................................11
Registration and Authorization..................................................................................................................................................................12
Deauthorizing a Computer..........................................................................................................................................................................14
Conclusion........................................................................................................................................................................................................15
Chapter 3: Using SoundSaver
Introduction....................................................................................................................................................................................................17
Get tin g Sta rte d in t he St art Page.............................................................................................. ...................................................................18
Con necti ng wit h the Connect ion Pa ge.....................................................................................................................................................18
Making Audio Connections........................................................................................................................................................................20
Diagram of Com mon Aud io Connections...............................................................................................................................................21
Setting SoundSaver’s Audio Input Level..................................................................................................................................................22
Making Your First Recording......................................................................................................................................................................22
Cleaning a Recording....................................................................................................................................................................................25
Cutt ing a Recor ding into Track s..................................................................................................................................................................30
Editing Tracks.................................................................................................................................................................................................32
Creating Tracks Manually............................................................................................................................................................................33
Exporting Your Finished Product..............................................................................................................................................................36
Customizing SoundSaver.............................................................................................................................................................................38
Conclusion.......................................................................................................................................................................................................40
Appendix 1: Keyboard Shortcuts
Sou ndSa ver Ke ybo ard S hort cuts.................................................................................................. ..............................................................41
Table of Contents v
Page 6

SoundSaver Quick Start Guidevi
Page 7

Chapter 1: Introducing SoundSaver
Welcome!
11
Thank you for purchasing BIAS SoundSaver!
SoundSaver is the simplest way to digitally record and
clean up your old records and tapes – and create highquality digital fi les for use in iTunes, portable media
players, or for burning to audio CD.
SoundSaver uses the same acclaimed digital audio
technology found in BIAS’ professional recording,
editing, processing, and mastering tools. You’ve
probably heard many songs and sound effects on CDs,
on the radio, and in your favorite movies – that were
created using BIAS audio software.
SoundSaver packages this advanced technology in a
very easy-to-use application, that’s simple enough for
anyone to use and achieve amazing results.
SoundSaver Features:
• Records audio from your tape deck or turntable*
through your computer’s built-in audio input – or
through many popular third-party sound cards
and audio interfaces.
• Manual and automatic input level control
• Adjustable output level control
• High-precision input level meters
• Record monitoring (listen while you record)
• Record timer lets you record for a specifi ed
amount of time
• Insert Markers during recording
• Append to current recording
• High-precision audio waveform display with
integrated timeline
• Adjustable waveform zoom level
• Simple transport controls (Play/Pause, Previous
Track, Next Track, etc.)
• High-precision counter display
(Hours:Minutes:Seconds:Milliseconds)
• “One-click” broadband noise reduction/removal
with “Learn” function – allows automatic noise
reduction/removal
• 50 & 60 Hz hum reduction/removal
• Rumble reduction/removal
• “Preserve Voice” – specialized fi ltering for voice-
based media fi les
• Click & Crackle reduction/removal
• Audio enhancement allows tone enhancement
when working with degraded media sources, such
as old audio or video cassettes or vinyl records
• Automatic track defi nition – cuts recordings into
tracks based on audio level, ideal for working
with recordings of typical commercially produced
records and tapes with clearly defi ned gaps
between tracks
• Manual track defi nition – cuts recordings into
tracks manually – perfect for working with
continuous-play DJ mixes, live concerts, or
classical music
Chapter 1 – Introducing SoundSaver 7
Page 8

• Opens AIFF, WAV, and SoundSaver Project fi les
• ID3 metadata tags for MP3 fi le export
• Export fi nished projects as individual MP3 tracks,
export tracks to iTunes, export uncompressed WAV
fi les for burning audio CDs, or as SoundSaver projects
for later editing/transfer to another computer
• Integrated localized tool tips
Windows:
• Intel CPU (P4 or greater), or AMD Athlon CPU,
with SSE instructions (≥ 1.5 GHz processor
recommended)
• Windows 7, Vista, or XP (SP3)
• 2 GB RAM for Windows 7 or Vista; 1 GB RAM for
XP
• 55 MB available disk space
Non-USB turntables require use of a phono pre-amp.
Who is SoundSaver designed for?
SoundSaver is designed for anyone who wishes to
quickly and easily record their records and tapes into
a digital format – and clean up clicks, crackles, pops,
broadband noise, and hum.
SoundSaver’s advanced technology and simple user
interface make this process easy enough for anyone
with basic computer skills to convert their analog media
into a digital format.
With its few intuitive controls, you can learn how to use
SoundSaver in just a few minutes – and you’ll quickly
see why SoundSaver is perfect for anyone!
Minimum System Requirements
Your computer must meet certain minimum
performance requirements in order to use SoundSaver.
Mac:
• G4, G5, or Intel-based Mac (≥ 1 GHz processor
recommended)
• Mac OS X v.10.4.11, 10.5.8, and 10.6.4 or later
• 1.25 GB RAM
• 25 MB available disk space
Both:
• Hard drive with 8 ms (or faster) access time
• 10 MB/minute available disk space for recordings
• QuickTime 7 or greater (for opening certain fi le
types, such as MP3)
For the most up-to-date info, please visit:
http://www.bias-inc.com/soundsaver/
About Your Quick Start Guide
SoundSaver is designed to be simple and intuitive.
This guide is designed to help you set up and use
SoundSaver as quickly as possible.
This Quick Start Guide assumes that you are familiar
with standard Mac and/or Windows operating
techniques, including:
• Setting up, starting, and using your computer
• Installing & authorizing software
• Choosing commands from menus
• Double-clicking, selecting, shift-selecting, and
dragging with the mouse
• Opening, copying, saving, and deleting fi les
• Opening, closing, scrolling, moving, re-sizing, and
selecting windows
SoundSaver Quick Start Guide8
Page 9

If you don’t know how to perform these tasks, please
refer to the documentation that was included with
your computer, and spend a little time learning about
your operating system before going any further. This
will make using SoundSaver much easier and more
enjoyable.
The sections in your SoundSaver Quick Start Guide
are arranged in the order in which you would typically
perform tasks to remove unwanted noise from your
media.
• Chapter 1 introduces you to SoundSaver and
explains some of the requirements for using it
• Chapter 2 explains how to install, register, and
authorize SoundSaver
• Chapter 3 explains the various features in
SoundSaver and how they are used to record and
edit audio, how to reduce/remove noise, and how
to export a fi nished product
• Appendix 1 includes a list of SoundSaver keyboard
shortcuts
A tutorial video is also available on the BIAS website:
11
http://www.bias-inc.com
Look for important tips and notes whenever you
see this exclamation mark!
Conclusion
Now that you know a little about SoundSaver, proceed
to the next section to learn how to install and authorize
your software.
Chapter 1 – Introducing SoundSaver 9
Page 10

SoundSaver Quick Start Guide10
Page 11

Chapter 2:
Installation, Registration,
and Authorization
Installing SoundSaver
SoundSaver’s auto-installer software makes installation very
easy. The steps below will guide you through the process.
Your complete SoundSaver system consists of:
• CD-ROM installer
• Serial number
• Authorization File
Before you install SoundSaver, please check the
Minimum System Requirements on Page 8.
To install SoundSaver on a Mac:
1. If you are using any virus protection software,
turn it off or temporarily remove it, and restart
your Mac.
2. Insert the SoundSaver installer CD-ROM into your
CD-ROM drive – when its icon appears on your
computer’s desktop, double-click to open it and
start the installer.
3. The Installer will prompt you about running
a program to determine if SoundSaver can be
installed – click Continue when this appears.
4. When the Installer dialog appears, click the
Continue button.
5. Read the Software License Agreement – then click
the Continue button to proceed.
6. Click the Agree button if you agree to the terms of
the Software License Agreement.
2
7. Select the hard drive/volume on which you wish
to install SoundSaver, and click the Continue
button.
8. Click the Install/Upgrade button (depending
on the confi guration of your user account, you
may need to enter your account password.
If prompted for your password, enter it and
click the OK button. If you do not know your
account password, please contact your system
administrator for assistance).
9. When the installation is complete, a message will
appear indicating that the installation was successful.
Click the Close button to quit the Installer.
Be sure to turn back on any virus protection
software you may have disabled during
installation!
What SoundSaver installs on Mac systems:
The SoundSaver installer places a number of fi les
on your computer. The fi les and install location are
described below:
SoundSaver Application
The SoundSaver application is placed into your system’s
Applications folder:
/Mac HD/Applications/
Chapter 2 – Installation, Registration, & Authorization 11
Page 12

Documentation
An electronic (PDF format) version of the SoundSaver
User’s Guide, and a Read Me fi le with late-breaking
information are both installed into:
Be sure to turn back on any virus protection
software you may have disabled during
installation!
/Mac HD/Library/Documentation/BIAS/SoundSaver/
BIAS Authorization Manager
The BIAS Authorization Manager is an application that
allows you to authorize and deauthorize your BIAS
software. It is installed into your Applications folder:
/Mac HD/Applications/
To install SoundSaver on a Windows PC:
1. If you are using any virus-protection software,
turn it off or temporarily remove it, and restart
your computer.
2. Insert the SoundSaver Installer CD-ROM in your
CD-ROM drive. If the SoundSaver Setup program
does not automatically launch, double-click the
Install SoundSaver icon.
3. When the InstallShield Wizard for BIAS
SoundSaver appears, click the Next button.
4. Read the Software License Agreement, and
then click the “I accept the terms in the license
agreement” radio button to continue with
installation.
5. To install SoundSaver into the default directory
(recommended), click the Next button (Vista
users – skip this step).
6. In the Setup Type dialog, choose the Typical
option (Vista users choose the Complete option),
and click the Next button.
7. In the Select Program Folder dialog, click the Next
button to continue with installation.
8. In the Ready to Install dialog, click the Next
button to continue with installation.
9. When you are fi nished installing, click Finish to
exit the installer.
What SoundSaver Installs on Windows
Systems:
The SoundSaver installer places a number of fi les
on your computer. The fi les and install location are
described below:
SoundSaver Application
The SoundSaver application is placed into:
\Program Files\BIAS\BIAS SoundSaver\
Documentation
An electronic (PDF format) version of the SoundSaver
Quick Start Guide, and a Read Me fi le with late-breaking
information are both installed into:
\Program Files\BIAS\BIAS SoundSaver\
BIAS Authorization Manager
The BIAS Authorization Manager is an application that
allows you to authorize and deauthorize your BIAS
software. It is installed into:
\Program Files\BIAS\
Registration & Authorization
SoundSaver must be authorized to work on your
computer. You must register SoundSaver with BIAS
in order to authorize it. BIAS offers two methods to
authorize your computer – though registering and
authorizing via the internet with the computer on
which SoundSaver will be run is by far the fastest and
easiest method. Both methods are outlined below.
SoundSaver Quick Start Guide12
Page 13
Serial Number-Based Authorization System
SoundSaver’s standard authorization system consists of
the following components:
• BIAS Authorization Manager – A simple
application for managing BIAS software licenses.
• Serial Number – Located on Owner’s Certifi cate.
• Registration Account – Your registration and
authorization information on the BIAS Server.
• Authorization Request File – A fi le transferred
from your computer to the BIAS server, which
adds the computer you are authorizing to your
BIAS Registration Account.
• Authorization File – A fi le transferred from the
BIAS server to your computer, which authorizes it
to run SoundSaver.
The registration/authorization process provides the
following services:
• Registers your software with BIAS – making you
eligible for technical support and product updates.
• Authorizes your computer so it can run
SoundSaver. You may authorize up to two
computers for use with SoundSaver – for example,
a studio or offi ce computer, and a laptop for home
or mobile use.
Keep in mind that for each license of SoundSaver –
the software may only be used by one user, on one
computer system at a time. If you have used both of
your authorizations, and need to authorize a new
computer, you will need to fi rst de-authorize one of
the authorized computers before you are issued a new
authorization for the new computer.
About Registration, Authorization, and Trial
Modes:
When SoundSaver is fi rst launched, you will be
prompted to either authorize it or run it in trial mode.
For full functionality, authorize it with the included
serial number.
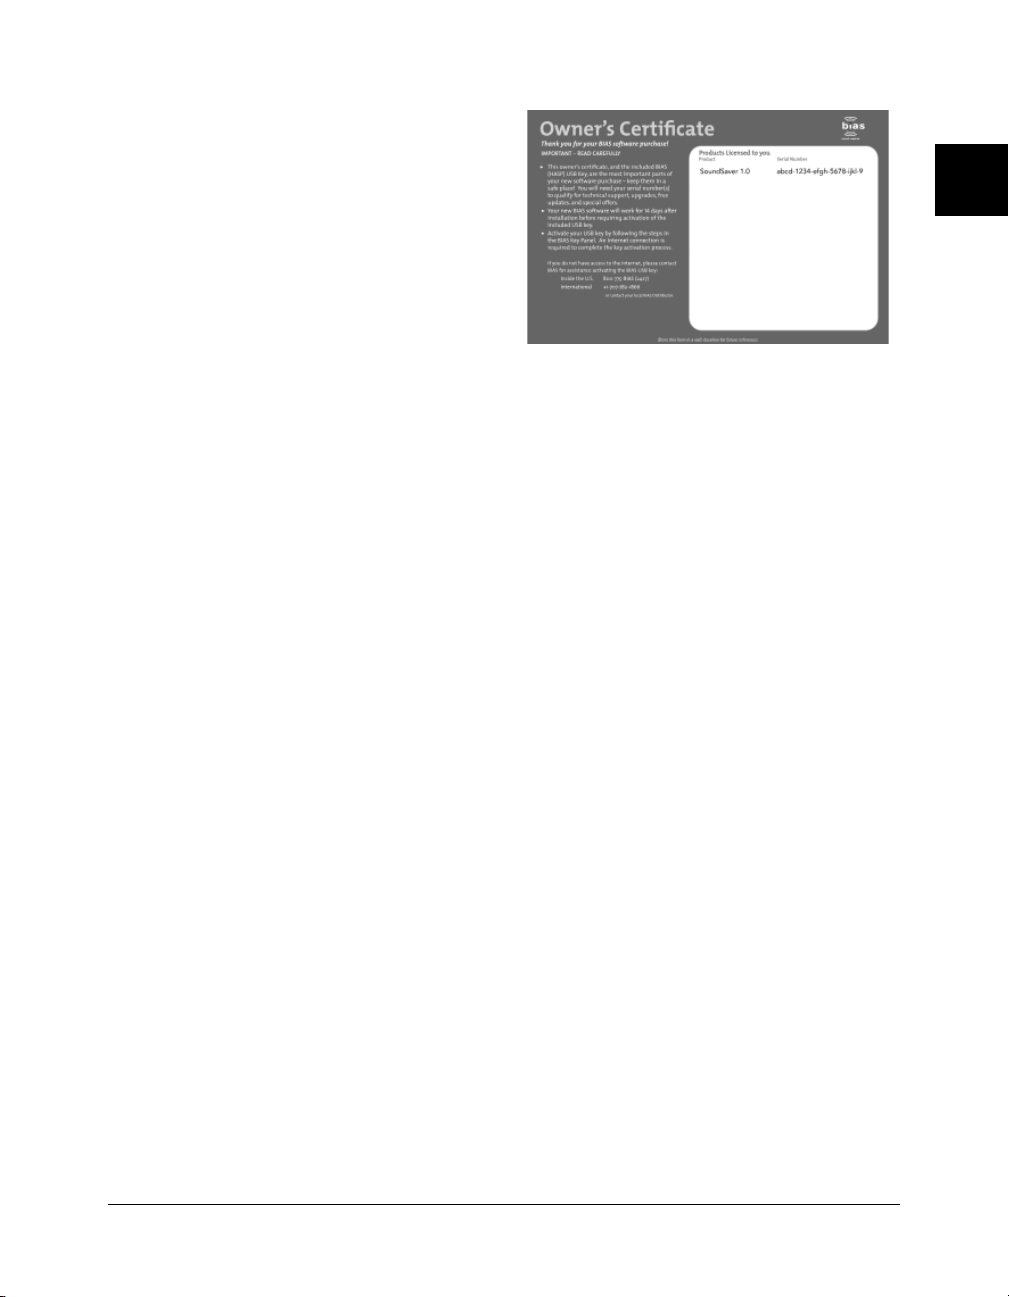
Your ser ial num be r is loc ated o n th e inclu ded Ow ner’s Certifi cate – or
in the electronic receipt for a downloade d purchase.
Requirements for Registration &
Authorization:
1. SoundSaver must be installed.
2. Your serial number must be available. Depending
on how you obtained SoundSaver, the serial
number will be provided in various ways:
• In new retail or upgrade packages – on the
Owner’s Certifi cate
• In downloaded purchases – in an email
receipt from BIAS
• When bundled with another product – in
the accompanying materials for the product
the BIAS software is bundled with. Check
with the manufacturer of the product the
BIAS software is bundled with for more
information.
3. A computer with internet access must be available.
To Register & Authorize SoundSaver on a computer with
internet access:
1. Launch SoundSaver – when fi rst launched on an
unauthorized computer, you will be prompted
to authorize it or run it in Trial mode. Click
the “Authorize” button to continue to the BIAS
Authorization Manager – you will need to enter an
administrator password to proceed.
2. Select the product you wish to authorize, and
enter your serial number and email address.
2
Chapter 2 – Installation, Registration, & Authorization 13
Page 14
If you use more than one email address, be sure
to make a note of which one you registered with –
this will make managing your BIAS Registration
Account faster and simpler in the future.
3. Click the “Authorize” button. SoundSaver is now
authorized – click the “Done” button to exit the
BIAS Authorization Manager.
If the computer on which you plan to run
SoundSaver does not have internet access,
you may use another computer to aid in the
authorization process – see the following section
for directions on how to do so.
To Register & Authorize SoundSaver on a computer
without internet access:
1. Launch SoundSaver – when fi rst launched on an
unauthorized computer, you will be prompted
to authorize it or run it in trial mode. Click the
“Authorize” button to continue to the BIAS
Authorization Manager – you will need to enter an
administrator password to proceed.
2. Select the product you wish to authorize, then
enter your serial number and email address.
3. Click the “Alternate Authorization” button.
4. In the Alternate Authorization dialog, click the
“Generate Authorization Request” button to
generate an Authorization Request File.
5. Transfer the Authorization Request File that is
generated to a computer with internet access (via
LAN, CD-ROM, fl ash drive, iPod, etc.).
6. After transferring the Authorization Request File
to the internet-equipped computer, double-click
the Authorization Request File – doing so will
automatically open your web browser, transmit
the Authorization Request File to the BIAS server,
and download your Authorization File to the
computer’s default download directory.
7. Locate the downloaded folder containing the
Authorization File (called “X_BIAS SoundSaver”),
and transfer it back to the host computer on
which it will be used.
8. In the BIAS Authorization Manager’s Alternate
Authorization dialog, go directly to the “To Finalize
the Alternate Authorization Process” section and
click the “Open Authorization File” button.
9. Locate the Authorization File that was transferred
back to the host computer in Step 7, and click the
“Open” button. SoundSaver is now authorized
– click the “Done” button to exit the BIAS
Authorization Manager.
If you do not have internet access on any
computer, please contact BIAS for assistance at:
US Toll-Free: 1-800-775-2427
Inte rnation al: +1-707-78 2-18 66
The BIAS Authorization Manager can be found in the
following location, should you later need to deauthorize
or reauthorize SoundSaver:
• Mac Systems – Applications/BIAS Authorization
Manager
• Windows Systems – \Program Files\BIAS\BIAS
Authorization Manager\BIAS Authorization
Manager.exe
Deauthorizing a Computer
If you need to de-authorize a particular computer that
will no longer be used to run SoundSaver, you can do
so by following the steps below. The computer running
SoundSaver must be connected to the internet in order
to deauthorize it.
To De-Authorize a Computer:
1. Launch the BIAS Authorization Manager from
your hard drive (or launch the BIAS Authorization
Manager program from your installer CD-ROM).
SoundSaver Quick Start Guide14
Page 15

2. In the BIAS Authorization Manager, select the
product you wish to de-authorize – the serial
number and email address used to authorize that
product will be automatically recalled and will
appear in the Serial Number and Email Address
fi elds.
3. Click the Deauthorize button.
4. Click the Deauthorize button to confi rm the
deauthorization process – the Deauthorization
Successful dialog appears.
5. Click the OK button – then click the Done button
in the BIAS Authorization Manager.
Conclusion
Now that you have installed, registered, and authorized
SoundSaver, please proceed to the next chapter to learn
about using it.
2
Chapter 2 – Installation, Registration, & Authorization 15
Page 16

SoundSaver Quick Start Guide16
Page 17
Chapter 3: Using SoundSaver
Introduction
This chapter explains how to use SoundSaver to record
and clean up your LPs and cassettes, and how to deliver
them in a variety of digital formats, including MP3,
iTunes Export, uncompressed WAV for burning CDs, and
SoundSaver Project fi les.
Workfl ow Overview
SoundSaver is designed to be very easy to use –here’s
a brief overview of how it works. In the Start page, you
choose whether you’ll be making a new recording, or
opening up an existing audio recording (or SoundSaver
project) to work on. If you’re making a new recording,
you’ll move to the Connection page, which guides you
3
through physically connecting your audio source to
your computer, and confi guring the audio input level.
If you plan to open and work with an existing
recording or SoundSaver project, you can move
directly to the Clean page – or if your recording
does not require cleaning, you can move directly
to the Defi ne Tracks page.
Once the connection is made between your audio
source and computer, move to the Record page, where
you can begin recording audio. A number of recording
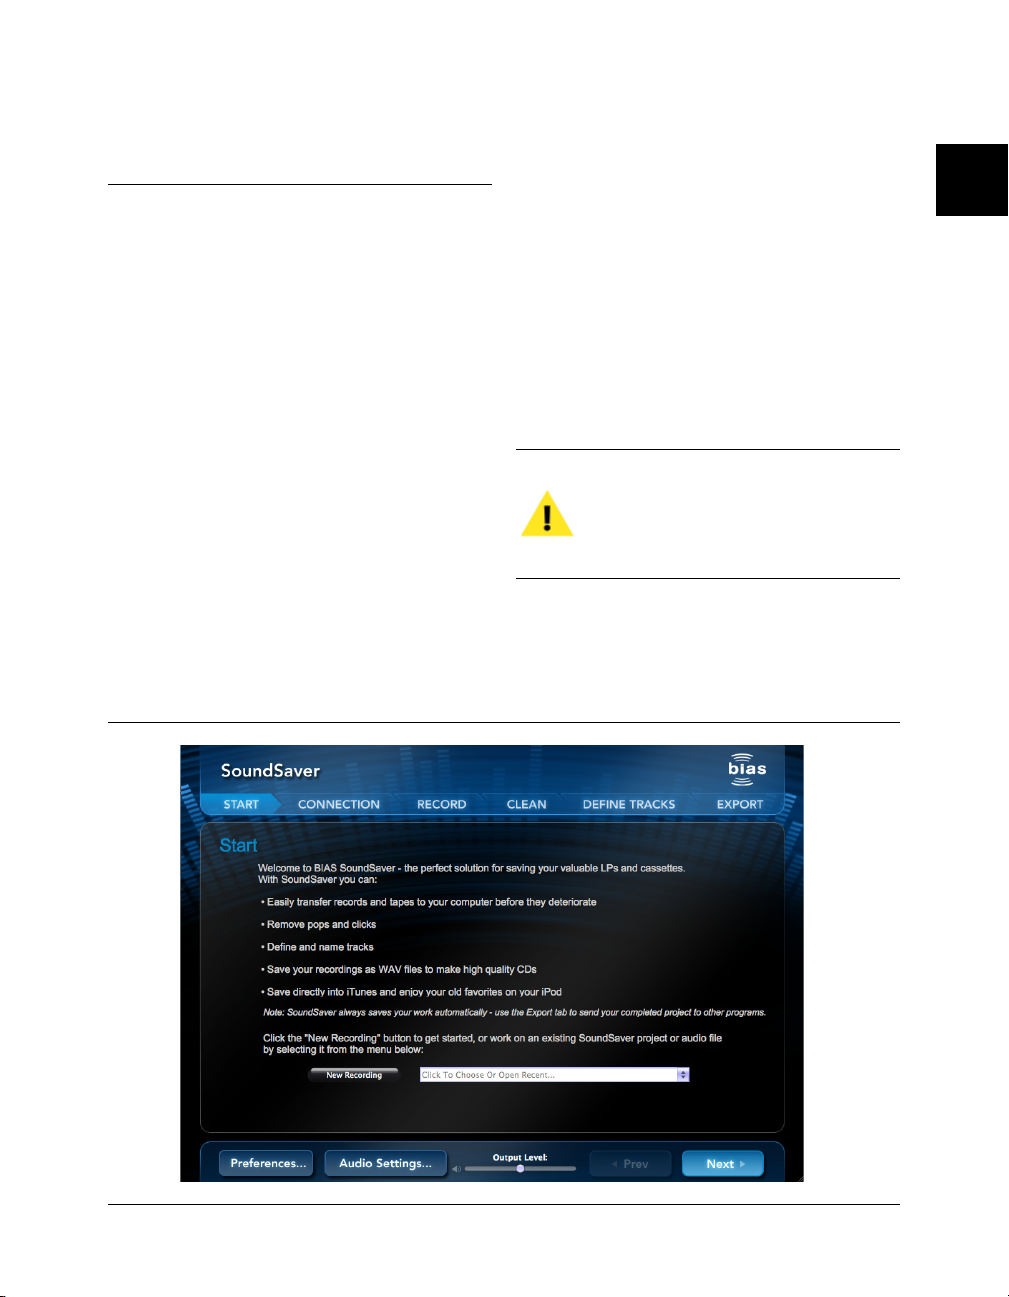
In the St art page, you can choo se to make a new reco rding, or open a n existing re cording or Sou ndSaver proje ct fi le.
Chapter 3 – Using SoundSaver 17
Page 18
options are available, such as setting a Record Timer,
monitoring your recording as your record, etc. When
fi nished recording, move along to the Clean page if you
wish to clean up unwanted clicks, crackles, pops, hum,
rumble, or hiss. Once your recording has been cleaned,
the Defi ne Tracks page lets you cut a long recording into
separate tracks, and add track, artist, and album names.
Finally, the Export page gives you options to create
high resolution WAV fi les for burning to audio CD, or
compressed MP3 fi les to use in portable media players, or
send your tracks directly into your iTunes library, where
they can be converted into any fi le format that iTunes
supports. SoundSaver project fi les can also be exported
for editing on another computer, or as a backup.
Getting Started in the Start Page
Once you’ve installed and authorized SoundSaver – it’s
time to get started recording! When you fi rst launch
SoundSaver, you’ll see the Start page, which allows
you to either start a new recording project, or open an
existing audio fi le or SoundSaver project for further
editing. We’ll cover making a new recording here.
If you’re opening an existing audio fi le or
SoundSaver project, you’ll probably want to skip
ahead to the “Cleaning Up Your Files” section.
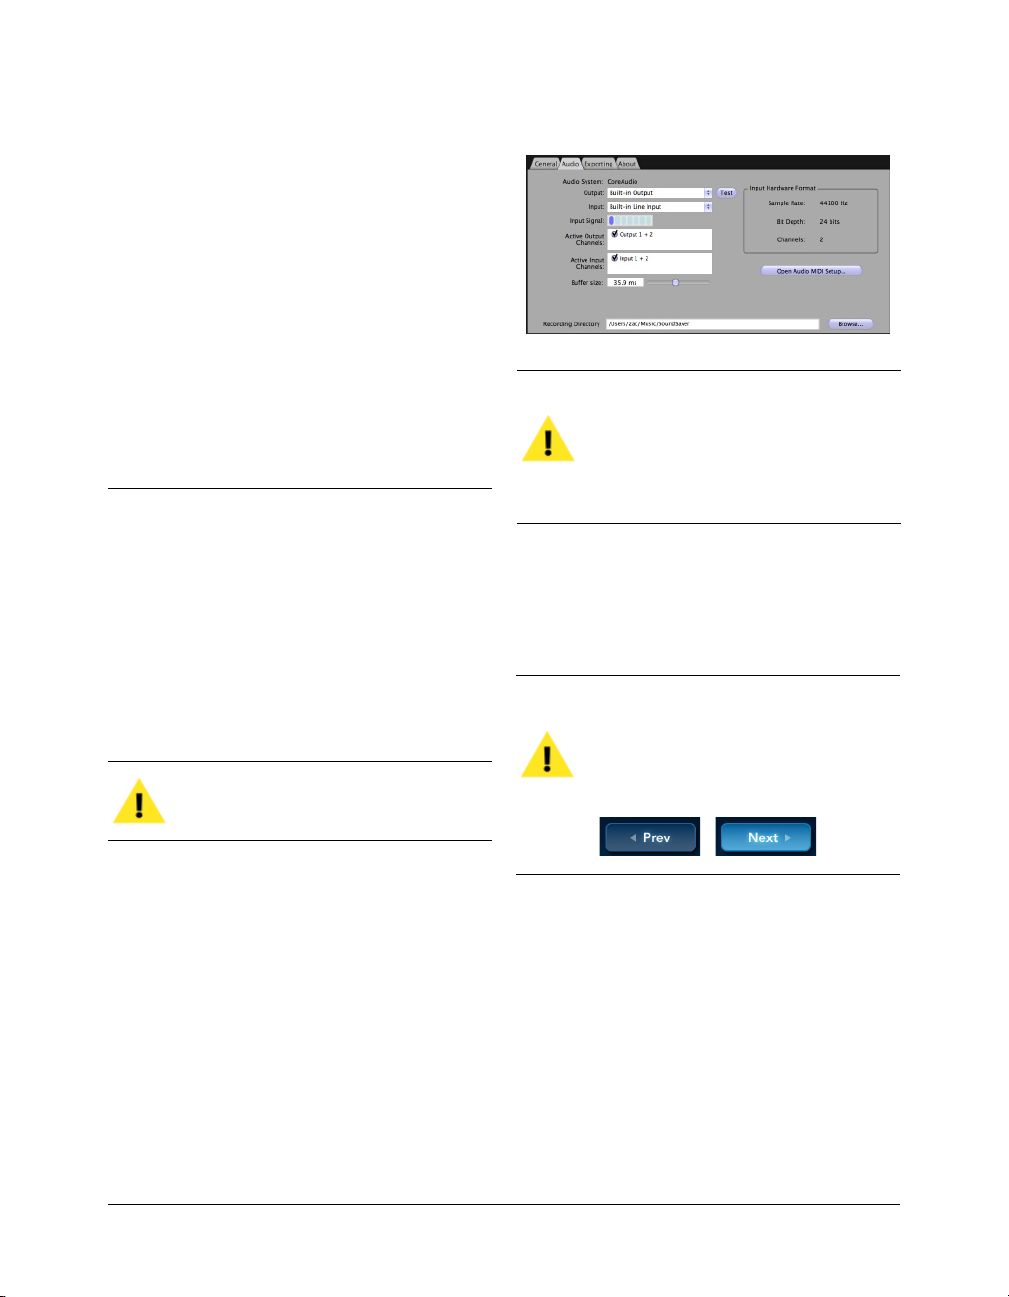
3. Click OK to exit the Audio Preferences.
The most common settings will be for using your
computer’s built-in audio input and output.
The only reason to change these settings is if you
are using a third-party internal sound card,
external audio interface, or recording from a
USB turntable or cassette deck.
Continue along to the Connection Page to learn about
making audio connections between your audio source
(i.e., tape deck, turntable, etc.).
To move between SoundSaver’s pages, you can
either click on the page heading at the top of the
interface, or press Shift-Left Arrow (Previous Page),
or Shift-Right Arrow (Next Page). Keyboard shortcuts
for all commands/features are listed in Appendix 1.
Audio Settings
Before we actually start recording, we’ll need to set
some audio settings, in order to route the audio signal
from your source into SoundSaver.
To Make Audio Settings:
1. Click the Audio Settings button at the bottom of
the page.
2. In the Audio Preferences tab, select the audio
hardware device(s) you would like to use for audio
input and output.
SoundSaver Quick Start Guide18
Connecting with the Connection Page
Now that we’ve confi gured the proper audio inputs and
outputs for your computer, it’s time to connect your
audio source, and record some audio into SoundSaver.
Common Audio Source Connections
The audio sources you will use will have either fi xed
or variable output levels. Fixed output level sources
Page 19
include those with “Line Out”, or “Record Out”
connections, or USB turntables and cassette decks. A
typical variable output level sources is the headphone
output on a portable audio device, such as a cassette
player or boom-box.
Line-level Audio Sources
recording input level. Since the source has a variable
output level, and SoundSaver has its own variable input
level, it’s important to set the proper output level on the
source, and the proper input level in SoundSaver. An
output level of about 70 – 75% is a good starting point
for your source. (See the section: Setting SoundSaver’s
Audio Input Level, later in this chapter).
3
The connections for the most common audio sources
are shown in the connection diagram that can be
opened from the Connection page. Typically, an audio
source will have a connection labeled “Line Out” or
“Record Out”, which uses the common red and white
(sometimes red and black or grey) RCA plugs found on
most home stereo and video equipment.
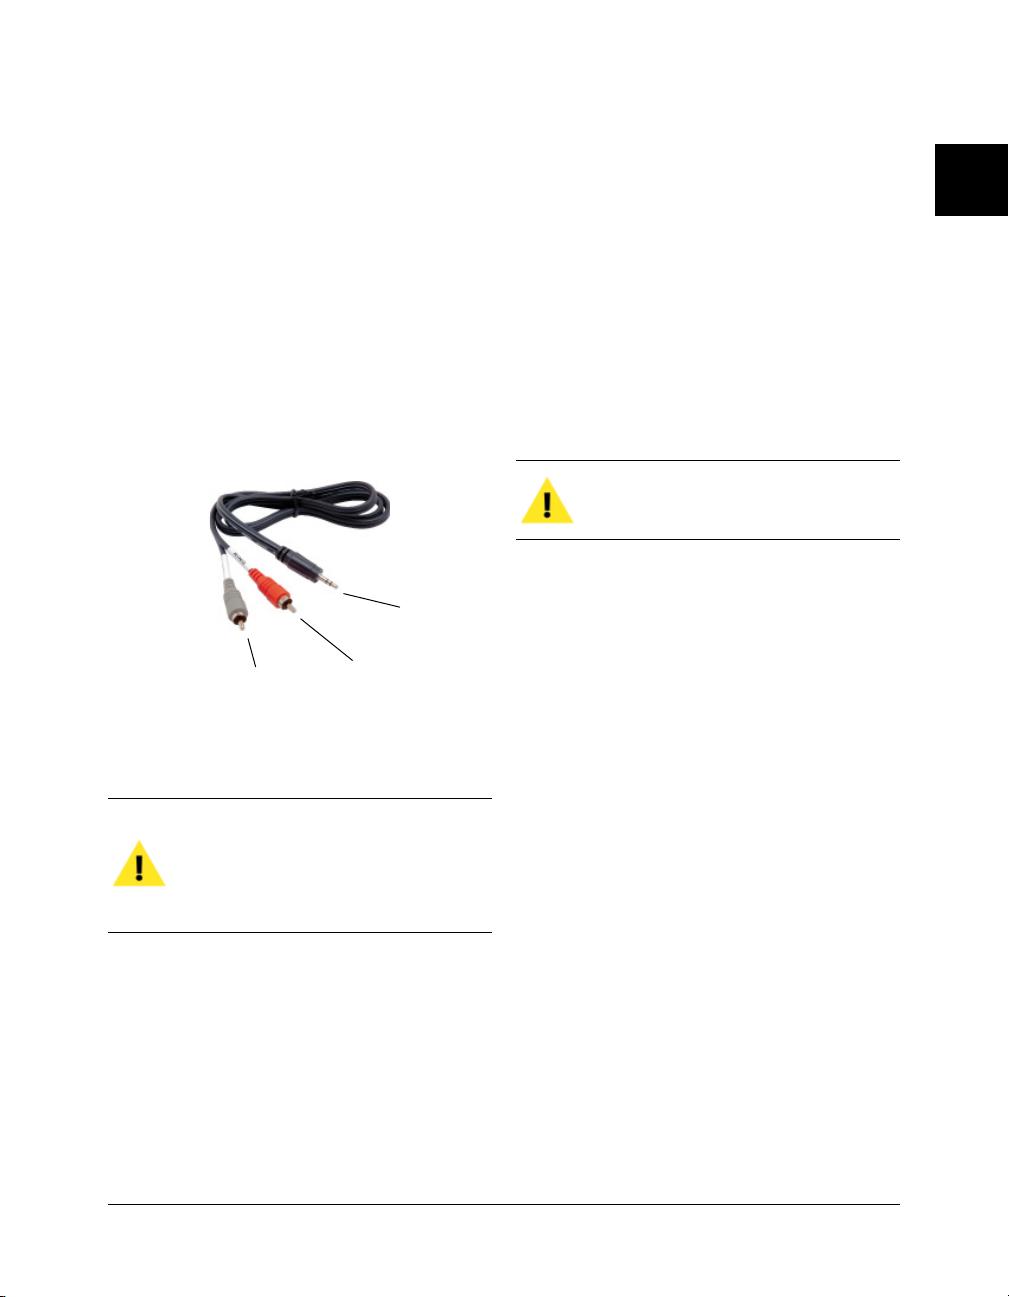
1/8 ” Stereo
Miniplug
RCA - Right
RCA - Lef t
Channel (Grey)
RCA --> 1/8” Stere o miniplug is the most common cable use d to
connect a ste reo system to a computer (le ft channel is usually colored
black, white or grey/right channel is usually red or orange).
Channel (Red)
Not all audio sources will feature RCA outputs!
Depending on your equipment, you may need
to use adapters to convert RCA to 1/4”, or RCA to
1/8”, 1/4” to 1/8”, etc. This is especially true when
recording from variable-level audio sources.
USB Audio Sources
USB turntables and cassette decks also feature a fi xed
output level, so it’s not necessary to confi gure their
output levels.
Some USB sources may also offer analog “Line
Out” connections. When used this way, they
should be set up as fi xed Line level audio sources.
Your Computer’s Audio Hardware
On the other end of the audio connection chain is the
computer – the way you connect audio sources to it will
vary depending on what type of audio hardware is uses.
Audio hardware in a computer is responsible for
taking in an analog audio signal from the source, and
converting it into a digital format that can be stored on
the computer’s hard drive.
The most common form of audio hardware in a
computer is built-in, which usually uses 1/8” stereo
mini-jack connections for both audio input and output.
Variable-level Audio Sources
Variable output level audio sources include the
headphone output of most portable tape players, boomboxes, memo recorders, iPods, iPhones, etc. These types
of audio sources are the most likely to require use of an
audio adapter to physically connect to your computer.
In addition, variable output level audio sources require
a bit more setup when confi guring SoundSaver’s
Chapter 3 – Using SoundSaver 19
Other types of audio hardware include internal sound
cards, PC/Express slot sound cards, or USB or FireWire
interfaces. This type of audio hardware contains the
audio input connections to which your audio source
connects. Then, the digitized audio signal is sent to the
computer via the sound card itself, or through a USB or
FireWire cable – depending on the audio hardware used.
Audio hardware is also used to play back sounds from
your computer. For playback, the hardware converts
Page 20
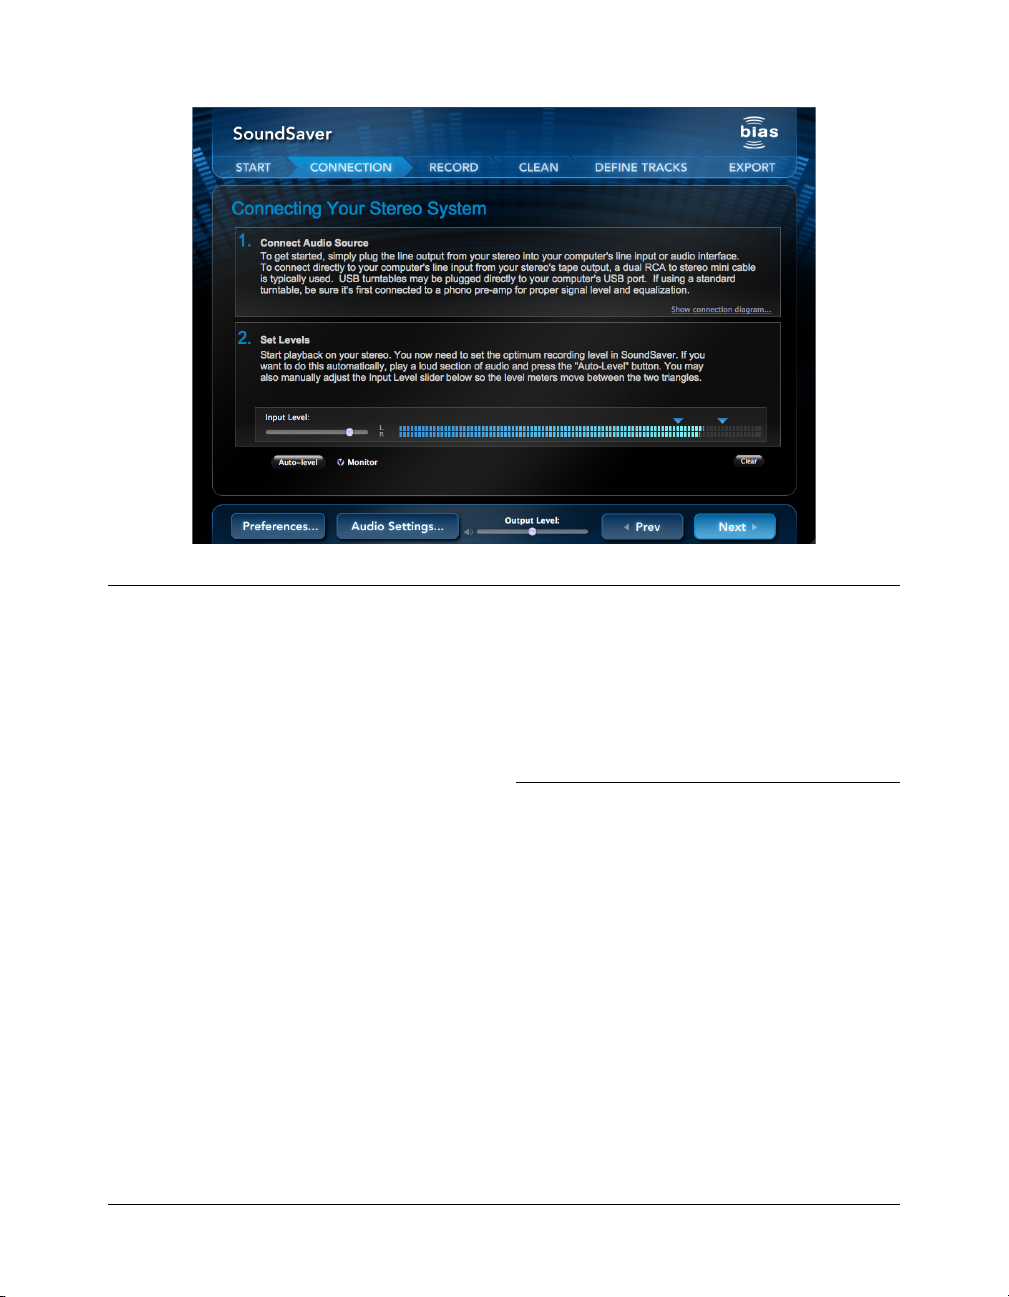
The Connection page helps you conne ct your audio source to your computer, and to set an optimal recording level.
the digitized audio on your hard drive back to analog,
and this is routed to your speakers or headphones. This
is known as audio output.
Built-in Audio Hardware
If you are using built-in audio hardware in your
computer, chances are it will be in the form of a 1/8”
stereo mini-jack for both audio input and output. Some
desktop computers with more advanced built-in audio
hardware may also feature RCA jacks.
Third-party PCI, PC/Express Card Audio Hardware
This form of audio hardware is usually added into a
computer system to upgrade its audio recording and
playback capabilities. These can be in the form of PCI,
PCIe, etc. sound cards which are installed internally on
desktop computers, or as small cards that slide into the
PC or Express card slots commonly found on laptop
computers. Some audio hardware in this category will
not feature audio connections directly on the card itself,
but instead in a “breakout box” that connects to the
card using a separate cable.
USB & FireWire Audio Hardware
This type of audio hardware usually takes the form
of a small box with various audio input and output
connections, which is connected to the computer via a
USB or FireWire cable.
Making Audio Connections
Now that you have a little background in the wide
variety of audio hardware and connections, it’s time to
physically connect your audio source to your computer,
and then start recording!
To connect your audio source to your computer:
1. Locate your audio source’s output(s).
2. Connect the appropriate type of audio cable to
the output connection.
3. Locate your computer’s audio input(s).
4. Connect the audio cable to the computer’s input.
SoundSaver Quick Start Guide20
Page 21
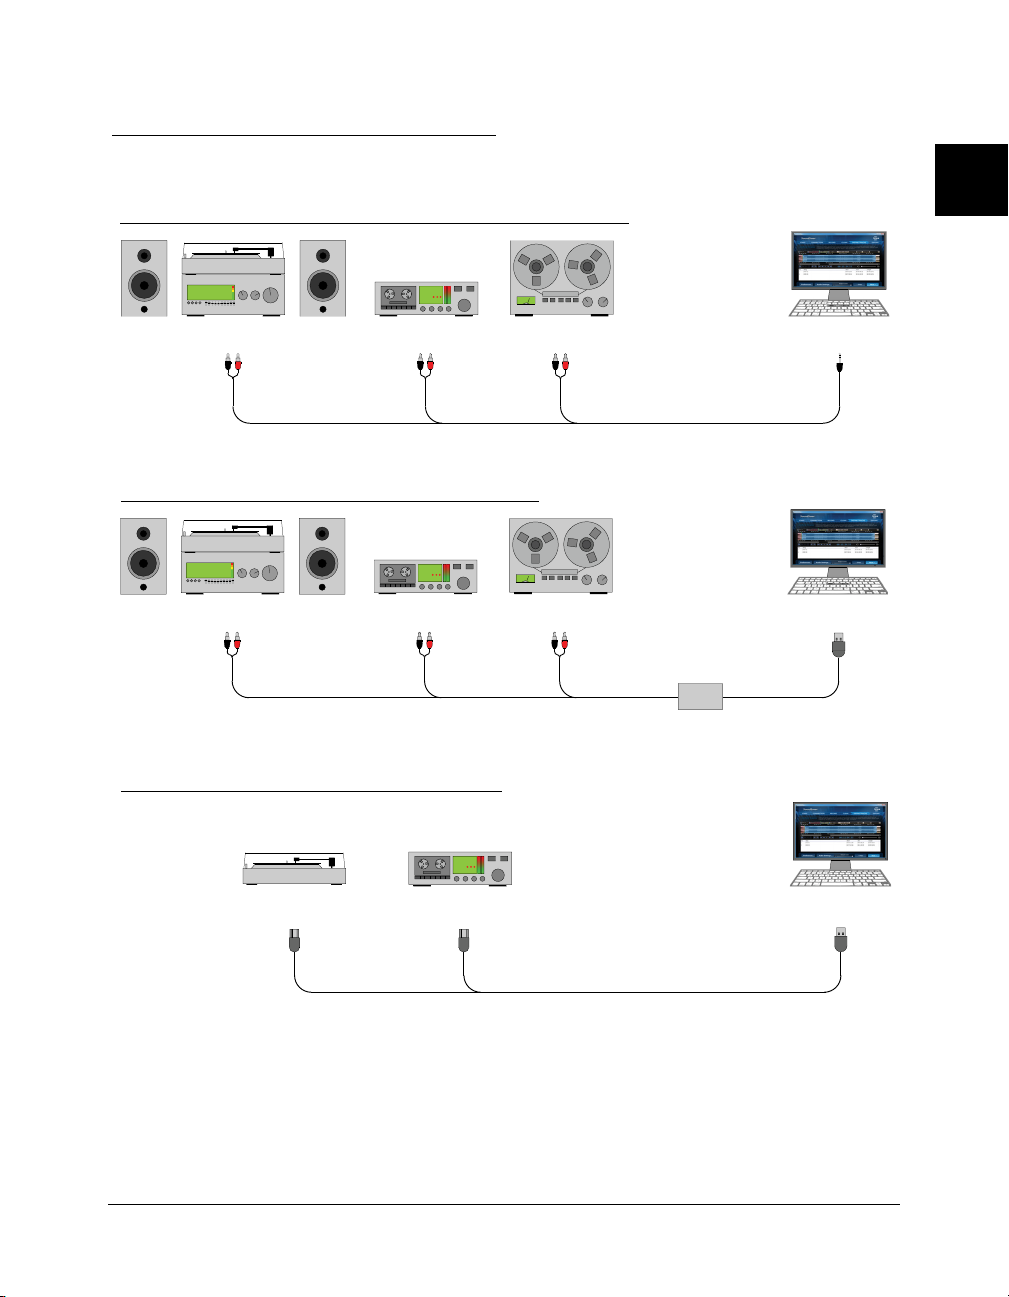
Common Audio Connections
Connections with built-in audio input or internal sound card
Side A
Phono
0234
3
Turntable w/Preamp
(Tape/Rec Out)*
Cassette Tape Deck
(Line Out)*
Reel-to-Reel Tape Deck
Connections with USB or FireWire audio interface
Side A
Phono
Turntable w/Preamp
(Tape/Rec Out)*
0234
Cassette Tape Deck
(Line Out)*
Reel-to-Reel Tape Deck
Connections with USB turntable or tape deck
Side A
0234
USB Turntable
(USB Out)
USB Tape Deck
(USB Out)
(Line Out)*
(Line Out)*
USB / FireWire Audio Interface*
Computer
(Line In)*
Computer
(USB/FireWire In)
Computer
(USB In)
*Note t hat depending on your s tereo system and compute r hardware, you may need to use aud io adapters (i.e., RCA --> 1/8”, RCA --> 1/4”,
1/4” --> 1/8”, etc. to make the proper connections .
Chapter 3 – Using SoundSaver 21
Page 22
You may need to use adapters to make the
connection – visit your local electronics or
home stereo/theatre store if you need to purchase
adapters.
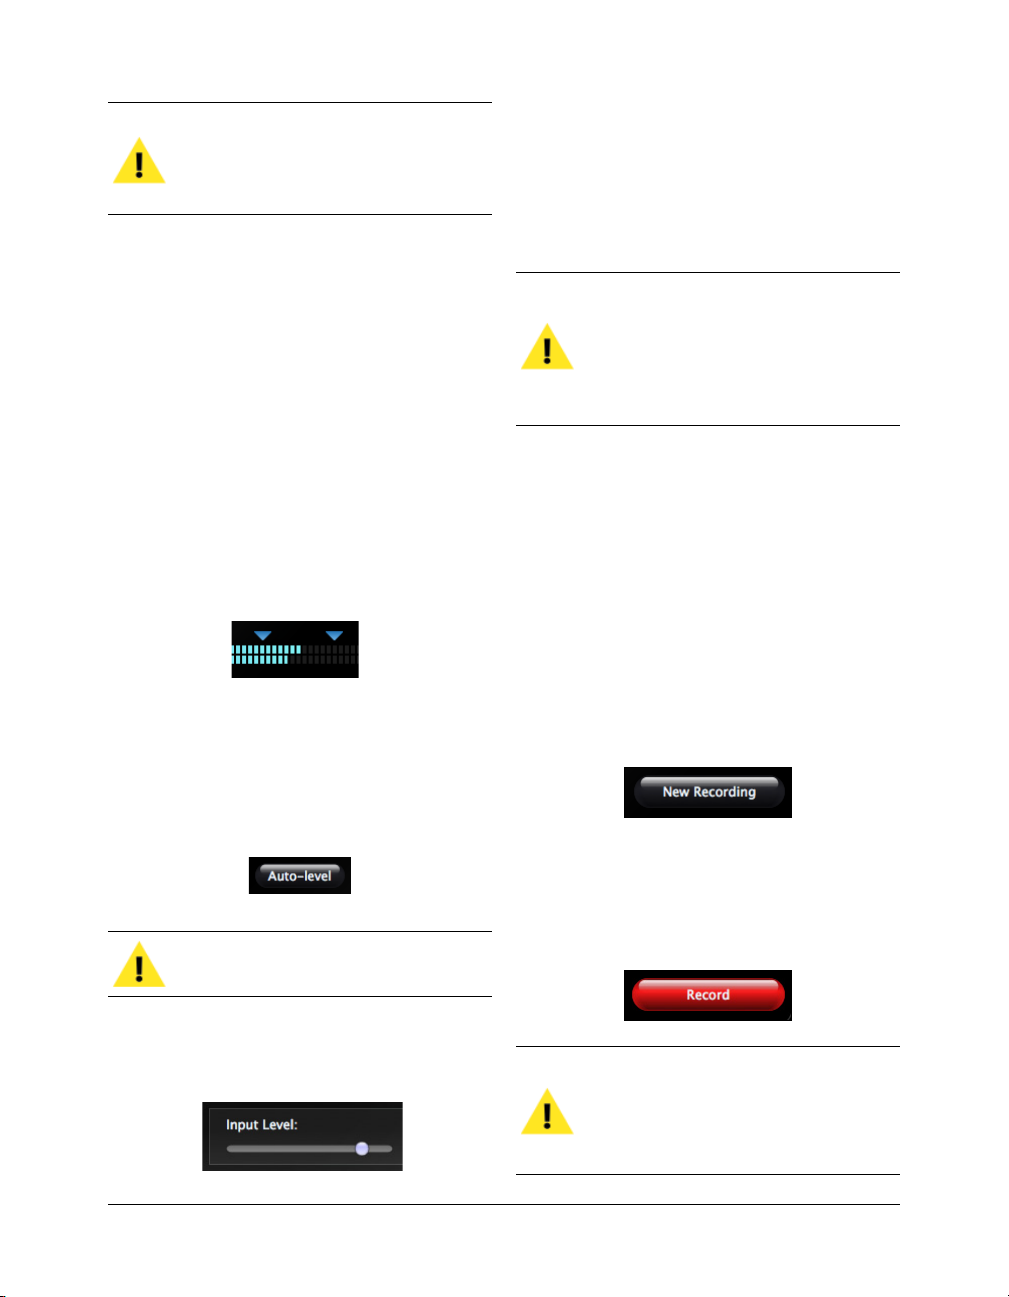
2. Adjust the Input Level slider in the Connection
page until the loudest part of the audio source
material registers between the two blue triangles
located just above SoundSaver’s Input Level
Meters.
Setting SoundSaver’s Audio Input
Level
Now that you’ve physically connected your audio source
to your computer, there’s just one more thing to do
before we start recording – setting SoundSaver’s audio
input level, so that the audio signal it records isn’t too
quiet or too loud. This can be done automatically or
manually.
With an ideal input level, the loudest parts of the audio
source material should register between the two blue
triangles located just above SoundSaver’s Input Level
Meters.
To Set SoundSaver’s Audio Input Level Automatically:
1. Play the loudest part of your audio source.
2. Click the Auto-level button in the Connection
page – SoundSaver “listens” for audio input and
sets the ideal recording level automatically.
Windows XP does not support the Auto-level
feature – nor do all audio hardware devices.
If recording from a variable output level
device, be sure to set its output level to about
70 – 75% as a starting point, and then adjusting
SoundSaver’s input level as described above. You
may need to fi ne-tune the device’s output level,
but this should be a good starting point.
Making Your First Recording
Now that we’ve connected your audio source to your
computer, and confi gured input and output levels, we
can move on to SoundSaver’s Record page – it’s time to
make a recording!
Making a Recording:
1. Click the New Recording button in the Record
page.
2. Name your recording, and choose a location to
save it.
3. Start your audio source.
4. Click the Record button.
To Set SoundSaver’s Audio Input Level Manually:
1. Play the loudest part of your audio source.
SoundSaver Quick Start Guide22
If the input signal level is too high, you will see the
red “clip” indicators at the right end of the meters
illuminate. This means that the signal is causing
digital distortion. Check/lower your recording
level, and start the recording over.
Page 23
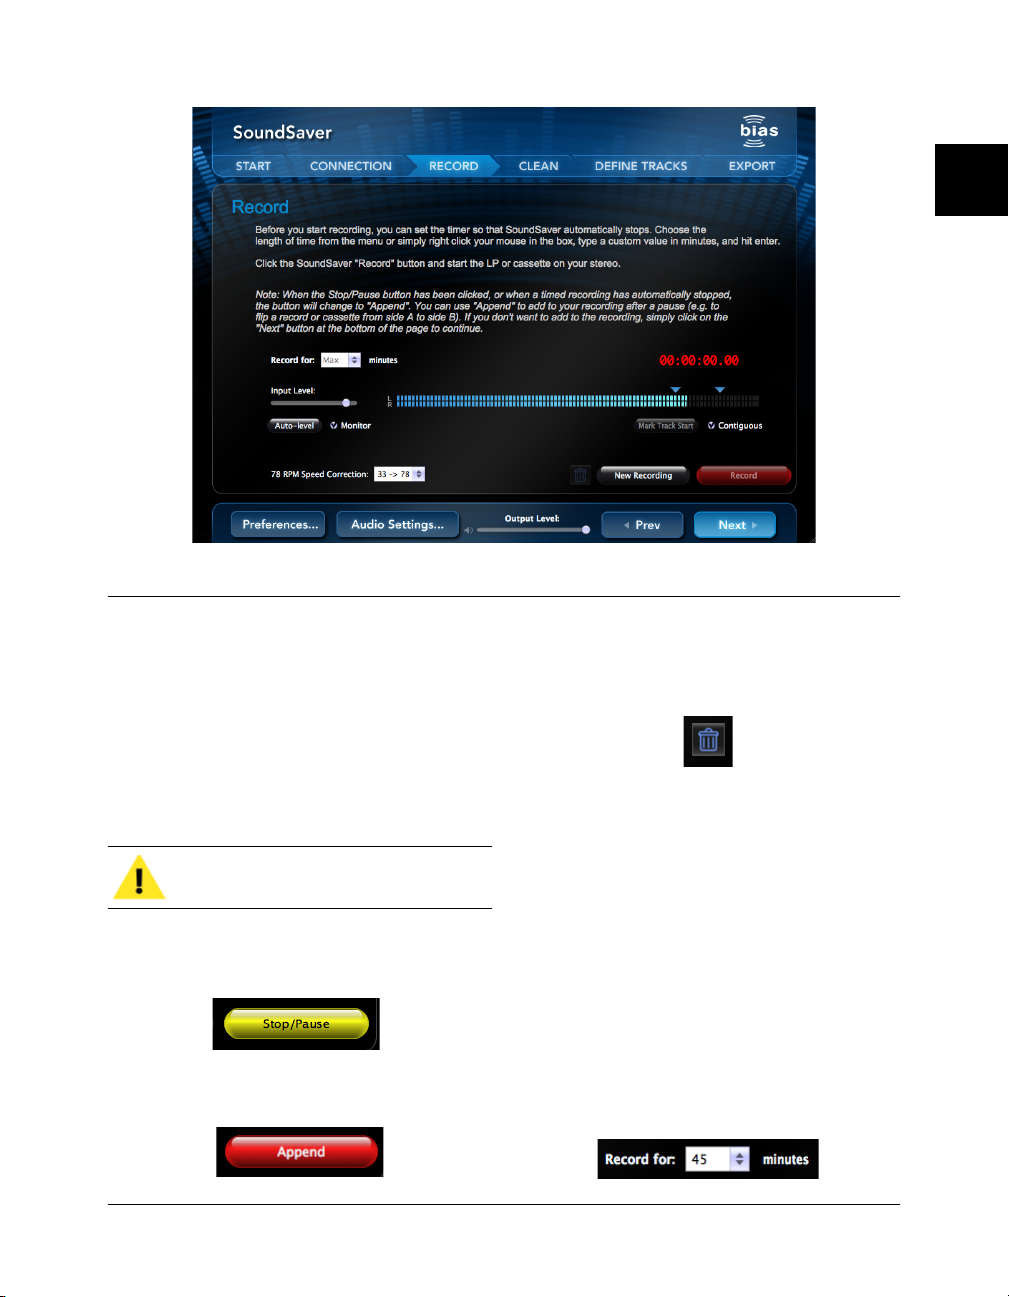
In the Record page, you can record audio, set a record timer, monitor audio as you record it, add trac k marker s,
and correct speed for 78 RPM rec ords recorded on 33 or 45 RPM turntables .
3
Stopping or Pausing a Recording
Stopping or pausing a recording works the same way, using
the Stop/Pause button found in SoundSaver’s Record page.
You’ll need to stop recording in order to move on to the
Clean page. Pausing recordings is useful when you need to
fl ip a record or cassette to record the other side.
The Record button turns into the Stop/Pause
button while recording, and vice-versa.
To Stop or Pause a Recording:
• Click the Stop/Pause button.
To Resume Recording:
• Click the Append button.
To Delete a Recording:
1. Click the Stop/Pause button.
2. Click the Trash Can button.
Recording Options
There are a number of useful recording options – you
can use the Record Timer to record for a particular
length of time – or add markers to identify song start
and end point, or other areas of interest in a recording.
Record Timer
The Record Timer allows you to record for a specifi ed
amount of time. This is useful if you need to record
program material of a particular length, such one side
of a 90-minute tape, or one side of an LP. The Record
Timer offers several settings, in different increments.
Chapter 3 – Using SoundSaver 23
Page 24
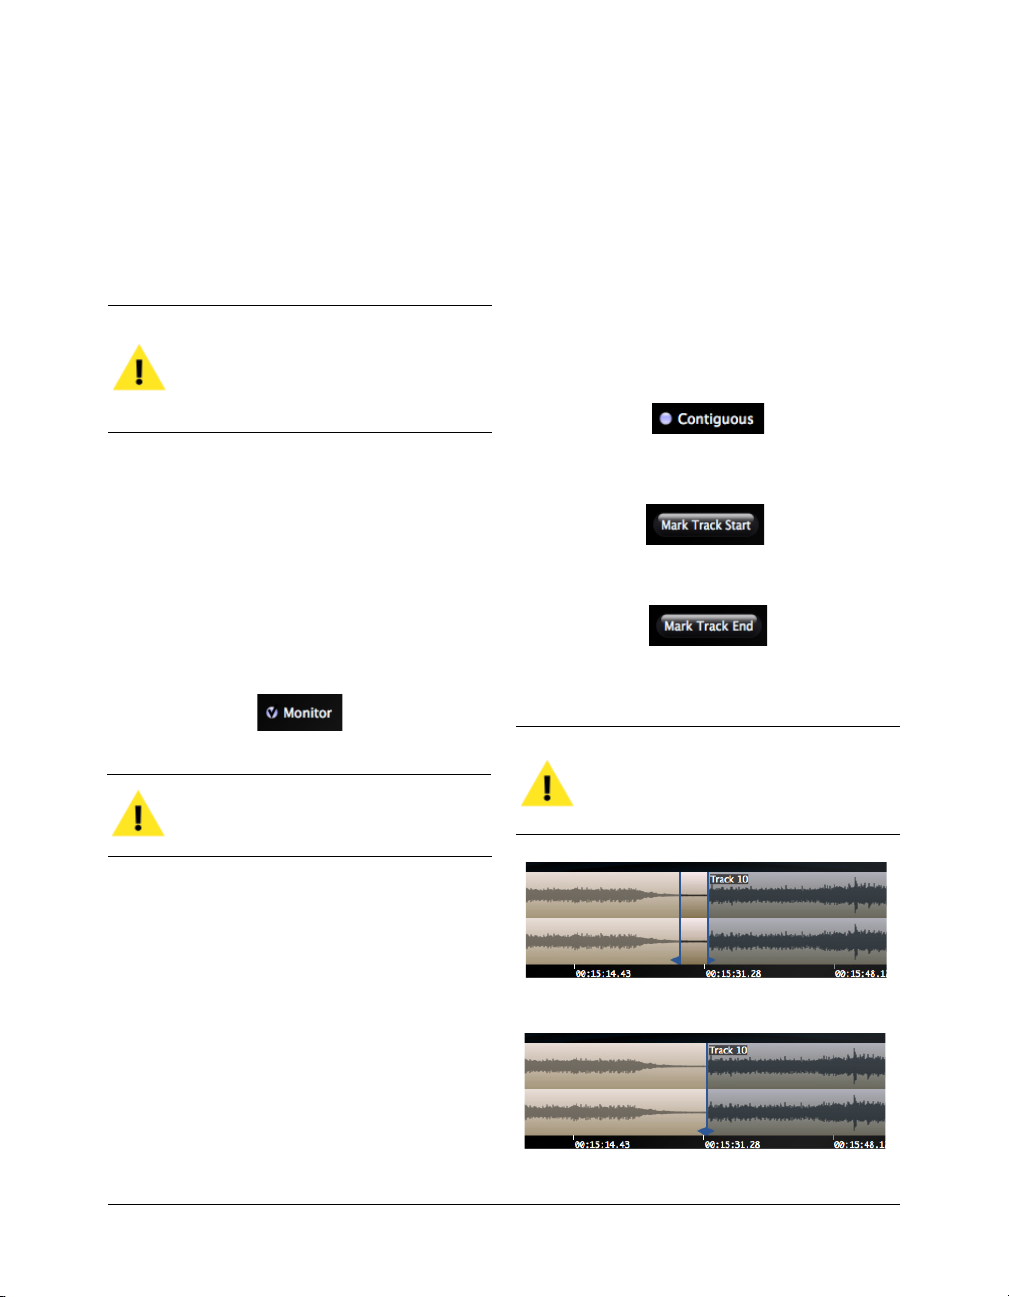
To Use the Record Timer:
1. Click the Record For menu, and choose the
number of minutes you’d like to record – or
simply type a value into the box.
2. Click the Record button – recording stops
automatically after the selected amount of time.
Standard Mode
When using standard mode, clicking the Mark Track
Start button adds a Track Start marker to that location
in the recording. Once you click the Track Start button
to create a Start Track marker, the same button becomes
the Mark Track End button, and clicking it creates a
Track End marker in a recording.
Note that you can reset the Record Timer when a
recording is paused (or while recording). This is
useful if you are simply pausing the recording to
fl ip your record or tape, and would like to set the
Record Timer to record the second side.
Monitoring a Recording
When recording, you can choose to monitor (listen)
to the recording while it’s taking place – or if you
prefer you can turn this option off. When monitoring,
the audio signal that is recorded into SoundSaver is
simultaneously played out of the currently selected
output device (i.e., the computer’s speakers, external
speakers, headphones, etc.).
It’s a good idea to turn down SoundSaver’s
Output Level slider when turning Monitoring on
or off!
To Add Markers to a Recording:
1. Start a recording.
2. Make sure the “Contiguous” checkbox is unchecked.
3. Click the Mark Track Start button to add a Track
Start marker.
4. Click the Mark Track End button to add a Track
End marker.
5. Repeat to create markers for additional tracks.
Think of Track Start and Track End markers as the
beginning and end of a CD track or MP3, as these
will eventually defi ne the start and end points of
the individual fi les you export or burn to CD.
Adding Markers to a Recording
The Mark Track feature allows you to drop markers into
the recorded digital fi le. Markers are used in the audio
waveform display to show the Start or End of a track.
Adding markers during recording is optional; they can
always be added later in the editing process. However,
adding them during recording is handy, and makes later
editing go faster, as it’s easier to fi nd songs or other
points of interest in a recording.
SoundSaver Quick Start Guide24
Example of discontiguous markers (not back-to-back)
Example of contiguous markers (back-to-back)
Page 25
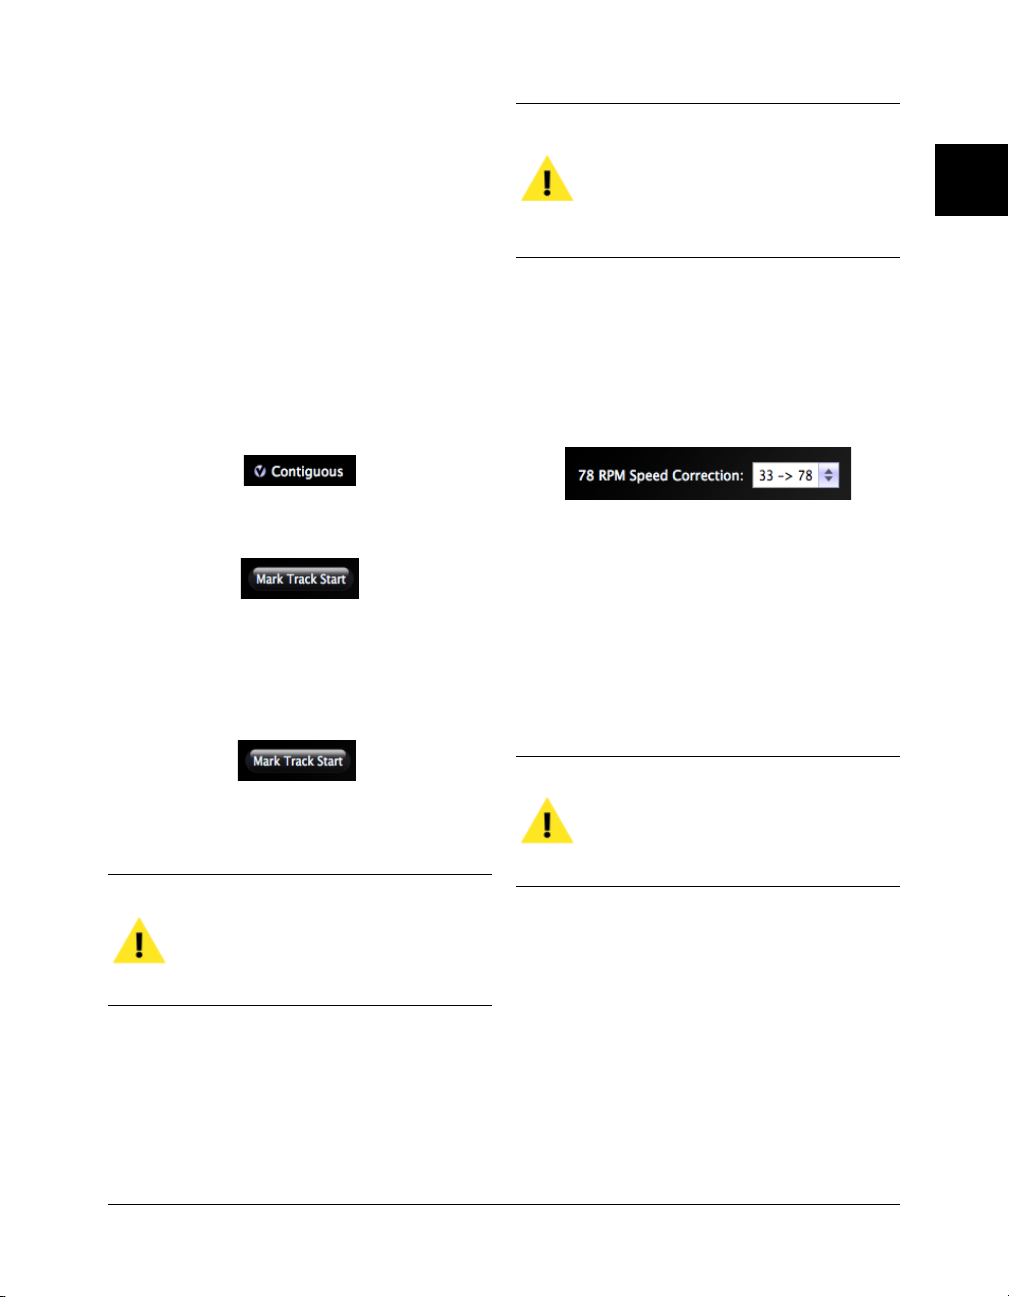
Contiguous Mode (Back-to-back)
Contiguous mode is designed for adding back-to-back
Track Start and End markers to continuous-play DJ
mixes, classical music recordings, live concerts, etc.
When using Contiguous mode, clicking the Mark
Track Start button defi nes both the end of the current
track, and the start of the next one – at the exact same
location in the recording.
To Add Contiguous ( Back-to-back) Markers to a
Recording:
1. Start a recording – make sure the “Contiguous”
checkbox is checked.
2. Click the Mark Track Start button to add a Track
Start marker.
3. Click the Mark Track Start button again to
add a Track End marker for the current track,
and a Track Start marker for the next track
simultaneously.
For example, some music players add a two
second pause between songs. With contiguous
track markers, the fi nal exported tracks will play
back-to-back. If a track contains silence, such as
a very long fade out at the end of a song, that will
be audible.
Adjusting Speed for 78 RPM Records
When recording 78 RPM records on a turntable that only
features 33 or 45 RPM playback speeds, you can use this
function to automatically adjust recording, so that the
fi nal digitized product plays back at the correct speed.
To Adjust Speed in Recording of a 78 RPM Record:
1. Make a recording of your 78 RPM record.
2. Before exiting the Record page, select the
appropriate speed correction for your recording
(i.e., if you were recording at 33 RPM, select the 33
--> 78 option – if you were recording at 45 RPM,
select the 45 --> 78 option).
3
4. Repeat to create markers for additional tracks.
The fi rst click defi nes just the start of the fi rst
track, and the last click defi nes just the end of
the last track – all intermediary clicks defi ne the
end of one track and beginning of the next track
simultaneously.
When contiguous track markers are used, the fi nal
fi les exported from SoundSaver will play seamlessly,
with no gaps or pauses between them (unless the
program material located between a track’s Start and
End markers contains silence), and allow the listener to
navigate from track to track.
Chapter 3 – Using SoundSaver 25
If you monitor a recording of a 78 RPM record
played at 33 or 45 RPM, it’s normal for it to sound
“too slow”. It will play back at the correct speed
after processing with SoundSaver’s 33/45 --> 78
RPM speed correction.
Cleaning a Recording
With SoundSaver, you can clean up clicks, crackles,
pops, hiss, electrical hum, and rumble – and make your
fi nal product sound like a brand-new CD! SoundSaver’s
built-in cleaning uses the same advanced technology as
BIAS’ professional studio noise reduction tools.
Once you’ve made a recording, just move on to the
Clean page to begin cleaning it.
Page 26
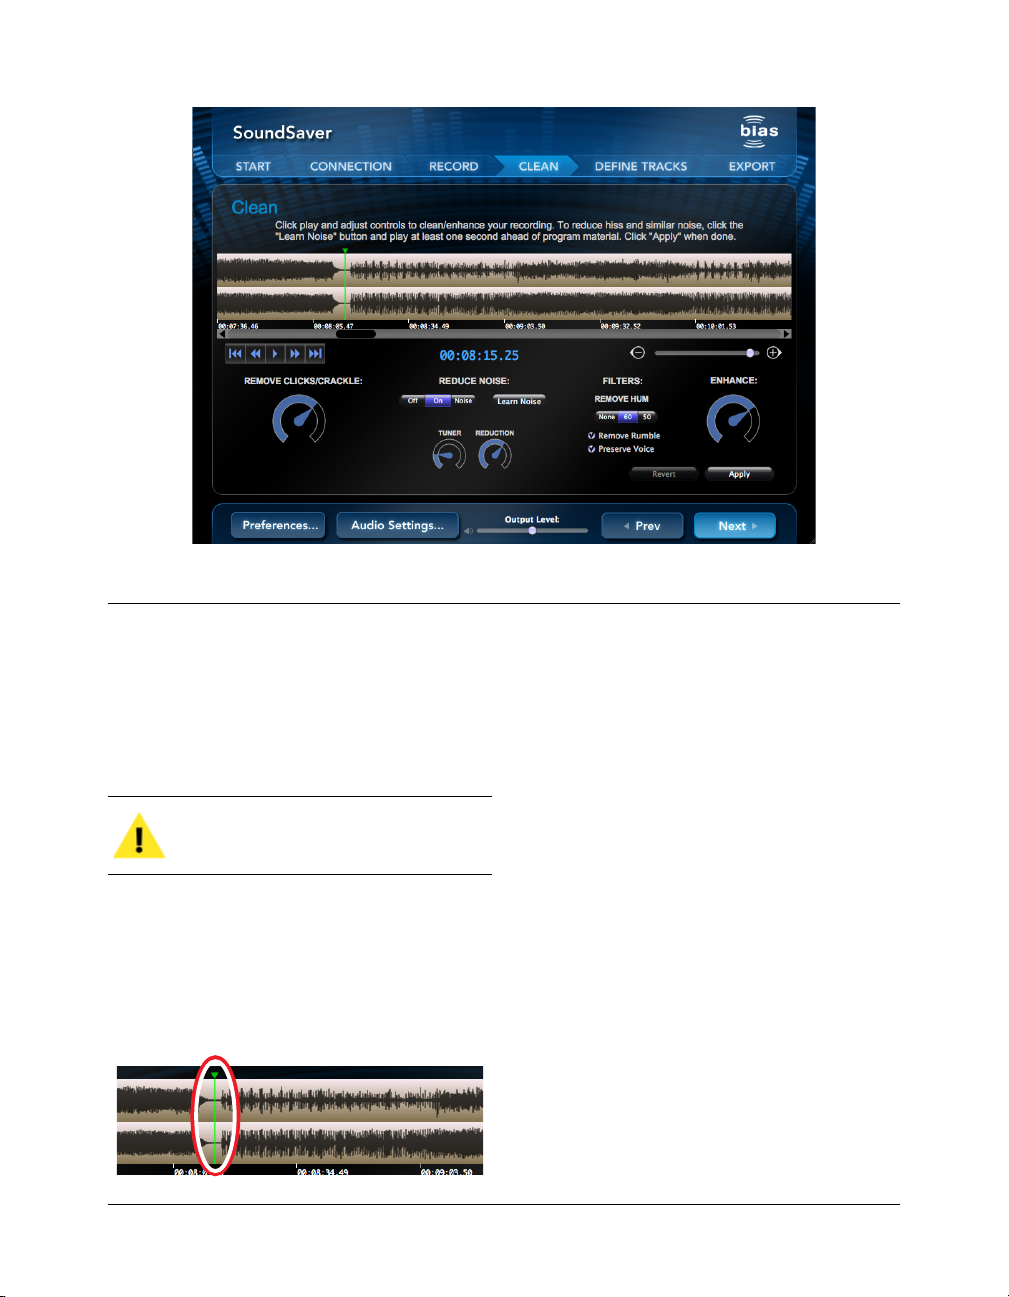
The Clean page is where you can remove unwa nted noise from your recordings – SoundSaver can remove clic ks,
crack les, pops , hiss, hum, a nd rumble, al l of which are co mmonly foun d in recordin gs made from re cords and cas settes .
Navigation
As you clean your tracks, it’s important to know how to
get around. SoundSaver’s transport controls and audio
waveform make navigation intuitive and fast.
The navigation controls described below are also
found in the Defi ne Tracks page, and operate
identically.
Audio Waveform & Overview
SoundSaver’s audio waveform offers an easy way to
navigate to a particular location in a recording. The
included timeline displays the recording time at various
intervals.
SoundSaver’s audio waveform display, with playhead highlighted
When zoomed out all the way, the main audio waveform
display also displays the entire recording and offers
immediate access to any part of it. When you need
additional detail (for learning noise, etc.) you can zoom in.
Clicking on the waveform at the desired location moves
the playhead to that location. If audio is playing when
the waveform or overview is clicked, audio will continue
playing when the playhead jumps to a new location.
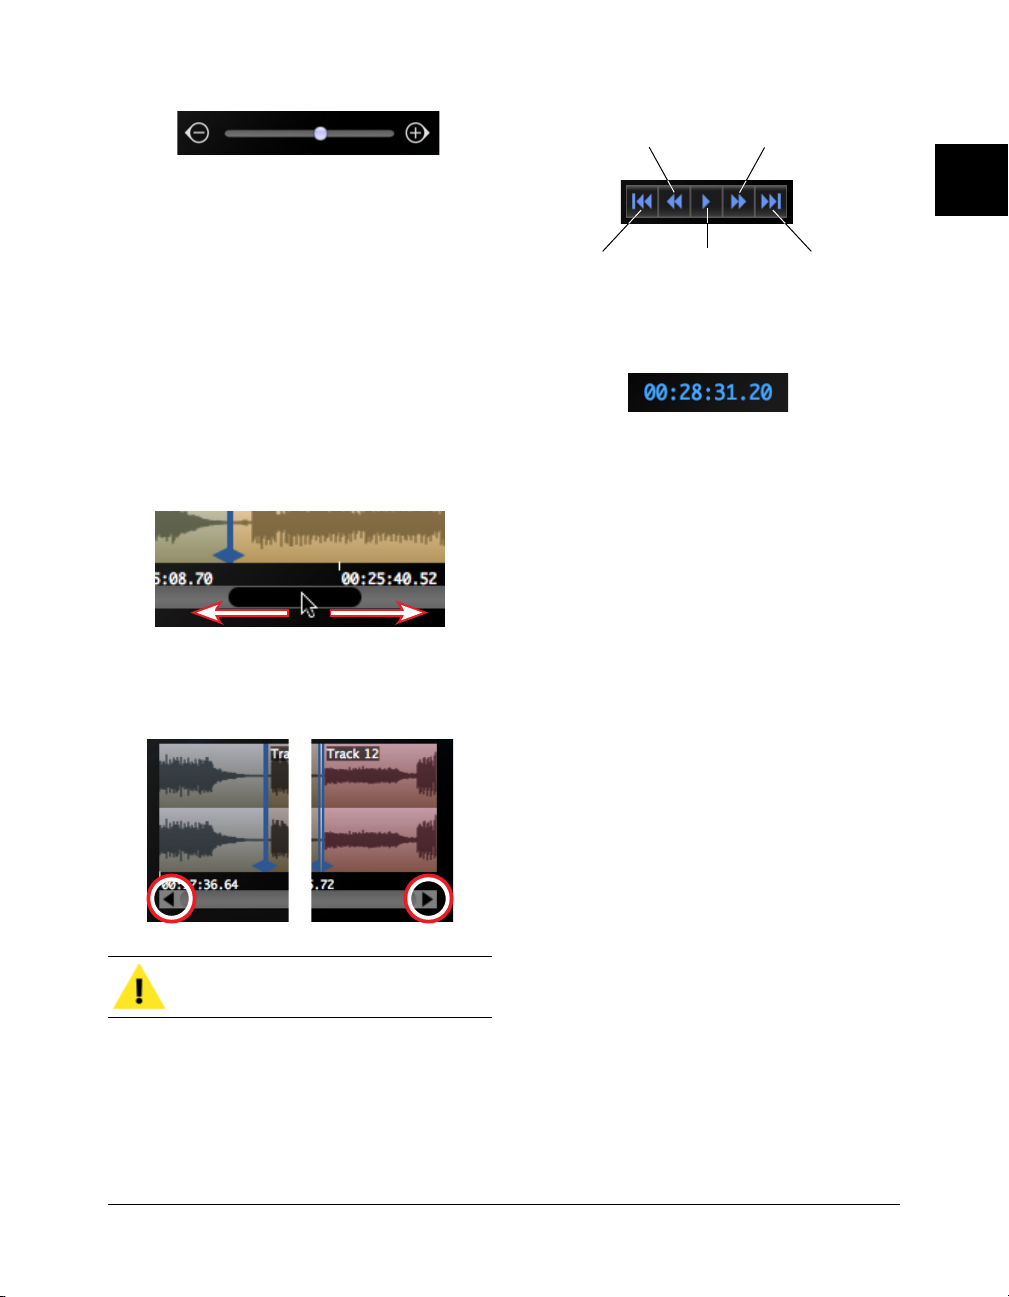
When zoomed in, the audio waveform’s horizontal scroll
bars and arrows become active, and offer another handy
way to navigate the audio waveform.
To Zoom In for a Closer View of the Audio Waveform:
• Place playhead in the location you would like to
zoom in on, and move the zoom slider right to
zoom-in in large increments
or:
• Click the + button on the right side of the zoom
slider to zoom-in in smaller increments (or press
-Right Arrow (Mac), Ctrl-Shift-Right Arrow
(Windows).
SoundSaver Quick Start Guide26
Page 27
Jump to
Previous Track
Jump to
Next Track
To Zoom Out for a Wider View of the Audio Waveform:
• Move the zoom slider left to zoom-out in larger
increments
or:
• Click the – button on the left side of the zoom
slider to zoom-out in smaller increments (or
press -Left Arrow (Mac), Ctrl-Shift-Left Arrow
(Windows).
To Navigate using the Scroll Bar/ Arrows :
• Click and drag the Scroll Bar left or right to move
the audio waveform in larger increments.
or:
• Click the left or right Scroll Arrows to move the
audio waveform in smaller increments.
of Recording
Play/PauseJump to Beginning
Jump to End of
Recording
The Counter Display shows the elapsed time and
corresponds to the playhead’s position in a recording.
To Start or Stop Playback:
• Click the Play/Pause button – if playback is
stopped, it will start – if playback is active, it will
stop. (Spacebar)
To Move to the Next Track:
• Click the Jump to Next Track button. (Right
Arrow)
To Move to the Previous Track:
• Click the Jump to Previous Track button. (Left
Arrow)
To Move to the Beginning of the Recording:
• Click the Jump to Start of Recording button. (Press
Return twice)
3
Scrolling is not available when zoomed all the
way out.
Transport Controls & Counter Display
SoundSaver’s transport controls work much like those on
a CD player, hardware or software music player, and many
other familiar media playback devices. They allow you to
start and stop playback and move from track to track.
Chapter 3 – Using SoundSaver 27
To Move to the End of the Recording :
• Click the Jump to End of Recording button.
Removing Clicks, Crackles, and Pops from
Vinyl Records
When it comes to removing the clicks, crackles, and
pops that are commonly found in recordings of vinyl
records, it couldn’t be easier! A single control lets you
dial in exactly how much to remove.
To Remove Clicks, Crackles, and Pops from a Recording:
1. Play your recording.
2. Adjust Remove Clicks/Crackle dial until clicks,
Page 28
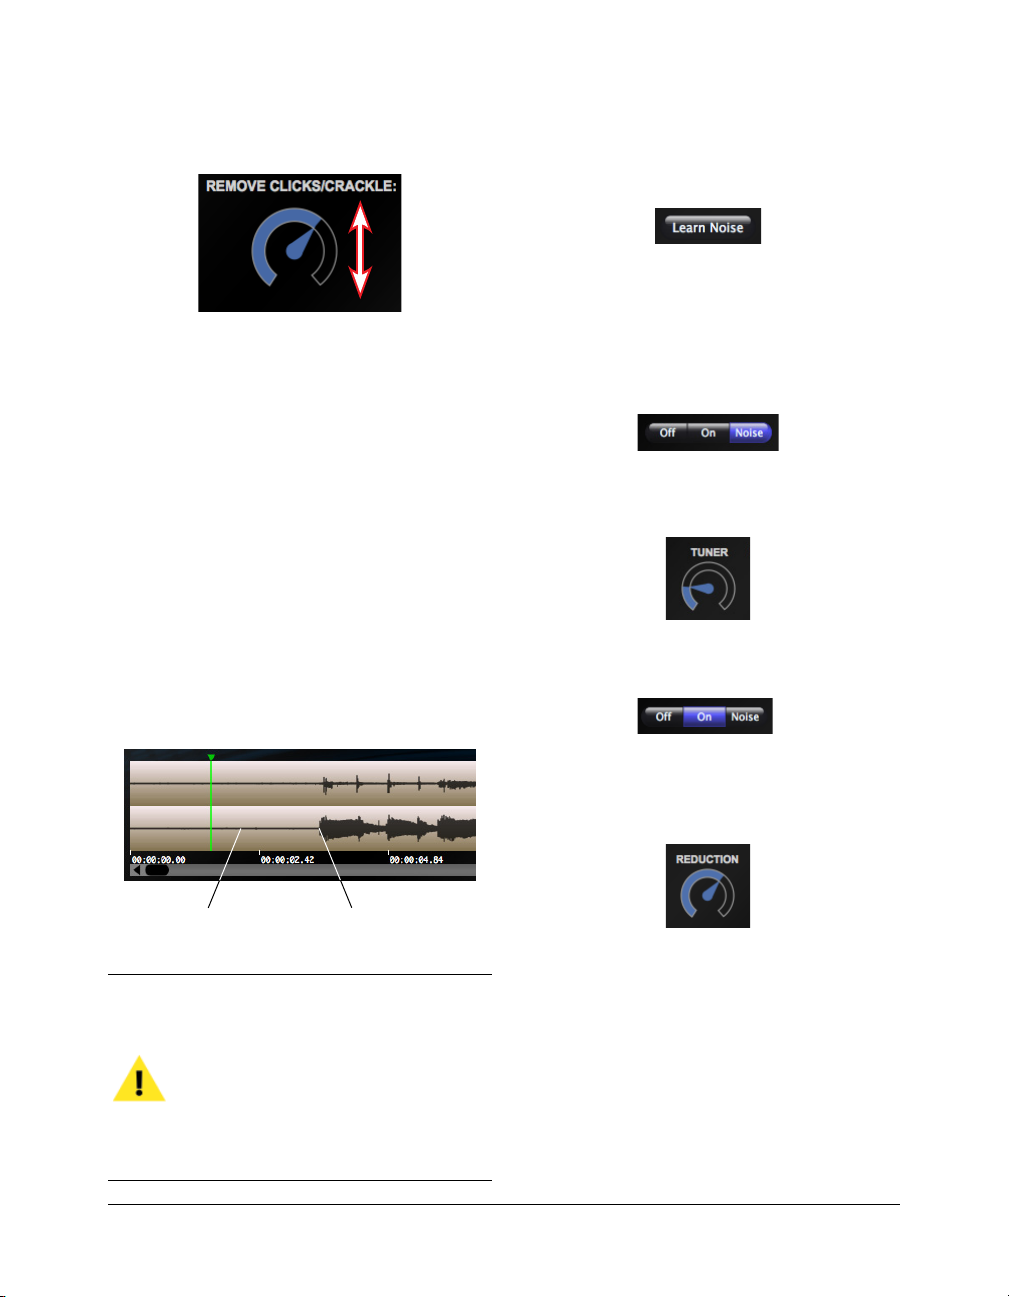
crackles, and pops are gone – use the lowest
setting that eliminates the clicks/crackles.
Removing Tape Hiss and Vinyl Surface Noise
Eliminating pesky tape hiss and vinyl surface noise
(also known as “broadband” noise) is very easy with
SoundSaver, with just a few clicks. The key to successful
noise reduction is where in a recording you use the
Learn Noise function. The Learn Noise function
identifi es the frequencies that make up the tape hiss or
surface noise, and eliminates them, leaving behind only
the audio content you want. Once these frequencies
have been identifi ed, you can apply a variable amount of
noise reduction.
To Remove Tape Hiss or Surface Noise from a Recording:
1. Locate an area in your recording that contains just
the unwanted noise.
2. Start playback at the beginning of the area
containing the noise only.
3. Click the Learn Noise button.
4. Play an area of the recording that contains the
audio content you’re trying to clean up (i.e. voice,
music, etc.)
5. Click the Noise button, and play an area of the
desired content.
6. Adjust the Tuner dial until you hear just the
unwanted noise.
7. Click the On button, and continue playing the
desired audio content.
Area that contains
just unwanted noise
Beginning of de sired
audio content
Usually the fi rst few seconds of a recording – the
cassette’s leader, or fi rst few revolutions of a record
– are the ideal places to “learn noise”. In other
cases, if there is a pause of a few seconds between
two tracks, that’s also a good place to “learn noise”.
In some cases it may be helpful to use the horizontal
zoom controls to get a closer look at the audio
waveform when locating an area to learn noise.
SoundSaver Quick Start Guide28
8. Adjust the Reduction dial until the unwanted
noise is gone – use the lowest possible setting that
successfully eliminates it.
Removing Low-frequency Hum and Rumble
Occasionally recordings may contain low-frequency
noises called hum and rumble. Hum is generally caused
by poor electrical grounding in a turntable, but can also
be caused by bad audio cables (in the recording studio
that originally produced the LP or cassette, or in the
stereo system you use to play them back), or by an A/C
ground loop in an electrical circuit.
Page 29
Rumble is an even lower frequency noise, and is
sometimes found in recordings of vinyl records.
Rumble is the result of the turntable’s motor creating
a low-frequency noise that’s picked up as a vibration
through the turntable’s needle.
These are the easiest types of unwanted noise to
diagnose and clean up, though it’s important to note
that not every recording will contain them. Use these
fi lters only when you actually hear hum or rumble.
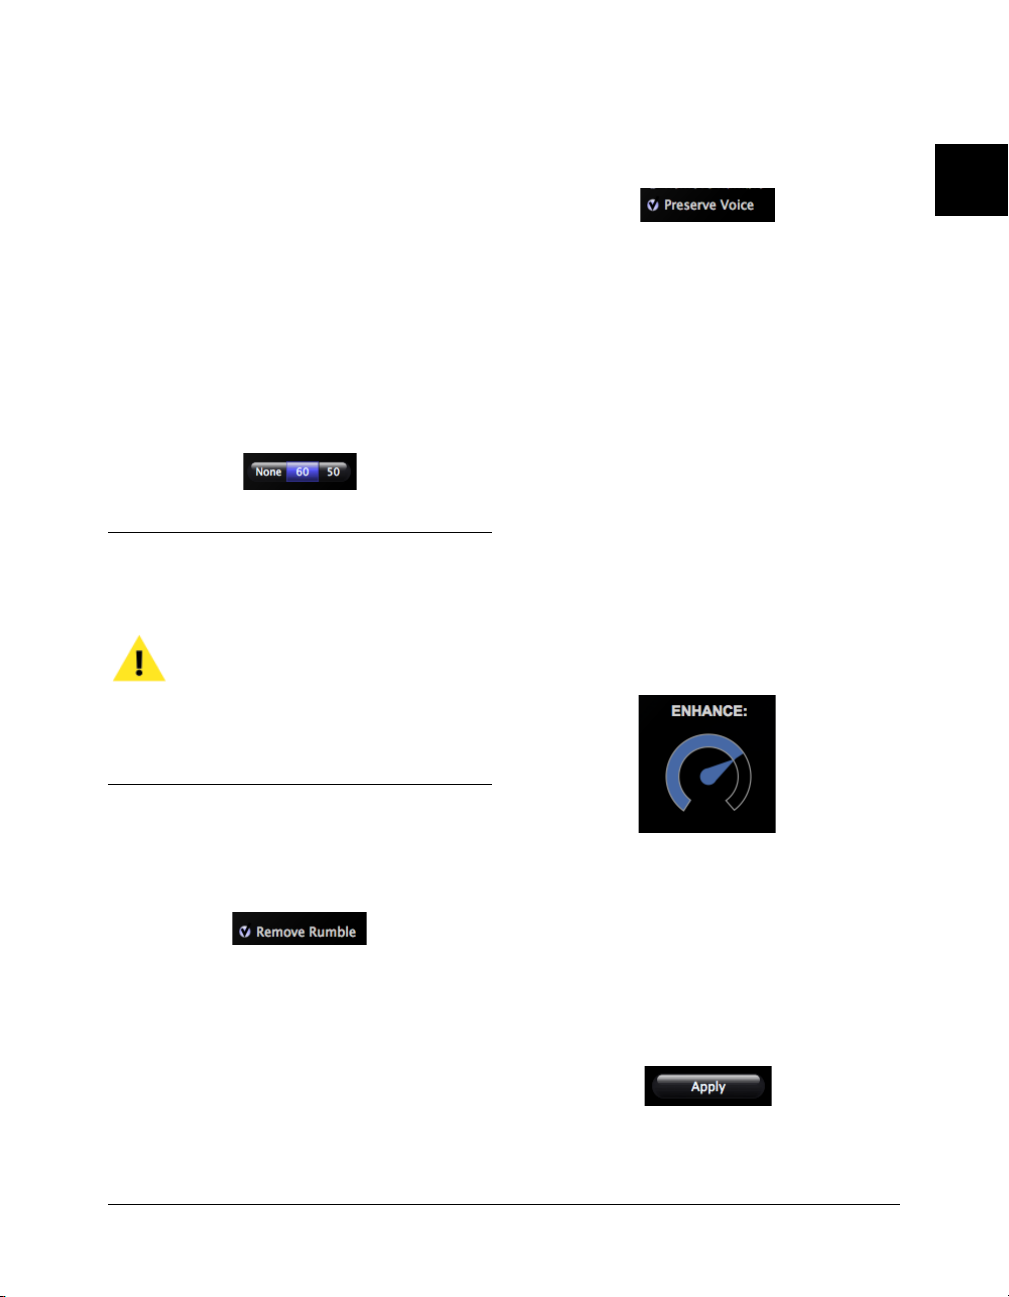
To Remove Hum from a Recording:
• Play your recording – if it contains hum, click the
60 or 50 button.
Hum is most commonly found at either 50 or 60
Hertz (Hz) – and which you might fi nd in your
recordings will depend on the electrical current
used in your part of the world. For example,
recordings made in North America (that contain
hum) will always contain 60 Hz hum, and
recordings made in Europe will always contain
50 Hz hum. If you’re not sure which settings to use
to clean up the hum in your recording, it’s pretty
simple – one will work, and the other won’t!
To Preserve Voice in a Voice-only Recording:
• Play your voice-only recording, and click the
Preserve Voice checkbox.
3
Applying Enhancement to Bring Old
Recordings Back to Life
Many old records and tapes may have been played a
million times, and are just worn out. When this old
media is recorded into SoundSaver, you can use the
Enhance feature to boost high and low frequencies, and
breathe a little life back into these recordings. Enhance
restores frequencies to make bass and drums sound
deep and loud, and adds sparkle to cymbals, guitars,
voices, and other instruments/sounds.
To Enhance a Recording:
• Play your recording made from an old, worn
out analog source, and adjust the Enhance dial
until you are happy with the sound and level of
enhancement.
To Remove Rumble from a Recording:
• Play your recording – if it contains very-lowfrequency rumble, click Remove Rumble checkbox.
Preserving Voice
If your recording contains just voice, and no other
music or audio, you can use the Preserve Voice fi lter to
automatically eliminate unwanted noise that’s outside of
the frequency range of the human voice.
Chapter 3 – Using SoundSaver 29
Applying Cleaning Settings
Once you’re happy with your cleaning/enhancement
settings, be sure to apply them!
To Apply Cleaning/Enhancement Settings :
• Click the Apply button.
Page 30
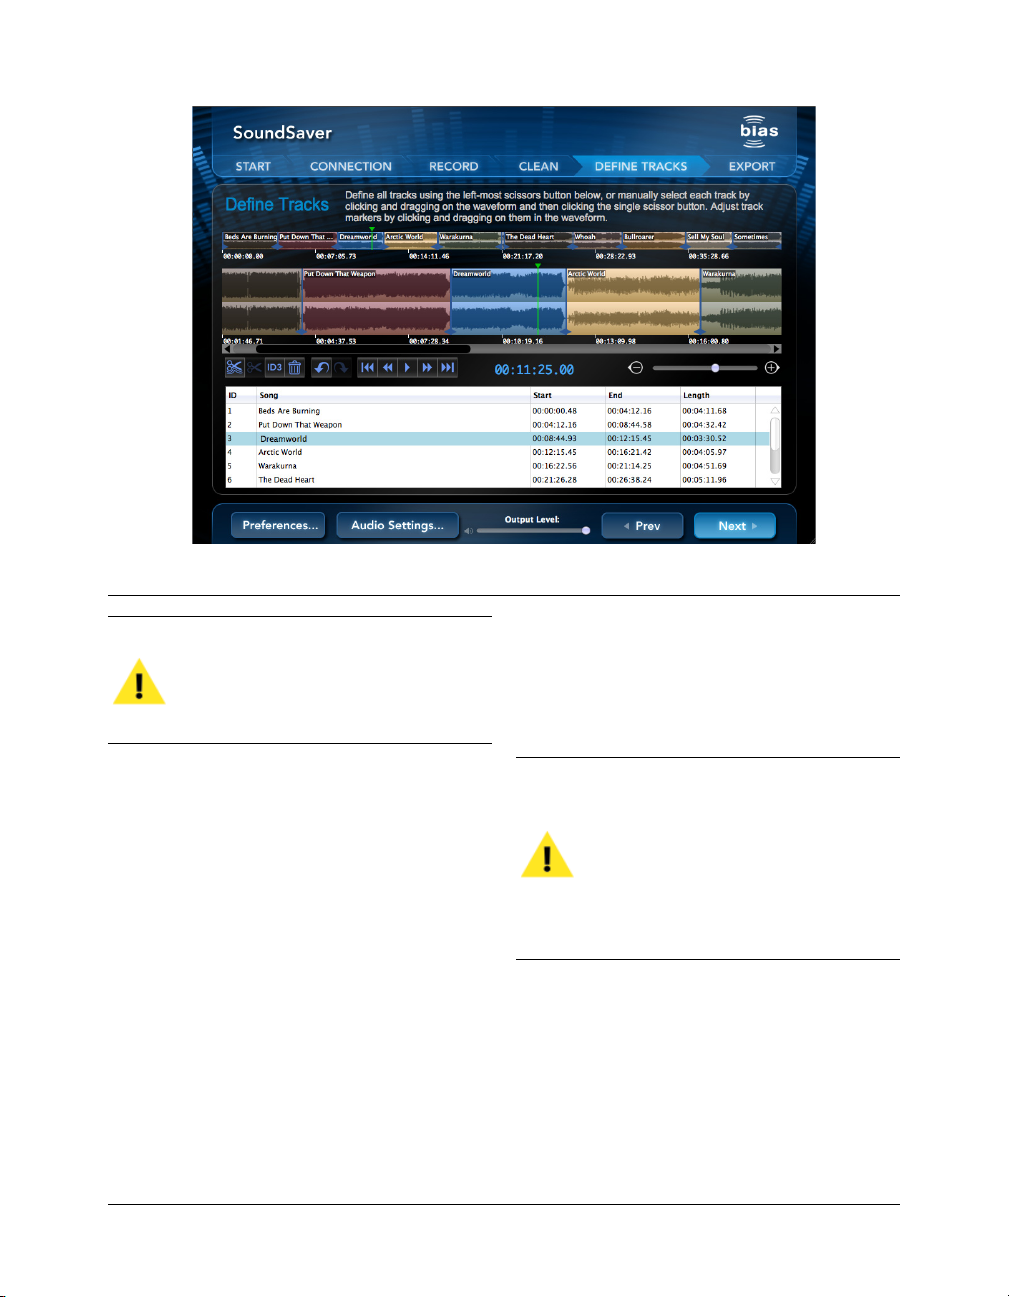
In the De fi ne Tracks page, you ca n cut up a long recording into separate tracks , and add track, artist, and album
info – either manually or automatically.
With audio enhancement there is no right or
wrong setting! Audio enhancement is a personal
preference – some will prefer more and others
less – just make adjustments until you are happy
with the sound!
Cutting a Recording into Tracks
Up to this point, your entire recording is essentially one
very long track, even though you may have recorded
multiple songs (or other types of separate “tracks”).
While you can export the entire recording as a single
track, this can lead to problems when burned to audio
CD, or exported to your iPod, etc.
If such a recording is played back as a CD or on an iPod,
it will sound the same as the original recording in terms
of content – the problem is how do you navigate to the
next (or previous) track? The only way to do it in one
long continuous track is to hold down a Fast-Forward or
Rewind button, which can take several minutes to get to
the right part of the recording.
In this section you’ll learn how to easily cut up
a recording into separate tracks. With the tools
in SoundSaver’s Defi ne Tracks page, you can cut
recordings into tracks automatically or manually.
Note that if you added markers during recording,
they will appear in the Defi ne Tracks page.
These markers can be moved or deleted just like
track markers that are created in the Defi ne
Tracks page – for example if a track marker
added during recording is not in quite the right
location, it can be nudged into the right spot in
the Defi ne Tracks page.
Creating Tracks Automatically
SoundSaver’s automatic track creation works best with
recordings of typical commercially-produced records
and tapes, in which there are clearly defi ned breaks
or gaps between the various tracks. With this kind
of audio content, SoundSaver detects the difference
SoundSaver Quick Start Guide30
Page 31
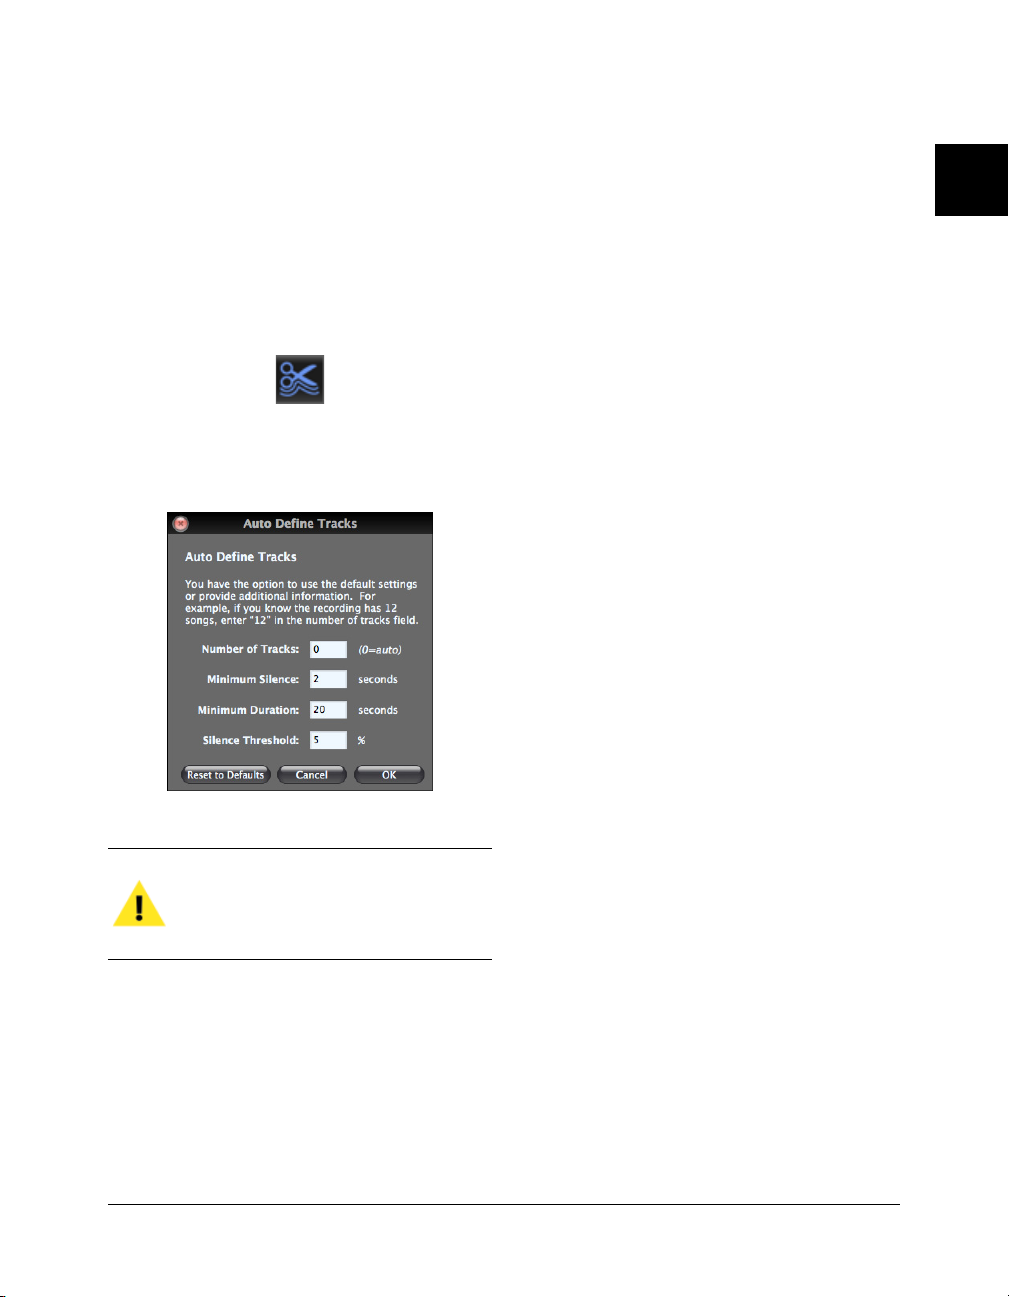
between the silent areas between tracks, and the louder
audio content, and creates track markers automatically.
To Defi ne Tracks Automatically:
1. Record new audio content or open an existing
audio fi le.
2. Navigate to the Defi ne Tracks page.
3. Click the Automatically Defi ne Tracks button.
[-Shift-D (Mac), Ctrl-Shift-D (Windows)]
Number of Tracks
If you know the number of tracks in the original analog
recording, enter it in the Number of Tracks fi eld. If
you don’t know the number of tracks in the original
recording, we suggest fi rst using the default “0” value.
Minimum Silence
If the recording you are working with contains two second
gaps between each song, start with the default value of
“2” in this fi eld. If the gaps between songs vary in length,
enter the value of the shortest gap in the entire recording.
3
4. Make desired settings in the Auto Defi ne Tracks
window, and click the OK button to automatically
defi ne tracks in your recording.
It is highly recommended to fi rst work with
the default settings, which should work very
well for creating tracks in recordings of most
commercially produced records and tapes.
Options for Automatically Defi ning Tracks
The Auto Defi ne Tracks window’s default settings work
very well for creating tracks accurately in recordings
of most commercially produced records and tapes. To
give even more fl exibility and control, the Auto Defi ne
Tracks settings can be adjusted for even better track
detection accuracy.
Minimum Duration
SoundSaver needs information about the length of each
song in order to accurately divide a long recording into
individual songs.
The Minimum Duration fi eld tells Auto Defi ne Tracks how
long the shortest track in a recording is, and helps ensure
that track markers are placed in the correct location in the
audio waveform – that is, a Track Start marker just before
a song starts, and a Track End marker just after a song
ends – even if the audio level falls below the threshold
value set in the Silence Threshold fi eld (see next section).
If a recording you are working with contains songs that
are all approximately 4-5 minutes long, a good value to
enter in this fi eld would be 240 seconds (4 minutes).
Silence Threshold
This fi eld controls the threshold level between audio
material you wish to defi ne as a track and the gaps
between it. As this value is changed, Auto Defi ne Tracks
becomes more or less sensitive to “silence”.
For example, if you’vre working with a recording from
a cassette, the gaps will typically contain hiss or other
noise that is not completely silent, but has a signifi cantly
lower amplitude level than the program material that
you are trying to isolate into tracks. By changing the
Silence Threshold, you can make the judgment as to
what should be silence, even if it does contain some low
level audio such as tape hiss, or other background noise.
Chapter 3 – Using SoundSaver 31
Page 32
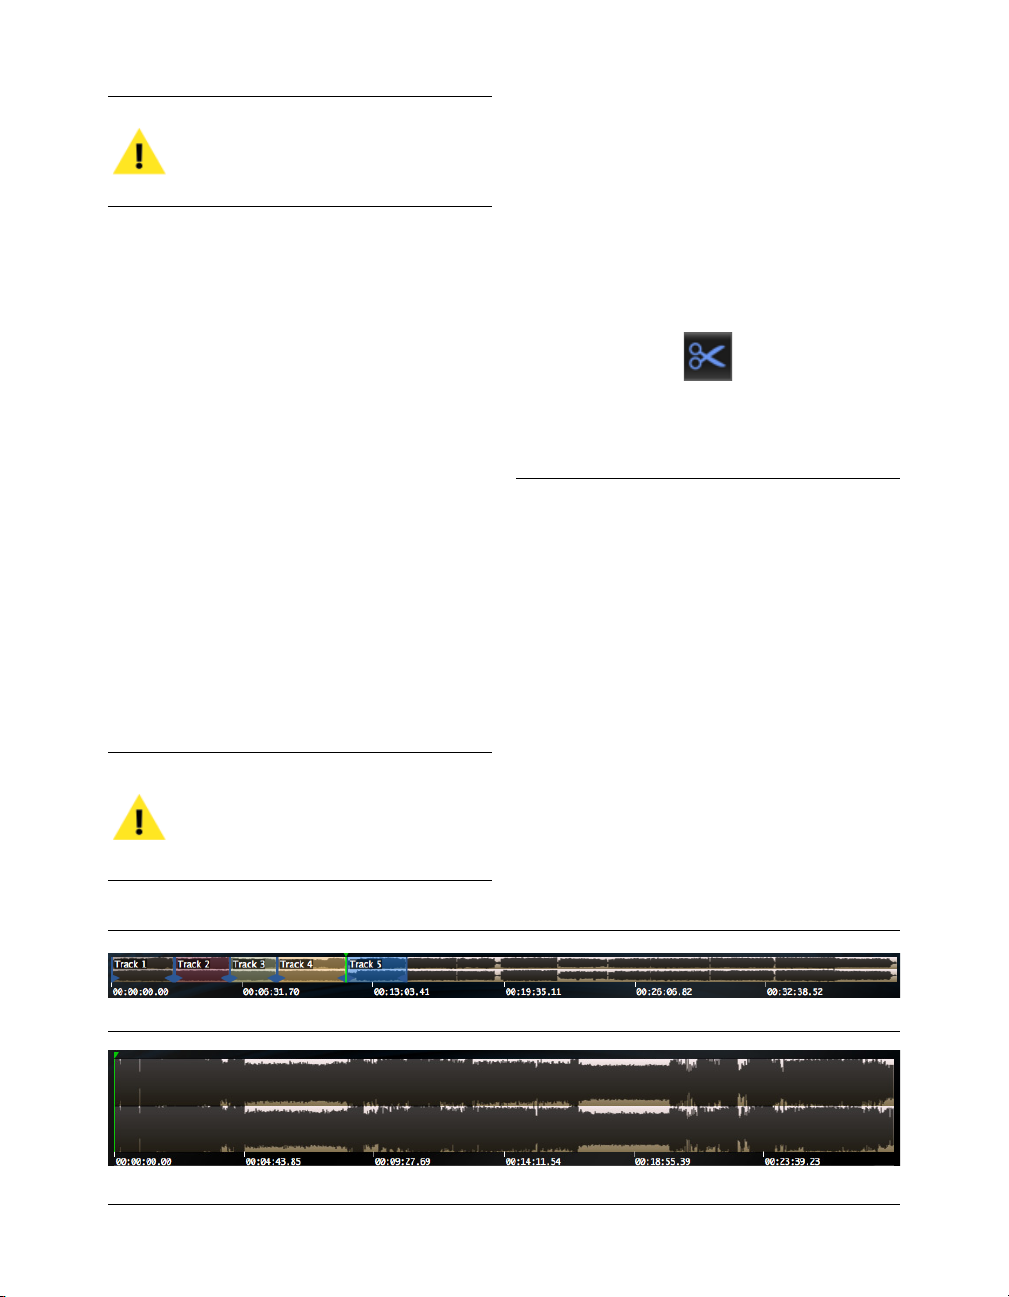
Users who prefer more control can also use
manual track creation when working with
recordings of commercially produced records and
tapes with well-defi ned gaps between the tracks.
Creating Tracks Manually
While SoundSaver’s automatic track defi ning capability
is ideal for working with recordings of most typical
records and tapes, there are some cases in which it’s
better to create tracks manually.
For example, in a commercially-produced DJ mix, live
concert, or classical music recording, there are separate
tracks. These are arranged back-to-back, with no spaces
between them. This means that if you listen from
beginning to end, it sounds as if it’s one long track, but
since there are actually separate tracks, you can jump to
the next or previous track.
To create this same arrangement, manual track defi nition
must be used, as there would be no silent gaps between
tracks for SoundSaver to detect – track markers must be
placed manually at the appropriate locations.
To Defi ne Tracks Manually:
1. Record new audio content or open an existing
audio fi le.
2. Select the portion of the waveform you would like
to defi ne as a track by clicking and dragging over
the waveform using your mouse.
3. Click the Defi ne Selection as New Track button.
-D (Mac), Ctrl-D (Windows)]
[
4. Repeat until you have the desired number of tracks.
Editing Tracks
There will be times when you need to delete or modify
your track lengths, positions, names, etc. SoundSaver
offers completely non-destructive editing, making track
editing very easy.
Navigation Using the Waveform Overview
Dropping in markers (in Contiguous mode)
during recording is essentially the same as
adding them later in the Defi ne Tracks page –
though it can save a little time as they are added
in real-time at the correct locations.
In addition to the Transport controls, Main Waveform
Display, and Scroll Bars/Arrows (described earlier in
the “Cleaning a Recording” section), the Defi ne Tracks
page also includes a waveform overview for navigation
and reference. The waveform overview is a miniature
version of the audio waveform for the entire recording,
The miniature Waveform Over view appears above the main wavefo rm – and of fers a quick way to navigate to any location in a recording.
DJ mixes ( shown above), live concerts , and some class ical music recording s may not have clearly de fi ned gaps betwee n the tracks. For the se
type s of recording s, placing contiguous (back-to- back) t rack markers manually is the best approach.
SoundSaver Quick Start Guide32
Page 33
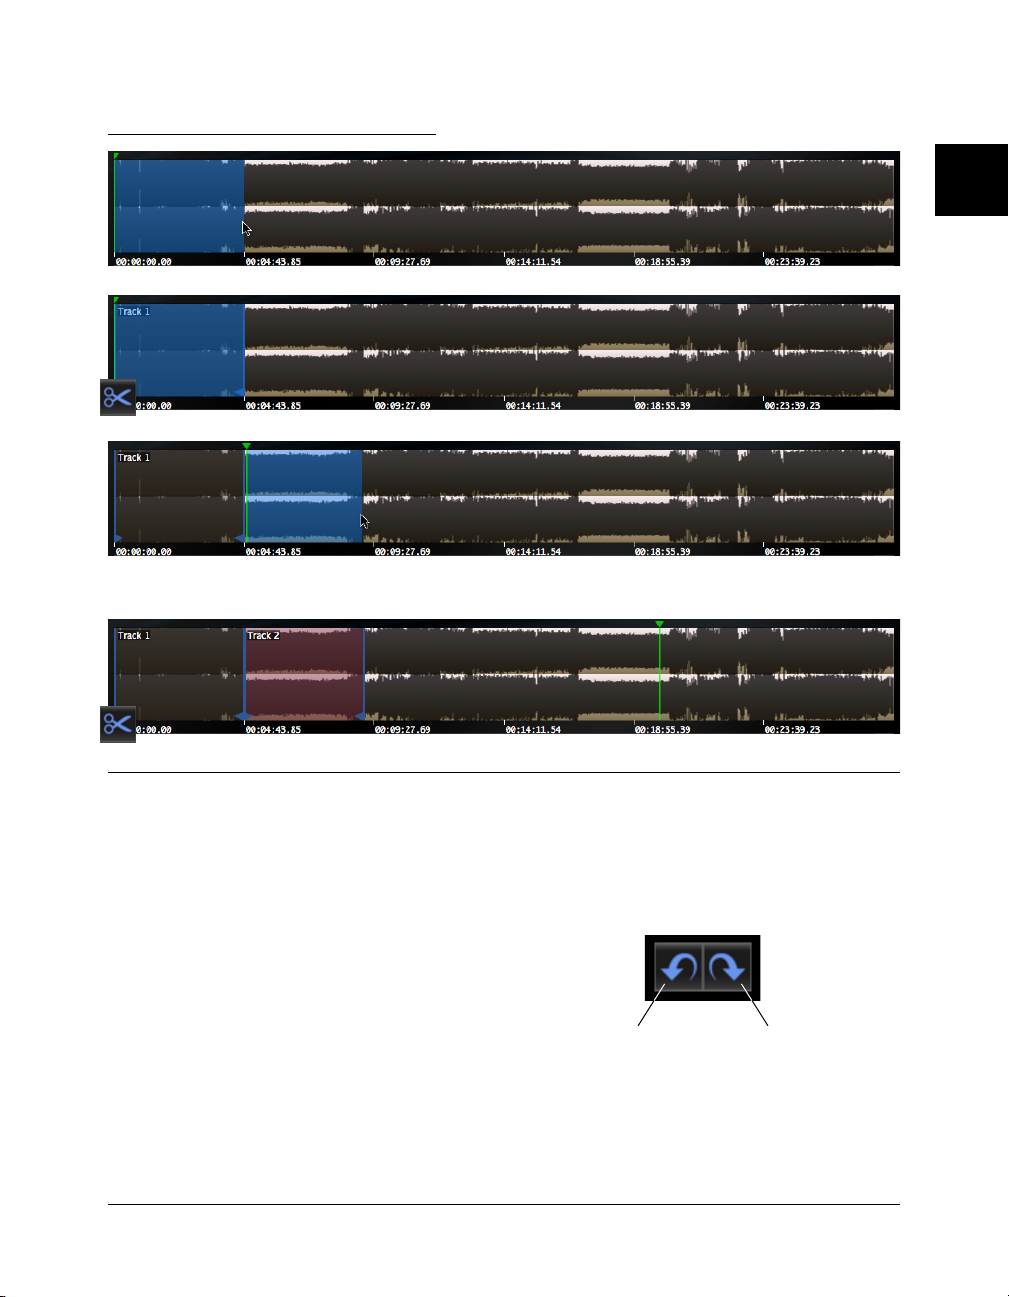
Creating Tracks Manually
Selec t the portion of the wavefor m you would like to defi ne as a track by clicking and dragging over the waveform with your mouse...
Click the Defi ne Track button (single scissor icon) to defi ne the fi rst sele cted area as a t rack...
Selec t the portion of the wavefor m you would like to defi ne as the sec ond track. If you select st art ing near th e end of the fi rst track, SoundSaver
automatically snaps the selection to the end of the fi r st track, so there is no gap bet ween the track s, which ensures continuous gap -free playba ck
(unless there is silence contained between the track ’s Start and End markers) .
3
Click the Defi ne Track button (single scissor icon) to defi ne the second selected area as a track, and so on...
making it easy to jump directly to any location in the
entire recording.
When you need additional detail for accurate Track
marker placement, etc. you can zoom in for detail, and
To Undo an Action:
• Click the Undo button.
To Redo an Action:
• Click the Redo button.
still retain the ability to jump to any location in the
recording using the overview. Simply clicking in the
waveform or overview at the desired location moves the
playhead to that location.
Undo Redo
Undo/Redo
Deleting Tracks
SoundSaver’s Undo/Redo function is the most basic
editing tool, which allows you to undo or redo a series
of actions.
Chapter 3 – Using SoundSaver 33
Deleting a track (or several tracks) in SoundSaver is
very simple. There are a variety of reason to delete
Page 34
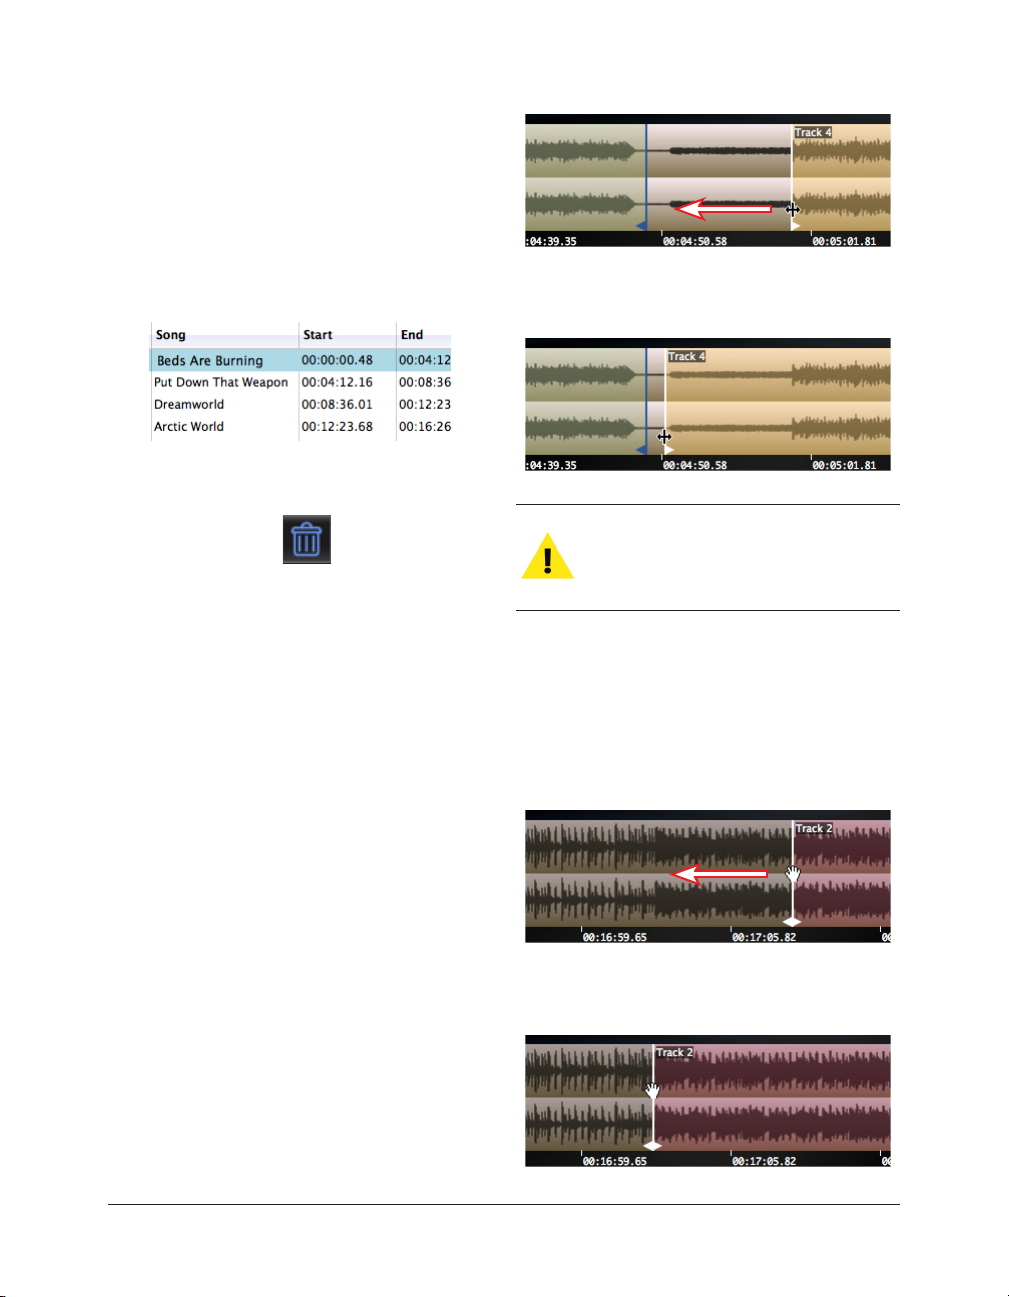
tracks: Perhaps you made a mistake creating the track;
maybe auto-dene tracks added an extra track where it
shouldn’t have, etc.
To Delete a Track):
1. In the Track List, select the track(s) you wish to
delete – or double-click between the track’s Start
and End markers to select it.
2. Click the Trash Can button (or press the Delete/
Backspace) key on your keyboard).
Adjusting Track Markers/Changing the
Length of a Track
Understanding how to adjust Track markers is perhaps
the most important editing skill when it comes to
working with SoundSaver. At some point you’re bound
to create a track that starts too late, or ends too soon,
and will need to have its markers moved so as to include
all of the desired audio content.
2. Click and drag the highlighted marker to the
desired position in the audio waveform.
Bydefault,TrackStartorEndMarkerswillsnapto
thepositionoftheplayheadwhentheyaremoved
closetoit.HoldingdowntheControlkeywhile
movingamarkertemporarilydisablessnapping.
To Adjust the Position of Contiguous Track Markers :
1. Position your mouse cursor over the middle part
of the contiguous Track markers you wish to
move – the mouse cursor icon turns into a hand,
and the markers become highlighted in white,
indicating they can be moved.
Individual Track Start and End markers can be moved
independently, and contiguous (back-to-back) Track
markers can be moved simultaneously, keeping
their back-to-back positioning, which is crucial for
continuous-play program material like DJ mixes or live
concert recordings.
To Adjust a Track Marker’s Position/Change the Length
of a Track:
1. Position your mouse cursor over the top or
bottom part of the Track marker you wish to move
– the mouse cursor will turn into a double arrow,
and the marker becomes highlighted in white,
indicating it can be moved.
SoundSaver Quick Start Guide34
2. Click and drag the highlighted marker to the
desired position in the audio waveform.
Page 35
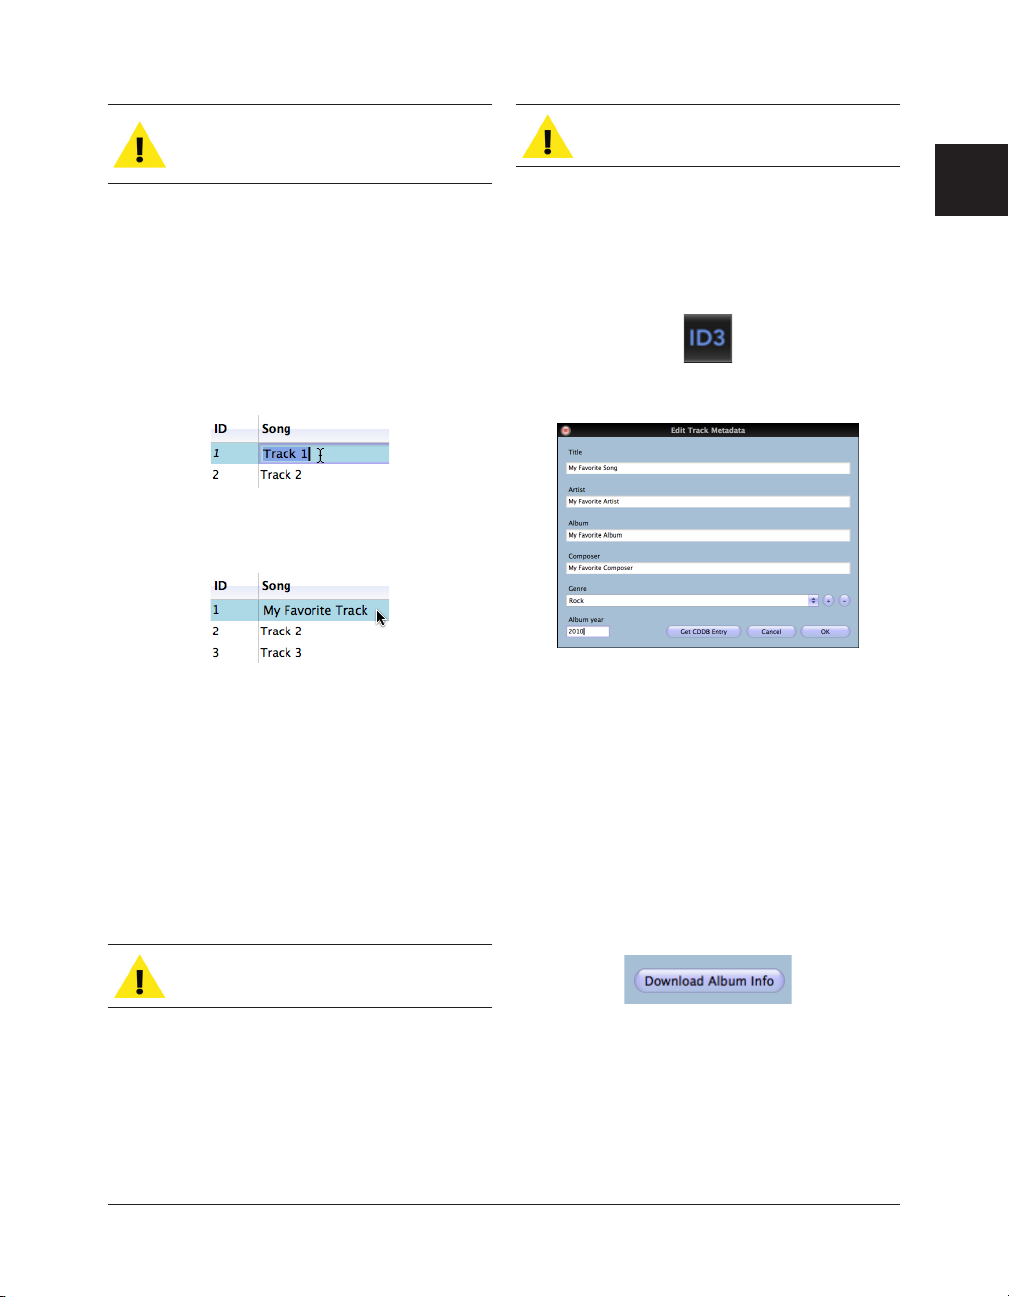
Youmaywanttozoominforacloserview
oftheaudiowaveformforthemostaccurate
markerplacement!
Naming Tracks
To Name/Re-name a Track:
1. In the Track List, single-click a selected track
name, or double-click an unselected track name
– the existing (or default) track name becomes
editable.
2. Enter the desired name, and press the Return/
Enter key on your keyboard.
Internetaccessisrequiredforautomatic
metadataretrieval.
To Add Track Metadata Manually:
1. In the Track List, select a track.
2. Click the ID3 button. [z-I (Mac), Ctrl-I
(Windows)]
3. Enter desired metadata.
3
Track Metadata (ID3 Tags)
SoundSaver allows you to add metadata that is exported
with each track – when exporting as MP3 les, or to
your iTunes library. This means that you can enter the
track name, artist, album, composer, genre, and album
year once in SoundSaver, and that information will
also appear in iTunes and your iPod – or other ID3compatible hardware and software music players.
MetadataisnotsupportedwithWAVleexport!
Metadata can be entered manually or automatically.
Automatic metadata entry uses the online MusicBrainz
library, which contains album, artist, and track name
listings for thousands of – but not all – popular
recordings.
Chapter 3 – Using SoundSaver 35
4. Click the OK button.
5. Repeat for additional tracks.
To Add Track Metadata Automatically:
1. In the Track List, select a track.
2. Click the ID3 button. [z-I (Mac), Ctrl-I
(Windows)]
3. In the Edit Track Metadata window, enter the
artist or album name, and click the Download
Album Info button...
...if a match is found, SoundSaver will retrieve the
track, artist, album, and album year information
automatically. If multiple matches are found,
you will be prompted to choose the appropriate
listing.
Page 36
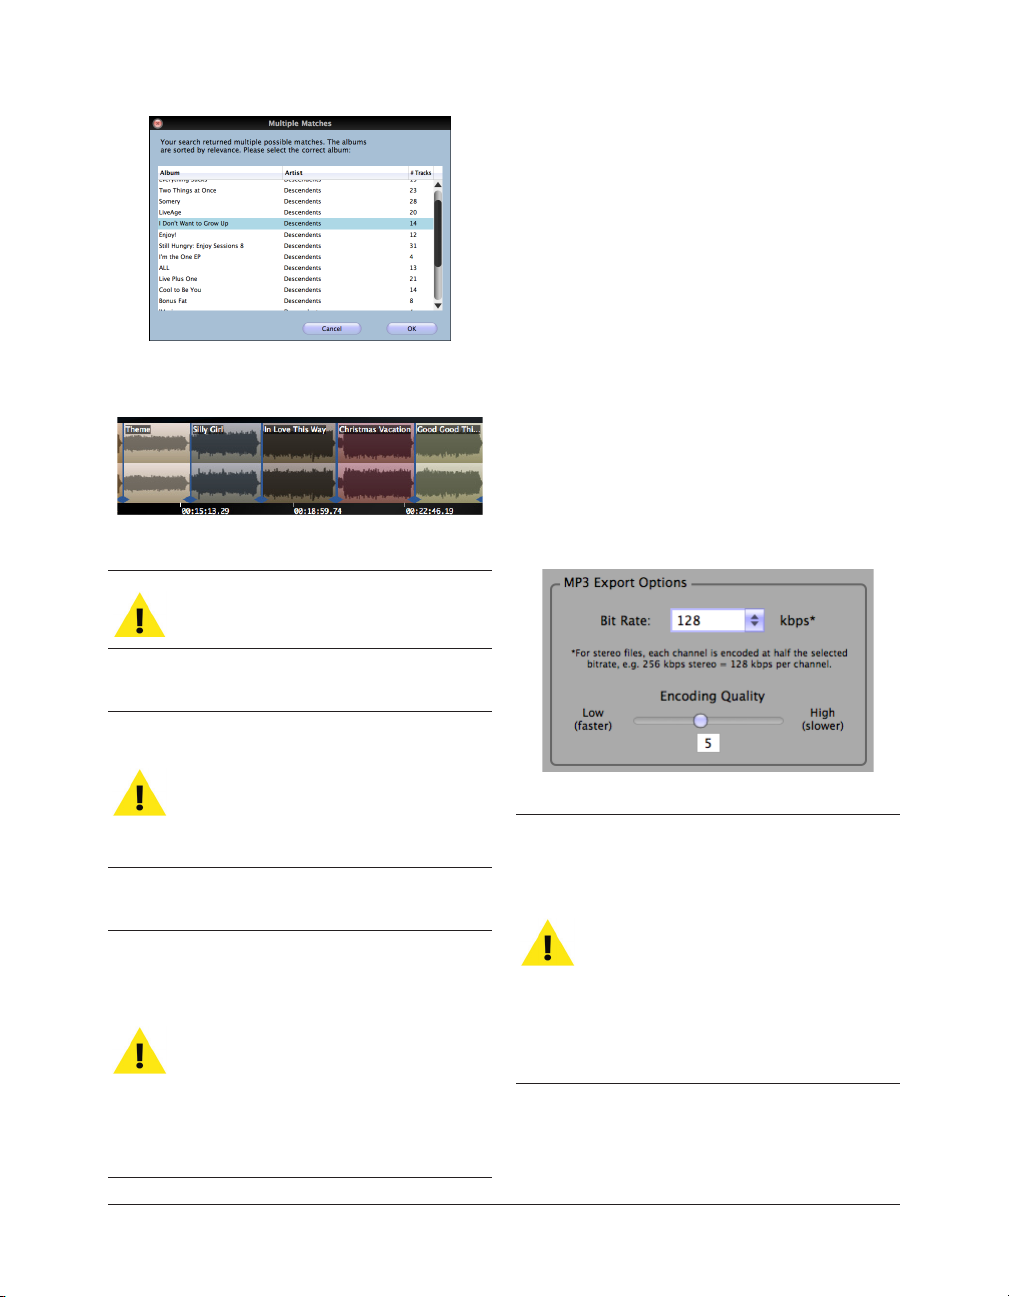
4. Click the OK button – SoundSaver automatically
names the tracks!
YoucanalsoShift-clickorz-Click(Mac)/Ctrl-click
(Windows)toselectmultipletracksandsetcommon
metadatasuchasartistoralbumnameallatonce.
Exporting Your Finished Product
It’s the moment you’ve been waiting for – exporting
your creation so you can enjoy listening to it in its new
cleaned up digital format.
SoundSaver includes options to export directly to MP3
and WAV les, as well as to your iTunes library, and as
a SoundSaver Project le, which can be transferred to
another computer, or used for later editing.
MP3 Export Options
Choosing MP3 as the output le format creates
compressed MP3 les suitable for use in many hardware
and software music players. The bit-rate and quality of
the les can be adjusted in the SoundSaver Preferences
Panel > Exporting Tab.
Whenretrievingmetadata,it’simportantto
havethecorrectnumberoftracksdened,
sothatthemetadataisappliedtothecorrect
tracks!Ifyoudonothavethecorrectnumberof
tracks,SoundSaverwillretrieveapartiallistof
metadata,forthetracksyoudohave.
Acommoncauseforthisiswhentwosongsrun
together,withnoclearlydenedbreakbetween
them.Ifyouuseddenedtracksautomatically,
it’slikelythatSoundSaverwouldnothave
detectedtwosuchsongsasbeingseparatesongs,
andwouldhaveinsteaddenedthemasa
single,longtrackcontainingbothsongs.Inthis
situation,yousimplyneedtomanuallyadjust
thetrack’smarkersandcreateanothertrack–
thenattempttoretrievemetadataagain.
SoundSaver Quick Start Guide36
ChoosingtheMP3exportoptioncreatesMP3
lesusingSoundSaver’sbuilt-inMP3encoding,
whichusestheLAMEMP3encoder.Youcanalso
choosetocreateMP3sbyusingtheiTunesexport
option,andchoosingtheiTunesMP3encoder
inSoundSaver’sExportingPreferences>
iTunesExportOptions.ThisusestheFraunhofer
encoder.SomepeoplepreferthesoundofMP3s
createdwiththeLAMEencoder,whileothers
preferthosemadewithiTunes’Fraunhofer
encoder.
Page 37
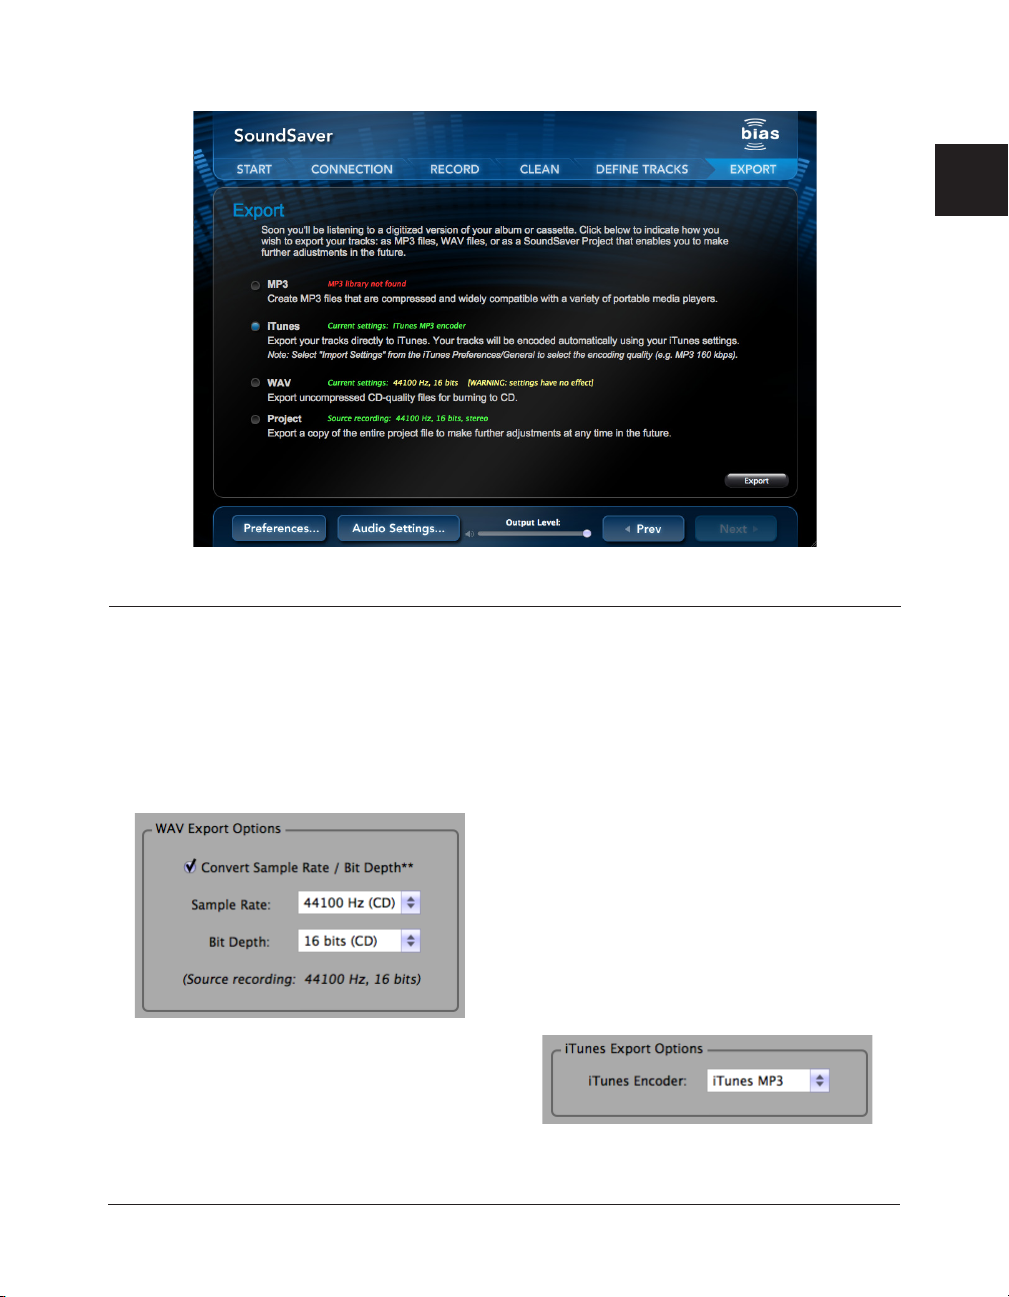
The Export page includes options for expor ting popular digital audio file format s, including MP3 , WAV – or export
direc tly into your iTunes library.
3
WAV Export Options
Selecting WAV as the output format creates high
quality uncompressed les which are ideal for burning
to audio CD – or transferring into another audio or
video application.
Convert Sample Rate/Bit-depth
This preference allows the sample rate and bit-depth
of the exported les can be adjusted. This means that
you can record and clean/edit at a higher resolution,
Chapter 3 – Using SoundSaver 37
such as 24-bit/96 kHz, and then deliver WAV les
suitable for burning to audio CD (16-bit/44.1 kHz) – as
well as other common sample rates and bit-depths.
When this option is turned off, exported WAV les will
have the same format as what was originally recorded
(i.e., whatever input format was shown in the Audio
Preferences > Input Hardware Format.
iTunes Export Options
Choosing iTunes as the export option means les
exported from SoundSaver will be sent into your iTunes
library – however, selecting the actual le format that
they will be delivered in must be set in the Exporting
Preferences > iTunes Export Options.
Since iTunes’ built-in encoders allow les to be
imported as AAC, AIFF, Apple Lossless, MP3, or WAV
Page 38
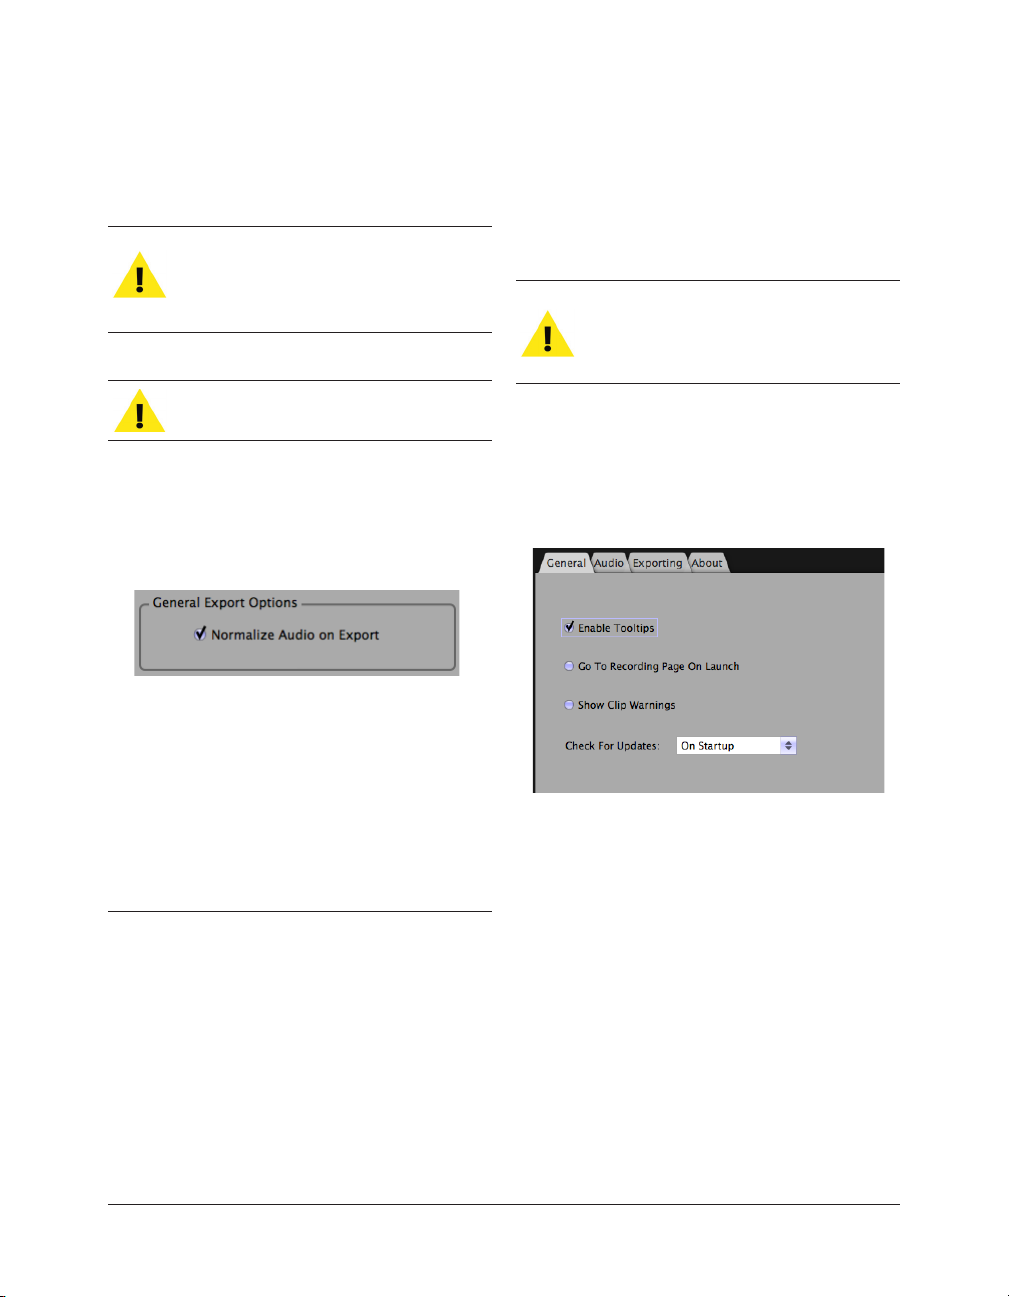
– choosing iTunes as an export option opens the door
for SoundSaver to deliver any of these le formats into
iTunes.
ThisSoundSaverpreferencesimplysetsthe
desiredleformat.Tochangethebit-rate,
quality,etc.youmustopentheiTunesGeneral
Preferences>ImportSettings.
YoucanuseiTunestoburnanaudioCD.
To Access SoundSaver Preferences:
1. Click the Preferences button in the lower left of
the SoundSaver interface.
2. Click the tab that contains the preferences you wish
to customize (i.e., General, Audio, Exporting, etc.).
SoundSaver’sAudioPreferencescanalsobe
accesseddirectlybyclickingtheAudioSettings
buttoninthelowerpartoftheSoundSaver
interface.
General Preferences
General Export Options
SoundSaver features the following general export
options.
Normalize Audio on Export
When active, this preference normalizes the audio
level of the tracks that are exported from SoundSaver.
Normalization is the process of raising the audio level
as high as possible without introducing digital clipping/
distortion.
Customizing SoundSaver
SoundSaver features a number of customizable
preferences that allow you to ne-tune it to best suit
your workow. The default settings are carefully
designed to work best in most situation – you may wish
to work with the defaults before modifying preferences.
Preference options are described below.
SoundSaver’s General Preferences include the following
items.
Enable Tooltips
When active, oating tooltips appear over interface
controls, with useful tips and information about what
the control is, and how it works. Tooltips are great for
beginners just learning how to use SoundSaver.
Go to Recording Page On Launch
When active, SoundSaver opens with the Record
Page visible. This is ideal for those who have already
congured the connection between their audio
source and computer, and wish to quickly jump into
recording.
SoundSaver Quick Start Guide38
Page 39
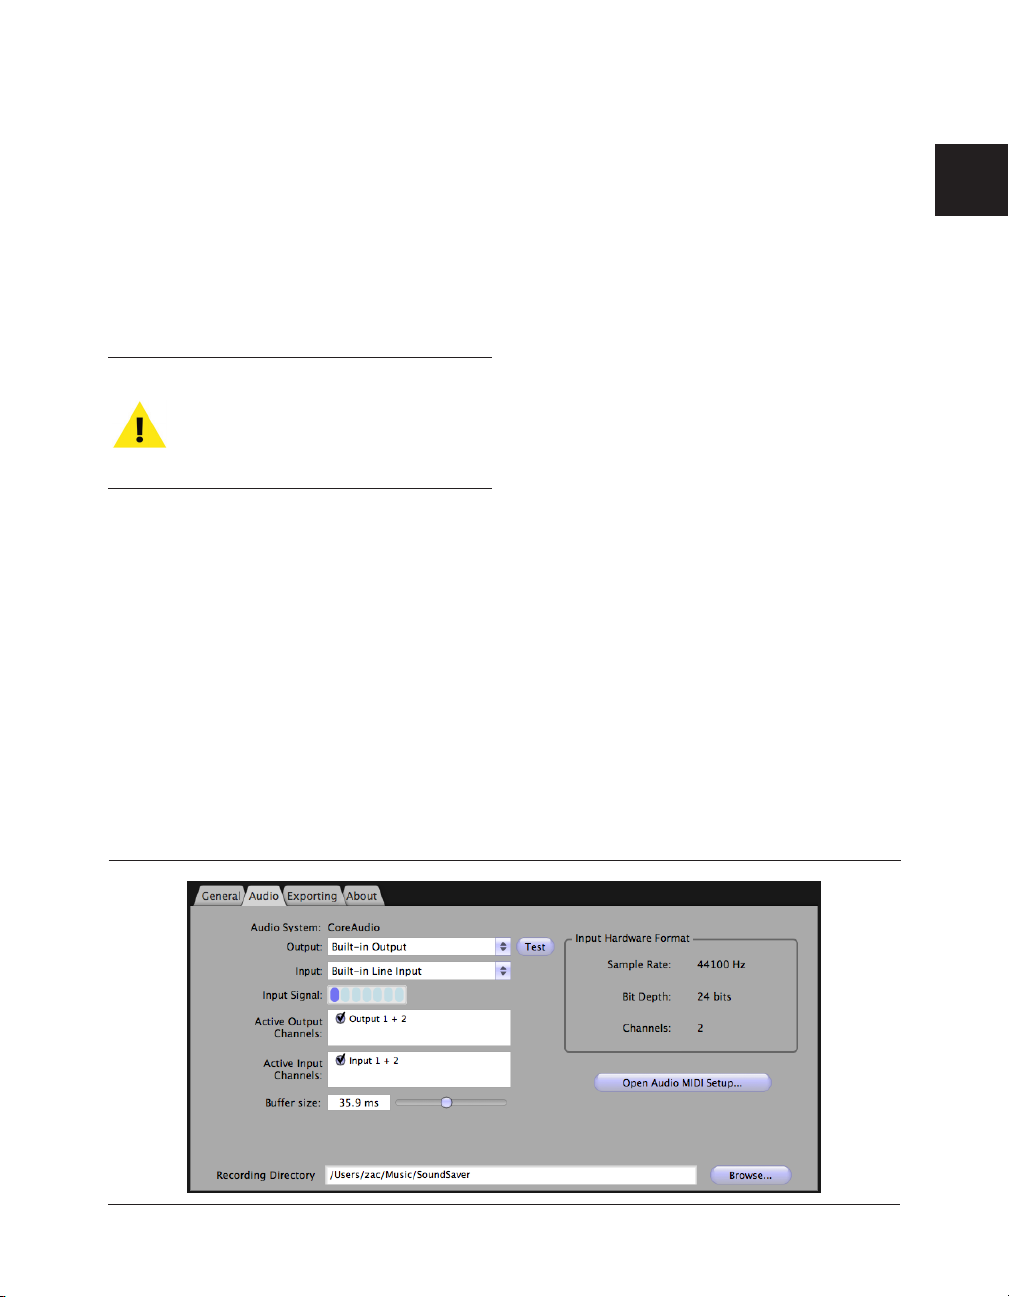
Show Clip Warnings
Audio System
When active, a dialog will appear when SoundSaver
detects a “clipped”, or distorted audio input level,
which is the result of having too high of an input level.
Digital clipping sounds very unpleasant, and is not
something you would want to hear in your nished
product. This option is useful for those just getting
started with digital recording.
NotethatevenifShowClipWarningsis
disabled,theclipindicatorsatthefarrightof
theInputLevelMetersarestillactive,andlight
upinredforafewsecondswhentheydetecta
clippedsignal.
Check for Updates
The Check for Updates preference allows you to set
SoundSaver to automatically check for updates. If an
update is available, SoundSaver will prompt you to
download it.
Audio Preferences
The Audio Preferences allow you to set which channels
on your computer’s audio hardware are used for
audio input and output, and the recording format and
location.
Displays the current audio system in use, not user
selectable.
Output
Use this menu to select the audio hardware device that
will be used for audio output from your computer. (i.e.,
playback from SoundSaver on your computer to your
speakers or headphones).
Input
Use this menu to select the audio hardware device that
will be used for audio input (i.e., recording audio from
your source into SoundSaver on your computer).
Active Output Channels
Use this menu to congure which channels on the
selected audio hardware device should be used for
audio output (i.e., playback from SoundSaver to your
speakers/headphones).
Active Input Channels
Use this menu to congure which channels on the
selected audio hardware device should be used for
audio input (i.e., recording audio from your source into
SoundSaver on your computer).
3
Chapter 3 – Using SoundSaver 39
Page 40
Notethatwithmostaudiohardwareinterfaces,
therewillonlybeonesetofstereoinputsand
outputs,andtheonlyoptionsyouwillseeare
Output1+2andInput1+2.Advancedaudio
hardwaremayfeaturemoreinputandoutputs,
inwhichcaseyoumusttellSoundSaverwhichof
theinputs/outputsareactuallyconnectedtoyour
recordingsourceandplaybacksystem.
2. Check your computer’s documentation for details
on how to set the audio input format.
Exporting Preferences
SoundSaver’s Exporting Preferences include items such
as MP3, WAV, iTunes, and General Export options.
Buffer Size
The Buffer Size Preference controls the size of the
“chunks” of digital audio that are captured by your
computer’s audio hardware device during recording, and
read from it during playback. The default setting should
work well for most computers. Generally speaking,
lower buffer sizes are best for very fast systems, and
higher sizes are best for older, slower systems.
Recording Directory
This preference controls the default directory that
SoundSaver will record into. This setting should work
ne for most users. It’s recommended that you change
this only if you need to record to a specic directory.
IfyoudochangetheRecordingDirectory
preference,besurethatyouruseraccounthas
diskwritepermissionsforthedirectoryyouselect.
Input Hardware Format
Thesepreferencesarecoveredintheprevious
section–ExportingyourFinishedProduct.
About Screen
The About screen displays the SoundSaver version
number, along with a link to the BIAS website, where
you can get technical support for SoundSaver, watch a
tutorial video, and learn about other BIAS products.
While the actual Input Hardware Format (i.e., number of
channels, bit-depth, and sample rate) is not something
you set directly with SoundSaver itself (this is set in the
Audio MIDI Setup Utility (Mac), or Sound Control Panel
(Windows), this display conveniently shows you the
current settings.
To change format settings:
1. Click the Open Audio MIDI Setup button (Mac), or
Open Sound Control Panel button (Windows).
SoundSaver Quick Start Guide40
Conclusion
You should now be familiar with how to use
SoundSaver. Enjoy digitizing your old records and
tapes!
A tutorial video, and technical support resources are
available on the BIAS website:
http://www.bias-inc.com
Page 41

Appendix 1: Keyboard Shortcuts
Mac
Keyboard Shortcut Equivalent Command
Spacebar Play/Pause
Return (2x) Jump to start of recording
Left Arrow Jump to previous track
Right Arrow Jump to next track
-D Defi ne track
-Shift-D Auto-defi ne tracks
-I Edit Track Info (ID3 metadata)
-Left Arrow Zoom waveform out
-Right Arrow Zoom waveform in
-Shift-Left Arrow Zoom waveform out full
-Shift-Right Arrow Zoom waveform in full
Shift + Left Arrow Navigate to previous page
Shift + Right Arrow Navigate to next page
1A1
1
Windows
Keyboard Shortcut Equivalent Command
Spacebar Play/Pause
Return (2x) Jump to start of recording
Left Arrow Jump to previous track
Right Arrow Jump to next track
Ctrl-D Defi ne track
Ctrl-Shift-D Auto-defi ne tracks
Ctrl-I Edit Track Info (ID3 metadata)
Ctrl-Left Arrow Zoom waveform out
Ctrl-Right Arrow Zoom waveform in
Ctrl-Shift-Left Arrow Zoom waveform out full
Ctrl-Shift-Right Arrow Zoom waveform in full
Shift + Left Arrow Navigate to previous page
Shift + Right Arrow Navigate to next page
Appendix 1 – Keyboard Shortcuts 41
Page 42

 Loading...