

Page 1

DeckDeck
Deck
DeckDeck
Software User’s Guide
Version 3.0
Berkley Integrated Audio Software, Inc.
1370 Industrial Ave., Suite A
Petaluma, CA 94952
707.782.1866
http://www.bias-inc.com
™
BIAS Technical Support
707.782.1866
Monday-Friday 9AM–5PM PST
or
Page 2

Software Copyright and Warranty
This legal document is an agreement between you, the
end user, and BIAS, Inc. BY UTILIZING THE SOFTWARE ON THESE DISKS, YOU ARE AGREEING TO
BECOME BOUND BY THE TERMS OF THIS AGREEMENT, WHICH INCLUDES THE SOFTWARE LICENSE
AND THE SOFTWARE DISCLAIMER OF WARRANTY
(collectively the “Agreement”). THIS AGREEMENT
CONSTITUTES THE COMPLETE AGREEMENT
BETWEEN YOU AND BIAS, INC. IF YOU DO NOT
AGREE TO THE TERMS OF THIS AGREEMENT, DO
NOT USE THE SOFTWARE ON THE DISKS INCLUDED
IN THIS PACKAGE AND PROMPTLY RETURN THE
UNOPENED PACKAGE AND THE OTHER MATERIALS
(INCLUDING WRITTEN MATERIALS, BINDERS OR
OTHER CONTAINERS) THAT ARE PART OF THIS
PRODUCT TO THE PLACE WHERE YOU OBTAINED
THEM FOR A FULL REFUND.
BIAS SOFTWARE LICENSE
1. GRANT OF LICENSE. In consideration of payment
of the LICENSE fee, which is part of the price you paid
for this product, BIAS, as Licensor, grants to you, the
LICENSEE, a non-exclusive right to use and display this
copy of a BIAS software program (hereinafter the
“SOFTWARE”) an a single COMPUTER (i.e., with a
single CPU) at a single location. BIAS reserves all rights
not expressly granted to LICENSEE.
2. OWNERSHIP OF SOFTWARE. As the LICENSEE, you
own the magnetic or other physical media on which
the SOFTWARE is originally or subsequently recorded
or fixed, but BIAS retains title and ownership of the
SOFTWARE recorded on the original disk copy (or
copies) and all subsequent copies of the SOFTWARE,
regardless of the form or media on which the original
and other copies may exist. This License is not a sale of
the original SOFTWARE or any copy.
3. COPY RESTRICTIONS. This SOFTWARE and the
accompanying written materials are copyrighted.
Unauthorized copying of the SOFTWARE, including
SOFTWARE that has been modified, merged, or
included with other software, or of the written
materials is expressly forbidden. You may be held
legally responsible for any copyright infringement that
is caused or encouraged by your failure to abide by the
terms of this License. Subject to these restrictions, and
if the SOFTWARE is not copy-protected, you may make
one (1) copy of the SOFTWARE solely for backup
purposes. You must reproduce and include the
copyright notice on the backup copy.
4. USE RESTRICTIONS. As the LICENSEE, you may
physically transfer the SOFTWARE from one computer
to another provided that the SOFTWARE is used on
only one computer at a time. You may not electronically transfer the SOFTWARE from one computer to
another over a network. You may not distribute copies
of the SOFTWARE or accompanying written materials
to others. You may not modify, adapt, translate,
reverse engineer, de-compile, disassemble, or create
derivative works based on the SOFTWARE. You may
not modify, adapt, translate, or create derivative works
based on the written materials without the prior
written consent of BIAS.
5. TRANSFER RESTRICTIONS. This SOFTWARE is
licensed only to you, the LICENSEE, and may not be
transferred to anyone without the prior written
consent of BIAS. Any authorized transferee of the
SOFTWARE shall be bound by the terms and conditions of this Agreement. In no event may you transfer,
assign, rent, lease, sell, or otherwise dispose of the
SOFTWARE on a temporary or permanent basis except
as expressly provided herein.
6. TERMINATION. This License is effective until
terminated. This License will terminate automatically
without notice from BIAS if you fail to comply with any
provision of this License. Upon termination you shall
destroy the written materials and all copies of the
SOFTWARE, including modified copies, if any.
7. UPDATE POLICY. BIAS may create, from time to
time, updated versions of the SOFTWARE. At its
option, BIAS will make such updates available to the
LICENSEE and transferees who have paid the update
fee and returned the registration card to BIAS.
8. MISCELLANEOUS. This Agreement is governed by
the law of the State of California.
DISCLAIMER OF WARRANTY AND LIMITED WARRANTY
THE SOFTWARE AND ACCOMPANYING WRITTEN
MATERIALS (INCLUDING INSTRUCTIONS FOR USE)
ARE PROVIDED “AS IS” WITHOUT WARRANTIES OF
ii
Deck User’s Guide
Page 3

ANY KIND. FURTHER, BIAS DOES NOT WARRANT,
GUARANTEE, OR MAKE ANY REPRESENTATIONS
REGARDING THE USE, OR THE RESULTS OF THE
USE, OF THE SOFTWARE OR WRITTEN MATERIALS IN
TERMS OF CORRECTNESS, ACCURACY, RELIABILITY,
CURRENTNESS, OR OTHERWISE. THE ENTIRE RISK
AS TO THE RESULTS AND PERFORMANCE OF THE
SOFTWARE IS ASSUMED BY YOU, AND NOT BIAS OR
ITS DEALERS, DISTRIBUTORS, AGENTS, OR EMPLOYEES, YOU AGREE TO ASSUME THE ENTIRE COST OF
ALL NECESSARY SERVICING, REPAIR, OR CORRECTION.
BIAS warrants to the original LICENSEE that the
disk(s) on which the SOFTWARE is recorded is free
from defects in materials and workmanship under
normal use and service for a period of ninety (90) days
from the date of delivery as evidenced by a copy of the
receipt and. Further, BIAS hereby limits the duration
of any implied warranty (or warranties) on the disk to
the respective periods stated above. Some states do
not allow limitations on duration of an implied
warranty, so the above limitation may not apply to you.
BIAS’ entire liability and your exclusive remedy as to
disk(s) shall be, at BIAS’ option, either (a) return of
the purchase price or (b) replacement of the disk that
does not meet BIAS’ Limited Warranty and which is
returned to BIAS with a copy of the receipt. If failure
of the disk has resulted from accident, abuse, or
misapplication, BIAS shall have no responsibility to
replace the disk or refund the purchase price. Any
replacement disk will be warranted for the remainder
of the original warranty period or thirty (30) days,
whichever is longer.
THE ABOVE ARE THE ONLY WARRANTIES OF ANY
KIND, EITHER EXPRESS OR IMPLIED, INCLUDING
BUT NOT LIMITED TO THE IMPLIED WARRANTIES
OF MERCHANTABILITY AND FITNESS FOR A
PARTICULAR PURPOSE, THAT ARE MADE BY BIAS
CONCERNING THE BIAS PRODUCT. NO ORAL OR
WRITTEN INFORMATION OR ADVICE GIVEN BY BIAS,
ITS DEALERS, DISTRIBUTORS, AGENTS, OR EMPLOYEES SHALL CREATE A WARRANTY OR IN ANY WAY
INCREASE THE SCOPE OF THIS WARRANTY, AND
YOU MAY NOT RELY ON ANY SUCH INFORMATION
OR ADVICE. THIS WARRANTY GIVES YOU SPECIFIC
LEGAL RIGHTS. YOU MAY HAVE OTHER RIGHTS
WHICH VARY FROM STATE TO STATE.
NEITHER BIAS NOR ANYONE ELSE WHO HAS BEEN
INVOLVED IN THE CREATION, PRODUCTION, OR
DELIVERY OF THIS PRODUCT SHALL BE LIABLE FOR
ANY DIRECT, INDIRECT, CONSEQUENTIAL, OR
INCIDENTAL DAMAGES (INCLUDING DAMAGES FOR
LOSS OF BUSINESS PROFITS, BUSINESS INTERRUPTION, LOSS OF BUSINESS INFORMATION, AND THE
LIKE) ARISING SUCH DAMAGES. BECAUSE SOME
STATES DO NOT ALLOW THE EXCLUSION OR
LIMITATION OF LIABILITY FOR CONSEQUENTIAL OR
INCIDENTAL DAMAGES, THE ABOVE LIMITATION
MAY NOT APPLY TO YOU.
This Disclaimer of Warranty and Limited Warranty is
governed by the laws of the State of California.
U.S. GOVERNMENT RESTRICTED RIGHTS
The SOFTWARE and documentation is provided with
RESTRICTED RIGHTS. Use, duplication, or disclosure
by the Government is subject to restrictions as set
forth in subdivision (b)(3)(ii) of The Rights in
Technical Data and Computer Software clause at
252.227-7013.
Contractor/manufacturer is BIAS (Berkley Integrated
Audio Software), Inc./ 1370 Industrial Ave., Suite A,
Petaluma, CA 94952
Should you have any questions concerning this
Agreement, or if you desire to contact BIAS for any
reason, please contact in writing:
BIAS Customer Sales and Service,
1370 Industrial Ave., Suita A, Petaluma CA 94952.
Copyright 1998 BIAS, Inc.
Table of Contents
iii
Page 4

Credits
Deck Software:
Josh Rosen, Mats Myrberg, John Dalton, Jeff Moore,
Steve Berkley, and Walter Horat.
Mercutio MDEF from Digital Alchemy, Copyright ©
Ramon M. Felciano 1992-2000, All Rights Reserved.
ASIO and VST are trademarks of Steinberg Software
und Hardware GmbH.
Special Thanks to:
Thomas DiMuzio and Hank Hansen
iv
Deck User’s Guide
Page 5

Contents
Chapter 1: Introducing Deck 3
Welcome! ............................................................................................................................................................................... 3
Deck Features: ....................................................................................................................................................................... 3
What’s New in Deck 3.0? ....................................................................................................................................................... 4
Minimum System Requirements .......................................................................................................................................... 4
Maximizing Deck’s Performance .......................................................................................................................................... 4
About Your User’s Guide ...................................................................................................................................................... 5
About Deck LE ....................................................................................................................................................................... 5
Conclusion ............................................................................................................................................................................. 6
Chapter 2: Installing and Configuring Deck 9
Installing Deck ....................................................................................................................................................................... 9
Authorization ......................................................................................................................................................................... 9
Allocating RAM to Deck ........................................................................................................................................................ 10
Making Audio Connections .................................................................................................................................................. 10
PCI and PCMCIA Audio Cards, and USB and Firewire Audio Interfaces .............................................................................................. 11
Using the Inputs and Outputs of an Audio Card or Audio Interface ....................................................................................................12
ASIO ....................................................................................................................................................................................... 13
Configuring Deck for ASIO ..................................................................................................................................................................... 13
Installing the ASIO Driver ........................................................................................................................................................................ 13
Korg SoundLink ..................................................................................................................................................................... 14
Hardware Configuration ....................................................................................................................................................... 14
Audio Card ................................................................................................................................................................................................ 14
Clock Source ............................................................................................................................................................................................ 15
Play audio while in background .............................................................................................................................................................. 15
Record monitoring ................................................................................................................................................................................... 15
Hardware Options ................................................................................................................................................................. 16
Configuring Deck and Setting Maximum Playback Tracks ................................................................................................. 16
Using dedicated audio drives .................................................................................................................................................................. 17
Conclusion ............................................................................................................................................................................. 17
Chapter 3: Getting Started 21
Deck sessions ........................................................................................................................................................................ 21
Creating, opening, closing, and saving sessions .................................................................................................................................... 21
Adding Audio Files and Regions to a Session ...................................................................................................................... 22
The Tracks, Transport, Mixer, Master Outputs, and CPU Meter windows ......................................................................... 23
The Tracks window .................................................................................................................................................................................. 23
The Transport window ............................................................................................................................................................................. 23
The Mixer window ...................................................................................................................................................................................23
The Master Outputs window ................................................................................................................................................................... 24
The CPU Meter window ...........................................................................................................................................................................24
Recording into the Tracks window ....................................................................................................................................... 24
Effects ........................................................................................................................................................................................................26
Location times .......................................................................................................................................................................................... 26
Loop mode ............................................................................................................................................................................................... 27
Automated punch-in and punch-out recording .....................................................................................................................................27
Table of Contents
v
Page 6

Naming Tracks .......................................................................................................................................................................................... 29
Compact Session ...................................................................................................................................................................................... 29
Conclusion ............................................................................................................................................................................. 29
Chapter 4: Visual Waveform Editing 33
Moving and Renaming Tracks ............................................................................................................................................... 33
Navigating the Tracks window .............................................................................................................................................. 34
Basic Range Mode and Object Mode Editing ...................................................................................................................... 35
Selecting Axis Units and Managing the Grid........................................................................................................................ 37
Editing Regions ...................................................................................................................................................................... 39
Using Play Tracks and Work Tracks....................................................................................................................................... 40
Fast Cueing and Auditioning ................................................................................................................................................ 40
Constructive Fades and Crossfades...................................................................................................................................... 40
Fade out shapes .......................................................................................................................................................................................41
Fade in shapes .......................................................................................................................................................................................... 42
Possible envelope combinations ............................................................................................................................................................. 42
Compacting audio that contains crossfades ...........................................................................................................................................45
Using Compact Session and Compact Audio Files.............................................................................................................. 45
Compact Session ...................................................................................................................................................................................... 45
Compact Audio File.................................................................................................................................................................................. 46
Spotting Audio Regions to Timecode .................................................................................................................................. 47
Using the Tempo and Time Signature settings ................................................................................................................... 47
Using an External Editor ....................................................................................................................................................... 48
Using BIAS Peak as Deck’s External Editor ............................................................................................................................................ 49
Conclusion ............................................................................................................................................................................. 49
Chapter 5: Effects 53
Deck’s destructive effects ..................................................................................................................................................... 53
Real-time effects .................................................................................................................................................................... 54
Assigning effects to play tracks ................................................................................................................................................................54
Adjusting Effect parameters ....................................................................................................................................................................55
About Deck’s Built-in Effects ................................................................................................................................................................... 56
Setting effects preferences ...................................................................................................................................................................... 57
Premiere Plug-ins .................................................................................................................................................................. 57
VST Plug-ins ........................................................................................................................................................................... 58
Installing VST Plug-Ins ............................................................................................................................................................................. 58
Organizing VST Plug-Ins .......................................................................................................................................................................... 58
Inserting VST Plug-Ins ..............................................................................................................................................................................58
Mono, Mono to Stereo, and Stereo VST inserts .....................................................................................................................................59
Signal flow by channel ............................................................................................................................................................................. 60
Bouncing your VST plug-in assignments ................................................................................................................................................ 61
Conclusion ............................................................................................................................................................................. 61
Chapter 6: Automation, Mixing, and Mastering 65
Mixer-based Automation ....................................................................................................................................................... 65
Visual Automation Envelopes ............................................................................................................................................... 66
Automation and QuickTime Movie Scrubbing .......................................................................................................................................68
Copying and Pasting Automation Envelopes ......................................................................................................................................... 68
Show/Hide Automation Envelope .......................................................................................................................................................... 69
Conform to Audio Edits ........................................................................................................................................................................... 69
Using mixer states ................................................................................................................................................................. 69
vi
Deck User’s Guide
Page 7

Bouncing tracks in Deck ....................................................................................................................................................... 71
Virtual mixing ........................................................................................................................................................................ 72
Renaming Tracks ...................................................................................................................................................................................... 73
Final mastering to a mono or stereo disk file ...................................................................................................................... 73
Conclusion ............................................................................................................................................................................. 76
Chapter 7: QuickTime 79
Importing a QuickTime Movie ............................................................................................................................................. 79
QuickTime window .................................................................................................................................................................................. 80
Deck’s QuickTime tools ..........................................................................................................................................................................80
Scrubbing QuickTime video .................................................................................................................................................................... 81
Exporting the final QuickTime movie ....................................................................................................................................................81
Conclusion ............................................................................................................................................................................. 83
Chapter 8: MIDI and Synchronization 87
MIDI Setup ............................................................................................................................................................................. 87
The Open Music System (OMS) ..............................................................................................................................................................87
MIDI preferences ..................................................................................................................................................................................... 87
Sending MIDI timecode ........................................................................................................................................................ 88
MIDI Key Maps ...................................................................................................................................................................... 88
MIDI Map Fader .......................................................................................................................................................................................88
Edit MIDI Map .......................................................................................................................................................................................... 88
Save and Load MIDI Map ......................................................................................................................................................................... 89
Using Deck with the Metro Sequencer ................................................................................................................................ 90
Setting the Deck Connections on the Metro Setup menu ....................................................................................................................90
Setting the Slave Settings preference on the Deck File menu ..............................................................................................................90
Setting the screen update speed for Metro within Deck ...................................................................................................................... 91
Setting up Deck with a MIDI or audio metronome ...............................................................................................................................91
Importing MIDI files .............................................................................................................................................................. 92
MIDI Thru .............................................................................................................................................................................. 93
Synchronization ..................................................................................................................................................................... 93
Conclusion ............................................................................................................................................................................. 95
Chapter 9: Deck Reference 99
Tracks Global Control Area ...................................................................................................................................................................... 100
Track Control Area ................................................................................................................................................................................... 102
Tracks window key commands ............................................................................................................................................................... 104
Tracks window key commands (Range mode only) .............................................................................................................................. 106
Tracks window key commands (Object mode only) .............................................................................................................................107
Mixer window ........................................................................................................................................................................ 107
Channel Signal Flow ................................................................................................................................................................................ 110
Transport Window ................................................................................................................................................................. 110
Library window ...................................................................................................................................................................... 113
MIDI window ......................................................................................................................................................................... 114
QuickTime window ............................................................................................................................................................... 115
Effect window ........................................................................................................................................................................ 116
Master Outputs window ....................................................................................................................................................... 117
CPU Meter window ............................................................................................................................................................... 118
File menu ............................................................................................................................................................................... 119
Preferences ............................................................................................................................................................................................... 120
Edit menu .............................................................................................................................................................................. 126
Table of Contents
vii
Page 8

Process menu ........................................................................................................................................................................ 129
Destructive Effects ................................................................................................................................................................................... 131
External Effects ......................................................................................................................................................................................... 131
Audition submenu.................................................................................................................................................................................... 132
Options menu ........................................................................................................................................................................ 133
Automation submenu .............................................................................................................................................................................. 135
Selection Tools submenu ......................................................................................................................................................................... 137
Hardware Configuration dialog ...............................................................................................................................................................138
Session menu ......................................................................................................................................................................... 139
Library Operations submenu .................................................................................................................................................................. 140
Windows menu ...................................................................................................................................................................... 140
Links menu ............................................................................................................................................................................ 140
QuickTime menu .................................................................................................................................................................. 140
Help menu ............................................................................................................................................................................. 140
Conclusion ............................................................................................................................................................................. 141
Chapter 10: Digital Recording and Mixing Basics 145
Basic Sampling Concepts ...................................................................................................................................................... 145
MIDI overview ....................................................................................................................................................................... 146
Digital multitracking and the mixing board metaphor ....................................................................................................... 147
Recording from scratch ......................................................................................................................................................... 148
The input signal ....................................................................................................................................................................................... 148
Macintosh audio inputs ........................................................................................................................................................................... 148
Digital distortion ...................................................................................................................................................................................... 148
Automated punching in and out ............................................................................................................................................................. 148
Bouncing tracks and virtual mixing ........................................................................................................................................................149
Audio file formats and the Deck session file .......................................................................................................................................... 149
New audio files ......................................................................................................................................................................................... 150
Support of different audio file formats ................................................................................................................................................... 150
What is non-destructive recording? ........................................................................................................................................................ 150
Fader automation .................................................................................................................................................................. 151
Synchronizing sound to picture .............................................................................................................................................................. 152
Final stereo mixdown ..............................................................................................................................................................................152
Archiving suggestions .............................................................................................................................................................................. 153
Suggested reading ................................................................................................................................................................. 153
Appendix 1: Fine Tuning and Troubleshooting Your System 157
Hard drives, formatting, and SCSI ....................................................................................................................................... 157
Throughput .............................................................................................................................................................................................. 157
Formatting ................................................................................................................................................................................................ 158
SCSI Termination ..................................................................................................................................................................................... 158
Extensions and Control Panel Conflicts ............................................................................................................................... 158
RAM Allocation and Memory Management Hints ............................................................................................................... 159
Allocating RAM to Deck ........................................................................................................................................................................... 159
MIDI ....................................................................................................................................................................................... 159
File management tips ............................................................................................................................................................ 160
Session file ................................................................................................................................................................................................ 160
Track .......................................................................................................................................................................................................... 160
Work tracks ...............................................................................................................................................................................................160
Audio file ................................................................................................................................................................................................... 160
Crossfade file ............................................................................................................................................................................................ 160
Region ....................................................................................................................................................................................................... 160
viii
Deck User’s Guide
Page 9

Recording strategies ................................................................................................................................................................................ 160
A Note About Crashing and Restarting ................................................................................................................................ 161
Troubleshooting .................................................................................................................................................................... 161
Problems with output levels during monitoring ....................................................................................................................................161
Error Message: “Problems initializing Playback engine. No Supported hardware installed.” ............................................................. 161
Problem: Cannot Record in Stereo—no Stereo Separation. ................................................................................................................. 162
Problem: Scratchy-sounding Audio.........................................................................................................................................................162
General Problems with audio playback (glitches, pops, clicks, “Disk is Too Slow” messages) .......................................................... 162
Problem: Trouble with MIDI or with syncing to external time code (MTC) ........................................................................................ 162
Error messages ......................................................................................................................................................................................... 162
A note about “Disk Too Slow” messages ................................................................................................................................................164
Appendix 2: Support for the Tascam US-428 166
Glossary 171
Index 179
Table of Contents
ix
Page 10

x
Deck User’s Guide
Page 11
Chapter 1
Introducing Deck
Page 12

2
Deck User’s Guide
Page 13

Chapter 1: Introducing Deck
Welcome!
BIAS Deck 3.0 is a full-featured, multitrack digital
audio application for the Macintosh. Deck has won
critical acclaim for its vast array of professional features
and its intuitive user interface. Deck offers completely
non-destructive editing, allowing you to edit any track
as much as you like, with no fear of losing or altering
the original material. Use Deck to record and edit up
to 64 simultaneous audio playback tracks (dependent
upon the speed of your CPU and hard drives). Deck
also offers up to 999 virtual work tracks.
Deck 3.0 is fully native-capable with any G4, G3, or
PowerPC Macintosh. You can use your Mac's built-in
audio connections with no additional hardware
required. Deck also supports the ASIO industry
standard, giving you a wide choice of audio hardware
options.
1
Deck is intended for a wide variety of users. Musicians
use it as a composition environment. Engineers use it
for multitrack recording, editing, and mixing. Deck is
used in video post-production for spotting sound
effects and sound tracks. Sound designers use it for
audio sweetening and layback tasks. Multimedia
producers use Deck as a self-contained digital audio
and video post-production environment. Radio
broadcasters use it for field recording as well as cutting
entire programs. Anyone with an interest in audio and
a capable Macintosh system will benefit from Deck.
Deck Features:
• Professional multitrack recording, editing &
processing solution
• Up to 64 simultaneous tracks - no audio hardware
required
• Runs on most Macs - even PowerBooks
Deck delivers real-time signal processing with built-in
graphic EQs, delay, chorusing, and more—on every
track (subject to CPU speed and power). There's full
support for a wide range of VST audio Plug-Ins, as well
as support for Adobe Premiere-compatible audio PlugIns.
Deck offers a wealth of pro-calibre audio post
production features, including frame-accurate spotting
and SMPTE/EBU sync capability, and frame-accurate
sync to QuickTime movies. Deck is an ideal companion to any Adobe, Avid, Finalcut Pro, iMovie, Media
100, Radius, or other digital video editing system or
software.
• Up to 999 virtual tracks
• Built-in real-time DSP effects include graphic &
parametric EQs, delay, chorus, gain & more
• Support for VST and Adobe Premiere audio plugins
• 24-bit automated level mixing with high-res
moving faders
• Automated mutes, pans & levels
• Copy, paste, drag & draw automation envelopes
•- Integrated digital video support - with frame-
accurate MTC & SMPTE/EBU timecode sync
• Syncs to all OMS compatible MIDI sequencers
Introducing Deck
3
Page 14

• Launch BIAS Peak or BIAS Peak le directly from
Deck
• 5MB minimum available hard disk space (for
program)
• Includes BIAS Peak LE
What’s New in Deck 3.0?
Version 3.0 of Deck includes the following new
features:
• VST Plug-In support
• Enhanced playback track capability, limited only
by your system, with up to 64 simultaneous
playback tracks
• Master Outputs window: includes Master Fader
and Meters, and VST inserts
• Improved Graphics
• CPU Meter window: displays RAM, CPU, and Disk
usage
• Desktop Curtain
• Virtual Memory is supported with Virtual Memory-
compatible 3rd party ASIO drivers and VST plugins
• Mac OS 8.5 or later
• QuickTime 3.0 or later
• Sound Manager 3.2.1 or later
• OMS 2.3.8 required for synchronizing Deck to
OMS-compatible MIDI sequencers & playback of
MIDI tracks
• Hard drive(s) running at 7,200 rpm or faster, UWSCSI recommended
The Deck application runs in native mode on
PowerPC, G3, and G4 Macintosh computers. Deck
supports ASIO 1.0 compatible sound cards using the
Deck ASIO Plug-in. Deck also offers direct support for
the Korg 1212 I/O PCI-bus audio card using the DECK
II 1212 I/O Driver.
To record and play back tracks you will also need the
following:
• To record, a line-level sound source (mixing
board, electronic instrument, CD player, turntable,
cassette player, audio DAT machine, microphone,
etc.).
• To play back, a stereo amplifier and speakers or
powered speakers.
Minimum System Requirements
To use Deck you will need:
• PowerPC, G3, or G4 Processor (266MHz or faster)
• Built-in 16-bit Macintosh sound, or supported
ASIO-compatible audio hardware and the most
recent ASIO 1.0 driver software from ASIO
hardware manufacturer, or Korg 1212 I/O PCI-bus
audio card.
• Frame-accurate sync to SMPTE/EBU timecode
requires an OMS-compatible hardware.
• 32MB System RAM minimum
4
Deck User’s Guide
• A mixer or ASIO hardware with an onboard mixer
(e.g., Tascam US-428) is strongly recommended.
Maximizing Deck’s Performance
To get the best performance out of Deck and your
Macintosh, observe the following.
To maximize Deck’s performance:
• Use a minimal number of System Extensions.
Extensions can slow down your Macintosh by
using precious processor cycles. In particular,
Page 15
disable third party extensions that you do not
require while running Deck. To set up a dedicated
set of extensions for Deck, duplicate your Mac OS
Base extensions set in the extensions manager
and rename it (something like audio_set), restart
your computer with this extensions set and install
Deck, enable the additional extensions required
for Deck (e.g., OMS, drivers for your audio
hardware, etc.), and, restart your computer with
this updated extensions set.
• Turn File Sharing off, unless you need it.
• Unmount network volumes while running Deck
because the Finder can cause slowdowns as it
polls network volumes in the background.
• Opening, closing, scrolling, moving, re-sizing, and
selecting Macintosh windows
If you don’t know how to perform these tasks, please
refer to your Macintosh User’s Guide and spend a little
time learning about your Macintosh before going any
further. This will make using Deck much easier and
more enjoyable.
Look for important tips and notes whenever
you see this exclamation mark.
Conventions
The Deck User’s Guide uses the following conventions
to indicate menu choices and key commands:
1
• Allocate additional RAM to Deck if possible, using
the Finder’s Get Info command. (Select the Deck
application in the Finder, choose Get Info from
the Finder’s File menu, and enter the desired
RAM allocation in the Preferred Size field. Make
sure you allocate more RAM than the amount
indicated in the Minimum Size field!).
• Optimize your hard drive.
About Your User’s Guide
Deck is designed to be simple and intuitive. Your
User’s Guide is designed to help you set up and use
Deck for digital recording and editing as quickly and
easily as possible.
This User’s Guide assumes that you are familiar with
standard Macintosh operating techniques, including:
• Setting up, starting, and using your Macintosh
• Choosing commands from menus
• Double-clicking, selecting, Shift-selecting, and
dragging with the mouse
• Opening, copying, saving and deleting files
Convention Action
File > Save Choose Save from the
File menu.
Command-S Hold down the Command
key and press the S key.
Option-click Hold down the Option key
and click with the mouse.
About Deck LE
If you are using the limited edition of Deck, not all
features will be available. Specifically, the following
features are not available in Deck LE:
• No more than 8 playback tracks
• Virtual Tracks
• 24-bit Automation
• Automation Envelopes
• Real-time DSP Effects
• Adobe Premiere Plug-In support
• VST Plug-Ins
• QuickTime movie support
Introducing Deck
5
Page 16

• MIDI Time Code and SMPTE/EBU support
Features that are not supported in Deck LE will
show this icon in the manual. LE features will
also appear grayed out in their menus.
Conclusion
Now that you know a little about Deck, proceed to the
next chapter to learn how to install your software and
get started using it.
6
Deck User’s Guide
Page 17
Chapter 2
Installing and Configuring Deck
Page 18

8
Deck User’s Guide
Page 19
Chapter 2: Installing and Configuring Deck
2
double-click the Install Deck icon.
Deck offers powerful high-end synchronization,
editing, mixing, and audio processing functions.
However, before you can begin using Deck, you need
to install and configure your Deck software, and
configure your computer and audio hardware. The
hardware consists of the built-in 16-bit stereo sound
hardware of your Macintosh, or a PCI or PCMCIA audio
card, or a USB or Firewire Audio Interface. You will
also be using some combination of mixer, amplifier,
and speakers to get audio in and out of your
Macintosh.
Installing Deck
Deck’s auto-installer software makes installation very
easy.
Your complete Deck system consists of:
• CD-ROM Installer
• Deck serial number and Product Authorization
Code (PAC)
Before you install Deck, please check the
Minimum System Requirements on Page 4 of
this Users Guide.
3. When the Installer dialog appears, read the Read
Me for late-breaking information concerning the
Installer, then click Continue to proceed.
4. Select where you would like to install Deck, using
the Switch Disk pop-up menu.
5. Click Install at the bottom right of this dialog.
6. After you have clicked Install, follow the on-screen
instructions. Deck will be installed into a folder
named Deck 3.0 on your selected hard disk.
7. At the end of the installation, the installer will
allow you to register Deck electronically, which
you may find more convenient than mailing your
registration card.
8. When the installation is complete, a message will
appear indicating that the installation was
successful. Click Quit to quit the Installer, or click
Continue to install additional copies (don't forget
to turn back on any virus-protection software that
you may be using the next time you restart the
computer).
If you don't register Deck, it will expire, you
will not be eligible for technical support, and
you won't be notified about updates, upgrades
and other important news from BIAS!
To install Deck:
1. If you are using any virus-protection software,
turn it off or temporarily remove it, and restart
your Macintosh.
2. Insert the Deck Install CD-ROM in your CD-ROM
drive, open the Product Installers folder, and
Authorization
Deck must be authorized to work on your Macintosh.
To authorize Deck, you will need your Product
Authorization Code (PAC) in addition to the serial
Installing and Configuring Deck
9
Page 20
number that appears on your Deck Owner’s Certificate. BIAS will provide you with your Product
Authorization Code when you register Deck.
to exactly 1MB above the total system memory;
this is the optimal setting, any higher and you risk
degraded performance and/or unexpected results.
You must register Deck in order to obtain your
Product Authorization Code; Deck will not
launch after the 14 day registration period
unless you authorize Deck with your Name,
Organization, Serial Number, and Product
Authorization Code!
When you first launch Deck, it will prompt you to
authorize it by entering your Name, Organization,
Serial number, and Product Authorization Code.
If you have not yet received you PAC, Deck will run
fully functional in Registration Mode for 14 days. This
allows ample time to register Deck and get the
Product Authorization Code from BIAS. To run Deck
in Registration Mode, click the “Still waiting for
Product Authorization Code” button. If you have
registered Deck with BIAS, and have received your
PAC, enter your Name, Organization, Serial #, and
Product Authorization Code, and click the “Authorize”
button or press the Return key. Your copy of Deck 3.0
will now be authorized.
Allocating RAM to Deck
Now you will need to allocate RAM for Deck. In most
instances, you will need to allocate more RAM than the
factory default setting.
3. From the Finder, determine how much free RAM
is available for Deck by selecting About This
Macintosh from the Apple menu.
4. The Largest Unused Block will show how much
RAM is free. Here you can also see how much
RAM is being used by your system software.
5. Select the Deck application icon in the Deck
folder on your desktop.
6. Choose File > Get Info (Command-I).
7. Set the Preferred Size to the amount you want
while leaving enough RAM for your system (and
any other applications you might want to run
simultaneously, e.g., BIAS Peak) to function.
For example, if you have 128MB of RAM and your
System is taking up 24MB, you can safely allocate
92MB of RAM to Deck. You should always leave a
minimum of 5MB for the largest unused block in your
system.
You may have to experiment a bit with the amount of
RAM you assign to Deck. Many factors can affect the
amount of RAM you will need, such as the amount of
free RAM in your system, the size and complexity of
your Deck session, and the RAM required to use plugin effects or an external audio editor such as BIAS
Peak.
Deck is not compatible with Connectix RAM
Doubler.
To change Deck’s RAM allocation:
1. Quit any applications that you have running.
2. Deck now supports virtual memory , so you
should leave virtual memory on unless it conflicts
with the ASIO driver or any of the VST plug-ins
that you are using with Deck. Set virtual memory
10
Making Audio Connections
Deck supports most Apple Sound Manager or ASIO
compatible audio hardware, as well as the Macintosh
Built-in sound. Deck also directly supports the Korg
1212 I/O audio card (via SoundLink) and the Tascam
US-428 USB audio interface (via ASIO). Follow the
manufacturers installation instructions for your
specific audio card/interface.
Deck User’s Guide
Page 21
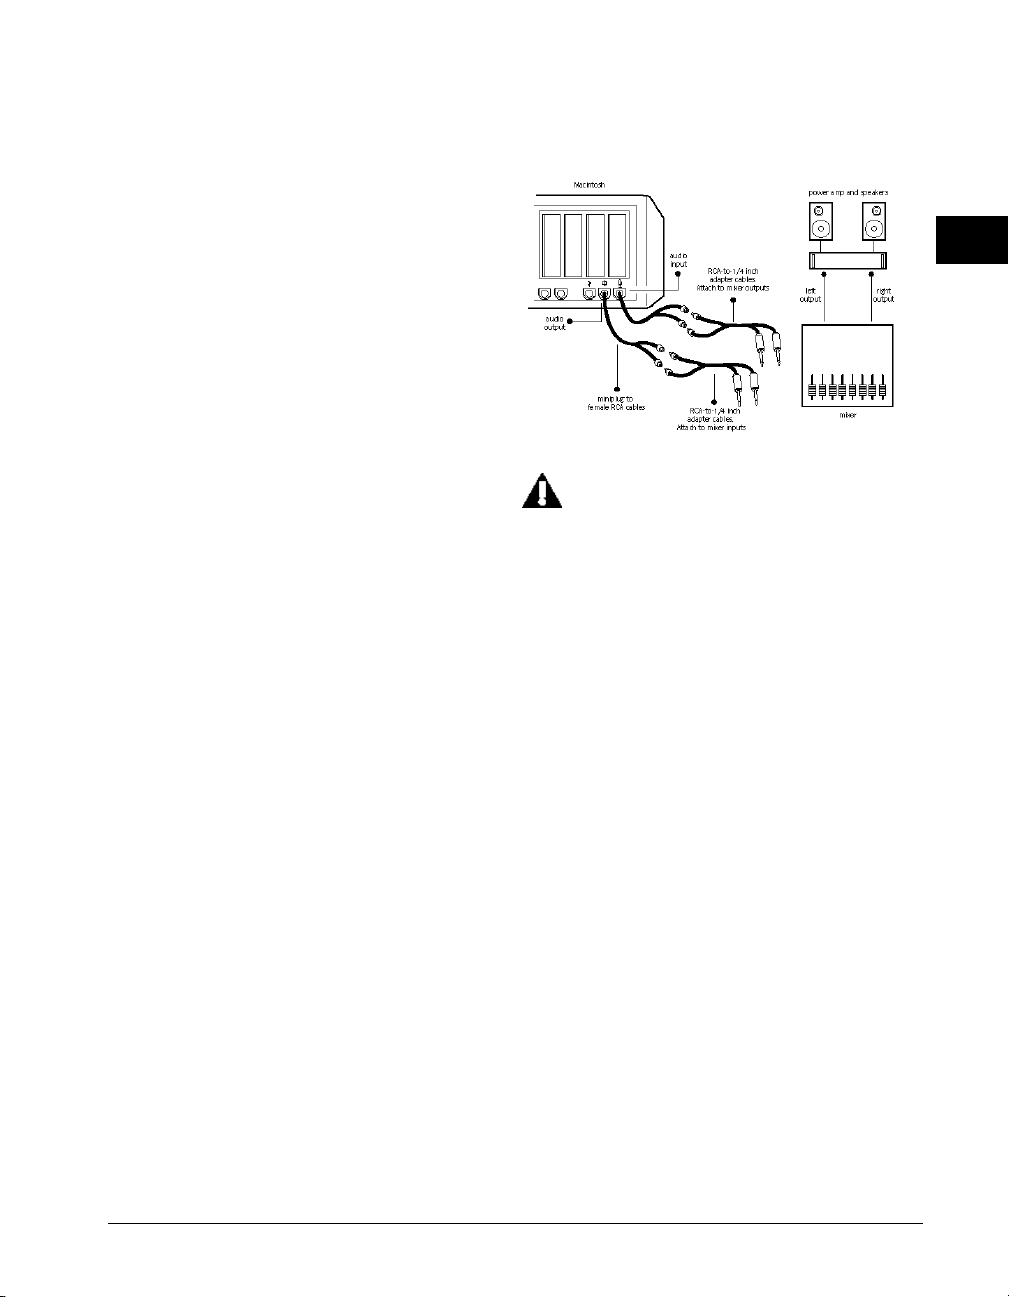
It is easy to set up audio connections between your
Macintosh and a mixer or speaker system. Your exact
setup will differ slightly depending on whether you are
using the built-in sound input and output connectors
on your Macintosh, or those of third-party audio
hardware. Instructions for each case are given below.
Using the Macintosh’s Built-in Inputs and
Outputs
If you wish to use your Macintosh’s built-in audio
inputs and outputs for recording and playback, do the
following:
1. Turn down the volume on your playback system.
cable or adapter.
2
Deck can be used with a variety of playback
systems, including:
• a stereo receiver or amplifier and speakers
• a mixer, amplifier, and a pair of speakers
• a mixer and a pair of amplified (self-powered)
speakers
• or simply a pair of amplified (self-powered)
speakers, smaller versions of which are often
called “multimedia” speakers.
2. Connect your audio source output to the
Macintosh's audio input connector.
Your audio source can be one of a variety of
devices, such as:
• a cassette, CD, DAT, or mini-disc output
• a mixer output, bus send, or aux send
• a stereo receiver line output (such as “tape deck
record” output)
• an instrument line output (such as the output of a
synthesizer).
The audio input jacks on most Macs are a standard
mini-plug (1/8-inch) connector. Most source outputs
are either 1/4 inch “phone” connectors or RCA
connectors. To make this connection, you may need
to use an 1/4-inch to mini-plug or RCA to mini-plug
For advanced users: Certain professional
mixing consoles, DAT decks, or other audio
sources may have a nominal output level of
+4dBu, whereas the Macintosh expects to see a
nominal -10dBu level. Be aware that you may
need to adjust your mixers output levels
accordingly to prevent overloading the
Macintosh’s input; or alternately, you may
need to use a “+4 to -10” line-matching
transformer.
3. Connect your Macintosh’s audio output to your
playback system’s input. The Macintosh’s audio
output jack is a standard stereo mini-plug (1/8inch) connector. Most mixer, receiver, and
amplified speaker inputs are equipped with 1/4inch, RCA, or mini-plug jacks. To make this
connection, you may need to use a mini-plug to 1/
4-inch or mini-plug to RCA cable or adapter.
4. Raise the volume on your mixer or playback
system. Your system should now be properly
configured and ready for recording and playback.
PCI and PCMCIA Audio Cards, and USB and Firewire Audio Interfaces
If you have a Sound Manager-compatible or ASIO
compatible audio card, or USB or Firewire audio
interface, installed in your computer and wish to use
Installing and Configuring Deck
11
Page 22
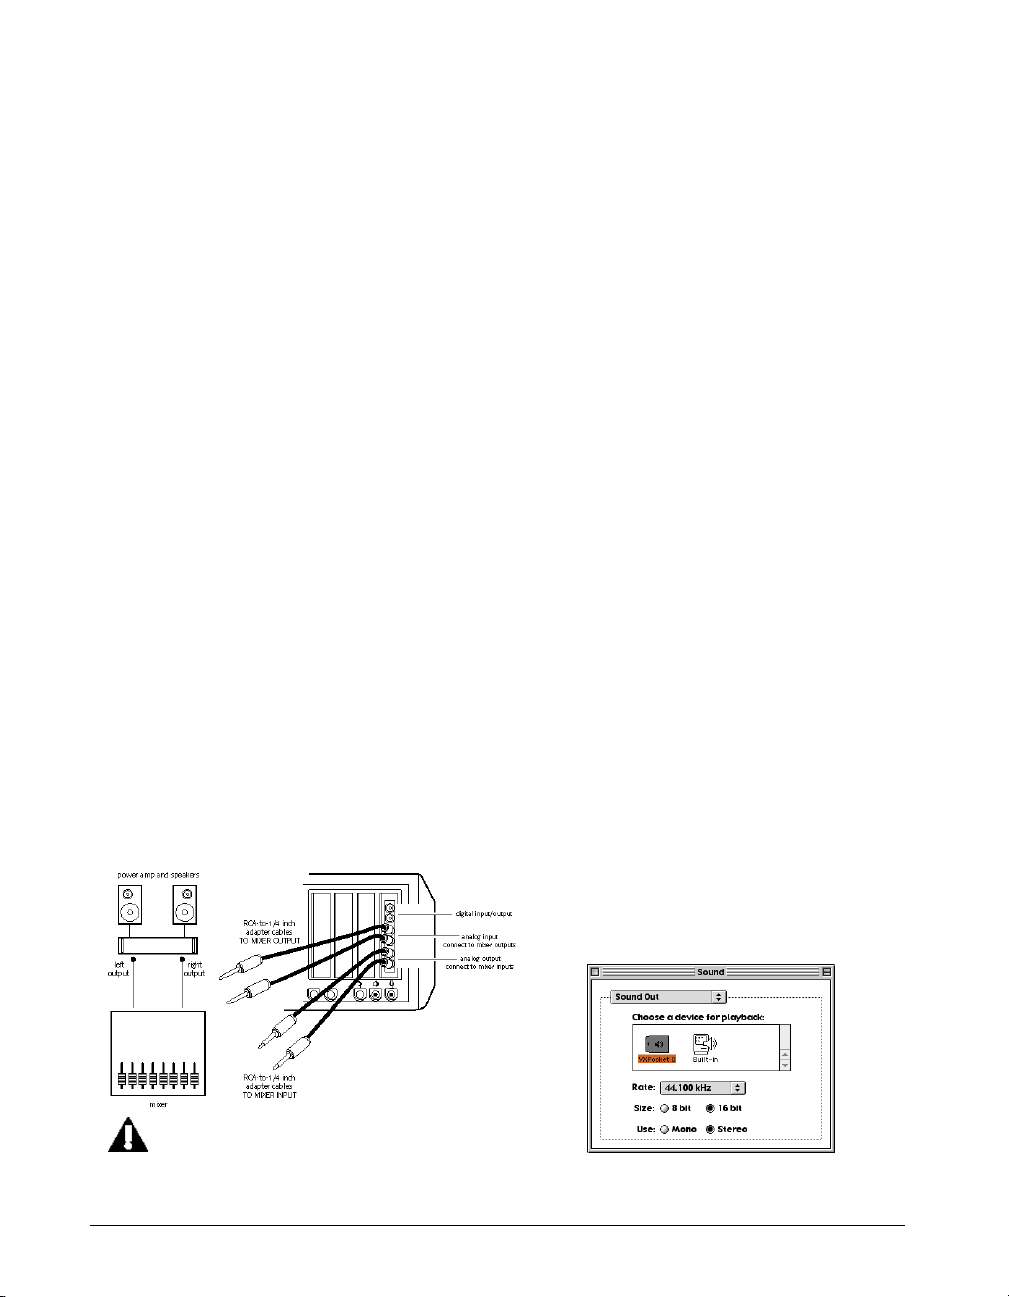
its input and output capabilities instead of your
Macintosh’s built-in capabilities, do the following:
1. Turn down the volume on your mixer or playback
system.
2. Make sure that you have installed the audio card
into one of the available PCI expansion slots
inside your Macintosh or a PCMCIA card slot in
your PowerBook, or connect your USB or Firewire
audio interface to an available USB or Firewire
port on your Macintosh. If you are not sure how
to do this, please refer to the manufacturer’s
instructions that came with your audio card or
interface.
3. Install the Sound Manager and/or ASIO drivers for
your audio card or interface. Please refer to the
manufacturer’s installation instructions for your
audio card on how to do this.
To use the audio card’s or interface’s ASIO driver
with Deck, place the ASIO driver inside Deck’s
ASIO Drivers folder in the Deck folder.
4. Connect your mixer’s output to the audio
hardware’s input connectors.
5. Connect your audio hardware’s outputs to your
mixer’s (or playback system) input.
6. Raise the volume on your mixer or playback
system. Your system should now be properly
configured and ready for recording and playback.
inputs on your mixer and to have the auxiliary
or bus sends from the mixer go to the inputs of
the computer. Instruments you want to record
you patch into other channel inputs on the
mixer and you can then route them to the
auxiliary or bus sends on the mixer to be
recorded by the computer. The mixer’s main
outputs go to the amplifier/speakers.
Using the Inputs and Outputs of an Audio Card or Audio Interface
Deck supports most Sound Manager compatible and
ASIO compatible audio cards and interfaces. In order
to effectively use these cards with Deck, you will need
to make sure you have installed the sound manager
drivers supplied by the manufacturer (most audio
hardware manufacturers include their own drivers). If
you haven’t already installed your sound hardware’s
sound manager drivers, please do so now. In most
cases, you will need to place the hardware’s sound
manager driver extension in your System Folder’s
Extensions folder. After you have done this, restart
your computer.
If your audio hardware also has an ASIO 1.0 driver or a
backwards compatible ASIO 2.0 driver you will want to
put it into Deck’s ASIO Drivers folder.
To use a third-party audio hardware’s outputs for
previewing Premiere-format plug-ins:
1. Choose Sound Out from the Sound Control Panel
pop-up menu.
12
A typical mixer/computer configuration is to
have the computer outputs go to channel
Deck User’s Guide
2. Select audio card (Digigram’s VX Pocket is shown
in this example) as the sound output device.
The Apple Sound Control Panel
Page 23
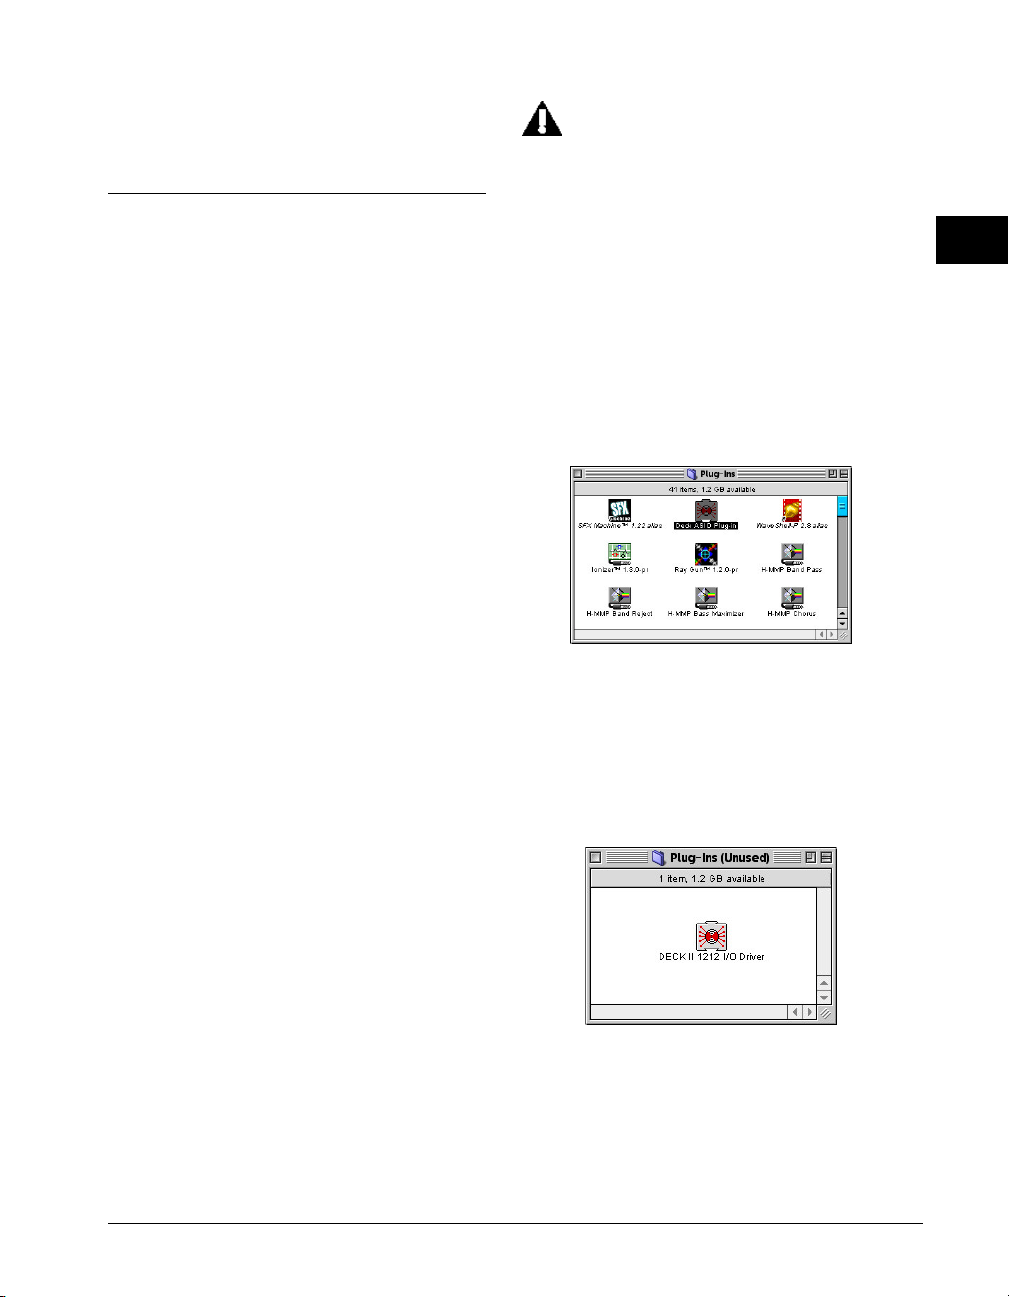
3. Close the Sound Control Panel when you have
finished.
ASIO
Deck 3.0 supports ASIO 1.x audio drivers for recording
and playback of audio through your ASIO-supported
audio hardware. ASIO is a standard technology for
routing audio between sound cards and software
application developed by Steinberg Software und
Hardware, GmBH. ASIO, unlike the Apple Sound
Manager, allows for more than 2 channels of simultaneous audio. Most audio hardware currently available
have ASIO drivers. BIAS has tested the following cards
for ASIO compatibility with Deck 3.0:
• Apple Sound Manager
• Digidesign Direct IO
• Digigram VX Pocket
• Echo Gina, Layla, and Darla
• Ensoniq PARIS
• Gadget Labs WAVE/8-24
• Korg 1212 I/O
• Lucid PCI-24
The MOTU PCI-324 needs to be configured
using the MOTU PCI-324 Console and the PCI324 Cuemix Console prior to launching Deck.
The Yamaha DSP Factory requires that you be
running MixTest prior to launching Deck and
selecting the DS2416 ASIO driver. Other cards
may similarly require software utilities
provided by the manufacturer of the card
(such as the M-Audio Delta series).
Configuring Deck for ASIO
In order for Deck to use the ASIO driver for your
audio hardware, you must make sure that the Deck
ASIO Plug-in is located in the Deck Plug-Ins folder.
Deck 3.0 also supports the Korg 1212 SoundLink
system. To use SoundLink with Deck, be sure that the
DECK II 1212 I/O Driver is in the Deck Plug-Ins folder.
If you are planning on running Deck with ASIO you
must move the DECK II 1212 I/O Driver to the PlugIns (Unused) folder.
2
• M-Audio Delta Series
• Midiman DMAN 2044
• MOTU PCI-324
• RME Digi96
• SeaSound
• Sonorous STUDI/O
• Tascam US-428
• Yamaha DSP Factory
Installing the ASIO Driver
To install an ASIO driver for use with Deck, drag and
drop the ASIO driver for your ASIO-supported audio
card into the ASIO Drivers folder in Deck’s root folder.
Installing and Configuring Deck
13
Page 24
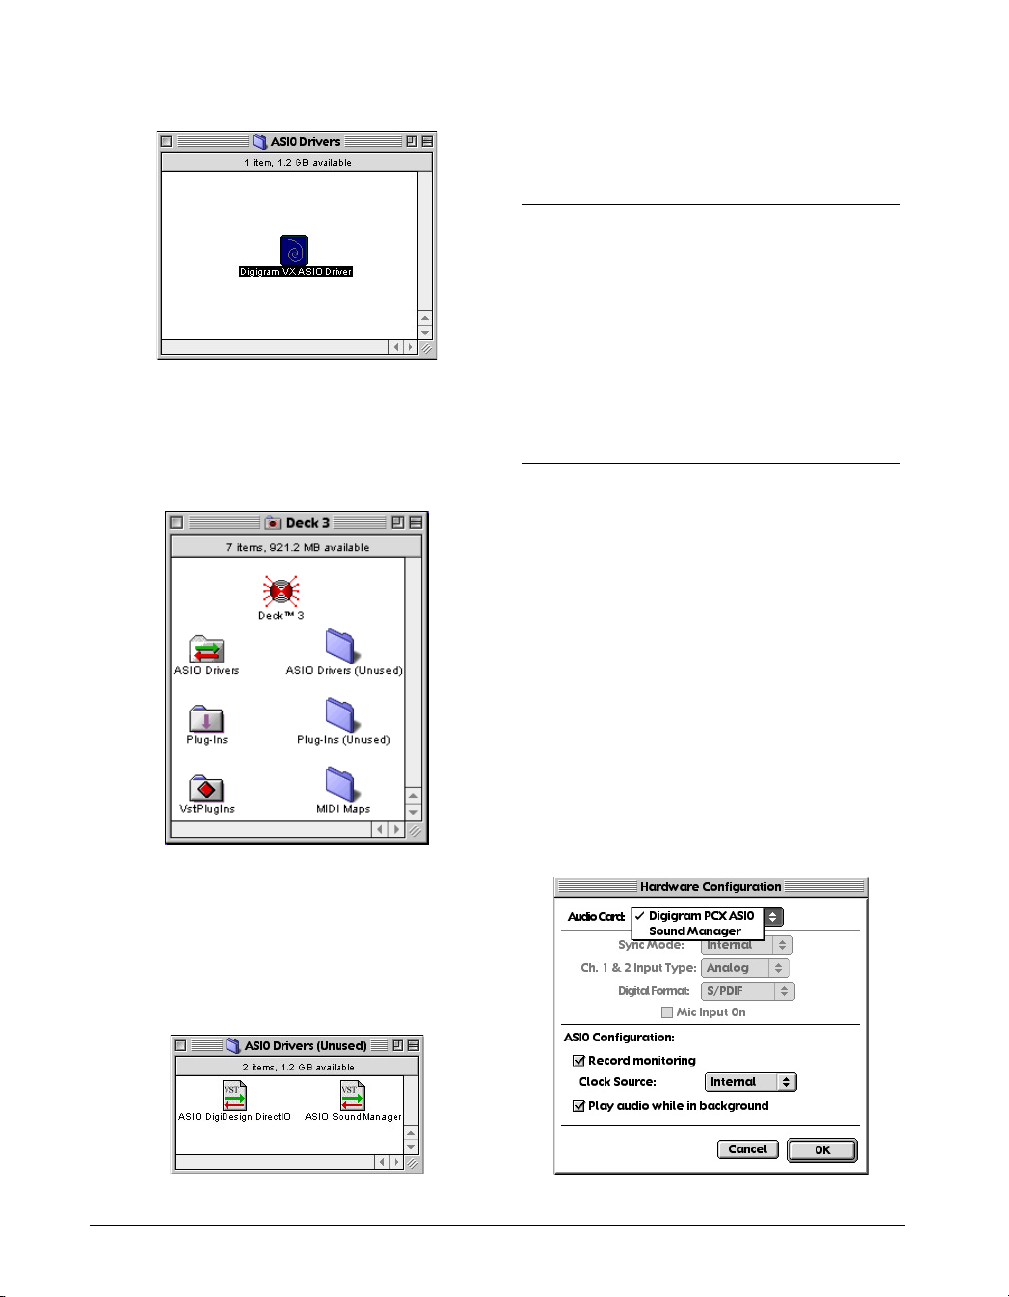
Please note that the Deck application must reside in
the same folder (i.e., the Deck folder) as the ASIO
Drivers folder in order for Deck to be able to
recognize the ASIO driver.
Once you have installed the ASIO driver for your audio
card, launch the Deck application. Deck will load and
register the ASIO driver on launch.
Korg SoundLink
Deck 3.0 supports the Korg 1212 I/O card via
SoundLink™. To use SoundLink with Deck and the
Korg 1212 card, be sure that the Deck Korg 1212 I/O
Driver is located in the Deck Plug-Ins folder and that
the Deck ASIO driver is moved to the Plug-Ins
(unused) folder.
Hardware Configuration
Once Deck is open, you will need to select and
configure your audio interface via the Hardware
Configuration dialog whether you are using the Apple
Sound Manager, ASIO, or Korg SoundLink.
Choose Hardware Configuration from the Options
menu in Deck to open the Hardware Configuration
dialog.
Please note that Deck can only have one ASIO driver in
Deck’s ASIO Drivers folder. You can put multiple ASIO
drivers in the folder called ASIO Drivers (Unused), but
you will need to manually drag them in and out of
Deck’s ASIO driver folder if you wish switch ASIO
drivers.
14
Deck User’s Guide
Audio Card
Choose either Sound Manager or your audio card’s
ASIO driver from the Audio Card pop-up menu.
Page 25
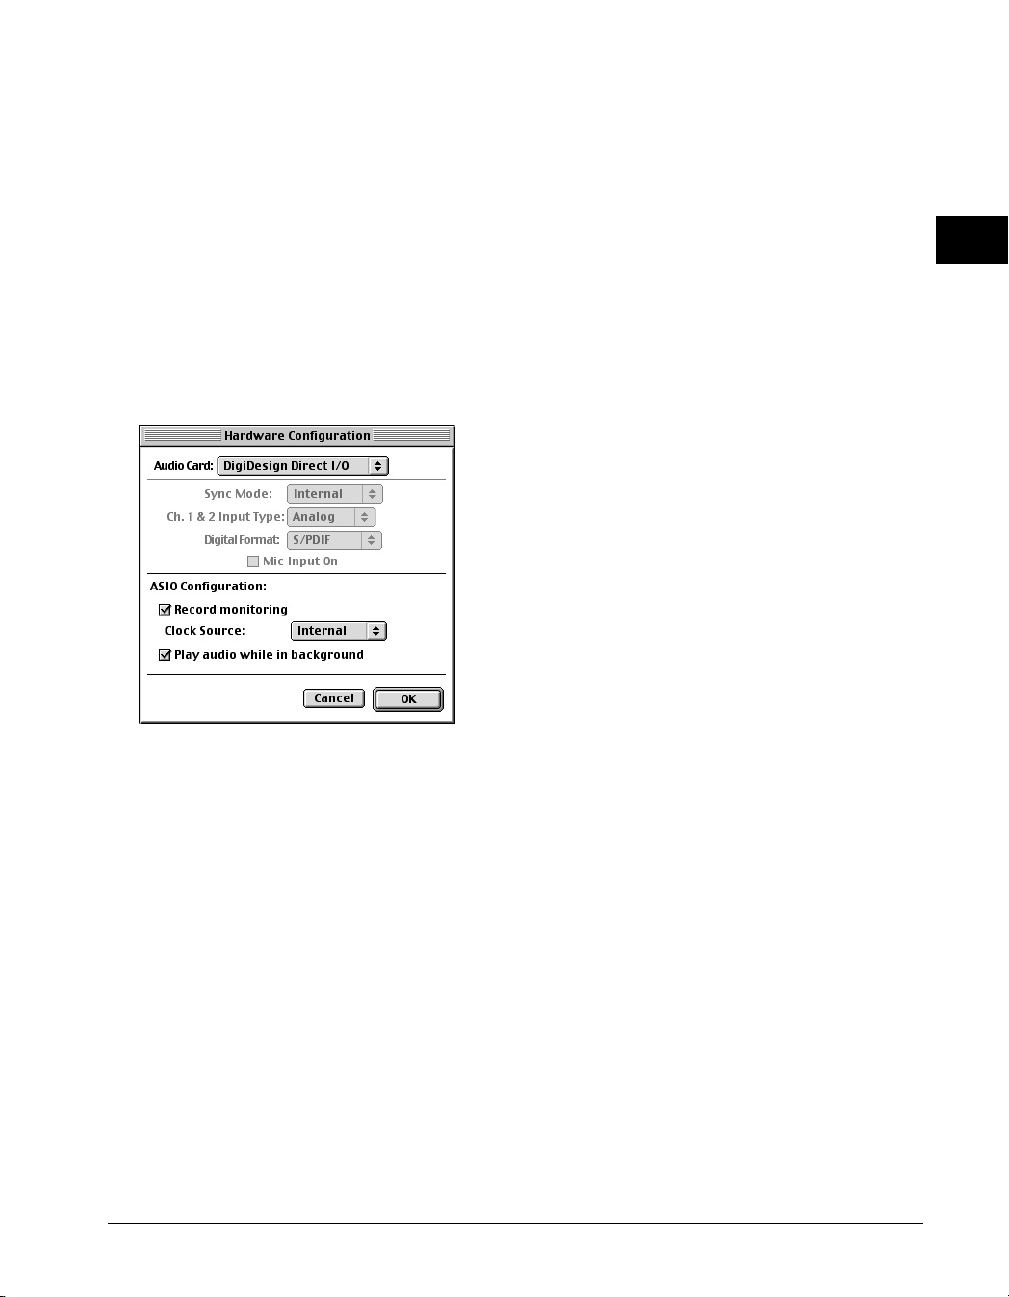
Choosing the Sound Manager will allow Deck to use
for audio input and output whatever is selected for
Sound In and Sound Out in you Apple Sound Control
Panel.
If you are using SoundLink with the Korg 1212 card,
choose SoundLink from the Audio Card pop-up menu.
Choose your audio card’s ASIO Driver from the Audio
Card pop-up menu to allow Deck to access the full
multichannel I/O capabilities of your audio card via
ASIO.
If you are using Deck with your audio card’s ASIO
driver, be sure to use the checkboxes to enable or
disable Record monitoring and Play audio while in
background.
Clock Source
It is important to note when recording digital audio
signals (e.g. SPDIF, ADAT optical, etc.) that the Clock
Source be set to the appropriate digital clock source.
Recording a digital signal with the clock source set to
an incorrect source will lead to “jitter” error, resulting
in clicks and pops in the recorded audio stream.
Play audio while in background
The Play audio while in background check box enables
the ASIO driver to operate in the background while
Deck is in the background. If you are running more
than one audio application using the same ASIO driver
(e.g., BIAS Peak), you will want to disable Play audio
while in background.
Record monitoring
If you want to monitor audio input in the digital
domain while you are recording, be sure to enable
Record monitoring in the Hardware Configuration
dialog.
To monitor recording in the digital domain:
1. Enable Record monitoring in the Hardware
Configuration dialog.
2. Choose the channel inputs for the tracks in Deck
you intend to record on.
3. Record enable those tracks.
4. Start recording.
It is strongly recommended that you monitor your
recording in the analog domain when recording live or
overdubbing. Use your analog mixer to monitor the
analog audio signal while recording in Deck. When
you record monitor in Deck, there will be a latency
equal to twice the size of the ASIO buffer (e.g. at
44,100 with a 2,048 byte buffer size there will be
almost 93ms of latency from when you recorded the
signal into Deck to when you hear it come back out of
the speakers). Monitoring the recording in the analog
domain avoids this problem.
To monitor recording in the analog domain:
1. Disable Record monitoring in the Hardware
Configuration dialog.
2. Be sure that the analog signal(s) you intend to
record are correctly routed to the inputs of your
audio interface for recording into Deck as well as
to be monitored through your speakers.
3. Choose the channel inputs for the tracks in Deck
you intend to record on.
4. Record enable those tracks.
5. Start recording.
2
Installing and Configuring Deck
15
Page 26
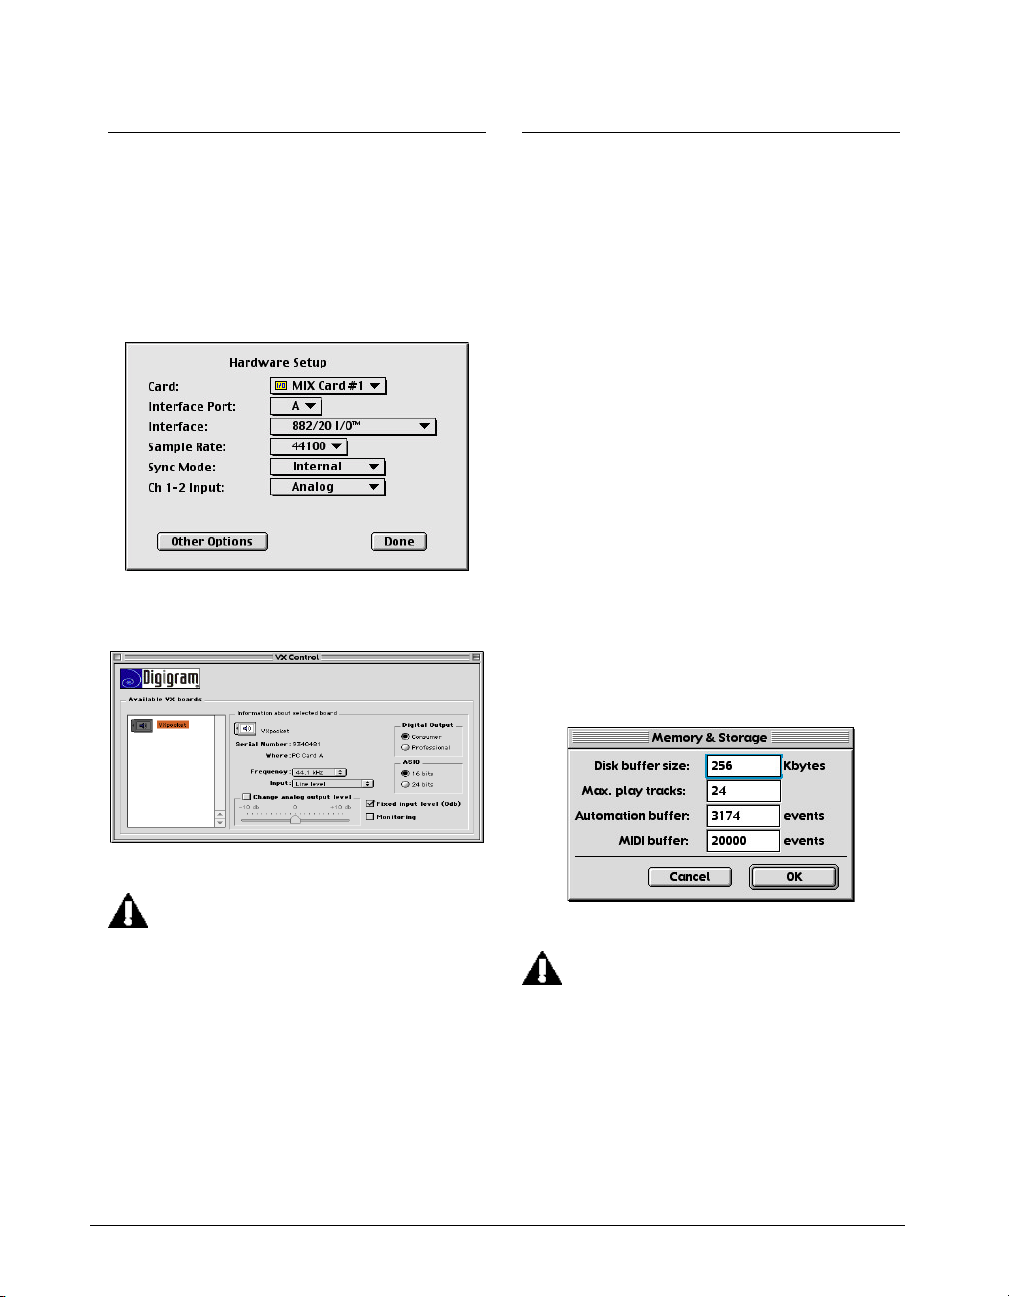
Hardware Options
Choose Hardware Options from the Options menu in
Deck to open the ASIO driver’s utility for certain ASIO
supported cards (the Digidesign Hardware Setup
dialog and the Digigram VX Pocket Control Panel are
shown below).
Configuring Deck and Setting Maximum Playback Tracks
You need to make sure Deck is set to the correct
hardware. This usually occurs automatically. You may
also need to set the number of playback tracks,
especially if you are upgrading from an earlier version
of Deck or upgrading your computer platform.
To configure Deck and set the playback track count:
1. Within Deck, choose Options > Hardware
Configuration.
2. Select your audio hardware from the Audio Card
option and click OK.
3. Choose File > Preferences > Memory & Storage.
Digidesign Hardware Setup dialog
Digigram VX Pocket Control Panel
Please note that some cards’ drivers will either
not have driver setup utilities or they will have
driver setup utilities that need to be configured
prior to launching Deck (such as the MOTU
PCI-324 or the M-Audio Delta series) and
cannot be accessed from within Deck.
4. Set Max. Play Tracks as desired. (In most cases,
the value will default to the nominal track count
for your system.) The actual maximum playback
tracks will vary depending on your system and
hardware.
Memory & Storage preferences dialog
You can always set the maximum play tracks
to a number below the actual maximum
available. This is advised if you experience
“Disk is too slow” messages, or if you experience poor interface response.
Optimum track count on any machine depends on
many factors, such as the speed of your drive, the
speed of your CPU, and the model of Macintosh you
run Deck on.
16
Deck User’s Guide
Page 27

Using dedicated audio drives
Using your system drive to record and play back will
decrease your system performance, due to system
software design. Use a non-system SCSI hard drive for
recording and playback to achieve optimal performance. Using dedicated audio drives running at 7,200
rpm or faster will further improve Deck’s track count
and performance. UW-SCSI is the current standard for
high performance drives, but UDMA-66 drives can
achieve nearly the same performance. Firewire hard
drives provide another exciting new standard with data
transfers up to 30gb/second! (1 16-bit 44,100 audio
channel = 88kb/second.) Remember, the faster the
hard drive the better.
Conclusion
Now that you have installed and configured Deck,
proceed to the next chapter to learn several basic
concepts and functions essential to using Deck.
2
Installing and Configuring Deck
17
Page 28

18
Deck User’s Guide
Page 29
Chapter 3
Getting Started
Page 30

20
Deck User’s Guide
Page 31

Chapter 3: Getting Started
Deck generally looks and acts just like a portable mixer
and recorder. It enables you to record tracks, monitor
them while recording other tracks, adjust the level and
EQ of what you’ve recorded, and effects, and mix
down your recording to a master. Deck also offers
many features you would not find on a portable analog
recorder, including advanced visual waveform editing,
noiseless track bounce, multi-point auto-location,
moving-fader mixer automation, non-destructive realtime and destructive effects, and CD-quality 16-bit
sound. This chapter covers creating and saving
sessions, importing audio files, recording, and the
basic functions of your Deck system.
Deck sessions
Recording and Mixing Basics” and the Appendix, “FineTuning & Troubleshooting Your System.”
3
Creating, opening, closing, and saving sessions
To create a new session:
1. Choose File > New (Command-N).
2. Name your session and select its location.
3. Choose a sample rate and click OK.
Generally you will use the 44100 Hz sample rate (the
CD standard rate). For more information about sample
rates, see “Basic sampling concepts” on page 190.
To open an existing session:
1. Choose File > Open (Command-O).
2. Locate and select the desired session file.
A Deck session file is a Macintosh document that
contains a map of a specific recording project. It does
not contain audio files, but instead it contains pointers
to audio files on your hard drive.
When you create a new session, a session file
document and an Audio Files folder are created and
placed in their own folder by Deck, which is named
after the session. If you later create crossfades in the
session, a Crossfades folder is automatically created.
The Audio Files folder contains any audio files you
record into the session and any that are physically
copied during import (either by your choice or if they
need to be converted).
It is a good idea to keep all of the data associated with
each session—the session file, Audio File folder, and
Crossfades folder—in that one session folder,
especially at first. For more information about the
structure of Deck sessions, see Chapter 10, “Digital
3. Click Open.
The Open command cannot be used to open sound
files. Instead, they must be added to a session.
To save a session:
• Choose File > Save (Command-S).
If you wish to save the current session under a new
name, choose File > Save A Copy As.
To close a session:
• Choose File > Close Session (Option-CommandW).
Getting Started
21
Page 32

2. Find and select the desired audio file from the list
of files on the left.
Adding Audio Files and Regions to a Session
The simplest and most common task you will need to
perform involves placing existing audio files and
organizing them for playback. You can select files in
any supported sound file format from your hard drive,
add them to the Clipboard, and then place them in any
order in the Tracks window. If your Macintosh has a
CD-ROM drive, you can also add audio files or
QuickTime movies from any CD-ROM disk, or audio
files from a regular audio CD. The Library window
automatically keeps track of all source material added
to the session in this manner.
Deck uses monophonic sound files in the Sound
Designer II format. If you add any other type of sound
file, Deck will automatically copy the sound file and
convert the copy to the correct format. Deck imports
Sound Designer I, Sound Designer II, AIFF, Apple
Resource (SND), QuickTime, and WAV audio files.
Audio files may also need to be converted by Deck if
they are not at a supported sampling rate.
Although Deck makes extensive use of the Clipboard
to add audio files to a session, it does not put the
actual audio data on the Clipboard, it merely uses the
Clipboard to keep track of the files you are adding or
editing. Therefore you do not need large amounts of
RAM to add large audio files to a session.
To add sound files and regions to a session:
1. Choose File > Add Audio to Clipboard (Command-D).
• To add tracks from an audio CD, use the Add
Audio CD Tracks to Clipboard command.
• To add a SND resource, use the Add SND to
Clipboard command.
• To add the audio from a QuickTime movie,
choose QuickTime > Import Movie.
Information about the selected file appears in the
comments area in the lower left corner of the
dialog box, and a list of the regions within that
sound file appear in list in the upper right corner.
The top region represents the entire file.
3. Select the desired region in the sound file from
the list on the right.
An audio region marked with •F• represents the
entire sound file. Regions marked with •R• are
simple audio regions, and those marked with •L•
are loops (AIFF files only). Stereo files are split
and have the suffix .L (left) and .R (right).
• Click Play to audition the selected file, region, or
loop. You can hear the audio looped by turning
on the Loop Audition option.
• Turn on the Make a Copy option to copy all
imported files into the Audio Files folder for the
session. (Note that Deck automatically copies files
added from read-only media to the Audio Files
folder.)
4. Click Add Region to add the selected region to
the current track.
5. The current track is displayed in the lower right
corner of the dialog box. To remove regions from
the current track, select them and click Remove.
6. Follow steps 2 through 5 until you have added all
of the files and regions you desire, then click
Done.
If necessary, Deck converts the selected files and
regions to match the sample rate and bit depth of the
current session.
Do one of the following:
• To place the selected audio at a specific point in
time, click in the waveform area of the Tracks
window at the desired time and choose Edit >
Paste At. The current time location of the cursor’s
position is displayed at the top of the Tracks
22
Deck User’s Guide
Page 33
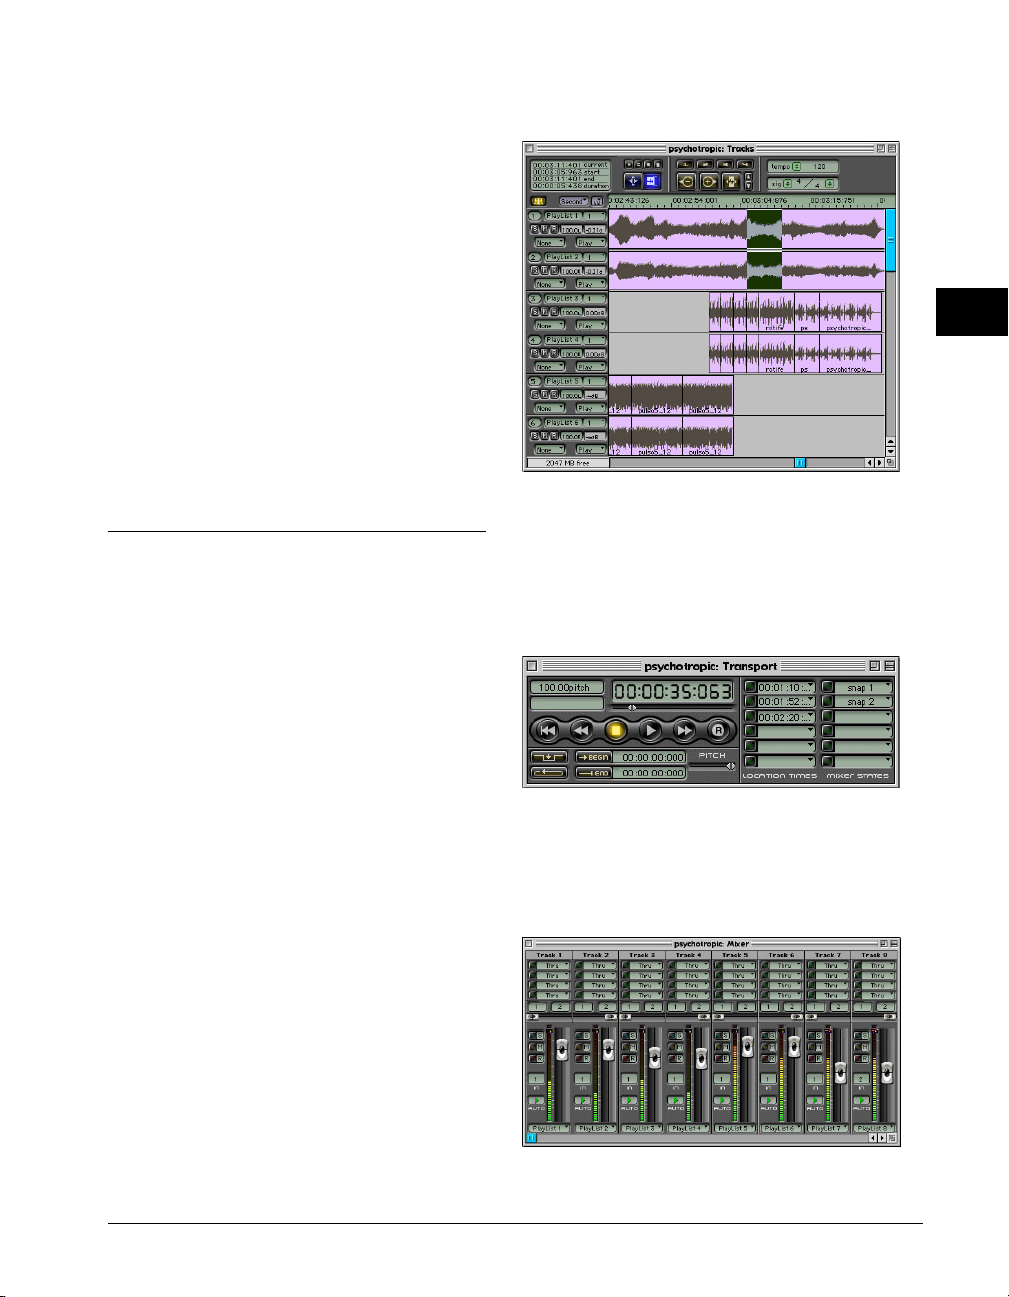
window. If you are adding stereo or multichannel
files and regions, select two or more tracks. This
assures all the pasted audio will have its channels
in phase. For more information about the Tracks
window, see “The Tracks, Transport, and Mixer
windows” on page 18.
• To place the selected audio on new tracks, choose
Edit > Deselect, then choose Edit > Paste At.
The new track (or tracks if the selected audio is
multichannel) is placed at the top of the Tracks
window and any existing audio is moved to lower
tracks.
• To place the selected audio at different points in
time on various tracks, drag them from the Library
window to the Tracks window.
The Tracks, Transport, Mixer, Master Outputs, and CPU Meter windows
To perform the basic functions in Deck you will be
frequently using Tracks, Transport, Mixer, Master
Outputs, and CPU Meter windows.
3
Tracks window
The Transport window
The Transport window acts a lot like the transport on
any tape recorder, only it has more features and
functions.
The Tracks window
The Tracks window is where you view, arrange, and
edit audio files along a timeline. Although only the
allotted number of play tracks can play, you can always
bounce those tracks down to one or two tracks, or use
work tracks and virtual mixing to create mixes that are
hundreds of tracks deep. For more information about
bouncing tracks and virtual mixing, see Chapter 8,
“Automation, Mixing, and Mastering.”
Transport window
The Mixer window
Use the Mixer window for control of audio recording
and playback.
Mixer window
Getting Started
23
Page 34
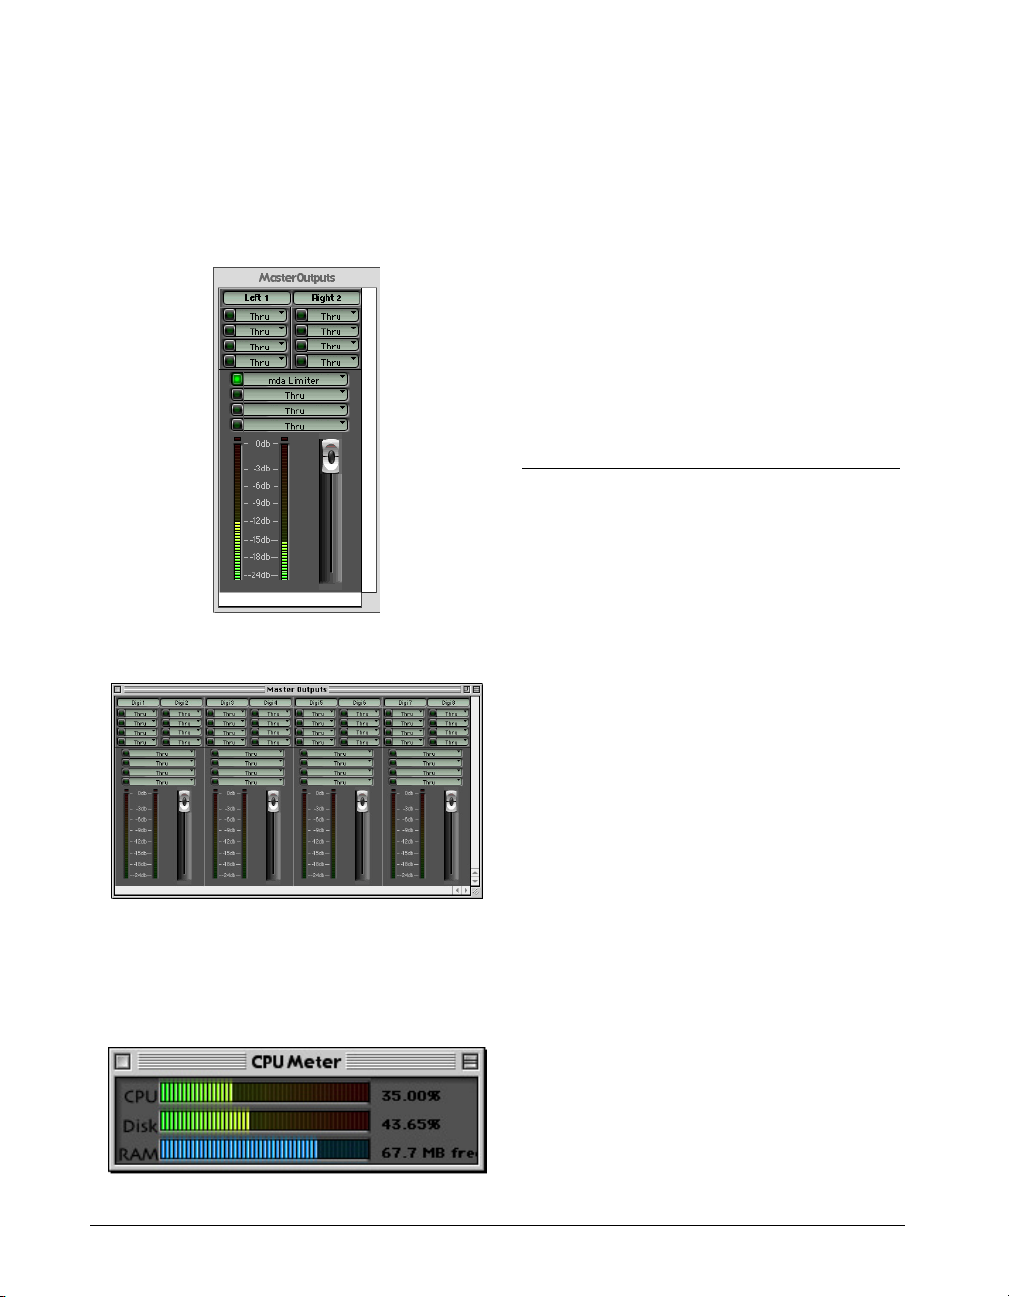
The Master Outputs window
Use the Master Outputs window to monitor and
attenuate the levels of stereo pairs of outputs. You can
also assign VST Plug-Ins to mono and stereo output
channels.
Master Outputs window with stereo audio interface
You can change the default position of all Deck
windows using the File > Preferences > Save Settings
as Template command. Every time you begin a new
session, the windows will appear in these default
positions.
The Transport and Mixer windows can be operated
while in the background. That means you can have the
Transport controls or Mixer faders partially covered by
other Deck windows, yet still access their key
functions in real-time without bringing them to the
foreground. For detailed information about these and
the other Deck windows, see Chapter 9, “Deck
Reference.”
Recording into the Tracks window
The Tracks window allows you to record directly into
any of its playback tracks. By monitoring the signal
with the Mixer window VU meters you can adjust the
signal to avoid it being too quiet (resulting in a noisy
recording due to poor signal-to-noise ratio) or too
loud (resulting in digital distortion due to clipping).
Master Outputs window with multichannel audio interface
The CPU Meter window
Use the CPU Meter window to monitor Deck’s usage
of the CPU, disk, and RAM.
CPU Meter window
24
Deck User’s Guide
If you intend to integrate MIDI into a Deck session, it
is a good idea to plan for this from the very beginning.
If you have an existing MIDI sequence and you wish to
record audio over that sequence, make sure to load
the MIDI file into Deck’s MIDI window before
recording any audio. If you wish to record audio first
and then lay in MIDI tracks, you may wish to record
the audio tracks in time to a MIDI metronome, which
can be supplied in real-time from OMS-compatible
MIDI sequencing software running in the background;
you can also accomplish this by recording a simple
MIDI click file and importing it into your session.
Doing this assures that your audio tracks will be
recorded with a consistent, predictable time base, and
your subsequent MIDI tracks will be easy to assemble
and synchronize with your digital audio tracks. For
more information about the integration of MIDI and
audio in Deck, see Chapter 7, “MIDI and Synchronization.”
Page 35

To record into the Tracks window:
1. Make sure you have a Deck session open and that
a sound source is hooked up to the audio inputs.
2. To hear what you are recording, you should also
hook up the audio outputs to an amplifier with
speakers or a headphone amplifier. For more
information, see “Making Audio Connections” on
page 10.
3. Select the desired audio input from the pop-up
menu to the right of the track name.
4. Click the R button to record-enable the desired
track.
5. Choose Windows > Mixer. The Track VUs will
now be input level VUs and register any input
signal.
6. Begin playing from your source and monitor the
incoming signal to keep the VU meter as close to
the top without turning on the clip light (the
small square at the top of the VU meter). The clip
light indicates that audio recorded at this level will
be distorted. Turn off the clip light by clicking it,
and adjust the incoming audio and/or the input
level as follows:
• If you are using the built-in 16 bit audio hardware
of your Power Macintosh, set the Analog Input
Level (from the Options menu) to 0 and turn up
the level of your incoming audio (instrument or
mixer) at the source until it registers correctly in
the input VU meters. An Analog Input Level
setting of 0 does not turn off the input; it turns off
the low-quality on-board preamp that causes
recording anomalies.
• If you have any other audio hardware, you may
need to adjust the volume of the incoming signal
at the source to get a good level.
to pan one track hard left and the other hard right
to match the stereo image of your source audio.
8. Adjust the monitor level of the track you’re
recording by sliding its track fader up or down in
the Mixer window.
When you have a track record-enabled, the track
volume fader adjusts the volume level for
monitoring the track. It does not change the
record level. When the track is not recordenabled, the track volume fader adjusts the
output level of any audio that is already on the
track. This volume can be set to a different level
than the input monitor volume, which is useful
during punch-in recording. You should use the
track faders to adjust playback volume to your
liking, but always make sure that the analog input
level or output level of your source is set so that
the channel VU meter registers a high signal level,
with no clipping.
Due to limitations in Apple’s Sound Manager, you
cannot change the monitor volume or pan of any
track while it is being recorded with a Power
Macintosh. Moreover, tracks being recorded will
always play back through the system at full
volume while you record, and will monitor
through the channel you’ve set as their input
channel. (In other words, you cannot record into
input 1 and monitor through output 2.) It may be
useful to use an external mixer hooked up to your
Macintosh computer’s audio output jacks to
better control playback volume and panning.
9. When you are ready to record on the enabled
track(s), click the Transport’s Record button, and
then click the Play button (Spacebar).
As soon as you click the Play button, Deck begins
recording.
3
7. Multiple tracks can be recorded at once, but two
record tracks cannot be set to the same input. If
you wish to record in stereo, simply record-enable
two tracks, assigning one to input 1 and the other
to input 2. For true stereo separation, remember
10.When you are finished recording, click the
Transport’s Stop button (Spacebar).
If the recording ends before you stop it, you have run
out of disk space.
Getting Started
25
Page 36
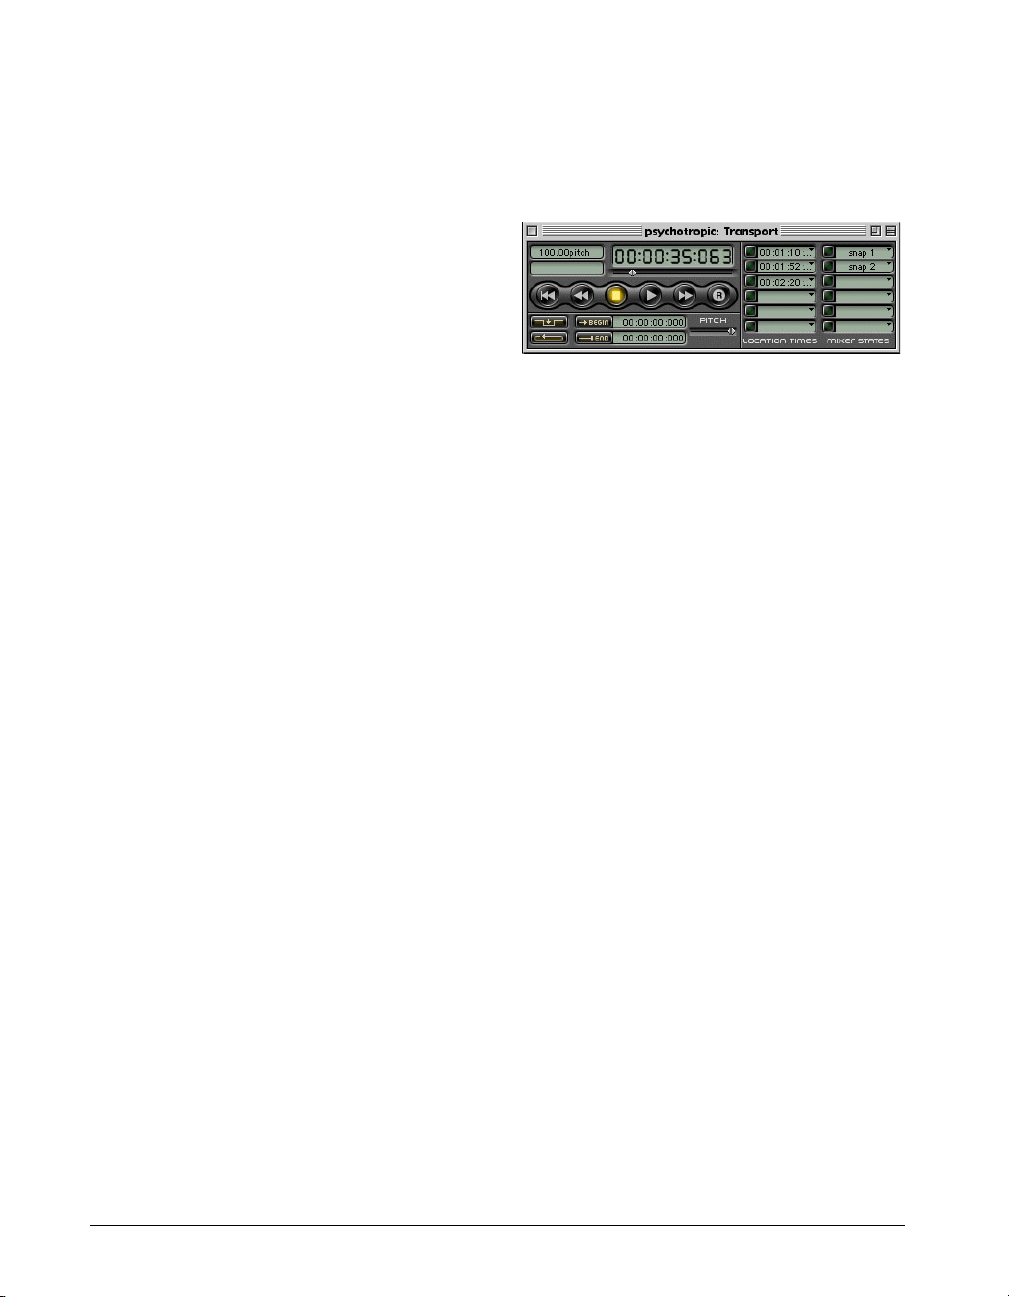
To hear the track you just recorded:
• Click the Transport window’s Return-to-zero
button (Return) and click the Play button
(Spacebar).
Your recorded track is now being played back, and you
should see Deck’s track VU registering audio level. To
adjust the output level of your recorded track, slide its
mixer volume fader up (louder) or down (quieter). To
pan the track left or right in the stereo image, adjust
the track’s pan fader in the mixer window.
To see the waveform overview of the track you just
recorded:
• In the Tracks window, use the Magnify/Demagnify
buttons to adjust your viewing resolution. OptionShift-clicking these buttons will result in larger
resolution jumps.
As you play tracks back, Deck’s cursor moves along the
time axis, indicating your current location. Enabling
Scroll During Playback in the Options menu will make
the entire track display scroll during playback, so your
current location stays on-screen at all times. (As Scroll
During Playback is a computation-intensive feature, its
operation may be disabled on older, slower Macintosh
computers.)
If you are satisfied with the track you just recorded,
you can now go on to recording the next track. If you
wish to re-record the track, repeat the procedure you
just used. To learn how to re-record only a few select
areas of the track, see “Automated punch-in and
punch-out recording” on page 27.
Effects
You can also listen to your tracks with Deck’s Built-in
effects—such as EQ, Delay, Chorus, or Gain —or VST
Plug-Ins. In the Mixer window, click one of the four
Thru pop-up menus on the track to which you wish to
add processing, and select the effect you want. Then
open the Effect window (Command-7) for Deck’s
Built-in effects, or Option-click on the name of the VST
Plug-In, and adjust the parameters of that effect. For
more information about Deck’s Built-in effects and
VST Plug-Ins, see Chapter 5, “Effects.”
Location times
On the right side of the enlarged Transport window
you see two sets of six pop-up menus. The six pop-ups
on the left are Deck’s Location Time buttons.
Transport window with Location Times and Mixer States visible
For those familiar with multitrack recording devices,
these are the Deck autolocate memories. Each of
these six pop-up menus gives you access to the full list
of all location times you have ever stored for the
current session. The arrows directly to the left of each
menu are the controls that you will use to record and
playback location times.
The Transport window can be collapsed or expanded
by clicking on the box at its upper right-hand corner.
The Location Time, Mixer State, and Punch-In Tools
are all hidden when the Transport window is
collapsed.
To set location times when playback is stopped:
• Scrub or play the session to set the playhead at
the desired time location.
Do one of the following:
• Command-click an arrow button to the left of one
of the Location Times windows.
• Choose New from the Location Times pop-up
menu.
Location Times are reflected in the Tracks Window by
a red flag, or Marker, in the Tracks Window Time Axis
(also known as the timeline, which is right above the
tracks display, and below the tool buttons, in the
Tracks window).
26
Deck User’s Guide
Page 37
To set location times during playback:
• Press Enter on the keypad. The time is added to
the list of times on the Location Times pop-up
menu.
mouse over the begin tape counter. To set the
loop time with the keyboard, hold down the
Command key and click the begin counter. Then
use the dialog to set your time.
To recall location times using the Location Time arrow
buttons:
• In the Transport window, click the arrow button
directly to the left of the stored position.
Whenever you click the arrow button (or select a
location on the pop-up) you will immediately be
snapped to that location time, whether audio is
playing back or not.
All location times also store the current loop/punch
Start and End times. To recall a location time with its
Begin and End times, just hold down the control key
when you click a Location Time arrow button.
To name location times:
1. Command-click the location time pop-up.
2. Type a name and click OK.
Loop mode
The loop mode function lets you define a section of
your session and automatically loop playback of that
section over and over. This is particularly useful for
practicing along with a short section of a session in
preparation for recording a track, or for evaluating
potential loops for arrangement purposes.
To set loop begin and end times, and turn on loop
play:
1. Scrub the small begin tape counter in the
Transport window to the desired loop start point.
• You can scrub the counter by clicking and holding
down the mouse over the counter. When the
cursor changes to right/left arrows, drag to the
right (forward) or left (backward) to set the exact
point in the recording. Scrubbing this way will play
audio as the counter moves. If you wish to slide
the counter value without hearing audio, hold
down the Shift key. Then click and drag the
• You can also click the Begin and End buttons to
enter the current master counter time while a
session is playing back. After the times have been
picked up, you can fine tune the begin and end
times by scrubbing. Command-click the Begin and
End buttons to transfer their times to the
Transport window’s master counter.
2. Scrub the small end tape counter to the desired
loop end point.
3. Click the Loop button.
4. Click the Transport’s Play button to play back the
loop. Click the Stop button to halt playback.
Loops may not be shorter than 0.5 seconds. If
you try to set a loop that is shorter than half a
second, Deck will automatically turn off the
loop.
There are a number of tools that greatly enhance the
usability of Loop mode. You can automatically move
the selection range (in the Tracks window) to the
begin and end counters using the Option > Selection
Tools > Set Punch Times From command (or move
the other direction using the Set from Punch Time
command). You can also use other commands on this
submenu to automatically select the waveform range
between the begin and end times indicated in the
Transport window. For more information see Chapter
9, “Deck Reference.” Finally, when the Track window
is open, you can press C on your keyboard at any time.
This issues a Cue command, which automatically sets
the Transport window’s start and end times to match
the current selection and turns on Loop mode.
Option-C turns Loop mode off.
Automated punch-in and punch-out recording
Although sometimes a recorded track is perfect after
the first try, in most situations at least part of the track
3
Getting Started
27
Page 38

will need to be recorded again. Picture, for example, a
five-minute vocal track that has only a single line with
a mistake. As the engineer on this session, you would
want to make one more recording pass and replace
only a small piece of the recorded track. In traditional
recording, this process of piecemeal replacement is
called punch-in recording. Deck offers automated
punch-in/punch-out recording.
To punch-in and punch-out a track section automatically:
1. Scrub the small begin tape counter in the
Transport window to the desired punch-in point.
This will be the point where replacement
recording automatically begins.
• You can scrub the counter by clicking and holding
down the mouse over the counter. When the
cursor changes to right/left arrows, drag to the
right (forward) or left (backward) to set the exact
point in the recording. Scrubbing this way will play
audio as the counter moves. If you wish to slide
the counter value without hearing audio, hold
down the Shift key. Then click and drag the
mouse over the begin tape counter. To set the
punch time with the keyboard, hold down the
Command key and click the begin counter. Then
use the dialog to set your time.
• You can also click the Begin and End buttons to
enter the current master counter time while a
session is playing back. After the times have been
picked up, you can fine tune them by scrubbing.
2. Scrub the small end tape counter to the desired
punch-out point. This will be the point where the
replacement recording automatically ends.
You have now set your punch-in (begin) and
punch-out (end) times.
3. Click the Punch button.
Punch mode is now turned on, and the portion of
the session between the begin and end times will
be recorded automatically on the record-enabled
track on your next recording pass. No other
section of the track will be replaced.
4. Click the Transport’s Play button.
As the existing track plays, monitor (play) your
new source signal (your instrument, microphone,
and so on). Set the input level so that the
replacement signal meter level approximately
matches the meter level of the signal on the track.
When you are punching-in, you can set the
monitor level of the existing track to a different
level than the monitor level of the incoming
signal. (Remember, monitor level is how loud you
hear it, while input level is how loud it is actually
recorded.) When a track is not record-enabled,
the track’s volume fader adjusts the playback
(monitor) level of that track. When a track is
record-enabled, the track’s volume fader adjusts
the playback (monitor) level of the incoming
signal. Switch record enable on and off to match
these two levels.
5. Adjust the relative monitor levels of the other
tracks by sliding their volume faders up or down.
6. When you are ready to punch into the track, click
the Transport’s Record button, and then on the
Transport’s Play button (Spacebar). Both will be
highlighted.
Deck begins playback, and you will hear both the
existing track and you new input signal. Remember, however, that only the track section between
the counter’s begin and end times will be
recorded. When playback hits the punch begin
point, recording will start automatically and you
will no longer hear the original audio track.
Recording will continue until the punch end
point, at which time you will hear the original
audio track again.
7. When you are done, click the Transport’s Stop
button (Spacebar). Next click the Transport’s
Return-to-zero button (Return), and then on the
Play button (Spacebar) to hear what you
recorded.
Remember, Deck is a non-destructive recorder, so
when you punch-in new material, the old material is
28
Deck User’s Guide
Page 39

not deleted. This means you can open the Track
window after you have punched-in and view your
newly recorded range. If you don’t like the new take,
you can delete it and stretch the old region to reveal
the original take. For more information, see Chapter 4,
“Visual Waveform Editing,” and the Appendix, “FineTuning & Troubleshooting Your System” for tips on
managing multiple takes in Deck.
Naming Tracks
You may wish to begin renaming your tracks when you
start doing multiple tracks. The tracks will name
themselves Track 1, Track 2, and so on. By giving your
tracks more descriptive names, such as “Bass, take 3,”
you will find it much easier to work with them. To
rename a track, Command-click the Track name popup box at the left of its track window. This brings up a
dialog box that allows you to enter in a new name for
your track. (You can also click the track in the Tracks
window to select it, then choose Rename from the File
menu.) For more information about renaming and
editing tracks and regions, see Chapter 4, “Visual
Waveform Editing.”
Compact Session
After you have made you final decisions regarding
takes, you can automatically delete the unused takes
from your session by using Compact Session, or
compact single audio files using Compact Audio.
Before you compact any files, make sure you
understand how compacting works, and what it does.
For information about compacting session audio files,
see Chapter 4, “Visual Waveform Editing.”
3
Conclusion
Now that you know how to import existing audio files
and regions, record directly into Deck, proceed to the
next chapter to learn how to edit your audio in a Deck
session.
Getting Started
29
Page 40

30
Deck User’s Guide
Page 41
Chapter 4
Visual Waveform Editing
Page 42

32
Deck User’s Guide
Page 43

Chapter 4:
Visual Waveform
Editing
This chapter of the Deck manual will help you get the
most out of the Tracks window, Deck’s visual
waveform editing environment. You will use the
Tracks window to slip tracks, arrange audio, redefine
regions, place existing audio, create and edit visual
automation envelopes, spot sound to picture, bounce
tracks, create work tracks, and more!
The Tracks window is where you will find Deck’s real
workstation power, and although you do not need to
use the Tracks window to record and mix tracks, you
need to understand the Tracks window in order to use
most of Deck’s editing functions.
Control area to its new position. As you drag the
track, you will see a dark horizontal line highlighting the destination spot.
If you are using this method to move tracks from
position to position in the Tracks window, you may
find it easier to accomplish your tasks when the tracks
are set to a smaller size. (Click the Track Size buttons
in the Tracks window to toggle between track display
modes.)
To cut, copy, and paste entire tracks:
1. Click the Track Control area. The track will be
highlighted to indicate that it is selected. When a
track is selected in this fashion, any Edit menu
command can be executed on the track.
4
Moving and Renaming Tracks
The Tracks window uses track position to determine
which tracks will play back. Active real-time play tracks
are numbered in their Track Control areas, at the left
of each track. All other tracks (up to 999 available) are
work tracks, as indicated by the letter W which
appears in their Track Control areas. Work tracks do
not playback. In order to playback audio regions that
are currently on a work track, you must move them to
a play track. For this reason, it is important that you
understand how to change the position of the
different tracks.
To move a track from one track to another, do one of
the following:
1. In the Track Control area at the left of the
destination track, select the new track from the
Track pop-up menu.
2. Click the Track Control area, then drag the
2. Choose Edit > Cut (Command-X) or Copy
(Command-C).
3. Click any track’s Control area to select that track
as the destination.
4. Choose Edit > Paste (Command-V).
Tracks are never replaced when you use Deck’s Paste
command. The pasted track is always placed on the
track below the selected destination track.
To rename a track:
1. Click the track’s Control area.
2. Choose Edit > Rename.
3. Type in a new name for the track, then click OK.
The Tracks window will appear immediately showing
the track’s new name in the Control area pop-up.
You can also rename tracks by holding down the
Command key and clicking on the Track pop-up
Visual Waveform Editing
33
Page 44
menu. This method offers a simple way to change the
name of the current item in most of Deck’s list popups. The same shortcut works with Location Times
and Mixer States in the Deck Transport window.
Navigating the Tracks window
Before you can really edit audio regions and waveforms, you will need a basic understanding of the tools
you will use to navigate within the Tracks window and
configure the waveform display area.
To change the waveform display magnification:
• To magnify (zoom in on) the current waveform
display, click the Magnify button.
Fit Selection button
• Option-click the Fit Selection button to center the
display on the beginning of the selected range or
region. Command-click the Fit Selection button to
center the display on the end of the selected
range or region.
To magnify the vertical display of waveforms:
• Click the up arrow (Waveform Expand) button to
magnify the view of a low-level signal.
• Click the down arrow (Waveform Contract) to
return the display to its normal resolution.
Magnify button
• To demagnify (zoom out on) the current
waveform display, click the Demagnify button.
Demagnify button
• Command-click the Magnify or Demagnify button
to zoom all the way in or all the way out,
respectively. Option-click them to (de)magnify 2
times; Shift-Option-click to (de)magnify 4 times.
• To auto-zoom to show only the current selection,
first select a range or region and then click the Fit
Selection button. This is a particularly useful tool
for display manipulation when accurate waveform
editing is required.
Vertical Zoom buttons
This will only magnify the display of the waveform, not
the actual audio data. If you wish to alter the disk data
to increase the actual level of the audio, use the
Normalize command. For more information, see
Chapter 5, “Effects.”
Use the left and right bracket keys ([ and ]) as a quick
shortcut when expanding or contracting the waveform
display.
To store view memories:
1. Set the waveform display so that you are viewing
the range you desire at the magnification you
wish.
2. Command-click any of the four View Memory
buttons.
View Memory buttons
To recall the stored view:
• Click a view memory button.
34
Deck User’s Guide
Page 45
The Deck Magnify and Fit Selection tools allow you to
zoom in and out in steps that are smaller than the
steps between display resolutions. If you are not
paying attention, you may end up with the display
adjusted to an odd resolution. To pop back to the
resolution of your choice, select that resolution on the
Axis Resolution pop-up.
To toggle track size:
• Click the Track Size Buttons to select track size.
Track Size buttons
reference to where transitions or changes occur. You
can also use Markers in conjunction with the Tab key
to facilitate locating and returning to parts of your
session where numerous edits or processes are
required.
Markers are identical to Location Times, which are
accessed from the Transport window. Whenever you
create a Marker (by pressing the Enter key) the
Marker’s time or name is added to the Location Times
pop-up menus, and can be accessed through the popup as an autolocate point.
4
The Track Size buttons allow you to select one of four
waveform display modes. The larger modes are best
for locating zero points in a waveform, while the
medium display is best for waveform range or region
editing, and the shortest is quite useful for track
shuffling.
To place markers in the Tracks Window Time Axis
(timeline):
• Press Enter on the keypad. Whenever you press
the Enter key, (during recording, playback or
when idle) a red flag—or Marker—is placed in the
Tracks Window Time Axis (or timeline) at the
current location. The numbers that appear next to
the Marker indicates the Marker’s time coordinate.
• To rename a marker, Command-click it and a
naming dialog will appear.
• To delete markers, Option-click them. Pressing
Tab automatically scrolls the Tracks display to
bring the next marker along the Time Axis into
view.
Markers can greatly aid the decision-making and
navigation tasks associated with Tracks window
editing. For example, enter markers while recording or
playing back audio to flag mistakes or keeper passages,
so you can easily locate these areas when you begin
editing. If you tend to get lost when recording long
repetitive parts, use Markers to provide an on-screen
Basic Range Mode and Object Mode Editing
Range mode lets you select any piece of any waveform
on any track, and slice or copy that piece to create or
alter a region. Object mode lets you select groups of
regions and move those regions for the purposes of
song writing, effects spotting, or general organization.
You can’t select anything smaller than one region in
Object mode.
Object and Range Mode buttons
Range mode allows you to select waveform ranges by
dragging across those ranges. Most of the edits you
would perform in Range mode pertain to defining
pieces of an audio track as regions, cutting and pasting
small portions of longer audio regions, and fading or
crossfading sections of audio regions. Object mode is
designed for wholesale arrangement of existing
regions, and general trimming and placement
functions.
For a complete list of keyboard shortcuts that make
editing more efficient, see Chapter 9, “Deck Reference.”
Visual Waveform Editing
35
Page 46
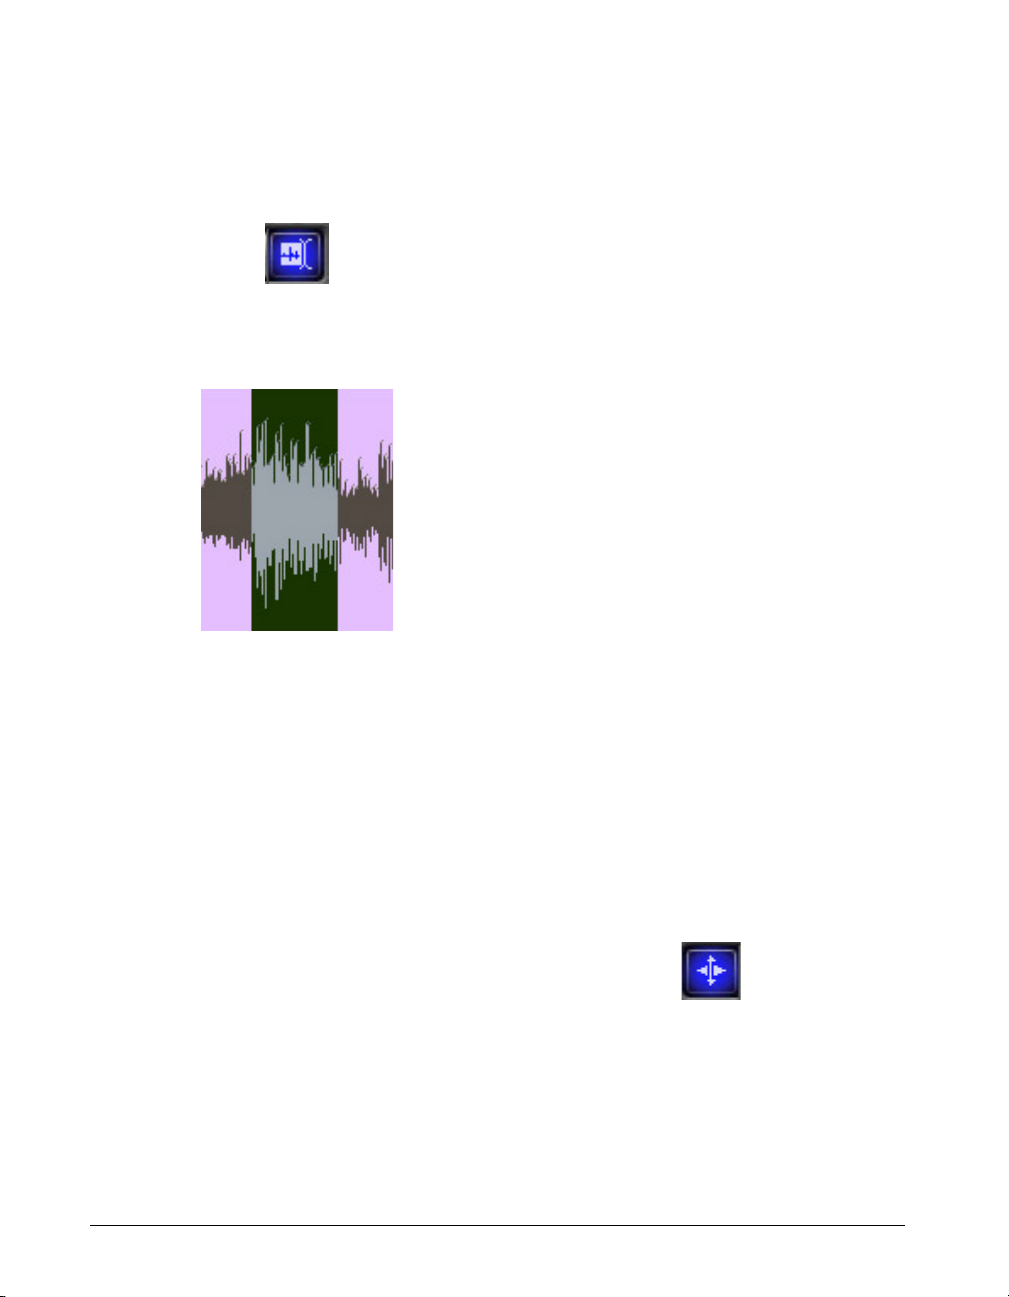
To select a waveform range:
1. Click the Range Mode button (or the ~ key) to
make sure you are in Range mode. The button
will be highlighted.
Range Mode button
2. Drag over any waveform area.
If you’re working in pattern-based music forms, the
Range mode can help you do cookie-cutter editing, so
you can find and edit loops quickly and seamlessly.
Assume you’ve already recorded or imported a 1-bar
drum loop and pasted copies of it end-to-end in track
one. While listening to this drum loop, you then
record a bass line on track two. Now you can use the
range of the drum loop as a cookie-cutter to ease
selection of a bass passage for looping. Just click once
on any drum loop region in track one, then press the
tilde (~) key. If you were originally in Object mode,
you’ll now be in Range mode. If you were originally in
Range mode, press the tilde (~) key once more, to
get back to Object mode. The selection range will now
exactly equal the length of the drum loop. Next, press
the down arrow to move the selection range to your
new bass track. You can audition the bass track (ShiftSpacebar) and move the selection range along the
track using Option-left/right arrow to find the desired
bass repetition. Slice your best take (Command-R)
then copy and paste it to build a new looped bass
track.
Selected waveform range
If you drag anywhere within the selection, you can tear
off the selected range and place it on any track at any
time. If you want to define the selected range as a new
audio region (for later arrangement in Object mode),
you can choose Edit > Slice (Command-R) to create
new regions out of the selected range in place, so no
overall change in timing or audio placement occurs.
You can also process audio ranges with destructive
effects available in the Process menu.
There are a number of key commands that greatly
enhance the Range mode drag-edit functions. For
example, the up and down arrow keys move the
selection range between tracks, holding down the
Option key while pressing the left or right arrow keys
will cause the selection to travel along the timeline,
and holding down the Shift key and pressing the arrow
keys will extend the selection range. Holding down the
Command key when using the arrow keys will let you
move the selected audio.
Because you’ve used your consistent drum-loop
building block as your cutting tool, you won’t have to
individually edit the begin/end points of subsequent
loops. This editing approach makes the loop
identifying, editing and placement processes much
easier and is an enormous time saver.
To object-select a region:
1. Click the Object Mode button (or ~ key) to make
sure you are in Object mode. The button will be
highlighted.
Object Mode button
2. Click the desired waveform region.
36
Deck User’s Guide
Page 47
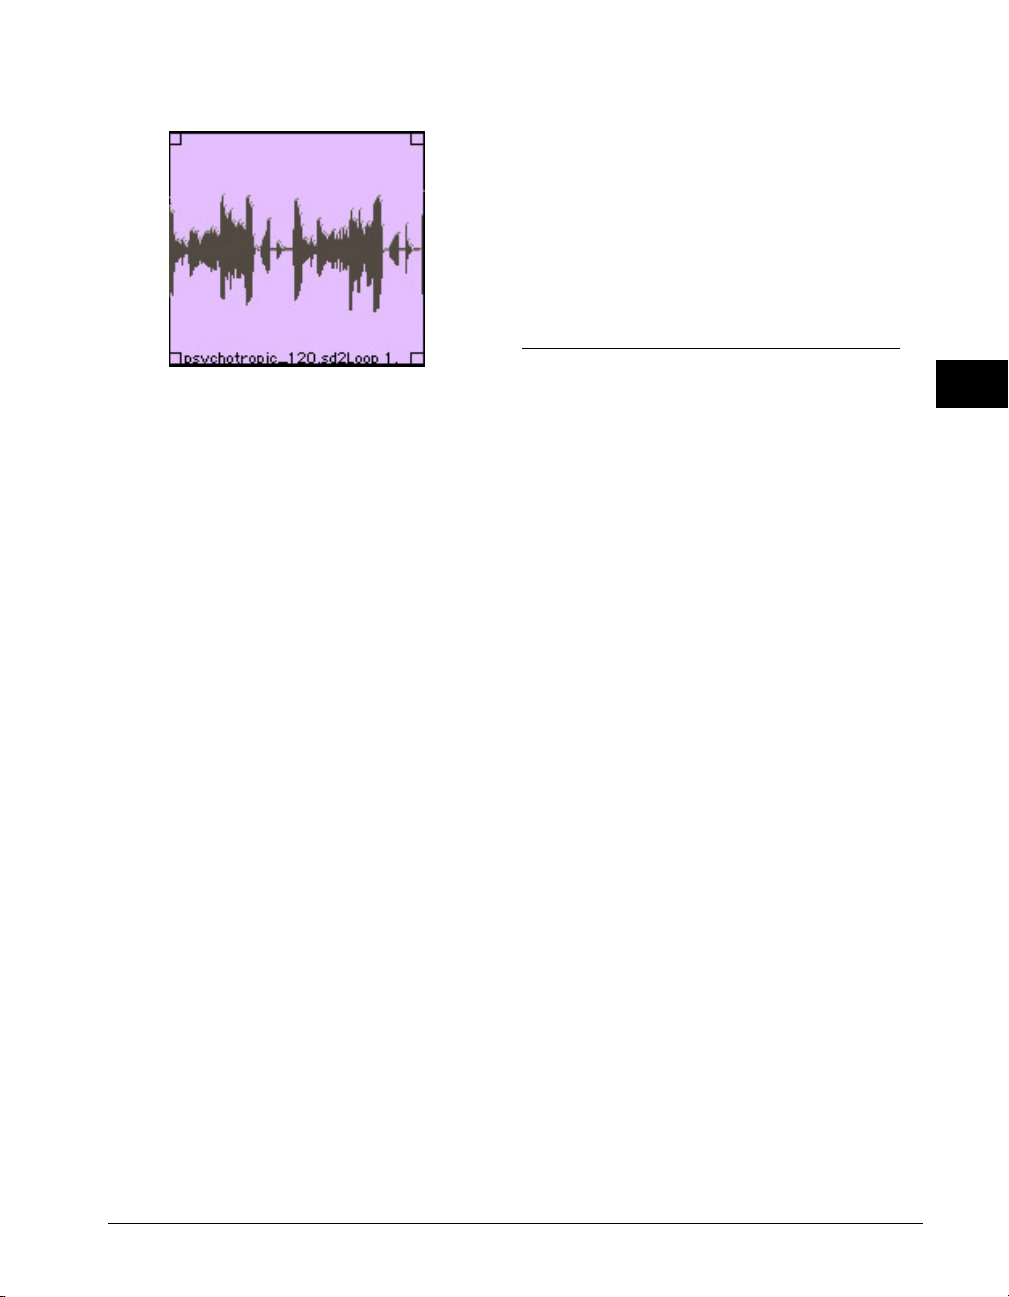
click and drag to paste the current selection at the end
of the preceding region (commonly known as a butt
splice), and the Command-Option arrow key
combinations to move selected audio regions around
in the Tracks window. Note that whenever you move a
region into an area of the Tracks window where other
regions already exist, the region being moved will
actually cut (or edit) any regions it falls onto or
overlaps.
A selected waveform region
You can hold down the Shift key and click another
region to add that region to the selection. Note that
Deck allows you to select multiple regions which
aren’t next to each other, which can be very useful for
checkerboard-style editing and processing. You can
now edit the selected region in a number of ways. If
you click and drag anywhere within the region, you
can drag and place it anywhere within the Tracks
window. You can accomplish the same thing by
choosing Cut (Command-X) from the Edit menu, and
then placing an insertion point anywhere in the Tracks
window to paste the selection. (You can also delete
the selected range simply by hitting the Delete key on
your Macintosh keyboard, but then it will be deleted—
it won’t go into the Clipboard.) You can use the Edit
menu’s Copy and Paste commands to paste multiple
copies of the region end-to-end (or in any other
desired arrangement). You can also execute destructive effects on any selected region or regions. To do
so, select the Destructive Effects submenu from the
Process menu. For more information about effects, see
Chapter 5, “Effects.”
Note that when you move a region, the Data Indicator
boxes in the upper right corner of the Tracks window
will update to show you the duration of the region and
the start, stop, and current (mouse) positions. Use
these numbers to help place audio at the desired
sample, frame, beat or second.
Selecting Axis Units and Managing the Grid
Deck allows you to adjust any session to show you all
times and waveforms in seconds, samples, SMPTE
frames or bars and beats. You can set these units
based on the type of editing you plan to do, and you
can reset them at any time without worrying about
altering the timing of your tracks. The different units
can be very helpful, and it is important to understand
them, because many Tracks window edit functions are
unit-oriented. One major reason for this is the Tracks
window grid, which is extremely useful for many
arrangement tasks.
Smart Grid
Deck’s smart grid is like an invisible template that
automatically pops your edits to the nearest applicable
unit. It’s called a smart grid because it automatically
adjusts to the most reasonable units for the current
display resolution. For example, if you have chosen
seconds as your Axis Units, the Tracks window grid
can automatically switch between settings—minutes,
10 seconds, 1 second, centiseconds, milliseconds, and
samples—based on how far in you zoom. The Deck
grid is a particularly important tool for musical
arrangement, because it allows you to do drum
machine-style editing of audio regions, and edit
general audio regions to specific tempos. Although
you are free to turn off the grid at any time, it will be
worth your while to learn its basic functions.
4
Use Option-click and drag to tear off a copy of any
region, while leaving the original behind, Command-
Visual Waveform Editing
37
Page 48
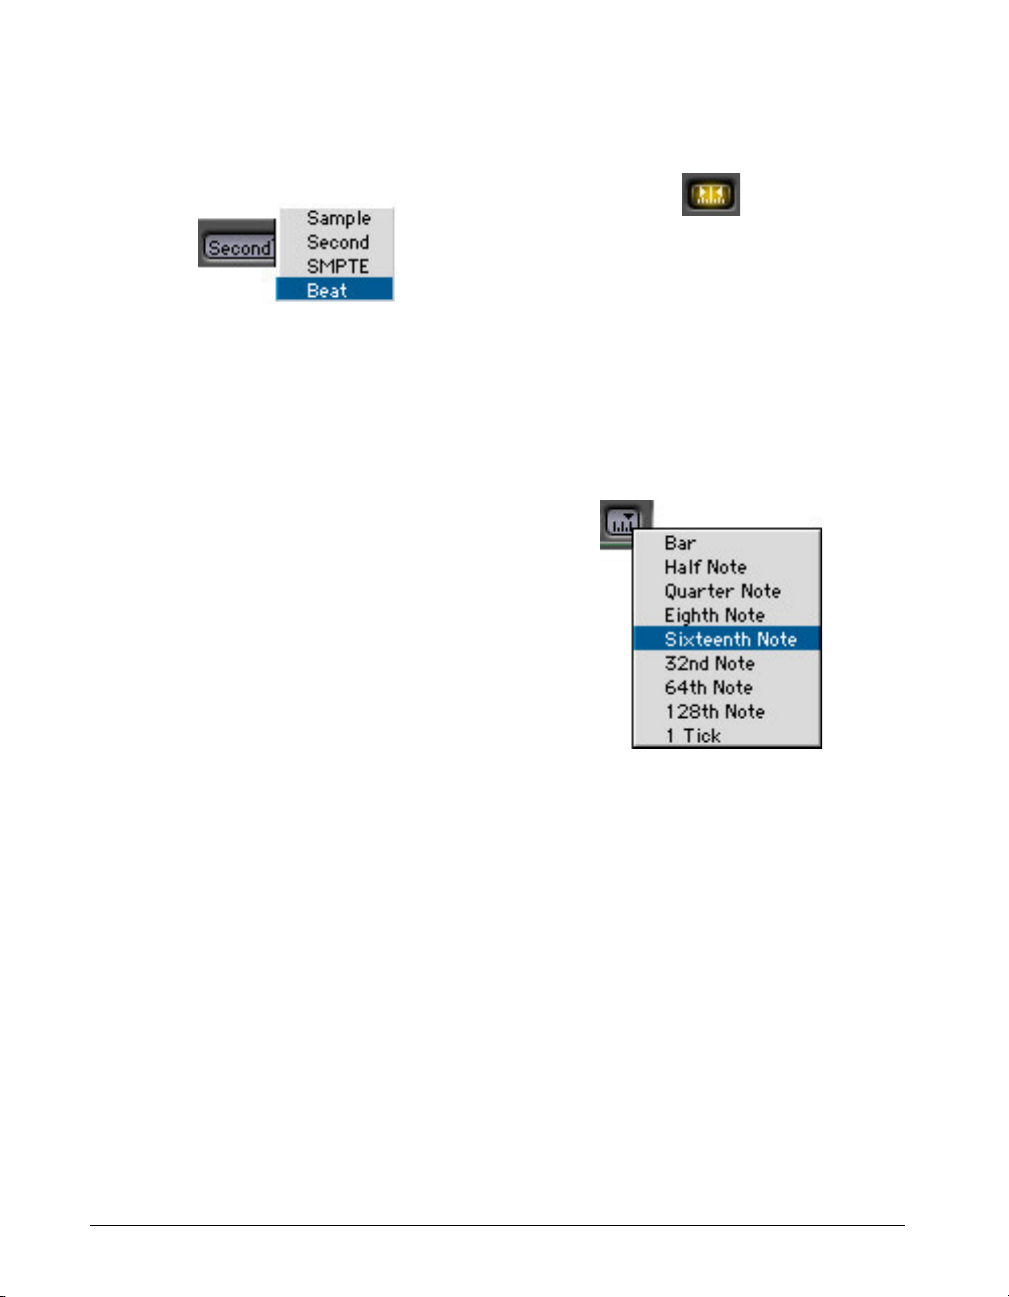
To select time units for viewing the session:
• Select the desired units from the Axis Units popup near the top left of the Tracks window.
by clicking on the Grid button directly to the left
of the Axis Units pop-up.
Grid button
2. Click this button again to turn the grid back on.
Axis Units pop-up menu
These units will be saved as a part of the session, and
when the session is next opened, it will show all time
in these units. Remember, you can change your
chosen units at any time without affecting the
placement of any audio regions.
Beat Mode
If you are working in Beat mode, there is a circumstance in which you may wish to have audio regions
stick to their bar and beat placement when tempo is
changed. If you are using Deck as a virtual drum
machine (playing individual drum sounds back as
regions), then you will often want to make sure that
any tempo changes will adjust audio region placement
to make sure that the regions still start at their original
bar and beat locations. In this situation, changing
tempo will alter where bar and beat boundaries occur
in relation to real-time, and bar/beat start times are
considered to be relative times rather than absolute
times. Deck offers a special preference for this type of
editing. If you wish the regions to stick to their bar and
beat locations whenever tempo is changed (in Beat
mode), then see the “Change region start times with
BPM change” preference in the File menu’s General
Preferences submenu. When this option is turned on,
tempo changes in Beat mode will adjust the placement
of audio regions so that they retain their bar and beat
locations. For more information, see Chapter 7, “MIDI
and Synchronization.”
To turn the Grid on and off:
1. Choose Snap to Grid from the Options menu,
which allows you to toggle the grid on and off.
Note also that you can toggle the grid on and off
The Grid button will be highlighted when Snap to Grid
is enabled.
To jump to a specific display resolution:
• Select the desired resolution from the Axis
Resolution pop-up to the right of the Axis Units
pop-up.
Axis Resolution pop-up menu
This is the fastest and most accurate way to set the
waveform display area to show the resolution you
want. You can now proceed with any edits that should
be based on the current units. Remember, you can use
any of the four Tracks window view memories to store
your current waveform view.
When the resolution is changed, the waveform area is
zoomed in or out at its left side. This may pop the
display to an area that no longer shows the current
selection (or shows its center, but makes it impossible
to see the start or end of the selection). Remember,
regardless of resolution, you can immediately center
the waveform display on the beginning or end of the
current selection. To do so, use Position at Beginning
38
Deck User’s Guide
Page 49
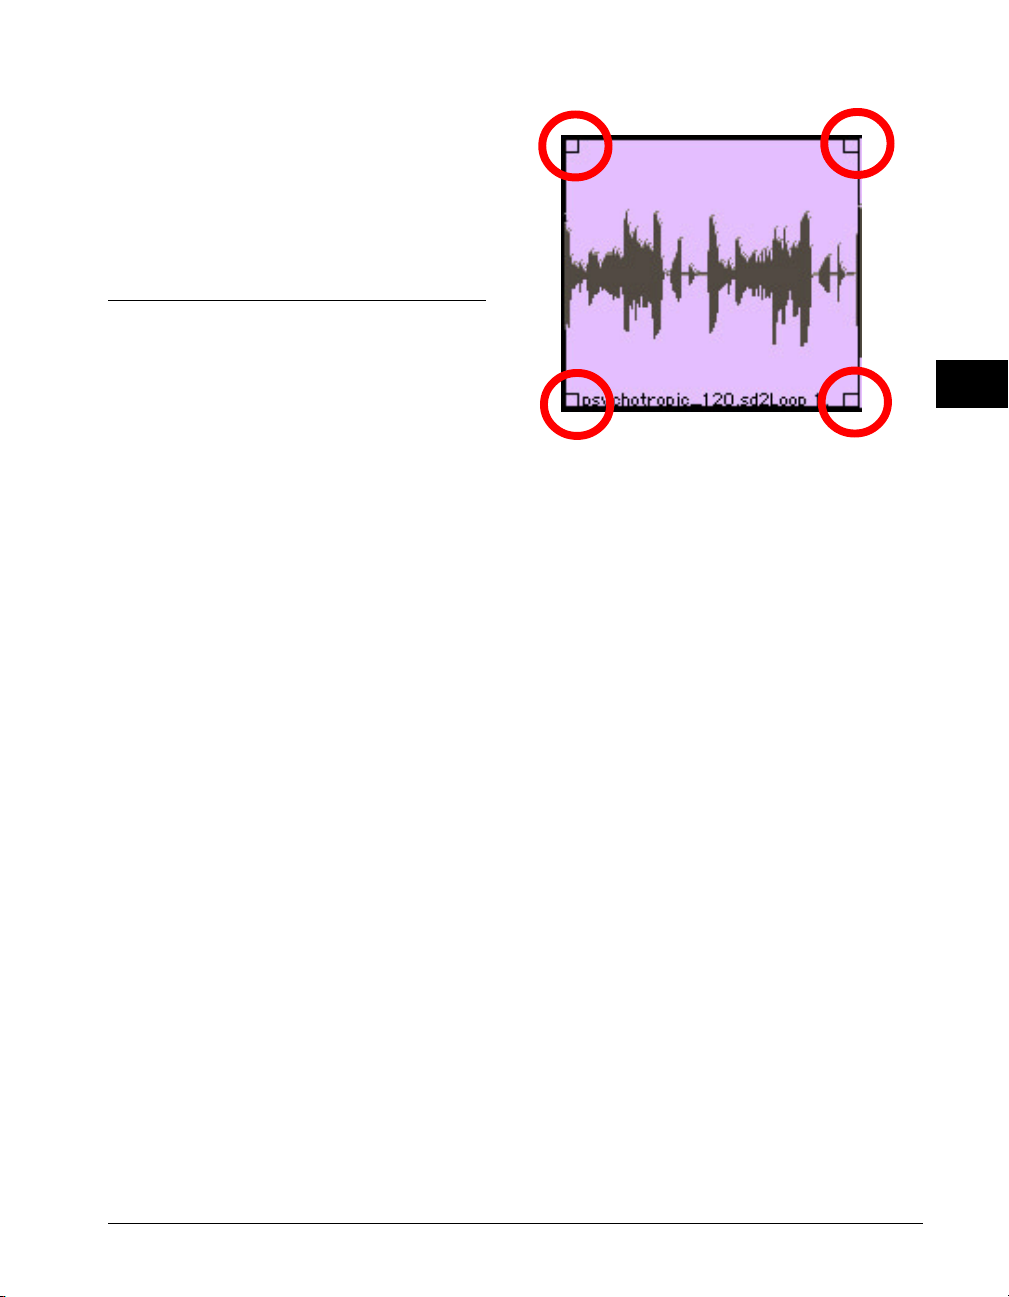
(Command-[) or Position at End (Command-]) from
the Option menu’s Selection Tools submenu.
To locate to a specific point in the session, simply click
the Time Axis (also known as the timeline) to jump to
that point. The square black cursor in the Time Axis
indicates your current session location.
Editing Regions
Audio regions are the building block of any Deck
session, and the techniques for creating and defining
regions are among the most important skills to
develop. A region can be created in a number of
simple ways, from simply tearing off a waveform range
to slicing the range in place. Once you have created an
audio region, there is a very simple method to edit the
start and end points of that region. It requires no
special mode, and can be done very quickly.
Whenever possible, make your begin/end points occur
during a silent passage, between sound events. Or, if
it’s not possible to find a good break between words
or notes, try to cut at the zero-crossing, where the
waveform crosses the line in the middle of the track
display. These simple techniques will help you avoid
audible clicks and pops resulting from abrupt edits.
To re-size an audio region:
1. Click the Object Mode button (or ~ key) to make
sure you are in Object mode.
2. Select the desired waveform region.
3. To re-size the region, click, drag on any of the
four region definition tabs, located in each corner
of the selected object.
4
Region definition tabs
While you do this, a marquee will appear, highlighting
the new size of the region. You can view the numeric
display in the upper right corner of Tracks window to
see the current size of the region. If you are editing
region size with the grid turned on, the size will
automatically be constrained to the grid.
Remember, an audio region is like a tiny window into
the source sound file. You can adjust that window to
show any part of the sound file, but there is no way to
make an audio region reveal more data than is
contained in the source sound file. When you drag a
region definition tab to re-size the region, but the
region refuses to grow any larger, this means you have
reached the end of the source sound file data.
You can edit the begin and end points of two or more
regions simultaneously by selecting multiple regions in
Object mode. Just click and drag from an empty
section of the Tracks window to create a marquee
selection, or hold down the shift key while clicking on
the regions you wish to select. Then, click any one of
the selected regions’ Region Definition tabs and hold
down the mouse button while re-sizing. All selected
regions will re-size to the begin or end point you set.
Visual Waveform Editing
39
Page 50

Using Play Tracks and Work Tracks
While Deck looks like a simple multitrack audio
recorder and editor, the concept of virtual tracks
allows you to create mixes that are many layers deep
without bouncing tracks. You can think of it like this:
Deck allows you to record and arrange a virtually
unlimited number of tracks, but at any time you can
choose which of those tracks will play. All tracks other
than the top play tracks in the Tracks window are
called Work tracks. Work tracks do not play back, but
they can be mixed together with the play tracks if you
have the Virtual Mix command enabled. Work tracks
store all information about a track, including automation. If you do not have the Virtual Mix command
enabled, you can use work tracks as a visual database
of potential playback tracks, arrangements, and premix sources.
To move tracks from Play tracks to Work tracks and
back:
• In the Tracks window Control area, click and hold
on the track name of the destination track. You
will see a pop-up listing all tracks currently in your
session. Select the new track. When you let go of
the mouse, the new track and all associated
information will appear on that track.
2. Select Audition Selection from the Process menu’s
Audition submenu (Command-T, or Shiftspacebar).
Your selected range or region(s) will play back. On
playback, all audio will be panned to the center, and
automation will be ignored. Note that the Audition
command will play back work track audio, if you have
that audio selected.
To autocue a session range for loop evaluation:
1. Select the waveform range or regions that
constitute the portion of the session you wish to
hear in loop playback. All tracks will play back
when you begin the cue loop, regardless of which
tracks are contained in the selection.
2. Press C. The current selection range is automatically transferred to the Transport window’s begin
and end times, and Loop mode is turned on. You
are now ready to hear the loop.
3. Press the Play button in the Transport window (or
the spacebar on your Macintosh keyboard) to
hear the loop.
The loop will play back repeatedly until you click the
Stop button in the Transport window or hit the
spacebar on your Macintosh keyboard. To turn off the
loop, click the Loop button in Transport window (or
press Option-C).
Fast Cueing and Auditioning
The Deck Tracks window offers a number of shortcut
features you can use to audition specific selections and
autocue a range for loop evaluation.
To audition any waveform range or region:
1. Select the waveform range (Range mode) or
region (Object mode) you wish to audition. You
can select a range or regions on multiple tracks, if
you wish.
40
Deck User’s Guide
Loop button
Constructive Fades and Crossfades
The Deck Tracks window offers all of the standard
constructive fade and crossfade functions you would
expect in an audio workstation. Unlike automation
envelopes (which physically control the volume or pan
faders), fades and crossfades create new audio data,
and place that audio data on top of the selected range,
without deleting the original audio data. Crossfades in
particular are extremely important sound design tools,
Page 51
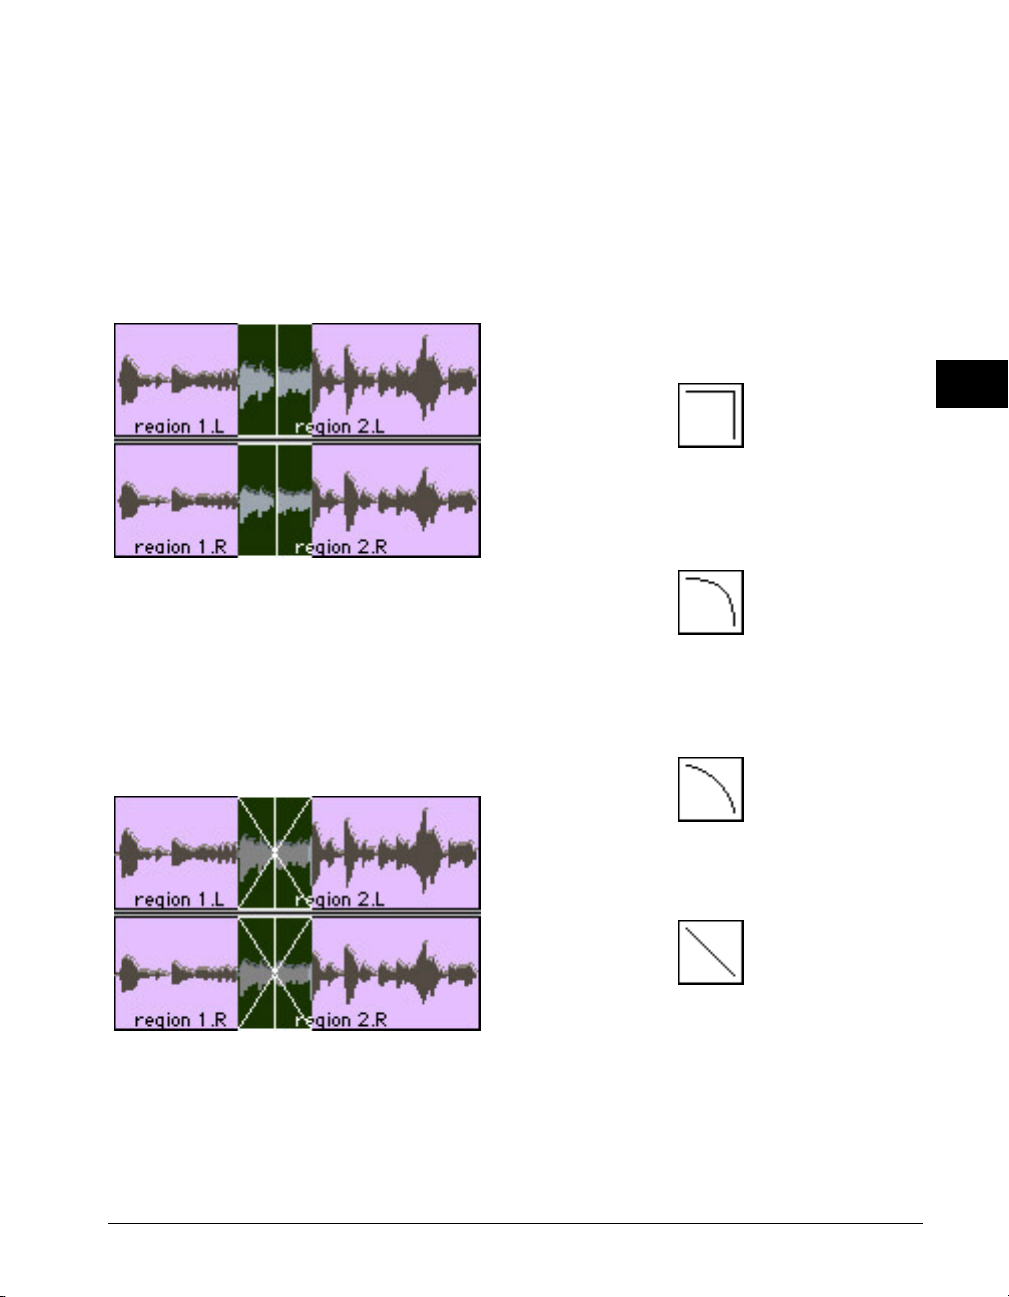
because they let you overlap two audio regions on the
same track, and edit the transition between the two
regions so that the first one fades out as the second
one fades in. Normally, this would require two tracks,
but Deck makes it possible to accomplish this on a
single track. This is the kind of range selection you
might make to generate a crossfade between two
regions:
If you executed a crossfade in this selection, you
would get the following results. Region 1 will begin
fading out at the beginning of the selected range, and
will be fully faded by the end of the selected range.
Region 2 will begin fading in at the beginning of the
selected range, and will be at full volume by the end of
the selected range. The result of this crossfade would
look like this:
Crossfades are based on audio data that is after the
end of region 1 and other data that is before the
beginning of region 2 in the source sound files. If you
attempt to create a crossfade using regions which
reference sound files that contain no data after the
end of region 1 or before the beginning of region 2,
Deck will warn you that there is no data. You will still
be allowed to create the crossfade, but Deck will use
silence as the surrogate data.
Fade out shapes
4
This curve keeps Region 1 at full volume throughout
the crossfade and then immediately fades it out at the
very end of the selection.
This curve fades out Region 1 relatively slowly,
keeping the amplitude fairly high. Towards the end of
the crossfade, the amplitude drops off sharply.
Fades and crossfades are usually based on the current
selection, but Deck offers a number of different fade in
and fade out shapes, which also have a great effect on
the outcome of any fade or crossfade.
This curve fades out Region 1 slightly faster, with the
amplitude slightly lower than the previous envelope.
This envelope fades out Region 1 with a linear fade
curve. It creates a smooth, even fade out. It is the
default curve.
Visual Waveform Editing
41
Page 52
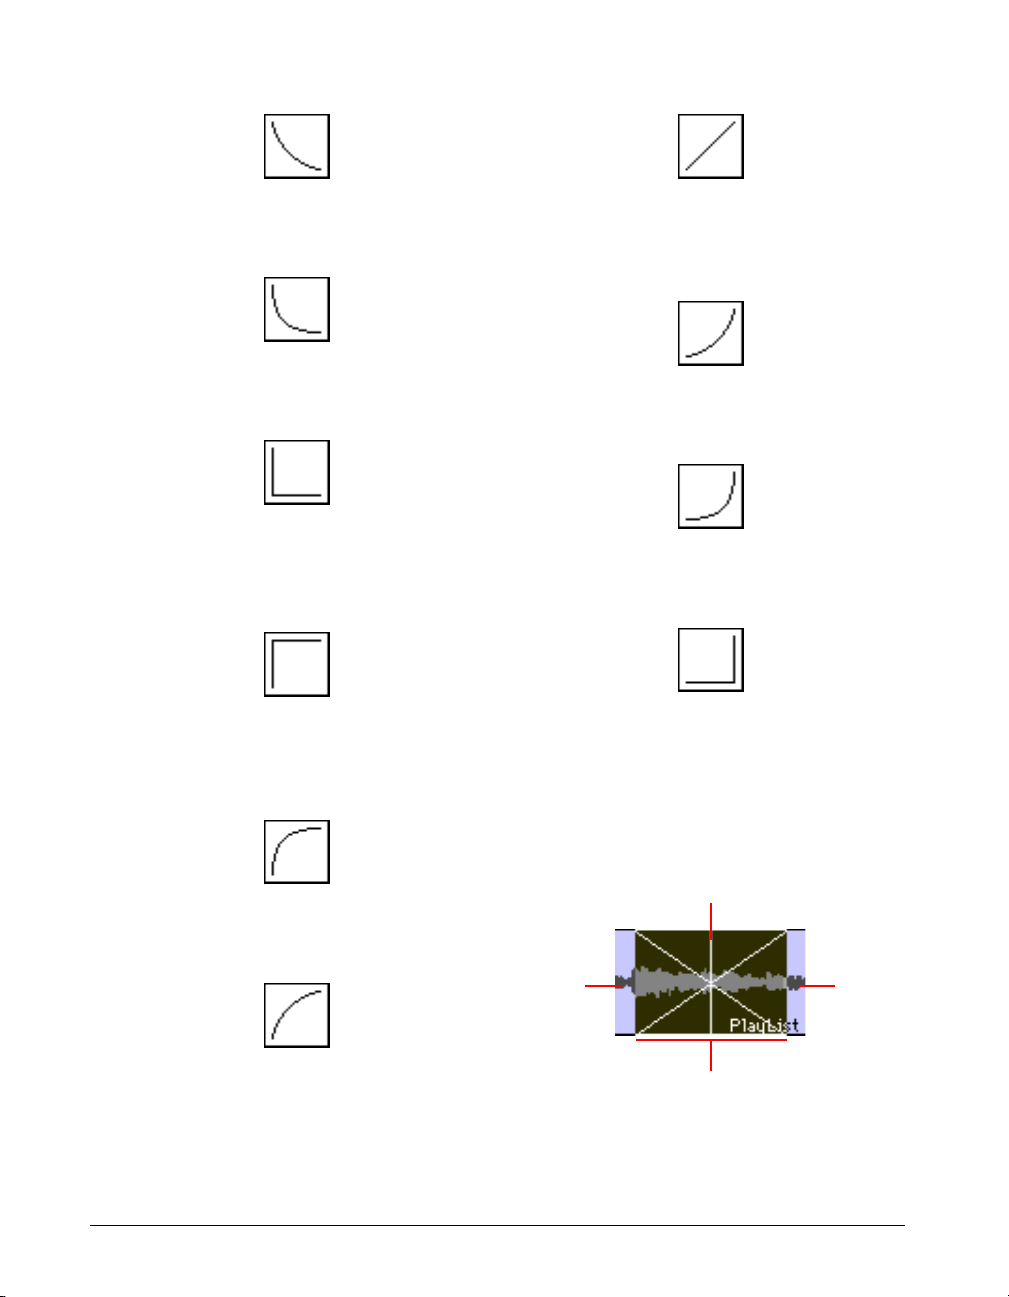
This curve fades out the amplitude of Region 1
Border of region 1 and 2
Selection range crosses both regions
Region 2
Region 1
relatively quickly at the beginning of the crossfade.
This curve drops the amplitude of Region 1 even more
quickly at the beginning of the crossfade.
This envelope silences Region 1 at the beginning of
the crossfade.
Fade in shapes
This curve fades in Region 2 with a linear fade curve. It
is slightly slower, with an even amplitude throughout
the crossfade. This is the default envelope.
This curve fades in Region 2 slowly at the beginning of
the crossfade.
This curve fades in Region 2 even more slowly than
the previous curve.
This curve brings up Region 2 at full volume immediately at the very beginning of the crossfade and keeps
it there throughout the crossfade.
This curve fades in Region 2 quickly in the beginning,
reaching full amplitude fairly early in the crossfade.
This curve fades in Region 2 at a moderately fast rate
with slightly lower overall amplitude.
42
Deck User’s Guide
This curve silences Region 2 until the end of the
crossfade.
Possible envelope combinations
Here are some combinations of Fade Out and Fade In
envelopes that you may wish to try.
Page 53
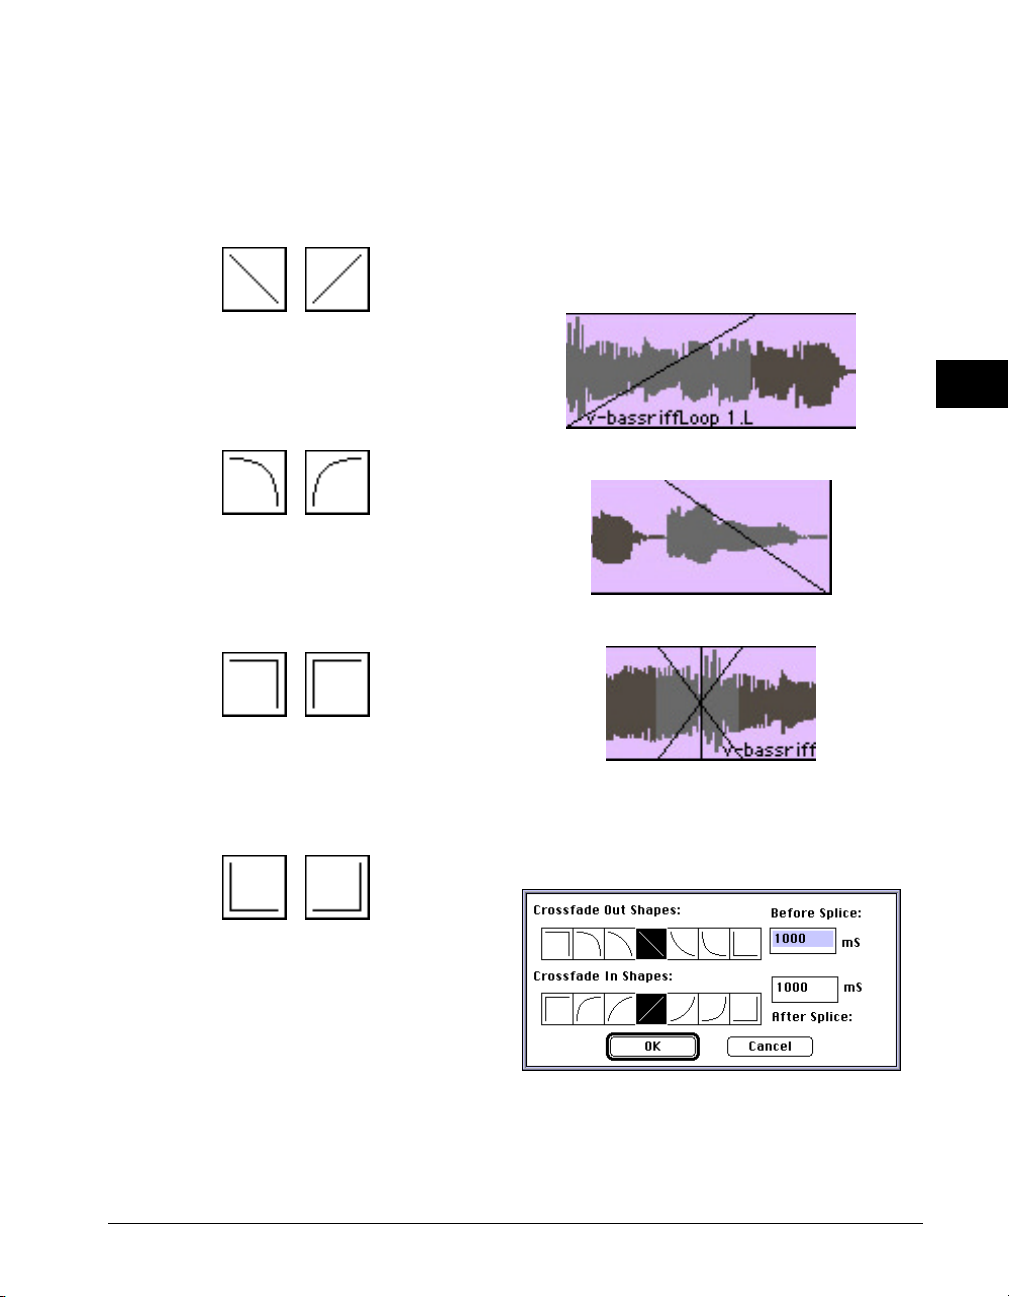
Linear Crossfade—A good general purpose
crossfade with a smooth, even transition between
Region 1 and Region 2. If volume drops across the
center of the crossfade, try the equal power
crossfade.
Equal Power Crossfade—A good general purpose
crossfade, useful in cases where a linear crossfade
seems to create an overall drop in volume across
the splice point.
Overlap Fade—This combination of curves keeps
both regions at full amplitude throughout the
crossfade: Region 2 jumps in at the beginning and
Region 1 jumps out at the end.
crosses the border between two touching regions,
a crossfade is generated.
2. Select Fade Selection from the Process menu.
Remember, fade in always begins at the beginning of
the selected region and fade out always ends at the
end of the region. This is true no matter how far from
the beginning or end you select.
4
Fade in
Fade out
Silence—Choosing these two curves will create
silence for the duration of the crossfade. This
combination is not particularly useful for most
applications.
To fade or crossfade the current selection:
1. Open the Tracks window (Command-3), make
sure you’re currently in Range mode (~ key),
then click and drag with the mouse to select the
waveform range you wish to fade or crossfade.
This range must cross at least one region
boundary. If it crosses only the beginning of a
region, a fade in is generated. If it crosses only the
end of a region, a fade out is generated. If it
Cross fade
To set the default fade/crossfade:
1. Select Set Default Fade from the Process menu.
The default fade is the basic fade in and fade out
shapes (along with default durations) that are used
when you choose the Fade Selection command or the
Visual Waveform Editing
43
Page 54
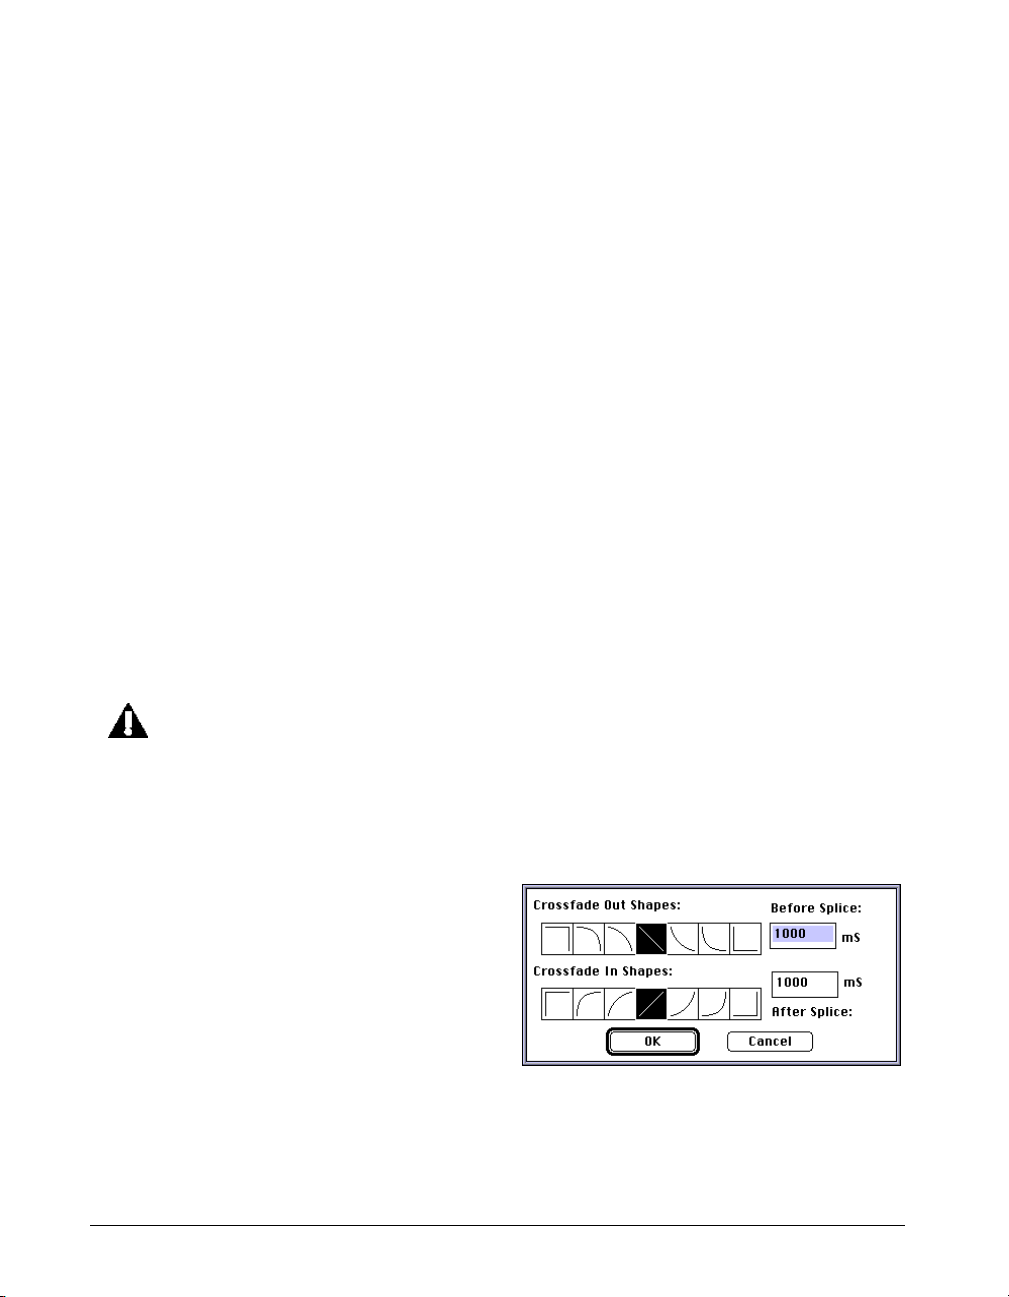
Default Fade command. The Fade Selection command
always uses the default fade curves, but creates the
fade or crossfade according to the current waveform
selection. The Default Fade command always executes
the fade or crossfade using the default fade shapes and
the default fade durations. This is a very useful
command when you want to create tiny smoothing
fades or crossfades, but you don’t want to zoom all the
way in to select a tiny range. The Default Fade
command lets you make large waveform selections
that are capable of creating very subtle fades.
Whenever you want to create a fade or crossfade that
doesn’t use the default fade shapes, use the Custom
Fade command. This command works just like the
Fade Selection command, except it always prompts
you to choose your fade shapes before it creates the
fade.
2. Set your fade in and fade out shapes, and enter
time durations that will be used by the Default
Fade command.
3. Click the OK button.
You have now set your default fade information.
Remember, Deck allows you to execute fades
and crossfades on any number of regions at
one time. When you select multiple regions and
choose the Default Fade command, all selected
regions are faded or crossfaded using the
default fade shapes and durations. When you
select multiple regions and choose the Fade
Selection command, all selected regions are
faded or crossfaded using the default fade
shapes and their whole duration as the fade
durations.
3. Select Default Fade (Command-H) from the
Process menu.
If you have a great number of regions selected, this
process may take a while. After a few moments, the
Deck Tracks window will reappear and all of your
fades and crossfades will be in place.
If you are editing music, dialog, or effects, you can use
the Default Fade command as an auto pop-filter for
correcting the clicks and pops you may have across
region boundaries. To do this, set the default fade
shapes to equal power and the default fade durations
to a short period (60ms, for example). Then select all
regions and choose the Default Fade command. All
regions will be faded in, faded out and/or crossfaded,
guaranteeing that no region transitions will be abrupt.
For more information about fade combinations, see
“Possible envelope combinations” on page 42.
To create a custom fade or crossfade:
1. Open the Tracks window and select the waveform
range you wish to fade or crossfade. This range
must cross at least one region boundary. If it
crosses only over the beginning of a region, a fade
in is generated. If it crosses only over the end of a
region, a fade out is generated. If it crosses the
border between two touching regions, a crossfade
is generated.
2. Select Custom Fade (Command-G) from the
Process menu.
To execute the default fade/crossfade:
1. Make sure you have set your default fade
information as described above.
2. Open the Tracks window and select the waveform
range you wish to fade or crossfade (Range
mode), or any region or regions (Object mode)
you wish to fade or crossfade.
44
Deck User’s Guide
3. Choose your fade out shape and fade in shape
4. Click the OK button.
Page 55

After a few moments, your crossfade will be complete
and you will see it in the Tracks window. Remember, if
there is no audio data in the source file after the end
of Region 1 or before the beginning of region 2, Deck
will warn you that no data is available. However, Deck
will allow you to execute the fade anyway, using
silence as the missing crossfade source data.
If you have selected a waveform range that only covers
a region beginning or a region end, you will see only
one set of fade shapes, rather than two, because you
are executing a fade, not a crossfade.
To delete crossfades:
1. Open the Tracks window and select a waveform
range that touches any crossfade or regions that
contain any crossfades.
2. Choose Delete Fade from the Process menu.
Compacting audio that contains crossfades
When you are dealing with crossfades, you must pay
special attention if you plan to use Compact Session or
Compact Audio File later on. Both of these processes
offer an adjustment called Handle Size, which allows
you to choose how much source audio before each
region’s start and after each region’s end will be
retained when the source sound files are compacted
(that is, when unused portions of sound files are
deleted). It is possible to compact a session or sound
file with smaller handles than you would need to
recreate session crossfades. Remember, crossfades are
built from the sound data before the beginning and
after the end of the regions. If you delete crossfades or
perform edits that delete crossfades after you have
compacted with a small handle size, there may not be
enough data to recreate the deleted crossfades.
4
All fades in any regions touched by the current
selection will be deleted. Note that fades and
crossfades are small audio files that are generated
automatically by Deck and placed in the current
session’s Crossfades Folder. When you delete fades,
they will be deleted from your hard disk. However, the
crossfades are not physically deleted until you save the
current session. When you do so, the disk space
occupied by the deleted fades will become available.
When you move regions that are connected by a
crossfade, that crossfade will be deleted automatically.
Any crossfade is related specifically to the two regions
it bridges. The crossfade loses all meaning when the
regions are separated.
Fades and crossfades are generated by Deck from the
original source sound files. Deck always keeps track of
the source sound files, and can recreate the crossfades
automatically if you delete any of them from your
drive. If you ever want to free up disk space consumed
by a session’s Crossfades Folder, you can simply throw
that folder away. The crossfades will be rebuilt
automatically when you next open the session.
Using Compact Session and Compact Audio Files
Compaction is a destructive process, so make sure you
understand what you’re doing before you use it. It is
particularly important that you understand the Always
Save Regions when Session is Saved and Rewrite
Regions preferences in the Deck General Preferences
dialog. These preferences have strong effects on the
compaction process. Make sure to read about those
preferences before you compact audio files or
sessions.
Compact Session
The Compact Session function can be very useful.
Because Deck is a non-destructive recorder, audio
data is not deleted when new audio is recorded. This
means that no recording or editing process actually
changes, damages or deletes the original source files,
so you can always go back to previous takes and
versions. The only negative side effect of this
characteristic is that unused takes and throwaway
regions stay on your hard disk, even after you stop
using them. If, for example, you record three voice-
Visual Waveform Editing
45
Page 56

over takes and decide to keep the second take, takes 1
and 3 remain on your drive even after you remove
them from the session. To permanently delete all
unused audio associated with the current session, you
will use the Compact Session process. To permanently
delete all unused audio from a single audio file, you
will use Compact Audio File.
Compact Session automatically compacts all of the
audio files in the session’s Audio Files folder which are
used in the current session. This is the command you
will always use to get rid of unused audio data (junk
takes, deleted words or unused solos, for example) in
all sound files associated with the session.
Files are compacted in the following way: Deck looks
at the list of audio regions and loops in each audio file.
It then looks through the audio data in each file, and
finds all audio data that is not used in any region. After
the unused audio has been found, it is permanently
deleted from the drive, and all region definitions are
updated.
Compact Session only compacts audio files located in
the current session’s Audio Files folder. It will not
compact audio files located elsewhere on the drive, or
on other drives. This safety feature has been built into
Deck to prevent the accidental compaction of sound
files in a central sound effects library, or of sound files
used in multiple sessions. Make sure you always keep
sound library files and shared sound files in a folders
outside the current session’s Audio Files folder.
To compact a session:
1. Make sure you have deleted all unwanted audio
regions from the Tracks window—Play Tracks and
Work Tracks.
2. Choose File > Preferences > General and turn
on the “Always save regions when session is
saved” and “Rewrite region list” options.
3. Open the Library window (Command-6).
4. Choose Session > Library Operations > Update
from Session.
5. Save your session (Command-S).
6. Choose Session > Compact Session, set a Handle
Size.
7. Click OK.
The Handle Size setting allows you to keep a little bit
of extra audio data before every region start and after
every region end, which will be useful in the future if
you plan to crossfade the regions. You will probably
want to set your handle size to at least two seconds for
this purpose.
When your session contains crossfades, you must pay
special attention to Handle Size settings. It is possible
to compact a session or sound file with smaller
handles than you would need to recreate your
session’s crossfades. (Remember, crossfades are built
from the sound data before the beginning and after
the end of the regions.) Compacting with too small a
handle size will not alter your current crossfades.
However, if you delete crossfades or perform edits
that delete crossfades after you have compacted with a
small handle size, there may not be enough data to
recreate the deleted crossfades.
Compact Audio File
When you select Compact Audio File, Deck looks
through the audio data in the file, and finds all audio
data in that file that is not used in any region in the
current session. After the unused audio has been
found, it is permanently deleted from the drive, and all
region definitions are updated. The Handle Size
setting allows you to keep a little bit of extra audio
data before every region start and after every region
end, which will be useful if you plan to crossfade the
regions. You will probably want to set handle size to at
least 2 seconds for this purpose.
To compact audio files:
1. Choose File > Preferences > General.
2. Turn on “Always save regions when session is
saved” and “Rewrite region list.”
3. Open the Library window (Command-6) and
46
Deck User’s Guide
Page 57

choose Session > Library Operations > Update
from Session.
4. Select File > Compact Audio File.
5. To compact an audio file, just select that file,
enter a handle size and click the Compact button.
This process is permanent, so be sure you want to
alter the selected audio file before you proceed. You
may wish to make a copy of the file if you think you
might want to use it in its original form later on.
Compact Audio File affects only the audio file you
select, unlike Compact Session, which affects all of the
audio in your session’s audio files folder.
Spotting Audio Regions to Timecode
The current time indicator is particularly useful when
you want to spot a sound to an internal sync point (a
point other than the start or end of the region). If, for
example, you had the sound of a car roaring by, with a
skid sound half way through, you could place the
mouse at the skid sound and spot that sound to the
desired frame.
You do not have to drag the region to place it. You can
also Copy or Cut the region, click to place the
insertion point at the correct frame, and then choose
the Paste At or Paste After command.
If you know the exact time to which you wish to spot a
region, double-click the region, which brings up the
Region Info dialog. You can change the region’s start
time by typing in the new time or capturing one. You
can also change the region’s name by typing in a new
name.
4
One of the most common tasks in the audio postproduction process is the placement (or spotting) of
sound to a particular SMPTE frame. Deck allows you to
do this in a very simple way using the normal editing
tools.
To spot an audio region to a specific SMPTE frame:
1. Open the Tracks window and set the units of the
window to SMPTE using the Axis Units pop-up.
2. Click the Object Mode button (or ~ key) to
switch to Object mode.
3. Add the audio region you wish to spot using the
process described in “Adding Audio Files and
Regions to a Session” on page 22.
4. Click and hold on the audio region you wish to
spot.
5. Drag the region to the frame you desire.
As you drag the region, the number indicator boxes
near the upper right of the Tracks window are
updated to show the start time, end time, current
time, and duration of the selected range. The current
time is the time that is directly under the cursor.
For more information about synchronization and
spotting with Deck, see “Synchronization” on page 93.
Using the Tempo and Time Signature settings
The Deck Tracks window offers some simple tools that
make it possible to edit audio according to traditional
bar and beat settings. This is an absolute necessity
when you are recording or arranging music to match a
MIDI tempo, click track, or MIDI sequencer track.
When you run Deck with the Metro sequencer, the
tempo settings take on particular importance, because
they allow you to match bar and beat edits between
the two programs. For more information about using
Deck with Metro, see “Using Deck with the Metro
Sequencer” on page 90.
To set and use Deck’s tempo and time signature
information:
1. Open the Tracks window and set the units of the
window to Beat using the Axis Units pop-up.
Visual Waveform Editing
47
Page 58
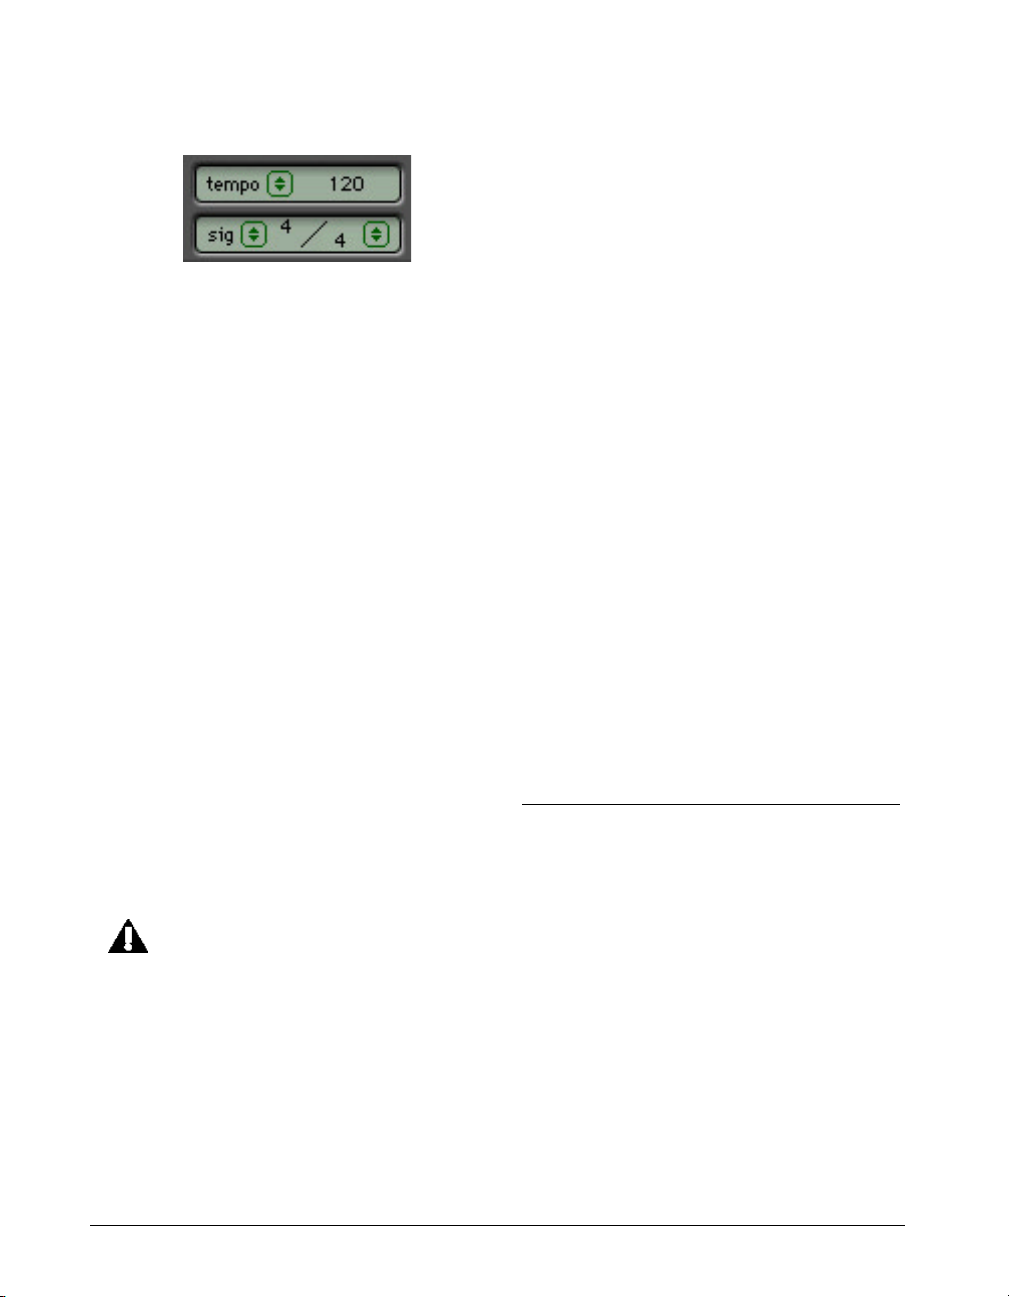
2. Drag on the Tempo selector to set a new tempo.
information in Metro if you are running both
programs. Remember, Deck supports tempo
maps, so Metro tempo maps will always be
reflected on the Deck Tracks window axis
markers (when you are in Beat mode).
Tempo selector
3. You can also hold down the Command key and
click the selector to enter the new tempo or time
signature as text. Then press the Return key on
your Macintosh keyboard to apply the change.
4. Drag on the time signature numerator selector to
set the number of beats to a measure.
5. Drag on the time signature denominator selector
to set the value of the note that should be
considered one beat.
For example, setting this to 4 means that a quarter
note is considered to be one beat.
These values are very useful for song-oriented
arrangement. When you set these values, you are
determining the units that will be used by the beat
mode axis markers, and the associated grid settings.
Note that the tempo and time signature values only
effect the way that Deck’s Tracks window Time Axis,
Grid, and numeric indicators functions (and, of
course, the Transport window’s counter). The tempo
and time signature values do not alter the placement
of any audio regions unless you have configured Deck
as described in the following Important message.
If you are using the Metro sequencer, you will
find that any tempo and time signature
changes you make in Metro will automatically
be made in Deck. Also, any current selection
range in Metro’s Note Editor or Tracks window
will automatically be selected when you switch
to Deck. Note, however, that changes made to
tempo and time signature in Deck are not
passed to Metro when you switch (Metro is
designated as the tempo master), so you should
change your tempo and time signature
If you are working in Beat mode, there is a circumstance in which you may wish to have audio regions
stick to their bar and beat placement when tempo is
changed. If you are using Deck as a virtual drum
machine (playing individual drum sounds back as
regions), you will often want to make sure that any
tempo changes will adjust audio region placement to
make sure that the regions still start at their original
bar and beat locations. In this situation, changing
tempo will alter where bar and beat boundaries occur
in relation to real-time, and bar/beat start times are
considered to be relative times rather than absolute
times. Deck offers a special preference for this type of
editing. If you wish the regions to stick to their bar and
beat locations whenever tempo is changed (in Beat
mode), then see the “Change region start times with
BPM change” preference (under General preferences
in the File menu’s Preferences submenu). When this
option is turned on, tempo changes in Beat mode will
adjust the placement of audio regions so that they
retain their bar and beat locations. For more information, see Chapter 7, “MIDI and Synchronization.”
Using an External Editor
Deck allows you to assign an external audio editing
program, such as BIAS Peak, which can be launched
from within Deck and used to process audio files.
Deck is designed to allow you to run an external editor
and Deck at the same time, and Deck’s Launch Editor
command automatically switches you into the other
program.
Editing audio in programs that recognize audio
regions is different than editing in programs that do
48
Deck User’s Guide
Page 59
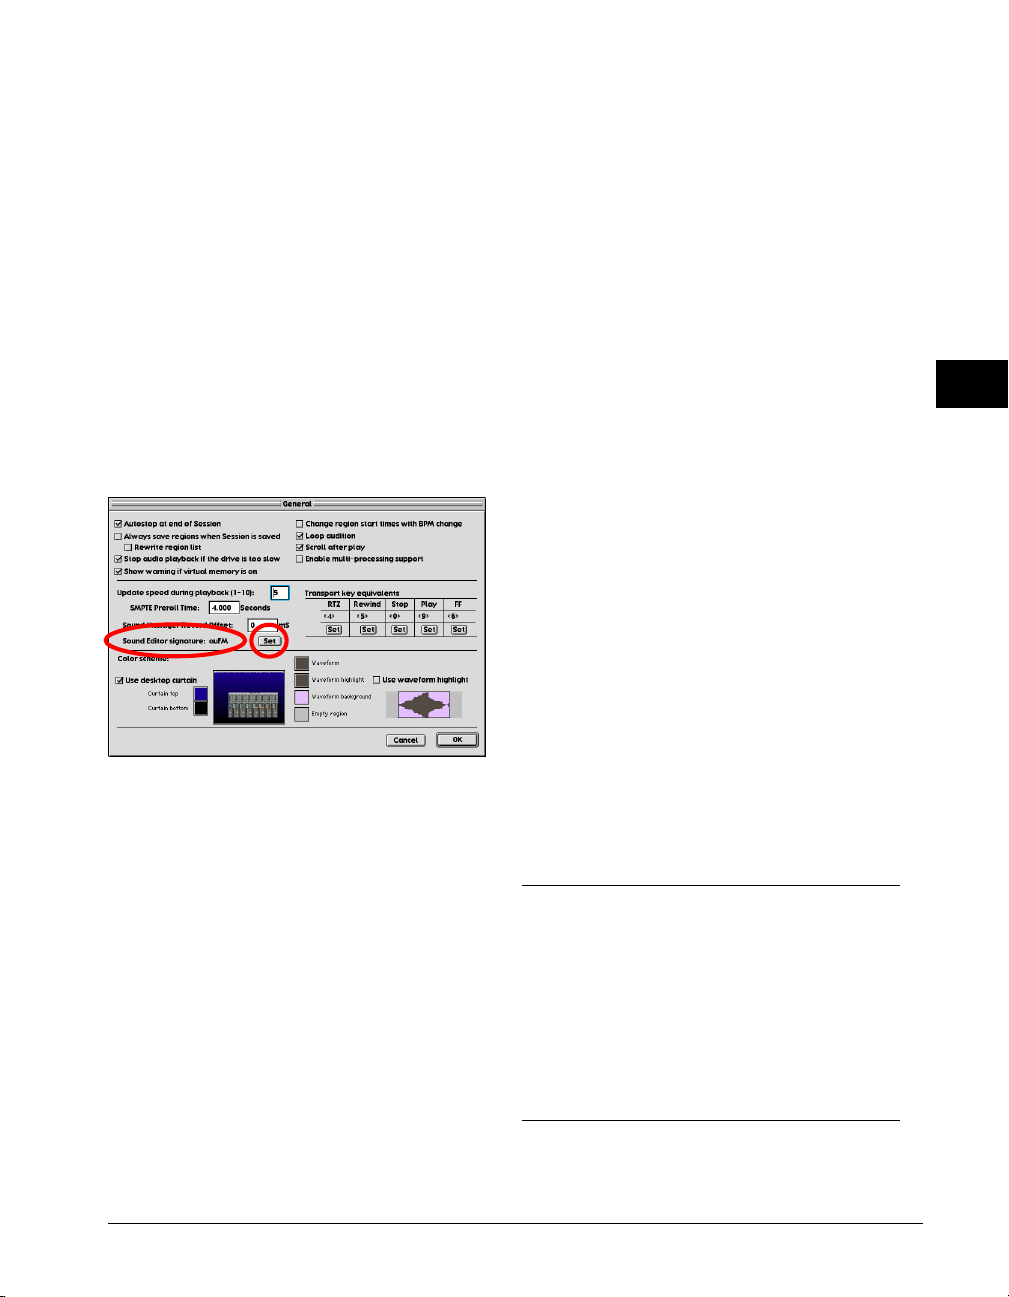
not recognize regions. Both methods are discussed in
the following section.
To use an external editor with Deck, you will have to
have sufficient RAM to run both programs. Use the
Finder’s Get Info command to find out how much
RAM you audio editing programs requires.
Edit your audio with care if you plan to play it from
Deck again. If you destructively delete a waveform
range or change the length of the file, you will change
the overall timing of the Deck track(s), and your
Tracks window arrangement may be permanently
altered. It is a good idea to work with a copy of the
sound file if you can.
To set an external sound editor:
1. Choose File > Preferences > General.
2. Click Set to the right of Sound Editor signature.
3. Locate and select your editing program.
4. Click Open.
Set Sound Editor signature in the General preferences dialog
To edit Deck audio files using an external editor:
1. Make sure you have selected your sound editor
using the process described above.
Using BIAS Peak as Deck’s External Editor
Editing audio regions using Peak as external editor is a
bit different than using any other editor, since Peak
recognizes the concept of audio regions.
To edit a Deck audio region in Peak:
1. Make sure you have selected Peak as your sound
editor using the process described in the previous
section.
2. In the Tracks window, switch to Object mode.
3. Select the audio region you wish to edit.
4. Choose Process > Launch Editor (Command-E).
You will immediately be launched into Peak, and the
selected region will be opened in that program. The
region will be highlighted. You can now perform any
edit you desire, and when you save the change and
switch back to Deck, the changed sound file will play
back.
Only changes made to the waveform and saved will be
reflected in Deck.
4
2. Make sure the Tracks window is in Object mode
and select the region or file that you wish to edit.
3. Choose Process > Launch Editor (Command-E).
You will immediately be launched into your external
editor, and the entire audio file that contains the
selected region will be opened in that program. You
can now perform any edit you desire, and when you
save the change and switch back to Deck, the changed
sound file will play back.
Conclusion
You have learned how to edit and manage audio
regions in Deck, proceed to the next chapter to learn
about Deck’s Built-in destructive and real-time effects
as well how to use Premiere format and VST plug-ins
with Deck.
Visual Waveform Editing
49
Page 60

50
Deck User’s Guide
Page 61
Chapter 5
Effects
Page 62

52
Deck User’s Guide
Page 63
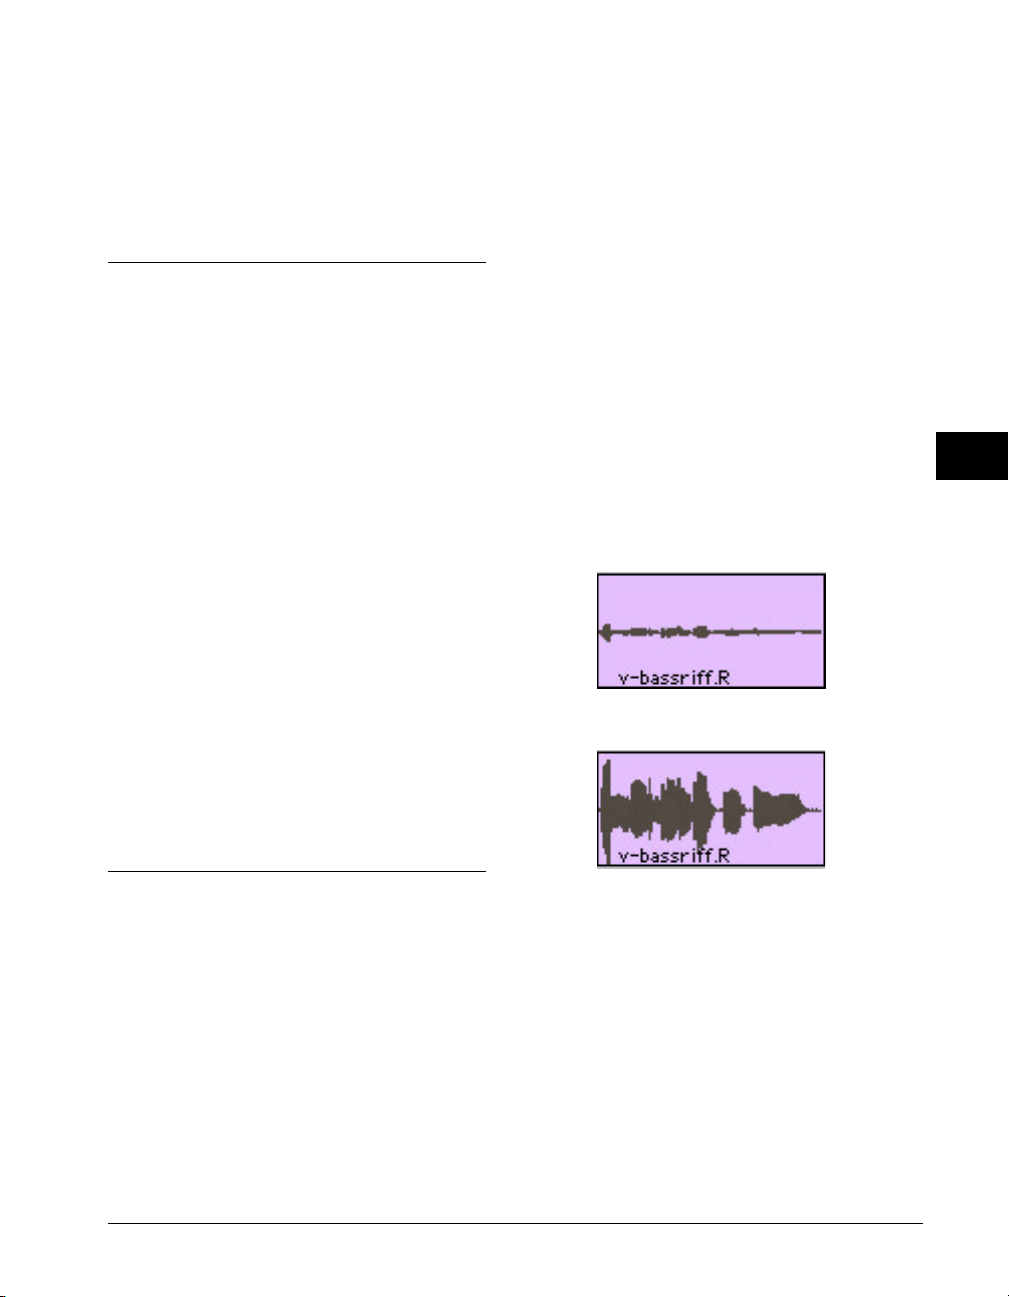
Chapter 5: Effects
The effects available in Deck fall into three basic
categories: Destructive effects that actually rewrite
audio files; non-destructive real-time, in-line effects
that act in much the same way as standard external
effects boxes or the EQ controls on an external mixer,
affecting the signal in real-time during playback or
mixdown, leaving the source audio file intact; and
Plug-Ins.
Deck plug-in effects use both the Adobe Premiere
plug-in architecture and Steinberg VST plug-ins, and
are designed by third-party developers such as
Arboretum Systems and Waves. These are separate
optional software packages that may be purchased
from these developers.
You may also choose to use other stand-alone sound
editing programs— such as Peak—to destructively edit
Deck audio files. Virtually any digital audio editing
program that works with Deck-supported audio
formats can be assigned as an external editor in Deck,
and can be launched from within Deck with a single
command.
Deck’s destructive effects
There are certain cases where you might want to
change the actual audio data in a destructive, or
permanent, manner. Suppose you have recorded a
perfect solo, but the overall level is slightly low (or the
waveform seems short). You would definitely want to
increase the level of that track to its maximum. All the
destructive effects are on the Process > Destructive
menu.
Normalize—looks at an audio region (or group of
regions) and automatically adjusts amplitude
(volume) to the maximum allowable level. This
allows you to bring up low-level signals to a
reasonable level, which uses all of the amplitude
resolution available on your system.
Group Normalize—functions in the same manner
as Normalize, except that it finds the peak over a
group of regions and adjusts each region the
same amount.
Waveform before Normalizing
Waveform after Normalizing
Reverse—takes the selected audio region (or group
of regions) and turns them around so they are
backwards. This is quite useful for specialty effects
and preprocessing effects such as pre-echo.
Invert—flips the audio region (or group of regions)
upside-down. This does not alter the sound of the
region(s), but can be very useful for matching
waveforms for looping and general sound design
tasks.
Duplicate—physically duplicates the range or
5
Effects
53
Page 64
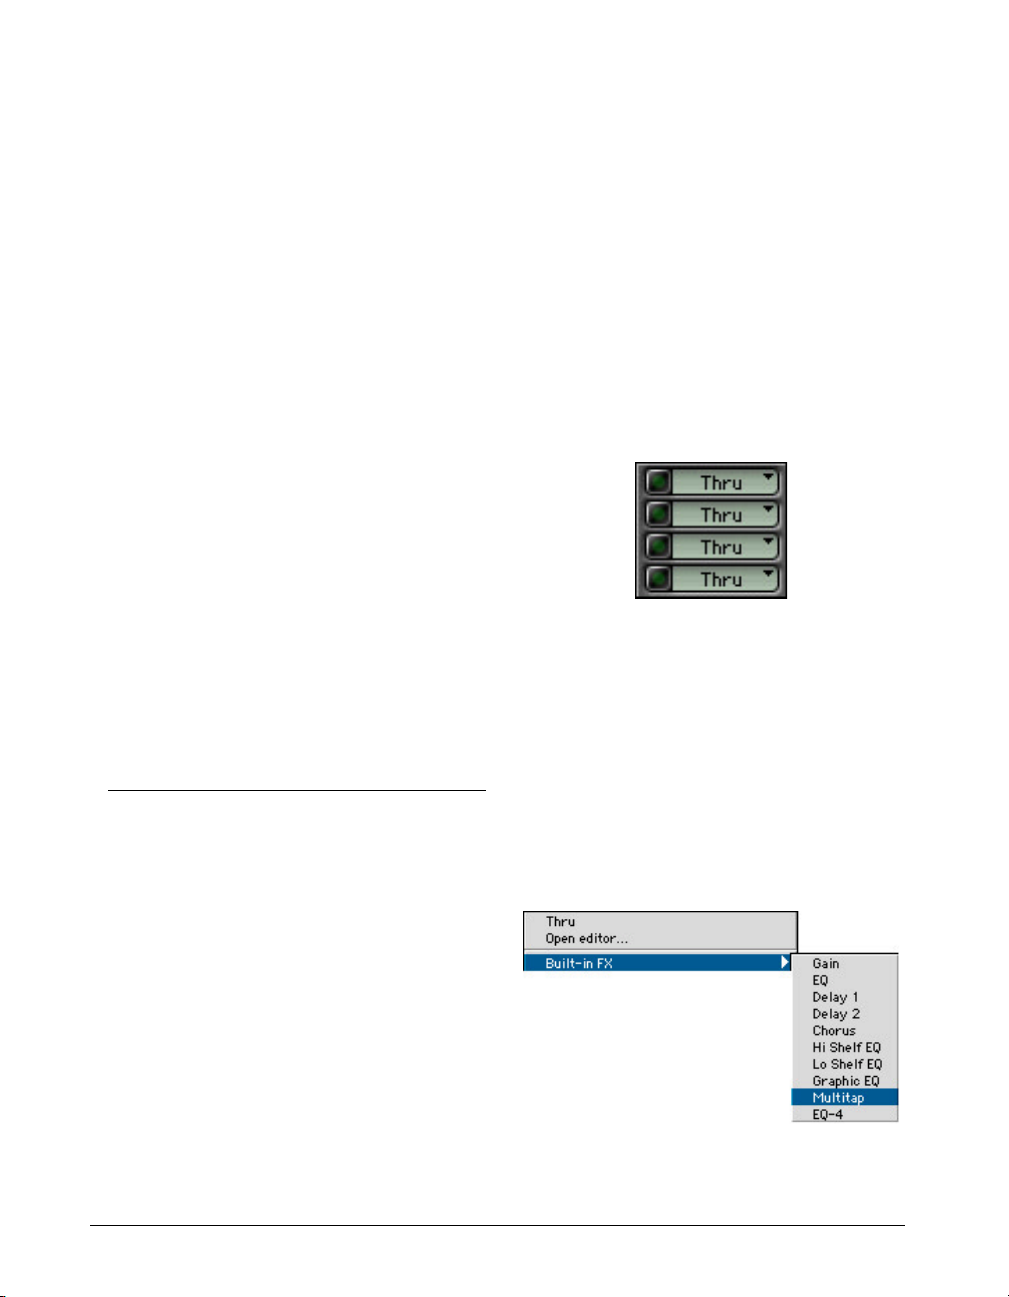
region(s) you have selected and copy the new
audio file(s) to that session’s Audio Files folder.
This is useful if you have copied an audio region
several times in your Deck session, but want to
have only one instance of that audio file affected
by an edit, for example. Deck will make a separate
physical copy of that region in the Audio Files
folder, and changes made to it will not affect
other copies of that region.
To normalize, reverse, invert or duplicate a region or
group of regions:
1. In the Tracks window, select the range or
region(s) you wish to process.
2. Choose the desired effect from the Process >
Destructive Effects submenu.
3. Whenever you perform a destructive effect, Deck
will ask you if the process should be executed on
a copy. Signal processing permanently changes
audio data, and it can’t be undone, so it is always
a good idea to select Make a Copy when using
destructive effects.
4. Click OK or Make a Copy to continue.
If you chose Make a Copy, the copy has been placed in
the position of the original audio region, but the
original region has not been altered.
Real-time effects
Deck offers built-in real-time, in-line non-destructive
effects that are available during playback. The real-time
effects in Deck are: Parametric EQ (single and 4-band),
Delay, Chorus, Hi Shelf EQ, Lo Shelf EQ, Gain, and
Graphic EQ.
Preferences menu’s Effects submenu.
These effects are simple to use, and have an intuitive
graphic interface that is similar to that of any multieffects box. In fact, these effects are easier to use than
many hardware multiprocessors, as all the controls for
all of the effects you have chosen are available to you
in a single window.
Assigning effects to play tracks
In Deck, create a new session, or open an existing
session. Open the Mixer window from the Windows
menu (Command-2). You will notice four boxes
labeled Thru at the top of each track’s mixer module.
Effect Selector pop-ups at top of each mixer module
These are the Effect Selector pop-ups. When you click
and hold on Thru in one of the Effect Selector boxes, a
pop-up menu will appear containing the names of all
the Built-in and VST effects available to you. Keep
holding down the mouse button, and scroll through
the list to select an effect to add to that track. (Note
that you can add up to four effects to each play track
by using each of the track’s selector boxes.) Choose
one of Deck’s Built-In effects for the Effect Selector
pop-up menu > Built-in FX submenu.
These effects are available at each play track’s Mixer
module, and can be configured in the Effect window.
You may assign up to four real-time effects to each
play track. The quantity of each kind of effect you will
have available in the Mixer window and the configuration of the Effect window can be altered in the
54
Deck User’s Guide
Built-in FX submenu in the Effect Selector pop-up menu
Page 65
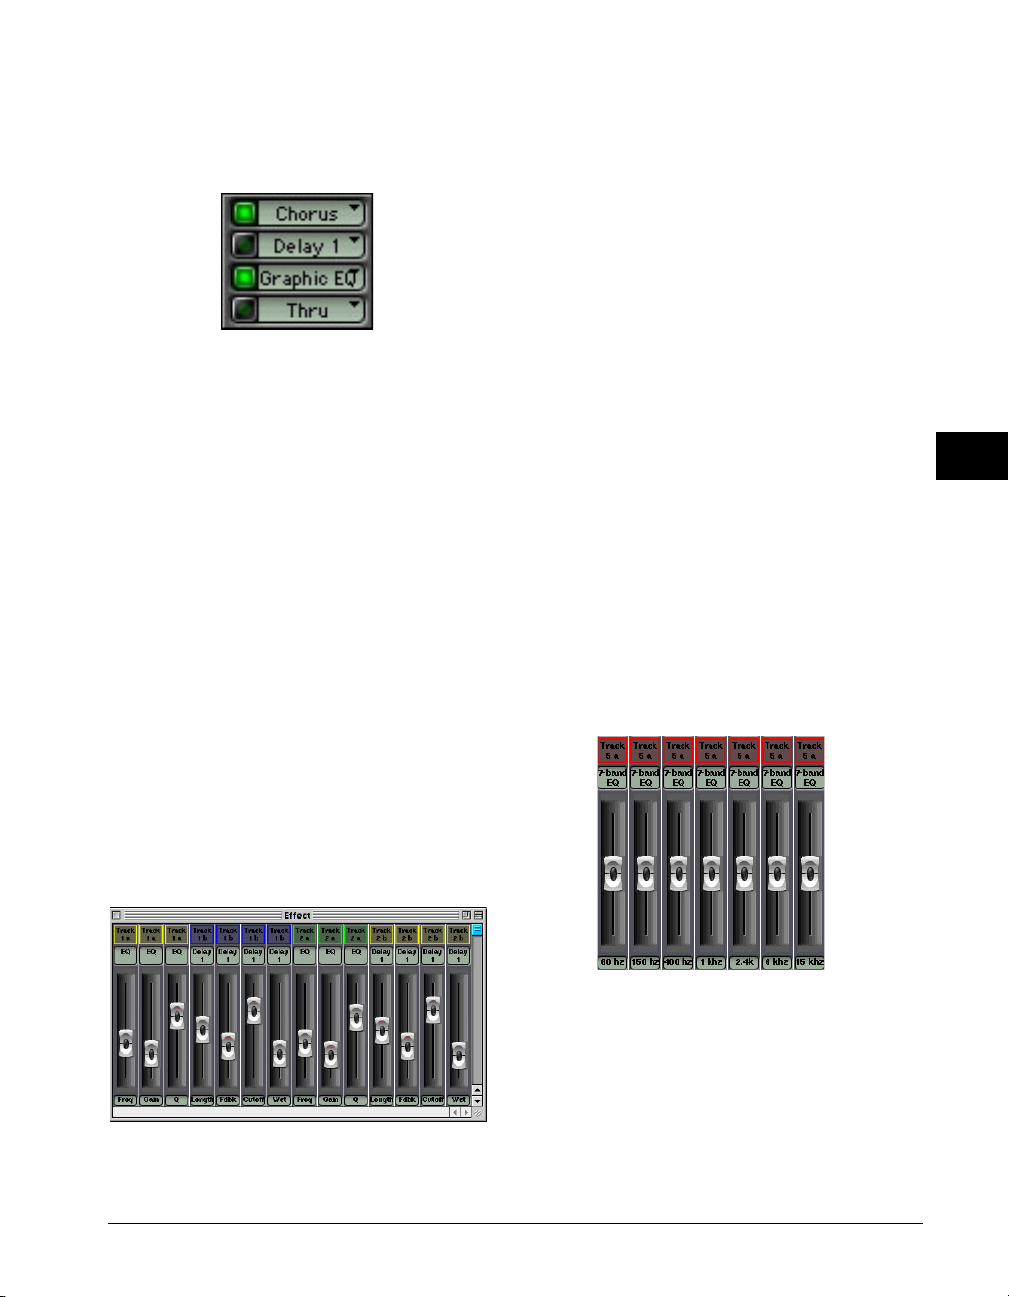
Once you have added effects to your play tracks, you
will see the names of the effects you’ve selected in
these selector boxes.
Effects selected, the Delay 1 effect is bypassed
You will now hear the effects when you play back your
session. To temporarily bypass an effect, click the
Bypass Button to the left of that effect’s selector box,
and click again to turn the effect back on—the Bypass
Button will be highlighted with the effect is on. This
allows you to turn the effect on for only part of a track,
or to hear the track with and without the effect while
keeping the changes you’ve made to that effect’s
settings.
To remove an effect and all of its settings from a track,
click that effect’s selector box and scroll up to Thru.
This removes the effect and all of its settings from that
track, but you can always add it, or a different effect, at
any time, and re-configure it in the Effect window.
Now open up the Effect window from the Windows
menu (Command-7). You will see slider controls
corresponding to each of the effects that you have
selected for your session in the Effect window. The
following example shows the Effect window with
multiple effects.
Each effect has a different set of parameters that you
can change to tailor each effect to your needs. Even if
you have chosen one kind of effect for multiple play
tracks, the settings of each track’s effect can be altered
independently of the others. You literally can have up
to four independent effects per play track. Note
however that the actual number of possible simultaneous effects is determined by your computer’s clock
speed. You can monitor your system in the CPU Meter
window and avoid exceeding your system’s capabilities.
You will know you have applied too many real-time
effects in a session when Deck starts to behave
erratically. When this occurs, it is a good idea to
reduce the number of real-time effects applied. The
Graphic EQ is the most processor intensive real-time
effect.
Adjusting Effect parameters
Each effect has a different set of parameters that can
be adjusted using the sliders in the Effect window. For
example, the Graphic EQ sliders work like a real
graphic EQ. You can boost or cut each frequency by
moving the sliders.
5
Effect window
Graphic EQ Effect sliders in Deck
Many of the effects work in tandem with the Transport
window. For example, as you move the Frequency
slider in the EQ window, the value represented by that
slider will be shown in the Control Value Indicator box
(upper left) of the Transport window, and will track as
you change values by moving the slider. This can be
Effects
55
Page 66
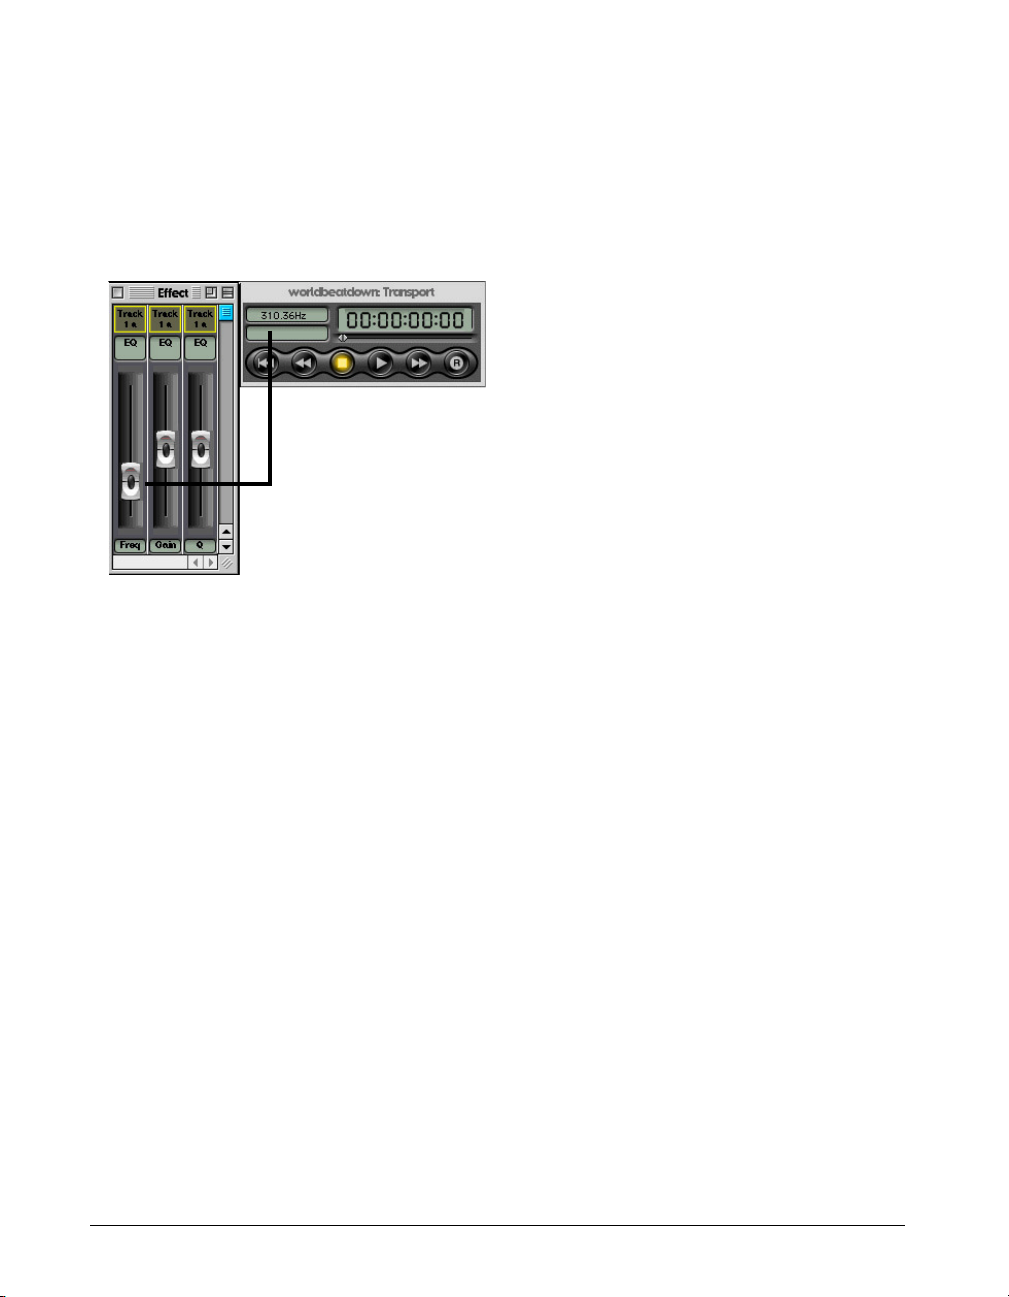
very useful for isolating a particular frequency with the
EQ, or for finding a specific delay speed for the Delay
or Chorus effects.
The following diagram shows the Transport window
tracking an EQ Frequency slider.
boost, or cut, certain frequencies (that is, turn
them up or down). You might use this to add
mid-range punch to a bass track, or to remove
sibilance from a vocal.
Deck’s EQs (single and 4-band) allow you to
select the frequency affected, the gain (the
amount of cut or boost) and Q, or resonance, for
each EQ selected. The Hi and Lo EQ, are shelf
EQ’s that allow you to select the frequency and
gain of the shelf, or threshold. The Graphic EQs
operate as 7-band graphic equalizers, with a slider
to boost or cut each of the 7 frequency bands.
Both the Graphic EQ and the 4-band EQ are
processor intensive.
Delay—Adds a delayed copy of the audio at specified
intervals, creating an echo effect. A short delay, or
slapback, sounds good on rock vocals and
rockabilly guitar, and sounds almost like reverb. A
long delay yields long, spacey echo effects.
Notice that the mouse cursor is on the frequency
slider, and the value of that slider is shown in Hz in the
Transport window’s Control Value Indicator box.
Using the Transport window to track each slider can
help you set the various parameters of each effect. You
may want to test each effect individually on the same
track to get acquainted with them.
Remember that these effects are non-destructive, and
will not affect audio files, ranges or regions. They are
available on playback, and during mix to disk
operations, and you can turn them on and off and
change the settings at any time, even on the fly during
playback.
About Deck’s Built-in Effects
Here is a brief description of all of Deck’s real-time
effects, and the different parameters you can adjust for
each of them in the Effect window.
EQ (single and 4-band), Hi EQ, Lo EQ, Graphic
EQ (7-band)—Can be thought of as a very
flexible version of the Treble and Bass controls on
your home stereo. EQ allows you to isolate and
The Delay effects in Deck offer you control over
the delay time (length of delay), amount of
feedback, cutoff frequency and “wet,” or percent
of effect, compared to “dry,” or unaffected, signal.
Gain—A one-control-slider effect, which gives you a
+18/-18 dB gain stage. Try using it pre- or postEQ. This is essentially a preamp, or attenuator,
which either increases or decreases the amplitude
(volume) of your playback track.
Chorus—Is really a short delay with modulation. The
delayed sound is mixed with the unaffected audio
to create a thicker sound, and with extreme
settings, a woozy sound. Chorus adds a lot of
body and richness to vocals and guitar, and at
extreme settings makes an excellent special effect.
The Deck Chorus effects allow you to choose
amount of delay, speed, depth of modulation and
“wet,” or percent of effect, compared to “dry,” or
unaffected, signal.
Multitap—Designed to use multiple delays to
simulate reverb-like effects. Multitap is processorintensive.
56
Deck User’s Guide
Page 67
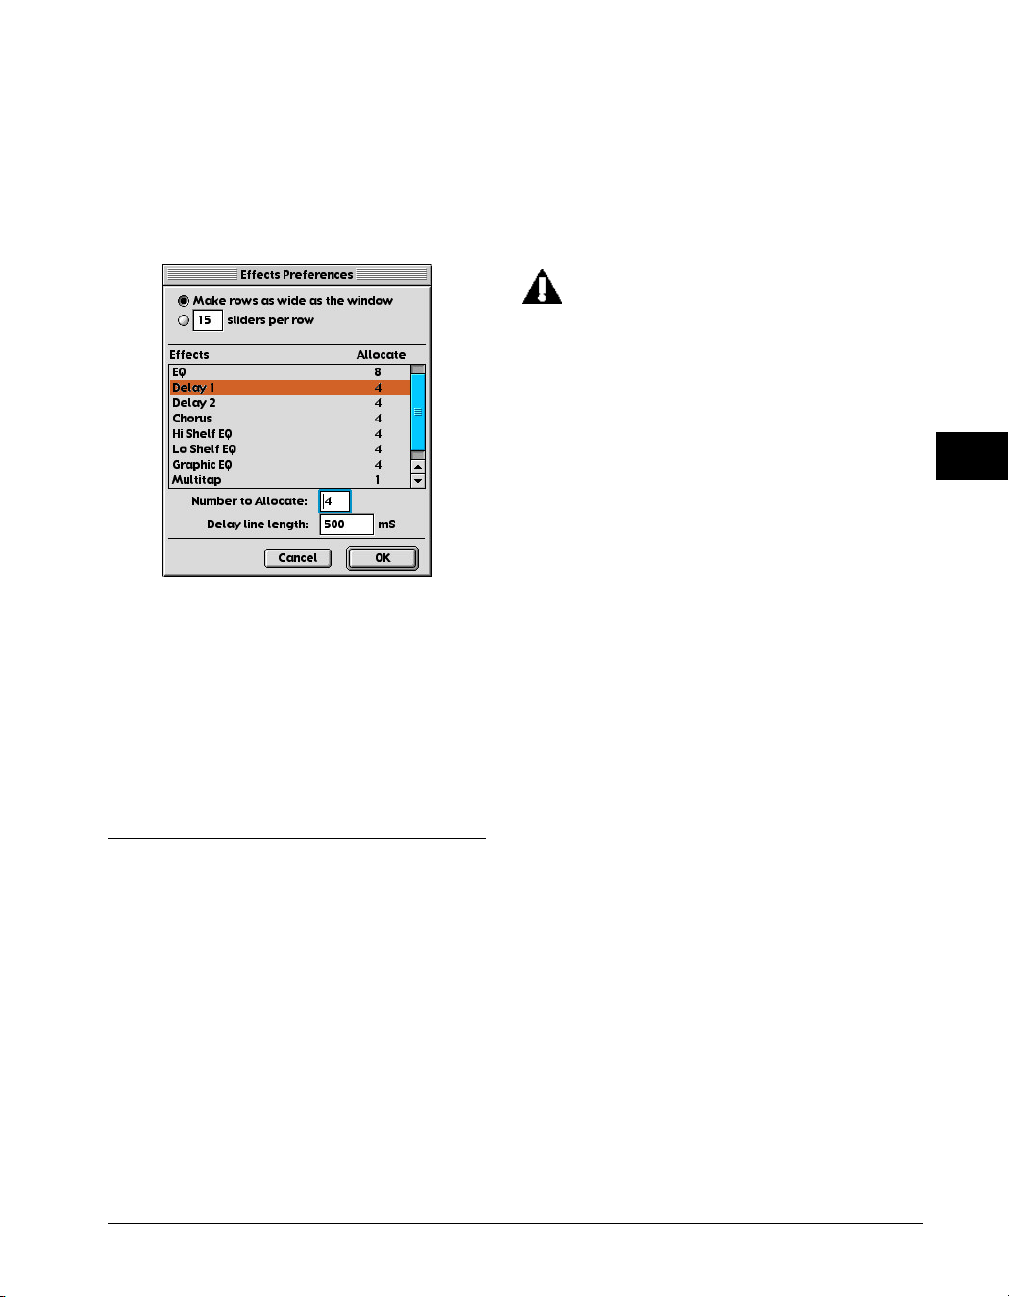
Setting effects preferences
You may want to change the way the Effect window is
configured, or change the quantity of each kind of
effect available. You can change these settings by using
the Effects Preferences menu.
Effects Preferences dialog
You can use this dialog to specify how you want the
Effect windows sliders to be arranged, and to select
the number of each kind of effect you want to have
available to you in the Mixer window’s Effect Selector
boxes. You can also select the maximum length of
delay in the delay effects by entering the value, in
milliseconds, into the Delay Line Length field.
Premiere Plug-ins
Premiere format plug-in audio effects for Deck are
currently available from third-party developers
including Arboretum Systems and Waves. You don’t
need any extra hardware to use Premiere plug-ins—any
Macintosh that is supported by Deck should also run
the plug-ins. Although features and interfaces will vary
quite a bit depending on which plug-ins you add, you
can expect to greatly enhance your audio processing
capabilities by using Premiere plug-ins.
You don’t need Adobe Premiere to use Premierecompatible effects plug-ins with Deck. We have simply
adopted the architecture that Adobe defined for
Premiere audio plug-ins, as it represents a simple and
open alternative to controlled standards such as the
sound designer or TDM plug-in architectures.
The Plug-ins that come with Adobe Premiere
itself cannot be used in programs other than
Premiere.
Premiere format plug-ins are separate software
packages that can be purchased, copied to your hard
drive, and placed in the Deck Plug-Ins folder. Your
plug-in effects will be listed in the External Effects
submenu.
Although Premiere plug-in effects are destructive,
meaning that they physically rewrite audio files to
contain the processed audio data, they create a copy
of your audio file, and work from that copy. Plug-in
effects will also remove any crossfade information
from the region, and may also remove automation
data from the portion of the track that you have
processed. It is a good idea to add crossfades and
automation after processing audio with plug-in effects.
Note that you may have to leave extra RAM free in your
system in order to use these effects. The more RAM
you can leave free for your Premiere format plug-ins,
the longer preview time you will have to audition the
effect before you process the audio file.
Previewing (or auditioning) plug-in effects occurs
through the Apple Sound Manager. If you are using an
Apple Sound Manager compatible sound card, be sure
that you have installed its Sound Manager drivers and
that it is selected for Sound Out in the Apple Sound
control panel.
To apply a Premiere format plug-in:
1. Select the audio in the Tracks window, either in
Range Mode or Object mode, that you want to
process.
5
Effects
57
Page 68
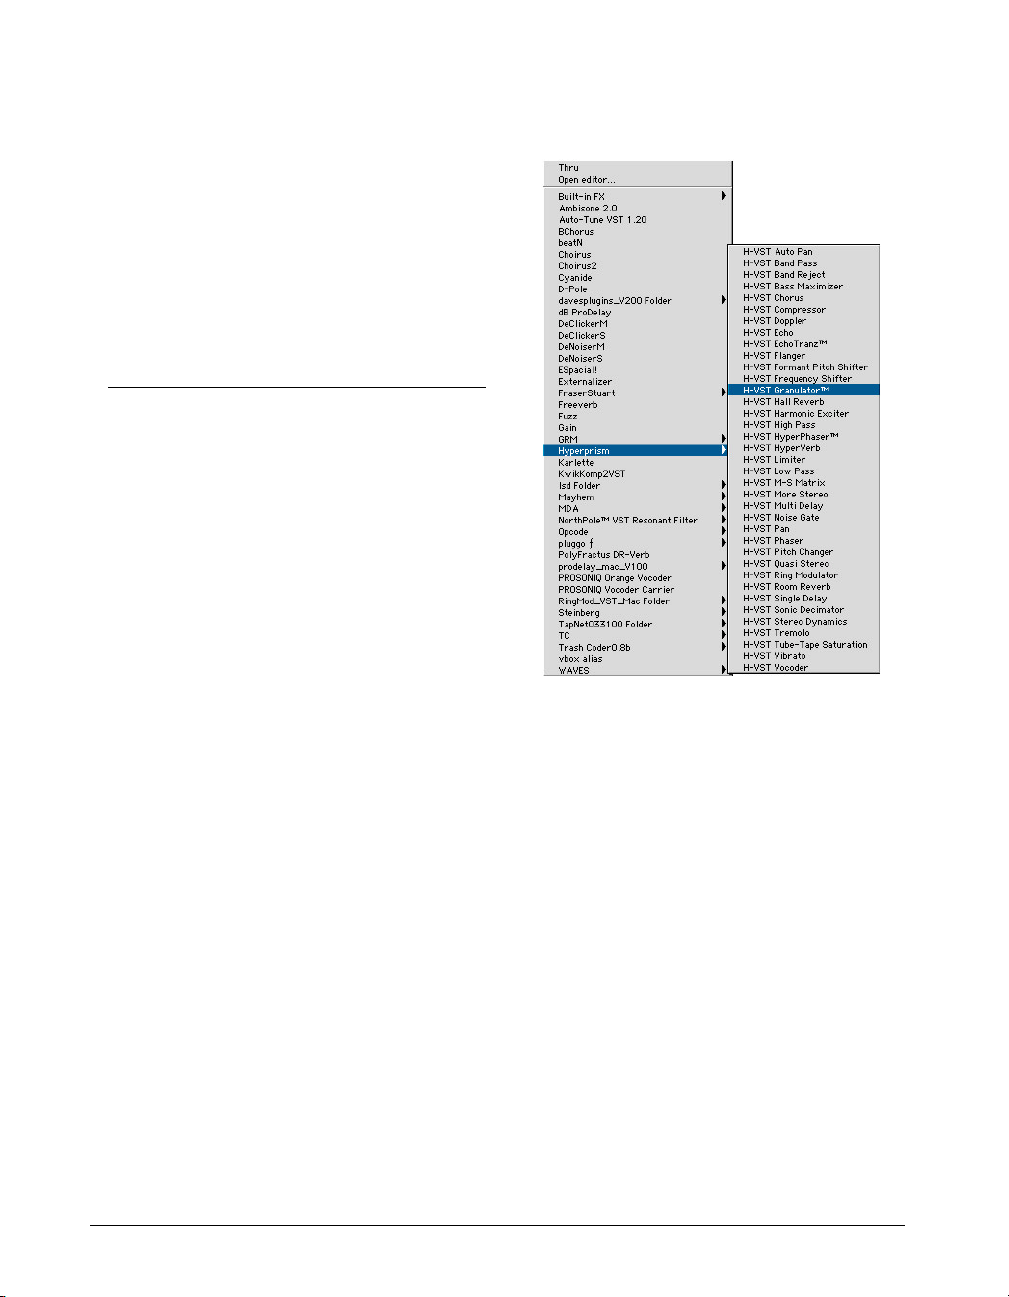
2. Choose the plug-in you want to process your
audio with from the Process > External Effects
submenu.
3. Adjust the settings of the plug-in and preview the
plug-in before processing the selected audio.
4. Click the Process button in the plug-in to process
the selected audio.
Deck will then process the selected audio with the
plug-in and redraw the waveform.
VST Plug-ins
Deck s supports VST 1.0 format plug-ins. VST is a
standard audio plug-in technology developed by
Steinberg Software und Hardware, GmBH. VST plugins offer an exciting array of real-time effects by
companies like Steinberg, Cycling ’74, Arboretum,
Waves, and others.
You can chain up to 4 VST plug-ins per channel in realtime using Deck, as long as you have a fast enough
CPU in your Macintosh—VST plug-ins are real-time,
host-based audio plug-ins that are dependent on the
host processor (i.e., your Mac’s CPU). Use the CPU
Meter window to monitor system usage so as to not
overtax the system when using VST Plug-Ins.
Installing VST Plug-Ins
VST plug-ins are installed in the VstPlugIns folder in
the Deck folder. VST Plug-ins are not installed in the
Deck Plug-Ins folder, rather the Deck VSTPlugIns
folder. To install a VST plug-in, consult the documentation that came with your VST plug-in.
Organizing VST Plug-Ins
Deck allows you to organize your VST plug-ins in subdirectories. Create folders in the Deck VSTPlugIns
folder and move VST plug-ins into these folders. Doing
this will organize your VST Plug-ins into submenus in
the Effects Selector pop-up menu in the Mixer window
and the Master Outputs window.
Effects Selector pop-up with VST plug-ins and submenus
Inserting VST Plug-Ins
To insert a VST plug-in in the Mixer window:
1. In the Mixer window, select a VST plug-in from
the Effects Selector pop-up menu on the channel
you want to apply the effect to.
2. Choose Open editor from the Effects Selector
pop-up menu or Option-click the name of the VST
plug-in to open its editor.
3. Press the space bar or the play button in the
Transport window to hear the audio processed by
the VST plug-in.
4. Adjust the settings of the VST plug-in.
5. You can hide the VST plug-in editor by clicking in
the close box of the plug-in editor or choose File
> Close (Command-W). The plug-in will remain
58
Deck User’s Guide
Page 69
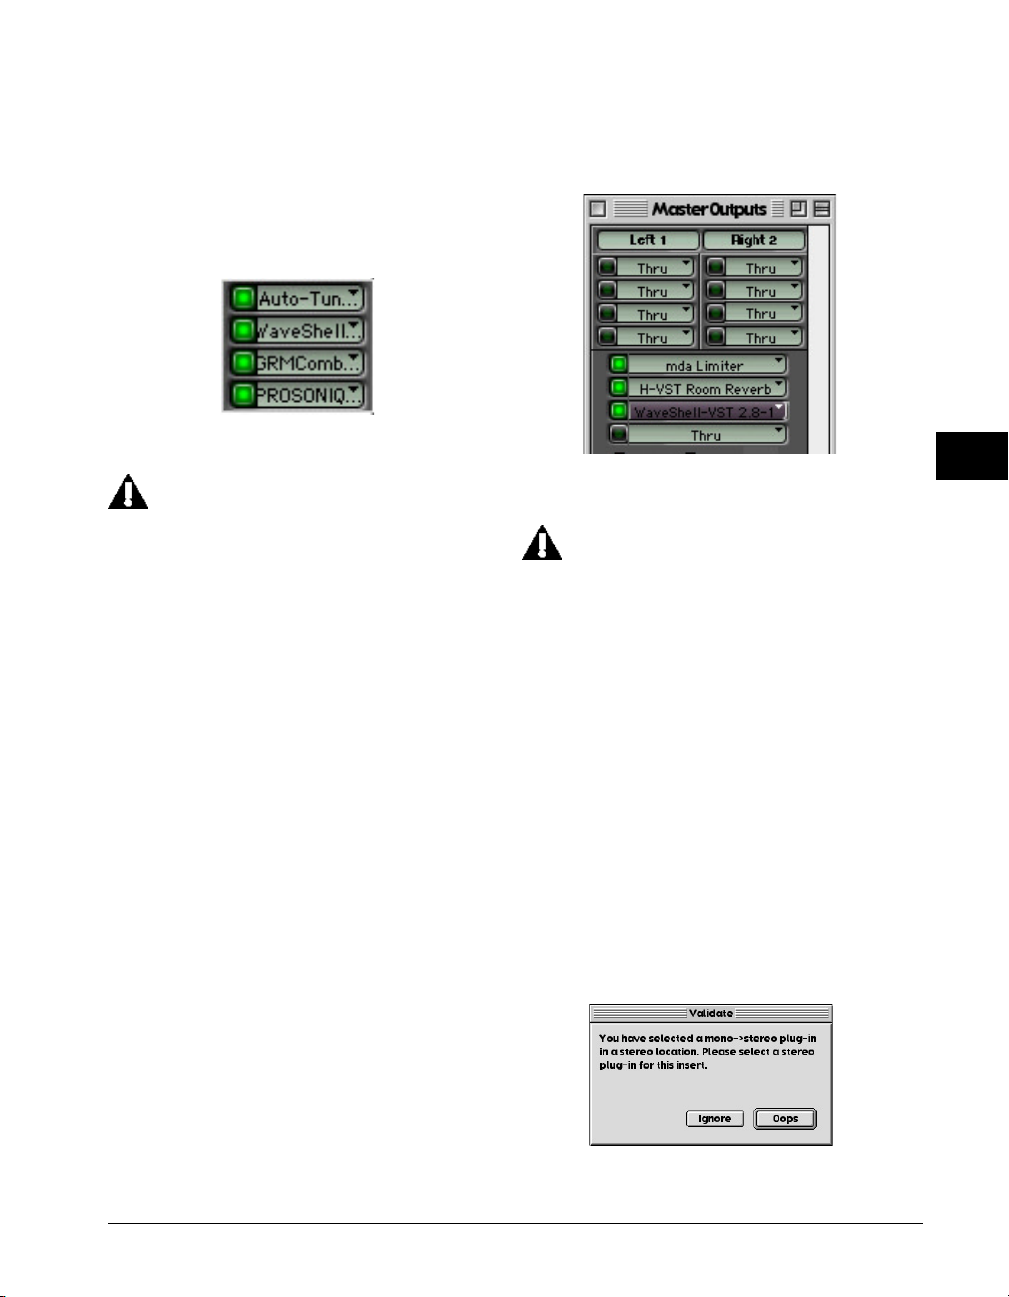
active until you remove it, by selecting Thru in the
Effects Selector pop-up menu. To make the editor
of an active VST plug-ins reappear, simply choose
Open editor from the Effects Selector pop-up
menu or Option-click on the name of the VST
plug-in in the Effects Selector box.
VST channel inserts in the Effects Selector boxes on a channel in the
Mixer window
The Mixer window supports mono to mono,
and stereo to stereo VST plug-ins. You can use
mono to stereo VST plug-ins in the mixer
window, but they are treated as stereo to
stereo, so you should pan your signal hard
left—panning to the right attenuates the signal
towards -∞.
To insert a VST plug-in in the Master Outputs window:
1. In the Master Outputs window, select a VST plugin from the Effects Selector pop-up menu from
either the left or right channel, or the stereo
channel pair that you want to apply the effect to.
2. Choose Open editor from the Effects Selector
pop-up menu or Option-click the name of the VST
plug-in to open its editor.
Option-click on the name of the VST plug-in in
the Effects Selector box.
VST channel inserts in the Effects Selector boxes on stereo channels in
the Master Outputs window
The Master Outputs window supports mono to
mono and stereo to stereo VST plug-ins.
Mono, Mono to Stereo, and Stereo VST inserts
Mono to stereo VST plug-ins are not generally
supported by deck. However, you can use them in a
stereo location with the caveat that the plug-in is
throwing away the right channel.
If you want to use a stereo insert on a pair of mono
tracks, put your mono tracks on adjacent tracks, pan
one hard left, pan the other hard right, then place the
stereo effect on the Master Outputs for that pair.
5
3. Press the space bar or the play button in the
Transport window to hear the audio processed by
the VST plug-in.
4. Adjust the settings of the VST plug-in.
5. You can hide the VST plug-in editor by clicking in
the close box of the plug-in editor or choose File
> Close (Command-W). The plug-in will remain
active until you remove it, by selecting Thru in the
Effects Selector pop-up menu. To make the editor
of an active VST plug-ins reappear, choose Open
editor from the Effects Selector pop-up menu or
If you select the wrong type of insert, Deck will warn
you and give you the option of canceling your
selection by clicking on the Oops button, or keeping it
by clicking on the Ignore button.
Effects
59
Page 70
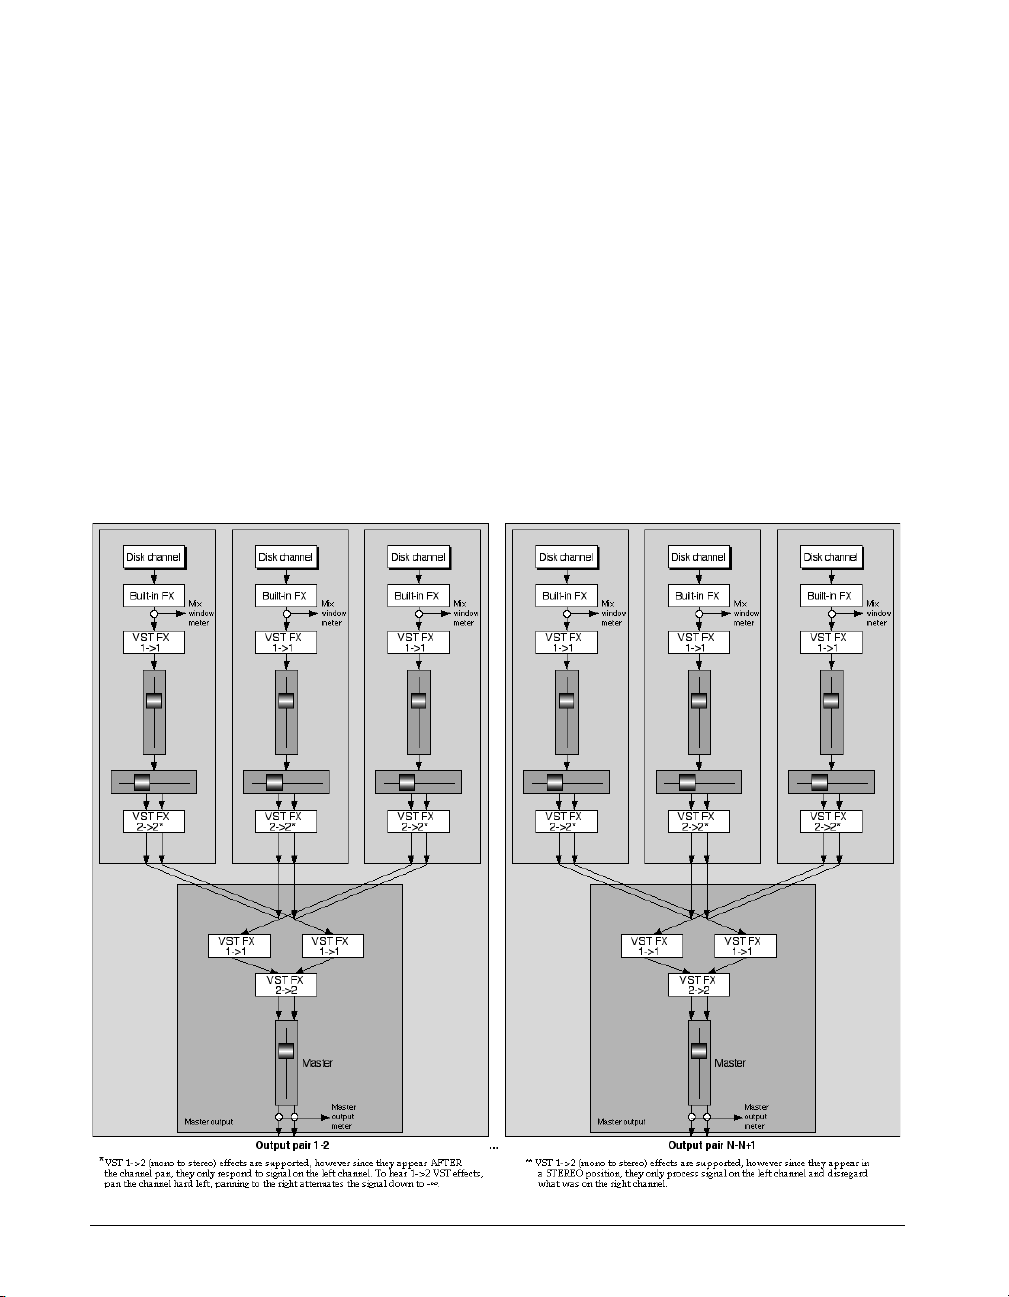
Mono to Mono plug-ins in a stereo insert mute
the right channel (you hear effect if panned hard
left, silence if panned hard right).
Mono to Stereo plug-ins in a stereo insert mute
the right channel (you hear effect if panned hard
left, silence if panned hard right).
Mono to Stereo plug-ins in a mono insert throw
away the right channel coming out of the plug-in.
Stereo to Stereo plug-ins in a mono insert is
generally not allowed. However, in the rare
instance where it is, it throws away the right
channel coming out of the plug-in.
To remove a VST plug-in:
• Choose Thru from the Effects Selector pop-up
menu. The VST plug-in on that insert will no
longer be active.
Signal flow by channel
In the Mixer window, built-in and mono-to-mono VST
effects are run mono-to-mono at the top of the chain
(pre-fader, pre-pan pot), and stereo-to-stereo VST
effects are run after the built-in effects, after the fader
and pan pot.
60
Deck User’s Guide
Page 71
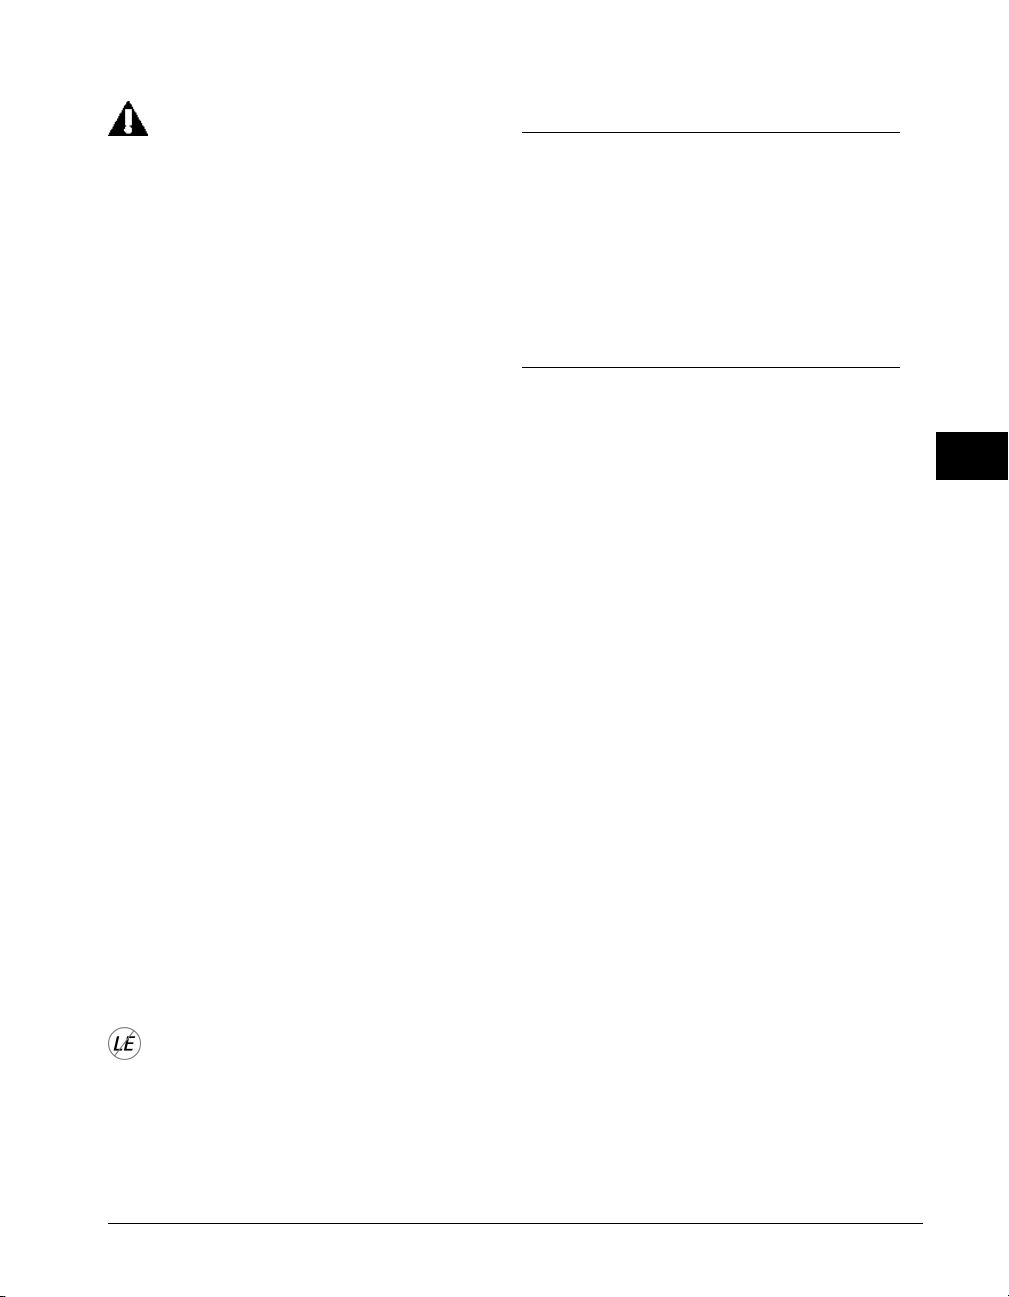
If you try to assign more VST plug-ins than your
CPU can handle, audio may begin to playback
erratically. Use the CPU Meters window to
monitor the CPU usage when assigning VST
plug-ins.
Bouncing your VST plug-in assignments
Once you have the right settings for your VST plug-ins,
you may want to permanently apply the effects to the
track(s) to which the VST effects are assigned. Simply
solo the track(s) you want to process and Bounce to
Mono or Bounce to Stereo Clipboard, and then Paste
the clipboard to any available track(s). Active VST plugins will also be applied using the Mix to Disk function.
To bounce VST plug-ins:
1. Solo the track(s) with active VST plug-ins that you
wish to bounce.
2. Choose Process > Bounce to Mono Clipboard or
Process > Bounce to Stereo Clipboard.
3. Place the cursor on the track(s) in the Tracks
window where you wish to place the processed
audio.
Conclusion
You have learned how to use Deck’s built in destructive and real-time effects as well as how to use
Premiere format and VST plug-ins in Deck. Proceed to
the next chapter to learn about volume and pan
automation, mixing, and mastering in Deck.
5
4. Choose Edit > Paste (Command-V).
5. Change the VST plug-in(s) to Thru in the Effect
Selector pop-up menu in the Mixer window for
the original track(s).
6. Disable the solo button(s) in the Mixer window
for the original track(s).
7. You may choose to mute the original track(s) or
mix it with the processed track(s).
8. Press the spacebar or click the Play button in the
Transport window to hear the mix.
Deck LE does not support VST plug-ins.
Effects
61
Page 72

62
Deck User’s Guide
Page 73
Chapter 6
Automation, Mixing, and Mastering
Page 74

64
Deck User’s Guide
Page 75

Chapter 6: Automation, Mixing, and Mastering
Mixing and mastering are generally the final steps in
any audio post-production process. They generate the
finished product which you will publish or deliver to
clients. This chapter covers mixer-based automation,
mixing, and mastering.
visually in the Tracks window. To accomplish mixerbased automation, Deck uses the concepts of real-time
fader motion recording, mixer states, and transition
time. Real-time fader motion recording records the
actual movement of Deck’s mixer faders, and is a
simple, intuitive way to create automation.
When you have finished this chapter, you will have all
of the knowledge necessary to take a Deck audio
project from start to finish and produce a finished
digital audio master.
Mixer-based Automation
The process of mixing down a multitrack recording to
a stereo master is always complicated by the level and
stereo pan changes that must occur during the
mixdown process. Smooth fades in and out, instantaneous pan changes that are modulated to a specific
rhythm, usually require quite a bit of physical
coordination and they are difficult to repeat. This is
why high-end mixing boards offer automated mixdown
capabilities.
Deck allows you to create and record mixer automation so you can fully automate your mixdown process.
Perhaps the simplest way to automate a mixdown is to
create and edit visual volume and pan envelopes in the
Deck Tracks window.
Deck also offers more traditional real-time mixer
automation that is based on the idea of performing a
mix and recording the motion of the faders during the
performance. This mixer-based automation also
creates automation envelopes that can be edited
Mixer State Automation is scene-by-scene oriented. A
mixer state is like a picture of the current position of
every fader on the mixer. Each state is stored on
Deck’s Mixer State pop-up in the Transport window,
and each can be recalled at any time. A fixed transition
time can be set, and that time is always used to fade
smoothly between each mixer state.
Although real-time recording of fader motion and
mixer states may seem a bit cumbersome at first, you
will find that it often allows simple, one-step recording
mixdown automation.
To record real-time fader motion:
1. Open the session that you wish to automate and
open the Mixer window by selecting Windows >
Mixer (Command-2).
2. Decide which track volume and pan faders you
wish to automate.
3. Use the Automation pop-up on these tracks to
select which automation you wish to record. You
can choose Record Volume, Record Pan, or
Record All. You can choose your controls by track
(for example volume on track 1 and pan on track
2), or you can use the Options menu’s Automation submenu to record all volumes and pans by
choosing Record All.
6
Automation, Mixing, and Mastering
65
Page 76
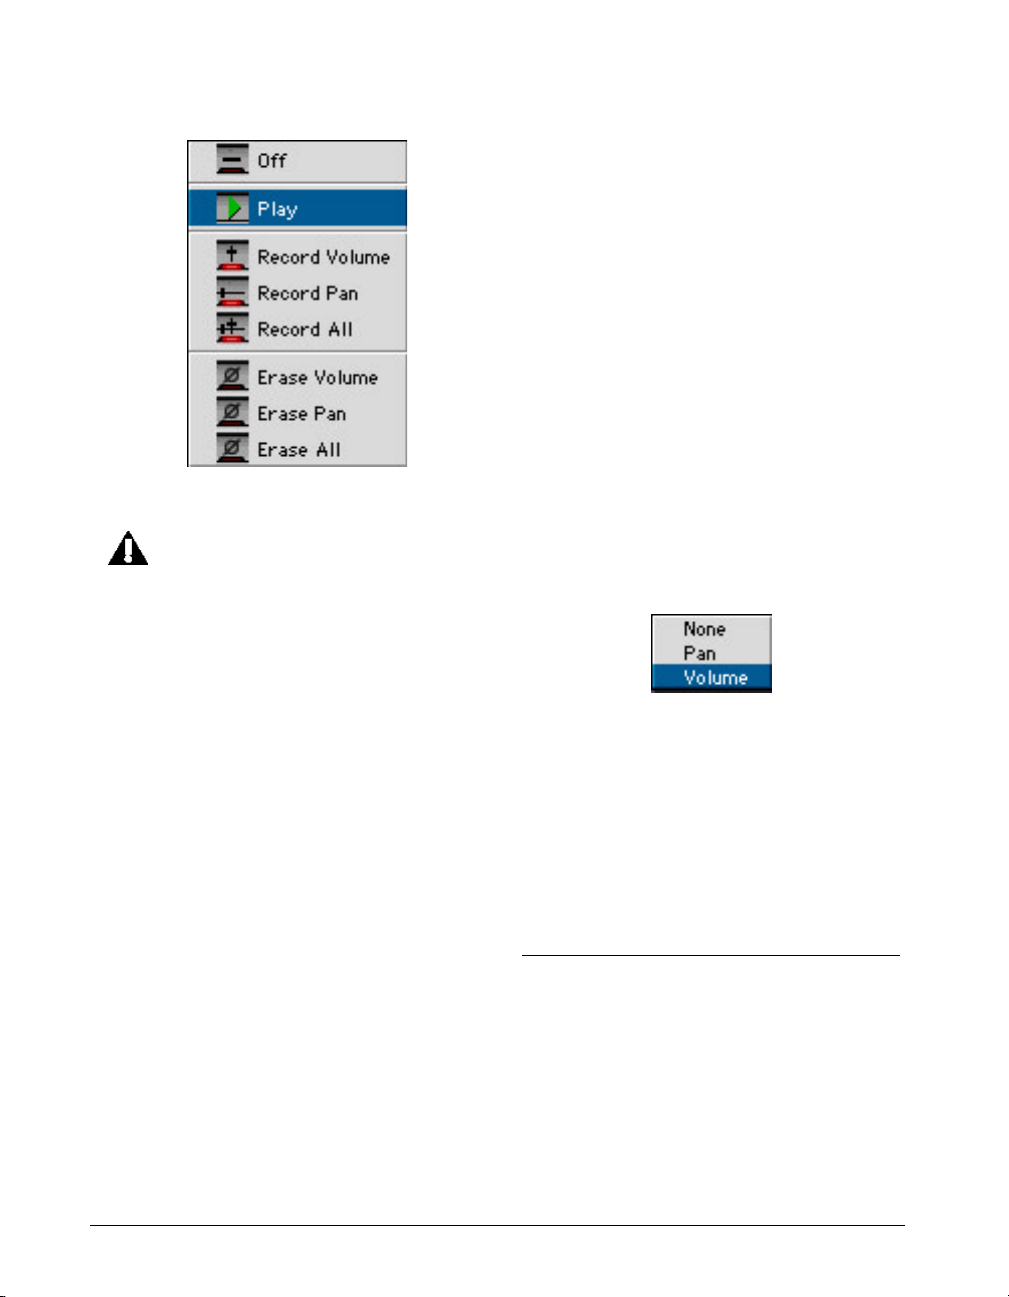
Automation pop-up menu
Although it is possible to record automation
using the mouse as a controller, you may find
this cumbersome, as the mouse can only move
one control at a time. For the best possible
results, use an external MIDI controller (e.g., a
Peavey PC-1600 or Tascam US-428) to control
the mixer faders that will be recorded. See
“MIDI Setup” on page 87 and “MIDI Key Maps”
on page 88.
4. Click the Transport’s Record button, then click
the Play button (or press Spacebar) to begin
recording automation.
5. Perform your mix as desired. All motion of recordenabled faders will be recorded.
6. Click the Transport’s Return-to-zero button
(Return), and click the Play button (Spacebar) to
see and hear your new automation.
Deck’s recording functions work the same way with
automation as they do with audio. For example, you
can use punch-in mode to replace a segment of
automation just as you would replace a segment of
audio.
You can erase the automation on any track by using
the erase commands located on the track’s Automation pop-up. You can also use this pop-up to mute the
automation on any track by setting the pop-up to Off.
Although the faders’ movement may appear jumpy, do
not be deceived by this. Deck automation is always
reproduced with 24-bit accuracy (over 16 million
values between full volume and no volume). Updating
the screen has a lower priority than the control of
volume and pan level. Your automation will always
play and sound smooth even when the faders appear
to jump.
To view the visual envelopes for the motion you have
just recorded:
1. Choose Windows > Tracks (Command-3).
2. Set the Display pop-up on the track that contains
the automation you wish to edit to Volume or
Pan.
Display pop-up menu
You can now see and edit the automation envelope
you created when you recorded real-time fader
motion. (In the illustration, track 2 is set to display the
volume envelope.) If you wish to edit these envelopes,
you will find it easier if you first choose Automation
Thin from the Process menu. Automation Thin will
look for straight lines in your automation data and
eliminate extraneous breakpoints.
Visual Automation Envelopes
Controlling the volume and stereo placement of sound
is the essence of a mix. Deck allows you to control the
volume or pan of any playback track in real-time, and
also makes it possible for you to record volume and
pan fader motion as you perform it. The concept of
performing a mix is a traditional one, but is only one
66
Deck User’s Guide
Page 77
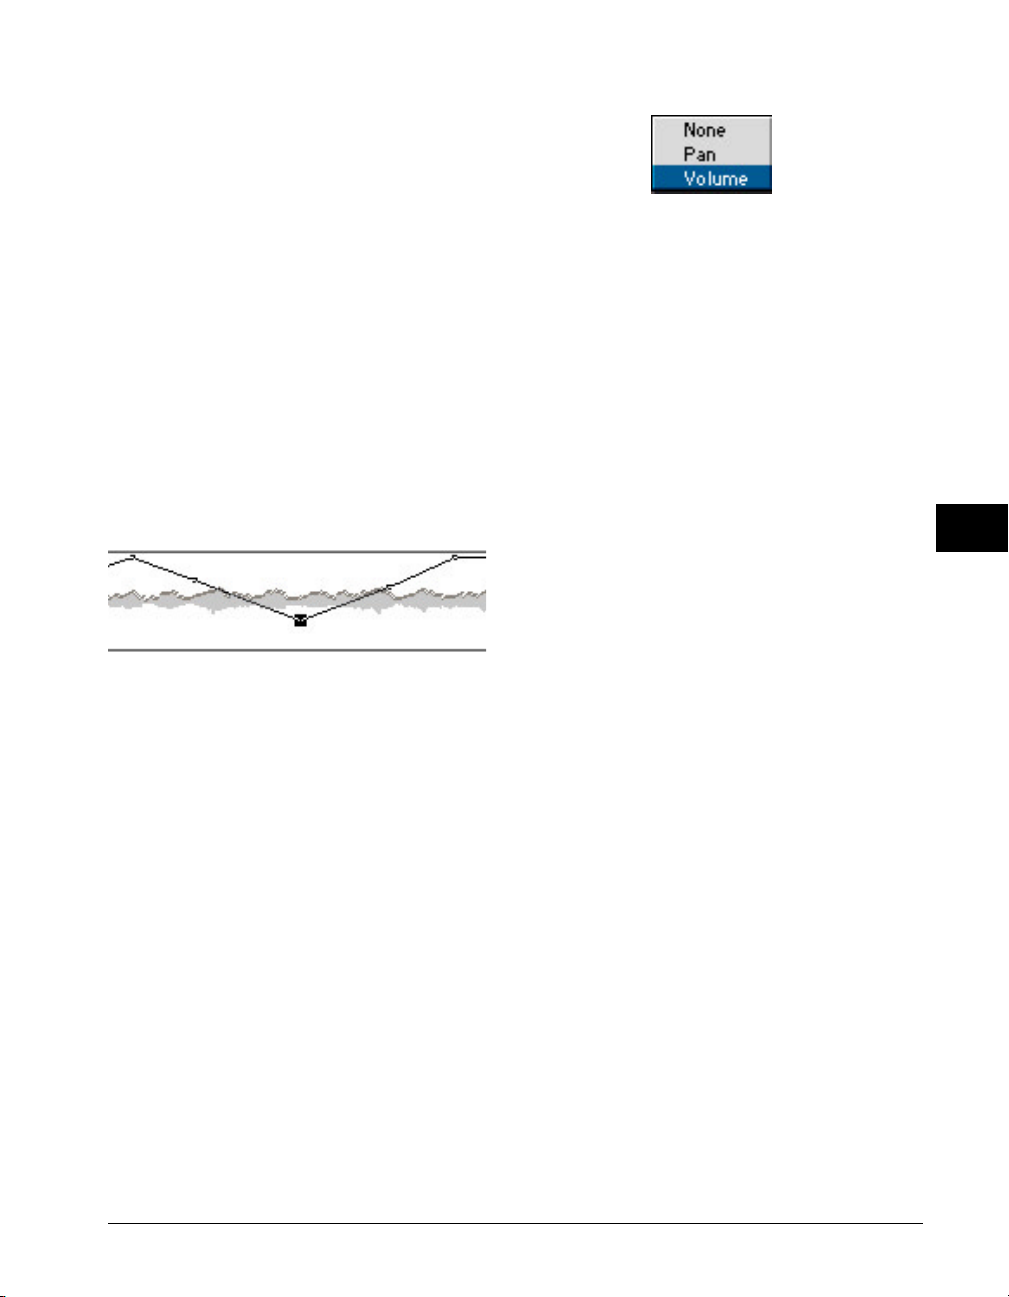
way to automate a mix.
With the advent of the digital audio workstation, many
other methods for creating automated mixes have
surfaced. The simple visual editing of a line graph
(envelope) to control volume and panning is one of
the most powerful and flexible of these new methods.
Deck allows you to create and edit all automation data
in this fashion if you wish.
Let’s say you had a region of audio and you wanted it
to come in loud, decrease in volume for about half its
duration, and then increase slowly back to full volume.
In the analog world you would play back your tape
deck and use your automated mixing board to record
yourself making the physical fader motion. In Deck,
you could simply open up the Tracks window, find the
audio region, and create this volume envelope.
Volume automation envelope with highlight breakpoint
The volume in this illustration is controlled (and
indicated) by the thick line. The lower the line goes,
the lower the volume; the top of the track is full
volume and the bottom is no volume. If you look
closely, you will see a number of breakpoints in the
line where the angle of the line changes. Creating
these points, which are automatically connected by
lines, is the simplest method you can use to automate
a mix. Adding and editing these points allows you to
alter the mix in very exact ways. These automation
envelopes can be edited using the same basic Tracks
window functions you use to edit the waveforms.
To create an automation envelope:
1. Use the Track Automation View pop-up to choose
the type of automation envelope you plan to
create or edit. To set all tracks to the same
automation type, Option-select the automation
type.
Track Automation View pop-up menu
2. The track audio data will dim to light gray which
indicates that you cannot edit audio data at the
same time as automation. When you have the
Track Automation View pop-up set to None, then
you will be viewing and editing only normal audio
waveform data in the waveform area. When the
pop-up is set to Volume, waveform data will still
be shown, but only volume envelopes can be
created and edited on the track. In this situation,
up is full volume and down is no volume. When
the pop-up is set to Pan, waveform data will still
be shown, but only stereo pan envelopes can be
created and edited on the track. In this situation,
up is left channel and down is right channel.
3. You can view the exact setting of any volume or
pan envelope breakpoint by looking at the level
or pan indicator on that track as you move the
point. The exact current value will be shown as
you adjust any point.
4. To create an automation point, hold down the
Command key and click the mouse anywhere in
the track.
5. As you do so, an automation breakpoint appears,
along with the associated flat automation line.
You have now set a single level setting.
6. Continue Command-clicking anywhere over the
waveform to create more automation points and
develop the general envelope shape you wish. To
insert a breakpoint with the same vertical value as
the previous, hold down the Control and
Command keys and click the new location.
At any time you can play back the audio using the
Transport window controls (or the spacebar) to hear
the new automation. If you open the Mixer window,
you can also see the new fader moves reproducing the
envelope you just created.
6
Automation, Mixing, and Mastering
67
Page 78

To adjust a breakpoint:
• Click the point and drag it to a new position. To
constrain the time to the nearest whole axis unit,
hold down the Shift key while dragging.
To delete a breakpoint:
• Hold down the Option key and click that point.
When you are done, you can set the Track Automation
View pop-up to None to hide the automation
envelope.
Automation and QuickTime Movie Scrubbing
If you are working with a QuickTime movie, and have
Chase Positioning enabled in the QuickTime menu,
automation edits will scrub QuickTime frames. As you
move a group of breakpoints earlier or later in a track
with the arrow keys, Deck’s QuickTime window will
update, tracking the lead-edge of your automation
edit. This provides an easy visual reference for precise
positioning of automation events in synch with video
frames.
You can now continue editing audio waveform ranges
and regions, if you wish. As long as the Automation
Status pop-up is set to the Play position, all automation on the track will play back.
To edit automation envelopes:
1. Use the Track Automation View pop-up to choose
the type of automation envelope you plan to edit.
2. Do one of the following:
• To adjust a breakpoint, click the point and drag it
to a new position.
• To delete a breakpoint, Option-click that point.
• To edit automation envelope ranges, switch to
Object edit mode, drag to select breakpoints, and
then use the Command-arrow keys to move
them.
You can also click the Range Mode button (~ key) to
switch the Tracks window to Range mode. Select any
automation envelope range and edit it as if it were a
waveform, tearing off copies and moving them around.
To delete automation ranges, select a range of points
(in either Object or Range mode) and press the Delete
key.
See Chapter 7, “QuickTime” for more information on
Deck’s QuickTime functions.
Copying and Pasting Automation Envelopes
You can copy and paste automation envelopes. You
can also use the Tracks window range and region
dragging functions and arrow key manipulations to
drag, nudge and copy automation ranges on a track, or
between tracks. A list of all Tracks window key
commands, including automation shortcuts, appears
in Chapter 9, “Deck Reference.”
Muting and Erasing Automation Envelopes
To mute or erase automation envelopes:
1. Choose the track on which you wish to mute or
erase automation.
2. Click and hold on that track’s Automation Status
pop-up.
3. To mute all automation on that track, scroll to Off.
This mutes all of the automation on the current track.
That automation is not deleted; it is simply turned off.
To turn it back on, just set the track’s Automation
Status pop-up to Play.
To erase all automation on that track, select Erase
Volume, Erase Pan, or Erase All in that track’s
Automation Status pop-up. The automation type you
choose will be permanently deleted from the track.
68
Deck User’s Guide
Page 79
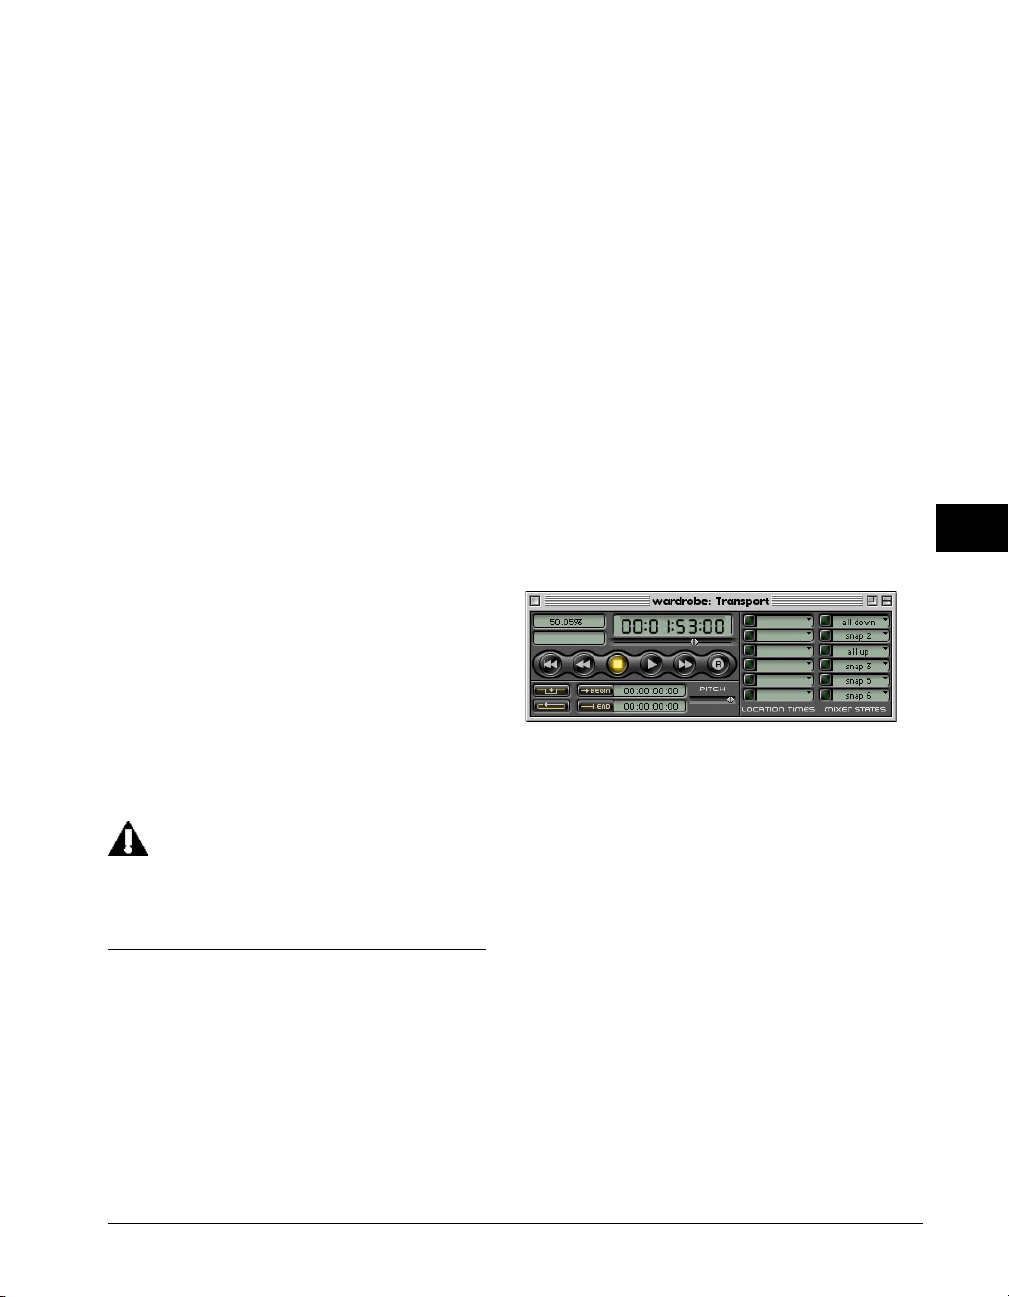
Show/Hide Automation Envelope
At any time you can use a track’s Automation View
pop-up to show or hide automation envelopes on that
track. Even when you have hidden the current
automation envelopes, the functions on the Automation Status pop-up (play, off, erase, and so on) will still
function. You do not need to see an automation
envelope to have it play.
window with a single mouse click. In order to use a
mixer state for real-time automation, you will need to
store it. Once a mixer state has been stored, it can be
recorded in the same way that any real-time automation is recorded. In fact, you can mix real-time fader
motion automation and mixer state automation. Both
styles of automation create automation envelopes that
can be edited in the Deck Tracks window.
Conform to Audio Edits
Deck’s automation follows the track, so that if you
move a track to another track, it’s automation moves
with it. However, you may find that you want to only
move or copy a region of audio from one track or
location to another, and you might want to move the
automation with it. Deck allows you to do this with the
Conform to Edits command. Conform to Edits
essentially locks the automation to the region of audio
so that if you move or copy the region, the automation
is moved or copied along with it.
To enable/disable Conform to Audio Edits:
1. Select Options > Automation > Conform to
Audio Edits
2. A check will appear next to Conform to Audio
Edits to indicate that it is enabled.
3. Select Options > Automation > Conform to
Audio Edits again to disable it.
Be sure that your automation breakpoints are
within the region boundaries when using
Conform to Audio Edits, otherwise irregular
automation may be introduced.
To store a mixer state:
1. Open the session that you wish to automate.
2. While playing back the audio, set the volume and
pan faders to your liking. You can also set these
states when Deck is not playing back.
3. When the entire mixing board is set up the way
you desire, Command-click the arrow button next
to the spot where the mixer state should be
stored.
Stored Mixer States in the Transport window
You have now stored a mixer state, and the button
next to that state can be used at any time to recall or
play that state back onto the Deck Mixer. Note that
new states are created with the name “snap” followed
by a number. You can rename any mixer state by
Command-clicking its name.
6
Using mixer states
Although it is possible to automate an entire mix
without using Deck’s mixer states, these snapshotstyle states can be very useful (especially for creating
complex automation moves that should occur at
specific spots). The mixer states allow you to move any
or all of the volume and pan faders in the Mixer
Automation, Mixing, and Mastering
Deck allows you to store an unlimited number of
mixer states. Every time you store one, it is added to
the Mixer State pop-up, which contains all of the mixer
states you have created for this session. Each of the six
mixer state arrow buttons can be set to give you
instant access to any mixer state.
Simply use the Mixer State pop-up menu in the
Transport window to select the state you want. That
state will be placed at the current arrow button for
69
Page 80
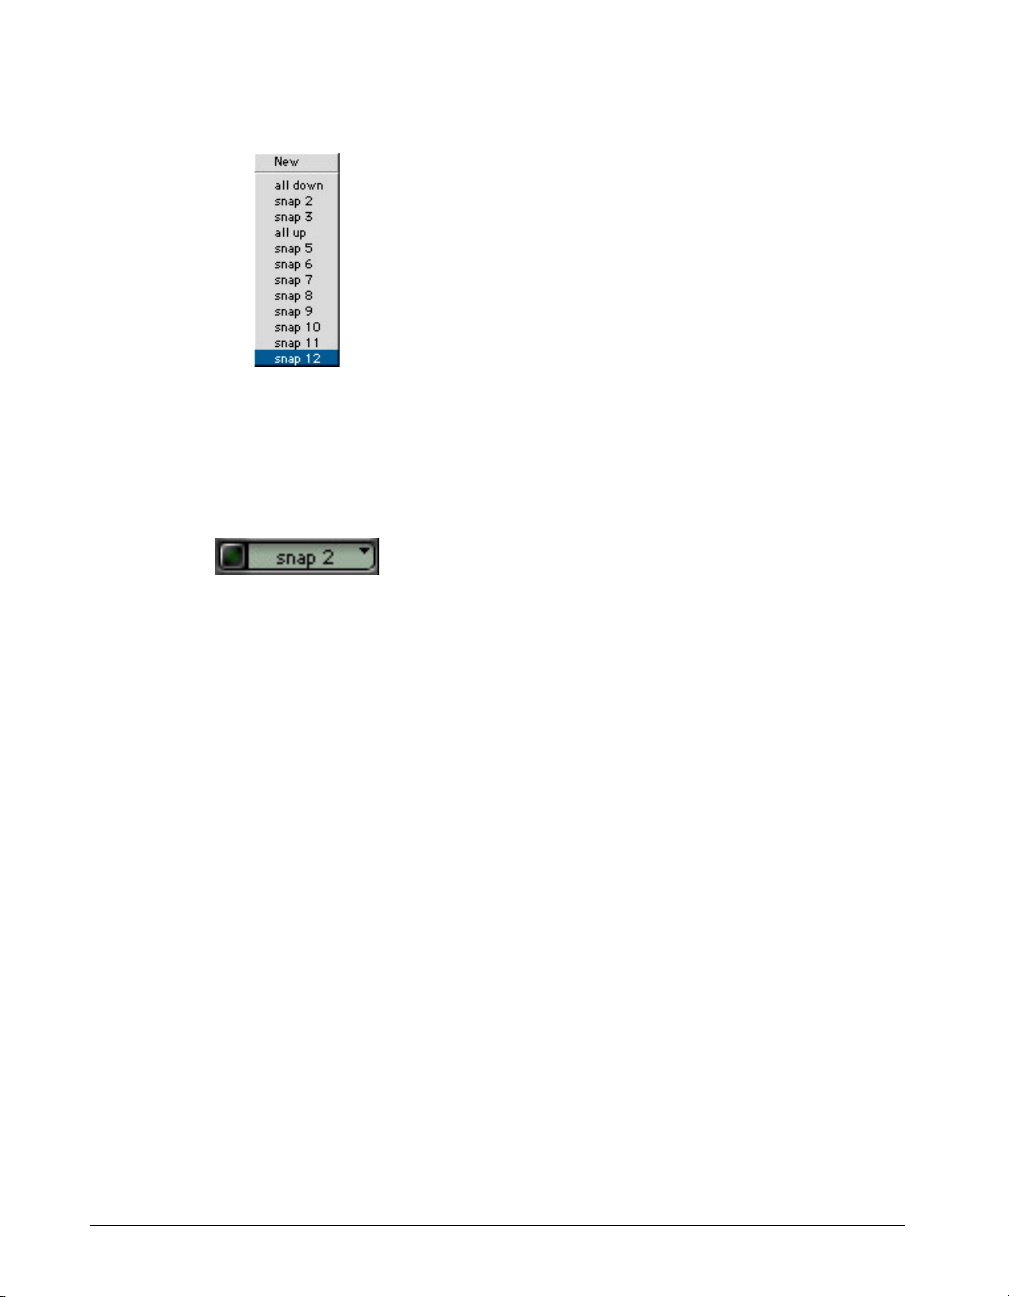
instant access.
Mixer State pop-up menu
To recall a mixer state:
• Click the button to the left of the desired mixer
state. That state is instantly recalled by the Deck
mixer.
To delete a mixer state:
• Option-click the Mixer State button to delete the
currently-loaded mixer state.
To rename a mixer state:
• Command-click the Mixer State pop-up to rename
the currently-loaded mixer state.
You can choose Record Volume, Record Pan, or
Record All. You may choose your controls by track
(for example, volume on track 1 and pan on track
2), or you can use the Options menu’s Automation submenu to record all volumes and pans by
choosing Record All. Even though you are
recording mixer states, only those faders that are
set to record will be recorded from the states.
This allows you to isolate portions of your mixer
states for automation recording.
5. Click the Transport’s Record button, then click
the Play button (Spacebar) to begin recording
automation.
6. During playback, click the mixer state arrows
whenever you want to record a mixer state.
The mixer state will be recorded at the moment you
click the arrow. Don’t worry about the exact timing
accuracy of the state. All automation can be edited
visually in the Deck Tracks window after it has been
recorded.
Deck’s recording functions work the same way with
automation as they do with audio. For example, you
can use punch-in mode to replace a segment of state
automation just as you would replace a segment of
audio.
All stored mixer states are saved with the current
session and will be present just as you left them when
you next open the session.
To record mixer state automation:
1. Open the session that you wish to automate and
open the Mixer window.
2. Set the state transition time to zero (choose
Options > State Transition Time).
3. Decide which track volume and pan faders you
wish to automate.
4. Use the Automation pop-up on the tracks you
wish to automate to set (record-enable) which
controls you will be recording.
70
Deck User’s Guide
Click the Return-to-zero button (or Return) in the
Transport window, then click the Play button
(Spacebar) to see and hear your new automation.
You can erase the automation on any track by using
the erase commands located on the track’s Automation pop-up. You can also use this pop-up to mute the
automation on any track by setting the pop-up to Off.
To record mixer state automation with pre-programmed transition fade times:
1. Choose Options > State Transition Time.
2. Enter the duration of the smooth transition fade
you wish, then click OK.
This duration is the period of time that it will take to
Page 81
fade to the new mixer state. Suppose you have a mixer
state that has all of the track volume faders at full
volume, but all of the faders are currently turned all
the way down. You set the State Transition Time to 2
seconds and begin playback. After a few moments, you
click your All Up mixer state. You will immediately see
the faders begin to move smoothly, and after 2
seconds, the faders will all be in the full volume
position. This has allowed you to generate smooth
motion on all faders at once with a single mouse click.
To record this motion in real-time, follow the same
steps explained in “Mixer-based Automation” on page
65.
To record mixer states in the Tracks window:
1. Select whether to edit Pan or Volume.
2. In Range (Waveform) mode, make an insertion
point at the point in time where the automation
should be.
3. Click the correct mixer state in the Tracks
window. The new automation envelopes
associated with the mixer state will be at the
desired location.
the problems caused by a limited number of tracks.
Although Deck imposes no restrictions on the number
of tracks that can be mixed together, Deck also allows
bouncing. For more information, see “Virtual mixing”
on page 72. Deck brings major improvements to
analog bouncing: Deck bounces tracks digitally, which
doesn’t degrade the sound quality of the source
tracks. Also, Deck allows you to keep all of your source
tracks, so you can always go back to the original tracks
and re-bounce for a new submix. (Analog bouncing
generally requires that the source tracks be erased so
that new tracks can be recorded.)
Deck allows you to bounce tracks in a purely visual
fashion. To bounce tracks in Deck, you simply select a
range of time in the Tracks window and choose one of
the Bounce to Clipboard commands. Your bounce
takes place immediately, and the resulting track or
region can be placed anywhere you desire.
To bounce tracks:
1. Switch to Range mode by clicking the Range
Mode button (~ key):
6
When you record mixer state automation with
automated smooth transitions, the resulting automation can be edited visually in the Tracks window.
Remember, Deck’s automation follows the
track. If you move a track to a work track and
record a new one, you will need to create
automation for the new track.
Bouncing tracks in Deck
Bouncing is the process of ping-ponging, or
submixing, multiple tracks together to create one or
two new tracks. The new track is then used in place of
the original source tracks, thereby freeing up formerlyoccupied tracks for more recording. On most four- or
eight-track systems, bouncing presents a solution to
Automation, Mixing, and Mastering
2. Drag to select the destination range for your
bounced track(s).
When you bounce in Deck, all of your play tracks are
always included in the bounce, except for muted
tracks. For this reason, it really doesn’t matter upon
which track you choose to select the range. Because of
this, you can use the shortcut of selecting the
destination range instead of the source range. This will
return you to the Tracks window after the bounce is
complete, and require only that you use the Paste At
command to finish the bounce and paste the new
audio at the correct point in time. Remember, you will
want to select two destination tracks if you are
choosing Bounce to Stereo Clipboard.
3. If you want to make sure that certain tracks are
not used as source for a bounce, mute those
tracks. Mute and solo are taken into account
71
Page 82

when you Bounce to the Clipboard. Also, set the
Automation pop-up to Play to include automation.
4. Choose Process > Bounce All to Mono Clipboard
(Command-Shift-B) or Bounce All to Stereo
Clipboard (Command-Option-B).
5. When the bounce is complete, you will be
returned to the Tracks window, and your
originally selected range will still be selected.
6. Choose Edit > Paste At (Command-Option-V) to
paste the newly-bounced region at the correct
place in time.
You are now free to delete the regions that were used
to create the bounce. Try using the up and down
arrow keys to move the highlighted selection range up
or down to tracks you wish to delete for a deadaccurate cut. Or, you can simply move the tracks used
as source for the bounce down to the Work Tracks
area, where they will not play back. This is the best
option, because it allows you to go back to your
original source tracks if you desire.
Virtual mixing
A major advantage in using a digital audio workstation,
like Deck, is that you are not hindered by the
limitations of the analog world. Analog recorders and
mixers are physically limited to the number of tracks
that can be played. Deck does not do its mixing in realtime, so there is no limit to the amount of audio it can
mix (other than hard disk space). Although you can
only play back the amount of simultaneous real-time
play tracks your system is capable of, you can create
up to 999 work tracks.
Deck’s Virtual Mixing function controls which tracks
Deck will mix when you choose to use the Bounce to
Disk or Mix to Disk functions. When Virtual Mix is
enabled in the Process menu, Deck will mix the audio
in your play tracks, and any audio on the Work tracks
with the Volume and Panning automation you have
created.
To use Virtual mixing:
1. Choose Process > Virtual Mix to enable Virtual
Mix. A check will appear next to the Virtual Mix
menu item. Now, whenever you choose a Bounce
or Mix command, Deck will mix work tracks as
well as play tracks into the new file.
2. Record your tracks as usual. Add any desired
automation to the new tracks.
3. When you have filled up the play tracks, create
work tracks by selecting New Track from the
Process menu. Enter the number of playtracks
you recorded in the dialog box. You will now have
new work tracks that will serve as destination
tracks for the tracks you have just recorded.
4. Move the tracks to the work tracks. Use the Track
Name pop-up menu to select Track 1 on the first
work track, Track 2 on the second, and so on.
5. Select New Track from the Track pop-up on each
of the play tracks.
6. Repeat the above steps until you have recorded all
of your material. When you are finished recording
and editing, create a master as described in “Final
mastering to a mono or stereo disk file” on page
73.
Because you had Virtual Mix selected, the new audio
file which is created by the mix or bounce will contain
the sound of all your play tracks, plus your work
tracks, and all associated automation and effects.
If you chose Bounce to Clipboard, your new mix is in
the Clipboard’s memory and ready for pasting into the
session.
If you did a Mix to Disk, your new mix file is on your
hard drive in the folder you selected and can be
imported into your session using the Add Audio to
Clipboard dialog box.
Using virtual mixing will quickly use up hard disk
space. If your hard disk space is limited, you may be
best served by bouncing tracks and compacting your
session. In either case, be sure you leave enough hard
72
Deck User’s Guide
Page 83

disk space for the final Mix to Disk process. For
example, at a rate of 44.1kHz, you should allow about
5MB per minute for a mono mix and 10MB per minute
for a stereo mix.
For more information about moving tracks and using
work tracks, see Chapter 4, “Visual Waveform Editing.”
Renaming Tracks
If you are planning to record many tracks, it is a good
idea to rename them. Using Deck’s default naming
system (Track 1, Track 2, Track 3, and so on) will get
confusing with many tracks.
To rename a track:
1. Command-click the track name.
2. Type in the new name in the resulting dialog box.
For more information about organizing Deck Tracks,
see “File management tips” on page 158.
Final mastering to a mono or stereo disk file
nized MIDI file from the Metro sequencer,
Deck’s MIDI window, or other MIDI sequencer,
the MIDI tracks will obviously not be included
in a digital master until they have been
digitally recorded. The easiest way to do this is
observe the following:
1. When all of your Deck audio tracks are automated
and ready for mastering, select Virtual Mix from
the Process menu. Use the process described
previously in the Virtual Mixing section to free
two play tracks. If you are limited by disk space,
select Bounce All to Stereo Clipboard from the
Process menu to bounce all of your play tracks to
a final stereo image, then paste those bounced
regions on tracks 1 and 2, for example.
2. Mix the playback from your MIDI device into a
stereo image at your mixing board, and record it
in stereo onto two remaining Deck tracks—tracks
3 and 4, for example. You now have your original
audio plus your MIDI instrument tracks in stereo
audio form.
3. Add any extra mixer automation or effects you
might need and you’re ready for the mastering.
6
The last step in a recording project is generally the
mastering process. During mastering, a final stereo
mixdown of the recording is created. This stereo
version is the master from which all distributed copies
will be made. For this reason, the master must be the
best possible copy of the final mix.
Once your final mix is automated to your satisfaction,
you are ready for the digital mastering process. In this
process you will use Deck to create a mono or stereo
Sound Designer II, Audio Interchange (AIFF), Sound
Resource, QuickTime, or .WAV sound file on your hard
disk. This sound file will be an exact digital copy of the
mixdown from which it is created, including all effects
processing, level and pan settings, and automation.
Remember that there are some planning steps
you will need to take before creating a digital
master. If your session plays back a synchro-
Automation, Mixing, and Mastering
To create a digital hard disk master of a session:
1. Open the session you wish to master (CommandO). Make sure that it plays back exactly as you
wish the final mix file to sound, because the
master will be an exact copy of the session as you
now hear it.
2. If you are using Virtual Mixing, be sure to audition
each worktrack in a play track before mixing. The
Virtual Mix will not sound exactly like the session,
as it adds data to the mix from the work tracks,
which cannot be heard during real time playback.
3. Choose Windows > Tracks (Command-3).
4. If you want to mix only a portion of the session to
disk, select the range you wish to mix before you
choose the Mix to Disk command.
Remember, all of your play tracks (and work
73
Page 84
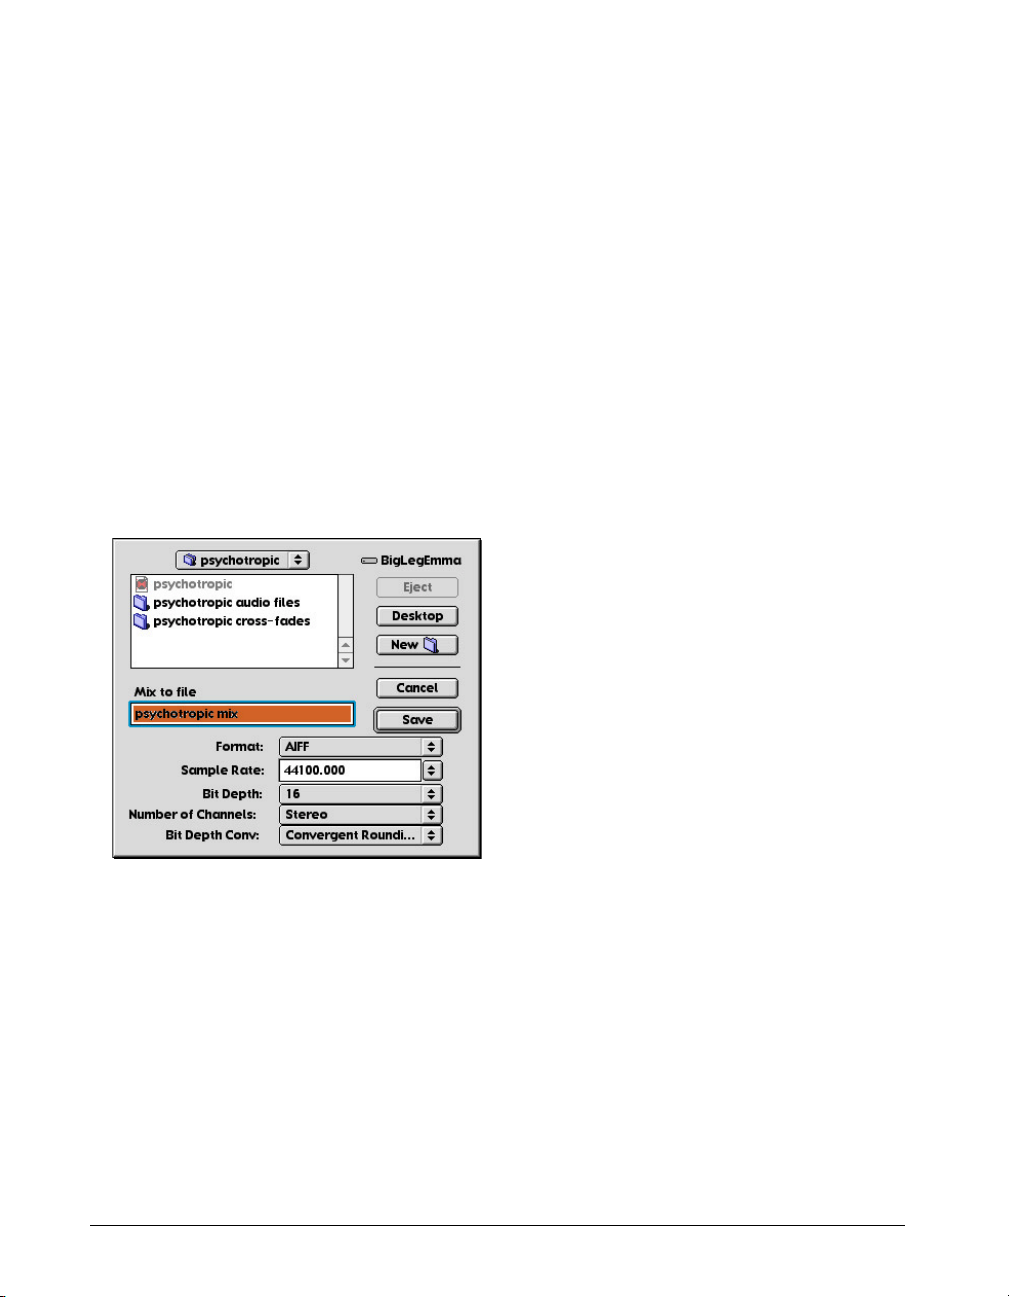
tracks, if Virtual Mixing is enabled) are mixed to
disk, even if you only select a range (or regions)
on a single track. To remove tracks from the mix,
mute those tracks and/or deselect Virtual Mixing
in the Process menu. Be sure to select Play from
the Automation pop-ups to include automation in
the mix.
If you want to mix the entire session to disk, make
sure that no audio range or region is selected.
You can choose Deselect from the Edit menu to
make sure that no audio is currently selected.
Note that you can also choose Select All before
you mix to disk to make sure that the entire
session file is mixed down.
7. Choose Mix to Disk from the Process menu.
Mix to Disk dialog
8. Type in the name you wish to use for your master
sound file. This will always default to the name of
the session followed by “mix.” It is probably a
good idea to use this naming scheme, because it
associates the master and the source session, and
prevents accidentally replacing an important
existing file.
9. Select the destination folder for the master.
Format—sets the type of file you wish to create.
Choose from the following formats:
Sound Designer II (SDII)—The most common
format. This is the native format used by Deck
and is supported by a great number of audio
programs. If you are creating 16-bit stereo
masters for CD mastering, this is generally the
format of choice.
Audio Interchange File Format (AIFF)—
Popular high-resolution audio format. There is no
difference in quality or portability between Sound
Designer II files and AIFF files. AIFF files are
better for cross-platform file exchange and were
designed with this purpose in mind. However,
AIFF files do not allow you to save region
definitions within the sound file, and cannot be
used for direct audio recording in Deck or Sound
Designer II. For this reason, Sound Designer II
files are generally suggested.
Sound Resource files (.SND)—Apple-standard
format audio files which have the highest level of
desktop integration. Eight-bit sound resource
files are the standard used by older Macintosh
systems, and they can be played back through
most internal Macintosh speakers directly from
the desktop simply by double-clicking on their
icons. Such 8-bit sound resources are also easily
integrated into programs such as Macromedia
Director or Adobe Premiere, although 16-bit
audio is becoming more widely supported by
many programs.
Wave (.WAV)—Is a Windows sound file format
and is useful for transferring sounds or mixed
sessions to the Windows platform.
QuickTime—Sound files can be used for
QuickTime movies, or as stand-alone Macintosh
audio-only sound file-players. This format is
especially useful for transferring shorter sound
file demos over the Internet or to anyone with a
QuickTime capable Macintosh or IBM computer.
10.Choose from the following options:
74
Sample Rate—Sets the sample rate you wish to
Deck User’s Guide
Page 85

have for your final mix file. The pop-up allows
you to choose from a variety of preset, standard
sample rates, such as 44100Hz and 22050Hz, or
you may enter any rate you choose into the popup box. You will use different rates for different
purposes. 44100Hz is the CD standard rate.
Generally speaking, higher sample rates are
better because they offer higher fidelity.
However, they also require more disk space.
Rates such as 22050Hz are good for general
purpose multimedia work, as they take up less
space—but the lower the rate, the noisier the
audio, so choose the lower rates with care.
If you are mixing down to an 8-bit Sound
Resource file for desktop playback, the 22050Hz
setting will produce very good results.
Bit Depth—Specifies the audio bit-depth you wish
for your audio master file when the audio is
mixed. You may choose between 8-bit and 16-bit.
(Remember to select an appropriate Bit-Depth
Conversion method for your session if you
convert to 8-bit sound.) If you wish to create a
true high-fidelity master, always choose 16-bit.
Number of Channels—Determines whether your
mix will be to a mono file, an (interleaved) stereo
file, or split stereo files (which will automatically
have .L and .R suffixes attached to their file
names). If you’re mastering for CD-ROM burning,
try using the stereo (interleaved) option, which
combines both left and right channels in a single
file. If you’re planning to bring your mix back into
Deck for further work, select the split stereo
option, which results in separate left (.L) and
right (.R) mix files.
Bit Depth Conversion—Sets the 16-to-8 bit
conversion method. If you are converting your
16-bit Deck file to an 8-bit file, Bit Depth
Conversion makes it possible to create better
sounding 8-bit files.
artifacts, or noise—especially on low-level signals
and human speech.
Rounding—Treats the original 16-bit sample as a
fixed-point number, with the decimal point
between bytes. If the low byte is greater than or
equal to 0.5, then 1 is added to the high byte
(hence the name rounding) and the high byte is
taken as the sample value.
Convergent Rounding—Differs from Rounding
in how it treats the value of 0.5 in the low byte of
your sound file—1 is only added to the high byte
if the low-byte value is greater than or equal to 0.5
and the high byte is even. Otherwise, the high
byte is taken as the sample value.
Dithering—Is similar to the Dithering function in
digital imaging programs. Dithering applies a low
level noise signal to the sound file to cover up the
unpleasant artifacts caused by truncating. This
method is also called Error Diffusion Dithering.
Generally, Rounding and Dithering produce
better results than Truncation, but the results of
these conversion methods will depend on your
source material. Experiment with different kinds
of conversion to see what works best for you.
11.Click Save to create the digital mix file.
Deck uses the exact same set of routines to create a
mix file that it uses to play back the source tracks. For
this reason, you can be absolutely sure that the mix file
will be a true copy of the session’s mix. Once you have
created a digital master of your session, you are free to
transfer it to a portable medium for duplication. Better
still, use BIAS Peak to master your stereo mix and burn
it to CD yourself.
6
Truncation—Takes the high byte of your sound
file as the sample value, and throws away the low
byte. Truncation can often cause unpleasant
Automation, Mixing, and Mastering
75
Page 86

Conclusion
You have learned how to mix and master in Deck. In
the next chapter you will learn about using Deck to
score QuickTime movies.
76
Deck User’s Guide
Page 87
Chapter 7
QuickTime
Page 88

78
Deck User’s Guide
Page 89
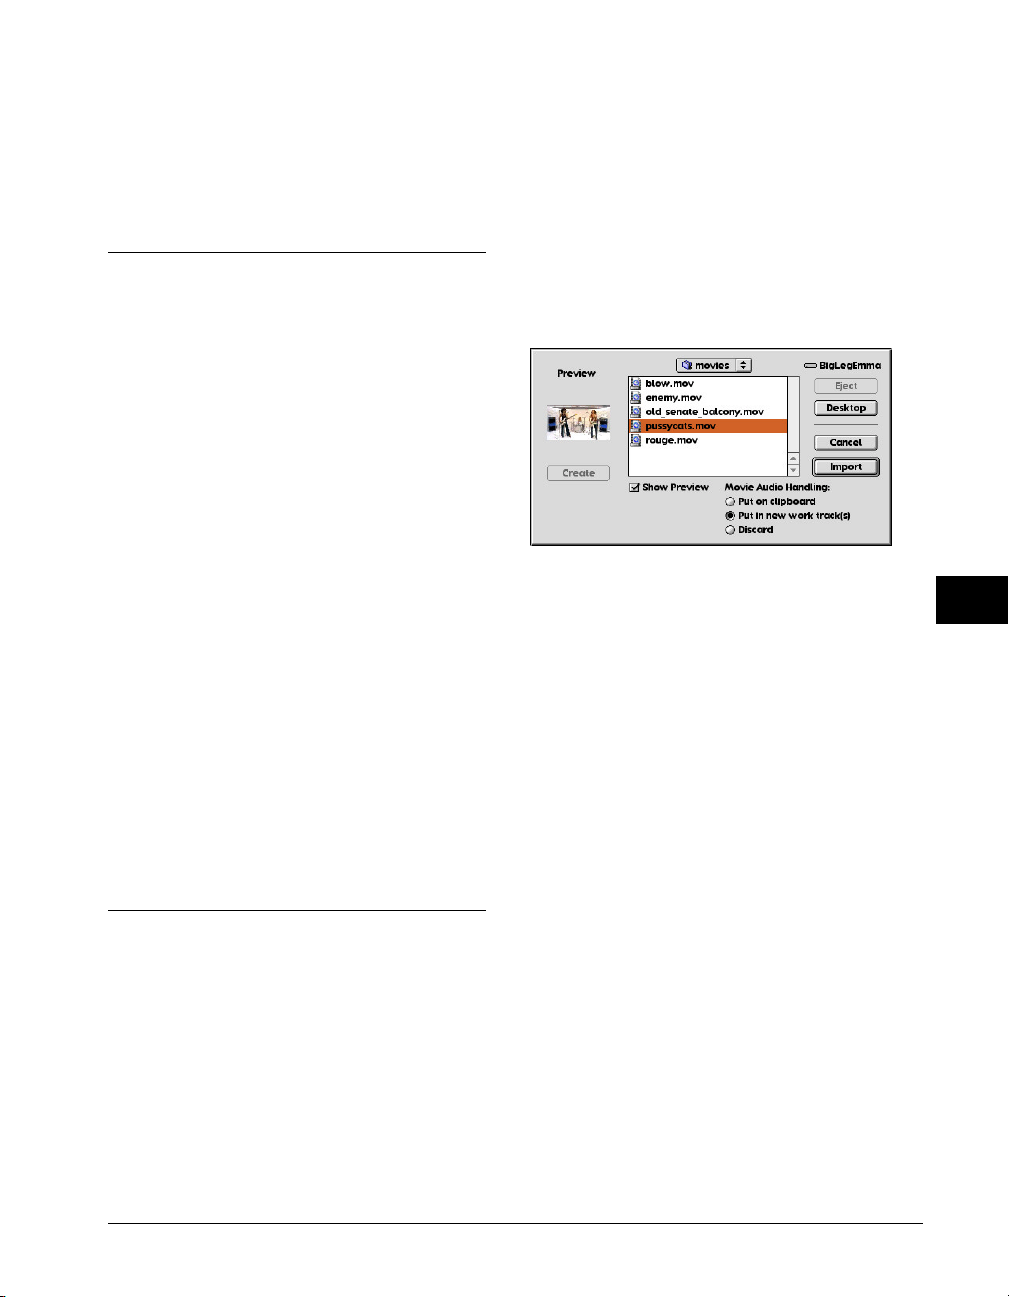
Chapter 7: QuickTime
Deck is the perfect compliment to any QuickTime
movie authoring program, such as Adobe Premiere,
Final Cut Pro, or iMovie. You can import any existing
QuickTime movie into Deck and add synchronized
audio to that movie, exploiting all of Deck’s audio
editing, processing, and mixing features.
Deck is capable of playing back multiple tracks of 16bit audio and a QuickTime movie—and that movie’s
native soundtrack, if desired—simultaneously from a
single hard drive. You can add music, narration, and
sound effects to your QuickTime movie, and export it
as a new movie with its soundtrack mixed down in a
variety of sample and bit rates for distribution,
multimedia and CD-ROM production, or just for fun.
You need to have Apple’s QuickTime extension,
version 3.0 or higher, installed in your Macintosh.
(QuickTime is usually included in Apple System
software, but if you don’t have it, you can download it
from Apple’s Web site, or contact Apple directly.) It is
also helpful to have a movie playing program, such as
QuickTime Player, if you want to be able to playback
your finished self-contained QuickTime movies
without opening Deck.
Importing a QuickTime Movie
When importing a QuickTime movie that already has a
soundtrack, you can either discard or import the
movie’s audio along with the movie. If you do import
the movie’s audio, Deck will convert the movie’s audio
to 16-bit at your session’s chosen sample rate.
To import a QuickTime movie into Deck:
1. Create a new session, or open the session you
wish to synchronize to a QuickTime movie.
2. Select QuickTime > Import Movie.
3. Locate and select the desired movie.
4. Select one of the following:
• Put on Clipboard—Removes the existing
soundtrack from the QuickTime movie and
converts it to 16-bit monophonic Sound Designer
II file(s) at whatever sampling rate you’ve selected
for your session. These files are created in the
session’s audio files folder and then placed on the
Clipboard for pasting into any track in the Tracks
window. To guarantee that the Clipboard file will
sync to the imported movie, you will need to drag
or paste it so that it starts at the session zero time.
If the source audio was stereo, you will need to
select two tracks in Deck’s Tracks window when
you paste the audio.
• Put in new work track(s)—Removes the source
audio from the QuickTime movie and converts it
to 16-bit monophonic Sound Designer II files.
These files are created in the session’s Audio Files
folder, and then placed onto new work tracks at
the bottom of the Tracks window. To play back
these tracks, click the track control area(s) to
select the track, then drag the track up to one of
the play tracks. (You can also use the track pop-up
7
QuickTIme
79
Page 90

at the bottom of any track in the Mixer window to
move these new tracks up to playback tracks.)
Choose this option to make sure that the original
QuickTime audio will be included in any 16-bit
stereo mixdowns and in exported QuickTime
movies.
Here are some of the QuickTime tools you will find in
Deck’s QuickTime menu:
Dispose Movie—Closes the current movie so that
you can import another; only one QuickTime
movie may be opened at a time.
• Discard—Imports the QuickTime movie without
its original audio.
You can change the size of the QuickTime window
using the QuickTime menu’s Size submenu. If you
added the movie’s audio to the Clipboard, you will
need to paste it onto a track by choosing Edit > Paste
At, or by dragging the audio into the Tracks window
from the Library window. Be sure to place the movie’s
audio at the very beginning of the session—session
zero. The QuickTime movie will always play back in
sync with that Deck session, and the movie will always
open whenever that session is opened.
Sessions are set to have a default length of 10 seconds
if they contain no audio. If you wish to play back a
QuickTime movie without its native soundtrack, use
Session End Time from the Session menu to set the
session length to be as long or longer than the movie’s
duration.
QuickTime window
To open the QuickTime window, or to bring it to the
front of the screen if it becomes buried under Deck’s
other windows, select QuickTime from the Windows
menu (Command-4). The QuickTime window contains
no controls. The movie’s playback is controlled by
Deck’s Transport controls. However, note that you can
scrub the QuickTime movie by clicking and holding in
the QuickTime window—move the cursor to the left
too scrub back and move it to the right to scrub
forward.
Deck’s QuickTime tools
Now that you have a QuickTime movie imported into
Deck, you will want to get acquainted with Deck’s
QuickTime tools.
Get Movie Info—Opens a dialog box that shows you
information about the current movie, including its
location on your hard drive, the date the movie
was created, number of frames, frames per second,
and length.
Copy Frame—Copies whatever frame of your movie
is currently showing to the Clipboard. You can
then paste that frame into the Scrapbook, or into a
word processing or imaging program such as
Microsoft Word or Adobe Photoshop. The frame is
always copied at the size you see. You can also use
Copy Frame to copy a frame of live video from the
Live Video window.
Set Poster—Sets and saves the current QuickTime
movie’s poster—or preview—frame. The poster
frame is the frame that will be used as the movie’s
icon and as the preview frame that will show when
programs like Deck show QuickTime movies for
importing or opening.
Chase Positioning—Turns on QuickTime Chase
Mode, which automatically scrolls the QuickTime
movie along with the audio and automation in the
Tracks window. The QuickTime window will scrub
to the current frame when audio regions are
moved. (The frame at the region’s start time is
always shown.) Alternatively, selecting an audio
region in the Tracks window, then scrubbing in
the QuickTime window (click and hold down the
cursor, then drag left or right) will cause currentlyselected audio to reposition to the lead edge of
the current frame. This is a fast, indispensable
function for spotting music, dialog, and effects to
specific QuickTime movie frames.
If Chase Positioning is enabled, moving volume or pan
automation break points along the track timeline will
also scrub QuickTime frames, enabling fast positioning
80
Deck User’s Guide
Page 91

of automation events with sub-frame accuracy.
Set Offset—Lets you start the movie at a time other
than session zero. Normally, when you import a
QuickTime movie into Deck, it will begin at
session zero—the very beginning of the session.
Live Video—Is useful if you are using Deck to add
music or spot effects to live analog video coming
into the video port of your AV Macintosh or the
inputs of a video card.
Configure Live Video—Configures the incoming
video signal, such as selecting a compressor, color
depth, and frame rate. The options available
depend on your video hardware.
Non-real-time QuickTime functions such as scrub or
Chase positioning do allow you to view and spot all
the QuickTime frames in a given movie, up to 30
frames per second, regardless of your computer’s
speed or disk throughput, and don’t require additional
video hardware. So even if your setup won’t play back
full-motion, full-frame video, you can still spot and edit
accurately to 30 frames per second QuickTime.
To scrub video direct from the drive:
1. Place the mouse cursor over the QuickTime
window. Then click and hold down the mouse
button. The arrow cursor changes to a right-left
triangle.
2. Drag to the left (earlier) or right (later) to scrub
video directly from the drive.
To Scrub To Spot:
1. Choose QuickTime > Chase Positioning.
2. Select an audio region or group of regions in the
Tracks window.
3. Place the mouse cursor over the QuickTime
window. Then click and hold down the mouse
button. The arrow cursor changes to a right-left
triangle.
4. Drag to the left (earlier) or right (later) to find the
video frame on which the selected audio should
start. Then let go of the mouse button to auto-spot
the selected region or regions on that frame.
7
Size—Sets a size for your QuickTime movie window.
Note that the Size option does not affect the actual
size of the QuickTime movie, and it will revert to
its native size when you export it. The Size option
only affects the size of Deck’s QuickTime window,
and is for your convenience while you work with
QuickTime in Deck.
Center—Places the QuickTime window in the center
of your monitor without the title bar.
Scrubbing QuickTime video
Two of Deck’s other QuickTime features are scrub
video, which allows you to drag smoothly through
video on your hard disk, and scrub-to-spot, which lets
you select an audio region in the Tracks window and
drag through video frames to spot audio to a specific
QuickTime frame.
When you let go, the entire Tracks window selection
will be moved so that it starts on the frame you chose.
Use this function for quick spotting of sound effects or
music cues.
When you have a QuickTime movie imported into
Deck and you know your way around Deck’s
QuickTime features, you may add multitrack audio to
your digital video. All of Deck’s audio importing,
recording, editing, layering, processing, and mixing
features can be used to add a soundtrack to your
movie.
Once you have finished your Deck soundtrack, you
may Export your movie as a new flattened QuickTime
movie with its new audio attached.
Exporting the final QuickTime movie
If you are using Deck as a QuickTime audio postproduction tool, then the last step in your process is
QuickTIme
81
Page 92
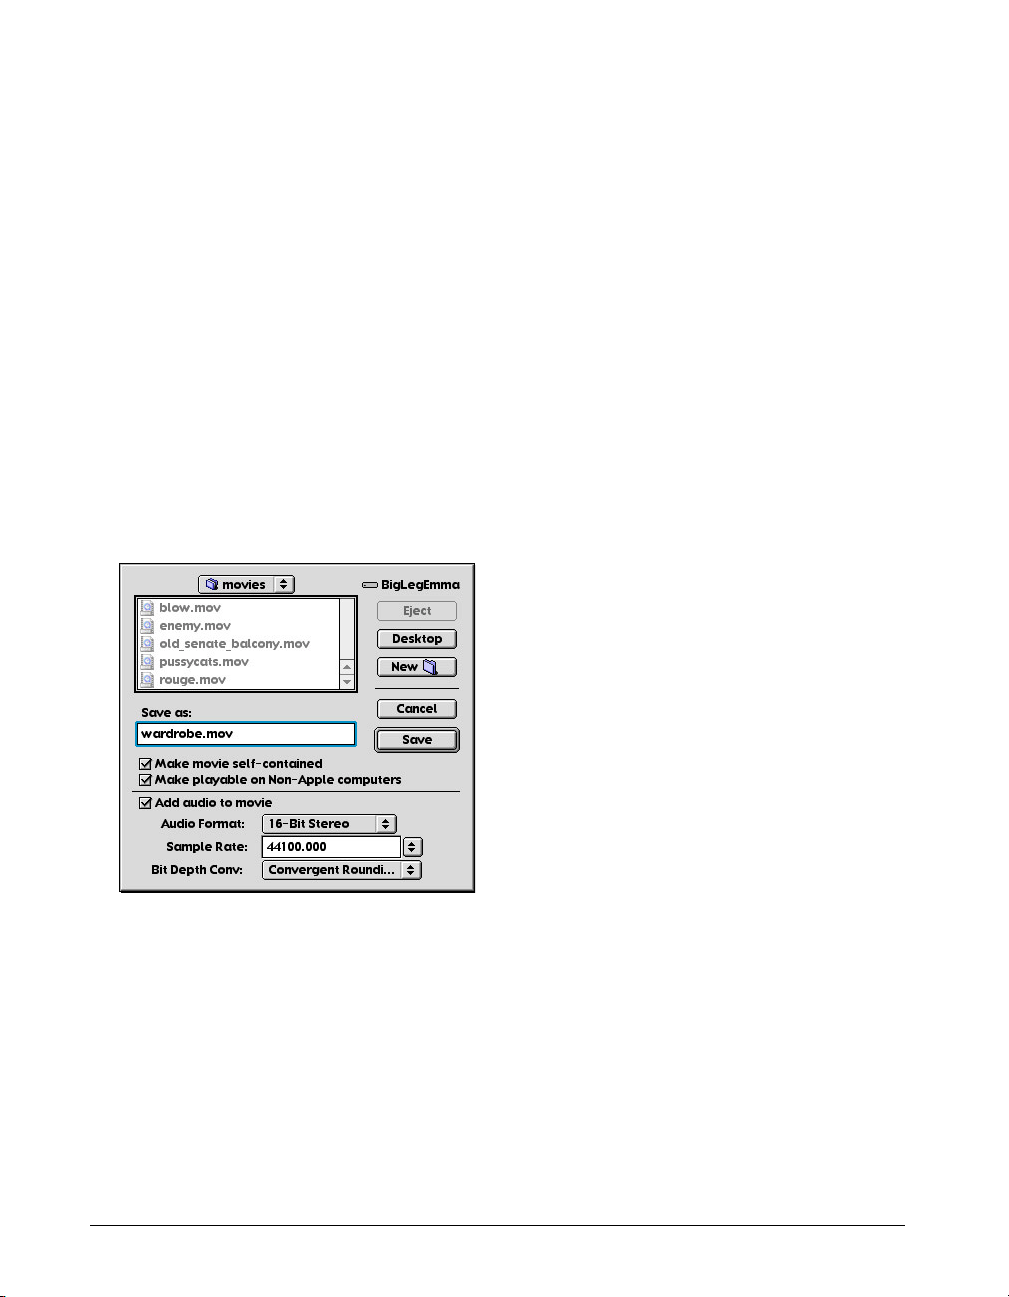
quite similar to the final audio mastering process
described in Chapter 6, “Automation, Mixing, and
Mastering.” The main difference is that you are
creating a finished file (or files) that consist of a
desktop playable picture as well as sound. The process
of mixing down a final QuickTime movie (with audio)
from the current session is very simple.
To create a final QuickTime movie with session audio:
1. Open the session that contains the audio and
movie you wish to mix down.
2. Make sure that the session and its movie play back
exactly as you wish the final product to look and
sound. The exported movie will be an exact copy
of the session as you see and hear it.
3. Choose QuickTime > Export Movie.
result can be played back on any QuickTime-capable
computer.
4. Choose a destination folder and type in a name for
the movie.
5. Select from the following options:
Make movie self-contained—Creates an entirely
new, self-contained movie. The self-contained
movie will consist of a single QuickTime (Movie
Player) document that contains all picture and
sound. According to QuickTime specifications, the
sound and picture are interleaved, creating a
movie that is fully transportable and plays
efficiently. Note that a self-contained movie will
take a while for Deck to create, because it requires
an extra step (flattening), which can be time
consuming. Remember, a self-contained movie will
generally be quite a large document.
Make a movie self-contained when you want to
create a single document for delivery. If you are
simply performing test edits and mixdowns, do not
make the movie self-contained. When the movie is
not self-contained, a new, extremely small
(typically around 30K) movie document is created.
Like a Deck session, this document simply
references the source sound and picture files. The
Movie Info command in Apple’s QuickTime Movie
Player can always be used to determine which
audio and picture files are used by a movie that is
not self-contained.
Export Movie dialog
The Export Movie dialog allows you to create new
QuickTime movies that contain (or reference) 8- or 16bit mono or stereo audio interchange file format
(AIFF) audio tracks at a variety of sample rates. The
exported movie contains all of the edited audio,
automation, and audio effects, if any. You can think of
the Export Movie command as a Mix-to-disk command
for picture and sound. It is usually the last step in the
QuickTime audio post-production process, and the
82
Deck User’s Guide
Make playable on Non-Apple Computers—
Creates a self-contained movie that is playable on
other QuickTime capable platforms, such as
Windows. It will flatten your movie and remove all
Macintosh-specific data from it. You will need to
check “Make movie self-contained” in order to use
this option.
Add audio to movie—Determines whether the
audio from the current Deck session will be mixed,
converted, and added to the finished movie. You
will generally want to have this option turned on.
When it is turned off, a silent movie document is
Page 93

created, and the audio data stays in Deck.
Audio Format—Specifies the audio bit-depth you
wish for your audio mixdown file when the audio
is mixed and the movie is exported. An AIFF sound
file is always created unless you chose “Make
movie self-contained,” in which case the audio is
placed directly into the movie picture data. You
may choose between 8-bit mono, 8-bit stereo, 16bit mono, or 16-bit stereo. The 8-bit mono format
requires less disk space, takes less time to upload
to the Internet, and plays back more efficiently on
older Macintosh computers. If you wish to create a
high-fidelity master, choose 16-bit stereo.
Sample Rate—Sets the sample rate you wish to have
for your final QuickTime movie audio. You can
select one of the preset, standard rates, or select
other and enter any rate into the pop-up box.
Generally speaking, higher sample rates are better
because they offer higher fidelity. However, they
also require more disk space. For the highestfidelity results, set this pop-up to the highest
supported rate, such as 48000 or 44100Hz. This
will mix down your audio as a CD-quality
soundtrack, but will also create a large movie
document. If you don’t need CD-quality audio, or
if you require a smaller movie, a rate of 22050Hz
provides a good balance between audio quality
and file size.
(hence the name rounding) and the high byte is
taken as the sample value.
Convergent Rounding—Differs from Rounding in
how it treats the value of 0.5 in the low byte of
your sound file—1 is only added to the high byte if
the low-byte value is greater than or equal to 0.5
and the high byte is even. Otherwise, the high
byte is taken as the sample value.
Dithering—Is similar to the Dithering function in
digital imaging programs. Dithering applies a low
level noise signal to the sound file to cover up the
unpleasant artifacts caused by truncating. This
method is also called Error Diffusion Dithering.
If you are mixing down a QuickTime movie with 8bit sound for desktop playback, a sample rate of
22050Hz and Dithering or Convergent Rounding
will produce very good results.
6. Click Save.
7
Conclusion
Now that you know a about Deck’s QuickTime
functionality, proceed to the next chapter to learn
about Deck’s MIDI and SMPTE sync capabilities.
Bit Depth Conversion—Specifies the down
sampling method. If you are converting your 16-bit
Deck file to an 8-bit file, Bit Depth Conversion
makes it possible to create better sounding 8-bit
files.
Truncation—Takes the high byte of your sound file
as the sample value, and throws away the low
byte. Truncation can often cause unpleasant
artifacts, or noise—especially on low-level signals
and human speech.
Rounding—Treats the original 16-bit sample as a
fixed-point number, with the decimal point
between bytes. If the low byte is greater than or
equal to 0.5, then 1 is added to the high byte
QuickTIme
83
Page 94

84
Deck User’s Guide
Page 95
Chapter 8
MIDI and Synchronization
Page 96

86
Deck User’s Guide
Page 97

Chapter 8: MIDI and Synchronization
Using the MIDI functions will enable you to synchronize your session to SMPTE time code, use Deck as a
master time code source, import a MIDI file for
synchronous playback with your session, and control
Deck with external MIDI devices. You can also
synchronize Deck with a MIDI sequencer, such as
Metro.
your MIDI studio’s configuration and have that
description be recognized by all OMS-compatible
programs. Once you have set up your OMS environment, OMS-compatible applications can list all of your
MIDI instruments (including sound-generating
devices, interfaces and controllers) by name. This
eliminates the need to separately set up and define
your MIDI system configuration in every software
application.
The next section of this chapter focuses on the
methods you will employ to synchronize Deck to an
analog video or audio deck. You will need to
understand synchronization in order to add audio to
video or film picture, or extend the tracks of your
analog multitrack with synchronized hard disk audio
tracks. You can also synchronize Deck to QuickTime
movies. For more information, see Chapter 7,
“QuickTime.”
MIDI Setup
Before you can use Deck’s MIDI functions, you will
need to install and configure OMS (Open Music
System, formerly the Opcode MIDI System). The OMS
installer can be downloaded for free from
www.opcode.com. Please refer to the Opcode
Technical Documentation for more detailed information on configuring OMS.
OMS must be installed and configured to run
Deck with MIDI.
The Open Music System (OMS)
OMS consists of a set of system documents that, along
with the OMS Setup application, allow you to describe
When you have OMS installed, configure Deck as
follows:
1. Open any Deck Session.
2. Choose Options > MIDI Setup.
If you are running Deck with OMS-compatible slave
programs (e.g., Metro) set up the dialog to allow Only
OMS Applications. This will make it possible for you to
switch between Deck and the slave program(s) during
playback without forcing MIDI or audio playback to
stop. If you are running Deck with programs in the
background that are NOT OMS-compatible, select the
Allow Non-OMS Applications option. This will allow
the ports to be shared, but may stop MIDI and/or
audio playback when you switch between applications.
(For more information about configuring and using
OMS, see the OMS documentation available from
Opcode.)
MIDI preferences
The next step in configuring your system for MIDI is
setting your MIDI Preferences. Choose File >
Preferences > MIDI to open the MIDI Preferences
dialog.
8
MIDI and Synchronization
87
Page 98
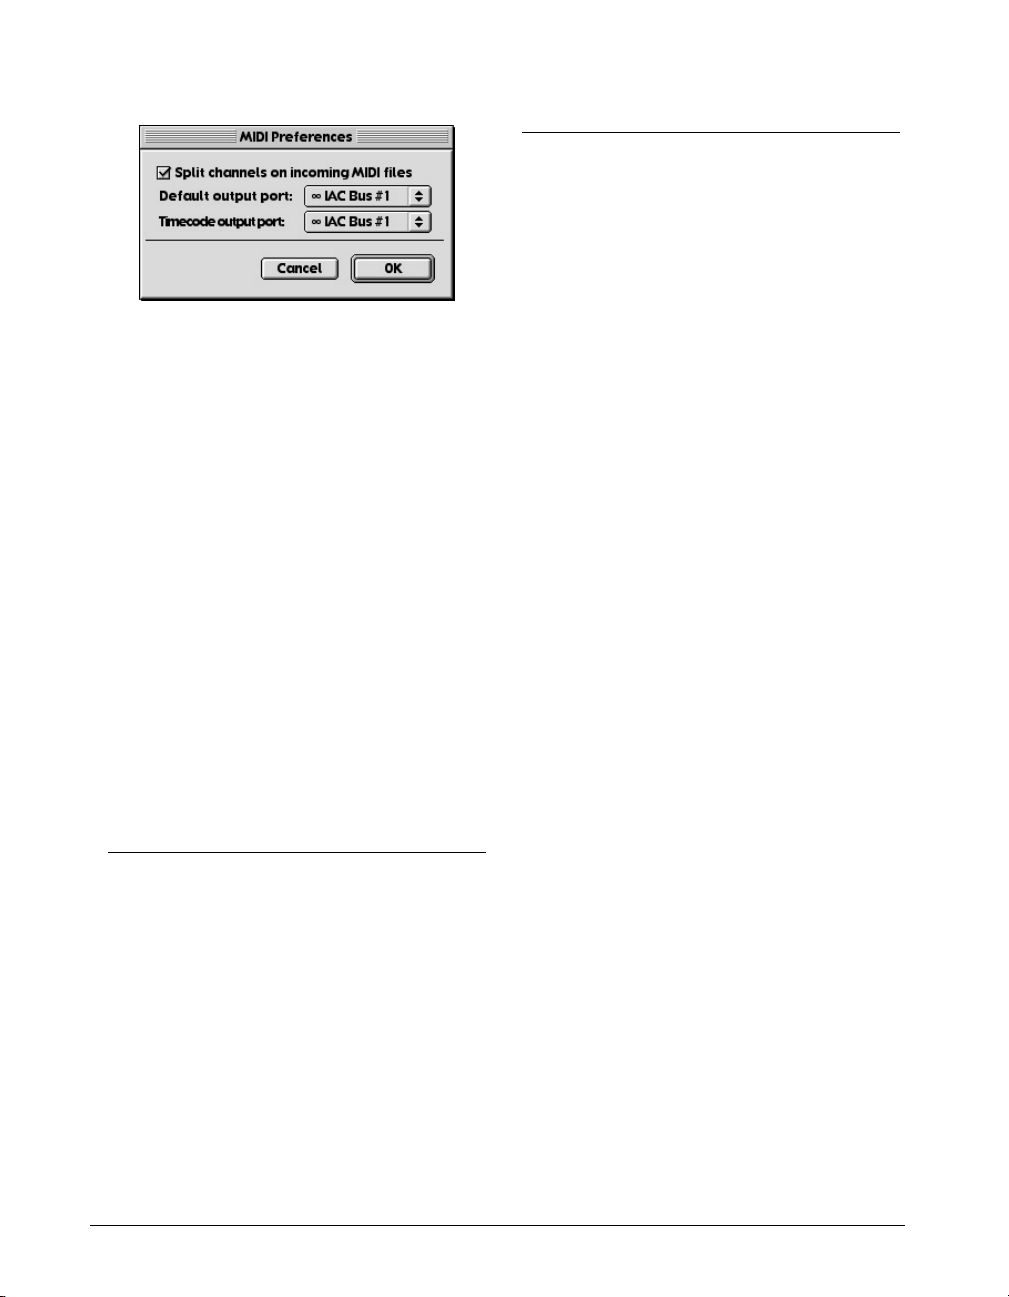
MIDI Preferences dialog
Split channels on incoming MIDI files—Splits
the channels when you import a MIDI file. This is
useful when you are importing Type 0 MIDI files,
which store all track data in one channel.
Default Output Port—Specifies the default MIDI
output port.
Timecode Output Port—Controls through which
port outgoing MIDI time code is sent. To change
the port, simply select a different port using the
pop-up menu.
If you plan to import large MIDI files, you should first
increase the MIDI buffer size in the Memory and
Storage preferences. Remember, whenever you
increase the buffer size, you should also increase the
amount of RAM allocated to Deck.
You have now finished configuring your MIDI setup
and can use any of Deck’s MIDI functions.
MIDI Key Maps
Deck allows you to create, save, and load MIDI Key
Maps. You can map MIDI controllers to the Transport
controls (Rewind, Fast Forward, Stop, Play, and
Record). The Panning and Volume faders, and Solo,
Mute, and Record enable buttons in the Mixer window
can also be mapped to MIDI control. The Mixer state
and Location buttons in the Transport window also
respond to MIDI controller messages in addition to
MIDI keydown and keyup messages. Deck’s MIDI
mapping capabilities allow you to quickly and easily
setup Deck to be controlled by any MIDI control
surface.
MIDI Map Fader
To map MIDI controllers to Deck
1. Enable MIDI Map Faders in the Options menu. All
MIDI mappable faders and buttons will turn
green.
2. Click on the fader(s) or button(s) that you want to
map a MIDI controller to. The fader(s) or
button(s) will turn yellow.
3. Toggle the MIDI control you want mapped to the
highlighted fader(s) or button(s). The fader(s) or
button(s) will turn red.
4. Repeat steps 2 and 3 for each MIDI controller you
want to map.
Sending MIDI timecode
You can use Deck as a time code master very easily.
Simply choose Output MIDI Timecode from the
Options menu. Deck will automatically generate time
code and send it through the Timecode Output Port
you chose in the MIDI Preferences. To stop sending
timecode, choose Output MIDI Timecode again. You
can tell if Deck is sending timecode by looking for a
check next to Output MIDI Timecode in Options. If
the command is checked, Deck is sending time code.
88
Deck User’s Guide
5. When you have finished assigning MIDI control-
lers to Deck’s faders and buttons, uncheck MIDI
Map Faders in the Options menu.
To map more than one button or fader to a single
MIDI controller, simply click the faders or buttons you
want to map and then toggle the MIDI controller you
want mapped.
Edit MIDI Map
Deck allows you to Edit the MIDI Map manually.
Page 99
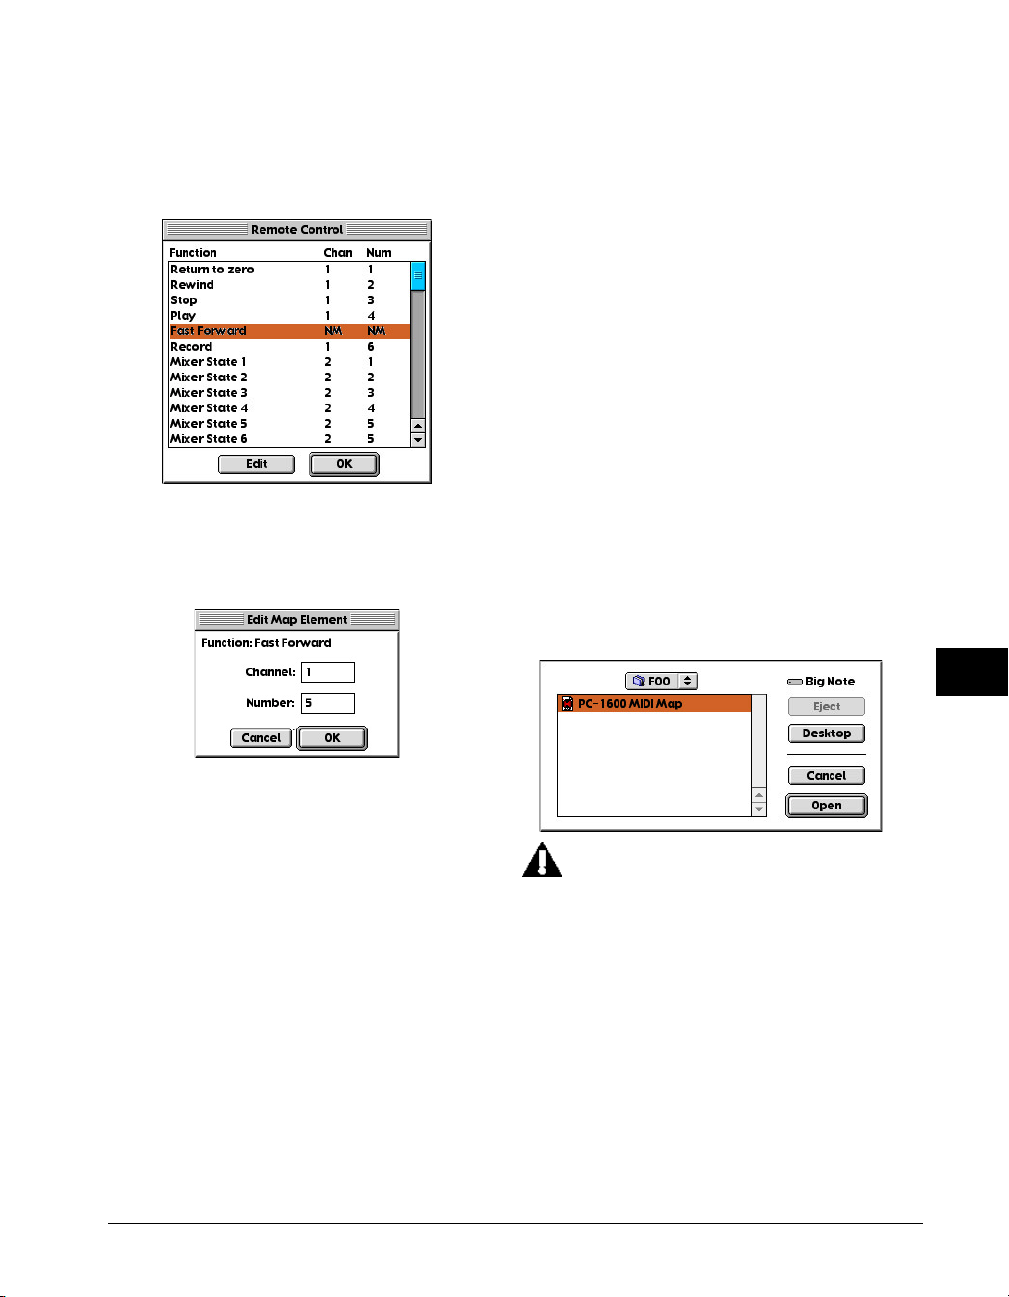
To manually Edit Deck’s MIDI Map:
1. Choose Edit MIDI Map from the Options menu to
open the Remote Control dialog.
2. Highlight the Function you wish to edit and click
the Edit button to open the Edit Map Element
dialog.
4. Click once on any mapped (red) fader to unmap
it. The fader will be filled highlighted in green to
indicate that it is no longer mapped.
5. Choose MIDI Map Faders again to turn off map
mode.
You have now unmapped the fader. Remember to save
the session if you wish to unmap the fader permanently.
Save and Load MIDI Map
Once you have Mapped MIDI controllers to Deck’s
faders and buttons, you can Save your MIDI Maps and
Load them later. This is especially useful if you
regularly work with different control interfaces or if
you frequently use the same MIDI Mappings in every
session. To Save your MIDI Map, simply select Save
MIDI Map from the File menu and you will be
prompted to Save the current MIDI Map to your hard
drive. To Load a previously saved MIDI Map, select
Load MIDI Map from the File menu and locate the
desired MIDI Map on your hard drive and click Open.
8
3. Enter the MIDI Channel and MIDI controller
number that you want to map to the designated
function and click OK.
4. Repeat steps 2 and 3 for each Function you wish
to edit and click OK in the Remote Control dialog
when you are finished.
To unmap a mapped fader:
1. Open the session that contains the faders you
wish to unmap.
2. Move your external MIDI controllers to see how
the mapped screen faders move along with them.
3. Choose MIDI Map Faders from the Options menu.
All of the mapped faders on the screen will
automatically be highlighted in red. (Other faders
will be highlighted in green.)
The Tascam US-428 communicates to Deck via.
MIDI, however most of its faders and buttons
are already mapped to functions in Deck. If
you attempt to MIDI map one of the US-428
controls that Deck already understands, the
built-in behavior will override the MIDI
mapping that you select. The Aux 1 ... Aux 4
and F2 and F3 buttons on the US-428 are
unused by Deck and could be used to map to
Deck's Location Times or Mixer State buttons in
the transport window.
MIDI and Synchronization
89
Page 100
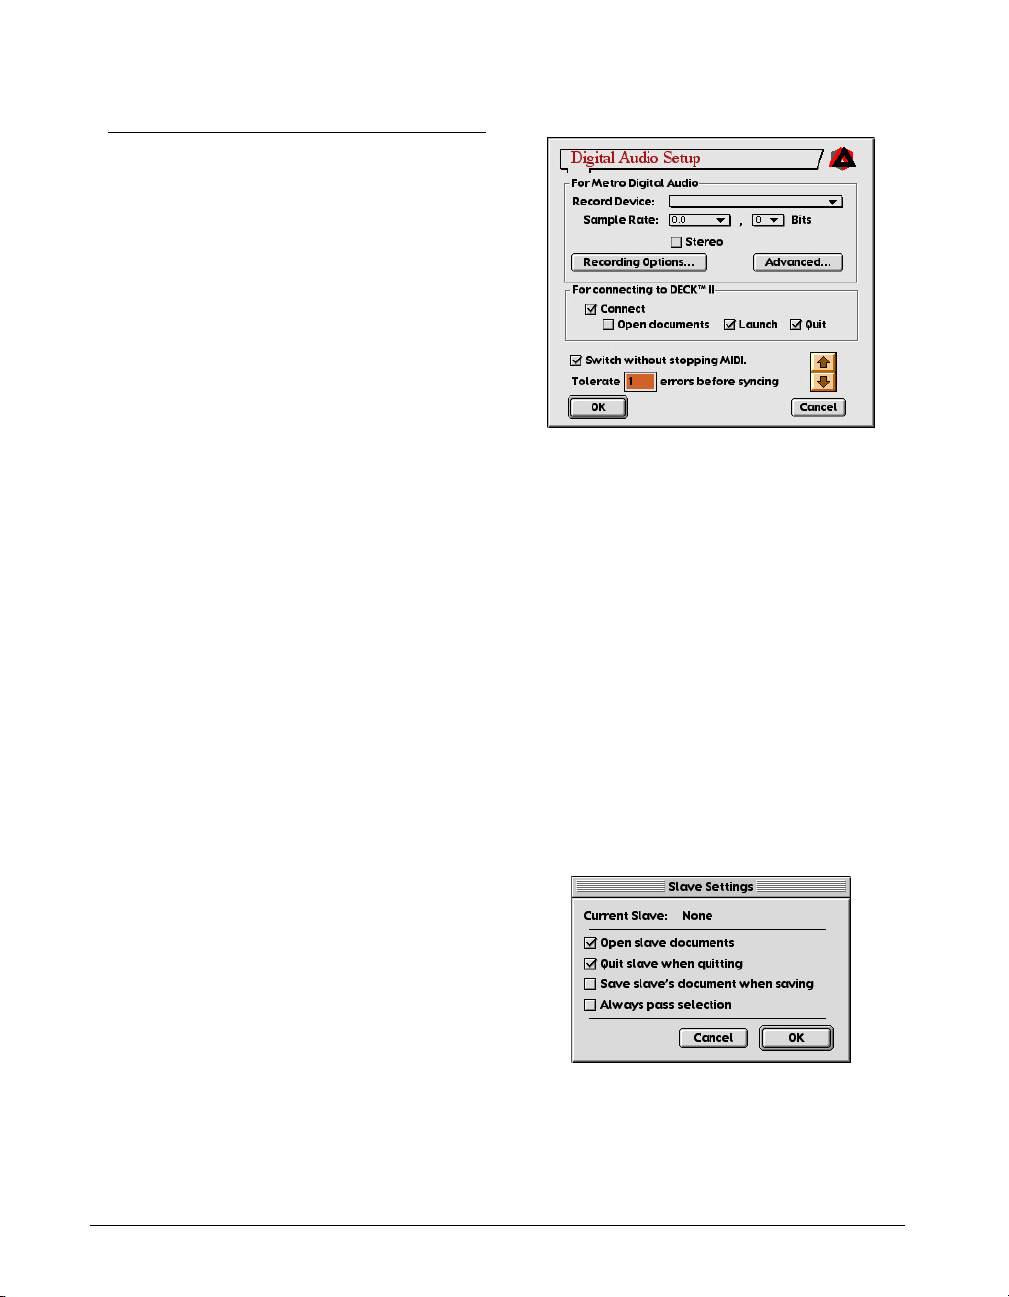
Using Deck with the Metro Sequencer
Deck offers the ability to synchronize to the Metro
sequencer on a single Macintosh. Running Deck and
Metro together requires no special software or
complicated setup process. If the two programs are
running simultaneously, they automatically connect to
each other and stay synchronized. You can edit, play,
and record from either program and the other runs in
sync. You can even switch between programs during
playback and edit without stopping. Each program can
save and open documents automatically in the other,
can pass tempos and selections, and can start up and
quit the other. The level of cross-program control is
up to you.
There are a number of key advantages to using Metro
as your MIDI solution with Deck, as opposed to using
other OMS-compatible third party sequencers. One
benefit is the enhanced level of integration and interoperability, as described above. Another advantage is
that Deck and Metro use a proprietary timing
architecture which allows the two programs to
continuously share timing data, so they can stay
locked in rock-solid sync. By contrast, OMS and MIDI
Manager only allow for trigger sync, meaning two
programs can start at the same time, but they have no
way to re-synchronize downstream should their timing
slip. Deck and Metro’s continuous MIDI/Audio resynchronization therefore gets you more reliable
punch-ins and punch-outs, plus more stability on
longer sessions.
Metro Digital Audio Setup dialog
If you are planning to run Deck with Metro in the
background, you can set the preferences as shown in
the above illustration. This setup assumes that you will
be starting Deck, and that you always want Metro to be
started up and connected in the background. To
complete the configuration process, you will also want
to set up Deck’s Slave Settings, as explained below.
Setting the Slave Settings preference on the Deck File menu
Deck offers a settings dialog that allows you to
configure the level of interaction between Deck and
any compatible slave program (Metro or other MIDI
sequencers). Choose File > Preferences > Slave
Settings to open the Slave Settings dialog.
Setting the Deck Connections on the Metro Setup menu
Metro offers a settings dialog that allows you to
configure the level of interaction between Deck and
Metro. In Metro, choose Setups > Digital Audio.
90
Deck User’s Guide
Slave Settings dialog
When you are running Deck with Metro in the
background, you can set the slave settings as shown in
the above illustration. This setup assumes that you will
 Loading...