

Page 1
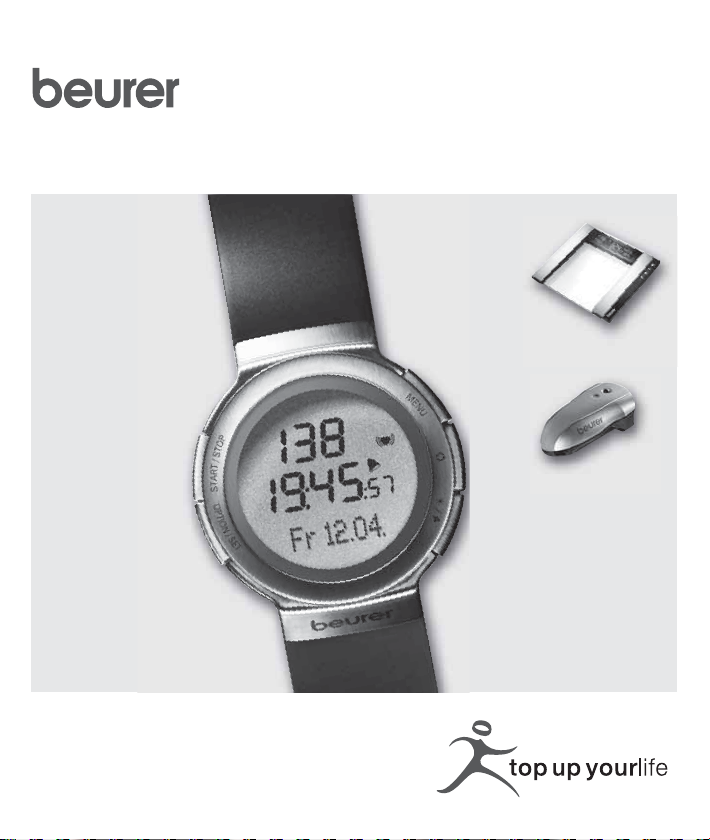
heart rate monitor
herzfrequenz pulsuhr
germanlengineering
PM80
Option
Optional
Option
Optional
Operating Instructions
Gebrauchsanleitung
Page 2

Page 3

TABLE OF CONTENTS
Scope of delivery.............................................................................3
Important Notes...............................................................................4
General Information for Training....................................................6
Functions of the HR monitor..........................................................8
Transmission of signal and methods of Devices Measurement.9
Getting started...............................................................................10
General operation of the HR monitor...........................................14
Buttons on the HR watch..........................................................14
Display......................................................................................15
Menus.......................................................................................16
Basic settings ................................................................................18
Overview ..................................................................................18
Enter personal data..................................................................19
Set training zone ......................................................................20
Set units ...................................................................................21
Pairing the signals from the device ..........................................22
Watch settings...............................................................................23
Overview ..................................................................................23
Set time of day and date ..........................................................23
Set alarm clock.........................................................................25
Display speed and distance .....................................................25
Recording of training ....................................................................27
Overview ..................................................................................27
Stop run times ..........................................................................29
Record laps ..............................................................................29
Display speed and distance .....................................................30
Stop and store recording..........................................................31
1
G
B
Page 4

Delete all recordings.................................................................32
Analyzing memory messages...................................................33
Speed and distance.......................................................................34
Overview...................................................................................34
Change speed units..................................................................35
Calibrate the Speedbox............................................................36
Set target distance and target time...........................................38
Display speed and distance......................................................40
Results............................................................................................41
Overview...................................................................................41
Display training data.................................................................41
Transmit weight management data to the monitor...................43
Lap results......................................................................................45
Overview...................................................................................45
Display lap results ....................................................................45
Fitness test.....................................................................................46
Overview...................................................................................46
Conduct fitness test..................................................................47
Display fitness values...............................................................48
EasyFit software............................................................................50
Technical specifications and batteries........................................52
List of abbreviations......................................................................53
Index ...............................................................................................56
2
Page 5
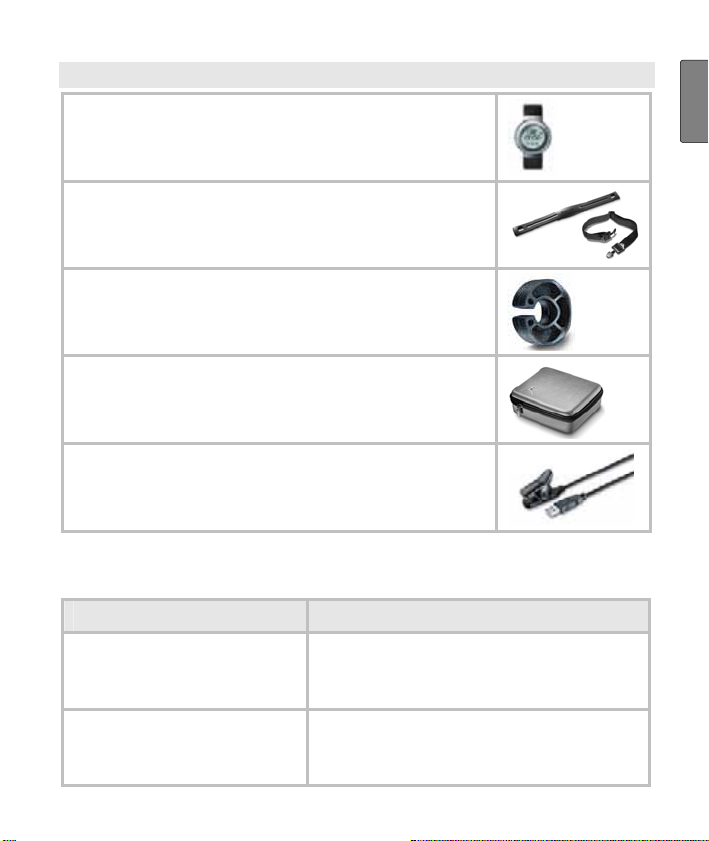
SCOPE OF DELIVERY
Heart rate monitor with wrist band
Chest strap and elastic tension strap (adjustable)
Bike mount
Storage box
PC Software EasyFit (CD)
and PC interface cable (USB)
In addition: Operating instructions and separate short instructions.
Beurer accessories are available from specialised stores:
Accessory Function
Beurer Speedbox You can have your speed and dis-
tance values displayed on the HR
monitor.
Beurer scale (e.g. Scale
BG56, Item Number
750.30).
You can measure your weight and
your body fat with the scale and
transmit them to the HR monitor.
G
B
3
Page 6
IMPORTANT NOTES
Please carefully read through these operating instructions, keep it
for future reference and also make it available to others.
Training
This product is not a therapeutic device. It is a training instrument,
which was developed for the measurement and representation of
the human heart rate.
With high-risk sports, please note that the use of the heart rate
monitor can represent an additional source of injury.
If in doubt or for illnesses, please consult your doctor concerning
the values of your upper and lower target heart rate as well as the
duration and frequency of training. In such a way, you can
achieve optimal results when training.
WARNING: People suffering from heart and circulatory illnesses
or those with pacemakers should only use this heart rate monitor
after having consulted their doctor.
Application
The device is only intended for private use.
This device may only be used for the purpose it was designed for
and in the manner outlined in this operating instructions. Any form
of improper use can be dangerous. The manufacturer is not liable
for damages that are caused by improper or incorrect use.
The heart rate monitor is waterproof. (see chapter "Technical
Specifications")
4
Page 7
Cleaning and care
From time to time, carefully clean your chest strap, elastic chest
strap, heart rate monitor and if necessary the Speedbox with a
soap and water solution. Then rinse off all components with clean
water. Carefully dry them with a soft towel. You can wash the
elastic chest strap in the washing machine at 30° without fabric
softener. The chest strap is not made for the dryer!
Store the chest strap in a clean and dry place. Dirt impairs the
elasticity and functioning of the transmitter. Sweat and moisture
can keep the electrodes wet and consequently activate the
transmitter, which shortens battery life.
Repair, Accessories and Disposal
Prior to use, it should be ensured that the device and accessories
are free of damage. If in doubt, do not use the device and consult
your sales representative or the customer service address provided.
Repairs may only be conducted by customer service or author-
ized dealers. Please do not in any case attempt to repair the device!
Use the device only with the original accessories of Beurer.
Avoid contact with sunscreen or the like since these can cause
damage to the imprint or plastic components.
Please dispose of the device in accordance with Waste Electric
and Electronic Equipment 2002/96/EC - WEEE. For inquiries,
please contact the municipal authority responsible for disposal in
your area.
G
B
5
Page 8

GENERAL INFORMATION FOR TRAINING
This heart rate monitor serves to measure the human pulse. By
means of various settings, you can support your individual training
program and monitor your pulse. You should monitor your pulse
during exercise because you should prevent your heart from excessive strain on the one hand and on the other in order to achieve the
optimal training results. The table provides you with some information on the selection of your training zone. The maximum heart rate
reduces with advancing age. Information on the training heart rate
must therefore always be in relation to the maximum heart rate. The
following rule of thumb helps to identify the maximum heart rate:
220 - age = maximum heart rate
The following example applies to a 40-year-old person: 220-40 = 180
Max. heart rate
range
Effect
Suitable for
Training
Heart/health
programme
50 - 60%
Strengthens the
heart and the
circulatory system
Ideal for beginners
Regenerative
training
Fat burning zone Fitness
60 - 70%
The body burns
the highest percentage of calories from fat.
Strengthens the
heart and the
circulatory system,
enhances fitness
Weight control
and loss
programme
70 - 80% 80 - 90% 90 - 100%
Improves the
respiratory and
circulatory system.
Ideal to promote
the basic
endurance
Athletes at
amateur level
Fitness training Endurance
Endurance training programme
Improves speed
maintenance and
increases basic
speed
Ambitious athletes
at amateur level,
professional
athletes
training
Anaerobic
training
Overloads specific
muscles. High
injury risk for
athletes at amateur level, risk related to the heart
in case of disease
Only professional
athletes
Fitness training
addressing
specific zones
See the chapter "Basic Settings", section "Setting your training zone"
on how to individually set your training zone. See the chapter "Fitness Test" on how the heart rate monitor sets your individual limits
of the suggested training zone through the fitness test.
6
Page 9

Analysis of the Training
With the PC software EasyFit you can acquire the results from the
watch and analyze them in various ways. In addition, EasyFit provides useful calendar and administrative functions, which also support optimal training over longer periods of time. Using the software,
you can also control and monitor your weight management.
G
B
7
Page 10

FUNCTIONS OF THE HR MONITOR
HR functions
Exact ECG heart rate
measurement
Transmission: digital
Individual training zone
adjustable
Acoustic and visual alarm
for exit from the training
zone
Average heart rate (aver-
age)
Maximum training heart rate
Calorie consumption in Kcal
(basis jogging)
Fat burning in g/oz
Time functions
Time of day
Calendar (up to 2099) and
weekday
Date
Alarm / alarm clock
Stop watch
50 laps for each training,
recall of all of them or each
one. Display of lap time and
average heart rate
Settings
Gender
Weight
Unit of weight kg/lb
Height
Unit of height cm/inch
Age
Maximum heart rate
Speed units km(mi)/h or
min/km(mi)
Fitness test
Fitness index with interpre-
tation
Maximum oxygen-breath
volume (VO
Basal metabolic rate (BMR)
Active metabolic rate (AMR)
Calculated maximum heart
max)
2
rate
Suggested training zones
8
Page 11

TRANSMISSION OF SIGNAL AND METHODS OF DEVICES MEAS-
UREMENT
Receiving range of the heart rate monitor
Your heart rate monitor picks up the heart rate signals sent by the
chest strap transmitter within a range of 70 centimeters.
Your HR monitor receives the signals from the Speedbox within a
range of three meters.
Sensors on the chest strap
The entire chest strap consists of two components: the actual chest
strap and an elastic tension belt. On the inside of the chest strap
contacting the body, there are two rectangular, corrugated sensors.
Both sensors determine your heart rate ECG exactly and transmit
this to the heart rate monitor.
The digital transmission works almost without interference. Your HR
monitor only receives the signal from the corresponding transmitter.
There can be no interfering signals from other transmitters.
The chest strap is not compatible with analogue devices, such as
e.g. ergometers.
Signal transmission from the diagnostic scale
The diagnostic scale offers an additional convenience. You can
measure your current weight and your body fat at any time with the
scale and transmit them to the HR monitor. The weight values registered manually in the HR monitor are then updated by the values of
the scale.
G
B
9
Page 12
Measuring device of the Speedbox
Your HR monitor has all the functions to analyze the signals from the
Beurer Speedbox. A multidimensional measuring device is installed
in the Speedbox. This calculates the acceleration of your foot and
transmits this value to the HR monitor. The HR monitor calculates
the distance covered and the speed from the acceleration and the
time of each individual pace.
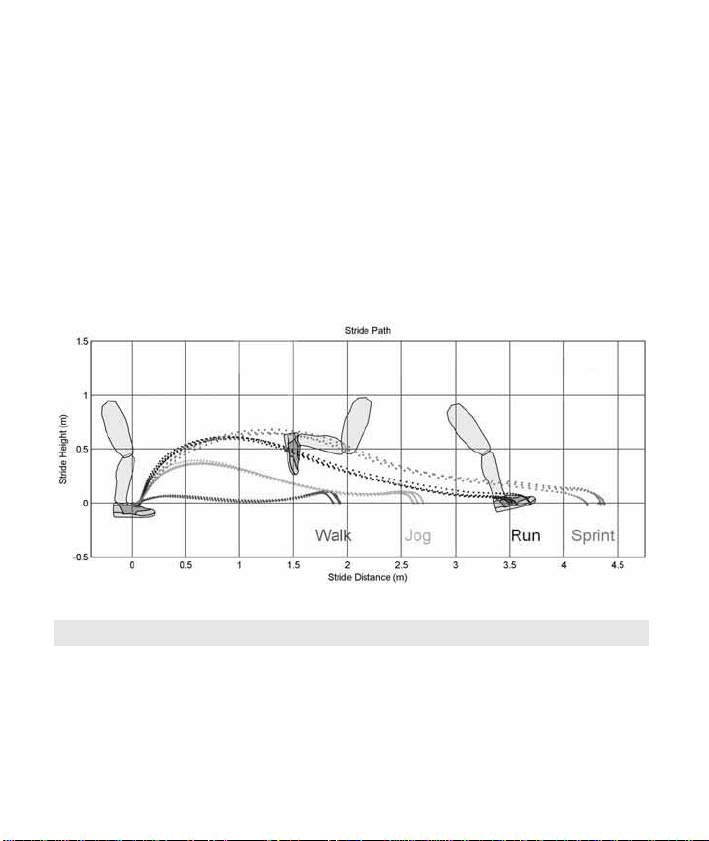
The following diagram shows the measured movements of feet over
two paces depending on the type of pace i.e. walking, jogging, running and sprinting.
Quelle: Dynastream Technology
GETTING STARTED
Putting on the heart rate monitor
You can wear your heart rate monitor like a wrist watch. In order to
fix the heart rate monitor on bike handle bars, attach the bike mount
included to the handle bars. Tighten the heart rate monitor around
the mount such that it is not able to slip while riding.
10
Page 13
Activating the HR watch from transport mode
During transport the monitor is blank. You can remove the transport
mode by pressing the button
MENU
and then
START/STOP
.
Activating the heart rate monitor from power saving
mode
You can activate your heart rate monitor by pressing any key. If the
heart rate monitor has not received any signal for approx. five minutes, it switches to the power saving mode. At that point, only the
current time and the date will be displayed. Press any key in order to
reactivate the watch.
Putting on the chest strap
Tighten the chest strap with the elastic tension
belt. Adjust the length of the belt such that the
belt is snug, but neither too loose nor too tight.
Position the belt around the chest such that the
logo is facing outwards and in the correct position directly over the breast bone. For men, the
chest belt should be located directly below the
pectoral muscles, for women, directly below the
breast.
Since optimal contact between the skin and the heart rate sensors
can not be created immediately, it may take some time until the
heart rate is measured and displayed. If necessary, alter the position of the transmitter in order to achieve optimal contact. Most of
the time, sufficient contact is achieved through the accumulation
of sweat beneath the chest strap. You can, however, also wet the
contact points on the inside of the chest strap. For this, lift the
chest strap up from the skin slightly and wet the two sensors with
saliva, water or ECG gel (available at the chemistry). The contact
G
B
11
Page 14
between the skin and chest strap may not be interrupted also with
greater movements of the thorax such as during deep breathing.
Significant chest chair can interfere with and even prevent contact.
Put on the chest strap a few minutes before starting in order to
warm it up to body temperature and establish optimal contact.
Pairing the signals from the device
The digital transmitters (chest strap, Speedbox, diagnostic scale)
and receiver (HR monitor) have to be paired. If you buy each device
separately, e.g. as a replacement, or if you change the batteries,
then you have to pair the devices before use.
You can find out how to pair the devices by reading the chapter
“Basic settings”, section “Pairing the device signals”.
Connecting the devices
Your HR monitor receives signals from the digital transmitters, chest
strap and Speedbox, as soon as you have activated them and have
changed into the
Training menu by pressing the
How you can identify on the display whether signals are being received:
If the heart symbol flashes, then the heart rate is being received from the chest strap.
If “0” is displayed in the 1st line for a longer period, then the HR
monitor cannot receive the signals from the chest strap. The
display “0” can occur in the
Training, Time and Spd’nDist
menus. In this case, change into the Training menu with the
MENU
button. The HR monitor tries once more to make
contact with the devices.
MENU
button.
12
Page 15

Attaching the Speedbox
Place the speedbox as close to the toe-cup as possible but never place it above the ankle for shoes with
high leg.
Fasten the rear of the Speedbox to your shoe by
pulling the shoelaces through the hole provided. You
then only have to put the front hole of the Speedbox
between the shoelaces. Pull the shoelaces tightly
before doing up the shoe.
Calibrating the Speedbox
You will get the most accurate results if you calibrate your Speedbox. You can read how to calibrate your Speedbox in chapter
“Speed and distance”, section “Calibrate the Speedbox”.
Weight management data
You can transmit your weight data and your body fat from the diagnostic scale to the HR monitor. Your can read how to transmit the
data in chapter “Results”, section “Transmit weight management
data”.
G
B
13
Page 16
GENERAL OPERATION OF THE HR MONITOR
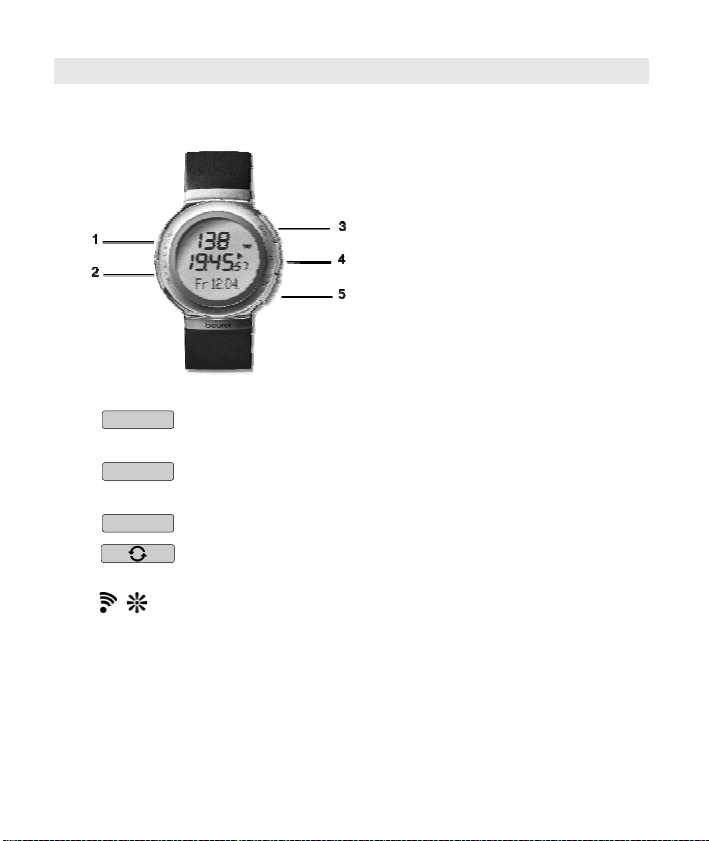
Buttons on the HR watch
START/STOP
1
OPTION/SET
2
3
4
5
MENU
/
Starts and stops functions and adjusts values.
Press and holding accelerates the entry.
Switches between the functions within one menu
and confirms settings.
Switches between the different menus.
Switches between different displays for speed and
distance values.
Pressing quickly illuminates the display for five
seconds.
Pressing and holding activates/deactivates the
acoustic alarm when exiting the training zone.
14
Page 17
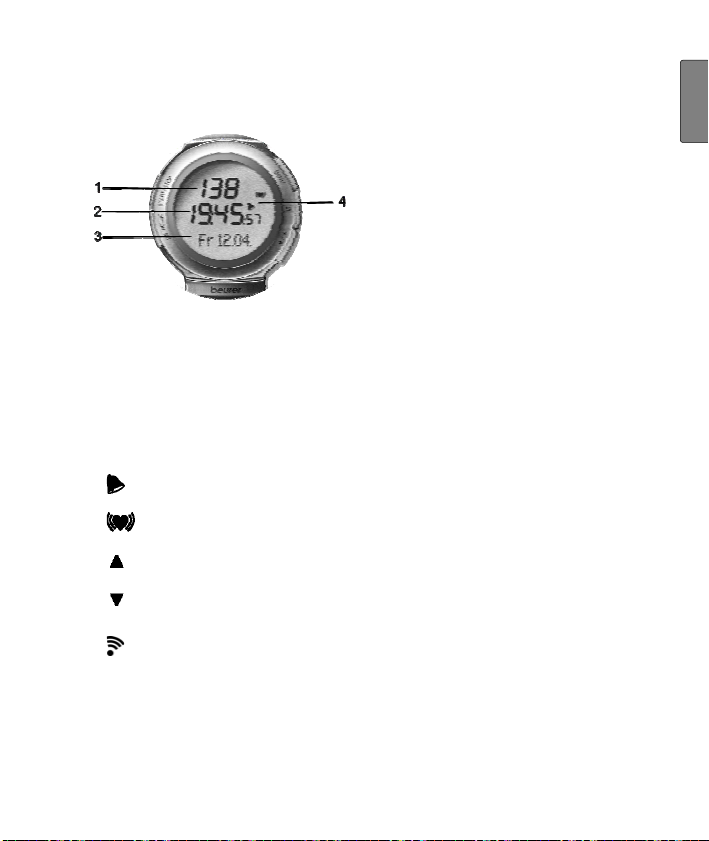
Display
1
Top line
2
Middle line
3
Bottom line
4
Symbols
G
B
Alarm clock is activated.
Heart rate is being received.
Training zone has been exceeded.
Training zone has been underrun.
Acoustic alarm for exit from the training zone is activated.
An explanation of the display abbreviations can be found in the list of
abbreviates at the end of the operating instructions.
15
Page 18
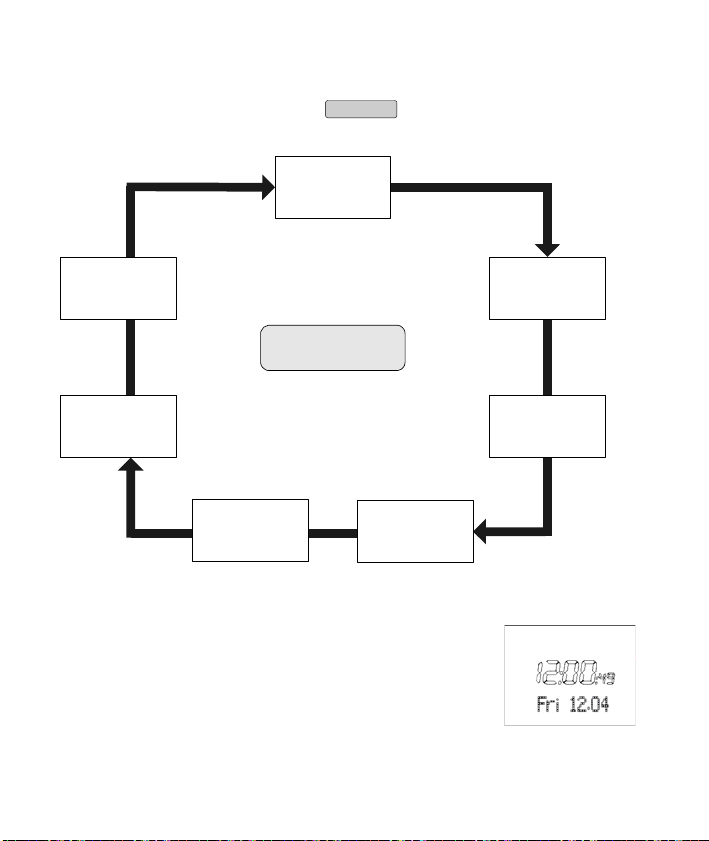
Menus
You can switch menus with the
Time
MENU
Button.
FitTest
MENU
Setting
LAP
Result
Power saving mode
If your heart rate monitor has not received any
signal for approx. five minutes, it switches to the
power saving mode. In that case, only the current
time and the date will be shown. Press any key to
reactivate the HR monitor.
Result
16
Training
Spd´nDist
Page 19
Main display
When changing menus, the name of the menu is
first shown, then your HR monitor will automatically switch to the main display of the active
menu.
From there, you have to first choose a submenu
or you can directly access functions.
Overview of the menus
Menu Meaning Description:
see chapter...
Time
Training
Spd'nDist
Result
Lap Re-
sult
Setting
FitTest
Time "Watch Settings"
Training "Recording of Training"
Speed and distance "Speed and distance"
Result "Results"
Lap result "Lap results"
Settings "Basic settings"
Fitness test "Fitness test"
G
B
Menu
automatically
Main
display
17
Page 20
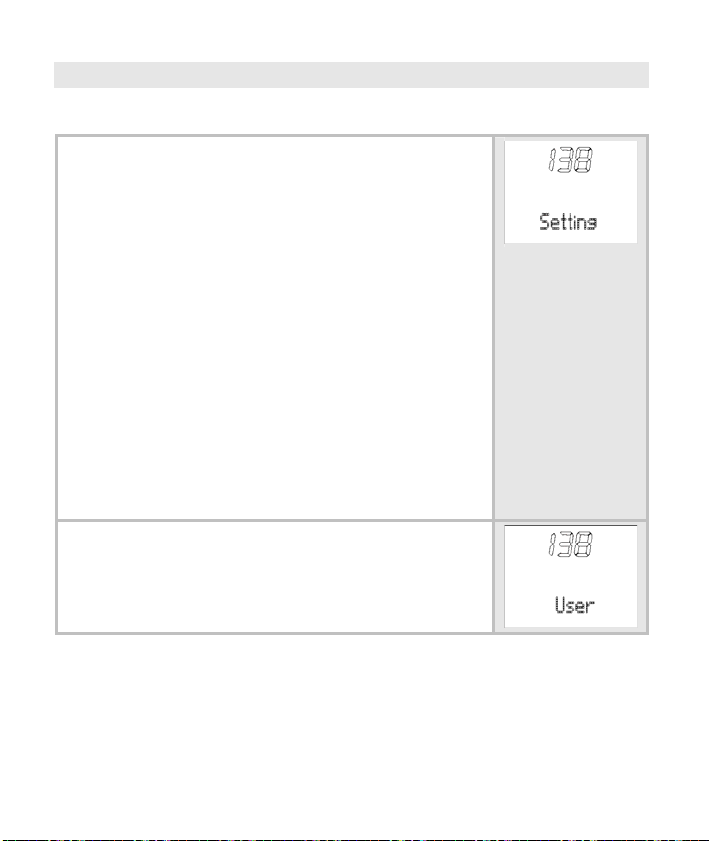
BASIC SETTINGS
Overview
In the menu Setting you can:
Enter your personal data (user). Based on this
data, your HR monitor determines your calorie
consumption and your fat burning during training!
Set your training zone (limits). See chapter
"General Information on Training" for explanations on how to set the training zones. Your
HR monitor issues an acoustic and visual
alarm during your training when the training
zone is exited.
Change the units of measurement (units) for
height and weight.
Pair the signals of your new devices (Pair-
NewDev).
Once you are in the menu Setting, your HR
monitor automatically switches to the main display. This displays
User.
18
Page 21
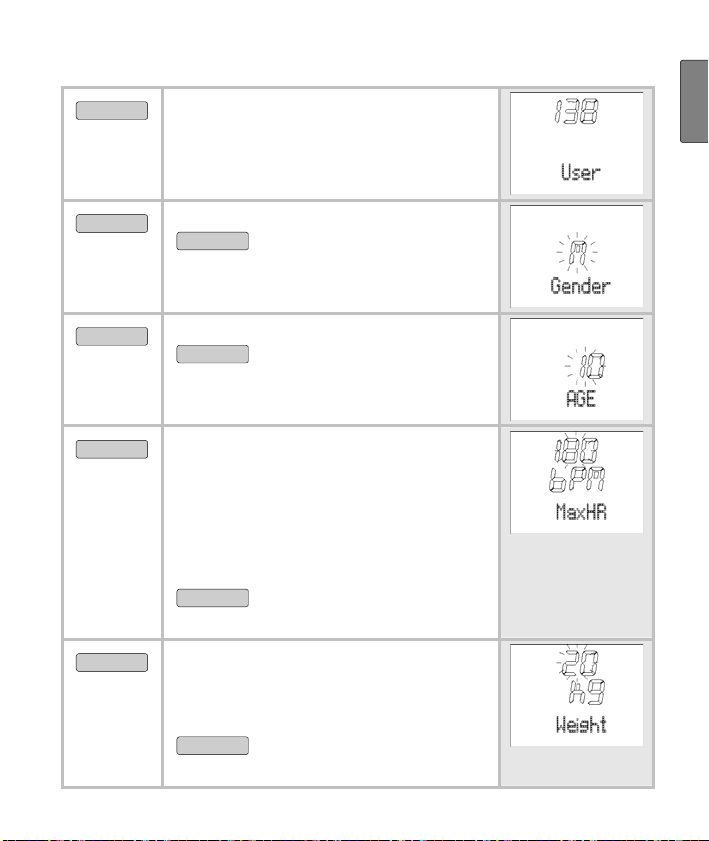
Enter personal data
MENU
Switch to the menu Setting.
G
B
START/STOP
OPTION/SET
OPTION/SET
OPTION/SET
Gender is displayed.
START/STOP
Select
Select M, if you are male.
F, if you are female.
AGE is displayed.
START/STOP
Set your age (10-99).
MaxHR is displayed. The HR monitor
automatically calculates the maximum heart rate according to the
formula: 220 - age = MaxHR. Please
note that the HR monitor also determines the MaxHR after every fitness
test and sets it as a suggested value.
START/STOP
You can overwrite the value
calculated (65-239).
Weight is displayed. Please note that
the scale overwrites this weight
value each time the weight is measured.
START/STOP
Please select your weight
(20-227 kg or 44-499 lbs).
19
Page 22
OPTION/SET
Height is displayed.
START/STOP
Set your height (80-227 cm
or 2'6''-7'6'' feet).
OPTION/SET
Return to the display User.
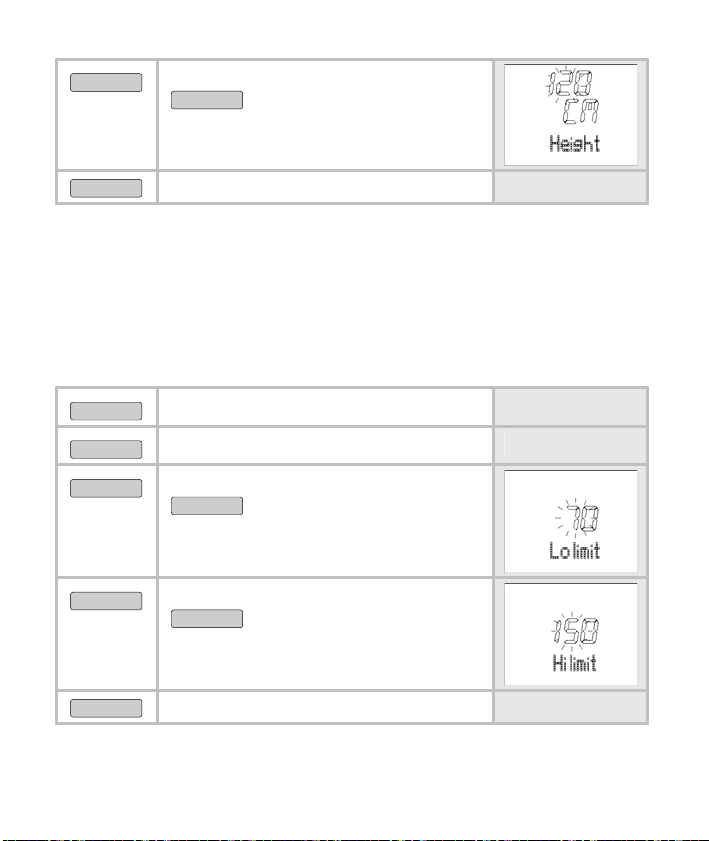
Set training zone
You can set your individual upper and lower heart rate limit as described below.
Please note that both limits are automatically set as a training zone
suggestion after every fitness test and that the old data are consequently overwritten. For this, the lower limit of the suggested training
zone totals 65%, the upper limit 85% of the maximum heart rate.
MENU
OPTION/SET
START/STOP
OPTION/SET
OPTION/SET
Switch to the menu Setting.
Limits is displayed.
Lo limit is displayed.
START/STOP
Set the lower limit for your
training zone (40-238).
Hi limit is displayed.
START/STOP
Set the upper limit (41-239).
Return to the display Limits.
20
Page 23
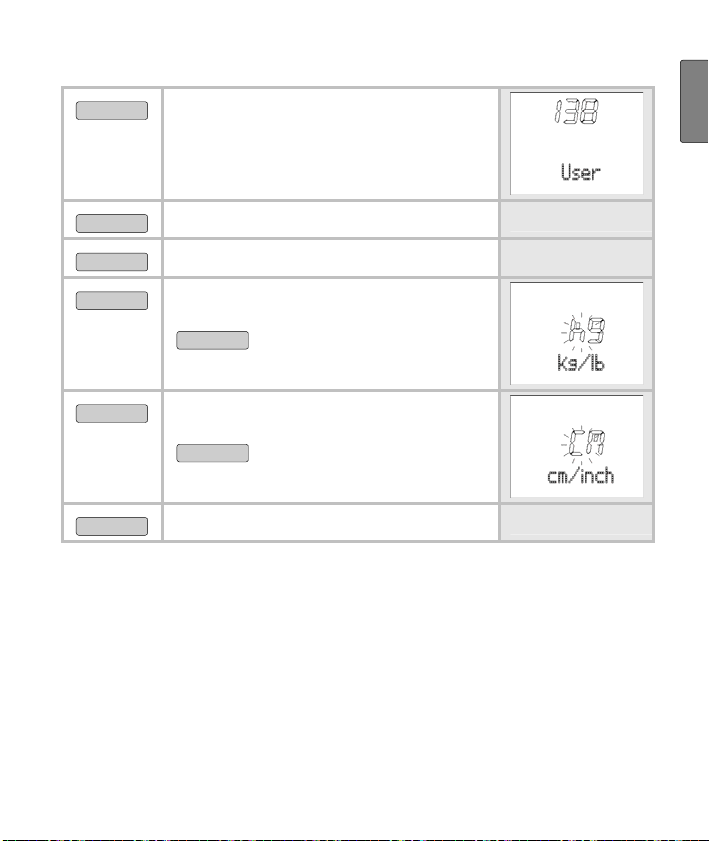
Set units
MENU
Switch to the menu Setting.
G
B
OPTION/SET
OPTION/SET
START/STOP
OPTION/SET
OPTION/SET
Limits is displayed.
Units is displayed.
kg/lb is displayed. The weight unit
blinks.
START/STOP
Switch between the units.
cm/inch is displayed. The unit of
measurement for height blinks.
START/STOP
Switch the units.
Return to the display Units.
21
Page 24
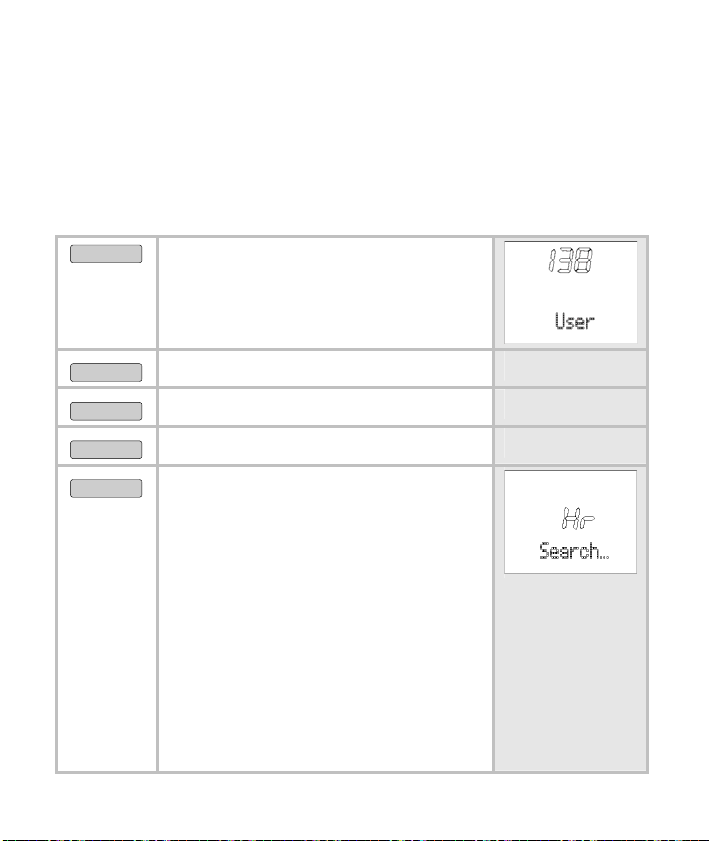
Pairing the signals from the device
The digital transmitter and receiver have to be paired. If you buy
each device separately, e.g. as a replacement, or if you change the
batteries, then you have to pair the devices before use.
The devices have to be switched on for this operation. To do this put
on the chest strap, activate the Speedbox and switch on the scale by
pressing it slightly with your foot.
MENU
Change into the Setting menu.
OPTION/SET
OPTION/SET
OPTION/SET
START/STOP
Limits is displayed.
Units is displayed.
Pair NewDev is displayed.
Hr Search is displayed. Your HR
monitor starts to search for the devices. You can follow the success of
the search on the display:
HR-Belt signals that the chest strap
has been successfully connected.
SPD Dev signals that the Speedbox
has been successfully connected.
Scale signals that the scale has been
successfully connected. If the scale
has switched itself off automatically
in the meantime, then switch them
on again.
22
Page 25
The display No Device found appears at the end of the search for the
devices, if no devices were connected.
OPTION/SET
Back to the main display.
WATCH SETTINGS
Overview
In the Time menu you can:
Set the time and the date.
Set the alarm clock.
With , information on the speed/dis-
tances can be displayed in the bottom line.
When you are in the Time menu the heart rate
monitor automatically activates the main display.
In this mode both the weekday and the current
date are displayed. On the display:
(Friday 12th April).
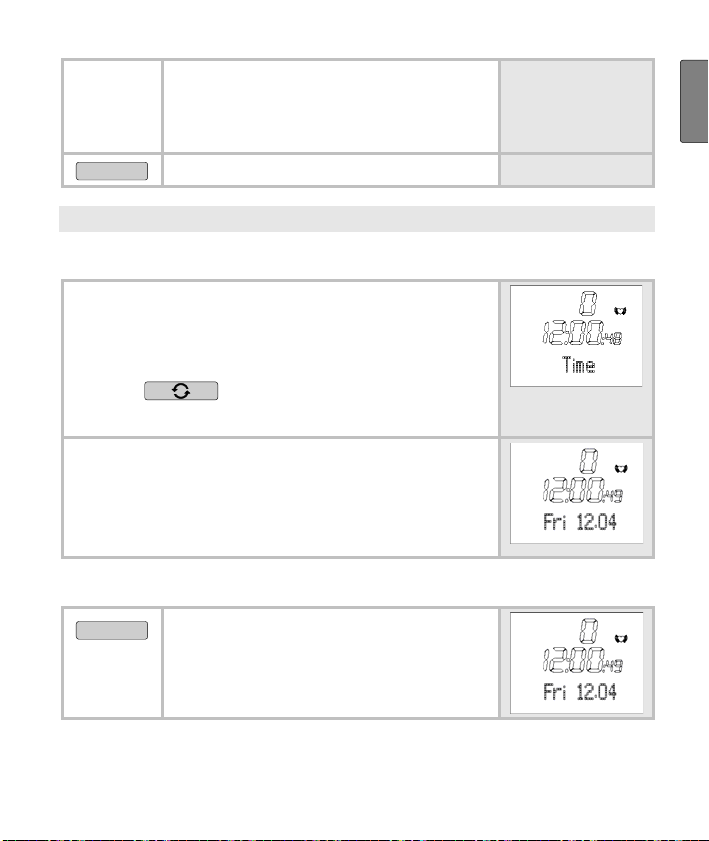
Set time of day and date
MENU
Switch to the menu Time.
Fri 12.04
G
B
23
Page 26
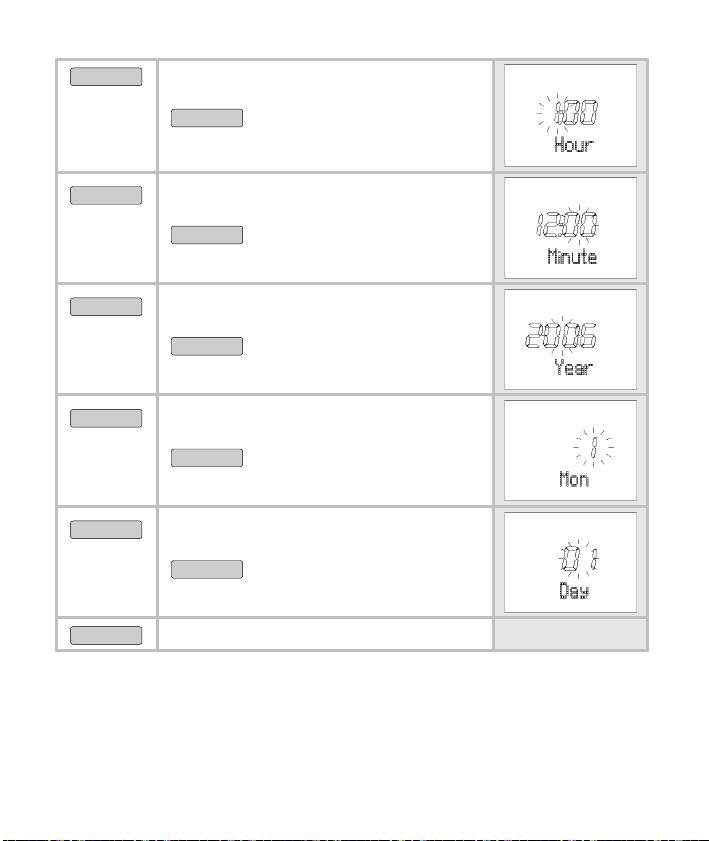
START/STOP
5 sec
Set Time is shown briefly. Hour is
displayed. The hour setting blinks.
START/STOP
Set the hour (0-24).
OPTION/SET
OPTION/SET
OPTION/SET
OPTION/SET
OPTION/SET
Minute is displayed. The hour setting
blinks.
START/STOP
Set the minute (0-59).
Year is displayed. The year setting
blinks.
START/STOP
Set the year. The calendar
goes up to 2099.
Month is displayed. The monthly
setting blinks.
START/STOP
Set the month (1-12).
Day is displayed. The day setting
blinks.
START/STOP
Set the day (1-31).
Back to the main display.
24
Page 27
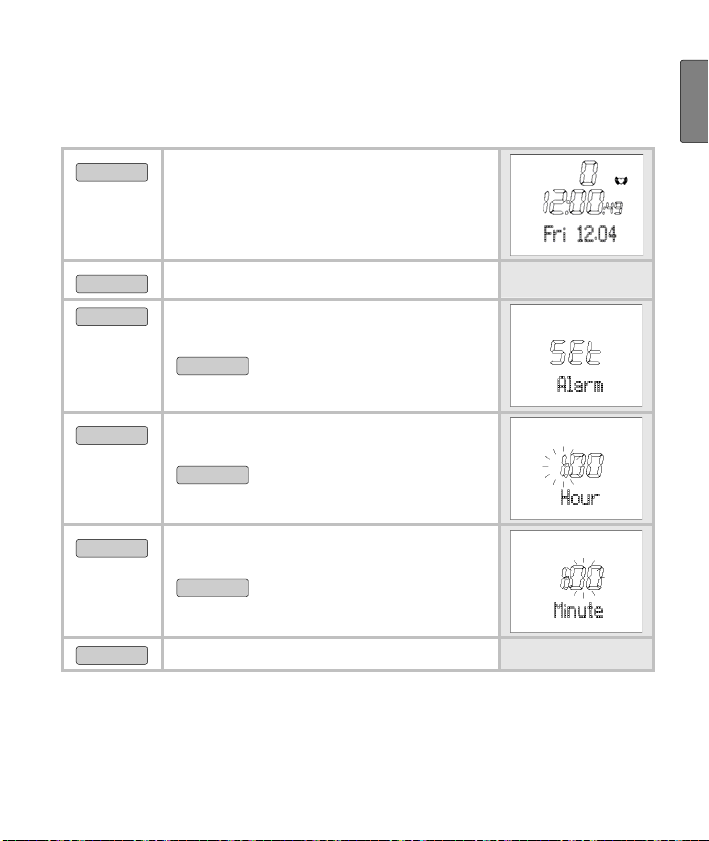
Set alarm clock
You can turn off the alarm clock by pressing any button. On the
following day, we will be woken up at the same time.
MENU
Switch to the menu Time.
G
B
OPTION/SET
START/STOP
5 sec
Alarm is displayed.
Set Time is shown briefly.
On Alarm is displayed.
START/STOP
Turns the alarm clock off
(Off) and on (On).
OPTION/SET
Hour is displayed. The hour setting
blinks.
OPTION/SET
START/STOP
Minute is displayed. The hour setting
Set the hour.
blinks.
OPTION/SET
START/STOP
Back to the main display.
Set the minute.
Display speed and distance
If you run with the Speedbox, then you can have your speed and
distance values displayed. While you are running, you have the
option to change between the different displays. If you prefer to use
25
Page 28
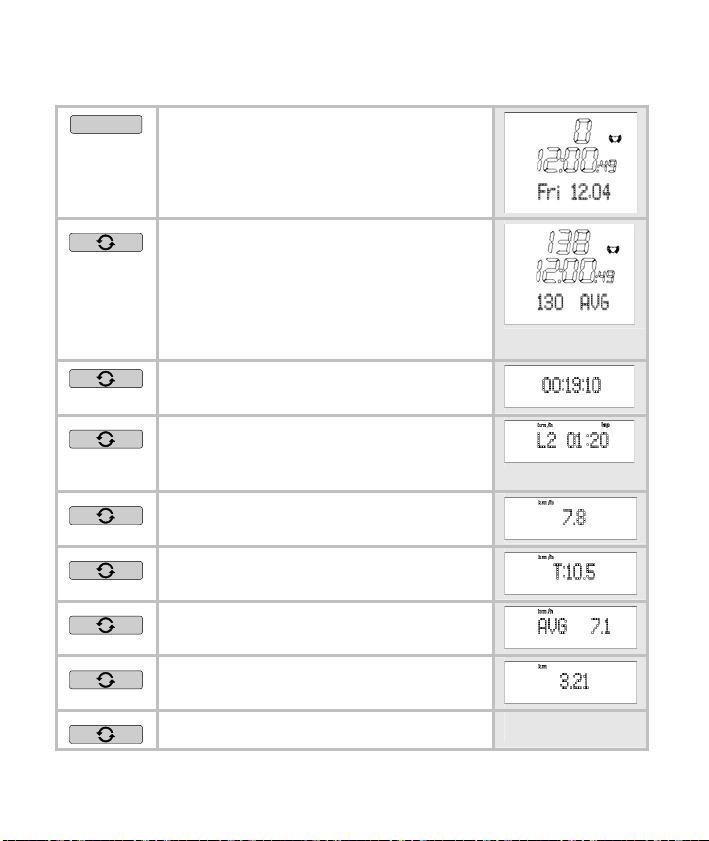
one particular display, then you can also keep this for your entire
run.
MENU
Change into the Time menu.
Your average heart rate is displayed
in the bottom line. If you have set a
particular display for the speed and
distance in advance in the
Time
menu, then you will see this in the
bottom line.
Your total training time [Hrs:Min:Sec]
is displayed in the bottom line.
Your current laps and the lap time
[Hrs:Min] are displayed in the bottom
line.
Your current speed is displayed in
the bottom line.
Your set target speed is displayed in
the bottom line.
Your average speed is displayed in
the bottom line.
The distance you have just covered
is displayed in the bottom line.
Back to the main display.
26
Page 29
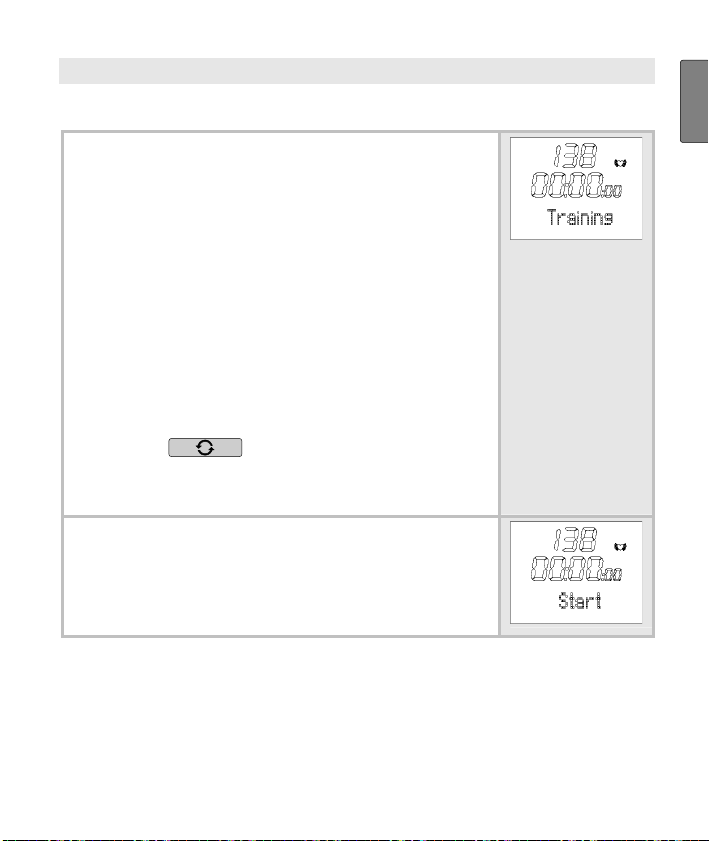
RECORDING OF TRAINING
Overview
As soon as you change into the Training menu,
your HR monitor will look for the paired digital
transmitters, the chest strap and the Speedbox.
As soon as a signal is identified, contact is made.
In the menu
Stop your run times and thereby record your
training session.
Record individual laps.
Stop and save your recording.
Delete all recordings.
Analyze memory messages.
With , information on the
speed/distances can be displayed in the bottom line.
Once you are in the menu Training, your HR
monitor automatically switches to the main display. This displays the already recorded training
time on the middle line (after Save/Delete:
00:00:00) and on the line below
Training you can:
Start.
G
B
27
Page 30

Things to know about the recordings
As soon as you have started the recording, your HR monitor
starts recording your training data. Your HR monitor continually
records your training data until you save or delete this. This also
applies when you first start training on the following day. The running time also allows you to stop your training session at any
time.
If “0” is displayed for a longer period on the display, this means
that the receipt of the signals has been interrupted. In this case
change into the
Training menu, by pressing
MENU
7 times.
The HR monitor tries to make contact with the devices once more.
Your HR watch has a memory. You can record up to 24 hours of
your training session. 10 hours of which are stored. You can record a maximum of 60 laps. A maximum of 50 laps is possible for
each training. Your HR watch informs you if the memory is almost
full. At this point, at the latest, we recommend transmitting the recordings to your PC and thus emptying the memory on the HR
watch. Alternatively you can delete all recordings manually. Read
the section “Delete all recordings” in this chapter to find out how
to delete the recordings.
You can let your training data be displayed. In the Result menu,
the last recording stopped can be called. In the menu
Lap Result
you can see the laps for this recording.
As soon as you have transferred the recordings into the EasyFit
software, you can view and analyze them there. The memory will
be deleted every time you have successfully transferred the data
to the PC. You can find explanations regarding the transfer of
data to the PC in the chapter “EasyFit Software”.
28
Page 31

Stop run times
MENU
Switch to the menu Training. If you
have already stopped a run time, the
recorded training time is displayed
on the middle line.
G
B
START/STOP
Start the recording. Run is displayed.
Even if you change to another menu
during the recording, the time continues to run in the background.
START/STOP
Stop the recording. Stop is displayed. You can interrupt and resume your recordings at any time by
pressing the button
START/STOP
.
Record laps
While the recording of your entire training is in progress, you can
record individual laps. The time continues to run as the laps are
recorded.
Training and
OPTION/SET
You are in the menu
your training is currently being recorded.
Run is displayed.
Time a new lap. The display shows
the time and number of the last lap
timed for five seconds, for example
Lap 1.
29
Page 32

The display automatically switches
back to Run and shows the number
of the current lap, for example
Run 2.
OPTION/SET
Record additional training laps as
needed. You can record up to a total
of 50 laps for each training.
Display speed and distance
If you run with the Speedbox, then you can have your speed and
distance values displayed. While you are running, you have the
option to change between the different displays. If you prefer to use
one particular display, then you can also keep this for your entire
run.
You are in the
training session is just being recorded.
Run is displayed.
Your average heart rate is displayed
in the bottom line. If you have set a
particular display for the speed and
distance in advance in the
menu, then you will see this in the
bottom line.
Your current laps and the lap time
[Hrs:Min] are displayed in the bottom
line.
Training menu. A
Training
30
Page 33

Your current speed is displayed in
the bottom line.
Your set target speed is displayed in
the bottom line.
Your average speed is displayed in
the bottom line.
The distance previously covered is
displayed in the bottom line.
Back to the main display.
Stop and store recording
Please note that after finishing and saving, you can no longer have
the data displayed in the
You are in the menu
have just recorded a training.
Stop is displayed.
Result and Lap Result menus.
Training. You
G
B
START/STOP
5 sec
Save the recording. You can store
up to 10 hours.
Hold Save is displayed.
The display automatically switches
back to the main display.
The data is now ready to be transmitted to the PC.
31
Page 34

Delete all recordings
Your HR watch informs you automatically when the memory is almost full. Before you then delete the memory, we recommend analyzing the training recording or transmit to the PC! The memory on
the HR watch will be deleted automatically every time you successfully transfer data to the PC. Alternatively you can delete the memory manually as described here.
The automatic or manual deletion causes all training recordings
including your laps to be deleted.
You can delete the data before or after
the training:
You are in the menu Training. Start
is displayed.
You are in the menu Training. You
have just recorded a training.
is displayed.
Stop
OPTION/SET
5 sec
Delete all recordings.
MEM Delete is displayed.
The monitor automatically switches to
the main display.
32
Page 35

Analyzing memory messages
In the menu Training your HR watch automatically informs you if the
memory is almost full or if almost all the laps are occupied.
Message Meaning
When switching to the menu
watch signals
the memory or less than 10 laps are free.
During training, the HR watch signals every 5
seconds
memory is free.
On the display:
During training the HR watch signals every 5
seconds
(of a total of 60) laps .
On the display:
Read in the previous section “Delete all recordings” to find out how
to delete the memory manually.
The memory is also deleted every time the data is transferred to the
PC. You can find the relevant explanations in the chapter “EasyFit
Software”.
MEM LOW, if less than 10% of
MEM x% Free, if less than 10% of the
MEM 8% Free (still 8% free).
LAP Rest x, if there are less than 10
LAP Rest 7 (still 7 laps free).
Training the HR
G
B
33
Page 36

SPEED AND DISTANCE
Overview
IMPORTANT: All settings in this menu only have
an effect if the Speedbox is used!
You can also use the Speedbox only to measure
your pace. Please note that the recording cannot
be transmitted to the PC. To be able to transmit,
the HR monitor needs a heart rate signal. Therefore put the chest strap on briefly at the beginning of the recording.
Spd’nDist menu you can:
In the
Change the speed units. In the basic setting
[cm], you can change from [km/h] to [min/km],
in the basic setting [inch] from [mi/h] to
[min/mi].
Calibrate the Speedbox.
Specify a target distance and a target time
which you want to run during the training
session. Your HR monitor will calculate the
target speed from these values. You can have
this displayed as a target in the
menu and compared with your current training
values. In this way you can continually control
the deviations from your set target speed during the training session.
With , information on the
speed/distances can be displayed in the bottom line.
34
Page 37

As soon as you are in the Spd’nDist menu, your
HR monitor changes automatically into the main
display. This displays the current speed in the
middle line. The bottom line displays the average
heart rate.
Change speed units
As some people prefer to have the speed display in a particular unit
when training, two different units are offered as an option. Many
runners prefer the information in min/km instead of km/h.
MENU
Change into the Spd’nDist menu.
G
B
OPTION/SET
START/STOP
OPTION/SET
Set Spd’nDist is displayed.
By pressing repeatedly you can
change between the speed units.
In the basic setting [cm]: min/km
(minutes per kilometer) or km/h
(kilometer per hour) is displayed.
In the basic setting [in]: min/mi
(minutes per mile) or mi/h (miles
per hour) is displayed.
CAL Distance is displayed.
If you would like to calibrate your
Speedbox, continue to read in
section “Calibrate Speedbox”.
35
Page 38

You have already calibrated the
devices earlier on. You would now
like to have your target speed calculated. Continue to read in section “Set target time and target
distance”.
If you would not like carry out any
of the two functions, but would like
to leave the menu, then press the
button
OPTION/SET
7 times.
Calibrate the Speedbox
For the kind of pace "Jog" the measurement precision of your wrist
watch with speedbox is at least 97% even without calibration. After
calibration the precision increases to reach at least 99%. For the
kind of paces Walk, Run and Sprint the speedbox has to be necessarily calibrated. Recalibrate it every time you would like to change
your pace.
You are in the
If you have set the speed units in
advance, then
ready be displayed.
If you have called up the menu for
the first time, then press
then
OPTION/SET
CAL Distance is displayed.
Spd’nDist menu.
CAL Distance will al-
START/STOP
and once more
.
OPTION/SET
,
36
Page 39

START/STOP
5 sec
Change to the calibration operation.
CAL 000 Start
is displayed.
Now activate your Speedbox.
G
B
START/STOP
START/STOP
Start running.
CAL 000 Run is displayed.
Run a distance where you know the
exact length (reference distance).
For example 4 stadium laps = 1600
m. Your monitor will display the distance (meters) in the middle line
during the run.
Please note that the calibration only
applies to the relevant type of pace.
If you change the type of pace, then
this has an effect on the accuracy of
the speed and distance recordings.
End your run. The HR monitor displays the measured length of the
distance, e.g. 1596 m.
If the displayed value is lower than
the distance covered, increase the
value with
If the displayed value is higher than
MENU
.
the distance covered, decrease the
value with
OPTION/SET
.
37
Page 40

START/STOP
The corrected length of the distance
is displayed, e.g.
tance
.
ACT 1600 Dis-
START/STOP
CAL Distance is displayed. You now
have two options:
You would like to have your target
speed calculated. Continue to
read in section “Set target time
and target distance”.
If you would like to leave the
menu, press the button
7 times.
Set target distance and target time
You are in the Spd’nDist menu.
If you have set the speed units in
advance or have calibrated the
Speedbox, then
already be displayed.
If you have called up the menu for
the first time, press
START/STOP
and once more
CAL Distance is displayed.
CAL Distance will
OPTION/SET
OPTION/SET
, then
OPTION/SET
.
38
Page 41

OPTION/SET
T-Dist is displayed.
START/STOP
Set the target kilometers
(0-99).
G
B
OPTION/SET
OPTION/SET
OPTION/SET
OPTION/SET
OPTION/SET
2 times
T-Dist is displayed. The meter set-
ting flashes.
START/STOP
Set the target meters
(0-99), e.g. 85 then means 850m.
T-time is displayed. The hour setting
flashes.
START/STOP
Set the target hours (0-99).
T-time is displayed. The minute set-
ting flashes.
START/STOP
Set the target minutes
(0-59).
T-time is displayed. The second
setting flashes.
START/STOP
Set the target seconds
(0-59).
Back to the main display.
39
Page 42

Display speed and distance
If you run with the Speedbox, then you can have your speed and
distance values displayed. While you are running, you have the
option to change between the different displays. If you prefer to use
one particular display, then you can also keep this for your entire
run.
MENU
Change into the Spd’nDist menu
The main display shows the current
speed in the middle line.
The bottom line displays the average
heart rate. If you have set a specific
display for speed and distance in
advance in the
Spd’nDist menu, you
will see this in the bottom line.
Your total training time [Hrs:Min:Sec]
is displayed in the bottom line.
Your current laps and the lap time
[Hrs:Min] are displayed in the bottom
line.
Your target speed is displayed in the
bottom line.
Your average speed is displayed in
the bottom line.
The distance you have just covered
is displayed in the bottom line.
Back to the main display.
40
Page 43

RESULTS
Overview
In the menu Result you can:
Display your training data of the last recording
stopped: mean and maximum heart rate,
times within and outside of the training zone
as well as calorie consumption and fat burning.
Transmit your weight management data from
the diagnostic scale to the HR monitor.
As soon as you are in the Result menu, your HR
monitor changes automatically into the main
display.
This displays
Display training data
MENU
TrData.
Change into the Result menu.
TrData is displayed.
G
B
START/STOP
BPM AVG (average training heart
rate) is displayed.
41
Page 44

OPTION/SET
HRmax (maximum training heart
rate) is displayed.
OPTION/SET
OPTION/SET
OPTION/SET
OPTION/SET
In [min] (time within the training
zone) is displayed.
Lo [min] (time below the training
zone) is displayed.
Hi [min] (time above the training
zone) is displayed.
[kcal] (the total calorie consump-
tion during the recording of the
training session) is displayed. The
calculation is conducted based on
moderately fast jogging. The
basis for the display of the calorie
consumption and fat burning are:
Personal data (basic settings)
the time and heart rate meas-
ured during the training session.
42
Page 45

OPTION/SET
Fat[g] (Fat burning during the
entire training recording) is displayed.
G
B
OPTION/SET
Back to the main display.
Transmit weight management data to the monitor
You can transmit your weight data and your body fat from the diagnostic scale to the HR monitor. Your HR monitor can store up to 10
recordings of the scale with the current date and time. If you record
more than ten times, then the oldest recordings will be overwritten.
You can transmit one recording per day to the monitor. If a second
recording within one day is transmitted, then the previous recording
of the same day is overwritten. Hold your HR monitor in your hand
during transmission and proceed as follows:
MENU
OPTION/SET
Activate your scale by tapping the
Change into the Result menu.
TrData is displayed.
WMData (Weight management) is
displayed.
standing surface briefly but with
pressure.
Select the storage place where you
would like to store your personal
data by pressing the “User” button
several times. It is displayed one
after the other until the display “0.0”
43
Page 46

START/STOP
OPTION/SET
OPTION/SET
appears. Step onto the scale barefoot. Pay attention that you are
standing calmly on the stainless
steel electrodes.
The scale calculates your weight and
your body fat and transmit both values to the monitor. For a short period
during the transmission horizontal
lines are shown on the display.
Please note that the body fat can
only be measured and transmitted, if
you have set the personal user data
on the scale. You can however also
transmit your weight without measuring your body fat. Your weight is
automatically updated during the
measurement in the
Setting menu.
Your weight which was calculated by
the scale
Weight[kg] is displayed. If
you do not measure your weight,
then the last weight stored will be
displayed.
Your body fat which was calculated
by the scale
BF[%] is displayed. If
you do not measure your body fat,
then the last body fat stored will be
displayed.
Press the button again and again
until your get into the main display.
44
Page 47

LAP RESULTS
Overview
In the menu LAP Result you can have the time
and average heart rate as well as the last training recording and the individual laps displayed.
Once you are in the menu LAP Result, your HR
monitor automatically switches to the main display. The top line shows the average heart rate,
the middle line the training time last recorded.
Display lap results
MENU
Switch to the menu LAP Result.
G
B
OPTION/SET
OPTION/SET
OPTION/SET
AVG 1: Results in lap 1 are dis-
played. The top line shows the average heart rate, the middle line displays the lap time.
Pressing again switches to the individual result display for the following
lap (maximum 50 laps for each training).
Back to the main display.
45
Page 48

FITNESS TEST
Overview
In the menu FitTest you can:
Test your personal fitness in a 1600m run (1
mile).
Have your fitness evaluated: Fitness index (1-
5), maximum oxygen-breath volume
max), basal metabolic rate (BMR) and
(VO
2
active metabolic rate (AMR).
Have your individual upper and lower limit
calculated automatically as a recommended
training zone and overwritten the two limits in
the menu
ting training zone".
Have your maximum heart rate (MaxHR)
automatically calculated and have it overwritten in the menu
The fitness test is not just designed for active
athletes, but also for those with a lower fitness
level from all age groups.
After one second, the main display appears. The
top line displays your fitness index:
0 = No test has been conducted yet
1 = Poor
2 = Fair
3 = Average
Setting. Also see the chapter "Set-
Setting.
46
Page 49

4 = Good
5 = Elite
On the middle line, the date of your last fitness
test is displayed. If you have not yet completed a
fitness test, then the preset date is displayed.
Conduct fitness test
The units displayed "m" or "mile" result from the basic settings. In
the chapter "Basic Settings", section "Setting units", you can read
how to change these units.
MENU
Switch to the menu FitTest.
G
B
START/STOP
The scrolling display appears Press
START to begin
. Now you have five
minutes to warm up. Your HR monitor signals the end of the 5-minute
warmup phase with a beep. In the
event you would like to shorten the
warmup phase, you can press the
button
START/STOP
to switch to the next
screen.
Briskly walk exactly 1600m (1 mile).
For this, choose a level route of exactly 1600m. Ideally, you will cover a
distance of four stadium laps (4
times 400m = 1600m).
47
Page 50

The scrolling display
after 1600 m
the button
reminds you to press
START/STOP
Press STOP
after 1600m.
The scrolling display Test Finished
appears and the time required is
displayed.
START/STOP
Back to the main display. It displays
your fitness index (1-5) with evaluation and the current date.
Display fitness values
The display of the fitness values only makes sense, if you have
completed at least one fitness test. The fitness values displayed
refer to the last test.
MENU
OPTION/SET
Change to the menu FitTest. The
fitness index (1-5) and the date of
your last fitness test is shown. If no
fitness test has been completed yet,
a 0 is displayed.
VO2max is displayed. The maximum
oxygen-breath volume is displayed in
millilitres within one minute per kg of
body weight. It is the basis for the
evaluation of your fitness test.
48
Page 51

OPTION/SET
OPTION/SET
OPTION/SET
BMR (Basal Metabolic Rate) is dis-
played. The basal metabolic rate is
calculated based on the values of
age, gender, body height and weight.
The BMR specifies the calories
needed to maintain your vital functions - in the absence of movement.
AMR (Active Metabolic Rate) is dis-
played. The active metabolic rate is
calculated based on the basic metabolic rate and an "activity premium",
which is dependant on the fitness
level.
Back to the main display.
G
B
49
Page 52

EASYFIT SOFTWARE
You can analyze your training data optimally with the EasyFit software. In addition to that, you will find many other functions for weight
management and for workout planning.
Calendar functions
Transmission of all training recordings
Weekly workout planning for achieving the desired weight
Various analyses and graphics for observing the training progress
Installation of the software
To install the software, please pay attention to the printed instruction
or to the file "Install_Readme" on the enclosed CD.
Please follow the instructions carefully.
System requirements
Operating system Windows 2000/XP
CPU optimal 1.2 GHz+
Main memory optimal 256 MB+ RAM
Disk space optimal 200 MB+ free space, at least 100 MB
Graphic resolution
Other requirements CD-ROM drive, USB interface
800 x 600 or 1024 x 768
50
Page 53

Starting the software
You can either start the EasyFit software by doubleclicking on the EasyFit symbol or via the start menu. If
you start the software for the first time, please input
your personal data under New Registration and confirm it with Save.
Connecting the HR watch and transferring data
1. In the menu Administration | Logs click on the button Transfer
data.
2. The software requests you to connect the HR watch to the PC.
To do this, please use the data transfer cable supplied. The cable consists of two connecting components, a USB connector
for the PC and a clip for the HR watch. It is important for proper
data transfer that first of all the clip is in contact with all three
connector pins on the backside of the HR watch. Then connect
the USB connector to a vacant USB port on your PC.
3. As soon as you have connected the data transfer cable and thus
have established a connection, the HR watch monitor shows PC
Link. The data is transferred into the software. PC OK shows
that the transfer has been finished. Remove the USB connector
from the port. You can view and analyze the updated data in the
software or close the software via the button Exit. Please note
that after transfer, all recordings in the memory of the HR watch
will be deleted.
4. If there is an error in transfer, the monitor shows PC ERR. The
recordings stay in the memory of the HR watch. You can try to
start a new transfer.
Remove the USB connector from the port
and repeat steps 1 to 3. Please pay attention to the sequence.
G
B
51
Page 54

TECHNICAL SPECIFICATIONS AND BATTERIES
HR monitor Waterproof to 50 m (suitable for
swimming)
Chest strap Waterproof (suitable for swimming)
Speedbox Waterproof to 30 m (shower-proof)
Battery HR monitor
Battery chest strap 3V lithium battery, type CR2032
Battery Speedbox 1,5V Mikro AAA (LR03)
Replacing the batteries
The battery of the HR monitor may only be replaced by a specialized
dealer (any lock-maker's shop) and at the service address provided.
You can replace the battery in the chest strap on your own. The
battery compartment is located on the inner side. Use a coin or the
battery to be used to open the compartment. The positive pole of the
battery inserted must face upwards. Carefully close the battery compartment again.
You can change the battery of the Speedbox yourself. The battery
compartment is located on the back. Use a coin to open the battery
compartment. The negative pole has to face the lid of the battery
compartment. Close the battery compartment again carefully.
Used batteries do not belong in the household garbage. Dispose of these through your electronics
dealer or your local collecting point for recoverables.
You are legally required to do this. We will find this
symbol on batteries containing toxic chemicals: Pb =
battery contains lead, Cd = battery contains cadmium, Hg = battery contains mercury.
3V lithium battery, type CR2032
52
Page 55

LIST OF ABBREVIATIONS
Abbreviations on the display in alphabetical order:
Abbreviation English
AGE Age
Alarm Alarm
AMR Calories needed for the activity
AVG Average heart rate during training
AVG Run Average heart rate during training
BF [%] Body Fat [%]
BMR Basal Metabolism
BPM Heart beats per minute
bPM AVG Average heart rate during training, beats per minute
bPM Hrmax Maximal heart rate during training, beats per minute
CAL Calibration
cm/inch Centimeter/Inch
Day Day
FitTest Fitness Test
f female
Fat[g] Fat in gram
Fri Friday
Gender Gender
Height Height
Hi Time above the training zone
Hi limit Highest training limit
Hold Save Save the recording
Hour Hour
HR Heart Rate
HR Search Heart Rate Search
HR-Belt Heart Rate Belt Found
HRmax Max. heart rate during training
In Time within the training zone
G
B
53
Page 56

Abbreviation English
[Kcal] Calorie consumption in Kcal
kg Kilogram
kg/lb Kilogram/pound
km/h Kilometer per hour (speed)
km/h AVG Average speed
L1 Lap 1
lap Lap
Limits Training limits
Lo Time below the training zone
Lo limit Lowest training limit
m male
MaxHR Maximum Heart Rate (formula: 220 - age)
MEM Memory
MEM Delete Memory Delete
Minute Minute
[min] Minute
min/km Minutes per kilometer
min/mi Minutes per Mile
Mon Monday
Month Month
PAIr NewDev Pair New Device
PC-Link PC Link
Result Result
Run Run time is measured
Sat Saturday
Scale Scale Found
SCL search Scale search
Setting Settings (Menu)
SEt Setting
Spd'nDist Speed and Distance
Speed Speed
54
Page 57

Abbreviation English
SPd Dev Speedbox found
SPd Search Speedbox Search
Start Start
Stop Stop
Sun Sunday
T: Target Speed
T-Dist Target Distance
T-time Target Time
Time Time (Menu)
Thu Thursday
Training Training (Menu)
TrData Training Data
Tue Tuesday
Units Units
User User
VO2max Maximal Amount of Oxygen
Wed Wednesday
Weight Weight
WMData Weight Management Data
Year Year
G
B
55
Page 58

INDEX
A
Accessories 5
Alarm Clock 15
Application 4
B
Basic settings 18
Batteries 52
Buttons 14
C
Calibrate the Speedbox 36
Care 5
Change speed unit 35
Cleaning 5
Conduct fitness test 47
D
Delete all recordings 32
Display 15
Display fitness values 48
Display lap results 45
Display speed and distance, Menu
Spd’nDist 40
Display speed and distance, Menu
Training 30
Display Speed/Distance, Menu Time 25
Display training data 41
Display weight management data 43
Disposal 5
E
EasyFit Software 50
Enter personal data 19
F
Fitness index 46
Fitness test 46
G
Getting started 10
I
Installation of the software 50
L
Lap results 45
List of abbreviations 53
Main display 17
M
Memory messages analyzing 33
Menu overview 17
Menus 16
Methods of Device Measurement 9
N
Notes 4
P
Pacemakers 4
Pairing the signals from the device 22
PC Software EasyFit 7
Power saving mode 16
R
Record laps 29
Recording of training 27
Recordings delete 32
Repair 5
Replacing the batteries 52
Results 41
S
Scope of delivery 3
Set alarm clock 25
Set target distance and target time 38
Set time of day and date 23
Set training zone 20
Set units 21
Software EasyFit 50
Speed and Distance 34
Stop and store recording 31
Stop run times 29
Stopwatch 29
Symbol 15
T
Technical specifications 52
Training 6
Transmission of Signal from Devices 9
type of pace 10
W
Watch settings 23
56
Page 59

INHALTSVERZEICHNIS
Lieferumfang..................................................................................59
Wichtige Hinweise.........................................................................60
Allgemeines zum Training............................................................62
Funktionen der Herzfrequenz-Pulsuhr ........................................64
Signalübertragung und Messprinzipien der Geräte...................65
Inbetriebnahme..............................................................................67
Allgemeine Bedienung der Pulsuhr.............................................70
Knöpfe der Pulsuhr...................................................................70
Display......................................................................................71
Menüs.......................................................................................72
Grundeinstellungen.......................................................................74
Übersicht ..................................................................................74
Persönliche Daten eingeben....................................................75
Trainingszone einstellen...........................................................76
Einheiten einstellen ..................................................................77
Gerätesignale aufeinander abstimmen ....................................78
Uhr-Einstellungen..........................................................................80
Übersicht ..................................................................................80
Uhrzeit und Datum einstellen ...................................................80
Weckalarm einstellen ...............................................................82
Geschwindigkeit und Strecke anzeigen ...................................83
Trainingsaufzeichnung .................................................................85
Übersicht ..................................................................................85
Laufzeiten stoppen...................................................................87
Runden aufzeichnen ................................................................88
Geschwindigkeit und Strecke anzeigen ...................................89
Aufzeichnung beenden und speichern.....................................90
57
D
Page 60

Alle Aufzeichnungen löschen ...................................................91
Speichermeldungen beurteilen.................................................92
Geschwindigkeit und Strecke.......................................................93
Übersicht ..................................................................................93
Geschwindigkeitseinheit wechseln...........................................94
Speedbox kalibrieren................................................................96
Zielstrecke und Zielzeit einstellen.............................................98
Geschwindigkeit und Strecke anzeigen..................................100
Ergebnisse ...................................................................................102
Übersicht ................................................................................102
Trainingsdaten anzeigen........................................................103
Gewichtsmanagement-Daten an die Uhr übertragen.............105
Runden-Ergebnisse.....................................................................107
Übersicht ................................................................................107
Runden-Ergebnisse anzeigen................................................107
Fitnesstest....................................................................................108
Übersicht ................................................................................108
Fitnesstest durchführen..........................................................109
Fitnesswerte anzeigen............................................................110
EasyFit Software..........................................................................112
Technische Daten, Batterien und Garantie...............................114
Abkürzungsverzeichnis ..............................................................116
Stichwortverzeichnis...................................................................119
58
Page 61

LIEFERUMFANG
Herzfrequenz-Pulsuhr mit Armband
Brustgurt und elastischer Spanngurt
(verstellbar)
Fahrradhalterung
Aufbewahrungsbox
PC-Software EasyFit (CD)
und PC-Schnittstellenkabel (USB)
Zusätzlich: Diese Gebrauchsanleitung und separate Kurzanleitung
Im Fachhandel ist außerdem folgendes Zubehör erhältlich:
Zubehör Funktion
Beurer Speedbox Sie können sich auf der Uhr Ihre
Geschwindigkeits- und Streckenwerte anzeigen lassen.
Beurer Diagnosewaage
(z. B. Waage BG56,
Artikelnummer 750.30)
Sie können Ihr aktuelles Gewicht
und Ihren Körperfettanteil messen
und an die Pulsuhr übermitteln.
D
59
Page 62

WICHTIGE HINWEISE
Lesen Sie diese Gebrauchsanleitung sorgfältig durch, bewahren Sie
sie auf und machen sie diese auch anderen Personen zugänglich.
Training
Dieses Produkt ist kein medizinisches Gerät. Es ist ein Trainings-
instrument, welches für die Messung und Darstellung der
menschlichen Herzfrequenz entwickelt wurde.
Beachten Sie bei Risiko-Sportarten, dass die Verwendung der
Pulsuhr eine zusätzliche Verletzungsquelle darstellen kann.
Bitte erkundigen Sie sich im Zweifelsfall oder bei Krankheiten bei
Ihrem behandelnden Arzt über Ihre eigenen Werte bezüglich oberer und unterer Trainings-Herzfrequenz, sowie Dauer und Häufigkeit des Trainings. Somit können Sie optimale Ergebnisse beim
Training erzielen.
ACHTUNG: Personen mit Herz- und Kreislaufkrankheiten oder
Träger von Herzschrittmachern sollten diese Herzfrequenzmessuhr nur nach Rücksprache mit ihrem Arzt verwenden.
Verwendungszweck
Das Gerät ist nur für den privaten Gebrauch bestimmt.
Dieses Gerät darf nur für den Zweck verwendet werden, für den
es entwickelt wurde, und auf die in der Gebrauchsanleitung angegebene Art und Weise. Jeder unsachgemäße Gebrauch kann
gefährlich sein. Der Hersteller haftet nicht für Schäden, die durch
unsachgemäßen oder falschen Gebrauch verursacht wurden.
Diese Pulsuhr ist wasserdicht. (siehe Kapitel „Technische Daten“)
60
Page 63

Reinigung und Pflege
Reinigen Sie Brustgurt, elastisches Brustband, Pulsuhr und ge-
gebenenfalls die Speedbox von Zeit zu Zeit sorgfältig mit einer
Seifenwasserlösung. Spülen Sie alle Teile dann mit klarem Wasser ab. Trocknen Sie sie sorgfältig mit einem weichen Tuch ab.
Das elastische Brustband können Sie in der Waschmaschine bei
30° ohne Weichspüler waschen. Das Brustband ist nicht für den
Wäschetrockner geeignet!
Bewahren Sie den Brustgurt an einem sauberen und trockenen
Ort auf. Schmutz beeinträchtigt die Elastizität und die Funktion
des Senders. Schweiß und Feuchtigkeit können bewirken, dass
durch Feuchtigkeit der Elektroden der Sender aktiviert bleibt, wodurch sich die Lebensdauer der Batterie verkürzt.
Reparatur, Zubehör und Entsorgung
Vor dem Gebrauch ist sicherzustellen, dass das Gerät und Zube-
hör keine sichtbaren Schäden aufweisen. Benutzen Sie es im
Zweifelsfall nicht und wenden Sie sich an Ihren Händler oder an
die angegebene Kundendienstadresse.
Reparaturen dürfen nur vom Kundendienst oder autorisierten
Händlern durchgeführt werden. Versuchen Sie in keinem Fall, das
Gerät selbständig zu reparieren!
Benutzen Sie das Gerät nur mit Beurer Original-Zubehörteilen..
Vermeiden Sie Kontakt mit Sonnencremes oder ähnlichem, da
diese den Aufdruck oder die Kunststoffteile beschädigen könnten.
Bitte entsorgen Sie das Gerät gemäß der Elektro- und Elektronik
Altgeräte Verordnung 2002/96/EC – WEEE (Waste Electrical and
Electronic Equipment). Bei Rückfragen wenden Sie sich bitte an
die für die Entsorgung zuständige kommunale Behörde.
D
61
Page 64

ALLGEMEINES ZUM TRAINING
Diese Pulsuhr dient zur Erfassung des Pulses beim Menschen.
Durch die verschiedenen Einstellmöglichkeiten können Sie Ihr individuelles Trainingsprogramm unterstützen und den Puls überwachen. Sie sollten Ihren Puls beim Training überwachen, weil Sie zum
einen Ihr Herz vor Überlastung schützen sollten und zum anderen,
um einen optimalen Trainingseffekt zu erzielen. Die Tabelle gibt
Ihnen einige Hinweise zur Auswahl Ihrer Trainingszone. Die maximale Herzfrequenz verringert sich mit zunehmendem Alter. Angaben
zum Trainingspuls müssen deshalb immer in Abhängigkeit zur maximalen Herzfrequenz stehen. Zur Bestimmung der maximalen
Herzfrequenz gilt die Faustformel:
220 - Lebensalter = maximale Herzfrequenz
Folgendes Beispiel gilt für eine 40-jährige Person: 220 - 40 = 180
Anteil der max.
Herzfrequenz
Auswirkung
Für wen
geeignet?
Training
Herz-Gesundheitszone
50 - 60%
Stärkung HerzKreislaufsystem
Ideal für Anfänger
Regeneratives
Training
Fettverbrennungszone
60 - 70%
Körper verbrennt
prozentual die
meisten Kalorien
aus Fett.
Trainiert HerzKreislaufsystem,
verbessert Fitness
Gewichtskontrolle,
-reduktion
Fitnesszone Kraftausdauer-
70 - 80% 80 - 90% 90 - 100%
Verbessert
Atmung und
Kreislauf.
Optimal zur
Steigerung der
GrundlagenAusdauer.
Freizeitsportler Ambitionierte
Fitness-Training K raftausdauer-
bereich
Verbessert
Tempohärte und
steigert die Grundgeschwindigkeit.
Freizeitsportler,
Leistungssportler
Training
Anerobes
Training
Überlastet gezielt
Muskulatur.
Hohes Verletzungsrisiko für
Freizeitsportler,
bei Erkrankung:
Gefahr fürs Herz
Nur
Leistungssportler
Entwicklungsbereichstraining
Wie Sie Ihre individuelle Trainingszone einstellen, lesen Sie im Kapitel "Grundeinstellungen", Abschnitt "Trainingszone einstellen". Wie
die Pulsuhr Ihre individuellen Grenzen des Trainingszonenvorschlags über den Fitnesstest automatisch einstellt, lesen Sie im
Kapitel "Fitnesstest".
62
Page 65

Auswertung des Trainings
Mit der PC-Software EasyFit können Sie die Ergebnisse der Uhr
übernehmen und auf vielfältige Weise auswerten. Zudem verfügt
EasyFit über nützliche Kalender- und Verwaltungsfunktionen, die
ein optimales Training, auch über längere Zeiträume, unterstützen.
Mit der Software können Sie darüber hinaus Ihr Gewichtsmanagement steuern und überwachen.
D
63
Page 66

FUNKTIONEN DER HERZFREQUENZ-PULSUHR
Puls-Funktionen
EKG-genaue Herzfrequenz-
Messung
Übertragung: digital
Individuelle Trainingszone
einstellbar
Akustischer und visueller
Alarm beim Verlassen der
Trainingszone
Durchschnittliche Herzfre-
quenz (Average)
Maximale Trainings-
Herzfrequenz
Kalorienverbrauch in Kcal
(Basis Joggen)
Fettverbrennung in g/oz
Einstellungen
Geschlecht
Gewicht
Gewichtseinheit kg/lb
Körpergröße
Körpergrößeneinheit cm/inch
Alter
Maximale Herzfrequenz
Geschwindigkeitseinheit
km(mi)/h oder min/km(mi)
Zeit-Funktionen
Uhrzeit
Kalender (bis Jahr 2099) und
Wochentag
Datum
Alarm / Wecker
Stoppuhr
50 Runden je Training, Abruf
alle zusammen oder jede einzeln. Anzeige von Rundenzeit
und durchschnittlicher Herzfrequenz
Fitnesstest
Fitnessindex mit Interpretation
Maximales Sauerstoff-
Atemvolumen (VO
Grundumsatz (BMR)
Aktivitätsumsatz (AMR)
Maximale Herzfrequenz be-
rechnen
Trainingszonen-Vorschlag
max)
2
64
Page 67

SIGNALÜBERTRAGUNG UND MESSPRINZIPIEN DER GERÄTE
Empfangsbereich der Pulsuhr
Ihre Pulsuhr empfängt die Pulssignale des Brustgurt-Senders innerhalb von 70 Zentimetern.
Die Signale der Speedbox empfängt Ihre Pulsuhr innerhalb von drei
Metern.
Sensoren des Brustgurtes
Der gesamte Brustgurt besteht aus zwei Teilen: dem eigentlichen
Brustgurt und einem elastischen Spanngurt. Auf der am Körper anliegenden Innenseite des Brustgurtes befinden sich in der Mitte zwei
rechteckige, gerippte Sensoren. Beide Sensoren erfassen Ihre Herzfrequenz EKG-genau und senden diese an die Pulsuhr weiter.
Die digitale Übertragung funktioniert nahezu störungsfrei. Ihre Pulsuhr empfängt nur das Signal des dazugehörigen Senders. Es kann
keine Störsignale von anderen Sendern geben.
Der Brustgurt ist nicht kompatibel zu analogen Geräten, wie zum
Beispiel Ergometern.
Signalübermittlung der Diagnosewaage
Die Diagnosewaage bietet Ihnen zusätzlichen Komfort. Sie können
mit der Waage jeder Zeit Ihr aktuelles Gewicht und Ihren Körperfettanteil messen und an die Pulsuhr übermitteln. Die in der Pulsuhr
manuell erfassten Gewichtswerte werden dabei durch die Werte der
Waage aktualisiert.
D
65
Page 68

Messvorrichtung der Speedbox
Die Beurer Speedbox können Sie als Zubehör in Ihrem Beurer
Fachgeschäft erwerben. Ihre Pulsuhr besitzt alle Funktionen, um die
Signale der Beurer Speedbox auszuwerten.
In der Speedbox ist eine mehrdimensionale Messvorrichtung eingebaut. Diese ermittelt die Beschleunigung des Fußes und sendet
diese Werte an Ihre Pulsuhr weiter. Die Pulsuhr berechnet aus der
Beschleunigung und der Zeit jedes einzelnen Schrittes die zurückgelegte Strecke und Geschwindigkeit.
Das folgende Diagramm zeigt die gemessenen Fußbewegungen
während eines Doppelschrittes abhängig von den Gangarten Walk
(Gehen), Jog (Langsames Joggen), Run (Schnelles Joggen) und
Sprint (Sprinten).
Quelle: Dynastream Technology
Erläuterung des Diagrammes:
Stride Height (m): Schritthöhe (m)
Stride Distance (m): Schrittweite (m)
66
Page 69

INBETRIEBNAHME
Anlegen der Pulsuhr
Ihre Pulsuhr können Sie wie eine Armbanduhr tragen. Um die Pulsuhr an einer Fahrrad-Lenkstange zu montieren, stecken Sie die
mitgelieferte Halterung auf die Lenkstange. Befestigen Sie die Pulsuhr um die Halterung so fest, dass diese beim Fahren nicht rutschen
kann.
Aktivieren der Pulsuhr aus dem Transportmodus
Während des Transports zeigt das Display nichts an. Sie können
den Transportmodus aufheben, indem Sie den Knopf
dann den Knopf
START/STOP
drücken.
Aktivieren der Pulsuhr aus dem Stromsparmodus
Sie können Ihre Pulsuhr mit einem beliebigen Knopf aktivieren.
Wenn die Pulsuhr ca. 5 Minuten lang kein Signal empfängt, schaltet
die Uhr in den Stromsparmodus. Es werden dann nur die aktuelle
Uhrzeit und das Datum angezeigt. Drücken Sie einen beliebigen
Knopf, um die Uhr wieder zu aktivieren.
Anlegen des Brustgurtes
Befestigen Sie den Brustgurt am elastischen
Spanngurt. Stellen Sie die Gurtlänge so ein,
dass der Gurt gut, jedoch nicht zu locker oder
zu eng anliegt. Legen Sie den Gurt so um die
Brust, dass das Logo nach außen zeigt und in
der richtigen Position direkt auf dem Brustbein
anliegt. Bei Männern sollte sich der Brustgurt direkt unter dem Brustmuskel, bei Frauen direkt
unter dem Brustansatz befinden.
MENU
und
D
67
Page 70

Da nicht sofort ein optimaler Kontakt zwischen Haut und Puls-
sensoren hergestellt werden kann, kann es einige Zeit dauern, bis
der Puls gemessen und angezeigt wird. Verändern Sie gegebenenfalls die Position des Senders, um einen optimalen Kontakt zu
erhalten. Durch Schweißbildung unterhalb des Brustgurtes wird
meist ein ausreichend guter Kontakt erreicht. Sie können jedoch
auch die Kontaktstellen der Innenseite des Brustgurtes befeuchten. Heben Sie dazu den Brustgurt leicht von der Haut ab und befeuchten Sie die beiden Sensoren leicht mit Speichel, Wasser
oder EKG-Gel (erhältlich in der Apotheke). Der Kontakt zwischen
Haut und Brustgurt darf auch bei größeren Bewegungen des
Brustkorbs, wie zum Beispiel bei tiefen Atemzügen, nicht unterbrochen werden. Starke Brustbehaarung kann den Kontakt stören
oder sogar verhindern.
Legen Sie den Brustgurt bereits einige Minuten vor dem Start an,
um ihn auf die Körpertemperatur zu erwärmen und einen optimalen Kontakt herzustellen.
Gerätesignale aufeinander abstimmen (Pairing)
Digitale Sender (Brustgurt, Speedbox, Diagnosewaage) und Empfänger (Pulsuhr) müssen aufeinander abgestimmt sein. Wenn Sie
jedes Gerät separat kaufen, beispielsweise bei Ersatzkauf, oder
wenn Sie die Batterien wechseln dann müssen Sie Ihre Geräte vor
dem Einsatz aufeinander abstimmen.
Wie Sie die Geräte aufeinander abstimmen, lesen Sie im Kapitel
„Grundeinstellungen“, Abschnitt „Gerätesignale aufeinander abstimmen“.
Verbinden der Geräte (Connect)
Ihre Pulsuhr empfängt Signale von den digitalen Sendern Brustgurt
und Speedbox, sobald Sie diese aktiviert haben und mit dem Knopf
MENU
in das Menü Training gewechselt haben.
Wie Sie auf dem Display erkennen, ob Signale empfangen werden:
68
Page 71

Wenn das Herzsymbol blinkt, wird die Herzfrequenz vom
Brustgurt empfangen.
Wenn in der 1. Zeile für längere Zeit „0“ angezeigt wird, kann
die Pulsuhr die Signale von dem Brustgurt nicht empfangen.
Die Anzeige „0“ kann in den Menüs
Spd’nDist auftreten. Wechseln Sie in diesem Fall mit dem
Knopf
MENU
in das Menü Training. Die Pulsuhr versucht
Training, Time und
erneut eine Verbindung zu den Geräten herzustellen.
Anlegen der Speedbox
Platzieren Sie die Speedbox möglichst nahe zur
Schuhspitze und bei Schuhen mit hohem Schaft
keinesfalls an Stellen oberhalb der Fußknöchel. Den
hinteren Bereich der Speedbox befestigen Sie an
Ihrem Schuh, indem Sie den Schnürsenkel durch die
hierfür vorgesehene Öffnung ziehen. Dann müssen
Sie nur noch die vordere Öffnung der Speedbox
zwischen die Schnürsenkel stecken. Ziehen Sie die
Schnürsenkel gut an, bevor Sie den Schuh zubinden.
Kalibrieren der Speedbox
Sie erzielen die genauesten Ergebnisse, wenn Sie Ihre Speedbox
kalibrieren. Wie Sie Ihre Speedbox kalibrieren, lesen Sie im Kapitel
„Geschwindigkeit und Strecke“, Abschnitt "Speedbox kalibrieren“.
Gewichtsmanagement-Daten
Sie können Ihre Gewichtsdaten und Ihren Körperfettanteil von der
Diagnosewaage an die Pulsuhr übermitteln. Wie Sie die Daten übertragen, lesen Sie im Kapitel „Ergebnisse“, Abschnitt „Gewichtsmanagement-Daten übertragen“.
D
69
Page 72

ALLGEMEINE BEDIENUNG DER PULSUHR
Knöpfe der Pulsuhr
START/STOP
1
OPTION/SET
2
3
4
5
MENU
/
Startet und stoppt Funktionen und stellt Werte ein.
Gedrückt Halten beschleunigt die Eingabe.
Wechselt zwischen Funktionen innerhalb eines
Menüs und bestätigt Einstellungen.
Wechselt zwischen den verschiedenen Menüs.
Wechselt zwischen verschiedenen Anzeigen der
Geschwindigkeits- und Streckenwerte.
Kurzes Drücken beleuchtet das Display für 5 Se-
kunden.
Langes Drücken aktiviert/deaktiviert den akusti-
schen Alarm bei Verlassen der Trainingszone.
70
Page 73

Display
1
Obere Zeile
2
Mittlere Zeile
3
Untere Zeile
4
Symbole
Weckalarm ist aktiviert.
Herzfrequenz wird empfangen.
Trainingszone ist überschritten.
Trainingszone ist unterschritten.
Akustischer Alarm bei Verlassen der Trainingszone ist
aktiviert.
Eine Erklärung der Display-Abkürzungen finden Sie im Abkürzungsverzeichnis am Ende der Gebrauchsanleitung.
D
71
Page 74

Menüs
Zwischen den Menüs wechseln Sie mit dem Knopf
Time
MENU
.
FitTest
MENU
Setting
LAP
Result
Stromsparmodus
Wenn Ihre Pulsuhr ca. 5 Minuten lang kein Signal
empfängt, schaltet die Uhr in den Stromsparmodus. Es werden dann nur die aktuelle Uhrzeit und
das Datum angezeigt. Drücken Sie einen beliebigen Knopf, um die Pulsuhr wieder zu aktivieren.
Result
72
Training
Spd´nDist
Page 75

Hauptanzeige
Bei jedem Menüwechsel wird zunächst der Name
des Menüs angezeigt, dann wechselt Ihre Pulsuhr
Menü
automatisch in die Hauptanzeige des aktiven Menüs.
Automatisch
Von hier aus müssen Sie entweder erst ein Untermenü wählen oder können direkt Funktionen starten.
Haupt-
anzeige
Übersicht der Menüs
Menü Bedeutung Beschreibung siehe Kapitel…
Time
Training
Spd'nDist
Zeit "Uhr-Einstellungen"
Training "Trainingsaufzeichnung"
Geschwindigkeit
"Geschwindigkeit und Strecke"
und Strecke
Result
Lap Re-
sult
Setting
FitTest
Ergebnis "Ergebnisse"
Runden-
"Runden-Ergebnisse"
Ergebnis
Einstellungen "Grundeinstellungen"
Fitnesstest „Fitnesstest"
D
73
Page 76

GRUNDEINSTELLUNGEN
Übersicht
Im Menü Setting können Sie:
Ihre persönlichen Daten (User) eingeben. Ihre
Pulsuhr errechnet aus diesen Daten Ihren Kalorienverbrauch und Ihre Fettverbrennung
während des Trainings!
Ihre Trainingszone (Limits) einstellen. Erklä-
rungen zur Einstellung der Trainingszonen
finden Sie im Kapitel „Allgemeines zum Training“. Ihre Pulsuhr gibt während Ihres Trainings einen akustischen und visuellen Alarm
beim Verlassen der Trainingszone.
Die Maßeinheiten (Units) für die Körpergröße
und das Gewicht ändern.
Die Signale Ihrer Geräte aufeinander abstim-
men (PairNewDev).
Sobald Sie im Menü Setting sind, wechselt Ihre
Pulsuhr automatisch in die Hauptanzeige. Diese
User an.
zeigt
74
Page 77

Persönliche Daten eingeben
MENU
START/STOP
OPTION/SET
OPTION/SET
OPTION/SET
Wechseln Sie in das Menü Setting.
Gender wird angezeigt.
START/STOP
ein Mann sind. Wählen Sie
Wählen Sie M, wenn Sie
F, wenn
Sie eine Frau sind.
AGE wird angezeigt.
START/STOP
Stellen Sie Ihr Lebensalter
ein (10-99).
MaxHR wird angezeigt. Die Pulsuhr
errechnet die maximale Herzfrequenz automatisch gemäß der For-
220–Lebensalter = MaxHR
mel:
Beachten Sie, dass die Pulsuhr auch
nach jedem Fitnesstest den MaxHR
errechnet und als Vorschlag einstellt.
START/STOP
Sie können den errechne-
ten Wert überschreiben (65-239).
Weight wird angezeigt.
Beachten Sie, dass die Waage bei
jeder Gewichtsmessung diesen Gewichtswert überschreibt.
START/STOP
Stellen Sie Ihr Gewicht ein
(20-227 kg oder 44-499 Pfund).
D
75
Page 78

OPTION/SET
Height wird angezeigt.
START/STOP
Stellen Sie Ihre Körpergröße ein (80-227 cm oder 2'6''-7'6''
feet).
OPTION/SET
Zurück in die Anzeige User.
Trainingszone einstellen
Sie können Ihre individuelle Ober- und Untergrenze Ihres Pulses wie
im Folgenden beschrieben einstellen.
Beachten Sie, dass nach jedem Fitnesstest beide Grenzen als Trainingszonenvorschlag automatisch eingestellt und dadurch die alten
Angaben überschrieben werden. Die untere Grenze des Trainingszonenvorschlags beträgt dabei 65%, die obere Grenze 85% der
maximalen Herzfrequenz.
MENU
OPTION/SET
START/STOP
OPTION/SET
OPTION/SET
Wechseln Sie in das Menü Setting.
Limits wird angezeigt.
Lo limit wird angezeigt.
START/STOP
Stellen Sie die untere
Grenze Ihrer Trainingszone ein (40-
238).
Hi limit wird angezeigt.
START/STOP
Stellen Sie die obere Grenze ein (41-239).
Zurück in die Anzeige Limits.
76
Page 79

Einheiten einstellen
MENU
OPTION/SET
Wechseln Sie in das Menü Setting.
Limits wird angezeigt.
D
OPTION/SET
START/STOP
OPTION/SET
OPTION/SET
Units wird angezeigt.
kg/lb wird angezeigt. Die Gewichts-
einheit blinkt.
START/STOP
Wechseln Sie zwischen
den Einheiten.
cm/inch wird angezeigt. Die Maß-
einheit für die Körpergröße blinkt. Im
metrischen System [cm] werden die
Strecken in [km] angezeigt. Im UKSystem [inch] werden die Strecken in
[Miles] angezeigt.
START/STOP
Wechseln Sie zwischen
den Einheiten.
Zurück in die Anzeige Units.
77
Page 80

Gerätesignale aufeinander abstimmen
Digitale Sender und Empfänger müssen aufeinander abgestimmt
sein. Wenn Sie jedes Gerät separat kaufen, beispielsweise bei Ersatzkauf, oder wenn Sie die Batterien wechseln, dann müssen Sie
Ihre Geräte vor dem Einsatz aufeinander abstimmen.
Für diesen Vorgang müssen die Geräte eingeschaltet sein. Legen
Sie dazu den Brustgurt an, aktivieren Sie die Speedbox und schalten Sie die Waage durch Antippen mit dem Fuß ein.
MENU
Wechseln Sie in das Menü Setting.
OPTION/SET
OPTION/SET
OPTION/SET
START/STOP
Limits wird angezeigt.
Units wird angezeigt.
Pair NewDev wird angezeigt.
Hr Search wird angezeigt. Ihre Puls-
uhr startet die Suche nach den Geräten. Sie können den Erfolg der Suche auf dem Display verfolgen:
HR-Belt meldet, dass der Brustgurt
erfolgreich verbunden wurde.
SPD Dev meldet, dass die Speedbox
erfolgreich verbunden wurde.
Scale meldet, dass die Waage er-
folgreich verbunden wurde. Falls
sich die Waage inzwischen automatisch abgeschaltet hat, schalten Sie
78
Page 81

OPTION/SET
sie wieder ein.
Die Anzeige
No Device found am
Ende der Gerätesuche erscheint,
wenn kein Gerät verbunden wurde.
Zurück in die Hauptanzeige.
D
79
Page 82

UHR-EINSTELLUNGEN
Übersicht
Im Menü Time können Sie:
Die Uhrzeit und das Datum einstellen.
Den Weckalarm einstellen.
Mit Informationen zu Geschwindig-
keit/Strecke in der unteren Zeile anzeigen lassen.
Sobald Sie im Menü Time sind, wechselt Ihre
Pulsuhr automatisch in die Hauptanzeige. Diese
zeigt den Wochentag und das Datum an. Auf
dem Bild:
Uhrzeit und Datum einstellen
MENU
Fri 12.04 (Freitag, den 12. April).
Wechseln Sie in das Menü Time.
START/STOP
5 sec
Set Time wird kurz angezeigt. Hour
wird angezeigt. Die StundenEinstellung blinkt.
START/STOP
Stellen Sie die Stunde (0-24) ein.
80
Page 83

OPTION/SET
Minute wird angezeigt. Die Minuten-
Einstellung blinkt.
START/STOP
Stellen Sie die Minute (0-
59) ein.
OPTION/SET
OPTION/SET
OPTION/SET
OPTION/SET
Year wird angezeigt. Die Jahres-
Einstellung blinkt.
START/STOP
Stellen Sie das Jahr ein.
Der Kalender geht bis in das Jahr
2099.
Month wird angezeigt. Die Monats-
Einstellung blinkt.
START/STOP
Stellen Sie den Monat (1-
12) ein.
Day wird angezeigt. Die Tages-
Einstellung blinkt.
START/STOP
Stellen Sie den Tag (1-31)
ein.
Zurück in die Hauptanzeige.
D
81
Page 84

Weckalarm einstellen
Den Weckalarm können Sie durch das Drücken eines beliebigen
Knopfs ausschalten. Am nächsten Tag werden Sie wieder zur gleichen Zeit geweckt.
MENU
Wechseln Sie in das Menü Time.
OPTION/SET
START/STOP
5 sec
OPTION/SET
OPTION/SET
OPTION/SET
Alarm wird angezeigt.
Set Alarm wird kurz angezeigt.
On Alarm wird angezeigt.
START/STOP
Schaltet den Weckalarm
abwechselnd aus (Off) und ein (On).
Hour wird angezeigt. Die Stunden-
Einstellung blinkt.
START/STOP
Stellen Sie die Stunde ein.
Minute wird angezeigt. Die Minuten-
Einstellung blinkt.
START/STOP
Stellen Sie die Minute ein.
Zurück in die Hauptanzeige.
82
Page 85

Geschwindigkeit und Strecke anzeigen
Wenn Sie mit der Speedbox laufen, können Sie sich Ihre Geschwindigkeits- und Streckenwerte anzeigen lassen. Während Sie laufen,
haben Sie die Möglichkeit, zwischen den verschiedenen Anzeigen
zu wechseln. Wenn Sie eine Anzeige bevorzugen, können Sie diese
aber auch während Ihres ganzen Laufs konstant halten.
MENU
Wechseln Sie in das Menü Time.
In der unteren Zeile wird Ihre durchschnittliche Herzfrequenz angezeigt.
Falls Sie vorher im Menü
Time eine
bestimmte Anzeige zur Geschwindigkeit und Strecke eingestellt hatten, sehen Sie diese in der unteren
Zeile.
Ihre gesamte Trainingszeit
[Std:Min:Sek] wird in der unteren
Zeile angezeigt.
Ihre aktuelle Runde und die Rundenzeit [Std:Min] werden in der unteren Zeile angezeigt.
Ihre aktuelle Geschwindigkeit wird in
der unteren Zeile angezeigt.
Ihre eingestellte Zielgeschwindigkeit
wird in der unteren Zeile angezeigt.
D
83
Page 86

Ihre durchschnittliche Geschwindigkeit wird in der unteren Zeile angezeigt.
Ihre bisher gelaufene Strecke wird in
der unteren Zeile angezeigt.
Zurück in die Hauptanzeige.
84
Page 87

TRAININGSAUFZEICHNUNG
Übersicht
Sobald Sie in das Menü Training wechseln,
sucht Ihre Pulsuhr nach den auf sie abgestimmten digitalen Sendern Brustgurt und Speedbox.
Sobald ein Signal erkannt wird, ist die Verbindung hergestellt. Im Menü
Ihre Laufzeiten stoppen und damit Ihr Training
aufzeichnen.
Einzelne Runden aufzeichnen.
Aufzeichnung beenden und speichern.
Alle Aufzeichnungen löschen.
Speichermeldungen beurteilen.
Mit Informationen zu Geschwindig-
keit/Strecke in der unteren Zeile anzeigen lassen.
Sobald Sie im Menü Training sind, wechselt Ihre
Pulsuhr automatisch in die Hauptanzeige. Diese
zeigt in der mittleren Zeile die bereits aufgezeichnete Trainingszeit an (nach Speichern/Löschen: 00:00:00) und in der unteren
Zeile
Start.
Training können Sie:
D
Wissenswertes zu den Aufzeichnungen
Sobald Sie die Aufzeichnung starten, beginnt Ihre Pulsuhr mit der
Aufzeichnung Ihrer Trainingsdaten. Ihre Pulsuhr zeichnet Ihre
Trainingsdaten kontinuierlich auf, bis Sie diese speichern oder lö-
85
Page 88

schen. Das gilt auch, wenn Sie erst am nächsten Tag ein neues
Training beginnen. Die fortlaufende Zeit ermöglicht Ihnen auch,
Ihr Training jederzeit zu unterbrechen.
Wenn Sie längere Zeit die Anzeige „0“ auf dem Display sehen,
bedeutet dies, dass der Empfang der Signale unterbrochen ist.
Wechseln Sie in diesem Fall erneut in das Menü
MENU
Sie 7 mal
drücken. Die Pulsuhr versucht erneut eine
Training, indem
Verbindung zu den Geräten herzustellen.
Ihre Pulsuhr verfügt über einen Speicher. Sie können bis zu 24
Stunden Training aufzeichnen. Davon werden 10 Stunden gespeichert. Sie können maximal 60 Runden aufzeichnen. Pro Training sind maximal 50 Runden möglich. Ihre Pulsuhr meldet Ihnen,
wenn der Speicher fast voll ist. Spätestens dann empfehlen wir
die Aufzeichnungen auf den PC zu übertragen und dadurch den
Speicher auf der Pulsuhr zu leeren. Alternativ können Sie alle
Aufzeichnungen manuell löschen. Wie Sie diese löschen können,
lesen Sie im Abschnitt „Alle Aufzeichnungen löschen“ in diesem
Kapitel.
Ihre Trainingsdaten können Sie sich anzeigen lassen. Im Menü
Result ist die zuletzt gestoppte Aufzeichnung abrufbar. Im Menü
Lap Result sehen Sie die Runden dieser Aufzeichnung.
Sobald Sie Ihre Aufzeichnungen in die Software EasyFit übertra-
gen haben, können Sie sie dort betrachten und auswerten. Mit jeder erfolgreichen Übertragung auf den PC wird der Speicher gelöscht. Erklärungen zur Übertragung auf den PC finden Sie im
Kapitel „EasyFit Software“.
86
Page 89

Laufzeiten stoppen
MENU
START/STOP
START/STOP
Wechseln Sie in das Menü Training.
Wenn Sie bereits eine Laufzeit gestoppt haben, steht in der mittleren
Zeile die aufgezeichnete Trainingszeit.
Starten Sie die Aufzeichnung. Run
wird angezeigt. Auch wenn Sie während der Aufzeichnung in ein anderes Menü wechseln, läuft die Zeit im
Hintergrund weiter.
Stoppen Sie die Aufzeichnung. Stop
wird angezeigt. Sie können Ihre
Aufzeichnungen jederzeit durch
Drücken des Knopfes
terbrechen und wieder fortsetzen.
START/STOP
D
un-
87
Page 90

Runden aufzeichnen
Während die Aufzeichnung Ihres Gesamttrainings läuft, können Sie
einzelne Runden aufzeichnen. Die Zeit läuft, während Sie die Runden aufzeichnen, stets weiter.
Sie sind im Menü
Training wird gerade aufgezeichnet.
Run wird angezeigt.
Training und Ihr
OPTION/SET
OPTION/SET
Stoppen Sie eine neue Runde ab.
Die Anzeige zeigt für 5 Sekunden die
Zeit und Nummer der zuletzt gemessenen Runde, zum Beispiel
Lap 1.
Die Anzeige wechselt automatisch
wieder auf
Run und zeigt die Num-
mer der aktuellen Runde an, zum
Beispiel
Run 2.
Zeichnen Sie bei Bedarf weitere
Trainingsrunden auf. Sie können
maximal 50 Runden je Training aufzeichnen.
88
Page 91

Geschwindigkeit und Strecke anzeigen
Wenn Sie mit der Speedbox laufen, können Sie sich Ihre Geschwindigkeits- und Streckenwerte anzeigen lassen. Während Sie laufen,
haben Sie die Möglichkeit, zwischen den verschiedenen Anzeigen
zu wechseln. Wenn Sie eine Anzeige bevorzugen, können Sie diese
aber auch während Ihres ganzen Laufs konstant halten.
Sie sind im Menü Training. Es wird
gerade ein Training aufgezeichnet.
Run wird angezeigt.
Ihre durchschnittliche Herzfrequenz
wird in der unteren Zeile angezeigt.
Falls Sie vorher im Menü
eine bestimmte Anzeige zur Geschwindigkeit und Strecke eingestellt
hatten, sehen Sie diese in der unteren Zeile.
Ihre aktuelle Runde und die Rundenzeit [Std:Min] werden in der unteren
Zeile angezeigt.
Ihre aktuelle Geschwindigkeit wird in
der unteren Zeile angezeigt.
Ihre eingestellte Zielgeschwindigkeit
wird in der unteren Zeile angezeigt.
Ihre durchschnittliche Geschwindigkeit wird in der unteren Zeile angezeigt.
Training
D
89
Page 92

Ihre bisher gelaufene Strecke wird in
der unteren Zeile angezeigt.
Zurück in die Hauptanzeige.
Aufzeichnung beenden und speichern
Beachten Sie, dass Sie die Daten nach dem Beenden und Speichern nicht mehr in den Menüs
lassen können.
Sie sind im Menü
ben gerade ein Training aufgezeich-
Stop wird angezeigt.
net.
Result und Lap Result anzeigen
Training. Sie ha-
START/STOP
5 sec
Speichern Sie die Aufzeichnung. Die
maximale Aufzeichnungszeit des
Speichers beträgt 10 Stunden.
Hold Save wird angezeigt.
Die Anzeige wechselt automatisch
wieder in die Hauptanzeige.
Die Daten stehen nun bereit zur
Übertragung auf den PC.
90
Page 93

Alle Aufzeichnungen löschen
Ihre Pulsuhr informiert Sie automatisch, wenn der Speicher fast voll
ist. Bevor Sie dann den Speicher löschen, empfehlen wir, die Trainingsaufzeichnung auszuwerten oder auf den PC zu übertragen! Mit
jeder erfolgreichen Datenübertragung auf den PC wird der Speicher
auf der Pulsuhr automatisch gelöscht. Alternativ können Sie den
Speicher wie hier beschrieben manuell löschen.
Das automatische oder manuelle Löschen bewirkt, dass alle Trainingsaufzeichnungen einschließlich ihrer Runden gelöscht werden.
Sie können die Daten vor oder nach
dem Training löschen:
Sie sind im Menü Training. Start
wird angezeigt.
Sie sind im Menü Training. Sie
haben gerade ein Training aufgezeichnet.
Stop wird angezeigt.
D
OPTION/SET
5 sec
Löschen Sie alle Aufzeichnungen.
MEM Delete wird angezeigt.
Die Anzeige wechselt automatisch
wieder in die Hauptanzeige.
91
Page 94

Speichermeldungen beurteilen
Im Menü Training informiert Sie Ihre Pulsuhr automatisch, wenn der
Speicher fast voll ist oder fast alle Runden belegt sind.
Meldung Bedeutung
Bei Wechsel in das Menü Training meldet die
Pulsuhr
Speichers oder weniger als 10 Runden frei
sind.
Während des Trainings meldet die Pulsuhr alle
5 Sekunden
10% des Speichers frei sind.
Auf dem Bild:
Während des Trainings meldet die Pulsuhr alle
5 Sekunden
(von insgesamt 60) Runden frei sind.
Auf dem Bild:
Wie Sie den Speicher manuell löschen können, lesen Sie im vorherigen Abschnitt „Alle Aufzeichnungen löschen“.
Der Speicher wird auch mit jeder Übertragung auf den PC gelöscht.
Erklärungen dazu finden Sie im Kapitel „EasyFit Software“.
MEM LOW, wenn weniger als 10% des
MEM x% Free, wenn weniger als
MEM 8% Free (noch 8% frei).
LAP Rest x, wenn weniger als 10
LAP Rest 7 (noch 7 Runden frei).
92
Page 95

GESCHWINDIGKEIT UND STRECKE
Übersicht
WICHTIG: Alle Einstellungen dieses Menüs
wirken sich nur bei Verwendung der Speedbox
aus!
Sie können die Speedbox auch nur zur Schrittmessung verwenden. Beachten Sie, dass die
Messung dann nicht auf den PC übertragbar ist.
Um eine Übertragung zu ermöglichen, benötigt
die Pulsuhr ein Herzfrequenzsignal. Legen Sie
dazu den Brustgurt zu Beginn der Messung kurz
an.
D
Im Menü
Die Geschwindigkeitseinheit wechseln. Bei
Spd’nDist können Sie:
Grundeinstellung [cm] können Sie von [km/h]
nach [min/km] wechseln, bei Grundeinstellung
[inch] von [mi/h] nach [min/mi].
Die Speedbox kalibrieren.
Eine Zielstrecke und eine Zielzeit festlegen,
die Sie im Training laufen wollen. Ihre Pulsuhr
errechnet aus diesen Werten Ihre Zielgeschwindigkeit. Diese können Sie sich als Sollvorgabe im Menü
anzeigen lassen
und mit Ihren aktuellen Trainingswerten vergleichen. So haben Sie während des Trainings eine ständige Kontrolle über die Abweichungen von der gesetzten Zielgeschwindigkeit.
93
Page 96

Mit Informationen zu Geschwindig-
keit/Strecke in der unteren Zeile anzeigen lassen.
Sobald Sie im Menü Spd’nDist sind, wechselt
Ihre Pulsuhr automatisch in die Hauptanzeige.
Diese zeigt in der mittleren Zeile die aktuelle
Geschwindigkeit an. Die untere Zeile zeigt die
durchschnittliche Herzfrequenz an.
Geschwindigkeitseinheit wechseln
Da manche Personen beim Training die Geschwindigkeitsanzeige in
einer bestimmten Einheit bevorzugen, stehen zwei Einheiten zur
Auswahl. Viele Läufer bevorzugen die Angabe min/km anstatt km/h.
MENU
Wechseln Sie in das Menü
Spd’nDist.
OPTION/SET
START/STOP
Set Spd’nDist wird angezeigt.
Wiederholtes Drücken wechselt
zwischen den Einheiten.
Bei Grundeinstellung [cm]:
min/km (Minuten pro Kilometer)
km/h (Kilometer pro Stunde)
oder
wird angezeigt.
Bei Grundeinstellung [in]: min/mi
(Minuten pro Meile) oder mi/h
(Meilen pro Stunde) wird angezeigt.
94
Page 97

OPTION/SET
CAL Distance wird angezeigt. Sie
haben nun drei Möglichkeiten:
Wenn Sie Ihre Speedbox kalibrie-
ren möchten, lesen Sie weiter im
Abschnitt „Speedbox kalibrieren“.
Sie haben die Geräte bereits zu
einem früheren Zeitpunkt kalibriert. Sie möchten nun Ihre Zielgeschwindigkeit errechnen lassen. Lesen Sie weiter im Abschnitt „Zielzeit und Zielstrecke
einstellen“.
Wenn Sie keine der beiden Funk-
tionen durchführen möchten, sondern das Menü verlassen möchten, drücken Sie 7 mal den Knopf
OPTION/SET
.
D
95
Page 98

Speedbox kalibrieren
Bei der Gangart „Jog“ (langsames Joggen) beträgt die Genauigkeit
der Messungen Ihrer Pulsuhr mit Speedbox auch ohne Kalibrierung
mindestens 97%. Nach Kalibrierung verbessert sich die Genauigkeit
auf mindestens 99%. Für die Gangarten Walk, Run und Sprint muss
die Speedbox in jedem Fall kalibriert werden. Führen Sie auch eine
neue Kalibrierung durch, wenn Sie Ihre Gangart ändern möchten.
Spd’nDist.
CAL Distance ange-
und nochmals
.
OPTION/SET
,
START/STOP
5 sec
Sie sind im Menü
Wenn Sie zuvor die Geschwindig-
keitseinheiten eingestellt haben,
wird bereits
zeigt.
Wenn Sie das Menü neu aufgeru-
fen haben, drücken Sie
START/STOP
dann
OPTION/SET
CAL Distance wird angezeigt.
Wechseln Sie zum Kalibrierungsvorgang.
CAL 000 Start wird angezeigt.
Aktivieren Sie nun Ihre Speedbox.
START/STOP
Beginnen Sie Ihren Lauf. CAL 000
Run
wird angezeigt. Laufen Sie eine
Strecke, von der Sie die exakte Länge kennen (Referenzstrecke). Zum
Beispiel 4 Runden im Stadion =
1600 m. Während des Laufens zeigt
Ihre Uhr in der mittleren Zeile die
Strecke (Meter) an. Beachten Sie,
96
Page 99

START/STOP
START/STOP
dass die Kalibrierung nur für die
jeweilige Gangart gilt. Verändern Sie
die Gangart, so wirkt sich das auf die
Genauigkeit der Geschwindigkeitsund Streckenmessung aus.
Beenden Sie Ihren Lauf. Die Pulsuhr
zeigt die gemessene Streckenlänge
an, z.B. 1596 m.
Wenn der angezeigte Wert niedri-
ger als die gelaufene Strecke ist,
erhöhen Sie den Wert mit
MENU
.
Wenn der angezeigte Wert höher
als die gelaufene Strecke ist, verringern Sie den Wert mit
OPTION/SET
Die korrigierte Streckenlänge wird
angezeigt, z.B.
ACT 1600 Distance.
D
.
START/STOP
CAL Distance wird angezeigt. Sie
haben nun zwei Möglichkeiten:
Sie möchten Ihre Zielgeschwin-
digkeit errechnen lassen. Lesen
Sie weiter im Abschnitt „Zielzeit
und Zielstrecke einstellen“.
Wenn Sie das Menü verlassen
möchten, drücken Sie 7 mal den
Knopf
OPTION/SET
.
97
Page 100

Zielstrecke und Zielzeit einstellen
Sie sind im Menü Spd’nDist.
Wenn Sie zuvor die Geschwindig-
keitseinheiten eingestellt haben
oder die Speedbox kalibriert haben,
CAL Distance ange-
START/STOP
und nochmals
.
Stellen Sie die Zielkilometer
OPTION/SET
wird bereits
zeigt.
Wenn Sie das Menü neu aufgeru-
fen haben, drücken Sie
dann
OPTION/SET
CAL Distance wird angezeigt.
T-Dist wird angezeigt.
START/STOP
(0-99) ein.
OPTION/SET
,
OPTION/SET
OPTION/SET
T-Dist wird angezeigt. Die Meter-
Einstellung blinkt.
START/STOP
Stellen Sie die Zielmeter (0-
99) ein, z.B. bedeutet 85 dann 850m.
T-time wird angezeigt. Die Stunden-
Einstellung blinkt.
START/STOP
Stellen Sie die Zielstunden
(0-99) ein.
98
 Loading...