

Page 1
PM 62
Heart Rate Monitor
Instruction manual ..................1
Medidor de pulsaciones
Manual de instrucciones.......55
Beurer North America LP
Hallandale Beach, FL 33009
www.beurer.com
Page 2
1. IMPORTANT SAFETY NOTES
Signs and symbols
The following signs appear in the Safety Section (pages 1, 2, 3, 4, 5,
6) and in this manual on pages 11, 15, 16, 22, 27, 33, 36, 40, 43, 44,
45, 46, 47.
READ THIS ENTIRE MANUAL INCLUDING THE SAFETY SECTION
AND ALL INSTRUCTIONS AND WARNINGS COMPLETELY AND CAREFULLY BEFORE USING THIS PRODUCT. FOLLOW ALL SAFETY
INSTRUCTIONS AND WARNINGS TO AVOID HAZARDOUS SITUATIONS AND TO MAKE CORRECT USE OF THIS PRODUCT.
WARNING
CAUTION
NOTICE
WARNING:
This product is a supplementary not a medical device. It is a
training instrument, which was developed for the measurement and representation of the human heart rate and should
not replace professional medical devices which are used to
measure heart rate. The heart rate readings are for reference
only, and no responsibility is accepted for the consequences of any erroneous readings.
The signals used by this product may interfere with a pace-
maker or other implanted electronic devices. Consult the
manufacturer of the implant device and your physician before using this product. The frequency used by this device
WARNING indicates a hazardous situation which, if
not avoided, could result in death or serious injury.
CAUTION indicates a hazardous situation which, if
not avoided, may result in minor or moderate injury.
NOTICE addresses practices not related to personal
injury, such as product and/or property damage.
1
Page 3

may cause the above mentioned medical devices to malfunction.
Consult your physician or healthcare provider to help you
determine your maximum heart rate, upper and lower limits,
the exercise frequency and duration of training appropriate
for you and your specific goals. Limits, training schemes,
goals, or the like being not in accordance with your health
condition represent a risk for your health.
People suffering from heart and circulatory illnesses should
only use this heart rate monitor after having consulted their
doctor.
Always consult your physician or healthcare provider be-
fore beginning or modifying a weight reduction or exercise
program.
Always consult your physician to determine what will be
suitable for you.
The fitness test result is for your reference only. Your fit-
ness level can only be ascertained by a licensed physician.
This product is not designed to detect arrhythmia or irregu-
lar rhythms and will interpret them as noise or interference.
Arrhythmia can only be ascertained by a licensed physician.
With high-risk sports, please note that the use of the heart
rate monitor can represent an additional source of injury.
It is important to be sensitive to your body’s responses dur-
ing training. If you feel unexpected pain or excessive fatigue
when training, stop the exercise or continue at a lighter intensity. If case of emergency call 911 immediately.
Keep the unit out of the reach of children, toddlers and in-
fants. This product contains small parts that may present a
choking hazard. NEVER LEAVE CHILDREN OR THOSE WHO
REQUIRE CLOSE SUPERVISION UNATTENDED WITH THIS
DEVICE. Immediately contact your physician if any piece is
swallowed. In case of emergency call 911 immediately.
The EasyFit Software is a motivational tool which helps you
to monitor your physical activities. Never use it as a basis
2
Page 4

for any decision concerning your health, medication, weight
reduction or exercise program, or the like. Always consult
your physician what will be suitable for you.
This product is not a toy. Keep it out of reach of children,
toddlers, and infants.
Packaging materials are a deadly hazard for children and
can cause suffocation. Remove all packaging materials immediately and keep them away from children at all times.
Swallowing batteries and/or battery fluid can be extremely
dangerous. Keep the battery and unit out of the reach of
children and disabled persons. Should any person swallow
a battery and/or battery fluid, please call 911 immediately.
Batteries should not be charged or reactivated by any other
means. The batteries may explode.
Batteries should not be taken apart, thrown in the fire or
short circuited. The batteries may explode.
Should battery fluid leak and come into contact with your
eyes or skin immediately rinse with plenty of clean water.
Please call 911 immediately.
The PC interface cable, the chest strap and the elastic ten-
sion strap presents a strangulation hazard. Keep this product away from children and those who require close supervision, e.g. people with mental disorders. NEVER LEAVE
CHILDREN OR THOSE WHO REQUIRE CLOSE SUPERVISION UNATTENDED WITH THIS DEVICE.
CAUTION:
Use the unit only on human beings and for its intended pur-
pose as outlined in the operating instructions. Do not use
for any other purpose. Any form of improper use can be
dangerous. The manufacturer is not liable for damages that
are caused by improper or incorrect use.
The device is only intended for private use. Do not use this
product for commercial or professional purposes.
3
Page 5

If a battery has leaked do not touch the battery fluid. Avoid
skin contact (e.g. put on protective gloves) and clean the
battery compartment with a dry cloth.
Do not disassemble the unit. You could get injured.
Do not look at the display while you are running to avoid
accidents by stumbling.
Do not adjust the wristband too tight. You could get injured.
Do not use mobile telephones, microwaves, and other de-
vices which generate strong electrical or electromagnetic
fields near the unit. This may result in incorrect operation of
the unit.
Do not use any parts and accessory other than those explic-
itly recommended by “Beurer North America” for use with
this product. Parts and accessories which are not approved
for use with the device may cause damage to your health
and to the product.
NOTICE:
Never attempt to repair, open and/or disassemble the unit or
adjust it yourself. This may damage the unit and impair the
functions. If you need to have the unit repaired, please contact customer service at 1-800-536-0366. Before submitting
any complaint, first check the battery of the chest strap and
replace it if necessary.
Changes or modifications to the unit will nullify the user
warranty.
The non-user-replaceable battery of the heart rate monitor
has to be changed by a specialist or by Beurer customer
service. Improper replacement will damage the unit and void
the user warranty.
Protect the unit against hard knocks (e.g. dropping the unit
on the floor), moisture, dirt, dust, chemicals, extreme hot or
cold temperatures, major temperature fluctuations, direct
exposure to sunlight and heat sources which are too close
(e.g. stoves, heating radiators). This may damage the unit
4
Page 6

and impair the functions. The device must be stored and
used in the specified ambient conditions. Please see chapter "15 Care and Maintenance" and chapter "17 Technical
specifications" for details.
Do not use aggressive solvents, abrasive cleaning agents,
detergents or any other strong chemicals to clean the device and accessory. Clean the heart rate monitor with a dry
soft cloth.
Do not jump into water (high pressure load) and press but-
tons in the rain or while in water. This might impair the impermeability of the monitor to moisture and therefore damage the unit.
Do not wash the chest strap and the monitor in a washing
machine, dish washer or tumble dryer.
Do not soak, spin-dry, iron, dry clean or bleach the elastic
tension strap. Do not use detergent with bleach or fabric
softener. This may damage the elastic tension strap.
Avoid contact with sunscreen or the like since these can
cause damage to the imprint or plastic components.
Do not excessively twist, bend or stretch the chest strap.
This may damage the chest strap, its conductive points and
impair the functions.
Do not use any sharp objects to remove the battery from the
chest strap.
Always use the size and type of battery indicated. The use
of other batteries will damage the device.
Never use rechargeable batteries. This may damage the
unit.
Leaking batteries may damage the device. If you do not in-
tend to use the unit for longer periods, remove the battery
from the chest strap and have the monitor’s battery removed by a specialist before placing the device in storage.
Do not drop or insert any object into any opening. This may
damage the unit
5
Page 7

Do not press the buttons with excessive force or with any
pointed objects.
Observe the local regulations for material disposal. Dispose
of the device, components and optional accessories according to applicable local regulations. Unlawful disposal may
cause environmental pollution.
Batteries can contain toxins that are harmful to the envi-
ronment. Always dispose of batteries in accordance with
applicable local regulations. Do not dispose of batteries
with normal household waste.
6
Page 8

CONTENT
1. Important Safety Notes................................................................................ 1
WARNING: ............................................................................................. 1
CAUTION:.............................................................................................. 3
NOTICE:....................................................................................................... 4
2. Package Content........................................................................................ 10
3. General Information for Training.............................................................. 11
4. Functions of the HR monitor..................................................................... 13
5. Transmission of signal and methods of Devices Measurement ........... 14
5.1 Receiving range of the heart rate monitor.............................................. 14
5.2 Sensors on the chest strap .................................................................... 14
5.3 Operating Range.................................................................................... 14
Getting started............................................................................................ 14
6.
6.1 Activating the HR watch from transport mode........................................ 14
6.2 Activating heart rate monitor from power saving mode.......................... 15
6.3 Putting on the heart rate monitor............................................................ 15
6.4 Putting on the chest strap ...................................................................... 15
6.5 Water Resistance................................................................................... 16
7. General operation of the HR monitor ....................................................... 16
7.1 Buttons on the HR watch ....................................................................... 16
7.2 Display.................................................................................................... 17
7.3 Menus..................................................................................................... 18
7.4 Power saving mode................................................................................ 18
7.5 Main display ........................................................................................... 18
7.6 Overview of the menus .......................................................................... 19
8. Basic settings............................................................................................. 19
8.1 Overview ................................................................................................ 19
8.2 Set units ................................................................................................. 20
8.3 Enter personal data................................................................................ 20
8.4 Set training zone .................................................................................... 22
9. Watch settings............................................................................................ 24
9.1 Overview ................................................................................................ 24
9.2 Set time of day and date ........................................................................ 24
9.3 Set alarm clock....................................................................................... 26
10. Recording of training................................................................................. 27
10.1 Overview .............................................................................................. 27
10.2 Stop run times ...................................................................................... 29
7
Page 9

10.3 Record laps ..........................................................................................29
10.4 Stop and store recording ......................................................................30
10.5 Delete all recordings............................................................................. 31
10.6 Analyzing memory messages............................................................... 32
11. Results......................................................................................................... 33
11.1 Overview............................................................................................... 33
11.2 Display training data.............................................................................33
11.3 Lap results............................................................................................35
12. Fitness test.................................................................................................. 36
12.1 Overview............................................................................................... 36
12.2 Conduct fitness test..............................................................................37
12.3 Display fitness values...........................................................................39
13. EasyFit software.........................................................................................40
13.1 Overview............................................................................................... 40
13.2 Installation of the software.................................................................... 41
13.3 Data transfer.........................................................................................41
13.4 System requirements............................................................................ 42
13.5 EasyFit Instructions .............................................................................. 42
14. Batteries ......................................................................................................43
14.1. Heart Rate Monitor ..............................................................................44
14.2. Chest Strap.......................................................................................... 44
15. Care and Maintenance ...............................................................................45
15.1 Cleaning and Care................................................................................ 46
15.2 Storage ................................................................................................. 47
15.3 Disposal................................................................................................ 47
16. Distortion and interference........................................................................ 47
17. Technical specifications ............................................................................ 48
18. List of abbreviations ..................................................................................50
19. Troubleshooting .........................................................................................52
20. Warranty ......................................................................................................53
8
Page 10

SAVE THESE INSTRUCTIONS FOR FUTURE REFERENCE
If the instruction manual is damaged or if you no longer have the instruction manual in your possession, please contact Beurer customer
service. Please see warranty for service contact.
Dear Customer,
Thank you for choosing this Beurer product. Our name stands for
high-quality, thoroughly tested products for applications in the areas
of heat, weight, blood pressure, body temperature, pulse, gentle therapy, massage and air.
This heart rate monitor is great tool which can help you to increase
the benefit from your exercise program. It helps you to improve the
effectiveness of your exercise program by monitoring and quantifying your results every step of the way.
Please read these instructions completely and carefully before using
this product and keep them for later reference. Be sure to make them
accessible to other users and observe the information they contain.
With best regards,
Your Beurer Team
9
Page 11

2. PACKAGE CONTENT
Heart rate monitor with wrist band
Chest strap
Elastic tension strap (adjustable)
Bike mount
Storage box
Easy Fit Software and PC interface
(USB)
In addition:
Operating instructions
Quick reference guide
NOTE: Prior to use, you have to ensure that the heart rate monitor is
free of damage. If in doubt, do not use the heart rate monitor and
contact Beurer customer service. Please see warranty for service
contact.
10
Page 12

3. GENERAL INFORMATION FOR TRAINING
WARNING:
This product is a supplementary not a medical device. It is a
training instrument, which was developed for the measurement and representation of the human heart rate and should
not replace professional medical devices which are used to
measure heart rate. The heart rate readings are for reference
only, and no responsibility is accepted for the consequences
of any erroneous readings.
The signals used by this product may interfere with a pace-
maker or other implanted electronic devices. Consult the
manufacturer of the implant device and your physician before using this product. The frequency used by this device
may cause the above mentioned medical devices to malfunction.
Consult your physician or healthcare provider to help you
determine your maximum heart rate, upper and lower limits,
the exercise frequency and duration of training appropriate
for you and your specific goals. Limits, training schemes,
goals, or the like being not in accordance with your health
condition represent a risk for your health.
People suffering from heart and circulatory illnesses should
only use this heart rate monitor after having consulted their
doctor.
Always consult your physician or healthcare provider before
beginning or modifying a weight reduction or exercise program.
Always consult your physician to determine what will be
suitable for you.
This product is not designed to detect arrhythmia or irregu-
lar rhythms and will interpret them as noise or interference.
Arrhythmia can only be ascertained by a licensed physician.
With high-risk sports, please note that the use of the heart
rate monitor can represent an additional source of injury.
11
Page 13

This heart rate monitor serves to measure the human pulse. By
means of various settings, you can support your individual training
program and monitor your pulse. You should monitor your pulse during exercise because you should prevent your heart from excessive
strain on the one hand and on the other in order to achieve the optimal training results.
The table provides you with some information on the selection of your
training zone. The maximum heart rate reduces with advancing age.
Information on the training heart rate must therefore always be in
relation to the maximum heart rate. The following rule of thumb helps
to identify the maximum heart rate:
220 - age = maximum heart rate
The following example applies to a 40-year-old person:220-40=180
This rule of thumb offers only an indication, for exact determination
of the maximum heart rate consult your doctor or trainer.
Hearth health
Max. heart
rate range
Goal Light exercise Weight Management Aerobic base
Possible
Effects
Suitable for Ideal for beginners Weight control and
Training Regenerative
programme
50 – 60% 60 – 70% 70 – 80% 80 – 90% 90 – 100%
Strengthens the
heart and the
circulatory system
training
Fat burning zone Fitness
The body burns the
highest percentage
of calories from fat.
Strengthens the heart
and the circulatory
system, enhances
fitness
loss
Fitness training Endurance training Fitness
programme
building
Improves the
respiratory and
circulatory
system.
Ideal to promote the basic
endurance
Athletes at
amateur level
Endurance training
programme
Optimal conditioning
Improves speed
maintenance and
increases basic
speed
Ambitious athletes
at amateur level,
professional
athletes
Anaerobic
training
Elite athletic
training
Overloads
specific
muscles.
High injury
risk for
athletes at
amateur
level, risk
related to the
heart in case
of disease
Only professional
athletes
training
addressing
specific
zones
12
Page 14

See the chapter "8 Basic Settings", section "8.4 Set training zone"
on how to individually set your training zone. See the chapter
"12 Fitness Test" on how the heart rate monitor sets your individual
limits of the suggested training zone through the fitness test.
4. FUNCTIONS OF THE HR MONITOR
For product information, questions or customer service call toll-free
1-800-536-0366 or email info@beurer.com.
HR functions
Heart rate measurement
Transmission: analogue
Individual training zone ad-
justable
Acoustic and visual alarm as
well as colour change of LED
for exit from the training zone
Average heart rate (AVG)
Maximum training heart rate
Calorie consumption in Kcal
(basis jogging)
Fat burning in [oz] / [g]
Settings
Gender
Weight
Unit of weight [kg] / [lb]
Height
Unit of height [cm] / [inch]
Age
Maximum heart rate
Time functions
Time of day [12h] / [24h]
Calendar (up to 2099) and
weekday
Date
Alarm / alarm clock
Stop watch
50 laps for each training, recall
of all of them or each one. Display of lap time and average
heart rate
Fitness test
Fitness index with interpreta-
tion
Maximum oxygen-breath vol-
ume (VO
Basal metabolic rate (BMR)
Active metabolic rate (AMR)
Calculated maximum heart rate
Suggested training zones
max)
2
13
Page 15
5. TRANSMISSION OF SIGNAL AND METHODS OF DEVICES
MEASUREMENT
5.1 Receiving range of the heart rate monitor
Your heart rate monitor picks up the heart rate signals sent by the
chest strap transmitter within a range of 28 inches (70 cm).
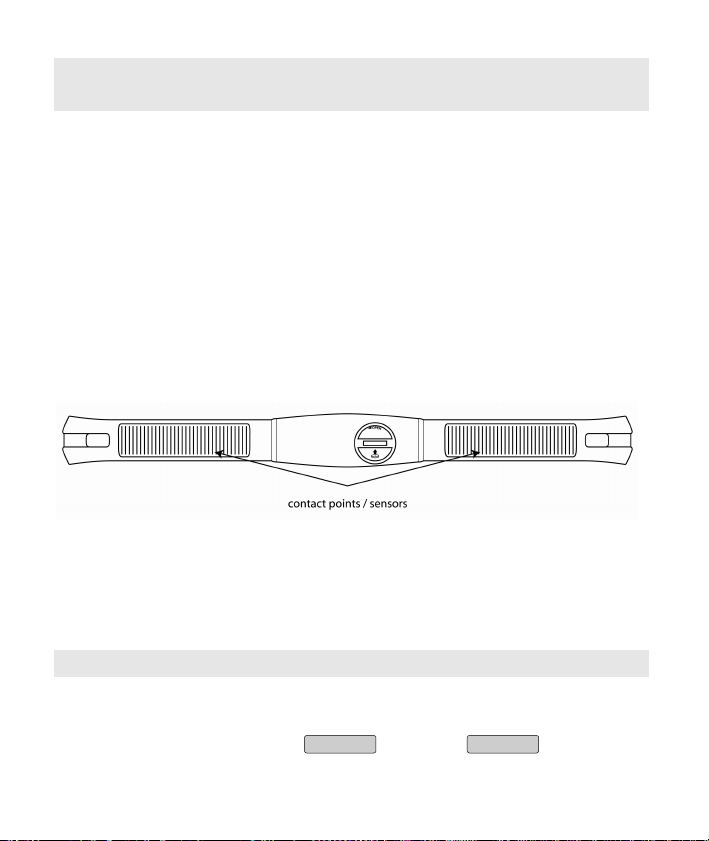
5.2 Sensors on the chest strap
The entire chest strap consists of two components: the actual chest
strap and an elastic tension strap. On the inside of the chest strap
contacting the body, there are two rectangular, corrugated sensors.
Both sensors determine your heart rate and transmit this to the heart
rate monitor.
NOTE: The chest strap is compatible with other analogue devices,
using the same transmission frequency, such as e.g. ergometers.
Please see chapter "17 Technical specifications" for details.
5.3 Operating Range
The chest strap and the heart rate monitor should be worn or
mounted within 28 inches (70 centimetres) from each other. In case
of exceeding this length the monitor displays “0” HR.
6. GETTING STARTED
6.1 Activating the HR watch from transport mode
During transport the monitor is blank. You can remove the transport
mode by pressing the button
MENU
and then
START/STOP
.
14
Page 16
6.2 Activating heart rate monitor from power saving mode
You can activate your heart rate monitor by pressing any button. If the
heart rate monitor has not received any signal for approx. five minutes, it switches to the power saving mode. At that point, only the
current time and the date will be displayed. Press any button in order
to reactivate the heart rate monitor.
6.3 Putting on the heart rate monitor
CAUTION:
Do not adjust the wristband too tight. You could get injured.
You can wear your heart rate monitor like a wrist watch. In order to fix
the heart rate monitor on bike handle bars, attach the bike mount
included to the handle bars. Tighten the heart rate monitor around the
mount such that it is not able to slip while riding.
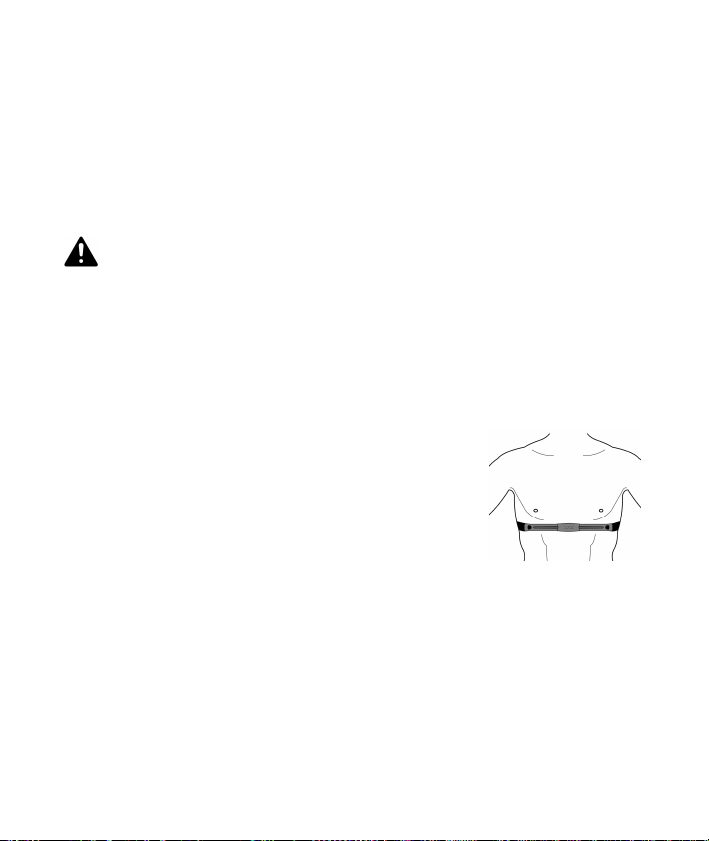
6.4 Putting on the chest strap
Tighten the chest strap with the elastic tension
strap. Adjust the length of the elastic tension
strap such that the strap is snug, but neither
too loose nor too tight. Position the strap
around the chest such that the logo is facing
outwards and in the correct position directly
over the breast bone. For men, the chest
strap should be located directly below the
pectoral muscles, for women, directly below
the breast.
Since optimal contact between the skin and the heart rate sensors
can not be created immediately, it may take some time until the
heart rate is measured and displayed. If necessary, alter the position of the transmitter in order to achieve optimal contact. Most of
the time, sufficient contact is achieved through the accumulation
of sweat beneath the chest strap. You can, however, also wet the
15
Page 17
contact points on the inside of the chest strap. For this, lift the
chest strap up from the skin slightly and wet the two sensors with
a little saliva or water or a conductive gel.
The contact between the skin and chest strap may not be interrupted also with greater movements of the thorax such as during
deep breathing. Significant chest hair can interfere with and even
prevent contact.
Put on the chest strap a few minutes before starting in order to
warm it up to body temperature and establish optimal contact.
6.5 Water Resistance
NOTICE:
Do not jump into water (high pressure load) and press but-
tons in the rain or while in water. This might impair the impermeability of the monitor to moisture and therefore damage the unit.
The PM62 is suitable for bathing and swimming.
Water Resistance = 98 ft. (30 m).
NOTE: The consistency of sea water, or chemicals used in a swimming pool may impact the heart rate signal reception.
7. GENERAL OPERATION OF THE HR MONITOR
7.1 Buttons on the HR watch
START/STOP
1
OPTION/SET
2
MENU
3
4 /
Starts and stops functions and adjusts values.
Press and holding accelerates the entry.
Switches between the functions within one
menu and confirms settings.
Switches between the different menus.
Pressing quickly illuminates the display for
five seconds. Pressing and holding activates/ deactivates the acoustic alarm when
exiting the training zone.
16
Page 18
NOTE: If no button is pressed the heart rate monitor will automatically exit the setting mode after 60 seconds and turns back to the
main display.
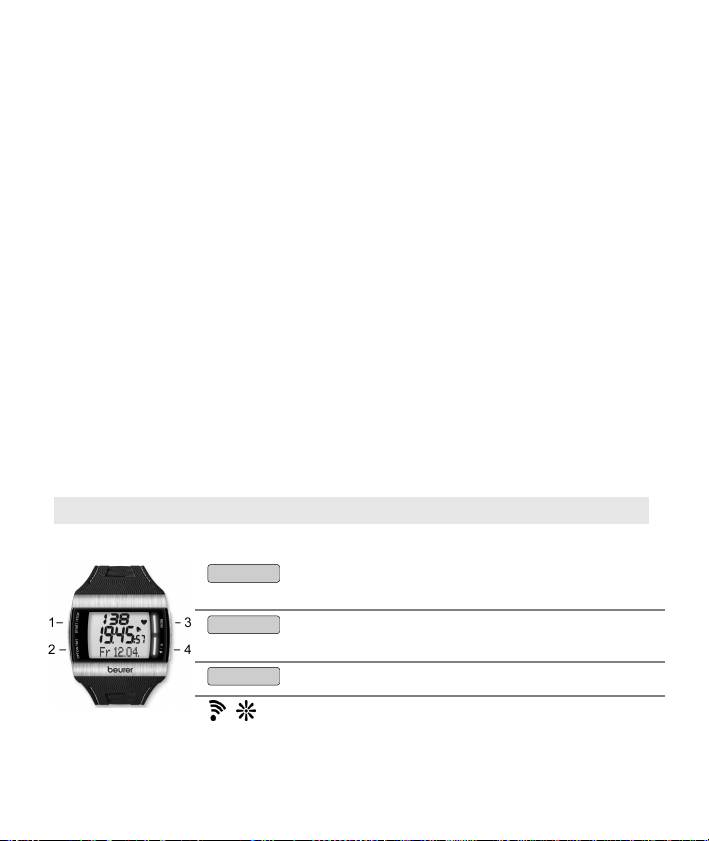
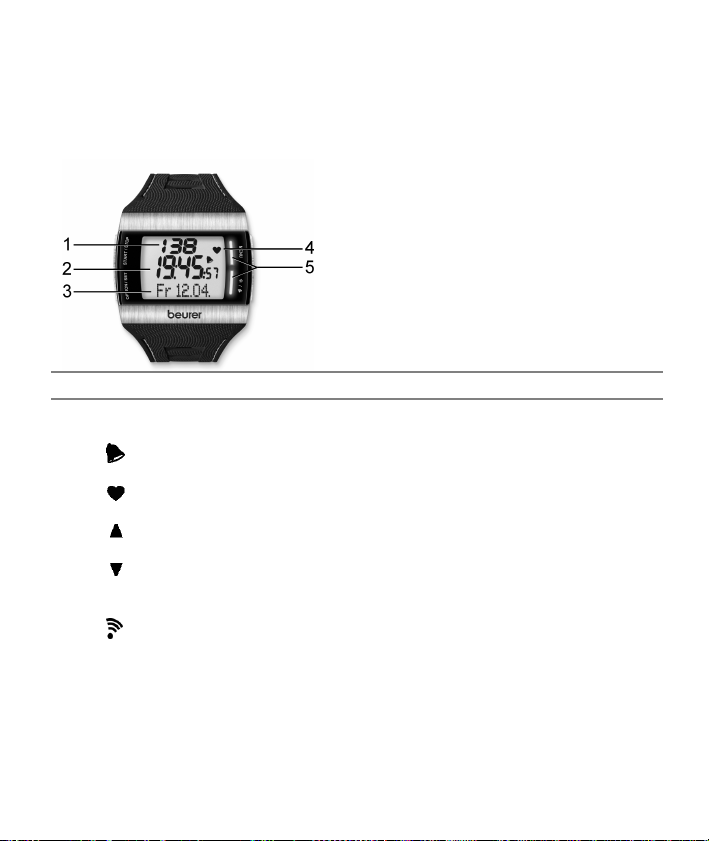
7.2 Display
1 Top line 2 Middle line 3 Bottom line
4
Symbols
Alarm clock is activated.
Heart rate is being received.
Training zone has been exceeded.
Training zone has been underrun.
Acoustic alarm for exit from the training zone is activated.
The sound when pressing the buttons is activated.
5
Two LEDs: Blink in time with heart rate. Colour change from
green to red for exit from the training zone.
An explanation of the display abbreviations can be found in the list of
abbreviations at the end of the operating instructions.
17
Page 19
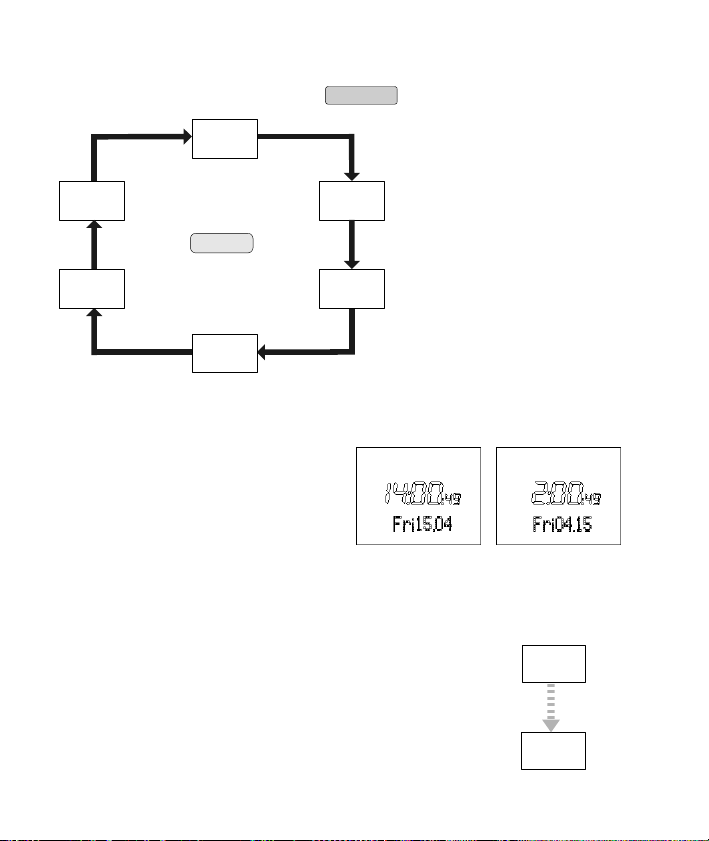
7.3 Menus
You can switch menus with the
Time
MENU
Button.
FitTest
MENU
Setting
LAP
Result
Training
Result
7.4 Power saving mode
If your heart rate monitor has
not received any signal for
approx. five minutes, it switches
to the power saving mode. In
that case, only the current time
and the date will be shown.
Press any button to reactivate
the HR monitor.
24 h format 12 h format
7.5 Main display
When changing menus, the name of the menu is first
shown, then your HR monitor will automatically switch
to the main display of the active menu. From there,
you have to first choose a submenu or you can directly
access functions.
Menu
automatically
Main
display
18
Page 20
7.6 Overview of the menus
Menu Meaning Description: see chapter...
Time
Training
Result
Lap Result
Setting
FitTest
Time 9 Watch Settings
Training 10 Recording of Training
Result 11 Results
Lap result 11.3 Lap results
Settings 8 Basic settings
Fitness test 12 Fitness test
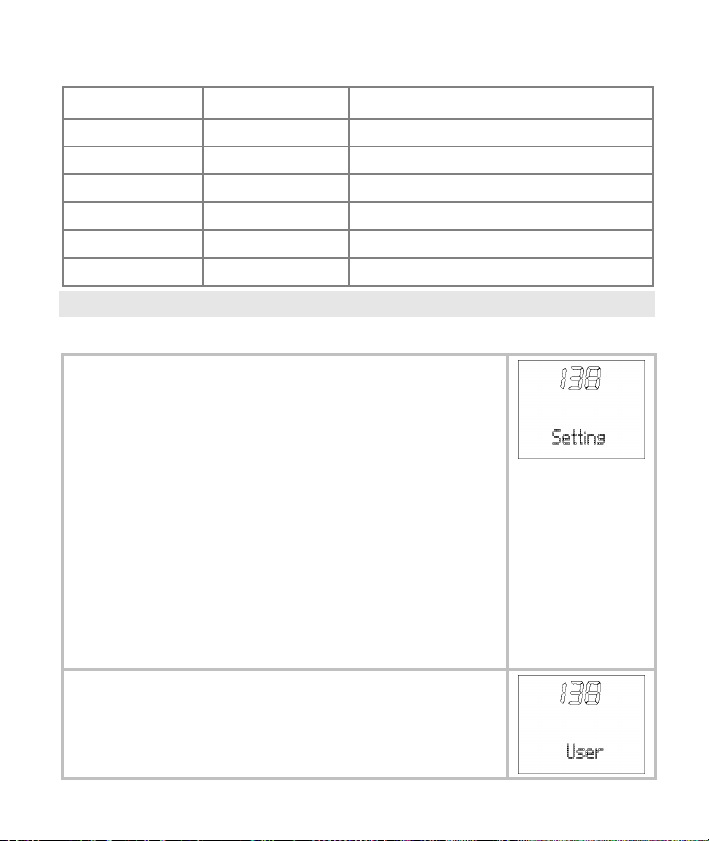
8. BASIC SETTINGS
8.1 Overview
In the menu Setting you can:
Change the measurement units for height
(cm/inch) and weight (kg/lb).
Enter your personal data (user). Based on this
data, your HR monitor determines your calorie
consumption and your fat burning during training!
Set your training zone (limits). See chapter
"3 General Information for Training" for explanations on how to set the training zones. Your
HR monitor issues an acoustic and visual
alarm during your training when the training
zone is exited.
Once you are in the menu Setting, your HR
monitor automatically switches to the main display. This displays
User.
19
Page 21
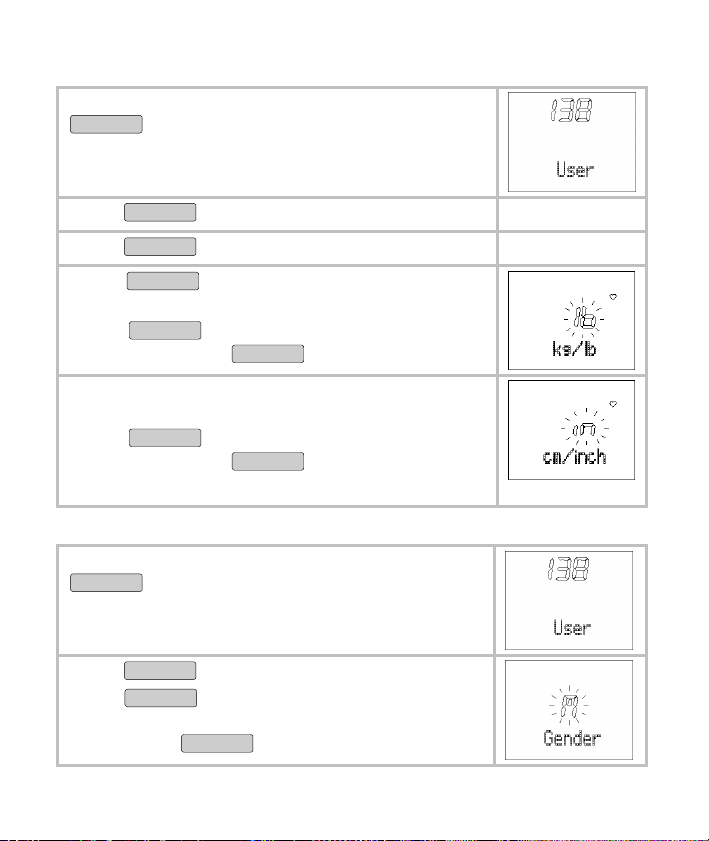
8.2 Set units
Switch to the menu Setting by pressing the
MENU
button. Wait till the monitor automati-
cally switches to the main display. This displays
User.
Press
Press
Press
OPTION/SET
OPTION/SET
START/STOP
button. Limits is displayed.
button. Units is displayed.
button. kg/lb is displayed. The
weight unit blinks.
Press
units. Confirm with
START/STOP
button to switch between the
OPTION/SET
button.
cm/inch is displayed. The unit of measurement
for height blinks.
Press
units. Confirm with
START/STOP
button to switch between the
OPTION/SET
button.
Units is displayed.
8.3 Enter personal data
Switch to the menu Setting by pressing the
MENU
button. Wait till the monitor automati-
cally switches to the main display. This displays
User.
Press
Press
M, if you are male. Select F, if you are female.
Confirm with
START/STOP
START/STOP
button. Gender is displayed.
button to set your gender. Select
OPTION/SET
button.
20
Page 22
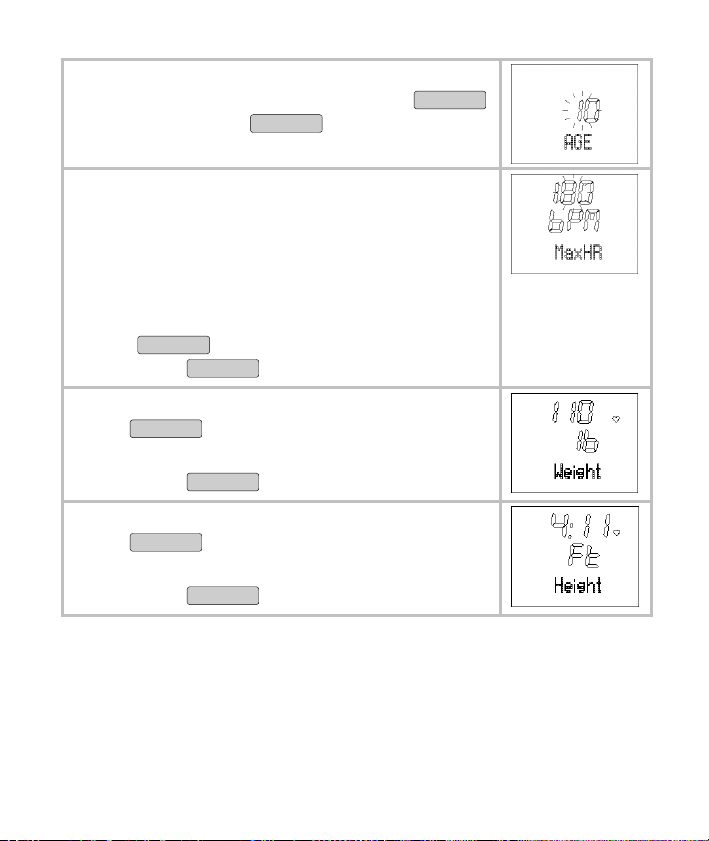
AGE is displayed.
Set your age (10-99) by pressing the
button. Confirm with
OPTION/SET
button.
START/STOP
MaxHR is displayed. The HR monitor automati-
cally calculates the maximum heart rate according to the formula: 220 - age = MaxHR
Please note that the HR monitor also determines
the MaxHR after every fitness test and sets it as
a suggested value.
You can overwrite the value calculated by pressing the
START/STOP
Confirm with
button (setting range: 65 to 239).
OPTION/SET
button.
Weight is displayed.
Press
START/STOP
button to select your weight.
Setting range: 44 to 499 lbs (20 to 226 kg).
Confirm with
OPTION/SET
button.
Height is displayed.
Press
START/STOP
button to set your height.
Setting range: 2'6'' to 7'6'' feet (80 to 227 cm).
Confirm with
OPTION/SET
button. User is displayed.
21
Page 23

8.4 Set training zone
WARNING:
Consult your physician or healthcare provider to help you
determine your maximum heart rate, upper and lower limits,
the exercise frequency and duration of training appropriate
for you and your specific goals. Limits, training schemes,
goals, or the like being not in accordance with your health
condition represent a risk for your health.
You can set your individual upper and lower heart rate limit as described below.
NOTE: Both limits are automatically set as a training zone suggestion
after every fitness test and that the old data are consequently overwritten. For this, the lower limit of the suggested training zone totals
65%, the upper limit 85% of the maximum heart rate.
You can calculate the lower and upper heart rate limits by multiplying your maximum heart rate by the percentages for the selected
training zone (see chapter "3 General Information for Training").
Please note that the lower limit must be smaller than the upper limit.
E.g. a 50-year-old man training for Weight Management (fat burning
zone).
His lower heart rate limit: (220-50)*65% = 110.5 Æ 111
His upper heart rate limit: (220-50)*85% = 144.5 Æ 145
NOTE: For a safe and efficient training determining the individual
training zone is a critical step.
Do not precipitate – Start slowly. Gradually step up your training
zone as you become more physically fit. Select the training zone
which suits your needs the most.
22
Page 24
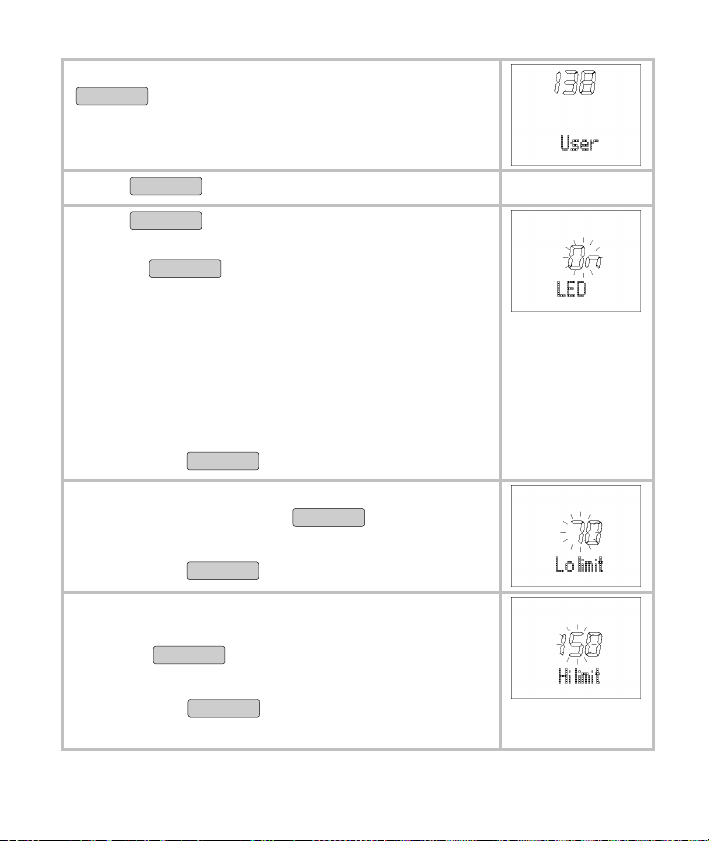
Switch to the menu
MENU
button. Wait till the monitor automati-
Setting by pressing the
cally switches to the main display. This displays
User.
Press
Press
OPTION/SET
START/STOP
button. Limits is displayed.
button. On LED is displayed.
The LED is activated (ON) or shut off (OFF) with
pressing
LED (ON)
START/STOP
button.
The LED gives a red light when your heart rate
is outside the training zone.
The LED gives a green light when your heart
rate is inside the training zone.
LED (OFF)
LED is deactivated. No light will flash up.
Confirm with
OPTION/SET
button.
Lo limit is displayed. Set the lower limit for your
training zone by pressing
START/STOP
button.
Setting range: 40-238
Confirm with
OPTION/SET
button.
Hi limit is displayed.
Set the upper limit for your training zone by
pressing
START/STOP
button.
Setting range: 41-239
Limits.
OPTION/SET
button and to return to the
Confirm with
display
23
Page 25
9. WATCH SETTINGS
9.1 Overview
In the Time menu you can:
Set the time and the date.
Set the alarm clock.
When you are in the Time menu the heart rate
monitor automatically activates the main display. In this mode both the weekday and the
current date are displayed.
9.2 Set time of day and date
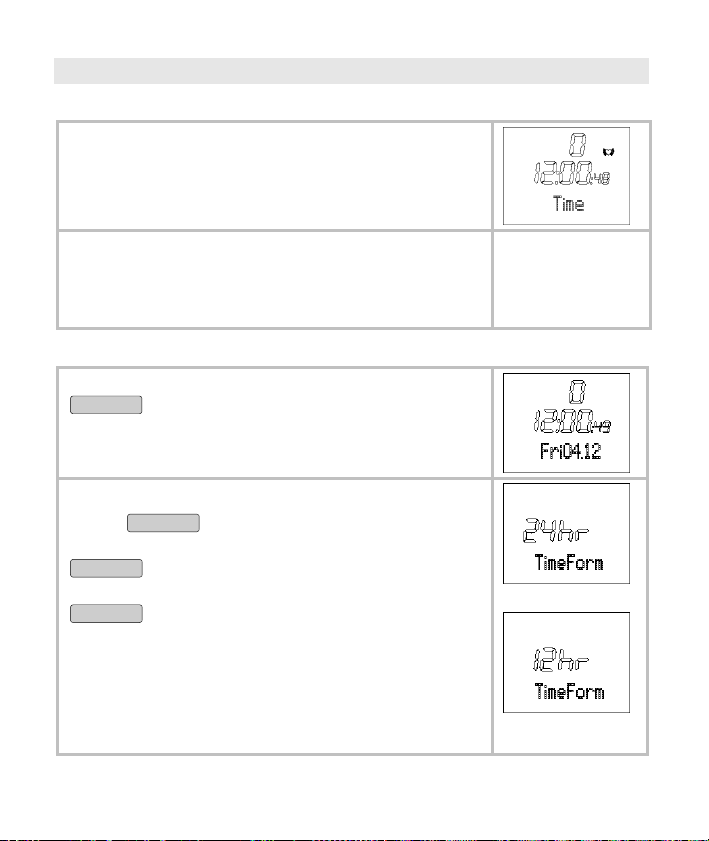
Switch to the menu Time by pressing the
MENU
button.
Set time format
Press
24 hr or 12 hr TimeFORM is displayed. Press
START/STOP
START/STOP
or 24-hour universal clock. Confirm with
OPTION/SET
NOTE:
If you select 24hr time format date will be
displayed “weekday day.month”.
If you select 12 hr time format date will be
displayed “weekday month.day”.
button for approx. 5 seconds.
button to choose the 12-hour AM/PM
button.
Ú
24
Page 26
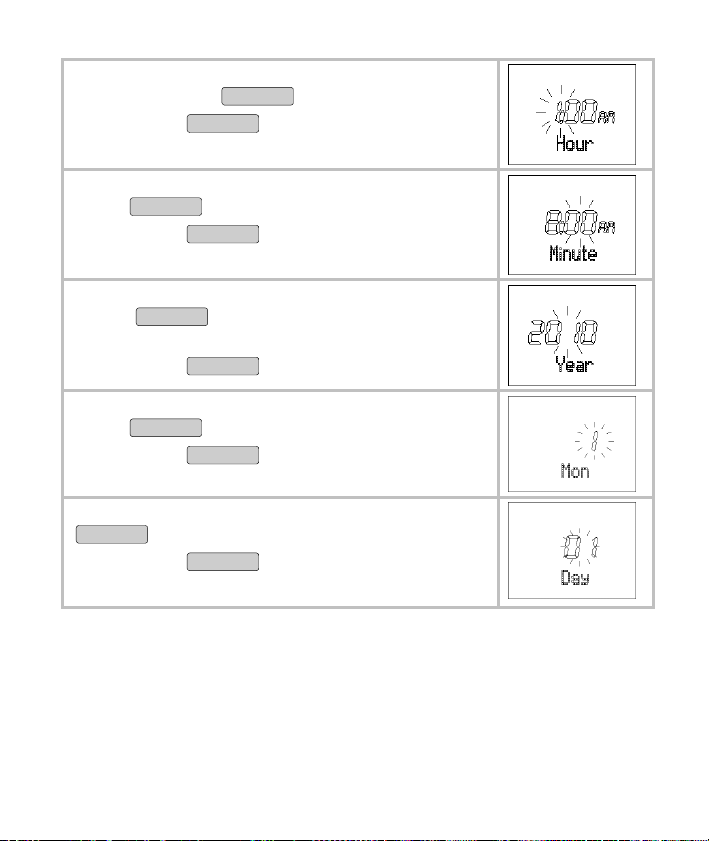
Hour is displayed. The hour setting blinks. Set
the hour with the
Confirm with
START/STOP
OPTION/SET
button.
button.
Minute is displayed. The minute setting blinks.
Press
Confirm with
START/STOP
button to set the minute (0-59).
OPTION/SET
button.
Year is displayed. The year setting blinks.
Press
START/STOP
button to set the year. The
calendar goes up to 2099.
Confirm with
OPTION/SET
button.
Month is displayed. The monthly setting blinks.
Press
Confirm with
START/STOP
button to set the month (1-12).
OPTION/SET
button.
Day is displayed. The day setting blinks. Press
START/STOP
Confirm with
button to set the day (1-31).
OPTION/SET
button.
The display shows the current time and date.
25
Page 27
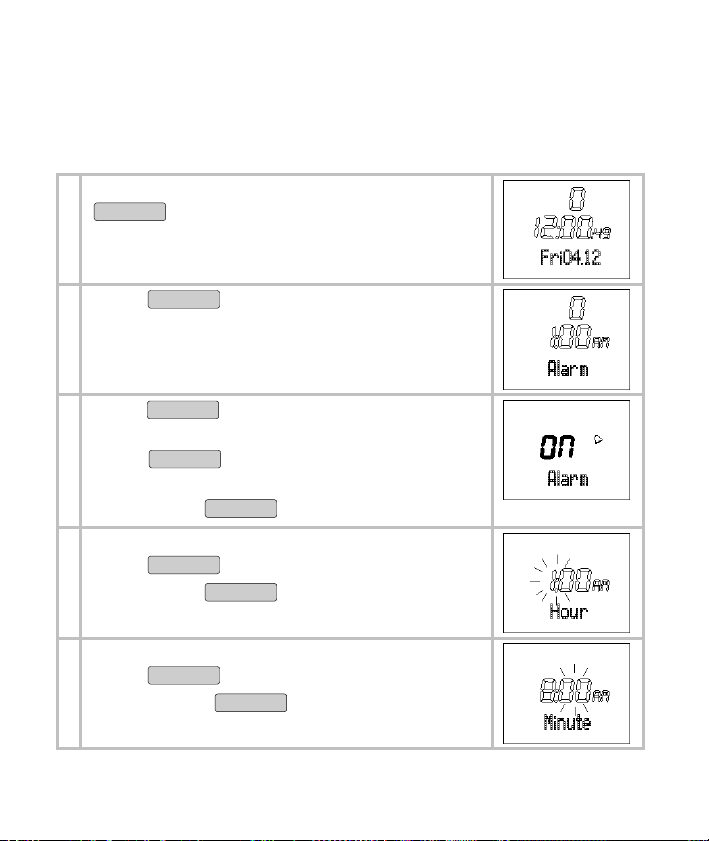
9.3 Set alarm clock
When the alarm clock function is activated, the alarm will go off at
the set time every day. You can turn off the alarm clock by pressing
any button.
Switch to the menu Time by pressing the
MENU
button.
Press
Alarm is displayed.
Press
On Alarm is displayed.
Press
OPTION/SET
START/STOP
START/STOP
button.
button for approx. 5 seconds.
button to turn the alarm clock
off (Off) and on (On).
Confirm with
Hour is displayed. The hour setting blinks.
Press
Confirm with
Minute is displayed. The hour setting blinks.
Press
OPTION/SET
START/STOP
OPTION/SET
START/STOP
Confirm with
button.
button to set the hour.
button.
button to set the minute.
OPTION/SET
button and to return
back to the main display.
26
Page 28
10. RECORDING OF TRAINING
WARNING:
The signals used by this product may interfere with a pace-
maker or other implanted electronic devices. Consult the
manufacturer of the implant device and your physician before using this product. The frequency used by this device
may cause the above mentioned medical devices to malfunction.
It is important to be sensitive to your body’s responses dur-
ing training. If you feel unexpected pain or excessive fatigue
when training, stop the exercise or continue at a lighter intensity. If case of emergency call 911 immediately.
CAUTION:
Do not look at the display while you are running to avoid
accidents by stumbling.
Do not use any parts and accessory other than those explic-
itly recommended by "Beurer North America" for use with
this product. Parts and accessory which are not approved
for use with the device may cause damage to your health
and to the product.
10.1 Overview
NOTE:
Before starting training recording, you need to wear the chest
strap.
Avoid doing any awkward motion during measurement. It will
create inaccurate heart rate reading.
In addition to training intensity, medication for heart conditions /
blood pressure / physiological conditions / asthma / breathing, etc.
as well as some energy drinks, alcohol, and nicotine may also affect heart rate.
27
Page 29
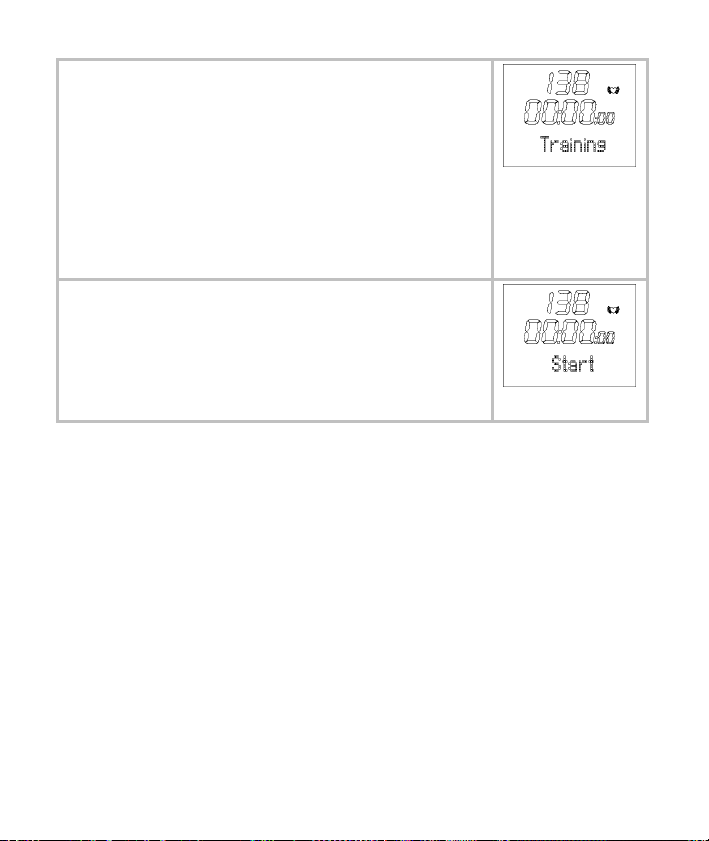
In the menu
Stop your run times and thereby record your
Training you can:
training session.
Record individual laps.
Stop and save your recording.
Delete all recordings.
Analyze memory messages.
Once you are in the menu Training, your HR
monitor automatically switches to the main
display. This displays the already recorded
training time on the middle line (after
Save/Delete: 00:00:00) and on the line below
Start.
Things to know about the recordings
As soon as you have started the recording, your HR monitor
starts recording your training data. Your HR monitor continually
records your training data until you save or delete this. This also
applies when you first start training on the following day. The running time also allows you to stop your training session at any
time.
Your HR watch has a memory. The recording time is up to 24
hours and depends on the number of laps. A maximum of 50 laps
is possible for each training. Your HR watch informs you if the
memory is almost full. At this point, at the latest, we recommend
transmitting the recordings to your PC and thus emptying the
memory on the HR watch. Alternatively you can delete all recordings manually. Read the section "10.5 Delete all recordings"
in this chapter to find out how to delete the recordings.
28
Page 30
You can let your training data be displayed. The last recording
saved, can be recalled in the menu
sult
you can see the laps for this recording.
As soon as you have transferred the recordings into the EasyFit
Result. In the menu Lap Re-
software, you can view and analyze them there. The memory will
be deleted every time you have successfully transferred the data
to the PC. You can find explanations regarding the transfer of
data to the PC in the chapter "13 EasyFit Software".
10.2 Stop run times
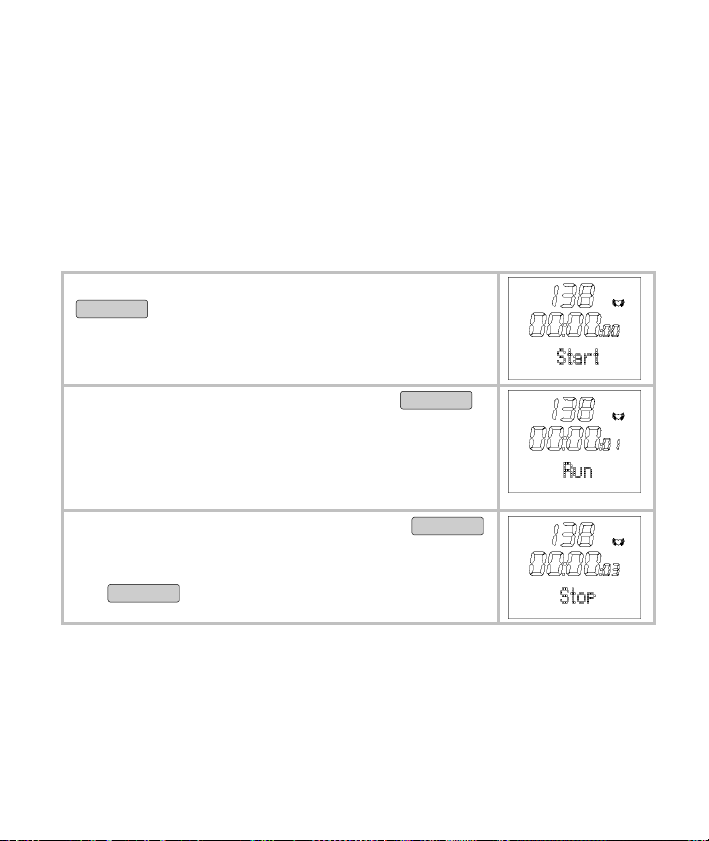
Switch to the menu Training by pressing the
MENU
button. If you have already stopped a
run time, the recorded training time is displayed
on the middle line.
Start the recording by pressing the
START/STOP
button.
Run is displayed. Even if you change to an-
other menu during the recording, the time continues to run in the background.
Stop the recording by pressing the
button.
Stop is displayed. You can interrupt and
START/STOP
resume your recordings at any time by pressing
START/STOP
the
button.
10.3 Record laps
While the recording of your entire training is in progress, you can
record individual laps. The time continues to run as the laps are recorded.
29
Page 31

You are in the menu
Training and your training
is currently being recorded.
Run is displayed.
Press
OPTION/SET
button to time a new lap. The
display shows the time and number of the last
lap timed for five seconds, for example
Lap 1.
The display automatically switches back to Run
and shows the number of the current lap, for example
Run 2.
Press
OPTION/SET
button to record additional training laps as needed. You can record up to a total
of 50 laps for each training.
10.4 Stop and store recording
Please note that after finishing and saving, you can no longer have
the data displayed in the
display them on your PC with the help of the EasyFit Software.
You are in the menu
recorded a training.
Stop is displayed.
Result and Lap Result menus. You can only
Training. You have just
30
Page 32

Save the recording by pressing
START/STOP
but-
ton for approx. 5 seconds.
Hold Save is displayed.
The display automatically switches back to the
main display.
The data is now ready to be transmitted to the
PC.
10.5 Delete all recordings
Your HR watch informs you automatically when the memory is almost full. Before you then delete the memory, we recommend analyzing the training recording or transmit to the PC! The memory on
the HR watch will be deleted automatically every time you successfully transfer data to the PC. Alternatively you can delete the memory manually as described here.
The automatic or manual deletion causes all training recordings
including your laps to be deleted.
You can delete the data before or after the training:
You are in the menu Training. Start is displayed.
You are in the menu Training. You have just recorded a train-
Stop is displayed.
ing.
Delete all recordings by pressing
button for approx. 5 seconds.
MEM Delete is displayed.
OPTION/SET
31
Page 33

The monitor automatically switches to the main
display.
10.6 Analyzing memory messages
In the menu Training your HR watch automatically informs you if the
memory is almost full or if almost all the laps are occupied.
Message Meaning
When switching to the menu
MENU
pressing the
signals
MEM LOW, if less than 10% of the
button the HR watch
memory or less than 10 laps are free.
During training, the HR watch signals every 5
seconds
MEM x% Free, if less than 10% of the
memory is free.
E. g. on the display:
free).
MEM 8% Free (still 8%
During training the HR watch signals every 5
seconds
LAP Rest x, if there are less than 10
(of a total of 100) laps .
E. g. on the display:
free).
LAP Rest 7 (still 7 laps
If the memory is full, you cannot start a new training session. Read
in the previous section "10.5 Delete all recordings" to find out how to
delete the memory manually.
The memory is also deleted every time the data is transferred to the
PC. You can find the relevant explanations in the chapter "13 EasyFit
Software".
32
Training by
Page 34

11. RESULTS
WARNING:
This product is a supplementary not a medical device. It is a
training instrument, which was developed for the measurement and representation of the human heart rate and should
not replace professional medical devices which are used to
measure heart rate. The heart rate readings are for reference
only, and no responsibility is accepted for the consequences of any erroneous readings.
This product is not designed to detect arrhythmia or irregu-
lar rhythms and will interpret them as noise or interference.
Arrhythmia can only be ascertained by a licensed physician.
11.1 Overview
In the menu Result you can display your training
data of the last recording stopped: mean and
maximum heart rate, times within and outside of
the training zone as well as calorie consumption
and fat burning.
Once you are in the menu Result, your HR
monitor automatically switches to the main
display.
This displays
bPM AVG.
11.2 Display training data
Switch to the menu Result by pressing the
MENU
button.
33
Page 35

BPM AVG (average training heart rate) is dis-
played.
OPTION/SET
OPTION/SET
OPTION/SET
OPTION/SET
OPTION/SET
button.
button.
button.
button.
button.
Press the
HRmax (maximum training heart rate) is dis-
played.
Press the
In [min] (time within the training zone) is dis-
played.
Press the
Lo [min] (time below the training zone) is dis-
played.
Press the
Hi [min] (time above the training zone) is dis-
played.
Press the
[kcal] (the total calorie consumption during the
recording of the training session) is displayed.
The calculation is conducted based on moderately fast jogging. The basis for the display of
the calorie consumption and the fat burning
are:
34
Page 36

Personal data (basic settings)
the time and heart rate measured during the
training session.
Press the
Fat[g]/[oz] (Fat burning during the entire train-
ing recording) is displayed.
Press the
Back to the main display.
OPTION/SET
OPTION/SET
button.
button.
11.3 Lap results
Overview
In the menu
and average heart rate as well as the last
stopped training recording and the individual laps
displayed.
Once you are in the menu LAP Result, your HR
monitor automatically switches to the main
display. The top line shows the average heart
rate, the middle line the training time last recorded.
LAP Result you can have the time
35
Page 37

Display lap results
Switch to the menu
MENU
button.
Press the
AVG 1: Results in lap 1 are displayed: The top
OPTION/SET
LAP result by pressing the
button.
line shows the average heart rate, the middle
line displays the lap time.
Pressing
individual result display for the following lap.
Maximum 50 laps for each training.
Press the
main display.
12. FITNESS TEST
WARNING:
The fitness test result is for your reference only. Your fitness
level can only be ascertained by a licensed physician.
12.1 Overview
In the menu FitTest you can:
Test your personal fitness in a 1 mile (1600
meters) run.
Have your fitness evaluated:
Fitness index (1-5), maximum oxygen-breath
volume (VO
and active metabolic rate (AMR).
OPTION/SET
button again switches to the
OPTION/SET
button to get back to the
max), basal metabolic rate (BMR)
2
36
Page 38

Have your individual upper and lower limit
calculated automatically as a recommended
training zone and overwritten the two limits in
the menu
Setting. Also see the section "8.4
Set training zone".
Have your maximum heart rate (MaxHR)
automatically calculated and have it overwritten in the menu
Setting.
The fitness test is not just designed for active
athletes, but also for those with a lower fitness
level from all age groups.
One second after entering the Fitness test
mode, the main display appears. The top line
displays your fitness index:
0 = No test has been conducted yet
1 = Poor
2 = Fair
3 = Average
4 = Good
5 = Elite
On the middle line, the date of your last fitness
test is displayed. If you have not yet completed a
fitness test, then the preset date is displayed.
12.2 Conduct fitness test
The units displayed [mile] or [m] (meter) result from the basic settings.
In the chapter "8 Basic Settings", section "8.2 Set units", you can read
how to change these units.
37
Page 39

Put on the chest strap and wait till the monitor
receives a heart rate. Switch to the menu
by pressing the
Test
MENU
button.
Fit-
The scrolling display appears PressSTART to
begin
. Your pulse will now be shown on the
display and you have five minutes to warm up.
Your HR monitor signals the end of the 5-
minute warmup phase with a beep. In the event
you would like to shorten the warm-up phase,
you can press the
START/STOP
button to switch to
the next screen.
Briskly walk exactly 1 mile (1600m). For this,
choose a level route of exactly 1 mile (1600m).
The scrolling display PressSTOP after 1mile
(1600 m)
reminds you to press the
button after 1 mile (1600m).
START/STOP
The scrolling display Test Finished appears
and the time required is displayed.
Press
START/STOP
button to get back to the main
display. It displays your fitness index (1-5) with
evaluation and the current date.
38
Page 40

12.3 Display fitness values
The display of the fitness values only makes sense, if you have completed at least one complete fitness test. The fitness values displayed
refer to the last test.
Change to the menu
MENU
button. The fitness index (1-5) and
the date of your last fitness text is shown. If no
fitness test has been completed yet, a 0 is displayed.
Press the
OPTION/SET
played. The maximum oxygen-breath volume is
displayed in millilitres within one minute per
2.2 pounds (1 kg) of body weight. It is the basis
for the evaluation of your fitness test.
Press the
BMR (Basal Metabolic Rate) is displayed. The
OPTION/SET
basal metabolic rate is calculated based on the
values of age, gender, height and weight. The
BMR specifies the calories needed to maintain
your vital functions - in the absence of movement.
Press the
AMR (Active Metabolic Rate) is displayed. The
OPTION/SET
active metabolic rate is calculated based on the
basic metabolic rate and an "activity premium",
which is dependant on the fitness level.
Press the
main display.
OPTION/SET
FitTest by pressing the
button. VO
max is dis-
2
button.
button.
button to get back to the
39
Page 41

13. EASYFIT SOFTWARE
WARNING:
The EasyFit Software is a motivational tool which helps you
to monitor your physical activities. Never use it as a basis
for any decision concerning your health, medication, weight
reduction or exercise program, or the like. Always consult
your physician what will be suitable for you.
The PC interface cable, the chest strap and the elastic ten-
sion strap presents a strangulation hazard. Keep this product away from children and those who require close supervision, e.g. people with mental disorders. NEVER LEAVE
CHILDREN OR THOSE WHO REQUIRE CLOSE SUPERVISION UNATTENDED WITH THIS DEVICE.
13.1 Overview
With the EasyFit software you can transfer your training data to a PC
via your Heart Rate Monitor’s PC interface. The required accessories,
consisting of a CD with the PC software EasyFit and a communication
cable, are included in the scope of supply. The EasyFit software helps
you to monitor your training data and control your achievements over
a longer period of time. In addition to that, you will find many other
functions for the support of your weight management and workout
planning.
Calendar functions
Weekly workout planning
Various analyses and graphics for observing the training progress
NOTE: The EasyFit Software can also be used with EasyFit ready
Beurer Activity sensor and scales. You thus get an overview of your
activity, training and weight data. Please contact Beurer customer
service for more information. Please see warranty for service contact.
40
Page 42

13.2 Installation of the software
To install the software, please pay attention to printed instructions or
to the file "Install_Readme" on the enclosed CD. Please follow the
instructions carefully to install the software exactly and in the order
specified.
1. Place the CD-ROM supplied in the drive and choose the CD
drive in Windows Explorer or on the desktop of your PC.
2. Double-click the "setup.exe" file to run it.
3. Choose your language and follow the installation instructions.
Confirm with "Next" or "Install" as appropriate.
4. When you click "Finish", the software starts.
5. Enter your personal settings and details under "New registration" in the EasyFit program and click "Save" or "Next" to confirm.
13.3 Data transfer
1. Start EasyFit.
2. Create a new person or click on an existing account.
3. Go to "Data Manager" and click the "Transfer data" button.
4. Connect the PC clip to the heart rate monitor and after that connect the USB plug to the USB port of your PC.
5. After successful data transfer your training data can be viewed in
the menu "Training", "Data Manager" or can be called up individually in the calendar.
NOTE: Do not turn off the PC or unplug the USB connector during
uploading of the measured data.
FURTHER INFORMATION
Should you have any questions concerning the use of the EasyFit
Software please call customer service at toll-free 1-800-536-0366 or
email info@beurer.com.
41
Page 43

13.4 System requirements
Operating system Windows 2000/XP (SP2), Vista, Windows 7
CPU optimal at 1.2 GHz+
Main memory optimal at 256 MB RAM+
Hard disk space optimal 200 MB+ free space – at least 100 MB
Graphic resolution starting from 1024 x 768
Other requirements CD-ROM drive, USB interface
13.5 EasyFit Instructions
Detailed instructions concerning the different functions and the operation of the software are included in the help function.
42
Page 44

14. BATTERIES
WARNING:
Swallowing batteries and/or battery fluid can be extremely
dangerous. Keep the battery and unit out of the reach of
children and disabled persons. Should any person swallow
a battery and/or battery fluid, please call 911 immediately.
Batteries should not be charged or reactivated by any other
means. The batteries may explode.
Batteries should not be taken apart, thrown in the fire or
short circuited. The batteries may explode.
Should battery fluid leak and come into contact with your
eyes or skin immediately rinse with plenty of clean water.
Please call 911 immediately.
CAUTION:
If a battery has leaked do not touch the battery fluid. Avoid
skin contact (e.g. put on protective gloves) and clean the
NOTICE:
battery compartment with a dry cloth.
The non-user-replaceable battery of the heart rate monitor
has to be changed by a specialist or by Beurer customer
service. Improper replacement will damage the unit and void
the user warranty.
Do not use any sharp objects to remove the battery from the
chest strap.
Always use the size and type of battery indicated. The use
of other batteries will damage the device.
Never use rechargeable batteries. This may damage the
unit.
Leaking batteries may damage the device. If you do not in-
tend to use the unit for longer periods, remove the battery
from the chest strap and have the monitor’s battery removed by a specialist before placing the device in storage.
43
Page 45

Batteries can contain toxins that are harmful to the envi-
ronment. Always dispose of batteries in accordance with
applicable local regulations. Do not dispose of batteries
with normal household waste.
NOTE: This product contains a CR Type Coin Lithium Battery which
contains Perchlorate Material – special handling may apply.
See: www.dtsc.ca.gov/hazardouswaste/perchlorate.
14.1. Heart Rate Monitor
If the intensity of the display reduces or no display appears at all,
have the battery of the HR monitor only changed by a specialist (e.g.
clock-maker's shop or jewlery store) or by Beurer customer service
otherwise the water resistance might be impaired. Improper replacement will void the warranty.
NOTE: Excessive use of the LED light drains the battery more rapidly.
14.2. Chest Strap
If the heart rate signals become unsteady or stop your chest strap
battery may need to be replaced.
1
You can replace the battery in the
chest strap on your own. The battery
compartment is located on the inner
side. Use a coin to open the compartment.
2
The positive pole of the battery inserted must face upwards.
3
Carefully close the battery compartment again.
44
Page 46

15. CARE AND MAINTENANCE
CAUTION:
Do not disassemble the unit. You could get injured.
Do not use any parts and accessory other than those explic-
itly recommended by "Beurer North America" for use with
this product. Parts and accessory which are not approved
for use with the device may cause damage to your health
and to the product.
NOTICE:
Never attempt to repair, open and/or disassemble the unit or
adjust it yourself. This may damage the unit and impair the
functions. If you need to have the unit repaired, please contact customer service at 1-800-536-0366. Before submitting
any complaint, first check the battery and replace them if
necessary.
Changes or modifications to the unit will nullify the user
warranty.
Protect the unit against hard knocks (e.g. dropping the unit
on the floor), moisture, dirt, dust, chemicals, extreme hot or
cold temperatures, major temperature fluctuations, direct
exposure to sunlight and heat sources which are too close
(e.g. stoves, heating radiators). This may damage the unit.
The device must be stored and used in the specified ambient conditions. Please see chapter "15 Care and Maintenance" and chapter "17 Technical specifications" for details.
Do not use aggressive solvents, abrasive cleaning agents,
detergents or any other strong chemicals to clean the device and accessory. Clean the heart rate monitor with a dry
soft cloth.
Do not jump into water (high pressure load) and press but-
tons in the rain or while in water. This might impair the im-
45
Page 47

permeability of the monitor to moisture and therefore damage the unit.
Do not wash the chest strap and the monitor in a washing
machine, dish washer or tumble dryer.
Do not soak, spin-dry, iron, dry clean or bleach the elastic
tension strap. Do not use detergent with bleach or fabric
softener. This may damage the elastic tension strap.
Avoid contact with sunscreen or the like since these can
cause damage to the imprint or plastic components.
Do not excessively twist, bend or stretch the chest strap.
This may damage the chest strap, its conductive points and
impair the functions.
Do not drop or insert any object into any opening. This may
damage the unit
Do not press the buttons with excessive force or with any
pointed objects.
15.1 Cleaning and Care
From time to time, carefully clean your chest strap, elastic tension
strap and heart rate monitor with a soap and water solution. Then
rinse off all components with clean water. Carefully dry them only
with a soft towel. Always thoroughly dry off any moisture on the
components before put them into storage.
NOTE: Dirt impairs the elasticity and functioning of the transmitter.
To avoid build up of material that can interfere with the chest strap’s
ability to receive a valid pulse, rinse the chest strap under running
water after every use. Carefully dry it only with a soft towel.
You can wash the elastic tension strap in the washing machine at
30° without fabric softener. Use a washing pouch. The elastic tension strap is not made for the dryer! Detach the chest strap from the
elastic tension strap. Never put the chest strap in the washing machine or dryer.
46
Page 48

15.2 Storage
Store your monitor and accessories in the original storage box in a
cool and dry place.
NOTE: Never store the chest strap and elastic tension strap
when they are wet and make sure that the contact points of the
chest strap do not contact anything damp, such as sport towel or wet
elastic tension strap. Sweat and moisture can keep the contact
points wet and consequently activate the chest strap, which shortens
battery life.
15.3 Disposal
NOTICE:
Observe the local regulations for material disposal. Dispose
of the device, components and optional accessories according to applicable local regulations. Unlawful disposal may
cause environmental pollution.
Batteries can contain toxins that are harmful to the envi-
ronment. Always dispose of batteries in accordance with
applicable local regulations. Do not dispose of batteries
with normal household waste.
16. DISTORTION AND INTERFERENCE
WARNING:
The signals used by this product may interfere with a pace-
maker or other implanted electronic devices. Consult the
manufacturer of the implant device and your physician before using this product. The frequency used by this device
may cause the above mentioned medical devices to malfunction.
In the HR monitor, a receiver for signals from the chest strap transmitter is integrated. During use, it may arise that the HR monitor receives
signals other than those transmitted by the chest strap.
47
Page 49

How can I recognize interference?
Interference can be recognized in that the values displayed are unrealistic. If your normal heart rate amounts to e.g. 130 bpm and it is suddenly
shown to be 200, then a short-term disturbance is present. Once you
have removed yourself from the vicinity of the source causing the disturbance, the values will automatically resume being accurate. Please note
that distorted values can influence the training result displays and overall
values.
What kind of causes for interference are there?
In some situations, short-range electromagnetic interference can occur. In
order to avoid these, keep well away from these sources.
Nearby power lines
Walking through security gates in airports.
Nearby overhead lines (tram)
Nearby traffic lights, television sets, car motors, bike computers
Nearby exercise equipment
Nearby mobile phones
Interference from other devices for measuring heart rates
The HR monitor as a receiver can react to interfering stray signals such
as other heart rate monitors within a vicinity of one metre. This can result
in incorrect measurements particularly when training in groups. If you e.g.
jog next to one another, it can be beneficial to wear the HR monitor on the
other wrist or to increase the distance to one's training partner.
17. TECHNICAL SPECIFICATIONS
Model PM62
Heart rate monitor
Real time clock 12/24 hour with hour/minute/second
Heart rate measurement 35 to 240 bpm
Accuracy of heart rate +- 1bpm, whichever larger, definition ap-
plies to steady state conditions
48
Page 50

Water Resistant (not actuating keys)
Battery HR monitor
(non-user-replaceable
battery)
98 ft. (30 m) suitable for swimming and
bathing
NOTE: The impermeability of the monitor
to moisture cannot be guaranteed if you
jump into water (high pressure load) and
also if the buttons are pressed in the rain.
3V lithium battery, type CR2032 (Recommendation: SONY batteries).
NOTE: The service life is approx 15
months if the monitor with pulse display is
used for 1 hour daily. In addition, activated
functions such as e.g. acoustic alarm or
activated LED display could reduce the
service life of the battery to up to seven
months. The included batteries are only
for test mode and could be consumed
within one year.
Chest strap
Chest strap size
Water Resistant Waterproof (suitable for swimming)
Transmission frequency 5.3 KHz
Battery chest strap 3V lithium battery, type CR2032
Weight HR monitor (including battery) = 1.7 oz (47 g)
Operating Temperature
Storage and transport
temperature
Subject to technical modifications.
max. 51.2" (max. 130 cm)
Service life: approx 28 months
Chest strap (including battery) = 1.6 oz (46 g)
Elastic tension strap = 0.9 oz (26 g)
14°F to 140° F (-10° C to 60 °C)
-4°F to 158° F (-20° C to 70 °C)
49
Page 51

18. LIST OF ABBREVIATIONS
Abbreviation English
12hr 12-hour AM/PM clock
24hr 24-hour universal clock
AGE Age
Alarm Alarm
AM Ante meridiem: time between midnight and noon
AMR Calories needed for the activity
AVG Average heart rate during training
AVG Run Average heart rate during training
BMR Basal Metabolism
BPM Heart beats per minute
bPM AVG Average heart rate during training, beats per minute
bPM Hrmax Maximal heart rate during training, beats per minute
cm/inch Centimeter/Inch
Day Day
f female
Fat [oz]/[g] Fat in ounces / gram
FitTest Fitness Test
Fri Friday
Gender Gender
Height Height
Hi Time above the training zone
Hi limit Highest training limit
Hold Save Save the recording
Hour Hour
HR Heart Rate
HRmax Max. heart rate during training
in inch
In Time within the training zone
[Kcal] Calorie consumption in Kcal
kg Kilogram
kg/lb Kilogram/pound
50
Page 52

Abbreviation English
lb Pound
lap Lap
LED Light emitting diode
Limits Training limits
Lo Time below the training zone
Lo limit Lowest training limit
m male
MaxHR Maximum Heart Rate (formula: 220 – age)
MEM Memory
MEM Delete Memory Delete
Minute Minute
[min] Minute
Mon Monday
Month Month
PM Post meridiem: time between noon and midnight
Result Result
Run Run time is measured
Sat Saturday
Setting Settings (Menu)
SEt Setting
Start Start
Stop Stop
Sun Sunday
Time Time (Menu)
Thu Thursday
Training Training (Menu)
Tue Tuesday
Units Units
User User
VO
max Maximal Amount of Oxygen
2
Wed Wednesday
Weight Weight
Year Year
51
Page 53

19. TROUBLESHOOTING
Problem/Question Possible Cause / Remedy
No heart rate
signal
Training cannot be
started.
Unusual high or
low values
Obscure display
LCD is black The unit has been exposed too long to direct
Shorten the distance between the watch and the
chest strap.
Adjust the position of the chest strap and the
elastic tension strap. Make sure the chest strap
sensors are wet.
Check the battery in the chest strap and replace it
if necessary.
Move away from other heart rate monitors or
other sources of electrical or radio interference.
Tighten the elastic tension strap. If the chest strap
is too loose, the movement of the contact points
disturbs the detection of the heart rate signal.
Hairy chest may also weaken the contact. Try to
find the best possible position for the contact
points.
Dirty contact points. Clean the chest strap.
See section
"15.1 Cleaning and Care".
Full memory. Delete your saved training sessions
or transmit them to the PC.
Move away from other heart rate monitors or
other sources of electrical or radio interference.
Wear the unit properly according to the manual.
Battery of the chest strap is low/empty.
Low battery. Have the battery changed by a spe-
cialist or Beurer customer service.
Ambient temperature is too low. The display will
recover to its normal status when the temperature
rises.
sunlight or high temperatures. It will recover to its
normal status under the shade.
52
Page 54

Problem/Question Possible Cause / Remedy
No display
Battery is empty. Have the battery changed by a
specialist or Beurer customer service.
The unit is broken. Contact customer service at
1-800-536-0366 or email info@beurer.com.
Mem 0% Memory is full. As a result the training cannot be
started / reset to 00:00. Transfer data to the PC
(see chapter "13 EasyFit Software") or delete the
memory (see section
"10.5 Delete all recordings").
20. WARRANTY
Limited Lifetime Warranty For Original Purchaser
Your Beurer Heart Rate Monitor, Model PM62, excluding the batteries and all accessories, is warranted to be free from defects in materials and workmanship for the life of
the product under normal conditions of intended use and service. This warranty extends only to the original retail purchaser and does not extend to retailers or subsequent owners.
We will, at our option, repair or replace the Beurer Heart Rate Monitor, Model PM62,
without additional charge, for any part or parts covered by these written warranties. No
refunds will be given. Repair or replacement is our only responsibility and your only
remedy under this written warranty. If replacement parts for defective materials are not
available, Beurer reserves the right to make product substitutions in lieu of repair or
replacement.
For warranty service contact our customer service department at 1-800-536-0366 or at
info@beurer.com to provide a description of the problem. If the problem is deemed to
be within the scope of the limited lifetime warranty, you will be asked to mail the product at your costs in its original package with proof of purchase, your name, address
and phone number. If the problem is not deemed to be within the scope of the limited
lifetime warranty, we will provide a quotation for repair respectively replacement and
return shipping fee.
This warranty does not cover damage caused by misuse or abuse; accident; the attachment of unauthorized accessory; alteration to the product; improper installation;
misapplication; lack of reasonable care with respect to the product; unauthorized
repairs or modifications; improper use of power supply; old worn battery; normal wear;
loss of power; dropped product; malfunction or damage of an operating part as a result
of failure to comply with instructions for use or to provide manufacturer’s recommended
maintenance; transit damage; theft; neglect; vandalism; or environmental conditions;
loss of use during the period the product is at a repair facility or otherwise awaiting
parts or repair; or any other conditions whatsoever that are beyond the control of
53
Page 55

Beurer. This warranty is void if the product is ever used in a commercial or business
environment. The maximum liability of Beurer under this warranty is limited to the
purchase price actually paid by the customer for the product covered by the warranty,
as confirmed by proof of purchase, regardless of the amount of any other direct or
indirect damage suffered by the customer.
This warranty is effective only if the product is purchased and operated in the country
in which the product is purchased. A product that requires modifications or adaptation
to enable it to operate in any other country than the country for which it was designed,
manufactured, approved and/or authorized, or repair of products damaged by these
modifications is not covered under this warranty.
THE WARRANTY PROVIDED HEREIN SHALL BE THE SOLE AND EXCLUSIVE
WARRANTY. ANY IMPLIED WARRANTIES, OBLIGATIONS, OR LIABILITES, INCLUDING BUT NOT LIMITED TO THE IMPLIED WARRANTY OF MERCHANTABILITY AND FITNESS FOR A PARTICULAR PURPOSE, ARE LIMITED IN DURATION
TO THE DURATION OF THIS APPLICABLE WRITTEN WARRANTY. Some states do
not allow limitations on how long an implied warranty lasts, so the above limitations
may not apply to you.
IN NO EVENT SHALL BEURER BE LIABLE FOR ANY SPECIAL, INCIDENTAL,
INDIRECT OR CONSEQUENTIAL DAMAGES FOR BREACH OF THIS OR ANY
OTHER WARRANTY, EXPRESS, IMPLIED OR ANY OTHER THEORY OF LIABILITY, WHATSOEVER. Some states do not allow the exclusion or limitation of special,
incidental, or consequential damages, so the above limitation may not apply to you.
Beurer does not authorize anyone, including, but not limited to, retailers, the subse-
quent consumer purchaser of the product from a retailer or remote purchaser, to obligate Beurer in any way beyond the terms set forth herein.
This warranty does not extend to the purchase of opened, used, repaired, repackaged
and/or resealed products, including but not limited to sale of such products on Internet
auction sites and/or products by surplus or bulk resellers. Any and all warranties or
guarantees shall immediately cease and terminate in connection with any products or
parts thereof which are repaired, replaced, altered, or modified, without the prior explicitly written consent of Beurer.
This warranty gives you specific legal rights, and you may also have other rights which
may vary from state to state.
For more information regarding our product line in the USA,
Beurer North America LP, Hallandale Beach, FL 33009, www.beurer.com
Questions or comments? Call toll-free 1-800-536-0366 or contact info@beurer.com
Made in China.
please visit: www.beurer.com
54
Page 56

1. NOTAS IMPORTANTES DE SEGURIDAD
Signos y símbolos
Los siguientes símbolos aparecen en la sección Seguridad (páginas
55, 56, 57, 58, 59, 60) y en este manual en las páginas 65, 66, 69, 70,
77, 82, 88, 91, 95, 98, 99, 100, 101, 102.
LEA CON ATENCIÓN TODO ESTE MANUAL, INCLUYENDO LA SECCIÓN DE SEGURIDAD Y TODAS LAS INSTRUCCIONES Y ADVERTENCIAS ANTES DE USAR ESTE PRODUCTO. SIGA TODAS LAS
INSTRUCCIONES Y ADVERTENCIAS DE SEGURIDAD PARA EVITAR
SITUACIONES PELIGROSAS Y PARA USAR CORRECTAMENTE
ESTE PRODUCTO.
ADVERTENCIA indica una situación peligrosa
ADVERTENCIA
PRECAUCIÓN
AVISO
que, si no se evita, podría causar la muerte o
una lesión seria.
PRECAUCIÓN indica una situación peligrosa
que, si no se evita, podría causar una lesión
menor o moderada.
AVISO se refiere a prácticas que no están
relacionadas con lesiones, como es el caso de
daños al producto o daños materiales.
ADVERTENCIA:
Este producto es un dispositivo complementario; no es un
dispositivo médico. Es un instrumento de entrenamiento
que ha sido desarrollado para la medición y representación
del ritmo cardiaco humano y no deberá reemplazar a ningún
dispositivo médico profesional que se use para medir el
ritmo cardiaco. Las lecturas del ritmo cardiaco son solo para referencia, y no se acepta ninguna responsabilidad por
las consecuencias de cualquier lectura errónea.
55
Page 57

Las señales que usa este producto pueden interferir con un
marcapasos u otros dispositivos electrónicos implantados.
Consulte al fabricante del dispositivo implantado y a su
médico antes de usar este producto. La frecuencia que usa
este dispositivo puede causar mal funcionamiento de los
dispositivos médicos antes mencionados.
Consulte a su médico o proveedor de servicios médicos pa-
ra que le ayude a determinar su ritmo cardiaco máximo, límites inferiores y superiores, la frecuencia y duración del
ejercicio de entrenamiento adecuado para usted y sus objetivos específicos. Los límites, esquemas de entrenamiento,
objetivos y otros similares que no vayan de acuerdo con su
estado de salud representan un riesgo para usted.
Las personas que sufren enfermedades cardiacas
y circulatorias deberán usar este monitor del ritmo cardiaco
solo después de haber consultado a su médico.
Consulte siempre a su médico o proveedor de servicios
médicos antes de empezar o modificar un programa de reducción de peso o de ejercicio.
Consulte siempre a un médico para determinar qué es lo
más adecuado para usted.
El resultado de la prueba de forma física es solamente para
referencia. Solamente un médico puede determinar su nivel
de forma física.
Este producto no está diseñado para detectar arritmia
o ritmos irregulares, y los interpretará como ruido
o interferencia. Solo un médico puede diagnosticar la arritmia.
Al practicar deportes de alto riesgo, tenga en cuenta que el
uso del monitor del ritmo cardiaco puede representar una
causa adicional de lesiones.
Es importante que tome en cuenta las respuestas de su
cuerpo durante el entrenamiento. Si siente dolor inesperado
o fatiga excesiva al entrenar, deje de hacer ejercicio
56
Page 58

o continúe a una intensidad menor. En caso de emergencia,
llame inmediatamente al 911.
Mantenga esta unidad fuera del alcance de los niños
e infantes. Este producto contiene piezas pequeñas que
pueden representar riesgo de asfixia para los niños. NUNCA
DEJE A NIÑOS QUE REQUIERAN SUPERVISIÓN ESTRECHA
SOLOS CON ESTE DISPOSITIVO. Si ocurre ingestión de alguna pieza, llame de inmediato a un médico. En caso de
emergencia, llame al 911 de inmediato.
El software EasyFit es una herramienta motivacional que le
ayuda a monitorear sus actividades físicas. Nunca lo use
como base para tomar una decisión en relación a su salud,
medicación, programa de reducción de peso o de ejercicios
u otros similares. Consulte siempre a un médico para determinar qué es lo más adecuado para usted.
Este producto no es un juguete. Manténgalos lejos del al-
cance de los niños e infantes.
Los materiales de embalaje son un riesgo mortal para los
niños y pueden causar asfixia. Retire de inmediato todos
los materiales de embalaje y manténgalos alejados de los
niños en todo momento.
La ingestión de baterías o líquido de baterías puede ser
sumamente peligrosa. Mantenga la batería y el dispositivo
fuera del alcance de los niños y las personas con discapacidad. Si alguien traga una batería o el fluido de la batería,
llame inmediatamente al 911.
Las baterías no deben cargarse ni reactivarse por ningún
otro medio. Las baterías pueden explotar.
Las baterías no deben abrirse, arrojarse al fuego ni conec-
tarse en corto circuito. Las baterías pueden explotar.
En caso de que el líquido de la batería se derrame y haga
contacto con sus ojos o piel, enjuague de inmediato con
agua limpia en abundancia. Llame de inmediato al 911.
El cable de interfaz de computadora, la correa para el pecho
y la correa de tensión elástica representan riesgo de es-
57
Page 59

trangulación. Mantenga este producto lejos del alcance de
los niños y de quienes necesiten supervisión, tal como las
personas con trastornos mentales. NUNCA DEJE A LOS NIÑOS QUE REQUIERAN SUPERVISIÓN ESTRECHA SOLOS
CON ESTE DISPOSITIVO.
PRECAUCIÓN:
Use la unidad solamente en personas y para el propósito
para el que fue creada como se describe en las instrucciones de operación. No la use para ningún otro propósito. Todo uso indebido puede ser peligroso. El fabricante no se
hace responsable por daños que cause el uso indebido o
incorrecto.
Este dispositivo es solo para uso personal. No use este
producto con fines comerciales o profesionales.
Si una batería se derrama, no toque el líquido. Evite el con-
tacto con la piel (use guantes protectores) y limpie el compartimiento de la batería con una tela seca.
No desarme este dispositivo. Usted podría sufrir lesiones.
No vea la pantalla cuando vaya corriendo para evitar acci-
dentes por tropiezo.
No use la muñequera demasiado apretada. Esto podría cau-
sarle lesiones.
No use teléfonos celulares, hornos de microondas ni otros
dispositivos que generan campos magnéticos o electromagnéticos intensos cerca de esta unidad. Esto puede causar mal funcionamiento de la unidad.
No use ninguna parte o accesorio que no sean los que re-
comienda explícitamente “Beurer North America” para este
producto. Las partes y accesorios no aprobados para usarse con este dispositivo pueden afectar su salud y al producto.
58
Page 60

AVISO:
Nunca trate de reparar, abrir o desarmar esta unidad usted
mismo. Podría dañar la unidad e impedir su funcionamiento
correcto. Si necesita que reparen su unidad, llame al servicio a clientes al teléfono 1-800-536-0366. Antes de presentar
cualquier queja, primero revise la batería y cámbiela si es
necesario.
Los cambios o modificaciones a la unidad anularán la ga-
rantía del usuario.
El usuario no puede reemplazar la batería, por lo cual solo
un especialista o el servicio de servicio al cliente de Beurer
puede reemplazarla. El reemplazo incorrecto dañará la unidad y anulará la garantía del usuario.
Proteja esta unidad de golpes fuertes (como dejarla caer al
piso), humedad, suciedad, polvo, químicos, temperaturas
demasiado altas o bajas, cambios drásticos de temperatura,
exposición a la luz solar directa y a fuentes de calor demasiado cercanas (como estufas y radiadores de calor). Esto
puede dañar el dispositivo e impedir su funcionamiento correcto. Este dispositivo debe guardarse en las condiciones
ambientales especificadas. Consulte el capítulo "15 Cuidado
y mantenimiento" y el capítulo "17 Especificaciones técnicas" para más detalles.
No use solventes, limpiadores abrasivos, detergentes u
otros químicos dañinos para limpiar el dispositivo y sus accesorios. Limpie el monitor del ritmo cardiaco con una tela
suave y seca.
No salte hacia el agua (carga de alta presión) ni presione los
botones bajo la lluvia o estando en el agua. Esto podría
afectar la impermeabilidad del monitor a la humedad y por
lo tanto dañar la unidad.
No lave la correa para el pecho ni el monitor en una lavado-
ra de ropa, máquina lavaplatos o secadora de ropa.
No remoje, seque por centrifugación, planche ni blanquee la
correa de tensión elástica. No use detergente con blan-
59
Page 61

queador ni suavizante de telas. Esto podría dañar la correa
de tensión elástica.
Evite el contacto con bloqueadores solares o productos si-
milares, ya que pueden dañar los grabados y las partes de
plástico.
No tuerza, doble ni estire excesivamente la correa para el
pecho. Esto podría dañar la correa para el pecho, sus puntos conductores y alterar sus funciones.
No use objetos punzantes para quitar la batería de la correa
para el pecho.
Use siempre el tamaño y tipo de batería indicada. Si usa
otras baterías pueda dañar el dispositivo.
Nunca use baterías recargables. Esto puede dañar la uni-
dad.
Las baterías que derraman pueden dañar el dispositivo. Si
no va a usar la unidad durante periodos prolongados, retire
la batería de la correa para el pecho y solicite a un especialista que retire la batería del monitor antes de guardar el dispositivo.
No permita que caiga ni introduzca ningún objeto por nin-
guna abertura. Esto puede dañar la unidad.
No presione los botones con fuerza excesiva o con objetos
punzantes.
Aplique las normas locales para desecho de materiales.
Deseche el dispositivo, componentes y accesorios opcionales de acuerdo con las regulaciones del lugar donde vive. El
desecho indebido puede causar contaminación ambiental.
Las baterías pueden contener toxinas nocivas para el medio
ambiente. Deseche siempre las baterías de acuerdo con las
normas locales correspondientes. No deseche las baterías
junto con la basura doméstica normal.
60
Page 62

CONTENIDO
1. Notas importantes de seguridad ..............................................................55
ADVERTENCIA:.................................................................................. 55
PRECAUCIÓN:.................................................................................... 58
AVISO:........................................................................................................ 59
2. Contenido del paquete............................................................................... 64
3. Informaciones generales sobre el entrenamiento ..................................65
4. Funciones del pulsómetro de frecuencia cardíaca................................. 67
5. Transmisión de señales y principios de medición de los aparatos...... 68
5.1 Gama de recepción del pulsómetro ....................................................... 68
5.2 Sensores de la correa pectoral .............................................................. 68
5.3 Rango de operación............................................................................... 68
6. Puesta en operación.................................................................................. 69
6.1 Activar el pulsómetro desde el modo de transporte............................... 69
6.2 Activar el pulsómetro desde el modo de ahorro de energía .................. 69
6.3 Colocación del pulsómetro..................................................................... 69
6.4 Colocación de la correa pectoral............................................................ 69
6.5 Resistencia al agua................................................................................ 70
7. Manejo general del pulsómetro ................................................................ 71
7.1 Botones del pulsómetro ......................................................................... 71
7.2 Pantalla .................................................................................................. 72
7.3 Menús..................................................................................................... 73
7.4 Modo de ahorro de energía.................................................................... 73
7.5 Indicación principal................................................................................. 73
7.6 Visión general de los menús .................................................................. 74
8. Ajustes básicos.......................................................................................... 74
8.1 Vista general .......................................................................................... 74
8.2 Ajustar unidades .................................................................................... 75
8.3 Introducir los datos personales .............................................................. 75
8.4 Ajustar la zona de entrenamiento .......................................................... 77
9. Ajuste de la hora ........................................................................................ 79
9.1 Vista general .......................................................................................... 79
9.2 Ajustar la hora y fecha ........................................................................... 79
9.3 Ajustar el despertador ............................................................................ 81
10. Registro del entrenamiento....................................................................... 82
10.1 Vista general ........................................................................................ 82
10.2 Cronometrar tiempos de marcha ......................................................... 84
61
Page 63

10.3 Registrar rondas ................................................................................... 84
10.4 Finalizar y almacenar el registro........................................................... 85
10.5 Borrar todos los registros .....................................................................86
10.6 Evaluar avisos de almacenamiento...................................................... 87
11. Resultados ..................................................................................................88
11.1 Vista general......................................................................................... 88
11.2 Visualizar datos de entrenamiento ....................................................... 89
11.3 Resultados de las rondas.....................................................................90
12. Test de forma física.................................................................................... 91
12.1 Vista general......................................................................................... 91
12.2 Llevar a cabo un test de forma física.................................................... 92
12.3 Visualizar valores de forma física......................................................... 94
13. Software EasyFit......................................................................................... 95
13.1 Vista general......................................................................................... 95
13.2 Instalación del software........................................................................96
13.3 Transferencia de la información ........................................................... 96
13.4 Requisitos del sistema.......................................................................... 97
13.5 Instrucciones del EasyFit...................................................................... 97
14. Baterías .......................................................................................................98
14.1. Monitor de ritmo cardiaco....................................................................99
14.2. Correa para el pecho........................................................................... 99
15. Cuidado y mantenimiento........................................................................ 100
15.1 Limpieza y cuidado............................................................................. 101
15.2 Almacenamiento................................................................................. 102
15.3 Desecho .............................................................................................102
16. Averías e interferencias ........................................................................... 102
17. Especificaciones técnicas ....................................................................... 104
18. Lista de abreviaturas................................................................................ 105
19. Solución de problemas ............................................................................ 107
20. Garantía ..................................................................................................... 109
62
Page 64

CONSERVE ESTAS INSTRUCCIONES PARA REFERENCIA FUTURA
Si el manual de instrucciones está dañado o si ya no lo tiene, llame
a servicio al cliente de Beurer. Vea en la garantía la información de
contacto de servicio.
Estimado cliente:
Gracias por elegir este producto Beurer. Nuestro nombre significa
productos de alta calidad, minuciosamente probados para uso en las
áreas de medición de calor, peso, presión sanguínea, temperatura
corporal, pulso, terapia moderada, masajes y aire.
Este monitor del ritmo cardiaco es un excelente instrumento que puede ayudarle a aumentar el beneficio de su programa de ejercicio. Le
ayuda a mejorar la eficacia de su programa de ejercicio al monitorear
y cuantificar sus resultados en cada paso del programa.
Lea estas instrucciones completamente y con atención antes de usar
este producto y consérvelas para referencia futura. Asegúrese de
tenerlas disponibles para otros usuarios y observe la información que
contienen.
Saludos cordiales,
Su equipo de Beurer
63
Page 65

2. CONTENIDO DEL PAQUETE
Pulsómetro de frecuencia cardíaca con
pulsera
Correa pectoral
Correa tensora elástica (ajustable)
Soporte para bicicleta
Caja de almacenamiento
Easy Fit Software y cable USB para
computadora
Además:
Instructivo de uso
Guía de referencia rápida (en inglés)
NOTA: Antes de usarlo, debe asegurarse de que el monitor del ritmo
cardiaco no presente ningún daño. Si tiene dudas, no use el monitor
del ritmo cardiaco y póngase en contacto con el servicio al cliente de
Beurer. Vea en la garantía la información de contacto de servicio.
64
Page 66

3. INFORMACIONES GENERALES SOBRE EL ENTRENAMIENTO
ADVERTENCIA:
Este producto es un dispositivo complementario; no es un
dispositivo médico. Es un instrumento de entrenamiento
que ha sido desarrollado para la medición y representación
del ritmo cardiaco humano y no deberá reemplazar a ningún
dispositivo médico profesional que se use para medir el ritmo cardiaco. Las lecturas del ritmo cardiaco son solo para
referencia, y no se acepta ninguna responsabilidad por las
consecuencias de cualquier lectura errónea.
Las señales que usa este producto pueden interferir con un
marcapasos u otros dispositivos electrónicos implantados.
Consulte al fabricante del dispositivo implantado y a su médico antes de usar este producto. La frecuencia que usa este
dispositivo puede causar mal funcionamiento de los dispositivos médicos antes mencionados.
Consulte a su médico o proveedor de servicios médicos pa-
ra que le ayude a determinar su ritmo cardiaco máximo, límites inferiores y superiores, la frecuencia y duración del ejercicio de entrenamiento adecuado para usted y sus objetivos
específicos. Los límites, esquemas de entrenamiento, objetivos y otros similares que no vayan de acuerdo con su estado de salud representan un riesgo para usted.
Las personas que sufren enfermedades cardiacas
y circulatorias deberán usar este monitor del ritmo cardiaco
sólo después de haber consultado a su médico.
Consulte siempre a su médico o proveedor de servicios mé-
dicos antes de empezar o modificar un programa de reducción de peso o de ejercicio.
Consulte siempre a un médico para determinar qué es lo
más adecuado para usted.
Este producto no está diseñado para detectar arritmia
o ritmos irregulares, y los interpretará como ruido
o interferencia. Solo un médico puede diagnosticar la arritmia.
65
Page 67

Al practicar deportes de alto riesgo, tenga en cuenta que el
uso del monitor del ritmo cardiaco puede representar una
causa adicional de lesiones.
Este pulsómetro se usa para registrar el pulso humano. Gracias a sus
diferentes posibilidades de ajuste, puede utilizarlo para apoyar su programa
individual de entrenamiento y, al mismo tiempo, controlar el pulso. Recuerde controlar su pulso durante el entrenamiento pues, por una parte, podrá
proteger su corazón contra sobrecargas (lo cual es aconsejable) y, por otra
parte, podrá obtener un efecto óptimo con su entrenamiento. La tabla le
proporciona algunas indicaciones sobre cómo seleccionar su zona de entrenamiento. La frecuencia cardíaca máxima se reduce a medida que
avanza la edad. Por lo tanto, los datos relativos al pulso del entrenamiento
dependerán siempre de la frecuencia cardíaca máxima. La frecuencia
cardíaca máxima se calcula a partir de la siguiente fórmula:
Por ejemplo, en el caso de una persona de 40 años, la frecuencia cardíaca
220 – Edad = frecuencia cardíaca máxima
máxima sería la siguiente: 220 - 40 = 180
Esta regla general ofrece solo una indicación; para determinar con exactitud
el ritmo cardiaco máximo, consulte a su médico o entrenador.
Zona de sa-
Porcentaje de
frecuencia
cardíaca máxima
Objetivo Ejercicio
Posibles efectos Fortaleci-
¿Apropiado para
quién?
Entrenamiento Entrenamien-
lud cardíaca
50-60% 60-70% 70-80% 80-90% 90-100%
ligero
miento del
sistema
cardiovascular
Ideal para
principiantes
to regenerador
Zona de combustión de
grasas
Manejo del peso Desarrollo de
La mayor parte de
las calorías que
quema el cuerpo
está formada por
grasas. Entrena el
sistema cardiovascular, mejora
la forma física.
Control y reducción del peso
Entrenamiento
Zona de
buena forma
física
la base aerobic
Mejora la
respiración y la
circulación.
Ideal para
aumentar la
resistencia
básica.
Deportistas
aficionados
para una
buena forma
física
Sector de
resistencia de
fuerza
Acondicionamiento óptimo
Mejora la
constancia en
el ritmo y
aumenta la
velocidad.
Deportistas
aficionados,
deportistas de
competición
Entrenamiento
de resistencia
de fuerza
Entrenamiento
anaerobio
Entrenamiento
atlético de élite
Sobrecarga la musculatura de forma
selectiva. Los deportistas aficionados pueden correr un gran
riesgo si padecen
una enfermedad: Peligro para el corazón
Sólo deportistas de
competición
Entrenamiento del
área de desarrollo
66
Page 68

Para ajustar su zona de entrenamiento individual, consulte el capítulo "8 Ajustes básicos",
sección "8.4 Ajustar la zona de entrenamien-
to". Para consultar la forma en que el pulsómetro ajusta automáticamente los límites concretos de una propuesta de entrenamiento
en función del test de forma física, consulte el capítulo "12 Test de
forma física".
4. FUNCIONES DEL PULSÓMETRO DE FRECUENCIA CARDÍACA
Para información del producto o servicio al cliente, llame gratis al
1-800-536-0366 o envíe un correo electrónico a info@beurer.com.
Funciones de pulso
Medición de la frecuencia cardíaca
Transmisión: analógica
Zona de entrenamiento individual
ajustable
Alarma acústica y visual, así como
cambio de color del diodo luminoso
al abandonar la zona de entrenamiento
Frecuencia cardíaca media (AVG)
Frecuencia cardíaca máxima de
entrenamiento
Consumo de calorías en Kcal (jog-
ging básico)
Combustión de grasas en [oz] / [g]
Ajustes
Sexo
Peso
Unidad de peso [kg] / [lb]
Estatura
Unidad de estatura [cm] / [pulgadas]
Edad
Frecuencia cardíaca máxima
Funciones de tiempo
Hora del día en [12h] / [24h]
Calendario (hasta el año
2099) y día de la semana
Fecha
Alarma / Despertador
Cronómetro
50 tiempos de ronda, pueden
seleccionarse al mismo tiempo o por separado. Indicación
de tiempo de ronda y de la
frecuencia cardíaca media
Test de forma física
Índice de forma física con
interpretación
Volumen respiratorio máximo
de oxígeno (VO
Metabolismo basal (BMR)
Metabolismo activo (AMR)
Frecuencia cardíaca máxima
máx)
2
calculada
Propuesta de zona de entre-
namiento
67
Page 69

5. TRANSMISIÓN DE SEÑALES Y PRINCIPIOS DE MEDICIÓN DE
LOS APARATOS
5.1 Gama de recepción del pulsómetro
Su pulsómetro recibe las señales de pulso del transmisor de la correa
pectoral en un alcance de 28 pulgadas (70 centímetros).
5.2 Sensores de la correa pectoral
La correa pectoral completa consta de dos partes: la correa pectoral
propiamente dicha y la cinta tensora elástica. El lado interior de la
correa pectoral (el que está en contacto con el cuerpo) dispone en la
parte central de dos sensores rectangulares ranurados. Ambos sensores determinan su ritmo cardiaco y transmiten éste al monitor del
ritmo cardiaco.
NOTA: La correa para el pecho es compatible con otros dispositivos
análogos que usan la misma frecuencia de transmisión, por ejemplo
los ergómetros. Consulte el capítulo "17 Especificaciones técnicas"
para más detalles.
5.3 Rango de operación
La correa para el pecho y el monitor del ritmo cardiaco deben usarse o colocarse a menos de 28 pulgadas (70 centímetros) uno del
otro. En caso de exceder esta longitud, el monitor muestra un ritmo
cardiaco de “0”.
68
Page 70

6. PUESTA EN OPERACIÓN
6.1 Activar el pulsómetro desde el modo de transporte
Durante el transporte, la pantalla no visualiza nada. Vd. puede abandonar el modo de transporte presionando el botón
botón
START/STOP
.
6.2 Activar el pulsómetro desde el modo de ahorro de energía
Puede activar el pulsómetro accionando cualquiera de los botones. Si
el pulsómetro no recibe señal alguna durante unos 5 minutos, éste
pasará al modo de ahorro de energía. En este caso, sólo mostrará la
hora actual. Para volver a activar el pulsómetro, presione cualquier
botón.
6.3 Colocación del pulsómetro
PRECAUCIÓN:
No use la muñequera demasiado apretada. Usted podría su-
frir lesiones.
El pulsómetro puede llevarse como un reloj pulsera. Para montar el
pulsómetro en el manillar de una bicicleta, coloque el soporte previsto
en dicho manillar. A continuación, sujete firmemente el pulsómetro en
el soporte, de modo que no pueda resbalarse durante el manejo de la
bicicleta.
6.4 Colocación de la correa pectoral
Sujete la correa pectoral a la correa tenso-
ra elástica. Adapte la longitud de la cinta
tensora elástica de forma que ésta quede
ajustada sin estar demasiado suelta o demasiado apretada. Coloque la correa alrededor del pecho de modo que el logotipo
quede hacia el exterior y en su posición correcta directamente sobre el esternón. Si
69
MENU
y luego el
Page 71

se trata de un hombre, la correa pectoral debe quedar colocada
directamente bajo los músculos pectorales; si se trata de una
mujer, debe quedar colocada directamente bajo los pechos.
Como es imposible establecer inmediatamente un contacto ópti-
mo entre la piel y los sensores del pulso, puede que pase algún
tiempo hasta que el pulso se mida y visualice. En caso necesario,
modifique la posición del transmisor hasta establecer un contacto
óptimo. En la mayoría de los casos, el sudor producido bajo la correa pectoral es suficiente para establecer un buen contacto. No
obstante, también puede humedecer los puntos de contacto del
lado interior de dicha correa. Para esto, separe la correa para el
pecho ligeramente de la piel y humedezca los dos sensores con
un poco de saliva, agua o gel conductor.
El contacto entre la piel y la correa pectoral no debe interrumpirse,
ni siquiera durante movimientos intensos del tórax, como son los
de respiración profunda. Una cantidad excesiva de vello en el pecho puede dificultar, o incluso impedir, el contacto con el sensor.
Colóquese la correa pectoral unos pocos minutos antes de la
partida para precalentarlo a la temperatura del cuerpo y establecer así un contacto óptimo.
6.5 Resistencia al agua
AVISO:
No salte hacia el agua (carga de alta presión) ni presione los
botones bajo la lluvia o mientras está en el agua. Esto podría afectar la impermeabilidad del monitor a la humedad
y por lo tanto dañar la unidad.
El PM62 es adecuado para bañarse y nadar.
Resistencia al agua = 98 pies (30 m).
NOTA: La consistencia del agua del mar o los productos químicos
que se usan en las piscinas pueden afectar la recepción del monitor
del ritmo cardiaco.
70
Page 72

7. MANEJO GENERAL DEL PULSÓMETRO
7.1 Botones del pulsómetro
START/STOP
1
OPTION/SET
2
MENU
3
4 /
Inicia y detiene funciones y ajusta valores. Si se mantiene pulsado, acelera la introducción de datos.
Cambia entre las diferentes funciones dentro de un menú y confirma los ajustes.
Cambia entre los diversos menús.
Si se pulsa brevemente, la pantalla se ilumina durante 5
segundos.
Si se pulsa durante más tiempo, se activa/desactiva la
alarma acústica cuando se abandona la zona de entrenamiento.
NOTA: Si no se presiona ningún botón, el monitor del ritmo cardiaco
sale automáticamente del modo de configuración después de
60 segundos y regresa a la pantalla principal.
71
Page 73

7.2 Pantalla
1 Línea superior 2 Línea central 3 Línea inferior
4
Símbolos
Despertador activado.
La frecuencia cardíaca se está recibiendo (parpadea).
Se ha alcanzado un nivel superior a la zona de entrenamiento.
Se ha alcanzado un nivel inferior a la zona de entrenamiento.
La alarma acústica de abandono de la zona de entrenamiento está activada.
La función de sonido del teclado está activa.
5
Diodo luminoso: Parpadea en la frecuencia cardíaca. Cambio
de color verde a rojo cuando se abandona la zona de entrenamiento.
El índice de abreviaturas que se incluye al final de estas instrucciones de uso contiene una explicación de las abreviaturas usadas en
la pantalla.
72
Page 74

7.3 Menús
Para acceder a los diversos menús use el botón
Time
MENU
.
FitTest
MENU
Setting
LAP
Result
Training
Result
7.4 Modo de ahorro de energía
Si el pulsómetro no recibe señal
alguna durante unos 5 minutos,
éste pasará al modo de ahorro
de energía. En este caso, sólo
mostrará la hora actual. Para
volver a activar el pulsómetro,
24 horas formato 12 horas formato
presione cualquier botón.
7.5 Indicación principal
Cada vez que se cambia de menú, en primer
lugar se muestra el nombre del menú y, después,
el pulsómetro pasa automáticamente a la indicación principal del menú activo.
Desde aquí debe seleccionar un submenú, o bien
iniciar funciones directamente.
Menú
Automáticamente
Indicación
principal
73
Page 75

7.6 Visión general de los menús
Menú Significado Véase descripción en el capítulo…
Time
Training
Result
Lap
Result
Setting
FitTest
Hora
Entrenamiento
Resultado
Resultado de
las rondas
Ajustes
Test de forma
física
9 Ajuste de la hora
10 Registro de entrenamiento
11 Resultados
11.3 Resultados de las rondas
8 Ajustes básicos
12 Test de forma física
8. AJUSTES BÁSICOS
8.1 Vista general
El menú Setting permite realizar las siguientes
actividades:
Cambie las unidades de medida para estatura
(cm/inch) y peso (kg/lb).
Introducir sus datos personales (user). A
partir de estos datos, el pulsómetro calculará
su consumo de calorías y su combustión de
grasa durante el entrenamiento.
Ajustar su zona de entrenamiento (limits). En
el capítulo "3 Informaciones generales sobre
el entrenamiento" encontrará explicaciones
sobre cómo ajustar las zonas de entrenamiento. Su pulsómetro emite una alarma
acústica y visual durante su entrenamiento si
se abandona dicha zona.
74
Page 76

Una vez que esté en el menú
Setting, el monitor
de ritmo cardiaco cambia automáticamente a la
pantalla principal. Ésta muestra
User.
8.2 Ajustar unidades
Cambie al menú Setting al presionar el botón
MENU
. Espere hasta que el monitor cambie
automáticamente a la pantalla principal.
Aparece
Presione el botón
Presione el botón
Presione el botón
unidad de peso parpadea.
Presione el botón
unidades. Confirme con el botón
cm/inch. La unidad de medida para estatura
parpadea.
Presione el botón
unidades.Confirme con el botón
Aparece
User.
Units.
OPTION/SET
OPTION/SET
START/STOP
START/STOP
START/STOP
. Aparece Limits.
. Aparece Units.
. Aparece kg/lb. La
para cambiar de
OPTION/SET
.
para cambiar de
OPTION/SET
.
8.3 Introducir los datos personales
Cambie al menú Setting al presionar el botón
MENU
. Espere hasta que el monitor cambie
automáticamente a la pantalla principal. Ésta
muestra
User.
75
Page 77

Presione el botón
START/STOP
Presione el botón
sexo. Seleccione
F, si es usted mujer. Confirme con el botón
cione
OPTION/SET
.
M, si es usted hombre. Selec-
. Aparece Gender.
START/STOP
para establecer su
Aparece AGE.
Ajuste su edad (10-99) con el botón
Confirme con el botón
OPTION/SET
.
START/STOP
Aparece MaxHR. El pulsómetro calcula la frecuencia cardíaca máxima automáticamente
según la fórmula siguiente: 220–edad=MaxHR
Observe que el monitor del ritmo cardiaco también determina el ritmo cardiaco máximo después de cada test de forma física y lo establece
como un valor sugerido.
Usted puede sobrescribir el valor calculado al
presionar el botón
START/STOP
a 239). Confirme con el botón
Aparece Weight. Presione el botón
(rango de ajuste: 65
OPTION/SET
.
START/STOP
para seleccionar su peso. Rango de ajuste: 44
a 499 lb (20 a 226 kg).
Confirme con el botón
OPTION/SET
Aparece Height. Presione el botón
.
START/STOP
para ajustar su estatura. Rango de ajuste:
2'6'' a 7'6'' (80 a 227 cm).Confirme con el botón
OPTION/SET
. Aparece User.
.
76
Page 78

8.4 Ajustar la zona de entrenamiento
ADVERTENCIA:
Consulte a su médico o proveedor de servicios médicos pa-
ra que le ayude a determinar su ritmo cardiaco máximo, límites inferiores y superiores, la frecuencia y duración del ejercicio de entrenamiento adecuado para usted y sus objetivos
específicos. Los límites, esquemas de entrenamiento, objetivos y otros similares que no vayan de acuerdo con su estado de salud representan un riesgo para usted.
Para ajustar los límites superior e inferior individuales para su pulso,
proceda tal como se describe a continuación.
NOTA: Ambos límites se establecen automáticamente como una
sugerencia de zona de entrenamiento después de cada test de forma
física y los datos antiguos se sobrescriben consecuentemente. El
límite inferior de la propuesta de zona de entrenamiento es el 65% de
la frecuencia cardíaca máxima y el límite superior, el 85%.
Usted puede calcular los límites de ritmo cardiaco superior e inferior
al multiplicar su ritmo cardiaco máximo por los porcentajes para la
zona de entrenamiento seleccionada (consulte el capítulo "3 Informaciones generales sobre el entrenamiento"). Tenga en cuenta que
el límite inferior debe ser menor que el límite superior.
Por ejemplo, un hombre de 50 años entrenando para Manejo de
peso (zona de quema de grasa).
Su límite inferior de ritmo cardiaco: (220-50)*65% = 110.5 Æ 111
Su límite superior de ritmo cardiaco: (220-50)*85% = 144.5 Æ 145
NOTA: Para un entrenamiento seguro y eficiente, la determinación
de la zona de entrenamiento individual es un paso crítico.
77
Page 79

No se precipite; inicie lentamente. Aumente gradualmente su zona
de entrenamiento a medida que adquiera una mejor forma física.
Seleccione la zona de entrenamiento que se adapte mejor a sus
necesidades.
Cambie al menú
MENU
. Espere hasta que el monitor cambie
Setting al presionar el botón
automáticamente a la pantalla principal. Ésta
muestra
User.
Presione el botón
Presione el botón
OPTION/SET
START/STOP
. Aparece Limits.
. Se visualiza On LED.
El LED se activa (ON) o apaga (OFF) al presionar
el botón
LED (ON)
START/STOP
.
El LED se enciende de color rojo cuando el ritmo
cardiaco está fuera de la zona de entrenamiento.
El LED se enciende de color verde cuando el
ritmo cardiaco está dentro de la zona de entrenamiento.
LED (OFF)
El LED está desactivado. Ninguna luz parpadeará.
Confirme con el botón
OPTION/SET
.
Aparece Lo limit. Establezca el límite inferior
para su zona de entrenamiento al presionar el
botón
START/STOP
.
Rango de ajuste: 40-238
Confirme con el botón
OPTION/SET
.
78
Page 80

Aparece
Hi limit.
Establezca el límite superior para su zona de
entrenamiento al presionar el botón
START/STOP
.
Rango de ajuste: 41-239
Confirme con el botón
a la pantalla
Limits.
OPTION/SET
y para regresar
9. AJUSTE DE LA HORA
9.1 Vista general
El menú Time permite realizar las siguientes
actividades:
Ajustar la hora y la fecha.
Ajustar el despertador.
Tan pronto como accede al menú Time, el
pulsómetro pasa automáticamente a la indicación principal, que muestra el día de la semana
y la fecha.
9.2 Ajustar la hora y fecha
Cambie al menú Time al presionar el botón
MENU
.
Formato de hora
Presione el botón
START/STOP
rante aproximadamente 5 segundos. Aparece
TimeFORM
24 hr o 12 hr
.
du-
Ù
79
Page 81

Presione el botón
START/STOP
para seleccionar
12 horas AM/PM o el reloj universal de
24 horas. Confirme con el botón
OPTION/SET
.
NOTE:
Si selecciona el formato de hora de 24 h, la
fecha se mostrará como "día de la semana
día.mes".
Si selecciona el formato de hora de 12 h, la
fecha se mostrará como "día de la semana
mes.día".
Aparece Hour. El valor de la hora parpadea.
Ajuste la hora con el botón
Confirme con el botón
OPTION/SET
START/STOP
.
.
Aparece Minute. El valor de los minutos parpadea. Presione el botón
START/STOP
para ajustar los
minutos (0-59).
Confirme con el botón
OPTION/SET
.
Aparece Year. El valor del año parpadea.
Presione el botón
START/STOP
para ajustar el año.
El calendario llega hasta 2099.
Confirme con el botón
OPTION/SET
.
Aparece Month. El valor del mes parpadea.
Presione el botón
START/STOP
(1-12). Confirme con el botón
para ajustar el mes
OPTION/SET
.
80
Page 82

Aparece
ne el botón
Confirme con el botón
Day. El valor del día parpadea. Presio-
START/STOP
para ajustar el día (1-31).
OPTION/SET
.
La pantalla muestra la hora y fecha actuales.
9.3 Ajustar el despertador
La pantalla muestra la hora y fecha actuales. Para desconectar el
despertador, pulse cualquiera de los botones.
Cambie el menú
MENU
.
Presione el botón
Time al presionar el botón
OPTION/SET
.
Aparece Alarm.
OPTION/SET
START/STOP
START/STOP
.
durante aproxima-
On Alarm.
para apagar (Off)
Presione el botón
damente 5 segundos. Aparece
Presione el botón
y encender (On) el reloj despertador. Confirme
con el botón
Aparece Hour. El valor de la hora parpadea.
Presione el botón
START/STOP
Confirme con el botón
para ajustar la hora.
OPTION/SET
.
81
Page 83

Aparece
dea. Presione el botón
minutos. Confirme con el botón
regresar a la pantalla principal.
Minute. El valor de los minutos parpa-
START/STOP
para ajustar los
OPTION/SET
y para
10. REGISTRO DEL ENTRENAMIENTO
ADVERTENCIA:
Las señales que usa este producto pueden interferir con un
marcapasos u otros dispositivos electrónicos implantados.
Consulte al fabricante del dispositivo implantado y a su médico antes de usar este producto. La frecuencia que usa este
dispositivo puede causar mal funcionamiento de los dispositivos médicos antes mencionados.
Es importante que tome en cuenta las respuestas de su
cuerpo durante el entrenamiento. Si siente dolor inesperado
o fatiga excesiva al entrenar, deje de hacer ejercicio
o continúe a una intensidad menor. En caso de emergencia,
llame inmediatamente al 911.
PRECAUCIÓN:
No vea la pantalla cuando vaya corriendo para evitar acci-
dentes por tropiezo.
No use ninguna parte o accesorio que no sean los que reco-
mienda explícitamente “Beurer North America” para este
producto. Las partes y accesorios no aprobados para usarse
con este dispositivo pueden afectar su salud y al producto.
10.1 Vista general
NOTA:
Antes de iniciar el registro de entrenamiento, deberá tener puesta
la correa para el pecho.
Evite hacer movimientos torpes durante la medición. Esto creará
lecturas del ritmo cardiaco imprecisas.
82
Page 84

Además de la intensidad del entrenamiento, la medicación para
condiciones cardiacas, la tensión arterial, las condiciones sicológicas, el asma, la respiración y las bebidas energéticas, el alcohol
y la nicotina también pueden afectar el ritmo cardiaco.
El menú
Training permite realizar las siguien-
tes actividades:
Cronometrar los tiempos y registrar con ellos
su entrenamiento.
Registrar rondas individuales.
Finalizar y almacenar el registro.
Borrar todos los registros.
Evaluar avisos de almacenamiento.
Tan pronto como accede al menú Training, el
pulsómetro pasa automáticamente a la indicación principal, que muestra en la línea central
el tiempo de entrenamiento registrado hasta
ahora (después de un reinicio: 00:00:00) y en
la línea inferior muestra
Start.
Informaciones interesantes sobre los registros
Tan pronto como Vd. inicie el registro comienza el pulsómetro a
registrar sus datos de entrenamiento. Su pulsómetro registra sus
datos de entrenamiento contínuamente hasta que Vd. los almacena o borra. Esto rige también cuando Vd. comienza un nuevo
entrenamiento el día siguiente. El tiempo continuo permite a Vd.
también interrumpir su entrenamiento en cualquier momento.
Su pulsómetro está provisto de una memoria. El tiempo de regis-
tro es de hasta 24 horas y depende del número de rondas. Cada
entrenamiento consta de un máximo de 50 rondas. El pulsómetro
avisa al usuario, poco antes de agotarse la capacidad de la memoria. Recomendamos transmitir a más tardar ahora los registros
al PC, a fin de vaciar la memoria del pulsómetro. La alternativa es
83
Page 85

borrar todos los registros manualmente. Las instrucciones para el
borrado se encuentran en el apartado "10.5 Borrar todos los registros" de este capítulo.
Vd. puede visualizar sus datos de entrenamiento. En el menú
Result se puede activar el registro medido en último lugar. En el
Lap Result se visualizan las rondas de este registro.
menú
Tn pronto como Vd. ha transferido sus registros al software Ea-
syFit, puede usted aquí visualizarlos y evaluarlos. Cada vez que
se hace una transmisión correcta hacia el PC, se borra la memoria. En el capítulo "13 Software EasyFit" encontrará Vd. explicaciones sobre la transmisión hacia el PC.
10.2 Cronometrar tiempos de marcha
Cambie al menú Training al presionar el botón
MENU
. Si ya ha cronometrado un tiempo de
marcha, en la línea central aparece el tiempo
de entrenamiento registrado.
Comience el registro al presionar el botón
START/STOP
. Aparece Run. El tiempo sigue corriendo en el segundo plano, incluso si durante
el registro se accede a otro menú.
Detenga el registro al presionar el botón
START/STOP
. Aparece Stop. Puede parar y reanudar sus registros en cualquier momento pulsando el botón
START/STOP
.
10.3 Registrar rondas
Mientras está en marcha el registro de su entrenamiento total, usted
puede registrar rondas individuales. El tiempo continúa corriendo
mientras registra las rondas.
84
Page 86

Está en el menú
Training y su entrenamiento se
está registrando.
Aparece
Presione el botón
Run.
OPTION/SET
para medir un nuevo ciclo. La pantalla muestra durante 5 segundos el tiempo y el número de la última ronda
medida, por ejemplo,
Lap 1.
La pantalla cambia automáticamente a Run y
muestra el número de la ronda actual, por ejemplo
Run 2.
Presione el botón
OPTION/SET
para registrar ciclos
de entrenamiento adicionales según sea necesario. Puede registrar un total de como máximo
50 rondas.
10.4 Finalizar y almacenar el registro
Sírvase observar que después de la finalización y almacenamiento,
Vd. ya no puede visualizar más los datos en los menús
Result
. Solamente puede mostrarlos en su PC con la ayuda del soft-
ware EasyFit.
Vd. está en el menú
registrar un entrenamiento. Se visualiza
Training. Vd. acaba de
Stop.
Result y Lap
85
Page 87

Guarde el registro al presionar el botón
START/STOP
durante aproximadamente 5 segúndos.
Se visualiza
Hold Save.
La indicación retorna automáticamente a la indicación principal.
Ahora los datos están listos para su transmisión
al PC.
10.5 Borrar todos los registros
El pulsómetro avisa al usuario automáticamente, poco antes de agotarse la capacidad de la memoria. Antes de borrar ahora la memoria,
recomendamos a Vd. evaluar primero el registro de entrenamiento o
bien transmitirlo al PC. Cada vez que se hace una transmisión correcta de lops datos hacia el PC, se borra la memoria automáticamente.
La alternativa es borrar todos los registros manualmente, como se
describe aquí.
El borrado automático o manual tiene como resultado el borrado de
todos los registros de entrenamiento inclusive sus rondas.
Vd. puede borrar los datos antes o después del entrenamiento.
Vd. está en el menú Training. Se visualiza Stop.
Vd. está en el menú Training. Vd. acaba de registrar un entre-
namiento. Se visualiza
Borre todos los registros al presionar el botón
OPTION/SET
Se visualiza
durante aproximadamente 5 segúndos.
MEM Delete.
Stop.
86
Page 88

La indicación retorna automáticamente a la indicación principal.
10.6 Evaluar avisos de almacenamiento
En el menú Training su pulsómetro informa automáticamente a Vd.,
poco antes de agotarse la capacidad de la memoria o de estar ocupadas todas las rondas.
Avisio Significado
Al acceder al menú
botón
LOW, si la capacidad de la memoria está bajo
MENU
un 10% o bien si hay menos de 10 rondas
libres.
Durante el entrenamiento, el pulsómetro visualiza cada 5 segundos
capacidad de la memoria está bajo un 10%.
Por ejemplo, en la pantalla:
8% libre aún).
Durante el entrenamiento, el pulsómetro visualiza cada 5 segundos
menos de 10 rondas libres (de un total de 60).
Por ejemplo, en la pantalla:
rondas libres aún).
Cuando la memoria esté llena, no podrá iniciar una nueva sesión de
entrenamiento. Para borrar la memoria manualmente, léase en el
apartado anterior "10.5 Borrar todos los registros".
Training al presionar el
el pulsómetro visualiza MEM
MEM x% Free, si la
MEM 8% Free (un
LAP Rest x, si hay
LAP Rest 7 (7
87
Page 89

Cada vez que tiene lugar una transmisión hacia el PC, también se
borra la memoria. Explicaciones más detalladas se encuentran en el
capítulo "13 Software EasyFit".
11. RESULTADOS
ADVERTENCIA:
Este producto es un dispositivo complementario; no es un
dispositivo médico. Es un instrumento de entrenamiento
que ha sido desarrollado para la medición y representación
del ritmo cardiaco humano y no deberá reemplazar a ningún
dispositivo médico profesional que se use para medir el
ritmo cardiaco. Las lecturas del ritmo cardiaco son solo para referencia, y no se acepta ninguna responsabilidad por
las consecuencias de cualquier lectura errónea.
Este producto no está diseñado para detectar arritmia
o ritmos irregulares, y los interpretará como ruido
o interferencia. Solo un médico puede diagnosticar la arritmia.
11.1 Vista general
En el menú Result puede Vd. visualizar sus
datos de entrenamiento del registro medido en
último lugar: frecuencia cardíaca media y máxima, tiempos dentro y fuera de la zona de entrenamiento así como consumo de calorías y combustión de grasa.
Tan pronto como accede al menú Result, el
pulsómetro pasa automáticamente a la indicación principal.
Ésta muestra
bPM AVG.
88
Page 90

11.2 Visualizar datos de entrenamiento
Cambie al menú Result al presionar el botón
MENU
.
Aparece bPM AVG (frecuencia cardíaca media
de entrenamiento).
OPTION/SET
OPTION/SET
OPTION/SET
OPTION/SET
OPTION/SET
.
.
.
.
.
Presione el botón
Aparece
HRmax (frecuencia cardíaca máxima
de entrenamiento).
Presione el botón
Aparece
In [min] (tiempo dentro de la zona de
entrenamiento).
Presione el botón
Aparece
Lo [min] (tiempo por debajo la zona de
entrenamiento).
Presione el botón
Aparece
Hi [min] (tiempo por encima la zona de
entrenamiento).
Presione el botón
Aparece
[kcal] (el consumo total de calorías
durante el registro de su entrenamiento). Las
bases para la indicación del consumo de calorí-
89
Page 91

as y de la combustión de grasa son:
Datos personales (ajustes básicos)
Y el tiempo y frecuencia cardíaca medidos
durante el entrenamiento.
Presione el botón
Aparece
Fat[g]/[oz] (combustión de grasa du-
OPTION/SET
.
rante el registro completo de su entrenamiento).
Presione el botón
Regreso a la indicación principal.
OPTION/SET
.
11.3 Resultados de las rondas
Vista general
En el menú
LAP Result puede Vd. visualizar el
tiempo y la frecuencia cardíaca media. Estas
visualizaciones son activables tanto para el registro completo del entrenamiento medido en último
lugar como también para cada una de las rondas.
Tan pronto como accede al menú LAP Result,
el pulsómetro pasa automáticamente a la indicación principal. En la línea superior se muestra
la frecuencia cardíaca media, mientras que en
la línea central aparece el tiempo de entrenamiento registrado ya.
Mostrar resultados de las rondas
Cambie al menú
botón
MENU
LAP result al presionar el
.
90
Page 92

Presione el botón
Aparece
AVG 1: resultados de la ronda 1. En la
OPTION/SET
.
línea superior se muestra la frecuencia cardíaca media, mientras que en la línea central aparece el tiempo de ronda.
Al presionar el botón
OPTION/SET
nuevamente
cambia a la pantalla de resultado individual
para el siguiente ciclo. Un máximo de 50 rondas.
Presione el botón
pantalla principal.
OPTION/SET
para regresar a la
12. TEST DE FORMA FÍSICA
ADVERTENCIA:
El resultado de la prueba de forma física es solamente para
referencia. Solamente un médico puede determinar su nivel
de forma física.
12.1 Vista general
El menú FitTest permite realizar las siguientes
actividades:
Llevar a cabo un test de su forma física per-
sonal en una marcha de 1 milla (1.600 m).
Evaluar su forma física: Índice de forma
física (1-5), volumen respiratorio máximo de
oxígeno (VO
máx), metabolismo basal
2
(BMR) y metabolismo activo (AMR).
Calcular automáticamente sus límites supe-
rior e inferior individuales como propuesta de
entrenamiento y sobrescribir ambos límites
91
Page 93

en el menú
Setting. Véase también el capí-
tulo "8.4 Ajustar zona de entrenamiento".
Determinar automáticamente su frecuencia
cardíaca máxima (MaxHR) y sobrescribirla
en el menú
Setting.
El test de forma física no sólo es apropiado
para deportistas activos, sino también para
personas menos experimentadas de cualquiera
edad.
Un segundo después de ingresar en el modo
de test de forma física, aparece la pantalla
principal. La línea superior muestra su índice
de forma física:
0 = aún no se ha llevado a cabo test alguno
1 = Poor (débil)
2 = Fair (suficiente)
3 = Average (mediano)
4 = Good (bueno)
5 = Elite (excelente)
En la línea central se muestra la fecha de su
último test de forma física. Si aún no se ha llevado a cabo un test de forma física, aparece la
fecha actual.
12.2 Llevar a cabo un test de forma física
La unidades indicadas [mile] o bien [m] (metros) provienen de los
ajustes básicos. Para saber cómo cambiar estas unidades, consulte
el apartado "8.2 Ajustar unidades" del capítulo "8 Ajustes básicos".
92
Page 94

Colóquese la correa para el pecho y espere
hasta que el monitor detecte un ritmo cardiaco.
Cambie al menú
MENU
.
FitTest al presionar el botón
Aparece la pantalla de desplazamiento
PressSTART to begin. Su pulso se mostrará
ahora en la pantalla y usted tiene cinco minutos
para calentar.
Su pulsómetro emite un sonido para señalizar
que ha finalizado la fase de precalentamiento
de 5 minutos. Si desea reducir la fase de precalentamiento, puede acceder también a la
pantalla siguiente pulsando el botón
START/STOP
.
Marche sin interrupción exactamente 1 milla
(1.600 m). Para ello, elija un trayecto que tenga
exactamente esta longitud.
La indicación continua PressSTOP after 1mile
(1600 m)
START/STOP
le recuerda que pulse el botón
después de 1 milla (1.600 m).
Aparece la indicación continua TestFinished y
se indica el tiempo necesario.
Presione el botón
START/STOP
para regresar a la
pantalla principal. Ésta muestra su índice de
forma física (1-5) con la evaluación y la fecha
actual.
93
Page 95

12.3 Visualizar valores de forma física
La pantalla de los valores de forma física solo tiene sentido si usted
ha completado al menos un test de forma física. Los valores indicados para la forma física se refieren al último test.
Cambie al menú
MENU
. Aparece el índice de forma física (1-
5) y la fecha de su último test de forma física.
Si aún no se ha llevado test alguno de forma
física, aparece 0.
Presione el botón
El volumen respiratorio máximo de oxígeno se
indica en mililitros dentro de un minuto por 2.2
libras (1 kg) de peso corporal. Esta es la base
para la evaluación del test de su forma física.
Presione el botón
(Basal Metabolic Rate). El metabolismo basal
se calcula en función de la edad, el sexo, la
estatura y el peso. El BMR indica el consumo
de calorías que una persona necesita para
mantener sus funciones vitales, sin movimiento.
Presione el botón
(Active Metabolic Rate). El metabolismo activo
se calcula en función del metabolismo basal
más un "suplemento de actividad" orientado al
nivel de forma física.
Presione el botón
pantalla principal.
FitTest al presionar el botón
OPTION/SET
. Aparece VO
OPTION/SET
OPTION/SET
max.
2
. Aparece BMR
. Aparece AMR
OPTION/SET
para regresar a la
94
Page 96

13. SOFTWARE EASYFIT
ADVERTENCIA:
El software EasyFit es una herramienta motivacional que le
ayuda a monitorear sus actividades físicas. Nunca lo use
como base para tomar una decisión en relación a su salud,
medicación, programa de reducción de peso o de ejercicios
u otros similares. Consulte siempre a un médico para determinar qué es lo más adecuado para usted.
El cable de interfaz de computadora, la correa para el pecho
y la correa de tensión elástica representan un riesgo de estrangulación. Mantenga este producto lejos del alcance de
los niños y de quienes necesiten supervisión, tal como las
personas con trastornos mentales. NUNCA DEJE A NIÑOS
QUE REQUIERAN SUPERVISIÓN ESTRECHA SOLOS CON
ESTE DISPOSITIVO.
13.1 Vista general
Con el software EasyFit usted puede transferir sus datos de entrenamiento a una computadora a través de la interfaz de computadora de
su monitor de ritmo cardiaco. Los accesorios que se necesitan, que
consisten en un CD que contiene el software EasyFit para computadora y un cable de comunicación, se incluyen con el dispositivo. El
software EasyFit le ayuda a monitorear sus datos de entrenamiento
y a controlar sus logros durante un periodo de tiempo más largo.
Además encontrará usted numerosas funciones para el manejo del
peso y para planificar el entrenamiento.
Funciones de calendario
Planeación del ejercicio semanal
Diversas evaluaciones y gráficas para la observación del avance
del entrenamiento
NOTA: El software EasyFit también puede usarse con el sensor de
actividad y básculas Beurer listos para EasyFit.
De estas forma, usted
95
Page 97

tiene una visión general de su actividad, entrenamiento e información de
su peso. Comuníquese a servicio al cliente Beurer para obtener más
información. Vea en la garantía la información de contacto de servicio.
13.2 Instalación del software
Para instalar el software, lea con atención las instrucciones impresas o el archivo "Install_Readme" que viene en el CD.
Siga las instrucciones con cuidado para instalar el software exactamente en el orden especificado.
1. Inserte el CD-ROM incluido en la unidad de CD y seleccione la
unidad de CD en Windows Explorer o en el escritorio de su
computadora.
2. Haga doble clic en el archivo "setup.exe" para ejecutarlo.
3. Seleccione su idioma y sigas las instrucciones de instalación.
Confirme con "Siguiente" o "Instalar" según corresponda.
4. Cuando haga clic en "Finalizar", el software se inicia.
5. Introduzca sus configuraciones personales y detalles en "Nuevo
aviso" en el programa EasyFit y haga clic en "Almacenar" o "Siguiente" para confirmar.
13.3 Transferencia de la información
1. Abra el programa EasyFit.
2. Cree una nueva persona o haga clic en una cuenta existente.
3. Vaya "Administrador de datos" y haga clic en el botón "Transferir
datos".
4. Conecte la pinza para computadora en el monitor de ritmo cardiaco y luego conecte el conector USB en el puerto USB de su
computadora.
5. Después de la transferencia satisfactoria, puede ver sus datos de
entrenamiento en el menú "Entrenamiento", "Administrador de
datos" o puede extraerlos individualmente en el calendario.
NOTA: No apague su computadora ni desconecte el enchufe USB
durante la descarga de la información.
96
Page 98

INFORMACIÓN ADICIONAL
Si tiene alguna pregunta acerca del uso del software EasyFit, llame
a servicio al cliente gratis al teléfono 1-800-536-0366 o envíe un
correo electrónico a info@beurer.com.
13.4 Requisitos del sistema
Sistema operativo Windows 2000/XP (SP2), Vista, Windows 7
CPU óptimo a 1.2 GHz o más
Memoria principal óptima a 256 MB de RAM o más
Espacio en disco duro óptimo 200 MB o más de espacio libre;
mínimo 100 MB
Resolución gráfica a partir de 1024 x 768
Otros requerimientos Unidad CD-ROM, conexión USB
13.5 Instrucciones del EasyFit
Las instrucciones detalladas relativas a las diferentes funciones y a la
operación del software se incluyen en la función de ayuda.
97
Page 99

14. BATERÍAS
ADVERTENCIA:
La ingestión de baterías o líquido de baterías puede ser
sumamente peligrosa. Mantenga la batería y la unidad fuera
del alcance de los niños y de las personas con discapacidad. Si alguien ingiere una batería o el fluido de la batería,
llame inmediatamente al 911.
Las baterías no deben cargarse ni reactivarse por ningún
otro medio. Las baterías pueden explotar.
Las baterías no deben abrirse, arrojarse al fuego ni conec-
tarse en corto circuito. Las baterías pueden explotar.
En caso de que el líquido de la batería se derrame y haga
contacto con los ojos o piel, enjuague de inmediato con
agua limpia en abundancia. Llame de inmediato al 911.
PRECAUCIÓN:
Si una batería se derrama, no toque el líquido. Evite el con-
tacto con la piel (use guantes protectores) y limpie el com-
AVISO:
partimiento de la batería con una tela seca.
El usuario no puede reemplazar la batería, por lo cual solo
un especialista o el servicio de servicio al cliente de Beurer
puede reemplazarla. El reemplazo incorrecto dañará la unidad y anulará la garantía del usuario.
No use objetos punzantes para quitar la batería de la correa
para el pecho.
Use siempre el tamaño y tipo de batería indicados. Si usa
otras baterías pueda dañar el dispositivo.
Nunca use baterías recargables. Esto puede dañar la unidad.
Las baterías que derraman pueden dañar el dispositivo. Si
no va a usar la unidad durante periodos prolongados, retire
la batería de la correa para el pecho y solicite a un especia-
98
Page 100

lista que retire la batería del monitor antes de guardar el dispositivo.
Las baterías pueden contener toxinas nocivas para el medio
ambiente. Deseche siempre las baterías de acuerdo con las
normas locales correspondientes. No deseche las baterías
junto con la basura doméstica normal.
NOTA: Este producto contiene una batería de litio en forma de mo-
neda tipo CR que contiene un perclorato; puede requerir manejo
especial. Consulte: www.dtsc.ca.gov/hazardouswaste/perchlorate.
14.1. Monitor de ritmo cardiaco
Si la intensidad de la pantalla se reduce o si no aparece la pantalla,
solicite a un especialista que cambie la batería del monitor del ritmo
cardiaco (por ejemplo, en un taller de fabricación de relojes o en un
taller de joyería) o al servicio al cliente de Beurer; de lo contrario, la
resistencia al agua podría afectarse. El reemplazo incorrecto anulará la garantía.
NOTA: El uso excesivo de la luz LED agota la batería más rápidamente.
14.2. Correa para el pecho
Si las señales del ritmo cardiaco llegan a ser inestables o se detienen,
la batería de la correa para el pecho podría necesitar reemplazo.
1
Usted mismo puede reemplazar la batería de la correa para el pecho. El compartimiento de la batería se encuentra
en el lado interno. Use una moneda
para abrir el compartimiento.
2
El polo positivo de la batería colocada
debe quedar hacia arriba.
3
Cierre con cuidado el compartimiento de la batería.
99
 Loading...