

Page 1
heart rate monitor
herzfrequenz pulsuhr
german|engineering
PM 18
Operating Instructions
Gebrauchsanleitung
Page 2

Page 3

TABLE OF CONTENTS
1. Scope of delivery......................................................................... 2
2. Important Notes...........................................................................2
3. Interesting Facts about this HR Monitor ...................................4
Measuring your pulse .................................................................4
Measuring the distance when running or walking ......................5
General information for training..................................................6
4. Functions of the HR monitor......................................................7
5. General Operation of the HR Monitor........................................8
General Operation of the HR Monitor......................................... 8
Buttons on the HR monitor .......................................................................8
Display....................................................................................................... 9
Power saving mode.................................................................................10
Main menus .............................................................................................10
Pulse measurement .................................................................11
Basic settings/Personal data ....................................................12
Overview..................................................................................................12
Setting the stride length for walking and running.....................................13
Setting the sensitivity of the sensor for pace counting ............................13
Training ....................................................................................14
Set training zones.................................................................................... 14
Display speed/distance............................................................................15
Display training data................................................................................16
Display calorie and fat consumption........................................................ 16
Operate stop watch .................................................................................17
Timer ........................................................................................17
Alarm clock...............................................................................18
6. Changing the Batteries .............................................................19
7. Troubleshooting ........................................................................20
8. Technical Specifications and Batteries................................... 20
9. Explanation of the Abbreviations on the Display................... 21
G
B
1
Page 4
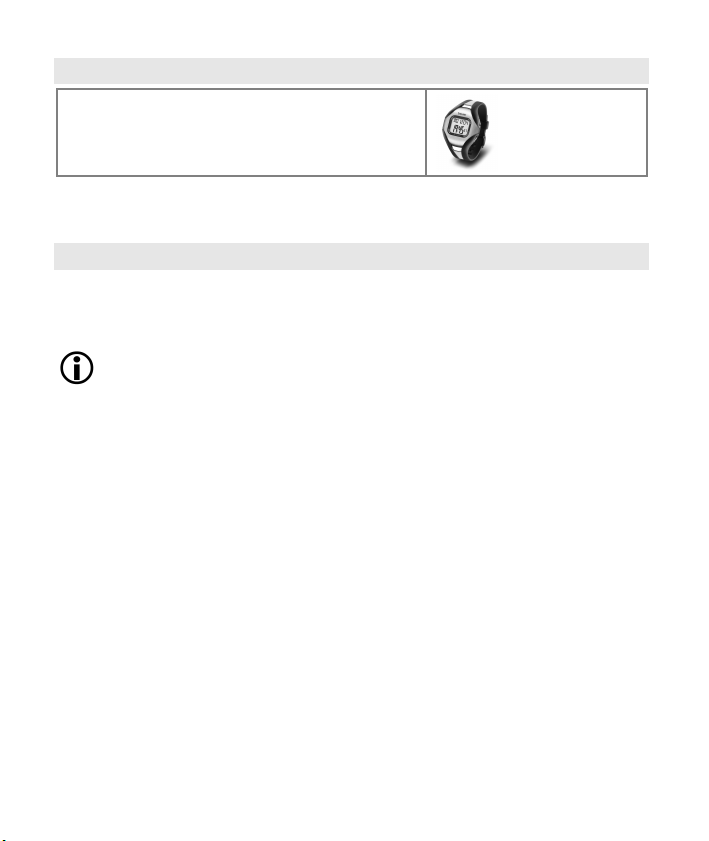
1. SCOPE OF DELIVERY
Heart rate monitor with wrist band
In addition: These operating instructions and separate short instructions
2. IMPORTANT NOTES
Please read these operating instructions carefully, keep them for future reference and also make them available to others. Pay attention
to all information in these operating instructions!
Training
Did you know that doing daily at least 10,000 paces or exercising
for half an hour (less for older persons, more for children) is good
for your health.
This HR monitor is not a therapeutic device. It is a training instru-
ment which was developed for the measurement and representation of the human heart rate.
With high-risk sports, please note that the use of the HR monitor
can represent an additional source of injury.
If in doubt or in the case of illnesses, please consult your doctor
about your ideal upper and lower training heart rate, as well as the
recommended duration and frequency of the training. In such a
way, you can achieve optimal results when training.
WARNING: People suffering from cardiovascular diseases or those
with pacemakers should only use this heart rate monitor after having consulted their doctor.
2
Page 5
Application
The heart rate monitor is only intended for private use.
The heart rate monitor may only be used in the manner outlined in
the operating instructions. The manufacturer is not liable for damages that are caused by improper or incorrect use.
The heart rate monitor supports you in many types of training (for
example even when cycling), however all the functions can only be
used during running training.
This HR monitor is waterproof (50m) and thus suitable for use
when swimming. However you must not press any buttons in the
water.
Cleaning and care
From time to time, clean the HR monitor carefully with soapy water.
In addition, once in a while the back of the monitor in particular
should be wiped with a damp cloth. Then rinse the complete HR
monitor with clean water. Carefully dry it with a soft towel.
Do not use skin cream if you would like to use the HR monitor.
Have the battery changed by a specialized dealer (CR2032 3V
lithium battery).
Repair, Accessories and Disposal
Prior to use, you have to ensure that the HR monitor is free of
damage. If in doubt, do not use the HR monitor and consult your
sales representative or the customer service address provided.
Clean your skin and fingers with soap to ensure a better transmis-
sion of the signal when measuring your pulse.
Transmission problems can occur in the case of very dry or thick
skin.
G
B
3
Page 6

If your pulse is not measured correctly or not at all: Wet the tips of
your fingers or use a conductive paste.
Avoid twisting and bending your wrist when measuring.
Repairs may only be conducted by customer service or authorized
dealers. Please do not in any case attempt to repair the HR monitor! In the case of complaints, please consult your dealer or the
service address.
If you have a complaint, please replace the battery at a specialized
dealer beforehand.
The warranty expires if the monitor is opened or due to improper
use.
Use the HR monitor only in combination with Beurer original ac-
cessories.
Avoid contact with suntan lotions or the like, since these can cause
damage to the imprint or plastic components.
Please dispose of the HR monitor and used batteries
only in accordance with the Waste Electric and Electronic
Equipment Directive 2002/96/EC – WEEE. For inquiries,
please contact the municipal authority responsible for
disposal in your area.
3. INTERESTING FACTS ABOUT THIS HR MONITOR
Measuring your pulse
With this HR monitor (without chest strap) you can monitor your heart
rate and set a training zone corresponding to your training objectives
with an upper and lower limit value. An exact ECG heartbeat is calculated and displayed without having to wear the annoying chest strap.
4
Page 7
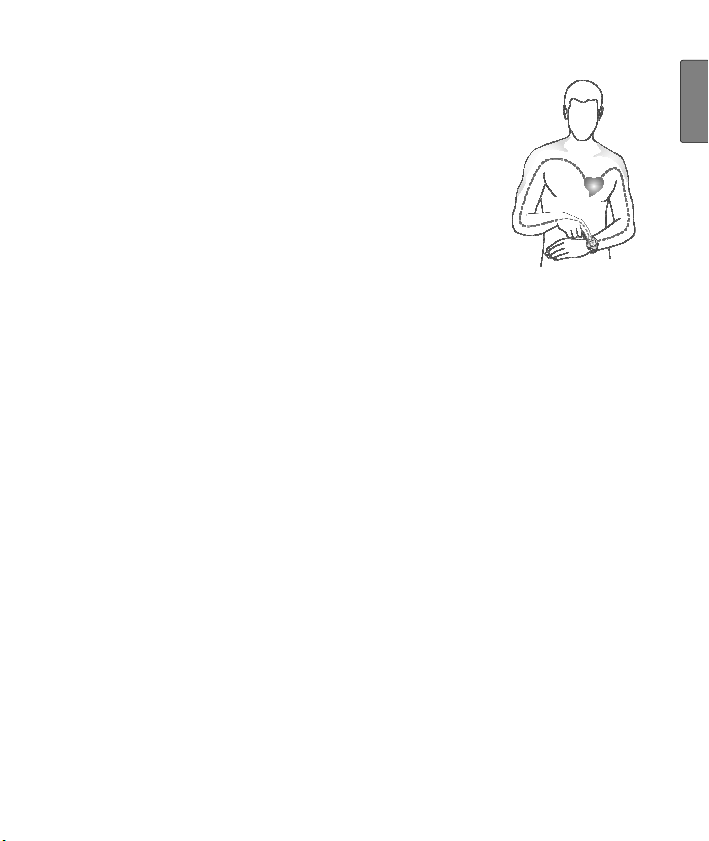
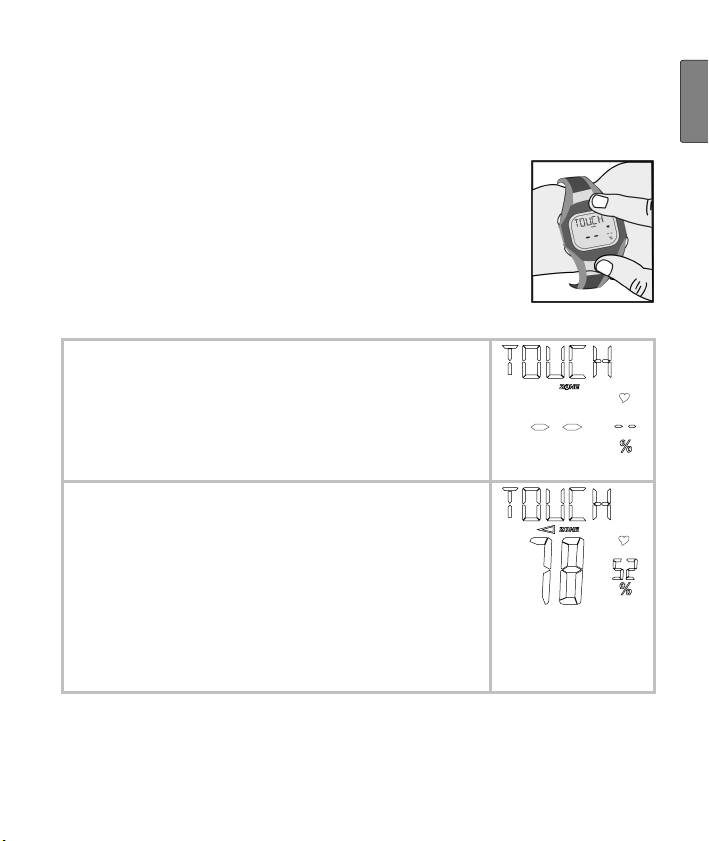
To do this, strap the monitor to your wrist and touch
the metal application on the front of the monitor
with your index finger or thumb. Your heart rate can
be determined ECG-exact within a few seconds by
measuring from the metal application via the arm,
upper part of the body, other arm and on to the
sensor plate on the back of the HR monitor. The
monitor has to have direct contact with your skin so
that the sensor plate on the back of your HR monitor can determine your pulse.
This HR monitor is thus suitable in particular for people who cannot or
do not want to wear a chest strap and for sports such as hiking or
walking. Together with the running speed, the pulse measurement
can also calculate the calories consumed as well as the fat burned
during training.
Tip: Measure your heart rate at regular intervals – in particular if your
heart rate increases or decreases -, or at the end of each training
section!
Measuring the distance when running or walking
Sufficient movement is required for healthy living. At least 7,000 10,000 paces or 30 minutes exercise a day is optimal (Source: acc. to
WHO, Dr. Catrine Tudor-Locke, Dr. David R. Bassett jr.).
With this HR monitor you have the possibility to check your daily
amount of exercise. An integrated activity sensor provides an overview of your daily movements and calculates the number of paces,
amount of time, the distance covered and the speed. On existing
training monitors a special sensor had to be attached to your foot to
calculate the distance. Now no external sensor is required because of
the integrated activity sensor.
You can specify the typical stride length in the basic settings of the
monitor so that the HR monitor can calculate the distance trained and
G
B
5
Page 8
your running speed from the stride length and number of paces. You
can also adjust the sensitivity of the integrated sensor so that the
result does not depend on your personal movement activity.
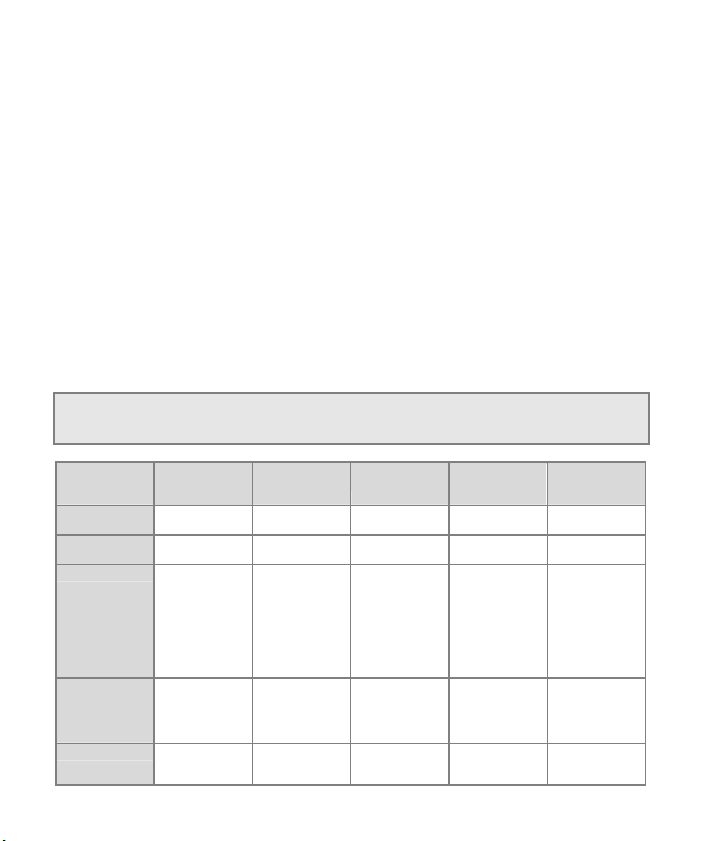
General information for training
This heart rate monitor serves primarily to measure the human pulse.
By means of various settings, you can support your individual training
program and monitor your pulse. You should monitor your pulse during exercise because you should prevent your heart from excessive
strain on the one hand and on the other in order to achieve the optimal training results. The table provides you with some information on
the selection of your ideal training zone. The maximum heart rate
reduces with advancing age. Information on the training heart rate
must therefore always be in relation to the maximum heart rate. The
following rule of thumb helps to identify the maximum heart rate:
220 – age = maximum heart rate
The following example applies to a 40-year-old person: 220 – 40 = 180
Heart/health
Max. heart rate
range
Display on
monitor
Effect Strengthens the
Suitable for Ideal for
Training Regenerative
programme
50-65% 55-75% 65-80% 80-90% 90-100%
HEALTH FAT-B AROBIC – –
heart and the
circulatory system
beginners
training
Fat burning
zone
The body burns
the highest
percentage of
calories from fat.
Strengthens the
heart and the
circulatory
system,
enhances fitness
Weight control
and loss
Fitness training Endurance
Fitness programme
Improves the
respiratory and
circulatory
system. Ideal to
promote the basic
endurance
Athletes at
amateur level
Endurance
training programme
Improves speed
maintenance and
increases basic
speed.
Ambitious
athletes at
amateur level,
professional
athletes
training
Anaerobic
training
Overloads
specific muscles.
High injury risk for
athletes at
amateur level,
risk to the heart in
case of disease.
Only professional
athletes
Fitness training
addressing
specific zones
6
Page 9

Three pulse ranges have already been preset and stored in the HR
monitor (HEALTH/FAT-B/AROBIC). See chapter “Setting your training
zone” to select and set your pulse limits.
4. FUNCTIONS OF THE HR MONITOR
G
B
HR functions
Exact ECG heart rate measurement
The heart rate symbol flashes during
measurement
Individual training zone adjustable
Acoustic and visual alarm for exit from
the training zone
Calorie consumption in Kcal (based on
the walking or running speed)
Fat burning in g (grams)
Training zone proposal
Activity functions
Number of paces
Total time of activity
Daily deletion of training/activity values
at 3:00 hours
Speed functions
Distance
Current speed
Average speed
Time functions
Time of day
Calendar (up to 2099)
and weekday
Date
Alarm clock
Hour signal
Pushbutton signal
Stop watch
Countdown timer
Settings
Gender, weight,
height, year of birth
Unit of measure selec-
tion
Maximum heart rate
Stride length for walk-
ing and running
Sensitivity of sensor
for pace counting
7
Page 10
5. GENERAL OPERATION OF THE HR MONITOR
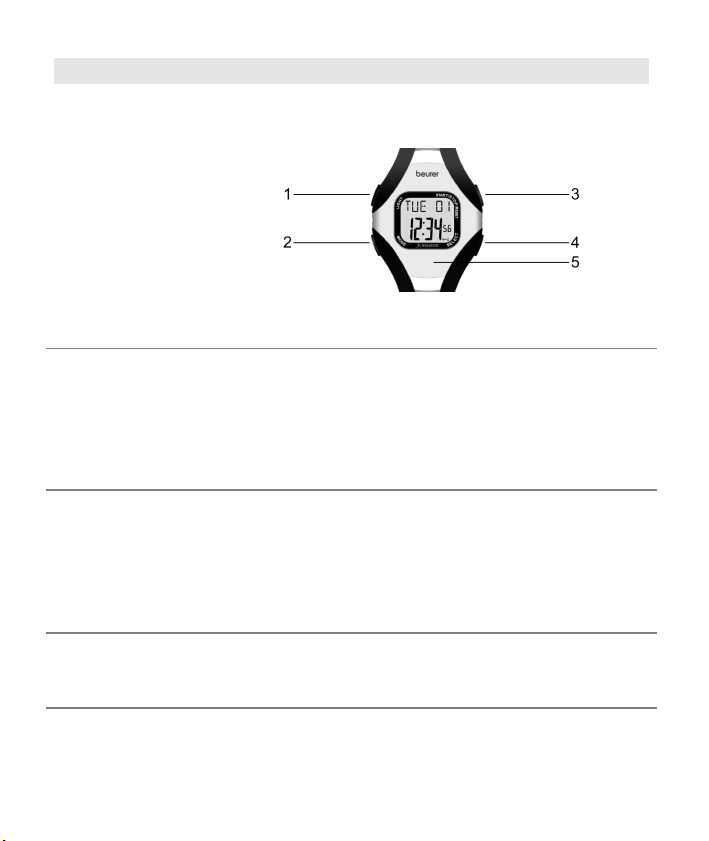
General Operation of the HR Monitor
Buttons on the
HR monitor
1
LIGHT Pressing quickly illuminates the display for
3 seconds
2
MODE Switches between the different menus and set-
ting displays. If you keep the MODE button
pressed for at least 5 seconds, you get into the
setting mode for a menu. Exit the setting mode
also by keeping the MODE button pressed for 5
seconds.
3
START/
STOP/
RESET
4
SELECT
5
SENSOR Metal application on the front of the HR monitor.
Start/stops functions, sets values. Keep
pressed to accelerate input.
Counts values forwards.
Starts and stops the stop watch.
Resets the stop watch function and the re-
sults (Kcal etc.).
Sets values.
Counts values backwards.
Display in training mode.
Starts the pulse measurement automatically
when touching the metal surface.
8
Page 11
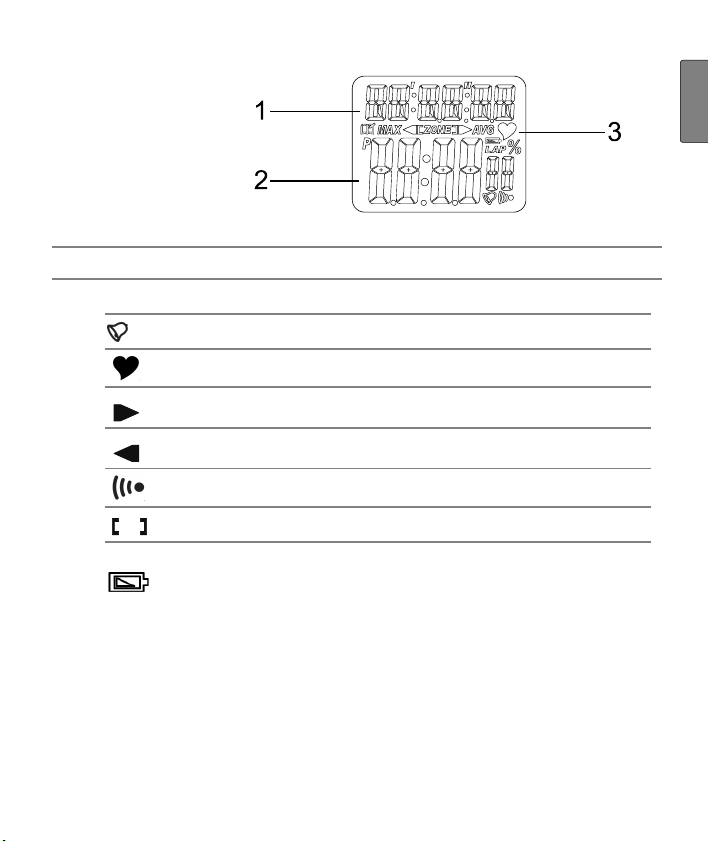
Display
1
Top line
2
Bottom line
3
The most important symbols:
An explanation of the display abbreviations can be found in the list of
abbreviations at the end of the operating instructions.
Hour signal is activated
Heart rate is being received
Training zone has been exceeded
Training zone has been underrun
Alarm clock is activated
Heart rate is within the pulse limits
To continue getting exact results, the battery has to be replaced as soon as possible
after this symbol has been displayed.
G
B
9
Page 12
Power saving mode
Hold the SELECT button in real time mode for
approx. 5 seconds to enter the power saving
mode. The display is turned off in this mode, so
that the battery can lasts longer. Please note that
the functions (e.g. Time) are still working and the
display is just turned off. Press any button to reactivate the display again.
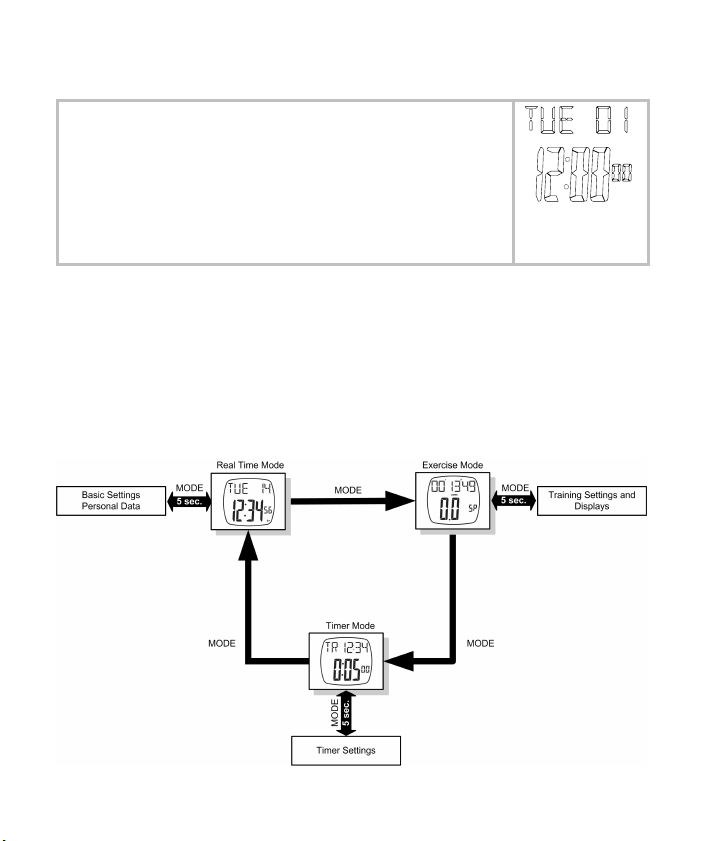
Main menus
The operation of the HR monitor is organized into three main menus.
From each of the main menus, you can then switch into the relevant
setting menus. Press the MODE button to switch between the main
menus. You get into the setting menus by keeping the MODE button
pressed for about 5 seconds. In the same way you can also exit the
setting menus again and return to the relevant main menu.
10
Page 13
Pulse measurement
The key element of your HR monitor is to record the heart rate. The
simple operation makes it easy for you during training to determine
your current heart rate in between.
Put your index finger or thumb on the metal surface of
the casing. Pay attention that the back of the monitor
has direct contact with your skin.
Press your finger slightly on the metal surface
of the casing for 3-7 seconds continuously.
The heart symbol and the two horizontal lines
in the middle flash during measurement.
As soon as your heart rate has been determined, it is displayed in beats per minute.
In addition, on the right you can see a percentage value which indicates where your
pulse is in comparison to the recommended/set maximum pulse. An arrow appears next to the ZONE symbol, it indicates
whether the heart rate exceeds or falls short of
the set values.
As soon as you remove your finger or press a button, you return to
the mode last used.
Please note: Do not measure you pulse under water!
11
G
B
Page 14
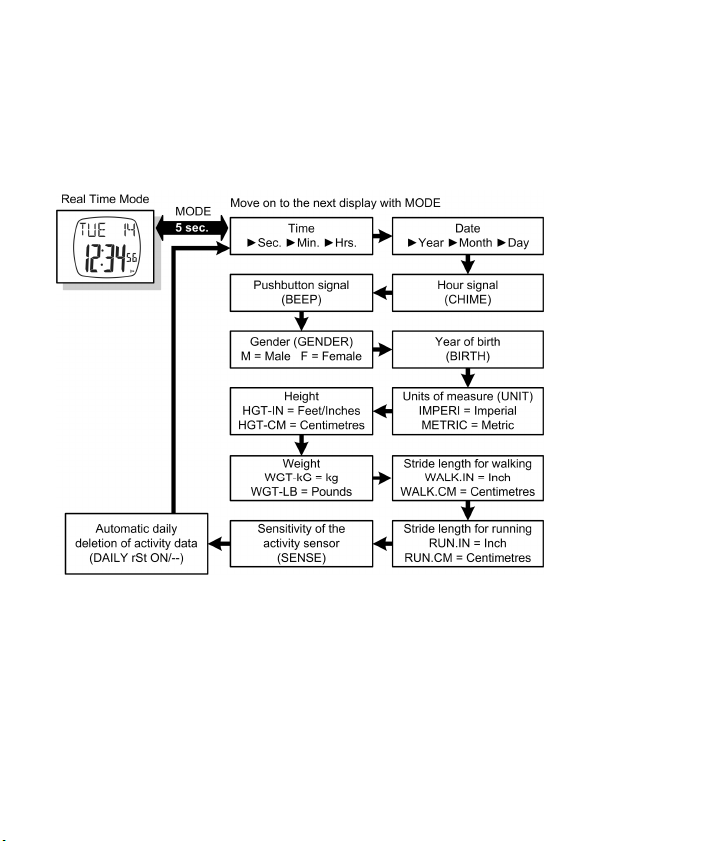
Basic settings/Personal data
Overview
In this menu you can set the time, specify basic functions of the HR
monitor and input personal settings.
From the time display, press the MODE button for approx. 5 seconds.
You get into the setting menu with a number of settings; move on to
the next setting by pressing the MODE button. The default settings
flash if you can change them. Change these settings with the
START/STOP/RESET and SELECT buttons.
Exit the setting menu by keeping the MODE button pressed for
approx. 5 seconds.
12
Page 15

Tip: If you keep the START/STOP/RESET and SELECT buttons
pressed for more than 2 seconds, then the relevant setting counts
forwards or backwards automatically until you let the button go.
Setting the stride length for walking and running
An important presetting for the distance and running speed function is
to enter your individual stride length as accurately as possible.
1. Run or walk a distance where you know the exact length (reference distance). For example the 100 meter track in the athletics
stadium.
2. Count the paces you require for it.
3. Divide the reference distance by the number of paces, and you will
get the stride length (e.g. 100 m / 125 paces = 0.8 m = 80 cm).
4. Record this value in the Stride length menu for walking or running,
depending on the relevant type of pace.
If you change the type of pace during training, then this has an effect
on the accuracy of the speed and distance recordings.
Setting the sensitivity of the sensor for pace counting
To achieve an optimum result, the sensitivity of the sensor should be
individually set for the user. Five sensitivity levels can be selected
here (1=Low sensitivity, 5=High sensitivity). To get the optimal setting,
we recommend test runs before the first training. The slower your
running speed, the higher you should select the sensitivity level.
Using the monitor when jogging/walking
Walk or run a distance in your training speed (at least 50 paces). Do
not change your normal running arm movements. Compare the
counted paces with the pace display of the HR monitor, see Chapter
“Display training data”. If the monitor does not display enough paces,
then you have to increase the sensitivity of the sensor. If too many
paces are displayed, then reduce the sensitivity. Once you have ad-
G
B
13
Page 16

justed the sensitivity of the sensor to your pace, then you can achieve
95-100% accuracy.
Please note: A change in your running style or running speed can
affect the accuracy.
Use as activity sensor
To prevent the sensor from mistakenly interpreting your hand movements as paces, you should select a lower sensitivity level of the sensor. The sensitivity needs to be adjusted depending on the day’s
activities.
Please note: The HR monitor should be removed for activities, where
only hand movements are carried out (e.g. cleaning windows) to avoid
incorrect results.
Training
First of all you should set your training zone. During training you can
switch between various displays.
Set training zones
You can set your individual upper and lower heart rate limit here by
selecting your optimal training load. To do this, you can choose from
three default values:
optimal health [HEALTH] (50-65 % of the max. heart rate)
fat burner [FAT-B] (55-75 % of the max. heart rate)
fitness [AROBIC] (65-80 % of the max. heart rate)
Or you can specify your own limits for the heart rate. In addition, you
can also set the acoustic alarm, if your heart rate is outside your pulse
limits during training.
14
Page 17

G
B
Press the MODE button in the main menu Training Mode for approx.
5 seconds. You get into the setting menu; move on to the next setting
by pressing the MODE key. The settings flash if you can change
them. Change the settings with the START/STOP/RESET and
SELECT buttons. Confirm with the MODE button.
Then leave the setting menu again by keeping the MODE button
pressed for approx. 5 seconds.
Tip: If you keep the START/STOP/RESET and SELECT buttons
pressed for more than 2 seconds, the relevant setting automatically
counts forwards or backwards.
Display speed/distance
In the bottom line of the display, you can generally select between the
two main displays (speed and distance) as well as automatically
switch between these main displays. If you prefer to use one particular display, then you can keep this for your entire run.
If you press the SELECT button in training mode for 2 seconds, you
can switch the display between speed (SP) and distance (DI). If you
15
Page 18

press the SELECT button for 4 seconds, you enter the automatic
switching mode between speed and distance (SCAN). In SCAN mode
the display changes every 2 seconds. To stop the SCAN mode press
the SELECT button for 2 seconds.
Display training data
In the top line of the display, you can have different results displayed
with the SELECT button:
Training time
Kilocalories (kC) in kilocalories [kcal]
Fat burning (g) in grams [g]
Distance (DI) in kilometres [km]
Momentary speed (SP) in kilometres per hour [km/h] or miles per
hour [mi/h]
Average speed (SP with AVG symbol)
Number of paces (ST=Steps)
Activity time (M=Motion)
Time of day
After pressing SELECT again, the display returns from the last screen
to the first screen.
Display calorie and fat consumption
In the training data display, you can also display the number of calories consumed and the fat burning during training when scrolling with
the SELECT button
Please note: The calculation of the calorie and fat burning
values is based on your running speed during training. The
calorie and fat burning values cannot be measured exactly
when cycling.
16
Page 19

Operate stop watch
In the Stop Watch mode, there is a zero “000000” in the top line.
Start the stop watch with the START/STOP/RESET button.
Stop the stop watch by pressing the START/STOP/RESET button
again.
To reset the stop watch and to delete all stored training and activity
data, keep the START/STOP/RESET pressed for at least 2 sec-
Reset all and then Reset done is displayed.
onds.
Timer
The timer has a stop watch that counts time backwards. The HR
monitor emits a short acoustic alarm as soon as the counter has less
than 10 seconds left to count. A continuous acoustic alarm sounds
when it gets to zero, it can be switched off by pressing any button.
Display the Timer mode
The current time and the remaining time of the
timer are displayed in this mode.
Settings of the Timer mode
G
B
17
Page 20

Press the MODE button for approx. 5 seconds. The settings flash if
you can change them. Change the settings with the
START/STOP/RESET and SELECT buttons. Switch between the
Hours, Minutes and Seconds settings with the MODE button, at the
same time the new values are stored.
Leave the setting menu again by keeping the MODE button pressed
for approx. 5 seconds.
Tip: If you keep the START/STOP/RESET and SELECT buttons
pressed for more than 2 seconds, then the relevant setting automatically counts forwards or backwards.
You can start and stop the timer at any time with the
START/STOP/RESET button. To reset the timer settings press the
SELECT button for 2 seconds.
Alarm clock
Your HR monitor has an alarm clock, which emits an acoustic signal
when it reaches the wake-up time. Press any button (apart from
LIGHT) to stop the alarm.
Display the alarm clock
Press the START/STOP/RESET button when you are in the time
display
In this mode, the set wake-up time is displayed (in
the picture: 12 o’clock) and whether the alarm
clock is activated (in the picture it has been
switched off “OFF”).
As soon as you release the START/STOP/RESET button, you get
back into the time display.
18
Page 21

Setting the alarm clock
G
B
Press the START/STOP/RESET button in the time display for at least
2 seconds. You get into the setting menu; move on to the next setting
by pressing the MODE key. The settings flash if you can change
them. Change the settings with the START/STOP/RESET and
SELECT buttons.
Then leave the setting menu again by keeping the MODE button
pressed for approx. 2 seconds.
Tip: If you keep the START/STOP/RESET and SELECT buttons
pressed for more than 2 seconds, then the relevant setting automatically counts forwards or backwards.
6. CHANGING THE BATTERIES
Have the battery changed by a specialized dealer (CR2032 3V lithium battery).
Used batteries do not belong in the household garbage. Dispose of these through your electronics
dealer or your local collecting point for recoverables.
You are legally required to do this. We will find this
symbol on batteries containing toxic chemicals: Pb =
battery contains lead, Cd = battery contains cadmium,
Hg = battery contains mercury.
19
Page 22

7. TROUBLESHOOTING
Dry skin or very hairy arms
Use a conductive paste or wet your fingers and wrist.
Your finger does not have proper contact with the sensor
Your finger (not only the finger tips!) has to lie flat and firmly on the
metal casing and the monitor has to be strapped skin-tightly to your
wrist.
Irregular heartbeat
A correct heart rate measurement is very difficult in this case, irregular measurement periods can be expected. The result will not be
reliable in all cases!
Movement during the pulse measurement
Avoid moving intensively during the pulse measurement to get a
reliable result.
8. TECHNICAL SPECIFICATIONS AND BATTERIES
HR
monitor
Battery 3V Lithium battery, CR2032 type.
Waterproof to 50 m (suitable for swimming)
The impermeability of the monitor to moisture
cannot be guaranteed when jumping into water
(high pressure load) and also when pressing the
buttons in the rain.
Battery life approx. 12 months (depending on the number of pulse measurements). The battery already inserted upon purchase is for the test run and can be flat
within a year.
20
Page 23

9. EXPLANATION OF THE ABBREVIATIONS ON THE DISPLAY
Abbreviations on the display in alphabetical order:
Abbreviation Explanation
[cm] Centimetre
[IN] Inch
[km/h] Kilometres per hour
[mi/h] Miles per hour
AL Alarm clock (OFF=switched off, ON=switched on)
AROBIC Fitness: 65-80 % of the max. heart rate
BEEP Pushbutton signal
BIRTH Year of birth (4-digit, e.g. “1978”)
CHIME Hour signal
DAILY Daily
DI Distance in kilometres [km]
FAT-B Fat Burner: 55-75 % of the max. heart rate
Fri Friday
g Fat burning in grams [g]
Gender Gender (M=male, F=female)
HEALTH Optimal health: 50-65 % of the max. heart rate
HGT Height in inches [IN] or [CM] centimetres
IMPERI Imperial units of measure
kC Calorie consumption in kilocalories [kcal]
M Activity time with the format [Hour:Minute:Second]
METRIC Metric units of measure
Mon Monday
RUN Stride length for running in centimetres [CM] or inches [IN]
Sat Saturday
SCAN Automatic display change between speed and distance
SENSE Sensitivity of the activity sensor
SP Momentary speed in [km/h] or [m/h]
SP AVG Average speed in [km/h] or [m/h]
G
B
21
Page 24

Abbreviation Explanation
ST Number of paces
Sun Sunday
Thu Thursday
TR Timer Mode
Tue Tuesday
UNIT Unit of measure in Imperial [IMPERI] or Metric [METRIC]
WALK Stride length for walking in centimetres [CM] or inches [IN]
Wed Wednesday
WGT Weight in kilograms [kg] or pounds [LB]
ZONE Training limits
22
Page 25

INHALTSVERZEICHNIS
1. Lieferumfang..............................................................................24
2. Wichtige Hinweise..................................................................... 24
3. Wissenswertes über diese Pulsuhr .........................................26
Zur Pulsmessung .....................................................................26
Zur Wegstreckenmessung beim Laufen oder Gehen............... 27
Allgemeines zum Training ........................................................28
4. Funktionen der Pulsuhr ............................................................29
5. Bedienung der Pulsuhr............................................................. 30
Allgemeine Bedienung der Pulsuhr ..........................................30
Knöpfe der Pulsuhr.................................................................................. 30
Display..................................................................................................... 31
Stromsparmodus .....................................................................................32
Hauptmenüs ............................................................................................32
Pulsmessung............................................................................33
Grundeinstellungen/Persönliche Daten....................................34
Überblick..................................................................................................34
Schrittlänge für Gehen und Laufen einstellen .........................................35
Empfindlichkeit des Sensors zur Schrittzählung einstellen .....................35
Training ....................................................................................36
Trainings-Zone einstellen ........................................................................36
Geschwindigkeit/Laufstrecke anzeigen ...................................................37
Trainingsdaten anzeigen .........................................................................38
Kalorien- und Fettverbrauch anzeigen ....................................................38
Stoppuhr bedienen ..................................................................................39
Timer ........................................................................................39
Wecker .....................................................................................40
6. Batteriewechsel .........................................................................41
7. Fehlerbehebung ........................................................................42
8. Technische Daten, Batterien und Garantie............................. 42
9. Erläuterung der Abkürzungen auf dem Display .....................43
D
23
Page 26

1. LIEFERUMFANG
Herzfrequenz-Pulsuhr mit Armband
Zusätzlich: Diese Gebrauchsanleitung und separate Kurzanleitung
2. WICHTIGE HINWEISE
Lesen Sie diese Gebrauchsanleitung sorgfältig durch, bewahren Sie
sie auf, und machen Sie sie auch anderen Personen zugänglich.
Beachten Sie alle Hinweise in dieser Gebrauchsanleitung!
Training
Wussten Sie schon, dass es für Ihre Gesundheit gut ist, täglich
mindestens 10.000 Schritte zu gehen oder sich eine halbe Stunde
zu bewegen (ältere Personen weniger, Kinder mehr).
Diese Pulsuhr ist kein medizinisches Gerät. Sie ist ein Trainingsin-
strument, welches für die Messung und Darstellung der menschlichen Herzfrequenz entwickelt wurde.
Beachten Sie bei Risiko-Sportarten, dass die Verwendung der
Pulsuhr eine zusätzliche Verletzungsquelle darstellen kann.
Bitte erkundigen Sie sich im Zweifelsfall oder bei Krankheiten bei
Ihrem behandelnden Arzt über die für Sie ideale obere und untere
Trainings-Herzfrequenz, sowie die empfohlene Dauer und Häufigkeit des Trainings. Somit können Sie optimale Ergebnisse beim
Training erzielen.
ACHTUNG: Personen mit Herz- und Kreislaufkrankheiten oder
Träger von Herzschrittmachern sollten diese Pulsuhr nur nach
Rücksprache mit ihrem Arzt verwenden.
24
Page 27

Verwendungszweck
Die Pulsuhr ist nur für den privaten Gebrauch bestimmt.
Die Pulsuhr darf nur in der Gebrauchsanleitung angegebene Art
und Weise verwendet werden. Der Hersteller haftet nicht für Schäden, die durch unsachgemäßen oder falschen Gebrauch verursacht wurden.
Die Pulsuhr unterstützt Sie bei vielen Trainingsarten (zum Beispiel
auch beim Fahrradfahren), jedoch können nur beim Lauftraining alle Funktionen genutzt werden.
Diese Pulsuhr ist wasserdicht (50 m) und damit zum Schwimmen
geeignet. Im Wasser dürfen Sie jedoch keine Taste drücken.
Reinigung und Pflege
Reinigen Sie die Pulsuhr von Zeit zu Zeit sorgfältig mit einer Sei-
fenwasserlösung. Besonders die Rückseite der Uhr sollten Sie hin
und wieder zusätzlich mit einem feuchten Tuch abwischen. Spülen
Sie die gesamte Pulsuhr dann mit klarem Wasser ab. Trocknen Sie
sie sorgfältig mit einem weichen Tuch.
Verwenden Sie keine Hautcreme, wenn Sie die Pulsfunktion be-
nutzen möchten.
Lassen Sie den Batteriewechsel von einem Fachgeschäft durch-
führen (CR2032 3V Lithium-Batterie).
D
Reparatur, Zubehör und Entsorgung
Vor dem Gebrauch müssen Sie sicherstellen, dass die Pulsuhr
keine sichtbaren Schäden aufweist. Benutzen Sie die Pulsuhr im
Zweifelsfall nicht, und wenden Sie sich an Ihren Händler oder an
die angegebene Kundendienstadresse.
25
Page 28

Reinigen Sie Ihre Haut und Finger mit Seife, um eine bessere
Übertragung des Signals bei der Pulsmessung zu gewährleisten.
Bei sehr trockener oder dicker Haut kann es zu Übertragungsprob-
lemen kommen.
Falls die Pulsmessung nicht oder nicht richtig funktioniert: Befeuch-
ten Sie Ihre Fingerspitzen oder verwenden Sie eine Leitpaste.
Vermeiden Sie bei der Messung ein Verdrehen und Abwinkeln des
Handgelenkes.
Reparaturen dürfen nur vom Kundendienst oder von autorisierten
Händlern durchgeführt werden. Versuchen Sie in keinem Fall, die
Pulsuhr selbständig zu reparieren! Bei Reklamationen wenden Sie
sich an Ihren Händler oder an die Serviceadresse.
Batterie vor der Reklamation im Fachgeschäft austauschen lassen.
Bei Öffnung oder unsachgemäßer Behandlung erlischt die Ge-
währleistung.
Benutzen Sie die Pulsuhr nur mit Beurer Original-Zubehörteilen!
Vermeiden Sie Kontakt mit Sonnencremes oder ähnlichem, da
diese den Aufdruck oder die Kunststoffteile beschädigen könnten.
Entsorgen Sie die Pulsuhr und verbrauchte Batterien nur
gemäß Elektro- und Elektronik Altgeräte-Verordnung
2002/96/EC – WEEE (Waste Electrical and Electronic
Equipment). Bei Rückfragen wenden Sie sich bitte an die
für die Entsorgung zuständige kommunale Behörde.
3. WISSENSWERTES ÜBER DIESE PULSUHR
Zur Pulsmessung
Mit dieser brustgurtlosen Pulsuhr können Sie Ihre Herzfrequenz
überwachen und eine Trainingszone entsprechend Ihres Trainingszieles mit oberem und unterem Grenzwert einstellen. Der Herzschlag
wird EKG-genau ermittelt und angezeigt, ohne dass Sie einen lästigen Brustgurt tragen.
26
Page 29

Dazu legen Sie die Uhr an Ihrem Handgelenk an
und berühren mit Ihrem Zeigefinger bzw. Daumen
die Metall-Applikation auf der Vorderseite der Uhr.
Durch eine Messung von Metall-Applikation über
Arm, Oberkörper, anderem Arm zur Sensorplatte
auf der Rückseite der Pulsuhr kann Ihr Herzschlag
EKG-genau innerhalb weniger Sekunden ermittelt
werden. Tragen Sie die Uhr direkt auf der Haut,
damit die Sensorplatte auf der Rückseite der Uhr
Ihre Pulswerte ermitteln kann.
Damit eignet sich diese Pulsuhr besonders für Personen, die keinen
Brustgurt tragen können oder wollen und für Sportarten, wie Wandern
oder Walking. Über die Pulsmessung lässt sich zusammen mit der
Laufgeschwindigkeit auch die Zahl der verbrauchten Kalorien ermitteln, sowie die Fettverbrennung beim Training.
Tipp: Messen Sie die Herzfrequenz in regelmäßigen Zeitabständen –
besonders bei steigender oder fallender Herzfrequenz –, oder am
Ende Ihrer Trainingsabschnitte!
Zur Wegstreckenmessung beim Laufen oder Gehen
Ausreichende Bewegung ist Voraussetzung für ein gesundes Leben.
Ein tägliches Pensum von mindestens 7.000-10.000 Schritten oder
30 Minuten Aktivität sind optimal (Quelle: nach WHO, Dr. Catrine
Tudor-Locke, Dr. David R. Bassett jr.).
Diese Pulsuhr bietet die Möglichkeit, Ihr tägliches Bewegungspensum
zu kontrollieren. Ein integrierter Aktivitätssensor gibt Ihnen einen
Überblick über Ihre tägliche Bewegung und ermittelt die Anzahl Ihrer
Schritte, die Aktivitätszeit, die zurückgelegte Strecke und die Geschwindigkeit. Um bei bisherigen Trainingsuhren die Wegstrecke zu
ermitteln, musste ein spezieller Sensor am Fuß befestigt werden. Mit
dem integrierten Aktivitätssensor kann auf einen externen Sensor
verzichtet werden.
D
27
Page 30

Über die Grundeinstellungen der Uhr können Sie Ihre typische
Schrittweite vorgeben, so dass die Pulsuhr aus Schrittweite und
Schrittzahl die Länge Ihrer Trainingsstrecke und Ihre Laufgeschwindigkeit berechnen kann. Damit das Ergebnis nicht von Ihrer persönlichen Bewegungs-Aktivität abhängt, können Sie zudem die Empfindlichkeit des integrierten Sensors anpassen.
Allgemeines zum Training
Diese Pulsuhr dient in erster Linie zur Erfassung des Pulses beim
Menschen. Durch die verschiedenen Einstellmöglichkeiten können
Sie Ihr individuelles Trainingsprogramm unterstützen und den Puls
überwachen. Sie sollten Ihren Puls beim Training überwachen, weil
Sie zum einen Ihr Herz vor Überlastung schützen sollten und zum
anderen, um einen optimalen Trainingseffekt zu erzielen. Die Tabelle
gibt Ihnen einige Hinweise zur Auswahl einer für Sie idealen Trainingszone. Die maximal zulässige Herzfrequenz verringert sich mit
zunehmendem Alter. Angaben zum Trainingspuls müssen deshalb
immer in Abhängigkeit zur maximalen Herzfrequenz stehen. Zur Bestimmung der maximalen Herzfrequenz gilt die Faustformel:
220 – Lebensalter = maximale Herzfrequenz
Folgendes Beispiel gilt für eine 40-jährige Person: 220 - 40 = 180
Herz-Gesund-
Anteil der max.
Herzfrequenz
Anzeige auf UhrDisplay
Auswirkung Stärkung Herz-
Für wen geeignet?
Training Regeneratives
heitszone
50-65% 55-75% 65-80% 80-90% 90-100%
HEALTH FAT-B AROBIC – –
Kreislaufsystem
Ideal für Anfänger Gewichtskontrol-
Training
Fettverbrennungszone
Körper verbrennt
prozentual die
meisten Kalorien
aus Fett. Trainiert
Herz-Kreislaufsystem, verbessert Fitness
le, -reduktion
Fitness-Training Kraft-
Fitnesszone Kraftausdauer-
Verbessert Atmung und Kreislauf. Optimal zur
Steigerung der
Grundlagen-Ausdauer
Freizeitsportler Ambitionierte
bereich
Verbessert Tempohärte und
steigert die
Grundgeschwindigkeit.
Freizeitsportler,
Leistungssportler
Ausdauertraining
28
Anaerobes
Training
Überlastet gezielt
die Muskulatur.
Hohes Verletzungsrisiko für
Freizeitsportler,
bei Erkrankung:
Gefahr fürs Herz.
Nur Leistungssportler
Entwicklungsbereichstraining
Page 31

In der Pulsuhr sind bereits drei voreingestellte Pulsbereiche gespeichert (HEALTH/FAT-B/AROBIC). Zur Auswahl und Einstellung der
Pulsgrenzen siehe Kapitel „Trainings-Zone einstellen“.
4. FUNKTIONEN DER PULSUHR
Puls-Funktionen
EKG-genaue Herzfrequenz-Messung
Blinken des Symbols für die Herzfre-
quenz während der Messung
Individuelle Trainingszone einstellbar
Akustischer und visueller Alarm beim
Verlassen der Trainingszone
Kalorienverbrauch in kcal
(auf Basis der Geh- oder LaufGeschwindigkeit)
Fettverbrennung in g (Gramm)
Trainingszonen-Vorschlag
Aktivitätsfunktionen
Anzahl der Schritte
Gesamt-Aktivitätszeit
Löschen der Trainings-/Aktivitätswerte
täglich um 3:00 Uhr
Geschwindigkeits-Funktionen
Laufstrecke (Distanz)
Aktuelle Geschwindigkeit
Durchschnittliche Geschwindigkeit
Zeit-Funktionen
Uhrzeit
Kalender (bis 2099)
und Wochentag
Datum
Wecker
Stundensignal
Tastensignal
Stoppuhr
Count-Down-Timer
Einstellungen
Geschlecht, Gewicht,
Körpergröße, Geburtsjahr
Wahl der Maß-
Einheiten
Maximale Herzfre-
quenz
Schrittlänge für Gehen
und Laufen
Empfindlichkeit des
Sensors zur Schrittzählung
D
29
Page 32

5. BEDIENUNG DER PULSUHR
Allgemeine Bedienung der Pulsuhr
Knöpfe der Pulsuhr
1
LIGHT Kurzes Drücken beleuchtet das Display für
3 Sekunden.
2
MODE Wechselt zwischen den drei verschiedenen
Hauptmenüs. Wenn Sie den Knopf MODE für
mindestens 5 sec. gedrückt halten, gelangen
Sie in das Einstellmenü für ein Hauptmenü.
Einstellmenü verlassen, indem Sie den Knopf
MODE für 5 sec. gedrückt halten.
3
START/
STOP/
RESET
4
SELECT
5
SENSOR Metallapplikation auf der Vorderseite der Puls-
Startet/stoppt Funktionen, stellt Werte ein.
Gedrückt halten beschleunigt die Eingabe.
Zählt Einstellwerte hoch.
Startet und stoppt die Stoppuhr.
Stellt die Stoppuhr-Funktion und die Ergeb-
nisdaten (kcal etc.) zurück.
Stellt Werte ein.
Zählt Einstellwerte herunter.
Anzeigen im Trainings-Modus.
uhr. Startet nach Berühren der Metallfläche
automatisch die Pulsmessung.
30
Page 33

Display
1
Obere Zeile
2
Untere Zeile
3
Die wichtigsten Symbole:
Stundensignal ist aktiviert
Puls wird empfangen
Trainingszone ist überschritten
Trainingszone ist unterschritten
Eine Erklärung der Display-Abkürzungen finden Sie im Abkürzungsverzeichnis am Ende der Gebrauchsanleitung.
Weckalarm ist aktiviert
Herzfrequenz liegt innerhalb der Pulsgrenzen
Batterie muss nach Anzeige dieses Symbols baldmöglichst gewechselt werden, um weiterhin genaue
Ergebnisse zu erhalten.
D
31
Page 34

Stromsparmodus
Drücken Sie aus der Zeit-Anzeige heraus den
Knopf SELECT für ca. 5 sec., um den Stromsparmodus einzuschalten. Die Anzeige der Pulsuhr
wird in diesem Modus ausgeschaltet, um die Batterielebensdauer zu erhöhen. Dabei bleiben die
Funktionen (z. B. Zeit) in Betrieb, nur die Anzeige
wird abgeschaltet. Drücken Sie einen beliebigen
Knopf, um die Anzeige wieder zu aktivieren.
Hauptmenüs
Die Bedienung der Pulsuhr ist in drei Hauptmenüs aufgebaut. Von
jedem der Hauptmenüs aus können Sie dann in deren Einstellmenüs
wechseln. Zwischen den Hauptmenüs wechseln Sie mit dem Knopf
MODE. In die Einstellmenüs gelangen Sie, wenn Sie den Knopf
MODE für etwa 5 sec. gedrückt halten. Genauso können Sie die Einstellmenüs auch wieder verlassen und in das zugehörige Hauptmenü
zurück springen.
32
Page 35

Pulsmessung
Kernstück Ihrer Pulsuhr ist das Erfassen der Herzfrequenz. Die einfache Bedienung erleichtert es Ihnen, zwischendurch während des
Trainings Ihre aktuelle Herzfrequenz zu ermitteln.
Legen Sie Ihren Zeigefinger oder Daumen auf die
Metalloberfläche des Gehäuses. Achten Sie darauf,
dass die Rückseite der Uhr direkten Kontakt mit der
Haut hat.
Lassen Sie den Finger 3-7 sec. ununterbrochen
auf der Metalloberfläche des Gehäuses leicht
angedrückt liegen. Während der Messung blinken das Herz-Symbol und die beiden waagrechten Striche in der Mitte.
Sobald Ihre Herzfrequenz ermittelt ist, wird sie
als Schläge pro Minute angezeigt.
Außerdem sehen Sie rechts einen Prozentwert,
der Ihnen sagt, wo Ihr Puls im Vergleich zum
empfohlenen/eingestellten maximalen Pulswert
liegt. Neben dem Symbol ZONE erscheint ein
Pfeil, der das Unter- oder Überschreiten der
Herzfrequenz gegenüber den eingestellten
Grenzwerten markiert.
Sobald Sie den Finger wegnehmen oder einen Knopf drücken, gelangen Sie zurück in den zuletzt benutzten Modus.
Hinweis: Messen Sie den Puls nicht unter Wasser!
D
33
Page 36

Grundeinstellungen/Persönliche Daten
Überblick
In diesem Menü stellen Sie die Uhrzeit ein, legen Grundfunktionen
der Pulsuhr fest und nehmen persönliche Einstellungen vor.
Von der Zeitanzeige aus drücken Sie den Knopf MODE für ca. 5 sec.
Sie gelangen in das Einstellmenü mit einer Vielzahl von Einstellungen; blättern Sie jeweils zur nächsten Einstellung mit dem Knopf
MODE. Vorgegebene Einstellungen, die Sie verändern können, blinken. Verändern Sie diese Einstellungen mit den Knöpfen
START/STOP/RESET und SELECT.
Verlassen Sie das Einstellmenü, indem Sie den Knopf MODE für ca.
5 sec. festhalten.
34
Page 37

TIPP: Wenn Sie die Knöpfe START/STOP/RESET und SELECT für
mehr als 2 sec. festhalten, zählt die jeweilige Einstellung automatisch
hoch oder herunter, bis Sie den Knopf loslassen.
Schrittlänge für Gehen und Laufen einstellen
Eine wichtige Voreinstellung für die Funktion der Laufstrecke und der
Laufgeschwindigkeit ist die möglichst genaue Eingabe Ihrer individuellen Schrittlänge.
1. Laufen oder gehen Sie eine Strecke, von der Sie die exakte Länge
kennen (Referenzstrecke). Zum Beispiel die 100-Meter-Bahn im
Leichtathletik-Stadion.
2. Zählen Sie Ihre dafür benötigten Schritte.
3. Teilen Sie die Referenzstrecke durch die Schrittzahl, und Sie er-
halten Ihre Schrittlänge (z. B. 100 m/125 Schritte = 0,8 m = 80 cm).
4. Erfassen Sie diesen Wert im Menü Schrittlänge für Gehen bzw.
Laufen, je nach der jeweiligen Gangart.
Verändern Sie beim Training die Gangart, so wirkt sich das auf die
Genauigkeit der Geschwindigkeits- und Streckenmessung aus.
Empfindlichkeit des Sensors zur Schrittzählung einstellen
Um ein optimales Ergebnis zu erzielen sollte die Empfindlichkeit des
Sensors auf den Benutzer individuell eingestellt werden. Hierzu stehen fünf Empfindlichkeitsstufen zur Auswahl (1=Empfindlichkeit gering, 5=Empfindlichkeit hoch). Vor dem ersten Training empfehlen wir
Testläufe zur optimalen Einstellung. Je geringer Ihre Laufgeschwindigkeit ist, umso höher sollten Sie die Empfindlichkeitsstufe wählen.
Verwendung der Uhr beim Jogging/Walking
Gehen oder laufen Sie auf einer Strecke in Ihrer Trainingsgeschwindigkeit (mindestens 50 Schritte). Die Armbewegung zum normalen
Laufen nicht verändern. Vergleichen Sie die gezählten Schritte mit der
Schrittanzeige der Uhr, siehe Kapitel „Trainingsdaten anzeigen“.
Wenn die Uhr zu wenige Schritte anzeigt, so müssen Sie die Emp-
D
35
Page 38

findlichkeit des Sensors erhöhen. Werden zu viele Schritte angezeigt,
so verringern Sie die Empfindlichkeit. Ist die Empfindlichkeit des Sensors auf Ihren persönlichen Gang gut abgestimmt, so können Sie eine
Genauigkeit zwischen 95 und 100 % erreichen.
Hinweis: Eine Veränderung Ihres Laufstils oder der Laufgeschwindigkeit kann die Genauigkeit beeinträchtigen.
Verwendung als Aktivitätssensor
Damit der Sensor Ihre Handbewegungen nicht fälschlicherweise als
Schritte interpretiert, sollte die Empfindlichkeit des Sensors eher gering gewählt werden. Abhängig von der Tagesaktivität ist es notwendig, die Empfindlichkeit anzupassen.
Hinweis: Bei Tätigkeiten, bei denen ausschließlich Handbewegungen
ausgeführt werden (z. B. Fensterputzen), sollte die Uhr abgelegt werden, um falsche Ergebnisse zu verhindern.
Training
Zunächst sollten Sie Ihre Trainings-Zone einstellen. Während des
Trainings haben Sie die Möglichkeit, zwischen verschiedenen Anzeigen auf dem Display zu wechseln.
Trainings-Zone einstellen
Hier stellen Sie die individuelle Ober- und Untergrenze Ihres Pulses
ein, indem Sie die für Sie optimale Trainingsbelastung wählen. Dazu
können Sie entweder eine von drei Vorgaben wählen:
gesundheitsoptimiert [HEALTH] (50-65 % der max. Herzfrequenz)
Fat-Burner [FAT-B] (55-75 % der max. Herzfrequenz)
Fitness [AROBIC] (65-80 % der max. Herzfrequenz)
Oder Sie können Ihre individuellen Grenzen für die Herzfrequenz
festlegen. Zusätzlich können Sie den akustischen Alarm einstellen,
wenn Ihre Herzfrequenz beim Training außerhalb Ihrer Pulsgrenzen
liegt.
36
Page 39

D
Drücken Sie den Knopf MODE im Hauptmenü Trainings-Modus für
ca. 5 sec. Sie gelangen in das Einstellmenü; blättern Sie jeweils zur
nächsten Einstellung mit dem Knopf MODE. Einstellungen, die Sie
ändern können, blinken. Verändern Sie die Einstellungen mit den
Knöpfen START/STOP/RESET und SELECT. Bestätigen Sie mit dem
Knopf MODE.
Verlassen Sie das Einstellmenü danach wieder, indem Sie den Knopf
MODE für ca. 5 sec. festhalten.
TIPP: Wenn Sie die Knöpfe START/STOP/RESET und SELECT für
mehr als 2 sec. festhalten, zählt die jeweilige Einstellung automatisch
hoch oder herunter.
Geschwindigkeit/Laufstrecke anzeigen
Generell können Sie in der unteren Display-Zeile zwischen zwei
Hauptanzeigen (Geschwindigkeit und Laufstrecke), sowie einem automatischen Wechsel dieser Hauptanzeigen, wählen. Wenn Sie eine
Anzeige bevorzugen, können Sie diese während Ihres ganzen Laufs
konstant halten.
37
Page 40

Wenn Sie im Trainings-Modus den Knopf SELECT für etwa 2 sec.
drücken, können Sie die Anzeige zwischen Geschwindigkeit (SP) und
Laufstrecke (DI) wechseln. Wenn Sie den Knopf SELECT für etwa
4 sec. drücken, gelangen Sie in den automatischen Wechsel zwischen Geschwindigkeit und Laufstrecke (SCAN). Im SCAN-Modus
wechselt die Anzeige im 2-Sekunden-Takt. Um den SCAN-Modus
abzuschalten, drücken Sie den Knopf SELECT für 2 sec.
Trainingsdaten anzeigen
In der oberen Display-Zeile können Sie mit dem Knopf SELECT unterschiedliche Ergebnisse anzeigen lassen:
Trainingszeit
Kilokalorien (kC) in Kilokalorien [kcal]
Fettverbrennung (g) in Gramm [g]
Laufstrecke (DI) in Kilometer [km]
Momentan-Geschwindigkeit (SP) in Kilometern pro Stunde [km/h]
oder Meilen pro Stunde [mi/h]
Durchschnitts-Geschwindigkeit (SP mit Symbol AVG)
Schrittzahl (ST=Steps)
Aktivitätszeit (M=Motion)
Uhrzeit
Vom letzten Bildschirm aus springt die Anzeige bei erneuter Betätigung von SELECT wieder zum ersten Bildschirm zurück.
Kalorien- und Fettverbrauch anzeigen
In der Anzeige der Trainingsdaten können Sie mit der Taste SELECT
beim Durchblättern auch die Zahl der verbrauchten Kalorien sowie die
Fettverbrennung beim Training anzeigen lassen.
Hinweis: Die Ermittlung der Kalorien- und Fettverbrennungswerte basiert auf Ihrer Laufgeschwindigkeit beim Training.
Beim Fahrradfahren kann keine genaue Messung der Kalorien- und Fettverbrauchswerte durchgeführt werden.
38
Page 41

Stoppuhr bedienen
Im Stoppuhr-Modus steht in der oberen Zeile eine Null „000000“.
Starten Sie die Stoppuhr mit dem Knopf START/STOP/RESET.
Stoppen Sie die Stoppuhr, indem Sie den Knopf
START/STOP/RESET nochmals drücken.
Um die Stoppuhr zurückzusetzen und alle gespeicherten Trainings-
und Aktivitätsdaten zu löschen, halten Sie den Knopf
START/STOP/RESET mindestens 2 sec. lang gedrückt. Es wird
Reset all und daraufhin Reset done angezeigt.
Timer
Der Timer ist eine rückwärts laufende Stoppuhr. Die Pulsuhr gibt einen kurzen akustischen Alarmton aus, sobald der Zähler noch weniger als 10 Sekunden zu zählen hat. Beim Erreichen der Null ertönt ein
anhaltender akustischer Alarm, der durch Drücken einer beliebigen
Taste ausgeschaltet werden kann.
Anzeige des Timer-Modus
Es wird in diesem Modus die aktuelle Uhrzeit und
die verbleibende Restzeit des Timers angezeigt.
Einstellungen des Timer-Modus
D
39
Page 42

Drücken Sie den Knopf MODE für ca. 5 sec. Einstellungen, die Sie
ändern können, blinken. Verändern Sie die Einstellungen mit den
Knöpfen START/STOP/RESET und SELECT. Zwischen den Einstellungen Stunden, Minuten und Sekunden wechseln Sie mit dem Knopf
MODE, wobei gleichzeitig die neuen Werte gespeichert werden.
Verlassen Sie das Einstellmenü wieder, indem Sie den Knopf MODE
für ca. 5 sec. festhalten.
TIPP: Wenn Sie die Knöpfe START/STOP/RESET und SELECT für
mehr als 2 sec. festhalten, zählt die jeweilige Einstellung automatisch
hoch oder herunter.
Sie können den Timer jederzeit mit dem Knopf START/STOP/RESET
starten und stoppen. Um die Einstellungen des Timers zu löschen,
drücken Sie den Knopf SELECT für 2 sec.
Wecker
Ihre Pulsuhr verfügt über einen Wecker, der sich beim Erreichen der
Weckzeit mit einem akustischen Signal meldet. Drücken Sie dann
einen beliebigen Knopf (außer LIGHT), um den Alarm zu stoppen.
Anzeige des Weckers
Drücken Sie aus der Zeitanzeige heraus den Knopf
START/STOP/RESET
Es wird in diesem Modus die eingestellte Weckzeit
angezeigt (im Bild: 12 Uhr) und ob der Wecker
aktiviert ist (im Bild ist er ausgeschaltet, „OFF“).
Sobald Sie den Knopf START/STOP/RESET loslassen, gelangen Sie
zurück in die Zeitanzeige.
40
Page 43

Einstellungen des Weckers
D
Drücken Sie den Knopf START/STOP/RESET aus der Zeitanzeige
heraus für mindestens 2 sec. Sie gelangen in das Einstellmenü; blättern Sie jeweils zur nächsten Einstellung mit dem Knopf MODE. Einstellungen, die Sie ändern können, blinken. Verändern Sie die Einstellungen mit den Knöpfen START/STOP/RESET und SELECT.
Verlassen Sie das Einstellmenü danach wieder, indem Sie den Knopf
MODE für ca. 5 sec. festhalten.
TIPP: Wenn Sie die Knöpfe START/STOP/RESET und SELECT für
mehr als 2 sec. festhalten, zählt die jeweilige Einstellung automatisch
hoch oder herunter.
6. BATTERIEWECHSEL
Die Batterie der Pulsuhr (CR2032 3V Lithium-Batterie) darf nur ein
Fachgeschäft (jede Uhrmacherwerkstätte) oder die angegebene Serviceadresse austauschen. Ansonsten erlöschen Garantieansprüche.
Verbrauchte Batterien gehören nicht in den Hausmüll.
Entsorgen Sie diese über Ihren Elektrofachhändler
oder Ihre örtliche Wertstoff-Sammelstelle. Dazu sind
Sie gesetzlich verpflichtet. Hinweis: Diese Zeichen
finden Sie auf schadstoffhaltigen Batterien:
Pb = Batterie enthält Blei, Cd = Batterie enthält Cadmium, Hg = Batterie enthält Quecksilber
41
Page 44

7. FEHLERBEHEBUNG
Trockene Haut oder stärker behaarte Arme
Verwenden Sie eine Leitpaste oder befeuchten Sie Finger und Handgelenk.
Der Finger hat keinen festen Kontakt mit dem Sensor
Der Finger (nicht nur die Fingerspitzen!) muss flach und fest auf
dem Metallgehäuse liegen und die Uhr eng am Handgelenk sitzen.
Herzrhythmusstörungen
Hier ist eine korrekte Pulsmessung sehr schwierig, es sind unregelmäßige Messzeiten zu erwarten. Das Ergebnis wird nicht in jedem
Falle zuverlässig sein!
Bewegung während der Pulsmessung
Vermeiden Sie intensive Bewegung während der Pulsmessung, um
ein zuverlässiges Ergebnis zu erhalten.
8. TECHNISCHE DATEN, BATTERIEN UND GARANTIE
Pulsuhr Wasserdicht bis 50 m (zum Schwimmen geeignet)
Die Dichtigkeit der Uhr gegenüber Nässe kann
bei Sprüngen ins Wasser (hohe Druckbelastungen) sowie beim Drücken der Knöpfe im Regen
nicht gewährleistet werden.
Batterie 3V Lithium-Batterie, Typ CR2032.
Lebensdauer ca. 12 Monate (je nach Anzahl der Pulsmessungen). Die beim Kauf bereits eingelegte Batterie
ist für den Testbetrieb bestimmt und kann innerhalb
eines Jahres leer sein.
42
Page 45

Garantie
Wir leisten drei Jahre Garantie ab Kaufdatum für Material- und Fabrikationsfehler des Produktes. Die Garantie gilt nicht:
im Falle von Schäden auf Grund unsachgemäßer Bedienung
für Verschleißteile, wie zum Beispiel Batterien oder das Armband
für Mängel, die dem Kunden bereits bei Kauf bekannt waren
bei Eigenverschulden des Kunden
Die gesetzlichen Gewährleistungen des Kunden bleiben durch die
Garantie unberührt. Für Geltendmachung eines Garantiefalles innerhalb der Garantiezeit ist durch den Kunden der Nachweis des Kaufes
zu führen. Die Garantie ist innerhalb eines Zeitraumes von drei Jahren ab Kaufdatum gegenüber der Beurer GmbH, 89077 Ulm, Germany, geltend zu machen. Der Kunde hat im Garantiefall das Recht zur
Reparatur der Ware bei unseren eigenen oder bei von uns autorisierten Werkstätten.
9. ERLÄUTERUNG DER ABKÜRZUNGEN AUF DEM DISPLAY
Abkürzungen auf dem Display in alphabetischer Reihenfolge:
Abkürzung Erläuterung
[cm] Zentimeter
[IN] Inch/Zoll
[km/h] Kilometer pro Stunde
[mi/h] Meilen pro Stunde
AL Wecker (OFF=ausgeschaltet, ON=eingeschaltet)
AROBIC
BEEP Tastensignal
BIRTH Geburtsjahr (4-stellig, zum Beispiel „1978“)
CHIME Stundensignal
DAILY täglich
DI Laufstrecke in Kilometer [km]
FAT-B
Fitness: 65-80 % der max. Herzfrequenz
Fat-Burner: 55-75 % der max. Herzfrequenz
D
43
Page 46

Abkürzung Erläuterung
Fri Freitag
g Fettverbrennung in Gramm [g]
Gender Geschlecht (M=männlich, F=weiblich)
HEALTH Gesundheitsoptimiert: 50-65 % der max. Herzfrequenz
HGT Körpergröße in Zoll [IN] oder [CM] Zentimeter
IMPERI Imperiale Maßeinheiten
kC Kalorienverbrauch in Kilokalorien [kcal]
M Aktivitätszeit im Format [Stunde:Minute:Sekunde]
METRIC Metrische Maßeinheiten
Mon Montag
RUN Schrittlänge für Laufen in Zentimeter [CM] oder Inch [IN]
Sat Samstag
SCAN automatischer Anzeigen-Wechsel zwischen Geschwin-
SENSE Empfindlichkeit des Aktivitätssensors
SP Momentan-Geschwindigkeit in [km/h] oder [m/h]
SP AVG Durchschnitts-Geschwindigkeit in [km/h] oder [m/h]
ST Schrittzahl
Sun Sonntag
Thu Donnerstag
TR Timer-Modus
Tue Dienstag
UNIT Maßeinheit in Imperial [IMPERI] oder Metrisch [METRIC]
WALK Schrittlänge für Gehen in Zentimeter [CM] oder Inch [IN]
Wed Mittwoch
WGT Körpergewicht in Kilogramm [kg] oder Pfund [LB]
ZONE Trainingsgrenzen
digkeit und Laufstrecke
44
Page 47

Page 48

heart rate monitor
herzfrequenz pulsuhr
753.254-0509 Irrtum und Änderungen vorbehalten
Beurer GmbH, Söflinger Str. 218, 89077 Ulm, Germany
www.beurer.de, Tel: (0049) 0731-3989144, Fax: (0049) 0731-3989255, kd@beurer.de
 Loading...