

Beurer LB55 Service Manual
LB 55
DE
Luftbefeuchter
Gebrauchsanweisung ................ 2
EN
Air humidifier
Instructions for use .................. 12
FR
Humidificateur d’air
Mode d’emploi ......................... 22
ES
Humidificador de aire
Instrucciones de uso ................ 32
IT
Umidificatore
Istruzioni per l'uso .................... 42
TR
Hava Nemlendirici
Kullanım Kılavuzu ..................... 52
RU
Увлажнитель воздуха
Инструкция по применению .. 62
PL
Nawilżacz powietrza
Instrukcja obsługi ..................... 73
DEUTSCH
Inhalt
1. Zum Kennenlernen ..................................................... 2
2. Bestimmungsgemäßer Gebrauch .............................. 3
3. Funktionen des Gerätes ............................................. 3
4. Sicherheitshinweise.................................................... 3
5. Gerätebeschreibung ................................................... 6
6. Inbetriebnahme........................................................... 6
7. Bedienung ................................................................... 7
8. Reinigung und Aufbewahrung ................................... 8
9. Was tun bei Problemen? .......................................... 10
10. Technische Angaben .............................................. 11
11. Nachkaufartikel ...................................................... 11
12. Garantie/Service ..................................................... 11
Lieferumfang
• L
uftbefeuchter
• 1
5 Ersatz-Kalkpads
• D
iese Gebrauchsanweisung
WARNUNG
• Dieses Gerät kann von Kindern ab 8 Jahren und darüber sowie von Personen mit verringerten physischen, sensorischen oder mentalen Fähigkeiten oder Mangel an Erfahrungen und Wissen benutzt werden, wenn
sie beaufsichtigt oder bezüglich des sicheren Gebrauchs des Gerätes
unterwiesen wurden und die daraus resultierenden Gefahren verstehen.
• Kinder dürfen nicht mit dem Gerät spielen.
• Reinigungs und Benutzer-Wartung dürfen nicht von Kindern ohne Be
aufsichtigung durchgeführt werden.
• Trennen Sie das Gerät während dem Füllen und Reinigen vom Netz.
• Bei Verwendung mit zugeschalteter Wasserverdampfung ist der austre
tende Dampf heiß - es besteht Verbrühungsgefahr.
• Verwenden Sie keine lösungsmittelhaltigen Reiniger.
• Wenn die Netzanschlussleitung dieses Geräts beschädigt wird, muss
sie entsorgt werden. Ist sie nicht abnehmbar, muss das Gerät entsorgt
werden.
-
-
1. Zum Kennenlernen
Der Mensch verbringt den größten Teil seiner Zeit in geschlossenen Räumen. Für die ideale Raumluft wird
eine relative Luftfeuchtigkeit von 40 bis 60% empfohlen. Vor allem im Winter wird dieser Wert häufig unter
schritten, wenn beim Lüften kalte Luft mit wenig Feuchtigkeit in Wohnräume strömt und dort aufgewärmt wird.
Diese trockene Raumluft nimmt Feuchtigkeit auf und trocknet dadurch Schleimhäute und Haut aber auch
Einrichtungsgegenstände aus.
Zu trockene Raumluft hat eine Reihe negativer Auswirkungen:
•
Schleimhäute und Lippen trocknen aus
•
D
ie Augen brennen
•
I
nfektionen und Erkrankungen der Atemwege werden begünstigt
•
A
bgespanntheit, Müdigkeit und Konzentrationsschwäche
•
H
austiere und Zimmerpflanzen werden belastet
2
-

•
PAP
S
taubentwicklung wird gefördert
•
E
lektrostatische Aufladung von Textilien und Kunstfasern, wie Teppiche und Kunststoffböden
•
E
inrichtungsgegenstände aus Holz und besonders Parkettböden nehmen Schaden
•
M
usikinstrumente verstimmen sich
Beachten Sie, dass es bei diesem Luftbefeuchter auch zu einer Überfeuchtung des Raumes kommen kann,
z.B. wenn
• S
ie das Gerät auf hoher Leistungsstufe betreiben,
• d
ie abgegebene Feuchtigkeit nicht aus dem Raum entweichen kann,
• b
ereits eine hohe Luftfeuchtigkeit besteht.
Kontrollieren Sie idealerweise die Luftfeuchtigkeit mit einem Hygrometer.
2. Bestimmungsgemäßer Gebrauch
Dieser elektrische Luftbefeuchter dient zum hygienischen, geruchslosen und bakterienfreien Befeuchten von
Wohn- und Arbeitsräumen im privaten Bereich.
WARNUNG
–
Wenn Sie an einer schweren Krankheit der Atemwege oder Lunge leiden, befragen Sie vor der
Benutzung des Luftbefeuchters Ihren Arzt.
–
Das Gerät ist nur für den in dieser Gebrauchsanleitung beschriebenen Zweck vorgesehen. Der
Hersteller kann nicht für Schäden haftbar gemacht werden, die durch unsachgemäßen oder leichtsinnigen Gebrauch entstehen.
3. Funktionen des Gerätes
Der Luftbefeuchter LB 55
•
befeuchtet die Luft mit Warmwasserdampf, besonders Hygienisch
•
weist eine Befeuchtungsleistung auf: 200 ml/h und 400 ml/h
•
geeignet für Raumgrößen bis 50m
•
besitzt einen herausnehmbaren Wassertank von 6 Liter
•
schützt vor Überhitzung
•
schaltet sich automatisch ab wenn kein Wasser vorhanden ist
•
Kontrollanzeige grün: Gerät in Betrieb
•
Kontrollanzeige rot: leerer Wassertank
•
kann je nach Wasserhärte mit Kalkspads verwendet werden umd starke Verkalkung zu vermeiden.
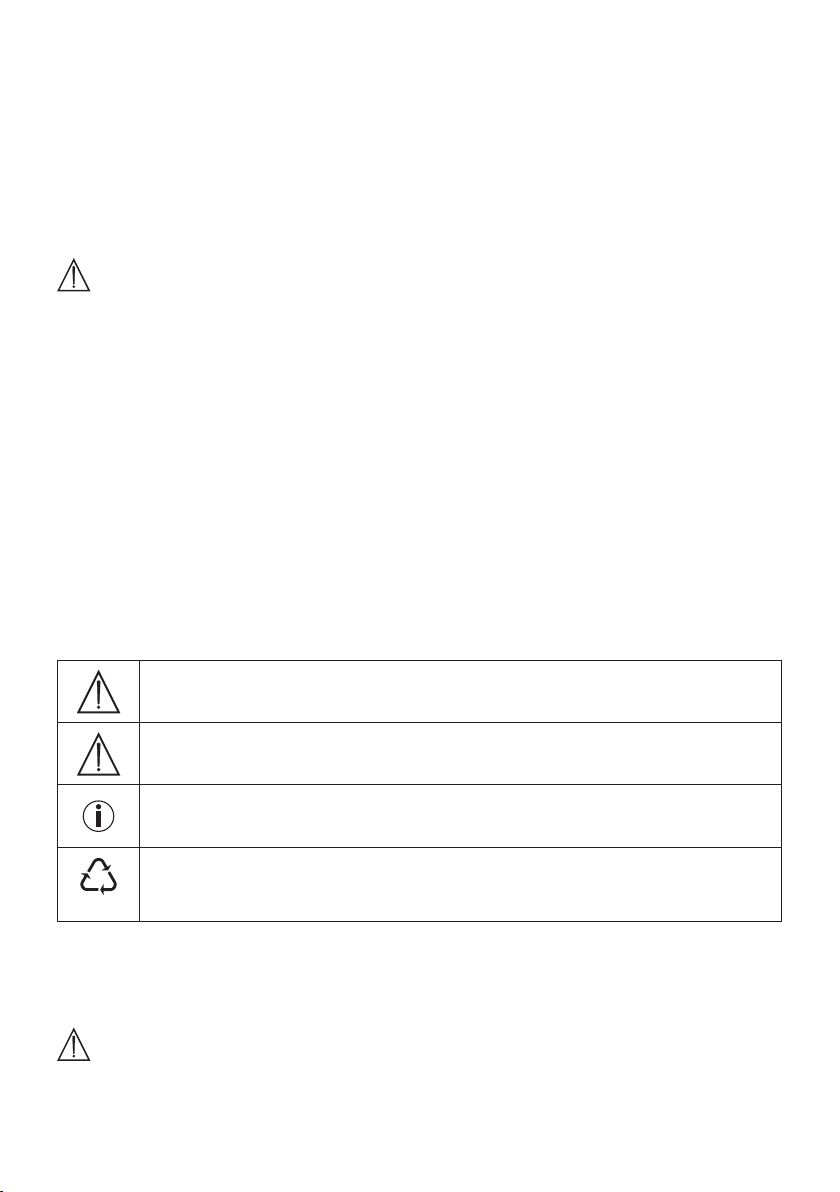
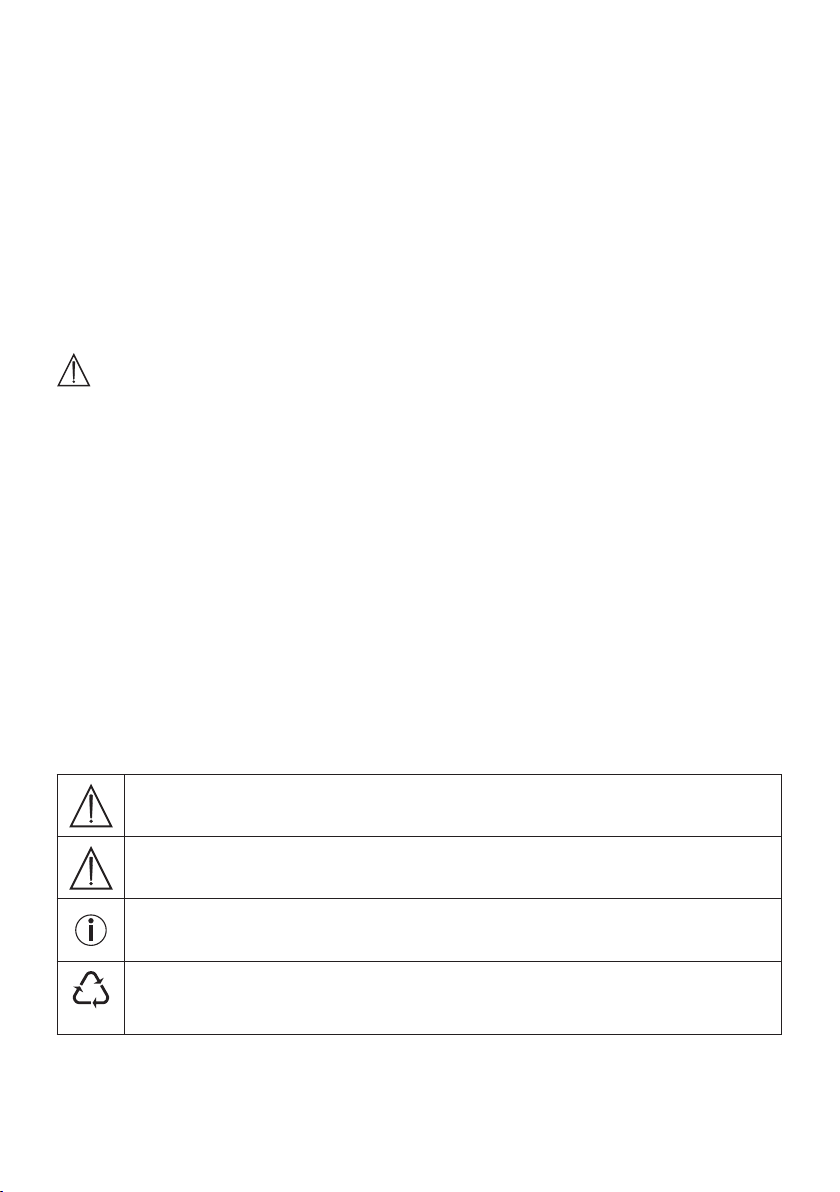
Zeichenerklärung
In der Gebrauchsanweisung bedeuten folgende Symbole:
2
WARNUNG
Warnhinweis auf mögliche Verletzungsgefahren oder Gefahren für Ihre Gesundheit.
ACHTUNG
Sicherheitshinweis auf mögliche Schäden an Gerät/Zubehör.
Hinweis
Hinweis auf wichtige Informationen.
20
Verpackung umweltgerecht entsorgen.
4. Sicherheitshinweise
Lesen Sie diese Gebrauchsanweisung sorgfältig! Ein Nichtbeachten der nachfolgenden Hinweise kann Personen- oder Sachschäden verursachen. Bewahren Sie die Gebrauchsanweisung auf und machen Sie diese
auch anderen Anwendern zugänglich. Übergeben Sie diese Anweisung bei Weitergabe des Geräts.
3

WARNUNG
Halten Sie Kinder von Verpackungsmaterial fern. Es besteht Erstickungsgefahr.
Stromschlag
WARNUNG
W
ie jedes elektrische Gerät ist dieser Luftbefeuchter vorsichtig und umsichtig zu gebrauchen, um
Gefahren durch elektrische Schläge zu vermeiden.
•
Benutzen Sie das Gerät nur mit der auf dem Gerät notierten Netzspannung (das Typenschild befindet
sich auf der Unterseite der Basis).
•
Stecken Sie immer nur das Netzkabel in die Steckdose, wenn das Gerät ausgeschaltet ist.
•
Benutzen Sie das Gerät nie, wenn das Gerät oder Zubehör sichtbare Schäden aufweisen.
•
Benutzen Sie das Gerät nicht, wenn es heruntergefallen ist oder wenn Wasser ins Geräteinnere
eingedrungen ist.
•
Benutzen Sie das Gerät nicht während eines Gewitters.
•
Schalten Sie das Gerät im Falle von Defekten oder Betriebsstörungen sofort aus. Ziehen Sie den
Stecker aus der Steckdose.
•
Ziehen Sie nicht am Netzkabel oder am Gerät, um den Stecker aus der Steckdose zu ziehen.
•
Halten oder tragen Sie das Gerät niemals am Netzkabel.
•
Klemmen sie das Netzkabel nicht ein.
•
Halten Sie Abstand zwischen dem Netzkabel und warmen Oberflächen.
•
Stellen Sie sicher, dass das Netzkabel und der Stecker nicht mit Wasser, Dampf oder anderen
FIüssigkeiten in Berührung kommen.
•
Benutzen Sie das Gerät nur in trockenen Innenräumen (z.B. nie im Badezimmer, in der Sauna usw.).
•
Greifen Sie niemals nach einem Gerät, das ins Wasser gefallen ist. Ziehen Sie sofort den Stecker
aus der Steckdose.
•
Setzen Sie das Gerät keinen Stößen aus und lassen Sie es nicht fallen.
Brandgefahr
WARNUNG
B
ei nicht bestimmungsgemäßem Gebrauch bzw. Missachtung der vorliegenden Gebrauchsanleitung
besteht unter Umständen Brandgefahr!
B
etreiben Sie den Luftbefeuchter deshalb
•
nie unter einer Abdeckung, wie z.B. Decke, Kissen, ...
•
nie in der Nähe von Benzin oder anderen leicht entflammbaren Stoffen.
Verbrühungsgefahr
WARNUNG
•
Der austretende Dampf ist heiß!
•
Halten Sie Hände und Gesicht auf keinen Fall während des Betriebs über die drehbare Dampfdüse [1].
•
Vermeiden Sie Kontakt mit heißen Oberflächen.
•
Versuchen Sie nicht, den Dampfturm [3], die Dampfdüse [1] oder das Kalkpad [4] während des Betriebs
oder innerhalb 15 Minuten nach dem Ausschalten und Ausstecken zu entfernen. Diese Teile dürfen
nur für Reinigungszwecke entfernt werden.
•
Da in diesem Luftbefeuchter hohe Temperaturen herrschen, treffen Sie bitte entsprechende Vorsichtsmaßnahmen, insbesondere in der Anwesenheit von Kindern und stellen Sie das Gerät an einem für
Kinder unzugänglichen Ort auf.
4

Handhabung
ACHTUNG
• Nach jedem Gebrauch und vor jeder Reinigung ist das Gerät auszuschalten und auszustecken.
•
D
as Gerät ist nur für den in dieser Gebrauchsanleitung beschriebenen Zweck vorgesehen. Der
Hersteller kann nicht für Schäden haftbar gemacht werden, die durch unsachgemäßen oder leichtsinnigen Gebrauch entstehen.
•
V
erlegen Sie das Netzkabel stolpersicher.
•
S
tecken Sie keine Gegenstände in Geräteöffnungen.
•
S
tellen Sie keine Gegenstände auf dem Gerät ab.
•
S
chützen Sie das Gerät vor hohen Temperaturen.
•
V
ermeiden Sie Wasserschäden durch sorgfältigen Umgang (z.B. Wasserschäden durch Spritzwasser
bei Holzfußböden).
•
S
ollte das Gerät versehentlich umkippen, kann Wasser auslaufen, auch wenn das Gerät ausge-
schaltet und nicht eingesteckt ist.
•
D
ie direkte Umgebung des Luftbefeuchters kann feucht werden.
•
M
it kalkhaltigem Wasser kann sich ein weißer Niederschlag bilden.
•
S
tellen Sie das Gerät nicht auf den Boden, sondern erhöht auf (z.B. auf einen Tisch, auf eine
Kommode).
•
S
tellen Sie das Gerät so auf, dass der Nebelaustritt nicht auf Gegenstände gerichtet ist.
•
L
eeren Sie das Restwasser aus, wenn Sie das Gerät nicht verwenden.
•
S
chützen Sie das Gerät vor hohen Temperaturen.
•
S
tellen Sie das Gerät auf einem wasserempfindlichen Untergrund auf.
Aufbewahrung und Pflege
ACHTUNG
•
Reinigen Sie das Gerät nur in der angegebenen Weise.
•
Stellen Sie sicher, dass kein Wasser in das Geräteinnere sowie auf das Kabel [11] oder den Netzstecker gelangt.
•
Schalten Sie das Gerät immer ab, wenn der Wassertank [8] leer ist oder wenn Sie das Gerät nicht
benutzen.
•
Wenn Sie das Gerät über längere Zeit nicht benutzen, ziehen Sie den Netzstecker [11] und reinigen
Sie das Gerät.
•
Schützen Sie das Gerät vor zu nahen Wärmequellen wie Öfen, Heizkörpern oder direktem Sonnenlicht.
•
Bewahren Sie kein Benzin oder andere leicht entflammbare Stoffe in der Nähe des Geräts auf.
Reparatur
WARNUNG
•
Reparaturen an Elektrogeräten dürfen nur von Fachkräften durchgeführt werden. Durch unsachgemäße Reparaturen können erhebliche Gefahren für den Benutzer entstehen. Wenden Sie sich bei
Reparaturen an den Kundenservice oder an einen autorisierten Händler.
Entsorgung
ACHTUNG
Im Interesse des Umweltschutzes darf das Gerät am Ende seiner Lebensdauer nicht mit dem
Hausmüll entsorgt werden.
Die Entsorgung kann über entsprechende Sammelstellen in Ihrem Land erfolgen. Entsorgen
Sie das Gerät gemäß der Elektro- und Elektronik Altgeräte EG-Richtlinie – WEEE (Waste Electrical and Electronic Equipment).
Bei Rückfragen wenden Sie sich an die für die Entsorgung zuständige kommunale Behörde.
5
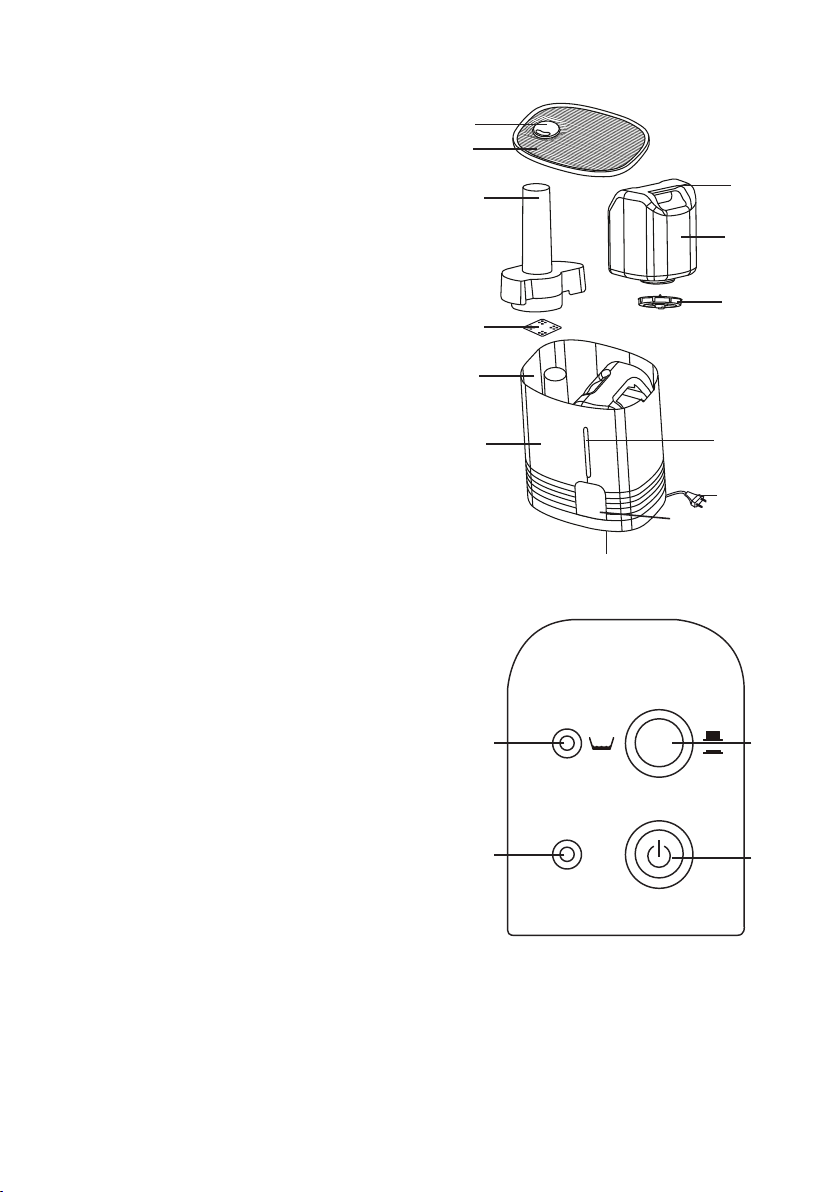
5. Gerätebeschreibung
Luftbefeuchter
1 Dampfdüse
2 Abdeckung
3 Dampfturm
4 Kalkpad
(unterhalb des Dampfturms
in der Heißwasserkammer)
5 Heißwasserkammer
(unterhalb des Dampfturms, nicht abgebildet)
6 Gehäuse des Luftbefeuchters
7 Griffmulden am Wassertank
8 Wassertank, Inhalt 6 Liter
9 Tankverschluss mit Ventil
10 Wasserstandsanzeige
11 Kabel mit Netzstecker
12 Bedienfeld (siehe auch Abbildung unten)
13 Schwarzer Luftfilter
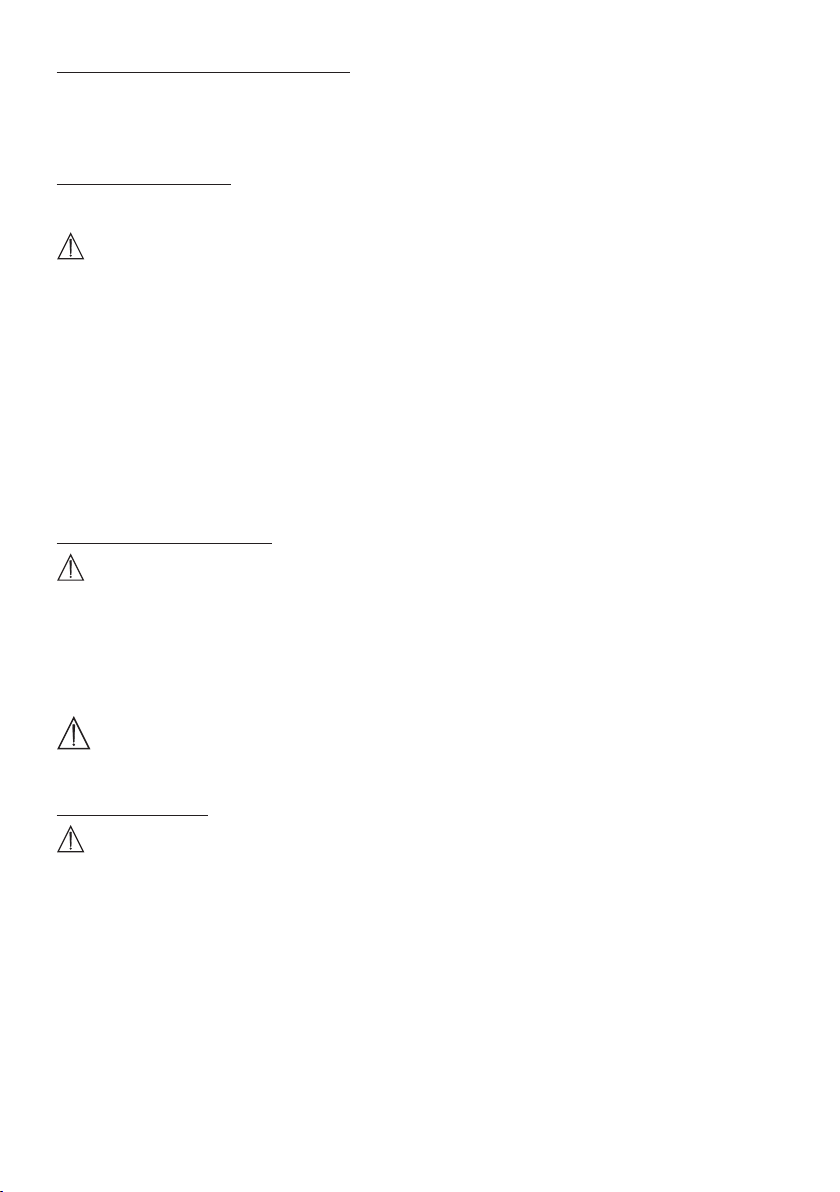
Bedienfeld
A Rote Kontrollanzeige leuchtet,
wenn der Wassertank leer ist.
B Grüne Kontrollanzeige leuchtet,
wenn der Luftbefeuchter eingeschaltet ist.
C Dampf-Taste für Regelung der Luftfeuchtigkeit
• Taste gedrückt: ca. 400 ml/h (viel Dampf)
• Taste nicht gedrückt: ca. 200 ml/h (wenig Dampf)
D ON/OFF-Taste zum Ein-/Ausschalten
des Luftbefeuchters
• Taste gedrückt: Gerät ist eingeschaltet
• Taste nicht gedrückt: Gerät ist ausgeschaltet
1
2
3
4
5
6
12
13
A C
B
10
11
7
8
9
I
II
D
6. Inbetriebnahme
•
Öffnen Sie die Kartonverpackung.
•
Entfernen Sie nun alle Folien.
•
Überprüfen Sie Gerät, Netzstecker und Kabel auf Beschädigungen.
6
Vor dem ersten Gebrauch reinigen
Aus hygienischen Gründen empfehlen wir, das Gehäuse des Luftbefeuchters [6], den Wassertank [8] und
das Kalkpad [4] vor dem ersten Gebrauch gründlich mit kaltem Wasser auszuspülen. Gehen Sie dabei vor,
wie beschrieben im Kapitel 8 „Reinigung und Aufbewahrung“, Abschnitt „Gerät reinigen“.
Wassertank befüllen
Befüllen Sie den Wassertank [8], wenn Sie das Gerät in Betrieb nehmen oder wenn die rote Kontrollanzeige
[A] leuchtet und so einen zu niedrigen Wasserstand anzeigt.
ACHTUNG
•
Verwenden Sie ausschließlich frisches Leitungswasser zum Befüllen des Wassertanks [8].
•
Geben Sie keinesfalls irgendwelche Zusätze ins Wasser.
•
Stellen Sie sicher, dass der Tankverschluss [9] mit Dichtung an der Unterseite des Wassertanks [8]
fest verschlossen ist, bevor Sie das Gerät in Betrieb nehmen.
•
Nehmen Sie die Abdeckung [2] vom Luftbefeuchter.
•
Ziehen Sie den Wassertank [8] an den Griffmulden [7] nach oben aus dem Luftbefeuchter. Schrauben
Sie den Tankverschluss [9] vom Wassertank [8] ab.
•
Spülen Sie den Wassertank [8] mit frischem Wasser aus.
•
Füllen Sie den Wassertank [8] mit kaltem Leitungswasser.
•
Schrauben Sie den Tankverschluss [9] auf den Wassertank [8]. Setzen Sie den Wassertank [8] in den
Luftbefeuchter ein.
•
Setzen Sie die Abdeckung [2] oben auf den Luftbefeuchter.
Luftbefeuchter aufstellen
ACHTUNG
Stellen Sie das Gerät so auf, dass die drehbare Dampfdüse [1] nicht direkt auf eine Wand gerichtet ist.
Die austretende Feuchtigkeit könnte zu Beschädigungen der Wand führen, insbesondere von Tapeten.
•
Stellen Sie den Luftbefeuchter auf einen ebenen, festen und wasserunempfindlichen Untergrund.
•
Platzieren Sie das Netzkabel [11] so, dass das Gerät nicht umgeworfen werden kann.
7. Bedienung
ACHTUNG
Prüfen Sie stets die Luftfeuchtigkeit Ihrer Raumluft. Der intensive Dauerbetrieb kann zu einer Überfeuchtung des Raumes führen. Die relative Luftfeuchtigkeit soll nicht über 60% steigen.
Gerät einschalten
ACHTUNG
•
Luftbefeuchter nie ohne Wassertank [8] oder Dampfturm [3] einschalten.
•
Den Stecker in die Steckdose stecken.
•
Drücken Sie die ON/OFF-Taste [D], um den Luftbefeuchter einzuschalten. Die grüne Kontrollanzeige
[B] leuchtet.
•
Noch vor Beginn der Dampfabgabe: Drehen Sie die Dampfdüse [1] so, dass der Dampf in die
gewünschte Richtung ausströmt.
•
Nach wenigen Minuten beginnt das Gerät mit der Dampfabgabe. Die grüne Kontrollanzeige [B] leuch-
tet, solange das Gerät am Stromnetz angeschlossen und eingeschaltet ist.
7
Dampfmenge wählen
• W
ählen Sie die Dampfmenge über die Dampf-Taste [C] .
Stufe I: wenig Dampf (ca. 200 ml/h)
Stufe II: viel Dampf (ca. 400 ml/h)
Nach wenigen Minuten beginnt das Gerät mit der geänderten Dampfabgabe.
Gerät ausschalten
Hinweis
•
Das Gerät ist für den Dauerbetrieb geeignet. Wir empfehlen dennoch, es für längere Zeit nicht ohne
Aufsicht zu betreiben (Nachtbetrieb).
•
Das Gerät verfügt über eine automatische Abschaltfunktion bei leerem Wassertank.
Drücken Sie die ON/OFF-Taste [D], um das Gerät auszuschalten. Die grüne Kontrollanzeige [B] erlischt.
8. Reinigung und Aufbewahrung
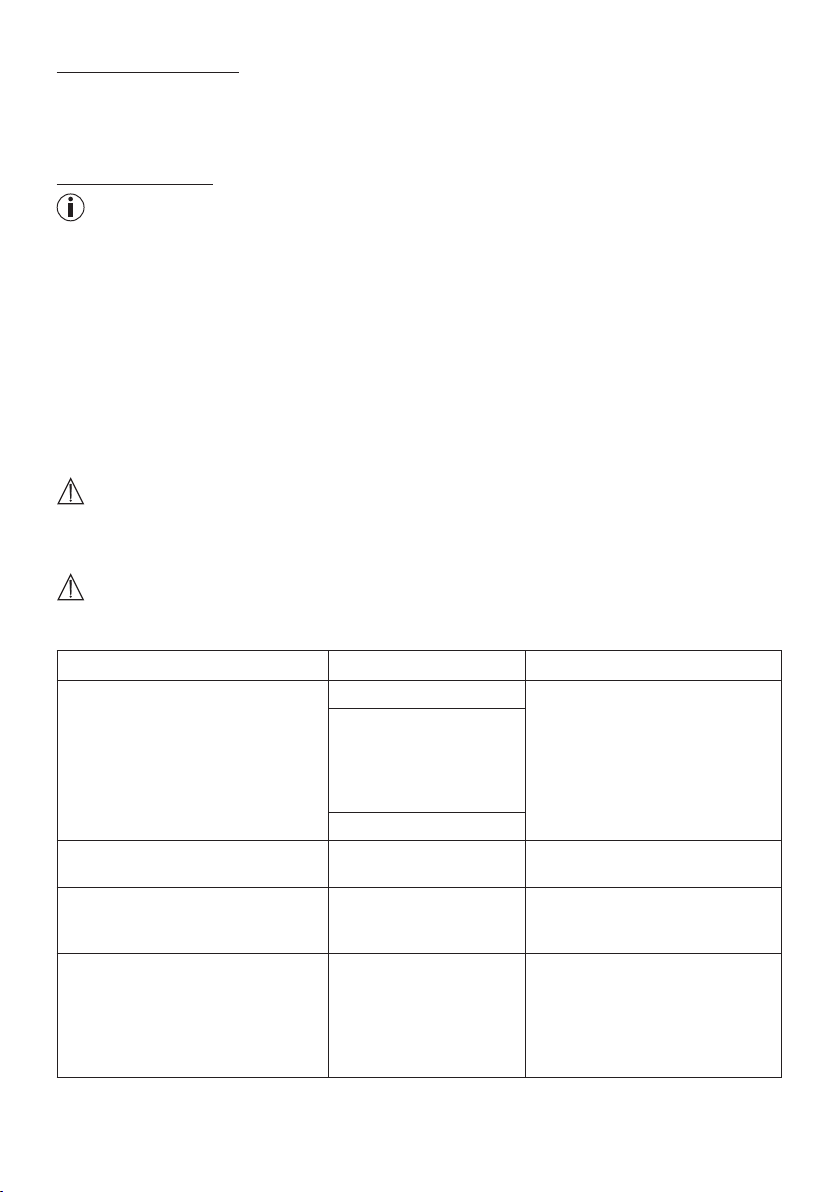
Übersicht
Ihr Luftbefeuchter sollte regelmäßig gereinigt und entkalkt werden, damit sich Rückstände aus dem Wasser,
wie z. B. Kalk, nicht im Gerät festsetzen können. Nur sorgfältige Pflege gewährleistet die maximale Dampfleistung, Hygiene und lange Lebensdauer des Luftbefeuchters. In der folgenden Tabelle sind alle erforderlichen Maßnahmen aufgeführt:
WARNUNG
Bevor Sie Ihren Luftbefeuchter reinigen oder entkalken:
•
ziehen Sie unbedingt den Netzstecker [11] aus der Steckdose,
•
warten Sie, bis das Gerät vollständig ausgekühlt ist.
ACHTUNG
Luftbefeuchter und Einzelteile nicht in der Spülmaschine reinigen.
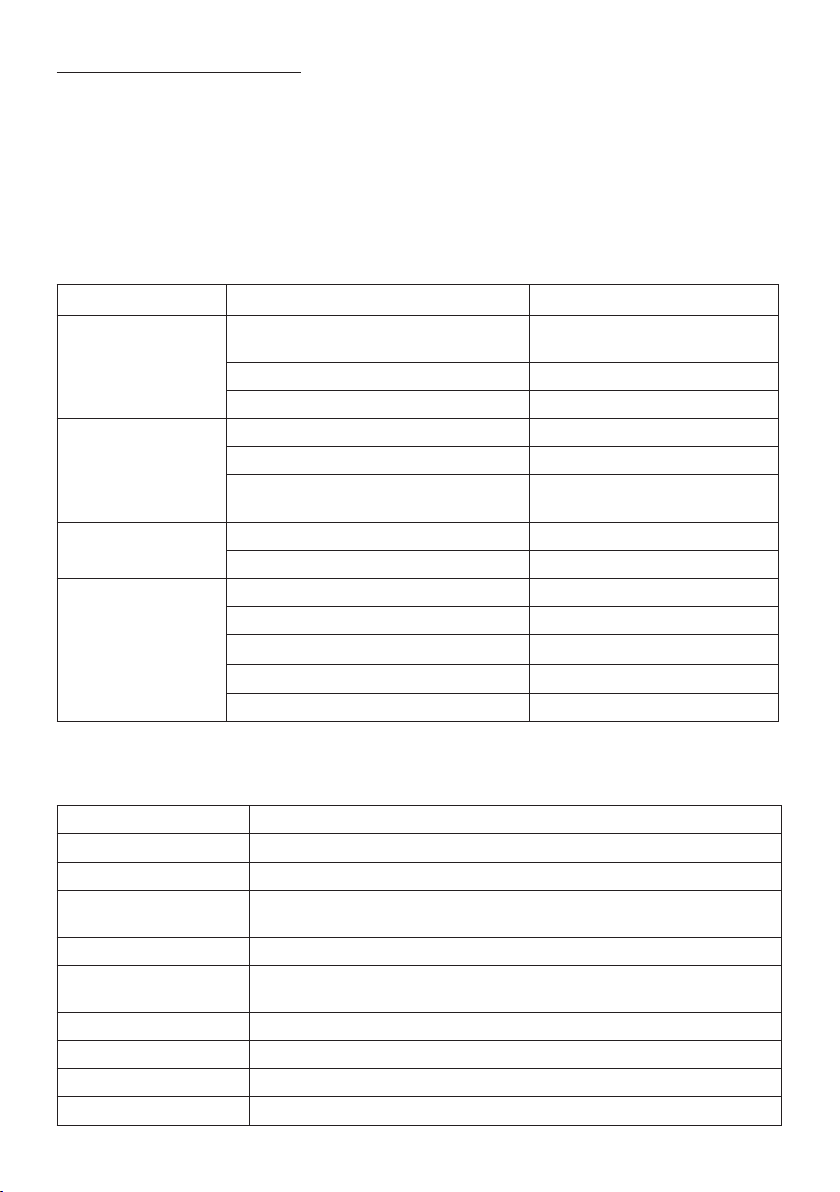
Wann muss ich … welches Teil … wie pflegen?
Einmal wöchentlich Gerät innen Siehe Kapitel 8, Abschnitt „Gerät
• Abdeckung [2]
• Dampfdüse [1] und
Dampfturm [3]
• Wassertank [8] und
Tankverschluss [9]
Gehäuse außen [6]
Je nach Verschmutzung, mindestens
aber einmal wöchentlich
Je nach Härtegrad des Wassers,
spätestens aber nach jeder Befeuch
tungssaison
Bei einem Härtegrad II (7 bis 14° dH)
Ihres Wassers empfehlen wir eine
wöchentliche Reinigung des Gerä
tes. Reinigen Sie spätestens, wenn
die Heißwasserkammer [5] von einer
Kalkschicht bedeckt ist.
Kalkpad [4] Siehe Kapitel 8, Abschnitt „Gerät
Kalkpad [4] Siehe Kapitel 8, Abschnitt „Gerät
-
Gerät Siehe Kapitel 8, Abschnitt „Gerät
-
8
reinigen“.
reinigen“.
reinigen“, „Kalkpad auswechseln“.
entkalken“.
Vor dem Reinigen und Entkalken
Gerät vom Netz nehmen
• S
chalten Sie das Gerät mit der ON/OFF-Taste [D] aus. Die grüne Kontrollanzeige [B] erlischt.
• Z
iehen Sie den Netzstecker [11] aus der Steckdose und warten Sie mindestens 15 Minuten, bis der Luft-
befeuchter vollständig ausgekühlt ist.
Gerät zerlegen
• N
ehmen Sie die Abdeckung [2] vom Luftbefeuchter.
• Z
iehen Sie den Wassertank [8] an den Griffmulden [7] nach oben aus dem Luftbefeuchter. Schrauben Sie
den Tankverschluss [9] vom Wassertank [8] ab.
• Z
iehen Sie den Dampfturm [3] nach oben aus dem Luftbefeuchter. Nehmen Sie die Dampfdüse [1] vom
Dampfturm [3].
• E
ntfernen Sie das Kalkpad [4] aus der Heißwasserkammer [5].
Gerät reinigen
Gerät innen und außen reinigen
WARNUNG
•
Elektrische Teile nicht mit Wasser in Berührung bringen.
•
Gerät keinesfalls unter fließendes Wasser halten oder in Wasser tauchen.
•
Falls sich noch Restwasser im Gerät befindet, schütten Sie es weg. Nehmen Sie dazu das Gerät mit
beiden Händen und kippen Sie das Wasser seitlich aus dem Unterteil.
•
Spülen Sie das Gerät innen gründlich mit frischem Wasser aus.
•
Wischen Sie das Gehäuse des Luftbefeuchters [6] außen mit einem feuchten Lappen und einem milden Reinigungsmittel sauber.
Einzelteile reinigen
• W
aschen Sie das Kalkpad [4] mit klarem Wasser aus. Hartnäckige Kalkablagerungen können Sie entfernen, indem Sie das Kalkpad [4] erst in eine schwache Essiglösung legen. Falls das Kalkpad [4] hart und
nicht mehr biegsam ist, muss es ersetzt werden (siehe nächsten Abschnitt 3 „Kalkpad auswechseln“).
• R
einigen Sie die folgenden Einzelteile des Gerätes gründlich mit Spülmittel und warmem Wasser. Entfer-
nen Sie die Rückstände von Reinigungsmitteln gründlich.
• W
assertank [8] und Tankverschluss [9].
Bei der Reinigung des Tankverschlusses [9] das Ventil nicht beschädigen!
• D
ampfturm [3] und Dampfdüse [1].
• A
bdeckung [2].
Kalkpad auswechseln
Hinweis
•
Kalkpads erhalten Sie bei der Service-Adresse oder dem Fachhändler.
•
Entfernen Sie das verbrauchte Kalkpad [4] aus der Heißwasserkammer [5]. Entsorgen Sie das Kalkpad im Hausmüll.
•
Falls sich noch Restwasser im Gerät befindet, schütten Sie es weg.
•
Verwenden Sie ein neues Kalkpad [4].
•
Waschen Sie das neue Kalkpad [4] mit klarem Wasser aus und legen Sie es in die Heißwasserkammer [5].
9
Gerät entkalken
Luftbefeuchter entkalken
Hinweis
•
Versuchen Sie keinesfalls, Kalkablagerungen mit spitzen oder scharfen Gegenständen zu entfernen.
Der Luftbefeuchter könnte dadurch beschädigt oder undicht werden.
•
Beachten Sie auch die Hersteller-Hinweise zu Ihrem Entkalkungsmittel.
•
Verwenden Sie ein handelsübliches Entkalkungsmittel.
•
Füllen Sie die Heißwasserkammer [5] bis zum Rand mit Entkalkerlösung.
•
Lassen Sie die Entkalkerlösung so lange einwirken, bis sich der Kalk gelöst hat.
•
Schütten Sie die Entkalkerlösung weg. Kippen Sie das Gerät seitlich und entfernen Sie so die Entkalkerlösung.
•
Spülen Sie das Gerät gründlich mit frischem Wasser aus.
Nach dem Reinigen und Entkalken
Kalkpad einlegen
• L
egen Sie das gereinigte Kalkpad oder das Ersatz-Kalkpad [4] in die Heißwasserkammer [5].
Gerät zusammensetzen
• Setzen Sie den Dampfturm [3] wieder in den Luftbefeuchter ein. Drücken Sie die Dampfdüse [1] in die
Öffnung oben am Dampfturm [3].
• S
chrauben Sie den Tankverschluss [9] auf den Wassertank [8]. Setzen Sie den Wassertank [8] in den Luft-
befeuchter ein.
• S
etzen Sie die Abdeckung [2] oben auf den Luftbefeuchter.
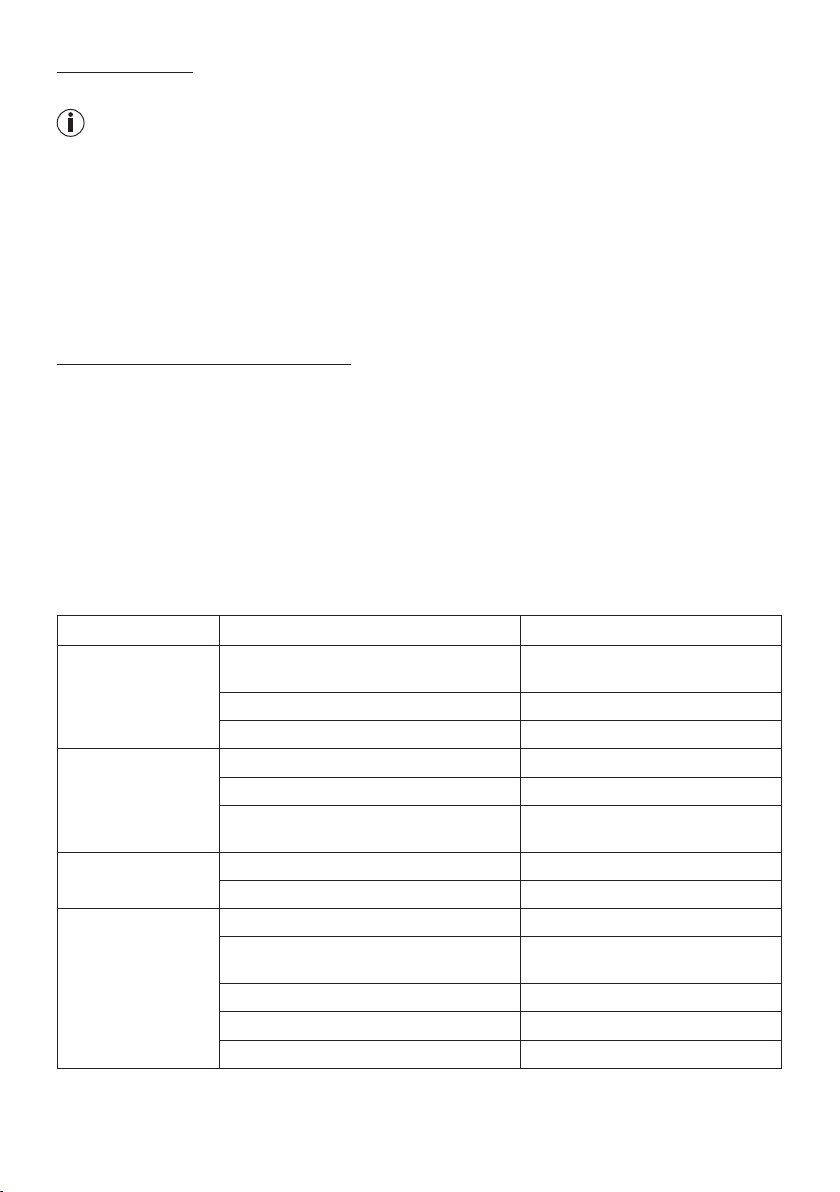
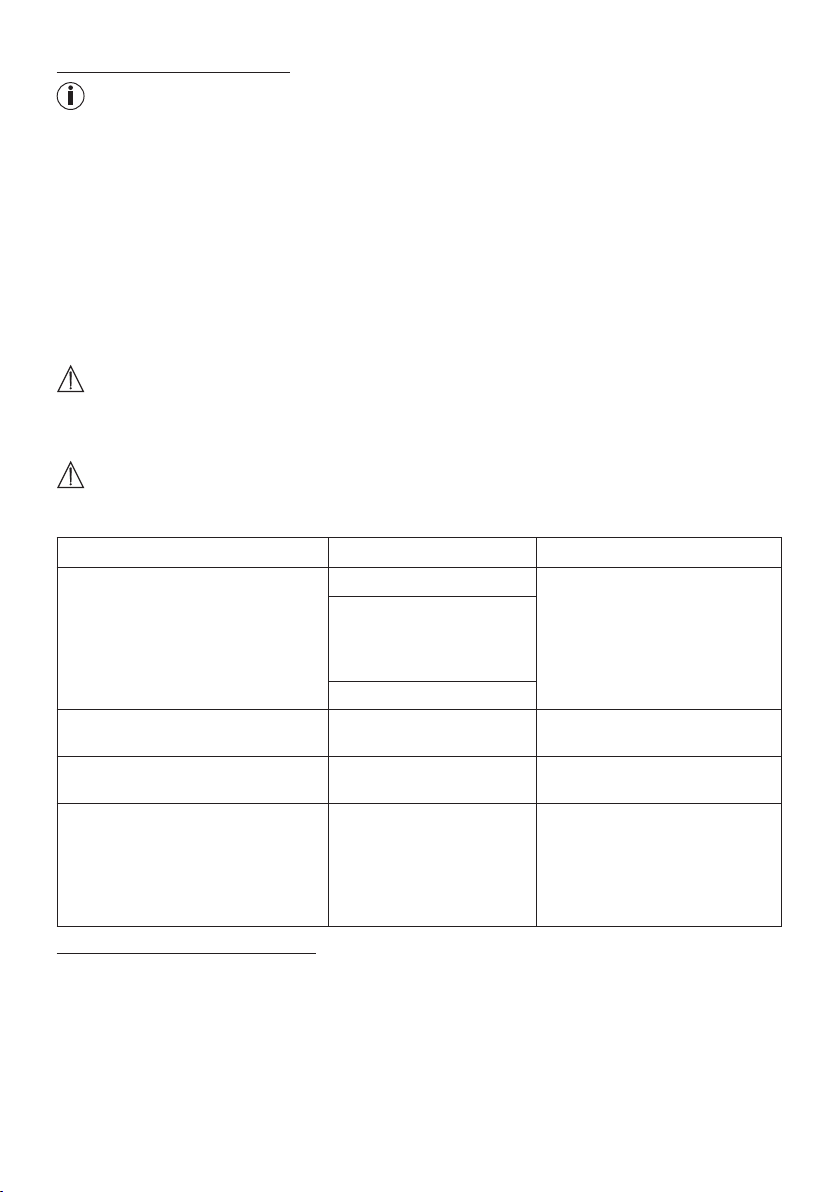
9. Was tun bei Problemen?
Problem Ursache Behebung
Keine Dampfabgabe Gerät nicht am Netz angeschlossen. Netzstecker [11] einstecken und
Wassertank [8] leer. Wasser nachfüllen.
Wassertank [8] nicht richtig eingesetzt. Wassertank [8] richtig einsetzen.
Gerät undicht Wassertank [8] undicht. Wassertank [8] ersetzen.
Wassertank [8] nicht richtig verschlossen. Verschluss [9] richtig schließen.
Dampfturm [3] nicht oder nicht richtig
eingesetzt.
Verzögerte
Dampfabgabe
Rote Kontrollanzeige
[A] leuchtet
Sehr kaltes Wasser im Wassertank [8]. Wärmeres Wasser verwenden.
Gerät stark verkalkt. Gerät entkalken.
Wassertank [8] leer. Wasser nachfüllen.
Ventil des Tankverschlusses [9] ist mit
Schmutz überzogen.
Gerät stark verkalkt. Gerät entkalken.
Wassertank [8] nicht richtig verschlossen. Verschluss [9] richtig schließen.
Wassertank [8] nicht richtig eingesetzt. Wassertank [8] richtig einsetzen.
Gerät einschalten.
Dampfturm [3] richtig einsetzen.
Reinigen Sie das Ventil.
Wenn das Problem bestehen bleibt, wenden Sie sich bitte an den Kundendienst.
10
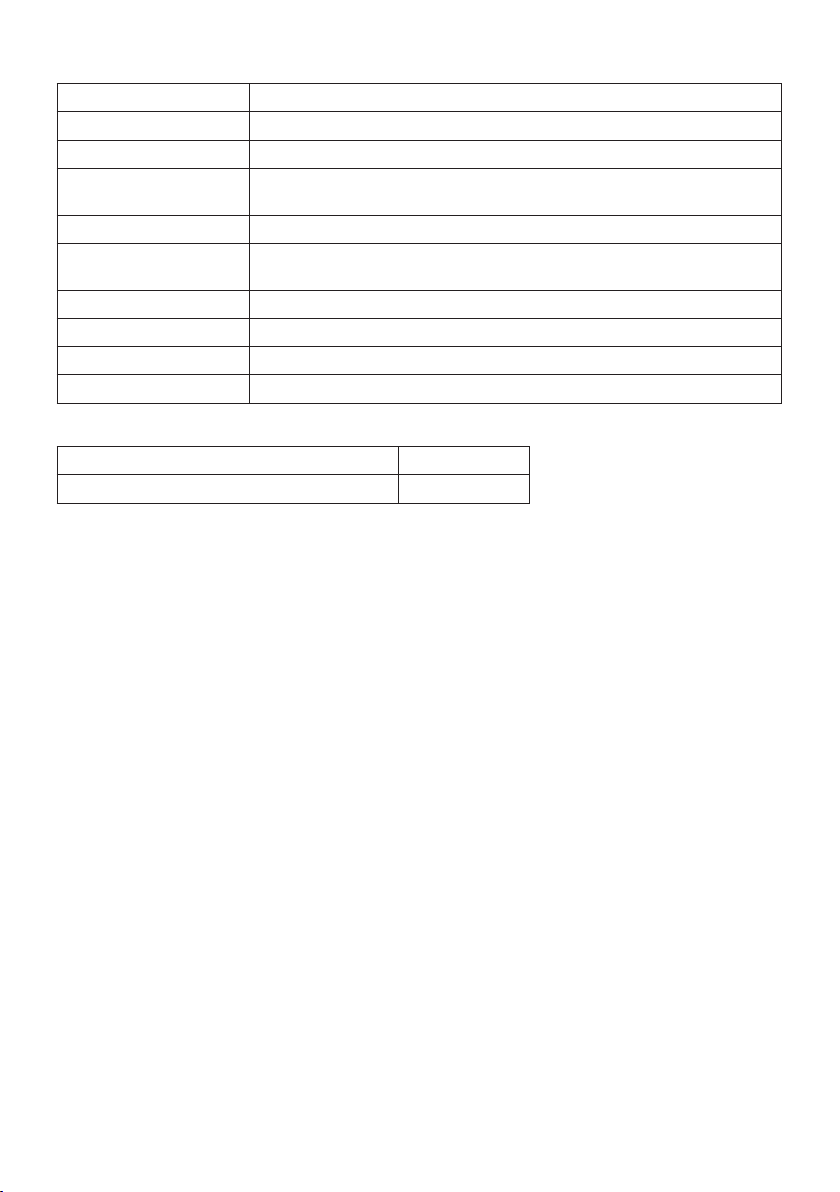
10. Technische Angaben
Nennleistung 365W
Nennspannung 230V / 50Hz
Inhalt Wassertank Ca. 6 Liter
Verdampfungsleistung Stufe I: ca. 200 ml/h
Überhitzungsschutz Mittels Thermostat
Trockengangsicherung Wenn nicht mehr genügend Wasser im Heizkopf ist, schaltet sich das Gerät
Schaltung 2-stufig
Gewicht Gewicht ca. 3,0 kg
Masse (B / H / T) 310 / 230 / 350 mm
Anschluss Festes Netzkabel, ca. 1,4 m lang
Stufe II: ca. 400 ml/h
automatisch aus. Das Gerät ermittelt den Wasserstand mittels Sensor.
11. Nachkaufartikel
Artikel Artikelnummer
10 Stück Kalkpads 163.141
12. Garantie/Service
Wir leisten 3 Jahre Garantie ab Kaufdatum für Material- und Fabrikationsfehler des Produktes. Die Garantie
gilt nicht:
• Im Falle von Schäden, die auf unsachgemäßer Bedienung beruhen.
• Für Verschleißteile.
• Bei Eigenverschulden des Kunden.
• Sobald das Gerät durch eine nicht autorisierte Werkstatt geöffnet wurde.
Die gesetzlichen Gewährleistungen des Kunden bleiben durch die Garantie unberührt. Für Geltendmachung
eines Garantiefalles innerhalb der Garantiezeit ist durch den Kunden der Nachweis des Kaufes zu führen.
Die Garantie ist innerhalb eines Zeitraumes von 3 Jahren ab Kaufdatum gegenüber der Beurer GmbH, Ulm
(Germany) geltend zu machen.
Bitte wenden Sie sich im Falle von Reklamationen an unseren Service unter folgendem Kontakt:
Service Hotline:
Tel.: +49 (0) 731 / 39 89-144
E-Mail: kd@beurer.de
www.beurer.com
Fordern wir Sie zur Übersendung des defekten Produktes auf, ist das Produkt an folgende Adresse zu
senden:
Beurer GmbH
Servicecenter
Lessingstraße 10 b
89231 Neu-Ulm
Germany
11
Irrtum und Änderungen vorbehalten
ENGLISH
Contents
1. Getting to know your appliance ............................... 12
2. Intended use ............................................................. 13
3. Instrument functions ................................................ 13
4. Safety information .................................................... 13
5. Appliance description .............................................. 16
6. Start-up ..................................................................... 16
7. Operation .................................................................. 17
8. Cleaning and storage ............................................... 18
9. In the event of problems .......................................... 20
10. Technical details ..................................................... 20
11. Replacement items ................................................ 21
12. Warranty/service .................................................... 21
Scope of supply
• A
ir humidifier
• 1
5 replacement pads
• I
nstructions for use
WARNING
• This device may be used by children over the age of eight and by people with reduced physical, sensory or mental skills or a lack of experience or knowledge, provided that they are supervised or have been
instructed on how to use the device safely, and are fully aware of the
consequent risks of use.
• Children must not play with the device.
• Cleaning and user maintenance must not be performed by children
unless supervised.
• Disconnect the device from the mains supply during filling or cleaning.
• When the water evaporation is activated, the escaping steam is hot –
risk of scalding.
• Do not use any solvent-based cleaning products.
•
If the mains connection cable of this device is damaged, it must be disposed of. If it cannot be removed, the device must be disposed of.
1. Getting to know your appliance
Humans spend a large proportion of their time indoors. For ideal ambient air, a humidity level of between
40% and 60% is recommended. This value is often not reached, particularly in winter, when cold, dry air
enters living spaces that are being aired and is then warmed up.
This dry ambient air draws in moisture, drying out mucous membranes and skin, but also furniture.
Ambient air that is too dry has a number of negative effects:
•
Mucous membranes and lips dry out
•
E
yes become irritated
•
I
nfections and respiratory diseases are more likely to occur
•
E
xhaustion, tiredness and difficulty concentrating
•
P
ets and plants are put under unnecessary strain
•
D
ust forms more quickly
•
E
lectrostatic charging of textiles and synthetic fibres, such as carpets and plastic floor coverings
•
W
ooden furniture, and especially parquet floors, are damaged
12
•
PAP
M
usical instruments go out of tune
Note that with this air humidifier, it also possible to over-humidify the room, e.g.
• i
f you operate the appliance at a high setting,
• t
he humidity that is generated cannot escape from the room,
• t
he air is already very humid.
It is best to check humidity with a hygrostat.
2. Intended use
This electric air humidifier is used for hygienic, odourless and bacteria-free humidification of living and work
areas for private use.
WARNING
–
If you suffer from a severe respiratory or lung disease, consult your doctor before using the air
humidifier.
–
The device is only intended for the purpose described in these instructions for use. The manufacturer
is not liable for damage resulting from improper or careless use.
3. Instrument functions
The LB 55 air humidifier
• moistens the air with warm steam, particularly hygienic
• with a humidification output of: 200 ml/h and 400 ml/h
• suitable for room sizes up to 50m
• with a removable 6 litre water tank
• overheating protection
• automatically turns off when no water is available
• green control display: Device in use
• red control display: empty water tank
• can be used with lime scale pads depending on water hardness to avoid heavy lime scale.
Explanation of symbols
The symbols in the instructions for use denote the following:
2
WARNING
Warning of possible risks of injury or health hazards.
IMPORTANT
Safety information about possible damage to appliance/accessories.
Note
Important information.
20
Dispose of packaging in an environmentally friendly manner.
4. Safety information
Read the instructions for use carefully. Failure to observe the following information can cause injuries or
damage to property. Keep the instructions carefully and also make them accessible to other users. Always
pass on these instructions together with the appliance.
WARNING
Keep packaging material away from children! There is a choking hazard.
13

Electric shock
WARNING
A
s with every electrical device, use this air humidifier carefully and cautiously, in order to avoid hazards
due to electric shock.
•
Only operate the device at the voltage indicated on the device (the type plate is located on the
underside of the base unit).
•
Only insert the mains cable into the socket when the device is switched off.
•
Never use the device if it or its accessories are visibly damaged.
•
Do not use the device if it has sustained afall or if water has penetrated the device interior.
•
Do not use the device during astorm.
•
In the event of defects or operational faults, switch off the device immediately and disconnect the
device from the mains socket.
•
Do not pull on the mains cable or on the device to disconnect the plug from the socket.
•
Never hold or carry the device by the mains cable.
•
Do not clamp or pinch the mains cable.
•
Keep the mains cable away from hot surfaces.
•
Ensure that the mains cable and plug do not come into contact with water, steam or other liquids.
•
Only use the device in dry internal rooms (e.g. never in the bathroom, sauna, etc.).
•
Never reach for adevice that has been submerged in water. Pull the plug out of the mains socket
immediately.
•
Do not subject the device to any impacts or drop the device.
Risk of fire
WARNING
T
here is a risk of fire if the device is used improperly or these instructions for use are ignored.
T
herefore, never use the air humidifier
• Underneath a cover, such as blanket, pillow, etc.
•
Near petrol or other highly flammable substances.
Risk of scalding
WARNING
•
The exiting steam is hot!
•
Never hold your hands or face over the rotary steam nozzle during operation [1].
•
Avoid contact with hot surfaces.
•
Never try to remove the steam tower [3], steam nozzle [1] or pad [4] during operation or within 15
minutes of switching off and unplugging the appliance from the mains. These parts may only be
removed for cleaning purposes.
•
As there are high temperatures inside this air humidifier, please take appropriate precautions, especially in the presence of children, and install the appliance in a location inaccessible to children.
Handling
IMPORTANT
• The device must be switched off and disconnected from the mains every time after use and before
cleaning.
•
T
he device is only intended for the purpose described in these instructions for use. The manufacturer
is not liable for damage resulting from improper or careless use.
•
E
nsure that the mains cable does not pose a trip hazard.
•
D
o not insert any objects into openings on the device.
•
D
o not place any objects on the device.
•
D
o not expose the device to high temperatures.
14
•
A
void water damage by handling the device carefully (e.g. water damage from splashing in the
vicinity of wooden floors).
•
I
f the device should accidentally tip over, water may escape, even if the device is switched off and
unplugged.
•
T
he immediate vicinity of the air humidifier may become damp.
•
C
alcareous water can leave white deposits.
•
D
o not place the device on the floor, but in a raised position (e.g. on a table or chest of drawers).
•
P
osition the device so that the mist outlet is not directed towards objects.
•
E
mpty any remaining water when the device is not in use.
• Place device on a water-resistant surface.
Storage and care
IMPORTANT
•
Only clean the appliance in the manner specified.
•
Make sure that no water gets inside the appliance or onto the cable [11] or mains plug.
•
Always switch off the appliance if the tank [8] is empty or the appliance is not in use.
•
If you are not going to use the appliance for some time, pull out the plug [11] from the mains and
clean the appliance.
•
Make sure that the appliance is not too close to heat sources such as ovens, radiators or direct sunlight.
•
Do not store petrol or any other highly flammable substances near the appliance.
Repair
WARNING
•
Repairs to electrical appliances may only be carried out by specially trained persons. Incorrect repairs
can lead to considerable danger for the user. In the event of repairs, please contact customer service
or an authorised dealer.
Disposal
WARNING
For environmental reasons, do not dispose of the device in the household waste at the end of
its useful life. Dispose of the unit at a suitable local collection or recycling point. Dispose of the
device in accordance with EC Directive – WEEE (Waste Electrical and Electronic Equipment).
If you have any questions, please contact the local authorities responsible for waste disposal.
15

5. Appliance description
Air humidifier
1 Steam nozzle
2 Cover
3 Steam tower
4 Pad
(beneath the steam tower in the
hot water chamber)
5 Hot water chamber
(beneath the steam tower, not illustrated)
6 Air humidifier casing
7 Water tank handles
8 Water tank, volume 6 litres
9 Tank catch, with valve
10 Water level window
11 Cable with mains plug
12 Control panel (see diagram below)
13 Black air filter
Control panel
A Red indicator illuminated when
water tank is empty
B Green indicator illuminated when
air humidifier is switched on
C Steam button for regulating humidity
• Button depressed: approx. 400 ml/h (maximum
steam)
• Button released: approx. 200 ml/h (minimum steam)
D ON/OFF button for switching
air humidifier on and off
• Button depressed: Appliance is switched on
• Button released: Appliance is switched off
1
2
3
4
5
6
12
13
A C
B
10
11
7
8
9
I
II
D
6. Start-up
•
Open the cardboard packaging.
•
Now remove all plastic films.
•
Check the device, mains plug and cable for damage.
16

Clean before using for the first time
For reasons of hygiene, we recommend rinsing the air humidifier, water tank and pad [4] thoroughly with
cold water before using for the first time. Then proceed as described in the “Cleaning the device” section of
chapter 8 “Cleaning and storage”.
Filling the tank
Fill the tank when putting the appliance into operation for the first time or if the red indicator [A] is illuminated,
indicating that the water level is too low.
IMPORTANT
•
Only ever use fresh tap water to fill the tank [8].
•
Never put any additives into the water.
•
Make sure that the tank catch [9] with seal on the base of the water tank [8] is tightly fastened before
putting the appliance into operation.
•
Remove the cover [2] from the air humidifier.
•
Pull the water tank [8] out of the air humidifier using the handles [7]. Unscrew the tank catch [9] from
the tank [8].
•
Rinse out the water tank [8] with clean water.
•
Fill the water tank [8] with cold tap water.
•
Screw the tank catch [9] onto the water tank [8]. Place the water tank [8] in the air humidifier.
•
Place the cover [2] on top of the air humidifier.
Air humidifier placement
Caution
Place the appliance so that the steam nozzle [1] is not pointing directly at a wall. The exiting moisture might
otherwise cause damage to walls, particularly to wallpaper.
• P
lace the air humidifier on a firm, even, water-resistant surface.
• P
osition the mains cable [11] so that the appliance cannot be knocked over.
7. Operation
IMPORTANT
Check the humidity of your ambient air regularly. Intensive continuous operation can cause the ambient air to become excessively humid. The relative air humidity should not exceed 60%.
Switching on the device
IMPORTANT
•
Never switch on the air humidifier without the water tank [8] or steam tower [3].
•
Insert the plug into the mains socket.
•
Press the ON/OFF button [D] in order to switch on the air humidifier. The green indicator [B] is illuminated.
•
Before the steam starts exiting: Rotate the steam nozzle [1] so that the steam exits in the required
direction.
•
After a few minutes, the appliance starts to give off steam. The green indicator [B] is illuminated while
the appliance is switched on and connected to the mains.
Selecting the amount of steam
•
Select the amount of steam using the steam button [C] .
Level 1: minimum steam (approx. 200 ml/h)
Level II: maximum steam (approx. 400 ml/h)
After a few minutes, the appliance alters the amount of steam generated.
17
Switching off the appliance
Note
•
The appliance is suitable for continuous operation. We recommend, however, that it is not operated
for any length of time without supervision (night operation).
•
The appliance has an automatic switch-off function when the tank is empty.
Press the ON/OFF button [D] in order to switch off the appliance. The green indicator light [B] goes out.
8. Cleaning and storage
Overview
Your air humidifier should be cleaned and descaled regularly in order to ensure that residue from the water
such as limescale does not accumulate in the appliance. Only if the air humidifier is carefully maintained
can we guarantee maximum steam output, hygiene and a long service life. The following table lists all the
measures necessary:
WARNING
Before you clean or descale your air humidifier:
•
be absolutely sure to pull out the plug [11] from the wall socket,
•
wait until the appliance has entirely cooled down.
IMPORTANT
Never clean the air humidifier or individual parts in the dishwasher.
When to do what ... to which part ... how?
Once a week Inside appliance
• Cover [2]
• Steam nozzle [1] and
steam tower [3]
• Tank [8] and tank catch [9]
Outside of casing [6]
Depending on soiling, but at least
once a week
Depending on water hardness, but at
the latest after each humid season
With a water hardness up to II (7 to
14° dH), we recommend cleaning the
appliance every week. The appliance
must be cleaned, at the very latest,
if the hotwater chamber is covered
with a layer of limescale.
Pad [4]
Pad [4]
Instrument
Before cleaning and descaling
Unplug the appliance
• S
witch off the appliance with the ON/OFF button [D]. The green indicator light [B] goes out.
• P
ull the plug [11] out from the wall socket and wait at least 15 minutes until the air humidifier has entirely
cooled.
See Chapter 8 in the section on
‘Cleaning the appliance’.
See Chapter 8 in the section on
‘Cleaning the appliance’.
See Chapter 8 in the section on
‘Cleaning the appliance’.
See Chapter 8 in the section on
‘Descaling the appliance’..
18
Disassemble the appliance
• R
emove the cover [2] from the air humidifier.
• P
ull the water tank [8] out of the air humidifier using the handles [7]. Unscrew the tank catch [9] from the
tank [8].
• Pull up the steam tower [3] out of the air humidifier. Remove the steam nozzle [1] from the steam tower [3].
• R
emove the pad [4] from the hotwater chamber.
Cleaning the appliance
Clean the inside and outside of the appliance
WARNING
•
Electrical parts must never come into contact with water.
•
Never hold the appliance under running water or immerse in water.
•
If there is any water left in the appliance, pour it away. To do this, hold the appliance with both hands
and tip the water out from the side of the base unit.
•
Rinse out the inside of the appliance thoroughly with clean water.
•
Wipe the outside of the air humidifier casing [6] with a damp cloth and mild cleaning agent.
Clean individual parts
• Wash the pad [4] with clean water. You can remove stubborn limescale by first putting the pad [4] in a weak
vinegar solution. If the pad [4] is hard and rigid, it must be replaced (see next section 3 ‘Changing the pad’).
• C
lean the following individual parts of the appliance thoroughly with washing-up liquid and warm water.
Any residue from cleaning agents should be thoroughly removed.
• T
ank [8] and tank catch [9]. When cleaning the tank catch [9], do not damage the valve.
• S
team tower [3] and steam nozzle [1].
• C
over [2].
Changing the pad
Note
• P
ads are obtainable from the service address or from the authorised dealer.
• R
emove the worn pad [4] from the hotwater chamber. Dispose of the pad in the household refuse.
• I
f there is any water left in the appliance, pour it out.
• U
se a new pad [4].
• W
ash out the new pad [4] with clean water and put in the hotwater chamber.
D
escaling the appliance
Descale the air humidifier
Note
•
Never try to remove any limescale deposit with pointed or sharp objects. This might damage the air
humidifier or cause it to leak.
•
You should also note the manufacturer’s advice for the descaling agent which you are using.
•
Use a standard commercial descaling agent.
•
Fill the hotwater chamber up to the brim with descaling solution.
•
Leave the descaling solution to work until the limescale has dissolved.
•
Pour away the descaling solution. Tip the appliance sideways to remove the descaling solution.
•
Rinse out the appliance thoroughly with clean water.
19
After cleaning and descaling
Insert the pad
• P
ut the cleaned pad or replacement pad [4] into the hotwater chamber.
Assemble the appliance
• P
ut the steam tower [3] back into the air humidifier. Press the steam nozzle [1] into the opening at the top
of the steam tower [3].
• S
crew the tank catch [9] onto the water tank [8]. Place the water tank [8] in the air humidifier.
• P
lace the cover [2] on top of the air humidifier.
9. In the event of problems
Problem Cause Remedy
No steam exiting Appliance not connected to power.
Water tank [8] empty. Replenish water.
Water tank [8] not fitted correctly. Fit tank [8] properly.
Appliance leaking Water tank [8] leaking. Replace tank [8].
Water tank [8] not shut properly. Fasten the catch [9] properly.
Steam tower [3] not installed or not
installed correctly.
Delay in steam output Very cold water in tank. Use warmer water.
Appliance heavily scaled. Descale the appliance.
Red indicator [A] illuminated
Water tank [8] empty. Replenish water.
Valve on tank catch [9] is covered with dirt.
Appliance heavily scaled. Descale the appliance.
Water tank [8] not shut properly. Close the catch [9] properly.
Water tank [8] not fitted correctly. Fit tank [8] properly.
Insert the plug [11] into the mains
and switch on the appliance.
Install steam tower [3] properly.
Clean the valve.
If the problem persists, please contact customer service.
10. Technical details
Rated output 365W
Nominal voltage 230V / 50Hz
Water tank volume approx. 6 litres
Evaporation rate Level I: approx. 200 ml/h
Overheating protection Through thermostat
Safeguard against
running dry
Switching 2-stage
Weight approx. 3.0 kg
Dimensions (W / H / D) 310 / 230 / 350 mm
Connection Fixed cable, approx. 1.4 m in length
Level II: approx. 400 ml/h
If there is not enough water in the heater unit, the appliance switches off automatically. The appliance has a sensor which detects the water level.
20

11. Replacement items
Item Item number
10 anti-lime pads 163.141
12. Warranty/service
In case of a claim under the warranty please contact your local dealer or the local representation which is
mentioned in the list “service international”.
In case of returning the unit please add a copy of your receipt and a short report of the defect.
The following warranty terms shall apply:
1. The warranty period for BEURER products is either 3 years or- if longer- the country specific warranty
period from date of Purchase.
In case of a warranty claim, the date of purchase has to be proven by means of the sales receipt or
invoice.
2. Repairs (complete unit or parts of the unit) do not extend the warranty period.
3. The warranty shall not be valid for damages because of
a. improper treatment, e.g. nonobservance of the user instructions.
b. repairs or tampering by the customer or unauthorised third parties.
c. transport from the manufacturer to the consumer or during transport to the service centre.
d. The warranty shall not be valid for accessories which are subject to normal wear and tear (cuff, batte
ries etc.).
4. Liability for direct or indirect consequential losses caused by the unit are excluded even if the damage
to the unit is accepted as a warranty claim.
-
21
Subject to errors and changes

FRANÇAIS
Contenu
1. Premieres experiences ............................................. 22
2. Utilisation conforme aux recommandations ........... 23
3. Fonctions de l’appareil ............................................. 23
4. Remarque de securite .............................................. 23
5. Description de l‘appareil .......................................... 26
6. Mise en service ......................................................... 26
7. Utilisation .................................................................. 27
8. Nettoyage et stockage ............................................. 28
9. Que faire en cas de probleme ? ............................... 30
10. Dinnees techniques ................................................ 31
11. Articles de rechange ............................................. 31
12. Garantie/Maintenance ............................................ 31
Fourniture
• H
umidificateur d’air
• 1
5 tampons anti-tartre de rechange
• L
e présent mode d’emploi
AVERTISSEMENT
• Cet appareil peut être utilisé par les enfants à partir de 8ans ainsi que
les déficients physiques, sensoriels ou mentaux et les personnes ayant
peu de connaissances ou d’expérience à la condition qu’ils soient
surveillés ou sachent comment l’utiliser en toute sécurité et en com
prennent les risques.
• Les enfants ne doivent pas jouer avec l’appareil.
• Le nettoyage et l’entretien ne doivent pas être effectués par des enfants
sans surveillance.
• Débranchez l’appareil pendant son remplissage et son nettoyage.
• En cas d’utilisation avec la fonction évaporation de l’eau activée, la
vapeur qui sort est chaude et peut causer des brûlures.
• N’utilisez pas de produit nettoyant contenant des solvants.
• Si le câble d’alimentation électrique de l’appareil est endommagé, il doit
être mis au rebut. S’il n’est pas détachable, l’appareil doit être mis au
rebut.
-
1. Premieres experiences
Nous passons la plus grande partie de notre temps dans des pièces fermées. L’air ambiant idéal doit contenir
une humidité relative de 40 à 60%. Cette valeur baisse principalement en hiver lorsqu’on aère une pièce et
que l’air extérieur, froid et sec, entre et se réchauffe à l’intérieur.
Cet air ambiant plus sec absorbe l’humidité et assèche donc les muqueuses et la peau ainsi que les meubles.
L’air ambiant trop sec a des conséquences négatives:
• Il assèche les muqueuses et les lèvres
• Les yeux brûlent
• L’air sec favorise les infections et maladies des voies respiratoires
• Épuisement, fatigue et trouble de la concentration
• Les animaux domestiques et les plantes d’appartement peuvent être affectés
• Il favorise le dépôt de poussière
22
• Il augmente la charge électrostatique des textiles et des fibres synthétiques, comme les tapis et les
PAP
revêtements de sol en plastique
• Il endommage les meubles en bois et notamment les parquets
• Il désaccorde les instruments de musique
Notez que cet humidificateur d’air pourra également provoquer une humidité excessive dans la pièce, par
exemple si
• v
ous utilisez l’appareil à une puissance élevée,
• l’humidité dégagée ne peut pas s’échapper de la pièce,
• l’humidité ambiante est déjà très élevée.
Idéalement, contrôlez l’humidité ambiante au moyen d’un hygrostat.
2. Utilisation conforme aux recommandations
Cet humidificateur d’air électrique sert à l’humidification hygiénique, inodore et sans bactéries des pièces
d’habitation et de travail du domaine privé.
AVERTISSEMENT
–
Si vous souffrez d’une maladie grave des voies respiratoires ou des poumons, consultez votre
médecin avant d’utiliser l’humidificateur d’air.
–
L’appareil est conçu pour l’utilisation décrite dans ce mode d’emploi. Le fabricant ne peut être tenu
responsable des dommages causés par une utilisation inappropriée ou non conforme.
3. Fonctions de l’appareil
L’humidificateur d’air LB 55
• humidifie l’air de manière particulièrement hygiénique
• offre de véritables performances en termes d’humidification: 200ml/h et 400ml/h
• est adapté aux grandes pièces jusqu’à 50m
• dispose d’un réservoir amovible de 6litres
• protège l’appareil contre la surchauffe
• s’arrête automatiquement lorsqu’il n’y a plus d’eau
• dispose d’un affichage de contrôle vert indiquant que l’appareil est en service
• dispose d’un affichage de contrôle rouge indiquant que le réservoir est vide
• peut être utilisé avec des plaquettes anticalcaire en fonction de la dureté de l’eau afin d’éviter un entartrage
important.
Explication des signes
Les symboles suivants employés tout au long du mode d’emploi ont la signification suivante :
2
AVERTISSEMENT
Avertissement, risque de blessure ou danger possible pour votre santé.
ACHTUNG
Remarque de sécurité relative à la possibilité de dommages sur l’appareil/les accessoires.
Remarque
Remarque relative à des informations importantes.
20
Emballage à trier.
4. Remarque de securite
Lisez attentivement le présent mode d’emploi ! La non-observation des remarques suivantes peut causer des
dommages personnels ou matériels. Conservez le mode d’emploi et faites en sorte qu’il soit accessible aux
autres utilisateurs. Lors du transfert de l’appareil, n’oubliez pas de donner aussi le présent mode d’emploi.
23

AVERTISSEMENT
Maintenez les emballages hors de la portée des enfants. Ils pourraient s’étouffer.
Choc électrique
AVERTISSEMENT
C
omme tout appareil électrique, cet humidificateur d’air nécessite prudence et circonspection lors de
son utilisation pour éviter tout risque de choc électrique.
•
N’utilisez l’appareil qu’à la tension indiquée sur l’appareil (la plaque signalétique se trouve en-dessous de
la base).
•
Veillez toujours àne brancher le câble d’alimentation dans la prise que lorsque l’appareil est éteint.
•
N’utilisez jamais l’appareil lorsque celui-ci ou un accessoire présente des dégâts visibles.
•
N’utilisez pas l’appareil s’il est tombé par terre ou si de l’eau a pénétré àl’intérieur.
•
N’utilisez pas l’appareil en cas d’orage.
•
En cas de défauts ou de problèmes de fonctionnement, éteignez immédiatement l’appareil. Décon
nectez la prise du secteur.
•
Ne tirez pas sur le câble d’alimentation ou sur l’appareil pour retirer la fiche de la prise.
•
Ne tenez ou ne portez jamais l’appareil par le câble d’alimentation.
•
Ne tordez pas le câble d’alimentation.
•
Mettez une certaine distance entre le câble et les surfaces chaudes.
•
Assurez-vous que le câble d’alimentation et la prise n’entrent pas en contact avec de l’eau, de la
vapeur ou d’autres liquides.
•
Utilisez l’appareil seulement dans des pièces intérieures sèches (par ex. jamais dans une salle de
bain, un sauna, etc.).
•
N’essayez pas de récupérer un appareil qui est tombé dans l’eau. Déconnectez-le immédiatement
du secteur.
•
Ne soumettez l’appareil àaucun coup et ne le faites pas tomber.
Risque d’incendie
AVERTISSEMENT
Toute utilisation inappropriée ou non conforme aux présentes instructions d’utilisation peut entraîner
un risque d’incendie!
N
’utilisez jamais l’humidificateur d’air
• recouvert par une couverture ou des coussins, par exemple.
•
n’utilisez jamais l’appareil à proximité d’essence ou d’autres matières inflammables.
-
Risque de brûlures
AVERTISSEMENT
•
La vapeur qui sort est chaude !
•
Pendant le fonctionnement, ne mettez en aucun cas les mains ni le visage au-dessus de la buse de
vapeur rotative [1].
•
Evitez de toucher les surfaces chaudes.
•
Pendant le fonctionnement ou durant les 15 minutes qui suivent l’arrêt ou la mise hors secteur de
l’appareil, n’essayez pas de retirer la tour d’évaporation [3], la buse de vapeur [1] ou le tampon antitartre [4]. Ces pièces ne doivent être enlevées qu’à des fins de nettoyage.
24

•
Les températures à l’intérieur de l’humidificateur d’air sont élevées. Par conséquent, prenez les précautions correspondantes, notamment en présence d’enfants, et placez l’appareil à un endroit auquel
les enfants ne pourront pas accéder.
Utilisation
ATTENTION
• L’appareil doit être éteint et débranché après chaque utilisation et avant chaque nettoyage.
•
L
’appareil est conçu pour l’utilisation décrite dans ce mode d’emploi. Le fabricant ne peut être tenu
responsable des dommages causés par une utilisation inappropriée ou non conforme.
•
P
lacez le câble d’alimentation de manière à ne pas trébucher.
•
N
’insérez aucun objet dans les ouvertures de l’appareil.
•
N
e posez aucun objet sur l’appareil.
•
N
’exposez pas l’appareil à des températures élevées.
•
M
anipulez l’appareil avec précaution afin d’éviter tout dégât des eaux (des éclaboussures sur un
parquet peuvent occasionner un dégât des eaux).
•
S
i l’appareil est renversé par inadvertance, de l’eau peut s’écouler, même si l’appareil est éteint
et débranché.
•
L
a zone autour de l’humidificateur d’air peut être mouillée.
•
L
’eau calcaire peut créer des dépôts blancs.
•
N
e posez pas l’appareil sur le sol, mais plutôt en hauteur (par ex. sur une table, une commode).
•
P
lacez l’appareil de manière à ce que la sortie de la vapeur ne soit pas orientée vers des objets.
•
V
idez l’eau restante lorsque vous n’utilisez pas l’appareil.
•
N
’exposez pas l’appareil à des températures élevées.
• Posez l’appareil sur une surface résistante à l’eau.
Rangement et entretien
ATTENTION
•
Nettoyez l’appareil uniquement selon la méthode indiquée.
•
Veillez à ce qu’il n’aille pas d’eau à l’intérieur de l’appareil, sur le câble [11] ou sur la fiche secteur.
•
Eteignez toujours l’appareil lorsque le réservoir d’eau [8] est vide ou lorsque vous ne l’utilisez pas.
•
Si vous prévoyez de ne pas utiliser l’appareil avant un long moment, débranchez- le [11] et nettoyez-le.
•
Protégez l’appareil des sources de chaleur trop proches telles que fours, radiateurs ou rayons directs
du soleil.
•
Ne conservez pas d’essence ou d’autres produits facilement inflammables à proximité de l’appareil.
Réparations
AVERTISSEMENT
•
Les réparations des appareils électriques doivent être effectuées uniquement par des électriciens
qualifiés. Les réparations non conformes peuvent présenter des risques sérieux pour l’utilisateur. Pour
toute réparation, adressez-vous au service après-vente ou à un dépositaire agréé.
Elimination
ATTENTION
Dans l’intérêt de la protection de l’environnement, l’appareil ne doit pas être jeté avec les
ordures ménagères à la fin de sa durée de service. L’élimination doit se faire par le biais des
points de collecte compétents dans votre pays. Veuillez éliminer l’appareil conformément à la
directive européenne – WEEE (Waste Electrical and Electronic Equipment) relative aux appa
reils électriques et électroniques usagés. Pour toute question, adressez-vous aux collectivités locales
responsables de l’élimination et du recyclage de ces produits.
25
-
 Loading...