

Page 1

LB 45
DE
Luftbefeuchter
Gebrauchsanweisung .................. 2
EN
Air humidifier
Instructions for use .................... 13
FR
Humidificateur d’air
Mode d’emploi ........................... 23
ES
Humidificador de aire
Instrucciones de uso ................. 33
IT
Umidificatore
Istruzioni per l'uso...................... 44
TR
Hava nemlendirici
Kullanım kılavuzu ....................... 54
RU
Увлажнитель воздуха
Инструкция поприменению .... 64
PL
Nawilżacz powietrza
Instrukcja obsługi ....................... 74
Page 2
DEUTSCH
Lesen Sie diese Gebrauchsanweisung sorgfältig durch,
bewahren Sie sie für den späteren Gebrauch auf, machen Sie
sie anderen Benutzern zugänglich und beachten Sie die
Hinweise.
Inhaltsverzeichnis
1. Zum Kennenlernen ........................................3
2. Bestimmungsgemäßer Gebrauch .................4
3. Sicherheitshinweise.......................................4
4. Gerätebeschreibung ......................................5
5. Inbetriebnahme..............................................6
6. Bedienung ......................................................7
7. Reinigung und Pflege ....................................7
8. Zusatzartikel Kalkfilter ..................................9
9. Was tun bei Problemen? ............................10
10. Technische Daten .......................................10
11. Entsorgung .................................................11
12. Nachkaufartikel ..........................................11
13. Garantie/Service .........................................12
WARNUNG
• Dieses Gerät kann von Kindern ab 8 Jahren und darüber sowie von
Personen mit verringerten physischen, sensorischen oder mentalen
Fähigkeiten oder Mangel an Erfahrungen und Wissen benutzt werden,
wenn sie beaufsichtigt oder bezüglich des sicheren Gebrauchs des
Gerätes unterwiesen wurden und die daraus resultierenden Gefahren
verstehen.
• Kinder dürfen nicht mit dem Gerät spielen.
• Reinigungs und Benutzer-Wartung dürfen nicht von Kindern ohne Be
aufsichtigung durchgeführt werden.
• Trennen Sie das Gerät während dem Füllen und Reinigen vom Netz.
• Verwenden Sie keine lösungsmittelhaltigen Reiniger.
• Wenn die Netzanschlussleitung dieses Geräts beschädigt wird, muss
sie entsorgt werden. Ist sie nicht abnehmbar, muss das Gerät entsorgt
werden.
-
Sehr geehrte Kundin, sehr geehrter Kunde,
wir freuen uns, dass Sie sich für ein Produkt unseres Sortimentes entschieden haben. Unser Name steht
für hochwertige und eingehend geprüfte Qualitätsprodukte aus den Bereichen Wärme, Gewicht, Blutdruck,
Körpertemperatur, Puls, Sanfte Therapie, Massage, Beauty, Baby und Luft.
Bitte lesen Sie diese Gebrauchsanweisung aufmerksam durch, bewahren Sie sie für späteren Gebrauch auf,
machen Sie sie anderen Benutzern zugänglich und beachten Sie die Hinweise.
Mit freundlicher Empfehlung
Ihr Beurer-Team
2
Page 3

Lieferumfang
PAP
1x Luftbefeuchter
15x Ersatz-Aromapads
1x Diese Gebrauchsanweisung
1. Zum Kennenlernen
Der Mensch verbringt den größten Teil seiner Zeit in geschlossen Räumen. Für die ideale Raumluft wird eine
relative Luftfeuchtigkeit von 40 bis 60% empfohlen. Vor allem im Winter wird dieser Wert häufig unterschrit
ten, wenn beim Lüften kalte Luft mit wenig Feuchtigkeit in Wohnräume strömt und dort aufgewärmt wird.
Diese trockene Raumluft nimmt Feuchtigkeit auf und trocknet dadurch Schleimhäute und Haut, aber auch
Einrichtungsgegenstände, aus.
Zu trockene Raumluft hat eine Reihe negativer Auswirkungen:
•
S
chleimhäute und Lippen trocknen aus.
•
D
ie Augen brennen.
•
I
nfektionen und Erkrankungen der Atemwege werden begünstigt.
•
A
bgespanntheit, Müdigkeit und Konzentrationsschwäche.
•
H
austiere und Zimmerpflanzen werden belastet.
•
S
taubentwicklung wird gefördert.
•
E
lektrostatische Aufladung von Textilien aus Kunstfasern, wie Teppiche und Kunststoffböden.
•
E
inrichtungsgegenstände aus Holz und besonders Parkettböden nehmen Schaden.
•
M
usikinstrumente verstimmen sich.
Zeichenerklärung
Folgende Symbole werden in der Gebrauchsanweisung, auf der Verpackung und auf dem Typenschild verwendet:
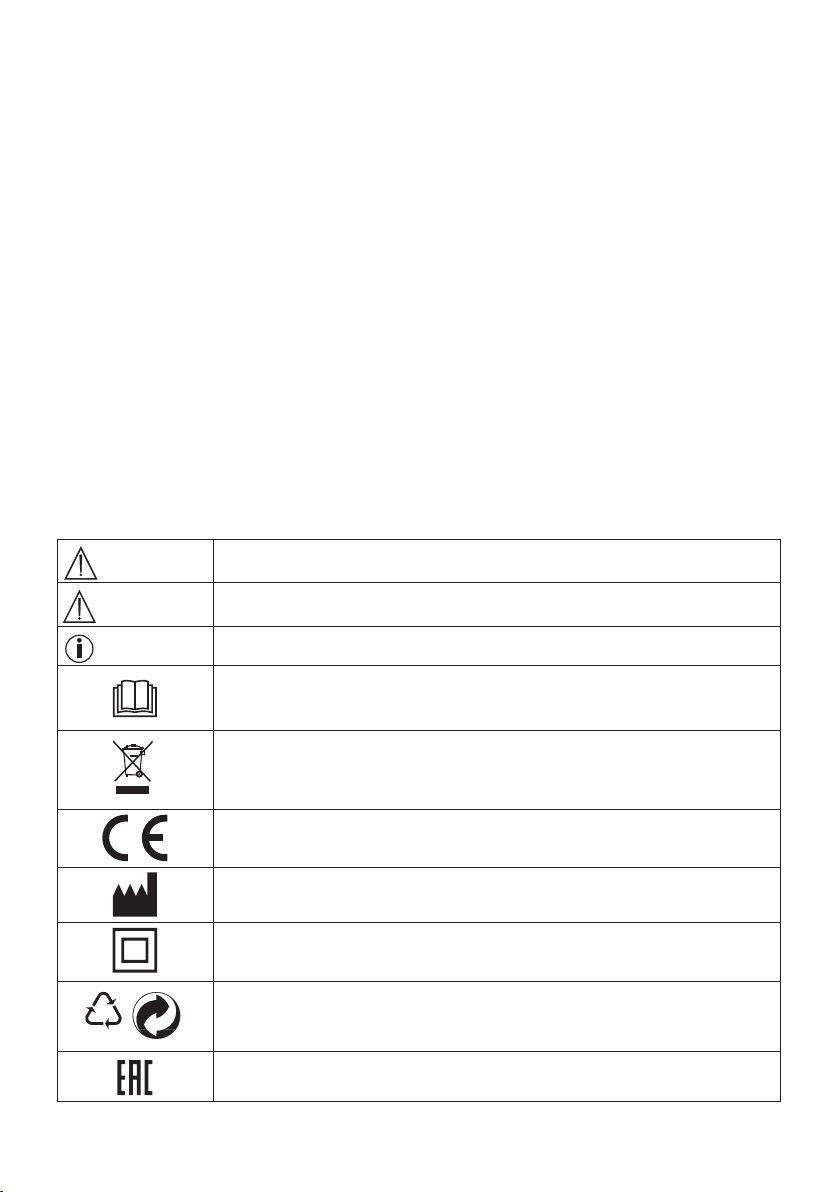
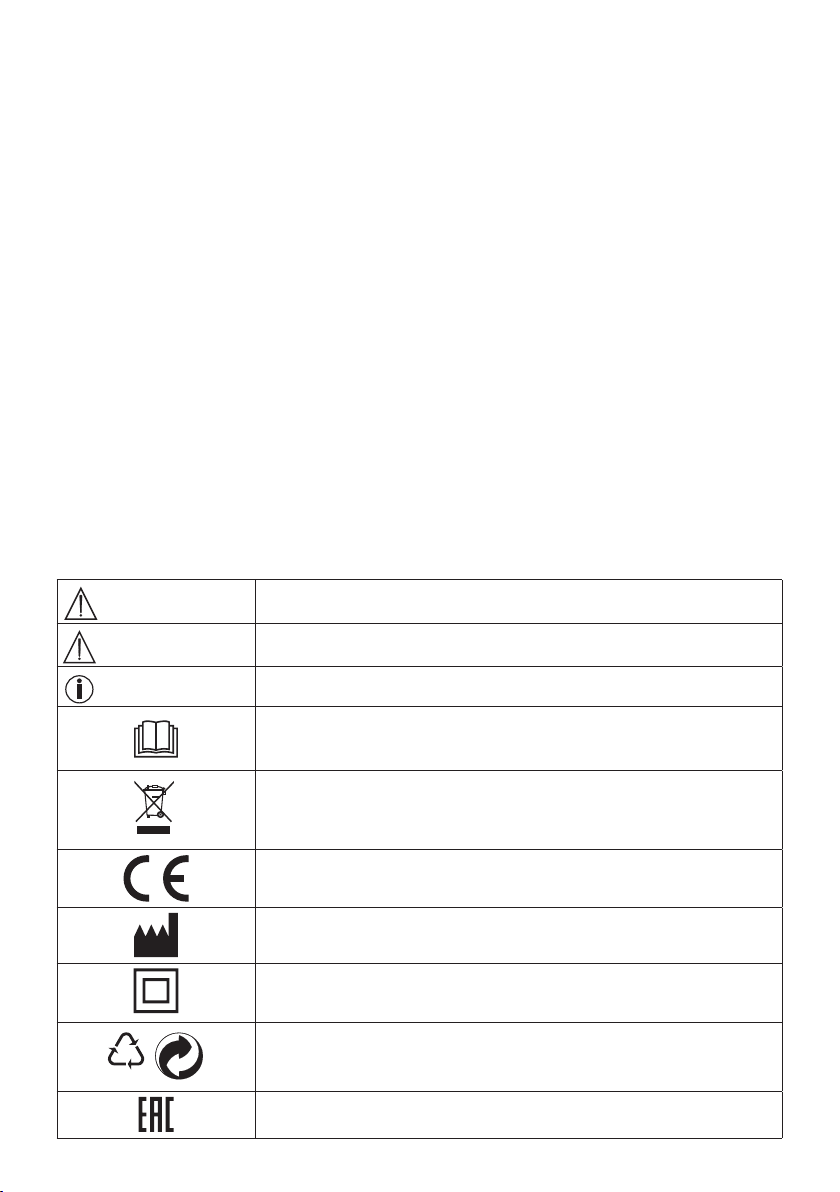
WARNUNG Warnhinweis auf Verletzungsgefahren oder Gefahren für Ihre Gesundheit.
-
ACHTUNG Sicherheitshinweis auf mögliche Schäden am Gerät/Zubehör.
Hinweis Hinweis auf wichtige Informationen.
Gebrauchsanweisung beachten.
Entsorgung gemäß Elektro- und Elektronik-Altgeräte EG-Richtlinie – WEEE (Waste
Electrical and Electronic Equipment).
Dieses Produkt erfüllt die Anforderungen der geltenden europäischen und nationalen Richtlinien.
Hersteller
Das Gerät ist doppelt schutzisoliert und entspricht also der Schutzklasse 2.
20
Verpackung umweltgerecht entsorgen.
Zertifizierungszeichen für Produkte, die in die Russische Föderation und in die
Länder der GUS exportiert werden.
3
Page 4

2. Bestimmungsgemäßer Gebrauch
Dieser Luftbefeuchter ist nur zur Befeuchtung von Raumluft bestimmt.
Das Gerät ist nur für den privaten Gebrauch bestimmt.
3. Sicherheitshinweise
Lesen Sie diese Gebrauchsanweisung sorgfältig! Ein Nichtbeachten der nachfolgenden Hinweise kann Personen- oder Sachschäden verursachen. Bewahren Sie die Gebrauchsanweisung auf und machen Sie diese
allen Anwendern zugänglich. Übergeben Sie diese Anleitung bei Weitergabe des Geräts.
Stromschlag
WARNUNG
Wie jedes elektrische Gerät ist dieser Luftbefeuchter vorsichtig und umsichtig zu gebrauchen, um Gefahren
durch elektrische Schläge zu vermeiden.
•
B
enutzen Sie das Gerät nur mit der auf dem Gerät notierten Netzspannung (das Typenschild befindet
sich auf der Unterseite der Basis).
•
S
tecken Sie immer nur das Netzkabel in die Steckdose, wenn das Gerät ausgeschaltet ist.
•
B
enutzen Sie das Gerät nie, wenn das Gerät oder Zubehör sichtbare Schäden aufweisen.
•
B
enutzen Sie das Gerät nicht, wenn es heruntergefallen ist oder wenn Wasser ins Geräteinnere einge-
drungen ist.
•
B
enutzen Sie das Gerät nicht während eines Gewitters.
•
S
chalten Sie das Gerät im Falle von Defekten oder Betriebsstörungen sofort aus. Ziehen Sie den Stecker
aus der Steckdose.
•
Z
iehen Sie nicht am Netzkabel oder am Gerät, um den Stecker aus der Steckdose zu ziehen.
•
H
alten oder tragen Sie das Gerät niemals am Netzkabel.
•
K
lemmen sie das Netzkabel nicht ein.
•
H
alten Sie Abstand zwischen dem Netzkabel und warmen Oberflächen.
•
S
tellen Sie sicher, dass das Netzkabel und der Stecker nicht mit Wasser, Dampf oder anderen FIüssig-
keiten in Berührung kommen.
•
B
enutzen Sie das Gerät nur in trockenen Innenräumen (z.B. nie im Badezimmer, in der Sauna usw.).
•
G
reifen Sie niemals nach einem Gerät, das ins Wasser gefallen ist. Ziehen Sie sofort den Stecker aus
der Steckdose.
•
S
etzen Sie das Gerät keinen Stößen aus und lassen Sie es nicht fallen.
Reparatur
WARNUNG
• Die Basis darf nicht geöffnet werden.
•
R
eparaturen an Elektrogeräten dürfen nur von Fachkräften durchgeführt werden. Durch unsachgemäße
Reparaturen können erhebliche Gefahren für den Benutzer entstehen. Wenden Sie sich bei Reparaturen
an den Kundenservice oder an einen autorisierten Händler.
Brandgefahr
WARNUNG
Bei nicht bestimmungsgemäßem Gebrauch bzw. Missachtung der Gebrauchsanweisung besteht unter
Umständen Brandgefahr!
•
B
enutzen Sie das Gerät nicht unter einer Abdeckung, wie z.B. Decke oder Kissen.
•
B
enutzen Sie das Gerät nicht in der Nähe von leicht entflammbaren Stoffen.
4
Page 5

Bedienung
WARNUNG
• Das Gerät ist nur für den in dieser Gebrauchsanweisung beschriebenen Zweck vorgesehen. Der Hersteller kann nicht für Schäden haftbar gemacht werden, die durch unsachgemäßen oder leichtsinnigen
Gebrauch entstehen.
•
W
enn Sie an einer schweren Krankheit der Atemwege oder Lunge leiden, befragen Sie vor der Benutzung
des Luftbefeuchters Ihren Arzt.
•
S
chalten Sie das Gerät nach jedem Gebrauch und vor jeder Reinigung aus. Ziehen Sie den Stecker aus
der Steckdose.
•
V
erlegen Sie das Netzkabel stolpersicher.
ACHTUNG
• Stellen Sie sicher, dass das Gerät auf einer festen, klappsicheren, gegen Feuchtigkeit unempfindlichen
Fläche steht.
•
S
tecken Sie keine Gegenstände in Geräteöffnungen. Achten Sie darauf, dass die beweglichen Teile sich
immer frei bewegen können.
•
S
tellen Sie keine Gegenstände auf dem Gerät ab.
•
S
chützen Sie das Gerät vor hohen Temperaturen.
4. Gerätebeschreibung
Der Luftbefeuchter
•
b
efeuchtet die Luft,
•
a
rbeitet geräuscharm und ist stufenlos regelbar,
•
e
ignet sich für Raumgrößen bis zu 30 m2,
•
i
st energiesparend und schaltet sich bei leerem Wassertank automatisch ab,
•
s
chaltet sich bei Abnahme des Wassertanks automatisch ab,
•
b
esitzt ein Aromafach zur Raumbeduftung,
•
i
st einfach zu reinigen.
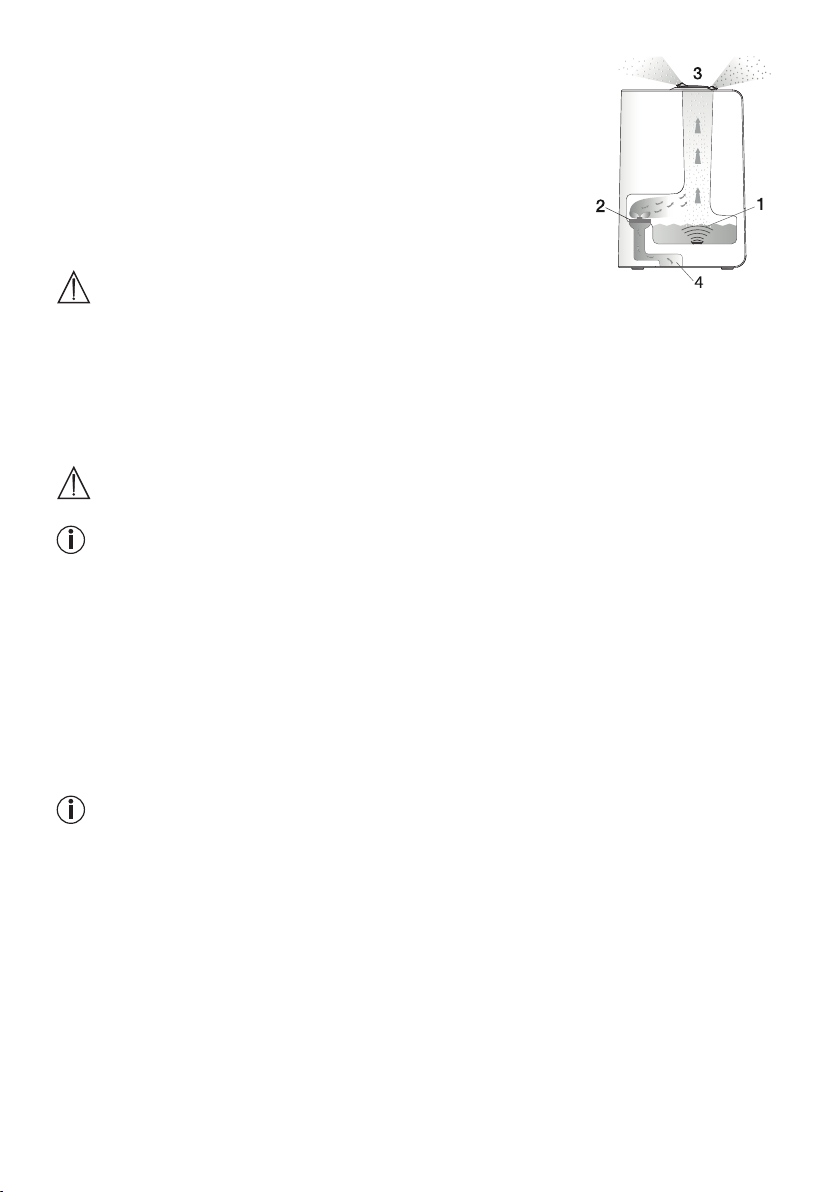
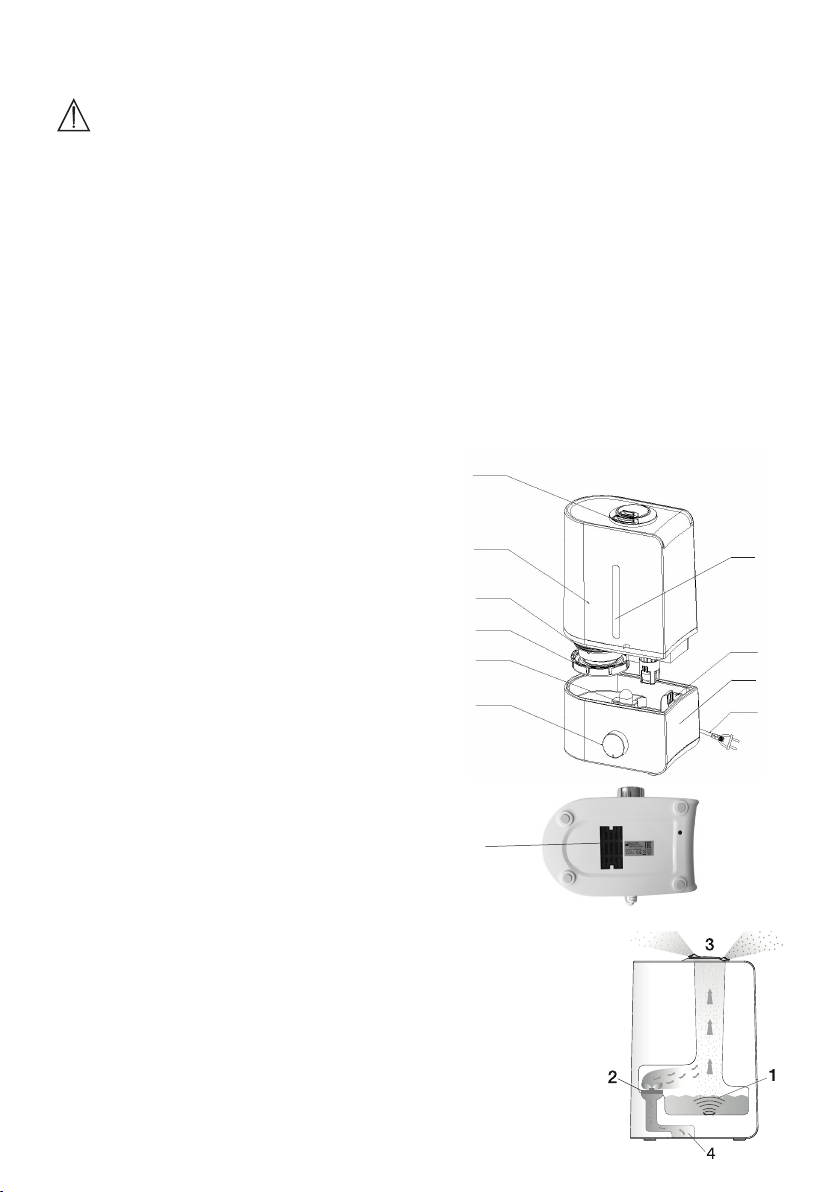
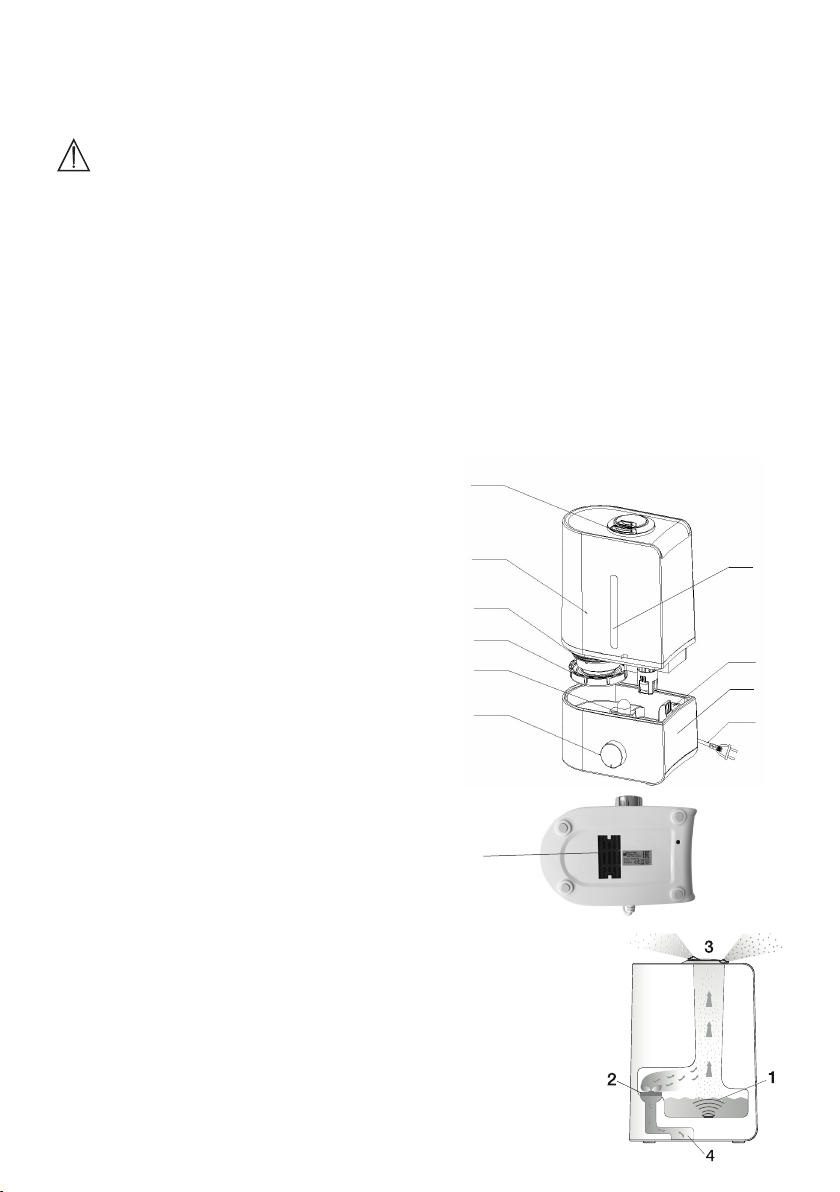
1. Nebelauslass
2. Wassertank
3. Kalkfilter
4. Schraubverschluss Wassertank
5. Ultraschallmembran
6. Drehregler
7. Füllstandsanzeige
8. Aromafach mit Aromapad
9. Basis
10. Netzkabel
11. Luftfilter
1
2
7
3
4
5
8
9
6
10
11
5
Page 6
Prinzip Luftbefeuchter LB 45
1.
Eine durch Ultraschall bewegte Membran bewegt das Wasser und löst dabei
kleinste Wassertröpfchen von der Oberfläche.
2. Der Ventilator zieht am Boden des Geräts Luft an.
3.
Die Luft wird mit den gelösten Wassertröpfchen angereichert und oben zur
Öffnung sanft ausgeblasen.
4. Auf Wunsch kann das Gerät mit Aromen angewendet werden.
5. Inbetriebnahme
Gerät auspacken
WARNUNG
Halten Sie Kinder von Verpackungsmaterial fern. Es besteht Erstickungsgefahr.
1. Öffnen Sie die Kartonverpackung.
2. Entnehmen Sie den oberen Schutzeinleger. Lassen Sie die Folie verschlossen.
3. Nehmen Sie das Gerät nach oben aus der Verpackung.
4. Entfernen Sie den Folienbeutel.
5. Prüfen Sie das Gerät, den Netzstecker und das Kabel auf Beschädigungen.
Aufstellort
WARNUNG
Lesen Sie die Sicherheitshinweise, bevor Sie das Gerät in Betrieb nehmen.
Hinweis
• Die direkte Umgebung des Luftbefeuchters kann feucht werden.
•
M
it kalkhaltigem Wasser kann sich ein weißer Niederschlag bilden.
•
S
tellen Sie das Gerät nicht auf den Boden, sondern erhöht auf (z.B. auf einem Tisch, auf einer Kommode).
• Stellen Sie das Gerät so auf, dass der Nebelaustritt nicht auf Gegenstände gerichtet ist.
•
V
erwenden Sie den Luftbefeuchter nicht in Räumen mit starken Temperaturschwankungen, da diese zu
Kondensationen im Geräteinneren führen können.
•
L
eeren Sie das Restwasser aus, wenn Sie das Gerät nicht verwenden.
•
D
en Luftbefeuchter auf eine feste, waagrechte und wasserfeste Unterlage stellen.
Sollte das Gerät versehentlich umkippen, kann Wasser auslaufen, auch wenn das Gerät ausgeschaltet und
nicht eingesteckt ist.
Wasser
Hinweis
• Geben Sie keine ätherischen Öle oder Duftstoffe ins Wasser. Das Kunststoffmaterial wird bei Anwendung
von Zusätzen möglicherweise verfärbt und beschädigt. Die Ultraschall-Membran verklebt und wird damit
beschädigt.
•
V
erwenden Sie im Gerät frisches Trinkwasser. Ist das Trinkwasser sehr hart, können Sie demineralisiertes
oder destilliertes Wasser verwenden.
• Verwenden Sie warmes Wasser (30°C-45°C) und füllen Sie den Tank immer bis zum Maximum auf, an
dernfalls kann es aufgrund physikalischer Gegebenheiten zu einem Auslaufen des Gerätes kommen.
• Tipp! Bei hartem Wasser empfehlen wir den Einsatz des optionalen Kalkfilters.
6
-
Page 7
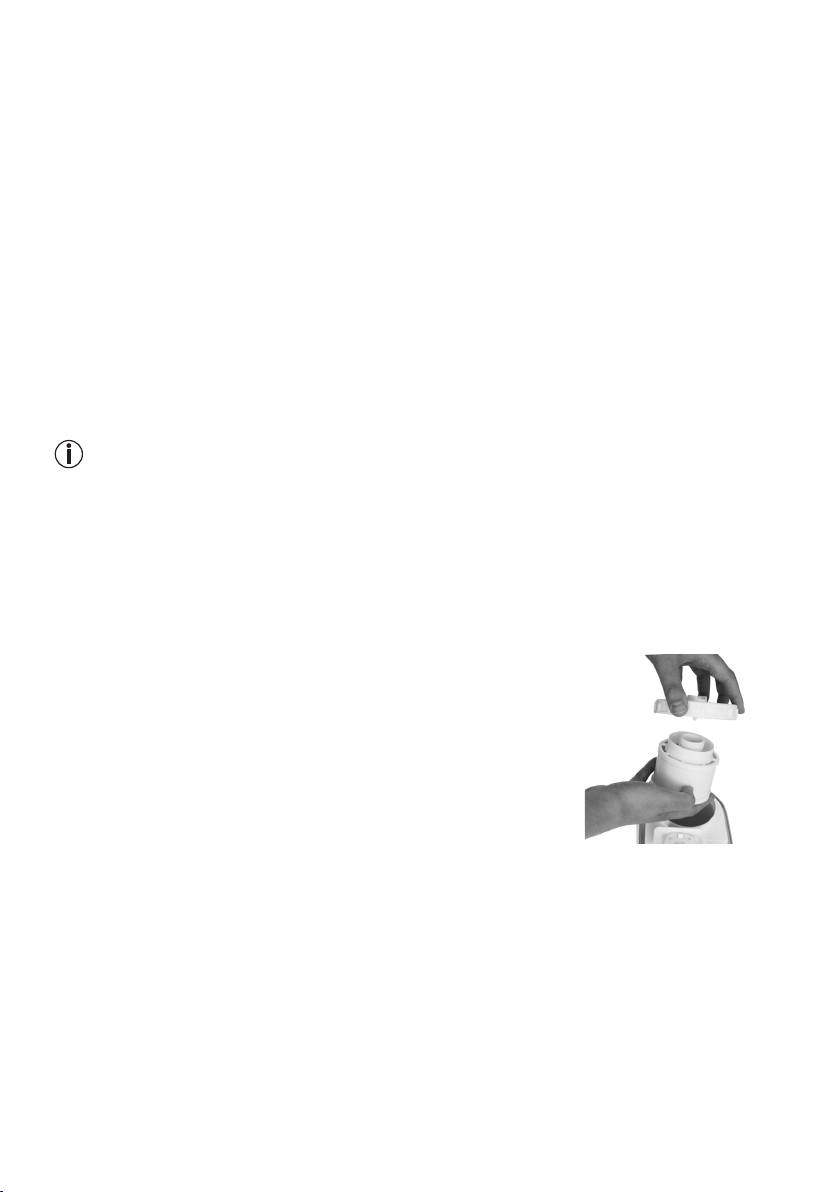
Wassertank auffüllen
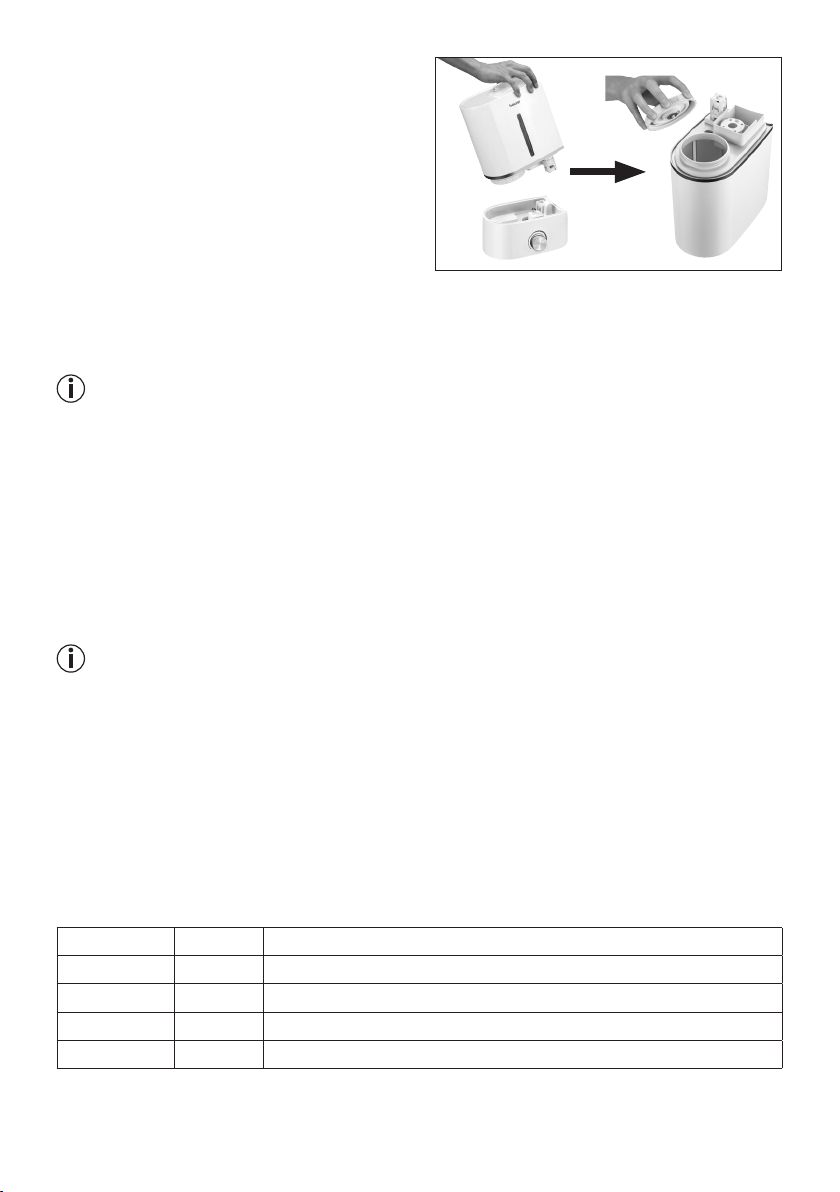
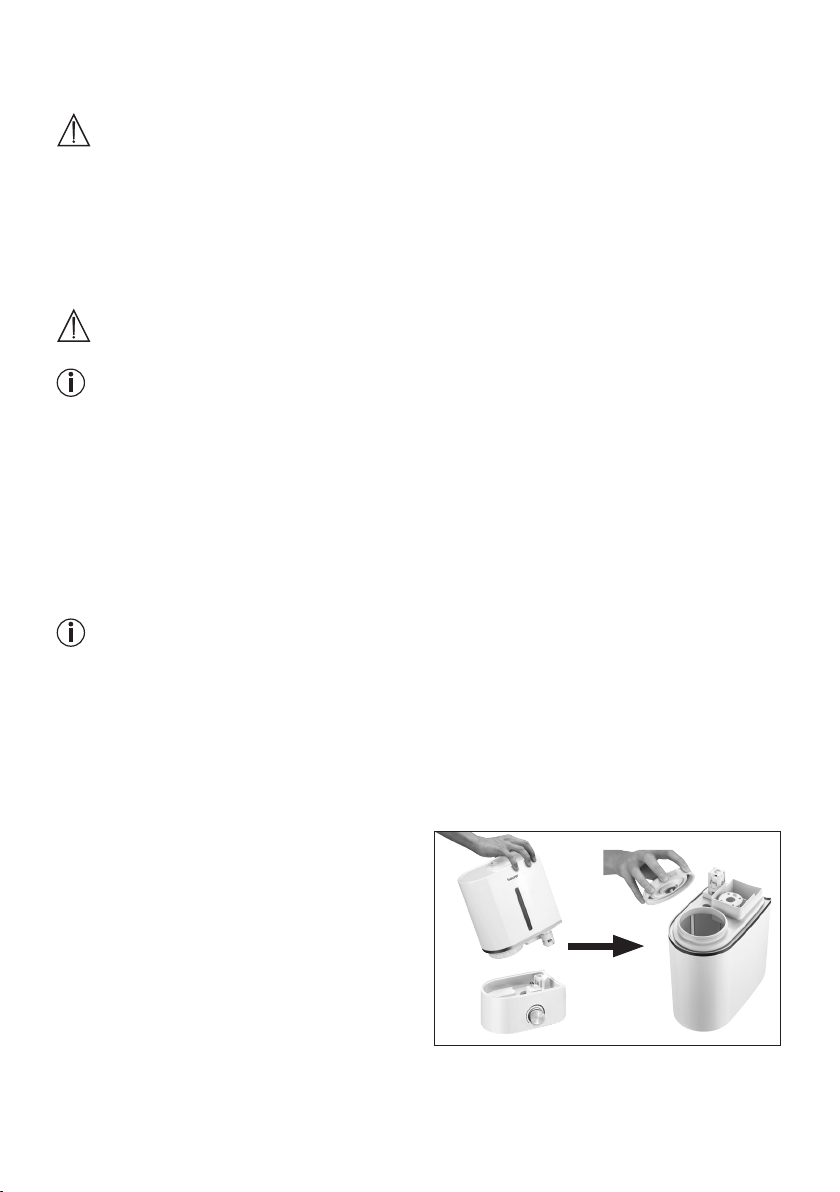
1.
Ziehen Sie den Wassertank von der Basis nach
oben ab.
2.
Drehen Sie den Wassertank um. Ein Federventil
verschließt den Wassertank.
3.
Öffnen Sie den Schraubverschluss am Wassertank.
4.
Füllen Sie warmes Wasser (30°C-45°C) in den Wassertank. Der Wassertank fasst maximal 4,0 Liter.
Der Wasserstand ist von außen sichtbar.
5. Verschließen Sie den Schraubverschluss am Was
sertank ganz fest.
6. Drehen Sie den Wassertank um.
7. Setzen Sie den Wassertank auf die Basis.
Achten Sie darauf, dass der Wassertank fest auf der Basis sitzt.
-
6. Bedienung
Hinweis
Prüfen Sie stets die Luftfeuchtigkeit ihrer Raumluft. Der intensive Dauerbetrieb kann zu einer Überfeuchtung des Raumes führen. Die relative Luftfeuchtigkeit soll nicht über 60% steigen.
Gerät einschalten
1. Stecken Sie das Netzkabel in eine geeignete Steckdose.
2.
Drehen Sie den Drehregler im Uhrzeigersinn nach rechts. Die Füllstandsanzeige beginnt blau zu leuchten.
Aus dem Nebelauslass strömt nun Nebel. Sollte sich kein oder nicht ausreichend Wasser im Wassertank
befinden, leuchtet die Füllstandsanzeige rot und das Gerät schaltet sich aus Sicherheitsgründen aus.
Sollte sich das Gerät ausschalten, befüllen Sie den Wassertank wie im Kapitel "Wassertank auffüllen"
beschrieben.
3. Stellen Sie mit dem Drehregler Ihre gewünschte Verdunstungsleistung ein. Die maximale Verdunstungs
leistung beträgt 300 ml pro Stunde.
Hinweis
Auf Wunsch können Sie im Aromafach das innen liegende Aromapad mit Aromen / Duftölen betreufeln.
Dies dient zur Raumbeduftung. Geben Sie in keinem Fall das Aroma direkt ins Wasser.
-
Gerät ausschalten
1. Drehen Sie den Drehregler bis zum Anschlag nach links, bis Sie einen leichten Widerstand spüren und
der Drehregler klickt. Die Füllstandsanzeige erlischt.
2. Ziehen Sie das Netzkabel aus der Steckdose.
7. Reinigung und Pflege
Eine regelmäßige Reinigung und Desinfektion ist Voraussetzung für einen hygienischen, störungsfreien Betrieb. Die Verschmutzung des Gerätes ist abhängig von der Wasserqualität und der Betriebsdauer. ln jedem
Fall empfehlen wir folgende Reinigungsintervalle.
Alle drei Tage Bei Bedarf
x Ultraschallmembran mit Wattestäbchen reinigen, Basis spülen
x Wassertank spülen, Wasser erneuern
x Luftbefeuchter innen und außen reinigen
x Entkalken
7
Page 8
WARNUNG
Schalten Sie das Gerät nach jedem Gebrauch und vor jeder Reinigung aus. Ziehen Sie den Stecker aus der
Steckdose.
ACHTUNG
Reinigen Sie den Wassertank und leeren Sie den Luftbefeuchter unbedingt vollständig, wenn das Gerät länger
als eine Woche nicht mehr in Betrieb war.
Hinweis
• Reinigen Sie das Gerät nur in der angegebenen Weise.
• Es darf keinesfalls Wasser in das Gehäuseinnere eindringen.
•
V
erwenden Sie keine Iösungsmittelhaltigen Reiniger.
•
V
erwenden Sie zur Reinigung und Desinfektion ausschließlich milde Spülmittel oder Essig/Essigreiniger.
Ultraschallmembran reinigen, Basis spülen
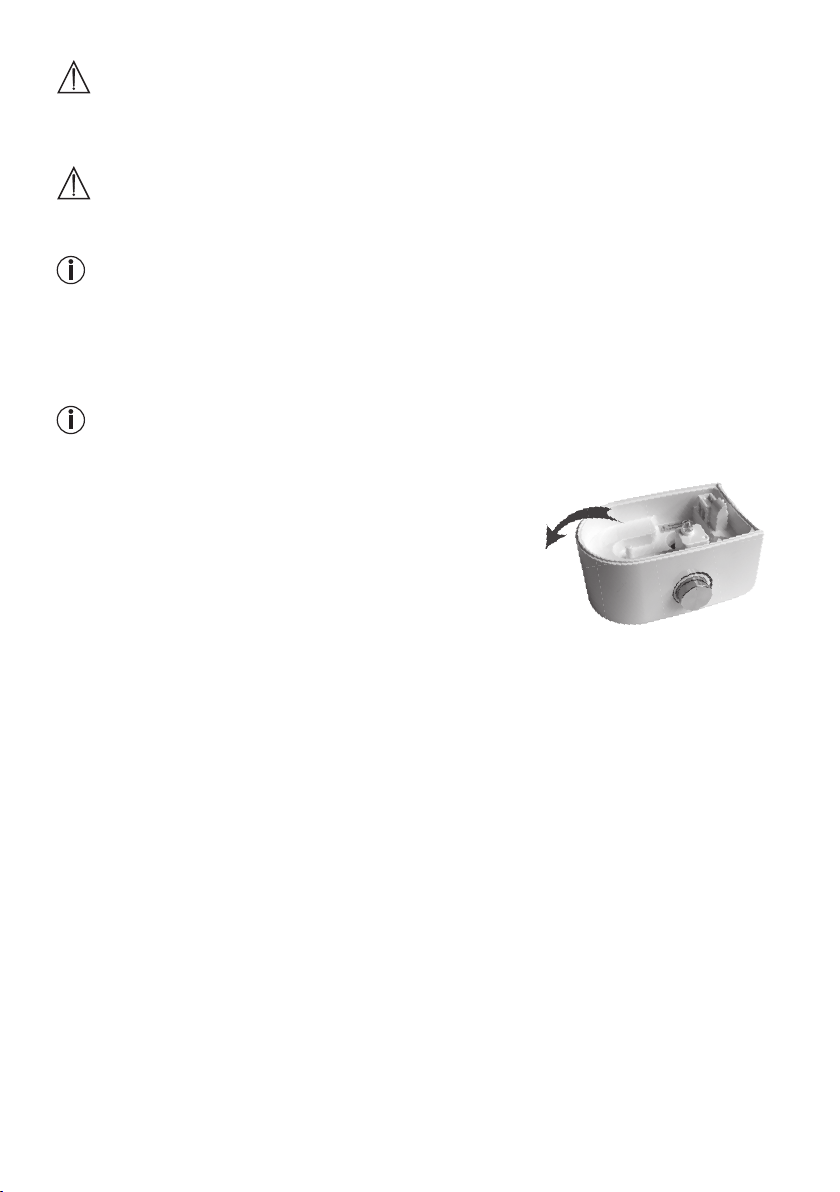
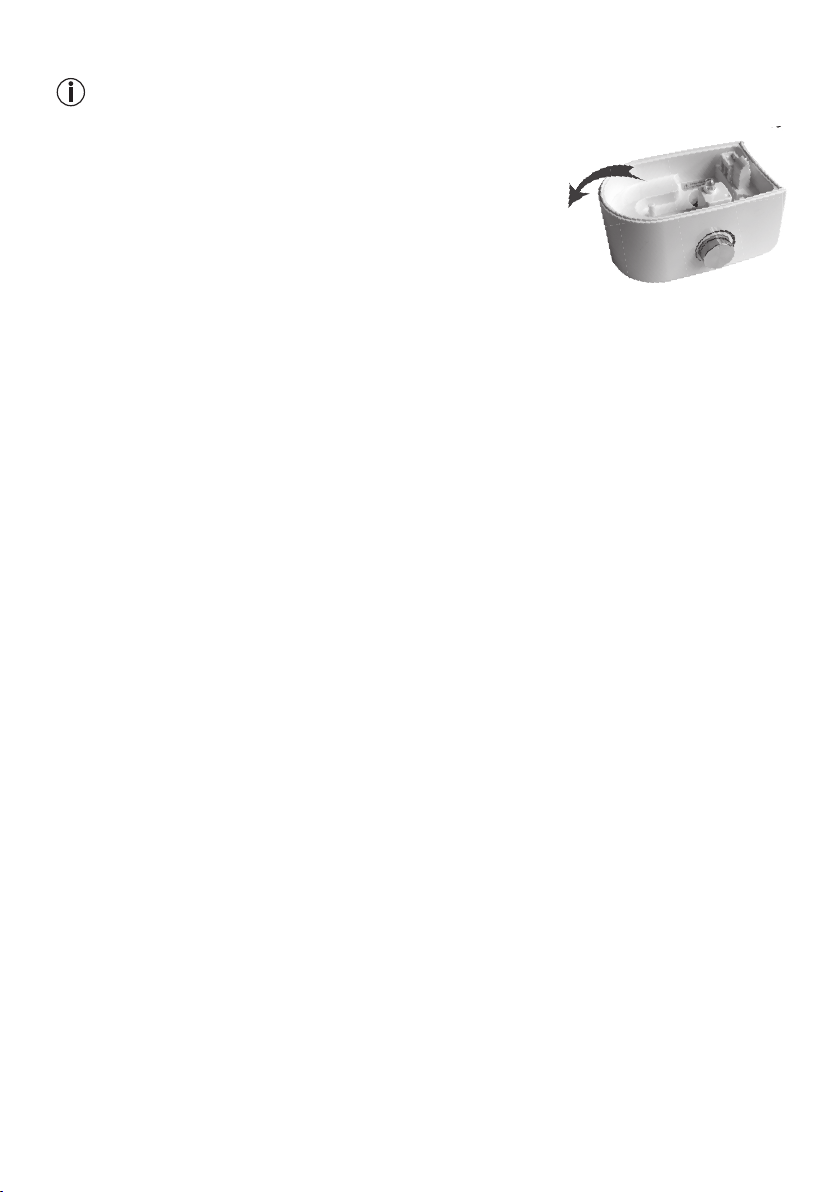
Hinweis
Leeren Sie das Wasser aus der Basis über die seitliche Kante in Pfeilrichtung aus. Achten Sie darauf, dass
kein Wasser ins Geräteinnere dringt, wie z.B. über die Ventilatoröffnung.
1.
Reinigen Sie die Ultraschall-Membran mit einem Wattestäbchen.
2.
Leeren Sie das Wasser aus der Basis über die seitliche Kante aus.
Achten Sie auf die Markierung im Gerät!
3.
Falls Verschmutzungsrückstände in der Basis verbleiben, leeren
Sie etwas klares, frisches Wasser in die Basis und kippen Sie es
über die seitliche Kante aus.
Wassertank spülen, Wasser erneuern
Reinigen Sie den Wassertank regelmäßig, bei täglichem Betrieb spätestens wöchentlich. Verwenden Sie ein
mildes Reinigungsmittel oder Essig / Essigreiniger.
1. Reinigen Sie das Gewinde des Schraubverschlusses mit einer weichen Bürste.
2. Füllen Sie den Wassertank halb mit Wasser.
3. Verschließen Sie den Schraubverschluss am Wassertank.
4. Schütteln und kippen Sie den Wassertank hin und her.
5. Öffnen und entleeren Sie den Wassertank vollständig.
6. Wiederholen Sie den Vorgang mit klarem frischem Wasser.
Luftbefeuchter innen und außen reinigen
1. Leeren Sie das Wasser aus der Basis über die seitliche Kante aus.
2. Wischen Sie den Luftbefeuchter außen und innen mit einem feuchten Tuch ab. Verwenden Sie zur Rei-
nigung ausschließlich milde Spülmittel oder Essig / Essigreiniger.
Entkalken
Ultraschall-Membran entkalken
Hartes Wasser kann zur Verkalkung des Geräts und vor allem der Ultraschall-Membran führen. Dies macht
sich durch einen weißen Niederschlag bemerkbar. Entkalken Sie das Gerät regelmäßig.
1. Tropfen Sie etwas Entkalker auf die Ultraschall-Membran.
2. Lassen Sie den Entkalker 2 bis 5 Minuten einwirken.
3.
Reinigen Sie nach Ablauf der Einwirkzeit die Ultraschall-Membran mit dem mitgelieferten Reinigungspinsel.
4. Spülen Sie die Basis mehrfach mit klarem, frischem Wasser aus.
8
Page 9
Basis innen reinigen
1. Tauchen Sie ein feuchtes, weiches Tuch kurz in eine Entkalkungslösung.
2. Wischen Sie mit dem Tuch die Basis innnen aus.
3. Geben Sie vorsichtig etwas frisches, klares Wasser in die Basis.
4. Leeren sie das Wasser aus der Basis über die seitliche Kante aus.
5. Wiederholen Sie den Vorgang mit klarem frischem Wasser.
Wassertank entkalken
1. Füllen Sie den Wassertank halb mit Wasser.
2. Geben Sie eine kleine Menge Entkalker hinzu.
3. Verschließen Sie den Schraubverschluss am Wassertank.
4. Schütteln und kippen Sie den Wassertank hin und her.
5. Öffnen und entleeren Sie den Wassertank vollständig.
6. Wiederholen Sie den Vorgang mehrfach mit klarem frischem Wasser.
8. Zusatzartikel Kalkfilter
TIPP!
Bei hartem Wasser empfehlen wir den Einsatz des Kalkfilters (siehe Kapitel "12. Nachkaufartikel" ).
Hinweis
• Wenn das Gerät trotz der Kalkfilters verkalkt, oder wenn sich um das Gerät weißer Niederschlag
bildet, dann sollte der Kalkfilter ausgetauscht werden.
•
D
ie Lebensdauer des Kalkfilters beträgt höchstens ca. 2-3 Monate.
•
W
ird das Gerät längere Zeit nicht benutzt, muss der Kalkfilter aus dem Wassertank genommen und
getrocknet werden.
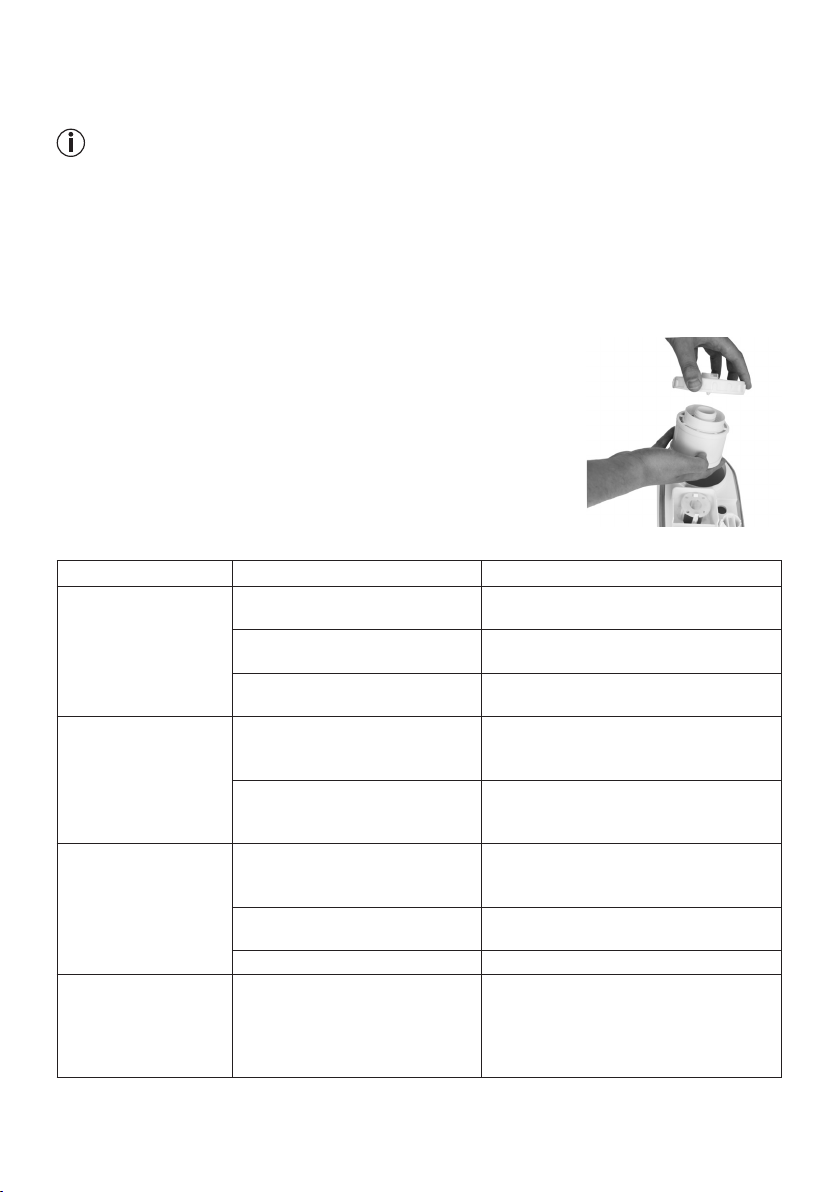
Kalkfilter einbauen
1. Vegewissern Sie sich, dass das Gerät ausgeschaltet ist.
2. Ziehen Sie den Wassertank nach oben von der Basis ab.
3. Drehen Sie den Wassertank um.
4. Öffnen Sie den Schraubverschluss am Wassertank.
5.
Schrauben Sie den Kalkfilter auf das Schraubverschlussgewinde des
Wassertanks.
6.
Verschließen Sie den Schraubverschluss am Wassertank. Der Kalkfilter
ist nun eingebaut.
9
Page 10
9. Was tun bei Problemen?
Problem Ursache Behebung
Kein Nebel tritt aus
Der Nebel riecht
eigenartig
Auffälliges Geräusch Der Wassertank sitzt nicht korrekt
Der Nebel tritt unterhalb
des Wassertanks aus
Das Netzkabel ist nicht eingesteckt.
Der Drehregler steht auf der
Aus-Position.
Der Wasserstand ist zu niedrig, der
Wassertank ist leer.
Neues Gerät.
Abgestandenes oder verschmutz
tes Wasser.
auf der Basis.
Im Wassertank ist zu wenig Wasser.
Das Gerät steht nicht eben und
stabil.
Der Wassertank sitzt nicht korrekt
auf der Basis.
-
Stecken Sie das Netzkabel in eine
geeignete Steckdose.
Den Drehregler im Uhrzeigersinn in Richtung der Maximum-Position drehen.
Den Wassertank auffüllen.
Den Wassertank abnehmen, den Schraubverschluss aufdrehen und abnehmen.
Den offenen, leeren Wassertank an einem
kühlen, trockenen Platz 12 Stunden lüften.
Die Basis und den Wassertank leeren und
gründlich reinigen. Den Wassertank mit
frischem Wasser auffüllen.
Den Wassertank abnehmen und korrekt
auf die Basis setzen.
auf der Basis sitzen.
Den Wassertank auffüllen.
Das Gerät auf einer waagrechten und festen
Unterlage aufstellen.
Den Wassertank abnehmen.
der Übergang Basis zu Wassertank sauber
ist. Bei Bedarf reinigen. Den Wassertank
korrekt auf die Basis setzen Der Tank
sollte fest auf der Basis sitzen.
Der Tank sollte fest
Prüfen ob
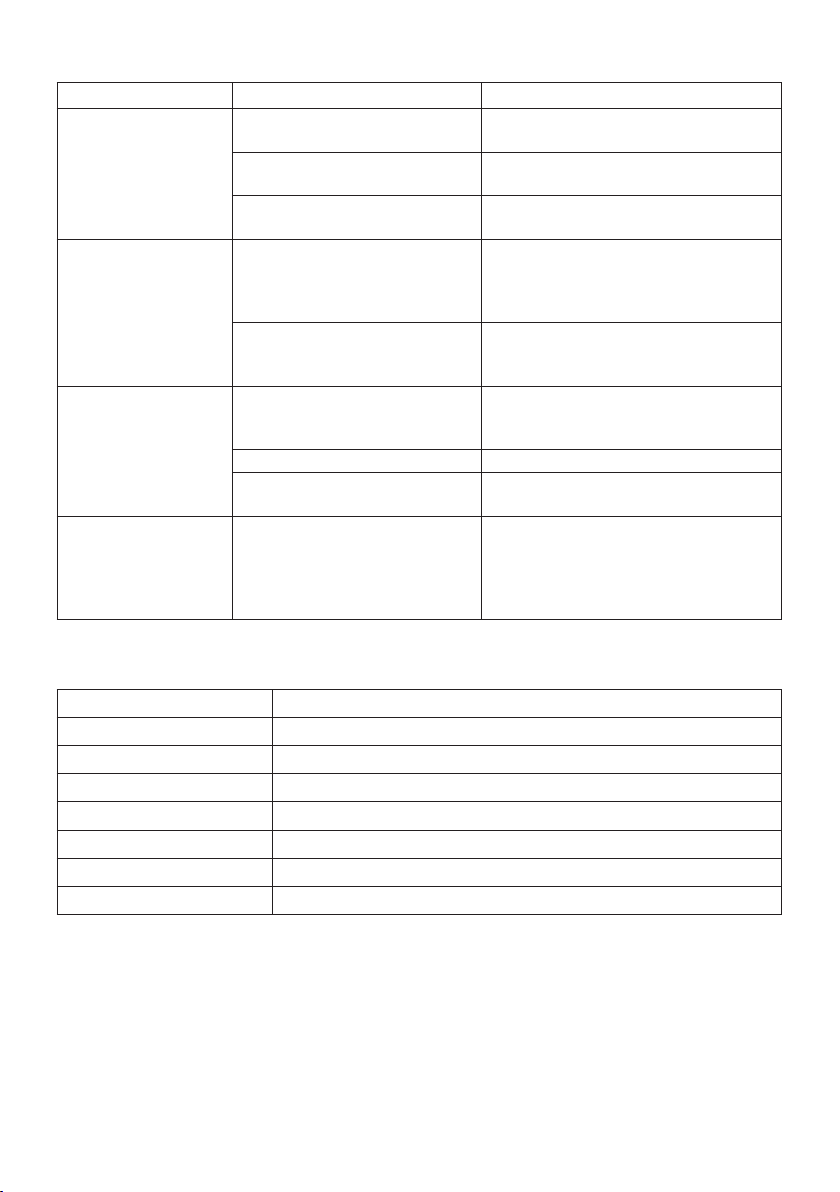
10. Technische Daten
Maße (LxBxH) ca. 25 cm x 12 cm x 34 cm
Kabellänge ca. 1,5 m
Leergewicht ca. 1,5 kg
Netzspannung/-Frequenz 100 – 240 V AC / 50/60 Hz
Nennleistung 25 Watt
Raumgröße bis 30 m
Fassungsvermögen ca. 4 Liter
Verdunstungsleistung 300 ml / Stunde
2
10
Page 11
11. Entsorgung
Im Interesse des Umweltschutzes darf das Gerät am Ende seiner Lebensdauer nicht mit dem
Hausmüll entsorgt werden.
Die Entsorgung kann über entsprechende Sammelstellen in Ihrem Land erfolgen. Entsorgen Sie
das Gerät gemäß der Elektro- und Elektronik Altgeräte EG-Richtlinie – WEEE (Waste Electrical and
Electronic Equipment).
Bei Rückfragen wenden Sie sich an die für die Entsorgung zuständige kommunale Behörde.
12. Nachkaufartikel
Für Nachkauf- / Zusatzartikel besuchen Sie www.beurer.com oder wenden Sie sich an die jeweilige Serviceadresse in ihrem Land (laut Serviceadresse).
Die Nachkauf-/ Zusatzartikel sind zusätzlich im Handel erhältlich.
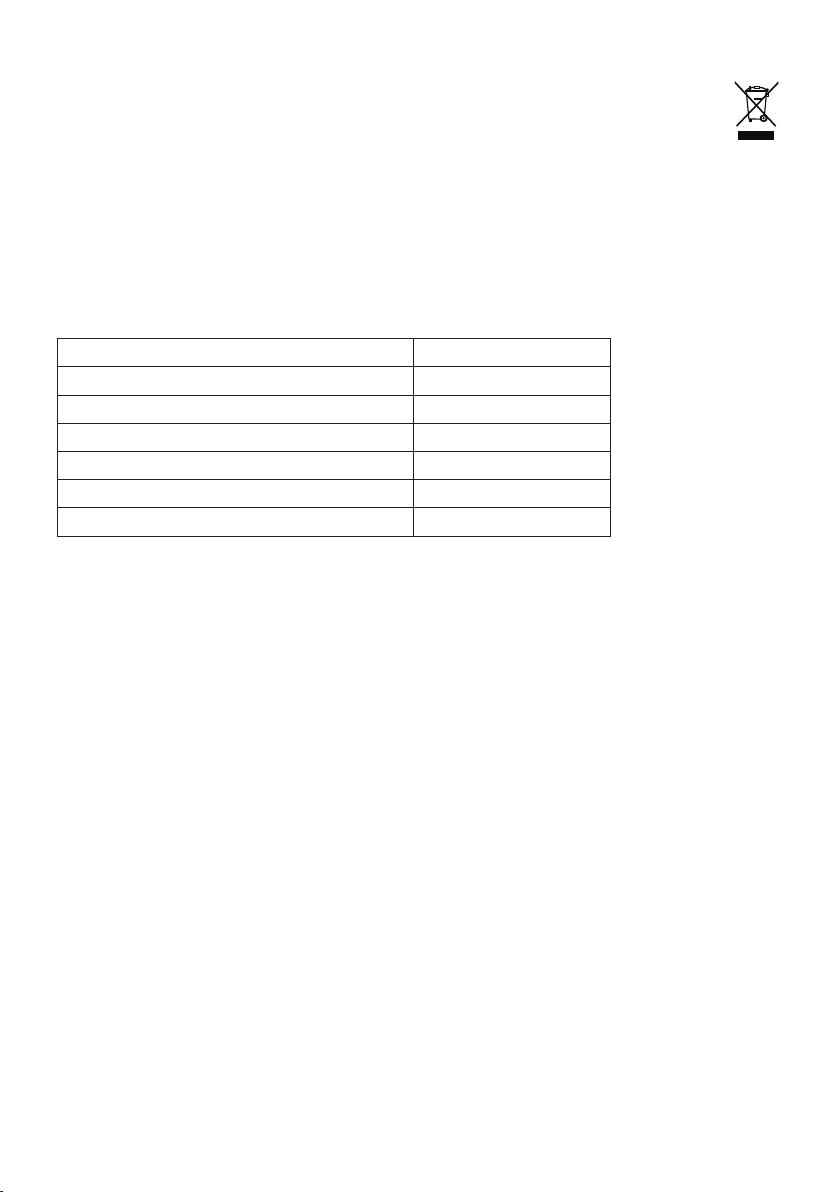
Artikel Artikelnummer
Beurer by Taoasis Aroma-Öl „Vitality“ (10 ml) 681.30
Beurer by Taoasis Aroma-Öl „Harmony“ (10 ml) 681.31
Beurer by Taoasis Aroma-Öl „Relax“ (10 ml) 681.32
Beurer by Taoasis Aroma-Öl „Sleep Well“ (10 ml) 681.33
10 Stück Aromapads 164.148
Kalkfilter 164.147
11
Page 12

13. Garantie/Service
Die Beurer GmbH, Söflinger Straße 218, D-89077 Ulm (nachfolgend „Beurer“ genannt) gewährt unter den
nachstehenden Voraussetzungen und in dem nachfolgend beschriebenen Umfang eine Garantie für dieses
Produkt.
Die nachstehenden Garantiebedingungen lassen die gesetzlichen Gewährleistungsverpflichtungen
des Verkäufers aus dem Kaufvertrag mit dem Käufer unberührt.
Die Garantie gilt außerdem unbeschadet zwingender gesetzlicher Haftungsvorschriften.
Beurer garantiert die mangelfreie Funktionstüchtigkeit und die Vollständigkeit dieses Produktes.
Die weltweite Garantiezeit beträgt 3 Jahre ab Beginn des Kaufes des neuen, ungebrauchten Produktes
durch den Käufer.
Diese Garantie gilt nur für Produkte, die der Käufer als Verbraucher erworben hat und ausschließlich zu per
sönlichen Zwecken im Rahmen des häuslichen Gebrauchs verwendet.
Es gilt deutsches Recht.
Falls sich dieses Produkt während der Garantiezeit als unvollständig oder in der Funktionstüchtigkeit als mangelhaft gemäß der nachfolgenden Bestimmungen erweist, wird Beurer gemäß diesen Garantiebedingungen
eine kostenfreie Ersatzlieferung oder Reparatur durchführen.
Wenn der Käufer einen Garantiefall melden möchte, wendet er sich zunächst an den Beurer Kunden
service:
Beurer GmbH, Servicecenter
Tel: +49 731 3989-144
Für eine zügige Bearbeitung nutzen Sie bitte unser Kontaktformular auf der Homepage www.beurer.com
unter der Rubrik ‚Service‘.
Der Käufer erhält dann nähere Informationen zur Abwicklung des Garantiefalls, z.B. wohin er das Produkt
kostenfrei senden kann und welche Unterlagen erforderlich sind.
Eine Inanspruchnahme der Garantie kommt nur in Betracht, wenn der Käufer
- eine Rechnungskopie/Kaufquittung und
- das Original-Produkt
Beurer oder einem autorisierten Beurer Partner vorlegen kann.
Ausdrücklich ausgenommen von dieser Garantie sind
- Verschleiß, der auf normalem Gebrauch oder Verbrauch des Produktes beruht;
- zu diesem Produkt mitgelieferte Zubehörteile, die sich bei sachgemäßen Gebrauch abnutzen bzw.
verbraucht werden (z.B. Batterien, Akkus, Manschetten, Dichtungen, Elektroden, Leuchtmittel, Auf
sätze, Inhalatorzubehör);
- Produkte, die unsachgemäß und/oder entgegen der Bestimmungen der Bedienungsanleitung ver
wendet, gereinigt, gelagert oder gewartet wurden sowie Produkte, die vom Käufer oder einem nicht
von Beurer autorisierten Servicecenter geöffnet, repariert oder umgebaut wurden;
- Schäden, die auf dem Transportweg zwischen Hersteller und Kunde bzw. zwischen Servicecenter
und Kunde entstehen
- Produkte, die als 2.Wahl-Artikel oder als gebrauchte Artikel gekauft wurden;
- Folgeschäden, welche auf einem Mangel dieses Produktes beruhen (es können für diesen Fall jedoch
Ansprüche aus Produkthaftung oder aus anderen zwingenden gesetzlichen Haftungsbestimmungen
bestehen).
Reparaturen oder ein Komplettaustausch verlängern in keinem Fall die Garantiezeit.
12
-
-
Irrtum und Änderungen vorbehalten
Page 13

ENGLISH
Read these instructions for use carefully and keep them for
later use, be sure to make them accessible to other users and
observe the information they contain.
Table of contents
1. Getting to know your device .......................14
2. Intended use ................................................15
3. Safety notes .................................................15
4. Device description .......................................16
5. Initial use ......................................................17
6. Operation .....................................................18
7. Cleaning and maintenance .........................18
8. Additional anti-limescale filter ..................20
9. What if there are problems? ......................20
10. Technical data.............................................21
11. Disposal ......................................................21
12. Replacement items ....................................21
13. Warranty/service ........................................22
WARNING
• This device may be used by children over the age of 8 and by people
with reduced physical, sensory or mental skills or a lack of experience
or knowledge, provided that they are supervised or have been
instructed on how to use the device safely, and are fully aware of the
consequent risks of use.
•
C
hildren must not play with the device.
•
C
leaning and user maintenance must not be performed by children
unless supervised.
•
D
isconnect the device from the mains supply during filling or cleaning.
•
D
o not use any solvent-based cleaning products.
•
I
f the mains connection cable of this device is damaged, it must be
disposed of. If it cannot be removed, the device must be disposed of.
Dear customer,
Thank you for choosing a product from our range. Our name stands for high-quality, thoroughly tested
products for applications in the areas of heat, weight, blood pressure, body temperature, pulse, gentle
therapy, massage, beauty, baby and air.
Please read these instructions for use carefully and keep them for later use. Be sure to make them accessible
to other users and observe the information they contain.
With kind regards
Your Beurer team
13
Page 14
Included in delivery
PAP
1x Air humidifier
15x Replacement aroma pads
1x These instructions for use
1. Getting to know your device
Humans spend a large proportion of their time indoors. For ideal ambient air, a relative humidity level of
between 40% and 60% is recommended. This value is often not reached, particularly in winter, when cold,
dry air enters living spaces that are being aired and is then warmed up. This dry ambient air draws in moisture,
drying out mucous membranes and skin, but also furniture.
Ambient air that is too dry has a number of negative effects:
•
M
ucous membranes and lips dry out.
•
E
yes become irritated.
•
I
nfections and respiratory diseases are more likely to occur.
•
E
xhaustion, tiredness and difficulty concentrating.
•
P
ets and plants are put under unnecessary strain.
•
D
ust forms more quickly.
•
E
lectrostatic charging of textiles made of synthetic fibres, such as carpets and plastic floor coverings.
•
W
ooden furniture and, especially, parquet floors, are damaged.
•
M
usical instruments go out of tune.
Signs and symbols
The following symbols appear in the instructions for use, on the packaging and on the type plate:
WARNING Warning notice indicating a risk of injury or damage to health.
IMPORTANT Safety note indicating possible damage to the device/accessory.
Note Note on important information.
Observe the instructions for use.
Disposal in accordance with the Waste Electrical and Electronic Equipment EC
Directive – WEEE.
This product satisfies the requirements of the applicable European and national
directives.
Manufacturer
The unit is double-protected and thus corresponds to protection class 2.
20
Dispose of packaging in an environmentally friendly manner.
Certification symbol for products that are exported to the Russian Federation and members of the CIS
14
Page 15

2. Intended use
This air humidifier is only intended for humidifying ambient air.
The device is intended for private use only.
3. Safety notes
Read these instructions for use carefully! Non-observance of the following information may result in personal
injury or material damage. Store these instructions for use in a safe place and make them accessible to all
users. Make sure you include these instructions for use when handing over the device to third parties.
Electric shock
WARNING
As with every electrical device, use this air humidifier carefully and cautiously in order to avoid hazards
resulting from electric shock.
•
U
se the device only with the mains voltage specified on the device (the type plate is located underneath
the base unit).
•
O
nly insert the mains cable into the socket when the device is switched off.
•
N
ever use the device if it or any of its accessories are visibly damaged.
•
D
o not use the device if it has sustained a fall or if water has penetrated the device interior.
•
D
o not use the device during a storm.
•
I
n the event of defects or operational faults, switch off the device immediately. Pull the plug out of the
mains socket.
•
D
o not pull on the mains cable or on the device to disconnect the plug from the socket.
•
N
ever hold or carry the device by the mains cable.
•
D
o not clamp or pinch the mains cable.
•
K
eep the mains cable away from hot surfaces.
•
E
nsure that the mains cable and plug do not come into contact with water, steam or other liquids.
•
O
nly use the device in dry internal rooms (e.g. never in the bathroom, sauna, etc.).
•
N
ever reach for a device that has been submerged in water. Pull the plug out of the mains socket
immediately.
•
D
o not drop the device or subject it to any impacts.
Repairs
WARNING
• Do not open the base unit.
•
O
nly specialist personnel may perform repairs on electrical devices. Improper repairs may subject users
to considerable danger. For repairs, please contact Customer Services or an authorised retailer.
Risk of fire
WARNING
There is a risk of fire if the device is used improperly or these instructions for use are ignored.
•
N
ever use the device underneath a cover, such as a blanket or pillow.
•
N
ever use the device near highly flammable substances.
Operation
WARNING
• The device is only intended for the purpose described in these instructions for use. The manufacturer is
not liable for damage resulting from improper or careless use.
•
I
f you suffer from a severe respiratory or lung disease, consult your doctor before using the air humidifier.
15
Page 16
•
S
witch off the device after every use and before cleaning. Pull the plug out of the mains socket.
•
E
nsure that the mains cable does not pose a trip hazard.
IMPORTANT
• Ensure that the device is placed on a firm, secure surface that is not susceptible to moisture.
•
D
o not insert any objects into openings on the device. Ensure that the moving parts can move freely at
all times.
•
D
o not place any objects on the device.
•
D
o not expose the device to high temperatures.
4. Device description
The air humidifier
•
h
umidifies the air,
•
r
uns quietly and is continuously adjustable,
•
i
s suitable for rooms up to 30 m²,
•
h
as a low energy consumption and switches off automatically when the water tank is empty,
•
s
witches off automatically when the water tank is removed,
•
c
ontains an aroma compartment for room fragrancing,
•
i
s easy to clean.
1. Mist outlet
2. Water tank
3. Anti-limescale filter
4. Water tank screw plug
5. Ultrasound membrane
6. Control dial
7. Fill level indicator
8. Aroma compartment with aroma
pad
9. Base unit
10. Mains cable
11. Air filter
1
2
3
4
5
6
7
8
9
10
11
Principle behind the LB 45 air humidifier
1.
A membrane, vibrated by ultrasound, moves the water and releases tiny water
droplets from the surface.
2. The fan draws in air at the bottom of the device.
3.
The air is humidified with the released water droplets and blown gently
upwards towards the opening.
4. If you wish, the device can be used with aromas.
16
Page 17
5. Initial use
Unpacking the device
WARNING
Keep packaging material away from children. There is the risk of suffocation.
1. Open the cardboard packaging.
2. Remove the protective insert. Keep the plastic film closed.
3. Lift the device up and out of the packaging.
4. Remove the plastic covering.
5. Check the device, the mains plug and the cable for damage.
Installation location
WARNING
Read the safety notes before putting the device into operation.
Note
• The immediate vicinity of the air humidifier can become damp.
•
C
alcareous water can leave white deposits.
•
D
o not place the device on the floor, but in a raised position (e.g. on a table or chest of drawers).
•
P
osition the device so that the mist outlet is not directed towards objects.
•
D
o not use the air humidifier in rooms with significant temperature variations since this could lead to
condensation inside the device.
•
E
mpty any remaining water when the device is not in use.
•
P
lace the air humidifier on a firm, level and water-resistant surface.
If the device should accidentally tip over, water may escape, even if the device is switched off and unplugged.
Water
Note
• Do not add any essential oils or fragrances to the water. If additives are used, the plastic material may
become discoloured and damaged. The ultrasound membrane gets stuck and is damaged.
•
U
se fresh drinking water in the device. If the drinking water is very hard, you can use demineralised or
distilled water.
•
U
se warm water (30°C-45°C) and always fill the tank to the maximum level, otherwise the device could
leak due to physical factors.
• Tip! If the water is hard, we recommend using the optional anti-limescale filter.
Filling the water tank
1.
Remove the water tank from the base unit in an
upward direction.
2.
Turn the water tank over. The water tank is kept
closed by means of a spring valve.
3. Open the screw plug on the water tank.
4.
Fill the water tank with warm water (30°C-45°C).
The water tank holds a maximum of 4.0 litres. The
water level is visible from the outside.
5. Close the screw plug on the water tank tightly.
6. Turn the water tank over.
7. Place the water tank on the base unit.
Ensure that the water tank is sitting firmly on the
base unit.
17
Page 18

6. Operation
Note
Check the humidity of your ambient air regularly. Intensive continuous operation can cause the ambient air
to become excessively humid. The relative air humidity should not exceed 60%.
Switching on the device
1. Plug the mains cable into a suitable socket.
2. Turn the control dial clockwise.. The fill level indicator starts to glow blue. Mist now flows from the mist
outlet. If there is not enough water or no water at all in the water tank, the fill level indicator will light up
red and the device will switch off for safety reasons. Should the device switch off, fill the water tank as
described in the section “Filling the water tank”.
3.
Using the control dial, select the desired evaporation output. Evaporation is limited to a maximum of
300 ml per hour.
Note
You may optionally add drops of aroma/scented oils to the aroma pad in the aroma compartment. This
releases a fragrance into the air. Under no circumstances should you add the aroma directly to the water.
Switching off the device
1. Turn the control dial left as far as it will go, until you feel slight resistance and the control dial clicks. The
fill level indicator goes out.
2. Unplug the mains cable from the mains socket.
7. Cleaning and maintenance
Regular cleaning and disinfection is a prerequisite for hygienic and fault-free operation. The level of
contamination of the device depends on the water quality and how long it has been in operation. In any
case, we recommend the following cleaning intervals.
Every three days As required
x
x Rinsing the water tank, replacing the water
x Cleaning the air humidifier inside and out
x Descaling
Cleaning the ultrasound membrane with a cotton bud, rinsing the base
unit
WARNING
Switch off the device after every use and before cleaning. Pull the plug out of the mains socket.
IMPORTANT
The water tank must be cleaned and the air humidifier completely emptied if the device has not been used
for over a week.
Note
• Clean the device using only the methods specified.
•
U
nder no circumstances may water enter the inside of the housing.
•
D
o not use any solvent-based cleaning products.
•
U
se only a mild detergent or vinegar/vinegar-based cleaner to perform cleaning or disinfection work.
18
Page 19
Cleaning the ultrasound membrane, rinsing the base unit
Note
Empty the water from the base unit via the side rim in the direction indicated by the arrow. Ensure that no
water gets inside the device, e.g. via the fan opening.
1. Clean the ultrasound membrane with a cotton bud.
2. Empty the water from the base unit via the side rim. Observe the
markings on the device!
3. Should dirty residue remain in the base unit, pour some clean, fresh
water into the base unit and tip it out via the side edge.
Rinsing the water tank, replacing the water
Clean the water tank regularly, at least once a week if using daily. Use a
vinegar-based cleaner.
1. Clean the thread of the screw plug using a soft brush.
2. Fill the water tank halfway with water.
3. Close the screw plug on the water tank.
4. Shake and turn the water tank over repeatedly.
5. Open and empty the water tank completely.
6. Repeat the process using clean, fresh water.
mild cleaning product or vinegar/
Cleaning the air humidifier inside and out
1. Empty the water from the base unit via the side rim.
2. Wipe the air humidifier with a damp cloth inside and out. Use only a mild detergent or vinegar/vinegar-
based cleaner to perform cleaning work.
Descaling
Descaling the ultrasound membrane
Hard water can cause limescale to build up in the device and, especially, on the ultrasound membrane. This
forms white deposits. Descale the device regularly.
1. Drop some descaler onto the ultrasound membrane.
2. Allow the descaler to work for 2 to 5 minutes.
3. After this time, clean the ultrasound membrane with the cleaning brush provided.
4. Rinse the base unit several times with clean, fresh water.
Cleaning inside the base unit
1. Dip a damp, soft cloth briefly in descaling solution.
2. Wipe the inside of the base unit with the cloth.
3. Carefully add some clean, fresh water into the base unit.
4. Empty the water from the base unit via the side rim.
5. Repeat the process using clean, fresh water.
Descaling the water tank
1. Fill the water tank halfway with water.
2. Add a small amount of descaler.
3. Close the screw plug on the water tank.
4. Shake and turn the water tank over repeatedly.
5. Open and empty the water tank completely.
6. Repeat the process several times using clean, fresh water.
19
Page 20
8. Additional anti-limescale filter
TIP!
If the water is hard, we recommend using the anti-limescale filter (see section “12. Replacement items”).
Note
• If the anti-limescale filter does not prevent limescale build-up, or if white deposits form on or in the
device, the anti-limescale filter should be replaced.
•
T
he service life of the anti-limescale filter is around 2 to 3 months at most.
•
I
f the device is not used for a relatively long time, the anti-limescale filter must be removed from
the water tank and dried out.
Fitting the anti-limescale filter
1. Ensure that the device is switched off.
2. Remove the water tank from the base unit in an upward direction.
3. Turn the water tank over.
4. Open the screw plug on the water tank.
5.
Screw the anti-limescale filter on the screw plug thread of the water tank.
6. Close the screw plug on the water tank. The anti-limescale filter is now
fitted.
9. What if there are problems?
Problem Cause Solution
No mist is produced The mains cable is not plugged in. Plug the mains cable into a suitable
The control dial is in the off
position.
The water level is too low; the
water tank is empty.
The mist has a strange
smell
Strange noise The water tank is not positioned
Mist escapes from
underneath the water
tank
The device is new. Lift up the water tank, turn the screw plug
Stale or dirty water. Empty the base unit and the water tank
correctly on the base unit.
There is too little water in the water
tank.
The device is not level and unstable.
The water tank is not positioned
correctly on the base unit.
socket.
Turn the control dial clockwise towards the
maximum position.
Fill the water tank.
and remove it. Air the open, empty water
tank in a cool, dry place for 12 hours.
and clean them thoroughly. Fill the water
tank with fresh water.
Lift up the water tank and position it cor
rectly on the base unit. The tank should sit
tightly on the base unit.
Fill the water tank.
Place the device on a firm, level surface.
Lift up the water tank. Check whether the
join between the base unit and water tank
is clean. Clean if required. Position the
water tank correctly on the base unit. The
tank should sit tightly on the base unit.
-
20
Page 21
10. Technical data
Dimensions (L x W x H) approx. 25 cm x 12 cm x 34 cm
Cable length approx. 1.5 m
Deadweight approx. 1.5 kg
Mains voltage/frequency 100 – 240 V AC / 50/60 Hz
Nominal power 25 watts
Room size up to 30 m
Maximum capacity approx. 4 litres
Evaporation output 300 ml/hour
2
11. Disposal
For environmental reasons, do not dispose of the device in the household waste at the end of its
service life.
Dispose of the device at a suitable local collection or recycling point in your country. Dispose of
the device in accordance with EC Directive – WEEE (Waste Electrical and Electronic Equipment).
If you have any questions, please contact the local authorities responsible for waste disposal.
12. Replacement items
For replacement parts and additional items visit www.beurer.com or contact the corresponding service
address in your country (according to the service address list).
Replacement parts and additional items are also available from retailers.
Item Item number
Beurer by Taoasis “Vitality” aroma oil (10 ml) 681.30
Beurer by Taoasis “Harmony” aroma oil (10 ml) 681.31
Beurer by Taoasis “Relax” aroma oil (10 ml) 681.32
Beurer by Taoasis “Sleep Well” aroma oil (10 ml) 681.33
10 aroma pads 164.148
Anti-limescale filter 164.147
21
Page 22

13. Warranty/service
Beurer GmbH, Söflinger Straße 218, 89077 Ulm, Germany (hereinafter referred to as “Beurer”) provides
a warranty for this product, subject to the requirements below and to the extent described as follows.
The warranty conditions below shall not affect the seller’s statutory warranty obligations which
ensue from the sales agreement with the buyer.
The warranty shall apply without prejudice to any mandatory statutory provisions on liability.
Beurer guarantees the perfect functionality and completeness of this product.
The worldwide warranty period is 3 years, commencing from the purchase of the new, unused product
from the seller.
The warranty only applies to products purchased by the buyer as a consumer and used exclusively for
personal purposes in the context of domestic use.
German law shall apply.
During the warranty period, should this product prove to be incomplete or defective in functionality in
accordance with the following provisions, Beurer shall carry out a repair or a replacement delivery free
of charge, in accordance with these warranty conditions.
If the buyer wishes to make a warranty claim, they should approach their local retailer in the first
instance: see the attached “International Service” list of service addresses.
The buyer will then receive further information about the processing of the warranty claim, e.g. where they
can send the product and what documentation is required.
A warranty claim shall only be considered if the buyer can provide Beurer, or an authorised Beurer partner,
with
- a copy of the invoice/purchase receipt, and
- the original product.
The following are explicitly excluded from this warranty:
- deterioration due to normal use or consumption of the product;
- accessories supplied with this product which are worn out or used up through pro per use (e.g.
batteries, rechargeable batteries, cuffs, seals, electrodes, light sources, attachments and nebuliser
accessories);
- products that are used, cleaned, stored or maintained improperly and/or contrary to the provisions of
the instructions for use, as well as products that have been opened, repaired or modified by the buyer
or by a service centre not authorised by Beurer;
- damage that arises during transport between manufacturer and customer, or between service centre
and customer;
- products purchased as seconds or as used goods;
- consequential damage arising from a fault in this product (however, in this case, claims may exist
arising from product liability or other compulsory statutory liability provisions).
Repairs or an exchange in full do not extend the warranty period under any circumstances.
22
Subject to errors and changes
Page 23
FRANÇAIS
Lisez attentivement ce mode d’emploi, conservez-le pour un
usage ultérieur, mettez-le à disposition des autres utilisateurs
et suivez les consignes qui y figurent.
Table des matières
1. Familiarisation avec l’appareil .....................24
2.
Utilisation conforme aux recommandations
3. Consignes de sécurité .................................25
4. Description de l’appareil .............................26
5. Mise en service ............................................27
6. Utilisation .....................................................28
7. Nettoyage et entretien .................................28
..25
8. Filtre anti-calcaire supplémentaire ............30
9. Que faire en cas de problèmes?...............30
10. Données techniques ...................................31
11. Élimination ..................................................31
12. Articles de rechange .................................31
13. Garantie/maintenance ................................32
AVERTISSEMENT
• Cet appareil peut être utilisé par les enfants à partir de 8ans ainsi que
les personnes souffrant d’un handicap physique, sensoriel ou mental
et celles ayant peu de connaissances ou d’expérience à la condition
qu’elles soient surveillées ou sachent comment l’utiliser en toute sécu
rité et en comprennent les risques.
•
L
es enfants ne doivent pas jouer avec cet appareil.
•
L
e nettoyage et l’entretien ne doivent pas être effectués par des
enfants sans surveillance.
•
D
ébranchez l’appareil pendant son remplissage et son nettoyage.
•
N
’utilisez pas de produit nettoyant contenant des solvants.
•
S
i le câble d’alimentation électrique de l’appareil est endommagé, il
doit être mis au rebut. S’il n’est pas détachable, l’appareil doit être mis
au rebut.
-
Chère cliente, cher client,
Nous vous remercions d’avoir choisi l’un de nos produits. Notre société est réputée pour l’excellence de
ses produits et les contrôles de qualité auxquels ils sont soumis. Nos produits couvrent les domaines de la
chaleur, du poids, de la pression sanguine, de la température corporelle, de la thérapie douce, des massages,
de la beauté, des soins pour bébé et de l’amélioration de l’air.
Veuillez lire ce mode d’emploi attentivement, conservez-le pour un usage ultérieur, mettez-le à disposition
des autres utilisateurs et suivez les consignes qui y figurent.
Sincères salutations,
Votre équipe Beurer
23
Page 24
Contenu
PAP
1 humidificateur d’air
15coussinets aromatiques de rechange
1 le présent mode d’emploi
1. Familiarisation avec l’appareil
Nous passons la plus grande partie de notre temps dans des pièces fermées. L’air ambiant idéal doit contenir
une humidité relative de 40 à 60%. Cette valeur baisse principalement en hiver lorsqu’on aère une pièce et
que l’air extérieur, froid et sec, entre et se réchauffe à l’intérieur. Cet air ambiant plus sec absorbe l’humidité
et assèche donc les muqueuses et la peau ainsi que les meubles.
L’air ambiant trop sec a des conséquences négatives:
•
i
l assèche les muqueuses et les lèvres;
•
i
l brûle les yeux;
•
i
l peut provoquer des infections et des maladies des voies respiratoires;
•
i
l peut également causer l’épuisement et la fatigue et entraîner des troubles de la concentration;
•
i
l affecte les animaux et les plantes;
•
i
l favorise le dépôt de poussière;
•
i
l augmente le chargement électrique des textiles synthétiques, comme les tapis et les revêtements de
sol plastique;
•
i
l endommage les meubles en bois et notamment les parquets;
•
i
l désaccorde les instruments de musique.
Symboles utilisés
Les symboles suivants sont employés dans le mode d’emploi, sur l’emballage et sur la plaque signalétique:
Ce symbole vous avertit des risques de blessures ou des dangers pour
AVERTISSEMENT
ATTENTION
votre santé.
Ce symbole vous avertit des éventuels dommages au niveau de l’appareil
ou d’un accessoire.
Remarque Indication d’informations importantes.
Respecter les consignes du mode d’emploi.
Élimination conformément à la directive européenne WEEE (Waste Electrical
and Electronic Equipment) relative aux déchets d’équipements électriques
et électroniques.
Ce produit répond aux exigences des directives européennes et nationales
en vigueur.
Fabricant
L’appareil bénéficie d’une double isolation de protection et répond à la classe
de sécurité2.
20
Éliminer l’emballage dans le respect de l’environnement.
Marque de certification pour les produits exportés en Fédération de Russie
et dans les pays de la CEI.
24
Page 25

2. Utilisation conforme aux recommandations
Cet humidificateur d’air est conçu exclusivement pour humidifier l’air ambiant.
L’appareil est conçu uniquement pour un usage personnel.
3. Consignes de sécurité
Lisez attentivement ce mode d’emploi! Le non-respect des instructions suivantes est susceptible d’entraîner
des dommages corporels ou matériels. Conservez ce mode d’emploi et tenez-le à la disposition de tous les
utilisateurs. Si vous transmettez l’appareil à quelqu’un, remettez-lui également ces instructions.
Décharge électrique
AVERTISSEMENT
Comme tout appareil électrique, cet humidificateur d’air doit être utilisé avec précaution et prudence afin
d’éviter tout danger dû aux chocs électriques.
•
N
’utilisez l’appareil qu’à la tension indiquée sur l’appareil (la plaque signalétique se trouve à la base de
l’appareil).
•
N
e branchez le câble d’alimentation dans la prise que lorsque l’appareil est éteint.
•
N
’utilisez jamais l’appareil si ce dernier ou ses accessoires sont visiblement endommagés.
•
N
’utilisez pas l’appareil s’il est tombé ou si de l’eau s’est infiltrée à l’intérieur.
•
N
’utilisez pas l’appareil pendant un orage.
•
E
n cas de défaut ou de panne, arrêtez immédiatement l’appareil. Débranchez la fiche de la prise.
•
N
e tirez pas sur le câble d’alimentation ou sur l’appareil pour retirer la fiche de la prise électrique.
•
N
e tenez ou ne portez jamais l’appareil par le câble d’alimentation.
•
N
e coincez pas le câble d’alimentation.
•
G
ardez une distance entre le câble et les surfaces chaudes.
•
A
ssurez-vous que le câble d’alimentation et la fiche ne soient pas en contact avec de l’eau, de la brume
ou d’autres liquides.
•
U
tilisez l’appareil seulement dans des pièces intérieures sèches (par ex. jamais dans une salle de bain
ou un sauna).
•
N
e saisissez jamais un appareil qui est tombé dans l’eau. Débranchez immédiatement la fiche de la prise.
• Évitez de heurter ou de faire tomber l’appareil.
Réparation
AVERTISSEMENT
• La base ne doit pas être ouverte.
•
S
eul un spécialiste peut réparer des appareils électriques. Toute réparation inappropriée peut engendrer
un danger important pour l’utilisateur. Pour toute réparation, adressez-vous au service client ou à un
revendeur agréé.
Risque d’incendie
AVERTISSEMENT
Toute utilisation inappropriée ou non conforme aux instructions d’utilisation entraîne un risque d’incendie!
•
N
’utilisez pas l’appareil dans un endroit couvert, sous une couverture ou des coussins par exemple.
•
N
’utilisez pas l’appareil à proximité de matières inflammables.
Utilisation
AVERTISSEMENT
• L’appareil est conçu pour l’utilisation décrite dans ce mode d’emploi. Le fabricant ne peut être tenu responsable des dommages causés par une utilisation inappropriée ou non conforme.
25
Page 26
•
S
i vous souffrez d’une maladie grave des voies respiratoires ou des poumons, consultez votre médecin
avant d’utiliser l’humidificateur d’air.
•
É
teignez l’appareil après chaque utilisation et avant chaque nettoyage. Déconnectez la fiche de la prise.
•
P
lacez le câble d’alimentation de manière à ne pas trébucher.
ATTENTION
• Assurez-vous que l’appareil se trouve sur une surface plane, stable et insensible à l’humidité.
•
N
’insérez aucun objet dans les ouvertures de l’appareil. Assurez-vous que les parties mobiles sont tou-
jours libres de mouvement.
•
N
e posez aucun objet sur l’appareil.
•
N
’exposez pas l’appareil à des températures élevées.
4. Description de l’appareil
L’humidificateur d’air
•
h
umidifie l’air,
•
f
onctionne silencieusement et est réglable en continu,
•
e
st adapté à des pièces jusqu’à 30m²,
•
c
onsomme peu d’énergie et s’éteint automatiquement lorsque le réservoir d’eau est vide,
•
s
’éteint automatiquement lors du retrait du réservoir d’eau,
•
d
ispose d’un compartiment à arôme pour parfumer la pièce,
•
e
st facile à nettoyer.
1. Sortie de brume
2. Réservoir d’eau
3. Filtre anti-calcaire
4. Fermeture à vis du réservoir
d’eau
5. Membrane à ultrasons
6. Bouton tournant
7. Indicateur du niveau de
remplissage
8. Compartiment à arôme avec
coussinet aromatique
9. Base
10. Câble d’alimentation
11. Filtre à air
1
2
3
4
5
6
11
7
8
9
10
Principe de l’humidificateur d’air LB45
1. Une membrane déplacée par ultrasons fait bouger l’eau et détache les plus
petites gouttelettes d’eau de la surface.
2. Le ventilateur attire l’air vers le bas de l’appareil.
3. Les gouttelettes d’eau s’ajoutent à l’air avant que celui-ci soit soufflé déli
catement vers le haut en direction de l’ouverture.
4. Si vous le souhaitez, l’appareil peut aussi être utilisé avec des arômes.
26
-
Page 27

5. Mise en service
Déballer l’appareil
AVERTISSEMENT
Conservez les emballages hors de la portée des enfants. Ils pourraient s’étouffer.
1. Ouvrez l’emballage en carton.
2. Retirez la protection supérieure. Ne retirez pas encore le film de protection en plastique.
3. Sortez l’appareil de son emballage en le soulevant vers le haut.
4. Retirez à présent le film de protection en plastique.
5. Vérifiez que l’appareil, la fiche secteur et le câble ne sont pas endommagés.
Emplacement de montage
AVERTISSEMENT
Lisez les consignes de sécurité avant d’utiliser l’appareil.
Remarque
• Les alentours de l’humidificateur d’air peuvent devenir humides.
•
L
’eau calcaire risque de créer des dépôts blancs.
•
N
e posez pas l’appareil sur le sol, mais plutôt en hauteur (par ex. sur une table, une commode).
•
P
lacez l’appareil de manière à ce que la sortie de la brume ne soit pas orientée vers des objets.
•
N
’utilisez pas l’humidificateur d’air dans des pièces soumises à de fortes variations de température, car
celles-ci peuvent entraîner de la condensation à l’intérieur de l’appareil.
•
V
idez le reste d’eau lorsque vous n’utilisez pas l’appareil.
•
P
osez l’humidificateur d’air sur une surface solide, horizontale et résistante à l’eau.
Si l’appareil est renversé par inadvertance, l’eau peut s’écouler, même si l’appareil est éteint et débranché.
Eau
Remarque
• N’ajoutez aucune huile essentielle ou substance aromatique à l’eau. L’utilisation d’additifs pourrait
décolorer et endommager la matière plastique. La membrane à ultrasons risquerait de se coller et de
s’endommager.
•
U
tilisez de l’eau potable fraîche dans l’appareil. Si l’eau est très dure, vous pouvez utiliser de l’eau
déminéralisée ou distillée.
•
U
tilisez de l’eau chaude (30°C-45°C) et remplissez toujours le réservoir au maximum, sinon les conditions
physiques peuvent entraîner des fuites sur l’appareil.
• Conseil! Si l’eau utilisée est dure, nous recommandons d’utiliser le filtre anti-calcaire en option.
Remplir le réservoir d’eau
1. Retirez le réservoir d’eau de la base vers le haut.
2.
Retournez le réservoir d’eau. Le réservoir d’eau est
fermé par une soupape à ressorts.
3. Ouvrez le bouchon à vis du réservoir d’eau.
4.
Remplissez le réservoir d’eau avec de l’eau chaude
(30°C-45°C). Le réservoir d’eau a une capacité
maximale de 4,0litres. Le niveau d’eau est visible
de l’extérieur.
5.
Fermez hermétiquement le bouchon à vis du réservoir d’eau.
6. Retournez le réservoir d’eau.
7. Replacez le réservoir d’eau sur la base.
Veillez à ce que le réservoir d’eau soit bien en place sur la base.
27
Page 28

6. Utilisation
Remarque
Vérifiez toujours le taux d’humidité de l’air ambiant. L’utilisation intensive de l’appareil peut rendre la pièce
trop humide. L’humidité relative de l’air ne doit pas dépasser 60%.
Allumer l’appareil
1. Branchez le câble d’alimentation sur une prise secteur adaptée.
2.
Tournez la molette dans le sens des aiguilles d’une montre vers la droite. L’indicateur du niveau de remplissage s’allume en bleu. La brume sort maintenant de la sortie de brume. S’il n’y a pas ou pas assez d’eau
dans le réservoir d’eau, l’indicateur s’allume en rouge et l’appareil s’éteint pour des raisons de sécurité.
Si l’appareil s’éteint, remplissez le réservoir d’eau comme décrit au chapitre «Remplir le réservoir d’eau».
3.
Utilisez la molette pour régler la puissance d’évaporation souhaitée. L’évaporation maximale est de
300ml par heure.
Remarque
Si vous le souhaitez, vous pouvez verser quelques gouttes d’arôme/d’huile parfumée sur le coussinet
aromatique placé dans le compartiment à arôme. Cela fera alors office de parfum d’intérieur. N’ajoutez en
aucun cas l’arôme directement dans l’eau.
Éteindre l’appareil
1. Tournez la molette vers la gauche jusqu’à ce que vous sentiez une légère résistance et que la molette
clique. L’indicateur du niveau de remplissage s’éteint.
2. Débranchez le câble d’alimentation de la prise.
7. Nettoyage et entretien
Il est nécessaire de nettoyer et de désinfecter régulièrement l’appareil pour une utilisation efficace et hygiénique. La salissure de l’appareil dépend de la qualité de l’eau et de la durée de fonctionnement. Nous
recommandons les intervalles de nettoyage suivants:
Tous les trois jours Au besoin
x Nettoyer la membrane à ultrasons avec un coton-tige, rincer la base
x Rincer le réservoir d’eau, renouveler l’eau
x Nettoyer l’intérieur et l’extérieur de l’humidificateur d’air
x Détartrage
AVERTISSEMENT
Éteignez l’appareil après chaque utilisation et avant chaque nettoyage. Déconnectez la fiche de la prise.
ATTENTION
Nettoyez le réservoir d’eau et videz complètement l’humidificateur d’air si l’appareil n’a pas été utilisé depuis
au moins une semaine.
Remarque
• Nettoyez l’appareil en suivant rigoureusement les instructions.
•
L
’eau ne doit en aucun cas pénétrer à l’intérieur du boîtier.
•
N
’utilisez pas de produit nettoyant contenant des solvants.
•
P
our le nettoyage et la désinfection de l’appareil, n’utilisez que du produit vaisselle doux ou du vinaigre.
28
Page 29

Nettoyer la membrane à ultrasons, rincer la base
Remarque
Videz l’eau de la base par l’arête latérale dans le sens de la flèche. Assurez-vous qu’il n’y a pas eu d’infiltration d’eau à l’intérieur de l’appareil, comme par exemple dans l’ouverture du ventilateur.
1. Nettoyez la membrane à ultrasons avec un coton-tige.
2.
Videz l’eau de la base par l’arête latérale.
Respectez les indications mentionnées sur l’appareil!
3. Si des résidus restent dans la base, versez un peu d’eau fraîche et
claire dans la base et videz-la par l’arête latérale.
Rincer le réservoir d’eau, renouveler l’eau
Nettoyez régulièrement le réservoir d’eau et nettoyez le réservoir au moins
lisation quotidienne. Utilisez un produit vaisselle doux ou du vinaigre.
1. Nettoyez le filetage du bouchon à vis avec une brosse douce.
2. Remplissez le réservoir d’eau à moitié avec de l’eau.
3. Fermez le bouchon à vis du réservoir d’eau.
4. Agitez et inclinez le réservoir d’eau d’avant en arrière.
5. Ouvrez et videz complètement le réservoir d’eau.
6. Répétez l’opération avec de l’eau claire et fraîche.
une fois par semaine en cas d’uti-
Nettoyer l’intérieur et l’extérieur de l’humidificateur d’air
1. Videz l’eau de la base par l’arête latérale.
2.
Essuyez l’extérieur et l’intérieur de l’humidificateur d’air avec un chiffon humide. Pour le nettoyage de
l’appareil, utilisez uniquement du produit vaisselle doux ou du vinaigre.
Détartrage
Détartrer la membrane à ultrasons
De l’eau dure peut provoquer un entartrage de l’appareil et surtout de la membrane à ultrasons. Un dépôt
blanc est alors visible. Détartrez régulièrement l’appareil.
1. Étalez quelques gouttes de détartrant sur la membrane à ultrasons.
2. Laissez agir le détartrant pendant 2 à 5minutes.
3.
Une fois le temps d’action écoulé, nettoyez la membrane à ultrasons avec le pinceau de nettoyage fourni.
4. Rincez la base plusieurs fois à l’eau claire et fraîche.
Nettoyer l’intérieur de la base
1. Plongez un chiffon doux et humide brièvement dans une solution de détartrage.
2. Essuyez l’intérieur de la base avec un chiffon.
3. Verser avec précaution un peu d’eau claire et fraîche dans la base.
4. Videz l’eau de la base par l’arête latérale.
5. Répétez l’opération avec de l’eau claire et fraîche.
Détartrer le réservoir d’eau
1. Remplissez le réservoir d’eau à moitié avec de l’eau.
2. Ajoutez une petite quantité de détartrant.
3. Fermez le bouchon à vis du réservoir d’eau.
4. Agitez et inclinez le réservoir d’eau d’avant en arrière.
5. Ouvrez et videz complètement le réservoir d’eau.
6. Répétez plusieurs fois l’opération avec de l’eau claire et fraîche.
29
Page 30

8. Filtre anti-calcaire supplémentaire
CONSEIL!
Si l’eau utilisée est dure, nous recommandons d’utiliser le filtre anti-calcaire (cf. chapitre
« 12. Articles de rechange »).
Remarque
• Si l’appareil s’entartre malgré le filtre anti-calcaire ou si un dépôt blanc se forme autour de l’appareil,
le filtre anti-calcaire doit être changé.
•
L
a durée de vie du filtre anti-calcaire est de 2 à 3mois au maximum.
•
S
i l’appareil n’est pas utilisé pendant un long moment, le filtre anti-calcaire doit être retiré du réser-
voir d’eau et séché.
Installer le filtre anti-calcaire
1. Assurez-vous que l’appareil est éteint.
2. Retirez le réservoir d’eau de la base vers le haut.
3. Retournez le réservoir d’eau.
4. Ouvrez le bouchon à vis du réservoir d’eau.
5. Vissez le filtre anti-calcaire sur le filetage du bouchon du réservoir d’eau.
6.
Fermez le bouchon à vis du réservoir d’eau. Le filtre anti-calcaire est
maintenant installé.
9. Que faire en cas de problèmes?
Problème Cause Solution
Aucune brume ne sort
La brume a une odeur
bizarre.
Bruit suspect. Le réservoir d’eau n’est pas placé
De la brume sort sous
le réservoir d’eau.
Le câble d’alimentation n’est pas
branché.
La molette se trouve en position
Arrêt.
Le niveau d’eau est trop bas, le
réservoir d’eau est vide.
Appareil neuf. Retirer le réservoir d’eau, tourner et
Eau pas fraîche ou sale. Vider la base et le réservoir d’eau et bien
correctement sur la base.
Il y a trop peu d’eau dans le réser
voir.
L’appareil n’est pas à l’horizontal
et stable.
Le réservoir d’eau n’est pas placé
correctement sur la base.
Brancher le câble d’alimentation sur une
prise secteur adaptée.
Tourner la molette dans le sens des aiguilles
d’une montre vers la position maximum.
Remplir le réservoir d’eau.
retirer la fermeture à vis. Aérer pendant
12heures le réservoir d’eau vide et ouvert
dans un lieu frais et sec.
nettoyer. Remplir le réservoir d’eau claire.
Retirer le réservoir d’eau et le placer
correctement sur la base. Le réservoir doit
être bien placé sur la base.
-
Remplir le réservoir d’eau.
Placer l’appareil sur un support horizontal
et solide.
Retirer le réservoir d’eau. Vérifier si le
conduit entre la base et le réservoir d’eau
est propre. Nettoyer au besoin. Placer le
réservoir d’eau correctement sur la base.
Le réservoir d’eau doit être bien placé sur
la base.
30
Page 31

10. Données techniques
Dimensions (LxlxH) env. 25cm x 12cm x 34cm
Longueur du câble env. 1,5m
Poids à vide env. 1,5kg
Tension/fréquence 100 – 240VAC - 50/60Hz
Puissance nominale 25watts
Taille de la pièce jusqu’à 30m²
Contenance env. 4litres
Puissance d’évaporation 300ml/heure
11. Élimination
Dans l’intérêt de la protection de l’environnement, l’appareil ne doit pas être jeté avec les ordures
ménagères à la fin de sa durée de service.
L’élimination doit se faire par le biais des points de collecte compétents dans votre pays. Éliminez
l’appareil conformément à la directive européenne – WEEE (Waste Electrical and Electronic Equip
ment) relative aux appareils électriques et électroniques usagés.
Pour toute question, adressez-vous aux collectivités locales responsables de l’élimination et du recyclage
de ces produits.
-
12. Articles de rechange
Pour commander des consommables/articles supplémentaires, rendez-vous sur le site www.beurer.com ou
contactez le service après-vente concerné dans votre pays (cf. la liste des adresses du service après-vente).
Les consommables et les articles supplémentaires sont disponibles dans le commerce.
Article Référence de l’article
Huile aromatique Beurer by Taoasis «Vitality» (10ml) 681.30
Huile aromatique Beurer by Taoasis «Harmony» (10ml) 681.31
Huile aromatique Beurer by Taoasis «Relax» (10ml) 681.32
Huile aromatique Beurer by Taoasis «Sleep Well» (10ml) 681.33
10coussinets aromatiques 164.148
Filtre anti-calcaire 164.147
31
Page 32

13. Garantie/maintenance
La société Beurer GmbH, sise Söflinger Straße 218, 89077 Ulm, Allemagne, (ci-après désignée « Beurer »)
propose une garantie pour ce produit dans les conditions suivantes et dans la mesure prévue ci-après.
Les conditions de garantie suivantes n’affectent en rien les obligations de garantie du vendeur
découlant du contrat de vente conclu avec l’acheteur.
La garantie s’applique également sans préjudice de la responsabilité légale obligatoire.
Beurer garantit le bon fonctionnement et l’intégrité de ce produit.
La période de garantie mondiale est de 3 ans à compter de la date d’achat par l’acheteur du produit neuf
et non utilisé.
Cette garantie ne s’applique qu’aux produits achetés par l’acheteur en tant que consommateur et utilisés
uniquement à des fins personnelles dans le cadre d’une utilisation domestique.
Le droit allemand s’applique.
Si, au cours de la période de garantie, ce produit s’avère incomplet ou défectueux conformément aux dis
positions suivantes, Beurer s’engage à proposer gratuitement un remplacement ou une réparation conformément aux présentes Conditions de garantie.
Si l’acheteur souhaite faire valoir la garantie, il doit d’abord s’adresser au revendeur local : cf. liste «
Service client à l’international » ci-jointe pour connaître les adresses du service après-vente.
L’acheteur recevra ensuite des informations complémentaires concernant le déroulement de la demande
de garantie, par exemple, l’adresse à laquelle envoyer le produit et les documents requis.
Une demande de garantie ne peut être prise en compte que si l’acheteur présente
- une copie de la facture/du reçu et
- le produit d’origine
à Beurer ou à un partenaire autorisé de Beurer.
La présente Garantie exclut expressément
- toute usure découlant de l’utilisation ou de la consommation normale du produit ;
- les accessoires fournis avec le produit qui s’usent ou qui sont consommés dans le cadre d’une uti
lisation normale du produit (par exemple, piles, piles rechargeables, manchettes, joints, électrodes,
ampoules, embouts et accessoires pour inhalateur) ;
- les produits utilisés, nettoyés, stockés ou entretenus de manière inappropriée et/ou contraire aux
conditions d’utilisation, ainsi que les produits ouverts, réparés ou modifiés par l’acheteur ou par un
service client non agréé par Beurer ;
- les dommages survenus lors du transport entre le fabricant et le client ou entre le service client et le
client ;
- les produits achetés en tant qu’article de second choix ou d’occasion ;
- les dommages consécutifs qui résultent d’une défaillance du produit (dans ce cas, toutefois, des
réclamations peuvent être soulevées relatives à la responsabilité du fait des produits ou à d’autres
dispositions légales obligatoires relatives à la responsabilité).
-
-
Les réparations ou le remplacement complet ne prolongent en aucun cas la période de garantie.
32
Sous réserve d’erreurs et de modifications
Page 33

ESPAÑOL
Lea atentamente estas instrucciones de uso, consérvelas para
su futura utilización, póngalas a disposición de otros usuarios
y respete las indicaciones.
Índice
1. Información general .....................................34
2. Uso correcto ................................................35
3. Indicaciones de seguridad ..........................35
4. Descripción del aparato ..............................36
5. Puesta en funcionamiento ..........................37
6. Manejo .........................................................38
7. Limpieza y cuidado .....................................38
8. Artículo adicional filtro de cal ....................40
9. Solución de problemas ..............................41
10. Datos técnicos ............................................41
11. Eliminación .................................................42
12. Artículos de postventa ..............................42
13. Garantía/asistencia .....................................42
ADVERTENCIA
• Este aparato puede ser utilizado por niños mayores de 8 años, así
como por personas con facultades físicas, sensoriales o mentales
limitadas, o con poca experiencia o conocimientos, siempre que estén
vigiladas o se les indique cómo usarlo de forma segura y entiendan los
peligros que conlleva.
•
L
os niños no deberán jugar nunca con el aparato.
•
L
as tareas de limpieza y de mantenimiento ordinario no deberán ser
realizadas por niños sin supervisión.
•
D
esconecte el aparato de la red durante el llenado y la limpieza.
•
N
o use limpiadores que contengan disolventes.
•
S
i el cable de alimentación de este aparato se daña, deberá sustituirse.
Si el cable no se puede extraer, el aparato deberá sustituirse.
Estimada clienta, estimado cliente:
Nos alegramos de que haya elegido un producto de nuestra gama. Nuestro nombre es sinónimo de productos de alta y comprobada calidad en el ámbito de aplicación de calor, peso, presión arterial, temperatura
corporal, pulso, tratamiento suave, masaje, belleza, bebés y aire.
Lea detenidamente estas instrucciones de uso, consérvelas para su futura utilización, asegúrese de que
estén accesibles para otros usuarios y respete las indicaciones.
Atentamente,
El equipo de Beurer
33
Page 34

Artículos suministrados
PAP
1 humidificador de aire
15 almohadillas aromáticas de repuesto
1 estas instrucciones de uso
1. Información general
El ser humano pasa la mayor parte del tiempo en espacios cerrados. Para un aire ambiente ideal se recomienda una humedad relativa del 40 al 60%. En invierno, especialmente, no se suele alcanzar este valor,
puesto que al ventilar una estancia fluye dentro aire frío con menos humedad que se calienta dentro. Este
aire ambiente seco absorbe humedad y seca las mucosas y la piel, así como los muebles.
Un aire ambiente demasiado seco tiene una serie de efectos negativos:
•
S
equedad en mucosas y labios.
•
P
icor en los ojos.
•
S
e favorece la aparición de infecciones y dolencias de las vías respiratorias.
•
F
atiga, cansancio y falta de concentración.
•
L
as mascotas y las plantas de interior se ven afectadas.
•
S
e favorece la formación de polvo.
•
C
arga electroestática de tejidos de fibras sintéticas, como alfombras y suelos sintéticos.
•
L
os muebles de madera y en especial los suelos de parquet se estropean.
•
L
os instrumentos musicales se desafinan.
Símbolos
En las instrucciones de uso, en el embalaje y en la placa de características se utilizan los siguientes símbolos:
Indicación de advertencia sobre riesgos de lesiones u otros peligros para la
ADVERTENCIA
ATENCIÓN
Nota
salud.
Indicación de seguridad sobre posibles daños en el aparato o los accesorios.
Indicación de información importante.
Respetar las instrucciones de uso.
Eliminación según la Directiva europea sobre residuos de aparatos eléctricos
y electrónicos (RAEE).
Este producto cumple los requisitos de las directrices europeas y nacionales
vigentes.
Fabricante
El aparato cuenta con una protección de aislamiento doble y cumple por tanto
los requisitos de la clase de protección 2.
20
Eliminar el embalaje respetando el medio ambiente.
Sello de certificación para aquellos productos que se exportan a la Federación
de Rusia y a los países de la CEI.
34
Page 35

2. Uso correcto
Este humidificador de aire ha sido diseñado únicamente para humidificar el aire ambiente.
Este aparato solo está destinado al uso privado.
3. Indicaciones de seguridad
Lea detenidamente estas instrucciones de uso. El incumplimiento de las siguientes indicaciones puede
ocasionar daños personales o materiales. Conserve estas instrucciones de uso y asegúrese de que se encuentren disponibles para otros usuarios. Si entrega el aparato a un tercero, incluya las instrucciones de uso.
Descarga eléctrica
ADVERTENCIA
Como todos los aparatos eléctricos, este humidificador de aire debe utilizarse con extremo cuidado para
evitar recibir una descarga eléctrica.
•
Ú
selo solo con la tensión de red indicada en el aparato (la placa de características se encuentra en la
parte inferior de la base).
•
E
nchufe únicamente el cable de alimentación a la toma de corriente si el aparato está apagado.
•
N
o use el aparato si este o sus accesorios presentan daños visibles.
•
N
o use el aparato si se ha caído o si ha penetrado agua en su interior.
•
N
o use el aparato durante una tormenta eléctrica.
•
A
pague el aparato de inmediato en caso de defectos o fallos de funcionamiento. Desenchúfelo de la
toma de corriente.
•
N
o tire del cable de alimentación ni del aparato para desenchufarlo.
•
N
o sujete ni transporte el aparato agarrándolo por el cable de alimentación.
•
N
o pille el cable de alimentación.
•
M
antenga el cable de alimentación alejado de superficies calientes.
•
A
segúrese de que el cable de alimentación y el conector no entren en contacto con agua, vapor u otros
líquidos.
•
U
se el aparato únicamente en interiores secos (nunca en la bañera, la sauna, etc.).
•
N
o toque nunca un aparato que se haya caído al agua. Desenchúfelo de inmediato de la toma de corriente.
• No golpee el aparato ni deje que se caiga.
Reparación
ADVERTENCIA
• La base no debe abrirse.
•
L
as reparaciones de los aparatos eléctricos solo debe llevarlas a cabo personal especializado, ya que
una reparación inadecuada puede ocasionar peligros considerables para el usuario. Diríjase al servicio
de atención al cliente o a un distribuidor autorizado para llevar a cabo las reparaciones.
Peligro de incendio
ADVERTENCIA
En determinadas circunstancias, el uso inadecuado del aparato o el incumplimiento de las instrucciones de
uso puede ocasionar peligro de incendio.
•
N
o use el aparato si hay algún objeto cubriéndolo, como una manta o un cojín.
•
N
o use el aparato cerca de sustancias fácilmente inflamables.
35
Page 36

Manejo
ADVERTENCIA
• Este aparato solo se ha diseñado para el fin descrito en estas instrucciones de uso. El fabricante no se
responsabiliza de los daños derivados de un uso inadecuado o irresponsable.
•
S
i padece alguna enfermedad grave de las vías respiratorias o los pulmones, consulte a su médico antes
de utilizar el humidificador de aire.
•
A
pague siempre el aparato después de usarlo y antes de limpiarlo. Desenchúfelo de la toma de corriente.
• Tienda el cable de alimentación de forma que no se pueda tropezar con él.
ATENCIÓN
• Asegúrese de colocar el aparato sobre una superficie estable y resistente a la humedad en la que no se
pueda volcar.
•
N
o introduzca ningún objeto en los orificios del aparato. Asegúrese de que las piezas móviles se puedan
mover siempre bien.
•
N
o coloque objetos sobre el aparato.
•
P
roteja el aparato de temperaturas elevadas.
4. Descripción del aparato
El humidificador
•
h
umedece el aire,
•
e
s silencioso y puede regularse de forma continua,
•
r
esulta apropiado para habitaciones de hasta 30m²,
•
a
horra energía y se apaga automáticamente cuando el depósito de agua está vacío,
•
s
e apaga automáticamente cuando se retira el depósito de agua,
•
d
ispone de un compartimento para el aroma para perfumar la estancia,
•
e
s fácil de limpiar.
1. Salida de vapor
2. Depósito de agua
3. Filtro de cal
4.
Tapón roscado del depósito de
agua
5. Membrana de ultrasonidos
6. Regulador
7. Indicador de nivel de llenado
8.
Compartimento para el aroma
con almohadilla aromática
9. Base
10. Cable de alimentación
11. Filtro de aire
1
2
7
3
4
5
8
9
6
10
36
11
Page 37

Principio del humidificador de aire LB 45
1.
Una membrana movida por ultrasonidos mueve el agua y libera las gotas de
agua más pequeñas de la superficie.
2. El ventilador atrae el aire al fondo del aparato.
3. El aire se enriquece con las gotitas de agua liberadas y se expulsa suave
mente hacia la abertura.
4. Si se desea, el aparato puede utilizarse con aromas.
-
5. Puesta en funcionamiento
Desempaquetado del aparato
ADVERTENCIA
No deje que los niños se acerquen al material de embalaje. Existe peligro de asfixia.
1. Abra el embalaje de cartón.
2. Retire el inserto de protección superior. Deje el plástico cerrado.
3. Saque el aparato del embalaje tirando hacia arriba.
4. Retire la bolsa de plástico.
5. Compruebe que el aparato, el conector de red y el cable no presenten daños.
Lugar de colocación
ADVERTENCIA
Antes de poner en funcionamiento el aparato, lea las indicaciones de seguridad.
Nota
• El entorno directo del humidificador de aire puede humedecerse.
•
C
on agua caliza es posible que se forme una precipitación blanca.
•
N
o coloque el aparato en el suelo, sino en un lugar elevado (sobre una mesa, una cómoda, etc.).
•
C
oloque el aparato de tal forma que la salida de vapor no esté orientada hacia ningún objeto.
•
N
o utilice el humidificador de aire en estancias con fuertes oscilaciones de temperatura, ya que estas
pueden producir condensaciones en el interior del aparato.
•
V
acíe el agua residual cuando no vaya a utilizar el aparato.
•
C
oloque el humidificador de aire sobre una superficie firme, horizontal y resistente al agua.
Si el aparato volcara accidentalmente, el agua podría derramarse incluso si este estuviera apagado y
desenchufado.
Agua
Nota
• No añada aceites esenciales ni sustancias aromáticas al agua. Es posible que la utilización de aditivos
decolore y dañe el plástico. La membrana de ultrasonidos se adhiere y, por lo tanto, se deteriora.
•
U
tilice agua limpia en el aparato. Si el agua potable es muy dura, se puede usar agua desmineralizada
o destilada.
•
U
tilice agua caliente (30°C-45°C) y llene el depósito siempre hasta el máximo. De lo contrario, podría
derramarse agua del aparato debido a las condiciones físicas.
• Sugerencia: Con aguas duras se recomienda el uso del filtro de cal opcional.
37
Page 38

Llenado del depósito de agua
1.
Extraiga el depósito de agua de la base tirando hacia
arriba.
2. Voltee el depósito de agua. Una válvula de resorte
lo cierra.
3. Abra el tapón roscado del depósito de agua.
4.
Rellene el depósito con agua caliente (30°C-45°C).
Su capacidad es de 4,0 litros como máximo. El nivel
del agua puede verse desde fuera.
5. Cierre bien el tapón roscado del depósito.
6. Voltee el depósito de agua.
7. Colóquelo sobre la base.
Asegúrese de que quede bien asentado sobre la
base.
6. Manejo
Nota
Compruebe constantemente la humedad del aire ambiente. Un uso intensivo y prolongado puede provocar un exceso de humedad en la habitación. La humedad relativa del aire no debe exceder el 60%.
Encender el aparato
1. Enchufe el cable de alimentación en una toma de corriente adecuada.
2. Gire el regulador hacia la derecha en el sentido de las agujas del reloj. El indicador de nivel de llenado
comienza a iluminarse en azul. Ahora sale vapor de la salida de vapor. Si no hay agua en el depósito o el
agua que hay no es suficiente, el indicador de nivel de llenado se ilumina en rojo y el aparato se apaga
automáticamente por razones de seguridad. Si el aparato se apaga, rellene el depósito de agua como se
describe en el apartado "Llenado del depósito de agua".
3. Ajuste la potencia de evaporación deseada con el regulador. La potencia de evaporación máxima es de
300 ml por hora.
Nota
Si lo desea, puede rociar la almohadilla que está dentro del compartimento para el aroma con aromas y
aceites aromáticos. Esto sirve para perfumar la habitación. No añada en ningún caso el aroma directa
mente al agua.
-
Apagar el aparato
1. Gire el regulador hasta que haga tope hacia la izquierda, hasta que note una ligera resistencia y el regu-
lador haga clic. El indicador de nivel de llenado se apaga.
2. Desenchufe el cable de alimentación de la toma de corriente.
7. Limpieza y cuidado
Una limpieza y desinfección regulares resultan esenciales para un funcionamiento higiénico y sin errores. La
cantidad de suciedad que se acumula en el aparato depende de la calidad del agua y del tiempo que esté
funcionando. De todos modos, se recomiendan los siguientes intervalos de limpieza.
Cada tres días
x
x Limpieza del depósito de agua y cambio del agua
Cuando sea
necesario
Limpieza de la membrana de ultrasonidos con un bastoncillo de algodón
y enjuague de la base
x Limpieza del interior y el exterior del humidificador de aire
x Descalcificación
38
Page 39

ADVERTENCIA
Apague siempre el aparato después de usarlo y antes de limpiarlo. Desenchúfelo de la toma de corriente.
ATENCIÓN
Limpie el depósito de agua y vacíe por completo el humidificador de aire si no lo ha usado desde hace más
de una semana.
Nota
• Limpie el aparato únicamente de la forma indicada.
•
B
ajo ningún concepto debe penetrar agua en el interior del aparato.
•
N
o use limpiadores que contengan disolventes.
•
U
tilice únicamente un lavavajillas suave, vinagre o un limpiador a base de vinagre para la limpieza y
desinfección.
Limpieza de la membrana de ultrasonidos y enjuague de la base
Nota
Vacíe el agua de la base por los bordes laterales en la dirección de la flecha. Asegúrese de que no penetre
agua en el interior del aparato, por ejemplo a través de la abertura del ventilador.
1.
Limpie la membrana de ultrasonidos con un bastoncillo de algodón.
2.
Vacíe el agua de la base por los bordes laterales.
Preste atención a las marcas del aparato.
3. Si quedan restos de suciedad en la base, vierta un poco de agua
limpia en la misma y vacíela después por los bordes laterales.
Limpieza del depósito de agua y cambio del agua
Limpie el depósito de agua con regularidad. Si usa el aparato a diario, límUtilice un producto de limpieza suave, vinagre o un limpiador a base de vinagre.
1. Limpie la rosca del tapón roscado con un cepillo suave.
2. Llene de agua el depósito hasta la mitad.
3. Cierre el tapón roscado del depósito de agua.
4. Agite e incline a uno y otro lado el depósito de agua.
5. Abra y vacíe completamente el depósito.
6. Repita el proceso con agua limpia.
pielo al menos una vez por semana.
Limpieza del exterior y el interior del humidificador de aire
1. Vacíe el agua de la base por los bordes laterales.
2.
Limpie el exterior y el interior del humidificador de aire con un paño húmedo. Utilice únicamente un
producto de limpieza suave, vinagre o un limpiador a base de vinagre para limpiarlo.
Descalcificación
Descalcificación de la membrana de ultrasonidos
El agua dura puede provocar la calcificación del aparato y, sobre todo, de la membrana de ultrasonidos. La
calcificación se nota cuando aparece una precipitación blanca. Descalcifique el aparato con regularidad.
1. Ponga unas gotas de descalcificador en la membrana de ultrasonidos.
2. Déjelo actuar entre 2 y 5 minutos.
3. Una vez transcurrido este tiempo, limpie la membrana de ultrasonidos con el cepillo de limpieza sumi-
nistrado.
4. Enjuague la base varias veces con agua limpia.
39
Page 40

Limpieza del interior de la base
1. Sumerja brevemente un paño húmedo y suave en una solución descalcificadora.
2. Limpie el interior de la base con el paño.
3. Con cuidado, vierta un poco de agua limpia en la base.
4. Vacíe el agua de la base por los bordes laterales.
5. Repita el proceso con agua limpia.
Descalcificación del depósito de agua
1. Llene de agua el depósito hasta la mitad.
2. Añada una pequeña cantidad de descalcificador.
3. Cierre el tapón roscado del depósito de agua.
4. Agite e incline a uno y otro lado el depósito de agua.
5. Abra y vacíe completamente el depósito.
6. Repita el proceso varias veces con agua limpia.
8. Artículo adicional filtro de cal
SUGERENCIA
Con aguas duras se recomienda el uso del filtro de cal (véase el apartado "12. Artículos de post venta" ).
Nota
• Si el aparato se calcifica a pesar del filtro de cal o si se forma una precipitación blanca alrededor
de él, se deberá cambiar el filtro de cal.
•
L
a vida útil del filtro de cal es de dos a tres meses como máximo.
•
S
i el aparato no se usa durante un periodo de tiempo prolongado, se debe extraer y secar el filtro
de cal del depósito de agua.
Montaje del filtro de cal
1. Asegúrese de que el aparato esté apagado.
2. Separe el depósito de agua de la base tirando hacia arriba.
3. Voltee el depósito de agua.
4. Abra el tapón roscado del depósito de agua.
5. Enrosque el filtro de cal en la rosca del tapón del depósito de agua.
6.
Cierre el tapón roscado del depósito de agua. El filtro de cal ya está
colocado.
40
Page 41

9. Solución de problemas
Problema Causa Solución
No sale vapor
El vapor tiene un olor
raro
Ruido anómalo El depósito de agua no está bien
El vapor sale por deba
jo del depósito de agua
El cable de alimentación no está
enchufado.
El regulador está en la posición de
apagado.
El nivel de agua es demasiado ba
jo; el depósito de agua está vacío.
El aparato es nuevo. Extraiga el depósito de agua, desenros
El agua está sucia o estancada. Vacíe completamente la base y el depó
asentado sobre la base.
Hay muy poca agua en el depósito
de agua.
El aparato no está nivelado ni estable.
-
El depósito de agua no está bien
asentado sobre la base.
Enchufe el cable de alimentación en una
toma de corriente adecuada.
Gire el regulador en el sentido de las agujas
del reloj hacia la posición máxima.
-
Rellene el depósito de agua.
que el tapón roscado y quítelo. Deje que
el depósito se ventile abierto y vacío en
un sitio fresco y seco durante 12 horas.
sito de agua y límpielos a fondo. Llene el
depósito de agua con agua limpia.
Retire el depósito de agua y colóquelo
correctamente sobre la base. El depósito
debe quedar bien asentado sobre la base.
Rellene el depósito de agua.
Coloque el aparato sobre una superficie
horizontal y firme.
Retire el depósito de agua. Compruebe
si el paso de la base al depósito de agua
está limpio. Límpielo si es necesario. Co
loque el depósito de agua correctamente
sobre la base. El depósito debe quedar
bien asentado sobre la base.
-
-
-
10. Datos técnicos
Dimensiones (largo x ancho x alto) aprox. 25 x 12 x 34cm
Longitud del cable aprox. 1,5 m
Peso sin carga aprox. 1,5 kg
Tensión/frecuencia de red 100 – 240 V CA/50/60 Hz
Potencia nominal 25 vatios
Tamaño de la habitación hasta 30 m²
Capacidad aprox. 4 litros
Potencia de evaporación 300 ml/hora
41
Page 42

11. Eliminación
A fin de preservar el medio ambiente, cuando el aparato llegue al final de su vida útil no lo deseche
con la basura doméstica.
Se puede desechar en los puntos de recogida adecuados disponibles en su zona. Deseche el
aparato según la Directiva europea sobre residuos de aparatos eléctricos y electrónicos (RAEE).
Para más información, póngase en contacto con la autoridad municipal competente en materia de elimina
ción de residuos.
-
12. Artículos de postventa
Para artículos de reposición y complementos visite www.beurer.com o diríjase a la dirección de servicio
técnico de su país (indicada en la lista de direcciones de servicio técnico).
Los artículos de reposición y complementos también pueden adquirirse en comercios.
Artículo Referencia
Aceite aromático "Vitality" de Beurer by Taoasis (10ml) 681.30
Aceite aromático "Harmony" de Beurer by Taoasis (10ml) 681.31
Aceite aromático "Relax" de Beurer by Taoasis (10ml) 681.32
Aceite aromático "Sleep Well" de Beurer by Taoasis (10ml) 681.33
10 almohadillas aromáticas 164.148
Filtro de cal 164.147
13. Garantía/asistencia
Beurer GmbH, Söflinger Straße 218, D-89077 Ulm (en lo sucesivo, "Beurer") concede una garantía para
este producto. La garantía está sujeta a las siguientes condiciones y el alcance de la misma se describe
a continuación.
Las siguientes condiciones de garantía no afectan a las obligaciones de garantía que la ley pres
cribe para el vendedor y que emanan del contrato de compra celebrado con el comprador.
La garantía se aplicará además sin perjuicio de las normas legales preceptivas.
Beurer garantiza el perfecto funcionamiento y la integralidad de este producto.
La garantía mundial tiene una validez de 3 años a partir de la fecha de compra del producto nuevo y sin
utilizar por parte del comprador.
Esta garantía se ofrece solo para productos que el comprador haya adquirido en tanto que consumidor
con fines exclusivamente personales en el marco de una utilización privada en el hogar.
Se aplica la legislación alemana.
En el caso de que, durante el periodo de garantía, este producto resultara estar incompleto o no funcio
nara correctamente conforme a lo dispuesto en las siguientes disposiciones, Beurer se compromete a
sustituir el producto o a repararlo según las presentes condiciones de garantía.
Cuando el comprador desee recurrir a la garantía lo hará dirigiéndose en primera instancia al distri
buidor local: véase la lista adjunta "Servicio internacional" que contiene las distintas direcciones de
servicio técnico.
42
-
-
-
Page 43

A continuación, el comprador recibirá información pormenorizada sobre la tramitación de la garantía,
como el lugar al que debe enviar el producto y qué documentos deberá adjuntar.
El comprador solo podrá invocar la garantía cuando pueda presentar:
- una copia de la factura o del recibo de compra y
- el producto original
a Beurer o a un socio autorizado por Beurer.
Quedan excluidos explícitamente de la presente garantía
- el desgaste que se produce por el uso o el consumo normal del producto;
- los accesorios suministrados con el producto que se desgastan o consumen durante un uso normal
(p. ej., pilas, baterías, brazaletes, juntas, electrodos, luminarias, cabezales y accesorios de inhalación);
- productos cuyo uso, limpieza, almacenamiento o mantenimiento sea indebido o vaya contra lo dis
puesto en las instrucciones de uso, así como productos que hayan sido abiertos, reparados o modificados por el comprador o por un centro de servicio técnico no autorizado por Beurer;
- daños que se hayan producido durante el transporte entre las instalaciones del fabricante y las del
cliente o bien entre el centro de servicio técnico y el cliente;
- productos que se hayan adquirido como productos de calidad inferior o de segunda mano;
- daños derivados que resulten de una falta del producto. En este caso, podrían invocarse eventual
mente derechos derivados de la normativa de responsabilidad de productos o de otras disposiciones
de responsabilidad legal preceptiva.
Las reparaciones o la sustitución del producto no prolongarán en ningún caso el periodo de garantía.
-
-
43
Salvo errores y modificaciones
Page 44

ITALIANO
Leggere attentamente le presenti istruzioni per l'uso,
conservarle per impieghi futuri, renderle accessibili ad altri
utenti e attenersi alle indicazioni.
Indice
1. Introduzione .................................................45
2. Uso conforme ..............................................46
3. Indicazioni di sicurezza ...............................46
4. Descrizione dell'apparecchio......................47
5. Messa in funzione ........................................48
6. Uso ...............................................................49
7. Pulizia e cura ................................................49
8. Articolo aggiuntivo: filtro anticalcare ........51
9. Che cosa fare in caso di problemi? ...........51
10. Dati tecnici ..................................................52
11. Smaltimento ................................................52
12. Articoli di postvendita ...............................52
13. Garanzia/Assistenza ...................................53
AVVERTENZA
• Questo apparecchio può essere utilizzato da ragazzi di età superiore
a 8 anni e da persone con ridotte capacità fisiche, percettive o mentali
o non in possesso della necessaria esperienza e conoscenza esclusi
vamente sotto supervisione oppure se sono stati istruiti in merito alle
misure di sicurezza e comprendono i rischi ad esse correlati.
•
I
bambini non devono giocare con l'apparecchio.
•
L
a pulizia e la manutenzione a cura dell'utente non devono essere ese-
guite da bambini, a meno che non siano sorvegliati.
•
S
collegare l'apparecchio dalla rete elettrica durante le operazioni di
riempimento e pulizia.
•
N
on utilizzare detergenti contenenti solventi.
•
S
e il cavo di alimentazione dell'apparecchio è danneggiato, è necessario smaltirlo. Nel caso non sia possibile rimuoverlo, è necessario
smaltire l'apparecchio.
-
Gentile cliente,
siamo lieti che Lei abbia scelto un prodotto del nostro assortimento. Il nostro marchio è garanzia di prodotti
di elevata qualità, controllati nei dettagli, relativi ai settori calore, peso, pressione, temperatura corporea,
pulsazioni, terapia dolce, massaggio, Beauty, Baby e aria.
Leggere attentamente le presenti istruzioni per l'uso, conservarle per impieghi futuri, renderle accessibili ad
altri utenti e attenersi alle indicazioni.
Cordiali saluti
Il Team Beurer
44
Page 45

Fornitura
PAP
1 umidificatore
15 inserti aromatici di ricambio
1 le presenti istruzioni per l'uso
1. Introduzione
Le persone trascorrono la maggior parte del proprio tempo in locali chiusi. Per un'aria ambiente ideale si
raccomanda un'umidità relativa tra il 40 e il 60%. Spesso questo valore non viene raggiunto, in particolare
durante l'inverno, quando aerando gli ambienti entra nei locali aria fredda poco umida che viene poi riscal
data. L'aria ambiente secca assorbe l'umidità, causando la secchezza di mucose e cute, oltre che dei mobili.
Un'aria ambiente troppo secca ha una serie di conseguenze negative:
•
S
ecchezza delle mucose e delle labbra.
•
B
ruciore agli occhi.
•
M
aggior facilità di contrarre infezioni e malattie delle vie respiratorie.
•
S
possatezza, stanchezza e difficoltà di concentrazione.
•
E
ffetti negativi su animali domestici e piante da appartamento.
•
A
umento della polvere.
•
C
arica elettrostatica di tessuti in fibra sintetica, quali tappeti e pavimenti in materiale plastico.
•
D
anneggiamento di mobili in legno e in particolare dei pavimenti in parquet.
•
P
erdita di accordatura degli strumenti musicali.
Spiegazione dei simboli
I seguenti simboli sono utilizzati nelle istruzioni per l'uso, sull'imballo e sulla targhetta:
-
AVVERTENZA
ATTENZIONE
Nota
20
Avvertimento di pericolo di lesioni o di pericoli per la salute.
Indicazione di sicurezza per possibili danni all'apparecchio/agli accessori.
Nota che fornisce informazioni importanti.
Seguire le istruzioni per l'uso.
Smaltimento secondo la direttiva europea sui rifiuti di apparecchiature elettriche
ed elettroniche (RAEE).
Il presente prodotto soddisfa i requisiti delle direttive europee e nazionali vigenti.
Produttore
L'apparecchio è dotato di doppio isolamento di protezione corrispondente alla
classe di protezione 2.
Smaltire la confezione nel rispetto dell'ambiente.
Marchio di certificazione per i prodotti esportati nella Federazione Russa e nei
paesi CSI.
45
Page 46

2. Uso conforme
Questo umidificatore è concepito esclusivamente per l'umidificazione dell'aria ambiente.
Questo apparecchio è concepito unicamente per l'uso privato.
3. Indicazioni di sicurezza
Leggere le presenti istruzioni per l'uso con attenzione! Il mancato rispetto delle seguenti indicazioni può
provocare danni alle persone o alle cose. Conservare le istruzioni per l'uso e renderle accessibili a tutti gli
utilizzatori. Consegnare le presenti istruzioni in caso di cessione dell'apparecchio.
Scossa elettrica
AVVERTENZA
Come qualsiasi apparecchio elettrico, anche questo umidificatore deve essere maneggiato con attenzione
e cautela al fine di evitare il rischio di scosse elettriche.
•
U
tilizzare l'apparecchio esclusivamente con la tensione di rete indicata (la targhetta si trova sul lato
inferiore della base).
•
I
nserire il cavo di alimentazione nella presa sempre solo ad apparecchio spento.
•
N
on utilizzare mai l'apparecchio o gli accessori se presentano danni visibili.
•
N
on utilizzare l'apparecchio se è caduto o se è penetrata acqua al suo interno.
•
N
on utilizzare l'apparecchio in caso di temporale.
•
I
n caso di difetti o malfunzionamenti, spegnere immediatamente l'apparecchio. Estrarre la spina dalla presa.
• Non tirare il cavo di alimentazione o l'apparecchio per estrarre la spina dalla presa.
•
N
on tenere né trasportare l'apparecchio dal cavo di alimentazione.
•
N
on incastrare il cavo di alimentazione.
•
T
enere il cavo di alimentazione lontano dalle superfici calde.
•
A
ccertarsi che il cavo di alimentazione e la spina non entrino in contatto con acqua, vapore o altri liquidi.
•
U
tilizzare l'apparecchio solo in locali chiusi asciutti (mai, ad esempio, in bagno, sauna, e così via).
•
N
on recuperare mai un apparecchio che è caduto in acqua. Estrarre subito la spina dalla presa.
•
N
on esporre l'apparecchio a urti e non farlo cadere.
Riparazione
AVVERTENZA
• Non aprire la base.
•
L
e riparazioni degli apparecchi elettrici devono essere effettuate esclusivamente da personale specializ-
zato. Riparazioni non conformi possono rappresentare un grave pericolo per l'utente. Per le riparazioni
rivolgersi all'Assistenza clienti o a un rivenditore autorizzato.
Pericolo di incendio
AVVERTENZA
In caso di uso non conforme o mancato rispetto delle istruzioni per l'uso sussiste pericolo d'incendio!
•
N
on coprire l'apparecchio durante l'uso, ad esempio con una coperta o un cuscino.
•
N
on utilizzare l'apparecchio in prossimità di sostanze facilmente infiammabili.
Uso
AVVERTENZA
• L'apparecchio è concepito solo per l'uso descritto nelle presenti istruzioni per l'uso. Il produttore non è
da ritenersi responsabile in caso di danni riconducibili a un uso non conforme o sconsiderato.
•
C
onsultare il proprio medico prima di utilizzare l'umidificatore in caso di patologie polmonari o delle vie
respiratorie.
46
Page 47

•
S
pegnere l'apparecchio al termine di ogni utilizzo e prima di ogni pulizia. Estrarre la spina dalla presa.
•
P
osare il cavo di alimentazione in modo che nessuno possa inciampare.
ATTENZIONE
• Accertarsi che l'apparecchio si trovi su una superficie stabile, sicura e resistente all'umidità.
•
N
on inserire alcun oggetto nelle fessure dell'apparecchio. Accertarsi che le parti mobili siano sempre libere.
• Non posizionare oggetti sull'apparecchio.
•
P
roteggere l'apparecchio dalle temperature elevate.
4. Descrizione dell'apparecchio
L'umidificatore
•
u
midifica l'aria,
•
è
silenzioso e permette una regolazione continua,
•
è
adatto ad ambienti di dimensioni fino a 30 m²,
•
h
a consumi ridotti e si spegne automaticamente a serbatoio vuoto,
•
s
i spegne automaticamente quando si rimuove il serbatoio
•
è
dotato di un vano per aromi per profumare l'ambiente,
•
è
facile da pulire.
1. Uscita nebulizzazione
2. Serbatoio dell'acqua
3. Filtro anticalcare
4. Tappo a vite del serbatoio
5. Membrana a ultrasuoni
6. Selettore di regolazione
7. Indicatore di livello
8. Vano per aromi con inserto
9. Base
10. Cavo di alimentazione
11. Filtro dell’aria
1
2
3
4
5
6
7
8
9
10
11
Funzionamento dell'umidificatore LB 45
1. Una membrana attivata mediante ultrasuoni muove l'acqua, liberando dalla
superficie minuscole goccioline di acqua.
2. La ventola convoglia l'aria sul fondo dell'apparecchio.
3. L'aria viene arricchita delle goccioline di acqua liberate e soffiata delicata
mente verso l'apertura in alto.
4. Se lo si desidera, l'apparecchio può essere utilizzato con aromi
47
-
Page 48

5. Messa in funzione
Disimballaggio dell'apparecchio
AVVERTENZA
Tenere lontani i bambini dal materiale d'imballaggio. Pericolo di soffocamento.
1. Aprire l'involucro di cartone.
2. Rimuovere la protezione superiore. Lasciare chiuso l'involucro di cellophane.
3. Estrarre l'apparecchio dall'imballaggio tirandolo verso l'alto.
4. Rimuovere l'involucro di cellophane.
5. Verificare l'eventuale presenza di danni sull'apparecchio, sulla spina e sul cavo.
Luogo d'installazione
AVVERTENZA
Prima di mettere in funzione l'apparecchio, leggere le avvertenze di sicurezza.
Nota
• L'area intorno all'umidificatore può diventare umida.
•
L
'acqua con alto livello di calcare può lasciare un sedimento bianco.
•
N
on posizionare l'apparecchio sul pavimento, ma sollevato da terra (ad esempio su un tavolo o un mobile).
• Posizionare l'apparecchio in modo che la nebulizzazione non sia diretta su oggetti.
•
N
on utilizzare l'umidificatore in locali con forti sbalzi di temperatura che potrebbero causare la formazione
di condensa all'interno dell'apparecchio.
•
E
liminare l'acqua residua quando non si utilizza l'apparecchio.
•
P
osizionare l'umidificatore su una superficie stabile, orizzontale e impermeabile.
In caso di ribaltamento involontario dell'apparecchio, può fuoriuscire acqua anche se l'apparecchio è spento
e non collegato alla presa.
Acqua
Nota
• Non aggiungere essenze o profumi all'acqua. L'utilizzo di sostanze aggiuntive può colorare e danneggiare
il materiale plastico. La membrana a ultrasuoni si incolla e il funzionamento risulta compromesso.
•
U
tilizzare acqua potabile. Se l'acqua potabile è molto dura, è possibile utilizzare acqua demineralizzata
o distillata.
•
U
tilizzare acqua calda (30°C-45°C) e riempire sempre il serbatoio fino al livello massimo, altrimenti in
determinate circostanze fisiche l'apparecchio potrebbe svuotarsi.
• Suggerimento! Se la durezza dell'acqua è elevata, suggeriamo l'uso del filtro anticalcare opzionale.
Riempimento del serbatoio dell'acqua
1.
Estrarre il serbatoio dalla base tirandolo verso l'alto.
2. Capovolgere il serbatoio. Una valvola di sicurezza
chiude il serbatoio.
3. Aprire il tappo a vite del serbatoio.
4.
Riempire il serbatoio con acqua calda (30°C-45°C).
Il serbatoio ha una capienza massima di 4,0 litri. Il
livello dell'acqua è visibile dall'esterno.
5. Chiudere il tappo a vite del serbatoio stringendolo
bene.
6. Capovolgere il serbatoio.
7. Posizionare il serbatoio sulla base.
Accertarsi che il serbatoio sia ben fermo sulla base.
48
Page 49

6. Uso
Nota
Verificare costantemente il grado di umidità dell'aria ambiente. Un uso intensivo può causare una sovraumidificazione dell'ambiente. L'umidità relativa non deve superare il 60%.
Accensione dell'apparecchio
1. Inserire il cavo di alimentazione in una presa adeguata.
2. Ruotare il selettore di regolazione in senso orario verso destra. L'indicatore di livello si accende in blu.
A questo punto la nebulizzazione esce dall'apposita uscita. Se nel serbatoio non c'è acqua o il livello è
insufficiente, l'indicatore di livello si accende in rosso e l'apparecchio si spegne per motivi di sicurezza.
Se l'apparecchio si spegne, riempire il serbatoio come descritto nel capitolo "Riempimento del serbatoio
dell'acqua".
3. Impostare la capacità di nebulizzazione desiderata con il selettore di regolazione. La capacità di nebu
lizzazione massima è di 300 ml l'ora.
-
Nota
Se lo si desidera, è possibile versare aromi/oli essenziali sull'inserto presente all'interno del vano per aromi
per profumare l'ambiente. Non versare l'aroma direttamente nell'acqua.
Spegnimento dell'apparecchio
1. Ruotare il selettore di regolazione fino a battuta verso sinistra, finché si avverte una leggera resistenza e
il selettore fa clic. L'indicatore di livello si spegne.
2. Estrarre il cavo di alimentazione dalla presa.
7. Pulizia e cura
Una pulizia e una disinfezione regolari sono la premessa indispensabile per garantire l'igiene e il perfetto
funzionamento del prodotto. Le impurità presenti nell'apparecchio dipendono dalla qualità dell'acqua e dal
tempo di utilizzo. In ogni caso, raccomandiamo i seguenti intervalli di pulizia.
Ogni tre giorni
x Pulizia della membrana a ultrasuoni con un cotton fioc, lavaggio della
x Lavaggio del serbatoio, sostituzione dell'acqua
All'occorrenza
base
x Pulizia interna ed esterna dell'umidificatore
x Rimozione del calcare
AVVERTENZA
Spegnere l'apparecchio al termine di ogni utilizzo e prima di ogni pulizia. Estrarre la spina dalla presa.
ATTENZIONE
Pulire il serbatoio dell'acqua e svuotare sempre completamente l'umidificatore, se l'apparecchio non è stato
messo in funzione da più di una settimana.
Nota
• Pulire l'apparecchio solo nel modo indicato.
•
E
vitare assolutamente di lasciar penetrare acqua nel corpo dell'apparecchio.
•
N
on utilizzare detergenti contenenti solventi.
•
P
er la pulizia e la disinfezione utilizzare esclusivamente detergenti delicati o aceto/detergenti a base di
aceto.
49
Page 50

Pulizia della membrana a ultrasuoni, lavaggio della base
Nota
Eliminare l'acqua contenuta nella base facendola uscire dal bordo laterale, nel senso della freccia. Accertarsi che non penetri acqua all'interno dell'apparecchio, ad esempio attraverso l'apertura del ventilatore.
1. Pulire la membrana a ultrasuoni con un cotton fioc.
2.
Eliminare l'acqua contenuta nella base facendola uscire dal bordo laterale.
Prestare attenzione al contrassegno sull'apparecchio!
3.
Se nella base permangono residui di sporcizia, versare poca acqua
pulita nella base, quindi svuotarla dal bordo laterale.
Lavaggio del serbatoio, sostituzione dell'acqua
Pulire il serbatoio regolarmente, in caso di uso quotidiano al massimo dopo una settimana. Utilizzare una
detergente delicato oppure aceto / detergenti e a base di aceto.
1. Pulire la filettatura del tappo a vite con una spazzola morbida.
2. Riempire metà serbatoio con acqua.
3. Chiudere il tappo a vite del serbatoio.
4. Scuotere il serbatoio inclinandolo avanti e indietro.
5. Aprire il serbatoio e svuotarlo completamente.
6. Ripetere la procedura con acqua pulita.
Pulizia interna ed esterna dell'umidificatore
1. Eliminare l'acqua contenuta nella base dal bordo laterale.
2. Pulire l'umidificatore esternamente e internamente con un panno umido. Per la pulizia utilizzare esclusi-
vamente detergenti delicati o aceto / detergenti a base di aceto.
Rimozione del calcare
Rimozione del calcare dalla membrana a ultrasuoni
L'acqua dura può creare depositi di calcare nell'apparecchio e soprattutto sulla membrana a ultrasuoni.
Il calcare crea un sedimento bianco ben visibile. Rimuovere il calcare dall'apparecchio regolarmente.
1. Versare qualche goccia di anticalcare sulla membrana a ultrasuoni.
2. Lasciar agire per 2-5 minuti.
3. Trascorso questo periodo, pulire la membrana a ultrasuoni con il pennello di pulizia fornito in dotazione.
4. Sciacquare la base più volte con acqua pulita.
Pulizia interna della base
1. Immergere brevemente un panno morbido e umido in una soluzione anticalcare.
2. Ripulire l'interno della base con il panno.
3. Versare con cautela dell'acqua pulita nella base.
4. Eliminare l'acqua contenuta nella base facendola uscire dal bordo laterale.
5. Ripetere la procedura con acqua pulita.
Rimozione del calcare dal serbatoio
1. Riempire metà serbatoio con acqua.
2. Aggiungere una piccola quantità di anticalcare.
3. Chiudere il tappo a vite del serbatoio.
4. Scuotere il serbatoio inclinandolo avanti e indietro.
5. Aprire il serbatoio e svuotarlo completamente.
6. Ripetere la procedura più volte con acqua pulita.
50
Page 51

8. Articolo aggiuntivo: filtro anticalcare
SUGGERIMENTO!
Se la durezza dell'acqua è elevata, suggeriamo l'uso del filtro anticalcare (vedere il capitolo
"12. Articoli di postvendita").
Nota
• Se l'apparecchio presenta depositi di calcare nonostante il filtro anticalcare o se intorno all'apparecchio si forma un deposito bianco, è necessario sostituire il filtro anticalcare.
•
L
a durata massima del filtro anticalcare è di circa 2-3 mesi.
•
S
e l'apparecchio non viene utilizzato per lungo tempo, è necessario rimuovere il filtro anticalcare
dal serbatoio e farlo asciugare.
Inserimento del filtro anticalcare
1. Accertarsi che l'apparecchio sia spento.
2. Estrarre il serbatoio dalla base tirandolo verso l'alto.
3. Capovolgere il serbatoio.
4. Aprire il tappo a vite del serbatoio.
5. Avvitare il filtro anticalcare sulla filettatura del tappo a vite del serbatoio.
6. Chiudere il tappo a vite del serbatoio. A questo punto il filtro anticalcare
è inserito.
9. Che cosa fare in caso di problemi?
Problema Causa Soluzione
Non c'è nebulizzazione.
L'acqua nebulizzata ha
uno strano odore.
Forte rumore Il serbatoio dell'acqua non è ben
L'acqua nebulizzata
fuoriesce dalla parte
inferiore del serbatoio
Il cavo di alimentazione non è collegato alla presa.
Il selettore di regolazione è in
posizione OFF.
Il livello dell'acqua è troppo basso,
il serbatoio è vuoto.
Apparecchio nuovo. Rimuovere il serbatoio, svitare e rimuo-
Acqua stantia o sporca. Svuotare la base e il serbatoio dell'acqua
posizionato sulla base.
L'acqua nel serbatoio è insufficiente.
L'apparecchio non è stabile e in
piano.
Il serbatoio dell'acqua non è ben
posizionato sulla base.
Inserire il cavo di alimentazione in una
presa adeguata.
Ruotare il selettore in senso orario, verso la
posizione di massimo.
Riempire il serbatoio dell'acqua.
vere il tappo a vite. Lasciar aerare per 12
ore il serbatoio vuoto, aperto, in un luogo
fresco e asciutto.
e pulire accuratamente. Riempire il serbatoio con acqua pulita.
Rimuovere il serbatoio e posizionarlo correttamente sulla base. Il serbatoio deve
essere stabile sulla base.
Riempire il serbatoio dell'acqua.
Posizionare l'apparecchio su una base orizzontale e stabile.
Rimuovere il serbatoio. Verificare che
il passaggio dalla base al serbatoio sia
pulito. Se necessario, pulire. Posizionare
il serbatoio correttamente sulla base. Il
serbatoio deve essere stabile sulla base.
51
Page 52

10. Dati tecnici
Dimensioni (LxPxA) circa 25 cm x 12 cm x 34 cm
Lunghezza cavo circa 1,5 m
Peso a vuoto circa 1,5 kg
Tensione/frequenza di rete 100 – 240 V CA / 50/60 Hz
Potenza nominale 25 Watt
Dimensione dell'ambiente fino a 30 m
Capacità circa 4 litri
Capacità di nebulizzazione 300 ml / ora
2
11. Smaltimento
A tutela dell'ambiente, al termine del suo ciclo di vita, l'apparecchio non deve essere smaltito nei
rifiuti domestici,
ma conferito negli appositi centri di raccolta. Smaltire l'apparecchio secondo la direttiva europea
sui rifiuti di apparecchiature elettriche ed elettroniche (RAEE).
In caso di dubbi, rivolgersi alle autorità comunali competenti per lo smaltimento.
12. Articoli di postvendita
Per articoli di postvendita/aggiuntivi visitare www.beurer.com o rivolgersi all'Assistenza clienti del proprio
Paese (in base all'indirizzo).
Gli articoli di postvendita/aggiuntivi sono disponibili anche in commercio.
Articolo Codice articolo
Olio aromatico Beurer by Taoasis "Vitality" (10ml) 681.30
Olio aromatico Beurer by Taoasis "Harmony" (10ml) 681.31
Olio aromatico Beurer by Taoasis "Relax" (10ml) 681.32
Olio aromatico Beurer by Taoasis "Sleep Well" (10ml) 681.33
10 inserti aromatici 164.148
Filtro anticalcare 164.147
52
Page 53

13. Garanzia/Assistenza
Beurer GmbH, Söflinger Strasse 218, D-89077 Ulm (di seguito denominata "Beurer") offre una garanzia
per questo prodotto, nel rispetto delle seguenti condizioni e nella misura descritta di seguito.
Le seguenti condizioni di garanzia lasciano invariati gli obblighi di garanzia di legge del venditore
stabiliti nel contratto di acquisto con l'acquirente.
La garanzia si applica inoltre fatte salve le prescrizioni di legge obbligatorie in materia di responsabilità.
Beurer garantisce la perfetta funzionalità e la completezza di questo prodotto.
La garanzia mondiale è di 3 anni a partire dall'acquisto del prodotto nuovo, non usato, da parte dell'acqui
rente.
Questa garanzia copre solo i prodotti che l'acquirente ha acquistato come consu matore e che utilizza
esclusivamente a scopo personale, in ambito domestico.
Vale il diritto tedesco.
Nel caso in cui il prodotto, durante il periodo di garanzia, si dimostrasse incompleto o presentasse difetti
di funzionamento in linea con le seguenti disposizioni, Beurer provvederà a sostituire o riparare gratuita
mente il prodotto in base alle presenti condizioni di garanzia.
Per segnalare un caso di garanzia, l'acquirente deve rivolgersi innanzitutto al proprio rivenditore
locale: vedere l'elenco "Service International" in cui sono riportati gli indirizzi dei centri di assi
stenza.
L'acquirente riceverà quindi informazioni più dettagliate sulla gestione del caso di garanzia, ad esempio
dove deve inviare il prodotto e quali documenti sono necessari.
L'attivazione della garanzia viene presa in considerazione solo se l'acquirente può presentare
- una copia della fattura/prova d'acquisto e
- il prodotto originale
a Beurer o a un partner Beurer autorizzato.
Sono espressamente esclusi dalla presente garanzia
- l'usura dovuta al normale utilizzo o al consumo del prodotto;
- gli accessori forniti assieme a questo prodotto che, in caso di utilizzo conforme, si consumano o si
esauriscono (ad es. batterie, batterie ricaricabili, manicotti, guarnizioni, elettrodi, lampadine, acces
sori e accessori per inalatore);
- i prodotti che sono stati utilizzati, puliti, conservati o sottoposti a manutenzione in modo improprio
e/o senza rispettare le disposizioni riportate nelle istruzioni per l'uso, nonché i prodotti che sono stati
aperti, riparati o smontati e rimontati dall'acquirente o da un centro di assistenza non autorizzato da
Beurer;
- i danni occorsi nel trasporto dal produttore al cliente o tra il centro di assistenza e il cliente;
- i prodotti acquistati come articoli di seconda scelta o usati;
- i danni conseguenti che dipendono da un difetto del prodotto (in questo caso possono tuttavia esi
stere diritti derivanti dalla responsabilità per i prodotti o da altre disposizioni di legge obbligatorie in
materia di responsabilità).
-
-
-
-
-
Le riparazioni o la sostituzione completa non prolungano in alcun caso il periodo di garanzia.
53
Possibili errori e variazioni
Page 54

TÜRKÇE
Lütfen bu kullanım kılavuzunu dikkatle okuyun, ileride
gerekebileceği için saklayın, diğer kullanıcıların erişebilmesini
sağlayın ve içindeki yönergelere uyun.
İçindekiler
1. Ürün özellikleri .............................................55
2. Amacına uygun kullanım .............................56
3. Güvenlik yönergeleri ....................................56
4. Cihaz açıklaması ..........................................57
5. İlk çalıştırma .................................................58
6. Kullanım .......................................................59
7. Temizlik ve bakım ........................................59
8. İlave ürün kireç filtresi ................................61
9. Sorunların giderilmesi ................................61
10. Teknik veriler ...............................................62
11. Bertaraf etme ..............................................62
12. Sonradan satın alınabilecek ürünler ..........62
13. Garanti/servis .............................................63
UYARI
• Bu cihaz, 8 yaş ve üzeri çocuklar ve fiziksel, algısal ve akli becerileri
kısıtlı veya tecrübesi ve bilgisi yetersiz olan kişiler tarafından ancak
gözetim altında veya cihazın emniyetli kullanımı hakkında bilgilendiril
miş olmaları ve cihazın kullanımı sonucu ortaya çıkabilecek tehlikelerin
bilincinde olmaları koşuluyla kullanılabilir.
•
Ç
ocuklar cihazla oynamamalıdır.
•
T
emizlik ve kullanıcı bakımı, gözetim altında olmadıkları sürece çocuklar
tarafından yapılmamalıdır.
•
C
ihazı doldururken ve temizlerken elektrik kablosunu prizden çıkarın.
•
Ç
özücü maddeler içeren temizlik malzemeleri kullanmayın.
•
B
u cihazın elektrik bağlantı kablosu hasar gördüğünde bertaraf edilme-
lidir. Elektrik bağlantı kablosu çıkarılamıyorsa, cihaz bertaraf edilmelidir.
-
Sayın müşterimiz,
Ürünlerimizden birini seçtiğiniz için teşekkür ederiz. Isı, ağırlık, kan basıncı, vücut sıcaklığı, nabız, yumuşak
terapi, masaj, güzellik, bebek ve hava konularında değerli ve titizlikle test edilmiş kaliteli ürünlerimiz, dünyanın
her tarafında tercih edilmektedir.
Lütfen bu kullanım kılavuzunu dikkatle okuyun, ileride gerekebileceği için saklayın, diğer kullanıcıların erişe
bilmesini sağlayın ve içindeki yönergelere uyun.
Yeni cihazınızı iyi günlerde kullanmanızı dileriz
Beurer Ekibiniz
54
-
Page 55

Teslimat kapsamı
PAP
1 hava nemlendirici
15 adet yedek aroma pedi
1 bu kullanım kılavuzu
1. Ürün özellikleri
İnsanlar zamanlarının çoğunu kapalı alanlarda geçirirler. İdeal oda havasında bağıl nemin %40-60 oranında
olması önerilir. Özellikle kışın odayı havalandırdığınızda az nemli soğuk havanın odaya girmesi ve burada
ısınması nedeniyle sık sık bu seviyenin altında kalınır. Odadaki bu kuru hava nemi emerek mukoza zarında ve
ciltte, ancak aynı zamanda eşyalarda da kuruluk oluşmasına yol açar.
Oda havasının fazla kuru olmasının bir dizi olumsuz yan etkisi vardır:
•
M
ukoza zarı ve dudaklar kurur.
•
G
özlerde yanma meydana gelir.
•
S
olunum yolları enfeksiyonları ve hastalıklarına yakalanmak kolaylaşır.
•
Y
orgunluk, bitkinlik ve konsantrasyon zayıflığı baş gösterir.
•
E
v hayvanları ve bitkileri olumsuz etkilenir.
•
T
oz oluşumu artar.
•
H
alı veya muşamba gibi sentetik lifli ürünlerde elektrostatik yük oluşur.
•
Ö
zellikle parke gibi tahta kaplamalar zarar görür.
•
M
üzik enstrümanlarının ses ayarı bozulur.
İşaretlerin açıklaması
Kullanım kılavuzunda, ambalajda ve tip etiketinde aşağıdaki semboller kullanılmıştır:
UYARI
DİKKAT
Not
20
Yaralanma tehlikelerine veya sağlığınızla ilgili tehlikelere yönelik uyarı.
Cihazda/aksesuarlarda oluşabilecek hasarlara yönelik güvenlik uyarısı.
Önemli bilgilere yönelik not.
Kullanım kılavuzu dikkate alınmalıdır.
Elektrikli ve elektronik atık cihazlarla ilgili AB direktifine (WEEE - Waste Electrical
and Electronic Equipment) uygun şekilde bertaraf edilmelidir.
Bu ürün geçerli Avrupa Birliği yönergelerinin ve ulusal yönergelerin gereklerini yerine
getirmektedir.
Üretici
Cihaz çift koruyucu izolasyonludur ve Koruma Sınıfı 2'ye tabidir.
Ambalaj çevreye zarar vermeyecek şekilde bertaraf edilmelidir.
Rusya ve Bağımsız Devletler Topluluğu ülkelerine ihraç edilecek ürünler için sertifika
işareti.
55
Page 56

2. Amacına uygun kullanım
Hava nemlendirici sadece odadaki havayı nemlendirmek içindir.
Cihaz sadece kişisel kullanım için tasarlanmıştır.
3. Güvenlik yönergeleri
Bu kullanım kılavuzunu dikkatle okuyun! Aşağıdaki bilgilerin dikkate alınmaması, yaralanmaya veya maddi
hasara neden olabilir. Kullanım kılavuzunu tüm kullanıcıların erişebileceği bir yerde muhafaza edin. Cihazı
devretmeniz durumunda bu kullanım kılavuzunu da verin.
Elektrik çarpması
UYARI
Elektrik çarpma tehlikesini önlemek için her elektrikli cihaz gibi bu hava nemlendirici de dikkatle kullanılmalıdır.
• Cihazı yalnızca üzerinde belirtilen şebeke voltajında çalıştırın (model etiketi cihaz ünitesinin arka yüzünde
yer alır).
•
E
lektrik kablosunu yalnızca cihaz kapalıyken prize takın.
•
C
ihazda veya aksesuarda görünür bir hasar varsa, cihazı kesinlikle kullanmayın.
•
Y
ere düşmüşse veya içine su girmişse, cihazı kesinlikle kullanmayın.
•
C
ihazı fırtınalı havalarda kullanmayın.
•
A
rıza veya çalışma bozukluğu durumunda cihazı hemen kapatın. Fişi prizden çekin.
•
F
işi prizden çekerken elektrik kablosundan veya cihazdan tutarak çekmeyin.
•
C
ihazı elektrik kablosundan tutmayın veya bu şekilde taşımayın.
•
E
lektrik kablosunu cihazın etrafına sarmayın.
•
E
lektrik kablosu ve sıcak yüzeyler arasında mesafe bırakın.
•
E
lektrik kablosunun ve fişin su, buhar veya diğer sıvılara temas etmesini önleyin.
•
S
adece kuru iç mekanlarda kullanın (örn. asla banyo küvetinde, saunada vs. kullanmayın).
•
S
uya düşmüş bir cihaza kesinlikle dokunmayın. Fişi hemen prizden çekin.
•
C
ihazı hiçbir şekilde darbeye maruz bırakmayın ve yere düşürmeyin.
Onarım
UYARI
• Cihazın tabanı kesinlikle açılmamalıdır.
•
E
lektrikli cihazlar sadece uzmanlar tarafından onarılmalıdır. Usulüne uygun olmayan onarımlar, kullanıcı
için ciddi tehlikeler oluşturabilir. Onarım için müşteri servisi veya yetkili bir satıcıya başvurun.
Yangın tehlikesi
UYARI
Amacına uygun olmayan kullanım veya kullanım kılavuzunun dikkate alınmaması gibi durumlar yangın tehlikesine yol açar!
•
C
ihazı battaniye veya yastık gibi nesnelerle örterek kullanmayın.
•
C
ihazı kolayca tutuşabilen maddelerin yakınında kullanmayın.
Kullanım
UYARI
• Cihaz sadece kullanım kılavuzunda açıklanan şekilde kullanılmak üzere tasarlanmıştır. Usulüne uygun
olmayan ve dikkatsiz kullanım sonucu oluşan hasarlardan üretici firma sorumlu tutulamaz.
•
S
olunum yolları veya akciğerlerle ilgili ağır bir hastalığınız varsa, hava nemlendiriciyi kullanmadan önce
hekiminize danışın.
•
C
ihazı her kullanımdan sonra ve her temizleme işleminden önce kapatın. Fişi prizden çekin.
•
E
lektrik kablosunu ayağınız takılmayacak şekilde yerleştirin.
56
Page 57

DİKKAT
• Cihazı mutlaka sağlam, devrilme tehlikesi bulunmayan, neme karşı duyarlı olmayan bir yüzeye koyun.
•
C
ihazdaki deliklere herhangi bir cisim sokmayın. Hareketli parçaların her zaman serbest hareket edebilir
durumda olmasına dikkat edin.
•
C
ihazın üzerine hiçbir nesne koymayın.
•
C
ihazı yüksek sıcaklıklardan koruyun.
4. Cihaz açıklaması
Hava nemlendirici
•
h
avayı nemlendirir,
•
s
essiz bir şekilde çalışır ve kademesiz ayarlanabilir,
•
3
0 m²'ye kadar odalar için uygundur,
•
e
nerji tasarrufu sağlar ve su haznesi boşalınca kendiliğinden kapanır,
•
s
u haznesinin çıkarılması durumunda otomatik olarak kapanır,
•
a
roma gözü sayesinde odanın güzel kokmasını sağlar,
•
k
olayca temizlenir.
1. Buhar çıkışı
2. Su haznesi
3. Kireç filtresi
4. Su haznesi vidalı kapağı
5. Ultrasonik membran
6. Çevirmeli düğme
7. Dolum seviyesi göstergesi
8. Aroma pedli aroma gözü
9. Taban
10. Elektrik kablosu
11. Hava filtresi
1
2
3
4
5
6
7
8
9
10
11
LB 45 hava nemlendiricinin çalışma prensibi
1.
Ultrason tarafından hareket ettirilen membran suyu hareket ettirir ve yüzeydeki
en küçük su damlacıklarının bile çözülmesini sağlar.
2. Vantilatör cihazın tabanında havayı emer.
3. Hava çözülmüş su damlacıkları ile zenginleşerek hafifçe yukarıdaki açıklığa
doğru püskürtülür.
4. İstendiğinde cihaz aromalarla kullanılabilir.
57
Page 58

5. İlk çalıştırma
Cihazın ambalajından çıkarılması
UYARI
Çocukları ambalaj malzemesinden uzak tutun. Boğulma tehlikesi vardır.
1. Karton ambalajı açın.
2. Üst koruma katmanını çıkarın. Folyoyu kapalı bırakın.
3. Cihazı yukarı doğru çekerek ambalajından çıkarın.
4. Plastik poşeti çıkarın.
5. Cihazda, elektrik fişinde ve kabloda hasar olup olmadığını kontrol edin.
Cihazın koyulacağı yer
UYARI
Cihazı çalıştırmadan önce güvenlik yönergelerini okuyun.
Not
• Hava nemlendiricinin bulunduğu ortam nemlenebilir.
•
K
ireçli su beyaz bir tortu oluşturabilir.
•
C
ihazı yere koymayın, yüksek bir yere yerleştirin (örn. masanın, komodinin üzerine).
•
C
ihazı buharın doğrudan eşyalarınızın üzerine gelmeyeceği şekilde yerleştirin.
•
C
ihazı, iç kısmında yoğuşmaya neden olabileceği için aşırı sıcaklık değişikliklerinin gerçekleştiği odalarda
kullanmayın.
•
C
ihaz kullanılmadığında kalan suyu boşaltın.
•
N
emlendiriciyi sert, düz ve sudan etkilenmeyen bir yüzeye koyun.
Cihaz yanlışlıkla devrilirse, cihaz kapalı ve prize takılı olmasa da su sızdırabilir.
Su
Not
• Suya eter içeren yağlar veya koku maddeleri ilave etmeyin. İlave maddelerin kullanımı plastiğin zarar görmesine veya renginin değişmesine yol açabilir. Ultrasonik membran yapışır ve bunun sonucunda zarar görür.
•
C
ihazda taze içme suyu kullanın. İçme suyu çok sertse, demineralize veya damıtılmış su kullanabilirsiniz.
•
I
lık su kullanın (30°C-45°C) ve hazneyi daima maksimum seviyesine kadar doldurun, aksi halde fiziksel
koşullar nedeniyle cihazda taşma meydana gelebilir.
• Öneri! Sert su için isteğe bağlı kireç filtresini kullanmanızı öneririz.
Su haznesinin doldurulması
1. Su haznesini tabandan yukarı doğru çekip çıkarın.
2. Su haznesini çevirin. Bir yaylı supap su haznesinin
kapanmasını sağlar.
3. Su haznesindeki vidalı kapağı açın.
4.
Su haznesine ılık su (30°C-45°C) doldurun. Su haznesine en fazla 4 litre su doldurulabilir. Su seviyesi
dışarıdan görülebilir.
5. Su haznesinin vidalı kapağını sıkıca kapatın.
6. Su haznesini çevirin.
7. Su haznesini tabana yerleştirin.
Su haznesinin tabana sıkı bir şekilde oturmasına
dikkat edin.
58
Page 59

6. Kullanım
Not
Odanızdaki havanın nemini her zaman kontrol edin. Yoğun ve sürekli kullanım odada aşırı nemlenmeye yol
açabilir. Bağıl hava nemi %60'ı geçmemelidir.
Cihazın açılması
1. Elektrik kablosunu uygun bir prize takın.
2. Çevirmeli düğmeyi saat yönünde sağa doğru çevirin. Doluluk seviyesi göstergesi mavi yanmaya başlar.
Buhar çıkışından buhar çıkar. Haznede su yoksa veya yetersizse, doluluk seviyesi göstergesi kırmızı yanar
ve cihaz güvenlik gerekçeleriyle kendiliğinden kapanır. Cihaz kendiliğinden kapanırsa, su haznesini "Su
haznesinin doldurulması" bölümünde açıklanan şekilde doldurun.
3.
Çevirmeli düğmeyle istediğiniz buharlaşma gücünü ayarlayın. Maksimum buharlaşma gücü saatte
300 ml'dir.
Not
İsterseniz aroma gözünde iç kısımda bulunan pedin üzerine aroma/kokulu yağlar damlatabilirsiniz. Bu,
odanın güzel kokmasını sağlar. Aromayı asla doğrudan suya ilave etmeyin.
Cihazın kapatılması
1.
Çevirmeli düğmeyi, hafif bir direnç hissedinceye ve tık sesi duyuncaya kadar sola çevirin. Doluluk seviyesi
göstergesi söner.
2. Elektrik kablosunu prizden çekin.
7. Temizlik ve bakım
Cihazın hijyenik ve arızasız bir şekilde çalışması için düzenli olarak temizlenmesi ve dezenfekte edilmesi
gerekir. Cihazın kirlenmesi su kalitesi ve kullanım süresine bağlıdır. Her durumda aşağıdaki temizleme aralıklarını öneririz.
Üç günde bir İhtiyaç halinde
x
x Su haznesinin yıkanması, suyun yenilenmesi
x Hava nemlendiricinin içinin ve dışının temizlenmesi
x Kireçten arındırılması
Ultrasonik membranın bir kulak pamuğu yardımıyla temizlenmesi,
tabanın yıkanması
UYARI
Cihazı her kullanımdan sonra ve her temizleme işleminden önce kapatın. Fişi prizden çekin.
DİKKAT
Cihazın bir haftadan uzun süre kullanılmadığı durumlarda su haznesini temizleyin ve hava nemlendiriciyi
tamamen boşaltın.
Not
• Cihazı yalnızca belirtilen şekilde temizleyin.
•
G
övdenin içine kesinlikle su girmemelidir.
•
Ç
özücü maddeler içeren temizlik malzemeleri kullanmayın.
•
T
emizlik ve dezenfeksiyon için yalnızca yumuşak bir temizlik maddesi veya sirke/sirke bazlı temizleyici
kullanın.
59
Page 60

Ultrasonik membranı temizleyin, tabanı yıkayın
Not
Tabandaki suyu yan kenardan ok yönünde boşaltın. Cihazın içine örn. vantilatör boşluğundan su kaçma masına
dikkat edin.
1. Ultrasonik membranı bir kulak pamuğu ile temizleyin.
2.
Tabandaki suyu yan kenardan ok yönünde boşaltın.
Cihazın üzerindeki işarete dikkat edin!
3. Tabanda kir artıkları kalırsa, içine biraz taze temiz su dökün ve eğerek
yan kenardan boşaltın.
Su haznesinin yıkanması, suyun yenilenmesi
Su haznesini düzenli olarak, günlük kullanımda en geç haftada bir temizleyin. Yumuşak bir temizlik maddesi
veya sirke/sirke bazlı temizleyici kullanın.
1. Vidalı kapağın dişli bölümünü yumuşak bir fırçayla temizleyin.
2. Su haznesini yarısına kadar suyla doldurun.
3. Su haznesindeki vidalı kapağı kapatın.
4. Su haznesini ileri geri sallayıp eğin.
5. Su haznesini açın ve tamamen boşaltın.
6. İşlemi taze temiz su ile tekrarlayın.
Hava nemlendiricinin içinin ve dışının temizlenmesi
1. Tabandaki suyu yan kenardan boşaltın.
2.
Hava nemlendiricinin dışını ve içini nemli bir bezle silin. Temizlik için yalnızca yumuşak bir temizlik maddesi
veya sirke/sirke bazlı temizleyici kullanın.
Kireçten arındırılması
Ultrasonik membranın kireçten arındırılması
Sert su, cihazın ve özellikle ultrasonik membranın kireçlenmesine yol açabilir. Bu beyaz bir tortu ile kendini
belli eder. Cihazı düzenli olarak kireçten arındırın.
1. Ultrasonik membranın üzerine biraz kireç giderici damlatın.
2. Kireç gidericinin etkisini göstermesi için 2 ila 5 dakika bekleyin.
3. Etki süresi geçtikten sonra ultrasonik membranı birlikte verilen temizleme fırçasıyla temizleyin.
4. Tabanı birkaç kez temiz ve taze su ile durulayın.
Tabanın içinin temizlenmesi
1. Nemli yumuşak bir bezi kısa bir süre kireç giderici çözeltiye batırın.
2. Bu bezle tabanın içini silin.
3. Tabana dikkatlice biraz taze temiz su dökün.
4. Tabandaki suyu yan kenardan boşaltın.
5. İşlemi taze temiz su ile tekrarlayın.
Su haznesinin kireçten arındırılması
1. Su haznesini yarısına kadar suyla doldurun.
2. Az bir miktar kireç giderici ekleyin.
3. Su haznesindeki vidalı kapağı kapatın.
4. Su haznesini ileri geri sallayıp eğin.
5. Su haznesini açın ve tamamen boşaltın.
6. İşlemi temiz su ile birkaç kez tekrarlayın.
60
Page 61

8. İlave ürün kireç filtresi
ÖNERİ!
Sert su için kireç filtresini kullanmanızı öneririz (bkz. bölüm “12. Sonradan satın alınabilecek ürünler” ).
Not
• Cihaz kireç filtresine rağmen kireçlenirse veya çevresinde beyaz bir tortu oluşursa kireç filtresini
değiştirin.
•
K
ireç filtresinin maksimum kullanım ömrü yakl. 2-3 aydır.
•
C
ihazı uzun bir süre kullanmayacaksanız kireç filtresi su haznesinden çıkarılarak kurutulmalıdır.
Kireç filtresinin takılması
1. Cihazın kapalı olduğundan emin olun.
2. Su haznesini tabandan yukarı doğru çekip çıkarın.
3. Su haznesini çevirin.
4. Su haznesindeki vidalı kapağı açın.
5. Kireç filtresini su haznesinin vidalı kapağının dişlisine vidalayın.
6. Su haznesindeki vidalı kapağı kapatın. Kireç filtresi takılmıştır.
9. Sorunların giderilmesi
Sorun Neden Çözüm
Buhar çıkmıyor Elektrik kablosu takılı değil. Elektrik kablosunu uygun bir prize takın.
Çevirmeli düğmeyi saat yönünde maksimum pozisyonu yönünde çevirin.
Su haznesini doldurun.
çıkarın. Açık ve boş su haznesini serin, kuru bir yerde 12 saat boyunca havalandırın.
temizleyin. Su haznesini taze suyla doldurun.
şekilde yerleştirin. Hazne tabana sıkıca
yerleştirilmelidir.
Cihazı düz ve sağlam bir yüzey üzerine koyun.
sine giden çıkışın temiz olup olmadığını
kontrol edin. Gerekirse temizleyin. Su
haznesini tabana doğru şekilde yerleştirin.
Hazne tabana sıkı bir şekilde oturmalıdır.
Buharda tuhaf bir koku
var
Dikkati çeken bir gürültü var
Su haznesinin altından
buhar çıkıyor
Çevirmeli düğme kapalı pozisyonunda duruyor.
Su seviyesi çok düşük, su haznesi
boş.
Yeni cihaz. Su haznesini çıkarın, vidalı kapağı söküp
Bayat veya kirli su. Tabanı ve su haznesini boşaltın ve iyice
Su haznesi tabana tam oturmamış. Su haznesini çıkarın ve tabana doğru
Su haznesinde çok az su var. Su haznesini doldurun.
Cihazın duruşu düz ve dengeli değil.
Su haznesi tabana tam oturmamış. Su haznesini çıkarın. Tabandan su hazne-
61
Page 62

10. Teknik veriler
Ölçüler (UxGxY) yakl. 25 cm x 12 cm x 34 cm
Kablo uzunluğu yakl. 1,5 m
Boş ağırlık yakl. 1,5 kg
Şebeke gerilimi/frekansı 100 ila 240 V AC / 50/60 Hz
Nominal güç 25 Watt
Oda büyüklüğü maks. 30 m
Hazne kapasitesi yakl. 4 litre
Buharlaşma gücü 300 ml/saat
2
11. Bertaraf etme
Çevreyi korumak için, kullanım ömrü dolan cihazı evsel atıklarla beraber bertaraf etmeyin.
Cihaz, ülkenizdeki uygun atık toplama merkezleri aracılığıyla bertaraf edilebilir. Cihazı elektrikli ve
elektronik atık cihazlarla ilgili AB direktifine (WEEE - Waste Electrical and Electronic Equipment)
uygun şekilde bertaraf edin.
Bertaraf işlemiyle ilgili sorularınız olduğunda bölgenizdeki yetkili makamlara başvurun.
12. Sonradan satın alınabilecek ürünler
Sonradan satın alınabilecek/ilave ürünler için www.beurer.com adresini ziyaret edin veya ülkenizdeki ilgili
servis adresine başvurun (servis adresine göre).
Sonradan satın alınabilecek/ilave ürünleri mağazalarda da bulabilirsiniz.
Ürün Ürün numarası
Beurer by Taoasis Aroma Yağı "Vitality" (10 ml) 681.30
Beurer by Taoasis Aroma Yağı "Harmony" (10 ml) 681.31
Beurer by Taoasis Aroma Yağı "Relax" (10 ml) 681.32
Beurer by Taoasis Aroma Yağı "Sleep Well" (10 ml) 681.33
10 adet aroma pedi 164.148
Kireç filtresi 164.147
62
Page 63

13. Garanti/servis
Beurer GmbH, Söflinger Straße 218, D-89077 Ulm (aşağıda "Beurer" olarak anılacaktır) bu ürün için aşağıdaki koşullar çerçevesinde ve aşağıda açıklanan kapsamda bir garanti sunmaktadır.
Aşağıdaki garanti koşulları, satıcının müşteri ile yaptığı satış sözleşmesinden doğan yasal garanti
yükümlülüklerini etkilemez.
Garanti, yasalarla zorunlu kılınan sorumlulukların kapsamında herhangi bir kısıtlamaya neden
olmaksızın geçerlidir.
Beurer, bu ürünün kusursuz bir şekilde çalıştığını ve eksiksiz olduğunu garanti eder.
Yeni ve kullanılmamış bir ürünün müşteri tarafından satın alınmasıyla başlayan ve dünya genelinde geçerli
olan garanti süresi 3 yıldır.
Bu garanti sadece tüketici olarak müşteri tarafından satın alınan ve bireysel amaçlarla sadece evde kullanı
lan ürünler için geçerlidir.
Alman yasaları geçerlidir.
Bu ürünün garanti süresi içinde aşağıda belirtilen hükümler uyarınca eksiksiz olmadığı veya çalışma açı
sından kusurlu olduğu saptanırsa, Beurer bu garanti koşulları kapsamında ücretsiz bir ikame ürün teslimatı
veya onarım gerçekleştirmekle yükümlüdür.
Müşteri bir garanti talebinde bulunmak istediğinde önce yerel satıcıya başvuracaktır: Servis adres
lerinin olduğu ekteki "Uluslararası Servis" listesini inceleyin.
Bu durumda müşteriye, garanti işlemlerinin yürütülmesiyle ilgili olarak örneğin ürünün nereye gönderileceği
ve hangi belgelerin gerekli olduğu gibi ayrıntılı bilgiler verilecektir.
Garanti talebi ancak müşterinin
- faturanın/satın alma belgesinin bir kopyasını ve
- orijinal ürünü
yetkili bir Beurer iş ortağına sunabilmesi halinde işleme konabilir.
Aşağıdaki durumlar kesinlikle bu garanti kapsamının dışındadır:
- Ürünün normal kullanımından veya tüketiminden kaynaklanan aşınmalar ve yıpranmalar;
- Bu ürün ile birlikte teslim edilen ve usulüne uygun kullanıldığında da yıpranabilecek veya tükenebilecek
aksesuar parçaları (örneğin piller, şarj edilebilir piller, manşetler, contalar, elektrotlar, aydınlatma malze
meleri, başlıklar ve nebulizatör aksesuarları);
- Kullanım kılavuzundaki bilgiler dikkate alınmadan ve/veya usulüne uygun olmayan bir şekilde kul
lanılan, temizlenen, depolanan veya bakımı yapılan ürünler ve Beurer tarafından yetkilendirilmemiş
bir servis merkezi veya müşterinin kendisi tarafından açılan, onarılan veya üzerinde değişiklik yapılan
ürünler;
- Ürünün üreticiden müşteriye nakliyesi sırasında oluşan hasarlar;
- İkinci kalite ürün veya kullanılmış ürün olarak satın alınan ürünler;
- Bu üründeki bir kusurdan kaynaklanan müteakip hasarlar (ancak bu durumda ürün sorumluluğu veya
yasal zorunlu sorumluluk hükümleri uyarınca tüketici hakları olabilir).
-
-
-
-
-
Onarım veya komple değişim garanti süresini hiçbir şekilde uzatmaz.
63
Hata ve değişiklik hakkı saklıdır
Page 64

РУССКИЙ
Внимательно прочтите инструкцию по применению,
сохраните ее для последующего использования, храните
вдоступном для других пользователей месте иследуйте
ее указаниям.
Содержание
1. Ознакомительная информация ................65
2. Использование поназначению ................66
3. Указания потехнике безопасности .........66
4. Описание прибора .....................................67
5. Ввод вэксплуатацию ................................68
6. Управление .................................................69
7. Очистка иуход ...........................................69
8. Противоизвестковый фильтр как
дополнительная принадлежность .........71
9.
Что делать при возникновении проблем? ..
10. Технические характеристики ..................72
11. Утилизация .................................................73
12.
Предметы, приобретаемые дополнительно
13. Гарантия/сервисное обслуживание .......73
ПРЕДУПРЕЖДЕНИЕ
• Данный прибор может использоваться детьми старше 8лет,
атакже лицами сограниченными физическими, сенсорными или
умственными способностями или снедостаточными знаниями
иопытом втом случае, если они находятся под присмотром взрос
лых или проинструктированы обезопасном применении прибора
ивозможных опасностях.
•
Н
епозволяйте детям играть сприбором.
•
Д
ети не должны выполнять очистку прибора иуход заним без
присмотра взрослых.
•
В
овремя заполнения иочистки отсоединяйте прибор отсети.
•
Н
еиспользуйте чистящие средства, содержащие растворители.
•
Е
сли провод сетевого питания прибора поврежден, его необходимо утилизировать. Если он несъемный, необходимо утилизировать
весь прибор.
72
.73
-
Уважаемый покупатель!
Благодарим Вас завыбор продукции нашей компании. Мы производим современные, тщательно
протестированные высококачественные изделия для обогрева тела, измерения массы, кровяного
давления, температуры тела, пульса, для легкой терапии, массажа, косметических процедур, ухода
задетьми иочистки воздуха.
Внимательно прочтите данную инструкцию поприменению, сохраните ее для последующего исполь
зования, держите ее вдоступном для других пользователей месте иследуйте ее указаниям.
Снаилучшими пожеланиями, компания Beurer
Комплект поставки
64
-
Page 65

1 Увлажнитель воздуха
PAP
15 сменных ароматических подушечек
1 Инструкция поприменению
1. Ознакомительная информация
Большую часть времени человек проводит взакрытых помещениях. Оптимальная относительная
влажность воздуха впомещениях составляет от 40 до60%. Чаще всего этот показатель занижен
взимний период, когда при проветривании холодный сухой воздух попадает впомещение инагревается. Этот сухой воздух впитывает влагу ивысушивает слизистые оболочки икожу, атакже предметы,
находящиеся впомещении.
Слишком сухой воздух впомещении приводит кряду негативных последствий:
•
в
ысыханию слизистых оболочек игуб;
•
ж
жению глаз;
•
в
озникновению благоприятных условий для инфекций изаболеваний дыхательных путей;
•
п
оявлению ощущения вялости, усталости, снижается концентрация внимания;
•
в
озникновению неблагоприятных условий для домашних животных икомнатных растений;
•
у
скоренному образованию пыли;
•
п
овышению статического заряда изделий изискусственных волокон, например, ковров исинте-
тических напольных покрытий;
•
п
ричинению вреда предметам имебели издерева, вособенности паркетному покрытию;
•
р
асстраиванию музыкальных инструментов.
Пояснения ксимволам
Винструкции поприменению, наупаковке ина типовой табличке используются следующие символы:
ПРЕДУПРЕЖДЕНИЕ
ВНИМАНИЕ
Предупреждает обопасности травмирования или нанесения вреда
здоровью.
Указывает на возможность повреждения прибора/принадлежностей.
Указание
20
Важная информация.
Соблюдайте указания инструкции поприменению.
Утилизация прибора всоответствии сдирективой ЕС поотходам
электрического иэлектронного оборудования— WEEE (Waste
Electrical and Electronic Equipment).
Это изделие соответствует требованиям действующих европейских
инациональных директив.
Изготовитель.
Прибор имеет двойную защитную изоляцию исоответствует, таким
образом, классу защиты 2.
Утилизация упаковки всоответствии спредписаниями поохране
окружающей среды.
Сертификационный знак для изделий, экспортируемых в Российскую
Федерацию и страны СНГ.
65
Page 66

2. Использование поназначению
Данный увлажнитель воздуха предназначен только для увлажнения воздуха впомещениях.
Прибор предназначен исключительно для частного использования.
3. Указания потехнике безопасности
Внимательно прочтите данную инструкцию поприменению! Несоблюдение следующих указаний может
привести ктравмам людей или материальному ущербу. Сохраните эту инструкцию поприменению
идержите ее вместе, доступном для других пользователей. Передавайте прибор другому человеку
вместе синструкцией.
Удар электрическим током
ПРЕДУПРЕЖДЕНИЕ
Как илюбой другой электрический прибор, данный увлажнитель воздуха требует осторожного ибережного обращения воизбежание опасности поражения электрическим током.
•
Э
ксплуатируйте прибор только при указанном нанем напряжении (типовая табличка расположена
нанижней стороне основы увлажнителя).
•
Е
сли прибор выключен, подсоединяйте крозетке только сетевой кабель.
•
Н
е используйте прибор или его принадлежности при видимых повреждениях.
•
Н
е используйте прибор после падения или попадания внего воды.
•
Н
е используйте прибор вовремя грозы.
•
В
случае появления дефектов или неполадок вработе немедленно отключите прибор. Вытяните
штекер изрозетки.
•
Н
икогда не тяните засетевой кабель или заприбор, чтобы вытянуть штекер изрозетки.
•
Н
икогда неперемещайте прибор, держа его засетевой кабель.
•
Н
е зажимайте сетевой кабель.
•
С
етевой кабель должен находиться назначительном расстоянии отгорячих поверхностей.
•
У
бедитесь, что сетевой кабель иштекер не контактируют сводой, паром или другими жидкостями.
• Используйте прибор только всухих помещениях (например, никогда не используйте его вванной,
сауне ит.д.).
•
Н
икогда не пытайтесь взяться заприбор, если он упал вводу. Немедленно вытяните штекер изро-
зетки.
•
Б
ерегите прибор отударов ипадений.
Ремонт прибора
ПРЕДУПРЕЖДЕНИЕ
• Запрещено открывать основу увлажнителя.
•
Р
емонт электроприборов должен выполняться только специалистами. Неквалифицированное выполнение ремонта влечет засобой серьезную опасность для пользователя. Если прибор нуждается
времонте, обратитесь всервисную службу или кофициальному дистрибьютору.
Опасность пожара
ПРЕДУПРЕЖДЕНИЕ
Использование прибора не поназначению или несоблюдение правил, указанных вэтой инструкции,
может при определенных обстоятельствах привести кпожару!
66
Page 67

•
Н
е накрывайте прибор при использовании, например, одеялом или подушкой.
•
Н
е используйте прибор вблизи отлегковоспламеняющихся веществ.
Управление
ПРЕДУПРЕЖДЕНИЕ
• Допускается использование прибора только вцелях, описываемых вданной инструкции поприменению. Изготовитель ненесет ответственности заущерб, причиненный вследствие ненадлежащего
использования прибора или халатного обращения сним.
•
П
ри тяжелых заболеваниях дыхательных путей или легких перед применением увлажнителя воздуха
проконсультируйтесь уврача.
•
В
ыключайте прибор после каждого применения иперед чисткой. Вытяните штекер изрозетки.
•
П
оложите сетевой кабель так, чтобы обнего нельзя было споткнуться.
ВНИМАНИЕ
• Убедитесь, что прибор находится напрочной, устойчивой иневосприимчивой квлажности поверхности.
•
Н
езакрывайте отверстия прибора посторонними предметами. Следите затем, чтобы подвижные
части перемещались свободно.
•
Н
еставьте никакие предметы наприбор.
•
Б
ерегите прибор отвысоких температур.
4. Описание прибора
Увлажнитель воздуха:
•
у
влажняет воздух;
•
р
аботает тихо иплавно регулируется;
•
п
одходит для помещений площадью до30м²;
•
э
кономит электроэнергию иавтоматически отключается при пустом водяном резервуаре;
•
а
втоматически отключается при удалении водяного резервуара;
•
и
меет ароматический отсек для придания помещению приятного запаха;
•
п
рост вчистке.
1. Отверстие для выпуска пара
2. Резервуар для воды
3. Противоизвестковый фильтр
4. Навинчивающаяся крышка
водяного резервуара
5. Ультразвуковая мембрана
6. Поворотный регулятор
7. Индикатор уровня заполнения
8.
Ароматический отсек сароматическими подушечками
9. Основа
10. Сетевой кабель
11. Воздушный фильтр
1
2
3
4
5
6
7
8
9
10
67
11
Page 68

Принцип работы увлажнителя воздуха LB45
1.
Мембрана, приводимая вдвижение ультразвуком, перемещает воду, высвобождая при этом споверхности мельчайшие частицы воды.
2. Вентилятор внижней части прибора всасывает воздух.
3. Воздух обогащается высвобожденными частицами воды инесильным по
током выдувается вверхнее отверстие.
4.
По желанию прибор можно использовать сароматическими подушечками.
-
5. Ввод вэксплуатацию
Распаковка прибора
ПРЕДУПРЕЖДЕНИЕ
Недавайте упаковочный материал детям. Существует опасность удушения.
1. Вскройте картонную упаковку.
2. Извлеките верхнюю защитную вкладку. Не снимайте пленку.
3. Извлеките устройство изупаковки, подняв его вверх.
4. Снимите пленку.
5. Убедитесь вотсутствии повреждений наприборе, сетевом штекере икабеле.
Место установки прибора
ПРЕДУПРЕЖДЕНИЕ
Прежде чем приступить киспользованию прибора, прочтите указания потехнике безопасности.
Указание
• Область непосредственно вокруг увлажнителя воздуха может стать влажной.
•
П
ри использовании содержащей известь воды может образовываться белый осадок.
•
С
тавьте прибор не напол, анавозвышения (например, настол, комод).
•
У
станавливайте прибор так, чтобы выходящий пар небыл направлен напредметы.
•
Н
е используйте увлажнитель воздуха впомещениях ссильными колебаниями температуры, так
как это может привести кконденсации внутри прибора.
•
С
ливайте оставшуюся воду, если не используете прибор.
•
У
становите увлажнитель воздуха напрочную, горизонтальную иводостойкую поверхность.
При случайном опрокидывании прибора изнего может вытечь вода, даже если прибор был выключен,
а сетевой кабель вытянут.
Вода
Указание
• Не добавляйте вводу эфирные масла или ароматические вещества. Использование добавок мо-
жет повредить пластиковым деталям иих покрытию. Ультразвуковая мембрана может засориться
ивыйти изстроя.
•
И
спользуйте вприборе свежую питьевую воду. Если питьевая вода слишком жесткая, Вы можете
использовать вместо нее деминерализованную или дистиллированную воду.
•
И
спользуйте теплую воду (30–45 °C), всегда заполняйте резервуар домаксимума, впротивном
случае возможно протекание прибора, обусловленное физическими характеристиками.
•
Совет! При жесткой воде рекомендуется использовать противоизвестковый фильтр, поставляемый
пожеланию.
68
Page 69

Наполнение водяного резервуара водой
1. Потяните вверх резервуар для воды иотсоеди-
ните его отосновы.
2.
Переверните резервуар. Пружинный клапан
закрывает водяной резервуар.
3.
Открутите навинчивающуюся крышку резервуара.
4.
Залейте теплую воду (30–45 °C) врезервуар.
Водяной резервуар вмещает макс. 4л. Уровень
воды виден снаружи.
5.
Плотно закрутите навинчивающуюся крышку
нарезервуаре для воды.
6. Переверните резервуар.
7. Поставьте резервуар наоснову.
Убедитесь что резервуар плотно сидит наоснове.
6. Управление
Указание
Регулярно проверяйте уровень влажности воздуха впомещении. Интенсивное ипродолжительное
использование прибора может привести кпереувлажнению воздуха. Относительная влажность
не должна превышать 60%.
Включение прибора
1. Вставьте сетевой кабель вподходящую розетку.
2.
Поверните регулятор почасовой стрелке направо. Индикатор уровня заполнения загорится синим светом. Изотверстия для выпуска пара начнет выходить пар. Если вводяном резервуаре нет
воды или ее недостаточно, наиндикаторе уровня заполнения загорится красный свет ивцелях
безопасности прибор отключится. Если прибор выключится, заполните резервуар для воды, как
описано вглаве «Наполнение водяного резервуара водой».
3.
Спомощью регулятора установите желаемую мощность испарения. Максимальная мощность
испарения составляет 300мл/ч.
Указание
Пожеланию Вы можете нанести ароматические масла наароматическую подушечку, расположенную вароматическом отсеке. Это придаст помещению приятный запах. Ни вкоем случае не добавляйте ароматическое вещество прямо вводу.
Выключение прибора
1. Поверните регулятор доупора влево, пока не почувствуете небольшое сопротивление ине услы-
шите щелчок регулятора. Индикатор уровня заполнения погаснет.
2. Вытяните сетевой кабель изсетевой розетки.
7. Очистка иуход
Регулярная очистка прибора является главным условием его бесперебойной работы исоблюдения
гигиены. Загрязненность прибора зависит откачества воды ивремени работы. Влюбом случае
мы рекомендуем следующие интервалы очистки.
Каждые три дня
x
x Промывка водяного резервуара, замена воды
При необходимости
Очистка ультразвуковой мембраны спомощью ватной
палочки, промывка основы увлажнителя
x Очистка увлажнителя воздуха внутри иснаружи
x Удаление известкового налета
69
Page 70

ПРЕДУПРЕЖДЕНИЕ
Выключайте прибор после каждого применения иперед чисткой. Вытяните штекер изрозетки.
ВНИМАНИЕ
Обязательно очистите водяной резервуар ислейте всю воду изувлажнителя воздуха, если прибор
не использовался более недели.
Указание
• Очищайте прибор только указанным способом.
•
Н
е допускайте попадания жидкости внутрь прибора.
•
Н
еиспользуйте чистящие средства, содержащие растворители.
•
И
спользуйте для чистки и дезинфекции только мягкие моющие средства или уксус/чистящие
средства, содержащие уксус.
Очистка ультразвуковой мембраны, промывка основы увлажнителя
Указание
Сливайте воду изосновы увлажнителя через боковой край внаправлении, указанном стрелкой. Следите, чтобы внутрь прибора не попала вода, например, через отверстие вентилятора.
1.
Очистите ультразвуковую мембрану спомощью ватной палочки.
2.
Сливайте воду изосновы увлажнителя через боковой край.
Обратите внимание намаркировку наприборе!
3.
Если воснове остались какие-либо загрязнения, залейте внее
немного чистой свежей воды ислейте ее через боковой край.
Промывка водяного резервуара, замена воды
Регулярно чистите водяной резервуар, при ежедневном использовании
раза внеделю. Используйте мягкое чистящее средство или уксус/чистящее средство, содержащее
уксус.
1. Очищайте резьбу навинчивающейся крышки спомощью мягкой щетки.
2. Наполовину заполните резервуар водой.
3. Плотно закрутите навинчивающуюся крышку резервуара.
4. Несколько раз переверните ипотрясите водяной резервуар.
5. Слейте всю воду.
6. Повторите процесс, используя чистую свежую воду.
делайте это не реже одного
Очистка увлажнителя воздуха внутри иснаружи
1. Сливайте воду изосновы увлажнителя через боковой край.
2.
Влажной салфеткой протрите увлажнитель воздуха внутри иснаружи. Используйте для чистки
только мягкие моющие средства или уксус/чистящие средства, содержащие уксус.
Удаление известкового налета
Удаление известкового налета сультразвуковой мембраны
Жесткая вода может привести квозникновению извести наприборе ивособенности наультразвуковой мембране. Ее можно обнаружить побелому осадку. Регулярно удаляйте известковый налет
сприбора.
1. Налейте несколько капель средства для удаления извести наультразвуковую мембрану.
2. Оставьте на2–5 минут.
3. Очистите ультразвуковую мембрану, используя кисточку для чистки.
4. Дважды промойте основу чистой свежей водой.
70
Page 71

Внутренняя чистка основы
1. Ненадолго опустите влажную мягкую салфетку враствор для удаления извести.
2. Салфеткой протрите основу изнутри.
3. Аккуратно налейте свежую чистую воду воснову.
4. Сливайте воду изосновы увлажнителя через боковой край.
5. Повторите процесс, используя чистую свежую воду.
Удаление известкового налета сводяного резервуара
1. Наполовину заполните резервуар водой.
2. Добавьте немного средства для удаления извести.
3. Плотно закрутите навинчивающуюся крышку резервуара.
4. Несколько раз переверните ипотрясите водяной резервуар.
5. Слейте всю воду.
6. Повторите процесс еще несколько раз, используя чистую свежую воду.
8. Противоизвестковый фильтр как дополнительная
принадлежность
СОВЕТ!
При жесткой воде рекомендуется использовать противоизвестковый фильтр, поставляемый пожеланию (см. главу 12, «Предметы, приобретаемые дополнительно» ).
Указание
• Если, несмотря наустановку противоизвесткового фильтра, наприборе образовалась известь
или виден белый осадок, фильтр необходимо заменить.
•
С
рок службы противоизвесткового фильтра составляет не более 2–3 месяцев.
•
Е
сли прибор долгое время не используется, необходимо извлечь противоизвестковый фильтр
изводяного резервуара ипросушить его.
Установка противоизвесткового фильтра
1. Убедитесь, что прибор выключен.
2. Потяните вверх резервуар для воды иотсоедините его отосновы.
3. Переверните резервуар.
4. Открутите навинчивающуюся крышку резервуара.
5.
Навинтите противоизвестковый фильтр нарезьбу навинчивающейся
крышки водяного резервуара.
6. Плотно закрутите навинчивающуюся крышку резервуара. Противоизвестковый фильтр установлен.
71
Page 72

9. Что делать при возникновении проблем?
Проблема Причина Меры поустранению
Пар не выходит, Не подключен сетевой кабель. Вставьте сетевой кабель вподходящую
Поворотный регулятор находит
ся ввыключенном положении.
Слишком низкий уровень воды,
водяной резервуар пуст.
Пар странно пахнет, Новый прибор. Снимите резервуар для воды, открути
Застоявшаяся или грязная вода. Опорожните итщательно очистите ос
Странные звуки, Водяной резервуар неверно
Пар выходит из-под
водяного резервуара,
установлен наоснове.
Слишком мало воды вводяном
резервуаре.
Прибор стоит неровно инеустойчиво.
Водяной резервуар неверно
установлен наоснове.
розетку.
-
Поверните регулятор почасовой стрелке
внаправлении положения Maximum.
Наполните резервуар.
те иснимите навинчивающуюся крышку. Проветривайте открытый пустой
резервуар для воды втечение 12часов
всухом прохладном месте.
нову иводяной резервуар. Наполните
резервуар свежей водой.
Снимите ипереустановите резервуар
наоснову. Резервуар должен плотно
сидеть наоснове.
Наполните резервуар.
Установите прибор наустойчивую гори
зонтальную поверхность.
Снимите резервуар. Проверьте,
не загрязнилось ли соединение между
основой ирезервуаром. При необ
ходимости очистите его. Правильно
разместите резервуар для воды наос
нове. Резервуар должен быть прочно
закреплен наоснове.
-
-
-
-
-
10. Технические характеристики
Размеры ДхШхВ ок. 25x 12x 34см
Длина кабеля ок. 1,5м
Масса без воды ок. 1,5кг
Напряжение/частота сети 100–240В перем.тока/50/60Гц
Номинальная мощность 25Вт
Площадь помещения до 30м
Максимальная вместимость ок. 4л
Мощность испарения 300мл/час
2
72
Page 73

11. Утилизация
Винтересах охраны окружающей среды позавершении срока службы прибора запрещается
утилизировать его вместе сбытовыми отходами.
Утилизация производится через соответствующие пункты сбора вВашей стране. Прибор
следует утилизировать согласно директиве ЕС поотходам электрического иэлектронного
оборудования— WEEE (Waste Electrical and Electronic Equipment).
При возникновении вопросов обращайтесь вместную коммунальную службу, ответственную заути
лизацию отходов.
12. Предметы, приобретаемые дополнительно
Для приобретения расходных материалов ипринадлежностей посетите www.beurer.com или свяжитесь
ссоответствующим сервисным центром вВашей стране (см. адрес сервисного центра).
Расходные материалы ипринадлежности также можно приобрести врозничной торговле.
Наименование изделия Артикул
Ароматическое масло Vitality (Beurer by Taoasis) (10мл) 681.30
Ароматическое масло Harmony (Beurer by Taoasis) (10мл) 681.31
Ароматическое масло Relax (Beurer by Taoasis) (10мл) 681.32
Ароматическое масло Sleep Well (Beurer by Taoasis) (10 мл)
10 ароматических подушечек 164.148
Противоизвестковый фильтр (пожеланию) 164.147
681.33
13. Гарантия/сервисное обслуживание
Более подробная информация по гарантии/сервису находится в гарантийном/сервисном талоне,
который входит в комплект поставки.
-
73
Возможны ошибки иизменения
Page 74

POLSKI
Należy dokładnie przeczytać niniejszą instrukcję obsługi,
zachować ją i przechowywać w miejscu dostępnym dla innych
użytkowników oraz przestrzegać podanych w niej wskazówek.
Spis treści
1. Informacje ogólne ........................................75
2. Użytkowanie zgodne z przeznaczeniem ....76
3. Zasady bezpieczeństwa ..............................76
4. Opis urządzenia ...........................................77
5. Uruchomienie...............................................78
6. Obsługa ........................................................79
7. Czyszczenie i konserwacja .........................80
8. Dodatkowy produkt – filtr
zabezpieczający przed kamieniem ...........81
9. Postępowanie w przypadku problemów ...82
10. Dane techniczne .........................................82
11. Utylizacja.....................................................83
12. Produkty uzupełniające .............................83
13. Gwarancja/serwis .......................................83
OSTRZEŻENIE
• Dzieci od 8. roku życia oraz osoby z ograniczoną sprawnością fizyczną, ruchową i umysłową lub brakiem doświadczenia i wiedzy mogą
obsługiwać urządzenie tylko wtedy, gdy znajdują się pod nadzorem lub
zostały im przekazane instrukcje dotyczące bezpiecznego korzystania
z urządzenia i są świadome zagrożeń wynikających z jego użytkowania.
•
D
zieciom nie wolno bawić się urządzeniem.
•
C
zyszczenie i konserwacja urządzenia nie mogą być przeprowadzane
przez dzieci, chyba że znajdują się one pod opieką osoby dorosłej.
•
P
rzed napełnianiem i czyszczeniem należy odłączyć urządzenie od
zasilania.
•
N
ie należy używać środków czyszczących zawierających rozpuszczal-
niki.
•
J
eśli kabel zasilający urządzenia ulegnie uszkodzeniu, należy go zutyli-
zować. Jeżeli nie można wyjąć kabla, należy zutylizować urządzenie.
Drodzy Klienci!
Cieszymy się, że zdecydowali się Państwo na zakup naszego produktu. Firma Beurer oferuje dokładnie
przetestowane wysokojakościowe produkty przeznaczone do pomiaru wagi, ciśnienia krwi, temperatury
ciała i tętna, łagodnej terapii, masażu, ogrzewania i nawilżania powietrza, a także urządzenia służące do
pielęgnacji urody i ułatwiające opiekę nad dziećmi.
Należy uważnie przeczytać niniejszą instrukcję obsługi, zachować ją i przechowywać w miejscu dostępnym
dla innych użytkowników oraz przestrzegać podanych w niej wskazówek.
Z poważaniem
Zespół Beurer
74
Page 75

Zawartość opakowania
PAP
1 nawilżacz powietrza
15 zapasowych wkładek aromatycznych
1 niniejsza instrukcja obsługi
1. Informacje ogólne
Człowiek spędza większość czasu w zamkniętych pomieszczeniach. Zgodnie z zaleceniami idealna względna
wilgotność powietrza w pomieszczeniu powinna wynosić od 40% do 60%. Wartość ta jest przekraczana
szczególnie często w zimie, kiedy to w trakcie wietrzenia zimne powietrze o niewielkiej wilgotności dostaje
się do pomieszczeń mieszkalnych i jest tam ogrzewane. To suche powietrze w pomieszczeniu pobiera wil
goć i tym samym wysusza nie tylko błony śluzowe i skórę, ale także sprzęty domowe.
Zbyt suche powietrze niesie ze sobą szereg negatywnych skutków:
•
B
łony śluzowe i usta wysychają.
•
O
czy pieką.
•
P
owstają warunki sprzyjające infekcjom oraz chorobom dróg oddechowych.
•
P
ojawiają się objawy wyczerpania, zmęczenia i osłabienia koncentracji.
•
Z
wierzęta domowe i rośliny pokojowe są wystawione na działanie suchego powietrza.
•
W
zmaga się tworzenie kurzu.
•
P
owstają wyładowania elektrostatyczne materiałów ze sztucznego włókna, np. dywanów i wykładzin.
•
E
lementy wyposażenia z drewna, w szczególności parkiety, ulegają uszkodzeniom.
•
I
nstrumenty muzyczne rozstrajają się.
Objaśnienie symboli
W niniejszej instrukcji obsługi, na opakowaniu i tabliczce znamionowej zastosowano następujące symbole:
Ostrzeżenie przed niebezpieczeństwem utraty zdrowia lub odniesienia obrażeń
OSTRZEŻENIE
UWAGA
Wskazówka
ciała.
Ostrzeżenie przed niebezpieczeństwem uszkodzenia urządzenia lub akcesoriów.
Ważne informacje.
-
Należy przestrzegać instrukcji obsługi.
Utylizacja zgodnie z dyrektywą WE o zużytych urządzeniach elektrycznych i elektronicznych – WEEE (Waste Electrical and Electronic Equipment).
Niniejszy produkt spełnia wymagania obowiązujących dyrektyw europejskich
i krajowych.
Producent
Urządzenie ma podwójną izolację ochronną i odpowiada klasie ochronności 2.
20
Opakowanie zutylizować w sposób przyjazny dla środowiska.
Oznakowanie certyfikacyjne produktów eksportowanych do Federacji Rosyjskiej
oraz WNP.
75
Page 76

2. Użytkowanie zgodne z przeznaczeniem
Nawilżacz powietrza służy do nawilżania powietrza w pomieszczeniach.
Urządzenie przeznaczone jest wyłącznie do użytku prywatnego.
3. Zasady bezpieczeństwa
Należy uważnie przeczytać niniejszą instrukcję obsługi! Nieprzestrzeganie poniższych wskazówek może
doprowadzić do obrażeń ciała i szkód materialnych. Należy zachować niniejszą instrukcję obsługi oraz
zapewnić do niej dostęp wszystkim użytkownikom. W przypadku przekazania urządzenia innym osobom
należy dołączyć również instrukcję obsługi.
Porażenie prądem elektrycznym
OSTRZEŻENIE
Tak jak każdego urządzenia elektrycznego, również tego nawilżacza powietrza należy używać w sposób
ostrożny i rozważny, aby uniknąć porażenia prądem elektrycznym.
•
N
ależy korzystać z urządzenia wyłącznie przy napięciu sieciowym określonym na urządzeniu (tabliczka
znamionowa znajduje się na spodzie bazy).
•
K
abel zasilania należy wkładać do gniazdka tylko wtedy, gdy urządzenie jest wyłączone.
•
N
ie używać urządzenia, jeśli ono lub jego akcesoria posiadają widoczne uszkodzenia.
•
N
ie korzystać z urządzenia, jeśli spadło z wysokości lub do jego wnętrza dostała się woda.
•
N
ie używać urządzenia podczas burzy.
•
W
razie wystąpienia uszkodzeń lub zakłóceń w pracy urządzenia natychmiast je wyłączyć. Wyjąć wtycz-
kę z gniazda.
•
N
ależy wyjąć wtyczkę z gniazdka, nie ciągnąc za kabel ani za urządzenie.
•
N
ie wolno trzymać ani przenosić urządzenia za kabel zasilania.
•
N
ie owijać ciasno kabla zasilania wokół urządzenia.
•
Z
achować odstęp pomiędzy kablem a gorącymi powierzchniami.
•
U
pewnić się, że kabel zasilania oraz wtyczka nie mają kontaktu z wodą, parą ani innymi cieczami.
•
U
żytkować urządzenie tylko w suchych pomieszczeniach (np. nigdy w łazience, w saunie itp.).
•
N
igdy nie sięgać po urządzenie, jeśli wpadło do wody. Natychmiast wyjąć wtyczkę z gniazdka.
•
N
ie narażać urządzenia na uderzenia mechaniczne ani upadki.
Naprawa
OSTRZEŻENIE
• Nie wolno otwierać bazy.
•
N
aprawy urządzeń elektrycznych mogą być wykonywane wyłącznie przez fachowców. Nieodpowiednio
przeprowadzona naprawa może spowodować poważne zagrożenia dla użytkownika. W celu naprawy
należy zwrócić się do serwisu lub autoryzowanego dystrybutora.
Zagrożenie pożarowe
OSTRZEŻENIE
W przypadku użycia niezgodnego z przeznaczeniem lub nieprzestrzegania instrukcji obsługi może dojść do
zagrożenia pożarowego!
•
U
rządzenia nie należy używać pod przykryciem, np. pod kocem lub poduszką.
•
N
ie należy używać urządzenia w pobliżu materiałów łatwopalnych.
76
Page 77

Obsługa
OSTRZEŻENIE
• Urządzenie jest przeznaczone wyłącznie do używania w celu określonym w niniejszej instrukcji obsługi.
Producent nie ponosi odpowiedzialności za szkody wynikłe z nieprawidłowego lub lekkomyślnego użycia.
• Jeżeli użytkownik cierpi na poważną chorobę dróg oddechowych lub płuc, przed użyciem urządzenia
powinien zasięgnąć porady lekarskiej.
•
U
rządzenie należy wyłączyć każdorazowo po użyciu oraz przed czyszczeniem. Wyjąć wtyczkę z gniazda.
• Należy ułożyć kabel zasilania tak, aby nie można się było o niego potknąć.
UWAGA
• Należy upewnić się, że urządzenie stoi na stabilnej, niewywracalnej, odpornej na wilgoć powierzchni.
•
N
ie wolno wtykać przedmiotów do otworów urządzenia. Należy zadbać o to, aby części ruchome mogły
się swobodnie poruszać.
•
N
ie należy stawiać żadnych przedmiotów na urządzeniu.
•
N
ależy chronić urządzenie przed wysoką temperaturą.
4. Opis urządzenia
Nawilżacz powietrza
•
n
awilża powietrze,
•
p
racuje cicho i posiada bezstopniową regulację,
•
n
adaje się do pomieszczeń o maksymalnej powierzchni 30 m²,
•
j
est energooszczędny i wyłącza się automatycznie w razie braku wody w zbiorniku,
•
w
yłącza się automatycznie po wyjęciu zbiornika,
•
p
osiada przegródkę na aromat umożliwiającą rozprowadzanie zapachu w pomieszczeniu,
•
j
ego czyszczenie nie sprawia trudności.
1. Wylot pary
2. Zbiornik na wodę
3. Filtr zabezpieczający przed
kamieniem
4. Zakręcane zamknięcie zbiornika
na wodę
5. Membrana ultradźwiękowa
6. Pokrętło
7. Wskaźnik poziomu napełnienia
8. Przegródka z wkładką aroma
tyczną
-
1
2
7
3
4
5
8
9
6
10
9. Baza
10. Kabel sieciowy
11. Filtr powietrza
11
77
Page 78

Zasada działania nawilżacza powietrza LB 45
1.
Poruszana przez ultradźwięki membrana porusza wodę i powoduje powstawanie
kropelek wody na powierzchni.
2. Wentylator na spodzie urządzenia zasysa powietrze.
3.
Powietrze jest wzbogacane o powstałe kropelki wody i delikatnie wydmuchiwane
górą do otworu.
4. Można także używać nawilżacza z aromatami.
5. Uruchomienie
Rozpakowanie urządzenia
OSTRZEŻENIE
Opakowanie przechowywać w miejscu niedostępnym dla dzieci. Istnieje ryzyko uduszenia.
1. Otworzyć kartonowe opakowanie.
2. Zdjąć górną wkładkę ochronną. Pozostawić folię zamkniętą.
3. Wyjąć urządzenie z opakowania, podnosząc je do góry.
4. Usunąć worek foliowy.
5. Sprawdzić, czy urządzenie, wtyczka lub kabel nie są uszkodzone.
Miejsce ustawienia
OSTRZEŻENIE
Przed użyciem urządzenia należy zapoznać się ze wskazówkami dotyczącymi bezpieczeństwa.
Wskazówka
• Wilgotność w bezpośrednim otoczeniu nawilżacza powietrza może być wysoka.
•
J
eśli użyje się wody wapiennej, w urządzeniu może pojawić się biały osad.
•
U
rządzenia nie należy umieszczać na podłodze. Należy je postawić wyżej (np. na stole lub komodzie).
•
U
rządzenie należy ustawić w taki sposób, aby wylot pary nie był skierowany na inne przedmioty.
•
N
awilżacza powietrza nie należy używać w pomieszczeniach o dużych wahaniach temperatury, ponieważ
mogą one spowodować wystąpienie zjawiska skraplania wewnątrz urządzenia.
•
J
eśli urządzenie nie jest używane, należy wylać pozostałą wodę.
•
N
awilżacz powietrza można ustawiać wyłącznie na stabilnych, poziomych i wodoodpornych powierzch-
niach.
W razie przypadkowego przewrócenia urządzenia może z niego wypłynąć woda, nawet jeśli jest ono wyłą
czone i niepodłączone do prądu.
-
Woda
Wskazówka
• Do wody nie należy dodawać olejków eterycznych ani substancji zapachowych. W przypadku zastosowania
tego typu dodatków materiał z tworzywa sztucznego może zostać odbarwiony i uszkodzony. Membrana
ultradźwiękowa skleja się i zostaje w ten sposób uszkodzona.
•
N
ależy stosować wyłącznie świeżą wodę pitną. Jeśli woda pitna jest bardzo twarda, można używać wody
demineralizowanej lub destylowanej.
•
N
ależy używać ciepłej wody (30–45°C) inapełniać zbiornik zawsze do poziomu maksymalnego. Wprze-
ciwnym wypadku, ze względu na warunki fizyczne, może dojść do wycieku zurządzenia.
• Rada! W przypadku twardej wody zaleca się zastosowanie opcjonalnego filtra zabezpieczającego przed
kamieniem.
78
Page 79

Napełnianie zbiornika na wodę
1. Wyjąć zbiornik na wodę z bazy do góry.
2.
Przekręcić zbiornik na wodę. Zbiornik na wodę jest
zamykany zaworem sprężynowym.
3.
Otworzyć zakręcane zamknięcie znajdujące się przy
zbiorniku na wodę.
4. Wlać ciepłą wodę (30–45°C) do zbiornika. Zbiornik
wody ma pojemność maksymalną 4,0 l. Poziom
wody jest widoczny od zewnątrz.
5.
Zamknąć do końca zakręcane zamknięcie przy
zbiorniku na wodę.
6. Przekręcić zbiornik na wodę.
7. Umieścić zbiornik na wodę na bazie.
Uważać, aby zbiornik wody był mocno osadzony na bazie.
6. Obsługa
Wskazówka
Należy regularnie sprawdzać wilgotność powietrza w pomieszczeniu. Intensywne i długotrwałe używanie
urządzenia może doprowadzić do zbyt dużej wilgotności powietrza. Względna wilgotność powietrza nie
powinna wynosić więcej niż 60%.
Włączanie urządzenia
1. Umieścić kabel zasilania w odpowiednim gniazdku.
2.
Przekręcić pokrętło w kierunku zgodnym z ruchem wskazówek zegara w prawo. Wskaźnik poziomu napełnienia zaczyna świecić się na niebiesko. Z wylotu pary wydobywa się teraz para. Jeśli w zbiorniku nie ma
wody lub jej ilość jest niewystarczająca, wskaźnik poziomu napełnienia świeci na czerwono, a urządzenie
wyłącza się ze względów bezpieczeństwa. Gdy urządzenie się wyłączy, należy napełnić zbiornik wody
zgodnie z rozdziałem „Napełnianie zbiornika na wodę”.
3. Za pomocą pokrętła ustawić wybraną wydajność parowania. Maksymalna wydajność parowania wynosi
300 ml na godzinę.
Wskazówka
Można także skropić aromatem/olejkiem zapachowym wewnętrzną wkładkę znajdującą się w przegródce
na aromat. Umożliwi to rozprowadzanie zapachu w pomieszczeniu. W żadnym wypadku nie należy wlewać
olejku zapachowego bezpośrednio do wody.
Wyłączanie urządzenia
1.
Przekręcić pokrętło w lewo do poczucia niewielkiego oporu i kliknięcia pokrętła. Wskaźnik poziomu
napełnienia zgaśnie.
2. Wyjąć kabel sieciowy z gniazdka wtykowego.
79
Page 80

7. Czyszczenie i konserwacja
Regularne czyszczenie i dezynfekcja to warunek higienicznej i bezusterkowej pracy urządzenia. Zanieczyszczenie urządzenia jest uzależnione od jakości wody i czasu pracy. W każdym przypadku zalecamy wykonywanie czyszczenia w następujących odstępach czasu.
Co trzy dni W razie potrzeby
x
x Płukanie zbiornika na wodę, wymiana wody
x Czyszczenie nawilżacza powietrza od wewnątrz i z zewnątrz
x Odkamienianie
OSTRZEŻENIE
Urządzenie należy wyłączyć każdorazowo po użyciu oraz przed czyszczeniem. Wyjąć wtyczkę z gniazda.
UWAGA
W razie nieużywania urządzenia przez ponad tydzień należy koniecznie całkowicie opróżnić nawilżacz
powietrza i oczyścić zbiornik na wodę.
Wskazówka
• Urządzenie czyścić tylko w podany sposób.
•
D
o wnętrza urządzenia nie może dostać się woda.
•
N
ie używać środków czyszczących zawierających rozpuszczalniki.
•
D
o czyszczenia i dezynfekcji stosować jedynie delikatny środek czyszczący lub ocet/środek na bazie octu.
Czyszczenie membrany ultradźwiękowej, płukanie bazy
Wskazówka
Wylewać wodę z bazy przez boczną krawędź zgodnie z kierunkiem strzałki. Uważać, aby do wnętrza urządzenia nie dostała się woda, np. przez otwór wentylatora.
Czyszczenie membrany ultradźwiękowej za pomocą patyczków kosmetycznych, płukanie bazy
1. Membranę ultradźwiękową czyścić patyczkiem kosmetycznym.
2.
Wylać wodę z bazy poprzez boczną krawędź.
Pamiętać o oznaczeniu znajdującym się w urządzeniu!
3. Jeśli w bazie zostaną resztki zanieczyszczeń, wlać do niej trochę
czystej, świeżej wody i wylać krawędzią boczną.
Płukanie zbiornika na wodę, wymiana wody
Zbiornik na wodę czyścić regularnie, w przypadku codziennego użytkowania przynajmniej raz w tygodniu.
Używać delikatnego środka czyszczącego lub octu/środka na bazie octu.
1. Gwint zakręcanego zamknięcia czyścić miękką szczotką.
2. Wypełnić zbiornik na wodę do połowy wodą.
3. Zamknąć zakręcane zamknięcie znajdujące się przy zbiorniku na wodę.
4. Wstrząsnąć zbiornikiem na wodę, a następnie przechylić go w jedną i drugą stronę.
5. Otworzyć zbiornik na wodę i całkowicie go opróżnić.
6. Powtórzyć powyższą czynność z czystą, świeżą wodą.
80
Page 81

Czyszczenie nawilżacza powietrza od wewnątrz i z zewnątrz
1. Wylać wodę z bazy przez boczną krawędź.
2.
Wytrzeć nawilżacz od wewnątrz i z zewnątrz wilgotną szmatką. Stosować wyłącznie delikatny środek
czyszczący lub ocet/środek na bazie octu.
Odkamienianie
Usuwanie kamienia z membrany ultradźwiękowej
Twarda woda może doprowadzić do powstania kamienia w urządzeniu, przede wszystkim na membranie
ultradźwiękowej. Jeśli do tego dochodzi, pojawia się biały osad. Urządzenie należy regularnie oczyszczać z kamienia.
1. Wlać kilka kropel odkamieniacza na membranę.
2. Pozostawić odkamieniacz do zadziałania na 2–5 minut.
3. Po upływie tego czasu oczyścić membranę ultradźwiękową dołączonym pędzelkiem.
4. Kilkakrotnie przepłukać bazę czystą, świeżą wodą.
Czyszczenie wnętrza bazy
1. Na krótko zanurzyć wilgotną, miękką ściereczkę w roztworze odkamieniającym.
2. Wytrzeć ściereczką wnętrze bazę.
3. Ostrożnie wlać do bazy odrobinę świeżej, czystej wody.
4. Wylać wodę z bazy przez boczną krawędź.
5. Powtórzyć powyższą czynność z czystą, świeżą wodą.
Odkamienianie zbiornika na wodę
1. Wypełnić zbiornik na wodę do połowy wodą.
2. Dodać małą ilość odkamieniacza.
3. Zamknąć zakręcane zamknięcie znajdujące się przy zbiorniku na wodę.
4. Wstrząsnąć zbiornikiem na wodę, a następnie przechylić go w jedną i drugą stronę.
5. Otworzyć zbiornik na wodę i całkowicie go opróżnić.
6. Powtórzyć powyższy proces z czystą, świeżą wodą.
8. Dodatkowy produkt – filtr zabezpieczający przed kamieniem
RADA!
W przypadku twardej wody zaleca się zastosowanie opcjonalnego filtra zabezpieczającego przed kamieniem
(zob. rozdział „12. Produkty uzupełniające” ).
Wskazówka
• Jeśli pomimo zastosowania filtra w urządzeniu osadza się kamień lub jeśli tworzy się biały osad,
należy wymienić filtr.
•
Ż
ywotność filtra wynosi maksymalnie około 2–3 miesięcy.
•
J
eżeli urządzenie nie jest używane przez dłuższy czas, należy wyjąć filtr ze zbiornika na wodę i wy-
suszyć go.
Montaż filtra zabezpieczającego przed kamieniem
1. Upewnić się, że urządzenie jest wyłączone.
2. Wyjąć zbiornik na wodę z bazy do góry.
3. Przekręcić zbiornik na wodę.
4. Otworzyć zakręcane zamknięcie znajdujące się przy zbiorniku na wodę.
5.
Przykręcić filtr za pomocą śruby na gwint zakręcanego zamknięcia zbiornika na wodę.
6. Zamknąć zakręcane zamknięcie znajdujące się przy zbiorniku na wodę.
Teraz filtr zabezpieczający przed kamieniem jest zamontowany.
81
Page 82

9. Postępowanie w przypadku problemów
Problem Przyczyna Rozwiązanie
Z urządzenia nie wydostaje się para
Para dziwnie pachnie Nowe urządzenie. Wyjąć zbiornik na wodę, odkręcić i zdjąć
Wyraźne szumy Zbiornik nie jest odpowiednio
Para wydostaje się ze
spodu zbiornika na
wodę
Kabel zasilania nie jest podłączony.
Pokrętło znajduje się w pozycji
wyjściowej.
Poziom wody jest zbyt niski, zbior
nik na wodę jest pusty.
Nieświeża lub brudna woda. Wylać wodę z bazy oraz ze zbiornika
umieszczony na bazie.
W zbiorniku jest za mało wody. Napełnić zbiornik na wodę.
Urządzenie nie stoi równo i stabilnie.
Zbiornik nie jest odpowiednio
umieszczony na bazie.
Umieścić kabel zasilania w odpowiednim
gniazdku.
Przekręcić pokrętło zgodnie z ruchem
wskazówek zegara w kierunku pozycji
maksymalnej.
-
Napełnić zbiornik na wodę.
zakręcane zamknięcie. Otwarty, pusty
zbiornik na wodę wietrzyć przez 12 godzin
w chłodnym, suchym miejscu.
i dokładnie je wyczyścić. Napełnić zbior
nik świeżą wodą.
Podnieść zbiornik na wodę i umieścić go
prawidłowo na bazie. Zbiornik powinien
być mocno osadzony na bazie.
Ustawić urządzenie na poziomym i stabilnym podłożu.
Podnieść zbiornik na wodę. Sprawdzić,
czy połączenie bazy ze zbiornikiem jest
czyste. W razie potrzeby wyczyścić je.
Zbiornik na wodę prawidłowo ustawić
na bazie. Powinien on być na niej mocno
osadzony.
-
10. Dane techniczne
Wymiary (dł. × szer. × wys.) ok. 25 cm × 12 cm × 34 cm
Długość przewodu ok. 1,5 m
Masa pustego urządzenia ok. 1,5 kg
Napięcie zasilające /
częstotliwość sieciowa
Moc znamionowa 25 W
Wielkość pomieszczenia do 30 m
Objętość ok 4 l
Wydajność parowania 300 ml/godz.
100–240 V AC / 50/60 Hz
2
82
Page 83

11. Utylizacja
W związku z wymogami w zakresie ochrony środowiska nie należy wyrzucać urządzenia po zakończeniu eksploatacji wraz z odpadami domowymi.
Zlecić utylizację w odpowiednim punkcie zbiórki w danym kraju. Urządzenie należy zutylizować
zgodnie z dyrektywą WE o zużytych urządzeniach elektrycznych i elektronicznych – WEEE (Waste
Electrical and Electronic Equipment).
W razie pytań należy zwrócić się do odpowiedniej lokalnej instytucji odpowiedzialnej za utylizację.
12. Produkty uzupełniające
W celu zakupienia produktów uzupełniających/dodatkowych można odwiedzić stronę internetową
www.beurer.com lub zwrócić się do serwisu w danym kraju (zgodnie z listą adresów serwisów).
Produkty dodatkowe i uzupełniające są również dostępne w sklepach.
Produkt Numer produktu
Olejek aromatyczny Beurer by Taoasis „Vitality” (10ml) 681.30
Olejek aromatyczny Beurer by Taoasis „Harmony” (10ml) 681.31
Olejek aromatyczny Beurer by Taoasis „Relax” (10ml) 681.32
Olejek aromatyczny Beurer by Taoasis „Sleep Well” (10ml) 681.33
10 szt. wkładek aromatycznych 164.148
Filtr zabezpieczający przed kamieniem (opcjonalny) 164.147
13. Gwarancja/serwis
Firma Beurer GmbH, Söflinger Straße 218, D-89077 Ulm (zwana dalej „Beurer”) udziela gwarancji na ten
produkt na następujących warunkach i w poniżej opisanym zakresie.
Poniższe warunki gwarancji nie naruszają ustawowych zobowiązań gwarancyjnych sprzedającego
wynikających z umowy kupna zawartej z kupującym.
Gwarancja obowiązuje również w sposób nienaruszający bezwzględnie obowiązujących przepisów
dot. odpowiedzialności.
Firma Beurer gwarantuje bezawaryjne działanie oraz kompletność niniejszego produktu.
Obowiązujący na całym świecie okres gwarancji obejmuje 3 lata/lat, licząc od zakupu nowego, nieużywa
nego produktu przez kupującego.
Niniejsza gwarancja dotyczy tylko produktów nabytych przez kupującego jako konsumenta wyłącznie
w celach prywatnych w ramach użytku domowego.
Obowiązuje niemieckie prawo.
Jeśli w okresie obowiązywania gwarancji produkt zostanie uznany za niekompletny lub wadliwy w dzia
łaniu zgodnie z poniższymi postanowieniami, firma Beurer bezpłatnie wymieni go lub naprawi zgodnie
z niniejszymi warunkami gwarancji.
Jeśli kupujący chce zgłosić reklamację gwarancyjną, najpierw kontaktuje się z lokalnym dealerem:
patrz załączona lista „Service International” z adresami serwisowymi.
83
-
-
Page 84

Następnie kupujący otrzymuje dalsze informacje dot. rozpatrywania reklamacji gwarancyjnej, np. gdzie
wysłać produkt i jakie dokumenty są wymagane.
Roszczenie z tytułu gwarancji będzie rozpatrywane tylko wtedy, gdy kupujący może przedłożyć
- kopię faktury/paragon zakupu oraz
- oryginalny produkt
firmie Beurer lub autoryzowanemu partnerowi firmy Beurer.
Niniejsza gwarancja wyraźnie nie obejmuje:
- zużycia wynikającego z normalnego użytkowania lub zużywania się produktu;
- dostarczanych z tym produktem akcesoriów, które zużywają się lub ulegają zużyciu podczas
prawidłowego użytkowania (np. baterii, akumulatorów, mankietów, uszczelek, elektrod, źródeł światła,
nakładek i akcesoriów inhalatora);
- produktów, które były używane, czyszczone, przechowywane lub konserwowane w niewłaś
ciwy sposób i/lub niezgodnie z treścią instrukcji obsługi, a także produktów, które zostały otwarte,
naprawione lub zmodyfikowane przez kupującego lub centrum serwisowe nieautoryzowane przez firmę
Beurer;
- uszkodzeń powstałych podczas transportu między producentem a klientem lub między centrum serwi
sowym a klientem;
- produktów, które zostały zakupione jako artykuły grupy B („B-Ware”) lub jako artykuły używane;
- szkód następczych, które wynikają z wady tego produktu (w tym przypadku mogą jednak istnieć
roszczenia z tytułu odpowiedzialności za produkt lub wynikające z innych bezwzględnie obowiązują
cych przepisów prawa dot. odpowiedzialności).
Naprawy lub całkowita wymiana w żadnym wypadku nie przedłużają okresu gwarancji.
-
-
-
BEURER GmbH • Söflinger Str. 218 • 89077 Ulm (Germany) • www.beurer.com
www.beurer-gesundheitsratgeber.com • www.beurer-healthguide.com
84
Zastrzega się prawo do pomyłek i zmian
681.07_LB45_2019-07-01_03_IM1_BEU
 Loading...