

Bertazzoni KCH30XV, KCH24XV User Manual
CHIMNEY HOOD •
Installations instructions
EN
HOTTE DE CUISINE •
Instructions pour le montage
FR
MODEL K36HERX/14 K31A.HV5X..UA
MODEL K48HERX/14 K41A.HV5X..UA
3LIOU3LG.1
1
B
C
A
2x
3,2x13mm
2
3
5
4
1
*
6x
4,8x40mm
6x
Ø 8mm
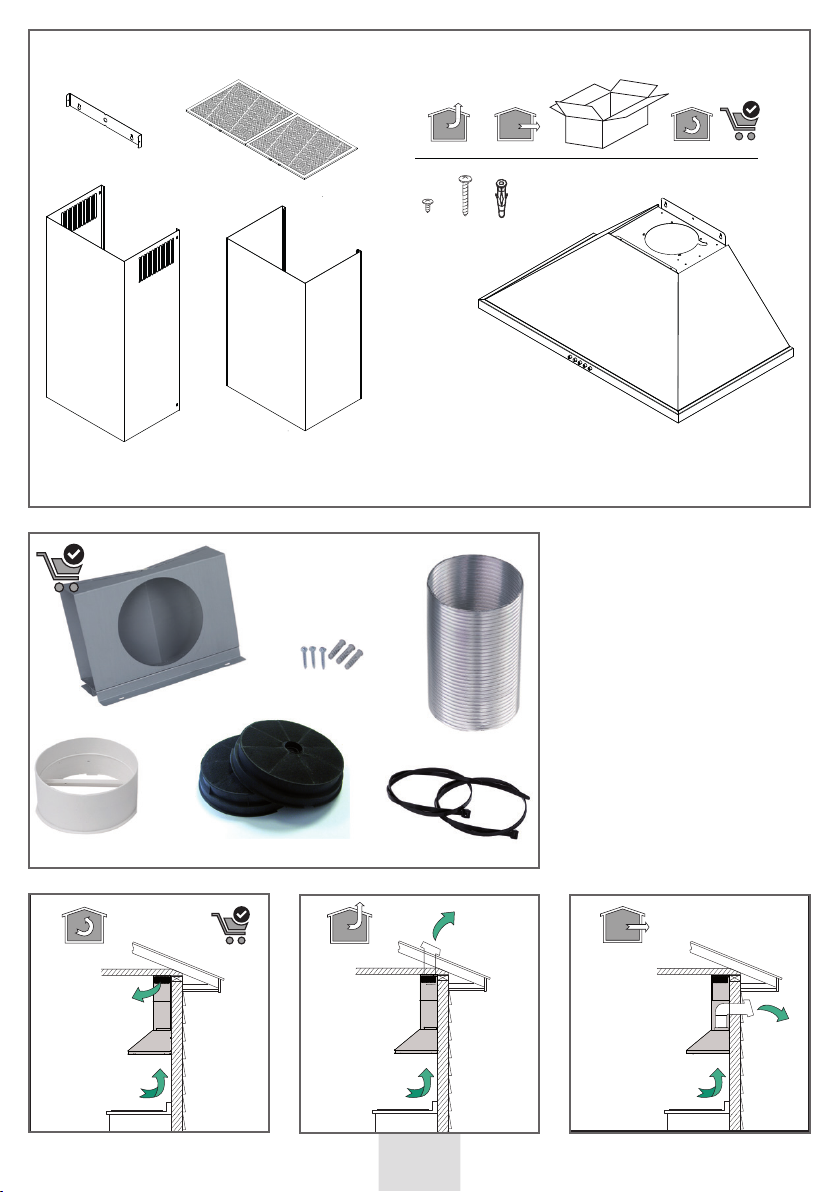
Components kit:
1) Air outlet Ø 150 mm
2)Airdeector
3)Fixingscrews
4)Carbonlter
5)Connectingpipe
6)Fixingclamps
optional/onrequest
*
*
*
6
*
A
B
2
C
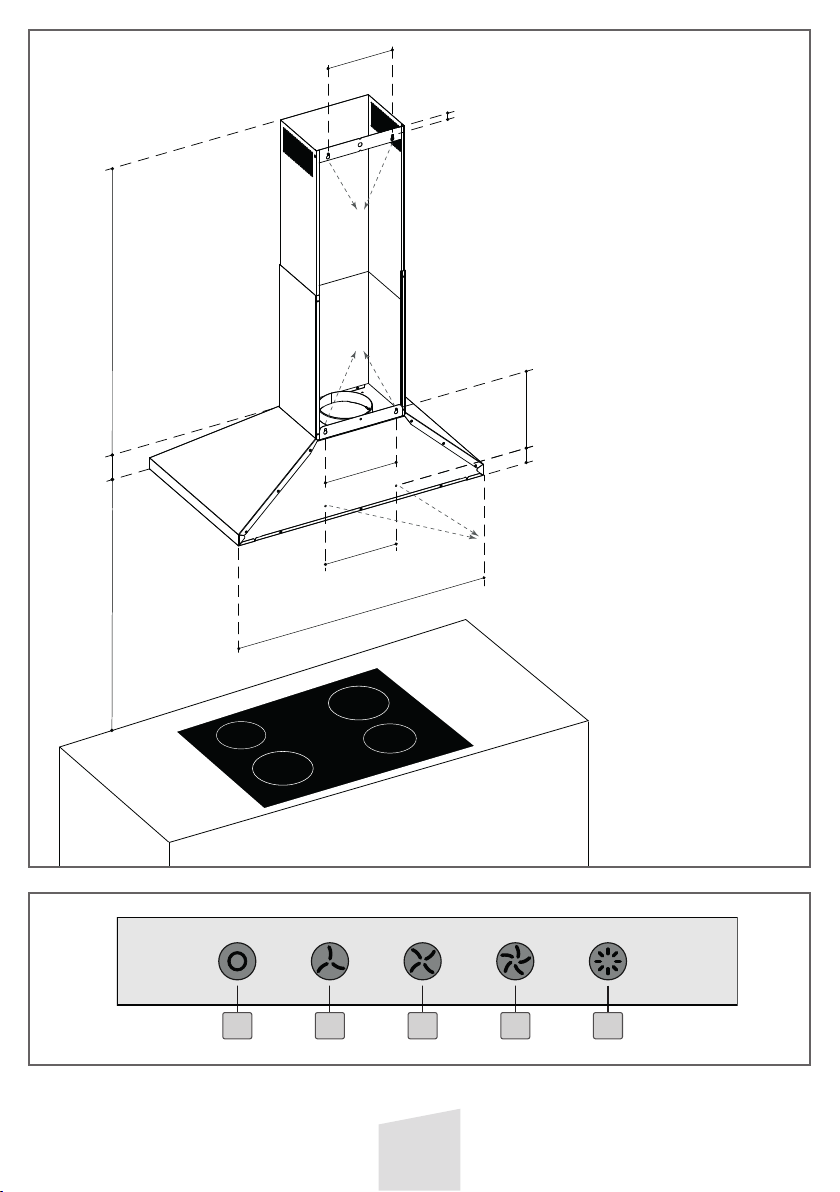
A B C D E
Fig.1
7"
7/8
0"
25/32
46/91
C
63 : "
46/32
71 "
A
9"
3/8
46/52
8"
21/32
1"
21/38
01 "
23/71
8"
21/32
92** : "
23/91
24" - 30" - 36"- 48"
B
*electric, elettrico, elektro,
èlectrique, elèctrico
**gas, gaz
52* "
Fig.2
3
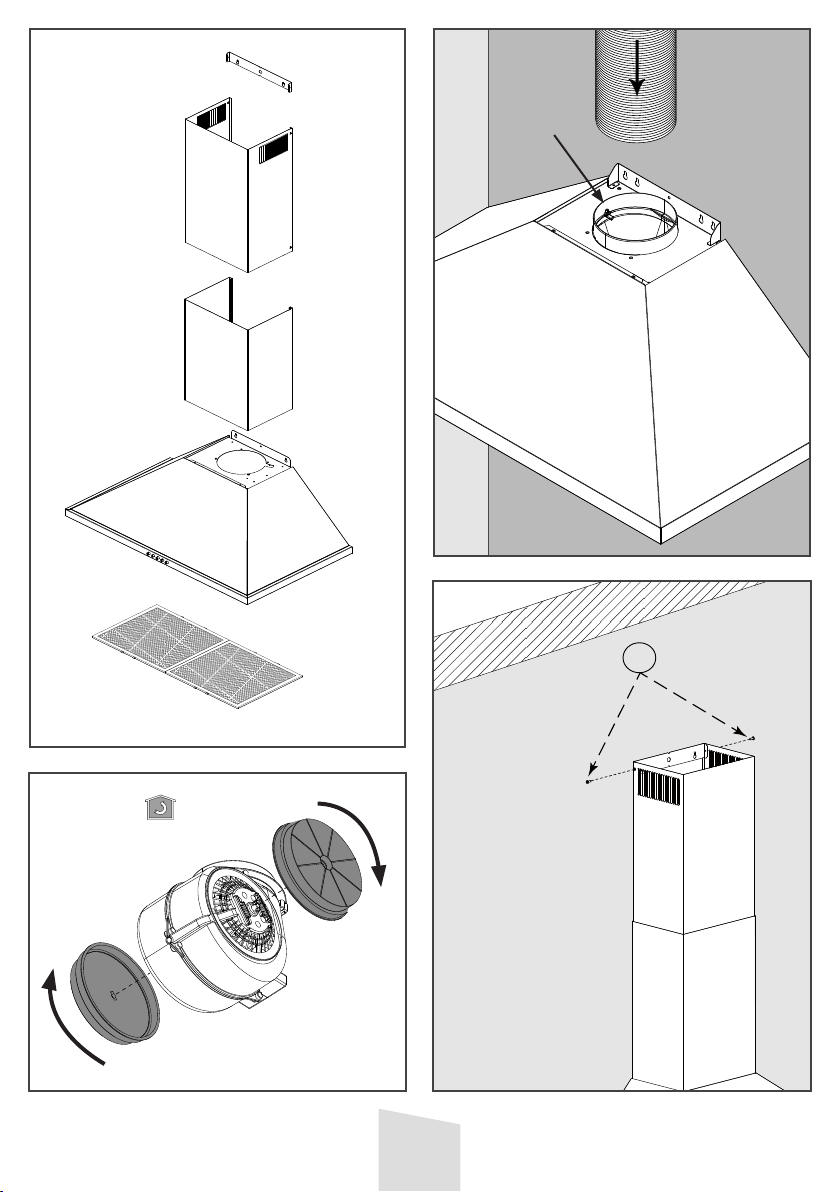
Fig.4 Fig.5
Ⓩ
Ⓔ
Ⓕ
Ⓨ
Fig.6
Fig.7
G
Ⓜ
A
4

EN
IMPORTANT SAFETY INSTRUCTIONS
Carefully read the following important information
regarding installation safety and maintenance.
READ AND SAVE THESE INSTRUCTIONS
future reference.
REQUIREMENTS:
UL350WAC120V,60Hz3.3ACircuitgrounding.
INTENDED FOR DOMESTIC COOKING
ONLY !
IMPORTANT SAFEGUARDS
- Do not connect the exhaust hood to the
chimneys, ues and airducting the room.
- The evacuated air must not be let into a
warm air duct.
- This appliance must be connected to a system equipped with earth or ground plate.
- When performing maintenance operations,
disconnect the appliance from the eld
connection.
- Do not do any ambè cooking underneath
the hood - When frying, never leave the pan
alone because the cooking oil could are up.
- Clean all the surfaces frequently to avoid
danger of re. To do so use a cloth and or
brush soaked in denatured ethyl alcohol.
It also important to remove and clean or
substitute frequently the lter installed in
the hood.
- It advisable to utilise kitchens of the same
width as the hood.
- Do not operate with a damaged cord or
plug. Discard fan or return to an authorized service facility for examination and/or
repair.
- Do not run cord under carpeting. Do not
cover with throw rugs, runners or similar coverings. Arrange cord away from trac area
and where it will not be tripped over.
- Do not route cord under furniture or appliances.
- Do not operate any fan with a damaged
cord or plug. Discard fan or return to an au-
for
thorized service facility for examination and/
or repair. Do not run cord under carpeting.
- Wiring shall be protected from sharp
edges (including male screw threads), burrs,
ns, moving parts, and other agencies that
might abrade the insulation on conductors.
INTRODUCTION
These instructions are designed to tell you of
the various technical details of your cooker
hood and to make you familiar with its use.
Since these instructions cover more than
one type of hood within the same series, it
may be that reference is made to components that do not form part of the hood that
you are installing. The hood should be used
in the exhaust version to discharge all the
kitchen vapours and odours out-door of the
building. Fittings can vary from country to
country. We reserve the right to modify the
product without any notice always with the
aim of improvements and in compliance with
the relevant norms.
SUGGESTIONS FOR USING THE HOOD IN
EXHAUST POSITION
When an exhaust hood and a heat source
requiring ambient air (e.g. gas, oil, coal
stoves, etc.) are used at the same time,
attention is required because the air necessary for combustion is exhausted from the
room through the hood and this creates
depression. There is no such danger when
the maximum depression in the room is
0,04 mbar. In this condition no exhaust gas
from the heat source is piped. To assure this
condition, make opening in the room which
cannot be closed (doors, windows, etc. are
insucient) and through which the air necessary for combustion can freely ow.
Note : All the exhaust ductwork in the
apartment or house should be studied. In
case of doubts, get advice or authorization
from the person or agency responsible for
the building.
Note : The eciency of the exhaust hood
decreases as the length of the ducts and
number of increase. When using the
exhaust version, follow these rules : Do not
connect the exhaust hood to chimneys,
5

ues, and air ducts serving the room. Before
venting into exhaust ues and ducts no
longer in use, ask for approval of person or
agency responsable for the building. The
evacuated air must not be let into a warm
airduct. For the evacuation of the exhausted
air please note ocial instructions.
INSTALLATION
The hood may be in ltering or in ducting
version (see A-B-C pag.2). Decide from the
outset which type is to be installed. For better eciency, we recommend installing the
hood in the ducting version (if possible).
FILTERING VERSION (A)
The hood puries the air and
recycles the clean air backb into
the room. For this version, the
following is required: a theft-proof
cover, a reducer and charcoal lter.
In the version with ue, the upper
ue must have the air evacuation
slots positioned in the upper part
and the deector must be used in
place of the anti-theft cover. The
upper ue air evacuation slots must
be positioned at the top.
DUCTING VERSION (B) (C)
The hood puries the air and evacuates it to the outside through an
exhaust duct or hole (diameter 150
mm).
Roof Venting (B)
Wall Venting (C)
AIR VENT
(for ducting versions)
! Prepare the hole and the air vent duct
(150 mm diameter - not provided with the
product).
! Use a duct of the minimum indispensible
length.
! Use a duct with as few elbows as possible
(maximum elbow angle: 90°).
! Avoid drastic changes in the duct crosssection.
! Use a duct with an as smooth as possible
inside.
! The duct must be made of certied mate-
rial.
! Do not connect the hood to smoke exhaust
ducts for the products of combustion (boilers, replaces, stoves, etc).
! For the air vents comply with the provisions laid down by the competent authorities. In addition, the air must not be
evacuated through a hole in the wall unless
specically intended for this purpose.
! Fit air intakes in the room to prevent the
hood from creating a negative pressure
in the room (which must not exceed 0.04
mbar); if the hood is used at the same time
as non-electrical equipment (gas-, oil- and
charcoal-red stoves, etc.) the exhaust gas
may be sucked in by the heat source.
ASSEMBLY
! WARNING: Very heavy product; hood
handling and installation must be carried
out by at least two persons.
! WARNING: Wear gloves and goggles when
carrying out installation and maintenance
operations.
! WARNING: Failure to install the screws
or xing device in accordance with these
instructions may result in electrical hazards.
!The minimum distance between the supporting surface for the cooking equipment
on the hob and the lowest part of the range
hood must be not less than 65 cm from electric cookers and 75 cm from gas or mixed
cookers. If the instructions for installation
for the gas hob specify a greater distance,
this must be adhered to.
! Expansion wall plugs are provided to secure the hood to most types of walls/ceilings.
However, a qualied technician must verify
suitability of the materials in accordance
with the type of wall/ceiling. The wall/ceiling
must be strong enough to take the weight
of the hood. Do not tile, grout or silicone.
! In case of doubt, consult an authorised
service assistance centre or similar qualied
person.
CONNECTION EXHAUST
Link a 150 mm diameter air outlet chimney
6
 Loading...