

Page 1
Installation, Maintenance and User Manual
F60CONXT and F60PROXT
Australian Version
Page 2

Page 3

BERTAZZONI SpA
Via Palazzina 8
42016 Guastalla RE
ITALY
WWW.BERTAZZONI.COM
FROM THE DESK OF THE PRESIDENT
Dear new owner of a Bertazzoni product,
Our company brings to homeowners around the world
beautiful, high-performance kitchen appliances, which
make their dreams come true.
We marry the finest Italian craftsmanship with
technical precision using state-of-the-art
manufacturing, which give our customers peace of
mind.
Our brand elevates food – preparing it, sharing it,
enjoying it – to a new dimension where taste, fun, and
lifestyle - the values of our land - come together.
We have built this company with the unique passion
and dedication of family entrepreneurship. Our fathers
handed it to us. Our children will inherit it. It’s in our
minds, our hearts, our soul.
Since 1882 our name is on the products we build. We
are proud – and at the same time humbled – by our
heritage. This company is Bertazzoni. We are
Bertazzoni. And we vow to continue building this great
enterprise into the future.
DALLA SCRIVANIA DEL PRESIDENTE
Gentile proprietario di un prodotto Bertazzoni,
Abbiamo costruito un’impresa che porta nelle case di
tutto il mondo prodotti con altissime prestazioni, il
meglio del Design italiano, con sicurezza e rispetto per
l’ambiente.
Abbiamo costruito un’impresa che eleva la
preparazione e la condivisione della buona cucina ad
una nuova dimensione, dove il gusto, il saper vivere ed
i valori della nostra terra sono portati a fattor comune.
Abbiamo costruito questa impresa con la passione
personale, la serietà e la dedizione
dell’imprenditorialità familiare. I nostri padri ce l’hanno
trasmessa, i nostri figli, speriamo con personale merito,
la porteranno ancor più in alto. E’ nelle nostre menti,
nel nostro cuore, nella nostra anima.
Dal 1882 il nostro nome è sui prodotti che costruiamo,
siamo orgogliosi ed allo stesso tempo consapevoli della
responsabilità che la nostra tradizione comporta.
Questa azienda è Bertazzoni. Ci impegniamo per la
continuazione di questa grande impresa nel futuro.
Grazie!
1
Page 4

SAFETY INSTRUCTIONS
Read this Instruction Manual carefully to
obtain the best performance from your
oven. K
eep this manual so that it can be
read by a new owner.
Electricity Safety
The oven is supplied with a H05RR-F,
Ÿ
H05SS-F or H07RN-F for connection to
the power supply. The connection
diagram is shown in Figure 20.
The oven should always have a good
Ÿ
earth connection in line with current
regulations.
Connection must be made by means of
Ÿ
an omnipolar switch that is suitable for
the current drawn and with a minimum
aperture between contacts of 3mm for
disconnection in case of emergency,
cleaning or bulb changing. Under no
circumstances must the earth wire
pass through this switch.
This switch may be replaced by a plug,
Ÿ
provided it is accessible for normal use.
Any handling or repair to the appliance,
Ÿ
including replacement of the power
cable, should be carried out by
authorised Technical Service Personnel
using original spare parts. Repairs or
handling by others may damage the
appliance or cause malfunctioning that
could be hazardous to your safety.
Unplug your oven if it malfunctions.
Ÿ
In ovens combined with hobs, only
Ÿ
those recommended by the
manufacturer may be fitted.
If the supply cord is damaged, it must
Ÿ
be replaced by the manufacturer, its
service agent or similarly qualified
persons in order to avoid a hazard.
Refer to connection diagram shown in
Figure 20.
1
Child Safety
During use, the appliance becomes hot.
Ÿ
Care should be taken to avoid touching
heating elements inside the oven.
WARNING: Accessible parts may
Ÿ
become hot during use. To avoid burns,
young children should be kept away.
Accessible parts may become hot when
the grill is in use. Children should be
kept away.
WARNING: This appliance is not
Ÿ
intended for use by persons (including
children) with reduced physical, sensory
or mental capabilities, or lack of
experience and knowledge, unless they
have been given supervision or
instruction concerning use of the
appliance by a person responsible for
their safety. Children should be
supervised to ensure that they do not
play with the appliance.
Safety in the use of the oven
The oven must always be operated with
Ÿ
the door closed.
Only use the oven after it has been
Ÿ
installed inside the kitchen unit (See
Installing the Oven).
The tray and grill have a system for
Ÿ
easy part removal and handling of food.
The oven heats up when in use, so
Ÿ
please use oven gloves when
performing operations inside the oven
and avoid touching the heating
elements.
Only use the temperature probe
Ÿ
supplied to measure the temperature
inside the oven (in models that come
with this feature).
2
Page 5

2
Cleaning and Maintenance
Disconnect the appliance from the
Ÿ
mains power supply before any
operation.
Do not use abrasive cleaning products,
Ÿ
or steam or pressurised water cleaning
equipment.
Cleaning and maintenance tasks to be
Ÿ
carried out by the user should not be
done by children without supervision.
Before replacing a bulb, first make sure
Ÿ
that the oven has been disconnected
from the mains to avoid the possibility
of receiving an electric shock.
CAUTION
For the specific features and performance
of your oven, please consult the Quick
Start Guide that comes with this Manual.
3
Page 6
4
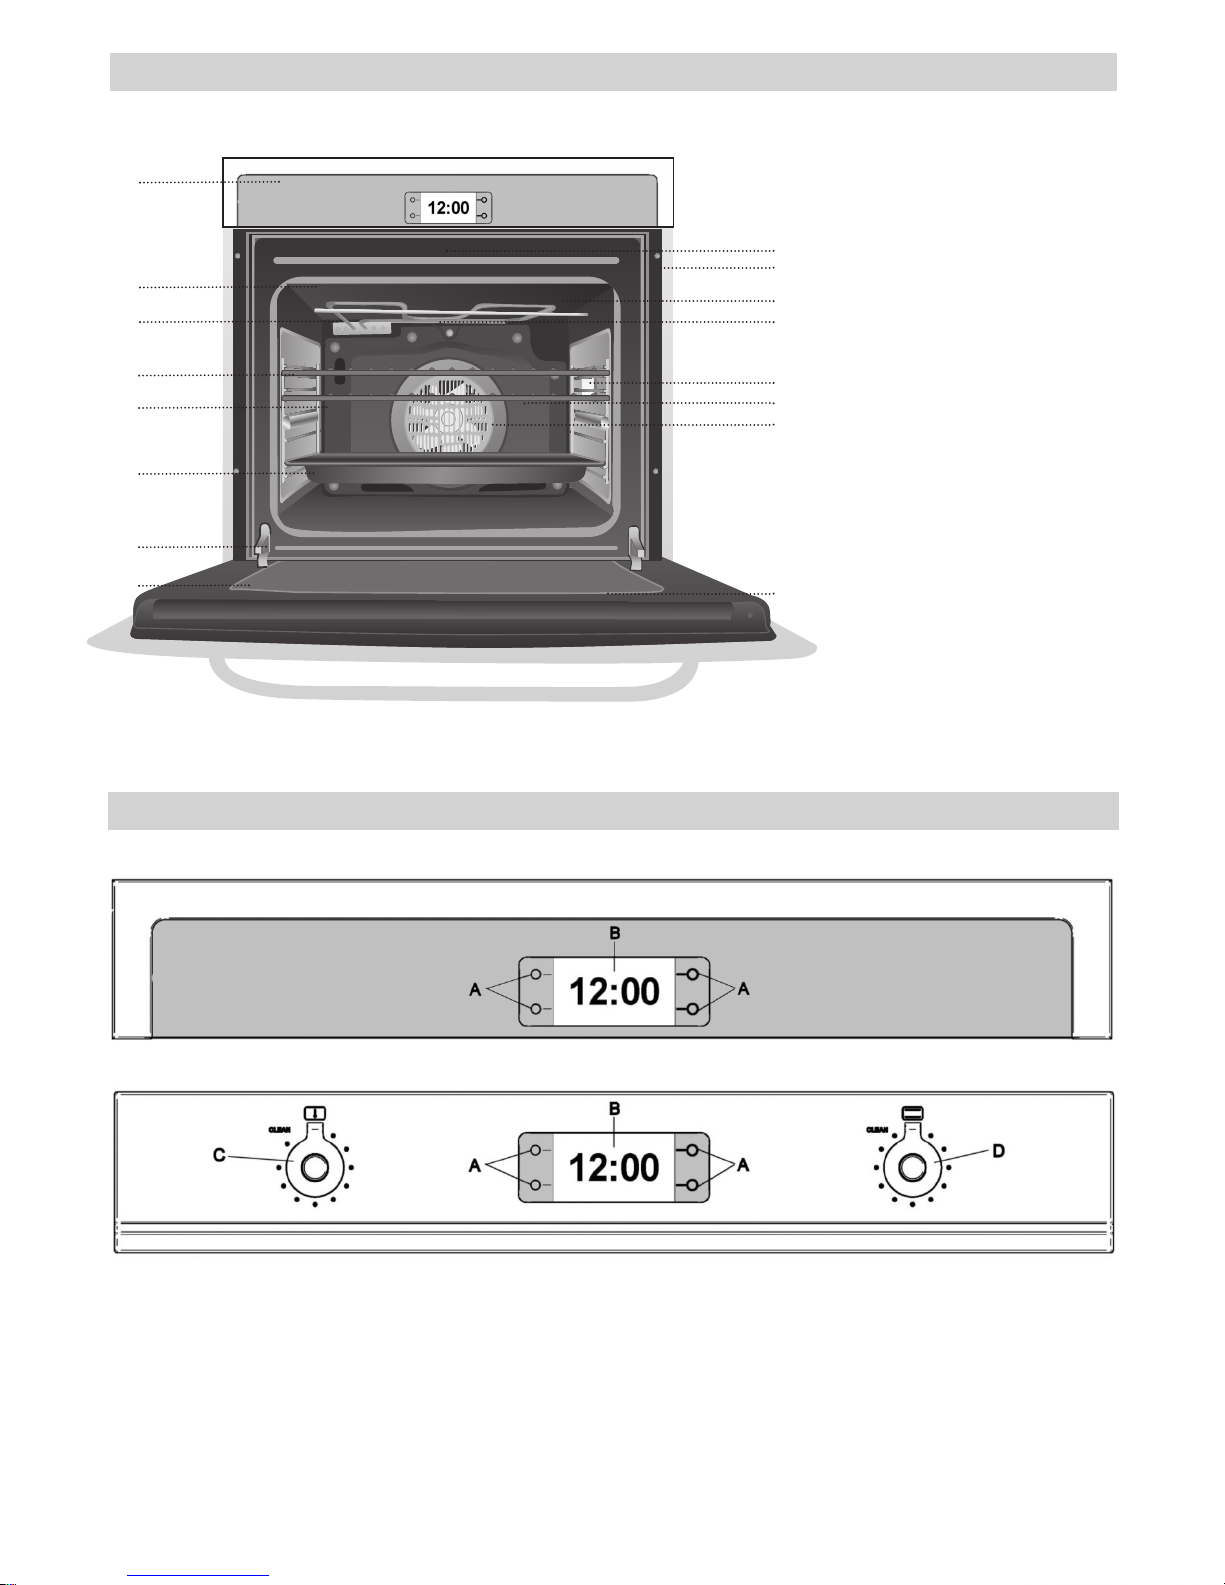
11 Control Panel
12 Oven Seal
13 Grill Element
14 Chrome Support
+ Telescopic Guides
15 Oven Grid
16 Cake Tray
17 Hinge
18 Door
19 Air Outlet
for Cooling
10 Cabinet Mounting
11 Grill Screen
12 Smoke Outlet
13 Side light
14 Back Wall Panel
15 Fan
16 Large Inner
Glass Door
2
3
5
7
6
8
4
10
9
11
13
12
14
15
16
1
F60CONXT / F60PROXT
A Touch control areas
B LCD Display
Control Panel
C Temperature knob
D Cooking modes knob
FX60CONXT
FX60PROXT
Page 7

5
Before First Use
There may be traces of grease and other substances in the oven as a result of its manufacturing process. These should be removed by
means of the following procedure:
• Remove all of the packaging from your oven,
including the protective plastic, if any.
• Turn the oven to setting , or else place it
on the defect settingt , at 200ºC, for 1
hour. Consult the Quick Start Guide accompanying this manual on how to do this.
• Cool the oven with the door open so that it
ventilates and no odours remain inside it.
• Once cold, clean the oven and accessories.
During this first operation, smoke and smells
will be produced. The kitchen should therefore
be well ventilated.
Environmentally Friendly
Packaging
The packaging is made from totally recyclable
materials which can be put to other uses.
Consult your local council regarding the necessary procedures for disposing of these materials.
CAUTION
The symbol on the product or packaging
indicates that this appliance cannot be disposed of as normal household waste. It should
be taken to an electrical and electronic equipment collection point for recycling. In this way,
any negative consequences for the environment
and public health from incorrect handling can
be avoided. Contact your local council, household waste disposal service or the establishment you bought the product from for more
information on recycling the appliance.
• The oven must always be operated with the
door closed.
• The manufacturer takes no responsibility for
any use of the oven other than for the home
preparation of food.
• Do not store oil, fats or inflammable materials
inside the oven. This may be dangerous if the
oven is turned on.
• Do not lean or sit on the open oven door. You
could damage it, as well as endanger your
own safety.
• Do not cover the bottom of the oven with aluminium foil as this may affect cooking performance and damage the enamel inside the
oven and the interior of your kitchen unit.
• To cook any food, insert the tray or grill in the
side rails in the oven.
• Do not place containers or food on the bottom
surface of the oven. Always use the trays and
grill.
• Do not pour water on the bottom surface of
the oven when in use; this may damage the
enamel.
• Open the oven door as little as possible during
cooking. This will reduce power consumption.
• It is normal for condensation to occur on the
oven door when cooking dishes with a high
liquid content.
• Clean the oven interior to remove traces of
grease or food, which could later give off
smoke and odours and cause stains to
appear.
Other important
instructions
Page 8
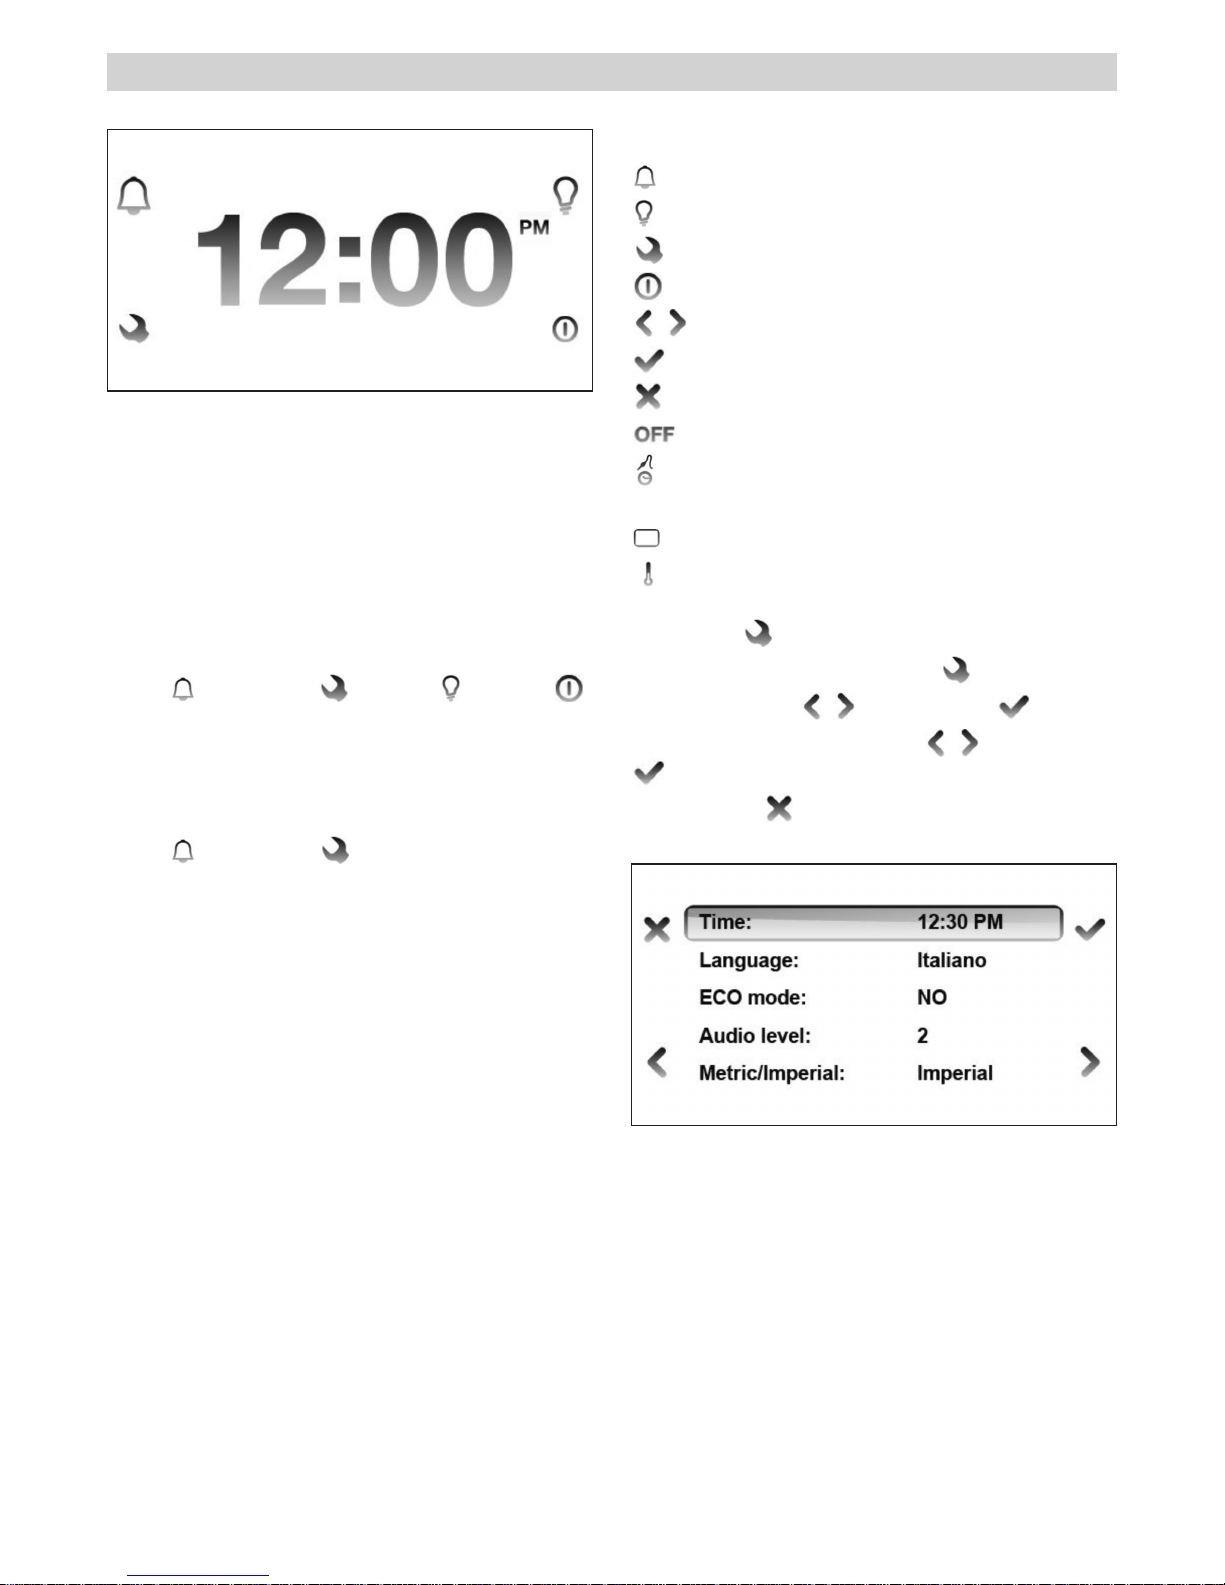
ICONS LEGEND
Timer
Light
Settings menu
Start
Scroll left/right and up/down
Confirm selection
Remove selection or leave menu
Stop cooking
Set cooking time, delay start/end time, food
probe
Modify cooking mode
Modify cooking temperature
SETTINGS
Activate SETTINGS menu with
Select field with and confirm
Set the desired values with and confirm
Leave menu
Notes
ECO mode: this setting reduces energy
consumption by:
– turning off the oven before the end of a
cooking program and using residual heat to
complete the cooking
–
switching off the oven light during cooking
– switching off the display in stand-by mode.
Audio Level: Level 1 to 3. Level 1 is NO AUDIO
START
The LCD display can be operated 1 minute after
the power supply is connected.
To activate the display:
DESIGN SERIES OVENS (CON MODELS)
Tap for 2 seconds any of the touch control areas
(A). The following icons will appear:
Timer Settings Light Start
PROFESSIONAL SERIES OVENS (PRO MODELS)
Turn the cooking modes knob (right side). The
following icons will appear:
Timer Settings
Once activated each menu will show the icons
necessary for navigation and programming next
to the touch control areas.
After 1 minute without operation the display will
go in stand-by mode to reduce power
consumption and the touch control areas will
turn off. Touch any control area for 2 seconds to
reactivate the display.
USING THE LCD DISPLAY
6
Page 9
Note
The timer can be used independently from
cooking.
The display will show the countdown. A tone
sound will be heard at the end of the countdown.
To stop sound at the end of the countdown tap
any touch control areas. To modify the timer
enter this menu again.
LIGHT
Turn the oven light on and off by tapping this
icon.
Note : this function is not available in the PRO
series ovens.
Metric /Imperial
Metric: Celsius/Kg/24 hour clock
Imperial:Farenheit/Lbs/12 hour clock
SHOW ROOM mode: this option is for showroom
demonstration. In showroom mode the heating
elements are not activated. Never use this at
home.
TIMER
Activate TIMER with
Set desired time (max 10 hours) with and
confirm
Leave menu
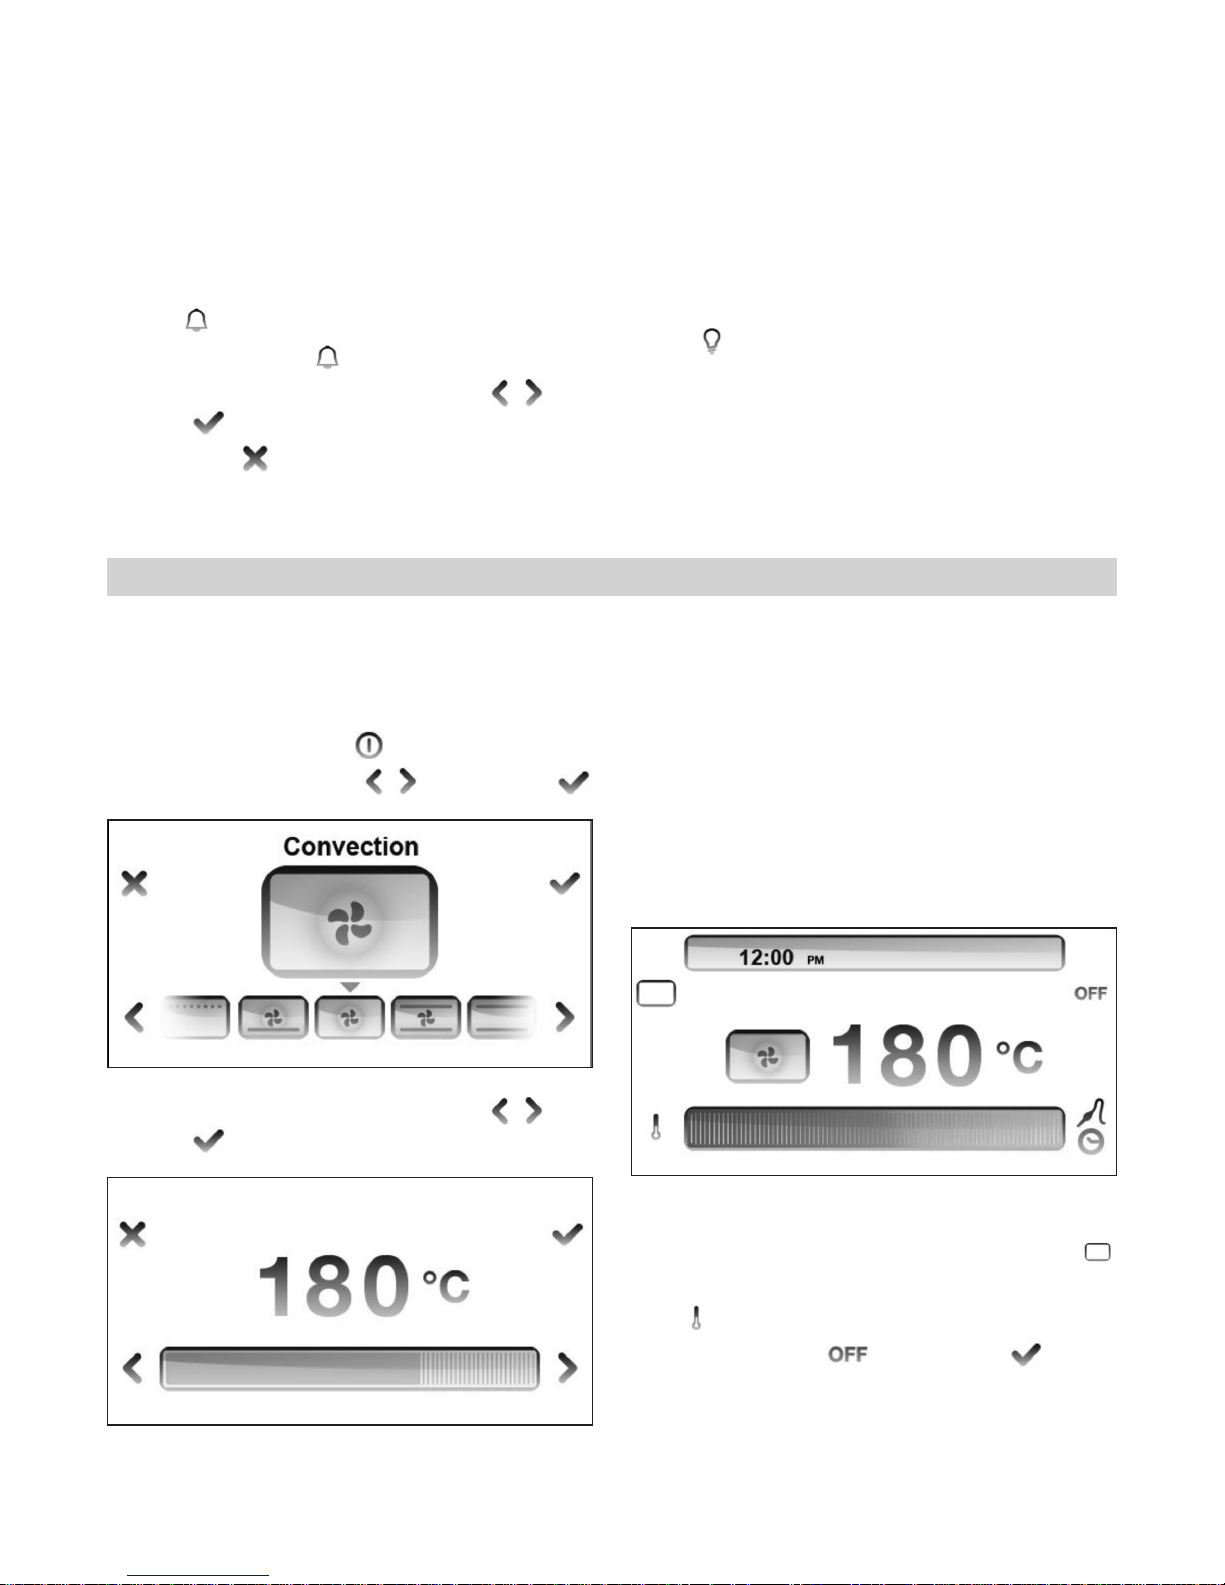
The oven will start PRE-HEATING in a few second
showing the progress in the display. The end of
pre-heating will be confirmed with a tone. Place
the food in the oven when the desired
temperature has been reached.
Note
The preheating bar is not shown.in broil,
convection broil, dehydrate, defrost, warming
and proofing modes.
MODIFY/STOP
Modify COOKING MODE during cooking with
Modify COOKING TEMPERATURE during cooking
with
STOP cooking with and confirm
START
Activate the oven by touching any control area
for 2 seconds.
Start programming with
Select COOKING MODES and confirm
Set desired COOKING TEMPERATURE and
confirm
BASIC OPERATION - DESIGN SERIES MODELS ( F60 CON XT)
7
Page 10
E
In order to shorten the heat-up time the
preheating is always done with turbo mode
Each cooking mode has a default optimum
temperature that appears as soon the cooking
mode is selected
MODIFY/STOP
Modify COOKING MODE during cooking by
turning the cooking mode knob
Modify COOKING TEMPERATURE during cooking
by turning the temperature knob
Stop cooking by turning the function knob in the
OFF position
START
Activate the oven by turning the COOKING MODE
knob (right)
Select COOKING MODE by turning the right knob
Select COOKING TEMPERATURE by turning the
temperature left knob
The oven will start PRE-HEATING in a few second
showing the progress in the display. The end of
pre-heating will be confirmed with a tone. Place
the food in the oven when the desired
temperature has been reached.
Note
The preheating bar is not shown-in broil,
convection broil, dehydrate, defrost, warming
and proofing modes.
Important!
COOKING WILL NOT STOP AT THE END OF THE
COUNTDOWN. TURN THE OVEN OFF MANUALLY
AND REMOVE FOOD FROM OVEN TO AVOID
OVERCOOKING.
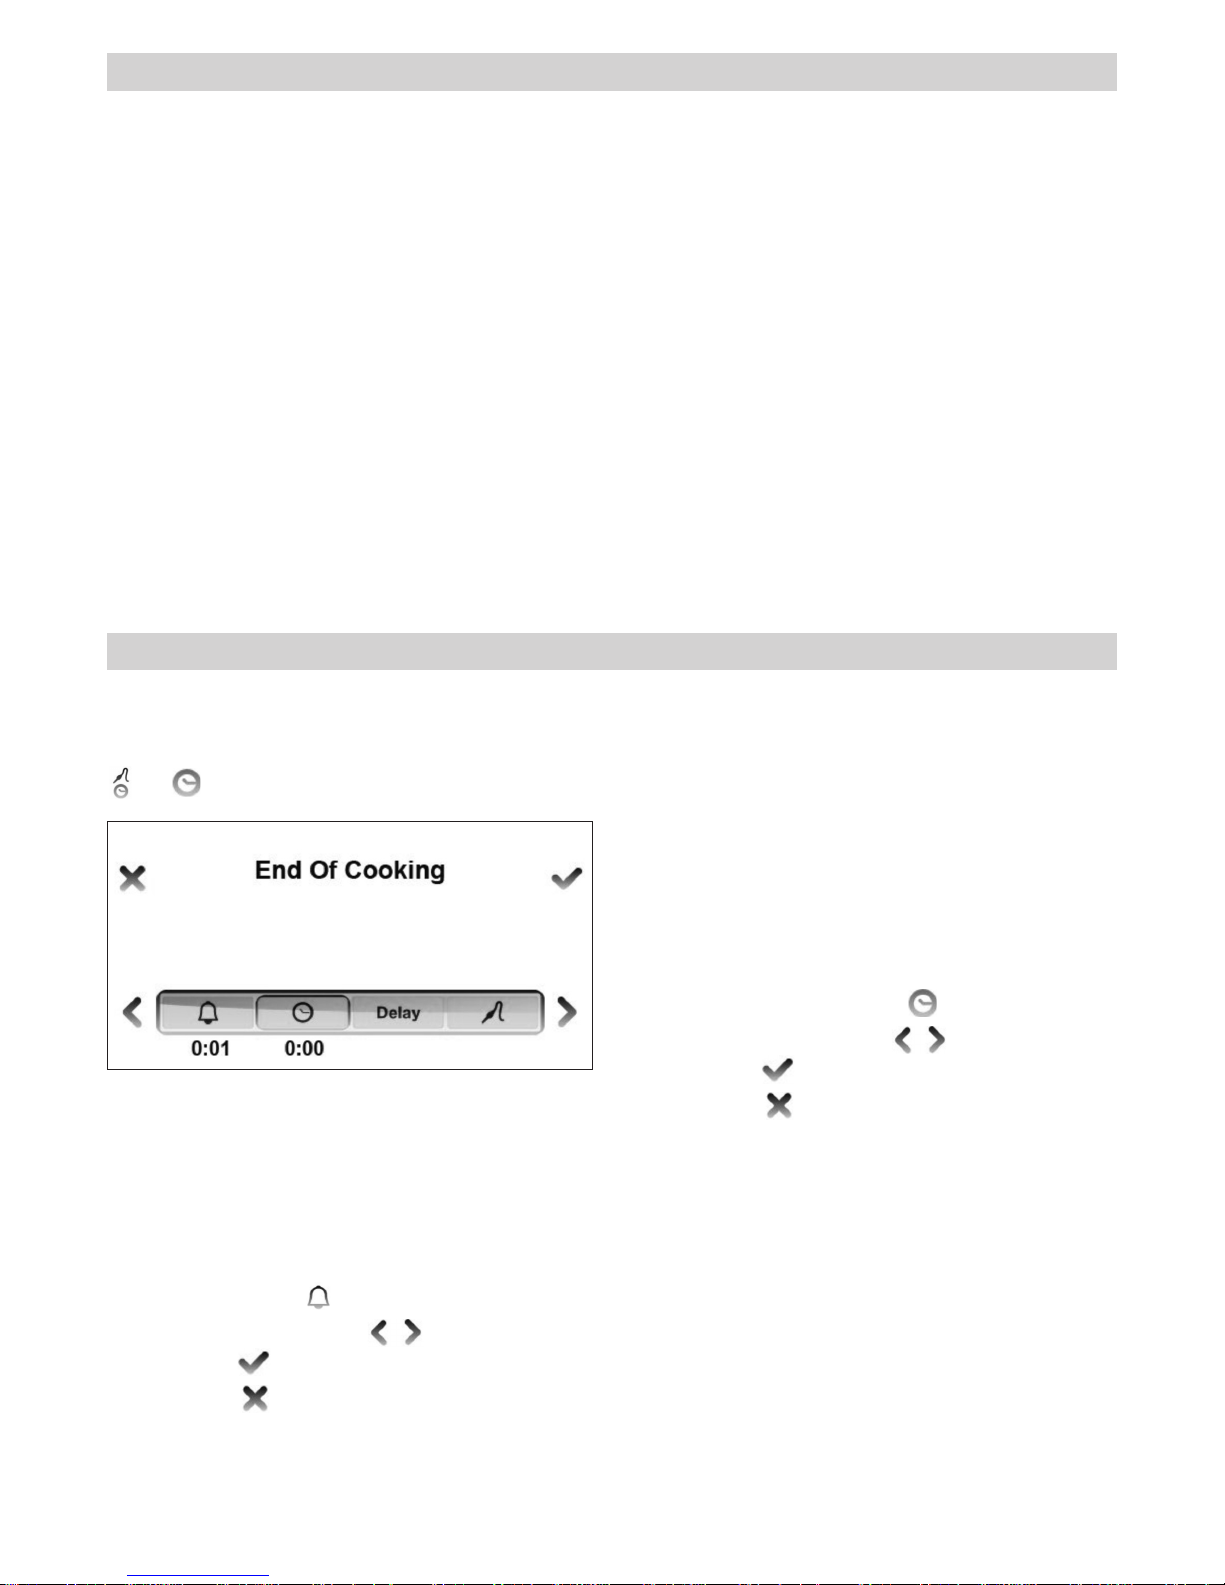
END OF COOKING
The oven will automatically turn off after the set
cooking time has elapsed.
Activate END OF COOKING
Set the desired duration (max 10 hours)
and confirm
Leave menu
The display will show the countdown. the oven
will turn off at the end of the countdown and the
display will show END OF COOKING – BUON
APPETITO! The end of the countdown will be
confirmed with a repeating tone. Touch any
touch control area to stop tone.
MODIFY/CANCEL
Activate end of cooking menu and modify the
time value.
Set time to 0:00 to cancel
START
After programming the oven for cooking, touch
or to enter the time management menu.
SET TIMER
This function is simply a minute minder: the
timer can be used independently from cooking
and it will not turn off the oven at the end of the
set time. For the oven to shut off automatically,
select END OF COOKING (see below).
Activate the TIMER
Set the desired duration (max 10 hours)
and confirm
Leave menu
The display will show the countdown. The end of
the countdown will be confirmed with a
repeating tone. Tap any touch control area to
stop tone.
BASIC OPERATION – PROFESSIONAL SERIES MODELS (F60 PRO XT)
TIME MANAGEMENT MENU – TIMER, DELAY/END COOKING, FOOD PROBE
8
Page 11
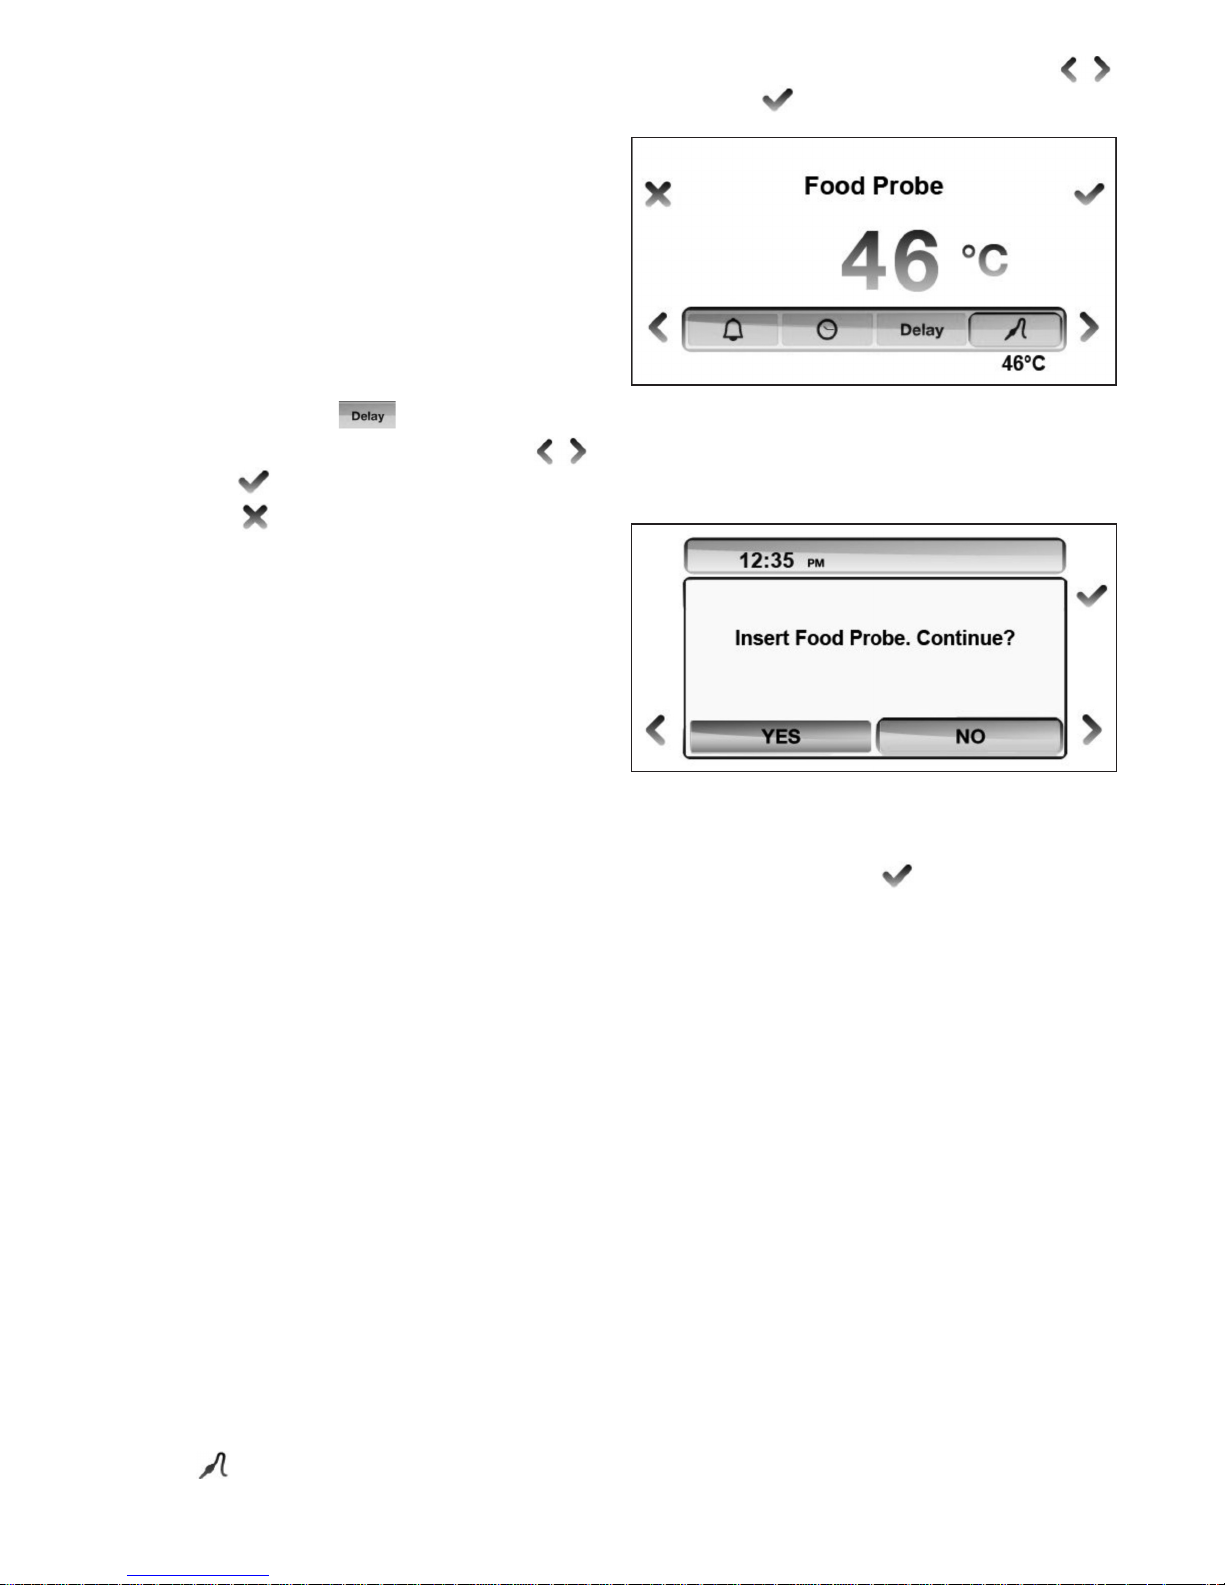
Select the desired food temperature with
and confirm
After the preheating sequence is completed, the
display will show the message INSERT FOOD
PROBE. CONTINUE?
Connect the probe jack to the port located in the
upper left side of the oven cavity. Place the food
in the oven and confirm
The display will show the set temperature and
the actual temperature measured by the probe.
The oven will turn off when the desired food
temperature is reached. The display will show
END OF COOKING – BUON APPETITO! End of
cooking will be confirmed with a tone. To stop
tone tap any touch control area.
Note
Food probe temperature can be selected at any
time while cooking.
If the probe jack is not inserted in its port, a
message will appear on the display requiring
confirmation of the probe insertion. Cooking will
stop if the probe is not inserted. Select NO on
the confirmation screen to continue cooking
without probe.
Important
DO NOT LEAVE THE PROBE IN THE OVEN CAVITY
WHEN NOT IN USE.
Note
Cooking time is calculated from the end of
preheating. During preheating the end of
cooking time is not shown in the display.
It is not possible to set end of cooking when
using the food probe. If a food probe
temperature is set, the end of cooking will be
deleted.
DELAY START
The oven will start at a desired time.
Activate DELAY START
Set desired time before oven will turn on
and confirm
Leave menu
The display will show the countdown. The oven
will turn on at the end of a count down. The end
of the countdown will be confirmed with a
repeating tone.
Note
DELAY START can be combined with the END OF
COOKING.
FOOD PROBE
The food probe is only available on XT models.
The food probe monitors the core temperature
of the food during cooking and turns off the oven
when the desired temperature is reached. It can
be used ONLY with the following cooking modes:
Convection
Bake
Convection bake
Turbo
Broil
Convection Broil
Insert the food probe in the item to be cooked.
For best results, insert the probe as close as
possible to the center of the item and make sure
it is not in contact with bones or fat. Improper
placement of the probe could shut the oven off
too early and result in uncooked food. With
poultry, make sure the probe does not rest in a
cavity.
Activate
9
Page 12

10
COOKING MODES GUIDE
MODE DETAILS USE FOR/TIPS
BAKE Bake and broil elements ON
Convection OFF
Temperature 37°C – 260°C
Use lower 2 shelf levels.
Soufflés
Meringues
Angel food cakes
Cream puffs
Cookies
Cakes
Cheesecakes,
Pies
Quiches
Baked potatoes
CONVECTION
BAKE
Bake element ON at full power
Broil element ON at moderate power
Convection fan ON
Temperature 37°C – 260°C
Use several levels at the same time.
NOTE: As a general rule, the
temperature of a recipe not designed
for baking in a convection oven should
be lowered by 20F (15C)
Cookies
Cakes
Breads
Rising dough
Cheesecake
Pies
Quiches
Baked potatoes
Casseroles
CONVECTION Convection fan and convection
element ON
Use several levels at the same time.
Temperature 37°C – 260°C
NOTE: As a general rule, the
temperature of a recipe not designed
for baking in a convection oven should
belowered by (15 °C.)
Gentle cooking of pastries, soufflés
and cakes.
At higher temperature use also for
roasting meats and poultry.
TURBO Bake element ON at full power
Convection element and fan ON at full
power
Temperature 37°C – 260°C
Use shelf levels 2 and 3
Uniform cooking with strong heat from
the bottom of pizza, focaccia and
bread.
Page 13

11
MODE DETAILS USE FOR/TIPS
BROIL Broil element ON
4 power settings – LOW (1) to HIGH (4)
The element is heated for the first 3
minutes at maximum power and then
the power is reduced according to the
selected power setting.
Brown food on the top side only. Turn
food over if browning is required on
both sides.
CONVECTION
BROIL
Broil element ON
Convection fan ON
4 power settings – LOW (1) to HIGH (4)
The element is heated for the first 3
minutes at maximum power and then
the power is reduced according to the
selected power setting.
Brown food on top and bottom side.
This mode is preferred for browning
food that is too delicate for turning
such as fish.
NOTE: The degree of browning on each
side might be different.
DEFROST/
DEHYDRATE
In DEFROST mode only the fan is
active to circulate air in the cavity. All
heating elements are turned off.
In DEHYDRATE mode the fan is on and
the cavity is maintained at 37°C.
Defrost food
Dehydrate food, flowers, vegetables.
PROOFING Bake element ON at low constant heat
power
Fan on every 5 minutes to eliminate
stagnant air.
Use any shelf level.
For best results, place dough in bowl
and cover with a clean towel.
WARMING Bake element at low to moderate
power.
Temperature 60/76/93°C preset.
Use the warming program in Sabbath
mode (S.M.) during religious
observance.
Page 14

Select BROIL to brown food on the top side only.
This mode requires turning food if browning is
required on both sides
Select CONVECTION BROILER to brown food
slightly also on the bottom side. This mode is
preferred for browning food on both sides that is
too delicate for turning such as fish. The degree
of browning on each side might be different
The broil element operates on 4 different power
levels.
The element is heated for the first 3 minutes at
maximum power and then the power is reduced
according to different desired effects.
Level 1 produce a mild browning of the food
surface
Level 4 produce an intense irradiated heat that
cause a fast browning of food.
Select the power level according to the desired
effect on food.
BROIL / CONVECTION BROIL
12
Page 15

13
TIPS FOR BEST RESULTS – BROILING AND ROASTING
ADJUST TO DESIRE LEVEL OF ‘DONENESS’
FOOD
SHELF
POSITION
COOKING MODE
TEMPE-
RATURE
APPROXIMATE
COOKING TIME
SUGGESTIONS
Ground beef
patties, ½” thick
6 Broiler
Convection Broiler
LEV 4 15 to 20
minutes
Broil until not
pink in center
T-Bone steak 6 Broiler
Convection Broiler
LEV 4 12 to 20
minutes
Broil until done to
desired level
Flank steak 6 Broiler
Convection Broiler
LEV 4 12 to 20
minutes
Broil until done to
desired level
Eye of round roast 5 Bake
Convection bake
165°C 20 to 25 min
per pound
Small roasts
require longer
time per pound;
reduce time
using Convection
Bake
Loin roast 5 Bake
Convection bake
165°C 20 to 25 min
per pound
Cook until juices
are clear
Boneless skinless
chicken breasts
6 Broiler
Convection Broiler
LEV 3 20 to 25
minutes
Cook until juices
are clear
Chicken thighs 5 Broiler
Convection Broiler
LEV 3 25 to 30
minutes
Remove skin and
ook until juices
are clear
Half chicken 5 Broiler
Convection Broiler
LEV 4 30 to 45
minutes
Turn with tongs
and cook until
juices are clear
Roast chicken 4 Bake
Convection bake
175°C 75 to 90
minutes
Reduce time
using Convection
Bake. Time may
vary if stuffed.
Turkey 4 Bake or
Convection bake
165°C 20 to 25 min
per pound
Reduce time
using Convection
Bake. Time may
vary if stuffed.
Page 16

14
TIPS FOR BEST RESULTS - BAKING
CHECK PACKAGE DIRECTIONS
FOOD PAN
TEMPE-
RATURE
COOKING TIME
(minutes)
LEVEL
Cookies 30x38 Cookie Sheet 185° 8 to 12 2..5
Layer Cakes 20 or 22”Round 175° 25 to 35 2..5
Sheet Cakes 22x33 Pan 175° 30 to 40 2..5
Bunt Cakes 30 Cup 160° 60 to 75 2..5
Brownies, Bar
Cookies
22x22 Pan 160° 20 to 25 2..5
Biscuits 30x38 Cookie Sheet 215° 10 to 15 2..5
Quick Bread 20x10 Loaf Pan 175° 55 to 70 2..5
Muffins 12 cup Muffin Pan 215° 14 to 19 2..5
Fruit Pies 22 Diameter 215° 35 to 45 2..5
Fruit Cobblers 22x22 Pan 200° 25 to 30 2..5
Yeast Bread 20x10 Loaf Pan 185° 25 to 30 2..5
Dinner Rolls 22x32" Pan 200° 12 to 18 2..5
Cinnamon Rolls 22x32" Pan 185° 25 to 30 2..5
Yeast Cake 30x38 Cookie Sheet 200° 20 to 30 2..5
Page 17

15
TIPS FOR BEST RESULTS - DEHYDRATE
FOOD PREPARATION
APPROXIMATE
TIME (hrs)
DONE WHEN…
Apples Cut in 5mm slices and dip in 1/4
cup lemon juice + 2 cups water
solution
11-15 Slightly pliable
Bananas Cut in 5mm slices and dip in 1/4
cup lemon juice + 2 cups water
solution
10-15 Soft, pliable
Cherries Wash and towel dry. Remove pits 10-15 Pliable, leathery,
chewy
Orange peels and
slices
Peel and cut in 1/4" slices Peels:2-4
Slices: 12-16
Orange peel: dry and
brittle.
Orange slices: skins
are dry and brittle,
fruit is slightly
Pineapple rings Towel dry Canned: 9-13
Fresh: 8-12
Soft and pliable
Strawberries Wash and towel dry. Cut in 1cm
slices. Place skin (outside) down
on rack
12-17 Dry, brittle
Red peppers Wash and towel dry. Remove
stems, chop coarsely about 2,5cm
pieces
16-20 Leathery with no
moisture inside
Mushrooms Wash and towel dry. Cut off stem
end. Cut into 2mm slices
7-12 Tough and leathery,
dry
Tomatoes Wash, drain well.and towel dry.
Cut in 2mm slices.
16-23 Dry, brick red colour
Oregano, sage,
parsley, thyme,
fennel
Rinse and dry with paper towel 3-5 Crisp and brittle
Basil Use basil leaves 3 to 4 inches
from top. Spray with water, shake
off moisture and pat dry
3-5 Crisp and brittle
Page 18

Enjoy selecting the sequences already stored in
the ASSISTANT that best suit your own style of
cooking and culinary taste. After you have
familiarized with them, you will be able to build
new sequences of your own creation and store
them for future use.
The ASSISTANT is available on XT models only
together with a food probe for temperature
control.
Available on XT models only
Developed with the help of Italian professional
chef consultant Roberto Carcangiu, Bertazzoni’s
exclusive ASSISTANT function is a revolutionary
system for upgrading oven cooking in the home.
The ASSISTANT is pre-programmed with finely
calibrated sets of cooking modes, temperatures
and times sequences for each type of food. The
system does not provide recipes – those are
yours to choose from. The ASSISTANT will simply
‘pilot’ the oven to help you make the best of your
oven recipes.
ASSISTANT FUNCTION
16
Page 19

Selected food categories will guide you through
the selection of additional parameters (e.g. for
meat: weight, type of cut, food probe
temperature). Follow the directions on the
display, select the appropriate parameters and
confirm.
The oven will begin pre-heating and signal the
end of the pre-heating cycle with a tone. Insert
the food in the oven only after the pre-heating is
complete.
START
Activate the oven by touching any control area
for 2 seconds.
Start programming with
Select ASSISTANT with or with right
knob and confirm
Select MANAGE with and confirm
Select TYPE OF FOOD with and confirm
ASSISTANT MENU
MANAGE - Selected the food type, weigh/size, type of cooking and desired
finish and let the Assistant oversee the cooking until your dish is perfect.
SAVE – After you cook a perfect dish, name the cooking sequence and let the
Assistant store it for future use.
RETRIEVE – Retrieve a previously stored set and let the ASSISTANT manage the
oven according to the instructions you selected for that dish.
BREAD
CAKES AND PASTRY
FISH
MEAT
PASTA
PIZZA
POULTRY
VEGETABLES
17
Page 20

The oven will turn off when the food temperature
measured by the probe reaches the desired
level. The display will show END OF COOKING –
BUON APPETITO! End of cooking will be
confirmed with a tone.
Important:
COOKING WILL CONTINUE WITH RESIDUAL
HEAT. REMOVE THE DISH FROM THE OVEN
IMMEDIATELY TO AVOID OVERCOOKING.
STOP/MODIFY
To STOP cooking tap and confirm.
It is not possible to change cooking mode,
temperature or duration while cooking with the
ASSISTANT function. If additional cooking is
needed, operate the oven in manual mode until
the desired result is obtained.
Important
Pre-programmed sequences have been
calibrated for cooking food starting from room
temperature. If using frozen food for a dish,
defrost it before starting a sequence.
Note :
In low temp roasting mode, food is baked at a
very low temperature then requiring long
cooking time. Baking time can last up to 5/6
hours, according to food dimensions.
In assistant cooking mode, the time is
calculated from the end of preheating. Make
sure to introduce food in the oven as soon as the
preheating time is finished, otherwise the
cooking time can result too short.
All cooking methods refer to fresh food, except
where indicated. For frozen food, refer to your
standard procedure
The display will show the time remaining until
the end of the cooking sequence.
The oven will turn off at the end of the cooking
cycle. The display will show END OF COOKING –
BUON APPETITO! End of cooking will be
confirmed with a tone.
Important:
COOKING WILL CONTINUE WITH RESIDUAL
HEAT. REMOVE THE DISH FROM THE OVEN
IMMEDIATELY TO AVOID OVERCOOKING.
FOOD PROBE
If the cooking sequence requires the use of the
food probe, the display will ask you to input the
desired food temperature (lower = rare, higher =
well done). Once the pre-heating cycle is
completed, the display will remind you to insert
the food probe. Connect the food probe jack to
the appropriate port in the oven cavity at the end
of preheating. The cooking sequence will start
only after confirmation that the food probe has
been inserted.
When using the food probe, the display will show
the food probe temperature (actual and target)
instead of the remaining time until the end of
cooking.
18
Page 21

19
ASSISTANT FUNCTION - OPTIONS CHART
Food Preparation Food probe
Pre-programmed
cooking time*
Meat Traditional Roasting yes
Low Temp. Roasting yes
Braising 90 min.
Slow cooking yes
Oven Fried 6 min.
Poultry Traditional Roasting yes
Slow cooking yes
Fish Traditional Roasting yes
Oven Fried 12 min.
Grilled - food temp. probe yes
Grilled – manual 7 min.
Cakes Rising pastry dough 35 min.
Shortbread dough 25 min.
Bread Manual 22 min.
Food temp. probe yes
Pizza Homemade pizza 14 min.
Pasta Frozen au gratin yes
Fresh au gratin 35 min.
Vegetables Stew / Sautè 20 min.
Grilled 7 min.
Roasted potatoes 50 min.
* Time indicated excludes pre-heating
Page 22

Confirm
Select FOOD CATEGORY and confirm
Enter a name for this cooking sequence - scroll
through the keyboard with and confirm
each letter with
NOTE: scrolling accelerates by keeping the finger
on the touch area.
Confirm with
Touch to leave this menu without saving the
sequence.
After saving a sequence, the display will return
to the main ASSISTANT menu.
Important
The memory can store up to a maximum of 32
personalized cooking sequences in addition to
those pre-programmed. When the memory is full
and you attempt to store another cooking
sequence, a message will prompt you to delete
one of the previously stored sequences.
The interface will eliminate steps that are not
significant for cooking results, such as functions
used for less then 1 minute.
A maximum of 4 different cooking steps
(combination of function/temperature/time) can
be recorded in a sequence.
SLOW COOKING
Slow cooking allows cooking of very large pieces
of meat and poultry (over 4Kg.) for several hours
at a very low temperature. This cooking mode
does not end when the temperature set on the
food probe is reached, but the food is then
continuously kept at this temperature. The
temperature shown on the food probe will them
continuously be adjusted once the set valve has
been reached.
A manual switch off of the oven is then required.
A cooking time of 12 hours is suggested. The
program is automatically switched off after 24h.
CUT TYPE
SAVE
The ASSISTANT stores your latest cooking
sequence for future use.
Select ASSISTANT with or with right
knob and confirm
Select SAVE with and confirm
The display will show the last cooking sequence
performed, indicating the set of cooking modes,
temperatures and times used for the cycle.
Cut type Type of meat
Less tender
Beef chuck
Beef brisket
Corned beef
Short ribs
Pork shoulder
Lamb shank
Pork blade roast
Tender
Beef tenderloin
Prime rib
Pork tenderloin
Leg of lamb
Chicken legs/thighs
20
Page 23

You will have the following options:
– START: will immediately start the cooking
sequence.
– MODIFY: allows to modify food category and
name associated to a personal cooking
sequence
– DELETE: delete the selected cooking
sequence. Confirmation is required.
Note:
if no cooking sequence is saved an empty menu
will be displayed.
RETRIEVE
To retrieve a previously stored personal
sequence follow these simple steps.
Select ASSISTANT with or with right
knob and confirm
Select RETRIEVE with and confirm
Select FOOD CATEGORY and confirm
Select a stored sequence and confirm
The oven lights will not turn on in Sabbath Mode
even if the door is open.
MODIFY/STOP
To modify cooking mode:
– DESIGN SERIES OVEN: Scroll COOKING
MODES
– PROFESSIONAL SERIES OVENS: use the
cooking mode knob (right)
Turn off the oven with
This special program is designed for religious
observances.
START
Activate the oven by touching any control area
for 2 seconds.
Start programming with
Select WARMING with or with right knob
and confirm
Select S.M. with and confirm
The oven will turn on and pre-heat until the
temperature of 100°C is reached. Then, the
temperature will be held constant until the oven
is switched off. Opening of the door will not
cause an immediate re-heating of the oven: the
heating will continue according to a set
procedure independent from use.
SABBATH MODE
21
Page 24

22
TROUBLESHOOTING GUIDE
OVEN PROBLEM POSSIBLE CAUSES AND/OR REMEDY
Oven does not function Range is not connected to electrical power. Ask a professional to
check power circuit breaker, wiring and fuses.
Oven light does not work Light bulb is burned out.
Oven is not connected to power.
Oven is not heating Check the circuit breaker or fuse box to your house.
Make sure there is proper electrical power to the oven.
Make sure the oven temperature has been selected.
Oven light is not working
properly
Replace or reinsert the light bulb if loose or defective.
Oven light stays on Check for obstruction in oven door. Check to see if hinge is bent.
Cannot remove light cover There may be debris/spillage around the lens cover. Wipe lens
cover area with a clean dry towel prior to attempting to remove the
lens cover.
Specific error messages may appear in case of malfunction. Call after sale service and provide
the information that appear in the display for a quick and accurate diagnosis.
Page 25

Positioning the oven trays & shelves
The Grill Tray or Oven Shelf can be located in
any of the five height positions in the oven.
When fitting the trays or shelves, ensure
they are fitted between the two wires that
are closest together. It is recommended to
fit the Oven Shelves on the lower position
equipped with the telescopic slides.
Caution
Oven shelves have a stop so that they are
not fully withdrawn by accident. To fully
remove the oven shelves, lift the front of the
shelf slightly and withdraw fully from the
oven.
Please note: The Grill Tray does not have
a stop position and can be fully withdrawn
without interruption, so be careful not to
accidentally fully withdraw the tray.
23
Page 26

24
If the remains of food on the enamel cannot be
cleaned off using normal (self-cleaning) methods, then:
1 Dismantle the panels and leave them to soak
long enough to soften the remains.
2 Clean the panels with a sponge and clean
water.
3 Dry the panels and mount them in the oven
again.
4 Operate the oven for one hour at 200 ºC.
Caution
Do not use commercial cleaning products or
abrasive powder cleansers on the surface of the
catalytic panels.
Instructions for Dismantling the Flat Catalytic
Panels and their Supports.
1 Remove all accessories from inside the oven.
2 Pull on the supports (C), releasing them from
the nut (D). Figure 3
3 Unscrew the nut (D) to release the flat cataly-
tic panels. Figure 4
4 To dismantle the panel at the back, remove
the screw (E). Figure 5
5 To assemble, proceed in reverse order.
Caution
For your own safety, never turn the oven on without the rear panel in position since this protects
the fan.
Clean the outside of the oven and accessories
with warm soapy water or with a mild detergent.
Take great care when cleaning stainless steel
surfaces. Use only sponges or cloths that do not
scratch.
The oven may get hotter than usual so
children should be kept away.
Cleaning the Oven Door
Cleaning the Oven Exterior and
Accessories
Cleaning the Catalytic Panels
Cleaning and Maintenance
Caution:
Disconnect the appliance from mains power
supply before any operation.
1 Easy-to-clean enamel ovens
Use nylon brushes or sponges with warm
soapy water to clean enamelled surfaces
such as the bottom of the oven. Clean when
the oven is cold. Use oven-cleaning products
only on enamelled surfaces and always follow
the manufacturer’s instructions.
2 Ovens coated in special enamel adapted to
other cleaning systems
Please consult the Specifications Sheet for
your oven.
Caution
Do not clean the oven interior with steam or
pressurised water cleaning equipment. Do not
use metal scouring pads, wire brushes or any
utensil that can scratch the enamel.
• Other oven models have a catalytic (self-cleaning) cleaning system. This system removes
small traces of grease while cook-ing at high
temperatures.
Use of Fold-down Grill (depending on Model)
To clean the top part of the oven:
• Wait until the oven is cold.
• Turn the screw (A) and lower the grill element
as far as possible. Figure 1
• In other oven models, push the rod of the grill
element (B) with both hands until it is released from the upper fastening point. Figure 2
• Turn the element round and clean the upper
part of the oven.
• Finally, return the grill element to its original
position.
Cleaning the Oven Interior
Page 27

25
Do not use metal scouring pads, wire brushes or
commercially available or abrasive powder
cleansers to clean the oven door as they could
scratch the surface and cause the glass to
break.
In some oven models the door may be removed
to make them easier to clean, by proceeding as
follows:
1 Open the door.
2 Turn the two clamps (F) right round. Figure 6
3 Close the door until it fits in the two clamps.
Figure 7
4 Holding the door at the sides with both
hands, raise and remove the door from the
oven until the hinges (G) have been completely removed. Figure 8
To mount the door, proceed in reverse order.
For other oven models, follow these instructions:
1 Open the oven door completely.
2 Insert the safety pins in the visible slots in the
door hinges. Figure 9
3 Hold the door at the sides with both hands
and close it almost completely.
4 Now lift the door and remove the hinges from
the slots in the front of the oven by pulling
them out. Figure 8
Caution
Do not remove the safety pins at any time since
the hinge is taut and may cause injury. It would
also be impossible to mount the door without
the pins being in place.
To mount the door, hold it with both hands and
insert the hinges in the appropriate openings in
the front of the oven. Slowly open the door until
it is fully open.
Instructions for Removing / Replacing Inner
Glass
1 Open the oven door.
2 Pull the glass outwards by the bottom (H).
Figure 10
3 The inside glass will become loose. Remove
it.
Caution
Be very careful when removing the inner glass,
as the oven door will close.
4 Clean the inner glass and the inner surface of
the oven door.
5 Return the glass supports to the upper door
slots (I). Figure 11
6 Turn the glass towards the door (K).
7 Attach the glass to the door again by push-ing
the two lower supports (L) with both hands
while pushing the glass towards the door (M).
Figure 12
Instructions to remove / replace inside glass
panels. 90 cm oven
1 Open the oven door.
2 Fully rotate the two clamps (N) to stop the
door from closing. Fig 13
3 Squeeze point 1 located on the upper part of
both sides of the oven door. Fig 14
4 Continue squeezing point 1 and pull out the
upper clasp of the door. Fig 15
5 The inside glass panels will now be loose and
can be easily cleaned with window
cleaning liquid and a soft cloth.
Warning
If the door has not been blocked with the clamp
(N), please take care when removing the inside
glass panels as the oven door will close.
Cleaning the Large Inner
Glass Door
Page 28

Caution
If these problems persist despite these tips,
contact Technical Service.
1
6 Once clean, return the glass panels in the
same order so that the word TERMOGLASS
can be read.
7 Replace the upper clasp of the door, making
sure that the side tabs fit in point 1.
Caution
First make sure the oven is unplugged before
proceeding to change the bulb.
• Unscrew the bulb-holder glass cover.
• Replace the bulb and reassemble the glass
cover.
The replacement bulb must be resistant to temperatures up to 300ºC. You can order one from
the Technical Assistance Service. Figure 16
For other oven models, follow these instructions:
• Loosen the lens from the lampholder with the
help of the appropriate tool. Fig 17
• Exchange the bulb.
• Replace the lens, making sure it fits in the
correct position without forcing it. Fig 18
WARNING: Ensure that the appliance is
switched off before replacing the lamp to
avoid the possibility of electric shock.
Changing the Oven Light bulb
E
If Something Goes Wrong
The oven stops working
Check the power connection.
Check the fuses and the circuit breaker
for your installation.
Make sure the timer is either in the manual
or programmed setting.
Check the position of the function
and temperature setting.
The light inside the oven does not go on
Change the bulb.
Check that it has been properly inserted
according to the Instruction Manual.
The heating pilot light does not turn on
Select a temperature.
Select a function.
It should only come on while the oven
is heating up to the temperature selected.
Oven smoking during use
Normal during first use.
Clean the oven regularly.
Reduce the amount of grease or oil in the tray.
Do not use temperatures higher than
those indicated in the cooking chart.
The expected cooking results
are not achieved
Check the cooking chart for guidance
on how your oven operates.
26
Page 29

27
The installer must ensure that:
• The mains power voltage and frequency correspond to what is marked on the identification plate.
• The wiring system can withstand the maximum power marked on the identification
plate.
• After connecting the power, check that all
electrical parts of the oven are working correctly.
For all ovens. after the power has been connected:
1 Position the oven inside the unit and en- sure
that the power cable is not trapped or in contact with parts of the oven that heat up.
2 Anchor the oven to the unit with the screws
supplied, screwing them into the unit through
the holes that can be seen when the door is
open.
3 Make sure that the body of the oven is not in
contact with the walls of the unit and that
there is a separation of at least 2 mm with
the adjacent units.
Oven Installation
Electrical Connection
Technical Specifications
If the appliance does not work, inform Technical
Service of the kind of problem you are experiencing and give the:
1 Serial Number (S-No)
2 Model of Appliance (Mod.)
You will find this information engraved on the
identification plate. This plate is on the bottom
of the oven and can be seen when open-ing the
door.
Installation
This information is exclusively for the installer,
who is responsible for the oven’s assembly and
electrical connection. If you install the oven
yourself, the manufacturer will not accept liability for possible damage.
• To unpack the oven, pull on the tab located at
the bottom of the box and hold it by the side
handles, never by the oven door handle.
• The opening in the kitchen unit must be that
indicated on the diagram.
(See Figure 19).
• The adhesive used in the plastic lining the kitchen units must be able to withstand temperatures over 85ºC.
• Please refer to electrical safety
instructions on page 2 of this manual
before installation.
Prior to Installation
Page 30

Page 31

29
Fig 11 Fig 12
I
K
M
L
Fig 9 Fig 10
H
Fig 15
Fig 13 Fig 14
Fig 16
N
Page 32

Fig 19
Fig 17 Fig 18
400*
560
595
597
540
22
90*
* Ventilation: provide cut out at
rear for wall oven installation only
90mm x 400mm
Ventilation cutout in
cavity base 380mm x 380mm
in all cases
Ventilation cutout in
cavity base 380mm x 380mm
in all cases
Flush Fit
We recommended that our
600mm electric ovens be installed
as flush fit only
580 min
22
A
580 min
22
A
600
600
600
600
A: Fixing Cleet (Both sides)
595mm(H) x 100mm(W) x 19mm(D)
30
Page 33

31
Fig 20
Page 34

 Loading...