

Bernina Embroidery User Manual
BERNINA®Embroidery Module/Machine
Mastering Your
®
BERNINA
Mastering
Your
BERNINA
®
Embroidery
Module/Machine
Owner’s Workbook
MASTERING YOUR BERNINA® EMBROIDERY MODULE/MACHINE 2/06 1
©2006 BERNINA® of America, Inc. Permission to copy granted only to Authorized BERNINA® Dealers

Mastering
BERNINA®Embroidery Module/Machine
Table of Contents
Section A: Embroidery Beginnings .............................................................................. 3
Introduction .............................................................................................................. 4
General Information: Your Embroidery Machine/Module .......................................... 5
4 Levels of BERNINA
Getting Started........................................................................................................10
Needles ..................................................................................................................14
Thread ....................................................................................................................16
Embroidery Thread.................................................................................................17
Stabilizers & Interfacings ........................................................................................18
Sewing & Craft Sprays ...........................................................................................19
Samples
Stitching A Motif .................................................................................................20
Monochrome Embroidery .................................................................................22
Customizing Thread Color ................................................................................24
Duplicating & Rescaling Motifs .........................................................................26
Proportional Resizing of Motifs .........................................................................28
Rotating Designs ..............................................................................................30
Proportional Resizing & Rotation ......................................................................32
Stretching Designs............................................................................................34
Right-to-Left Mirror Image .................................................................................36
Up-to-Down Mirror Image ..................................................................................38
Using Embroidery Cards ..................................................................................40
Using an Embroidery CD or USB stick ..............................................................42
Saving & Deleting Embroidery Motifs .....................................................................44
Embroidery Beginnings Shopping List....................................................................46
®
v4.0 Embroidery Software.................................................. 9
Your
BERNINA
®
Section B: Beyond the Basics .....................................................................................47
General Information: Working with Alphabets & Text ..............................................48
Selecting, Adding, & Deleting Letters......................................................................49
Saving Text Designs ...............................................................................................50
Samples
Alphabet Sampler .............................................................................................52
Manipulating Alphabets ......................................................................................54
Stitch Density ....................................................................................................56
Combining Motifs ..............................................................................................58
Combining Lettering & Motifs ............................................................................60
Rehooping .........................................................................................................62
Free-Arm Embroidery .......................................................................................64
Baseline Sampler .............................................................................................66
Changing Lettering Height .................................................................................68
Changing Lettering Spacing ..............................................................................70
Mega Hoop ........................................................................................................72
myartista Portal ...............................................................................................74
Beyond the Basics Shopping List...........................................................................76
MASTERING YOUR BERNINA® EMBROIDERY MODULE/MACHINE 2/06
©2006 BERNINA® of America, Inc. Permission to copy granted only to Authorized BERNINA® Dealers
2
BERNINA®Embroidery Module/Machine
Mastering Your
®
BERNINA
Embroidery
Mastering
Your
BERNINA
®
Module/Machine
Owner’s Workbook
Section A
Embroidery Beginnings
MASTERING YOUR BERNINA® EMBROIDERY MODULE/MACHINE 2/06 3
©2006 BERNINA® of America, Inc. Permission to copy granted only to Authorized BERNINA® Dealers
Mastering
BERNINA®Embroidery Module/Machine
Your
BERNINA
®
Introduction
Congratulations on your purchase of a BERNINA® embroidery machine and/or module!
This workbook is designed to be used in conjunction with the Owners Classes you will take at your
BERNINA
of your new BERNINA
embroidery hoops and accessories, all of which will increase your knowledge of sewing and assist
you in achieving success in all of your sewing endeavors.
Once you have completed the exercises designated for your BERNINA
samples to the indicated pages and insert the pages into plastic page protectors and store them in
a 3-ring binder. They can then be used as a reference tool in the future as you use your machine and
explore the creative possibilities it affords you.
BERNINA
with informative publications and classes. Along with providing Owners Classes, your local BERNINA
dealer stocks BERNINA® books and magazines, such as ABC’s of Embroidery and Through the
Needle. Plus, BERNINA® of America, Inc. has a website – www.berninausa.com – offering free projects
and embroidery designs, inspirational stories, and interviews with creative stitchers.
®
dealership, and contains a series of exercises intended to familiarize you with the features
®
. In addition, you will learn about needles, threads, stabilizers, interfacing,
®
machine, attach the sewn
®
of America, Inc. strives to provide its customers not just with quality sewing machines, but
®
Learn to use your BERNINA
This class is formatted for owners of the following
BERNINA
®
embroidery systems:
• deco 330
• aurora 430E
• aurora 440QEE
• artista 630E
• artista 640E
• artista 730E
• artista 200E with 730 upgrade installed
®
machine to its full extent and enjoy being creative with fabric and thread!
My BERNINA® embroidery
machine/module model is:
______________________
I purchased it on: ________
at ____________________
______________________
______________________
MASTERING YOUR BERNINA® EMBROIDERY MODULE/MACHINE 2/06
©2006 BERNINA® of America, Inc. Permission to copy granted only to Authorized BERNINA® Dealers
4
BERNINA®Embroidery Module/Machine
General Information:
Your Embroidery Machine/Module
Module/Machine Details
See Owners Manual for details.
• Card Slot
• USB Port
• Hoop Clamp
• Selection Menu
• Layout/Edit Screen(s)
• Embroidery/Stitch Screen
Mastering
Your
BERNINA
®
Selection
Menus
Layout /
Edit 1 & 2
Screens
deco 330
artista 630E & 640E
artista 730E
Embroidery
Screens
MASTERING YOUR BERNINA® EMBROIDERY MODULE/MACHINE 2/06 5
©2006 BERNINA® of America, Inc. Permission to copy granted only to Authorized BERNINA® Dealers
Mastering
BERNINA®Embroidery Module/Machine
Embroidery Hoops
• deco 330 Hoops
Small Free-Arm Hoop - optional accessory
Medium Hoop - standard accessory
Large Hoop - standard accessory
Round Hoop - optional accessory
• aurora & artista Hoops
Small
- standard for artista 730E
- optional for artista 630E & 640E
- optional for aurora 430E & 440QEE
Spacer for freearm embroidery
- standard with artista 730E
- optional for artista 630E & 640E
- optional for aurora 430E & 440QEE
Medium
- standard for artista 640E & 730E
- optional for artista 630E
- optional for aurora 430E & 440QEE
Large Oval
- standard for artista 630E, 640E, and 730E
- standard for aurora 430E & 440QEE
Note: optional Hoop’N’Buddyz Hat Hoop Insert
available for stitching caps (fits Large Oval only)
Mega
- optional; available for artista 630E, 640E, and 730E
- not available for aurora 430E & 440QEE
Your
BERNINA
Notes
®
• Hoop-It-All™ Hoops (optional)
Note: Not all hoops are available for all systems.
- Quilters Square Double Wide
- Super Double Wide
- deco 330 Double Wide
- Big/Cap
Additional Accessories
• Hoop Templates (included with hoops)
• Spool Caps
• Thread Net - helps control slippery embroidery threads
• Supplemental/Silky Thread Guide (artista & aurora only)
MASTERING YOUR BERNINA® EMBROIDERY MODULE/MACHINE 2/06
©2006 BERNINA® of America, Inc. Permission to copy granted only to Authorized BERNINA® Dealers
6

BERNINA®Embroidery Module/Machine
• Multi-Spool Thread Stand (adapter bases available for all
BERNINA® embroidery systems)
• Multi-Spool Thread Stand Extender
- holds three additional spools
- Thread Stand accommodates two Extenders
• Straight Stitch Plate (optional, artista & aurora only)
• Embroidery (gold latch) Bobbin Case
(artista 640E & 730E only)
• Dust Cover (deco only)
• Zippered Travel Bag for Module
• Suitcase System (optional for all machines and modules)
Mastering
Your
BERNINA
Notes
®
Studio BERNINA® Embroidery Collections
• .exp formatted cards for deco 330/500/600/650 & artista
systems (aurora systems: access cards via Magic Box Plus)
• non-encrypted, multi-format CDs including true .art files for use
with the artista 730E through the CD drive, or for use with all
other BERNINA® Embroidery Systems through BERNINA®
Embroidery Software (Editor Lite through Designer Plus)
• .art formatted CDs for artista 730E & BERNINA® Embroidery
Software
• multi-formatted (including .art) USB sticks for artista
embroidery systems & BERNINA® Embroidery Software
• Embroidery Take-Out design CDs available through dealers
• www.embroideryonline.com – downloadable design files
Needles
• Types/Sizes/Parts - see information on pages 14-15
• Match needle size and type to thread size & fabric type
• For more information: Feetures Volume 3, Unit P, pages 1-11
Embroidery & Bobbin Thread
Good quality vs. poor quality: the better the thread, the better
the results and the easier the process
Fiber content: different types (polyester, nylon, rayon, cotton,
metallic, acrylic, etc.) produce different results
Thread weight: the thicker the thread, the denser the stitching –
embroidery designs are generally digitized for use with 40
weight embroidery threads such as Isacord or Polysheen
MASTERING YOUR BERNINA® EMBROIDERY MODULE/MACHINE 2/06 7
©2006 BERNINA® of America, Inc. Permission to copy granted only to Authorized BERNINA® Dealers
Mastering
BERNINA®Embroidery Module/Machine
Software and Peripherals
• BERNINA
Editor Lite (available for aurora & artista systems only)
Editor
Auto-Designer
Designer Plus
• USB Cable (standard with aurora & artista systems)
to connect embroidery system to computer
• BERNINA
• BERNINA
accessory for artista 200E/730E only)
®
Embroidery Software
®
CD Drive (optional accessory for artista 730E only)
®
Modem for dial-up service providers (optional
Your
BERNINA
Notes
®
• BERNINA® Ethernet LAN card for broadband (highspeed)
service providers (optional accessory for artista 200E/730E
only)
• Magic Box Plus & Mini Magic Box Plus
Used to transfer designs to artista Magic card for deco 330
Used to convert non-.art design cards
Used by the aurora embroidery system to access Studio
BERNINA
Used to transfer .art files (in .exp format) to artista Magic
Card for artista 730E
Used to read non-.art design collection files into the
BERNINA
• Swap Box
Used to convert deco 500/600/650 cards to deco 330
Used to transfer designs from deco 500/600/650 cards
to artista Swap Card for use in deco 330 and artista
embroidery systems
• USB PC Card Reader from OESD
Used to transfer designs from PC to artista 730E & deco 330
Personal Design Card
®
embroidery card files
®
Embroidery Software
MASTERING YOUR BERNINA® EMBROIDERY MODULE/MACHINE 2/06
©2006 BERNINA® of America, Inc. Permission to copy granted only to Authorized BERNINA® Dealers
8

Mastering
BERNINA®Embroidery Module/Machine
Your
BERNINA
®
4 Levels of BERNINA® v4.0 Embroidery Software
There are 4 levels of BERNINA® version 4.0 Embroidery Software: Editor Lite (available only with aurora & artista 630E/
640E/730E embroidery systems),
Editor, Auto-Designer, & Designer Plus. For a complete comparison chart, visit
Editor Lite v4.0
Basic customizing software for quickly & easily combining designs & text.
Functions as the “editing screen” for the aurora embroidery system, and as an alternate “editing” screen for the artista
630E/640E/730E
• For the user that wishes to combine and re-color designs
• For the user that wishes to add text and manipulate lettering
• For users wishing to work with design CDs, USB sticks, and/or designs downloaded from www.embroideryonline.com
• Can use Magic Box Plus and artista Magic Card, and/or USB PC Card Reader and artista 200E/730E Personal Design
Card, and/or BERNINA
• Integral part of the aurora embroidery system
• Also included with artista 630E/640E/730E embroidery systems
®
USB Stick
www.berninausa.com.
Editor v4.0
Powerful but easy-to-use software for making changes to existing designs.
• For the user that wishes to customize and edit designs and lettering
• For users wishing to work with designs from cards, disks, CDs, USB sticks, and/or designs downloaded from Internet
• Includes the Cross Stitch Program
• Includes the BERNINA
• Can use the Reader/Writer Box and Personal Design Cards
• Can use the Magic Box Plus and artista Magic Card, and/or the USB PC Card Reader and the artista 200E/730E
Personal Design Card, and/or BERNINA
Auto-Designer v4.0
Create professional-looking embroidery designs in seconds.
• For the user that wishes to customize and edit designs and lettering
• For users wishing to work with designs from cards, disks, CDs, USB sticks, and/or designs downloaded from Internet
• For the user that wishes to create (digitize) designs automatically
• Includes the Cross Stitch Program
• Includes the BERNINA
• Includes the PhotoSnap Program
• Can use the Reader/Writer Box and Personal Design Cards
• Can use Magic Box Plus and artista Magic Card, and/or USB PC Card Reader and artista 200E/730E Personal
Design Card, and/or BERNINA
Designer Plus v4.0
Explore the complete world of embroidery software including hand-look
Craft Stitches, Auto-Applique, Auto-Digitizing & Manual Digitizing tools
• For the user that wishes to create (digitize) original embroidery designs
• For the user that wishes to customize and edit designs and lettering
• For users wishing to work with designs from cards, disks, CDs, USB sticks, and/or designs downloaded from Internet
• For the user that wishes to create (digitize) designs automatically
• For the user that wants complete control and digitizing flexibility
• Includes the Cross Stitch, PhotoSnap, and BERNINA
• Can use the Reader/Writer Box and Personal Design Cards
• Can use Magic Box Plus and artista Magic Card, and/or USB PC Card Reader and artista 200E/730E Personal
Design Card, and/or BERNINA
®
Quilter Program
®
Quilter Program
®
USB stick
®
USB stick
®
USB stick
®
Quilter Programs
MASTERING YOUR BERNINA® EMBROIDERY MODULE/MACHINE 2/06 9
©2006 BERNINA® of America, Inc. Permission to copy granted only to Authorized BERNINA® Dealers

Mastering
BERNINA®Embroidery Module/Machine
Getting Started
artista & aurora Embroidery Module Set Up
• Turn machine OFF
(Note: artista 630E/640E/730E ONLY may start with
machine ON)
• Module Connection Cable
- Stored on the bottom back edge of the module
- Make sure the FLAT side of the cable plug is to the FRONT
• Attaching the Module
- Place the machine on a flat surface (such as a table or
countertop)
- Place the module on the machine behind the free arm
- Slide module on from left until lugs engage in base plate
• Removing Module
- Turn machine OFF
(Note: artista 630E/640E/730E ONLY may leave
machine ON)
- Remove cable plug from sewing/embroidery computer
- Lift module slightly (do NOT lift using the embroidery arm!)
and slide the module to the left
Your
BERNINA
Notes
®
Prepare for Embroidery
• Presser Foot
- Attach Embroidery Foot #15 or #26 to the machine (artista
& aurora only)
• Needles
- Use the proper needle for the thread and fabric being used
- Insert a new needle at the beginning of each project
- Needle should be in the highest position when attaching
the hoop to prevent snagging fabric and/or bending needle
• Straight Stitch Plate (optional accessory for artista & aurora)
- Reduces flagging of fabric, resulting in improved stitching
• Bobbin
- Use the Embroidery (gold latch) Bobbin Case (artista 640E
& 730E), threading the “pigtail” for increased bobbin
thread tension
- Thread the “finger” of the bobbincase (artista 630E &
aurora 430E & 440E) for increased bobbin thread tension
MASTERING YOUR BERNINA® EMBROIDERY MODULE/MACHINE 2/06
©2006 BERNINA® of America, Inc. Permission to copy granted only to Authorized BERNINA® Dealers
10

BERNINA®Embroidery Module/Machine
Threading
• Thread machine with the presser foot up (this releases tension)
• Thread using either the horizontal or vertical spool pin with
the foam pad attached
- Horizontal spool pin is for use with cross-wound threads
- match disc size to end of spool
- smallest disc fits into the end of large cones/spools
such as Isacord embroidery thread
- Vertical spool pin is for use with stacked threads
- also for some decorative threads (metallic threads)
- use supplemental thread guide as needed to control
problematic threads
• Use a thread net to prevent thread from forming loops which
might interfere with consistent feeding of thread
• Multiple Spool Holder (optional; available for deco, artista &
aurora)
- attaches to the back of the machine
- holds up to 13 thread spools
Mastering
Your
BERNINA
Notes
®
Hooping Fabric
• Find the center of the fabric
• Separate the embroidery hoop sections
- Loosen the screw. It should be loose enough that fabric
and stabilizer both will EASILY fit into the hoop
Note: For more information, see appropriate pages in manual
(aurora 430E & 440QEE: pages 67-68; artista 630E/640E
pages 115-116; artista 730E: pages 221-222)
• Embroidery Templates
- Use to ensure that the motif is centered in the hoop
- Each hoop has a corresponding template
- When inserted correctly, “BERNINA” reads left to right,
right side up
- Template surface is marked in 1cm squares
- Each template has cut-outs to facilitate transfer of markings
to fabric
- There are finger holes to facilitate easy removal of the
small and medium hoop templates
- Included with the Large Oval and Mega hoop templates,
special attachment clips facilitate easy removal
MASTERING YOUR BERNINA® EMBROIDERY MODULE/MACHINE 2/06 11
©2006 BERNINA® of America, Inc. Permission to copy granted only to Authorized BERNINA® Dealers

Mastering
BERNINA®Embroidery Module/Machine
• Secure fabric/stabilizer in the hoop
- Lay the outer hoop on a HARD, FLAT surface
- (deco 330 only: Place so the clamp lies off the edge of the
surface and the hoop lies flat.)
- Secure stabilizer to the back of the fabric by lightly spraying
stabilizer with HRFive temporary adhesive spray
- Place fabric and stabilizer on a firm surface
- Position template inside the inner hoop
- Position inner hoop on fabric, aligning any markings
- Grasping both inner hoop and fabric/stabilizer, insert them
into the outer hoop, making sure that the arrows align at
the edges of both the inner and outer hoops
- DO NOT DISTORT THE FABRIC when tightening the screw
on the hoop
- Hooped fabric should be taut, but not stretched or distorted
- Remove template before stitching
Your
BERNINA
Notes
®
Attaching and Removing Hoop
• When attaching hoops, be sure to seat the frame securely.
• Release the clamp completely before removing the frame from
the machine
MASTERING YOUR BERNINA® EMBROIDERY MODULE/MACHINE 2/06
©2006 BERNINA® of America, Inc. Permission to copy granted only to Authorized BERNINA® Dealers
12
BERNINA®Embroidery Module/Machine
Adjusting the Hoop Reference Position (aurora & artista only)
• This process calibrates the needle to the center of the hoop
• Only necessary to calibrate one hoop, as the adjustment
applies to all hoop sizes
Adjusting Embroidery Hoop (EC on PC)
This process is only necessary if the hoop center does not
correspond with the indicated hoop center of the EC on PC
display.
• place template in hoop
Note: aurora 430E/440QEE Large Oval template grid is orange
• select attached hoop
• use arrow keys to place center of template exactly under
the needle point
• press the Shift key (keep depressed)
• using the mouse, click on the icon that appears on the screen
next to the Position Hoop icon
• the adjustment will be saved
Mastering
Your
BERNINA
Notes
®
Adjusting Embroidery Hoop (on-screen)
(artista 630E/640E/730E)
• touch external Setup button.
• select the Embroidery Settings option.
• insert embroidery template into large hoop and attach hoop
to module.
Note: artista 630E/640E Large Oval template grid is orange;
artista 730E Large Oval template grid is purple.
• touch “Check”; hoop position will be read and hoop will stop
with needle over center marking of hoop template.
• if needle is not positioned directly over the center, use the
positioning arrows to make adjustments.
• touch OK; hoop setting is now saved and you may touch Esc
to leave this menu as well as the Setup menu.
MASTERING YOUR BERNINA® EMBROIDERY MODULE/MACHINE 2/06 13
©2006 BERNINA® of America, Inc. Permission to copy granted only to Authorized BERNINA® Dealers
Mastering
BERNINA®Embroidery Module/Machine
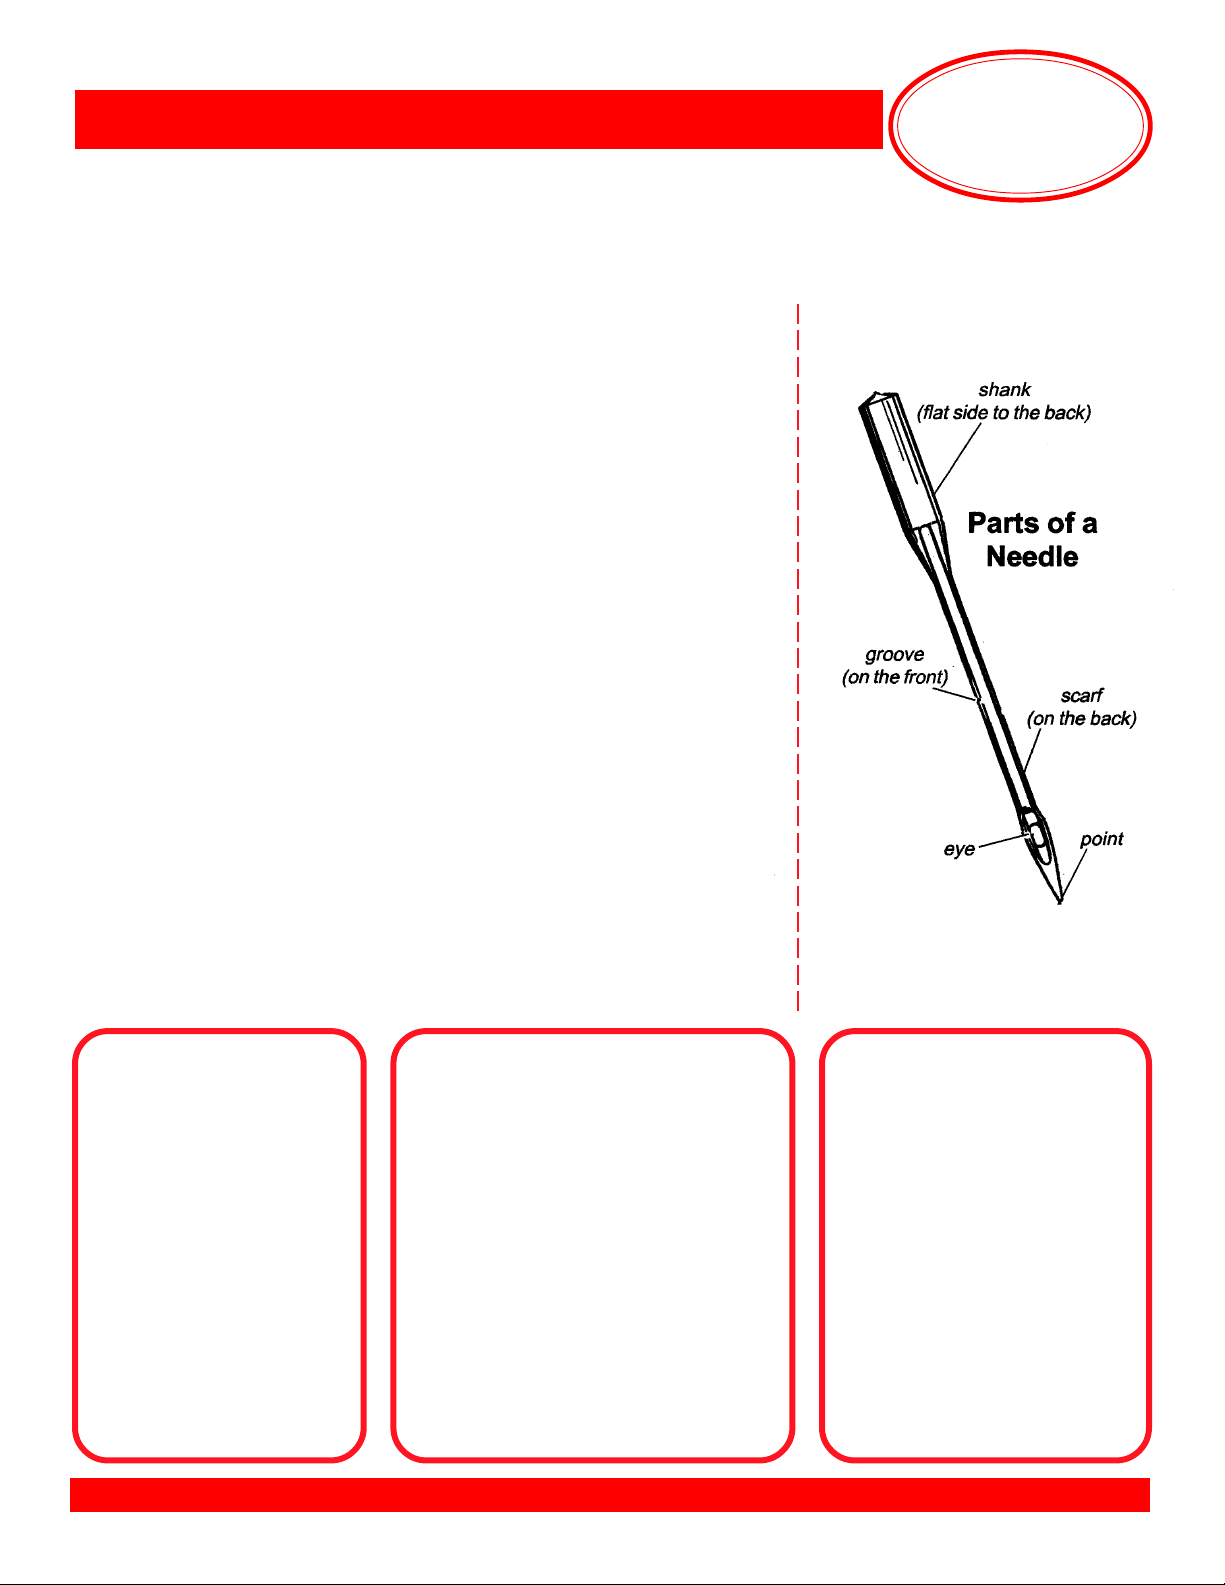
Sewing Machine Needles
Along with thread, needles are very important to stitch formation. Many
“mechanical” problems and damage to fabrics can be traced to a bent,
damaged, or incorrect size or type needle. Approximately 60% of all
needles are discarded at some stage of production. When selecting
the correct needle for any sewing project, consider the following:
Needle system – 130/705H
Needle point – to assure proper stitch formation and avoid fabric damage
Needle size – smaller for lightweight fabrics; larger for heavier fabrics
If the needle is:
Too small – the thread can’t stay in the groove to form a loop to be picked
up by the hook point
Bent – thread loop forms too far away from hook point; hook can’t enter
the loop to form stitch
Blunt – needle won’t pierce fabric so no thread loop forms to make a stitch
Your
BERNINA
®
• Needles should be changed after every 1-2 hours of embroidery stitching,
before stitching the outline of any design, and after every 4-6 hours of regular
sewing. The needle is the most inexpensive part in your embroidery system but is
one of the most crucial for getting good results and keeping your machine
running well. Don’t let false economy keep you from doing what is best for your
embroidery projects and your machine.
• Selected thread should fit in the groove on the front of the needle. If it isn’t
protected by the groove, a needle with a larger groove should be used.
• Always make sure needles are fully inserted, as high as possible, with the
flat side to the back.
Needle Size
Conversion Chart
European vs. Domestic
60 = 8
70 = 10
75 = 11
80 = 12
90 = 14
100 = 16
110 = 18
120 = 19
Regardless of the system,
the greater the number,
the larger the diameter of
the needle.
Not all needles are appropriate for
use in embroidery machines. As with
all sewing projects, needle choice is
detemined by the fabric, thread, and
application. For most embroidery, an
Organ needle or Embroidery needle
is the best choice.
Occasionally, other needles may be
recommended for specially digitized
techniques, such as a Wing needle
heirloom embroidery.
Which Needle?
Needle “Secret” Code
• DRI = Triple
• E = Embroidery
• J = Jeans
• L, LL, R = Leather
• M = Microtex
• MET = Metallica
• N = Topstitching/Cordonnet
• Q = Quilting
• S = Stretch
• SUK = Fine Ball Point
• SES = Medium Ball Point
• WING = Wing
• ZWI = Double
• ZWIHO = Double Wing
MASTERING YOUR BERNINA® EMBROIDERY MODULE/MACHINE 2/06
©2006 BERNINA® of America, Inc. Permission to copy granted only to Authorized BERNINA® Dealers
14
BERNINA®Embroidery Module/Machine
Mastering
Your
BERNINA
®
Ball Point
Stretch
Stretch
Double
Universal
Double
Universal
Triple
(Drilling)
Jeans
60-100
70-90
2.5/75
3.0/75
60-120
1.6/70-
8.0/100
2.5/90
3.0/90
70-110
Has a rounded point. 70 for lingerie,
nylon, jersey; 80 for
T-shirt; 90 for sweatshirt fleece.
A stretch needle has a more rounded
point than a Ball Point, and a blue
anti-cling coating which helps to
prevent skipped stitches in knits and
elastic. Sometimes used on
Ultrasuede
Two ballpoint needles on one shank;
each needle has a large scarf. Used
for hemming and for stitching on knit
fabric.
A compromise between a sharp and
a ballpoint needle; can be used on
both wovens and knits.
60 – very fine batiste
70 – broadcloth
80 – trigger and gabardine
90 – denim and twill
100/110/120 – canvas
Two needles attached to one shank.
Used for pintucks, hems, and
decorative work.
Three needles attached to one
shank. Used to create mock smocking and other decorative effects.
Has a sharp point and a shaft that is
less prone to flex. The sharpness of
the needles makes it better for use on
denim and woven fabrics where a
clean stitch is desired.
®
, vinyl, and plastic.
Microtex
/ Sharp
Quilting
Topstitch
Embroidery
Embroidery
Double
Metafil
Wing
A sharp point with a thin shaft.
Specially designed for microfiber
fabrics.
The thin, tapered point of this needle
causes less damage to fabric when
seaming and cross seaming.
A sharp point with a large eye and
deep groove. For use with heavier
fabrics – the large groove cradles
heavier threads.
Sharp needle with a large eye and
groove; also has a coating and a
larger scarf. For use with embroidery
thread – prevents shredding of rayon
or metallic threads. Two threads
may be used through the eye.
Two Embroidery needles attached
to one shaft; for double needle
work with embroidery threads.
Similar to Embroidery needle, with
large eye and deep groove, but
made of a special heat-resistant alloy
and with a friction-reducing coating.
Especially suitable for manufactured
fibers such as polyester, acrylic, nylon.
Sharp pointed needle with a noncutting wedge of metal on each side.
Makes a hole in the fabric without
cutting the threads of the fabric. Used
for decorative and heirloom work,
such as hemstitching. Works best on
natural fibers or on the bias.
Jeans
Double
Leather
MASTERING YOUR BERNINA® EMBROIDERY MODULE/MACHINE 2/06 15
©2006 BERNINA® of America, Inc. Permission to copy granted only to Authorized BERNINA® Dealers
4.0/80
80-100
Two Jeans needles attached to one
shank. For topstitching on denim with
heavy thread; can also be used for
decorative stitching with metallic
thread.
Point is a sharp cutting wedge.
Used for leather only. Not for vinyl
or simulated leathers.
Double
Wing
Metallica
Metallica
Double
One regular needle and one wing
needle attached to a single shaft.
Makes one large and one regular hole.
Designed for use with metallic threads;
has a large eye and deep groove.
Two Metallica points on one shaft.
Mastering
BERNINA®Embroidery Module/Machine
Thread
Poor quality or the wrong type of thread can cause poor stitches on any
machine. Thread passes through the eye of the needle approximately 37
times in a “seesaw” action before it forms a single stitch. Poor quality
thread results in crooked and looped stitches, uneven fills, misaligned
outlines, frayed thread, and/or needle breakage. To achieve quality
stitches, an embroidery machine needs five things: correct thread,
correct stabilizer, correct hooping, correct needle, and properly adjusted
thread tensions.
Several factors such as the fiber, twist, ply, finish, and size of thread
must be considered for use with today’s fabrics for fine stitches.
Staple – refers to the length of fibers used to twist together to form a
single ply. Domestic thread fiber lengths are usually 1½” to 2½” long
while European threads use 5½” to 6½” lengths.
Your
BERNINA
Notes
®
Ply – number of strands twisted together to make a single thread.
Roll – the tendency of thread to roll to the right or left during
stitching, causing the stitch to appear slightly crooked. Poor quality
threads are more likely to roll.
Twist – the crimping of fibers which causes them to interlock firmly into
a single ply. Thread should not untwist during stitching. This will cause
skipped stitches, thread breakage, crooked stitches, and weak spots in
seams.
Right twist – most American threads
are twisted to the right, causing
some rolling. This gives average
stitch quality.
Left twist – Most commercial and
imported threads are twisted to the
left, giving better than average stitch
quality. Left twist resists rolling and
makes a larger loop for the hook
point to enter, reducing skipped
stitches.
MASTERING YOUR BERNINA® EMBROIDERY MODULE/MACHINE 2/06
©2006 BERNINA® of America, Inc. Permission to copy granted only to Authorized BERNINA® Dealers
16

BERNINA®Embroidery Module/Machine
Embroidery Thread
The popularity of embroidery and wearable art embellishments has
necessitated the creation and marketing of many new thread types,
such as shiny polyesters, rayons and metallics. High quality threads
made in West Germany generally have a left twist; Mettler and Isacord
threads are also left twist. To test the twist of a thread: while holding the
spool in the left hand, roll the strand of thread towards you with one
thumb. Left twist will tighten, right twist will loosen.
Fiber – refers to the type of material used to produce the thread.
Some commonly used embroidery and embellishment threads:
• Polyester 2 ply embroidery thread – Isacord and Polysheen
embroidery thread – excellent for embroidery, very abrasion
resistant. Recently made available in variegated colorways.
Mastering
Your
BERNINA
Notes
®
• Acrylic embroidery thread – excellent for embroidery. Abrasion
resistant. Available in variegated colors.
• Cotton 2 ply embroidery thread – such as Mettler 60/2 – excellent
for French Machine Sewing, delicate machine embroidery, piecing
and darning. Has a matte finish with a slight sheen.
• Cotton 2 ply embroidery thread – such as Mettler 30/2 – loose
twist for a soft, shiny look in machine embroidery, applique, and
buttonholes. Thicker than most embroidery threads, 30 weight
cotton may require that the stitch density be decreased slightly.
Available in variegated colors.
• Rayon – available in 30 and 40 weight – a lustrous embroidery
thread. Weaker than cotton, it is used for decorative work only.
Available in variegated colors.
Thread Storage
Thread does wear out and deteriorate with age; it should be stored
with care to keep it usable as long as possible. Extreme moisture may
cause thread to swell while very dry conditions can leave it dry and
brittle as it ages. Store thread in a covered place (thread box with a lid,
cabinet with doors, or drawers that close) if possible to keep it dustfree.
Be wary of old spools of thread recovered from Grandma’s sewing box.
The fibers may be so weak and brittle that even if it sews without
breaking, it may be so unstable that the garment or project will not hold
together and the life of the project may be considerably shortened.
MASTERING YOUR BERNINA® EMBROIDERY MODULE/MACHINE 2/06 17
©2006 BERNINA® of America, Inc. Permission to copy granted only to Authorized BERNINA® Dealers

Mastering
BERNINA®Embroidery Module/Machine
Stabilizers & Interfacings
Tear-Away Stabilizer: The most commonly used type of stabilizer,
designed to provide temporary support of stitching. Placed on the wrong
side of the project and carefully pulled away once stitching is complete.
Available in three weights – heavy, medium, and light. Multiple lightweight
layers may be preferable to one heavy layer, as they are easier to
remove. The Hydro-Stick version, available in lightweight and heavyweight tear-away, has water-activated adhesive on one side for a secure
bond and a high degree of stabilization for very dense and/or intricate
designs. Also available: Smooth Touch Tear-Away, Ultra Clean & Tear.
Cut-Away Stabilizer: The most widely used stabilizer in the commercial
market. Does not break down under dense stitching, due to the high fiber
– rather than paper – content. Excess stabilizer is trimmed away after
stitching (leave approximately ¼” of stabilizer around the edges).
A Hydro-Stick version of heavyweight cut-away is also available.
Your
BERNINA
Notes
®
Web/Poly-Mesh Type Stabilizer: A specially formulated cut-away
stabilizer developed for use behind lightweight or light-colored fabrics.
Available in fusible or non-fusible versions.
Water-Soluble Stabilizer: Used for backing and topping, in single or
multiple layers. Available in several weights: Aqua Film Universal Weight,
Aqua Film Extra Weight, Badgemaster (very heavy), and Aqua Mesh
Wash Away. Excellent for decorative stitching and cutwork as there are
no remnants of stabilizer left after removal (it dissolves). As a topping,
it keeps stitches from being lost in heavily napped fabrics such as velvet
and corduroy.
Iron-On Tear-Away Stabilizer: A non-woven product similar to paper.
Perfect for knits, this tear-away stabilizer is temporarily bonded to the
fabric, inhibiting the tendency of the material to stretch.
Heat Removable Stabilizer: Woven from strands of fiber that are
burned away at a low temperature, heat removable stabilizers are
perfect for heirloom stitchery.
Liquid/Spray Stabilizers: Wonderful for sheer fabrics from which all
stabilizer must be removed after stitching, these products are painted or
sprayed onto the fabric. Several light applications are preferable to one
heavy layer.
MASTERING YOUR BERNINA® EMBROIDERY MODULE/MACHINE 2/06
©2006 BERNINA® of America, Inc. Permission to copy granted only to Authorized BERNINA® Dealers
18

BERNINA®Embroidery Module/Machine
Knit Fusible Interfacing: A very lightweight, flexible interfacing sometimes used in addition to or instead of a stabilizer, it gives permanent
support (as an underlining) to a fabric. Perfect for plackets, garment
edges, under buttonholes, and anywhere extra body and stability are
needed. Can also be used to stabilize decorative stitch work.
Woven Fusible Interfacing: This interfacing is sometimes used in
addition to or instead of a stabilizer, it gives permanent support (as an
underlining) to a fabric. Generally cut on the bias to provide better drape.
Gives a firmer hand or finish than knit or non-woven interfacings. Used for
lapels, facings, and anywhere a great deal of extra body and stability are
needed.
Mastering
Your
BERNINA
Notes
®
Sewing & Craft Sprays
HRFive Temporary Adhesive Spray: It’s water-soluble, so it washes
out completely. Great for basting or holding two layers of fabric and/or
batting together. Can be used as a repositionable spray, allowing items
to stay sticky but be repositioned on other surfaces. This water-soluble
adhesive washes out completely. Works well for securing “hard-to-hoop”
items such as collars and cuffs to hooped stabilizer for embroidering.
Also works on paper, and can be used as a no-show adhesive on vellum.
606 Fusible Spray: 606 is used to make any fabric or stabilizer fusible.
Apply to the wrong side of the fabric to be fused, using several light coats,
rather than one heavy coating. The more coats used, the stronger the
bond will be. Fuse as directed on label.
Fabric Shield: Used to protect fabrics from dust, dirt, grease, and oil,
this spray is water repellent and can be laundered and dry-cleaned.
HRZero Adhesive Remover Spray: For removing adhesives, such as
quilt sprays and other spray adhesives, in addition to label and tapes from
various surfaces. Use on work surface areas, hoops, needles, frames,
quilting frames, stencils, table tops, etc. For use on plastic, metal, wood,
glass, stone, and ceramic surfaces. Not intended for fabric surfaces.
MASTERING YOUR BERNINA® EMBROIDERY MODULE/MACHINE 2/06 19
©2006 BERNINA® of America, Inc. Permission to copy granted only to Authorized BERNINA® Dealers
BERNINA®Embroidery Module/Machine
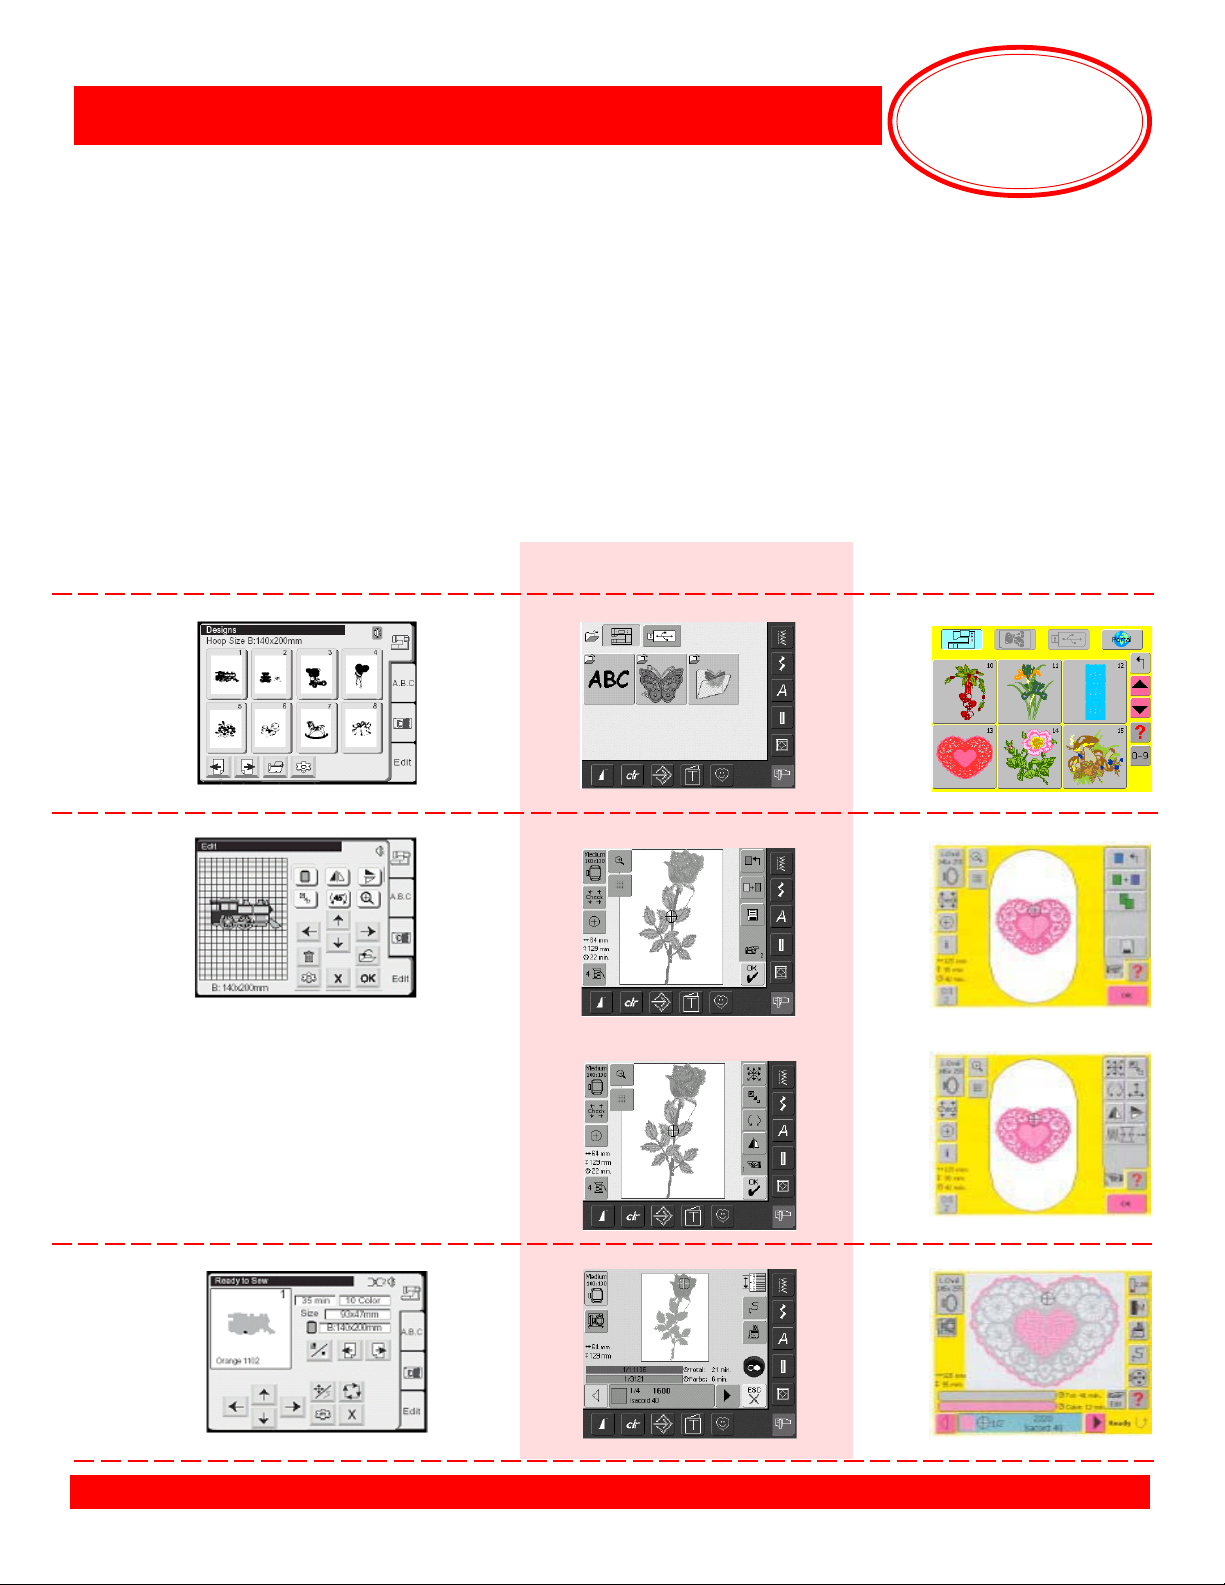
Stitching A Motif
Mastering
Your
BERNINA
®
deco 330
Select indicated motif.
Stitch. Note:
color, the machine automatically stops and a message
appears reminding you to cut
the thread and rethread for the
next color.
At the end of each
When the motif is complete, a
message appears indicating
that the stitching is finished.
Press the carriage return key
after finishing the last section to
return the carriage to the stored
position.
aurora 430E & 440QEE
Select and open indicated motif. Click
on Write to Machine icon. Select
aurora 430/440 (stitch out only); EC
on PC opens. Note: Make sure feed
dog is lowered, presser foot is up,
and foot control is removed.
Attach hoop. Click on the module arm
graphic to calibrate the module.
Click on start button on EC on PC
screen. Hoop moves, then an animation prompts you to lower the presser
foot and press the Start/Stop button on
the machine.
Machine will sew a few stitches and
stop. An animation appears, prompting
you to trim thread tail. When first color
is complete, animation will prompt you
to change the thread to the next color.
When embroidery is complete, 9
appears in lower left corner of EC on
PC screen. Trim and mount sample.
Notes
artista 630E & 640E
Select the sewing machine icon
and motifs (butterfly) folder to
access the stored embroidery
designs.
artista 730E
Select the sewing machine icon
and motifs (butterfly) folder to
access the stored embroidery
designs.
Embroidery Motif
Select indicated design; stitch.
630E: At the end of each color,
the machine automatically stops
and a message appears reminding you to cut the thread and
rethread for the next color.
Select indicated design. Touch
OK to go to Embroidery Ready
screen.
Stitch. Note: At the end of each
color, thread is automatically
cut and a message appears
640E: At the end of color one, the
thread is automatically cut and a
message appears reminding you
to thread the next color.
reminding you to thread the
next color.
When the motif is complete, a
message will appear indicating
When motif is complete, an OK
appears on screen to indicate
that stitching is finished.
MASTERING YOUR BERNINA® EMBROIDERY MODULE/MACHINE 2/06
©2006 BERNINA® of America, Inc. Permission to copy granted only to Authorized BERNINA® Dealers
that the stitching is finished.
deco 330
#36 - floral swag
aurora 430E & 440QEE
My Designs > Floral3.art
artista 630E & 640E
#17 - floral heart
artista 730E
#5 - floral wreath
Fabric & Stabilizer
8” x 10” rectangle
20
BERNINA®Embroidery Module/Machine
Stitching A Motif Sample
Mastering
Your
BERNINA
®
deco 330
artista 630E & 640E
aurora 430E & 440QEE
artista 730E
MASTERING YOUR BERNINA® EMBROIDERY MODULE/MACHINE 2/06 21
©2006 BERNINA® of America, Inc. Permission to copy granted only to Authorized BERNINA® Dealers
BERNINA®Embroidery Module/Machine
Monochrome Embroidery
Mastering
Your
BERNINA
®
deco 330
Note: To achieve the same
effect on the deco 330, use the
same thread color for all color
changes.
aurora 430E & 440QEE
Select Mono/Multicolor icon
(paintbrush). When engaged,
the entire design will stitch
without stopping
for color changes.
Click EC on PC start button;
lower presser foot and press
the Start/Stop button on the
machine. The complete motif
will be embroidered without
stopping.
When stitching is complete, a
9 appears in the lower left
corner of the EC on PC screen.
Trim and mount sample.
Notes
artista 630E & 640E
Touch OK to go to Embroidery
Ready screen.
Select the Single/Multi color
motif symbol (paintbrush icon).
With this function engaged, the
entire motif will be completed
in one color with no stops or
thread cuts.
Stitch.
MASTERING YOUR BERNINA® EMBROIDERY MODULE/MACHINE 2/06
©2006 BERNINA® of America, Inc. Permission to copy granted only to Authorized BERNINA® Dealers
artista 730E
Touch OK to go to Embroidery
Ready screen.
Select the Single/Multi color
motif symbol (paintbrush icon).
With this function engaged, the
entire motif will be completed
in one color with no stops or
thread cuts.
Stitch.
Embroidery Motif
deco 330
#36 - floral swag
aurora 430E & 440QEE
My Designs > Floral3.art
artista 630E & 640E
630E: #14 - floral heart
640E: #17 - floral heart
artista 730E
#5 - floral wreath
Fabric & Stabilizer
8” x 10” rectangle
22
BERNINA®Embroidery Module/Machine
Monochrome Embroidery Sample
Mastering
Your
BERNINA
®
deco 330
artista 630E & 640E
aurora 430E & 440QEE
artista 730E
MASTERING YOUR BERNINA® EMBROIDERY MODULE/MACHINE 2/06 23
©2006 BERNINA® of America, Inc. Permission to copy granted only to Authorized BERNINA® Dealers
 Loading...