

Page 1

Mastering
BERNINA®/bernette® Sewing Machines
Mastering Your
®
BERNINA
/bernette
Sewing Machine
Your
BERNINA
®
®
Owner’s Workbook
MASTERING YOUR BERNINA®/bernette® SEWING MACHINE 1/06 1
©2006 BERNINA® of America, Inc. Permission to copy granted only to Authorized BERNINA® Dealers
Page 2

Mastering
BERNINA®/bernette® Sewing Machines
Table of Contents
Class 1 - General Information ..................................................................3
Introduction ....................................................................................................... 4
Meet Your Feet ................................................................................................. 5
Sewing Machine Needles ................................................................................. 6
Thread .............................................................................................................. 8
Stabilizers & Interfacings ................................................................................. 10
Samples........................................................................................................... 12
Product Reference List .................................................................................... 30
Class 2 - Practical Stitching ....................................................................31
Seam Samples ................................................................................................ 32
Hem and Edging Samples ............................................................................... 40
Product Reference List .................................................................................... 52
Class 3 - More Practical Stitching...........................................................53
Elastic Samples ............................................................................................... 54
Buttonhole & Eyelet Types & Uses .................................................................. 58
Buttonhole Feet ............................................................................................... 59
Button & Buttonhole Samples .......................................................................... 60
Zipper Samples ............................................................................................... 70
Darning Sample ............................................................................................... 74
Product Reference List .................................................................................... 76
Your
BERNINA
®
Class 4 - Decorative Techniques.............................................................77
Gathering Samples .......................................................................................... 78
Specialty Needle Samples ............................................................................... 86
Product Reference List .................................................................................... 94
Class 5 - More Decorative Techniques ................................................... 95
Decorative Technique Samples ....................................................................... 96
Patchwork/Quilting/BSR/Applique Samplers .................................................. 108
Surface Embellishment Sampler .................................................................... 124
Product Reference List ................................................................................... 128
Class 6 - Stitch Manipulations................................................................129
Memory - Basic Information ............................................................................ 130
Function Sampler ........................................................................................... 132
Memory Samples ............................................................................................ 144
Setup Program ............................................................................................... 164
Tutorial............................................................................................................ 166
Creative Consultant ........................................................................................ 167
Product Reference List ................................................................................... 168
Class 7 - Directional Stitching................................................................169
Directional Stitching Samples ......................................................................... 170
Product Reference List ................................................................................... 190
Appendices ..............................................................................................191
MASTERING YOUR BERNINA®/bernette® SEWING MACHINE 1/06
©2006 BERNINA® of America, Inc. Permission to copy granted only to Authorized BERNINA® Dealers
2
Page 3
Mastering
BERNINA®/bernette® Sewing Machines
Class 1
General Information
Class Overview
Machine Overview
Parts of the machine
Setting up the machine
Getting ready to sew
Winding a bobbin
Threading the upper thread
Using the needle threader
Presser Feet & Accessories
BERNINA’s philosophy - use correct tools
Specific feet for each machine
Attaching the presser feet
Overview of additional feet
Stitch Plates
Feed Dog
Stabilizers & Interfacing
Difference between the two
Different types and applications
Sewing sprays
Samples
1 Straight Stitch/Seaming
2 Needle Positions
3 Securing Stitches
4 Stitching Corners
5 Zigzag/Oversewing Edges
6 Satin Stitch
7 Topstitch/Edgestitch
8 Basting
9 Temporary Altered Stitch Memory
Your
BERNINA
®
Stitch Access
How to find the stitches on your machine
Making the settings for each stitch
Tension
Adjusting tension
Stitch formation
Needle Stop Adjustment
Foot control
Needle Stop Up/Down function
Correct use of handwheel
Sewing Machine Needles
Types of needles
Sizes of needles
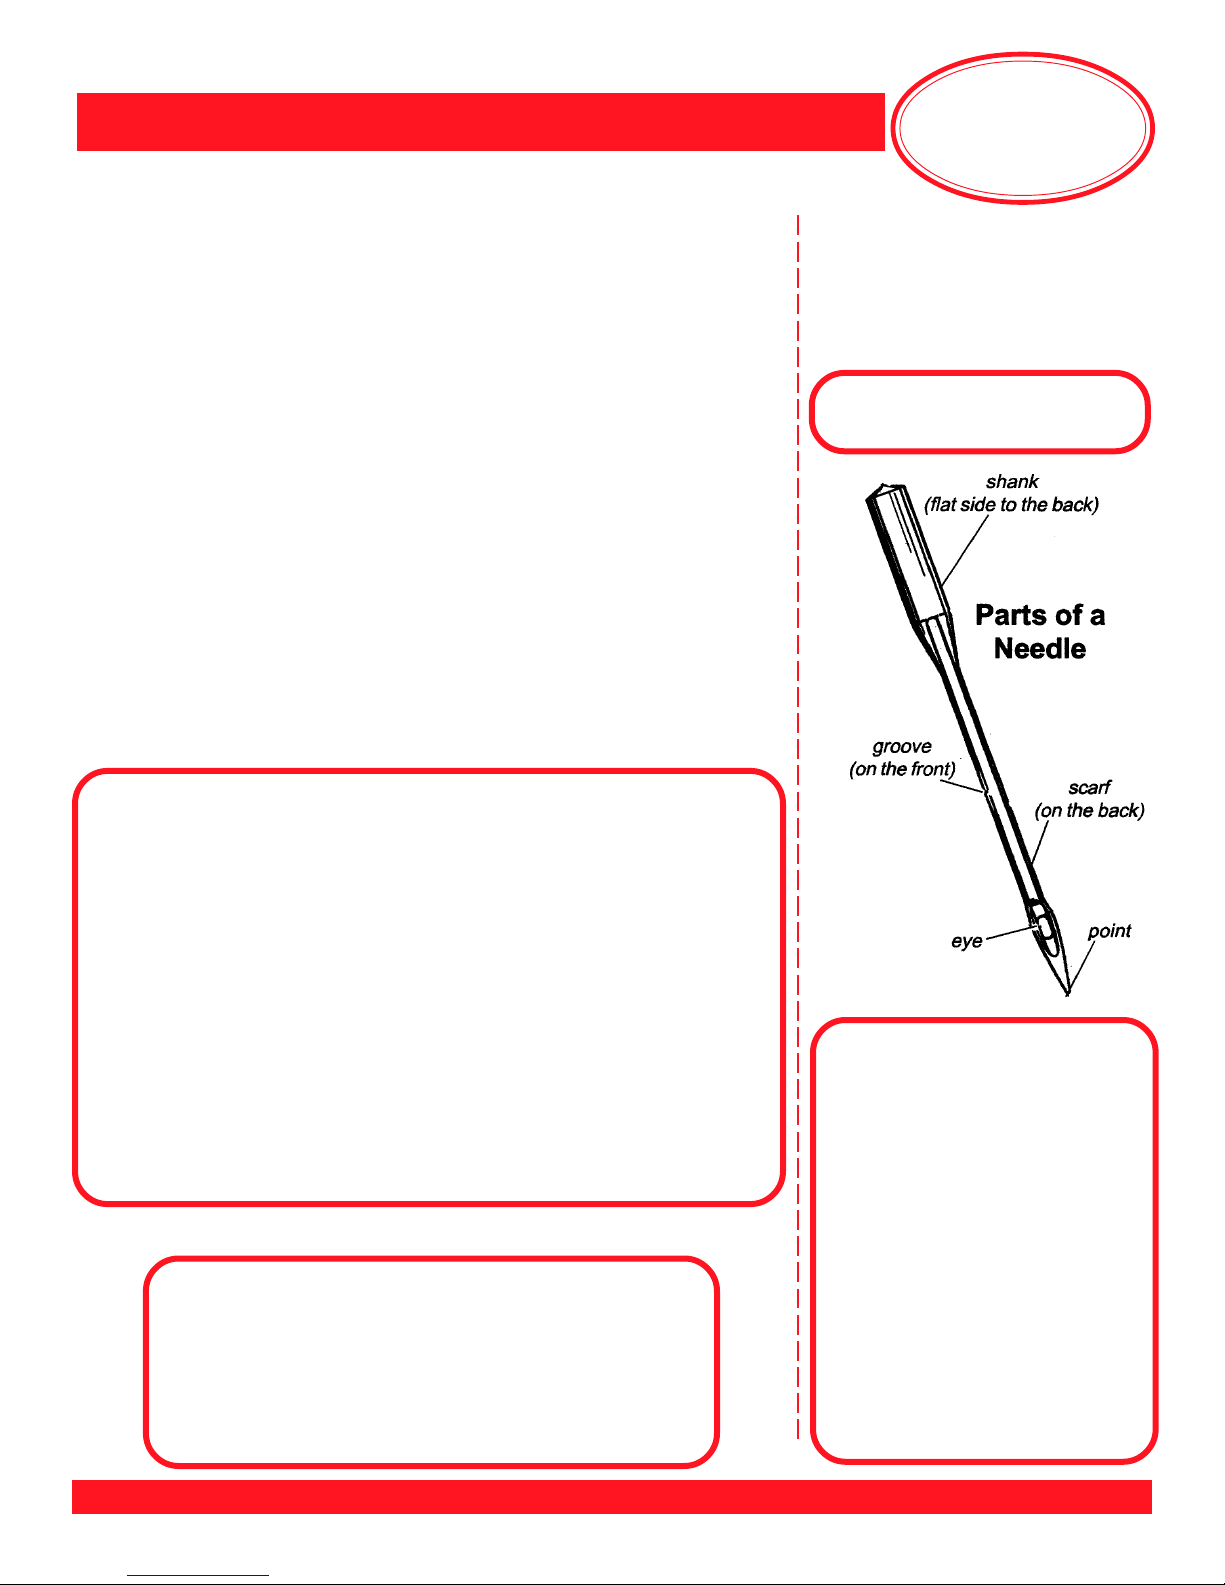
Parts of needle
Matching needle and thread
Sewing Thread
Good quality vs. poor quality
Fibers and weight
Thread storage ideas
Care and Cleaning of the Machine
Cleaning the feed dog and needle areas
Cleaning and lubricating the hook
Cleaning the outside of the machine
This class is formatted for owners of the
following BERNINA
• classic 1008
• activa 220
• activa 230PE
• activa 240
• aurora 430
• aurora 440QE
• artista 630
• artista 640
• artista 730 & 200 with 730 upgrade installed
This class is also formatted for owners of the
following
bernette
• 55 • 65 • 80e • 90e
®
sewing machine models:
®
sewing machine models:
MASTERING YOUR BERNINA®/bernette® SEWING MACHINE 1/06 3
©2006 BERNINA® of America, Inc. Permission to copy granted only to Authorized BERNINA® Dealers
Page 4
Mastering
BERNINA®/bernette® Sewing Machines
Your
BERNINA
Introduction
Congratulations on your purchase of a BERNINA® or bernette® for BERNINA® sewing machine!
This workbook is designed to be used in conjunction with the Owners Classes you will take at
your BERNINA® dealership, and contains a series of exercises intended to familiarize you with
®
the features of your new BERNINA
needles, threads, stabilizers, interfacing, presser feet and accessories, all of which will increase
your knowledge of sewing and assist you in achieving success in all of your sewing endeavors.
Once you have completed the exercises designated for your BERNINA
attach the sewn samples to the indicated pages and insert the pages into plastic page protectors
and store them in a 3-ring binder. They can then be used as a reference tool in the future as you
use your machine and explore the creative possibilities it affords you.
or bernette® sewing machine. In addition, you will learn about
®
or bernette® machine,
®
BERNINA® of America, Inc. strives to provide its customers not just with quality sewing machines,
but with informative publications and classes. Along with providing Owners Classes, your local
BERNINA® dealer stocks BERNINA® books and magazines, such as Feetures and Through the
Needle. Plus, BERNINA® of America, Inc. has a website – www.berninausa.com – offering free
projects, basic sewing information, a glossary of sewing terms, inspirational stories, interviews
with creative stitchers, and a variety of articles and postings that appeal to all types of stitchers,
no matter which machines are their favorites.
Learn to use your BERNINA® or bernette® machine
to its full extent and enjoy being creative with fabric
and thread!
My BERNINA® or bernette® sewing
machine model is: _______________
Serial Number: _________________
I purchased it on: ________________
at ____________________________
______________________________
______________________________
MASTERING YOUR BERNINA®/bernette® SEWING MACHINE 1/06
©2006 BERNINA® of America, Inc. Permission to copy granted only to Authorized BERNINA® Dealers
4
Page 5
Mastering
BERNINA®/bernette® Sewing Machines
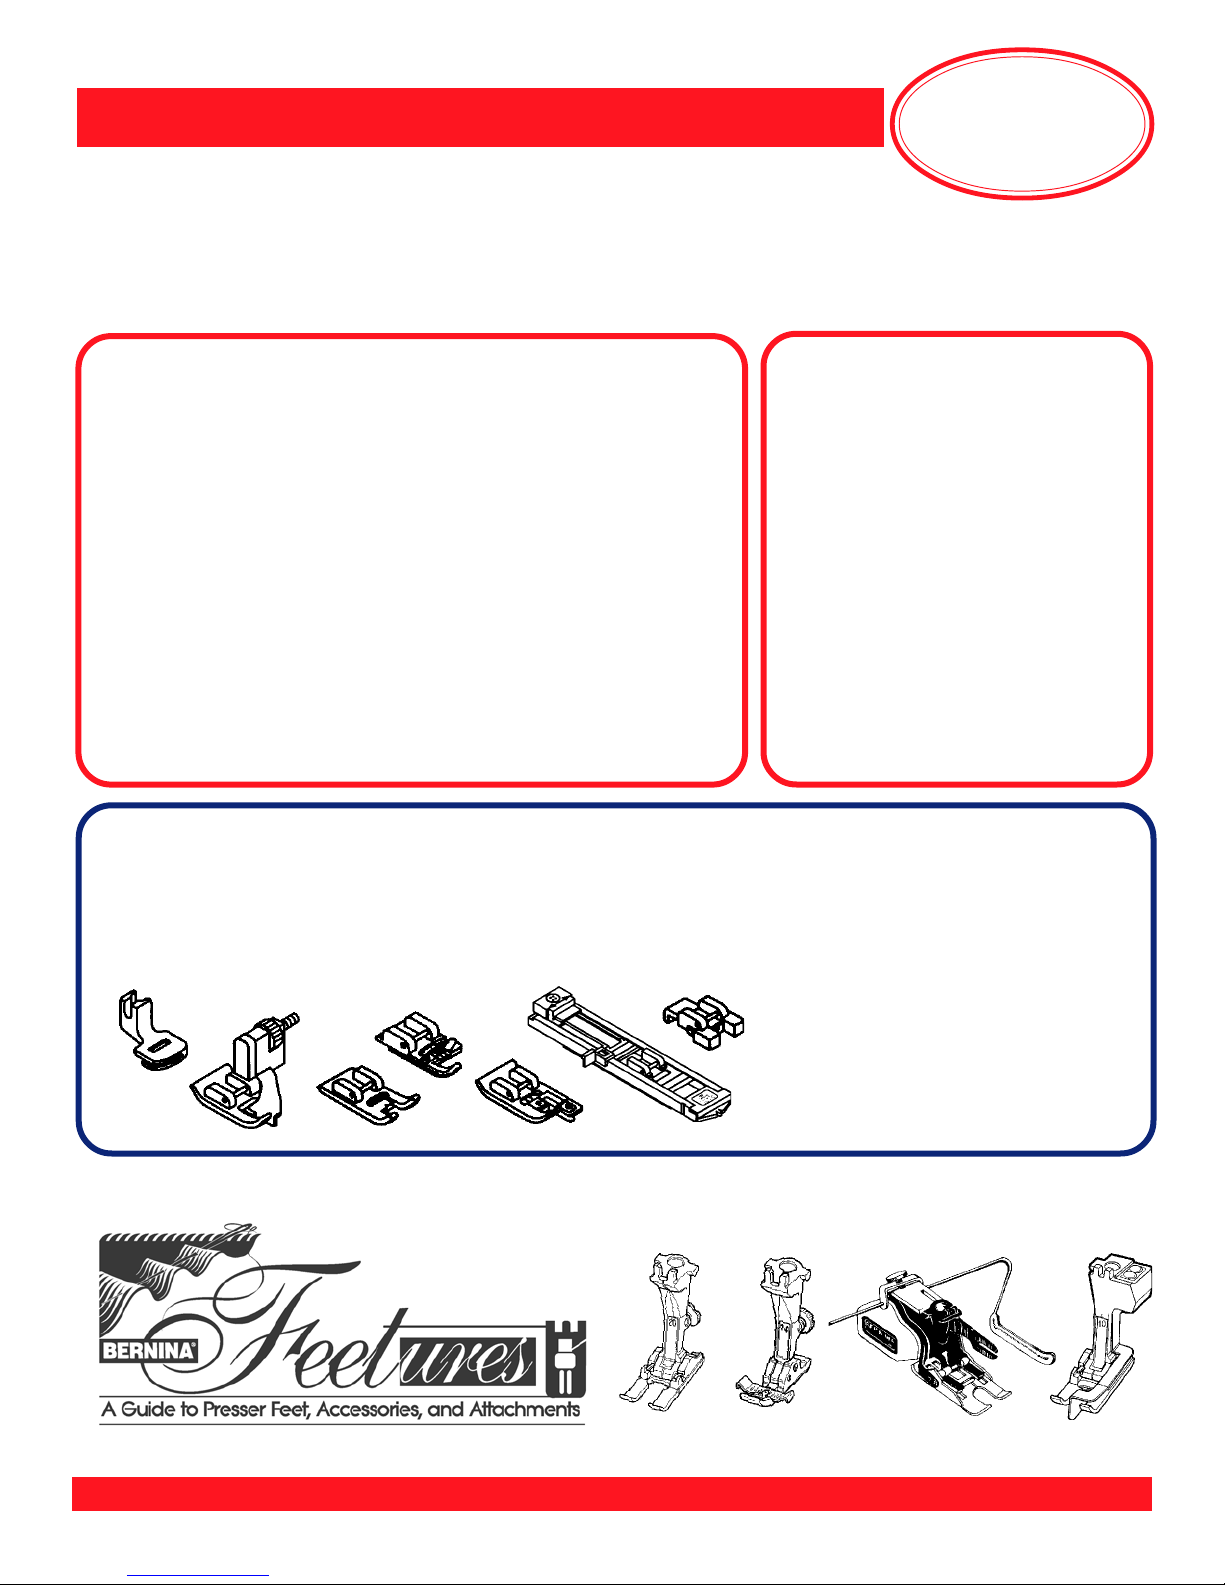
Meet Your Feet
BERNINBERNIN
BERNIN
BERNINBERNIN
• are precision engineered for specific functions
• are Swiss-made for the highest quality
• are one-piece metal feet, making them sturdy and durable
• are easy to change with one hand, requiring no special tools
• have a white shank, making it easier to see the eye of the
needle, resulting in easier threading
• are, in some cases, modeled after commercial feet used
in factories to increase speed and production with
professional looking results
• do the job intended in relation to all types of sewing
(ex. garment-making, quilting, home dec, etc.)
• are supported by the best and most complete educational
materials in the industry, such as Feetures volumes 1, 2, & 3,
and the BERNINA® website at www.berninausa.com
AA
A® Presser Feet:
AA
2005 Top Ten Accessory Feet
11
1
Patchwork Foot with Guide #57
11
3 3
3
3 3
55
5 Bulky Overlock Foot #12/12C
55
77
7 Freemotion Quilting Foot #29/29C
77
88
8 Open Embroidery Foot #20/20C
88
1010
10 Freemotion Couching Foot #43
1010
Your
BERNINA
BERNINBERNIN
BERNIN
BERNINBERNIN
22
2
Walking Foot #50
22
Edgestitch Foot #10/10C
4 4
4
Patchwork Foot #37
4 4
66
6 Clear Foot #34/34C
66
99
9 Invisible Zipper Foot #35
99
AA
A
AA
®
®
bernette® Presser Feet:
• have a white shank, making it easier to see the eye of the
needle, resulting in easier threading
• are available for some of the most common sewing tasks
such as piping, quilting, couching, etc.
Walking Foot
Quilting Foot
Blindhem Foot
Satin Stitch Foot
Darning/Embroidery Foot
Gathering Foot
Cording Foot
Overcasting Foot
Hemmer Foot
MASTERING YOUR BERNINA®/bernette® SEWING MACHINE 1/06 5
©2006 BERNINA® of America, Inc. Permission to copy granted only to Authorized BERNINA® Dealers
Page 6
BERNINA®/bernette® Sewing Machines
Sewing Machine Needles
Along with thread, needles are very important to stitch formation. Many
“mechanical” problems and damage to fabrics can be traced to a bent,
damaged, or incorrect size or type needle. Approximately 60% of all
needles are discarded at some stage of production. When selecting
the correct needle for any sewing project, consider the following:
Mastering
Your
BERNINA
®
Needle system – 130/705H
Needle point – to assure proper stitch formation and avoid fabric damage
Needle size – smaller for lightweight fabrics; larger for heavier fabrics
If the needle is:
Too small – the thread can’t stay in the groove to form a loop to be
picked up by the hook point
Bent – thread loop forms too far away from hook point; hook can’t enter
the loop to form stitch
Blunt – needle won’t pierce fabric so no thread loop forms to make
a stitch
Need To Know
• Needle should be changed every 4-6 hours of sewing. The needle
is the most inexpensive part in your sewing machine but is one of the
most crucial for getting good results and keeping your machine
running well. Don’t let false economy keep you from doing what is
best for your sewing projects and your machine.
• European needles are chrome-plated to glide in and out of fabric
easily.
Notes
• The selected thread should fit in the groove on the front of the
needle. If it isn’t protected by the groove, a needle with a larger
groove should be used.
• Always make sure needles are fully inserted as high as possible,
with the flat side to the back.
Needle Size Conversion
European vs. Domestic
60 = 8
70 = 10
75 = 11
80 = 12
MASTERING YOUR BERNINA®/bernette® SEWING MACHINE 8/05
©2005 BERNINA® of America, Inc. Permission to copy granted only to Authorized BERNINA® Dealers
90 = 14
100 = 16
110 = 18
120 = 19
Regardless of the system,
the greater the number,
the larger the diameter
of the needle.
Needle “Secret” Code
• DRI = Triple
• E = Embroidery
• J = Jeans
• L, LL, R = Leather
• M = Microtex
• MET = Metallica
• N = Topstitching/Cordonnet
• Q = Quilting
• S = Stretch
• SUK = Fine Ball Point
• SES = Medium Ball Point
• WING = Wing
• ZWI = Double
• ZWIHO = Double Wing
6
Page 7
BERNINA®/bernette® Sewing Machines
Sewing Machine Needles
Mastering
Your
BERNINA
®
Ball Point
Stretch
Stretch
Double
Universal
Double
Universal
Triple
(Drilling)
Jeans
60-100
70-90
2.5/75
3.0/75
60-120
1.6/70-
8.0/100
2.5/90
3.0/90
70-110
Has a rounded point. 70 for lingerie,
nylon, jersey; 80 for
T-shirt; 90 for sweatshirt fleece.
A stretch needle has a more rounded
point than a Ball Point, and a blue
anti-cling coating which helps to
prevent skipped stitches in knits and
elastic. Sometimes used on
Ultrasuede
Two ballpoint needles on one shank;
each needle has a large scarf. Used
for hemming and for stitching on knit
fabric.
A compromise between a sharp and
a ballpoint needle; can be used on
both wovens and knits.
60 – very fine batiste
70 – broadcloth
80 – trigger and gabardine
90 – denim and twill
100/110/120 – canvas
Two needles attached to one shank.
Used for pintucks, hems, and
decorative work.
Three needles attached to one shank.
Used to create mock smocking and
other decorative effects.
Has a sharp point and a shaft that is
less prone to flex. The sharpness of
the needles makes it better for use on
denim and woven fabrics where a
clean stitch is desired.
®
, vinyl, and plastic.
Microtex
/ Sharp
Quilting
Topstitch
Embroidery
Embroidery
Double
Metafil
Wing
60-90
75 & 90
70-100
75 & 90
2.0/75
3.0/75
80
100 &
110
A sharp point with a thin shaft.
Specially designed for microfiber
fabrics.
The thin, tapered point of this needle
causes less damage to fabric when
seaming and cross seaming.
A sharp point with a large eye and
deep groove. For use with heavier
fabrics – the large groove cradles
heavier threads.
Sharp needle with a large eye and
groove; also has a coating and a
larger scarf. For use with embroidery
thread – prevents shredding of rayon
or metallic threads. Two threads
may be used through the eye.
Two Embroidery needles attached
to one shaft; for double needle
work with embroidery threads.
Similar to Embroidery needle, with
large eye and deep groove, but
made of a special heat-resistant alloy
and with a friction-reducing coating.
Especially suitable for manufactured
fibers such as polyester, acrylic, nylon.
Sharp pointed needle with a noncutting wedge of metal on each side.
Makes a hole in the fabric without
cutting the threads of the fabric. Used
for decorative and heirloom work,
such as hemstitching. Works best on
natural fibers or on the bias.
Jeans
Double
Leather
MASTERING YOUR BERNINA®/bernette® SEWING MACHINE 8/05 7
©2005 BERNINA® of America, Inc. Permission to copy granted only to Authorized BERNINA® Dealers
4.0/80
80-100
Two Jeans needles attached to one
shank. For topstitching on denim with
heavy thread; can also be used for
decorative stitching with metallic
thread.
Point is a sharp cutting wedge.
Used for leather only. Not for vinyl
or simulated leathers.
Double
Wing
Metallica
Metallica
Double
100
70-90
2.0/80
2.0/80
One regular needle and one wing
needle attached to a single shaft.
Makes one large and one regular hole.
Designed for use with metallic threads;
has a large eye and deep groove.
Two Metallica points on one shaft.
Page 8
BERNINA®/bernette® Sewing Machines
Thread
Poor quality or the wrong type of thread can cause poor stitches on any
machine. Thread passes through the eye of the needle approximately
37 times in a “seesaw” action before it forms a single stitch. Poor quality
thread results in crooked and looped stitches, puckered seams, frayed
thread, and/or needle breakage. To achieve quality stitches, a sewing
machine needs three things: correct thread, correct size needle, and
properly adjusted thread tensions.
Several factors such as the fiber, twist, ply, finish, and size of thread
must be considered for use with today’s fabrics for fine stitches.
Staple – refers to the length of fibers used to twist together to form a
single ply. Domestic thread fiber lengths are usually 1½” to 2½” long
while European threads use 5½” to 6½” lengths.
Mastering
Your
BERNINA
Notes
®
Ply – number of strands twisted together to make a single thread.
Roll – the tendency of thread to roll to the right or left during stitching,
causing the stitch to appear slightly crooked. Poor quality threads are
more likely to roll.
Twist – the crimping of fibers which causes them to interlock firmly into
a single ply. Thread should not untwist during stitching. This will cause
skipped stitches, thread breakage, crooked stitches, and weak spots in
seams.
Right twist – most American
threads are twisted to the right,
causing some rolling. This gives
average stitch quality.
Left twist – Most commercial and
imported threads are twisted to
the left, giving better than average
stitch quality. Left twist resists
rolling and makes a larger loop for
the hook point to enter, reducing
skipped stitches.
MASTERING YOUR BERNINA®/bernette® SEWING MACHINE 8/05
©2005 BERNINA® of America, Inc. Permission to copy granted only to Authorized BERNINA® Dealers
8
Page 9

BERNINA®/bernette® Sewing Machines
Thread
Wearable art embellishment has necessitated the creation and
marketing of many new thread types, such as rayons and metallics.
Threads made in West Germany are left twist threads; Mettler and
Isacord threads are also left twist. To test the twist of a thread: while
holding the spool in the left hand, roll the strand of thread towards
you with one thumb. Left twist will tighten, right twist will loosen.
Fiber – refers to the type of material used to produce the thread.
Some commonly used threads:
• Polyester 2 ply – such as Metrosene 100. Good for clothing
construction on man-made, natural or blended fabrics. Will
tolerate heat up to 450° Fahrenheit.
• Polyester 3 ply cordonnet – topstitching or buttonhole twist –
such as Mettler 30/3.
• Cotton 2 ply – such as Mettler 60/2 – excellent for French
Machine Sewing, delicate machine embroidery, piecing and
darning.
• Cotton 2 ply – such as Mettler 30/2 – loose twist for a soft,
shiny look in machine embroidery, applique, and buttonholes.
• Cotton 3 ply – such as Mettler 50/3 – excellent for clothing
construction on natural fibers. Tighter twist than embroidery
cotton thread and less puckering on problem fabrics. Cotton
thread stretches less than polyester.
• Rayon – a lustrous embroidery thread. Weaker than cotton,
it is used for decorative work only.
• Polyester 2 ply embroidery thread – Isacord and Polysheen
embroidery thread – excellent for embroidery, very abrasion
resistant.
Mastering
Your
BERNINA
Notes
®
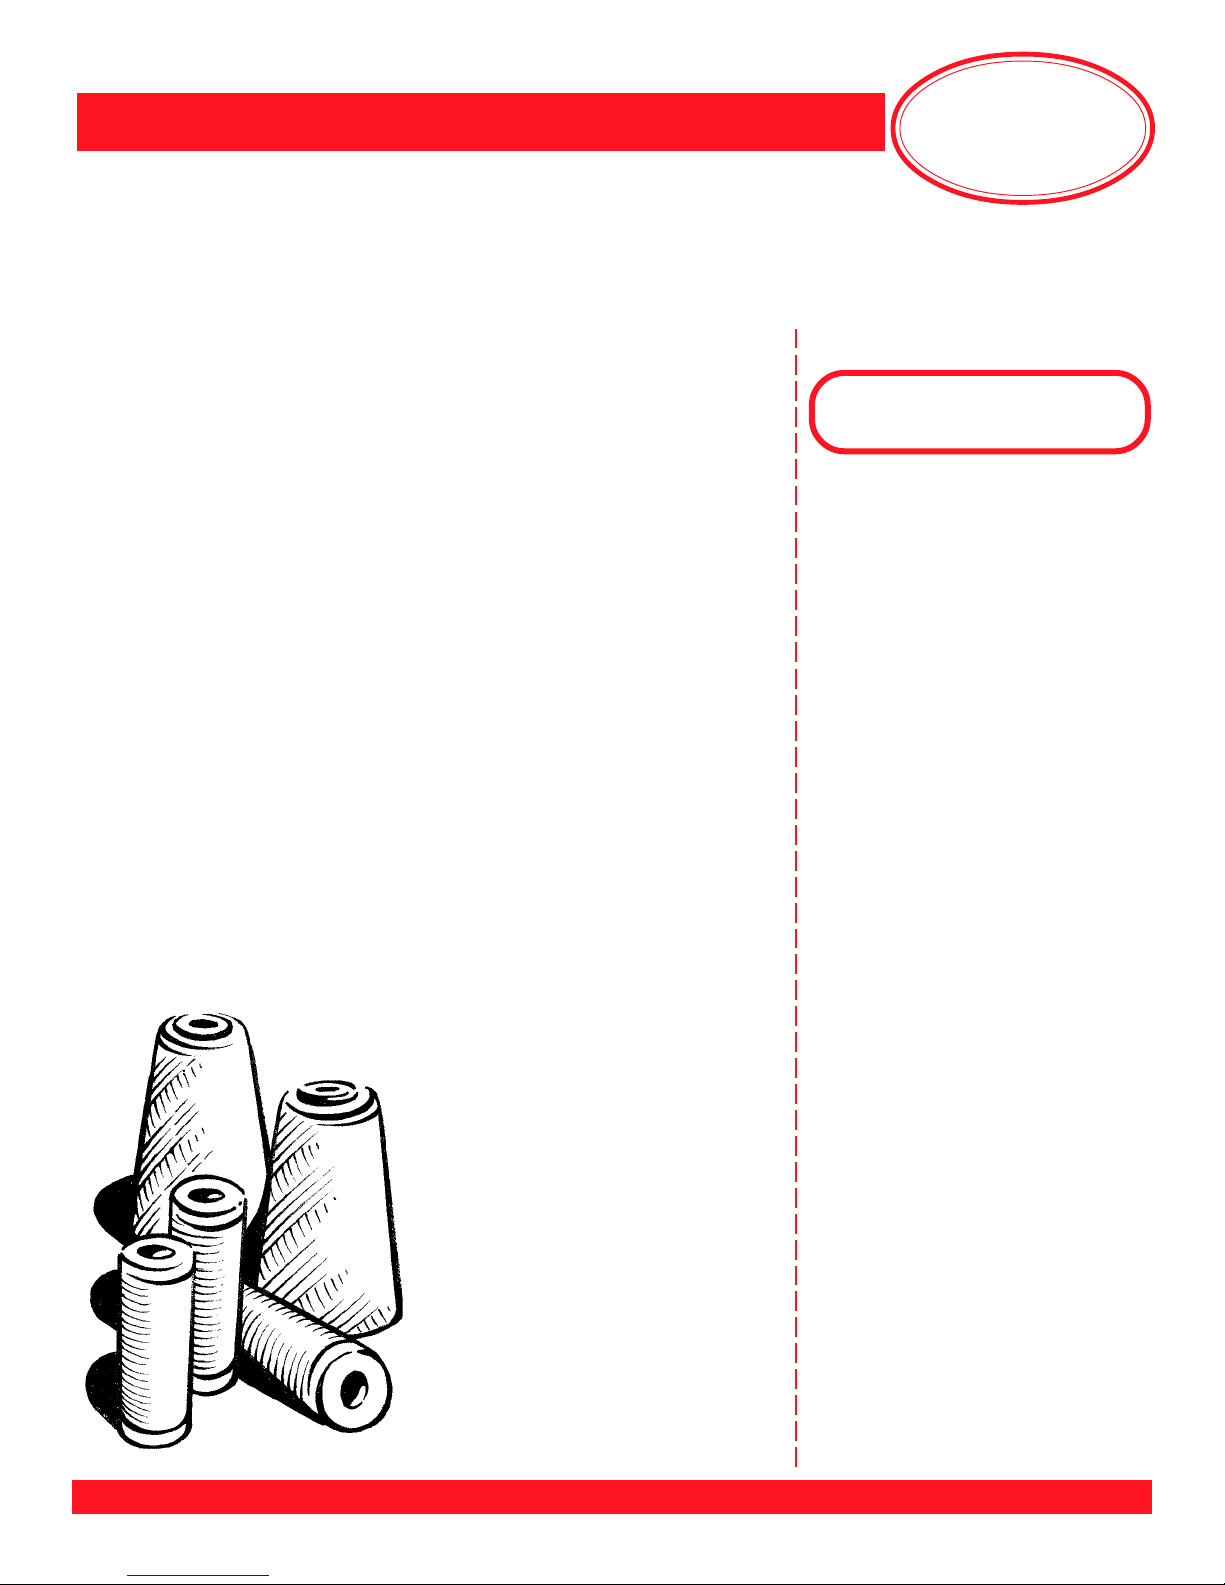
Thread Storage
Thread does deteriorate with age and should be stored with care
to keep it usable as long as possible. Extreme moisture may cause
thread to swell while very dry conditions can leave it dry and brittle
as it ages. Store thread in a covered container (thread box with a lid,
cabinet with doors, or drawers that close) if possible to keep it dustfree.
Be wary of old spools of thread recovered from Grandma’s sewing
box. The fibers may be so weak and brittle that even if it sews into a
seam, it may be so unstable that the garment or project will not hold
together and the life of the project may be considerably shortened.
MASTERING YOUR BERNINA®/bernette® SEWING MACHINE 8/05 9
©2005 BERNINA® of America, Inc. Permission to copy granted only to Authorized BERNINA® Dealers
Page 10

BERNINA®/bernette® Sewing Machines
Stabilizers & Interfacings
Tear-Away Stabilizer: The most commonly used type of stabilizer,
designed to provide temporary support of stitching. Placed on the
wrong side of the project and carefully pulled away once stitching
is complete. Available in three weights – heavy, medium, and light.
Multiple lightweight layers may be preferable to one heavy layer,
as they are easier to remove. Many adhesive versions have appeared
on the market lately, including Stabil-Stick, which has a peel-away
backing which exposes the sticky adhesive, and Hydro-Stick, has
a water-activated adhesive on one side which provides a secure
bond and a high degree of stabilization for very dense and/or intricate
designs. Available in white and black.
Mastering
Your
BERNINA
Notes
®
Cut-Away Stabilizer: The most widely used stabilizer in the commercial market. Does not break down under dense stitching, due to the
high fiber – rather than paper – content. Excess stabilizer is trimmed
away after stitching (leave approximately ¼” of stabilizer around the
edges). Remaining stabilizer continues to support stitches throughout
life of garment/project. Stabil-Stick and Hydro-Stick are available as
cut-away stabilizers; in addition, PolyMesh, described below, is available in a fusible version. Available in white and black.
Web/Poly-Mesh Type Stabilizer: A specially formulated cut-away
stabilizer developed for use behind lightweight or light-colored fabrics.
Available in fusible and non-fusible versions. Available in white, black,
and beige.
Water-Soluble Stabilizer: Used for backing and topping, in single
or multiple layers. Available in two weights. Excellent for decorative
stitching and cutwork as there are no remnants of stabilizer left after
removal (it dissolves). As a topping, it keeps stitches from being lost
in heavily napped fabrics such as velvet and corduroy. Examples:
Aqua Film and Badge Master. Aqua Mesh Plus is an adhesive
water-soluble stabilizer.
Iron-On Stabilizer: A non-woven product similar to paper. Perfect
for knits, this tear-away stabilizer is temporarily bonded to the fabric,
inhibiting the tendency of the material to stretch.
Heat Removable Stabilizer: Woven from strands of fiber that are
burned away at a low temperature, heat removable stabilizers are
perfect for heirloom stitchery.
MASTERING YOUR BERNINA®/bernette® SEWING MACHINE 8/05
©2005 BERNINA® of America, Inc. Permission to copy granted only to Authorized BERNINA® Dealers
10
Page 11

BERNINA®/bernette® Sewing Machines
Stabilizers & Interfacings
Liquid/Spray Stabilizers: Wonderful for sheer fabrics from which all
stabilizer must be removed after stitching, these products are painted or
sprayed onto the fabric. Several light applications of spray stabilizer are
preferable to one heavy application.
Knit Fusible Interfacing: A very lightweight, flexible interfacing sometimes used as a stabilizer, it gives permanent support (as an underlining)
to a fabric. Perfect for plackets, garment edges, under buttonholes, and
anywhere extra body and stability are needed. Can also be used to
stabilize decorative stitch work. Available in white, cream, black, and
gray; sometimes available in additional colors.
Mastering
Your
BERNINA
Notes
®
Woven Fusible Interfacing: This interfacing is sometimes used as a
stabilizer and is generally cut on the bias to provide better drape. Gives
a firmer hand or finish than knit or non-woven inter-facings. Used for
lapels, facings, and anywhere a great deal of extra body and stability
are needed.
Sewing and Craft Sprays
HRFive Temporary Adhesive Spray: It’s water-soluble, so it washes
out completely. Great for basting or holding two layers of fabric and/or
batting together. Can be used as a repositionable spray, allowing items
to stay sticky but be repositioned on other surfaces. This water-soluble
adhesive washes out completely. Works well for securing “hard-to-hoop”
items such as collars and cuffs to hooped stabilizer for embroidering.
Also works on paper, and be used as a no-show adhesive on vellum.
606 Fusible Spray: 606 is used to make any fabric or stabilizer fusible.
Apply to the wrong side of the fabric to be fused, using several light
coats rather than one heavy coating. The more coats used, the stronger
the bond will be. Fuse as directed on product label.
Fabric Shield: Used to protect fabrics from dust, dirt, grease, and oil,
this spray is water repellent and can be laundered and dry-cleaned.
HRZero Adhesive Remover Spray: For removing adhesives, such as
quilt sprays and other spray adhesives, as well as labels and tapes, from
various surfaces. Use on work surface areas, hoops, needles, frames,
quilting frames, stencils, table tops, etc. For use on plastic, metal, wood,
glass, stone, and ceramic surfaces. Not intended for fabric surfaces.
MASTERING YOUR BERNINA®/bernette® SEWING MACHINE 8/05 11
©2005 BERNINA® of America, Inc. Permission to copy granted only to Authorized BERNINA® Dealers
Page 12

BERNINA®/bernette® Sewing Machines
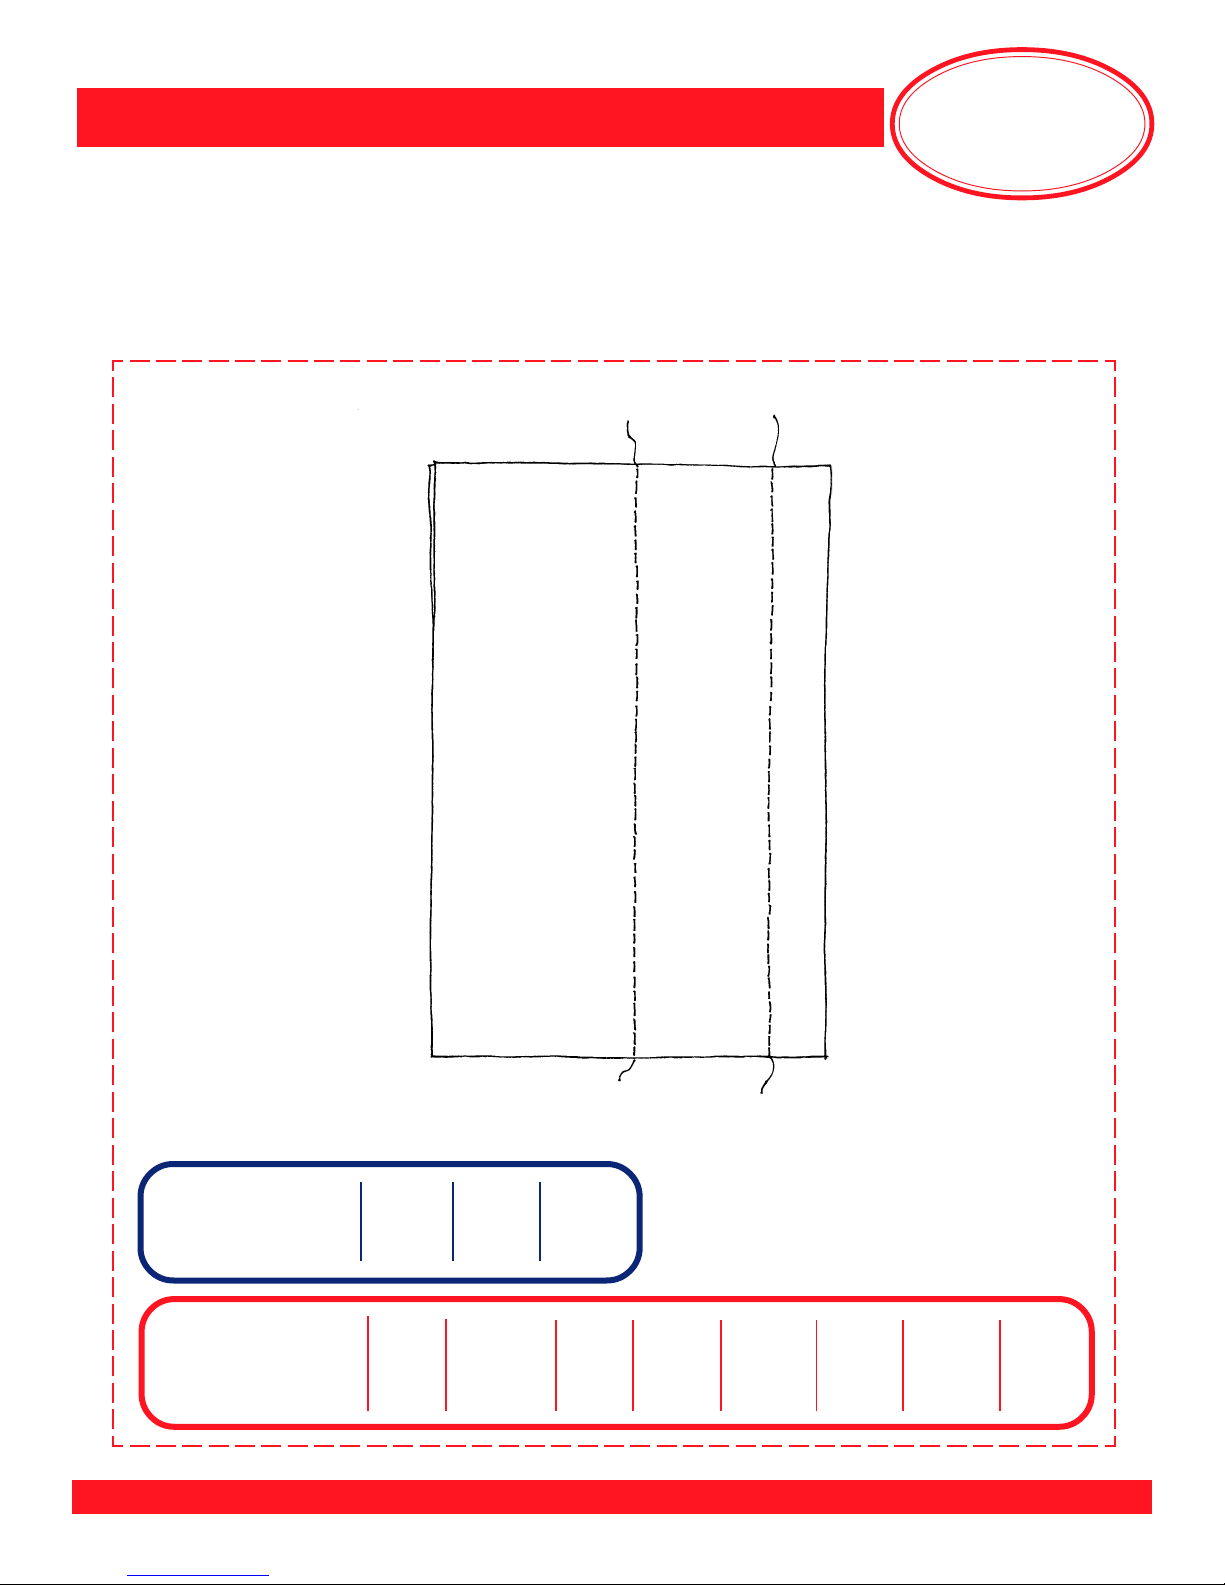
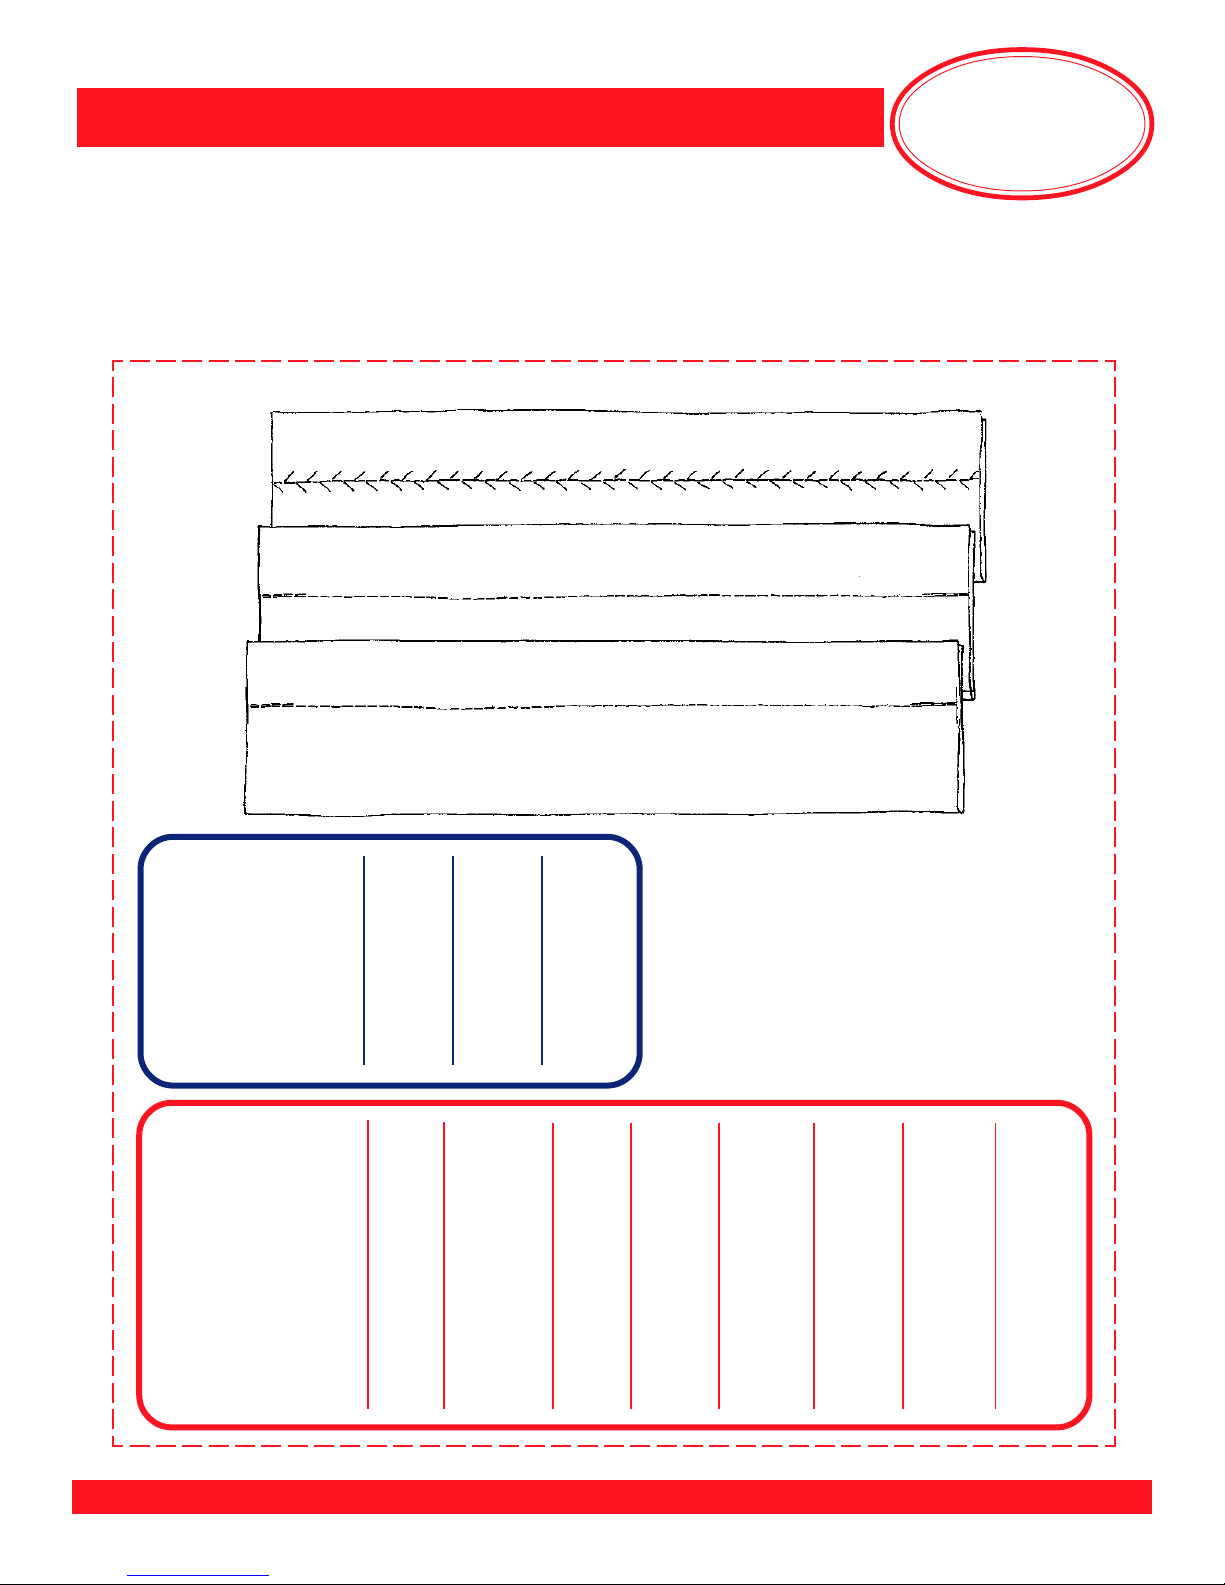
Straight Stitch/Seaming
Fabric .......................... two pieces firm, woven fabric, each 4” x 6”
Needle .................................................................... 90/14 Universal
Thread ......................... 30 wt. cotton embroidery, contrasting color
Presser Foot .................. BERNINA® Reverse Pattern Foot #1/1C
.......................................BERNINA® Quilting/Seam Guide
..........................................
....................................................
Stitch ................................................................................. straight
Needle Position .....................................................................center
bernette
®
Zigzag/Universal Foot
bernette
®
seam guide bar
Mastering
Your
BERNINA
Notes
®
Find the 5/8” engraved guide line on the stitch plate. [Not available
on bernette® 55.]
Place fabric pieces right sides together and align them with the
engraved guide line.
Sew a 5/8” seam on one 6” edge.
Attach and adjust the seam guide and sew a 2” seam on the
opposite edge of the fabric.
MASTERING YOUR BERNINA®/bernette® SEWING MACHINE 8/05
©2005 BERNINA® of America, Inc. Permission to copy granted only to Authorized BERNINA® Dealers
12
Page 13
BERNINA®/bernette® Sewing Machines
Straight Stitch/Seaming Sample
Mastering
Your
BERNINA
®
bernette
Straight 2222
Stitch
BERNINA®1008 220 230PE 240 430 440QE 630 640 730
Straight 111111111
Stitch
MASTERING YOUR BERNINA®/bernette® SEWING MACHINE 8/05 13
©2005 BERNINA® of America, Inc. Permission to copy granted only to Authorized BERNINA® Dealers
®
55 65 80e 90e
Page 14

BERNINA®/bernette® Sewing Machines
Needle Positions
Fabric ...................................................... firm, woven fabric 4” x 6”
Stabilizer .............................................lightweight tear-away, 4” x 6”
Needle .................................................................... 90/14 Universal
Thread .......................... 30 wt. cotton embroidery, contrasting color
Presser Foot .................. BERNINA® Reverse Pattern Foot #1/1C
.......................................... bernette® Zigzag/Universal Foot
Stitch ................................................................................. straight
Needle Position ................................................................. as noted
Fold fabric in half to 2” x 6”.
Mastering
Your
BERNINA
Notes
®
Select Straight Stitch.
Position the fold of the fabric on the 1” mark on the right side of
the stitch plate. [Not available on bernette® 55.]
Sew ½” (approximately five stitches). Stop with the needle up,
out of the fabric.
Move the needle one position to the left.
bernettes
Stitch ½”. Stop with needle out of the fabric. Repeat until all left
needle positions have been stitched.
Leaving the fabric under the foot – move the needle position back
to center.
BERNINA® models only:
Move needle one position to the right. Stitch ½”. Note: On the
1008, avoid bending the needle by moving it up out of the fabric
before changing the needle position; this is not necessary on
computerized models, as the machine will automatically wait until
the needle is in the highest position before moving the needle.
Repeat this until all right needle positions have been stitched.
®
: Move ½ number to the left using the Stitch Width dial.
Note: If your machine has a Pattern Repeat function, activate
Pattern Repeat 1x, stitch until the machine automatically stops,
then adjust the needle position; repeat until all positions are sewn.
MASTERING YOUR BERNINA®/bernette® SEWING MACHINE 8/05
.
©2005 BERNINA® of America, Inc. Permission to copy granted only to Authorized BERNINA® Dealers
14
Page 15
BERNINA®/bernette® Sewing Machines
Needle Positions Sample
Mastering
Your
BERNINA
®
bernette
Straight 2222
Stitch
Needle 2.5-5mm 3.5-7mm 3.5-7mm 3.5-7mm
Position
Range
BERNINA®1008 220 230PE 240 430 440QE 630 640 730
Straight 111111111
Stitch
Needle 5 9 9 9 11 11 11 11 11
Positions
Pattern -- -- -- -- -- -- yes yes yes
Repeat
Function
Needle -- yes yes yes yes yes yes yes yes
Down/Up
Function
®
55 65 80e 90e
MASTERING YOUR BERNINA®/bernette® SEWING MACHINE 8/05 15
©2005 BERNINA® of America, Inc. Permission to copy granted only to Authorized BERNINA® Dealers
Page 16

BERNINA®/bernette® Sewing Machines
Securing Stitches
Fabric .............................4 pieces firm, woven fabric, each 4” x 6”
Needle ................................................................... 90/14 Universal
Thread ......................... 30 wt. cotton embroidery, contrasting color
Presser Foot ........... BERNINA® Reverse Pattern Foot #1 or #1C
......................................... bernette® Zigzag/Universal Foot
Additional Accessories .................................. Quilting/Seam Guide
..................................................... Seam Guide with Rulers
................................................. bernette® Seam Guide Bar
Stitches............................................................................... straight
..................... securing stitch and/or quilters securing stitch
....................................................................... feather Stitch
Needle Position .................................................................... center
Mastering
Your
BERNINA
Notes
®
Row 1 - Straight Stitch:
Find the
55.] Fold one piece of fabric in half lengthwise. Place it under the
presser foot; align one 6” edge with the
Select straight stitch. Sew a few stitches forward, then press the
Quick Reverse Button/Lever; sew a few stitches backward; machine
will sew in reverse until the Quick Reverse Button/Lever is released.
Continue stitching the seam; secure the end in the same way.
BERNINA
Row 2 - Securing Stitch or Quilter’s Securing Stitch:
Attach the Quilting/Seam Guide or Seam Guide with Rulers to the
foot. Set the guide
piece of fabric; align the raw edges with the guide.
Select the Securing Stitch. Begin to sew; machine will automatically
secure the stitching, then continue stitching forward. At the end of
the seam, press and release the Quick Reverse button. The machine
will automatically secure the stitching, then stop.
Sample 3 - Securing Function:
Place remaining two fabric pieces wrong sides together. Attach one
of the Seam Guides with Rulers to presser foot. Set guide 2” from
needle; select a feather stitch. Engage the Securing Function, if
available; machine will automatically secure the stitches at beginning
of stitching. Re-engage when approaching the end of the stitching;
machine will automatically secure the stitching at the end of the
current stitch pattern (630/640 will stop stitching as well).
5
/8” guide line on the stitch plate. [Not available on bernette
5
/8” guide line.
®
models only:
5
/8” from the center needle position. Fold another
®
Securing Stitch:
Five straight stitches forward
and back at beginning; five
stitches backward and forward
at end.
Quilters Securing Stitch:
Several very short stitches at
beginning and end of straight
stitching.
Securing Function:
Several very short stitches at
beginning/end of stitching; can
be applied to decorative as well
as straight stitches.
MASTERING YOUR BERNINA®/bernette® SEWING MACHINE 8/05
©2005 BERNINA® of America, Inc. Permission to copy granted only to Authorized BERNINA® Dealers
16
Page 17
BERNINA®/bernette® Sewing Machines
Securing Stitches Sample
Mastering
Your
BERNINA
®
bernette
Straight 2222
Stitch
Securing -- -- -- -Stitch
Securing -- -- -- -Function
BERNINA®1008 220 230PE 240 430 440QE 630 640 730
Securing
and/or --/-- 5/-- --/5 5/-- 5/-- 5/-- 5/324 5/324 5/324
Quilters
Securing
Stitch
Feather -- 45 28 44 53 48 332 332 332
Stitch
Securing -- -- -- -- yes yes yes yes yes
Function
®
55 65 80e 90e
MASTERING YOUR BERNINA®/bernette® SEWING MACHINE 8/05 17
©2005 BERNINA® of America, Inc. Permission to copy granted only to Authorized BERNINA® Dealers
Page 18
BERNINA®/bernette® Sewing Machines
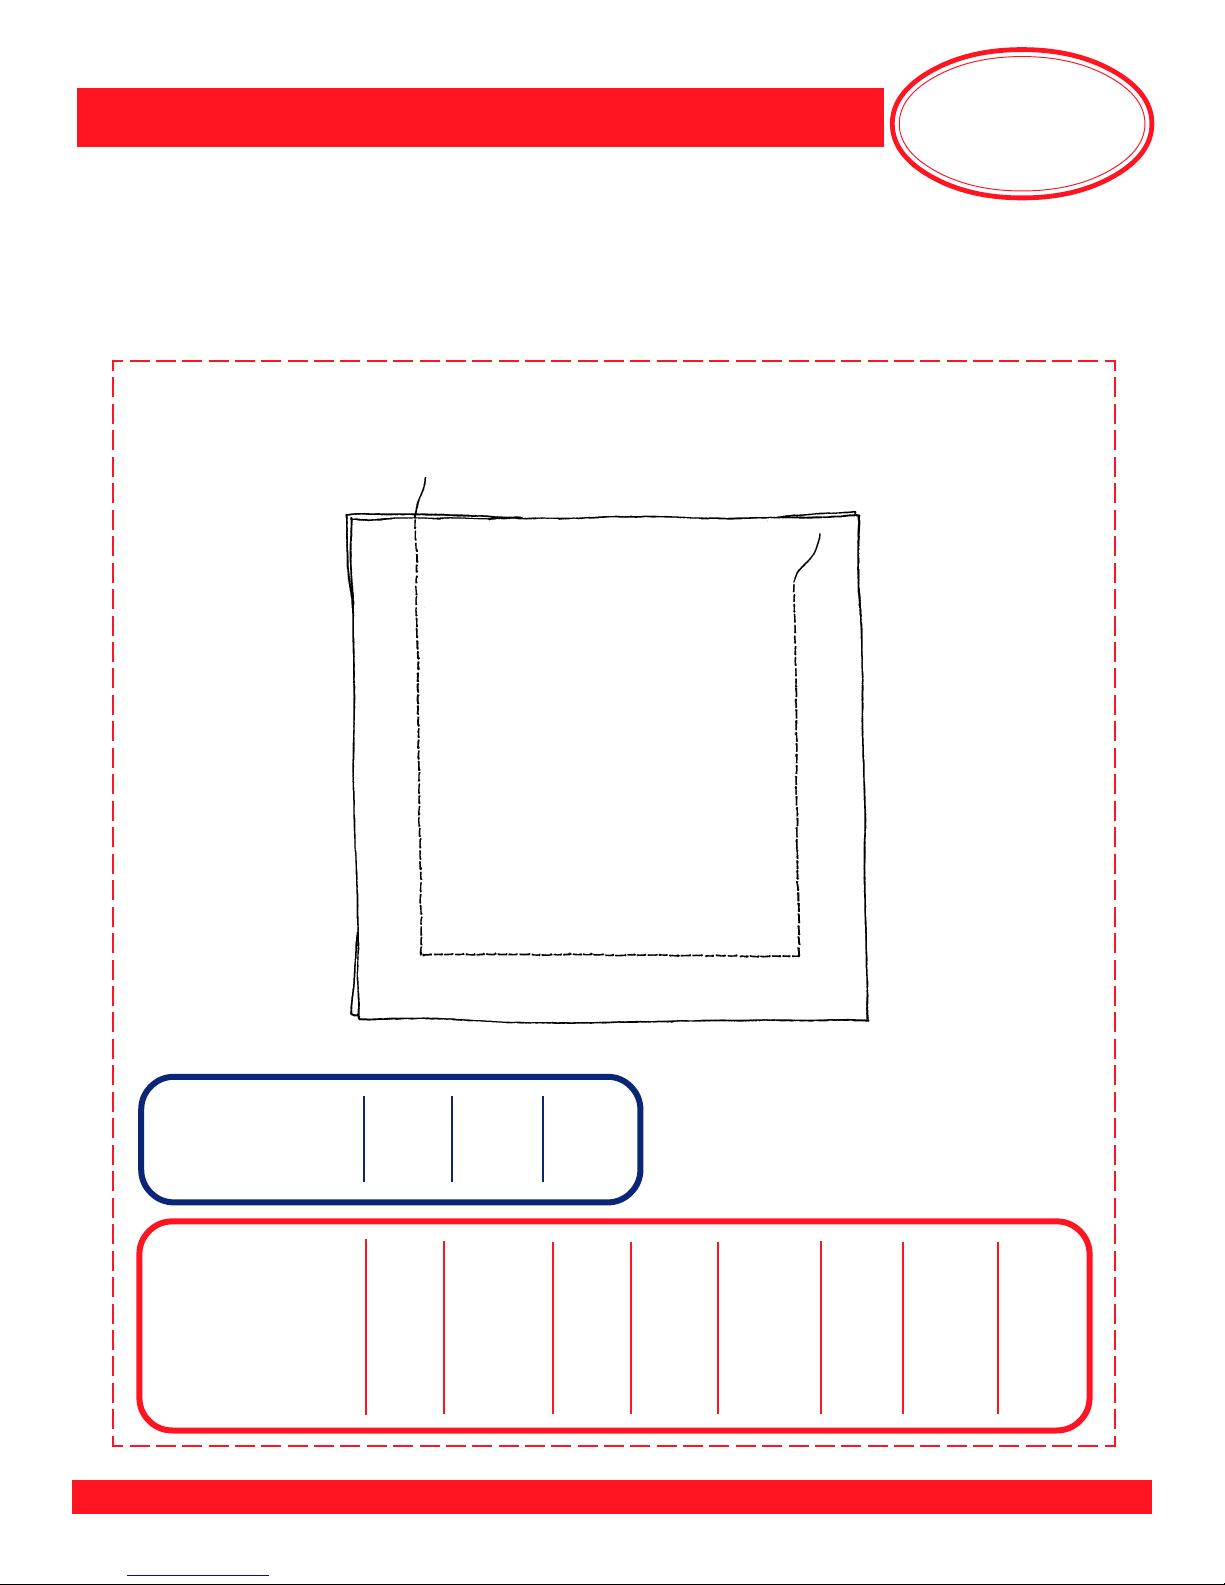
Stitching Corners
Fabric ..................... two pieces firm, woven fabric, each 4” x 6”
Stabilizer .......................................... lightweight tear-away, 4” x 6”
Needle ................................................................. 90/14 Universal
Thread ....................... 30 wt. cotton embroidery, contrasting color
Presser Foot ................ BERNINA® Reverse Pattern Foot #1/1C
.......................................
bernette
Stitch ...............................................................................straight
®
Zigzag/Universal Foot
Mastering
Your
BERNINA
Notes
®
BERNINA
Select straight stitch.
Place fabric pieces right sides
together.
Place the fabric under the foot
with the top edge even with the
horizontal line behind the foot.
The right edge should be even
with the
Engage the Needle Down function, if available.
Sew until the bottom edge
touches the horizontal line in
front of the needle; stop.
Pivot, using FHS (Free Hand
System) if available. Continue
sewing until you reach the next
corner; repeat the pivot.
Stitch 3 sides of this sample.
Note: For crisply turned corners,
take two small stitches diagonally
across corner before completing
the pivot.
®
5
/8” seam line.
bernette
Draw a line 5/8” from each corner
of one fabric square.
Select straight stitch.
Place fabric pieces right sides
together.
Place fabric under foot, top edge
even with 2nd horizontal line
behind foot (not available on 55).
Right edge should be even with
5
the
®
/8” seam line.
80e & 90e: Engage Needle Down
function; audio signal will beep
once. Note: To take a single stitch,
press Needle Up/Down two times.
5
Sew until the needle is
the end of the fabric.
Pivot. Continue sewing until you
come to the next corner; repeat
the pivot.
Stitch three sides of this sample.
Note: For crisply turned corners,
take two small stitches diagonally
across corner before completing
the pivot.
/8” from
MASTERING YOUR BERNINA®/bernette® SEWING MACHINE 8/05
©2005 BERNINA® of America, Inc. Permission to copy granted only to Authorized BERNINA® Dealers
18
Page 19
BERNINA®/bernette® Sewing Machines
Stitching Corners Sample
Mastering
Your
BERNINA
®
bernette
Needle -- -- yes yes
Down/Up
BERNINA®1008 220 230PE 240 430 440QE 630 640 730
Needle -- yes yes yes yes yes yes yes yes
Down/Up
Function
Freehand -- optional optional yes yes yes yes yes yes
System
MASTERING YOUR BERNINA®/bernette® SEWING MACHINE 8/05 19
©2005 BERNINA® of America, Inc. Permission to copy granted only to Authorized BERNINA® Dealers
®
55 65 80e 90e
Page 20
BERNINA®/bernette® Sewing Machines
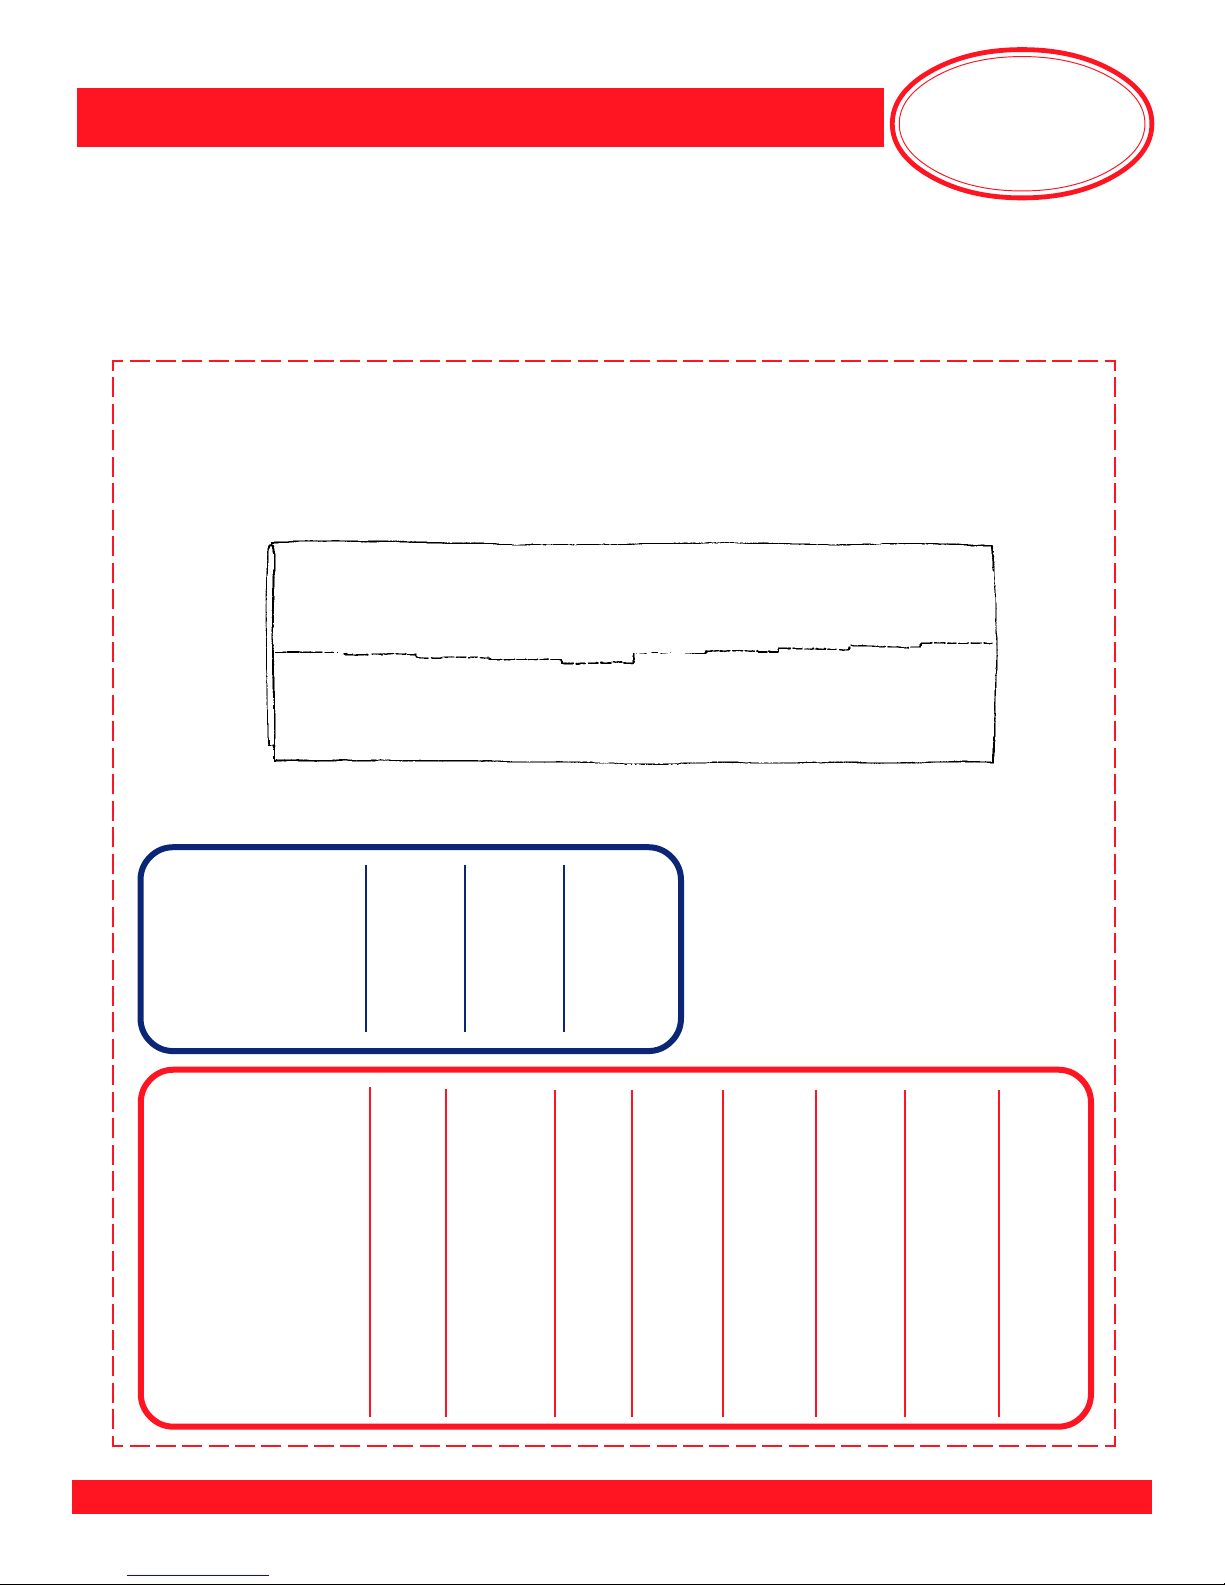
Zigzag/Oversewing Edges
Fabric ................................................... firm, woven fabric, 4” x 6 ”
Needle ................................................................90/14 Embroidery
Thread ......................... 30 wt. cotton embroidery, contrasting color
Presser Foot ........... BERNINA® Reverse Pattern Foot #1 or #1C
......................................... bernette® Zigzag/Universal Foot
Stitch ........................................................................ zigzag stitch
Needle Position .................................................. center or far right
Select the Zigzag Stitch (width = 4, length = 2).
Mastering
Your
BERNINA
Notes
®
Finish one 6” edge using the following steps.
Guide edge of fabric under the middle of the presser foot – or –
Move needle position to far right; sew using the inside edge
of the right toe as a guide.
The needle should go into the fabric on one stroke of the needle
and over the edge on the next stroke.
Do not use too long a stitch or too wide a stitch; the edge should
lie flat, not roll.
Match the weight of the thread to the weight of the fabric.
Trim and mount the sample.
MASTERING YOUR BERNINA®/bernette® SEWING MACHINE 8/05
©2005 BERNINA® of America, Inc. Permission to copy granted only to Authorized BERNINA® Dealers
20
Page 21

BERNINA®/bernette® Sewing Machines
Zigzag/Oversewing Edges Sample
Mastering
Your
BERNINA
®
bernette
Zigzag 3333
Stitch
BERNINA®1008 220 230PE 240 430 440QE 630 640 730
Zigzag 222222222
Stitch
Needle 59991111111111
Positions
MASTERING YOUR BERNINA®/bernette® SEWING MACHINE 8/05 21
©2005 BERNINA® of America, Inc. Permission to copy granted only to Authorized BERNINA® Dealers
®
55 65 80e 90e
Page 22

BERNINA®/bernette® Sewing Machines
Satin Stitch
Fabric .................................................. firm, woven fabric, 6” x 8”
Stabilizer ............................................................ tear-away, 4” x 6”
Needle .............................................................. 90/14 Embroidery
Thread ....................... 30 wt. cotton embroidery, contrasting color
Presser Foot .... BERNINA® Open Embroidery Foot #20 or #20C
................................. or BERNINA® Embroidery Foot #6
®
..................... or BERNINA
................................................
Extra Accessory Embroidery Bobbin Case (artista 730/640 only)
Stitch ....................................................................... zigzag stitch
Needle Position ......................................................... as indicated
Clear Embroidery Foot #39
bernette
®
Satin Stitch Foot
Mastering
Your
BERNINA
Notes
®
Fold fabric in half to 4” x 6”. Use stabilizer as needed.
Select the Zigzag Stitch. Change the stitch length to satin stitch
and the stitch width to the widest possible.
Thread the bobbin thread through the eye in the bobbin case
finger if using a machine with a CB hook system. For machines
with a rotary bobbin system, loosen the needle tension slightly
and use the Embroidery (gold latch) Bobbin Case.
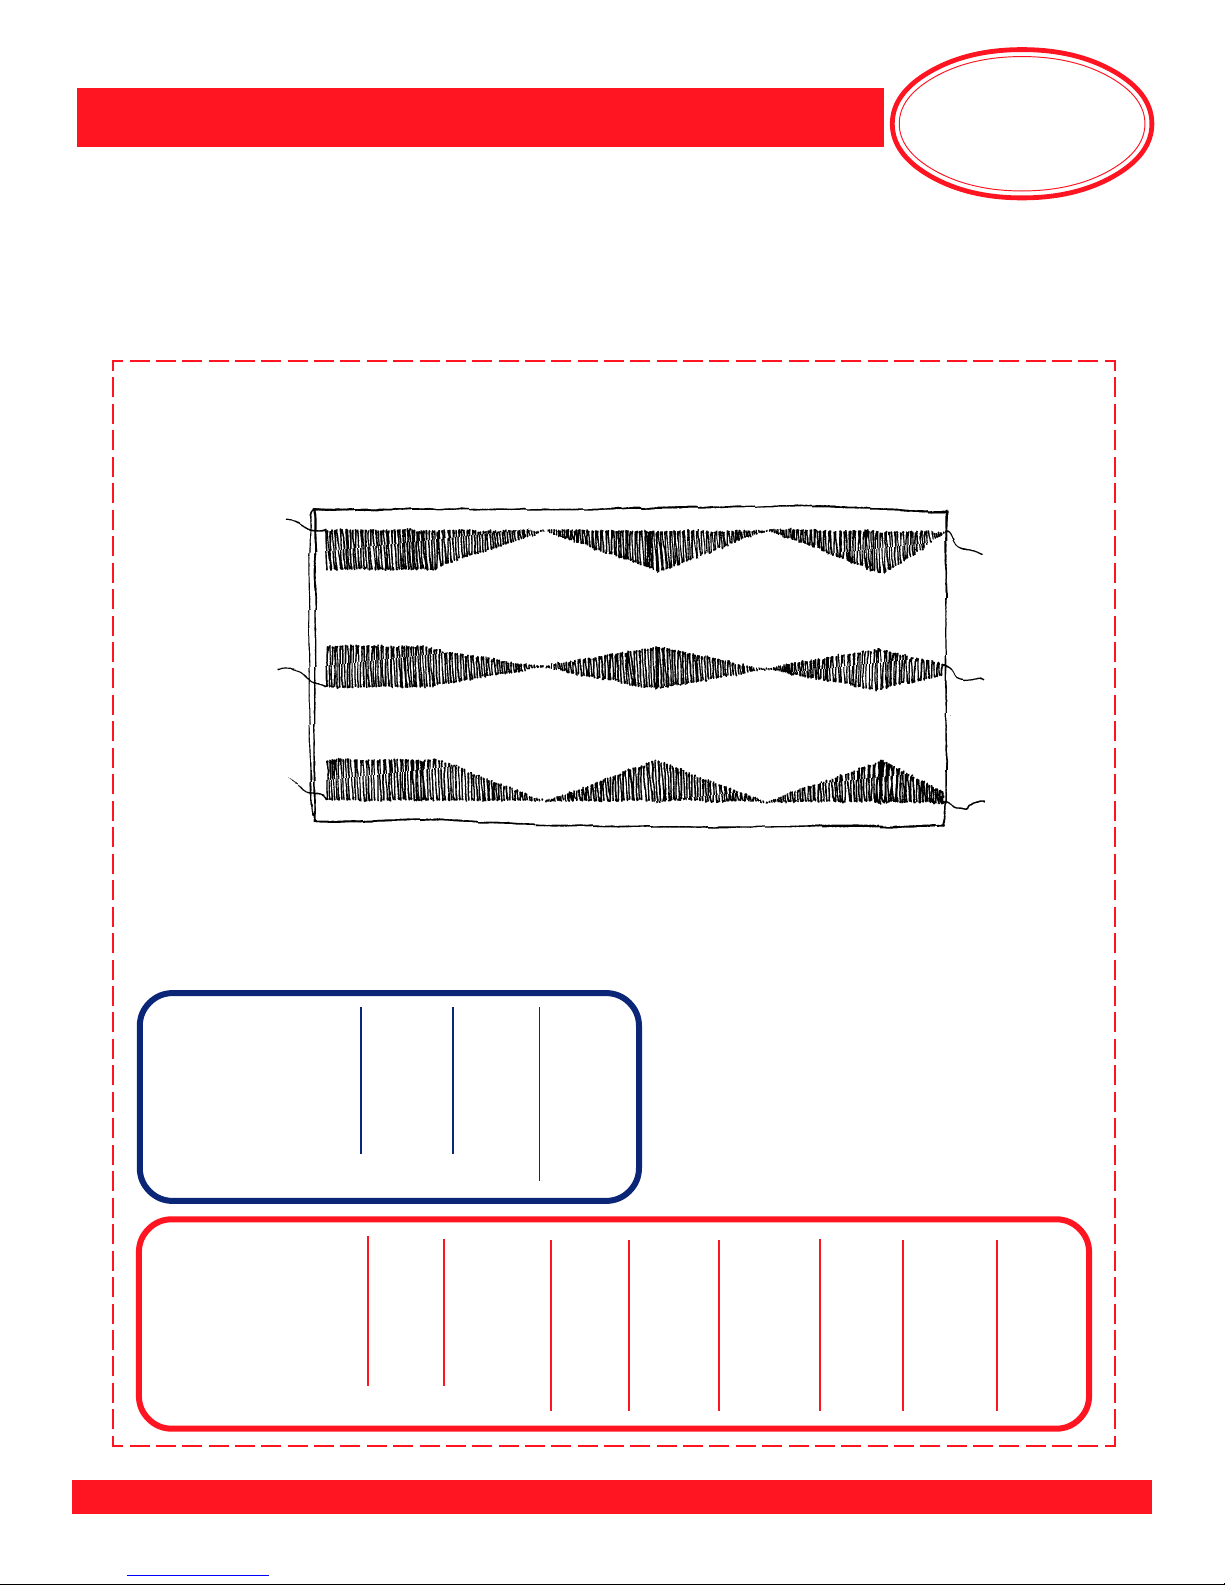
Move the needle position to the center. Sew along the center of
the fabric about 1”, then, while continuing to sew, decrease the
stitch width to taper the stitch to 0mm. Continue sewing, widening
the stitch back to maximum. Repeat until stitching reaches end
of fabric.
BERNINA® models only:
Move the needle position all the way to the left. Position the raw
edge of the fabric on the 3/8” line (on the right side of the stitch
plate). Stitch, tapering and widening the satin stitch while sewing.
Move the needle position all the way to the right. Position the fold
of the fabric on the 3/8” line (on the left side of the stitch plate).
Stitch along the right side of the fabric, tapering and widening the
stitching while sewing.
Note: A preprogrammed satin stitch is available on artista models
630/640/730: stitch #354 in the Quilt Stitch menu.
MASTERING YOUR BERNINA®/bernette® SEWING MACHINE 8/05
©2005 BERNINA® of America, Inc. Permission to copy granted only to Authorized BERNINA® Dealers
22
Page 23
BERNINA®/bernette® Sewing Machines
Satin Stitch Sample
Mastering
Your
BERNINA
®
bernette
Zigzag 3333
Stitch
Bobbin ORRR
Hook
System (Oscillating/O or Rotary/R)
BERNINA®1008 220 230PE 240 430 440QE 630 640 730
Zigzag 222222222
Stitch
Bobbin CB CB CB CB CB CB CB R R
Hook
System (Oscillating/CB or Rotary/R)
MASTERING YOUR BERNINA®/bernette® SEWING MACHINE 8/05 23
©2005 BERNINA® of America, Inc. Permission to copy granted only to Authorized BERNINA® Dealers
®
55 65 80e 90e
Page 24

BERNINA®/bernette® Sewing Machines
Topstitch/Edgestitch
Fabric ....................... firm, woven fabric, two pieces, 4” x 6” each
Needle ............................................................... 90/14 Embroidery
Thread ........................ 30 wt. cotton embroidery, contrasting color
Presser Foot ................ BERNINA® Edgestitch Foot #10 or #10C
.................................................... bernette® Blindhem Foot
Stitch ............................................................. triple straight stitch
Needle Position .......................................................... as indicated
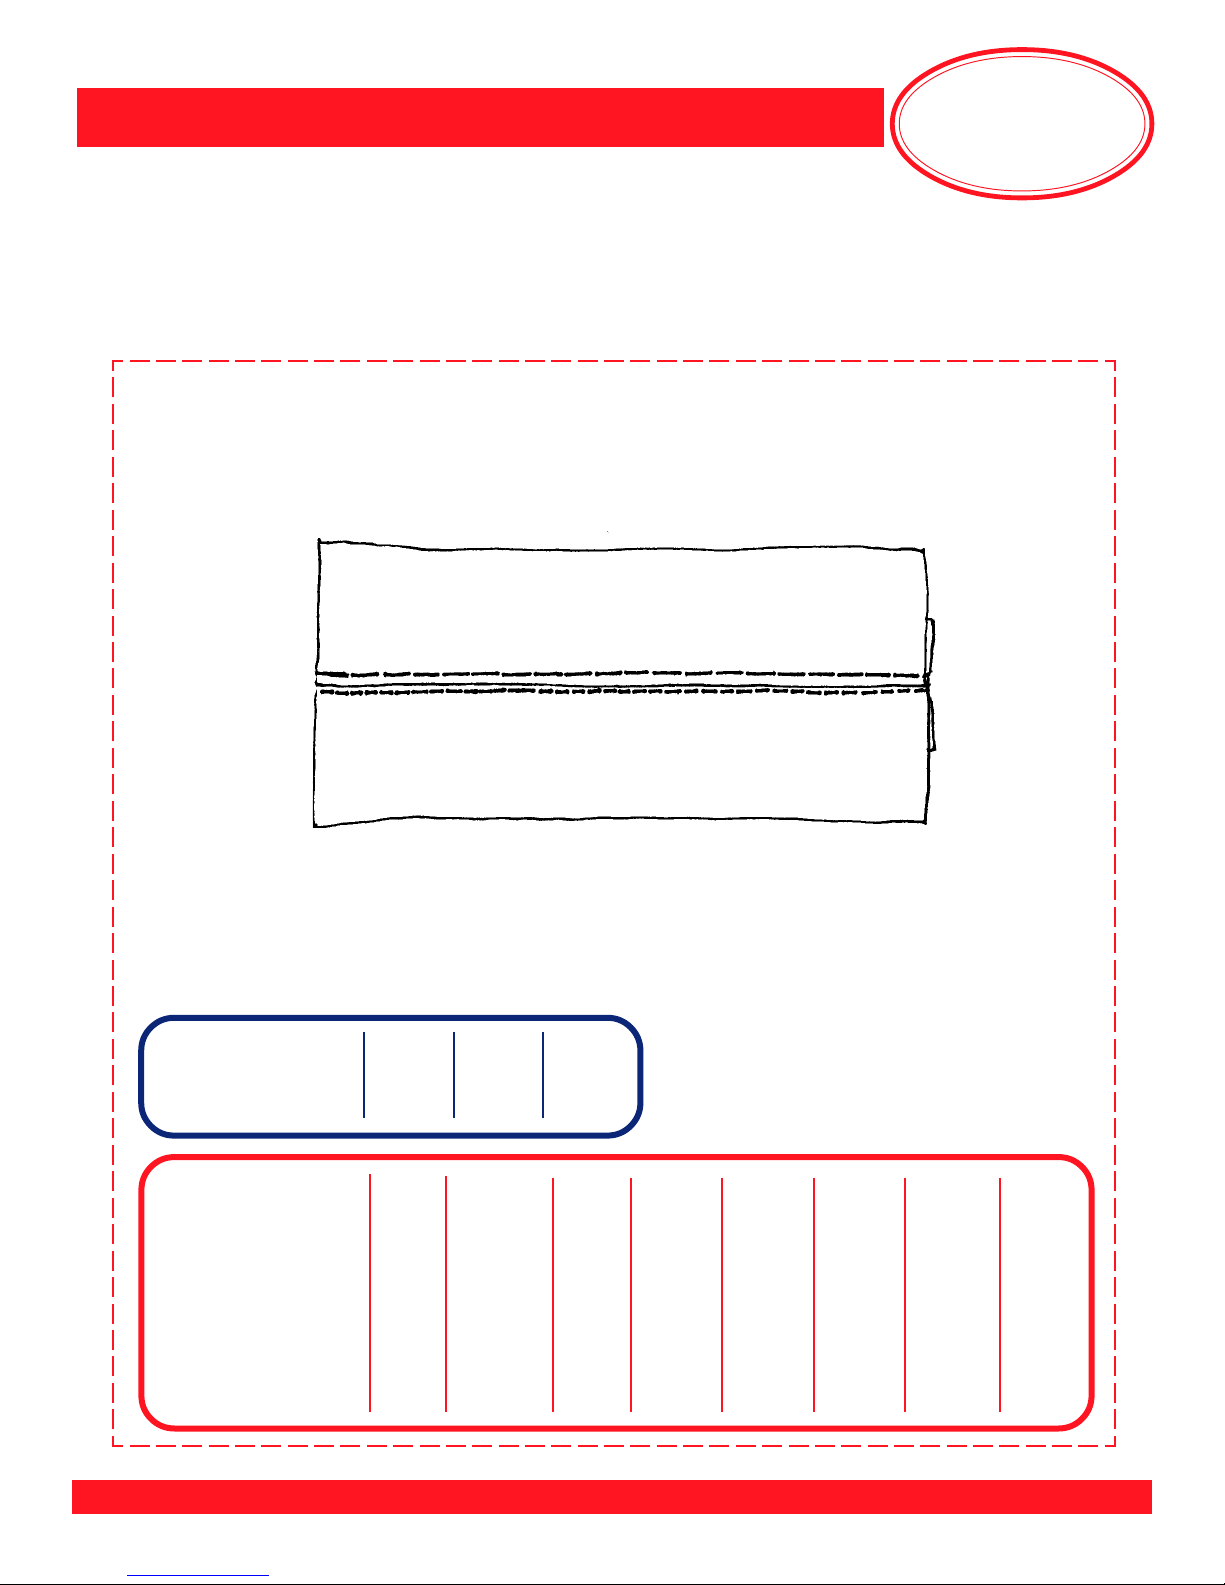
Place fabrics right sides together. Stitch together with a 5/8” seam
along one 6” side. Finger-press the seam open.
Mastering
Your
BERNINA
Notes
®
Select the triple straight stitch.
BERNINA
From the right side, position
the blade of Foot #10/10C in
the ditch of the seam. Move
the needle position two places
to the left.
Stitch the length of the seam.
If available, select the Long
Stitch function. If not available,
increase the stitch length to
5mm.
Move the needle all the way
to the right, if available.
Starting at the top of the seam
again, stitch the length of the
seam.
®
bernette
Move the white blade 1/8” from
the needle. Position the blade
in the ditch of the seam.
Stitch the length of the seam.
Increase the stitch length to
5mm.
Move the needle all the way to
the left.
Move white blade to line up
with right side of the needle
opening of the presser foot.
With the guide in the ditch of
the seam, and starting at the
top of the seam again, stitch
the length of the seam.
®
MASTERING YOUR BERNINA®/bernette® SEWING MACHINE 8/05
©2005 BERNINA® of America, Inc. Permission to copy granted only to Authorized BERNINA® Dealers
24
Page 25
BERNINA®/bernette® Sewing Machines
Topstitch/Edgestitch Sample
Mastering
Your
BERNINA
®
bernette
Triple 7 155151
Straight Stitch
BERNINA®1008 220 230PE 240 430 440QE 630 640 730
Triple 966666666
Straight
Stitch
Needle 59991111111111
Positions
Long Stitch -- -- -- -- -- -- -- yes yes
Function
MASTERING YOUR BERNINA®/bernette® SEWING MACHINE 8/05 25
©2005 BERNINA® of America, Inc. Permission to copy granted only to Authorized BERNINA® Dealers
®
55 65 80e 90e
Page 26

BERNINA®/bernette® Sewing Machines
Basting
Fabric .................................... firm, woven fabric, 2 pieces, 4” x 6” each
Needle ........................................................................ 90/14 Embroidery
Thread ................................. 30 wt. cotton embroidery, contrasting color
®
Foot ... BERNINA
...... BERNINA
.................................................. bernette
Stitches......................................................................................... straight
......................................................................................... basting
Needle Position ............................................................................. center
Place fabric pieces right sides together.
Reverse Pattern Foot #1/1C (1008, 640 & 730) – or –
®
Darning Foot #9 (220/230/240, 430/440 & 630)
®
Zigzag/Universal Foot
Mastering
Your
BERNINA
Notes
®
BERNINA
artista 640 & 730
Select preprogrammed basting
stitch, if available, or straight
stitch (preprogrammed length).
Engage Long Stitch function if
available.
Attach Foot #1/1C. Baste a
seam along one side of fabric.
Adjust stitch length to 5mm; baste
another
side of fabric.
activa 220/230/240,
aurora 430/440 & artista 630
Select preprogramed basting
stitch. Attach Foot #9 and lower
feed dog.
Sew one stitch; pull fabric
desired length (2.5mm) of stitch
from behind machine. Take one
stitch. Repeat as needed.
®
5
/8”
5
/8” seam along opposite
bernette
®
& BERNINA® 1008
Using a straight stitch with a
length of 5mm, baste a 5/8”
seam along one side of fabric.
Repeat for opposite edge,
moving fabric 5mm or more
between stitches.
MASTERING YOUR BERNINA®/bernette® SEWING MACHINE 8/05
©2005 BERNINA® of America, Inc. Permission to copy granted only to Authorized BERNINA® Dealers
26
Page 27
BERNINA®/bernette® Sewing Machines
Basting Sample
Basting Stitch or [Straight Stitch + Long Stitch Function]
Preprogrammed settings (Stitch Length = 2mm)
Mastering
Your
BERNINA
®
Basting Stitch or [Straight Stitch + Long Stitch Function]
Stitch Length = 5mm
bernette
Straight 2222
Stitch
BERNINA®1008 220 230PE 240 430 440QE 630 640 730
Basting -- 16 19 21 19 21 30 21 21
Stitch
®
55 65 80e 90e
Long Stitch -- -- -- -- -- -- -- yes yes
Function
MASTERING YOUR BERNINA®/bernette® SEWING MACHINE 8/05 27
©2005 BERNINA® of America, Inc. Permission to copy granted only to Authorized BERNINA® Dealers
Page 28

BERNINA®/bernette® Sewing Machines
BERNINA® electronic models only
Temporary Altered Stitch Memory
Fabric .................................................... firm, woven fabric, 6” x 8”
Stabilizer ............................................................. tear-away, 4” x 6”
Needle ................................................................90/14 Embroidery
Thread ......................... 30 wt. cotton embroidery, contrasting color
Presser Foot ........... BERNINA® Reverse Pattern Foot #1 or #1C
Stitch .................................................................................... heart
Needle Position .................................................................... center
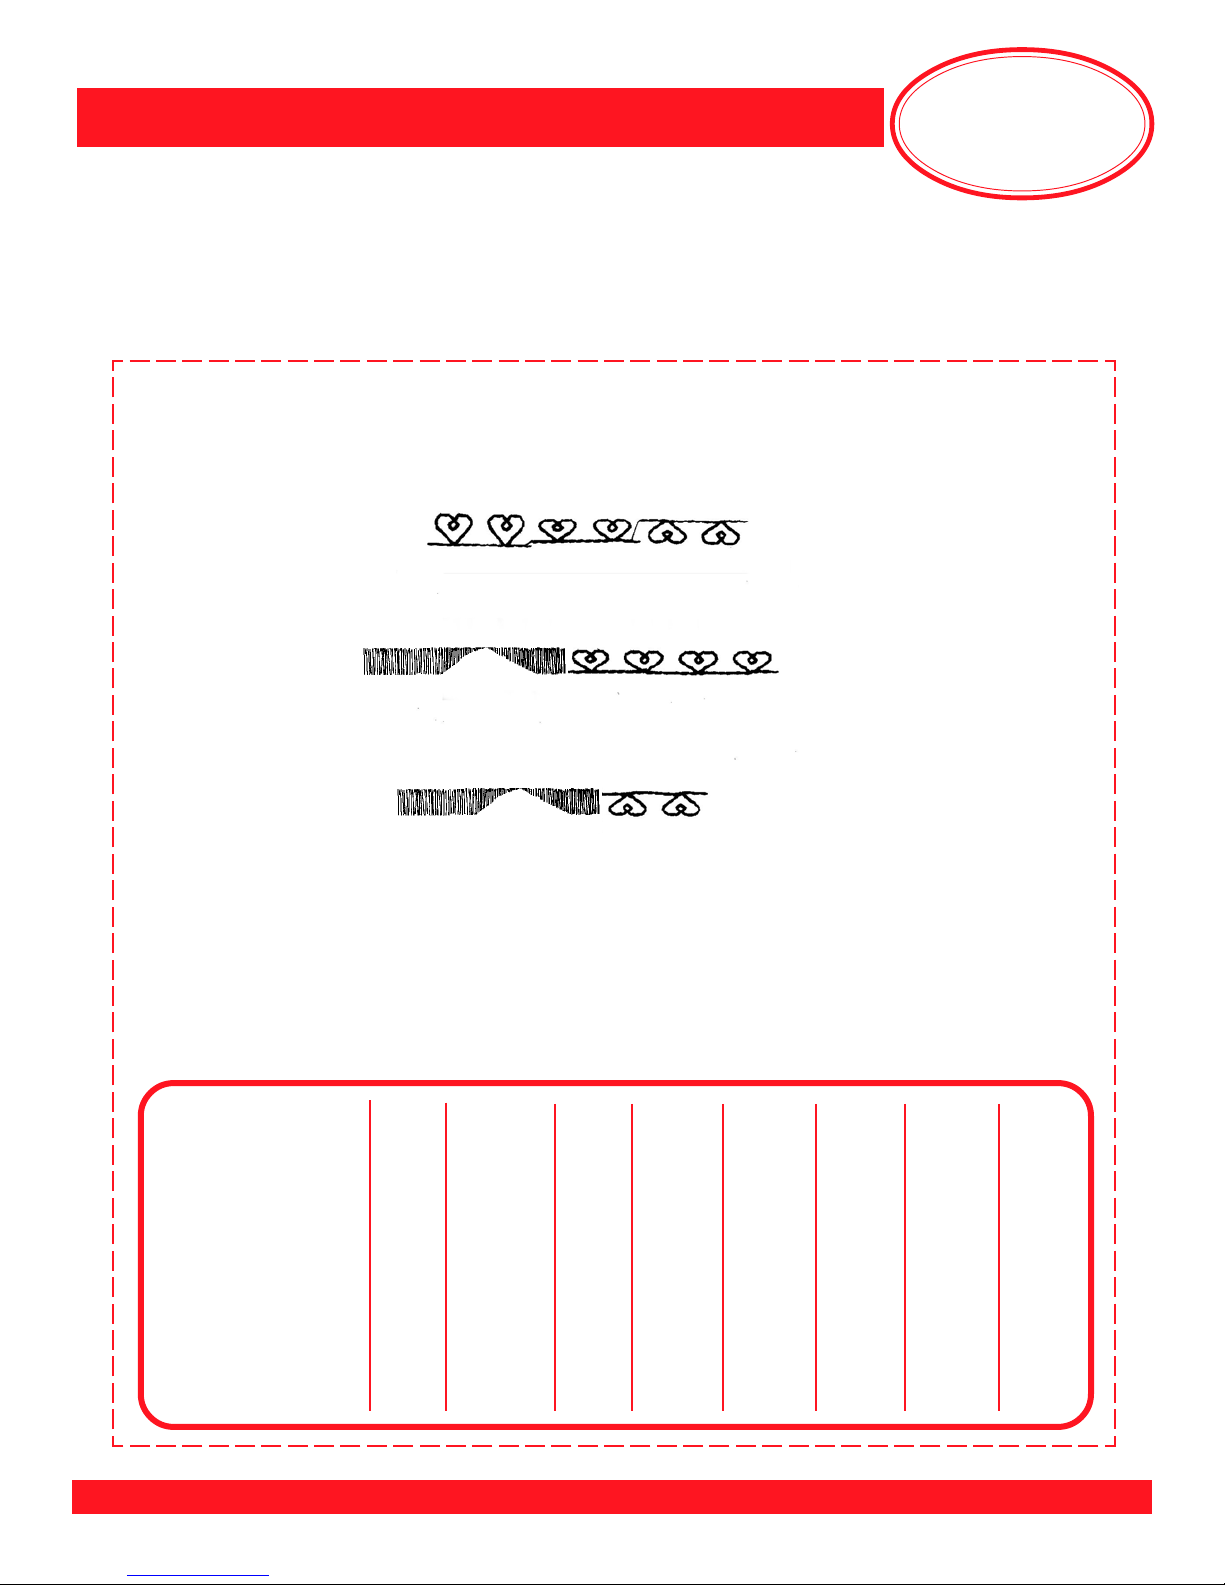
Fold fabric to 4” x 6”. Insert stabilizer between layers.
Select the heart or other pattern stitch. Stitch two patterns and stop.
Note: If available, select the Pattern Repeat function 2x. Stitch;
machine will automatically stop after two repeats.
– or –
Note: If available, touch Pattern End while sewing second pattern;
machine will automatically stop at the end of the current pattern.
Mastering
Your
BERNINA
Notes
®
Reduce the stitch width to 4mm (6mm for the artista 640 and 730).
Stitch two more repeats.
Select Vertical Mirror Image function if available. Stitch two more
repeats.
Select the zigzag stitch from Satin Stitching exercise (pages 22-23).
Note: The sewing computer remembered all the changes made to
the stitch – length, width, and needle position.
All models except artista 630/640/730: Disengage the Mirror Image
function, as it remains active until turned off.
Select heart stitch again. Sew. Note: The sewing computer
remembered all changes made to heart stitch, as well as to zigzag.
Note: In addition to stitch width, length, and needle position, the
artista 630/640/730 sewing computer remembers changes to the
Mirror Image and Pattern Repeat functions. Temporary Altered
Memory will be explored further in Class 6, artista Extras.
Return the active stitch to default settings by touching clr (clear).
MASTERING YOUR BERNINA®/bernette® SEWING MACHINE 8/05
©2005 BERNINA® of America, Inc. Permission to copy granted only to Authorized BERNINA® Dealers
28
Page 29
Mastering
BERNINA®/bernette® Sewing Machines
Your
BERNINA
Temporary Altered Stitch Memory Sample
®
(
BERNINA® 1008 220 230PE 240 430 440QE 630 640 730
Heart -- 32 46 85 127 156 712 712 712
Stitch
Pattern End -- -- yes yes yes yes yes yes yes
Mirror -- -- -- yes yes yes yes yes yes
Image
Pattern -- -- -- -- -- -- yes yes yes
Extend
Temporary -- yes yes yes yes yes yes yes yes
Stitch Memory
artista 630/640/730
)
MASTERING YOUR BERNINA®/bernette® SEWING MACHINE 8/05 29
©2005 BERNINA® of America, Inc. Permission to copy granted only to Authorized BERNINA® Dealers
Page 30

Mastering
BERNINA®/bernette® Sewing Machines
Class 1
Product Reference List
General Information
Feet-ures, Volumes 1, 2, and 3
BERNINA
BERNINA
BERNINA
BERNINA
BERNINA
BERNINA
BERNINA
bernette
Deluxe Accessory Box
Thread Storage Box
Bobbins
Magnetic Pin Cushion
Magnetic Bobbin Holder
Straight Stitch Plate
Seam Sealant
Thread Stand
Supplementary Thread Guide
Multi-Spool Thread Holder
Left Seam Guide
Seam Guide with Rulers (right and left)
Magnifying Lens Set
Suitcase System
®
Embroidery Foot #6
®
Darning Foot #9
®
Edgestitch Foot #10 or
®
Edgestitch Foot #10C
®
Open Embroidery Foot #20 or
®
Open Embroidery Foot #20C
®
Clear Embroidery Foot #39
®
Satin Stitch Foot
OESD Stabilizers
Aqua Film (topping, backing)
Aqua Mesh
Aqua Mesh Plus (adhesive-backed)
Tear-Away (lightweight, medium weight)
Hydro-Stick Tear-Away
Stabil-Stick Tear-Away
Cut-Away (heavy weight)
Xtra Heavyweight Cut-Away
Hydro-Stick Cut-Away
Stabil-Stick Cut-Away
Poly Mesh
Fusible Poly Mesh
HRFive Temporary Adhesive Spray
606 Spray and Fix
Fabric Shield
Thread
Isacord Polyester
YLI (variety)
Mettler Cotton Embroidery
Mettler Metrosene Polyester
Mettler Silk-finish Cotton
Your
BERNINA
®
Needles
Universal 60/70/80/90/100/110/120
Double 1.6/2.0/2.5/3.0/4.0/6.0/8.0
Wing Single/Double
Embroidery 75/90
Quilting 75/90
Stretch 70/75/80/90
Ballpoint 60/70/80/90/100
MASTERING YOUR BERNINA®/bernette® SEWING MACHINE 1/06
©2006 BERNINA® of America, Inc. Permission to copy granted only to Authorized BERNINA® Dealers
Quilters’ Resource Nifty Notions Scissors
Dressmaker’s shears
Trimming scissors
Applique Scissors
30
Page 31

Mastering
BERNINA®/bernette® Sewing Machines
Class 2
Practical Stitching
Class Overview
Stretch Seam Samples
1 Zigzag Seam
2 Super Stretch Seam
3 Vari-Overlock Seam
4 Flat Joining Seam
Hem & Edging Samples
5 Blind Hem
6 Handpicked Hem
7 Double Needle Hem
8 Jeans Hem
9 Shell Edge
10 Rolled and Whipped Edge
Your
BERNINA
®
This class is formatted for owners of the
following BERNINA® sewing machine models:
• classic 1008
• activa 220
• activa 230PE
• activa 240
• aurora 430
• aurora 440QE
• artista 630
• artista 640
• artista 730 & 200 with 730 upgrade installed
This class is also formatted for owners of the
following bernette® sewing machine models:
• 55 • 65 • 80e • 90e
MASTERING YOUR BERNINA®/bernette® SEWING MACHINE 1/06 31
©2006 BERNINA® of America, Inc. Permission to copy granted only to Authorized BERNINA® Dealers
Page 32

BERNINA®/bernette® Sewing Machines
Zigzag Seam
Fabric ........................................................... firm knit fabric 4” x 6”
Needle ................................................................... 80/12 Universal
Thread ...........................................................................all-purpose
Presser Foot ........... BERNINA® Reverse Pattern Foot #1 or #1C
......................................... bernette® Zigzag/Universal Foot
Stitch .................................................................................. zigzag
Needle Position .................................................................... center
Cut the fabric piece in half lengthwise, creating two pieces,
2” x 6” each.
Mastering
Your
BERNINA
Notes
®
Select the Zigzag Stitch – stitch width of 1.5mm and stitch length
of approximately 1.5mm (generally between 1.4mm and 1.6mm).
Position the fabric to produce a 5/8” seam down one side.
Stitch the seam.
Clip one seam allowance in the middle.
Press one part of the seam open and leave the other half closed
so the stitch is visible.
Trim and mount the sample.
MASTERING YOUR BERNINA®/bernette® SEWING MACHINE 8/05
©2005 BERNINA® of America, Inc. Permission to copy granted only to Authorized BERNINA® Dealers
32
Page 33

BERNINA®/bernette® Sewing Machines
Zigzag Seam Sample
Mastering
Your
BERNINA
®
bernette
Zigzag 3333
Stitch
BERNINA®1008 220 230PE 240 430 440QE 630 640 730
Zigzag 222222222
Stitch
MASTERING YOUR BERNINA®/bernette® SEWING MACHINE 8/05 33
©2005 BERNINA® of America, Inc. Permission to copy granted only to Authorized BERNINA® Dealers
®
55 65 80e 90e
Page 34

BERNINA®/bernette® Sewing Machines
BERNINA® models only
Super Stretch Seam
Fabric .....................................................heavy double knit, 4” x 6”
Needle .................................................................... 80/12 Universal
Thread ........................................................................... all-purpose
Presser Foot .................. BERNINA® Reverse Pattern Foot #1/1C
Stitch .................................................................................. stretch
Needle Position .....................................................................center
Cut fabric in half lengthwise creating two pieces, 2” x 6” each.
Select the Stretch Stitch.
Mastering
Your
BERNINA
Notes
®
Position the fabric to produce a 5/8” seam down one side.
Stitch the seam; if fabric stretches, lighten the presser foot
pressure (if available).
Clip one seam allowance in the middle and press one part of
the seam open.
Trim and mount the sample.
Note: This stitch is good for an open seam on all knit fabrics;
works well for sportswear.
MASTERING YOUR BERNINA®/bernette® SEWING MACHINE 8/05
©2005 BERNINA® of America, Inc. Permission to copy granted only to Authorized BERNINA® Dealers
34
Page 35

BERNINA®/bernette® Sewing Machines
Super Stretch Seam Sample
Mastering
Your
BERNINA
®
BERNINA®1008 220 230PE 240 430 440QE 630 640 730
Super --99999111111
Stretch
Stitch
Presser -- -- -- -- yes yes yes yes yes
Foot Pressure
Control
MASTERING YOUR BERNINA®/bernette® SEWING MACHINE 8/05 35
©2005 BERNINA® of America, Inc. Permission to copy granted only to Authorized BERNINA® Dealers
Page 36

BERNINA®/bernette® Sewing Machines
Vari-Overlock Seam
Fabric .......................................................... cotton interlock 4” x 6”
ribbing, 2” x 6”
Needle .................................................................... 80/12 Universal
Thread ........................................................................... all-purpose
Presser Foot ....................... BERNINA® Overlock Foot #2 or #2A
.................................................bernette® Overcasting Foot
Stitch ...................................................... vari-overlock or overlock
Needle Position ..................................................................... center
Cut an inside curve in one corner of fabric to simulate a neckline.
Mastering
Your
BERNINA
Notes
®
Select the Vari-Overlock Stitch.
If available, engage the Needle Down function.
Place folded ribbing along the curved edge of the fabric (ribbing
and fabric, right sides together).
BERNINA®: Guide the raw edges of the fabric under the pin of
the foot and stitch. If available, use the FHS (Free Hand System)
to maneuver the curve.
bernette
stitch length and width if needed. Adjust the fabrics as needed.
Trim the sample and mount as shown.
®
: Guide the fabric against the blade of the foot. Adjust
MASTERING YOUR BERNINA®/bernette® SEWING MACHINE 8/05
©2005 BERNINA® of America, Inc. Permission to copy granted only to Authorized BERNINA® Dealers
36
Page 37

BERNINA®/bernette® Sewing Machines
Vari-Overlock Seam Sample
Mastering
Your
BERNINA
®
bernette
Overlock 5666
Stitch
Needle -- -- yes yes
Up/Down
BERNINA®1008 220 230PE 240 430 440QE 630 640 730
VariOverlock 333333333
Stitch
Needle -- yes yes yes yes yes yes yes yes
Up/Down
Freehand -- optional optional yes yes yes yes yes yes
System
MASTERING YOUR BERNINA®/bernette® SEWING MACHINE 8/05 37
©2005 BERNINA® of America, Inc. Permission to copy granted only to Authorized BERNINA® Dealers
®
55 65 80e 90e
Page 38

BERNINA®/bernette® Sewing Machines
Flat Joining Seam
Fabric ...................................... two pieces terry cloth, 4” x 6” each
Needle .................................................................. 90/14 Universal
Thread ...........................................................................all-purpose
Presser Foot ............. BERNINA® Reverse Pattern Foot #1/1C or
........................................ BERNINA® Clear Foot #34/34C
........................................ bernette ® Zigzag/Universal Foot
Stitches......................................stretch overlock or towelling stitch
Needle Position .................................................................... center
Select the Stretch Overlock stitch.
Mastering
Your
BERNINA
Notes
®
Cut a 5/8” seam allowance off one piece of fabric along one long
edge.
Mark a line on the other piece of fabric, 5/8” from one long edge.
This will be the right-hand piece of fabric.
Overlap the fabric edges left over right, aligning the left raw edge
with the drawn line on the right-hand piece.
Stitch along the raw edge. Turn the fabric over and stitch along
the remaining raw edge.
NOTE: This is a great seam technique to use on bulky fabrics
such as terry cloth.
MASTERING YOUR BERNINA®/bernette® SEWING MACHINE 8/05
©2005 BERNINA® of America, Inc. Permission to copy granted only to Authorized BERNINA® Dealers
38
Page 39

BERNINA®/bernette® Sewing Machines
Flat Joining Seam Sample
Mastering
Your
BERNINA
®
bernette
Stretch 10 13 S5 S5
Overlock
Stitch
BERNINA®1008 220 230PE 240 430 440QE 630 640 730
Stretch 11 15 17 19 -- 23 13 13 13
Overlock
Stitch
MASTERING YOUR BERNINA®/bernette® SEWING MACHINE 8/05 39
©2005 BERNINA® of America, Inc. Permission to copy granted only to Authorized BERNINA® Dealers
®
55 65 80e 90e
Page 40

BERNINA®/bernette® Sewing Machines
Blind Hem
Fabric .....................................................................heavy flannel, 6” x 8”
Needle ............................................................................. 80/12 Universal
Thread ............................................. 60 weight cotton embroidery thread
Foot ....... BERNINA® Reverse Pattern Foot #1/1C (1008, 640 & 730) or
BERNINA
.......................... BERNINA® Blind Hem Foot #5 (all models)
..................................... bernette® Zigzag/Universal Foot and
..................................................... bernette® Blind Hem Foot
Stitch ............................................................................................zigzag
...................................................................................... blindstitch
Needle Position ........................................................................ as needed
®
Darning Foot #9 (220/230/240, 430/440 & 630) and
Mastering
Your
BERNINA
Notes
®
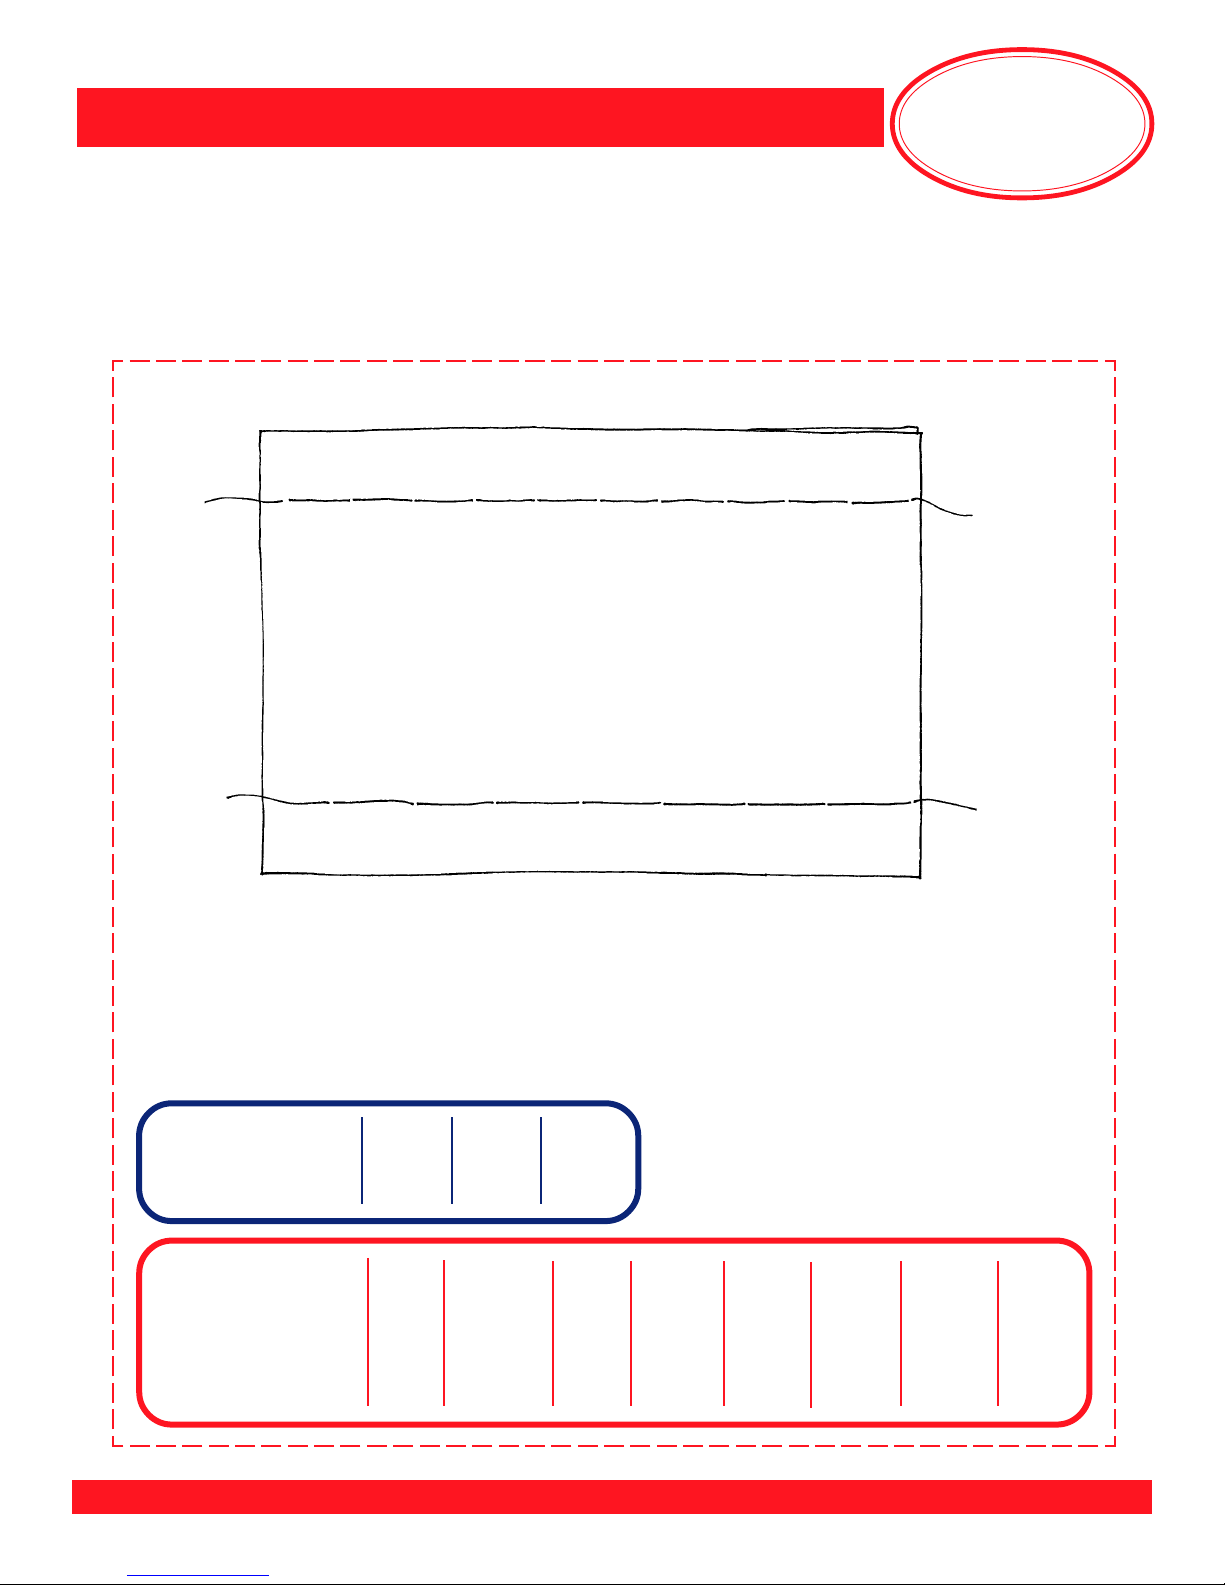
Finish one 6” edge of the fabric by oversewing with a zigzag stitch
(see pages 20-21).
Fold a 2” hem to the wrong side of the fabric and press.
BERNINA
Select a Basting Stitch (see
pages 26-27) and baste hem
in place, sewing about ¼” from
the raw edge.
Select the Blindstitch and
attach Blind Hem Foot #5 to
machine.
Fold hem back to the right side over the basting line.
Sew on the extended hem allowance, keeping the folded edge
next to the guide on the foot.
Adjust the stitch width (BERNINA®) or white guide (bernette®)
if needed so that the needle barely stitches into the fold.
®
bernette
Select a Basting Stitch (see
pages 26-27) and baste the
hem in place, sewing about ¼”
from the raw edge.
Select Blindstitch and attach
blindhem foot to the machine.
Lengthen blindstitch to 5mm.
®
Mount the sample with the edges folded back as shown.
MASTERING YOUR BERNINA®/bernette® SEWING MACHINE 8/05
©2005 BERNINA® of America, Inc. Permission to copy granted only to Authorized BERNINA® Dealers
40
Page 41

BERNINA®/bernette® Sewing Machines
Blind Hem Sample
Mastering
Your
BERNINA
®
bernette
Zigzag 3333
Stitch
Blindstitch 4 5 12 13
BERNINA®1008 220 230PE 240 430 440QE 630 640 730
Zigzag 222222222
Stitch
Basting -- 16 19 21 19 21 30 21 21
Stitch
Blindstitch 377777999
MASTERING YOUR BERNINA®/bernette® SEWING MACHINE 8/05 41
©2005 BERNINA® of America, Inc. Permission to copy granted only to Authorized BERNINA® Dealers
®
55 65 80e 90e
Page 42

BERNINA®/bernette® Sewing Machines
Handpicked Hem
Fabric .............................................. lightweight broadcloth, 6” x 8”
Needle .................................................................... 80/12 Universal
Thread .................................... 60 weight cotton embroidery thread
Presser Foot ................................ BERNINA
................................................... bernette® Blind Hem Foot
Stitch ............................................................................. blindstitch
Needle Position .............................................................. as needed
Turn up a 1” hem along one of the 6” edges and press.
®
Blind Hem Foot #5
Mastering
Your
BERNINA
Notes
®
Turn up the depth of the hem again and press.
Fold the entire hem toward the right side of the garment, so
that the garment fold is almost even with the top edge of the
hem. A scant 1/8” to 1/16” of hem edge should be visible. This
will ensure that both folds are caught by the blind hem stitch.
Place the fabric under the foot just as a traditional blind hem
would be placed.
Sew the hem with Blindstitch, making sure that the zigzag
catches both folds while the straight stitch falls off the edge
and stitches in air forming a chain along the upper hem edge.
Adjust stitch width if needed.
Press and mount the sample.
MASTERING YOUR BERNINA®/bernette® SEWING MACHINE 8/05
©2005 BERNINA® of America, Inc. Permission to copy granted only to Authorized BERNINA® Dealers
42
Page 43

BERNINA®/bernette® Sewing Machines
Handpicked Hem Sample
Mastering
Your
BERNINA
®
bernette
Blindstitch 4 5 12 13
BERNINA®1008 220 230PE 240 430 440QE 630 640 730
Blindstitch 377777999
MASTERING YOUR BERNINA®/bernette® SEWING MACHINE 8/05 43
©2005 BERNINA® of America, Inc. Permission to copy granted only to Authorized BERNINA® Dealers
®
55 65 80e 90e
Page 44

BERNINA®/bernette® Sewing Machines
Double Needle Hem
Fabric ........................................................ cotton interlock, 6” x 8”
Needle ..................................................................... Double, 3.0/80
Thread ............................................................ all-purpose, 2 colors
®
Presser Foot .................. BERNINA
..........................................
Stitches........................................................................... as needed
Needle Position .....................................................................center
Turn up a 2” hem along one of the 6” edges and press.
bernette
Thread the needles with two different colors of thread.
If available, select the Double Needle Limitation or Security
Program, and set for the 3.0mm Double Needle.
Note: If these features are not available, check to be sure the
Place the folded edge of the fabric along the 1” guideline on the
right side of the stitch plate. (bernette® 55 only: The 1” guide is
the one farthest from the needle.)
®
only: When threading the right needle, skip last guide.
needles will not strike the foot by turning the handwheel
to “walk” the machine through the first stitch.
Reverse Pattern Foot #1/1C
bernette
®
Zigzag/Universal Foot
Mastering
Your
BERNINA
Notes
Manual
Double Needle
“Limitation”
To calculate the maximum
stitch width which can be
stitched by any Double
needle, subtract the width
of the needle from the
maximum stitch width
of your sewing machine.
For example:
5.5mm - 2.0mm = 3.5mm
®
Select the straight stitch; sew half of the hem.
Select the suggested stitch or experiment with similar stitches;
stitch the remainder of the seam.
Trim excess fabric from the wrong side of the hem.
Press and mount the sample.
Note: This is a good stitch to use when hemming T-shirts and
pajamas. You can use other stitches with a double needle
for other types of fabrics.
MASTERING YOUR BERNINA®/bernette® SEWING MACHINE 8/05
©2005 BERNINA® of America, Inc. Permission to copy granted only to Authorized BERNINA® Dealers
Double Needle
Threading
Use a supplementary spool
holder and attach a supplementary thread guide to the
machine, if available. Thread
as usual, placing one thread
to the left of the tension disc
and through the eye of the
left needle; thread the other
to the right of the tension
disk and through the eye of
the right needle.
44
Page 45

BERNINA®/bernette® Sewing Machines
Double Needle Hem Sample
Mastering
Your
BERNINA
®
bernette
Straight 2222
Stitch
Suggested 5444
Stitch
BERNINA®1008 220 230PE 240 430 440QE 630 640 730
Straight 111111111
Stitch
Suggested 744444161616
Stitch
Specialty -- -- -- -- -- -- security security security
Needle
Function
MASTERING YOUR BERNINA®/bernette® SEWING MACHINE 8/05 45
©2005 BERNINA® of America, Inc. Permission to copy granted only to Authorized BERNINA® Dealers
®
55 65 80e 90e
SL = 2.5 SL = 2.5 SL = 2.5 SL = 2.5 SL = 2.5
Page 46

BERNINA®/bernette® Sewing Machines
Jeans Hem
Fabric ...................................................................... denim, 4” x 6”
Needle ..................................................... Jeans, 100/16 or 110/18
Thread .......................................................................... all-purpose
Presser Foot ........................................ BERNINA
..................................... bernette® Zigzag/Universal Foot or
........................................................ bernette® Quilting Foot
Stitch ................................................................................ straight
Needle Position .................................................................... center
Cut fabric in two pieces, 4” x 3” each.
®
Jeans Foot #8
Mastering
Your
BERNINA
Notes
®
Insert a Jeans needle and select the Straight Stitch.
With right sides together, sew a 5/8” seam along one 4” side.
Press seam to one side.
Topstitch, using the edge of the foot along the seam as a guide,
and stitching through the seam allowances.
Turn up the lower edge twice, about 3/8” each time.
Topstitch the hem in place, about 1/8” from the upper edge
of the hem.
Press and mount the sample.
Hint: Sew toward the “gradual rise” of thick seams rather than
toward the thickest part of the seam. Use the Height
Compensation Tool (included with your machine) to keep
the presser foot level; this helps keep the foot in contact
with the fabric, and the fabric in contact with the feed dog.
MASTERING YOUR BERNINA®/bernette® SEWING MACHINE 8/05
©2005 BERNINA® of America, Inc. Permission to copy granted only to Authorized BERNINA® Dealers
46
Page 47

BERNINA®/bernette® Sewing Machines
Jeans Hem Sample
Mastering
Your
BERNINA
®
bernette
Straight 2222
Stitch
BERNINA®1008 220 230PE 240 430 440QE 630 640 730
Straight 111111111
Stitch
MASTERING YOUR BERNINA®/bernette® SEWING MACHINE 8/05 47
©2005 BERNINA® of America, Inc. Permission to copy granted only to Authorized BERNINA® Dealers
®
55 65 80e 90e
Page 48

BERNINA®/bernette® Sewing Machines
Shell Edge
Fabric ............................................................... nylon tricot, 6” x 4”
Stabilizer ............................................................. Aqua Film, 2” x 6”
Needle .................................................................... 80/12 Universal
Thread ........................................................................... all-purpose
Presser Foot ......................... BERNINA
.......................................................bernette® Hemmer Foot
Stitch ................................... BERNINA® blindstitch (or overlock)
.................................................... bernette® shell hem stitch
Needle Position .............................................................. as needed
®
Shell Hemmer Foot #69
Mastering
Your
BERNINA
Notes
®
BERNINA
Select Blindstitch (SW 4mm;
leave SL at default setting).
Engage Vertical (Left/Right)
Mirror Image function if available.
Alternative: Select the overlock
stitch (SW 4mm, SL 3.5 mm).
Note: The longer the stitch
length, the larger the shells.
Pull on the fabric a bit to see which way the edge curls. Be sure to
hem “with the curl” rather than against it.
Place the Aqua Film under the edge of the hem, extending about
2” beyond the back edge of the fabric; baste layers together along
the back edge.
Twirl the stabilizer into the scroll of the hemmer foot – the Aqua
Film is stiff enough to easily move into the coil. Begin stitching,
using the Aqua Film to guide the fabric edge into
the coil of the foot.
®
bernette
Select the Shell Hem stitch
(stitch width = 4mm; leave stitch
length at default setting).
Increase/tighten the upper
thread tension to 6-8.
®
If necessary, increase/tighten the needle thread tension to create
more defined scallops. Remember to return to normal setting after
completing this sample.
Trim and mount the sample.
MASTERING YOUR BERNINA®/bernette® SEWING MACHINE 8/05
©2005 BERNINA® of America, Inc. Permission to copy granted only to Authorized BERNINA® Dealers
48
Page 49

BERNINA®/bernette® Sewing Machines
Shell Edge Sample
Mastering
Your
BERNINA
®
bernette
Shell Hem 6655
Stitch
BERNINA®1008 220 230PE 240 430 440QE 630 640 730
Blindstitch 377777999
MASTERING YOUR BERNINA®/bernette® SEWING MACHINE 8/05 49
©2005 BERNINA® of America, Inc. Permission to copy granted only to Authorized BERNINA® Dealers
®
55 65 80e 90e
Page 50

BERNINA®/bernette® Sewing Machines
Rolled and Whipped Edge
Fabric .................................................... lightweight cotton, 6” x 4”
Needle ................................................................... 80/12 Universal
Thread .......................................................................... all-purpose
Presser Foot ........... BERNINA® Standard Buttonhole Foot #3/3C
......................................... bernette® Clear Satin Stitch Foot
Stitch .................................................................................. zigzag
Needle Position ......................................................................... left
Clean one 6” lengthwise edge of “whiskers”
Mastering
Your
BERNINA
Notes
®
Select the Zigzag Stitch (BERNINA® SW = 2.5mm and SL =
1mm or less; bernette® SW = 3.5mm and SL = buttonhole setting).
Loosen the top tension if necessary.
BERNINA
Place cut edge of fabric between the center and left toes of
the presser foot and sew.
Notes:
- The left swing of the needle should be in the fabric, while the
right swing falls off of the right edge of the fabric.
- As needle swings left, it should roll fabric into a tiny rolled edge.
- The finer the fabric, the finer the needle and thread used.
Trim and mount the sample.
This edge finish is used on a single thickness of fine lightweight
fabrics. It is also use as a seam finish or as an edge on ruffles,
hems, etc.
®
bernette
Place cut edge of fabric against
the inside of the right toe of the
foot and sew.
®
MASTERING YOUR BERNINA®/bernette® SEWING MACHINE 8/05
©2005 BERNINA® of America, Inc. Permission to copy granted only to Authorized BERNINA® Dealers
50
Page 51

BERNINA®/bernette® Sewing Machines
Rolled and Whipped Edge Sample
Mastering
Your
BERNINA
®
bernette
Zigzag 3333
Stitch
BERNINA®1008 220 230PE 240 430 440QE 630 640 730
Zigzag 222222222
Stitch
MASTERING YOUR BERNINA®/bernette® SEWING MACHINE 8/05 51
©2005 BERNINA® of America, Inc. Permission to copy granted only to Authorized BERNINA® Dealers
®
55 65 80e 90e
Page 52

Mastering
BERNINA®/bernette® Sewing Machines
Class 2
Product Reference List
Practical Stitching
Feet-ures, Volumes 1, 2, and 3
BERNINA® Vari-Overlock Foot #2 or
BERNINA® Vari-Overlock Foot #2A
BERNINA® Standard Buttonhole Foot #3 or
BERNINA® Standard Buttonhole Foot #3C
BERNINA® Jeans Foot #8
BERNINA® Edgestitch Foot #10 or
Thread
All-Purpose
Mettler 60 weight Cotton Embroidery
Double Needles
2.0mm
2.5mm
Your
BERNINA
®
BERNINA® Edgestitch Foot #10C
BERNINA® Clear Foot #34 or
BERNINA® Clear Foot #34C
BERNINA® Shell Hemmer Foot #69
bernette® Clear Satin Stitch Foot
bernette® Blind Hem Foot
bernette® Overcasting Foot
bernette® Quilting Foot
bernette® Hemmer Foot
Stitch Witchery - 5/8” roll
Rotary Cutter
Rotary Cutting Mat
Clear, Gridded Ruler
Aqua Film Stabilizer
3.0mm
4.0mm
6.0mm (artista 640 and 730 only)
8.0mm (artista 640 and 730 only)
Jeans Needles
90/14
100/16
Double
Seam Pressing Tools
BERNINA® Iron
Seam Pressing Stick
Hem Gauges
Curved Hem Ruler
6” Sewing Gauge
MASTERING YOUR BERNINA®/bernette® SEWING MACHINE 1/06
©2006 BERNINA® of America, Inc. Permission to copy granted only to Authorized BERNINA® Dealers
52
Page 53

Mastering
BERNINA®/bernette® Sewing Machines
Class 3
More Practical Stitching
Class Overview
Elastic Samples
1 Elastic Edging
2 Turned Under Elastic
Buttonhole & Eyelet Types & Uses
Buttonhole Feet
Your
BERNINA
®
Sizing Buttonholes
Buttonhole Samples
3 Manual Buttonhole/Corded Buttonhole
4 Automatic Buttonhole
5 Memory Buttonhole
6 Straight Stitch Buttonhole
7 Button Sew-On
Zipper Samples
8 Centered Zipper
9 Invisible Zipper
Mending
10 Darning
This class is formatted for owners of the
following BERNINA® sewing machine models:
• classic 1008
• activa 220
• activa 230PE
• activa 240
• aurora 430
• aurora 440QE
• artista 630
• artista 640
• artista 730 & 200 with 730 upgrade installed
MASTERING YOUR BERNINA®/bernette® SEWING MACHINE 1/06 53
©2006 BERNINA® of America, Inc. Permission to copy granted only to Authorized BERNINA® Dealers
This class is also formatted for owners of the
following bernette® sewing machine models:
• 55 • 65 • 80e • 90e
Page 54

BERNINA®/bernette® Sewing Machines
Elastic Edging
Fabric ...............................................................nylon tricot, 6” x 4”
Notions ................................................................. 9” of elastic lace
Needle ................................................... 80/12 Balllpoint or Stretch
Thread .......................................................................... all-purpose
Presser Foot ................. BERNINA® Reverse Pattern Foot #1/1C
......................................................
Stitch ................................................................................ running
Needle Position .................................................................... center
Select the Running stitch (SW = 5mm, SL = 3.5 to 4mm).
bernette
®
Zigzag/Universal Foot
Mastering
Your
BERNINA
Notes
®
BERNINA
Engage the Needle Down
function, if available.
Position the elastic wrong side down on the right side of the tricot
along one of the 6” edges.
Leave a tail of elastic at the back of the presser foot for a “handle”.
Position the elastic so the stitching is at the bottom edge of the
elastic lace.
Stretch the elastic lace gently, as it is being sewn.
After stitching, trim the surplus tricot from the wrong side of the
elastic lace, close to the stitching.
Mount the sample.
®
bernette
Engage the Needle Down
function after stopping.
®
80e & 90e
MASTERING YOUR BERNINA®/bernette® SEWING MACHINE 8/05
©2005 BERNINA® of America, Inc. Permission to copy granted only to Authorized BERNINA® Dealers
54
Page 55

BERNINA®/bernette® Sewing Machines
Elastic Edging Sample
Mastering
Your
BERNINA
®
bernette
Running 5444
Stitch
Needle -- -- yes yes
Down/Up
Function
BERNINA®1008 220 230PE 240 430 440QE 630 640 730
Running 744444444
Stitch
Needle -- yes yes yes yes yes yes yes yes
Down/Up
Function
MASTERING YOUR BERNINA®/bernette® SEWING MACHINE 8/05 55
©2005 BERNINA® of America, Inc. Permission to copy granted only to Authorized BERNINA® Dealers
®
55 65 80e 90e
Page 56

BERNINA®/bernette® Sewing Machines
Turned Under Elastic
Fabric ............................................. lycra (cotton or nylon), 6” x 4”
Notions .............................. 9” of cotton swimwear elastic, ½” wide
Needle ................................................... 80/12 Ballpoint or Stretch
Thread ..........................................................................all-purpose
Presser Foot ................. BERNINA
.......................................... bernette® Zigzag/Universal Foot
Stitch ................................................................................. zigzag
Needle Position ....................................BERNINA® only: far right
Select the zigzag stitch #2 (SW = 3.5 to 4mm and SL = 3.5 to
4mm). BERNINA® only: Set the needle position to the far right.
®
Reverse Pattern Foot #1/1C
Mastering
Your
BERNINA
Notes
®
Position the elastic on the wrong side of the fabric, along one
6” edge.
Allow a 2” tail of elastic to extend beyond the fabric. Lower the
presser foot; this will hold the elastic in place.
Sew the elastic to the fabric, keeping the edge of the elastic and
the edge of the fabric together, and stretching elastic in front of
the foot to simulate the leg of an exercise leotard or swimsuit.
If stopping midway, use the Needle Down function (if available)
to hold the elastic and fabric in place.
Fold the elastic to the wrong side and overstitch the elastic from
the right side using a sewn-out zigzag, lycra, or running stitch with
a length of 3.5 to 4mm. The left side of the stitch should sew off
the edge of the elastic, stitching only into the fabric.
If available, adjust the presser foot pressure and/or stitch length
as needed if elastic stretches out as it is sewn.
Note: This same technique can be used for a turned waistband,
using wider elastic.
MASTERING YOUR BERNINA®/bernette® SEWING MACHINE 8/05
©2005 BERNINA® of America, Inc. Permission to copy granted only to Authorized BERNINA® Dealers
56
Page 57

BERNINA®/bernette® Sewing Machines
Turned Under Elastic Sample
Mastering
Your
BERNINA
®
bernette
Zigzag 3333
Stitch
Needle -- -- yes yes
Down/Up
Overstitch 5444
Options
BERNINA®1008 220 230PE 240 430 440QE 630 640 730
Zigzag 222 222222
Stitch
Needle -- yes yes yes yes yes yes yes yes
Down/Up
Overstitch 7 4, 18 4, 21 4, 24, 25 25 27 16 16 16
Options
MASTERING YOUR BERNINA®/bernette® SEWING MACHINE 8/05 57
©2005 BERNINA® of America, Inc. Permission to copy granted only to Authorized BERNINA® Dealers
®
55 65 80e 90e
Page 58

Mastering
BERNINA®/bernette® Sewing Machines
Buttonholes & Eyelets
Types & Uses
STANDARD BUTTONHOLE
Fine to medium weight fabrics. Blouses, shirts, trousers, bed linens.
HEIRLOOM BUTTONHOLE
Fine to medium weight fabrics. Blouses, shirts, dresses, trousers, children’s and baby
clothes, doll clothes, heirloom work.
STRETCH BUTTONHOLE
All stretch fabrics made from cotton, wool, silk, and synthetic fibers.
ROUND BUTTONHOLE WITH NORMAL BARTACK
Medium to heavy weight fabrics of all types. Clothing, jackets, coats, rainwear.
Your
BERNINA
®
ROUND BUTTONHOLE WITH HORIZONTAL BARTACK
Medium to heavy weight fabrics of all types. Clothing, jackets, coats, rainwear.
KEYHOLE BUTTONHOLE WITH NORMAL BARTACK
Heavy weight, non-stretch fabrics. Jackets, coats, trousers, leisure wear.
KEYHOLE BUTTONHOLE WITH POINTED BARTACK
Non-stretch firm fabric. Jackets, coats, leisure wear.
KEYHOLE BUTTONHOLE WITH HORIZONTAL BARTACK
Firm, non-stretch fabrics. jackets, coats, leisure wear.
STRAIGHT STITCH BUTTONHOLE
For prestitching buttonholes and pocket openings. For bound buttonholes & welt pockets.
HAND-LOOK BUTTONHOLE
For light- to medium-weight woven fabrics. Blouses, dresses, leisure wear, bedding, crafts
BUTTON SEW-ON PROGRAM
For flat buttons with 2 and 4 holes. For sewing on snaps, hooks, and charms.
NARROW ZIGZAG EYELET
Opening for cords and narrow ribbons/bands, other decorative work.
STRAIGHT STITCH EYELET
Opening for cords and narrow ribbons/bands, other decorative work.
MASTERING YOUR BERNINA®/bernette® SEWING MACHINE 1/06
©2006 BERNINA® of America, Inc. Permission to copy granted only to Authorized BERNINA® Dealers
58
Page 59

Mastering
BERNINA®/bernette® Sewing Machines
BERNINA® Buttonhole Feet
A number of buttonhole feet are available for BERNINA® sewing machines.
The descriptions below will help differentiate between the various feet.
BUTTONHOLE FOOT #3
The standard 5mm
buttonhole foot. Works
with any BERNINA
sewing machine.
BUTTONHOLE FOOT WITH SLIDE #3B
5mm foot with a movable slide indicating
buttonhole length, making it easy to sew a
series of identical buttonholes. For any
BERNINA
recommended for 1008 and other
mechanical models.
®
sewing machine; especially
®
BUTTONHOLE FEET
Included with the
artista 630
Snap-on version
included with
1008 & activa 220
BUTTONHOLE FOOT #3C
The standard 9mm buttonhole
foot. “C” indicates a “coded”
foot with a light sensor that
allows 9mm wide stitching.
For models 1630, artista
180, 185 & 730.
AUTOMATIC BUTTONHOLE FOOT #3C
The automatic buttonhole foot for older models
with a 9mm feed system, indicated by the letter
“C”. Works with 1630 and artista 180.
Your
BERNINA
Included with
artista 640
and 730
®
AUTOMATIC BUTTONHOLE FOOT #3A
Automatic foot for older machines with a
5mm and 9mm feed system. “A” indicates
an “automatic” foot, with a light sensor for
counting stitches. Works with models
1130-1530 and 150-170QE.
bernette
4-STEP BUTTONHOLE FOOT
5mm foot with a movable slide
indicating buttonhole length, making
it easy to sew a series of identical buttonholes. For the
bernette
®
55 sewing machine.
AUTOMATIC BUTTONHOLE FOOT WITH SLIDE #3A
Combines the handy slide measuring system
of Buttonhole Foot #3B with the electronic
sensor of the older Automatic Buttonhole
Feet #3A and #3C. Works with models
135PE/145 and 150-730, as well as
current models indicated below.
Included with activa 230 & 240,
aurora 430 & 440QE,
artista 630, 640, and 730
®
Buttonhole Feet
AUTOMATIC BUTTONHOLE FOOT
The automatic buttonhole foot for
bernette
the
sewing machines.
®
65, 80e, and 90e
MASTERING YOUR BERNINA®/bernette® SEWING MACHINE 1/06 59
©2006 BERNINA® of America, Inc. Permission to copy granted only to Authorized BERNINA® Dealers
Page 60

BERNINA®/bernette® Sewing Machines
Manual/Corded Buttonhole
Fabric .................................................................... heavy flannel, 6” x 8”
Stabilizer..................................................... lightweight tear-away, 4” x 6”
Notions ........................................................................... 10” of gimp cord
...................................................................................... ½” button
Needle ............................................................................ 90/14 Universal
Thread ................................. 30 wt. cotton embroidery, contrasting color
Presser Foot..................... BERNINA® Standard Buttonhole Foot #3/3C
...................................
Stitches..................................... standard buttonhole, keyhole buttonhole
Needle Position .............................................................................. center
Fold the fabric in half to 4 ” x 6”. Press; insert the stabilizer between the layers.
Draw a line 1½” from the fold along the 6” length. Draw a 2nd line 1” from 1st
line. Mark 3 horizontal lines, between fold and drawn line, spaced about 2” apart.
bernette® 55 only: 4-step buttonhole foot
Mastering
Your
BERNINA
Notes
®
BERNINA
Select the standard buttonhole; select
the man function from the function
toolbar, if applicable.
Position the foot over the first short
line, aligning the fold of the fabric with
the 5/8” marking on the stitch plate,
behind the foot.
Sew the first side of the buttonhole,
engaging step #1.Stop at the drawn
line and select step #2. Continue
stitching remaining buttonhole steps.
BERNINA® & bernette
Fold cord in half and loop middle around center “toe” of foot [bernette
loop cord at back of foot; lock in front grooves and tie ends in front]. Stitch
buttonhole on second line as before, then carefully remove fabric from under
foot. Pull ends of cord until loop is pulled up under buttonhole; trim ends of
cord. If working on a knit fabric, knot ends of cord together before trimming.
®
Standard Buttonhole
®
55 Corded Buttonhole
bernette® 55 Standard Buttonhole
Select buttonhole; set SW = 5 and SL
= buttonhole.
Position foot over 1st short line,
aligning needle with 1½” line.
• Select step 1; sew bartack.
• Select step 2; sew left side of
buttonhole, stopping at 2nd long line.
• Select step 3; sew bartack.
• Select step 4; sew right side.
When stitching is complete, remove
fabric from under the foot. Bring thread
tails to the back and tie off.
®
55 –
BERNINA
®
Buttonholes
There are slight variations in the
buttonhole stitching sequences
on different BERNINA® sewing
machine models. On most
models, turn the buttonhole
knob or press and release the
Quick Reverse button to move
from one step to the next. See
Owner’s Manual for detailed
instructions for your machine.
BERNINA® Keyhole Buttonhole
Select keyhole buttonhole if available; select man function from function toolbar,
if applicable. Place third short line under presser foot as before. Sew keyhole
buttonhole on 2nd marked line. Cut 1 buttonhole open. Trim and mount sample.
MASTERING YOUR BERNINA®/bernette® SEWING MACHINE 8/05
©2005 BERNINA® of America, Inc. Permission to copy granted only to Authorized BERNINA® Dealers
60
Page 61

BERNINA®/bernette® Sewing Machines
Manual/Corded Buttonhole Sample
Mastering
Your
BERNINA
®
bernette
Standard 1111
Buttonhole
Manual yes -- -- --
Buttonhole
Auto -- yes yes yes
Buttonhole
BERNINA®1008 220 230PE 240 430 440QE 630 640 730
Standard dial 10 10 10 10 10 51 51 51
Buttonhole
Keyhole -- 11 11 13 13 14 56 56 56
Buttonhole
Manual yes yes yes yes yes yes yes yes yes
Buttonhole
MASTERING YOUR BERNINA®/bernette® SEWING MACHINE 8/05 61
©2005 BERNINA® of America, Inc. Permission to copy granted only to Authorized BERNINA® Dealers
®
55 65 80e 90e
Page 62

BERNINA®/bernette® Sewing Machines
Automatic Buttonhole
Mastering
Your
BERNINA
®
Fabric ............................................ BERNINA® cotton interlock, 6” x 8”
............................ BERNINA
®
& bernette
®
heavy flannel, 6” x 8”
...... BERNINA® fine linen/batiste, 6” x 8” (aurora & artista only)
Stabilizer ................................................................. 3 pieces, 4” x 6” each
Needle ............................................................................ 90/14 Universal
Thread ................................. 30 wt. cotton embroidery, contrasting color
Presser Foot.............. BERNINA® Automatic Buttonhole with Slide #3A
............................................ bernette® automatic buttonhole foot
Buttonholes ............. stretch, standard, handlook (aurora & artista only)
Needle Position .............................................................................. center
Preparation
Fold each fabric in half to 4” x 6”. Press; insert stabilizer between layers. Draw
a line 1½” from the fold along the 6” length. Mark two horizontal lines, running
between the fold and the drawn line, about 2” apart.
BERNINA
Note: 1008 & activa 220 do not have
an Automatic Buttonhole feature.
Stretch Buttonhole (cotton interlock)
Position foot over the first short line;
align fabric fold with 5/8” marking
behind foot. Sew buttonhole.
®
bernette® 65/80e/90e
Select the buttonhole; set SW = 5
and SL = buttonhole setting.
Automatic Standard Buttonhole
Position the foot over the first short
line, aligning the needle (front end of
buttonhole) with the long drawn line.
Notes
Stop at the horizontal line; press
Quick Reverse button – this programs
length. Continue sewing – buttonhole
is completed automatically.
Sew the programmed buttonhole on
the second line.
Keyhole Buttonhole (heavy flannel)
Stitch a buttonhole on the first line;
sew programmed buttonhole on the
second line. Note: To determine the
buttonhole length, calculate bead
length only; eye will sew accordingly.
Handlook Buttonhole (linen/batiste)
(aurora 430/440 & artista 630/640/730)
Stitch buttonhole on first line; sew
programmed buttonhole on 2nd line.
MASTERING YOUR BERNINA®/bernette® SEWING MACHINE 8/05
©2005 BERNINA® of America, Inc. Permission to copy granted only to Authorized BERNINA® Dealers
• Open button plate and insert button.
• Lower buttonhole lever and push it
toward the back of the machine.
• Stitch buttonhole; the machine will
complete buttonhole automatically.
When stitching is complete, remove
fabric from under the presser foot.
Bring thread tails to back and tie off.
Push lever up when not in use.
Corded Automatic Buttonhole
Fold cord in half and loop at back of
foot; lock in front grooves and tie ends.
Stitch as above. Tie off as described
at the bottom of page 60.
62
Page 63

BERNINA®/bernette® Sewing Machines
Automatic Buttonhole Samples
Mastering
Your
BERNINA
®
bernette
Standard 1111
Buttonhole
Manual yes -- -- --
Buttonhole
Auto -- yes yes yes
Buttonhole
BERNINA®1008 220 230PE 240 430 440QE 630 640 730
Automatic -- -- yes yes yes yes yes yes yes
Buttonhole
Standard dial 10 10 10 10 10 51 51 51
Buttonhole
Handlook -- -- -- -- 15 16 63 63 63
Buttonhole
Stretch -- -- -- 12 12 12 53 53 53
Buttonhole
®
55 65 80e 90e
MASTERING YOUR BERNINA®/bernette® SEWING MACHINE 8/05 63
©2005 BERNINA® of America, Inc. Permission to copy granted only to Authorized BERNINA® Dealers
Page 64

BERNINA®/bernette® Sewing Machines
®
BERNINA
models only
Memory Buttonhole
Fabric ........................................................... heavy woven, 6” x 8”
Stabilizer ............................................lightweight tear-away, 4” x 6”
Needle ................................................................... 90/14 Universal
Thread ......................... 30 wt. cotton embroidery, contrasting color
Presser Foot ......................... Automatic Buttonhole with Slide #3A
Stitch ............................................................ standard buttonhole
........................................................... any other buttonhole
Needle Position .................................................................... center
Fold the fabric in half to 4” x 6”. Insert the stabilizer between the
fabric layers. Mark 4 lines on the fabric where the buttonholes will
be sewn.
Mastering
Your
BERNINA
Notes
®
Temporary Buttonhole Memory
Select the Standard Buttonhole; sew a buttonhole of the desired
length on the first line.
Sew the programmed buttonhole again on the second line.
The machine will remember this length until a new measurement
is programmed or until the machine is turned off.
Long Term Buttonhole Memory
Select any buttonhole; sew a buttonhole of the desired length
on the third line.
To save buttonhole in Long Term Memory, touch the appropriate
symbol or button for your machine.
Turn machine off, then on again.
Select the same buttonhole; sew it again on the fourth line and
compare the size to the previous buttonhole.
MASTERING YOUR BERNINA®/bernette® SEWING MACHINE 8/05
©2005 BERNINA® of America, Inc. Permission to copy granted only to Authorized BERNINA® Dealers
64
Page 65

BERNINA®/bernette® Sewing Machines
Memory Buttonhole Sample
Mastering
Your
BERNINA
®
BERNINA®1008 220 230PE 240 430 440QE 630 640 730
Standard dial 10 10 10 10 10 51 51 51
Buttonhole
Long Term -- -- mem mem mem mem save save save
Memory
Buttonhole
MASTERING YOUR BERNINA®/bernette® SEWING MACHINE 8/05 65
©2005 BERNINA® of America, Inc. Permission to copy granted only to Authorized BERNINA® Dealers
Page 66

BERNINA®/bernette® Sewing Machines
BERNINA® models only
Straight Stitch Buttonhole
Fabric ................................................... firm, woven fabric, 4” x 6”
Stabilizer ........................................... lightweight tear-away, 4” x 6”
Needle ................................................................... 90/14 Universal
Thread ........................ 30 wt. cotton embroidery, contrasting color
Presser Foot .................Automatic Buttonhole Foot with Slide #3A
Stitch ................................................................................ straight
Needle Position ....................................................................center
Mark two lines perpendicular to the fold, spaced about 2” apart.
Mastering
Your
BERNINA
Notes
®
Attach Automatic Buttonhole Foot with Slide #3A/3C to machine.
Select the Straight Stitch Buttonhole.
Stitch a buttonhole, positioning the beginning of it on the first line,
aligning the fold with the 5/8” marking behind the foot.
Position the needle on the second line. Stitch another straight
stitch buttonhole - do not remove fabric.
Select the Standard Buttonhole - sew this buttonhole (the same
length as the straight stitch buttonhole) directly on top of the
straight stitch buttonhole.
Notes:
- Straight stitch buttonholes can be used to pre-sew and reinforce buttonholes on fabrics that fray easily. The buttonhole
beads and bartacks will cover the stitching. Any method for
determining buttonhole length can be used.
- Straight stitch buttonholes can be used as buttonholes on
imitation suede and leather.
- The distance between the prestitched lines can be adjusted
with the stitch width. The stitch length can also be adjusted
to suit the fabric.
MASTERING YOUR BERNINA®/bernette® SEWING MACHINE 8/05
©2005 BERNINA® of America, Inc. Permission to copy granted only to Authorized BERNINA® Dealers
66
Page 67

BERNINA®/bernette® Sewing Machines
Straight Stitch Buttonhole Sample
Mastering
Your
BERNINA
®
BERNINA®1008 220 230PE 240 430 440QE 630 640 730
Straight -- -- 12 14 14 15 59 59 59
Stitch
Buttonhole
Standard dial 10 10 10 10 10 51 51 51
Buttonhole
MASTERING YOUR BERNINA®/bernette® SEWING MACHINE 8/05 67
©2005 BERNINA® of America, Inc. Permission to copy granted only to Authorized BERNINA® Dealers
Page 68

BERNINA®/bernette® Sewing Machines
Button Sew-On
Fabric ..................................................... firm, woven fabric 4” x 6”
Stabilizer ............................................lightweight tear-away, 4” x 6”
Notions .................... button, charm, hook/eye, 6” of narrow ribbon
Needle ................................................................... 90/14 Universal
Thread ......................... 30 wt. cotton embroidery, contrasting color
Presser Foot ....................... BERNINA® Button Sew-On Foot #18
............................................... bernette® button sew-on foot
Stitch .................. button sew on program (or universal or zigzag)
Needle Position .................................................................... center
Lower the feed dogs, then attach the button sew-on foot to the
machine. Select the button the sew-on stitch. If not available,
select the universal or zigzag stitch.
Mastering
Your
BERNINA
Notes
®
Fold fabric in half to 2” x 6”; press. Insert stabilizer between layers.
Technique #1 – With Thread Shank
Optional: Use a glue stick to hold a button in place.
BERNINA® only: Adjust the pin on Button Sew-On Foot #18 to
the highest position for a long shank. Note: A short shank can be
made for dresses and blouses or a long shank can be made for
heavier fabrics such as coats and blazers.
All BERNINA® & bernette
the holes of the button by turning the hand wheel; adjust the stitch
width if necessary. Hold the thread tails as you begin to sew.
If using the button sew-on stitch, the machine stops automatically
when program is complete; threads are secured as part of the
program.
If using the universal or zigzag stitch, sew 6-8 stitches, stop, and
tie threads on the wrong side to secure; trim excess thread
Technique #2 – Without Thread Shank
Using the lowest shank setting and the instructions above, attach
a charm, a ribbon, and a hook-and-eye to the same fabric.
®
Machines: Check distance between
Mount the sample.
MASTERING YOUR BERNINA®/bernette® SEWING MACHINE 8/05
©2005 BERNINA® of America, Inc. Permission to copy granted only to Authorized BERNINA® Dealers
68
Page 69

BERNINA®/bernette® Sewing Machines
Button Sew-On Sample
Mastering
Your
BERNINA
®
bernette
Universal --766
Stitch
Zigzag 3333
Stitch
BERNINA®1008 220 230PE 240 430 440QE 630 640 730
Button -- 12 13 15 16 17 60 60 60
Sew-On
Stitch
Universal 4 1720232426151515
Stitch
Zigzag 222222222
Stitch
MASTERING YOUR BERNINA®/bernette® SEWING MACHINE 8/05 69
©2005 BERNINA® of America, Inc. Permission to copy granted only to Authorized BERNINA® Dealers
®
55 65 80e 90e
Page 70

BERNINA®/bernette® Sewing Machines
Centered Zipper
Fabric .......................................two pieces of firm, woven fabric, 6” x 8”
Other ......................................................................... 9” neckline zipper
Needle ............................................................................ 90/14 Universal
Thread ................................. 30 wt. cotton embroidery, contrasting color
Presser Foot........................... BERNINA
........................................................BERNINA
....................................BERNINA
....................................................
....................................................................
Stitch ......................................................................................... straight
Needle Position ....................................... far left or far right, as indicated
Other ................................................ Collins Wash-Away Wonder Tape
®
Reverse Pattern Foot #1/1C
®
Zipper Foot with Guide #14
bernette
®
Zipper Foot #4
®
zigzag/universal foot
bernette
®
zipper foot
Mastering
Your
BERNINA
Notes
®
Attaching the Zipper
Using BERNINA® Foot #1/1C or bernette® zigzag/universal foot and a straight
stitch, sew seam from bottom to where zipper stop will be. Select a basting stitch
(see pages 18-19); continue stitching to within ½” from top of seam. Change
back to a regular length stitch; sew the rest of the way to secure.
Press seam open; place right side of zipper against seam allowance so zipper
teeth are centered over the seam. Pin or baste (using Wonder Tape) each side
of zipper to seam allowance only.
Change to zipper foot; adjust needle/foot position to right or left as needed to
stitch close to zipper teeth. Sew through zipper tape and seam allowance only,
from bottom to top on each side. Pin or baste through all layers.
Topstitching the Zipper
BERNINA
Change to Zipper Foot with Guide #14.
Left Side: Adjust seam guide 1 notch
right of center. Adjust needle position
to far left. Sewing from right side of
fabric and starting at lower edge, sink
needle into the seam. Sew out from
zipper stop about 3/8”, stop, pivot and
make sure seam guide lying in ditch
of seam. Sew up left side of zipper.
Right Side: Adjust guide one notch to
left of center; move needle position to
far right. Repeat above steps, starting
at seam and sewing to the right.
®
bernette
Left Side: Adjust foot to left of center.
Sewing from right side of fabric and
starting at lower edge, sink needle into
the seam. Sew out from zipper stop
about 3/8”, stop, pivot and make sure
the edge of the foot is lying in the ditch
of the seam. Sew up left side of zipper.
Right Side: Adjust foot to right of
center. Repeat above steps, starting
at seam and sewing to the right.
Mount sample, attaching only at top.
®
Mount sample, attaching only at top.
MASTERING YOUR BERNINA®/bernette® SEWING MACHINE 8/05
©2005 BERNINA® of America, Inc. Permission to copy granted only to Authorized BERNINA® Dealers
70
Page 71

BERNINA®/bernette® Sewing Machines
Centered Zipper Sample
Mastering
Your
BERNINA
®
bernette
Straight 2222
Stitch
BERNINA®1008 220 230PE 240 430 440QE 630 640 730
Straight 111111111
Stitch
Needle 59991111111111
Positions
MASTERING YOUR BERNINA®/bernette® SEWING MACHINE 8/05 71
©2005 BERNINA® of America, Inc. Permission to copy granted only to Authorized BERNINA® Dealers
®
55 65 80e 90e
Page 72

BERNINA®/bernette® Sewing Machines
BERNINA® models only
Invisible Zipper
Fabric ................................. two pieces of firm, woven fabric, 6” x 8”
Other ................................................................ 9” invisible zipper
Needle ............................................................................ 90/14 Universal
Thread ................................. 30 wt. cotton embroidery, contrasting color
Presser Foot...................................................... Invisible Zipper Foot #35
...................................................... Bulky Overlock Foot #12/12C
........................................................ Reverse Pattern Foot #1/1C
Stitch ......................................................................................... straight
Needle Position ....................................................................... as needed
Note: The invisible zipper can be used in place of a conventional
zipper when an uninterrupted design line is desired.
Mastering
Your
BERNINA
Notes
®
Zipper Insertion
Mark seam lines on right side of fabric. Select the Straight Stitch.
Open zipper. It is not necessary to press coils as with other invisible
zipper applications. Invisible Zipper Foot #35 has specially designed
grooves that guide the zipper coils out of the way as the tape is stitched
in place. Note: Do not sew the seam first as with conventional zippers.
Invisible zipper tapes are sewn to fabric sections first, then seam is
sewn.
With right sides together, baste or pin the right zipper tape to the right
garment piece, so coil is on the
Using center needle position, place coil in right groove of Foot #35.
Sew until foot is stopped by the zipper pull. Note: Needle should sew
close to, but not into, the zipper coils.
With right sides together, baste or pin the left zipper tape to the left
garment piece so that the coil is again on the
Check to be sure the zipper is not twisted. Place the coil in the left
groove of the foot and complete as with the right side.
Completing Seam
Close zipper. Using Bulky Overlock Foot #12 or #12C, place fabric
right sides together and stitch as close to the zipper as possible,
starting about ½” above the bottom of the zipper. It may be necessary
to move the needle position to the left slightly. Backstitch to begin and
sew about 2”; then change to Foot #1C to complete the seam. Press
and trim the sample. Mount it, attaching it only at the top. You can then
lift the sample and use it as a reference.
5
/8” seam line.
5
/8” seam line.
MASTERING YOUR BERNINA®/bernette® SEWING MACHINE 8/05
©2005 BERNINA® of America, Inc. Permission to copy granted only to Authorized BERNINA® Dealers
72
Page 73

BERNINA®/bernette® Sewing Machines
Invisible Zipper Sample
Mastering
Your
BERNINA
®
BERNINA®1008 220 230PE 240 430 440QE 630 640 730
Straight 111111111
Stitch
MASTERING YOUR BERNINA®/bernette® SEWING MACHINE 8/05 73
©2005 BERNINA® of America, Inc. Permission to copy granted only to Authorized BERNINA® Dealers
Page 74

BERNINA®/bernette® Sewing Machines
Darning
Fabric .............................................................. firm, woven fabric 4” x 6”
Interfacing ........................................ fusible tricot knit interfacing, 3” x 4”
Needle ............................................................................ 90/14 Universal
Thread ................................. 30 wt. cotton embroidery, contrasting color
Presser Foot.............................................. BERNINA
®
................................... BERNINA
®
.............. BERNINA
Automatic Buttonhole Foot with Slide #3A
..............................................
............................................................
Reverse Pattern Foot #1/1C
bernette
®
bernette
Stitch ......................................................................................... straight
............................................................... simple darning program
.......................................................... reinforced darning program
Needle Position .............................................................................. center
®
Darning Foot #9
embroidery/darning foot
®
satin stitch foot
Mastering
Your
BERNINA
Notes
®
Preparation: Make a ½” hole in the fabric; make 2 tears about 1” each.
Manual Darning
Attach darning foot to machine. Lower feed dog; select straight stitch. Bond
fusible knit interfacing to wrong side of fabric, behind round hole. Hoop fabric
to prevent distortion. Stitch, moving the hoop up and down, then side to side
without pressure. Raise feed dog when finished.
BERNINA
Simple Darning
Select the simple darning program,
if available, for the first tear. Attach
Foot #1/1C or #3A. Engage appropriate symbol for your machine.
Sew 1st row the length of tear –
press & release Quick Reverse
at end of row; length is now programmed. Complete darning program – machine stops automatically.
Reinforced Darning
Select Reinforced Darning Program
for second tear. Use Foot #3A.
Insert needle to left of top of tear.
Begin sewing; notice that running
stitch is sewn first.
®
bernette
Darning with Sewn-Out Zigzag
Select the 3-step zigzag for the
first tear. Attach the satin stitch
foot to the machine.
Sew first row of stitching the length
of the tear, through middle of tear.
Sew a second and third row, overlapping the first row on each side.
Stitch a fourth and fifth row, overlapping the second and third rows
on each side.
Continue until entire tear is covered.
®
When length of the tear has been
covered, press Quick Reverse.
Programming is complete and the
machine will finish automatically.
MASTERING YOUR BERNINA®/bernette® SEWING MACHINE 8/05
©2005 BERNINA® of America, Inc. Permission to copy granted only to Authorized BERNINA® Dealers
74
Page 75

BERNINA®/bernette® Sewing Machines
Darning Sample
Mastering
Your
BERNINA
®
bernette
Straight 2222
Stitch
3-Step 5444
Zigzag Stitch
BERNINA®1008 220 230PE 240 430 440QE 630 640 730
Straight 111111111
Stitch
Simple -- 13 15 17 18 20 22 22 22
Darning Program
Simple -- foot #1 foot #1 foot #1 foot #1 foot #1 foot #3 foot #3C foot #3A
Darning Symbol auto auto auto auto auto counting... counting... recording
Reinforced -- -- -- -- -- -- 23 23 23
Darning Program recording recording recording
MASTERING YOUR BERNINA®/bernette® SEWING MACHINE 8/05 75
©2005 BERNINA® of America, Inc. Permission to copy granted only to Authorized BERNINA® Dealers
®
55 65 80e 90e
Page 76

Mastering
BERNINA®/bernette® Sewing Machines
Class 3
Product Reference List
More Practical Stitching
Feet-ures, Volumes 1, 2, and 3
BERNINA® Standard Buttonhole Foot #3 or
BERNINA® Standard Buttonhole Foot #3C
BERNINA® Buttonhole Foot with Slide #3B
BERNINA® Bulky Overlock Foot #12/12C
BERNINA® Zipper Foot with Guide #14
BERNINA® Button Sew-On Foot #18
BERNINA® Invisible Zipper Foot #35
bernette® Zipper Foot
bernette® Embroidery/Darning Foot
bernette® Satin Stitch Foot
bernette® Button Sew-On Foot
bernette® Automatic Buttonhole Foot (65, 80e, 90e)
bernette® 4-Step Buttonhole Foot (55)
Your
BERNINA
®
BERNINA® Iron
Gimp or Pearl Crown Rayon
Stitch Witchery (narrow roll)
OESD Tear-Away Stabilizer
Buttonhole Space Tape
Buttonhole Placement Gauge
Marking Pens & Pencils
Applique Scissors
Seam Sealant
Glue Stick
Buttonhole Cutter & Block Set
Cotton Elastic
Collins Wash-A-Way Wonder Tape
MASTERING YOUR BERNINA®/bernette® SEWING MACHINE 1/06
©2006 BERNINA® of America, Inc. Permission to copy granted only to Authorized BERNINA® Dealers
76
Page 77

Mastering
BERNINA®/bernette® Sewing Machines
Class 4
Decorative Techniques
Class Overview
Gathering Samples
1 Gathering Over One Cord
2 Gathering Over Two Cords
3 Gathering with the Gathering Foot
4 Gathering with BERNINA
Specialty Needle Samples
5 Pintucks & Double Needles
6 Triple (Drilling) Needle
7 Wing Needle/Double Wing Needle
8 Entreduex
®
Ruffler #86
Your
BERNINA
®
This class is formatted for owners of the
following BERNINA® sewing machine models:
• classic 1008
• activa 220
• activa 230PE
• activa 240
• aurora 430
• aurora 440QE
• artista 630
• artista 640
• artista 730 & 200 with 730 upgrade installed
This class is also formatted for owners of the
following bernette® sewing machine models:
• 55 • 65 • 80e • 90e
MASTERING YOUR BERNINA®/bernette® SEWING MACHINE 1/06 77
©2006 BERNINA® of America, Inc. Permission to copy granted only to Authorized BERNINA® Dealers
Page 78

BERNINA®/bernette® Sewing Machines
Gathering Over One Cord
Fabric ........................................... medium weight cotton, 12” x 4”
Notions .......................................................................... 18” of cord
Needle ................................................................... 80/12 Universal
Thread .......................................................................... all-purpose
Presser Foot .......................... BERNINA® Embroidery Foot #6 or
.............................................. BERNINA® Clear Foot #39
.......................................................... bernette® cording foot
Stitch .................................................................................. zigzag
Needle Position .................................................................... center
Trim all four edges of sample fabric before beginning.
Mastering
Your
BERNINA
Notes
®
BERNINA
Thread cord through the hole in
Foot #6 OR #39, leaving a 2”-3”
tail behind the foot.
Select the zigzag stitch and set SW = 2.5mm and SL = 2-2.5mm.
Stitch 5/8” from one 12” edge; sew over the cord.
Secure the cord at the beginning and then pull it to gather the
sample to 6”.
Notes:
- Gathering over cord adds additional strength, eliminates
thread breakage and allows better control of gathering.
- Drop the feed dog and sew a bartack at the beginning and end
of cord for strength.
- Do not sew through cording.
®
bernette
Thread cord through center
groove of cording foot, leaving
a 2”-3” tail behind the foot.
®
MASTERING YOUR BERNINA®/bernette® SEWING MACHINE 8/05
©2005 BERNINA® of America, Inc. Permission to copy granted only to Authorized BERNINA® Dealers
78
Page 79

BERNINA®/bernette® Sewing Machines
Gathering Over One Cord Sample
Mastering
Your
BERNINA
®
bernette
Zigzag 3333
Stitch
BERNINA®1008 220 230PE 240 430 440QE 630 640 730
Zigzag 222222222
Stitch
MASTERING YOUR BERNINA®/bernette® SEWING MACHINE 8/05 79
©2005 BERNINA® of America, Inc. Permission to copy granted only to Authorized BERNINA® Dealers
®
55 65 80e 90e
Page 80

BERNINA®/bernette® Sewing Machines
Gathering Over Two Cords
Fabric ........................................... medium weight cotton, 12” x 4”
Notions .......................................................................... 30” of cord
Needle ................................................................... 80/12 Universal
Thread .......................................................................... all-purpose
Presser Foot ........... BERNINA® Standard Buttonhole Foot #3/3C
........................................................... bernette® cording foot
Stitch ........................................................ BERNINA® gathering
................................................................bernette® rampart
Needle Position .................................................................... center
Trim all 4 edges of the fabric piece with a wavy rotary cutter.
Mastering
Your
BERNINA
Notes
®
Place fabric under foot and lower the needle but not the foot.
BERNINA
Select the gathering sitch.
Fold cord in half and loop
around the middle toe of foot
#3C; lower the foot.
Lift cord loop from toe and pull
cord forward leaving 3” tails
behind the foot.
Begin to sew, allowing the two
grooves of the buttonhole foot
to guide the cord.
Sew along one 12” edge, 5/8” from the edge.
Pull on both cords to gather the sample to 6”.
®
bernette® 80e & 90e only:
Select the rampart stitch.
Fold cord in half. With loop
behind the foot, position the
cords in the left and right
grooves.
Begin to sew, allowing the two
grooves of the cording foot to
guide the cord.
Note: Lower the feed dogs and sew a bartack at beginning and
end of cord for strength.
MASTERING YOUR BERNINA®/bernette® SEWING MACHINE 8/05
©2005 BERNINA® of America, Inc. Permission to copy granted only to Authorized BERNINA® Dealers
80
Page 81

BERNINA®/bernette® Sewing Machines
Gathering Over Two Cords Sample
Mastering
Your
BERNINA
®
bernette
Rampart -- -- 8 8
Stitch
BERNINA®1008 220 230PE 240 430 440QE 630 640 730
Gathering -- 14 16 18 21 22 12 12 12
Stitch
MASTERING YOUR BERNINA®/bernette® SEWING MACHINE 8/05 81
©2005 BERNINA® of America, Inc. Permission to copy granted only to Authorized BERNINA® Dealers
®
55 65 80e 90e
Page 82

BERNINA®/bernette® Sewing Machines
Gathering with the Gathering Foot
Fabric .. 2 pieces medium weight cotton, one 4” x 6”, one 4” x 12”
Needle ................................................................... 80/12 Universal
Thread .......................................................................... all-purpose
Presser Foot ................. BERNINA® Wide Gathering Foot #16 or
...................... BERNINA® Extra-wide Gathering Foot #16
.......................................................bernette® gathering foot
Stitch ................................................................................ straight
Needle Position ........................................................... as indicated
Mastering
Your
BERNINA
Notes
®
BERNINA
Attach the gathering foot to the
machine.
Select the straight stitch; adjust
stitch length to 5mm; set needle
position to the far left.
Trim all four edges of the sample fabrics before beginning.
Place 12” length of fabric right side up under foot. Align edge of fabric
with
Insert the 6” length of fabric right side down into the slot of the foot,
with the raw edge against the right side of the slot.
Continue stitching, carefully guiding both pieces of fabric. Guide fabric
that is being gathered with the left hand, flat fabric with the right hand.
Note that fabric being gathered moves under the foot much faster
than the flat, top layer.
Trim and mount sample.
®
5
/8” mark on the stitch plate. Stitch for 2” to 3”; stop.
bernette
Remove presser foot holder and
attach gathering foot to machine.
Select the straight stitch; adjust
length to 5mm; set needle position to center. Tighten upper
thread tension to 7.
®
Notes: There are three things that effect the amount of gathers:
1. Fabric Weight - The lighter weight the fabric, the easier to gather.
2. Tension - Increased upper tension increases the amount of
gathering.
3. Stitch Length - The longer the stitch length, the tighter the gathers.
Use the basting stitch or the Long Stitch function to increase gathers
in heavier weight fabrics such as woolens and corduroys.
MASTERING YOUR BERNINA®/bernette® SEWING MACHINE 8/05
©2005 BERNINA® of America, Inc. Permission to copy granted only to Authorized BERNINA® Dealers
82
Page 83

Mastering
BERNINA®/bernette® Sewing Machines
Your
BERNINA
Gathering with the Gathering Foot Sample
®
bernette
Straight 2222
Stitch
BERNINA®1008 220 230PE 240 430 440QE 630 640 730
Straight 111111111
Stitch
MASTERING YOUR BERNINA®/bernette® SEWING MACHINE 8/05 83
©2005 BERNINA® of America, Inc. Permission to copy granted only to Authorized BERNINA® Dealers
®
55 65 80e 90e
Page 84

BERNINA®/bernette® Sewing Machines
Gathering with BERNINA® Ruffler #86
Fabric .. 2 pieces medium weight cotton, one 4” x 6”, one 4” x 18”
Needle ................................................................... 80/12 Universal
Thread .......................................................................... all-purpose
Presser Foot ..........................BERNINA® Ruffler Attachment #86
Stitch ................................................................................ straight
Needle Position .................................................................... center
Mastering
Your
BERNINA
Notes
®
BERNINA
Attach Ruffler Attachment #86 to
the machine.
Trim fabric edges with wavy rotary cutter before sewing.
Select Straight Stitch (SW = 0mm, SL= 1mm to 5mm). The longer
the stitch length, the deeper the pleats will be.
Set the adjustment lever on the attachment at 1.
Place the 18” length of fabric (the piece to be ruffled) wrong side
up between the two blades, snugging it against the edge of the
seam guide slot, making sure it is slightly beyond the needle.
Lower the foot and begin sewing; stitch for 2” to 3”. If gathers
are too deep, turn the adjusting screw counter clockwise; if too
shallow, turn the screw clockwise.
®
bernette
Remove the presser foot holder
from the machine.
Remove the
from Ruffler Attachment #86.
Attach the Ruffler to the machine.
®
BERNINA® adapter
MASTERING YOUR BERNINA®/bernette® SEWING MACHINE 8/05
©2005 BERNINA® of America, Inc. Permission to copy granted only to Authorized BERNINA® Dealers
84
Page 85

Mastering
BERNINA®/bernette® Sewing Machines
Your
BERNINA
Gathering with BERNINA® Ruffler #86 Sample
®
bernette
Straight 2222
Stitch
BERNINA®1008 220 230PE 240 430 440QE 630 640 730
Straight 111111111
Stitch
MASTERING YOUR BERNINA®/bernette® SEWING MACHINE 8/05 85
©2005 BERNINA® of America, Inc. Permission to copy granted only to Authorized BERNINA® Dealers
®
55 65 80e 90e
Page 86

BERNINA®/bernette® Sewing Machines
Pintucks & Double Needles
Fabric ............................................. lightweight cotton, 6” x 8”, starched
Needle ...................... Double (size should correspond to foot/machine*)
Thread ................................................................ two spools, all-purpose
Miscellaneous ................. gimp cord or other colorfast, shrink-proof cord
Presser Foot................. BERNINA
............................................................
Stitches........................... straight, various decorative stitches as desired
Needle Position .............................................................................. center
®
Pintuck Foot #30, #31, #32, or #33
bernette
®
satin stitch foot
Mastering
Your
BERNINA
Notes
®
BERNINA
Insert the Double needle and
thread with 2 different colors.
Select straight stitch; adjust length
to 1.75mm-2mm. Engage Double
Needle Limitation function or
Security Program if available
and select appropriate Double
Needle option.
Parallel Pintucks
Start sewing in one corner and
meander across fabric. Sew 5-6
more rows, evenly spaced across
one corner of fabric. Position the
previously sewn tuck in the groove
of the foot.
Corded Pintucks
Thread machine, using the same thread in both needles and the bobbin.
BERNINA
It is not possible, with a double needle, to turn completely around a corner
in one step. To turn corners, use the following steps:
bernette
- Sew to corner; needle in fabric, drop feed dogs.
- Turn 45°, take 1 stitch, lower needles into fabric, turn another 45°.
- Raise feed dogs and continue.
Sew four random corners.
Sew 2 points as on a leaf or star.
- Sew to corner; needle up.
- Pivot work carefully and lower needles back into same place.
Decorative Pintucks
Select desired decorative stitches; stitch several rows of pintucks.
®
®
only: Thread cord through the hole in the needle plate.
®
only: Remove accessory table; use center needle position
bernette
Insert the Double needle and
thread with 2 different colors.
Use the auxilliary spool pin for the
second spool and skip the thread
guide just above the needle
Select the straight stitch; adjust
length to 1.75mm-2mm. Adjust
needle position to maximum stitch
width – see chart at right.
Parallel Pintucks
Start sewing in one corner and
meander across fabric. Sew 5-6
more rows evenly spaced across
corner of the fabric. Position
previous tuck against edge of foot
®
Tips
Sew at a slower speed and
test movement of the needle,
making sure that it doesn’t hit
the presser foot.
Tighten top tension to create
more dimension.
* Choose the correct needle:
•
BERNINA® Pintuck Foot #30
3 groove: 4mm needle
• BERNINA
®
Pintuck Foot #31
5 groove: 2.5 or 3mm needle
• BERNINA® Pintuck Foot #32
7 groove: 2mm needle
• BERNINA® Pintuck Foot #33
9 groove: 1.6 needle
• bernette® 55
satin stitch foot
2.0 needle = 2.5mm max SW
3.0 needle = 2mm max SW
bernette
•
®
65, 80e, 90e
satin stitch foot
2.0 needle = 4mm max SW
3.0 needle = 4mm max SW
MASTERING YOUR BERNINA®/bernette® SEWING MACHINE 8/05
©2005 BERNINA® of America, Inc. Permission to copy granted only to Authorized BERNINA® Dealers
86
Page 87

BERNINA®/bernette® Sewing Machines
Pintucks & Double Needles Sample
Mastering
Your
BERNINA
®
bernette
Scallop 12 8 11 12
Stitch
Square 13 9 10 11
Stitch
Decorative -- -- 9 10
Stitch
BERNINA®1008 220 230PE 240 430 440QE 630 640 730
Feather -- 45 28 44 53 48 332 332 332
Stitch
Running 744444444
Stitch
Straight -- -- -- -- 131 160 719 719 719
Stitch Scallop
MASTERING YOUR BERNINA®/bernette® SEWING MACHINE 8/05 87
©2005 BERNINA® of America, Inc. Permission to copy granted only to Authorized BERNINA® Dealers
®
55 65 80e 90e
Page 88

BERNINA®/bernette® Sewing Machines
Triple (Drilling) Needle
Fabric ............................................................ firmly woven, 6” x 8”
Stabilizer................................... firm tear-away or cut-away, 6” x 8”
Needle ..................................................................... Triple (3.0mm)
Thread ...................... Isacord embroidery thread, 3 different colors
Presser Foot .......................... BERNINA® Clear Foot #34/#34C or
.................... BERNINA® Open Embroidery Foot #20/#20C
............................................................ bernette® satin stitch foot
Stitch ................................................................................. straight
................................. various decorative stitches as desired
Needle Position .....................................................................center
Mastering
Your
BERNINA
Notes
®
Thread each needle with a different color thread. (bernette
the auxiliary spool pin and a supplementary thread stand.)
Engage the Triple Needle Limitation or Security Program,
if available..
Note: If these features are not available, check to be sure the
needles will not strike the foot by turning the handwheel to “walk”
the machine through the first stitch.
Select 5 different stitches and sew across the fabric randomly.
When doing decorative needle work you must sew slowly –
change motor to ½ speed if this option is available.
Trim threads, then trim sample edges, and mount.
®
use
Tips
Sew at a slower speed and test
the movement of the needle,
making sure that it doesn’t hit
the presser foot.
MASTERING YOUR BERNINA®/bernette® SEWING MACHINE 8/05
©2005 BERNINA® of America, Inc. Permission to copy granted only to Authorized BERNINA® Dealers
Tighten top tension to create
more dimension.
88
Page 89

BERNINA®/bernette® Sewing Machines
Triple (Drilling) Needle Sample
Mastering
Your
BERNINA
®
bernette
Decorative 4444
Stitch Option
Decorative --777
Stitch Option
Decorative -- -- 26 28
Stitch Option
BERNINA®1008 220 230PE 240 430 440QE 630 640 730
Decorative 3 45 28 44 53 48 332 332 332
Stitch Option
Decorative 7 4 68 95 25 27 16 16 16
Stitch Option
Decorative 13 14 16 18 21 22 12 12 12
Stitch Option
MASTERING YOUR BERNINA®/bernette® SEWING MACHINE 8/05 89
©2005 BERNINA® of America, Inc. Permission to copy granted only to Authorized BERNINA® Dealers
®
50 65 80e 90e
Page 90

BERNINA®/bernette® Sewing Machines
Wing Needle/Double Wing Needle
Fabric ................................................................ cotton organdy, 6” x 8”
Notions .............................................. 6” length of heirloom insertion lace
Needle ......................................................................... Wing size 100/16
................................................................................ Double Wing
Thread ...................... two spools embroidery thread or 60 weight cotton
®
Presser Foot.............................. BERNINA
.................... BERNINA® Open Embroidery Foot #20/#20C
....................................................bernette® clear satin stitch foot
Stitch ...................... straight, blindstitch, decorative stitches as desired
Needle Position .............................................................................. center
Clear Foot #34/#34C or
Mastering
Your
BERNINA
Notes
®
Single Wing Needle
Insert Wing needle. If available, engage the Wing Needle Limitation
function or Security Program (Wing needle option). This alters the stitch
width so that the “wings” of the needle will not hit the presser foot; also
constrains stitches to the center needle position.
Position lace on top of organdy. Select pin stitch or blanket stitch (if not
available, select a narrow zigzag stitch with SW = 2mm). Stitch along
one edge of lace, engaging the Mirror Image function if necessary and
available. Sew along remaining edge, again engaging Mirror Image –
or turning fabric – as needed. Carefully trim fabric from under lace.
Frame lace insertion with three of the stitches suggested in the chart.
Double Wing Needle
Insert Double Wing needle. Select straight stitch. Engage Double Wing
Needle Limitation/Security function if available. Adjust stitch length
to 3mm. Stitch across the fabric on the bias (diagonal). At end, carefully
pivot and sew back along first line of stitching, with “wing” portion of
Double needle entering holes created by the first line of stitching.
Frame center row with two additional lines of stitching:
- 1st row - blindstitch - sew in one direction, pivot, and stitch back
to create a “chain” effect
- 2nd row - decorative straight stitch motif, such as a scallop
Carefully remove the stabilizer following the manufacturer’s directions.
Trim and mount the sample.
Wing Needle Tips:
When selecting stitches to
use with a Wing or Double
Wing Needle, look for multimotion stitches where the
needle enters the same hole
multiple times.
Stitching on the diagonal
(bias) of the fabric allows
holes created by the Wing
needle to open more easily.
To help support fabric and
stitching, temporarily bond a
layer of heavy, water-soluble
stabilizer to wrong side of
fabric using a temporary
spray adhesive.
MASTERING YOUR BERNINA®/bernette® SEWING MACHINE 8/05
©2005 BERNINA® of America, Inc. Permission to copy granted only to Authorized BERNINA® Dealers
90
Page 91

Mastering
BERNINA®/bernette® Sewing Machines
Your
BERNINA
Wing Needle/Double Wing Needle Sample
®
bernette
Wing 9 10 S10 S11
Needle 10 11 S8 S8
Stitch 11 12 S4 S4
Options
Double Wing 2222
Needle 912S4S4
Stitch 6655
Options -- -- S8 S8
®
55 65 80e 90e
-- -- 8 8
BERNINA®1008 220 230PE 240 430 440QE 630 640 730
Wing 2 28 25 41 50/132 45/161 720/329 720/329 720/329
Needle 744444726726726
Stitch 4 41 59 76 118 147 701 701 701
Options -- 14 16 18 141 171 732 732 732
Double Wing 111111111
Needle 377777999
Stitch 4 14 16 18 141 171 719 719 733
Options
Specialty -- -- -- -- -- -- security security security
Needle Function
MASTERING YOUR BERNINA®/bernette® SEWING MACHINE 8/05 91
©2005 BERNINA® of America, Inc. Permission to copy granted only to Authorized BERNINA® Dealers
Page 92

BERNINA®/bernette® Sewing Machines
BERNINA® models only
Entredeux
Fabric ....................................................... cotton organdy, 8” x 6”
Notions .......................................... heavy cotton thread for cording
Stabilizer ...................... spray starch and/or water soluble stabilizer
Needle ..................................................................... Wing, size 100
Thread ...................................................................60 weight cotton
Presser Foot .....................................BERNINA® Cording Foot #25
Stitch ................................................................................. straight
Needle Position .....................................................................center
Insert Wing needle. If available, engage the Security Program,
selecting the Wing needle option. This alters the stitch width so
that the “wings” of the needle will not hit the presser foot; also
constrains stitches to the center needle position.
Mastering
Your
BERNINA
Notes
®
Select the entreduex or star stitch; adjust stitch length to 3mm.
Attach Cording Foot #25, but do not load cord into the guides
at this time. Stitch a row of entredeux.
Load Cording Foot #25 with lengths of heavy cotton thread
in grooves 2 and 4.
Stitch a second row of entredeux. As the hemstitching is sewn,
the heavy cotton threads fill the outer edges of the stitching,
creating a stitch that looks very similar to fine, purchased
endredeux.
Trim and mount sample.
MASTERING YOUR BERNINA®/bernette® SEWING MACHINE 8/05
©2005 BERNINA® of America, Inc. Permission to copy granted only to Authorized BERNINA® Dealers
92
Page 93

BERNINA®/bernette® Sewing Machines
Entreduex Sample
Mastering
Your
BERNINA
®
BERNINA®1008 220 230PE 240 430 440QE 630 640 730
Star/Pattern -- 44 64 84 126 155 711 711 711
Stitch
Entredeux -- 41 59 76 118 147 701 701 701
Stitch
MASTERING YOUR BERNINA®/bernette® SEWING MACHINE 8/05 93
©2005 BERNINA® of America, Inc. Permission to copy granted only to Authorized BERNINA® Dealers
Page 94

Mastering
BERNINA®/bernette® Sewing Machines
Class 4
Product Reference List
Decorative Techniques
Feet-ures, Volumes 1, 2, and 3
BERNINA® Standard Buttonhole Foot #3 or
BERNINA® Standard Buttonhole Foot #3C
Embroidery Foot #6
Wide Gathering Foot #16 or
Extra Wide Gathering Foot #16
BERNINA® Open Embroidery Foot #20 or
BERNINA® Open Embroidery Foot #20C
BERNINA® 3-Groove Cording Foot #22
BERNINA® 5-Groove Cording Foot #25
Pintuck Feet
#30 - 3 groove
#31 - 5 groove
#32 - 7 groove
#33 - 9 groove
BERNINA® Clear Foot #34 or
BERNINA® Clear Foot #34C
Clear Embroidery Foot #39
Ruffler Attachment #86
bernette® Cording Foot
bernette® Gathering Foot
bernette® Satin Stitch Foot
Needles
Double Needles
(1.6/70, 1.6/80, 2.0/80, 2.5/80, 3.0/80, 4.0/80,
3.0/90, 4.0/90, 4.0/100, 6.0/100, 8.0/100)
Triple (or Drilling) Needles (2.5/80, 3.0/80)
Wing Needle (100/16, 120/20)
Double Wing Needle (100/16)
Guide Bar Set with Rulers
Wavy Rotary Cutter
Ruler
Cutting Mat
BERNINA® Iron
Elastic Thread
Gimp Cord or Pearl Crown Rayon
Spray Sizing
Your
BERNINA
®
MASTERING YOUR BERNINA®/bernette® SEWING MACHINE 1/06
©2006 BERNINA® of America, Inc. Permission to copy granted only to Authorized BERNINA® Dealers
94
Page 95

Mastering
BERNINA®/bernette® Sewing Machines
Class 5
More Decorative Techniques
Class Overview
Decorative Detail Samples
1 Pleats and Tucks
2 Off-the-Edge Scallops
3 Lace Insertion
4 Fagoting and Bundling
5 Fringing
6 Piping
Your
BERNINA
®
Embellishment Samples
7 Patchwork/Quilting
8 Applique
9 Surface Embellishment
• Crazy Patchwork
• Decorative Stitching
• Bobbinwork
• Couching
This class is formatted for owners of the
following BERNINA® sewing machine models:
• classic 1008
• activa 220
• activa 230PE
• activa 240
• aurora 430
• aurora 440QE
• artista 630
• artista 640
• artista 730 & 200 with 730 upgrade installed
MASTERING YOUR BERNINA®/bernette® SEWING MACHINE 1/06 95
©2006 BERNINA® of America, Inc. Permission to copy granted only to Authorized BERNINA® Dealers
This class is also formatted for owners of the
following bernette® sewing machine models:
• 55 • 65 • 80e • 90e
Page 96

BERNINA®/bernette® Sewing Machines
Pleats and Tucks
Fabric ................................................ medium weight cotton, 4” x 18”
Needle ........................................................................ 80/12 Universal
Thread ........................................................ all-purpose sewing thread
Presser Foot................................... BERNINA® Clear Foot #34/34C
............................................ BERNINA
................................................
bernette
...........................................................
Stitch ..................................................................................... straight
Needle Position ................................................................. as directed
®
BERNINA
Mark fabric as shown; fold fabric along lines; press.
Clear Foot #34/34C or bernette® zigzag/universal foot
®
Edgestitch #10/10C
®
zigzag/universal foot
bernette
®
blindhem foot
Mastering
Your
BERNINA
Notes
®
Fold fabric on 1st line. Stitch
1st tuck, aligning right edge of
foot with fold.
Fold fabric along second
line. Move needle position
to the far left; stitch tuck,
aligning fold with the right
edge of the foot.
Attach seam guide to back of foot. Adjust guide to 2¼” from center needle
position. Fold fabric on 3rd line; stitch a 3rd tuck, aligning guide along fold.
BERNINA
Edgestitch Foot #10/10C
Fold fabric along fourth line. Place
fold to the left of the center blade of
Foot #10/10C, with the fold against
the blade.
Move needle position all the way to
the left; sew.
Fold fabric along fifth line; position
fabric as for the last fold.
®
bernette
blindhem foot
Move white blade to right until it is
aligned with the right side of the
needle opening.
Fold fabric along fourth line. Place
fold to the left of guide, with fold
against guide. Sew.
Fold fabric along fifth line; position
fabric as for the last fold.
®
5” 1½”1”3”2½” 5”
Move needle position to “half left”
position; sew.
Note: Very narrow tucks are easily
stitched with this foot by adjusting
the needle position.
MASTERING YOUR BERNINA®/bernette® SEWING MACHINE 8/05
©2005 BERNINA® of America, Inc. Permission to copy granted only to Authorized BERNINA® Dealers
Move white guide halfway back to
center; sew.
Note: Very narrow tucks are easily
stitched with this foot by repositioning the white guide.
96
Page 97

BERNINA®/bernette® Sewing Machines
Pleats and Tucks Sample
Mastering
Your
BERNINA
®
bernette
Straight 2222
Stitch
BERNINA®1008 220 230PE 240 430 440QE 630 640 730
Straight 111111111
Stitch
Needle 59991111111111
Positions
MASTERING YOUR BERNINA®/bernette® SEWING MACHINE 8/05 97
©2005 BERNINA® of America, Inc. Permission to copy granted only to Authorized BERNINA® Dealers
®
55 65 80e 90e
Page 98

BERNINA®/bernette® Sewing Machines
BERNINA® models only
Off-the-Edge Scallops
Fabric ........................................... medium weight cotton, 12” x 4”
Notions ............................................... cording (gimp, perle cotton)
........................ Stitch N Ditch™ Heirloom Stabilizer, 1 yard
Needle ................................................................... 80/12 Universal
Thread .............................................................. #75/11 Embroidery
Presser Foot .......................... BERNINA® Patchwork Foot #37 or
...................... BERNINA® Patchwork Foot with Guide #57
................... BERNINA® Open Embroidery Foot #20/#20C
Stitch ................................................................................ straight
Needle Position .................................................................... center
Mastering
Your
BERNINA
Notes
®
Draw 4 lines about 1½” apart across the width of the fabric. Fold
along each line and press.
Select the Straight Stitch; attach Patchwork Foot #37 to machine.
Sew a ¼” tuck on each of the folds.
Change to Open Embroidery Foot #20 or #20C.
Select the Satin Scallop Stitch. Thread the cord through the hole
in the stitch plate (directly in front of the needle).
Lay the edge of the Stitch N Ditch™ under the previously sewn
tuck, with most of the paper showing beyond the fold of the tuck.
Begin stitching on the paper; cord will be drawn into the scallop
stitching. (The scallop actually forms over the cord.) Continue
stitching, guiding the fabric under the foot so that only 2-3 stitches
at the “V” of the scallop stitch into the fold.
Sew off-the-edge scallops to each of the stitched tucks.
Gently remove Stitch N Ditch™ from completed scallops.
Trim and mount the sample.
Off the Edge Tip:
Stitch N Ditch™ Heirloom
Stabilizer is very thin, crisp,
and easy to tear, which makes
it perfect for off-the-edge
techniques.
MASTERING YOUR BERNINA®/bernette® SEWING MACHINE 8/05
©2005 BERNINA® of America, Inc. Permission to copy granted only to Authorized BERNINA® Dealers
98
Page 99

BERNINA®/bernette® Sewing Machines
Off-the-Edge Scallops Sample
Mastering
Your
BERNINA
®
BERNINA®1008 220 230PE 240 430 440QE 630 640 730
Straight 111111111
Stitch
Satin Stitch 8 34 48 58 88 114 416 416 416
Scallop
MASTERING YOUR BERNINA®/bernette® SEWING MACHINE 8/05 99
©2005 BERNINA® of America, Inc. Permission to copy granted only to Authorized BERNINA® Dealers
Page 100

BERNINA®/bernette® Sewing Machines
Lace Insertion
Fabric .................................................... lightweight cotton 4” x 6”
Notions ............................................ 9” insertion lace, ½ ”- ¾” wide
Needle ................................................................... 70/10 Universal
Thread .................................................................. 60 weight cotton
Presser Foot ............................... BERNINA® Edgestitch #10/10C
.......................................................
bernette
Stitch ................................................................................ straight
Needle Position ...................................................half left, half right
First Run: Pin or spray-baste lace in position on top of fabric. Select
straight stitch; adjust length to 1.5mm-2mm.
®
blindhem foot
Mastering
Your
BERNINA
Notes
®
BERNINA
Move needle to half left (artista
640 & 730: adjust needle one
position to left). Align left edge of
lace with blade; sew.
Sew the right side in the same
manner using the half right needle
position (artista 640 & 730: adjust
needle one position to right).
From the back, carefully cut through fabric, between the two rows of
stitching, leaving lace intact. Press fabric back against the straight stitch.
Second Run: Select zigzag stitch; SW = 1.5-2mm and SL = 0.75-1mm.
BERNINA
Move needle to half left (640/730:
adjust needle one position to left).
Place edge of lace first to the left
of the guide, and zigzag over the
edge of the lace and previously
sewn straight stitch.
®
®
bernette
Move white blade 1/8” from the
needle). Align right edge of lace
with guide; sew.
Turn fabric 180° and sew the right
side in the same manner.
bernette
Place edge of lace first to the right
of the blade, and zigzag over the
edge of the lace and the previously
sewn straight stitch.
Turn fabric 180° and sew the right
side in the same manner.
®
®
Sew right side in the same way,
using a half right needle position
(artista 640/730: adjust needle
one position to right).
Trim surplus fabric from wrong side. Trim and mount sample.
MASTERING YOUR BERNINA®/bernette® SEWING MACHINE 8/05
©2005 BERNINA® of America, Inc. Permission to copy granted only to Authorized BERNINA® Dealers
100
 Loading...