

Page 1
‘Ornette’
715
740 E
r //y.y hWML'f
Instruction Manual
Livret d’instructioo
Handlet
"5^Zî®^e740E
•“ ■(»«(* ^
Page 2

Congratulations on th« purchase of your new
sewing machine!
Nous vous félicitons d'avoir acquis votre nouvelle
machine à coudre*
HarteUjk gefelicieerd mei de aankoop van uw
nieuwe naaimachine!
You have bought a quality product which was
manufacturedwiihcareartdatiention Yoursewmg
machine is easy to use but this instruction book has
been written to hefp you get the most out of your
machine. We suggest you read it before starting to
sew.
You will no ckxibt have questions now and then for
which you cannot find an answer m this book Your
dealer is always on hand to help with advice and
tips.
We wish you many hours of sewing pleasure.
Vousavez, en effet, opté pour un produit de qualité
qui a été fabnqué avec le plus grand soin. Votre
machine à coudre est facile à utiliser, mais il faut,
naturellement suivre les règles du jeu. Nous les
avons rassemblées pour vous dans ce livret
d'instructions. Si vous tes respectez, vous réussi
rez. dès le commencement ce que vous entrepre
nez.
Sûrement, en tant que créatrice de mode pour la
famille, vous aurez, de temps à autre, des ques
tions auxquelles nous n'avons pas répondu
entièrement dans ce livret. Alors, il vous suffit de
demander à votre agent. Il sera toujours là pour
vous.
Maintenant, nous vous souhaitons bien du plaisir
durant vos loisirs pour l'habillement. Avec votre
machir>e. donnez libre cours à votre imagination.
U heeft een kwaiiteitsprodukt gekocht dat mei veel '
zorgvuidigheid werd vervaardigd. Uw naaimachi
ne is eenvoudig te bedienen en deze handleidmg
heipt u om alle mogelijkheden van uw machine te
ontdekken. Lees deze aandachtig door voordat u
met het naaien begint.
Af en toe zuit u wei eens een vraag hebben die dit
boek met kan beantwoorden. Uw Bernette vakhandeiaar is dan altijd graag bereid om u advies en
hps te geven.
Wij wensen u veel plezier bij het naaien.
Page 3

01992 Fnte Gegairf Ltd.
Bemina Sewing Machines
CH-8266 Steckborn (Switzerland)
e I9d2 Fritz Gegaut SA
Fabrique de rnachines à coudre Bernina
CH-6266 Steckborn (Suisse)
91992 Fritz Gegaut AG
Bernmâ Naaimachinelabriek
CH-8266 Steckbom (Zwitserland)
We reserve (he right to make technical changes in
the interest of progress
Sous réserve des modifications apportées dans
hmérèt du progrès technique.
Veranderir)gen in het belang van de technische
vooruitgang voorbehouden.
Page 4

List of contents
Accessones
Aulomatic needte stop
(Model 740E onty)
Automatic needle throader
(Model 74oe ontyi
Bsnd hen%'1>ngene sMch
SoObin • msertng
Bobbin • tension
Bobbin • winding............................
Bnnging up die lowo'
thread...........................—
Butb - chanoing
Buttons • sewing on
(Model 740E oniyi
Buttonholes...................................
Colour code green and blue
Colour code red and yeiiow
Cixmeciing the rischine
Corcingtoot
(Model 740E onlyi
Darrwig
Decorative stitches
(Model 740E ootyi......................
Details oi the machine
Feed d^ • lo'wenng
Foot control
Hemmer loot.................................
......................-................
.....................
......................
.............
..........................
............................
........
.............................
..........
.....
......
............
.............
...................
......................
........................................
....................
.......
................
..................................
Noatening edges
10
Noodle - inserting....................
.
......
......
......
.....
......
.38.40
......
.....
......
.14.16
......
.....
.72. 74 Triple straighl stitch;z<g-zag
.....6. 8 Trouble shooting guide
.....
.14.16
Needle positions.....................
20
NeediO'Thread table
36
Overlock stitches
78
.26 Practical stitches.................. .66, 68. 70
Pressor loot - removing
26
Prosser foot • attachng ............
Presser foot lifter
18 Reverse sewing .....................
84
Safety regulations
Smocking stitch
76
Speed control..Stitch selection
48 Stitch table
Straight sUclvzig-zag
88 Tension - upper thread
Tension ' lower thread..............
Threading - upper thread ...
60
Three-step zig-zag
Twin needle
20 (Model 740E only)...............
Zips - sewing «
....
................
...............
....................
............
....................
...................
......................
......................
.......................
.............................
...............
............
..................
............
...................
.
...........
52
...........
28
...........
44
...........
30
......
56. 58
............
............
............
............
..............
............
............
......
60.62
............
............
............34
............
............
............
......
60.62
............
.
...........
22
22
13
42
5
64
14
12
50
26
32
54
92
82
Inserting the neetse
inserting the seam guxJe...............
LED display ..................................
Light.........................................
Mamtonanco..........................—
.......................
.....
.....
....
......
28
14
48
14.16
90
Page 5

IMPORTANT SAFETY INSTRUCTIONS
When ustng an eiectncai appliance, basic safety
precautions should always be followed, including
the following:
Read all instructions before using this sewing
machine.
DANGER
To reduce the risk of electric shock:
1 An appliance should never be left unattended
when plugged in.
2. Always unplug this appliance from the electric
outlet immediately after u$ir>g and before cle
aning.
3 Alwaysunplugbeforerelamping Reptacebulb
with same type rated IS Watts.
WARNING
To reduce the nsk of bums. fire, electric shock, or
injury to persons:
1 Do not allow to be used as a toy. Close atten
tion is necessary when this appliance is used
by or near children.
2. Use this appliance only lor its intended use as
described in this manual. Use only attach
ments reoynmended by the manufacturer as
contained in this manual.
3. Never operate this appliance if it has a dama
ged cord of plug, if it is not working properly, if
It has been dropped or damaged, or ckopped
into water. Return the appliance to the nearest
authorized dealer or service center for exami
nation. repair, electrical or mechanical adjust
ment.
4 Never operate the appliance with any air
openings block. Keep ventilation openings of
the sewing machine and foot controller free
from accumulation of lint. dust, and loose cloth.
5. Keep fingers away from all moving parts
Special care is required arourxf the sewing
machine needle.
6. Always use the proper needle plate. The wrong
plate can cause the needte lo break.
7. Do not use bent needles.
8. Do not pull or push fabric while stltchir>g, It may
detlect the needle causing it to break.
9. Switch the sewing machine off (*0’> when ma
king any adjustmenfs in the needle area, such
as threading needle, changing needle, threadir>g bobbin, or changing pressor foot, and the
like.
10. Always unplug sewing machine from the
electrical outlet wen removing covers, lubncatmg. or when making an other user servicir>g
adjustments mentioned m the instruction ma
nual.
11- Never dtof> or insert any objeci into any
opening.
12 Do not use outdoors
13. Do not operate where aerosol (spray) products
are being used or where oxygen is being
administered.
14. To disconnect, turn all controls to the off <*0*j
position, then remove plug from outlet
15. Do not unplug by pulling on cord To unplug,
grasp the plug, not the cord.
16 This appliance 1$ provided with double insula
tion. Use onfy identical replacement parts. See
instructions lor Servidnq of Double-Insulated
Appliances (except USA/Canada)
Servicing of Double-Insulated Products
17. In a double-insulated product, two systems of
insulation are provided instead of grounding.
No grounding means is provided on a doubleinsulated product, nor should a means for
grounding bo added to the product. Servicing
of a double-insulated (xodud requires extre
me care and knowledge of the system, and
should be done onfy by qualified service per
sonnei. Replacement parts for a double-insu
lated produd must bo indentical to those parts
in the product. A double-insulated product is
marked with the words "double insulation"
or DOUBLE INSULATED".
Page 6

Consignes de sécurité
Velligheldsvoorschriften
The symbol D may also be marked on the product.
SAVE THESE
INSTRUCTIONS
Th(S sewing machine Is intended for household
use only.
Les consignes de sécurité énumérées d-après
doiverjf éfre »mpérai/vemenf respectées:
Dès qu’elle est en mouvement, l'aiguille est source
de danger (risque de blessure pour les doigts). Il
convient dor>c d'obsen/er en permanence
remplacement où s'effectue la couture.
Toute manipulation dans la гопе d’action de
l'aiguille (remplacement de l'aiguille, du pied-de-
biche. de la plaque à aiguille ou mise en route du
dispositif automatique d'enfilage) ne doit
s'effectuer que lorsque la machine est débranchée
(interrupteur princip^ sur 'D'^.
Pour tous les travaux d’entretien (nettoyage et
huilage), ainsi que pour le remplacement de
l'ampoule. ilconv>ent de débrancher la macNne en
retirant la fiche de la prise électnque. Procéder de
rrrème lors d’interruptions ou à la fin d'un travail
Ne jamais intervertir dans la partie électrique de la
machine, notamment pour le remplacement du
raccorderrtent de la pé^e de commande. Ce type
de travail doitétreconliéà un technicien du service
après-vente.
De navoigerxie veiligheidsvoorschnften dienen
aPsotuut in acht te worden genomen:
Oe bewegende naaM is een gevaar voor uw vingers. Het naa>oppervlaK dient dar ook steeds in
het oog te worden gehouden.
Alle handeiingen binnen het bereik van de bewe
gende naaki. bijv. het vervangen van de naaid. de
naah/oet. de steekplaat of hei bedienen van de
aulorrratische inrijger, rrtogen alleen uitgevoerd
worden wanneer de machine uitgeschakeld is
(hoofdschakelaar op *0* zetten).
Bij alle onderhoudswerkzaamheden (reinigen en
olidn), alsrrtede bij het verwisselen van het gioeilampje dient de naaimachirte uitgeschakeld te
worden door middel van de stekker uit het siopkontakt te trekken. Oe machirte dient eveneerts bij
onderbreking en na be^irrdigirrg van het naaiwerk
uitgeschakeld te worden door de stekker uit het
stopkontakt te venmjdeten.
Alle reparaties aan het elektrische gedeeite van de
machine, in het bijzonder het vervangen van de
aansluiting naar de voetweerstand. mögen alleen
door uw Semette vakharrdelaar worden uitge
voerd.
Page 7
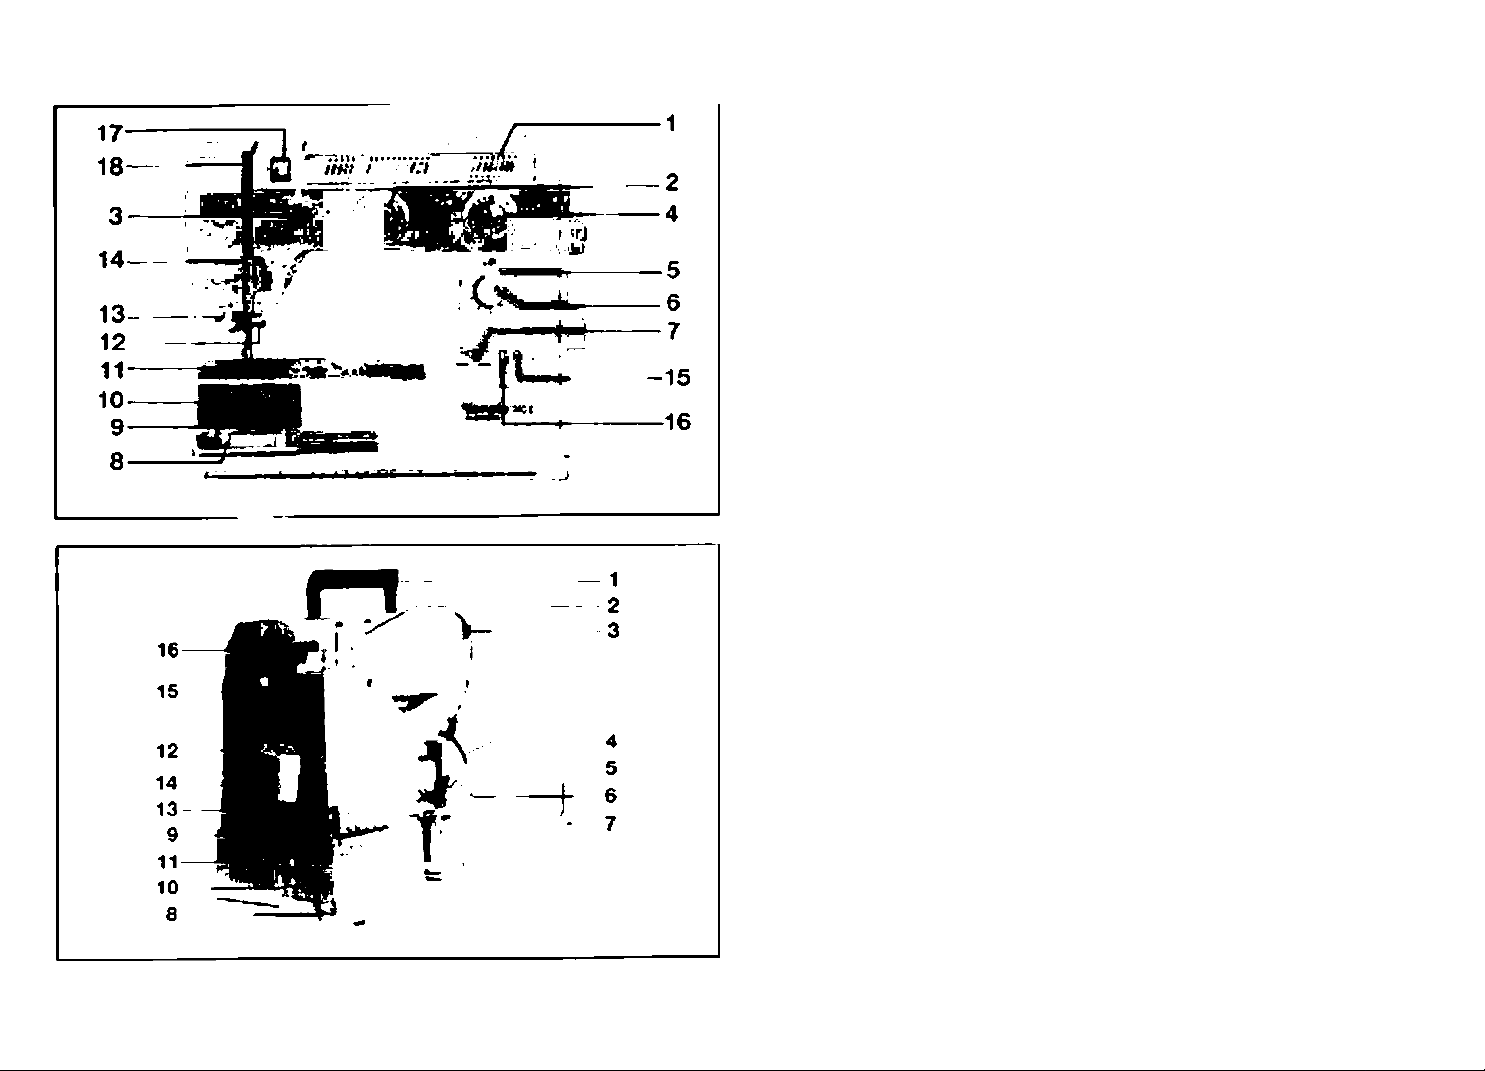
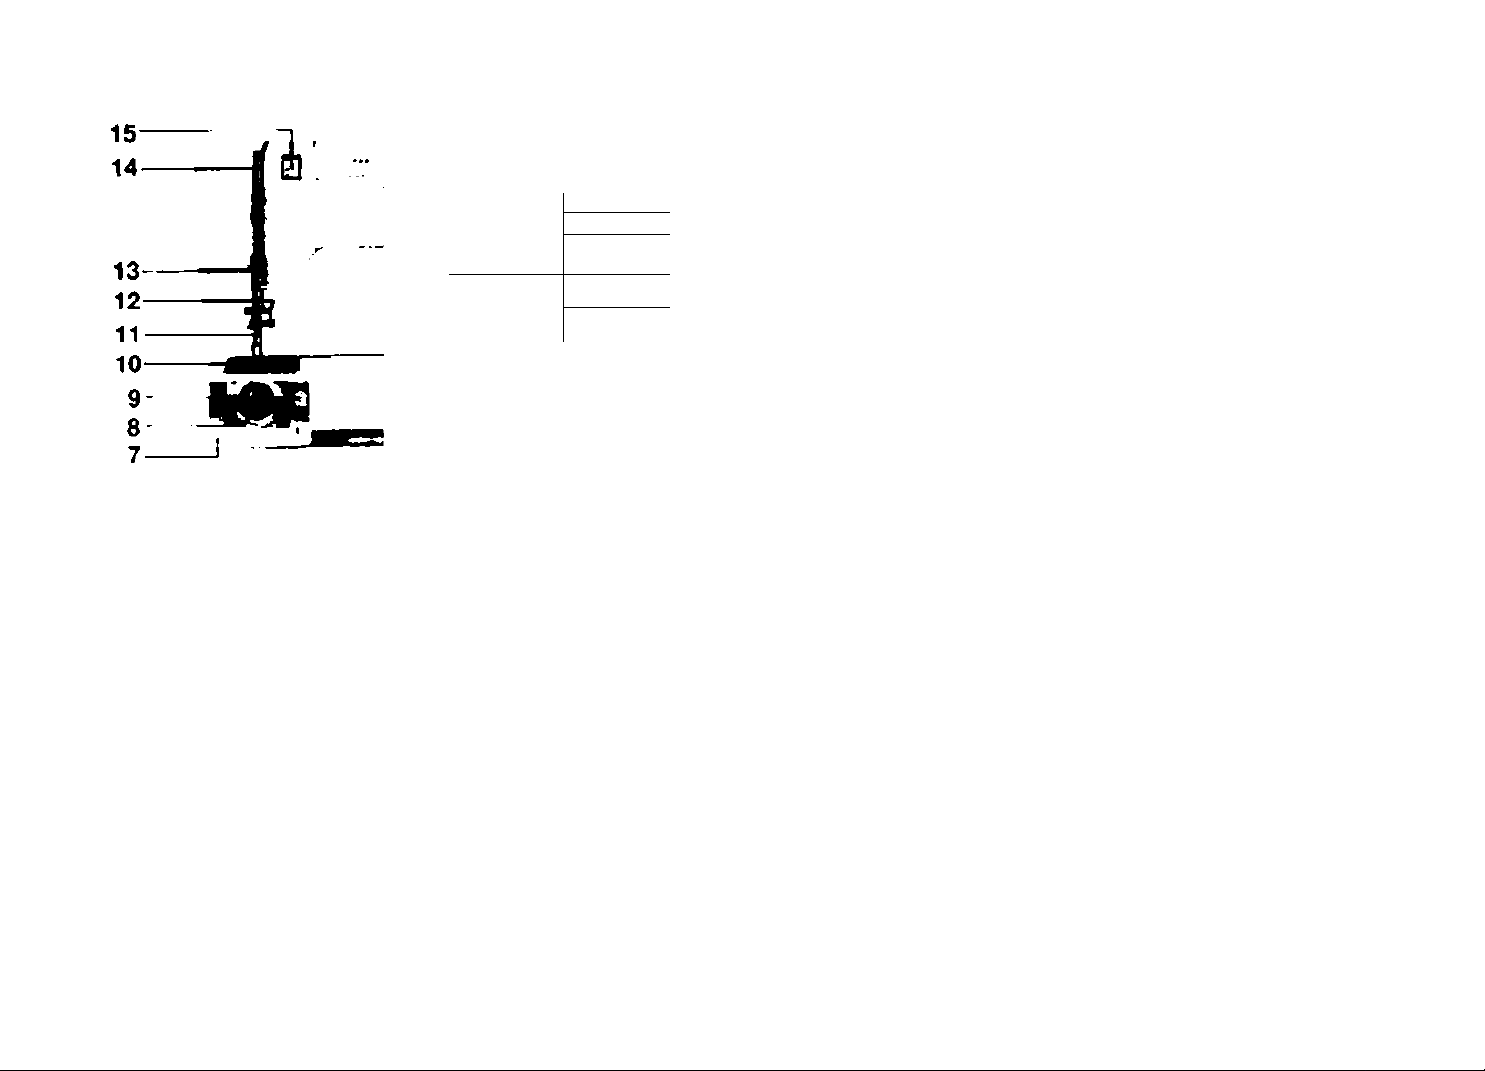
Details of the machine
■i/oaet$ 740EJ30I
1 LED display 1
2 Stitch selection doi 2
3 Needle position Knob 3
4 Stitch width dial 4
5 Stitch length dial 5
6 Reverse sewing button
7 Speed adiustment knob 6
8 Hinged bobbir> cover 7
9 Bobbin case
10 Drop teed control 8
11 Stitch plate 9
12 Needle damp screw 10
13 Automatic needle threader 11
14 Thread take-up sprir>g 12
1 s Needle stop up 13
16 Needle stop down 14
17 Thread tension control 15
18 Thread take-up lever 16
Carrying handle
^xrol holder pms
Thread guide
Two-step presser foot lifter
Thread cutter on presser tool
holder
Presser toot release
Extension table and open ac
cessory box
Foot control socket
Mam plug socket
Power switch
Light switch
Bobbin winder cover
Bobbin wir>der
Bobbin winder thread cutter
Handwheel
Bobbin thread guide
Page 8
0^
*>
--------
<»
Details of the machine
Mowi nS)
1 Carrying handle
2 Stitch selection dial
3 Handwheel
4 Stitch length dial
A
6
5 Reverse sowing button
6 Bobbin winder cover
7 Hinged bobbin cover
8 Bobbin case
9 Drop feed control
to Stitch plate
It Thread cutter on pressor tool
holder
12 Needle damp screw
13 Thread take-up spnng
14 Thread take-up
15 Thread tension control
Page 9

Accessories
a General purpose foot No- 3
D Embroidery loot No. 4
c OvertocK foot No 8
d Zipper foot No. N
e* Cording foot No- 2
f Darning foot
g Buttonhole foot
h* Hemmer No t
i Btirxl hem toot No. 9
k* Button sewing foot No. 6
We recommend the use of these
specialy designed presser feet for
perfect results.
’ Those 3 presser feet are not
supplied with Models 715 and 730.
They are however available as
special accessories from your local
dealer
1
Large screwdriver
Oiler
2
3
Cleaning brush
4
Seam npper
5
Needles (3x)
6
Bobbins (3x)
7
Seam guide
Page 10

stitch choice for each model
Stitch
III
Buttonhole
Straight stitch
Tnple straight stitch
i
Zig-zag
i Triple zig-zag
3-Step zig-zag
Smocking stitch
Shell hem
Rampart
Double oveilock
Stretch Blindhem
i
1 Double arrow
• Blindhemtingehe
Single overtook
1
i Elastic overlook
Stretch overtock
1
Standard overtook
■1
6ridgir>g
Feather sMch
%
Ribbon
) Scallop
1 Double scallop
t Triangle long
Square stitch
>
) Cross stitch
»
» Diamond sttch
715
• •
• •
• •
•
•
•
•
• •
• •
•
730
e
•
•
•
•
•
•
•
•
•
•
12
Page 11
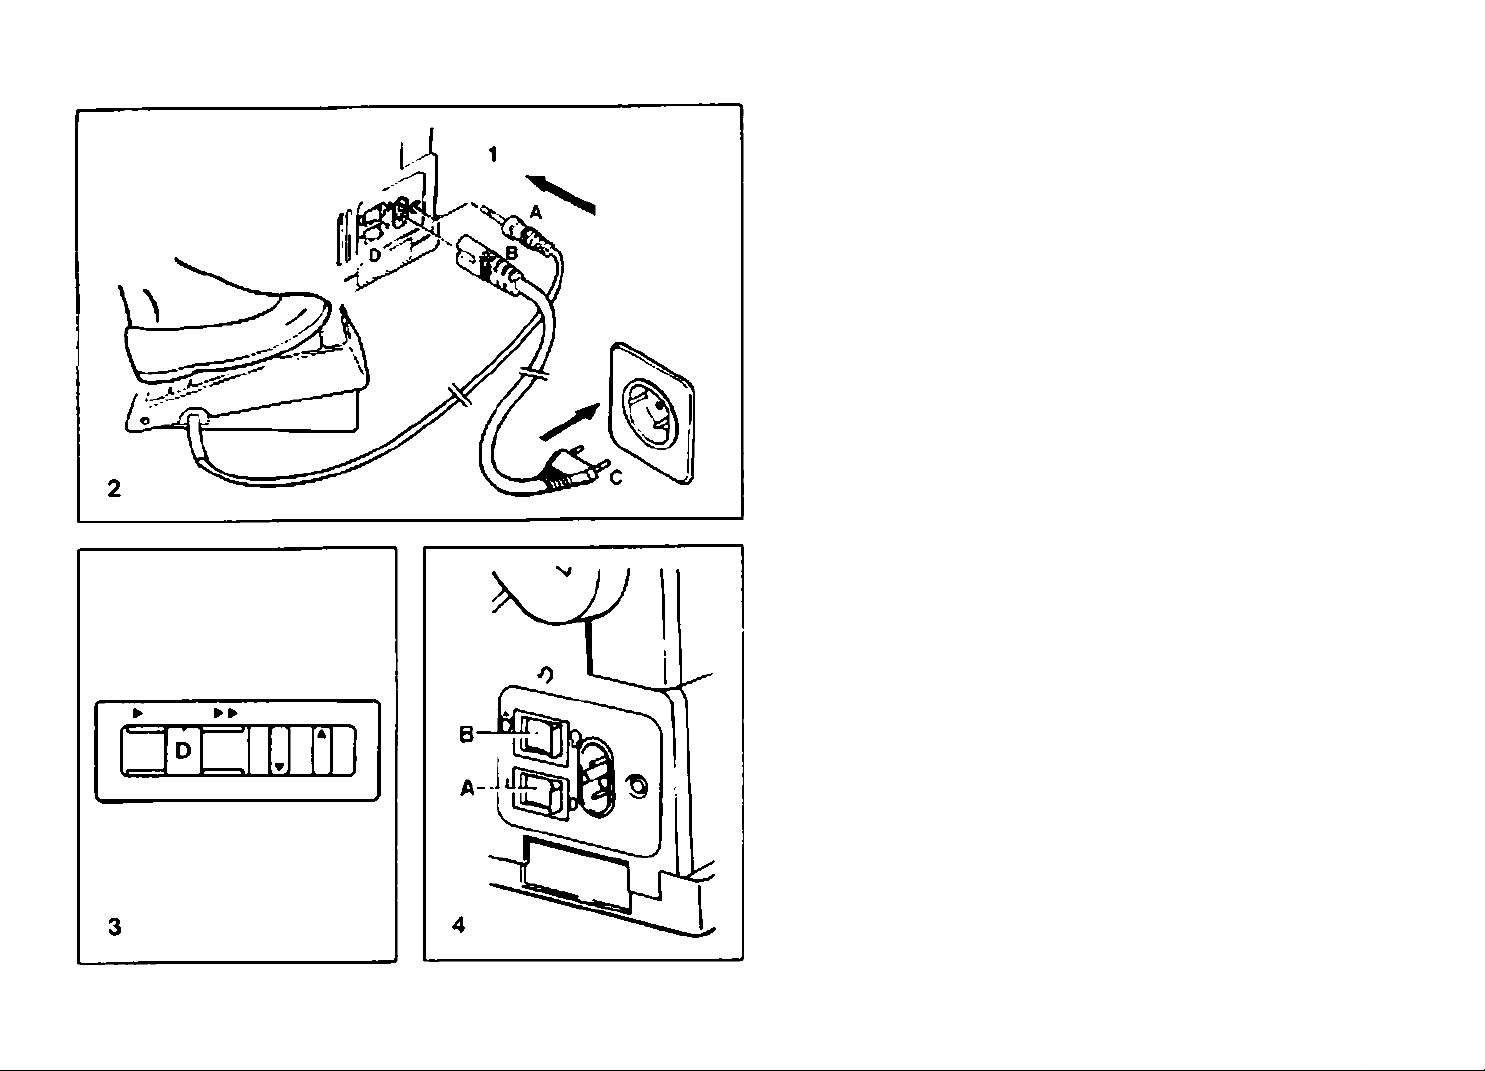
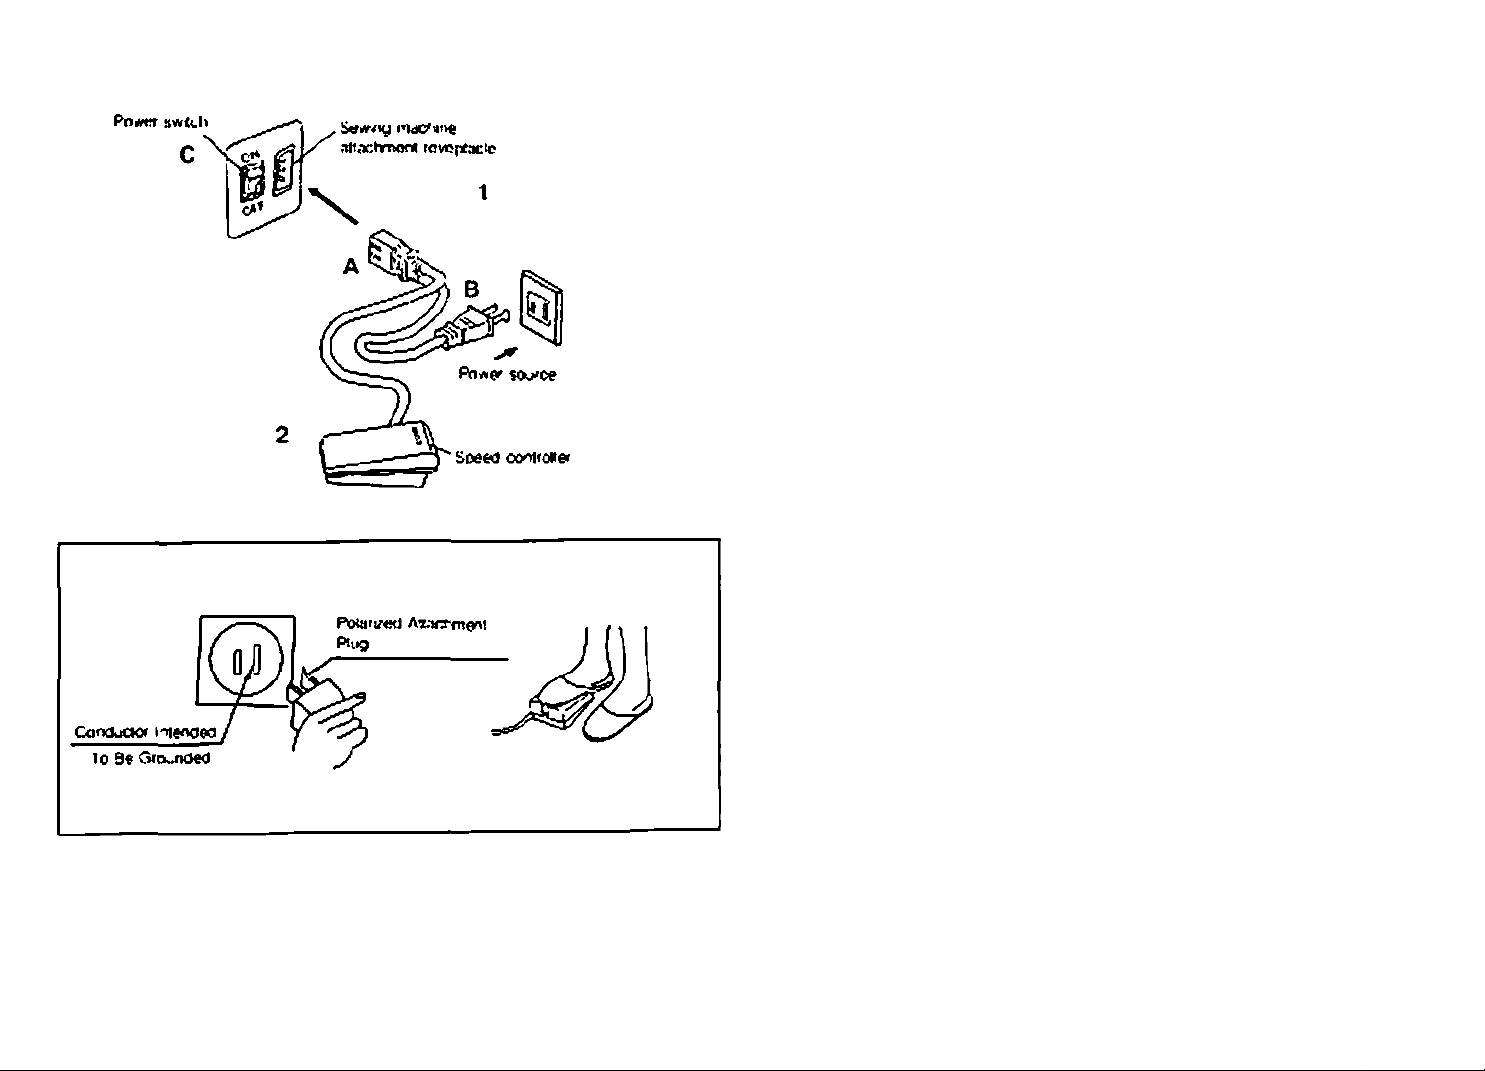
Connecting the machine to the power source
(MOIW 74061
Conned plug *A" and plug '6' to the
machine and plug 'C into the mams
socket. Turn on power switch *0“. {1)
This appliance has a polarued plug
(one blade wider than ihe other)
To reduce the nsk ol electric shock,
this plug is intended to lit in a polariz
ed outlet only one way.
If the plug does not lit tulty in Ihe outlet,
reverse the plug
If it still does not fit, contact a qualified
electrician to install the proper outlet.
Oo not modify the plug m any way.
Caution; The Foot Controller Model
4C-337B is for using with
Sewing Machine Model
740E.
Foot control
The speed of the machine can bo
regulated by applying pressure to the
fool control. (2)
Speed control
\UC69* J*0(i
The maximum speed of the machirve
can be reduced with the speed con
trol knob "O*. (3)
The speed control function is particularty useful for intricate work, e g
sewing corners, matching up pat
terns etc and is ideal lor beginners
> minimum
► ► maximum
Sewing light
740t)
14
Press pov/er switch ’A". Press light
switch 'B-. (4)
High power, high frequency
interference can cause variations in
the motor speed of up to 50%.
These will disappear however, as
soon as the interference stops.
Page 12
Connecting the machine to the power source
Connect plug 'A' to the machine and
plug 'B* to the mams socket. Turn on
power switch *c^ (1)
This appliance has a polarized plug
(one blade wider than the other).
To reduce the risk o< electric shock,
this plug is intended to lit in a polariz
ed outlet only one way.
If the plug does fwt fit fully in the Outlet. Turn on powei switch C
leverse (he plug.
If il still does not fit, cor^aci a qualified
electrician to install the proper outlet
Do not modify the plug in any way
Caution- The Foot Controller Model
3C-135B or 4C-3168 IS for
using with Sewing
Machine Model 71$ and
730A
Foot control
The speed of tne machine can be
regulated by applying pressure to
the ^ooi control (2)
Sewing light
iMexJe's 7;5. 730i
16
Page 13
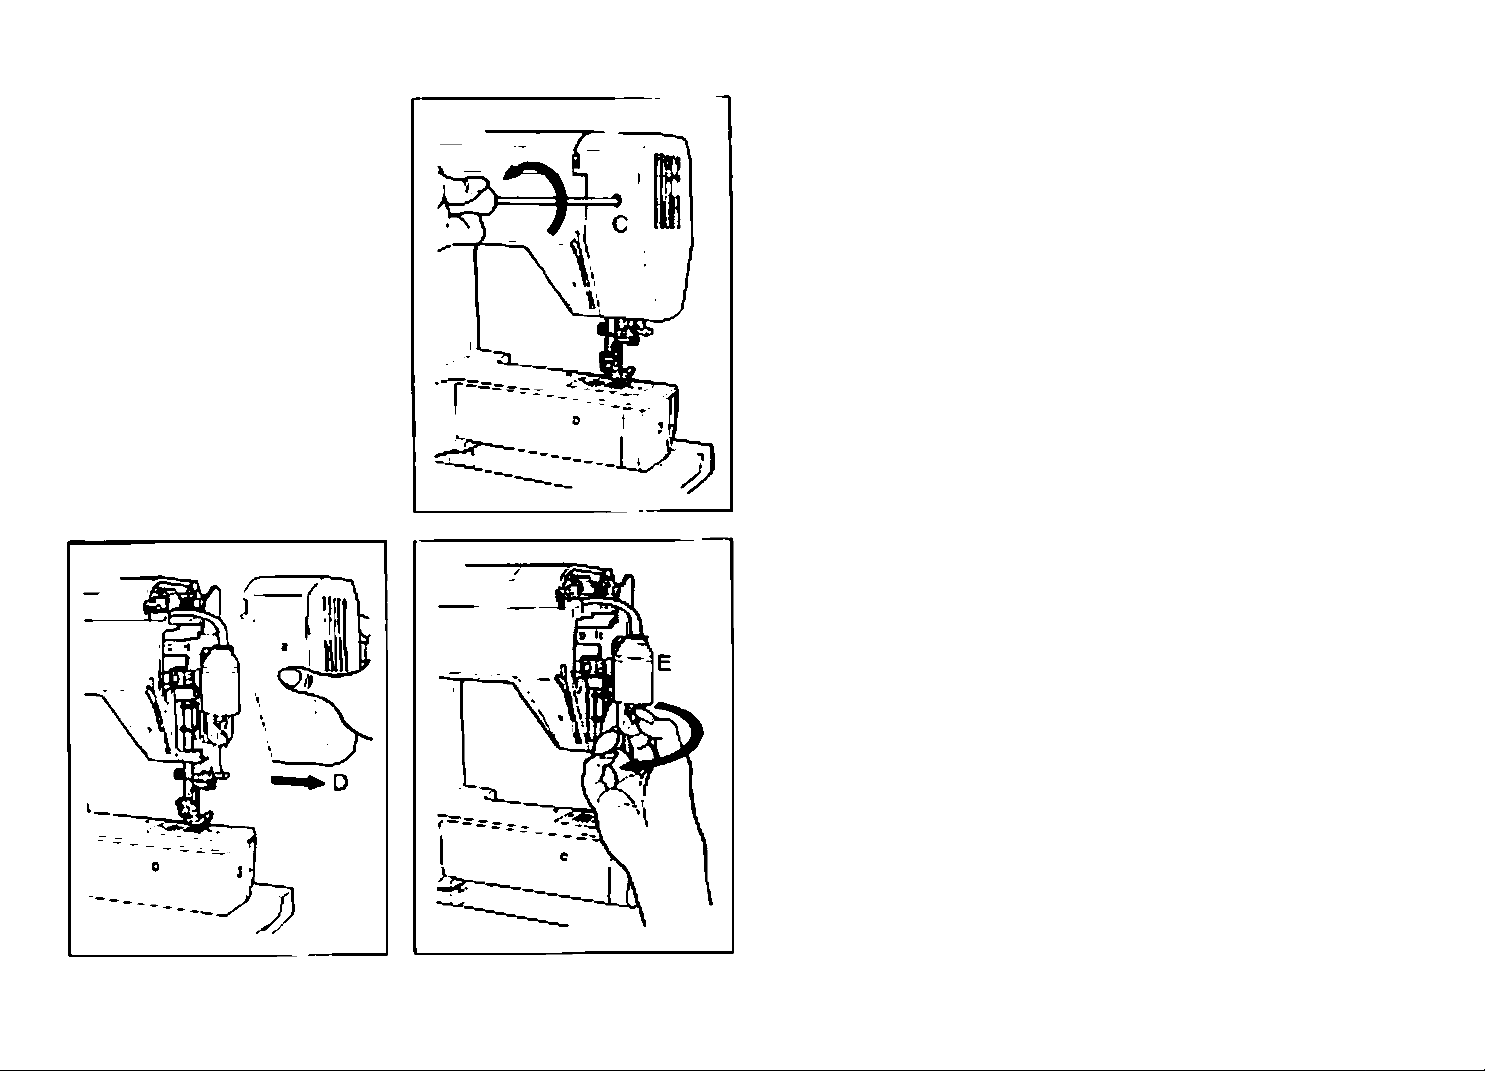
Changing the bulb
Disconnect the machine trom the
power suppty by removing the plug
from the mains socketl
- Loosen screw X* on the back of
the head cover
- Remove the head cover "D“.
- Unscrew the bulb *E" and fit new
bulb.
Replace the head cover and tigh
ten screw.
Should there bo any problem, ask
your local dealer for advice.
16
Page 14

Automatic neodio stop
(Moca- 740E only]
When the machine stops, tho needle
stops at its highest position. (1)
Certain types ol sewing tasks are
made easier if the needle is lowered
in the labric. e.g. sewing corners,
starting to sew.
Press button *A" for needle down
- Press button *B’ for needle up
Two-step presser foot lever
When sewir>g several layers or thick
fabrics, the presser loot can be
raised a second stage for easy po$>tk>r>ing of the work. (2)
Drop feed control
20
For normal sewing, the feed dog
should be in the raised pdsit>on.
Press 'A'. {3f
For certain types of work. e.g. dar
ning or free-hand embroidery, the
feed dog must be lowered. Press "B’.
Page 15
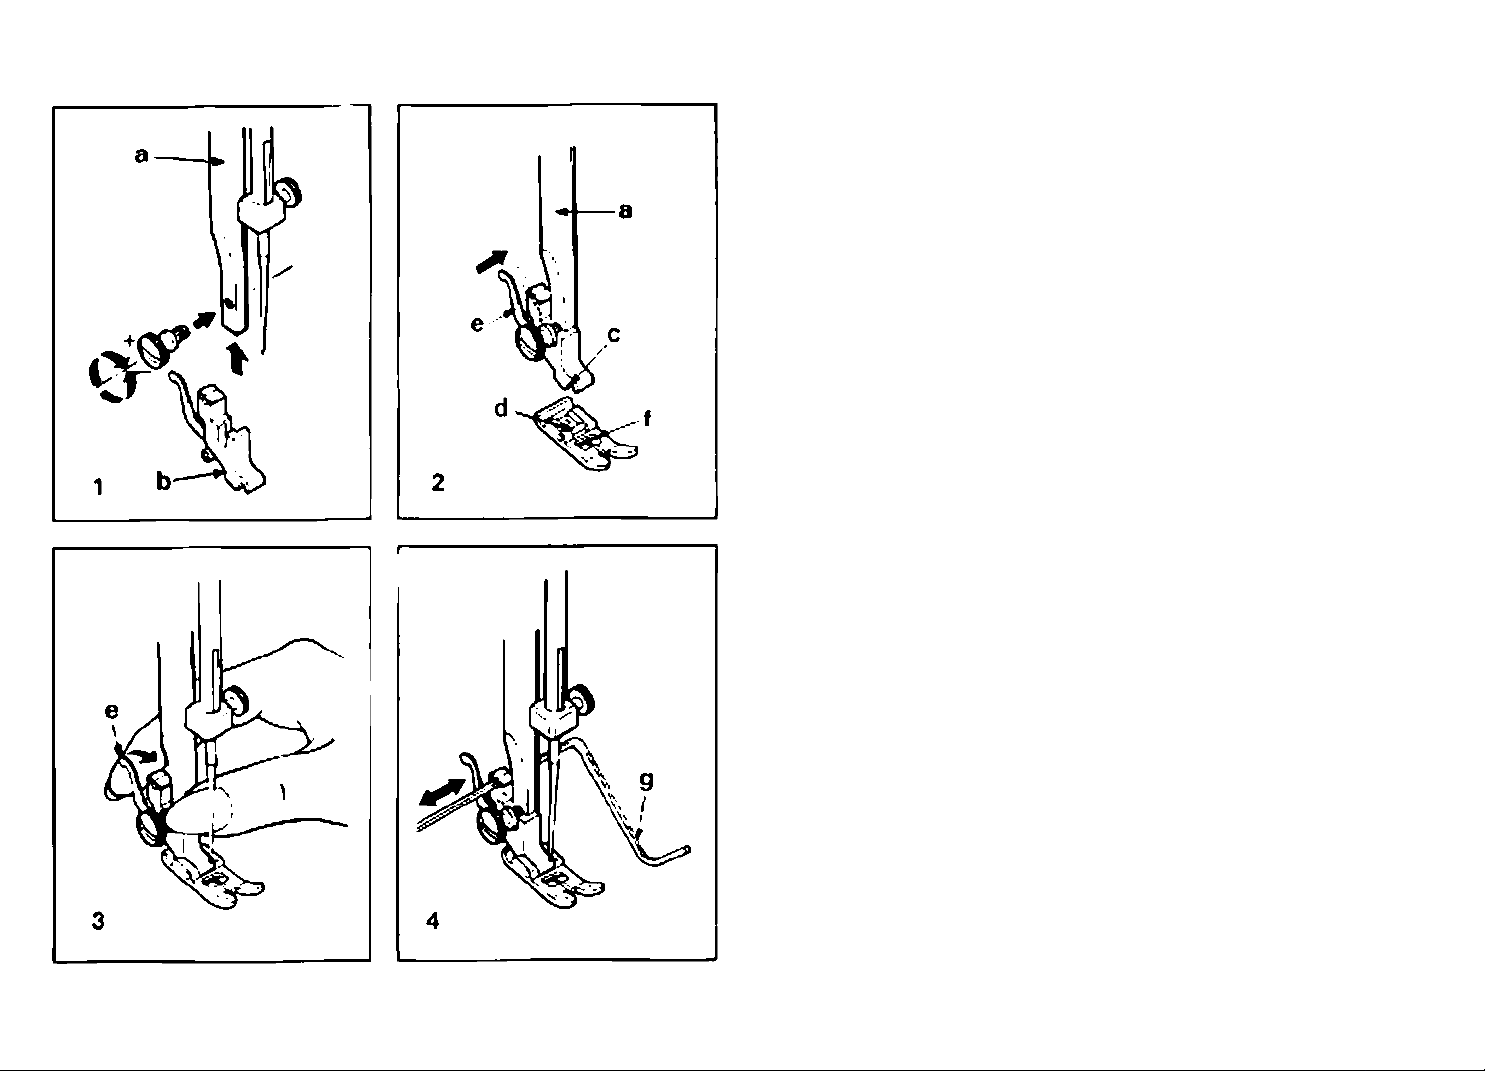
Attaching the presser foot holder
Raise the presser foot clamp "a". <i)
Attach the presser foot holder V as
illustrated.
Attaching the presser foot
Lower the presser foot holder *a*until
the cut-out V is directly above the
pin -d". (2)
Raise the lever *e’.
Lower №e presser fool holder *a' and
The presser foot T will engage auto
matically.
Removing the presser foot
Raise the presser foot. (3)
Raise the lever *e* and the foot disen
gages.
22
Attaching the seam guide
Attach the seam guide 'g' in the slot
as iHustrated. Adjust according to
need for hems, pleats, etc (4)
Attentfon:
Turn power switch to ’0' when
carrying out any of the above
operations!
Page 16
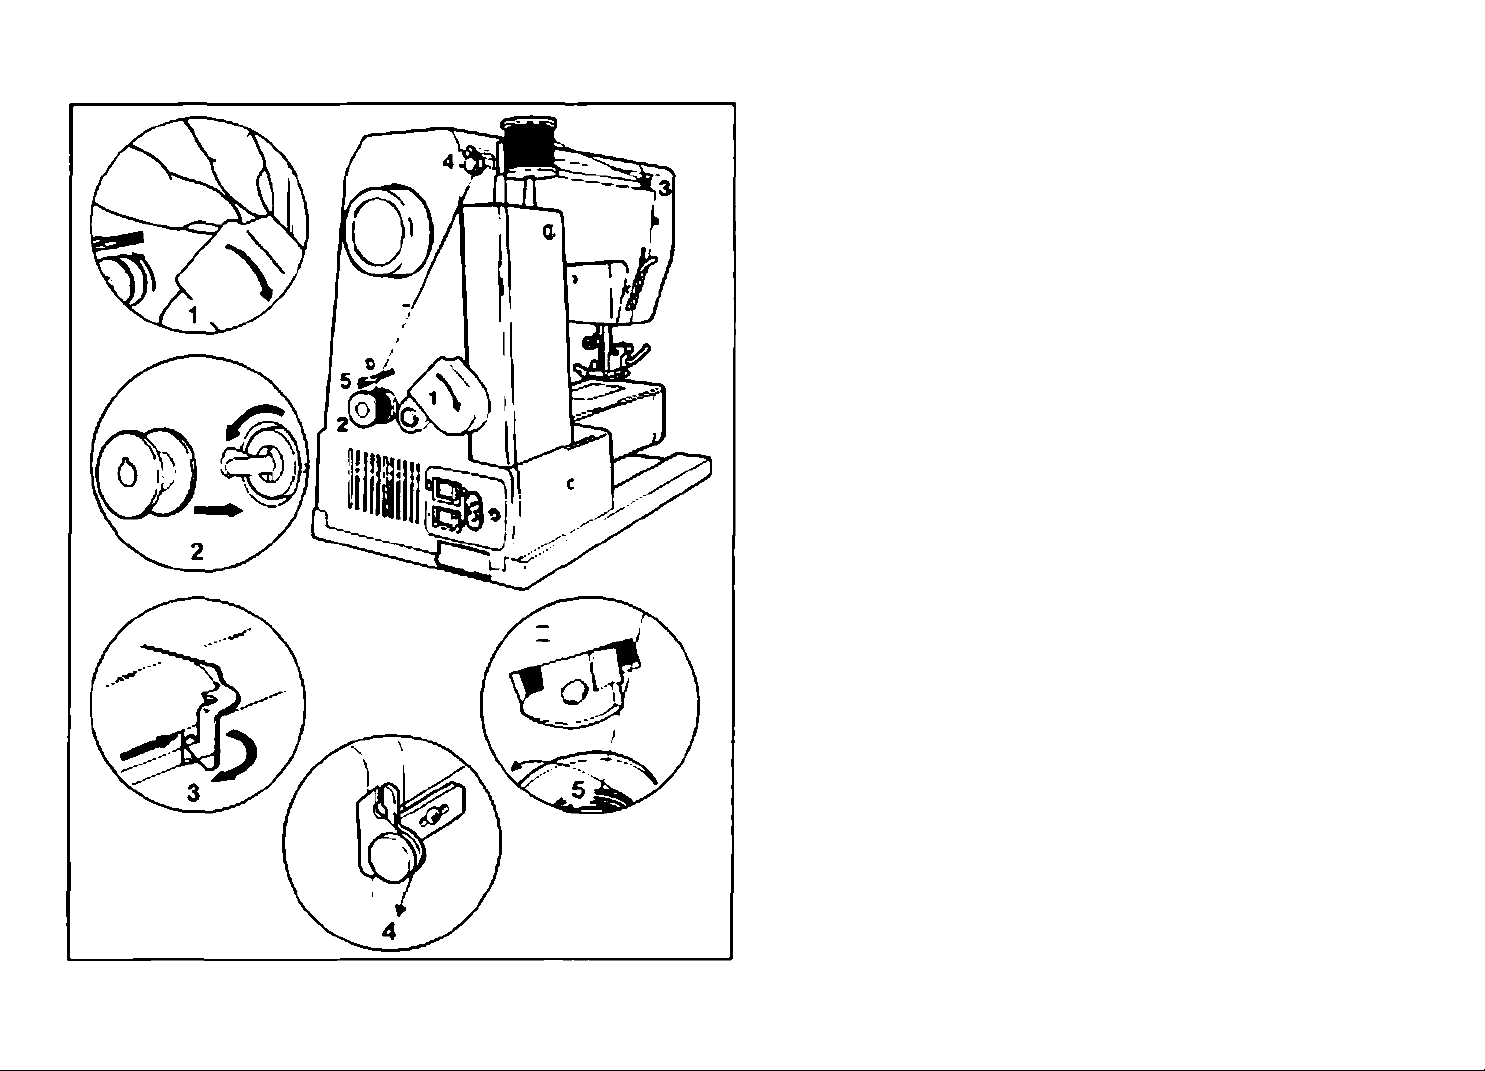
Winding the bobbin
Open the bobbin winder cover. (1)
Place empty bobbin on spindle.
Movement of the needte is automati*
cally cut out. (2)
Take the thread from the spool
through the guide to the bobbin. (3/4)
Wind thread a lew times by hand
round the empty bobbin in a clock
wise direction. Press the foot control.
As soon as the bobbin is full, wirxing
will stop and the thread will be cut
automaticalty. Remove the bobbin
and dose the boMxn winder case. (5)
24
Page 17

Inserting the bobbin
When inserting or removing the bobb«n. the needle must be fully raised.
Open the hinged cover. (1)
Hold the bobbin case with one hand.
Insert the bobbin so that the thread
rurts in a clockwise direction (arrow).
(2)
Pull the Oiread through the slit and
under the finger. (3)
Hold the boli^n case by the hinged
latch. (4)
Insert it into the shuttle. (5)
Anentfon:
Turn power switch to "X)*.
Bobbin thread tension
Note:
The bobbin thread tension
does not normally have to be
adjusted.
26
To test the bobbin thread tension,
remove the bobbin case and bobbin
and hold it by suspending it by the
thread. Jerk it once or twice. If the
tension is correct, the thread will unwir>d by about an inch or two. K the
tension is too tight, it does not unwind
at all. If the tension is too loose, it will
drop too much. To ad)ust. turn the
smalt screw on the side of the bobbin
case. (6)
Page 18

Inserting the needle
(SyiteiTi 13O705H)
I Change the needle regularly.
I especially if it is showing signs of
wear ar>d causing problems.
Insert the needle as illustrated as
follows:
A Loosen the needle damp screw
arxf lighten again after inserting
the new needle. (1)
B The flat side of Ihe shaft should
be towards the back.
C/D Insert Ihe needle as far up as it
will go.
Attontion:
Turn power switch to “O’!
26
Needles must be in p»^eci condition.
(2)
Problems can occur with:
A bent needles
B blunt needles
C damaged points
Page 19

Needle-Thread table
Tableau des aiguilles et fils
Au/e of fhumb.'Tbe thicker the fabric and the thicker
the thread, the higher the count of needle.
Type of fabric
Fine fabric, e.g. Bastiste
silk
Medium-weight fabric.
e.g. cotton
Thick fabric.
corduroy, tweed
Hard, firm fabrics.
e.g. denim
Stretch fabrics.
e.g. iersey. knits
For alt types of fabric
For fine to mediumweight fabrics
For thick fabrics Pintucks
Leather, imitation leather All work Leather needle 80-100
Sewing task
Seams
Topstitching
Seams
Topstkchir>g
Seams
Topstitching
Seams
Topstitching
Seams
Topstitching (ball point)
Damirtg, n>endir>g, Universal needle 70-90
neatening. buttonholes, fine embroidery
Pintucks
Decorative seams
Decorative seanis
Needle system 130/705H
Universal needie 70
Universal needle 80
Universal needle 90-110
Jeans needle 90-U0
Stretch needle 80-90
Double needle 70
Double needle 80
Type of thread
Conon №read Etoffes fines coutures
Cotton thread
Synthetic thread
Cotton thread p. ex. velours cdtelé. tweed surpiqûres
polyester thread
Jeans thread.
polyester thread
Polyester thread
Embroidery and boutonnières.
darning thread cotton
thread
Cotton thread
Embroidery thread
Cotton thread
Polyester thread
Polyester thread couture
туре d'étoffe
p. ex. batiste, soie surpiqûres
Etoffes moyennes
p. ex. coton, linge surpiqûres
Etoffes épaisses coutures
Etoffes dures et stables coutures
comme les jeans
Etoffes élastiques
p. ex. jersey, tricot
pour tous types
d'ôtoffes surfUage.
Pour types d'étoffes couture de nervures
fir>es à moyennes
Pour types d'éloftes couture de nervures
épaisses
Cuir, simili-cuir
Travaux de couture
coutures
surpiqûres
coutures
surpiqûres
reprisage, rapiéçage.
broderies fines
coutures décoratives
coutures décoratives
tous travaux de
30
Page 20

Threading the upper thread
Attention: Turn power switch to
*0*. Raise the r>eedle bar.
- Take the thread through the guide
on the back of the machine from
right to left, then (1)
- between the thread tension disc^
and (2)
- from ri^t to left in the thread takeup spring (3)
- upa^fromrighttoleftthroughthe
thread lake-up lever (4)
- down through the guides (5/6)
and thread the needle, always from
front to back (see next page).
32
Page 21

Upper thread tension
Basic thread tension setilrtg; 4
To increase the tension, turn the dial
to the next number up.
To reduce the tension, turn the dial to
the next number down.
A NormaJ thread tension
B Thread tertsion too loose
C Thread tertsion too tight
34
Page 22

Automatic needle threader
(Modol 740E only)
- Raise the r>eodlo to its highest
position
- Press lever *A* right down
- Thethreaderauiomaiicallyswir>gs
to the threading position "B*
- TaKethethieadrourtdthehook'C
- Take the thread in tront of the
needle round the hook ~D' from
bottom to top
- Release lever 'A'
- Pull the thread through the needle
eye.
Anenbon:
Turn power switch to “O"!
Page 23

Bringing up the lower thread
:Mo0tl7«)C оПу)
The lower thread can be brought up
by using the needle stop lurx^ion or
by tapping the foot control-
1 Hold the upper thread in your left
hand
2 Press button “A"
Press button 'B*
3 Pull gently on the upper thread to
bring up the lower thread. Lay both
threads to the back urrder the
presser foot.
The lower thread can also be brought
up by u&ng the handwheel: HoM the
upper thread in the left hand, turn the
handwheel forwards until the needle
israised artd pull on the upper thread.
38
Page 24

Bringing up the lower thread
iMoOwnS. 733)
Hold the upper thread with the left
hand Turn the handwheel forwards
until the rreedie is raised. <1)
Pull on the upper thread to bring the
lower thread up through the stitch
plate hole. Lay both threads to Ihe
back under Ihe presser foot. (2)
Page 25

Reverse sewing
At the end ol the seam, press the
Reverse sewing button. Saw a few
reverse stitches. Release the button
arid the machine will sew forwards
again. (1)
Removing the work
Turn the handwheel forwards to bring
the thread take-up lever to its highest
position, raise the presser foot and
remove work towards the back (2)
Cutting the thread:
Hold the threads behind the presser
foot with both hands, guide them to
the slit “A* and press down.
42
Page 26

lìiree needle positions
(Model 7406 omyl
Turn the stitch selection dial to straig
ht stitch. (1)
The needle position can be altered
with the lever *A*. For twrual work,
the needle position is Centre. For
edge stitching or sewing parallel lines
of lop stitching, select needle posi
tion Lett or Right.
B Needle position: C (aH normal
work)
C Needle position; L (edge stitching,
etc.)
D Needle position: R (top stitching,
etc.)
Sewing with a Twin needle
(Modal 7406 fifXyl
For Visible seams in jerseys, decora
tive work, pintucks. (2)
Seams in jersey can be sewn and
neatened In or>e operation. Attractive
effects can be obtained in woven
fabrics, depending on the type of
stitch.
Always sew on the right side of the
fabric with a Twin needle.
Attention:
Use needle position 'Centre*
only. The stitch width should r>ot
be more than 3. .For safety's
sake, turn the har>dwheet to
check that the needle does not
go into the stitch plate.
44
Attention:
Turn power switch to tTI
Insert the Twin needle, thread both
threads, see Illustration Page 30,
thread needle eyes separately.
Page 27

Colour coded stHch selection
lUocM 71S)
Turn the stitch select>on dial to the
desired position. (1)
Note the colour of the chosen stitch.
Turn the stitch length dial In the range
of the same colour. (2)
The stitch length can be adjusted
within the same coloured area.
The stitch width Is given (with the
exception of Zig-zag).
46
Page 28

LED Display
(MocW 740E onirl
o o o o o
una2%9
oooeooooooo
rc a
W • ff M S M OltH'-«-
mnm^
• • r « I 4 I 21
SUlch selection with hght diode and
colour code.
Colour code Green arKl Blue.
Turn the stitch selection dial (1 > until
the green diode lights up at the stitch
desired.
Note the colour of the chosen stitch.
Colour indicator
{tMti 730
Stitch selection with coloured mar
king and colour code.
Adjustments as described.
Turn the stitch width dial (2) and the
stitch length dial to the same colour
code.
Stitch width and length can be adju
sted within the same area of colour.
Note the colour of the chosen stitch.
Turn the stitch width dial (2) to the
same colour code. The stitch width
can be adjusted within the red mar
ked area
Stitch Balance (4) for stitches A:
+ lengthen
• shorten
(model 740E only)
48
Colour code Red and Yellow
Turn the stitch length dial (3) to the
position il you want to select *redV
'yellOM/' stitches.
The siitch lertgth is given automaticaRy.
Turn the stitch seiection dial (1) until
the red diode lights up at the stitch
desired.
Page 29

straight stitch
Set the machine as illustrated.
Rule of thumb: The thicker the fabric,
tiuead and needle, the longer the
stitch should be. (1)
Zig-zag
Adjust the stitch width. (2)
Adjust to the zig-zag width desired.
(3)
50
Page 30

Neatening edges
Set the machine as illustrated. (1)
Ouide the fabric so that the needle
goes in just over the edge oí the
fabric. (2)
Attention:
Use Foot No. 6 for fabrics which
tend to pucker. Select Zig-zag
and stitch width 4-5.
52
Page 31

3*Step Zig-zag
Sewing on lace and elastic, darning,
mending, reinlorong edges.
Set the machine as illustrated. (1)
Place patch in position. The stitch
ler>gth can be shortened to produce
very close stitches. (2)
When mending tears, it is advisable
to use a piece ot backing fabric to
reinforce. The stitch density can be
varied by adjustir>g the stitch lertgth.
First sew over the centre and then
overlap on both sides. Oeperxfing on
the type of fabric and damage, sew
between 3 and 5 rows. (3)
54
Page 32

Overtock stitches
Seams, neatenmg, visible hems.
Turn stitch length dial (3) to 'A'.
Turn the stitch selechon dial until the
red diode lights up at the desired
stitch.
The stitch vridth (2) can be adjusted
to suit the fabric. (4-S)
Standard overlock
<MoO»l 740€ only)
For fine knits, jerseys, neck edges,
ribbing.
Double overtock stitch
(Model 740E only)
For fine knits, handknits. seams.
Anenaon:
Use new needles or ball point
needles'
56
Overlock stitch
For fine knits, jerseys, neck edges,
hbbing.
All overlock stitches are suitable for
sewing and neatemng edges and vi
sible seams in one operation.
When neatenir>g, the needle should
just go over the edge of the fabric.
Page 33

Overlook
IMOM 730)
Stretch overlock
iMod«i 730)
Seams, nealening e<)ges. visible
hems.
Set machine as illustrated. (1)
E for fine fabrics
C for thick fabrics
Both stitches are suitable for sewing
and neatenir>g edges and visible
hems in one operation When neatenir>g. the needle should just go over
the edge of the fabric.
58
Page 34

o o o o o
OOOOOOOOOOO
ooooopo#
StUch election
Triple straight stitch
(MocMi8 79(V740E only)
1«::
»< 1» 22 » »
1» • fl H » M t»tin'-10-
nunm.
715/730 740 E
i 21
For hardwearing seams.
Turn the stitch length dial (3) to *A'.
Turn the stitch selection dial (1) until
the red dKxle lights up as illustrated.
Turn the stitch width dial (2) to *0*.
The machine sews two stitches for
wards and one stitch backwards.
This gives triple reinforcement.
Triple zig-zag
For hardwearirtg seams, hems and
decorative seams.
Turn the stitch length dial (3) to *A'.
Adjust the stitch width dial (2) to
between 3 and 5.
Triple zig-zag is suitable for firm fab
rics like denim, corduroy, etc.
60
Page 35

Stitch selection
Triple straight stitch
<Uod«i7iSo-'ly)
For hardwearirtg seams.
Set the machine as illustrated. The
machine sews two stitches forward
and or>e stitch backwards. This gives
triple reinforcement.
Triple 2ig*2ag
iModel 7l5only>
For hardwearirtg seams, hems and
decorative seams.
Triple zig-zag is ideal for firm falxics
such as denim, corduroy, etc.
62
Page 36

Smocking stitch
(ModM 73Q740E only)
00090 O^OOOOOOOQO
tun
Mn»»n a«iT»»w oofl
oooooowo
f I ) t i 4 ) 21
Seams, hems. T-shirts, underwear,
etc.
Set the machine as illustrated. This
stitch can be used for all types of
Jersey as well as for woven fabrics.
0)
Sew at 1 cm (V4") from the fabric
edge and trim the surplus fabric. (2)
64
Page 37

Practical stitches
Set the machine as illustrated
Turn the sMch selection dial (1) until
the green diode lights up ai the
desired sWch.
Turn the stitch width dial (2}andstitch
length dial (3( to the same colour
code and adjust to suit the fabric.
Shell hem 16
For decorative edges.
Suitable tor edges on sheer, line and
stretch fabrics The larger stitch
should go just over the edge of the
labric to create the shell effect
Bridging 17
(Models 73O7a0C oriyl
For seams, place mats, tabtedoths.
This stitch can be used for firm, thikker fabrics
66
Decorative joining seam for a fagotted effect Gattierir>g with cord or
starring elastic
Rampart 18
iMooei 740E only)
For flat joining seams, sewing on
elastic, visible hems.
Page 38

OOOOO OOOC0090000
itili isiim
i*anm I» N » » IS 14 non'-h_>
00400400
1 I >4 » 4 1 } I
Practical siitchaa
Set the machine as illustrated.
Turn the stitcti selection dial (1) until
the red diode lights up at the desired
stitch. Turn the stitch length dial {3) to
*A* The stftch width dial (2) can be
ac^usted to between 3 and 5.
Elastic overiock 4
iNmIoi I^e4 71S)
For hems, decorative seams. Suita
ble for hems or decorative seams in
stretch fabrics
Double arrow 7
(OfVy lor Mcdol 740E)
For seams arKj hems. This stitch is
suitable for sewing arid neatening
stretch fabrics and as a decorative
seam in thicker fabrics
68
Page 39

Practical stitches
000000 #00000 000
mm
IVHOU II «9 9119 «12 <-!-■
ED]
Set the machine as illustrated.
Turn the stitch selection dial (1) until
the red diode goes on at the stitch
desired
Turn the stitch length dial (3) to "A*
and adjust the stitch length diai (2) to
between 3 and 5.
Feather stitch 6
(Model 730 artfi
sloining seams, decorative seams
For seams in stretch fabrics, joining
seams in fine and thick fabrics.
70
Page 40

Decorative stttches
iUodd740e orly)
• ooo
ant
}«;j 77 n II N ir « n 1« nan > M -
00000000
1 I 7 « $ « J 2 I
cufls. embroidery.
19 Square slitcb
20 Diarrxmd stitch
21 Ribbon
22 ScaHop
23 Double scallop
24 Triangle long
Turn the stitch length dial (1} until the
green diode lights up at the stitch
desired. For anattractive. decorative
effect, adjust the stitch width (2) to
maximum and the sDtch length accorcfir>g to the desired etfect. For
better results, use a paper or tear
away backing.
Embroidery thread adds to the ef
fect.
For edges, tabledoths. bed linen,
72
Page 41

Decorative stitches
lMOOe< 740E only)
Edges, tablecloths, bed lirten. cufts.
embroHMry.
Cross stitch 9
Turn the stitch selection dial (1) until
the rod diode lights up at the stitch
desired. Cross stitch: Turn the stitch
ier>gth dial (3) to 'A’
For an attractive, decorative e«ect.
adjust the stitch width (2) to maxi
mum arid the stitch ler>gth according
to the desired effect. For better re
sults, use a paper or tear-away bac-
King.
Embroidery thread adds to the effect
74
Page 42

Buttonholes
Set the machine as illustrated. (i)
(Adjust the stitch length dial >n the
green marked area for a correct stitch
density - varies according to the fab
ric). Always test sew a buttonhole.
Follow the sequence- (2)
Position the button on the loot as
iDustraied Loosen the large screw
*6" of the part *A" and slide it towards
the button until it lightly touches the
other edge, then re-tighten screw "B*
Remove the button ar>d attach the
Bunonhole foot. The gauge is now
set for sewing perfectly even length
buttonholes. (3)
When starting to sew the buttonhole,
the gauge on the foot should be
pushed fully forwards. (4)
Use the seam ripper and cut button
hole open from both ends towards
the middle.
76
r<ps:
- A slightly reduced upper thread
tension produces better results.
- Use a bacKir>g for fine or stretchy
fabrics.
- It IS advisable to use gimp cord for
stretch or knit fabrics The zig-zag
should sew over the gimp.
Page 43

Blind hem lingerie stitch
For hems, curtains, trousers, skkts.
etc.
u Biind hem for stretch fabrtcs.
15 BlirKt hemlingerie for firm fab
rics.
Set the machine as illustrated. <1)
Note:
It takes practice to sew blind
hems. Always rrtake a sewing
tesi first
Fold the fetbric as illustrated with the
wrong Side uppermost. (2)
Place the ft^ic under the foot. Turn
the handwheel forwards by hand until
the needle swings fully to the left. It
shoutd just pierce the fokf of the fab
ric. If it does not. adjust the stitch
width accordingly. (3)
78
Adjust the guide (4) by turning the
Knob (5) so that the guide just rests
against the foW.
Sew slowty. guiding the tabnc care
fully along the edge of the guide.
Turn the speed control to Mtnimumf
Page 44

o 0 o o o
ooeooOQ*Ooa OOOOODOO
Darning
Set the machine asillustraled. Lower
the feed dog. (1)
tint i$iE51i:llECJ
M » 22 m
e « n « K M oen <-n-‘ ( I 2 < S 4 S 21
Remove the presser foot clamp. (2)
Attach the Oarnir>g foot to the pres
ser fool hotder. The lever 'A* should
t>e behind the needle clamp screw
■B". Press the Darning foot on firmly
from b^ind with your index finger
and tighten the screw ’C* (3)
Rrst sew round the edge of the hole
(to secure the threads). (4)
Rrst row: Always work from left to
right. Turn work by 'A and oversew,
A darning ring is recommended for
easier sewing arKl better results.
Note:
When darmng is completed,
raise the feed dogi
80
Page 45

.0600 OOOOOOnoOO'*
nziniti« ti M I) « « It nan'-«-'
Sewing in zips
Set the machine as illustrated. (1)
oooouoOO
The zip foot can be inserted right or
left. depend’Pg on which side of the
toot you are going to sew. (2*3)
To sew past the zip pull, lower the
needle into the fabric, raise the presser loot and push the zip pull behind
the presser foot. Lower the foot and
continue to sow.
Page 46

OOOOO OOOOCOv*fO*
iuli
9 9 9
<33
» « ?i » t» a II It 8 u IJ Kti - a-'
y O O I- •• 'i
Sewing on buttons
iMooe 740feonty,
Set the machine as illustrated. Lower
the feed dog. Needle position righi
<i>
Position the worK under the foot.
Place the button on the marked posi
tion. lower the foot, adjust stitch width
to 'O' arid sew a tew securing stit
ches. Adjust the stitch width (rv^rmally between 3 and 4). Turn the handwheel to check that the needle goes
cleanly into the leM hole ol the button
(adjust the stitch width according to
the button), and sew on the buttort.
Adjust the stitch width to '0* and sew
a tew securing stitches. (2}
If a shank is required, place adarnmg
needle on top ot the button and sew.
(3) For buttons with 4 holes, sew
through the front two holes first (Ftg.
2). push work forward arxf ttien sew
ttuough the back two holes as des
cribed. (3)
84
Page 47

Sewing wfth the Hemmer foot
>U00el 704E
For hems in fine or sheer fatKics.
Set the machine a$ illustrated. (1)
Neaten the edge of the tabnc. At the
beginrung of the hem. turn under the
edge twice by about 3 mm ('/»’) and
sew 4-5 stitches to secure Pull the
thread slightly towards lire back. In
sert the r>eedie into the fabric, raise
the presser foot and guide the fold
into the scroll on the tool. (2)
Gently pull the fabric edge towards
you and lower the presser foot. 8egm
sewing, guiding the fabric into the
scroll by hokjif^g it upright and slightly
to the left (3)
Page 48

Sewing with the Cording foot
it/Mei /*0E onff)
Oecorairve effects, cushtons. ta
blecloths. etc.
Set the machine as illustrated. Vanous stitches are suitable for sewmg
on cord. e.g. Zig zag. Triple zig-zag.
decorahve stitches. (i)
Insert the cord between the spnng
coverirtg the cord groove and the
loot. The cord should run in the
groove Orie. two or three cords can
be sewn on. The stitch width is adju
sted according to the number of
cords and the stitch selected. (2/3)
88
Page 49

Maintenance
Attention:
Disconnect the machine from
the eiectncity su|^ by remo
ving the plug from the mains
socket- When cleaning the ma
chine. it must always be dis
connected from the electricity
supply.
Remove the stitch plate:
Turn the handwheel until the needle
is fully raised. Open the hinged front
cover and push the release lever
upwards. (1)
Cleaning the feed dog:
Remove the bobbin case (see Page
26) and use the brush supplied to
dean the whole area <2)
two hook retaining arms. Insert ttie
bobbin case and bobbin and replace
the stitch plate
Impoftant:
Fabric fluff and threads must be re
moved regularly. Your machine
should be serviced at regular inter
vals at one of our service agencies.
90
Cleaning arxf lubricating the hook:
Remove the bobbin case (see Page
26) Snap Ihe two hook retaining
arms (3) outwards. Remove the hook
race cover (4) ahd the hook (5) arvd
dean with a soft doth. Lubricate at
the points (6) (1 ~2 drops) with sewing
machir>e pit. Turn the handwheel until
the hook race (7) is in the left position.
Replace the hook (5). Replace the
hook race cover and snap back the
Page 50

Trouble shooting guide
AffeniKjH.
O$connecl rnacbne from otoceidty supply
РгоЫпт
Upper ihread break«
Lower iivead break»
SkrppeO sMches
Neede break«
Loo«« stncrros
Seams gather or pucker
Cause
t. The macNne'» not threaded correcer
2. The thread tension >s юо dght
3. The ihrersd cs too thick tor the needle
<1 The tteade is not inserted correct^
S The ihtetMi a rourd wound the «pool holder pm
6. The need« is damaged
t. The bobom case le not ineened correctly
2. The bobom case is threaded wrortgiy
3. The lower thread tension it loo l^hi
t The neede is not msonod oomcOy
2. The neede is damaged
3 The wrong size neodo has been used
4 The loot is not anached correctly
t. The needte Is damaged
2. The neede is not correcdy msorted
3 Wrong neerSe size tor the fabro
4 The wrong toot >8 attached
1. The machine « not correctly trreadt>d
2 The bobbin case is not conecPy threaded
3 Needle-labrtcilhread combmaten e wrong
4 Thread lenaon wrong
I The neodo is too thick lot the tabric
2. The stitch length « wrongly adiusteo
3 The thread tension it loo tight
Correction
1 Rethread the machine 32
2 Reduce the tireed tension (tower number) 3<
3 Seed a larger needle 30
4 Remove and reinsert the r«ede (flat sbe towards the back) 28
5 Remove the reel and witvl dvead onto reel
6 Reptaca me needte 28
1
Remove and reinsert the bobbn case and put on the thread. The thread
shoiid p<4 eastly 26
2. Chet* both bobbm and bobbin case 26
3 Loosen lower thread tension as deserbed 26
1. Remove and remsen rteerSe {Rat sde towards the back) 28
2 insert a new neerRe 28
3 Cttoose a nee^ to sun the thread and tabnc 30
4 Chedr and attach oorteclly 22'tO
t Insert a new rteedle 28
2
been the needle conectly {hat s>de towards the back)
28
3 Choose a needle to sun the thread and fabr« 30
4 se-ect the correct toot 22rto
1. Check me threading 32
2 Thread the bobbin case as illustrated 26
3. The neede size must eutl the istnc and ihread 30
4 Correct the thread tensón 34
1 SeTecI a finer needle X
2 Read(u$i ire stiicn length
3 Loosen the thread tensón 34
Uneven stitches, uneven feed
The machine is noojr
The rrtachne |em»
92
I Poor quaMy ttiroad
2- The bobbin case « wrongly threaded
3 Pebric has been pullrxl
t The machine must be lubricated
2. rtutl or ol have cotiecied on the hoc* or neede bar
3 Poor диаЧу 0> has been used
4 The needle is damaged
I Thread is caught tn the hoc*
1 Select a belter quality thread
2
Remove bobtxn case and remread and msert oorrectly 26
3 Oo not putt on the tabnc while smvng. W I be taken up by the macNne
1 Lubncaieasdescnbed 90
2 Clean me hook and leed dog as descrioed 90
3 Ody use good quality sewing machine oil 90
4 Replace the r>eede 28
1 Remo-ze the upper thread and boObm case, turn the nardwheei
backwards and forwards by hand and remove the tivead remants.
Lubricale as described 90
Page 51

021ОЮ102<С)
 Loading...