


X13E-PLUS

OWNER/OPERATOR
MANUAL
NOTICIA IMPORTANTE
Este manual contiene importantes instrucciones
de seguridad que deben ser seguidas el pie de la
letra cuando utilice esta maquina.
MODELS
X13E-PLUS &
X13AE-PLUS
S
LICERS
IMPORTANT NOTICE
This manual contains Important Safety
Instructions which must be strictly
followed when using this equipment.
F35290 Rev. A (August 2014)

BEFORE USING THIS EQUIPMENT
Berkel’s slicers are designed to slice meat and other food products safely and
effi ciently. However, unless the operator is properly trained and supervised,
there is the possibility of a serious injury. It is the responsibility of the owner
to ensure that this slicer is used properly and safely, strictly following the
instructions contained in this manual and any requirements of local law.
No one should use or service this slicer without proper training and supervi sion. All operators should be thoroughly familiar with the procedures contained in this manual. Even so, Berkel cannot anticipate every circumstance or
environment in which its slicers will be used. You, the owner and/or operator,
must remain alert to the hazards posed by the function of a slicer—particularly the sharp rotating blade and moving table. No one uner 18 years of age
should operate this equipment. If you are uncertain about a particular task, ask
your supervisor.
This manual contains a number of safe practices in the General Safety Instruction Section. Additional warnings are placed throughout this manual. WA R N-
INGS RELATED TO YOUR PERSONAL SAFETY ARE INDICATED
BY:
WA R N I NG
If any warning label, wall chart or manual becomes misplaced, damaged or
illegible, please contact your nearest distributor or Berkel directly, for a free
replacement.
Remember, however, THIS MANUAL OR THE WARNING LABELS DO
NOT REPLACE THE NEED TO BE ALERT AND TO USE YOUR
COMMON SENSE WHEN USING THIS SLICER.

TABLE OF CONTENTS
Page
General Safety Instructions ......................................................................................................................... 2
Equipment Description ................................................................................................................................ 4
Intended Uses and Characteristics .............................................................................................................. 6
Unpacking and Installation ......................................................................................................................... 6
Operation ..................................................................................................................................................... 7
Cleaning and Sanitizing .............................................................................................................................. 8
Sharpeni ng ................................................................................................................................................. 10
Repair Parts/Repair Service ...................................................................................................................... 10
Troubleshooting ..........................................................................................................................................11
Specifi cations ............................................................................................................................................. 12
Optional Accessories ................................................................................................................................. 13
Warranty .................................................................................................................................................... 14
The Berkel Company • World’s Leading Manufacturer of Slicers and Food Processing Equipment
BERKEL COMPANY
2006 Northwestern Parkway • Louisville, KY 40201
Phone: 800-348-0251 • Fax 888-888-2838
www.berkelequipment.com
Printed in USA Berkel Company Part No. 0F-35290

PELIGRO
CUCHILLA FILOSA
para evitar serios accidentes a su
persona siga las instrucciones de este
manual y
1. NUNCA utilice esta mçquina sin previa instrucciùn y autorizaciùn de su
supervisor.
2. LA MçQUINA DEBE apoyarse sobre un nivel solido y plano.
3. LOS PROTECTORES deben colocarse ANTES de enchufar y operar la
mçquina.
4. SIEMPRE utilice el enchufe original proveido por el fabricante.
5. SIEMPRE utilice el utensillo para empujar la
comida - nunca su mano.
6. NUNCA TOQUE LA CUCHILLA CON
LA MANO.
7. MANTENGA manos, brazos, cabello y
ropa suelta LEJOS de toda parte en movimiento
de la mçquina.
8. EN CASO DE QUE LA MÇQUINA SE TRABE,
apague y desconecte ANTES de sacar lo que la obstruye.
9. APAGUE Y DESCONECTE LA MçQUINA antes de limpiar,
sanitizar, o arreglar.
10. UTILIZE UNICAMENTE los repuestos provistos por el fabricante.
11. EN CASO de que los membretes de ‘PELIGRO’ se desprendan
de la mçquina o sean illegibles, llame al fabricante o a su
representante de service Berkel para que lo reemplace sin cargo.
2 • X13E-PLUS & X13AE-PLUS OWNER/OPERATOR MANUAL
WAR NI NG
SHARP KNIFE BLADE
to avoid serious personal injury
follow all the instructions in this manual
and
1. NEVER touch this machine without training and authorization by your
supervisor.
2. MACHINE MUST BE on solid level support.
3. GUARDS MUST BE in place before plugging in and turning on machine.
4. ALWAYS use three pronged plug provided.
5. ALWAYS use food pusher not your hand.
6. NEVER TOUCH ROTATING KNIFE.
7. KEEP hands, arms, hair and loose clothing
clear of all moving parts.
8. SHOULD MACHINE JAM, turn off and unplug
before removing obstruction.
9. TURN OFF AND UNPLUG machine from power source before cleaning,
sanitizing or servicing.
10. USE ONLY the attachments provided by the manufacturer.
11. SHOULD any warning label on a machine come off or become unreadable,
contact the manufacturer or your Designated Berkel Service Location for a free
replacement.
X13E-PLUS & X13AE-PLUS OWNER/OPERATOR MANUAL • 3
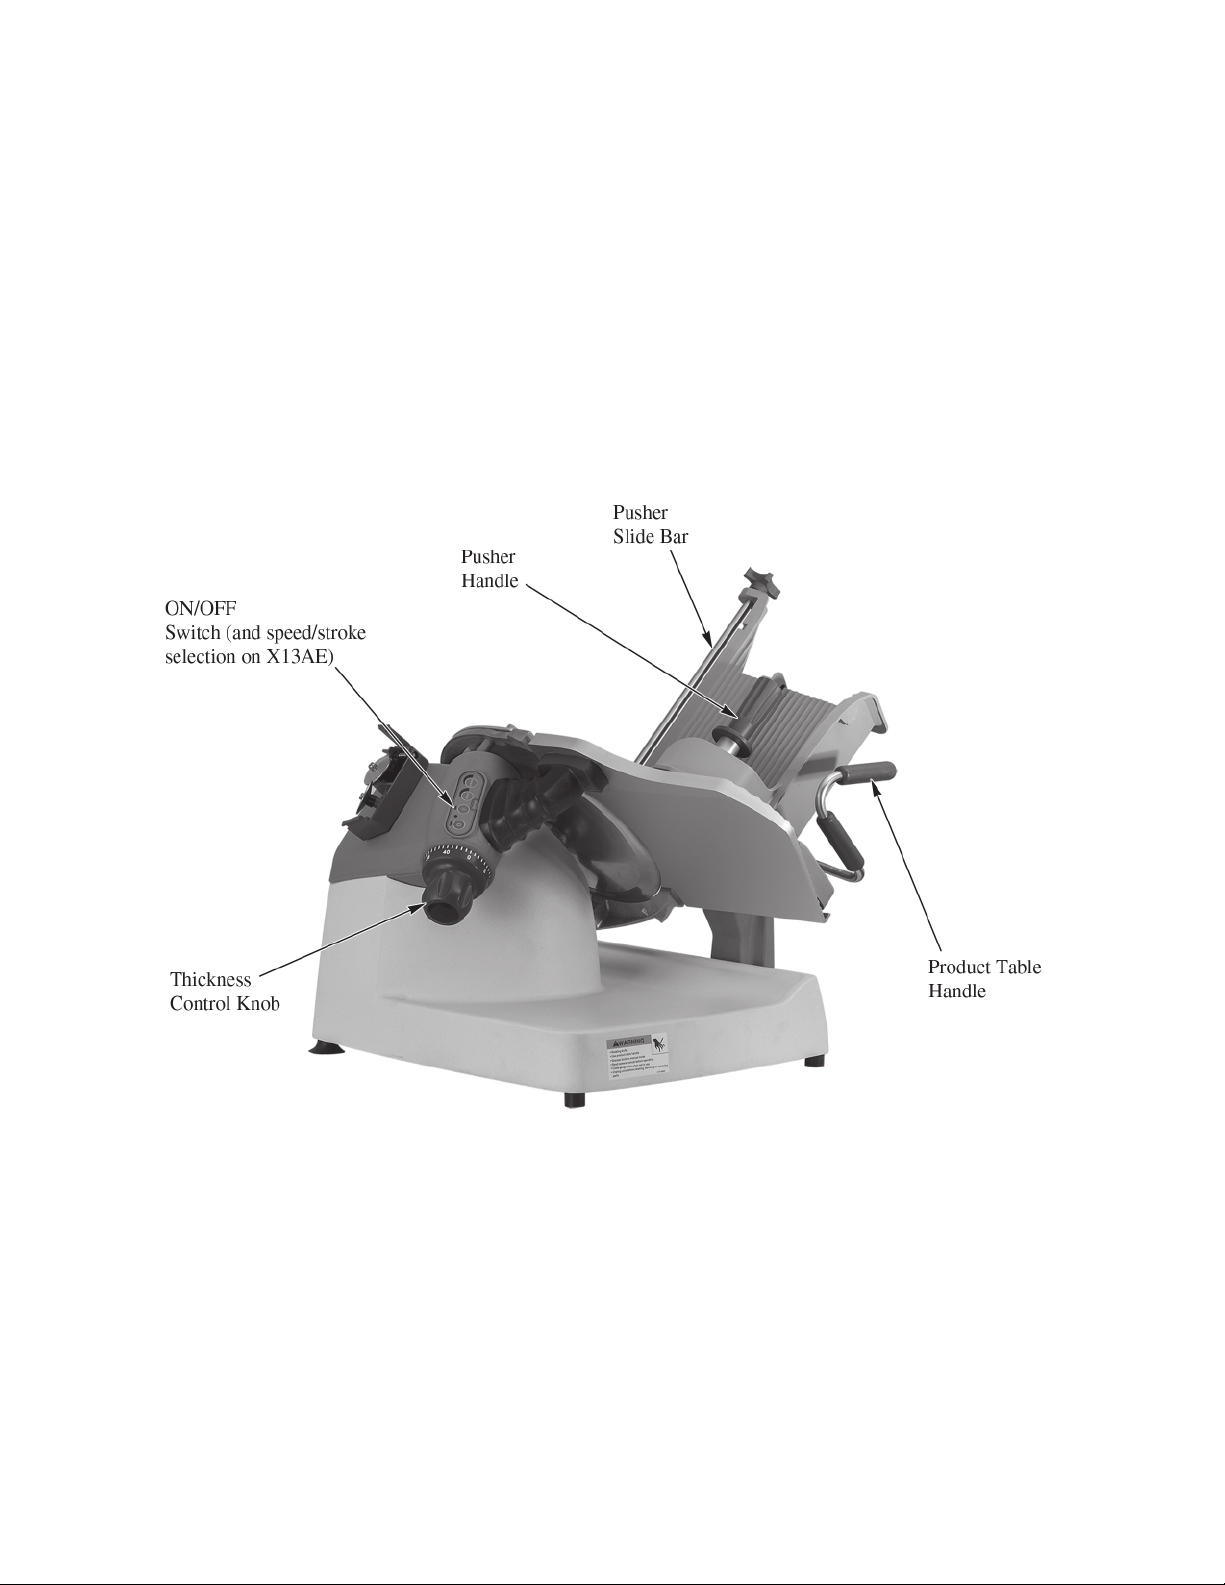
EQUIPMENT DESCRIPTION
4 • X13E-PLUS & X13AE-PLUS OWNER/OPERATOR MANUAL
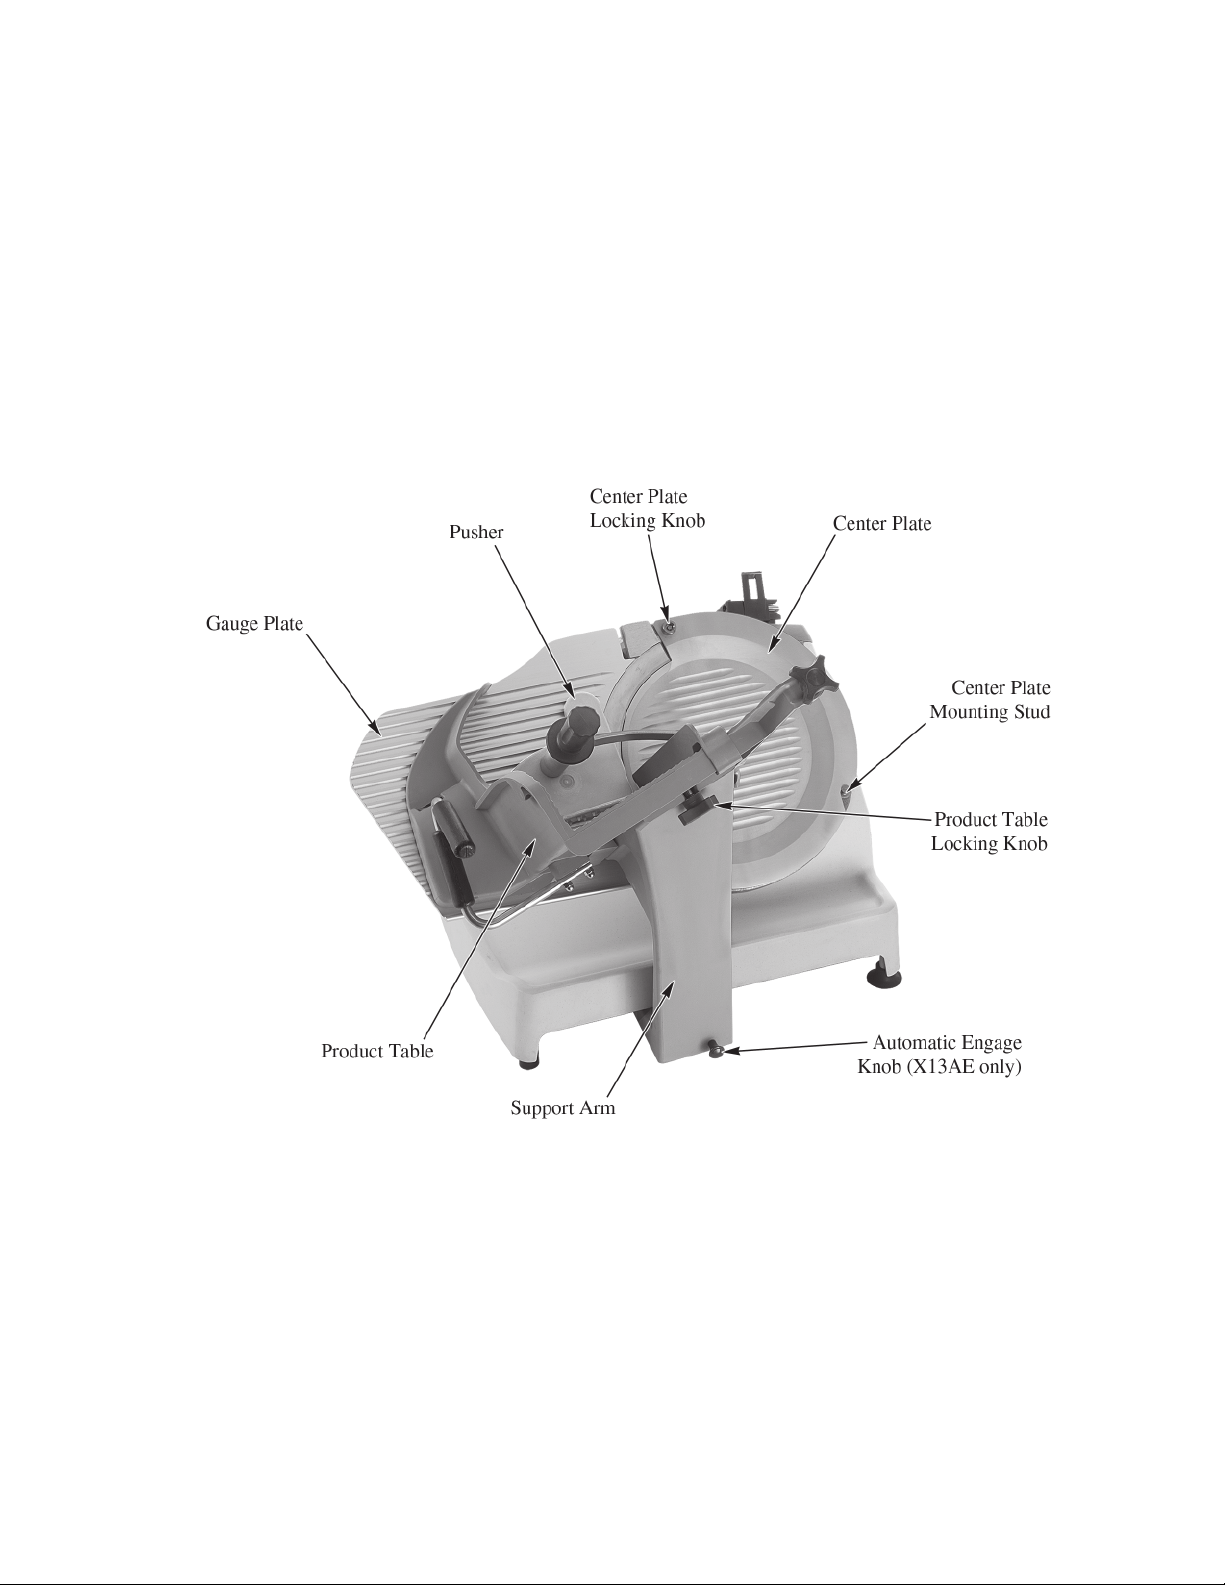
EQUIPMENT DESCRIPTION
X13E-PLUS & X13AE-PLUS OWNER/OPERATOR MANUAL • 5

Intended Uses and Characteristics
Intended Uses
The model X13E-PLUS and X13AE-PLUS slicers are designed for cutting the following types of products:
•
Meat (without bones)
•
Cheese
•
Vegetables
The following types of items are NOT suitable for slicing on the Model X13E-PLUS or X13AE-PLUS
slicers:
•
Non-food products
•
Frozen foods
•
Bone in products
Special Features/Characteristics
Reduced seams and joints for better sanitation
Left hand thickness adjustment for easier cleaning and better user interface
Kick stand for cleaning under the slicer
3 slicing speeds (automatic only)
3 slicing stroke lengths (automatic only)
Automatic return to home at the end of the cutting cycle (automatic only)
Unpacking and Installation
Note: Immediately after unpacking, check the slicer for shipping damage. If the equipment is
found to be damaged, save everything! Notify the carrier within 5 days of delivery.
1. Carefully remove the cardboard carton from around the slicer.
2. Slide the product table off the gauge plate. It is in the cardboard box on the gauge plate.
3. Get assistance from another individual and place the slicer on a solid, level surface that is free of
any obstructions.
4. Make sure to unpack the sharpener, fence and brush. They are located in pockets in the cardboard
base.
5. Slide the product table onto the support arm and secure using the red product table locking knob.
WARNING
To eliminate a potential shock hazard, a properly grounded outlet using the three-pronged plug
provided must power this unit. Before plugging the slicer in, check your outlet voltage to be sure it
complies with the voltage specifi ed on the serial number plate on the slicer.
Note: The model/serial number plate is located on the back of the slicer.
6 • X13E-PLUS & X13AE-PLUS OWNER/OPERATOR MANUAL

Operation
General
1. Check to see that the center plate and product table are in place on the slicer and the gauge plate is
completely closed. The holes in the bottom of the center plate fi t over the bottom mounting studs in
the ring guard and the center plate locking knob is at the top of the center plate. The product table
slides completely onto the support arm and is secured with the red product table locking knob.
2. If the slicer is an automatic, then make sure the automatic engage knob on the right side of the table
support arm is pushed in, towards the left.
3. Plug the slicer in. The pilot light, between the start and stop buttons will illuminate.
4. Push the green ON button and the slicer blade will start to turn. Press the red STOP button to stop
the knife.
Automatic Operation
5. If you have an automatic slicer, with the slicer stopped, pull the automatic engage knob fully out on
the right side of the machine. This will put the slicer in the automatic mode.
6. Push the speed selection button to change the speed:
One illuminated LED indicates 20 slicers per minute (slow speed)
Two illuminated LED’s indicates 40 slices per minute (medium speed)
Three illuminated LED’s indicates 60 slices per minute (high speed)
7. Pushing the stroke length selection button changes the length of the stroke. This allows smaller
products to be sliced quicker, without the table moving any faster. Make sure the stroke length is
longer than the width of the product.
One illuminated LED indicates 1/3 of the total possible stroke length
Two illuminated LED’s indicates 2/3 total possible stroke length
Three illuminated LED’s indicates full stroke length
8. Press the green START button and the product table will slowly come to its forward position to fi nd
its home position. Once it gets back to the home position, then it will start to go back and forth at
the preset speed and stroke length.
9. Push the red STOP button and the table will complete its stroke and stop in the home position.
10. As long as the slicer remains in the automatic mode it will remember its home position and always
start right up when the green START button is pushed. It will always start slow and gradually build
up to its full speed. This is the “soft start” feature.
11. Each time you take the slicer out of the automatic mode, and then back into the automatic mode, it
will always fi nd its home position before it starts to run (as indicated in step #8).
12. Each time you activate the slicer into automatic mode, the last speed and stroke length settings will
be remembered until power is disrupted from the slicer (i.e. disconnecting the power cord from
the outlet). Once power is reconnected to the slicer, the default for automatic is slow speed and full
stroke length.
X13E-PLUS & X13AE-PLUS OWNER/OPERATOR MANUAL • 7

Cleaning and Sanitizing
The following cleaning procedures have been prepared with the grateful
cooperation of Kay Chemical, an Ecolab company.
Frequency:
The slicer shall be cleaned and sanitized at intervals to comply with national, state and/or local health codes.
Supplies:
®
Dish Detergent such as KAY
Sanitizer such as KAYQUAT® II
Nonabrasive Pad
Nylon Brush
Cut-Resistant gloves
Cloth wipes
Note: Sanitizer concentration shall comply with Section 4-501.114, Manual and Mechanical Warewashing
Equipment, Chemical Sanitization – Temperature, pH, Concentration, and Hardness of the FDA Food Code. If a
chemical sanitizer other than chlorine, iodine, or quaternary ammonium is used, it shall be applied in accordance
with the EPA-registered label use instructions.
Pot & Pan Detergent
Procedure:
CAUTION: Use extreme care when cleaning blade.
1. Close the slicer thickness control knob.
2. Turn the slicer off and unplug power cord from the wall outlet.
3. Pull the product table to the front of the slicer. If it is an automatic slicer, make sure the engagement
knob is in the manual position before pulling the product table to the front of the slicer.
4. Unscrew the red handle from the pusher and remove the pusher from the pusher arm. Unscrew and
remove the pusher arm slide rod from the product table. Loosen the product table locking knob and
remove the table. The product table cannot be removed unless it is fully forward and the thickness
control knob is completely closed.
5. Remove the center plate by lifting the center plate locking knob at the top of the center plate and lift
from the slicer.
6. Pre-scrape food from removable product table and center plate.
7. Wash center plate, product table, red handle, pusher, pusher arm, and slide rod in hot detergent solution.
The sharpener can be submerged in the hot detergent solution for cleaning.
8. Rinse the center plate, product table, red handle, pusher, pusher arm, slide rod, and sharpener in fresh,
hot, potable water.
9. Submerge the center plate, product table, red handle, pusher, pusher arm, slide rod, and sharpener in
sanitizer solution. Set parts to the side on a sanitized surface and allow to air dry.
8 • X13E-PLUS & X13AE-PLUS OWNER/OPERATOR MANUAL
 Loading...