

Page 1

Joybook R41 Series User Manual
Welcome
Page 2

Copyright
Copyright 2006 by BenQ Corporation. All rights reserved. No part of this publication may be reproduced, transmitted, transcribed, stored in a retrieval system
or translated into any language or computer language, in any form or by any means, electronic, mechanical, magnetic, optical, chemical, manual or otherwise,
without the prior written permission of this company.
Disclaimer
BenQ Corporation makes no representations or warranties, either expressed or implied, with respect to the contents hereof and specifically disclaims any
warranties, merchantability or fitness for any particular purpose. Further, BenQ Corporation reserves the right to revise this publication and to make changes
from time to time in the contents hereof without obligation of this company to notify any person of such revision or changes.
Windows, Internet Explorer and Outlook Express are trademarks of Microsoft Corporation. Others are copyrights of their respective companies or
organizations.
Joybook models covered by this manual
This manual contains the information about the following Joybook models:
• Joybook R41 Series
Please note that the actual hardware or software capabilities will vary according to the model you purchased. To determine your Joybook model, please refer to
the label on the packing box, or the printing on your Joybook.
Page 3

Table of contents
Overview...............................................................................................1
About this book ............................................................................. 1
Typographics.................................................................................. 1
Getting started......................................................................................2
Package contents............................................................................ 2
Getting your Joybook ready for use.............................................. 2
Expanding the capabilities of your Joybook................................. 4
Touring your Joybook .........................................................................6
Front view ...................................................................................... 6
Left side view.................................................................................. 7
Right side view ............................................................................... 8
Rear view ........................................................................................ 9
Bottom view ................................................................................... 9
Indicators ....................................................................................... 10
Using your Joybook ............................................................................. 11
Using the touchpad........................................................................ 11
Using the keyboard........................................................................ 12
Function hotkeys ..................................................................... 12
Windows keys and lock keys................................................... 13
Using the built-in wireless LAN function (optional) .................. 14
Connecting to a wireless network:.......................................... 14
Connecting to another wireless network:............................... 14
Using Bluetooth (optional)........................................................... 16
Adding a Bluetooth device ...................................................... 16
Sending files to a Bluetooth device ......................................... 18
Using BIOS setup .................................................................................19
When and how to use BIOS setup ................................................ 19
Navigating the BIOS setup screen................................................. 20
Main menu............................................................................... 20
Security menu.......................................................................... 20
Boot menu ............................................................................... 20
Exit menu................................................................................. 21
Boot from LAN...............................................................................21
Connecting to external display devices ...............................................22
Connecting to a VGA display device.............................................22
Installing additional memory ..............................................................23
FAQ and troubleshooting ....................................................................26
General............................................................................................26
Battery and power ..........................................................................26
Connection .....................................................................................27
System .............................................................................................27
Display ............................................................................................30
Information on cleaning and battery maintenance............................32
Battery maintenance ......................................................................32
Cleaning your Joybook ..................................................................32
Service and support..............................................................................33
BenQ Joybook Global On-line Service..........................................33
Joybook on-line registration..........................................................33
Appendix...............................................................................................34
General safety information ............................................................34
Safety information about the battery ............................................34
Caution texts concerning lithium batteries ............................34
Safety information about the AC adapter .....................................34
Safety information about the modem...........................................34
Caution .....................................................................................34
Disposal of Waste Electrical and Electronic Equipment by users in
private households in the European Union..................................35
Declaration of Conformity ............................................................35
Safety instructions for Poland, Romania, Slovenia, Bulgaria,
Latvia, and Croatia .........................................................................36
Table of contents iii
Page 4

<Memo>
Table of contentsiv
Page 5
Overview
About this book
This book provides you the main information about various components
in your Joybook and demonstrates how to use them. The following are
the major chapters of this book.
In addition to this book, you can find more information from “Joybook
Application Software User Manual” in the supplied CD.
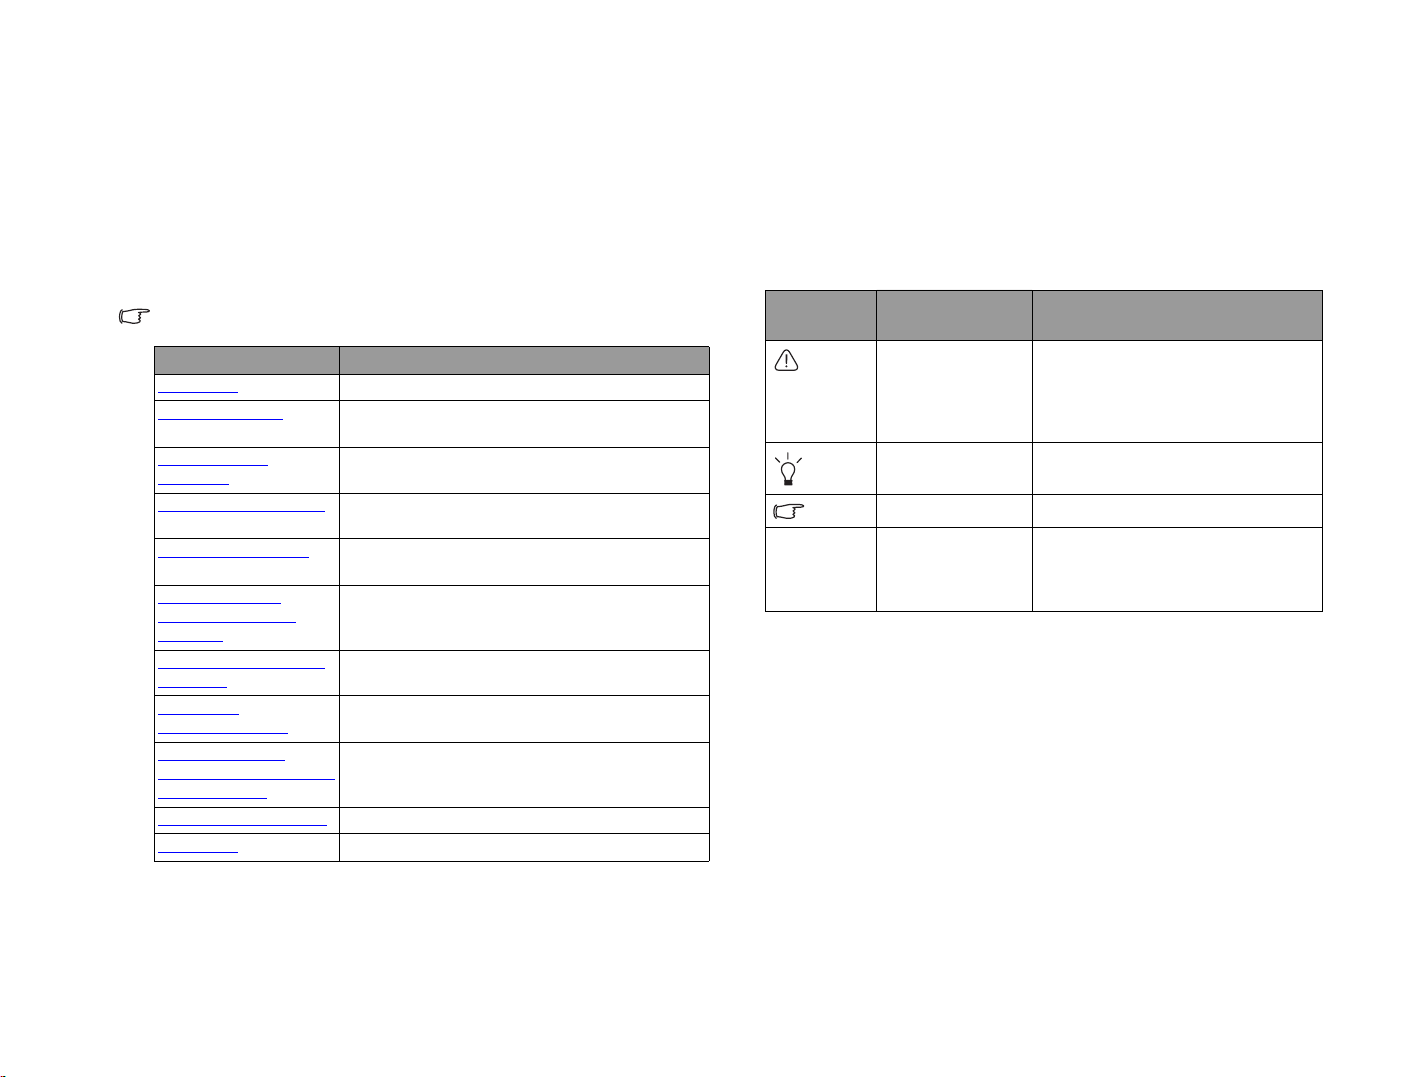
Chapter title Description
Overview
Getting started
Touring your
Joybook
Using your Joybook
Using BIOS setup
Connecting to
external display
devices
Installing additional
memory
FAQ and
troubleshooting
Information on
cleaning and battery
maintenance
Service and support
Appendix
Introduction to this book.
Information about beginning to use your
Joybook.
Introduction to the hardware components
of your Joybook.
Basic and advanced information about
operating your Joybook.
Information about how to use the BIOS
setup utility.
Information about how to connect your
Joybook to external display devices
Information about how to add the memory.
Information about frequently asked
questions and troubleshooting.
Information about cleaning and battery
maintenance.
Joybook service and support information.
Important safety information.
Typ og ra phics
The usage of notes, tips and warnings is specifically for different
purposes, which are described as follows.
Icon/
Symbol
< > or [ ] Keys on the
Item Meaning
Warning Information mainly to prevent the
Tip Useful information for completing
Note Supplementary information.
keyboard; User
Interface (UI) on
the screen
damage to components, data, or
personal injury caused by misuse
and improper operation or
behavior.
a task.
Indicates a key on the keyboard,
or the UI on the screen. Do not
actually type the symbols
together with the enclosed letters.
Overview 1
Page 6
Getting started
Depending on the model of your Joybook, the appearance may be
different from the illustrations shown in this manual.
Package contents
Before using your Joybook for the first time, please check if you have all
the items with you. For details about what should be included in the
package, refer to the Package Contents label inside the accessory box. If
any of the items are missing or appear damaged, contact your dealer
immediately. Save the packaging in case you need to ship your Joybook
for service.
Getting your Joybook ready for use
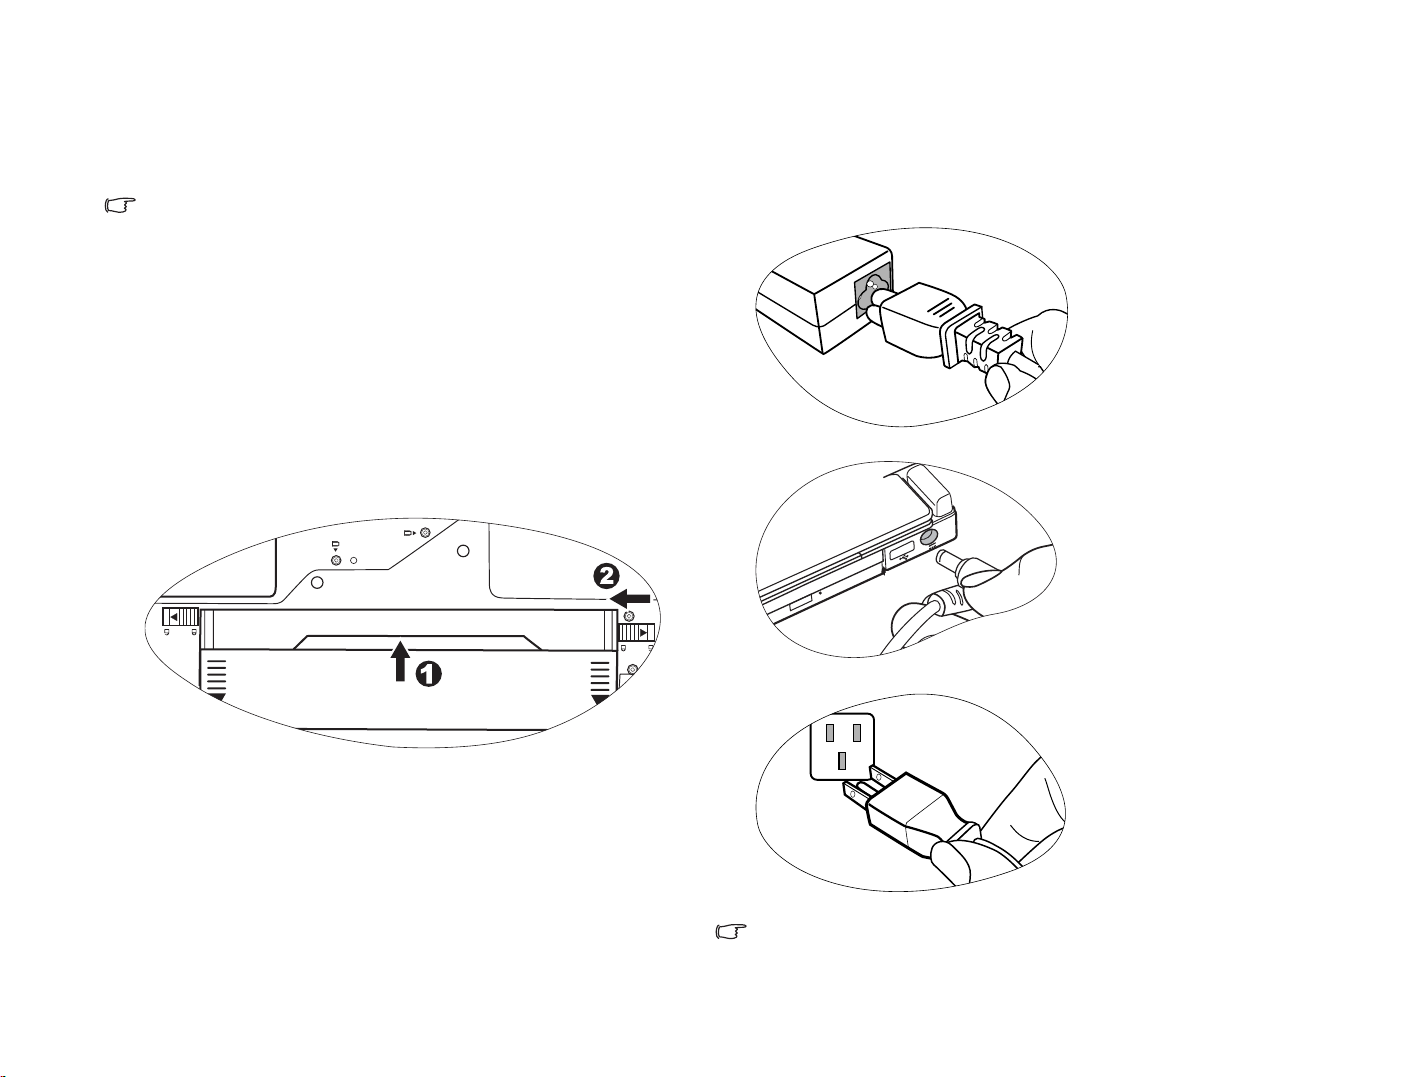
1. Installing the battery pack
Turn your Joybook upside down and put it on a soft clean cloth. With the
label side of the battery pack facing down, slide it gently into the battery
compartment until it snaps into place (1). Move the release latch to the
left as shown to lock the battery pack into place (2).
2. Connecting the power
Connect the power cord to the power adapter.
Connect the power adapter to the power socket on your Joybook.
Connect the power cord to a wall outlet and start charging the battery.
Power systems and plug types might vary depending on your country/
region.
Getting started2
Page 7
• When the battery is charging, the battery indicator appears in amber.
When the charging process is complete, the light goes off.
4. Performing initial setup
• For details about the colors and meanings of the indicators, refer to
"Indicators" on page 10
.
3. Opening your Joybook
Gently lift up the latchless lid that allows you to open the case easily.
Press the power button to start up your Joybook, and then follow the onscreen instructions to complete the initial Windows XP setup.
• The actual operating system that comes with your Joybook might vary.
For more information, refer to the Product Specifications label on the
product carton.
• Your Joybook R41 Series only works with Microsoft Windows® XP
Home and Windows® XP Professional editions.
Getting started 3
Page 8
Expanding the capabilities of your Joybook
Connect an external display device (such as a monitor or projector) to the
VGA port of your Joybook.
Connect a telephone line to the modem port of your Joybook and dial-up
to the Internet or send a fax.
Getting started4
Access local area network (LAN) by connecting a network cable to the
LAN port of your Joybook.
Insert an ExpressCard/34 module or ExpressCard/54 module to further
expand the capabilities of your Joybook.
Page 9
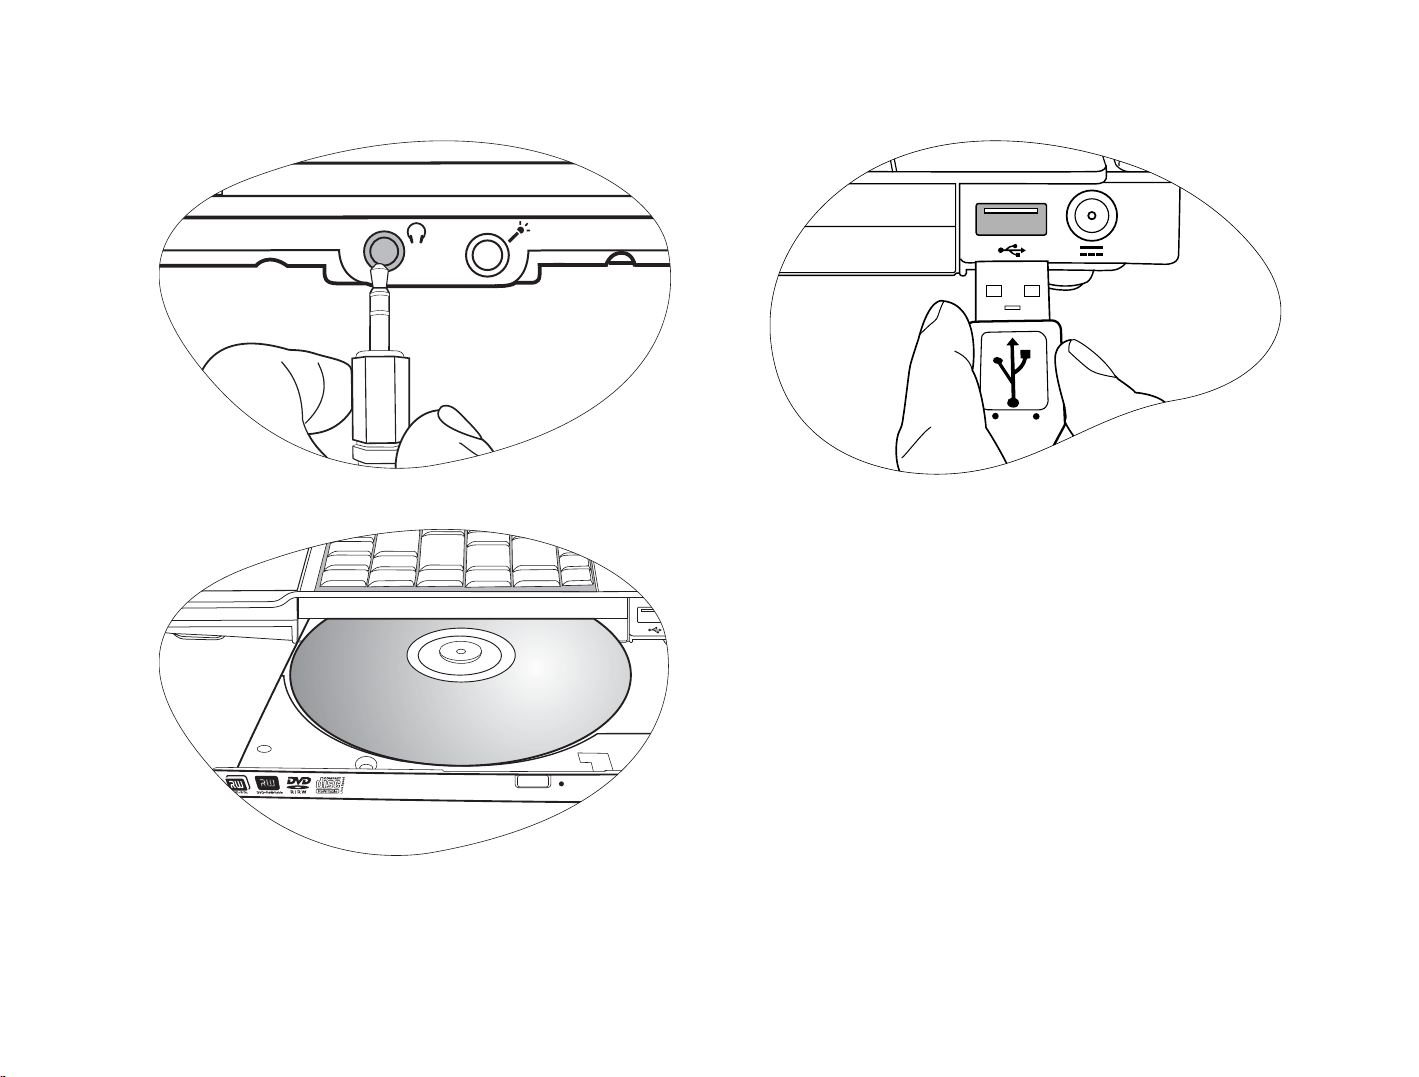
Connect an earphone or microphone to the earphone or microphone
jack to output or record sounds.
Use the optical drive to access data on various kinds of discs or enjoy
DVD/VCD movies.
Connect USB peripherals to the USB port of your Joybook.
Getting started 5
Page 10
Tour i n g your Joy b ook
Depending on the model of your Joybook, the appearance may be different from the illustrations shown in this manual.
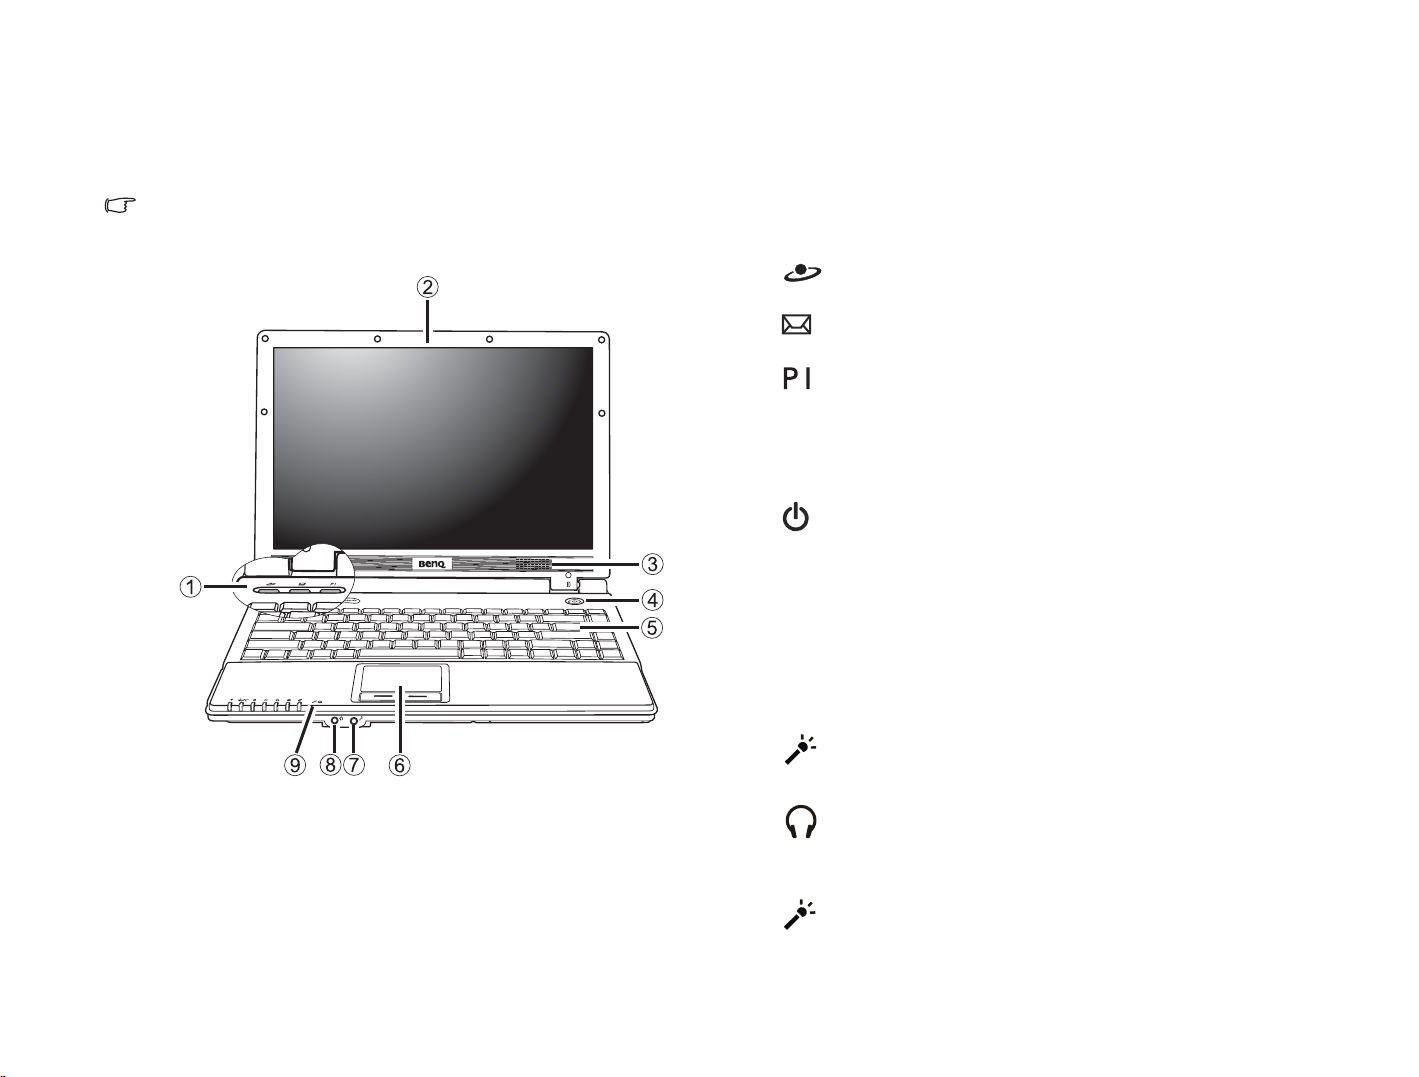
Front view
(1) Quick access buttons
Internet hotkey
Starts up the Internet Explorer Web browser.
E-Mail hotkey
Starts up the Outlook Express e-mail client.
Customizable hotkey 1
Can be customized to open an application.
(2) LCD panel
(3) Speakers
(4) Power switch with LED
• Turns your Joybook on or off.
• When the system is on, it lights up in blue.
R41
• When the system is in Suspend mode, it lights up in amber.
• When the system is in Hibernation mode or powered off, the light
goes off.
(5) Keyboard
(6) Touchpad
(7) Microphone input jack
Can be used to connect to a microphone for recording sounds.
(8) Audio output jack
Can be used to connect to an earphone/headset or external speaker for
playing Joybook audio.
(9) Built-in microphone
Receives sounds and voices for recording.
Touring your Joybook6
Page 11
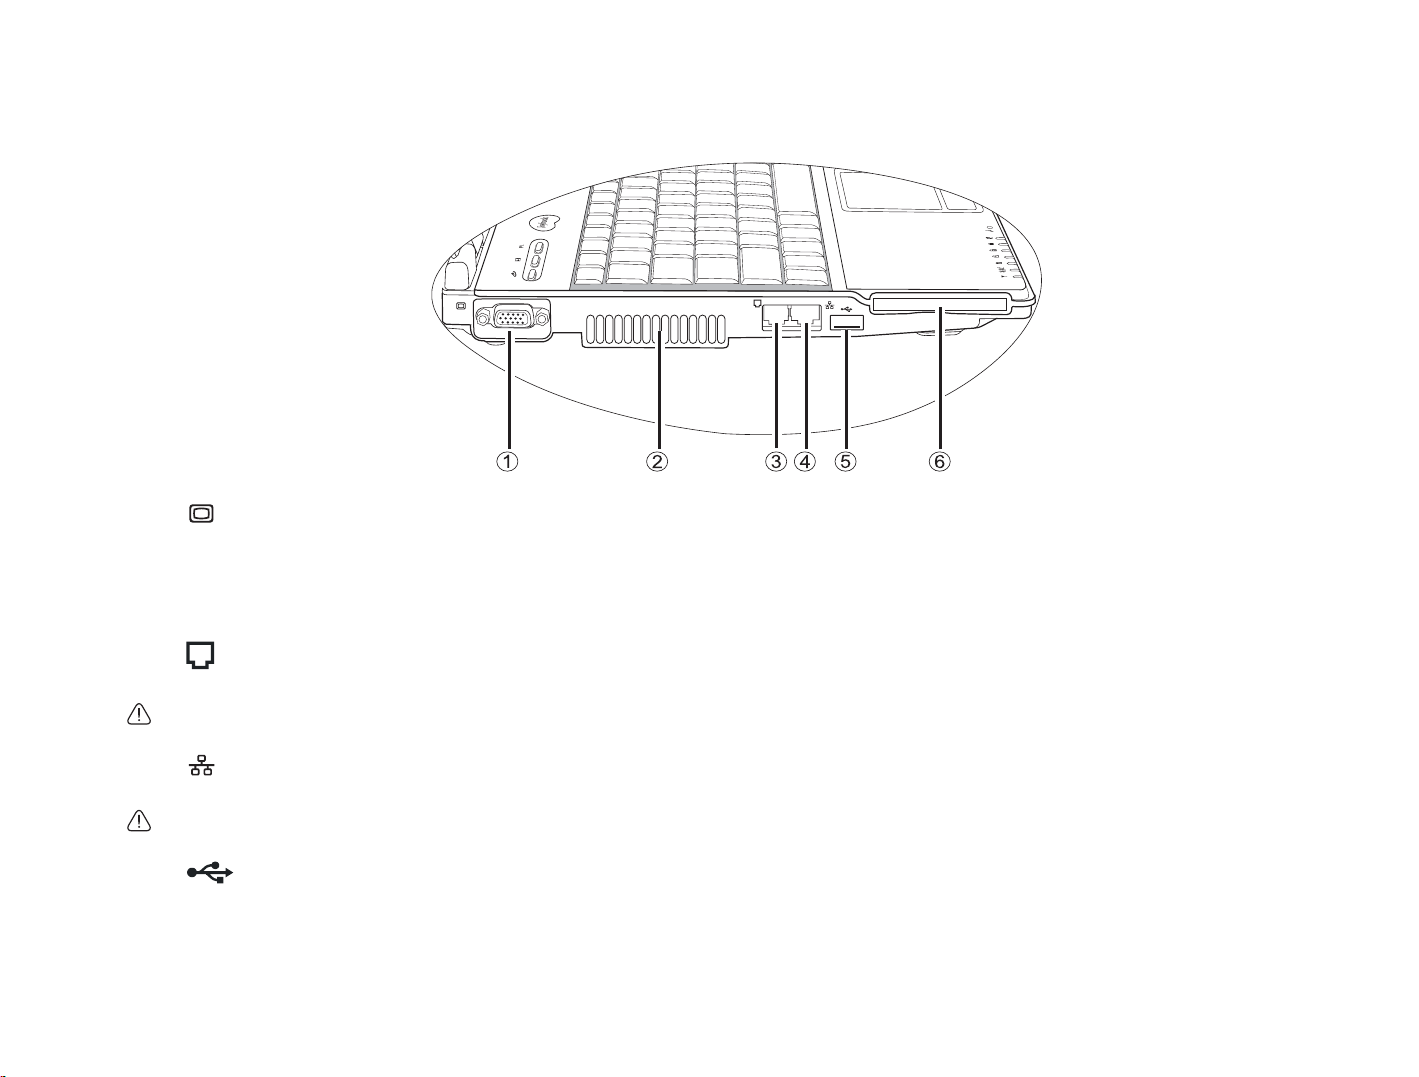
Left side view
R41
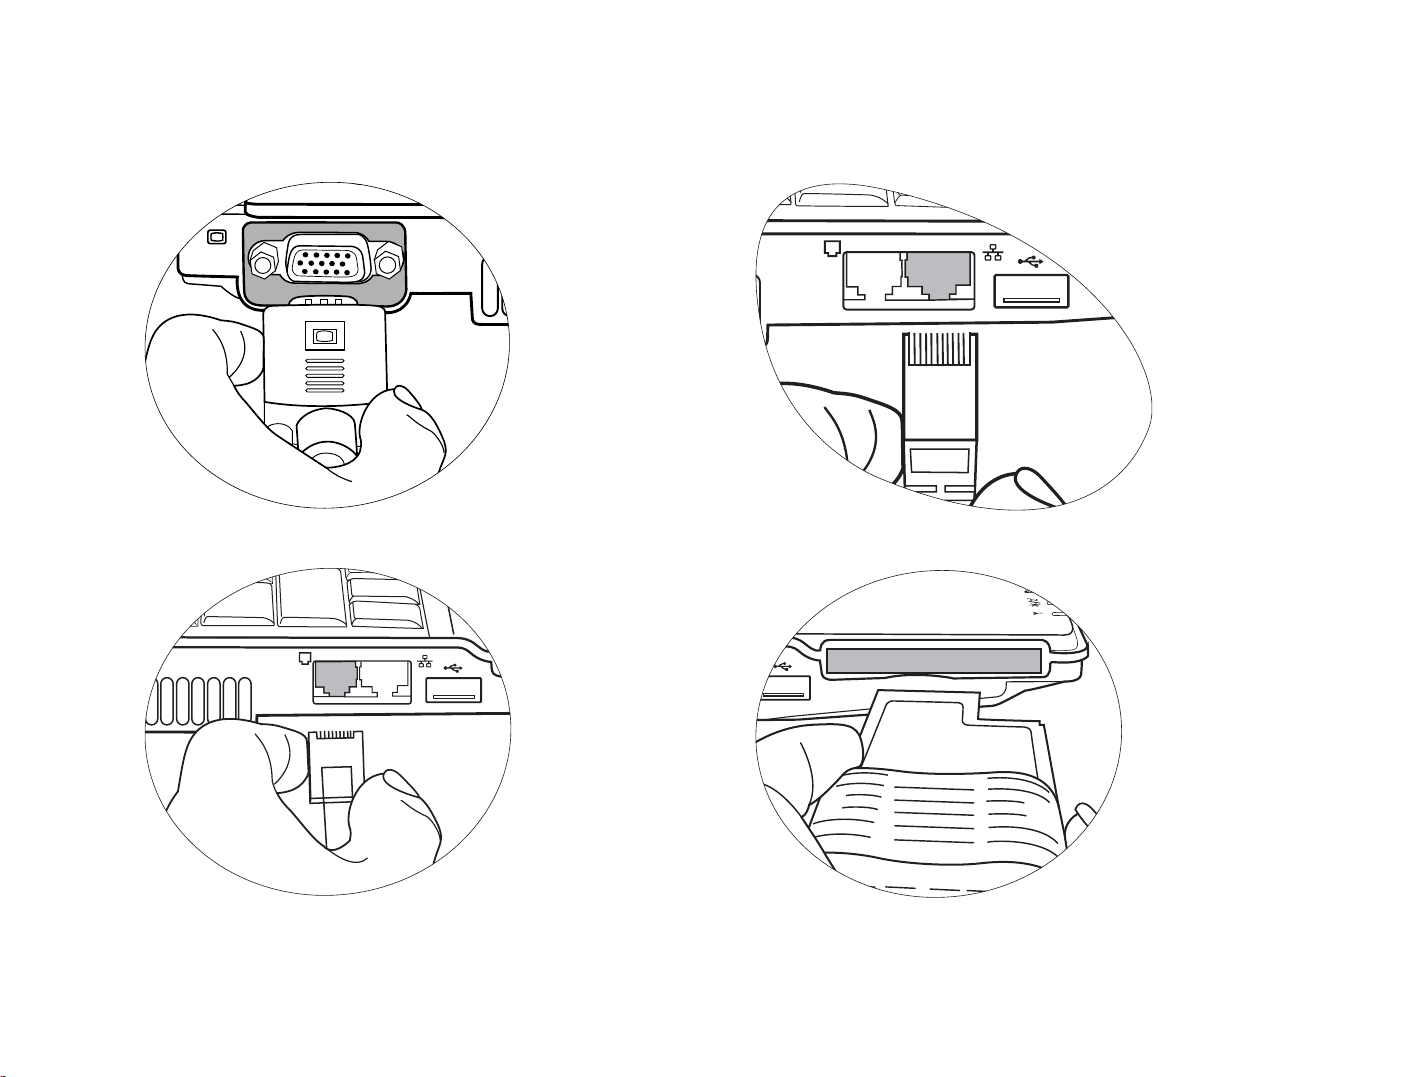
(1) VGA port
For connecting external display devices, such as monitors and projectors.
(2) Ventilation holes
For dissipating heat and keeping the computer at an optimal
temperature.
(3) Modem port (RJ-11 connector)
Accepts an analog telephone line for use with the internal modem.
To reduce the risk of fire, use only No. 26 AWG or larger
telecommunications line cord.
(4) LAN (Ethernet) port (RJ-45 connector)
Allows Joybook to connect to a 10/100Mbps Ethernet network.
Do not plug a phone jack connector in the RJ-45 port. This may damage
this device.
(5) USB 2.0 port
For connecting peripherals such as mice, digital cameras and MP3 players
that use the USB interface.
(6) ExpressCard slot
This ExpressCard slot accepts two formats of the standard ExpressCard
modules: ExpressCard/34 and ExpressCard/54. The ExpressCard/34
module is characterized by its 34 mm width, and the ExpressCard/54
module is characterized by its 54 mm width. You can use an ExpressCard
to further expand the capabilities of your Joybook.
Insert an ExpressCard into the slot following the direction indicated on
the card and complete related driver settings.
Touring your Joybook 7
Page 12
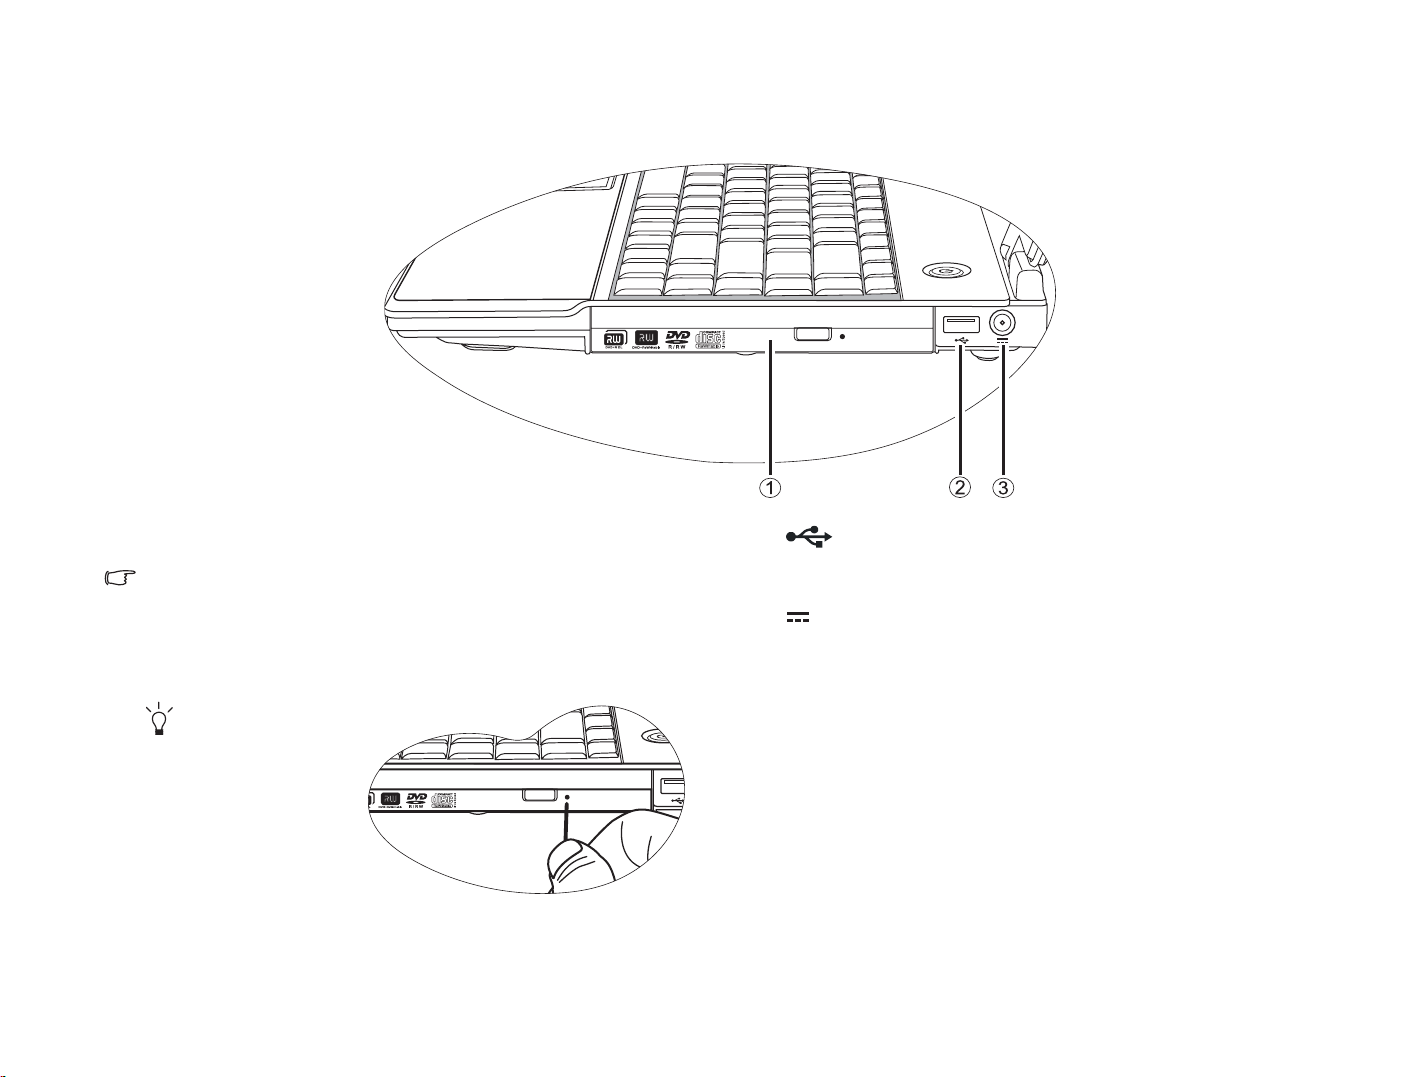
Right side view
(1) DVD/CD-RW Combo/DVD-Dual/Super-Multi drive
(optional)
The type of optical drive varies by model, and the support of disc types
depends on the optical drive that comes with your Joybook.
Supports multi-functional optical module for reading music CDs, VCDs
and DVDs or burning CD-R/CD-RW or DVD+R/DVD-R/DVD+RW/
DVD-RW/DVD-RAM (optional) discs. Discs can be inserted/ejected by
pressing the small ejection button on the drive.
If you wish to open the
disc tray of the drive when
your Joybook power is off,
or it can't be opened using
the ejection button, insert a
pointed object into the tray
ejection hole next to the
ejection button to release
the disc tray.
Touring your Joybook8
(2) USB 2.0 port
For connecting peripherals such as mice, digital cameras and MP3 players
that use the USB interface.
(3) Power jack
For connecting AC power supply.
Page 13
Rear view
(1) USB 2.0 ports
For connecting peripherals such as mice, digital cameras and MP3 players
that use the USB interface.
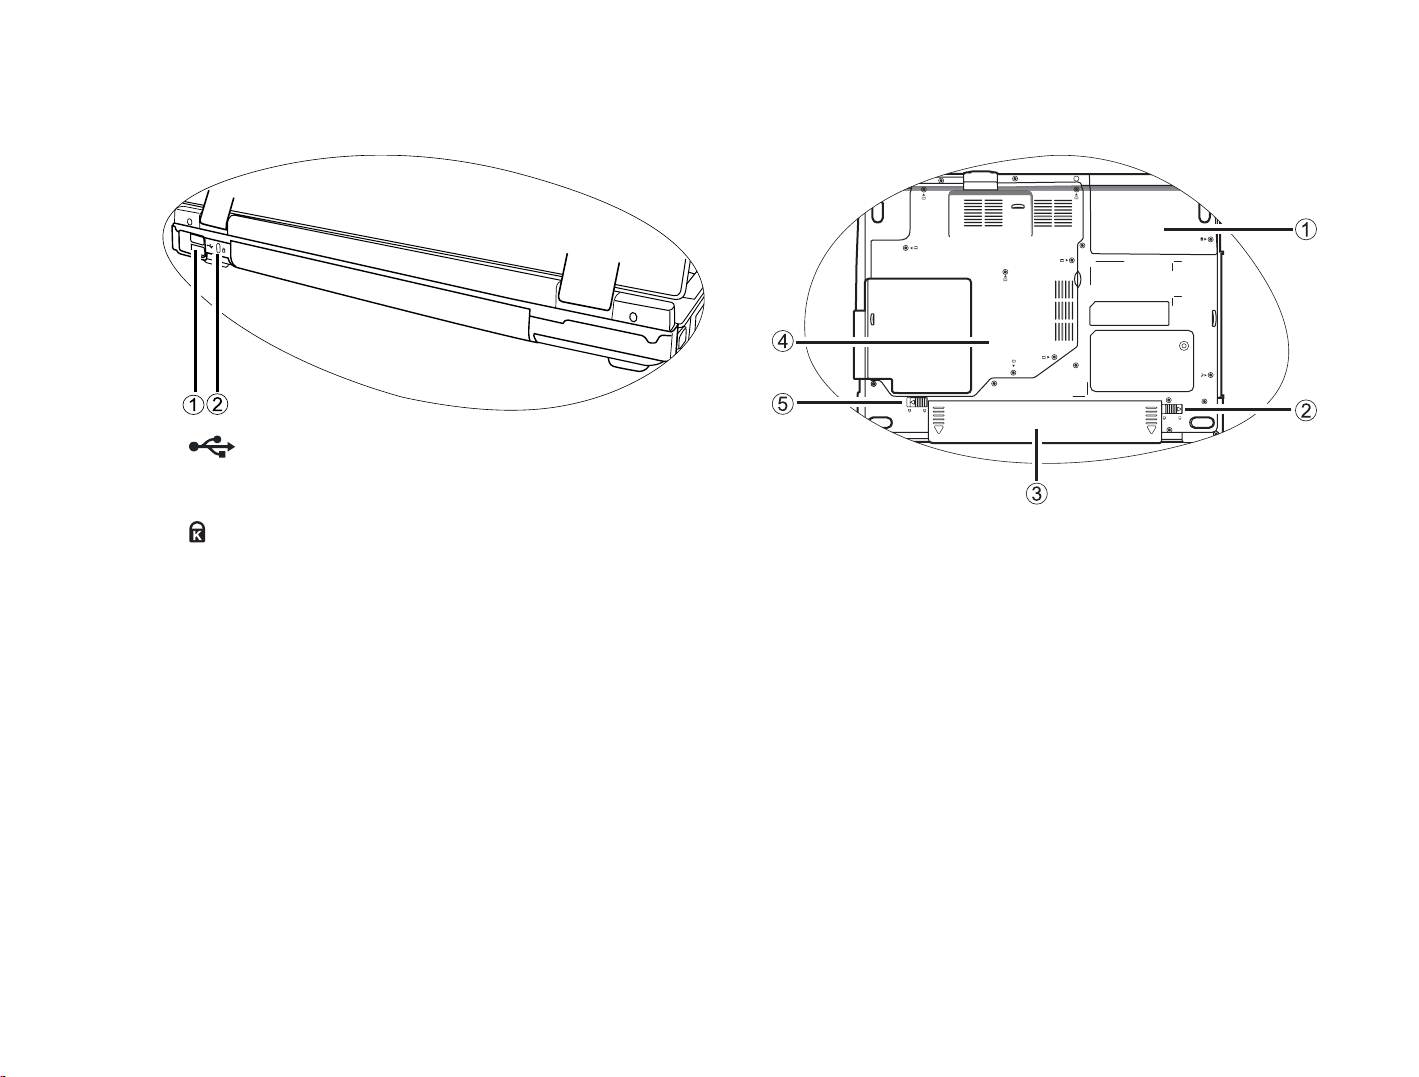
Bottom view
(2) Anti-theft Kensington lock hole
You can attach a anti-theft Kensington lock and cable to this hole to help
prevent possible theft.
(1) Hard disk drive compartment
Accommodates the hard disk drive of Joybook.
(2) Battery retainer A
Secures the battery in place.
(3) Battery pack
Supplies power to Joybook when external power is not connected.
(4) MiniCard slot, memory expansion slot and CPU
compartment
Accommodates the CPU and memory slot of Joybook. There is also a
MiniCard slot for using an optional MiniCard. Depending on your
model, a MiniCard wireless network card may have been pre-installed.
(5) Battery retainer B
Secures the battery in place.
Touring your Joybook 9
Page 14

Indicators
(1) Wireless network/Bluetooth indicator
• When the wireless LAN is on, it lights up in blue.
• When the wireless LAN is off, the blue light goes off.
• When the Bluetooth is on, it lights up in amber.
• When the Bluetooth is off, the amber light goes off.
• When the wireless LAN and Bluetooth are both on, it lights up in
purple.
(2) Power indicator
• When the system is on, it lights up in blue.
• When the system is in Suspend mode, it lights up in amber.
• When the system is in Hibernation mode or powered off, the light
goes off.
(3) Battery indicator
• When the system is on and the battery is in use, it lights up in blue.
• When the battery is charging, it lights up in amber.
• When the charging is complete, the blue and amber light both go
off.
• Flashing blue indicates that the battery is running low.
Touring your Joybook10
• Flashing amber indicates that the battery is malfunctioning, in
which case you should contact service personnel.
(4) Caps Lock indicator
Lights up in blue when the Caps Lock is activated.
(5) Num Lock indicator
Lights up in blue when the Num Lock is activated.
(6) Hard disk activity indicator
Flashes in blue when the data in the hard disk drive is being accessed.
(7) Optical drive activity indicator
Flashes in blue when the optical drive is being accessed.
Page 15

Using your Joybook
Using the touchpad
The touchpad with its buttons is a pointing device that functions as an
optional external mouse, which can perform navigation, scrolling and
selection functions. The components of the touchpad are described as
follows.
No. Component Function
Touchpad Moves the pointer, selects or
(1)
Left touchpad button Equivalent to the left button of an
(2)
Right touchpad button Equivalent to the right button of an
(3)
activates items on the screen.
optional external mouse.
optional external mouse.
To set the touchpad preferences in Microsoft Windows XP, select Start,
Control Panel, Printers and Other Hardware, and Mouse.
Function Left touchpad
button
Select Click once. Tap once.
Execute Click twice
quickly.
Drag Click once and
hold the item,
and then use
your finger on
the touchpad to
drag.
Bring up
the context
menu
The touchpad is a pressure sensitive device that requires proper care to
avoid damage.
• Do not rest heavy objects on the touchpad or its buttons.
• Do not scratch the touchpad with sharp-pointed objects or your
fingernails.
Right touchpad
button
Click once.
Touchpad
Tap twice
quickly.
Tap twice quickly
and hold the
item, and then
move your finger
on the touchpad
to drag.
• To use the touchpad as an optional external mouse, press the left and
right touchpad buttons, which provide the same click functions as an
external mouse does.
• To move the pointer, place your finger with slight pressure on the
touchpad and move in the direction as desired.
• The touchpad can be activated and deactivated by pressing the <Fn> +
<F6> hotkey combination.
Using your Joybook 11
Page 16

Using the keyboard
Function hotkeys
You can use the function hotkeys to access commonly used functions or make quick settings. To use the hotkeys, press and hold the <Fn> (Function) key
at the lower left corner of the keyboard, and then press the desired hotkey.
<Fn> + <F1> Opens function keys on-line Help. <Fn> + <F7> Activates or deactivates the speakers.
<Fn> + <F2> Puts Joybook into sleep mode. <Fn> + <F8> Decreases volume.
<Fn> + <F3> Switches display between the screen and an
external monitor/projector, or allows simultaneous
display; switches between internal/external display
& TV-output.
<Fn> + <F4> Decreases screen brightness. <Fn> + <F10> Switches among the 3 basic power profiles of QPower.
<Fn> + <F5> Increases screen brightness. <Fn> + <F11> Not available.
<Fn> + <F6> Activates or deactivates the touchpad. <Fn> + <F12> Switches between all 3 combinations of WLAN and
<Fn> + <F9> Increases volume.
For more information about how to use QPower, refer to
“Joybook Application Software User Manual”.
Bluetooth on/off. The status is indicated by the on-screen
display.
WLAN and Bluetooth are optional depending on your
purchased model.
Using Your Joybook12
Page 17

Windows keys and lock keys
+ Tab
+ E
+ M
Windows Key
Functionally equivalent to clicking the Start
button on the Windows desktop.
Makes the next item on the Windows task bar
active.
Opens the My Computer window for browsing
disks and files.
Minimizes all windows. Caps Lock Capitalizes all text entered.
Shift + + M
+ R
Num Lk Activates or deactivates the numeric keypad
Application Key
Cancels minimization of all windows.
Activates the Run dialogue box.
integrated in the keyboard (indicated by the light
gray shade in the illustration above).
Provides the same function as the right touch
pad button, bringing up a contextual pop-up
menu.
Using Your Joybook 13
Page 18

Using the built-in wireless LAN function (optional)
With the built-in wireless network function on your Joybook, you can
access Ethernet network wirelessly without the constraints of network
cables.
At home or in the office, you need an access point, which serves as an air
station to make transmission possible. Outdoors in places such as in
coffee shops or library, you can inquire the service personnel about an
account.
WLAN is optional depending on your purchased model.
Connecting to a wireless network:
1. Make sure that you are located within the wireless network service area
and you have already obtained the user name and password for
accessing such network from the service provider.
2. Press the <Fn> + <F12> hotkey combination several times until
WLAN is “ON”.
3. If the wireless LAN icon on the System Tray located at the lower
right corner of the desktop shows in green, you are now connected to
the network.
4. For details about the current status of the wireless radio, right-click on
the icon, and then select Open Atheros Client Utility. The
information is available under the Current Status tab.
To access Internet, you may have to undergo another authorization
process and enter username and password. For details, please consult
your ISP.
Connecting to another wireless network:
1. If you want to connect to another wireless network, you need to scan
available networks first.
2. Right-click on the icon, and then select Open Atheros Client
Utility.
3. Click the Profile Management tab, and then click Scan.
4. A list of available infrastructure and ad-hoc networks may be
displayed. Select a network name and click Activate to connect an
available network.
Using your Joybook14
Page 19

5. If no configuration profile exists for that network, the Profile
Management window opens to the General tab. Fill in the profile name
and click OK to create a profile for that network.
• If you want to configure security authentication and encryption method
for your network, click the Security tab in the Profile Management
window.
• For details, refer to the on-line help by right-clicking on the icon and
then select Help.
If you are not going to use the WLAN card in your Joybook, you could
instead use dial-up connection using the modem port, ADSL and
broadband transmission using the LAN port. Please contact your local
ISP to get more information.
When travelling by air, please be sure to turn off wireless networking to
avoid any possible risks to flight safety.
Using your Joybook 15
Page 20

Using Bluetooth (optional)
The Bluetooth function allows you to get connected to various devices
and services that support Bluetooth transmission. You can get rid of
those annoying cables when printing documents, synchronizing your
PIM data with your PDA or another PC, mobile phone or even sharing a
network connection.
When you use the Bluetooth function on your Joybook for the first time,
be sure to click Start, All Programs, Bluetooth, Bluetooth Settings, so
that the Bluetooth icon can appear on the Windows system tray located
at the lower-right-hand corner of the desktop correctly.
• Bluetooth is optional depending on your purchased model.
• When Bluetooth is turned on, the Bluetooth icon appears in white on
the Windows system tray.
• When Bluetooth is turned off, the Bluetooth icon appears in red on
the Windows system tray.
Adding a Bluetooth device
1. Press the <Fn> + <F12> hotkey combination several times until
Bluetooth is “ON”.
2. Turn on the power of your Bluetooth device and activate its Bluetooth
function.
• For details about how to activate the device's Bluetooth function, please
refer to its documentations.
• The maximum effective range of connection between your Joybook and
the Bluetooth device is 10 meters.
3. Right-click on the Bluetooth icon on the Windows system tray
located at the lower-right-hand corner of the desktop, and then click
Bluetooth Settings to bring up the Bluetooth wizard.
4. The Add New Connection Wizard screen will appear. Make sure your
Bluetooth device is turned on and in Discoverable mode. Then, click
to select Express Mode and click Next.
5. The system will begin searching for available Bluetooth devices nearby.
After it finishes searching, you will see a list of found devices.
Highlight a device and click Next.
Using Your Joybook16
Page 21

6. Please wait while the connection is in progress. If an authentication is
required, a dialogue appears where you need to enter your passkey
(PIN code) for the Bluetooth device.
• The Bluetooth PIN code is a set of code for pairing and identifying
Bluetooth devices. The code entered on your device and another device
with Bluetooth connectivity must be identical.
• If you are using a device that has a fixed Bluetooth PIN code, refer to the
documentation that comes with the device for details.
7. Click Next to continue.
8. Enter the connection name, telephone number, user name and
password, and then click Finish.
The example shown above is specifically for connecting to a mobile
phone. To connect to other Bluetooth devices, refer to the on-line Help
for details.
Using Your Joybook 17
Page 22

Sending files to a Bluetooth device
1. After your Joybook is connected to a Bluetooth device, click the
Bluetooth icon on the system tray to bring up the pop-up box and
select Wireless File Transfer.
2. Click Add to select the files on your Joybook to be sent to the
Bluetooth device.
3. In the Tra nsf e r-e n abl ed d ev ice : area, place a check next to the desired
Bluetooth device and then click Send.
4. Wait for file transfer to complete.
5. You have completed sending files to a Bluetooth device. Click OK.
Using Your Joybook18
Page 23

Using BIOS setup
BIOS (Basic Input/Output System) is a layer of software, called firmware,
that translates instructions from other layers of software into instructions
that Joybook hardware can understand. The BIOS settings are needed by
Joybook to identify the types of installed devices and establish special
features.
BIOS settings are specific to your Joybook hardware. Do NOT change
existing BIOS settings unless you are sure they need to be changed, and
are aware of the consequences. Any incorrect BIOS settings may
degrade the performance, operation and functionality of your Joybook.
For latest BIOS updates, visit http://Support.BenQ.com.
When and how to use BIOS setup
You need to use BIOS setup when:
• You see an error message on the screen requesting you to run BIOS
setup.
• You want to restore the factory default settings.
• You want to modify some specific settings according to the hardware.
• You want to modify some specific settings to optimize system
performance.
• The BIOS setup screen shown in this chapter is for your reference only.
The actual items or settings on your Joybook may differ.
• The BIOS setup program may have been updated after the publication
of this manual.
• The settings you select in your operating system might override similar
settings in BIOS setup.
To run BIOS setup, press the <F2> key immediately when the BenQ logo
appears on the screen during system startup. The logo shows up on the
screen for only a few seconds, so you must press the <F2> key at the time.
The BIOS setup main screen will appear as follows.
The BIOS setup screen can be divided into four areas:
• On the top line is the menu bar containing the titles of available menus.
Each menu title contains a specific menu.
• The center left column of the menu contains information regarding the
current settings of the system. If you open a pull-down menu and select
an item that provides multiple options, the left column will display a
submenu where you can make further selections.
• The right column of the menu contains Help information about the
current menu selected. When a menu item is highlighted, more detailed
information is given.
• The bottom lines of the menu provide keyboard instructions for
moving around and making selections.
Using BIOS setup 19
Page 24

Navigating the BIOS setup screen
Keyboard information can be found at the bottom of the screen. A brief
description of keyboard usage is listed below:
Key Function
Left and right arrow
keys (, )
Up and down arrow
keys (, )
Enter Brings up the sub-menu when an item
Tab Jumps from one item to another.
Esc Exits BIOS setup.
Main menu
The Main menu contains the basic configuration settings of the system,
including information about “System BIOS Version”, “KBC Version”,
“ S y s te m T i m e”, “S ys t e m Da t e ”, “ Pr i m a r y M a st er ”, “S e c o n d ar y Ma s t e r ”,
“CPU Type”, “Physical Memory”, and “HDD Capacity”.
• System Time: allows you to set the time of the system. Type in the value
and then press Enter or Ta b to change the next value.
• System Date: allows you to set the date of the system. Type in the value
and then press Enter or Ta b to change the next value.
• Advanced Configuration: contains the I/O (Input/Output)
configuration settings of the system for advanced users. There are 3
items included as follows.
a. Frame Buffer Size: the total amount of system memory locked
by the BIOS for video. A larger frame buffer size should result in
higher video performance.
b. Legacy USB Support: This item allows the support of legacy
USB devices during system boot and under DOS.
Selects a menu title.
Selects an item or option.
with the arrow sign is selected.
Opens or closes the option window when
an item is selected.
Returns to the previous menu if in a submenu.
Closes the options window if one is open.
c. Forced Display Toggle: This item determines if toggling to an
external display device will be allowed even when no device is
connected to your Joybook.
• “Forced Display Toggle” is for non-standard devices only.
• Once this item is enabled, when you press <Fn> + <F3>, the screen
goes black even if no external device is connected.
If you are not familiar with the items in Advanced Configuration menu,
you are advised to keep the default.
Security menu
The Security menu contains the security settings, which safeguard your
system against unauthorized use.
Do NOT set the BIOS security password without having memorised it or
written it down and stored it with your Joybook warranty documentation.
Should you happen to forget or mislay the password once set, you will be
greatly inconvenienced in gaining subsequent access to your Joybook.
• Set Supervisor Password: This set of password controls access to the
whole BIOS setup menu. It must be set before User Password can be set.
When typing the password, first make sure that Num Lock is off, and
then type your password in the entry fields and press Enter. Confirm
your password by typing it again and pressing Enter.
• Set User Password: This set of password controls access to part of the
BIOS setup menu.
• Password on boot: This item determines if a password will be prompted
during system boot. When this item is enabled, the password is always
required to boot the computer.
If Supervisor Password and User Password are both set, you can enter
either one of them during the password prompt. To have full privileges in
BIOS setup, enter Supervisor Password.
Boot menu
The Boot menu contains the boot configuration settings of the system. A
list of devices will be displayed under Boot priority order.
• Use <> or <> to select a device, and then press <F6> to move it up or
<F5> to move it down.
• To select a boot device manually, press the <F9> key when the BenQ
logo appears on the screen during system startup. The Boot Menu will
appear. Use the up and down arrow keys (, ) to select a boot device,
and then press <Enter> to confirm.
Using BIOS setup20
Page 25

Exit menu
The Exit menu displays ways of exiting BIOS setup. After finishing with
your settings, you must save and exit so that the new settings can take
effect.
• Exit Saving Changes: saves the changes you have made and exits BIOS
setup. After finished with your settings, you must save and exit so that
the new settings can take effect.
• Exit Discarding Changes: exits BIOS setup without saving the changes
you have made.
• Load Setup Defaults: loads factory default values for all the items.
• Discard Changes: cancels all changes since last save, without exiting the
BIOS setup utility.
• Save Changes: Save changes without exiting the BIOS setup utility.
It is recommended that you go into BIOS to load setup defaults,
whenever you have installed new hardware components.
Boot from LAN
During system startup, pressing <F12> will activate the Boot from LAN
feature, enabling your Joybook to boot from an OS image via the
network.
Using BIOS setup 21
Page 26

Connecting to external display devices
P41
Connecting to a VGA display device
You can output Joybook’s video signal to an external display device, such as a projector or monitor. Press the <Fn> + <F3> hotkey combination to switch
between Joybook’s own screen and the external display device, or use simultaneous display.
Monitor
Projector
VGA port
Connecting to external display devices22
Page 27

Installing additional memory
You can replace the existing memory module with a higher-capacity one.
Before you upgrade or replace memory, please check on the BenQ web
site to determine the module which can be used, or contact BenQ
distributor or customer service center. It is recommended that you take
your Joybook to the BenQ distributor or customer service center for the
upgrade or memory replacement.
For details about the limit of maximum memory, refer to the product
information from http://BenQ.com.
Please follow the steps below to consult the FAQ information and find
out the types of BenQ certified memory modules for your Joybook:
1. Connect to BenQ On-line Service and Support
(http://Support.BenQ.com).
2. Click FAQ.
3. Click Joybook.
1. Shut down your Joybook completely. Disconnect the AC adapter and
turn over your Joybook.
Memory Cover
2. Slide the battery retainer A to the unlock
3. Slide the battery retainer B to the unlock
still holding the retainer, pull the battery away from its compartment
(2).
position.
Battery retainer A
position (1) and, while
Battery
Battery retainer B
Installing additional memory 23
Page 28

4. The memory cover is secured with 7 screws. Use a screwdriver to
remove these screws.
The screw labels indicate the screws’ position to help you locate them
easily. Only remove these 7 screws on the Memory Cover, and retain
them in a safe place for later use.
5. Open the Cover.
• Ground yourself to your Joybook with professional grounding
equipment like an anti-static wristband, or touch the metal surface on
the inside of your Joybook to discharge any static electricity.
• Handle the memory module by its edge and avoid touching the
contacts.
6. Align the memory module with the slot, and then insert it. When
inserting, pay attention to the direction of the memory module.
7. Gently push the free edge downwards until the module locks into
place.
If the memory module is not installed properly, your Joybook may not
boot properly and there will be no error messages shown on the screen.
Installing additional memory24
Page 29

8. Replace the Cover.
9. Use a screwdriver to secure it with the screw.
10.Install the battery (1), and then slide the battery retainer A to the to
position (2). Connect the AC adapter. When you start
the lock
Joybook, it will automatically test and configure the new memory.
Battery retainer A
It is recommended that you go into BIOS to load setup defaults after
installing additional memory. For details, refer to "Using BIOS setup" on
page 19.
Installing additional memory 25
Page 30

FAQ and troubleshooting
The following are descriptions of situations that you may encounter
during use of the Joybook, along with basic troubleshooting steps. If you
are not able to resolve the issue, immediately contact a BenQ service
center for assistance.
General
What is Joybook? What are the differences between Joybooks and
traditional notebooks?
BenQ call it Joybook, because BenQ has combined entertainment and
stylish design with traditional notebook's functions. For example,
enhanced 3D processing power for gaming and movie viewing. With
Joybook, you will be able to enjoy the most exciting audio and visual
experience ever!
What is a Wireless LAN (WLAN)?
A WLAN is a type of Local Area Network (LAN) that uses high frequency
radio waves rather than wires to communicate and transmit data among
nodes. It is a flexible data communication system implemented as an
extension to, or as an alternative for, a wired LAN within a building or
campus.
Battery and power
How long should I charge the battery for the first time?
The length of the charging time may depend. When the amber light of the
battery indicator goes off, it means that the charging is completed.
My computer won't start up with the battery inserted?
• Make sure the battery is properly inserted.
• Make sure that the battery is fully charged. If this does not work, consult
your BenQ dealer.
What should I do with the battery if I will not use my Joybook for a
longtime?
Recharge the battery or discharge it to about 40% full, and then store it in
a dry place at about 15°C to 25°C. Extremely high or low temperature
will shorten the life of battery.
When charging the battery, the power indicator on Joybook suggests that
the battery is fully charged. When I check it from the Power Manager in
Windows, the battery level is only about 95%-99%. Why?
It is the result of the battery protection design of Joybook. When the
power indicator on Joybook is off, it means that the battery has reached a
saturated voltage: 95%-99%. At this moment, the voltage difference
detected by Joybook is very small, so it will reduce the charging current to
prevent overcharging the battery with excess current or voltage, which
will damage the battery. Moreover, in order to protect the battery from
exposing to high voltage and current for a long time during charging, the
battery has been equipped with a protection circuit that will charge the
battery at low current in the final phase.
How come my notebook is not fully charged even after a full night
charge?
Make sure that the Joybook is receiving power. Is the cord plugged in
correctly? When the battery is installed in the computer and it is properly
plugged in to an AC outlet, check to see if the battery level icon is showing
a charge sign. If this does not fix the problem, the battery, the power
source in the notebook, or the AC power cord may be defective. Consult
your BenQ dealer for help and maintenance.
What should I do if the battery gets hot in my Joybook?
Take the battery out and let it cool down. If the problem persists once it is
inserted back into the Joybook, the battery could be defective and it may
need to be replaced.
Joybook will not start up, even though the power button was pressed.
Check the power indicator.
FAQ and troubleshooting26
Page 31

• If it is not lit up, Joybook is not being supplied by power, either from an
external power source via the AC adapter or from the battery. Make sure
that the AC adapter is correctly inserted into the power jack of Joybook
and a working electrical socket, and allow the battery to begin charging.
• If the power indicator is lit up in blue, the Joybook is being supplied
normally with power, meaning that the problem lies elsewhere.
• If you have added any hardware (memory for example), check if
it has been installed correctly.
• It is possible that certain operating system files are damaged or
missing. If so, you may need to first back up all your data, and
then use the Drivers and Applications disc that came with the
Joybook to return the its software to original state. Please note
however that doing so will cause all of your personal data on the
hard disk drive to be lost!
Connection
My modem does not connect at 56K speed?
Several factors can affect connection speed, such as line noise, number of
people connecting/connected to your ISP, and the age and condition of
the telephone lines. A 56K modem does not guarantee all connections at
56K; rather it offers the ability to connect at up to 56K speed.
Can't connect to the Internet with the built-in network interface on
Joybook?
Check if the network has a fixed IP address. Contact your network
administrator for further solutions.
When connecting to a local network with Joybook, the connection is
unstable.
The instructions below will guide you through the troubleshooting
process.
1. Right-click My Computer and select Properties, Hardware, Device
Manager.
2. Double click Network adapters. When the name of the network
adapter of Joybook appears, double-click on it.
3. The Properties window will pop up. Click the Advanced tab, and then
click the Link speed & duplex item on the left.
4. Select the appropriate mode according to the settings of your LAN
service from the Va l u e drop-down menu on the right, and then click
OK.
• If the situation persists, use the <Fn> + <F12> function key
combination to shut down wireless network function, to reduce
interference of different network connection modes.
I have problem setting up wireless network.
Please follow the instructions below to resolve the problem:
• Have you enabled the wireless LAN function of the Joybook? Remember
to use the <Fn> + <F12> function key combination to enable it.
• Click the Start button and select Control Panel, Network and internet
Connections, Network Connections and then double-click Wireless
Network Connections. Make sure the connection status is connected
and with appropriate signal strength. If you do not see the connection
status, make sure your wireless device is set up correctly so your
Joybook can pick up the signal.
• Make sure that your wireless router or access point is broadcasting the
SSID. Refer to your wireless device's documentation for enabling this
broadcasting feature.
• If you are doing it correctly, right click on the wireless connection icon
on the System Tray located at the lower right corner of the desktop
and select Show Connection Status and you should see the SSID that
your wireless hub or device is broadcasting. If not, call your wireless
device (router or access point) manufacturer to get support on how to
enable this broadcasting feature.
System
How should I resolve the “Low on Disk Space” or “Out of Disk Space”
error messages.
Windows uses disk space for operations such as caching and virtual
memory. The Joybook may not run reliably if the hard drive's free disk
space drops under 100MB or 200 MB (for Windows XP). The following
instructions will help you free up the disk space.
1. Click Start and then My Computer.
2. Right click the hard drive icon and then select Properties.
3. Observe how much free space is on the hard drive.
FAQ and troubleshooting 27
Page 32

4. To free up hard drive space, click Disk Cleanup and follow the
instructions that follow to proceed.
How do I update the driver?
Please visit BenQ on-line product support (http://Support.BenQ.com) to
search for updated sound driver software.
My system is running very slow. How can I improve performance?
System resources are the amount of memory and hard drive space that
your Joybook can use and can degrade over time slowing the computer.
However, you still can improve the system performance by using the
methods below:
• Close all open programs not being used. Use software program that are
absolutely necessary. Try running virus scans and other tools when away
from the desk. Closing software program that are not necessary helps
window perform more efficiently.
• Prevent background software programs from loading. As software
programs load the small icons on the System Tray, they will be running
in the background and each one consumes valuable system resources.
You can follow the steps below to prevent application programs from
running when Windows launches:
1. Click the Start button and then select Run....
2. Type “msconfig” in the Open field. This will open the system
configuration utility.
3. Click the Startup tab and then uncheck any task that is unwanted.
4. Click OK and restart the Joybook.
• Remove programs from the Startup folder. Removing programs from
the Startup folder also helps to prevent programs from running when
Windows starts up. To do so, follow the steps below:
1. Right click anywhere in the open area on the desktop and select New,
Folder. Give the folder a name. This folder will be used later.
2. Right click the Start button and then select Open. A folder named
Programs will appear in the Start Menu window.
3. Double click the Programs folder and then the Startup folder.
4. Right click any icon in the folder and then select Properties. The
information about the icon will appear. this will help you to judge if
the program is necessary to be left in the Startup folder.
5. Select unwanted program icons, right click on them and select Cut.
6. Close the open windows to return to the windows desktop.
7. Open the folder created in step 1.
8. Select the Edit and Paste commands in the folder window. The icons
that were cut from the Startup folder are now placed in the folder.
9. Restart the Joybook. The programs removed from the Startup folder
will no longer run when Windows starts. However, you can still run
them by double clicking their icons in the folder created in step 1.
• Empty the Recycle Bin. You can free up disk space by clearing files you
no longer need from the Recycle Bin. To do so, right-click the Recycle
Bin icon on the desktop and select Empty Recycle Bin.
• Delete temporary files and directories. This will increase hard disk space
and reduce the time Window takes to access the hard drive. It will also
help to solve problems associated with spooling print job.
1. Close all running programs.
2. Click the Start button and select All Programs, Accessories, System
To o l s , and then Disk Cleanup.
3. Check the types of files you want to delete (temporary files are safe to
delete).
4. Click OK.
• Use the Scan Disk and Defragment functions. The Scan Disk function
checks a hard drive for errors, while the Disk Defragment function takes
all the scattered bits of program data and groups them back together in
the front of the drive.
1. Click the Start button and then select My Computer.
2. Right-click the hard drive's icon and select Properties.
3. Click the Tools tab and then the Check Now button.
4. Check all check boxes in the dialog that follows.
5. Click Start, Ye s .
6. Restart the computer. It may take a long time to complete.
To run Disk Defragmentation in Windows XP:
1. Close all running software programs.
2. Right-click the hard drive's icon and select Properties.
3. Click the Tools tab and then the Defragment Now button.
4. Click to select a drive and then click the Defragment button. It may
take a long time to complete.
If Disk Defragmenter start itself over and over, it means that some hidden
background software program is still accessing the hard drive. Restart the
computer and try again.
FAQ and troubleshooting28
Page 33

USB devices quit working unexpectedly in Microsoft Windows XP.
This is because USB devices such as camera, scanners. or printer loses its
connection and stops working unexpectedly. Please follow the steps
below to resolve the problem.
1. Click Start, and right click My Computer.
2. Click Properties and then Hardware.
3. Click Device Manager.
4. Double-click the Universal Serial Bus Controllers branch to expand it.
5. Right-click USB Root Hub, and then click Properties.
6. Click Power Management.
7. Deselect Allow the computer to turn off this device to save power.
8. Repeat steps 5 through 7 for each USB Root hub.
9. Click OK, and then close Device Manager.
Why does the keyboard and/or palm rest get warm?
Typically, the Joybook tends to be slightly warm. The location of the
battery is typically underneath the palm rest and as a result, the palm rest
gets warm. The location of the processor is typically underneath the
keyboard and since heat rises, the keyboard may slightly get warm. There
is no need to be concerned. However, since your computer has a
thermally controlled fan, when the CPU and/or internal temperature of
the notebook reaches a certain temperature level, the fan is turned ON
and stays ON until the temperature drops to a pre-defined level.
The U, I, O, P, J, K, L keys on my Joybook are coming up as numbers
instead of letters?
The number keys are enabled. Press the Num Lk (Number Lock) key
once to disable the number lock function, and the letters will return to
normal.
There is no sound coming from the speakers.
Check the following:
• The speakers may have been muted. Look at the volume control
(speaker icon) on the Windows Taskbar to see if mute has been set. If so,
turn off the mute.
• The speakers may have been turned off. Use the <Fn> + <F7> hotkey
combination to turn them on.
• The volume may have been set too low. Use the Volume Up/Down
Button to increase the volume.
• An earphone or external speakers may be connected to the audio-out
jack, automatically turning off the computer's internal speakers.
CD or DVD does not function.
Please verify the following:
• Joybook is turned on, and the CD or DVD discs are properly inserted in
the center of the disc tray in the optical drive.
• The disc tray is closed.
• The CD or DVD is not bent or badly scratched.
• Noise from the optical drive when the disk plays shows that the optical
drive may be deformed, and the computer needs to be repaired. If the
disk tray does not open after the Eject button is pressed, insert a pin into
the Emergency Eject hole to force the tray out.
DVD movies will not play.
The region code of the DVD inserted must match that of the DVD
playback software used. This region code can be set up to five times. If
you have not reached this limit, a prompt will appear that will allow you
to change the region code of the software to match that of the move.
Otherwise, you can only play back DVDs with the same region code as
the last DVD played back successfully.
Why is the hard drive capacity displayed by the OS be different from its
nominated capacity?
Most users may have discovered that the capacity of a 10GB hard drive
will become 9GB when displayed from the OS; and 20GB become 19GB,
40GB become 38GB..., etc. The bigger the capacity, the bigger the
difference. It is because hard drive makers and OS developers calculate
hard drive capacity in different ways. As a result, the nominated capacity
is different from the exact capacity displayed by the OS.
Calculation of hard drive
capacity by drive makers
1GB=1,000MB
1MB=1,000KB
1KB=1,000 byte
Calculation of hard drive
capacity by OS developers
1GB=1,024MB
1MB=1,024KB
1KB=1,024 byte
FAQ and troubleshooting 29
Page 34

Example of a 40GB hard drive:
Calculation by drive makers Calculation by OS developers
40GB=40,000MB
=40,000,000KB
=40,000,000,000byte
40GB=40,960MB
=41,943,040KB
=42,949,672,960byte
Exact capacity of a 40GB hard drive displayed in the OS:
40,000,000,000÷1024÷1024÷1024=37.2529 (GB).
Furthermore, when you partition a hard drive, the system will reserve
some space on the drive for system files. Therefore, the total capacity of a
hard drive displayed by the OS will never be the same as its nominated
capacity.
I hear noise when connecting an earphone to Joybook.
The instructions below will guide you through the troubleshooting
process.
• Connect the earphone to other devices, such as a radio to see if you can
still hear that noise. If the noise persists, the earphone may be out of
order.
• If you can hear the noise only when inserting, it is the result of high
instantaneous current. It is a normal phenomenon.
How can I reduce the wearing of the screen hinge when I open the screen?
We suggest that you open and close your screen gently and slowly with
both hands. Apply force evenly on both hands to reduce hinge wearing
and prevent deformation or breaking of hinge due to uneven force
application.
Display
There is nothing visible on the screen.
Check the power indicator.
• If it is not lit up, no power is being supplied to Joybook. Connect the AC
adapter and restart Joybook.
• If it is lit up in amber, Joybook has entered sleep mode in order to
conserve power. Simply pressing the power button or any key should
return Joybook to normal operating mode.
• If it is lit up in blue, Joybook is being supplied normally with power.
There are two possible causes for the problem.
• The screen's brightness may be set too low. Use the <Fn> +
<F5> hotkey combination to increase the brightness.
• The display mode may be set to use an external display. Use the
<Fn> + <F3> hotkey combination to switch the display mode to
use Joybook’s own LCD panel or to use simultaneous display.
When I connect the Joybook to an external monitor, the display is
abnormal.
The instructions below will guide you through the troubleshooting
process.
• Use the <Fn> + <F3> function key combination to set external video
signal enabled.
• Refer to the user manual of the external monitor to check the settings.
• Connect the cable to the Joybook and reboot the system. If there is no
display on the external monitor after system reboot, connect Joybook to
a standard VGA monitor and wait until you can see things properly on
that VGA monitor. Then connect the target display to Joybook again.
When I connect the Joybook to an external monitor, there is no display
on the Joybook when playing VCD/DVD movies or video clips.
Joybook R41 Series does not support dual display and simultaneous
display on Joybook and an external monitor, when playing VCD/DVD
movies or video clips.
FAQ and troubleshooting30
Page 35

How can I judge if my LCD panel is out of order and what should I do if
it happens?
If your Joybook cannot display images at the default resolution, please
visit the BenQ website to download and update the latest Joybook display
drivers.
Contact your BenQ dealer if either of the following phenomena occurs:
• The screen shakes when the system started up normally.
• Fonts displayed on the screen are unclear and strange codes appear.
• There is no display when the hard drive is running normally.
• Colors on the screen are strange and turn into white.
• Vertical or horizontal lines appear on the screen.
• When playing back a media file using Windows Media Player, the frame
speed is abnormal.
• The sound changes while the screen remains the same when playing
games.
FAQ and troubleshooting 31
Page 36

Information on cleaning and battery maintenance
Battery maintenance
1. Fully charge/discharge battery up to 4 cycles before achieving full
capacity of a new battery.
2. Fully discharge and then fully charge the battery every two to three
weeks for battery conditions.
3. Remove from the device and stored in a cool, dry, clean place if the
battery will not be in use for a month or longer and recharge the
battery after a storage period.
4. Do not short-circuit. A short-circuit may cause severe damage to the
battery.
5. Do not drop, hit or otherwise abuse the battery as this may result in
the exposure of the cell contents, which are corrosive.
6. Do not expose the battery to moisture or rain.
7. Keep battery away from fire or other sources of extreme heat. Do not
incinerate. Exposure of battery to extreme heat may result in an
explosion.
8. Do not use AC adapters other than the one provided with the Joybook.
9. Do not place the battery within reach of children.
10.Follow the local laws governing the disposal of batteries. As far as
possible, submit used batteries to be recycled.
11.Use of improper batteries, or attempting to disassemble a battery, may
result in explosions. Follow vendor recommendations in using
batteries of the identical or equivalent type as replacements for wornout batteries.
Cleaning your Joybook
When cleaning Joybook, follow these steps:
1. Turn off Joybook, disconnect the AC adapter, and remove the battery.
2. Use a damp cloth to wipe the outer surface of the computer. Do not
apply liquid or spray cleaners directly on the Joybook.
3. Do not use cleaners containing alcohol or acetone. Instead, use
cleaning fluids specially formulated for LCD screens.
Information on cleaning and battery maintenance32
Page 37

Service and support
BenQ Joybook Global On-line Service
Welcome to BenQ Joybook Global On-line Service
(http://Support.BenQ.com). In order to ensure you an enjoyable
experience with your Joybook, the following supports are provided so
you can get assisted whenever and wherever you are.
• Warranty: Global warranty information of your Joybook product. For
local warranty information, please refer to the local warranty
documentation in the package.
• Download Center: Drivers, documentations and additional software for
keeping your Joybook up-to-date.
• FAQ: Contains answers to frequently asked questions about Joybook as
well as additional tips.
• Contact Center: Here you can directly contact BenQ Customer Service
for answers and advice to your questions. You can also obtain the
information about the BenQ service stations in your country.
Joybook on-line registration
Register now to get free product news and latest information about
BenQ! To register, follow the steps below:
1. Refer to the illustration below to locate the 24-digit product serial
number on the bottom side of your Joybook and write it down.
Serial number
2. Connect to http://service.benq.com/orw/joybook
3. Click Register Now to begin with registration and follow the
instructions on the screen to proceed.
Service and support 33
Page 38

Appendix
General safety information
When setting up or operating Joybook, please pay special attention to the
following:
1. Keep this manual in a safe place for easy reference when needed.
2. Make sure to follow all instructions and warnings related to the
system.
3. Place Joybook on stable, level surface, and ensure that the ventilation
holes are not obstructed.
4. Do not expose Joybook to rain or excess humidity, and keep it away
from liquids (such as beverages, faucets, and so on).
5. Do not expose Joybook to direct sunlight, and keep it away from
sources of heat (such as radiators, space heaters, stoves, and so on).
6. Do not expose Joybook to heavy impacts or strong vibrations. When
closing the computer, do not use excessive force.
7. Do not place Joybook in environments where the temperature is below
0°C or above 50°C.
8. Do not use Joybook in environments where the temperature is below
5°C or above 35°C. Otherwise the system performance will be
adversely affected.
9. Do not place the computer in the area of strong magnetic fields.
10.Use an appropriate electrical outlet, and make sure that no heavy
objects are placed on the AC adapter or power cord.
11.The AC adapter is a high-voltage component. Do not attempt to repair
it on your own. If it becomes damaged, please contact an authorized
BenQ distributor or service center.
12.Make sure that the modem port is used only with a regular analog
phone line. Do not connect a digital phone line to the modem port, as
this will cause damage to the modem.
Safety information about the battery
Caution texts concerning lithium batteries
Caution: Danger of explosion if battery is incorrectly replaced. Replace
only with the same or equivalent type recommended by the equipment
manufacturer. Discard used batteries according to manufacturer's
instructions.
Safety information about the AC adapter
• Use only the AC adapter supplied with your computer. Use of another
type of AC adapter will result in malfunction and/or danger.
• Do not use the adapter in a high moisture environment. Never touch
the adapter when your hands or feet are wet.
• Allow adequate ventilation around the adapter when using it to operate
the device or charge the battery. Do not cover the AC adapter with
paper or other objects that will reduce cooling. Do not use the AC
adapter while it is inside a carrying case.
• Connect the adapter to a proper power source. The voltage
requirements are found on the product case and/or packaging.
• Do not use the adapter if the cord becomes damaged.
• Do not attempt to service the unit. There are no service parts inside.
Replace the unit if it is damaged or exposed to excess moisture.
Safety information about the modem
Caution
• Never install telephone wiring during a lightning storm.
• Never install telephone jacks in wet locations unless the jack is
specifically designed for wet locations.
• Never touch non-insulated telephone wires or terminals unless the
telephone line has been disconnected at the network interface.
Appendix34
Page 39

• Use caution when installing or modifying telephone lines.
• Avoid using the telephone function (other than a cordless type) during
an electrical storm. There may be a remote risk of electric shock from
lightning.
• Do not use the telephone function to report a gas leak in the vicinity of
the leak.
• Do not use this product near water, for example near a bathtub, wash
bowl, kitchen sink or laundry tub, in a wet basement or near a
swimming pool.
Disposal of Waste Electrical and
Electronic Equipment by users in
private households in the European
Union.
This symbol on the product or on the packaging indicates
that this can not be disposed of as household waste. You must
dispose of your waste equipment by handing it over to the
applicable take-back scheme for the recycling of electrical and
electronic equipment. For more information about recycling
of this equipment, please contact your city office, the shop
where you purchased the equipment or your household waste
disposal service. The recycling of materials will help to
conserve natural resources and ensure that it is recycled in a
manner that protects human health and environment.
Declaration of Conformity
For the following equipment:
Type o f Equi p m e nt:
Notebook PC
Company name, address, telephone & fax no.
Name: BenQ Europe B.V.
Ekkersrijt 4130, 5692 DC Son Address:
The Netherlands
TEL/Fax: +31 (499) 750 500 /+31 (499) 750-599
is herewith confirmed to comply with the requirements set out in the
Council Directive on the Approximation of the Laws of the Member
States relating Electromagnetic Compatibility (89/336/EEC) and Low
Voltage Directive (73/23/EEC) and R&TTE Directive (99/05/EEC).
For the evaluation regarding the electromagnetic compatibility, the
following standards were applied:
EN55022:1994+A1:1995+A2:1997
EN55024: 1998: EN61000-4 series
EN60950-1/IEC60950-1
ETSI EN301-489-1 V1.4.1
ETSI EN301489-17 V1.2.1
ETSI EN300328 V.1.4.1
ETSI EN301893 V1.2.3
ETSI EN301-489-1 V1.4.1
ETSI EN301489-17 V1.2.1
ETSI EN300328 V.1.4.1
ETSI EN301893 V1.2.3
Brand name or mark:
BenQ
Model designation(s)/Model no(s):
DHR400; Joybook R41 Series
Appendix 35
Page 40

Safety instructions for Poland, Romania, Slovenia, Bulgaria, Latvia, and Croatia
Polski
1. Należy upewnić się, że zastosowano się do wszystkich instrukcji i
ostrzeżeń dotyczących systemu.
2. Nie należy umieszczać komputera w miejscach oddziaływania silnych
pól magnetycznych.
3. Ostrzeżenie: Nieprawidłowa wymiana baterii może spowodować jej
wybuch. Baterię można wymienić wyłącznie na baterię tego samego
lub zamiennego typu zalecanego przez producenta urządzenia. Zużyte
baterie należy usuwać zgodnie z instrukcjami producenta.
4. Podłącz zasilacz do prawidłowego źródła zasilania. Wymagania
dotyczące zasilania znajdują się na obudowie produktu i/lub na
opakowaniu.
5. Nie należy używać zasilacza jeśli przewód jest uszkodzony.
6. Nie należy próbować naprawiać urządzenia. Wewnątrz nie ma części,
które można naprawiać. Urządzenie należy wymienić, jeśli zostanie
uszkodzone lub narażone na oddziaływanie nadmiernej wilgoci.
7. Nigdy nie należy instalować kabli telefonicznych podczas burzy z
wyładowaniami atmosferycznymi.
România
1. Asiguraţi-vă că respectaţi toate instrucţiunile şi avertismentele
privitoare la sistem.
2. Nu plasaţi computerul într-o zonă cu puternice câmpuri magnetice.
3. Pericol de explozie dacă bateria este incorect înlocuită. Înlocuiţi
numai cu acelaşi tip sau cu un tip echivalent recomandat de
producătorul echipamentului. Aruncaţi bateriile folosite în
conformitate cu instrucţiunile producătorului.
4. Conectaţi adaptorul la o sursă de tensiune corectă. Cerinţele privind
tensiunea se găsesc pe carcasa produsului şi/sau pe ambalaj.
5. Nu folosiţi adaptorul dacă se defectează cordonul.
6. Nu încercaţi să depanaţi aparatul. În interior nu există componente
depanabile. Înlocuiţi aparatul dacă acesta se deteriorează sau este
expus la umezeală în exces.
7. Nu instalaţi niciodată cablu telefonic în timpul unei furtuni cu fulgere.
Slovensko
1. Glede sistema sledite navodilom in opozorilom.
2. Raèunalnika ne postavljajte na mesta z moènim magnetnim poljem.
3. V primeru nepravilne namestitve akumulatorja obstaja nevarnost
eksplozije. Nadomestite ga le z isto ali ekvivalentno vrsto, priporoèeno
s strani proizvajalca opreme. Rabljen akumulator odstranite skladno z
navodili proizvajalca.
4. Adapter spojite na primeren vir napajanja. Napetostne zahteve so
navedene na ohišju izdelka in/ali njegovi embalaži.
5. V primeru, da je napajalni kabel poškodovan, adapterja ne
uporabljajte.
6. Ne postopajte se popravljanja enote. Znotraj ni nobenih delov, ki bi jih
bilo moè popraviti. Èe je enota poškodovana ali izpostavljena visoki
vlagi, jo nadomestite z novo.
7. Nikoli ne namešèajte telefonske linije med nevihto z grmenjem.
Български
1. Следвайте всички инструкции и предупреждения относно
системата.
2. Не слагайте компютъра на място със силно магнитно поле.
3. Опасност от експлозия при погрешна смяна на батерията.
Използвайте само същия или еквивалентен тип батерия,
препоръчан от производителя на оборудването. Изхвърляйте
старите батерии съгласно инструкциите на производителя.
4. Свържете адаптера към подходящ източник на захранване.
Изискванията към напрежението са посочени на корпус а на
продукта и/или опаковката.
5. Не използвайте адаптера, ако кабелът се повреди.
6. Не се опитвайте да поправяте продукта. В него няма части, които
могат да се поправят. Сменете продукта, ако се повреди или ако
бъде изложен на прекомерна влага.
7. Никога не инсталирайте телефонни кабели по време на
гръмотевична буря.
Appendix36
Page 41

Latviski
1. Sekojiet visām sistēmai atbilstošajām norādēm un brīdinājumiem.
2. Nenovietojiet datoru tuvu spēcīgiem magnētiskajiem laukiem.
3. Nepareizi nomainīts akumulators var uzsprāgt. Mainiet akumulatoru
tikai pret tādu pašu vai līdzvērtīgu ražotāja ieteiktu akumulatoru.
Utilizējiet izlietotos akumulatorus saskaņā ar ražotāja norādēm.
4. Pievienojiet adapteri atbilstošai strāvas padevei. Strāvas padeves
parametrus Jūs varat atrast uz produkta korpusa un/vai iepakojuma.
5. Nelietojiet adapteri, ja ir bojāts tā vads.
6. Nemēģiniet labot iekārtu pašrocīgi. Detaļu bojājumu gadījumā vai
arī, ja tā bijusi pakļauta mitruma ietekmei, griezieties autorizētā
servisa centrā.
7. Nekad nelietojiet un neveiciet telefona līnijas pieslēgumu negaisa
laikā.
Hrvatski
1. Pridržavajte se svih uputa i upozorenja u vezi sa sustavom.
2. Ne postavljajte računalo u područje jakih magnetskih polja.
3. Nepravilna zamjena baterije izazvat će opasnost od eksplozije.
Prilikom zamjene, koristite istu ili ekvivalentnu vrstu baterije koju je
preporučio proizvođač. Rabljene baterije odložite prema uputama
proizvođača.
4. Mrežni prilagodnik priključite na odgovarajući izvor napajanja.
Propisani napon naveden je na kućištu proizvoda i/ili pakiranju.
5. Ne koristite mrežni prilagodnik kojem je oštećen kabel.
6. Ne pokušavajte servisirati uređaj. U uređaju se ne nalaze dijelovi koje
možete popraviti. Uređaj zamijenite u slučaju oštećenja ili izloženosti
prekomjernoj vlazi.
7. Nikada ne instalirajte ožičenje telefona za vrijeme grmljavine
Appendix 37
Page 42

<Memo>
Appendix38
 Loading...