

Page 1

Joybook 3000 User Manual
Before using your Joybook, please read the Quick Start Guide to get
your computer up and running. Read this manual for more detailed
information that can help you use all of your Joybook's capabilities
more effectively and enjoyably.
Table of Contents
Joybook 3000 Features................................................................... 3
Function Hotkeys ........................................................................... 8
Getting Started with Windows XP ............................................ 10
Using the Q-Media Bar ................................................................ 11
Your Digital Entertainment Center --- BenQ Joybook 3000 ... 12
Sending and Receiving E-mail................................................ 13
Getting Online ........................................................................ 14
Listening to Music and Creating Custom Music Collections 15
Watching Video and Making Your Own Movies.................. 16
Viewing Digital Photographs and Creating Slide Shows .... 18
Burning CDs ............................................................................ 20
Attaching External Display Devices ........................................... 22
Installing Additional Memory...................................................... 24
Recommendations and Troubleshooting................................... 26
Basic Specifications ...................................................................... 28
Information on Safety, Cleaning, and Battery Maintenance.... 29
Page 2

Copyright
Copyright © 2003 by BENQ Corporation. All rights reserved. No part of this publication may be reproduced, transmitted, transcribed, stored in a
retrieval system or translated into any language or computer language, in any form or by any means, electronic, mechanical, magnetic, optical,
chemical, manual or otherwise, without the prior written permission of this company.
Disclaimer
BENQ Corporation makes no representations or warranties, either expressed or implied, with respect to the contents hereof and specifically
disclaims any warranties, merchantability or fitness for any particular purpose. Further, BENQ Corporation reserves the right to revise this
publication and to make changes from time to time in the contents hereof without obligation of this company to notify any person of such revision
or changes.
*Windows, Internet Explorer and Outlook Express are trademarks of Microsoft Corporation. Others are copyrights of their respective companies or organizations.
2 Copyright
Page 3
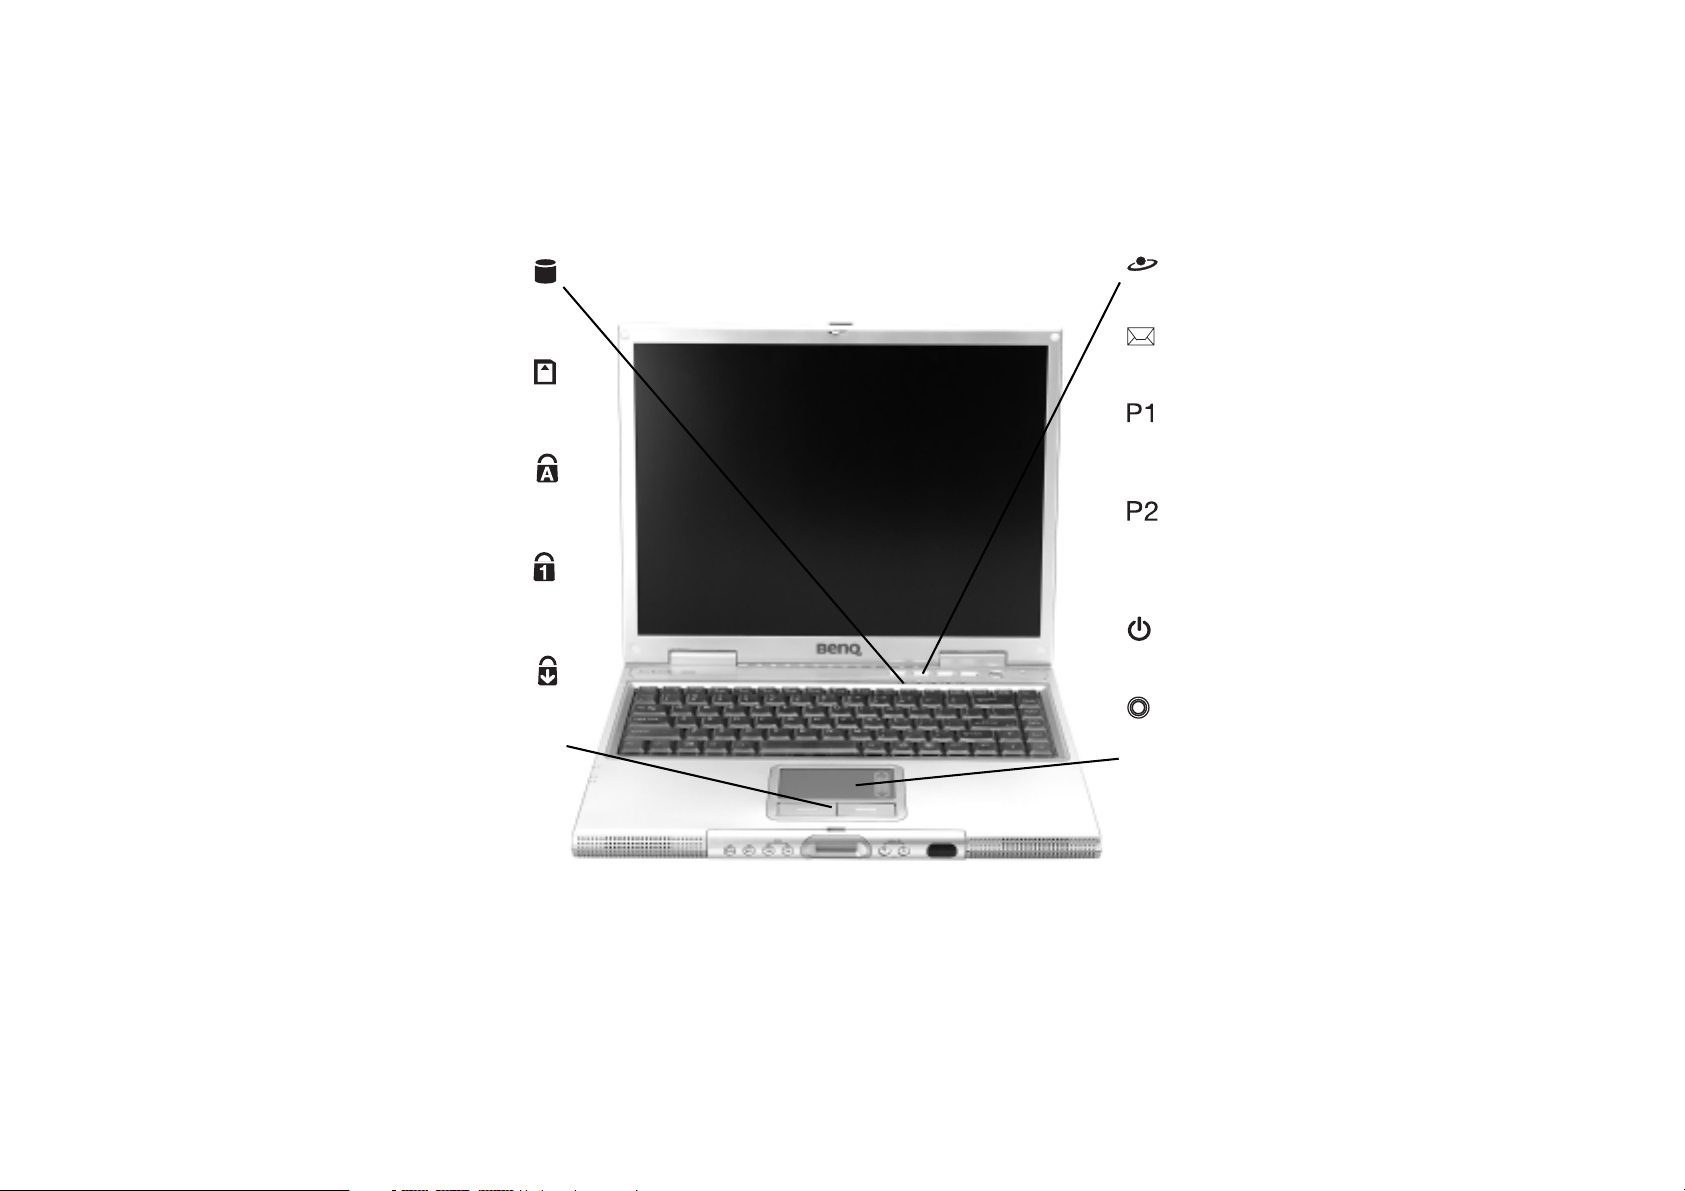
Joybook 3000 Features
Hard Disk Drive Activity Indicator
Lights up in blue when the computer is reading
the data in the hardware.
Four-in-One Card Indicator
Lights up in blue when the computer is reading
the card data.
Caps Lock Indicator
Lights up in blue when the Caps Lock is
engaged.
Num Lock Indicator
Lights up in blue when the Num Lock key is
engaged.
Scroll Lock Indicator
Lights up in blue when Scroll Lock is active.
Left and Right Selection Buttons
Equivalent to the left and right buttons on a
mouse.
Internet Hotkey
Starts up the Internet Explorer Web browser.
E-Mail Hotkey
Starts up the Outlook Express e-mail client.
Customizable Hotkey 1
Can be set by the user to open the same
application as the third icon on the Q-Media bar.
Customizable Hotkey 2
Can be set by the user to open the same
application as the fourth icon on the Q-Media
bar.
Power Button
Turns the computer on or off.
Cover Switch
To u c h P a d
For controlling the on-screen cursor. Can be
activated and deactivated by pressing the Fn +
F6 hotkey combination.
Joybook 3000 Features 3
Page 4
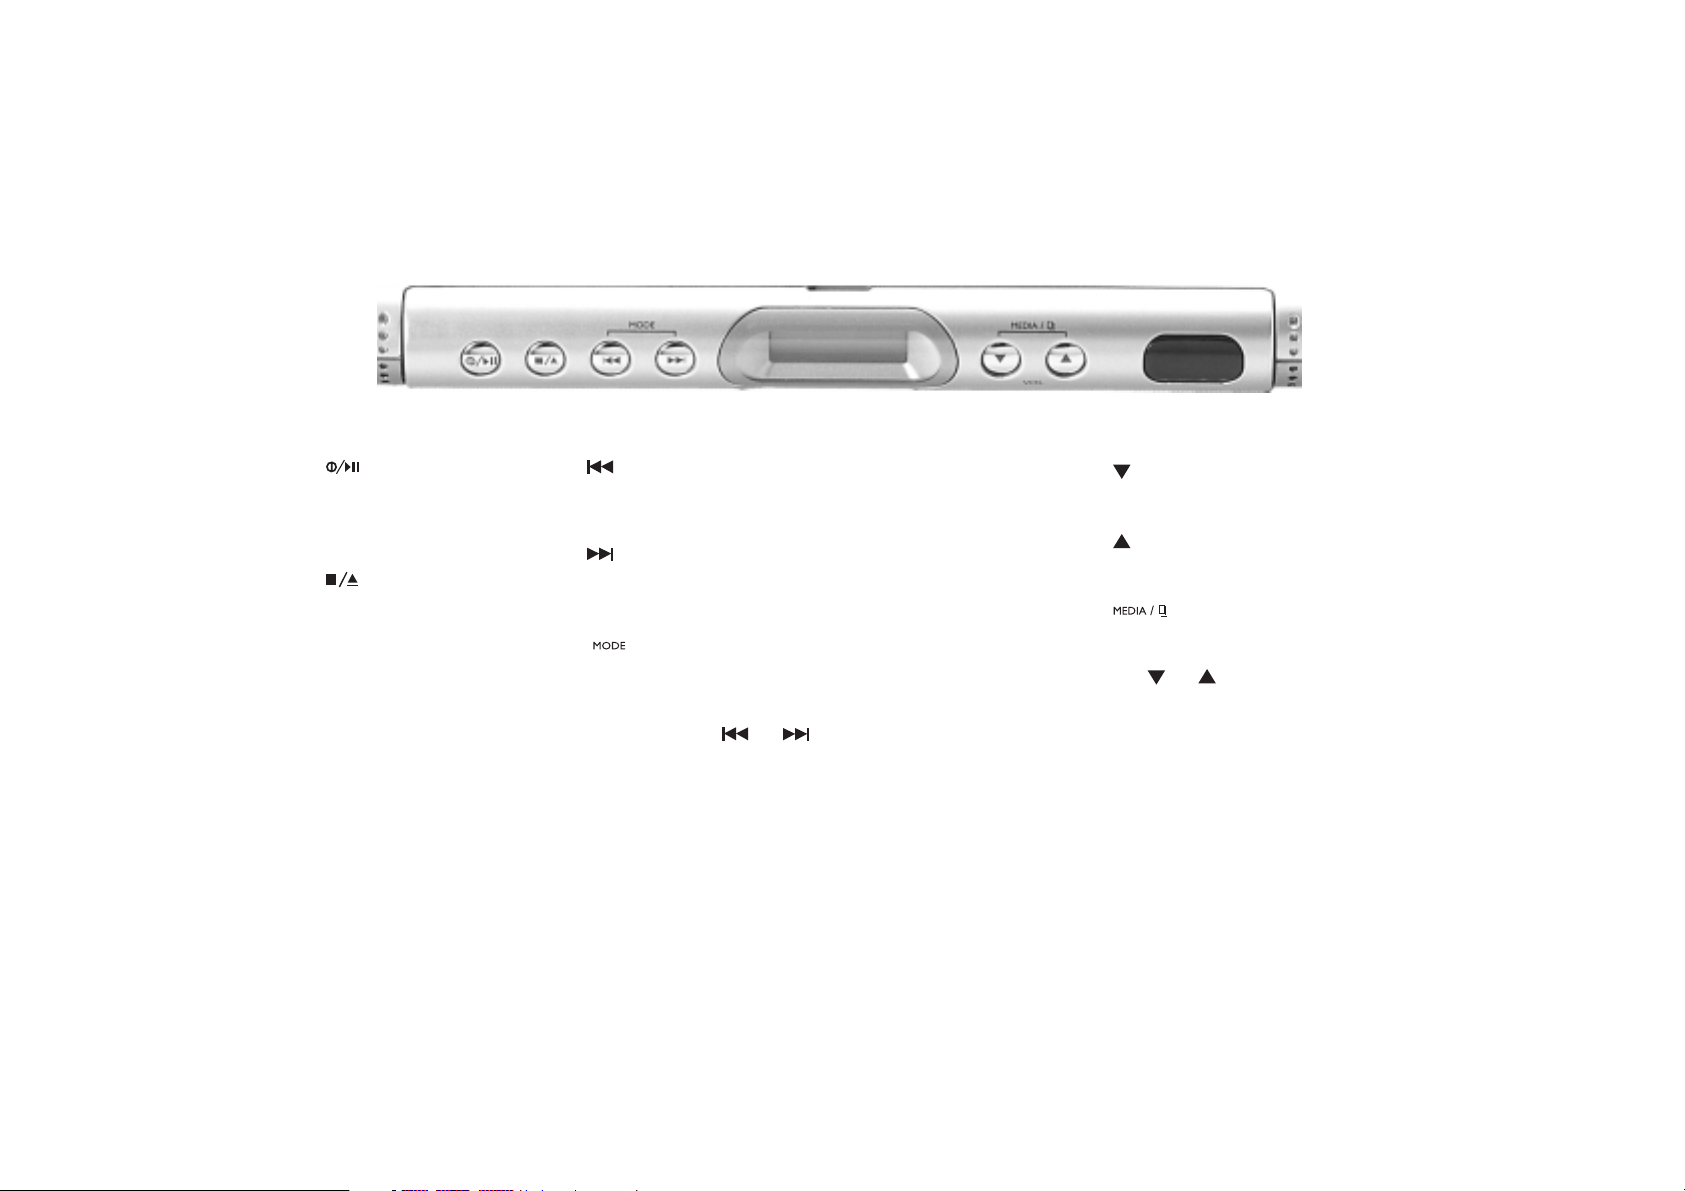
Power Button/Play/Pause
Music Button
Can play music even when the
computer is turned off.
Stop/ Eject
Stops playback from an audio CD. If
pressed again, ejects the CD.
* Power automatically cuts off if the
SuperDJ stops playing for more than
10 minutes.
Rewind
Allows fast backwards searching on
audio CDs.
Forward
Allows fast forwards searching on
audio CDs.
Select Play Mode
When power on, SuperDJ is set to
play once from the beginning to the
end. When the SuperDJ plays, pauses
or stops, press both and to
select playback once, repeated
playback, repeated single piece
playback or random playback.
LCM Display Screen
Limitations on LCM:
1. LCM displays 199 songs at most,
while the 200th song will be
displayed as the first one.
2. A song list can play at most 999
songs. Each list is categorized as
P1, P2,..., P9, and SuperDJ
supports 9 song lists at most.
3. The file folder in the playback
media runs from F0,F1,F2,...,to
F9. F0 is the root menu, and may
be selected only once, while F1
stands for the first file folder.
SuperDJ supports 99 file folders
at most.
Lower Volume
Decreases the volume of CD playback.
Raise Volume
Increases the volume of CD playback.
Select Playback Media
and Song List/File Folder
When SuperDJ is off, you can press
both and to select another
playback media*. If either button is
pressed, switch to another song list or
file folder.
* Playback media includes hard disk,
CD, Flash Card and USB device.
Infrared Port
The interface for infrared
communications allows the transfer of
data to and from PDAs or mobile
phone or computer with infrared
capabilities.
4 Joybook 3000 Features
Page 5
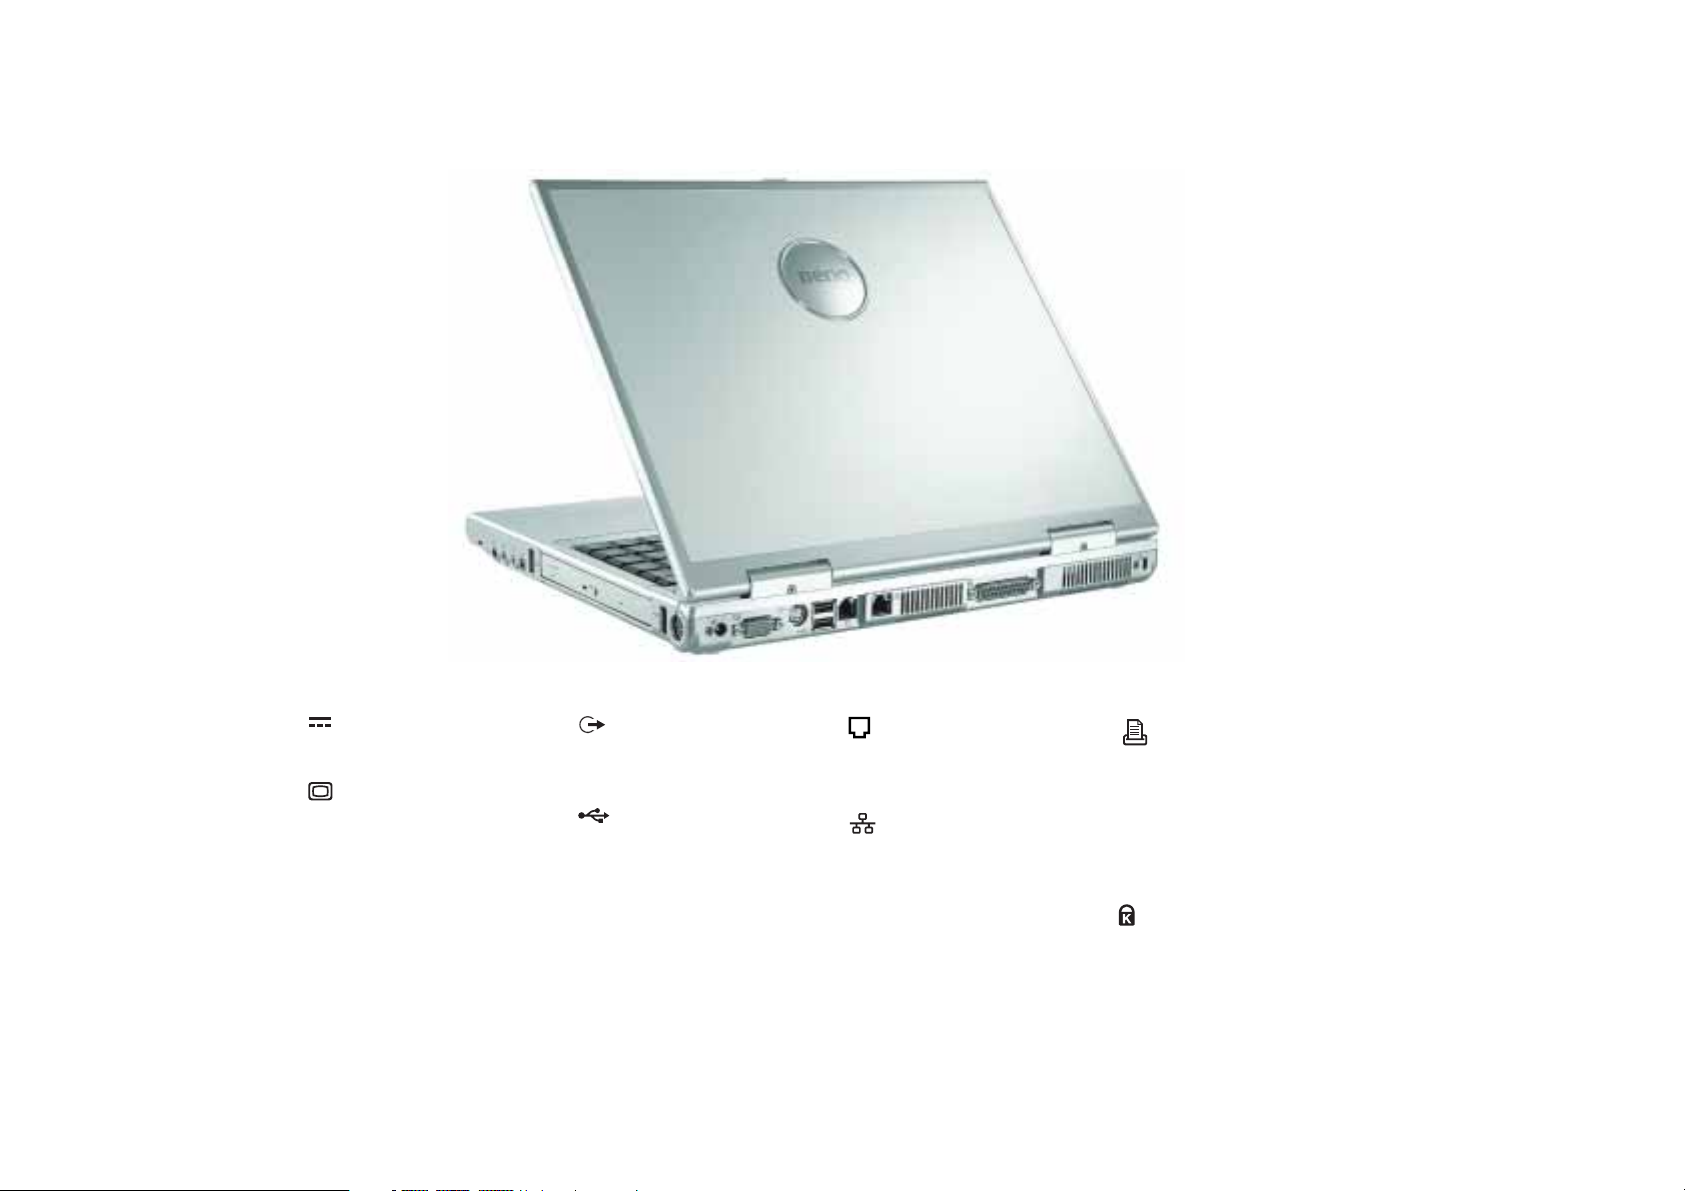
Power Ja c k
For connecting the AC adapter.
VGA Port
For connecting external display devices,
such as monitors and projectors.
S-Video Out
Outputs S-Video signals to a television
set or a projector.
USB Port
For connecting peripherals such as
mice, digital cameras and MP3 players
that use the USB interface.
Modem Port
Accepts an analog telephone line for
use with the internal modem.
Ethernet Port
Allows the computer to connect to an
Ethernet 10/100BaseT network.
Ventilation Holes
For dissipating heat and keeping the
computer at an optimal temperature.
Parallel Port
For connecting devices such as printers
that use the parallel port interface.
Ventilation Holes
For dissipating heat and keeping the
computer at an optimal temperature.
Ken sin gto n Lo ck
Joybook 3000 Features 5
Page 6
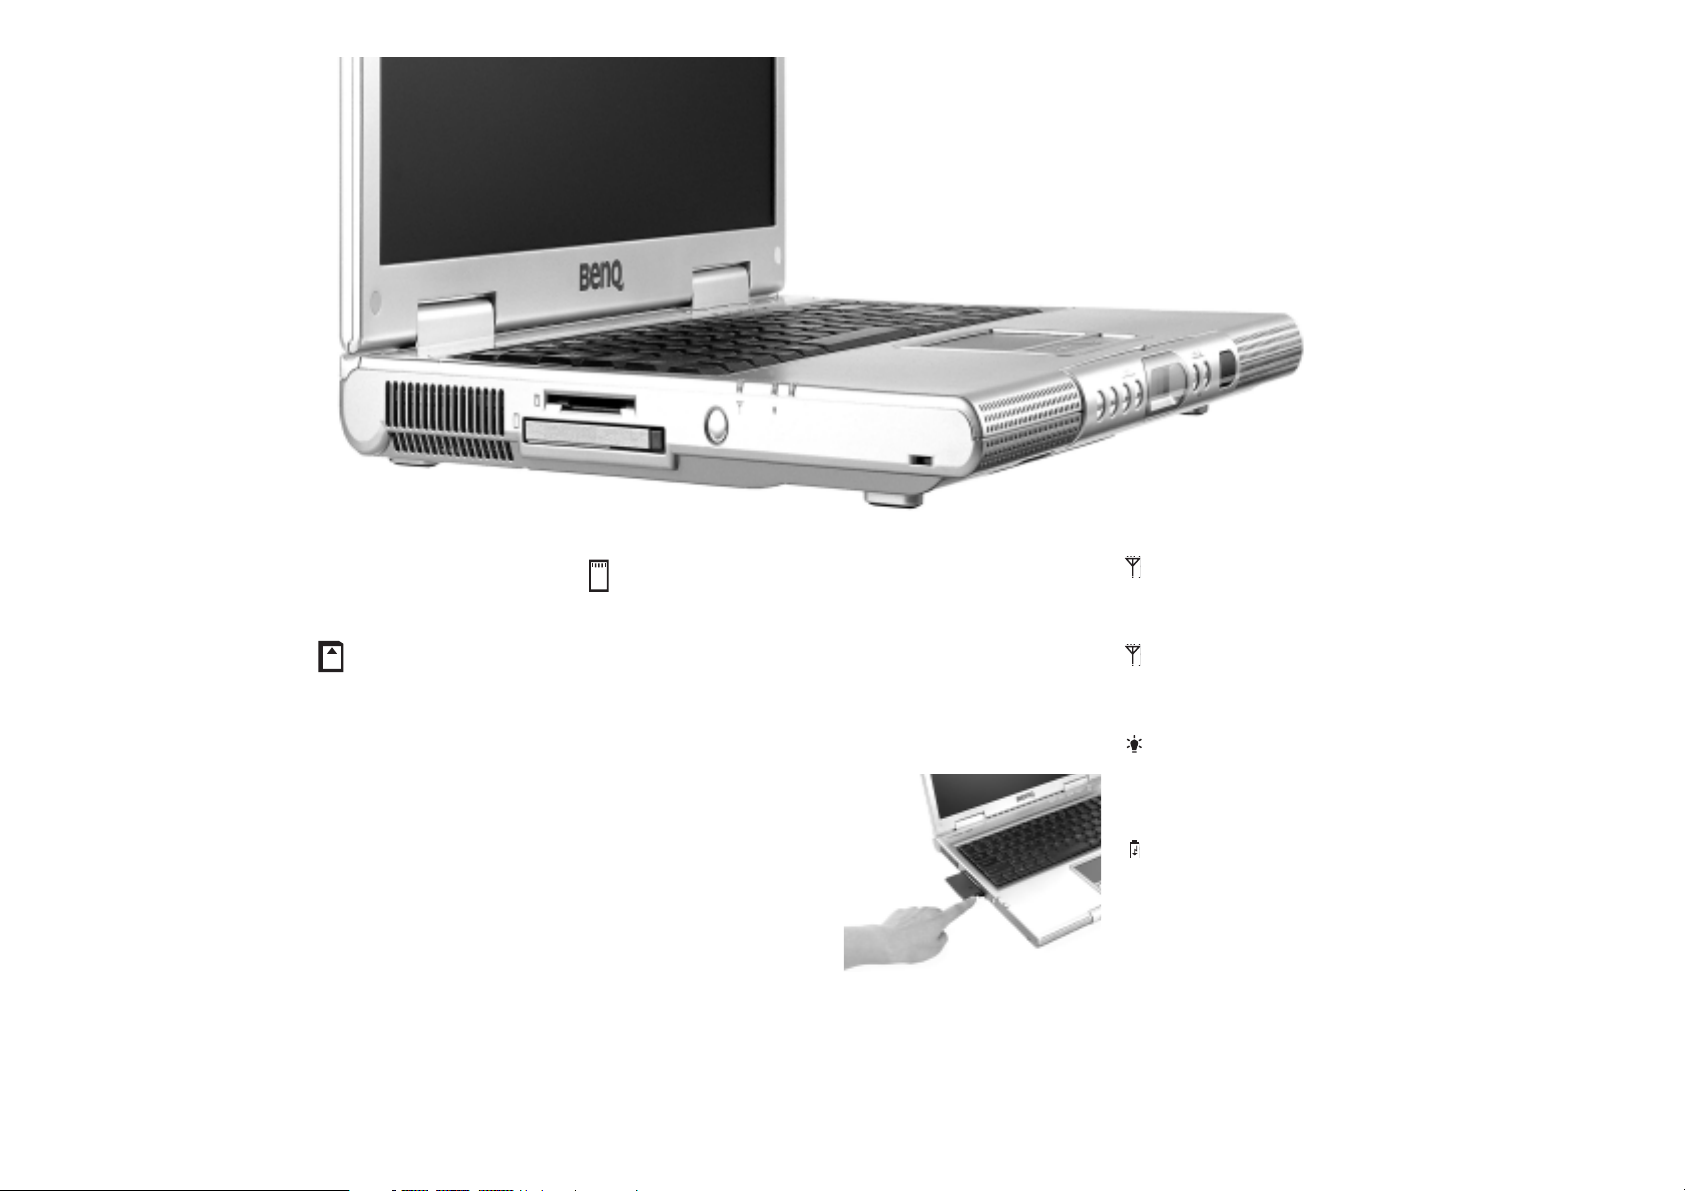
Ventilation Holes
For dissipating heat and keeping the
computer at an optimal temperature.
Four-in-One Slot
Reads Memory Stick Card, SD Card,
Smart Media Card and MMC Card.
6 Joybook 3000 Features
PC Card Expansion Slot
Allows the functionality of the
computer to be extended through
the use of a wide variety of PC Card
modules available—for example,
wireless networking cards and mobile
disks.
PC Card Eject Button
Before ejecting a PC Card:
1. Quit all PC Card applications
and shut down all PC Card
functions.
2. Push in, then release the PC
Card eject button, causing it to
pop out.
3. When the button has popped
out, push it in again to eject the
PC Card.
Wireless Network Card
Power Button
currently not supported.)
(The function is
Wireless Network Card
Activity Indicator (The function
is currently not supported.)
Power Indicator
Lights up in blue when the computer
is turned on. When the system enters
sleep mode, turns orange.
Battery Indicator
When the computer is in use, lights up
in blue. When the battery is charging,
turns orange. Flashing blue indicates
that the battery is running low.
Flashing orange indicates that the
battery is malfunctioning, in which case
you should contact service personnel.
Page 7
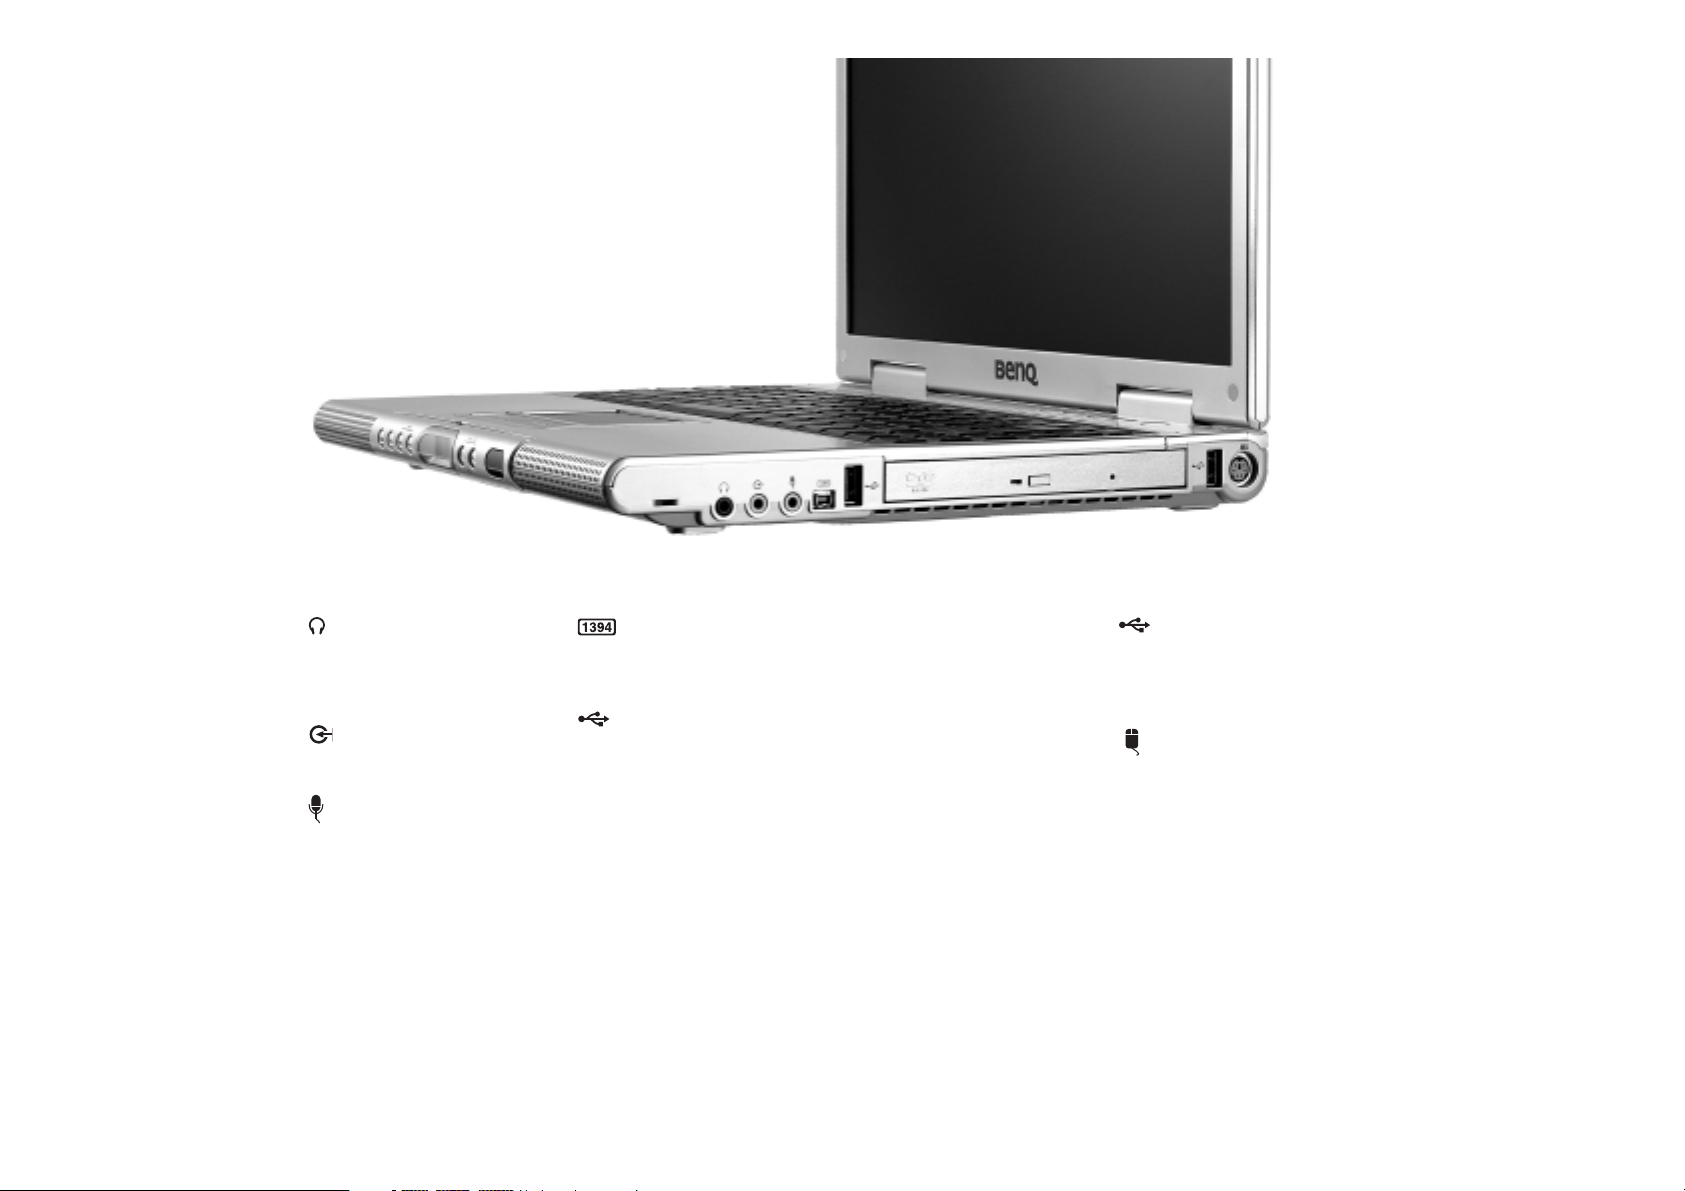
Earphone Jack/S/PDIF
Outputs optical sound. Can be
connected to optical audio-enabled
speakers for high quality music.
Line-in
Inputs sound into the computer.
Mic in
Inputs speech into the computer.
IEEE 1394 Port
For connecting external display devices,
such as monitors and projectors.
USB Port
For connecting peripherals such as
mice, digital cameras and MP3 players
that use the USB interface.
DVD Drive
Supports multi-functional optical
module for music CD, VCD and DVD.
Disks can be inserted/ejected pressing
the small rectangular button at the
center of the Drive.
USB Port
For connecting peripherals such as
mice, digital cameras and MP3 players
that use the USB interface.
PS2 Mouse Port
Joybook 3000 Features 7
Page 8
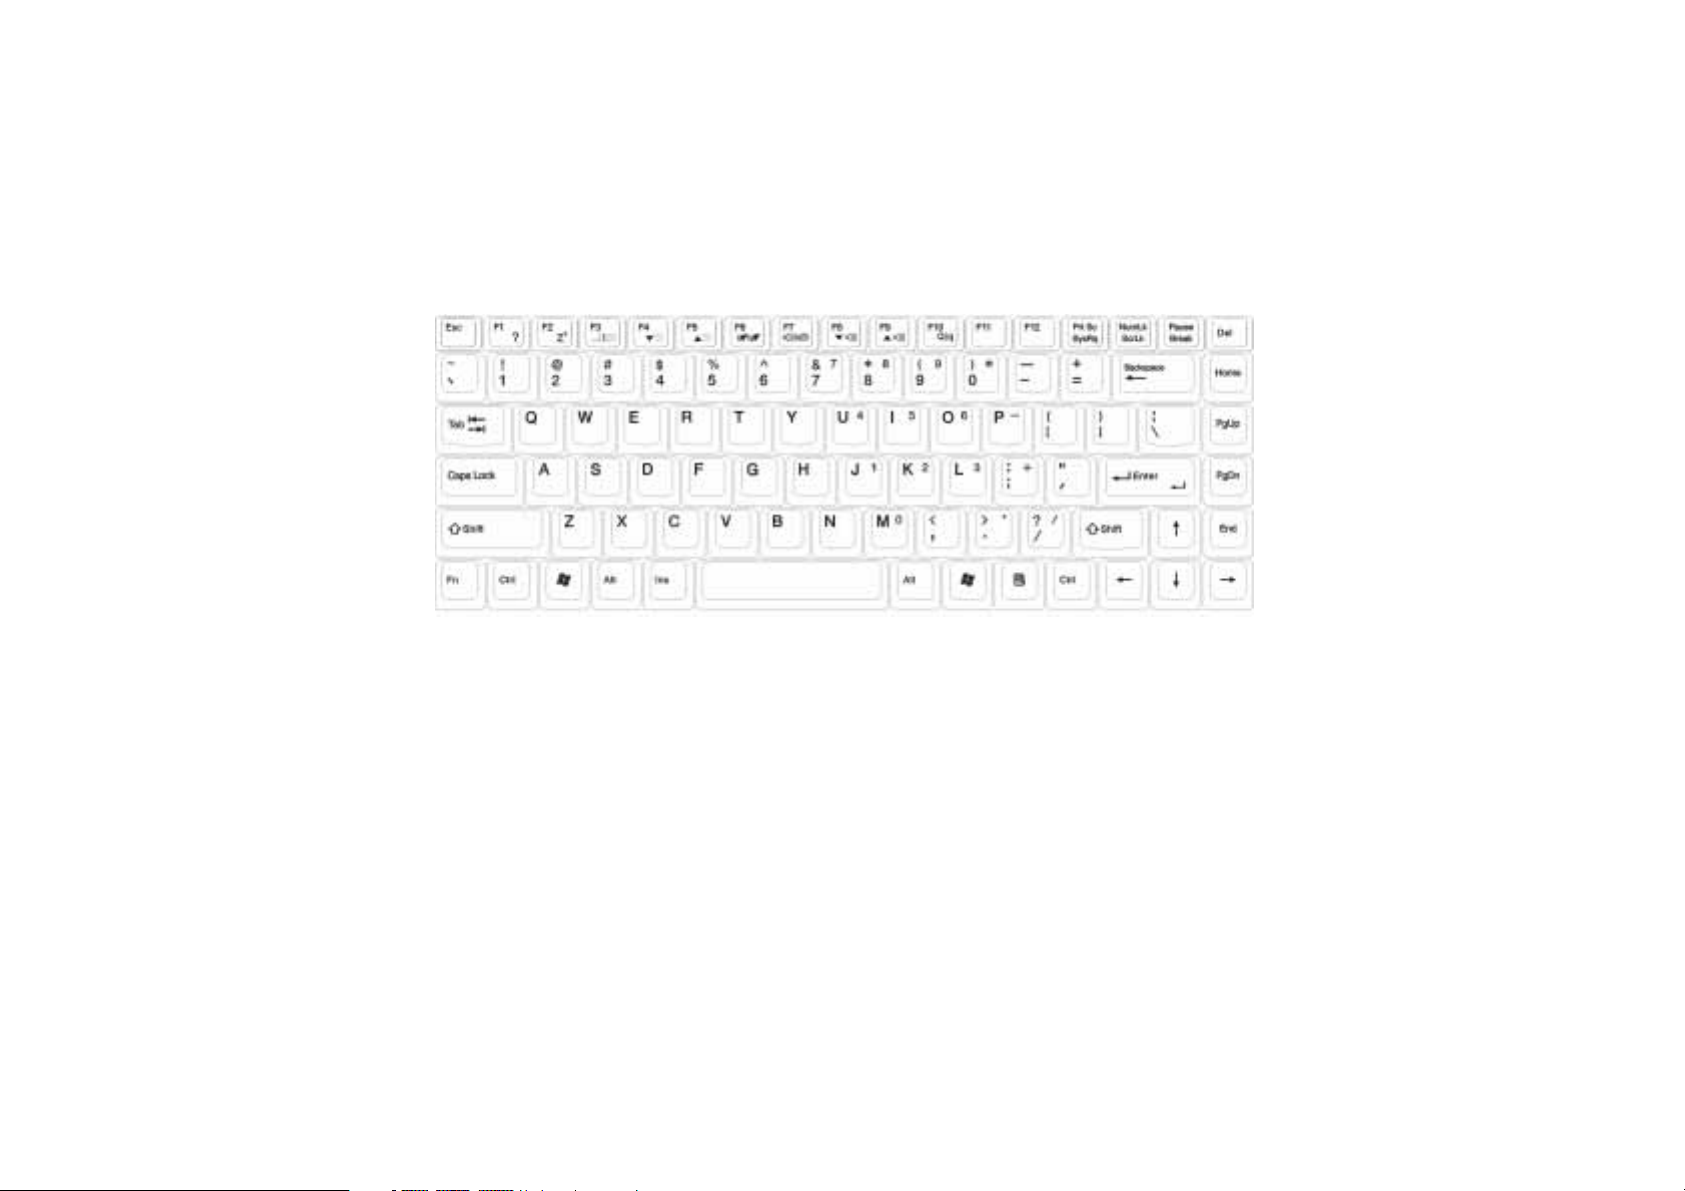
Function Hotkeys
You can use the function hotkeys to access commonly used functions or make quick settings. To use the hotkeys, press and hold the Fn key in the
lower left corner of the keyboard, and then press the desired hotkey.
Fn + F1
Opens online help.
Fn + F2
Puts the computer into sleep mode.
Fn + F3
Switches display between the screen
and an external monitor, or allows
simultaneous display.
8 Function Hotkeys
Fn + F4
Decreases screen brightness.
Fn + F5
Increases screen brightness.
Fn + F6
Activates or deactivates the touch
pad.
Fn + F7
Activates or deactivates the
speakers.
Fn + F8
Lowers speaker volume.
Fn + F9
Increases speaker volume.
Fn + F10
Turns on or off the Logo backlight.
Page 9

Windows Key
Functionally equivalent to clicking the
Start button on the Windows
desktop.
+ Tab
Makes the next item on the Windows
task bar active.
+ E
Opens the My Computer window for
browsing disks and files.
+ M
Minimizes all windows.
Shift + + M
Cancels minimization of all windows.
+ R
Activates Run dialogue box.
Num Lock
Activates the numeric keypad
integrated in the keyboard.
Caps Lock
Capitalizes all text entered.
Application Key
Provides the same function as the
right touch pad button, bringing up a
contextual pop-up menu.
Function Hotkeys 9
Page 10
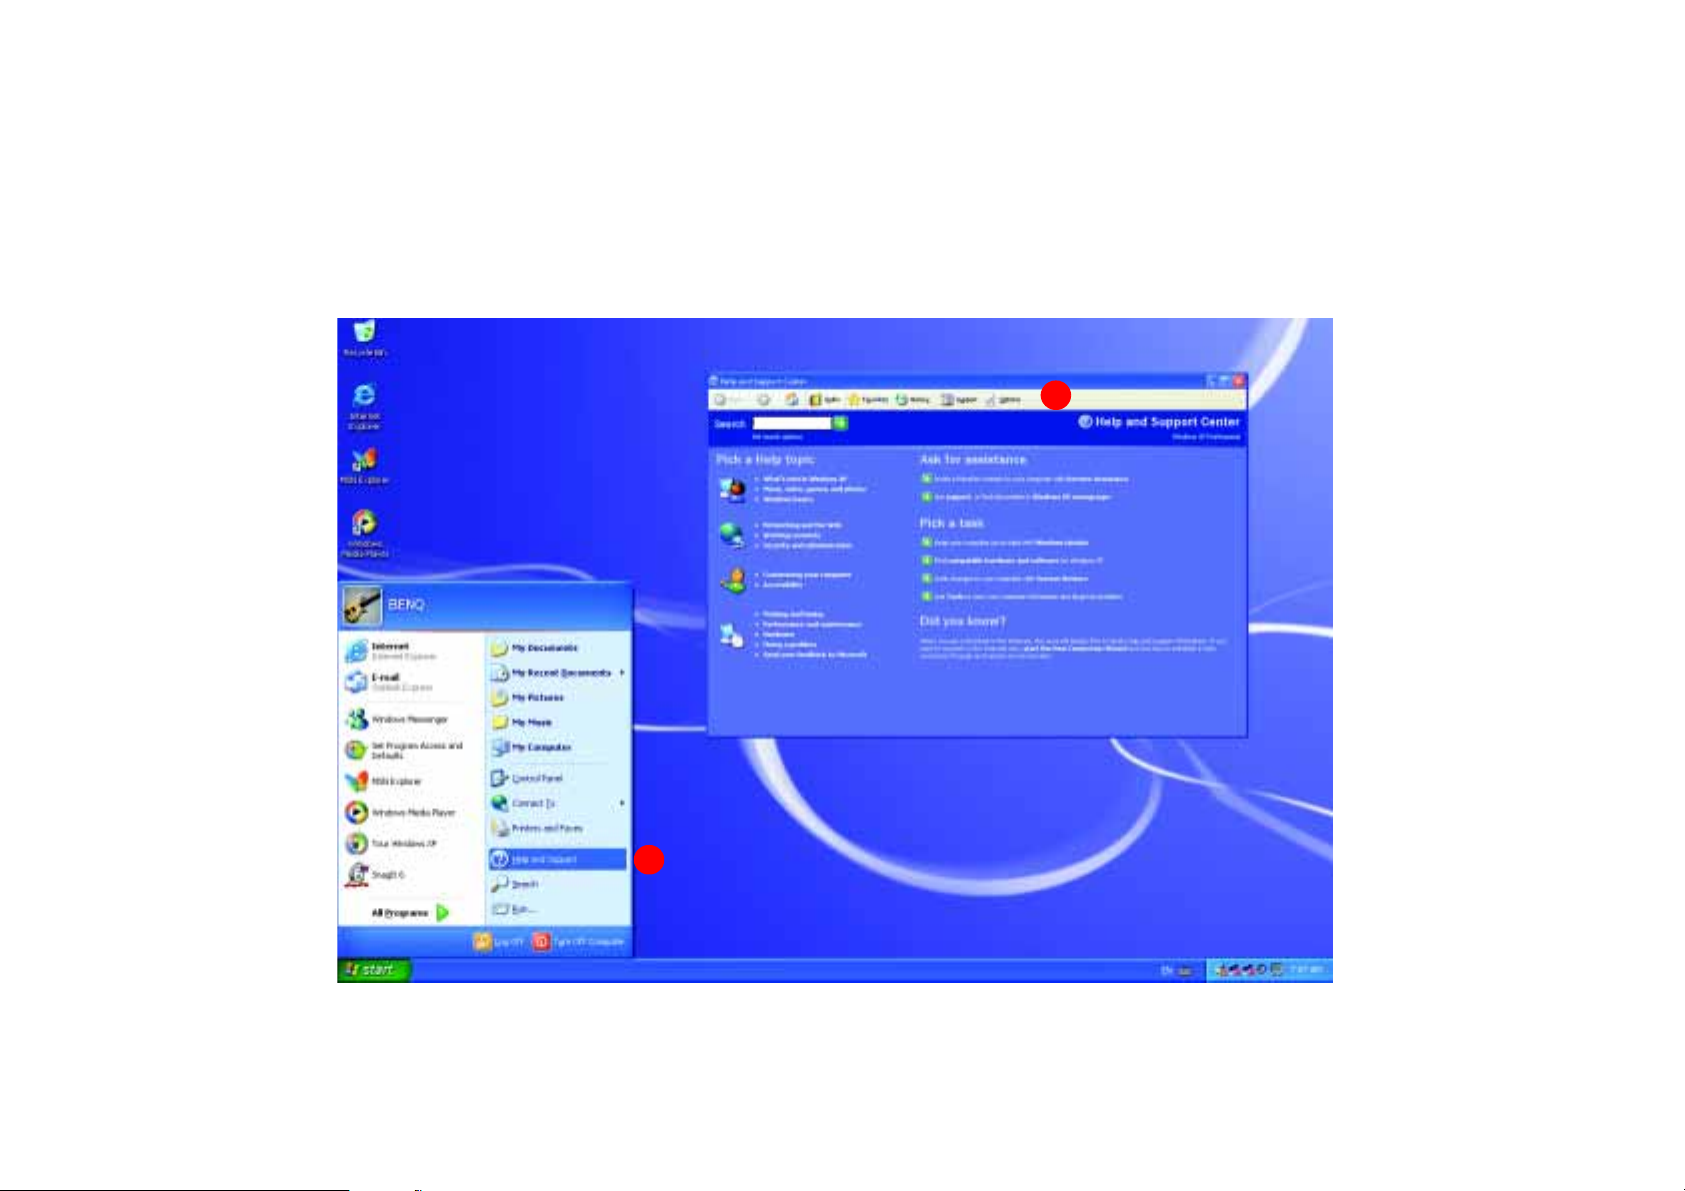
Getting Started with Windows XP
Your Joybook 3000 comes installed with Windows XP Home Edition, Microsoft's latest operating system for consumer PCs. The first time you start
up your computer, Windows XP will ask you a few questions. Answer the questions to ensure that your full rights are protected.
2
10 Getting Started with Windows XP
1
Page 11

Using the Q-Media Bar
The Q-Media bar integrates a number of software applications to enhance the multimedia experience on your Joybook 3000.
From the Q-Media bar, you can quickly start up Internet Explorer and Outlook Express to
e-mail
favorite music. Not only does QMusic support playback of MP3 and audio CD music, but you can also use it to burn audio CDs from MP3s, or
conversely to turn your audio CDs into compact MP3 files for storage on your hard disk drive or creating custom music compilations. If you want
to
own video masterpieces
photographs from a digital camera. Photo Explorer also lets you produce
friends and family. CD-Maker makes it easy for you to
you wish.
. QMusic is a great tool for listening to music and for creating personalized audio CDs with your
watch a DVD or video files, start up Power-DVD from the Q-Media bar. Power-Director lets you edit your
, while Photo Explorer is perfect for viewing and editing image files, such as
online photo albums of your favorite photos for sharing with
burn CD-R disks for storing music, photographs, or any other kind of data
browse the Web and access your
Using the Q-Media Bar 11
Page 12

Your Digital Entertain-
ment Center --- BenQ
Joybook 3000
Send and receive e-mail. Browse the
Web.
Listen to music and creating your own
custom music collections.
Convert music into the MP3 format
and take your favorite tunes wherever
you go.
12 Your Digital Entertainment Center --- BenQ Joybook 3000
Watch video. Create your own
movies.
Browse and edit digital photographs.
Quickly and reliably burn CD-R disks.
Page 13
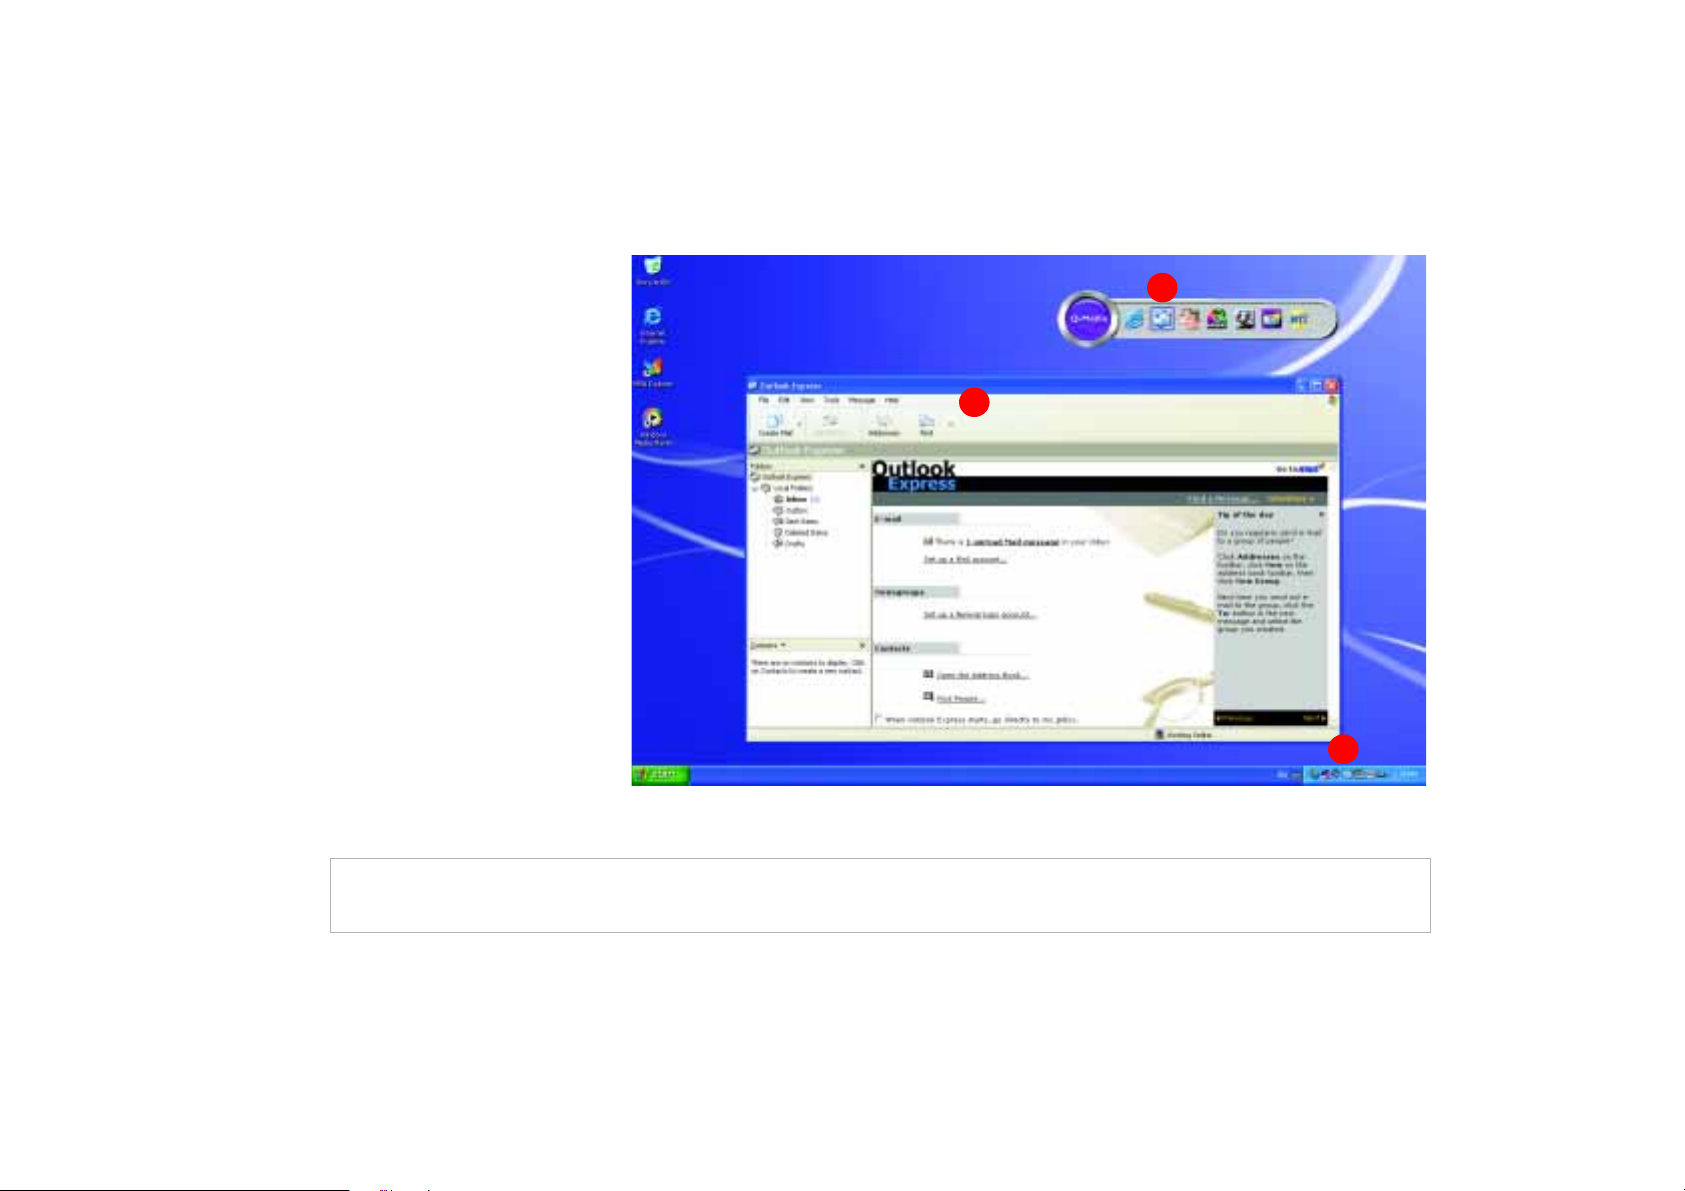
Sending and Receiving E-mail
By using the Q-Media bar or the hotkey on
the right side of the keyboard, you can
instantly start up the Outlook Express e-mail
client.
2
1. Activate the Q-Media bar by double-
clicking its icon on the Windows
desktop.
2. Click the Outlook Express icon on the
Q-Media bar.
3. After the Outlook Express application
window opens, you can send and
receive e-mail.
In order to use e-mail, you must have an account with an ISP (Internet service provider) and perform needed software configuration. For detailed information on
accounts, passwords, e-mail servers and other settings, please consult your system administrator or ISP.
3
1
Sending and Receiving E-mail 13
Page 14

Getting Online
From the Q-Media bar, or by using the hotkey on the keyboard, you can instantly start
up Internet Explorer wed browser.
1. Activate the Q-Media bar by double-
clicking its icon on the desktop.
2. Click the Internet Explorer icon on the
Q-Media bar.
3. After the Internet Explorer application
window opens, enter the URL address
for the webpage you wish to view in
the Address field.
2
3
1
14 Getting Online
When traveling by air, please be sure to turn off wireless networking when the plane is taking off or landing to avoid any possible risks to flight safety.
If your Joybook are loaded with the network card and the wireless network card, the system will optimize the working environment itself when you connect to the
Internet.
Page 15

Listening to Music and Creating Custom Music Collections
Qmusic is the perfect tool for playing your favourite music. You can use it to play music on audio CDs or MP3 files, burn MP3 songs to audio CDs,
convert audio CD tracks to MP3 format for storage on your hard disk drive, or create custom music compilation.
Action
Depending on the item
selected elsewhere in the
QMusic window, burns a
CD, converts songs, stops
the current action, or con-
tinues a suspended action.
Add
Depending on the item
selected elsewhere in the
QMusic window, creates
new play lists or adds songs.
Option
Accesses application prefer-
ences.
Music Library
Lists your music file collec-
tions.
My Joybee
When a Joybee MP3 player is
connected, you can transfer
all listed songs by selecting
Renew Songs.
QMusic application
window controls
Search Window
Song List window
Displays songs and related
information. You can also
select the song you would
like to play or burn to CD.
--Play
--Stop
--Previous song
--Next song
--Eject
Repeat
Randomize
My Play Lists
You can select your favorite
songs in My Play Lists and
give it an album name.
; Volu m e
From left to right: Next Visual Effect, Equalizer , My Play Lists
* Please refer to the Joybee user manual for further information about QMusic .
Listening to Music and Creating Custom Music Collections 15
Page 16

Watching Video and Making Your Own Movies
You can use the integrated DVD player in
your Joybook 3000 to watch VCD and DVD
videos.
1. Insert the disk, and the DVD will auto-
matically start up and begin playback.
2. If you wish, select full-screen mode for
more comfortable viewing.
3. To view an explanation of the function
for any button on the control panel,
place the on-screen cursor over the
button. A floating tool tip will appear.
Do not put non-standard size CDs into the DVD player.
16 Watching Video and Making Your Own Movies
Page 17

The Joybook 3000 can help you edit video files to create a movie that you can share with family and friends. With a digital video camera or other
source of digital video footage, you can take advantage of the Power Director software included with your Joybook 3000 to produce your very own
cinematic masterpiece—or if you’re less ambitious, just the coolest home video ever!
Power
Brings up the i-Power
online resources portal website.
Media Databank
Shows various types of raw
media files that can be used
in the storyboard pane.
Preview Pane
Displays previews of video
footage, transitions, and
various types of effects.
Tr a s h C an
For deleting items from the
Media Databank or Story-
board pane.
Storyboard Pane
Provides area for manipu-
lating all the media seg-
ments, transitions, special
effects and user settings
needed to produce the
final movie.
Minimize
Minimizes the PowerDirector application window.
Close
Closes the PowerDirector
Mode Wheel
Used for switching
between various editing modes.
Vol um e
Controls audio volume.
Watching Video and Making Your Own Movies 17
Page 18

Viewing Digital Photographs and Creating Slide Shows
Photo Explorer can help you manage your digital photographs and other images, letting you easily view, print, and edit them, as well as create
customized slide shows.
Customizable
Toolbar
Location
Directory Tree
Preview Pane
Viewer
1
2
3
5
1. Locate the desired image files in
the Directory Tree.
2. Files in the directory you
selected will be shown as thumbnails
or in a list in the Browse Pane. Select
the image you wish to view.
Browse Pane
Slide Show Storyboard
3. The image you selected will be
shown in the Preview Pane. Doubleclicking in the Preview Pane will open
the Viewer window for a closer look
at the image.
18 Viewing Digital Photographs and Creating Slide Shows
Page 19

Creating a Slide Show
---
4. Select Tools
the Slide Show Storyboard and create a new
project.
Slide Show to open
>
5. Select the image, video, and sound files
you wish to use in your slide show, and drag
them to the Slide Show Storyboard. These
files may come from different directories.
* To use a sound file as the soundtrack for your slide
show, drag it to a position before the first slide on the
Slide Show Storyboard.
7. Click Save. If you wish to make changes
to the slide show, open the .use file for
the slide show and edit it on the Slide
Show Storyboard.
* The .use project file stores only file locations,
sequences, names, and slide show options. It does not
store the actual images, video, and sound files. If you wish
to save a slide show to a CD for sharing with friends and
family, or for archiving purposes, collect all its files in a
single directory, and then burn this directory to a CD-R
disk.
6. Click Slide Show Options to select
transition effects and other options.
Choose to run the slide show automatically or control it manually. If you choose
to run the slide show automatically, you
should also set the duration each slide
should be displayed. (This setting applies
only to images, as video and sound files
will play to completion.)
Viewing Digital Photographs and Creating Slide Shows 19
Page 20
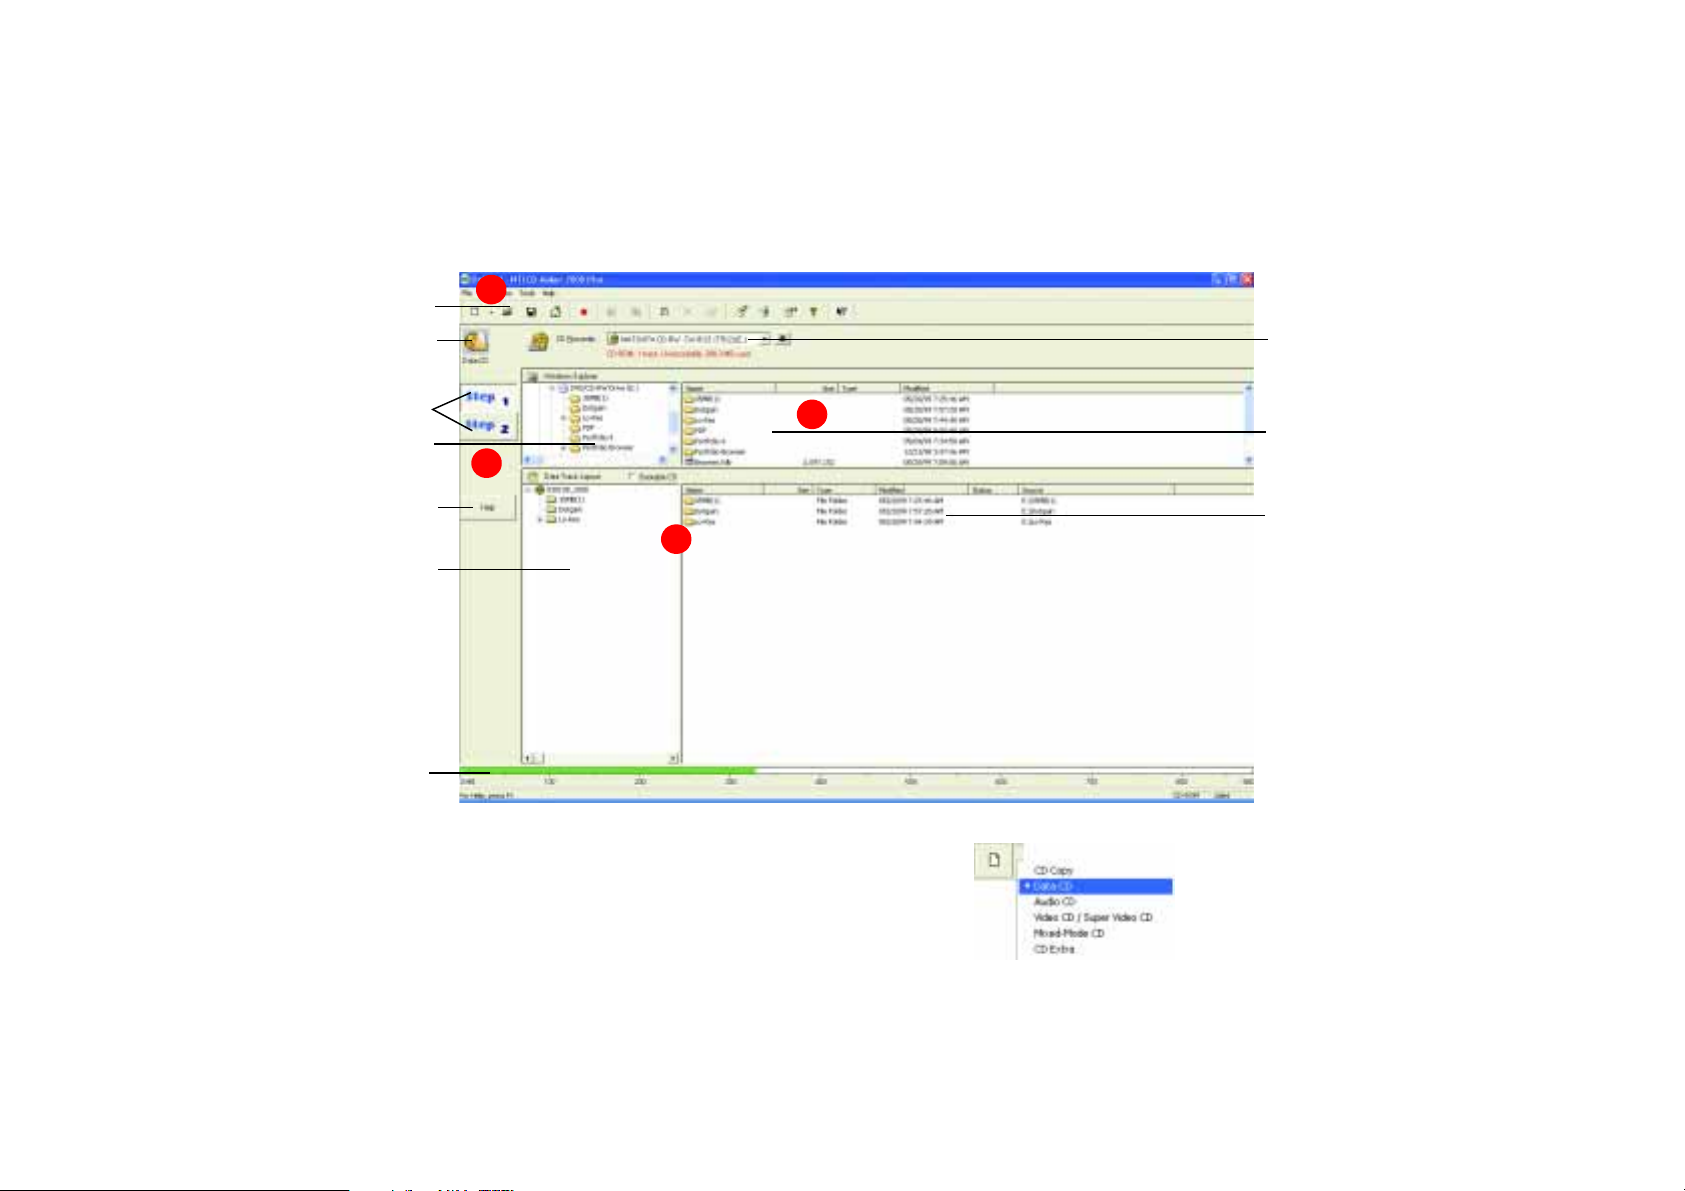
Burning CDs
You can use your Joybook 3000 when connected to a CD burner with the included CD-Maker software to burn different types of data to CD.
Toolbar
CD type
Steps
Windows
Explorer
Help
CD Layout
File Size Bar
Displays the size of the
files in the Destination
Pane.
1
Choose CD
Recorder
2
Source Pane
3
Destination Pane
2
1. Press the first (New) icon on the Toolbar.
* To select the type of CD you would like to burn, click
the arrow on the right side of the Open New File icon.
You can select from the pull-down menu Copy CD, Data
CD, Audio CD, Video CD, Super Video CD, Mixed-Mode
CD or CD-Extra.
20 Burning CDs
Page 21
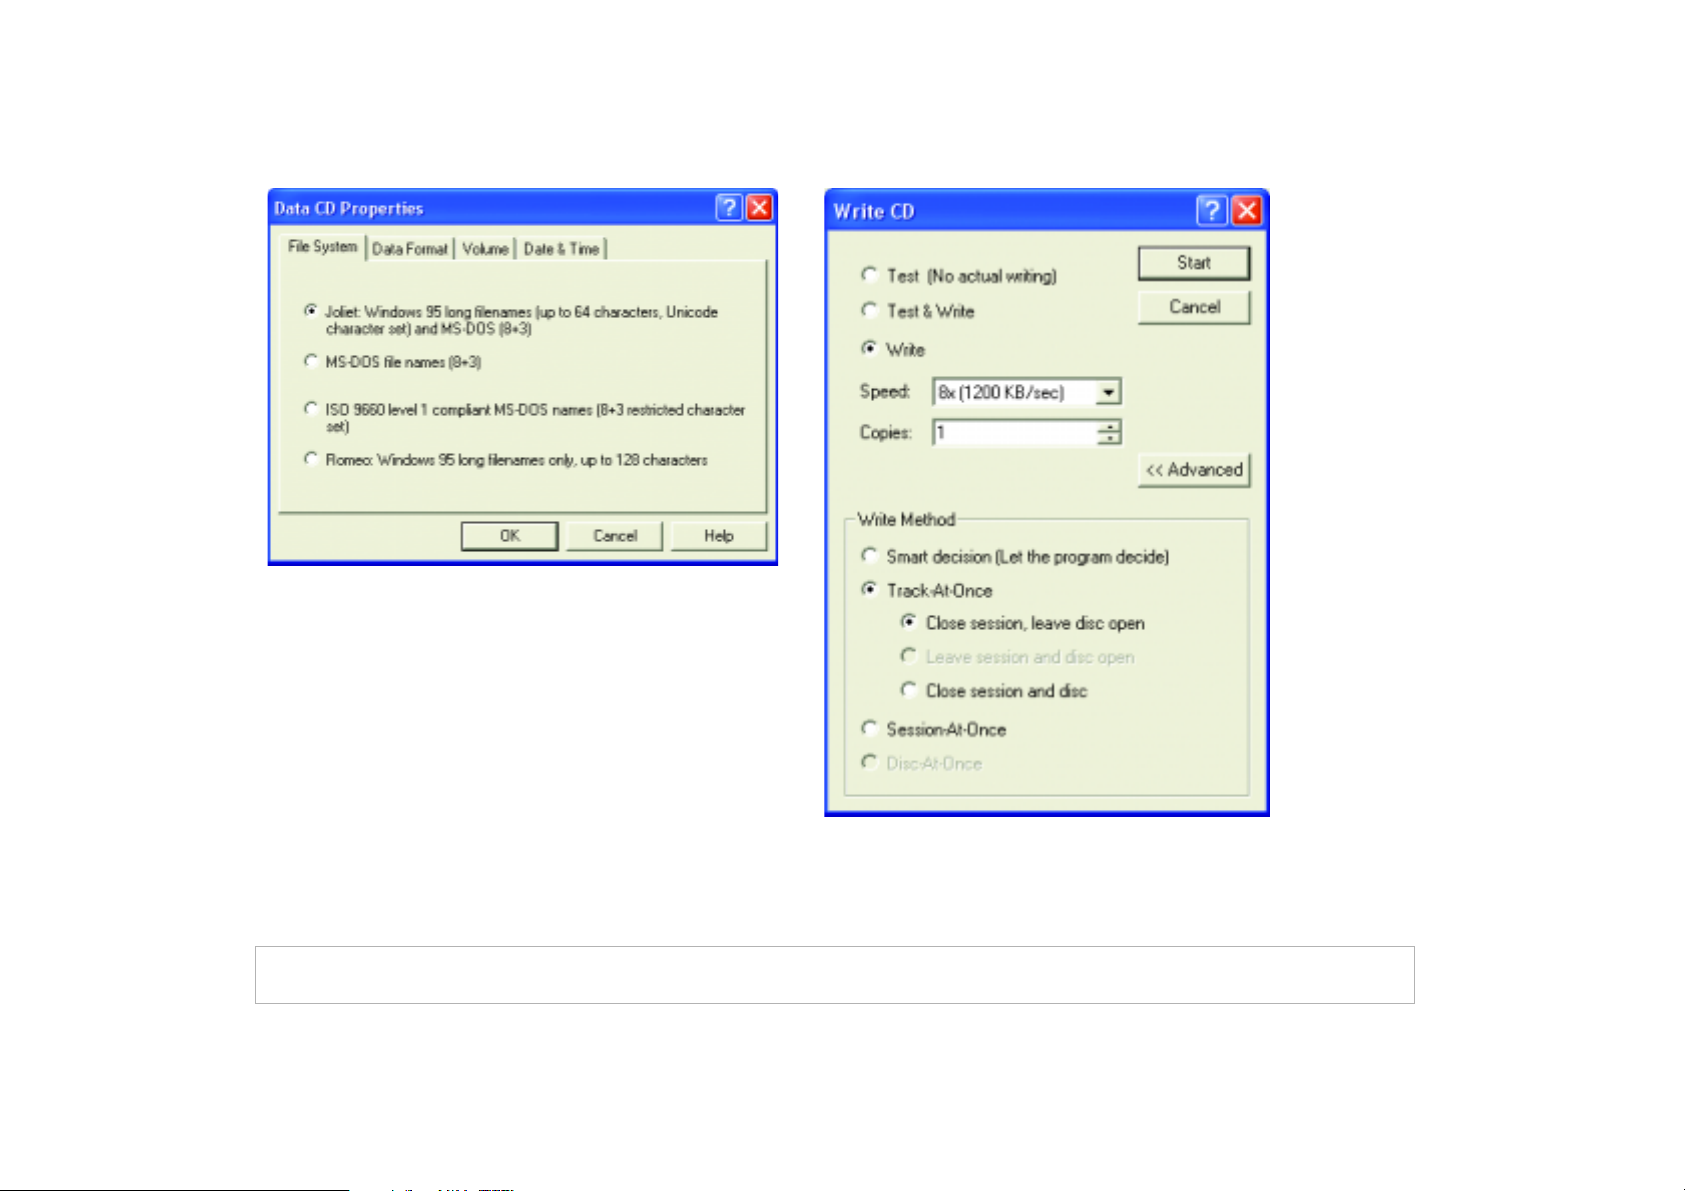
2. In the Source Pane, select the files you wish to burn to CD
and drag them to the Destination Pane. Then right-click on the
right side of the CD icon in the CD Layout area and select Data
CD Properties from the pop-up menu that appears.
3. Click the Step 2 button and make the desired settings and start burning
your CD.
In general, regardless of the burning format, two major steps are to be followed: Step 1 is to create the desired settings for the CD content. Step 2 is to burn the new CD.
Three steps are required only for burning Mixed-Mode CD and CD Extra CD, as they have both data and audio track on the same disk, which are two different types.
Burning CDs 21
Page 22

Attaching External Display Devices
Attaching a VGA display device
When giving a presentation, you can ouput the Joybook 3000’s video signal to an external display device, such as a projector or monitor. Press the
Fn + F3 hotkey combination to switch between the computer's own LCD panel and the attached display device, or use simultaneous display.
Monitor
22 Attaching External Display Devices
Projector
Page 23

S-Video Out
The S-Video Out port allows you to output display signals to a television set or VCR for viewing or recording.
Te le v i s i on S e t
VCR
Attaching External Display Devices 23
Page 24

Installing Additional Memory
Please contact BenQ distributor or customer service center, or check the module which can be used on the BenQ web site, before you upgrade or
replace memory. If you wish to upgrade memory, you can replace the existing 128 MB or 256 MB module with a higher-capacity one. The product
warranty as provided by BenQ does not cover any damage to the machine as a result of your own discretionary upgrade or memory replacement.
Therefore, it is recommended that you take your Joybook 3000 to the BenQ distributor or customer service center for the upgrade or memory
replacement.
Your Joybook 3000 comes with 128MB or 256MB of system memory as one DDR (Double Data Rate) 266 SDRAM SoDIMMs ( Small Outline Dual
Inline Memory Modules). Memory can be extended to up to 1 GB.
Battery
Memory
24 Installing Additional Memory
1. Turn off the computer, and disconnect
the AC adapter. Turn the computer over.
2. Take out the battery, and use a screw-
driver to remove the screws that secure the
memory subsystem cover. Open the cover.
Page 25

3. Align the memory module with the slot,
and then insert it.
4. Gently push the free edge downwards
until the module locks into place.
5. Replace the cover, and use a screwdriver
to secure it with the screws. Insert the battery, and then connect the AC adapter. When
you start the computer, it will automatically
test and configure the new memory.
Installing Additional Memory 25
Page 26

Recommendations and Troubleshooting
The following are descriptions of situations that you may encounter during use of the computer, along with basic troubleshooting steps. If you are
not able to resolve the issue, immediately contact a BenQ service center for assistance.
The computer will not start up, even
though the power button was pressed.
Check the power indicator.
• If it is not lit up, the computer is not being supplied by power—either
from an external power source via the AC adapter or from the battery.
Make sure that the AC adapter is correctly inserted into the power jack
of the computer and a working electrical socket, and allow the battery
to begin charging.
• If the power indicator is lit up in blue, the computer is being supplied
normally with power, meaning that the problem lies elsewhere.
• If you have added any hardware (for example, memory or a wireless network card), check if it has been installed correctly.
• It is possible that certain operating system files are damaged or missing.
If so, you may need to use the restore CD that came with the computer
to return the computer’s software to its original state. Please note however that doing so will cause all of your personal data on the hard disk
drive to be lost!
There is nothing visible on the screen.
Check the power indicator.
• If it is not lit up, no power is being supplied to the computer. Connect
the AC adapter and restart the computer.
• If it is lit up in orange, the computer has entered sleep mode in order to
conserve power. Simply pressing the power button should return the
computer to normal operating mode.
• lf it is lit up in blue, the computer is being supplied normally with power.
There are two possible causes for the problem.
• The screen’s brightness may be set too low. Use the Fn + F5 hotkey
combination to increase the brightness.
• The display mode may be set to use an external display. Use the Fn + F3
hotkey combination to switch the display mode to use the computer’s
own LCD panel or to use simultaneous display.
There is no sound coming from the speakers.
Check the following:
• The speakers may have been muted. Look at the volume control
(speaker icon) in the Windows task bar to see if mute has been set. If so,
turn off the mute.
• The speakers may have been turned off. Use the Fn + F7 hotkey combination to turn them on.
• The volume may have been set too low. Use the Fn + F9 hotkey combination to increase the volume.
• An earphone or external speakers may be connected to the audio-out
jack, automatically turning off the computer’s internal speakers.
26 Recommendations and Troubleshooting
Page 27

CD or DVD does not function.
Please verify the following:
• The computer is turned on, and the CD or DVD disks are properly
inserted in the center of the disk tray in the optical drive.
• The DVD disk tray is closed.
Noise from the optical drive when the disk plays shows that the optical drive
may be deformed, and the computer needs to be repaired. If the disk tray
does not open after the Eject button is pressed, insert a pin into the Emergency Eject hole to force the tray out.
DVD movies will not play.
The region code of the DVD inserted must match that of the DVD playback
software used. This region code can be set up to five times. If you have not
reached this limit, a prompt will appear that will allow you to change the
region code of the software to match that of the move. Otherwise, you can
only play back DVDs with the same region code as the last DVD played back
successfully.
The computer is unable to use the infrared
port to communicate with other devices.
Please confirm the following:
• Communication speeds for the computer and the external device are
identical.
• The infrared port is clear.
• There are no objects blocking the path between the computer and the
external device.
• The distance and angle between the computer and device do not exceed
the effective range of the port.
• You are not attempting to establish the link under conditions of direct
sunlight.
• The infrared port is not facing any other infrared-enabled devices.
• There are no incompatibilities between the communications software
that is attempting to establish the infrared link and any other communications software on the computer. For further information, please consult the manual for the particular software.
Recommendations and Troubleshooting 27
Page 28

Basic Specifications
Hardware Specifications Software Specifications
Processor
Memory
Hard Disk Drive
Optical Drive
Display
Graphics
Subsystem
Weigh t
Intel P4-M 1.8 GHz Intel P4-DT 1.7 GHz
256 MB 128 MB
30 GB HDD 20 GB HDD
DVD (8*24x)
15.0" high-brightness TFT LCD
nVIDIA MAP17, 16MB SDRAM
3.05 kg 3.1 kg
Operating
System
Included
Software
Microsoft Windows XP Home Edition
Q-Media Bar
QMusic
Photo Explorer
Power DVD
Power Director
CD-Maker
28 Basic Specifications
Page 29

Information on Safety, Cleaning, and Battery Maintenance
Using the Computer Safely
When setting up or operating the computer, please pay special attention to the following:
1. Keep this manual in a safe place for easy reference when needed.
2. Make sure to follow all instructions and warnings related to the system.
3. Place the computer on stable, level surface, and ensure that the
ventilation holes are not obstructed.
4. Do not expose the computer to rain or excess humidity, and keep it
away from liquids (such as beverages, faucets, and so on).
5. Do not expose the computer to direct sunlight, and keep it away from
sources of heat (such as radiators, space heaters, stoves, and so on).
6. Do not expose the computer to heavy impacts or strong vibrations.
When closing the computer, do not use excessive force.
7. Do not place the computer in environments where the temperature is
below 0×C or above 50°C.
8. Do not place the computer in the area of strong magnetic fields.
9. Use an appropriate electrical outlet, and make sure that no heavy objects
are placed on the AC adapter or power cord.
10. The AC adapter is a high-voltage component. Do not attempt to repair
it on your own. If it becomes damaged, please contact an authorized
BenQ distributor or service center.
11. Make sure that the modem port is used only with a regular analog phone
line. Do not connect a digital phone line to the modem port, as this will
cause damage to the modem.
Battery Maintenance
1. Do not use AC adapters other than the one provided with the
computer.
2. After an extended period of usage, the battery's ability to retain charge
will gradually deteriorate—this is entirely normal. To replace an old
battery, turn off the computer, and be sure to use a new battery from
the same manufacturer..
3. Do not place the battery within reach of children, and keep well away
from sources of fire.
4. Follow the local laws governing the disposal of batteries. As far as
possible, submit used batteries to be recycled.
5. Use of improper batteries, or attempting to disassemble a battery, may
result in explosions. Follow vendor recommendations in using batteries
of the identical or equivalent type as replacements for worn-out
batteries.
Cleaning Your Computer
When cleaning the computer, follow these steps:
1. Turn off the computer, disconnect the AC adapter, and remove the
battery.
2. Use a damp cloth to wipe the outer surface of the computer. Do not
apply liquid or spray cleaners directly on the computer.
3. Do not use cleaners containing alcohol or acetone. Instead, use cleaning
fluids specially formulated for LCD screens.
Information on Safety, Cleaning, and Battery Maintenance 29
 Loading...