

Page 1

Welcom
e
Joybee P330
Digital Audio Player
User.s Manual
Page 2
Welcom
e
Copyright
All rights reserved. No part of this publication may be reproduced, transmitted,
recorded,stored in a retrieval system, or translated into any language or computer
language, in any form or by any means, electronic or mechanical, recording,
photocopying, or otherwise,without the prior written permission of the BenQ
Corporation.
Disclaimer
BenQ Corporation makes no warranty or representation, either expressed or
implied,with respect to the quality, accuracy or fitness for any particular purpose of
this document. The information in this document is subject to change without notice
Windows is the registered trademark of Microsoft Corporation. All
trademarks or product names appearing in this manual are registered
property of their respective owners.
Cautions
. This digital audio player is a delicate device, do not drop it or subject it to force.
. Do not open or attempt to disassemble or modify any part of the device.
. Do not allow the device to become wet. Keep the device away from splashing liquids.
. Do not allow the device to become frozen or hot. Keep the device away from extreme
temperatures, humidity, dust or direct sunlight
. Do not clean the device with chemical solvents. Wipe the device with a soft dry cloth.
. Use only adapter and accessories approved by the manufacturer. Damage to the
device, its equipment, and users may occur, and the product warranty will become void
if nonapproved adapter or accessories are used
. Avoid extended periods of high volume usage which may damage your hearing.
. BenQ Corporation assumes no responsibility for the loss of data stored on the device
under any circumstances. Users are advised to back up data on another storage device.
. Do not use the product batteries for any other purpose than to power the product.
Page 3

3
Important information
FCC compliance
This device has been tested and found to comply with the limits for a Class B digital
device, pursuant to Part 15 of the FCC Rules. These limits are designed to provide
reasonable protection against harmful interference to radio or television reception.
This device generates, uses, and can radiate radio frequency energy and, if not installed
and used in accordance with these instructions, may cause harmful interference to
radio communications. However, there is no guarantee that interference will not occur
in a particular installation. If this device does cause harmful interference to radio or
television reception, which can be determined by turning the device off and on, the
user is encouraged to try to correct the interference by one or more of the following
measures:
. Reorient or relocate the receiving antenna of the effected receiver.
. Increase the separation between the equipment and effected receiver.
. Connect the device into an outlet on a circuit different from that to which the
effected receiver is connected.
. Consult the dealer or an experienced radio/TV technician for assistance.
Any unauthorized changes or modifications to this device will void the user.s authority
to operate this device.
Disposal of Waste Electrical and Electronic Equipment
(Applicable in the European Union and other European
countries with recycling systems)
This symbol on the product or on its packaging indicates that this
product shall not be treated as household waste. Instead it shall be
Page 4

4
handed over to the applicable take-back scheme for the recycling of
electrical and electronic equipment. By ensuring this product is
disposed on correctly, you will help prevent potential negative
consequences for the environment and human health, which could
otherwise be caused by inappropriate waste handling of this product.
The recycling of material will help to conserve natural resources. For
more detailed information about recycling of this product, please
contact your local BenQ office.
Table of Contents
Precautions ……………………………………………….……..6
BenQ Joybee P330 Digital Audio Player…………….………..7
Introduction……………………………………………………..7
System requirements………………………………………….7
Package contents……………………………………………..8
Getting to know your Joybee P330 Digital Audio Player..…9
Key definition…………………………………………………10
The joybee P330 Digital Audio Player menu map………..11
Getting Start……………………………………………………..12
Charging the Player……………………………………..… ..12
Charging by connecting to a computer…………………12
Turning the Player on and off………………………………13
Locking the keys……………………………………………..13
Page 5

5
Force shutting down the Player……………………………..13
Using Joybee P330 as digital audio Player…………………..14
Playing the music files………………………………… ..… ..14
Using the recording functions…………………..…………..25
Playing the recorded files…………………….……………..29
Listening to FM radio…………………………………………34
Browsing the JPEG/BMP/GIF pictures……………………..37
Playing the AMV files………………………………………..38
Browsing the E-book……………………………………….39
System setup………………………………………………..41
Clock ………………………………………………………41
LCD set………………………….. …………………..…….42
Language……………………….. …………..…………..42
Power off…………………………………..……..……….43
Replay mode………………………..………...… ..……..44
Memory info…………………………..… ………..……….44
Firmware version…………………….… .. …..…………..44
Firmware upgrade…………………………..……….……44
Using BenQ Joybee P330 as a flash disk………….… . …….45
Advanced operation…………………….. ……….……..……..47
Troubleshooting…………………….. ……………..…………..54
Technical Specifications………….. …………..… ..…………..56
Page 6

6
Page 7
7
Precautions
u Do not place the Player in places with too high/ low temperature or
damp.
u Do not let any object drop or impact onto the Player.
u Avoid using the Player in places with too much dust or soot.
u Do not use chemicals such as alcohol and benzene attenuant.
u Never disassemble, fix or modify the Player.
u Do not impact onto the LCD of the Player. Keep away from any objects
carrying static.
u The Player should never suffer water drops or splashes. And no objects
filled with liquids, such as a vase, should be placed on the Player.
u Never change the battery. Improper change of battery may cause an
explosion. Only use the same type or equivalent batteries for change!
Page 8
8
BenQ Joybee P330 Digital Audio Player
Introduction
Thank you for purchasing the BenQ Joybee P330 Digital Audio Player.
In this manual, you will find all the information about your player, including
instructions. Please read this manual carefully in order to make the best use
of your player.
System requirements
System requirements:
. Microsoft Windows 2000/XP or later Operation System (OS)
. Intel Pentium 200MHz or faster processor
. 32 MB RAM
. 60 MB unused and available Hard Disk Drive (HDD) space
. USB connector (USB 2.0 High Speed recommended)
. CD-ROM driver
. Before install the software, please make sure that the DirectX9(or above)
and the Windows Media Player9(or above) have been installed.
. To make a connection between a PC with Windows 98SE and the player,
install the driver from the provided CD first.
Page 9
9
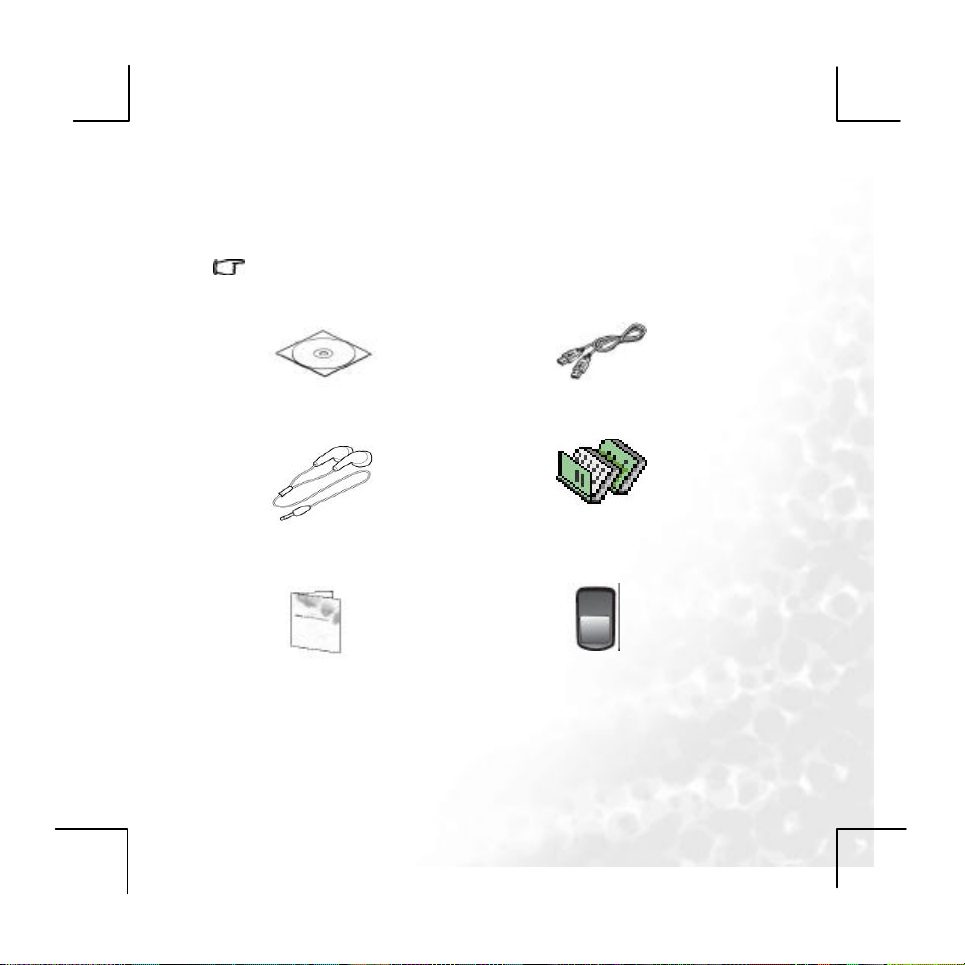
Package contents
Please check the contents of the packaging. Should any part be missing or
damaged, please contact your dealer immediately
The parts illustrated may differ slightly in appearance from those supplied.
Basic package
Setup CD-ROM USB Connecting
Earphone Quick Start
Warranty card Adapter
Notice: All affixes are according to substance.
Page 10
10
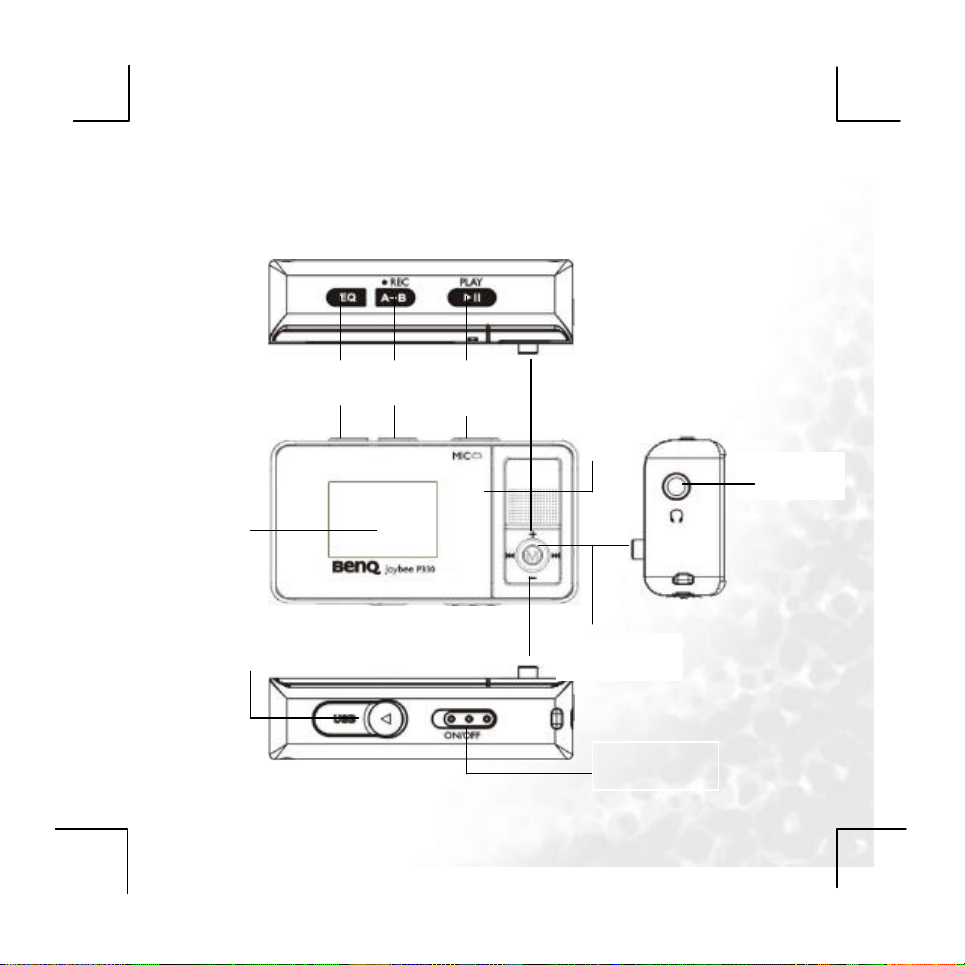
Getting to know your Joybee P330 Digital Audio
Player
LCD
USB mini Connect
EQ
A-B Play
Mic
Earphone
Five-key
ON/OFF
Page 11
11
Key definition
PLAY : Turn On, Turn Off, Play, Pause, and Stop.
MODE: Switching Working Mode, Menu Options, Interface Switching.
NEXT : Move to Right, Forward
LAST : Move to Left, Backward
VOL+: Volume Increasing, Last Item
VOL-: Volume Decreasing, Next Item
A-B/REC: Special A-B / Recording Hot Button
EQ: When playing MP3 musical files, use this button to directly change their
sound effects without entering the option menus. Long-pressing of this
button will lock or unlock the button
POWER: Turn on or off the power
Page 12
12
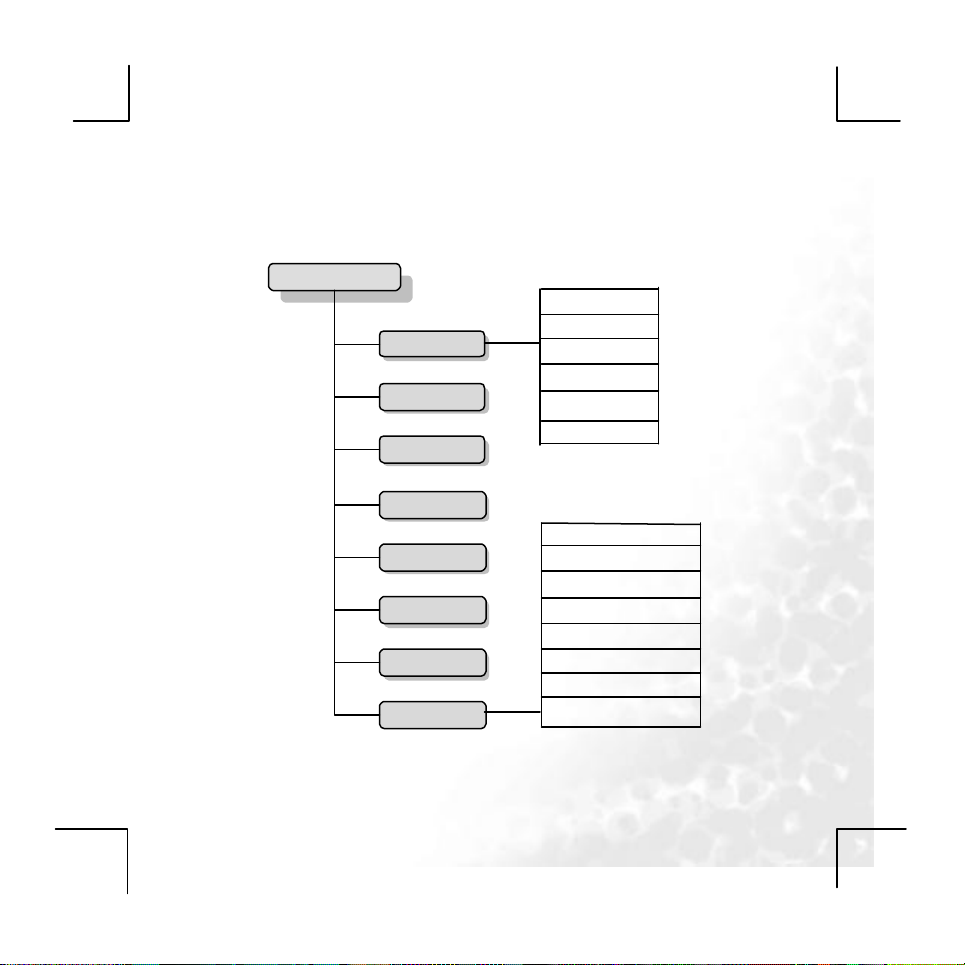
The Joybee N200 Digital Audio Player menu
map
Main menu
Music
Voice REC
Play REC
FM
PIC
Video
E -Book
Setting
Repeat
Equalizer
Tempo
Replay
Replay times
Replay gap
Clock
LCD set
Language
Power off
Replay mode
Memory info
Firmware version
Firmware upgrade
Page 13
13
Getting Started
Charging the player
The player offers about 20 hours of continuous MP3 playtime when the
battery is new and fully charged. The exact playtime is subject to battery age
and condition, and the format of the files being played.
Exact charging time differs according to battery status, which is indicated in
the battery bar on the player display. The screen shows the progress of
charging and indicates when charging is complete.
The Joybee P330 uses a rechargeable Lithium-Ion battery which can
provide you with years of service. To maintain the life of the battery, please
don.t allow it to remain discharged for an extended period. You can charge
the battery whenever you want, even when it is not flat. However, the life of
the battery also depends on the frequency of charging. The more frequently
the battery is fully charged/discharged, the shorter its replay time will be
owing to battery cycle life. This is expected normal battery behavior and is not
considered a manufacturing defect of the battery or charger.
Charging by connecting to a computer
Connect the mini USB end of the cable to the player and the USB end to
the computer. When charging through a USB connection, have your PC
switched on rather than in idle mode or switched off.
· When charging through a USB connection, you can transfer files to or from
the player to the PC at the same time.
· Alternatively, you can recharge the player using the power adapter.
Notice: When using or recharging the player, please push the
“On/Off” to the position of “On”.
Page 14

14
Turning the player on and off
· To turn on the player, press and hold play key for 3 seconds when the
· To turn on the player, press and hold play key for 3 seconds
power key is on. The player enters the last mode when it was turned off.
Locking the keys
To avoid any accidental key touches which may cause unexpected behavior
during the use of the player(like when the player is in your pocket), you can
temporarily lock all the keys by pressing and holding EQ key during music or
radio playback. To release the locked keys, press and hold EQ key again.
Force shutting down the player
To force shut down the player if it malfunctions, press the power key to off,
the player turns off immediately.
Page 15
15
Using BenQ Joybee P330 as digital audio
player
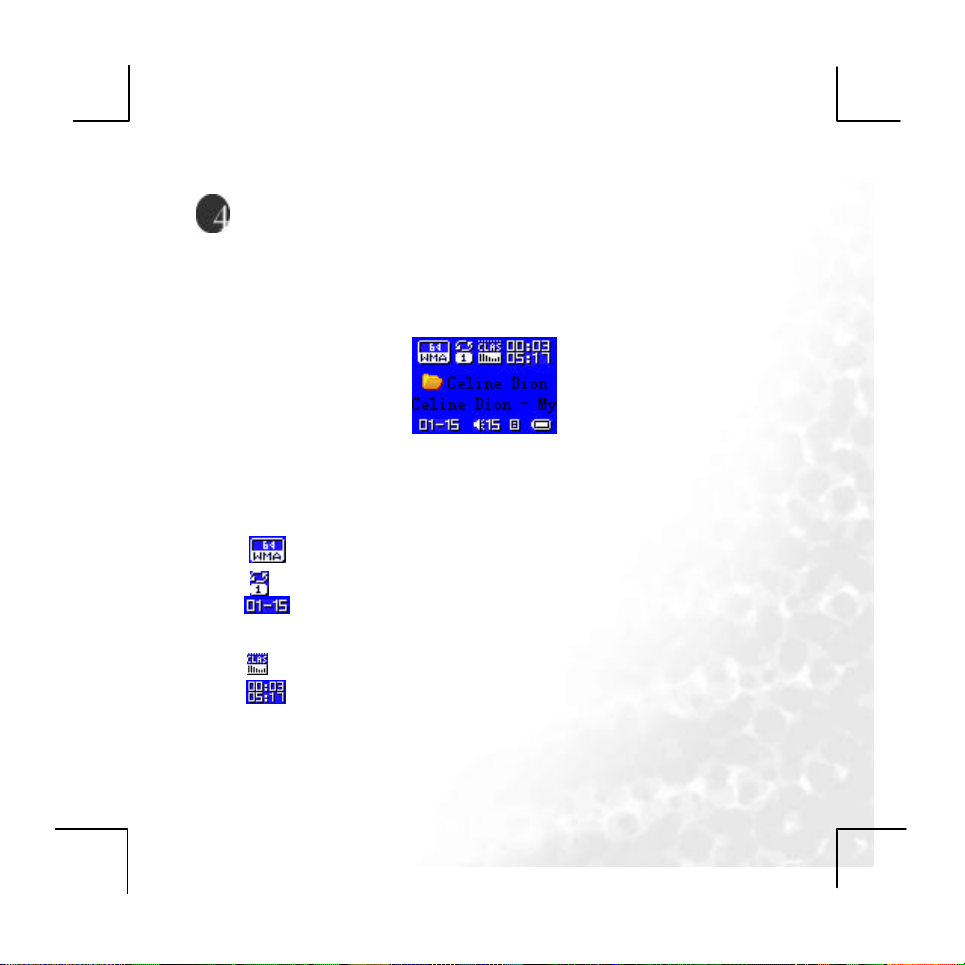
Playing the music files
Select the “Music” in the main menu, enter the music files playback
interface.
The Musical File Playback function realize the playback of musical files in
MP3 and WMA formats along with the features of repeating, following and
contrasting. It has the interfaces of stop, playing, lyrics display, repeating,
deleting, directory selecting, as well as function selection and settings.
indicates that the current musical file is in the WMA format with a bit
rate of 64Kbit.
represents that the current cycle mode is Repeat 1.
indicates that the current musical file is the first one and the total
number of the musical files is 15. The total number refers to the
number of musical files in the current directory.
indicates that the current EQ is Classic.
shows that the current playback position is at 00:03 and the total
ength of the song is 05:17.
Page 16
16
represents that the current song has its lyric.
“M y Heart Will Go On” is the name of the song. If the song does not have a
Tag, then its file name will be displayed here.
“Celine Dion” is the name of the singer.
Button Function in the Stop Interface
l Long-Press of MODE: Enter into the main menu.
l Short-Press of MODE: Enter into the Stop menu interface.
l Short-Press of PLAY: Play musical files.
l Long-Press of PLAY: Turn the player off.
l Hold-On of NEXT: Cycle to the next song in the current directory and the
time position of musical files is reset to zero.
l Hold-On of LAST: Function oppositely to NEXT.
l Short-Press of “Vol+” or ”Vol-”: Adjust the volume.
l Short-Press of A-B: Switch to the recording interface and start recording.
l Short-Press of EQ: Switch the sound effects.
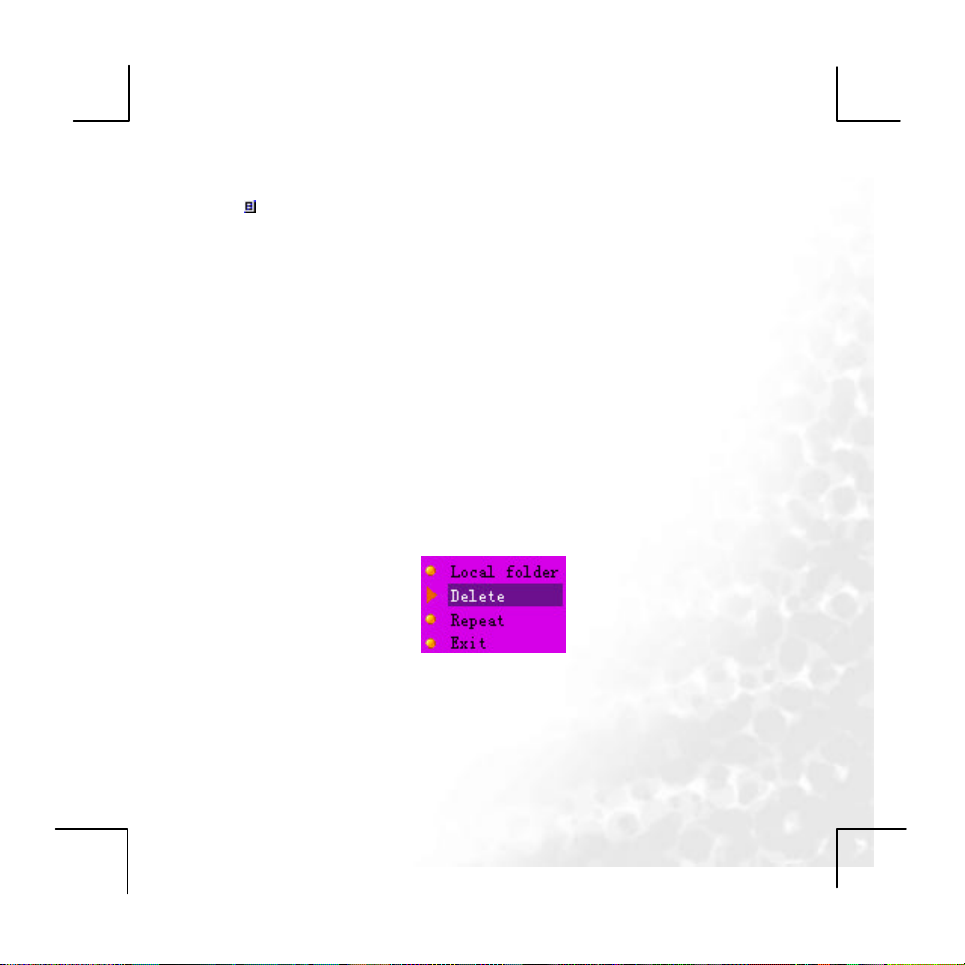
The Stop Menu Interface
You can select local folder , delete, repeat and exit. When you enter into this
interface.
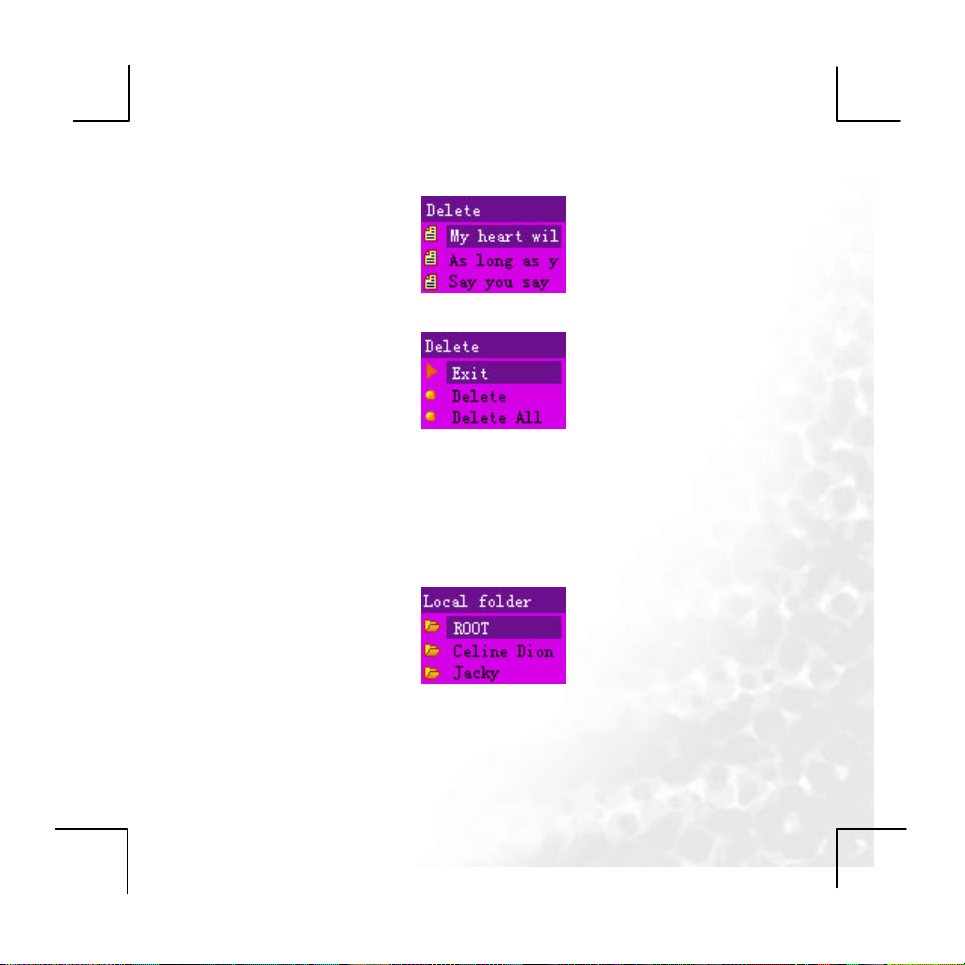
The Deleting Interface
You can delete a single file or all files in here.
Page 17
17
In this interface, press MODE to enter into the Deleting Ways selection
interface.
Button Function in the Deleting Interface
l Long-Press of PLAY: Turn the player off.
l Short-Press of PLAY: Return to the Stop Interface.
l Short-Press of A-B: Switch to the recording interface and start recording.
Directory Selection Interface
You can select the valid directory (the directory that contains musical files)
here to change the current playback directory. When you enter into this
interface, you are located at the current directory of the current disk.
Button Function in the Directory Selection Interface
l Short-Press or Long-Press of “Vol-”: The selection strip sw itches to the
Page 18

18
next directory one by one. The selection strip scrolls in a way of two lines.
l Short-Press or Long-Press of “Vol+”: The selection strip switches to the
last directory one by one. The selection strip scrolls in a way of two lines.
l A short-press of MODE will select the directory and return to the Stop
interface. If the current directory (including the disk) is changed, then you
need to reset the current file as the first, otherwise, the file and playback
position will not be changed.
l A long-press of PLAY will turn the player off.
l A short-press of PLAY will return to the Stop Interface.
l A short-press of A-B will enter into the recording function.
Button Function in the Playing interface
l Short-Press of MODE: Enter into the Playing menu interface.
l Long-Press of MODE: If there is the corresponding lyric, then you will
enter into the Lyrics interface. If there is no corresponding lyrics, then the
song will stop playing and you will enter the main menu.
l Short-Press of PLAY: Enter into the Stop Interface.
l Long-Press of NEXT: Function as fast forward till the end of a song.
l Long-Press of LAST: Function as fast backward till the beginning of a
song.
l Short-Press of NEXT: The music fades out in 2 seconds. The player
jumps to the next song and start playing. In this case, the next song is
selected based on the current playing mode. If the current mode is
Cycling One, then the next song is selected based on Cycling All.
l Short-Press of LAST: Function oppositely to NEXT.
l Hold-On of “Vol+”: The volume will increase.
l Hold-On of “Vol-”: The volume will decrease.
Page 19

19
l Short-Press of A-B: Enter into the Repeat interface and confirm the A
point. One more short-press of A-B will confirm the B point and start
repeating the segment between A and B.
Playing Menu Interface
Note: This interface provides the user with the following options:
① Repeat: To set the ways for playing songs.
② Equalizer: To set sound effects for the playing songs.
③ Tempo rate: To adjust the speed of song playing, except for the songs in
the WMA format.
④ Replay: To enter the Repeat interface and start the Repeat function.
⑤ Replay Times: To set the times for repeating.
⑥ Replay gap: To set the interval between each repeating playing.
⑦ Exit: Return to the Playing mode. The music is still playing.
Repeat Setting Interface
Note: You can select Repeat Mode for playing songs in here. The music is still
playing.
List of Repeat Mode Options:
Page 20

20
Current directory, it will continue to play the songs in the next directory .
Repeat One: Repeat playing the current song.
Play Folder: The player will stop if it finishes playing the songs in the
Repeat Folder: Repeat playing the songs in the directory.
Repeat All: Repeat playing the songs in all directories.
Random: Play the songs in the current directory in a random way.
Pre-listen: Play the beginning 10 seconds of all the songs in the current
current directory.
directory in order.
Equalizer Setting Interface
Note: You can select Equalizer for playing songs in here. The music is still
playing.
List of Sound Effects Options:
Natural (Default)
Rock
Pop
Classic
Soft
Jazz
Double Bass
Repeat Interface
Note: You can perform manual or auto repeat in here. The repeat type you
use is set in the “Settings”. The Replay Times and Re play gap are set in the
Playing menu interface.
Page 21

21
Manual Repeat Operation
When you enter Manual Repeat, the “A” in will flash.
u A short-press of NEXT or A-B will set the “A” point, and then “B” will
flash.
u A short-press of NEXT or A-B will set the “B” point. Then the segment
between “A” and “B” will play repeatedly.
u After a short-press of LAST or A-B or the set repeating times, the repeat
function will be cycled.
u A short-press of NEXT will enter the cycle of Follow ->
Repeat. For the follow, ADPCM is adopted to record sound. The
recording duration is 10% longer than the repeat. The minimum
recording duration is 1 second.
u A short-press of LAST will return to the Repeat function.
u A short-press of NEXT will enter the cycle of Repeat ->
Compare. The Compare function refers to play the sound recorded
in the Follow function.
u A short-press of LAST will return to Follow-Repeat.
u A short-press of NEXT will begin the settings for the next Repeat.
Note: ① In the steps above, hold-on of “Vol+” or “Vol-” will change
the current playing speed. (Except for the WMA format)
② In all the steps above, a short-press of MODE will quit the
Repeat interface and return to the Playing interface.
Page 22

22
③ In all the steps above, a short-press of PLAY will quit the
Repeat interface and the Playing interface, and return to the
Auto Repeat Operation
u When you enter Auto Repeat, the “A” in will flash.
u A short-press of NEXT/A-B will set the “A” point, and then “B” will flash.
u If the player finds a blank or after a short-press of NEXT/A-B, the
u After the set repeat times, the “B” point will be automatically set to the
u A short-press of LAST will cycle the Setting->Repeat function.
u A short-press of NEXT will enter the cycle of Repeat ->
u A short-press of LAST will return to the Repeat function.
u A short-press of NEXT will enter the cycle of Repeat ->
u A short-press of LAST will return to Follow-Repeat.
u A short-press of NEXT will begin the settings for the next Repeat.
Note: ① In the steps above, hold-on of “ Vol+” or “Vol-” will change the
Stop interface.
Repeat will display, and the player will start repeating the segment
between A and B.
“A” point of the next segment, and then the “B” point is wanted.
Follow. For the follow, ADPCM is adopted to record sound. The recording
duration is 10% longer than the repeat. The minimum recording duration
is 1 second.
Compare. The Compare function refers to play the sound recorded in the
Follow function.
current playing speed.
② In all the steps above, a short -press of MODE will quit the
function setting interface and return to the Playing interface.
Page 23

23
③ In all the steps above, a short-press of PLAY will quit the
Repeat interface and the Playing interface, and return to the
Tempo rate Setting Interface
Note: You can set the current playing speed in here. This will affect the
playing of musical files in the MP3 format. However, this will not affect the
files in WMA format.
Stop interface.
Replay times
Note: The player will quit the Repeat mode after the set replay times. The
repeat times can be 1 to 10.
Replay gap
Note: During repeating, the player will pause for this period of time between
each repeat. The interval can be 1 to 10 seconds.
Page 24

24
Lyrics Show Interface
Note: When you enter into the Lyrics Show interface, the current song
continue to play and the corresponding lyrics will display according to the
playing progress of the song. When the playing of the song is over, the player
will run the subsequent song playing functions according to the Playing mode
set. If the subsequent songs have lyrics, then the player will still work in the
Lyrics Show interface. If there is no lyrics, then the player will return to the
Playing interface to play the subsequent songs.
English Songs:
n The screen is split into an upper part and a lower part. Generally, a line
in the LRC corresponds to a part. If a line in the LRC has more than 28
characters, the rest characters in the line will be displayed in the other
part. For each part, the sync time tag is calculated by averaging. Note
that, if a new line appears in the middle of a word, a “-” is required to
connect the two lines, but for a word with only two characters, the whole
word will be displayed in the next line.
n Chinese Songs: Similar with English songs. However, each part has 2
Page 25

25
lines. Each line has 7 Chinese characters.
n When the song is playing, its lyrics will be highlighted, and the next
sentence of the lyrics will wait in the other part. The waiting lyrics will be
highlighted when its time comes. The next sentence will be displayed in
the part where the last sentence has finished its presence. Whereas
the time in LRC usually has some delay, the lyrics can be showed
1 second ahead.
Button Function in the Lyrics Show Interface
u Short-Press of Mode: To return to the Playing interface.
u Short-Press of Play: To quit the Lyrics interface and enter the Stop
interface.
u Long-Press of Next: Function as fast forward till the end of a song. 8
will be displayed.
u Long-Press of LAST: Function as fast backward till the beginning of a
song. 7 will be displayed.
u Short-Press of NEXT: To switch to the next song.
u Short-Press of LAST: To switch to the last song.
u Short-Press of “Vol-”: Cycle to the next screen of the lyrics. This could
be overlaid by sync lyrics.
u Short-Press of “Vol+”: Cycle to the last screen of the lyrics. This could
be overlaid by sync lyrics.
u In this case, the A-B button is disabled.
Page 26

26
Using the recording functions
Select the “Voice REC” in the main menu, enter the recorder interface.
In this interface, it realize recording sound files of WAV and ACT format. It
has the following interfaces: stop, recording, pause and directory selection.
l 00:00:03 indicates the progress of the recording. In the Stop interface the
length of the current recording will be displayed.
l 05:05:17 indicates the space available for recording sound.
l indicates the coding format of the current recorded file, including AG8
and AD32.
l 01-15, the “01” will not change. The “15” represents the number of
currently existing recorded files.
l REC01 is the filename of the current recording file. 2004/10/29 08:56 is
the date of the file.
Button Function in the Stop Interface
l Long-Press of MODE: To return to the main menu.
l Short-Press of MODE: To enter into the Stop Menu interface.
l Short-Press of A-B/PLAY: To enter the recording interface and start
recording.
l Long-Press of PLAY: to turn the player off.
l LAST and NEXT: Disabled.
l “Vol+” and “Vol-”: Disabled.
Page 27

27
The Stop Menu Interface
Note: You can select Local folder, REC Types and Exit in here. When you
enter into this interface, the enabled position is the one where you quit last
time.
Local folder Selection Interface
Note: Here, you can select any directory as your current recording directory.
When you enter into the recording interface, you will be located at the current
directory of the current disk.
Button Function in the Directory Selection Interface
l Short-Press or Long-Press of “Vol-”: The selection strip switches to the
next directory one by one. The selection strip scrolls in a way of two
lines.
l Short-Press or Long-Press of “Vol+”: The selection strip switches to
the last directory one by one. The selection strip scrolls in a way of
two lines.
l A short-press of MODE will confirm the selection strip and return to the
Stop interface.
l A short-press of PLAY will cancel Directory Selection and quit to the
Recording Stop Interface.
l A long-press of PLAY will turn the player off.
l A short-press of A-B will enter into the recording function.
REC Type Selection Interface
Note: Here, you can choose REC types from Fine REC, Long REC, Fine VOR
and Long VOR.
Page 28

28
The Recording Interface
Note: When you enter into the Recording interface, a new recording file will
be generated, and the recording will start in a current coding ways. The
scrolling bar indicates that the player is in recording. It also indicates the
progress of the current recording.
Long press play key to save the file.
Button Function in the Recording Interface
l Short-Press of PLAY/A-B: To enter into the Pause Interface.
l Long-Press of PLAY/A-B: To return to the Stop Interface.
l LAST, NEXT, Vol+ and Vol-: Disabled.
VOR Function
When the player does not sense any valid voice, the system will stay at
Voice Waiting mode. When valid voice is sensed, the player will resume
recording.
Stop recording when the electronic signal level is too low.
When the player waits to record sound, the recording time length “00:00:03”
will flash.
In the recording, if the electronic signal level is too low, the recording file
Page 29

29
will be saved, and then the player will return to the Stop interface.
The Pause Interface
When you enter into the Pause interface, the Pause status will be
displayed and user’s operations are wanted. In this case, 00:00:03 will
flash at the rate of once per second.
Button Function in the Pause Interface
u Short-Press of PLAY/A-B: To return to the Recording interface to
resume recording.
u Long-Press of PLAY/A-B: To return to the Stop interface and save the
recording in the file system.
u LAST, NEXT, Vol+ and Vol-: Disabled.
Stop recording when the electronic signal level is too low.
During the pause, if the electronic signal level is too low, the recording file
will be saved, and then the player will return to the Stop interface.
Page 30

30
Playing the recorded files
Select the “Play REC” in the main menu, enter the interface of playing the
recorded files.
Realize the playback of *.WAV and *.ACT files. It has the following interfaces:
Playing, Local folder Selection, Delete, as well as function selection and
settings interfaces.
Functions in the Stop Interface
Note: When you enter into the Stop interface, the information about the
current playing of recorded sound will be displayed and user’s operations are
wanted.
l 00:00:03 is the time display for playing the recorded sound.
l 01/15 represents the order of current recorded file and the total number
of recorded files in the current directory.
l REC01 is the filename and 2004/3/15 10:23 is the date and time when
the file was created. (They will not scroll when the playing of the file
stops.)
Button Function in the Stop Interface
l Long-Press of MODE: To enter into the main menu.
l Short-Press of MODE: To enter into the Stop Menu interface.
l Short-Press of PLAY: To start playing the recorded sound.
l Long-Press of PLAY: To turn the player off.
Page 31

31
l Short-Press of LAST: To switch to the last recorded file in the current
directory and reset the time point to zero.
l Long-Press of LAST: To cycle to the last recorded files and reset the
time point to zero.
l Short-Press of NEXT: To switch to the next recorded file in the current
directory and reset the time point to zero.
l Long-Press of NEXT: To cycle to the next recorded files and reset the
time point to zero.
l Short-Press of A-B: To switch to the recording mode and start
recording.
The Stop Menu Interface
Note: Here, you can select Local folder, Delete and Exit. When you enter into
this interface, the enabled position is the one where you quit last time.
Folder Selection Interface
Note: The user can select a folder as the current folder from the valid
directories (the directories that contain recorded files). Each time when you
enter into the Recorded File Playing mode, you will be located at the current
directory of the current disk.
Button Function in the Directory Selection Interface
l Long-Press of “Vol-”: The selection strip switches to the next directory
one by one. The selection strip scrolls in a way of two lines.
l Long-Press of “Vol+”: The selection strip switches to the last directory
Page 32

32
one by one. The selection strip scrolls in a way of two lines.
l Short-Press of MODE: To select the selection strip and return to the
Stop interface. When you switch to a new directory, the resume playing
memory will be cleared.
l Short-Press of PLAY: To quit to the Stop Interface.
l Long-Press of PLAY: To turn the player off.
l Short-Press of A-B: To enter the recording function and start recording.
Delete Interface
Note: This interface is used for deleting files.
Deletion Confirmation Interface: It is the same as the Musical File Deletion
except that the files are changed to recorded files.
Button Functions in the Deleting Interface (Refer to the deletion of musical
files)
l Short-Press of MODE: To confirm the current selection and return to the
Stop interface.
l Short-Press of PLAY: To cancel the current selection and return to the
Stop interface.
l Long-Press of PLAY: Turn the player off.
l Short-Press of A-B: To switch to the recording interface and start
recording.
Functions in the Playing Interface
Note: When you enter into the Playing interface, the information about the
current song will be displayed. The player automatically resumes playing the
song and waits for the user’s operations.
Its interface is similar with the Stop interface except that its time column is
counting on.
Page 33

33
The “REC01 2004/01/01 10:23” is scrolling horizontally when the file is
playing,
Button Function in the Playing interface
l Short-Press of MODE: To enter into the Playing menu interface.
l Short-Press of PLAY: To enter into the Stop Interface.
l Long-Press of PLAY: To turn the player off.
l Short-Press of NEXT: To jump to next file and start playing from its
beginning.
l Short-Press of LAST: To jump to last file and start playing from its
beginning.
l Long-Press of NEXT: Fast forward till the end of the sound file.
l Hold-On of NEXT: Fast backward till the beginning of the sound file.
l Hold-On of “Vol+”: To increase the volume.
l Hold-On of “Vol-”: To decrease the volume.
l Short-Press of A-B: To enter the Repeat interface and confirm the “A”
point.
Playing Menu Interface
Note: This interface provides the user with various options, including Repeat
Mode, Tempo rate, Replay and Exit, while the recorded file is still playing.
It is the same as the submenu of Musical File Playback except that it does not
have the EQ options.
Repeat Setting Interface
Page 34

34
Note: You can select Repeat Mode for playing songs in here. The music is still
playing.
It is the same as the interface when playing music.
Repeat Interface
Note: You can perform the repeat function here.
Repeat Operation
u When you enter the Repeat function, the “A” in will flash.
u A short-press of NEXT will set the “A” point, and then “B” will flash.
u A short-press of NEXT will set the “B” point. Then the segment between
“A” and “B” will play repeatedly.
u A short-press of MEXT/LAST will cycle the Repeat function.
Note: ① In the steps above, hold-on of “ Vol+” or “ Vol-” will change the
current playing speed.
② In all the steps above, a short -press of MODE will quit the
Repeat interface and return to the Playing interface.
③ In all the steps above, a short-press of PLAY will quit the
Repeat interface and the Playing interface, and return to the
Stop interface.
Tempo Rate Setting Interface
Note: Here, you can set the current playing speed, which will affect both WAV
and AG8 files.
Page 35

35
Listening to FM radio
Select the “FM” in the main menu, enter the FM interface.
Each time when you enter into this function, you are in the playing mode. You
need to restore the current prestored radio stations to play. The first time you
enter this function the frequency of the current radio station is the minimum one.
: The current frequency position. It change s its position on the frequency scale
with the changing of current frequency.
: Frequency Scale.
: The channel number of the current radio station. Up to 20 radio
stations can be prestored.
: The current frequency.
:Stereo. If this icon does not appear, then the radio is in mono mode.
Listen to the Radio
The interface is as shown in Fig above. The current band is at 87-108MHz
(European and American Band). The initial value of the current frequency for a
new player is at 87MHz.
Operation Instructions
u A long-press of NEXT will search for a radio station backward and then
play its program. If its frequency is the same as the one prestored, then
its channel number will display. A short-press of NEXT will mo ve the
frequency forward at a step of 100KHz for fine tuning.
u A long-press of LAST will search for a radio station forward and then
Page 36

36
play its program. If its frequency is the same as the one prestored, then
its channel number will display. A short-press of LAST will move the
frequency backward at a step of 100KHz for fine-tuning.
u Short-Press of “Vol+” or ”Vol-” will adjust the volume.
u Long-Press of MODE: To enter into the main menu.
u Short -Press of MODE: To enter into the FM submenu.
u Long-Press of PLAY: To turn the player off.
u A short-press of PLAY will jump to the next prestored radio station. If
there is no other prestored channel numbers, the press will not be
responded. When the last prestored channel number is reached, the
player will cycle back to the first prestored channel number.
u A short-press of A-B will enter the recording mode and start recording.
While the radio program is still playing.
FM Submenus
l Save: To save the radio station you are now listening to.
l Delete: To delete the radio station you are now listening to.
l Delete All: To delete all the radio stations stored.
l Normal Band: 87-108MHz.
l School Band: 76-90MHz.
l Fine REC: To record the radio program you are now listening in wav
format.
Page 37

37
l Long REC: To record the radio program you are now listening in act
format.
l Exit: To quit the menu.
Save
Note: Save the frequency to a new preset channel number. If the frequency is
just the saved one that is fine tuned, then it will be saved to the current
channel number.
Delet
Note: If you want to delete the current saved radio station, press MODE to
delete the current channel and quit to the FM playing interface. Press of other
buttons will cancel the deletion and quit to the FM playing interface.
Delet All
Note: If you want to delete all the saved radio stations, press MODE to delete
all the channel and quit to the FM playing interface. Press of other buttons will
cancel the deletion and quit to the FM playing interface.
Normal Band
Select the current band as 87-108MHz.
School Band
Select the current band as 76-90MHz.
Page 38

38
Browsing the JPEG/BMP/GIF pictures
Select the “PIC” in the main menu, enter the picture browsing interface.
Realize viewing of JPEG, BMP, GIF pictures. Common formats are supported.
File Selection Status
A press of Play will enter into the Picture Playing status.
u Press ”Vol-” or “Vol+” to select the next/last file.
u A press of Mode will enter the Stop submenus. 1. Local Folder 2. Play
Set, 3. Delete and 4. Exit.
u There are two playing modes: 1. Manual and 2. Auto.
u In the Auto Playing mode, the auto page turning interval can be set to 1
-10 seconds.
u Other buttons are disabled.
Picture Playing Status
u A short–press of Next / Last will display the next/last picture.
u A short–press of Play will return to the File Selection status.
u A long-press of Mode will return to the main menu.
Page 39

39
Playing the AMV files
Select the “Video” in the main menu, enter the interface of playing AMV files.
The *.AMV files could be playback in this function(the *.AMV files can be
converted by using the software which in the CD).
Button Function
l Short-Press of MODE: Enter into the Playing menu interface.
l Long-Press of MODE: S top playing the AMV files and enter the main
menu.
l Short-Press of PLAY: Play or stop.
l Long-Press of NEXT: Function as fast forward till the end of a AMV file.
l Long-Press of LAST: Function as fast backward till the beginning of a
AMV file.
l Short-Press of NEXT: Jumps to the next AMV file and start playing. In
this case, the next file is selected based on the current playing mode. If
the current mode is Cycling One, then the next song is selected based
on Cycling All.
l Short-Press of LAST: Function oppositely to NEXT.
l Hold-On of “Vol+”: The volume will increase.
l Hold-On of “Vol-”: The volume will decrease.
l Short-Press of A-B: Switch to the recording interface and start recording.
Page 40

40
Browsing the E-book
Select the “E -Book” in the main menu, enter the interface of viewing txt
files.
File Selection Status
When you enter from the main menu, you are at the file selection status.
Press the PLAY button, begin to read the selected text file.
u Press “Vol-” or “Vol+” to select the next/last file.
u A press of Mode will enter the Stop submenus. 1. Local Folder 2. Play
Set, 3. Delete and 4. Exit.
u There are two playing modes: 1. Manual and 2. Auto.
u In the Auto Playing mode, the auto page turning interval can be set to 5 -
15 seconds.
u Other buttons are disabled.
Read the files
Press the PLAY button, begin to read the text file, as the Fig below:
Page 41

41
u A short-press “LAST” or “NEXT” to select the last page/next page
u A short–press of Play will return to the File Selection status.
u Long-Press of MODE: To enter into the main menu.
u Other buttons are disabled.
Page 42

42
System setup
Note: This is mainly used for the setting of system -related parameter and
status display. These settings include: Clock, LCD Set, Language, Power
off, Replay Mode, Memory Info, Firmware Version, Firmware Upgrade
and Exit Menu.
Interface Display
After you finish setting each of these functional interfaces, you will still be
returned to this interface.
Clock Setting
Button Function
l A short-press “Vol+” will enter the procedure of setting the
recording time, beginning with the setting of year. Follow the
order of “Year – Month – Date – Hour – Minute”.
l A long-press of PLAY will turn the player off.
l A short-press of MODE will confirm and quit.
l A short-press of A-B will enter the recording interface and start
Page 43

43
recording.
The Setting Procedure
u 2003 flashes(2HZ)
u Hold-on of NEXT will increase the year number step by step.
u Hold-on of Last will decrease the year number step by step.
u A short-press of “Vol+” will confirm the year number. Then the
setting item will be switched to Month, whose setting method is
the same as the that of Year.
u Keeping on the short-press of “Vol+” will set Date, Hour and
Minute in turn. Press “Vol+” once more to finish the setting.
u Press “Vol-” to set Minute, Hour, Date, Month and Year in turn.
u After the change of each setting item is confirmed, the system will
be updated in time.
LCD Set
Button Function
◆ A short-press of “Vol-“ or “Vol+” will switch among different options.
◆ A short-press of MODE will select and enter one of the options.
◆ After you enter the option, a short-press of LAST or NEXT will adjust
the position of the slide bar.
◆ A short-press of PLAY will cancel the setting and quit.
Language
Note: Selecting Languages.
Page 44

44
Power off
Button Function
l A short-press of “Vol-“ or “Vol+” will switch between the two
modes.
l A short-press of MODE will select and enter the Energy Saving
Mode or Sleeping Mode.
l A short-press of PLAY will cancel the setting and quit.
Off time
Note: In this mode, you can set the Auto Off, that is, in the Stop status,
after how long the player will be turned off if there is no operations. The
Range: 00’-60’.
Sleep time
Note: In this mode, you can set a time. When there is no operation, the
system will count down from this setting time. When the setting time is
over, the player will be turned off. This time will be reset to zero before
turning off the player. (This setting is only valid for once.) It is mainly
used for enjoying music before sleeping. The Range: 00’--120’.
Page 45

45
Replay
Note: In here, you can set the working status for the repeat function. One
is Manual, the other is Auto.
It is the same as the Power off Setting interface.
Button Function
l A short-press of “Vol-“ or ”Vol+” will switch between the two
modes.
l A short-press of MODE will confirm and quit.
l A short-press of PLAY will cancel the setting and quit.
M emory info
Note: View the size and use of the memory.
Firmware Version
Note: Used to display the current firmware version.
Firmware upgrade
Enter the upgrade interface. The details please refer to the 48th page
"MP3 Player Upgrade Tool".
Page 46

46
Using BenQ Joybee P330 as a flash disk
Realize the standard USB DISK functions. Except the UPGRADE module,
in other status, when inserted into the USB Port, the player will enter into
the Udisk function.
Interface Display
There are three status: Ready, Download and Upload.
Ready means that the UDISK is ready to use.
Download means that the UDisk is in downloading mode.
Upload means that the UDisk is in uploading mode.
Button Function
u In Busy status, the player will not respond to any button operation.
Page 47

47
u In Ready mode, a short-press of MODE will switch to the MUSIC
mode.
u Short-Press of A-B: Switch to the recording function and start
recording.
Ejection
When PC is ejected (without pulling out the player from the PC), the
player will go into the main menu automatically.
Switch to UPGRADE
When receiving the command of switching to UPGRADE from the PC
UPGRADE application, the player needs to respond and execute the
corresponding command.
Page 48

48
Advanced operation
BenQ Joybee P330
Notice: Before install the software, be sure of that the Media Player9(or
above) and the DirectX9 have been installed in your PC.
After the installation, you can find the program in the “start”:
AMV Convert Tool:It could convert the other video formats to .mtv format,
whic h could be played in the mp3.
AMV Player: It could playback the *.amv files which have been converted.
MP3 Player Update Tool:The firmware upgrade tool
Sound Convert Tool : The tool is designed for format conversion
Uninstall:Uninstall the software.
AMV Convert Tool
Select the “AMV Convert Tool”, the figure will be shown as below:
from rcd/rec/act to WAV for recording files , with
the function of files playback in WAV, MP3
format files included.
Page 49

49
Click the button of ①, select the files which need to be converted; click the
button of ②, select the path of the .amv files(you could not change the
name of the file)
Click the button of ③, select the settings of the file which will be converted.
Page 50

50
You can select:
Fram es per second of the AMV files: “low、middle、high”
After finishing the settings, click the “OK” button, it will return the main
figure. (Notice: every time when the software reset, all the settings will
return default)
Click the button of ⑤, the software will begin to work:
Page 51

51
When the work finished, the figure will be shown as below:
Click the “OK” button, the conversion will be finished. You can find the .amv
files in the path you have appointed.
Page 52

52
About the formats: If your Media Player could not playback the source
video(click the button of ④ in the main figure, it could
not playback normally), you should install the more
decoders, or the software will not work successfully.
AMV Player
Select the “AMV Player”, the figure will be shown as below:
The AMV Player will playback the amv files w hich have been converted
you choose.
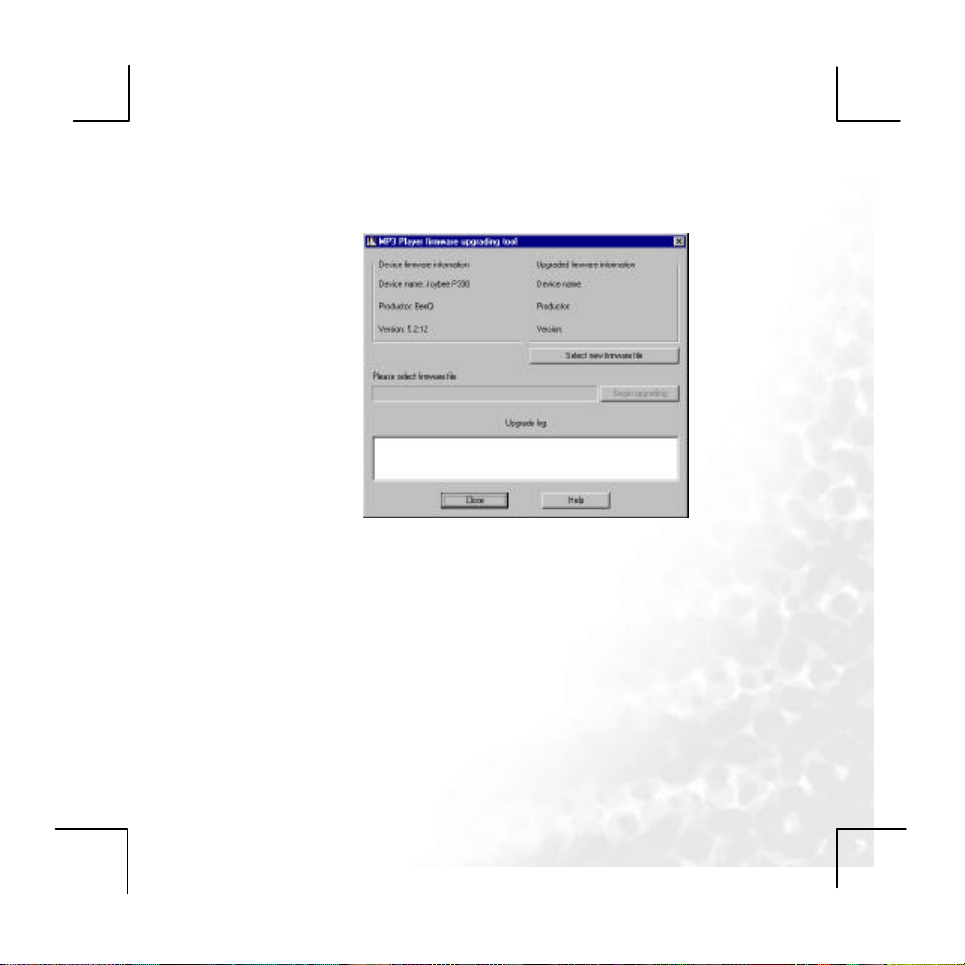
MP3 Player Update Tool
It upgrades a new version firmware for the MP3 Player.
Page 53
53
Connect the MP3 player to the PC, enter the firmware upgrade interface,
then click the program “MP3 Player Upgrade Tool”.
Click the “Select new firmware file” to select the firmware you need, then
click the “Begin upgrade” button. When the progress end, the upgrade is
successful.
Sound Convert Tool
Select “Sound Convert Tool”, the figure will be shown as below:
Page 54

54
The tool is designed for format conversion from rcd/rec/act to WAV for
recording files , with the function of files playback in WAV, MP3 format
files included.
Uninstall
Select “Uninstall”, it will uninstall the software:
Page 55

55
Troubleshooting
1.Push the play for 3 seconds, there is no display on the screen.
Please check the following: The battery is no power left, or the ON/OFF
2. The mess timing display on the screen when playbacking some songs.
Please check the following: At the moment, the Mp3 file is compressed by
3. Sometimes, plugging in or plugging out the device may infect the normal
work of the computer.
Please check the following: It is mainly because of plugging in or out the
4. When a song can’t playback smoothly, the buttons react very slowly and
the earphone may scream.
Please check the following: This may incurred by the unsupported of the
switch is not put on the “ON” position.
VBR format, the change of the timing display is
due to the change of the playback speed, so
the songs’ playback is no problems. Please
recompress the MP3 format file again; the
wrong timing display problem can be solved.
USB device. We advise the user not to
disconnect the device when transmitting
files or formatting files.
file-compress system, or the compress
speed rate of the song overruns the
capability of the system. To solve this
problem, you can delete this song or use the
Page 56

56
relevant software to recompress the song’s
Remark: To confirm the song’s file , you can connect the MP3 player to PC,
to check the file information by the playback tool in the computer
(e.g: Winamp)
5. No sound when playing a file.
Please check the following: The volume is too low, or the device is
6. Why does the capacity displayed in the player disaccord to the its claimed
capacity?
Please check the following: We need part of the device’s capacity to install
7. If the wording on the screen is distorted,
Please check the following: Please see if you have choose the correct
language.
8. Can’t download music smoothly:
Please check the following: Check if the USB cable has been damaged
and if the USB cable connect well. Also check if the driver has been well
installed, and if there is enough memory left.
9. Why sometimes the player informs “wrong format”?
Please check the following: There are damaged files in the player. Just
file into a standard one.
connecting the computer, or there is no
music files in your device.
some software and fonts, so the capacity you
have seen is usually smaller than it is
claimed.
connect the file to PC and delete the damaged file.
Our products don’t support NTFS and FAT32
Page 57
57
format)
10. Why my PC can’t use the Video converting software installed in the
Please check the following: If your computer is installed “Windows 2000”,
player?
please install the “DirectX9” software, which
you may find in the CD we attached in the
accessories.
Technical Specifications
LCD 65K 96*64 OLED full-color
Battery 550MAH Lithium battery
Music format supported MP3、WMA、WAV、AMV
S/N >80db
Temperature -5-40
Operate System Windows98SE/2000/XP(Windows98SE
Note: We will not announce If the product design and the specification will be
changed.
need to install the driver
Page 58

58
<Memo>
Page 59

59
 Loading...