


En
Fr
De
Es
It
User Manual
TuneTalk™ Stereo for iPod® video
Introduction
Introduction
Congratulations and thank you for purchasing this innovative product from Belkin mobility. Please review this User Manual carefully in order to get the best performance from your TuneTalk Stereo for iPod video.
Package Includes:
Compact |
iPod not included |
iPod Stand |
|
Plastic Spacer |
|
TuneTalk Stereo for iPod video
USB Cable
Introduction | 01

Using the TuneTalk Stereo
To select the recording quality:
From the iPod menu, select “Extras > Voice Memos > Quality”. Pressing the “Select” button will toggle between Low (22.05kHz, mono) or High (44.1kHz, stereo).
To record:
1. Connect the TuneTalk to the bottom of the iPod video. The iPod video will launch the “Record” function when you do this. With the “Record” option highlighted, press “Play/ Pause” or press the “Select” button to begin recording. To pause recording, press “Play/ Pause” again or highlight “Pause” and then press the “Select” button on the iPod video.
2. During recording, there are two options: “Pause” and “Stop and Save”. To end a recording, either press the “Menu” button or highlight the “Stop and Save” option, and then press the “Select” button. This saves your recording and lists it by date and time recorded.
NOTE: After stopping a recording, the recording LED remains on until the recording is saved to En the iPod.
3. To begin another recording, go to the top of the “Voice Memos” menu and select “Record Now”; or, from the iPod menu, select “Extras > Voice Memos > Record Now”. Or simply press the “Quick Memo” button on the TuneTalk Stereo.
NOTE: For personal memos or notes, hold the iPod video with the TuneTalk Stereo attached six to 18 inches from your mouth and speak in a normal tone. Holding the device too close or speaking too loudly may degrade the quality of your recording.
Using the TuneTalk Stereo | 02

Using the TuneTalk Stereo
3.5mm Auxiliary Stereo Input
The auxiliary input can be used with any line-level input, such as amplified microphones or other audio devices. The TuneTalk Stereo also provides three-volt (3V) “plug-in power” for use with an external microphone. When the TuneTalk Stereo senses that an auxiliary source is connected, the on-board microphones are automatically disabled.
Auto-Gain Switch
The TuneTalk Stereo includes a two-level auto-gain switch intended to optimize the quality of your recorded audio. The OFF setting is activated by moving the switch to the left of the setting bar. The OFF setting is for line-level input sources, such as amplified microphones, other audio devices, or microphone recordings in very loud environments. The ON setting is activated
by moving the switch to the right of the setting bar, and is suitable for most microphone recordings.
Auto-Gain Switch
Source |
Off |
On |
|
|
|
|
|
Internal |
Auto-gain off, low amplification. Useful |
Auto-gain on, with sufficient pre-gain |
|
for recording in loud situations. |
for normal microphone recordings. |
||
|
|||
|
|
|
|
|
Auto-gain off, no amplification. |
|
|
|
Useful for recording in very loud |
Auto-gain on, with sufficient pre-gain |
|
External |
situations, or when the external source |
||
for normal microphone recordings. |
|||
|
is a line-level audio source, like another |
||
|
|
||
|
MP3 player or a TV set. |
|
|
|
|
|
NOTE: Recording quality is dependent on the type of microphone used.
Using the TuneTalk Stereo | 03

Using the TuneTalk Stereo
Quick Memo Button
By pressing the “Quick Memo” button on the left side of the TuneTalk Stereo, the iPod video will automatically go to the “record” screen, no matter where you are in the iPod menu system, unless a recording is already in progress. Simply select “Record” or press “Play/Pause” to begin recording.
Recording LED Indicator
The TuneTalk Stereo features an LED to help you make the best possible recordings. This LED helps determine if the auto-gain switch is set correctly in conjunction with your microphone and/or recording setting. The LED will be off when TuneTalk is connected to the iPod video but not recording. The LED will blink twice to verify connection and remain solid red to indicate that the iPod video is recording. The LED will rapidly flash red when the sound level exceeds TuneTalk’s input range (e.g., when the audio is distorted, staticky, or breaks up [audio clipping]).
It is advisable to perform a quick sound check and playback before making longer recordings to
ensure that you are using the most appropriate setting.
En
USB Power/Sync Cable
Connect the mini-B USB connector into the TuneTalk Stereo and the other end into any powered USB port on your computer. iTunes will launch, allowing you to power and sync simultaneously.
NOTE: In order to power and charge, and continue to use the TuneTalk Stereo, you must first eject the iPod video from within iTunes. The iPod video will then exit Extended Mode and return to normal operation. The iPod video should still display the charging icon in the top right-hand corner.
You may find that the battery indicator on your iPod video shows that your iPod video’s battery drains very quickly when using your TuneTalk Stereo. The battery indicator tends to be very conservative when the iPod video’s hard drive is under heavy load, as it is when the iPod video is recording. Even if your battery indicator is in the red, you’ll often find that you have lots of recording time left before the iPod video’s battery is completely drained.
Using the TuneTalk Stereo | 04

Using the TuneTalk Stereo
To play a recording:
Select “Extras > Voice Memos” and choose the recording. Recordings are listed by date and time recorded. Recordings are saved in a “Recordings” folder on the iPod video in WAV file format.
To transfer recordings to your Windows-based computer:
Your iPod video must be enabled for use as a hard disk. Connect the iPod video to your computer and open the application you use to listen to audio. Through the “My Computer” menu, doubleclick the removable drive that represents the iPod video. Double-click on the “Recordings” folder. Double-click on a specific audio (WAV format) file to listen to the recording.
NOTE: You can play your files directly from the iPod video and/or transfer recordings to your computer by opening this folder and dragging the audio files to the desktop.
To transfer recordings using iTunes®:
Connect the iPod video to your computer. Wait a few seconds while iTunes recognizes the iPod video device. Once the device is recognized, iTunes will launch (if configured to do so
automatically). You will be asked if you would like to copy your voice memos to your music library. Select “Yes” or “No” to proceed. If you select “Yes”, all voice memos will be copied to your iTunes Music Library. A default “Voice Memos” folder, in which all voice memos will be stored, will be created in your iPod source list. Once your recordings are in iTunes, you can rename them and add other information by selecting a recording and choosing “File > Get Info”.
By default, the iPod video will record audio files in WAV format. These can be easily converted to alternate file types in iTunes to reduce the file size. In iTunes, select “Edit > Preferences > Advanced > Importing” and choose the audio compression format you want to use. Then select one or more recordings from your “Voice Memos” folder, right-click, and choose to convert them to a new format.
To locate recordings on the iPod video after syncing with iTunes:
Disconnect the iPod video from the computer. Select “Playlists > Voice Memos”
Using the TuneTalk Stereo | 05

Using the TuneTalk Stereo
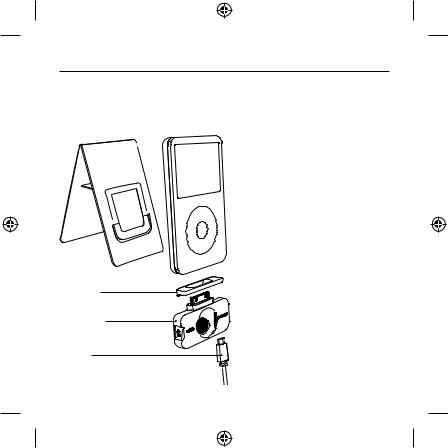
Insert the TuneTalk Stereo into the iPod video’s dock connector.
Extended connector provides compatibility with a case. Use the adapter when used without a case.
Connect the included USB cable to the bottom of the TuneTalk Stereo to power and/or sync your iPod from any powered USB port.
How to Set Up the TuneTalk Stereo and iPod with the Compact Stand |
En |
No bigger than a credit card, the iPod stand is small enough to fit in your wallet.
Fig. 1 |
Fig. 2 |
Fig. 3 |
1.Assemble the stand by placing the plastic tab through the rear panel for stability (Fig. 1).
2.Connect the TuneTalk Stereo to the iPod as shown above (Fig. 2).
3.When used with the stand, the TuneTalk Stereo can be positioned toward the source, which greatly improves the recording quality (Fig. 3).
Using the TuneTalk Stereo | 06

Information
FCC Statement
DECLARATION OF CONFORMITY WITH FCC RULES FOR ELECTROMAGNETIC COMPATIBILITY
We, Belkin Corporation, of 501 West Walnut Street, Compton, CA 90220, declare under our sole responsibility that the product:
F8Z082 / F8Z082-BLK
to which this declaration relates:
Has been tested and found to comply with the limits for a Class B digital device, pursuant to part 15 of the FCC Rules. These limits are designed to provide reasonable protection against harmful interference in a residential installation. This equipment generates, uses, and can radiate radio frequency energy and, if not installed and used in accordance with the instructions, may cause harmful interference to radio
communications. However, there is no guarantee that interference will not occur in a particular installation. If this equipment does cause harmful interference to radio or television reception, which can be determined by turning the equipment off and on, the user is encouraged to try to correct the interference by one or more of the following measures:
•Reorient or relocate the receiving antenna.
•Increase the separation between the equipment and receiver.
• |
Connect the equipment into an outlet on a circuit different from that to which the |
receiver is |
connected. |
|
|
• |
Consult the dealer or an experienced radio/TV technician for help. |
|
ICES This Class B digital apparatus complies with Canadian ICES-003. Cet appareil numérique de la classe B conforme á la norme NMB-003 du Canada.
Information | 07

Belkin Corporation Limited 3-Year Product Warranty
What this warranty covers.
Belkin Corporation warrants to the original purchaser of this Belkin product that the product shall be free of defects in design, assembly, material, or workmanship.
What the period of coverage is.
Belkin Corporation warrants the Belkin product for three years.
What will we do to correct problems?
Product Warranty.
Belkin will repair or replace, at its option, any defective product free of charge (except for shipping charges for the product).
What is not covered by this warranty?
All above warranties are null and void if the Belkin product is not provided to Belkin |
En |
|
|
Corporation for inspection upon Belkin’s request at the sole expense of the purchaser, or |
|
if Belkin Corporation determines that the Belkin product has been improperly installed, |
|
altered in any way, or tampered with. The Belkin Product Warranty does not protect against |
|
acts of God (other than lightning) such as flood, earthquake, war, vandalism, theft, normal- |
|
use wear and tear, erosion, depletion, obsolescence, abuse, damage due to low voltage |
|
disturbances (i.e. brownouts or sags), non-authorized program, or system equipment |
|
modification or alteration. |
|
Warranty | 08

Belkin Corporation Limited 3-Year Product Warranty
How to get service.
To get service for your Belkin product you must take the following steps:
1.Contact Belkin Corporation at 501 W. Walnut St., Compton CA 90220, Attn: Customer Service, or call (800)-223-5546, within 15 days of the Occurrence. Be prepared to provide the following information:
a.The part number of the Belkin product.
b.Where you purchased the product.
c.When you purchased the product.
d.Copy of original receipt.
2.Your Belkin Customer Service Representative will then instruct you on how to forward your receipt and Belkin product and how to proceed with your claim.
Belkin Corporation reserves the right to review the damaged Belkin product. All costs of shipping the Belkin product to Belkin Corporation for inspection shall be borne solely by the purchaser. If Belkin determines, in its sole discretion, that it is impractical to ship the damaged equipment to Belkin Corporation, Belkin may designate, in its sole discretion, an equipment repair facility to inspect and estimate the cost to repair such equipment. The cost, if any, of shipping the equipment to and from such repair facility and of such estimate shall be borne solely by the purchaser. Damaged equipment must remain available for inspection until the claim is finalized. Whenever claims are settled, Belkin Corporation reserves the right to be subrogated under any existing insurance policies the purchaser may have.
Warranty | 09
Belkin Corporation Limited 3-Year Product Warranty
How state law relates to the warranty.
THIS WARRANTY CONTAINS THE SOLE WARRANTY OF BELKIN CORPORATION, THERE ARE NO OTHER WARRANTIES, EXPRESSED OR, EXCEPT AS REQUIRED BY LAW, IMPLIED, INCLUDING THE IMPLIED WARRANTY OR CONDITION OF QUALITY, MERCHANTABILITY OR FITNESS FOR A PARTICULAR PURPOSE, AND SUCH IMPLIED WARRANTIES, IF ANY, ARE LIMITED IN DURATION TO THE TERM OF THIS WARRANTY.
Some states do not allow limitations on how long an implied warranty lasts, so the above limitations may not apply to you.
IN NO EVENT SHALL BELKIN CORPORATION BE LIABLE FOR INCIDENTAL, SPECIAL, DIRECT, INDIRECT, CONSEQUENTIAL OR MULTIPLE DAMAGES SUCH AS, BUT NOT LIMITED TO, LOST BUSINESS OR PROFITS ARISING OUT OF THE SALE OR USE OF ANY BELKIN PRODUCT, EVEN IF ADVISED OF THE POSSIBILITY OF SUCH DAMAGES.
This warranty gives you specific legal rights, and you may also have other rights, which may vary from state to state. Some states do not allow the exclusion or limitation of incidental, En consequential, or other damages, so the above limitations may not apply to you.
Warranty | 10

Belkin Ltd.
Express Business Park, Shipton Way
Rushden, NN10 6GL, United Kingdom
+44 (0) 1933 35 2000
+44 (0) 1933 31 2000 fax
Belkin B.V.
Boeing Avenue 333
1119 PH Schiphol-Rijk, Netherlands
+31 (0) 20 654 7300
+31 (0) 20 654 7349 fax
Belkin GmbH
Hanebergstraße 2,
80637 Munich, Germany
+49 (0) 89 143405 0
+49 (0) 89 143405 100 fax
Belkin SAS 130 rue de Silly
92100 Boulogne Billancourt, France
+33 (0) 1 41 03 14 40
+33 (0) 1 41 31 01 72 fax
Belkin Iberia Avda. Cerro del Aguila 3
28700 San Sebastián de los Reyes, Spain
+34 9 16 25 80 00
+34 9 02 02 00 34 fax
© 2006 Belkin Corporation. All rights reserved.
All trade names are registered trademarks of respective manufacturers listed. iPod is a trademark of Apple Computer, Inc., registered in the U.S. and other countries.
F8Z082ea/F8Z082eaBLK |
|
P75147ea |

Fr
Manuel de l’utilisateur
TuneTalk™ Stéréo pour iPod® vidéo
Introduction

Introduction
Félicitations et merci d’avoir choisi ce produit novateur dans la gamme mobile de Belkin. Veuillez lire attentivement ce manuel pour obtenir les meilleures performances possibles de votre TuneTalk Stéréo pour iPod vidéo.
Contenu de l’emballage :
iPod non fourni
Support compact pour iPod
Espaceur en plastique
TuneTalk Stéréo pour iPod vidéo
Câble USB
Introduction | 01
Utilisation du TuneTalk Stéréo
Pour régler la qualité d’enregistrement :
Dans le menu iPod, sélectionnez « Extras > Voice Memos » (Extras > Mémos vocaux). Appuyez sur le bouton « Select » pour aller de « Low »(22,05 kHz, mono) à « High » (44.1kHz, stéréo).
Pour enregistrer, procédez comme suit :
1. Branchez le TuneTalk à la partie inférieure du iPod vidéo. Lorsque vous effectuez cette opération, l’iPod vidéo lance l’application d’enregistrement. Lorsque l’option « Record » (Enregistrer) est mise en surbrillance, appuyez sur « Play/Pause » (Lecture/Pause) ou sur le bouton « Select » (Sélectionner) pour commencer l’enregistrement. Pour faire une pause dans l’enregistrement, appuyez de nouveau sur « Play/Pause » (Lecture/Pause) ou mettez « Pause » en surbrillance et appuyez sur le bouton « Select » (Sélectionner) de l’iPod vidéo.
2. Deux options s’offrent à vous pendant l’enregistrement : « Pause » et « Stop and Save » |
|
(Arrêter et enregistrer). Pour arrêter l’enregistrement, appuyez sur le bouton « Menu » ou |
|
mettez l’option « Stop and Save » (Arrêter et enregistrer) en surbrillance. Ensuite, appuyez |
|
sur le bouton « Select » (Sélectionner). Ceci permet de sauvegarder votre enregistrement et |
Fr |
de le faire figurer dans une liste triée par date et heure d’enregistrement. |
|
NOTE : Après avoir arrêté un enregistrement, le témoin demeure allumé jusqu’à ce que |
|
l’enregistrement est sauvegardé sur l’iPod. |
|
3. Pour commencer un autre enregistrement, allez en haut du menu « Voice Memos » |
|
(Mémos vocaux), puis sélectionnez « Record Now » (Enregistrer maintenant). Vous pouvez |
|
également choisir « Extras > Voice Memos > Record Now » (Extras > Mémos vocaux > |
|
Enregistrer maintenant) dans le menu iPod. Ou encore, appuyez sur le bouton « Quick |
|
Memo » (Mémo rapide) sur le TuneTalk Stéréo. |
|
REMARQUE : Pour les mémos ou notes personnelles, tenez l’iPod et le TuneTalk à une distance |
|
de 15 à 45 cm de votre bouche et parlez normalement. Si vous tenez le TuneTalk trop près ou si |
|
vous parlez trop fort, la qualité de l’enregistrement diminue. |
|
Utilisation du TuneTalk Stéréo | 02

Utilisation du TuneTalk Stéréo
Prise d’entrée stéréo auxiliaire 3,5 mm
La prise auxiliaire peut servir d’entrée pour différents matériels, comme des microphones ou d’autres dispositifs audio. Le TuneTalk Stéréo propose également une prise alimentée (3 V) pour l’utilisation d’un microphone externe. Lorsque le TuneTalk Stéréo détecte la présence d’une source auxiliaire, les microphones intégrés sont désactivés.
Commutateur de réglage du gain
L’e TuneTalk Stéréo comporte un commutateur de gain à deux niveaux pour optimiser la qualité du son enregistré. Pour activer la fonction « OFF », déplacez le commutateur vers la gauche
de la barre de réglage. Cette fonction convient pour les sources auxiliaires, telles que les microphones amplificateurs ou autres dispositifs audio, ou l’enregistrement avec microphone dans un environnement bruyant. Pour activer la fonction « ON », déplacez le commutateur vers la droite de la barre de réglage. Cette fonction convient aux enregistrements avec microphones courants.
|
Commutateur de réglage du gain |
||
|
|
|
|
Source |
Off (désactivé) |
On (activé) |
|
|
|
|
|
|
Réglage automatique du gain |
Réglage automatique du gain activé ; |
|
Interne |
désactivé ; amplification faible Idéal |
gain prédéterminé convenant pour les |
|
|
pour les environnements bruyants. |
enregistrements réguliers avec micro. |
|
|
|
|
|
|
Réglage automatique du gain |
|
|
|
désactivé ; aucune amplification |
Réglage automatique du gain activé ; |
|
|
Convient aux environnements très |
||
Externe |
gain prédéterminé convenant pour les |
||
bruyants ou lorsque la source externe |
|||
|
enregistrements réguliers avec micro. |
||
|
est une source auxiliaire, tel un autre |
||
|
|
||
|
lecteur MP3 ou un téléviseur. |
|
|
|
|
|
|
REMARQUE : La qualité d’enregistrement dépend du type de micro utilisé. |
|||
Utilisation du TuneTalk Stéréo | 03

Utilisation du TuneTalk Stéréo
Bouton « Quick Memo » |
|
Pour aller automatiquement à l’écran d’enregistrement de l’iPod à partir de n’importe quel |
|
écran, appuyez sur le bouton « Quick Memo » (Mémo rapide) situé du côté gauche du TuneTalk |
|
Stéréo, à moins qu’un enregistrement soit déjà en cours. Appuyez simplement sur « Record » |
|
(Enregistrer) ou sur « Play/Pause » (Lecture/pause) pour commencer l’enregistrement. |
|
Témoin d’enregistrement |
|
Le TuneTalk Stéréo possède un témoin servant de guide pour l’enregistrement audio. Il vous |
|
permet de savoir si le commutateur de gain est correctement placé par rapport à votre micro |
|
et/ou le type d’enregistrement choisi. Le témoin est éteint lorsque le TuneTalk est branché à |
|
l’iPod vidéo mais qu’aucun enregistrement n’est en cours. Le témoin clignote deux fois pour |
|
vérifier la connexion et demeure allumé en continu pour indiquer que l’iPod vidéo enregistre. |
|
Le témoin clignote rapidement lorsque le niveau sonore dépasse la plage du TuneTalk |
|
(distorsion, statique, coupures, etc.). |
|
Il est conseillé de réaliser une rapide vérification du son et de la lecture avant de faire de longs |
|
enregistrements afin de vous assurer que vous utilisez le réglage le mieux adapté. |
|
Câble USB d’alimentation/synchronisation |
|
Branchez le connecteur USB mini B au TuneTalk Stéréo et branchez l’autre extrémité du |
Fr |
câble à n’importe quel port USB alimenté sur votre ordinateur. Le logiciel iTunes est lancé |
|
automatiquement, vous permettant d’alimenter et de synchroniser votre iPod simultanément. |
|
REMARQUE : Pour alimenter et charger votre iPod tout en utilisant le TuneTalk Stéréo, vous |
|
devez d’abord éjecter l’iPod vidéo via iTunes. L’iPod vidéo quitte le mode étendu et reprend |
|
son fonctionnement normal. L’icône de chargement doit apparaître au coin inférieur droit de |
|
l’écran de l’iPod vidéo. |
|
Vous remarquerez peut-être que l’indicateur du niveau de la batterie de votre iPod vidéo |
|
indique que la batterie se vide rapidement lorsque vous utilisez le TuneTalk Stéréo. L’indicateur |
|
de niveau de la batterie fait une estimation prudente lorsque le disque dur de l’iPod vidéo est |
|
surchargé, comme c’est le cas lors de l’enregistrement. Même si l’indicateur est rouge, il est fort |
|
probable que vous pourrez enregistrer encore plusieurs minutes avant que la batterie de l’iPod |
|
ne soit vide. |
|
Utilisation du TuneTalk Stéréo | 04

Utilisation du TuneTalk Stéréo
Pour lire un enregistrement, procédez comme suit :
Sélectionnez « Extras > Voice Memos » (Extras > Mémos vocaux) et choisissez l’enregistrement. Les enregistrements sont répertoriés par date et heure d’enregistrement. Les enregistrements sont enregistrés au format WAV sur votre iPod vidéo dans un dossier appelé « Recordings » (Enregistrements).
Pour transférer vos enregistrements vers l’ordinateur, procédez comme suit :
Votre iPod doit être reconnu en tant que disque dur externe par votre ordinateur. Branchez l’iPod sur l’ordinateur et ouvrez l’application que vous utilisez pour écouter des fichiers audio. Dans
le menu « Poste de travail », cliquez deux fois le lecteur amovible qui représente l’iPod. Doublecliquez sur le dossier « Recordings » (Enregistrements). Double-cliquez sur un fichier audio (format WAV) pour écouter l’enregistrement.
REMARQUE : Vous pouvez lire les fichiers directement depuis l’iPod vidéo et/ou les transférer vers votre ordinateur. Pour ce faire, ouvrez ce dossier et faites glisser les fichiers audio vers le bureau.
Pour transférer des enregistrements au moyen iTunes®, procédez comme suit :
Branchez l’iPod vidéo sur l’ordinateur. Attendez quelques secondes qu’iTunes reconnaisse l’iPod vidéo. Une fois l’appareil reconnu, iTunes est lancé (l’opération est automatique). Un message vous demande si vous souhaitez copier vos mémos vocaux dans votre bibliothèque musicale. Sélectionnez « Yes » (Oui) ou « No » (Non) pour continuer. Si vous choisissez « Yes » (Oui), tous les mémos vocaux seront copiés dans votre bibliothèque musicale iTunes. Un dossier « Voice Memos » (Mémos vocaux) est créé dans la liste des sources iPod. Tous vos mémos vocaux y sont stockés. Lorsque vos enregistrements se retrouvent dans iTunes, vous pouvez les renommer et ajouter des informations en sélectionnant un enregistrement et en choisissant « File > Get Info » (Fichier > Information).
Par défaut, l’iPod vidéo enregistre les fichiers audio au format WAV. Vous pouvez convertir les fichiers en d’autres formats avec iTunes, afin d’en réduire la taille. Dans iTunes, sélectionnez « Edit > Preferences > Advanced > Importing » (Édition > Préférences > Avancé > Importer) et choisissez le format de compression audio désiré. Sélectionnez ensuite un ou plusieurs enregistrements de votre dossier « Voice Memos » (Mémos vocaux), cliquez avec le bouton droit de votre souris et sélectionnez l’option de conversion vers un nouveau format.
Pour rechercher des enregistrements sur l’iPod vidéo après avoir effectué la synchronisation avec iTunes, procédez comme suit :
Débranchez l’iPod de l’ordinateur. Sélectionnez « Playlists > Voice Memos » (Listes de lecture > Mémos vocaux).
Utilisation du TuneTalk Stéréo | 05
 Loading...