

Page 1
GO VIDEO KIT
Professional Video Production Microphone Kit
V 1.0
(EN) Safety Instruction
1. Read these instructions.
2. Keep these instructions.
3. Heed all warnings.
4. Follow all instructions.
5. Do not use thi s apparatus n ear water.
6. Clean only wi th dry cloth .
7. D o not block any ve ntilation ope nings.
Instal l in accordance w ith the manuf acturer ’s
instructions.
8. Do not insta ll near any heat so urces
such as ra diators, heat r egisters , stoves, or
other apparatus (including ampliers) that
produce heat.
9. Use only attachments/accessories
speci ed by the manuf acturer.
10. Use only wi th the cart , stand,
tripod, bracket, or table specied
by the manu facturer, or s old
with the a pparatus. W hen a cart is us ed, use
caution when moving the cart/apparatus
combination to avoid injury from tip-over.
11. Correc t disposal o f this produc t:
This sym bol indicat es that this
produc t must not be di sposed
of with household waste,
accordi ng to the WEEE Dire ctive (2012/19/EU)
and your na tional law. This pr oduct shoul d be
taken to a co llection ce nter licensed f or the
recyc ling of waste el ectrica l and electr onic
equipm ent (EEE). The misha ndling of this t ype
of waste c ould have a possi ble negative
impac t on the environ ment and human
health du e to potentiall y hazardous
subst ances that are ge nerally asso ciated with
EEE. At the s ame time, your co operation in t he
correc t disposal o f this produc t will contri bute
to the ec ient use of natu ral resourc es. For
more inf ormation abo ut where you ca n take
your was te equipment f or recycli ng, please
contac t your local c ity oce, or you r
household waste collection service.
12. Do not ins tall in a conne d space, such as
a book ca se or similar uni t.
13. Do not plac e naked ame sour ces, such as
lighted candles, on the apparatus.
(ES) Instrucción de seguridad
1. Lea las instrucciones.
2. Conserve estas instrucciones.
3. Preste atención a todas las advertencias.
4. Siga todas las instrucciones.
5. No use este a parato cerca d el agua.
6. Limpie est e aparato con un p año seco.
7. No bloquee las aberturas de ventilación.
Instal e el equipo de ac uerdo con las
instrucciones del fabricante.
8. No instale e ste equipo ce rca de fuente s
de calor tales como radiadores, acumuladores
de calor, es tufas u otro s aparatos (inc luyendo
amplicadores) que puedan producir calor.
9. Use únic amente los disp ositivos o
accesor ios especi cados por el f abricante.
10. Use únic amente la carr etilla,
plataf orma, trípo de, soporte o
mesa es pecicado s por el
fabricante o suministrados junto con el
equipo. A l transpor tar el equipo,
tenga cui dado para evi tar daños y caíd as al
tropezar con algún obstáculo.
11. Có mo debe deshac erse de este
aparato: E ste símbol o indica
que este a parato no debe s er
tratado como basura orgánica,
según lo i ndicado en la Di rectiva WE EE
(2012/19/EU) y a las norm ativas aplic ables en
su país. En l ugar de ello deb erá llevarlo al
punto lim pio más cercan o para el recic laje de
sus elementos eléctricos / electrónicos (EEE).
Al hacer es to estará ay udando a preven ir las
posibles consecuencias negativas para el
medio am biente y la salud q ue podrían se r
provocadas por una gestión inadecuada de
este tip o de aparatos . Además, el reci claje de
materia les ayudará a co nservar los r ecursos
naturales. Para más información acerca del
recicl aje de este apar ato, póngase en c ontacto
con el Ayunt amiento de su ci udad o con el
punto limpio local.
12. No insta le esta unida d en un espacio
muy redu cido, tal como en castrada e n una
librería o similar.
13. No coloqu e objetos con lla ma, como una
vela encen dida, sobre es te aparato.
(FR) Consignes de sécurité
1. Lisez ces consignes.
2. Conservez ces consignes.
3. Respectez tous les avertissements.
4. Respectez toutes les consignes
d’utilisation.
5. N’utilisez jamais l’appareil à proximité
d’un liquide.
6. Nettoyez l’appareil avec un chion sec.
7. Vei llez à ne pas empê cher la bonne
ventilat ion de l’appare il via ses ouïe s de
ventilation. Respectez les consignes du
fabricant concernant l’installation de
l’appareil.
8. Ne placez pas l ’appareil à prox imité d’une
source de c haleur telle q u’un chauage, u ne
cuisini ère ou tout app areil dégage ant de la
chaleur ( y compris un amp li de puissan ce).
9. Utilis ez exclusive ment des acces soires et
des appareils supplémentaires recommandés
par le fabricant.
10. Utilise z exclusivem ent des
chario ts, des diable s, des
présen toirs, des pi eds et des
surf aces de travail r ecommandé s par le
fabric ant ou livrés a vec le produit .
Déplacez précautionneusement tout chariot
ou diable chargé pour éviter d’éventuelles
blessu res en cas de chu te.
11. Mise au reb ut appropr iée de ce
produi t: Ce symbole i ndique
qu’en accord a vec la direct ive
DEEE (2012/19/EU) et le s lois en
vigueur d ans votre pays , ce produit ne do it
pas être j eté avec les déc hets ménage rs. Ce
produi t doit être dép osé dans un poin t de
collec te agréé pour l e recyclage d es déchets
d’équipements électriques et électroniques
(EEE). Une mau vaise manipu lation de ce ty pe
de déche ts pourrai t avoir un impac t négatif
sur l’envir onnement et la s anté à cause des
substances potentiellement dangereuses
généralement associées à ces équipements.
En même tem ps, votre coop ération dans la
mise au reb ut de ce produi t contribue ra à
l’utilisation ecace des ressources naturelles.
Pour plus d ’informat ions sur l’endro it où vous
pouvez déposer vos déchets d’équipements
pour le re cyclage, veu illez contac ter votre
mairie o u votre centre lo cal de collec te
des déchets.
12. N’inst allez pas l’app areil dans un
espace conné tel qu’une bibliothèque ou
meuble similaire.
13. Ne placez j amais d’objets e nammés, tels
que des bougies allumées, sur l’appareil.
(DE) Wichtige
Sicherhteitshinweise
1. Lesen Sie d iese Hinweis e.
2. Bewahren Si e diese Hinweis e auf.
3. Beachten Sie alle Warnhinweise.
4. Befolgen Sie alle Bedienungshinweise.
5. Betreib en Sie das Gerät ni cht in der Nähe
von Wasser.
6. Reinigen Si e das Gerät mit ei nem
trockenen Tuch.
7. B lockieren S ie nicht die
Belüf tungssch litze. Beach ten Sie beim Einb au
des Gerätes die Herstellerhinweise.
8. Stellen Sie das G erät nicht in d er Nähe von
Wärmequellen auf. Solche Wärmequellen
sind z. B. He izkörper, Herd e oder andere
Wärme erzeugende Geräte (auch Verstärker).
9. Verwenden Sie nur Zusatzgeräte/
Zubehörteile, die laut Hersteller geeignet
sind.
10. Verwenden Sie nur Wagen,
Standvor richtungen, Sta tive,
Halter oder Tische, die vom
Hersteller benannt oder im Lieferumfang des
Geräts enthalten sind. Falls Sie einen Wagen
benut zen, seien Sie vor sichtig bei m Bewegen
der Wagen- Gerätkombination, um
Verletzungen durch Stolpern zu vermeiden.
11. Korrekte Entsorgung dieses
Produk ts: Dieses Sy mbol weist
darauf hi n, das Produk t
entspr echend der WEE E
Direktive (2012/19/EU) und der jeweiligen
nationalen Gesetze nicht zusammen mit Ihren
Haushaltsabfällen zu entsorgen.
Dieses P rodukt sol lte bei einer au torisiert en
Sammelstelle für Recycling elektrischer und
elektronischer Geräte (EEE) abgegeben
werden. Wegen bedenklicher Substanzen, die
generell mit elektrischen und elektronischen
Geräten in Verbindung stehen, könnte eine
unsachgemäße Behandlung dieser Abfallart
eine nega tive Auswir kung auf Umwelt u nd
Gesundheit haben. Gleichzeitig gewährleistet
Ihr Beitrag zur richtigen Entsorgung dieses
Produkts die eektive Nutzung natürlicher
Ressourcen. Für weitere Informationen zur
Entsorgung Ihrer Geräte bei einer RecyclingStelle nehmen Sie bitte Kontakt zum
zuständigen städtischen Büro,
Entsorgungsamt oder zu Ihrem
Haushaltsabfallentsorger auf.
12. Instal lieren Sie das Ge rät nicht in
einer beengten Umgebung, zum Beispiel
Bücherregal oder ähnliches.
13. Stellen Sie k eine Gegens tände mit
oenen Flammen, etwa brennende Kerzen,
auf das Gerät.
(PT) Instruções de Segurança
Importantes
1. Leia estas instruções.
2. Guarde estas instruções.
3. Preste ate nção a todos os av isos.
4. Siga todas as instruções.
5. Não utilize e ste disposi tivo perto de á gua.
6. Limpe apena s com um pano sec o.
7. N ão obstrua as e ntradas de ven tilação.
Instal e de acordo com as i nstruções
do fabricante.
8. Não instale perto de quaisquer fontes
de calor t ais como radia dores, boca s
de ar quent e, fogões de sa la ou outros
aparelhos (incluindo amplicadores) que
produzam calor.
9. Utilize apenas ligações/acessórios
especicados pelo fabricante.
10. Utilize a penas com o car rinho,
estru tura, tripé, s uporte, ou
mesa es pecicado s pelo
fabric ante ou vendid os com o disposi tivo.
Quando u tilizar um car rinho, tenha c uidado
ao mover o con junto carri nho/disposit ivo para
evitar d anos provoca dos pela terp idação.
11. Correc ta eliminaç ão deste
produt o: este símbol o indica
que o prod uto não deve ser
elimina do juntamente c om os
resíduos domésticos, segundo a Directiva
REEE (2012/19/EU) e a legi slação nacio nal.
Este pr oduto deverá s er levado para u m
centro de r ecolha licenc iado para a rec iclagem
de resídu os de equipam entos eléc tricos e
elect rónicos (EEE). O t ratamento inc orrecto
deste ti po de resíduo s pode ter um event ual
impac to negativo no am biente e na saúd e
humana devido a substâncias potencialmente
perigosas que estão geralmente associadas
aos EEE. Ao me smo tempo, a sua co laboração
para a eli minação corr ecta dest e produto irá
contri buir para a uti lização ec iente dos
recursos naturais. Para mais informação
acerca d os locais onde p oderá deixa r o seu
equipa mento usado pa ra reciclag em, é favor
contactar os serviços municipais locais, a
entidad e de gestão de r esíduos ou os se rviços
de recolha de resíduos domésticos.
12. Não instale em lugares connados, tais
como estantes ou unidades similares.
13. Não coloq ue fontes de cha ma, tais como
velas acesas, sobre o aparelho.
(IT) Istruzioni di sicurezza
importanti
1. Leggere queste istruzioni.
2. Conservare queste istruzioni.
3. Prestar e attenzion e a tutti gli av visi.
4. Applicare tutte le istruzioni.
5. Non utiliz zare ques to dispositi vo vicino
l'acqua.
6. Pulire esclusivamente con un panno
asciutto.
7. Non bloccare le aperture di ventilazione.
Instal lare in confor mità con le ist ruzioni del
produttore.
8. Non instal lare vicino a fo nti di calore
come rad iatori, termo regolatori , stufe o
altri apparecchi (inclusi amplicatori) che
producono calore.
9. Utilizzare esclusivamente dispositivi/
accessori specicati dal produttore.
10. Utilizzare solo carrelli,
suppor ti, treppie di, stae o
tavoli in dicati dal pro duttore
o venduti c on l'apparecc hio. Utilizz ando un
carrello, prestare attenzione quando si
sposta la combinazione carrello/
apparecchio per evitare lesioni dovute al
ribaltamento.
11. Smaltim ento corret to di
questo p rodotto: qu esto
simbolo i ndica che que sto
disposi tivo non deve es sere
smaltito insieme ai riuti domestici,
second o la Diretti va RAEE (2012/19 / UE) e
la vostra legislazione nazionale. Questo
prodot to deve esser e portato in u n centro
di raccol ta autoriz zato per il ric iclaggio di
riuti di apparecchiature elettriche ed
elettroniche (RAEE). La cattiva gestione di
questo t ipo di riuti p otrebbe aver e un
possibile impatto negativo sull'ambiente e
sulla sal ute umana a caus a di sostanz e
potenzialmente pericolose che sono
generalmente associate alle
apparecchiature elettriche ed
elett roniche. Nel lo stesso temp o la vostra
collaborazione al corretto smaltimento di
questo p rodotto co ntribuirà al l'utilizzo
ecien te delle risor se naturali . Per
ulteriori informazioni su dove è possibile
traspo rtare le app arecchiatu re per il
ricicl aggio vi invit iamo a contat tare
l'ucio co munale local e o il servizi o di
raccolta dei riuti domestici.
12. Non inst allare in uno sp azio ristre tto,
come in una l ibreria o in una s truttur a
simile.
13. Non collo care sul dispo sitivo font i di
amme lib ere, come cand ele accese.
(NL) Belangrijke
veiligheidsvoorschriften
1. Lees deze voorschriften.
2. Bewaar deze voorschriften.
3. Neem alle waarschuwingen in acht.
4. Volg alle voorschriften op.
5. Gebruik di t apparaat ni et in de buurt
van water.
6. Reinig het ui tsluitend m et een
droge doek.
7. L et erop geen van d e ventilatie openin gen te bedekke n. Plaats en
instal leer het volge ns de voor- schri ften
van de fabrikant.
8. Het appara at mag niet word en
geplaat st in de buur t van radiator en,
warmte -uitlaten, k achels of ande re zaken
(ook versterkers) die warmte afgeven.
9. Gebruik uitsluitend door de producent
gespec i- ceerd toeb ehoren c.q.
onderdelen.
10. Gebrui k het apparaa t
uitsluitend in combinatie met
de wagen, h et statief, de
driepoot, de beugel of tafel die door de
produc ent is aangegev en, of die in
combina tie met het app araat wordt
verkocht. Bij gebruik van een wagen dient
men voorzichtig te zijn bij het verrijden
van de combinatie wagen/apparaat en
letse l door vallen te vo orkomen.
11. Correc te afvoer v an dit
produc t: dit symb ool geeft
aan dat u dit p roduct op
grond va n de AEEA-rich tlijn
(2012/19/EU) en de nati onale wetgevi ng
van uw land n iet met het gewo ne
huishoudelijke afval mag weggooien. Dit
produc t moet na aoo p van de nutti ge
levensduur naar een ociële inzamelpost
voor afg edankte ele ktrische e n
elekt ronische ap paratuur (AEE A) worden
gebrac ht, zodat het ka n worden
gerec ycleerd. Vanwe ge de potentie el
gevaarlijke stoen die in elektrische en
elektronische apparatuur kunnen
voorkom en, kan een onju iste afvoe r van
afval van het onderhavige type een
negati eve invloed op he t milieu en de
menselijke gezondheid hebben. Een juiste
afvoe r van dit produ ct is echter ni et alleen
beter voor het milieu en de gezondheid,
maar draa gt tevens bij aan e en
doelmatiger gebruik van de natuurlijke
hulpbronnen. Voor meer informatie over
de plaat sen waar u uw afge dankte
apparatuur kunt inleveren, kunt u contact
opnemen met uw gemeente of de
plaatselijke reinigingsdienst.
12. Installeer niet in een kleine ruimte,
zoals een boekenkast of iets dergelijks.
13. Plaats ge en open vlamme n, zoals
brandende kaarsen, op het apparaat.
(SE) Viktiga
säkerhetsanvisningar
1. Läs dessa anvisningar.
2. Spara dessa anvisningar.
3. Beakta alla varningar.
4. Följ alla anvisningar.
5. Använd inte ap paraten i när heten
av vatte n.
6. Rengör endast med torr trasa.
7. Bloc kera inte ventilationsöppningarna.
Installera enligt tillverkarens anvisningar.
8. Installera aldrig intill värmekällor som
värme- element, varmluftsintag, spisar
eller ann an utrustni ng som avger vär me
(inklusive förstärkare).
9. Använd en dast tillkop plingar och
tillbehör som angetts av tillverkaren.
10. Använd endast med vagn,
stati v, trefot, hållar e eller
bord som a ngetts av
tillverkaren, eller som sålts till-sammans
med appa raten. Om du anvä nder en vagn,
var för siktig, när d u föryt tar
kombinationen vagn-apparat, för att
förhindra olycksfall genom snubbling.
11. Kassera produkten på rätt
enligt WE EE direktiv et (2012/19/EU) och
gällande, nationell lagstiftning. Produkten
ska lämna s till ett auk toriserat
återvinningsställe för elektronisk och
sätt: d en här symbol en
indikerar att produkten inte
ska kast as i hushållss oporna,
elekt risk utrus tning (EEE). Om den h är
sorte ns avfall han teras på fel sä tt kan
miljön, och människors hälsa, påverkas
negati vt på grund av p otentiella
risksubstanser som ofta associeras med
EEE. Avfallshanteras produkten däremot
på rätt s ätt bidrar d etta till at t naturens
resur ser används på e tt bra sätt . Kontakta
kommun, ansvarig förvaltning eller
avfallshanteringsföretag för mer
information om återvinningscentral där
produkten kan lämnas.
12. Instal lera inte i ett t rångt utr ymme,
t.ex. i en b okhylsa elle r liknande enhe t.
13. Placera in te källor med öp pen eld, t.ex.
tända lju s, på apparate n.
(PL) Ważne informacje o
bezpieczeństwie
1. Proszę p rzeczy tać poniżs ze
wskazówki.
2. Proszę pr zechowyw ać niniejsz ą
instrukcję.
3. Należy przestrzegać wszystkich
wskazówek ostrzegawczych.
4. Należy po stępować zgo dnie z
instrukcją obsługi.
5. Urządze nia nie wolno uż ywać w
pobliżu wody.
6. Urządzen ie można czy ścić wyłą cznie
suchą szmatką.
7. N ie zasłania ć otworów
wentyl acyjnych. W c zasie podł ączania
urządzenia należy przestrzegać zaleceń
producenta.
8. Nie stawia ć urządzeni a w pobliżu
źróde ł ciepła ta kich, jak grze jniki, piece
lub urz ądzenia prod ukujące ciep ło (np.
wzmacniacze).
9. Używ ać wyłącz nie sprzętu
dodatkowego i akcesoriów zgodnie z
zaleceniami producenta.
10. Używa ć jedynie za lecanych
przez p roducenta lu b
znajduj ących się w zes tawie
wózków, stoj aków, statyw ów, uchwytów i
stołó w. W przypadk u posługiw ania się
wózkiem n ależy zach ować szczeg ólną
ostrożność w trakcie pr zewożenia zestawu,
aby uniknąć niebezpieczeństwa potknięcia się
i zranienia.
11. Prawidłowa utylizacja
produk tu: Ten symbol
wskazu je, że tego produ ktu nie
należy w yrzuca ć razem ze
zwyk łymi odpa dami domowy mi, tylko
zgodnie z dyrektywą w sprawie zużytego
sprzętu elektrycznego i elektronicznego
(WEEE) (2012/19/EU) o raz przepis ami
krajowymi. Niniejszy produkt należy
przekazać do autoryzowanego punktu zbiórki
zuży tego sprzęt u elektr ycznego i
elektronicznego. Niewłaściwe postępowanie
z tego ty pu odpadami mo że wywoł ać
szkodliwe działanie na środowisko naturalnej
i zdrowie c złowieka z p owodu potencj alnych
substancji niebezpiecznych zaliczanych jako
zuży ty sprzęt e lektryc zny i elektr oniczny.
Jednoc ześnie, Twój wkł ad w prawidło wą
utyli zację niniej szego produ ktu przyc zynia się
do oszczędnego wykorzysty wania zasobów
natural nych. Szczeg ółowych in formacji o
miejsc ach, w który ch można oddawa ć zużyty
sprzęt d o recyklin gu, udzielają u rzędy
miejskie, przedsiębiorstwa utylizacji
odpadó w lub najbliżs zy zakład u tylizacj i
odpadów.
12. Nie instaluj w ograniczonej przestrzeni,
takiej j ak półka na k siążki lub po dobny
zes taw.
13. Nie staw iaj na urządze niu źródeł
otwartego ognia, takich jak zapalone świece.
(JP) 安全指示
1. これらの指 示をお読 みください。
2. これ らの指示を 守 ってくだ さい 。
3. すべての警告に注意してください。
4. すべ ての 指示 に 従ってください 。
5. この装置を水の近くで使 用しない
でください。
6. 乾いた布でのみ拭いてください。
7. 換 気口をふさがないでください。
製造 元の指示に従ってインストールし
てくだ さい 。
8. ラジエーター 、ヒートレジスター、ス
ト ー ブ 、ま た は 熱 を 発 生 す る そ の 他 の
装置 (アンプを含む) などの熱源の近く
に設 置しな いでください。
9. 製 造 元が 指定した アタッチメント/ ア
クセサリのみを 使用してください。
10. 製 造 元 が 指 定 し た 、ま た は
装置と一 緒に 販売されたカ
ート、スタンド、三 脚、ブラ
ケット 、ま たは テ ーブルでのみ 使 用して
ください。カートを使用する場合は、カ
ートと装 置の 組 み合 わせ を移 動すると
きに、転倒による怪我を防ぐように注意
してくだ さい 。
11. こ の 製 品 の正しい 廃 棄:こ
の記号は、WEEE 指令
(2012/19 / EU) および国内法
ごみ と一 緒に 廃 棄して は なら ないこと
を 示 し て い ま す 。こ の 製 品 は 、廃 電 気 電
子機器 (EEE) のリ サ イクル を 許 可 さ れた
収 集セン ターに 持ち 込む 必要が ありま
す 。こ の 種 の 廃 棄 物 の 取 り 扱 い を 誤 る
と 、一 般 に EEE に関連する潜在 的に危
険な物質が原因で、環境と人間の健康
に悪影響を 与え る可 能 性 がありま す。
同時に、この製品 の正しい廃棄にご協
力 いた だく こ と で 、天 然 資 源 の 効 率 的
な利用に貢献します。廃棄物をリサイク
ル す る 場 所 の 詳 細 に つ い て は 、最 寄り
の市役 所または 家庭ごみ 収集サービス
にお 問い合わ せください 。
に 従 っ て 、こ の 製 品 を 家 庭
12. 本棚 などの 狭い 場所 には設置しな
いでください。
13. 火の ともった ろうそ くなど の 裸 火 源
を装置の上に置かないでください。
(CN) 安全须知
1. 请阅读这些说明。
2. 请 妥善保存这些说明。
3. 请注意所有的警示。
4. 请遵守所有的说明。
5. 请勿在靠近水的地方使用本产品。
6. 请用干布清洁本产品。
7. 请 勿堵塞通风孔, 安装本产品时请
遵照厂家的说明, 通风孔不要覆盖诸如
报纸、桌布和窗帘等物品而妨碍通风。
8. 请勿将本产品安装在热源附近, 如 暖
气片, 炉子或其它产生热量的设备 (包括
功放器)。 产品上不要放置裸露的火焰
源, 如点燃的蜡烛。
9. 请只使用厂家指定 的附属设备和
配 件 。
10. 请只使用厂家指定的或随货
销售的手推车, 架子, 三 角架,
支架和桌子。 若使用手推车
来搬运设备, 请注意安全放置设备,
以 避免手推车和设备倾倒而受伤。
11. 如果液体流入或异物落入设备内,
设备遭雨淋或受 潮, 设备不能正常运
作或被摔坏等, 设备受损需进行维修
时, 所有维修均须由合格的 维修人员
进行维修。
Page 1
Page 2
Features
(EN)
• Premium microphone kit for high-quality videography on-the-go
• Excellent choice for vlogs, podcasts, interviews, live-streaming, eld recordings
and more
• Noise-canceling capsule eliminates background noise
• High-resolution 32-bit / 96 kHz audio codec
• Zero-latency direct monitoring headphone output
• Tripod wit h tilting nec k for easy posi tioning
• Extension for recording sele videos
• Multi-device compatibility via adjustable smartphone clamp
• USB-A and USB -C connec tion cables f or computer a nd smartpho ne
• Customi zed foam wind screen and du rable carr y case inclu ded
Accessories List
• Tripod with smartphone holder
• USB connection cables
• Zipper case
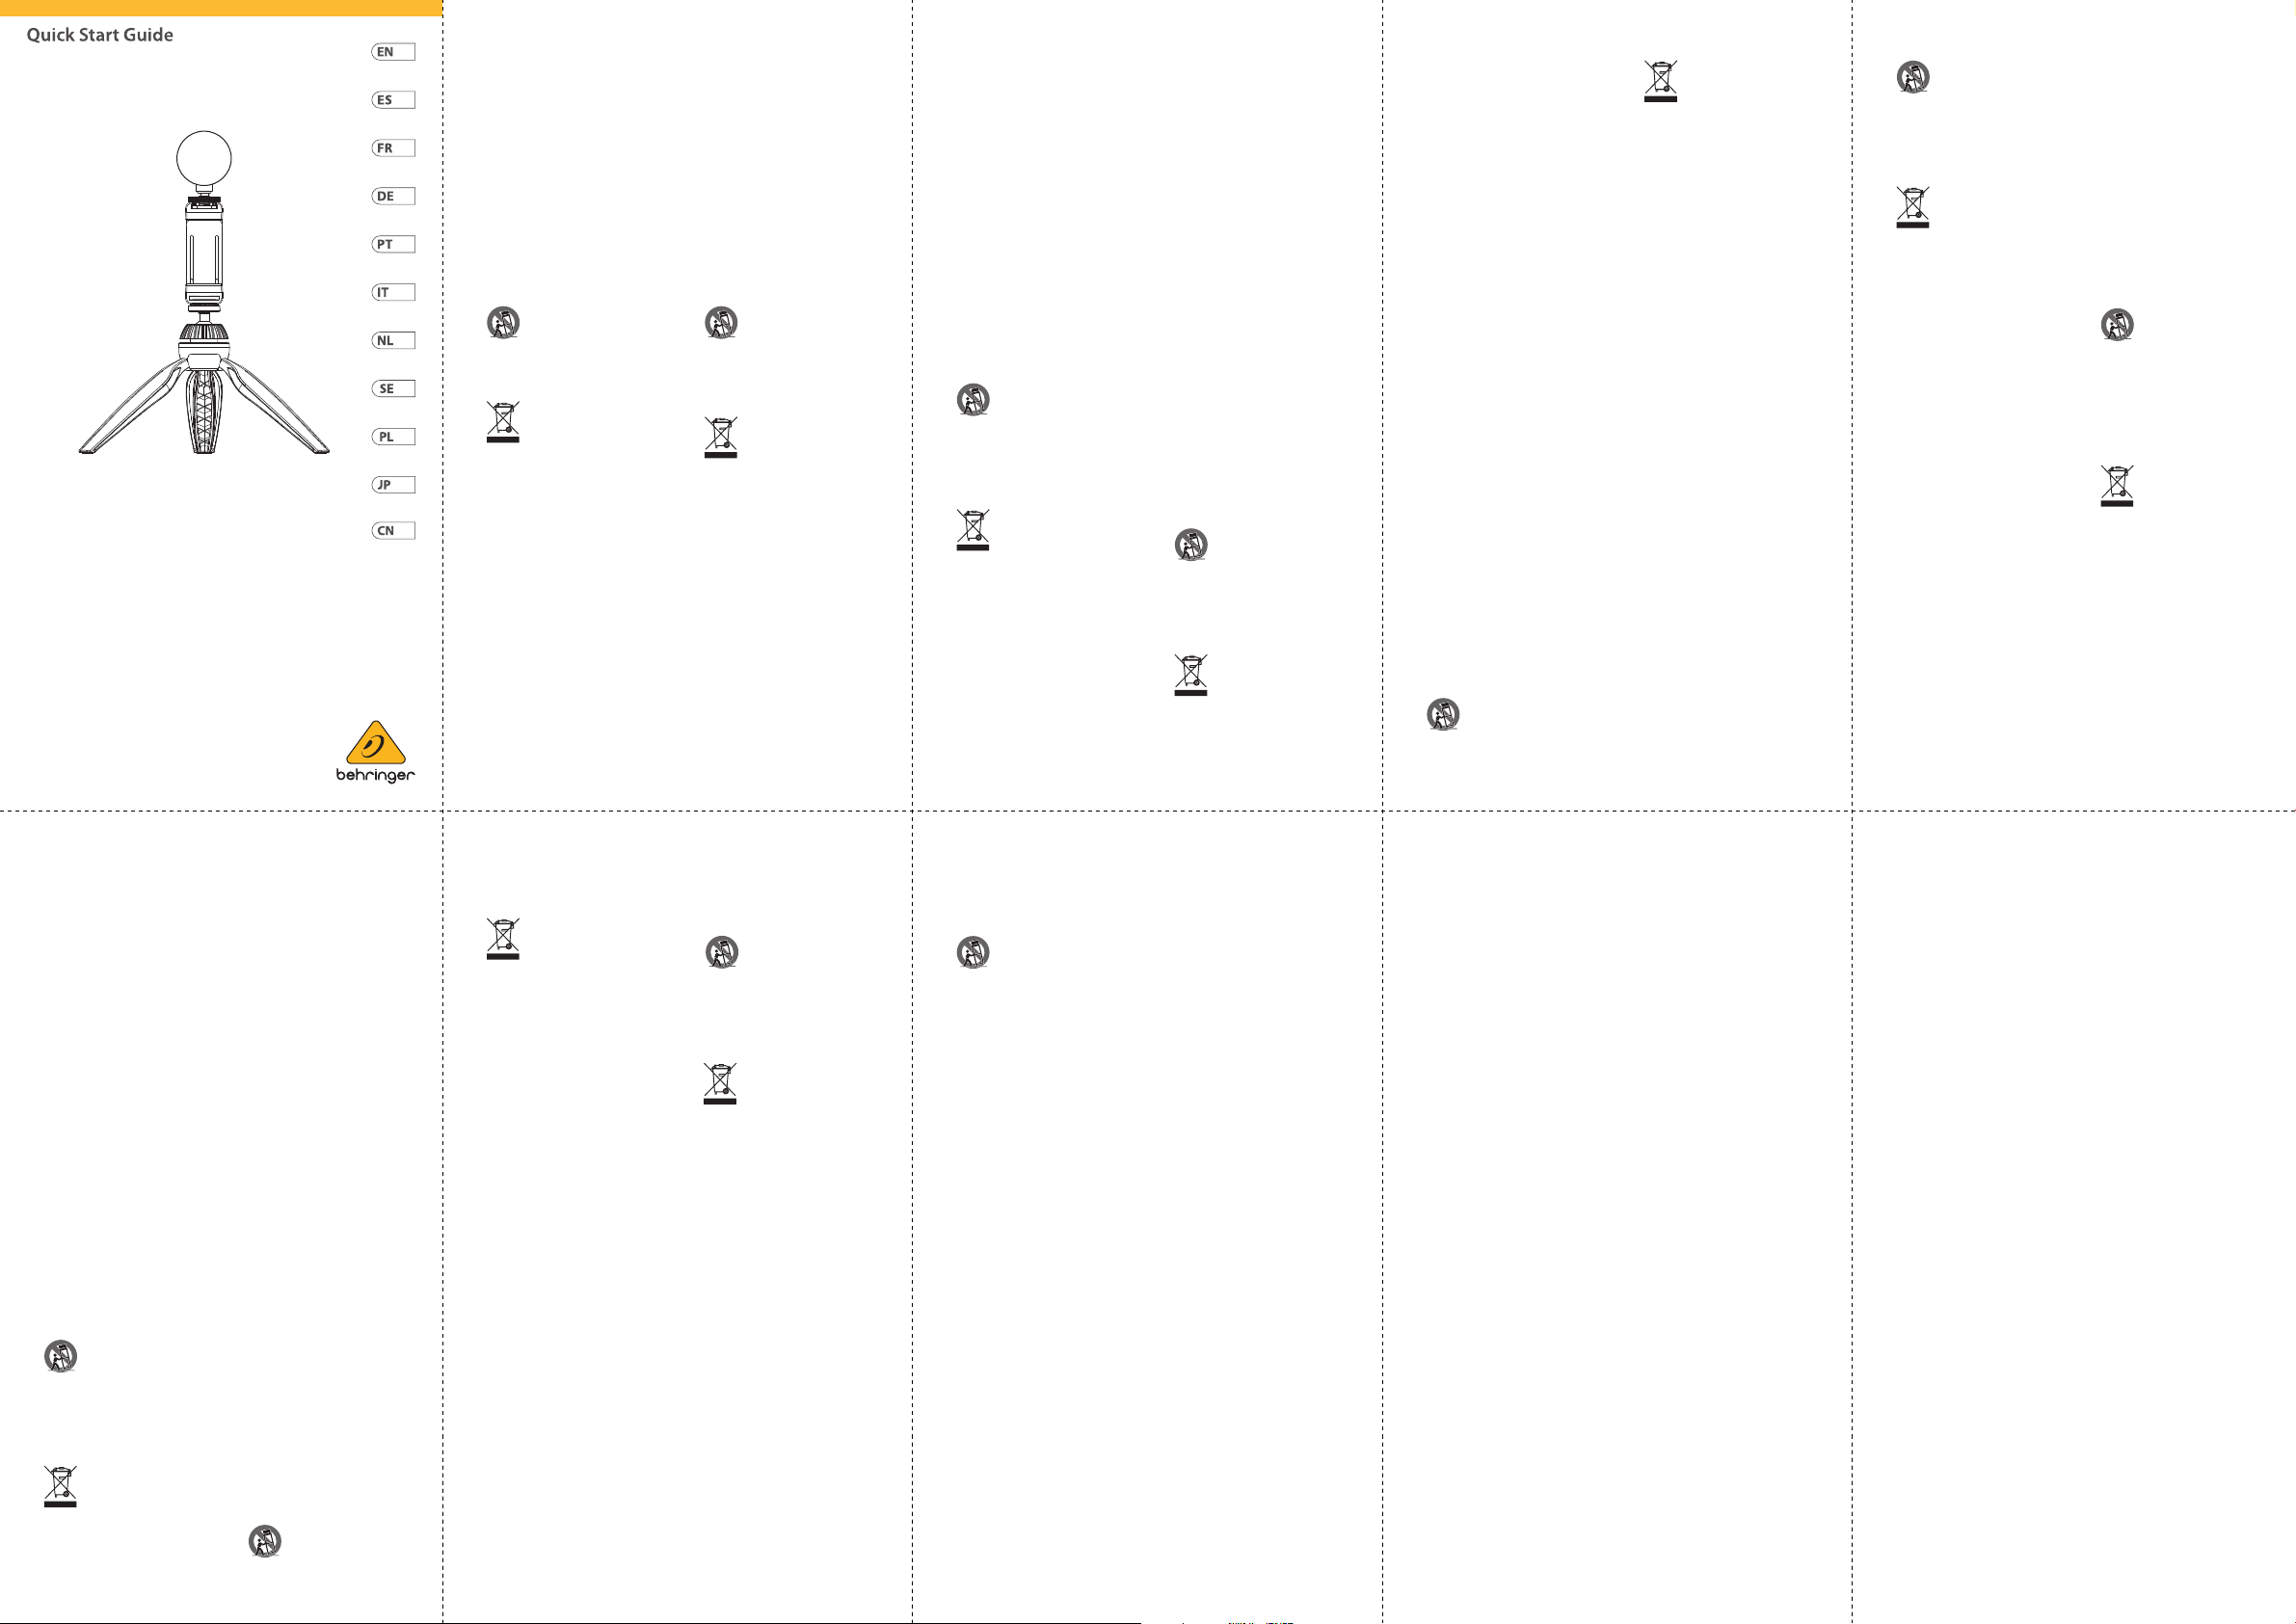
Basic on-the-go setup
To set up the ba sic congura tion, follow th ese steps:
1. Gently screw down the smartphone holder onto the tripod’s threaded mounting
point until secure.
2. Attach microphone clip with the smartphone holder's shoe mount and twist the
nut until s ecure.
3. Adjust the sm artphone h older to t your s martphon e by loosening t he rear knob.
Re-tig hten the rear kn ob to secure th e smartphon e in place.
4. Insert th e microphon e body into the mi crophone cl ip and place the wi ndscreen
over the microphone capsule.
5. Connect the smartphone with the microphone with Type-C cable.
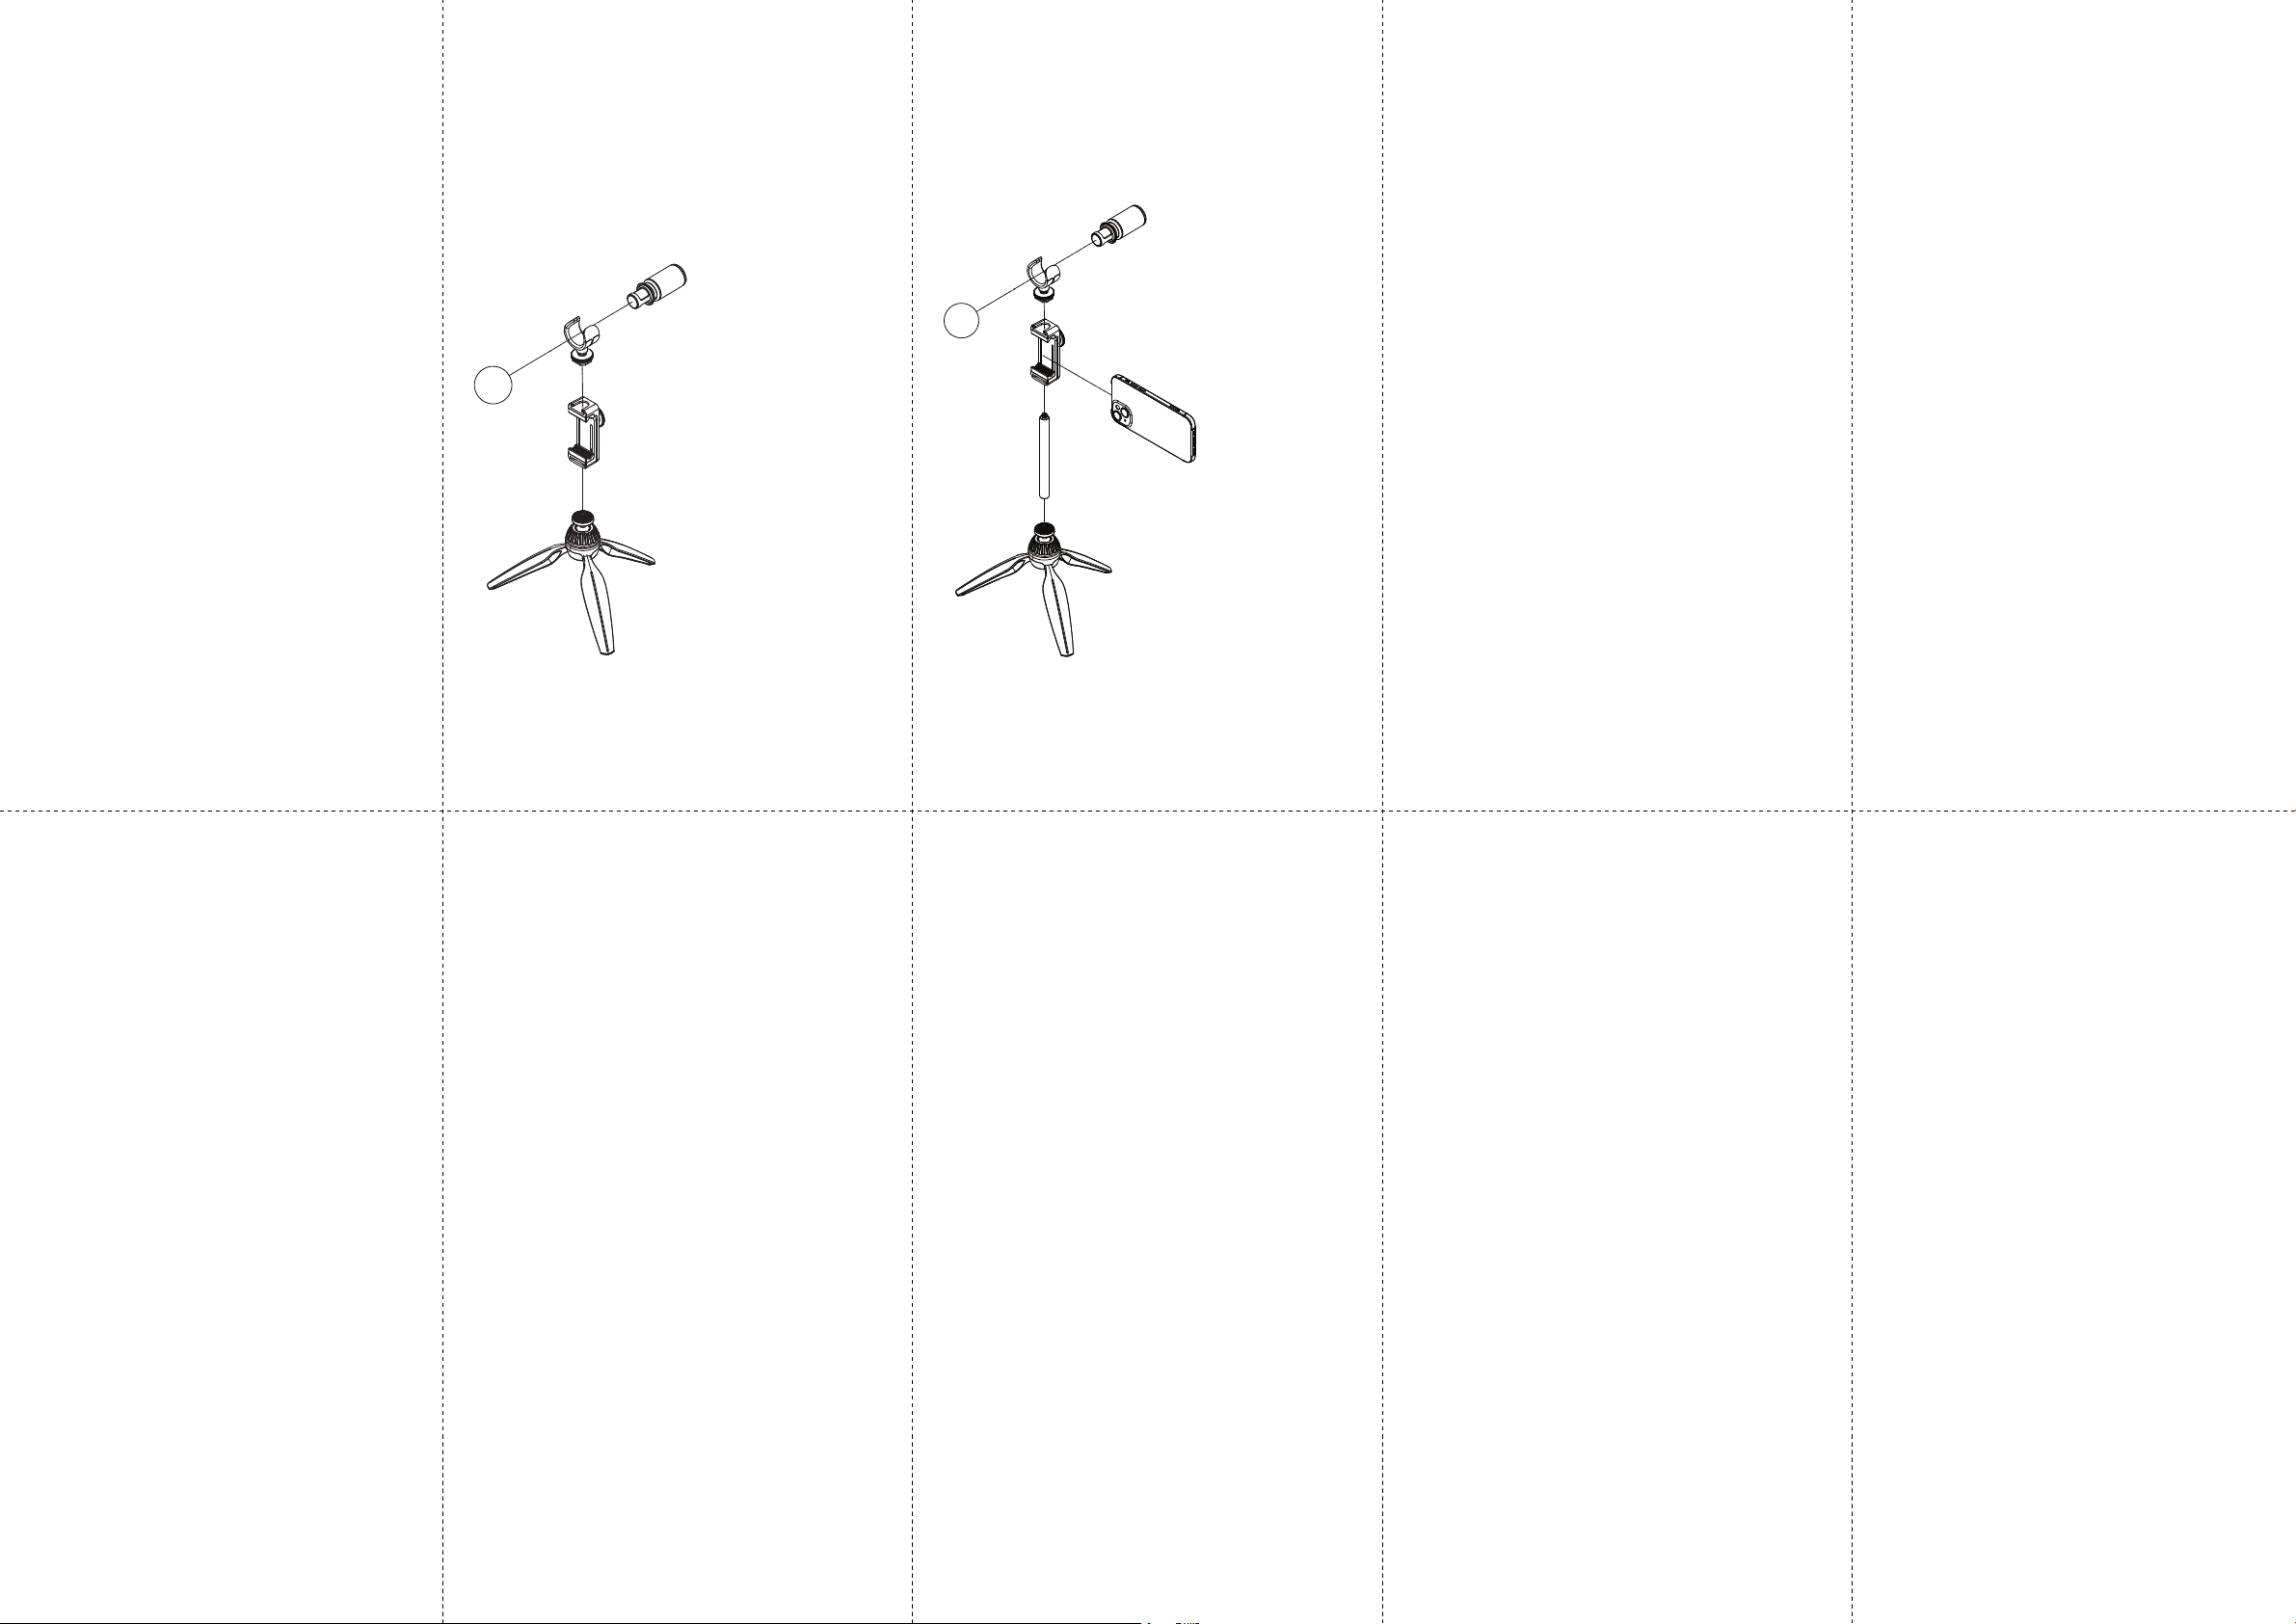
Sele video setup
When recording sele videos that require extra height for your smartphone, install the
sele ro d by following t hese setup s teps:
1. Gently s crew down the s ele rod onto th e tripod’s thr eaded mounti ng point
until secure.
2. Gently scr ew down the smar tphone hol der onto the sel e rod's thread ed
mounting point until secure.
3. Complete th e rest of the se tup as descr ibed in Steps (2) – (5) of th e Basic
on-the-go setup.
Características
(ES)
• Kit de mic rófono prem ium para vide ografía de alt a calidad sob re la marcha
• Excele nte opción par a vlogs, podc asts, entr evistas, tr ansmisión en vi vo, grabacion es de
campo y má s
• La cápsula de cancelación de ruido elimina el ruido de fondo
• Códec de audio de alta resolución de 32 bits/96 kHz
• Salida de auriculares de monitoreo directo de latencia cero
• Trípode con cuello inclinable para un fácil posicionamiento
• Extensión para grabar videos sele
• Compati bilidad con múl tiples disp ositivos a tra vés de la abraz adera ajust able para telé fonos
inteligentes
• Cables de conexión USB-A y USB-C para ordenador y smartphone
• Paravientos de espuma personalizado y estuche de transporte duradero incluido
Lista de accesorios
• Trípode con soporte para smartphone
• cables de conexion usb
• Estuche con cremallera
Conguración básica sobre la marcha
Para est ablecer la con guración b ásica, siga es tos pasos:
1. Atornill e suavemente el s oporte del te léfono inte ligente en el pun to de montaje ro scado
del tríp ode hasta qu e esté seguro.
2. Fije el clip de l micrófono c on la zapata de l soporte de l teléfono int eligente y gire l a
tuerca hasta que quede rme.
3. Ajuste el so porte para t eléfono inte ligente para q ue se ajuste a su te léfono intel igente
aojand o la perilla tra sera. Vuelva a ap retar la peri lla trasera p ara asegura r el teléfono
intelig ente en su lugar.
4. Inserte e l cuerpo del mi crófono en el c lip del micróf ono y coloque la p rotección co ntra el
viento sobre la cápsula del micrófono.
5. Conecte el teléfono inteligente con el micrófono con el cable Tipo-C.
Conguración de vídeo sele
Cuando grabe videos de seles que requieran una altura adicional para su teléfono inteligente,
instale la barra para seles siguiendo estos pasos de conguración:
1. Atornill e suavemente la ba rra para sel es en el punto de m ontaje rosc ado del trípo de
hasta que quede rme.
2. Atornille su avemente el sop orte del telé fono intelig ente en el punto d e montaje rosc ado
de la barr a sele hasta q ue esté segu ro.
3. Complete el r esto de la con guración com o se describ e en los pasos (2) a (5) de la
conguración básica sobre la marcha
Caractéristiques
(FR)
• Kit micr ophone haut de g amme pour une v idéographi e de haute qualit é en
déplacement
• Excelle nt choix pour l es vlogs, les po dcasts, le s intervie ws, la diusio n en direct, l es
enregi strements s ur le terrain e t plus encore
• La caps ule antibrui t élimine le bru it de fond
• Codec aud io haute réso lution 32 bits / 9 6 kHz
• Sort ie casque de sur veillance di recte sans l atence
• Trépied avec col inclinable pour un positionnement facile
• Extension pour enregistrer des vidéos de sele
• Compatibilité multi-appareils via une pince smartphone réglable
• Câbles de connexion USB-A et USB-C pour ordinateur et smartphone
• Pare-brise en mousse personnalisé et étui de transport durable inclus
Liste des accessoires
• Trépied avec support pour smartphone
• Câbles de connexion USB
• Étui à fer meture écla ir
Conguration de base en déplacement
Pour congurer la conguration de base, procédez comme suit :
1. Vissez d oucement le sup port de smar tphone sur l e point de monta ge leté du
trépie d jusqu'à ce qu'il so it bien xé.
2. Fixez le clip d u microphon e avec le suppor t de chaussur e du support d e
smart phone et tour nez l'écrou jus qu'à ce qu'il soit bi en xé.
3. Ajustez le s upport de sma rtphone po ur qu'il s'adapte à vo tre smartp hone en
desser rant le bouto n arrière. Res serrez le bo uton arrière p our xer le smar tphone
en place.
4. Insérez le co rps du microp hone dans le cli p du micropho ne et placez la bon nette
anti-vent sur la capsule du microphone.
5. Connect ez le smartph one au microp hone avec un câb le de type C.
Conguration vidéo sele
Lors de l'enregistrement de vidéos sele qui nécessitent une hauteur supplémentaire pour
votre sma rtphone, in stallez la ti ge sele en suiv ant ces étape s de congurat ion :
1. Vissez d oucement la tig e à sele sur le po int de montage leté du trépie d jusqu'à
ce qu'elle soi t bien xée.
2. Vissez dou cement le supp ort de smar tphone sur le po int de montage leté de la
tige à sel e jusqu'à ce qu'il s oit bien xé.
3. Terminez le re ste de la congu ration comme d écrit dans le s étapes (2) à (5) de la
conguration de base en déplacement.
Eigenschaften
(DE)
• Premium-Mikrofon-Kit für hochwertige Videograe unterwegs
• Hervorragende Wahl für Vlogs, Podcasts, Interviews, Live-Streaming,
Außenaufnahmen und mehr
• Noise-Cancelling-Kapsel eliminiert Hintergrundgeräusche
• Hochauösender 32-Bit / 96-kHz-Audio-Codec
• Latenzfreier Direktmonitor-Kopfhörerausgang
• Stativ mit neigbarem Hals für einfache Positionierung
• Erweiterung zum Aufnehmen von Sele-Videos
• Multi-Device-Kompatibilität durch verstellbare Smartphone-Klammer
• USB-A und USB-C Verbindungskabel für Computer und Smartphone
• Individuell angepasster Schaumsto-Windschutz und strapazierfähige Tragetasche im
Lieferumfang enthalten
Zubehörliste
• Stativ mit Smartphone-Halterung
• USB-Verbindungskabel
• Reißverschlussetui
Grundlegende Einrichtung für unterwegs
Um die Grundkonguration einzurichten, gehen Sie folgendermaßen vor:
1. Schrauben Sie den Smartphone-Halter vorsichtig auf den
Gewindebefestigungspunkt des Stativs, bis er fest sitzt.
2. Befestigen Sie den Mikrofonclip an der Schuhhalterung des Smartphone-Halters
und drehen Sie die Mutter, bis sie fest sitzt.
3. Passen Sie die Smartphone-Halterung an Ihr Smartphone an, indem Sie den
hintere n Knopf lösen. Z iehen Sie den hi nteren Knopf w ieder fest , um das
Smartphone zu sichern.
4. Stecken Sie den Mikrofonkörper in den Mikrofonclip und platzieren Sie den
Windschutz über der Mikrofonkapsel.
5. Verbinden Sie das Smartphone mit dem Mikrofon mit einem Typ-C-Kabel.
Einrichtung von Sele-Videos
Wenn Sie Sele-Videos aufnehmen, die zusätzliche Höhe für Ihr Smartphone erfordern,
installieren Sie die Sele-Stange, indem Sie die folgenden Einrichtungsschritte befolgen:
1. Schrauben Sie die Sele-Stange vorsichtig auf den Gewindebefestigungspunkt
des Stati vs, bis sie fes t sitzt.
2. Schrauben Sie den Smartphone-Halter vorsichtig auf den
Gewindebefestigungspunkt der Sele-Stange, bis er fest sitzt.
3. Schließe n Sie den Rest der E inrichtun g ab, wie in den Schr itten (2) – (5) der
grundlegenden Einrichtung für unterwegs beschrieben.
Características
(PT)
• Kit de microfone premium para videograa de alta qualidade em movimento
• Excele nte opção par a vlogs, podca sts, entre vistas, tra nsmissão ao vi vo, gravações d e campo
e muito mais
• A cápsula de cancelamento de ruído elimina o ruído de fundo
• Codec de áu dio de alta res olução de 32 bit s / 96 kHz
• Saída de fone de ouvido de monitoramento direto com latência zero
• Tripé com pescoço basculante para fácil posicionamento
• Exte nsão para grav ar vídeos de se le
• Compatibilidade com vários dispositivos através de braçadeira ajustável para smartphone
• Cabos de c onexão USB-A e USB -C para comp utador e smar tphone
• Pára-b risas de espu ma personal izado e estoj o de transpor te durável inc luído
Lista de acessórios
• Tripé com suporte para smartphone
• Cabos de c onexão USB
• Estoj o com zíper
Conguração básica em movimento
Para de nir a conguraç ão básica, si ga estas eta pas:
1. Parafuse suavemente o suporte do smartphone no ponto de montagem rosqueado do
tripé at é que esteja se guro.
2. Prenda o clip e do microfon e com a sapata do s uporte do sma rtphone e gi re a porca até
que que rme.
3. Ajuste o sup orte do smar tphone para c aber no seu smar tphone so ltando o botã o
trasei ro. Reapert e o botão trase iro para pren der o smartph one no lugar.
4. Insira o cor po do microfo ne no clipe do mic rofone e colo que o pára-br isas sobre a
cápsula do microfone.
5. Conecte o smartphone ao microfone com o cabo Type-C.
Conguração de vídeo sele
Ao gravar v ídeos de sel e que exigem alt ura extra p ara o seu smar tphone, inst ale a haste de
sele seguindo estas etapas de conguração:
1. Aparaf use suavement e a haste sele n o ponto de monta gem rosquead o do tripé até
que este ja seguro.
2. Parafuse suavemente o suporte do smartphone no ponto de montagem rosqueado da
haste se le até que este ja seguro.
3. Conclua o res tante da cong uração conf orme descr ito nas etapa s (2) – (5) da
conguração básica em movimento.
Caratteristiche
(IT)
• Kit microfono premium per videograa di alta qualità in movimento
• Scelta e ccellente per v log, podcas t, intervi ste, live stre aming, regis trazioni su l campo e altro
ancora
• La capsula con cancellazione del rumore elimina il rumore di fondo
• Codec aud io ad alta riso luzione a 32 bit / 96 k Hz
• Uscita c ue con monit oraggio dire tto a latenza z ero
• Treppiede con collo inclinabile per un facile posizionamento
• Estensione per la registrazione di video sele
• Compatibilità multi-dispositivo tramite morsetto per smartphone regolabile
• Cavi di col legamento USB -A e USB-C per com puter e smart phone
• Parabre zza in schi uma persona lizzato e cus todia per il tr asporto re sistente inc lusi
Elenco accessori
• Treppiede con supporto per smartphone
• Cavi di col legamento USB
• Custodia con cerniera
Congurazione di base in movimento
Per impostare la congurazione di base, attenersi alla seguente procedura:
1. Avvitare delicatamente il supporto per smartphone sul punto di montaggio lettato del
treppiede no a ssarlo.
2. Fissare la c lip del microf ono con il suppo rto per slit ta del suppo rto per smar tphone e
ruotar e il dado no a ss arlo.
3. Regola il sup porto per sm artphone p er adattar lo al tuo smart phone allent ando la
manopo la posterior e. Stringere nu ovamente la man opola poste riore per ss are lo
smartphone in posizione.
4. Inserire i l corpo del mic rofono nella c lip del microf ono e posizio nare il parabr ezza sopr a
la capsula del microfono.
5. Collega lo sm artphone a l microfono co n cavo Type-C.
Congurazione video sele
Durante la registrazione di video sele che richiedono un'altezza extra per il tuo smartphone,
installa l'asta sele seguendo questi passaggi di congurazione:
1. Avvitare delicatamente l'asta per sele sul punto di montaggio lettato del treppiede
no a ssa rla.
2. Avvitare delicatamente il supporto per smartphone sul punto di montaggio lettato
dell'ast a per sele no a ssarlo.
3. Completa il resto della congurazione come descritto nei passaggi (2) – (5) della
congurazione di base in movimento.
Características
(NL)
• Premium microfoonkit voor hoogwaardige videograe onderweg
• Uitstekende keuze voor vlogs, podcasts, interviews, livestreaming, veldopnames en meer
• Ruisonderdrukkende capsule elimineert achtergrondgeluiden
• Hoge resolutie 32-bits / 96 kHz audiocodec
• Directe bewaking hoofdtelefoonuitgang zonder latentie
• Statief met kantelbare nek voor eenvoudige positionering
• Extensie voor het opnemen van sele-video's
• Compatibiliteit met meerdere apparaten via verstelbare smartphoneklem
• USB-A- en USB -C-aansluitkab els voor compu ter en smartp hone
• Op maat gem aakte voorr uit van schui m en duurzame d raagtas inb egrepen
Lijst met accessoires
• Statief met smartphonehouder
• USB-aansluitkabels
• rits geval
Basisconguratie voor onderweg
Volg deze st appen om de bas iscongura tie in te stelle n:
1. Schroef de smartphonehouder voorzichtig op het bevestigingspunt met schroefdraad
van het statief totdat deze stevig vastzit.
2. Bevestig de microfoonclip met de schoenbevestiging van de smartphonehouder en
draai de moer totdat deze vastzit.
3. Pas de smartphonehouder aan uw smartphone aan door de achterste knop los te
draaien. Draai de achterste knop weer vast om de smartphone op zijn plaats te houden.
4. Plaats de microfoonbehuizing in de microfoonclip en plaats de voorruit over de
microfooncapsule.
5. Verbind de smartphone met de microfoon met Type-C kabel.
Sele video-instellingen
Bij het op nemen van sel e-video's die e xtra hoog te voor uw smar tphone verei sen, install eert u
de sele -staaf doo r deze install atiestap pen te volgen:
1. Schroef de sele-staaf voorzichtig op het bevestigingspunt met schroefdraad van het
statief totdat deze stevig vastzit.
2. Schroef de smartphonehouder voorzichtig op het schroefdraadbevestigingspunt van de
selestaaf totdat deze vastzit.
3. Voltooi de res t van de insta llatie zoals be schreven in St appen (2) – (5) van de
Basisinstallatie voor onderweg.
Funktioner
(SE)
• Premiummikrofonsats för högkvalitativ videofotografering när du är på språng
• Utmärkt val för vloggar, poddsändningar, intervjuer, livestreaming, fältinspelningar
och mer
• Brusreducerande kapsel eliminerar bakgrundsljud
• Högupp löst 32-bitar s / 96 kHz ljudco dec
• Direktövervakningsutgång för hörlurar med noll latens
• Stativ me d lutande hals f ör enkel posi tionering
• Tillägg för inspelning av sele-videor
• Kompatibilitet med era enheter via justerbar smarttelefonklämma
• USB-A och US B-C anslutn ingskablar f ör dator och sm artphone
• Skrädd arsydd vind ruta av skum oc h slitstar k väska medf öljer
Tillbehörslista
• Stativ med smartphonehållare
• USB-anslutningskablar
• Blixtlåsfodral
Grundläggande inställningar när du är på språng
Följ dessa steg för att ställa in den grundläggande kongurationen:
1. Skruva försiktigt ner smartphonehållaren på stativets gängade monteringspunkt
tills den s itter fast .
2. Fäst mikrofonklämman med smartphonehållarens skofäste och vrid muttern tills
den sitter fast.
3. Justera smartphonehållaren så att den passar din smartphone genom att lossa
den bakr e knappen. Dr a åt den bakre kna ppen igen fö r att säkra sm arttelef onen
på plats .
4. Sätt in mikrofonkroppen i mikrofonklämman och placera vindrutan över
mikrofonkapseln.
5. Anslut smarttelefonen med mikrofonen med Type-C-kabel.
Sele-videoinställning
När du spel ar in selevid eor som kräve r extra höjd f ör din smart phone, inst allera
selestaven genom att följa dessa installationssteg:
1. Skruva f örsikti gt ner seles taven på sta tivets gänga de montering spunkt till s
den sitter fast.
2. Skruva försiktigt ner smartphonehållaren på selestavens gängade
monteringspunkt tills den sitter fast.
3. Slutfö r resten av inst ällningarn a enligt besk rivningen i s teg (2) – (5) i den
grundläggande kongurationen när du är på språng.
Page 2
Page 3

Funkcje
(PL)
• Zestaw m ikrofonów p remium do wys okiej jakośc i lmowania w po dróży
• Doskona ły wybór d o vlogów, podca stów, wywia dów, transmisji na ż ywo, nagrań
terenow ych i nie tylk o
• Kapsuł a z redukcją sz umów eliminuj e szumy tła
• Kodek aud io o wysokie j rozdzielc zości 32-bit / 96 k Hz
• Wyjście słuchawkowe bezpośredniego monitorowania o zerowej latencji
• Staty w z odchylaną s zyjką do łat wego pozycj onowania
• Rozszerzenie do nagrywania lmów sele
• Kompatybilność z wieloma urządzeniami dzięki regulowanemu zaciskowi do
smartfona
• Kable po łączenio we USB-A i USB-C do ko mputera i smar tfona
• W zestaw ie dostosow ana piankowa sz yba przedn ia i wytrz ymały f uterał
Lista akcesoriów
• Staty w z uchwyte m na smartf on
• Kable połączeniowe USB
• Etui na za mek błysk awiczny
Podstawowa konguracja w podróży
Aby skongurować podstawową kongurację, wykonaj następujące kroki:
1. Delikat nie przyk ręć uchwy t na smartf ona do gwintow anego punk tu mocowania
statywu, aż będzie bezpieczny.
2. Przymo cuj klips mik rofonu do uchw ytu do uchw ytu na smar tfona i prz ekręć
nakrętkę, aż zostanie zamocowana.
3. Dopasuj uc hwyt do smar tfona, po luzowując ty lne pokrętł o. Dokręć ty lne
pokrętło, aby zabezpieczyć smartf on na miejscu.
4. Włóż korpus m ikrofonu do z acisku mikr ofonu i umieś ć osłonę prze ciwwiet rzną na
kapsułce mikrofonu.
5. Połącz s martfon z m ikrofonem k ablem Type-C .
Konguracja wideo sele
Podcz as nagryw ania lmów sel e, które wym agają dodatko wej wysokoś ci dla smart fona,
zainstaluj pręt do sele, wykonując następujące czynności konguracyjne:
1. Delikat nie przyk ręć pręt do se le do gwintow anego punkt u mocowania s tatywu,
aż zostanie zamocowany.
2. Delikatn ie przykr ęć uchwyt na s martfon a do gwintowan ego punktu m ocowania
drążka d o sele, aż zos tanie zamoco wany.
3. Dokończ re sztę kong uracji zgodn ie z opisem w kro kach (2) – (5) podsta wowej
konguracji w ruchu.
(JP) 特徴
• 外出先での高品質ビデオ撮影用のプレミアムマイクキット
• Vlog、ポ ッドキャスト、インタビュー、ラ イブストリーミング、フィールドレコーデ
ィング な どに 最 適 で す。
• ノイズ キャン セルカプ セル はバック グラ ウンドノイズを 排 除します
• 高解像度 32 ビット/ 96 kHz オーディオコーデック
• ゼロレイテンシーダイレクトモニタリングヘッドホン出力
• 首を傾けて簡単に配置できる三脚
• 自撮りビデオを録画するための拡張機能
• 調整 可能 なスマートフォンクランプによるマルチデバイスの互換 性
• コンピ ュ ー ターと スマートフ ォン 用 の USB-A および USB -C 接続ケーブル
• カスタマイズされたフォームウインドスクリーンと耐久性 のあるキャリーケース
が含まれています
アクセサリーリスト
• スマ ー トフォ ン ホ ル ダー 付 き 三 脚
• USB 接 続 ケーブ ル
• ジッパーケ ース
外出先での基本的なセットアップ
基本構成をセットアップするには、次の手順に従います。
1. スマートフォンホルダーを三脚のネジ山付き取り付けポイントにしっかりと
固定されるまでゆっくりとねじ込みます。
2. スマートフォンホル ダーのシューマウントにマイククリップを取り付け、しっ
かりと固定され るまでナットをひねります。
3. リアノブ を 緩 め て、スマ ー トフォンに合 うよ うに スマ ー トフォン ホ ル ダ ー を
調整します。後部ノブを締め直して、スマートフォンを所定の位置に固定
しま す。
4. マイク 本 体 をマ イクク リップ に挿 入し 、フ ロ ントガ ラスをマイク カプ セ ル の上
に置 きま す。
5. Type -C ケーブ ルでスマートフォンとマイクを接 続しま す。
自撮りビデオのセットアップ
スマートフォンに余分な高さが必要な自分撮りビデオを録画する場合は、次の設定
手 順 に従って 自 分 撮り ロッド を 取り 付 けます。
1. セルフィーロッドを三 脚のネジ山付き取り付けポイントにしっかりと固定さ
れるまでゆっくりとねじ込みます。
2. スマートフォンホ ルダー をセルフィーロッドのネジ 山付き取り付けポイント
にしっかりと固 定され るま でゆっくりとねじ込 みま す。
3. 基 本 的 な 外 出 先 セットアップ のス テップ( 2)〜( 5)の説 明に従って、残りの
セットア ップ を 完 了します。
特征
(CN)
• 高级麦克风套件,可随时随地进行高质量视频拍摄
• 视频博客、播客、采访、直播、现场录音等的绝佳选择
• 降噪胶囊可消除背景噪音
• 高分辨率 32 位 / 96 kH z 音频编解码器
• 零延迟直接监听耳机输出
• 三脚架带有可倾斜的颈部,便于定位
• 用于录制自拍视频的扩展
• 通过可调节的智能手机夹实现多设备兼容性
• 用于计算机和智能手机的 USB-A 和 USB-C 连接 电缆
• 包括定制 的泡沫防风罩和耐用 的手提箱
配件清单
• 带智能手机支架的三脚架
• USB 连接电缆
• 拉链盒
基本的移动设置
要设置基 本配置 ,请执行以下步骤:
1. 将智能手机支架轻轻拧入三脚架的螺纹安装点,直至牢固。
2. 将麦克风夹与智能手机支架的热靴座相连,然后拧紧螺母直至固定。
3. 松开后部旋钮,调整智能手机支架以适合您的智能手机。重新拧紧后旋钮以
将智能手机固定到位。
4. 将麦克风主体插入麦克风夹中,并将防风罩放在麦克风胶囊上。
5. 使用 Type -C 电缆将智能手机与麦克风连接起来。
自拍视频设置
为智能手机录制需要额外高度的自拍视频时,请按照以下设置步骤安装自拍杆:
1. 将自拍杆轻轻拧到三脚架的螺纹安装点上,直至固定。
2. 将智能手机支架轻轻拧入自拍杆的螺纹安装点,直至固定。
3. 按照基本移动设置的步骤 (2) - (5) 中的说明完成其余设置。
LEGAL DISCLAIMER
Music Trib e accepts n o liabilit y for any lo ss which may b e suere d by any perso n who relie s either wh olly or in
part upon any description, photograph, or statement contained herein. Technical specications, appearances
and othe r informa tion are su bject to c hange wit hout notic e. All trade marks ar e the prope rty of th eir respe ctive
owners. Midas, Klark Teknik, Lab Gruppen, Lake, Tannoy, Turbosound, TC Electronic, TC Helicon, Behringer, Bugera,
Aston M icropho nes and Coo laudio are t rademar ks or regi stered t rademar ks of Music Tri be Globa l Brands Ltd .
© Music Trib e Global Br ands Ltd. 202 2 All right s reser ved.
LIMITED WARRANTY
For the applicable warranty terms and conditions and additional information regarding Music Tribe’s Limited
Warranty, please see complete details online at community.musictribe.com/pages/support#warranty.
NEGACIÓN LEGAL
Music Tribe no admite ningún tipo de responsabilidad por cualquier daño o pérdida que pudiera sufrir cualquier
perso na por con ar total o par cialment e en la descr ipcion es, fotog rafías o a rmacion es conteni das en este
documento. Las especicaciones técnicas, imágenes y otras informaciones contenidas en este documento están
sujetas a modicaciones sin previo aviso. Todas las marcas comerciales que aparecen aquí son propiedad de
sus resp ectivo s dueños. M idas, Klar k Teknik, La b Gruppen , Lake, Tannoy, Turb osound, TC E lectro nic, TC Heli con,
Behringer, Bugera, Aston Microphones y Coolaudio son marcas comerciales o marcas registradas de Music Tribe
Global B rands Ltd. © M usic Tribe G lobal Bran ds Ltd. 2022 Re servad os todos lo s derech os.
GARANTÍA LIMITADA
Si quier e conocer lo s detalle s y condici ones apli cables de l a garantía a sí como inf ormació n adicion al sobre la
Garant ía limita da de Music Trib e, consult e online tod a la inform ación en la we b communi ty.music tribe.c om/pages /
support#warranty.
DÉNI LÉGAL
Music Trib e ne peut êt re tenu pour r espons able pour to ute pert e pouvant ê tre subie p ar toute pe rsonne s e
ant en pa rtie ou en t otalité à to ute descr iption, p hotogra phie ou ar mation con tenue dans c e documen t. Les
caractéristiques, l’apparence et d’autres informations peuvent faire l’objet de modications sans notication.
Toutes les marques appartiennent à leurs propriétaires respectifs. Midas, Klark Teknik, Lab Gruppen, Lake, Tannoy,
Turbosound, TC Electronic, TC Helicon, Behringer, Bugera, Aston Microphones et Coolaudio sont des marques ou
marque s déposé es de Music Tri be Global B rands Ltd. © M usic Tribe Gl obal Bran ds Ltd. 2022 Tous d roits ré servés .
GARANTIE LIMITÉE
Pour connaître les termes et conditions de garantie applicables, ainsi que les informations supplémentaires et
détail lées sur la G arantie L imitée de Mu sic Tribe, co nsultez le s ite Intern et commun ity.musi ctribe .com/page s/
support#warranty.
HAFTUNGSAUSSCHLUSS
Music Tribe übernimmt keine Haftung für Verluste, die Personen entstanden sind, die sich ganz oder teilweise auf
hier enthaltene Beschreibungen, Fotos oder Aussagen verlassen haben. Technische Daten, Erscheinungsbild und
andere Informationen können ohne vorherige Ankündigung geändert werden. Alle Warenzeichen sind Eigentum
der jeweiligen Inhaber. Midas, Klark Teknik, Lab Gruppen, Lake, Tannoy, Turbosound, TC Electronic, TC Helicon,
Behringer, Bugera, Aston Microphones und Coolaudio sind Warenzeichen oder eingetragene Warenzeichen der
Music Tribe Global Brands Ltd. © Music Tribe Global Brands Ltd. 2022 Alle Rechte vorbehalten.
BESCHRÄNKTE GARANTIE
Die geltenden Garantiebedingungen und zusätzliche Informationen bezüglich der von Music Tribe gewährten
beschränkten Garantie nden Sie online unter community.musictribe.com/pages/support#warranty.
LEGAL RENUNCIANTE
O Music Trib e não se resp onsabil iza por pe rda alguma q ue possa s er sofri da por qualq uer pesso a que
dependa, seja de maneira completa ou parcial, de qualquer descrição, fotograa, ou declaração aqui
contid as. Dados té cnicos, a parênci as e outras i nformaç ões estã o sujeita s a modica ções sem av iso prévi o.
Todas as mar cas são pr oprieda de de seus re specti vos donos . Midas, Kla rk Teknik, L ab Grupp en, Lake, Tannoy,
Turbosound, TC Electronic, TC Helicon, Behringer, Bugera, Aston Microphones e Coolaudio são marcas ou
marcas r egistr adas do Musi c Tribe Glob al Brands Lt d. © Music Trib e Global Br ands Ltd. 202 2 Todos direi tos
reservados.
GARANTIA LIMITADA
Para obter os termos de garantia aplicáveis e condições e informações adicionais a respeito da garantia
limita da do Music Tri be, favor ver icar de talhes na í ntegra at ravés do web site commu nity.mus ictrib e.com/
pages/support#warrant y.
DISCLAIMER LEGALE
Music Trib e non si assu me alcuna re sponsa bilità pe r eventual i danni che po ssono es sere subi ti da chiunq ue
si adi in t utto o in pa rte a quals iasi desc rizione, f otogra a o dichiar azione co ntenuta qu i. Speci che
tecnic he, aspet ti e altre i nformaz ioni sono s oggett e a modich e senza pr eavviso . Tutti i marc hi sono di
propr ietà dei ri spetti vi titola ri. Midas, K lark Teknik , Lab Grup pen, Lake, Tan noy, Turbosou nd, TC Elec tronic,
TC Helico n, Behring er, Bugera, A ston Mic rophone s e Coolaudi o sono marc hi o marchi r egistra ti di Music Tri be
Global B rands Ltd. © M usic Tribe G lobal Bran ds Ltd. 2022 Tut ti i dirit ti riser vati.
GARANZIA LIMITATA
Per i termini e le condizioni di garanzia applicabili e le informazioni aggiuntive relative
alla garanzia limitata di Music Tribe, consultare online i dettagli completi su community.musictribe.com/
pages/support#warrant y.
WETTELIJKE ONTKENNING
Music Trib e aanvaard t geen aans prakelij kheid voo r enig verli es dat kan wor den geled en door een
persoon die geheel of gedeeltelijk vertrouwt op enige beschrijving, foto of verklaring hierin. Technische
specicaties, verschijningen en andere informatie kunnen zonder voorafgaande kennisgeving worden
gewijzigd. Alle handelsmerken zijn eigendom van hun respectievelijke eigenaren. Midas, Klark Teknik,
Lab Gruppen, Lake, Tannoy, Turbosound, TC Electronic, TC Helicon, Behringer, Bugera, Aston Microphones en
Coolaudio zijn handelsmerken of gedeponeerde handelsmerken van Music Tribe Global Brands Ltd. © Music
Tribe Glo bal Brand s Ltd. 2022 Alle r echten vo orbehou den.
BEPERKTE GARANT IE
Voor de toepasselijke garantievoorwaarden en aanvullende informatie met betrekking tot de beperkte
garantie van Music Tribe, zie de volledige details online op community.musictribe.com/pages/
support#warranty.
FRISKRIVNINGSKLAUSUL
Music Trib e tar inget a nsvar fö r någon för lust som k an drabba s av någon per son som he lt eller de lvis för litar
sig på någon beskrivning, fotogra eller uttalande som nns här. Tekniska specikationer, utseenden och
annan information kan ändras utan föregående meddelande. Alla varumärken tillhör respektive ägare.
Midas, Klark Teknik, Lab Gruppen, Lake, Tannoy, Turbosound, TC Electronic, TC Helicon, Behringer, Bugera,
Aston Microphones och Coolaudio är varumärken eller registrerade varumärken som tillhör Music Tribe
Global B rands Ltd. © M usic Tribe G lobal Bran ds Ltd. 2022 Al la Rättig heter res ervera de.
BEGRÄNSAD GARANTI
För tillämpliga garantivillkor och ytterligare information om Music Tribes begränsade garanti, se fullständig
information online på community.musictribe.com/pages/support#warranty.
ZASTRZEŻENIA PRAWNE
Music Trib e nie ponos i odpowie dzialno ści za jaki ekolwie k straty, k tóre mogą p onieść os oby, które p olegają
w całoś ci lub w czę ści na jaki mkolwiek o pisie, fo tograi lu b oświadc zeniu za warty m w niniejsz ym
dokumencie. Specykacje techniczne, wygląd i inne informacje mogą ulec zmianie bez powiadomienia.
Wszystkie znaki towarowe są własnością ich odpowiednich właścicieli. Midas, Klark Teknik, Lab Gruppen,
Lake, Tannoy, Turbosound, TC Electronic, TC Helicon, Behringer, Bugera, Aston Microphones i Coolaudio
są znakami towarowymi lub zastrzeżonymi znakami towarowymi rmy Music Tribe Global Brands Ltd. ©
Music Trib e Global Br ands Ltd. 202 2 Wszyst kie prawa z astrze żone.
OGRANICZONA GWARANC JA
Aby zapoznać się z obowiązującymi warunkami gwarancji i dodatkowymi informacjami dotyczącymi
ograni czonej g warancji M usic Tribe, z apoznaj si ę ze wszys tkimi sz czegół ami w try bie online p od adres em
community.musictribe.com/pages/support#warranty.
法的放棄
ここに含まれる記述、写真、意見の全体または一部に依拠して、いかなる人が損害を生
じさせた場合にも、Music Tribe は一切の賠償責任を負いません。技術仕様、外観および
その他の情報は予告なく変更になる場合があります。商標はすべて、それぞれの所有者
に帰属します。Midas、 Klark Teknik、Lab Gruppen、Lake、Tannoy、Turbosound、 TC Electronic、
TC Helicon、Behringer、Bugera、Aston Microphones および Coolaudio は Music Tribe Global Brands Ltd.
の商標または登録商標です。© Music Tribe Global Brands Ltd. 2022 無断転用禁止。
限定保証
適用される保証条件と Music Tribe の限定保証に関する概要については、オンライン上
community.musictribe.com/pages/support#warranty にて詳細をご確認ください。
法律声明
对于任何因在此说明书提到的全部或部份描述、 图片或声明而造成的损失, Music Tribe 不负任
何责任。 技术参数和外观若有更改, 恕不另行通知。 所有的商标均为其各自所有者的财产。
Midas, Klark Teknik, Lab Gruppen, Lake, Tannoy, Turbosound, TC Electronic, TC Helicon, Behringer,
Bugera, Aston Microphones 和 Coolaudio 是 Music Tribe Global Brands Ltd. 公司的商标或注册商标。
© Music Tribe Global Brands Ltd. 2022 版权所有。
保修条款
有关音乐集团保修的适用条款及其它相关信息, 请登陆 community.musictribe.com/pages/
support#warranty 网站查看完整的详细信息。
Specications
Capsul e type Dual cond enser
Capsul e size 10 mm (0.4")
Polar pattern Cardiod, bi-directional
Frequen cy range 50 Hz to 16 kHz
Max. SPL 115 dB
A/D conve rsion 32-bit / 96 kH z
Sensit ivity -32 dB (±3 dB), 0 dB =
1 V/Pa @ 1 kHz (cardi oid)
-36 dB (±3 dB), 0 dB =
1 V/Pa @ 1 kHz (bi- directi onal)
Signal-to-noise ratio 65 dB
Headpho ne out 3.5 mm (⁄") T RS, stereo
Interf ace connec tor USB, type C
Cable le ngth 1.2 m (4.0 ft)
Accessories Tripod, USB connection cables
FEDERAL COMMUNICATIONS
COMMISSION COMPLIANCE
INFORMATION
Behringer
GO VIDEO KIT
Respon sible Part y Name: Mu sic Tribe Comme rcial NV Inc .
Address: 122 E. 42nd St.1,
8th Floo r NY, NY 10168,
United States
Email Address: legal@musictribe.com
GO VIDEO KIT
This equ ipment has bee n tested and fo und to comply wi th the limits f or a Class B
digital device, pursuant to part 15 of the FCC Rules. These limits are designed to provide
reasonable protection against harmful interference in a residential installation.
This equ ipment gener ates, uses and c an radiate rad io frequenc y energy and , if not
instal led and used in a ccordance wit h the instruc tions, may c ause harmfu l interfere nce
to radio co mmunicatio ns. However, ther e is no guarantee t hat interf erence will not o ccur
in a part icular inst allation. If th is equipment d oes cause har mful inter ference to ra dio
or televi sion recepti on, which can b e determined b y turning the e quipment o an d on,
the user i s encouraged t o try to corre ct the inter ference by on e or more of the fo llowing
measures:
• • R eorient or re locate the re ceiving anten na.
• • I ncrease the s eparation be tween the eq uipment and re ceiver.
• • C onnect the e quipment into a n outlet on a cir cuit diere nt from that to w hich the
receiver is connected.
• • C onsult the deal er or an experi enced radio/ TV techni cian for help.
This equ ipment compli es with Part 15 of t he FCC rules. Op eration is sub ject to the
following two conditions:
(1) this device ma y not cause harm ful interf erence, and
(2) this devi ce must accept an y interfere nce received , including int erferenc e that may
cause undesired operation.
Important information:
Changes o r modicat ions to the equi pment not exp ressly appro ved by Music Tribe c an void
the user ’s authority to use the equipment.
Hereby, Mus ic Tribe declare s that this prod uct is in comp liance with Dir ective 2014/30/ EU,
Direc tive 2011/65/EU and Amendme nt 2015/863/EU, Direc tive 2012/19/EU,
Regulat ion 519/2012 REACH SVHC and D irective 1907/200 6/EC.
Full text of EU DoC is available at https://community.musictribe.com/
EU Repres entative: Mu sic Tribe Brands D K A/S
Addres s: Gammel Stran d 44, DK-1202 København K, D enmark
UK Repre sentative: Mu sic Tribe Brands U K Ltd.
Addres s: 6 Lloyds Avenue, Un it 4CL London EC 3N 3AX, United K ingdom
Page 3
 Loading...