

Page 1
EUsers Manual
E
Bedienungsanleitung
Version 1.0 January 1999
D
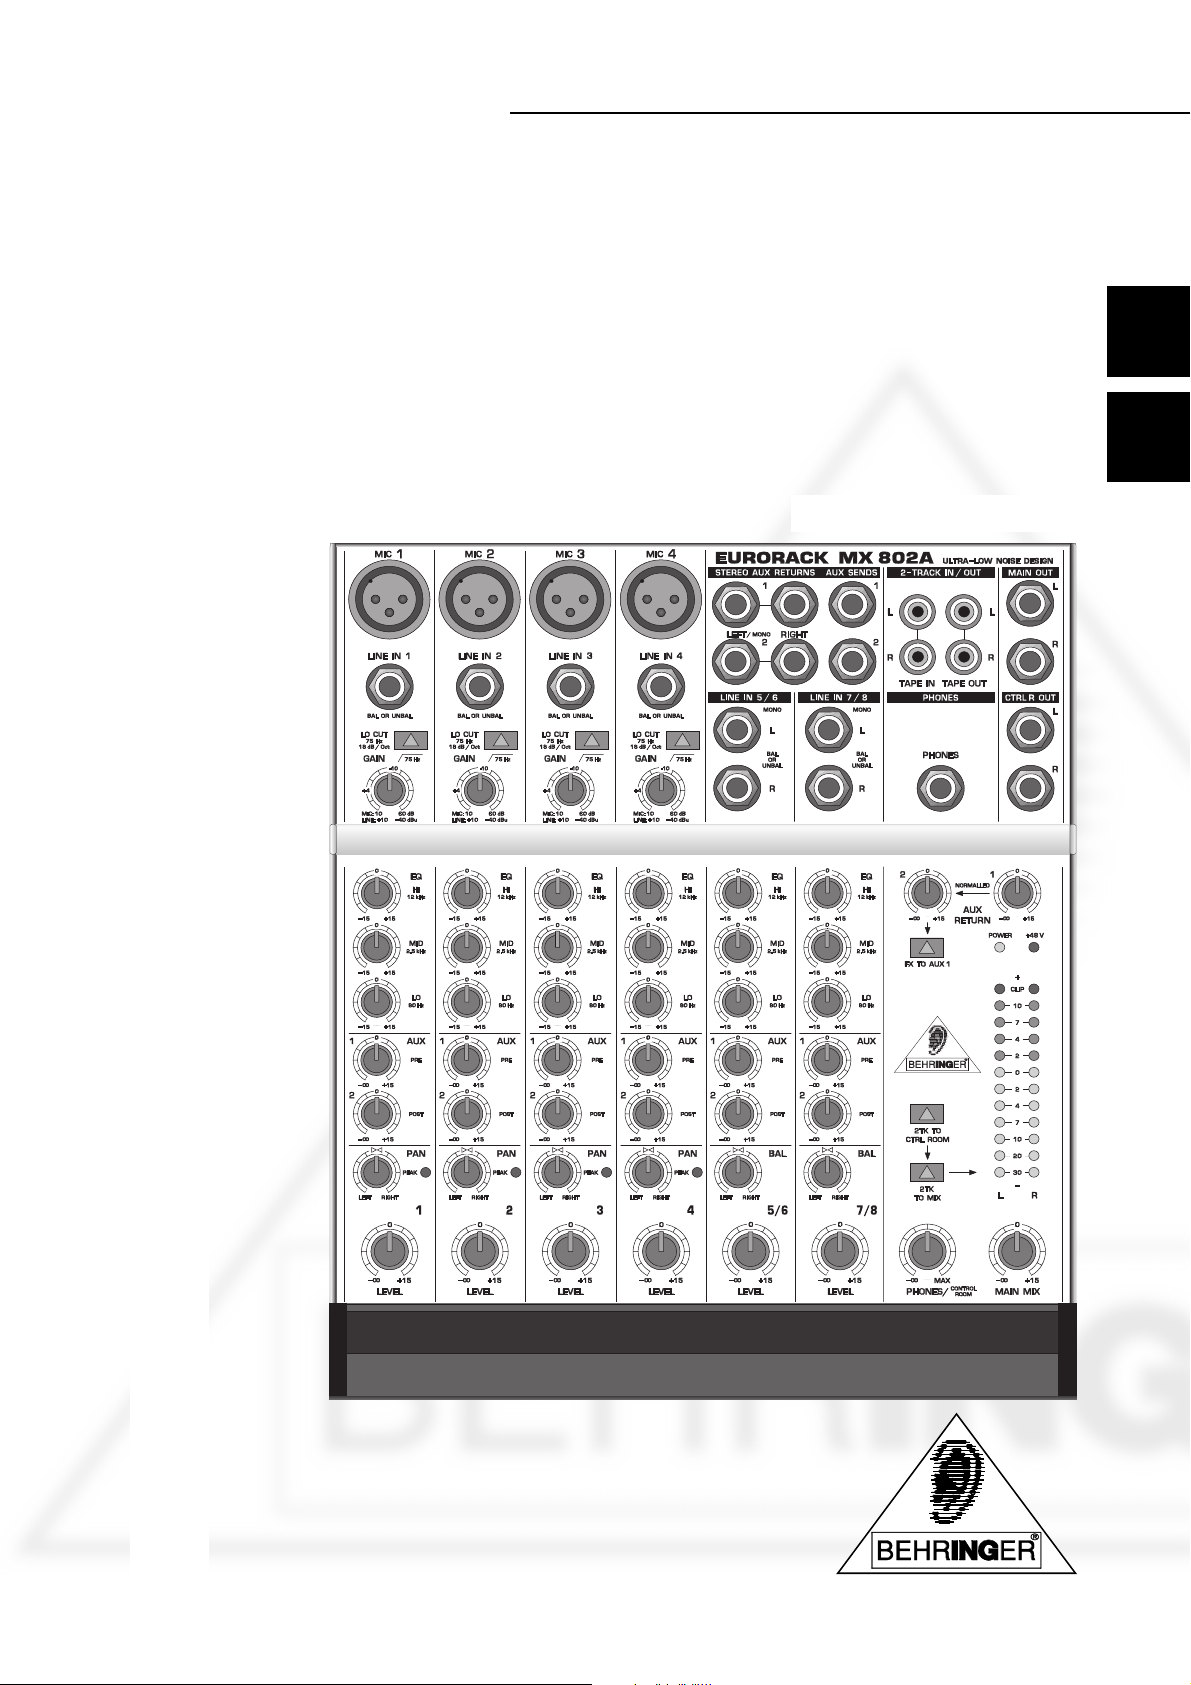
EURORACK MX802A
www.behringer.de
1
Page 2

EC-Declaration of Conformity
acc. to the Directives
89/336/EWG and 73/23/EWG
We, BEHRINGER INTERNATIONAL GmbH
Hanns-Martin-Schleyer-Straße 36-38
D - 47877 Willich
Name and address of the manufacturer or the introducer of the product on the market who is established in the EC
herewith take the sole responsibility to confirm that the product:
EURORACK MX802A
Type designation and article-No (if applicable)
INTERNATIONAL GmbH
to which this declaration refers, is in accordance with the following standards or standardized documents:
x EN 60065 x EN 61000-3-2
x EN 55020 x EN 61000-3-3
x EN 55013
The following operation conditions and installation arrangements have to be presumed:
acc. to Operating Manual
B. Nier, President Willich, 1.01.1999
Name, address, date and legally binding signature of the person responsible
2
Page 3
SAFETY INSTRUCTIONS
CAUTION: To reduce the risk of electrical shock, do not remove
the cover (or back). No user serviceable parts inside;
refer servicing to qualified personnel.
WARNING: To reduce the risk of fire or electrical shock, do not
expose this appliance to rain or moisture.
This symbol, wherever it appears, alerts
you to the presence of uninsulated
dangerous voltage inside the enclosure
- voltage that may be sufficient to constitute a risk of shock.
DETAILED SAFETY INSTRUCTIONS:
All the safety and operation instructions should be read before the appliance is operated.
Retain Instructions:
The safety and operating instructions should be retained for future reference.
Heed Warnings:
All warnings on the appliance and in the operating instructions should be adhered to.
Follow instructions:
All operation and user instructions should be followed.
Water and Moisture:
The appliance should not be used near water (e.g. near a bathtub, washbowl, kitchen sink, laundry tub, in a wet
basement, or near a swimming pool etc.).
Ventilation:
The appliance should be situated so that its location or position does not interfere with its proper ventilation.
For example, the appliance should not be situated on a bed, sofa rug, or similar surface that may block the
ventilation openings, or placed in a built-in installation, such as a bookcase or cabinet that may impede the
flow of air through the ventilation openings.
Heat:
The appliance should be situated away from heat sources such as radiators, heat registers, stoves, or other
appliance (including amplifiers) that produce heat.
Power Source:
The appliance should be connected to a power supply only of the type described in the operating instructions
or as marked on the appliance.
Grounding or Polarization:
Precautions should be taken so that the grounding or polarization means of an appliance is not defeated.
Power-Cord Protection:
Power supply cords should be routed so that they are not likely to be walked on or pinched by items placed
upon or against them, paying particular attention to cords and plugs, convenience receptacles and the point
where they exit from the appliance.
Cleaning:
The appliance should be cleaned only as recommended by the manufacturer.
Non-use Periods:
The power cord of the appliance should be unplugged from the outlet when left unused for a long period of time.
Object and Liquid Entry:
Care should be taken so that objects do not fall and liquids are not spilled into the enclosure through openings.
Damage Requiring Service:
The appliance should be serviced by qualified service personnel when:
- The power supply cord or the plug has been damaged; or
- Objects have fallen, or liquid has been spilled into the appliance; or
- The appliance has been exposed to rain; or
- The appliance does not appear to operate normally or exhibits a marked change in performance; or
- The appliance has been dropped, or the enclosure damaged.
Servicing:
The user should not attempt to service the appliance beyond that is described in the Operating Instructions. All
other servicing should be referred to qualified service personnel.
This symbol, wherever it appears, alerts
you to important operating and maintenance instructions in the accompanying
literature. Read the manual.
E
3
Page 4

MX802A
Ultra-low noise 8-Channel Mic/Line Mixer
s
4 Mono Input Channels with gold plated XLRs and balanced Line Inputs
s
Ultra-low noise discrete Mic Preamps with +48 V Phantom Power
s 2 Stereo Input Channels with balanced TRS Jacks
s 2 additional multifunctional Stereo Line Inputs
s
Extremely high headroom - offering more dynamic range
s
Balanced Inputs for highest signal integrity
s
Ultra-musical 3-band EQ on all channels
EURORACK
s
Peak LEDs and switchable low-Cut Filter on all Mono Channels
s 2 Aux Sends per channel for external effects and monitoring
s
Separate Main Mix, Control Room and Headphone Outputs
s
2-Track Inputs assignable to Main Mix, Control Room / Headphone Outputs
s
Highly accurate 12 segment Bargraph Meters
s
High-quality Panasonic sealed potentiometers
s Rugged design Power Supply ensures superior signal integrity
s
State-of-the-art 4580 ICs and high quality components ensure crystal-clear audio performance
and excellent noise figures
s
Rugged construction ensures long life even under the most demanding conditions
s
Manufactured under the stringent ISO9000 Managment System
4
Page 5

FOREWORD
Dear Customer,
Welcome to the team of EURORACK users and thank you very much for expressing your confidence in
BEHRINGER products by purchasing this unit.
It is one of my most pleasant tasks to write this letter to you, because it is the culmination of many months of
hard work delivered by our engineering team to reach a very ambitious goal: To produce a compact mixer,
which fully satisfies your and our expectations and delivers a superior sound quality, easy operation and
technical specifications. In addition to that the mixer is affordable for almost every musician. The task to design
the EURORACK MX802A certainly meant a great deal of responsibility, which we assumed by focosing on
you, the discerning user and musician. It also meant a lot of work and night shifts to accomplish this goal. But
it was fun, too. Developing a product usually brings a lot of people together, and what a great feeling it is when
everybody who participated in such a project can be proud of what weve achieved.
It is our philosophy to share our joy with you, because you are the most important member of the BEHRINGER
family. With your highly competent suggestions for new products youve greatly contributed to shaping our
company and making it successful. In return, we guarantee you uncompromising quality (manufactured under
ISO9000 certified management system) as well as excellent technical and audio properties at an extremely
favorable price. All of this will enable you to fully unfold your creativity without being hampered by budget
constraints.
We are often asked how we can make it to produce such high-grade devices at such unbelievably low prices.
The answer is quite simple: its you, our customers! Many satisfied customers means large sales volumes
enabling us to get better conditions of purchase for components, etc. Isnt it only fair to pass this benefit back
to you? Because we know that your success is our success, too!
E
I would like to thank the following people, whose help on Project EURORACK MX802A has made it all
possible:
s The existing users of BEHRINGERequipment (whose comments and suggestions have made them the
most important members of the BEHRINGERdesign team),
s Mark Devlaeminck (for this marvellous manual layout),
s Bernhard (Rammi) Ramroth (whose technical ingenuity is unique),
s C.W. for the fine mechanics (key-phrase Tooling modification)
s and all the others, who have made very personal contributions.
My friends, its been worth the effort!
Thank you very much,
Uli Behringer
5
Page 6

TABLE OF CONTENTS
1. INTRODUCTION ......................................................................................................................7
1.1 Architecture .................................................................................................................................... 7
1.2 Before you begin ............................................................................................................................ 7
1.2.1 PSU (Power Supply Unit) ..................................................................................................... 7
1.2.2 Warranty .............................................................................................................................. 8
1.2.3 Packing ................................................................................................................................ 8
2. MONO INPUT CHANNEL ......................................................................................................... 8
2.1 Input level setting ............................................................................................................................ 8
2.2 Equalizer ........................................................................................................................................ 8
2.3 Aux Sends ...................................................................................................................................... 8
2.4 Fading and panning ........................................................................................................................ 9
3. STEREO INPUT CHANNEL ..................................................................................................... 9
3.1 Input level setting ............................................................................................................................ 9
3.2 Equalizer ........................................................................................................................................ 9
3.3 Aux Sends ...................................................................................................................................... 9
3.4 Volume control and panning/balancing............................................................................................ 9
4. MAIN SECTION ........................................................................................................................ 9
4.1 Aux Sends ...................................................................................................................................... 9
4.2 Stereo Aux-Returns ....................................................................................................................... 10
4.3 Metering ....................................................................................................................................... 10
4.4 2-Track Input / Main Mix Output .................................................................................................... 10
4.5 Monitoring ..................................................................................................................................... 10
5. SETTING UP .......................................................................................................................... 11
5.1 Desk normalization ........................................................................................................................11
5.2 Selecting inputs ............................................................................................................................. 11
5.3 Initializing channels for gain setting ............................................................................................... 11
5.4 Auditioning a signal and setting up a channel ............................................................................... 12
5.5 Recording levels ........................................................................................................................... 12
5.6 Modification .................................................................................................................................. 12
6. CONNECTIONS ..................................................................................................................... 13
7. APPENDIX ............................................................................................................................. 15
7.1 Specifications ............................................................................................................................... 15
7.2 Front & back views ....................................................................................................................... 16
7.3 Block diagram ............................................................................................................................... 17
8. WARRANTY .......................................................................................................................... 18
6
Page 7

1. INTRODUCTION
Congratulations. In purchasing our EURORACK MX802A you have acquired a mixer whose small size belies
its incredible versatility and superlative audio performance. Your EURORACK is built to the same outstanding
quality as our top-of-the range console, the BEHRINGER EURODESK MX9000.
We recommend that you experiment with your EURORACK away from the pressures of a recording session or
live concert, in order to get a feel for it. It is a musical instrument. Learn to play it well.
Next to the specifications in the appendix you will find pages with drawings showing the front and rear panels
of your EURORACK. Keep them turned over, lying to the left of the text pages, while studying the manual. All
functions are numbered consistently throughout the manual, whether in the text or on an illustration.
1.1 Architecture
Mono Input Channels
Channels 1 - 4 are mono, with a choice of balanced Mic or Line inputs. The vintage-style high-current discrete
mic amps are of the same incredible quality as those found on the acclaimed BEHRINGER EURODESK
MX9000, while a large external power supply ensures low noise and superior transient response at all times.
Stereo Input Channels
A further 4 Line inputs are configured as 2 stereo input channels. These are ideal for accepting outputs from
MIDI and other electronic instruments.
Channel Outputs
A high-quality rotary potentiometer feeds the Main Mix via a constant-power Channel Pan potentiometer.
Aux Send
There are two Aux Send busses on the MX802A, Aux 1 is pre-fader, Aux 2 is post-fader (the channel's volume
control).
Stereo Line Inputs
There are two line-level Stereo Aux Returns at the top of the output section. They can be used to return stereo
effects or MIDI instruments etc.
E
In addition, a stereo Tape input is provided, which may also be routed to the Main Mix, giving the MX802A a
total of 14 possible inputs during mixing. Channels 1 - 4 on the MX802A have overload LEDs, while the Main
Mix output has 12-segment bargraph meters.
1.2 Before you begin
1.2.1 PSU (Power Supply Unit)
Any amplifier circuit is limited in its transient response by the available current. Every mixer has numerous line
level operational amplifiers (op-amps) inside. When being driven hard, many desks begin to show signs of
stress due to power supply limitations. Not so with the EURORACK. The sound will always stay clean and
crisp right up to the operating limits of the op-amps themselves, thanks to the generous 20 W external Power
Supply Unit.
+ Connect only the provided BEHRINGER power supply unit to the MX802A. Do not connect the
PSU to the EURORACK while the PSU is connected to the mains supply. The correct starting
sequence is: connect mixer and PSU and then connect the PSU to the mains.
+ Be sure that there is enough space around the unit for cooling and please do not place the
MX802A on high temperature devices such as power amplifiers etc. to avoid overheating.
When switched on, parts of the desk and the power supply unit will become warm, this is normal
during operation.
1. INTRODUCTION
7
Page 8

1.2.2 Warranty
Please take time to have the warranty card filled out completely by your specialized dealer and return it within
14 days after the date of purchase, so as to be entitled to benefit from our extended warranty.
1.2.3 Packing
Your BEHRINGER MX802A was carefully packed in the factory and the packaging was designed to protect the
unit from rough handling. Nevertheless, we recommend that you carefully examine the packaging and its
contents for any signs of physical damage, which may have occurred in transit.
+ If the unit is damaged, please do not return it to us, but notify your dealer and the shipping
company immediately, otherwise claims for damage or replacement may not be granted.
Shipping claims must be made by the consignee.
2. MONO INPUT CHANNEL
Each mono channel comes with an XLR Mic input and a balanced Line input on 1/4" jack . Phantom
powering is switchable from the back panel . The gain circuit has a wide range from +10 dB to +60 dB,
obviating the need for mic/line switching. The crucial operating input levels +4 dBu and -10 dBV are clearly and
accurately marked .
2.1 Input level setting
Mic Channel input level is determined by the GAIN control . In addition to Main Mix metering, a channel
PEAK LED illuminates when a channel is going into overload. These LEDs take their cue from post-EQ.
This level sampling is particularly useful when using extreme EQ settings.
There is no Solo or PFL function on the MX802A. To accurately set input follow the procedures given in section
5: SETTING UP. However, if the PEAK LED does not light the input gain cannot be too high. If a reasonable
input level is selected, auditioning a single signal should result in a reading of around 0 dB on the Main Mix
meters , provided that both channel and output level controls are set to unity gain (0 dB).
2.2 Equalizer
All mono input channels are fitted with three-band EQ, plus a switchable Lo Cut filter for eliminating unwanted
subsonics. The upper and lower shelving controls have their frequencies fixed at 12 kHz and 80 Hz
respectively. The Mid Range control has a peaking response, with Q fixed at 2 octaves, frequency at 2.5
kHz. All three bands have up to 15 dB of cut and boost, with a centre detent for off. The Lo Cut filter , slope
at 18 dB/oct., -3 dB at 75 Hz, is ideally suited for reducing floor rumble, breathing noises and popping, woolly
bottom end etc.
+ The combination of shelf boost at 80 Hz together with Lo Cut at 75 Hz results in a peaking
response, useful for adding warmth to vocals and instruments, and a firm bottom to kick drums
and basses, without losing control of low frequency speaker cones.
2.3 Aux Sends
Both Aux Sends are mono and post-EQ. Aux Send 1 is set pre-fader, while Aux Send 2 is
post-fader.
For almost all FX Send purposes, you will want Aux Sends to be post-fader, so that when a fader level is
adjusted, any reverb send from that channel follows the fader. Otherwise, when the fader is pulled down, the
reverb from that channel would still be audible. For cueing purposes, Aux Sends will usually be set pre-fader,
i.e. independent of the Channel Fader.
Aux 2 can be made pre-fader on mono channels Aux 2, see chapter 5.6 for details.
8
2. MONO INPUT CHANNEL
Page 9

2.4 Fading and panning
Level to the Main Mix bus is ultimately determined by the Channel Volume control .
Channel Pan positions the output of the channel in the stereo field. Its constant-power design ensures
there are no level discrepancies whether a signal is hard-panned, centre-stage or somewhere inbetween. Such
pinpoint accuracy will be a revelation if you have been working on consoles with lower quality circuits.
3. STEREO INPUT CHANNEL
Each stereo channel comes with two balanced line level inputs on 1/4" TRS jacks , for left and right
signals. When only the left input is connected, the channel operates in mono.
3.1 Input level setting
The Stereo inputs are designed for any line level signal. Most line level sources such as MIDI instruments and
FX units will have their own output level control. Those that dont, like CD players, all have an output level within
the scope of the MX802A. When the channel and master fader are set to unity gain the meters should read
between -4 and +7 dB. Remember that there is 15 dB gain on both the channel as well as master fader.
3.2 Equalizer
There are no Lo Cut filters on stereo channels, otherwise the EQ is in principle identical to that on Mono
Channels (see 2.2), except that the EQ is stereo, of course!
E
A stereo equalizer is generally preferable to using two mono equalizers when EQ-ing a stereo signal, as often
discrepancies between left and right settings can occur.
3.3 Aux Sends
It is the same as for Mono Channels (see 2.3). Note that a mono sum is taken from the stereo input.
3.4 Volume control and panning/balancing
The only difference here to the Mono Channel described in 2.4 is in the implementation of the Balance control
. When a channel is run in stereo, this control determines the relative balance of the Left and Right Channel
signals being sent to the left and right Main Mix buses. For example, with the Balance control turned fully
clockwise, only the right portion of the channel's stereo signal will be added to the Main Mix.
If a Stereo Channel is run in mono (only the left input connected), the Balance control acts as a pan in the
normal way.
4. MAIN SECTION
4.1 Aux Sends
Aux Sends are provided on unbalanced 6.3 mm jacks . Please adjust the input level control of your effects
unit to match the output level of your EURORACK. This can be done when typical signals are run through the
MX802A and the Aux Sends are set to center (0 dB). If your effects unit does not have an input gain and the
effects levels seems too low, remember that every channel Aux Send has up to 15 dB gain, which should be
more than enough to drive any effects unit.
3. STEREO INPUT CHANNEL
9
Page 10

4.2 Stereo Aux-Returns
There are two additional stereo line inputs (Aux Returns 1 and 2) on your MX802A. Their level can be adjusted
with and . Aux Returns 1 is permanently assigned to the Main Mix. If you connect a jack only to the
left socket, the Aux Return 1 operates in mono. Aux Return 2 can be switched between the Main Mix and the
cue feed (Aux Send 1) via a switch marked FX TO AUX 1 . This enables you to provide a wet cue mix
(signal with effect i.e. reverb) for the headphones or foldback speakers.
If no connection is made to Aux Return 2, the signal is normalled (connected directly) to Aux Return 1.
Depressing FX TO AUX 1 will then feed the signal from Aux Return 1 into the cue feed (Aux Send 1) and can
be controlled in level independently with Aux Return 2. This feature is primarily useful when you are using one
effect for the main mix and for the foldback speakers.
+ When using Aux Send 1 as a second (pre-fader) effects send and Aux Return 2 as the effect
input, do not engage FX TO AUX 1 . The connection from Aux Return 2 to Aux Send 1 could
cause feedback.
There are exceptions. For instance, when you want to send one effect into another, e.g. delay into chorus etc.
+ Sometimes an engineer wants to narrow the stereo width of a reverb field. To do this you will
have to come back on two mono channels to get independent Pan for the left and right signals.
4.3 Metering
Main Mix level is displayed on a pair of accurate 12-segment bargraph peak meters . Two further LEDs
indicate Power on and +48 V DC Phantom Power present .
The Main Mix bargraph meters should average around 0 dB during loud passages. If they read persistently
higher, or are peaking above +10 dB (top segment of the display) reduce either the Main Mix volume and/or the
channel volume, or (as a last resort) channel input gain or instrument / FX unit output level.
4.4 2-Track Input / Main Mix Output
Input
A 2-Track input, on RCA phono jacks , provides easy connection to DAT and other professional and
semiprofessional audio equipment. The 2-Track input is primarily for auditioning mix playback from tape.
Switch 2TK TO CTRL ROOM routes this signal to the studio monitors. However, it can also be routed to
the Main Mix via switch 2TK TO MIX. Here should be disengaged, or you will be listening to the 2Track signal twice over! With depressed you have another stereo line input available to the mix.
+ The 2-Track input could be normalled to the output of a HiFi preamp, allowing you to moni-
tor extra sources such as vinyl, cassette, CD etc.
Output
A single pair of electronically balanced TRS jacks deliver the Main Mix output to your 2-Track recorder (or
PA system). RCA phono jack outputs are also provided for easy connection to DAT, cassette desk etc.
Level is ultimately determined by a precision Main Mix volume control .
4.5 Monitoring
The MX802A has a separate headphone output . The phones signal follows the control room output .
A single volume control sends the level to the headphones and main monitors.
The L/R meters follow the Main Mix.
10
4. MAIN SECTION
Page 11

5. SETTING UP
Experience tells us that the cables in a studio environment get tangled very quickly (inviting mistakes). A
patchfield will facilitate patching and repatching considerably. The BEHRINGER ULTRAPATCH PRO PX2000
makes patching easier and trouble free, increasing both ergonomics and productivity.
5.1 Desk normalization
All board settings should be set to the normal default condition before or after every session. Usually volumes
are set to zero (minus infinity), EQs set flat, and Aux Sends turned fully counter-clockwise etc.
5.2 Selecting inputs
1) Mono Channels accept mic or Line inputs. If you are using the Mic input, make sure nothing is connected
to the Line input (and vice-versa).
+ The Mic inputs are more sensitive than the Line inputs. Do not connect mics with Phantom
Power switched on. Never use unbalanced mic cables with the Phantom Power switched on
ever! Shorting the +48 V to earth can cause serious damage.
2) Stereo Channels accept any line level signals. Any stereo channel can be run in mono simply by connect-
ing into the left jack socket only. These channels are suitable for a variety of line-level sources including
MIDI instruments and Tape Returns from multitrack.
E
3) Stereo Aux Returns are primarily designed for returning effects units, though these too may be given over to
tape returns or MIDI instrument outputs.
IN/OUT
Output
L&R
Input
Mono (L)
TAPE
Output
L&R
Fig. 5.1: Setup example
Input
L&R
5.3 Initializing channels for gain setting
1) Set Gain to minimum and all Aux Sends to off (fully counter-clockwise).
2) Set EQ to flat (all knobs at 12 o'clock).
3) Where applicable, engage the Lo Cut switch for most mics, except for signals with desired very low
frequency content.
4) Set the output level to unity gain ( set to 0).
5. SETTING UP
11
Page 12

5.4 Auditioning a signal and setting up a channel
1) Turn up channel volume to unity gain ( to 0). All other channel volume controls should be set fully
counter-clockwise (minus infinity).
2) Generate a signal, i.e. a voice through a microphone. There should now be some activity at the bargraph
meters .
3) For Mic Channels: Adjust the Gain control until transient peaks are regularly hitting +6 dB. Continuous
signals should not exceed 0 dB.
4) For Stereo Channels and other stereo line inputs, use the output volume of the source instrument or FX unit
to effect gain adjustment until transient peaks are regularly hitting +6 dB. Continuous signals should not
exceed 0 dB.
5) Altering EQ will affect a channel's gain. If EQ is adjusted at any time, repeat steps 2 and 3 or 4.
6) Turn the channel's volume control fully counter-clockwise. Move onto next channel and repeat steps
1 thru 6.
7) Once all channel inputs have been set for level, turn all active channel level controls back to 0 dB. You are
now ready to start mixing.
5.5 Recording levels
When recording to digital, it's a good idea to keep the recorder's peak meters below 0 dB. Most (not all, esp.
samplers) read 0 dB with some headroom left. This is because, unlike with analog, the onset of digital distortion is as sudden as it is horrible. If you really want to take your recording level to the limit (and fully exploit 16bit digital's 96 dB dynamic range for example), you'll have to do some calibrating. How to do it? Well, you could
run a tone at 0 dB from the mixer and use that as your DAT or ADAT reference. But your DAT or ADAT may be
way under its maximum input limit. Probably a better way to work out just how hard you can drive your recorder
is to incrementally increase the record level until the onset of digital distortion, subtract, say, 5 or 10 dB, and
never exceed that level. Engage peak hold on your recorder before recording if you want to confirm that you
haven't. Peak meters read more-or-less independent of frequency. Aim for 0 dB recording level for all signals.
5.6 Modification
The following modifications require you to do some soldering. Attempt only if you are experienced in using an
iron on PCBs. Otherwise, refer to qualified personnel. After modification the BEHRINGER warranty becomes
discretionary.
Links should not be threaded into holes on the PCB. They should be soldered to the tinned areas around the
holes, and bowed slightly upwards in between.
Mono Channel Aux Send 2 > pre-fader
All mono channel Aux Sends 2 are post-fader. If you want to convert them, carry out the modification described
below to each mono channel you want to be altered. The right PCB area is indicated by a yellow printing (see
figures below).
1) Switch desk off and disconnect it from the mains supply!
2) Cut the post track.
3) Add in a pre link.
Repeat for all mono channels you want to be modified.
12
6. CONNECTIONS
Page 13

Modification on Mono Channels
AUXAUX
Add a ´pre´ link
Cut the ´post´ track
PREPRE
POSTPOST
JPnJPn
AfterBefore
6. CONNECTIONS
You will need a lot of cables for different purposes - see the following figures to make sure you have got the
right ones. Unbalanced equipment may be connected to balanced inputs/outputs. Either use mono 1/4" jacks
or connect ring and sleeve of TRS jacks.
E
Fig. 6.1: Headphone connection
Cable InputOutput
Pin 1
2 1
Pin 2 = (+) Signal Positive
Shield
(+) Signal + Hum
(-) Signal + Hum
3
Pin 3 = (-) Signal
RFI and Hum
1 2
3
Ground
Negative
Fig. 6.2: Compensation of interference with balanced connections
6. CONNECTIONS
(+)Hum + Signal
(-)Hum + Signal
2 x Signal
= Signal + 6 dB
13
Page 14

Phantom power (+48 V DC) is provided. This can be switched on or off by the +48 V Phantom switch .
+ Care should be taken NOT to plug mics into the console (or stagebox) while the phantom
power is on. Also, mute the monitor/PA speakers when turning phantom power on or off.
Allow the system to adjust for a couple of seconds after engaging phantom power before
setting input gains.
If possible, connect the unit to other devices in a balanced configuration to allow for maximum interference
immunity.
Unbalanced use of
mono 1/4" jack plugs
Tip =
Signal
Sleeve =
Ground / Shield
Tip
Sleeve
Strain relief clamp
Balanced use of
stereo 1/4" jack plugs
Tip =
hot (+ve)
Ring =
cold (-ve)
Sleeve =
Ground / Shield
Tip
Ring
Sleeve
Strain relief clamp
For connection of balanced and
unbalanced plugs, ring and sleeve have
to be bridged at the stereo plug.
Balanced use with XLR connectors
2 1
1 = Ground / Shield
2 = hot (+ve)
3 = cold (-ve)
3
Input Output
For unbalanced use pin 1 and pin 3 have to be bridged
1 2
3
Fig. 6.3: Different plug types
14
6. CONNECTIONS
Page 15

7. APPENDIX
7.1 Specifications
Mono Inputs
Mic Input electronically balanced, discrete input configuration
Bandwidth 10 Hz to 60 kHz ± 3 dB
Distortion (THD&N) 0.007% at +4 dBu, 1 kHz, Bandwidth 80 kHz
Mic E.I.N. (22 Hz - 22 kHz) -129.5 dBu, 150 Ohm source
-117.3 dBqp, 150 Ohm source
-132.0 dBu, input shorted
-122.0 dBqp, input shorted
Gain range +10 dB to +60 dB
Line Input electronically balanced
Bandwidth 10 Hz to 60 kHz ± 3 dB
Distortion (THD&N) 0.007% at +4 dBu, 1 kHz, Bandwidth 80 kHz
Line level range +10 dBu to -40 dBu
Equalization
Hi Shelving 12kHz +/-15 dB
Mid Range 2.5 kHz +/-15 dB
Lo Shelving 80Hz +/-15 dB
Stereo inputs
Line Input unbalanced
Bandwidth 10 Hz to 55 kHz ± 3 dB
Distortion (THD&N) 0.007% at +4 dBu, 1 kHz, Bandwidth 80 kHz
E
Equalization
Hi Shelving 12kHz +/-15 dB
Mid Range 2.5 kHz +/-15 dB
Lo Shelving 80Hz +/-15 dB
Main Mix section
Max Output +22 dBu balanced
Aux Send Max Out +22 dBu unbalanced
Control Room Out +22 dBu unbalanced
Signal-To-Noise Ratio 112 dB, all channels at Unity Gain
Power supply
Mains Voltages USA/Canada ~ 115 V AC, 60 Hz, power supply unit MXUL2
U.K./Australia ~ 240 V AC, 50 Hz, power supply unit MXUK2
Europe ~ 230 V AC, 50 Hz, power supply unit MXEU2
Japan ~ 100 V AC, 60 Hz, power supply unit MXJP2
Physical
(H * W * D) 20 / 35 mm * 160 mm * 210 mm
Net Weight 3,0 kg (PSU not included)
Gross Weight 4.6 kg
BEHRINGER is constantly striving to maintain the highest professional standards. As a result of these efforts, modifications may be
made from time to time to existing products without prior notice. Specifications and appearance may differ from those listed or
shown.
7. APPENDIX
15
Page 16

7.2 Front & back views
16 167. APPENDIX
Page 17

7.3 Block diagram
E
17
7. APPENDIX
17
Page 18

8. WARRANTY
§ 1 WARRANTY CARD
To be protected by this warranty, the buyer must complete and
return the enclosed warranty card (signed/stamped by retail
dealer) within 14 days of the date of purchase to BEHRINGER
INTERNATIONAL (address see § 3). Failure to return the card in
due time (date as per postmark) will void any extended warranty
claims.
§ 2 WARRANTY
1. BEHRINGER INTERNATIONAL warrants the mechanical and
electronic components of this product to be free of defects in
material and workmanship for a period of one (1) year from the
original date of purchase, in accordance with the warranty regulations described below. If any defects occur within the specified warranty period that are not caused by normal wear or
inappropriate use, BEHRINGER INTERNATIONAL shall, at its sole
discretion, either repair or replace the product.
2. If the warranty claim proves to be justified, the product will be
returned freight prepaid by BEHRINGER INTERNATIONAL within
Germany. Outside of Germany, the product will be returned at
the buyers expense.
3. Warranty claims other than those indicated above are ex-
pressly excluded.
§ 3 RETURN AUTHORIZATION NUMBER
1. To obtain warranty service, the buyer must call BEHRINGER
INTERNATIONAL during normal business hours BEFORE returning the product (Tel.: +49 (0) 21 54 / 92 06 66). All inquiries must
be accompanied by a description of the problem. BEHRINGER
INTERNATIONAL will then issue a return authorization number.
2. The product must be returned in its original shipping carton,
together with the return authorization number, to the following
address:
BEHRINGER INTERNATIONAL GmbH
Service Department
Hanns-Martin-Schleyer-Str. 36-38
D - 47877 Willich-Münchheide
3. Shipments without freight prepaid will not be accepted.
§ 4 WARRANTY REGULATIONS
1. Warranty services will be furnished only if the product is
accompanied by an original retail dealers invoice. Any product
deemed eligible for repair or replacement by BEHRINGER INTERNATIONAL under the terms of this warranty will be repaired or
replaced within 30 days of receipt of the product at BEHRINGER
INTERNATIONAL.
2. If the product needs to be modified or adapted in order to
comply with applicable technical or safety standards on a national or local level, in any country which is not the country for
which the product was originally developed and manufactured,
this modification/adaptation shall not be considered a defect in
materials or workmanship. The warranty does not cover any
such modification/adaptation, irrespective of whether it was
carried out properly or not. Under the terms of this warranty,
BEHRINGER INTERNATIONAL shall not be held responsible for
any cost resulting from such a modification/adaptation.
3. Free inspections, maintenance/repair work and replacement
of parts are expressly excluded from this warranty, in particular
if caused by inappropriate use. Likewise, the warranty does not
cover defects of expendable parts caused by normal wear of
the product. Expendable parts are typically faders, potentiometers, switches and similar components.
4. Damages/defects caused by the following conditions are not
covered by this warranty:
s
misuse, neglect or failure to operate the unit in compliance
with the instructions given in the user or service manuals.
s
connection or operation of the unit in any way that does not
comply with the technical or safety regulations applicable in
the country where the product is used.
s
damages/defects that are caused by force majeure or by
any other condition beyond the control of
BEHRINGER INTERNATIONAL.
5. Any repair carried out by unauthorized personnel will void the
warranty.
6. Products which do not meet the terms of this warranty will be
repaired exclusively at the buyers expense. BEHRINGER INTERNATIONAL will inform the buyer of any such circumstance. If the
buyer fails to submit a written repair order within 4 weeks after
notification, BEHRINGER INTERNATIONAL will return the unit
C.O.D. with a separate invoice for freight and packing. Such
cost will also be invoiced separately when the buyer has sent in
a written repair order.
§ 5 WARRANTY TRANSFERABILITY
This warranty is extended exclusively to the original buyer (customer of retail dealer) and is not transferable to anyone who
may subsequently purchase this product. No other person (retail dealer, etc.) shall be entitled to give any warranty promise on
behalf of BEHRINGER INTERNATIONAL.
§ 6 CLAIM FOR DAMAGES
Failure of BEHRINGER INTERNATIONAL to provide proper warranty service shall not entitle the buyer to claim (consequential)
damages. In no event shall the liability of BEHRINGER INTERNATIONAL exceed the invoiced value of the product.
§ 7 OTHER WARRANTY RIGHTS
This warranty does not exclude or limit the buyers statutory
rights provided by national law, in particular, any such rights
against the seller that arise from a legally effective purchase
contract.
The information contained in this manual is subject to change without notice. No part of this manual may be reproduced or
transmitted in any form or by any means, electronic or mechanical, including photocopying and recording of any kind, for any
BEHRINGER, ULTRAPATCH and EURORACK are a registered trademarks. ALL RIGHTS RESERVED © 1998 BEHRINGER.
BEHRINGER INTERNATIONAL GmbH, Hanns-Martin-Schleyer-Str. 36-38, D-47877 Willich-Münchheide II
purpose, without the express written permission of BEHRINGER GmbH.
Tel. +49 (0) 21 54 / 92 06-0, Fax +49 (0) 21 54 / 92 06-30
 Loading...