


BTC6750GL/
BTC9750GL Cooker Hood
User Manual for your Baumatic
BTC6750GL/BTC9750GL
Cooker Hood
60 cm Cooker hood with LCD display
90 cm Cooker hood with LCD display
NOTE: This User Instruction Manual contains important information, including safety & installation points, which will enable you to get the most out of your appliance. Please keep it in a safe place so that it is easily available for future reference; for you or any person not familiar with the operation of the appliance.
DD 04/08/10
2

Contents Page
Environmental note |
4 |
|
IMPORTANT SAFETY INFORMATION |
5 – 7 |
|
Specifications of your BTC6750GL cooker hood |
8 |
|
Specifications of your BTC9750GL cooker hood |
9 |
|
Using your Baumatic cooker hood |
10 |
- 11 |
Before first use |
10 |
|
To use your cooker hood |
10 |
– 11 |
Setting the time of day |
11 |
|
The timer |
11 |
|
Cleaning your Baumatic cooker hood |
12 |
|
Cleaning |
12 |
|
The grease filter |
12 |
|
Maintenance |
13 |
- 15 |
Removing and cleaning the grease filter |
13 |
|
Changing a light bulb |
14 |
|
Fitting the carbon filters |
15 |
|
Installation |
16 |
- 25 |
Electrical connection |
16 |
- 17 |
Before beginning installation |
17 |
- 18 |
Installing your cooker hood |
18 |
– 20 |
Connecting to external ducting |
21 |
|
Fitting the chimney |
21 |
– 23 |
Attaching the glass canopy (BTC9750GL only) |
24 |
|
Completing the installation |
25 |
|
Extraction mode or recirculation mode? |
25 |
|
Troubleshooting |
26 |
- 27 |
Contact details |
28 |
|
3

ENVIRONMENTAL NOTE
Note: Before discarding an old appliance, switch off and disconnect it from the power supply. Cut off and render any plug useless. Cut the cable off directly behind the appliance to prevent misuse. This should be undertaken by a competent person.
CONFORMITY TO W.E.E.E. DIRECTIVE
4
IMPORTANT SAFETY INFORMATION
Your safety is of the utmost importance to Baumatic. Please make sure that you read this instruction booklet before attempting to install or use the appliance. If you are unsure of any of the information contained in this booklet, please contact the Baumatic Technical Department.
IMPORTANT: Any installation work must be carried out by a qualified electrician or competent person.
oThe hood must be installed in accordance with the installation instructions and all measurements followed.
oIf the cooker hood is installed for use above a gas appliance then the provision for ventilation must be in accordance with the Gas Safety Codes of Practice BS.6172, BS.5440 & BS.6891 (Natural Gas) and BS.5482 (LP Gas) 1994, the Gas Safety (Installation & Use) Regulations, the Building Regulations issued by the Department of the Environment, the Building Standards (Scotland) (Consolidated) Regulations issued by the Scottish Development Department.
o It is dangerous to alter the specifications or to modify this product. Do not tamper with it or attempt to modify the appliance in any way.
o When installing the hood, ensure that the following recommended distances are observed between the highest point on the hob top (including the burners) and the bottom of the cooker hood:
¾ Electric cookers: |
700 mm |
¾ Gas cookers: |
700 mm |
¾ Coal/ oil cookers: |
800 mm |
IMPORTANT: DO NOT SET YOUR COOKER HOOD LESS THAN 700mm ABOVE YOUR COOKER.
oWhen installed between adjoining wall cabinets, the cabinets must not overhang the hob.
5
oThe edges of the cooker hood are sharp – be mindful of this as you handle your appliance, especially during installation and cleaning. DO NOT CLEAN IN BEHIND THE GREASE FILTERS!
oIf the room where the cooker hood is to be used contains a fuel burning appliance such as a central heating boiler then its flue must be of the sealed or balanced flue type.
oIf other types of flue or appliances are fitted, ensure that there is an adequate supply of air in the room.
oWhen the hood is being used in its extractor function, ensure that the ducting is fire retardant and that there are no bends sharper than 90 degrees as this will reduce the efficiency of the hood.
o Ensure the ducting for the extractor function has the same diameter as the outlet hole all the way through.
oKeep young children from using, playing with or tampering with the cooker hood. Older children and infirm persons should be supervised if they are using the cooker hood.
o Your cooker hood is for domestic use only.
oPlease dispose of the packing material carefully – children are especially vulnerable to it.
o Dirty oil is an even greater fire risk.
o Always put lids on pots and pans when cooking on a gas cooker.
o The manufacturer refuses to accept any responsibility for damages arising to the hood or it catching on fire, from a failure to observe the fire safety advice contained in this instruction booklet.
6

oRemember that when in extraction mode, your cooker hood is removing air from your room. Ensure that proper ventilation measures are being observed.
o Note that it removes odours from your room, not steam.
o Warning - Always ensure that the cooker hood has been disconnected from the power supply before carrying out any work on the hood, including replacing light bulbs.
oDo not connect the ducting system of this appliance to any existing ventilation system which is being used for any other purpose.
o Do not install above a cooker with a high level grill.
o Never leave frying pans unattended during use as overheated fats and oils might catch fire.
o Do not leave naked flames under the cooker hood.
oDo not attempt to use the cooker hood if it is damaged in any way. Never attempt to use it without the grease filters fitted or if the filters are excessively greasy!
o Never flambé cook under this cooker hood.
oThe lights on this appliance should only be used during operation of the cooker hood. They should not be left on permanently and used as a lighting source.
oThe cooker hood should not be exposed to a direct heat source from the cooking device underneath it, i.e. a naked flame from a gas burner or heat from electric hob zones without a pan on them.
THE MANUFACTURER DECLINES ALL RESPONSIBILITY IN THE EVENT OF FAILURE TO OBSERVE THE INSTRUCTIONS GIVEN HERE, FOR INSTALLATION, MAINTENANCE AND SUITABLE USE OF THE HOOD.
7
Specifications of your BTC6750GL cooker hood
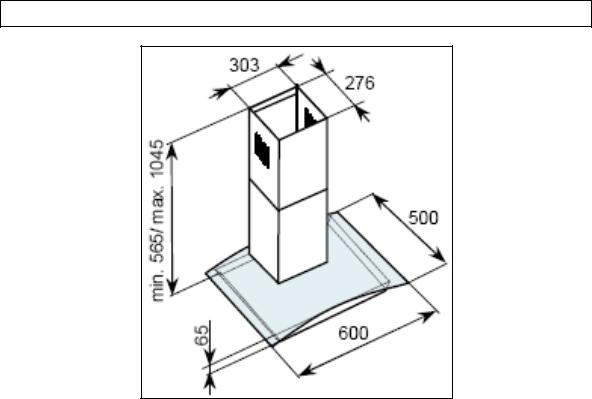
PRODUCT DIMENSIONS
Height: 565 mm – 1045 mm
Width: 600 mm
Depth: 500 mm
DIMENSIONS OF CHIMNEY SECTION:
276 mm x 303 mm
Your stainless steel cooker hood is fitted with:
o High extraction tangential motor o Touch control operation
o LCD display o 3 speeds
o 1 metallic grease filter o 2 halogen lights
o Cut off timer
Extraction capacity: |
750 m³/hr |
Noise level min/max: |
58 – 64 dB |
|
|
MODEL NUMBER |
CARBON FILTER REQUIRED |
BTC6750GL |
S1 |
8
Specifications of your BTC9750GL cooker hood
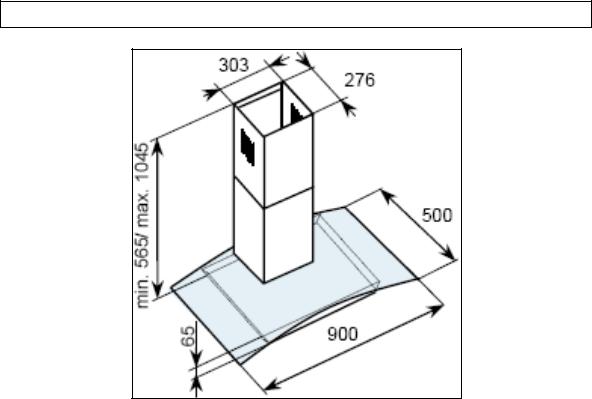
PRODUCT DIMENSIONS
Height: 565 mm – 1045 mm
Width: 900 mm
Depth: 500 mm
DIMENSIONS OF CHIMNEY SECTION:
276 mm x 303 mm
Your stainless steel cooker hood is fitted with:
o High extraction tangential motor o Touch control operation
o LCD display o 3 speeds
o 1 metallic grease filter o 2 halogen lights
o Cut off timer
Extraction capacity: |
750 m³/hr |
Noise level min/max: |
58 – 64 dB |
|
|
MODEL NUMBER |
CARBON FILTER REQUIRED |
BTC9750GL |
S1 |
9

Using your Baumatic cooker hood
Before first use
IMPORTANT: THIS PROCESS MUST BE FOLLOWED BEFORE THE COOKER HOOD IS USED FOR THE FIRST TIME.
oYou should use a good quality stainless steel cleaner on ALL of the stainless steel areas of your cooker hood, before it is used for the first time.
oThis will help to leave a silicone water-resistant film to protect the stainless steel surfaces.
To use your cooker hood
oMake sure that it has been installed by a suitably qualified person, as per the information contained in Baumatic’s installation instructions.
oFind the control panel, which is located in the middle of the canopy.
oThere are several buttons on the control panel, which perform separate functions.
oPress the Add/ON button to switch the cooker hood on. The hood will start to run at its lowest speed.
oThe cooker hood has three operating speeds; low, medium and high. Use the Add/ON button to increase the speed and use the Dec/OFF button to decrease the speed that it is operating at.
oThe operating speed that you have selected will appear on the LCD display.
oIf you press the Dec/OFF button when the hood is operating at its lowest speed, then the hood will switch off.
10
 Loading...