

Page 1

BeoCom 2
Guide
Page 2

Before you start …
This Guide contains instructions in how to set
up and use the BeoCom 2 handset with a
BeoLine base.
You can also use the handset with other
bases, such as a BeoCom 6000 base, a
BeoLine PSTN base, or a BeoLine ISDN base.
However, note that some functions work
differently or are unavailable when you use
the handset with one of these bases.
Differences are described in this Guide.
Page 3

Contents
Daily use, 4
Find out how to make and answer calls, adjust
the handset volume, make calls from the
Phonebook, Caller ID and Redial lists, store a
number in the Phonebook after a call, and silence
the handset ringer.
Advanced operations, 14
Find out how to enter, edit and delete names and
numbers in the Phonebook, store numbers from
the Redial and Caller ID lists, delete the content of
the Caller ID and Redial lists*, call and store
extension numbers, set a primary number and
adjust the volume level of some Bang & Olufsen
audio or video products.
Preference settings, 26
This chapter provides an overview of the Settings
menu. Find out, for example, how to register a
handset to a base, set the time and date, and
select settings for the ringer.
3
System use with several handsets, 29
Find out how to make a handset personal or
common, call another handset, for ward external
calls and make an internal conference call.
Index, 34
*This is only possible if you use the handset with a
BeoLine base.
Page 4

4
Make and answer calls
The key on the BeoCom 2 is used to start
and end a call. During the call, the phone
displays the duration of the call and the
number or name of the person called. If you
do not wish to answer a call, you can mute
the ringing signal.
0-- 9
23456689
C
23456
0-- 9
23456789
23456789
0:12
To make a call …
> Enter the telephone number using the digit
keys.
> To correct a digit, push the Tr ac k p oi nt left or
right to move the cursor to the right of the digit
in question and press C to delete it.
> Press
> Press
To answer a call …
> Press
> Press
To mute a handset ’s ringing …
> Press C to mute the ringing signal for the
If you end a call to or from a number not
previously stored in the Phonebook, the display
prompts you to do so. Refer to Store a number
after a call on page 7 for more information.
To get a dial tone before entering the number,
press
to make the call. The call time is shown,
and if the name is stored in the Phonebook, this
is shown as well.
to end the call. Alternatively, place the
handset in the charger.
to answer the call.
to end a call. Alternatively, place the
handset in the charger.
incoming call.
.
Page 5

Silence the handset ringer
You can silence the handset ringer if you do
not want to be disturbed. While the handset
is silenced, the ringer is deactivated, but
incoming calls are still registered in the New
calls menu, as described on page 6 in ‘Get
started’.
5
To silence the handset ringer …
> Press OK to bring up the main menu.
> Push the Track po in t down until Silence? is
shown and press OK. Silence selected appears
briefly in the display, and this changes to
Silenced when the handset returns to standby.
To reactivate the handset ringer …
> Press OK to be able to reactivate the ringer.
Silence off? appears in the display.
> Press OK. The ringer is reactivated. Silence off –
selected appears briefly in the display, and the
handset returns to standby.
OK
Redial list
Silence?
OK
Silence
selected
OK
Silence off?
OK
Silence off
selected
Page 6

6
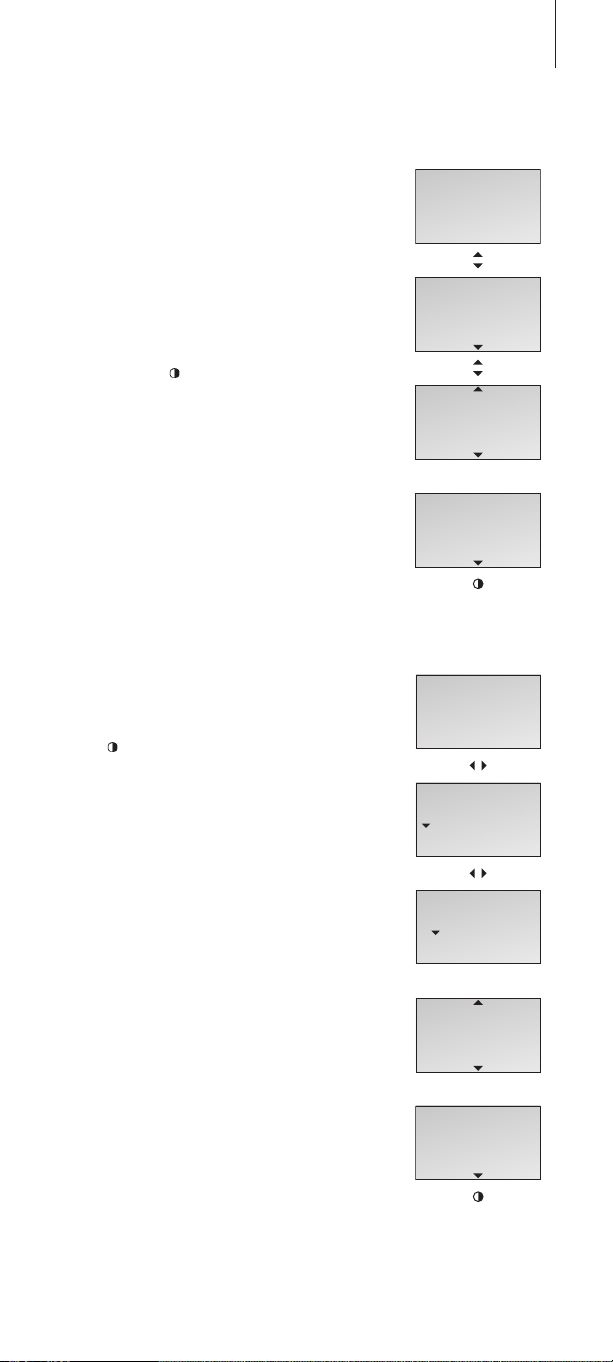
Volume and the microphone
During a call, you can adjust the volume level
using the Track point. You can also switch off
the microphone if you do not wish the
person on the phone to overhear a
conversation you are having with a person in
the room.
David Jones
10:41
Volume
Volume
Volume
David Jones
10:41
To turn the handset volume up or down …
> Push the Track po in t up or down to adjust the
handset volume.
A selected volume setting – with the exception of
the two highest settings – applies to all
subsequent calls until the next time you adjust the
volume.
To switch the microphone on or off during a
call …
> Press
> Press
to switch off the microphone. Mic. off
appears in the display and the handset beeps at
short inter vals until the microphone is switched
back on.
to switch on the microphone again.
David Jones
Mic. off
David Jones
10:41
Page 7

Store a number after a call
After a call, you will be asked whether you
want to store the number in the Phonebook,
if it is not already there. You can store the
number t ype – home, work, or mobile phone
– and enter a name with the number. You
can also add numbers to names already
stored in the Phonebook.
7
After a call …
> The display shows the number and prompts you
to store it in the Phonebook. If a name was
received with Caller ID information, this name is
shown.
> Press OK to be able to store the number. New
name? appears in the display. If you wish to add
a number to a name stored in the Phonebook,
refer to the next page
> Press OK if the number belongs to a name not
yet stored in the Phonebook. The spelling line
appears in the display
> …push the Track point left or right to select
the letters for the name. Select Aa to switch
between upper and lower-case letters, and A@
to use letters specific to your language*.
> Press OK to store the selected letter. If you
store an upper-case letter, the cursor moves to
the lower-case letters. If you store a space or
symbol, the cursor moves to the upper-case
letters.
> To include digits, press the number keys.
> When the name is complete, push the Tra ck
point left or right to move the cursor to the
symbol.
> Press OK to store the name. The display
prompts you to select a number type
> Push the Track po in t down to select either
Home, Mobile or Work and press OK to store it.
23456789
Store number?
OK
23456789
New name?
OK
Aa ABCDEF...
OK
David Jones
Aa abcdef...
OK
Number type
Home?
OK
Home
stored
Here are some tips that can help you make
Phonebook entries easier to find:
– When entering couples’ names, put first names
in alphabetical order;
– When entering names of colleagues, put the
company name first;
– When entering the names of childrens’ friends,
start with the child’s first initial.
Page 8

8
>> Store a number after a call
23456789
Add to name?
OK
First letter:
ADEGHKOPST...
First letter:
ADEGHKOPST...
OK
David Jones
OK
Number type
Home?
OK
Home
stored
To add a number to a name in the
Phonebook…
> When the display prompts you to store a new
name, push the Track p oi nt down to select
Add to name? and press OK. The first letters of
names stored in the Phonebook appear in the
dis play.
> Push the Track point left or right to select the
first letter of a name and press OK. The first
name beginning with the selected letter
appears in the display.
> Push the Track po in t up or down to select the
name and press OK to be able to select a
number type.
> Push the Track po in t down to select Home,
Mobile or Work and press OK to store it.
Page 9
Search the Phonebook and make a call
9
When the phone is not in use, you can use
the Track point to search directly from the
entire list of names in the Phonebook.
If there are few entries in the Phonebook …
> Push the Track po in t up or down to search
through the Phonebook and press OK to be
able to select a number type.
> Push the Track po in t down to select a number
type and press
If the Phonebook contains many entries…
> Push the Track po in t left or right to access the
Phonebook. The letters in the display
correspond to the first letters of Phonebook
entries.
> Push the Track po in t left or right to select the
first letter.
> Press OK to be able to search through names
beginning with the letter you selected.
> Push the Track po in t up or down to search
through the names.
> When you have selected a name, press OK to
be able to search through the number t ypes.
> Push the Track po in t down to select a number
type.
> Press
to make a call.
to make a call.
Living Room
16:35
Alice Smith
David Jones
OK
Home
23456789
Living Room
16:35
*Refer to page 25 for further information about
selecting a primary number for a name.
First letter:
ADEGHKOPST...
First letter:
ADEGHKOPST...
OK
David Jones
OK
Home
23456789
Page 10

10
Use Redial
Living Room
16:35
OK
Redial list
OK
David Jones
11:24 2 Jan
OK
David Jones
Call?
OK
Home
23456789
Mobile
34567890
David Jones
11:24 2 Jan
OK
David Jones
Details?
OK
The Redial function stores the last 24
telephone numbers you called. In addition to
the number called, you can also view the
time, date, and duration of the call. If you
have entered a name in the Phone book, this
is displayed instead of the number. Internal
calls are not registered in the Redial list.
To call from the Redial list…
> Press OK to bring up the main menu.
> If Redial list does not appear in the display, push
the Tra ck po in t down until Redial list is shown.
> Press OK to access the Redial list.
> Push the Track po in t down to select the name
or number. If you pause at a number, the
display alternates between showing the name
and the number type
> Press OK. The display prompts you to make the
call.
> Press OK. If only one number is stored with the
name, or if the number is not stored in the
Phonebook, the call is made.
> If other number types are stored with the
name, push the Track point down to select a
number type and press
To see call information for a selected
outgoing call …
> Press OK to view your options.
> Push the Track po in t down until Details?
appears in the display.
> Press OK. The phone number and the call
duration are shown.
You can store telephone numbers from the Redial
list directly in the Phonebook. Refer to Store
Redial and Caller ID numbers on page 19 for more
information.
The Redial list is only shared by handsets set up to
be ‘common’. Refer to Make a handset ‘personal’
or ‘common’ on page 31 for more information.
to call.
David Jones
2:44
Page 11

11
To delete a specific Redial number from the
list…
> Press OK to bring up the main menu.
> If Redial list does not appear in the display, push
the Tra ck po in t down until Redial list is shown.
> Press OK to access the Redial list.
> Push the Track po in t down to select the name
or number.
> Press OK to view your options.
> Push the Track po in t down until Delete call?
appears in the display.
> Press OK to delete the selected entry.
Living Room
16:35
OK
Redial list
OK
David Jones
11:24 2 Jan
OK
David Jones
Delete call?
OK
David Jones
Call deleted
Page 12

12
Use Caller ID
The last 24 numbers you have received calls
from are stored in the Caller ID list. If a name
is stored with the number in the Phone book,
this name is shown, even if your phone
company has provided Caller ID name
information. Identical numbers are only
stored once in the list – the most recent call.
This function requires a Caller ID subscription
with your telephone company.
Living Room
16:35
OK
Caller ID list
OK
David Jones
11:24 2 Jan
OK
David Jones
Call?
OK
Home
23456789
Mobile
34567890
To call from the Caller ID list …
> Press OK to bring up the main menu.
> Push the Track po in t down until Caller ID list is
shown and press OK to access the Caller ID list.
> Push the Track po in t down to select the name
or number. If you pause at a number, the
display alternates between showing the name
and the number type
> Press OK. The display prompts you to make the
call.
> Press OK. If only one number is stored with the
name, or if the number is not stored in the
Phonebook, the call is made.
> If other number types are stored with the
name, push the Track point down to select a
number type and press
To see call information for a selected
incoming call …
> Press OK to view your options.
> Push the Track po in t down until Details?
appears in the display.
> Press OK. The number of calls is shown.
to call.
Page 13

13
To delete a specific Caller ID number from
the list …
> Press OK to bring up the main menu.
> Push the Track po in t down until Caller ID list is
shown and press OK to access the Caller ID list.
> Push the Track po in t down to select the name
or number.
> Press OK to view your options.
> Push the Track po in t down until Delete?
appears in the display.
> Press OK to delete the selected entry.
You can store telephone numbers from the Caller
ID list directly in the Phonebook. Refer to Store
Redial and Caller ID numbers on page 19 for more
information.
Even if you subscribe to Caller ID, caller
information may still be unavailable for a
particular call. The following may appear in the
display during an incoming call*:
– Anonymous …Calls from unlisted numbers;
– No Caller ID …Caller ID not supported by the
service provider;
– International …Information unavailable for
international calls.
Living Room
16:35
OK
Caller ID list
OK
David Jones
11:24 2 Jan
OK
David Jones
Delete call?
OK
David Jones
Call deleted
*Your service provider may also send information
other than that described above.
Page 14

14
Enter a new name and number in the Phonebook
At any time, you can store a name and
number in the Phonebook. A number can
contain up to 48 digits, and a name up to 25*
characters. You can store up to 200 entries.
23456789
Store number?
OK
23456789
New name?
OK
Aa ABCDEF...
OK
David Jones
Aa abcdef...
OK
Number type
Home?
OK
Home
stored
To enter a number …
> Enter the telephone number using the digit
keys.
> Press OK to be able to store the number. New
name? appears in the display. If you wish to add
a number to a name stored in the Phonebook,
refer to the next page
> Press OK if the number belongs to a name not
yet stored in the Phonebook. The spelling line
appears in the display You can now enter a
name.
To enter a name …
> …push the Track point left or right to select
the letters for the name. Select Aa to switch
between upper and lower-case letters, and A@
to use letters specific to your language*.
> Press OK to store the selected letter. If you
store an upper case letter, the cursor
automatically moves to the lower-case letters. If
you store a space or symbol, such as ‘&’, the
cursor automatically moves to the upper-case
letters.
> Finish ‘typing’ the name.
> To include digits, press the number keys.
> When the name is complete, push the Tra ck
point left or right to move the cursor to the
symbol.
> Press OK to store the name. The display
prompts you to select a number type
> Push the Track po in t down to select either
Home, Mobile or Work and press OK to store it.
Names and numbers are shared by all handsets
set up to be ‘common’. Refer to Make a handset
‘personal’ or ‘common’ on page 31 for more
information.
*With bases other than BeoLine, a name can
contain up to 16 characters, and the Aa and A@
functions are unavailable.
Page 15

15
To add a number to a name in the
Phonebook…
> When the display prompts you to store a new
name, push the Track p oi nt down to select
Add to name? and press OK. The first letters of
names stored in the Phonebook appear in the
dis play.
> Push the Track point left or right to select the
first letter of a name and press OK. The first
name beginning with the selected letter
appears in the display.
> Push the Track po in t up or down to select the
name and press OK to be able to select a
number type.
> Push the Track po in t down to select Home,
Mobile or Work and press OK to store it.
23456789
Add to name?
OK
First letter:
ADEGHKOPST...
First letter:
ADEGHKOPST...
OK
David Jones
OK
Number type
Home?
OK
Home
stored
Page 16

16
David Jones
OK
Mobile
34567890
OK
Mobile
Edit?
OK
34567890
Mobile
34567890
Mobile
C
Edit a name or number in the Phonebook
You can edit a Phonebook entry – which
typically contains a name and at least one
number – at any time.
Edit a number in the Phonebook…
> Push the Track po in t up or down to select the
name.
> Press OK to be able to select a number type.
> Push the Track po in t down to select a number
type and press OK to view your options.
> Push the Track po in t down until Edit? is
shown.
> Press OK to be able to edit the number.
> Push the Track po in t left to select a digit you
wish to edit.
> Press C to delete the digit to the left of the
cursor.
> Enter a digit to replace the one you deleted.
> Repeat the above three steps for each digit you
wish to edit.
> Press OK when you are done editing the
numb er.
> The display prompts you to confirm that the
number is correct.
> Press OK to confirm. The display prompts you
to select a number type.
> Push the Track po in t down to select a number
type and press OK to store it.
3456890
Mobile
0– 9
34567890
Mobile
OK
34567890
Number OK?
OK
Number type
Mobile?
OK
Page 17

To edit a name …
> Push the Track po in t up or down to select the
name and press OK to view your options.
> Push the Track po in t down until Edit? appears
in the display and press OK to view your
options.
> Push the Track po in t down until Rename?
appears in the display and press OK.
> If the name is correct, press OK. Otherwise…
> …push the Track point left or right to select
the letters for the name.
> Press OK to store the selected letter. If you
store an upper case letter, the cursor
automatically moves to the lower-case letters. If
you store a space or symbol, such as ‘&’, the
cursor automatically moves to the upper-case
letters.
> Press C to delete the letter to the left of the
cursor.
> Finish ‘typing’ the name.
> To include digits, press the number keys.
> When the name is complete, push the Tra ck
point left or right to move the cursor to the
symbol.
> Press OK to store the name.
If you wish to enter an additional number for the
same person in the Phonebook, you must enter a
new number as described on page 14. An edited
entry replaces the previous entry in the
Phonebook.
17
Dave Jones
OK
Dave Jones
Edit?
OK
Dave Jones
Rename?
OK
Dave Jones
Aa a bcdefg...
C
Dav
Aa a bcdefg...
OK
David Jones
Aa abcdefg...
OK
David Jones
stored
. . .
David Jones
Page 18

18
David Jones
OK
Mobile
34567890
Delete a name or number in the Phonebook
You can delete names and numbers stored in
the Phonebook.
Delete one number …
> Push the Track po in t up or down to select the
name.
> Press OK to be able to select a number type.
> Push the Track point down to select a number
type and press OK to view your options.
> Push the Track po in t down until Delete?
appears in the display and press OK to delete
the number.
OK
Mobile
Delete?
OK
Mobile
deleted
David Jones
OK
David Jones
Edit?
OK
David Jones
Delete all?
Delete a name and all the numbers stored
with it …
> Push the Track po in t up or down to select the
name.
> Press OK to view your options.
> Push the Track po in t down until Edit? appears
in the display and press OK to view your
options.
> Push the Track po in t down until Delete all?
appears in the display and press OK. The
selected name and all the numbers stored with
it are deleted.
OK
David Jones
deleted
Page 19

Store Redial and Caller ID numbers
Telephone numbers from the Redial and
Caller ID lists can be stored and named in the
Phonebook.
> Press OK to bring up the main menu.
> Push the Track po in t down until Redial list or
Caller ID list is shown and press OK to access
the list.
> Push the Track po in t down to select a number
and press OK to view your options.
> Push the Track po in t down until Store
number? appears in the display and press OK.
> Press OK to be able to store the number. New
name? appears in the display. If you wish to add
a number to a name stored in the Phonebook,
refer to page 15.
> Press OK. You can now enter a name.
19
Living Room
16:35
OK
Caller ID list
OK
23456789
11:24 2 Jan
To enter a name …
> …push the Track point left or right to select
the letters for the name. Select Aa to switch
between upper and lower-case letters, and A@
to use letters specific to your language*.
> Press OK to store the selected letter. If you
store an upper case letter, the cursor
automatically moves to the lower-case letters.
> Finish ‘typing’ the name.
> To include digits, press the number keys.
> When the name is complete, push the Tra ck
point left or right to move the cursor to the
symbol.
> Press OK to store the name. The display
prompts you to select a number type
> Push the Track po in t down to select either
Home, Mobile or Work and press OK to store it.
*These functions are only available if you use the
handset with the BeoLine base.
OK
23456789
Store number?
OK
23456789
New name?
OK
Aa ABCDEF...
OK
David Jones
Aa abcdef...
OK
Number type
Home?
OK
Home
stored
Page 20

20
Delete the content of the Caller ID list or Redial list
You can delete the content of either list at
any time.
Living Room
16:35
OK
Redial list
Delete lists
OK
Caller ID list?
OK
Deleted
Caller ID list
To delete the content of a list…
> Press OK to bring up the main menu
> Push the Tra ck point down until Delete lists? is
shown and press OK
> Push the Tra ck point down to select Caller ID
list? or Redial list? and press OK to delete the
content of the list
If you have set your handset to personal as
described on page 31, deleting the content of a
list only applies to the handset. If you have set the
handset to common, the list is deleted for all
handsets set to common.
Page 21

21
Page 22

22
Adjust volume level on audio/video products
You can adjust the volume of your Bang &
Olufsen audio and video products directly
from your handset. First select which sound
source, audio or video, you wish to adjust.
David Jones
0:12
A.V
Audio
A.V
Video
A.V
Link audio
A.V
Link video
Link video
To adjust the volume of an audio or video
system …
> Press A.V repeatedly until the desired system
type appears in the display.
> Push the Track po in t up or down to turn the
volume up or down.
While the phone is ringing, you can adjust the
volume of a Bang & Olufsen product without
pressing the A.V button first. Simply push the
Track point up or down. The product must,
however, be the same one on which you last
adjusted the volume with the handset.
Link video
Page 23

Call and store extension numbers in
0--9
the Phonebook
23
If you need to make a call to an extension
number, such as those used by banks and
other businesses with switchboards, a pause
must be inserted before the extension
number. Store the main number, the pause
and the ex tension number in the Phonebook.
You can then call the number from the
Phonebook.
To call an extension number directly …
> Enter the main telephone number using the
digit keys.
> Press
> Enter the extension number.
> Press
To store an extension number in the
Phonebook …
> Enter the main telephone number.
> Press OK to be able to insert a pause.
> Push the Track po in t down until Insert pause?
> Enter the extension number.
> Press OK twice to store the entry. You can now
You can also enter a pause in a number by
pressing
to make the call. Wait for a connection.
to end the call.
appears in the display and press OK.
give the number a name, as described on page
14.
.
0-- 9
12345678
12345678
0:03
0-- 9
1234567811
0:05
12345678
OK
12345678
Insert pause?
OK
12345678–
0-- 9
12345678–11
OK
12345678–11
Store number?
OK
Page 24

24
>> Call and store extension numbers
Living Room
16:35
David Jones
OK
Work
12345678–11
David Jones
0:01
...
12345678–11
Continue?
OK
David Jones
0:12
To call an extension number from the
Phonebook …
> Push the Track po in t up or down to search
through the entire Phonebook.
> Press OK to be able to select the number.
> Press the Tra ck point down to select the
numb er.
> Press
> The display prompts you to continue. Press OK
to make a call. The main number is
dialled.
to call the extension number.
Page 25

Set a primary number
If you have stored several numbers with a
single name, you can set the number you call
most of ten as the primary number for that
name. Pressing
the display places a call to the primar y
numb er.
when the name is shown in
25
To set a primary number…
> Push the Track po in t up or down to select a
name.
> Press OK to be able to select a number type.
> Push the Track point down to select a number
type and press OK to view your options.
> Push the Track po in t down until Primary? is
shown.
> Press OK to store the setting.
Living Room
16:35
David Jones
OK
Home
23456789
Mobile
34567890
OK
Mobile
Call?
Mobile
Primary?
OK
Mobile
Primary
Page 26

26
Preference settings
The Settings menu contains several options
which allow you to adjust BeoCom 2
functions.
Living Room
16:35
OK
Settings
OK
Time and date
12:00 1 Jan
OK
Set year
2005?
OK
Set month
Jan?
OK
Set day
1?
...
Stored
16:23 9 Jan
To choose settings in the menu …
> Press OK to bring up the main menu.
> Push the Track po in t down to display Settings
and press OK to bring up the menu.
> Push the Track po in t down until the desired
option is displayed, such as Time and date.
> Press OK to bring up the menu.
> Push the Track po in t up or down to select a
setting and press OK to store it.
The Settings menu options
Ringer …This menu contains two separate ringer
settings:
– Ringer on/ off lets you switch the ringer on or
off, and set a time period in which the phone
will not ring. If you switch off the ringer, the
phone does not ring, but it does register
incoming calls in the Caller ID list. The ringer is
disconnected until you change the setting.
– Ringer level lets you set the ringer volume.
Options are Low, Medium or High. The ringing
signal selected is played after a moment.
Time and date …Enter the time and date.
News indicator …The news indication – the
display message indicating new, unanswered calls
– is set to On from the factory, so you can see
how many new calls you have received. Options
are On and Off.
Handset …The Handset menu contains three
sub-menus:
– Enter name allows you to give the handset a
new name using the Track point and OK key.
Note that this menu is called Change name
after you enter a name for the handset the first
time.
– Register allows you to register the handset to
the BeoLine base.
– Handset type allows you to set the handset to
be Personal or Common, as described on page
31.
Base …The Base menu contains three sub-menus:
– Remove handset cancels registration of the
handset to the base.
Page 27

– Open base for registration allows you to open
the base for registration of additional handsets.
This option is only available if you use the
handset with a BeoLine base.
– Change pincode allows you to enter a new
pincode for your base and change the pincode.
Use the number keys to enter the pincode and
the OK key to store it. The default pincode is
0000.
Language …Select the language of the display
texts.
Switchboard …Set BeoCom 2 for use with a
switchboard. Options are Ye s and No. If you
choose Ye s, use the number keys to enter a prefix
code and push the Track point to select a pause
length. You can select a pause length between 0
and 12 seconds, or select Wait. Note that you
must enter prefix codes manually when entering
phone numbers in the Phone book. This option is
only available if you use the handset with a
BeoCom 6000 base, a BeoLine PSTN base, or a
BeoLine ISDN base.
27
Flash time …Choose long, shor t or customized
The correct flash time depends on how you have
connected your phone.
Page 28

28
Dialling systems
NOTE! The information
on this page only
applies to the
Russian market!
The keys
be used only when
using the Tone (DTMF)
dialling system.
For further information
about the dialling
systems, contact
your telephone
company.
and can
You can set up the telephone to dial using
the Pulse dialling and Tone dialling (DTMF)
systems. Change the setting if you want to be
able to call home banking services or
extension numbers. The available settings
are described below. BeoLine is preset to
mod e 1.
– Predial … Enter the phone number and press
to make a call.
– Postdial … Press
the phone number to make a call. Postdial is
used with predial when you call a home
banking service or an extension number.
Mode 1
Predial is set to Pulse and postdial to Tone
(DTMF). If your net work uses Pulse and you want
to call a home banking number, use this setting.
> Press
> Press
> Press
Mode 2
In mode 2 both predial and postdial are set to
Pulse. If you do not use calling home banking
services, leave your phone in mode 2.
> Press
> Press
> Press
781 1 .
and await a dial tone.
to store the setting.
781 2 .
and await a dial tone.
to store the setting.
, await a dial tone and enter
Mode 3
In mode 3 both predial and postdial are set to
Tone ( DTMF ).
> Press
> Press
> Press
781 3 .
and await a dial tone.
to store the setting.
Page 29

System use with several handsets
With several handsets registered to one base,
you can make your own phone system. The
handsets can all receive external calls, also
during internal calls between handsets.
Handsets in the system are numbered 1–8*
and can be named as well.
Each handset is initially set up as ‘common’.
This means that the Phonebook, Caller ID list
and Redial list are all updated by the base
and shared with other handsets in the
system. If you want an independent
Phonebook, Caller ID list and Redial list in an
individual handset, make the handset
‘personal’ instead.
For further information about the
possibilities a system setup offers, please
refer to the following pages.
*If you use a BeoCom 6000 base, a BeoLine PSTN
base or a BeoLine ISDN base, you can only register
six handsets.
29
Page 30

30
Call another handset
Living Room
16:35
INT
Kitchen
2
Bedroom
3
Living Room
16:35
INT
Kitchen
2
You can call one handset or call all handsets
simultaneously. If you call all handsets, the
handset that responds first receives the call.
If you call one handset, the display shows
which handset has been called.
To call a handset …
> Press INT to make an internal call.
> Press the number of the handset and the call is
made automatically. Alternatively …
> …push the Track point down to search
through the internal listing of handsets and
to make the call. If the internal call can
press
not be made, you will hear a busy signal.
To call all handsets…
> Press INT to make an internal call.
> Press
To end a call…
> Press to end a call.
The phone system allows one internal call and
one external call to take place at the same time.
If you misplace a handset, you can locate it by
making a call to that handset.
to call all handsets.
All handsets
Page 31

Make a handset ‘personal’ or ‘common’
31
You can set your handset to be ‘personal’
instead of ‘common’. The Phonebook, Redial
list and Caller ID list of a personal handset
are located in the handset and not the base.
> Press OK to bring up the main menu.
> Push the Track po in t down to select the
Settings menu and press OK to bring up the
menu.
> Push the Track po in t down to select the
Handset menu and press OK to bring up the
menu.
> Push the Track po in t down to select Handset
type and press OK.
> Push the Track po in t down to select Personal
or Common and press OK to store the settings.
If you have a phone system with one or more
handsets set to personal and the others set to
common, note the following:
– Changing a handset from personal to common
causes the personal Phonebook, Caller ID list
and Redial list to be replaced, not
supplemented, by the common lists. Updating
the Phonebook, Caller ID and Redial lists may
take a few minutes.
Living Room
16:35
OK
Settings
OK
Handset
Living Room
OK
Handset type
Personal
OK
Handset type
Common?
OK
Phonebook
will be
replaced – OK?
OK
Stored
Common
Page 32

32
David Jones
10:41
INT
Kitchen
2
Kitchen
Retrieve?
...
Kitchen
Transfer?
Transfer external calls
You can transfer an external call to another
handset or to all hand sets. You can talk with
the person answering the internal handset
before transferring the call. When you
transfer an external call to all handsets, the
call goes to the handset which answers first.
Transfer an external call …
> Press INT to make an internal call.
> Press the number of the handset and the call is
made automatically. Alternatively …
> …push the Track point down to search
through the internal listing of handsets and
to make the call. If the internal call can
press
not be made, you will hear a busy signal.
If the internal call is answered …
> Press OK to transfer the call.
Retrieve the external call if the internal call is
not answered …
> Press OK or C to retrieve the external call on
hold.
OK
Call
transferred
...
Living Room
16:35
Page 33

Make an internal conference call
During an external call, you can call another
handset in the system to establish a
conference call. If one of the participants
hangs up, the call continues with those
remaining.
Start a conference call with one internal and
one external par ty …
> Press INT to make an internal call during an
external call.
> Press the number of the handset and the call is
made automatically. Alternatively …
> …push the Track point down to search
through the internal listing of handsets and
to make the call. If the internal call can
press
not be made, you will hear a busy signal.
33
David Jones
10:41
INT
Kitchen
2
If the internal call is answered …
> Push the Track po in t down to select
Conference? and press OK to start the
conference call.
> Press
Retrieve the external call if the internal call is
not answered …
> Press OK or C to retrieve the external call on
to end the conference call.
hold.
Kitchen
Retrieve?
...
Kitchen
Transfer?
Kitchen
Conference?
OK
Conference
10:57
Page 34

34
Index
The index is sorted alphabetically by
topic. Relevant chapter references
and their page numbers are listed
under each topic. Page numbers of
chapters located in ‘Get started’ are
prefaced by the abbreviation ‘GS’.
Page numbers without a preface
refer to chapters in the Guide.
Accessories
BeoCom 2 accessories, GS p. 14
Base
Make a handset ‘personal’ or
‘common’, 31
Registration of the handset to a
base, GS p. 10
The Base menu, 26
The BeoLine base, GS p. 10
Battery
Charge the handset battery, GS p. 8
BeoLine
Registration of the handset to a
base, GS p. 10
The BeoLine base, GS p. 10
BeoLink
Adjust volume level on audio/
video products, 22
Caller ID
Call from the Caller ID list, 12
Delete a specific Caller ID
number from the list, 13
Delete the content of the Caller
ID list or Redial list, 20
Store Redial and Caller ID
numbers, 19
Use Caller ID, 12
Calls
Call and store extension numbers
in the Phone book, 23
Call another handset, 30
Call from the Caller ID list, 12
Call from the Redial list, 10
Make and answer calls, 4
Make an internal conference
call, 33
Search the Phonebook and make
a call, 9
Store a number after a call, 7
Transfer external calls, 32
Charging
Charge the handset battery, GS p. 8
Conference calls
Make an internal conference
call, 33
Delete
Delete a name or number in the
Phone book, 18
Delete a specific Caller ID
number from the list, 13
Delete a specific Redial number
from the list, 11
Delete the content of the Caller
ID list or Redial list, 20
Displays and menus
Display of new, unanswered
calls, GS p. 6
Options in the main menu, GS p.
6
See call information for a
selected outgoing call, 10
The handset display, GS p. 6
Troubleshooting via the display –
the Alert menu, GS p. 7
Edit
Delete a name and number in the
Phone book, 18
Edit a name or number in the
Phonebook, 16
Enter a new name and number in
the Phone book, 14
Extension numbers
Call and store extension numbers
in the Phone book, 23
Handset
Call another handset, 30
Page 35

35
Charge the handset battery, GS p.
8
Handset keys, GS p. 4
Make a handset ‘personal’ or
‘common’, 31
Mute a handset’s ringing, 4
Name the handset, GS p. 12
Registration of the handset to a
base, GS p. 10
Set the time and date, GS p. 13
Silence the handset ringer, 5
The handset display, GS p. 6
The Handset menu, 26
Maintenance
Clean BeoCom 2, GS p. 14
Microphone
Volume and the microphone, 6
Phonebook
Call and store extension numbers
in the Phone book, 23
Delete a name or number in the
Phone book, 18
Edit a name or number in the
Phonebook, 16
Enter a new name and number in
the Phone book, 14
Search the Phonebook and make
a call, 9
Store a number after a call, 7
Store Redial and Caller ID
numbers, 19
Registration
First-time registration of the
handset to a base, GS p. 10
The BeoLine base, GS p. 10
Ringing signal
Mute a handset’s ringing, 4
Silence the handset ringer, 5
The Ringer menu, 26
Search
Call from the Caller ID list, 12
Call from the Redial list, 10
Search the Phonebook and make
a call, 9
Settings
Adjust volume level on audio/
video products, 22
Make a handset ‘personal’ or
‘common’, 31
Name the handset, GS p. 12
Set a primary number, 25
Set the time and date, GS p. 13
Silence the handset ringer, 5
The Base menu, 26
The Time and date menu, 26
The Flash Time menu, 27
The Handset menu, 26
The Language menu, 27
The News Indicator menu, 26
The Ringer menu, 26
The Switchboard menu, 27
Volume and the microphone, 6
Placement
Placement and surroundings, GS
p. 14
Redial
Call from the Redial list, 10
Delete a specific Redial number
from the list, 11
Delete the content of the Caller
ID list or Redial list, 20
See call information for a
selected outgoing call, 10
Store Redial and Caller ID
numbers, 19
Use Redial, 10
Volume
Adjust volume level on audio/
video products, 22
Volume and the microphone, 6
Page 36

Waste Electrical and Electronic Equipment
(WEEE) – Environmental protection
The European Parliament and the Council of the
European Union have issued the Waste Electrical
and Electronic Equip ment Directive. The purpose of
the Directive is the prevention of waste of electrical
and electronic equipment, and to promote the reuse
and recycling and other forms of recovery of such
waste. As such the Directive concerns producers,
distributors and consumers.
The WEEE directive requires that both
manufacturers and end-consumers dispose of
ele ctric al and electronic equipment and parts in an
environmentally safe manner, and that equipment
and waste are reused or recovered for their
materials or energy.
Electrical and electronic equipment and parts must
not be disposed of with ordinar y household refuse;
all electrical and electronic equipment and parts
must be collected and disposed of separately.
Products and equipment which must be collected
for reuse, recycling and other forms of recovery are
marked with the pictogram shown.
When disposing of electrical and electronic equipment by use of the collection systems available in
your country, you protect the environment, human
health and contribute to the prudent and rational
use of natural resources. Collecting electrical and
electronic equipment and waste prevents the
potential contamination of nature with the
hazardous substances which may be present in
electrical and electronic products and equipment.
Your Bang & Olufsen retailer will assist with and
advise you of the correct way of disposal in your
country.
Page 37

37
Technical specifications, features and the use
thereof are subject to change without notice.
Page 38

38
This product fulfils the
conditions stated in the EEU
directives 89/336 and 73/23.
Technical specifications, features and
the use thereof are subject to
change without notice!
Version 1.0 1109
Page 39

Page 40

www.bang-olufsen.com
 Loading...