


NutriBaby |
|
|
|
|
Réfs. : A001100 - A001114 - A001115 |
|
|
|
|
• Notice d’utilisation |
• Návod k použití |
|
|
|
• Instructions for use |
• Инструкция по использованию |
|
|
|
• Benutzungsanleitung |
• Hasznàlati utasitàs |
|
|
|
• Gebruikshandleiding |
• Instrucțiuni de utilizare |
|
|
|
• Instrucciones de uso |
• Instrukcja użytkowania |
|
|
|
• Instruções de uso |
• Brugsanvisning |
|
|
|
• Istruzioni per l’uso |
• Οδηγίες χρήσης |
|
|
|
Babymoov |
|
|
|
|
Parc Industriel des Gravanches |
|
|
|
|
|
|
|
|
|
16, rue Jacqueline Auriol |
|
|
|
|
63051 Clermont-Ferrand cedex 2 - France |
Designed and engineered |
|
|
|
www.babymoov.com |
by Babymoov in France |
|
|
|
|
|
|
||
|
|
|
||

a
b
c
b
n
i
c
h
d
J
e
k |
|
|
|
|
|
|
f |
|
|
|
|
|
|
||
|
|
||||||
l |
|
|
|
|
|
|
g |
|
|
|
|
|
|
||
|
|
|
|
|
|
|
|
|
|
|
|
|
|
|
|
|
|
|
|
|
|
|
|
|
|
|
|
|
|
|
|
2 |
m |

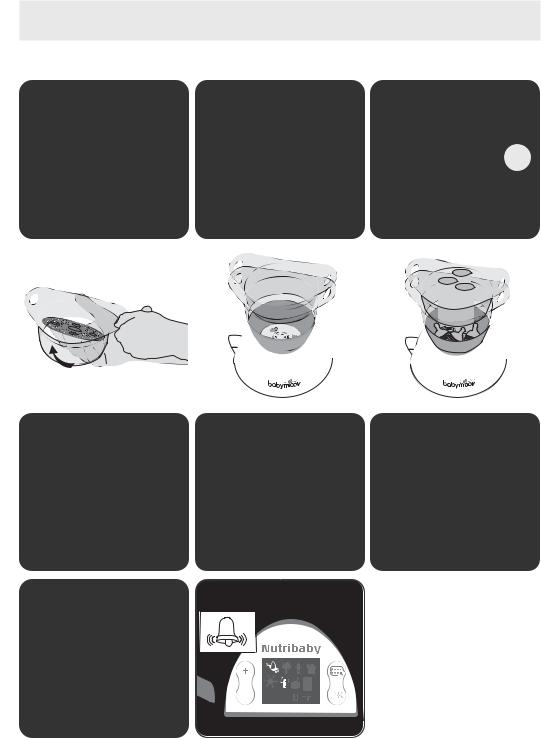
A.CHAUFFE-BIBERON - BOTTLE WARMER - FLÄSCHCHENWÄRMER - FLESSENWARMER CALIENTABIBERONES - AQUECEDOR DE BIBERÕES - SCALDA-BIBERON - OH ÍVA KOJENECKÝCH
РАЗОГРЕВ БУТЫЛОЧКИ - ΘΈΡΜΑΝΣΗ ΜΠΙΜΠΕΡΌ - PODGRZANIE BUTELKI - CUMISÜVEG
FELMELEGÍTÉS - - PODGRZEWACZ DO BUTELEK - FLASKEVARMER
A1 |
A2 |
A3 |
C
A4 |
A5 |
A6 |
|
|
|
A7 |
A8 |
A9 |
A10 |
A11 |
A12 |
3

B.RÉCHAUFFER LES PETITS POTS - HEATING A BABY FOOD JAR - GLÄSCHEN ERHITZEN - EEN POTJE OPWARMEN - CALENTAR UN POTITO - AQUECER UM BOIÃO - RISCALDARE UN VASETTO
- OHŘEV DĚTSKÉ |
SKLENIČCE - РАЗОГРЕВ БАНОЧКИ - ΘΈΡΜΑΝΣΗ ΒΑΖΑΚΙΟΥ - |
|
PODGRZANIE |
|
FELMELEGÍTÉSE - ÎNCALZIRE BORCANELE CU MÂNCARE - |
PODGRZEWANIE |
VARMER BABYMAD PÅ GLAS |
|
B1 |
B2 |
B3 |
C
B4 |
B5 |
B6 |
|
|
|
B7 |
B8 |
B9 |
|
|
|
B10 |
B11 |
4
C.STERILISER - STERILISING - STERILISIEREN - STERILISEREN - ESTERILIZAR - STERILIZZARE STERILIZACE - СТЕРИЛИЗАЦИЯ - ΑΠΟΣΤΕΙΡΩΣΗ - STERYLIZACJA - STERILIZÁLÁS - STERILIZARE -
STERYLIZOWANIE - STERILISERER
C1 |
C2 |
C3 |
B
C4 |
C5 |
C6 |
|
|
|
C7 |
C8 |
C9 |
C10 |
C11 |
5

D.CUISSON VAPEUR - STEAM COOKING - DAMPFGAREN - STOMEN - COCCIÓN AL VAPOR COZEDURA A VAPOR - COTTURA AL VAPORE - VAŘENÍ V PÁŘE - ВАРКА НА ПАРУ - ΨΗΣΙΜΟ ΜΕ ΑΤΜΟ
GOTOWANIE NA PARZE - PÁROLÁS - GATIRE CU ABURI - GOTOWANIE NA PARZE - DAMPER
D1 |
D2 |
D3 |
A
D4 |
D5 |
D6 |
a |
b 


c
|
|
|
|
D7 |
|
D8 |
|
|
|
|
|
D9 |
D10 |
D11 |
6

D12 |
D13 |
D14 |
F.MIXAGE - BLENDING - MIXEN - BATIR - MISTURA - FRULLATI - MIXOVÁNÍ - МИКСАЖ - ΑΝΑΜΕΙΞΗ
MIKSOWANIE - MIXERELÉS - MIXARE - MIKSOWANIE - MIKSER
F1 |
F2 |
F3 |
F4 |
F5 |
F6 |
|
|
|
|
|
|
|
|
|
|
|
|
|
|
|
|
|
|
|
|
|
|
|
|
F7 |
|
F8 |
|
|
|
|
|
|
|
|
|
7

H.NETTOYAGE DE VOTRE NUTRIBABY - CLEANING NUTRIBABY - REINIGUNG IHRES NUTRIBABY REINIGING VAN UW NUTRIBABY - LIMPIEZA DEL NUTRIBABY - LIMPEZA DO SEU NUTRIBABY PULIZIA DEL VOSTRO NUTRIBABY - MYTÍ PŘÍSTROJE NUTRIBABY - УХОД ЗА ВАШИМ NUTRIBABY ΚΑΘΑΡΙΣΜΟΤΟΥ NUTRIBABY - MYCIE URZĄDZENIA NUTRIBABY - NUTRIBABYTISZTÍTÁSA - CURATARE A
APARATULUIDUMNEAVOASTRANUTRIBABY-MYCIEURZĄDZENIANUTRIBABY-RENSNINGAFDINNUTRIBABY
H1
H2
8

TABLEAU DES TEMPS DE CUISSON - COOKING TIMES - GARTABELLE - KOOKSCHEMA - TABLA DE LOS TIEMPOS DE COCCIÓN - TABELA DOS TEMPOS DE COZEDURA - TABELLA DEI TEMPI DI COTTURA - TABULKA DOBY VARU POTRAVIN - ТАБЛИЦА ДЛИТЕЛЬНОСТИ -ΠΙΝΑΚΑΣ ΤΩΝ ΧΡΟΝΩΝ ΨΗΣΙΜΑΤΟΣ - TABELA CZASU GOTOWANIA - FŐZÉSI IDŐ TÁBLÁZAT - TABLOU CU TIMPUL DE GATIRE -
GOTOWANIA - TABEL FOR TILBEREDNINGSTID
|
|
|
|
|
|
|
g |
15 |
- 17 min |
|
|
|
|
|
|
|
200 g |
16 |
- 20 min |
|
|
|
|
|
|
|
200 g |
18 |
- 20 min |
|
|
|
|
|
|
|
250 g |
20 |
- 25 min |
|
|
|
|
|
|
|
300 g |
10 |
- 12 min |
|
|
|
|
|
|
|
200 g |
8 |
- 10 min |
|
|
|
|
|
|
|
400 g |
20 |
- 25 min |
|
|
|
|
|
|
|
200 g |
18 |
- 20 min |
|
|
|
|
|
|
1 - 2 |
20 |
- 25 min |
|
|
|
|
|
|
|
|
300 g |
17 |
- 20 min |
|
|
|
|
|
|
|
200 g |
12 |
- 15 min |
|
|
|
|
|
|
|
200 g |
14 |
- 16 min |
|
|
|
|
|
|
|
250 g |
12 |
- 15 min |
|
|
|
|
|
|
|
300 g |
10 |
- 14 min |
|
|
|
|
|
|
|
100 g |
8 |
- 10 min |
|
|
|
|
|
|
|
200 g |
15 |
- 17 min |
|
|
|
|
|
|
|
200 g |
12 |
- 14 min |
|
|
|
|
|
|
|
200 g |
8 |
- 10 min |
|
|
|
|
|
|
|
200 g |
8 |
- 12 min |
|
|
|
|
|
|
|
200 g |
8 |
- 10 min |
|
|
|
|
|
|
|
200 g |
8 |
- 10 min |
|
|
|
|
|
|
|
|
|
|
|
|
200 g |
|
6 - 8 min |
|
|
|
|
|
|
|
200 g |
|
3 - 7 min |
|
|
|
|
|
|
|
100 g |
6 |
- 10 min |
|
|
|
|
|
|
|
200 g |
12 |
- 14 min |
|
|
|
|
|
|
|
200 g |
12 |
- 14 min |
|
|
|
|
|
|
|
500 g |
14 |
- 18 min |
|
|
|
|
|
|
180 g |
15 |
- 18 min |
|
|
|
|
|
120 g |
10 |
- 12 min |
|
|
|
|
|
150 g |
8 |
- 12 min |
|
|
|
|
|
120 g |
8 |
- 10 min |
45 min
412 - 15 min
9
10
FR |
NOTICE D’UTILISATION |
FONCTIONS
•Réchauffe jusqu’à 3 biberons en même temps
•Réchauffe tous les petits pots
•Stérilise jusqu’à 3 biberons
•Cuit tous les aliments à la vapeur
•Décongèle
•Mixe
•Possibilité de cuire à la vapeur et mixer en même temps
CONSIGNES DE SÉCURITÉ
PRÉCAUTIONS D’EMPLOI : lire attentivement toutes les instructions ci-jointes avant d’utiliser le Nutribaby.
•Pour se protéger des décharges électriques, n’immergez pas l’appareil, le cordon dans l’eau ni dans aucun autre liquide.
•N’utilisez pas l’appareil pour un autre usage que pour cuire / chauffer / mixer / stériliser / décongeler. Toute autre utilisation peut-être dangereuse.
•Faites très attention quand vous manipulez les lames du mixeur, particulièrement quand vous retirez les lames du bol, quand vous videz le bol, et pendant le lavage.
•L’appareil ne contient aucune pièce utile à l’utilisateur pour une réparation. Ne pas démontez l’appareil.
•Surveillez l’appareil quand vous l’employez avec des enfants à proximité. Laissez l’appareil hors de portée des enfants.
•Cet appareil s’utilise en intérieur, ne l’utilisez pas dehors.
•Évitez de laisser le cordon dépasser de la table ou du compteur ou de le laisser à proximité de surfaces chaudes.
•Utilisez l’appareil sur une surface plane, stable et sèche.
•Ne mettez pas l’appareil sur une surface chaude ou à proximité d’un four ou d’une plaque de gaz ou tout ce qui s’apparente à une source de chaleur.
•Ne touchez pas les surfaces chaudes de l’appareil (chambre de chauffage).
•Ne déplacez pas l’appareil en service, une fois branché, ou s’il contient de l’eau chaude.
AVERTISSEMENTS
•AVERTISSEMENT : si le câble d’alimentation est endommagé, il doit être remplacé par le fabricant, son service après vente ou des personnes de qualification similaire afin d’éviter un danger.
•Toujours débrancher l'appareil de la source d’alimentation s'il est laissé sans surveillance et avant l'assemblage, le démontage ou le nettoyage.
•Cet appareil ne doit pas être utilisé par des enfants. Gardez l'appareil et son cordon d’alimentation hors de la portée des enfants. Les appareils peuvent être utilisés par des personnes avec des capacités physiques, sensorielles ou mentales réduites ou avec un manque d'expérience et de connaissance si on leur a donné la surveillance ou les consignes concernant l'utilisation de l'appareil d'une façon sûre et s'ils comprennent les dangers encourus.
•Les enfants ne doivent pas jouer avec l'appareil.
•Risque potentiel de blessure en cas de mauvaise utilisation de l’appareil
•Soyez prudent si du liquide chaud est versé dans le bol de mixage car il peut être éjecté de l'appareil en raison d'un dégagement de vapeur d'eau soudain.
•Respectez le temps de chauffe et assurez-vous que le biberon et son contenu sont à bonne température avant de donner la nourriture à votre bébé.
•Cet appareil est destiné à être utilisé dans des applications domestiques et analogues telles que:
-des coins cuisines réservés au personnel dans les magasins, bureaux et autres environnements professionnels,
-des fermes,
-l’utilisation par les clients des hôtels, motels et autres environnements à caractère résidentiel,
-des environnements du type de chambres d’hôtes.
•Utilisez des biberons en plastique ou en verre pouvant bouillir ou tous autres récipients thermorésistants avec cet appareil.
•Vérifiez toujours vos ustensiles avant de les employer avec le Nutribaby.
•Les équipements électriques et électroniques font l’objet d’une collecte sélective. Ne pas se débarrasser des déchets d’équipements électriques et électroniques avec les déchets municipaux non triés, mais procéder à leur collecte sélective.
•Ce symbole indique à travers l’Union Européenne
que ce produit ne doit pas être jeté à la poubelle ou mélangé aux ordures ménagères, mais faire l’objet d’une collecte sélective.
COMPOSITION
a. Couvercle du pôle cuisson |
f. Réservoir à eau |
k. Connecteur du mixeur |
b. Panier de cuisson |
g. Dôme de cuisson |
l. Écran LCD |
c. Plateau de cuisson amovible |
h. Couvercle du bol de mixage |
m. Connecteur du pôle cuisson |
d. Récupérateur de jus de cuisson |
i. Bouton d’actionnement du mixeur |
au pôle mixeur |
e. Grille d’isolation |
j. Bol de mixage |
n. Spatule |
NUTRIBABY • Notice d’utilisation |
11 |
|
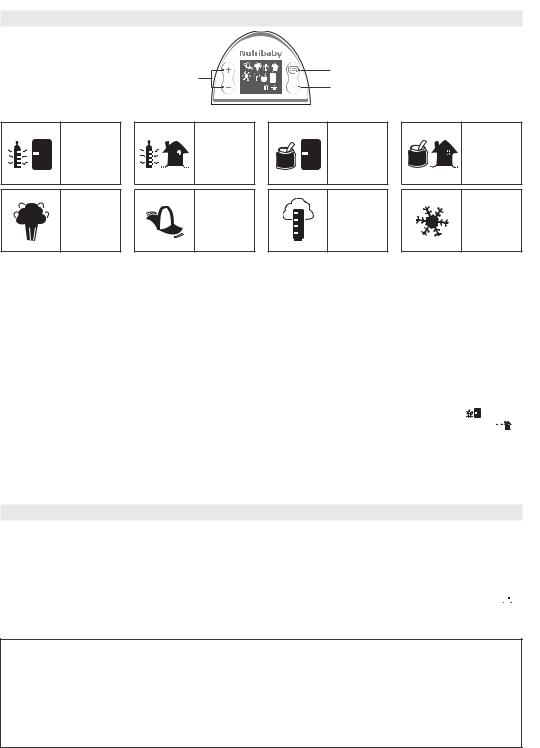
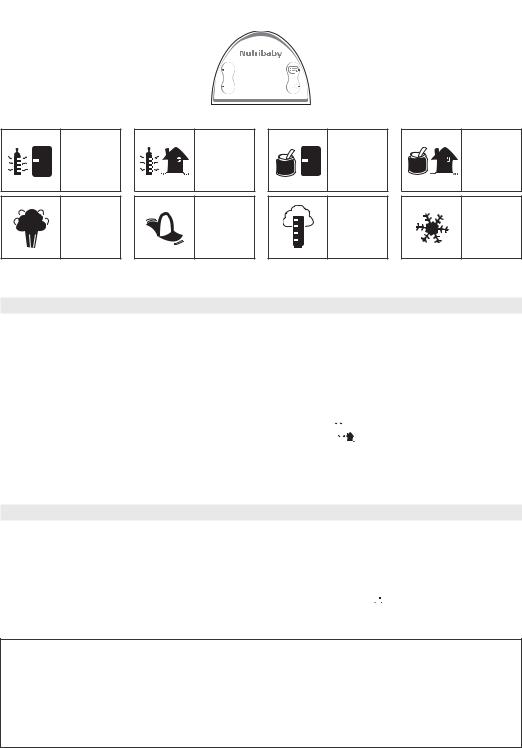
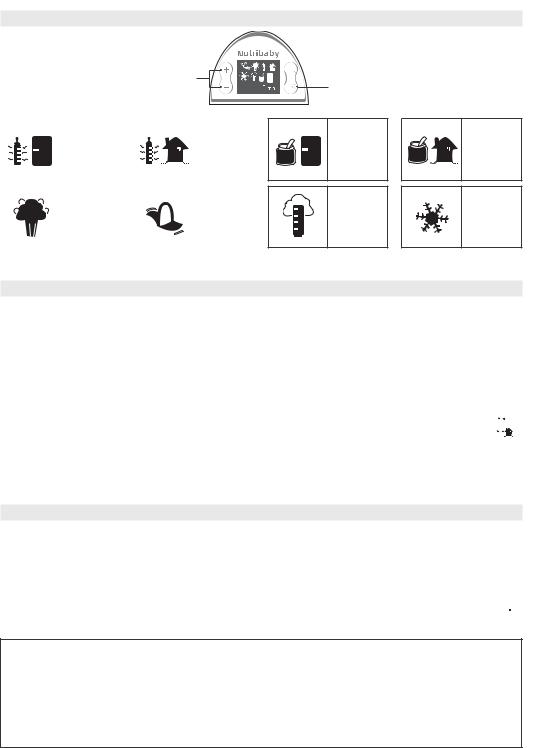
ÉCRAN LCD |
|
|
|
|
|
Sélection de la fonction |
|
|
|
|
Lancement ou |
|
|
|
|
arrêt du cycle |
|
|
Signification des icônes des fonctions |
|
|
|
|
Réchauffer |
Réchauffer |
Réchauffer |
Réchauffer |
|
un biberon |
un petit pot |
|||
un biberon |
un petit pot |
|||
venant |
venant |
|||
à température |
à température |
|||
du |
du |
|||
ambiante |
ambiante |
|||
réfrigérateur |
réfrigérateur |
|||
|
|
|||
Cuisson |
Mixage |
Stérilisation |
Décongélation |
L’icône de mixage est continuellement sélectionné peu importe le mode choisi. En effet, il est possible d’utiliser la fonction cuisson vapeur en même temps que la fonction mixage.
|
A. CHAUFFER UN BIBERON |
|
|
A1. |
Connectez le pôle cuisson au pôle mixage. |
|
|
A2. |
Retirez le réceptacle de jus de cuisson. |
|
|
A3. |
Versez 60 ml d’eau dans la cuve à l’aide des graduations du bol de mixage (niveau C). |
|
|
A4. |
Retirez les plateaux de chaque panier vapeur. |
|
|
A5. |
Empilez les paniers, et placez-les sur la base de l’appareil. |
|
|
A6. |
Placez vos biberons sur la grille d’isolation située au-dessus de la cuve d’eau. |
|
|
A7. |
Placez le couvercle sur le haut du pôle cuisson. |
|
|
A8. |
Allumez le bouton On/Off situé à l’arrière du pôle mixage. L’écran LCD à l’avant de l’appareil s’allume. |
|
|
A9. |
Faites défilez les différentes fonctions en appuyant sur le bouton « mode ». |
|
|
|
|
||
|
- Si l’eau que vous voulez réchauffer provient du réfrigérateur arrêtez-vous sur l’icône biberon + frigo |
|
. |
- Si l’eau que vous voulez réchauffer est à température ambiante arrêtez-vous sur l’icône biberon + maison 

 A10. Choisissez ensuite la quantité d’eau que vous souhaitez réchauffer en faisant défiler les quantités programmées
en appuyant sur les boutons + et -. A11. Appuyez sur le bouton OK pour valider.
A12. A la fin du cycle, une alarme sonore vous prévient que votre biberon est prêt. Appuyez sur OK pour arrêter l’alarme.
B. RÉCHAUFFER UN PETIT POT
Suivez les étapes 1 à 5 de la fonction chauffe-biberon. B6. Placez le petit pot à réchauffer sur la grille d’isolation. B7. Placez le couvercle sur le haut du pôle cuisson.
B8. Allumez le bouton On/Off situé à l’arrière du pôle mixage. L’écran LCD à l’avant de l’appareil s’allume. B9. Faites défilez les différentes fonctions en appuyant sur le bouton « mode ».
- Si l’eau que vous voulez réchauffer provient du réfrigérateur arrêtez-vous sur l’icône biberon + frigo 
 .
.
- Si l’eau que vous voulez réchauffer est à température ambiante arrêtez-vous sur l’icône biberon + maison 
 . B10. Appuyez sur OK pour démarrer le cycle de chauffe.
ATTENTION : pour éviter tous risques de brûlure, toujours s’assurer de la température de la nourriture avant de la donner à votre bébé. Pour un biberon, bien agiter ce dernier pour mélanger le lait. Versez une goutte sur l’intérieur du poignet pour vérifier sa température.
ATTENTION : les cycles préprogrammés sont basés sur un calcul moyen de temps de chauffe d’un biberon ou d’un petit pot. La matière et l’épaisseur du biberon ; la présence d’un fond amovible, la taille d’un petit pot sont des éléments qui peuvent influer sur la température du biberon. Le fait de réchauffer plusieurs biberons à la fois peut aussi influer sur le résultat. Si vous jugez le résultat trop chaud ou pas assez chaud, n’hésitez pas à réduire ou augmenter le temps de chauffe en utilisant la fonction « cuisson vapeur ».
12 |
NUTRIBABY • Notice d’utilisation |

Cycles préprogrammés pour les biberons
Quantité d’eau/lait |
90 ml |
120 ml |
150 ml |
180 ml |
210 ml |
240 ml |
270 ml |
300 ml |
330 ml |
|
dans le biberon |
||||||||||
|
|
|
|
|
|
|
|
|
||
|
|
|
|
|
|
|
|
|
|
|
Temps pour un |
2 min 35 |
2 min 45 |
3 min |
3 min |
3 min 10 |
3 min 10 |
3 min 10 |
3 min 15 |
3 min 25 |
|
biberon préparé avec |
||||||||||
de l’eau tempérée |
|
|
|
|
|
|
|
|
|
|
|
|
|
|
|
|
|
|
|
|
|
Temps pour un |
|
|
|
|
|
|
|
|
|
|
biberon préparé avec |
3 min 40 |
3 min 50 |
4 min 30 |
4 min 40 |
5 min |
5 min 05 |
5 min 10 |
5 min 15 |
5 min 30 |
|
de l’eau venant du |
|
|
|
|
|
|
|
|
|
|
réfrigérateur |
|
|
|
|
|
|
|
|
|
|
|
|
|
|
|
|
|
|
|
|
C. STÉRILISER
C1. Connectez le pôle cuisson au pôle mixage.
C2. Retirez le réceptacle de jus de cuisson.
C3. Versez 150 ml d’eau dans la cuve à l’aide des graduas du bol de mixage (niveau B). C4. Retirez les plateaux de chaque panier vapeur.
C5. Empilez les paniers, et placez-les sur la base de l’appareil.
C6. Placez vos biberons tête vers le bas sur la plaque située au-dessus de la cuve d’eau. Ajoutez les accessoires que vous souhaitez stériliser.
C7. Placez le couvercle sur le haut du pôle cuisson.
C8. Allumez le bouton On/Off situé à l’arrière du pôle mixage. L’écran LCD à l’avant de l’appareil s’allume.
C9. Faites défilez les différentes fonctions en appuyant sur le bouton « mode ». Arrêtez-vous sur l’icône stérilisation . C10. Appuyez sur le bouton OK pour lancer la stérilisation.
C11. A la fin du cycle, une alarme sonore vous prévient que vos biberons sont stérilisés. Appuyez sur OK pour arrêter l’alarme.
D. CUISSON VAPEUR
D1. Connectez le pôle cuisson au pôle mixage.
D2. Retirez le réceptacle de jus de cuisson.
D3. Versez 350 ml d’eau dans la cuve à l’aide des graduations du bol de mixage (niveau A).
D4. Replacez le réceptacle de jus de cuisson : il recueillera le jus de vos aliments et permettra d’en préserver les apports nutritionnels.
D5. Positionnez les plateaux dans les paniers, selon la configuration souhaitée.
D6. Coupez les ingrédients en petits cubes d’environ 15 mm x 15 mm et placez les dans les paniers de cuissons.
-Les ingrédients peuvent être séparés selon leur groupe (légumes/viande), ou le temps de cuisson dont ils ont besoin. Par exemple, placez les pommes de terre, qui nécessitent un temps de cuisson assez long, dans le panier inférieur, et placez les courgettes, qui cuisent plus vite, dans le panier supérieur, que vous viendrez ajouter en cours de cycle : terminé les légumes sur-cuits !
-Placez un maximum de 400 g d’aliments par panier.
-Grâce aux plateaux amovibles vous pouvez adapter la capacité à vos besoins : un petit panier (a), 2 paniers (b), ou un grand panier (c) en retirant le plateau du panier supérieur.
Une fois vos paniers en place, placez le couvercle.
D7. Allumez le bouton On/Off situé à l’arrière du pôle mixage. L’écran LCD à l’avant de l’appareil s’allume.
D8. Faites défiler les différentes fonctions en appuyant sur le bouton « mode ». Arrêtez-vous sur l’icône cuisson vapeur 


 . D9. Sélectionnez le temps de cuisson désiré avec les boutons + et -. Ce temps dépend de la nature et de la quantité
d’aliments que vous souhaitez cuire. Vous pouvez vous référer au tableau des temps de cuisson. D10. Appuyez sur OK pour lancer le cycle.
D11. À la fin du cycle, une alarme sonore vous prévient que la cuisson est terminée. Appuyez sur OK pour arrêter l’alarme. Si vous souhaitez poursuivre la cuisson, appuyez sur les boutons +/- pour ajouter des minutes et appuyez sur OK pour valider le cycle.
D12. Retirez le couvercle à l’aide de sa poignée. Faites attention de ne pas vous brûler. D13. Retirez les paniers vapeur en les saisissant par leurs poignées.
D14. Vous avez la possibilité de cuire des œufs. Placez les œufs dans les supports à œufs intégrés aux plateaux.
NUTRIBABY • Notice d’utilisation |
13 |

TABLEAU DES TEMPS DE CUISSON à consulter page 9
Les temps sont donnés à titre indicatif sur la base d’une cuisson dans le panier inférieur. Ces temps peuvent varier en fonction de la taille des aliments, de leur quantité, de l’espace vide laissé dans le panier, et de la température initiale des aliments. Vous devrez augmenter le temps de cuisson si vous utilisez le 2ème panier de cuisson.
Pour cuisiner des ingrédients qui nécessitent des temps de cuisson différents : placez les plus longs à cuire dans le panier inférieur. En cours de cuisson, ajoutez le 2ème panier avec les aliments à cuisson plus rapide.
E. DÉCONGÉLATION
Procédez comme pour la cuisson vapeur, en choisissant cette fois l’icône décongélation  .
.
F. MIXAGE
L’icône de mixage est continuellement sélectionné peu importe le mode choisi. En effet, il est possible d’utiliser la fonction cuisson vapeur en même temps que la fonction mixage.
F1. Une fois vos ingrédients cuits, laissez les reposer quelques instants. Ouvrez le couvercle du bol de mixage.
F2. Transvasez les aliments cuits dans le bol de mixage à l’aide la spatule fournie. Pour assurer un mixage optimal, le bol peut contenir un maximum de 400 g de fruits ou légumes cuits, et un total de 300 g d’un mélange viande/légumes.
F3. Saisissez le réceptacle à l’aide du côté opposé de la spatule, qui va vous servir de pince.
F4. Versez le jus de cuisson dans le bol de mixage, en le dosant en fonction de la texture que vous souhaitez obtenir. N’ajoutez pas plus de 200 ml de jus de cuisson.
F5. Installez et verrouillez le couvercle du bol de mixage.
F6. Verrouillez le bol de mixage sur sa base. Si le bol n’est pas verrouillé sur la base, vous ne pourrez pas mixer, pour garantir votre sécurité.
F7. Mixer votre préparation en appuyant sur le bouton pendant 5 secondes, puis laissez reposer 5 secondes, et mixez de nouveau 5 secondes. Ne mixez pas plus de 30 secondes pour éviter toute surchauffe. Vous pouvez réitérer cette opération 3 fois. Nous recommandons ensuite de laisser reposer l’appareil 30 minutes avant de procéder à un nouveau mixage.
Ouvrez votre bol de mixage et servez la purée à votre bébé, sans oublier d’en vérifier la température. Mélangez la préparation et vérifiez qu’elle n’est pas trop chaude.
G.ALARMES
-Si en cours de cycle de cuisson la cuve de l’appareil ne contient plus d’eau, une alarme retentit : retirez les paniers vapeurs et ajoutez de l’eau. Appuyez sur OK pour arrêter l’alarme, veillez à bien reconnecter le pôle cuisson au pôle mixage, et relancez un cycle de chauffe pour terminer la cuisson.
-Si en cours de cycle de cuisson le pôle mixage et le pôle cuisson ne sont pas correctement connectés, une alarme retentit : appuyez sur OK pour arrêter l’alarme, veillez à bien reconnecter les deux pôles et relancez votre cycle de cuisson.
-En fin de cycle, une alarme retentit pour vous prévenir que la cuisson est terminée.
H.NETTOYAGE DE VOTRE NUTRIBABY
H1. Débranchez votre Nutribaby et assurez-vous qu’il soit froid avant le nettoyage.
ATTENTION : les 2 bases du pôle cuisson et du pôle mixage ne passent pas au lave-vaisselle.
-Essuyez le dôme de cuisson au fond de la cuve et la base du bol de mixage avec un tissu ou une éponge humide. Utilisez de l’eau claire. Laissez sécher. N’immergez pas le Nutribaby dans l’eau ou dans un autre liquide. Ne lavez pas le Nutribaby sous l’eau courante. Ne laissez pas de l’eau entrer dans les parties contenant des composants électriques.
-N’employez pas d’abrasifs ou de dissolvants de récurage pour le nettoyage. Ils peuvent endommager l’appareil et ses surfaces.
-Les paniers cuisson, les plateaux amovibles, le récupérateur de jus de cuisson, les couvercles, la spatule et le bol de mixage peuvent être nettoyés avec une éponge, de l’eau chaude et un peu de liquide vaisselle. Rincez à l’eau claire et laissez sécher. Ces éléments peuvent également passer au lave-vaisselle.
Détartrage de la cuve de chauffe
Après avoir été employé un certain temps, des dépôts de minéraux peuvent se former sur le dôme de cuisson et endommager le Nutribaby. Vous devrez régulièrement détartrer la cuve de cuisson (tous les 5 cycles) en versant un mélange de 100 ml d’eau chaude et de 100 ml de vinaigre blanc sur la résistance. Laissez au moins une heure ou deux (ou plus si nécessaire) sans brancher l’appareil. Videz le mélange et rincez le dôme de cuisson à l’aide d’un peu d’eau dans un chiffon.
H2. Démontage des lames
14 |
NUTRIBABY • Notice d’utilisation |

EN |
INSTRUCTIONS FOR USE |
FUNCTIONS
•Heats up to three baby bottles at the same time
•Heats all baby food jar sizes
•Sterilises up to three baby bottles
•Steam cooks all foods
•Thaws
•Blends
•Possibility of steaming and of mixing at the same time (the icon of mixing is constantly selected no matter the chosen mode)
SAFETY INSTRUCTIONS
Read all the instructions below carefully before using Nutribaby.
•To prevent the risk of electric shock, do not immerse the apparatus or its electrical cord in water or any other liquid.
•Use the apparatus only to cook/heat/blend/sterilise or thaw. Any other use may be dangerous.
•Take care when handling the blender blades, especially when removing the blades from the bowl, and emptying or washing the bowl.
•The apparatus contains no parts useful to the user for repairs. Do not disassemble the apparatus.
•Monitor the apparatus when in use with children nearby. Keep the apparatus out of reach of children.
•This apparatus is for indoor use only. Do not use outdoors.
•Do not allow electrical cord to hang over the edge of the table or counter. Do not place near hot surfaces.
•Use the apparatus on a flat, stable and dry surface.
•Do not place the apparatus on a hot surface or near an oven or gas burner, or any other heat source.
•Do not touch the hot surfaces on the apparatus (heating chamber).
•Do not move the apparatus during use, once it has been plugged in, or if it contains hot water.
WARNINGS
•WARNING: To avoid danger, if the electrical cable is damaged, it must be replaced by the manufacturer, its after-sales service department or a qualified electrician.
•Always disconnect the appliance from the supply if it is left unattended and before assembling, disassembling or cleaning.
•This appliance shall not be used by children. Keep the appliance and its cord out of reach of children. Appliances can be used by persons with reduced physical, sensory or mental capabilities or lack of experience and knowledge if they have been given supervision or instruction concerning use of the appliance in a safe way and if they understand the hazards involved.
•Children shall not play with the appliance.
•The appliance potential injury from misuse.
•Be careful if hot liquid is poured into the blender as it can be ejected out of the appliance due to a sudden steaming.
•Respect heating times, and ensure the baby bottle and its contents are at a suitable temperature before feeding your baby.
•Use plastic or glass baby bottles suitable for boiling, or other heat-resistant recipients with this apparatus.
•Always check your utensils prior to using them with Nutribaby.
•This appliance is designed to be used for domestic and suchlike applications such as:
-kitchen areas reserved for personnel in stores, offices and other professional environments,
-farms,
-use by hotel, motel customers and other accommodation environments,
-bed and breakfast environments.
•Electrical and electronic equipment can be recycled. Do not throw electrical or electronic apparatuses away with
your household waste. Ensure they are recycled.
• Throughout the European Union, this symbol indicates that the product must not be disposed of with household waste, but must be recycled.
COMPONENTS
a. Cooker lid |
f. Water tank |
k. Blender connector |
b. Cooking basket |
g. Cooking base |
l. LCD screen |
c. Removable cooking tray |
h. Mixing bowl lid |
m. Cooker and blender connecter |
d. Cooking juices receptacle |
i. Blender switch |
n. Spatula |
e. Insulating grill |
j. Mixing bowl |
|
|
NUTRIBABY • Instructions for use |
15 |
|
|
LCD SCREEN |
||||||||
Heating time or baby |
|
|
|
|
|
|
|
|
Function selector |
|
|
|
|
|
|
|
|
|
|||
bottle capacity selector |
|
|
|
|
|
|
|
|
|
Cycle start |
|
|
|
|
|
|
|
|
|
|
and stop |
|
|
|
|
|
|
|
|
|||
Meaning of the function icons
Heat a cold |
Heat a |
Heat a cold |
Heat a |
|
lukewarm |
lukewarm |
|||
baby bottle |
baby food jar |
|||
baby bottle |
baby food jar |
|||
|
|
|||
Steam cook |
Blend |
Sterilising |
Defrosting |
The icon of mixing is constantly selected no matter the chosen mode. Indeed, it is possible to use the steaming function at the same time as the chopping function
A. HEATING A BABY BOTTLE
A1. Connect the cooker to the blender.
A2. Remove the cooking juices receptacle.
A3. Pour 60 ml of water into the tank using the measuring marks on the mixing bowl (level C). A4. Remove the trays from each steam basket.
A5. Stack the trays, and place them on the base of the apparatus. A6. Place the baby bottles on the insulating grill above the water tank. A7. Place the lid on the cooker.
A8. Turn on using the On/Off switch on the back of the blender. The LCD screen on the front of the apparatus lights up. A9. Press the “Mode” button one or more times to choose the desired function.
- If cold water is to be heated, select the baby bottle + refrigerator icon  - If lukewarm water is to be heated, select the baby bottle + house


A10. Press the + or – buttons to select the quantity of water to be heated. A11. Press OK to start.
A12. At the end of the cycle, an alarm will sound to inform you that the baby bottle is ready. Press OK to turn off the alarm.
B. HEATING A BABY FOOD JAR
Follow steps 1 to 5 of the baby bottle heating function. B6. Place the baby food jar to be heated on the insulating grill. B7. Place the lid on the cooker.
B8. Turn on using the On/Off switch on the back of the blender. The LCD screen on the front of the apparatus lights up. B9. Press the “Mode” button one or more times to choose the desired function.
- If cold baby food is to be heated, select the baby food jar + refrigerator icon 
 . - If lukewarm baby food is to be heated, select the baby food jar + house icon
 .
.
B10. Press OK to start.
CAUTION: To prevent the risk of burns, always check the temperature of the food before feeding your baby. Shake baby bottles well to mix, then pour a drop of milk on the inside of your wrist to check the temperature.
CAUTION: The pre-programmed cycles are based on the average heating time of a baby bottle or baby food jar. The material and thickness of the baby bottle, a removable bottom and the size of the baby food jar may affect the temperature of the food. Heating more than one bottle at once may also affect heating times. If the food is too hot or too cold, reduce or increase the heating time, using the “steam cooking” function.
16 |
NUTRIBABY • Instructions for use |

Pre-programmed times for baby bottles
Quantity of water/milk |
90 ml |
120 ml |
150 ml |
180 ml |
210 ml |
240 ml |
270 ml |
300 ml |
330 ml |
|
in the baby bottle |
||||||||||
|
|
|
|
|
|
|
|
|
||
|
|
|
|
|
|
|
|
|
|
|
Time for a baby bottle |
2 min 35 |
2 min 45 |
3 min |
3 min |
3 min 10 |
3 min 10 |
3 min 10 |
3 min 15 |
3 min 25 |
|
prepared with |
||||||||||
lukewarm water |
|
|
|
|
|
|
|
|
|
|
|
|
|
|
|
|
|
|
|
|
|
Time for a baby bottle |
3 min 40 |
3 min 50 |
4 min 30 |
4 min 40 |
5 min |
5 min 05 |
5 min 10 |
5 min 15 |
5 min 30 |
|
prepared with |
||||||||||
cold water |
|
|
|
|
|
|
|
|
|
|
|
|
|
|
|
|
|
|
|
|
C. STERILISING
C1. Connect the cooker to the blender.
C2. Remove the cooking juices receptacle.
C3. Pour 150 ml of water into the tank using the marks on the mixing bowl (level B). C4. Remove the trays from each steam basket.
C5.Stack the trays, and place them on the base of the apparatus.
C6. Place the baby bottles upside down on the tray above the water tank. Add any accessories you also wish to sterilise. C7. Place the lid on the cooker.
C8. Turn on using the On/Off switch on the back of the blender. The LCD screen on the front of the apparatus lights up. C9. Press the “Mode” button one or more times to choose the desired function. Select the “sterilisation” icon . C10. Press OK to start.
C11. At the end of the cycle, an alarm will sound to inform you that the baby bottles are ready. Press OK to turn off the alarm.
D. STEAM COOKING
D1. Connect the cooker to the blender.
D2. Remove the cooking juices receptacle.
D3. Pour 350 ml of water into the tank using the marks on the mixing bowl (level A).
D4. Replace the cooking juices receptacle: it will collect the juices from the food, allowing you to preserve its nutritional value. D5. Place the trays in the basket as desired.
D6. Cut the ingredients into small cubes measuring approx. 15 mm X 15 mm and place them in the cooking baskets.
-Ingredients can be separated by type (vegetables/meat), or cooking time. For example, place potatoes, which require a relatively long cooking time in the bottom basket, and courgettes, which cook more quickly, in the upper basket, which you will add during the cooking cycle: no more overcooked vegetables!
-Place no more than 400 g of food in each basket.
-Thanks to the removable trays, you can adjust the capacity according to need: one small basket (a), two baskets (b),
or one large basket (c) by removing the tray for the upper basket Once the baskets are in place, place the lid on top.
D7. Turn on using the On/Off switch on the back of the blender. The LCD screen on the front of the apparatus lights up. D8. Press the “Mode” button one or more times to choose the desired function. Select the “steam cooking” icon 


 . D9. Select the desired cooking time using the + and - buttons. The time will depend on the type and amount of food
you wish to cook. Refer to the cooking-time table. D10. Press OK to start cooking.
D11. At the end of the cycle, an alarm will sound to inform you that cooking is complete. Press OK to turn off the alarm. If you wish to continue cooking, press + or – to add minutes, then press OK to start.
D12. Use the handle to remove the lid. Take care not to burn yourself. D13. Use the handles to remove the steam baskets.
D14. You can also cook eggs. Place the eggs in the egg supports built into the trays.
NUTRIBABY • Instructions for use |
17 |

COOKING TIMES see page 9
Cooking times are based on cooking in the bottom basket. These times may vary according to the size of the pieces of food, their quantity, the amount of empty space left in the basket, and the initial temperature of the food. You must increase the cooking time if you use the second cooking basket.
To cook ingredients requiring different cooking times, place the foods that need to cook the longest in the bottom basket. During cooking, add the second basket with the foods requiring a shorter cooking time.
E. DEFROSTING
Proceed in the same way, choosing the “defrosting” icon  .
.
F. BLENDING
The icon of mixing is constantly selected no matter the chosen mode. Indeed, it is possible to use the steaming function at the same time as the chopping function.
F1. Once your ingredients are cooked, open the lid of the cooking bowl and let the food cool for a few minutes.
F2. Transfer the cooked food to the mixing bowl, using the spatula provided. For best results, do not blend more than 400 g of cooked fruit or vegetables, or a total of 300 g of meat/vegetables, mix at a time.
F3. Hold the receptacle using the side opposite the spatula, which you will use as a pincer.
F4. Pour the cooking juices into the mixing bowl, dosing them according to the desired texture. Do not add more than 200 ml of cooking juices.
F5. Place the lid on the mixing bowl and lock.
F6. Lock the mixing bowl onto the base. For your safety, the apparatus will not operate if the bowl is not locked on the base. F7. Blend the preparation, pressing on the button for 5 seconds, then waiting 5 seconds, then blending again for 5 seconds. Do not blend for more than 30 seconds to prevent overheating. Repeat this operation up to three times.
We recommend you then allow the apparatus to cool for 30 minutes prior to blending again.
G.ALARMS
-An alarm will sound if, during the cooking cycle, the apparatus tank runs out of water: remove the steamer baskets and add water. Press OK to shut off the alarm, ensuring you reconnect the cooker to the blender, and restart the heating cycle to finish cooking.
-An alarm will sound if, during the cooking cycle, the blender and the cooker are not correctly connected: Press OK to shut off the alarm, reconnect the blender and cooker and restart the cooking cycle.
-An alarm will sound at the end of the cycle to notify you that cooking is complete.
H.CLEANING NUTRIBABY
H1. Unplug Nutribaby and ensure it is cool before cleaning.
CAUTION: The bases of the cooker and blender must not be washed in a dishwasher.
-Wipe off the cooking dome inside the tank, and the base of the mixing bowl with a damp cloth or sponge. Do not use detergents or cleaners. Allow to dry. Do not immerse Nutribaby in water or any other liquid. Do not wash Nutribaby under running water. Do not allow water to enter parts containing electrical components.
-Do not use abrasive or scouring cleansers for cleaning as they may damage the apparatus and its surfaces.
-The cooking baskets, removable trays, cooking juices receptacles, lids, spatula and mixing bowl may be washed using a sponge, hot water and dish detergent. Rinse well and allow to dry. These elements are also dishwasher safe.
Descaling the cooking tank
After Nutribaby has been used for a certain time, mineral deposits may form on the cooking dome and damage it. You should descale the cooking tank regularly (after five cycles), pouring 100 ml of hot water and 100 ml of white vinegar on the resistance. Let it sit for one to two hours (or more if necessary), without plugging in the apparatus. Pour off the mixture and wipe off the cooking dome with a wet cloth.
H2. Removing the blades
18 |
NUTRIBABY • Instruction manual |

DE
BENUTZUNGSANLEITUNG
FUNKTIONEN
• Wärmt bis zu 3 Fläschchen gleichzeitig |
• Mixer |
• Erwärmt alle Gläschen |
• Möglichkeit, Dampf und Mischung |
• Sterilisiert bis zu 3 Fläschchen |
zur gleichen Zeit (Mixer-Symbol |
• Dampfgarfunktion |
ist kontinuierlich ausgewählte |
• Auftaufunktion |
Few gewählten Betriebsart). |
SICHERHEITSHINWEISE
GEBRAUCHSANLEITUNG: Vor Einsatz des Nutribaby die nachstehenden Hinweise aufmerksam lesen.
•Damit es nicht zu Stromschlägen kommt,
weder Gerät, noch Stromkabel in Wasser oder eine andere Flüssigkeit tauchen.
•Nutzen Sie das Gerät nur zum Kochen / Erwärmen / Mixen / Sterilisieren / Auftauen. Jeder andere Einsatz kann gefährlich sein.
•Seien Sie beim Umgang mit den Klingen des Mixers vorsichtig. Dies gilt insbesondere für das Entfernen der Klingen aus der Schüssel, das Leeren der Schüssel und während der Reinigung der Schüssel.
•Das Gerät enthält keine Teile, die dem Benutzer für eine Reparatur nützlich sein könnten. Bauen Sie das Gerät nicht auseinander.
•Überwachen Sie das Gerät, wenn während des Betriebs Kinder in der Nähe sind. Bewahren Sie das Gerät außerhalb der Reichweite von Kindern auf.
•Dieses Gerät ist nur für den Einsatz in Räumen geeignet. Benutzen Sie es nicht im Freien.
•Vermeiden Sie, dass das Stromkabel vom Tisch oder einem Tresen herab hängt. Lassen Sie es auch nicht in der Nähe heißer Flächen.
•Benutzen Sie das Gerät auf einer ebenen, stabilen und trockenen Fläche.
•Stellen Sie das Gerät nicht auf eine heiße Fläche, in die Nähe eines Ofens oder eines Gasbrenners oder eine sonstige Wärmequelle.
•Berühren Sie die heißen Flächen des Geräts (Erhitzungskammer) nicht.
•Bewegen Sie das Gerät nicht, wenn es angeschlossen und in Betrieb ist oder heißes Wasser enthält.
HINWEISE
•HINWEIS: Wenn das Stromkabel beschädigt ist, muss es zur Vermeidung von Gefahren vom Hersteller, dessen Kundendienst oder Personen mit ähnlicher Qualifikation ersetzt werden.
•Trennen Sie immer das Gerät von der Lieferung, wenn es unbeaufsichtigt(unbegleitet) und vor Zusammenbauen, Auseinanderbauen oder Reinigung gelassen(verlassen) wird.
•Dieses Gerät soll nicht durch Kinder verwendet werden. Halten Sie das Gerät und seine(ihre) für Kinder unerreichbare Schnur. Geräte können von Personen mit reduzierten physischen, sensorischen oder geistigen Fähigkeiten oder Mangel an der Erfahrung und Kenntnis verwendet werden, wenn ihnen Beaufsichtigung oder Anweisung bezüglich Gebrauches des Gerätes auf eine sichere Weise gegeben worden ist, und wenn sie die beteiligten Gefahren verstehen.
•Kinder sollen nicht mit dem Gerät spielen.
•Die Gerät-Potential-Verletzung von Mißbrauch.
•Seien Sie vorsichtig, wenn heiße Flüssigkeit in die Mischmaschine gegossen wird, wie es aus dem Gerät aufgrund eines plötzlichen Dämpfens vertrieben werden kann.
•Halten Sie die Aufwärmzeiten ein und prüfen Sie, dass das Fläschchen und sein Inhalt die richtige Temperatur haben, bevor Sie Ihr Kind füttern.
•Das Gerät ist nur für den häuslichen Gebrauch geeignet.
•Verwenden Sie zusammen mit diesem Gerät
hitzebeständige Kunststoffoder Glasfläschchen oder andere hitzebeständige Behälter.
•Prüfen Sie alle Utensilien, bevor Sie sie zusammen mit dem Nutribaby verwenden.
•Das Gerät ist für häusliche und ähnliche Anwendungen vorgesehen, zum Beispiel:
-Küchenecken für das Personal in Geschäften, Büros und ähnlichen beruflichen Umfeldern,
-Bauernhöfe,
-den Gebrauch durch Kunden von Hotels, Motels und sonstigen Beherbergungsstätten,
-Gästezimmer und ähnliche.
•Verwenden Sie zusammen mit diesem Gerät hitzebeständige Kunststoffoder Glasfläschchen oder andere hitzebeständige Behälter.
•Prüfen Sie alle Utensilien, bevor Sie sie zusammen mit dem Nutribaby verwenden.
•Elektround Elektronikausstattung werden getrennt vom häuslichen Abfall gesammelt. Entsorgen Sie keine Abfälle von Elektrogeräten und elektronischen Geräten mit dem unsortierten Hausmüll, sondern entsorgen Sie sie ordnungsgemäß.
•EU-weit zeigt dieses Symbol an, dass dieses Produkt nicht in den Hausmüll gehört, sondern getrennt zu entsorgen ist.
ZUSAMMENSETZUNG
a. Deckel des Zubereitungsbehälters |
f. Wassertank |
l. LCD-Display |
b. Garkorb |
g. Koch-Grundplatte |
m. Verbindung der Kochmit der |
c. Abnehmbare Kochplatte |
h. Mixerdeckel |
Mixereinheit |
d. Auffangvorrichtung für |
i. Einschalteknopf des Mixers |
n. Spatel |
die Garflüssigkeit |
j. Mixerschüssel |
|
e. Trenngitter |
k. Mixeranschluss |
|
|
NUTRIBABY • Bedienungsanleitung |
19 |
LCD-DISPLAY
Auswahl der Erwärmzeit
oder des Fassungsvermögens des Fläschchens
Bedeutung der Symbole der Funktionen
|
Ein aus dem |
|
|
Ein Fläschchen |
|
Kühlschrank |
|
|
mit |
|
kommendes |
|
|
Umgebungste |
|
Fläschchen |
|
|
mperatur |
|
erhitzen |
|
|
erhitzen |
|
|
|
|
|
|
|
|
|
|
|
Dampfgaren |
|
|
Mixen |
|
|
|
|
|

 Funktionswahl Programm ein / aus
Ein aus dem Kühlschrank kommendes Gläschen erhitzen
Sterilisieren
Ein Gläschen mit Umgebungste mperatur erhitzen
Auftaufunktion
Mixer-Symbol ist kontinuierlich ausgewählte Few gewählten Betriebsart. '' Tatsächlich ist es möglich, den Dampf Kochen Funktion zur gleichen Zeit wie die mischen-Funktion zu verwenden.
A. FLÄSCHCHEN ERHITZEN
A1. Verbinden Sie die Kochmit der Mixereinheit.
A2. Entfernen Sie den Auffangbehälter für Garflüssigkeit.
A3. Messen Sie anhand der Skala der Mixerschüssel 60 ml Wasser (Anzeige C) ab und gießen Sie es in den Behälter. A4. Entfernen Sie die Schalen jedes Dampfgarkorbes.
A5. Stapeln Sie die Schalen und setzen Sie sie auf den Gerätesockel.
A6. Stellen Sie die Fläschchen auf das Isoliergitter über dem Wasserbehälter. A7. Legen Sie den Deckel auf die Oberseite der Gareinheit.
A8. Schalten Sie das Gerät über den On/Off Knopf auf der Rückseite des Mixerteils ein. An der Gerätevorderseite schaltet sich das LCD-Display ein.
A9. Lassen Sie die verschiedenen Funktionen durch Druck auf die Taste „Mode“ durchlaufen.
- Wenn Sie Wasser aus dem Kühlschrank erhitzen wollen, wählen Sie das Symbol Fläschchen + Kühlschrank  . - Wenn Sie Wasser mit Umgebungstemperatur erhitzen wollen, wählen Sie das Symbol Fläschchen +


A10. Wählen Sie anschließend die zu erhitzende Wassermenge anhand des Durchlaufs der programmierten Mengen und Druck auf die Tasten + und -.
A11. Bestätigen Sie über OK.
A12. Zu Programmende macht ein Signalton Sie darauf aufmerksam, dass das Fläschchen bereit ist. Schalten Sie den Signalton durch Druck auf OK aus.
B. GLÄSCHEN ERHITZEN
Befolgen Sie Schritt 1 bis 5 wie unter Fläschchen erhitzen beschrieben. B6. Stellen Sie das zu erhitzende Gläschen auf das Isoliergitter
B7. Legen Sie den Deckel auf die Oberseite der Gareinheit.
B8. Schalten Sie das Gerät über den On/Off Knopf auf der Rückseite des Mixerteils ein. An der Gerätevorderseite schaltet sich das LCD-Display ein.
B9. Lassen Sie die verschiedenen Funktionen durch Druck auf die Taste „Mode“ durchlaufen.
-Wenn Sie ein Gläschen aus dem Kühlschrank erhitzen wollen, wählen Sie das Symbol Gläschen + Kühlschrank 
 .
.
-Wenn Sie ein Gläschen mit Umgebungstemperatur erhitzen wollen, wählen Sie das Symbol Gläschen + Haus 
 . B10. Durch Druck auf OK wird das Gläschen erhitzt.
ACHTUNG: Um Verbrennungen zu vermeiden, immer die Temperatur der Nahrung prüfen, bevor Sie Ihr Kind füttern. Fläschchen gut schütteln, um die Milch gut zu mischen. Gießen Sie einen Tropfen auf die Innenseite Ihres Handgelenks, um die Temperatur zu prüfen.
ACHTUNG: Die vorprogrammierten Programme basieren auf einer Berechnung der durchschnittlichen Erhitzungsdauer eines Fläschchens oder Gläschens. Material und Materialstärke des Fläschchens, ggf. vorhandener abnehmbarer Boden, Größe eines Gläschens sind Elemente, die die Temperatur des Inhalts beeinflussen können. Auch die gleichzeitige Erhitzung mehrerer Fläschchen kann sich auf das Ergebnis auswirken. Wenn Sie den Inhalt für zu warm oder nicht warm genug halten, senken oder verlängern Sie die Erwärmungszeit über die Funktion „Dampfgaren“.
20 |
NUTRIBABY • Bedienungsanleitung |
Für Fläschchen vorprogrammierte Programme
Wasser-/Milchmenge |
90 ml |
120 ml |
150 ml |
180 ml |
210 ml |
240 ml |
270 ml |
300 ml |
330 ml |
|
im Fläschchen |
||||||||||
|
|
|
|
|
|
|
|
|
||
|
|
|
|
|
|
|
|
|
|
|
Erwärmungsdauer eines |
2 min 35 |
2 min 45 |
3 min |
3 min |
3 min 10 |
3 min 10 |
3 min 10 |
3 min 15 |
3 min 25 |
|
mit temperiertem Wasser |
||||||||||
zubereiteten Fläschchens |
|
|
|
|
|
|
|
|
|
|
|
|
|
|
|
|
|
|
|
|
|
Erwärmungsdauer eines |
|
|
|
|
|
|
|
|
|
|
mit Wasser aus dem |
3 min 40 |
3 min 50 |
4 min 30 |
4 min 40 |
5 min |
5 min 05 |
5 min 10 |
5 min 15 |
5 min 30 |
|
Kühlschrank zubereiteten |
||||||||||
Fläschchens |
|
|
|
|
|
|
|
|
|
|
|
|
|
|
|
|
|
|
|
|
C. STERILISIEREN
C1. Verbinden Sie die Kochmit der Mixereinheit.
C2. Entfernen Sie den Auffangbehälter für Garflüssigkeit.
C3. Messen Sie anhand der Skala der Mixerschüssel 150 ml Wasser (Füllstand B) ab und gießen Sie es in den Behälter. C4. Entfernen Sie die Schalen jedes Dampfgarkorbes.
C5. Stapeln Sie die Schalen und setzen Sie sie auf den Gerätesockel.
C6. Stellen Sie die Fläschchen mit der Öffnung nach unten auf die Platte über dem Wasserbehälter. Fügen Sie das zu sterilisierende Zubehör hinzu.
C7. Legen Sie den Deckel auf die Oberseite der Gareinheit.
C8. Schalten Sie das Gerät über den On/Off Knopf auf der Rückseite des Mixerteils ein. An der Gerätevorderseite schaltet sich das LCD-Display ein.
C9. Lassen Sie die verschiedenen Funktionen durch Druck auf die Taste „Mode“ durchlaufen. Wählen Sie das Symbol „Sterilisieren“ .
C10. Über Druck auf OK beginnt der Sterilisationsvorgang.
C11. Zu Programmende macht ein Signalton Sie darauf aufmerksam, dass die Fläschchen sterilisiert sind. Schalten Sie den Signalton durch Druck auf OK aus.
D. DAMPFGAREN
D1. Verbinden Sie die Kochmit der Mixereinheit.
D2. Entfernen Sie den Auffangbehälter für Garflüssigkeit.
D3. Messen Sie anhand der Skala der Mixerschüssel 350 ml Wasser (Anzeige A) ab und gießen Sie es in den Behälter. D4. Setzen Sie den Auffangbehälter für Garflüssigkeit wieder ein: Er fängt die Garflüssigkeit der Nahrungsmittel auf
und erhält deren Nährwert.
D5. Legen Sie die Schalen nach Wunsch in die Garkörbe.
D6. Würfeln Sie die Zutaten (ca. 15 mm x 15 mm) und legen Sie sie in die Garkörbe.
-Die Zutaten können je nach Produktfamilie (Gemüse/Fleisch) oder Garzeit getrennt werden. Legen Sie z. B. Kartoffeln, die relativ langsam garen, in den unteren Garkorb und Zucchini, die schneller garen, in den oberen Korb, den Sie im Verlauf des Programmablaufs hinzufügen: So kochen Sie das Gemüse nie zu lange!
-Jeder Garkorb ist für maximal 400 g Nahrungsmittel geeignet.
-Dank der abnehmbaren Schalen können Sie die Kapazität an Ihren Bedarf anpassen: Ein kleiner Korb (a), 2 Körbe (b) oder ein großer Korb (c) durch Entfernen des oberen Korbes.
Wenn Sie den Korb angebracht haben, legen Sie den Deckel auf.
D7. Schalten Sie das Gerät über den On/Off Knopf auf der Rückseite des Mixerteils ein. An der Gerätevorderseite schaltet sich das LCD-Display ein.
D8. Lassen Sie die verschiedenen Funktionen durch Druck auf die Taste „Mode“ durchlaufen. Wählen Sie das Symbol „Dampfgaren“ 


 .
.
D9. Wählen Sie die gewünschte Garzeit über die Tasten + und -. Die Garzeit hängt von Art und Menge der zu garenden
Nahrungsmittel ab. Sie können die Tabelle der Garzeiten zu Rate ziehen. |
|
|
D10. |
Durch Druck auf OK startet das Programm. |
|
D11. |
Zu Programmende macht ein Signalton Sie darauf aufmerksam, dass die Garzeit abgelaufen ist. Schalten Sie |
|
|
den Signalton durch Druck auf OK aus. Wenn Sie die Garzeit verlängern wollen, drücken Sie die Tasten +/- und |
|
D12. |
bestätigen Sie über OK. |
|
Fassen Sie den Deckel am Griff. Geben Sie Acht, dass Sie sich nicht verbrennen. |
|
|
D13. |
Fassen Sie die Garkörbe an den Griffen, um sie herauszunehmen. |
|
D14. |
Sie können Eier kochen. Legen Sie die Eier in die Eierhalter der Platten. |
|
|
NUTRIBABY • Bedienungsanleitung |
21 |
 Loading...