

Page 1

USER MANUAL
ITV101E
v.1.0
PlayXtreme INTERNET TV HUB
Page 2

Page 3

CONTENTS
About the Device ............................................................................................................ 1
Package Contents .......................................................................................................... 2
Design ............................................................................................................................ 2
Front Panel .............................................................................................................. 3
Back Panel ............................................................................................................... 3
Getting Started ............................................................................................................... 4
Planning Your Network ........................................................................................... 5
Connecting the Aztech PlayXtreme Internet TV Hub.............................................. 6
Main Menu ................................................................................................................ 8
File Browser .......................................................................................................... 8
Music ..................................................................................................................... 9
Movie ..................................................................................................................... 9
Web .......................................................................................................................10
Picture ..................................................................................................................11
Setting ..................................................................................................................11
Application ...........................................................................................................12
TV ..........................................................................................................................13
Setting .....................................................................................................................13
Wireless & networks ...........................................................................................14
Ethernet ...............................................................................................................15
Display ..................................................................................................................15
Application ...........................................................................................................16
Development ........................................................................................................17
Account & sync ....................................................................................................18
Privacy ..................................................................................................................19
Storage .................................................................................................................20
Language & keyboard ..........................................................................................21
Date & Time .........................................................................................................22
Page 4

About the Device ..................................................................................................22
Wireless Qwerty Remote Control...........................................................................24
Using your Wireless Qwerty Remote Control .....................................................25
Frequently Asked Questions ..................................................................................27
Page 5

© COPY
© COPY© COPY
© COPYRIGHT 2011 ALL RIGHTS RESERVED
RIGHT 2011 ALL RIGHTS RESERVEDRIGHT 2011 ALL RIGHTS RESERVED
RIGHT 2011 ALL RIGHTS RESERVED
No part of this document may be reproduced, republished, or retransmitted in any form or by
any means whatsoever, whether electronically or mechanically, including, but not limited to,
by way of photocopying, recording, information recording, or through retrieval systems
without the express written permission. We reserve the right to revise this document at any
time without the obligation to notify any person and/or entity. All other company or product
names mentioned are used for identification purposes only and may be trademarks of their
respective owners.
LIMITATION OF LIABILITY AND DAMAGES
LIMITATION OF LIABILITY AND DAMAGESLIMITATION OF LIABILITY AND DAMAGES
LIMITATION OF LIABILITY AND DAMAGES
THE PRODUCT AND THE SOFTWARES WITHIN ARE PROVIDED "AS IS," BASIS. THE
MANUFACTURER AND MANUFACTURER’S RESELLERS (COLLECTIVELY REFERRED TO AS
“THE SELLERS”) DISCLAIM ALL WARRANTIES, EXPRESS, IMPLIED OR STATUTORY,
INCLUDING WITHOUT LIMITATION THE IMPLIED WARRANTIES OF NON-INFRINGEMENT,
MERCHANTABILITY OR FITNESS FOR A PARTICULAR PURPOSE, OR ANY WARRANTIES
ARISING FROM COURSE OF DEALING, COURSE OF PERFORMANCE, OR USAGE OF TRADE. IN
NO EVENT WILL THE SELLERS BE LIABLE FOR DAMAGES OR LOSS, INCLUDING BUT NOT
LIMITED TO DIRECT, INDIRECT, SPECIAL WILLFUL, PUNITIVE, INCIDENTAL, EXEMPLARY, OR
CONSEQUENTIAL, DAMAGES, DAMAGES FOR LOSS OF BUSINESS PROFITS, OR DAMAGES
FOR LOSS OF BUSINESS OF ANY CUSTOMER OR ANY THIRD PARTY ARISING OUT OF THE
USE OR THE INABILITY TO USE THE PRODUCT OR THE SOFTWARES, INCLUDING BUT NOT
LIMITED TO THOSE RESULTING FROM DEFECTS IN THE PRODUCT OR SOFTWARE OR
DOCUMENTATION, OR LOSS OR INACCURACY OF DATA OF ANY KIND, WHETHER BASED ON
CONTRACT, TORT OR ANY OTHER LEGAL THEORY, EVEN IF THE PARTIES HAVE BEEN
ADVISED OF THE POSSIBILITY OF SUCH DAMAGES. THE ENTIRE RISK AS TO THE RESULTS
AND PERFORMANCE OF THE PRODUCT OR ITS SOFTWARE IS ASSUMED BY CUSTOMER.
BECAUSE SOME STATES DO NOT ALLOW THE EXCLUSION OR LIMITATION OF LIABLITY FOR
DAMAGES, THE ABOVE LIMITATION MAY NOT APPLY TO THE PARTIES. IN NO EVENT WILL
THE SELLERS’ TOTAL CUMULATIVE LIABILITY OF EACH AND EVERY KIND IN RELATION TO
THE PRODUCT OR ITS SOFTWARE EXCEED THE AMOUNT PAID BY CUSTOMER FOR THE
PRODUCT.
Page 6

Page 7

User Manual
1 of 29
About the Device
About the DeviceAbout the Device
About the Device
Aztech PlayXtreme Internet TV Hub
Aztech PlayXtreme Internet TV HubAztech PlayXtreme Internet TV Hub
Aztech PlayXtreme Internet TV Hub
redefines home entertainment with a whole new level of
interactive, intuitive and innovative TV experience. Powered by the latest Android 2.3 platform,
Aztech PlayXtreme Internet TV Hub
Aztech PlayXtreme Internet TV HubAztech PlayXtreme Internet TV Hub
Aztech PlayXtreme Internet TV Hub
converts a regular TV to an Internet-enabled one,
transforming TV viewing experience to an engaging adventure with the integrated capabilities
of the Internet, computer, TV and media player. All that is required is a broadband connection
and a TV with HDMI or composite video input.
Full HD Media Playback with UPnP
Full HD Media Playback with UPnPFull HD Media Playback with UPnP
Full HD Media Playback with UPnP
Immerse into crystal-clear movie quality as
Aztech PlayXtreme Internet TV Hub
Aztech PlayXtreme Internet TV HubAztech PlayXtreme Internet TV Hub
Aztech PlayXtreme Internet TV Hub
is a well-
equipped media player to stream online, from external USB drive, SD card or NAS network
HDD.
Aztech PlayXtreme Internet TV Hub
Aztech PlayXtreme Internet TV HubAztech PlayXtreme Internet TV Hub
Aztech PlayXtreme Internet TV Hub
supports HDMI 1.3 digit audio/video interface,
supports 720(50/60Hz) and 1080i (50/60Hz) up to 1080P (50/60Hz). UPnP, Universal Plug and
Play, This allows seamless sharing of media on the network without any configuration.
Web Browsing, Social Networking, Instant Messaging, Movies and Music
Web Browsing, Social Networking, Instant Messaging, Movies and Music Web Browsing, Social Networking, Instant Messaging, Movies and Music
Web Browsing, Social Networking, Instant Messaging, Movies and Music
Launch favourite online sites onto the big TV screen. Email, chat and interact with friends on a
TV display instead of being confined to the small screens of the personal computer, laptop or
tablet. The Android 2.3 system supports HTML5 and Flash 10.3.
Be connected to Popular Apps and Gaming APK
Be connected to Popular Apps and Gaming APKBe connected to Popular Apps and Gaming APK
Be connected to Popular Apps and Gaming APK
Aztech
PlayXtreme
PlayXtreme PlayXtreme
PlayXtreme Aztech PlayXtreme Internet TV Hub
Aztech PlayXtreme Internet TV HubAztech PlayXtreme Internet TV Hub
Aztech PlayXtreme Internet TV Hub
is pre-installed with popular apps
for access to latest news and weather updates. What’s more, it empowers users to install
online games and third party APK files.
The Ultimate Photo Frame
The Ultimate Photo FrameThe Ultimate Photo Frame
The Ultimate Photo Frame
Fancy a digital photo frame? Turn the large TV screen into a beautiful photo gallery that
displays favorite family photos and treasured holiday memories. Insert the SD card to
instantly share these photos with friends.
Page 8
User Manual
Page 2
of 29
Package Contents
Package ContentsPackage Contents
Package Contents
Package contents are listed below. For any missing items, please contact your dealer
immediately. Product contents vary for different models.
ITV101E (Aztech PlayXtreme Internet TV Hub)
HDMI Cable
Multi-function cable
5V 2.0A DC Power Adapter
User Manual
Design
DesignDesign
Design
Page 9

User Manual
Page 3
of 29
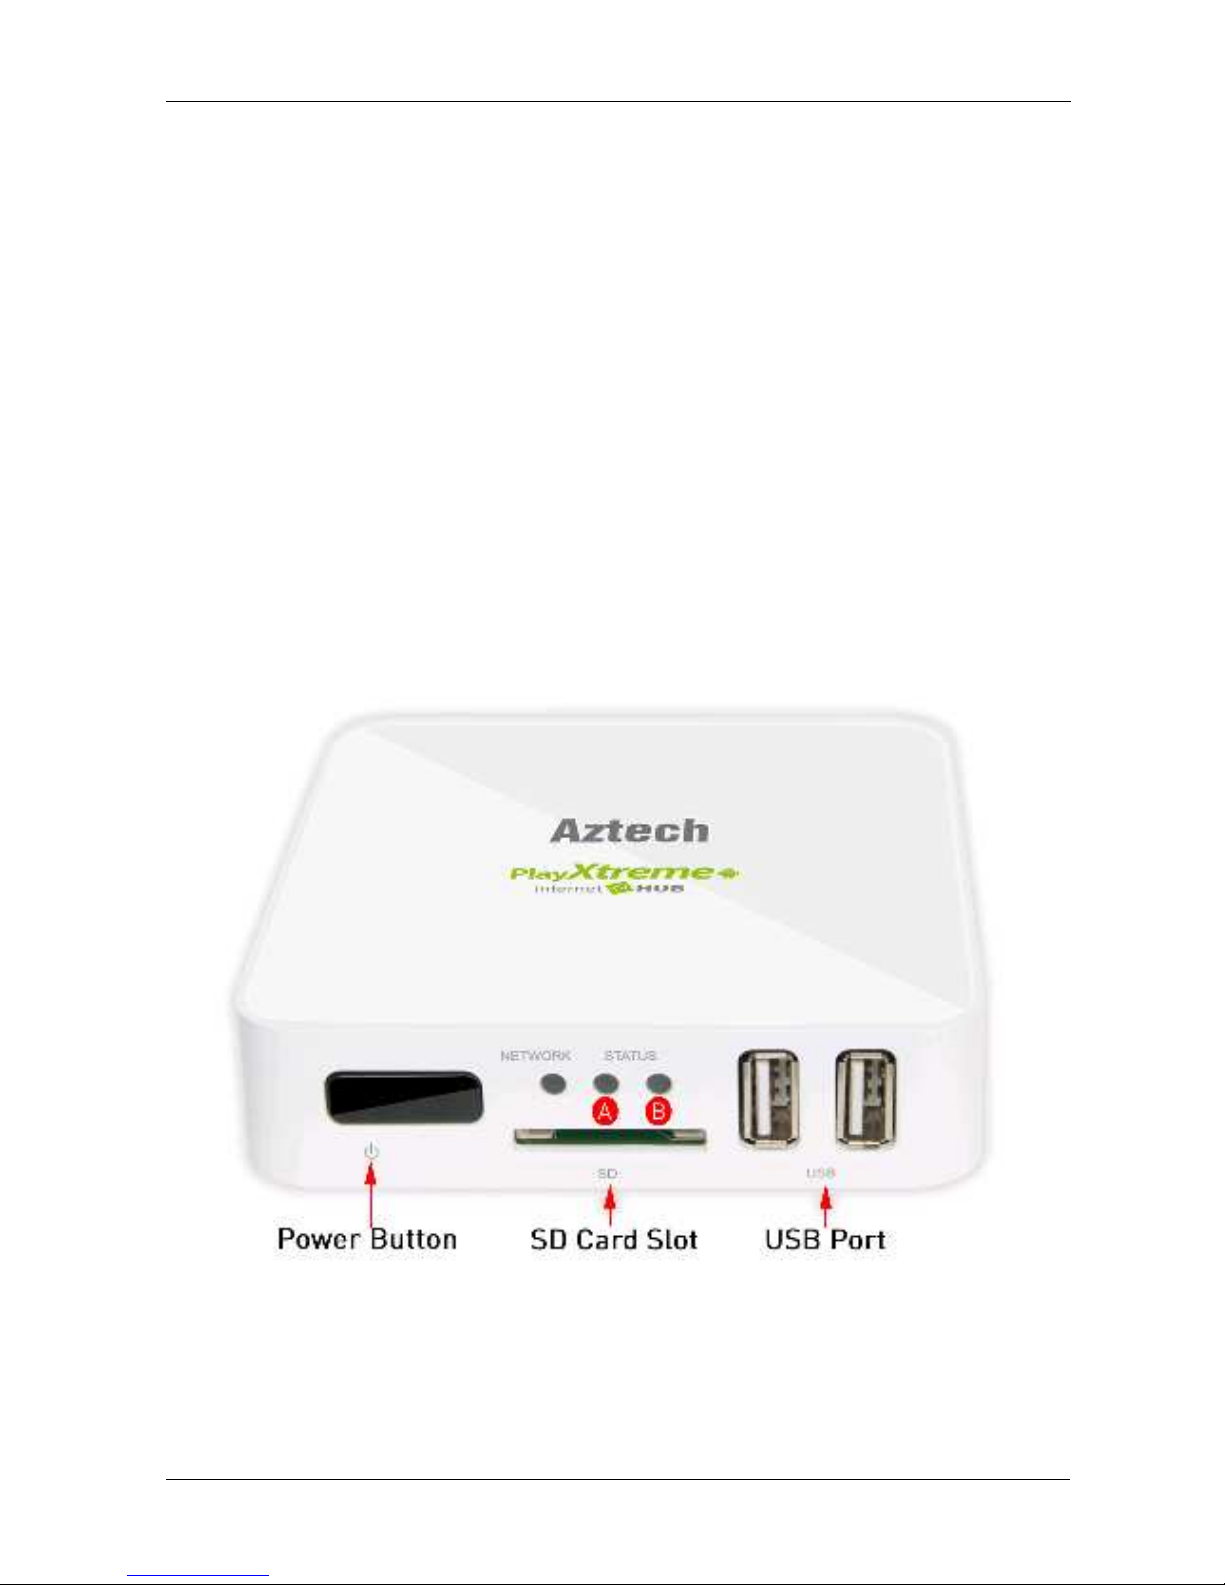
Front Panel
Front PanelFront Panel
Front Panel
LABEL
LABELLABEL
LABEL/ICON
/ICON/ICON
/ICON ACTION
ACTIONACTION
ACTION DESCRIPTION
DESCRIPTIONDESCRIPTION
DESCRIPTION
Press
and hold the Power button
to switch
OFF/ON the device.
Network
Off
ON - Amber
No Ethernet connection
Connected to the network
Transmitting/Receiving data
Status
LED A
- Off
LED A- Amber
LED B- Blue
LED B – Off
Complete initialization
Initializing
Connected to AC power supply
No power is supplied to the device.
SD card Interface
Connecting an SD card
USB
Interface
Connecting a USB device
BBBBack Panel
ack Panel ack Panel
ack Panel
Page 10
User Manual
Page 4
of 29
*Note that when upgrading the device ensure that Android OS and software are an Official
release from Aztech.
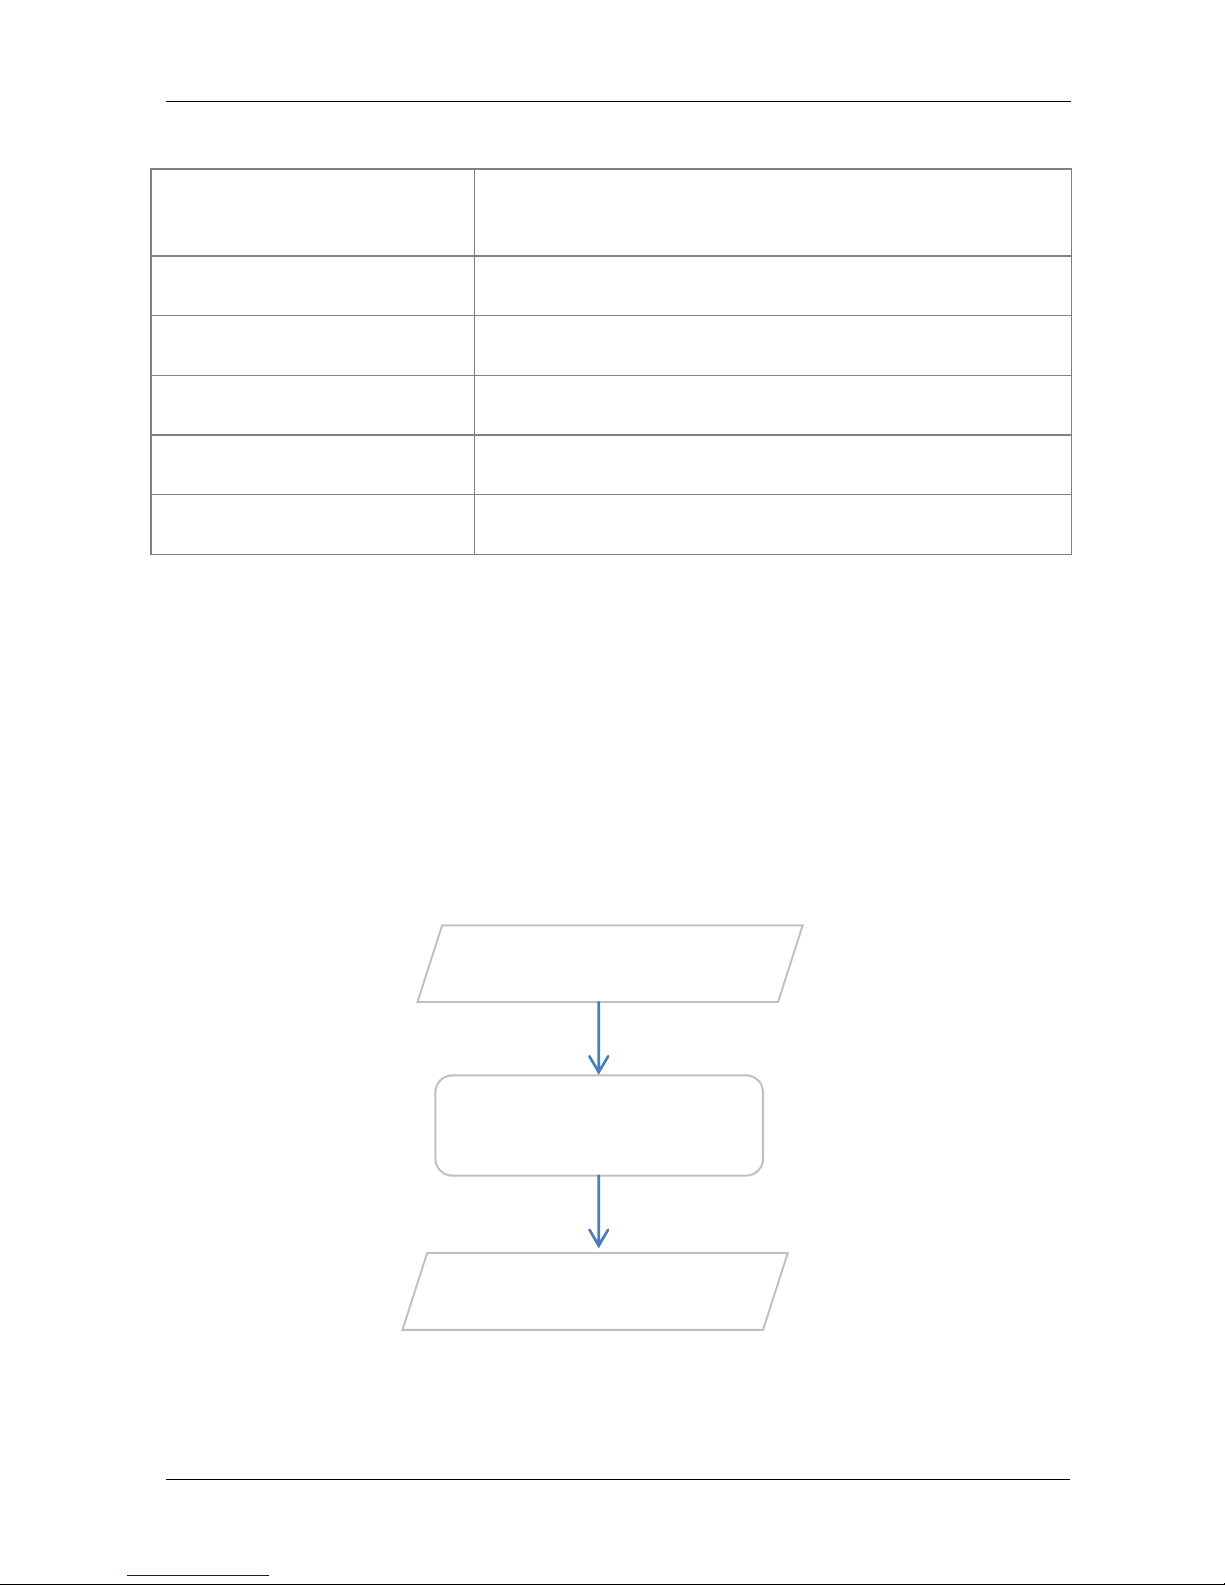
Getting Started
Getting StartedGetting Started
Getting Started
Setting up the device is easy. The flowchart below provides an outline of the steps needed to
complete the installation. Brief descriptions appear beside each step. Detailed instructions
are provided in the subsequent pages.
LABEL
LABELLABEL
LABEL DESCRIPTION
DESCRIPTIONDESCRIPTION
DESCRIPTION
DC
5V 2.0A DC Input port
AV Out
Connecting an AV converter
HDMI
Connecting HDMI cable
LAN
Connecting to a modem/router.
Reset
Press reset button when upgrading* the device.
Plan your Network
Connecting the Aztech
PlayXtreme Internet TV Hub
Ready to Use
Page 11
User Manual
Page 5
of 29
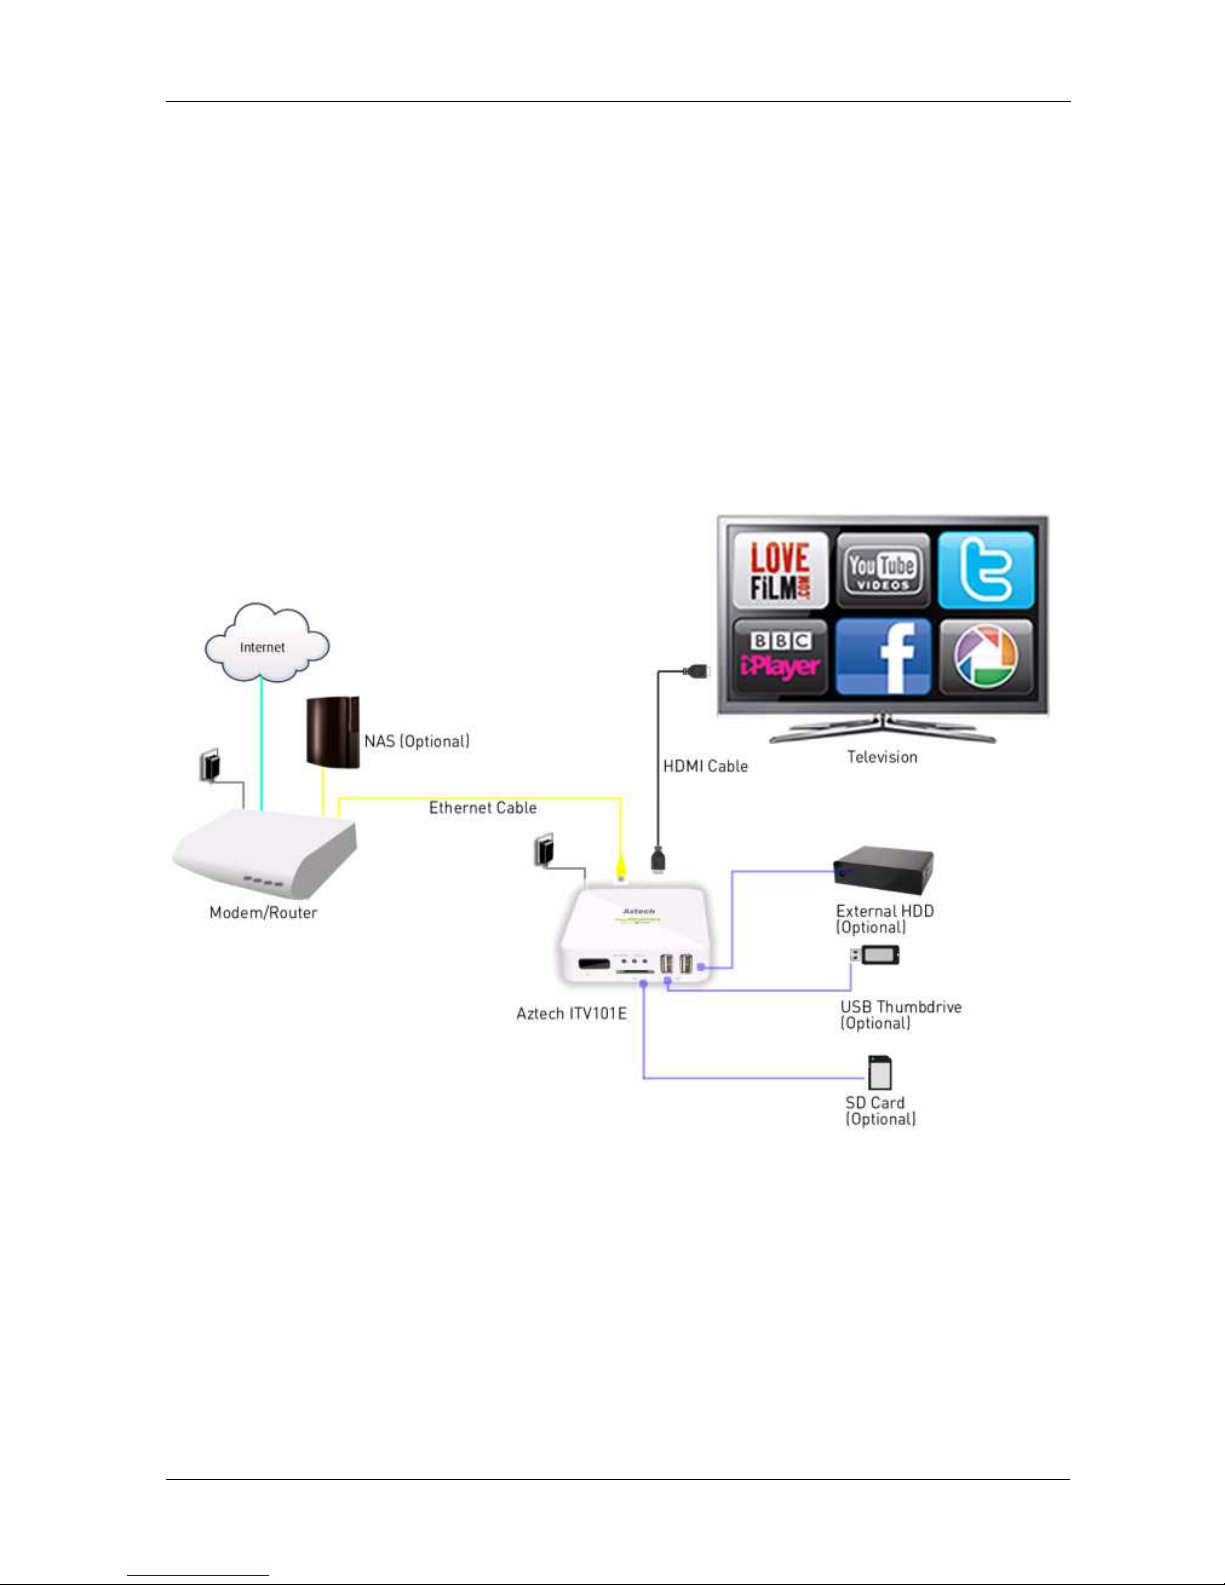
Planning Your Network
Planning Your NetworkPlanning Your Network
Planning Your Network
Before moving ahead to setup your network, it is a good idea to draw out a network diagram to
help identify your network devices and plan out how to connect these devices. The illustration
below is an example of a network diagram.
Page 12
User Manual
Page 6
of 29
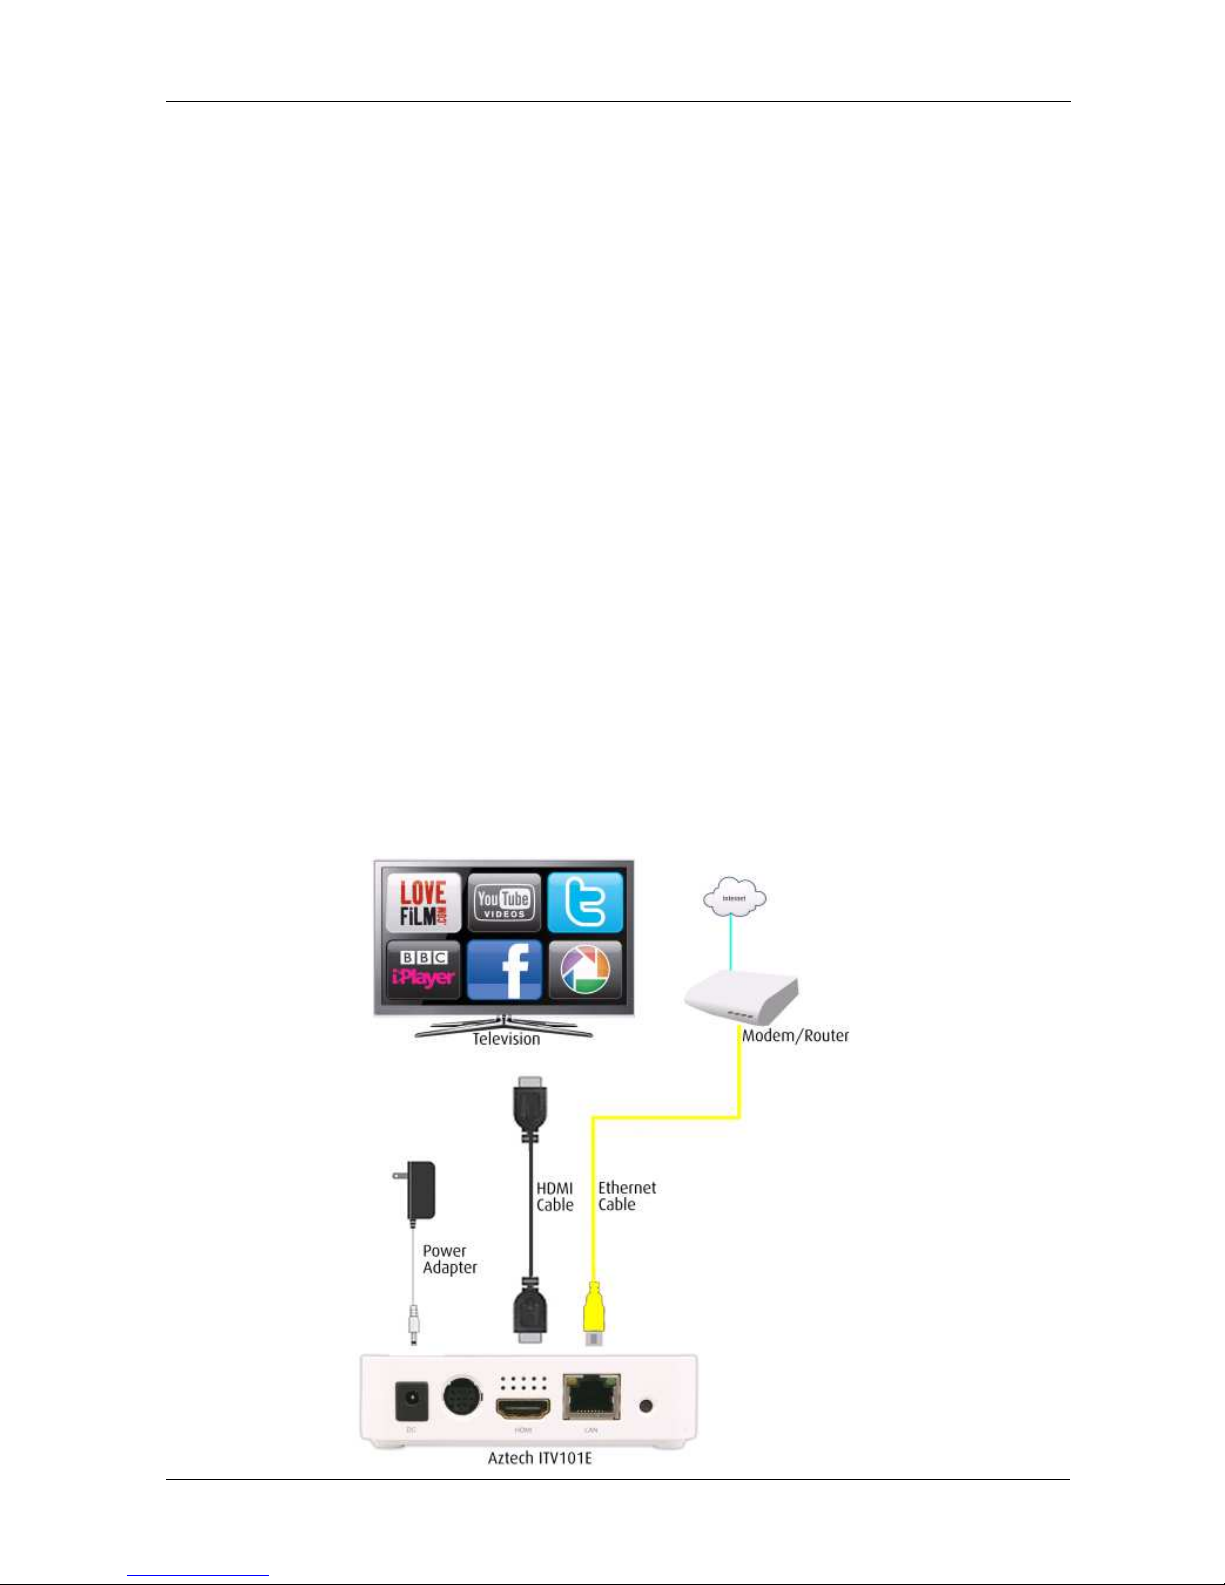
Connecting the
Connecting the Connecting the
Connecting the Aztech PlayXtreme Internet TV Hub
Aztech PlayXtreme Internet TV HubAztech PlayXtreme Internet TV Hub
Aztech PlayXtreme Internet TV Hub
When installing the Aztech PlayXtreme Internet TV Hub, find an area where there are enough
electrical outlets for the Aztech PlayXtreme Internet TV Hub, the television, the router and
your other devices.
To setup the
To setup the To setup the
To setup the Android TV Box
Android TV BoxAndroid TV Box
Android TV Box using HDMI cable
using HDMI cableusing HDMI cable
using HDMI cable::::
1. Connect the Aztech PlayXtreme Internet TV Hub box on your existing Television
using the HDMI cable.
2. Plug one end of the HDMI cable from the Aztech PlayXtreme Internet TV Hub’s HDMI
port and then plug the other end into the television’s HDMI port.
3. Switch ON the television and then select the HDMI as your television Video INPUT.
4. Connect the power adapter to the Aztech PlayXtreme Internet TV Hub’s DC port then
plug it into the power outlet.
5. Aztech PlayXtreme Internet TV Hub will switch ON and Android logo will be
displayed.
6. The Aztech PlayXtreme Internet TV Hub will initialize in less than 60 seconds and
will go to the main menu.
Page 13

User Manual
Page 7
of 29
To setup the
To setup the To setup the
To setup the Android TV Box using Multi
Android TV Box using MultiAndroid TV Box using Multi
Android TV Box using Multi----function cable
function cablefunction cable
function cable::::
1. Connect the Aztech PlayXtreme Internet TV Hub box on your existing Television
using the Multi-functional cable.
2. Plug one end of the Multi-functional cable from the Aztech PlayXtreme Internet TV
Hub’s AV out port.
3. Connect the component cable from the Multi-functional cable port then plug the
other end into the television’s component video port.
4. Switch ON the television and then select Component as your television Video INPUT.
5. Connect the power adapter to the Aztech PlayXtreme Internet TV Hub’s DC port then
plug it into the power outlet.
6. Aztech PlayXtreme Internet TV Hub will switch ON and Android logo will be
displayed.
7. The Aztech PlayXtreme Internet TV Hub will initialize in less than 30 seconds and
will go to the main menu.
Page 14

User Manual
Page 8
of 29
Main Menu
Main MenuMain Menu
Main Menu
File Browser
File BrowserFile Browser
File Browser
This section allows you to browse the files saved on your external HDD, USB thumb drive and
SD cards connected to your Aztech PlayXtreme Internet TV Hub.
1. Connect your external HDD, USB thumb drive and SD cards to your Aztech
PlayXtreme Internet TV Hub.
2. Click File Browser then select the storage that you would like to access your files.
Page 15

User Manual
Page 9
of 29
MMMMusic
usicusic
usic
This section allows you to browse and play the music saved on your external HDD, USB thumb
drive and SD cards connected to your Aztech PlayXtreme Internet TV Hub.
1. Connect your external HDD, USB thumb drive and SD cards to your Aztech
PlayXtreme Internet TV Hub.
2. Click Music then select the music that you would like to play.
Movie
MovieMovie
Movie
This section allows you to browse and play the video saved on your external HDD, USB thumb
drive and SD cards connected to your Aztech PlayXtreme Internet TV Hub.
1. Connect your external HDD, USB thumb drive and SD cards to your Aztech
PlayXtreme Internet TV Hub.
2. Click Movie then select the video that you would like to play.
Page 16

User Manual
Page 10
of 29
Web
WebWeb
Web
This section allows you to browse the Internet. Ensure that your Aztech PlayXtreme Internet
TV Hub is connected to your Router/Modem and Internet connection is UP.
Page 17

User Manual
Page 11
of 29
Picture
PicturePicture
Picture
This section allows you to browse the pictures saved on your external HDD, USB thumb drive
and SD cards connected to your Aztech PlayXtreme Internet TV Hub.
1. Connect your external HDD, USB thumb drive and SD cards to your Aztech
PlayXtreme Internet TV Hub.
2. Click Picture then select the photos that you would like to view.
Setting
SettingSetting
Setting
This section allows you to configure your Aztech PlayXtreme Internet TV Hub. Settings will
have the following features:
Page 18

User Manual
Page 12
of 29
• Wireless & Networks
• Ethernet
• Display
• Applications
• Account & sync
• Privacy
• Storage
• Language & Keyboard
• Date & Time
• About the Device
Application
ApplicationApplication
Application
This section allows you to select and run the pre-installed application on your Aztech
PlayXtreme Internet TV Hub.
Page 19

User Manual
Page 13
of 29
TV
TVTV
TV
This section allows you to watch movies from PPTV movie list.
Setting
SettingSetting
Setting
Page 20

User Manual
Page 14
of 29
Wireless & networks
Wireless & networksWireless & networks
Wireless & networks
Wi
WiWi
Wi----Fi Settings
Fi SettingsFi Settings
Fi Settings
This allows you to enable and connect via wireless. Ensure that you have a wireless client
connected to your ITV101E for this feature to work.
1. On the Main Menu select Settings then select Wireless & networks
2. Click Wireless to enable Aztech PlayXtreme Internet TV Hub’s Wireless connection.
3. Click Wi-Fi Settings to search for the available wireless network
4. Click your Wireless Network’s name then click Connect.
VPN Settings
VPN SettingsVPN Settings
VPN Settings
This allows you to add and configure your VPN account.
1. On the Main Menu select Settings then select Wireless & networks
2. Click Wireless to enable Aztech PlayXtreme Internet TV Hub’s Wireless connection.
3. Click VPN to Add your VPN account.
4. Click Add VPN then configure your VPN account information.
Page 21

User Manual
Page 15
of 29
Ethernet
EthernetEthernet
Ethernet
This allows you to enable and connect via Ethernet connection.
1. On the Main Menu select Settings then select Ethernet
2. Click Ethernet to enable Aztech PlayXtreme Internet TV Hub’s Ethernet connection.
3. Click Ethernet Settings if you want to configure your Ethernet IP addresses.
Display
DisplayDisplay
Display
This allows you to configure and set Aztech PlayXtreme Internet TV Hub output mode.
1. On the Main Menu select Settings then select Display
2. Click Output mode then select the TV resolution that you would like to use.
3. Click Yes on the confirmation message for the settings to take effect.
4. Your Aztech PlayXtreme Internet TV Hub supports 480i, 480p, 576i, 576p, 720p, 1080i
and 1080p.
Page 22

User Manual
Page 16
of 29
Application
ApplicationApplication
Application
This allows you to configure and uninstall applications installed on your Aztech PlayXtreme
Internet TV Hub.
Unknown sources
Unknown sourcesUnknown sources
Unknown sources
This allows you to enable/disable and install a non-Market application.
1. On the Main Menu select Settings then select Application.
2. Click Unknown sources to Enable Unknown sources. By default this feature is
disabled. Click Unknown sources again to disable the feature.
Compatibility Mode
Compatibility ModeCompatibility Mode
Compatibility Mode
This allows you run old application on your Aztech PlayXtreme Internet TV Hub by enabling
this feature.
1. On the Main Menu select Settings then select Application.
2. Click Compatibility Mode to Enable (Tick) this feature and allows you to run old
application. By default this feature is disabled. Click Unknown sources again to
disable (Un-tick) the feature.
Page 23

User Manual
Page 17
of 29
Manage Applications
Manage ApplicationsManage Applications
Manage Applications
This allows you to manage and uninstall applications on your Aztech PlayXtreme Internet TV
Hub.
1. On the Main Menu select Settings then select Application.
2. Click Manage Applications to browse all installed application on your Aztech
PlayXtreme Internet TV Hub.
3. Select an Application that you would like to configure.
Running Services
Running ServicesRunning Services
Running Services
This allows you to view and control all running applications on your Aztech PlayXtreme
Internet TV Hub.
1. On the Main Menu select Settings then select Application.
2. Click Running Services to browse all running applications on your Aztech
PlayXtreme Internet TV Hub.
3. Select an Application that you would like to configure.
Limit applications
Limit applicationsLimit applications
Limit applications
This allows you to limit the number of applications running on your Aztech PlayXtreme
Internet TV Hub.
1. On the Main Menu select Settings then select Application.
2. Click Limit applications then select the number of application that will be allowed to
run simultaneously on your Aztech PlayXtreme Internet TV Hub.
Storage use
Storage useStorage use
Storage use
This allows you to view and manage the applications save on your Aztech PlayXtreme Internet
TV Hub.
1. On the Main Menu select Settings then select Application.
2. Click Storage use then select the application that you would like to configure.
Development
DevelopmentDevelopment
Development
This allows you to enable Debug mode when a USB device is connected to your Aztech
PlayXtreme Internet TV Hub.
Page 24

User Manual
Page 18
of 29
Account &
Account & Account &
Account & ssssync
yncync
ync
This allows you to add and remove email accounts information. This feature will automatically
sync with your email account information.
1. On the Main Menu select Settings then select Account &sync.
2. Select your email account then configure the settings.
3. Click Add button if you want to add email account information.
Page 25

User Manual
Page 19
of 29
Privacy
PrivacyPrivacy
Privacy
This allows you to restore the device to its factory default, update the current firmware.
Factory data reset
Factory data resetFactory data reset
Factory data reset
This allows you to reset the device to its Factory default. Note that when restoring the device
to its factory default some pre-installed software will be deleted.
1. On the Main Menu select Settings then select Privacy.
2. Click Factory default if you want to restore the device to its factory default.
Update system
Update systemUpdate system
Update system
This allows you to delete the current partition on your Aztech PlayXtreme Internet TV Hub.
1. On the Main Menu select Settings then select Privacy.
2. Click Update system then click Update box.
Update system online
Update system onlineUpdate system online
Update system online
This allows you to update current firmware using an SD card wherein the firmware is saved.
1. On the Main Menu select Settings then select Privacy.
2. Click Update system online then insert your SD on the SD card slot.
Page 26

User Manual
Page 20
of 29
Storage
StorageStorage
Storage
This allows you to manage your SD card and provides internal storage status.
1. On the Main Menu select Settings then click Storage.
2. Select Erase SD card if you want to delete the files saved on your SD card.
3. Click Erase SD card to confirm deletion.
4. Click Erase everything to proceed with the deletion.
Page 27

User Manual
Page 21
of 29
Language & keyboard
Language & keyboardLanguage & keyboard
Language & keyboard
This allows you to change the default Language and default keyboard type.
1. On the Main Menu select Settings then click Language & keyboard.
2. Select language if you want change the default language set on the device.
3. Select Keyboard settings if you want change the default keyboard set on the device.
Page 28

User Manual
Page 22
of 29
Date & Time
Date & TimeDate & Time
Date & Time
This allows you to change and set the default date and time format on your Aztech PlayXtreme
Internet TV Hub.
1. On the Main Menu select Settings then click Language & keyboard.
2. Select language if you want change the default language set on the device.
3. Select Keyboard settings if you want change the default keyboard set on the device
About the Device
About the DeviceAbout the Device
About the Device
This allows you to view the current firmware version of your Aztech PlayXtreme Internet TV
Hub.
Page 29

User Manual
Page 23
of 29
Page 30

User Manual
Page 24
of 29
Wireless Qwerty Remote Control
Wireless Qwerty Remote ControlWireless Qwerty Remote Control
Wireless Qwerty Remote Control
LABEL
LABELLABEL
LABEL/ICON
/ICON/ICON
/ICON ACTION
ACTIONACTION
ACTION DESCRIPTION
DESCRIPTIONDESCRIPTION
DESCRIPTION
Press a
nd hold the Power button to switch
OFF the device.
Status LED Indicator
OFF
ON
Blinking
Mouse
Motion Detection Mode Disabled
Mouse Motion Detection Mode Enabled
Low battery
Mouse Right Button
Press to go back to the previous page.
Mouse Left Button
Press to select an Application.
Press and hold to change the wallpapers
from the Main Menu.
Navigation Key
Double
press
to Enable motion detection
mode.
Double press to Disable motion Detection
Mode
F1
Press to display the Menu option.
F2
Press
to go back to the Main Menu
Page 31

User Manual
Page 25
of 29
F5
Press to go to Email account settings
F6
Press to go to Music
launcher
F7
Press to Rewind
F8
Press to select Next Track
F9
Press to Forward
F10
Press to Mute
F11
Press to decrease the volume
F12
Press to inc
rease the volume
Using your Wireless Qwerty Remote Control
Using your Wireless Qwerty Remote Control Using your Wireless Qwerty Remote Control
Using your Wireless Qwerty Remote Control
Page 32

User Manual
Page 26
of 29
1. Connect the Wireless Qwerty receiver on your Aztech PlayXtreme Internet TV Hub’s
USB port.
2. Ensure that your Wireless Qwerty remote control has a battery for it to work
properly.
3. Double press the Navigation key to enable Motion detection mode.
4. Move over the arrow pointer to the application then press the mouse left button to
launch the selected application.
5. Press the mouse right button if you want to go back to the previous page.
Page 33

User Manual
Page 27
of 29
Frequently Asked Questions
Frequently Asked QuestionsFrequently Asked Questions
Frequently Asked Questions
How do I change the Android OS on my device?
How do I change the Android OS on my device?How do I change the Android OS on my device?
How do I change the Android OS on my device?
It is not recommended to change the Android OS on your device unless it is an official release
from Aztech.
1. Download and save the new firmware release on your SD card.
2. Unplug the power adapter then connect the SD card into the Aztech PlayXtreme
Internet TV Hub’s SD card slot.
3. Press and hold the reset button (use a small pin) then connect the Power adapter.
4. Wait until Firmware upgrade menu to display then let go from pressing the reset
button.
5. Once the Firmware upgrade progress bar is completed remove the SD card and wait
until the device completes rebooting.
How do I install new application on my device?
How do I install new application on my device?How do I install new application on my device?
How do I install new application on my device?
1. Save the apk file on your SD card or Thumbdrive then connect it to your Aztech
PlayXtreme Internet TV Hub’s SD card slot or USB port.
2. From the main menu select Application.
3. On the Application page click AppInstaller.
4. On the AppInstaller page select the device where you save your apk file.
5. Select the apk file name then click Install.
6. Installing progress bar will be displayed wait until “Application installed” message
to be displayed.
7. Click Open to run the new application installed on your Aztech PlayXtreme Internet
TV Hub.
How do I un
How do I unHow do I un
How do I un----install an applica
install an applicainstall an applica
install an application?
tion?tion?
tion?
1. From the main menu select Settings then click Applications.
2. Select Manage applications then select the Application that you would like to
uninstall.
3. Click Uninstall then click OK to proceed with the uninstallation.
4. Uninstall progress bar will be displayed wait until the “Uninstall finished” message
to be displayed.
Page 34

User Manual
Page 28
of 29
5. Click OK to go back to the Application list again.
How do I stream movie from NAS (Network Attached Storage)
How do I stream movie from NAS (Network Attached Storage)How do I stream movie from NAS (Network Attached Storage)
How do I stream movie from NAS (Network Attached Storage) using SoftMedia Player
using SoftMedia Playerusing SoftMedia Player
using SoftMedia Player????
1. Ensure that your NAS and Aztech PlayXtreme Internet TV Hub are connected to the
same router.
2. Go to Application then select SoftMedia Player select Choose media source.
3. Select your NAS device’s name then select Browse and play media.
4. All shared folders from NAS will be displayed select Video folder to launch the
movie list.
5. Select the movie that you would like to play.
6. In the event that the default video player doesn’t support the movie format, the
Aztech PlayXtreme Internet TV Hub will provide a list of other movie player for you
select and use to play the movie.
Page 35

User Manual
Page 29
of 29
Safety Precautions
Do not open, service, or change any component.
Only qualified technical specialists are allowed to service the equipment.
Observe safety precautions to avoid electric shock
Check voltage before connecting to the power supply. Connecting to the
wrong voltage will damage the equipment.
Page 36

User Manu
al
Notes:
__________________________________
__________________________________
__________________________________
__________________________________
__________________________________
__________________________________
__________________________________
__________________________________
__________________________________
__________________________________
__________________________________
__________________________________
__________________________________
__________________________________
__________________________________
__________________________________
__________________________________
__________________________________
Page 37

User Manual
Aztech Technica
Aztech TechnicaAztech Technica
Aztech Technica
l Support
l Supportl Support
l Support
Service Center Address:
Hotline: 6594 2297
31 Ubi Road 1 Aztech Building
Email: support@aztech.com
Lobby A Ground Floor
Support Web site:
www.aztech.com/support
Operating Hours:
Monday to Fr
iday: 9:00am to 6:15pm
Saturday: 9:00am to 1:00pm
Page 38

Copyright © 2011 | Aztech Technologies Pte Ltd | All Rights Reserved
.
 Loading...