

Page 1

Aztech HL119 EP
Smart Link HomePlug AV2 600 Mbps
With Pass-through
V1.0
Page 2

User Manual
Legal Notice
2013 © All rights reserved. Version 1.0
No part of this document may be reproduced, republished, or retransmitted in any form or
by any means whatsoever, whether electronically or mechanically, including, but not limited
to, by way of photocopying, recording, information recording, or through retrieval systems
without the express written permission. We reserve the right to revise this document at any
time without the obligation to notify any person and/or entity. All other company or product
names mentioned are used for identification purposes only and may be trademarks of their
respective owners.
LIMITATION OF LIABILITY AND DAMAGES
THE PRODUCT AND THE SOFTWARES WITHIN ARE PROVIDED "AS IS," BASIS. THE MANUFACTURER
AND MANUFACTURER’S RESELLERS (COLLECTIVELY REFERRED TO AS “THE SELLERS”) DISCLAIM
ALL WARRANTIES, EXPRESS, IMPLIED OR STATUTORY, INCLUDING WITHOUT LIMITATION THE
IMPLIED WARRANTIES OF NON-INFRINGEMENT, MERCHANTABILITY OR FITNESS FOR A
PARTICULAR PURPOSE, OR ANY WARRANTIES ARISING FROM COURSE OF DEALING, COURSE
OF PERFORMANCE, OR USAGE OF TRADE. IN NO EVENT WILL THE SELLERS BE LIABLE FOR
DAMAGES OR LOSS, INCLUDING BUT NOT LIMITED TO DIRECT, INDIRECT, SPECIAL WILLFUL,
PUNITIVE, INCIDENTAL, EXEMPLARY, OR CONSEQUENTIAL, DAMAGES, DAMAGES FOR LOSS OF
BUSINESS PROFITS, OR DAMAGES FOR LOSS OF BUSINESS OF ANY CUSTOMER OR ANY THIRD
PARTY ARISING OUT OF THE USE OR THE INABILITY TO USE THE PRODUCT OR THE SOFTWARES,
INCLUDING BUT NOT LIMITED TO THOSE RESULTING FROM DEFECTS IN THE PRODUCT OR
SOFTWARE OR DOCUMENTATION, OR LOSS OR INACCURACY OF DATA OF ANY KIND,
WHETHER BASED ON CONTRACT, TORT OR ANY OTHER LEGAL THEORY, EVEN IF THE PARTIES
HAVE BEEN ADVISED OF THE POSSIBILITY OF SUCH DAMAGES. THE ENTIRE RISK AS TO THE
RESULTS AND PERFORMANCE OF THE PRODUCT OR ITS SOFTWARE IS ASSUMED BY CUSTOMER.
BECAUSE SOME STATES DO NOT ALLOW THE EXCLUSION OR LIMITATION OF LIABILITY FOR
DAMAGES, THE ABOVE LIMITATION MAY NOT APPLY TO THE PARTIES. IN NO EVENT WILL THE
SELLERS’ TOTAL CUMULATIVE LIABILITY OF EACH AND EVERY KIND IN RELATION TO THE
PRODUCT OR ITS SOFTWARE EXCEED THE AMOUNT PAID BY CUSTOMER FOR THE PRODUCT.
Page 2 of 41
Page 3

User Manual
Contents
About the Product .................................................................. 5
How Does It Work? ............................................................................................................... 5
Smart Link ................................................................................................................................ 6
Direct Connection ................................................................................................................ 7
Package Contents ................................................................................................... 7
Device Design .......................................................................................................... 8
Pairing the Device .............................................................................................................. 10
How to Use Reset and Simple Connect Button ......................................................... 11
Resetting the Private Network Name ....................................................................... 12
Creating a Secured HomePlug AV2 Network ........................................................ 13
Joining an Existing Secured HomePlug AV2 Network .......................................... 18
Power Saving Mode ........................................................................................................... 23
Getting Started ..................................................................... 24
Plan Your Network .................................................................................................. 25
Local Network ...................................................................................................................... 25
Gaming Network ................................................................................................................ 26
Entertainment Network ..................................................................................................... 27
Media Network .................................................................................................................... 27
Setup the HomePlug AV2s .................................................................................... 28
For Twin Pack ........................................................................................................................ 28
For Single Pack..................................................................................................................... 28
About HomePlug AV2 Utility ................................................ 29
Requirements ......................................................................................................... 29
Installation ............................................................................................................... 30
Opening HomePlug AV2 Utility ............................................................................. 31
The User Interface .................................................................................................. 31
Home ...................................................................................................................................... 32
Private Network Name ...................................................................................................... 33
Local Private Network Name ...................................................................................... 34
Remote Private Network Name ................................................................................. 34
Page 3 of 41
Page 4

User Manual
Simulate Simple Connect Button ............................................................................... 35
Quality of Service ................................................................................................................ 36
Devices .................................................................................................................................. 37
Firmware Upgrade .............................................................................................................. 38
Appendix ............................................................................... 40
FCC Statement ....................................................................................................... 40
Page 4 of 41
Page 5

User Manual
About the Product
HomePlug AV2 is ready to use out of the box and does not require the installation of driver
software to work. It can be connected to computers, routers, gaming consoles, hubs, IPTV
set-top boxes, and other Ethernet devices regardless of operating system.
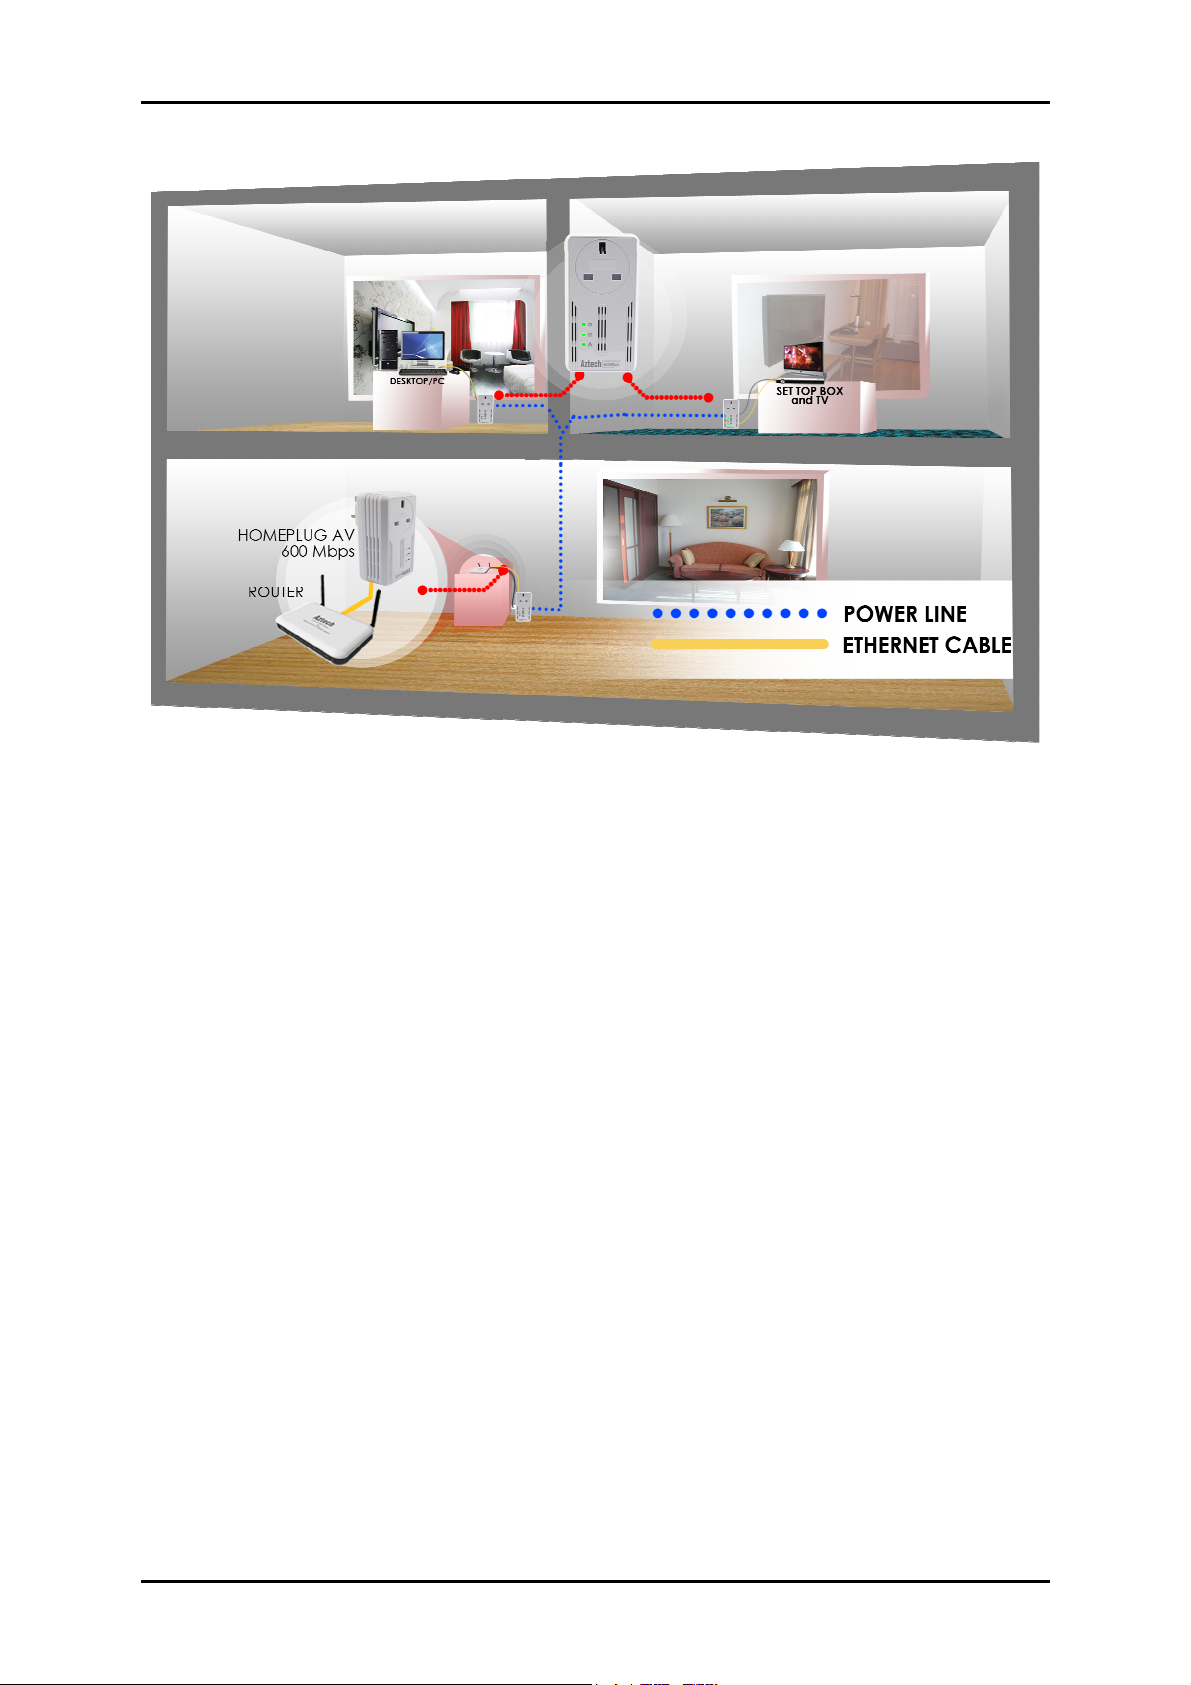
How Does It Work?
HomePlug AV2 utilizes the existing electrical wiring in the house as a path to create a
secured network of computers and Ethernet devices. With a maximum data rate of up to 600
Mbps, HomePlug AV2 can reliably handle high requirement applications like broadband
Internet, high definition video streaming, and Voice over IP.
HomePlug AV2 converts digital signals to a complex analog signal that traverses along the
electrical wires. When receiving the analog signal, HomePlug AV2 converts the analog signal
back to digital. To make the signal secured, a 128-bit AES encryption is applied.
A HomePlug AV2 device can only communicate with other HomePlug AV2 devices that use
the same Private Network Name. The Private Network Name can be easily changed in two
ways. (1) is through the HomePlug AV2 Utility software. It can be changed manually using the
HomePlug AV2 Utility software on a computer with a Windows operating system. When you
use the software, you have to manually type the Private Network Name for the device; (2) Is
through the Simple Connect button. The Simple Connect button automatically creates an
encrypted Private Network Name. It can also be used to reset the Private Network Name or
to add a device into an existing HomePlug AV2 network.
Note: HomePlug AV2 devices are effective when used in pairs. The Twin packs are already
configured to use a common Private Network Name unique for that pair and are ready to
use without involving any complex configurations. The HomePlug AV2 from a Single Pack on
the other hand, uses a random Private Network Name. You still need to change its Private
Network Name to allow it to communicate with an existing HomePlug AV2 network.
When a HomePlug AV2 communicates with another device, the Powerline Activity LED
color will indicate the status of the connection rate it provides: Red means below 30 Mbps;
Amber means 30 to 80 Mbps; and Green means more than 80 Mbps.
Page 5 of 41
Page 6
User Manual
Smart Link
Communication signals traverses in either the Line-Neutral pair or the Line-Ground pair.
Aztech HL119EP was developed differently compared to other Standard PLC devices. Unlike
Standard PLC devices wherein communication signals only traverse in the Line-Neutral pair,
Aztech HL119EP it utilizes both the Line-Neutral and the Line-Ground pair to improve and
increase the overall coverage of your home network; this innovation is called, the Smart Link.
Page 6 of 41
Page 7
User Manual
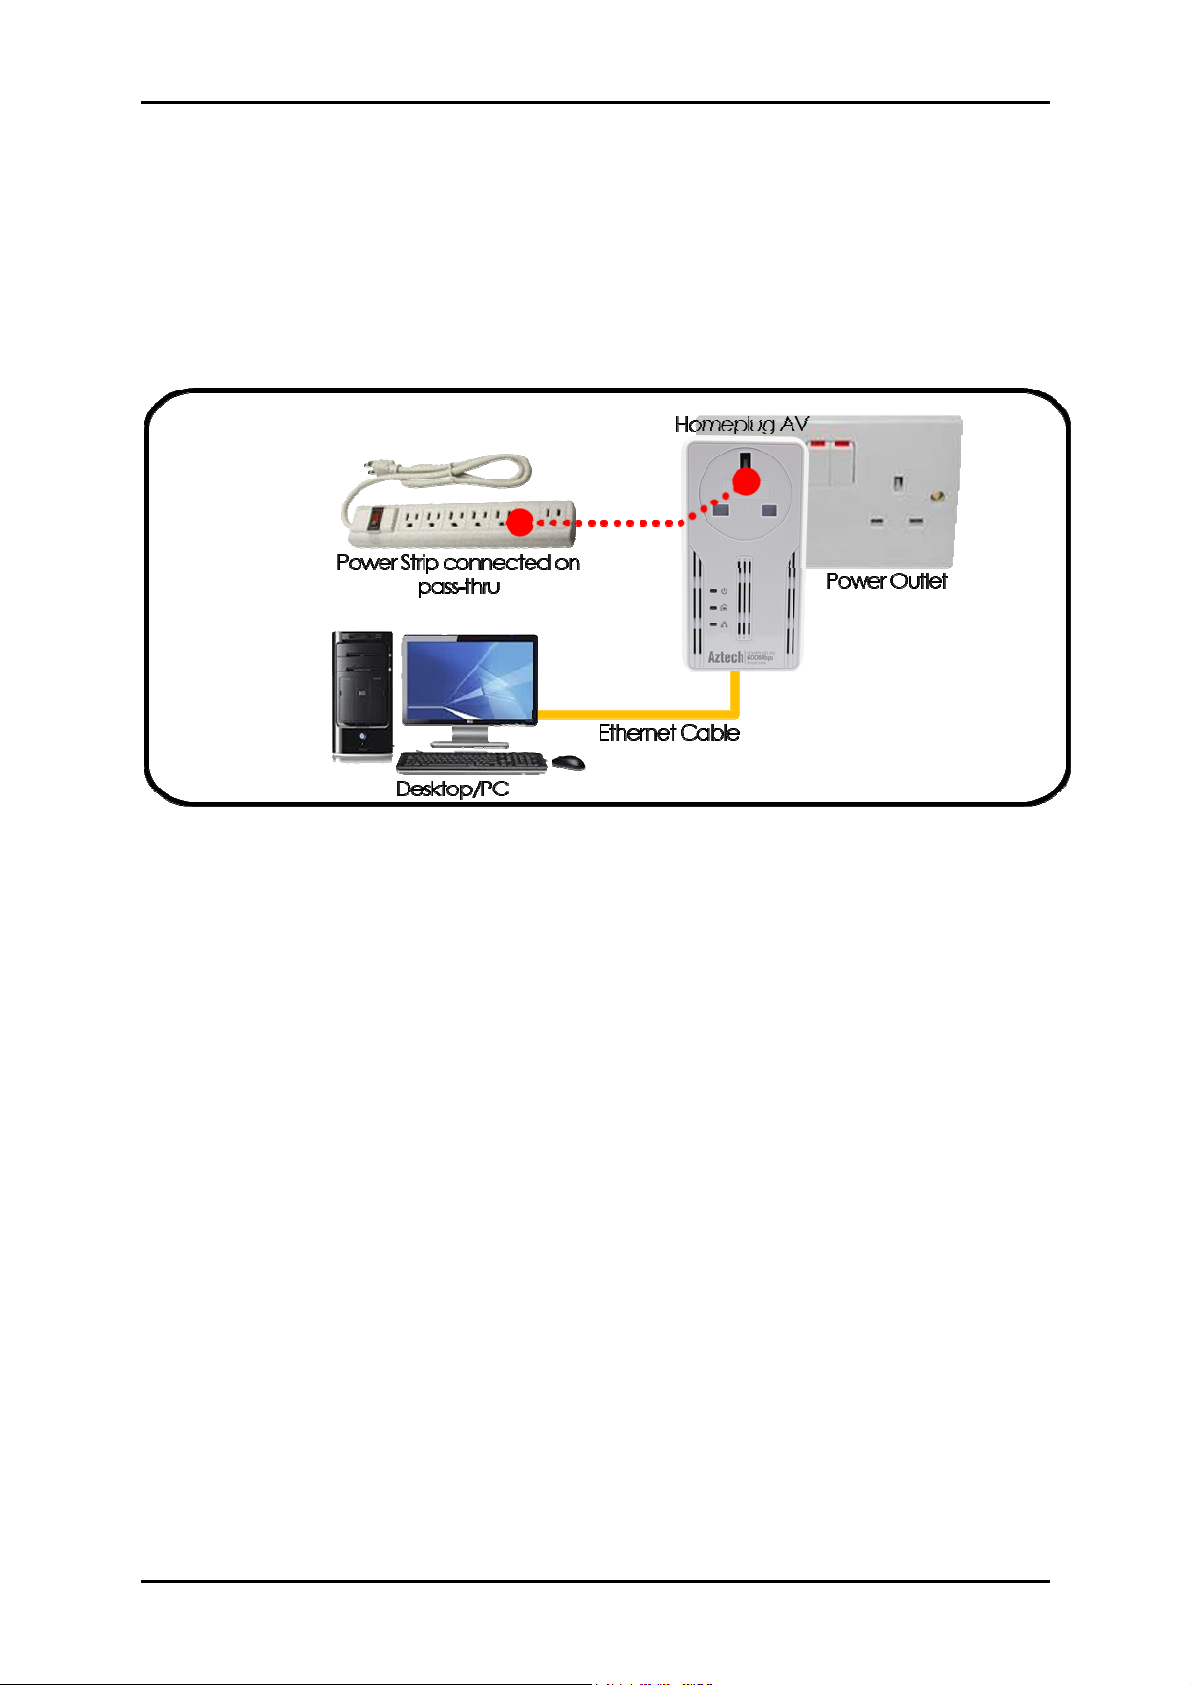
Direct Connection
For best performance, connect the HomePlug AV2 directly to a wall outlet. Avoid
connecting it to a power strip where other electrical devices are connected. Other devices
produce electrical noise or interferences that may affect the overall performance of your
HomePlug AV2.
Package Contents
The package contains the following items:
• 1 HomePlug AV2 for Single Pack or 2 HomePlug AV2s for Twin Pack
(Note: HomePlug AV2 is available in GBR, DEU and AUS Plugs)
• 1 Ethernet cable for Single Pack or 2 Ethernet cables for Twin Pack
• Resource CD that contains the HomePlug AV2 Utility installer and the User Manual.
• Easy Start Guide
Page 7 of 41
Page 8
User Manual
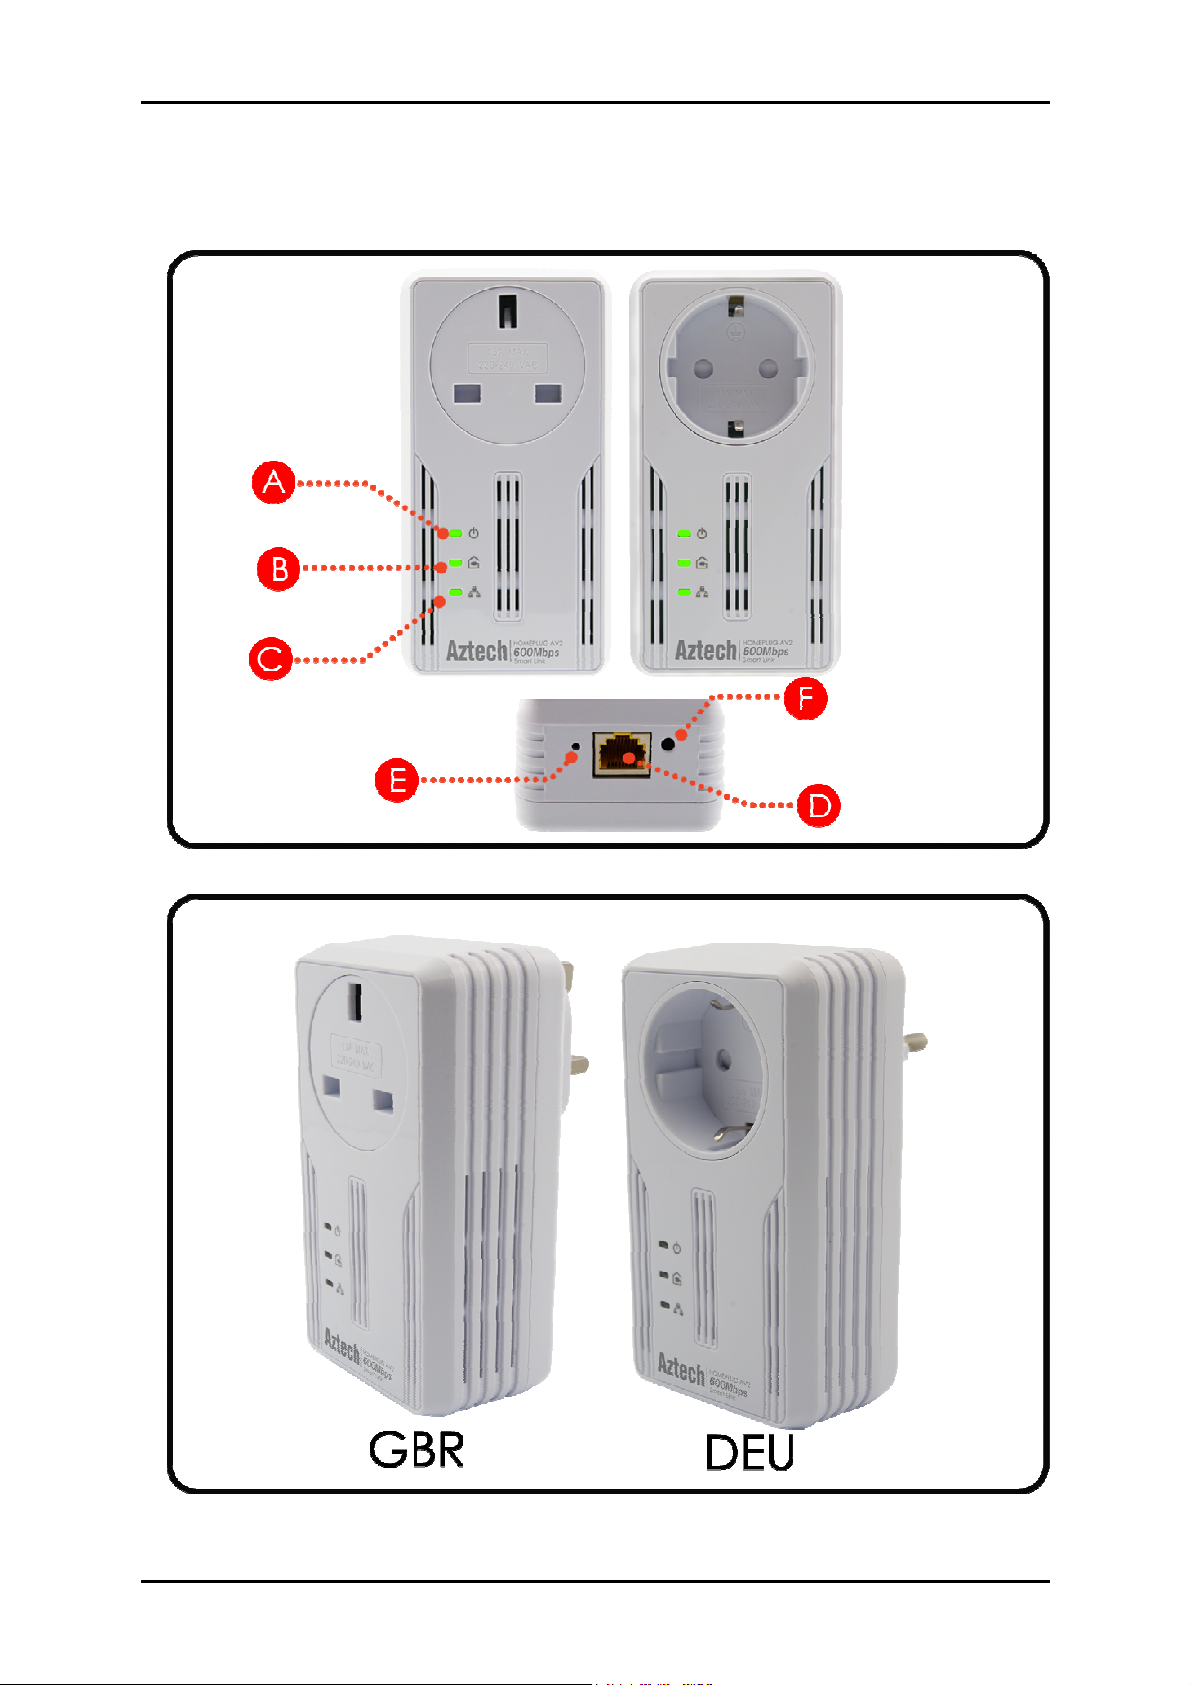
Device Design
GBR
DEU
Page 8 of 41
Page 9
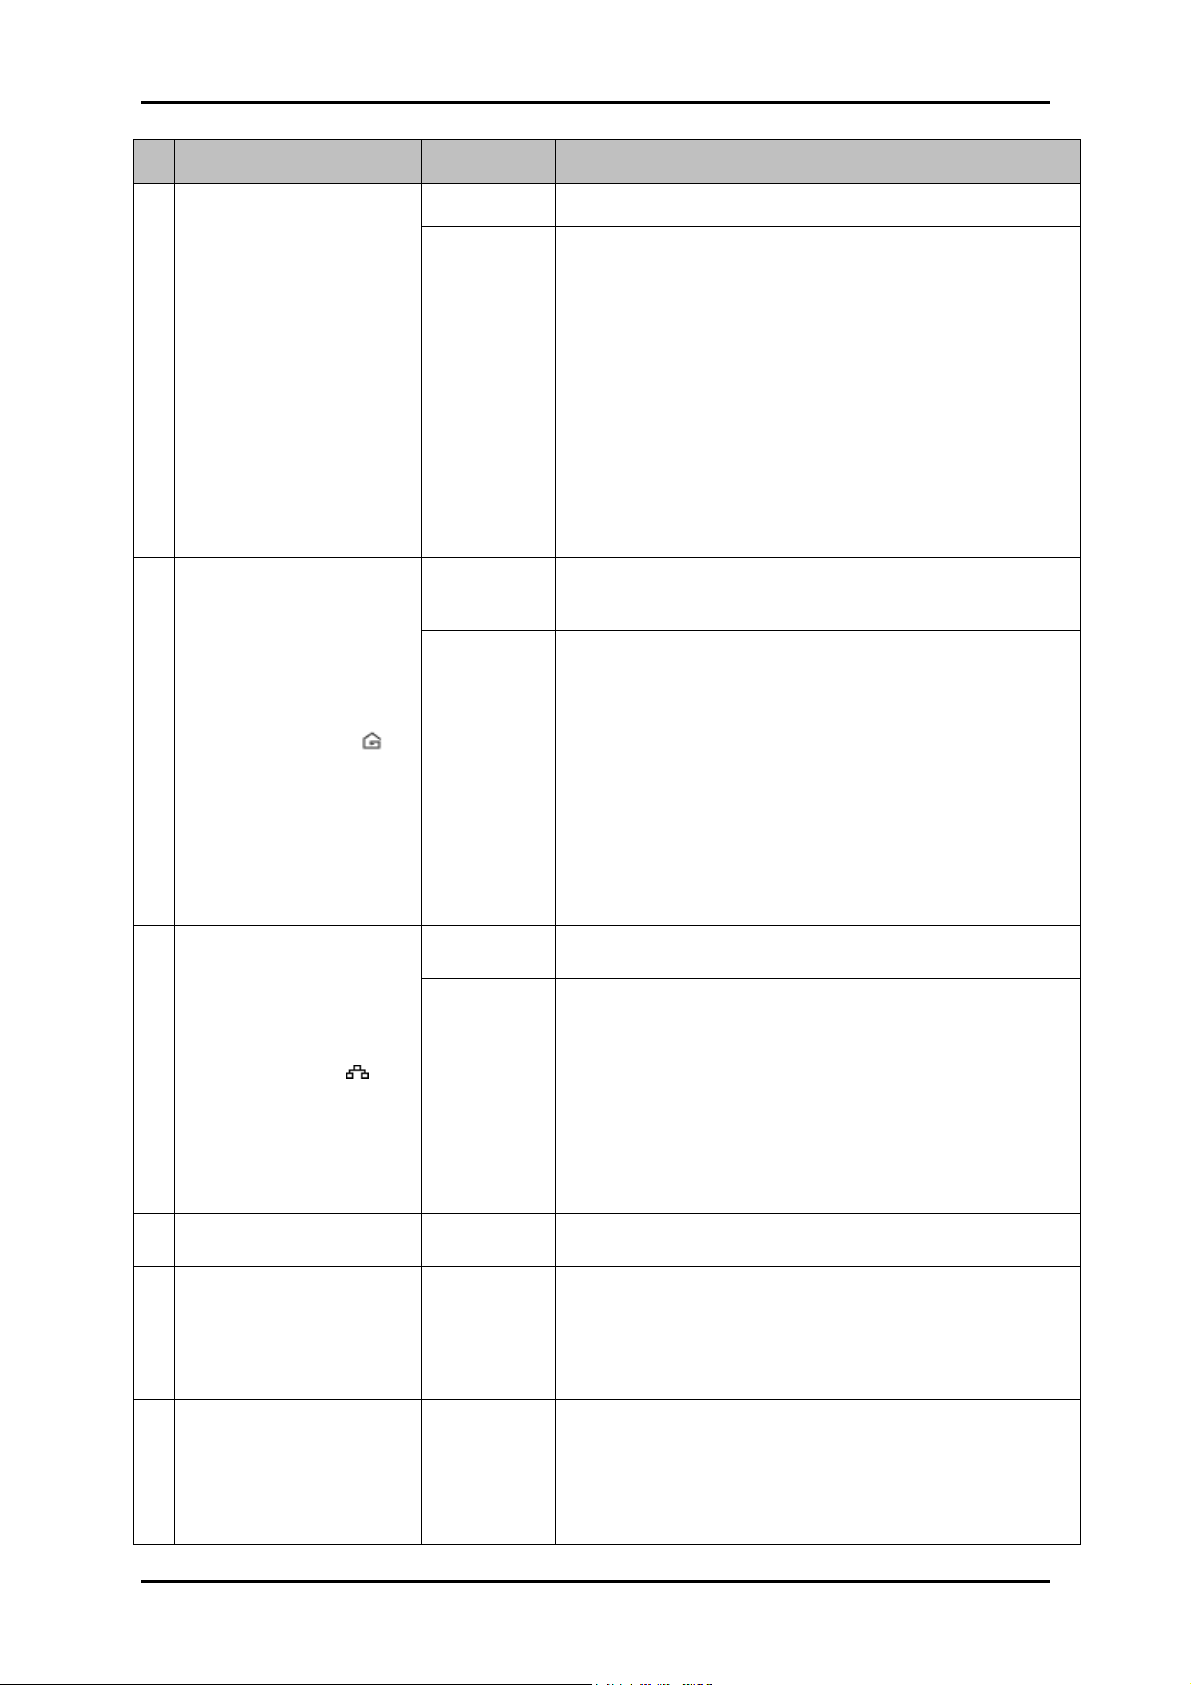
Label Status Description/ Function
Off • No power.
User Manual
A Power LED
B Powerline Activity
On
• HomePlug AV2 is on a Power Saving Status if
the Power LED is blinking slowly.
• When Simple Connect is pressed for 10
seconds, this LED will turn OFF and turn ON
to confirm the Private Network Name reset.
• After Simple Connect is pressed for 2
seconds, this LED will blink to confirm the
button press.
• If Reset Button is pressed for 3 seconds, this
LED will turn OFF and turn ON.
Off Device is not connected to a HomePlug AV2
network.
• When Simple Connect is pressed for 10
seconds, this LED will turn OFF to confirm the
Private Network Name reset.
• This LED is steady in color when the device is
On
part of a HomePlug AV2 network.
• The LED colors represents the connection
rate within the HomePlug AV2 network
whether it is good (red), better (amber), or
best (green).
C Ethernet Activity
D Ethernet Port
E Reset Button
F Simple Connect Button
Off An Ethernet device is not connected.
On
• This LED is steady when an Ethernet device is
connected.
• When Simple Connect is pressed for 10
seconds, this LED will turn OFF and turn ON
to confirm the Private Network Name reset.
(Ethernet is connected)
• The LED flashes to indicate Ethernet activity.
Accepts either cross or straight Ethernet cable.
Press for 3 seconds then release button to reset to
the factory default settings. When you reset to the
factory default, all your configuration changes will
be removed.
When Simple Connect is pressed for 10 seconds, it
will randomize the Private Network Name.
Press 2 seconds to join or add to another network.
Page 9 of 41
Page 10
User Manual
Pairing the Device
Your HomePlug AV2 devices by default are preconfigured to have a common Private
Network Name. Setting up your HomePlug AV2 network is as easy as 1,2 and 3.
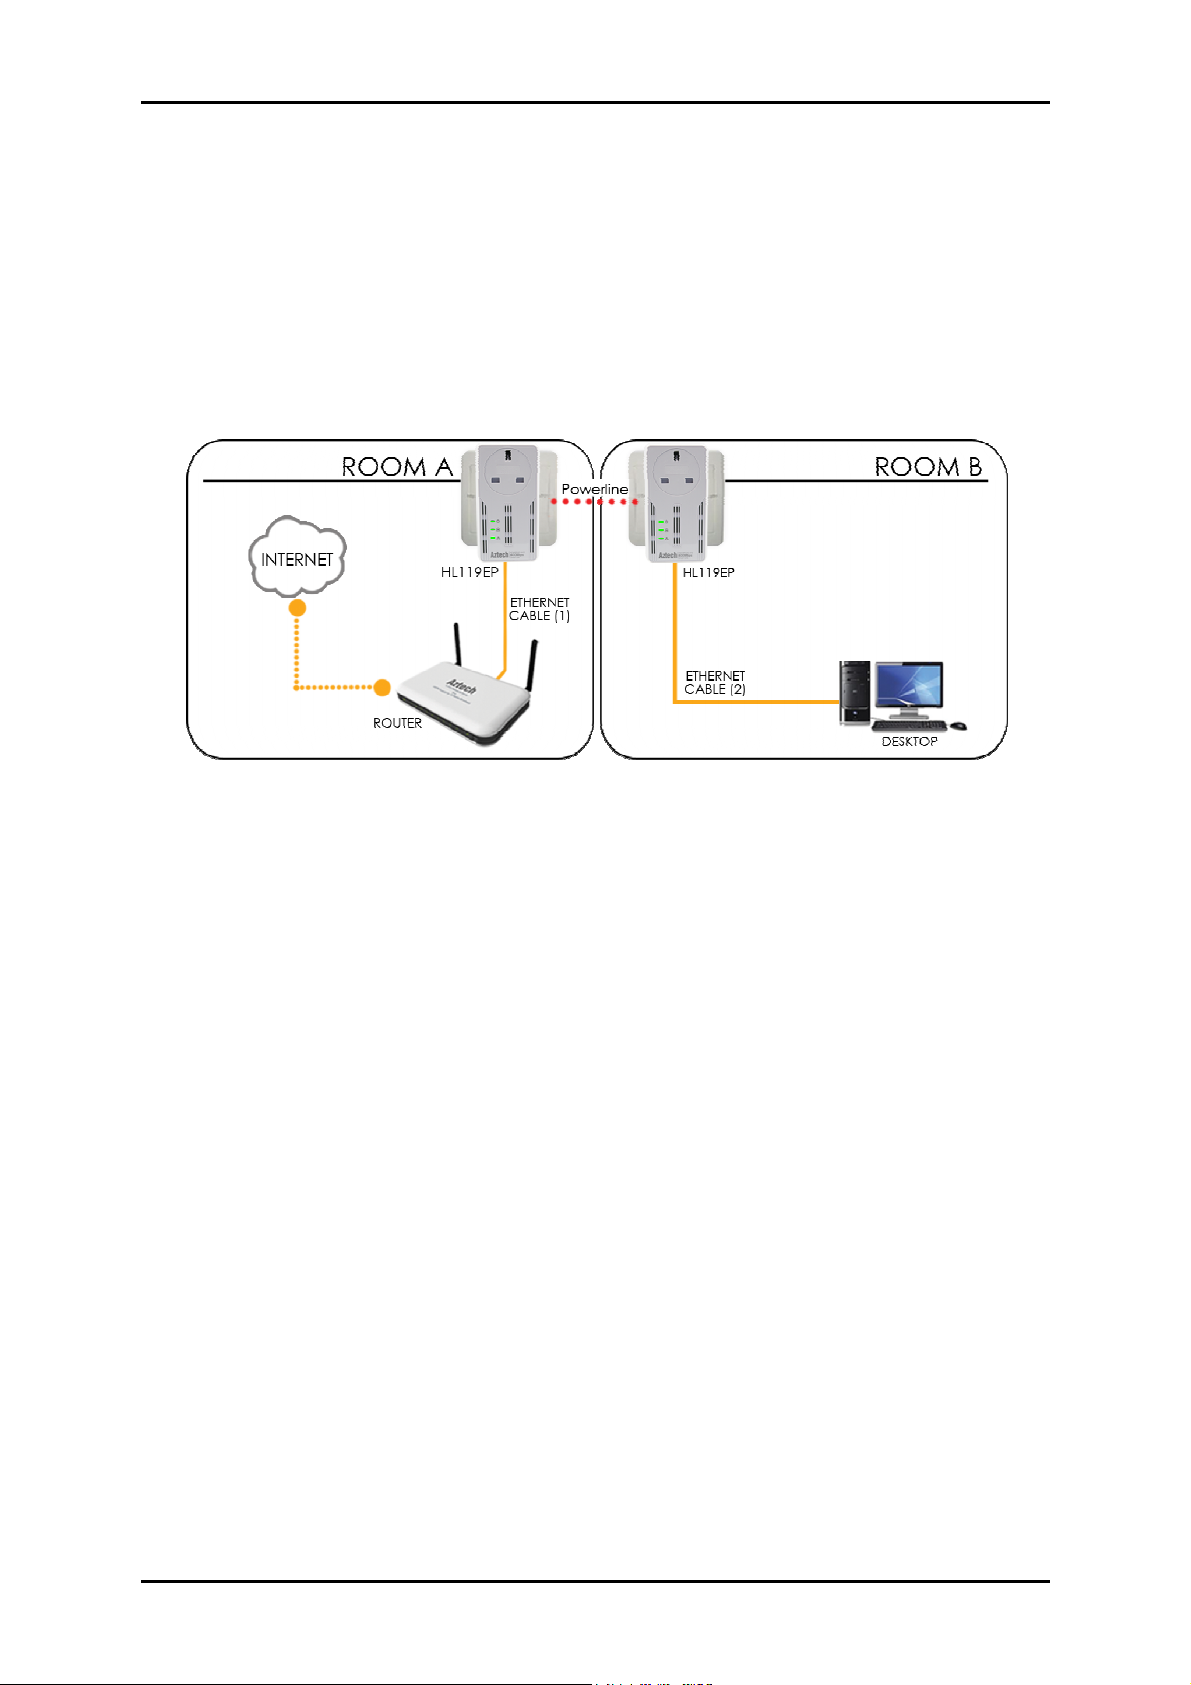
1. It is advisable that you plug in your HomePlug AV2 devices side by side to easily
observe the LED behaviors of each HomePlug AV2. Wait until the Power and PL-ACT
LED turns ON to confirm that the connection has been established
2. In ROOM A plug in your HomePlug AV2 into the wall socket then connect it to your
Modem/Router’s Ethernet port using an Ethernet cable.
3. In ROOM B plug in your HomePlug AV2 into the wall socket then connect it to your
computer’s Ethernet Port using an Ethernet cable. Your HomePlug AV2 is now ready
to use.
Page 10 of 41
Page 11
User Manual
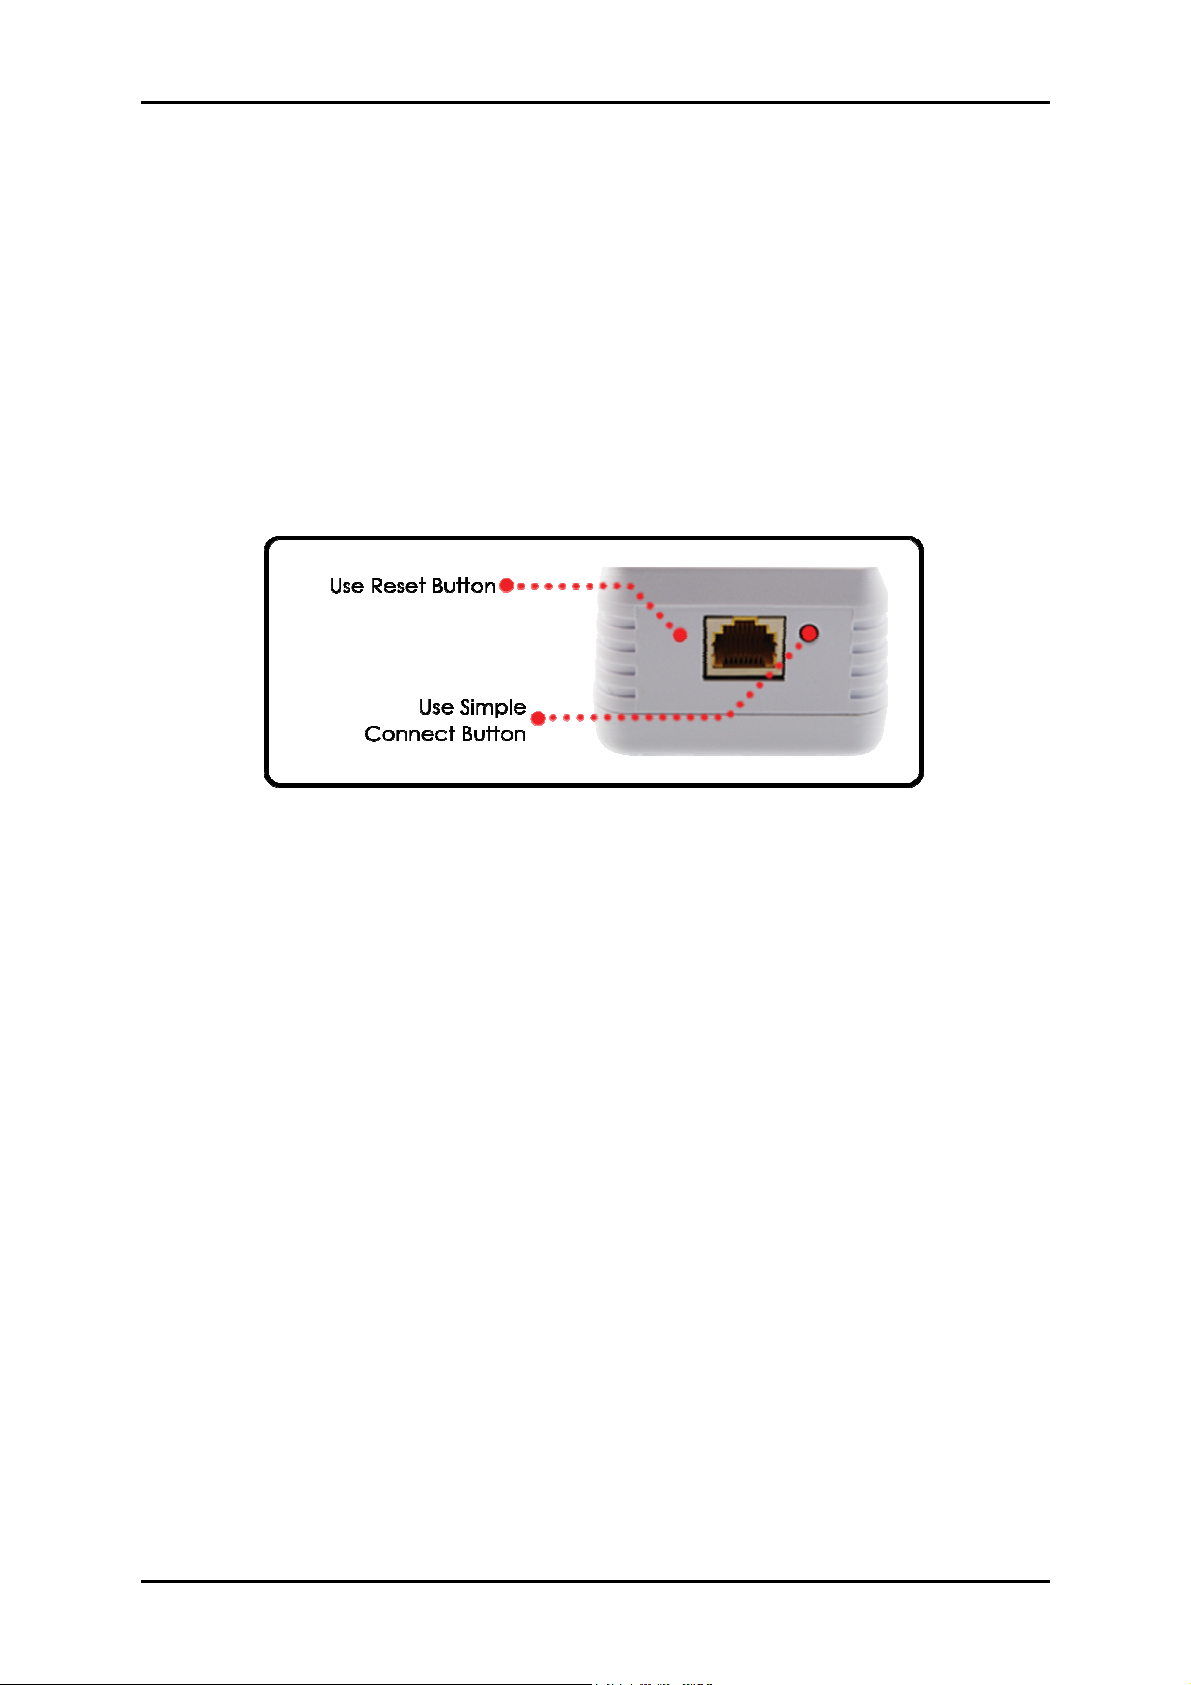
How to Use Reset and Simple Connect Button
Simple Connect provides a more convenient way of creating your HomePlug AV2 network
without the need to open the HomePlug AV2 Utility software from a computer. The button
has three main functions which include:
• Resetting the Private Network Name
• Creating a Secured HomePlug AV2 Network
• Joining an existing Secured HomePlug AV2 Network
Page 11 of 41
Page 12
User Manual
Resetting the Private Network Name
Simple Connect allows you to reset the HomePlug AV2’s Private Network Name to a random
key. When a HomePlug AV2 is reset to a random key, it will not be able to communicate with
any other device
Note: Resetting the Private Network Name is different from resetting the device to its factory
default settings. If you intend to reset the device to its factory default settings, press RESET on
the device for 3 seconds.
.
To reset the Private Network Name using Simple Connect:
Step 1
On HomePlug X, Press the Simple Connect
button for 10 seconds. Power LED and
Ethernet LED will turn OFF and turn ON
(Ethernet is connected). The Powerline
Activity LED will switch OFF on both units.
Step 2
On the second adapter (HomePlug Y), press
the Simple Connect button for 2 seconds
and do it on the first adapter to pair the
devices. The Power LED will blink to indicate
that the button is pressed.
Page 12 of 41
Page 13
User Manual
Creating a Secured HomePlug AV2 Network
To create a HomePlug AV2 network, you need at least two HomePlug AV2 devices using
random Private Network Names. When you press Simple Connect for 10 seconds on both
devices, a common Private Network Name will be automatically generated to enable them
to communicate with each other.
Note: New HomePlug AV2 can already communicate with each other once out of the box
and plugged. However, if you intend to create a new Private Network Name using Simple
Connect for both devices, you need to reset their Private Network Names to a random key
before proceeding.
To create a Secured HomePlug AV2 network using Simple Connect:
Step 1
Plug your HomePlug AV2s side by side where you can easily observe the LED behavior.
Upon connection, the Ethernet LEDs will blink simultaneously and then the Power LED and
Powerline Activity LED lights on steadily.
Press the Simple Connect button of HomePlug AV2 X for 10 seconds. Powerline Activity
LED will turn OFF. Power LED will Turn OFF and ON indicating that the Private Network
Name has been randomized.
Page 13 of 41
Page 14

User Manual
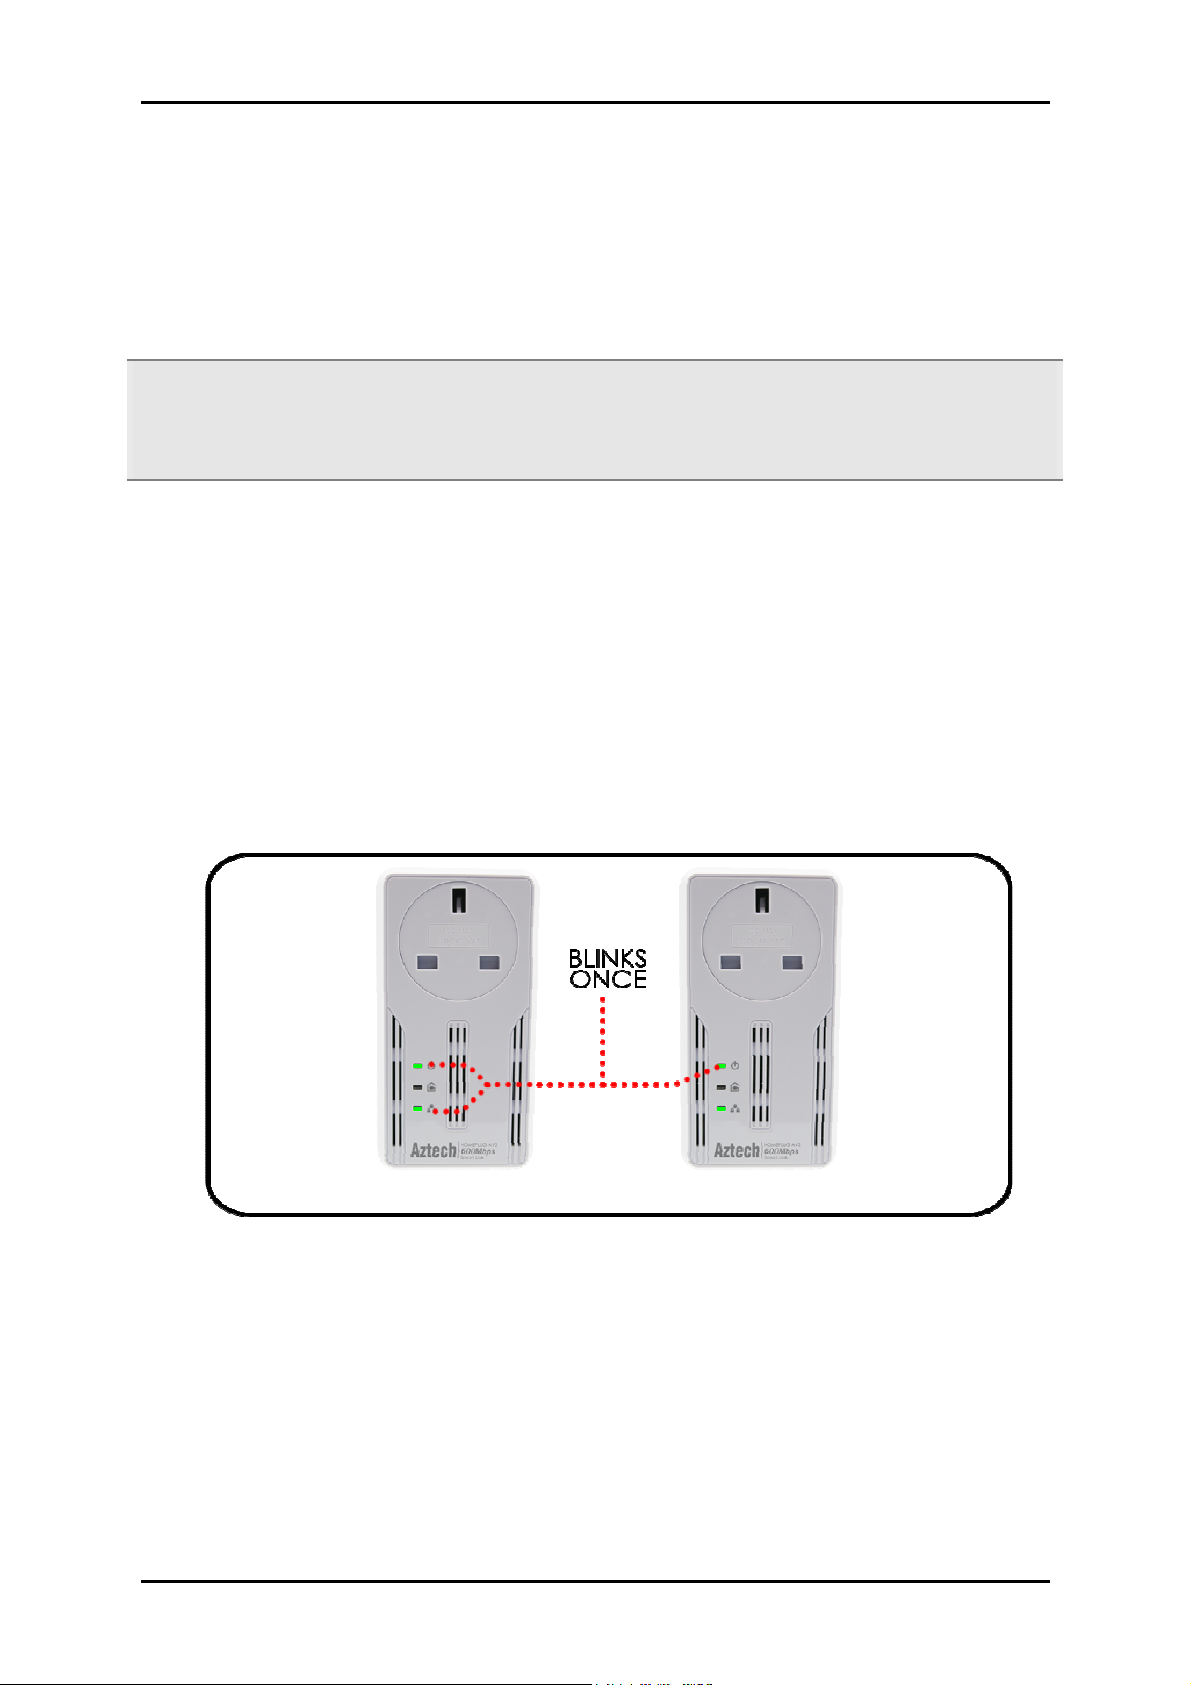
Step 2
Press the Simple Connect button for 2 seconds on HomePlug Y. After you release the button,
the Power LED will blink. If the Power LED did not blink, press Simple Connect again for
two seconds.
Note: Do not press Simple Connect for more than 2 seconds.
Page 14 of 41
Page 15

User Manual
Step 3
Press Simple Connect for two seconds on HomePlug X. After you release the button, the
Power LED will blink. If the Power LED did not blink, press Simple Connect again for two
seconds.
Pairing between two devices are only given two minutes upon pressing the Simple Connect
button for two seconds on HomePlug Y. After pressing Simple Connect on HomePlug Y, make
sure to press Simple Connect on HomePlug X within two minutes to ensure a successful
connection, otherwise repeat steps 2 and 3 until the LEDs of both devices switch OFF and on
twice, indicating that they are paired with one another.
Note: Do not press Simple Connect for more than 2 seconds
Page 15 of 41
Page 16

User Manual
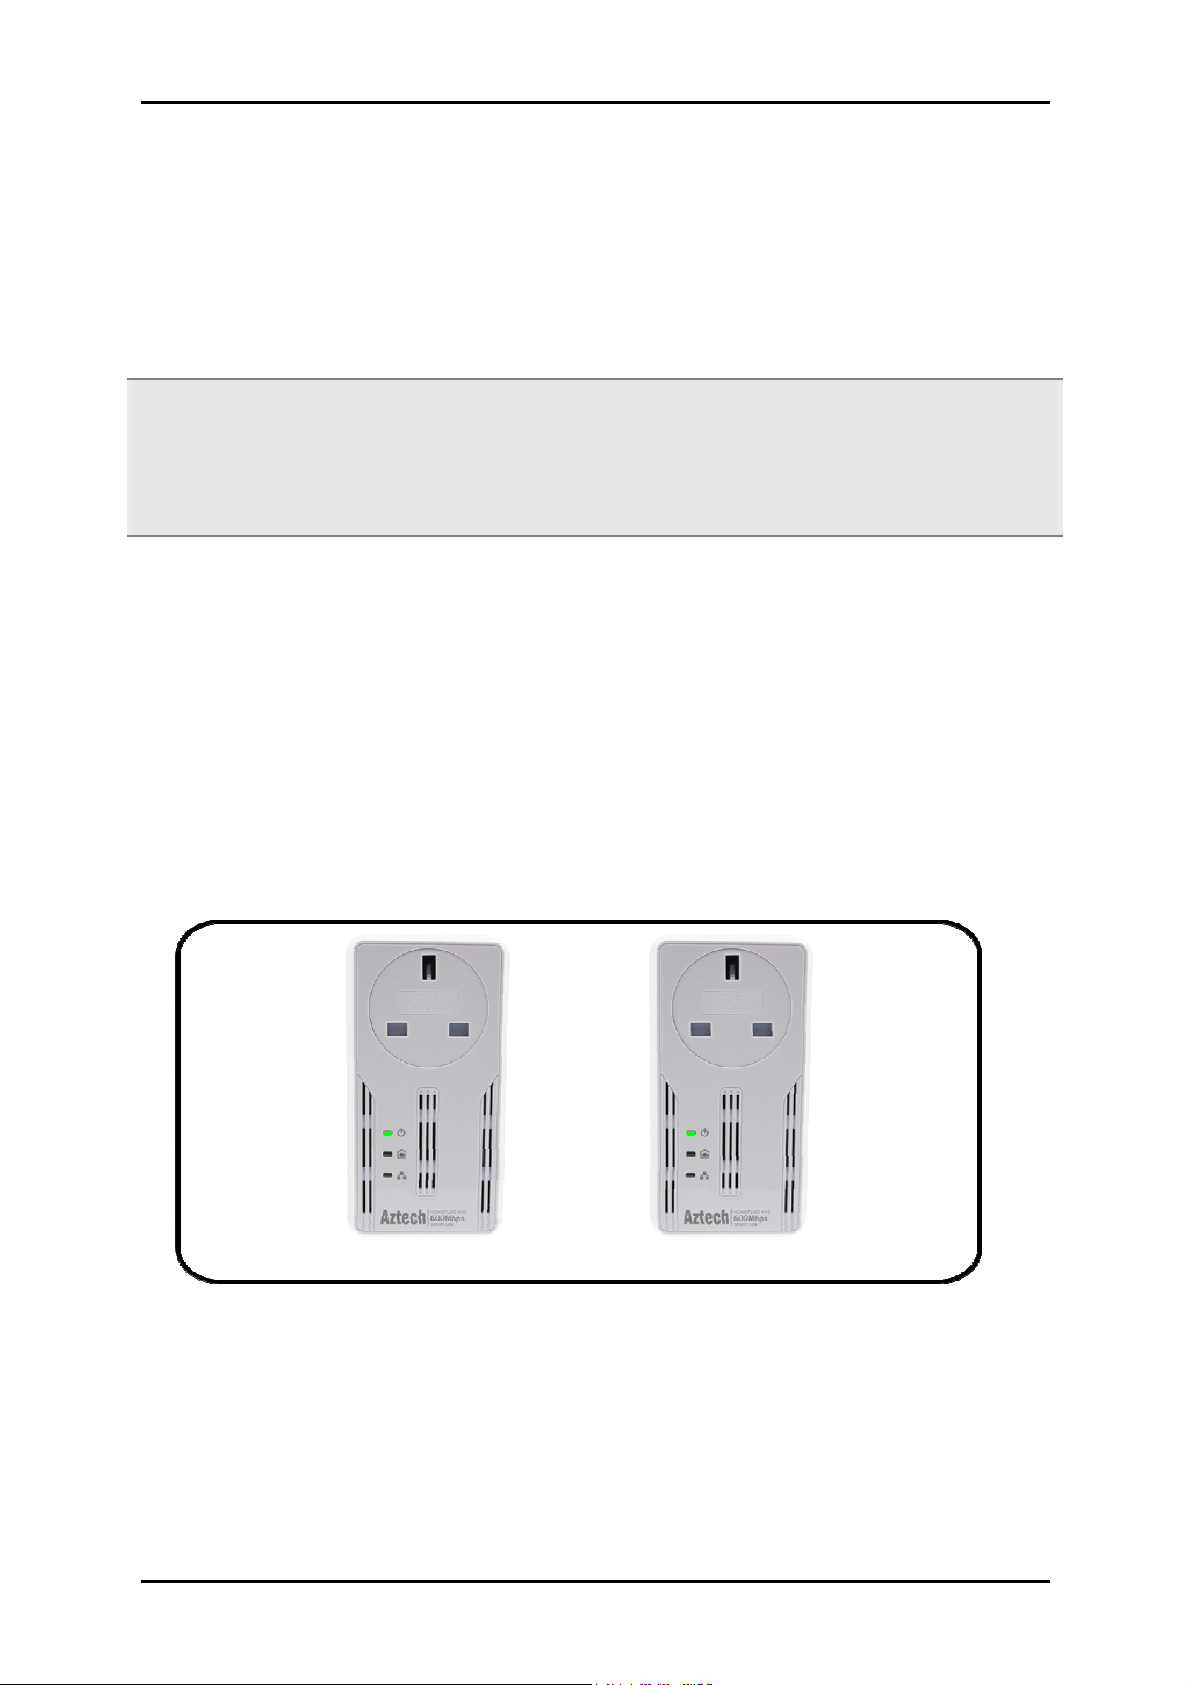
Step 4
To confirm if the connection was established, check the LEDs. The Power LEDs and the
Powerline Activity LEDs on both HomePlugs are ON.
When the Powerline Activity LED on either HomePlug X or HomePlug Y is OFF, this means
the pairing was unsuccessful. You have to repeat steps 1 to 3 again until all LEDS in all
HomePlug AV2 devices are on.
Page 16 of 41
Page 17

User Manual
Step 5
Unplug the HomePlug AV2s and then connect them to your Ethernet devices using the
Ethernet cables from the product package. After connecting the Ethernet cable, plug the
HomePlugs directly to a wall outlet.
An Ethernet-enabled device can be a router, computer, hub, gaming console, IP phone,
network printer, or IP TV set-top box.
Note: HomePlug AV2s work best when connected directly to a wall socket. It is suggested to
avoid plugging a HomePlug AV2 to a power strip or power extension as much as possible.
Other electrical devices plugged in the power strip produce electrical noise that may affect
the overall performance of the HomePlug.
Page 17 of 41
Page 18

User Manual
Joining an Existing Secured HomePlug AV2 Network
To enable a new device to join an existing network, Simple Connect will copy the Private
Network Name of the existing network to the new HomePlug AV2. You only have to pair the
new HomePlug AV2 device to any of the devices within the existing HomePlug AV2 Network
by pressing the Simple connect. If you pressed Simple Connect from multiple HomePlug
AV2s, only the signal from the first two devices will be processed.
To join an existing Secured HomePlug AV2 network using Simple
Connect:
Step 1
Plug HomePlug AV2 Z beside one of your existing HomePlug AV2 devices. It is important to
ensure that you can easily observe the LED behavior of the Homeplugs.
Upon connection, HomePlug Z’s LEDs will blink simultaneously and then the Power LED lights
ON steadily. Ethernet LED will be ON if there is an ethernet link.
Page 18 of 41
Page 19

User Manual
Step 2
Press Simple Connect for 10 seconds from HomePlug AV2 Z. After you release the button,
Power LED and Ethernet LED (Ethernet is connected) will turn OFF and turn ON.
Note: If the Power and Ethernet LED did not turn OFF and ON, press Simple Connect again
for 10 seconds.
Step 3
Press Simple Connect Button for two seconds on the existing HomePlug AV2 device. After you
release the button, the Power LED will continuously blink. If the Power LED did not blink,
press Simple Connect again for two seconds.
Make sure to press Simple Connect Button again on the HomePlug AV2 Z within two minutes
after you press Simple Connect from the existing network.
Page 19 of 41
Page 20

User Manual
Step 4
To confirm if the connection was established, check the LEDs. The Power LEDs and the
Powerline Activity LEDs on all HomePlugs are on
.
If the Powerline Activity LED on HomePlug Z is off, this means the pairing was unsuccessful.
You have to repeat steps 1 to 3 again until all LEDS in all HomePlug AV2 devices are ON.
Page 20 of 41
Page 21

User Manual
Step 5
Unplug HomePlug Z and then connect it to your Ethernet device using the Ethernet cables
from the product package. After connecting the Ethernet cable, plug HomePlug Z directly to
a wall outlet. An Ethernet-enabled device can be a router, computer, hub, gaming console,
IP phone, network printer, or IP TV set-top box.
Note: HomePlug AV2s work best when connected directly to a wall socket. It is suggested to
avoid plugging a HomePlug AV2 to a power strip or power extension as much as possible.
Other electrical devices in the power strip produce electrical noise that may affect the
overall performance of the HomePlug.
Page 21 of 41
Page 22

User Manual
Determining Connection Rate
Each LED color of the Powerline Activity represents a connection rating. The connection
rating can only be calculated when the device is part of an existing network. The exact
connection rate value can also be viewed by using the HomePlug AV2 Utility.
Good (Red) Better
(Amber)
Connection rate is
less than 30 Mbps
Connection rate is
between 30 to 80 Mbps
Best (Green)
Connection rate is
more than 80 Mbps
Page 22 of 41
Page 23

User Manual
Power Saving Mode
After 15 minutes of Ethernet inactivity, HomePlug AV2 will enter Power Saving Mode. The
Power LED will start BLINKING slowly to indicate its Power Saving Status.
Conditions of a HomePlug AV2 on a Power saving mode:
- Power LED is blinking slowly
- Powerline Activity LED and Ethernet LED are turned OFF.
- When connected to a PC or Laptop, if there is network card inactivity, HomePlug AV2
is also on a Power Saving mode.
Note: If another device is on a Power Saving Mode, the HomePlug AV2 Utility may detect the
device but would be unable to configure its respective setting.
Page 23 of 41
Page 24

User Manual
AV Utili
ty Software
Getting Started
Setting up the device is easy. The flowchart below provides an outline of the steps you need
to complete the installation. There are brief descriptions beside each step to help you along.
Detailed instructions are provided in the subsequent pages.
Plan your Network
Setup the
HomePlug AVs
(Optional)
Install HomePlug
Ready to Use
Use an Ethernet cable to connect
the HomePlug AV to your
computer or Ethernet device.
Install HomePlug AV Utility to
apply manual configuration
changes and monitor device
activity.
Page 24 of 41
Page 25

Plan Your Network
Here are ideas on how you can plan your HomePlug AV2 network.
Local Network
User Manual
Share ultra fast Internet connection with any computer wherever it is in your house
.
Page 25 of 41
Page 26

User Manual
Gaming Network
Connect your gaming console to the Internet and compete with other online
players.
Page 26 of 41
Page 27

Entertainment Network
Experience IP TV streaming into your home entertainment system.
User Manual
Media Network
Realize your high tech lifestyle by converging your IP devices into a single network.
Page 27 of 41
Page 28

User Manual
Setup the HomePlug AV2s
For Twin Pack
HomePlug AV2s from a Twin Pack are preconfigured to have a common Private Network
Name unique for that pair. All you have to do is connect the HomePlug AV2s to an Ethernet
device and then plug it to a wall socket.
To setup a pair of HomePlug AV2s:
1. Plug one end of the Ethernet cable to your Ethernet device and then connect the
other end to HomePlug AV2.
2. Connect the HomePlug AV2 to a wall socket.
3. Plug one end of the Ethernet cable to your other Ethernet device and then connect
the other end to HomePlug AV2.
4. Connect the HomePlug AV2 to a wall socket.
For Single Pack
A HomePlug AV2 from a single pack uses a random Private Network Name that prevents it
from communicating with other HomePlug AV2s. To add it into an existing network, you need
to use either the Simple Connect button or the HomePlug AV2 Utility software to change the
random Private Network Name to the Private Network Name being used by the existing
HomePlug AV2 network.
To add a HomePlug AV2 to an existing network:
1. Plug one end of the Ethernet cable to your Ethernet device and then connect the
other end to your new HomePlug AV2.
2. Connect the HomePlug AV2 to a wall socket.
3. Add the new HomePlug AV2 by using either Simple Connect or the HomePlug AV2
Utility software. To use Simple Connect, please refer to Joining an Existing HomePlug
AV2 Network. To use HomePlug AV2 Utility, please refer to Private Network Name.
Page 28 of 41
Page 29

User Manual
About HomePlug AV2 Utility
The HomePlug AV2 Utility is a software that allows you to manually configure your HomePlug
AV2s. It is mainly used for changing the Private Network Name, detecting other HomePlug
AV2’s in the network, and measuring the throughput of your HomePlug AV2 devices.
Installation is straightforward and the user interface is easy to use.
Note: To use HomePlug AV2 Utility, you need a computer using a Windows operating system
with the .NET Framework installed. If you do not have .NET installed, the HomePlug AV2
installer will installer it for you.
Requirements
Your computer must meet the following requirements:
Windows XP (32 and 64 bit), Vista (32 and 64 bit), Windows 8 (32 and 64 bit)
300 MHz Processor
128 Mb of RAM
.NET Framework
Windows Installer 3.1 for Windows XP (32 and 64 bit)
Network Interface Card
CD-ROM
128 Mb of free hard disk space
Page 29 of 41
Page 30

User Manual
Installation
To install HomePlug AV2 Utility:
1. Insert the Resource CD that comes with HomePlug AV2 into the CD-ROM drive.
2. Click the Start button, and then click Run.
3. In the Run dialog box, type D:\Setup.exe (where D: is your CD-ROM drive), and then
click OK.
4. Follow the instructions on the installation wizard.
Two applications will be installed in your computer - HomePlug AV2 Utility will be
installed first followed by .NET Framework. The installer detects any version of .NET
Framework in your computer. If .NET Framework is not installed, a dialog box opens to
ask if you would like to install .NET Framework. Click Yes. The .NET Framework will not
be installed if the required version is already in your computer.
Operating System .NET Framework version to be
installed
XP /Vista/Windows 7 32-bit .NET Framework 3.5 SP 1 32-bit
XP /Vista/Windows 7 64-bit .NET Framework 3.5 SP 1 64-bit
Page 30 of 41
Page 31

User Manual
Opening HomePlug AV2 Utility
Two ways to open HomePlug AV2 Utility:
Right-click the HomePlug AV2 Utility desktop shortcut and then select Open.
Click the Start button, click Programs, click HomePlug AV2, click HomePlug AV2
Ethernet Adapter, and then click HomePlug AV2 Utility.
The User Interface
The HomePlug AV2 Utility user interface is divided into tabs. These tabs include:
Home
Private Network Name
Quality of Service
Devices
Firmware Upgrade
Page 31 of 41
Page 32

User Manual
Home
Home provides a list of all the possible tasks you can perform in the HomePlug AV2 Utility. To
start a task, you first need to select the network card connected to your HomePlug AV2. This
is most helpful when you have more than one network card in your computer. When you
select a network card, the MAC Address of the HomePlug AV2 connected to your computer
appears. If there is no HomePlug AV2 connected to your computer, no MAC address will
appear.
After selecting the network card, there are four possible tasks you can perform. These tasks
include:
• Change the Private Network Name
• Change the QoS settings
• View devices in the network
• Upgrade the firmware
When you select one of the tasks available, you will be forwarded to the respective tab of
the selected task you have chosen.
Home
Page 32 of 41
Page 33

User Manual
Private Network Name
Private Network Name provides the function to manually change the Private Network Name
of local and remote HomePlug AV2s. A Private Network Name is a string of 8 to 64 characters
which enables HomePlug AV2 devices to communicate with each other.
If you intend to create multiple networks, you can assign different Private Network Names
among your devices. You have to, however, ensure that at least two HomePlug AV2s have a
similar Private Network Name. A HomePlug AV2 that uses a unique or random Private
Network Name will be unable to communicate with other devices which uses a different
random Private Network Name.
Private Network Name
Note: In case you cannot connect into the network after changing the Private Network
Name, please POWER CYCLE the device.
To POWER CYCLE the device, disconnect and then reconnect HomePlug AV2 from wall
socket.
Page 33 of 41
Page 34

User Manual
Local Private Network Name
Local Private Network Name refers to the Private Network Name of the HomePlug AV2 that is
directly connected to the computer where you are using the HomePlug AV2 Utility.
To change the local Private Network Name:
1. Open HomePlug AV2 Utility.
2. Click Private Network Name.
3. Type the new Private Network Name.
This field is case sensitive. It accepts 8 to 64 alphanumeric characters including
punctuation marks but no spaces.
4. Click Apply. When the process is complete, the message “Settings Applied” appears.
Remote Private Network Name
Without leaving your computer, you can remotely change the Private Network Name of
HomePlug AV2 devices, provided that they are using the same Private Network Name as
your local HomePlug AV2. You cannot change the Private Network Name of remote devices
that are not currently networked with your local HomePlug AV2.
Note: When changing the Private Network Name of remote devices, you will need the
Device ID that is displayed on the label pasted on each HomePlug AV2 device. It will be
more helpful if you list down the Device ID of all your HomePlug AV2s to enable you to
remotely change their settings using the HomePlug AV2 Utility software.
To remotely change the Private Network Name of a HomePlug AV2:
1. Open HomePlug AV2 Utility.
2. Click Private Network Name.
3. Type the new Private Network Name.
This field is case sensitive. It accepts 8 to 64 alphanumeric characters including
punctuation marks but no spaces.
4. Select Change Private Network Name of remote device.
Page 34 of 41
Page 35

User Manual
5. Type the Device ID of the remote device. The Device ID can be found on the label
pasted on each respective device.
6. Click Apply. When the process is complete, the message “Settings Applied” appears.
After changing the Private Network Name of the remote HomePlug AV2, it will no
longer be able to communicate with your local HomePlug AV2, not unless you are
using a similar Private Network Name for your local HomePlug AV2.
Simulate Simple Connect Button
Simulate Simple Connect Button allows you to apply functionalities without manually pressing
the Simple Connect button on a HomePlug AV2 device. However, this only works on local
devices.
Simple Connect Select to search and pair with another device, or search and join an
existing HomePlug AV2 network.
NMK Randomize Select to reset to a random Private Network Name. A HomePlug AV2
using a random Private Network Name will be disconnected from the HomePlug
network and will not be able to communicate with other devices until it forms a new
network or joins an existing network.
AVLN Status Displays the HomePlug AV2 Logical Network membership status number.
Note: The Simulate Simple Connect Button functions from HomePlug AV2 Utility can be used
for HomePlug AV2 versions with or without the Simple Connect button on the device.
To simulate a Simple Connect function:
1. Connect HomePlug AV2 to your computer.
2. Select a Simulate Simple Connect Button action:
a. Simple Connect
b. PNN Randomize
c. AVLN Status
3. Click Simulate Button Push.
Page 35 of 41
Page 36

User Manual
Quality of Service
Quality of Service gives you the capability to prioritize particular applications within your
network. QoS is not enabled by default.
Quality of Service
QoS Modes:
Online Game/Internet Prioritizes data streaming
Audio or Video Prioritizes data streaming multimedia streaming
Voice over IP Prioritizes voice applications
To enable QoS:
1. Open HomePlug AV2 Utility.
2. Click Quality of Service.
3. Check Enable QoS.
4. Select a QoS mode.
5. Click Apply. When the process is complete, the message Settings Applied appears.
Page 36 of 41
Page 37

User Manual
Devices
Devices displays information about remote HomePlug AV2’s detected in the network. Only
HomePlug AV2s using the same Private Network Name as the local HomePlug AV2 will
appear in the Remote Devices list.
Devices
Devices displays the following information:
TEI Displays the Terminal Equipment Identifier.
Device MAC address Displays the HomePlug AV2 MAC Address.
Bridge MAC Address Displays the MAC Address of the Ethernet network adapter
connected to the HomePlug AV2.
Connection Rate Displays the Transmit and Receive connection rates.
Page 37 of 41
Page 38

User Manual
Firmware Upgrade
Use Firmware Upgrade to upgrade the firmware of your HomePlug AV2. After upgrading the
firmware, HomePlug AV2 will still retain the same Private Network Name and MAC address
settings. Before you proceed with the upgrade, you need to have both the configuration file
(PIB extension) and the firmware file (NVM extension). You can download upgrade files from
the product’s Web site.
Firmware Upgrade
To upgrade the firmware of a HomePlug AV2:
1. Connect HomePlug AV2 to the computer where you are using the HomePlug AV2
Utility.
2. Open HomePlug AV2 Utility.
3. Click Firmware Upgrade.
4. Click Browse to select the location of the configuration and firmware files.
The configuration file has a PIB extension while the firmware file has an NVM
extension. After you select the location of the configuration and firmware files, the
upgrade will immediately start.
Page 38 of 41
Page 39

User Manual
To reset to factory default:
1. Connect HomePlug AV2 to the computer where you are using HomePlug AV2 Utility.
2. Open HomePlug AV2 Utility.
3. Click Factory Default.
Note: You can also perform a reset to the factory default when you press the RESET button on
the device 3 seconds.
Page 39 of 41
Page 40

User Manual
Appendix
FCC Statement
This equipment has been tested and complies with the specifications for a Class B digital
device, pursuant to Part 15 of the FCC Rules. These limits are designed to provide reasonable
protection against harmful interference in a residential installation. This equipment generates,
uses, and can radiate radio frequency energy and, if not installed and used according to
the instructions, may cause harmful interference to radio communications. However, there is
no guarantee that interference will not occur in a particular installation. If this equipment
does cause harmful interference to radio or television reception, which is found by turning
the equipment OFF and on, the user is encouraged to try to correct the interference by one
or more of the following measures:
Reorient or relocate the receiving antenna
Increase the separation between the equipment or devices
Connect the equipment to an outlet other than the receiver’s
Consult a dealer or an experienced radio/TV technician for assistance
European Regulations
The product has been designed, tested and manufactured according to the European
R&TTE directive 1999/5/EC.
Page 40 of 41
Page 41

User Manual
Safety Warnings
For your safety, be sure to read and follow all warning notices and instructions.
Do not open the device. Opening or removing the device cover can expose you to
dangerous high voltage points or other risks. Only qualified service personnel can
service the device. Please contact your vendor for further information.
Do not use your device during a thunderstorm. There may be a risk of electric shock
brought about by lightning.
Do not expose your device to dust or corrosive liquids.
Do not use this product near water sources.
Make sure to connect the cables to the correct ports.
Do not obstruct the ventilation slots on the device.
Page 41 of 41
 Loading...